Create OData Services Screen Scraping
37
SAP NetWeaver How-To Guide How To... Create OData Services Using the Screen Scraping Generator in SAP NetWeaver Gateway Applicable Releases: SAP NetWeaver Gateway 2.0 SP3+ Version 1.1 July 2012
-
Upload
rafael-riso -
Category
Documents
-
view
43 -
download
4
Transcript of Create OData Services Screen Scraping
SAP NetWeaver
How-To Guide
How To Create OData Services
Using the Screen Scraping
Generator in SAP NetWeaver
Gateway
Applicable Releases
SAP NetWeaver Gateway 20 SP3+
Version 11
July 2012
copy Copyright 2012 SAP AG All rights reserved
No part of this publication may be reproduced or
transmitted in any form or for any purpose without the
express permission of SAP AG The information contained
herein may be changed without prior notice
Some software products marketed by SAP AG and its
distributors contain proprietary software components of
other software vendors
Microsoft Windows Outlook and PowerPoint are
registered trademarks of Microsoft Corporation
IBM DB2 DB2 Universal Database OS2 Parallel
Sysplex MVSESA AIX S390 AS400 OS390
OS400 iSeries pSeries xSeries zSeries zOS AFP
Intelligent Miner WebSphere Netfinity Tivoli Informix
i5OS POWER POWER5 OpenPower and PowerPC are
trademarks or registered trademarks of IBM Corporation
Adobe the Adobe logo Acrobat PostScript and Reader
are either trademarks or registered trademarks of Adobe
Systems Incorporated in the United States andor other
countries
Oracle is a registered trademark of Oracle Corporation
UNIX XOpen OSF1 and Motif are registered
trademarks of the Open Group
Citrix ICA Program Neighborhood MetaFrame
WinFrame VideoFrame and MultiWin are trademarks or
registered trademarks of Citrix Systems Inc
HTML XML XHTML and W3C are trademarks or
registered trademarks of W3Creg World Wide Web
Consortium Massachusetts Institute of Technology
Java is a registered trademark of Sun Microsystems Inc
JavaScript is a registered trademark of Sun Microsystems
Inc used under license for technology invented and
implemented by Netscape
MaxDB is a trademark of MySQL AB Sweden
SAP R3 mySAP mySAPcom xApps xApp SAP
NetWeaver and other SAP products and services
mentioned herein as well as their respective logos are
trademarks or registered trademarks of SAP AG in
Germany and in several other countries all over the world
All other product and service names mentioned are the
trademarks of their respective companies Data contained
in this document serves informational purposes only
National product specifications may vary
These materials are subject to change without notice
These materials are provided by SAP AG and its affiliated
companies (SAP Group) for informational purposes only
without representation or warranty of any kind and SAP
Group shall not be liable for errors or omissions with
respect to the materials The only warranties for SAP
Group products and services are those that are set forth in
the express warranty statements accompanying such
products and services if any Nothing herein should be
construed as constituting an additional warranty
These materials are provided ldquoas isrdquo without a warranty of
any kind either express or implied including but not
limited to the implied warranties of merchantability
fitness for a particular purpose or non-infringement
SAP shall not be liable for damages of any kind including
without limitation direct special indirect or consequential
damages that may result from the use of these materials
SAP does not warrant the accuracy or completeness of the
information text graphics links or other items contained
within these materials SAP has no control over the
information that you may access through the use of hot
links contained in these materials and does not endorse
your use of third party web pages nor provide any warranty
whatsoever relating to third party web pages
SAP NetWeaver ldquoHow-tordquo Guides are intended to simplify
the product implementation While specific product
features and procedures typically are explained in a
practical business context it is not implied that those
features and procedures are the only approach in solving a
specific business problem using SAP NetWeaver Should
you wish to receive additional information clarification or
support please refer to SAP Consulting
Any software coding andor code lines strings (ldquoCoderdquo)
included in this documentation are only examples and are
not intended to be used in a productive system
environment The Code is only intended better explain and
visualize the syntax and phrasing rules of certain coding
SAP does not warrant the correctness and completeness of
the Code given herein and SAP shall not be liable for
errors or damages caused by the usage of the Code except
if such damages were caused by SAP intentionally or
grossly negligent
Disclaimer
Some components of this product are based on Javatrade Any
code change in these components may cause unpredictable
and severe malfunctions and is therefore expressively
prohibited as is any decompilation of these components
Any Javatrade Source Code delivered with this product is only
to be used by SAPrsquos Support Services and may not be
modified or altered in any way
Document History
Document Version Description
05 First unofficial release of this guide
10 Official release of this guided based on Gateway 20
11 Updated for SP3+ functionality
Typographic Conventions
Type Style Description
Example Text Words or characters quoted
from the screen These
include field names screen
titles pushbuttons labels
menu names menu paths
and menu options
Cross-references to other
documentation
Example text Emphasized words or
phrases in body text graphic
titles and table titles
Example text File and directory names and
their paths messages
names of variables and
parameters source text and
names of installation
upgrade and database tools
Example text User entry texts These are
words or characters that you
enter in the system exactly as
they appear in the
documentation
ltExample
textgt
Variable user entry Angle
brackets indicate that you
replace these words and
characters with appropriate
entries to make entries in the
system
EXAMPLE TEXT Keys on the keyboard for
example F2 or ENTER
Icons
Icon Description
Caution
Note or Important
Example
Recommendation or Tip
Table of Contents
1 Business Scenario 1
2 Background Information 1
3 Prerequisites 1
4 Step-by-Step Procedure 2
41 Create a Gateway Object based on Screen Scraping 2
42 Create a Screen Scraping Recording for the READ Operation 4
43 Create a Screen Scraping Recording for the UPDATE Operation 7
44 Expose a Search Help for use by the QUERY Operation 9
45 Map the QUERY operation to the Search Help object 10
46 Map the READ operation to the Recording of Transaction TZ60 11
47 Map the UPDATE Operation 16
48 Simplify the Data Model Name 19
49 Create the Gateway Consumption Model 21
410 Add an Alias to the Service 22
411 Test Your Gateway Object 25
How To Create OData Services Using the Screen Scraping Generator in SAP NetWeaver Gateway
July 2012 1
1 Business Scenario
A solution is required that exposes the SAP Flight Data model to the outside world via REST Using
Gateway will allow you to accomplish this Step 1 is to create a Gateway Object via Screen Scraping
some pre-existing Flight Dialog screens that contain some of the data you want to expose
2 Background Information
This guide requires that you have in place a configured SAP NetWeaver Gateway 20 system and
that the SAP Flight data model has been populated with data If it hasnrsquot you can use the report
SAPBC_DATA_GENERATOR to populate the flight tables with data
3 Prerequisites
SAP NetWeaver Gateway 20 is installed and configured
How To Create OData Services Using the Screen Scraping Generator in SAP NetWeaver Gateway
July 2012 2
4 Step-by-Step Procedure
In this section you will be guided thru the Screen Scraping process to creating a Gateway Object You
will first create a recording of a transaction that contains the Flight data After that you will create a
Search Help object to expose Search Help Flight data Once this is done you will create a Gateway
Data Model with QUERY READ and UPDATE operations
41 Create a Gateway Object based on Screen
Scraping
1 Go to transaction SE80 ndash ABAP Developer Workbench
2 Set the object type drop down to GW Data Model
3
4 Enter in the Gateway Data Model mode name Z_FLIGHT_SCS_ltYour Last Namegt Note ldquoZrdquo
objects are for the local domain you could also start your object naming with your own
namespace if you have one configured
Note model name cannot exceed 24 characters
5 Click the Eye Glasses icon button to start the object creation process
6 Click the Yes button in the popup window to create the object
7 In the Create Data Model popup window set Type to ldquoPSrdquo and select the Generate From Data
Source Object radio button (leaving the OData Channel check box marked)
How To Create OData Services Using the Screen Scraping Generator in SAP NetWeaver Gateway
July 2012 3
8 Click the Enter button
9 In the popup window enter a Description Data Source Type (Screen Scraping) and the System
Alias (this is the alias that is connected to the backend system)
10 Click the Continue button Assign the object to a transport or make it a local object and click the
enter button
11 You will be presented with the following screen Note the image below shows many recording
groups that you will not see
How To Create OData Services Using the Screen Scraping Generator in SAP NetWeaver Gateway
July 2012 4
42 Create a Screen Scraping Recording for the
READ Operation
1 Click the Create icon and in the drop down menu select Create Recording Group
2 In the popup window enter the name Z_FLIGHT_RECORDINGS_ltYour Last Namegt and a
suitable description
3 Click the Enter button
4 In the Screen Scraping Repository right click on the newly created recording group and in the
context menu select Create Recording
How To Create OData Services Using the Screen Scraping Generator in SAP NetWeaver Gateway
July 2012 5
5 In the popup window enter the recording name ldquoZ_TZ60_FLIGHT_DETAILSrdquo the Transaction
Code ldquoTZ60rdquo Recording Type ldquoRrdquo for read and a suitable description
6 Click the Enter button
7 You will be taken to the TZ60 transaction on the backend system
8 Enter in some valid flight data
9 Click the Enter button
10 The following screen should be displayed
How To Create OData Services Using the Screen Scraping Generator in SAP NetWeaver Gateway
July 2012 6
11 Place the cursor in the first cell in the first row of the table
12 Click the Page Down button that is found in the SAP GUI menu button bar
13 Press the page down button until you reach the bottom of the table contents then press it twice
more (if you donrsquot do this you will get a warning that the table wasnrsquot fully recorded in the next
step)
14 Click the back button twice to navigate out of the TZ60 transaction This will start the recording
generation and when it is done you will see a similar screen
How To Create OData Services Using the Screen Scraping Generator in SAP NetWeaver Gateway
July 2012 7
15 Drill into the Recording Tree you will see each screen recorded has a node in the tree with its
corresponding input values as attributes in addition the second screen has a table named
FLIGHTS
43 Create a Screen Scraping Recording for the
UPDATE Operation
1 In the Screen Scraping Repository right click on the recording group created earlier and in the
context menu select Create Recording
How To Create OData Services Using the Screen Scraping Generator in SAP NetWeaver Gateway
July 2012 8
2 In the popup window enter the recording name ldquoZ_TZ90_FLIGHT_UPDATErdquo the Transaction
Code ldquoTZ90rdquo Recording type ldquoUrdquo for update and a suitable description
3 Click the Enter button
4 You will be taken to the TZ90 transaction on the backend system
5 Enter in some valid flight data
6 Click the Change button
7 Change the Distance field (probably best to make only a minor change)
How To Create OData Services Using the Screen Scraping Generator in SAP NetWeaver Gateway
July 2012 9
8 Save your changes
9 Click the back button twice and save your recording by clicking the Yes button
10 You should now have the two recordings as shown below
44 Expose a Search Help for use by the QUERY
Operation
Search Helps are used to support the QUERY operation of a Screen Scrape based
Gateway Object
1 Right click on the Z_TZ60_FLIGHT_DETAILS recordings SFLIGHT-CONNID attribute and in the
context menu select Get Search Help
How To Create OData Services Using the Screen Scraping Generator in SAP NetWeaver Gateway
July 2012 10
2 This will create a node in the Recording Group named H_SPFLI (which is the name of the value
help) Open up the object and you can see the values it passes back
Note Value Help objects are used in QUERY operations only
45 Map the QUERY operation to the Search Help
object
1 Highlight the H_SPFLI search help object in the Screen Scraping Repository
2 Click the Create Mapping button in the Gateway Object Details
3 A popup window with the Mapping details for the QUERY operation is displayed
How To Create OData Services Using the Screen Scraping Generator in SAP NetWeaver Gateway
July 2012 11
4 Click the Enter button to complete the mapping Next step is to define the primary key of the
data entity you are creating
5 Your data model should now be in the following state
By default the FLIGHT_NUMBER is set as the primary key ndash this is because it is based on the
search help from the FLIGHT_NUMBERConnection ID We need to also add AIRLINECarrier
ID as the primary key
6 Right click on the AIRLINE attribute and in the context menu select Set Key
7 Your data model should now look like the following
46 Map the READ operation to the Recording of
Transaction TZ60
1 Highlight the screen scrape recording ldquoZ_TZ60_FLIGHT_DETAILSrdquo in the Screen Scraping
Repository
How To Create OData Services Using the Screen Scraping Generator in SAP NetWeaver Gateway
July 2012 12
2 Click the Create Mapping button in the Gateway Object Details
3 A popup window with the Mapping details for the READ operation is displayed
4 Under node SAPMTZ60(0100) highlight SFLIGHT-CONNID by right clicking on it
5 Click the Change Mapping Route button
How To Create OData Services Using the Screen Scraping Generator in SAP NetWeaver Gateway
July 2012 13
6 In the Change Mapping Route popup window highlight the FLIGHT_NUMBER attributehellipthis will
make the SFLIGHT-CARRID assigned to the FLIGHT_NUMBER of the data model which is one
of itrsquos keys
7 Click the Enter button
8 Your mapping should now look like this
9 As you can see above the Mapping Route for attributes under SAPMTZ60(0200) node is the
screen name followed by the attribute namehellipletrsquos flatten this mapping to make it easier to read
and understand for the consumers of our servicehellipin addition we are going to be mapping the
UPDATE operation later on which requires a flattened interface
10 Under the node SAPMTZ60(0200) uncheck SFLIGHT-CARRID and SFLIGHT-CONNID since
this is duplicate information already provided by the key fields
How To Create OData Services Using the Screen Scraping Generator in SAP NetWeaver Gateway
July 2012 14
11 Right click on the SCARR-CARRNAME attribute to select it then click the Change Mapping
Route button
12 In the Change Mapping Route popup window highlight the root node and change the property
name to AIRLINENAME
13 Your mapping should now look like this
14 For the rest of the SAPMTZ60(0200) attributes do the Change Mapping Route as you did
above accepting the default property name
15 Your mapping should now look like this
How To Create OData Services Using the Screen Scraping Generator in SAP NetWeaver Gateway
July 2012 15
16 Uncheck the FLIGHTS[] node We wonrsquot use it in this How To Guide to keep things simplehellipbut
you can make use of it as it is supported as output Your mapping should now look like this
17 Click the Enter button to complete the mapping
18 Your Gateway Object should now look like this
How To Create OData Services Using the Screen Scraping Generator in SAP NetWeaver Gateway
July 2012 16
47 Map the UPDATE Operation
1 In the Screen Scraping Repository highlight the recording you created earlier named
Z_TZ90_FLIGHT_UPDATE
2 Click the Create Mapping button
3 The default mapping looks like this
How To Create OData Services Using the Screen Scraping Generator in SAP NetWeaver Gateway
July 2012 17
4 We only need to make one change and that is to assign the SPFLI-CONNID to the correct data
model attribute FLIGHT_NUMBER Highlight SPFLI-CONNID as shown below by right clicking
on it
5 Click the Change Mapping Route button
6 In the Change Mapping Route popup window select FLIGHT_NUMBER
7 Click the Enter buttonhellipthe mapping should now look like the following
How To Create OData Services Using the Screen Scraping Generator in SAP NetWeaver Gateway
July 2012 18
8 Click the Enter button to complete your UPDATE operation mapping
9 Your data object model should now look like this
10 Click the Generate button at the upper left hand corner of the screen (this will generate code
that represents what you have configured)
How To Create OData Services Using the Screen Scraping Generator in SAP NetWeaver Gateway
July 2012 19
11 When the generation is complete the following popup window will be displayed notifying you
have what was generated
48 Simplify the Data Model Name
The name of your data model is currently Z_FLIGHT_SCS_ltYour Last Namegt This name will by
default be used when calling your service Letrsquos make it simpler name that describes the data ie ndash
ldquoFlightrdquo
1 Navigate for the Gateway Data Modeler back to the ABAP Workbench by clicking the Object
Navigator button
2 You should now be back in the ABAP Workbench (SE80) and should see your Gateway Data
Model
How To Create OData Services Using the Screen Scraping Generator in SAP NetWeaver Gateway
July 2012 20
3 Double click on the Data Model node (first node under the root node)
Double clicking on it will open up the editor for this node Notice the External Name input field
4 Go into change mode and change the External Name to be ldquoFlightrdquo
5 Save your changes Now your data model is known as ldquoFlightrdquo
How To Create OData Services Using the Screen Scraping Generator in SAP NetWeaver Gateway
July 2012 21
Note
If you go back in and change you data model (add a new operation or change some of the mapping) and then regenerate this configuration will be lost The name will revert to the old data model name
49 Create the Gateway Consumption Model
The Consumption Model is what exposes the Gateway Data Models to the network It does this by
creating a service in the Internet Communication Framework In this step you will create a
Consumption Model and then map your Data Model to it
1 Right click on the GW Data Modelrsquos Related GW Consumption Models node and in the context
menu select Add Consumpt Model
2 In the input field enter in the name of the consumption model you want created ndash zflightscsltyour
last namegt
3 Click the Enter button You will be asked if you want to create the consumption model click the
Yes button
4 Enter a description for your consumption model and click the Enter button
How To Create OData Services Using the Screen Scraping Generator in SAP NetWeaver Gateway
July 2012 22
5 You can see the Gateway service exposed in the ICF ndash transaction SICF ndash follow the ICF tree
path default_host gt sap gt opu gt odata gt sapthere you will see a list of all ICF services that
represent Gateway Consumption Models
410 Add an Alias to the Service
6 Go to the service maintenance transaction IWFNDMAINT_SERVICE
12 Click the search icon to search for your service in the list ndash the search icon is outlined in red
below
13 In the Find popup window enter in the Technical Service Name (ZFLIGHTSCSltYour Last
Namegt) for the search term
How To Create OData Services Using the Screen Scraping Generator in SAP NetWeaver Gateway
July 2012 23
14 Click the enter button your service should be located in the list
Hit the Cancel button on the Find dialog window to dismiss it
15 Click the Technical Service Name link (highlighted below in red on the top half of the screen)
this will cause the Alias assignment details be displayed at the bottom of the screen
6 Click the add System Alias button outlined in Red above in the bottom half of the screen You
should now see the screen to maintain service aliases
7 Click the New Entries button
8 Add your service document (the consumption model)hellipenter in the name of your consumption
model ndash zflightscsltyour last namegt and click the F4 help button
How To Create OData Services Using the Screen Scraping Generator in SAP NetWeaver Gateway
July 2012 24
9 Double click on your service document in the popup window
10 In the System Alias column enter the alias of the system you want your service to call ndash in this
case we are using the local alias
11 Save your changes then hit the back button You should now see that the LOCAL alias is
assigned to your service
12 Click the Call Browser button to launch a web browser that points to the service document of
your OData service
How To Create OData Services Using the Screen Scraping Generator in SAP NetWeaver Gateway
July 2012 25
Note
By default all gateway services are initial assigned basic
411 Test Your Gateway Object
Now for the fun part You get to test everything you have done up to this point Testing the QUERY
and READ operations is easyhellipyou just need a browser Testing the CREATE and UPDATE
operations (as well as the DELETE if we had implemented that) requires the use of a simple HTTP
tool the one we use here is the RESTClient plugin in for FireFox
1 In the browser that you launched in the last step replace the end of the URL ldquo$format=xmlrdquo
with ldquo$metadatardquo ndash this will bring up the metadata of your service
Example URL httpservicehttp_portsapopuodatasapZFLIGHTSCSGEBO$metadata
How To Create OData Services Using the Screen Scraping Generator in SAP NetWeaver Gateway
July 2012 26
2 In the URL replace ldquo$metadatardquo with ldquoFlightCollectionrdquo ndash this will execute the QUERY operation
You should now see a list of flights
3 To make it easier to test and debug add the query string parameter sap-ds-debug=true to the
URL ndash this will format the content as html allow us to follow links to the READ operation
Example URL
httpserverhttp_portsapopuodatasapZFLIGHTSCSGEBOFlightCollectionsap-ds-
debug=true
How To Create OData Services Using the Screen Scraping Generator in SAP NetWeaver Gateway
July 2012 27
Note
You will see an SAP icon in the bottom right hand corner Click it to see more details about the service call
4 To execute the READ operation for a specific flight just click the link
FlightCollection(airline=hellipflight_number=hellip)
5 Clicking this link will bring back the flight details from the READ operation
How To Create OData Services Using the Screen Scraping Generator in SAP NetWeaver Gateway
July 2012 28
6 Now let test the update functionality
7 To test the update (and create) functionality we will need a CSRF token (needed to prevent
Cross Site Request Forgery attacks)hellipto do this we need to request this token during a read by
passing in an http header value requesting the token To pass in a header value we need to use
the RESTClienthelliphere using the FireFox RESTClient (this is a free plugin for FireFox)
How To Create OData Services Using the Screen Scraping Generator in SAP NetWeaver Gateway
July 2012 29
8 Copy the URL used in the test in step 5 above (the URL that executed a READ) and paste it into
the URL input field
9 Remove the query string attribute ldquosap-ds-debug=truerdquo from the URL
10 Click the Headers menu item and select Custom Header
11 Enter the name value as shown below
Tip Check the ldquoSave to favoriterdquo check box so you can easily add this header for faster testing the next time
12 Click the Okay button You should now see the following
How To Create OData Services Using the Screen Scraping Generator in SAP NetWeaver Gateway
July 2012 30
13 Click the SEND button
14 In the Response section at the bottom of the RESTClient copy the value returned for the x-csrf-
token shown here outlined in red (note these token values are generated by the gateway
server)
The token will be passed back in when testing the create and update functionality
15 Change the value for header attribute x-csrf-token to be the value you copied above to do this
just click on the header attribute in the RESTClient you should now see something to the
following
16 Test the UPDATE_ENTITY UPDATE operation
17 Add the content-type header to the Request Headers section Click the Headers dropdown and
select Custom Header
18 Enter the namevalue ndash content-typeapplicationatom+xmltype=entry
Tip Save this as a favorite so you can easily add it again when testing
How To Create OData Services Using the Screen Scraping Generator in SAP NetWeaver Gateway
July 2012 31
19 Click the Okay button to add the header request
20 Switch to the ldquoResponse Body (Raw)rdquo tab and copy the contents there (we will be updating the
data that was sent back when reading the entity)
21 Paste the Response Body you just copied into the Request Body section
22 Change the Method dropdown to PUT Your RESTClient should now look similar to the
following
23 To test the update functionality we need to change some of the values in the request body that
we are sending to the Gateway serverhellipchange the value of the distance attribute
24 Click the SEND button
25 If the update is successful you will get a status code of 204 as shown below
How To Create OData Services Using the Screen Scraping Generator in SAP NetWeaver Gateway
July 2012 32
26 You can switch the Method back to GET and click the send button again then check the
response body to see if the values you changed for the update are returned by the read
27 Congrats You have successfully created and tested a simple OData service created with the
Screen Scraping generator
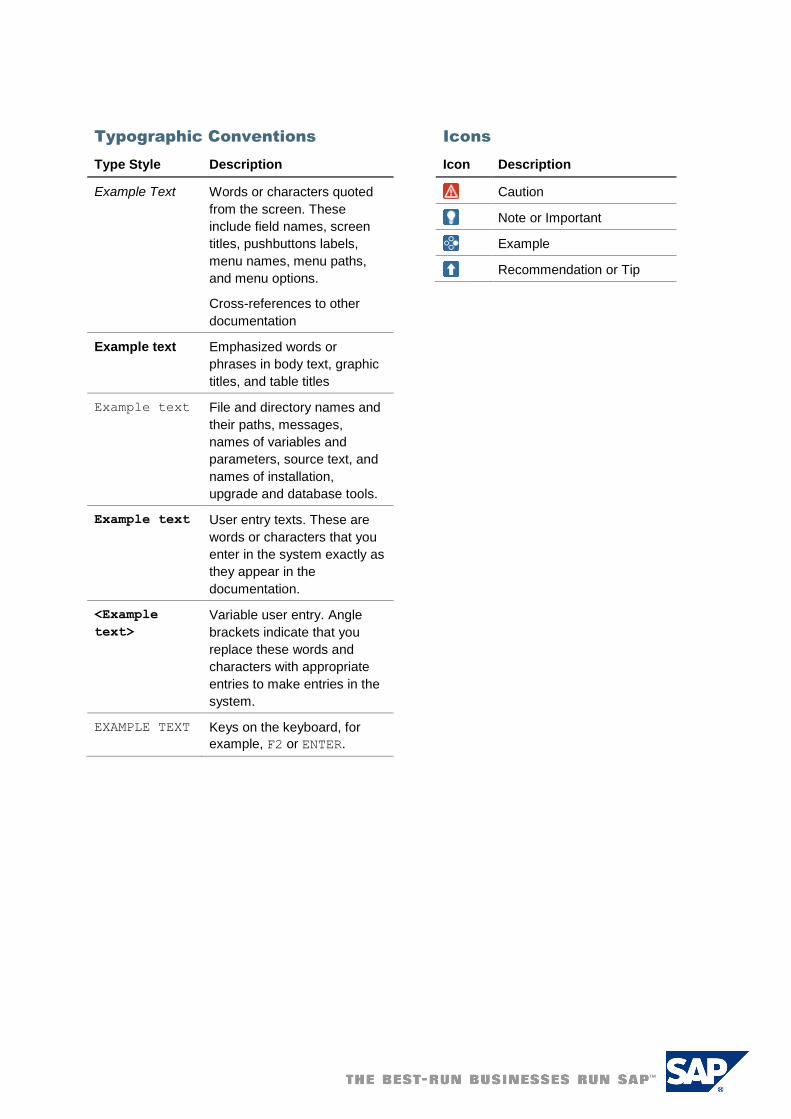
How To Create OData Services Using the Screen Scraping Generator in SAP NetWeaver Gateway
July 2012 1
1 Business Scenario
A solution is required that exposes the SAP Flight Data model to the outside world via REST Using
Gateway will allow you to accomplish this Step 1 is to create a Gateway Object via Screen Scraping
some pre-existing Flight Dialog screens that contain some of the data you want to expose
2 Background Information
This guide requires that you have in place a configured SAP NetWeaver Gateway 20 system and
that the SAP Flight data model has been populated with data If it hasnrsquot you can use the report
SAPBC_DATA_GENERATOR to populate the flight tables with data
3 Prerequisites
SAP NetWeaver Gateway 20 is installed and configured
How To Create OData Services Using the Screen Scraping Generator in SAP NetWeaver Gateway
July 2012 2
4 Step-by-Step Procedure
In this section you will be guided thru the Screen Scraping process to creating a Gateway Object You
will first create a recording of a transaction that contains the Flight data After that you will create a
Search Help object to expose Search Help Flight data Once this is done you will create a Gateway
Data Model with QUERY READ and UPDATE operations
41 Create a Gateway Object based on Screen
Scraping
1 Go to transaction SE80 ndash ABAP Developer Workbench
2 Set the object type drop down to GW Data Model
3
4 Enter in the Gateway Data Model mode name Z_FLIGHT_SCS_ltYour Last Namegt Note ldquoZrdquo
objects are for the local domain you could also start your object naming with your own
namespace if you have one configured
Note model name cannot exceed 24 characters
5 Click the Eye Glasses icon button to start the object creation process
6 Click the Yes button in the popup window to create the object
7 In the Create Data Model popup window set Type to ldquoPSrdquo and select the Generate From Data
Source Object radio button (leaving the OData Channel check box marked)
How To Create OData Services Using the Screen Scraping Generator in SAP NetWeaver Gateway
July 2012 3
8 Click the Enter button
9 In the popup window enter a Description Data Source Type (Screen Scraping) and the System
Alias (this is the alias that is connected to the backend system)
10 Click the Continue button Assign the object to a transport or make it a local object and click the
enter button
11 You will be presented with the following screen Note the image below shows many recording
groups that you will not see
How To Create OData Services Using the Screen Scraping Generator in SAP NetWeaver Gateway
July 2012 4
42 Create a Screen Scraping Recording for the
READ Operation
1 Click the Create icon and in the drop down menu select Create Recording Group
2 In the popup window enter the name Z_FLIGHT_RECORDINGS_ltYour Last Namegt and a
suitable description
3 Click the Enter button
4 In the Screen Scraping Repository right click on the newly created recording group and in the
context menu select Create Recording
How To Create OData Services Using the Screen Scraping Generator in SAP NetWeaver Gateway
July 2012 5
5 In the popup window enter the recording name ldquoZ_TZ60_FLIGHT_DETAILSrdquo the Transaction
Code ldquoTZ60rdquo Recording Type ldquoRrdquo for read and a suitable description
6 Click the Enter button
7 You will be taken to the TZ60 transaction on the backend system
8 Enter in some valid flight data
9 Click the Enter button
10 The following screen should be displayed
How To Create OData Services Using the Screen Scraping Generator in SAP NetWeaver Gateway
July 2012 6
11 Place the cursor in the first cell in the first row of the table
12 Click the Page Down button that is found in the SAP GUI menu button bar
13 Press the page down button until you reach the bottom of the table contents then press it twice
more (if you donrsquot do this you will get a warning that the table wasnrsquot fully recorded in the next
step)
14 Click the back button twice to navigate out of the TZ60 transaction This will start the recording
generation and when it is done you will see a similar screen
How To Create OData Services Using the Screen Scraping Generator in SAP NetWeaver Gateway
July 2012 7
15 Drill into the Recording Tree you will see each screen recorded has a node in the tree with its
corresponding input values as attributes in addition the second screen has a table named
FLIGHTS
43 Create a Screen Scraping Recording for the
UPDATE Operation
1 In the Screen Scraping Repository right click on the recording group created earlier and in the
context menu select Create Recording
How To Create OData Services Using the Screen Scraping Generator in SAP NetWeaver Gateway
July 2012 8
2 In the popup window enter the recording name ldquoZ_TZ90_FLIGHT_UPDATErdquo the Transaction
Code ldquoTZ90rdquo Recording type ldquoUrdquo for update and a suitable description
3 Click the Enter button
4 You will be taken to the TZ90 transaction on the backend system
5 Enter in some valid flight data
6 Click the Change button
7 Change the Distance field (probably best to make only a minor change)
How To Create OData Services Using the Screen Scraping Generator in SAP NetWeaver Gateway
July 2012 9
8 Save your changes
9 Click the back button twice and save your recording by clicking the Yes button
10 You should now have the two recordings as shown below
44 Expose a Search Help for use by the QUERY
Operation
Search Helps are used to support the QUERY operation of a Screen Scrape based
Gateway Object
1 Right click on the Z_TZ60_FLIGHT_DETAILS recordings SFLIGHT-CONNID attribute and in the
context menu select Get Search Help
How To Create OData Services Using the Screen Scraping Generator in SAP NetWeaver Gateway
July 2012 10
2 This will create a node in the Recording Group named H_SPFLI (which is the name of the value
help) Open up the object and you can see the values it passes back
Note Value Help objects are used in QUERY operations only
45 Map the QUERY operation to the Search Help
object
1 Highlight the H_SPFLI search help object in the Screen Scraping Repository
2 Click the Create Mapping button in the Gateway Object Details
3 A popup window with the Mapping details for the QUERY operation is displayed
How To Create OData Services Using the Screen Scraping Generator in SAP NetWeaver Gateway
July 2012 11
4 Click the Enter button to complete the mapping Next step is to define the primary key of the
data entity you are creating
5 Your data model should now be in the following state
By default the FLIGHT_NUMBER is set as the primary key ndash this is because it is based on the
search help from the FLIGHT_NUMBERConnection ID We need to also add AIRLINECarrier
ID as the primary key
6 Right click on the AIRLINE attribute and in the context menu select Set Key
7 Your data model should now look like the following
46 Map the READ operation to the Recording of
Transaction TZ60
1 Highlight the screen scrape recording ldquoZ_TZ60_FLIGHT_DETAILSrdquo in the Screen Scraping
Repository
How To Create OData Services Using the Screen Scraping Generator in SAP NetWeaver Gateway
July 2012 12
2 Click the Create Mapping button in the Gateway Object Details
3 A popup window with the Mapping details for the READ operation is displayed
4 Under node SAPMTZ60(0100) highlight SFLIGHT-CONNID by right clicking on it
5 Click the Change Mapping Route button
How To Create OData Services Using the Screen Scraping Generator in SAP NetWeaver Gateway
July 2012 13
6 In the Change Mapping Route popup window highlight the FLIGHT_NUMBER attributehellipthis will
make the SFLIGHT-CARRID assigned to the FLIGHT_NUMBER of the data model which is one
of itrsquos keys
7 Click the Enter button
8 Your mapping should now look like this
9 As you can see above the Mapping Route for attributes under SAPMTZ60(0200) node is the
screen name followed by the attribute namehellipletrsquos flatten this mapping to make it easier to read
and understand for the consumers of our servicehellipin addition we are going to be mapping the
UPDATE operation later on which requires a flattened interface
10 Under the node SAPMTZ60(0200) uncheck SFLIGHT-CARRID and SFLIGHT-CONNID since
this is duplicate information already provided by the key fields
How To Create OData Services Using the Screen Scraping Generator in SAP NetWeaver Gateway
July 2012 14
11 Right click on the SCARR-CARRNAME attribute to select it then click the Change Mapping
Route button
12 In the Change Mapping Route popup window highlight the root node and change the property
name to AIRLINENAME
13 Your mapping should now look like this
14 For the rest of the SAPMTZ60(0200) attributes do the Change Mapping Route as you did
above accepting the default property name
15 Your mapping should now look like this
How To Create OData Services Using the Screen Scraping Generator in SAP NetWeaver Gateway
July 2012 15
16 Uncheck the FLIGHTS[] node We wonrsquot use it in this How To Guide to keep things simplehellipbut
you can make use of it as it is supported as output Your mapping should now look like this
17 Click the Enter button to complete the mapping
18 Your Gateway Object should now look like this
How To Create OData Services Using the Screen Scraping Generator in SAP NetWeaver Gateway
July 2012 16
47 Map the UPDATE Operation
1 In the Screen Scraping Repository highlight the recording you created earlier named
Z_TZ90_FLIGHT_UPDATE
2 Click the Create Mapping button
3 The default mapping looks like this
How To Create OData Services Using the Screen Scraping Generator in SAP NetWeaver Gateway
July 2012 17
4 We only need to make one change and that is to assign the SPFLI-CONNID to the correct data
model attribute FLIGHT_NUMBER Highlight SPFLI-CONNID as shown below by right clicking
on it
5 Click the Change Mapping Route button
6 In the Change Mapping Route popup window select FLIGHT_NUMBER
7 Click the Enter buttonhellipthe mapping should now look like the following
How To Create OData Services Using the Screen Scraping Generator in SAP NetWeaver Gateway
July 2012 18
8 Click the Enter button to complete your UPDATE operation mapping
9 Your data object model should now look like this
10 Click the Generate button at the upper left hand corner of the screen (this will generate code
that represents what you have configured)
How To Create OData Services Using the Screen Scraping Generator in SAP NetWeaver Gateway
July 2012 19
11 When the generation is complete the following popup window will be displayed notifying you
have what was generated
48 Simplify the Data Model Name
The name of your data model is currently Z_FLIGHT_SCS_ltYour Last Namegt This name will by
default be used when calling your service Letrsquos make it simpler name that describes the data ie ndash
ldquoFlightrdquo
1 Navigate for the Gateway Data Modeler back to the ABAP Workbench by clicking the Object
Navigator button
2 You should now be back in the ABAP Workbench (SE80) and should see your Gateway Data
Model
How To Create OData Services Using the Screen Scraping Generator in SAP NetWeaver Gateway
July 2012 20
3 Double click on the Data Model node (first node under the root node)
Double clicking on it will open up the editor for this node Notice the External Name input field
4 Go into change mode and change the External Name to be ldquoFlightrdquo
5 Save your changes Now your data model is known as ldquoFlightrdquo
How To Create OData Services Using the Screen Scraping Generator in SAP NetWeaver Gateway
July 2012 21
Note
If you go back in and change you data model (add a new operation or change some of the mapping) and then regenerate this configuration will be lost The name will revert to the old data model name
49 Create the Gateway Consumption Model
The Consumption Model is what exposes the Gateway Data Models to the network It does this by
creating a service in the Internet Communication Framework In this step you will create a
Consumption Model and then map your Data Model to it
1 Right click on the GW Data Modelrsquos Related GW Consumption Models node and in the context
menu select Add Consumpt Model
2 In the input field enter in the name of the consumption model you want created ndash zflightscsltyour
last namegt
3 Click the Enter button You will be asked if you want to create the consumption model click the
Yes button
4 Enter a description for your consumption model and click the Enter button
How To Create OData Services Using the Screen Scraping Generator in SAP NetWeaver Gateway
July 2012 22
5 You can see the Gateway service exposed in the ICF ndash transaction SICF ndash follow the ICF tree
path default_host gt sap gt opu gt odata gt sapthere you will see a list of all ICF services that
represent Gateway Consumption Models
410 Add an Alias to the Service
6 Go to the service maintenance transaction IWFNDMAINT_SERVICE
12 Click the search icon to search for your service in the list ndash the search icon is outlined in red
below
13 In the Find popup window enter in the Technical Service Name (ZFLIGHTSCSltYour Last
Namegt) for the search term
How To Create OData Services Using the Screen Scraping Generator in SAP NetWeaver Gateway
July 2012 23
14 Click the enter button your service should be located in the list
Hit the Cancel button on the Find dialog window to dismiss it
15 Click the Technical Service Name link (highlighted below in red on the top half of the screen)
this will cause the Alias assignment details be displayed at the bottom of the screen
6 Click the add System Alias button outlined in Red above in the bottom half of the screen You
should now see the screen to maintain service aliases
7 Click the New Entries button
8 Add your service document (the consumption model)hellipenter in the name of your consumption
model ndash zflightscsltyour last namegt and click the F4 help button
How To Create OData Services Using the Screen Scraping Generator in SAP NetWeaver Gateway
July 2012 24
9 Double click on your service document in the popup window
10 In the System Alias column enter the alias of the system you want your service to call ndash in this
case we are using the local alias
11 Save your changes then hit the back button You should now see that the LOCAL alias is
assigned to your service
12 Click the Call Browser button to launch a web browser that points to the service document of
your OData service
How To Create OData Services Using the Screen Scraping Generator in SAP NetWeaver Gateway
July 2012 25
Note
By default all gateway services are initial assigned basic
411 Test Your Gateway Object
Now for the fun part You get to test everything you have done up to this point Testing the QUERY
and READ operations is easyhellipyou just need a browser Testing the CREATE and UPDATE
operations (as well as the DELETE if we had implemented that) requires the use of a simple HTTP
tool the one we use here is the RESTClient plugin in for FireFox
1 In the browser that you launched in the last step replace the end of the URL ldquo$format=xmlrdquo
with ldquo$metadatardquo ndash this will bring up the metadata of your service
Example URL httpservicehttp_portsapopuodatasapZFLIGHTSCSGEBO$metadata
How To Create OData Services Using the Screen Scraping Generator in SAP NetWeaver Gateway
July 2012 26
2 In the URL replace ldquo$metadatardquo with ldquoFlightCollectionrdquo ndash this will execute the QUERY operation
You should now see a list of flights
3 To make it easier to test and debug add the query string parameter sap-ds-debug=true to the
URL ndash this will format the content as html allow us to follow links to the READ operation
Example URL
httpserverhttp_portsapopuodatasapZFLIGHTSCSGEBOFlightCollectionsap-ds-
debug=true
How To Create OData Services Using the Screen Scraping Generator in SAP NetWeaver Gateway
July 2012 27
Note
You will see an SAP icon in the bottom right hand corner Click it to see more details about the service call
4 To execute the READ operation for a specific flight just click the link
FlightCollection(airline=hellipflight_number=hellip)
5 Clicking this link will bring back the flight details from the READ operation
How To Create OData Services Using the Screen Scraping Generator in SAP NetWeaver Gateway
July 2012 28
6 Now let test the update functionality
7 To test the update (and create) functionality we will need a CSRF token (needed to prevent
Cross Site Request Forgery attacks)hellipto do this we need to request this token during a read by
passing in an http header value requesting the token To pass in a header value we need to use
the RESTClienthelliphere using the FireFox RESTClient (this is a free plugin for FireFox)
How To Create OData Services Using the Screen Scraping Generator in SAP NetWeaver Gateway
July 2012 29
8 Copy the URL used in the test in step 5 above (the URL that executed a READ) and paste it into
the URL input field
9 Remove the query string attribute ldquosap-ds-debug=truerdquo from the URL
10 Click the Headers menu item and select Custom Header
11 Enter the name value as shown below
Tip Check the ldquoSave to favoriterdquo check box so you can easily add this header for faster testing the next time
12 Click the Okay button You should now see the following
How To Create OData Services Using the Screen Scraping Generator in SAP NetWeaver Gateway
July 2012 30
13 Click the SEND button
14 In the Response section at the bottom of the RESTClient copy the value returned for the x-csrf-
token shown here outlined in red (note these token values are generated by the gateway
server)
The token will be passed back in when testing the create and update functionality
15 Change the value for header attribute x-csrf-token to be the value you copied above to do this
just click on the header attribute in the RESTClient you should now see something to the
following
16 Test the UPDATE_ENTITY UPDATE operation
17 Add the content-type header to the Request Headers section Click the Headers dropdown and
select Custom Header
18 Enter the namevalue ndash content-typeapplicationatom+xmltype=entry
Tip Save this as a favorite so you can easily add it again when testing
How To Create OData Services Using the Screen Scraping Generator in SAP NetWeaver Gateway
July 2012 31
19 Click the Okay button to add the header request
20 Switch to the ldquoResponse Body (Raw)rdquo tab and copy the contents there (we will be updating the
data that was sent back when reading the entity)
21 Paste the Response Body you just copied into the Request Body section
22 Change the Method dropdown to PUT Your RESTClient should now look similar to the
following
23 To test the update functionality we need to change some of the values in the request body that
we are sending to the Gateway serverhellipchange the value of the distance attribute
24 Click the SEND button
25 If the update is successful you will get a status code of 204 as shown below
How To Create OData Services Using the Screen Scraping Generator in SAP NetWeaver Gateway
July 2012 32
26 You can switch the Method back to GET and click the send button again then check the
response body to see if the values you changed for the update are returned by the read
27 Congrats You have successfully created and tested a simple OData service created with the
Screen Scraping generator
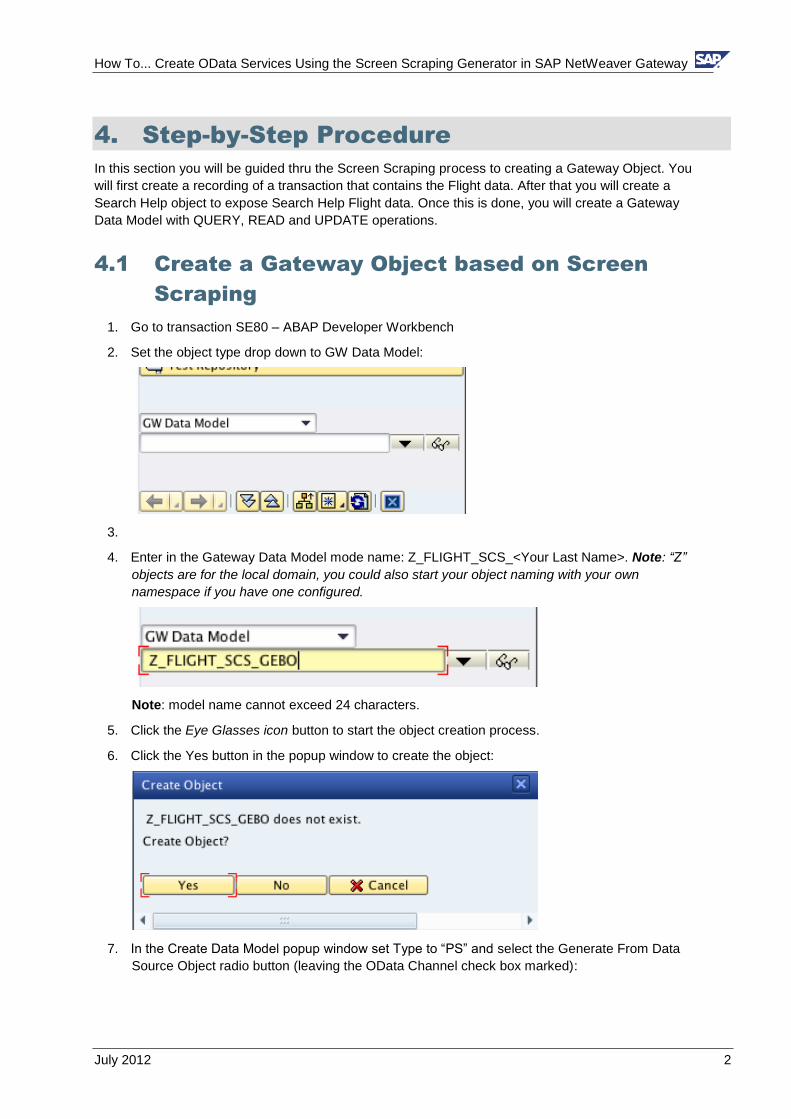
How To Create OData Services Using the Screen Scraping Generator in SAP NetWeaver Gateway
July 2012 2
4 Step-by-Step Procedure
In this section you will be guided thru the Screen Scraping process to creating a Gateway Object You
will first create a recording of a transaction that contains the Flight data After that you will create a
Search Help object to expose Search Help Flight data Once this is done you will create a Gateway
Data Model with QUERY READ and UPDATE operations
41 Create a Gateway Object based on Screen
Scraping
1 Go to transaction SE80 ndash ABAP Developer Workbench
2 Set the object type drop down to GW Data Model
3
4 Enter in the Gateway Data Model mode name Z_FLIGHT_SCS_ltYour Last Namegt Note ldquoZrdquo
objects are for the local domain you could also start your object naming with your own
namespace if you have one configured
Note model name cannot exceed 24 characters
5 Click the Eye Glasses icon button to start the object creation process
6 Click the Yes button in the popup window to create the object
7 In the Create Data Model popup window set Type to ldquoPSrdquo and select the Generate From Data
Source Object radio button (leaving the OData Channel check box marked)
How To Create OData Services Using the Screen Scraping Generator in SAP NetWeaver Gateway
July 2012 3
8 Click the Enter button
9 In the popup window enter a Description Data Source Type (Screen Scraping) and the System
Alias (this is the alias that is connected to the backend system)
10 Click the Continue button Assign the object to a transport or make it a local object and click the
enter button
11 You will be presented with the following screen Note the image below shows many recording
groups that you will not see
How To Create OData Services Using the Screen Scraping Generator in SAP NetWeaver Gateway
July 2012 4
42 Create a Screen Scraping Recording for the
READ Operation
1 Click the Create icon and in the drop down menu select Create Recording Group
2 In the popup window enter the name Z_FLIGHT_RECORDINGS_ltYour Last Namegt and a
suitable description
3 Click the Enter button
4 In the Screen Scraping Repository right click on the newly created recording group and in the
context menu select Create Recording
How To Create OData Services Using the Screen Scraping Generator in SAP NetWeaver Gateway
July 2012 5
5 In the popup window enter the recording name ldquoZ_TZ60_FLIGHT_DETAILSrdquo the Transaction
Code ldquoTZ60rdquo Recording Type ldquoRrdquo for read and a suitable description
6 Click the Enter button
7 You will be taken to the TZ60 transaction on the backend system
8 Enter in some valid flight data
9 Click the Enter button
10 The following screen should be displayed
How To Create OData Services Using the Screen Scraping Generator in SAP NetWeaver Gateway
July 2012 6
11 Place the cursor in the first cell in the first row of the table
12 Click the Page Down button that is found in the SAP GUI menu button bar
13 Press the page down button until you reach the bottom of the table contents then press it twice
more (if you donrsquot do this you will get a warning that the table wasnrsquot fully recorded in the next
step)
14 Click the back button twice to navigate out of the TZ60 transaction This will start the recording
generation and when it is done you will see a similar screen
How To Create OData Services Using the Screen Scraping Generator in SAP NetWeaver Gateway
July 2012 7
15 Drill into the Recording Tree you will see each screen recorded has a node in the tree with its
corresponding input values as attributes in addition the second screen has a table named
FLIGHTS
43 Create a Screen Scraping Recording for the
UPDATE Operation
1 In the Screen Scraping Repository right click on the recording group created earlier and in the
context menu select Create Recording
How To Create OData Services Using the Screen Scraping Generator in SAP NetWeaver Gateway
July 2012 8
2 In the popup window enter the recording name ldquoZ_TZ90_FLIGHT_UPDATErdquo the Transaction
Code ldquoTZ90rdquo Recording type ldquoUrdquo for update and a suitable description
3 Click the Enter button
4 You will be taken to the TZ90 transaction on the backend system
5 Enter in some valid flight data
6 Click the Change button
7 Change the Distance field (probably best to make only a minor change)
How To Create OData Services Using the Screen Scraping Generator in SAP NetWeaver Gateway
July 2012 9
8 Save your changes
9 Click the back button twice and save your recording by clicking the Yes button
10 You should now have the two recordings as shown below
44 Expose a Search Help for use by the QUERY
Operation
Search Helps are used to support the QUERY operation of a Screen Scrape based
Gateway Object
1 Right click on the Z_TZ60_FLIGHT_DETAILS recordings SFLIGHT-CONNID attribute and in the
context menu select Get Search Help
How To Create OData Services Using the Screen Scraping Generator in SAP NetWeaver Gateway
July 2012 10
2 This will create a node in the Recording Group named H_SPFLI (which is the name of the value
help) Open up the object and you can see the values it passes back
Note Value Help objects are used in QUERY operations only
45 Map the QUERY operation to the Search Help
object
1 Highlight the H_SPFLI search help object in the Screen Scraping Repository
2 Click the Create Mapping button in the Gateway Object Details
3 A popup window with the Mapping details for the QUERY operation is displayed
How To Create OData Services Using the Screen Scraping Generator in SAP NetWeaver Gateway
July 2012 11
4 Click the Enter button to complete the mapping Next step is to define the primary key of the
data entity you are creating
5 Your data model should now be in the following state
By default the FLIGHT_NUMBER is set as the primary key ndash this is because it is based on the
search help from the FLIGHT_NUMBERConnection ID We need to also add AIRLINECarrier
ID as the primary key
6 Right click on the AIRLINE attribute and in the context menu select Set Key
7 Your data model should now look like the following
46 Map the READ operation to the Recording of
Transaction TZ60
1 Highlight the screen scrape recording ldquoZ_TZ60_FLIGHT_DETAILSrdquo in the Screen Scraping
Repository
How To Create OData Services Using the Screen Scraping Generator in SAP NetWeaver Gateway
July 2012 12
2 Click the Create Mapping button in the Gateway Object Details
3 A popup window with the Mapping details for the READ operation is displayed
4 Under node SAPMTZ60(0100) highlight SFLIGHT-CONNID by right clicking on it
5 Click the Change Mapping Route button
How To Create OData Services Using the Screen Scraping Generator in SAP NetWeaver Gateway
July 2012 13
6 In the Change Mapping Route popup window highlight the FLIGHT_NUMBER attributehellipthis will
make the SFLIGHT-CARRID assigned to the FLIGHT_NUMBER of the data model which is one
of itrsquos keys
7 Click the Enter button
8 Your mapping should now look like this
9 As you can see above the Mapping Route for attributes under SAPMTZ60(0200) node is the
screen name followed by the attribute namehellipletrsquos flatten this mapping to make it easier to read
and understand for the consumers of our servicehellipin addition we are going to be mapping the
UPDATE operation later on which requires a flattened interface
10 Under the node SAPMTZ60(0200) uncheck SFLIGHT-CARRID and SFLIGHT-CONNID since
this is duplicate information already provided by the key fields
How To Create OData Services Using the Screen Scraping Generator in SAP NetWeaver Gateway
July 2012 14
11 Right click on the SCARR-CARRNAME attribute to select it then click the Change Mapping
Route button
12 In the Change Mapping Route popup window highlight the root node and change the property
name to AIRLINENAME
13 Your mapping should now look like this
14 For the rest of the SAPMTZ60(0200) attributes do the Change Mapping Route as you did
above accepting the default property name
15 Your mapping should now look like this
How To Create OData Services Using the Screen Scraping Generator in SAP NetWeaver Gateway
July 2012 15
16 Uncheck the FLIGHTS[] node We wonrsquot use it in this How To Guide to keep things simplehellipbut
you can make use of it as it is supported as output Your mapping should now look like this
17 Click the Enter button to complete the mapping
18 Your Gateway Object should now look like this
How To Create OData Services Using the Screen Scraping Generator in SAP NetWeaver Gateway
July 2012 16
47 Map the UPDATE Operation
1 In the Screen Scraping Repository highlight the recording you created earlier named
Z_TZ90_FLIGHT_UPDATE
2 Click the Create Mapping button
3 The default mapping looks like this
How To Create OData Services Using the Screen Scraping Generator in SAP NetWeaver Gateway
July 2012 17
4 We only need to make one change and that is to assign the SPFLI-CONNID to the correct data
model attribute FLIGHT_NUMBER Highlight SPFLI-CONNID as shown below by right clicking
on it
5 Click the Change Mapping Route button
6 In the Change Mapping Route popup window select FLIGHT_NUMBER
7 Click the Enter buttonhellipthe mapping should now look like the following
How To Create OData Services Using the Screen Scraping Generator in SAP NetWeaver Gateway
July 2012 18
8 Click the Enter button to complete your UPDATE operation mapping
9 Your data object model should now look like this
10 Click the Generate button at the upper left hand corner of the screen (this will generate code
that represents what you have configured)
How To Create OData Services Using the Screen Scraping Generator in SAP NetWeaver Gateway
July 2012 19
11 When the generation is complete the following popup window will be displayed notifying you
have what was generated
48 Simplify the Data Model Name
The name of your data model is currently Z_FLIGHT_SCS_ltYour Last Namegt This name will by
default be used when calling your service Letrsquos make it simpler name that describes the data ie ndash
ldquoFlightrdquo
1 Navigate for the Gateway Data Modeler back to the ABAP Workbench by clicking the Object
Navigator button
2 You should now be back in the ABAP Workbench (SE80) and should see your Gateway Data
Model
How To Create OData Services Using the Screen Scraping Generator in SAP NetWeaver Gateway
July 2012 20
3 Double click on the Data Model node (first node under the root node)
Double clicking on it will open up the editor for this node Notice the External Name input field
4 Go into change mode and change the External Name to be ldquoFlightrdquo
5 Save your changes Now your data model is known as ldquoFlightrdquo
How To Create OData Services Using the Screen Scraping Generator in SAP NetWeaver Gateway
July 2012 21
Note
If you go back in and change you data model (add a new operation or change some of the mapping) and then regenerate this configuration will be lost The name will revert to the old data model name
49 Create the Gateway Consumption Model
The Consumption Model is what exposes the Gateway Data Models to the network It does this by
creating a service in the Internet Communication Framework In this step you will create a
Consumption Model and then map your Data Model to it
1 Right click on the GW Data Modelrsquos Related GW Consumption Models node and in the context
menu select Add Consumpt Model
2 In the input field enter in the name of the consumption model you want created ndash zflightscsltyour
last namegt
3 Click the Enter button You will be asked if you want to create the consumption model click the
Yes button
4 Enter a description for your consumption model and click the Enter button
How To Create OData Services Using the Screen Scraping Generator in SAP NetWeaver Gateway
July 2012 22
5 You can see the Gateway service exposed in the ICF ndash transaction SICF ndash follow the ICF tree
path default_host gt sap gt opu gt odata gt sapthere you will see a list of all ICF services that
represent Gateway Consumption Models
410 Add an Alias to the Service
6 Go to the service maintenance transaction IWFNDMAINT_SERVICE
12 Click the search icon to search for your service in the list ndash the search icon is outlined in red
below
13 In the Find popup window enter in the Technical Service Name (ZFLIGHTSCSltYour Last
Namegt) for the search term
How To Create OData Services Using the Screen Scraping Generator in SAP NetWeaver Gateway
July 2012 23
14 Click the enter button your service should be located in the list
Hit the Cancel button on the Find dialog window to dismiss it
15 Click the Technical Service Name link (highlighted below in red on the top half of the screen)
this will cause the Alias assignment details be displayed at the bottom of the screen
6 Click the add System Alias button outlined in Red above in the bottom half of the screen You
should now see the screen to maintain service aliases
7 Click the New Entries button
8 Add your service document (the consumption model)hellipenter in the name of your consumption
model ndash zflightscsltyour last namegt and click the F4 help button
How To Create OData Services Using the Screen Scraping Generator in SAP NetWeaver Gateway
July 2012 24
9 Double click on your service document in the popup window
10 In the System Alias column enter the alias of the system you want your service to call ndash in this
case we are using the local alias
11 Save your changes then hit the back button You should now see that the LOCAL alias is
assigned to your service
12 Click the Call Browser button to launch a web browser that points to the service document of
your OData service
How To Create OData Services Using the Screen Scraping Generator in SAP NetWeaver Gateway
July 2012 25
Note
By default all gateway services are initial assigned basic
411 Test Your Gateway Object
Now for the fun part You get to test everything you have done up to this point Testing the QUERY
and READ operations is easyhellipyou just need a browser Testing the CREATE and UPDATE
operations (as well as the DELETE if we had implemented that) requires the use of a simple HTTP
tool the one we use here is the RESTClient plugin in for FireFox
1 In the browser that you launched in the last step replace the end of the URL ldquo$format=xmlrdquo
with ldquo$metadatardquo ndash this will bring up the metadata of your service
Example URL httpservicehttp_portsapopuodatasapZFLIGHTSCSGEBO$metadata
How To Create OData Services Using the Screen Scraping Generator in SAP NetWeaver Gateway
July 2012 26
2 In the URL replace ldquo$metadatardquo with ldquoFlightCollectionrdquo ndash this will execute the QUERY operation
You should now see a list of flights
3 To make it easier to test and debug add the query string parameter sap-ds-debug=true to the
URL ndash this will format the content as html allow us to follow links to the READ operation
Example URL
httpserverhttp_portsapopuodatasapZFLIGHTSCSGEBOFlightCollectionsap-ds-
debug=true
How To Create OData Services Using the Screen Scraping Generator in SAP NetWeaver Gateway
July 2012 27
Note
You will see an SAP icon in the bottom right hand corner Click it to see more details about the service call
4 To execute the READ operation for a specific flight just click the link
FlightCollection(airline=hellipflight_number=hellip)
5 Clicking this link will bring back the flight details from the READ operation
How To Create OData Services Using the Screen Scraping Generator in SAP NetWeaver Gateway
July 2012 28
6 Now let test the update functionality
7 To test the update (and create) functionality we will need a CSRF token (needed to prevent
Cross Site Request Forgery attacks)hellipto do this we need to request this token during a read by
passing in an http header value requesting the token To pass in a header value we need to use
the RESTClienthelliphere using the FireFox RESTClient (this is a free plugin for FireFox)
How To Create OData Services Using the Screen Scraping Generator in SAP NetWeaver Gateway
July 2012 29
8 Copy the URL used in the test in step 5 above (the URL that executed a READ) and paste it into
the URL input field
9 Remove the query string attribute ldquosap-ds-debug=truerdquo from the URL
10 Click the Headers menu item and select Custom Header
11 Enter the name value as shown below
Tip Check the ldquoSave to favoriterdquo check box so you can easily add this header for faster testing the next time
12 Click the Okay button You should now see the following
How To Create OData Services Using the Screen Scraping Generator in SAP NetWeaver Gateway
July 2012 30
13 Click the SEND button
14 In the Response section at the bottom of the RESTClient copy the value returned for the x-csrf-
token shown here outlined in red (note these token values are generated by the gateway
server)
The token will be passed back in when testing the create and update functionality
15 Change the value for header attribute x-csrf-token to be the value you copied above to do this
just click on the header attribute in the RESTClient you should now see something to the
following
16 Test the UPDATE_ENTITY UPDATE operation
17 Add the content-type header to the Request Headers section Click the Headers dropdown and
select Custom Header
18 Enter the namevalue ndash content-typeapplicationatom+xmltype=entry
Tip Save this as a favorite so you can easily add it again when testing
How To Create OData Services Using the Screen Scraping Generator in SAP NetWeaver Gateway
July 2012 31
19 Click the Okay button to add the header request
20 Switch to the ldquoResponse Body (Raw)rdquo tab and copy the contents there (we will be updating the
data that was sent back when reading the entity)
21 Paste the Response Body you just copied into the Request Body section
22 Change the Method dropdown to PUT Your RESTClient should now look similar to the
following
23 To test the update functionality we need to change some of the values in the request body that
we are sending to the Gateway serverhellipchange the value of the distance attribute
24 Click the SEND button
25 If the update is successful you will get a status code of 204 as shown below
How To Create OData Services Using the Screen Scraping Generator in SAP NetWeaver Gateway
July 2012 32
26 You can switch the Method back to GET and click the send button again then check the
response body to see if the values you changed for the update are returned by the read
27 Congrats You have successfully created and tested a simple OData service created with the
Screen Scraping generator
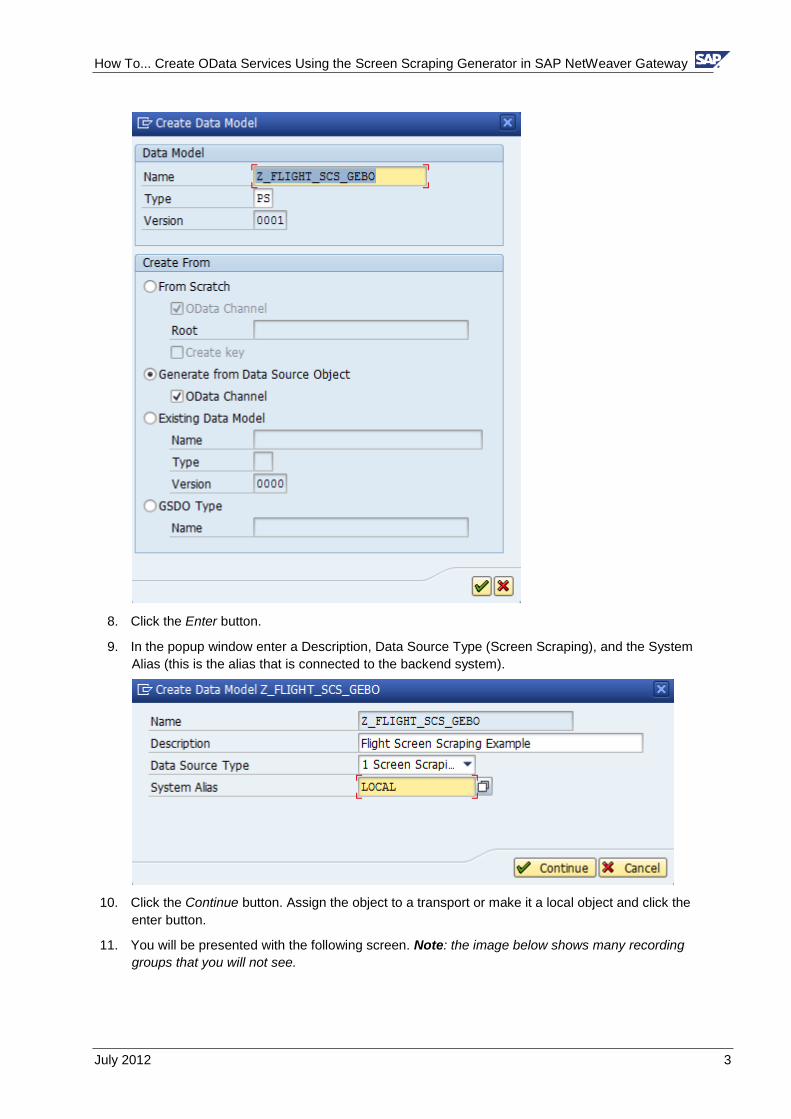
How To Create OData Services Using the Screen Scraping Generator in SAP NetWeaver Gateway
July 2012 3
8 Click the Enter button
9 In the popup window enter a Description Data Source Type (Screen Scraping) and the System
Alias (this is the alias that is connected to the backend system)
10 Click the Continue button Assign the object to a transport or make it a local object and click the
enter button
11 You will be presented with the following screen Note the image below shows many recording
groups that you will not see
How To Create OData Services Using the Screen Scraping Generator in SAP NetWeaver Gateway
July 2012 4
42 Create a Screen Scraping Recording for the
READ Operation
1 Click the Create icon and in the drop down menu select Create Recording Group
2 In the popup window enter the name Z_FLIGHT_RECORDINGS_ltYour Last Namegt and a
suitable description
3 Click the Enter button
4 In the Screen Scraping Repository right click on the newly created recording group and in the
context menu select Create Recording
How To Create OData Services Using the Screen Scraping Generator in SAP NetWeaver Gateway
July 2012 5
5 In the popup window enter the recording name ldquoZ_TZ60_FLIGHT_DETAILSrdquo the Transaction
Code ldquoTZ60rdquo Recording Type ldquoRrdquo for read and a suitable description
6 Click the Enter button
7 You will be taken to the TZ60 transaction on the backend system
8 Enter in some valid flight data
9 Click the Enter button
10 The following screen should be displayed
How To Create OData Services Using the Screen Scraping Generator in SAP NetWeaver Gateway
July 2012 6
11 Place the cursor in the first cell in the first row of the table
12 Click the Page Down button that is found in the SAP GUI menu button bar
13 Press the page down button until you reach the bottom of the table contents then press it twice
more (if you donrsquot do this you will get a warning that the table wasnrsquot fully recorded in the next
step)
14 Click the back button twice to navigate out of the TZ60 transaction This will start the recording
generation and when it is done you will see a similar screen
How To Create OData Services Using the Screen Scraping Generator in SAP NetWeaver Gateway
July 2012 7
15 Drill into the Recording Tree you will see each screen recorded has a node in the tree with its
corresponding input values as attributes in addition the second screen has a table named
FLIGHTS
43 Create a Screen Scraping Recording for the
UPDATE Operation
1 In the Screen Scraping Repository right click on the recording group created earlier and in the
context menu select Create Recording
How To Create OData Services Using the Screen Scraping Generator in SAP NetWeaver Gateway
July 2012 8
2 In the popup window enter the recording name ldquoZ_TZ90_FLIGHT_UPDATErdquo the Transaction
Code ldquoTZ90rdquo Recording type ldquoUrdquo for update and a suitable description
3 Click the Enter button
4 You will be taken to the TZ90 transaction on the backend system
5 Enter in some valid flight data
6 Click the Change button
7 Change the Distance field (probably best to make only a minor change)
How To Create OData Services Using the Screen Scraping Generator in SAP NetWeaver Gateway
July 2012 9
8 Save your changes
9 Click the back button twice and save your recording by clicking the Yes button
10 You should now have the two recordings as shown below
44 Expose a Search Help for use by the QUERY
Operation
Search Helps are used to support the QUERY operation of a Screen Scrape based
Gateway Object
1 Right click on the Z_TZ60_FLIGHT_DETAILS recordings SFLIGHT-CONNID attribute and in the
context menu select Get Search Help
How To Create OData Services Using the Screen Scraping Generator in SAP NetWeaver Gateway
July 2012 10
2 This will create a node in the Recording Group named H_SPFLI (which is the name of the value
help) Open up the object and you can see the values it passes back
Note Value Help objects are used in QUERY operations only
45 Map the QUERY operation to the Search Help
object
1 Highlight the H_SPFLI search help object in the Screen Scraping Repository
2 Click the Create Mapping button in the Gateway Object Details
3 A popup window with the Mapping details for the QUERY operation is displayed
How To Create OData Services Using the Screen Scraping Generator in SAP NetWeaver Gateway
July 2012 11
4 Click the Enter button to complete the mapping Next step is to define the primary key of the
data entity you are creating
5 Your data model should now be in the following state
By default the FLIGHT_NUMBER is set as the primary key ndash this is because it is based on the
search help from the FLIGHT_NUMBERConnection ID We need to also add AIRLINECarrier
ID as the primary key
6 Right click on the AIRLINE attribute and in the context menu select Set Key
7 Your data model should now look like the following
46 Map the READ operation to the Recording of
Transaction TZ60
1 Highlight the screen scrape recording ldquoZ_TZ60_FLIGHT_DETAILSrdquo in the Screen Scraping
Repository
How To Create OData Services Using the Screen Scraping Generator in SAP NetWeaver Gateway
July 2012 12
2 Click the Create Mapping button in the Gateway Object Details
3 A popup window with the Mapping details for the READ operation is displayed
4 Under node SAPMTZ60(0100) highlight SFLIGHT-CONNID by right clicking on it
5 Click the Change Mapping Route button
How To Create OData Services Using the Screen Scraping Generator in SAP NetWeaver Gateway
July 2012 13
6 In the Change Mapping Route popup window highlight the FLIGHT_NUMBER attributehellipthis will
make the SFLIGHT-CARRID assigned to the FLIGHT_NUMBER of the data model which is one
of itrsquos keys
7 Click the Enter button
8 Your mapping should now look like this
9 As you can see above the Mapping Route for attributes under SAPMTZ60(0200) node is the
screen name followed by the attribute namehellipletrsquos flatten this mapping to make it easier to read
and understand for the consumers of our servicehellipin addition we are going to be mapping the
UPDATE operation later on which requires a flattened interface
10 Under the node SAPMTZ60(0200) uncheck SFLIGHT-CARRID and SFLIGHT-CONNID since
this is duplicate information already provided by the key fields
How To Create OData Services Using the Screen Scraping Generator in SAP NetWeaver Gateway
July 2012 14
11 Right click on the SCARR-CARRNAME attribute to select it then click the Change Mapping
Route button
12 In the Change Mapping Route popup window highlight the root node and change the property
name to AIRLINENAME
13 Your mapping should now look like this
14 For the rest of the SAPMTZ60(0200) attributes do the Change Mapping Route as you did
above accepting the default property name
15 Your mapping should now look like this
How To Create OData Services Using the Screen Scraping Generator in SAP NetWeaver Gateway
July 2012 15
16 Uncheck the FLIGHTS[] node We wonrsquot use it in this How To Guide to keep things simplehellipbut
you can make use of it as it is supported as output Your mapping should now look like this
17 Click the Enter button to complete the mapping
18 Your Gateway Object should now look like this
How To Create OData Services Using the Screen Scraping Generator in SAP NetWeaver Gateway
July 2012 16
47 Map the UPDATE Operation
1 In the Screen Scraping Repository highlight the recording you created earlier named
Z_TZ90_FLIGHT_UPDATE
2 Click the Create Mapping button
3 The default mapping looks like this
How To Create OData Services Using the Screen Scraping Generator in SAP NetWeaver Gateway
July 2012 17
4 We only need to make one change and that is to assign the SPFLI-CONNID to the correct data
model attribute FLIGHT_NUMBER Highlight SPFLI-CONNID as shown below by right clicking
on it
5 Click the Change Mapping Route button
6 In the Change Mapping Route popup window select FLIGHT_NUMBER
7 Click the Enter buttonhellipthe mapping should now look like the following
How To Create OData Services Using the Screen Scraping Generator in SAP NetWeaver Gateway
July 2012 18
8 Click the Enter button to complete your UPDATE operation mapping
9 Your data object model should now look like this
10 Click the Generate button at the upper left hand corner of the screen (this will generate code
that represents what you have configured)
How To Create OData Services Using the Screen Scraping Generator in SAP NetWeaver Gateway
July 2012 19
11 When the generation is complete the following popup window will be displayed notifying you
have what was generated
48 Simplify the Data Model Name
The name of your data model is currently Z_FLIGHT_SCS_ltYour Last Namegt This name will by
default be used when calling your service Letrsquos make it simpler name that describes the data ie ndash
ldquoFlightrdquo
1 Navigate for the Gateway Data Modeler back to the ABAP Workbench by clicking the Object
Navigator button
2 You should now be back in the ABAP Workbench (SE80) and should see your Gateway Data
Model
How To Create OData Services Using the Screen Scraping Generator in SAP NetWeaver Gateway
July 2012 20
3 Double click on the Data Model node (first node under the root node)
Double clicking on it will open up the editor for this node Notice the External Name input field
4 Go into change mode and change the External Name to be ldquoFlightrdquo
5 Save your changes Now your data model is known as ldquoFlightrdquo
How To Create OData Services Using the Screen Scraping Generator in SAP NetWeaver Gateway
July 2012 21
Note
If you go back in and change you data model (add a new operation or change some of the mapping) and then regenerate this configuration will be lost The name will revert to the old data model name
49 Create the Gateway Consumption Model
The Consumption Model is what exposes the Gateway Data Models to the network It does this by
creating a service in the Internet Communication Framework In this step you will create a
Consumption Model and then map your Data Model to it
1 Right click on the GW Data Modelrsquos Related GW Consumption Models node and in the context
menu select Add Consumpt Model
2 In the input field enter in the name of the consumption model you want created ndash zflightscsltyour
last namegt
3 Click the Enter button You will be asked if you want to create the consumption model click the
Yes button
4 Enter a description for your consumption model and click the Enter button
How To Create OData Services Using the Screen Scraping Generator in SAP NetWeaver Gateway
July 2012 22
5 You can see the Gateway service exposed in the ICF ndash transaction SICF ndash follow the ICF tree
path default_host gt sap gt opu gt odata gt sapthere you will see a list of all ICF services that
represent Gateway Consumption Models
410 Add an Alias to the Service
6 Go to the service maintenance transaction IWFNDMAINT_SERVICE
12 Click the search icon to search for your service in the list ndash the search icon is outlined in red
below
13 In the Find popup window enter in the Technical Service Name (ZFLIGHTSCSltYour Last
Namegt) for the search term
How To Create OData Services Using the Screen Scraping Generator in SAP NetWeaver Gateway
July 2012 23
14 Click the enter button your service should be located in the list
Hit the Cancel button on the Find dialog window to dismiss it
15 Click the Technical Service Name link (highlighted below in red on the top half of the screen)
this will cause the Alias assignment details be displayed at the bottom of the screen
6 Click the add System Alias button outlined in Red above in the bottom half of the screen You
should now see the screen to maintain service aliases
7 Click the New Entries button
8 Add your service document (the consumption model)hellipenter in the name of your consumption
model ndash zflightscsltyour last namegt and click the F4 help button
How To Create OData Services Using the Screen Scraping Generator in SAP NetWeaver Gateway
July 2012 24
9 Double click on your service document in the popup window
10 In the System Alias column enter the alias of the system you want your service to call ndash in this
case we are using the local alias
11 Save your changes then hit the back button You should now see that the LOCAL alias is
assigned to your service
12 Click the Call Browser button to launch a web browser that points to the service document of
your OData service
How To Create OData Services Using the Screen Scraping Generator in SAP NetWeaver Gateway
July 2012 25
Note
By default all gateway services are initial assigned basic
411 Test Your Gateway Object
Now for the fun part You get to test everything you have done up to this point Testing the QUERY
and READ operations is easyhellipyou just need a browser Testing the CREATE and UPDATE
operations (as well as the DELETE if we had implemented that) requires the use of a simple HTTP
tool the one we use here is the RESTClient plugin in for FireFox
1 In the browser that you launched in the last step replace the end of the URL ldquo$format=xmlrdquo
with ldquo$metadatardquo ndash this will bring up the metadata of your service
Example URL httpservicehttp_portsapopuodatasapZFLIGHTSCSGEBO$metadata
How To Create OData Services Using the Screen Scraping Generator in SAP NetWeaver Gateway
July 2012 26
2 In the URL replace ldquo$metadatardquo with ldquoFlightCollectionrdquo ndash this will execute the QUERY operation
You should now see a list of flights
3 To make it easier to test and debug add the query string parameter sap-ds-debug=true to the
URL ndash this will format the content as html allow us to follow links to the READ operation
Example URL
httpserverhttp_portsapopuodatasapZFLIGHTSCSGEBOFlightCollectionsap-ds-
debug=true
How To Create OData Services Using the Screen Scraping Generator in SAP NetWeaver Gateway
July 2012 27
Note
You will see an SAP icon in the bottom right hand corner Click it to see more details about the service call
4 To execute the READ operation for a specific flight just click the link
FlightCollection(airline=hellipflight_number=hellip)
5 Clicking this link will bring back the flight details from the READ operation
How To Create OData Services Using the Screen Scraping Generator in SAP NetWeaver Gateway
July 2012 28
6 Now let test the update functionality
7 To test the update (and create) functionality we will need a CSRF token (needed to prevent
Cross Site Request Forgery attacks)hellipto do this we need to request this token during a read by
passing in an http header value requesting the token To pass in a header value we need to use
the RESTClienthelliphere using the FireFox RESTClient (this is a free plugin for FireFox)
How To Create OData Services Using the Screen Scraping Generator in SAP NetWeaver Gateway
July 2012 29
8 Copy the URL used in the test in step 5 above (the URL that executed a READ) and paste it into
the URL input field
9 Remove the query string attribute ldquosap-ds-debug=truerdquo from the URL
10 Click the Headers menu item and select Custom Header
11 Enter the name value as shown below
Tip Check the ldquoSave to favoriterdquo check box so you can easily add this header for faster testing the next time
12 Click the Okay button You should now see the following
How To Create OData Services Using the Screen Scraping Generator in SAP NetWeaver Gateway
July 2012 30
13 Click the SEND button
14 In the Response section at the bottom of the RESTClient copy the value returned for the x-csrf-
token shown here outlined in red (note these token values are generated by the gateway
server)
The token will be passed back in when testing the create and update functionality
15 Change the value for header attribute x-csrf-token to be the value you copied above to do this
just click on the header attribute in the RESTClient you should now see something to the
following
16 Test the UPDATE_ENTITY UPDATE operation
17 Add the content-type header to the Request Headers section Click the Headers dropdown and
select Custom Header
18 Enter the namevalue ndash content-typeapplicationatom+xmltype=entry
Tip Save this as a favorite so you can easily add it again when testing
How To Create OData Services Using the Screen Scraping Generator in SAP NetWeaver Gateway
July 2012 31
19 Click the Okay button to add the header request
20 Switch to the ldquoResponse Body (Raw)rdquo tab and copy the contents there (we will be updating the
data that was sent back when reading the entity)
21 Paste the Response Body you just copied into the Request Body section
22 Change the Method dropdown to PUT Your RESTClient should now look similar to the
following
23 To test the update functionality we need to change some of the values in the request body that
we are sending to the Gateway serverhellipchange the value of the distance attribute
24 Click the SEND button
25 If the update is successful you will get a status code of 204 as shown below
How To Create OData Services Using the Screen Scraping Generator in SAP NetWeaver Gateway
July 2012 32
26 You can switch the Method back to GET and click the send button again then check the
response body to see if the values you changed for the update are returned by the read
27 Congrats You have successfully created and tested a simple OData service created with the
Screen Scraping generator
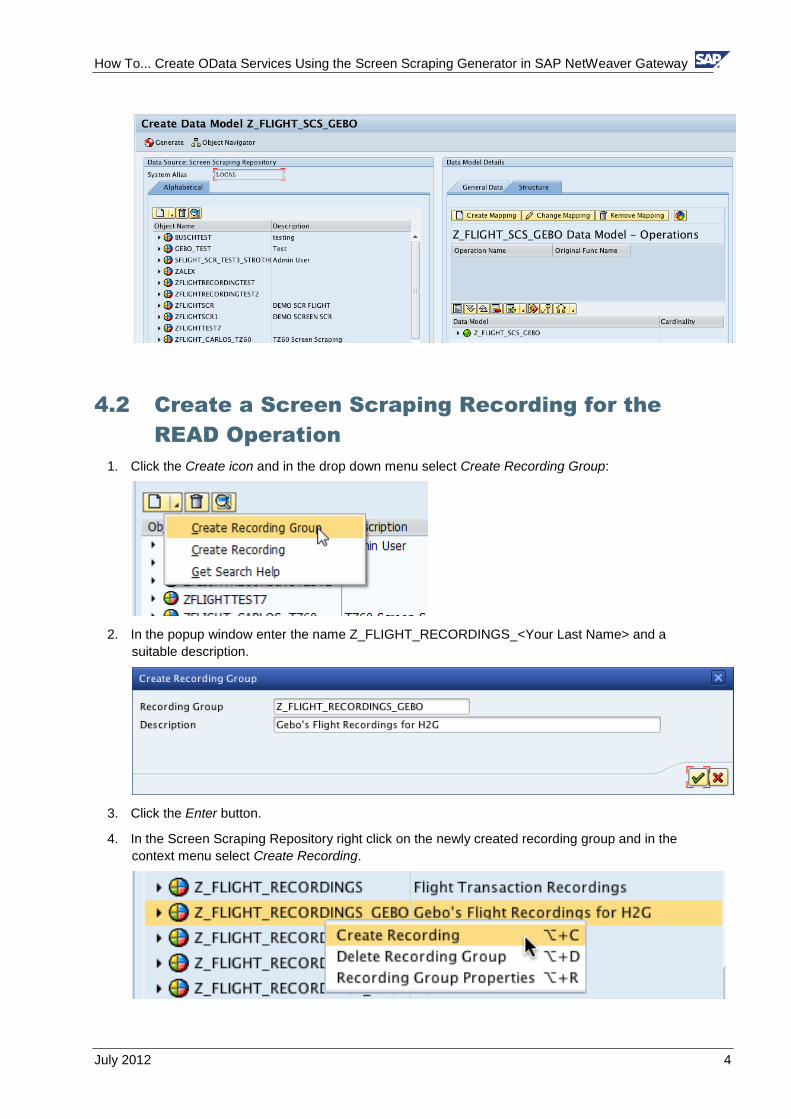
How To Create OData Services Using the Screen Scraping Generator in SAP NetWeaver Gateway
July 2012 4
42 Create a Screen Scraping Recording for the
READ Operation
1 Click the Create icon and in the drop down menu select Create Recording Group
2 In the popup window enter the name Z_FLIGHT_RECORDINGS_ltYour Last Namegt and a
suitable description
3 Click the Enter button
4 In the Screen Scraping Repository right click on the newly created recording group and in the
context menu select Create Recording
How To Create OData Services Using the Screen Scraping Generator in SAP NetWeaver Gateway
July 2012 5
5 In the popup window enter the recording name ldquoZ_TZ60_FLIGHT_DETAILSrdquo the Transaction
Code ldquoTZ60rdquo Recording Type ldquoRrdquo for read and a suitable description
6 Click the Enter button
7 You will be taken to the TZ60 transaction on the backend system
8 Enter in some valid flight data
9 Click the Enter button
10 The following screen should be displayed
How To Create OData Services Using the Screen Scraping Generator in SAP NetWeaver Gateway
July 2012 6
11 Place the cursor in the first cell in the first row of the table
12 Click the Page Down button that is found in the SAP GUI menu button bar
13 Press the page down button until you reach the bottom of the table contents then press it twice
more (if you donrsquot do this you will get a warning that the table wasnrsquot fully recorded in the next
step)
14 Click the back button twice to navigate out of the TZ60 transaction This will start the recording
generation and when it is done you will see a similar screen
How To Create OData Services Using the Screen Scraping Generator in SAP NetWeaver Gateway
July 2012 7
15 Drill into the Recording Tree you will see each screen recorded has a node in the tree with its
corresponding input values as attributes in addition the second screen has a table named
FLIGHTS
43 Create a Screen Scraping Recording for the
UPDATE Operation
1 In the Screen Scraping Repository right click on the recording group created earlier and in the
context menu select Create Recording
How To Create OData Services Using the Screen Scraping Generator in SAP NetWeaver Gateway
July 2012 8
2 In the popup window enter the recording name ldquoZ_TZ90_FLIGHT_UPDATErdquo the Transaction
Code ldquoTZ90rdquo Recording type ldquoUrdquo for update and a suitable description
3 Click the Enter button
4 You will be taken to the TZ90 transaction on the backend system
5 Enter in some valid flight data
6 Click the Change button
7 Change the Distance field (probably best to make only a minor change)
How To Create OData Services Using the Screen Scraping Generator in SAP NetWeaver Gateway
July 2012 9
8 Save your changes
9 Click the back button twice and save your recording by clicking the Yes button
10 You should now have the two recordings as shown below
44 Expose a Search Help for use by the QUERY
Operation
Search Helps are used to support the QUERY operation of a Screen Scrape based
Gateway Object
1 Right click on the Z_TZ60_FLIGHT_DETAILS recordings SFLIGHT-CONNID attribute and in the
context menu select Get Search Help
How To Create OData Services Using the Screen Scraping Generator in SAP NetWeaver Gateway
July 2012 10
2 This will create a node in the Recording Group named H_SPFLI (which is the name of the value
help) Open up the object and you can see the values it passes back
Note Value Help objects are used in QUERY operations only
45 Map the QUERY operation to the Search Help
object
1 Highlight the H_SPFLI search help object in the Screen Scraping Repository
2 Click the Create Mapping button in the Gateway Object Details
3 A popup window with the Mapping details for the QUERY operation is displayed
How To Create OData Services Using the Screen Scraping Generator in SAP NetWeaver Gateway
July 2012 11
4 Click the Enter button to complete the mapping Next step is to define the primary key of the
data entity you are creating
5 Your data model should now be in the following state
By default the FLIGHT_NUMBER is set as the primary key ndash this is because it is based on the
search help from the FLIGHT_NUMBERConnection ID We need to also add AIRLINECarrier
ID as the primary key
6 Right click on the AIRLINE attribute and in the context menu select Set Key
7 Your data model should now look like the following
46 Map the READ operation to the Recording of
Transaction TZ60
1 Highlight the screen scrape recording ldquoZ_TZ60_FLIGHT_DETAILSrdquo in the Screen Scraping
Repository
How To Create OData Services Using the Screen Scraping Generator in SAP NetWeaver Gateway
July 2012 12
2 Click the Create Mapping button in the Gateway Object Details
3 A popup window with the Mapping details for the READ operation is displayed
4 Under node SAPMTZ60(0100) highlight SFLIGHT-CONNID by right clicking on it
5 Click the Change Mapping Route button
How To Create OData Services Using the Screen Scraping Generator in SAP NetWeaver Gateway
July 2012 13
6 In the Change Mapping Route popup window highlight the FLIGHT_NUMBER attributehellipthis will
make the SFLIGHT-CARRID assigned to the FLIGHT_NUMBER of the data model which is one
of itrsquos keys
7 Click the Enter button
8 Your mapping should now look like this
9 As you can see above the Mapping Route for attributes under SAPMTZ60(0200) node is the
screen name followed by the attribute namehellipletrsquos flatten this mapping to make it easier to read
and understand for the consumers of our servicehellipin addition we are going to be mapping the
UPDATE operation later on which requires a flattened interface
10 Under the node SAPMTZ60(0200) uncheck SFLIGHT-CARRID and SFLIGHT-CONNID since
this is duplicate information already provided by the key fields
How To Create OData Services Using the Screen Scraping Generator in SAP NetWeaver Gateway
July 2012 14
11 Right click on the SCARR-CARRNAME attribute to select it then click the Change Mapping
Route button
12 In the Change Mapping Route popup window highlight the root node and change the property
name to AIRLINENAME
13 Your mapping should now look like this
14 For the rest of the SAPMTZ60(0200) attributes do the Change Mapping Route as you did
above accepting the default property name
15 Your mapping should now look like this
How To Create OData Services Using the Screen Scraping Generator in SAP NetWeaver Gateway
July 2012 15
16 Uncheck the FLIGHTS[] node We wonrsquot use it in this How To Guide to keep things simplehellipbut
you can make use of it as it is supported as output Your mapping should now look like this
17 Click the Enter button to complete the mapping
18 Your Gateway Object should now look like this
How To Create OData Services Using the Screen Scraping Generator in SAP NetWeaver Gateway
July 2012 16
47 Map the UPDATE Operation
1 In the Screen Scraping Repository highlight the recording you created earlier named
Z_TZ90_FLIGHT_UPDATE
2 Click the Create Mapping button
3 The default mapping looks like this
How To Create OData Services Using the Screen Scraping Generator in SAP NetWeaver Gateway
July 2012 17
4 We only need to make one change and that is to assign the SPFLI-CONNID to the correct data
model attribute FLIGHT_NUMBER Highlight SPFLI-CONNID as shown below by right clicking
on it
5 Click the Change Mapping Route button
6 In the Change Mapping Route popup window select FLIGHT_NUMBER
7 Click the Enter buttonhellipthe mapping should now look like the following
How To Create OData Services Using the Screen Scraping Generator in SAP NetWeaver Gateway
July 2012 18
8 Click the Enter button to complete your UPDATE operation mapping
9 Your data object model should now look like this
10 Click the Generate button at the upper left hand corner of the screen (this will generate code
that represents what you have configured)
How To Create OData Services Using the Screen Scraping Generator in SAP NetWeaver Gateway
July 2012 19
11 When the generation is complete the following popup window will be displayed notifying you
have what was generated
48 Simplify the Data Model Name
The name of your data model is currently Z_FLIGHT_SCS_ltYour Last Namegt This name will by
default be used when calling your service Letrsquos make it simpler name that describes the data ie ndash
ldquoFlightrdquo
1 Navigate for the Gateway Data Modeler back to the ABAP Workbench by clicking the Object
Navigator button
2 You should now be back in the ABAP Workbench (SE80) and should see your Gateway Data
Model
How To Create OData Services Using the Screen Scraping Generator in SAP NetWeaver Gateway
July 2012 20
3 Double click on the Data Model node (first node under the root node)
Double clicking on it will open up the editor for this node Notice the External Name input field
4 Go into change mode and change the External Name to be ldquoFlightrdquo
5 Save your changes Now your data model is known as ldquoFlightrdquo
How To Create OData Services Using the Screen Scraping Generator in SAP NetWeaver Gateway
July 2012 21
Note
If you go back in and change you data model (add a new operation or change some of the mapping) and then regenerate this configuration will be lost The name will revert to the old data model name
49 Create the Gateway Consumption Model
The Consumption Model is what exposes the Gateway Data Models to the network It does this by
creating a service in the Internet Communication Framework In this step you will create a
Consumption Model and then map your Data Model to it
1 Right click on the GW Data Modelrsquos Related GW Consumption Models node and in the context
menu select Add Consumpt Model
2 In the input field enter in the name of the consumption model you want created ndash zflightscsltyour
last namegt
3 Click the Enter button You will be asked if you want to create the consumption model click the
Yes button
4 Enter a description for your consumption model and click the Enter button
How To Create OData Services Using the Screen Scraping Generator in SAP NetWeaver Gateway
July 2012 22
5 You can see the Gateway service exposed in the ICF ndash transaction SICF ndash follow the ICF tree
path default_host gt sap gt opu gt odata gt sapthere you will see a list of all ICF services that
represent Gateway Consumption Models
410 Add an Alias to the Service
6 Go to the service maintenance transaction IWFNDMAINT_SERVICE
12 Click the search icon to search for your service in the list ndash the search icon is outlined in red
below
13 In the Find popup window enter in the Technical Service Name (ZFLIGHTSCSltYour Last
Namegt) for the search term
How To Create OData Services Using the Screen Scraping Generator in SAP NetWeaver Gateway
July 2012 23
14 Click the enter button your service should be located in the list
Hit the Cancel button on the Find dialog window to dismiss it
15 Click the Technical Service Name link (highlighted below in red on the top half of the screen)
this will cause the Alias assignment details be displayed at the bottom of the screen
6 Click the add System Alias button outlined in Red above in the bottom half of the screen You
should now see the screen to maintain service aliases
7 Click the New Entries button
8 Add your service document (the consumption model)hellipenter in the name of your consumption
model ndash zflightscsltyour last namegt and click the F4 help button
How To Create OData Services Using the Screen Scraping Generator in SAP NetWeaver Gateway
July 2012 24
9 Double click on your service document in the popup window
10 In the System Alias column enter the alias of the system you want your service to call ndash in this
case we are using the local alias
11 Save your changes then hit the back button You should now see that the LOCAL alias is
assigned to your service
12 Click the Call Browser button to launch a web browser that points to the service document of
your OData service
How To Create OData Services Using the Screen Scraping Generator in SAP NetWeaver Gateway
July 2012 25
Note
By default all gateway services are initial assigned basic
411 Test Your Gateway Object
Now for the fun part You get to test everything you have done up to this point Testing the QUERY
and READ operations is easyhellipyou just need a browser Testing the CREATE and UPDATE
operations (as well as the DELETE if we had implemented that) requires the use of a simple HTTP
tool the one we use here is the RESTClient plugin in for FireFox
1 In the browser that you launched in the last step replace the end of the URL ldquo$format=xmlrdquo
with ldquo$metadatardquo ndash this will bring up the metadata of your service
Example URL httpservicehttp_portsapopuodatasapZFLIGHTSCSGEBO$metadata
How To Create OData Services Using the Screen Scraping Generator in SAP NetWeaver Gateway
July 2012 26
2 In the URL replace ldquo$metadatardquo with ldquoFlightCollectionrdquo ndash this will execute the QUERY operation
You should now see a list of flights
3 To make it easier to test and debug add the query string parameter sap-ds-debug=true to the
URL ndash this will format the content as html allow us to follow links to the READ operation
Example URL
httpserverhttp_portsapopuodatasapZFLIGHTSCSGEBOFlightCollectionsap-ds-
debug=true
How To Create OData Services Using the Screen Scraping Generator in SAP NetWeaver Gateway
July 2012 27
Note
You will see an SAP icon in the bottom right hand corner Click it to see more details about the service call
4 To execute the READ operation for a specific flight just click the link
FlightCollection(airline=hellipflight_number=hellip)
5 Clicking this link will bring back the flight details from the READ operation
How To Create OData Services Using the Screen Scraping Generator in SAP NetWeaver Gateway
July 2012 28
6 Now let test the update functionality
7 To test the update (and create) functionality we will need a CSRF token (needed to prevent
Cross Site Request Forgery attacks)hellipto do this we need to request this token during a read by
passing in an http header value requesting the token To pass in a header value we need to use
the RESTClienthelliphere using the FireFox RESTClient (this is a free plugin for FireFox)
How To Create OData Services Using the Screen Scraping Generator in SAP NetWeaver Gateway
July 2012 29
8 Copy the URL used in the test in step 5 above (the URL that executed a READ) and paste it into
the URL input field
9 Remove the query string attribute ldquosap-ds-debug=truerdquo from the URL
10 Click the Headers menu item and select Custom Header
11 Enter the name value as shown below
Tip Check the ldquoSave to favoriterdquo check box so you can easily add this header for faster testing the next time
12 Click the Okay button You should now see the following
How To Create OData Services Using the Screen Scraping Generator in SAP NetWeaver Gateway
July 2012 30
13 Click the SEND button
14 In the Response section at the bottom of the RESTClient copy the value returned for the x-csrf-
token shown here outlined in red (note these token values are generated by the gateway
server)
The token will be passed back in when testing the create and update functionality
15 Change the value for header attribute x-csrf-token to be the value you copied above to do this
just click on the header attribute in the RESTClient you should now see something to the
following
16 Test the UPDATE_ENTITY UPDATE operation
17 Add the content-type header to the Request Headers section Click the Headers dropdown and
select Custom Header
18 Enter the namevalue ndash content-typeapplicationatom+xmltype=entry
Tip Save this as a favorite so you can easily add it again when testing
How To Create OData Services Using the Screen Scraping Generator in SAP NetWeaver Gateway
July 2012 31
19 Click the Okay button to add the header request
20 Switch to the ldquoResponse Body (Raw)rdquo tab and copy the contents there (we will be updating the
data that was sent back when reading the entity)
21 Paste the Response Body you just copied into the Request Body section
22 Change the Method dropdown to PUT Your RESTClient should now look similar to the
following
23 To test the update functionality we need to change some of the values in the request body that
we are sending to the Gateway serverhellipchange the value of the distance attribute
24 Click the SEND button
25 If the update is successful you will get a status code of 204 as shown below
How To Create OData Services Using the Screen Scraping Generator in SAP NetWeaver Gateway
July 2012 32
26 You can switch the Method back to GET and click the send button again then check the
response body to see if the values you changed for the update are returned by the read
27 Congrats You have successfully created and tested a simple OData service created with the
Screen Scraping generator
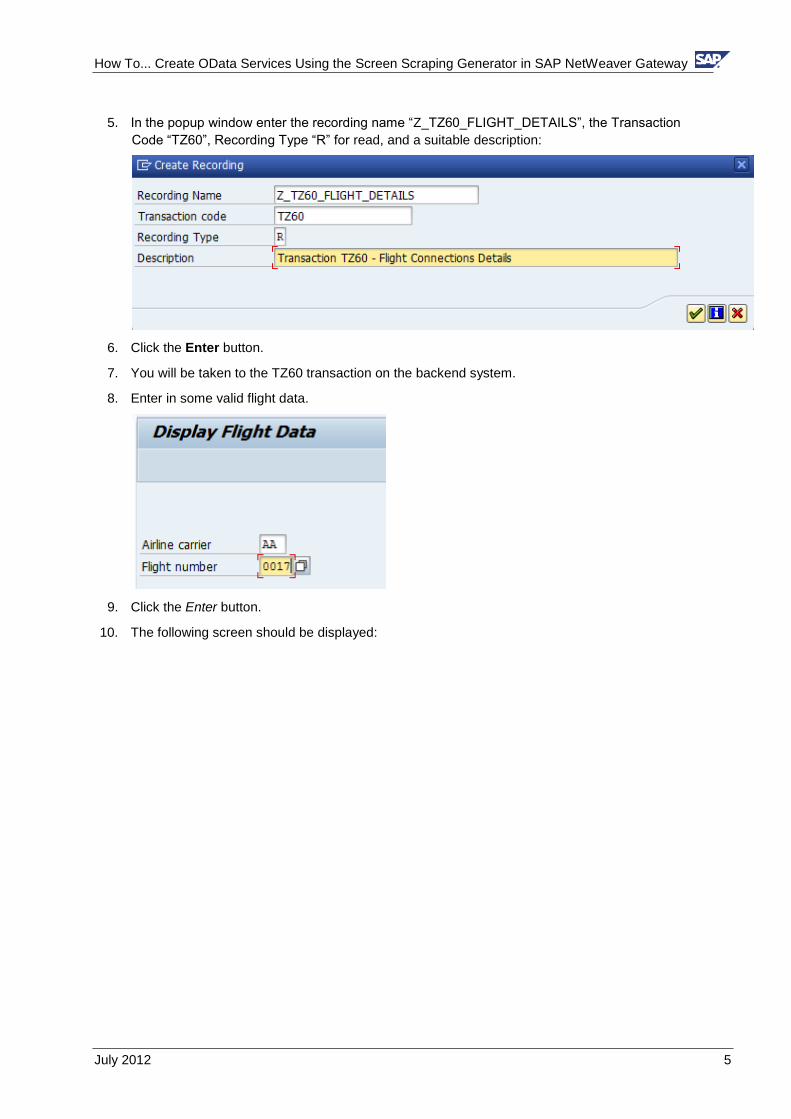
How To Create OData Services Using the Screen Scraping Generator in SAP NetWeaver Gateway
July 2012 5
5 In the popup window enter the recording name ldquoZ_TZ60_FLIGHT_DETAILSrdquo the Transaction
Code ldquoTZ60rdquo Recording Type ldquoRrdquo for read and a suitable description
6 Click the Enter button
7 You will be taken to the TZ60 transaction on the backend system
8 Enter in some valid flight data
9 Click the Enter button
10 The following screen should be displayed
How To Create OData Services Using the Screen Scraping Generator in SAP NetWeaver Gateway
July 2012 6
11 Place the cursor in the first cell in the first row of the table
12 Click the Page Down button that is found in the SAP GUI menu button bar
13 Press the page down button until you reach the bottom of the table contents then press it twice
more (if you donrsquot do this you will get a warning that the table wasnrsquot fully recorded in the next
step)
14 Click the back button twice to navigate out of the TZ60 transaction This will start the recording
generation and when it is done you will see a similar screen
How To Create OData Services Using the Screen Scraping Generator in SAP NetWeaver Gateway
July 2012 7
15 Drill into the Recording Tree you will see each screen recorded has a node in the tree with its
corresponding input values as attributes in addition the second screen has a table named
FLIGHTS
43 Create a Screen Scraping Recording for the
UPDATE Operation
1 In the Screen Scraping Repository right click on the recording group created earlier and in the
context menu select Create Recording
How To Create OData Services Using the Screen Scraping Generator in SAP NetWeaver Gateway
July 2012 8
2 In the popup window enter the recording name ldquoZ_TZ90_FLIGHT_UPDATErdquo the Transaction
Code ldquoTZ90rdquo Recording type ldquoUrdquo for update and a suitable description
3 Click the Enter button
4 You will be taken to the TZ90 transaction on the backend system
5 Enter in some valid flight data
6 Click the Change button
7 Change the Distance field (probably best to make only a minor change)
How To Create OData Services Using the Screen Scraping Generator in SAP NetWeaver Gateway
July 2012 9
8 Save your changes
9 Click the back button twice and save your recording by clicking the Yes button
10 You should now have the two recordings as shown below
44 Expose a Search Help for use by the QUERY
Operation
Search Helps are used to support the QUERY operation of a Screen Scrape based
Gateway Object
1 Right click on the Z_TZ60_FLIGHT_DETAILS recordings SFLIGHT-CONNID attribute and in the
context menu select Get Search Help
How To Create OData Services Using the Screen Scraping Generator in SAP NetWeaver Gateway
July 2012 10
2 This will create a node in the Recording Group named H_SPFLI (which is the name of the value
help) Open up the object and you can see the values it passes back
Note Value Help objects are used in QUERY operations only
45 Map the QUERY operation to the Search Help
object
1 Highlight the H_SPFLI search help object in the Screen Scraping Repository
2 Click the Create Mapping button in the Gateway Object Details
3 A popup window with the Mapping details for the QUERY operation is displayed
How To Create OData Services Using the Screen Scraping Generator in SAP NetWeaver Gateway
July 2012 11
4 Click the Enter button to complete the mapping Next step is to define the primary key of the
data entity you are creating
5 Your data model should now be in the following state
By default the FLIGHT_NUMBER is set as the primary key ndash this is because it is based on the
search help from the FLIGHT_NUMBERConnection ID We need to also add AIRLINECarrier
ID as the primary key
6 Right click on the AIRLINE attribute and in the context menu select Set Key
7 Your data model should now look like the following
46 Map the READ operation to the Recording of
Transaction TZ60
1 Highlight the screen scrape recording ldquoZ_TZ60_FLIGHT_DETAILSrdquo in the Screen Scraping
Repository
How To Create OData Services Using the Screen Scraping Generator in SAP NetWeaver Gateway
July 2012 12
2 Click the Create Mapping button in the Gateway Object Details
3 A popup window with the Mapping details for the READ operation is displayed
4 Under node SAPMTZ60(0100) highlight SFLIGHT-CONNID by right clicking on it
5 Click the Change Mapping Route button
How To Create OData Services Using the Screen Scraping Generator in SAP NetWeaver Gateway
July 2012 13
6 In the Change Mapping Route popup window highlight the FLIGHT_NUMBER attributehellipthis will
make the SFLIGHT-CARRID assigned to the FLIGHT_NUMBER of the data model which is one
of itrsquos keys
7 Click the Enter button
8 Your mapping should now look like this
9 As you can see above the Mapping Route for attributes under SAPMTZ60(0200) node is the
screen name followed by the attribute namehellipletrsquos flatten this mapping to make it easier to read
and understand for the consumers of our servicehellipin addition we are going to be mapping the
UPDATE operation later on which requires a flattened interface
10 Under the node SAPMTZ60(0200) uncheck SFLIGHT-CARRID and SFLIGHT-CONNID since
this is duplicate information already provided by the key fields
How To Create OData Services Using the Screen Scraping Generator in SAP NetWeaver Gateway
July 2012 14
11 Right click on the SCARR-CARRNAME attribute to select it then click the Change Mapping
Route button
12 In the Change Mapping Route popup window highlight the root node and change the property
name to AIRLINENAME
13 Your mapping should now look like this
14 For the rest of the SAPMTZ60(0200) attributes do the Change Mapping Route as you did
above accepting the default property name
15 Your mapping should now look like this
How To Create OData Services Using the Screen Scraping Generator in SAP NetWeaver Gateway
July 2012 15
16 Uncheck the FLIGHTS[] node We wonrsquot use it in this How To Guide to keep things simplehellipbut
you can make use of it as it is supported as output Your mapping should now look like this
17 Click the Enter button to complete the mapping
18 Your Gateway Object should now look like this
How To Create OData Services Using the Screen Scraping Generator in SAP NetWeaver Gateway
July 2012 16
47 Map the UPDATE Operation
1 In the Screen Scraping Repository highlight the recording you created earlier named
Z_TZ90_FLIGHT_UPDATE
2 Click the Create Mapping button
3 The default mapping looks like this
How To Create OData Services Using the Screen Scraping Generator in SAP NetWeaver Gateway
July 2012 17
4 We only need to make one change and that is to assign the SPFLI-CONNID to the correct data
model attribute FLIGHT_NUMBER Highlight SPFLI-CONNID as shown below by right clicking
on it
5 Click the Change Mapping Route button
6 In the Change Mapping Route popup window select FLIGHT_NUMBER
7 Click the Enter buttonhellipthe mapping should now look like the following
How To Create OData Services Using the Screen Scraping Generator in SAP NetWeaver Gateway
July 2012 18
8 Click the Enter button to complete your UPDATE operation mapping
9 Your data object model should now look like this
10 Click the Generate button at the upper left hand corner of the screen (this will generate code
that represents what you have configured)
How To Create OData Services Using the Screen Scraping Generator in SAP NetWeaver Gateway
July 2012 19
11 When the generation is complete the following popup window will be displayed notifying you
have what was generated
48 Simplify the Data Model Name
The name of your data model is currently Z_FLIGHT_SCS_ltYour Last Namegt This name will by
default be used when calling your service Letrsquos make it simpler name that describes the data ie ndash
ldquoFlightrdquo
1 Navigate for the Gateway Data Modeler back to the ABAP Workbench by clicking the Object
Navigator button
2 You should now be back in the ABAP Workbench (SE80) and should see your Gateway Data
Model
How To Create OData Services Using the Screen Scraping Generator in SAP NetWeaver Gateway
July 2012 20
3 Double click on the Data Model node (first node under the root node)
Double clicking on it will open up the editor for this node Notice the External Name input field
4 Go into change mode and change the External Name to be ldquoFlightrdquo
5 Save your changes Now your data model is known as ldquoFlightrdquo
How To Create OData Services Using the Screen Scraping Generator in SAP NetWeaver Gateway
July 2012 21
Note
If you go back in and change you data model (add a new operation or change some of the mapping) and then regenerate this configuration will be lost The name will revert to the old data model name
49 Create the Gateway Consumption Model
The Consumption Model is what exposes the Gateway Data Models to the network It does this by
creating a service in the Internet Communication Framework In this step you will create a
Consumption Model and then map your Data Model to it
1 Right click on the GW Data Modelrsquos Related GW Consumption Models node and in the context
menu select Add Consumpt Model
2 In the input field enter in the name of the consumption model you want created ndash zflightscsltyour
last namegt
3 Click the Enter button You will be asked if you want to create the consumption model click the
Yes button
4 Enter a description for your consumption model and click the Enter button
How To Create OData Services Using the Screen Scraping Generator in SAP NetWeaver Gateway
July 2012 22
5 You can see the Gateway service exposed in the ICF ndash transaction SICF ndash follow the ICF tree
path default_host gt sap gt opu gt odata gt sapthere you will see a list of all ICF services that
represent Gateway Consumption Models
410 Add an Alias to the Service
6 Go to the service maintenance transaction IWFNDMAINT_SERVICE
12 Click the search icon to search for your service in the list ndash the search icon is outlined in red
below
13 In the Find popup window enter in the Technical Service Name (ZFLIGHTSCSltYour Last
Namegt) for the search term
How To Create OData Services Using the Screen Scraping Generator in SAP NetWeaver Gateway
July 2012 23
14 Click the enter button your service should be located in the list
Hit the Cancel button on the Find dialog window to dismiss it
15 Click the Technical Service Name link (highlighted below in red on the top half of the screen)
this will cause the Alias assignment details be displayed at the bottom of the screen
6 Click the add System Alias button outlined in Red above in the bottom half of the screen You
should now see the screen to maintain service aliases
7 Click the New Entries button
8 Add your service document (the consumption model)hellipenter in the name of your consumption
model ndash zflightscsltyour last namegt and click the F4 help button
How To Create OData Services Using the Screen Scraping Generator in SAP NetWeaver Gateway
July 2012 24
9 Double click on your service document in the popup window
10 In the System Alias column enter the alias of the system you want your service to call ndash in this
case we are using the local alias
11 Save your changes then hit the back button You should now see that the LOCAL alias is
assigned to your service
12 Click the Call Browser button to launch a web browser that points to the service document of
your OData service
How To Create OData Services Using the Screen Scraping Generator in SAP NetWeaver Gateway
July 2012 25
Note
By default all gateway services are initial assigned basic
411 Test Your Gateway Object
Now for the fun part You get to test everything you have done up to this point Testing the QUERY
and READ operations is easyhellipyou just need a browser Testing the CREATE and UPDATE
operations (as well as the DELETE if we had implemented that) requires the use of a simple HTTP
tool the one we use here is the RESTClient plugin in for FireFox
1 In the browser that you launched in the last step replace the end of the URL ldquo$format=xmlrdquo
with ldquo$metadatardquo ndash this will bring up the metadata of your service
Example URL httpservicehttp_portsapopuodatasapZFLIGHTSCSGEBO$metadata
How To Create OData Services Using the Screen Scraping Generator in SAP NetWeaver Gateway
July 2012 26
2 In the URL replace ldquo$metadatardquo with ldquoFlightCollectionrdquo ndash this will execute the QUERY operation
You should now see a list of flights
3 To make it easier to test and debug add the query string parameter sap-ds-debug=true to the
URL ndash this will format the content as html allow us to follow links to the READ operation
Example URL
httpserverhttp_portsapopuodatasapZFLIGHTSCSGEBOFlightCollectionsap-ds-
debug=true
How To Create OData Services Using the Screen Scraping Generator in SAP NetWeaver Gateway
July 2012 27
Note
You will see an SAP icon in the bottom right hand corner Click it to see more details about the service call
4 To execute the READ operation for a specific flight just click the link
FlightCollection(airline=hellipflight_number=hellip)
5 Clicking this link will bring back the flight details from the READ operation
How To Create OData Services Using the Screen Scraping Generator in SAP NetWeaver Gateway
July 2012 28
6 Now let test the update functionality
7 To test the update (and create) functionality we will need a CSRF token (needed to prevent
Cross Site Request Forgery attacks)hellipto do this we need to request this token during a read by
passing in an http header value requesting the token To pass in a header value we need to use
the RESTClienthelliphere using the FireFox RESTClient (this is a free plugin for FireFox)
How To Create OData Services Using the Screen Scraping Generator in SAP NetWeaver Gateway
July 2012 29
8 Copy the URL used in the test in step 5 above (the URL that executed a READ) and paste it into
the URL input field
9 Remove the query string attribute ldquosap-ds-debug=truerdquo from the URL
10 Click the Headers menu item and select Custom Header
11 Enter the name value as shown below
Tip Check the ldquoSave to favoriterdquo check box so you can easily add this header for faster testing the next time
12 Click the Okay button You should now see the following
How To Create OData Services Using the Screen Scraping Generator in SAP NetWeaver Gateway
July 2012 30
13 Click the SEND button
14 In the Response section at the bottom of the RESTClient copy the value returned for the x-csrf-
token shown here outlined in red (note these token values are generated by the gateway
server)
The token will be passed back in when testing the create and update functionality
15 Change the value for header attribute x-csrf-token to be the value you copied above to do this
just click on the header attribute in the RESTClient you should now see something to the
following
16 Test the UPDATE_ENTITY UPDATE operation
17 Add the content-type header to the Request Headers section Click the Headers dropdown and
select Custom Header
18 Enter the namevalue ndash content-typeapplicationatom+xmltype=entry
Tip Save this as a favorite so you can easily add it again when testing
How To Create OData Services Using the Screen Scraping Generator in SAP NetWeaver Gateway
July 2012 31
19 Click the Okay button to add the header request
20 Switch to the ldquoResponse Body (Raw)rdquo tab and copy the contents there (we will be updating the
data that was sent back when reading the entity)
21 Paste the Response Body you just copied into the Request Body section
22 Change the Method dropdown to PUT Your RESTClient should now look similar to the
following
23 To test the update functionality we need to change some of the values in the request body that
we are sending to the Gateway serverhellipchange the value of the distance attribute
24 Click the SEND button
25 If the update is successful you will get a status code of 204 as shown below
How To Create OData Services Using the Screen Scraping Generator in SAP NetWeaver Gateway
July 2012 32
26 You can switch the Method back to GET and click the send button again then check the
response body to see if the values you changed for the update are returned by the read
27 Congrats You have successfully created and tested a simple OData service created with the
Screen Scraping generator
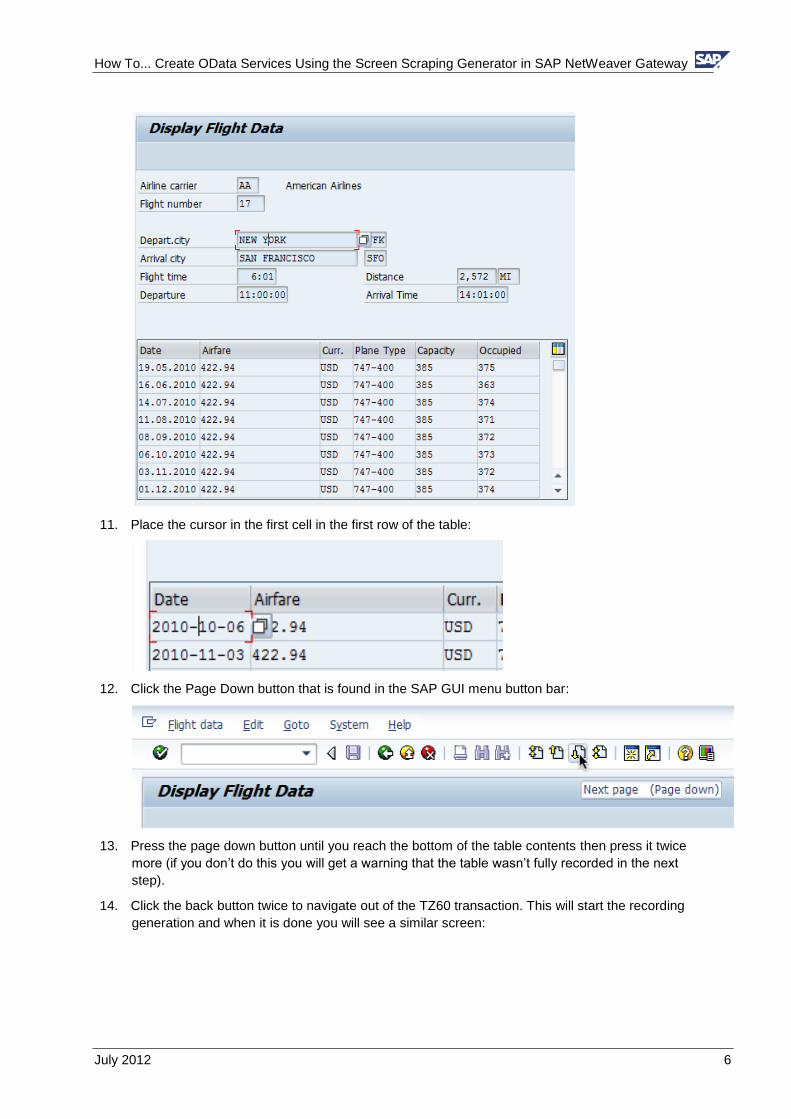
How To Create OData Services Using the Screen Scraping Generator in SAP NetWeaver Gateway
July 2012 7
15 Drill into the Recording Tree you will see each screen recorded has a node in the tree with its
corresponding input values as attributes in addition the second screen has a table named
FLIGHTS
43 Create a Screen Scraping Recording for the
UPDATE Operation
1 In the Screen Scraping Repository right click on the recording group created earlier and in the
context menu select Create Recording
How To Create OData Services Using the Screen Scraping Generator in SAP NetWeaver Gateway
July 2012 8
2 In the popup window enter the recording name ldquoZ_TZ90_FLIGHT_UPDATErdquo the Transaction
Code ldquoTZ90rdquo Recording type ldquoUrdquo for update and a suitable description
3 Click the Enter button
4 You will be taken to the TZ90 transaction on the backend system
5 Enter in some valid flight data
6 Click the Change button
7 Change the Distance field (probably best to make only a minor change)
How To Create OData Services Using the Screen Scraping Generator in SAP NetWeaver Gateway
July 2012 9
8 Save your changes
9 Click the back button twice and save your recording by clicking the Yes button
10 You should now have the two recordings as shown below
44 Expose a Search Help for use by the QUERY
Operation
Search Helps are used to support the QUERY operation of a Screen Scrape based
Gateway Object
1 Right click on the Z_TZ60_FLIGHT_DETAILS recordings SFLIGHT-CONNID attribute and in the
context menu select Get Search Help
How To Create OData Services Using the Screen Scraping Generator in SAP NetWeaver Gateway
July 2012 10
2 This will create a node in the Recording Group named H_SPFLI (which is the name of the value
help) Open up the object and you can see the values it passes back
Note Value Help objects are used in QUERY operations only
45 Map the QUERY operation to the Search Help
object
1 Highlight the H_SPFLI search help object in the Screen Scraping Repository
2 Click the Create Mapping button in the Gateway Object Details
3 A popup window with the Mapping details for the QUERY operation is displayed
How To Create OData Services Using the Screen Scraping Generator in SAP NetWeaver Gateway
July 2012 11
4 Click the Enter button to complete the mapping Next step is to define the primary key of the
data entity you are creating
5 Your data model should now be in the following state
By default the FLIGHT_NUMBER is set as the primary key ndash this is because it is based on the
search help from the FLIGHT_NUMBERConnection ID We need to also add AIRLINECarrier
ID as the primary key
6 Right click on the AIRLINE attribute and in the context menu select Set Key
7 Your data model should now look like the following
46 Map the READ operation to the Recording of
Transaction TZ60
1 Highlight the screen scrape recording ldquoZ_TZ60_FLIGHT_DETAILSrdquo in the Screen Scraping
Repository
How To Create OData Services Using the Screen Scraping Generator in SAP NetWeaver Gateway
July 2012 12
2 Click the Create Mapping button in the Gateway Object Details
3 A popup window with the Mapping details for the READ operation is displayed
4 Under node SAPMTZ60(0100) highlight SFLIGHT-CONNID by right clicking on it
5 Click the Change Mapping Route button
How To Create OData Services Using the Screen Scraping Generator in SAP NetWeaver Gateway
July 2012 13
6 In the Change Mapping Route popup window highlight the FLIGHT_NUMBER attributehellipthis will
make the SFLIGHT-CARRID assigned to the FLIGHT_NUMBER of the data model which is one
of itrsquos keys
7 Click the Enter button
8 Your mapping should now look like this
9 As you can see above the Mapping Route for attributes under SAPMTZ60(0200) node is the
screen name followed by the attribute namehellipletrsquos flatten this mapping to make it easier to read
and understand for the consumers of our servicehellipin addition we are going to be mapping the
UPDATE operation later on which requires a flattened interface
10 Under the node SAPMTZ60(0200) uncheck SFLIGHT-CARRID and SFLIGHT-CONNID since
this is duplicate information already provided by the key fields
How To Create OData Services Using the Screen Scraping Generator in SAP NetWeaver Gateway
July 2012 14
11 Right click on the SCARR-CARRNAME attribute to select it then click the Change Mapping
Route button
12 In the Change Mapping Route popup window highlight the root node and change the property
name to AIRLINENAME
13 Your mapping should now look like this
14 For the rest of the SAPMTZ60(0200) attributes do the Change Mapping Route as you did
above accepting the default property name
15 Your mapping should now look like this
How To Create OData Services Using the Screen Scraping Generator in SAP NetWeaver Gateway
July 2012 15
16 Uncheck the FLIGHTS[] node We wonrsquot use it in this How To Guide to keep things simplehellipbut
you can make use of it as it is supported as output Your mapping should now look like this
17 Click the Enter button to complete the mapping
18 Your Gateway Object should now look like this
How To Create OData Services Using the Screen Scraping Generator in SAP NetWeaver Gateway
July 2012 16
47 Map the UPDATE Operation
1 In the Screen Scraping Repository highlight the recording you created earlier named
Z_TZ90_FLIGHT_UPDATE
2 Click the Create Mapping button
3 The default mapping looks like this
How To Create OData Services Using the Screen Scraping Generator in SAP NetWeaver Gateway
July 2012 17
4 We only need to make one change and that is to assign the SPFLI-CONNID to the correct data
model attribute FLIGHT_NUMBER Highlight SPFLI-CONNID as shown below by right clicking
on it
5 Click the Change Mapping Route button
6 In the Change Mapping Route popup window select FLIGHT_NUMBER
7 Click the Enter buttonhellipthe mapping should now look like the following
How To Create OData Services Using the Screen Scraping Generator in SAP NetWeaver Gateway
July 2012 18
8 Click the Enter button to complete your UPDATE operation mapping
9 Your data object model should now look like this
10 Click the Generate button at the upper left hand corner of the screen (this will generate code
that represents what you have configured)
How To Create OData Services Using the Screen Scraping Generator in SAP NetWeaver Gateway
July 2012 19
11 When the generation is complete the following popup window will be displayed notifying you
have what was generated
48 Simplify the Data Model Name
The name of your data model is currently Z_FLIGHT_SCS_ltYour Last Namegt This name will by
default be used when calling your service Letrsquos make it simpler name that describes the data ie ndash
ldquoFlightrdquo
1 Navigate for the Gateway Data Modeler back to the ABAP Workbench by clicking the Object
Navigator button
2 You should now be back in the ABAP Workbench (SE80) and should see your Gateway Data
Model
How To Create OData Services Using the Screen Scraping Generator in SAP NetWeaver Gateway
July 2012 20
3 Double click on the Data Model node (first node under the root node)
Double clicking on it will open up the editor for this node Notice the External Name input field
4 Go into change mode and change the External Name to be ldquoFlightrdquo
5 Save your changes Now your data model is known as ldquoFlightrdquo
How To Create OData Services Using the Screen Scraping Generator in SAP NetWeaver Gateway
July 2012 21
Note
If you go back in and change you data model (add a new operation or change some of the mapping) and then regenerate this configuration will be lost The name will revert to the old data model name
49 Create the Gateway Consumption Model
The Consumption Model is what exposes the Gateway Data Models to the network It does this by
creating a service in the Internet Communication Framework In this step you will create a
Consumption Model and then map your Data Model to it
1 Right click on the GW Data Modelrsquos Related GW Consumption Models node and in the context
menu select Add Consumpt Model
2 In the input field enter in the name of the consumption model you want created ndash zflightscsltyour
last namegt
3 Click the Enter button You will be asked if you want to create the consumption model click the
Yes button
4 Enter a description for your consumption model and click the Enter button
How To Create OData Services Using the Screen Scraping Generator in SAP NetWeaver Gateway
July 2012 22
5 You can see the Gateway service exposed in the ICF ndash transaction SICF ndash follow the ICF tree
path default_host gt sap gt opu gt odata gt sapthere you will see a list of all ICF services that
represent Gateway Consumption Models
410 Add an Alias to the Service
6 Go to the service maintenance transaction IWFNDMAINT_SERVICE
12 Click the search icon to search for your service in the list ndash the search icon is outlined in red
below
13 In the Find popup window enter in the Technical Service Name (ZFLIGHTSCSltYour Last
Namegt) for the search term
How To Create OData Services Using the Screen Scraping Generator in SAP NetWeaver Gateway
July 2012 23
14 Click the enter button your service should be located in the list
Hit the Cancel button on the Find dialog window to dismiss it
15 Click the Technical Service Name link (highlighted below in red on the top half of the screen)
this will cause the Alias assignment details be displayed at the bottom of the screen
6 Click the add System Alias button outlined in Red above in the bottom half of the screen You
should now see the screen to maintain service aliases
7 Click the New Entries button
8 Add your service document (the consumption model)hellipenter in the name of your consumption
model ndash zflightscsltyour last namegt and click the F4 help button
How To Create OData Services Using the Screen Scraping Generator in SAP NetWeaver Gateway
July 2012 24
9 Double click on your service document in the popup window
10 In the System Alias column enter the alias of the system you want your service to call ndash in this
case we are using the local alias
11 Save your changes then hit the back button You should now see that the LOCAL alias is
assigned to your service
12 Click the Call Browser button to launch a web browser that points to the service document of
your OData service
How To Create OData Services Using the Screen Scraping Generator in SAP NetWeaver Gateway
July 2012 25
Note
By default all gateway services are initial assigned basic
411 Test Your Gateway Object
Now for the fun part You get to test everything you have done up to this point Testing the QUERY
and READ operations is easyhellipyou just need a browser Testing the CREATE and UPDATE
operations (as well as the DELETE if we had implemented that) requires the use of a simple HTTP
tool the one we use here is the RESTClient plugin in for FireFox
1 In the browser that you launched in the last step replace the end of the URL ldquo$format=xmlrdquo
with ldquo$metadatardquo ndash this will bring up the metadata of your service
Example URL httpservicehttp_portsapopuodatasapZFLIGHTSCSGEBO$metadata
How To Create OData Services Using the Screen Scraping Generator in SAP NetWeaver Gateway
July 2012 26
2 In the URL replace ldquo$metadatardquo with ldquoFlightCollectionrdquo ndash this will execute the QUERY operation
You should now see a list of flights
3 To make it easier to test and debug add the query string parameter sap-ds-debug=true to the
URL ndash this will format the content as html allow us to follow links to the READ operation
Example URL
httpserverhttp_portsapopuodatasapZFLIGHTSCSGEBOFlightCollectionsap-ds-
debug=true
How To Create OData Services Using the Screen Scraping Generator in SAP NetWeaver Gateway
July 2012 27
Note
You will see an SAP icon in the bottom right hand corner Click it to see more details about the service call
4 To execute the READ operation for a specific flight just click the link
FlightCollection(airline=hellipflight_number=hellip)
5 Clicking this link will bring back the flight details from the READ operation
How To Create OData Services Using the Screen Scraping Generator in SAP NetWeaver Gateway
July 2012 28
6 Now let test the update functionality
7 To test the update (and create) functionality we will need a CSRF token (needed to prevent
Cross Site Request Forgery attacks)hellipto do this we need to request this token during a read by
passing in an http header value requesting the token To pass in a header value we need to use
the RESTClienthelliphere using the FireFox RESTClient (this is a free plugin for FireFox)
How To Create OData Services Using the Screen Scraping Generator in SAP NetWeaver Gateway
July 2012 29
8 Copy the URL used in the test in step 5 above (the URL that executed a READ) and paste it into
the URL input field
9 Remove the query string attribute ldquosap-ds-debug=truerdquo from the URL
10 Click the Headers menu item and select Custom Header
11 Enter the name value as shown below
Tip Check the ldquoSave to favoriterdquo check box so you can easily add this header for faster testing the next time
12 Click the Okay button You should now see the following
How To Create OData Services Using the Screen Scraping Generator in SAP NetWeaver Gateway
July 2012 30
13 Click the SEND button
14 In the Response section at the bottom of the RESTClient copy the value returned for the x-csrf-
token shown here outlined in red (note these token values are generated by the gateway
server)
The token will be passed back in when testing the create and update functionality
15 Change the value for header attribute x-csrf-token to be the value you copied above to do this
just click on the header attribute in the RESTClient you should now see something to the
following
16 Test the UPDATE_ENTITY UPDATE operation
17 Add the content-type header to the Request Headers section Click the Headers dropdown and
select Custom Header
18 Enter the namevalue ndash content-typeapplicationatom+xmltype=entry
Tip Save this as a favorite so you can easily add it again when testing
How To Create OData Services Using the Screen Scraping Generator in SAP NetWeaver Gateway
July 2012 31
19 Click the Okay button to add the header request
20 Switch to the ldquoResponse Body (Raw)rdquo tab and copy the contents there (we will be updating the
data that was sent back when reading the entity)
21 Paste the Response Body you just copied into the Request Body section
22 Change the Method dropdown to PUT Your RESTClient should now look similar to the
following
23 To test the update functionality we need to change some of the values in the request body that
we are sending to the Gateway serverhellipchange the value of the distance attribute
24 Click the SEND button
25 If the update is successful you will get a status code of 204 as shown below
How To Create OData Services Using the Screen Scraping Generator in SAP NetWeaver Gateway
July 2012 32
26 You can switch the Method back to GET and click the send button again then check the
response body to see if the values you changed for the update are returned by the read
27 Congrats You have successfully created and tested a simple OData service created with the
Screen Scraping generator
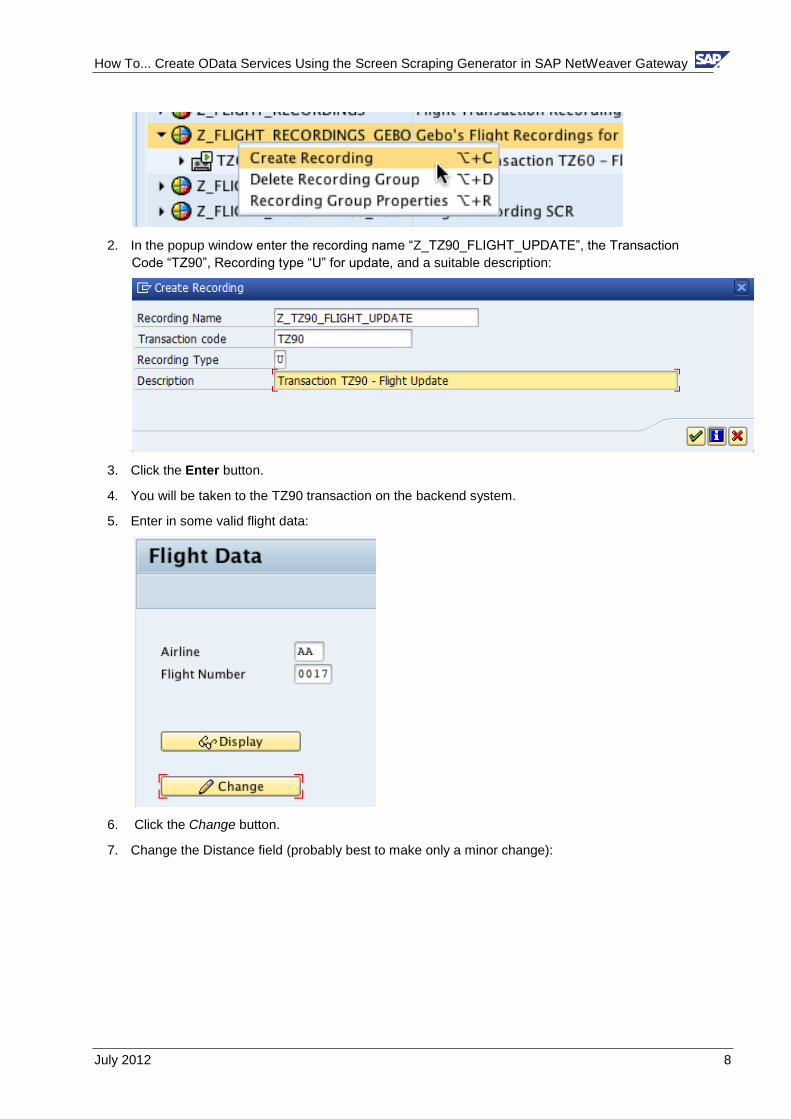
How To Create OData Services Using the Screen Scraping Generator in SAP NetWeaver Gateway
July 2012 9
8 Save your changes
9 Click the back button twice and save your recording by clicking the Yes button
10 You should now have the two recordings as shown below
44 Expose a Search Help for use by the QUERY
Operation
Search Helps are used to support the QUERY operation of a Screen Scrape based
Gateway Object
1 Right click on the Z_TZ60_FLIGHT_DETAILS recordings SFLIGHT-CONNID attribute and in the
context menu select Get Search Help
How To Create OData Services Using the Screen Scraping Generator in SAP NetWeaver Gateway
July 2012 10
2 This will create a node in the Recording Group named H_SPFLI (which is the name of the value
help) Open up the object and you can see the values it passes back
Note Value Help objects are used in QUERY operations only
45 Map the QUERY operation to the Search Help
object
1 Highlight the H_SPFLI search help object in the Screen Scraping Repository
2 Click the Create Mapping button in the Gateway Object Details
3 A popup window with the Mapping details for the QUERY operation is displayed
How To Create OData Services Using the Screen Scraping Generator in SAP NetWeaver Gateway
July 2012 11
4 Click the Enter button to complete the mapping Next step is to define the primary key of the
data entity you are creating
5 Your data model should now be in the following state
By default the FLIGHT_NUMBER is set as the primary key ndash this is because it is based on the
search help from the FLIGHT_NUMBERConnection ID We need to also add AIRLINECarrier
ID as the primary key
6 Right click on the AIRLINE attribute and in the context menu select Set Key
7 Your data model should now look like the following
46 Map the READ operation to the Recording of
Transaction TZ60
1 Highlight the screen scrape recording ldquoZ_TZ60_FLIGHT_DETAILSrdquo in the Screen Scraping
Repository
How To Create OData Services Using the Screen Scraping Generator in SAP NetWeaver Gateway
July 2012 12
2 Click the Create Mapping button in the Gateway Object Details
3 A popup window with the Mapping details for the READ operation is displayed
4 Under node SAPMTZ60(0100) highlight SFLIGHT-CONNID by right clicking on it
5 Click the Change Mapping Route button
How To Create OData Services Using the Screen Scraping Generator in SAP NetWeaver Gateway
July 2012 13
6 In the Change Mapping Route popup window highlight the FLIGHT_NUMBER attributehellipthis will
make the SFLIGHT-CARRID assigned to the FLIGHT_NUMBER of the data model which is one
of itrsquos keys
7 Click the Enter button
8 Your mapping should now look like this
9 As you can see above the Mapping Route for attributes under SAPMTZ60(0200) node is the
screen name followed by the attribute namehellipletrsquos flatten this mapping to make it easier to read
and understand for the consumers of our servicehellipin addition we are going to be mapping the
UPDATE operation later on which requires a flattened interface
10 Under the node SAPMTZ60(0200) uncheck SFLIGHT-CARRID and SFLIGHT-CONNID since
this is duplicate information already provided by the key fields
How To Create OData Services Using the Screen Scraping Generator in SAP NetWeaver Gateway
July 2012 14
11 Right click on the SCARR-CARRNAME attribute to select it then click the Change Mapping
Route button
12 In the Change Mapping Route popup window highlight the root node and change the property
name to AIRLINENAME
13 Your mapping should now look like this
14 For the rest of the SAPMTZ60(0200) attributes do the Change Mapping Route as you did
above accepting the default property name
15 Your mapping should now look like this
How To Create OData Services Using the Screen Scraping Generator in SAP NetWeaver Gateway
July 2012 15
16 Uncheck the FLIGHTS[] node We wonrsquot use it in this How To Guide to keep things simplehellipbut
you can make use of it as it is supported as output Your mapping should now look like this
17 Click the Enter button to complete the mapping
18 Your Gateway Object should now look like this
How To Create OData Services Using the Screen Scraping Generator in SAP NetWeaver Gateway
July 2012 16
47 Map the UPDATE Operation
1 In the Screen Scraping Repository highlight the recording you created earlier named
Z_TZ90_FLIGHT_UPDATE
2 Click the Create Mapping button
3 The default mapping looks like this
How To Create OData Services Using the Screen Scraping Generator in SAP NetWeaver Gateway
July 2012 17
4 We only need to make one change and that is to assign the SPFLI-CONNID to the correct data
model attribute FLIGHT_NUMBER Highlight SPFLI-CONNID as shown below by right clicking
on it
5 Click the Change Mapping Route button
6 In the Change Mapping Route popup window select FLIGHT_NUMBER
7 Click the Enter buttonhellipthe mapping should now look like the following
How To Create OData Services Using the Screen Scraping Generator in SAP NetWeaver Gateway
July 2012 18
8 Click the Enter button to complete your UPDATE operation mapping
9 Your data object model should now look like this
10 Click the Generate button at the upper left hand corner of the screen (this will generate code
that represents what you have configured)
How To Create OData Services Using the Screen Scraping Generator in SAP NetWeaver Gateway
July 2012 19
11 When the generation is complete the following popup window will be displayed notifying you
have what was generated
48 Simplify the Data Model Name
The name of your data model is currently Z_FLIGHT_SCS_ltYour Last Namegt This name will by
default be used when calling your service Letrsquos make it simpler name that describes the data ie ndash
ldquoFlightrdquo
1 Navigate for the Gateway Data Modeler back to the ABAP Workbench by clicking the Object
Navigator button
2 You should now be back in the ABAP Workbench (SE80) and should see your Gateway Data
Model
How To Create OData Services Using the Screen Scraping Generator in SAP NetWeaver Gateway
July 2012 20
3 Double click on the Data Model node (first node under the root node)
Double clicking on it will open up the editor for this node Notice the External Name input field
4 Go into change mode and change the External Name to be ldquoFlightrdquo
5 Save your changes Now your data model is known as ldquoFlightrdquo
How To Create OData Services Using the Screen Scraping Generator in SAP NetWeaver Gateway
July 2012 21
Note
If you go back in and change you data model (add a new operation or change some of the mapping) and then regenerate this configuration will be lost The name will revert to the old data model name
49 Create the Gateway Consumption Model
The Consumption Model is what exposes the Gateway Data Models to the network It does this by
creating a service in the Internet Communication Framework In this step you will create a
Consumption Model and then map your Data Model to it
1 Right click on the GW Data Modelrsquos Related GW Consumption Models node and in the context
menu select Add Consumpt Model
2 In the input field enter in the name of the consumption model you want created ndash zflightscsltyour
last namegt
3 Click the Enter button You will be asked if you want to create the consumption model click the
Yes button
4 Enter a description for your consumption model and click the Enter button
How To Create OData Services Using the Screen Scraping Generator in SAP NetWeaver Gateway
July 2012 22
5 You can see the Gateway service exposed in the ICF ndash transaction SICF ndash follow the ICF tree
path default_host gt sap gt opu gt odata gt sapthere you will see a list of all ICF services that
represent Gateway Consumption Models
410 Add an Alias to the Service
6 Go to the service maintenance transaction IWFNDMAINT_SERVICE
12 Click the search icon to search for your service in the list ndash the search icon is outlined in red
below
13 In the Find popup window enter in the Technical Service Name (ZFLIGHTSCSltYour Last
Namegt) for the search term
How To Create OData Services Using the Screen Scraping Generator in SAP NetWeaver Gateway
July 2012 23
14 Click the enter button your service should be located in the list
Hit the Cancel button on the Find dialog window to dismiss it
15 Click the Technical Service Name link (highlighted below in red on the top half of the screen)
this will cause the Alias assignment details be displayed at the bottom of the screen
6 Click the add System Alias button outlined in Red above in the bottom half of the screen You
should now see the screen to maintain service aliases
7 Click the New Entries button
8 Add your service document (the consumption model)hellipenter in the name of your consumption
model ndash zflightscsltyour last namegt and click the F4 help button
How To Create OData Services Using the Screen Scraping Generator in SAP NetWeaver Gateway
July 2012 24
9 Double click on your service document in the popup window
10 In the System Alias column enter the alias of the system you want your service to call ndash in this
case we are using the local alias
11 Save your changes then hit the back button You should now see that the LOCAL alias is
assigned to your service
12 Click the Call Browser button to launch a web browser that points to the service document of
your OData service
How To Create OData Services Using the Screen Scraping Generator in SAP NetWeaver Gateway
July 2012 25
Note
By default all gateway services are initial assigned basic
411 Test Your Gateway Object
Now for the fun part You get to test everything you have done up to this point Testing the QUERY
and READ operations is easyhellipyou just need a browser Testing the CREATE and UPDATE
operations (as well as the DELETE if we had implemented that) requires the use of a simple HTTP
tool the one we use here is the RESTClient plugin in for FireFox
1 In the browser that you launched in the last step replace the end of the URL ldquo$format=xmlrdquo
with ldquo$metadatardquo ndash this will bring up the metadata of your service
Example URL httpservicehttp_portsapopuodatasapZFLIGHTSCSGEBO$metadata
How To Create OData Services Using the Screen Scraping Generator in SAP NetWeaver Gateway
July 2012 26
2 In the URL replace ldquo$metadatardquo with ldquoFlightCollectionrdquo ndash this will execute the QUERY operation
You should now see a list of flights
3 To make it easier to test and debug add the query string parameter sap-ds-debug=true to the
URL ndash this will format the content as html allow us to follow links to the READ operation
Example URL
httpserverhttp_portsapopuodatasapZFLIGHTSCSGEBOFlightCollectionsap-ds-
debug=true
How To Create OData Services Using the Screen Scraping Generator in SAP NetWeaver Gateway
July 2012 27
Note
You will see an SAP icon in the bottom right hand corner Click it to see more details about the service call
4 To execute the READ operation for a specific flight just click the link
FlightCollection(airline=hellipflight_number=hellip)
5 Clicking this link will bring back the flight details from the READ operation
How To Create OData Services Using the Screen Scraping Generator in SAP NetWeaver Gateway
July 2012 28
6 Now let test the update functionality
7 To test the update (and create) functionality we will need a CSRF token (needed to prevent
Cross Site Request Forgery attacks)hellipto do this we need to request this token during a read by
passing in an http header value requesting the token To pass in a header value we need to use
the RESTClienthelliphere using the FireFox RESTClient (this is a free plugin for FireFox)
How To Create OData Services Using the Screen Scraping Generator in SAP NetWeaver Gateway
July 2012 29
8 Copy the URL used in the test in step 5 above (the URL that executed a READ) and paste it into
the URL input field
9 Remove the query string attribute ldquosap-ds-debug=truerdquo from the URL
10 Click the Headers menu item and select Custom Header
11 Enter the name value as shown below
Tip Check the ldquoSave to favoriterdquo check box so you can easily add this header for faster testing the next time
12 Click the Okay button You should now see the following
How To Create OData Services Using the Screen Scraping Generator in SAP NetWeaver Gateway
July 2012 30
13 Click the SEND button
14 In the Response section at the bottom of the RESTClient copy the value returned for the x-csrf-
token shown here outlined in red (note these token values are generated by the gateway
server)
The token will be passed back in when testing the create and update functionality
15 Change the value for header attribute x-csrf-token to be the value you copied above to do this
just click on the header attribute in the RESTClient you should now see something to the
following
16 Test the UPDATE_ENTITY UPDATE operation
17 Add the content-type header to the Request Headers section Click the Headers dropdown and
select Custom Header
18 Enter the namevalue ndash content-typeapplicationatom+xmltype=entry
Tip Save this as a favorite so you can easily add it again when testing
How To Create OData Services Using the Screen Scraping Generator in SAP NetWeaver Gateway
July 2012 31
19 Click the Okay button to add the header request
20 Switch to the ldquoResponse Body (Raw)rdquo tab and copy the contents there (we will be updating the
data that was sent back when reading the entity)
21 Paste the Response Body you just copied into the Request Body section
22 Change the Method dropdown to PUT Your RESTClient should now look similar to the
following
23 To test the update functionality we need to change some of the values in the request body that
we are sending to the Gateway serverhellipchange the value of the distance attribute
24 Click the SEND button
25 If the update is successful you will get a status code of 204 as shown below
How To Create OData Services Using the Screen Scraping Generator in SAP NetWeaver Gateway
July 2012 32
26 You can switch the Method back to GET and click the send button again then check the
response body to see if the values you changed for the update are returned by the read
27 Congrats You have successfully created and tested a simple OData service created with the
Screen Scraping generator
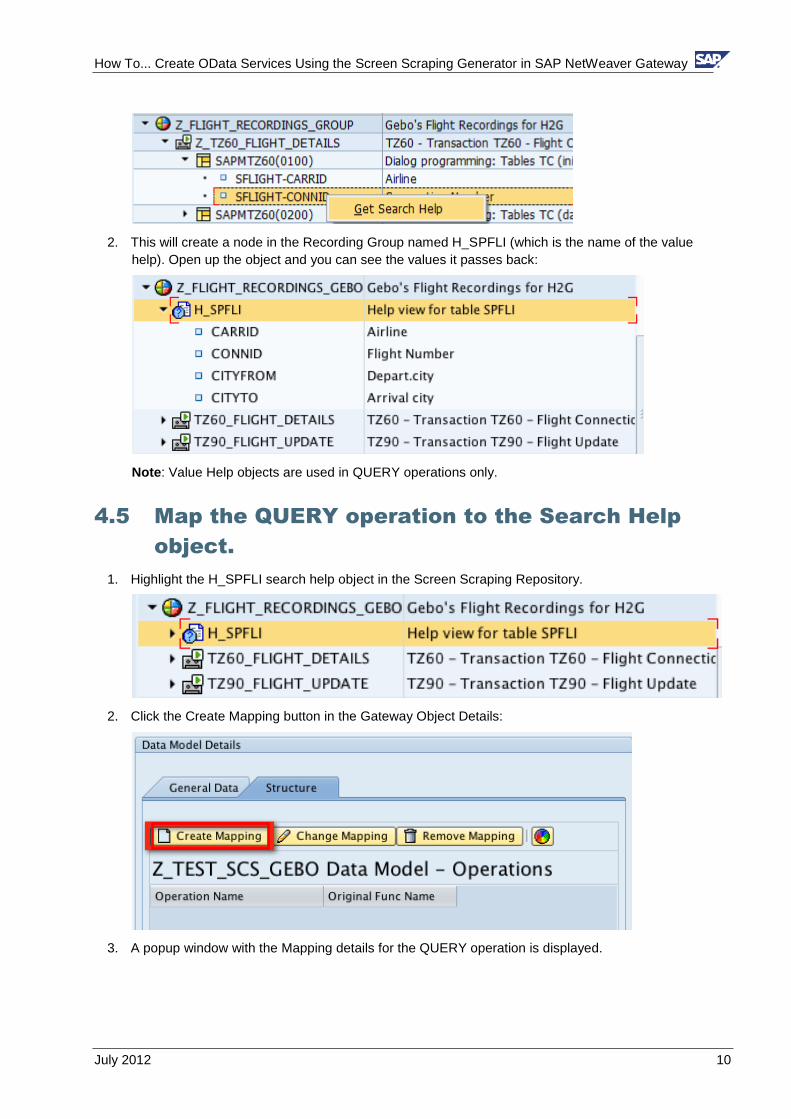
How To Create OData Services Using the Screen Scraping Generator in SAP NetWeaver Gateway
July 2012 10
2 This will create a node in the Recording Group named H_SPFLI (which is the name of the value
help) Open up the object and you can see the values it passes back
Note Value Help objects are used in QUERY operations only
45 Map the QUERY operation to the Search Help
object
1 Highlight the H_SPFLI search help object in the Screen Scraping Repository
2 Click the Create Mapping button in the Gateway Object Details
3 A popup window with the Mapping details for the QUERY operation is displayed
How To Create OData Services Using the Screen Scraping Generator in SAP NetWeaver Gateway
July 2012 11
4 Click the Enter button to complete the mapping Next step is to define the primary key of the
data entity you are creating
5 Your data model should now be in the following state
By default the FLIGHT_NUMBER is set as the primary key ndash this is because it is based on the
search help from the FLIGHT_NUMBERConnection ID We need to also add AIRLINECarrier
ID as the primary key
6 Right click on the AIRLINE attribute and in the context menu select Set Key
7 Your data model should now look like the following
46 Map the READ operation to the Recording of
Transaction TZ60
1 Highlight the screen scrape recording ldquoZ_TZ60_FLIGHT_DETAILSrdquo in the Screen Scraping
Repository
How To Create OData Services Using the Screen Scraping Generator in SAP NetWeaver Gateway
July 2012 12
2 Click the Create Mapping button in the Gateway Object Details
3 A popup window with the Mapping details for the READ operation is displayed
4 Under node SAPMTZ60(0100) highlight SFLIGHT-CONNID by right clicking on it
5 Click the Change Mapping Route button
How To Create OData Services Using the Screen Scraping Generator in SAP NetWeaver Gateway
July 2012 13
6 In the Change Mapping Route popup window highlight the FLIGHT_NUMBER attributehellipthis will
make the SFLIGHT-CARRID assigned to the FLIGHT_NUMBER of the data model which is one
of itrsquos keys
7 Click the Enter button
8 Your mapping should now look like this
9 As you can see above the Mapping Route for attributes under SAPMTZ60(0200) node is the
screen name followed by the attribute namehellipletrsquos flatten this mapping to make it easier to read
and understand for the consumers of our servicehellipin addition we are going to be mapping the
UPDATE operation later on which requires a flattened interface
10 Under the node SAPMTZ60(0200) uncheck SFLIGHT-CARRID and SFLIGHT-CONNID since
this is duplicate information already provided by the key fields
How To Create OData Services Using the Screen Scraping Generator in SAP NetWeaver Gateway
July 2012 14
11 Right click on the SCARR-CARRNAME attribute to select it then click the Change Mapping
Route button
12 In the Change Mapping Route popup window highlight the root node and change the property
name to AIRLINENAME
13 Your mapping should now look like this
14 For the rest of the SAPMTZ60(0200) attributes do the Change Mapping Route as you did
above accepting the default property name
15 Your mapping should now look like this
How To Create OData Services Using the Screen Scraping Generator in SAP NetWeaver Gateway
July 2012 15
16 Uncheck the FLIGHTS[] node We wonrsquot use it in this How To Guide to keep things simplehellipbut
you can make use of it as it is supported as output Your mapping should now look like this
17 Click the Enter button to complete the mapping
18 Your Gateway Object should now look like this
How To Create OData Services Using the Screen Scraping Generator in SAP NetWeaver Gateway
July 2012 16
47 Map the UPDATE Operation
1 In the Screen Scraping Repository highlight the recording you created earlier named
Z_TZ90_FLIGHT_UPDATE
2 Click the Create Mapping button
3 The default mapping looks like this
How To Create OData Services Using the Screen Scraping Generator in SAP NetWeaver Gateway
July 2012 17
4 We only need to make one change and that is to assign the SPFLI-CONNID to the correct data
model attribute FLIGHT_NUMBER Highlight SPFLI-CONNID as shown below by right clicking
on it
5 Click the Change Mapping Route button
6 In the Change Mapping Route popup window select FLIGHT_NUMBER
7 Click the Enter buttonhellipthe mapping should now look like the following
How To Create OData Services Using the Screen Scraping Generator in SAP NetWeaver Gateway
July 2012 18
8 Click the Enter button to complete your UPDATE operation mapping
9 Your data object model should now look like this
10 Click the Generate button at the upper left hand corner of the screen (this will generate code
that represents what you have configured)
How To Create OData Services Using the Screen Scraping Generator in SAP NetWeaver Gateway
July 2012 19
11 When the generation is complete the following popup window will be displayed notifying you
have what was generated
48 Simplify the Data Model Name
The name of your data model is currently Z_FLIGHT_SCS_ltYour Last Namegt This name will by
default be used when calling your service Letrsquos make it simpler name that describes the data ie ndash
ldquoFlightrdquo
1 Navigate for the Gateway Data Modeler back to the ABAP Workbench by clicking the Object
Navigator button
2 You should now be back in the ABAP Workbench (SE80) and should see your Gateway Data
Model
How To Create OData Services Using the Screen Scraping Generator in SAP NetWeaver Gateway
July 2012 20
3 Double click on the Data Model node (first node under the root node)
Double clicking on it will open up the editor for this node Notice the External Name input field
4 Go into change mode and change the External Name to be ldquoFlightrdquo
5 Save your changes Now your data model is known as ldquoFlightrdquo
How To Create OData Services Using the Screen Scraping Generator in SAP NetWeaver Gateway
July 2012 21
Note
If you go back in and change you data model (add a new operation or change some of the mapping) and then regenerate this configuration will be lost The name will revert to the old data model name
49 Create the Gateway Consumption Model
The Consumption Model is what exposes the Gateway Data Models to the network It does this by
creating a service in the Internet Communication Framework In this step you will create a
Consumption Model and then map your Data Model to it
1 Right click on the GW Data Modelrsquos Related GW Consumption Models node and in the context
menu select Add Consumpt Model
2 In the input field enter in the name of the consumption model you want created ndash zflightscsltyour
last namegt
3 Click the Enter button You will be asked if you want to create the consumption model click the
Yes button
4 Enter a description for your consumption model and click the Enter button
How To Create OData Services Using the Screen Scraping Generator in SAP NetWeaver Gateway
July 2012 22
5 You can see the Gateway service exposed in the ICF ndash transaction SICF ndash follow the ICF tree
path default_host gt sap gt opu gt odata gt sapthere you will see a list of all ICF services that
represent Gateway Consumption Models
410 Add an Alias to the Service
6 Go to the service maintenance transaction IWFNDMAINT_SERVICE
12 Click the search icon to search for your service in the list ndash the search icon is outlined in red
below
13 In the Find popup window enter in the Technical Service Name (ZFLIGHTSCSltYour Last
Namegt) for the search term
How To Create OData Services Using the Screen Scraping Generator in SAP NetWeaver Gateway
July 2012 23
14 Click the enter button your service should be located in the list
Hit the Cancel button on the Find dialog window to dismiss it
15 Click the Technical Service Name link (highlighted below in red on the top half of the screen)
this will cause the Alias assignment details be displayed at the bottom of the screen
6 Click the add System Alias button outlined in Red above in the bottom half of the screen You
should now see the screen to maintain service aliases
7 Click the New Entries button
8 Add your service document (the consumption model)hellipenter in the name of your consumption
model ndash zflightscsltyour last namegt and click the F4 help button
How To Create OData Services Using the Screen Scraping Generator in SAP NetWeaver Gateway
July 2012 24
9 Double click on your service document in the popup window
10 In the System Alias column enter the alias of the system you want your service to call ndash in this
case we are using the local alias
11 Save your changes then hit the back button You should now see that the LOCAL alias is
assigned to your service
12 Click the Call Browser button to launch a web browser that points to the service document of
your OData service
How To Create OData Services Using the Screen Scraping Generator in SAP NetWeaver Gateway
July 2012 25
Note
By default all gateway services are initial assigned basic
411 Test Your Gateway Object
Now for the fun part You get to test everything you have done up to this point Testing the QUERY
and READ operations is easyhellipyou just need a browser Testing the CREATE and UPDATE
operations (as well as the DELETE if we had implemented that) requires the use of a simple HTTP
tool the one we use here is the RESTClient plugin in for FireFox
1 In the browser that you launched in the last step replace the end of the URL ldquo$format=xmlrdquo
with ldquo$metadatardquo ndash this will bring up the metadata of your service
Example URL httpservicehttp_portsapopuodatasapZFLIGHTSCSGEBO$metadata
How To Create OData Services Using the Screen Scraping Generator in SAP NetWeaver Gateway
July 2012 26
2 In the URL replace ldquo$metadatardquo with ldquoFlightCollectionrdquo ndash this will execute the QUERY operation
You should now see a list of flights
3 To make it easier to test and debug add the query string parameter sap-ds-debug=true to the
URL ndash this will format the content as html allow us to follow links to the READ operation
Example URL
httpserverhttp_portsapopuodatasapZFLIGHTSCSGEBOFlightCollectionsap-ds-
debug=true
How To Create OData Services Using the Screen Scraping Generator in SAP NetWeaver Gateway
July 2012 27
Note
You will see an SAP icon in the bottom right hand corner Click it to see more details about the service call
4 To execute the READ operation for a specific flight just click the link
FlightCollection(airline=hellipflight_number=hellip)
5 Clicking this link will bring back the flight details from the READ operation
How To Create OData Services Using the Screen Scraping Generator in SAP NetWeaver Gateway
July 2012 28
6 Now let test the update functionality
7 To test the update (and create) functionality we will need a CSRF token (needed to prevent
Cross Site Request Forgery attacks)hellipto do this we need to request this token during a read by
passing in an http header value requesting the token To pass in a header value we need to use
the RESTClienthelliphere using the FireFox RESTClient (this is a free plugin for FireFox)
How To Create OData Services Using the Screen Scraping Generator in SAP NetWeaver Gateway
July 2012 29
8 Copy the URL used in the test in step 5 above (the URL that executed a READ) and paste it into
the URL input field
9 Remove the query string attribute ldquosap-ds-debug=truerdquo from the URL
10 Click the Headers menu item and select Custom Header
11 Enter the name value as shown below
Tip Check the ldquoSave to favoriterdquo check box so you can easily add this header for faster testing the next time
12 Click the Okay button You should now see the following
How To Create OData Services Using the Screen Scraping Generator in SAP NetWeaver Gateway
July 2012 30
13 Click the SEND button
14 In the Response section at the bottom of the RESTClient copy the value returned for the x-csrf-
token shown here outlined in red (note these token values are generated by the gateway
server)
The token will be passed back in when testing the create and update functionality
15 Change the value for header attribute x-csrf-token to be the value you copied above to do this
just click on the header attribute in the RESTClient you should now see something to the
following
16 Test the UPDATE_ENTITY UPDATE operation
17 Add the content-type header to the Request Headers section Click the Headers dropdown and
select Custom Header
18 Enter the namevalue ndash content-typeapplicationatom+xmltype=entry
Tip Save this as a favorite so you can easily add it again when testing
How To Create OData Services Using the Screen Scraping Generator in SAP NetWeaver Gateway
July 2012 31
19 Click the Okay button to add the header request
20 Switch to the ldquoResponse Body (Raw)rdquo tab and copy the contents there (we will be updating the
data that was sent back when reading the entity)
21 Paste the Response Body you just copied into the Request Body section
22 Change the Method dropdown to PUT Your RESTClient should now look similar to the
following
23 To test the update functionality we need to change some of the values in the request body that
we are sending to the Gateway serverhellipchange the value of the distance attribute
24 Click the SEND button
25 If the update is successful you will get a status code of 204 as shown below
How To Create OData Services Using the Screen Scraping Generator in SAP NetWeaver Gateway
July 2012 32
26 You can switch the Method back to GET and click the send button again then check the
response body to see if the values you changed for the update are returned by the read
27 Congrats You have successfully created and tested a simple OData service created with the
Screen Scraping generator
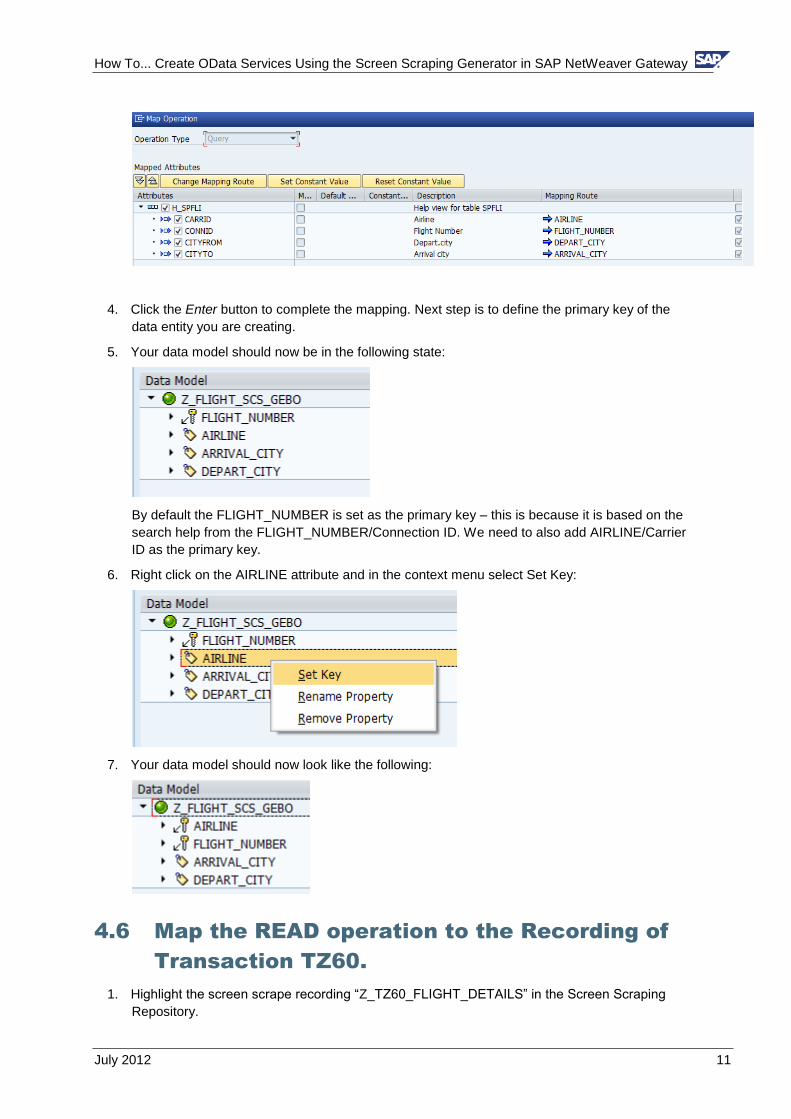
How To Create OData Services Using the Screen Scraping Generator in SAP NetWeaver Gateway
July 2012 11
4 Click the Enter button to complete the mapping Next step is to define the primary key of the
data entity you are creating
5 Your data model should now be in the following state
By default the FLIGHT_NUMBER is set as the primary key ndash this is because it is based on the
search help from the FLIGHT_NUMBERConnection ID We need to also add AIRLINECarrier
ID as the primary key
6 Right click on the AIRLINE attribute and in the context menu select Set Key
7 Your data model should now look like the following
46 Map the READ operation to the Recording of
Transaction TZ60
1 Highlight the screen scrape recording ldquoZ_TZ60_FLIGHT_DETAILSrdquo in the Screen Scraping
Repository
How To Create OData Services Using the Screen Scraping Generator in SAP NetWeaver Gateway
July 2012 12
2 Click the Create Mapping button in the Gateway Object Details
3 A popup window with the Mapping details for the READ operation is displayed
4 Under node SAPMTZ60(0100) highlight SFLIGHT-CONNID by right clicking on it
5 Click the Change Mapping Route button
How To Create OData Services Using the Screen Scraping Generator in SAP NetWeaver Gateway
July 2012 13
6 In the Change Mapping Route popup window highlight the FLIGHT_NUMBER attributehellipthis will
make the SFLIGHT-CARRID assigned to the FLIGHT_NUMBER of the data model which is one
of itrsquos keys
7 Click the Enter button
8 Your mapping should now look like this
9 As you can see above the Mapping Route for attributes under SAPMTZ60(0200) node is the
screen name followed by the attribute namehellipletrsquos flatten this mapping to make it easier to read
and understand for the consumers of our servicehellipin addition we are going to be mapping the
UPDATE operation later on which requires a flattened interface
10 Under the node SAPMTZ60(0200) uncheck SFLIGHT-CARRID and SFLIGHT-CONNID since
this is duplicate information already provided by the key fields
How To Create OData Services Using the Screen Scraping Generator in SAP NetWeaver Gateway
July 2012 14
11 Right click on the SCARR-CARRNAME attribute to select it then click the Change Mapping
Route button
12 In the Change Mapping Route popup window highlight the root node and change the property
name to AIRLINENAME
13 Your mapping should now look like this
14 For the rest of the SAPMTZ60(0200) attributes do the Change Mapping Route as you did
above accepting the default property name
15 Your mapping should now look like this
How To Create OData Services Using the Screen Scraping Generator in SAP NetWeaver Gateway
July 2012 15
16 Uncheck the FLIGHTS[] node We wonrsquot use it in this How To Guide to keep things simplehellipbut
you can make use of it as it is supported as output Your mapping should now look like this
17 Click the Enter button to complete the mapping
18 Your Gateway Object should now look like this
How To Create OData Services Using the Screen Scraping Generator in SAP NetWeaver Gateway
July 2012 16
47 Map the UPDATE Operation
1 In the Screen Scraping Repository highlight the recording you created earlier named
Z_TZ90_FLIGHT_UPDATE
2 Click the Create Mapping button
3 The default mapping looks like this
How To Create OData Services Using the Screen Scraping Generator in SAP NetWeaver Gateway
July 2012 17
4 We only need to make one change and that is to assign the SPFLI-CONNID to the correct data
model attribute FLIGHT_NUMBER Highlight SPFLI-CONNID as shown below by right clicking
on it
5 Click the Change Mapping Route button
6 In the Change Mapping Route popup window select FLIGHT_NUMBER
7 Click the Enter buttonhellipthe mapping should now look like the following
How To Create OData Services Using the Screen Scraping Generator in SAP NetWeaver Gateway
July 2012 18
8 Click the Enter button to complete your UPDATE operation mapping
9 Your data object model should now look like this
10 Click the Generate button at the upper left hand corner of the screen (this will generate code
that represents what you have configured)
How To Create OData Services Using the Screen Scraping Generator in SAP NetWeaver Gateway
July 2012 19
11 When the generation is complete the following popup window will be displayed notifying you
have what was generated
48 Simplify the Data Model Name
The name of your data model is currently Z_FLIGHT_SCS_ltYour Last Namegt This name will by
default be used when calling your service Letrsquos make it simpler name that describes the data ie ndash
ldquoFlightrdquo
1 Navigate for the Gateway Data Modeler back to the ABAP Workbench by clicking the Object
Navigator button
2 You should now be back in the ABAP Workbench (SE80) and should see your Gateway Data
Model
How To Create OData Services Using the Screen Scraping Generator in SAP NetWeaver Gateway
July 2012 20
3 Double click on the Data Model node (first node under the root node)
Double clicking on it will open up the editor for this node Notice the External Name input field
4 Go into change mode and change the External Name to be ldquoFlightrdquo
5 Save your changes Now your data model is known as ldquoFlightrdquo
How To Create OData Services Using the Screen Scraping Generator in SAP NetWeaver Gateway
July 2012 21
Note
If you go back in and change you data model (add a new operation or change some of the mapping) and then regenerate this configuration will be lost The name will revert to the old data model name
49 Create the Gateway Consumption Model
The Consumption Model is what exposes the Gateway Data Models to the network It does this by
creating a service in the Internet Communication Framework In this step you will create a
Consumption Model and then map your Data Model to it
1 Right click on the GW Data Modelrsquos Related GW Consumption Models node and in the context
menu select Add Consumpt Model
2 In the input field enter in the name of the consumption model you want created ndash zflightscsltyour
last namegt
3 Click the Enter button You will be asked if you want to create the consumption model click the
Yes button
4 Enter a description for your consumption model and click the Enter button
How To Create OData Services Using the Screen Scraping Generator in SAP NetWeaver Gateway
July 2012 22
5 You can see the Gateway service exposed in the ICF ndash transaction SICF ndash follow the ICF tree
path default_host gt sap gt opu gt odata gt sapthere you will see a list of all ICF services that
represent Gateway Consumption Models
410 Add an Alias to the Service
6 Go to the service maintenance transaction IWFNDMAINT_SERVICE
12 Click the search icon to search for your service in the list ndash the search icon is outlined in red
below
13 In the Find popup window enter in the Technical Service Name (ZFLIGHTSCSltYour Last
Namegt) for the search term
How To Create OData Services Using the Screen Scraping Generator in SAP NetWeaver Gateway
July 2012 23
14 Click the enter button your service should be located in the list
Hit the Cancel button on the Find dialog window to dismiss it
15 Click the Technical Service Name link (highlighted below in red on the top half of the screen)
this will cause the Alias assignment details be displayed at the bottom of the screen
6 Click the add System Alias button outlined in Red above in the bottom half of the screen You
should now see the screen to maintain service aliases
7 Click the New Entries button
8 Add your service document (the consumption model)hellipenter in the name of your consumption
model ndash zflightscsltyour last namegt and click the F4 help button
How To Create OData Services Using the Screen Scraping Generator in SAP NetWeaver Gateway
July 2012 24
9 Double click on your service document in the popup window
10 In the System Alias column enter the alias of the system you want your service to call ndash in this
case we are using the local alias
11 Save your changes then hit the back button You should now see that the LOCAL alias is
assigned to your service
12 Click the Call Browser button to launch a web browser that points to the service document of
your OData service
How To Create OData Services Using the Screen Scraping Generator in SAP NetWeaver Gateway
July 2012 25
Note
By default all gateway services are initial assigned basic
411 Test Your Gateway Object
Now for the fun part You get to test everything you have done up to this point Testing the QUERY
and READ operations is easyhellipyou just need a browser Testing the CREATE and UPDATE
operations (as well as the DELETE if we had implemented that) requires the use of a simple HTTP
tool the one we use here is the RESTClient plugin in for FireFox
1 In the browser that you launched in the last step replace the end of the URL ldquo$format=xmlrdquo
with ldquo$metadatardquo ndash this will bring up the metadata of your service
Example URL httpservicehttp_portsapopuodatasapZFLIGHTSCSGEBO$metadata
How To Create OData Services Using the Screen Scraping Generator in SAP NetWeaver Gateway
July 2012 26
2 In the URL replace ldquo$metadatardquo with ldquoFlightCollectionrdquo ndash this will execute the QUERY operation
You should now see a list of flights
3 To make it easier to test and debug add the query string parameter sap-ds-debug=true to the
URL ndash this will format the content as html allow us to follow links to the READ operation
Example URL
httpserverhttp_portsapopuodatasapZFLIGHTSCSGEBOFlightCollectionsap-ds-
debug=true
How To Create OData Services Using the Screen Scraping Generator in SAP NetWeaver Gateway
July 2012 27
Note
You will see an SAP icon in the bottom right hand corner Click it to see more details about the service call
4 To execute the READ operation for a specific flight just click the link
FlightCollection(airline=hellipflight_number=hellip)
5 Clicking this link will bring back the flight details from the READ operation
How To Create OData Services Using the Screen Scraping Generator in SAP NetWeaver Gateway
July 2012 28
6 Now let test the update functionality
7 To test the update (and create) functionality we will need a CSRF token (needed to prevent
Cross Site Request Forgery attacks)hellipto do this we need to request this token during a read by
passing in an http header value requesting the token To pass in a header value we need to use
the RESTClienthelliphere using the FireFox RESTClient (this is a free plugin for FireFox)
How To Create OData Services Using the Screen Scraping Generator in SAP NetWeaver Gateway
July 2012 29
8 Copy the URL used in the test in step 5 above (the URL that executed a READ) and paste it into
the URL input field
9 Remove the query string attribute ldquosap-ds-debug=truerdquo from the URL
10 Click the Headers menu item and select Custom Header
11 Enter the name value as shown below
Tip Check the ldquoSave to favoriterdquo check box so you can easily add this header for faster testing the next time
12 Click the Okay button You should now see the following
How To Create OData Services Using the Screen Scraping Generator in SAP NetWeaver Gateway
July 2012 30
13 Click the SEND button
14 In the Response section at the bottom of the RESTClient copy the value returned for the x-csrf-
token shown here outlined in red (note these token values are generated by the gateway
server)
The token will be passed back in when testing the create and update functionality
15 Change the value for header attribute x-csrf-token to be the value you copied above to do this
just click on the header attribute in the RESTClient you should now see something to the
following
16 Test the UPDATE_ENTITY UPDATE operation
17 Add the content-type header to the Request Headers section Click the Headers dropdown and
select Custom Header
18 Enter the namevalue ndash content-typeapplicationatom+xmltype=entry
Tip Save this as a favorite so you can easily add it again when testing
How To Create OData Services Using the Screen Scraping Generator in SAP NetWeaver Gateway
July 2012 31
19 Click the Okay button to add the header request
20 Switch to the ldquoResponse Body (Raw)rdquo tab and copy the contents there (we will be updating the
data that was sent back when reading the entity)
21 Paste the Response Body you just copied into the Request Body section
22 Change the Method dropdown to PUT Your RESTClient should now look similar to the
following
23 To test the update functionality we need to change some of the values in the request body that
we are sending to the Gateway serverhellipchange the value of the distance attribute
24 Click the SEND button
25 If the update is successful you will get a status code of 204 as shown below
How To Create OData Services Using the Screen Scraping Generator in SAP NetWeaver Gateway
July 2012 32
26 You can switch the Method back to GET and click the send button again then check the
response body to see if the values you changed for the update are returned by the read
27 Congrats You have successfully created and tested a simple OData service created with the
Screen Scraping generator
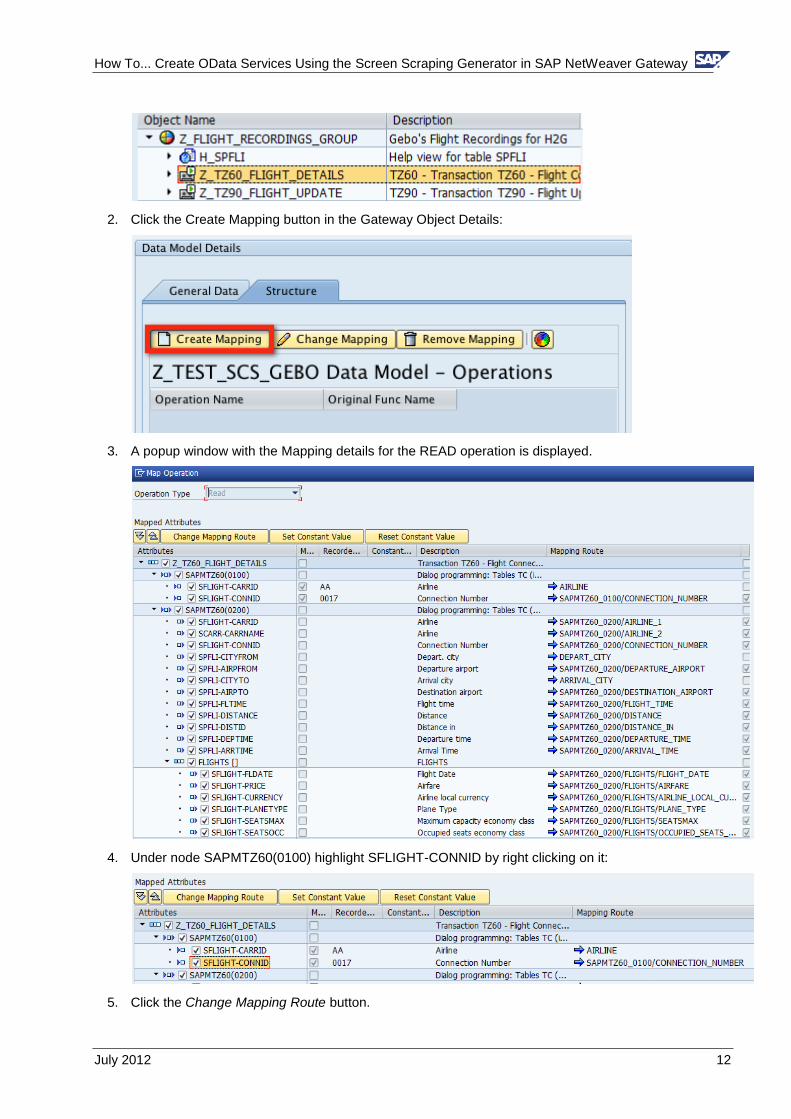
How To Create OData Services Using the Screen Scraping Generator in SAP NetWeaver Gateway
July 2012 12
2 Click the Create Mapping button in the Gateway Object Details
3 A popup window with the Mapping details for the READ operation is displayed
4 Under node SAPMTZ60(0100) highlight SFLIGHT-CONNID by right clicking on it
5 Click the Change Mapping Route button
How To Create OData Services Using the Screen Scraping Generator in SAP NetWeaver Gateway
July 2012 13
6 In the Change Mapping Route popup window highlight the FLIGHT_NUMBER attributehellipthis will
make the SFLIGHT-CARRID assigned to the FLIGHT_NUMBER of the data model which is one
of itrsquos keys
7 Click the Enter button
8 Your mapping should now look like this
9 As you can see above the Mapping Route for attributes under SAPMTZ60(0200) node is the
screen name followed by the attribute namehellipletrsquos flatten this mapping to make it easier to read
and understand for the consumers of our servicehellipin addition we are going to be mapping the
UPDATE operation later on which requires a flattened interface
10 Under the node SAPMTZ60(0200) uncheck SFLIGHT-CARRID and SFLIGHT-CONNID since
this is duplicate information already provided by the key fields
How To Create OData Services Using the Screen Scraping Generator in SAP NetWeaver Gateway
July 2012 14
11 Right click on the SCARR-CARRNAME attribute to select it then click the Change Mapping
Route button
12 In the Change Mapping Route popup window highlight the root node and change the property
name to AIRLINENAME
13 Your mapping should now look like this
14 For the rest of the SAPMTZ60(0200) attributes do the Change Mapping Route as you did
above accepting the default property name
15 Your mapping should now look like this
How To Create OData Services Using the Screen Scraping Generator in SAP NetWeaver Gateway
July 2012 15
16 Uncheck the FLIGHTS[] node We wonrsquot use it in this How To Guide to keep things simplehellipbut
you can make use of it as it is supported as output Your mapping should now look like this
17 Click the Enter button to complete the mapping
18 Your Gateway Object should now look like this
How To Create OData Services Using the Screen Scraping Generator in SAP NetWeaver Gateway
July 2012 16
47 Map the UPDATE Operation
1 In the Screen Scraping Repository highlight the recording you created earlier named
Z_TZ90_FLIGHT_UPDATE
2 Click the Create Mapping button
3 The default mapping looks like this
How To Create OData Services Using the Screen Scraping Generator in SAP NetWeaver Gateway
July 2012 17
4 We only need to make one change and that is to assign the SPFLI-CONNID to the correct data
model attribute FLIGHT_NUMBER Highlight SPFLI-CONNID as shown below by right clicking
on it
5 Click the Change Mapping Route button
6 In the Change Mapping Route popup window select FLIGHT_NUMBER
7 Click the Enter buttonhellipthe mapping should now look like the following
How To Create OData Services Using the Screen Scraping Generator in SAP NetWeaver Gateway
July 2012 18
8 Click the Enter button to complete your UPDATE operation mapping
9 Your data object model should now look like this
10 Click the Generate button at the upper left hand corner of the screen (this will generate code
that represents what you have configured)
How To Create OData Services Using the Screen Scraping Generator in SAP NetWeaver Gateway
July 2012 19
11 When the generation is complete the following popup window will be displayed notifying you
have what was generated
48 Simplify the Data Model Name
The name of your data model is currently Z_FLIGHT_SCS_ltYour Last Namegt This name will by
default be used when calling your service Letrsquos make it simpler name that describes the data ie ndash
ldquoFlightrdquo
1 Navigate for the Gateway Data Modeler back to the ABAP Workbench by clicking the Object
Navigator button
2 You should now be back in the ABAP Workbench (SE80) and should see your Gateway Data
Model
How To Create OData Services Using the Screen Scraping Generator in SAP NetWeaver Gateway
July 2012 20
3 Double click on the Data Model node (first node under the root node)
Double clicking on it will open up the editor for this node Notice the External Name input field
4 Go into change mode and change the External Name to be ldquoFlightrdquo
5 Save your changes Now your data model is known as ldquoFlightrdquo
How To Create OData Services Using the Screen Scraping Generator in SAP NetWeaver Gateway
July 2012 21
Note
If you go back in and change you data model (add a new operation or change some of the mapping) and then regenerate this configuration will be lost The name will revert to the old data model name
49 Create the Gateway Consumption Model
The Consumption Model is what exposes the Gateway Data Models to the network It does this by
creating a service in the Internet Communication Framework In this step you will create a
Consumption Model and then map your Data Model to it
1 Right click on the GW Data Modelrsquos Related GW Consumption Models node and in the context
menu select Add Consumpt Model
2 In the input field enter in the name of the consumption model you want created ndash zflightscsltyour
last namegt
3 Click the Enter button You will be asked if you want to create the consumption model click the
Yes button
4 Enter a description for your consumption model and click the Enter button
How To Create OData Services Using the Screen Scraping Generator in SAP NetWeaver Gateway
July 2012 22
5 You can see the Gateway service exposed in the ICF ndash transaction SICF ndash follow the ICF tree
path default_host gt sap gt opu gt odata gt sapthere you will see a list of all ICF services that
represent Gateway Consumption Models
410 Add an Alias to the Service
6 Go to the service maintenance transaction IWFNDMAINT_SERVICE
12 Click the search icon to search for your service in the list ndash the search icon is outlined in red
below
13 In the Find popup window enter in the Technical Service Name (ZFLIGHTSCSltYour Last
Namegt) for the search term
How To Create OData Services Using the Screen Scraping Generator in SAP NetWeaver Gateway
July 2012 23
14 Click the enter button your service should be located in the list
Hit the Cancel button on the Find dialog window to dismiss it
15 Click the Technical Service Name link (highlighted below in red on the top half of the screen)
this will cause the Alias assignment details be displayed at the bottom of the screen
6 Click the add System Alias button outlined in Red above in the bottom half of the screen You
should now see the screen to maintain service aliases
7 Click the New Entries button
8 Add your service document (the consumption model)hellipenter in the name of your consumption
model ndash zflightscsltyour last namegt and click the F4 help button
How To Create OData Services Using the Screen Scraping Generator in SAP NetWeaver Gateway
July 2012 24
9 Double click on your service document in the popup window
10 In the System Alias column enter the alias of the system you want your service to call ndash in this
case we are using the local alias
11 Save your changes then hit the back button You should now see that the LOCAL alias is
assigned to your service
12 Click the Call Browser button to launch a web browser that points to the service document of
your OData service
How To Create OData Services Using the Screen Scraping Generator in SAP NetWeaver Gateway
July 2012 25
Note
By default all gateway services are initial assigned basic
411 Test Your Gateway Object
Now for the fun part You get to test everything you have done up to this point Testing the QUERY
and READ operations is easyhellipyou just need a browser Testing the CREATE and UPDATE
operations (as well as the DELETE if we had implemented that) requires the use of a simple HTTP
tool the one we use here is the RESTClient plugin in for FireFox
1 In the browser that you launched in the last step replace the end of the URL ldquo$format=xmlrdquo
with ldquo$metadatardquo ndash this will bring up the metadata of your service
Example URL httpservicehttp_portsapopuodatasapZFLIGHTSCSGEBO$metadata
How To Create OData Services Using the Screen Scraping Generator in SAP NetWeaver Gateway
July 2012 26
2 In the URL replace ldquo$metadatardquo with ldquoFlightCollectionrdquo ndash this will execute the QUERY operation
You should now see a list of flights
3 To make it easier to test and debug add the query string parameter sap-ds-debug=true to the
URL ndash this will format the content as html allow us to follow links to the READ operation
Example URL
httpserverhttp_portsapopuodatasapZFLIGHTSCSGEBOFlightCollectionsap-ds-
debug=true
How To Create OData Services Using the Screen Scraping Generator in SAP NetWeaver Gateway
July 2012 27
Note
You will see an SAP icon in the bottom right hand corner Click it to see more details about the service call
4 To execute the READ operation for a specific flight just click the link
FlightCollection(airline=hellipflight_number=hellip)
5 Clicking this link will bring back the flight details from the READ operation
How To Create OData Services Using the Screen Scraping Generator in SAP NetWeaver Gateway
July 2012 28
6 Now let test the update functionality
7 To test the update (and create) functionality we will need a CSRF token (needed to prevent
Cross Site Request Forgery attacks)hellipto do this we need to request this token during a read by
passing in an http header value requesting the token To pass in a header value we need to use
the RESTClienthelliphere using the FireFox RESTClient (this is a free plugin for FireFox)
How To Create OData Services Using the Screen Scraping Generator in SAP NetWeaver Gateway
July 2012 29
8 Copy the URL used in the test in step 5 above (the URL that executed a READ) and paste it into
the URL input field
9 Remove the query string attribute ldquosap-ds-debug=truerdquo from the URL
10 Click the Headers menu item and select Custom Header
11 Enter the name value as shown below
Tip Check the ldquoSave to favoriterdquo check box so you can easily add this header for faster testing the next time
12 Click the Okay button You should now see the following
How To Create OData Services Using the Screen Scraping Generator in SAP NetWeaver Gateway
July 2012 30
13 Click the SEND button
14 In the Response section at the bottom of the RESTClient copy the value returned for the x-csrf-
token shown here outlined in red (note these token values are generated by the gateway
server)
The token will be passed back in when testing the create and update functionality
15 Change the value for header attribute x-csrf-token to be the value you copied above to do this
just click on the header attribute in the RESTClient you should now see something to the
following
16 Test the UPDATE_ENTITY UPDATE operation
17 Add the content-type header to the Request Headers section Click the Headers dropdown and
select Custom Header
18 Enter the namevalue ndash content-typeapplicationatom+xmltype=entry
Tip Save this as a favorite so you can easily add it again when testing
How To Create OData Services Using the Screen Scraping Generator in SAP NetWeaver Gateway
July 2012 31
19 Click the Okay button to add the header request
20 Switch to the ldquoResponse Body (Raw)rdquo tab and copy the contents there (we will be updating the
data that was sent back when reading the entity)
21 Paste the Response Body you just copied into the Request Body section
22 Change the Method dropdown to PUT Your RESTClient should now look similar to the
following
23 To test the update functionality we need to change some of the values in the request body that
we are sending to the Gateway serverhellipchange the value of the distance attribute
24 Click the SEND button
25 If the update is successful you will get a status code of 204 as shown below
How To Create OData Services Using the Screen Scraping Generator in SAP NetWeaver Gateway
July 2012 32
26 You can switch the Method back to GET and click the send button again then check the
response body to see if the values you changed for the update are returned by the read
27 Congrats You have successfully created and tested a simple OData service created with the
Screen Scraping generator
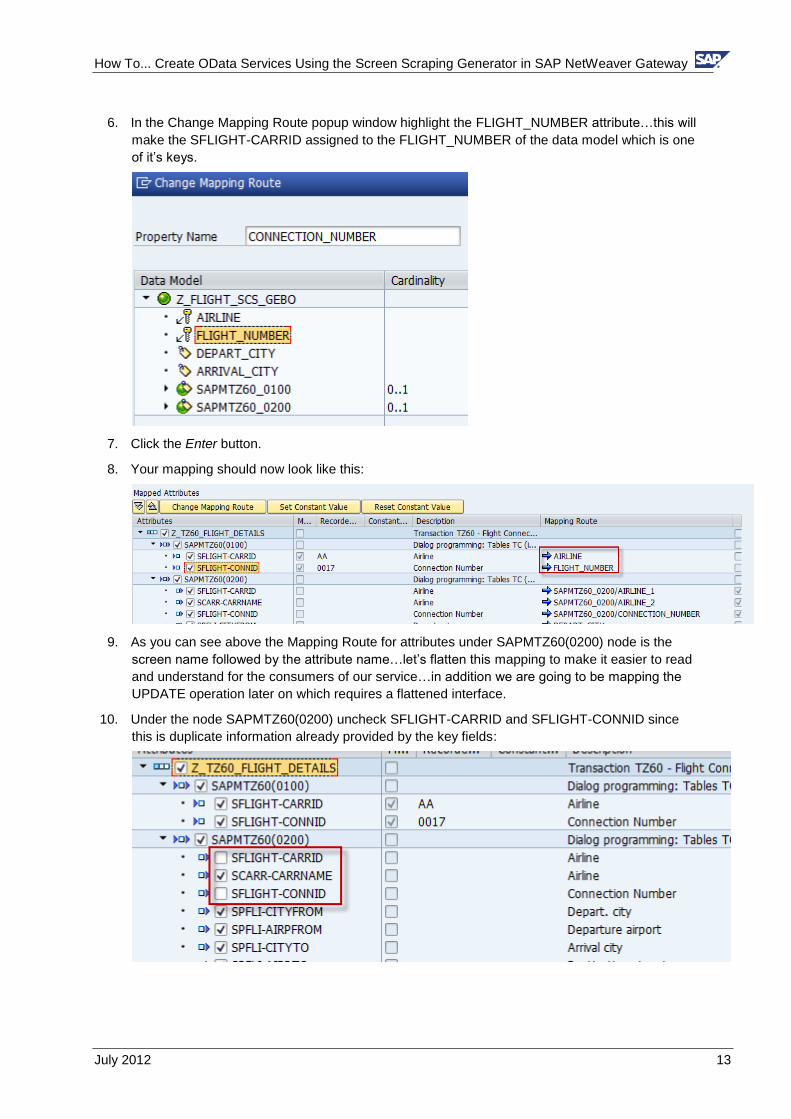
How To Create OData Services Using the Screen Scraping Generator in SAP NetWeaver Gateway
July 2012 13
6 In the Change Mapping Route popup window highlight the FLIGHT_NUMBER attributehellipthis will
make the SFLIGHT-CARRID assigned to the FLIGHT_NUMBER of the data model which is one
of itrsquos keys
7 Click the Enter button
8 Your mapping should now look like this
9 As you can see above the Mapping Route for attributes under SAPMTZ60(0200) node is the
screen name followed by the attribute namehellipletrsquos flatten this mapping to make it easier to read
and understand for the consumers of our servicehellipin addition we are going to be mapping the
UPDATE operation later on which requires a flattened interface
10 Under the node SAPMTZ60(0200) uncheck SFLIGHT-CARRID and SFLIGHT-CONNID since
this is duplicate information already provided by the key fields
How To Create OData Services Using the Screen Scraping Generator in SAP NetWeaver Gateway
July 2012 14
11 Right click on the SCARR-CARRNAME attribute to select it then click the Change Mapping
Route button
12 In the Change Mapping Route popup window highlight the root node and change the property
name to AIRLINENAME
13 Your mapping should now look like this
14 For the rest of the SAPMTZ60(0200) attributes do the Change Mapping Route as you did
above accepting the default property name
15 Your mapping should now look like this
How To Create OData Services Using the Screen Scraping Generator in SAP NetWeaver Gateway
July 2012 15
16 Uncheck the FLIGHTS[] node We wonrsquot use it in this How To Guide to keep things simplehellipbut
you can make use of it as it is supported as output Your mapping should now look like this
17 Click the Enter button to complete the mapping
18 Your Gateway Object should now look like this
How To Create OData Services Using the Screen Scraping Generator in SAP NetWeaver Gateway
July 2012 16
47 Map the UPDATE Operation
1 In the Screen Scraping Repository highlight the recording you created earlier named
Z_TZ90_FLIGHT_UPDATE
2 Click the Create Mapping button
3 The default mapping looks like this
How To Create OData Services Using the Screen Scraping Generator in SAP NetWeaver Gateway
July 2012 17
4 We only need to make one change and that is to assign the SPFLI-CONNID to the correct data
model attribute FLIGHT_NUMBER Highlight SPFLI-CONNID as shown below by right clicking
on it
5 Click the Change Mapping Route button
6 In the Change Mapping Route popup window select FLIGHT_NUMBER
7 Click the Enter buttonhellipthe mapping should now look like the following
How To Create OData Services Using the Screen Scraping Generator in SAP NetWeaver Gateway
July 2012 18
8 Click the Enter button to complete your UPDATE operation mapping
9 Your data object model should now look like this
10 Click the Generate button at the upper left hand corner of the screen (this will generate code
that represents what you have configured)
How To Create OData Services Using the Screen Scraping Generator in SAP NetWeaver Gateway
July 2012 19
11 When the generation is complete the following popup window will be displayed notifying you
have what was generated
48 Simplify the Data Model Name
The name of your data model is currently Z_FLIGHT_SCS_ltYour Last Namegt This name will by
default be used when calling your service Letrsquos make it simpler name that describes the data ie ndash
ldquoFlightrdquo
1 Navigate for the Gateway Data Modeler back to the ABAP Workbench by clicking the Object
Navigator button
2 You should now be back in the ABAP Workbench (SE80) and should see your Gateway Data
Model
How To Create OData Services Using the Screen Scraping Generator in SAP NetWeaver Gateway
July 2012 20
3 Double click on the Data Model node (first node under the root node)
Double clicking on it will open up the editor for this node Notice the External Name input field
4 Go into change mode and change the External Name to be ldquoFlightrdquo
5 Save your changes Now your data model is known as ldquoFlightrdquo
How To Create OData Services Using the Screen Scraping Generator in SAP NetWeaver Gateway
July 2012 21
Note
If you go back in and change you data model (add a new operation or change some of the mapping) and then regenerate this configuration will be lost The name will revert to the old data model name
49 Create the Gateway Consumption Model
The Consumption Model is what exposes the Gateway Data Models to the network It does this by
creating a service in the Internet Communication Framework In this step you will create a
Consumption Model and then map your Data Model to it
1 Right click on the GW Data Modelrsquos Related GW Consumption Models node and in the context
menu select Add Consumpt Model
2 In the input field enter in the name of the consumption model you want created ndash zflightscsltyour
last namegt
3 Click the Enter button You will be asked if you want to create the consumption model click the
Yes button
4 Enter a description for your consumption model and click the Enter button
How To Create OData Services Using the Screen Scraping Generator in SAP NetWeaver Gateway
July 2012 22
5 You can see the Gateway service exposed in the ICF ndash transaction SICF ndash follow the ICF tree
path default_host gt sap gt opu gt odata gt sapthere you will see a list of all ICF services that
represent Gateway Consumption Models
410 Add an Alias to the Service
6 Go to the service maintenance transaction IWFNDMAINT_SERVICE
12 Click the search icon to search for your service in the list ndash the search icon is outlined in red
below
13 In the Find popup window enter in the Technical Service Name (ZFLIGHTSCSltYour Last
Namegt) for the search term
How To Create OData Services Using the Screen Scraping Generator in SAP NetWeaver Gateway
July 2012 23
14 Click the enter button your service should be located in the list
Hit the Cancel button on the Find dialog window to dismiss it
15 Click the Technical Service Name link (highlighted below in red on the top half of the screen)
this will cause the Alias assignment details be displayed at the bottom of the screen
6 Click the add System Alias button outlined in Red above in the bottom half of the screen You
should now see the screen to maintain service aliases
7 Click the New Entries button
8 Add your service document (the consumption model)hellipenter in the name of your consumption
model ndash zflightscsltyour last namegt and click the F4 help button
How To Create OData Services Using the Screen Scraping Generator in SAP NetWeaver Gateway
July 2012 24
9 Double click on your service document in the popup window
10 In the System Alias column enter the alias of the system you want your service to call ndash in this
case we are using the local alias
11 Save your changes then hit the back button You should now see that the LOCAL alias is
assigned to your service
12 Click the Call Browser button to launch a web browser that points to the service document of
your OData service
How To Create OData Services Using the Screen Scraping Generator in SAP NetWeaver Gateway
July 2012 25
Note
By default all gateway services are initial assigned basic
411 Test Your Gateway Object
Now for the fun part You get to test everything you have done up to this point Testing the QUERY
and READ operations is easyhellipyou just need a browser Testing the CREATE and UPDATE
operations (as well as the DELETE if we had implemented that) requires the use of a simple HTTP
tool the one we use here is the RESTClient plugin in for FireFox
1 In the browser that you launched in the last step replace the end of the URL ldquo$format=xmlrdquo
with ldquo$metadatardquo ndash this will bring up the metadata of your service
Example URL httpservicehttp_portsapopuodatasapZFLIGHTSCSGEBO$metadata
How To Create OData Services Using the Screen Scraping Generator in SAP NetWeaver Gateway
July 2012 26
2 In the URL replace ldquo$metadatardquo with ldquoFlightCollectionrdquo ndash this will execute the QUERY operation
You should now see a list of flights
3 To make it easier to test and debug add the query string parameter sap-ds-debug=true to the
URL ndash this will format the content as html allow us to follow links to the READ operation
Example URL
httpserverhttp_portsapopuodatasapZFLIGHTSCSGEBOFlightCollectionsap-ds-
debug=true
How To Create OData Services Using the Screen Scraping Generator in SAP NetWeaver Gateway
July 2012 27
Note
You will see an SAP icon in the bottom right hand corner Click it to see more details about the service call
4 To execute the READ operation for a specific flight just click the link
FlightCollection(airline=hellipflight_number=hellip)
5 Clicking this link will bring back the flight details from the READ operation
How To Create OData Services Using the Screen Scraping Generator in SAP NetWeaver Gateway
July 2012 28
6 Now let test the update functionality
7 To test the update (and create) functionality we will need a CSRF token (needed to prevent
Cross Site Request Forgery attacks)hellipto do this we need to request this token during a read by
passing in an http header value requesting the token To pass in a header value we need to use
the RESTClienthelliphere using the FireFox RESTClient (this is a free plugin for FireFox)
How To Create OData Services Using the Screen Scraping Generator in SAP NetWeaver Gateway
July 2012 29
8 Copy the URL used in the test in step 5 above (the URL that executed a READ) and paste it into
the URL input field
9 Remove the query string attribute ldquosap-ds-debug=truerdquo from the URL
10 Click the Headers menu item and select Custom Header
11 Enter the name value as shown below
Tip Check the ldquoSave to favoriterdquo check box so you can easily add this header for faster testing the next time
12 Click the Okay button You should now see the following
How To Create OData Services Using the Screen Scraping Generator in SAP NetWeaver Gateway
July 2012 30
13 Click the SEND button
14 In the Response section at the bottom of the RESTClient copy the value returned for the x-csrf-
token shown here outlined in red (note these token values are generated by the gateway
server)
The token will be passed back in when testing the create and update functionality
15 Change the value for header attribute x-csrf-token to be the value you copied above to do this
just click on the header attribute in the RESTClient you should now see something to the
following
16 Test the UPDATE_ENTITY UPDATE operation
17 Add the content-type header to the Request Headers section Click the Headers dropdown and
select Custom Header
18 Enter the namevalue ndash content-typeapplicationatom+xmltype=entry
Tip Save this as a favorite so you can easily add it again when testing
How To Create OData Services Using the Screen Scraping Generator in SAP NetWeaver Gateway
July 2012 31
19 Click the Okay button to add the header request
20 Switch to the ldquoResponse Body (Raw)rdquo tab and copy the contents there (we will be updating the
data that was sent back when reading the entity)
21 Paste the Response Body you just copied into the Request Body section
22 Change the Method dropdown to PUT Your RESTClient should now look similar to the
following
23 To test the update functionality we need to change some of the values in the request body that
we are sending to the Gateway serverhellipchange the value of the distance attribute
24 Click the SEND button
25 If the update is successful you will get a status code of 204 as shown below
How To Create OData Services Using the Screen Scraping Generator in SAP NetWeaver Gateway
July 2012 32
26 You can switch the Method back to GET and click the send button again then check the
response body to see if the values you changed for the update are returned by the read
27 Congrats You have successfully created and tested a simple OData service created with the
Screen Scraping generator
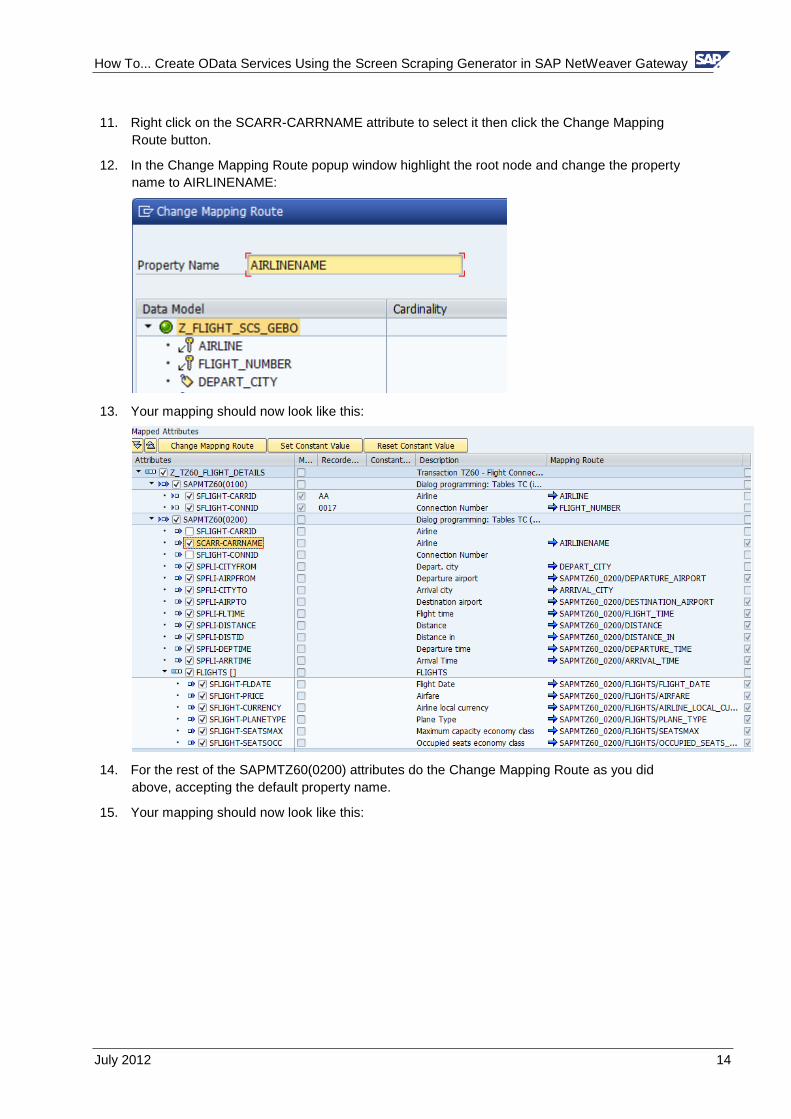
How To Create OData Services Using the Screen Scraping Generator in SAP NetWeaver Gateway
July 2012 15
16 Uncheck the FLIGHTS[] node We wonrsquot use it in this How To Guide to keep things simplehellipbut
you can make use of it as it is supported as output Your mapping should now look like this
17 Click the Enter button to complete the mapping
18 Your Gateway Object should now look like this
How To Create OData Services Using the Screen Scraping Generator in SAP NetWeaver Gateway
July 2012 16
47 Map the UPDATE Operation
1 In the Screen Scraping Repository highlight the recording you created earlier named
Z_TZ90_FLIGHT_UPDATE
2 Click the Create Mapping button
3 The default mapping looks like this
How To Create OData Services Using the Screen Scraping Generator in SAP NetWeaver Gateway
July 2012 17
4 We only need to make one change and that is to assign the SPFLI-CONNID to the correct data
model attribute FLIGHT_NUMBER Highlight SPFLI-CONNID as shown below by right clicking
on it
5 Click the Change Mapping Route button
6 In the Change Mapping Route popup window select FLIGHT_NUMBER
7 Click the Enter buttonhellipthe mapping should now look like the following
How To Create OData Services Using the Screen Scraping Generator in SAP NetWeaver Gateway
July 2012 18
8 Click the Enter button to complete your UPDATE operation mapping
9 Your data object model should now look like this
10 Click the Generate button at the upper left hand corner of the screen (this will generate code
that represents what you have configured)
How To Create OData Services Using the Screen Scraping Generator in SAP NetWeaver Gateway
July 2012 19
11 When the generation is complete the following popup window will be displayed notifying you
have what was generated
48 Simplify the Data Model Name
The name of your data model is currently Z_FLIGHT_SCS_ltYour Last Namegt This name will by
default be used when calling your service Letrsquos make it simpler name that describes the data ie ndash
ldquoFlightrdquo
1 Navigate for the Gateway Data Modeler back to the ABAP Workbench by clicking the Object
Navigator button
2 You should now be back in the ABAP Workbench (SE80) and should see your Gateway Data
Model
How To Create OData Services Using the Screen Scraping Generator in SAP NetWeaver Gateway
July 2012 20
3 Double click on the Data Model node (first node under the root node)
Double clicking on it will open up the editor for this node Notice the External Name input field
4 Go into change mode and change the External Name to be ldquoFlightrdquo
5 Save your changes Now your data model is known as ldquoFlightrdquo
How To Create OData Services Using the Screen Scraping Generator in SAP NetWeaver Gateway
July 2012 21
Note
If you go back in and change you data model (add a new operation or change some of the mapping) and then regenerate this configuration will be lost The name will revert to the old data model name
49 Create the Gateway Consumption Model
The Consumption Model is what exposes the Gateway Data Models to the network It does this by
creating a service in the Internet Communication Framework In this step you will create a
Consumption Model and then map your Data Model to it
1 Right click on the GW Data Modelrsquos Related GW Consumption Models node and in the context
menu select Add Consumpt Model
2 In the input field enter in the name of the consumption model you want created ndash zflightscsltyour
last namegt
3 Click the Enter button You will be asked if you want to create the consumption model click the
Yes button
4 Enter a description for your consumption model and click the Enter button
How To Create OData Services Using the Screen Scraping Generator in SAP NetWeaver Gateway
July 2012 22
5 You can see the Gateway service exposed in the ICF ndash transaction SICF ndash follow the ICF tree
path default_host gt sap gt opu gt odata gt sapthere you will see a list of all ICF services that
represent Gateway Consumption Models
410 Add an Alias to the Service
6 Go to the service maintenance transaction IWFNDMAINT_SERVICE
12 Click the search icon to search for your service in the list ndash the search icon is outlined in red
below
13 In the Find popup window enter in the Technical Service Name (ZFLIGHTSCSltYour Last
Namegt) for the search term
How To Create OData Services Using the Screen Scraping Generator in SAP NetWeaver Gateway
July 2012 23
14 Click the enter button your service should be located in the list
Hit the Cancel button on the Find dialog window to dismiss it
15 Click the Technical Service Name link (highlighted below in red on the top half of the screen)
this will cause the Alias assignment details be displayed at the bottom of the screen
6 Click the add System Alias button outlined in Red above in the bottom half of the screen You
should now see the screen to maintain service aliases
7 Click the New Entries button
8 Add your service document (the consumption model)hellipenter in the name of your consumption
model ndash zflightscsltyour last namegt and click the F4 help button
How To Create OData Services Using the Screen Scraping Generator in SAP NetWeaver Gateway
July 2012 24
9 Double click on your service document in the popup window
10 In the System Alias column enter the alias of the system you want your service to call ndash in this
case we are using the local alias
11 Save your changes then hit the back button You should now see that the LOCAL alias is
assigned to your service
12 Click the Call Browser button to launch a web browser that points to the service document of
your OData service
How To Create OData Services Using the Screen Scraping Generator in SAP NetWeaver Gateway
July 2012 25
Note
By default all gateway services are initial assigned basic
411 Test Your Gateway Object
Now for the fun part You get to test everything you have done up to this point Testing the QUERY
and READ operations is easyhellipyou just need a browser Testing the CREATE and UPDATE
operations (as well as the DELETE if we had implemented that) requires the use of a simple HTTP
tool the one we use here is the RESTClient plugin in for FireFox
1 In the browser that you launched in the last step replace the end of the URL ldquo$format=xmlrdquo
with ldquo$metadatardquo ndash this will bring up the metadata of your service
Example URL httpservicehttp_portsapopuodatasapZFLIGHTSCSGEBO$metadata
How To Create OData Services Using the Screen Scraping Generator in SAP NetWeaver Gateway
July 2012 26
2 In the URL replace ldquo$metadatardquo with ldquoFlightCollectionrdquo ndash this will execute the QUERY operation
You should now see a list of flights
3 To make it easier to test and debug add the query string parameter sap-ds-debug=true to the
URL ndash this will format the content as html allow us to follow links to the READ operation
Example URL
httpserverhttp_portsapopuodatasapZFLIGHTSCSGEBOFlightCollectionsap-ds-
debug=true
How To Create OData Services Using the Screen Scraping Generator in SAP NetWeaver Gateway
July 2012 27
Note
You will see an SAP icon in the bottom right hand corner Click it to see more details about the service call
4 To execute the READ operation for a specific flight just click the link
FlightCollection(airline=hellipflight_number=hellip)
5 Clicking this link will bring back the flight details from the READ operation
How To Create OData Services Using the Screen Scraping Generator in SAP NetWeaver Gateway
July 2012 28
6 Now let test the update functionality
7 To test the update (and create) functionality we will need a CSRF token (needed to prevent
Cross Site Request Forgery attacks)hellipto do this we need to request this token during a read by
passing in an http header value requesting the token To pass in a header value we need to use
the RESTClienthelliphere using the FireFox RESTClient (this is a free plugin for FireFox)
How To Create OData Services Using the Screen Scraping Generator in SAP NetWeaver Gateway
July 2012 29
8 Copy the URL used in the test in step 5 above (the URL that executed a READ) and paste it into
the URL input field
9 Remove the query string attribute ldquosap-ds-debug=truerdquo from the URL
10 Click the Headers menu item and select Custom Header
11 Enter the name value as shown below
Tip Check the ldquoSave to favoriterdquo check box so you can easily add this header for faster testing the next time
12 Click the Okay button You should now see the following
How To Create OData Services Using the Screen Scraping Generator in SAP NetWeaver Gateway
July 2012 30
13 Click the SEND button
14 In the Response section at the bottom of the RESTClient copy the value returned for the x-csrf-
token shown here outlined in red (note these token values are generated by the gateway
server)
The token will be passed back in when testing the create and update functionality
15 Change the value for header attribute x-csrf-token to be the value you copied above to do this
just click on the header attribute in the RESTClient you should now see something to the
following
16 Test the UPDATE_ENTITY UPDATE operation
17 Add the content-type header to the Request Headers section Click the Headers dropdown and
select Custom Header
18 Enter the namevalue ndash content-typeapplicationatom+xmltype=entry
Tip Save this as a favorite so you can easily add it again when testing
How To Create OData Services Using the Screen Scraping Generator in SAP NetWeaver Gateway
July 2012 31
19 Click the Okay button to add the header request
20 Switch to the ldquoResponse Body (Raw)rdquo tab and copy the contents there (we will be updating the
data that was sent back when reading the entity)
21 Paste the Response Body you just copied into the Request Body section
22 Change the Method dropdown to PUT Your RESTClient should now look similar to the
following
23 To test the update functionality we need to change some of the values in the request body that
we are sending to the Gateway serverhellipchange the value of the distance attribute
24 Click the SEND button
25 If the update is successful you will get a status code of 204 as shown below
How To Create OData Services Using the Screen Scraping Generator in SAP NetWeaver Gateway
July 2012 32
26 You can switch the Method back to GET and click the send button again then check the
response body to see if the values you changed for the update are returned by the read
27 Congrats You have successfully created and tested a simple OData service created with the
Screen Scraping generator
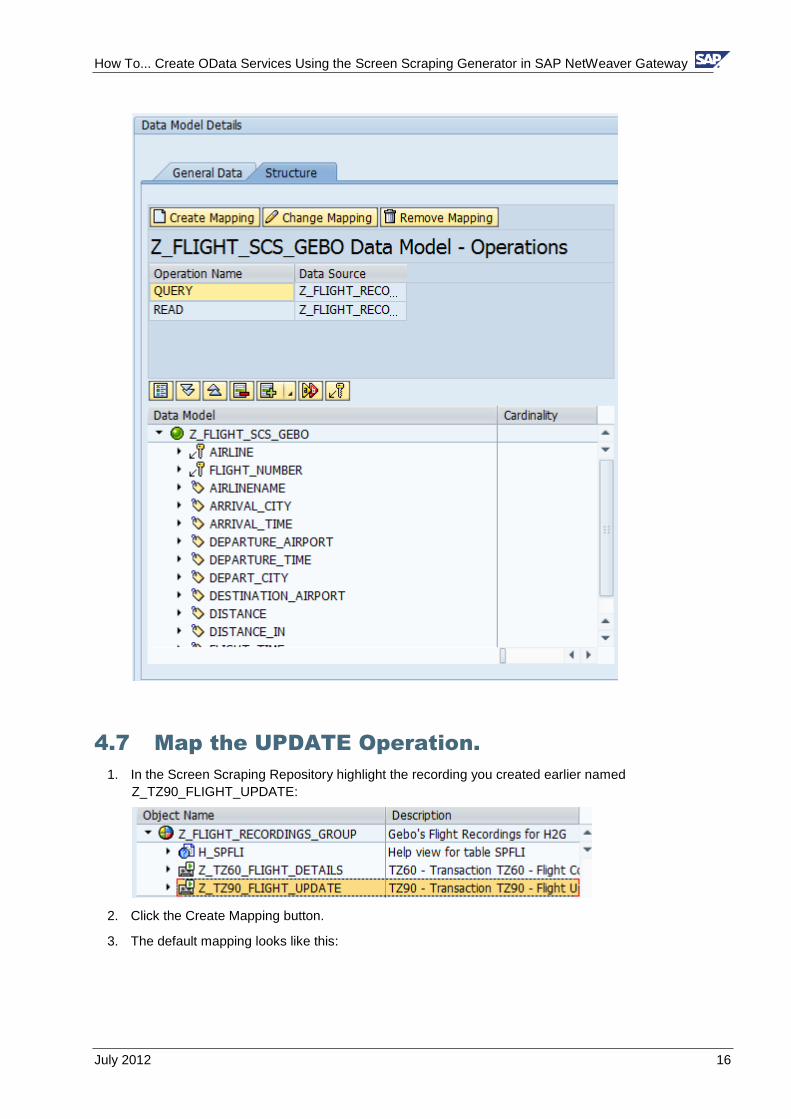
How To Create OData Services Using the Screen Scraping Generator in SAP NetWeaver Gateway
July 2012 16
47 Map the UPDATE Operation
1 In the Screen Scraping Repository highlight the recording you created earlier named
Z_TZ90_FLIGHT_UPDATE
2 Click the Create Mapping button
3 The default mapping looks like this
How To Create OData Services Using the Screen Scraping Generator in SAP NetWeaver Gateway
July 2012 17
4 We only need to make one change and that is to assign the SPFLI-CONNID to the correct data
model attribute FLIGHT_NUMBER Highlight SPFLI-CONNID as shown below by right clicking
on it
5 Click the Change Mapping Route button
6 In the Change Mapping Route popup window select FLIGHT_NUMBER
7 Click the Enter buttonhellipthe mapping should now look like the following
How To Create OData Services Using the Screen Scraping Generator in SAP NetWeaver Gateway
July 2012 18
8 Click the Enter button to complete your UPDATE operation mapping
9 Your data object model should now look like this
10 Click the Generate button at the upper left hand corner of the screen (this will generate code
that represents what you have configured)
How To Create OData Services Using the Screen Scraping Generator in SAP NetWeaver Gateway
July 2012 19
11 When the generation is complete the following popup window will be displayed notifying you
have what was generated
48 Simplify the Data Model Name
The name of your data model is currently Z_FLIGHT_SCS_ltYour Last Namegt This name will by
default be used when calling your service Letrsquos make it simpler name that describes the data ie ndash
ldquoFlightrdquo
1 Navigate for the Gateway Data Modeler back to the ABAP Workbench by clicking the Object
Navigator button
2 You should now be back in the ABAP Workbench (SE80) and should see your Gateway Data
Model
How To Create OData Services Using the Screen Scraping Generator in SAP NetWeaver Gateway
July 2012 20
3 Double click on the Data Model node (first node under the root node)
Double clicking on it will open up the editor for this node Notice the External Name input field
4 Go into change mode and change the External Name to be ldquoFlightrdquo
5 Save your changes Now your data model is known as ldquoFlightrdquo
How To Create OData Services Using the Screen Scraping Generator in SAP NetWeaver Gateway
July 2012 21
Note
If you go back in and change you data model (add a new operation or change some of the mapping) and then regenerate this configuration will be lost The name will revert to the old data model name
49 Create the Gateway Consumption Model
The Consumption Model is what exposes the Gateway Data Models to the network It does this by
creating a service in the Internet Communication Framework In this step you will create a
Consumption Model and then map your Data Model to it
1 Right click on the GW Data Modelrsquos Related GW Consumption Models node and in the context
menu select Add Consumpt Model
2 In the input field enter in the name of the consumption model you want created ndash zflightscsltyour
last namegt
3 Click the Enter button You will be asked if you want to create the consumption model click the
Yes button
4 Enter a description for your consumption model and click the Enter button
How To Create OData Services Using the Screen Scraping Generator in SAP NetWeaver Gateway
July 2012 22
5 You can see the Gateway service exposed in the ICF ndash transaction SICF ndash follow the ICF tree
path default_host gt sap gt opu gt odata gt sapthere you will see a list of all ICF services that
represent Gateway Consumption Models
410 Add an Alias to the Service
6 Go to the service maintenance transaction IWFNDMAINT_SERVICE
12 Click the search icon to search for your service in the list ndash the search icon is outlined in red
below
13 In the Find popup window enter in the Technical Service Name (ZFLIGHTSCSltYour Last
Namegt) for the search term
How To Create OData Services Using the Screen Scraping Generator in SAP NetWeaver Gateway
July 2012 23
14 Click the enter button your service should be located in the list
Hit the Cancel button on the Find dialog window to dismiss it
15 Click the Technical Service Name link (highlighted below in red on the top half of the screen)
this will cause the Alias assignment details be displayed at the bottom of the screen
6 Click the add System Alias button outlined in Red above in the bottom half of the screen You
should now see the screen to maintain service aliases
7 Click the New Entries button
8 Add your service document (the consumption model)hellipenter in the name of your consumption
model ndash zflightscsltyour last namegt and click the F4 help button
How To Create OData Services Using the Screen Scraping Generator in SAP NetWeaver Gateway
July 2012 24
9 Double click on your service document in the popup window
10 In the System Alias column enter the alias of the system you want your service to call ndash in this
case we are using the local alias
11 Save your changes then hit the back button You should now see that the LOCAL alias is
assigned to your service
12 Click the Call Browser button to launch a web browser that points to the service document of
your OData service
How To Create OData Services Using the Screen Scraping Generator in SAP NetWeaver Gateway
July 2012 25
Note
By default all gateway services are initial assigned basic
411 Test Your Gateway Object
Now for the fun part You get to test everything you have done up to this point Testing the QUERY
and READ operations is easyhellipyou just need a browser Testing the CREATE and UPDATE
operations (as well as the DELETE if we had implemented that) requires the use of a simple HTTP
tool the one we use here is the RESTClient plugin in for FireFox
1 In the browser that you launched in the last step replace the end of the URL ldquo$format=xmlrdquo
with ldquo$metadatardquo ndash this will bring up the metadata of your service
Example URL httpservicehttp_portsapopuodatasapZFLIGHTSCSGEBO$metadata
How To Create OData Services Using the Screen Scraping Generator in SAP NetWeaver Gateway
July 2012 26
2 In the URL replace ldquo$metadatardquo with ldquoFlightCollectionrdquo ndash this will execute the QUERY operation
You should now see a list of flights
3 To make it easier to test and debug add the query string parameter sap-ds-debug=true to the
URL ndash this will format the content as html allow us to follow links to the READ operation
Example URL
httpserverhttp_portsapopuodatasapZFLIGHTSCSGEBOFlightCollectionsap-ds-
debug=true
How To Create OData Services Using the Screen Scraping Generator in SAP NetWeaver Gateway
July 2012 27
Note
You will see an SAP icon in the bottom right hand corner Click it to see more details about the service call
4 To execute the READ operation for a specific flight just click the link
FlightCollection(airline=hellipflight_number=hellip)
5 Clicking this link will bring back the flight details from the READ operation
How To Create OData Services Using the Screen Scraping Generator in SAP NetWeaver Gateway
July 2012 28
6 Now let test the update functionality
7 To test the update (and create) functionality we will need a CSRF token (needed to prevent
Cross Site Request Forgery attacks)hellipto do this we need to request this token during a read by
passing in an http header value requesting the token To pass in a header value we need to use
the RESTClienthelliphere using the FireFox RESTClient (this is a free plugin for FireFox)
How To Create OData Services Using the Screen Scraping Generator in SAP NetWeaver Gateway
July 2012 29
8 Copy the URL used in the test in step 5 above (the URL that executed a READ) and paste it into
the URL input field
9 Remove the query string attribute ldquosap-ds-debug=truerdquo from the URL
10 Click the Headers menu item and select Custom Header
11 Enter the name value as shown below
Tip Check the ldquoSave to favoriterdquo check box so you can easily add this header for faster testing the next time
12 Click the Okay button You should now see the following
How To Create OData Services Using the Screen Scraping Generator in SAP NetWeaver Gateway
July 2012 30
13 Click the SEND button
14 In the Response section at the bottom of the RESTClient copy the value returned for the x-csrf-
token shown here outlined in red (note these token values are generated by the gateway
server)
The token will be passed back in when testing the create and update functionality
15 Change the value for header attribute x-csrf-token to be the value you copied above to do this
just click on the header attribute in the RESTClient you should now see something to the
following
16 Test the UPDATE_ENTITY UPDATE operation
17 Add the content-type header to the Request Headers section Click the Headers dropdown and
select Custom Header
18 Enter the namevalue ndash content-typeapplicationatom+xmltype=entry
Tip Save this as a favorite so you can easily add it again when testing
How To Create OData Services Using the Screen Scraping Generator in SAP NetWeaver Gateway
July 2012 31
19 Click the Okay button to add the header request
20 Switch to the ldquoResponse Body (Raw)rdquo tab and copy the contents there (we will be updating the
data that was sent back when reading the entity)
21 Paste the Response Body you just copied into the Request Body section
22 Change the Method dropdown to PUT Your RESTClient should now look similar to the
following
23 To test the update functionality we need to change some of the values in the request body that
we are sending to the Gateway serverhellipchange the value of the distance attribute
24 Click the SEND button
25 If the update is successful you will get a status code of 204 as shown below
How To Create OData Services Using the Screen Scraping Generator in SAP NetWeaver Gateway
July 2012 32
26 You can switch the Method back to GET and click the send button again then check the
response body to see if the values you changed for the update are returned by the read
27 Congrats You have successfully created and tested a simple OData service created with the
Screen Scraping generator
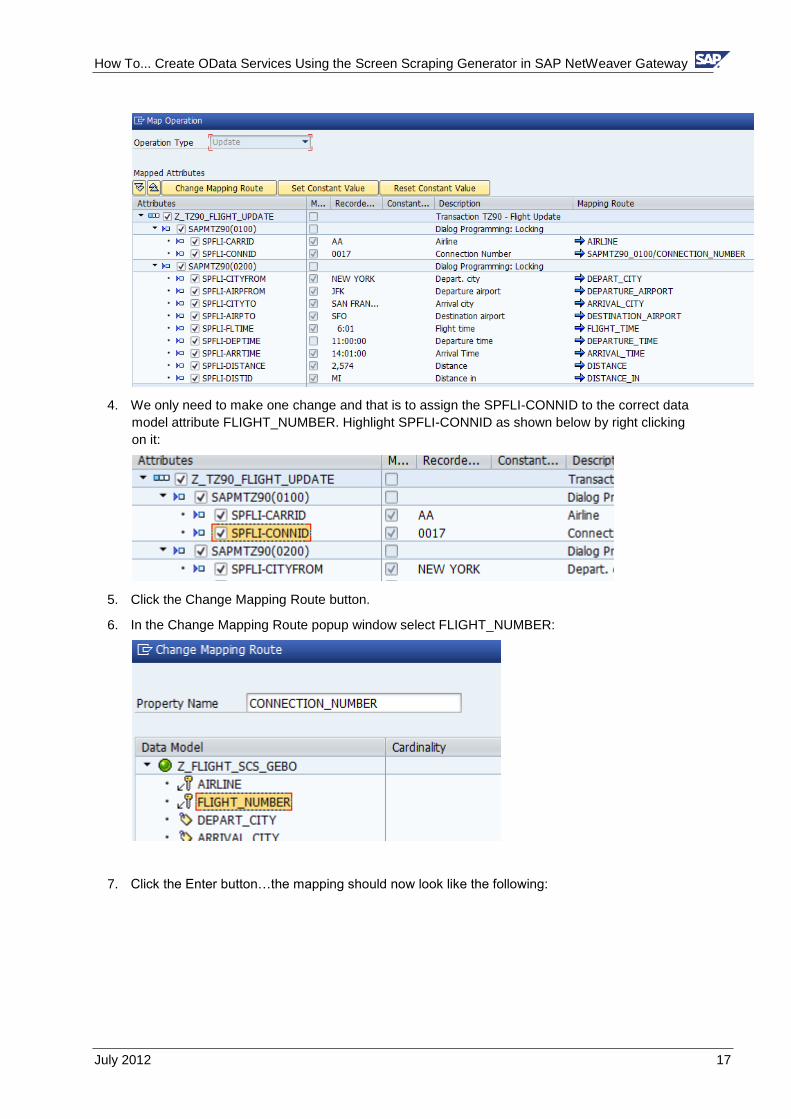
How To Create OData Services Using the Screen Scraping Generator in SAP NetWeaver Gateway
July 2012 17
4 We only need to make one change and that is to assign the SPFLI-CONNID to the correct data
model attribute FLIGHT_NUMBER Highlight SPFLI-CONNID as shown below by right clicking
on it
5 Click the Change Mapping Route button
6 In the Change Mapping Route popup window select FLIGHT_NUMBER
7 Click the Enter buttonhellipthe mapping should now look like the following
How To Create OData Services Using the Screen Scraping Generator in SAP NetWeaver Gateway
July 2012 18
8 Click the Enter button to complete your UPDATE operation mapping
9 Your data object model should now look like this
10 Click the Generate button at the upper left hand corner of the screen (this will generate code
that represents what you have configured)
How To Create OData Services Using the Screen Scraping Generator in SAP NetWeaver Gateway
July 2012 19
11 When the generation is complete the following popup window will be displayed notifying you
have what was generated
48 Simplify the Data Model Name
The name of your data model is currently Z_FLIGHT_SCS_ltYour Last Namegt This name will by
default be used when calling your service Letrsquos make it simpler name that describes the data ie ndash
ldquoFlightrdquo
1 Navigate for the Gateway Data Modeler back to the ABAP Workbench by clicking the Object
Navigator button
2 You should now be back in the ABAP Workbench (SE80) and should see your Gateway Data
Model
How To Create OData Services Using the Screen Scraping Generator in SAP NetWeaver Gateway
July 2012 20
3 Double click on the Data Model node (first node under the root node)
Double clicking on it will open up the editor for this node Notice the External Name input field
4 Go into change mode and change the External Name to be ldquoFlightrdquo
5 Save your changes Now your data model is known as ldquoFlightrdquo
How To Create OData Services Using the Screen Scraping Generator in SAP NetWeaver Gateway
July 2012 21
Note
If you go back in and change you data model (add a new operation or change some of the mapping) and then regenerate this configuration will be lost The name will revert to the old data model name
49 Create the Gateway Consumption Model
The Consumption Model is what exposes the Gateway Data Models to the network It does this by
creating a service in the Internet Communication Framework In this step you will create a
Consumption Model and then map your Data Model to it
1 Right click on the GW Data Modelrsquos Related GW Consumption Models node and in the context
menu select Add Consumpt Model
2 In the input field enter in the name of the consumption model you want created ndash zflightscsltyour
last namegt
3 Click the Enter button You will be asked if you want to create the consumption model click the
Yes button
4 Enter a description for your consumption model and click the Enter button
How To Create OData Services Using the Screen Scraping Generator in SAP NetWeaver Gateway
July 2012 22
5 You can see the Gateway service exposed in the ICF ndash transaction SICF ndash follow the ICF tree
path default_host gt sap gt opu gt odata gt sapthere you will see a list of all ICF services that
represent Gateway Consumption Models
410 Add an Alias to the Service
6 Go to the service maintenance transaction IWFNDMAINT_SERVICE
12 Click the search icon to search for your service in the list ndash the search icon is outlined in red
below
13 In the Find popup window enter in the Technical Service Name (ZFLIGHTSCSltYour Last
Namegt) for the search term
How To Create OData Services Using the Screen Scraping Generator in SAP NetWeaver Gateway
July 2012 23
14 Click the enter button your service should be located in the list
Hit the Cancel button on the Find dialog window to dismiss it
15 Click the Technical Service Name link (highlighted below in red on the top half of the screen)
this will cause the Alias assignment details be displayed at the bottom of the screen
6 Click the add System Alias button outlined in Red above in the bottom half of the screen You
should now see the screen to maintain service aliases
7 Click the New Entries button
8 Add your service document (the consumption model)hellipenter in the name of your consumption
model ndash zflightscsltyour last namegt and click the F4 help button
How To Create OData Services Using the Screen Scraping Generator in SAP NetWeaver Gateway
July 2012 24
9 Double click on your service document in the popup window
10 In the System Alias column enter the alias of the system you want your service to call ndash in this
case we are using the local alias
11 Save your changes then hit the back button You should now see that the LOCAL alias is
assigned to your service
12 Click the Call Browser button to launch a web browser that points to the service document of
your OData service
How To Create OData Services Using the Screen Scraping Generator in SAP NetWeaver Gateway
July 2012 25
Note
By default all gateway services are initial assigned basic
411 Test Your Gateway Object
Now for the fun part You get to test everything you have done up to this point Testing the QUERY
and READ operations is easyhellipyou just need a browser Testing the CREATE and UPDATE
operations (as well as the DELETE if we had implemented that) requires the use of a simple HTTP
tool the one we use here is the RESTClient plugin in for FireFox
1 In the browser that you launched in the last step replace the end of the URL ldquo$format=xmlrdquo
with ldquo$metadatardquo ndash this will bring up the metadata of your service
Example URL httpservicehttp_portsapopuodatasapZFLIGHTSCSGEBO$metadata
How To Create OData Services Using the Screen Scraping Generator in SAP NetWeaver Gateway
July 2012 26
2 In the URL replace ldquo$metadatardquo with ldquoFlightCollectionrdquo ndash this will execute the QUERY operation
You should now see a list of flights
3 To make it easier to test and debug add the query string parameter sap-ds-debug=true to the
URL ndash this will format the content as html allow us to follow links to the READ operation
Example URL
httpserverhttp_portsapopuodatasapZFLIGHTSCSGEBOFlightCollectionsap-ds-
debug=true
How To Create OData Services Using the Screen Scraping Generator in SAP NetWeaver Gateway
July 2012 27
Note
You will see an SAP icon in the bottom right hand corner Click it to see more details about the service call
4 To execute the READ operation for a specific flight just click the link
FlightCollection(airline=hellipflight_number=hellip)
5 Clicking this link will bring back the flight details from the READ operation
How To Create OData Services Using the Screen Scraping Generator in SAP NetWeaver Gateway
July 2012 28
6 Now let test the update functionality
7 To test the update (and create) functionality we will need a CSRF token (needed to prevent
Cross Site Request Forgery attacks)hellipto do this we need to request this token during a read by
passing in an http header value requesting the token To pass in a header value we need to use
the RESTClienthelliphere using the FireFox RESTClient (this is a free plugin for FireFox)
How To Create OData Services Using the Screen Scraping Generator in SAP NetWeaver Gateway
July 2012 29
8 Copy the URL used in the test in step 5 above (the URL that executed a READ) and paste it into
the URL input field
9 Remove the query string attribute ldquosap-ds-debug=truerdquo from the URL
10 Click the Headers menu item and select Custom Header
11 Enter the name value as shown below
Tip Check the ldquoSave to favoriterdquo check box so you can easily add this header for faster testing the next time
12 Click the Okay button You should now see the following
How To Create OData Services Using the Screen Scraping Generator in SAP NetWeaver Gateway
July 2012 30
13 Click the SEND button
14 In the Response section at the bottom of the RESTClient copy the value returned for the x-csrf-
token shown here outlined in red (note these token values are generated by the gateway
server)
The token will be passed back in when testing the create and update functionality
15 Change the value for header attribute x-csrf-token to be the value you copied above to do this
just click on the header attribute in the RESTClient you should now see something to the
following
16 Test the UPDATE_ENTITY UPDATE operation
17 Add the content-type header to the Request Headers section Click the Headers dropdown and
select Custom Header
18 Enter the namevalue ndash content-typeapplicationatom+xmltype=entry
Tip Save this as a favorite so you can easily add it again when testing
How To Create OData Services Using the Screen Scraping Generator in SAP NetWeaver Gateway
July 2012 31
19 Click the Okay button to add the header request
20 Switch to the ldquoResponse Body (Raw)rdquo tab and copy the contents there (we will be updating the
data that was sent back when reading the entity)
21 Paste the Response Body you just copied into the Request Body section
22 Change the Method dropdown to PUT Your RESTClient should now look similar to the
following
23 To test the update functionality we need to change some of the values in the request body that
we are sending to the Gateway serverhellipchange the value of the distance attribute
24 Click the SEND button
25 If the update is successful you will get a status code of 204 as shown below
How To Create OData Services Using the Screen Scraping Generator in SAP NetWeaver Gateway
July 2012 32
26 You can switch the Method back to GET and click the send button again then check the
response body to see if the values you changed for the update are returned by the read
27 Congrats You have successfully created and tested a simple OData service created with the
Screen Scraping generator
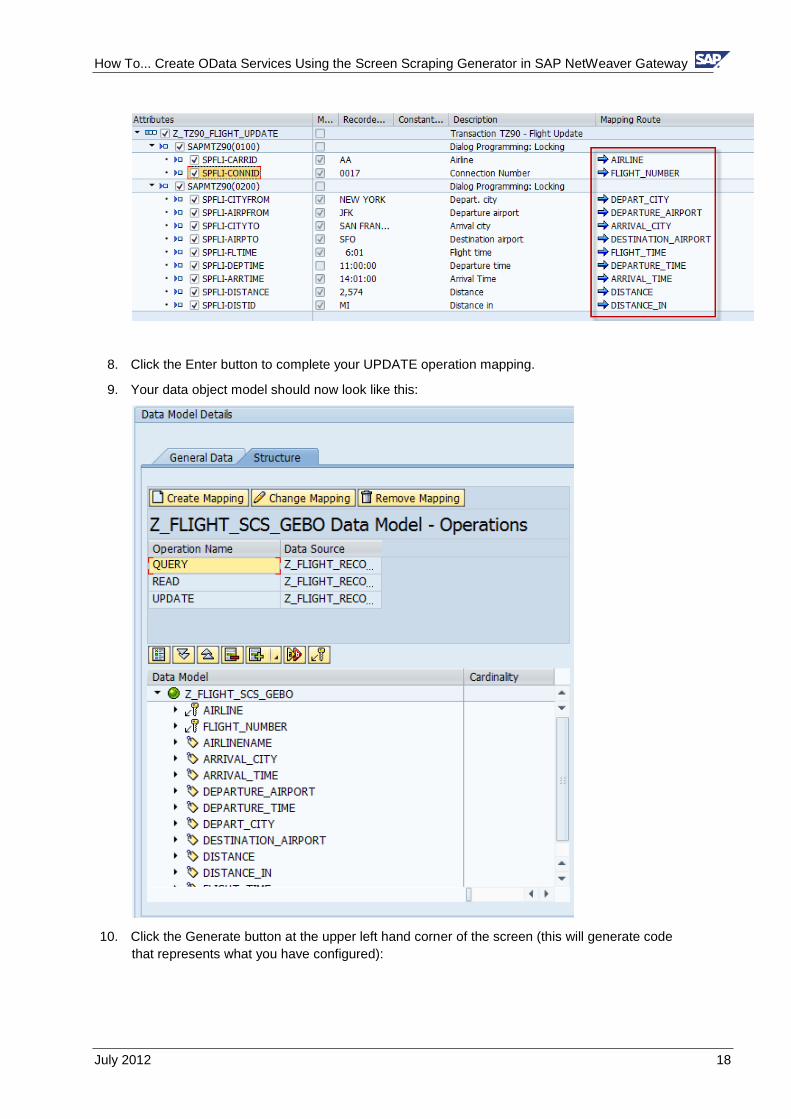
How To Create OData Services Using the Screen Scraping Generator in SAP NetWeaver Gateway
July 2012 18
8 Click the Enter button to complete your UPDATE operation mapping
9 Your data object model should now look like this
10 Click the Generate button at the upper left hand corner of the screen (this will generate code
that represents what you have configured)
How To Create OData Services Using the Screen Scraping Generator in SAP NetWeaver Gateway
July 2012 19
11 When the generation is complete the following popup window will be displayed notifying you
have what was generated
48 Simplify the Data Model Name
The name of your data model is currently Z_FLIGHT_SCS_ltYour Last Namegt This name will by
default be used when calling your service Letrsquos make it simpler name that describes the data ie ndash
ldquoFlightrdquo
1 Navigate for the Gateway Data Modeler back to the ABAP Workbench by clicking the Object
Navigator button
2 You should now be back in the ABAP Workbench (SE80) and should see your Gateway Data
Model
How To Create OData Services Using the Screen Scraping Generator in SAP NetWeaver Gateway
July 2012 20
3 Double click on the Data Model node (first node under the root node)
Double clicking on it will open up the editor for this node Notice the External Name input field
4 Go into change mode and change the External Name to be ldquoFlightrdquo
5 Save your changes Now your data model is known as ldquoFlightrdquo
How To Create OData Services Using the Screen Scraping Generator in SAP NetWeaver Gateway
July 2012 21
Note
If you go back in and change you data model (add a new operation or change some of the mapping) and then regenerate this configuration will be lost The name will revert to the old data model name
49 Create the Gateway Consumption Model
The Consumption Model is what exposes the Gateway Data Models to the network It does this by
creating a service in the Internet Communication Framework In this step you will create a
Consumption Model and then map your Data Model to it
1 Right click on the GW Data Modelrsquos Related GW Consumption Models node and in the context
menu select Add Consumpt Model
2 In the input field enter in the name of the consumption model you want created ndash zflightscsltyour
last namegt
3 Click the Enter button You will be asked if you want to create the consumption model click the
Yes button
4 Enter a description for your consumption model and click the Enter button
How To Create OData Services Using the Screen Scraping Generator in SAP NetWeaver Gateway
July 2012 22
5 You can see the Gateway service exposed in the ICF ndash transaction SICF ndash follow the ICF tree
path default_host gt sap gt opu gt odata gt sapthere you will see a list of all ICF services that
represent Gateway Consumption Models
410 Add an Alias to the Service
6 Go to the service maintenance transaction IWFNDMAINT_SERVICE
12 Click the search icon to search for your service in the list ndash the search icon is outlined in red
below
13 In the Find popup window enter in the Technical Service Name (ZFLIGHTSCSltYour Last
Namegt) for the search term
How To Create OData Services Using the Screen Scraping Generator in SAP NetWeaver Gateway
July 2012 23
14 Click the enter button your service should be located in the list
Hit the Cancel button on the Find dialog window to dismiss it
15 Click the Technical Service Name link (highlighted below in red on the top half of the screen)
this will cause the Alias assignment details be displayed at the bottom of the screen
6 Click the add System Alias button outlined in Red above in the bottom half of the screen You
should now see the screen to maintain service aliases
7 Click the New Entries button
8 Add your service document (the consumption model)hellipenter in the name of your consumption
model ndash zflightscsltyour last namegt and click the F4 help button
How To Create OData Services Using the Screen Scraping Generator in SAP NetWeaver Gateway
July 2012 24
9 Double click on your service document in the popup window
10 In the System Alias column enter the alias of the system you want your service to call ndash in this
case we are using the local alias
11 Save your changes then hit the back button You should now see that the LOCAL alias is
assigned to your service
12 Click the Call Browser button to launch a web browser that points to the service document of
your OData service
How To Create OData Services Using the Screen Scraping Generator in SAP NetWeaver Gateway
July 2012 25
Note
By default all gateway services are initial assigned basic
411 Test Your Gateway Object
Now for the fun part You get to test everything you have done up to this point Testing the QUERY
and READ operations is easyhellipyou just need a browser Testing the CREATE and UPDATE
operations (as well as the DELETE if we had implemented that) requires the use of a simple HTTP
tool the one we use here is the RESTClient plugin in for FireFox
1 In the browser that you launched in the last step replace the end of the URL ldquo$format=xmlrdquo
with ldquo$metadatardquo ndash this will bring up the metadata of your service
Example URL httpservicehttp_portsapopuodatasapZFLIGHTSCSGEBO$metadata
How To Create OData Services Using the Screen Scraping Generator in SAP NetWeaver Gateway
July 2012 26
2 In the URL replace ldquo$metadatardquo with ldquoFlightCollectionrdquo ndash this will execute the QUERY operation
You should now see a list of flights
3 To make it easier to test and debug add the query string parameter sap-ds-debug=true to the
URL ndash this will format the content as html allow us to follow links to the READ operation
Example URL
httpserverhttp_portsapopuodatasapZFLIGHTSCSGEBOFlightCollectionsap-ds-
debug=true
How To Create OData Services Using the Screen Scraping Generator in SAP NetWeaver Gateway
July 2012 27
Note
You will see an SAP icon in the bottom right hand corner Click it to see more details about the service call
4 To execute the READ operation for a specific flight just click the link
FlightCollection(airline=hellipflight_number=hellip)
5 Clicking this link will bring back the flight details from the READ operation
How To Create OData Services Using the Screen Scraping Generator in SAP NetWeaver Gateway
July 2012 28
6 Now let test the update functionality
7 To test the update (and create) functionality we will need a CSRF token (needed to prevent
Cross Site Request Forgery attacks)hellipto do this we need to request this token during a read by
passing in an http header value requesting the token To pass in a header value we need to use
the RESTClienthelliphere using the FireFox RESTClient (this is a free plugin for FireFox)
How To Create OData Services Using the Screen Scraping Generator in SAP NetWeaver Gateway
July 2012 29
8 Copy the URL used in the test in step 5 above (the URL that executed a READ) and paste it into
the URL input field
9 Remove the query string attribute ldquosap-ds-debug=truerdquo from the URL
10 Click the Headers menu item and select Custom Header
11 Enter the name value as shown below
Tip Check the ldquoSave to favoriterdquo check box so you can easily add this header for faster testing the next time
12 Click the Okay button You should now see the following
How To Create OData Services Using the Screen Scraping Generator in SAP NetWeaver Gateway
July 2012 30
13 Click the SEND button
14 In the Response section at the bottom of the RESTClient copy the value returned for the x-csrf-
token shown here outlined in red (note these token values are generated by the gateway
server)
The token will be passed back in when testing the create and update functionality
15 Change the value for header attribute x-csrf-token to be the value you copied above to do this
just click on the header attribute in the RESTClient you should now see something to the
following
16 Test the UPDATE_ENTITY UPDATE operation
17 Add the content-type header to the Request Headers section Click the Headers dropdown and
select Custom Header
18 Enter the namevalue ndash content-typeapplicationatom+xmltype=entry
Tip Save this as a favorite so you can easily add it again when testing
How To Create OData Services Using the Screen Scraping Generator in SAP NetWeaver Gateway
July 2012 31
19 Click the Okay button to add the header request
20 Switch to the ldquoResponse Body (Raw)rdquo tab and copy the contents there (we will be updating the
data that was sent back when reading the entity)
21 Paste the Response Body you just copied into the Request Body section
22 Change the Method dropdown to PUT Your RESTClient should now look similar to the
following
23 To test the update functionality we need to change some of the values in the request body that
we are sending to the Gateway serverhellipchange the value of the distance attribute
24 Click the SEND button
25 If the update is successful you will get a status code of 204 as shown below
How To Create OData Services Using the Screen Scraping Generator in SAP NetWeaver Gateway
July 2012 32
26 You can switch the Method back to GET and click the send button again then check the
response body to see if the values you changed for the update are returned by the read
27 Congrats You have successfully created and tested a simple OData service created with the
Screen Scraping generator
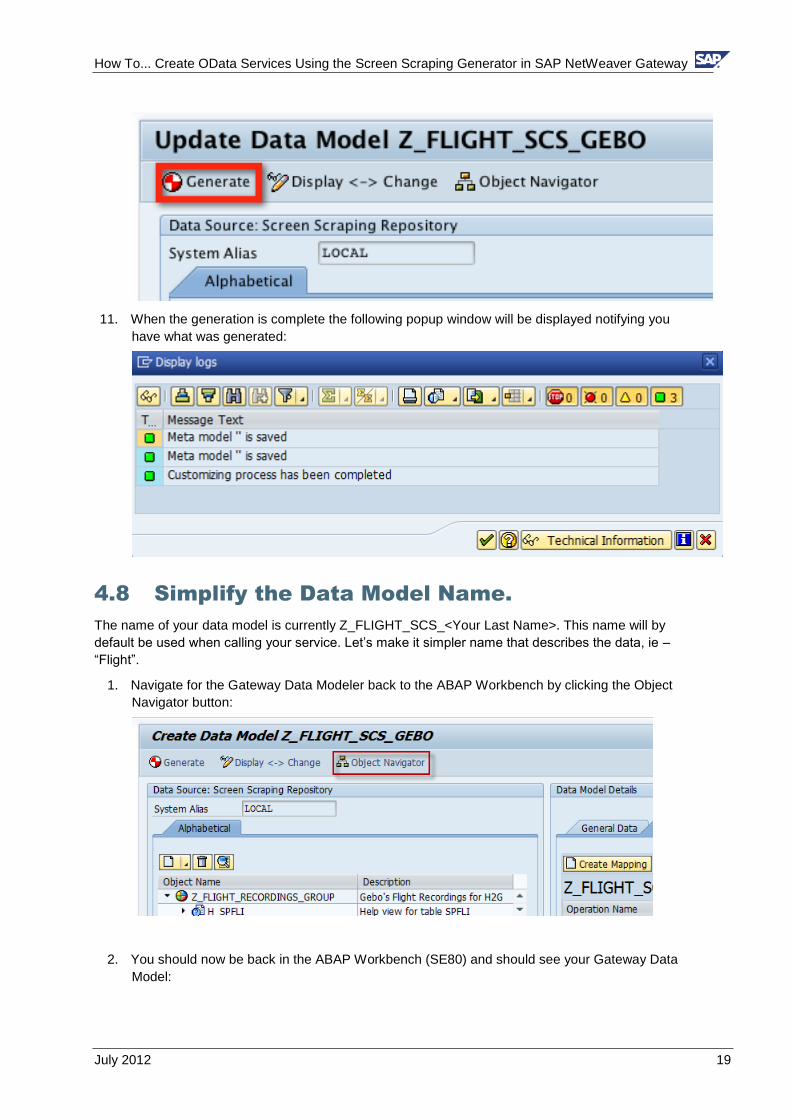
How To Create OData Services Using the Screen Scraping Generator in SAP NetWeaver Gateway
July 2012 19
11 When the generation is complete the following popup window will be displayed notifying you
have what was generated
48 Simplify the Data Model Name
The name of your data model is currently Z_FLIGHT_SCS_ltYour Last Namegt This name will by
default be used when calling your service Letrsquos make it simpler name that describes the data ie ndash
ldquoFlightrdquo
1 Navigate for the Gateway Data Modeler back to the ABAP Workbench by clicking the Object
Navigator button
2 You should now be back in the ABAP Workbench (SE80) and should see your Gateway Data
Model
How To Create OData Services Using the Screen Scraping Generator in SAP NetWeaver Gateway
July 2012 20
3 Double click on the Data Model node (first node under the root node)
Double clicking on it will open up the editor for this node Notice the External Name input field
4 Go into change mode and change the External Name to be ldquoFlightrdquo
5 Save your changes Now your data model is known as ldquoFlightrdquo
How To Create OData Services Using the Screen Scraping Generator in SAP NetWeaver Gateway
July 2012 21
Note
If you go back in and change you data model (add a new operation or change some of the mapping) and then regenerate this configuration will be lost The name will revert to the old data model name
49 Create the Gateway Consumption Model
The Consumption Model is what exposes the Gateway Data Models to the network It does this by
creating a service in the Internet Communication Framework In this step you will create a
Consumption Model and then map your Data Model to it
1 Right click on the GW Data Modelrsquos Related GW Consumption Models node and in the context
menu select Add Consumpt Model
2 In the input field enter in the name of the consumption model you want created ndash zflightscsltyour
last namegt
3 Click the Enter button You will be asked if you want to create the consumption model click the
Yes button
4 Enter a description for your consumption model and click the Enter button
How To Create OData Services Using the Screen Scraping Generator in SAP NetWeaver Gateway
July 2012 22
5 You can see the Gateway service exposed in the ICF ndash transaction SICF ndash follow the ICF tree
path default_host gt sap gt opu gt odata gt sapthere you will see a list of all ICF services that
represent Gateway Consumption Models
410 Add an Alias to the Service
6 Go to the service maintenance transaction IWFNDMAINT_SERVICE
12 Click the search icon to search for your service in the list ndash the search icon is outlined in red
below
13 In the Find popup window enter in the Technical Service Name (ZFLIGHTSCSltYour Last
Namegt) for the search term
How To Create OData Services Using the Screen Scraping Generator in SAP NetWeaver Gateway
July 2012 23
14 Click the enter button your service should be located in the list
Hit the Cancel button on the Find dialog window to dismiss it
15 Click the Technical Service Name link (highlighted below in red on the top half of the screen)
this will cause the Alias assignment details be displayed at the bottom of the screen
6 Click the add System Alias button outlined in Red above in the bottom half of the screen You
should now see the screen to maintain service aliases
7 Click the New Entries button
8 Add your service document (the consumption model)hellipenter in the name of your consumption
model ndash zflightscsltyour last namegt and click the F4 help button
How To Create OData Services Using the Screen Scraping Generator in SAP NetWeaver Gateway
July 2012 24
9 Double click on your service document in the popup window
10 In the System Alias column enter the alias of the system you want your service to call ndash in this
case we are using the local alias
11 Save your changes then hit the back button You should now see that the LOCAL alias is
assigned to your service
12 Click the Call Browser button to launch a web browser that points to the service document of
your OData service
How To Create OData Services Using the Screen Scraping Generator in SAP NetWeaver Gateway
July 2012 25
Note
By default all gateway services are initial assigned basic
411 Test Your Gateway Object
Now for the fun part You get to test everything you have done up to this point Testing the QUERY
and READ operations is easyhellipyou just need a browser Testing the CREATE and UPDATE
operations (as well as the DELETE if we had implemented that) requires the use of a simple HTTP
tool the one we use here is the RESTClient plugin in for FireFox
1 In the browser that you launched in the last step replace the end of the URL ldquo$format=xmlrdquo
with ldquo$metadatardquo ndash this will bring up the metadata of your service
Example URL httpservicehttp_portsapopuodatasapZFLIGHTSCSGEBO$metadata
How To Create OData Services Using the Screen Scraping Generator in SAP NetWeaver Gateway
July 2012 26
2 In the URL replace ldquo$metadatardquo with ldquoFlightCollectionrdquo ndash this will execute the QUERY operation
You should now see a list of flights
3 To make it easier to test and debug add the query string parameter sap-ds-debug=true to the
URL ndash this will format the content as html allow us to follow links to the READ operation
Example URL
httpserverhttp_portsapopuodatasapZFLIGHTSCSGEBOFlightCollectionsap-ds-
debug=true
How To Create OData Services Using the Screen Scraping Generator in SAP NetWeaver Gateway
July 2012 27
Note
You will see an SAP icon in the bottom right hand corner Click it to see more details about the service call
4 To execute the READ operation for a specific flight just click the link
FlightCollection(airline=hellipflight_number=hellip)
5 Clicking this link will bring back the flight details from the READ operation
How To Create OData Services Using the Screen Scraping Generator in SAP NetWeaver Gateway
July 2012 28
6 Now let test the update functionality
7 To test the update (and create) functionality we will need a CSRF token (needed to prevent
Cross Site Request Forgery attacks)hellipto do this we need to request this token during a read by
passing in an http header value requesting the token To pass in a header value we need to use
the RESTClienthelliphere using the FireFox RESTClient (this is a free plugin for FireFox)
How To Create OData Services Using the Screen Scraping Generator in SAP NetWeaver Gateway
July 2012 29
8 Copy the URL used in the test in step 5 above (the URL that executed a READ) and paste it into
the URL input field
9 Remove the query string attribute ldquosap-ds-debug=truerdquo from the URL
10 Click the Headers menu item and select Custom Header
11 Enter the name value as shown below
Tip Check the ldquoSave to favoriterdquo check box so you can easily add this header for faster testing the next time
12 Click the Okay button You should now see the following
How To Create OData Services Using the Screen Scraping Generator in SAP NetWeaver Gateway
July 2012 30
13 Click the SEND button
14 In the Response section at the bottom of the RESTClient copy the value returned for the x-csrf-
token shown here outlined in red (note these token values are generated by the gateway
server)
The token will be passed back in when testing the create and update functionality
15 Change the value for header attribute x-csrf-token to be the value you copied above to do this
just click on the header attribute in the RESTClient you should now see something to the
following
16 Test the UPDATE_ENTITY UPDATE operation
17 Add the content-type header to the Request Headers section Click the Headers dropdown and
select Custom Header
18 Enter the namevalue ndash content-typeapplicationatom+xmltype=entry
Tip Save this as a favorite so you can easily add it again when testing
How To Create OData Services Using the Screen Scraping Generator in SAP NetWeaver Gateway
July 2012 31
19 Click the Okay button to add the header request
20 Switch to the ldquoResponse Body (Raw)rdquo tab and copy the contents there (we will be updating the
data that was sent back when reading the entity)
21 Paste the Response Body you just copied into the Request Body section
22 Change the Method dropdown to PUT Your RESTClient should now look similar to the
following
23 To test the update functionality we need to change some of the values in the request body that
we are sending to the Gateway serverhellipchange the value of the distance attribute
24 Click the SEND button
25 If the update is successful you will get a status code of 204 as shown below
How To Create OData Services Using the Screen Scraping Generator in SAP NetWeaver Gateway
July 2012 32
26 You can switch the Method back to GET and click the send button again then check the
response body to see if the values you changed for the update are returned by the read
27 Congrats You have successfully created and tested a simple OData service created with the
Screen Scraping generator
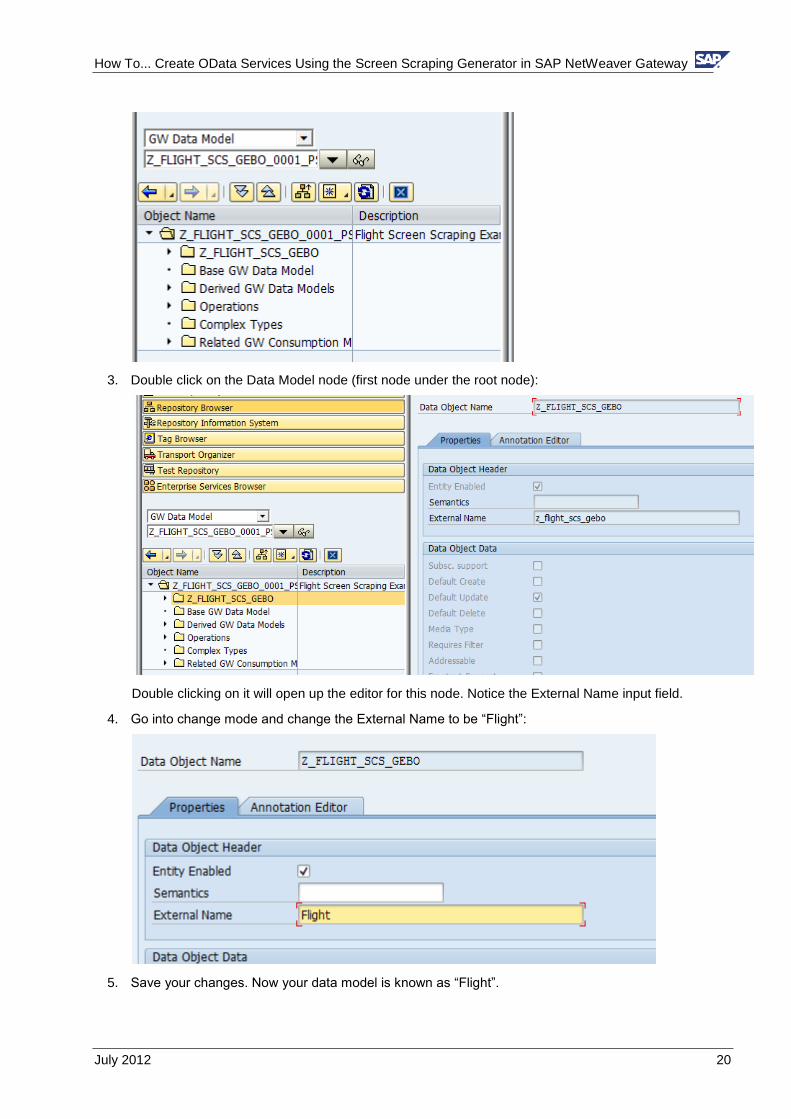
How To Create OData Services Using the Screen Scraping Generator in SAP NetWeaver Gateway
July 2012 20
3 Double click on the Data Model node (first node under the root node)
Double clicking on it will open up the editor for this node Notice the External Name input field
4 Go into change mode and change the External Name to be ldquoFlightrdquo
5 Save your changes Now your data model is known as ldquoFlightrdquo
How To Create OData Services Using the Screen Scraping Generator in SAP NetWeaver Gateway
July 2012 21
Note
If you go back in and change you data model (add a new operation or change some of the mapping) and then regenerate this configuration will be lost The name will revert to the old data model name
49 Create the Gateway Consumption Model
The Consumption Model is what exposes the Gateway Data Models to the network It does this by
creating a service in the Internet Communication Framework In this step you will create a
Consumption Model and then map your Data Model to it
1 Right click on the GW Data Modelrsquos Related GW Consumption Models node and in the context
menu select Add Consumpt Model
2 In the input field enter in the name of the consumption model you want created ndash zflightscsltyour
last namegt
3 Click the Enter button You will be asked if you want to create the consumption model click the
Yes button
4 Enter a description for your consumption model and click the Enter button
How To Create OData Services Using the Screen Scraping Generator in SAP NetWeaver Gateway
July 2012 22
5 You can see the Gateway service exposed in the ICF ndash transaction SICF ndash follow the ICF tree
path default_host gt sap gt opu gt odata gt sapthere you will see a list of all ICF services that
represent Gateway Consumption Models
410 Add an Alias to the Service
6 Go to the service maintenance transaction IWFNDMAINT_SERVICE
12 Click the search icon to search for your service in the list ndash the search icon is outlined in red
below
13 In the Find popup window enter in the Technical Service Name (ZFLIGHTSCSltYour Last
Namegt) for the search term
How To Create OData Services Using the Screen Scraping Generator in SAP NetWeaver Gateway
July 2012 23
14 Click the enter button your service should be located in the list
Hit the Cancel button on the Find dialog window to dismiss it
15 Click the Technical Service Name link (highlighted below in red on the top half of the screen)
this will cause the Alias assignment details be displayed at the bottom of the screen
6 Click the add System Alias button outlined in Red above in the bottom half of the screen You
should now see the screen to maintain service aliases
7 Click the New Entries button
8 Add your service document (the consumption model)hellipenter in the name of your consumption
model ndash zflightscsltyour last namegt and click the F4 help button
How To Create OData Services Using the Screen Scraping Generator in SAP NetWeaver Gateway
July 2012 24
9 Double click on your service document in the popup window
10 In the System Alias column enter the alias of the system you want your service to call ndash in this
case we are using the local alias
11 Save your changes then hit the back button You should now see that the LOCAL alias is
assigned to your service
12 Click the Call Browser button to launch a web browser that points to the service document of
your OData service
How To Create OData Services Using the Screen Scraping Generator in SAP NetWeaver Gateway
July 2012 25
Note
By default all gateway services are initial assigned basic
411 Test Your Gateway Object
Now for the fun part You get to test everything you have done up to this point Testing the QUERY
and READ operations is easyhellipyou just need a browser Testing the CREATE and UPDATE
operations (as well as the DELETE if we had implemented that) requires the use of a simple HTTP
tool the one we use here is the RESTClient plugin in for FireFox
1 In the browser that you launched in the last step replace the end of the URL ldquo$format=xmlrdquo
with ldquo$metadatardquo ndash this will bring up the metadata of your service
Example URL httpservicehttp_portsapopuodatasapZFLIGHTSCSGEBO$metadata
How To Create OData Services Using the Screen Scraping Generator in SAP NetWeaver Gateway
July 2012 26
2 In the URL replace ldquo$metadatardquo with ldquoFlightCollectionrdquo ndash this will execute the QUERY operation
You should now see a list of flights
3 To make it easier to test and debug add the query string parameter sap-ds-debug=true to the
URL ndash this will format the content as html allow us to follow links to the READ operation
Example URL
httpserverhttp_portsapopuodatasapZFLIGHTSCSGEBOFlightCollectionsap-ds-
debug=true
How To Create OData Services Using the Screen Scraping Generator in SAP NetWeaver Gateway
July 2012 27
Note
You will see an SAP icon in the bottom right hand corner Click it to see more details about the service call
4 To execute the READ operation for a specific flight just click the link
FlightCollection(airline=hellipflight_number=hellip)
5 Clicking this link will bring back the flight details from the READ operation
How To Create OData Services Using the Screen Scraping Generator in SAP NetWeaver Gateway
July 2012 28
6 Now let test the update functionality
7 To test the update (and create) functionality we will need a CSRF token (needed to prevent
Cross Site Request Forgery attacks)hellipto do this we need to request this token during a read by
passing in an http header value requesting the token To pass in a header value we need to use
the RESTClienthelliphere using the FireFox RESTClient (this is a free plugin for FireFox)
How To Create OData Services Using the Screen Scraping Generator in SAP NetWeaver Gateway
July 2012 29
8 Copy the URL used in the test in step 5 above (the URL that executed a READ) and paste it into
the URL input field
9 Remove the query string attribute ldquosap-ds-debug=truerdquo from the URL
10 Click the Headers menu item and select Custom Header
11 Enter the name value as shown below
Tip Check the ldquoSave to favoriterdquo check box so you can easily add this header for faster testing the next time
12 Click the Okay button You should now see the following
How To Create OData Services Using the Screen Scraping Generator in SAP NetWeaver Gateway
July 2012 30
13 Click the SEND button
14 In the Response section at the bottom of the RESTClient copy the value returned for the x-csrf-
token shown here outlined in red (note these token values are generated by the gateway
server)
The token will be passed back in when testing the create and update functionality
15 Change the value for header attribute x-csrf-token to be the value you copied above to do this
just click on the header attribute in the RESTClient you should now see something to the
following
16 Test the UPDATE_ENTITY UPDATE operation
17 Add the content-type header to the Request Headers section Click the Headers dropdown and
select Custom Header
18 Enter the namevalue ndash content-typeapplicationatom+xmltype=entry
Tip Save this as a favorite so you can easily add it again when testing
How To Create OData Services Using the Screen Scraping Generator in SAP NetWeaver Gateway
July 2012 31
19 Click the Okay button to add the header request
20 Switch to the ldquoResponse Body (Raw)rdquo tab and copy the contents there (we will be updating the
data that was sent back when reading the entity)
21 Paste the Response Body you just copied into the Request Body section
22 Change the Method dropdown to PUT Your RESTClient should now look similar to the
following
23 To test the update functionality we need to change some of the values in the request body that
we are sending to the Gateway serverhellipchange the value of the distance attribute
24 Click the SEND button
25 If the update is successful you will get a status code of 204 as shown below
How To Create OData Services Using the Screen Scraping Generator in SAP NetWeaver Gateway
July 2012 32
26 You can switch the Method back to GET and click the send button again then check the
response body to see if the values you changed for the update are returned by the read
27 Congrats You have successfully created and tested a simple OData service created with the
Screen Scraping generator
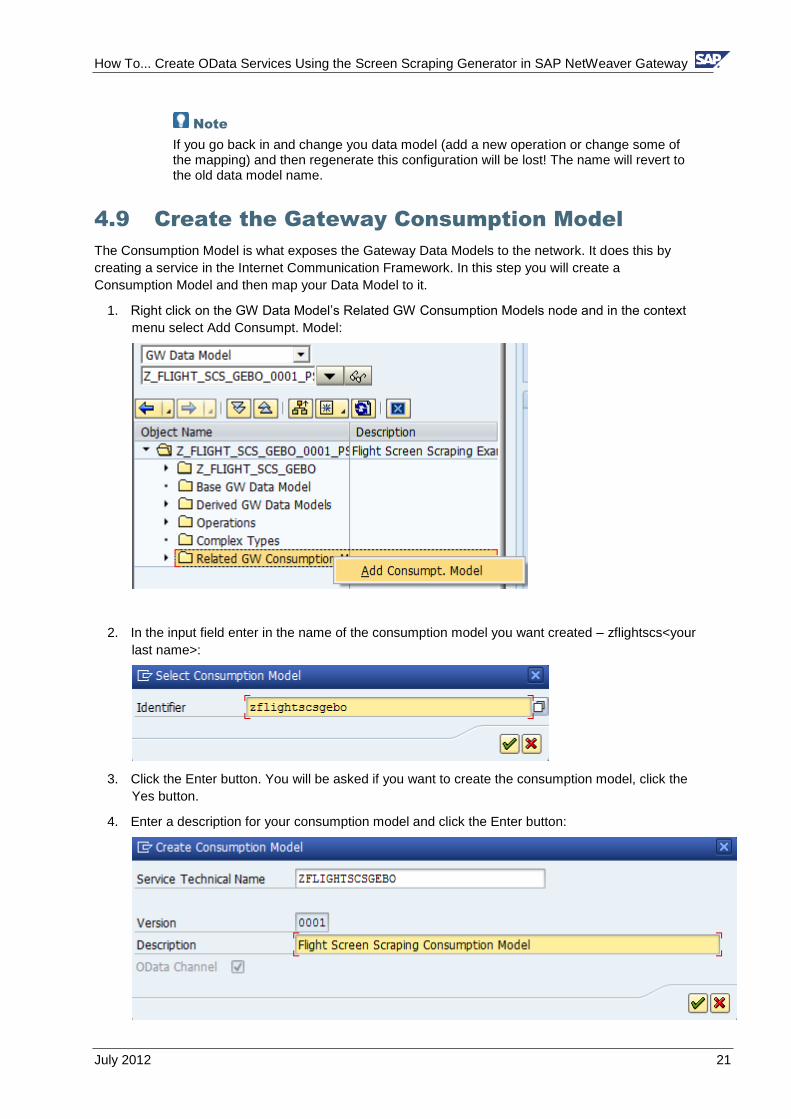
How To Create OData Services Using the Screen Scraping Generator in SAP NetWeaver Gateway
July 2012 21
Note
If you go back in and change you data model (add a new operation or change some of the mapping) and then regenerate this configuration will be lost The name will revert to the old data model name
49 Create the Gateway Consumption Model
The Consumption Model is what exposes the Gateway Data Models to the network It does this by
creating a service in the Internet Communication Framework In this step you will create a
Consumption Model and then map your Data Model to it
1 Right click on the GW Data Modelrsquos Related GW Consumption Models node and in the context
menu select Add Consumpt Model
2 In the input field enter in the name of the consumption model you want created ndash zflightscsltyour
last namegt
3 Click the Enter button You will be asked if you want to create the consumption model click the
Yes button
4 Enter a description for your consumption model and click the Enter button
How To Create OData Services Using the Screen Scraping Generator in SAP NetWeaver Gateway
July 2012 22
5 You can see the Gateway service exposed in the ICF ndash transaction SICF ndash follow the ICF tree
path default_host gt sap gt opu gt odata gt sapthere you will see a list of all ICF services that
represent Gateway Consumption Models
410 Add an Alias to the Service
6 Go to the service maintenance transaction IWFNDMAINT_SERVICE
12 Click the search icon to search for your service in the list ndash the search icon is outlined in red
below
13 In the Find popup window enter in the Technical Service Name (ZFLIGHTSCSltYour Last
Namegt) for the search term
How To Create OData Services Using the Screen Scraping Generator in SAP NetWeaver Gateway
July 2012 23
14 Click the enter button your service should be located in the list
Hit the Cancel button on the Find dialog window to dismiss it
15 Click the Technical Service Name link (highlighted below in red on the top half of the screen)
this will cause the Alias assignment details be displayed at the bottom of the screen
6 Click the add System Alias button outlined in Red above in the bottom half of the screen You
should now see the screen to maintain service aliases
7 Click the New Entries button
8 Add your service document (the consumption model)hellipenter in the name of your consumption
model ndash zflightscsltyour last namegt and click the F4 help button
How To Create OData Services Using the Screen Scraping Generator in SAP NetWeaver Gateway
July 2012 24
9 Double click on your service document in the popup window
10 In the System Alias column enter the alias of the system you want your service to call ndash in this
case we are using the local alias
11 Save your changes then hit the back button You should now see that the LOCAL alias is
assigned to your service
12 Click the Call Browser button to launch a web browser that points to the service document of
your OData service
How To Create OData Services Using the Screen Scraping Generator in SAP NetWeaver Gateway
July 2012 25
Note
By default all gateway services are initial assigned basic
411 Test Your Gateway Object
Now for the fun part You get to test everything you have done up to this point Testing the QUERY
and READ operations is easyhellipyou just need a browser Testing the CREATE and UPDATE
operations (as well as the DELETE if we had implemented that) requires the use of a simple HTTP
tool the one we use here is the RESTClient plugin in for FireFox
1 In the browser that you launched in the last step replace the end of the URL ldquo$format=xmlrdquo
with ldquo$metadatardquo ndash this will bring up the metadata of your service
Example URL httpservicehttp_portsapopuodatasapZFLIGHTSCSGEBO$metadata
How To Create OData Services Using the Screen Scraping Generator in SAP NetWeaver Gateway
July 2012 26
2 In the URL replace ldquo$metadatardquo with ldquoFlightCollectionrdquo ndash this will execute the QUERY operation
You should now see a list of flights
3 To make it easier to test and debug add the query string parameter sap-ds-debug=true to the
URL ndash this will format the content as html allow us to follow links to the READ operation
Example URL
httpserverhttp_portsapopuodatasapZFLIGHTSCSGEBOFlightCollectionsap-ds-
debug=true
How To Create OData Services Using the Screen Scraping Generator in SAP NetWeaver Gateway
July 2012 27
Note
You will see an SAP icon in the bottom right hand corner Click it to see more details about the service call
4 To execute the READ operation for a specific flight just click the link
FlightCollection(airline=hellipflight_number=hellip)
5 Clicking this link will bring back the flight details from the READ operation
How To Create OData Services Using the Screen Scraping Generator in SAP NetWeaver Gateway
July 2012 28
6 Now let test the update functionality
7 To test the update (and create) functionality we will need a CSRF token (needed to prevent
Cross Site Request Forgery attacks)hellipto do this we need to request this token during a read by
passing in an http header value requesting the token To pass in a header value we need to use
the RESTClienthelliphere using the FireFox RESTClient (this is a free plugin for FireFox)
How To Create OData Services Using the Screen Scraping Generator in SAP NetWeaver Gateway
July 2012 29
8 Copy the URL used in the test in step 5 above (the URL that executed a READ) and paste it into
the URL input field
9 Remove the query string attribute ldquosap-ds-debug=truerdquo from the URL
10 Click the Headers menu item and select Custom Header
11 Enter the name value as shown below
Tip Check the ldquoSave to favoriterdquo check box so you can easily add this header for faster testing the next time
12 Click the Okay button You should now see the following
How To Create OData Services Using the Screen Scraping Generator in SAP NetWeaver Gateway
July 2012 30
13 Click the SEND button
14 In the Response section at the bottom of the RESTClient copy the value returned for the x-csrf-
token shown here outlined in red (note these token values are generated by the gateway
server)
The token will be passed back in when testing the create and update functionality
15 Change the value for header attribute x-csrf-token to be the value you copied above to do this
just click on the header attribute in the RESTClient you should now see something to the
following
16 Test the UPDATE_ENTITY UPDATE operation
17 Add the content-type header to the Request Headers section Click the Headers dropdown and
select Custom Header
18 Enter the namevalue ndash content-typeapplicationatom+xmltype=entry
Tip Save this as a favorite so you can easily add it again when testing
How To Create OData Services Using the Screen Scraping Generator in SAP NetWeaver Gateway
July 2012 31
19 Click the Okay button to add the header request
20 Switch to the ldquoResponse Body (Raw)rdquo tab and copy the contents there (we will be updating the
data that was sent back when reading the entity)
21 Paste the Response Body you just copied into the Request Body section
22 Change the Method dropdown to PUT Your RESTClient should now look similar to the
following
23 To test the update functionality we need to change some of the values in the request body that
we are sending to the Gateway serverhellipchange the value of the distance attribute
24 Click the SEND button
25 If the update is successful you will get a status code of 204 as shown below
How To Create OData Services Using the Screen Scraping Generator in SAP NetWeaver Gateway
July 2012 32
26 You can switch the Method back to GET and click the send button again then check the
response body to see if the values you changed for the update are returned by the read
27 Congrats You have successfully created and tested a simple OData service created with the
Screen Scraping generator
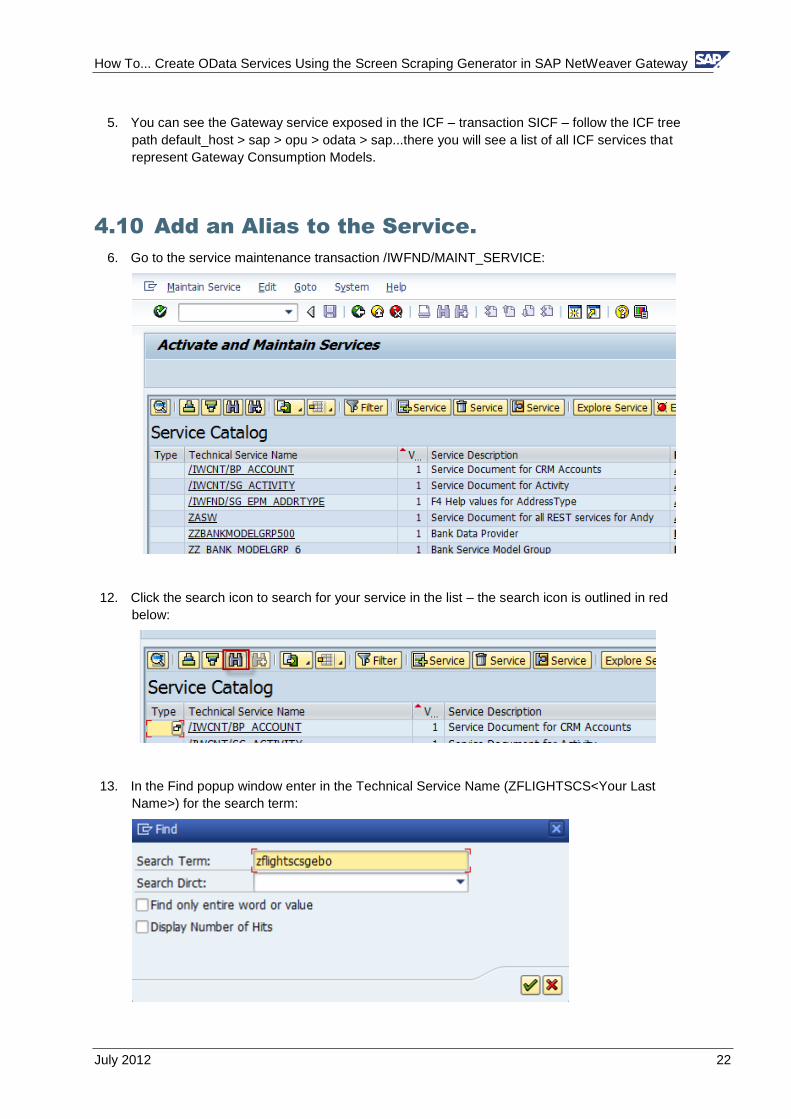
How To Create OData Services Using the Screen Scraping Generator in SAP NetWeaver Gateway
July 2012 22
5 You can see the Gateway service exposed in the ICF ndash transaction SICF ndash follow the ICF tree
path default_host gt sap gt opu gt odata gt sapthere you will see a list of all ICF services that
represent Gateway Consumption Models
410 Add an Alias to the Service
6 Go to the service maintenance transaction IWFNDMAINT_SERVICE
12 Click the search icon to search for your service in the list ndash the search icon is outlined in red
below
13 In the Find popup window enter in the Technical Service Name (ZFLIGHTSCSltYour Last
Namegt) for the search term
How To Create OData Services Using the Screen Scraping Generator in SAP NetWeaver Gateway
July 2012 23
14 Click the enter button your service should be located in the list
Hit the Cancel button on the Find dialog window to dismiss it
15 Click the Technical Service Name link (highlighted below in red on the top half of the screen)
this will cause the Alias assignment details be displayed at the bottom of the screen
6 Click the add System Alias button outlined in Red above in the bottom half of the screen You
should now see the screen to maintain service aliases
7 Click the New Entries button
8 Add your service document (the consumption model)hellipenter in the name of your consumption
model ndash zflightscsltyour last namegt and click the F4 help button
How To Create OData Services Using the Screen Scraping Generator in SAP NetWeaver Gateway
July 2012 24
9 Double click on your service document in the popup window
10 In the System Alias column enter the alias of the system you want your service to call ndash in this
case we are using the local alias
11 Save your changes then hit the back button You should now see that the LOCAL alias is
assigned to your service
12 Click the Call Browser button to launch a web browser that points to the service document of
your OData service
How To Create OData Services Using the Screen Scraping Generator in SAP NetWeaver Gateway
July 2012 25
Note
By default all gateway services are initial assigned basic
411 Test Your Gateway Object
Now for the fun part You get to test everything you have done up to this point Testing the QUERY
and READ operations is easyhellipyou just need a browser Testing the CREATE and UPDATE
operations (as well as the DELETE if we had implemented that) requires the use of a simple HTTP
tool the one we use here is the RESTClient plugin in for FireFox
1 In the browser that you launched in the last step replace the end of the URL ldquo$format=xmlrdquo
with ldquo$metadatardquo ndash this will bring up the metadata of your service
Example URL httpservicehttp_portsapopuodatasapZFLIGHTSCSGEBO$metadata
How To Create OData Services Using the Screen Scraping Generator in SAP NetWeaver Gateway
July 2012 26
2 In the URL replace ldquo$metadatardquo with ldquoFlightCollectionrdquo ndash this will execute the QUERY operation
You should now see a list of flights
3 To make it easier to test and debug add the query string parameter sap-ds-debug=true to the
URL ndash this will format the content as html allow us to follow links to the READ operation
Example URL
httpserverhttp_portsapopuodatasapZFLIGHTSCSGEBOFlightCollectionsap-ds-
debug=true
How To Create OData Services Using the Screen Scraping Generator in SAP NetWeaver Gateway
July 2012 27
Note
You will see an SAP icon in the bottom right hand corner Click it to see more details about the service call
4 To execute the READ operation for a specific flight just click the link
FlightCollection(airline=hellipflight_number=hellip)
5 Clicking this link will bring back the flight details from the READ operation
How To Create OData Services Using the Screen Scraping Generator in SAP NetWeaver Gateway
July 2012 28
6 Now let test the update functionality
7 To test the update (and create) functionality we will need a CSRF token (needed to prevent
Cross Site Request Forgery attacks)hellipto do this we need to request this token during a read by
passing in an http header value requesting the token To pass in a header value we need to use
the RESTClienthelliphere using the FireFox RESTClient (this is a free plugin for FireFox)
How To Create OData Services Using the Screen Scraping Generator in SAP NetWeaver Gateway
July 2012 29
8 Copy the URL used in the test in step 5 above (the URL that executed a READ) and paste it into
the URL input field
9 Remove the query string attribute ldquosap-ds-debug=truerdquo from the URL
10 Click the Headers menu item and select Custom Header
11 Enter the name value as shown below
Tip Check the ldquoSave to favoriterdquo check box so you can easily add this header for faster testing the next time
12 Click the Okay button You should now see the following
How To Create OData Services Using the Screen Scraping Generator in SAP NetWeaver Gateway
July 2012 30
13 Click the SEND button
14 In the Response section at the bottom of the RESTClient copy the value returned for the x-csrf-
token shown here outlined in red (note these token values are generated by the gateway
server)
The token will be passed back in when testing the create and update functionality
15 Change the value for header attribute x-csrf-token to be the value you copied above to do this
just click on the header attribute in the RESTClient you should now see something to the
following
16 Test the UPDATE_ENTITY UPDATE operation
17 Add the content-type header to the Request Headers section Click the Headers dropdown and
select Custom Header
18 Enter the namevalue ndash content-typeapplicationatom+xmltype=entry
Tip Save this as a favorite so you can easily add it again when testing
How To Create OData Services Using the Screen Scraping Generator in SAP NetWeaver Gateway
July 2012 31
19 Click the Okay button to add the header request
20 Switch to the ldquoResponse Body (Raw)rdquo tab and copy the contents there (we will be updating the
data that was sent back when reading the entity)
21 Paste the Response Body you just copied into the Request Body section
22 Change the Method dropdown to PUT Your RESTClient should now look similar to the
following
23 To test the update functionality we need to change some of the values in the request body that
we are sending to the Gateway serverhellipchange the value of the distance attribute
24 Click the SEND button
25 If the update is successful you will get a status code of 204 as shown below
How To Create OData Services Using the Screen Scraping Generator in SAP NetWeaver Gateway
July 2012 32
26 You can switch the Method back to GET and click the send button again then check the
response body to see if the values you changed for the update are returned by the read
27 Congrats You have successfully created and tested a simple OData service created with the
Screen Scraping generator
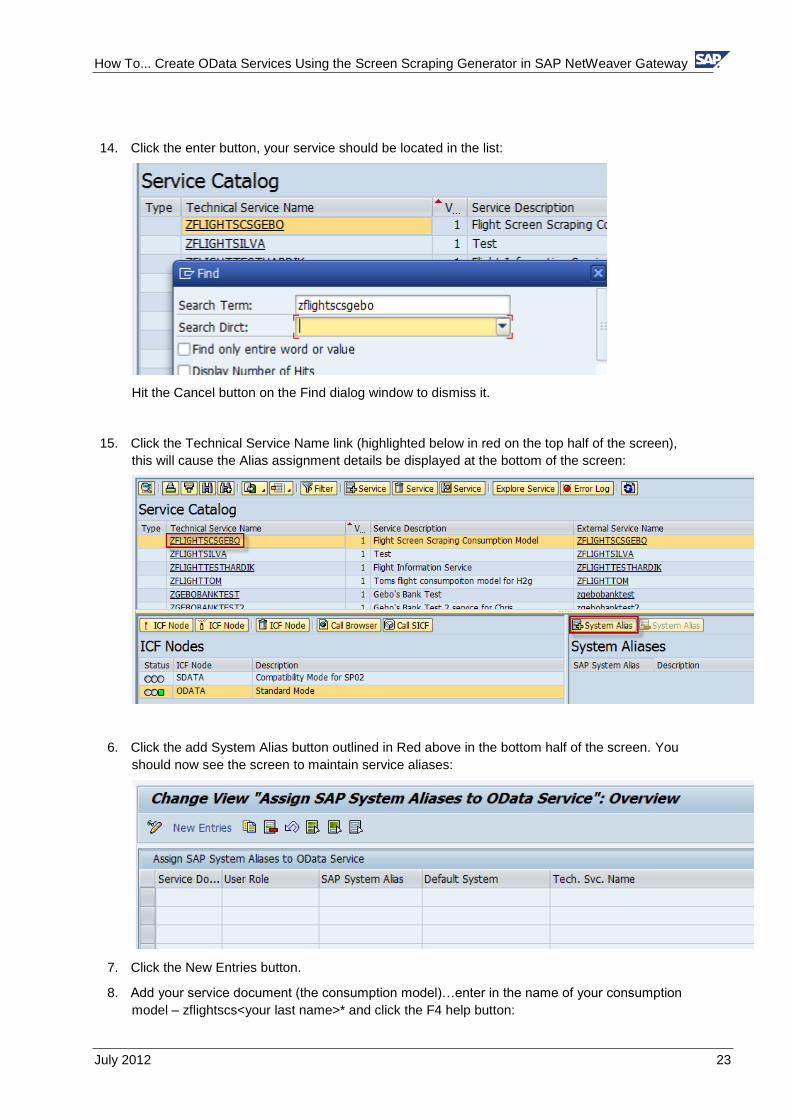
How To Create OData Services Using the Screen Scraping Generator in SAP NetWeaver Gateway
July 2012 24
9 Double click on your service document in the popup window
10 In the System Alias column enter the alias of the system you want your service to call ndash in this
case we are using the local alias
11 Save your changes then hit the back button You should now see that the LOCAL alias is
assigned to your service
12 Click the Call Browser button to launch a web browser that points to the service document of
your OData service
How To Create OData Services Using the Screen Scraping Generator in SAP NetWeaver Gateway
July 2012 25
Note
By default all gateway services are initial assigned basic
411 Test Your Gateway Object
Now for the fun part You get to test everything you have done up to this point Testing the QUERY
and READ operations is easyhellipyou just need a browser Testing the CREATE and UPDATE
operations (as well as the DELETE if we had implemented that) requires the use of a simple HTTP
tool the one we use here is the RESTClient plugin in for FireFox
1 In the browser that you launched in the last step replace the end of the URL ldquo$format=xmlrdquo
with ldquo$metadatardquo ndash this will bring up the metadata of your service
Example URL httpservicehttp_portsapopuodatasapZFLIGHTSCSGEBO$metadata
How To Create OData Services Using the Screen Scraping Generator in SAP NetWeaver Gateway
July 2012 26
2 In the URL replace ldquo$metadatardquo with ldquoFlightCollectionrdquo ndash this will execute the QUERY operation
You should now see a list of flights
3 To make it easier to test and debug add the query string parameter sap-ds-debug=true to the
URL ndash this will format the content as html allow us to follow links to the READ operation
Example URL
httpserverhttp_portsapopuodatasapZFLIGHTSCSGEBOFlightCollectionsap-ds-
debug=true
How To Create OData Services Using the Screen Scraping Generator in SAP NetWeaver Gateway
July 2012 27
Note
You will see an SAP icon in the bottom right hand corner Click it to see more details about the service call
4 To execute the READ operation for a specific flight just click the link
FlightCollection(airline=hellipflight_number=hellip)
5 Clicking this link will bring back the flight details from the READ operation
How To Create OData Services Using the Screen Scraping Generator in SAP NetWeaver Gateway
July 2012 28
6 Now let test the update functionality
7 To test the update (and create) functionality we will need a CSRF token (needed to prevent
Cross Site Request Forgery attacks)hellipto do this we need to request this token during a read by
passing in an http header value requesting the token To pass in a header value we need to use
the RESTClienthelliphere using the FireFox RESTClient (this is a free plugin for FireFox)
How To Create OData Services Using the Screen Scraping Generator in SAP NetWeaver Gateway
July 2012 29
8 Copy the URL used in the test in step 5 above (the URL that executed a READ) and paste it into
the URL input field
9 Remove the query string attribute ldquosap-ds-debug=truerdquo from the URL
10 Click the Headers menu item and select Custom Header
11 Enter the name value as shown below
Tip Check the ldquoSave to favoriterdquo check box so you can easily add this header for faster testing the next time
12 Click the Okay button You should now see the following
How To Create OData Services Using the Screen Scraping Generator in SAP NetWeaver Gateway
July 2012 30
13 Click the SEND button
14 In the Response section at the bottom of the RESTClient copy the value returned for the x-csrf-
token shown here outlined in red (note these token values are generated by the gateway
server)
The token will be passed back in when testing the create and update functionality
15 Change the value for header attribute x-csrf-token to be the value you copied above to do this
just click on the header attribute in the RESTClient you should now see something to the
following
16 Test the UPDATE_ENTITY UPDATE operation
17 Add the content-type header to the Request Headers section Click the Headers dropdown and
select Custom Header
18 Enter the namevalue ndash content-typeapplicationatom+xmltype=entry
Tip Save this as a favorite so you can easily add it again when testing
How To Create OData Services Using the Screen Scraping Generator in SAP NetWeaver Gateway
July 2012 31
19 Click the Okay button to add the header request
20 Switch to the ldquoResponse Body (Raw)rdquo tab and copy the contents there (we will be updating the
data that was sent back when reading the entity)
21 Paste the Response Body you just copied into the Request Body section
22 Change the Method dropdown to PUT Your RESTClient should now look similar to the
following
23 To test the update functionality we need to change some of the values in the request body that
we are sending to the Gateway serverhellipchange the value of the distance attribute
24 Click the SEND button
25 If the update is successful you will get a status code of 204 as shown below
How To Create OData Services Using the Screen Scraping Generator in SAP NetWeaver Gateway
July 2012 32
26 You can switch the Method back to GET and click the send button again then check the
response body to see if the values you changed for the update are returned by the read
27 Congrats You have successfully created and tested a simple OData service created with the
Screen Scraping generator
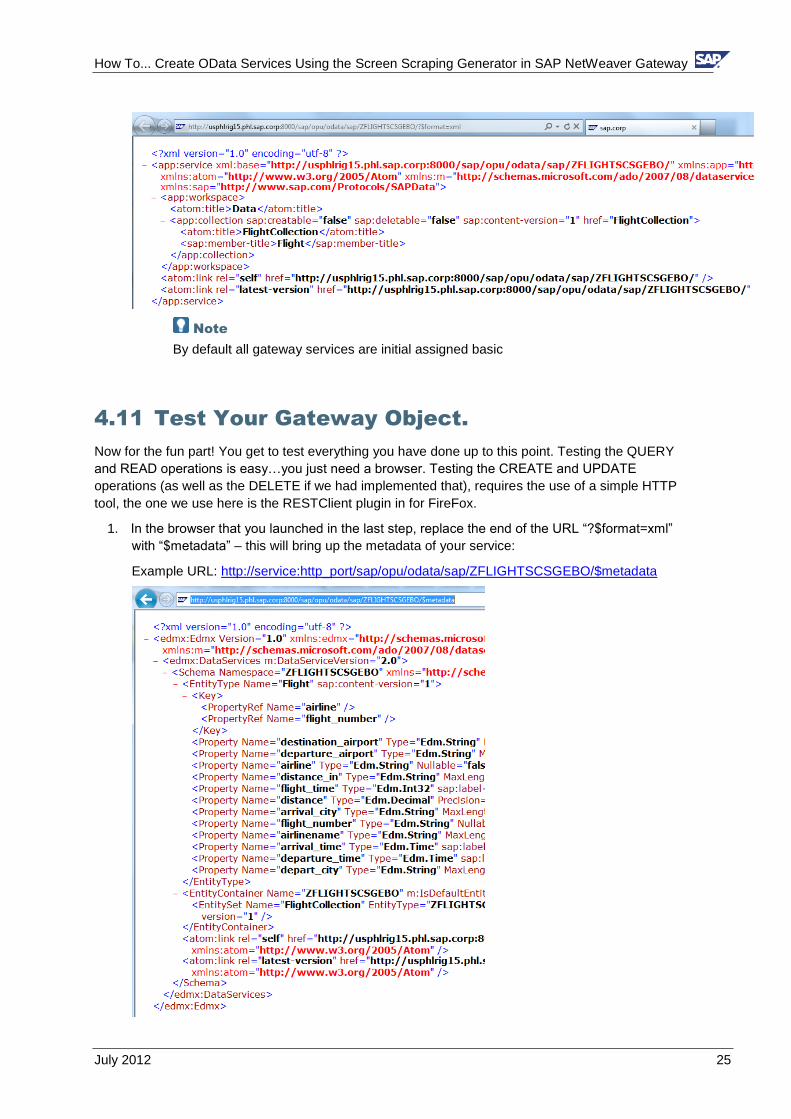
How To Create OData Services Using the Screen Scraping Generator in SAP NetWeaver Gateway
July 2012 25
Note
By default all gateway services are initial assigned basic
411 Test Your Gateway Object
Now for the fun part You get to test everything you have done up to this point Testing the QUERY
and READ operations is easyhellipyou just need a browser Testing the CREATE and UPDATE
operations (as well as the DELETE if we had implemented that) requires the use of a simple HTTP
tool the one we use here is the RESTClient plugin in for FireFox
1 In the browser that you launched in the last step replace the end of the URL ldquo$format=xmlrdquo
with ldquo$metadatardquo ndash this will bring up the metadata of your service
Example URL httpservicehttp_portsapopuodatasapZFLIGHTSCSGEBO$metadata
How To Create OData Services Using the Screen Scraping Generator in SAP NetWeaver Gateway
July 2012 26
2 In the URL replace ldquo$metadatardquo with ldquoFlightCollectionrdquo ndash this will execute the QUERY operation
You should now see a list of flights
3 To make it easier to test and debug add the query string parameter sap-ds-debug=true to the
URL ndash this will format the content as html allow us to follow links to the READ operation
Example URL
httpserverhttp_portsapopuodatasapZFLIGHTSCSGEBOFlightCollectionsap-ds-
debug=true
How To Create OData Services Using the Screen Scraping Generator in SAP NetWeaver Gateway
July 2012 27
Note
You will see an SAP icon in the bottom right hand corner Click it to see more details about the service call
4 To execute the READ operation for a specific flight just click the link
FlightCollection(airline=hellipflight_number=hellip)
5 Clicking this link will bring back the flight details from the READ operation
How To Create OData Services Using the Screen Scraping Generator in SAP NetWeaver Gateway
July 2012 28
6 Now let test the update functionality
7 To test the update (and create) functionality we will need a CSRF token (needed to prevent
Cross Site Request Forgery attacks)hellipto do this we need to request this token during a read by
passing in an http header value requesting the token To pass in a header value we need to use
the RESTClienthelliphere using the FireFox RESTClient (this is a free plugin for FireFox)
How To Create OData Services Using the Screen Scraping Generator in SAP NetWeaver Gateway
July 2012 29
8 Copy the URL used in the test in step 5 above (the URL that executed a READ) and paste it into
the URL input field
9 Remove the query string attribute ldquosap-ds-debug=truerdquo from the URL
10 Click the Headers menu item and select Custom Header
11 Enter the name value as shown below
Tip Check the ldquoSave to favoriterdquo check box so you can easily add this header for faster testing the next time
12 Click the Okay button You should now see the following
How To Create OData Services Using the Screen Scraping Generator in SAP NetWeaver Gateway
July 2012 30
13 Click the SEND button
14 In the Response section at the bottom of the RESTClient copy the value returned for the x-csrf-
token shown here outlined in red (note these token values are generated by the gateway
server)
The token will be passed back in when testing the create and update functionality
15 Change the value for header attribute x-csrf-token to be the value you copied above to do this
just click on the header attribute in the RESTClient you should now see something to the
following
16 Test the UPDATE_ENTITY UPDATE operation
17 Add the content-type header to the Request Headers section Click the Headers dropdown and
select Custom Header
18 Enter the namevalue ndash content-typeapplicationatom+xmltype=entry
Tip Save this as a favorite so you can easily add it again when testing
How To Create OData Services Using the Screen Scraping Generator in SAP NetWeaver Gateway
July 2012 31
19 Click the Okay button to add the header request
20 Switch to the ldquoResponse Body (Raw)rdquo tab and copy the contents there (we will be updating the
data that was sent back when reading the entity)
21 Paste the Response Body you just copied into the Request Body section
22 Change the Method dropdown to PUT Your RESTClient should now look similar to the
following
23 To test the update functionality we need to change some of the values in the request body that
we are sending to the Gateway serverhellipchange the value of the distance attribute
24 Click the SEND button
25 If the update is successful you will get a status code of 204 as shown below
How To Create OData Services Using the Screen Scraping Generator in SAP NetWeaver Gateway
July 2012 32
26 You can switch the Method back to GET and click the send button again then check the
response body to see if the values you changed for the update are returned by the read
27 Congrats You have successfully created and tested a simple OData service created with the
Screen Scraping generator
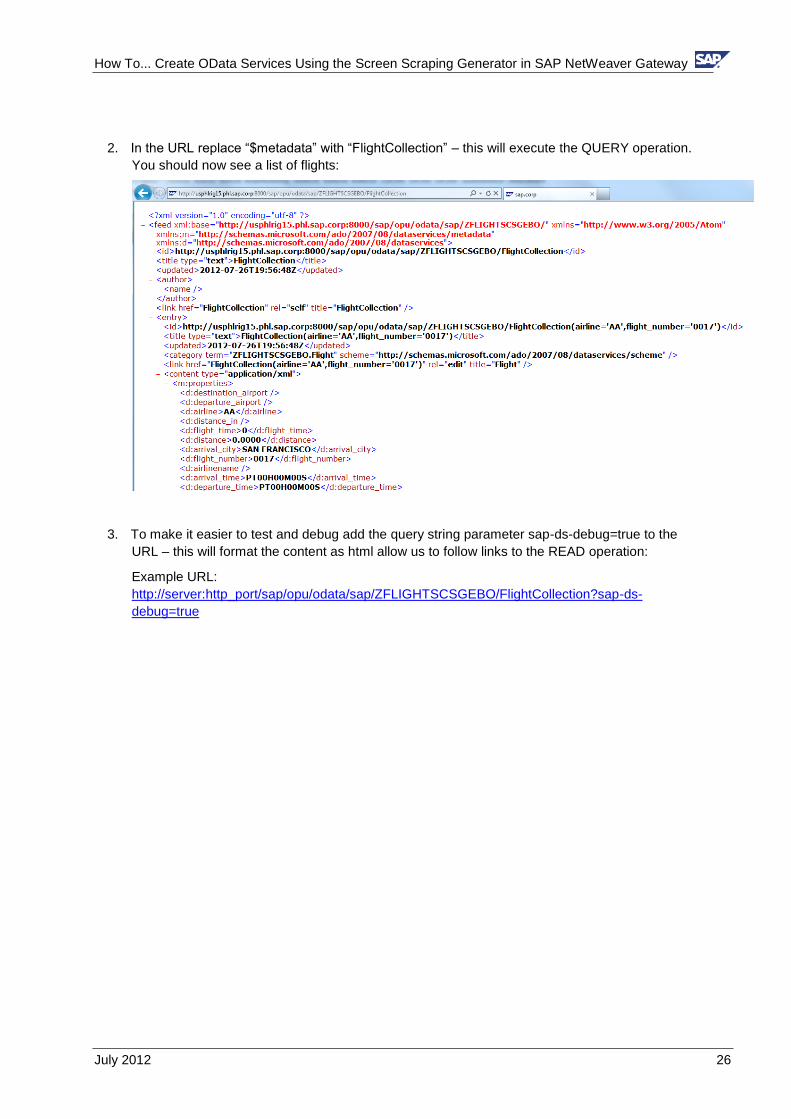
How To Create OData Services Using the Screen Scraping Generator in SAP NetWeaver Gateway
July 2012 27
Note
You will see an SAP icon in the bottom right hand corner Click it to see more details about the service call
4 To execute the READ operation for a specific flight just click the link
FlightCollection(airline=hellipflight_number=hellip)
5 Clicking this link will bring back the flight details from the READ operation
How To Create OData Services Using the Screen Scraping Generator in SAP NetWeaver Gateway
July 2012 28
6 Now let test the update functionality
7 To test the update (and create) functionality we will need a CSRF token (needed to prevent
Cross Site Request Forgery attacks)hellipto do this we need to request this token during a read by
passing in an http header value requesting the token To pass in a header value we need to use
the RESTClienthelliphere using the FireFox RESTClient (this is a free plugin for FireFox)
How To Create OData Services Using the Screen Scraping Generator in SAP NetWeaver Gateway
July 2012 29
8 Copy the URL used in the test in step 5 above (the URL that executed a READ) and paste it into
the URL input field
9 Remove the query string attribute ldquosap-ds-debug=truerdquo from the URL
10 Click the Headers menu item and select Custom Header
11 Enter the name value as shown below
Tip Check the ldquoSave to favoriterdquo check box so you can easily add this header for faster testing the next time
12 Click the Okay button You should now see the following
How To Create OData Services Using the Screen Scraping Generator in SAP NetWeaver Gateway
July 2012 30
13 Click the SEND button
14 In the Response section at the bottom of the RESTClient copy the value returned for the x-csrf-
token shown here outlined in red (note these token values are generated by the gateway
server)
The token will be passed back in when testing the create and update functionality
15 Change the value for header attribute x-csrf-token to be the value you copied above to do this
just click on the header attribute in the RESTClient you should now see something to the
following
16 Test the UPDATE_ENTITY UPDATE operation
17 Add the content-type header to the Request Headers section Click the Headers dropdown and
select Custom Header
18 Enter the namevalue ndash content-typeapplicationatom+xmltype=entry
Tip Save this as a favorite so you can easily add it again when testing
How To Create OData Services Using the Screen Scraping Generator in SAP NetWeaver Gateway
July 2012 31
19 Click the Okay button to add the header request
20 Switch to the ldquoResponse Body (Raw)rdquo tab and copy the contents there (we will be updating the
data that was sent back when reading the entity)
21 Paste the Response Body you just copied into the Request Body section
22 Change the Method dropdown to PUT Your RESTClient should now look similar to the
following
23 To test the update functionality we need to change some of the values in the request body that
we are sending to the Gateway serverhellipchange the value of the distance attribute
24 Click the SEND button
25 If the update is successful you will get a status code of 204 as shown below
How To Create OData Services Using the Screen Scraping Generator in SAP NetWeaver Gateway
July 2012 32
26 You can switch the Method back to GET and click the send button again then check the
response body to see if the values you changed for the update are returned by the read
27 Congrats You have successfully created and tested a simple OData service created with the
Screen Scraping generator
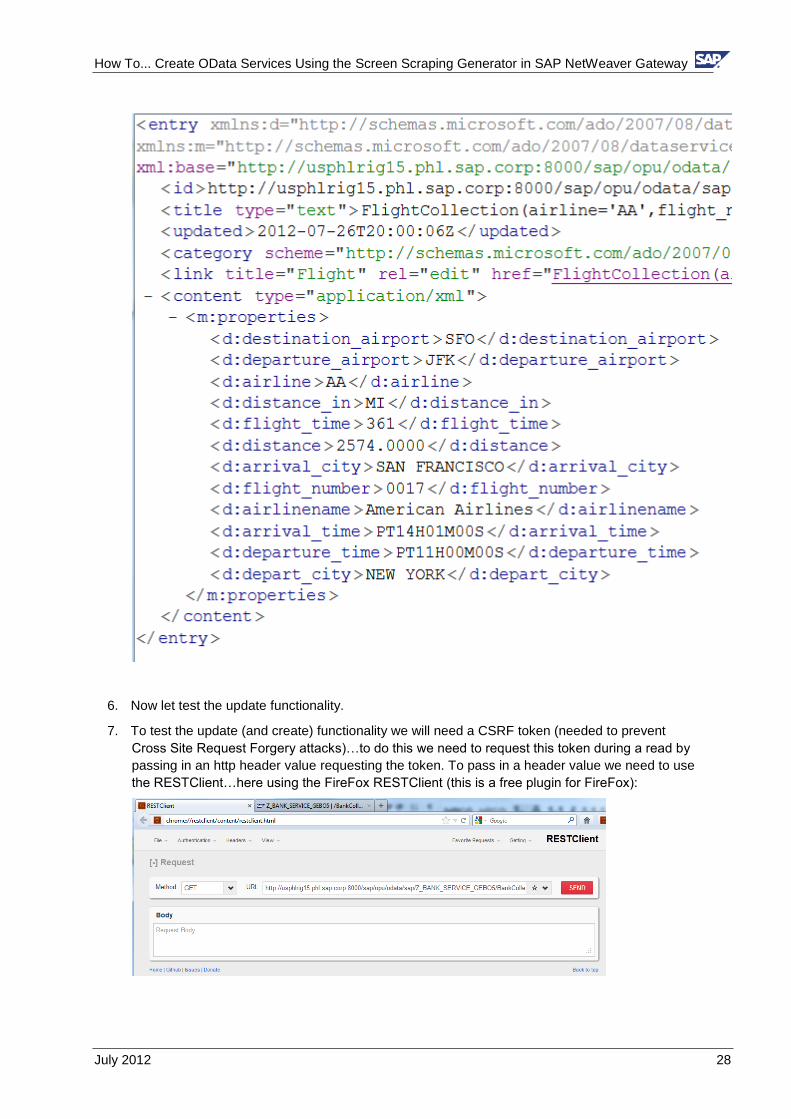
How To Create OData Services Using the Screen Scraping Generator in SAP NetWeaver Gateway
July 2012 28
6 Now let test the update functionality
7 To test the update (and create) functionality we will need a CSRF token (needed to prevent
Cross Site Request Forgery attacks)hellipto do this we need to request this token during a read by
passing in an http header value requesting the token To pass in a header value we need to use
the RESTClienthelliphere using the FireFox RESTClient (this is a free plugin for FireFox)
How To Create OData Services Using the Screen Scraping Generator in SAP NetWeaver Gateway
July 2012 29
8 Copy the URL used in the test in step 5 above (the URL that executed a READ) and paste it into
the URL input field
9 Remove the query string attribute ldquosap-ds-debug=truerdquo from the URL
10 Click the Headers menu item and select Custom Header
11 Enter the name value as shown below
Tip Check the ldquoSave to favoriterdquo check box so you can easily add this header for faster testing the next time
12 Click the Okay button You should now see the following
How To Create OData Services Using the Screen Scraping Generator in SAP NetWeaver Gateway
July 2012 30
13 Click the SEND button
14 In the Response section at the bottom of the RESTClient copy the value returned for the x-csrf-
token shown here outlined in red (note these token values are generated by the gateway
server)
The token will be passed back in when testing the create and update functionality
15 Change the value for header attribute x-csrf-token to be the value you copied above to do this
just click on the header attribute in the RESTClient you should now see something to the
following
16 Test the UPDATE_ENTITY UPDATE operation
17 Add the content-type header to the Request Headers section Click the Headers dropdown and
select Custom Header
18 Enter the namevalue ndash content-typeapplicationatom+xmltype=entry
Tip Save this as a favorite so you can easily add it again when testing
How To Create OData Services Using the Screen Scraping Generator in SAP NetWeaver Gateway
July 2012 31
19 Click the Okay button to add the header request
20 Switch to the ldquoResponse Body (Raw)rdquo tab and copy the contents there (we will be updating the
data that was sent back when reading the entity)
21 Paste the Response Body you just copied into the Request Body section
22 Change the Method dropdown to PUT Your RESTClient should now look similar to the
following
23 To test the update functionality we need to change some of the values in the request body that
we are sending to the Gateway serverhellipchange the value of the distance attribute
24 Click the SEND button
25 If the update is successful you will get a status code of 204 as shown below
How To Create OData Services Using the Screen Scraping Generator in SAP NetWeaver Gateway
July 2012 32
26 You can switch the Method back to GET and click the send button again then check the
response body to see if the values you changed for the update are returned by the read
27 Congrats You have successfully created and tested a simple OData service created with the
Screen Scraping generator
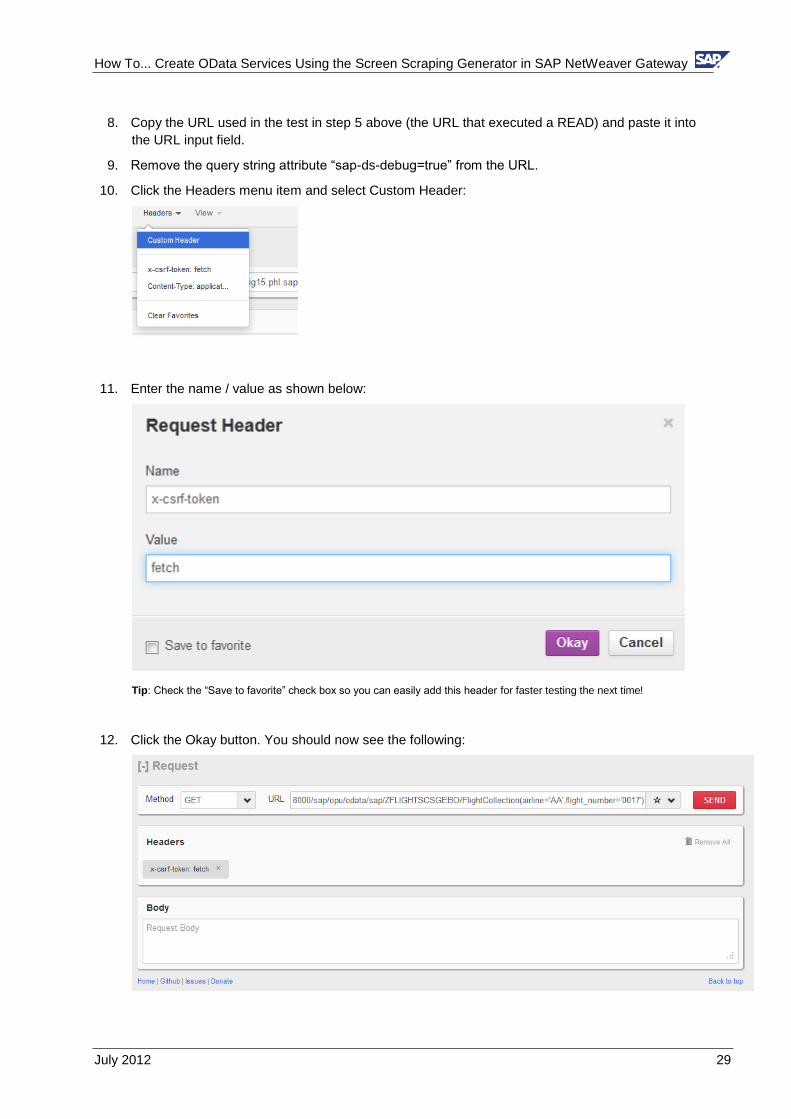
How To Create OData Services Using the Screen Scraping Generator in SAP NetWeaver Gateway
July 2012 32
26 You can switch the Method back to GET and click the send button again then check the
response body to see if the values you changed for the update are returned by the read
27 Congrats You have successfully created and tested a simple OData service created with the
Screen Scraping generator


![[MS-ODATA]: Open Data Protocol (OData) Specification](https://static.fdocuments.in/doc/165x107/6234c64dbccb0434a10bc856/ms-odata-open-data-protocol-odata-specification.jpg)


![[MS-ODATA]: Open Data Protocol (OData)](https://static.fdocuments.in/doc/165x107/622c6e460468f5535800c0b4/ms-odata-open-data-protocol-odata.jpg)