Craft-Bilt Structural Railing Installation - Posts With ...
29
Craft-Bilt Structural Railing Installation - Posts With Starter Pickets Page 1 Jan 1 2016
Transcript of Craft-Bilt Structural Railing Installation - Posts With ...
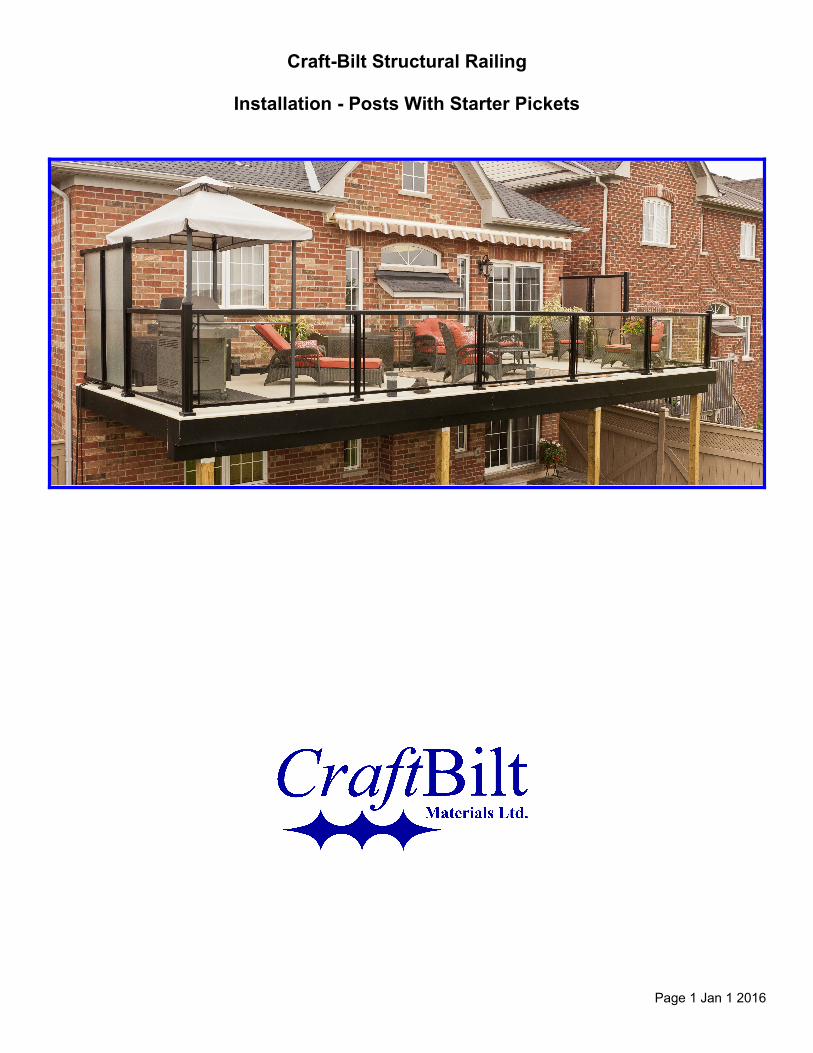
Craft-Bilt Structural Railing
Installation - Posts With Starter Pickets
Page 1 Jan 1 2016

INTRODUCTION
Thank you for choosing Craft-Bilt Aluminum Railing.
The railing must be installed on a deck or slab built to applicable building codes. Proper post spacing,fasteners and blocking should be used as per this guide and Craft-Bilt test reports. You are responsible to obtain any required permits, to comply with local building codes, and any cost associated with that compliance.
Please follow these instructions exactly and use all the components and fasteners as described. Always wear eye protection and follow the safety instructions that came with your tools.
Craft-Bilt can provide a test report to demonstrate compliance with local building codes however you are responsible to ensure that the system will comply in your area and to install your project in compliance with those codes. Craft-Bilt is not responsible for acceptance or permit approval by your local building department.
Cast aluminum post bases are powder coated for protection in most circumstances. For additional protection from concrete slabs that are rough or more corrosive, or if you desire extra protection from pressure treated wood, apply bituminous coating (roofing tar), ice & water shield, doublebond or similar to bottom of post base.
RECEIVING YOUR SHIPMENT
DO NOT SIGN for the shipment until your have checked it for damage or shortage. Follow our shipping instructions at craft-bilt.com/shipping-instructions
UNPACKING
Be careful not to scratch any parts when cutting away the wrapping.
TOOL LIST
Power Tools:Cordless variable speed drillCordless impact driverMiter saw with carbide tip blade for non-ferrous metalSDS hammer drill (for concrete slab)Impact wrench (for concrete slab)Sufficient length & gauge extension cords
Impact Driver Bits: #2 Robertson *T-40 Torx bit (for 2¼” & 3” posts on wood deck) Craft-Bilt part #0386459T-30 Torx bit (for 5½” posts on wood deck) Craft-Bilt part #0386453#3 Philips (for Wall Brackets on masonry)
Drill Bits:2 - 5/32” diameter (for pre-drilling Starter Pickets)⅜” Powers Wedge Bit (for 2¼” & 3” posts on concrete) part #03-1318 (SDS), #03-1380 (smooth)¼” Powers Wedge Bit (for 5½” posts on concrete) part #03-1314 (SDS), #03-1372 (smooth)¼” Powers Tapper Bit (for Wall Brackets on masonry) Craft-Bilt part #03-02895
Page 2 Jan 1 2016
Hand Tools:white rubber malletutility knifechannel lock pliershammerhacksaw
Measurement Tools:25 foot tape measure2 foot level
Miscellaneous:safety glasseslacquer thinner & white rags for cleaning up scuff marks on aluminum channels
For installing LED Sconce lights:Grinder with thin wheel suitable for aluminum extrusions (hack saw or strong aviation snips will also work)caulking gunsiliconewire cutter/stripper
TERMINOLOGY
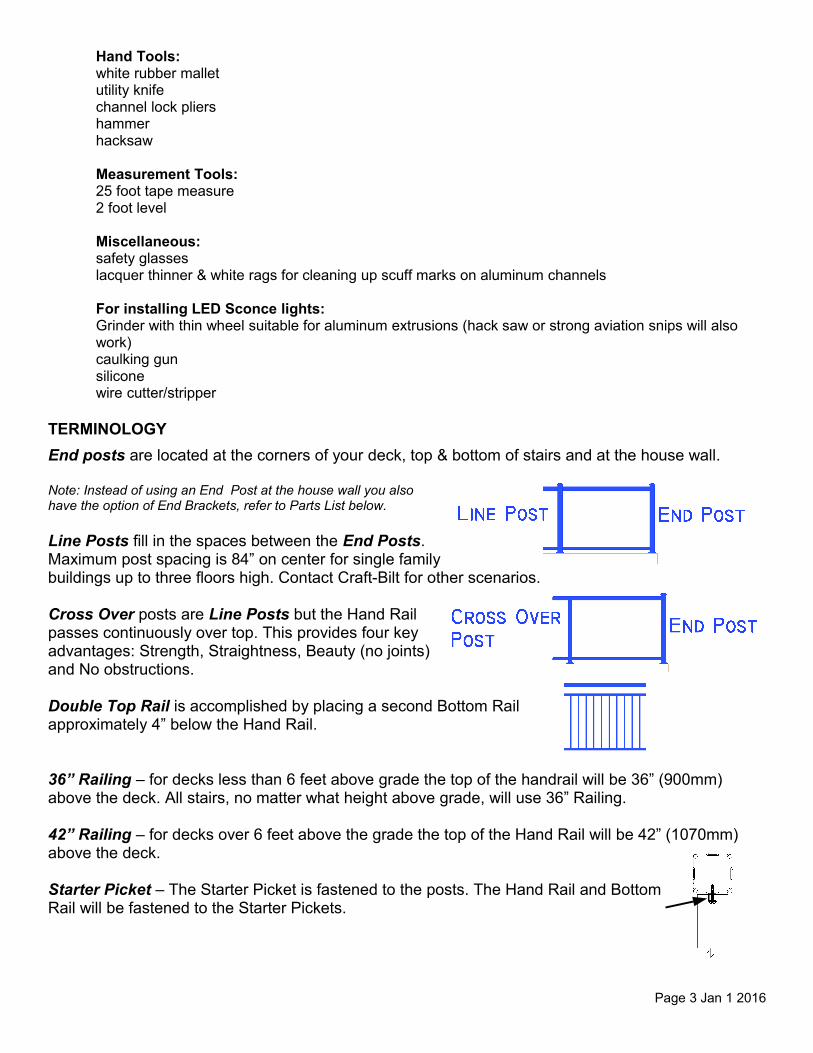
End posts are located at the corners of your deck, top & bottom of stairs and at the house wall.
Note: Instead of using an End Post at the house wall you alsohave the option of End Brackets, refer to Parts List below.
Line Posts fill in the spaces between the End Posts.Maximum post spacing is 84” on center for single familybuildings up to three floors high. Contact Craft-Bilt for other scenarios.
Cross Over posts are Line Posts but the Hand Railpasses continuously over top. This provides four keyadvantages: Strength, Straightness, Beauty (no joints)and No obstructions.
Double Top Rail is accomplished by placing a second Bottom Railapproximately 4” below the Hand Rail.
36” Railing – for decks less than 6 feet above grade the top of the handrail will be 36” (900mm) above the deck. All stairs, no matter what height above grade, will use 36” Railing.
42” Railing – for decks over 6 feet above the grade the top of the Hand Rail will be 42” (1070mm) above the deck.
Starter Picket – The Starter Picket is fastened to the posts. The Hand Rail and BottomRail will be fastened to the Starter Pickets.
Page 3 Jan 1 2016
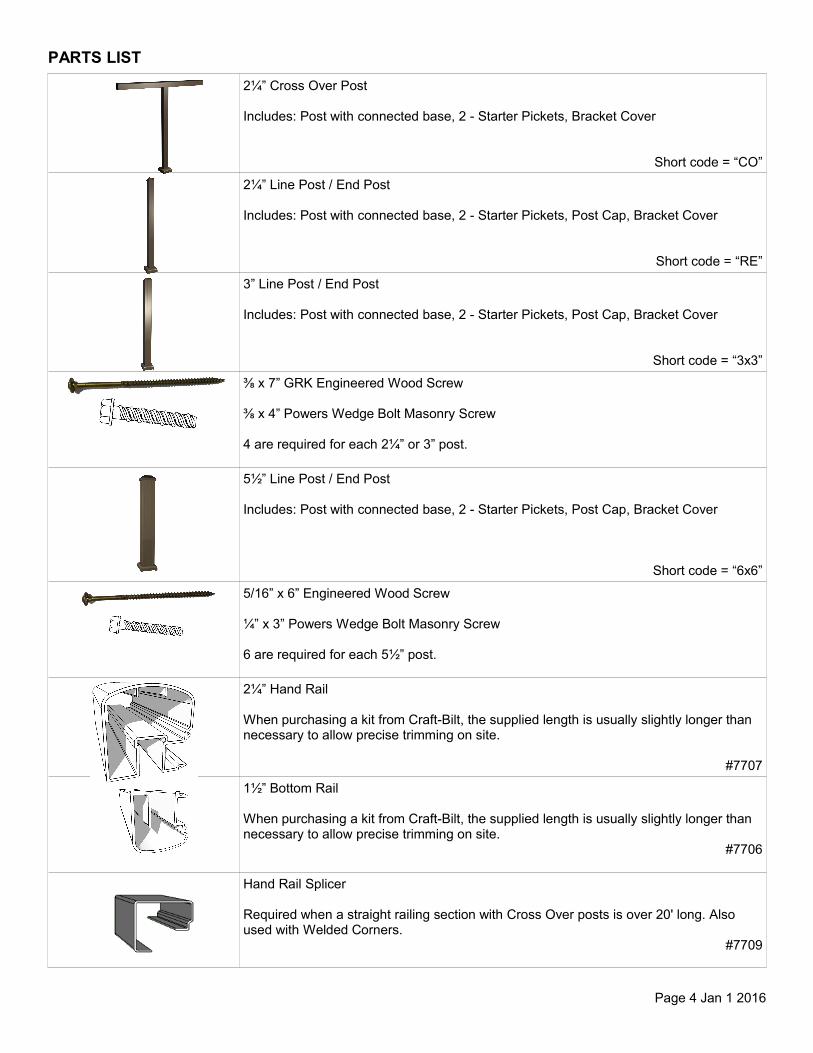
PARTS LIST
2¼” Cross Over Post
Includes: Post with connected base, 2 - Starter Pickets, Bracket Cover
Short code = “CO”
2¼” Line Post / End Post
Includes: Post with connected base, 2 - Starter Pickets, Post Cap, Bracket Cover
Short code = “RE”
3” Line Post / End Post
Includes: Post with connected base, 2 - Starter Pickets, Post Cap, Bracket Cover
Short code = “3x3”
⅜ x 7” GRK Engineered Wood Screw
⅜ x 4” Powers Wedge Bolt Masonry Screw
4 are required for each 2¼” or 3” post.
5½” Line Post / End Post
Includes: Post with connected base, 2 - Starter Pickets, Post Cap, Bracket Cover
Short code = “6x6”
5/16” x 6” Engineered Wood Screw
¼” x 3” Powers Wedge Bolt Masonry Screw
6 are required for each 5½” post.
2¼” Hand Rail
When purchasing a kit from Craft-Bilt, the supplied length is usually slightly longer than necessary to allow precise trimming on site.
#7707
1½” Bottom Rail
When purchasing a kit from Craft-Bilt, the supplied length is usually slightly longer than necessary to allow precise trimming on site.
#7706
Hand Rail Splicer
Required when a straight railing section with Cross Over posts is over 20' long. Also used with Welded Corners.
#7709
Page 4 Jan 1 2016
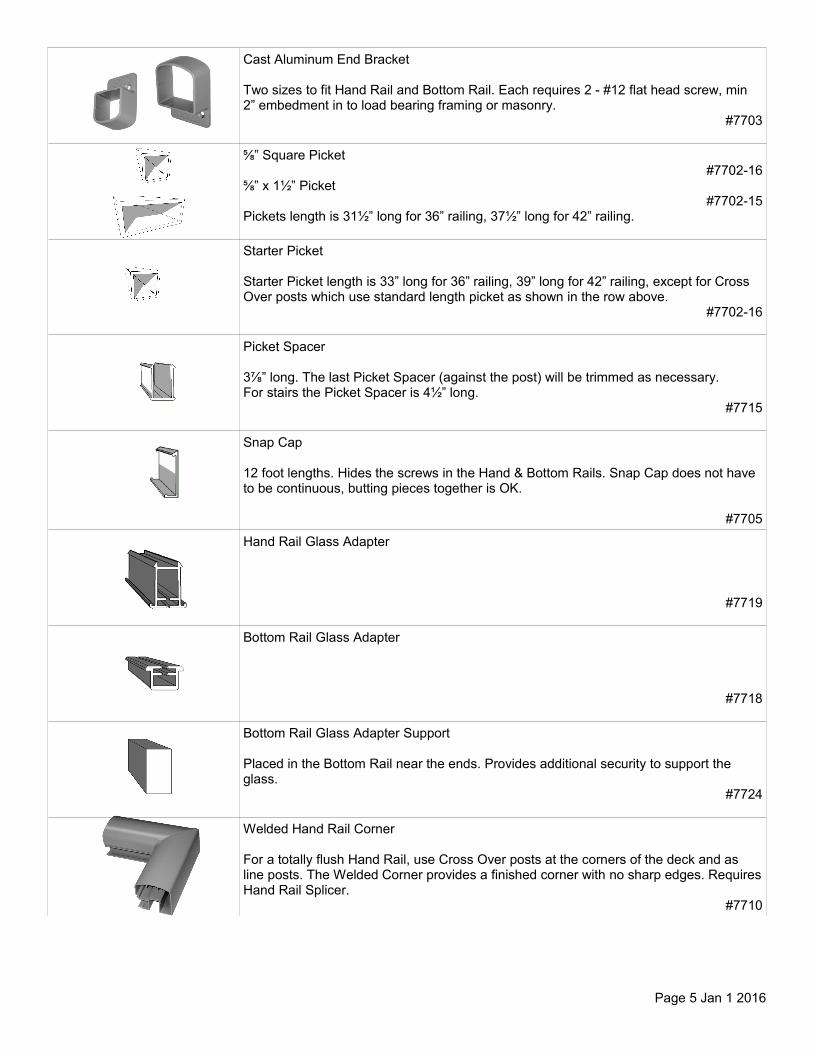
Cast Aluminum End Bracket
Two sizes to fit Hand Rail and Bottom Rail. Each requires 2 - #12 flat head screw, min 2” embedment in to load bearing framing or masonry.
#7703
⅝” Square Picket#7702-16
⅝” x 1½” Picket#7702-15
Pickets length is 31½” long for 36” railing, 37½” long for 42” railing.
Starter Picket
Starter Picket length is 33” long for 36” railing, 39” long for 42” railing, except for Cross Over posts which use standard length picket as shown in the row above.
#7702-16
Picket Spacer
3⅞” long. The last Picket Spacer (against the post) will be trimmed as necessary.For stairs the Picket Spacer is 4½” long.
#7715
Snap Cap
12 foot lengths. Hides the screws in the Hand & Bottom Rails. Snap Cap does not have to be continuous, butting pieces together is OK.
#7705
Hand Rail Glass Adapter
#7719
Bottom Rail Glass Adapter
#7718
Bottom Rail Glass Adapter Support
Placed in the Bottom Rail near the ends. Provides additional security to support the glass.
#7724
Welded Hand Rail Corner
For a totally flush Hand Rail, use Cross Over posts at the corners of the deck and as line posts. The Welded Corner provides a finished corner with no sharp edges. RequiresHand Rail Splicer.
#7710
Page 5 Jan 1 2016
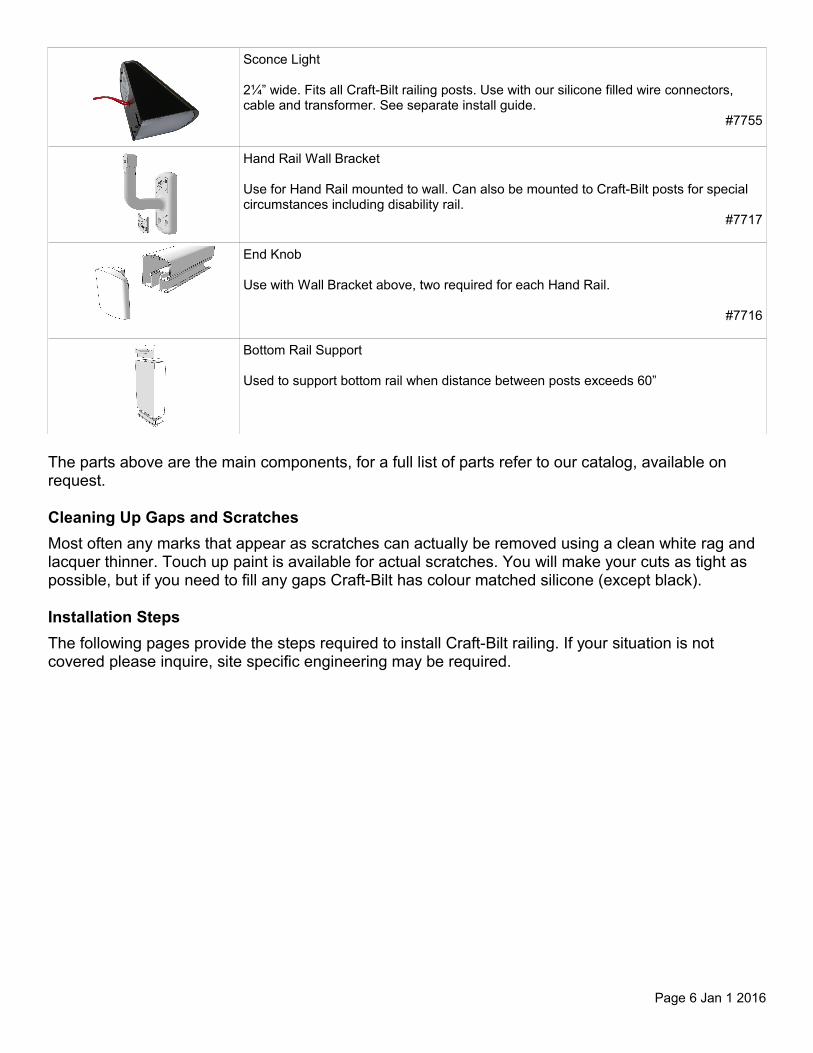
Sconce Light
2¼” wide. Fits all Craft-Bilt railing posts. Use with our silicone filled wire connectors, cable and transformer. See separate install guide.
#7755
Hand Rail Wall Bracket
Use for Hand Rail mounted to wall. Can also be mounted to Craft-Bilt posts for special circumstances including disability rail.
#7717
End Knob
Use with Wall Bracket above, two required for each Hand Rail.
#7716
Bottom Rail Support
Used to support bottom rail when distance between posts exceeds 60”
The parts above are the main components, for a full list of parts refer to our catalog, available on request.
Cleaning Up Gaps and Scratches
Most often any marks that appear as scratches can actually be removed using a clean white rag and lacquer thinner. Touch up paint is available for actual scratches. You will make your cuts as tight as possible, but if you need to fill any gaps Craft-Bilt has colour matched silicone (except black).
Installation Steps
The following pages provide the steps required to install Craft-Bilt railing. If your situation is not covered please inquire, site specific engineering may be required.
Page 6 Jan 1 2016

Project No.: N/ADate: Aug 13, 2020Scale: N.T.S.Drawn By: N/A
Revision: 425 Green Ct., Ajax, ON L1S 6W9
(800) 668-6430 [email protected] No.: 1
Title:
Desc:
Railing Installationw Starter Picket
Typical Floor Plan
Unpack your posts and determine their position on the deck. Refer to your company's sketch, the quote from Craft-Bilt or the packing list insert. Post heights (not incl. post cap)
36" railing: Line/End Post 37½" Cross Over 33¾"42" railing: Line/End Post 43½" Cross Over 39¾"
In the next step you will be attaching Starter Pickets to your posts. Line posts have two Starter Pickets on opposite faces, End Posts have a Starter Picket on one face except at corners where they are on adjacent faces.
1/2"
1/2"
End Brackets can be usedinstead of an End Post. Wallshould be smooth and havesufficient structural materialto hold the screws.
Rim Joist
End Post top of stairs(3" Post is shown)
Line Post(2¼" Cross Overpost is shown)
End Post at house(3" Post is shown)
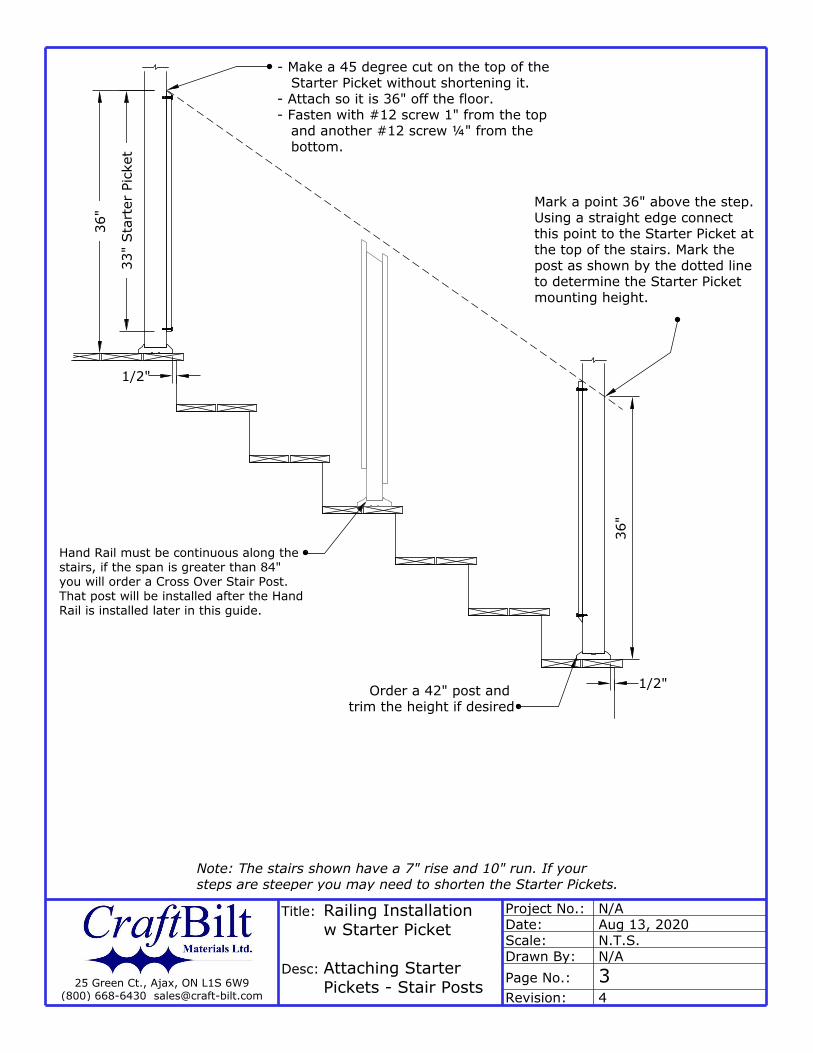
The post on the last step should be ordered as a 42" post. The height can be trimmed if desired.
2¼" & 3" post bases are placed ½" from edge of rim joist. When 5½" posts are being used review drawings elsewhere in this guide.
Your deck may be using 36" or 42" Railing but stairs will always use 36" Railing.
Project No.: N/ADate: Aug 13, 2020Scale: N.T.S.Drawn By: N/A
Revision: 425 Green Ct., Ajax, ON L1S 6W9
(800) 668-6430 [email protected] No.: 2
Title:
Desc:
Railing Installationw Starter Picket
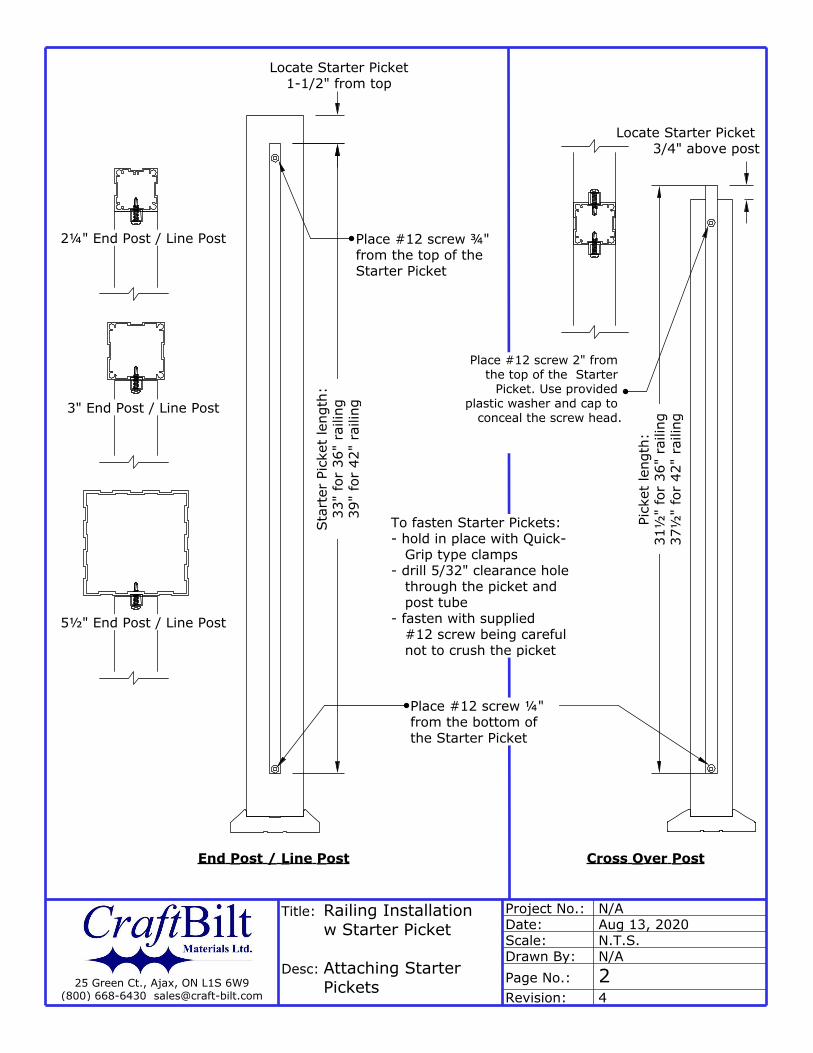
Attaching Starter Pickets
2¼" End Post / Line Post
3" End Post / Line Post
5½" End Post / Line Post
End Post / Line Post Cross Over Post
Place #12 screw ¾" from the top of the Starter Picket
Locate Starter Picket1-1/2" from top
Sta
rter
Pic
ket
leng
th:
33"
for
36"
raili
ng39
" fo
r 42
" ra
iling
Pick
et le
ngth
:31
½"
for
36"
raili
ng37
½"
for
42"
raili
ng
Locate Starter Picket 3/4" above post
Place #12 screw 2" from the top of the Starter
Picket. Use provided plastic washer and cap to
conceal the screw head.
Place #12 screw ¼" from the bottom of the Starter Picket
To fasten Starter Pickets:- hold in place with Quick- Grip type clamps- drill 5/32" clearance hole through the picket and post tube- fasten with supplied #12 screw being careful not to crush the picket
Project No.: N/ADate: Aug 13, 2020Scale: N.T.S.Drawn By: N/A
Revision: 425 Green Ct., Ajax, ON L1S 6W9
(800) 668-6430 [email protected] No.: 3
Title:
Desc:
Railing Installationw Starter Picket
Attaching Starter Pickets - Stair Posts
Order a 42" post and trim the height if desired
1/2"
1/2"
36"
36"
33"
Sta
rter
Pic
ket
Mark a point 36" above the step. Using a straight edge connectthis point to the Starter Picket at the top of the stairs. Mark the post as shown by the dotted line to determine the Starter Picket mounting height.
- Make a 45 degree cut on the top of the Starter Picket without shortening it. - Attach so it is 36" off the floor.- Fasten with #12 screw 1" from the top and another #12 screw ¼" from the bottom.
Hand Rail must be continuous along the stairs, if the span is greater than 84" you will order a Cross Over Stair Post. That post will be installed after the Hand Rail is installed later in this guide.
Note: The stairs shown have a 7" rise and 10" run. If your steps are steeper you may need to shorten the Starter Pickets.

Project No.: N/ADate: Aug 13, 2020Scale: N.T.S.Drawn By: N/A
Revision: 425 Green Ct., Ajax, ON L1S 6W9
(800) 668-6430 [email protected] No.: 4
Title:
Desc:
Railing Installationw Starter Picket
Fastening Posts to the Deck
4 - 3/8" x 4"Wedge Bolt anchor
by Powers Fasteners
4 - 3/8" x 7" RSSEngineered Screw
by GRK
5½" PostConnection to Wood Deck
5½" PostConnection to Concrete
4 - 3¼" x .120smooth framing nails or equiv. (typ.)
Blocking forWood Deck
36 1/8"or
42 1/8"
2 1/2"
Placement ofEnd Bracketson the wall
4000psi (30Mpa)min. concrete
strength
6 - 5/16" x 6"Engineered Screw
by GRK 6 - 1/4" x 3"Wedge Bolt anchor
by Powers
1/2" 1/2"
2¼" & 3" PostConnection to Wood Deck
2¼" & 3" PostConnection to Concrete
1/41/4
1-5/8"
When mixing 2¼" or 3" posts with 5½" posts, note the the spacing from the edge of the deck is different.
Tip: Fully tightening the post anchors can force the post off plumb, so tighten them just enough to hold it plumb. After the hand & bottom rails are installed, finish tightening if necessary.
Apply PL-2000 construction adhesive between blocking members and joists
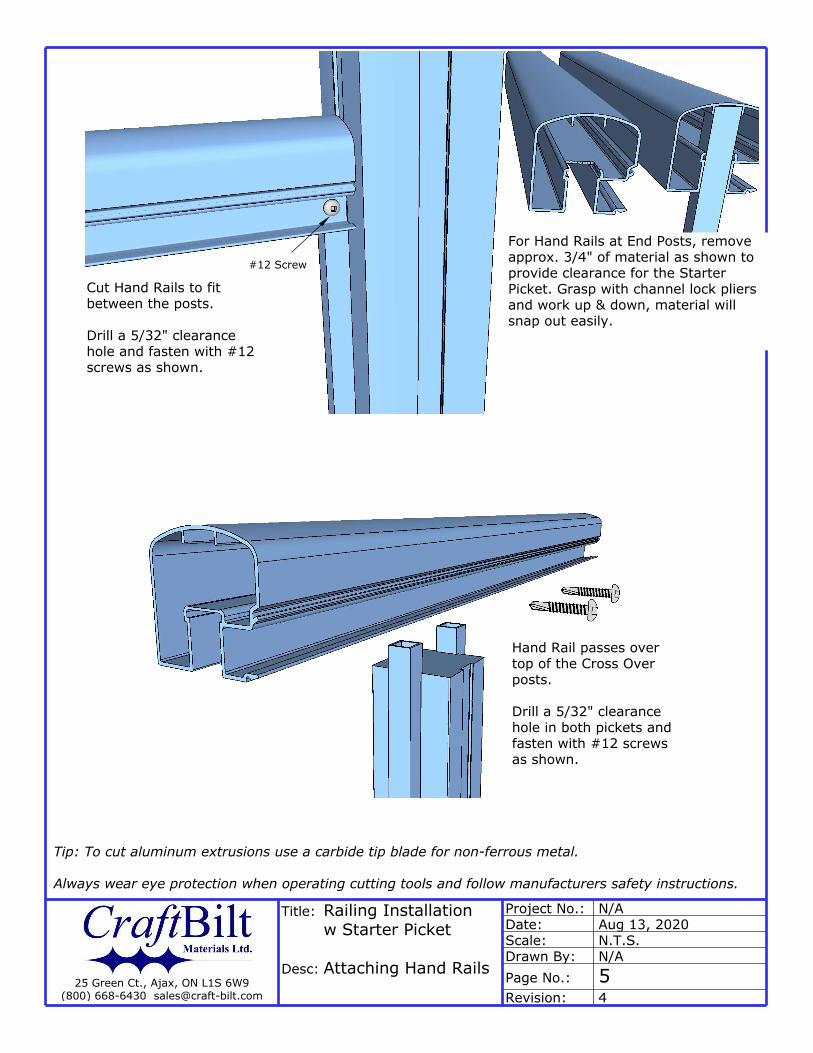
Cut Hand Rails to fit between the posts.
Drill a 5/32" clearance hole and fasten with #12 screws as shown.
Hand Rail passes over top of the Cross Over posts.
Drill a 5/32" clearance hole in both pickets and fasten with #12 screws as shown.
Project No.: N/ADate: Aug 13, 2020Scale: N.T.S.Drawn By: N/A
Revision: 425 Green Ct., Ajax, ON L1S 6W9
(800) 668-6430 [email protected] No.: 5
Title:
Desc:
Railing Installationw Starter Picket
Attaching Hand Rails
For Hand Rails at End Posts, remove approx. 3/4" of material as shown to provide clearance for the Starter Picket. Grasp with channel lock pliers and work up & down, material will snap out easily.
Tip: To cut aluminum extrusions use a carbide tip blade for non-ferrous metal.
Always wear eye protection when operating cutting tools and follow manufacturers safety instructions.
#12 Screw
Project No.: N/ADate: Aug 13, 2020Scale: N.T.S.Drawn By: N/A
Revision: 425 Green Ct., Ajax, ON L1S 6W9
(800) 668-6430 [email protected] No.: 6
Title:
Desc:
Railing Installationw Starter Picket
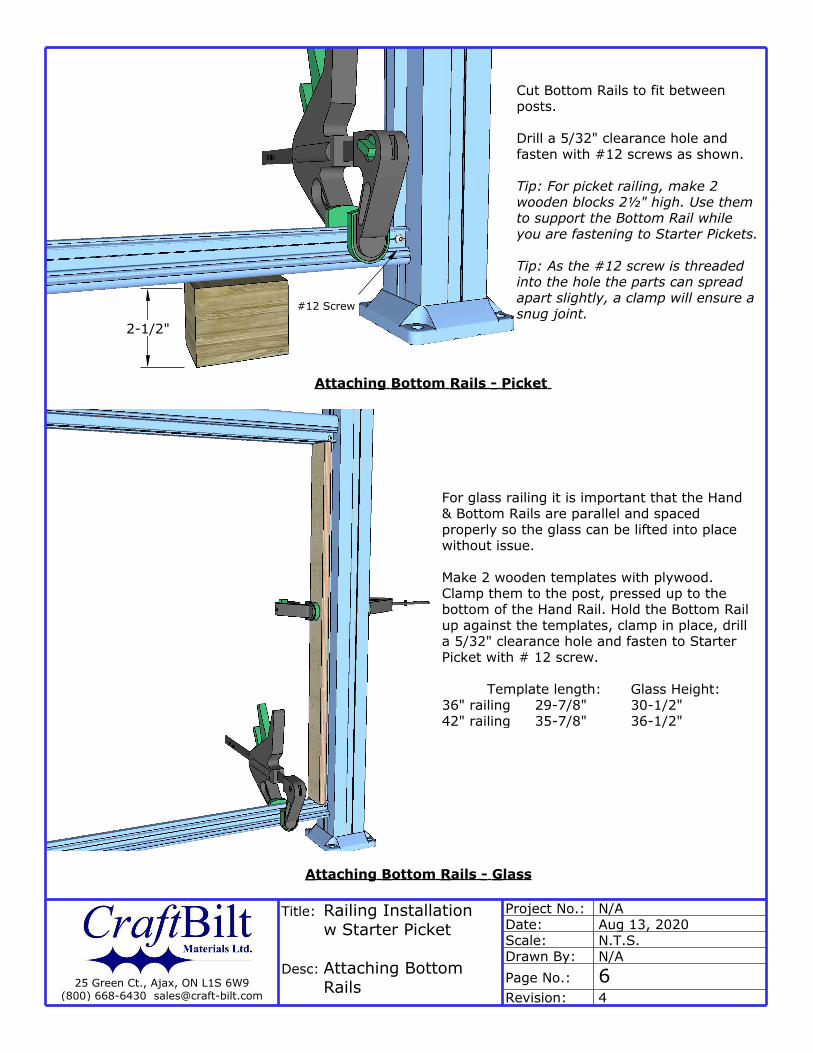
Attaching Bottom Rails
For glass railing it is important that the Hand & Bottom Rails are parallel and spaced properly so the glass can be lifted into place without issue.
Make 2 wooden templates with plywood. Clamp them to the post, pressed up to the bottom of the Hand Rail. Hold the Bottom Rail up against the templates, clamp in place, drill a 5/32" clearance hole and fasten to Starter Picket with # 12 screw.
Template length: Glass Height:36" railing 29-7/8" 30-1/2"42" railing 35-7/8" 36-1/2"
#12 Screw
Cut Bottom Rails to fit between posts.
Drill a 5/32" clearance hole and fasten with #12 screws as shown.
Tip: For picket railing, make 2 wooden blocks 2½" high. Use them to support the Bottom Rail while you are fastening to Starter Pickets.
Tip: As the #12 screw is threaded into the hole the parts can spread apart slightly, a clamp will ensure a snug joint.
Attaching Bottom Rails - Picket
Attaching Bottom Rails - Glass
2-1/2"
Project No.: N/ADate: Aug 13, 2020Scale: N.T.S.Drawn By: N/A
Revision: 425 Green Ct., Ajax, ON L1S 6W9
(800) 668-6430 [email protected] No.: 7
Title:
Desc:
Railing Installationw Starter Picket
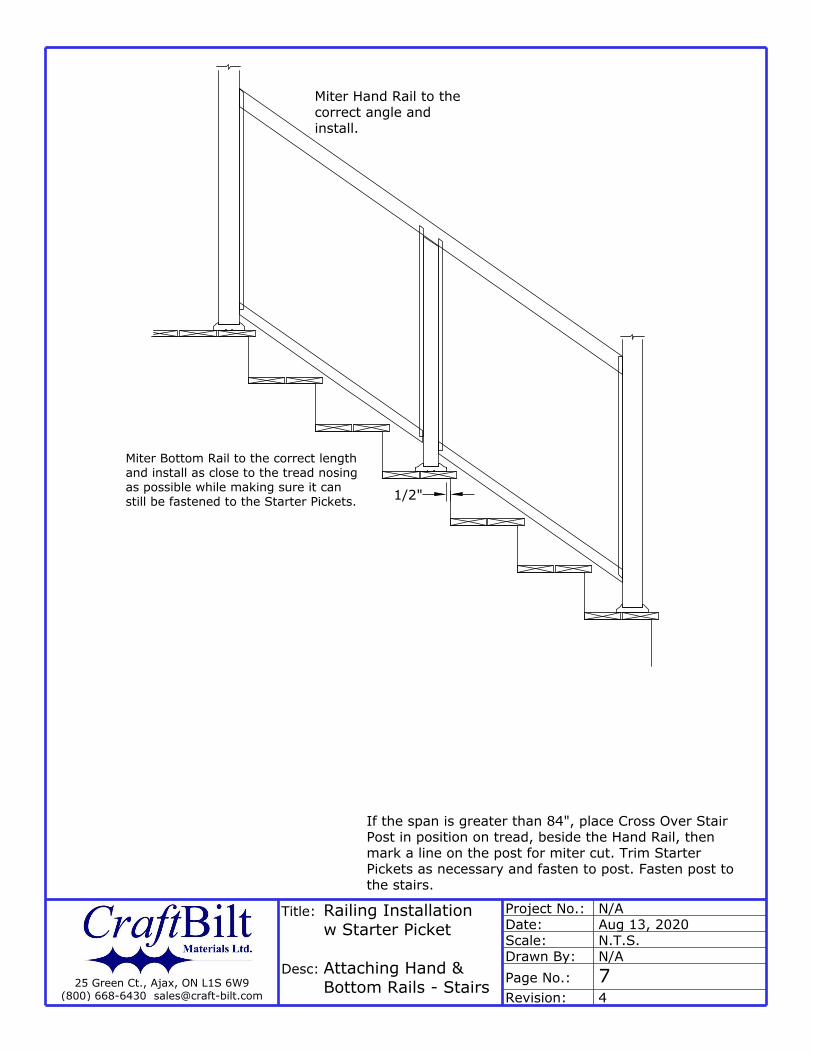
Attaching Hand & Bottom Rails - Stairs
Miter Hand Rail to the correct angle and install.
If the span is greater than 84", place Cross Over Stair Post in position on tread, beside the Hand Rail, then mark a line on the post for miter cut. Trim Starter Pickets as necessary and fasten to post. Fasten post to the stairs.
Miter Bottom Rail to the correct length and install as close to the tread nosing as possible while making sure it can still be fastened to the Starter Pickets. 1/2"
Project No.: N/ADate: Aug 13, 2020Scale: N.T.S.Drawn By: N/A
Revision: 425 Green Ct., Ajax, ON L1S 6W9
(800) 668-6430 [email protected] No.: 8
Title:
Desc:
Railing Installationw Starter Picket
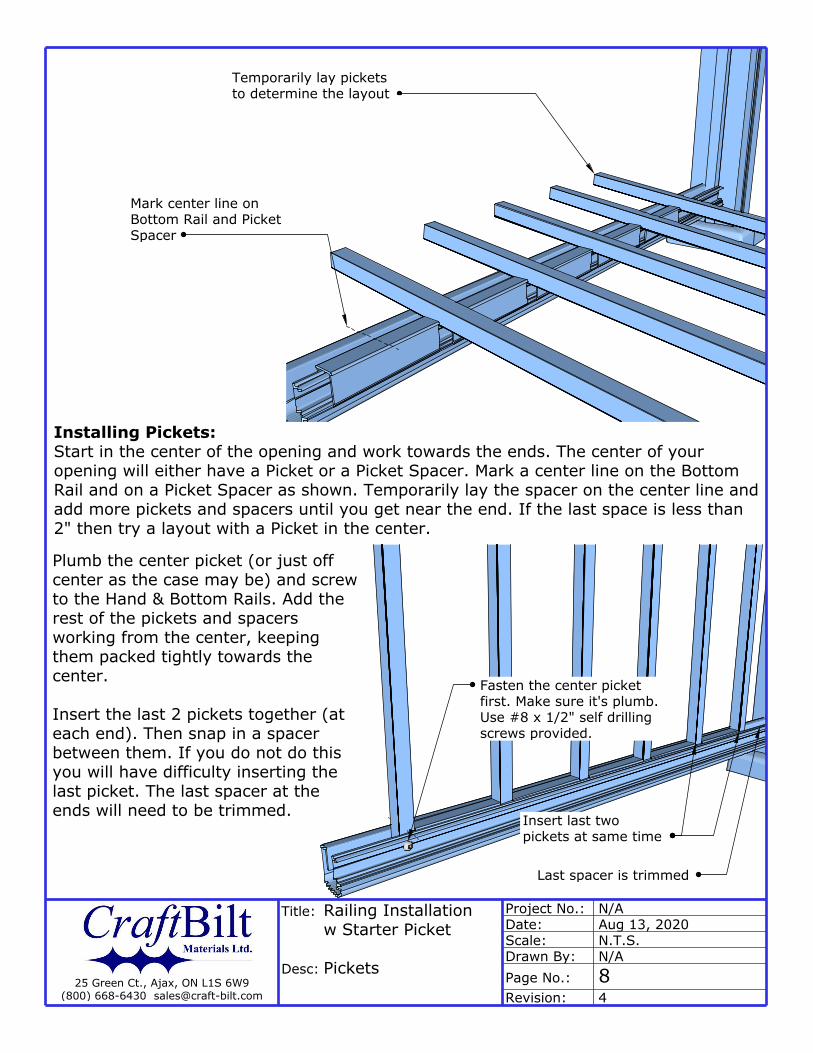
Pickets
Installing Pickets:Start in the center of the opening and work towards the ends. The center of your opening will either have a Picket or a Picket Spacer. Mark a center line on the Bottom Rail and on a Picket Spacer as shown. Temporarily lay the spacer on the center line and add more pickets and spacers until you get near the end. If the last space is less than 2" then try a layout with a Picket in the center.
Temporarily lay picketsto determine the layout
Fasten the center picket first. Make sure it's plumb.Use #8 x 1/2" self drillingscrews provided.
Insert last twopickets at same time
Last spacer is trimmed
Mark center line on Bottom Rail and Picket Spacer
Plumb the center picket (or just off center as the case may be) and screw to the Hand & Bottom Rails. Add the rest of the pickets and spacers working from the center, keeping them packed tightly towards the center.
Insert the last 2 pickets together (at each end). Then snap in a spacer between them. If you do not do this you will have difficulty inserting the last picket. The last spacer at the ends will need to be trimmed.
Project No.: N/ADate: Aug 13, 2020Scale: N.T.S.Drawn By: N/A
Revision: 425 Green Ct., Ajax, ON L1S 6W9
(800) 668-6430 [email protected] No.: 9
Title:
Desc:
Railing Installationw Starter Picket
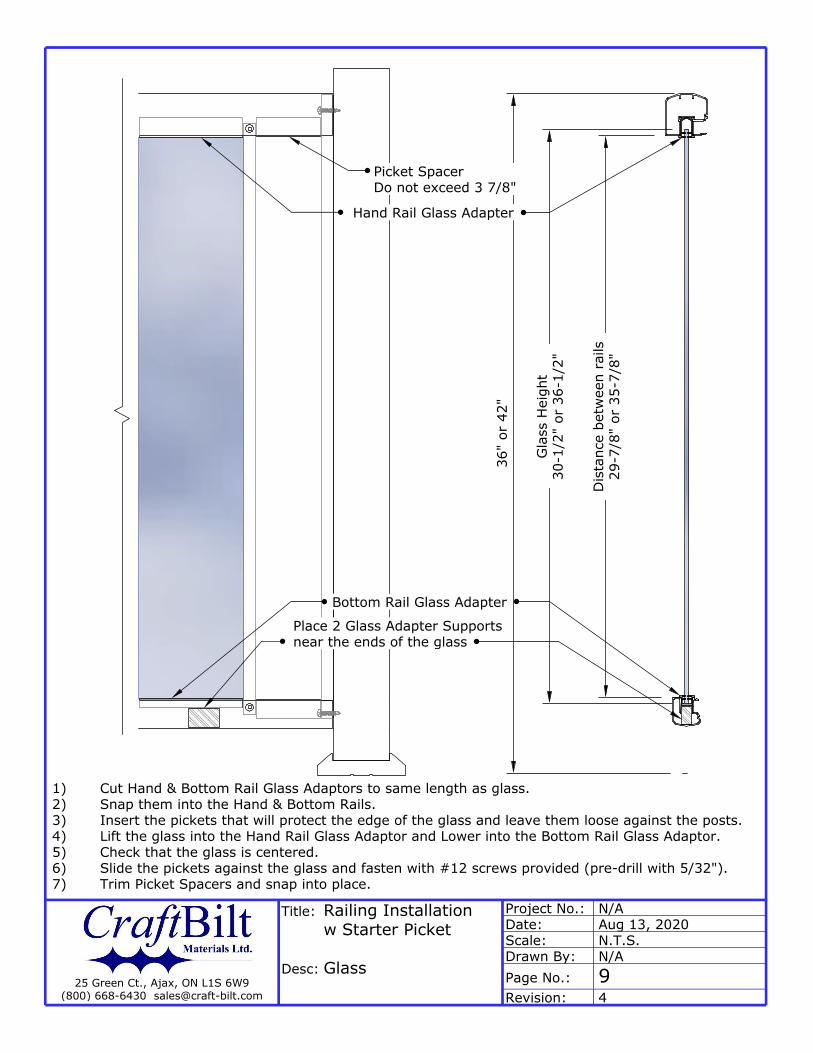
Glass
Place 2 Glass Adapter Supportsnear the ends of the glass
Bottom Rail Glass Adapter
1) Cut Hand & Bottom Rail Glass Adaptors to same length as glass.2) Snap them into the Hand & Bottom Rails.3) Insert the pickets that will protect the edge of the glass and leave them loose against the posts.4) Lift the glass into the Hand Rail Glass Adaptor and Lower into the Bottom Rail Glass Adaptor.5) Check that the glass is centered.6) Slide the pickets against the glass and fasten with #12 screws provided (pre-drill with 5/32").7) Trim Picket Spacers and snap into place.
36"
or 4
2"
Dis
tanc
e be
twee
n ra
ils29
-7/8
" or
35-
7/8"
Gla
ss H
eigh
t30
-1/2
" or
36-
1/2"
Hand Rail Glass Adapter
Picket SpacerDo not exceed 3 7/8"
Drop Legmating
Project No.: N/ADate: Aug 13, 2020Scale: N.T.S.Drawn By: N/A
Revision: 425 Green Ct., Ajax, ON L1S 6W9
(800) 668-6430 [email protected] No.: 10
Title:
Desc:
Railing Installationw Starter Picket
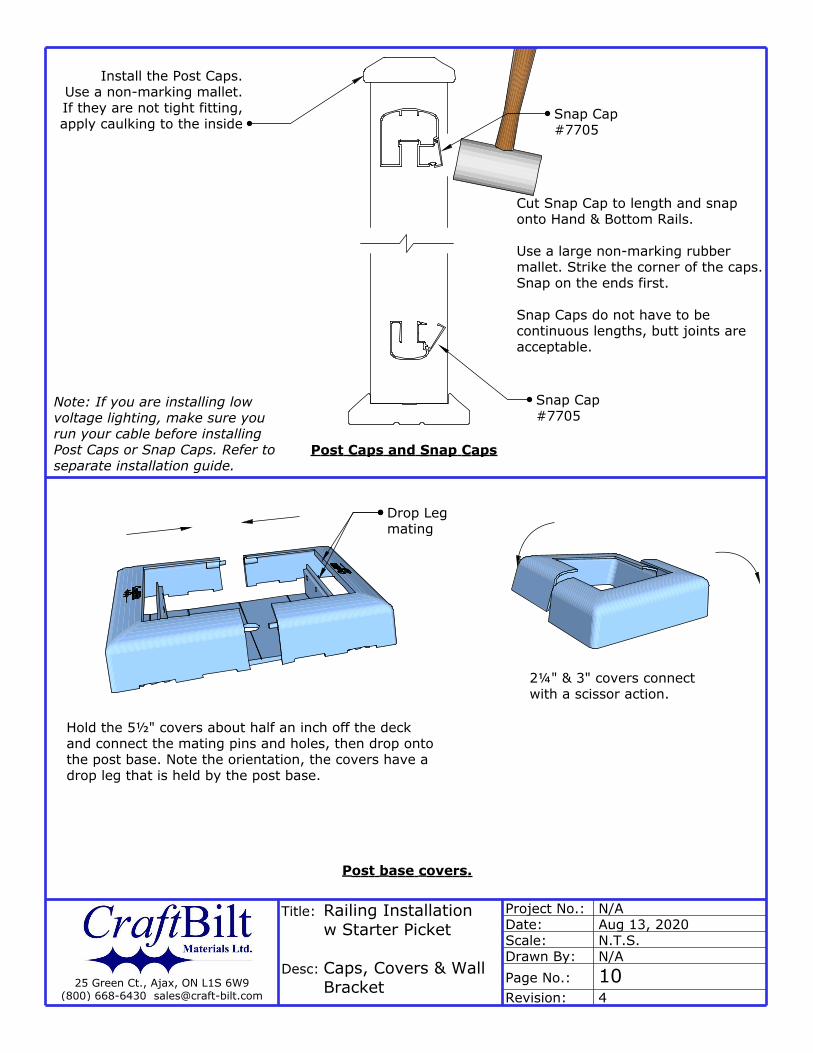
Caps, Covers & Wall Bracket
Snap Cap#7705
Snap Cap#7705
Cut Snap Cap to length and snap onto Hand & Bottom Rails.
Use a large non-marking rubber mallet. Strike the corner of the caps. Snap on the ends first.
Snap Caps do not have to be continuous lengths, butt joints are acceptable.
Install the Post Caps.Use a non-marking mallet.If they are not tight fitting,apply caulking to the inside
Post Caps and Snap Caps
Note: If you are installing low voltage lighting, make sure you run your cable before installing Post Caps or Snap Caps. Refer to separate installation guide.
2¼" & 3" covers connect with a scissor action.
Hold the 5½" covers about half an inch off the deck and connect the mating pins and holes, then drop onto the post base. Note the orientation, the covers have a drop leg that is held by the post base.
Post base covers.
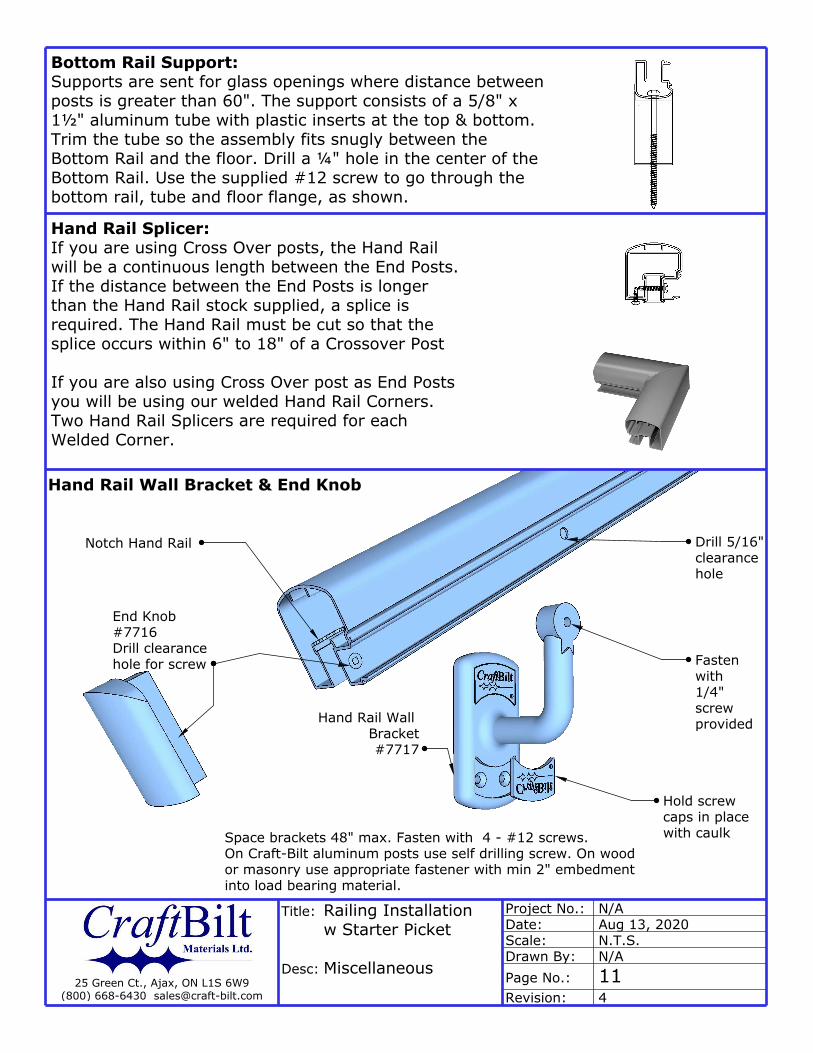
End Knob#7716Drill clearancehole for screw
Notch Hand Rail Drill 5/16"clearancehole
Fastenwith1/4"screw provided
Hand Rail Wall Bracket & End Knob
Hold screwcaps in placewith caulkSpace brackets 48" max. Fasten with 4 - #12 screws.
On Craft-Bilt aluminum posts use self drilling screw. On wood or masonry use appropriate fastener with min 2" embedment into load bearing material.
Hand Rail Wall Bracket#7717
Project No.: N/ADate: Aug 13, 2020Scale: N.T.S.Drawn By: N/A
Revision: 425 Green Ct., Ajax, ON L1S 6W9
(800) 668-6430 [email protected] No.: 11
Title:
Desc:
Railing Installationw Starter Picket
Miscellaneous
Bottom Rail Support:Supports are sent for glass openings where distance between posts is greater than 60". The support consists of a 5/8" x 1½" aluminum tube with plastic inserts at the top & bottom. Trim the tube so the assembly fits snugly between the Bottom Rail and the floor. Drill a ¼" hole in the center of the Bottom Rail. Use the supplied #12 screw to go through the bottom rail, tube and floor flange, as shown.
Hand Rail Splicer:If you are using Cross Over posts, the Hand Rail will be a continuous length between the End Posts. If the distance between the End Posts is longer than the Hand Rail stock supplied, a splice is required. The Hand Rail must be cut so that the splice occurs within 6" to 18" of a Crossover Post
If you are also using Cross Over post as End Posts you will be using our welded Hand Rail Corners. Two Hand Rail Splicers are required for each Welded Corner.
Project No.: N/ADate: Aug 13, 2020Scale: N.T.S.Drawn By: N/A
Revision: 425 Green Ct., Ajax, ON L1S 6W9
(800) 668-6430 [email protected] No.: 12
Title:
Desc:
Railing Installationw Starter Picket
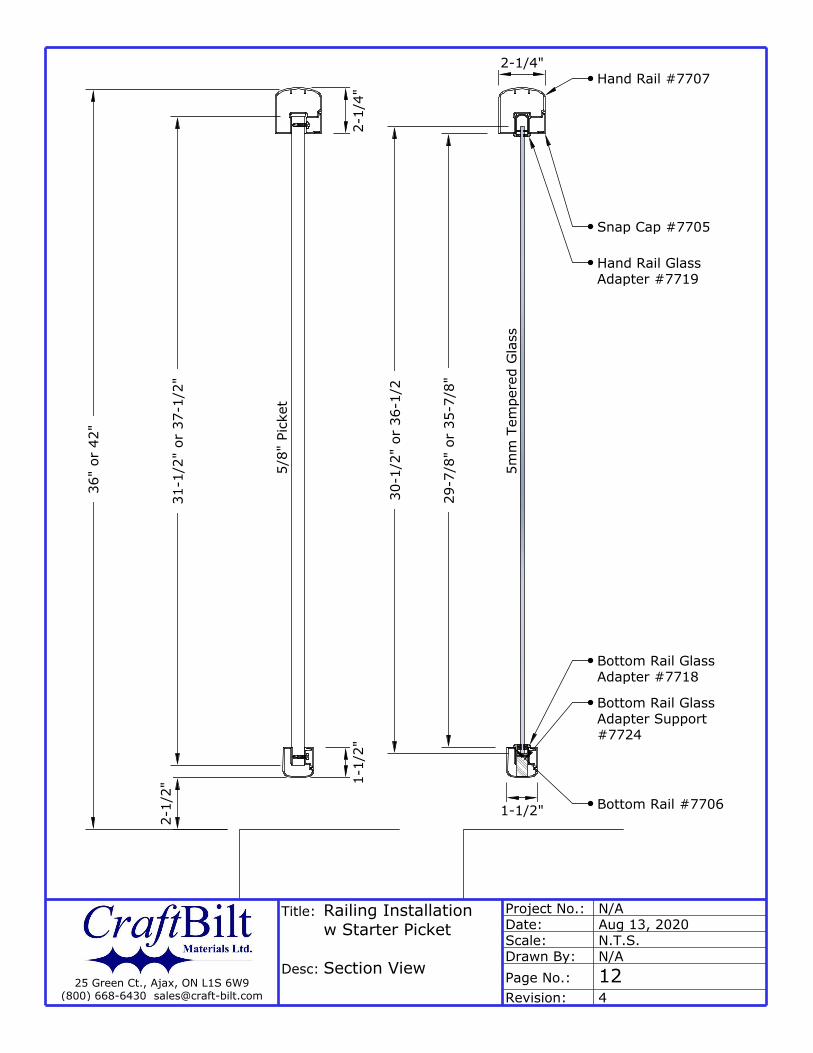
Section View
2-1/4"
31-1
/2"
or 3
7-1/
2"
29-7
/8"
or 3
5-7/
8"
30-1
/2"
or 3
6-1/
2
5/8"
Pic
ket
5mm
Tem
pere
d G
lass
2-1/
2"
Bottom Rail GlassAdapter Support#7724
Bottom Rail GlassAdapter #7718
Bottom Rail #7706
Snap Cap #7705
Hand Rail GlassAdapter #7719
Hand Rail #7707
2-1/
4"
1-1/2"
1-1/
2"
36"
or 4
2"
26-1
/2"
or 3
2-1/
2"
24-1
/2"
or 3
0-1/
2"3-
7/8"
2-1/
4"
2-1/4"
1-1/
2"
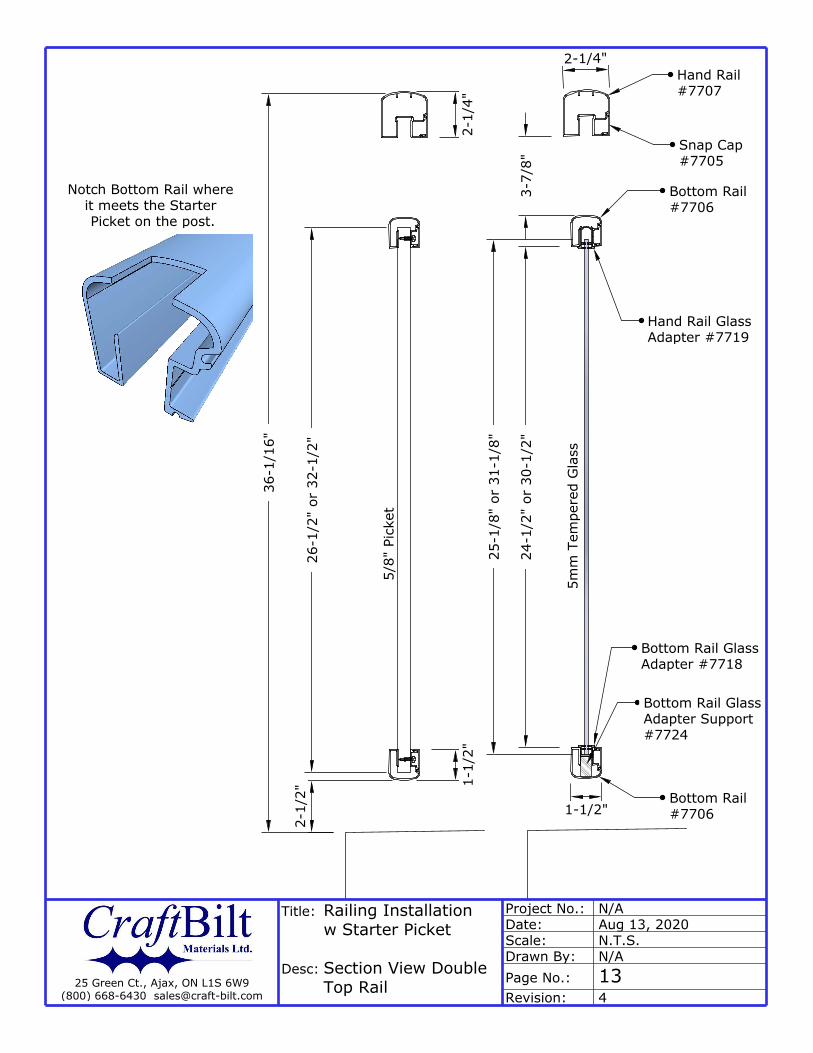
Notch Bottom Rail where it meets the Starter Picket on the post.
2-1/
2"
36-1
/16"
25-1
/8"
or 3
1-1/
8"
1-1/2"
Project No.: N/ADate: Aug 13, 2020Scale: N.T.S.Drawn By: N/A
Revision: 425 Green Ct., Ajax, ON L1S 6W9
(800) 668-6430 [email protected] No.: 13
Title:
Desc:
Railing Installationw Starter Picket
Section View Double Top Rail
5/8"
Pic
ket
5mm
Tem
pere
d G
lass
Bottom Rail GlassAdapter Support#7724
Bottom Rail GlassAdapter #7718
Bottom Rail #7706
Snap Cap #7705
Hand Rail GlassAdapter #7719
Hand Rail #7707
Bottom Rail #7706

Project No.: N/ADate: Aug 13, 2020Scale: N.T.S.Drawn By: N/A
Revision: 425 Green Ct., Ajax, ON L1S 6W9
(800) 668-6430 [email protected] No.: 14
Title:
Desc:
Railing Installationw Starter Picket
Section View Angled Post
1-1/
4"
22.5 Degree AdapterPart No 7781-02
Sold in pairs. Fasten to post with4 - #10 screws (provided)
Make sure painted endis facing up.
Adapter is 40" long. Mount 1¼"from tip of post (not incl post cap).It will extend past the hand andbottom rails by approx. ¼"
For 36" high railing, trim 6"from the adapters

Project No.: N/ADate: Aug 13, 2020Scale: N.T.S.Drawn By: N/A
Revision: 425 Green Ct., Ajax, ON L1S 6W9
(800) 668-6430 [email protected] No.: 15
Title:
Desc:
Railing Installationw Starter Picket
2¼" & 3" Post Deductions
4"
1-3/4"
End PostInside Corner / Top of Stairs
End PostAt corner
2¼" Post Deductions
1/2" fromhouse
1/2" fromrim joist
1/2"4"
1/2"
End PostAt house
3" Post Deductions
1/2" fromhouse
1/2" fromrim joist
1/2"
1/2"
End PostInside Corner / Top of Stairs
End PostAt corner
End PostAt house
4-3/8" 4-3/8"
1-3/8"

Project No.: N/ADate: Aug 13, 2020Scale: N.T.S.Drawn By: N/A
Revision: 425 Green Ct., Ajax, ON L1S 6W9
(800) 668-6430 [email protected] No.: 16
Title:
Desc:
Railing Installationw Starter Picket
5½" Post Deductions
HOUSE
Inside Corner orTop of Stairs
Dotted line represents thebracket cover which will be
located 1/8" from edge of rim joistand 1/8" away from house wall
1 1/4"
1 1/4"add for HandRail cut
Bottom of stairs, same placementas outside corner
CO (Cross Over) & 3x3 postbase is usually ½" from rim
joist but when using with 5½"posts they will be set back
further than normal: 1 5/8"
6 3/
4"de
duct
ion
for
hand
rail
cut
6 3/
4"de
duct
ion
for
hand
rail
cut
1 1/4"addition forhandrail cut
If using 2¼" or 3"post at bottom ofstairs, place 5½"post as show.
1-5/8"
1/4"
2-7/8"
6-3/4"
1-1/4"1/4"
1/8"
1/2"
Project No.: N/ADate: Aug 13, 2020Scale: N.T.S.Drawn By: N/A
Revision: 425 Green Ct., Ajax, ON L1S 6W9
(800) 668-6430 [email protected] No.: 17
Title:
Desc:
Railing Installationw Starter Picket
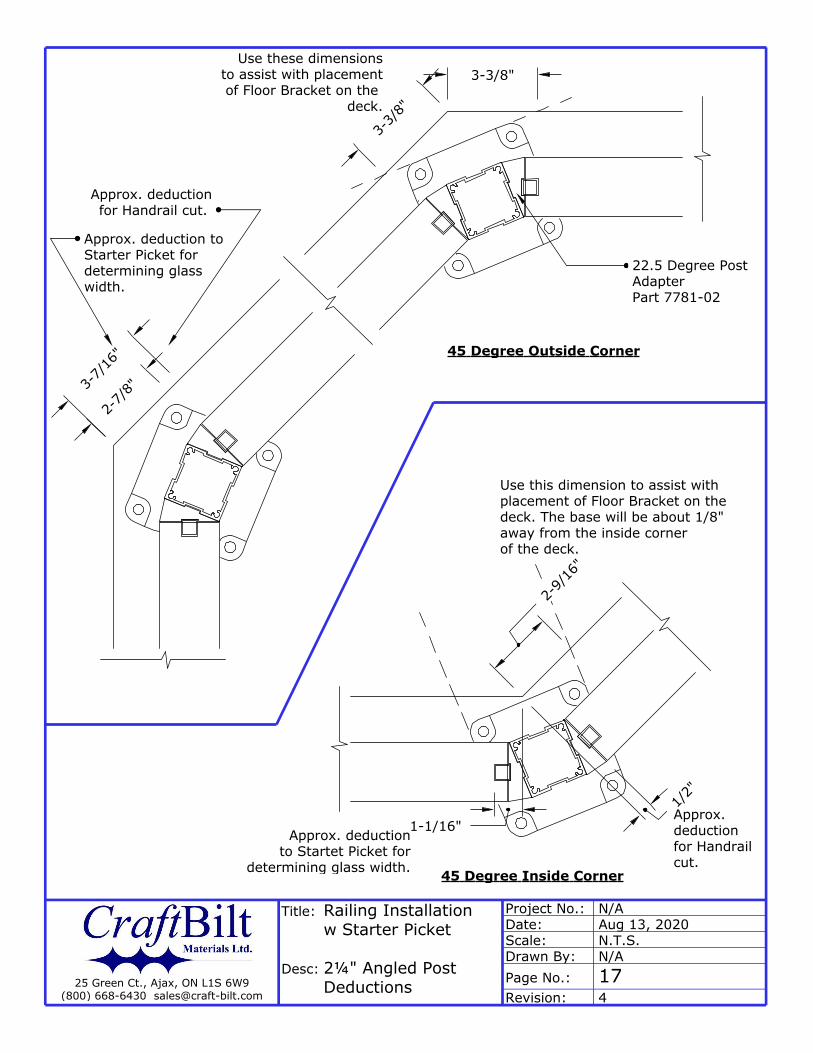
2¼" Angled Post Deductions
45 Degree Outside Corner
45 Degree Inside Corner
1-1/16"
1/2"
Approx. deductionfor Handrailcut.
Approx. deductionto Startet Picket for
determining glass width.
3-3/8"Use these dimensions
to assist with placementof Floor Bracket on the
deck.
3-3/
8"
2-7/
8"3-7/
16"
Approx. deduction toStarter Picket fordetermining glasswidth.
Approx. deductionfor Handrail cut.
22.5 Degree Post AdapterPart 7781-02
2-9/
16"
Use this dimension to assist with placement of Floor Bracket on the deck. The base will be about 1/8" away from the inside cornerof the deck.
Project No.: N/ADate: Aug 13, 2020Scale: N.T.S.Drawn By: N/A
Revision: 425 Green Ct., Ajax, ON L1S 6W9
(800) 668-6430 [email protected] No.: 18
Title:
Desc:
Railing Installationw Starter Picket
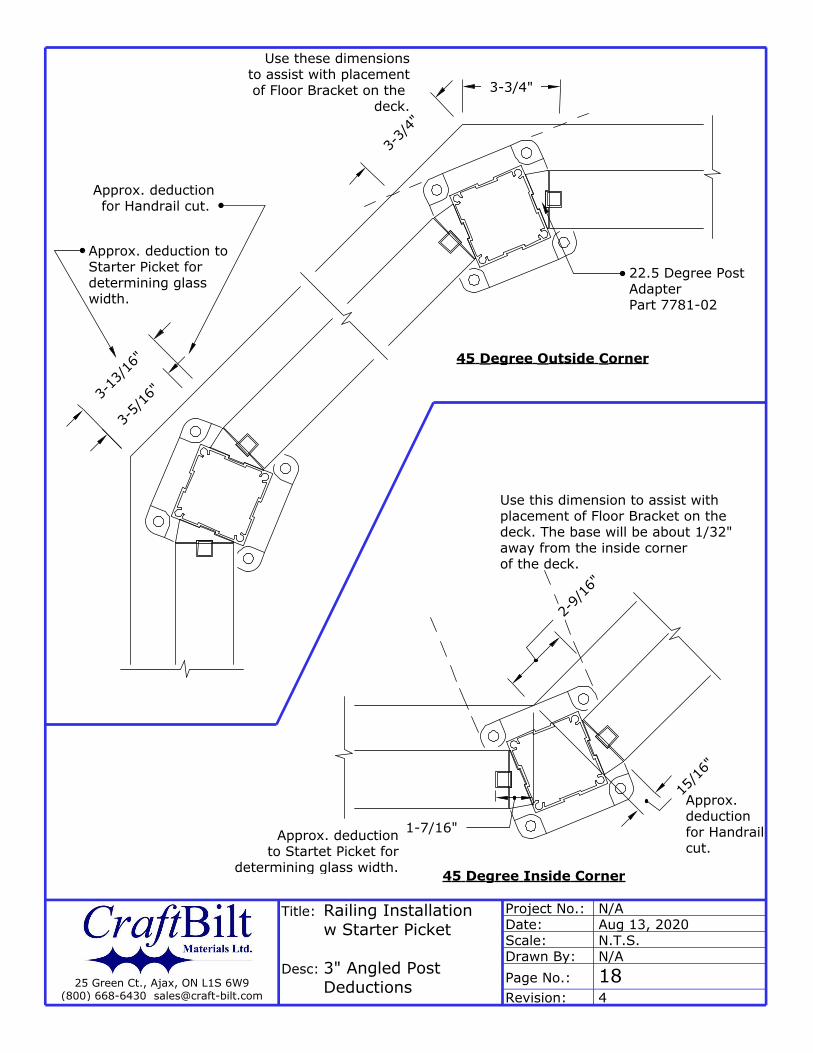
3" Angled Post Deductions
Use this dimension to assist with placement of Floor Bracket on the deck. The base will be about 1/32" away from the inside cornerof the deck.
45 Degree Outside Corner
45 Degree Inside Corner
3-3/4"
3-3/
4"
Use these dimensionsto assist with placementof Floor Bracket on the
deck.
3-13
/16"
Approx. deduction toStarter Picket fordetermining glasswidth.
Approx. deductionfor Handrail cut.
3-5/
16"
2-9/
16"
15/1
6"
1-7/16"
Approx. deductionfor Handrailcut.
22.5 Degree Post AdapterPart 7781-02
Approx. deductionto Startet Picket for
determining glass width.
Project No.: N/ADate: Aug 13, 2020Scale: N.T.S.Drawn By: N/A
Revision: 425 Green Ct., Ajax, ON L1S 6W9
(800) 668-6430 [email protected] No.: 19
Title:
Desc:
Railing Installationw Starter Picket
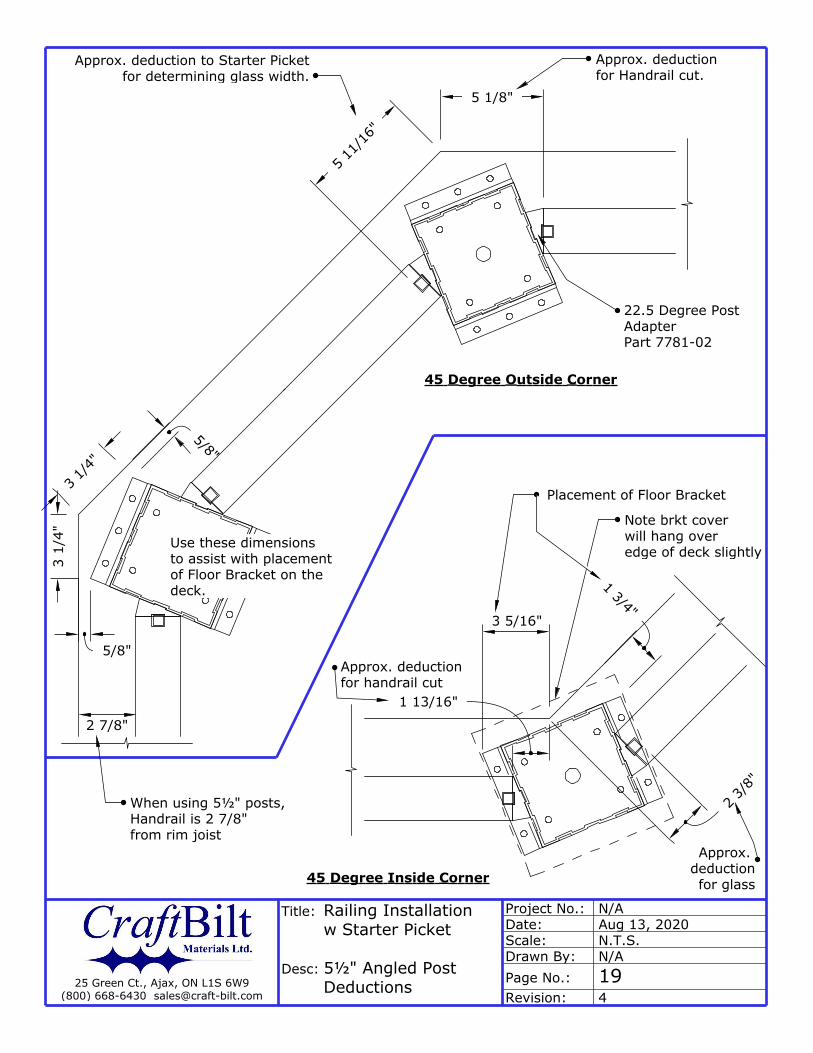
5½" Angled Post Deductions
When using 5½" posts,Handrail is 2 7/8"from rim joist
Approx. deductionfor Handrail cut.
Approx. deduction to Starter Picketfor determining glass width.
Placement of Floor Bracket
Approx. deductionfor glass
2 7/8"
Approx. deductionfor handrail cut
5 11
/16"
3 1/
4"
3 1/
4"
Use these dimensionsto assist with placementof Floor Bracket on the deck.
5/8"
5/8"
Note brkt coverwill hang overedge of deck slightly
3 5/16"
1 13/16"
2 3/
8"
22.5 Degree Post AdapterPart 7781-02
1 3/4"
5 1/8"
45 Degree Outside Corner
45 Degree Inside Corner

Project No.: N/ADate: Aug 13, 2020Scale: N.T.S.Drawn By: N/A
Revision: 425 Green Ct., Ajax, ON L1S 6W9
(800) 668-6430 [email protected] No.: 20
Title:
Desc:
Railing Installationw Starter Picket
2¼" Angled CO Post Deductions
7"
7"
3-9/16"
If you are using Cross Over posts as End Posts, you can handle a 45 degree corner with 2 posts. When placed as shown, no Bottom Rail or Pickets are required since the space between the posts is less than 4"
Edge of Deck
1/2"
Site miter Hand Rail or use Craft-Bilt
welded 45 deg corner
2"
Project No.: N/ADate: Aug 13, 2020Scale: N.T.S.Drawn By: N/A
Revision: 425 Green Ct., Ajax, ON L1S 6W9
(800) 668-6430 [email protected] No.: 21
Title:
Desc:
Railing Installationw Starter Picket
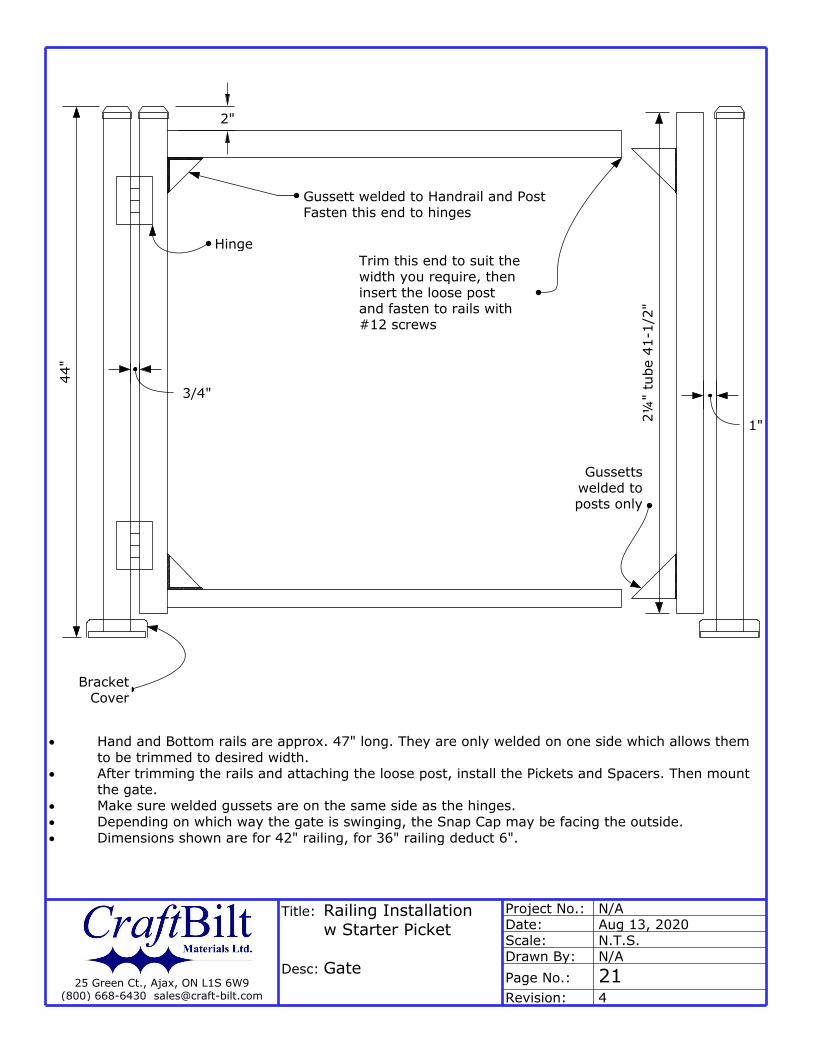
Gate
� Hand and Bottom rails are approx. 47" long. They are only welded on one side which allows them to be trimmed to desired width.
� After trimming the rails and attaching the loose post, install the Pickets and Spacers. Then mount the gate.
� Make sure welded gussets are on the same side as the hinges.� Depending on which way the gate is swinging, the Snap Cap may be facing the outside.� Dimensions shown are for 42" railing, for 36" railing deduct 6".
44"
Gussett welded to Handrail and PostFasten this end to hinges
2¼"
tube
41-
1/2"
3/4"
1"
Gussettswelded toposts only
Trim this end to suit thewidth you require, theninsert the loose postand fasten to rails with#12 screws
Hinge
BracketCover
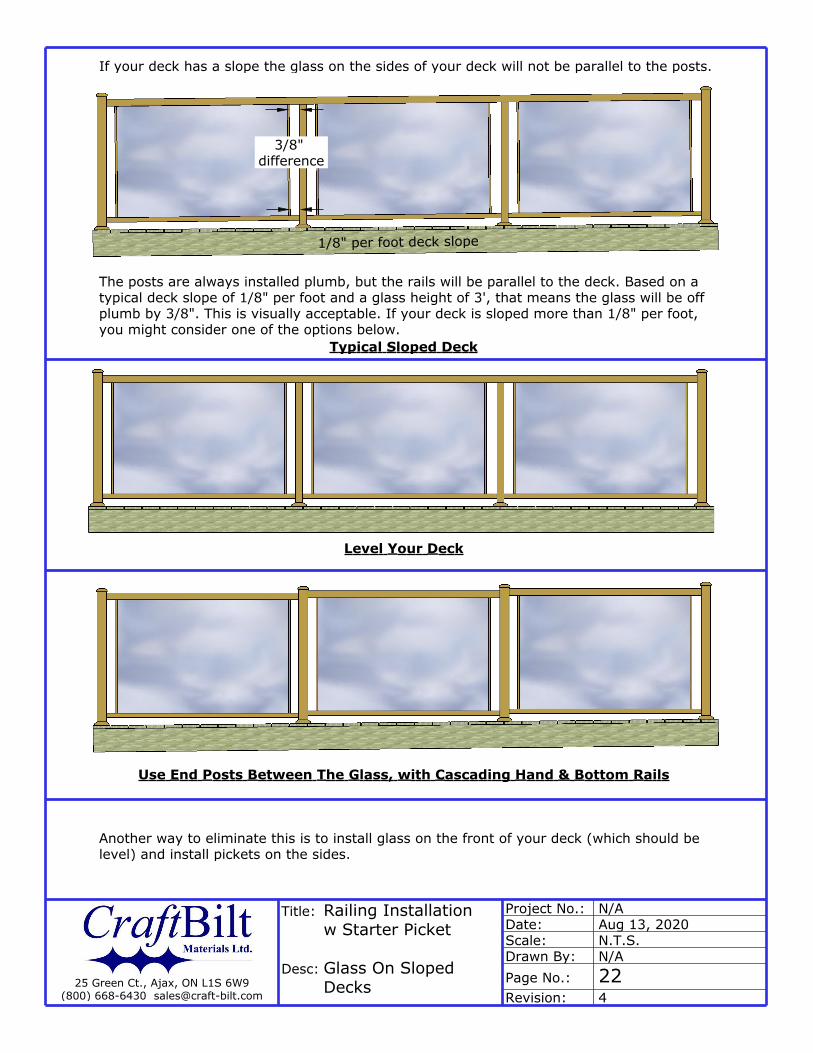
Typical Sloped Deck
Level Your Deck
Use End Posts Between The Glass, with Cascading Hand & Bottom Rails
Project No.: N/ADate: Aug 13, 2020Scale: N.T.S.Drawn By: N/A
Revision: 425 Green Ct., Ajax, ON L1S 6W9
(800) 668-6430 [email protected] No.: 22
Title:
Desc:
Railing Installationw Starter Picket
Glass On Sloped Decks
If your deck has a slope the glass on the sides of your deck will not be parallel to the posts.
The posts are always installed plumb, but the rails will be parallel to the deck. Based on a typical deck slope of 1/8" per foot and a glass height of 3', that means the glass will be off plumb by 3/8". This is visually acceptable. If your deck is sloped more than 1/8" per foot, you might consider one of the options below.
3/8" difference
1/8" per foot deck slope
Another way to eliminate this is to install glass on the front of your deck (which should be level) and install pickets on the sides.
~2-7/16"
Place starter Pickets at 42" and 60"
Project No.: N/ADate: Aug 13, 2020Scale: N.T.S.Drawn By: N/A
Revision: 425 Green Ct., Ajax, ON L1S 6W9
(800) 668-6430 [email protected] No.: 23
Title:
Desc:
Railing Installationw Starter Picket
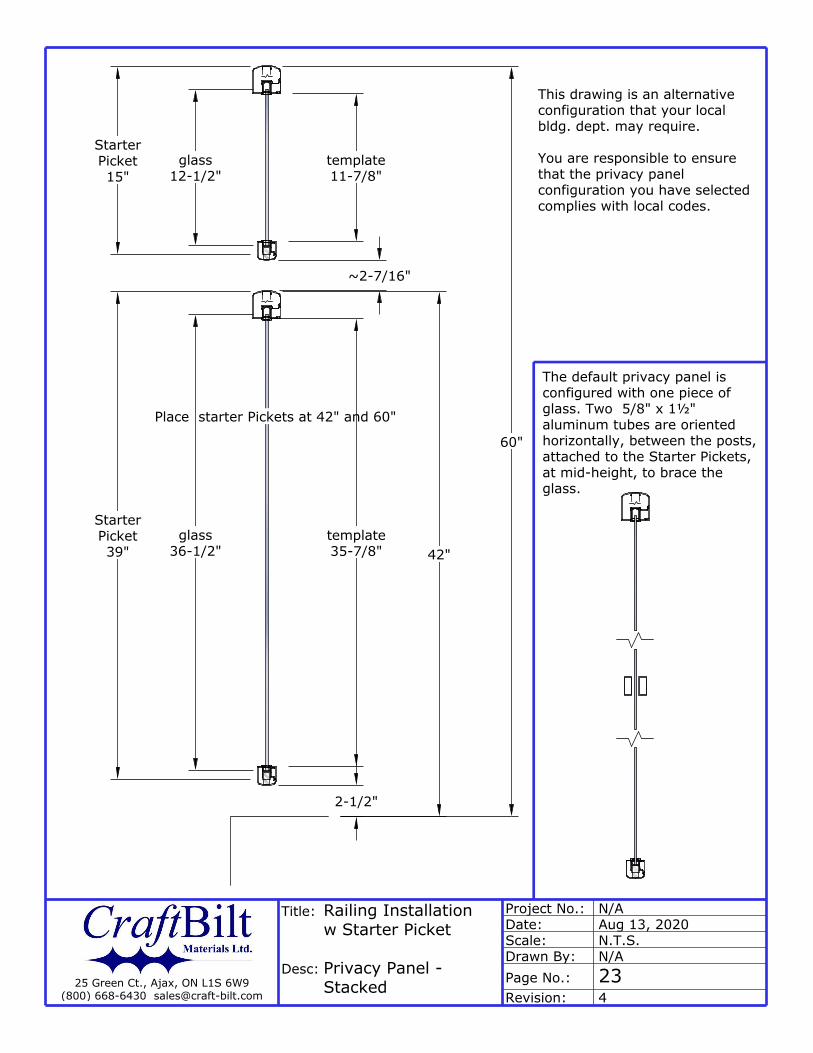
Privacy Panel - Stacked
This drawing is an alternative configuration that your local bldg. dept. may require.
You are responsible to ensure that the privacy panel configuration you have selected complies with local codes.
glass36-1/2"
StarterPicket39" 42"
60"
template35-7/8"
StarterPicket15"
glass12-1/2"
template11-7/8"
2-1/2"
The default privacy panel is configured with one piece of glass. Two 5/8" x 1½" aluminum tubes are oriented horizontally, between the posts, attached to the Starter Pickets, at mid-height, to brace the glass.