CR2003 3 band Auto set PLL Synthesised Clock Radio ROBERTS ISSUE.1.pdf · CR2003 3 band Auto set...
24
CR2003 3 band Auto set PLL Synthesised Clock Radio Please read this manual before use ROBERTS Sound for Generations
Transcript of CR2003 3 band Auto set PLL Synthesised Clock Radio ROBERTS ISSUE.1.pdf · CR2003 3 band Auto set...

CR20033 band Auto set PLL
Synthesised Clock Radio
Please read this manual before useROBER
TS
Soun
d fo
r Gen
erat
ions

Controls ........................................................................... 2-5
Display ............................................................................... 6Automatic tuning system (ATS) ......................................... 7
Automatic clock setting ...................................................... 7MSF radio signal ................................................................ 8Manual setting of the clock displays .................................. 8
Setting the date .................................................................. 9Operating the radio .......................................................... 10
Scan tuning ...................................................................... 10Manual tuning .................................................................. 11
Presetting stations ........................................................... 12Recalling a preset station ................................................ 13Alarms .............................................................................. 14
Setting alarms to wake to radio ....................................... 14Setting alarms to wake to buzzer .................................... 16
Snooze function ............................................................... 17Cancelling alarms ............................................................ 18Alarm sound level control ................................................ 18
Nap timer ......................................................................... 18Sleep timer ....................................................................... 19
Display backlight .............................................................. 20Time zone switch ............................................................. 20
ContentsHeadphone socket ........................................................... 20Reset ................................................................................ 20
Troubleshooting ............................................................... 21Specifications ................................................................... 21Mains supply .................................................................... 22
Guarantee ........................................................... rear cover
1

If you need any further advice, please call our Technical Helpline on :-020 8758 0338 (Mon-Fri) 2
Controls
1. Time/Date/Alarm set and ATS button2. Preset memories and Alarm days buttons3. Waveband and Alarm mode button4. Tuning Up/Down and Snooze button
(Top)
1
2
34
3
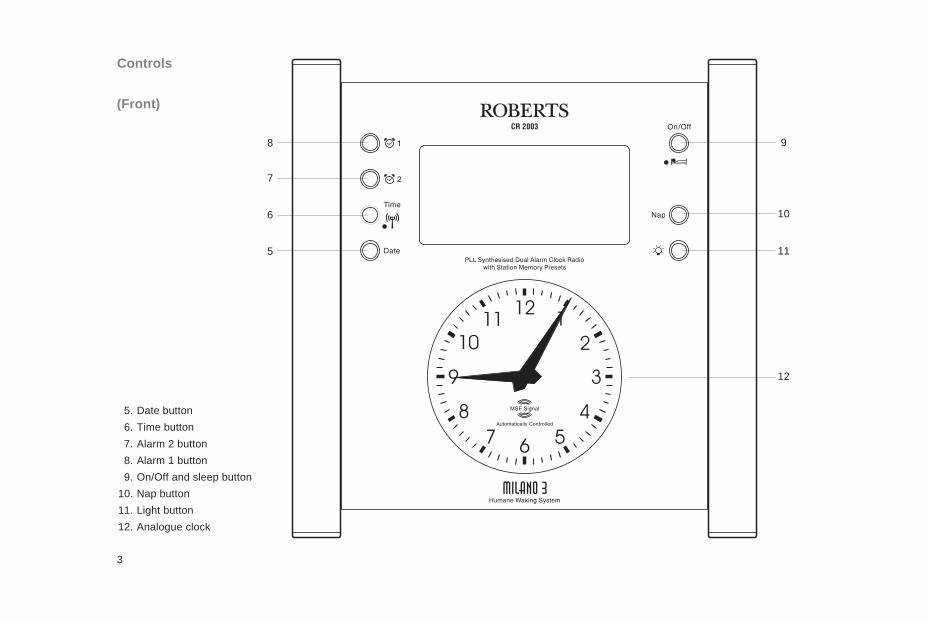
Controls
(Front)
5. Date button6. Time button7. Alarm 2 button8. Alarm 1 button9. On/Off and sleep button
10. Nap button11. Light button12. Analogue clock
8
7
6
5
9
10
11
12

If you need any further advice, please call our Technical Helpline on :-020 8758 0338 (Mon-Fri) 4
15
13. Tone control14. Volume control15. Headphone socket
14
13
Controls
(Right hand side)

5
17 18 19
16. Reset button17. Time zone switch18. Alarm sound level control19. Display brightness control
16
Controls
(Base)

If you need any further advice, please call our Technical Helpline on :-020 8758 0338 (Mon-Fri) 6
C
B
A
O M
L
K
J
I
HFE
A. Waveband and clock AM/PM indicatorsB. Time set indicatorC. Summer time indicatorD. Alarm indicatorsE. Sleep indicatorF. Nap indicatorG. Date indicator
D
H. Day of week indicatorsI. Month, date, year and alarm time displayJ. MSF indicatorK. Auto tuning indicatorL. Memory and seconds indicatorM. Minute indicatorN. Alarm AM/PM indicatorsO. Time indicators
G
N
Display

7
Automatic Tuning System (ATS)1. Place your radio on a flat surface and connect the mains plug to a wall
socket and switch on the wall socket.When connected to power for the first time or if power is restored aftertemporary loss the clock hands will set to the 12:00 o'clock position.Automatic tuning system (ATS) will commence. Your clock radio willstart searching the FM band followed by MW and finally the LW band.ATS will search and store stations in presets based on signal strengthorder - up to 7 stations will be stored on FM, 7 on MW and 7 on LW.
Automatic clock setting
1. After ATS completes your clock radio will display -:- and the MSFindicator will flash in the display.
2. After approximately 3 minutes your clock radio will synchronise to theofficial UK standard time signal transmitter (MSF) located at Rugbyin the U.K. The MSF indicator will stop flashing and the
correct time and date will appear in the LCD display.The analogue clock movement will automatically move the hands tothe correct position. Once synchronised to the radio time signalthe LCD and analogue clock will automatically switch fromsummer to winter time and vice versa.
3. If the MSF indicator continues to flash try to re-position your
clock radio so as to improve reception of the radio time signal. (Seealso section headed Troubleshooting on page 21)
4. If the two clock displays fail to set automatically due to local interfer-ence it may be necessary to set the clock manually - see sectionheaded Manual setting of the clock displays.

If you need any further advice, please call our Technical Helpline on :-020 8758 0338 (Mon-Fri) 8
MSF radio signalAt certain times of the year the MSF radio transmitter closes down formaintenance. During this time the clock will not automatically set (see thesection headed Manual setting of the time).Recorded information on transmitter status can be obtained on 0208943 6493.Your clock radio will need to be set manually if the transmitter is closeddown when your clock radio is first connected to the mains.At all other times if the transmitter closes down your clock radio willcontinue to run on its own highly accurate internal quartz crystal timebase.
Manual setting of the clock displays (only if automaticsetting fails)
1. Press the Time button, display will flash .
2. Press the Set button, the hour digits will flash in the display.
3. Press the up or down button to adjust the hours. The LCD clock usesa 12 hour display with a AM/PM indicators. Please ensure that thecorrect 12 hour cycle is selected.
4. Press the Set button, the minute digits will flash in the display.
5. Press the up or down button to adjust the minutes.
6. Press the Time button to complete time setting.
1
2
3 3
4
5 5 6

9
Setting the date (only if automatic setting fails)1. Press the Date button, DATE will flash in the LCD display.
2. Press the Set button, Year will flash in the LCD display.
3. Press the up or down button to adjust the year.
4. Press the Set button, Month will flash in the LCD display.
5. Press the up or down button to adjust the month.
6. Press the Set button, Day will flash in the LCD display.
7. Press the up or down button to adjust the day.
8. Press the Date button to complete setting of the date
2
3 3
4
6
1
8

If you need any further advice, please call our Technical Helpline on :-020 8758 0338 (Mon-Fri)
Operating the radioYour clock radio is equipped with three tuning methods:- Scan tuning,Manual tuning and Memory preset tuning. When switched-on your clockradio will display the waveband and frequency in use.
Scan tuning1. Press the On/Off button to switch on the radio.
2. Select the required waveband by repeatedly pressing the Bandbutton. On the FM waveband fully extend the Wire aerial located onthe rear of your clock radio - for MW and LW rotate your clock radiofor best reception.
3. Press and hold down either the up or down button buttons for morethe 0.5 sec and then release to commence scan tuning.
4. Your radio will scan the selected waveband and stop automaticallywhen it finds a station of sufficient strength. The station frequency willappear in the display.
5. To recommence scan tuning, again press and hold down either theup or down button buttons for more the 0.5 sec and then release torecommence scan tuning.
6. When the waveband end is reached the radio will beep and continuetuning from the opposite waveband end.
7. Set the Volume control and Tone controls to the desired settings.
8. To switch off your radio press the On/Off button.
3 3
1 2
7 78
10

Manual tuning1. Press the On/Off button to switch on your radio.
2. Select the required waveband by repeatedly pressing the Bandbutton. On the FM waveband fully extend the Wire aerial located onthe rear of your clock radio - for MW and LW rotate your clock radiofor best reception.
3. A single press on either the up or down button will change thefrequency in the following increments:-
FM 50kHzMW 9kHzLW 3kHz
4. When the waveband end is reached the radio will beep and continuetuning from the opposite waveband end.
5. Set the Volume and Tone controls to the desired settings.
6. To switch off your radio press the On/Off button.
3 3
1 2
5 56
11

If you need any further advice, please call our Technical Helpline on :-020 8758 0338 (Mon-Fri)
Presetting stationsThere are 7 memory presets for each of the 3 wavebands.
1. Press the On/Off button to switch on the radio.
2. Tune to the required station using one of the methods previouslydescribed.
3. Press and hold down the required Preset button until the radiobeeps (greater than 2 seconds) The preset number will appear in thedisplay and the station will be stored under the chosen preset button.
4. Repeat this procedure for the remaining presets.
5. Stations stored in preset memories may be overwritten by followingthe above procedure.
3
1
12
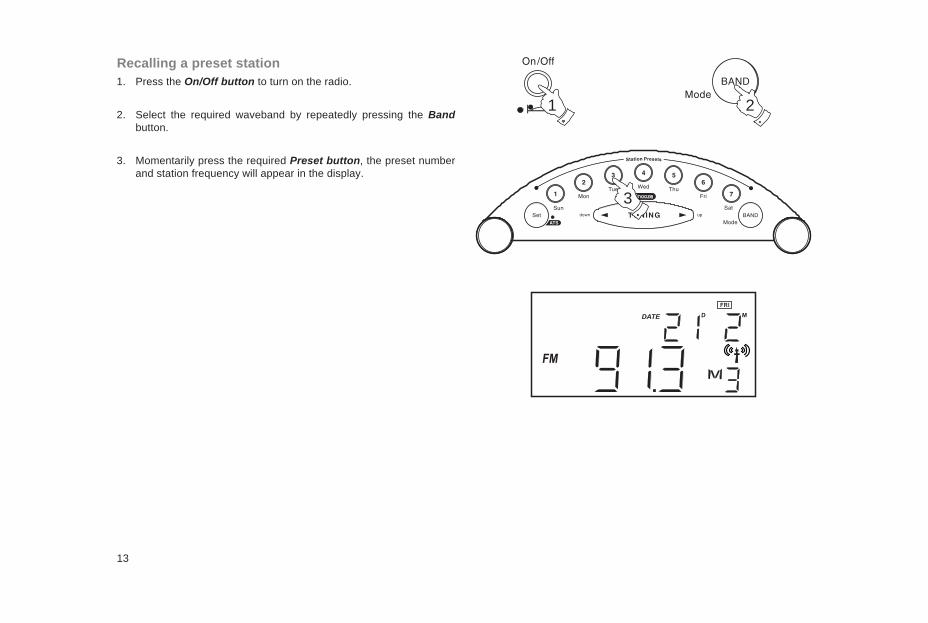
Recalling a preset station1. Press the On/Off button to turn on the radio.
2. Select the required waveband by repeatedly pressing the Bandbutton.
3. Momentarily press the required Preset button, the preset numberand station frequency will appear in the display.
3
1 2
13
If you need any further advice, please call our Technical Helpline on :-020 8758 0338 (Mon-Fri) 14
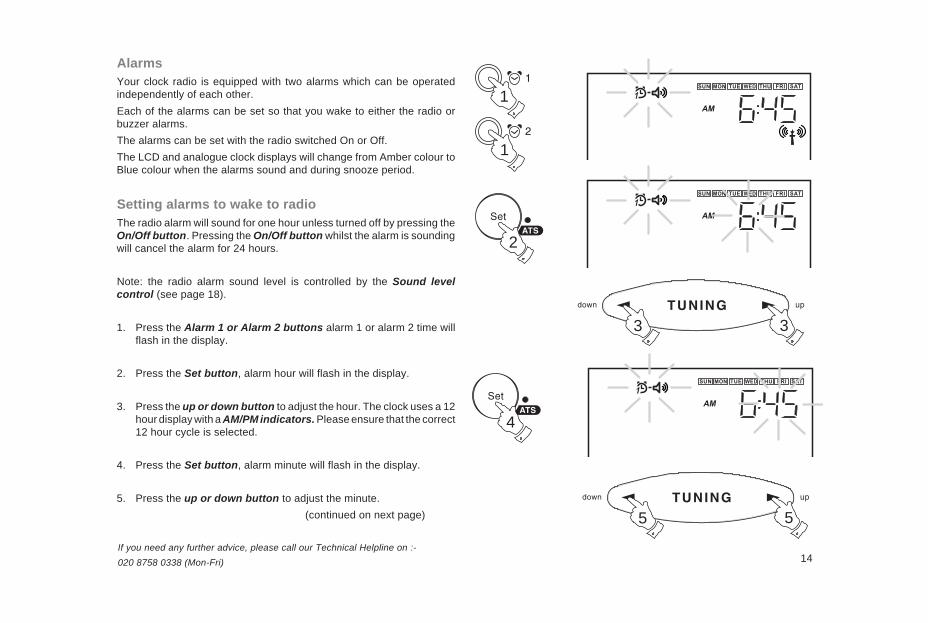
AlarmsYour clock radio is equipped with two alarms which can be operatedindependently of each other.Each of the alarms can be set so that you wake to either the radio orbuzzer alarms.The alarms can be set with the radio switched On or Off.The LCD and analogue clock displays will change from Amber colour toBlue colour when the alarms sound and during snooze period.
Setting alarms to wake to radioThe radio alarm will sound for one hour unless turned off by pressing theOn/Off button. Pressing the On/Off button whilst the alarm is soundingwill cancel the alarm for 24 hours.
Note: the radio alarm sound level is controlled by the Sound levelcontrol (see page 18).
1. Press the Alarm 1 or Alarm 2 buttons alarm 1 or alarm 2 time willflash in the display.
2. Press the Set button, alarm hour will flash in the display.
3. Press the up or down button to adjust the hour. The clock uses a 12hour display with a AM/PM indicators. Please ensure that the correct12 hour cycle is selected.
4. Press the Set button, alarm minute will flash in the display.
5. Press the up or down button to adjust the minute.(continued on next page)
2
3 3
4
1
1
5 5
15
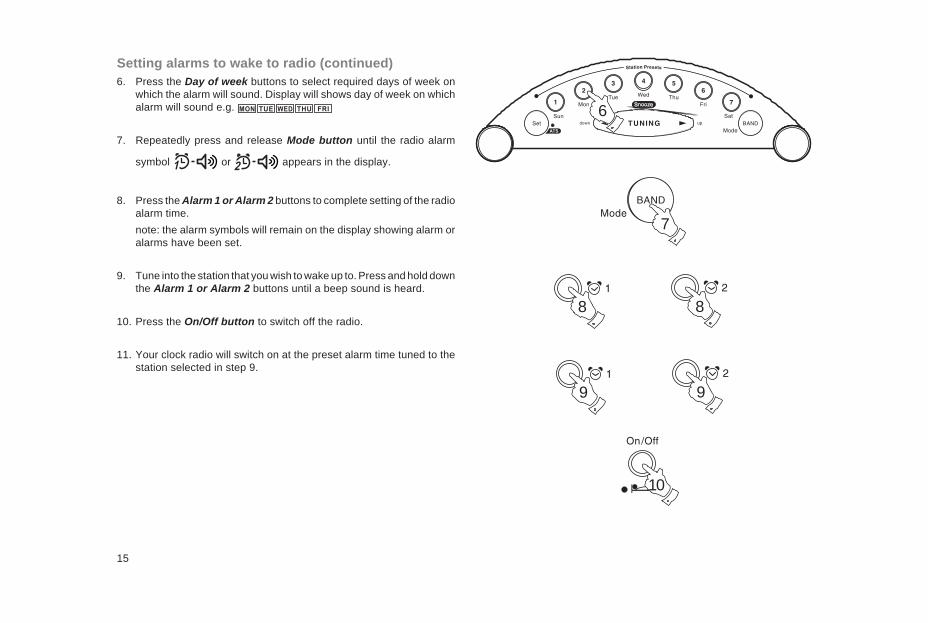
Setting alarms to wake to radio (continued)6. Press the Day of week buttons to select required days of week on
which the alarm will sound. Display will shows day of week on whichalarm will sound e.g.
7. Repeatedly press and release Mode button until the radio alarm
symbol or appears in the display.
8. Press the Alarm 1 or Alarm 2 buttons to complete setting of the radioalarm time.note: the alarm symbols will remain on the display showing alarm oralarms have been set.
9. Tune into the station that you wish to wake up to. Press and hold downthe Alarm 1 or Alarm 2 buttons until a beep sound is heard.
10. Press the On/Off button to switch off the radio.
11. Your clock radio will switch on at the preset alarm time tuned to thestation selected in step 9.
8 8
6
7
10
9 9

If you need any further advice, please call our Technical Helpline on :-020 8758 0338 (Mon-Fri) 16
Setting alarms to wake to buzzerA beep tone will sound when using the buzzer alarm. The alarm beep willincrease in volume every 15 seconds for one minute followed by oneminutes silence before repeating the cycle.The buzzer alarm will sound for one hour unless turned off by pressingthe On/Off button. Pressing the On/Off button whilst the alarm issounding will cancel the alarm for 24 hours.
Note: the buzzer alarm sound level is controlled by the Sound levelcontrol (see page 18)
1. Press the Alarm 1 or Alarm 2 buttons alarm 1 or alarm 2 time willflash in the display.
2. Press the Set button, alarm hour will flash in the display.
3. Press the up or down button to adjust the hour. The clock uses a 12hour display with a AM/PM indicators. Please ensure that the correct12 hour cycle is selected.
4. Press the Set button, minute will flash in the display.
5. Press the up or down button to adjust the minute.(continued on next page)
2
3 3
4
1
1
5 5

17
Setting alarms to wake to buzzer (continued)6. Press the Day of week buttons to select required days of week on
which the alarm will sound. Display will shows day of week on whichalarm will sound e.g.
7. Repeatedly press and release Mode button until the buzzer alarm
symbol or appears in the display.
8. Press the Alarm 1 or Alarm 2 to confirm setting of the buzzer alarmtime.note: the alarm symbols will remain on the display showing alarm oralarms have been set.
8 8
6
7
Snooze function1. Whilst an alarm is sounding press the up or down button to activate
the snooze function. The Radio or Buzzer alarms will be silenced for5 minutes.
2. The Display will flash both the snooze symbol and the alarmsymbol. The snooze function can be repeated during the period thatthe alarms are active.
3. Press the On/Off button to cancel the snooze function.
1 1
3

If you need any further advice, please call our Technical Helpline on :-020 8758 0338 (Mon-Fri) 18
1 1
2 3
Alarm sound level control1. The alarm sound level on both radio and buzzer alarms can be
adjusted using the Alarm sound level control located on theunderside of your clock radio. 1
Nap timer1. The Nap timer is a short term alarm which can be set for a delay of
10-120 minutes in 10 minute steps. Press and release the Napbutton until the required Nap time is shown on the display. Thebuzzer alarm will sound after the Nap time has elapsed.
2. Press the On/Off button to silence the Nap buzzer alarm
3. The Nap timer can be cancelled before the Nap time has elapsed bypressing and releasing the Nap button until the word OFF appearsin the display.
1
2 3
Cancelling alarms1. Press the Alarm 1 or Alarm 2 buttons (depending on which alarm
you wish to cancel).
2. Press the Set button the alarm symbols will flash in the display.
3. Repeatedly press and release Mode button until only the or symbols appear in the display.
4. Press the Alarm 1 or Alarm 2 button to confirm cancellation ofalarms. Alarm symbols or will disappear from the display after3 seconds indicating alarms have been cancelled. 4 4
19
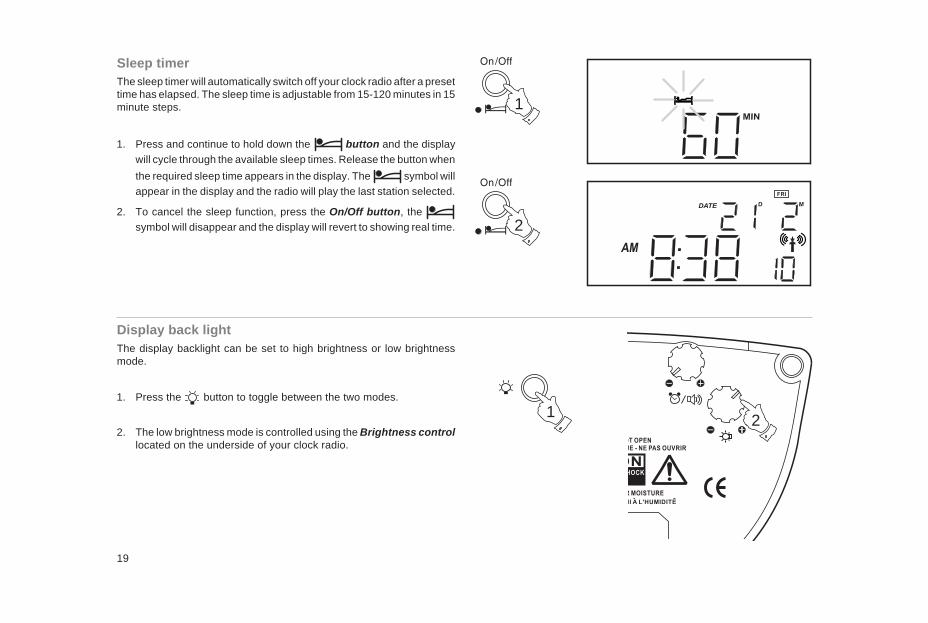
Sleep timerThe sleep timer will automatically switch off your clock radio after a presettime has elapsed. The sleep time is adjustable from 15-120 minutes in 15minute steps.
1. Press and continue to hold down the button and the displaywill cycle through the available sleep times. Release the button whenthe required sleep time appears in the display. The symbol willappear in the display and the radio will play the last station selected.
2. To cancel the sleep function, press the On/Off button, the symbol will disappear and the display will revert to showing real time.
Display back lightThe display backlight can be set to high brightness or low brightnessmode.
1. Press the button to toggle between the two modes.
2. The low brightness mode is controlled using the Brightness controllocated on the underside of your clock radio.
1
2
1 2

If you need any further advice, please call our Technical Helpline on :-020 8758 0338 (Mon-Fri) 20
Time zone switch1. The Time zone switch is used to provide offsets of -1 to + 2 hours
relative to GMT (UTC).This facility would only be used if your clock radio is used in anothercountry that is within range of the UK time signal transmitter e.g.France where the time is GMT (UTC) +1.
For normal operation within UK please ensure the Time zone switchis set to the 0 UTC position (factory set position).
Headphone socket1. A 3.5mm Headphone Socket located on the right-hand end of your
clock radio is provided for use with either headphones or an earpiece.Inserting a plug automatically mutes the internal loudspeaker.
1
ResetIf your radio fails to operate correctly, or some digits on the display aremissing or incomplete carry out the following procedure.1. With the aid of a suitable implement (the end of a paper clip) press the
reset button located on the underside of your radio for at least 3seconds, this will reset the microprocessor, clock time and clear allstations stored in preset memory.
1
1

21
SpecificationsPower RequirementsMains AC 230 volts, 50Hz only
Frequency CoverageFM 87.5-108MHzMW 522- 1629kHzLW 153- 279kHz
Loudspeaker 75mm x 100mm 4ohms
Output Power 800 mWHeadphone socket 3.5mm dia
Aerial System FM Wire aerial
MW Built-in Ferrite aerial
LW Built-in Ferrite aerial
Troubleshooting1. If the time does not set automatically it may be necessary to rotate
your clock radio to a position giving better reception of the MSFsignal.
2. It is recommended that your clock radio is placed as far away aspossible from any sources of interference such as computers ortelevisions, etc.
3. To re-synchronise with the MSF time signal, press and hold down the
time button until your clock radio beeps. The MSF indicator
will flash whilst synchronisation takes place. Synchronisation iscomplete when the MSF indicator stops flashing.
At certain times of the year the MSF transmitter closes down formaintenance. During this time the clock will not automatically set(see the section headed Manual setting of the clock displays).
Recorded information on MSF transmitter status can be obtained on020 8943 6493.
3

If you need any further advice, please call our Technical Helpline on :-020 8758 0338 (Mon-Fri) 22
The wire coloured BLUE must beconnected to the terminal marked Nor coloured BLACK.The wire coloured BROWN must beconnected to the terminal marked Lor coloured RED.
FuseThis apparatus must be protected by a 3A fuse (BS1362) in a 13A plug(BS1363). If another type of plug is used a 5A fuse should be fitted in theplug, adaptor or distribution board.
IF IN DOUBT - CONSULT A QUALIFIED ELECTRICIAN.
GeneralDo not allow this unit to be exposed to moisture (e.g. dripping orsplashing). It is recommended that the FM band be used whereverpossible as better results in terms of quality and freedom from interfer-ence will usually be obtained than on the MW or LW bands.
Mains supplyThe CR2003 will operate from a supply of AC 230volts, 50Hz only.For your convenience this product is supplied with a plug which is fittedwith a fuse of the appropriate rating. If the plug supplied is not suitable foryour socket outlet, it should be removed by unscrewing the plug top, theterminal screws and removing the cable.The correct style of plug to suit your household together with a correctlyrated fuse should be fitted.
IF IN DOUBT - CONSULT A QUALIFIED ELECTRICIANIMPORTANT. DO NOT make any connection to the larger terminal whichis marked with the letter E or by the safety earth symbol or colouredGreen or Green-and-yellow.The wires in the mains lead are coloured in accordance with the followingcodes :-
BLUE - NEUTRAL BROWN - LIVEAs these colours may not correspond with the coloured markings identi-fying the terminals in your plug, proceed as follows:-

Issue 1
ROBERTS RADIO TECHNICAL SERVICES97-99 Worton RoadIsleworth Middlesex
TW7 6EG
Technical Helpline :- 020 8758 0338 (Mon-Fri during office hours)
GuaranteeThis instrument is guaranteed for twelve months from the date of delivery to the original owner against failure due to faulty workmanship or componentbreakdown, subject to the procedure stated below. Should any component or part fail during this guarantee period it will be repaired or replaced freeof charge.The guarantee does not cover:
1. Damage resulting from incorrect use.2. Consequential damage.3. Receivers with removed or defaced serial numbers.
Procedure:Any claim under this guarantee should be made through the dealer from whom the instrument was purchased. It is likely that your Roberts' dealerwill be able to attend to any defect quickly and efficiently, but should it be necessary the dealer will return the instrument to the company’s servicedepartment for attention. In the event that it is not possible to return the instrument to the Roberts' dealer from whom it was purchased, please contactRoberts Radio Technical Services at the address shown below.