CP600 - Import Tags from AC500 eCo CPUs - ABB Ltd · CP600 - Import Tags from AC500 eCo CPUs ......
11
Application Note CP600 - Import Tags from AC500 eCo CPUs LVD-EOTN120U-EN REVA Page 1 of 11 1 Introduction: This application note will show step by step how to import tags from AC500 eCo PLC t0 CP600 panel. 2 ABB CoDeSys Ethernet Driver Configuration: • This driver has been specifically designed to support communication with AC500 CPUs • Designed for standardized IEC 61131-3 programming, based on the CODESYS V2.3 system • No specific configuration in Automation Builder • All variables within the CODESYS project are accessible • This driver supports the symbol file (.SDB) upload from AC500 CPU (Symbol file must be created and configured within the CODESYS project) • Easy sharing of the variables used between AC500 CPUs and CP600 HMI panels 2.1 In CoDeSys>Project>Options 1. Activate the checkbox “Dump symbol entries” 2. Click on button “Configure symbol file” 3. Select the program parts or variables list need to be to share 4. Activate the checkboxes as shown below and validates them by click “OK” 2.2 Download Symbol File setup in CoDeSys: • Click Resources tab > Target Settings 1. Click on the tab “General” 2. Activate the checkbox “Download symbol file” then click “OK”
Transcript of CP600 - Import Tags from AC500 eCo CPUs - ABB Ltd · CP600 - Import Tags from AC500 eCo CPUs ......
Application Note
CP600 - Import Tags from AC500 eCo CPUs
LVD-EOTN120U-EN REVA Page 1 of 11
1 Introduction: This application note will show step by step how to import tags from AC500 eCo PLC t0 CP600 panel.
2 ABB CoDeSys Ethernet Driver Configuration: • This driver has been specifically designed to support communication with AC500 CPUs • Designed for standardized IEC 61131-3 programming, based on the CODESYS V2.3 system • No specific configuration in Automation Builder • All variables within the CODESYS project are accessible • This driver supports the symbol file (.SDB) upload from AC500 CPU (Symbol file must be created and
configured within the CODESYS project) • Easy sharing of the variables used between AC500 CPUs and CP600 HMI panels
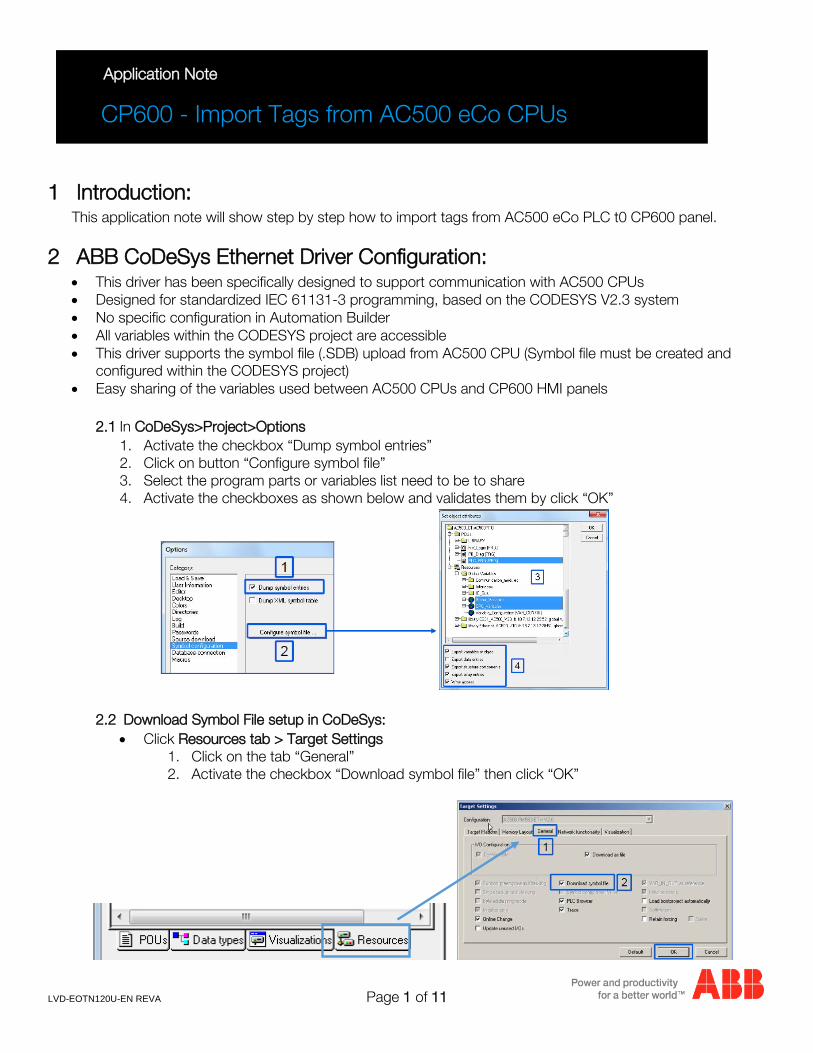
2.1 In CoDeSys>Project>Options
1. Activate the checkbox “Dump symbol entries” 2. Click on button “Configure symbol file” 3. Select the program parts or variables list need to be to share 4. Activate the checkboxes as shown below and validates them by click “OK”
2.2 Download Symbol File setup in CoDeSys: • Click Resources tab > Target Settings
1. Click on the tab “General” 2. Activate the checkbox “Download symbol file” then click “OK”
LVD-EOTN120U-EN REVA Page 2 of 11
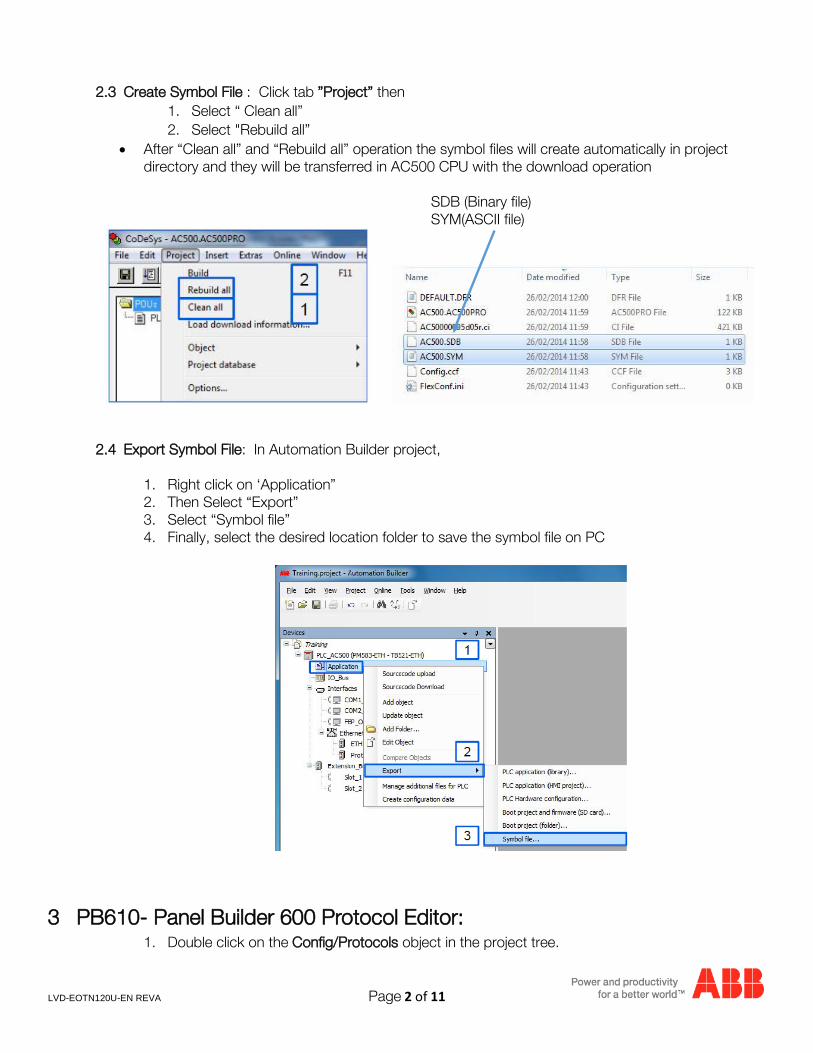
2.3 Create Symbol File : Click tab ”Project” then 1. Select “ Clean all” 2. Select "Rebuild all”
• After “Clean all” and “Rebuild all” operation the symbol files will create automatically in project directory and they will be transferred in AC500 CPU with the download operation
SDB (Binary file) SYM(ASCII file)
2.4 Export Symbol File: In Automation Builder project,
1. Right click on ‘Application” 2. Then Select “Export” 3. Select “Symbol file” 4. Finally, select the desired location folder to save the symbol file on PC
3 PB610- Panel Builder 600 Protocol Editor: 1. Double click on the Config/Protocols object in the project tree.
LVD-EOTN120U-EN REVA Page 3 of 11
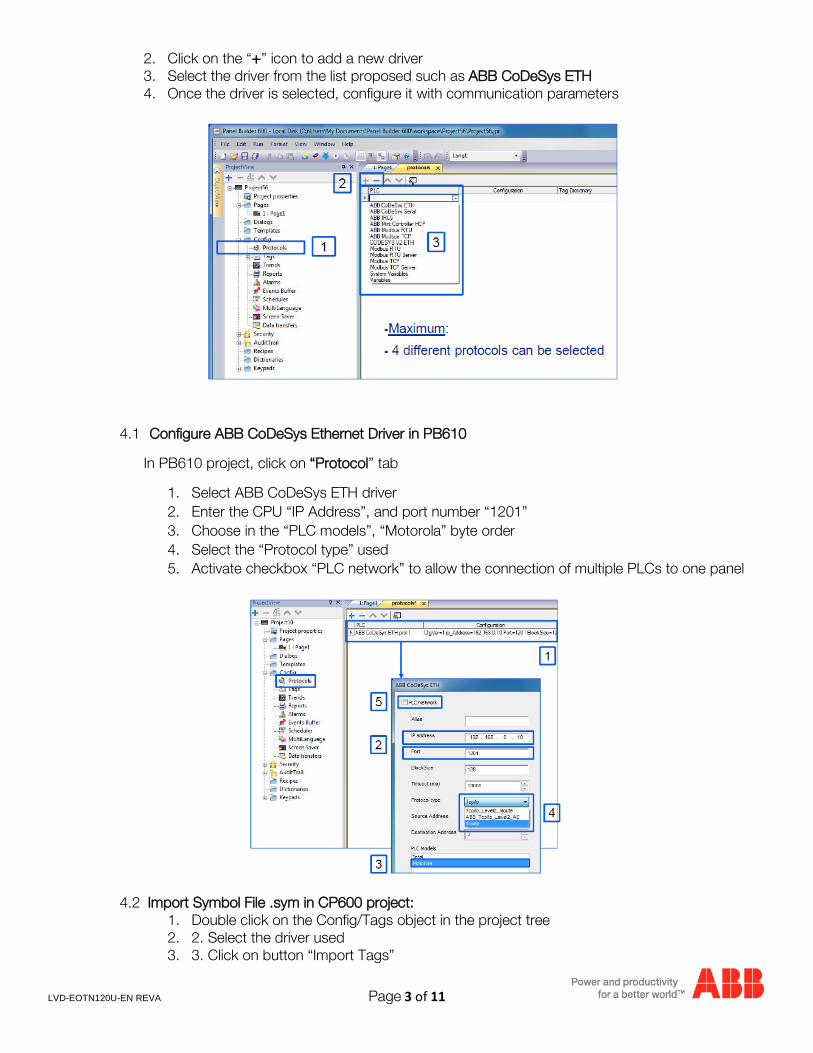
2. Click on the “+” icon to add a new driver 3. Select the driver from the list proposed such as ABB CoDeSys ETH 4. Once the driver is selected, configure it with communication parameters
4.1 Configure ABB CoDeSys Ethernet Driver in PB610 In PB610 project, click on “Protocol” tab
1. Select ABB CoDeSys ETH driver 2. Enter the CPU “IP Address”, and port number “1201” 3. Choose in the “PLC models”, “Motorola” byte order 4. Select the “Protocol type” used 5. Activate checkbox “PLC network” to allow the connection of multiple PLCs to one panel
4.2 Import Symbol File .sym in CP600 project: 1. Double click on the Config/Tags object in the project tree 2. 2. Select the driver used 3. 3. Click on button “Import Tags”
LVD-EOTN120U-EN REVA Page 4 of 11
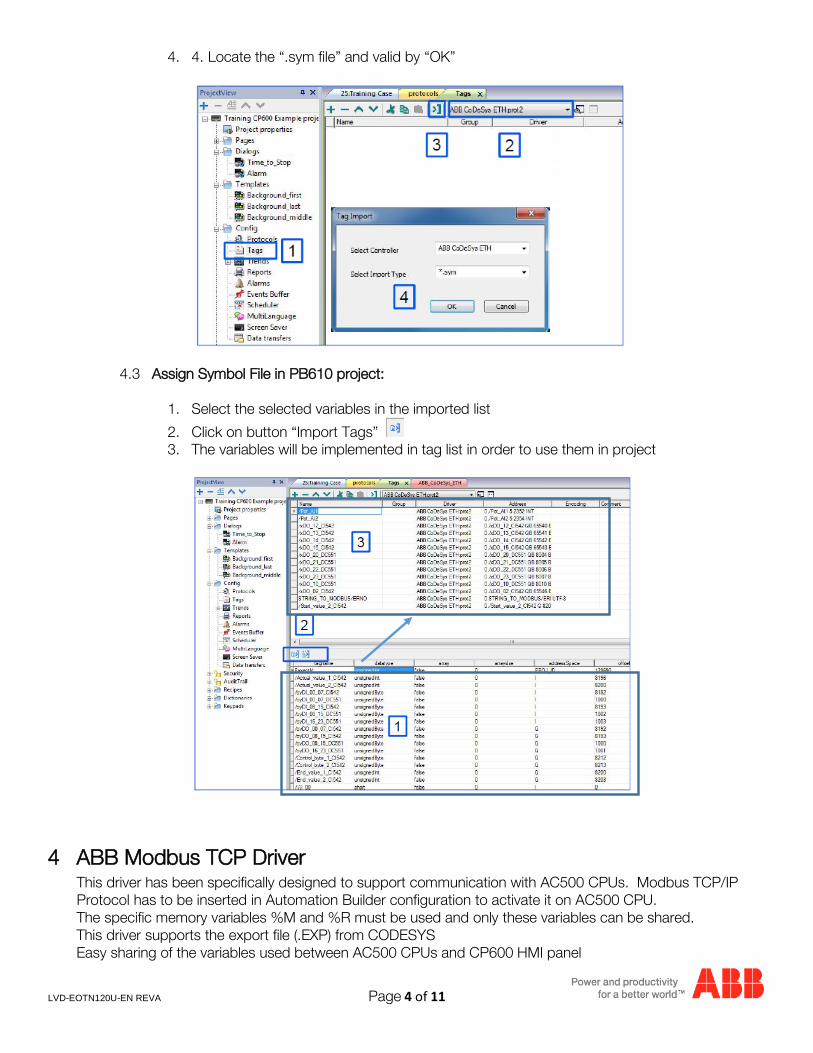
4. 4. Locate the “.sym file” and valid by “OK”
4.3 Assign Symbol File in PB610 project:
1. Select the selected variables in the imported list
2. Click on button “Import Tags” 3. The variables will be implemented in tag list in order to use them in project
4 ABB Modbus TCP Driver This driver has been specifically designed to support communication with AC500 CPUs. Modbus TCP/IP Protocol has to be inserted in Automation Builder configuration to activate it on AC500 CPU. The specific memory variables %M and %R must be used and only these variables can be shared.
This driver supports the export file (.EXP) from CODESYS Easy sharing of the variables used between AC500 CPUs and CP600 HMI panel
LVD-EOTN120U-EN REVA Page 5 of 11
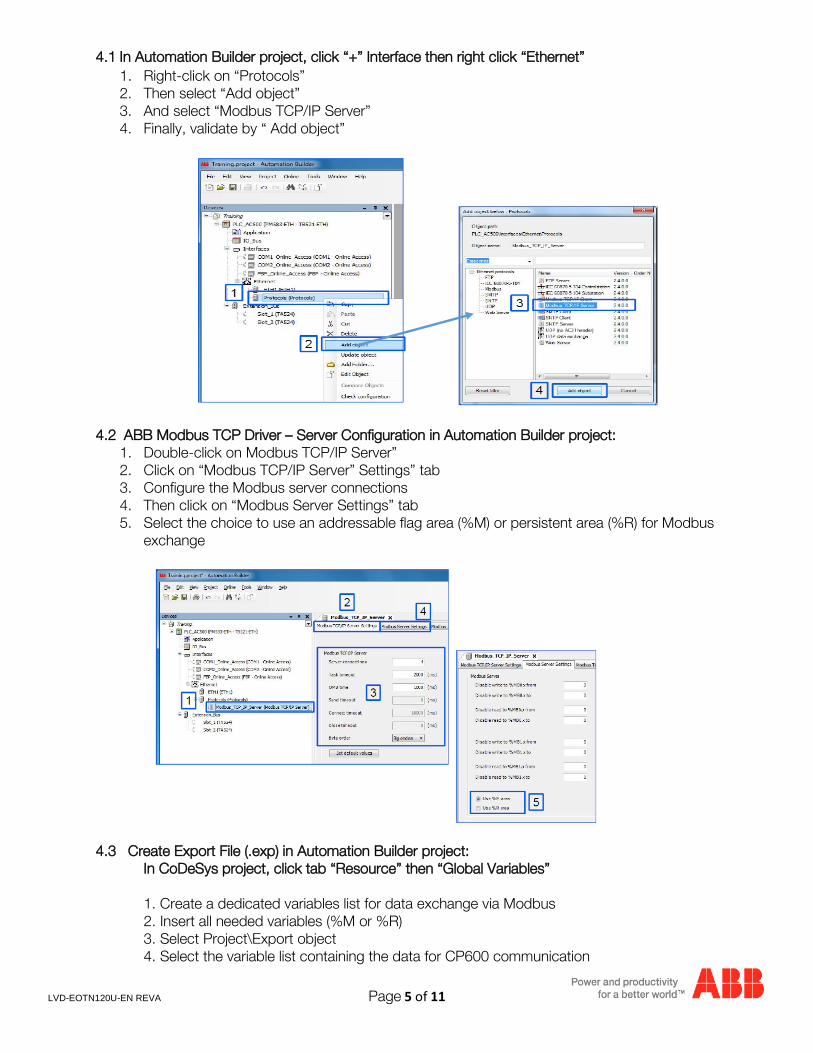
4.1 In Automation Builder project, click “+” Interface then right click “Ethernet” 1. Right-click on “Protocols” 2. Then select “Add object” 3. And select “Modbus TCP/IP Server” 4. Finally, validate by “ Add object”
4.2 ABB Modbus TCP Driver – Server Configuration in Automation Builder project: 1. Double-click on Modbus TCP/IP Server” 2. Click on “Modbus TCP/IP Server” Settings” tab 3. Configure the Modbus server connections 4. Then click on “Modbus Server Settings” tab 5. Select the choice to use an addressable flag area (%M) or persistent area (%R) for Modbus
exchange
4.3 Create Export File (.exp) in Automation Builder project: In CoDeSys project, click tab “Resource” then “Global Variables”
1. Create a dedicated variables list for data exchange via Modbus 2. Insert all needed variables (%M or %R) 3. Select Project\Export object 4. Select the variable list containing the data for CP600 communication
LVD-EOTN120U-EN REVA Page 6 of 11
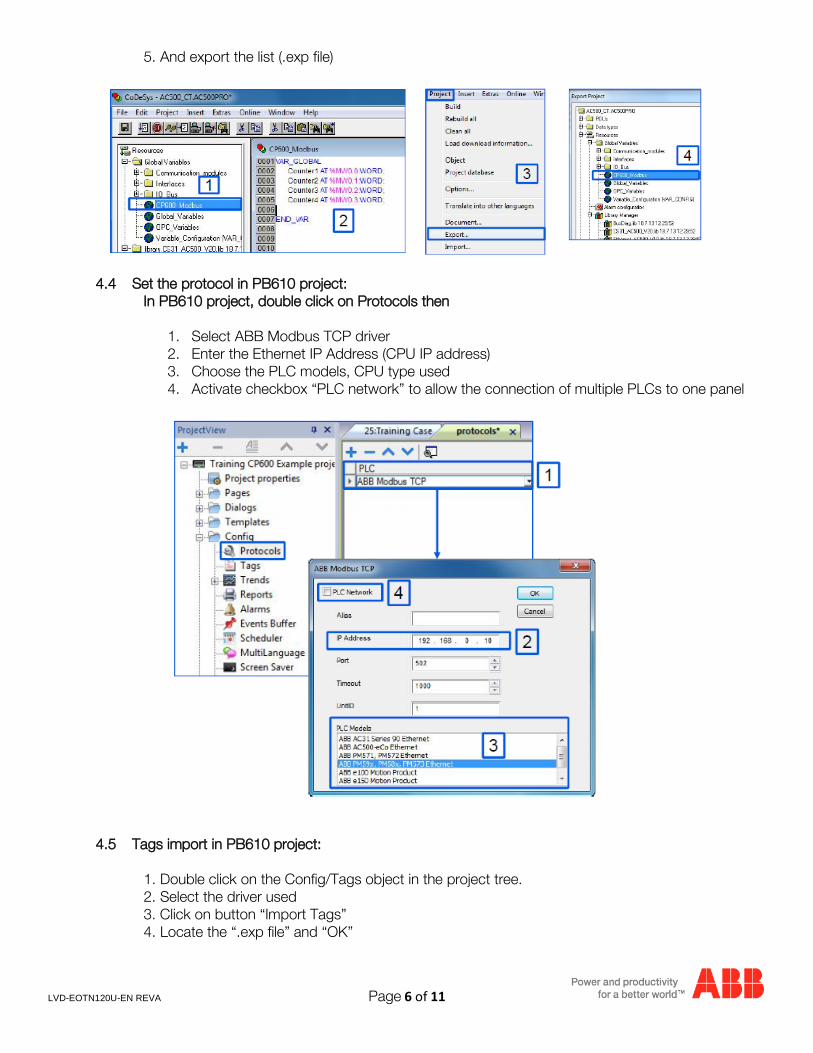
5. And export the list (.exp file)
4.4 Set the protocol in PB610 project: In PB610 project, double click on Protocols then
1. Select ABB Modbus TCP driver 2. Enter the Ethernet IP Address (CPU IP address) 3. Choose the PLC models, CPU type used 4. Activate checkbox “PLC network” to allow the connection of multiple PLCs to one panel
4.5 Tags import in PB610 project: 1. Double click on the Config/Tags object in the project tree. 2. Select the driver used 3. Click on button “Import Tags” 4. Locate the “.exp file” and “OK”
LVD-EOTN120U-EN REVA Page 7 of 11
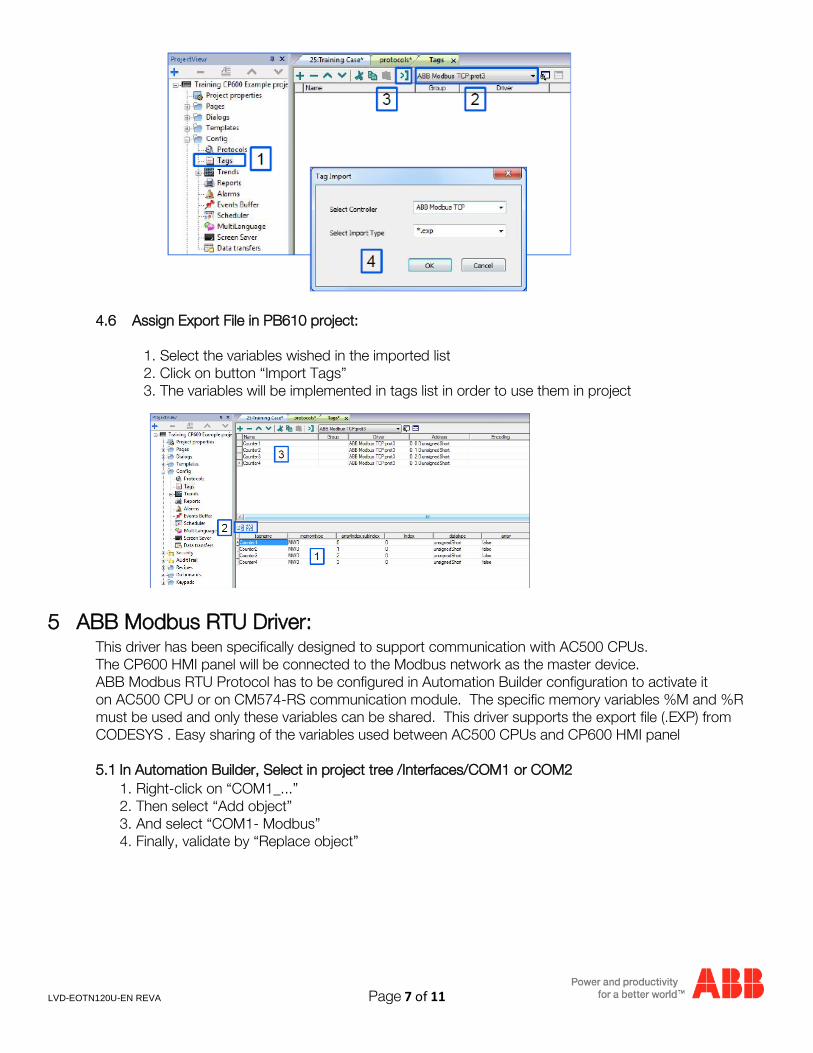
4.6 Assign Export File in PB610 project: 1. Select the variables wished in the imported list 2. Click on button “Import Tags” 3. The variables will be implemented in tags list in order to use them in project
5 ABB Modbus RTU Driver: This driver has been specifically designed to support communication with AC500 CPUs. The CP600 HMI panel will be connected to the Modbus network as the master device. ABB Modbus RTU Protocol has to be configured in Automation Builder configuration to activate it on AC500 CPU or on CM574-RS communication module. The specific memory variables %M and %R must be used and only these variables can be shared. This driver supports the export file (.EXP) from CODESYS . Easy sharing of the variables used between AC500 CPUs and CP600 HMI panel 5.1 In Automation Builder, Select in project tree /Interfaces/COM1 or COM2
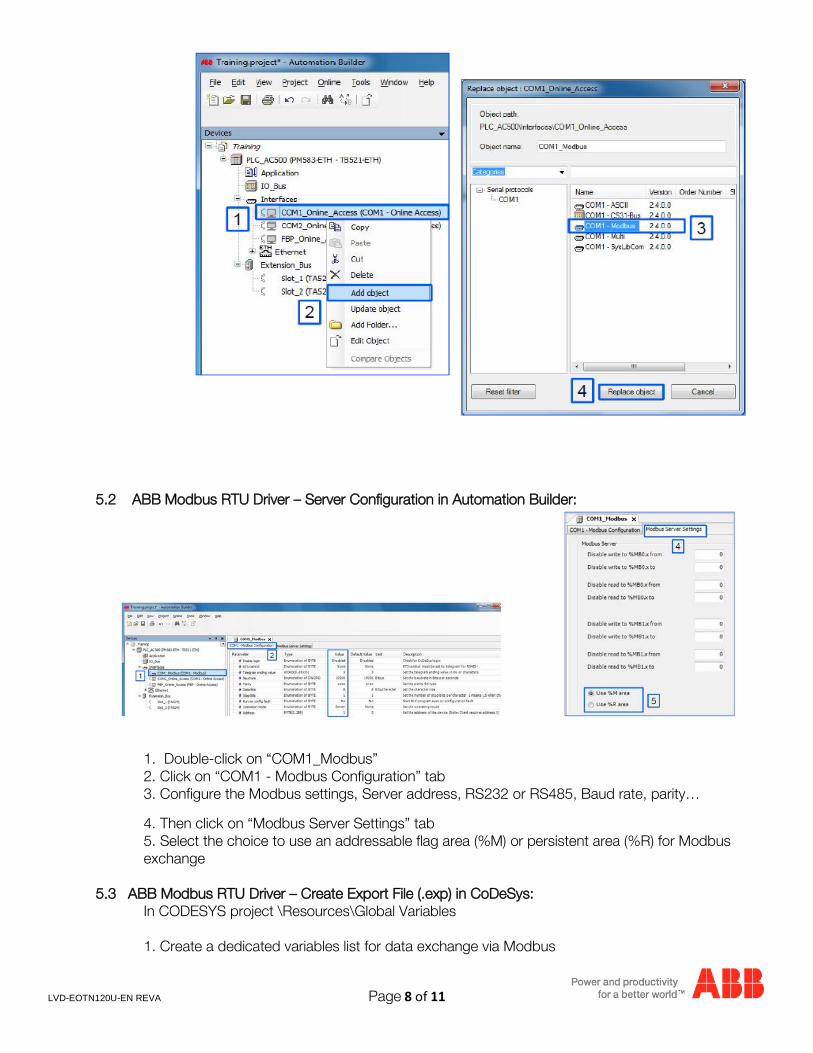
1. Right-click on “COM1_...” 2. Then select “Add object” 3. And select “COM1- Modbus” 4. Finally, validate by “Replace object”
LVD-EOTN120U-EN REVA Page 8 of 11
5.2 ABB Modbus RTU Driver – Server Configuration in Automation Builder:
1. Double-click on “COM1_Modbus” 2. Click on “COM1 - Modbus Configuration” tab 3. Configure the Modbus settings, Server address, RS232 or RS485, Baud rate, parity…
4. Then click on “Modbus Server Settings” tab 5. Select the choice to use an addressable flag area (%M) or persistent area (%R) for Modbus exchange
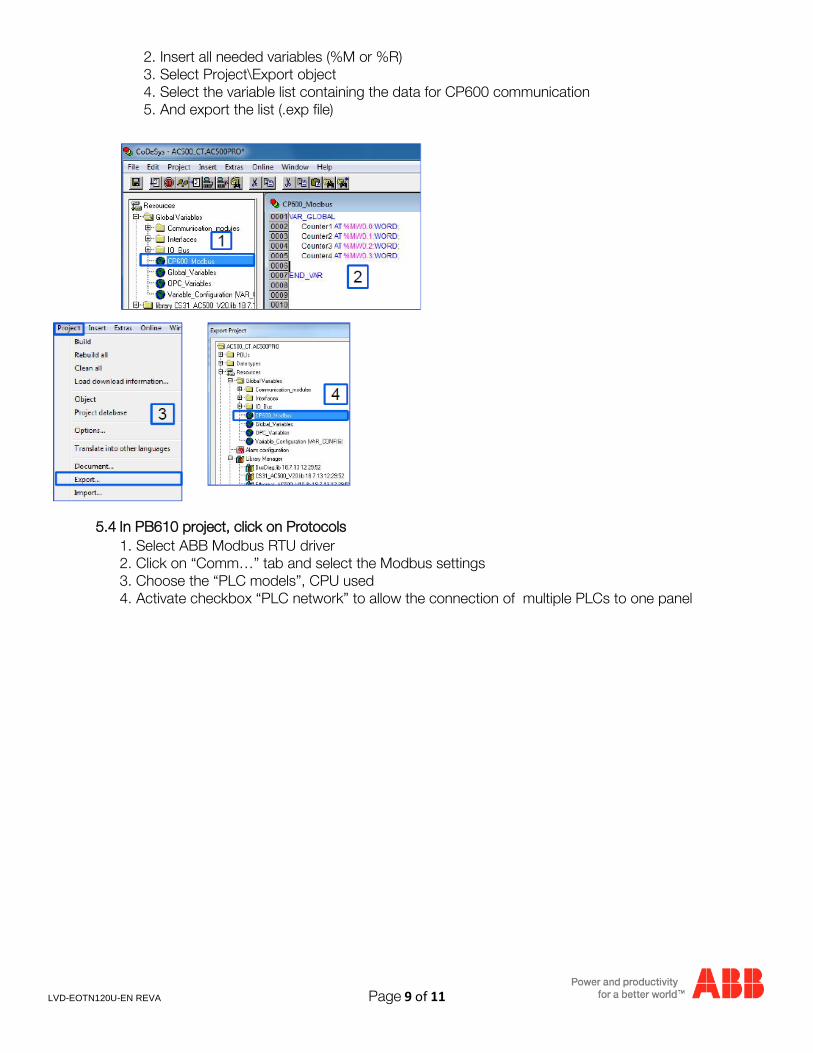
5.3 ABB Modbus RTU Driver – Create Export File (.exp) in CoDeSys: In CODESYS project \Resources\Global Variables
1. Create a dedicated variables list for data exchange via Modbus
LVD-EOTN120U-EN REVA Page 9 of 11
2. Insert all needed variables (%M or %R) 3. Select Project\Export object 4. Select the variable list containing the data for CP600 communication 5. And export the list (.exp file)
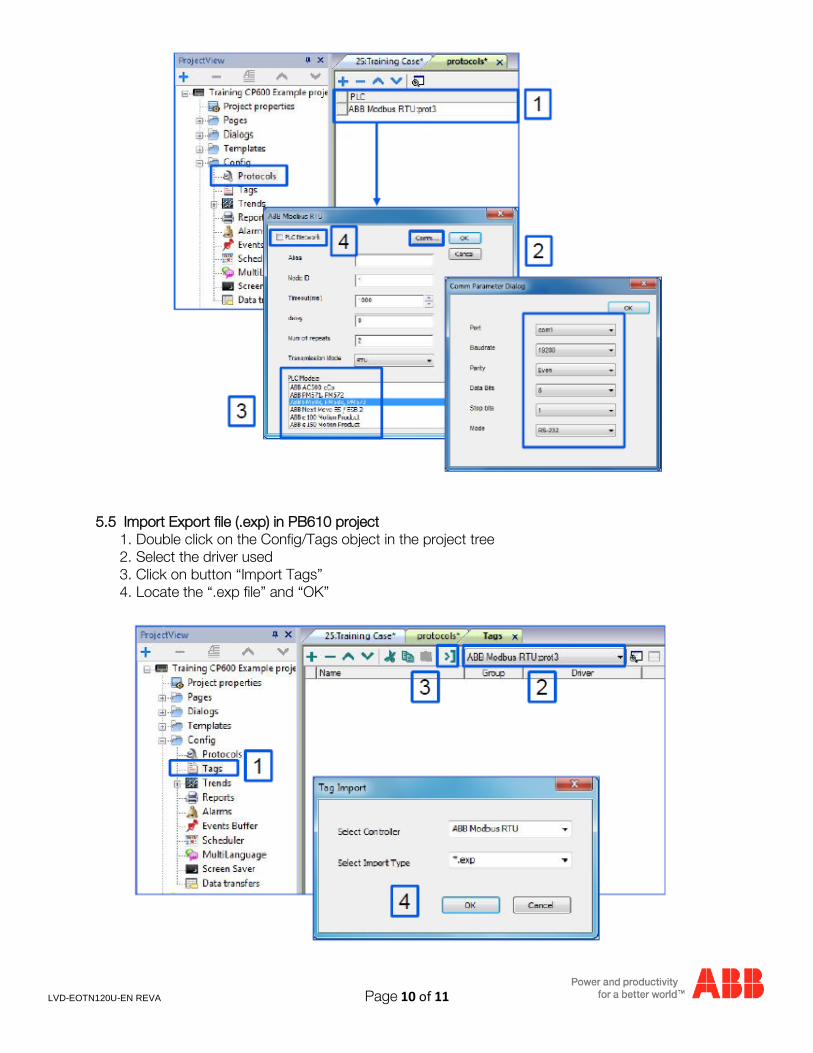
5.4 In PB610 project, click on Protocols 1. Select ABB Modbus RTU driver 2. Click on “Comm…” tab and select the Modbus settings 3. Choose the “PLC models”, CPU used 4. Activate checkbox “PLC network” to allow the connection of multiple PLCs to one panel
LVD-EOTN120U-EN REVA Page 10 of 11
5.5 Import Export file (.exp) in PB610 project 1. Double click on the Config/Tags object in the project tree 2. Select the driver used 3. Click on button “Import Tags” 4. Locate the “.exp file” and “OK”
LVD-EOTN120U-EN REVA Page 11 of 11
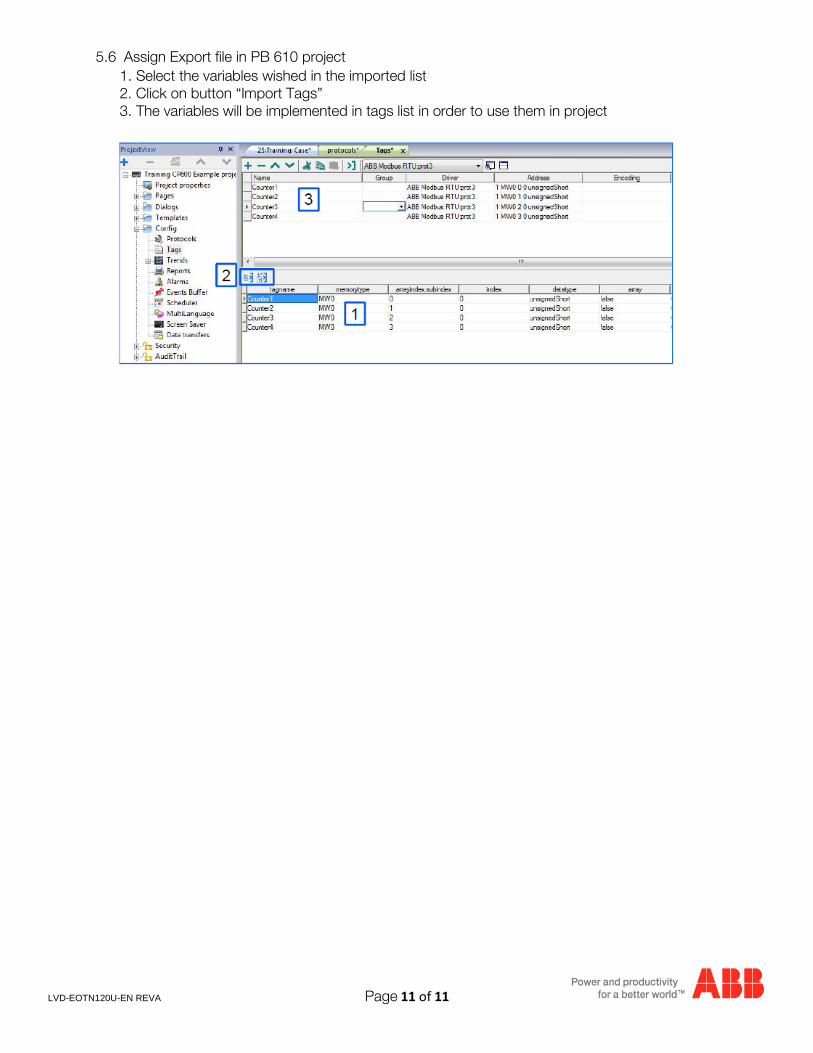
5.6 Assign Export file in PB 610 project 1. Select the variables wished in the imported list 2. Click on button “Import Tags” 3. The variables will be implemented in tags list in order to use them in project