COWL GRILLE REMOVAL/INSTALLATIONmellens.net/mazda/Mazda-Miata-2005/exterior_trim.pdf ·...
80
2005 ACCESSORIES & EQUIPMENT Exterior Trim - MX-5 Miata COWL GRILLE REMOVAL/INSTALLATION 1. Remove the windshield wiper arm and blade. (See WINDSHIELD WIPER ARM AND BLADE REMOVAL/INSTALLATION .) 2. Remove in the order indicated in the table. Fig. 1: Removing Cowl Grille Courtesy of MAZDA MOTORS CORP. 3. Install in the reverse order of removal. BELTLINE MOLDING REMOVAL/INSTALLATION 1. Remove the rear package trim. 2. Remove the set plate. 3. Remove the bolts. 4. Remove the beltline molding. 2005 Mazda MX-5 Miata 2005 ACCESSORIES & EQUIPMENT Exterior Trim - MX-5 Miata
Transcript of COWL GRILLE REMOVAL/INSTALLATIONmellens.net/mazda/Mazda-Miata-2005/exterior_trim.pdf ·...

2005 ACCESSORIES & EQUIPMENT
Exterior Trim - MX-5 Miata
COWL GRILLE REMOVAL/INSTALLATION
1. Remove the windshield wiper arm and blade. (See WINDSHIELD WIPER ARM AND BLADE REMOVAL/INSTALLATION .)
2. Remove in the order indicated in the table.
Fig. 1: Removing Cowl Grille Courtesy of MAZDA MOTORS CORP.
3. Install in the reverse order of removal.
BELTLINE MOLDING REMOVAL/INSTALLATION
1. Remove the rear package trim.
2. Remove the set plate.
3. Remove the bolts.
4. Remove the beltline molding.
2005 Mazda MX-5 Miata
2005 ACCESSORIES & EQUIPMENT Exterior Trim - MX-5 Miata
2005 Mazda MX-5 Miata
2005 ACCESSORIES & EQUIPMENT Exterior Trim - MX-5 Miata
Microsoft
Saturday, July 04, 2009 12:04:27 PM Page 1 © 2005 Mitchell Repair Information Company, LLC.
Microsoft
Saturday, July 04, 2009 12:05:07 PM Page 1 © 2005 Mitchell Repair Information Company, LLC.

Fig. 2: Removing Beltline Molding Courtesy of MAZDA MOTORS CORP.
5. Install in the reverse order of removal.
FRONT BELTLINE MOLDING REMOVAL/INSTALLATION
1. Remove the screws.
2. Pull front beltline molding upward to disengage the clips from the body and remove it.
2005 Mazda MX-5 Miata
2005 ACCESSORIES & EQUIPMENT Exterior Trim - MX-5 Miata
Microsoft
Saturday, July 04, 2009 12:04:27 PM Page 2 © 2005 Mitchell Repair Information Company, LLC.

Fig. 3: Removing Front Beltline Molding Courtesy of MAZDA MOTORS CORP.
3. Install in the reverse order of removal.
REAR WINDOW MOLDING REMOVAL
DETACHABLE HARDTOP
1. Pull the rear window molding to remove it.
2005 Mazda MX-5 Miata
2005 ACCESSORIES & EQUIPMENT Exterior Trim - MX-5 Miata
Microsoft
Saturday, July 04, 2009 12:04:27 PM Page 3 © 2005 Mitchell Repair Information Company, LLC.

Fig. 4: Removing Rear Window Molding Courtesy of MAZDA MOTORS CORP.
REAR WINDOW MOLDING INSTALLATION
DETACHABLE HARDTOP
1. Apply protective tape along the edge of the body to protect it from damage.
2. Cut the sealant using a razor as shown.
WARNING: Using a razor with bare hands can cause injury. Always wear gloves when using a razor.
2005 Mazda MX-5 Miata
2005 ACCESSORIES & EQUIPMENT Exterior Trim - MX-5 Miata
Microsoft
Saturday, July 04, 2009 12:04:28 PM Page 4 © 2005 Mitchell Repair Information Company, LLC.

Fig. 5: Cutting Sealant Using Razor Courtesy of MAZDA MOTORS CORP.
3. Insert the blade of the SST (Sealant Remover) into the sealant, and pull on the bar to cut the sealant near the body as shown.
2005 Mazda MX-5 Miata
2005 ACCESSORIES & EQUIPMENT Exterior Trim - MX-5 Miata
Microsoft
Saturday, July 04, 2009 12:04:28 PM Page 5 © 2005 Mitchell Repair Information Company, LLC.

Fig. 6: Cutting Sealant Near Body Courtesy of MAZDA MOTORS CORP.
4. Insert the blade of the SST (Sealant Remover) into the sealant, and pull on the bar to cut the sealant near the glass as shown.
5. Remove as much sealant as possible from between the body and the glass.
2005 Mazda MX-5 Miata
2005 ACCESSORIES & EQUIPMENT Exterior Trim - MX-5 Miata
Microsoft
Saturday, July 04, 2009 12:04:28 PM Page 6 © 2005 Mitchell Repair Information Company, LLC.

Fig. 7: Cutting Sealant Near Glass (1 Of 2) Courtesy of MAZDA MOTORS CORP.
6. Carefully clean around the edge of the glass and the adhesion surface of the body.
CAUTION: Keep the area free of dirt and grease, and do not touch the surface or the primer may not properly bond to the surface of the glass and body which may cause leaks to occur.
2005 Mazda MX-5 Miata
2005 ACCESSORIES & EQUIPMENT Exterior Trim - MX-5 Miata
Microsoft
Saturday, July 04, 2009 12:04:28 PM Page 7 © 2005 Mitchell Repair Information Company, LLC.

Fig. 8: Cutting Sealant Near Glass (2 Of 2) Courtesy of MAZDA MOTORS CORP.
7. Apply primer onto the bonding area of the new rear window molding using a brush. Allow the primer to dry for approximately 30 minutes .
8. Apply a 3.0 mm {0.12 in} bead of sealant between the glass and the body.
2005 Mazda MX-5 Miata
2005 ACCESSORIES & EQUIPMENT Exterior Trim - MX-5 Miata
Microsoft
Saturday, July 04, 2009 12:04:28 PM Page 8 © 2005 Mitchell Repair Information Company, LLC.

Fig. 9: Applying Primer Onto Bonding Area Of New Rear Window Molding Courtesy of MAZDA MOTORS CORP.
9. Reshape the sealant as shown if necessary.
2005 Mazda MX-5 Miata
2005 ACCESSORIES & EQUIPMENT Exterior Trim - MX-5 Miata
Microsoft
Saturday, July 04, 2009 12:04:28 PM Page 9 © 2005 Mitchell Repair Information Company, LLC.

Fig. 10: Reshaping Sealant Courtesy of MAZDA MOTORS CORP.
10. Install the rear window molding with the molding joint at the top.
If the molding is too long, cut the excess molding 10 mm {0.39 in} inside the molding joint edge. Hardening time of sealant
SEALANT HARDENING TIME Temperature Surface hardening time Time required until vehicle can be put into service5°C {41°F} Approx.1.5 h Approx.12 h20°C {68°F} Approx.1 h Approx.4 h35°C {95°F} Approx.10 min Approx.2 h
2005 Mazda MX-5 Miata
2005 ACCESSORIES & EQUIPMENT Exterior Trim - MX-5 Miata
Microsoft
Saturday, July 04, 2009 12:04:28 PM Page 10 © 2005 Mitchell Repair Information Company, LLC.

Fig. 11: Installing Rear Window Molding With Molding Joint At Top Courtesy of MAZDA MOTORS CORP.
2005 Mazda MX-5 Miata
2005 ACCESSORIES & EQUIPMENT Exterior Trim - MX-5 Miata
Microsoft
Saturday, July 04, 2009 12:04:28 PM Page 11 © 2005 Mitchell Repair Information Company, LLC.

Fig. 12: Identifying Joint Molding Edge Specification Courtesy of MAZDA MOTORS CORP.
11. Check for water leaks.
If a leak is found, wipe the water off well and repeat the installation.
WINDSHIELD MOLDING REMOVAL
1. Remove the windshield molding from the windshield.
2005 Mazda MX-5 Miata
2005 ACCESSORIES & EQUIPMENT Exterior Trim - MX-5 Miata
Microsoft
Saturday, July 04, 2009 12:04:28 PM Page 12 © 2005 Mitchell Repair Information Company, LLC.

Fig. 13: Removing Windshield Molding From Windshield Courtesy of MAZDA MOTORS CORP.
WINDSHIELD MOLDING INSTALLATION
1. Apply protective tape along the edge of the body to protect it from damage.
2. Cut the sealant using a razor as shown.
WARNING: Using a razor with bare hands can cause injury. Always wear gloves when using a razor.
2005 Mazda MX-5 Miata
2005 ACCESSORIES & EQUIPMENT Exterior Trim - MX-5 Miata
Microsoft
Saturday, July 04, 2009 12:04:28 PM Page 13 © 2005 Mitchell Repair Information Company, LLC.

Fig. 14: Cutting Sealant Using Razor Courtesy of MAZDA MOTORS CORP.
3. Insert the blade of the SST (Sealant Remover) into the sealant, and pull on the bar to cut the sealant near the body as shown.
2005 Mazda MX-5 Miata
2005 ACCESSORIES & EQUIPMENT Exterior Trim - MX-5 Miata
Microsoft
Saturday, July 04, 2009 12:04:28 PM Page 14 © 2005 Mitchell Repair Information Company, LLC.

Fig. 15: Cutting Sealant Near Body Courtesy of MAZDA MOTORS CORP.
4. Insert the blade of the SST (Sealant Remover) into the sealant, and pull on the bar to cut the sealant near the glass as shown.
5. Remove as much sealant as possible from between the body and the glass.
2005 Mazda MX-5 Miata
2005 ACCESSORIES & EQUIPMENT Exterior Trim - MX-5 Miata
Microsoft
Saturday, July 04, 2009 12:04:28 PM Page 15 © 2005 Mitchell Repair Information Company, LLC.

Fig. 16: Cutting Sealant Near Glass Courtesy of MAZDA MOTORS CORP.
6. Carefully clean around the edge of the glass and the adhesion surface of the body.
7. Align the edge of the protector to the spot mark.
2005 Mazda MX-5 Miata
2005 ACCESSORIES & EQUIPMENT Exterior Trim - MX-5 Miata
Microsoft
Saturday, July 04, 2009 12:04:28 PM Page 16 © 2005 Mitchell Repair Information Company, LLC.

Fig. 17: Cleaning Around Edge Of Glass Courtesy of MAZDA MOTORS CORP.
8. Securely bond the protector to the body as shown.
CAUTION: Keep the area free of dirt and grease, and do not touch the surface or the primer may not properly bond to the surface of the glass and body which may cause leaks to occur.
2005 Mazda MX-5 Miata
2005 ACCESSORIES & EQUIPMENT Exterior Trim - MX-5 Miata
Microsoft
Saturday, July 04, 2009 12:04:28 PM Page 17 © 2005 Mitchell Repair Information Company, LLC.

Fig. 18: Bonding Protector To Body Courtesy of MAZDA MOTORS CORP.
9. Apply primer onto the bonding area of the glass, body, and new windshield molding using a brush. Use only glass primer on the glass and body primer on the body and molding. Allow the primer to dry for approximately 30 minutes .
10. Apply a 3.0 mm {0.12 in} bead of sealant between the glass and the body.
2005 Mazda MX-5 Miata
2005 ACCESSORIES & EQUIPMENT Exterior Trim - MX-5 Miata
Microsoft
Saturday, July 04, 2009 12:04:28 PM Page 18 © 2005 Mitchell Repair Information Company, LLC.

Fig. 19: Apply Primer Onto Bonding Area Of Glass Courtesy of MAZDA MOTORS CORP.
11. Reshape the sealant as shown if necessary.
2005 Mazda MX-5 Miata
2005 ACCESSORIES & EQUIPMENT Exterior Trim - MX-5 Miata
Microsoft
Saturday, July 04, 2009 12:04:28 PM Page 19 © 2005 Mitchell Repair Information Company, LLC.

Fig. 20: Reshaping Sealant Courtesy of MAZDA MOTORS CORP.
12. Install the windshield molding before the sealant has hardened.
13. Align the center mark in the molding with the glass mark (A).
14. Install the upper portions of the molding into the body (B).
15. Push the corners of the molding onto the body (C).
2005 Mazda MX-5 Miata
2005 ACCESSORIES & EQUIPMENT Exterior Trim - MX-5 Miata
Microsoft
Saturday, July 04, 2009 12:04:28 PM Page 20 © 2005 Mitchell Repair Information Company, LLC.

Fig. 21: Installing Windshield Molding Courtesy of MAZDA MOTORS CORP.
16. Push the sides of the molding onto the body, beginning from the bottom (D).
SEALANT HARDENING TIME
17. Check for water leaks.
If a leak is found, wipe the water off well and repeat the installation.
Temperature Surface hardening time Time required until vehicle can be put into service5°C {41°F} Approx.1.5 h Approx.12 h20°C {68°F} Approx.1 h Approx.4 h35°C {95°F} Approx.10 min Approx.2 h
2005 Mazda MX-5 Miata
2005 ACCESSORIES & EQUIPMENT Exterior Trim - MX-5 Miata
Microsoft
Saturday, July 04, 2009 12:04:28 PM Page 21 © 2005 Mitchell Repair Information Company, LLC.

Fig. 22: Identifying Molding Courtesy of MAZDA MOTORS CORP.
CONVERTIBLE TOP REMOVAL/INSTALLATION
1. Cover both sides of the rear window glass with thick cloth to protect the window.
2. Remove the scuff plate.
3. Remove the quarter trim.
4. Remove the rear package trim.
5. Remove in the order indicated in the table.
2005 Mazda MX-5 Miata
2005 ACCESSORIES & EQUIPMENT Exterior Trim - MX-5 Miata
Microsoft
Saturday, July 04, 2009 12:04:28 PM Page 22 © 2005 Mitchell Repair Information Company, LLC.

Fig. 23: Removing Convertible Top - With Torque Specifications Courtesy of MAZDA MOTORS CORP.
6. Install in the reverse order of removal.
CONVERTIBLE TOP REMOVAL NOTE
1. Unlock the top lock.
2. Lower the convertible top fully.
CONVERTIBLE TOP INSTALLATION NOTE
1. Insert the rain rail into the beltline molding lip, and install it over the studs.
2005 Mazda MX-5 Miata
2005 ACCESSORIES & EQUIPMENT Exterior Trim - MX-5 Miata
Microsoft
Saturday, July 04, 2009 12:04:28 PM Page 23 © 2005 Mitchell Repair Information Company, LLC.

Fig. 24: Inserting Rain Rail Into Beltline Molding Lip Courtesy of MAZDA MOTORS CORP.
2. Align and install the link bracket over the studs with no clearance between the studs and the bracket.
3. Tighten the installation bolts.
Tightening torque
19-25 N.m {1.9-2.6 kgf.m, 14-18 ft.lbf}
2005 Mazda MX-5 Miata
2005 ACCESSORIES & EQUIPMENT Exterior Trim - MX-5 Miata
Microsoft
Saturday, July 04, 2009 12:04:28 PM Page 24 © 2005 Mitchell Repair Information Company, LLC.

Fig. 25: Installing Link Bracket Over Studs Courtesy of MAZDA MOTORS CORP.
CONVERTIBLE TOP DISASSEMBLY/ASSEMBLY
1. Disassemble in the order indicated in the table.
2005 Mazda MX-5 Miata
2005 ACCESSORIES & EQUIPMENT Exterior Trim - MX-5 Miata
Microsoft
Saturday, July 04, 2009 12:04:28 PM Page 25 © 2005 Mitchell Repair Information Company, LLC.

Fig. 26: Disassembling Convertible Top - With Torque Specifications Courtesy of MAZDA MOTORS CORP.
2. Assemble in the reverse order of disassembly.
RETAINER DISASSEMBLY NOTE
1. Set the convertible top upside down on a workbench covered with clean, thick cloth.
2. Mark around the retainer installation screws with paint before removing them.
2005 Mazda MX-5 Miata
2005 ACCESSORIES & EQUIPMENT Exterior Trim - MX-5 Miata
Microsoft
Saturday, July 04, 2009 12:04:28 PM Page 26 © 2005 Mitchell Repair Information Company, LLC.

Fig. 27: Disassembling Retainer Courtesy of MAZDA MOTORS CORP.
END PLATE DISASSEMBLY NOTE
1. Remove the rivets from the link using a drill.
Drill size
4.0 mm diameter {0.16 in diameter}
2. Remove the screws and remove the end plates from the link.
2005 Mazda MX-5 Miata
2005 ACCESSORIES & EQUIPMENT Exterior Trim - MX-5 Miata
Microsoft
Saturday, July 04, 2009 12:04:28 PM Page 27 © 2005 Mitchell Repair Information Company, LLC.

Fig. 28: Disassembling End Plate Courtesy of MAZDA MOTORS CORP.
TOP FABRIC DISASSEMBLY NOTE
1. Fold the convertible top.
2. Remove the top fabric from the link.
2005 Mazda MX-5 Miata
2005 ACCESSORIES & EQUIPMENT Exterior Trim - MX-5 Miata
Microsoft
Saturday, July 04, 2009 12:04:28 PM Page 28 © 2005 Mitchell Repair Information Company, LLC.

Fig. 29: Removing Top Fabric From Link Courtesy of MAZDA MOTORS CORP.
CABLE DISASSEMBLY NOTE
1. Peel back the top fabric from the front header.
2. Remove the screws and disconnect the cables from the rear of the link.
3. Unfold the convertible top and set it upright.
2005 Mazda MX-5 Miata
2005 ACCESSORIES & EQUIPMENT Exterior Trim - MX-5 Miata
Microsoft
Saturday, July 04, 2009 12:04:28 PM Page 29 © 2005 Mitchell Repair Information Company, LLC.

Fig. 30: Disconnecting Cables From Rear Of Link Courtesy of MAZDA MOTORS CORP.
4. Remove the rivets from the link using a drill.
Drill size
4.0 mm diameter {0.16 in diameter}
5. Pry back the bow retainers using a tape-wrapped flathead screwdriver.
2005 Mazda MX-5 Miata
2005 ACCESSORIES & EQUIPMENT Exterior Trim - MX-5 Miata
Microsoft
Saturday, July 04, 2009 12:04:28 PM Page 30 © 2005 Mitchell Repair Information Company, LLC.

Fig. 31: Removing Rivets From Link Courtesy of MAZDA MOTORS CORP.
6. Remove the top fabric from the bow retainer.
Fig. 32: Removing Top Fabric From Bow Retainer Courtesy of MAZDA MOTORS CORP.
2005 Mazda MX-5 Miata
2005 ACCESSORIES & EQUIPMENT Exterior Trim - MX-5 Miata
Microsoft
Saturday, July 04, 2009 12:04:28 PM Page 31 © 2005 Mitchell Repair Information Company, LLC.

7. Remove the cables from the cable guide.
8. Remove the top fabric and cables from the link.
Fig. 33: Removing Top Fabric And Cables From Link Courtesy of MAZDA MOTORS CORP.
9. Remove the cables from the top fabric.
2005 Mazda MX-5 Miata
2005 ACCESSORIES & EQUIPMENT Exterior Trim - MX-5 Miata
Microsoft
Saturday, July 04, 2009 12:04:28 PM Page 32 © 2005 Mitchell Repair Information Company, LLC.

Fig. 34: Removing Cables From Top Fabric Courtesy of MAZDA MOTORS CORP.
CABLE ASSEMBLY NOTE
1. Thread the cable into the top fabric.
2005 Mazda MX-5 Miata
2005 ACCESSORIES & EQUIPMENT Exterior Trim - MX-5 Miata
Microsoft
Saturday, July 04, 2009 12:04:28 PM Page 33 © 2005 Mitchell Repair Information Company, LLC.

Fig. 35: Threading Cable Into Top Fabric Courtesy of MAZDA MOTORS CORP.
TOP FABRIC ASSEMBLY NOTE
1. Cover the workbench with thick cloth to prevent damaging the top fabric and rear window.
2. Place the link onto the top fabric.
3. Install the top fabric to the front bow.
2005 Mazda MX-5 Miata
2005 ACCESSORIES & EQUIPMENT Exterior Trim - MX-5 Miata
Microsoft
Saturday, July 04, 2009 12:04:28 PM Page 34 © 2005 Mitchell Repair Information Company, LLC.

Fig. 36: Installing Top Fabric To Front Bow Courtesy of MAZDA MOTORS CORP.
4. Roll the top fabric over the bow retainer.
5. Hang the end of the top fabric on the bow retainer.
2005 Mazda MX-5 Miata
2005 ACCESSORIES & EQUIPMENT Exterior Trim - MX-5 Miata
Microsoft
Saturday, July 04, 2009 12:04:28 PM Page 35 © 2005 Mitchell Repair Information Company, LLC.

Fig. 37: Assembling Top Fabric To Bow Retainer Courtesy of MAZDA MOTORS CORP.
6. Clamp the top fabric to the bow using water pump pliers which have been wrapped in tape. Pull the top fabric by hand to verify that it is held securely.
7. Set the convertible top upright.
2005 Mazda MX-5 Miata
2005 ACCESSORIES & EQUIPMENT Exterior Trim - MX-5 Miata
Microsoft
Saturday, July 04, 2009 12:04:28 PM Page 36 © 2005 Mitchell Repair Information Company, LLC.

Fig. 38: Clamping Top Fabric To Bow Courtesy of MAZDA MOTORS CORP.
8. Rivet the cables to the front of the link.
2005 Mazda MX-5 Miata
2005 ACCESSORIES & EQUIPMENT Exterior Trim - MX-5 Miata
Microsoft
Saturday, July 04, 2009 12:04:28 PM Page 37 © 2005 Mitchell Repair Information Company, LLC.

Fig. 39: Riveting Cables To Front Of Link Courtesy of MAZDA MOTORS CORP.
SET PLATE ASSEMBLY NOTE
1. Turn the convertible top over and fold it.
2. Install the front of the top fabric to the front header.
3. Align the set plate and top fabric with the set plate installation holes.
4. Install the set plate to the link.
2005 Mazda MX-5 Miata
2005 ACCESSORIES & EQUIPMENT Exterior Trim - MX-5 Miata
Microsoft
Saturday, July 04, 2009 12:04:28 PM Page 38 © 2005 Mitchell Repair Information Company, LLC.

Fig. 40: Installing Set Plate To Link Courtesy of MAZDA MOTORS CORP.
END PLATE ASSEMBLY NOTE
1. Unfold the convertible top half-way.
2. Pass the cables through the cable guides.
3. Install the cables to the rear of the link.
4. Fold the convertible top.
2005 Mazda MX-5 Miata
2005 ACCESSORIES & EQUIPMENT Exterior Trim - MX-5 Miata
Microsoft
Saturday, July 04, 2009 12:04:28 PM Page 39 © 2005 Mitchell Repair Information Company, LLC.

Fig. 41: Installing Cables To Rear Of LinkCourtesy of MAZDA MOTORS CORP.
5. Install the top fabric to the link.
6. Unfold the convertible top.
7. Install the end plates to the link.
Fig. 42: Installing Top Fabric To Link Courtesy of MAZDA MOTORS CORP.
8. Rivet the top fabric to the link.
2005 Mazda MX-5 Miata
2005 ACCESSORIES & EQUIPMENT Exterior Trim - MX-5 Miata
Microsoft
Saturday, July 04, 2009 12:04:28 PM Page 40 © 2005 Mitchell Repair Information Company, LLC.

Fig. 43: Riveting Top Fabric To Link Courtesy of MAZDA MOTORS CORP.
RETAINER ASSEMBLY NOTE
1. Install the retainers to the link, aligning the retainer marks with the retainer installation screws.
2005 Mazda MX-5 Miata
2005 ACCESSORIES & EQUIPMENT Exterior Trim - MX-5 Miata
Microsoft
Saturday, July 04, 2009 12:04:28 PM Page 41 © 2005 Mitchell Repair Information Company, LLC.

Fig. 44: Installing Retainers To Link Courtesy of MAZDA MOTORS CORP.
CONVERTIBLE TOP ADJUSTMENT
1. Lift the protector away from the top lock adjusting nut.
2. Turn the adjusting nut clockwise to decrease clearance A and height B; turn the nut counterclockwise to increase them.
Clearance
A: 3-7 mm {0.12-0.27 in}
B: -2-2 mm {-0.07-0.07 in}
2005 Mazda MX-5 Miata
2005 ACCESSORIES & EQUIPMENT Exterior Trim - MX-5 Miata
Microsoft
Saturday, July 04, 2009 12:04:28 PM Page 42 © 2005 Mitchell Repair Information Company, LLC.

Fig. 45: Adjusting Convertible Top Courtesy of MAZDA MOTORS CORP.
3. Secure the adjusting nut with the protector.
RETAINER ADJUSTMENT
1. Remove the weatherstrip.
2. Loosen the retainer installation screws and adjust the retainer as necessary.
3. Tighten the screws and reinstall the weatherstrip.
2005 Mazda MX-5 Miata
2005 ACCESSORIES & EQUIPMENT Exterior Trim - MX-5 Miata
Microsoft
Saturday, July 04, 2009 12:04:28 PM Page 43 © 2005 Mitchell Repair Information Company, LLC.

Fig. 46: Adjusting Retainer Courtesy of MAZDA MOTORS CORP.
TOP FABRIC REMOVAL/INSTALLATION
1. Cover over the rear deck area using a protective rag.
2. Remove the rear package trim.
3. Remove in the order indicated in the table.
2005 Mazda MX-5 Miata
2005 ACCESSORIES & EQUIPMENT Exterior Trim - MX-5 Miata
Microsoft
Saturday, July 04, 2009 12:04:28 PM Page 44 © 2005 Mitchell Repair Information Company, LLC.
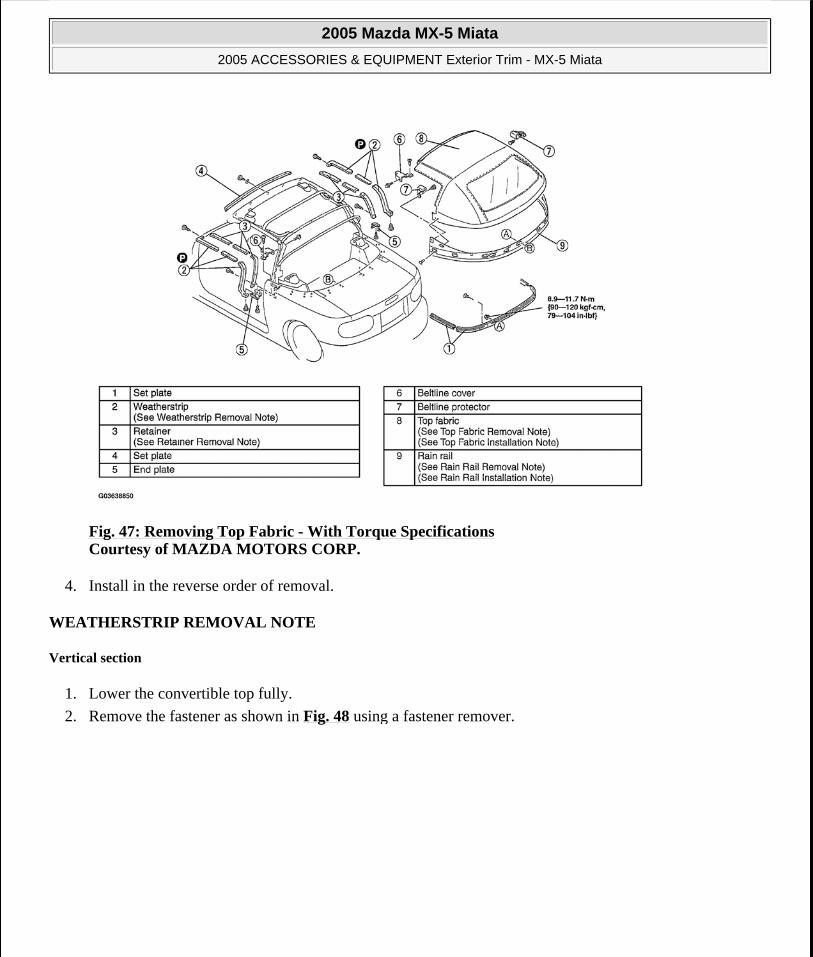
Fig. 47: Removing Top Fabric - With Torque Specifications Courtesy of MAZDA MOTORS CORP.
4. Install in the reverse order of removal.
WEATHERSTRIP REMOVAL NOTE
Vertical section
1. Lower the convertible top fully.
2. Remove the fastener as shown in Fig. 48 using a fastener remover.
2005 Mazda MX-5 Miata
2005 ACCESSORIES & EQUIPMENT Exterior Trim - MX-5 Miata
Microsoft
Saturday, July 04, 2009 12:04:28 PM Page 45 © 2005 Mitchell Repair Information Company, LLC.

Fig. 48: Removing Fastener Courtesy of MAZDA MOTORS CORP.
RETAINER REMOVAL NOTE
1. Mark around the retainer installation screws with paint before removing them.
2005 Mazda MX-5 Miata
2005 ACCESSORIES & EQUIPMENT Exterior Trim - MX-5 Miata
Microsoft
Saturday, July 04, 2009 12:04:28 PM Page 46 © 2005 Mitchell Repair Information Company, LLC.

Fig. 49: Marking Around Retainer Installation Screws Courtesy of MAZDA MOTORS CORP.
TOP FABRIC REMOVAL NOTE
1. Remove the rivets from the link with a drill.
Drill size
4.0 mm diameter{0.16 in diameter}
2. Peel the top fabric end.
3. Remove the rivets from the link using a drill.
Drill size
2005 Mazda MX-5 Miata
2005 ACCESSORIES & EQUIPMENT Exterior Trim - MX-5 Miata
Microsoft
Saturday, July 04, 2009 12:04:28 PM Page 47 © 2005 Mitchell Repair Information Company, LLC.

4.0 mm diameter{0.16 in diameter}
Fig. 50: Removing Rivets From Link Using Drill Courtesy of MAZDA MOTORS CORP.
4. Lower the convertible top to release the cable spring tension, and unhook the spring.
2005 Mazda MX-5 Miata
2005 ACCESSORIES & EQUIPMENT Exterior Trim - MX-5 Miata
Microsoft
Saturday, July 04, 2009 12:04:28 PM Page 48 © 2005 Mitchell Repair Information Company, LLC.
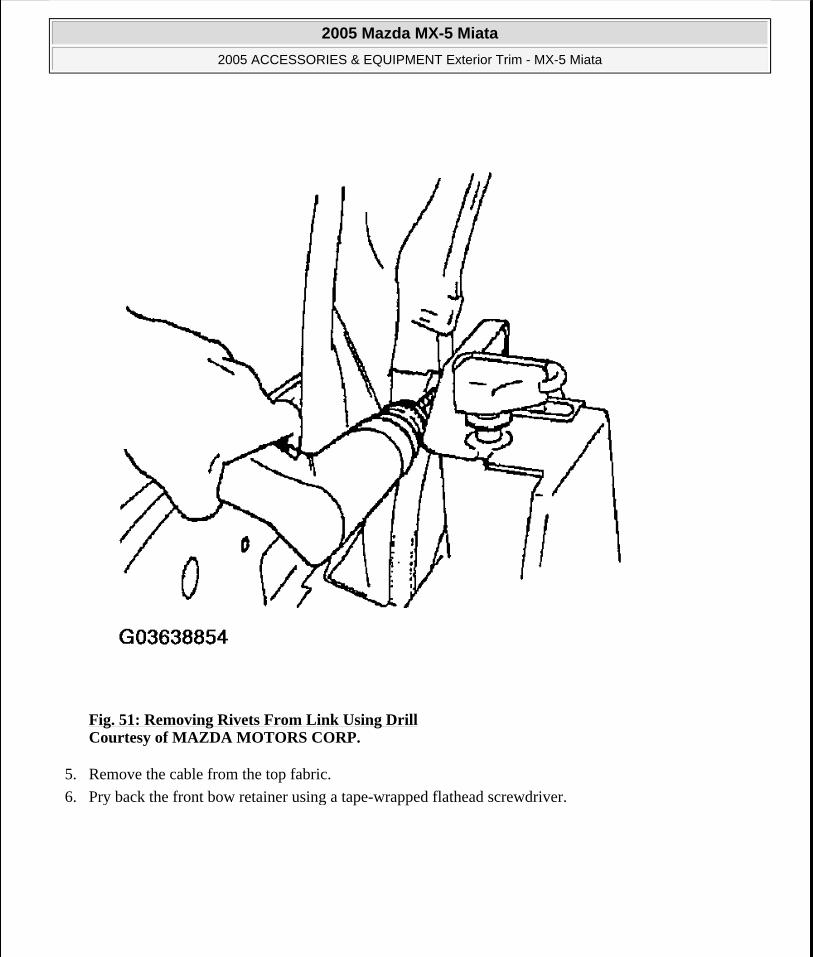
Fig. 51: Removing Rivets From Link Using Drill Courtesy of MAZDA MOTORS CORP.
5. Remove the cable from the top fabric.
6. Pry back the front bow retainer using a tape-wrapped flathead screwdriver.
2005 Mazda MX-5 Miata
2005 ACCESSORIES & EQUIPMENT Exterior Trim - MX-5 Miata
Microsoft
Saturday, July 04, 2009 12:04:28 PM Page 49 © 2005 Mitchell Repair Information Company, LLC.

Fig. 52: Identifying Cable Spring And Screw Courtesy of MAZDA MOTORS CORP.
7. Remove the top fabric from the bow retainer.
2005 Mazda MX-5 Miata
2005 ACCESSORIES & EQUIPMENT Exterior Trim - MX-5 Miata
Microsoft
Saturday, July 04, 2009 12:04:28 PM Page 50 © 2005 Mitchell Repair Information Company, LLC.

Fig. 53: Removing Top Fabric From Bow Retainer Courtesy of MAZDA MOTORS CORP.
RAIN RAIL REMOVAL NOTE
1. Remove the rivets from the top fabric using a drill.
Drill size
4.0 mm diameter {0.16 in diameter}
2005 Mazda MX-5 Miata
2005 ACCESSORIES & EQUIPMENT Exterior Trim - MX-5 Miata
Microsoft
Saturday, July 04, 2009 12:04:28 PM Page 51 © 2005 Mitchell Repair Information Company, LLC.

2005 Mazda MX-5 Miata
2005 ACCESSORIES & EQUIPMENT Exterior Trim - MX-5 Miata
Microsoft
Saturday, July 04, 2009 12:04:28 PM Page 52 © 2005 Mitchell Repair Information Company, LLC.

Fig. 54: Removing Rivets From Top Fabric Using DrillCourtesy of MAZDA MOTORS CORP.
RAIN RAIL INSTALLATION NOTE
If the rivets will not be used
1. Degrease the rain rail using white gasoline.
2. Install the insulation tape to the rivet installation holes of the rain rail.
Insulation tape
Width:20 mm {0.79 in}
Height:15 mm {0.59 in}
Thickness:3 mm {0.12 in}
Fig. 55: Installing Insulation Tape To Rivet Installation Holes Of Rain Rail Courtesy of MAZDA MOTORS CORP.
If the rivets will be used
2005 Mazda MX-5 Miata
2005 ACCESSORIES & EQUIPMENT Exterior Trim - MX-5 Miata
Microsoft
Saturday, July 04, 2009 12:04:28 PM Page 53 © 2005 Mitchell Repair Information Company, LLC.

1. Rivet the rain rail to the top fabric.
Fig. 56: Riveting Rain Rail To Top Fabric Courtesy of MAZDA MOTORS CORP.
2. Flatten the stem using a hammer.
2005 Mazda MX-5 Miata
2005 ACCESSORIES & EQUIPMENT Exterior Trim - MX-5 Miata
Microsoft
Saturday, July 04, 2009 12:04:28 PM Page 54 © 2005 Mitchell Repair Information Company, LLC.

Fig. 57: Flattening Stem Using Hammer Courtesy of MAZDA MOTORS CORP.
TOP FABRIC INSTALLATION NOTE
1. Place the top fabric onto the link.
2. Install the top fabric from the rear bow to the front bow.
3. Roll the top fabric over the bow retainer.
4. Hang the end of the top fabric on the bow retainer.
5. Clamp the top fabric to the bow using water pump pliers which have been wrapped in tape.
2005 Mazda MX-5 Miata
2005 ACCESSORIES & EQUIPMENT Exterior Trim - MX-5 Miata
Microsoft
Saturday, July 04, 2009 12:04:28 PM Page 55 © 2005 Mitchell Repair Information Company, LLC.

Fig. 58: Clamping Top Fabric To Bow Courtesy of MAZDA MOTORS CORP.
6. Pull the top fabric by hand to verify that it is held securely.
7. Insert a metal rod into the fabric as shown, tie the cable around the rod, and pull the cable through the fabric.
8. Raise the convertible top as shown in the figure.
2005 Mazda MX-5 Miata
2005 ACCESSORIES & EQUIPMENT Exterior Trim - MX-5 Miata
Microsoft
Saturday, July 04, 2009 12:04:28 PM Page 56 © 2005 Mitchell Repair Information Company, LLC.

Fig. 59: Inserting A Metal Rod Into Fabric Courtesy of MAZDA MOTORS CORP.
9. Install the screw.
2005 Mazda MX-5 Miata
2005 ACCESSORIES & EQUIPMENT Exterior Trim - MX-5 Miata
Microsoft
Saturday, July 04, 2009 12:04:28 PM Page 57 © 2005 Mitchell Repair Information Company, LLC.

Fig. 60: Installing Screw Courtesy of MAZDA MOTORS CORP.
10. Rivet the top fabric upper side to the link.
11. Peel the top fabric end.
2005 Mazda MX-5 Miata
2005 ACCESSORIES & EQUIPMENT Exterior Trim - MX-5 Miata
Microsoft
Saturday, July 04, 2009 12:04:28 PM Page 58 © 2005 Mitchell Repair Information Company, LLC.

Fig. 61: Riveting Top Fabric Upper Side To Link Courtesy of MAZDA MOTORS CORP.
12. Rivet the top fabric lower side to the link.
NOTE: If the lower side rivet is difficult to install to the link, install the top fabric using a Tinnerman clip and a screw.
2005 Mazda MX-5 Miata
2005 ACCESSORIES & EQUIPMENT Exterior Trim - MX-5 Miata
Microsoft
Saturday, July 04, 2009 12:04:28 PM Page 59 © 2005 Mitchell Repair Information Company, LLC.

Fig. 62: Riveting Top Fabric Lower Side To Link Courtesy of MAZDA MOTORS CORP.
TOP FABRIC REPAIR
HOLES
1. Place the repair sheet (NC10 R1 211) over the damaged section. Cut both the top fabric and the repair sheet using a razor and a straightedge.
2. Cut another piece of repair sheet larger than the first for use as a back repair sheet.
2005 Mazda MX-5 Miata
2005 ACCESSORIES & EQUIPMENT Exterior Trim - MX-5 Miata
Microsoft
Saturday, July 04, 2009 12:04:28 PM Page 60 © 2005 Mitchell Repair Information Company, LLC.

Fig. 63: Placing Repair Sheet Over Damaged Section Courtesy of MAZDA MOTORS CORP.
3. Trim the top fabric and the repair sheets using scissors.
2005 Mazda MX-5 Miata
2005 ACCESSORIES & EQUIPMENT Exterior Trim - MX-5 Miata
Microsoft
Saturday, July 04, 2009 12:04:28 PM Page 61 © 2005 Mitchell Repair Information Company, LLC.

Fig. 64: Identifying Repair Sheets Courtesy of MAZDA MOTORS CORP.
4. Degrease the repair sheets using ethyl alcohol.
5. Apply a generous amount of adhesive agent (K180 W0 313) or equivalent to the section being repaired, the repair sheet, and the back repair sheet. Let stand for a few minutes.
2005 Mazda MX-5 Miata
2005 ACCESSORIES & EQUIPMENT Exterior Trim - MX-5 Miata
Microsoft
Saturday, July 04, 2009 12:04:28 PM Page 62 © 2005 Mitchell Repair Information Company, LLC.

Fig. 65: Degreasing Repair Sheets Using Ethyl Alcohol Courtesy of MAZDA MOTORS CORP.
6. Insert the repair sheet squarely into the section of the top fabric being repaired. Then install the back repair sheet from the underside of the top.
2005 Mazda MX-5 Miata
2005 ACCESSORIES & EQUIPMENT Exterior Trim - MX-5 Miata
Microsoft
Saturday, July 04, 2009 12:04:28 PM Page 63 © 2005 Mitchell Repair Information Company, LLC.

Fig. 66: Inserting Repair Sheet Squarely Into Section Of Top Fabric Being Repaired Courtesy of MAZDA MOTORS CORP.
7. Press the repair sheets firmly together.
2005 Mazda MX-5 Miata
2005 ACCESSORIES & EQUIPMENT Exterior Trim - MX-5 Miata
Microsoft
Saturday, July 04, 2009 12:04:28 PM Page 64 © 2005 Mitchell Repair Information Company, LLC.

Fig. 67: Pressing Repair Sheets Together Courtesy of MAZDA MOTORS CORP.
8. Let the top fabric stand until the adhesive agent is fully dry.
TEARS
1. Cut a piece of repair sheet (NC10 R1 211) larger than the damaged section for use as a back repair sheet.
2. Degrease the repair sheet using ethyl alcohol.
3. Apply a generous amount of adhesive agent (K180 W0 313) or equivalent to the section being repaired and the back repair sheet. Let stand for a few minutes.
4. Install the back repair sheet from the underside of the top.
5. Press the repair sections firmly together.
2005 Mazda MX-5 Miata
2005 ACCESSORIES & EQUIPMENT Exterior Trim - MX-5 Miata
Microsoft
Saturday, July 04, 2009 12:04:28 PM Page 65 © 2005 Mitchell Repair Information Company, LLC.

Fig. 68: Degreasing Repair Sheet Using Ethyl Alcohol Courtesy of MAZDA MOTORS CORP.
6. Let the top fabric stand until the adhesive agent is fully dry.
2005 Mazda MX-5 Miata
2005 ACCESSORIES & EQUIPMENT Exterior Trim - MX-5 Miata
Microsoft
Saturday, July 04, 2009 12:04:28 PM Page 66 © 2005 Mitchell Repair Information Company, LLC.
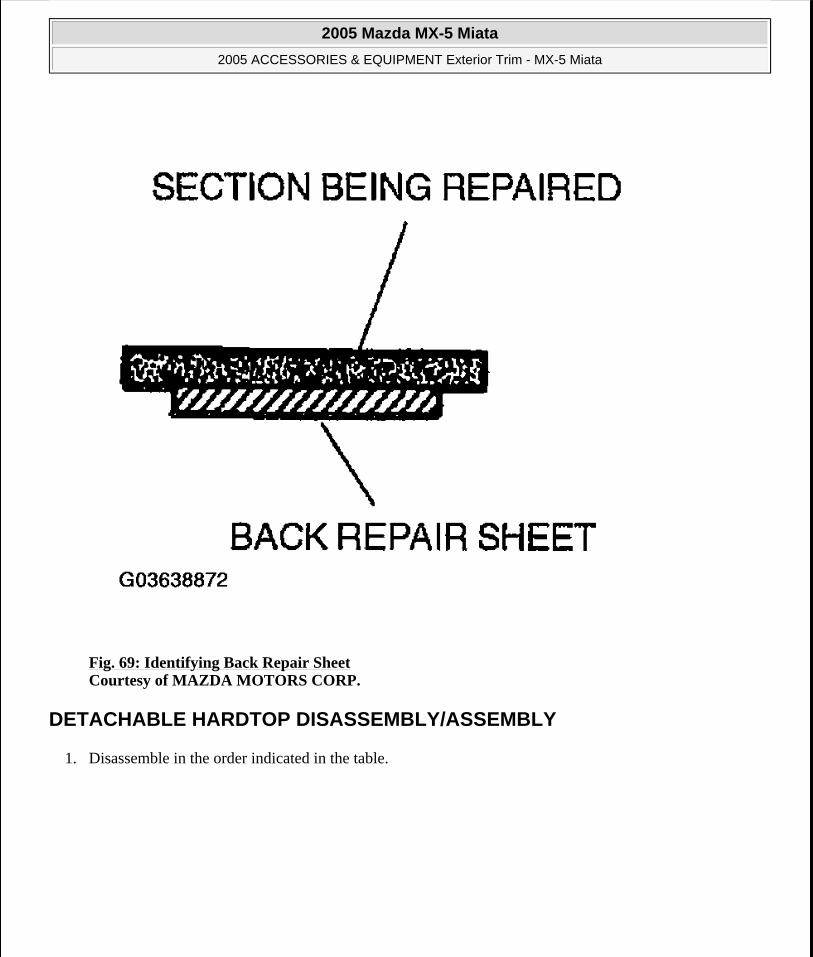
Fig. 69: Identifying Back Repair Sheet Courtesy of MAZDA MOTORS CORP.
DETACHABLE HARDTOP DISASSEMBLY/ASSEMBLY
1. Disassemble in the order indicated in the table.
2005 Mazda MX-5 Miata
2005 ACCESSORIES & EQUIPMENT Exterior Trim - MX-5 Miata
Microsoft
Saturday, July 04, 2009 12:04:28 PM Page 67 © 2005 Mitchell Repair Information Company, LLC.

Fig. 70: Disassembling Detachable Hardtop Courtesy of MAZDA MOTORS CORP.
2. Assemble in the reverse order of disassembly.
DETACHABLE HARDTOP ADJUSTMENT
TOP LOCK
1. Lift the protector away from the top lock adjusting nut.
2. Turn the adjusting nut clockwise to decrease clearance A and height B; turn the nut counterclockwise to increase them.
2005 Mazda MX-5 Miata
2005 ACCESSORIES & EQUIPMENT Exterior Trim - MX-5 Miata
Microsoft
Saturday, July 04, 2009 12:04:28 PM Page 68 © 2005 Mitchell Repair Information Company, LLC.

Clearance
A:3-7 mm {0.12-0.27 in}
B:-2-2 mm {-0.07-0.07 in}
3. Secure the adjusting nut with the protector.
Fig. 71: Adjusting Detachable Hardtop Courtesy of MAZDA MOTORS CORP.
2005 Mazda MX-5 Miata
2005 ACCESSORIES & EQUIPMENT Exterior Trim - MX-5 Miata
Microsoft
Saturday, July 04, 2009 12:04:28 PM Page 69 © 2005 Mitchell Repair Information Company, LLC.

SIDE LOCK
1. Lift the protector away from the side lock adjusting nut.
2. Turn the adjusting nut clockwise to tighten the striker and side lock engagement; turn the nut counterclockwise to loosen the engagement.
3. Secure the adjusting nut using the protector.
Fig. 72: Adjusting Side Lock Courtesy of MAZDA MOTORS CORP.
REAR DECK LOCK
1. Remove the screw and open the lock cover.
2005 Mazda MX-5 Miata
2005 ACCESSORIES & EQUIPMENT Exterior Trim - MX-5 Miata
Microsoft
Saturday, July 04, 2009 12:04:28 PM Page 70 © 2005 Mitchell Repair Information Company, LLC.

Fig. 73: Opening Lock Cover Courtesy of MAZDA MOTORS CORP.
2. Loosen the plate installation bolts.
3. Install the detachable hardtop to the body.
4. Move the plate right, left, fore, or aft until it is tight.
5. Tighten the plate installation bolts.
Tightening torque
18-26 N.m {1.8-2.7 kgf.m, 14-19 ft.lbf}
6. Close the lock cover and install the screw.
2005 Mazda MX-5 Miata
2005 ACCESSORIES & EQUIPMENT Exterior Trim - MX-5 Miata
Microsoft
Saturday, July 04, 2009 12:04:28 PM Page 71 © 2005 Mitchell Repair Information Company, LLC.

Fig. 74: Tightening Plate Courtesy of MAZDA MOTORS CORP.
FRONT AIRDAM SKIRT REMOVAL (BP WITH TC)
1. Remove the screws and fasteners.
2. Remove the front airdam skirt while cutting away the double-sided adhesive tape using a flathead
2005 Mazda MX-5 Miata
2005 ACCESSORIES & EQUIPMENT Exterior Trim - MX-5 Miata
Microsoft
Saturday, July 04, 2009 12:04:28 PM Page 72 © 2005 Mitchell Repair Information Company, LLC.

screwdriver or cutter.
Fig. 75: Removing Front Airdam Skirt (BP With TC) Courtesy of MAZDA MOTORS CORP.
FRONT AIRDAM SKIRT INSTALLATION (BP WITH TC)
1. If installing a new front airdam skirt, perform the following procedure:
1. Using a cutter, remove any remaining double-sided tape from the front bumper.
2. Remove any grease or dirt from the front bumper affixing surface.
2. If reusing the front airdam skirt, perform the following procedure:
1. Using a cutter, remove any remaining double-sided tape from the front airdam skirt and body.
WARNING: Using a cutter with bare hands can cause injury. Always wear gloves when using a cutter.
WARNING: Using a cutter with bare hands can cause injury. Always wear gloves when using a cutter.
NOTE: If installing a new front airdam skirt, double-sided adhesive tape is already affixed to the skirt.
2005 Mazda MX-5 Miata
2005 ACCESSORIES & EQUIPMENT Exterior Trim - MX-5 Miata
Microsoft
Saturday, July 04, 2009 12:04:28 PM Page 73 © 2005 Mitchell Repair Information Company, LLC.

2. Remove any grease or dirt from the front airdam skirt and front bumper affixing surfaces.
3. Affix double-sided adhesive tape to the front airdam skirt as shown in the figure.
3. Peel back the tape backing approx.3 cm from each end and fold towards the exposed surface of the front airdam skirt.
4. Install the front airdam skirt to the body.
Fig. 76: Affixing Double-Sided Adhesive Tape To Front Airdam Skirt Courtesy of MAZDA MOTORS CORP.
5. Install fasteners A.
6. Install fasteners B and temporarily tighten the screws.
7. Completely remove the tape backing and press to adhere.
8. Tighten the screws.
2005 Mazda MX-5 Miata
2005 ACCESSORIES & EQUIPMENT Exterior Trim - MX-5 Miata
Microsoft
Saturday, July 04, 2009 12:04:29 PM Page 74 © 2005 Mitchell Repair Information Company, LLC.

Fig. 77: Installing Front Airdam Skirt (BP With TC) Courtesy of MAZDA MOTORS CORP.
REAR AIRDAM SKIRT REMOVAL (BP WITH TC)
1. Remove the fasteners, screws, and bolts.
2. Remove the rear airdam skirt while cutting away the double-sided adhesive tape using a flathead screwdriver or cutter.
WARNING: Using a cutter with bare hands can cause injury. Always wear gloves when using a cutter.
2005 Mazda MX-5 Miata
2005 ACCESSORIES & EQUIPMENT Exterior Trim - MX-5 Miata
Microsoft
Saturday, July 04, 2009 12:04:29 PM Page 75 © 2005 Mitchell Repair Information Company, LLC.

Fig. 78: Removing Rear Airdam Skirt (BP With TC) Courtesy of MAZDA MOTORS CORP.
REAR AIRDAM SKIRT INSTALLATION (BP WITH TC)
1. If installing a new rear airdam skirt, perform the following procedure:
1. Using a cutter, remove any remaining double-sided tape from the rear bumper.
2. Remove any grease or dirt from the rear bumper affixing surface.
2. If reusing the rear airdam skirt, perform the following procedure:
1. Using a cutter, remove any remaining double-sided tape from the rear airdam skirt and rear bumper.
2. Remove any grease or dirt from the rear airdam skirt and rear bumper affixing surfaces.
3. Affix double-sided adhesive tape to the rear airdam skirt as shown in the figure.
3. Peel back the tape backing approx.3 cm from each end and fold towards the exposed surface of the rear airdam skirt.
WARNING: Using a cutter with bare hands can cause injury. Always wear gloves when using a cutter.
NOTE: If installing a new rear airdam skirt, double-sided adhesive tape is already affixed to the skirt.
2005 Mazda MX-5 Miata
2005 ACCESSORIES & EQUIPMENT Exterior Trim - MX-5 Miata
Microsoft
Saturday, July 04, 2009 12:04:29 PM Page 76 © 2005 Mitchell Repair Information Company, LLC.

Fig. 79: Affixing Double-Sided Adhesive Tape To Rear Airdam Skirt Courtesy of MAZDA MOTORS CORP.
4. Install the fasteners.
5. Install the rear airdam skirt to the rear bumper and temporarily install the screws.
6. Completely remove the tape backing and press to adhere.
7. Tighten the bolts.
2005 Mazda MX-5 Miata
2005 ACCESSORIES & EQUIPMENT Exterior Trim - MX-5 Miata
Microsoft
Saturday, July 04, 2009 12:04:29 PM Page 77 © 2005 Mitchell Repair Information Company, LLC.

Fig. 80: Installing Rear Airdam Skirt (BP With TC) - With Torque Specifications Courtesy of MAZDA MOTORS CORP.
REAR SPOILER REMOVAL (BP WITH TC)
1. Remove the bolts and nut.
2. Remove the rear spoiler while cutting away the double-sided adhesive tape using a flathead screwdriver or cutter.
WARNING: Using a cutter with bare hands can cause injury. Always wear gloves when using a cutter.
2005 Mazda MX-5 Miata
2005 ACCESSORIES & EQUIPMENT Exterior Trim - MX-5 Miata
Microsoft
Saturday, July 04, 2009 12:04:29 PM Page 78 © 2005 Mitchell Repair Information Company, LLC.

Fig. 81: Removing Rear Spoiler (BP With TC) Courtesy of MAZDA MOTORS CORP.
REAR SPOILER INSTALLATION (BP WITH TC)
1. If installing a new rear spoiler, perform the following procedure:
1. Using a cutter, remove any remaining double-sided tape from the trunk lid.
2. Remove any grease or dirt from the trunk lid affixing surface.
2. If reusing the rear spoiler, perform the following procedure:
1. Using a cutter, remove any remaining double-sided tape from the rear spoiler and trunk lid.
2. Remove any grease or dirt from the rear spoiler and trunk lid affixing surfaces.
3. Affix double-sided adhesive tape to the rear spoiler as shown in the figure.
3. Peel back the tape backing approx.3 cm from each end and fold towards the exposed surface of the rear spoiler.
WARNING: Using a cutter with bare hands can cause injury. Always wear gloves when using a cutter.
NOTE: If installing a new rear spoiler, double-sided adhesive tape is already affixed to the spoiler.
2005 Mazda MX-5 Miata
2005 ACCESSORIES & EQUIPMENT Exterior Trim - MX-5 Miata
Microsoft
Saturday, July 04, 2009 12:04:29 PM Page 79 © 2005 Mitchell Repair Information Company, LLC.

Fig. 82: Affixing Double-Sided Adhesive Tape To Rear Spoiler Courtesy of MAZDA MOTORS CORP.
4. Install the rear spoiler to the trunk lid.
5. Completely remove the tape backing and press to adhere.
6. Tighten the bolts and nut.
Fig. 83: Installing Rear Spoiler (BP With TC) Courtesy of MAZDA MOTORS CORP.
2005 Mazda MX-5 Miata
2005 ACCESSORIES & EQUIPMENT Exterior Trim - MX-5 Miata
Microsoft
Saturday, July 04, 2009 12:04:29 PM Page 80 © 2005 Mitchell Repair Information Company, LLC.