Coverland Tiling Guidelines Brochure A4 - monier.co.za · to SANS 10160-1:2011 for Regional Basic...
4
TILING GUIDELINES TILING Ascertain the mechanical fixing requirements as per the laying and fixing specifications. Roofs to be tiled in accordance with SANS 062. STARTING TILING Tile to the lines from the right-hand side, working towards the left, and moving upwards. Simultaneously secure the tiles as required, and install eave fillers where necessary. All Coverland concrete tiles should be laid “straight-bond” except for the Elite which must be laid “broken-bond”. Full tiles are marked to facilitate ease of laying to the lines. MECHANICAL FIXING Should be in accordance with the laying and fixing specifications. Where clips are used, they should be fixed to the battens. The clips should be at the tail of each tile - as close to the batten as the head of the tile beneath it permits. See fixing guidelines. CUTTING TILES Purpose-made cut tiles for use at hips and valleys are not manufactured because the position of the cut varies from tile to tile. Cutting of tiles is done on-site, either traditionally by hand or mechanically. Cut tiles are easily installed with Coverland kro clips that fix tiles to the valleys and hips. VALLEYS Extra care should be taken with the valley construction because of its lower pitch in relation to the rest of the roof and the fact that it drains water away from the slopes. The small tile sections should be secured to the valley battens to keep the valley clear and unobstructed and prevent water from overflowing into the roof space. CAUTION! Sand, which is used as an aggregate in making concrete, contains silica which is released in dust when mechanical dry cutting of tiles is performed. Inhalation over a long period of time could cause silicosis. It is recommended that a dust mask to a protection level of FFP3 and eye protection be worn as a safety precaution. Alternatively, wet cutting of tiles is recommended to contain the release of dust. 011 222 7300 | [email protected] www.coverland.co.za Part of BRAAS MONIER BUILDING GROUP ROOFING TERMINOLOGY
Transcript of Coverland Tiling Guidelines Brochure A4 - monier.co.za · to SANS 10160-1:2011 for Regional Basic...

TILING GUIDELINES
TILING
Ascertain the mechanical fi xing requirements as per the laying and fi xing specifi cations. Roofs to be tiled in accordance with SANS 062.
STARTING TILING
Tile to the lines from the right-hand side, working towards the left, and moving upwards. Simultaneously secure the tiles as required, and install eave fi llers where necessary. All Coverland concrete tiles should be laid “straight-bond” except for the Elite which must be laid “broken-bond”. Full tiles are marked to facilitate ease of laying to the lines.
MECHANICAL FIXING
Should be in accordance with the laying and fi xing specifi cations. Where clips are used, they should be fi xed to the battens. The clips should be at the tail of each tile - as close to the batten as the head of the tile beneath it permits. See fi xing guidelines.
CUTTING TILES
Purpose-made cut tiles for use at hips and valleys are not manufactured because the position of the cut varies from tile to tile. Cutting of tiles is done on-site, either traditionally by hand or mechanically. Cut tiles are easily installed with Coverland kro clips that fi x tiles to the valleys and hips.
VALLEYS
Extra care should be taken with the valley construction because of its lower pitch in relation to the rest of the roof and the fact that it drains water away from the slopes. The small tile sections should be secured to the valley battens to keep the valley clear and unobstructed and prevent water from overfl owing into the roof space.
CAUTION!Sand, which is used as an aggregate in making concrete, contains silica which is released in dust when mechanical dry cutting of tiles is performed. Inhalation over a long period of time could cause silicosis. It is recommended that a dust mask to a protection level of FFP3 and eye protection be worn as a safety precaution. Alternatively, wet cutting of tiles is recommended to contain the release of dust.
011 222 7300 | [email protected] Part of BRAAS MONIER BUILDING GROUP
ROOFING TERMINOLOGY
2
HIPS
The tiles from the two adjacent slopes should be cut closely and secured on the hip rafter to provide adequate support for the bedding of ridge tiles. Hip anchors should be used at the bottom edge of each hip rafter on steep pitches. It is essential to fix all cut tiles carefully at hips and valleys to retain them in position. This can be achieved by using Coverland kro clip or by using an adhesive such as Coverfill.
OPEN VALLEY
Once the valley battens have been positioned, a gutter is then formed in the valley using a suitable non-corrodible material. The fascia board is cut away so that no part of the valley gutter is raised above the fascia board when laid. The tiles on each side of the valley should be neatly cut to alignment and laid in such a way that they project over the side welt by at least 50mm. A gap of at least 50mm should be provided in the centre of the valley between the cut edges of the tiles.
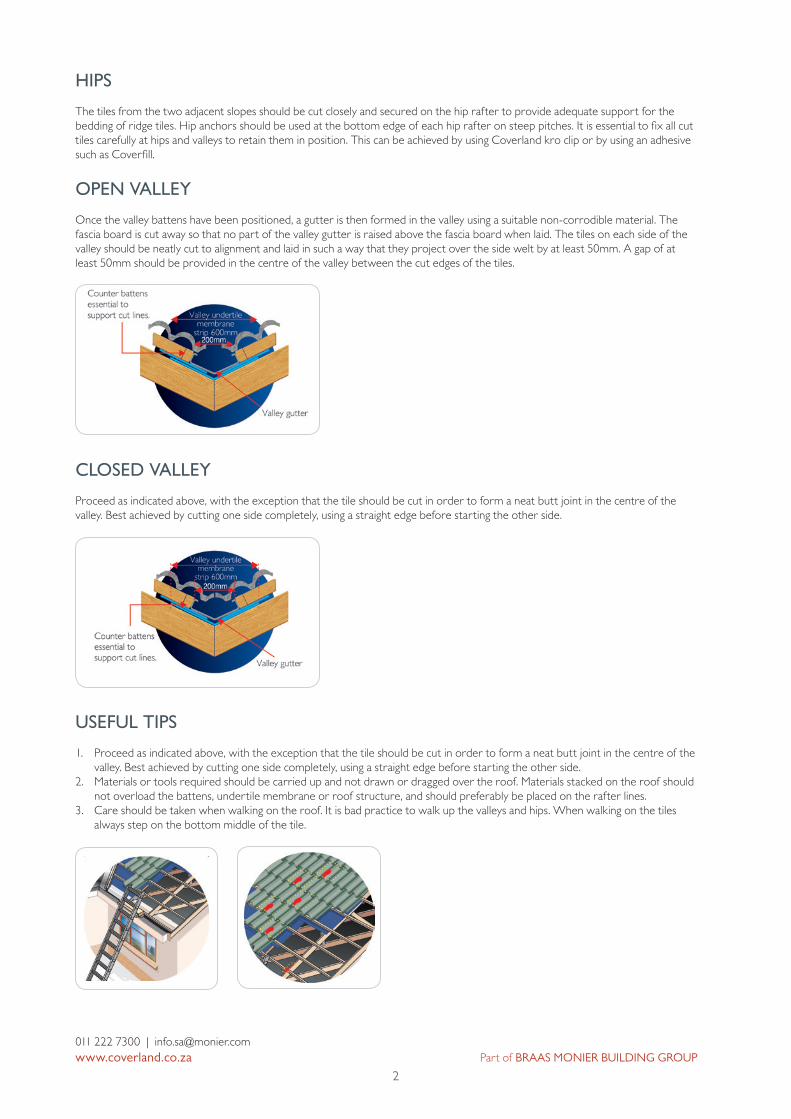
CLOSED VALLEY
Proceed as indicated above, with the exception that the tile should be cut in order to form a neat butt joint in the centre of the valley. Best achieved by cutting one side completely, using a straight edge before starting the other side.
USEFUL TIPS
1. Proceed as indicated above, with the exception that the tile should be cut in order to form a neat butt joint in the centre of the valley. Best achieved by cutting one side completely, using a straight edge before starting the other side.
2. Materials or tools required should be carried up and not drawn or dragged over the roof. Materials stacked on the roof should not overload the battens, undertile membrane or roof structure, and should preferably be placed on the rafter lines.
3. Care should be taken when walking on the roof. It is bad practice to walk up the valleys and hips. When walking on the tiles always step on the bottom middle of the tile.
011 222 7300 | [email protected] Part of BRAAS MONIER BUILDING GROUP

3
10 EASY STEPS TO TILING A ROOF
All specifications detailed are for a single storey domestic building – consult your nearest outlet for other applications.
1 Tools required 2 Truss centres
SawChalkline
Tape measurePointing trowel
HammerBrush
Nail bag
Max 760mm – 38 x 38mm BattenMax 900mm – 38 x 50mm Batten (on edge)Elite 950mm – 38 x 50mm Batten (on edge)Always consult your timber merchant for truss design and timber sizes.
1. Truss centres must be equal and correct distances apart
2. Apex – Truss heights must be level
011 222 7300 | [email protected] Part of BRAAS MONIER BUILDING GROUP
FIXING
Coverland offers a range of storm clips and nails for fast and professional securing of concrete and clay tiles on every part of the roof. Our clips are quick and easy to install, match the respective tile profiles exactly and provide reliable and durable protection against wind upliftment and slipping. It also has an added security benefit of preventing intruders from entering the roof.
Category A – Unexposed areasAll inland regions other than certain specified areas.
Mechanically fix two courses of tiles at the eaves, ridge and verges for the full overhang, whichever is greater. Cut tiles at hips, valleys and abutments to be secured with kro clips or coverfill. It is recommended that closed soffits be fitted on all verge and eave overhangs.ROOF PITCHES
17° to < 26° undertile membrane mandatory
26° to < 45° undertile membrane recommended
45° to < 55° undertile membrane recommended, each tile to be nailed
55° to vertical undertile membrane mandatory, each tile to be nailed and clipped.
Category B – Semi-exposed areasCoastal regions and certain inland areas, generally the area within 30km from the coastline, the top of the escarpment or the watershed of the first mountain inland. Whilst cognizance should be taken of local practices, the application of good roofing practice should not be compromised for expediency.
Mechanically fix a band of tiles (x) equal to a fifth of the number of courses on the rafter lengths at the eaves and ridges, and also at chimneys and abutments. Mechanically fix a band of tiles equal to (x) along (y), as calculated above, at each verge (or the full overhang, whichever is the greater.) Tiles at hips, valleys and abutments to be secured with kro clips to every third tile on the roof.ROOF PITCHES
17° to < 26° undertile membrane mandatory
26° to < 45° undertile membrane recommended (mandatory at the coast)
45° to vertical undertile membrane mandatory, each tile to be nailed and clipped
Closed soffits must be fitted to all verge and eave overhangs.
Category C – Exposed areasCritical coastal areas, and certain inland areas. The classification of exposure categories assumes the use of a suitable underlay, properly fixed over the total area of the roof including the gable end and eave overhangs. When possible, local knowledge and local wind speed data should be used in the assessment of the exposure category. (Refer to SANS 10160-1:2011 for Regional Basic Design Wind Speed determination.)ROOF PITCHES
17° to < 26° undertile membrane mandatory, each tile to be clipped
26° to < 45° undertile membrane mandatory, each tile to be nailed or clipped
45° to vertical undertile membrane mandatory, each tile to be nailed and clipped
Closed soffits to be fitted at all verge and eave overhangs.
3 Undertile Membrane
a. Coastal areas – mandatory at all pitches
b. Other areas – 17°-25° mandatory; 26°-45° optional (recommended)
c. Lay undertile membrane on top of trusses & under battens
d. Elite profile – undertile membrane mandatory at all pitches
4
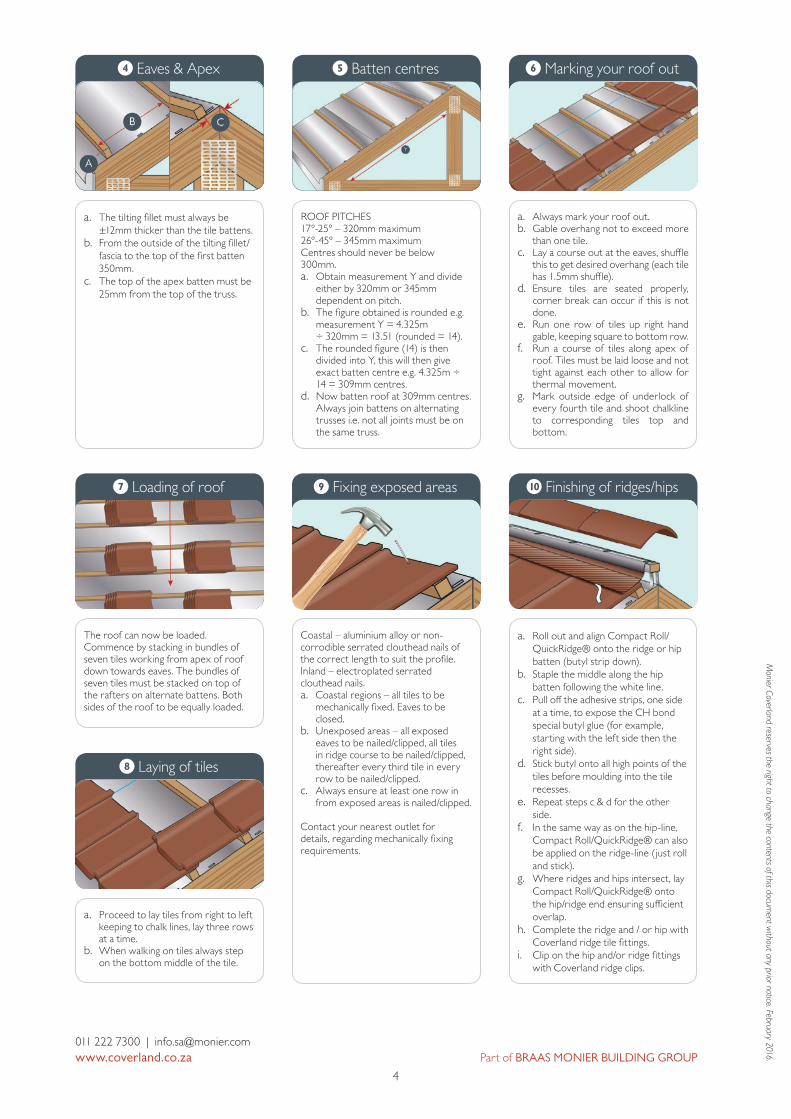
5 Batten centres 6 Marking your roof out
7 Loading of roof 10 Finishing of ridges/hips
8 Laying of tiles
9 Fixing exposed areas
ROOF PITCHES 17°-25° – 320mm maximum26°-45° – 345mm maximumCentres should never be below 300mm.a. Obtain measurement Y and divide
either by 320mm or 345mm dependent on pitch.
b. The figure obtained is rounded e.g. measurement Y = 4.325m ÷ 320mm = 13.51 (rounded = 14).
c. The rounded figure (14) is then divided into Y, this will then give exact batten centre e.g. 4.325m ÷ 14 = 309mm centres.
d. Now batten roof at 309mm centres. Always join battens on alternating trusses i.e. not all joints must be on the same truss.
a. Always mark your roof out.b. Gable overhang not to exceed more
than one tile.c. Lay a course out at the eaves, shuffle
this to get desired overhang (each tile has 1.5mm shuffle).
d. Ensure tiles are seated properly, corner break can occur if this is not done.
e. Run one row of tiles up right hand gable, keeping square to bottom row.
f. Run a course of tiles along apex of roof. Tiles must be laid loose and not tight against each other to allow for thermal movement.
g. Mark outside edge of underlock of every fourth tile and shoot chalkline to corresponding tiles top and bottom.
The roof can now be loaded. Commence by stacking in bundles of seven tiles working from apex of roof down towards eaves. The bundles of seven tiles must be stacked on top of the rafters on alternate battens. Both sides of the roof to be equally loaded.
a. Roll out and align Compact Roll/QuickRidge® onto the ridge or hip batten (butyl strip down).
b. Staple the middle along the hip batten following the white line.
c. Pull off the adhesive strips, one side at a time, to expose the CH bond special butyl glue (for example, starting with the left side then the right side).
d. Stick butyl onto all high points of the tiles before moulding into the tile recesses.
e. Repeat steps c & d for the other side.
f. In the same way as on the hip-line, Compact Roll/QuickRidge® can also be applied on the ridge-line (just roll and stick).
g. Where ridges and hips intersect, lay Compact Roll/QuickRidge® onto the hip/ridge end ensuring sufficient overlap.
h. Complete the ridge and / or hip with Coverland ridge tile fittings.
i. Clip on the hip and/or ridge fittings with Coverland ridge clips.
a. Proceed to lay tiles from right to left keeping to chalk lines, lay three rows at a time.
b. When walking on tiles always step on the bottom middle of the tile.
Coastal – aluminium alloy or non-corrodible serrated clouthead nails of the correct length to suit the profile. Inland – electroplated serrated clouthead nails.a. Coastal regions – all tiles to be
mechanically fixed. Eaves to be closed.
b. Unexposed areas – all exposed eaves to be nailed/clipped, all tiles in ridge course to be nailed/clipped, thereafter every third tile in every row to be nailed/clipped.
c. Always ensure at least one row in from exposed areas is nailed/clipped.
Contact your nearest outlet for details, regarding mechanically fixing requirements.
011 222 7300 | [email protected] Part of BRAAS MONIER BUILDING GROUP
4 Eaves & Apex
a. The tilting fillet must always be ±12mm thicker than the tile battens.
b. From the outside of the tilting fillet/fascia to the top of the first batten 350mm.
c. The top of the apex batten must be 25mm from the top of the truss.
Monier Coverland reserves the right to change the contents of this docum
ent without any prior notice. February 2016.