Course STP359 Supply Network Inventory in...
113
1 Version: Last Updated: SAP Training 3M Business Transformation & Information Technology Progress set in motion > External User Training Source To Pay 4.0 03-Apr-2017 STP359: Supply Network Inventory in SNC
Transcript of Course STP359 Supply Network Inventory in...

1
Version:
Last Updated:
SAP Training
3M Business Transformation & Information TechnologyProgress set in motion >
External User Training
Source To Pay
4.0
03-Apr-2017
STP359: Supply Network Inventory in SNC

2
This course describes the process of Supply Network Inventory (SNI) in Supply Network Collaboration (SNC), how to monitor Supplier inventory, manage alerts, and how to enter Stock and Key Figure data.
After completing this course, you will be able to:
Describe the Supply Network Inventory process in SNC.
Monitor supply chain inventory using SNI.
Recognize the steps for providing Stock and Key Figure data to SNI.
Compare historical Stock and Key Figure data.
Course Introduction

3
Supply Network Collaboration

4
After completing this module, you will be able to:
Explain which business processes integrate with your 3M work using SNC.
Log on to SNC.
Module Objectives

5
3M implemented SAP as its Enterprise Resource Planning (ERP) system to support end-to-end processes.
SAP software enables a better Supplier experience. It links business processes, people, and information with one global, seamlessly-integrated platform of standardized business processes.
As part of this implementation, 3M Sourcing Operations uses SAP SNC as a tool to improve communications and productivity for both 3M and our key Suppliers.
You access the SNC portal through 3M Supplier Direct.
Introduction to Supply Network Collaboration

6
3M wants:
More data sharing with our key Suppliers.
Key Suppliers to take greater responsibility and act proactively to work as a business partner.
SNC is a web-based component within the SAP Supply Chain Management suite that:
Supports collaboration between Suppliers and Customers. 3M primarily uses SNC with Suppliers who do not utilize operational transactions or share data electronically.
Improves process efficiency. SNC helps both 3M and our Suppliers save on cost and time.
Introduction to Supply Network Collaboration (continued)

7
SNC OverviewSNC offers a web-based platform for real-time collaboration with internal and external business partners.
Note: 3M’s implementation of Supplier Collaboration with SNC includes: Purchase Orders
(POs) Scheduling
Agreement (SA) Releases
Advance Shipping Notifications (ASNs)
Invoicing Order Forecast
Monitoring (OFM) Supplier Managed
Inventory (SMI) Kanban

8
Suppliers collaborate with 3M for the following processes:
SNC Strategies
SNC
Purchase Order Collaboration
Advance Shipping
Notification
DemandCollaboration
Release Process Collaboration
Subcontracting Collaboration
InvoiceCollaboration
Kanban
Supplier-Managed Inventory
Collaboration
InventoryCollaboration
Supply Network Inventory

9
Keeps 3M and Suppliers updated about PO fulfillment and Delivery Schedules for the POs.
Enables the Suppliers to respond to requirements quickly and accurately.
Facilitates accurate and real-time execution between 3M and our Suppliers—keeps the Supplier updated about:
Scheduling Agreements (SAs)
Delivery schedules
Cumulative received quantities
Any exceptions
SNC Strategies (continued)
SNC Purchase Order Collaboration
SNC Release Process Collaboration

10
By using the OFM in SNC, Demand Collaboration is enabled between 3M’s and Suppliers’ planning data.
It compares the data in a one-window environment.
Deviations between 3M's plan and the Supplier's plan are shown as absolute numbers, percentages, and color codes.
OFM provides alerts to all parties so they can quickly adapt planning and delivery capacity to mitigate critical situations.
Allows Suppliers to provide 3M with the details of a shipment through SNC in advance of, or at the time of, the actual shipment.
Communicates shipment information, vehicle details, transporter, and contact details to 3M in real time.
SNC Strategies (continued)
SNC Demand Collaboration
Advance Shipping Notification (ASN)

11
Enables adoption of different inventory management strategies for a smoother flow of inventory from a Supplier to the shop floor. This includes providing 3rd-Party Logistics Provider (3PL), which stores Supplier inventory, with the capability to send the ASN data to 3M for the Supplier.
The benefits of Inventory Collaboration are:
Quick replenishment of supply.
Help with planning multiple deliveries over the planning horizon.
Higher demand visibility.
SNC Strategies (continued)
SNC Inventory Collaboration

12
Allows 3M to release POs for Subcontractors in SAP and communicate them to the Subcontractors through SNC.
This process:
Keeps 3M and Subcontractors updated about PO fulfillment and Delivery Schedules.
Enables Subcontractors to respond to requirements quickly and accurately.
Complements subcontracting collaboration.
Supports Customers, Subcontractors, and Suppliers of the first level and up (suppliers of the Supplier), and other partners in monitoring stock levels and requirements for products at selected locations in the supply chain.
SNC Strategies (continued)
Subcontracting Collaboration
Supply Network Inventory

13
Enables a Supplier to create invoices for goods the Supplier provided to 3M.
A process that allows gross requirements planning and execution to be managed by a company’s Suppliers. The customer (3M) no longer needs to perform MRP planning.
Allows 3M Suppliers to review Purchase Orders and create Advance Shipping Notices.
SNC Strategies (continued)
Invoice Collaboration
Supplier Managed Inventory (SMI)
Kanban

14
Using SNC, Suppliers can:
Access 3M PO, Subcontracting PO, Scheduling Agreement, Delivery Schedule, and Release data.
Provide 3M with PO confirmation, Delivery Schedule acknowledgements, and ASN data, either online or by using a file upload process.
Access and download 3M planning, demand, and forecast data.
Upload planned production data.
Create and publish invoices and view invoice payment statuses.
Working with SNC

15
Access the 3M Supplier Direct Global Landing area by going to 3M.com/supplierdirect in your web browser.
Under Select Your 3M Supplier Direct Location, select your location from the list.
Log in to SNC

16
On the selected location’s 3M Supplier Direct Home page, click Please Sign In(or the person icon) in the upper right on the Supplier Direct website.
Log in to SNC (continued)

17
On the Enterprise Network Login window, enter your Username and Password,and click Login.
Log in to SNC (continued)

18
Under the Quick Links section on the right of the page, click the 3M ERP link to access SNC.
Note: You can also find the 3M ERP link on the Source to Pay Transactionspage under the Suppliers tab.
Log in to SNC (continued)

19
The ERP Portal opens in a new browser window.
Under the Supplier tab, then Supplier Network Communication tab, the default Alert Monitor page displays.
Log in to SNC (continued)

20
The key points covered in this module are:
3M provides Suppliers with a web tool called Supply Network Collaboration (SNC).
You access SNC using 3M Supplier Direct Portal.
Suppliers collaborate with 3M for these processes:
Purchase Order Collaboration
Release Process Collaboration
Demand Collaboration using OFM
Advance Shipping Notification
Inventory Collaboration
Subcontracting Collaboration
Invoice Collaboration
Module Summary

21
Introduction to Supply Network Inventory

22
After completing this module, you will be able to:
Describe the purpose of using SNI.
List the benefits of using SNI.
Describe the SNI process flow.
Identify the types of data that can be viewed in SNI.
Identify the products that can be monitored using SNI.
Module Objectives

23
Supply Network Inventory (SNI) is a subprocess of Supply Network Collaboration (SNC).
The main objective of SNI is to monitor the stock positions of one or more materials across an entire supply chain within a full planning cycle.
SNI supports monitoring stock positions at multiple locations in the supply chain, including:
3M locations
Customers
Subcontractors
Suppliers
Suppliers of the Supplier
3rd-Party Logistics Providers
Supply Network Inventory

24
A supply chain with an inventory that can be monitored in SNI:
Supply Network Inventory (continued)

25
SNI with SNC:
Improves inventory turns and reduces non-working inventory.
Enables more accurate planning and fulfillment across all Business Partners.
Benefits of SNI

26
Products that SNI allows to be monitored are:
3M products
3M products that are stored and processed further in the Supplier location
Supplier products (critical components only)
Products that are stored with another Business Partner (such as a 3PL provider or a Supplier's supplier)
Products Monitored using SNI

27
3M and the Business Partners:
SNI Process Flow
Check for SNI inventory exceptions. 2
Review inventory situation on the SNI Overview window. 3
Review the projected stock status on the SNI Details window. 4
Review current inventory on the Inventory Overview window. 5
Analyze Key Figure history on the SNI History Comparison window. 6
Maintain custom SNI alerts (3M User only). 7
Extract stock information from 3M backend SAP system and send to SNC. 1

28
The key points covered in this module are:
SNI supports all Business Partners across the supply chain in monitoring the stock positions across the supply chain, within a planning cycle.
SNI provides a period-oriented, time series-based view of the demands, receipts, and inventories of the components at the Business Partner’s locations.
Module Summary

29
Monitor Supply Chain Inventory Stock and Key Figures

30
After completing this module, you will be able to:
Review SNI alerts.
Review SNI status.
Review projected stock status.
Review a snapshot of current inventory.
Module Objectives

31
Alerts are triggered for any update on Key Figures in SNI. Any exception situations generate alerts. The alerts are conveyed to both 3M and the Supplier. SNI alerts include:
Below Minimum – Projected Stock (SNI)
Above Maximum – Projected Stock (SNI)
Out of Stock – Projected Stock (SNI)
Below Minimum – Stock on Hand (SNI)
Above Maximum – Stock on Hand (SNI)
Out of Stock – Stock on Hand (SNI)
SNI Alert – Alert conditions have been met for a custom SNI alert
Checking SNI Inventory Exceptions

32
To review individual exceptions in the Alert Monitor, the Supplier clicks the individual alert hyperlinks:
Checking SNI Inventory Exceptions (continued)
Summary of SNI Alerts

33
Detailed instructions on how to review SNI exceptions can be found on the Supply Network Collaboration Training site.
Step-by-Step Instructions

34
The SNI Overview window allows you to check the summary of stock in hand situation for all the 3M locations.
The stock positions are highlighted with different colors codes. This indicates various stock situations:
Red: The projected stock falls to or below zero.
Yellow: The projected stock falls below the minimum stock level (safety stock).
Blue: The projected stock exceeds the maximum stock level.
Green: The projected stock is between the minimum and maximum stock levels.
Review Inventory Status

35
To review the inventory status, from the SNI drop-down list, the Supplier selects SNI Overview:
Review Inventory Status (continued)

36
The SNI Overview window provides inventory information by location-product:
Current stock on hand
Number of custom SNI alerts maintained and status of the alerts
Projected stock status of ten relative future Time Buckets (TBs). The buckets are defined using the Time Buckets Profile (days, weeks, or months, including combinations).
The Time Buckets Profile determines the planning horizon and period division for a location product in the SNI Monitor.
Review Inventory Status (continued)

37
Detailed instructions on how to review inventory positions can be found on the Supply Network Collaboration Training site.
Step-by-Step Instructions

38
The Supplier reviews the projected stock status in two windows:
The SNI Details window
The SNI Details - Product View window
Review the Projected Stock Status

39
The Supplier may review the projected stock status on the SNI Details window and SNI Details - Product View window. To review projected stock status:
1. From the SNI drop-down list, select SNI Details.
Review the Projected Stock Status (continued)
40
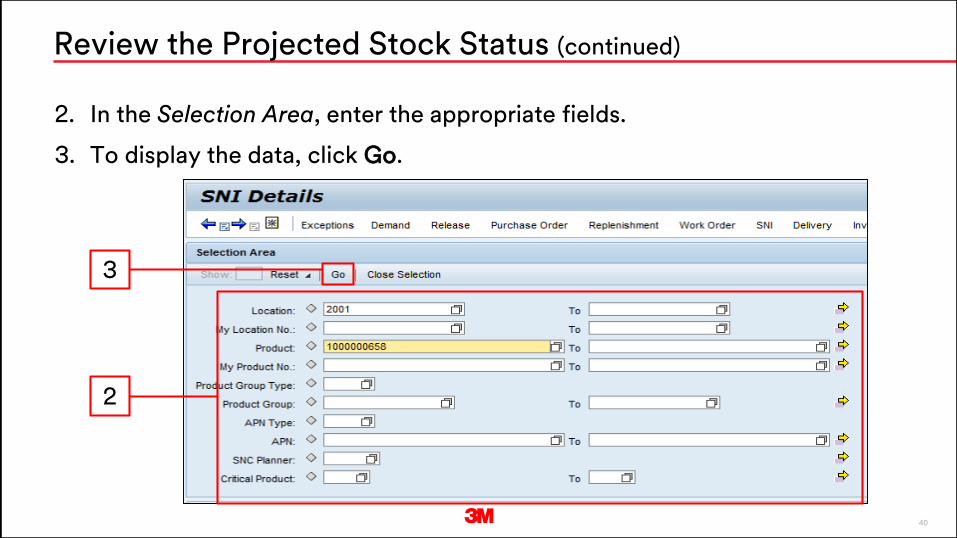
2. In the Selection Area, enter the appropriate fields.
3. To display the data, click Go.
Review the Projected Stock Status (continued)
3
2

41
For a given period of time, the SNI Details window displays:
Demand: SNI considers various types of demands on the output product when calculating Projected Stock. The Demand Key Figure is the sum of FirmDemand, Planned Demand, and Forecast.
Review the Projected Stock Status (continued)

42
Subcontracting Reservation: SNI considers demand for the input component from the Subcontractor when calculating Projected Stock.
Review the Projected Stock Status (continued)

43
Receipts: SNI considers various types of receipts, such as Planned Receipts entered by the Subcontractor or Supplier, Firm Receipts, and In-Transit Quantity when calculating Projected Stock.
Review the Projected Stock Status (continued)

44
Projected Stock: The calculated value that represents the stock anticipated to be available at a location at the end of a Time Bucket. For a given Time Bucket, it equals the Projected Stock of the previous Time Bucket + Firm Receipts + Planned Receipts + In-Transit Quantity – Demand –Subcontracting Reservations.
Review the Projected Stock Status (continued)

45
Minimum Stock and Maximum Stock: 3M and the Supplier agree upon these stock levels.
Review the Projected Stock Status (continued)

46
Minimum Proposal and Maximum Proposal: These are calculated values that represent the quantities required to meet the Minimum and Maximum Stock levels. Note: The Minimum and Maximum Stock fields must have values for the proposals to be calculated.
Review the Projected Stock Status (continued)

47
Days’ Supply: The calculated value that indicates the time for which the projected stock would last if there were no receipts in the subsequent Time Bucket. A value of 9,999 represents infinite days of supply.
Review the Projected Stock Status (continued)

48
On the Product Data tab, the Supplier may review location-product details (including multiple stock types) and export the data to an Excel sheet.
Review the Projected Stock Status (continued)

49
On the Graphic tab, the Supplier may view the product stock position in a graph.
Review the Projected Stock Status (continued)

50
Time Buckets Profiles determine the planning horizon and period division for a location-product in the SNI Details and Overview windows. The Time Buckets Profile is:
Maintained at the Location or Location-Product levels.
Period division options include:
Number of years in the long-term horizon in months.
Number of months in the medium-term horizon in weeks.
Number of weeks in the short-term horizon in days.
Period division may include a combination of days, weeks, and months.
Start offset may be used to move the start of the horizon a number of days into the past or future.
Maintain Time Buckets Profile

51
To maintain the Time Buckets Profile:
1. From the SNI drop-down list, select Time Buckets Profile (SNI).
Maintain Time Buckets Profile (continued)

52
2. Click Edit.
3. On the Time Buckets Profile (SNI) window, enter the profile parameters.
Maintain Time Buckets Profile (continued)
2
3

53
The Inventory Overview provides a view of stock on hand for selected location products:
Data-providing partner stock displays to discern inventory data that has been provided by multiple Business Partners.
Includes batch inventory information.
Inventory Overview

54
To review the Inventory Overview:
1. From the SNI drop-down list, select Inventory Overview.
Inventory Overview (continued)

55
2. To filter the list of User-specific SNI rules, in the Selection Area section, enter all appropriate data.
3. Click Apply.
Inventory Overview (continued)

56
4. In the Stk on Hnd column, review the stock on hand. Note: The CORP_3M Business Partner below refers to data that has been loaded from 3Ms SAP backend system.
Inventory Overview (continued)

57
The key points covered in this module are:
Alerts are triggered for any update on Key Figures in SNI. Any exception situations generate alerts. Alerts are conveyed to both 3M and the Supplier.
The Supplier reviews the projected stock status on the SNI Details and SNI Details – Product View windows.
The Inventory Overview window provides a view of on-hand stock for selected location products.
The SNI Overview window provides inventory information by location product.
Time Buckets Profiles change the planning horizon and period divisions displays on the SNI Details, SNI Details – Product View, and SNI Overview windows.
Module Summary

58
External Partner: Stock and Key Figures Data Entry

59
After completing this module, you will be able to explain the steps the Supplier performs to enter Stock and Key Figures data.
Module Objectives

60
The Supplier needs to provide data to SNC for SNI to work properly. The Supplier may:
Send data using Automatic Messaging.
Enter the data directly into the SNI Details and SNI Details –Product View window.
Send data using the File Transfer Method.
Methods for Suppliers to Provide Data to SNI

61
The Suppliers with SAP 6.02 version (and above) may transfer data to SNC automatically. The Supplier needs to:
Generate reports such as: ROEMPROACT2, RCMPROACT2, and RPRTPROACT.
Send the report to SNC.
Note: This option requires setup and testing on the 3M side. To enable this technology, the Supplier needs to contact 3M.
Data Transfer by Automatic Messaging Method

62
To transfer data to SNC offline, the Suppliers without SAP may use the File Transfer Method. The Supplier needs to:
Create profiles in SNC to download and upload files.
Download the data file using the SNC Download Center.
Furnish all the relevant details.
Save the file in .CSV format.
Upload the .CSV file into SNC using the SNC Upload Center.
Data Transfer by the File Transfer Method

63
In the SNI monitor, Suppliers can manually edit their Stock Data and other key information. The data entry is completed through two SNI monitor windows:
SNI Details: The Supplier can change various data such as requirements, receipts, and stocks for one or more locations.
SNI Details – Product View: This provides a detailed view of Stock Data and Key Figures pertaining to a single location product in tabular and graphical format.
Data Entry by the Supplier in SNI Details

64
Data can be entered in several grid arrangements:
Edit Details by Assigned Location and Data Provider: The Key Figures can be maintained at the Location, Product, and Data provider level.
Edit Details by Supplier/Ship-from Location and Data Provider: The Key Figures can be maintained at the Location, Product, Data provider, and Supplier/Ship-from level.
Edit All: The Key Figures can be maintained at the most granular level in SNI, such as Product, Location, Data provider, Assigned location, Supplier, and Ship-from location.
Data Entry by the Supplier in SNI Details (continued)

65
On the SNI Details window, to modify SNI data:
1. From the SNI drop-down list, select SNI Details.
Edit Data on the SNI Details Window

66
2. Enter the appropriate information and click Go.
Edit Data on the SNI Details Window (continued)

67
3. To change the grid arrangement to the appropriate view, enter: Edit Details by Assigned Location and Data Provider, Edit Details by Supplier/Ship-from Location and Data Provider, or Edit All.
Edit Data on the SNI Details Window (continued)

68
4. On the Grid tab, enter data in the appropriate fields.
Edit Data on the SNI Details Window (continued)

69
5. To simulate the changes to calculated Key Figures, click Simulate. Note: The simulated changes display and the calculated Key Figures update.
Edit Data on the SNI Details Window (continued)

70
6. Click Save.
Edit Data on the SNI Details Window (continued)

71
To modify SNI data on the SNI Details-Product window, the Supplier uses the same process as SNI Details:
Edit Data on the SNI Details – Product View Window

72
For the Supplier to upload Key Figures data into SNI:
1. On the Alert Monitor window, from the Invoice drop-down list, select File Transfer, then Download Center (External User).
Upload Key Figures Data into SNI

73
2. Prior to downloading an SNI file to Excel using the Download Center, a download profile must be created. From the Download Center (External User) window:
1) Enter the Choose Partner details.
2) Enter the Choose Profile Type details (Supply Network Inventory).
3) Enter the Specify Selection Criteria details.
4) Enter the Define Periodicity details.
5) Enter the Initiate File Generation details.
Upload Key Figures Data into SNI (continued)

74
3. To download an SNI file, in the URL for Download column, click the link.
Upload Key Figures Data into SNI (continued)

75
4. Update the editable fields (marked with an X) in the SNI file.
5. Save it as a comma-delimited file (.CSV) (not Excel).
Upload Key Figures Data into SNI (continued)

76
6. From the Invoice drop-down list, select File Transfer, then Upload Center
(External User).
Upload Key Figures Data into SNI (continued)

77
Prior to uploading an SNI file into SNC using the Upload Center, an upload profile must be created:
7. Enter the Profile Name.
8. In the Object Type field, enter Supply Network Inventory.
9. In the Customer field, enter CORP_3M.
Note: Leave the File to Upload field blank.
Upload Key Figures Data into SNI (continued)
7
8
9

78
10. Click Upload.
Upload Key Figures Data into SNI (continued)

79
11. To verify if the Key Figures data was uploaded correctly, view the Planned Receipts row.
Upload Key Figures Data into SNI (continued)

80
The key points covered in this module are:
The Supplier can edit key data in the SNI Details window and SNI Details-Product View window.
The Supplier can edit in several grid arrangements:
Edit Details by Assigned Location and Data Provider.
Edit Details by Supplier/Ship-from Location and Data Provider.
Edit All.
Through the File Transfer Method, the Supplier can mass upload data.
Module Summary

81
Compare Historical Stock and Key Figures

82
After completing this module, you will be able to compare the Historical Stock and Key Figures entered by external partners.
Module Objectives

83
The SNI History Comparison windows allows you to view the comparison of Key Figures or inventory for two time points in the past.
Inventory history may be viewed on two SNI windows:
1. SNI History Comparison (Inventory)
2. SNI History Comparison (Key Figures)
Comparing Inventory History

84
The SNI History Comparison windows use selection criteria to display history comparison results:
History date: The dates for which the Key Figures or inventory data display.
Time horizon for the history comparison: The earlier history is automatically selected as the beginning of the horizon. The later history date, plus the duration of the time horizon, is selected as the end of the time horizon.
The columns of the history comparison are set automatically on a daily basis.
Comparing Inventory History (continued)

85
The SNI History (Inventory) window displays the Comparison History for the selected criteria. In the example below, the stock on hand values on 10.09.2013 versus 19.09.2013 are displayed for comparison:
SNI History Comparison – Inventory

86
Detailed instructions on how to compare history (Inventory) can be found on the Supply Network Collaboration Training site.
Step-by-Step Instructions

87
The corresponding window displays the Key Figures for the selected criteria. In the example below, values for the Key Figures on 10.09.2013 versus 19.09.2013 display for comparison:
SNI History Comparison – Key Figures

88
Detailed instructions on how to compare history (Key Figures) can be found on the Supply Network Collaboration Training site.
Step-by-Step Instructions

89
The key points covered in this module are:
SNI History Comparison (Inventory)
SNI History Comparison (Key Figures)
Module Summary

90
User Specific SNI Alerts

91
After completing this module, you will be able to:
Display an SNI Alert Rule.
Manually trigger generation for an existing SNI Alert Rule.
Create a new SNI alert.
Modify an existing SNI alert.
Create a new SNI Alert Rule.
Delete an existing SNI Alert Rule.
Module Objectives

92
The workflow for User-specific SNI alerts:
The User creates a User-specific SNI Alert Rule in the SNC Alert Rules window.
SNC triggers an alert each time the scenario does not comply with the Alert Rule.
The User views the alert in SNC and resolves it, if possible.
User-defined Alert Rules are set for specific business scenarios not supported by the standard set of SNI alerts.
User-Specific SNI Alerts

93
The Buyer performs the following activities to manage User-specific SNI alerts:
Displays an existing SNI Alert Rule.
Manually triggers generation for an existing SNI Alert Rule.
Modifies an existing SNI Alert Rule.
Creates a new SNI Alert Rule.
Deletes an existing SNI Alert Rule.
User-Specific SNI Alerts (continued)

94
To display an existing SNI Alert Rule:
1. On the Alert Monitor window, click the Exceptions tab. From the drop-down list, select SNI Alert Rules.
Display an Existing SNI Alert Rule

95
2. Enter appropriate data in the Selection Area section to filter the list of User-specific SNI rules. Click Go.
Display an Existing SNI Alert Rule (continued)

96
3. Highlight the SNI Alert Rule and click Display Details to view the details of the rule.
Display an Existing SNI Alert Rule (continued)

97
4. You can also click the Rule ID hyperlink to view the details.
Display an Existing SNI Alert Rule (continued)

98
5. The rule details display.
Display an Existing SNI Alert Rule (continued)

99
To manually trigger alerts against an SNI Alert Rule:
1. On the Alert Monitor window, click the Exceptions tab. From the drop-down list, select SNI Alert Rules.
Manually Trigger Alerts against an SNI Alert Rule

100
2. Enter appropriate data in the Selection Area section to filter the list of User-specific SNI rules and click Go.
Manually Trigger Alerts against an SNI Alert Rule (continued)

101
3. Highlight the SNI Alert Rule and click Create Alert to manually trigger alert generation for the highlighted rule.
Manually Trigger Alerts against an SNI Alert Rule (continued)

102
4. Click Yes to confirm the alert should be generated with a background job.
Manually Trigger Alerts against an SNI Alert Rule (continued)

103
Detailed instructions on how to modify an existing Alert Rule can be found on the Supply Network Collaboration Training site.
Step-by-Step Instructions

104
Detailed instructions on how to create a new Alert Rule can be found on the Supply Network Collaboration Training site.
Step-by-Step Instructions

105
Alternatively, to create a new SNI Alert Rule:
1. On the Alert Monitor window, click the Exceptions tab. From the drop-down menu, select SNI Alert Rules.
Alternative Method to Create a New SNI Alert Rule

106
2. The SNI Alert Rules window displays. Select an existing rule and click Copy.
Alternative Method to Create a New SNI Alert Rule (continued)

107
3. The following message displays. Click Yes.
Alternative Method to Create a New SNI Alert Rule (continued)

108
4. The rules copy to a new rule generation window. Modify the rules to the requirement and click Save.
Alternative Method to Create a New SNI Alert Rule (continued)

109
To delete an existing SNI Alert Rule:
1. On the Alert Monitor window, click the Exceptions tab. From the drop-down list, select SNI Alert Rules.
Delete an Existing SNI Alert Rule

110
2. The SNI Alert Rules window display. Select an existing rule and click Delete.
Delete an Existing SNI Alert Rule (continued)

111
3. The following message displays. Click Yes. The rule deletes.
Delete an Existing SNI Alert Rule (continued)

112
The key points covered in this module are:
Displaying an SNI Alert Rule.
Creating a new SNI alert.
Modifying and deleting an existing SNI alert.
Creating a new SNI Alert Rule.
Module Summary

113
The key points covered in this course are:
SNI supports all Business Partners in monitoring the stock positions across the supply chain within a planning cycle.
External partners send data to SNI either through online reports or through the File Transfer Method.
Both current and projected stock positions can be monitored in SNI.
Historical inventory and Key Figures data is maintained in SNC for comparison.
Exception situations trigger alerts.
Conclusion