Corner Shower Walls B69912-3838-WH3 We recommend that you clean your bathing product with mild...
12
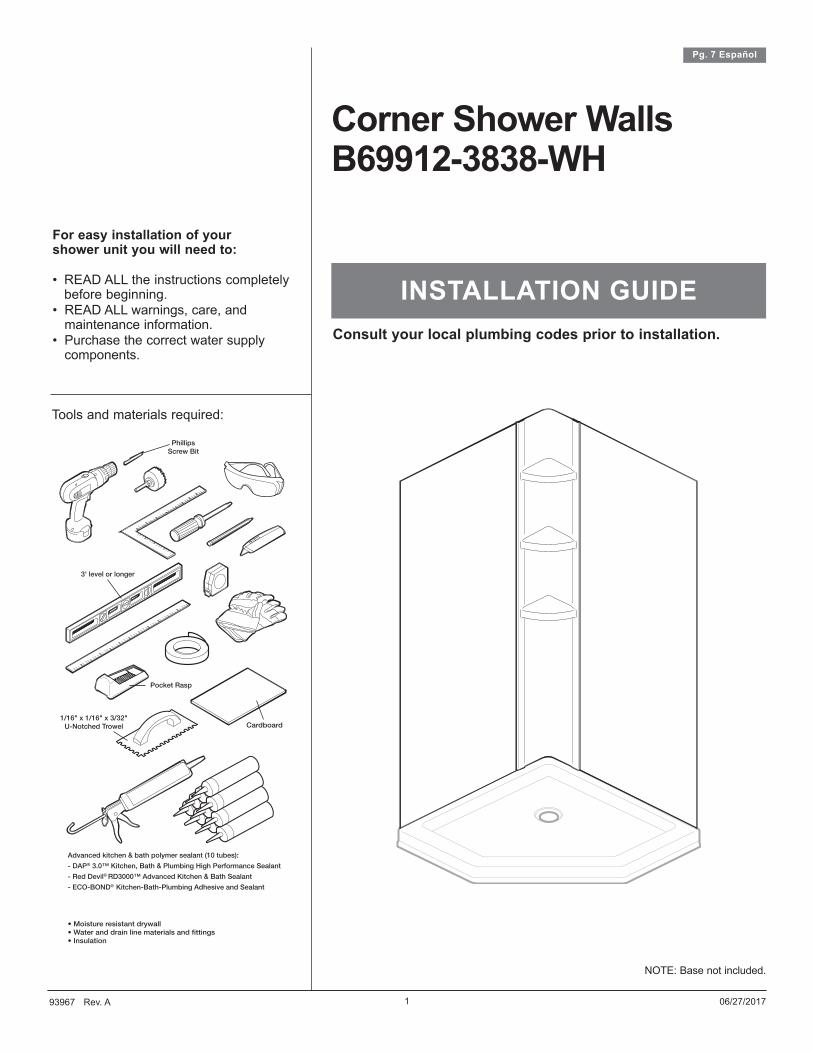
1 NOTE: Base not included. 06/27/2017 93967 Rev. A Consult your local plumbing codes prior to installation. INSTALLATION GUIDE Pg. 7 Español Corner Shower Walls B69912-3838-WH For easy installation of your shower unit you will need to: • READ ALL the instructions completely before beginning. • READ ALL warnings, care, and maintenance information. • Purchase the correct water supply components. Tools and materials required: Phillips Screw Bit Cardboard 3' level or longer • Moisture resistant drywall • Water and drain line materials and fittings • Insulation 1/16" x 1/16" x 3/32" U-Notched Trowel Pocket Rasp Advanced kitchen & bath polymer sealant (10 tubes): - DAP ® 3.0™ Kitchen, Bath & Plumbing High Performance Sealant - Red Devil ® RD3000™ Advanced Kitchen & Bath Sealant - ECO-BOND ® Kitchen-Bath-Plumbing Adhesive and Sealant
Transcript of Corner Shower Walls B69912-3838-WH3 We recommend that you clean your bathing product with mild...
1
NOTE: Base not included.
06/27/201793967 Rev. A
Consult your local plumbing codes prior to installation.
INSTALLATION GUIDE
Pg. 7 Español
Corner Shower Walls B69912-3838-WH
For easy installation of your shower unit you will need to:
• READ ALL the instructions completely before beginning.
• READ ALL warnings, care, and maintenance information.
• Purchase the correct water supply components.
Tools and materials required:
PhillipsScrew Bit
Cardboard
3' level or longer
• Moisture resistant drywall• Water and drain line materials and fittings• Insulation
1/16" x 1/16" x 3/32"U-Notched Trowel
Pocket Rasp
Advanced kitchen & bath polymer sealant (10 tubes):- DAP® 3.0™ Kitchen, Bath & Plumbing High Performance Sealant - Red Devil® RD3000™ Advanced Kitchen & Bath Sealant- ECO-BOND® Kitchen-Bath-Plumbing Adhesive and Sealant

2
Shower Walls Limited Warranty All parts and finishes of the Delta® shower unit are warranted to the original consumer purchaser to be free from defects in material and workmanship for the time periods listed below. Delta recommends using a professional plumber for all installation and repair. Delta will replace, FREE OF CHARGE, during the warranty period, any part or finish that proves defective in material and/or workmanship under normal installation, use and service for the time period listed below: • Non-residential or commercial application - 1 year • Residential applications - 1 yearThe original consumer purchaser must notify the manufacturer in writing of any defect covered by the warranty. THIS WARRANTY IS THE ONLY EXPRESS WARRANTY MADE BY THE MANUFACTURER. ANY CLAIMS MADE UNDER THIS WARRANTY MUST BE MADE DURING THE PERIOD REFERRED TO ABOVE. MANUFACTURER MAKES NO IMPLIED WARRANTY OF MERCHANTABILITY OR FITNESS FOR A PARTICULAR PURPOSE. LABOR CHARGES AND/OR DAMAGE INCURRED IN INSTALLATION, REPAIR OR REPLACEMENT AS WELL AS INCIDENTAL AND CONSEQUENTIAL DAMAGES CONNECTED THEREWITH ARE EXCLUDED AND WILL NOT BE PAID BY THE MANUFACTURER. Some states do not allow limitations on how long an implied warranty lasts, or the exclusion or limitation of incidental or consequential damages, so the above limitations or exclusions may not apply to you. This warranty gives you specifi c legal rights, and you may also have other rights which vary from state to state. This warranty is void for any damage to this product due to misuse, abuse, neglect, accident, improper installation, modifi cation, unauthorized repair, or any use violative of instructions furnished by us.
IMPORTANT: Shower wall units are designed to be installed in new and/or existing construction. For the best protection of the unit, it is recommended that the unit not be removed from the packaging until ready for installation.
• Read complete instructions before beginning installation• These instructions include suggestions for plumbing installation that we believe to be reliable. Local building codes vary and could supersede those
suggestions. If you are not confident in your ability to perform these tasks, contract out those tasks you need help with or use a professional installer.• Confirm that your model will fit in intended location and plumbing fixtures are located where required before beginning installation.• Walls must be solid, plumb and square. This shower kit has been designed with some adjustability for minor alignment problems, but a poor foundation will
result in a poor installation.• Use drop cloth or cardboard to protect base from damage during installation.• DO NOT install in areas where temperature may drop below 32ºF (0ºC).• Allow product to reach room temperature for 30 minutes before installation.• Two people recommended to install this product.• Wall should be 1/2" (1.3 cm) moisture-resistant drywall. Surfaces must be free of dirt and other residue. Painted surfaces must be sanded.• DO NOT install panels over ceramic tile, plywood, or wallpaper.• Dry fit all panels before applying adhesive.• Apply adhesive to panels using 1/16" x 1/16" x 1/32" u-notched trowel.• Follow manufacturer’s instructions for adhesive dry time and ventilation precautions.• Rough plumbing and base must be installed before panel installation.• Check drain fixture lengths as some drain products require a drain and waste assembly extension.• When disassembling unit, take care not to damage edges of unit.
LIMITED WARRANTY
BEFORE YOU START
93967 Rev. A

3
We recommend that you clean your bathing product with mild detergents. Use a terry cloth towel, soft cloth, or sponge. Avoid using abrasive scrubbing pads, steel wool, or sponges. After cleaning, rinse thoroughly with water.
Before cleaning this product with cleaning products, test a small, inconspicuous area.
NOTICE: When using drain cleaner or clog remover, rinse thoroughly with water.
NOTICE: Certain chemicals and cleaners mat\y deteriorate the product surface, causing cracks and, potentially, property damage. Never use cleaning products that state on their label that they are not suitable for use on Acrylic, ABS, Polystyrene, or Plastic. Do not use solvents (turpentine, lacquer thinner, mineral spirits, paint thinner, MEK, xylene, acetone, naphtha, etc.).
For further inquiries, and a list of safe cleaners to use, contact customer service at [email protected], or 1-800-355-2721.
CARE AND CLEANING
SHOWER WALL ASSEMBLY
Corner Panel
Left Wall Panel Right Wall Panel
93967 Rev. A

4
2 1/8"-1/4"
Sealant appliedbefore panel
Finished sealantbead
Wall panel
93967 Rev. A
1
Verify shower location is level, plumb, and square. Check dimensions of existing base/floor to ensure proper fit of shower walls.
NOTE: Place cardboard in shower base to protect surface while installing shower walls.
Install moisture resistant drywall. Leave a 1/8" to 1/4" gap between the drywall and shower base.
NOTICE: Failure to leave a gap between the drywall and base could lead to drywall water damage.
Remove center panel and mark the position of shower walls using a pencil.
Dry fit shower walls. Check that walls are level and plumb. If needed, make adjustments.
43

5
Measure location for plumbing fixtures.
Measure and mark plumbing fixture locations on back of shower wall. Using proper size hole saw, cut out plumbing fixture holes from back side of panel.
Apply beads of adhesive to the corner panel, then trowel out. Apply beads to both inside vertical corners, near the edges.
Press corner panel into position. Use painters tape to hold in position for 24 hours.
Trowel adhesive onto the drywall. Only apply adhesive for one panel at a time. Install first panel. Press firmly on wall panel to ensure complete contact. Repeat for second panel.
6
7
3
3
2
2
1
8
Vertical beads
5
93967 Rev. A

693967 Rev. A
9
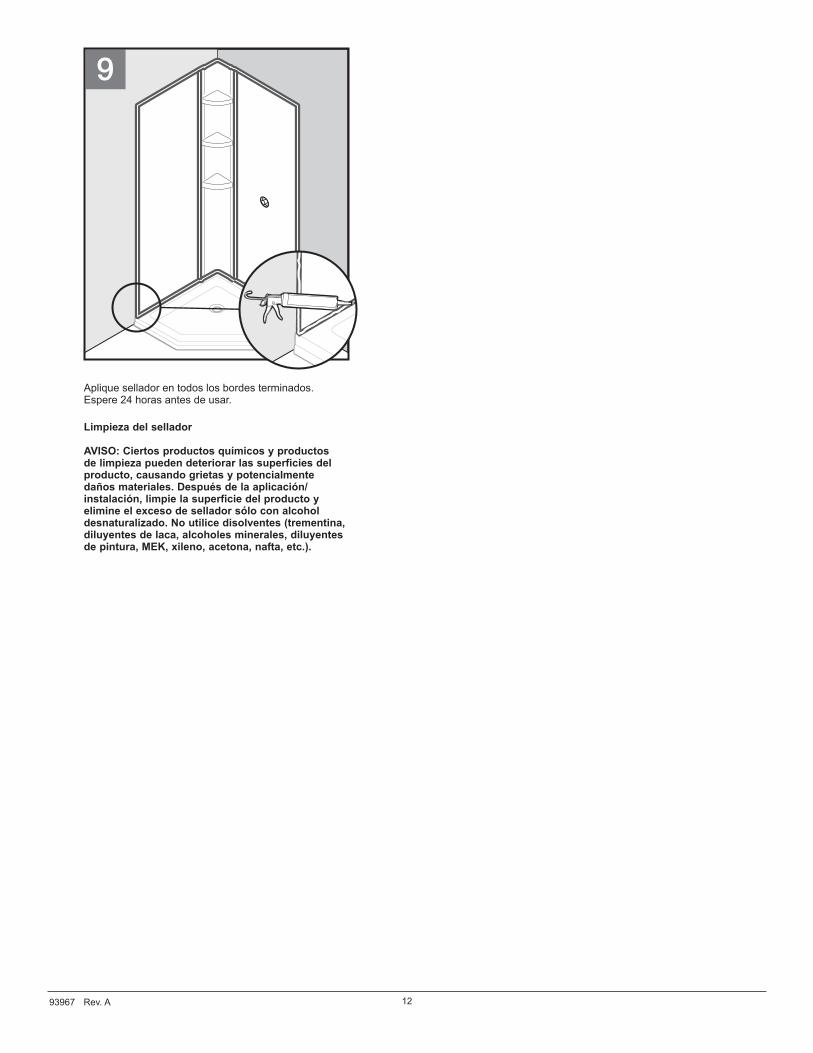
Apply sealant to all finished edges. Wait 24 hours before using.
Sealant Cleanup
NOTICE: Certain chemicals and cleaners may deteriorate product surfaces, causing cracks and, potentially, property damage. After application/installation, clean up the product surface and remove any excess sealant with denatured alcohol only. Do not use solvents (turpentine, lacquer thinner, mineral spirits, paint thinner, MEK, xylene, acetone, naphtha, etc.).

7
Paredes de regaderas de esquinaB69912-3838-WH
Para instalar fácilmente la unidad deducha Delta necesitará lo siguiente:
• LEER TODAS las instrucciones completamente antes de empezar.
• LEER TODOS los avisos, cuidados, e información de mantenimiento.
• Comprar las conexiones correctas para el suministro de agua.
NOTA: No se incluye la base.
06/27/2017
Consulte los códigos/normas locales de plomería antes de realizar la instalación.
Usted puede necesitar:
GUÍA DE INSTALACIÓN
93967 Rev. A
Boca detaladroPhilips
Nivel de 3' o más largo
• Paneles de yeso resistente a la humedad• Materiales y conectores para las líneas de desagüe y de agua• Aislamiento
Llana semicircular de 1/16" x 1/16" x 3/32"
Raspador de bolsillo
Cartón
Sellador de polímero avanzado para baño y cocina (10 tubos):- DAP® 3.0 ™ sellador de alto rendimiento para cocinas, baños y plomería- Sellador avanzado para cocinas y baños Red Devil® RD3000 ™- Adhesivo y sellador para cocinas-baños-plomería ECO-BOND®

8
Garantía limitada de paredes para ducha Toutes les pièces et finitions des douches Delta® acryliques avec technologie Innovex® sont garanties au client acheteur d’origine comme étant exemptes de défauts de matériel et de fabrication pendant les périodes indiquées ci-dessous. Delta recommande l’emploi d’un plombier professionnel pour toute installation ou réparation. Delta remplacera, GRATUITEMENT, pendant la durée de la garantie, toute pièce ou tout fini révélant un défaut de matériau et/ou de fabrication conformément à une installation, une utilisation et un entretien normaux pendant la période stipulée ci-dessous : • Application commerciale ou non résidentielle - 1 año • Applications résidentielles - 1 añoThe original consumer purchaser must notify the manufacturer in writing of any defect covered by the warranty. THIS WARRANTY IS THE ONLY EXPRESS WARRANTY MADE BY THE MANUFACTURER. ANY CLAIMS MADE UNDER THIS WARRANTY MUST BE MADE DURING THE PERIOD REFERRED TO ABOVE. MANUFACTURER MAKES NO IMPLIED WARRANTY OF MERCHANTABILITY OR FITNESS FOR A PARTICULAR PURPOSE. LABOR CHARGES AND/OR DAMAGE INCURRED IN INSTALLATION, REPAIR OR REPLACEMENT AS WELL AS INCIDENTAL AND CONSEQUENTIAL DAMAGES CONNECTED THEREWITH ARE EXCLUDED AND WILL NOT BE PAID BY THE MANUFACTURER. Some states do not allow limitations on how long an implied warranty lasts, or the exclusion or limitation of incidental or consequential damages, so the above limitations or exclusions may not apply to you. This warranty gives you specifi c legal rights, and you may also have other rights which vary from state to state. This warranty is void for any damage to this product due to misuse, abuse, neglect, accident, improper installation, modifi cation, unauthorized repair, or any use violative of instructions furnished by us.
IMPORTANTE: Las unidades de paredes para ducha están diseñadas para instalarse en construcciones nuevas y/o existentes. Para una mejor protección de la unidad, se recomienda no quitarla del empaque hasta que esté lista para su instalación.
• Lea las instrucciones completas antes de comenzar la instalación.• Estas instrucciones incluyen sugerencias para la instalación de cañerías que consideramos confiables. Los códigos locales de construcción varían según el
lugar y tienen prioridad por sobre estas sugerencias. Si no se siente capaz de realizar estas tareas, tercerícelas o contrate un instalador profesional.• Verifique que su modelo quepa en la ubicación deseada y que las cañerías se encuentren donde sea necesario antes de iniciar la instalación.• Las paredes deben estar firmes, niveladas y en escuadra. El juego de regadera se ha diseñado con una cierta capacidad de ajuste para problemas menores
de alineación, pero una cimentación deficiente producirá una instalación deficiente.• Utilice una lona protectora para proteger la base durante la instalación.• No realice la instalación en áreas donde la temperatura pueda ser inferior a 0°C (32°F).• Deje que el producto alcance la temperatura ambiente durante 30 minutos antes de la instalación.• Se recomienda que dos personas se encarguen de la instalación del producto.• La pared debe ser de placa de yeso de 1,3 cm (1/2") resistente a la humedad. Las superficies deben estar limpias, y deben estar libres de suciedad u otros
residuos. Las superficies pintadas se deben lijar.• No instale paneles sobre azulejos de cerámica, madera contrachapada o empapelado.• Seque y adapte todos los paneles antes de aplicar el adhesivo.• Aplique el adhesivo en la pared con una llana en U de 0,16 cm x 0,16 cm x 0,08 cm (1/16" x 1/16" x 1/32"). Cubra toda el área detrás del panel.• Siga las instrucciones del fabricante sobre el tiempo de secado del adhesivo y las precauciones de ventilación.• La plomería y la base iniciales deben estar colocadas antes de la instalación del panel.• Revise la longitud del dispositivo de desagüe, ya que muchos productos de desagüe necesitan una extensión del conjunto de desagüe y drenaje.• Cuando desmonte la unidad, aparte las piezas y tenga cuidado de no dañar los bordes de la unidad.
93967 Rev. A
GARANTÍA LIMITADA
ANTES DE COMENZAR

9
We recommend that you clean your bathing product with mild detergents. Use a terry cloth towel, soft cloth, or sponge. Avoid using abrasive scrubbing pads, steel wool, or sponges. After cleaning, rinse thoroughly with water.
Before cleaning this product with cleaning products, test a small, inconspicuous area.
NOTICE: When using drain cleaner or clog remover, rinse thoroughly with water.
NOTICE: Certain chemicals and cleaners mat\y deteriorate the product surface, causing cracks and, potentially, property damage. Never use cleaning products that state on their label that they are not suitable for use on Acrylic, ABS, Polystyrene, or Plastic. Do not use solvents (turpentine, lacquer thinner, mineral spirits, paint thinner, MEK, xylene, acetone, naphtha, etc.).
For further inquiries, and a list of safe cleaners to use, contact customer service at [email protected], or 1-800-355-2721.
CUIDADO Y LIMPIEZA
ENSAMBLE DE PARED PARA DUCHA
Panel de esquina
Panel de pared izquierdo Panel de pared derecho
93967 Rev. A

1093967 Rev. A
2 1/8"-1/4"
Sealant appliedbefore panel
Finished sealantbead
Wall panel1
Verifique que la ubicación para la ducha esté a plomo, a nivel y a escuadra. Verifique las dimensiones de la base/suelo existentes para asegurar el calce adecuado de las paredes de la ducha.
NOTA: Coloque el cartón en la base de la ducha para proteger la superficie al instalar las paredes para ducha.
Instale los paneles de yeso. Deje un espacio de 1/8" a 1/4" entre los paneles de yeso y la base de la regadera.
AVISO: el no dejar el espacio entre los paneles de yeso y la base puede conducir a daños de agua en el panel de yeso.
Retire el panel central y marque la posición de las paredes del cubículo de la regadera con un lápiz.
Seque las paredes para ducha. Verifique que las paredes estén a plomo y niveladas. Ajuste según sea necesario.
43

11
Mida la ubicación para los ensambles de plomería.
Mida y marque la ubicación los ensambles de plomería en la parte posterior de la pared para ducha. Utilice el tamaño adecuado del orificio de la sierra, corte los orificios del ensamble de plomería desde la parte lateral del panel.
Aplique listones de adhesivo al panel de la esquina, luego alise con la llana. Aplique listones a lo largo de ambas esquinas verticales, cerca de los bordes.
Presione el panel de la esquina en su posición. Utilice cinta de pintor para mantener en posición durante 24 horas.
Coloque el adhesivo sobre la pared de yeso. Aplique adhesivo solamente en un panel a la vez. Instale el primer panel. Presione firmemente el panel de pared para asegurar un contacto completo. Repita con el segundo panel.
7
3
3
2
2
1
8
Listones verticales
5 6
93967 Rev. A
1293967 Rev. A
9
Aplique sellador en todos los bordes terminados.Espere 24 horas antes de usar.
Limpieza del sellador
AVISO: Ciertos productos químicos y productos de limpieza pueden deteriorar las superficies del producto, causando grietas y potencialmente daños materiales. Después de la aplicación/instalación, limpie la superficie del producto y elimine el exceso de sellador sólo con alcohol desnaturalizado. No utilice disolventes (trementina, diluyentes de laca, alcoholes minerales, diluyentes de pintura, MEK, xileno, acetona, nafta, etc.).