CORE SAW OPERATION AND SAFETY MANUAL - …corewise.com.au/manuals/Corewise auto saw manual.pdf · -...
10
- 20 - Always remember to be alert and look what is happening around you to see what is going on and what others are doing. Always make sure you are wearing you Personal Protection Equipment. Do not use the machine until you have done the start up checks. IF YOU ARE NOT SURE STOP AND ASK SOMEONE CORE SAW OPERATION AND SAFETY MANUAL UNIT 1 / 5 ROWE STREET MALAGA WA 6090 ABN 20 117 045 217 PH: (08) 9249 6300 FAX: (08) 9249 8384 EMAIL: [email protected]
Transcript of CORE SAW OPERATION AND SAFETY MANUAL - …corewise.com.au/manuals/Corewise auto saw manual.pdf · -...

- 20 -
Always remember to be alert
and look what is happening
around you to see what is going
on and what others are doing.
Always make sure you are
wearing you Personal Protection
Equipment.
Do not use the machine until
you have done the start up
checks.
IF YOU ARE NOT SURE
STOP AND ASK SOMEONE
CORE SAW
OPERATION AND SAFETY
MANUAL
UNIT 1 / 5 ROWE STREET MALAGA WA 6090 ABN 20 117 045 217
PH: (08) 9249 6300 FAX: (08) 9249 8384 EMAIL: [email protected]

- 2 -
INSTRUCTION MANUAL
CONTENTS Section
1 Purpose
2 Scope
3 Safety
4 Specific Safety Consideration
5 Safety Feature & Purpose
6 Personal Protective Equipment
7 Pre-start Checklist
8 Detailed Procedure
9 Clean up – at End of Day’s
Operation
10 Components - Accessories
- 19 -
Recommended Personal
Protection Equipment
Rubber boots – preferable with steel capped toes and non slip soles for working in wet area and the lifting and carrying of core trays. Plastic Apron in the event of water spray from core cutting blades. Leather gloves for the handling and moving of core trays. Rugged shoes or boots with steel toe caps and non-slip for the handling and moving of core trays. Overalls for the protection of cloths and body. Preferably overalls that do not have loose belts and cuffs that can get caught in machinery. Rubber safety gloves for the handling of core – to and from the core cutting guides and the core trays. Ear protection from Corewise Cutting noise. Safety glasses to prevent fragments of core from hurting the eyes.

- 18 -
Additional Tools and
Accessories
Size 30 ring spanner for replacing the diamond cutting blade Hammer for breaking core into correct lengths for core guides Standard hose connector Water spray nozzle – plugged into water supply hose for washing Scrubbing brush for cleaning Broom for cleaning work area at the end of the days work or in between as required Cloths for wiping down and keeping work environment clean
- 3 -
1 PURPOSE The purpose of the instruction is to describe the method of splitting/cutting diamond drill core using the Corewise Core Saw, and to stress the importance of maintaining core samples integrity and original orientation/position in the tray.
1 SCOPE These instructions apply to all persons operating the Corewise Core Saw.
3 SAFETY Before commencing this task check that no abnormal conditions exist. Consider any potential hazard that may occur due to unusual circumstances.
SSSSPOT THE HAZARD POT THE HAZARD POT THE HAZARD POT THE HAZARD
AAAASSESS THESSESS THESSESS THESSESS THE RISK RISK RISK RISK
MMMMANAGE THE SITUATIONANAGE THE SITUATIONANAGE THE SITUATIONANAGE THE SITUATION

- 4 -
4 SPECIFIC SAFETY CONSIDERATIONS USING SAW
4.1 Electric shock hazards
In the event of an electrical problem cease operation immediately and report the fault, under no circumstances are unqualified persons to attempt repairs.
4.2 High speed rotating diamond saw blade (danger of laceration)
Do not lift the primary/secondary/top blade cover while the machine is in operation.
4.3 Moving parts (crushing and cutting)
Do not place hands or fingers between cutting block or block pushers and blade housing.
4.4 Noise (hearing loss)
Always wear hearing protection (ear plugs and/or muffs).
4.5 Flying core ships (can cause severe eye injury)
Always wear eye protection (safety glasses).
4.6 Water on floor (danger of slipping)
Take extra care when walking in wet areas.
- 17 -
Wiring Diagram

- 16 -
Corewise Automatic Core Saw
Blade Fitting
• Clean paint out of blade shaft hole to ensure perfect fit on shaft.
• Fit blade on shaft and
ensure pin is fitted in hole on blade. Ensure blade directional arrow is on opposite side to operators console.
• Fit blade washer
taking not of pin hold and fit blade locking nut.
• Tighten blade locking
nut with size 30 spanner. Close blade housing cover
• Close blade housing
cover and lock down. Replace core cutting height guide and adjust. You are now ready to start cutting again
- 5 -
4 SPECIFIC SAFETY CONSIDERATIONS USING SAW CONTINUED
4.7 Falling objects (inquires to feet and limbs)
Wear steel cap safety boots and ensure trays and tools are placed on a solid base where they can not be easily dislodged.
4.8 Lifting (back injuries)
Ensure safe lifting practices are employed.
4.9 Radiation - if cutting core that requires radiation monitoring
All employees are issued with a radiation monitoring tag (TLD badge), which is collected by the radiation department on a regular basis and a new tag is issued.
4.10 Heat – Dehydration
All area within the core farm building are air-conditioned or have free flowing air passages. Fluid levels should be maintained at all times.
4.11 Cold Heating is provided for use in the main areas of the core farm during the winter months.

- 6 -
5 SAFETY FEATURE AND PURPOSE
5.1 Blade guard Designed to contain
fragments or broken blade at no risk to the operator.
5.2 Spray/splash guard
Ensures no air borne vapour.
5.3 Emergency stop As well as stopping the machine the emergency stop has a braking effect rather that freewheeling to a stop.
5.4 Cut out switch on blade cover
Stops the machine of the primary/main cover is raised while the machine is running. This switch must be checked in the daily pre-start check.
5.5 Noise reduction While the machine is designed and constructed with noise reduction in mind the nature of the operation means noise levels are quite high and HEARING PROTECTION MUST BE WORN.
- 15 -
Corewise Automatic Core Saw
Accessories
Core Guide
Height
Adjustment
Core Guide and
Core Guide
Pusher
Corewise Diamond Blades
Broken Core Guide
V-Core Guide
- 14 -
Control unit
door and
waterproof
seal
Control
modules
Splash Guard
Core Guide and
Cut Core guide
Tray
Water Gully
and Waste
Drainage Pipe
Core
Cutting
Blade
- 7 -
6 PERSONAL PROTECTIVE EQUIPMENT
6.1 MINIMUM PERSONAL PROTECTIVE EQUIPMENT
6.1.1 Hearing protection
Ear plugs or muffs
6.1.2 Eye protection
Safety glasses
6.1.3 Hand protection
Vinyl gloves
6.1.4 Foot protection Steel cap safety boots
6.1.5 Overalls As issued – No loose belts or sleeves
6.2 RECOMMENDED PERSONAL PROTECTIVE EQUIPMENT
6.2.1 Rubber Boots Ensures dry feet
6.2.2 Apron Prevents wet clothing

- 8 -
7 PRESTART CHECKLIST 7.1 Is the work area clean and clean?
If not – tidy up before starting.
7.2 Has the pusher chain been lubricated after previous shut down?
If not – lubricate.
7.3 Is there a blade on the shaft? If so is there sufficient diamond on the blade to begin cutting?
If not – fit or replace.
7.4 Is water running? If not – Turn on.
7.5 Is drainage pipe properly fitted and draining away from work area?
If not – ensure proper connection and drainage.
7.6 Is power on at mains?
If not – turn on.
7.7 Are blade guards down and locked in place?
If – not – lock down.
7.8 Are you waring minimum personal protective equipment?
Minimum personal protective equipment must be worn.
- 13 -
Blade Cover
Core Guide inserted
in automatic feed slot
Core guide pushers
and drive chain
Meter mark cutting
aperture and clip
Core blade cover -
locking clamp
Hose
Connector
Noise
Proofing
V Belts
pulley
Blade locking
nut and washer
- 12 -
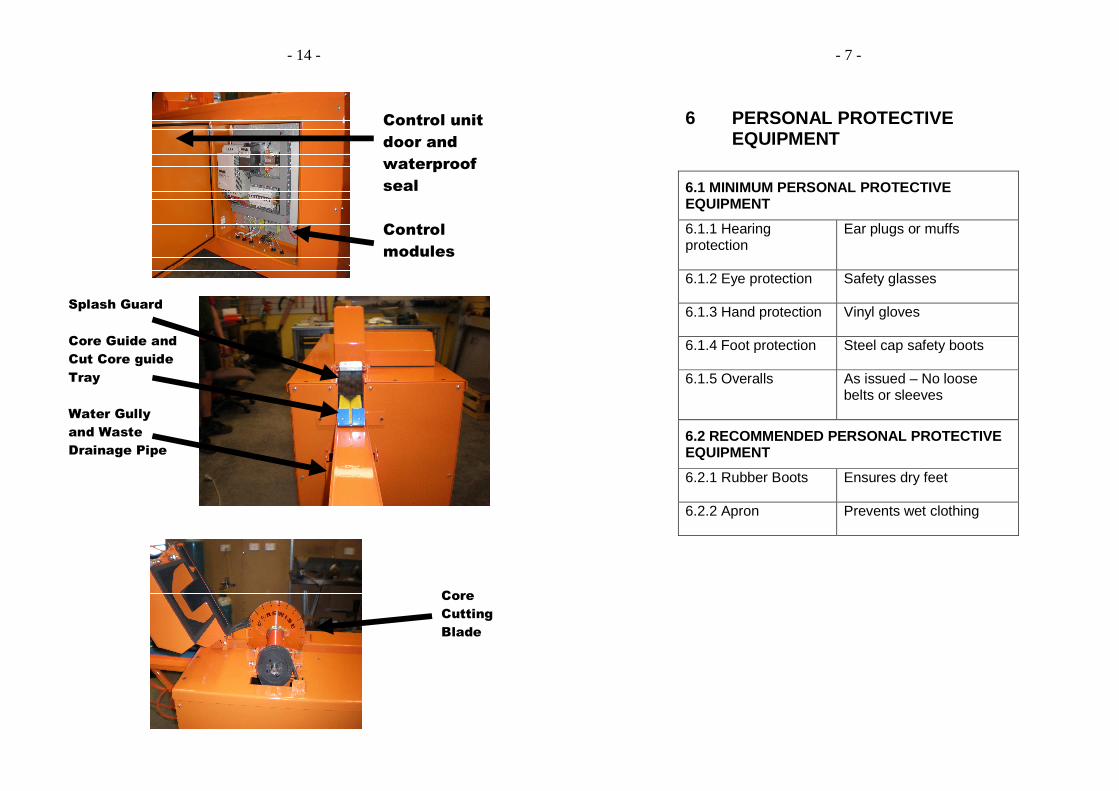
10 COMPONENTS - ACCESSORIES
Corewise Automatic Core Saw
Operation Control Panel
Corewise Automatic Core Saw
Main Components
Drive
Chain
Core Guide Blade Cover
Auto
Control
Panel
7.5 Kw
3 Phase
Electric
Motor
Gear Box
- 9 -
8 DETAILED PROCEDURE
8.1 START UP PROCEDURE
8.1.1 Pull emergency stop button on control panel out
Refer Annexure
8.1.2 Press reset button on control panel
Refer Annexure
8.1.3 Turn water on CHECK WATER IS RUNNING
8.1.4 Press start button on control panel
After the machine has started, check everything to be sure it is operating properly. Shut down immediately of anything is not operating correctly. Listen for and report any unusual noises.
8.2 MANDATORY SAFETY CHECKS
8.2.1 Press emergency stop button – to ensure machine stops. Unlatch blade cover and lift approximate 10 mm to ensure machine stops.
IF MACHINE FAILS EITH OF THESES 2 CHECKS – DO NOT USE THE MACHINE
8.2.2 Turn feed switch on control panel to forward.
Refer Annexure
8.2.3 To stop in the event of an emergency push emergency stop button in.
Refer Annexure

- 10 -
8 DETAILED PROCEDURE CONTINUED
8.3 CUTTING CORE
STEP CRITICAL
8.3.1 Load block and 1 and 2 and 3 in order from core tray
Maintain the same selection process
8.3.2 Place blocks in sequential order on moving feed chain (cutting process is automatic)
IMPORTANT: Sequence of blocks must be maintained
8.3.3 Remover block containing cut core from machine and replace core on original position in tray
IMPORTANT: Core MUST BE returned to original position in tray
8.3.4 Continue loading blocks in order, cutting core and replacing in original position on trays until all core is cut.
IMPORTANT: CORE SEQUENCE MUST BE MAINTAINED
8.4 SHUTTING DOWN
STEP CRITICAL
8.4.1 Check all core and cutting blocks removed from machine
8.4.2 Turn the feed switch to the off position
8.4.3 Push the stop button on
8.4.4 Turn water off at the saw and also the secondary tap on the mains
- 11 -
9 CLEAN UP – AT END OF DAY’S OPERATION
9.1 Apply degreaser to the exterior of the saw with a broom/brush
9.2 Wash out cutting blocks
9.3 Wash down saw and work area including marks on walls with hose
9.4 Wash all cutting debris from the floor into drains
9.5 Restart saw, turn feed switch to forward, allow feed chain to turn at least one complete revolution while being sprayed over its length with pressure pack chain lubricant.
9.6 Turn feed switch to off and shut down saw.