Core Components - Tips and Tricks Web viewOnly local instances of SQL Server 2008 Reporting...
27
Installing System Center Essentials 2010 Core Components 1. Run SetupSCE.exe from the root of the CD. After the System Center Essentials 2010 Setup Wizard opens, click Install to begin installing Essentials. Note - See http://go.microsoft.com/fwlink/?LinkID=155032 if you are not on the Setup Wizard page.
Transcript of Core Components - Tips and Tricks Web viewOnly local instances of SQL Server 2008 Reporting...

Installing System Center Essentials 2010
Core Components1. Run SetupSCE.exe from the root of the CD.
After the System Center Essentials 2010 Setup Wizard opens, click Install to begin installing Essentials. Note - See http://go.microsoft.com/fwlink/?LinkID=155032 if you are not on the Setup Wizard page.

Note - Select the Get the latest updates to System Center Essentials 2010 check box if you want to check for product updates.Click Install.
2. On the Product Registration page, enter your product key, if needed, and then click Next.
3. On the License Agreement page, read the license agreement, select the check box to accept the agreement, and then click Next.


4. If the server on which you are installing Essentials 2010 meets the appropriate hardware and software requirements, Setup makes additional components available for install. Select the Essentials components that you want to install, and then click Next.
5. Essentials 2010 Setup checks your environment for the hardware and software prerequisites required to install Essentials and selected components and prompts you to review those prerequisites that do not meet minimum requirements. After resolving potential system requirement issues, click Next.


6. Essentials 2010 uses a database server instance to host the databases that store data used by Essentials. Select the option to use a local database instance, or select the option to find remote database servers in your environment that Essentials 2010 can use for this purpose, and then click Next.
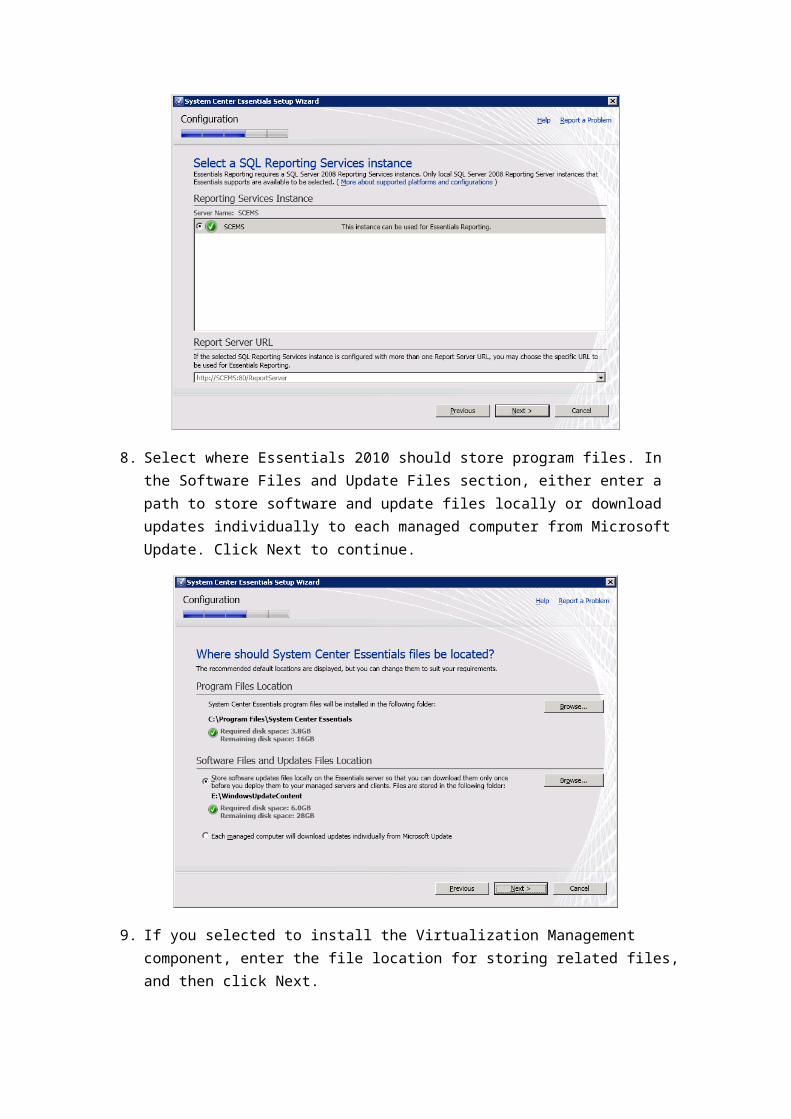
7. If you selected the Reporting component, you are required to specify a SQL Server 2008 Reporting Services instance for Essentials Reporting. Only local instances of SQL Server 2008 Reporting Services that are supported by Essentials 2010 are available to be selected. Select a Reporting Services instance and specify a specific URL to the reporting server if the instance is configured with more than one URL, and then click Next.

8. Select where Essentials 2010 should store program files. In the Software Files and Update Files section, either enter a path to store software and update files locally or download updates individually to each managed computer from Microsoft Update. Click Next to continue.
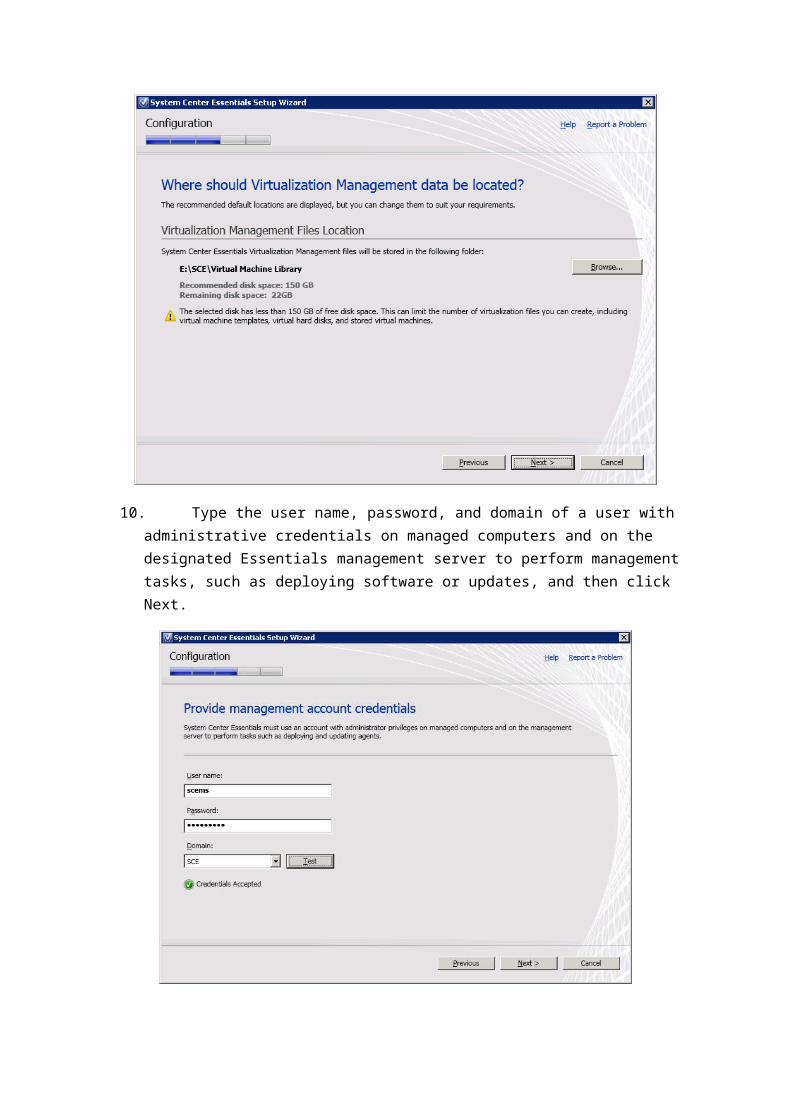
9. If you selected to install the Virtualization Management component, enter the file location for storing related files, and then click Next.
10. Type the user name, password, and domain of a user with administrative credentials on managed computers and on the designated Essentials management server to perform management tasks, such as deploying software or updates, and then click Next.
11. Select whether to participate in the Customer Experience Improvement Program, Error Reporting, and Operational Data Reporting, and then click Next.
12. Review the Installation Summary page. Click Previous to go back and make changes, or click Install to begin installing Essentials 2010.
13. Essentials 2010 displays the progress during installation. Select the check box if you want to start the Essentials console after the Setup Wizard closes.

Configuration
Before you can use System Center Essentials 2010 to manage your environment, you must complete the Configure System Center Essentials Wizard. This wizard walks you through configuring settings for Group Policy, firewall exceptions, remote assistance, computer discovery, notifications, proxy servers, monitoring, updates, and reports.
When the start page of the Configure Essentials Wizard appears, click Get started now to begin. A progress bar will be displayed while Essentials gathers information about your environment for configuration.
Note - Essentials configuration settings can be changed later through the Product Configuration Wizard by clicking Administration in the Essentials console, and then clicking the link beside Policy Mode under Configuration in the Administration Overview pane.

1. Essentials will scan Active Directory for Group Policy usage. On the Policy Type page, if you have the appropriate credentials to create Group Policy objects, select Yes, enter the user name and password, and then select the domain from the drop-down list box; otherwise, select No to configure Essentials to use local Group Policy objects. After making your selection, click Next.
The Conflicting Group Policies page will be displayed if Essentials detects any policies that conflict with the settings required by Essentials. Expand a conflicting group policy item to view more details, and click the Change settings link beside the item to open the Group Policy Object Editor and make the required changes to resolve the conflict. After resolving the conflicts, click Next.
Note
If you proceed without changing the settings to resolve these conflicts, Essentials might not operate correctly.

2. On the Firewall Exceptions page, select Yes to create Windows Firewall exceptions on all of the computers in your domain so that Essentials can communicate with them on the displayed ports. Selecting No might prevent Essentials from locating or installing agents on computers that are running Windows Firewall. Click Next.
Note - Computers with third-party firewall products installed have to manually configure the firewall exception on those computers for this port.
3. On the Configure Remote Assistance page, select Yes to enable the built-in Remote Assistance feature in Windows for all managed computers (recommended), or select No if you do not want to enable Remote Assistance on managed computers. Click Next.

4. On the Computer Discovery page, select Yes to allow Essentials to automatically discover new computers, or select No to manually discover them. If you select Yes, select whether to discover and manage all computers in your domain (recommended) or only in a specified Active Directory. If you choose only a specific Active Directory, add the organizational unit. Specify the number of hours between discoveries and the start time for discovery, and then click Next.
5. On the E-mail Notifications page, select Yes to set up an e-mail notification and enable the Daily Health Report (recommended), and then type the required information into the boxes provided to generate and send the notifications; otherwise, click No to set up notifications later. Click Next.

6. On the Proxy Server page, select No if you do not use a proxy; otherwise, select Yes and then type in the proxy server name, port number, and credentials that should be used to connect to the proxy server. When you click Synchronize, a progress page will be displayed while Essentials attempts to synchronize with Microsoft Update.

7. On the Monitoring Configuration page, select the check box under Automatic Discovery if you want Essentials to notify you when new management packs are available. Select the applications you want to monitor for updates, and then click Next.

Note
You can click any of the recommended applications to monitor to view a description.

8. On the Error Monitoring page, select Yes to collect application errors from managed computers (recommended). Select the upload location to store the error reports, and specify the port number to use when clients submit errors; otherwise, click No. Click Next.

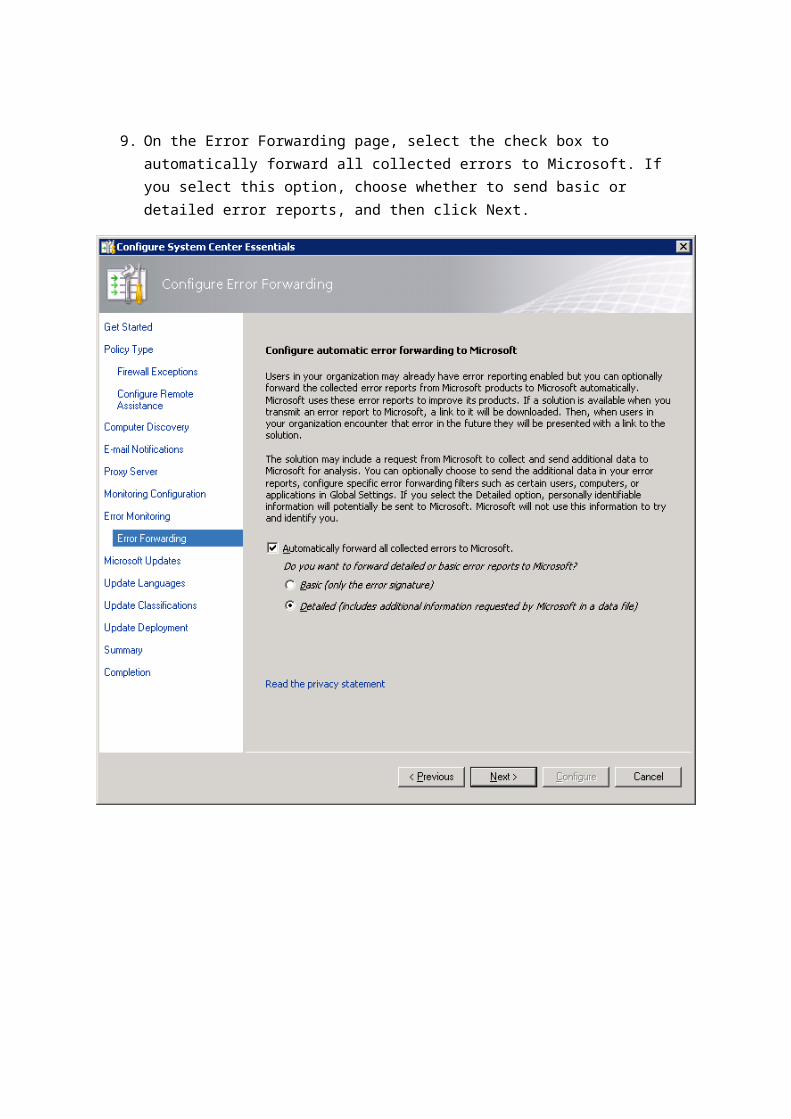
9. On the Error Forwarding page, select the check box to automatically forward all collected errors to Microsoft. If you select this option, choose whether to send basic or detailed error reports, and then click Next.

10. On the Software Updates from Microsoft page, select whether to automatically or manually download Microsoft Updates based on your environment. We recommend that you select Automatically; if you select to download updates manually, choose whether to download updates for operating systems only, or choose from the product list and select the items in the list for which you want to download updates. Click Next.
11. On the Update Languages page, select Yes to download updates in the language used on the server (English); otherwise, click No and select the languages to synchronize when downloading updates. Click Next.

12. On the Update Classifications page, select Yes to download only critical and security updates from Microsoft; otherwise, select No and select the types of updates that you want to download when synchronizing with Microsoft Update. Click Next.

13. On the Update Deployment page, you can select to auto-approve critical and security updates for the All Clients and All Servers computer groups. If you select the auto-approval option, you can also select to force the installation after a specified period of time and to have the updates install after that interval at a specific time. Click Next.

14. On the Completion page, the status of configuration is displayed. Features that fail to configure can be updated through the Administration pane or by clicking the link beside the failed feature. Select the check boxes to start Computer Discovery and synchronize with Microsoft Update after the Configure Essentials Wizard closes, and then click Close.

If you chose to discover computers automatically and automatically synchronize with Microsoft Update, a Configuration Progress window will be displayed while Essentials discovers computers and updates synchronization. The status for each of these tasks will be updated in the window after configuration has completed.