Coraid EtherDrive HBA for Windows Server Administration Guide
29
Coraid ® EtherDrive ® HBA for Windows Server Administration Guide Published: November 10, 2014 HBA Driver v7.0.1
Transcript of Coraid EtherDrive HBA for Windows Server Administration Guide
Coraid® EtherDrive® HBA for Windows Server
Administration Guide
Published: November 10, 2014
HBA Driver v7.0.1
© 2014 Coraid, Inc.
Except as specifically permitted herein, no portion of this document may be reproduced in any form or by any means without the express written consent of Coraid, Inc.
The trademarks, logos, and service marks (collectively “Trademarks”) appearing on the Coraid website are the property of Coraid and other parties. ALL OF THE TRADEMARKS MENTIONED IN THIS MANUAL ARE THE PROPERTY OF THEIR RESPECTIVE OWNERS. Nothing contained in this document should be construed as granting any license or right to use any Trademark without the prior written permission of the party that owns the Trademark. Coraid and EtherDrive are registered trademarks of Coraid. Coraid trademarks include RAIDShield, VirtualStorage, EtherCloud, EtherFlash and CorOS. Mac OS® is a registered trademark of Apple Inc. Microsoft, Encarta, MSN, and Windows are either registered trademarks or trademarks of Microsoft Corporation in the United States and/or other countries. VMware, vSphere, vCloud, vShield, ESXi and vCenter are either registered trademarks or trademarks of VMware, Inc. OpenSolaris is a trademark of Sun Microsystems, Inc. or its subsidiaries in the U.S. and other countries. PCIe is a registered trademark of PCI-SIG. The term “Linux” is a registered trademark of Linus Torvalds.
Coraid, Incorporated 255 Shoreline DriveRedwood City, California 94065 United States of America
Phone: 1-877-548-7200
Fax: 1-650-226-3884
Web: http://www.coraid.com
Email: [email protected]

HBA Driver v7.0.1 ©2014 Coraid, Inc. All rights reserved.
Contents . . . . . . . . . . . . . . . . . . . . . . . . . . . . . . . . . . . . . . . . . . . . . . . . . . . . . . . . . . . 3
Revision History . . . . . . . . . . . . . . . . . . . . . . . . . . . . . . . . . . . . . . . . . . . . . . . . . . . . . . 4
Introduction . . . . . . . . . . . . . . . . . . . . . . . . . . . . . . . . . . . . . . . . . . . . . . . . . . . . . . . . . 5
CorOS™ updates . . . . . . . . . . . . . . . . . . . . . . . . . . . . . . . . . . . . . . . . . . . . . . . . . . . . . . . .5
Coraid Ethernet Console (CEC) . . . . . . . . . . . . . . . . . . . . . . . . . . . . . . . . . . . . . . . . . . . . .5
Installation Overview . . . . . . . . . . . . . . . . . . . . . . . . . . . . . . . . . . . . . . . . . . . . . . . . . . 6
Requirements . . . . . . . . . . . . . . . . . . . . . . . . . . . . . . . . . . . . . . . . . . . . . . . . . . . . . . . . 6
Terminology. . . . . . . . . . . . . . . . . . . . . . . . . . . . . . . . . . . . . . . . . . . . . . . . . . . . . . . . . 7
Ethernet SAN Configuration. . . . . . . . . . . . . . . . . . . . . . . . . . . . . . . . . . . . . . . . . . . . . 8
Installing an EtherDrive HBA Card . . . . . . . . . . . . . . . . . . . . . . . . . . . . . . . . . . . . . . . . 8
Installing the EtherDrive HBA Driver & HBA HostView . . . . . . . . . . . . . . . . . . . . . . . . . 9
Managing Storage from HBA HostView . . . . . . . . . . . . . . . . . . . . . . . . . . . . . . . . . . . 12
Claiming and releasing devices with HBA HostView . . . . . . . . . . . . . . . . . . . . . . . . . . . .13
Viewing the status of HBA ports with HBA HostView . . . . . . . . . . . . . . . . . . . . . . . . . . . .16
Using CEC from HBA HostView . . . . . . . . . . . . . . . . . . . . . . . . . . . . . . . . . . . . . . . . . . . .17
Viewing and capturing debug information with HBA HostView. . . . . . . . . . . . . . . . . . . .18
Copying the CorOS update file to an SRX appliance . . . . . . . . . . . . . . . . . . . . . . . . . . . . .19
Using Windows Disk Management with HBA HostView . . . . . . . . . . . . . . . . . . . . . . . . .19
Managing Storage from a Command Line Interface. . . . . . . . . . . . . . . . . . . . . . . . . . 23
Commands. . . . . . . . . . . . . . . . . . . . . . . . . . . . . . . . . . . . . . . . . . . . . . . . . . . . . . . . . . . .23
Frequently Asked Questions . . . . . . . . . . . . . . . . . . . . . . . . . . . . . . . . . . . . . . . . . . . . 27
Contacting Coraid Technical Support . . . . . . . . . . . . . . . . . . . . . . . . . . . . . . . . . . . . . 28
Technical support . . . . . . . . . . . . . . . . . . . . . . . . . . . . . . . . . . . . . . . . . . . . . . . . . . . . . .28
Safety Information . . . . . . . . . . . . . . . . . . . . . . . . . . . . . . . . . . . . . . . . . . . . . . . . . . . . .28
Lithium battery notice for service personnel . . . . . . . . . . . . . . . . . . . . . . . . . . . . . . . . . .28
Laser warning . . . . . . . . . . . . . . . . . . . . . . . . . . . . . . . . . . . . . . . . . . . . . . . . . . . . . . . . .28
Regulatory compliance . . . . . . . . . . . . . . . . . . . . . . . . . . . . . . . . . . . . . . . . . . . . . . . . . .29
Contents
Coraid EtherDrive HBA for Windows Server Administration Guide—Revision History 4
HBA Driver v7.0.1 ©2014 Coraid, Inc. All rights reserved.
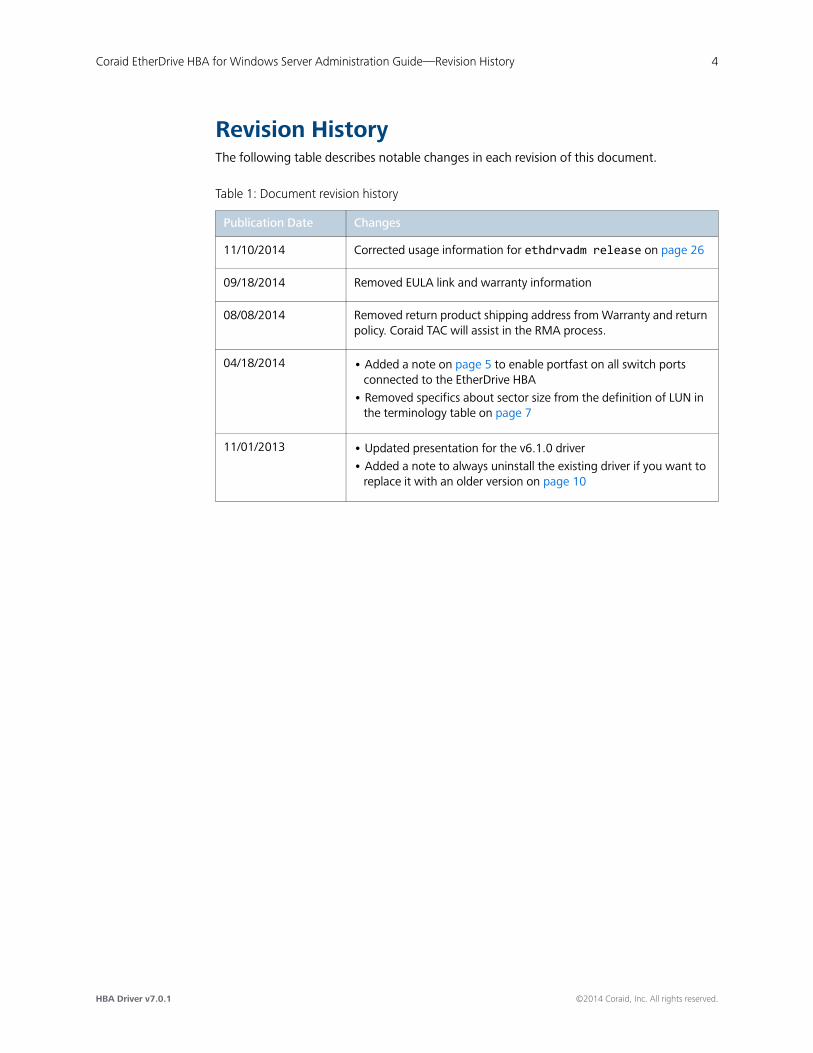
Revision HistoryThe following table describes notable changes in each revision of this document.
Table 1: Document revision history
Publication Date Changes
11/10/2014 Corrected usage information for ethdrvadm release on page 26
09/18/2014 Removed EULA link and warranty information
08/08/2014 Removed return product shipping address from Warranty and return policy. Coraid TAC will assist in the RMA process.
04/18/2014 • Added a note on page 5 to enable portfast on all switch ports connected to the EtherDrive HBA
• Removed specifics about sector size from the definition of LUN in the terminology table on page 7
11/01/2013 • Updated presentation for the v6.1.0 driver• Added a note to always uninstall the existing driver if you want to
replace it with an older version on page 10

Coraid EtherDrive HBA for Windows Server Administration Guide—Introduction 5
HBA Driver v7.0.1 ©2014 Coraid, Inc. All rights reserved.
IntroductionThank you for purchasing a Coraid® EtherDrive® Host Bus Adapter (HBA).
The EtherDrive HBA and HBA software driver deliver ATA-over-Ethernet (AoE) technology to your Microsoft® Windows® host for fast and affordable Ethernet SAN performance.
This guide explains how to install and configure your EtherDrive HBA to work inside a Windows host that is running any of the following operating systems:
• Microsoft Windows Server 2012 (standard and Server Core installations)
• Microsoft Windows Server 2008 R2 64-bit (standard and Server Core installations)
• Microsoft Windows Server 2008 32- and 64-bit
The Ethernet SAN is comprised of one or more LUNs providing shared storage. The EtherDrive HBA is installed in the Windows host and presents the LUN as a locally attached SCSI disk. The HBA driver and EtherDrive HBA translate disk requests to AoE requests and transmit the requests to the Ethernet SAN. As responses return from the Ethernet SAN, the reverse translation occurs in the HBA driver.
To use Coraid’s Ethernet SAN with your host, one or more Coraid EtherDrive HBAs must be installed. The EtherDrive HBA’s network ports are dedicated specifically for communication with Coraid Ethernet SAN appliances. At least one port from the EtherDrive HBA must be connected to the SAN where the Ethernet SAN is located.
CorOS™ updatesYou can copy a CorOS update file to an SRX storage appliance using the Coraid HBA HostView tool that is installed along with the EtherDrive HBA driver (see Copying the CorOS update file to an SRX appliance). The copied file must then be processed from the SRX console to update the CorOS (as described in the Coraid EtherDrive SRX Administration Guide).
Coraid Ethernet Console (CEC)The HBA HostView tool that is installed with the EtherDrive HBA driver includes the CEC (Coraid Ethernet Console) utility. CEC allows you to establish a console connection to SRX appliances from the host using standard Ethernet frames. Once the host is connected to the SAN through CEC, you can issue commands as though you are connected to the SRX console (see Using CEC from HBA HostView).
Note: Always enable portfast on all switch ports connected to the HBA for optimum reliability with the CEC connection. See the documentation from your switch manufacturer for more information about enabling portfast.

Coraid EtherDrive HBA for Windows Server Administration Guide—Installation Overview 6
HBA Driver v7.0.1 ©2014 Coraid, Inc. All rights reserved.
Installation OverviewTo install your Coraid EtherDrive HBA for Windows Server:
• Configure the Coraid Ethernet SAN. For instructions, see the Coraid EtherDrive SRX Administration Guide and the Coraid EtherDrive VSX Administration Guide.
• Install the EtherDrive HBA card as described in Installing an EtherDrive HBA Card or, if your HBA is a mezzanine card, see the separate Coraid EtherDrive HBA Addendum for your particular blade system (for example, Dell, HP, IBM).
• Determine the version of any previously installed EtherDrive HBA driver on your host. Depending on the version, you may have to uninstall it. For instructions, see To install the EtherDrive HBA driver and HBA HostView on your Windows host.
• Install the Coraid EtherDrive HBA driver and HBA HostView. For instructions, see Installing the EtherDrive HBA Driver & HBA HostView.
• Complete your storage configuration.
Requirements• In order to manage storage with the EtherDrive HBA, one or more SRX or VSX LUNs must
be present and online on the Ethernet SAN.
• The Coraid EtherDrive HBA should only be used in conjunction with Coraid Ethernet SAN appliances (SRX and VSX).
• The EtherDrive HBA requires an HBA driver. Install it as described in Installing the EtherDrive HBA Driver & HBA HostView.
• Make sure the host is running one of the following supported Windows operating systems:
– Microsoft Windows Server 2012 (standard and Server Core installations)
– Microsoft Windows Server 2008 R2 64-bit (standard and Server Core installations)
– Microsoft Windows Server 2008 32- and 64-bit
• Because the AoE protocol is not routable, the EtherDrive HBA and the EtherDrive SAN must be connected to the same network broadcast domain.
• EtherDrive HBA requires an available PCI Express (PCIe®) slot in the host or a mezzanine connector on a system board in the blade server. It does not support PCI-X.
• Always use high-quality cables appropriate for your installation.
• The EtherDrive HBA must be connected to a network switch that supports jumbo frames with an MTU (Maximum Transmission Unit) size of 9000 or greater. In addition, Coraid recommends a switch that supports flow control (IEEE 802.3).
Note: Isolate the SAN from other network traffic to ensure your SAN is dedicated exclusively for storage.

Coraid EtherDrive HBA for Windows Server Administration Guide—Terminology 7
HBA Driver v7.0.1 ©2014 Coraid, Inc. All rights reserved.
TerminologyThe information in this guide assumes familiarity with common data storage and networking concepts and familiarity with data center operations. Users unfamiliar with standard networking and storage terminology are encouraged to find definitions for unfamiliar terms using Web resources and reference documents.
This guide uses the following terms that might be unfamiliar to you or are specific to Coraid products.
Table 2: Terminology
Term Definition
AoE ATA-over-Ethernet protocol
AoE Target The shelf and LUN combination used to identify a block storage device on the Ethernet SAN
Host The computer accessing the storage over the Ethernet SAN
CorOS Operating system software that is embedded into—and distributed as an integral part of—the Coraid hardware storage solution
Coraid EtherCloud™ Storage Manager (ESM)
ESM provides live monitoring and management of EtherDrive appliances that use the AoE protocol, such as the SRX.
HBA (Host Bus Adapter)
An HBA connects a host computer to network storage. Coraid offers a range of HBAs with support for a variety of operating systems. For more information see www.coraid.com.
LUN (Logical Unit Number)
A grouping of uniquely numbered blocks of storage attached to a storage appliance by Ethernet SAN. Each LUN contains one RAID or JBOD. An SRX JBOD is a single-disk LUN.The terms “LUN,” “target,” “AoE Target,” “device,” and “disk” are used interchangeably in this document.
Windows standard installation option
Standard GUI-based Windows Server 2008 environment
Windows Server Core installation option
Windows Server 2008 installation option featuring a scaled-back Windows environment with no Windows Explorer shell. All configuration and maintenance is done through a command line interface. For instructions on using an EtherDrive HBA within a Server Core installation, see Managing Storage from a Command Line Interface.

Coraid EtherDrive HBA for Windows Server Administration Guide—Ethernet SAN Configuration 8
HBA Driver v7.0.1 ©2014 Coraid, Inc. All rights reserved.
Ethernet SAN ConfigurationBefore you can manage storage on the Ethernet SAN using your EtherDrive HBA, one or more SRX or VSX LUNs must already exist and be online on the SAN. For instructions, see the Coraid EtherDrive SRX Administration Guide and the Coraid EtherDrive VSX Administration Guide.
Note: RAID performance is suboptimal while a RAID on a LUN is initializing. For optimal performance, wait until RAIDs have finished initializing before using them.
Installing an EtherDrive HBA CardNote: This section applies only to a rack-mounted HBA card with physical SAN port connectors. It does not apply to an HBA card that connects directly to a mezzanine connector in a system board inside a blade server. If you are installing an HBA mezzanine card, see the separate Coraid EtherDrive HBA Addendum written specifically for your blade system.
To use Coraid’s Ethernet SAN with a Windows Server host, install one or more Coraid EtherDrive HBAs in the Windows host.
Seat the EtherDrive HBA(s) into an available PCIe slot with the host powered off. When the host is powered back on, each HBA port appears in Windows Device Manager as an unknown device.
After installing the EtherDrive HBA, install the EtherDrive HBA driver and HBA HostView software. For instructions, see Installing the EtherDrive HBA Driver & HBA HostView.
To install the EtherDrive HBA
NOTICE
Follow ESD (electrostatic discharge) and other safety precautions when handling the EtherDrive HBA. Static discharge can destroy the circuits etched in silicon microchips or dramatically shorten their life span. To protect the EtherDrive HBA from damage, observe standard ESD precautions.
1 Power off the host and disconnect the power cable.
2 Open the host chassis and locate an available PCIe slot.
3 Remove the slot cover (if any) by removing the screw or releasing the lever.
4 Seat the EtherDrive HBA firmly into the PCIe slot.
To access an available slot, you might need to remove and replace existing PCIe cards or other hardware.

Coraid EtherDrive HBA for Windows Server Administration Guide—Installing the EtherDrive HBA Driver & HBA HostView 9
HBA Driver v7.0.1 ©2014 Coraid, Inc. All rights reserved.
5 Attach the EtherDrive HBA retaining bracket using the existing screw or lever.
Note: Depending on whether you are using a full-height or half-height slot, you might need to change the retaining bracket on your EtherDrive HBA. Your EtherDrive HBA includes both a half-height and a full-height retaining bracket.
• (SFP+ EtherDrive HBA only) You must remove both transceivers before you can remove the retaining bracket.
• (CX4 EtherDrive HBA only) If you change the retaining bracket on your HBA, make sure you remove and replace the locking pin on each port carefully. Push on the pin one side at a time, alternating sides, until it comes loose or clicks back into place. The locking pin looks like this:
6 Close the host chassis, and then connect the power cable(s).
7 Connect cables from the HBA SAN ports to an Ethernet switch connected to the SAN. The switch must support jumbo frames with an MTU size of 9000 (see Requirements).
Each EtherDrive HBA provides two ports for communication with Coraid EtherDrive storage appliances. At least one port must be connected to the SAN network where the Ethernet SAN is located. You can also connect directly to the ports on the SRX appliance.
8 Power on the host.
9 Perform the procedure Installing the EtherDrive HBA Driver & HBA HostView.
Installing the EtherDrive HBA Driver & HBA HostView After you install the EtherDrive HBA in the host, install the appropriate EtherDrive HBA driver and HBA HostView software (32-bit or 64-bit). The host will not recognize the EtherDrive HBA until the HBA driver software is installed. In these instructions, the version and release numbers in the file names are replaced by xxx. When you install the driver, substitute the actual name of the package you downloaded.
The EtherDrive HBA translates disk commands to and from AoE commands. The translation is transparent to the Windows host.
To install the EtherDrive HBA driver and HBA HostView on your Windows host
1 Download the latest Windows EtherDrive HBA driver installer package (32-bit or 64-bit) from:
http://www.coraid.com/support
2 Uninstall any existing EtherDrive HBA driver, if necessary.
If an EtherDrive HBA driver is already installed on the Windows host, you may have to uninstall it, depending on the version. To determine the version of the installed driver:
• Launch HBA HostView.

Coraid EtherDrive HBA for Windows Server Administration Guide—Installing the EtherDrive HBA Driver & HBA HostView 10
HBA Driver v7.0.1 ©2014 Coraid, Inc. All rights reserved.
• Click Help > About.
– If the driver is v5.0.0 or later, do not uninstall it manually. Skip to step 4.
– If the driver is earlier than v5.0.0, you must uninstall it manually as described in step 3.
Note: Always uninstall the existing driver if you want to replace the driver with an older version. Installing older drivers without uninstalling the existing driver is not supported.
3 To uninstall a pre-v5.0.0 EtherDrive HBA driver, do the following:
NOTICE
This step is intended to ensure that no data is lost and that the Windows host does not crash when you uninstall a pre-v5.0.0 driver.
• Quiesce the applications running on the LUN(s) claimed by the Windows host.
• Flush cached data to disk using a utility such as Sync (available from Windows Sysinternals. Administrator privileges are required).
• Use the uninstall utility in Windows Control Panel to uninstall the Coraid EtherDrive HBA driver and HBA HostView tool.
4 Launch the driver installer package using the appropriate method:
• Microsoft Windows Server 2012 or 2008, standard installation:
– Double-click etherdrive‐hba‐windows‐x.x.x‐Rx‐xxbit.msi
• Microsoft Windows Server 2008, Server Core installation:
– Log on to the host as Administrator.
– From the command line, change directories to the location of the installer package and type msiexec /i <yourpath>\etherdrive‐hba‐windows‐x.x.x‐x1‐xxbit.msi
– Type the password when prompted.
5 Click Next in the Setup Wizard screen.
Coraid EtherDrive HBA for Windows Server Administration Guide—Installing the EtherDrive HBA Driver & HBA HostView 11
HBA Driver v7.0.1 ©2014 Coraid, Inc. All rights reserved.
6 Review and accept the license agreement, then click Next.
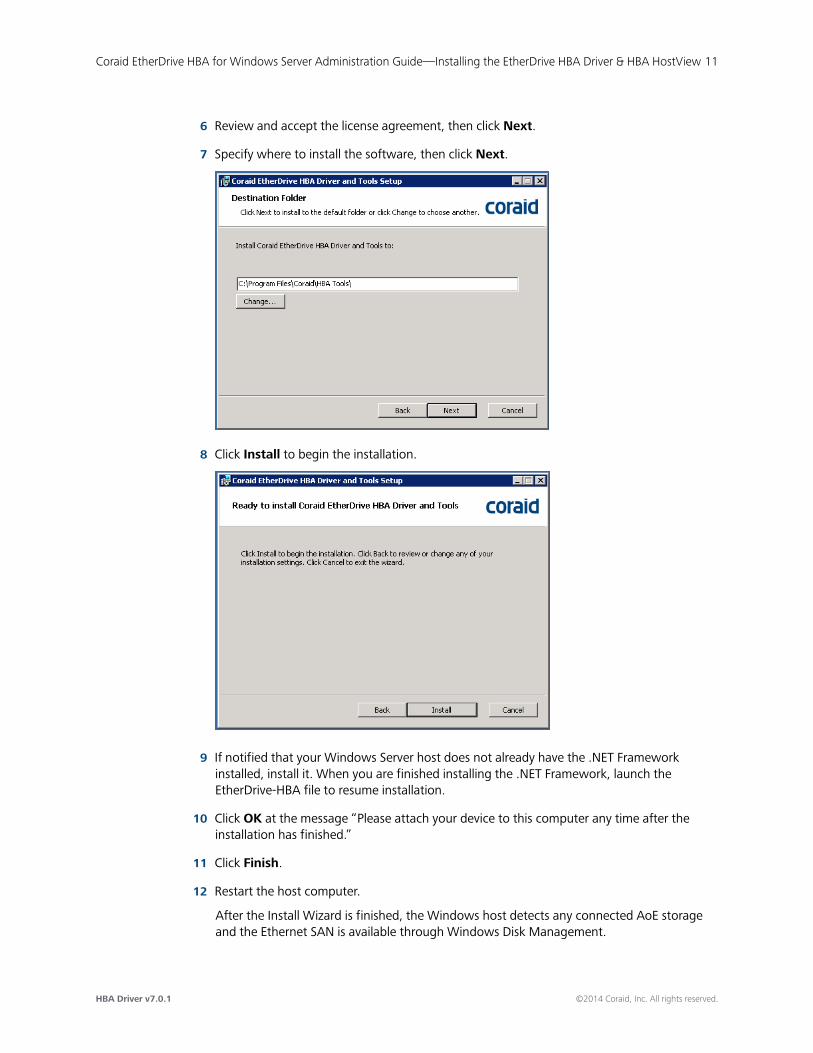
7 Specify where to install the software, then click Next.
8 Click Install to begin the installation.
9 If notified that your Windows Server host does not already have the .NET Framework installed, install it. When you are finished installing the .NET Framework, launch the EtherDrive-HBA file to resume installation.
10 Click OK at the message “Please attach your device to this computer any time after the installation has finished.”
11 Click Finish.
12 Restart the host computer.
After the Install Wizard is finished, the Windows host detects any connected AoE storage and the Ethernet SAN is available through Windows Disk Management.

Coraid EtherDrive HBA for Windows Server Administration Guide—Managing Storage from HBA HostView 12
HBA Driver v7.0.1 ©2014 Coraid, Inc. All rights reserved.
Managing Storage from HBA HostViewNote: HBA HostView is not supported in the Windows Server Core installation environment. To manage storage on your SAN from a command line interface (CLI) in either the standard Windows Server 2008 installation environment or the Windows Server 2008 Server Core installation environment, see Managing Storage from a Command Line Interface.
HBA HostView allows you to:
• Claim and release LUNs (see Claiming and releasing devices with HBA HostView).
• View the status of HBA ports (see Viewing the status of HBA ports with HBA HostView).
• Establish a console connection to SRX appliances through the CEC (Coraid Ethernet Console) utility (see Using CEC from HBA HostView).
• Gather debug information useful for working with Coraid Technical Support to resolve any issues (see Viewing and capturing debug information with HBA HostView).
• Copy a CorOS update file to an SRX appliance. After you have copied the file to the SRX, you can process it from the SRX console to update the CorOS (see Copying the CorOS update file to an SRX appliance).
• Access and use Windows Server Disk Management (see Using Windows Disk Management with HBA HostView).
To start HBA HostView
From the Windows Start menu, choose HBA HostView.
The appearance of the Start menu varies depending on the version of Windows you are using and the number of applications installed on your Windows host. If you do not see HBA HostView on the Start menu, navigate to All Programs > Coraid > HBA HostView.
The HBA HostView screen appears with the Devices tab displayed.
Note: If you do not see the LUN(s) you expect to see in the Devices tab, perform the actions detailed in Frequently Asked Questions.

Coraid EtherDrive HBA for Windows Server Administration Guide—Managing Storage from HBA HostView 13
HBA Driver v7.0.1 ©2014 Coraid, Inc. All rights reserved.
The Devices tab allows you to see and use available LUNs on your storage devices. The Devices tab also displays the mapping of LUNs-to-SCSI devices, the size of each device, and the HBA port through which each device is connected.
Note: LUN sizes are displayed in the Devices tab in base 10 (consistent with the practice of hard drive manufacturers and storage vendors). Windows Server Disk Management reports disk sizes in base 2. As a result, the capacity displayed in the Device Size column of HBA HostView may differ from the capacity displayed in Windows Server Disk Management, but the actual capacity of the device is the same.
Claiming and releasing devices with HBA HostViewBefore you can use an AoE target (LUN) with your Windows host, you must claim it with HBA HostView. When viewed from HBA HostView running on your host, LUNs claimed by your host appear in the Devices tab with a SCSI ID.
Note: In a non-clustering environment, a claimed LUN can only be used by the host that claimed it. In a clustering environment, a claimed LUN can be used by more than one host (see To claim an already-claimed LUN in a Windows clustering environment).
To claim a LUN (AoE Target)
1 Click the Devices tab.
2 Click Refresh to update the Devices tab.
Refresh clears LUNs that have been removed and/or placed offline. For best results, wait a few minutes after removing or offlining a LUN before clicking Refresh.
3 Select the LUN (AoE Target) you want to claim.
Shift-click or Control-click to select multiple LUNs.
4 Click the Claim button.
5 If an initialization wizard launches, follow the on-screen prompts.
For detailed instructions, see your Microsoft Windows Help documentation.

Coraid EtherDrive HBA for Windows Server Administration Guide—Managing Storage from HBA HostView 14
HBA Driver v7.0.1 ©2014 Coraid, Inc. All rights reserved.
To claim an already-claimed LUN in a Windows clustering environment
The Ethernet SAN and EtherDrive HBA support Windows Clustering technology (persistent reserve/release) which allows multiple hosts to share a single storage resource.
1 Click the Devices tab.
2 Select the claimed LUN you want to share.
3 Click the Claim button.
Note: You cannot Shift-click or Control-click to select and claim multiple claimed LUNs simultaneously.
To release a claim on a LUN held by the current host
1 In HBA HostView, click the Devices tab.
2 Click to select the LUN (AoE Target) you want to release.
Shift-click or control-click to select multiple LUNs.
3 Click the Release button.

Coraid EtherDrive HBA for Windows Server Administration Guide—Managing Storage from HBA HostView 15
HBA Driver v7.0.1 ©2014 Coraid, Inc. All rights reserved.
To release a claim on a LUN held by another host
1 Click the Devices tab.
2 Click to select the LUN (AoE Target) you want to release.
Shift-click or Control-click to select multiple LUNs.
3 Click the Force Release button.
NOTICE
Use Force Release with caution as it may cause data loss or corruption.
4 Click Yes in the warning message to verify that you want to release the device.

Coraid EtherDrive HBA for Windows Server Administration Guide—Managing Storage from HBA HostView 16
HBA Driver v7.0.1 ©2014 Coraid, Inc. All rights reserved.
Viewing the status of HBA ports with HBA HostViewThe HBA Ports tab provides information about your ports.
To view the status of HBA ports
1 Click the HBA Ports tab.
For each port, the HBA Ports tab lists the port number, port type, MAC address, and current routing performance.
Examples
The Link State (Actual/Max) displays the current and maximum link speed for each port.
Note: If the speed displayed is 0, the Ethernet cable may be missing, disconnected, or faulty, or the port may be down.
2 Click Refresh to update the port information.
Table 3: Example port descriptions in HBA Ports tab
Port Type Bus Interface
EHBA-2-E-RJ45 1GbE PCIe RJ45
EHBA-20-E-RJ45 10GbE PCIe RJ45
EHBA-20-E-CX4 10GbE PCIe CX4
EHBA-20-E-SFP 10GbE PCIe SFP+

Coraid EtherDrive HBA for Windows Server Administration Guide—Managing Storage from HBA HostView 17
HBA Driver v7.0.1 ©2014 Coraid, Inc. All rights reserved.
Using CEC from HBA HostViewYou can launch the CEC (Coraid Ethernet Console) utility from HBA HostView and establish a console connection to an SRX appliance. You can then issue commands from the host to the SRX appliance as though you are connected directly to the SRX console. SRX commands are detailed in the Coraid EtherDrive SRX Administration Guide.
By factory default, SRX appliances provide the CEC connection through onboard RJ45 ports ether0 and ether1. You can display and manage the SRX CEC port configuration by issuing the commands cecon and cecoff. CEC configuration persists across reboot.
NOTICE
CEC does not include any security or encryption mechanisms. Also, depending on your network configuration, be aware that enabling CEC and failing to log off might leave your system insecure. As with AoE, the appliance is only as secure as your network.
To access CEC from HBA HostView
1 Click the Action menu and choose CEC Console.
2 In the Select Shelf box, click Refresh to update the list of SRX appliances.
3 Select a shelf and then click Open.
Press Enter a few times until the prompt displays.

Coraid EtherDrive HBA for Windows Server Administration Guide—Managing Storage from HBA HostView 18
HBA Driver v7.0.1 ©2014 Coraid, Inc. All rights reserved.
4 To exit the CEC terminal, click the X in the upper right-hand corner of the window.
Viewing and capturing debug information with HBA HostViewThe Debug tab displays debug information you can use or share with the Coraid Technical Assistance Center (TAC).
To view and capture debug information
1 Click the Debug tab.
2 Click the Refresh button to display the most current information.
3 Click the Copy to Clipboard button to copy the complete contents of the Debug tab to your clipboard.
4 Paste the debug information into an email message to Coraid TAC ([email protected]).

Coraid EtherDrive HBA for Windows Server Administration Guide—Managing Storage from HBA HostView 19
HBA Driver v7.0.1 ©2014 Coraid, Inc. All rights reserved.
Copying the CorOS update file to an SRX applianceCorOS (Coraid Operating System) is an integral part of the Coraid hardware storage solution. Coraid recommends using the latest CorOS version on all Coraid Ethernet SAN appliances.
HBA HostView allows you to copy a CorOS update file to a pre-existing update LUN on an SRX appliance. After the update file is staged to the update LUN, it must be processed from the SRX console in order to update the CorOS on the appliance. For instructions, see the Coraid EtherDrive SRX CorOS Update Instructions.
NOTICE
Before updating the CorOS, you should restrict access to the storage appliance or quiesce the application(s) interacting with the appliance. To ensure that the update is completed without data loss, no writes should be performed to the appliance during the update.
Using Windows Disk Management with HBA HostViewWindows Disk Management allows you to view information (drive letter, label, size, type, and file system) about the volumes attached to your host. You can evaluate the information about the disk size and location to determine which disk shown in Windows Disk Management corresponds to an AoE LUN in HBA HostView.
After you have determined which disk corresponds to an AoE LUN, you can use Windows Disk Management to add descriptive text to the EtherDrive HBA volumes attached to your host. For instructions, see To add descriptive text to an EtherDrive HBA volume.
For information about managing storage with Windows Disk Management, see the Windows Disk Management online help.
Note: In Windows Server 2008 and 2012, shared storage is offline in the Disk Manager by default in order to prevent hosts from accessing storage that could be in use by another host. To change the status of a disk to Online or Offline, right-click the disk name and select the appropriate action.

Coraid EtherDrive HBA for Windows Server Administration Guide—Managing Storage from HBA HostView 20
HBA Driver v7.0.1 ©2014 Coraid, Inc. All rights reserved.
To view disk information in Windows Disk Management
1 From the Action menu of HBA HostView, choose Windows Disk Management.
2 In the lower portion of the Disk Management window, right-click the icon next to the Coraid Volume, and then choose Properties.

Coraid EtherDrive HBA for Windows Server Administration Guide—Managing Storage from HBA HostView 21
HBA Driver v7.0.1 ©2014 Coraid, Inc. All rights reserved.
3 In the General tab, match the Location information to the SCSI ID shown in the Devices tab of HBA HostView.

Coraid EtherDrive HBA for Windows Server Administration Guide—Managing Storage from HBA HostView 22
HBA Driver v7.0.1 ©2014 Coraid, Inc. All rights reserved.
To add descriptive text to an EtherDrive HBA volume
Consider adding the shelf.lun address of the Coraid-configured volume to the volume label (see step 3 below). The volume label is visible in Windows Explorer and other places where disks are listed. Adding the shelf.lun address to a volume label makes it easy to see that a particular LUN displayed in Windows Disk Management is the same as a particular LUN displayed in HBA HostView.
1 From the Action menu of HBA HostView, choose Windows Disk Management.
2 In the upper portion of the Disk Management window, right-click the Coraid Volume, and then choose Properties.
3 Add descriptive text to the volume label and click Apply.
4 When you have finished, click OK.
7.5 (shelf.lun) added to the volume label

Coraid EtherDrive HBA for Windows Server Administration Guide—Managing Storage from a Command Line Interface 23
HBA Driver v7.0.1 ©2014 Coraid, Inc. All rights reserved.
Managing Storage from a Command Line InterfaceThis section describes the commands provided by the ethdrvadm command line interface utility bundled with the EtherDrive HBA driver. The ethdrvadm utility works with standard and Server Core Windows installations, and is mandatory in Server Core installations.
Note: For details about the GUI-based HBA HostView tool that supports standard Microsoft Windows Server 2008 and 2012 installations, see Managing Storage from HBA HostView.
Before you can use the ethdrvadm utility to manage storage on the SAN, the following conditions must be met:
• The EtherDrive Storage appliance(s) is configured with at least one LUN.
• An EtherDrive HBA card(s) is installed in the host.
• The EtherDrive HBA is connected to a supported Ethernet switch or directly to an SRX appliance.
• The current EtherDrive HBA driver is installed on the Windows host and the host has been rebooted, if necessary. For more information, see To install the EtherDrive HBA driver and HBA HostView on your Windows host).
CommandsThe ethdrvadm utility provides the following commands:
• ethdrvadm list
• ethdrvadm list‐devices
• ethdrvadm list‐ports
• ethdrvadm claim
• ethdrvadm release
• ethdrvadm flush
• ethdrvadm sos
Command usage includes the following conventions:
• [/a]—Displays more detailed information.
• [/?]— Displays usage information.
• shelf.lun— Use with claim and release to specify the particular LUN.
• [/force]— If necessary, append /force to ethdrvadm release to force the EtherDrive HBA to release a LUN.
NOTICE
Data loss may result! The /force argument forces the host to release the LUN without first flushing cached data to disk.

Coraid EtherDrive HBA for Windows Server Administration Guide—Managing Storage from a Command Line Interface 24
HBA Driver v7.0.1 ©2014 Coraid, Inc. All rights reserved.
ethdrvadm listThe ethdrvadm list command displays information about all the LUNs on the SAN that are visible to the EtherDrive HBA.
Usage
ethdrvadm list [/a] [?]
Example
ethdrvadm list DEVICE TARGET SIZE PORTS CLAIMING HOST0:0:0 7.5 1000.204GB 0 Windows Host0:0:1 7.6 900.165GB 0 Windows Host‐ 20.5 900.165GB 0 GRAY‐ 20.6 900.165GB 0 ‐ 20.7 900.165GB 0 ‐ 20.8 900.165GB 0
Appending /a displays more detailed information.
Exampleethdrvadm list /aDEVICE TARGET SIZE/ PORTS/ CLAIMING HOST
PORT ADDRESS0:0:0 7.5 1000.204GB 0 Windows Host
0 00304800000a0:0:1 7.6 900.165GB 0 Windows Host
0 00304800000a‐ 20.5 900.165GB 0 GRAY
0 00259008a811‐ 20.6 900.165GB 0
0 00259008a811‐ 20.7 900.165GB 0
0 00259008a811‐ 20.8 900.165GB 0
0 00259008a811

Coraid EtherDrive HBA for Windows Server Administration Guide—Managing Storage from a Command Line Interface 25
HBA Driver v7.0.1 ©2014 Coraid, Inc. All rights reserved.
ethdrvadm list‐devicesThe ethdrvadm list‐devices command displays information about the LUNs claimed by the EtherDrive HBA installed in your Windows host.
Usage
ethdrvadm list‐devices [/a] [?]
Exampleethdrvadm list‐devices DEVICE TARGET SIZE PORT 0:0:0 7.5 1000.204GB 0 0:0:1 7.6 900.165GB 0
Appending /a displays more detailed information.
Exampleethdrvadm list‐devices /a DEVICE TARGET/ SIZE/ PORT
PORT ADDRESS0:0:0 7.5 1000.204GB 0
0 00304800000a 0:0:1 7.6 900.165GB 0
0 00304800000a
ethdrvadm list‐portsThe ethdrvadm list‐ports command displays information about attached ports.
Usage
ethdrvadm list‐ports [?]
Exampleethdrvadm list‐ports PORT MODEL ADDRESS SPEED 0 EHBA‐20‐E‐RJ45 0010040102e3 10000/10000 1 EHBA‐20‐E‐RJ45 0010040102e2 10000/10000
The SPEED column displays the current and maximum link speed (in that order) for each port. If the displayed speed is 0, the Ethernet cable may be missing, disconnected, or faulty, or the port may be down.
ethdrvadm claimIssue ethdrvadm claim to claim a LUN.
Usage
ethdrvadm claim shelf.lun

Coraid EtherDrive HBA for Windows Server Administration Guide—Managing Storage from a Command Line Interface 26
HBA Driver v7.0.1 ©2014 Coraid, Inc. All rights reserved.
Exampleethdrvadm claim 7.5Claim operation succeeded
ethdrvadm releaseThe ethdrvadm release command releases the EtherDrive HBA’s claim to the specified LUN. A successful release operation unmounts the disk, flushes uncached data to disk, and then releases the LUN.
Usage
ethdrvadm release [/force] shelf.lun
Examplesethdrvadm release 7.5Release operation succeeded
ethdrvadm release /force 7.5
Force release request sent
Appending /force forces the EtherDrive HBA to release the LUN.
NOTICE
Data loss may result! The /force argument forces the host to release the LUN without first flushing cached data to disk.
ethdrvadm flushThe ethdrvadm flush command refreshes the output of the ethdrvadm list and ethdrvadm list‐devices commands to remove targets that are no longer present on the SAN.
ethdrvadm sosThe ethdrvadm sos command displays diagnostic information that you can send to the Coraid TAC. For the quickest solution to your problem, include the ethdrvadm sos output with your initial email to TAC.
Note: The ethdrvadm sos command only displays information regarding configuration and status of this Windows host. It does not include any information about the data stored on the SAN.

Coraid EtherDrive HBA for Windows Server Administration Guide—Frequently Asked Questions 27
HBA Driver v7.0.1 ©2014 Coraid, Inc. All rights reserved.
Frequently Asked Questions
Question: The Coraid EtherDrive HBA looks like a standard Network Interface Card (NIC). Can I use the Coraid EtherDrive HBA for IP traffic?
Answer: No. The Coraid EtherDrive HBA is a dedicated storage device. Dedication allows the EtherDrive HBA to process storage commands at an exceptionally fast rate.
Question: What do I have to configure to use Multipath?
Answer: Nothing! The Coraid EtherDrive HBA driver automatically handles Multipath for all of the available EtherDrive HBA ports. Even if a single host has two EtherDrive HBA cards, the EtherDrive HBA driver automatically uses the ports on both devices.
Question: I understand that I need a Coraid EtherDrive HBA for my host in order to utilize my Ethernet SAN appliances. Do I also need an EtherDrive HBA for each of my Ethernet SAN appliances?
Answer: No. Only one Coraid EtherDrive HBA is required for each host. One EtherDrive HBA can communicate with any Ethernet SAN appliance running a compatible version of the CorOS. You can add additional EtherDrive HBAs to your host if you have unusual security or bandwidth requirements or if your storage exceeds the limitations of your operating system.
Question: Why don’t I see the LUN(s) that I expect to see when I launch HBA HostView?
Answer: If the LUNs you expect to see do not appear in the Devices tab of HBA HostView, do the following:
• Make sure that one or more SRX LUNs are present and online on the Ethernet SAN.
• Make sure you have clicked the Refresh button in HBA HostView, or issued the ethdrvadm flush command from a command line interface.
• Make sure that hibernation mode is disabled on the Windows host.
• Make sure the CorOS running on your Ethernet SAN appliances is compatible with the version of the EtherDrive HBA driver installed in your host.
• Make sure that all cables are routed correctly throughout the SAN and only Cat 6 cables are used for AoE traffic.
• Make sure the switch (if any) to which your host is connected meets the following requirements:
– supports jumbo frames with an MTU (Maximum Transmission Unit) size of 9000 or greater.
– is configured to operate at the proper link speed.
– supports flow control (IEEE 802.3) support (recommended).
• Make sure the Coraid EtherDrive HBA card is correctly seated in the host.

Coraid EtherDrive HBA for Windows Server Administration Guide—Contacting Coraid Technical Support 28
HBA Driver v7.0.1 ©2014 Coraid, Inc. All rights reserved.
Contacting Coraid Technical Support
Technical supportDo you have more questions? See the Coraid Support web site:
http://www.coraid.com/support/
Contact the Coraid Technical Assistance Center at:
To help the Technical Assistance Center diagnose your problem, send diagnostic output along with a description of your problem. To obtain diagnostic output, issue any available sos commands.
Safety InformationWARNING: Read the installation instructions before connecting the system to the power source.
ATTENTION: Avant de brancher le système sur la source d’alimentation, consulter les directives d’installation.
WARNUNG: Vor dem Anschließen des Systems an die Stromquelle die Installationsanweisungen lesen.
Lithium battery notice for service personnelThis product contains a lithium battery. Although the battery is not field-serviceable, observe the following warning:
CAUTION
Danger of explosion if battery is replaced with incorrect type. Replace only with the same type recommended by the manufacturer. Dispose of used batteries according to the manufacturer's instructions.
ATTENTION: II y a danger d'explosion s'il a remplacement incorrect de la batterie. Remplacer uniquement avec une batterie du meme type ou d'un type equivalent recommande par le constructeur. Mettre au rebut les batteries usagees conformement aux instructions du fabricant.
WARNUNG: Bei Einsetzen einer falschen Batterie besteht Explosionsgefahr. Ersetzen Sie die Batterie nur durch den gleichen oder vom Hersteller empfohlenen Batterietyp. Entsorgen Sie die benutzten Batterien nach den Anweisungen des Herstellers.
Laser warning
CAUTION
Class 1 Laser product.
ATTENTION: Produit laser de classe 1
WARNUNG: Laserprodukt der Klasse 1
EtherDrive equipment is intended for installation in restricted access areas.

Coraid EtherDrive HBA for Windows Server Administration Guide—Contacting Coraid Technical Support 29
HBA Driver v7.0.1 ©2014 Coraid, Inc. All rights reserved.
Regulatory compliance
United States FCC statement
This device complies with Part 15 of the FCC Rules. Operation is subject to the following two conditions: (1) This device may not cause harmful interference, and (2) this device must accept any interference received, including interference that may cause undesired operation.
Canada compliance statement (Industry Canada)
This Class [A] digital apparatus meets all requirements of the Canadian Interference-Causing Equipment Regulations.
Cet appareil numérique de la classe [A] respecte toutes les exigences du Réglement sur le matériel brouilleur du Canada.
European Union (CE) Statement
This product is in conformity with the essential requirements of the following EU directives:
• 2004/108/EC — Electromagnetic Compatibility Directive (EMC)
• 2006/95/EC — Low Voltage Directive (LVD)