Copyright©Baseball Excellence Practice Planner.pdf · A capable coaching staff is essential to the...
56
Practice Planner 1 Copyright©Baseball Excellence www.baseball-excellence.com Photos from the Baseball Excellence video “The Complete Baseball Practice” Clip art from arttody.com
Transcript of Copyright©Baseball Excellence Practice Planner.pdf · A capable coaching staff is essential to the...
Practice Planner 1
Copyright©Baseball Excellence www.baseball-excellence.com
Photos from the Baseball Excellence video
“The Complete Baseball Practice”
Clip art from arttody.com
Practice Planner 2
Copyright©Baseball Excellence www.baseball-excellence.com
TABLE OF CONTENTS
Forward 3
How to use this Planner 4
Stretch, Form Run and Throw 5
Sample Practice Schedule 6
Why Not Situational Defensive Practice? 10
Catch and Throw 11
Pitching 15
Pitchers Fielding Practice 18
Standard Defensive Positioning 19
Defensive Drills 21
Catching 29
Offense 33
Batting Practice 34
Situational Batting Practice Drill 38
Base Running 42
Miscellaneous Youth Drills 44
Bunting for Baseball Cards 45
Evaluate Your Team 47
Holding a Tryout 48
Summary 51
Skills Checklist 52

Practice Planner 3
Copyright©Baseball Excellence www.baseball-excellence.com
FORWARD
Whether you are a youth or advanced coach, your ultimate goal should be to help as
many kids as possible enjoy the game and give them the necessary skills to advance to
the next level. This requires effort and a commitment on your part.
Drills. There may be hundreds of them. Everybody has a favorite drill or two. But the
repetitions of drills are not a panacea. Skills have to be taught and reinforced. Just
executing a drill for the sake of the drill is not the answer. In other words; throwing long
toss everyday will not help a player who has an arm action fault. He will just keep
throwing with that same flaw and will not improve. It is up to the coach to attempt to help
him. That is the intent of this Planner; to show you a way to accomplish this.
How much time do you have for baseball practice? Because we all have demands on
our time it would be helpful to incorporate as many skills as possible in every drill we
teach. That is why we choose the drills in this Planner. They are team drills that integrate
multiple skills.
We have added some fun drills for youth players but consider that all drills should be
challenging and interesting. You make the transition from players doing drills to skillful
players by teaching. That means recognizing when they perform a skill incorrectly and
helping them improve.
If you will use all the drills in the Practice Planner and teach as you go, you will be
amazed at how much your kids improve. We know this works because we use them with
success and much of this has been adapted from professional techniques.
So choose your drills carefully. Practice has an enemy. The enemy is time.

Practice Planner 4
Copyright©Baseball Excellence www.baseball-excellence.com
HOW TO USE THIS PLANNER
The purpose of the Baseball Excellence Coaches Planner is to provide coaches with drills tips and
checkpoints that will help them teach and reinforce the skills necessary to play baseball. Each drill includes as
many of the essential skills as possible. They are intended to be fast-paced and fun for the players. The use of
‘stations’ is highly recommended to make the best use of allowed practice time and keep everyone occupied
and learning. This planner will not only prepare players to play the game but will help give them the skills
necessary to advance.
Particular emphasis is placed on catching and throwing the baseball. These basic skills are an integral part
of the game and are too often left to chance and/or under coached. Baseball coaches should give the
teaching of these skills high priority.
An everyday practice would look like this:
1. Warm-up, stretching, form running and throwing short to long toss. (Never skip this step)
2. Defensive skill work.
3. Batting practice.
4. Base running and/or conditioning drills.
5. Short talk.
The usual baseball practice should be preferably two hours. 50-60% of a practice should be spent on
hitting. Hitting should be a part of every practice. Many other skills can also be drilled during a typical BP,
for instance-bullpens and infield fungoes. Infielders should take ground balls every day.
The format of this Planner is for 2-weeks of pre-season practices. The coach then has the freedom to use
what drills he feels are necessary for the progress of his team. During the season the mistakes and
weaknesses encountered in games will tell the coach what needs to be practiced and reinforced.
Use the first few days of practice to evaluate and place your players. Use infield and outfield fungoes to
help determine where you will position them.
A capable coaching staff is essential to the success of a baseball team. The head coach should have at least
2 assistants. Defensive and offensive stations require the help of these additional coaches. A coach should
have his practice outlined for each day. Before each practice he should discuss with his coaches what he
wants to accomplish and what he wants them to do.
TIPS:
• Allow water breaks between stations. Individual breaks take too much time.
• On a baseball field and during practice, everyone should hustle. Players jog everywhere they go-no
walking. This is a “never give in” situation.
• All players should participate in picking up baseballs, equipment, setting up the field, etc.
• Coaches and players should be at the field and ready to go 10-15 minutes before practice.
• Plan practices ahead so there is no hesitation about what to do.
• One hour is not enough time for baseball practice. To think that a coach can make real progress with
his team in 60 minutes is unrealistic. However, some teams may have limited use of a field. If for
instance the time is limited to 1 hour, have the players at the facility at least 1/2-hour ahead of time
and get the stretch run, and throw routine accomplished off to the side. The time can also be used for
specialty drills such as rundowns. Skull and teaching sessions can also be included.
• A team ultimately plays exactly the way they practice. If you expect 100% effort in games you should
get 100% in practices. Intensity should be kept at game speed throughout practice. There is no magic
light switch to turn off and on. This is difficult to do but if the coach requires undivided attention to the
details, those ‘little things’ he will develop quality players.
• Try to make practice fun and challenging at the same time. Use positive reinforcement.
• Because of the time factor, practices should be conducted with a sense of urgency. Spend the first few
practices teaching your players how practices are going to be organized and what is expected of them.
Early in the season this will have to be constantly reinforced. After a while it then becomes routine.
• Spend time before or after practices with an individual that needs help in a certain area. A lot of
teaching can be accomplished in a short time with one-on-one instruction. Coach Grant always says
that this is where the real teaching gets done.
• It is important to work on defensive drills immediately after the stretch, run and throw routine. The
arms are still hot and fresh and the players’ concentration level is higher. BP will be the ‘carrot that
will help them get through defensive work at a higher intensity.
Practice Planner 5
Copyright©Baseball Excellence www.baseball-excellence.com
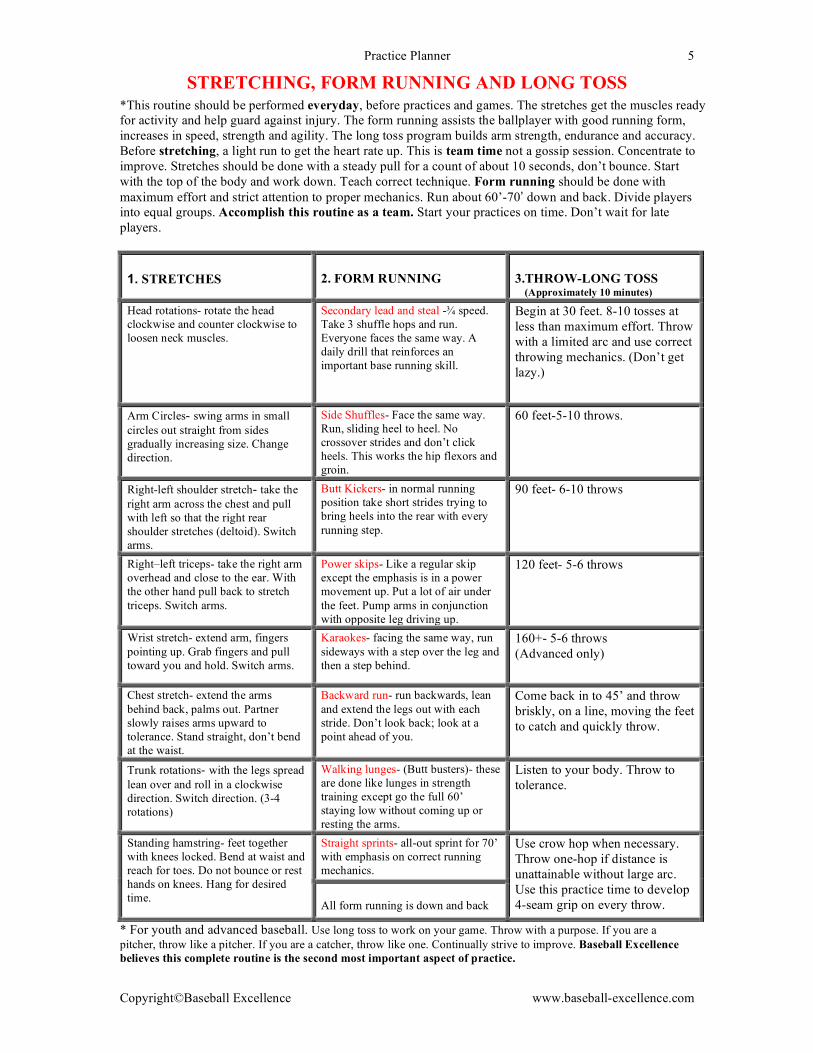
STRETCHING, FORM RUNNING AND LONG TOSS
*This routine should be performed everyday, before practices and games. The stretches get the muscles ready
for activity and help guard against injury. The form running assists the ballplayer with good running form,
increases in speed, strength and agility. The long toss program builds arm strength, endurance and accuracy.
Before stretching, a light run to get the heart rate up. This is team time not a gossip session. Concentrate to
improve. Stretches should be done with a steady pull for a count of about 10 seconds, don’t bounce. Start
with the top of the body and work down. Teach correct technique. Form running should be done with
maximum effort and strict attention to proper mechanics. Run about 60’-70’ down and back. Divide players
into equal groups. Accomplish this routine as a team. Start your practices on time. Don’t wait for late
players.
1. STRETCHES
2. FORM RUNNING
3.THROW-LONG TOSS (Approximately 10 minutes)
Head rotations- rotate the head
clockwise and counter clockwise to
loosen neck muscles.
Secondary lead and steal -! speed.
Take 3 shuffle hops and run.
Everyone faces the same way. A
daily drill that reinforces an
important base running skill.
Begin at 30 feet. 8-10 tosses at
less than maximum effort. Throw
with a limited arc and use correct
throwing mechanics. (Don’t get
lazy.)
Arm Circles- swing arms in small
circles out straight from sides
gradually increasing size. Change
direction.
Side Shuffles- Face the same way.
Run, sliding heel to heel. No
crossover strides and don’t click
heels. This works the hip flexors and
groin.
60 feet-5-10 throws.
Right-left shoulder stretch- take the
right arm across the chest and pull
with left so that the right rear
shoulder stretches (deltoid). Switch
arms.
Butt Kickers- in normal running
position take short strides trying to
bring heels into the rear with every
running step.
90 feet- 6-10 throws
Right–left triceps- take the right arm
overhead and close to the ear. With
the other hand pull back to stretch
triceps. Switch arms.
Power skips- Like a regular skip
except the emphasis is in a power
movement up. Put a lot of air under
the feet. Pump arms in conjunction
with opposite leg driving up.
120 feet- 5-6 throws
Wrist stretch- extend arm, fingers
pointing up. Grab fingers and pull
toward you and hold. Switch arms.
Karaokes- facing the same way, run
sideways with a step over the leg and
then a step behind.
160+- 5-6 throws
(Advanced only)
Chest stretch- extend the arms
behind back, palms out. Partner
slowly raises arms upward to
tolerance. Stand straight, don’t bend
at the waist.
Backward run- run backwards, lean
and extend the legs out with each
stride. Don’t look back; look at a
point ahead of you.
Come back in to 45’ and throw
briskly, on a line, moving the feet
to catch and quickly throw.
Trunk rotations- with the legs spread
lean over and roll in a clockwise
direction. Switch direction. (3-4
rotations)
Walking lunges- (Butt busters)- these
are done like lunges in strength
training except go the full 60’
staying low without coming up or
resting the arms.
Listen to your body. Throw to
tolerance.
Straight sprints- all-out sprint for 70’
with emphasis on correct running
mechanics.
Standing hamstring- feet together
with knees locked. Bend at waist and
reach for toes. Do not bounce or rest
hands on knees. Hang for desired
time.
All form running is down and back
Use crow hop when necessary.
Throw one-hop if distance is
unattainable without large arc.
Use this practice time to develop
4-seam grip on every throw.
* For youth and advanced baseball. Use long toss to work on your game. Throw with a purpose. If you are a
pitcher, throw like a pitcher. If you are a catcher, throw like one. Continually strive to improve. Baseball Excellence
believes this complete routine is the second most important aspect of practice.

Practice Planner 6
Copyright©Baseball Excellence www.baseball-excellence.com
SAMPLE PRE-SEASON PRACTICE SCHEDULE (Approximately 2 hours)
Week 1
Time
Monday Tuesday Wednesday Thursday
Friday
2PM
*Run to
centerfield and
back. Stretch
Form Run
Short to Long
Toss
Continually
Run to
centerfield and
back. Stretch
Form Run
Short to Long
Toss
Reinforce
Run to centerfield
and back. Stretch
Form Run
Short to Long
Toss
Correct
Run to
centerfield and
back. Stretch
Form Run
Short to Long
Toss
Throwing
Run to
centerfield and
back. Stretch
Form Run
Short to Long
Toss
Mechanics
2:20 Pitchers Fielding
Practice*
Fungoes to
outfielders
Infield Fungoes (evaluate Players)
9-Skill Throwing
to Bases Drill* (evaluate players)
Catcher Drills*
Infield-Outfield
Priorities*
Double Plays***
Slow Rollers*
9-Skill
Throwing to
Bases Drill
Double Plays
Catcher Drills
2:50 Teach Base
Running**
Rundowns*
(from pick-offs)
Bunt Defenses** 1st & 3
rd
Defense***
Teach bunting-
use pitching
machines (2
stations)**
Batting Practice
(Fungoes to
infielders)
(Outfielders
break on all
balls)
Batting Practice
(Fungoes to
infielders)
(Outfielders break
on all balls)
Bullpens
Batting Practice
(Fungoes to
infielders)
(Outfielders
break on all
balls)
Bullpens
Intra-squad
Game. Use
pitching
machine or
coach instead of
pitchers.
(Pitchers are not
ready)
(Have 1 round
of BP-6-8
swings and then
play game)
3:00
3:30
3:50
Batting Practice
(teach hitting
philosophy)
Quarterbacks* Base Running** Quarterbacks Base Running
Tips:
• Short talk every day after practice and games, usually on the outfield grass down the foul
line, away from distractions.
• Practice at 100% effort. How you practice is how you play. Skills are developed at practice.
They are displayed in games.
• Pitchers Fielding Practice (PFP) can be used in lieu of a bullpen for the pitchers. If they have
thrown too much they may ‘shadow pitch.’
• Stay flexible. If a drill needs more time, take it.
Intra squad game- have coaches fill any outfield positions or leave area vacant and call hit or
out. Teach while game is unfolding. Get in as many innings as time allows. When pitchers are
used, count pitches. Catchers can call strikes and balls.
In addition to this Planner These Skills and Defenses are demonstrated in three of our Videos:
*The Complete Baseball Practice
**The Game Within the Game
***Youth Skills and Special Drills http://www.baseball-excellence.com/onlinestore/merchant.ihtml

Practice Planner 7
Copyright©Baseball Excellence www.baseball-excellence.com
WEEK 2
2PM
*Stretch, Run,
Throw
Continually
Stretch, Run,
Throw
Reinforce
Stretch, Run,
Throw
Correct
Stretch, Run,
Throw
Throwing
Stretch, Run,
Throw
Mechanics
2:20 Relay Race
(entire team)
Double Plays
Catcher Drills
Double Plays
Slow rollers
Fungoes to
outfielders
Infield- Outfield
Fungoes
(Double Cuts)
Catcher Drills
Infield-Outfield
Priorities
Bunt Defenses
Double Plays
2:50 Bunt Defenses Pick-offs and
rundowns
Throwing to
Bases
Slow Rollers
Outfield Fungoes
3:00 Batting Practice
Fungoes to
infielders
Bullpens
Batting Practice +
Situational
Hitting with Base
Runners
Batting Practice +
Situational
Hitting with Base
Runners
Batting Practice
Fungoes to
infielders
Short Bullpens
(1 round BP)
Intra-squad Game
Use pitchers and
catchers
(If time is short,
start all hitters
with a 1-1 or 2-1
count.)
[No walks-swing
the bats]
(Count pitches)
3:50 Base running Quarterbacks Base running Quarterbacks Quarterbacks
Tips:
• Situational hitting & base running are outlined later in the Planner; very important.
• Quarterbacks and Base running at the end of practice are conditioning as well as skill
drills. Because they incorporate skills, these drills are much better than just having the
kids run. Make sure they perform these drills at 100% effort.
• The first week or two of practice spend a lot of time on teaching defensive and base
running skills. After that, devote more time to batting practice. Use batting practice to
keep infielders and outfielders sharp.
• The two intra-squad games are very important for using mistakes as teaching
opportunities.
• Be careful of bullpens early in the pre-season. Monitor the effort of the pitchers and
keep strict pitch counts.
• If you adhere to this plan, your players will be ready to play at a skillful and
competitive level.
The following is Coach Grant’s practice schedule for the first week of fall ball in 1995.
Notice the emphasis on base running and defensive techniques. We even had a running
coach, Dale Dawkins who was a receiver for the New York Jets. Attention to detail is a
characteristic of good coaching.
Coach Grant also felt it was important to recruit good kids. If you are going to spend your
time, spend it with kids that are willing to learn. The “Where did they go?” section will
bear that out.

Practice Planner 8
Copyright©Baseball Excellence www.baseball-excellence.com
AMERICAN LEGION POST 39 FALL BALL PRACTICE SCHEDULE
(First Week- 1995)
4:30 Stretch, Form Running
5:00 Throw Long Toss
Bounce off Feet 5:15 Groups 1-6
Ground Balls Group 1-4
Fly Balls Group 5-6
6:00 Bunting Group 1-3
Group 4-6
6:30 Base Running
Home to 1st
Lead off 1st Base
Primary Lead
Secondary Lead
6:30 Returning Pitchers and Catchers
10 Fastballs
10 Change ups
7:00 End
(Bring 3-5 lb. weights)
4:30 Stretch, Form Running
5:00 Throw Long Toss
Bounce off Feet
5:15 Groups 1-6
Ground Balls Group 1-4
Fly Balls Group 5-6
6:00 Bunting Group 1-3
Group 4-6
6:30 Base Running
Lead off 2nd
Primary Lead
Secondary Lead, 2 out Lead
Lead off 3rd
3 Step Walking Lead
5 Step Walking Lead
Recap Home to First
Recap Lead off 1st
6:30 Returning Pitchers and Catchers
10 Fastballs
10 Change ups
7:00 Jobe Exercises
Jump Rope
7:20 End
4:30 Stretch, Form Running (Coach Dawkins)
5:00 Throw Long toss
Bounce off Feet
5:15 Groups 1-6
Ground Balls Double Plays 1-4
Fly Balls Ground Balls 5-6
6:00 Hitting
6:30 Pitcher’s Fielding Practice
Catchers Blocking Balls
7:00 Jobe
Jump Rope
7:20 End
4:30 Stretch, Form running
5:00 Throw Long Toss
5:15 Groups 1-6
Ground Balls Double Plays,
Throws to 1st. 1-4
Fly Balls, Ground Balls 5-6
5:45 Blocking Balls Group 6
6:00 Pitchers Fielding Practice
Outfield Relays and Cut-offs
6:30 Hitting Video Tape
7:15 End
10:00 Guest Speaker (Jamie Ciampaglio) -
“Recruiting”
Parents Please Attend
10:30 Stretch, Form Running
11:00 Long Toss
11:15 Groups 1-6
Ground Balls, Double Plays
Throws to 1st 1-4
Fly Balls 5
Blocking Balls 6
11:30 Inter-Squad Game
3:00 End
Day 2 Wed.
Day 1 Tues., Sept 6 Day 3 Thurs., Sept 8
Day 4 Fri., Sept 9
Day 5 Sat., Sept 10

Practice Planner 9
Copyright©Baseball Excellence www.baseball-excellence.com
GROUP 1
McCoy
Johnston
A. Wilson
W. Lilliquist
Gifford
D. Williams
GROUP 4
Watanabe
Taylor
Calahan
Margrander
Reass
GROUP 2
Reed
S. Calahan
JJ Williams
Thompson
C Torres
Stenberg
GROUP 5
Stuckey
Smith
Carter
Bridwell
Carpenter
Cavanaugh
GROUP 3
Jacobs
Richert
Edsall
Girard
Rogers
GROUP 6
J. Torres
Harshman
Duncan
Sims
Anstey
Where did they go?
Clinton Johnston- Vanderbilt All American, 1st Round Pick- Pittsburgh Pirates. 1998
Andy Wilson- Stetson University All America as freshman (Now with the NY Mets)
Jason Torres- 14th
Round Pick- Texas Rangers (catcher)
Matt Gifford- St Leo, now assistant coach, Brewton-Parker, GA. (middle infield)
Drew Williams- Davidson (middle infield)
Shawn Calahan- Indian River Community College (pitcher)
Chris Stenberg- Jacksonville University (middle infield)
Derek McCoy- Flagler College (shortstop)
Wes Lilliquist- Indian River Community College (pitcher)
Steve Edsall- Rollins College (pitcher) {Signed with the Colorado Rockies}
Steve Harshman- St Petersburg Community College (catcher)
Skye Watanabe- College of William and Mary
John Taylor- Dartmouth
Jody Bridwell- Indian River Community College (pitcher) {Signed with Pirates in 2002}
Shawn Reass- West Point (pitcher)
Brandon Sims- West Alabama (middle infield)
Darryl Jacobs-West Alabama (3rd
base)
Brendon Rogers-North Florida Community College
Marshall Carter- Indian River Community College
Jay Duncan- US Air Force
Chris Torres- Senior Vero Beach High School. Signed letter of intent to FIU (catcher) (Update: Drafted by the Pittsburgh Pirates)
This was the year Coach Grant took his fall ball players to the library for study in lieu of
practice on Thursdays. Some were having problems with their grades. That turned out to be
a pretty good move. Set your sights high. Help your players advance. (Players’ ages were from 13-17)

Practice Planner 10
Copyright©Baseball Excellence www.baseball-excellence.com
UPDATE ON PLAYERS AS OF JANUARY 2006
Neil Wilson- 5
th round draft pick- Colorado Rockies
Andy Wilson- Most valuable Player St Lucie Mets (2005)
Jared Odom- Polk Community College (pitcher)
Alex Cobb-Fourth round draft pick- Tampa Bay Devil Rays
Jeff Stoeckel- Harvard University (middle infield)
Davis Bilardelo- University South Florida (pitcher)
Randy Hamrick- Polk Community College (pitcher)
Steve Edsall- Drafted 22nd
round by Colorado Rockies. Pitched in Division II College World
Series
Stephen Byrd-Newberry College (pitcher)
Practice Planner 11
Copyright©Baseball Excellence www.baseball-excellence.com
WHY NOT SITUATIONAL DEFENSIVE BASEBALL PRACTICE?
We made a comment in our early Coaches Practice Planners and in one of our “Tips of the Week” that
‘situational baseball practice is essentially a waste of time.’ We got some feed back from some coaches, youth
and high school coaches alike, who did not agree.
What is situational baseball practice? “OK guys, (the coach is addressing the 9 players in their respective
positions (The other players, the non-starters are usually base runners.) one out, a runner on first.” Then he hits
a ground ball to the shortstop. The shortstop bobbles the ball and incorrectly flips it to the second baseman who
using faulty footwork and arm action, promptly throws the ball in the dirt at the first baseman’s feet. The first
baseman lets the ball go by him and it rolls to the fence. The play took about 15 seconds. A runner can get to
first in less than 5.
“OK guys, let’s do it again.” And the coach hits another fungo to the shortstop but this time he hits it too hard
and the infielder can’t make the play. He “OLE’s” it. (The coach slowly but surely begins to think he does not
have a good team.) Does he not have a good team or are they not being taught baseball skills?
Meanwhile the outfielders are standing around picking their noses and precious practice time goes whizzing by.
What is wrong with this picture? Several things are wrong.
The players get bored. That is not a good teaching environment.
A lot of time is wasted. There is too much standing around by the players not involved in the play and the
coach ends up yelling at them to “back up a base!”
The outfielders get an attitude and tell their dads that they don’t want to play right field. The dads criticize the
coach and etc, etc, etc. Practice time is much too limited and valuable for that kind of nonsense. If you are
going to put a kid in the outfield, teach him how to play the position. I would much rather have an outfielder
who could track the ball and catch it than to have him worry about which base to back up.
Let’s get our priorities in order. It takes about 10 minutes to teach the players where to go to back up plays. It
takes 3+ years to begin building competent baseball skills.
There was no teaching, except for the capacity to get out of the way of a ‘too-hard-hit’ fungo. The coach is
directing the players and telling them what to do. He is not teaching skills.
Baseball Excellence believes coaches do a lot of situational practice because they simply don’t know how to
teach baseball skills. This type of practice is “busy work.” And it is very widespread.
Since he is not being taught the skill, any movement a player makes incorrectly is reinforced.
Instead of positive reinforcement, you get negative. With a season full of incorrect repetitions you get built-in
muscle memory that may impede a player’s development.
What would have been a better way of teaching the double play? The coach could kneel down 10 feet from
second base on the infield grass and roll balls to the shortstop and teach him the correct way to make the play.
By rolling the balls the players can concentrate on fielding, footwork and throwing and not have to worry about
a hard-hit baseball. By kneeling near the bag, the coach can assist the players with their footwork in turning the
double play. All the middle infielders could get in line at short and second and go through the drill, slowly at
first and then game-speed after the players get it right. (Change lines after every rep.) By kneeling on the infield
grass, the coach is close enough to see the footwork around the bag and make corrections. Then he rolls balls to
the second basemen. He teaches and makes corrections to every player. Fifteen minutes will get an infielder a
lot of correct repetitions.
What is everyone else doing? Another coach is hitting fly balls to the outfielders and a pitcher is throwing his
bullpen session. The first baseman is working on his game by taking the throws from the middle infielders. The
third baseman is working on fielding slow rollers. By breaking the team into small groups everyone stays busy,
the players have more fun and the coaches have a much better teaching environment. Here it is in a nutshell: By
isolating the different baseball skills you have a better approach to teaching them and you have more time for
the necessary repetitions. And everyone has more fun. Players learn better in that kind of environment. You
know what else is beneficial with this approach? There is more time for batting practice.
Who said hitting is the single hardest thing to do well in sports? Could it have been Ted Williams? Let’s get the
bats out. I have seen coaches use situational defensive baseball as an excuse for practice day in and day out. Is
it because they don’t know what else to do? I have seen coaches yelling at players for executing poor skills
when that coach hasn’t even taught the skills. Is it because they don’t know how to teach or won’t make the
effort?

Practice Planner 12
Copyright©Baseball Excellence www.baseball-excellence.com
CATCH AND THROW
Throwing a baseball correctly is a basic requirement of the game, yet may be the most under coached skill.
Players may get away with poor arm action* in their early years, but as the field gets larger and the speed of the
game increases, good throwing mechanics and arm strength become absolutes and are taken for granted. At the
ages of 13, 14 and 15 too many players leave the game of baseball because they were never taught to throw
properly. Teaching a young player to throw and catch correctly may be the single most important thing a youth
coach can do for a player.
LOWER BODY
Throwing starts with the feet. The right foot should be perpendicular to the target.
Teaching Tip: Point the right anklebone at the target. (RH player)
The front foot should land slightly closed (10-15º) and on a straight line with the target.
Teaching Tip: Point the toes of the front foot just to the right of the target as the front foot lands.
UPPER BODY
The lead arm should be elbow high and aligned with the throwing arm. (Good lead arm technique is vital for
throwing accuracy.)
Teaching Tip: Point the lead arm elbow at the target- use it as a ‘gun sight.’
The throwing arm should be approximately elbow high and aligned with the head and lead arm.
Teaching Tip: The arm is in a ‘cocked’ (L) position with the ball pointing backwards and fingers on top of the
ball.
The ball is thrown out in front of the head with the wrist outside the angle of the elbow.
Teaching Tip: Throw the ball when “nose is over toes.” (Get the chest out over the front knee.)
Throw the ball with a smooth, fluid follow through.
Teaching Tip: Show the back of the rear shoulder to the target on follow through.
*ARM ACTION
Arm action is defined as the circular movement of the throwing arm as it leaves the glove, moves down, back
and up and delivers the baseball. An infielder’s arm action is different from a pitcher/outfielder in that the
pitcher takes his arm down, back and up and the infielder/catcher takes the ball out of his glove straight back to
the cocked position (the infielder/catcher needs a quicker release). The thumb must be under the baseball and
the fingers on top. The wrist must be supple but firm so it does not flop off to either side. It stays behind the
baseball all the way to release.
Baseball Excellence believes a coach should not teach a short-arm method of throwing. Instead, teach down,
back and up.

Practice Planner 13
Copyright©Baseball Excellence www.baseball-excellence.com
THROWING CHECKLIST
GRIP
1. Make sure the grip is a 4- seam fastball grip and the ball is not choked back into the
palm. Between the time the player catches the ball and the time his arm is in the
cocked position, he should have the ball in a 4-seam grip. (He should practice that
grip everyday as he plays catch until it becomes automatic.)
FEET 2. Look at the feet first. Often when a player makes a throwing error it is because he
didn’t have his feet set properly. The anklebone of his throwing-side foot should be
pointed at the target (closed). The lead foot should land slightly (10º) closed and
pointing at the target.
ARM ALIGNMENT
3. Both arms should be aligned with the head and shoulders. (If he were a pitcher, his
arms would be aligned with second base.)
ELBOW
4. Elbow shoulder high- whether he has the arm action of a pitcher or outfielder or
catcher or infielder, his elbow should be at shoulder- height the instant before he
brings his arm forward. (the cocked position.)
LEAD ARM
5. The lead arm should be shoulder high also and aligned properly. The lead arm elbow
can be pointed at the target. Whether or not the elbow is pointing at the target, it
should be shoulder-high.
EXTENSION
6. The ball is released out in front of the head and not beside the head. The fingers
remain on top of the ball and do not flop off to the side. The arm snaps to full
extension.
SMOOTH FOLLOW
THROUGH
7. Finish the throw with a smooth fluid motion and the head out over the front foot.
Tips:
• As the hand leaves the glove, keep the thumb underneath the baseball and the fingers on top.
• The hand, arm and elbow form a slightly expanded ‘L’ with the baseball facing back.
• Do not open up to throw the baseball until the front foot has landed.
• Keep the front shoulder pointing at the target until the front foot lands.
• Release the ball at full extension. The grip should be 4-seam
• Look to see if the lead shoulder is closed when the player’s front foot lands. It is common for a
player to ‘open’ his front side too early, resulting in added stress on the arm and inaccurate
throws.
• Teaching a player to throw correctly is one of the most important things a coach can do.
• Pay close attention to arm action. Common faults are hooking the ball, low elbow, turning the
wrist, improper ‘cocked position’, flailing, long arming, wrist inside the angle created by the
elbow and ‘pie throwing’.
Practice Planner 14
Copyright©Baseball Excellence www.baseball-excellence.com
CATCHING THE BASEBALL
The ability to catch and throw a baseball is basic to the game and yet it deceptively difficult.
Watching accomplished baseball players throw and catch makes it look very easy. Players who are
never properly taught these skills have an unproductive baseball experience and eventually leave the
game. As coaches and parents you can play an important part in the continuance of this great game by
teaching your youngsters how to throw and catch. For the very young it is suggested that the coach
use ‘reduced injury factor’ baseballs. The fear of getting hit will hinder a young player’s catching
mechanics. In fact you may begin by using tennis balls. Tennis balls will remove some initial fear
and they have the added benefit of requiring the player to bring the ball into his body as he catches it.
The term for this is ‘soft hands’. Baseball players require soft hands. Instead of keeping their hands
and fingers rigid and their arms extended as they catch, they should relax their fingers, flex their arms
and bring the ball in toward their body as it enters the glove. Begin at a distance of 15-20 feet. Easy
tosses at first and because the coach is much taller than the player he may kneel down so they are
level. Teach the player these fundamentals:
• Feet shoulder width apart, toes facing the coach, knees slightly flexed (bent), flexed at the waist.
This is a basic athletic position.
• The glove should fit and not be too large or too heavy. Make sure it is open to receive the ball. (A
common mistake.)
• Use these 2 rules of thumb:
1. If the ball is above the waist, the fingers of the glove should be up.
2. If the ball is below the waist, the fingers go down.
• As the ball enters the glove the player should follow the ball with his eyes. Coaches should watch
closely to see if the player is ‘looking the ball’ into his glove.
• Although using 2 hands is important, don’t stress this point. There are plenty of plays that require
the use of only one hand. In the initial stages pay more attention to the fact that his glove is open
and that the player moves to the ball.
• The player must learn how to use his feet. If the ball is thrown to either side he must move his
feet as the ball is in the air so he can get his body in front of the ball. This is very basic and very
important. Whenever a player ‘reaches’ for a ball, remind him to “Move your feet.” Constant
reinforcement of this skill is essential.
• On a pop fly the player should get his feet under the ball as it reaches its apex and catch the ball
above and in front of his head with his glove fingers up. Play catch with your son in the back
yard. Every practice should begin with throwing a catching the baseball. Keep it fun and have
patience. Always use positive reinforcement.
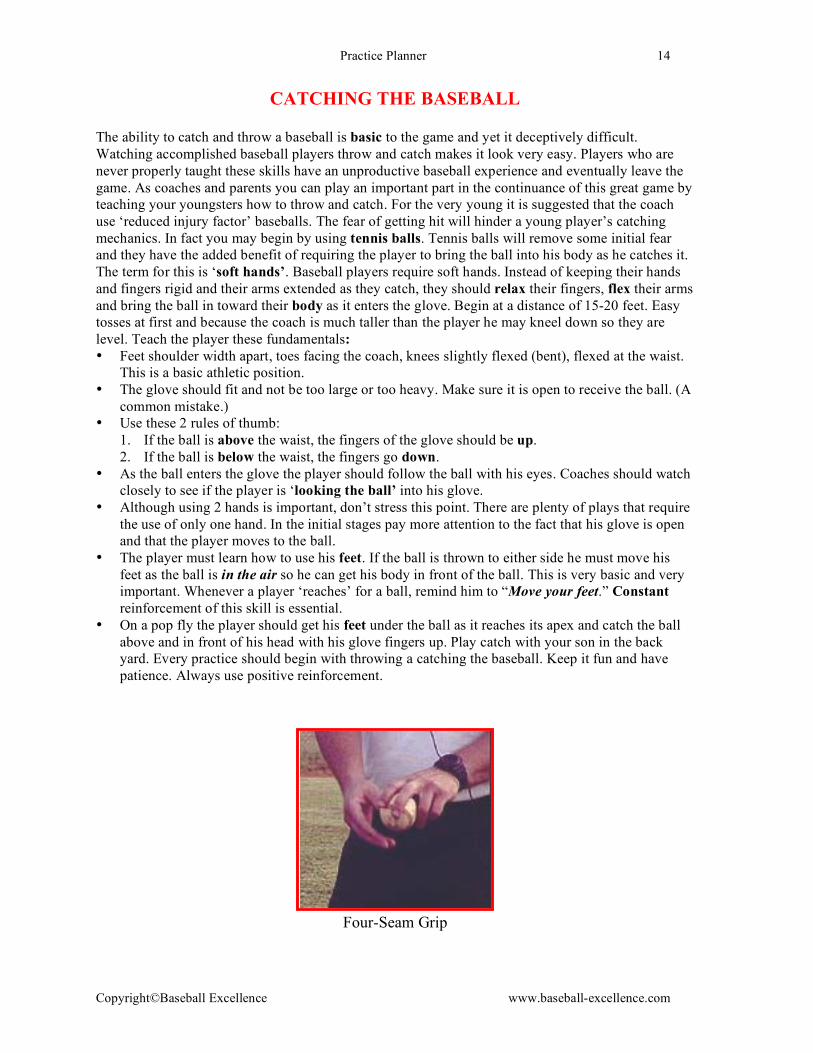
Four-Seam Grip

Practice Planner 15
Copyright©Baseball Excellence www.baseball-excellence.com
COMMON THROWING AND PITCHING FAULTS
Two common faults in one
young athlete. His fingers are
under the ball (pie throwing)
and his front shoulder has flown
open. The results are stress,
lack of velocity and control.
This young pitcher’s front
shoulder has flown open long
before his front foot has landed.
This causes his arm to drag.
Result is stress on the shoulder
and control problems.
This young pitcher has his fingers
under the ball instead of on top.
Future elbow problems
Here this pitcher looks good.
Notice the fence in the
background.
Someone must have told him to
drop and drive. Notice how low
his head is now and how he is
swinging his lead leg out to
landing.
This swinging of the leg has
created balance problems and has
made him land very open (landing
leg toward first base line instead of
aligned to the plate. Arm stress and
control problems.
Practice Planner 16
Copyright©Baseball Excellence www.baseball-excellence.com
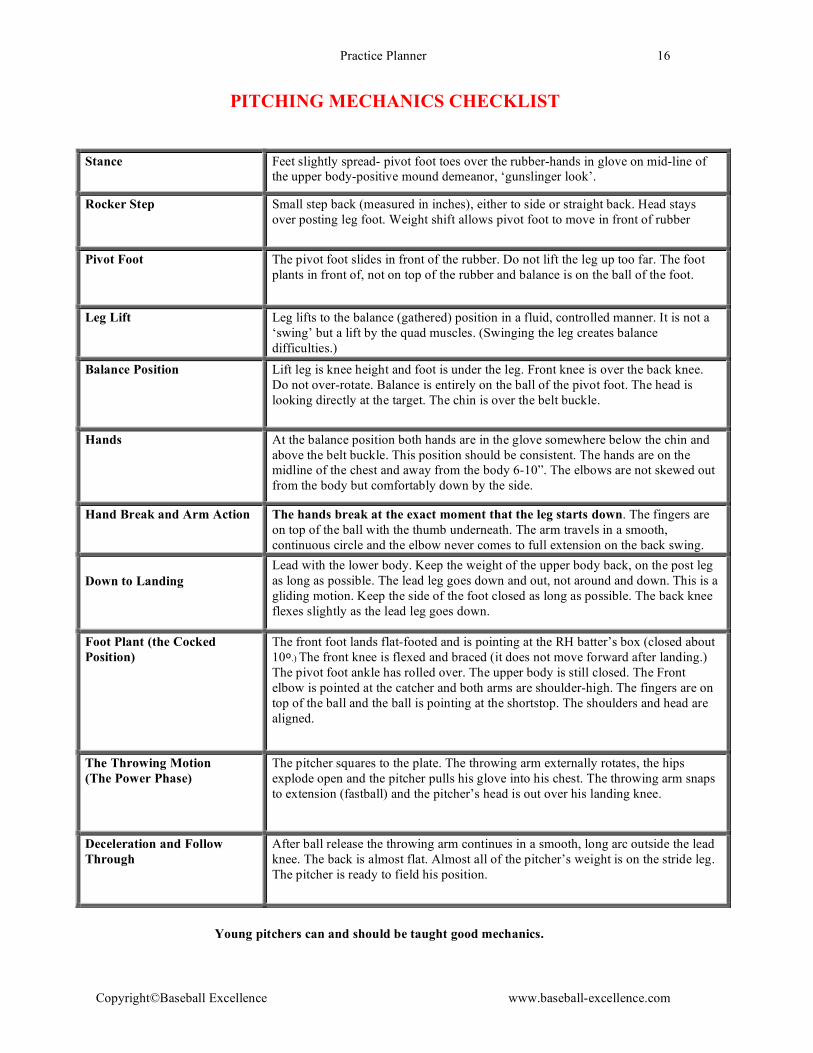
PITCHING MECHANICS CHECKLIST
Stance Feet slightly spread- pivot foot toes over the rubber-hands in glove on mid-line of
the upper body-positive mound demeanor, ‘gunslinger look’.
Rocker Step Small step back (measured in inches), either to side or straight back. Head stays
over posting leg foot. Weight shift allows pivot foot to move in front of rubber
Pivot Foot The pivot foot slides in front of the rubber. Do not lift the leg up too far. The foot
plants in front of, not on top of the rubber and balance is on the ball of the foot.
Leg Lift Leg lifts to the balance (gathered) position in a fluid, controlled manner. It is not a
‘swing’ but a lift by the quad muscles. (Swinging the leg creates balance
difficulties.)
Balance Position Lift leg is knee height and foot is under the leg. Front knee is over the back knee.
Do not over-rotate. Balance is entirely on the ball of the pivot foot. The head is
looking directly at the target. The chin is over the belt buckle.
Hands At the balance position both hands are in the glove somewhere below the chin and
above the belt buckle. This position should be consistent. The hands are on the
midline of the chest and away from the body 6-10”. The elbows are not skewed out
from the body but comfortably down by the side.
Hand Break and Arm Action The hands break at the exact moment that the leg starts down. The fingers are
on top of the ball with the thumb underneath. The arm travels in a smooth,
continuous circle and the elbow never comes to full extension on the back swing.
Down to Landing
Lead with the lower body. Keep the weight of the upper body back, on the post leg
as long as possible. The lead leg goes down and out, not around and down. This is a
gliding motion. Keep the side of the foot closed as long as possible. The back knee
flexes slightly as the lead leg goes down.
Foot Plant (the Cocked
Position)
The front foot lands flat-footed and is pointing at the RH batter’s box (closed about
10º.) The front knee is flexed and braced (it does not move forward after landing.)
The pivot foot ankle has rolled over. The upper body is still closed. The Front
elbow is pointed at the catcher and both arms are shoulder-high. The fingers are on
top of the ball and the ball is pointing at the shortstop. The shoulders and head are
aligned.
The Throwing Motion
(The Power Phase)
The pitcher squares to the plate. The throwing arm externally rotates, the hips
explode open and the pitcher pulls his glove into his chest. The throwing arm snaps
to extension (fastball) and the pitcher’s head is out over his landing knee.
Deceleration and Follow
Through
After ball release the throwing arm continues in a smooth, long arc outside the lead
knee. The back is almost flat. Almost all of the pitcher’s weight is on the stride leg.
The pitcher is ready to field his position.
Young pitchers can and should be taught good mechanics.

Practice Planner 17
Copyright©Baseball Excellence www.baseball-excellence.com
PITCH COUNT GUIDELINES
Age Bullpen Pitches
Recommended Max Game Pitches
Recommended Max Pitches per Inning
Days Rest
10-11 25-28 50-60 15-20 3-4
12 30-35 65-70 15-20 4
13-14 35-40 70-75 15-20 4
14-16 40-45 80-90 15-20 4
17+ 40-50 100+ 15-20 4
TIPS
• The bullpen pitches do not include long toss or throws to warm up.
• Some non-competitive throwing should take place on off days.
• Use common sense with your pitchers.
• Don’t let a dominant pitcher cloud your judgment.
• We recommend that younger pitchers (under 14) not throw breaking balls.
• Keep the number of curve balls to a minimum.
• Throwing on days off should be “to tolerance.”
• Immediately stop throwing if you experience any pain.
• Think “development over winning.” Be patient.
• The number of days of rest is very important.
• Start throwing pre-game bullpens at 75% velocity. Gradually increase to 100%.
• Use common sense if the pitcher plays another position the day after pitching.
• Pay attention to the pitches per inning, especially early in the season. Overuse injuries can occur
if a pitcher throws too many competitive pitches per inning.
Jody Bridwell (Signed with Pirates 2002)

Practice Planner 18
Copyright©Baseball Excellence www.baseball-excellence.com
HOW TO THROW A BULLPEN
A bullpen session is much more than just loosening up. The pitcher should have a purpose in mind. He
must find the release point for all his pitches, give himself a quick mental overview of his mechanics,
achieve good rotation on his pitches and locate them as well. This should be done in the space of 15-20
minutes (approximately 30-50 pitches depending on age).
The pitching coach should be there to watch every pitch. He should make suggestions as to mechanics,
watch the arm speed on his changeup, make sure the catcher counts the pitches and gives
encouragement to his pitcher.
A pitcher should always come away from a bullpen session feeling that he has
accomplished something, even if he was not particularly effective. A positive attitude
is important.
TIPS FOR PRE-GAME BULLPEN
After the stretch run and throw routine begin by throwing a few pitches in front of
the mound to get loose. (You may then elect to throw a few pitches from behind the
mound.)
Start the bullpen session by throwing at about 75%. Never begin throwing at full velocity.
Fastball command is our number one priority.
We have our pitchers throw every bullpen starting with this sequence: The catcher sets up 1 foot off
the right side of the plate-pitcher throws 4 fastballs; catcher sets up 1 foot off the left side of the
plate- pitcher throws 4 fastballs; catcher sets up on the inside corner-4 fastballs; outside corner- 4
fastballs. This starts the pitcher with 16 fastballs, helping him spot it by concentrating on hitting the
glove. (A pitcher’s number 1 job-‘Hit the glove.’ This helps train a pitcher to develop fastball
command.)
Throw 3 fastballs up and in.
Don’t practice throwing fastballs down the middle.
Do throw all changeups down the middle. (5-10 depending on what it takes to get the feel.)
Throw 5-6 breaking pitches. (It is recommended that youth pitchers don’t throw breaking pitches.)
Throw an equal number of 2-seam and 4-seam fastballs. They give the hitter a slightly different
look and movement. The 2-seam fastball is a very important pitch.
Throw ! of the session from the stretch. (Advanced Baseball)
Visualize the ball hitting the target before you throw.
Gradually increase the velocity until the last 10 or so pitches are thrown at full speed and mix up
your pitches-fastball-change, fastball curve. Try to simulate game conditions.
It is important to develop a set routine that you can use for every pre-game session.
BETWEEN GAME BULLPENS
Throw one full bullpen between starts. The full bullpen is the same as the pre-game session except
stay at 50-75% velocity. Don’t air it out. (The distance may be shortened slightly.)
Play catch and work on something every practice; mechanics, release point, arm action, etc.
This pen is a good time to work on the ‘feel’ of the change up and breaking pitch. Since this session
is not at full velocity, there is little risk of arm injury.
The pitching coach should watch every pitcher’s bullpen, regulate his effort and give
encouragement.
The pitcher may throw this bullpen on flat ground and/or at a shorter distance.

Practice Planner 19
Copyright©Baseball Excellence www.baseball-excellence.com
PITCHERS FIELDING PRACTICE
Whether at advanced or youth level, Pitchers Fielding Practice should be a part of pre-season baseball drills.
Every play can be used; bunts, covering first, ‘comebackers’ and throwing to third.
Place all infielders at their positions. Line up the pitchers behind the mound, each one with a baseball.
The pitchers throw fastballs to the catcher. They attempt to throw strikes. A pitcher may get in 15 or 20 fastballs in
this drill. (PFP can be used in lieu of a bullpen.)
As the catcher receives the ball, the pitcher holds his ‘follow through’ until the coach hits a ground ball to the first
baseman. The pitcher sprints to the first base bag and receives an underhand toss from the infielder. (The catcher
yells, “Get over there!”) He touches the inside of the bag and immediately bounces off, turns and looks at the
infield( for any runners trying to advance. )
The infielder must stay low and ‘walk behind the ball’ when he tosses the ball to the pitcher. If he raises up, the ball
will sail. The pitcher then goes to the back of the line with his baseball and the next pitcher steps on the mound.
After a few rounds the pitchers field bunts down the lines. The catcher shouts ‘Step and throw!’
The next round is ‘comebackers’ with an imaginary runner on first. The pitcher pitches to the catcher and the coach
hits a ground ball to him. The pitcher turns and fires the ball to the shortstop covering second base to begin the 1-6-
3 double play. If at all possible the pitcher should attempt to field the ball with his shoulder closed to second base
(drop his glove-side foot back). This allows for much quicker footwork and ball release.
The next round is bunts along the third base line and the pitcher throws to third base for a force play. The catcher
directs the throw. The pitcher should be ‘over the ball’ as he picks it up. A RH pitcher must pick up the ball and
pivot to get in position to make the throw. A LH pitcher simply picks it up and throws. (Use this play only if the
pitcher can get to the ball very quickly. Otherwise throw to first.)
Tips: If the pitchers pick up a bunted ball with their bare hand, look to see that they do not put the ball back in the glove.
This takes too much time.
Sometimes during this drill a pitcher will ‘cheat’ by leaving too early. If he leaves to cover first too early hit a
ground ball back up the middle (behind him) to keep him honest. Have them hold that “follow through.”
Pitchers may ‘shadow throw’ when they have thrown too much.
As a pitcher covers first he may have a tendency to step on the middle of the bag or actually cross over it into foul
territory. A base runner can run up his back creating the possibility of injury. Make sure he touches the inside of the
bag with his right foot and immediately gets out of the way.
The pitcher is responsible for retrieving his ball after each play. (Drill Time: 30 min)

Practice Planner 20
Copyright©Baseball Excellence www.baseball-excellence.com
STANDARD DEFENSIVE POSITIONING
Standard Defensive Positioning recognizes the fact that there are more balls hit up the
middle (“Vee” of the field) than in the holes or down the lines. This configuration allows for
the best possible defensive range, covering areas of the field where the ball will most likely be
hit. In certain situations and with certain hitters the coach may elect to alter his defense
slightly. There are certain responsibilities that go with this defense. The middle infielders must
be able the make the backhand play, the third baseman must be able to play the bunt and the
slow roller and the first baseman must be agile and quick. Notice how far back they are.
FIRST BASE- Play 5-7 full steps off the line and 6 or 9 full steps back. This positioning gives
him the best possible range and still allows him to get to the bag in time. In a situation later in the
game that requires him to cut down on the possibility of a double he will play closer to the line.
With a runner on first base, he will hold him on. With runners on first and second or bases
loaded, he may play back unless the runner takes too large a lead or he wants to keep the double
play in order.
SECOND BASE- Play 9 full steps over and 9 steps back. In a double play situation he
should pinch in a little (4 steps over and 4-7 back). In a double play situation with a left-hand
pull hitter at bat play 7 steps over and 7 back.
SHORTSTOP- Play 9 full steps over and 9 back. Double play situations are 4-7 over and 4-
7 back.
THIRD BASE- Play 6 full steps over and 5-8 back. In the late innings or if a right hand pull
hitter is at bat he may play closer to the line. With hitters who run well he may play even
with the bag. As the count eliminates the bunt possibility he may move back.
CENTER FIELD- Play a few steps either left or right of second base depending on the
hitter. Do not let the alignment of second base and the pitcher block your view of the strike
zone.
LEFT FIELD- Extend an imaginary line from first base through second and into the middle
of the outfield. Have him take 8 full steps to his right. That is the normal position.
RIGHT FIELD-Extend the imaginary line from third base through second and into the
outfield. Have him take 8 full steps to his left.

Practice Planner 21
Copyright©Baseball Excellence www.baseball-excellence.com
Tips:
With 2 outs the outfield may play deeper to cut down on the possibility of a double.
In order to quickly react to the bunt, the infielders should learn to ‘read the barrel of the
bat.’ (React immediately as the bat comes off the hitter’s shoulder.)
Pitchers must cover first on all ground balls hit to the right side of the infield. They must
sprint to the bag.
With a runner on third the team may elect to play the infield in. Play a few steps on the clay
behind the grass rather than on the grass. The infielder must come forward anyway to field
the ball and this gives a step or 2 more range. “Pinch” the infield in towards the middle.
Winning teams are strong ‘up the middle’- catcher, pitcher, second baseman, shortstop and
center fielder. This is not by accident. Position the defense so your players can make the
play ‘up the middle.’
Never hold a runner on at third. Where is he going? Don’t hold a runner on second either.
There are techniques for keeping a runner close at second.
YOUTH LEAGUE
FIRST BASE- Play 3-5 steps over and 5 steps back.
SECOND BASE- Play 6 steps over and 6 full steps back. Runner on first- 4 over and 4 back.
(Double play)
SHORTSTOP- Play 6 steps over and 6 back. Man of first- 4 over and 4 back. (Double play)
THIRD BASE- Play 4 over and 4-5 back. Bunt situation-even with the bag.
CENTER FIELD-Play a few steps either left or right of second base depending on the hitter.
Do not let the pitcher block your view of the strike zone by playing directly behind the bag.
LEFT FIELD-Extend an imaginary line from first base through second and into the middle
of the outfield. Now have him take 5 steps to his right. That is the normal position.
RIGHT FIELD-Extend the imaginary line from third base through second and into the
middle of the outfield. Have him take 5 steps to his left
(Except in obvious bunting situations, play those corners back. Teams are not going to beat you
with surprise bunts. The whole idea of Standard Defensive Positioning is to give your defense
more range- the ability to make more routine plays.)
First base position on youth field

Practice Planner 22
Copyright©Baseball Excellence www.baseball-excellence.com
DEFENSIVE DRILLS
The following drills will reinforce the fundamentals of the game as well as developing arm
strength. Please use all of them.
Practice Planner 23
Copyright©Baseball Excellence www.baseball-excellence.com
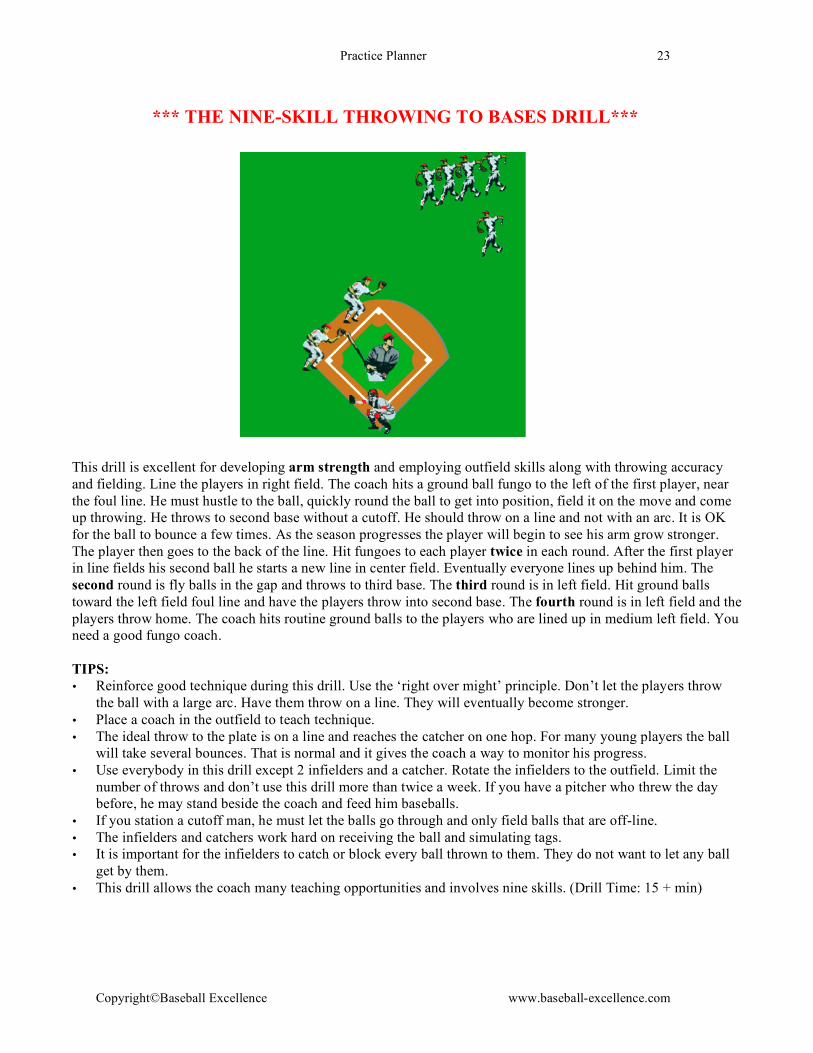
*** THE NINE-SKILL THROWING TO BASES DRILL***
This drill is excellent for developing arm strength and employing outfield skills along with throwing accuracy
and fielding. Line the players in right field. The coach hits a ground ball fungo to the left of the first player, near
the foul line. He must hustle to the ball, quickly round the ball to get into position, field it on the move and come
up throwing. He throws to second base without a cutoff. He should throw on a line and not with an arc. It is OK
for the ball to bounce a few times. As the season progresses the player will begin to see his arm grow stronger.
The player then goes to the back of the line. Hit fungoes to each player twice in each round. After the first player
in line fields his second ball he starts a new line in center field. Eventually everyone lines up behind him. The
second round is fly balls in the gap and throws to third base. The third round is in left field. Hit ground balls
toward the left field foul line and have the players throw into second base. The fourth round is in left field and the
players throw home. The coach hits routine ground balls to the players who are lined up in medium left field. You
need a good fungo coach.
TIPS:
• Reinforce good technique during this drill. Use the ‘right over might’ principle. Don’t let the players throw
the ball with a large arc. Have them throw on a line. They will eventually become stronger.
• Place a coach in the outfield to teach technique.
• The ideal throw to the plate is on a line and reaches the catcher on one hop. For many young players the ball
will take several bounces. That is normal and it gives the coach a way to monitor his progress.
• Use everybody in this drill except 2 infielders and a catcher. Rotate the infielders to the outfield. Limit the
number of throws and don’t use this drill more than twice a week. If you have a pitcher who threw the day
before, he may stand beside the coach and feed him baseballs.
• If you station a cutoff man, he must let the balls go through and only field balls that are off-line.
• The infielders and catchers work hard on receiving the ball and simulating tags.
• It is important for the infielders to catch or block every ball thrown to them. They do not want to let any ball
get by them.
• This drill allows the coach many teaching opportunities and involves nine skills. (Drill Time: 15 + min)
Practice Planner 24
Copyright©Baseball Excellence www.baseball-excellence.com
THE NINE SKILLS
Are the simple things often the best? Are drills that teach a multitude of skills valuable? You bet. Use
this drill once or twice a week in the pre-season and as needed during the season. Everybody is in the
outfield except 2 infielders and 1 catcher. This drill teaches and reinforces:
1. Outfielders Fielding ground balls on the run. (A specific technique)
2. Cutting off ground balls. (Preventing them from getting by the outfielder)
3. Develops arm strength (Throwing to bases without cutoffs, {coach can monitor improvement})
Let the ball travel all the way into the base, even if it takes several hops.
4. Develops Throwing accuracy
5. Learning how to find and throw with the 4-seam grip on the run.
6. Develops good throwing technique (throwing the ball on a line without a large arc.)
7. Teaches infielders to field incoming balls of various hops. (Important not to let the ball get by
them.)
8. Teaches infielders to make tags.
9. Teaches catchers to field balls and make plays at the plate.
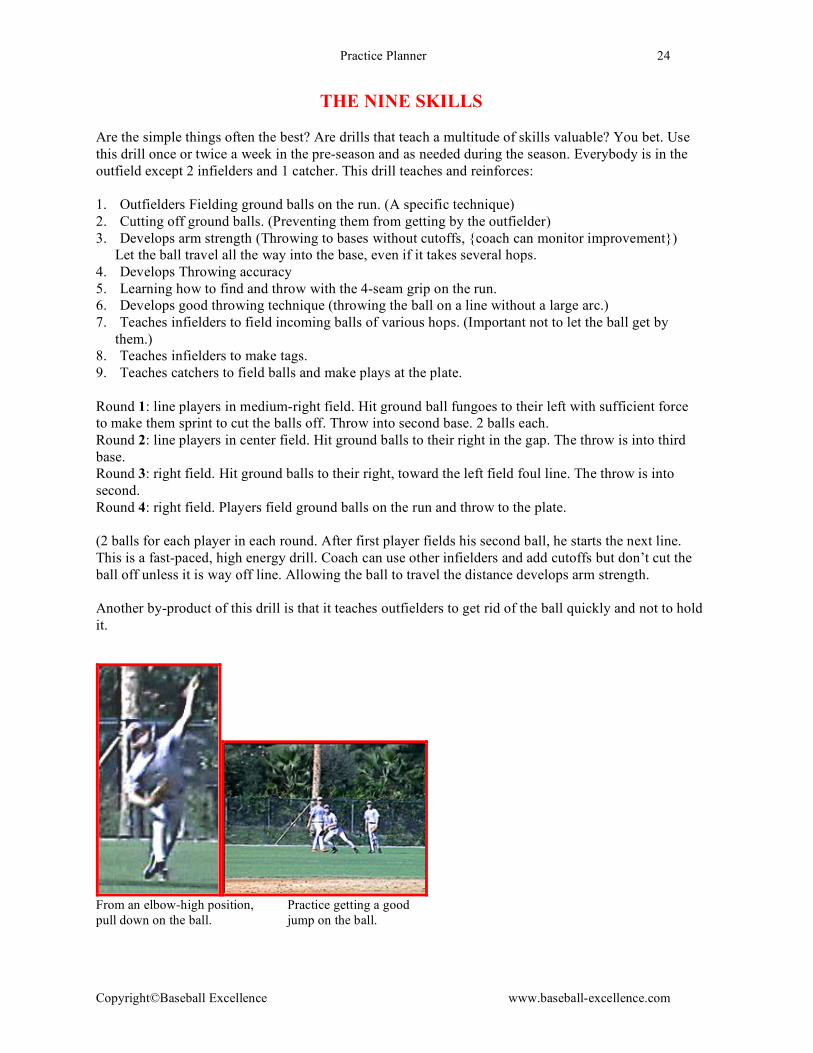
Round 1: line players in medium-right field. Hit ground ball fungoes to their left with sufficient force
to make them sprint to cut the balls off. Throw into second base. 2 balls each.
Round 2: line players in center field. Hit ground balls to their right in the gap. The throw is into third
base.
Round 3: right field. Hit ground balls to their right, toward the left field foul line. The throw is into
second.
Round 4: right field. Players field ground balls on the run and throw to the plate.
(2 balls for each player in each round. After first player fields his second ball, he starts the next line.
This is a fast-paced, high energy drill. Coach can use other infielders and add cutoffs but don’t cut the
ball off unless it is way off line. Allowing the ball to travel the distance develops arm strength.
Another by-product of this drill is that it teaches outfielders to get rid of the ball quickly and not to hold
it.
From an elbow-high position, Practice getting a good
pull down on the ball. jump on the ball.

Practice Planner 25
Copyright©Baseball Excellence www.baseball-excellence.com
OUTFIELD PRIORITIES
This drill should be practiced in the pre-season. It not only gives the outfielders fly ball work but also
teaches the vital skill of communication.
Line the outfielders into 2 groups- center and right field. Hit fly ball fungoes in the gap. As the outfielders
sprint to the ball they call to each other: one says loudly “Got it, got it” We don’t have the off fielder say
‘take it’ because it may break the other fielder’s concentration. (Don’t let them say, “mine”. That’s a hole in
the ground. They can say, “ball, ball.”) The players then go to the back of the opposite line. The center
fielder has priority over the other fielders. If he calls for the ball the other player should back off and back
him up. (A pitching machine may be used for this drill. It may give the players more chances in a shorter
period of time. )
Then the coach adds his infielders and hits fly balls to the areas where either the infielder or outfielder can
make the catch. The outfielder has priority over the infielder because he is coming in and has a better view.
But the infielder should try to make the catch until called off.
During this drill the catchers can do blocking drills or the pitchers can be throwing a bullpen.
The off-fielder should not take his eyes off the ball to look at the other fielder. He should concentrate on
the baseball and listen. (Drill time: 15+ min)

Practice Planner 26
Copyright©Baseball Excellence www.baseball-excellence.com
INFIELD-OUTFIELD FUNGOES
Infield and outfield fungoes are one of the game’s most important drills. These skills should be practiced every
day in some form (usually during batting practice). This drill not only develops fielding and throwing skills it
has the added benefit of increasing arm strength. It is a very good pre-season evaluation drill.
Infield: Line the infielders outside the foul line with one player at third base. Hit a routine ground ball to him.
He fields the ball and throws across to first base and then goes to the back of the line. The next player
immediately takes his place and assumes the ‘ready’ position. Hit fungoes to each player in this sequence: 2
routine ground balls, 2 balls to their left, 2 balls to their backhand side, 2 slow rollers.
The players then move to the shortstop position and the same sequence is hit to them. Lastly they move to
second base and perform the same routine. (Don’t neglect your first baseman.)
Outfield: Another coach hits ground ball and fly ball fungoes to the outfielders lined up medium-deep in the
outfield. Hit 2 ground balls to each player’s right and then their left. Hit 4-5 HIGH fly balls with varying
degrees of difficulty. Have them throw the ball all the way into the coach. He may elect to use a cutoff if he
wants to work on that skill. The cut-off also may be used to rest the outfielders’ arms.
Tips:
• Use this drill early in the season to evaluate your players.
• Infielders should take ground balls every day. On most days they may take them during batting practice in
lieu of this drill.
• Occasionally the head coach may walk about halfway down the right field foul line and watch this drill
from there. It gives him a very good overall view of the infielders’ skill level; arm strength, fielding ability
and footwork.
• It is necessary to have a competent fungo hitter. Hit routine ground balls. Don’t hit them too hard. You want
the players to work on technique.
• As the infielder fields the ball, look at the brim of his cap. It should be pointing down. If not, he is not seeing
the ball all the way into his glove.
• Have the players ‘move through the ball’ as they field it. They should always keep their feet moving.
• On slow rollers the player should field the ball in front of his left foot.
Practice the backhand play every day. (Drill time: 20-30 min)
Practice Planner 27
Copyright©Baseball Excellence www.baseball-excellence.com
INFIELDERS SHOULD FIELD GROUND BALLS DAILY
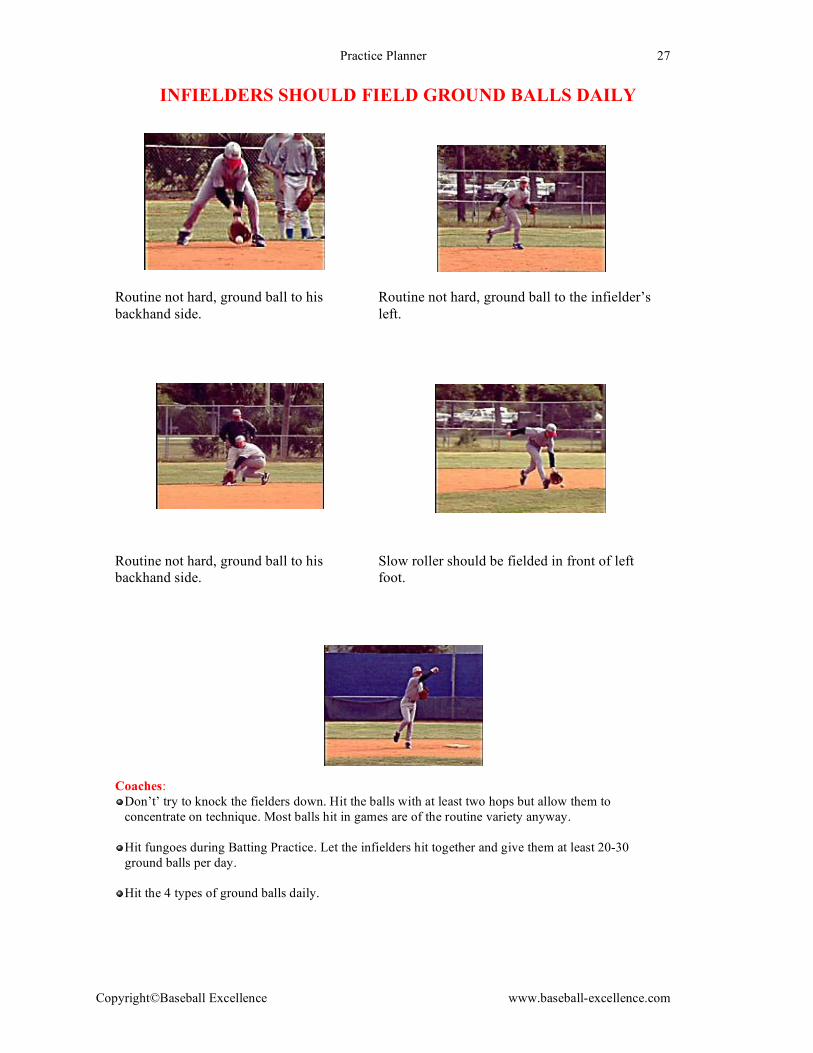
Routine not hard, ground ball to his
backhand side.
Routine not hard, ground ball to the infielder’s
left.
Routine not hard, ground ball to his
backhand side.
Slow roller should be fielded in front of left
foot.
Coaches:
Don’t’ try to knock the fielders down. Hit the balls with at least two hops but allow them to
concentrate on technique. Most balls hit in games are of the routine variety anyway.
Hit fungoes during Batting Practice. Let the infielders hit together and give them at least 20-30
ground balls per day.
Hit the 4 types of ground balls daily.

Practice Planner 28
Copyright©Baseball Excellence www.baseball-excellence.com
QUARTERBACKS
This drill not only is great for fly ball skill work but also is an outstanding conditioning drill.
Players line up on one foul line and the coach in the middle of the outfield. (about 150 feet from
home plate on a regulation-size field.)
Each player has a baseball.
On “Go” the first player jogs to the outfield side of the coach. As he approaches the coach he tosses
him his baseball and sprints toward the opposite foul line.
The coach calls ‘ball’ and the player looks over his throwing shoulder (as the ball is in the air.)
The coach leads the player with a long, high ‘pass’ and the player runs under it and catches it.
As soon as the first player tosses the ball to the coach, the next player in line starts toward the
coach.
Repeat the sequence until all the players are on the opposite foul line. Then have them start back.
**The coach may elect to occasionally throw the ball to the players’ glove side. The player looks
over his throwing shoulder and determines that the ball is on his other side. Without breaking stride
or getting turned around, he turns his head (head only, not his body) the other way to pick up the
ball and makes a backhand catch. This is an important skill for players to learn. The tendency is to
get turned around, making the play impossible.
The players must run full speed after they have tossed their ball to the coach.
The coach may run this 5-10 times back and forth.
Tips:
Position a coach at each foul line and make sure the players leave on time in order to keep the drill
flowing smoothly.
Teach players to run through the ball and not give up on it.
Put the glove up the last three steps only.
Encourage players to ‘lay out’ for the ball.
After tossing the ball to the coach make sure they sprint toward the foul line. It is important that they
learn to catch the ball running at full speed. A twist can be added to this drill. They must go one time
through without anyone dropping a ball in order to quit the drill. (Drill Time: 10-15 min)

Practice Planner 29
Copyright©Baseball Excellence www.baseball-excellence.com
RUNDOWNS
The player who gets into a rundown has made an offensive mistake. The defense should take the attitude that
they will get the out every time. Here are some tips for completing a successful rundown.
• If a runner is caught too far off a base, the pitcher or infielder with the ball should run directly at the runner
until he commits to a base. Sometimes the runner will freeze or hesitate too long and the player with the
ball can run him down without a throw. This is the best-case scenario.
• The player with the ball should hold it head high and in the proper throwing position. He should not make
faking motions with the ball because he might deceive his own teammate.
• When a player throws the ball he should toss it to his teammate’s glove side. The players should be on the
same side so they don’t have to throw over the runner.
• The player with the ball should run full speed at the base runner until the base runner makes a definite
commitment to the next base. The infielder without the ball should begin to immediately “close” on the
runner. (Failure to ‘close’ is a very common mistake.)
• When the runner has reached “commitment” speed and nears the other infielder, the player with the ball
tosses it to his teammate. This teammate then makes the tag.
• Keep in mind that if the runner runs into a player without the ball, he is awarded the next base. Some
coaches teach this to their base runners so you have to be aware of it.
• The timing of the rundown play is critical and the coach should focus on that aspect. The player with the
ball must throw at the right time and the other infielder must have “closed” enough so he can run the base
runner down and make the tag.
• Always strive to make this play with only one throw.
• It is usually necessary for the players to catch the ball and make the tag with one hand on this play.
• Players have to learn to catch the ball and make the tag on the run.
Unsuccessful rundowns usually occur when the player throws the ball too soon, too late or the other player
has not closed on the runner. (Drill Time: 15-20 min)
Practice Planner 30
Copyright©Baseball Excellence www.baseball-excellence.com
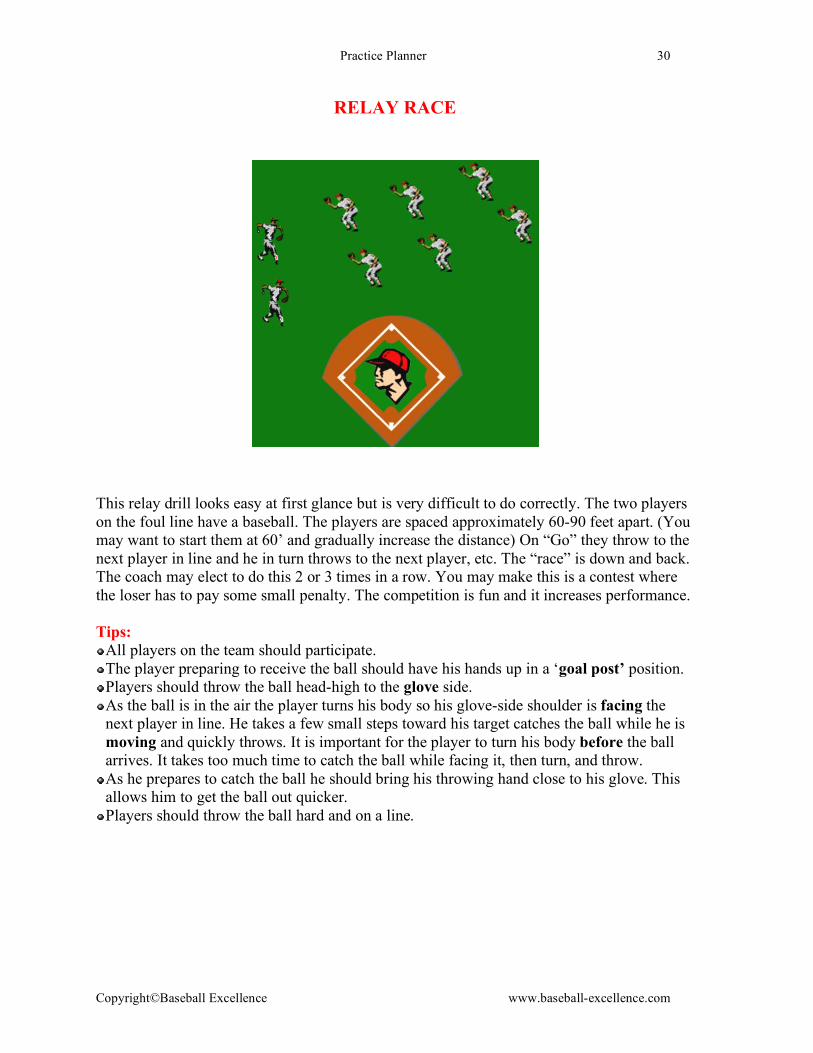
RELAY RACE
This relay drill looks easy at first glance but is very difficult to do correctly. The two players
on the foul line have a baseball. The players are spaced approximately 60-90 feet apart. (You
may want to start them at 60’ and gradually increase the distance) On “Go” they throw to the
next player in line and he in turn throws to the next player, etc. The “race” is down and back.
The coach may elect to do this 2 or 3 times in a row. You may make this is a contest where
the loser has to pay some small penalty. The competition is fun and it increases performance.
Tips:
All players on the team should participate.
The player preparing to receive the ball should have his hands up in a ‘goal post’ position.
Players should throw the ball head-high to the glove side.
As the ball is in the air the player turns his body so his glove-side shoulder is facing the
next player in line. He takes a few small steps toward his target catches the ball while he is
moving and quickly throws. It is important for the player to turn his body before the ball
arrives. It takes too much time to catch the ball while facing it, then turn, and throw.
As he prepares to catch the ball he should bring his throwing hand close to his glove. This
allows him to get the ball out quicker.
Players should throw the ball hard and on a line.
Practice Planner 31
Copyright©Baseball Excellence www.baseball-excellence.com
CATCHING
COMMON FAULTS AT THE CATCHING POSITION
Over the past years we have devoted a section in every Baseball Excellence
Monthly Newsletter to catching. We want to emphasize how important that
position is and how small flaws in mechanics can negatively effect the outcome of a game. A mistake-prone
catcher is like a poor quarterback on a football team. You are not going to win many games, the games won’t
go smoothly, and you or your players won’t have much fun.
Poor catching can make a game look pretty ugly. The pitcher doesn’t get the borderline strikes, there are too
many passed balls, base runners steal at will and the defense deteriorates and self-destructs. Whenever there is
a lot of movement on the base paths the defense is put under pressure and mistakes frequently occur. A
competent catcher can put a stop to much of that folly.
We like a game where the pitcher works fast and throws strikes, the hitters swing the bats, the defense makes
the routine plays and the game moves along at a brisk pace. In fact, that is the heart of coaching baseball. A
coach aspires to get his players to the level where competent play is the norm rather than the exception. And it
all starts with a skilled pitcher and catcher.
Throwing To Bases
The most common mistakes are with the feet. Look at the feet first. Here are the most serious transgressions a
catcher makes when he throws to a base:
He crow hops. A catcher doesn’t have time to take those extra steps. By the time a catcher has taken a crow
hop, a runner at full speed has taken 4-6 strides. If a coach will just put a stop to that unnecessary movement
he will give his catcher much more of an advantage. The crow hop is very common in youth catchers.
When he executes a jump pivot, he jumps back. This movement takes him further away from the base he is
throwing to.
The drill here is to draw lines in the clay behind his heels when his feet are in the receiving position. Watch
them as he executes a jump pivot. If the right foot moves behind the position of the left heel he has made an
unnecessary movement. The ‘teach’ is to tell the catcher to “change places with your feet.” His left foot
should land in the spot where his right foot originally was.
He jumps ‘around the corner’. His feet move back and too far to his left. It is actually as if he has jumped
around the corner of a building. Again, “change places with your feet.”
He does not close off his back foot properly. If he is throwing to second base, his right anklebone should be
pointing at the bag, not somewhere between third base and the shortstop.
He steps open with this left foot. (He steps toward the shortstop instead of second base.) This will pull his
front shoulder off direction to the base. Throws will often be to the shortstop side of second base. Let’s don’t
forget the upper body. There are plenty of mistakes made here also:
His front shoulder flies open. One reason may be the front foot we mentioned earlier. A more common reason
is that in an effort to throw hard, the catcher starts the throwing motion prematurely before his front foot
lands.
He drops his elbow when he throws. There is that dreaded ‘low elbow’ again. Often this is an error in timing
or the distance is too challenging. You will often see the ball ’sail’ high and away as it approaches second
base.
His arm path is too long. Instead of straight back, he goes down, back and up. A catcher must ‘short-arm’ his
throwing motion. This is one reason why pitchers should not be catchers. This category also includes faulty
arm action. We promise we won’t go into that again but they are plentiful among young catchers. You won’t
see too many at higher levels of play because by that time faulty arm action has forced young players out of
the game.
He doesn’t close off his front side. He never adequately closes off his front side to second base. The way to
teach good technique is to have the catcher bring glove, throwing hand and ball straight back to the back
shoulder together. He then continues with his throwing arm to the cocked position while the front elbow is
pointing at the base. This helps his front shoulder stay closed.
He doesn’t have a 4-seam grip on the baseball. This takes practice. By the time he catches the ball to the time
he is in the cocked position he must have a 4-seam grip. Otherwise he may throw a slider to the base.

Practice Planner 32
Copyright©Baseball Excellence www.baseball-excellence.com
He slips on home plate. This is embarrassing. Teach the jump pivot for inside pitches and the jab step for
outside pitches. This will help keep the catcher’s feet away from the plate.
Plays At The Plate
The biggest mistake here is that the catcher doesn’t close off his left leg to the runner. He exposes the side of
his leg and leaves himself open to a serious knee injury.
The catcher doesn’t get low enough.
Poor positioning in relation to the foul line.
Receiving The Ball
Let’s review a few common receiving errors:
Instead of holding the pitch firmly the catcher lets it travel into his body. This action impedes the umpire’s
view of the baseball and often takes the ball out of the strike zone.
He pushes a low pitch into the ground, taking away a possible strike. He must learn to ‘stick it.’
He constantly is guilty of too many passed balls. This may be partially due to a young catcher’s inability to
anticipate the path of the pitch. There is also the possibility he may be in the wrong position. Catching is hard
and it requires a very athletic player.
Receiving the high pitch incorrectly. The catcher must learn to get his glove above the high pitch. Many times
poor technique will cause the ball to ‘tick’ off the top of his glove.
Hard hands is the opposite of ‘soft hands.’ It is the inability to receive the ball correctly. The catcher may
stab at the ball or it may often bounce out of his glove. If correct technique has been taught this may just be
lack of athletic ability.
Blocking Balls in the Dirt
One of the most common faults among young catchers is trying to short hop or catch a ball in the dirt instead
of trying to block it. This requires constant verbal reinforcement and hours of blocking drills.
After a catcher blocks the ball he doesn’t hustle after it and allows the runner to advance.
He fails to get in the proper catching position with runners on base (or with 2 strikes). He must unlock his
hips and raise his haunches to make it easier to drop down to block the ball in the dirt. (Very common
mistake)
The catcher must learn to:
1. Get to his knees very quickly. He might think of “exploding down.”
2. Bend over the ball and absorb it with his body. His upper body should “roll over” the ball. In this manner
he can gain a measure of control of the ball.
3. Practice these techniques as “shadow drills.” He may do them at home.

Practice Planner 33
Copyright©Baseball Excellence www.baseball-excellence.com
CATCHER DRILLS
Balls to the mask.
Reduces fear of being hit
in the face with the ball.
No hands blocking drill.
Round shoulders and absorb
ball with body.
Routine blocking drill. Keep right hand
behind glove.
Drill blocking with a hitter
in the box. Catchers don’t
like getting under the bat.
Notice how he pushes off with
his right foot to get into
position.
Catcher then executes the block, using
good technique.
Foul pop-ups. Derek hits
high foul fly ball.
Catcher finds ball and holds
mask.
He throws mask away from direction
of the ball and keeps his back to the
infield with his hands over his head.
Conditioning Drill-
3 sets of 10 (Don’t use
your hands to provide
impetus.)
Catcher jumps from side to
side maintaining good form.
The coach challenges the catcher to
make the jumps as quickly as possible.

Practice Planner 34
Copyright©Baseball Excellence www.baseball-excellence.com
OFFENSE
Coach Grant Discusses Hitting
Plate coverage with 2 strikes.
Learning which area of the strike zone is most productive for you.
Knowing the fastball counts. (Counts in which it is likely for the pitcher to throw a
fastball.)
Learning how to recognize the pitch out of the pitcher’s hand.
How to hit to different areas of the field.
Understanding fastball movement.
The importance of being an aggressive hitter
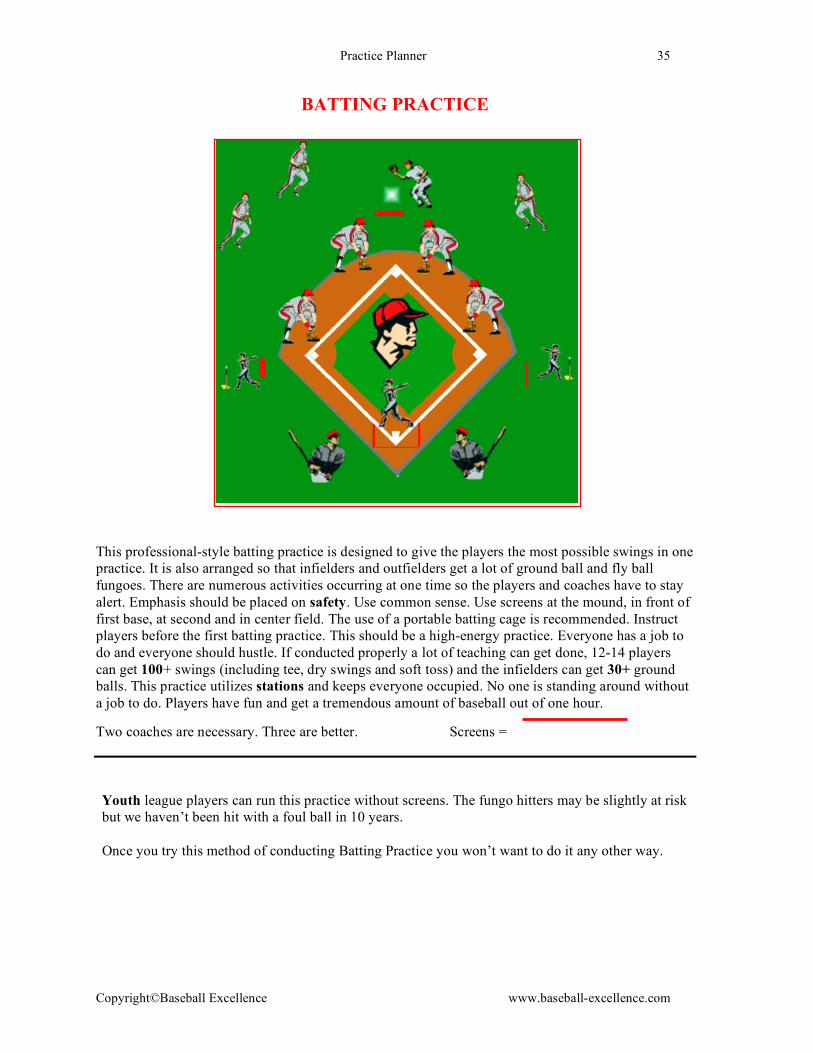
Practice Planner 35
Copyright©Baseball Excellence www.baseball-excellence.com
BATTING PRACTICE
This professional-style batting practice is designed to give the players the most possible swings in one
practice. It is also arranged so that infielders and outfielders get a lot of ground ball and fly ball
fungoes. There are numerous activities occurring at one time so the players and coaches have to stay
alert. Emphasis should be placed on safety. Use common sense. Use screens at the mound, in front of
first base, at second and in center field. The use of a portable batting cage is recommended. Instruct
players before the first batting practice. This should be a high-energy practice. Everyone has a job to
do and everyone should hustle. If conducted properly a lot of teaching can get done, 12-14 players
can get 100+ swings (including tee, dry swings and soft toss) and the infielders can get 30+ ground
balls. This practice utilizes stations and keeps everyone occupied. No one is standing around without
a job to do. Players have fun and get a tremendous amount of baseball out of one hour.
Two coaches are necessary. Three are better. Screens =
Youth league players can run this practice without screens. The fungo hitters may be slightly at risk
but we haven’t been hit with a foul ball in 10 years.
Once you try this method of conducting Batting Practice you won’t want to do it any other way.

Practice Planner 36
Copyright©Baseball Excellence www.baseball-excellence.com
TIPS
Divide the players into groups; eg. 12 players, 3 groups of 4.
It’s a good idea to put the best hitters in the first group. They can ‘show the way’ and help give the
younger players incentive to improve. Or you may put your catchers and pitchers in the first group
so they are available for bullpens.
First group hits, 2nd
group-outfield, 3rd group- take infield fungoes. (If batting cages are available,
create another group.)
Hitting group: 1st player hits, 2
nd player hits off tee, 3
rd player takes soft toss, 4
th player warm-up
swings and responsible for foul balls over the screen. He can work on his hitting mechanics and take
overload-under load swings. The soft toss hitter is next in line to hit.
Example of hitting rounds: 1st round-2 bunts, 1 hit-and –run, 10 swings. 2
nd round: 2 bunts, 1 hit-
and –run 6 swings. 3rd
round: 6 swings. 4th
round: 3 swings. (A swing and a miss is considered a
swing- none of that “end on a good one” stuff. Everyone has the same number of swings.)
The reason for bunting first is that bunting requires concentration and the player watches the ball hit
the bat. It prepares him for hitting in addition to reinforcing bunting technique. Bunt down both
lines.
On next to last pitch, pitching coach calls “Coming out.” After the next swing, the hitter exits to his
right and another hitter immediately steps into the batter’s box or portable cage from the left.
First baseman and shortstop take ground ball fungoes from the 3rd
base fungo coach. Second and
third basemen take groundballs from the 1st base fungo coach. Fungoes are hit in this manner to give
game-like angles to ground balls.
Infielders throw the fungo ball back to the coach with an arc so it lands on one hop. This is a skill
and it must be learned. There aren’t enough coaches to help catch. They are needed elsewhere. This
also reduces stress on players’ arms and keeps the infielders facing the plate for safety’s sake.
Infielders take fungoes from the coach only. All balls hit by the batter are let go through the infield
and fielded by the outfielders.
Fungoes are timed after pitched ball is hit so as to not to have 2 balls hit to an infielder at the same
time. The fungo coach should pay close attention to this. Pitching coach-allow time between swings.
Outfielders break on all fly balls, retrieve and throw to bagman. Coach should be alert for teaching
opportunities in the outfield. All outfield balls are thrown into the bagman.
Outfielders should be working on their throwing accuracy to the bagman and learning to “break’
on fly balls. Pitchers shagging in the outfield can work on mechanics by shadow pitching.
Coaches should be aware that some players will have a tendency to cluster in the outfield. That is
counterproductive and the group should be broken up. Station outfielders to all fields.
When the last hitter is on his last round the coach calls “Next group.” They RUN to the outfield
foul line (to avoid getting hit by baseballs) and to their stations.
When the pitching coach’s bucket gets low he calls “Balls in” and the bagman RUNS the balls into
him taking care not to get hit by a batted ball.
When bucket is empty the pitching coach has EVERYONE in the hitting group quickly pick up
balls.
Higher levels require screens and a portable batting cage.
Keep the practice running at an urgent pace. The more swings and fungoes the players get, the
better.
Station 2 outfielders along both foul lines. If a big hitter is at bat, position a player outside the fence
to retrieve home run balls.
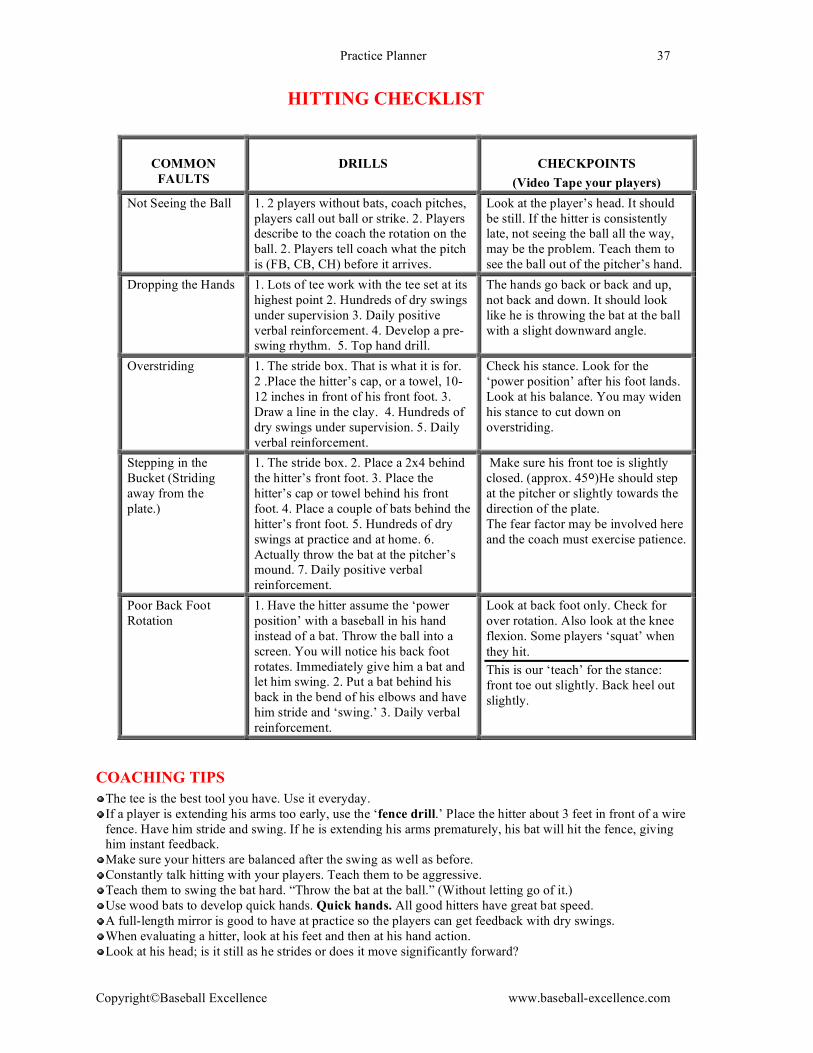
Practice Planner 37
Copyright©Baseball Excellence www.baseball-excellence.com
HITTING CHECKLIST
COMMON
FAULTS
DRILLS CHECKPOINTS
(Video Tape your players)
Not Seeing the Ball 1. 2 players without bats, coach pitches,
players call out ball or strike. 2. Players
describe to the coach the rotation on the
ball. 2. Players tell coach what the pitch
is (FB, CB, CH) before it arrives.
Look at the player’s head. It should
be still. If the hitter is consistently
late, not seeing the ball all the way,
may be the problem. Teach them to
see the ball out of the pitcher’s hand.
Dropping the Hands 1. Lots of tee work with the tee set at its
highest point 2. Hundreds of dry swings
under supervision 3. Daily positive
verbal reinforcement. 4. Develop a pre-
swing rhythm. 5. Top hand drill.
The hands go back or back and up,
not back and down. It should look
like he is throwing the bat at the ball
with a slight downward angle.
Overstriding 1. The stride box. That is what it is for.
2 .Place the hitter’s cap, or a towel, 10-
12 inches in front of his front foot. 3.
Draw a line in the clay. 4. Hundreds of
dry swings under supervision. 5. Daily
verbal reinforcement.
Check his stance. Look for the
‘power position’ after his foot lands.
Look at his balance. You may widen
his stance to cut down on
overstriding.
Stepping in the
Bucket (Striding
away from the
plate.)
1. The stride box. 2. Place a 2x4 behind
the hitter’s front foot. 3. Place the
hitter’s cap or towel behind his front
foot. 4. Place a couple of bats behind the
hitter’s front foot. 5. Hundreds of dry
swings at practice and at home. 6.
Actually throw the bat at the pitcher’s
mound. 7. Daily positive verbal
reinforcement.
Make sure his front toe is slightly
closed. (approx. 45º)He should step
at the pitcher or slightly towards the
direction of the plate.
The fear factor may be involved here
and the coach must exercise patience.
Poor Back Foot
Rotation
1. Have the hitter assume the ‘power
position’ with a baseball in his hand
instead of a bat. Throw the ball into a
screen. You will notice his back foot
rotates. Immediately give him a bat and
let him swing. 2. Put a bat behind his
back in the bend of his elbows and have
him stride and ‘swing.’ 3. Daily verbal
reinforcement.
Look at back foot only. Check for
over rotation. Also look at the knee
flexion. Some players ‘squat’ when
they hit.
This is our ‘teach’ for the stance:
front toe out slightly. Back heel out
slightly.
COACHING TIPS
The tee is the best tool you have. Use it everyday.
If a player is extending his arms too early, use the ‘fence drill.’ Place the hitter about 3 feet in front of a wire
fence. Have him stride and swing. If he is extending his arms prematurely, his bat will hit the fence, giving
him instant feedback.
Make sure your hitters are balanced after the swing as well as before.
Constantly talk hitting with your players. Teach them to be aggressive.
Teach them to swing the bat hard. “Throw the bat at the ball.” (Without letting go of it.)
Use wood bats to develop quick hands. Quick hands. All good hitters have great bat speed.
A full-length mirror is good to have at practice so the players can get feedback with dry swings.
When evaluating a hitter, look at his feet and then at his hand action.
Look at his head; is it still as he strides or does it move significantly forward?

Practice Planner 38
Copyright©Baseball Excellence www.baseball-excellence.com
THE THREE-MAN DRILL
This drill accomplishes several objectives. It allows one or two coaches to instruct three players at
one time as they each work on their different skills.
It involves a hitter, catcher and pitcher only. And it is a ‘live’ drill. The hitter is trying to hit, the
pitcher is trying to get him out and the catcher is working on his game.
Three players only are on the field playing a simulated game. One coach sets up behind the portable
batting cage and the pitching coach is behind a screen on the outfield side of the pitching mound.
The other players can be working on drills on another field or in the batting cages or shagging balls.
A hitter is on deck and another pitcher and catcher is warming up in the bullpen, waiting their turn.
A lot of teaching can get done with this drill. The isolation allows opportunities for very meaningful
instruction. A coach can spend as much time as 1 - 3 simulated innings with each trio. (He should
keep a pitch count.) He can give his entire pitching staff game-like conditions in one practice session
and he can give his hitters a significant workout. You will find that in these sessions, the hitters will
not always be as successful as in batting practice. They should understand that. The pitcher is trying
to get them out. This drill has terrific mental as well as physical applications and comes under the
category of making good use of time.
Tips:
• Occasionally give situations to the hitter: runner on third no outs, bunt situation, etc.
• The pitching coach can get a good view of the pitcher’s arm action, direction and balance under
game- like conditions. It is a good time to work with him on his mechanics.
• Give positive verbal instruction.
• If necessary, one coach can run this drill.
• Because this drill uses game-like conditions, the teaching applications can really help a player with
his progress. (Drill Time: 1+ hour)

Practice Planner 39
Copyright©Baseball Excellence www.baseball-excellence.com
SITUATIONAL BATTING PRACTICE DRILL
This is Batting Practice with a purpose. Practice this offensive drill at least twice a week after
an abbreviated batting practice. It is very important to winning baseball because it practices
(and continually reinforces) the ways teams score runs. The use of a runner allows coaches to
teach the important skills of base running at the same time the batter is hitting. Correctly
reading and reacting to what the hitter does will develop a very savvy and sound offensive
team.
This drill involves 3 players- a base runner, a hitter and a player on deck. A coach should be
with the hitter and a coach should be with the runner. Other players will be shagging in the
outfield and/or hitting in the cages. The base runner goes to the on- deck position, the hitter
then becomes the runner and the on-deck player becomes the hitter. After the three players
have both hit and run the bases, three more players are brought in. (Call the next group in
while the last hitter is hitting his final five swings.)
This is the drill and a good part of its effectiveness is that the hitter is under the gun to
execute. He gets only one attempt on each of the 12 segments of the drill.
1. Hitter places two sacrifice bunts, one down each foul line. Base runner at first base (after
his correct primary and secondary leads) ‘breaks’ (2 or 3 steps) on each bunt but does not
advance. It is important that the coach sees that the runner understands leads and when to
break. The runner must read the down angle off the bat. He must freeze and retreat on a
popup.
(Teaching base runners to read and react to balls off the bat is a real skill in itself and besides
real games the Situational Batting Practice Drill is the best way to teach it.)
2. Hit-and-run. The next pitched ball is the hit and run. Runner breaks and runs all the way
to third base (quick look-in after three strides.) Hitter attempts to hit ball on the ground. If
the ball is hit in the air, the runner hesitates (to show he recognizes it) but continues on to
third anyway. (To make the drill move along at a practical pace.)
3. At third, the coach gives the squeeze bunt sign* as the runner approaches the base. The
hitter acknowledges that it is a squeeze. The runner sprints for home at the appropriate
time (when the pitcher’s front foot lands) and the hitter bunts the ball on the ground. The
runner continues (runs) behind the cage and the hitter bunts a pitch for a base hit (while
the runner is returning to first base.) If he has time he may bunt twice here. If you have
hitters who cannot bunt for a base hit have them sacrifice bunt.
4. Hit -and –run when the runner reaches first base. The runner this time stops at second
base
5. The hitter then attempts to hit behind the runner to advance him to third base. The runner
sprints to third base after reading where the ball was hit. (It must get by the pitcher.)
6. The hitter then gets five free “get in” swings. The coach may give the hitter situations;
infield in (in which case he tries to hit a fly ball deep enough to score the runner) or
infield back (the hitter has the option of hitting a fly ball or a ground ball to the middle of
the infield.) The hitting coach instructs the hitter as to pitch selection; if the ball is up- hit
a fly ball, low and away- ground ball to the right side.

Practice Planner 40
Copyright©Baseball Excellence www.baseball-excellence.com
The runner, after his walking leads, “reads” all five balls and breaks or returns to the base on
each one. He does not go home on each one, merely breaks two or three steps so that the
coach can see that he knows the correct technique and understands the situations.
This is critical teaching time for the runner at third. The base runner must come to understand
what he can and cannot do to score.
On Ground Balls:
1. The ball must get by the pitcher.
2. The runner can score if the ball is hit to either middle infielder. (Playing back)
3. The runner can score if the third baseman has to range to his left to field a ground
ball.
4. The runner cannot score if the ball is hit directly to the first or third basemen.
On Fly Balls:
1. The runner immediately returns to the base on any ball hit into the air. Do not hang in
the baseline.
2. From the safety of the bag he watches the flight of the ball and determines if he can
score. He takes three steps toward home plate after the ball is caught. Tag with the
left foot and look over the left shoulder. Never take eyes off flight of ball. Stand on
the bag with his left foot so he can face the fly ball without getting turned around.
3. All foul fly balls are a tag up situation and may score him as well.
That is the sequence for each hitter-12 attempts. The on-deck hitter then steps into the cage
while the hitter becomes the base runner and the runner becomes the on-deck batter.
TIPS:
For the hit and run and hitting behind the runner, the base runner advances even if the hitter
is not successful. This keeps the drill moving and allows all players to hit, and run the bases
in one session. Coaches, be careful to note that the runner makes the correct reads. The batter
gets one swing (or bunt) only- no multiple attempts.
This should be a highly intense teaching session for the first few times because it involves so
many skills. (Coaches, do your homework before introducing this drill. There will be a
multitude of teaching opportunities.) Talk each hitter through the drill the first few times.
Once your team has gone through several of these sessions this drill will move more rapidly
and can be added to your regular batting practice.
Time must be spent teaching during this drill. All mistakes must be corrected as they occur.
The pitching coach must pitch from the stretch position during this drill to provide realism
for the base runner. He may occasionally step off or make a mock throw to first base during
the hit and run segment to keep the runners honest. If a pitching machine is used
(recommended) the ball feeder should simulate the stretch position as well. Allow time
between pitches to allow the base runner to get back to his position.

Practice Planner 41
Copyright©Baseball Excellence www.baseball-excellence.com
As the base runners are constantly moving and reacting during the entire drill Situational
Batting Practice also has very good conditioning aspects. This drill will help your team get in
“Baseball Shape.”
Youth teams that cannot lead off first base can perform similar situational hitting without the
hit-and-run. They can bunt runners over and hit behind them to move them over. Instead of
the squeeze bunt they can execute a “contact play” where the hitter bunts the ball down the
first base line and the runner scores from third. Teach the runners how to read the angle of
the ball off the bat. Teach them to score without the coach’s input. (Our Video, “Youth Skills
and Special Drills” has this play.)
The year my son Stephen was 12, his team won the LL county championship. The two weeks
leading up to the playoffs we practiced the Situational Batting Practice Drill every day. (They
got to where they could do it in their sleep.)
This is the Drill: (we used a pitching machine)
1. Batter bunts twice. (Sacrifice bunts down each foul line.)
2. On the first bunt the runner reads, reacts and returns to first base. On the second bunt
the runner advances to second base.
3. Hitter hits behind the runner and advances him to third base.
4. Coach gives the ‘squeeze’* (go on contact sign and the hitter acknowledges it.)
5. The batter bunts the ball along the first base line and the runner scores. The batter
must bunt the ball on the ground.
6. As he continues behind home plate to first base the batter bunts for a base hit. (or a
sacrifice) There is no wasted time during this drill.
7. Batter bunts once and the runner advances to second base.
8. Batter hits behind the runner and the runner advances to third base.
9. The batter gets 5 “get in” swings and the runner reads and reacts to each one. (The
coach gives the hitter different situations.)
Every team youth or advanced, should make the Situational Batting Practice Drill an integral
part of their practice routine. If a team will practice this drill continuously throughout the
season they will become a very good offensive team; never at a loss for scoring runs. It
automatically puts them in a ‘situational mindset’ with runners on base and gives them the
confidence to execute the plays that win baseball games.

Practice Planner 42
Copyright©Baseball Excellence www.baseball-excellence.com
SACRIFICE BUNT CHECKLIST
The pivot method is superior to the “square around” method. The position is easier to assume the
bunter has more mobility and better coverage of the strike zone without putting his body in harm’s
way.
The batter must understand that he is there to sacrifice his turn at bat so that he may advance the
runner. “Show” bunt early.
Bunting is a very difficult skill so you must practice it daily as part of batting practice.
CORRECT APPROACH COMMON MISTAKES
He moves up in the box.* The toes of both
feet are pointing at the pitcher with back
foot slightly closer to the plate than the
front. He assumes a balanced athletic
posture. His backside is under his
shoulders.
The feet are not placed properly and the bunter is
not in an athletic position. His body is leaning too
far forward.
*Moving up in the box, ahead of the plate cuts
down on foul balls.
The bunter holds the bat relatively level
and at the top of the strike zone and has
coverage of the plate. He has both hands
up on the bat.
He holds the bat too low and the bat head is not
level but in a downward position.
The bunter lowers his body to bunt a low
pitch. He does not move the bat up or
down but moves his body by bending his
knees.
The bunter drops the bat head to attempt to bunt a
low pitch. This will invariably cause the ball to be
popped up.
The bunter allows the ball to arrive over
the plate and simply lets the ball hit the
bat.
The bunter reaches out for the ball. This will cause
the ball to be struck too hard, possibly negating
the desired effect of a bunt.
For an outside pitch the bunter bunts down
the first base line by pointing the knob of
the bat at third base. The inside pitch is
bunted by pointing the bat head at first
base.
The bunter bunts back at the pitcher negating the
desired result of a bunt.
The bunter bunts strikes only. He
understands that a base on balls moves the
runner over also.
The bunter offers at pitches outside the strike
zone.

Practice Planner 43
Copyright©Baseball Excellence www.baseball-excellence.com
TEACHING BASERUNNING
Line the players outside the first base line. Go through the base running techniques for each base and
have them each perform the skills.
First base- Take a primary lead. * (Lead off in a straight line from the front corner of the bag
because it gives the pitcher the illusion that the runner is closer to the base than he actually is.) As the
pitcher comes set, take the last 2 deliberate shuffle steps. This can have a distracting effect on a young
pitcher. The primary lead gives the runner approximately a 15-foot lead. With a left-hand pitcher he
may elect to take a shorter lead, 3 shuffle steps only. (One-way lead.) As the pitcher delivers the pitch
the runner takes his secondary lead. * The runner’s chest is facing the catcher and the runner keeps
his eyes on the pitcher’s back foot. (If the back heel raises he is throwing over.)
Second Base- starting with the right foot, take 3 steps off the base in a straight line toward 3rd
. As the
pitcher comes set take 2 deliberate shuffle steps. As the pitcher delivers the ball to the plate the base
runner takes his secondary lead. (Can be up to 20’, third base coach gives directions) Before the pitch
the runner should keep his eyes on the pitcher only.
2-out lead at Second Base- same as primary lead at 1st and 2
nd but 12’ behind the bag, toward left
field. The 12’ arc is now established and provides an angle for sharp turns at 3rd
base. He should go at
the ‘crack of the bat.’
Third Base- Lead off in foul territory, return to the base in fair. The lead is as far as the third baseman
is away from the bag. From your primary lead, if the pitcher is pitching from the stretch, take a 3 step
walking lead, timed so that your right foot lands at the moment the ball crosses the plate. If the pitcher
is pitching from the windup, take a 5 step walking lead. This is an advantage because your lead has
taken you 25-28 feet from third base.
*Primary Lead- With the left foot on the base take 3 full steps beginning with the right foot. R-L-R.
Stop. When the pitcher comes set, take 2 steps. Shuffle, shuffle. R-L, R-L stop.
*Secondary Lead- As the pitcher delivers to the plate take 3 skip hops, leading with the right foot,
timed so the last hop is in unison with the ball crossing the plate. Read the pitch- hits the catcher’s
glove or is hit. If it is hit read the angle of the ball off the bat, down or up. (Drill Time: Whatever
time it takes. This is a vital skill.)

Practice Planner 44
Copyright©Baseball Excellence www.baseball-excellence.com
YOUTH LEAGUE Have the players kneel on the grass in front of home plate. Go through the base running techniques and
move them around the bases as you teach. Then have them perform the skills.
Home to first- when contact is made, immediately drop the bat and push off with the rear foot
directly towards first base. Look straight ahead, not where the ball was hit. Run with the head up. At
the runner’s box (about half way) take a quick look at the infield to see if the ball went through.
(Don’t break stride.) If there is to be a play at first, touch the front of the bag. Run full speed through
the base, break down and look right. (Look right to see if there is an overthrow.) If the ball goes
through, make an 8-foot arc approaching the base, lean, and push off the inside corner of the base with
either foot. As you round the base, still at full speed make the determination whether to advance or
retreat back to the bag.
First to second-determine the number of outs, the situation, look for a sign from the coach and find
the outfielders. Remain on the base until the ball crosses the plate. Take 2 shuffle steps while facing
the plate. If the ball is hit on the ground, take a crossover step and run full speed to second. If a fly ball
is hit to the outfield, go ‘halfway’ to see if it is caught. If not, sprint to second base. If caught, run full
speed back to first. On a base hit to the outfield take an 8 foot arc and approach second base the same
way as at first, leaning and pushing off the inside of the bag. As you make that arc pick up the third
base coach and look for a signal.
Second to third- look at the coach for a sign, recognize the number of outs, and find the outfielders. If
a ground ball is hit to the runner’s right and he is not forced, make sure he doesn’t run into an out by
the shortstop or third baseman. If there is a runner on first he must run on a ground ball. On fly balls to
the outfield go halfway. On ground balls to the right side sprint to third. On base hits to the outfield
think ‘score’ and pick up the coach at third base.
Third to home- pick up the sign. Lead off in foul territory and return in fair. He can advance as far
down the line as the third baseman is away from the bag. On any fly ball he should immediately
return to the bag and tag up (It is common for young players to not hustle back to the bag.). On any
ground ball to the middle infielders if they are at normal depth, he may score. If the infield is in, wait
for the ball to go through. Read the ball in the dirt and make the decision whether or not to go on a
passed ball.
BASE RUNNING AND CONDITIONING
Use this drill for teaching as well as conditioning purposes.
• Players line up in the right hand batter’s box.
• On “Go” the first player runs from home to first. As he reaches the runner’s box (1/2 way) the next player
runs.
• Teach good technique: run with head up, quick look to infield at runner’s box, hit front of bag, break down
and look right.
• Run the players from home to first 4 times. They walk back in foul territory to get in line.
• The next series is home to second.
• As the base runner nears the bag he runs out away from the baseline hits the corner with either foot and
pushes off toward second base.
• Run the players from home to second 4 times. They walk back through the middle of the infield.
• The next series is first to third. Run the players 4 times from first to third.
• The last series is circling the bases- twice.
• Players should run at full speed at all times.
• As they run, have a coach at each base to monitor technique.
• Run this drill the last thing at practice. (Drill Time: 10 min)

Practice Planner 45
Copyright©Baseball Excellence www.baseball-excellence.com
MISCELLANEOUS DRILLS
These drills have a specific purpose and/or provide some variety for the players.
Teaching Sliding- Line the players along the outfield foul line. Have them sit on the grass and make
a ‘figure 4 ‘with their legs. That is the position they should be in when they slide. Lay out a flattened
large cardboard box 60’ away in the outfield. (You can get these boxes from an appliance store or
auto body shop.) Have the players take off their shoes and one at a time run full speed to the box and
simply sit down on that ‘figure 4.’ The tendency is to drag their hands on the ground behind them.
Have them keep their hands in the air. This drill is a lot of fun.
Short Hops- Arrange the players in two lines, about 10’ apart, facing each other in the outfield grass.
Each member of one group has a baseball. The other players get into the ‘ready’ fielding position
with their gloves on the ground. The player with the baseball tosses the ball on the ground in front of
the player’s gloves. The player fields the ball by looking the ball into his glove and bringing the ball
into his stomach. The tosses should be medium speed. The players’ gloves should be as wide open as
possible. They should not move their feet during this drill but keep them in a shoulder wide, athletic
position (this is a ‘hands’ only drill). The players should have their hands out in front of their body.
They may also do this drill from a kneeling position. (5 min)
Infield Fungoes with no Glove- line players behind third base. They have no gloves. Hit or roll
ground balls; they field them and throw to first. This drill teaches the players to have soft hands and
takes away fear of the baseball. You may use RIF balls. (5 min)
Fly Balls Near the Fence- Throw high fly balls to the outfielders so they have to go back on the ball
and catch it near the fence. They should keep their eyes on the ball and reach out to find the fence
with their throwing hand. (5 min)
Rounding First (Bobble Drill)- line the players behind the batter’s box. Have a coach in medium
center field and a player or coach at second base. The first player slaps his hands to simulate a swing
and sprints to first. Another coach hits a ground or fly ball into the outfield. As the runner approaches
first base he takes his 8’ arc, hits the inside corner of the bag and rounds the base at full speed. The
coach in the outfield either makes the play or bobbles the ball, allowing the runner to make the
decision to keep going to second base. If the coach makes the play, the runner quickly returns to first.
This drill teaches players to be aggressive and intelligent on the base paths. (10-15 min) *Good Base
Running Drill. Young players have a tendency to be satisfied with just reaching a base. Teach them to
be aggressive. (Youth Skills and Special Drills Video.)
Football Drill- (variation of Quarterbacks-a good drill when no field is available) Line players
behind the outfield foul line. On ‘go’ the first player sprints into the outfield. The coach with a
baseball calls “left, right or ball.” On left the player makes a sharp turn to his left and looks for a
‘pass.’ “Ball” means the coach is throwing the ball directly over the player’s head. After the catch the
next player in line hold up both hands in the ‘goal post’ position. The player who caught the ball fires
it into this ‘cut-off’ man. This drill involves athleticism, catching and throwing accuracy. (10-15 min)
Skull Session- (Rain days or days when the field is too wet) Coach tests individual players with
situational questions. He may give baseball cards for right answers. These are great times to watch an
instructional video, go over mental mistakes, your philosophy, etc. (1 hour) Don’t cancel practice
because it is raining.
Around the Horn- (all players) Place the players 3 deep at each base. The catcher starts the drill. He
throws to the third baseman, third to second to first and back to the catcher. (Clockwise) The players
must move their feet, catch the ball out in front of their bodies with 2 hands and quickly throw the
ball to the next base. After 3 rounds of that, they throw counterclockwise (catcher throws to first base
to start the round.) This is harder because their shoulders are not closed to their target. The ‘teach’ for
this is “Change places with your feet.” It is the responsibility of the coach to keep this drill moving at
high intensity. He may end the practice with this drill. He also may challenge them to go around a
certain number of times without an error (Perhaps 5 each way). He can time this drill and challenge
the players to improve their time. (10-15 min)
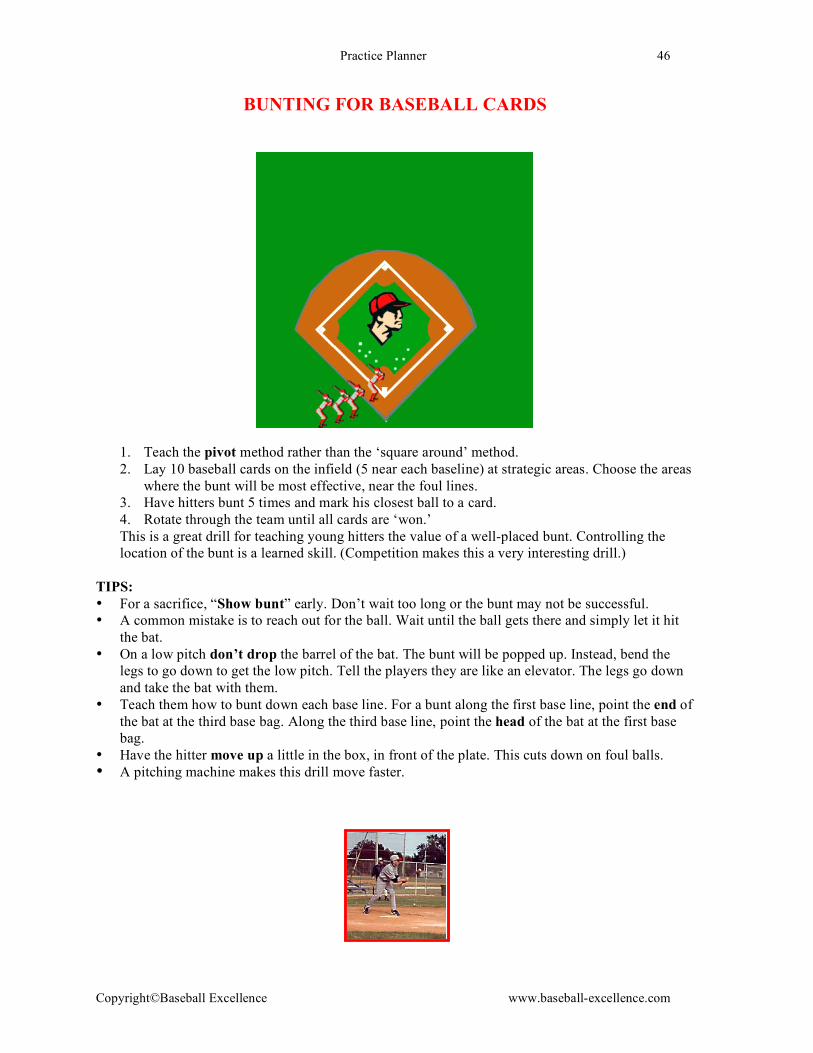
Practice Planner 46
Copyright©Baseball Excellence www.baseball-excellence.com
BUNTING FOR BASEBALL CARDS
1. Teach the pivot method rather than the ‘square around’ method.
2. Lay 10 baseball cards on the infield (5 near each baseline) at strategic areas. Choose the areas
where the bunt will be most effective, near the foul lines.
3. Have hitters bunt 5 times and mark his closest ball to a card.
4. Rotate through the team until all cards are ‘won.’
This is a great drill for teaching young hitters the value of a well-placed bunt. Controlling the
location of the bunt is a learned skill. (Competition makes this a very interesting drill.)
TIPS:
• For a sacrifice, “Show bunt” early. Don’t wait too long or the bunt may not be successful.
• A common mistake is to reach out for the ball. Wait until the ball gets there and simply let it hit
the bat.
• On a low pitch don’t drop the barrel of the bat. The bunt will be popped up. Instead, bend the
legs to go down to get the low pitch. Tell the players they are like an elevator. The legs go down
and take the bat with them.
• Teach them how to bunt down each base line. For a bunt along the first base line, point the end of
the bat at the third base bag. Along the third base line, point the head of the bat at the first base
bag.
• Have the hitter move up a little in the box, in front of the plate. This cuts down on foul balls.
• A pitching machine makes this drill move faster.

Practice Planner 47
Copyright©Baseball Excellence www.baseball-excellence.com
Short hops fielded on knees. This short hop drill is also From a kneeling position
Good “hands only” drill “hands only.” Don’t move practice “laying out for balls
the feet
Hit ground ball fungoes during Pitchers covering first base
Batting Practice (2 coaches)
SLASH BUNT (Also called Slug Bunt or Butcher Boy) A good offensive tactic to use with runners on first
and second and less than 2 outs.
Batter shows bunt early. As pitcher’s front foot lands the Batter hits the ball on the ground
batter draws the bat back into the into the “V” of the infield,
hitting position. (Notice he remains past the pitcher.
“Choked up” on the bat.)

Practice Planner 48
Copyright©Baseball Excellence www.baseball-excellence.com
EVALUATE YOUR TEAM
At the end of your season reflect on the past season and evaluate the skills of your players as
individuals and as a team. The following are a few examples:
Team play-
Did your team sacrifice bunt well? Did they bunt 85% of the time on the first attempt? Bunting
on the first attempt is very important. It keeps the batter away from the 2-strike dilemma.
Did they run the bases well? How well did they run from 1st to 3
rd? How were their lead-offs?
Was their lead large enough? Did they ‘look in’ at the right time on the hit and run?
Was your pitching staff a 2-pitch staff? Should you use the fall to develop a 3rd
pitch? (usually a
change-up)
As a staff, did your pitchers improve their fastball command?
How well did your pitching staff pitch with runners on base?
Do you have enough catchers? Did you develop a second catcher?
How was your outfield play? Could they throw out runners at the plate? Could they “track” the
ball? Did they communicate?
Did your infielders communicate?
Individual Players-
Evaluate arm strength and accuracy of each player. Devise an off-season plan to improve arm
strength.
How well did your infielders move to their left? To their right? Backhands? Slow rollers?
Recognize the infielders who consistently made the same defensive mistakes.
How well did your catchers block balls? Frame pitches? How was their overall generalship?
Recognize the hitters who consistently made outs the same way. (i.e. Groundouts.)
Evaluate your players’ running ability. Who needs improvement? Hiring a running coach can
be a wise investment.

Practice Planner 49
Copyright©Baseball Excellence www.baseball-excellence.com
HOLDING A TRYOUT
Whether for a league or a Travel Team the following way to hold a tryout will help in your
selection process. It is simple and yet geared to the baseball skills required for skillful play.
This tryout is run in a similar manner to the way professional team conduct tryouts, with a few
modifications.
It is a good idea to register each youngster and if desired, pin a number on his back.
Then sit them all down in a dugout and explain how the tryout is to be run. Tell them it is being
held just like a major league tryout and that they are expected to hustle at all times on the field
and give 100% effort.
Tell the kids that they are going to be timed at 40 yards, then take 4 ground balls at the SS
position, throw to third from right field, throw home from center field and finally, hit.
It is desirable for a good fungo hitter to run the tryout and let the coaches evaluate the players
as it all unfolds.
First, have them stretch, run and throw short to long toss so they can get warmed up. Evaluate
their arm action and athleticism.
Have a 40-yard area in the outfield measured off, starting from one foul line and marked off
with cones. (Major league scouts use a 60-yard course. Everything in LL dimensions is 2/3 of a
regulation ball field.) If this is a high school age tryout, measure off 60 yards.
The coaches stand at the end of the “course” and the players stand at the foul line. They run in
two’s, not only for time’s sake but to create competition to increase their effort.
Because light travels faster than sound, use the drop of a cap to signal when they players
should start. Hold the cap out in front of your body and simply let it fall. As the cap drops the
players start running and the coaches start their stopwatches. Run them 1-2, 3-4, etc. in that
order. Give the coaches time to write the results and reset their watches.
After all players run for time, have them jog to the outfield grass in front of the shortstop
position. Player number one takes his ready position at shortstop. (The shortstop position is
played 6 steps over (9 regulation field) and back just in front of the outfield grass. I mention
this because too many teams play their shortstop out of position.) Always evaluate infield play
from the shortstop position. It is the best place to judge arm strength and athletic ability.
Hit four ground balls to each player; the first right at him, the second to his left, the third to his
backhand and the fourth a slow roller. Have them throw each one to the first baseman. Hit
routine ground balls, not hard smashes. You want the coaches to be able to evaluate technique
and skill, not have the kids bailing out because they might be afraid of hard-hit ground balls.
After the SS round, hit four fungoes to each first baseman and have them field the balls and
throw to third base- a long throw.

Practice Planner 50
Copyright©Baseball Excellence www.baseball-excellence.com
A good fungo hitter can make any tryout a success. You want to hit these routine ground balls
so they take at least two hops (2-3 hops are more difficult and a little more intimidating.) and
you want them to be very accurate.
After each player takes four ground balls, they jog to right field. Hit two ground balls each and
have them throw to third base. Do not cut any balls off. Evaluate not only their fielding ability
and arm strength; evaluate their accuracy as well. You might have a coach stand where the
cutoff would play to give the outfielders the correct perspective but do not cut anything off.
After two ground balls each they all jog to medium center field. Each player gets two balls, one
grounder and one fly ball. They throw each one home. Again, look for accuracy and arm
strength.
As the tryout progresses the coaches judge the athletic ability of each player; how they move,
how they react to the balls, how they run, their arm action and overall demeanor.
Lastly, they all go to the dugout to get ready to hit. Have the hitter and two other hitters on
deck taking dry swings and getting ready to go. Instruct the players to swing at all pitches that
are not below their knees or over their hands. You want a very accurate batting practice
pitcher. (A machine is okay for this). Throw hard enough so that the balls keep their trajectory
and do not drop. (About 40-45 mph LL field & 60-65 on a regulation field.)
Each hitter gets five swings. If the ball is out of the strike zone and he doesn’t swing, he gets
another one. A swing and miss counts as one swing. Players don’t get another just because they
whiff. Even if they miss all five attempts they don’t get another chance. That “end on a good
one” stuff is nonsense. You usually don’t get another chance in life. Don’t prepare your kids by
making them think life is full of extra attempts. Plus, giving everyone the same number of
chances will make better players out of them by causing them to concentrate harder. Hold
strictly to the five-swing count. No hitter got extra hacks. This tryout should be fair for all. You
will be amazed at what you get when you tell kids to swing the bats. The simple instruction of
telling the kids to swing the bats and they are not here to be evaluated for “taking” pitches will
give you very good results.
After the last kid has hit have them kneel down in front of the dugout and thank them for trying
out. Tell them that the ones not picked should not feel slighted but there is an area of their
game that needs work and they should concentrate on that to improve for next season.
Then ask if any player felt he didn’t get a representative round and if anyone wants to take a
few more ground balls or take a few extra swings. After all, the tryout is for them. Always ask
players if they need another chance.
Then look briefly at the players who say they want to pitch. Have them warm up a little and
throw five- seven fastballs each.
You can accomplish this tryout with thirty to forty players in under two hours. These drills we
will tell a coach everything he needs to know about the baseball ability of each player. You
don’t need more than that.
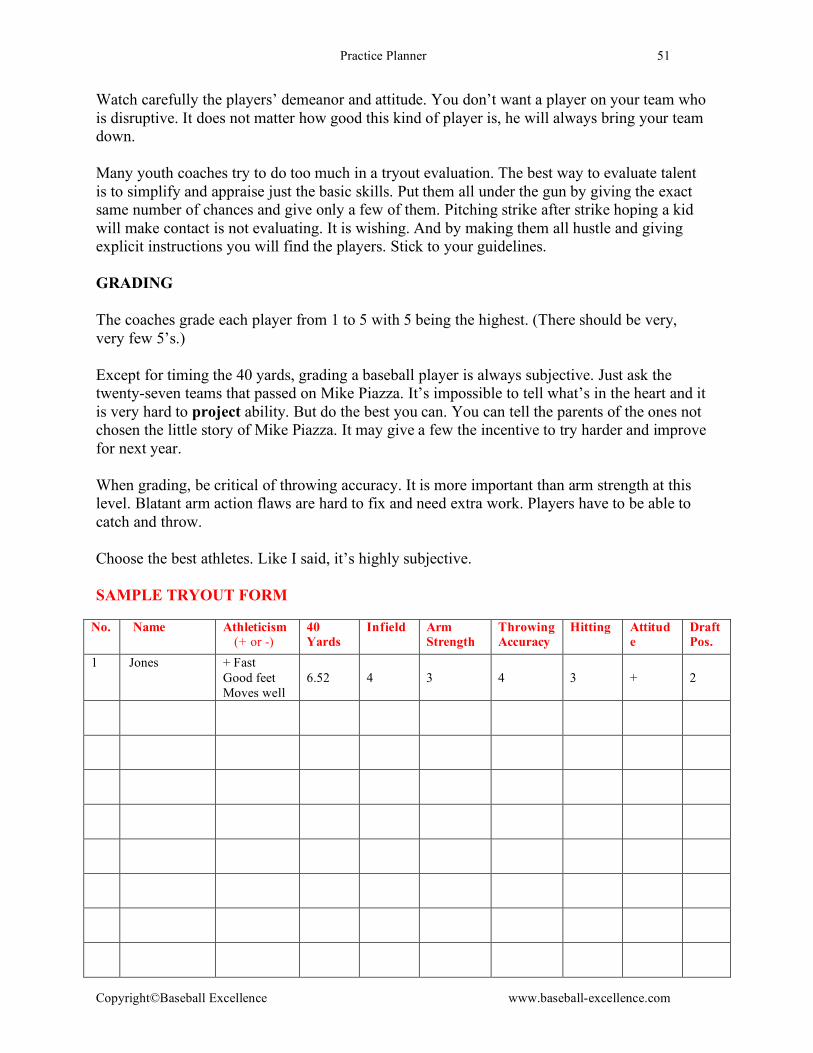
Practice Planner 51
Copyright©Baseball Excellence www.baseball-excellence.com
Watch carefully the players’ demeanor and attitude. You don’t want a player on your team who
is disruptive. It does not matter how good this kind of player is, he will always bring your team
down.
Many youth coaches try to do too much in a tryout evaluation. The best way to evaluate talent
is to simplify and appraise just the basic skills. Put them all under the gun by giving the exact
same number of chances and give only a few of them. Pitching strike after strike hoping a kid
will make contact is not evaluating. It is wishing. And by making them all hustle and giving
explicit instructions you will find the players. Stick to your guidelines.
GRADING
The coaches grade each player from 1 to 5 with 5 being the highest. (There should be very,
very few 5’s.)
Except for timing the 40 yards, grading a baseball player is always subjective. Just ask the
twenty-seven teams that passed on Mike Piazza. It’s impossible to tell what’s in the heart and it
is very hard to project ability. But do the best you can. You can tell the parents of the ones not
chosen the little story of Mike Piazza. It may give a few the incentive to try harder and improve
for next year.
When grading, be critical of throwing accuracy. It is more important than arm strength at this
level. Blatant arm action flaws are hard to fix and need extra work. Players have to be able to
catch and throw.
Choose the best athletes. Like I said, it’s highly subjective.
SAMPLE TRYOUT FORM
No. Name Athleticism
(+ or -) 40
Yards
Infield Arm
Strength
Throwing
Accuracy
Hitting Attitud
e
Draft
Pos.
1
Jones
+ Fast
Good feet
Moves well
6.52
4
3
4
3
+
2

Practice Planner 52
Copyright©Baseball Excellence www.baseball-excellence.com
Summary
It is the coach’s responsibility to teach the game to his players. Baseball skills do not come
naturally and must be taught and reinforced. This should be a coach’s number one priority-
over winning, over all other considerations. If you teach skills correctly winning will take
care of itself. We cannot emphasize this point enough.
Teach your kids how to throw. Most do not throw correctly. It’s a major part of your job.
Eschew trick plays and esoteric stuff. Teach the basics. You only have so much time.
Practice is where games are won. Focus on that and pass that on to your players. Skills are
developed at practice. They are displayed in games.
The structure and nature of baseball lends itself to routines. Develop a sound routine for your
team, stick with it and watch them grow and improve.
There should be no cries of boredom from your players and their parents. If you and your
coaching staff teach, this will not be a factor.
NGI- Never Give In.
The checklist on the following pages may look like large and daunting but rest assured coaches
should teach these skills and reinforce the correct techniques. I have seen far too many coaches and teams ignore these basic skills and the results are less than satisfying.
And you know what? These are skills needed to make the routine plays. These are your
everyday garden variety abilities.
It looks like a coach might not have enough time to cover all these and yet it can and should be
done. Use drills that integrate more than one skill (They are covered in this Practice Planner),
use game mistakes as teaching opportunities and coach and reinforce the “little things.”
Develop the attitude that if your players make a mistake it is because of something you did not
cover at practice. Excellence will not come overnight. Have patience.
Use the Skills Checklist to make sure you have covered everything.
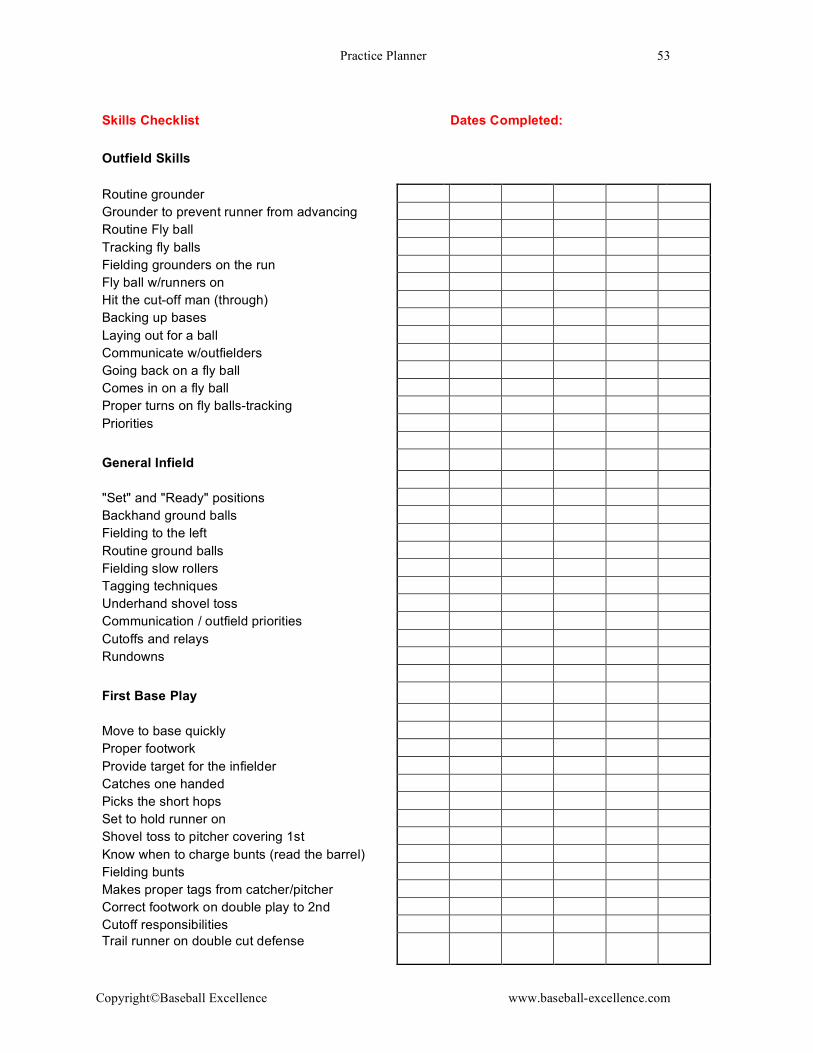
Practice Planner 53
Copyright©Baseball Excellence www.baseball-excellence.com
Skills Checklist Dates Completed:
Outfield Skills
Routine grounder
Grounder to prevent runner from advancing
Routine Fly ball
Tracking fly balls
Fielding grounders on the run
Fly ball w/runners on
Hit the cut-off man (through)
Backing up bases
Laying out for a ball
Communicate w/outfielders
Going back on a fly ball
Comes in on a fly ball
Proper turns on fly balls-tracking
Priorities
General Infield
"Set" and "Ready" positions
Backhand ground balls
Fielding to the left
Routine ground balls
Fielding slow rollers
Tagging techniques
Underhand shovel toss
Communication / outfield priorities
Cutoffs and relays
Rundowns
First Base Play
Move to base quickly
Proper footwork
Provide target for the infielder
Catches one handed
Picks the short hops
Set to hold runner on
Shovel toss to pitcher covering 1st
Know when to charge bunts (read the barrel)
Fielding bunts
Makes proper tags from catcher/pitcher
Correct footwork on double play to 2nd
Cutoff responsibilities
Trail runner on double cut defense

Practice Planner 54
Copyright©Baseball Excellence www.baseball-excellence.com
Middle Infield
Take throws from outfield, make tags
Fielding pop ups in outfield
Back up all throws
Proper footwork with the turn
Take throws from catcher, make tags
Comebackers from pitcher on double plays
Yes, yes, no, no communication
Field and throw on double plays
Trailer on double cuts
Pick off fakes, attempts
Third Base Play
Read and field bunts
Slow roller a routine play
Field and make throws to 2nd on double plays
Makes tags from catcher, outfield
Cut off man on base hits to LF
Hitting
Reinforce correct form thru practice
Correct contact points on inside, outside pitches
Understand "quality" at bat
Read the ball out of pitcher's hand
Develop good bunting mechanics
Develop good 2 strike hitting ability
Hit up the middle and opposite field
Lay off pitches over hands
Sound mental approach (Think swing)
Bunt down both lines
On deck time
Hit and runs
Hit behind the runner at 2nd
Study pitchers from the dugout
Bunting for a base hit
Slash bunts
Signs
Understanding all signs
Acknowledging signs
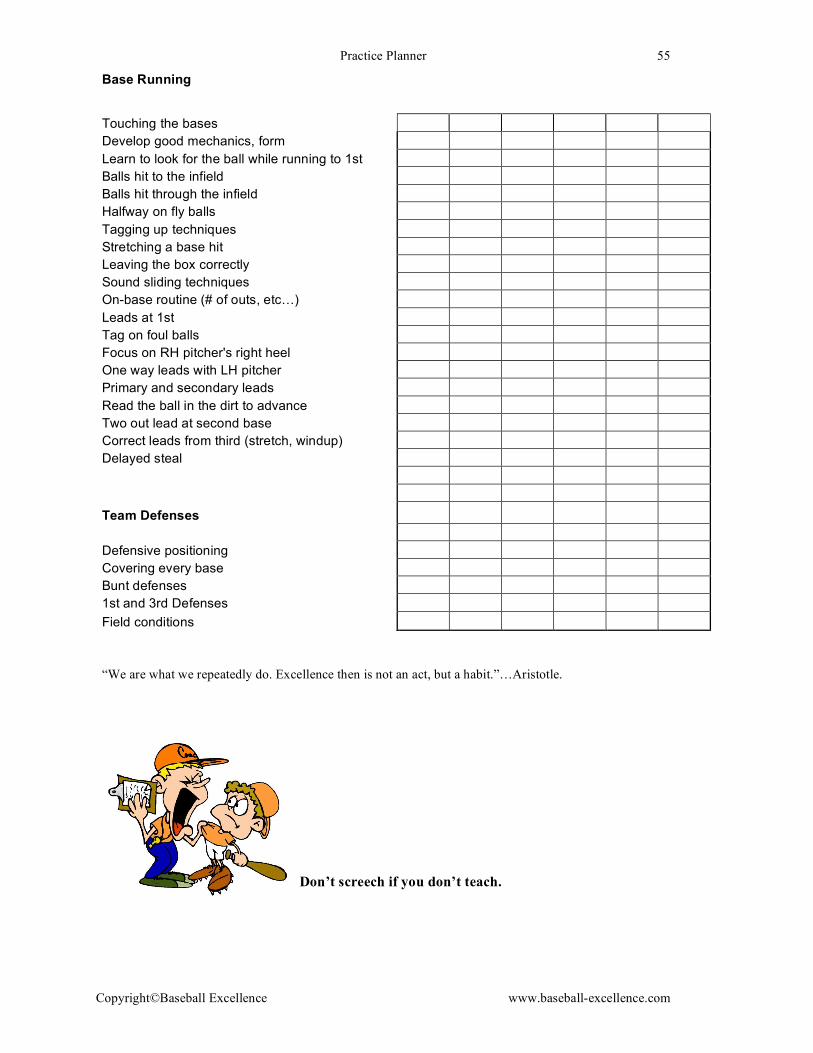
Practice Planner 55
Copyright©Baseball Excellence www.baseball-excellence.com
Base Running
Touching the bases
Develop good mechanics, form
Learn to look for the ball while running to 1st
Balls hit to the infield
Balls hit through the infield
Halfway on fly balls
Tagging up techniques
Stretching a base hit
Leaving the box correctly
Sound sliding techniques
On-base routine (# of outs, etc…)
Leads at 1st
Tag on foul balls
Focus on RH pitcher's right heel
One way leads with LH pitcher
Primary and secondary leads
Read the ball in the dirt to advance
Two out lead at second base
Correct leads from third (stretch, windup)
Delayed steal
Team Defenses
Defensive positioning
Covering every base
Bunt defenses
1st and 3rd Defenses
Field conditions
“We are what we repeatedly do. Excellence then is not an act, but a habit.”…Aristotle.
Don’t screech if you don’t teach.

Practice Planner 56
Copyright©Baseball Excellence www.baseball-excellence.com
SUCCESS STORIES A FEW OF THE PLAYERS WHO HAVE PLAYED FOR AND BEEN INFLUENCED BY BASEBALL EXCELLENCE
Clinton Johnston
1st round Draft Pick
Pittsburgh Pirates 1998
Neil Wilson
5th
round draft pick
Colorado Rockies 2002
Jared Odom
27th
Round Pick
Toronto Blue Jays2002
Jody Bridwell
Signed with the
Pittsburgh Pirates 2002
Andy Wilson
All-American Stetson
University 1999
Coach Grant-above left
Derek Lilliquist- above
right