
Lead, Partner, Achieve. /promo/cahn-2009-5.wmv /promo/cahn-2009-5.wmv.
ConvertXtoDVD
Complete Manual
Version 2.1.14, February 13th, 2007
2
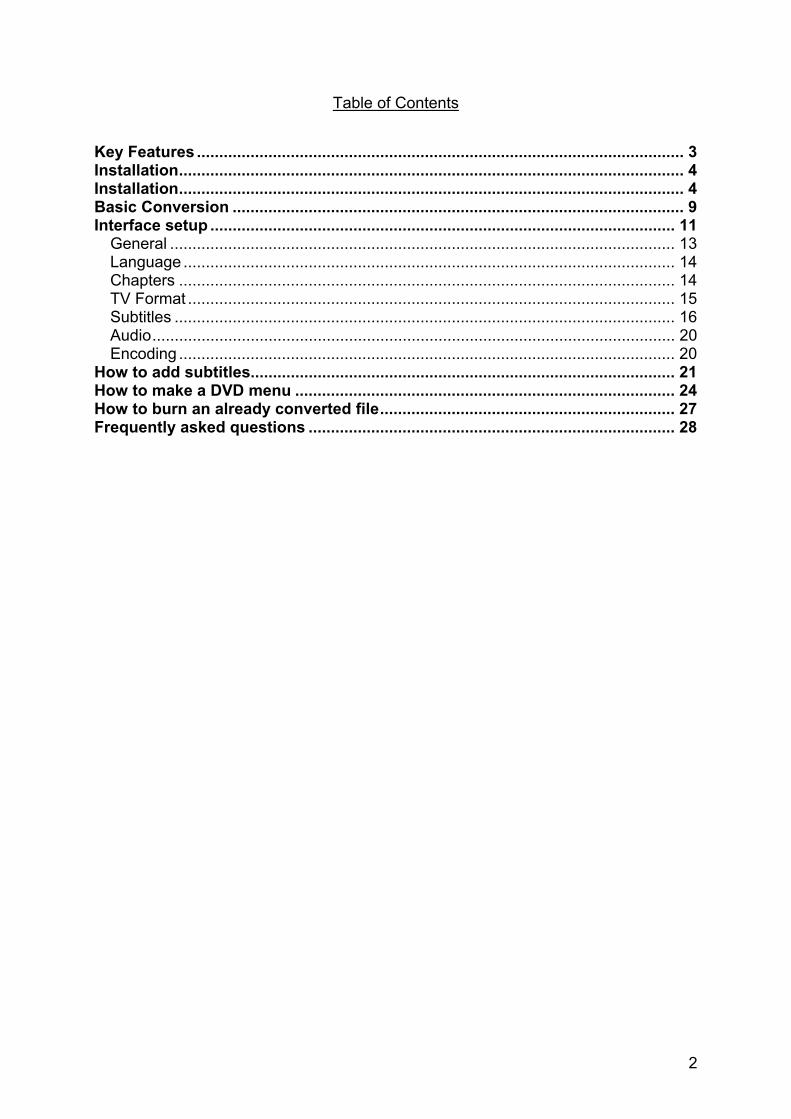
Table of Contents
Key Features ............................................................................................................. 3 Installation................................................................................................................. 4 Installation................................................................................................................. 4 Basic Conversion ..................................................................................................... 9 Interface setup ........................................................................................................ 11
General ................................................................................................................. 13 Language .............................................................................................................. 14 Chapters ............................................................................................................... 14 TV Format ............................................................................................................. 15 Subtitles ................................................................................................................ 16 Audio..................................................................................................................... 20 Encoding ............................................................................................................... 20
How to add subtitles............................................................................................... 21 How to make a DVD menu ..................................................................................... 24 How to burn an already converted file.................................................................. 27 Frequently asked questions .................................................................................. 28
3
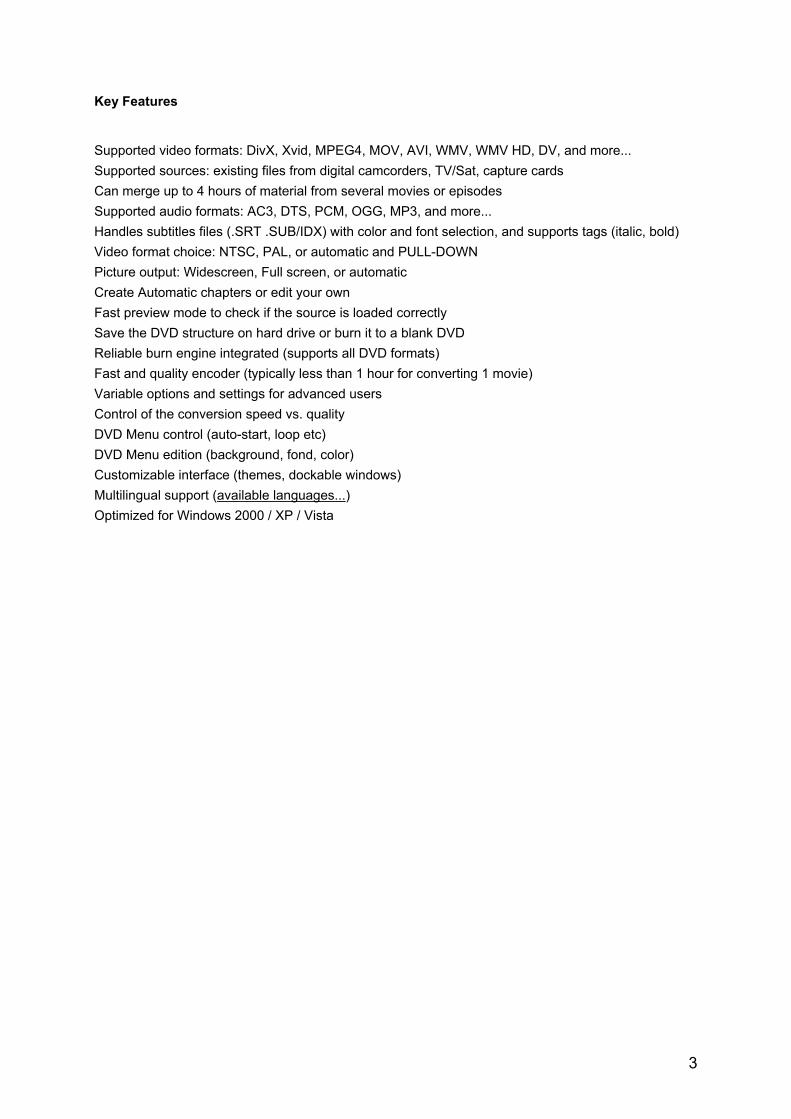
Key Features
Supported video formats: DivX, Xvid, MPEG4, MOV, AVI, WMV, WMV HD, DV, and more... Supported sources: existing files from digital camcorders, TV/Sat, capture cards Can merge up to 4 hours of material from several movies or episodes Supported audio formats: AC3, DTS, PCM, OGG, MP3, and more... Handles subtitles files (.SRT .SUB/IDX) with color and font selection, and supports tags (italic, bold) Video format choice: NTSC, PAL, or automatic and PULL-DOWN Picture output: Widescreen, Full screen, or automatic Create Automatic chapters or edit your own Fast preview mode to check if the source is loaded correctly Save the DVD structure on hard drive or burn it to a blank DVD Reliable burn engine integrated (supports all DVD formats) Fast and quality encoder (typically less than 1 hour for converting 1 movie) Variable options and settings for advanced users Control of the conversion speed vs. quality DVD Menu control (auto-start, loop etc) DVD Menu edition (background, fond, color) Customizable interface (themes, dockable windows) Multilingual support (available languages...) Optimized for Windows 2000 / XP / Vista

4
Installation The first step during the installation process is to select the language you want to use during this process:
Figure 1 Announces the version you are about to install and any suggestions you should follow during installation.
Figure 2
5
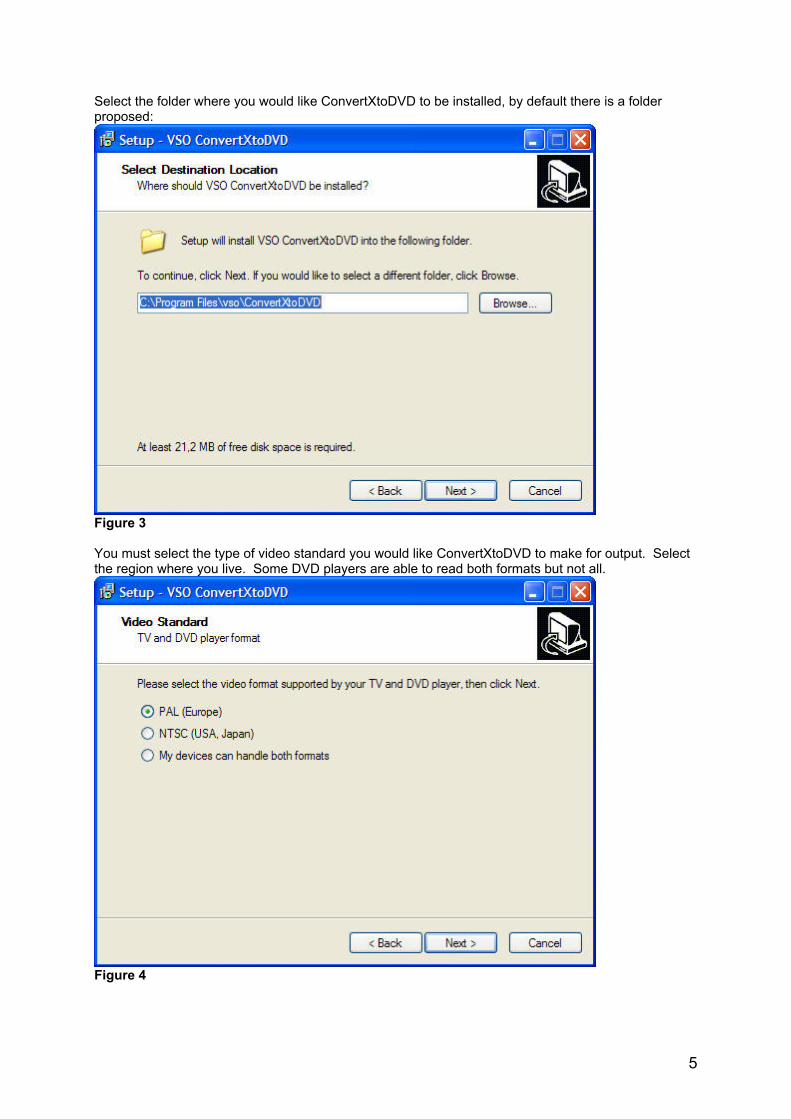
Select the folder where you would like ConvertXtoDVD to be installed, by default there is a folder proposed:
Figure 3 You must select the type of video standard you would like ConvertXtoDVD to make for output. Select the region where you live. Some DVD players are able to read both formats but not all.
Figure 4
6
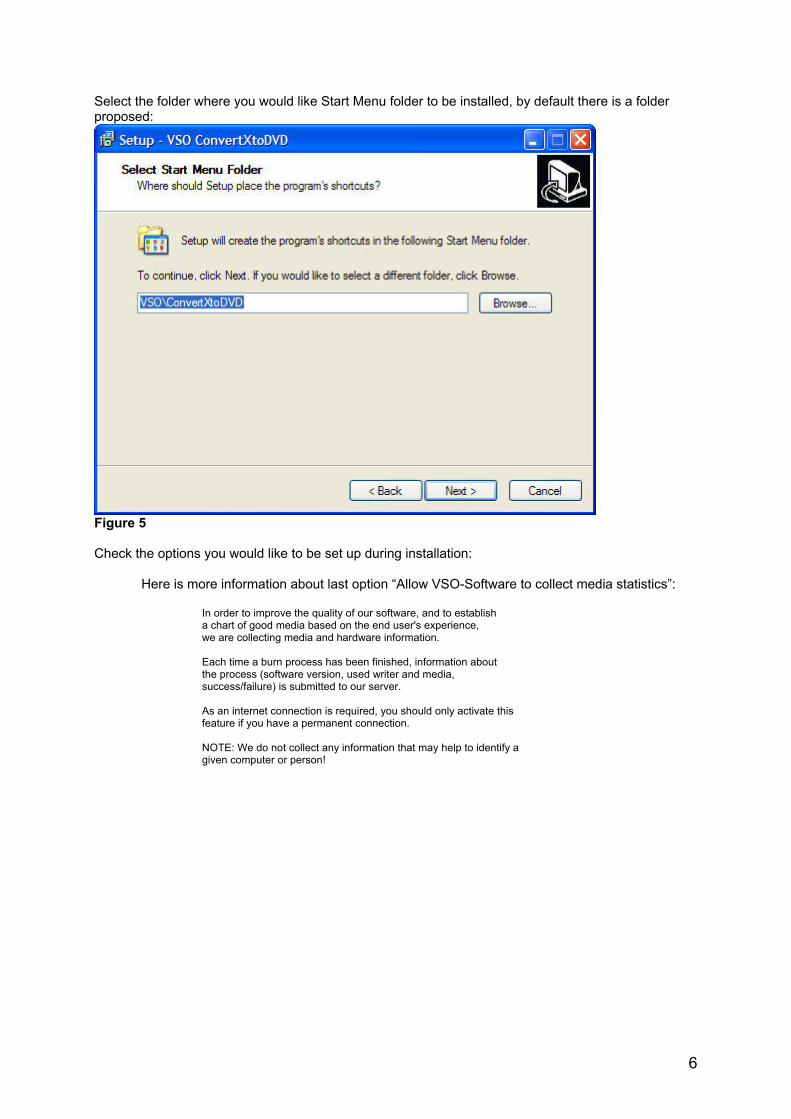
Select the folder where you would like Start Menu folder to be installed, by default there is a folder proposed:
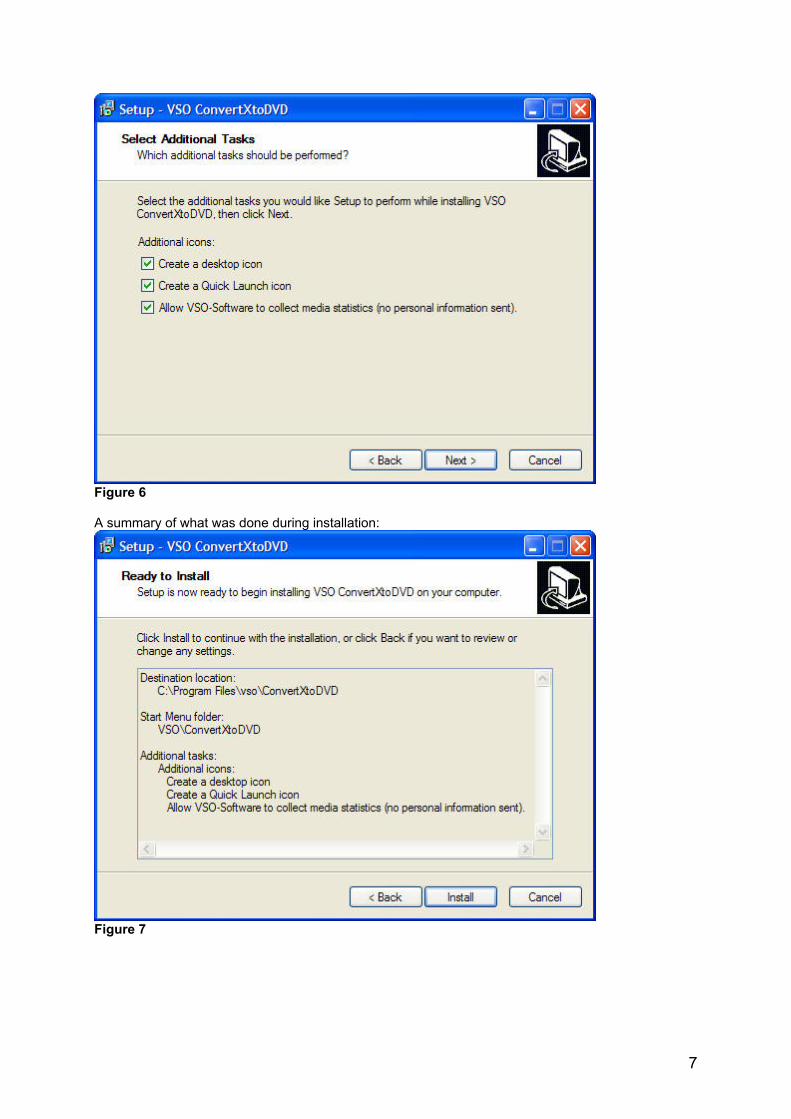
Figure 5 Check the options you would like to be set up during installation:
Here is more information about last option “Allow VSO-Software to collect media statistics”:
In order to improve the quality of our software, and to establish a chart of good media based on the end user's experience, we are collecting media and hardware information. Each time a burn process has been finished, information about the process (software version, used writer and media, success/failure) is submitted to our server. As an internet connection is required, you should only activate this feature if you have a permanent connection. NOTE: We do not collect any information that may help to identify a given computer or person!
7
Figure 6 A summary of what was done during installation:
Figure 7
8
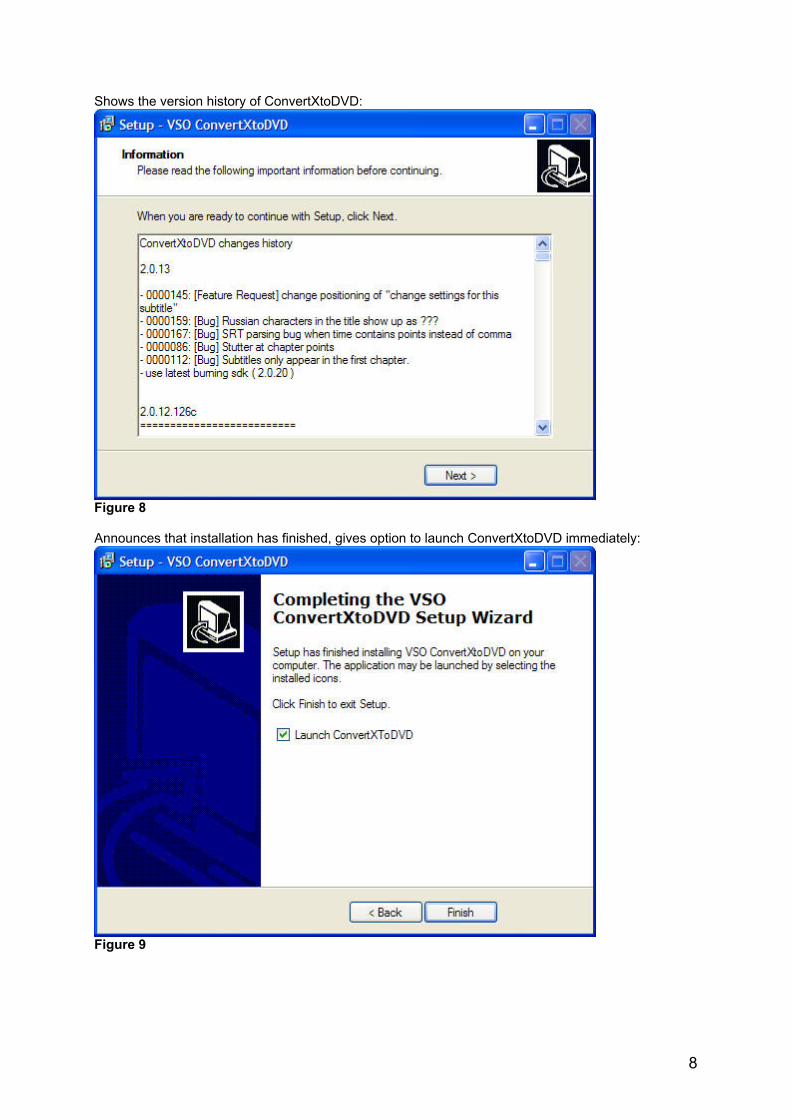
Shows the version history of ConvertXtoDVD:
Figure 8 Announces that installation has finished, gives option to launch ConvertXtoDVD immediately:
Figure 9
9
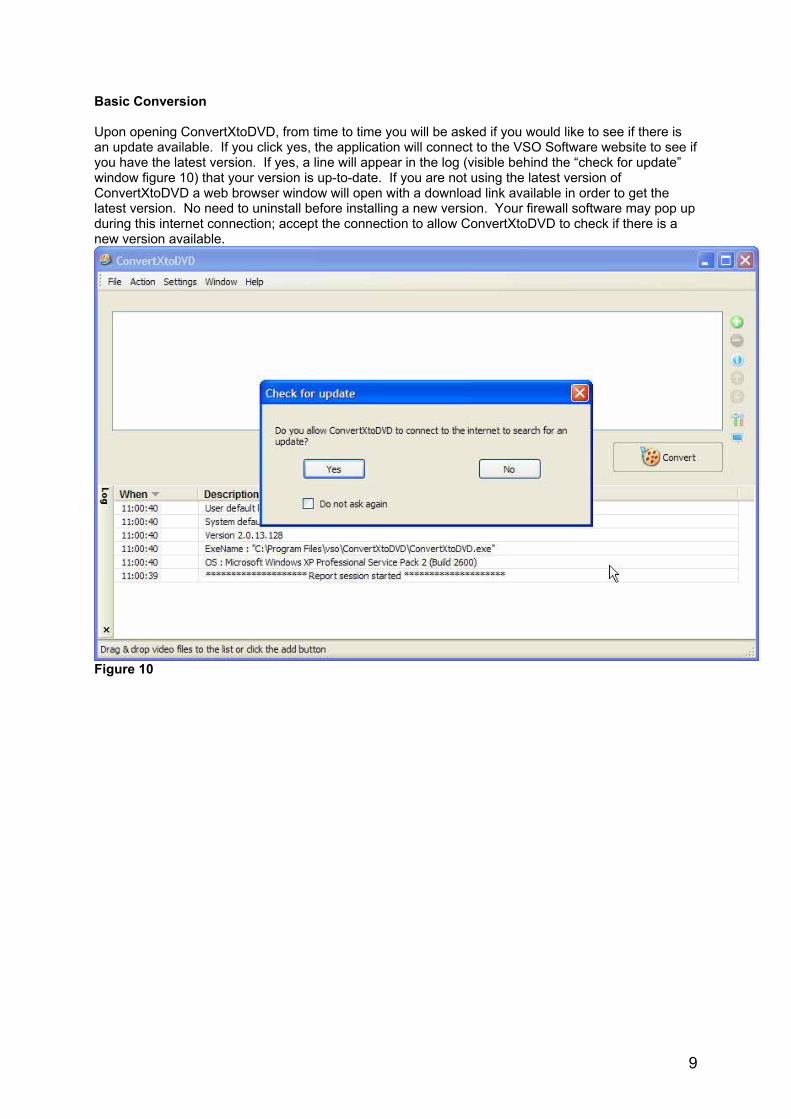
Basic Conversion Upon opening ConvertXtoDVD, from time to time you will be asked if you would like to see if there is an update available. If you click yes, the application will connect to the VSO Software website to see if you have the latest version. If yes, a line will appear in the log (visible behind the “check for update” window figure 10) that your version is up-to-date. If you are not using the latest version of ConvertXtoDVD a web browser window will open with a download link available in order to get the latest version. No need to uninstall before installing a new version. Your firewall software may pop up during this internet connection; accept the connection to allow ConvertXtoDVD to check if there is a new version available.
Figure 10
10
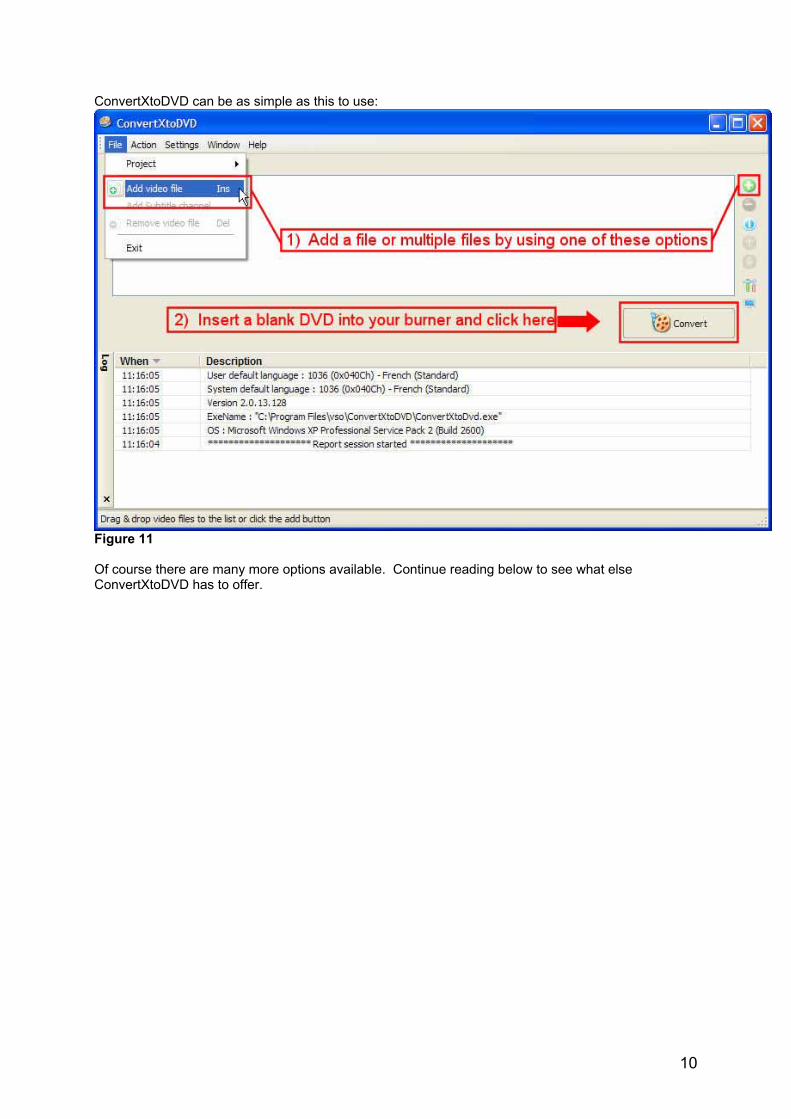
ConvertXtoDVD can be as simple as this to use:
Figure 11 Of course there are many more options available. Continue reading below to see what else ConvertXtoDVD has to offer.
11
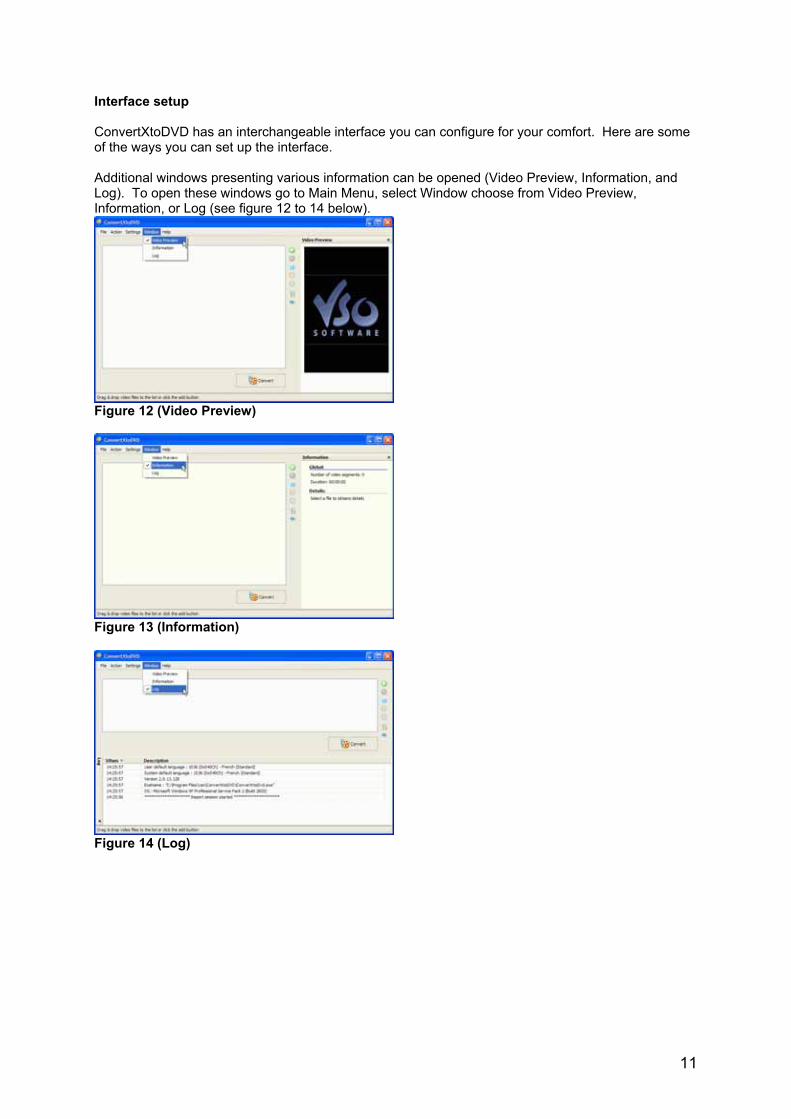
Interface setup ConvertXtoDVD has an interchangeable interface you can configure for your comfort. Here are some of the ways you can set up the interface. Additional windows presenting various information can be opened (Video Preview, Information, and Log). To open these windows go to Main Menu, select Window choose from Video Preview, Information, or Log (see figure 12 to 14 below).
Figure 12 (Video Preview)
Figure 13 (Information)
Figure 14 (Log)

12
You can also have all windows open all at once detached or within the main frame window of ConvertXtoDVD:
Figure 15 Highlighted in figure 16 are the ways in which you can move and resize each window. To move a window, place your mouse on the bar that says either ‘Video Preview’, ‘Log’, or ‘Information’ (as boxed in red below in figure 16) and drag the window where you would like it. The double arrow cursor (boxed twice in red below) appears when you place your mouse between two touching windows, you can change their size by pressing down the mouse button and moving.
Figure 16

13
Settings The settings are accessible from the main menu under Settings
Figure 17 Here is a look at each section tab found under Settings. Notice that in each window you have a button to “reset to default” settings. General 1 Where ConvertXtoDVD will place
all created files, you can change this location
2 If for some reason the preview
appears upside down in the interface check this box, close ConvertXtoDVD and open it again. The preview will now be right side up.
3 Will check for version updates 4 If checked, ConvertXtoDVD will
not ask for permission before checking for an update.
5 Change appearance of the
interface by clicking on the various themes in the list.
Figure 18
14
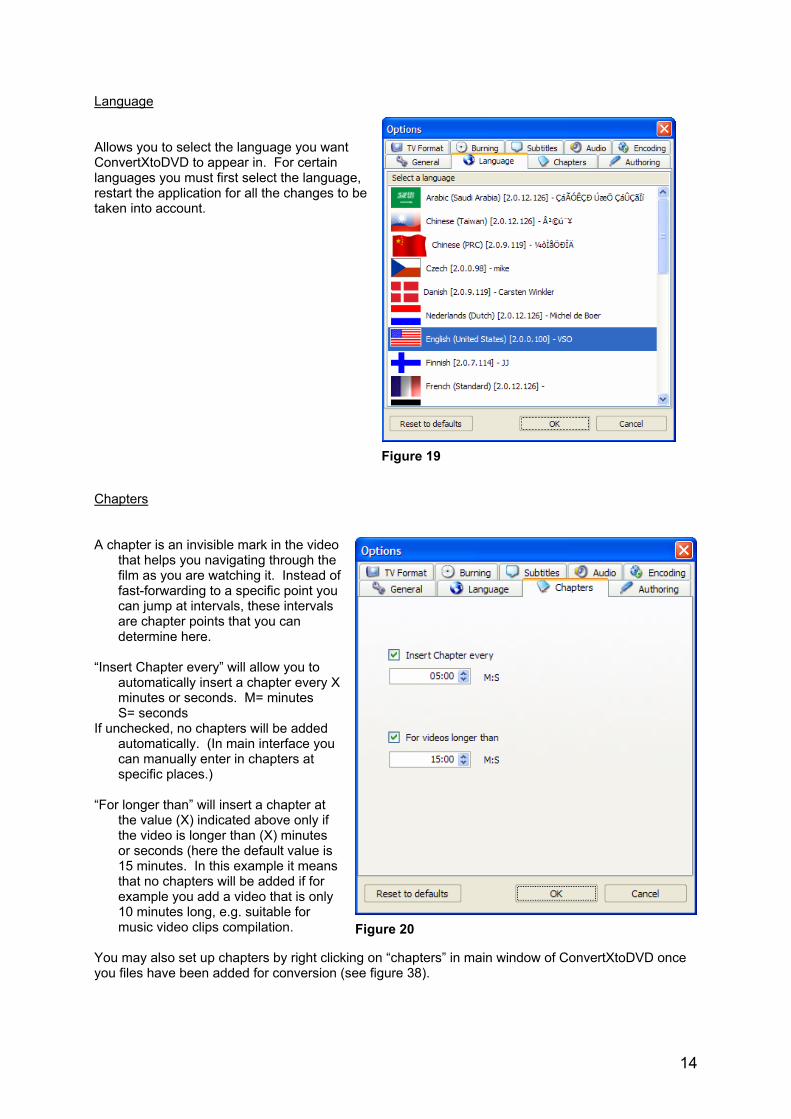
Language Allows you to select the language you want ConvertXtoDVD to appear in. For certain languages you must first select the language, restart the application for all the changes to be taken into account.
Chapters A chapter is an invisible mark in the video
that helps you navigating through the film as you are watching it. Instead of fast-forwarding to a specific point you can jump at intervals, these intervals are chapter points that you can determine here.
“Insert Chapter every” will allow you to
automatically insert a chapter every X minutes or seconds. M= minutes S= seconds
If unchecked, no chapters will be added automatically. (In main interface you can manually enter in chapters at specific places.)
“For longer than” will insert a chapter at
the value (X) indicated above only if the video is longer than (X) minutes or seconds (here the default value is 15 minutes. In this example it means that no chapters will be added if for example you add a video that is only 10 minutes long, e.g. suitable for music video clips compilation.
You may also set up chapters by right clicking on “chapters” in main window of ConvertXtoDVD once you files have been added for conversion (see figure 38).
Figure 19
Figure 20
15
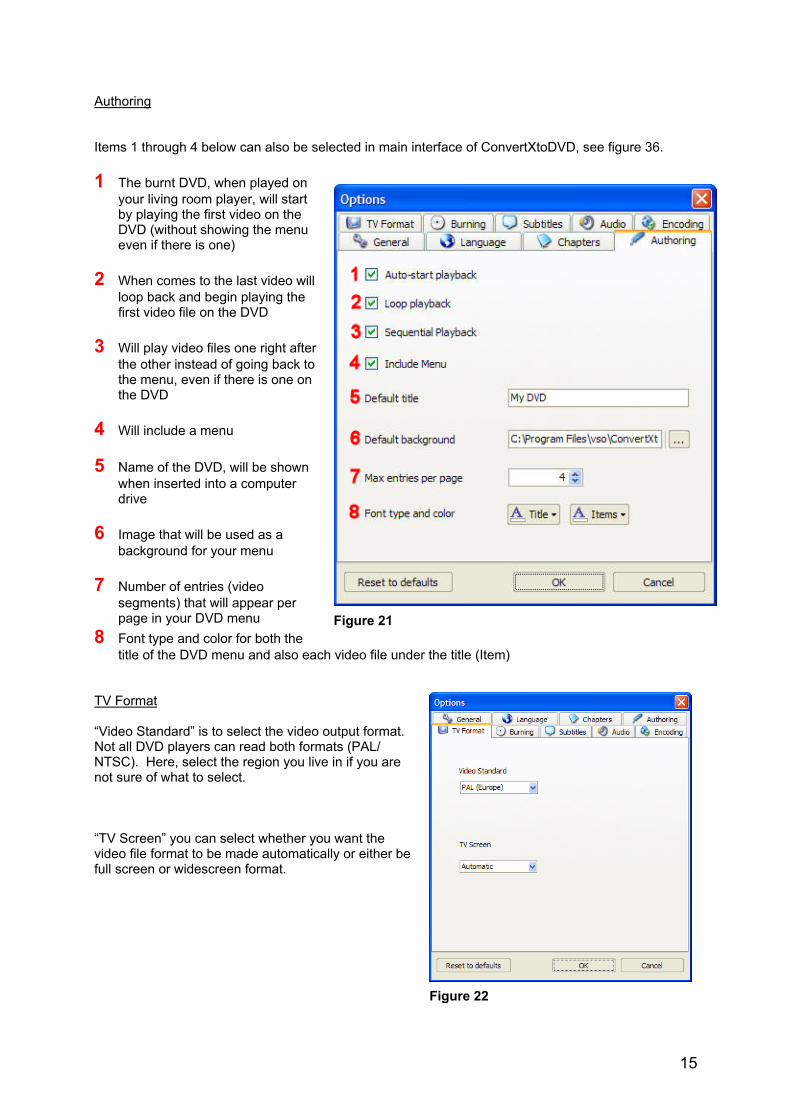
Authoring Items 1 through 4 below can also be selected in main interface of ConvertXtoDVD, see figure 36. 1 The burnt DVD, when played on
your living room player, will start by playing the first video on the DVD (without showing the menu even if there is one)
2 When comes to the last video will
loop back and begin playing the first video file on the DVD
3 Will play video files one right after
the other instead of going back to the menu, even if there is one on the DVD
4 Will include a menu 5 Name of the DVD, will be shown
when inserted into a computer drive
6 Image that will be used as a
background for your menu 7 Number of entries (video
segments) that will appear per page in your DVD menu
8 Font type and color for both the title of the DVD menu and also each video file under the title (Item)
TV Format
“Video Standard” is to select the video output format. Not all DVD players can read both formats (PAL/ NTSC). Here, select the region you live in if you are not sure of what to select. “TV Screen” you can select whether you want the video file format to be made automatically or either be full screen or widescreen format.
Figure 21
Figure 22
16
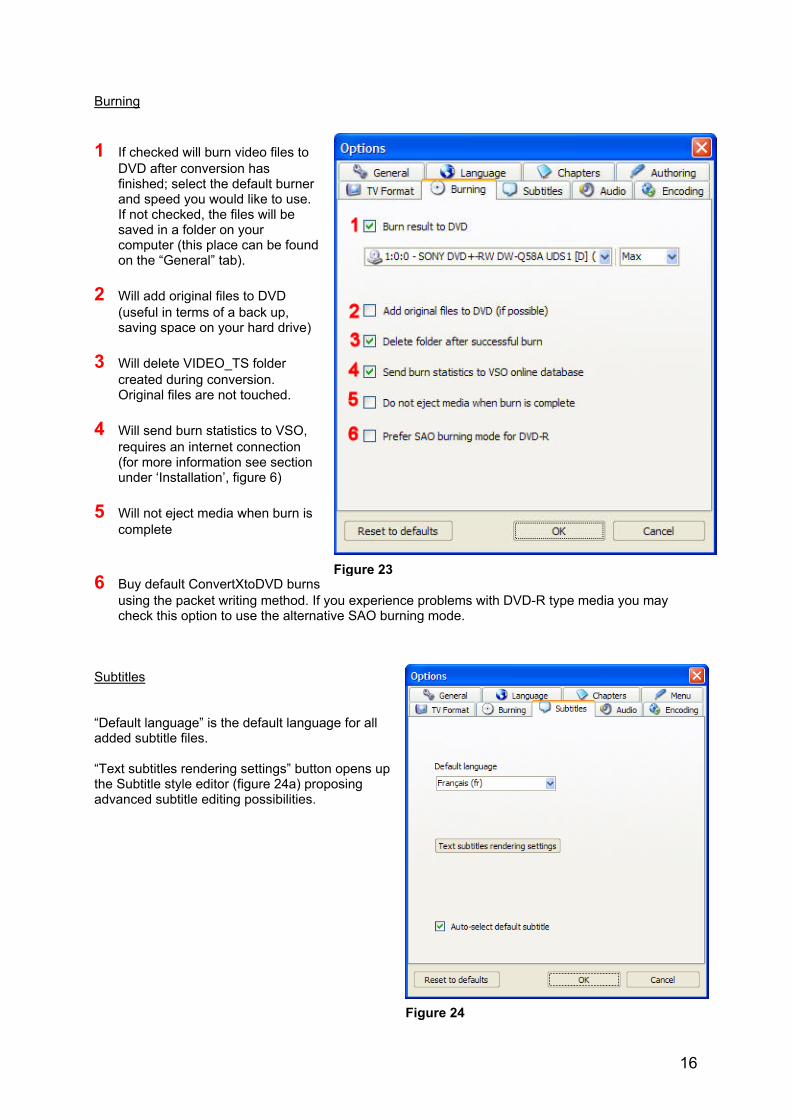
Burning
1 If checked will burn video files to
DVD after conversion has finished; select the default burner and speed you would like to use. If not checked, the files will be saved in a folder on your computer (this place can be found on the “General” tab).
2 Will add original files to DVD
(useful in terms of a back up, saving space on your hard drive)
3 Will delete VIDEO_TS folder
created during conversion. Original files are not touched.
4 Will send burn statistics to VSO,
requires an internet connection (for more information see section under ‘Installation’, figure 6)
5 Will not eject media when burn is
complete 6 Buy default ConvertXtoDVD burns
using the packet writing method. If you experience problems with DVD-R type media you may check this option to use the alternative SAO burning mode.
Subtitles “Default language” is the default language for all added subtitle files. “Text subtitles rendering settings” button opens up the Subtitle style editor (figure 24a) proposing advanced subtitle editing possibilities.
Figure 23
Figure 24
17
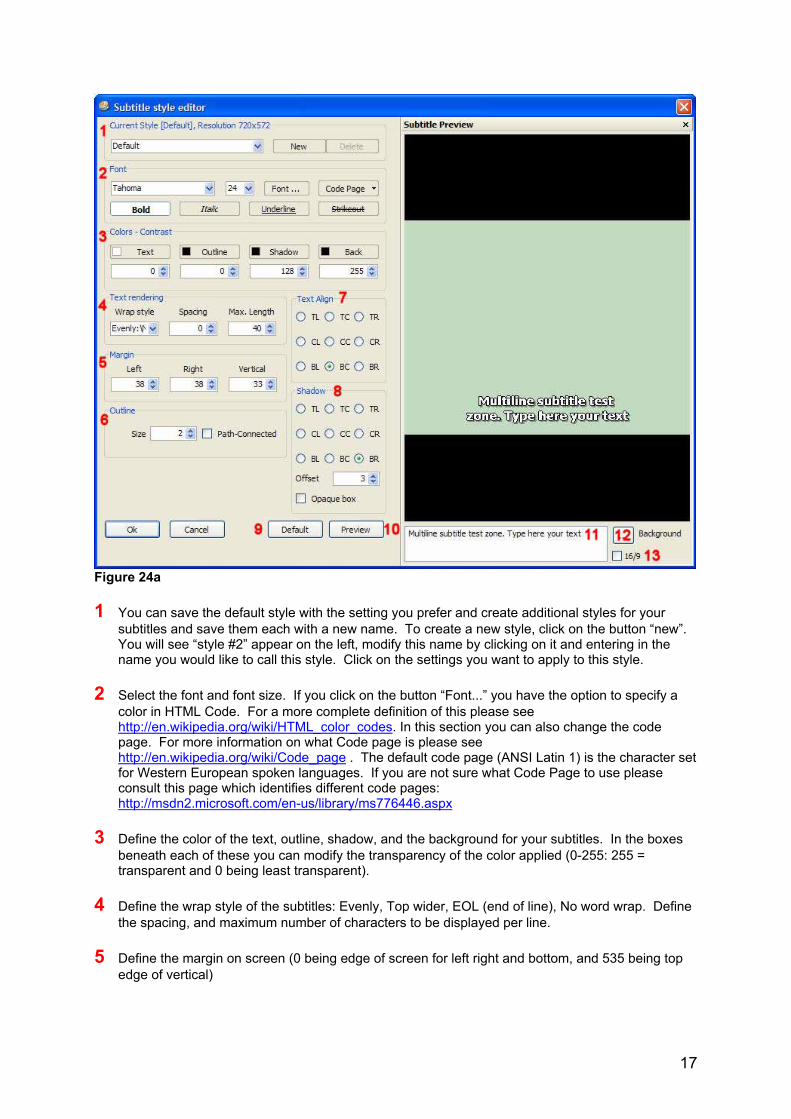
Figure 24a 1 You can save the default style with the setting you prefer and create additional styles for your
subtitles and save them each with a new name. To create a new style, click on the button “new”. You will see “style #2” appear on the left, modify this name by clicking on it and entering in the name you would like to call this style. Click on the settings you want to apply to this style.
2 Select the font and font size. If you click on the button “Font...” you have the option to specify a
color in HTML Code. For a more complete definition of this please see http://en.wikipedia.org/wiki/HTML_color_codes. In this section you can also change the code page. For more information on what Code page is please see http://en.wikipedia.org/wiki/Code_page . The default code page (ANSI Latin 1) is the character set for Western European spoken languages. If you are not sure what Code Page to use please consult this page which identifies different code pages: http://msdn2.microsoft.com/en-us/library/ms776446.aspx
3 Define the color of the text, outline, shadow, and the background for your subtitles. In the boxes
beneath each of these you can modify the transparency of the color applied (0-255: 255 = transparent and 0 being least transparent).
4 Define the wrap style of the subtitles: Evenly, Top wider, EOL (end of line), No word wrap. Define
the spacing, and maximum number of characters to be displayed per line. 5 Define the margin on screen (0 being edge of screen for left right and bottom, and 535 being top
edge of vertical)
18
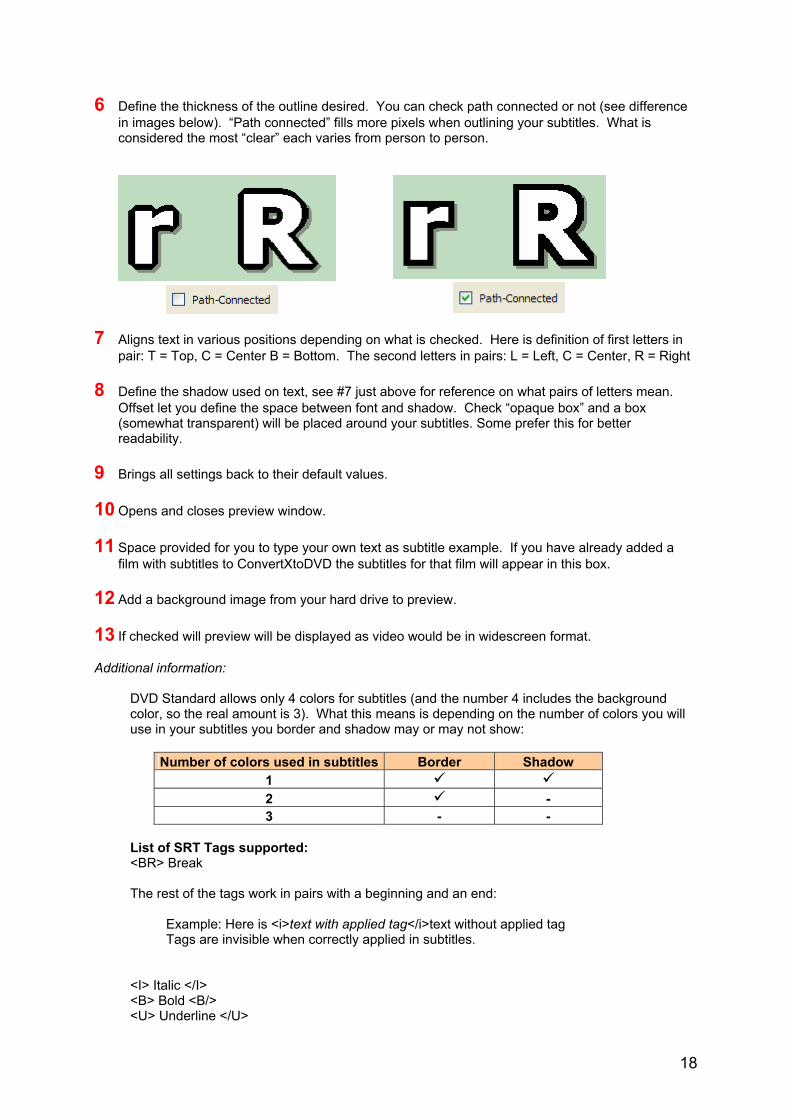
6 Define the thickness of the outline desired. You can check path connected or not (see difference in images below). “Path connected” fills more pixels when outlining your subtitles. What is considered the most “clear” each varies from person to person.
7 Aligns text in various positions depending on what is checked. Here is definition of first letters in
pair: T = Top, C = Center B = Bottom. The second letters in pairs: L = Left, C = Center, R = Right 8 Define the shadow used on text, see #7 just above for reference on what pairs of letters mean.
Offset let you define the space between font and shadow. Check “opaque box” and a box (somewhat transparent) will be placed around your subtitles. Some prefer this for better readability.
9 Brings all settings back to their default values. 10 Opens and closes preview window. 11 Space provided for you to type your own text as subtitle example. If you have already added a
film with subtitles to ConvertXtoDVD the subtitles for that film will appear in this box. 12 Add a background image from your hard drive to preview. 13 If checked will preview will be displayed as video would be in widescreen format. Additional information:
DVD Standard allows only 4 colors for subtitles (and the number 4 includes the background color, so the real amount is 3). What this means is depending on the number of colors you will use in your subtitles you border and shadow may or may not show:
Number of colors used in subtitles Border Shadow 1 2 - 3 - -
List of SRT Tags supported: <BR> Break The rest of the tags work in pairs with a beginning and an end:
Example: Here is <i>text with applied tag</i>text without applied tag Tags are invisible when correctly applied in subtitles.
<I> Italic </I> <B> Bold <B/> <U> Underline </U>
19
<S> Strikethrough </S> <Font size = “xx”> Font Size </font> (replace xx with desired font size) <Font color = “xxx”> Font color </Font> (Font color is a number in html color code. For a more complete definition of this please see http://en.wikipedia.org/wiki/HTML_color_codes) Multiple tags can be applied at once: Type your <u><font color = "#FF0000"><i>text </i></font>here</u>
When using these tags, make sure to nest them properly. If you open Tag A then Tag B, you must first close B then A, you cannot close A before B. List of SSA tags supported 1= apply 0 = don’t apply {\b1} Bold {\i1} Italic {\u1} Underline {\s1} Strikethrough {\fn} Font name (ex {\fnArial} ) {\fs} Font size (ex {\fs33} ) No color tag is currently available for SSA subtitles Multiple tags can be applied at once: {\fs33}Type {\u1}{\i1} your subs {\u0} here{\i0} and more
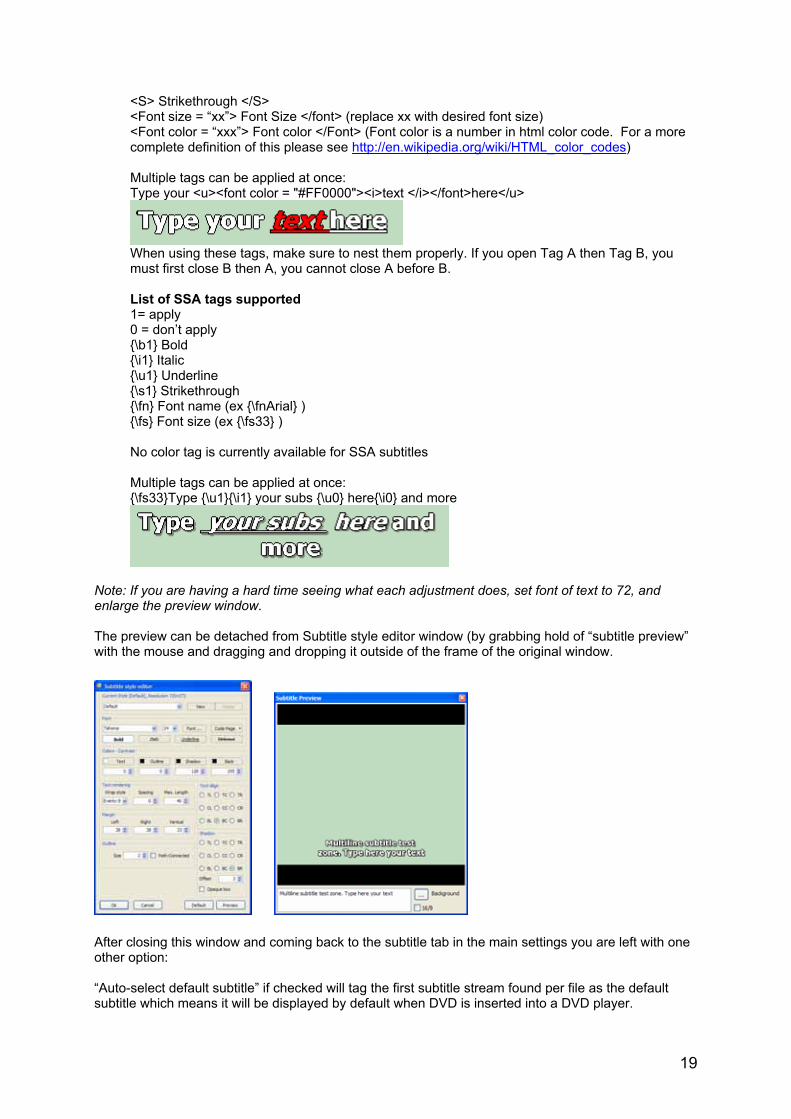
Note: If you are having a hard time seeing what each adjustment does, set font of text to 72, and enlarge the preview window. The preview can be detached from Subtitle style editor window (by grabbing hold of “subtitle preview” with the mouse and dragging and dropping it outside of the frame of the original window.
After closing this window and coming back to the subtitle tab in the main settings you are left with one other option: “Auto-select default subtitle” if checked will tag the first subtitle stream found per file as the default subtitle which means it will be displayed by default when DVD is inserted into a DVD player.
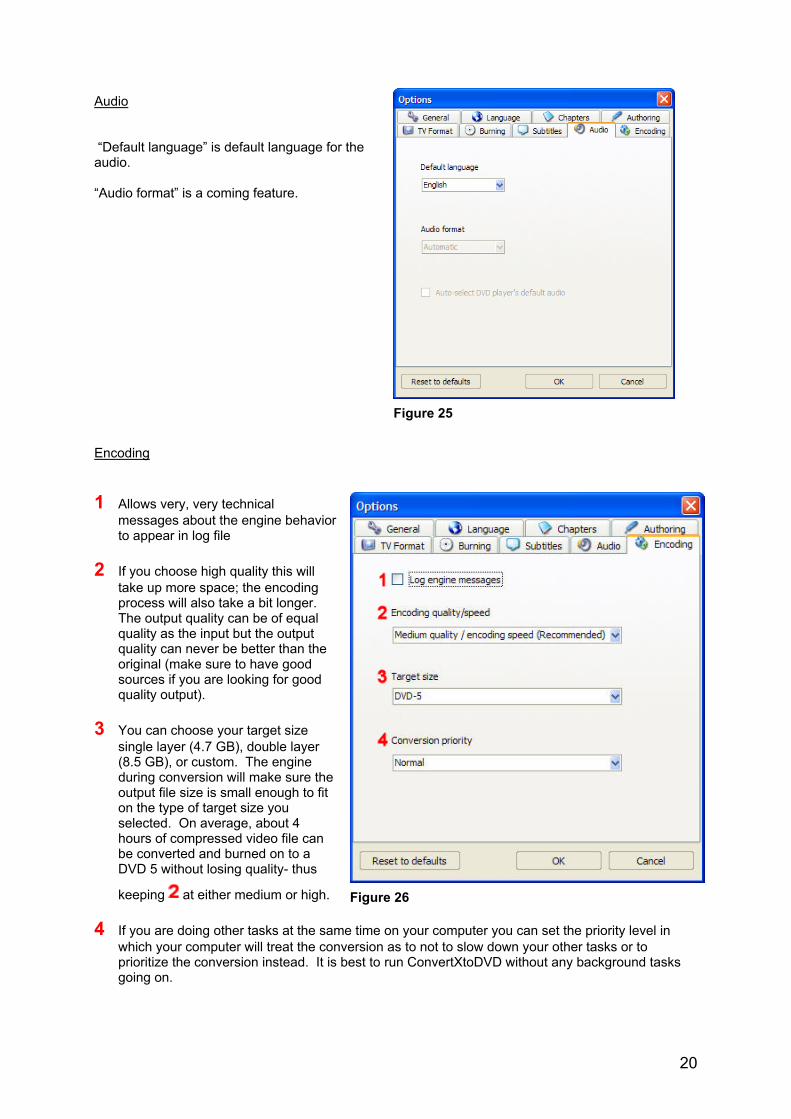
20
Audio “Default language” is default language for the audio. “Audio format” is a coming feature. Encoding 1 Allows very, very technical
messages about the engine behavior to appear in log file
2 If you choose high quality this will
take up more space; the encoding process will also take a bit longer. The output quality can be of equal quality as the input but the output quality can never be better than the original (make sure to have good sources if you are looking for good quality output).
3 You can choose your target size
single layer (4.7 GB), double layer (8.5 GB), or custom. The engine during conversion will make sure the output file size is small enough to fit on the type of target size you selected. On average, about 4 hours of compressed video file can be converted and burned on to a DVD 5 without losing quality- thus
keeping at either medium or high. 4 If you are doing other tasks at the same time on your computer you can set the priority level in
which your computer will treat the conversion as to not to slow down your other tasks or to prioritize the conversion instead. It is best to run ConvertXtoDVD without any background tasks going on.
Figure 25
Figure 26
21
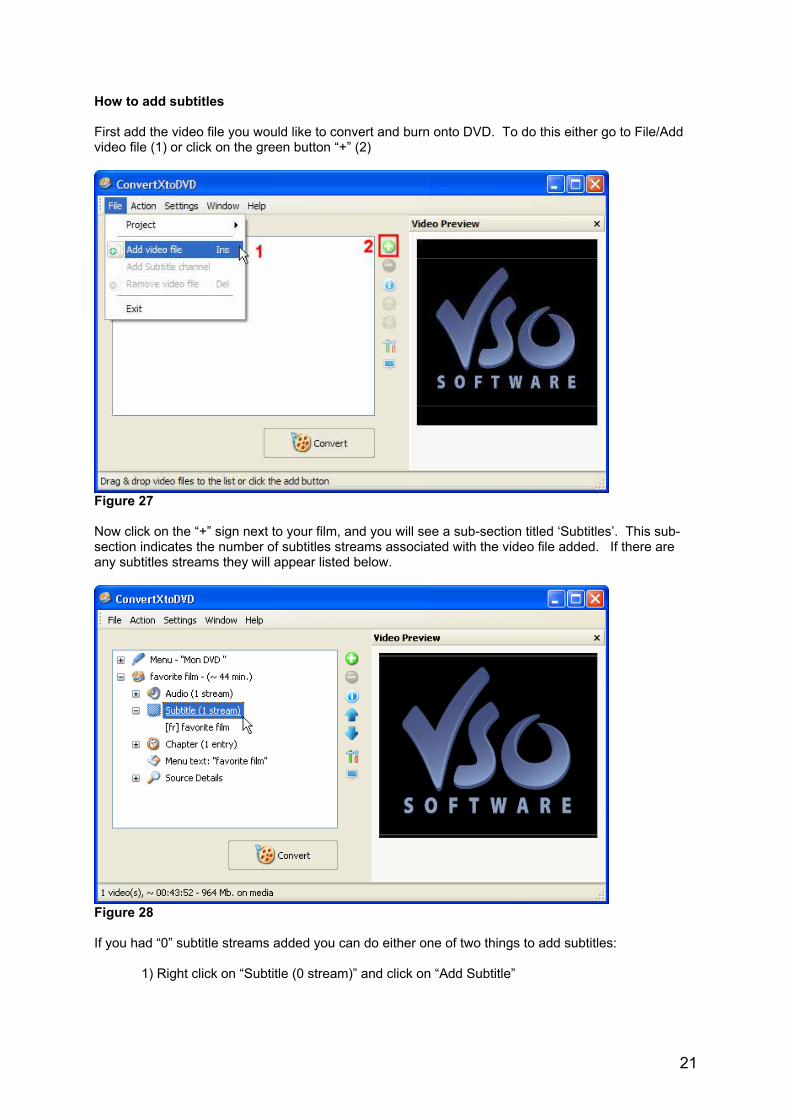
How to add subtitles First add the video file you would like to convert and burn onto DVD. To do this either go to File/Add video file (1) or click on the green button “+” (2)
Figure 27 Now click on the “+” sign next to your film, and you will see a sub-section titled ‘Subtitles’. This sub-section indicates the number of subtitles streams associated with the video file added. If there are any subtitles streams they will appear listed below.
Figure 28 If you had “0” subtitle streams added you can do either one of two things to add subtitles:
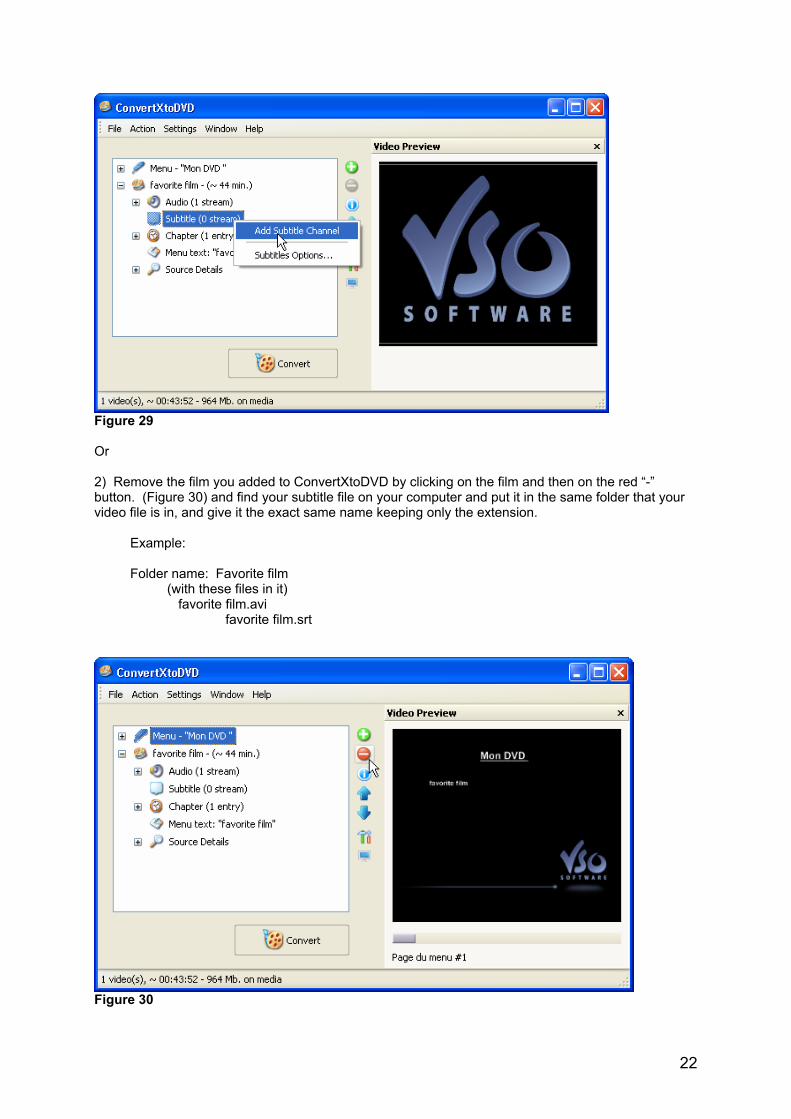
1) Right click on “Subtitle (0 stream)” and click on “Add Subtitle”
22
Figure 29 Or 2) Remove the film you added to ConvertXtoDVD by clicking on the film and then on the red “-” button. (Figure 30) and find your subtitle file on your computer and put it in the same folder that your video file is in, and give it the exact same name keeping only the extension.
Example: Folder name: Favorite film (with these files in it) favorite film.avi favorite film.srt
Figure 30
23
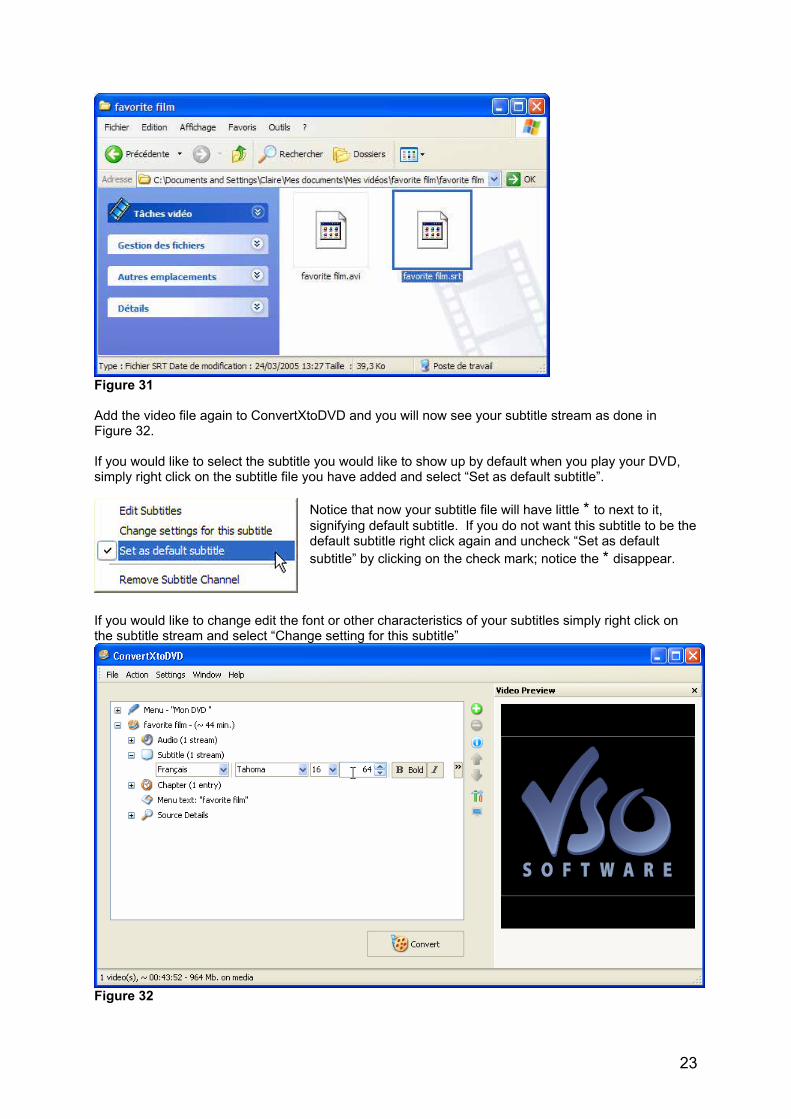
Figure 31 Add the video file again to ConvertXtoDVD and you will now see your subtitle stream as done in Figure 32. If you would like to select the subtitle you would like to show up by default when you play your DVD, simply right click on the subtitle file you have added and select “Set as default subtitle”.
Notice that now your subtitle file will have little * to next to it, signifying default subtitle. If you do not want this subtitle to be the default subtitle right click again and uncheck “Set as default subtitle” by clicking on the check mark; notice the * disappear.
If you would like to change edit the font or other characteristics of your subtitles simply right click on the subtitle stream and select “Change setting for this subtitle”
Figure 32
24
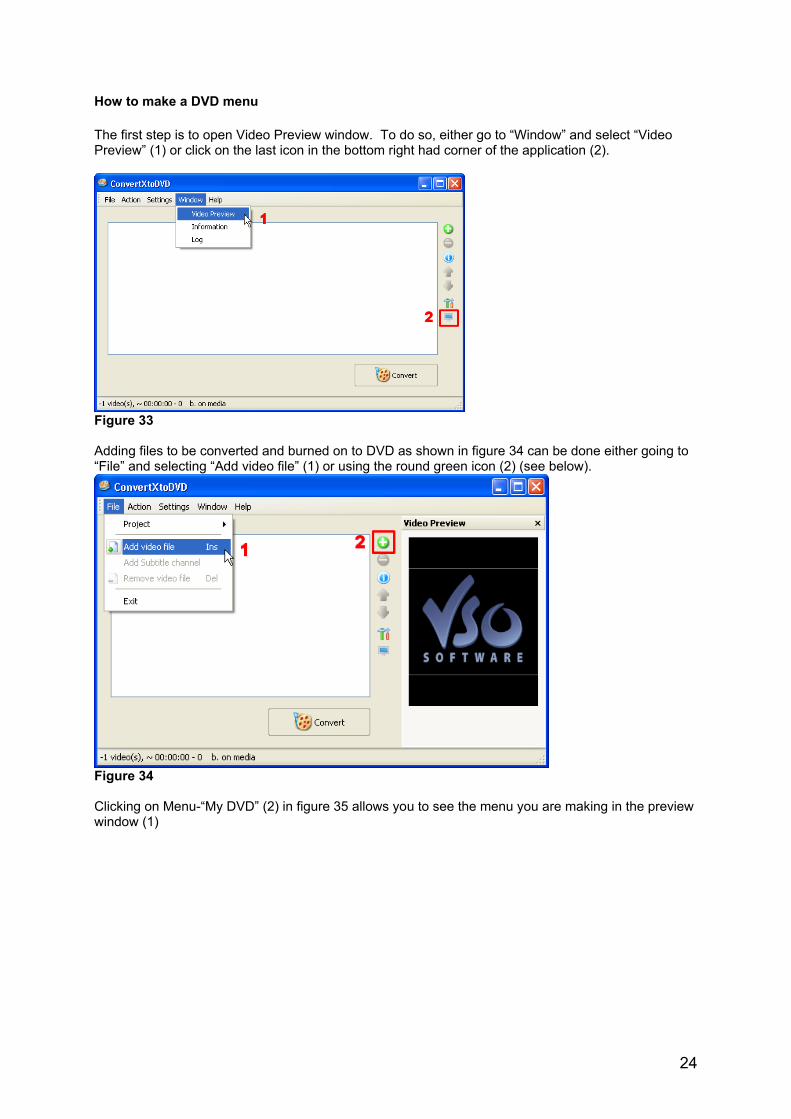
How to make a DVD menu The first step is to open Video Preview window. To do so, either go to “Window” and select “Video Preview” (1) or click on the last icon in the bottom right had corner of the application (2).
Figure 33 Adding files to be converted and burned on to DVD as shown in figure 34 can be done either going to “File” and selecting “Add video file” (1) or using the round green icon (2) (see below).
Figure 34 Clicking on Menu-“My DVD” (2) in figure 35 allows you to see the menu you are making in the preview window (1)
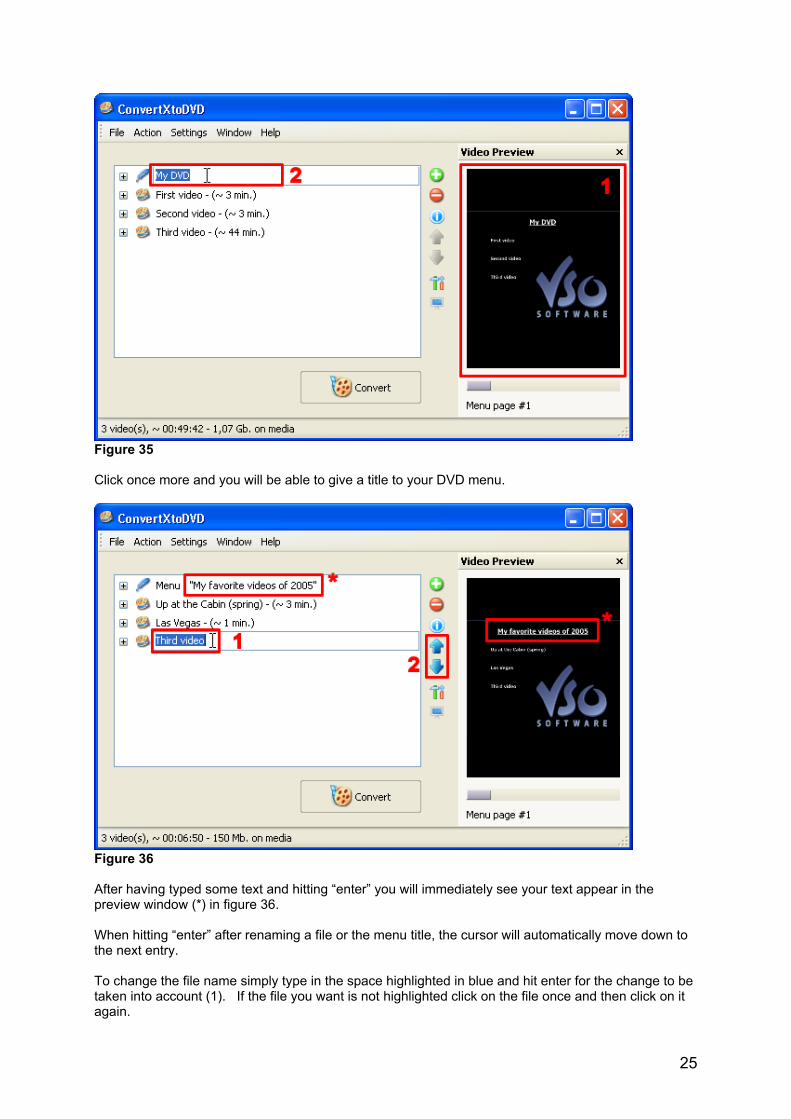
25
Figure 35 Click once more and you will be able to give a title to your DVD menu.
Figure 36 After having typed some text and hitting “enter” you will immediately see your text appear in the preview window (*) in figure 36. When hitting “enter” after renaming a file or the menu title, the cursor will automatically move down to the next entry. To change the file name simply type in the space highlighted in blue and hit enter for the change to be taken into account (1). If the file you want is not highlighted click on the file once and then click on it again.
26
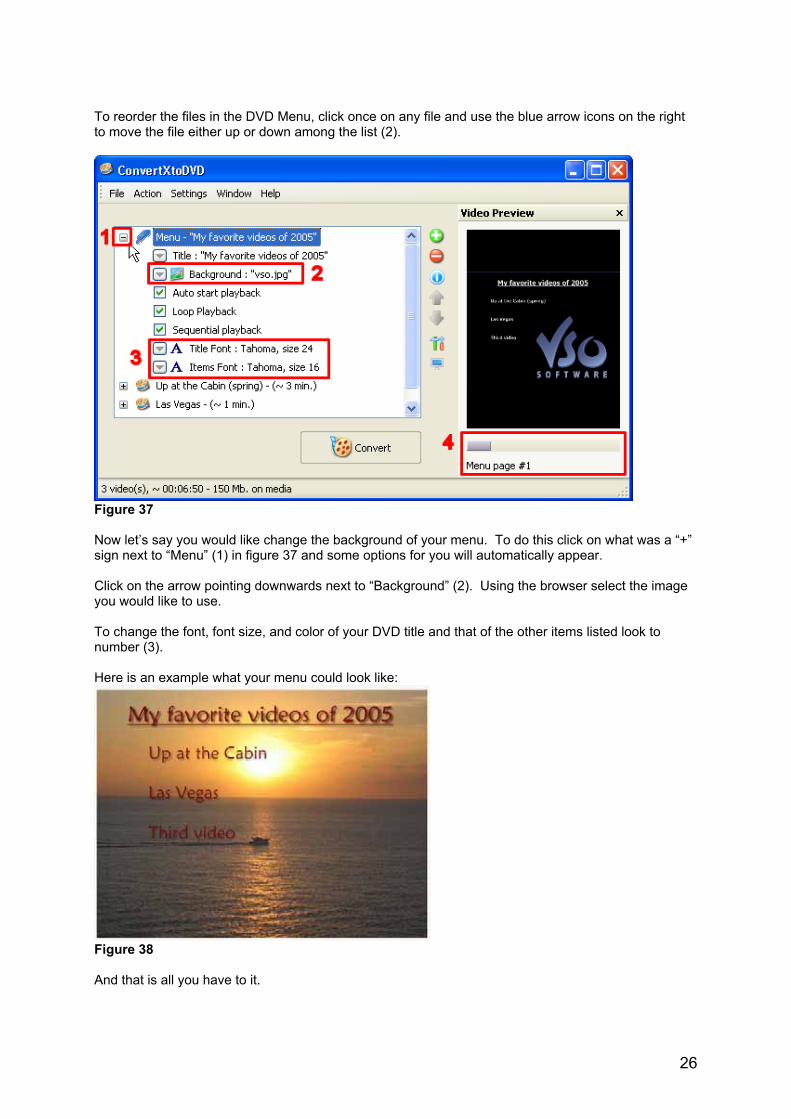
To reorder the files in the DVD Menu, click once on any file and use the blue arrow icons on the right to move the file either up or down among the list (2).
Figure 37 Now let’s say you would like change the background of your menu. To do this click on what was a “+” sign next to “Menu” (1) in figure 37 and some options for you will automatically appear. Click on the arrow pointing downwards next to “Background” (2). Using the browser select the image you would like to use. To change the font, font size, and color of your DVD title and that of the other items listed look to number (3). Here is an example what your menu could look like:
Figure 38 And that is all you have to it.
27
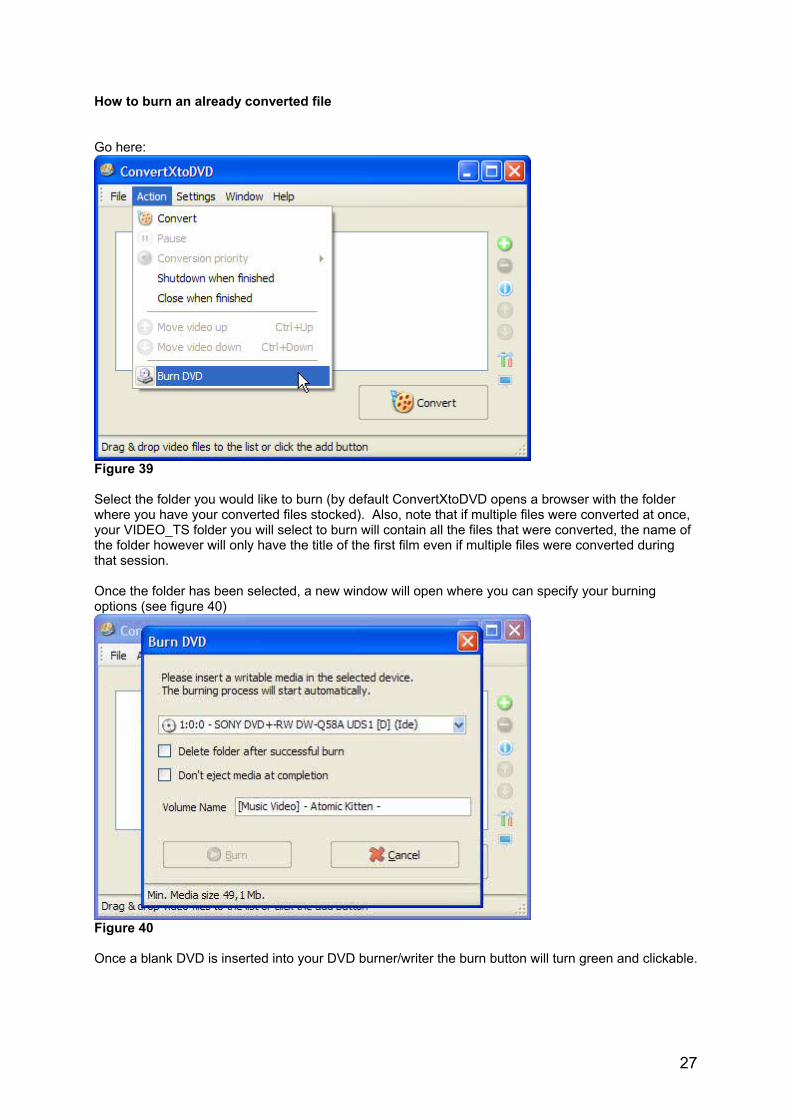
How to burn an already converted file Go here:
Figure 39 Select the folder you would like to burn (by default ConvertXtoDVD opens a browser with the folder where you have your converted files stocked). Also, note that if multiple files were converted at once, your VIDEO_TS folder you will select to burn will contain all the files that were converted, the name of the folder however will only have the title of the first film even if multiple files were converted during that session. Once the folder has been selected, a new window will open where you can specify your burning options (see figure 40)
Figure 40 Once a blank DVD is inserted into your DVD burner/writer the burn button will turn green and clickable.
28
Frequently asked questions What does audio discrepancy mean? This many appear in the log file during conversion. It is simply a note that the encoding engine makes to itself so that it can treat the file appropriately. It does not me that you with have audio synchronization problems. Let the conversion finish and watch it on your computer before burning if you want to be sure the file is fine before burning it to DVD. How come I do not see my subtitles? When watching your DVD on your living room DVD player hit the “subtitle” button on your remote control for your subtitles to appear. What does unsupported encoder for output stream mean? It means that in this version there is no support for the file format that you have added. Future versions of ConvertXtoDVD may support that file format. Check regularly for version updates or contact VSO to inquire about the file format. Can my computer be shutdown automatically after the conversion has finished? Yes, open ConvertXtoDVD go to main menu: Action and check “Shutdown when finished” Why does nothing show up in the preview window? If the preview window is not functioning properly, make sure you have the latest version of Microsoft DirectX® installed on your computer. Run Windows Update to obtain latest version of DirectX®.


![Senna [2010] Dvd Rip Xvid [Stb]](https://static.fdocuments.in/doc/165x107/577ce5491a28abf103904af5/senna-2010-dvd-rip-xvid-stb.jpg)


![Nightcrawler. 2014.DVDSCR.ac3.XViD ACAB.[Sharethefiles.com]](https://static.fdocuments.in/doc/165x107/55cf882e55034664618e215e/nightcrawler-2014dvdscrac3xvid-acabsharethefilescom.jpg)