![IT’S YOUR LAND AND MY LAND [image] · Contributed to Maine Memory Network by Maine Historical Society (Sheet Music 21) MMN #42212 Date: 1923 Description: Sheet music for “It’s](https://static.fdocuments.in/doc/165x107/5b4416997f8b9a8e388ba73a/its-your-land-and-my-land-image-contributed-to-maine-memory-network-by.jpg)
Contributing Partners' Manual - Maine Memory Network ... · Last updated on 8/10/18. 6 Part 1:...
77
www.MaineMemory.net © Maine Historical Society Contributing Partners' Manual • • Your Guide to Digitizing and Cataloging Historical Items for Maine Memory Network NOT This document is subject to change. You may download the most current version in PDF format on the MMN website, www.MaineMemory.net .
Transcript of Contributing Partners' Manual - Maine Memory Network ... · Last updated on 8/10/18. 6 Part 1:...

www.MaineMemory.net © Maine Historical Society
Contributing Partners' Manual
•
• Your Guide to Digitizing and Cataloging Historical Items for Maine Memory Network
NOT
This document is subject to change. You may download the most current version in PDF format on the MMN website, www.MaineMemory.net.

Last updated on 8/10/18.
2
Table of Contents Introduction ................................................................................................................ 4
About This Manual ...........................................................................................................4 Conventions Used in this Manual .....................................................................................5 We Need Your Feedback .................................................................................................5
Part 1: Getting to Know MMN .................................................................................... 6 Chapter 1: Becoming a Contributing Partner ...................................................................6
What Is Maine Memory Network? .....................................................................................6 Benefits of Becoming a Partner ........................................................................................7 Signing Up ........................................................................................................................7
Chapter 2: Overview of How to Share Your Collections ..................................................9 Part 2: Contributing Your Collections .................................................................... 10
Introduction & Philosophy ...............................................................................................10 Chapter 3: Selecting Items to Contribute to MMN ..........................................................11
Suitability for MMN .........................................................................................................11 Types of Historical Source Material ................................................................................13
Chapter 4: Legal Restrictions and Copyright .................................................................15 Special Cases ................................................................................................................17
Chapter 5: Digitizing Your Collections ...........................................................................19 Standards for Digitizing ..................................................................................................19 Scanning vs. Photography ..............................................................................................20 Scanning Your Collections..............................................................................................21 Editing and Correcting the Scan .....................................................................................23 Cropping Examples ........................................................................................................24 Photographing Your Collections .....................................................................................26 Scanning Glass Negatives..............................................................................................26 Choosing Items to Photograph .......................................................................................27 Studio Setup and Photography Equipment .....................................................................28 Editing and Correcting the Photograph ...........................................................................34 Standards for Selling an Image on MMN ........................................................................36 Checklist: Determining Whether Your Scan is Ready to Send ........................................36 Quality Control................................................................................................................37 Internet Resources .........................................................................................................37
Chapter 6: Uploading Your Images to MMN ...................................................................38 Uploading Images One-at-a-time ....................................................................................38 Uploading Images using FTP .........................................................................................40 Sending Images on CD, DVD, or Flashdrive to MHS ......................................................40
Part 3: Cataloging ..................................................................................................... 41 Chapter 7: Accessing Your Records...............................................................................41
Definitions of Contributing Partner Tools ........................................................................41 Accessing Your Account .................................................................................................43
Chapter 8: Cataloging Your Items ...................................................................................45 Cataloging an Item .........................................................................................................45 Catalog Field Definitions and How to Use Them .............................................................45 Saving Your Records......................................................................................................65 Submitting Fully Cataloged Records ...............................................................................66 Editing Records ..............................................................................................................66

Last updated on 8/10/18.
3
Chapter 9: Managing Your Records ................................................................................68 Taking an Image Offline .................................................................................................68 Deleting Images and Records ........................................................................................68 Replacing Images ...........................................................................................................68
Part 4: Selling Your Images ..................................................................................... 69 Chapter 10: Images for Sale ............................................................................................69
How does it work? ..........................................................................................................69 Pricing ............................................................................................................................69 Distribution of funds and reports .....................................................................................70 Standards .......................................................................................................................70
Part 5: Appendices ................................................................................................... 71 Appendix A: More About Digitizing Images ...................................................................71 Appendix B: Scanning Standards Charts .......................................................................73 Appendix C: Copyright Chart ..........................................................................................74
Internet Resources .........................................................................................................75 Appendix D: Photographer's Notes and Worksheet ......................................................76

Last updated on 8/10/18.
4
Introduction Many of Maine’s libraries, archives, museums, and historical societies hold unique resources on Maine history. The Maine Memory Network (MMN) was developed to expand access to these items. We welcome and support participation by the region's historical societies, museums, and libraries, and hope they will include electronic versions of their collections on the Maine Memory Network. This Contributors’ Manual contains the information you need to become a Contributing Partner of MMN—how to get started, what you need to know, and where to go for help. A Contributing Partner is any collecting organization that uploads digital images of its collections to the MMN website. As a Contributing Partner, you will be responsible for digitizing, uploading, cataloging, and managing the items you contribute to the database. You’ll maintain control over all of your images, giving you the ability to add new digital images, take them offline, update cataloging information, and make an image available for purchase. Any digital image your organization contributes to MMN will be watermarked, displayed at a web-appropriate resolution, properly credited, and accompanied by your organization’s contact information. Once your digital images are in the system, you will have the ability to create online exhibits, and slideshows—a great way to showcase your images and share local history. About This Manual This manual is organized for beginners, with sections specifically aimed to help those with less experience with technology. Those who want more in-depth explanations can refer to the appendices or contact us at 207-774-1822. The major sections in this manual cover the following: • Becoming a Contributing Partner • Selecting and digitizing collections • Uploading digital images • Cataloging images

Last updated on 8/10/18.
5
Conventions Used in this Manual This Contributing Partners' Manual uses the term “historical source material” and “original item” to refer to the actual, pre-digitized item from your collections. Original items and source materials are primary sources. Primary sources are the raw materials of history — original documents and objects which were created at the time under study. They are different from secondary sources, accounts or interpretations of events created by someone without firsthand experience.1 The term “digital image” refers to the image that was created after scanning or digitally photographing your original item. Once a digital image is uploaded to MMN, it is connected to a cataloging record. MMN is a database of records and digital images. The term “system” refers to this database. The term “users” refers to the audience of the site. There are public users that include students, historians, researchers, publishers, and others. There are also administrative users that include the Contributing Partners. The term "Contributing Partner" or “CP” refers to the organizations that choose to participate in MMN by contributing digital images. We Need Your Feedback MMN is an ever-evolving project in an ever-evolving medium. The only way we can improve our practices is through feedback. Please e-mail any comments and suggestions to [email protected]. 1 http://www.loc.gov/teachers/usingprimarysources/

Last updated on 8/10/18.
6
Part 1: Getting to Know MMN Chapter 1: Becoming a Contributing Partner What Is Maine Memory Network? Maine Memory Network is a statewide repository of electronic versions of Maine's historical source materials contributed by the region's historical societies, museums, and libraries. The website was built and is maintained by the Maine Historical Society <www.mainehistory.org>. Seed funding came from the New Centuries Community Program; funding for outreach was provided, in part, by grants from the U.S. Dept. of Commerce - Technology Opportunities Program (TOP), the Institute of Museum and Library Services (IMLS), National Endowment for the Humanities (NEH), Jane's Trust, and various other funders. Conceived as the online museum of Maine, MMN grew out of the idea that the historical resources of our state could be shared through new technology. MMN includes digital images of letters, journals, photographs, paintings, drawings, museum objects, broadsides, maps, and sound and video files, all relating to Maine. In addition to being digitized, all handwritten documents are transcribed. Our goal is to digitally represent the entire state through the cultural heritage of its historical source materials. Contributing Partners from across the State put digital images directly into the database through their own Web browsers. Users see the contact information about the Contributing Partner on each of the images and we encourage users to contact the Contributing Partner if they need more information about particular online images. General users of MMN can: • search the database by entering keywords; browsing by category, town or
Contributing Partner (CP); • add comments about each item to add more information or start a discussion; • help us solve mysteries of unidentified people and places in photographs; • view online Exhibits; • save items to their personal online album; • tell a story of their own with the album tool; and • purchase a high-resolution file or a print of most images from
VintageMaineImages.com.

Last updated on 8/10/18.
7
Benefits of Becoming a Partner When your organization joins MMN, you will enjoy the following: • Joining MMN will greatly expand your audience. There are over 25,000 unique
sessions/visitors per month to the website. • Creating and using digital copies of originals can assist in preservation and
security, and reduce the handling of originals. MMN encourages inclusion of aging, fragile, or valuable historical materials, if doing so would benefit the contributing organization. Original materials that have high frequency of demand or high retrieval costs are also good candidates for inclusion.
• You can contribute scans and digital photos of your historical objects from your
own computer and facility. We provide you with an administrative area to upload and catalog your items.
• You will receive assistance digitizing your collections while retaining full ownership and control of your scans. Every item on the website appears with full credit and a link to your organization's website or Facebook page.
• You can increase your revenue by selling digital copies of your images on
VintageMaineImages.com. • Participation is free of charge. Signing Up To become a Contributing Partner to the MMN, follow these steps: 1. Fill out the online form at http://www.mainememory.net/apply.
2. Discuss your application with us and describe the images you wish to
contribute to the MMN. We will provide training for the scanning and cataloging. 3. Sign the Contributor’s Agreement (found at
http://www.mainememory.net/resources) which outlines your rights and responsibilities, and mail, fax or email it to us at:
Maine Memory Network c/o Maine Historical Society 489 Congress Street Portland, ME 04101 Fax: 207-775-4301 Email: [email protected]

Last updated on 8/10/18.
8
4. Register for a user name and password at http://www.mainememory.net/login. The MMN administrator will then give you Contributing Partner permissions. With this account you will be able to upload, catalog, and manage your digitized images. The entire CP registration process only takes a few moments to complete but please contact MMN staff to set up your account. Allow the appropriate amount of time for us to process your registration before you make plans to use the contributor tools. Face-to-face training is highly recommended.

Last updated on 8/10/18.
9
Chapter 2: Overview of How to Share Your Collections Here is a quick overview of how you can share your historical source materials on MMN. With the exception of scanning, everything below can be done on the website using your contributing partner's account. 1. Become a Contributing Partner.
See Chapter 1 for instructions. 2. Scan or photograph original items.
Instructions and standards for digitizing are in Chapter 5 of this manual. There are different procedures for scanning items that are intended to be available for purchase. All digital images uploaded to the system must be in JPG format.
3. Upload images.
There are three methods for uploading images to the database: one-at-a-time via the website, FTP upload, or you can send us a CD or DVD and we can upload them for you.
4. Catalog item(s). We have modeled the cataloging record after the Dublin Core system of object description. When an image is uploaded to the database, it receives a unique MMN record number and a blank cataloging record that is completed by the Contributing Partner. Cataloging instructions can be found in Chapter 8.
5. Manage online digital images. Once your digital images are in the database, you can: • edit the record, • replace the image, • add the item to the Mystery Corner section, • take the image offline (yet keep it in the system), • attach associated files (audio - .mp3, or movie files - .mov), • monitor user comments, and • make the digital file available for purchase.

Last updated on 8/10/18.
10
Part 2: Contributing Your Collections Introduction & Philosophy This section1 offers base-level standards, benchmarks, and procedures on selecting and digitizing historical source material for inclusion in the Maine Memory Network (MMN). In an effort to provide assistance with local digitization efforts, it also introduces concepts advocated by Cornell University Library and the Library of Congress that we feel are necessary in undertaking a digital initiative. We encourage everyone to scan their images and documents using high-resolution standards for the best quality, longevity, and most flexibility. (41-43 MB) It is the position of the Maine Historical Society that digitization is not preservation, but a tool of preservation. Before defining your institution’s procedures, you should first define your goals. If you seek assistance, Maine Historical Society may be able to provide consultation services. We also suggest you study Cornell University’s online tutorial: http://www.library.cornell.edu/preservation/tutorial/contents.html.
1 Much of this section is based on Moving Theory Into Practice, Digital Imaging for Libraries and Archives, by Anne R. Kennedy and Oya Y. Rieger, published in 2000 by Research Library’s Group (RLG). The RLG has many resources for digitization, which can be accessed at www.rlg.org.
Last updated on 8/10/18.
11
Chapter 3: Selecting Items to Contribute to MMN All items submitted to MMN should be primary documents, appropriate for a general audience and be related to the history of the state of Maine and the surrounding region. Suitability for MMN Maine Memory Network seeks to include digital images of photographs, paintings, printed materials, manuscripts, and museum artifacts from across the state in a central repository made accessible on the Internet. MMN was created to provide better public access to the collections of historical societies, archives, museums, libraries and other organizations. Therefore, what you choose to put online should draw from the collections of your historical society, museum, or library. Keep in mind, however, Maine Historical Society staff is the final arbiter of what is placed on the MMN website. We reserve the right to accept or reject any items. Consult with us if you have questions. MMN is a resource for researchers, teachers, students, authors, publishers, journalists, and the general public to aid in understanding local history and Maine history, and, through those pursuits, the nation’s history. MMN includes documents and images from all geographical areas of the state, from all time periods, and from many themes (politics and government, industry and business, home life, different religious, racial, ethnic, gender, and socioeconomic groups; social and political action, and so forth). Consider these suggestions when selecting items for MMN: • Choose items that are the highlights of your organizations collections, ones that
are your "favorites" or ones that help inform and tell a specific story. • Choose particular "named" collections of related items. These can be the first
step toward an online exhibit. • Consider the historical significance: Will this item help users better understand
their community, state, nation, the time period, or how people lived? • The items you select need to have a clear Maine connection. • Choose items that you know information about – you will have to describe and
catalog the item, so it is helpful to know something – or be able to find out – about the item. If you don’t know the information, consider adding it to the Mystery Corner section of the site.
• Choose items that will reproduce well digitally. Some items are too big or, in the case of manuscript items, too faded or too worn out, or damaged rendering them "unreadable."

Last updated on 8/10/18.
12
• Avoid newspaper articles. They don't reproduce well online and many are not true primary sources. They can be used as informational sources for your descriptions or your exhibits and essays, but not as MMN items.
• What makes history interesting for many of us is people and the connections to people – if it's an object you're digitizing, who owned it? Who used it? Ditto a house. Who lived there? What did they do? Who's in the photo? Who wrote the document?
• Each MMN record must be a single item – even if you're looking at an album that has 5 pictures on one page, you must digitize each photo separately
• You should digitize complete items – the whole image, the entire page of text, the whole pamphlet. It is OK to do the cover of a book or other object, but the goal is to do entire items. Remember, the purpose of MMN is access for the public.
• All manuscript material – letters, documents, etc. – has to be transcribed – typed in a document, in MS Word for example. Choose manuscript material accordingly.
Provenance Contributing Partners are responsible for the copyright of the items they put on MMN. Maine Memory Network and the Maine Historical Society will not be held responsible for copyright violations committed by Contributing Partners. See your Contributing Partner Agreement for details, and refer to Chapter 4 in this manual. Ensure that you have the authority to publish an item online, or have at least done your due diligence in attempting to determine who owns such rights. Avoid using copies of photographs if possible and do not use photocopies of documents. If originals of photographs or illustrations do not exist and copies are of sufficient quality, these can be put on MMN. Be sure to always check copyright regulations and privacy rules to ensure that the items can be used legally. Check the U.S. Copyright office website for more information (www.copyright.gov). Items Owned by Individuals Often, Contributing Partners wish to include items on MMN that are owned by individuals in their communities. Contributing Partners can serve as the sponsor for the item(s) and should follow the same guidelines noted above in deciding whether to accept the item. Sponsoring organizations must obtain a release form from the individual that insures that the organization has his or her permission to photograph or scan the item and to include it in MMN. This release form must also specify fair use policy for items placed online to insure that the contributing individual understands how users might legally make use of the image that is placed on MMN.

Last updated on 8/10/18.
13
Types of Historical Source Material MMN stores and provides access to digital versions of historical source material that are uploaded into the system including visual images, manuscripts, printed matter, three-dimensional physical objects, sound files, and video files. When choosing items to digitize, remember MMN uses the whole item—all pages of a document, the entire photograph, or the whole object. Visual Images Visual images include photographs, paintings, architectural drawings, mechanical drawings, sketches, maps, memorabilia, etc. Manuscripts and Printed Matter Manuscripts, defined as hand-written documents, include journals, letters, diaries, treatises, personal accounts, etc. The entire document should be digitized. If the cover or title page is significant, you can use that alone, but not a random single page. Printed Matter includes books, broadsides, business cards, treaties, postcards, etc. All manuscripts and printed material must be fully and accurately transcribed before they will be accepted in MMN. Please see our transcription guidelines at http://www.mainememory.net/resources.
Note: Newspapers and other halftone images generally scan poorly, therefore halftone images may not be accepted in MMN. Halftone is the process of reproducing an image as a series of variable-sized dots.
Physical Objects Three-dimensional objects include Native American artifacts, sculptures, textiles, housewares, coins, tools, weapons, military objects, clothing, memorabilia, etc. Sound and Video Files Sound (.mp3) and video files (.mov) can be items on MMN. The recordings should be no longer than about three minutes. You may edit audio and video files and upload them as separate MMN items. Use only contiguous pieces for each item. The following types of sound files are acceptable: • Oral histories • Speeches • Film footage • Original motion pictures

Last updated on 8/10/18.
14
On MMN, sound files must be attached to the following digital image that MMN will provide. A still image from the video should be used for the presenting image for videos. Transcriptions must be provided for audio files.

Last updated on 8/10/18.
15
Chapter 4: Legal Restrictions and Copyright Putting images of historical materials on MMN is a form of publication, or public distribution, and therefore a number of interesting legal questions arise. The goal of MMN is to find a way for all Maine collecting organizations to share the state's historical heritage with the people of Maine. Every organization should exercise due diligence with respect to copyright and protection issues. Do you have the right to use an image on Maine Memory Network? The first question that arises is whether your organization has the legal right to reproduce, distribute (hence publish on the Web), or sell the images of materials in your collections. The fact that you own these objects, photos, documents, etc., does not mean you have the right to use images of these in any way you choose. If you use an image that you do not have the rights to, the rightful owner could bring an infringement action against your organization and MMN. Also, items may be protected whether they have been published or not. In general, to determine whether an image is protected you need to know: 1. When it was created, 2. Who owns it (the object and the copyright), 3. Whether it was it ever published, and if so, when. The following is a simplified account of copyright and protection issues; you're encouraged to view the tables in Appendix C and to learn more about these matters by consulting the sites and sources also listed there. You may digitize and distribute public domain items. If a copyrighted work (for example a photograph, a film, a musical selection) enters the Public Domain it means that it is a property that no longer belongs to anyone and that is freely available to the public at large to use, without any need to obtain permission. You may post items on MMN that are in the public domain. MMN does not give users access to the high-resolution images, however, unless they contact the MHS image services department, who administers VintageMaineImages.com. Much of the material owned by historical organizations falls into the public domain category, which is to say that copyright protections no longer apply. This category includes works: 1. published before 1923, 2. unpublished works whose authors died before 1945 (this changes each year) (life
of the author + 70 years); and 3. unpublished anonymous works or works made for hire that were produced before
1895 (120 years from date of creation).

Last updated on 8/10/18.
16
You may digitize and distribute items to which you own the copyright. Some organizations do own the copyright to things in their collections. The simple fact that an object was given to you, or bought by you, does not mean that you own the copyright. Neither does the existence of a deed of gift, unless that deed specifies the transfer of copyright to your organization and unless the donor owns that right and can therefore give it to you. Be especially careful about unpublished works created before 1978 that may have been subsequently published between 1978 and the present, and works published between 1923 and the present. Their copyright might have been renewed. Get permission from the rightful owner of the copyright. This is perhaps the trickiest condition of all. Many works fall into categories that are still subject to copyright protection, whether they have been published or not. Photographs, personal letters, and diaries also present special cases (see Appendix C). Quite often the problem comes from an inability to identify the rightful copyright owner of a work that may still be under protection, either because they are dead or they or their heirs are unreachable, or the details of publication are unknown. There are various services and sites that can help, but the basic concept is that a documented search effort should be made before an organization decides to use an image that may be under protection. Start with the charts in Appendix C. The U.S. copyright office circular #22 "How to Investigate the Copyright status of a Work" is also a good reference tool on how to search the Copyright Office catalogs and other records. http://www.copyright.gov/circs/. After you have conducted your own research and still cannot determine the ownership of the material, you may wish to request that the U.S. Copyright Office conduct a search of its records for a fee. Key points to remember • Items are protected whether they have been published or not. This protection lasts
for the life of the author plus 70 years. • Works published prior to 1923 can be presumed to be in the public domain. • Works published after 1978 may be protected if the copyright was renewed. • For works published between 1923 and 1978, some research is necessary to
determine whether the work was registered, by whom, and whether or not it was renewed.
• For works produced by state and local government employees, check with attorney general, county attorney, or city attorney's office.

Last updated on 8/10/18.
17
Risks As stated earlier, the goal of MMN is to find a way for all Maine collecting organizations to share the state's historical heritage with the people of Maine. We think it is worth taking some risks but we need to inform you of potential infractions. There are three levels of infringement: innocent, standard, and willful. Proof of an effort to determine copyright might cause a judge or jury to lean closer to innocent infringement. Also, the true copyright owner must prove ownership. If a copyright dispute arises, the document under contention will be removed from the website immediately and will only be reinstated after clear copyright ownership is established. The MMN staff will work with you and try to help you solve any dispute. Please refer to the Contributor Rights and Responsibilities Agreement for details of your rights and MHS's responsibilities. For more information, refer to your copy of the Contributing Partner Agreement. Special Cases Deeds of Gift A deed of gift is the legal agreement between the archives and the donor documenting the terms of the donation. If a deed of gift was acquired, make sure that the donor gave and assigned all rights of copyright to the library. If not, you will need to receive permission from the donor or donor's family to distribute. If a deed of gift was not acquired, you must contact the donor or donor's family to receive permission. If the donor or donor's family does not hold the copyright, the University of Texas has generated a list of collective rights organizations that can be contacted for assistance in locating copyright holders. The list includes contact information for various formats of materials. http://www.utsystem.edu/OGC/IntellectualProperty/permissn.htm The Library of Congress also provides links to Copyright Internet Resources at: http://www.copyright.gov/ If a well-documented search has been performed and the copyright owner is still unidentifiable, the organization may wish to take the risk. Photographs You need permission from the photographer and the subject(s) in the photograph to digitize and distribute the photograph. Again, see if the deed of gift assigned all rights to you. If you do not have such permission, you will need to make an effort to contact both parties or groups to obtain permission. Otherwise the copyright may be held by the heirs of the photographer, or someone else.

Last updated on 8/10/18.
18
It may be difficult to trace the subjects of group photographs; if the subjects are unidentifiable it will probably be okay to distribute the image. You must be able to provide detailed documentation of your effort to contact the holders of the copyright. This documentation is for your protection if you decide to digitize an item after an unsuccessful attempt to contact the copyright holder(s). Personal Letters You must have permission from the author of the letter and the addressee to distribute the document. Check the deed of gift. If you do not have such permission, you will need to make an effort to contact both parties to obtain permission. If there is any personal or sensitive information in the letter, it is best to contact legal council with questions concerning such content. You must be able to provide detailed documentation of your effort to contact the holders of the copyright. This documentation is for your protection if you decide to digitize an item after an unsuccessful attempt to contact the copyright holder(s). Diaries You must have permission from the author and the owner of the diary to distribute the work. If you do not have such permission, you will need to make an effort to contact both parties to obtain permission. If there is any personal or sensitive information that may be harmful to distribute in the diary, it is best to contact legal council with questions concerning such content.

Last updated on 8/10/18.
19
Chapter 5: Digitizing Your Collections Standards for Digitizing This chapter provides a set of digitization standards used by the Maine Historical Society, both for scanning and photography. These standards reflect best practices as identified by MHS. Historical objects chosen for inclusion on MMN may either be scanned using a flatbed scanner (if the entire image fits on the scanner), photographed with a digital camera, or photographed with a conventional 35mm camera. If the latter is done, the resultant print or slide should be scanned. These standards are subject to change as technologies and delivery systems improve. Refer to Appendix A for the reasoning behind our decisions. File Formats Scans and digital photographs: .TIF (Tagged Image File Format) for master scan
.JPG (Joint Photographers Expert Group) Transcriptions Text files (WORD, RTF, Pages) later turned into .PDF format by MMN staff Sound .MP3 (Motion Picture Expert Group) Video .MOV (Quicktime Movie) Note: Most institutions use the TIF file format to store their master images. TIF format will not result in loss of quality due to compression, as JPG files will. See Appendix A for more. File Size (megabites) Resolution x Document's physical size = File size Resolution (dpi = dots per inch) is only one factor in the quality of a scan. MMN uses file size as the benchmark, a more comprehensive measurement than resolution. Below are the values for the file that gets uploaded to MMN. If you crop the image, make sure the resulting file still meets these file size standards. File size defines the amount of information in the scan. The larger the file, the more detail it contains. The image size and resolution (also known as dpi, or dots per inch) are tied to the file size in a three-way relationship. If any one of the three increases, one or both of the others must increase as well. (See Appendix A for more explanation and Appendix B for a handy chart.) When scanning, it is important to know what you want to do with the scan. We want Contributors to be able to print high-quality copies of their own images at 300 dpi and MMN's zoom tool to work well. To achieve these two goals, we recommend Contributing Partners scan all documents and images in color RGB mode with a 40.5 - 43 MB target size. This will result in a printable output that is maximum 11" x 14". This also results in a file that is 3000 pixels wide on the smallest side.

Last updated on 8/10/18.
20
When digitally photographing objects, set your camera to the highest possible file size that the camera allows. Maine Memory can accept file sizes smaller than 40 MB but keep in mind, the larger the file size, the closer someone can zoom into your image and the larger you can print the image. If your files are too small, we may ask that you rescan them before putting them online. File size summary: MMN requires a high-quality scan so that it can be printed at 300 dpi up to 11" x 14". Also the MMN zoom feature requires a high detailed scan to allow users to zoom into the photograph or document.
40.5 - 43.0 MB in RGB Color 3000 pixels minimum on the shortest side See Appendix B for dpi approximations
Color Mode Scan and save all historical items in RGB color mode regardless of whether the item is color or black and white. Bit Depth Use 24 bits per pixel (8 bits per color channel). This is the appropriate bit depth for scanning historical material that is not high-resolution to begin with. JPG Compression Save all JPG files at a low (10%) compression value. Using Photoshop, save your JPGs with a quality value of 11 out of 12. Scanning vs. Photography Determining whether to scan or photograph your materials can be simplified by these steps. You’ll need to ask these questions: 1. Is the object 3-D? If yes, photograph it. 2. Is the object 2-D? If yes, go to question 3. 3. Is the 2-D object fragile or falling apart? If yes, photograph it. You don’t want to
damage a book's binding or a torn page by scanning it. If no, go to question 4. 4. Is the 2-D object small enough to fit onto a flatbed scanner? If yes, scan it. If no,
photograph it. These questions may seem very easy, but to ensure the best images are captured you’ll need to use the most appropriate methods of digitizing. Scanning gives the highest resolution, unless you have a 60-megapixel camera. So, if your flat materials

Last updated on 8/10/18.
21
can fit onto your scanner, use that method. Sort through your photographs, manuscripts, and other 2-D materials and separate them into those that can be scanned, and those that are large and need to be photographed. Scanning Your Collections Our scanning philosophy is to go through the process only once for each item you scan. In other words, we hope that your scan will be of a sufficient quality that you'll be able to use the digital file for all possible future uses--web, reprints, use in publications, even poster size. Maine Memory Network recommends that all contributing partners save two scans of original source material: an original, untouched scan and an edited scan. (Editing is explained further in this chapter.) The original, or master scan, should be saved locally to your computer's hard drive or perhaps to some removable storage system (CD or DVD or external harddrive). You should make a copy of the master scan to edit for any subsequent use and to submit to MMN. There are several compelling reasons for creating an archival quality digital master image: • The master image provides an unedited, information-rich file that closely
represents the information contained in the original. • Creating a master scan will reduce the need to rescan and handle the original
source materials. • High quality master scans will make your investment in the digitizing process
worthwhile. • A digital master is available and rich enough to accommodate future needs and
applications. Creating a master scan The method you will use to achieve high and low resolution scans may vary according to the platform and software you’re using to scan, but the concept behind it remains as follows: General steps for scanning flatwork are as follows: 1. Place the original item on the scanner.
Make sure that the glass is free of dust, hair and smudges. 2. Preview the image. 3. Carefully outline or select the image that you want to scan using the tool in
your scanning software.

Last updated on 8/10/18.
22
This will determine the area to be scanned. Include the edges of the document or photograph.
4. Set the target output size to 100% (the same size of the original).
The image size of the scan should be equal to the image size of the original. 5. Adjust the resolution setting so the file size matches MMN standards. The
resolution setting appears in different places, depending on the software you are using.
High resolution scans
Platform Windows or Macintosh Scan type Color File Size when opened*
40.5 - 42 Mb
Mode Color Bit Depth 24 bits / 16.7 million colors File Types TIF and JPG Compression - Quality
10%/high quality 11 (out of 12) in Photoshop
*File size should be determined when the file is open in your image editing software. After the JPG file is saved and closed, it is compressed, resulting in size reduction.
NOTE: MMN will accept lower resolution images as long as they are above 3 MB when opened. Keep in mind that the larger the file size, the better quality the image will be on MMN. Users can zoom into images and they will be able to zoom further in if the file size meets our high-resolution standard. 6. Scan your image. 7. Save the image as a TIF file as soon as it appears in your image editing
software. When naming your image, we recommend that you give it a name that helps you cross-reference the digital image with any existing catalog records.
8. Save the image again as a JPG file. To save the image again, use File > Save As. This creates the digital image that you will edit. Never edit your master scan. This file is the one that you will edit and upload to MMN. Note: JPG files are compressed when closed. The file size you see for the closed file will be less than 40MB.
9. Rotate, crop, and correct the file as needed. Save again.

Last updated on 8/10/18.
23
Storing the master scan We recommend that you keep a local copy of your master file on your hard drive or some other storage device, particularly if your organization’s digitization standards differ from those of MMN. Even though your images are uploaded to the MMN website, Maine Historical Society will not be held responsible for loss of data on MMN. Additionally, operating support for MMN depends on public and private funding, and the longevity of this project cannot be guaranteed. Editing and Correcting the Scan It is the goal of MMN to provide a faithful representation of a historical item at the time it was digitally captured. Editing a digital file should be limited to making it look like the original. Editing should not include repairing tears, stains, markings, or any other blemishes on the original. Such editing falls within the domain of archiving and preservation, for which this manual does not provide standards.
Note: Never edit your master scan. Make a copy of your master scan and edit the copy. Cleaning Scans Make sure you clean the glass on the scanner before scanning to prevent unnecessary touchup later. Scanners pick up dust, hair, and smudges that result in additional visual elements that were not present on the original. It is acceptable, but not necessary, to clean such marks off a scan and this will make your images more appealing. This process can be time-consuming and expensive when dealing with a large volume. Monitor Calibration Color management is a challenging task with the current variety of monitors, scanners, and computers. Different monitors may produce different results. When editing digital files, we suggest you calibrate your monitor to a gamma setting of 2.0 (half way between PC (1.8) and Mac (2.2) standards). Sharpening Do not sharpen digital images of photographs or paintings. Manuscripts may have minimal sharpening to allow the text to be readable. Rotating Digital files that are crooked (not aligned square to the edge) will not be accepted in MMN. Make sure that you square your items as best as you can before scanning or photographing. Rotating the image electronically is acceptable.

Last updated on 8/10/18.
24
Cropping MMN has specific requirements regarding cropping of images. We think it is important to show the edges of documents and photographs, in most cases. For example, if a photograph, drawing, sketch, etc. is torn, or if the edges are irregular, we scan the image so all edges are showing. • Manuscripts are cropped to show all edges. • Paintings are cropped so the frame is not included, unless the frame provides
historical information. • Photographs are cropped so borders, matting, and frames are not included,
unless the border, mat, or frame includes historically important information.
NOTE: If you crop the image, recheck your image size to make sure that it is not below the required file size.
Cropping Examples If you need to crop your images, it is important that they be cropped correctly to give the user an accurate representation of the original object. Below are some examples of correctly and incorrectly cropped images. Use these as a guide to cropping your own. Keep in mind that after an image is cropped, it must still meet the standards of the site. Manuscripts should be cropped to show all edges. Figure 1: Examples of cropping manuscripts
Incorrect – no edges
Correct – Showing all edges

Last updated on 8/10/18.
25
Paintings should be cropped so the frame is not included, unless the frame provides historical information or is historically significant. This is a judgment call.
Figure 2: Examples of cropping framed material
Photographs can be cropped so borders, matting, and frames are not included, unless the border, mat, or frame includes historically important information.
Correct - Includes historically significant frame with small space around it.
Correct - No frame included. The frame was not important.
Correct - No border or matting
Correct - Border included because it
Incorrect – frame partially included and it is crooked.

Last updated on 8/10/18.
26
It is also acceptable to crop the image so all edges are showing. Photographing Your Collections Figure 3: Examples of cropping photographs
This section will teach you practical ways to photograph historical items for Maine Memory Network. Three-dimensional objects must be photographed on a solid background with proper lighting. If using a traditional camera, the resulting negative or print can then be scanned. If using a digital camera, your file must be over 3mb when opened. Photographing an object may not give you the highest amount of detail or resolution that you expect. The camera and lens greatly affects the quality of the image. Cameras with 10 megapixels or more will create better-looking images than those with less. Cameras with attached lenses will also yield better quality images than those with built-in optical zoom lenses. Photographing objects with a 10-megapixel camera (or similar) may give you a file size of about 20 megabytes. This size is sufficient for sharing on MMN but also good for printing up to 8x10 inches. Scanning Glass Negatives We recommend scanning glass plate negative in color (RGB) mode, at 24 bit depth. This allows the scanner to capture more of the shadow depth than if you scanned in grayscale, 16 bit mode. You will have to have a Color Film setting on your scanner. Save your color scan as a TIF, and leave untouched, as the master scan.
Correct – All edges showing

Last updated on 8/10/18.
27
After saving, remove the color to make a black and white copy of the negative. This can be done by finding a Remove Color menu option, or reducing the color saturation to 0. Resave this image as a JPG file and upload to Maine Memory Network. Choosing Items to Photograph Items you wish to photograph for MMN may include: • Oversized photographs, flat maps, and other two dimensional documents • Photographs, postcards, stereographs, daguerreotypes, and other photographic
materials that cannot be placed on a scanner • Jewelry, hats, clothing, toys, and other material-culture objects • Any other two- or three-dimensional objects The size of the object will determine the set-up for the photographs. If you are photographing small objects, you can use a small space. If you are photographing large objects, you will need a larger space. Plan ahead for where you are setting up and choose the materials based on your space.
Last updated on 8/10/18.
28
Studio Setup and Photography Equipment Setting up a photography studio can be quite simple. You don’t need a lot of space and this can be done within a classroom or small activities room. Try to choose a space where there is no natural light from windows or where windows have light-blocking curtains. You will need the following materials to set up a photo studio: • A large flat workspace, such as a table or desk, to place the items before you
photograph them--a staging area. • A table to put the historic objects on • A small step ladder or sturdy chair • A good quality digital camera • A tripod for the camera • Lights (hot lights are not recommended for photographing historic materials) • Light stands • Reflectors (can use aluminum foil and white poster board) • Extension cord and power strip (if outlets are nearby this may not be necessary) • Duct tape to tape down wires on the floor Other materials to bring to the work area should include: • An ironed white or gray flat bed sheet or backdrop cloth or a very large piece/ roll
of white paper or a white or gray piece of foam core/ gator board/ poster board to use as backdrop
• Clips to hang the cloth or paper • A ruler and a coin (or crisp dollar bill) to show scale • Weights to hold down paper edges (such as small sandbags or a paperweight) • A tabletop lazy-susan to help show different angles • White or clear tacks
Setup 1. Set up the studio by first choosing the table to put all the historic materials on.
Place items in the order they will be photographed. Put like items together (books together, small objects together, larger objects together) on the table. Make a list of everything you will photograph. If the objects have an accession (identification) number, include that on your list.
2. Choose the surface where you will place the items to be photographed. Place the
poster board on the surface, if starting with the 2-D objects. Hang the backdrop/ sheet, if starting with the 3-D objects.

Last updated on 8/10/18.
29
3. Put the camera on a tripod. Set up two lights, one on either side of the table close to where the object will be. Plug in all the cords (if any) and use duct tape to tape the cords to the floor for safety reasons.
Lights Lights can be used in a number of ways based on what you are photographing and where. • Block out all natural light from windows, and turn off the room lights. The object
needs to be illuminated by lights you can control. • Using two lights at equal distances from the camera is the best method. Put the
lights on either side of the object and tilt them downward to point the light just above the object.
• If the object still looks too dark, you can use reflectors to increase the amount of light shining on it. Use white paper, tin foil, or a photographer’s reflector. Place the reflector in front of the object (or on the side between the light and the camera). Clamp it to a stand or have someone hold it steady. Make sure the reflector does not block the camera view or appear in the shot. Using a reflector can help add light to an object by bouncing light from the reflector back to the object.
Setup for 2-D objects Two-dimensional objects are best photographed when using a copy stand. Adjust the tripod so the camera is facing down on the object and not straight ahead. If the tripod you are using does not allow this angle, use the straight-on method. Here you would set your camera lens to be parallel to the object. You’ll need to use a board to tack or fasten the objects. Angle the board so it's vertical or at a slight angle from the table.

Last updated on 8/10/18.
30
Figure 4: Setup for photographing 2-D objects

Last updated on 8/10/18.
31
Setup for 3-D objects Three-dimensional objects will need a seamless backdrop. You can use an ironed bed-sheet or a roll of paper. Tack or tape one end of the roll to a vertical surface (wall, chalkboard) and roll the paper or sheet onto the table, taping the other end on the table’s edge, closest to the camera. The backdrop should be seamless, allowing there to be a smooth curve in the background. Place the object on the table near the camera. Set up your lights on either side of the object at the same angles. If a top light can be rigged or clamped, it will provide excellent overhead light. Place the camera and tripod close to the object so the lens and the object are on parallel planes.
Figure 5: Setup for photographing 3-D objects
Using a Flash The internal flash provides more light to the object. Turn off the flash when using external lights. A flash often gives a harsh, uneven light to your object. Find the flash icon on your camera's controls and turn it off. If you are not using any external lights, flash is acceptable, but be aware that your object may photograph too flat or bright. If there are shiny or light parts of your object, a flash may cause them to look even lighter and brighter, resulting in an undesirable photo.
Last updated on 8/10/18.
32
Taking the Photos 1. Begin with a fully charged camera battery and an empty memory card, or one with
ample free space. 2. Set up the camera, tripod, and lights based on the kind of objects you are
photographing. 3. Adjust the tripod to keep the camera’s lens angle parallel to the object. 4. Adjust your camera settings and bracket to test the light. This means that you will
try one camera setting combination (aperture and shutter speed), then another, and another without moving the object. Look at the images to find the best setting. Then, use that setting for your series of objects.
5. Leave space around the object in the viewfinder (the part you look through) but not too much. You may need to crop the image later on.
6. Focus on the object only, not the backdrop. You can use an Auto-Focus setting on your camera.
7. Take more than one picture of each object as a rule of thumb. 8. If you wish, place a ruler, coin (such as a quarter), or a crispy dollar bill near the
object to show its scale. 9. Decide if you want to include detail shots. Sometimes when an object is large, you
may want to photograph the entire object, and then choose an interesting part of it to photograph as a close detail shot. An example of this may be a vase: photograph the vase, and then make another picture of the back side and maybe the bottom. NOTE: MMN does not accept detail shots at this time but you may want them for other cataloging software such as Past Perfect.
Camera Settings Using the Automatic setting on your camera may not be the ideal method for getting the desired results. Photography is all about choosing the right combinations to take a properly exposed photo. You’ll learn to accurately combine Aperture and Shutter Speed. Aperture is dependant on the distance the camera is to the object, and how focused you want the background. The shutter speed refers to how fast the camera will take the picture.
• File Size: This is the first setting to make and is critical. Some cameras are set automatically to take a picture small, medium or large in size. Choose the setting that will give you the largest file. This way, when you want to enlarge the photo on the screen or when printing, it will be clear and not pixelated.
• Aperture: Aperature is the size of the lens opening. In cameras, there is a
small hole where light enters the lens to create the picture. If the opening is small, it will need more time for light to come through. If the opening is large, it will need less time for light to come through. Aperture settings are marked as

Last updated on 8/10/18.
33
“Av” and settings include numbers that refer to the size of the opening: 1.4, 2, 2.8, 4, 5.6, 6.3, 8, 9, 11, 14, 16, 22. Aperture settings can be slightly different on every camera. The aperture stop of a photographic lens can be adjusted to control the amount of light reaching the film or image sensor. In combination with variation of shutter speed, the aperture size will regulate image sensor's degree of exposure to light. Typically, a fast shutter speed will require a larger aperture to ensure sufficient light exposure, and a slow shutter speed will require a smaller aperture to avoid excessive exposure.
• Shutter Speed is the length of time the camera shutter is open; how long the
light comes through the opening to create the picture. The time is marked in fractions of a second. The shutter speed setting is marked as “Tv” and times include: 1/500, 1/250, 1/125, 1/80, 1/60, 1/30, 1/15, 1/8, 1/4, 1. This means that 1/60 equals one sixtieth of a second.
Combinations in the camera can be made automatically by choosing only one setting, Av or Tv. When you choose one, the camera will automatically set the other. For example, if you choose an aperture setting of 8, the camera sensor will determine how much time the light will need to pass through the opening of that size in order to create the picture. It might choose 1/125 if there is ample light, or 1/30 if there is not much light. If you choose a shutter speed setting of 1/30, the camera sensor will determine what the aperture size should be so light can pass through the camera at the speed you chose, creating the right exposure. The sensor might select an aperture of 8 if there is a lot of light, or 2.8 if there is not much light. You can use the manual setting on a camera, marked “M”, to create your own combinations. This means you can choose both the aperture and the shutter speed to create the best image. This is a great way to learn about the setting combinations. Taking Notes Note taking is an important task when trying to find the right combination. Once you have taken the picture, review it on the camera’s digital screen and decide if it looks too light, dark, or out of focus. Record the settings on your camera so you can go back to those settings for the next object. Once you have discovered a good combination, leave that setting on the camera. Combinations are unlikely to change for each object, unless you move or change the lighting. You should be able to use the same combination for similar objects when the lighting is the same. You will also want to keep notes about which objects you have photographed and which ones you have not. Working with Your Photos After completing the photo shoot you need to move your pictures from the camera to your computer for editing and uploading to Maine Memory Network.
Last updated on 8/10/18.
34
Moving the photos onto your computer
1. Now you need to move the images from your camera's memory card to your computer. Remove memory card from the camera, and place it in a card reader (unless your camera can plug directly into your computer). Plug the card reader into your computer.
2. Make a new folder on your desktop for your new images. Look for the device
icon on the screen (on a Mac) or for the card's drive letter in "My Computer" on a Windows computer. Open the device or drive and select all the images. Copy/paste or drag the files into the folder you just created.
3. Open the folder to confirm the images are there. Eventually you will want to
delete the images from the card. You can do this by manually deleting the images when the card is back in the camera or by loading the card into your computer the same way just described.
4. Backup the folder of images onto a disc, external hard drive, flash drive, or
server to make sure the images you just photographed are saved in two locations.
Editing and Correcting the Photograph It is the goal of MMN to provide a faithful representation of a historical item at the time it was digitally captured. Editing a digital file should be limited to making it look like the original. Editing should not include repairing tears, stains, markings, or any other blemishes on the original.
Note: Never edit your master scan. Make a copy of your master scan and edit the copy.
Monitor Calibration Color management is a challenging task with the current variety of monitors, scanners, and computers. Different monitors may produce different results. When editing digital files, we suggest you calibrate your monitor to a gamma setting of 2.0 (half way between PC (1.8) and Mac (2.2) standards). Sharpening Do not sharpen digital images of photographs or paintings.

Last updated on 8/10/18.
35
Rotating Make sure that you square your items as best as you can before scanning or photographing. Rotating the image electronically is acceptable, Digital files that are crooked (not aligned square to the edge) will not be accepted in MMN. Cropping In most instances you may need to crop your digital photograph to isolate the object and minimize the white space around it. Manuscripts should be photographed and cropped to show all edges. Paintings should be cropped so the frame is not included, unless the frame provides historical information. Oversized photographs can be cropped so borders, matting, and frames are not included, unless the border, mat, or frame includes historically important information. Ideally you should photograph the image so all edges are showing. Color Adjustments The lights you used and the camera's internal settings may make your image look different than it does in real life. You should change the color to look like the original object and its surroundings. There are usually automatic adjustments in software that can help with this. Auto Contrast, Auto Levels, or Auto Color Correction may work. You may want to adjust the saturation also. This can be done in your color correcting menus. File Naming When you take your photos, your camera will give them a name such as IMG_001.jpg. Change that name to something useful. Use the accession or object identification number, if you have one. Otherwise give the file the name of the object, but do not get too lengthy. 15-20 characters is best. For objects that have detail shots, rename the file with "_detail" as a suffix, for example. It's important to be consistent and to edit your images in a uniform way. All colors should look true to real life and the brightness, color and contrast should all be similar.

Last updated on 8/10/18.
36
Standards for Selling an Image on MMN When putting images on MMN, you are also able to make them available for sale. If you choose to do so, the images must be digitized to meet the high-resolution standards described here. For more information about selling your images on MMN, see Chapter 11. High resolution scans
Platform Windows or Macintosh Scan type Color File Size when opened*
41-43 MB
Mode Color Bit Depth 24 bits / 16.7 million colors File Type JPG (TIF master scan) Compression 10%/high quality 11 (out of 12): in
Photoshop *File size should be determined when the file is open in your image editing software. After the JPG file is saved and closed, it is compressed, resulting in size reduction. Images created with a digital camera are sometimes made available for purchase but they often cannot be printed at the maximum size offered of 11" x 14". If you wish to make a copy of an oversized document for sale, have it photographed professionally, and scan the transparency or slide. Checklist: Determining Whether Your Scan is Ready to Send The following guidelines will help you determine if your image is acceptable to upload to MMN: Technical • Scans should be 41-43 MB, opened (we say 40MB as a guide but a little above
that is safe). • If you have file sizes smaller than our standard, please contact us. • Save your master scan in TIF format. • All files sent to MMN should be JPG format with minimal compression. • Bit Depth should be 24 bits for color images. • Color images should be RGB format, not CMYK.

Last updated on 8/10/18.
37
Image Quality Benchmarks • The monitor's gamma setting should be 2.0, and brightness and contract both set
at 80%. • Color and tonal range should convey the same appearance of the original item.
Color and tonal range assessment is highly subjective and varies according to the viewing environment and characteristics of monitors.
• Any street signs or text in a scan should be as legible as in the original document when the scan is viewed at 100%.
Quality Control We seek a true representation of the original source material, and since we do not have access to most of your items, we ask that you conduct your own internal quality control operations in house. Our staff will examine each digital image and cataloging record to ensure it meets the standards. Only then will the image and record be accepted for public view into MMN.
1) Is the item straight? 2) Have you included the edges of the image or document? 3) Are the colors true to the original object? 4) Does your file size meet the MMN standards?
In order to provide an accurate representation of historical source materials, please calibrate your monitor. Refer to your monitor’s users’ manual for more information. Internet Resources For information on the Library of Congress’s benchmarks, go to: http://memory.loc.gov/ammem/formats.html For a summary of leading organizations’ technical benchmarks, go to: http://www.library.cornell.edu/preservation/tutorial/ LYRASIS - Originally established as the Colorado Digitization Project in 1999, the CDP later evolved into the Collaborative Digitization Program, earning national recognition for its collaborative digitization expertise. The CDP merged into BCR in April 2007, creating BCR's CDP. In 2010 BCR established a partnership with LYRASIS which hosts and has added new resources for practitioners working in the areas of digitization and preservation. The best practices and digital toolbox materials came from the Collaborative Digitization Program's website. https://www.lyrasis.org/

Last updated on 8/10/18.
38
Chapter 6: Uploading Your Images to MMN There are three methods for uploading images to the database.
• Upload images through the website, one by one, • Send images to MMN using an FTP program, or • Send the files to MHS on a CD or DVD and MMN staff will upload them for you.
This is suggested if you have a large number of files or a slow Internet connection.
Regardless of the method, when an image is uploaded to the database, it automatically receives a unique MMN number and a blank cataloging record is created. The original filename will be saved as part of the record. Uploading Images One-at-a-time To upload files one at a time through the MMN website, follow these steps:
1. Go to www.MaineMemory.net and click on Login. 2. Login with your username and password.
Notice the My Account Tools box at the top right of the page.
Figure 6: Contributing Partner Account Tools
3. Click the drop-down box and select Add Items.
MMN Add Items page opens, as shown in Figure 7.

Last updated on 8/10/18.
39
Figure 7: Add Items page
4. Click on the Browse button and locate the JPG file on your computer that
you wish to upload. You can only choose one file at a time. NOTE: You may also create an empty cataloging record. This may be useful if you wish to catalog items before scanning or photographing them. You can then use the Replace Image feature to upload the corresponding image.
5. Double-click on the file name.
The name will appear in the File Upload box on this page. 6. Click on the Upload button.
Be patient--depending on the file size and your modem speed, it can take a while to transfer the file from your computer to the MMN server.
When the upload transfer is complete, a thumbnail image of your digital image appears with an empty catalog record form.
You may choose to complete the catalog record now (go to Chapter 9, Cataloging Your Images) or continue uploading more images by clicking on Add Items in the dropdown menu.

Last updated on 8/10/18.
40
You may view the uploaded images that are not yet online by clicking on Offline Items in the My Account Tools menu.
Uploading Images using FTP 1. E-mail [email protected] to notify us that you would like to FTP your
images. We will provide you with instructions.
Sending Images on CD, DVD, or Flashdrive to MHS 1. Save images onto a CD or DVD. 2. Label the disk with your organization's name and mail it to:
Maine Historical Society Attn: Maine Memory Network 489 Congress Street Portland, ME 04101-3498
We will notify you when your images are in the database and ready to be cataloged.
We will return your disk, if requested.

Last updated on 8/10/18.
41
Part 3: Cataloging Chapter 7: Accessing Your Records Browser Recommendations For optimal performance, we recommend the most up-to-date versions of your Internet browser (Internet Explorer, Firefox, Safari, or Chrome). The administrative pages of MMN work more reliably with these browsers. MMN cataloging pages have not yet been optimized for mobile devices. Your screen display resolution should ideally be set to at least 1024 x 768. The Model We have modeled the catalog record after the Dublin Core metadata element set because of its ease of use and widespread acceptance among the library and museum communities for Internet description. Definitions of Contributing Partner Tools After logging in to MMN, a variety of administrative links will appear in the My Account Tools box at the top right of the interior pages in your browser. Add Items—the page from which you can upload your digital images. Offline Items—a page displaying a list or thumbnail images of your uploaded digital images that are waiting to be cataloged. Only images that are Offline or Pending Approval will appear, not Online images. Cold Storage Items—a page displaying a list uploaded digital images that can be used to store items that you want to put on hold and keep offline. Online Items—a page displaying the list of uploaded images that have been put online for public viewing. Items for Review—a page displaying a list of your items that have been sent to MMN staff for review. Image Sales Report—If you have chosen to sell your digital images, this displays a sales report of your items that have been sold. Monthly Payment Report—Displays the amount due to contributors who sold images through VintageMaineImages.com.

Last updated on 8/10/18.
42
Timesheet—a form for Contributing Partners to report their time spend on the project. This is used to calculate “in kind” time on our grant reports. Report problems--a form for Contributing Partners to report technical problems with the administration pages.
Figure 8: Contributing Partner Account Tools

Last updated on 8/10/18.
43
Accessing Your Account Locating Offline and “For Review” Images 1. Go to www.MaineMemory.net, and click on the Login link. Login with your
username and password. Your administrative tools appear in the drop-down box called My Account Tools. (See Figure 8). This box is does not appear on the homepage. If you don’t see the Account tools box, please contact us.
2. Click on Offline Items
A list of your uploaded digital images will appear as thumbnail images. You can view a list view by selecting the “List” option in the View Options box, then click Apply Filters. Only images that are Offline or Awaiting Review will appear. Online images, those in the public view, will not appear on this page.
3. Click on the Edit link or the thumbnail image that you want to catalog
Its record will appear. Add or edit any information you wish in the fields provided and click the Save Record link or button.
Locating Online Images
You may locate your Online images by clicking the “Online Items” link in the My Account Tools or by selecting the “Online” status in the Filters box and clicking “Apply Filters” button. Using the Online Items link in My Account Tools When viewing the thumbnail grid, click on the Edit link beneath the image to access the catalog record form (see Figure 9). When viewing the items as a list, click on the Edit link in the Actions column.
Figure 9: Thumbnail view with Edit/Album/Download/Delete links.

Last updated on 8/10/18.
44
Filters
You may also view Offline items, Online items, items you have sent for review, Mystery Items, and Cold Storage items in your account by using the filters and options at the top of the Record List (see Figure 10). After selecting the filter, click Apply Filters button.
Figure 10: Tools at top of Record list in the Contributors account.

Last updated on 8/10/18.
45
Chapter 8: Cataloging Your Items Cataloging an Item Once your digital items have been uploaded, you are ready to catalog them. Follow these instructions: 1. Go to www.mainememory.net and login with your username and password
from the homepage. 2. Click on Offline Items in the My Account tools menu at the top of the screen. 3. Click on the edit link for the item you want to catalog. 4. Complete the cataloging record using the descriptions and examples below
as a guide. Catalog field definitions and examples are accessible by clicking on the "?" link next to the field name on the catalog page.
5. SAVE your record. If you leave the page or close the browser without saving the
record, your changes will be lost. Save your record by clicking on Save Changes button or the Save Changes links.
Catalog Field Definitions and How to Use Them Maine Memory Network cataloging uses the Dublin Core standard of object description. (for more information about Dublin Core standards, go to www.dublincore.org). This section describes each of the cataloging fields, how to use them, and how the information you enter will appear on the website. If you have questions, please e-mail the Project Cataloger at [email protected]. MMN Item Number “Edit Item..”
This number is automatically assigned when your item is added to the database. This number will appear with every instance of the image and appears on the large views of the image as part of the watermark. Use this number to quickly locate your record once it is Online. Item Status
This section tells you the status of your item (see Figure 11). Items can have the following statuses:

Last updated on 8/10/18.
46
Figure 11: Cataloging page – Item Status
Offline—Keeps the record in your own administration area. Offline images are not visible to the public. In order to put an item online, it must have at least a Title, Description, Object Type, and high-resolution image attached. The record is considered “Incomplete” without these. Required fields are indicated with an *. After you have completed the record, you can select “Request Review.” Online—Only MMN staff can put items Online. This will make your items visible to the public when they search or browse for items in the database. You can edit these records at any time. Featured Mystery or Mystery—When items are placed in the Mystery Corner, this status will appear in the Item Status box. If it is an item that MMN Staff is featuring on the Mystery Corner page, it will state “Featured Mystery.” Awaiting Review—After cataloging your item, selecting “Request Review” will send the image to an area where the MMN staff will review it to make sure it meets MMN standards. After approval, the image’s status will be changed to "Online" and the image will be moved into the "Online Items" area. Cold Storage—Another offline area to help you organize your items. Things in Cold Storage are considered "out of the way." This can be used for items that you do not want to catalog yet or that are only used in exhibits and not found in the searchable database (i.e. contemporary image of your historical society building or members).
Changing the status To send your item to MMN staff for approval – Fill in the cataloging record completely and click the Request Review button. To edit an online item – Edit the cataloging fields of the item and click Save Changes. There is no need to send the record for approval again, unless you wish. Changes will appear immediately. Records only need to be reviewed the first time before being places online.

Last updated on 8/10/18.
47
File Information This area includes identifying information about the digital image that is used for management and tracking. (see Figure 12)
Contributor Code Our system automatically inserts an identifier code for your organization.
Figure 12: Cataloging page--File information
Original JPG Name This is the original name of your JPG file when it was uploaded to the MMN system. This field is filled in automatically to help you cross reference MMN record number with your own internal naming system for electronic files. Student scanned Click this when the item was scanned by a student either for a school project or as a volunteer for MMN. When clicked, the following graphic appears beneath the item on the public detail page.
School Name Enter the name of the school that the student attends. From Individual Often, Contributing Partners wish to include items on MMN that are owned by individuals in their communities. Maine Memory Network accepts contributions from individuals directly, but occasionally a CP can serve as the “agent” for the

Last updated on 8/10/18.
48
item(s) and should follow the MMN guidelines in deciding whether to accept the item. See Copyright information in Chapter 4. Check this box if the item does not belong to your organization but you want to put it on MMN.
Text Enter the name of the individual who owns the original, or leave this blank to keep the owner anonymous.
Printable Worksheet (link)—This will print a worksheet that can be used to help manage your project with your staff or volunteer. Sometimes a paper trail is helpful.
Online Availability This section allows you to select which website your item will appear on.
Maine Memory Network – This is the default setting. If this box is checked, the item will appear on www.mainememory.net. Vintage Maine Images (Available for Purchase) - Click on this box (see Figure 13) if you want the digital image to be available for purchase on VintageMaineImages.com. If the box is unchecked, the item will not be able to be added to a user’s cart and users will be told to contact your organization directly. IMPORTANT: if an image is for sale, it must be a high-quality, high-resolution scan. Procedures and standards for these scans are found in Chapter 5, Digitizing Your Collections.
Figure 13: Cataloging page – Online Availability
Mystery Corner If you would like your item to appear in the Mystery Corner section of Maine Memory, fill in the prompt and click “Add to Mystery Corner.” (see Figure 14) The item will appear on the Mystery Corner page organized under the county name link. Please fill out as much information as you know about the item, following the MMN standards and protocols, including the title, description, people and location.

Last updated on 8/10/18.
49
The item will also appear in the general search of Maine Memory with a Mystery graphic over the image.
Mystery Prompt – Enter a question to help gather information you are looking for. Keep it short and to the point. Examples of Prompts: Who is this woman? Where is she? Who were these team members? Can you identify the man with the harp?
Figure 14: Cataloging page – Mystery Corner
Links: SAVE / Status / File info / Object Info / Subject Info / Browse Tool / Related Items / Associated Files / Exhibits / Delete Item
These links appear at the top, middle, and bottom of the Cataloging Page. They help you move up and down the page, and allow you to save or delete the record. Save —Saves the information you entered, or the changes you have made, to the database. If you neglect this step, the information you entered will not be saved when you go to a different page or close your browser (your image will remain intact). You should save your record often while working on it. Item Status --Takes you to the beginning of the record, at the top of the page, where you decide the status of the item. File Information – Takes you to the part of the page where you enter the information about the digital file. Object Info--Takes you to the part of the page where you enter descriptive information about the object.

Last updated on 8/10/18.
50
Subject Info—Moves you to the part of the page where you can enter subject information. BrowseTool—Moves you to the part of the page where you can assign your items to predetermined categories. Related Items—Moves you to the part of the page where you can connect items to other items on MMN. Associated Files--Moves you to the bottom of the page where you can upload or remove files connected to your digital image. Associated files can be: • transcriptions in PDF format, • audio files in MP3 format, and • video files in MOV format. Exhibits—Displays which exhibits contain that item. Delete Item--Deletes your entire record as well as the digital image from the database. The original digital image stored on your own computer will not be affected. If you delete your record and image inadvertently, you will need to start over by uploading the image again. If you want to take an image offline but leave it in the system, see Chapter 10: Managing Your Records.

Last updated on 8/10/18.
51
Object Identifier This area includes identifying information about the physical item that is used for management and tracking. (see Figure 14a)
Local Code (call number) This field holds the internal code, number, or name that your organization uses to find the original object. For example, the Dewey or Library of Congress numbers, call number, or accession number. The local code appears near your organization’s contact information when your item is displayed. It will help your staff locate original materials in your collections. Collection Name The name of the collection (if the object is part of a larger collection). Do not put the name of your organization here.
Figure 14a: Object Identifier
Object Information
This section describes how and where to input descriptive cataloging information about the original object. Information about the subject of the digital image (i.e. the people in a photograph) is recorded in the Subject Information Section.
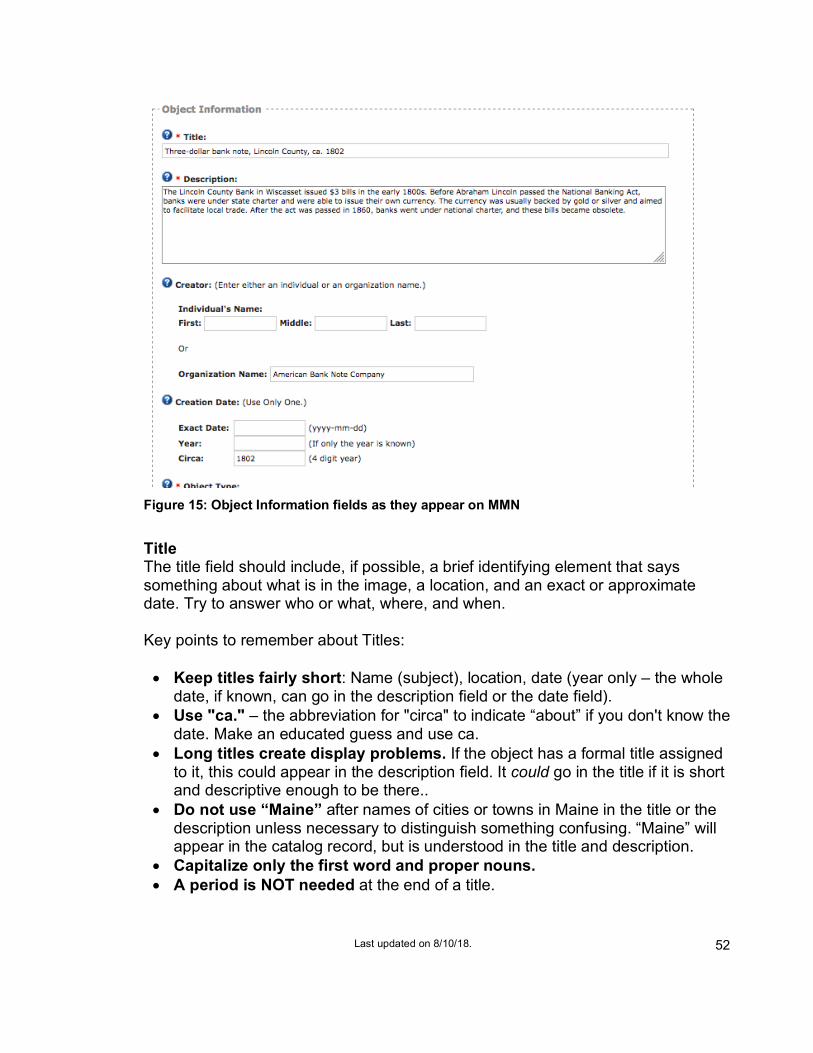
Last updated on 8/10/18.
52
Figure 15: Object Information fields as they appear on MMN
Title The title field should include, if possible, a brief identifying element that says something about what is in the image, a location, and an exact or approximate date. Try to answer who or what, where, and when. Key points to remember about Titles: • Keep titles fairly short: Name (subject), location, date (year only – the whole
date, if known, can go in the description field or the date field). • Use "ca." – the abbreviation for "circa" to indicate “about” if you don't know the
date. Make an educated guess and use ca. • Long titles create display problems. If the object has a formal title assigned
to it, this could appear in the description field. It could go in the title if it is short and descriptive enough to be there..
• Do not use “Maine” after names of cities or towns in Maine in the title or the description unless necessary to distinguish something confusing. “Maine” will appear in the catalog record, but is understood in the title and description.
• Capitalize only the first word and proper nouns. • A period is NOT needed at the end of a title.

Last updated on 8/10/18.
53
Examples of titles:
Peleg Wadsworth letter to his wife about Penobscot Expedition, 1779 Ethel Bascome Jewett, London, 1910 or 1912 Girl in canoe, Sebago Lake, ca. 1925 Map of the District of Maine, 1795 Satin wedding dress, Westbrook, ca. 1912
Figure 16: Search Results Screen: notice the appearance of the title.
Description This field should include factual information about the original object and the subject—the who, what, when, where, and why. It should contain as much information as is necessary to “place” the item being described. It should not discuss the larger context of the item. • Write in complete sentences. • Identify the item in the picture: Name, location, subject, date and other
pertinent details.

Last updated on 8/10/18.
54
• Avoid lots of text that is not directly related to the image shown. The description should be about that image. For instance, do not give too much related history – or too much detail about the photographer or relatives of the person pictured, or other historical details that are tangential to the image itself.
• There is no need for a full biography of people. A few salient details that put the person in some historical context are preferable.
• Use birth and death dates if known – in parentheses after the person’s name. i.e.: "Henry Wadsworth Longfellow (1807-1882), a noted poet, ….."
• Avoid repeating the same description for numerous items (don't cut and paste identical text). Try to provide different information or otherwise vary the description.
• Do NOT refer to other MMN items by number in the description. It can be confusing for people who then try to find those items which don't necessarily show together in the search results.
• Use active voice whenever possible. For instance, “Mary Smith wrote the letter…” rather than “The letter was written to Joe Williams by Mary Smith ….”
• Identify people in photographs if their names are known. Use the following structure:
o Front, from left, ….. ; rear, from left. OR, o First row, from left: ……..; second row, from left, ……….. OR, o From left, ………
• Break up long paragraphs of more than a few sentences. Shorter segments of text are easier to read on the Web.
• Use only one space between sentences. Description EXAMPLES:
Item 6550 - West Oxford Agricultural Society fair, ca. 1880 The photograph shows a parade at the track and the judge's stand at the "old" Fryeburg Fair, prior to 1885. Peleg Wadsworth, Samuel Stickney, E.L. Osgood and John W. Dana, who formed the West Oxford Agricultural Society, organized the fair in 1851. For its first seven years, the fair rotated between Fryeburg, Brownfield, Porter, Denmark and Lovell. On Oct. 6, 1885 the Society bought the present-day Fryeburg Fairgrounds and since then, the fair has been held in Fryeburg. Item 13309 – Lydia Taylor letter to husband, Fairfield, 1841

Last updated on 8/10/18.
55
Lydia Taylor of Fairfield wrote to her husband, Samuel, while he was traveling on Society of Friends (Quaker) business. The letter, addressed to him in Baltimore, fills him in on the health and activities of family and friends. Item 74238 - Dog 'Peter,' Falmouth, ca. 1920 "Peter" was the dog of the Horace W. Shaylor Jr. family of Falmouth Foreside. He accompanied the family -- Horace Jr., Rose, and daughter, Georgina -- nearly everywhere they went. Several pages in a Shaylor family photo album are dedicated solely to "Peter." Item 18445 - George F. Shepley to Horatio N. Jose, New Orleans, 1862 George F. Shepley, a brigadier general in the Union Army, wrote to Horatio Jose, his friend in Portland, about various business dealings. He apparently used Jose to carry on his business activities in Portland, an activity that they tried to keep confidential. Shepley (1818-1893), commander of the 12th Maine Regiment, had been military commandant of New Orleans and was named military governor of Louisiana in June 1862. Shepley was a lawyer and U.S. attorney in Portland before the war. For a time, Jose, a businessman, was quartermaster of the 12th Maine.

Last updated on 8/10/18.
56
Creator Enter the name of the person or the organization that created the original item: the name of the photographer or author. Use either the person or the organization field, not both. There is space for only one person’s name. If there is more than one creator, we suggest using the Description field to elaborate on this information.
Creation Date Enter the date that the object was created. Use only one of the date fields (except in the Span fields). A record with no date information is not as useful as a record with at least minimal date information. If you don’t have the date information, we suggest you make an educated guess and include it in the Circa field with appropriate entries in the Title and Description fields to complete the record. (For example, enter 1920 in the Circa field and in the Description field enter, “This photograph was taken in the 1920s.”)
Date fields include: • Exact Date • Year (if only the year is known) • Circa (within 5 years on either side) • Span (this field has two parts, Span Start and Span End)
Exact Date (yyyy-mm-dd) Use this field if you have exact year, month, and day information. You must use hyphens in your entry. Enter the information in the following format: 1976-07-22 to signify July 22, 1976. Use the four-digit year, followed by the two-digit month, followed by the two-digit day. This way of entering dates is the internationally accepted standard set by the International Organization for Standardization (ISO 8601). Year (if only the year is known) When you know only the year, or only the month and year, enter the year in this field, and leave the Exact Date field blank. If you know the month, enter that information in the Description field. Circa When you only know the era or time period of an item, record that information in this field. Use four digits for a year. When we have date information like “the 20s”, use the median “1925” in this Circa field.

Last updated on 8/10/18.
57
Span Start—Span End Use this area for diaries, journals, and items that were created over time. Use only four-digit years—no months or days. If you want to include the more detailed date information, please use the Description field.
NOTE: Any additional date information that isn’t satisfied by these choices can be added to the Title or Description fields.
Figure 17: Object Information continued
Object Type This allows you to select the type of object. You may select only to describe your object.
Image--Photographs, paintings, etchings, drawings, or any other two-dimensional graphical object Text--Text-only documents such as letters, diaries, journals, and other manuscripts, as well as posters without pictures, broadsides without pictures, and printed matter

Last updated on 8/10/18.
58
Text and Image--Objects that include text and images, such as broadsides, valentines or cartoons Physical Object—Three-dimensional objects such as furniture, pottery, firearms, jewelry, museum objects, artifacts, etc. Video & Sound--Moving pictures and audio files, such as video tape, film, oral histories, music recordings, etc.
Media Format This refers to the material out of which the item is made, or the type of item, in the case of photographs or prints. The entry should be short and fairly simple. Common entries include: Photograph, Oil on canvas, Ink on paper, Glass negative, Wood, Brass, Leather, Lithograph, Etching. Size Use these fields for the object's height, width, and depth. Centimeters are the international standard for measurement but we allow you to enter your measurements in inches. You may round your measurements to whole numbers. The conversion for inches, feet, and yards is as follows:
1 inch = 2.54 centimeters 1 foot = 30.48 centimeters 1 yard = 91.44 centimeters Any other size information should go in the Description field. Notes The Notes field is for you, the cataloger, and is not for the public view. Use this field to enter any internal information about the object that you want to have connected to the record but not publicly available. Occasionally MMN staff will communicate with CPs using this notes field. If your record still appears in "Offline Items," check this field for notes or comments from the MMN cataloger. Subject Information This section describes how and where to input information relating to the subject(s) of the historical source material.

Last updated on 8/10/18.
59
Figure 18: Subject information fields
Subject Date This is the date for subject matter of an item, not necessarily the date an item was created. Example where creation date and subject date differ: A letter written on August 17, 1785 discusses a Revolutionary War battle that happened on January 8, 1776. Though the letter was created well after the war, it refers to something that happened years before it was written. The date the letter was created (1785/08/17) is not recorded here; it is recorded in the Creation Date field. The date recorded in the Subject Date field (1776/01/08) is the date that describes the subject matter of the letter, the date of the Revolutionary War battle. Date fields include:

Last updated on 8/10/18.
60
• Exact Date • Year (if only the year is known) • Circa • Span (this field has two parts, Span Start and Span End) For explanations about each field, please see page 56 “Creation Date.” The fields are the same but as stated above, the Creation and Subject dates may vary.
Subject Who Enter the names of people associated with the subject of the item. For example, if you know the names of the people in a photograph, record them here. When the item is a letter, enter the letter writer, recipient, and any other people mentioned in the letter that you feel would be important to users searching for that item.
Follow these steps when you have more than three people to enter: 1. Fill in the first three fields. 2. Click on Save Record.
The system will automatically add on three more blank fields. Subject Location Country—State—County—Town—Local Name The actual item itself is stored at your organization; these fields are not for that information. These fields refer to information in a letter, in the subject of a photograph, in the subject of a painting, etc. For example, a photograph of a railroad at Cooks Corner would be entered as follows:
USA ME Cumberland Brunswick Cooks Corner
Country Use the full country names except for the United States. Use USA for United States: USA for United States Canada for Canada France for France
States Use the US Postal Service two letter state or province code:

Last updated on 8/10/18.
61
ME for Maine NH for New Hampshire MA for Massachusetts NB for New Brunswick
State codes can be found here:
https://about.usps.com/who-we-are/postal-history/state-abbreviations.htm County Enter the county name that the item pertains to. If you are unsure of a county name, use the following resources: • Maine Atlas and Gazetteer by DeLorme • AAA maps • Search MMN under the town name to see if the county is listed • Go to http://geonames.usgs.gov and "Search Domestic Names." Enter
the town name and state, and "Send Query". Town Use the current, official town name and spelling. If an item from Maine’s past is from a town that no longer exists, use the current town or township name and spelling in this section, and record the old town name on the next Subject Location line, in the keyword field, and in the description field. Local Name This field is for less common, informal names of an area, village, neighborhood, lake, etc. A local name may not appear on a map, but local residents would know a place by its local name.
Subject What
This field, only visible on the catalog input page to MMN staff, is reserved for standardized Library of Congress Subject Headings and the Thesaurus of Graphic Names. The MMN cataloger fills in this field, which helps users find related items.
Keywords Keywords can improve the effectiveness of finding items on MMN. In the keywords field, enter synonyms or words that a user may enter to find your items. There is no need to duplicate words from your description field. Examples: school, education, teacher, students, children… When entering Keywords, hit the ENTER key after each entry and AFTER THE LAST entry.

Last updated on 8/10/18.
62
Figure 19: Subject Information fields continued and Browsetool Management
Tip: Think as they think Try to step in the shoes of the researcher when thinking of terms for this keyword field. Think from the user’s perspective, and words a magazine editor might type into search engines to locate your object based on feeling, concepts, or message. The more thought you put into this field, and the more terms you enter, the more successful the user’s search will be. Tip: Use Variations Think about all the different ways that a user might search for a subject or concept. Enter those terms in the keyword field. For example, “Indians of North America” is a Library of Congress subject heading, but it is more likely that anyone searching for subjects referring to Native Americans will use the words “Native Americans” or “Indians” instead. Browse Tool Management This section allows you to assign categories or topics to your item so they are more discoverable.

Last updated on 8/10/18.
63
Figure 20: Browse Tool Management
Subject categories or topics are another way for users to find your items. The Browse page on Maine Memory has categories and subcategories that users can click on. For your items to appear within these categories, you need to assign them to a category.
To assign an item to a category:
1. Click on the first drop-down box to view the top-level categories (see
Figure 20). 2. Select a category to assign your item to that category. 3. Move to the box on the right and select a subcategory for your item. 4. A third box with categories will now appear. If your item fits into one of
those, select it. It is not necessary to select 3 levels of categories for each item.
If you have selected three category paths for your item, click SAVE and three more boxes will appear. You can continue to assign your item to as many categories as you wish.

Last updated on 8/10/18.
64
To unassign, or delete, a category assignment from the record, click on the box in front of the category path name and then click the SAVE link. Related Items You can connect your MMN items to other items in the database. (Figure 20a) Related items might include, for example, similar items, other works by the same artist, other views of the same place, or other images of the same person. These items may or may not be from the same contributor. Enter up to three (3) MMN item number at a time. After clicking the SAVE button, three more fields will appear.
Figure 20a: Related items and exhibits
Related Exhibits You can connect any MMN online item to online exhibits in the database. Related exhibits might include exhibits in which a single item appears, or exhibits about a similar topic. For example, an exhibit about a “Paper Manufacturing” could be attached to the record of a photograph of a Millinocket paper mill. The item does not need to be in the exhibit to which it is being linked or be created by the same contributor. Enter up to three (3) MMN exhibit URLs at a time. After clicking the SAVE button, three more fields will appear. Associated Files MMN can make history come alive through audio, video, or PDF files attached to uploaded images. Users can read transcriptions of hand-written documents, listen to
Last updated on 8/10/18.
65
readings of manuscripts, or view video files. The Associated Files area of the cataloging page allows Contributing Partners to attach these special files to the cataloging record. The supported file types are: Transcriptions .PDF (Adobe Acrobat) Sound .MP3 Video .MOV
NOTE: PDF files are used for full transcriptions of manuscripts (letters, diaries, and other hand-written documents). All manuscripts need to have a full transcription. At the present time all PDF files are created and attached by MMN staff.
To attach a file to an existing record, follow these steps: 1. Create and save your audio or video file on your computer. 2. Locate the Offline or Online Item to which you wish to attach a file. 3. On the cataloging record page, scroll down to the Associated Files area. 4. Go to the Audio file or Video file box, depending on the type of file you have. 5. Click on the link to upload your file. (Step 1)
This takes you to the object upload page. 6. Change the name of the link if you wish. (Step 2) 7. Check the box that says “make this link visible.” (Step 3)
A check mark appears. 8. Click Save Record. (Step 4) Saving Your Records The most important step Remember that you must click Save Record to submit all entries and changes to the database. This is very important! The data will not automatically save if you leave the page or close the browser. Viewing Offline images To return to the page with your Offline Image thumbnails, click on Offline Items (in My Account Tools) after clicking Save Record.

Last updated on 8/10/18.
66
Submitting Fully Cataloged Records Putting your images online When you are satisfied with the cataloged record, you need to submit it for review by MMN staff, follow these steps: 1. Click Offline Items in My Account Tools. 2. Click the Edit link for the image that you want to put Online. 3. Select the Request Review button.
We’ll flip the switch Once you have sent your item for review, the record is sent to us to look over and approve. We will contact you if there are missing items or additional information needed. We will then put it “Online." This should take no longer than one week but will depend upon the workload. We will contact you with any questions. Occasionally MMN staff will communicate with CPs using the Notes field but generally will email the CP contact. If your record still appears in "Offline Items," check the Notes field for comments from the MMN cataloger. Editing Records You maintain control over all of your digital images and their corresponding cataloging records, both online and offline. Once a record has been sent for review (by selecting the Request Review button) it gets placed in the "holding pen" for us to review. If accepted, it goes Online for public view. Change images and records as follows: 1. Go to www.MaineMemory.net and login with your username and password.
Your administrative tools appear in the dropdown box on the top right of the screen called My Account Tools.
2. Click on Offline Items or Online Items or Pending Items
A list of titles or thumbnail images of your uploaded digital items will appear. 3. Click the Edit link for the image that you want to catalog.

Last updated on 8/10/18.
67
Its cataloging record will appear.
4. Change the record or replace the image. For replacing images see Chapter 10.
5. Click Save Record to save your changes. If the record was online, your changes will be reflected immediately.

Last updated on 8/10/18.
68
Chapter 9: Managing Your Records Taking an Image Offline If you want to take an item offline, but leave it in the system, select Offline from the Online Status drop-down menu. Deleting Images and Records WARNING: This operation permanently removes the catalog record and the image file from MMN. To delete a cataloging record and its digital image, do the following: 1. Access the cataloging record (see Chapter 8—Accessing Your Records). 2. Click on the Delete link and follow screen directions.
The record is then deleted from our files. This does not affect any local copies you may have on your computer.
Replacing Images Sometimes you may want to replace an item with a corrected one or one of better quality. When replacing an image, the cataloging record remains intact. Uploading a new image will automatically create the new image in its various forms (thumbnail, large view, etc.) throughout the website. 1. Access the cataloging record.
(see Chapter 8—Accessing Your Records). 2. Click on the Replace Image link below the thumbnail image. 3. Click on the Browse button. 4. Locate the file you want to upload, double-click on its filename, and click OK.
The name will appear in the box. 5. Click the Upload button. 6. Wait for the file to upload. You will be returned to the cataloging page. The file upload is finished when the new thumbnail image appears on your screen at the top of the cataloging page. The image will be automatically renamed and will replace the previous image. If you do not see the corrected or newly uploaded file, click the shift+refresh button on your browser. This should clear the browser's cache and replace the image.

Last updated on 8/10/18.
69
Part 4: Selling Your Images Chapter 10: Images for Sale Many of the images on Maine Memory Network are for sale on our site Vintage Maine Images (VMI: www.vintagemaineimages.com). Users can order prints or high-resolution digital files. All MMN images that are available for purchase are high quality, high-resolution reproductions of original items--useful for magazine and newspaper articles, websites, video, advertising, book covers, inserts, theses, or for displaying on a wall. Licensing is for one time use and scans are not to be distributed beyond the purchaser's stated purpose. All purchasers are asked to agree to a purchase and use agreement before purchasing an image. You, as a Contributing Partner, can benefit greatly from selling your items on VMI. You can: • Sell your images online, therefore increasing your revenue through participation, • Receive quarterly payments and reports on purchase details, • Benefit from the ready-made e-commerce tools, • Have the protection through the purchasing agreement, and • Receive credit in publications that purchase and use your images. How does it work? Making your items available for sale is easy. On the cataloging page, contributors can simply check the box "Vintage Maine Images (available for purchase)" and that will place the image on VintageMaineImages.com. If someone purchases a digital copy that belongs to a contributor, the contributing organization will receive 50% of the sale price, paid to you from MHS four times a year. The sale price is determined by Maine Historical Society and the Image Services Coordinator manages all the sales. Pricing For prices, please check VintageMaineImages.com. Digital Files All editorial buyers will receive a digital file of images purchased along with a non-exclusive, one-time license to use the image in a single publication in one medium only, with no other rights. Buyers are required to agree to the use policy before purchasing an image. The use and purchase policies can be found here: https://www.vintagemaineimages.com/pages/about/website-policies/
Last updated on 8/10/18.
70
Prints For personal use, individual buyers can purchase digital quality prints. We offer a variety of sizes printed on photo paper, unframed, and suitable for hanging in a home or office. Contributing Partners receive a 20% discount on all purchases. Maine Historical Society members receive a 10% discount. Distribution of funds and reports Contributing Partners will receive quarterly reports from the Maine Historical Society indicating what images were purchased, who bought them, and the intended use. This report will include a check with your profits from the sale of your images. For more information about how the profits are distributed, please contact Maine Historical Society. Standards In order to sell digital copies of items through VintageMaineImages.com, the file sizes must be at least 40 MB. Please see the section on scanning images for more information.
Last updated on 8/10/18.
71
Part 5: Appendices Appendix A: More About Digitizing Images Color Modes The RGB mode provides one channel for each color (red, green, and blue). 24 bits/pixel translates into 8 bits per color channel. RGB is best for monitor display and will still allow for the flexibility of other uses. CMYK mode is limited to printing purposes. Grayscale uses only one channel to record gray information on a scale from black to white. Black and white images are usually scanned and saved in Grayscale mode because this will provide the same information in a much smaller file size. If a black and white image is scanned and saved in RGB mode, it will use three-color channels instead of only one to record the information, and therefore be three times as large. For simplicity sake, we have decided that all items should be scanned using RGB mode. Although it is not necessary to scan a black and white image using anything other than grayscale mode, we lose nothing by scanning it in color. File Format and Compression File formats that use compression schemes (such as JPG, PNG, and GIF) reduce image file size for storage, processing, and transmission. All compression techniques abbreviate the string of binary code in an uncompressed image to a form of mathematical shorthand, based on complex algorithms. The file size for digital images can be quite large, taxing the computing and networking capabilities of many systems. There is considerable debate in the library and archival community over the use of file formats that use compression schemes in master image files. In general, it is better to use a standard (hopefully a broadly supported one rather than a proprietary one) that may offer more efficient compression and/or better quality, and lend itself to long-term use or digital preservation strategies. Compression schemes can be characterized as either lossless or lossy. Lossless schemes, such as a TIFF file format, abbreviate the binary code without discarding any information. Therefore, when the image is "decompressed," it is identical--bit-for-bit--to the original. Lossy schemes, such as JPG file formats, use a means for averaging or discarding the least significant information based on an understanding of visual perception. It may, in fact, be extremely difficult to detect the effects of lossy compression, and the image may be considered "visually lossless." It is important to note that the file size of a JPG file when opened is considerably larger than the file size when closed. This is because the JPG compression scheme compresses the file and makes it smaller when closing the file. Also note that if you open a JPG file and do not make changes, there will be no additional loss when you

Last updated on 8/10/18.
72
close the file again. On the other hand, if you open a JPG file, make changes, and then resave the file, the file will be compressed a second time and further loss will result. Keep your editing and resaving to a minimum. Another option is to edit a copy of the TIF file, and only save the JPG file when you have completed all your edits. Resolution, Image Size, & File Size Resolution is only one factor in the equation of a high-quality scan. It is not enough for us to recommend scanning your historical source materials at 300 dpi. If you scan a 1”x1.5” slide at 300 dpi, and try to print it at 8”x10”, you will not have enough information to expand it and create a quality print. Your printed image will be pixilated.
NOTE: You can always reduce a digital image (resample/shrink it/crop it), but you cannot enlarge it. The result: "fuzzy" "muddy" "pixilated" images.
We benchmark an image by its file size, of which resolution is one component. File Size is calculated by multiplying the surface area of a photo or document (height x width) by the bit depth and the resolution (dpi squared). Because file size is represented in bytes, which are made up of 8 bits, divide this figure by 8.
Formula for File Size File Size = (height x width x bit depth x dpi2) / 8
Because digital images result in very large files, the number of bytes is usually represented in increments of 210 (1,024) or more: 1 Kilobyte (KB) = 1,024 bytes 1 Megabyte (MB) = 1,024 KB 1 Gigabyte (GB) = 1,024 MB 1 Terabyte (TB) = 1,024 GB A 40 MB color file will give you the ability to print to the highest quality printers at a size up to 11"x14" at 300dpi. It will record enough information for archivists in the future to closely study the content of your images, but not enough information for them to conduct a detailed study of the physical makeup of the paper the original was printed on.

Last updated on 8/10/18.
73
Appendix B: Scanning Standards Charts This chart will illustrate how the original image size and scanning resolution are related. If you cannot set the DPI on your scanner, use this resolution as a guide.
Image Size (inches) Resolution File Size
Width Height COLOR
10.5 14 300 40.0MB 8.5 11 375 40.0MB 8 10 410 40.0MB 5 7 620 40.0MB 4 6 745 40.0MB 4 4 915 40.0MB 3 5 945 40.0MB 3 3 1,220 40.0MB
2.5 3.5 1,235 40.0MB 2 3 1,500 40.0MB 2 2 1,825 40.0MB 1 2 2,580 40.0MB 1 1 3,650 40.0MB
0
500
1,000
1,500
2,000
2,500
3,000
3,500
4,000
1x1 1x2 2x2 2x3 2.5x3.5 3x3 3x5 4x4 4x6 5x7 8x10 8.5x11 10.5x14
Reso
lutio
n (D
PI)
Document dimensions
MMN Scanning Formula (to$achieve$maximum$11"x14"$printable*$file$at$300$dpi)$
Color:$40MB*dimensions depend on height and width ratio

Last updated on 8/10/18.
74
Appendix C: Copyright Chart When Works Pass Into the Public Domain in the United States: Copyright Term for Archivist From https://copyright.cornell.edu/resources/publicdomain.cfm
UNPUBLISHED WORKS
Type of Work Copyright Term What will become public domain on 1 January 2017
Unpublished works Life of the author + 70 years Works from authors who died before 1947.
Unpublished anonymous and pseudonymous works, and works made for hire (corporate authorship)
120 years from date of creation Works created before 1897.
Unpublished works created before 1978 that are published before 1 January 2003
Life of the author + 70 years or 31 December 2047, whichever is greater
Nothing. The soonest the publications can enter the public domain is 1 January 2048.
Unpublished works created before 1978 that are published after 31 December 2002
Life of the author + 70 years Works of authors who died before 1933.
Unpublished works when the death date of the author is not known2
120 years from date of creation3 Works created before 1897.3
PUBLISHED WORKS
Time of Publication in the U.S. Conditions Public Domain Status
Before 1923 None In public domain
1923 through 1977 Published without a copyright notice
In public domain
1978 to 1 March 1989 Published without notice, and without subsequent registration within 5 years
In public domain
1978 to 1 March 1989 Published without notice, but with subsequent registration within 5 years
70 years after death of author, or if work of corporate authorship, the shorter of 95 years from publication, or 120 years from creation
1923 through 1963 Published with notice but copyright was not renewed4
In public domain
1923 through 1963 Published with notice and the copyright was renewed5
95 years after publication date
1964 through 1977 Published with notice 95 years after publication date
After 1 March 1989 None 70 years after death of author, or if work of corporate authorship, the shorter of 95 years from publication, or 120 years from creation

Last updated on 8/10/18.
75
Internet Resources Circulars from the United States Copyright Office http://www.copyright.gov/circs/ United States Copyright Office http://www.copyright.gov Copyright Infringement and Remedies http://www4.law.cornell.edu/uscode/17/ch5.html Determine if something is under copyright http://librarycopyright.net/resources/genie/

Last updated on 8/10/18.
76
Appendix D: Photographer's Notes and Worksheet EXAMPLE Photographer’s Notes Date: November 10, 2009________________________________________________ Photographer’s Name(s): Dani Fazio and MCHP Team Biddeford_________________ Location: Biddeford High School___________________________________________ Project Name: Photography Workshop / Sample Materials from MacArthur Library___ Object # Description Camera
Setting Notes
√ 12001
Ladies Gloves, ca. 1900
f/ 8 1/60
Put them on the lazy susan to show two angles.
√
12002
Children’s Gloves, ca. 1900
f/8 1/50 1/60
Made a detail shot of the label inside the right glove.
√
12003
Children’s Stockings, ca. 1890
f/8 1/40
Had to back up camera since they are so long.
12004
Wine Glass, ca. 1920
f/ 5.6 1/125
Needed reflectors to help with the lighting the glass
12005
Civil War Medal, ca. 1861
f/ 9 1/30 1/40
Pinned on board. Took a detail shot.
12006
Oversized Photo of the MacArthur Library, ca. 1950
f/ 9 1/60
Used copy stand method

Last updated on 8/10/18.
77
Photographer’s Notes Date: _______________________________________________________________ Photographer’s Name(s): _______________________________________________ Location: ____________________________________________________________ Project Name: ________________________________________________________ Object # Description Camera
Setting Notes
√