Jumping from Continuous Integration to Continuous Delivery with Jenkins Enterprise

Continuous Integration with Jenkins
Summary
In this tutorial, you’ll be introduced to the concept of continuous integration - a way of checking thatthe code you and your team is producing is suitable for inclusion in the main builds, across all of thetarget platforms. To enable the usage of continuous integration with your team project, you will beshown how to use the Jenkins continuous integration platform, including how to set up users, connectit to your code repository, get the platform building all of your different configurations, and what todo if one of the builds has failed.
Continuous Integration Background
Unless you are working solo on a personal project, it is likely that the software you develop in thefuture will be made as part of a team, with multiple programmers working on producing code thatmust interact correctly with the contributions of others. This is primarily achieved via the use of acode repository that users commit their work to, and retrieve previously committed changes to thefiles that comprise the program being worked on. It is common for such tools to support versioning,whereby changes can be undone if necessary, and every committed change to a set of files createsa ’checkpoint’ that can be used to identify when bugs and problems have been introduced into thesoftware, or when new features have been created.
With large codebases, many of these version checkpoints may be generated per day, and not ev-ery programmer will have their own local copy of the codebase up to date with the latest versioningcheckpoint, and may have begun changing a file which is now out of date with the latest version bythe time they are at the point they can commit their code changes. When this occurs, its commonfor the versioning tools to provide the ability to ’merge’ files together, combining the changes oneprogrammer has made with those that have been committed since the changes were developed.
As each programmer will be at a different repository checkpoint, it is inevitable that at some point,someone is going to commit code that breaks the compilation of the project. This is especially true incases where the software may be built in a number of different configurations - some code that com-piles fine with the compilation toolchain of one platform may break on that of a different platform.Being able to quickly identify cases where problems with integrating code changes arise is important- broken code can hold up the project, and may point to fundamental software architecture problemsthat must be tackled.
1
Ideally, every code change will be tested against every possible configuration the codebase can bein before being committed to ensure that nothing gets fundamentally broken by the change. Inpractice, however, this is impractical - checking that a single line of code being changed successfullycompiles in the debug and release modes of the Windows, PlayStation, and Android versions of acodebase takes a lot of time, time that the programmer cannot actively program in, and time in whichthe programmer is falling further behind the latest versioning checkpoint.
This problem keeps getting worse, too - it’s common to have many different configurations per plat-form (along with debug and release, there may be specific configurations that enable testing features,or experimental functionality), or the versioning of the codebase itself may have been ’branched’ toallow concurrent development of different features, in which case a code change may work fine in onebranch, but cause problems in another!
The solution: Continuous Integration
The solution to this problem of assessing the validity of the code being submitted is to automatethe process to compiling code as it is submitted to the code repository, and verifying that all of therequired configurations are in a working state. This is achieved via the usage of continuous integrationtools. As the name suggests, these will continuously try and compile the changes being submitted toa code repository, and report on the success (or failure!) of the compilation. These tools generally runon a dedicated server machine, and are often controlled via a web interface. Some of these integrationtools will also support distributed compilation, a process whereby the spare resources of the developer’smachines are used to compile parts of the program, which can allow builds to be generated quickerthan relying upon a single server machine, and thus inform programmers of any potential errors asquickly as possible.
Introduction to Jenkins
One popular continuous integration tool, and the one we will be concentrating on here is Jenkins, anopen source server program, that can connect to a wide number of code repository types, and generatecompilation results from a number of programming languages. While anyone can download and usethe tool as they wish (from https://jenkins.io), for the purposes of your team project each team hasbeen provided with a freshly installed version of Jenkins on a University-based Windows machine,allowing you to configure it as necessary, and benefit from not having to risk slowing down one of yourteam’s machines by making it constantly compile whenever a change is made.
Jenkins has a number of capabilities that will be useful to you - it can trigger Visual Studio builds,and connect to repositories in popular formats such as Perforce, Subversion, and Git. If it detects acompilation failure, it can email team members to inform them that the build has failed (or becomeunstable in Jenkins parlance), when it has started working again, and can also email specifically theperson who committed the change that resulted in the build failing, letting them know that there isan issue that should be resolved immediately.
Managing Jenkins
Jenkins is managed entirely through a web interface - you will be emailed the address of your team’sJenkins server at the start of your team project. By navigating to the address via a web browser, youshould find yourself at the main Jenkins control panel, which should look similar to the following:
2

Creating Projects
Your first stop in Jenkins is to create a project. Think of this as being like a Visual Studio solution, inthat it contains all of the configuration settings required to execute its task - in this case continuousintegration of code. To create a new project, click on the New Item button from the Jenkins menuon the left of the Configuration screen:
From there, you can name your project, and specify its type. Click on Freestyle project, and thenOK. This type of project allows for the greatest range of options to configure what Jenkins shoulddo, so should be a good starting point for however you wish to configure your continuous integrationsetup.
Upon clicking OK, you’ll be sent to the Configuration page. This has a number of tabs for settingoptions on various parts of how Jenkins will operate. You’ll be seeing a lot of this page, as toget Jenkins compiling the code for your team project you have to do a bit of setting up of variouscomponents of the system.
3

Installing Plugins
A freshly installed Jenkins instanced doesn’t do very much! For it to become a useful tool you mustconfigure it to connect to your code repository, and compile the code in a specified manner. Depend-ing on the repository and compilation toolchain you use, you may need to extend the functionality ofJenkins with a number of plugins, too. As it doesn’t come with support for Visual Studio projectsby default, you are definitely going to have to handle plugins at some point, so we’ll start by takinga look at how to obtain and configure the Visual Studio plugin.
The process for installing Jenkins projects is reasonably straight forward. To start off with, clickon the Jenkins icon at the top of the web page:
This will take you to the root of the options Jenkins can provide on its left hand list. From thislist, select Manage Jenkins:
This will open up a selection of options in the right hand pane - select Manage Plugins:
This will then show tabs that can display installed plugins, those that have new updates to install,and new plugins available for installation. As Visual Studio will be your main IDE during the teamproject, Jenkins is going to have to be capable of building Visual Studio solution files. It’s possibleto compile a Visual Studio project from the command line using the Visual Studio MSBuild tool.Jenkins has a plugin available to use with MSBuild, so from the plugin management part of the webinterface, click on the Available tab, and tick the box to the left of the MSBuild plugin entry.
Once you’ve done this, click on the Install without restart button at the bottom of the page. That’sit! That’s all you need to do to install plugins.
4
Configuring Plugins
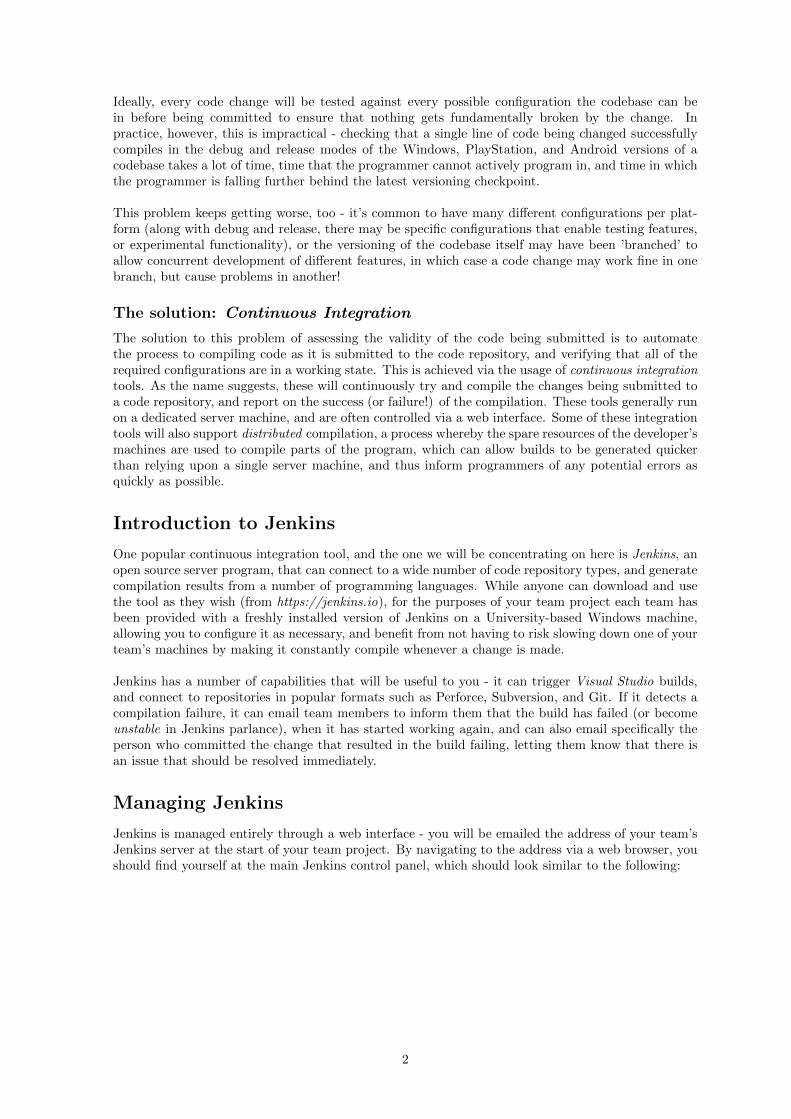
Some plugins add new memu items or items within your project settings, but some must have ad-ditional properties set specifically for them. The MSBuild plugin is like this, so now’s a good timeto see more of the configuration options Jenkins has. Return to the Manage Jenkins option we usedearlier, but instead of going to Manage Plugins, instead go to Global Tool Configuration. Towards thebottom of the resulting menu, you should see that there’s now an MSBuild option in the right handpane - navigate towards it and press the Add MSBuild button.
This will expand some options specific to the MSBuild plugin, in this case the location of theMSBuild executable, installed as part of Visual Studio. Add the following name and path to yourconfiguration, and then press Save:
That’s all we need to do to set up the MSBuild plugin, although we’ll see some per-project settingsrelating to solution files later on.
Repositories
To obtain your team’s code, Jenkins must be able to connect to the repository it is being committedto. As part of its default installation, Jenkins comes with support for Git and Subversion repositories- if your team has chosen another software versioning system, you will have to seek out and installthe Jenkins plugin for it, in similar manner to the MSBuild plugin described earlier.
Subversion
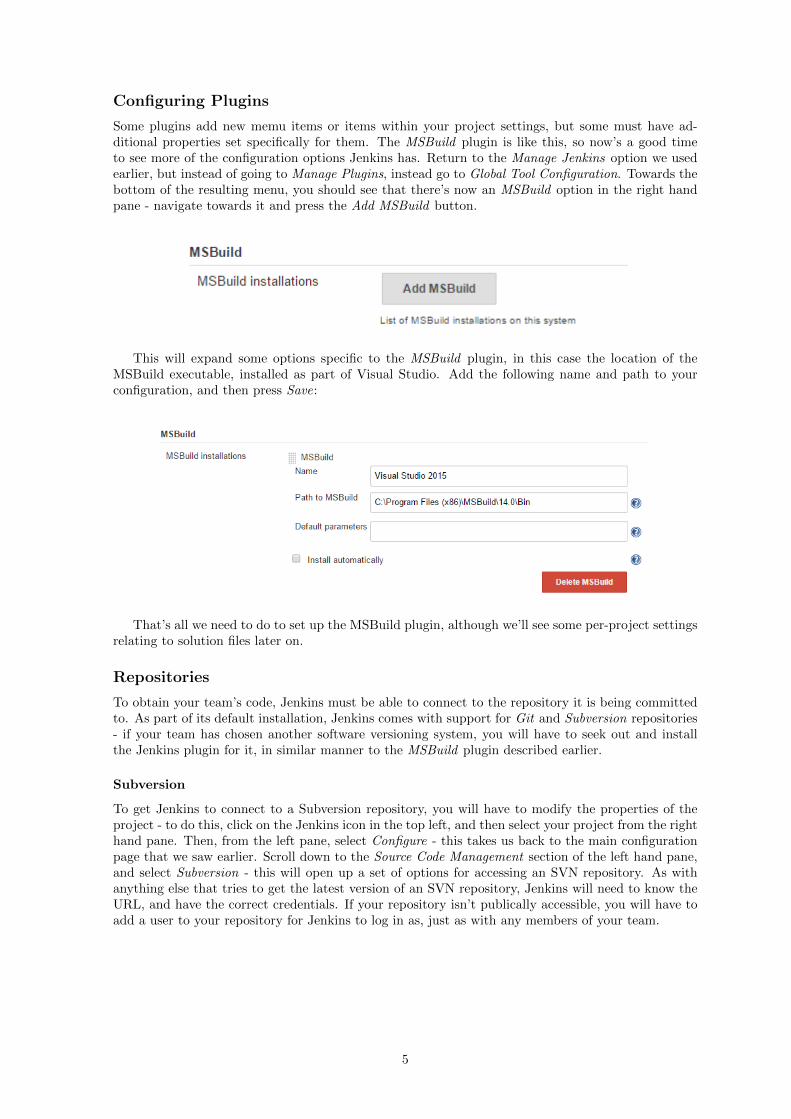
To get Jenkins to connect to a Subversion repository, you will have to modify the properties of theproject - to do this, click on the Jenkins icon in the top left, and then select your project from the righthand pane. Then, from the left pane, select Configure - this takes us back to the main configurationpage that we saw earlier. Scroll down to the Source Code Management section of the left hand pane,and select Subversion - this will open up a set of options for accessing an SVN repository. As withanything else that tries to get the latest version of an SVN repository, Jenkins will need to know theURL, and have the correct credentials. If your repository isn’t publically accessible, you will have toadd a user to your repository for Jenkins to log in as, just as with any members of your team.
5

To give Jenkins the credentials required to log in to your Subversion repository, click on the Addbutton next to the Credentials box in the left hand pane, then select Jenkins from the pop up box.This should bring up a menu that looks like the following:
Add your newly created user name and password here, leaving all other options default (theyshould be as in the image). Once you’ve clicked Add, you’ll return to the Configuration screen auto-matically. At this point, Jenkins will also try and log in to the Subversion repository; if somethinghas gone wrong (such as typing the password wrong), then you’ll see a red warning sign like this appear:
Otherwise, you’re all set! Just press Save and Jenkins will then be able to connect to yourrepository and grab the latest version of the files on it.
6
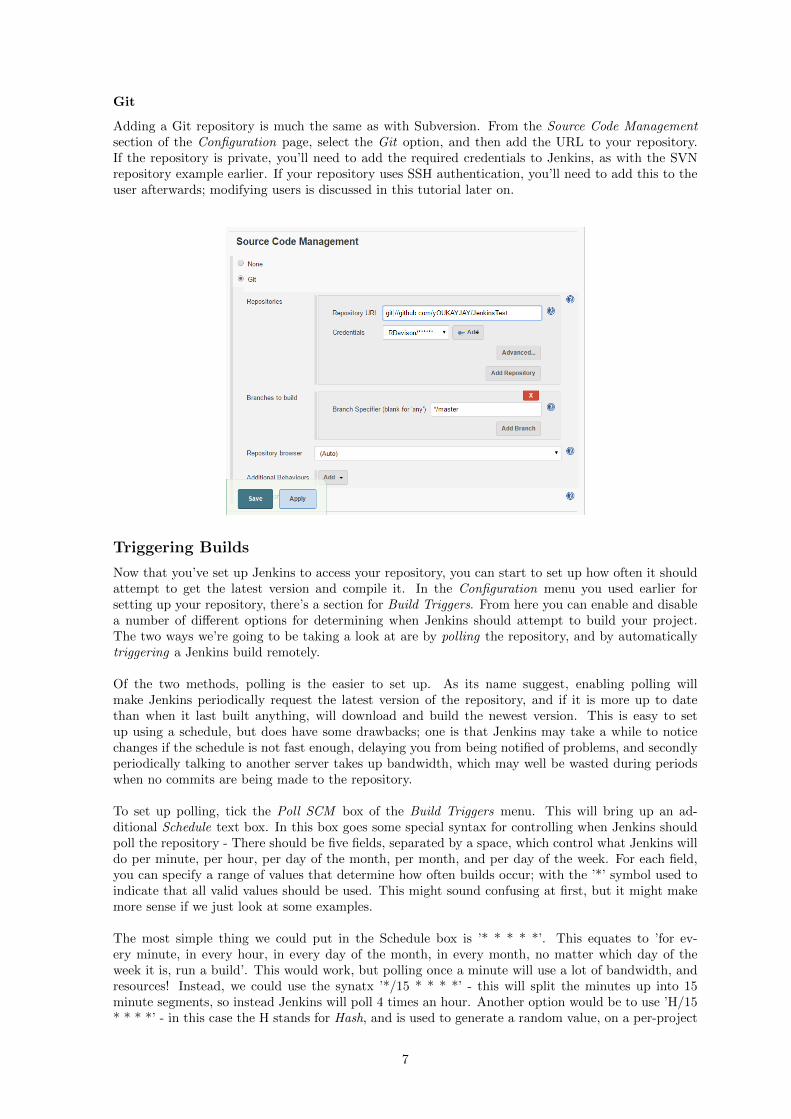
Git
Adding a Git repository is much the same as with Subversion. From the Source Code Managementsection of the Configuration page, select the Git option, and then add the URL to your repository.If the repository is private, you’ll need to add the required credentials to Jenkins, as with the SVNrepository example earlier. If your repository uses SSH authentication, you’ll need to add this to theuser afterwards; modifying users is discussed in this tutorial later on.
Triggering Builds
Now that you’ve set up Jenkins to access your repository, you can start to set up how often it shouldattempt to get the latest version and compile it. In the Configuration menu you used earlier forsetting up your repository, there’s a section for Build Triggers. From here you can enable and disablea number of different options for determining when Jenkins should attempt to build your project.The two ways we’re going to be taking a look at are by polling the repository, and by automaticallytriggering a Jenkins build remotely.
Of the two methods, polling is the easier to set up. As its name suggest, enabling polling willmake Jenkins periodically request the latest version of the repository, and if it is more up to datethan when it last built anything, will download and build the newest version. This is easy to setup using a schedule, but does have some drawbacks; one is that Jenkins may take a while to noticechanges if the schedule is not fast enough, delaying you from being notified of problems, and secondlyperiodically talking to another server takes up bandwidth, which may well be wasted during periodswhen no commits are being made to the repository.
To set up polling, tick the Poll SCM box of the Build Triggers menu. This will bring up an ad-ditional Schedule text box. In this box goes some special syntax for controlling when Jenkins shouldpoll the repository - There should be five fields, separated by a space, which control what Jenkins willdo per minute, per hour, per day of the month, per month, and per day of the week. For each field,you can specify a range of values that determine how often builds occur; with the ’*’ symbol used toindicate that all valid values should be used. This might sound confusing at first, but it might makemore sense if we just look at some examples.
The most simple thing we could put in the Schedule box is ’* * * * *’. This equates to ’for ev-ery minute, in every hour, in every day of the month, in every month, no matter which day of theweek it is, run a build’. This would work, but polling once a minute will use a lot of bandwidth, andresources! Instead, we could use the synatx ’*/15 * * * *’ - this will split the minutes up into 15minute segments, so instead Jenkins will poll 4 times an hour. Another option would be to use ’H/15* * * *’ - in this case the H stands for Hash, and is used to generate a random value, on a per-project
7

basis. Without this, the repository would be polled exactly every 15 minutes, start from on the hour- if you have many projects, this will mean Jenkins will poll all of them at the same time! By addingthe hash, each project will get its own starting value, spreading the load out over time. To get started,use the ’H/15 * * * *’ syntax so that at least Jenkins will do something !
While polling will work pretty well, there is a way that can avoid wasted time and bandwidth causedby polling a build that hasn’t changed. Many software versioning packages, including Subversion andGit, support post-commit hooks - small tasks that can be executed by the versioning system upona successful commit by a user. The exact method of creating one of these hooks is dependent onspecifics of the installation used, but they can commonly be set up to visit a website address; Jenkinscan record visits to a special URL and use it to trigger a build. To enable this feature, tick the Triggerbuilds remotely box in the Build Triggers menu. You will then be asked to create an AuthenticationToken, a string that forms part of the specially crafted URL used to trigger builds. Simply fill thisin with something unique, and make note of the URL noted underneath; you can test that this willtrigger a build by opening a new web browser tab and going to it - you won’t see anything when itloads, but looking back at your Jenkins tab should show that a build has been scheduled.
Triggering Builds In GitHub
It’s worth having a quick look at how to configure post-commit hooks in two popular source codecontrol websites, GitHub and Gitlab; they’re both pretty easy! In GitHub, a user marked as admin-istrator for a repostiory can add post-commit hooks by logging in to the website, navigating to thedesired project, and going to Settings along the top menu, and then Webhooks down the left hand side:
8

Once there, you’ll be able to paste the URL from earlier into the Payload URL section - don’tforget to add the Authentication Token!
Triggering Builds In GitLab
The process for GitLab is pretty similar to that of GitHub - log into the website, navigate to theproject you want to continuously integrate, select Settings from the top menu, then Web Hooks fromthe left. From there, you should be able to paste the URL you made note of earlier.
Triggering Builds From Tortoise
Sometimes it’s not possible to trigger Jenkins builds from your code repository directly - if Jenkins isrunning on a non web-facing machine, for example. In those cases, it’s also possible to trigger a newbuild automatically upon commiting code from the software client you are using to communicate withyour repository. A popular package for both Subversion and Git is Tortoise, which hooks itself intoWindows itself so that simply right clicking on a repository folder will allow you to commit code andupdate your local copy of a repository. To enable post commit hooks in either TortoiseGit or Tor-toiseSVN, first right click on your repository, hover over the Tortoise sub menu, and select Settings,as shown:
9
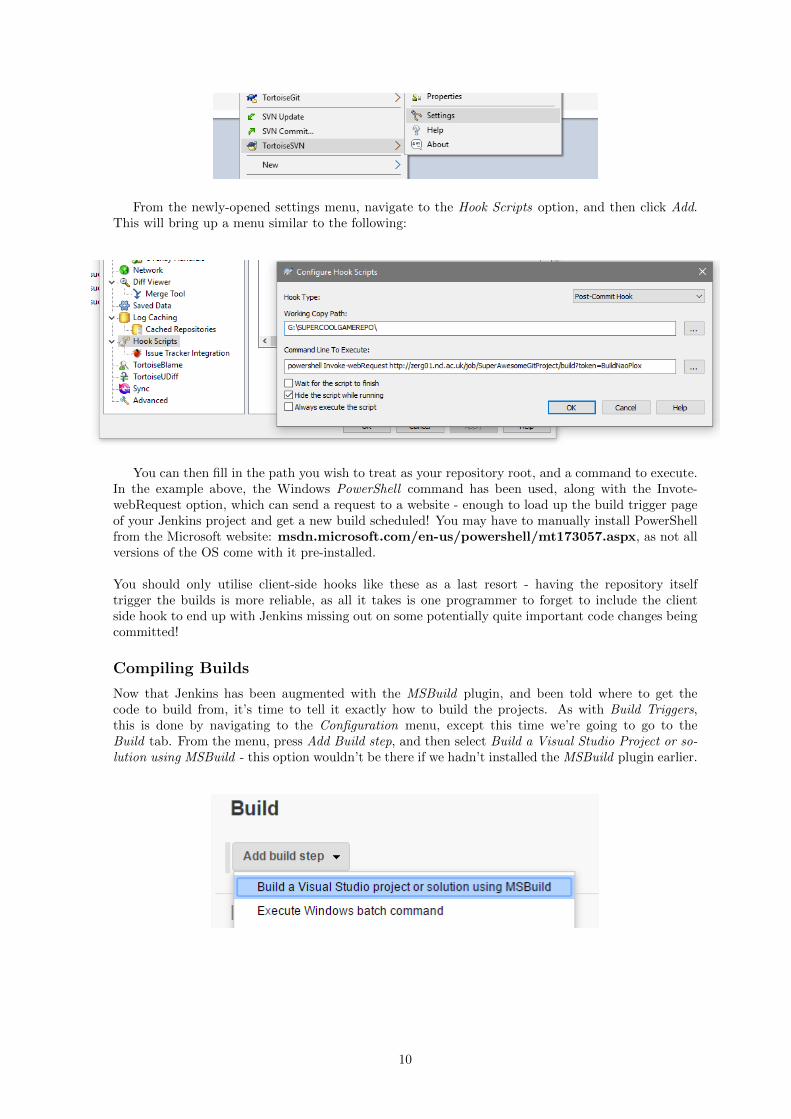
From the newly-opened settings menu, navigate to the Hook Scripts option, and then click Add.This will bring up a menu similar to the following:
You can then fill in the path you wish to treat as your repository root, and a command to execute.In the example above, the Windows PowerShell command has been used, along with the Invote-webRequest option, which can send a request to a website - enough to load up the build trigger pageof your Jenkins project and get a new build scheduled! You may have to manually install PowerShellfrom the Microsoft website: msdn.microsoft.com/en-us/powershell/mt173057.aspx, as not allversions of the OS come with it pre-installed.
You should only utilise client-side hooks like these as a last resort - having the repository itselftrigger the builds is more reliable, as all it takes is one programmer to forget to include the clientside hook to end up with Jenkins missing out on some potentially quite important code changes beingcommitted!
Compiling Builds
Now that Jenkins has been augmented with the MSBuild plugin, and been told where to get thecode to build from, it’s time to tell it exactly how to build the projects. As with Build Triggers,this is done by navigating to the Configuration menu, except this time we’re going to go to theBuild tab. From the menu, press Add Build step, and then select Build a Visual Studio Project or so-lution using MSBuild - this option wouldn’t be there if we hadn’t installed the MSBuild plugin earlier.
10
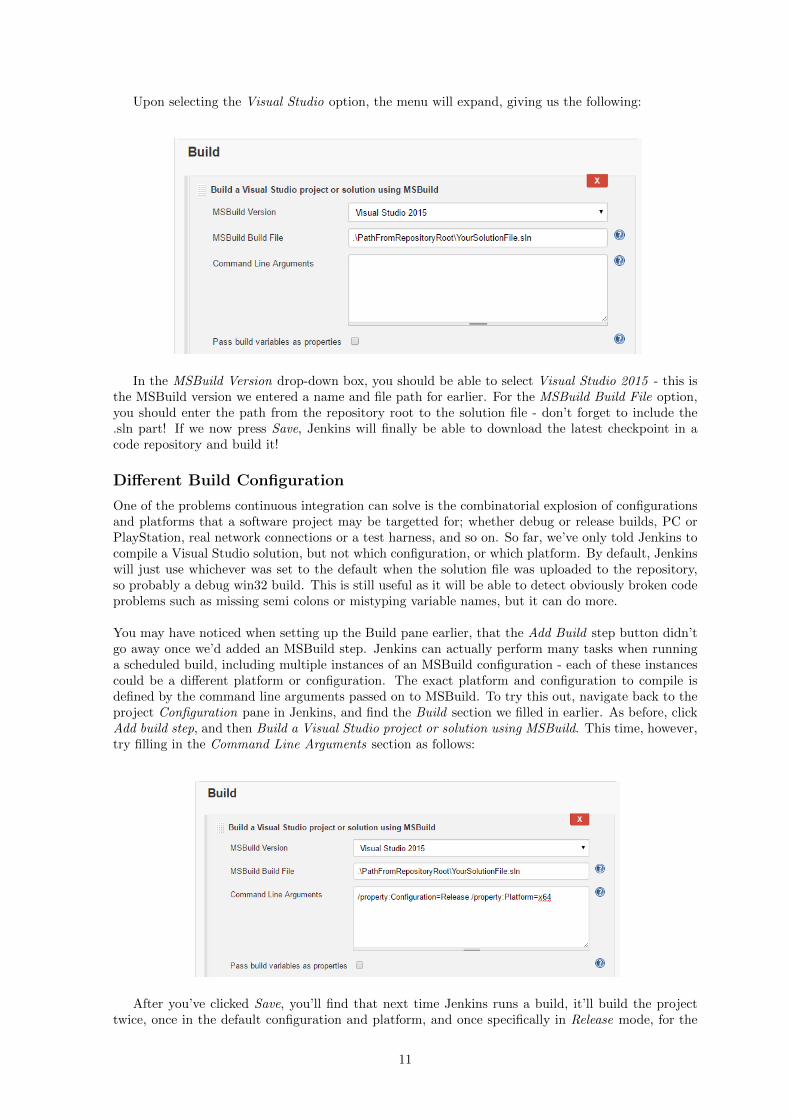
Upon selecting the Visual Studio option, the menu will expand, giving us the following:
In the MSBuild Version drop-down box, you should be able to select Visual Studio 2015 - this isthe MSBuild version we entered a name and file path for earlier. For the MSBuild Build File option,you should enter the path from the repository root to the solution file - don’t forget to include the.sln part! If we now press Save, Jenkins will finally be able to download the latest checkpoint in acode repository and build it!
Different Build Configuration
One of the problems continuous integration can solve is the combinatorial explosion of configurationsand platforms that a software project may be targetted for; whether debug or release builds, PC orPlayStation, real network connections or a test harness, and so on. So far, we’ve only told Jenkins tocompile a Visual Studio solution, but not which configuration, or which platform. By default, Jenkinswill just use whichever was set to the default when the solution file was uploaded to the repository,so probably a debug win32 build. This is still useful as it will be able to detect obviously broken codeproblems such as missing semi colons or mistyping variable names, but it can do more.
You may have noticed when setting up the Build pane earlier, that the Add Build step button didn’tgo away once we’d added an MSBuild step. Jenkins can actually perform many tasks when runninga scheduled build, including multiple instances of an MSBuild configuration - each of these instancescould be a different platform or configuration. The exact platform and configuration to compile isdefined by the command line arguments passed on to MSBuild. To try this out, navigate back to theproject Configuration pane in Jenkins, and find the Build section we filled in earlier. As before, clickAdd build step, and then Build a Visual Studio project or solution using MSBuild. This time, however,try filling in the Command Line Arguments section as follows:
After you’ve clicked Save, you’ll find that next time Jenkins runs a build, it’ll build the projecttwice, once in the default configuration and platform, and once specifically in Release mode, for the
11

x64 platform. Using the same process, you can build debug and release versions of your Android andPlayStation 4 versions of the codebase - Jenkins doesn’t know or care about what platforms you use,just as long as you’ve installed the correct toolchains for MSBuild to find and utilise.
Creating Users
At this point, you should be able to get Jenkins to connect to your repository, and build it in all theconfigurations you need, either periodically, or when a new commit has been made. At some point,however, Jenkins is going to need to tell the outside world the current state of the project, especiallyif it has become unstable in one of the combinations of configuration and platform. To do this, itcan email users about the state of the project upon completion of a compilation attempt. Users canbe added to Jenkins in two ways - either manually from the control web page, or automatically byJenkins by scanning who has made commits to the repository it is connected to.
To add a new user, clink on the Jenkins icon at the top left of the page, and go to the ManageJenkins page - we’ve been here a few times now, so it should feel familiar to you. From there, selectthe Manage Users option. This will then allow you to click on Create User from the left hand pane:
Figure 1: Creating a New User
This will then let you fill in the new user form. The Full name and E-mail address entries areused when notifying users of problems with builds. Once a user has been created, they can log in andchange their details, including their password, so it’s fine to just create a random one to start with,as the user can reset it to something else later.
To modify an existing user, click on the Jenkins icon at the top left, and then People icon fromthe left hand pane:
This will bring up a list of all users. If you click on a user on the list, you’ll be able to seea Configure button on the left hand pane; clicking this will lead you to a page where you can setan email address to users that have been automatically generated from repository logs, or changepasswords and add SSH public keys, often used as a security check in Git repositories.
Notifying Users
The final part of configuring Jenkins is to tell it what to email, when, and to who. To do this, weneed to go back to the Project Configuration page we went to earlier when setting up source codemanagement and build triggers. As before, click on the Jenkins icon in the top left of the screen, then
12

click on your project, then click Configure from the left hand pane. This time, we’re going to scrolldown to the Post-Build Actions section of the page where you’ll find the Add post-build action button- click it, then select E-mail Notification from the pop-up menu.
This will create a new item on the page, like so:
From here, you can fill in a list of email addresses that should always be mailed when the projectbecomes unstable (or returns to stability) - it may be useful for a person to be designated ’in charge’of making sure builds get fixed, and so have their email address here. You can also check the Sendseparate e-mails box, which will inform users who have committed changes that prevent the projectfrom compiling that they might have caused something bad to happen, and should take a look at theerror logs.
There’s one last step to making email notifications work correctly - Jenkins needs to know whichemail server and address to use when generating emails. To do this, we need to take one last trip tothe main Jenkins Configuration panel, so click on the top left Jenkins icon, click Manage Jenkins, andthen this time we’re going to select the Configure System option:
Then, scroll down to the E-mail Notification section of the right-hand pane, and press Advanced.This will allow you to set up the server used for outgoing mail from Jenkins. If you are going to usethe University’s email server, you are going to have to set up SMTP authentication, so tick that box,and enter the details as shown:
13

For the User Name and Password fields, someone in each team is going to have to provide theirlogin details, to allow Jenkins to masquerade as them - everyone else on the team will just have to getused to receiving a lot of emails from this person! Once you’ve clicked Save, you’ll finally be finishedsetting up Jenkins - it can now connect to a specific repository, retrieve the latest builds upon newcommits, compile it as a Visual Studio project, and email people if the overall health of the projectchanges in some way.
Conclusions
Development of software as part of a team is a process fraught with difficulties - maintaining a solidworking build can be difficult when multiple programmers are developing and using the same API,or concurrently writing code in the same file. At some point in every project, some conflict betweencode changes occurs, and the compilation of the project fails; this is natural, but it is important forthe problem to be identified and corrected as quickly as possible. This is where continuous integrationcomes in, by allowing the process of compiling every possible combination of projects automaticallyas code is committed, and informing the coders of problems when they arise.
Jenkins is a very useful continuous integration tool, capable of integrating with the software packagesyou’ll find yourself utilising over the course of your team project. This tutorial has shown you howto connect Jenkins up to a repository, determine when to try and grab the latest build off it, how tocompile it, and how to tell the required people of any potential changes in the status of the project.It takes a little setting up to fully work, but it will save you time in the long run, as reacting to themessages Jenkins sends you will help prevent errors accumulating in your projects and leading to atangled mess of code that must be laboriously fixed.
As powerful as Jenkins is, the most important part of a successful continuous integration method-ology is you, the programmer. You must utilise the power that software versioning and continuousintegration bring to a project, by helping it along the way as much as possible. Primarily, this isby committing code often to the project, rather than sending whole chunks of new code once perweek. While you’ve been writing your week long chunk of code, other programmers have been makingchanges to the files you yourself are relying on, and you may find yourself working on out of datecode. Furthermore, if you commit a huge chunk of code that results in the build breaking, it may bea difficult task to determine how best to fix the problem, due to being one part of a larger commit.It is far better to structure your commits in such a way as you make many smaller changes, so thatthe exact problem can be pinpointed quicker when it arises. It’s also a good idea to update yourproject to the latest checkpoint on your repository before committing your changes, to catch obviousproblems before they even make it into your next commit log!
14