Contents · Web viewCreate Word Template in CRM as shown below. Navigate to CRM -> Settings ->...
79
Dynamics CRM IMS APP Deployment Document
Transcript of Contents · Web viewCreate Word Template in CRM as shown below. Navigate to CRM -> Settings ->...

Dynamics CRM IMS APP Deployment Document

ContentsContents...........................................................................................................................21.Summary.......................................................................................................................3
1.1 Overview.............................................................................................................31.2 Document Overview................................................................................................3
2. Prerequisites.................................................................................................................32.1 Power Auto Number................................................................................................32.2 Data Export Service................................................................................................52.3 Email Lab Alerts......................................................................................................62.4 Voice of Customer (VOC).........................................................................................72.5 CRM Hub Installation...............................................................................................92.6 Portal Installation and Configuration.....................................................................112.7 System Settings....................................................................................................162.8 Group Policy Set up...............................................................................................172.9 Windows PowerShell..............................................................................................182.10 Azure Setup.........................................................................................................20
3. Install IMS App Package..............................................................................................224. Download IMS App Azure Components.......................................................................265.Post Deployment Configuration...................................................................................33
5.1 CRM Configurations...............................................................................................335.2 Azure Configurations.............................................................................................50
6.TroubleShooting Details..............................................................................................586.2 Azure Applications.................................................................................................586.2.1 Web Service Plan................................................................................................586.2.2 Web Jobs............................................................................................................596.2.3 Web Applications................................................................................................636.3 FN Portal................................................................................................................686.4 Questionnaire Portal..............................................................................................68
7.Uninstalling Immigration AppSource System...............................................................698. Aspose License SetUp.................................................................................................69

1.Summary1.1 OverviewMicrosoft AppSource is our new destination to enable business users to explore and use line-of-business SaaS apps from Microsoft and our partners. Users can also discover add-ins for Microsoft business apps, like Dynamics 365, Power BI, Office and more. Through AppSource, ISVs (app publishers) and other partners can reach a broad range of customers right where the users are either through the AppSource portal or within the context of the Microsoft services they’re already using.
1.2 Document OverviewThis document describes the components of Immigration Management System ( referred as “IMS” in the document) App and its related information including the prerequisites to be made available in the system before proceeding with the IMS App Solution installation and steps to download and import the solution.
This is a living document that will be used to support the CRM application and its associated portal.
2. PrerequisitesAs a part of prerequisites to install the IMS App, the below solutions must be installed or imported into the user’s CRM organization. The user must login with Office 365 Administrator account to install the below apps.
Power Auto Number Data Export service Email Lab Alerts Voice of Customer CRM Hub Installation Portal Installation and Configuration(Custom Portal)
2.1 Power Auto NumberPower Auto Number is an app that enables automatic insertion of random numbers, letters, dates or times in any field of any entity in CRM. The app enables the use of combination of numbers, letters and dates in the CRM fields and provide the ability to number more than one field in each entity. Random numbers are guaranteed to be unique. Power Auto Number is used in this application to create an unique identifier in Foreign national entity.
The power Auto number solution can be downloaded from the below web site.
https://www.powerobjects.com/powerpacks/powerautonumber

Import the same into the CRM system by navigating to Settings - > Solutions.
Click on Import button in the solutions page.
After importing the Power auto number, the same is available in the below imported list.

2.2 Data Export Service Data Export Service is an add-on service for Dynamics 365 (online) that provides the ability to replicate sales, service and marketing data to a SQL store in a customer-owned Azure subscription. It simplifies the technical and administrative complexity of deploying and managing a data export solution managing schema and data.
Navigate to the below URL , go to “Dynamics 365” Add-Ins and search with the name of “Data Export Service” as shown below
URL: https://appsource.microsoft.com/en-us/marketplace
The system will request the connection details like user name, organization name and other details as shown below. Enter the appropriate details and click on Continue.

The solution is imported into the system and the same is available in the Imported list as shown below.
2.3 Email Lab AlertsThe Email Alert Solution is an add-on feature to dynamics 365 CRM which provides an overview of received and unread CRM emails on a Case. This is used in this application as it enables users to get the unread mails count which were received on a case.
Navigate to the below URL , go to “Dynamics 365” Add-Ins and search with the name of “Email Alert” as shown below
URL: https://appsource.microsoft.com/en-us/marketplace

The system will request the connection details like user name, organization name and other details as shown below. Enter the appropriate details and click on Continue.
The solution is imported into the system and the same is available in the Imported list as shown below.
2.4 Voice of Customer (VOC)Voice of the Customer is a new Dynamics CRM 2016 feature that was created to capture feedback regarding the product or service provided by the CRM. Voice of the Customer, enables setting up of surveys, survey distribution to contacts via workflows, and capture responses. These captured data can be utilized for generating reports and making appropriate changes to the product/service.

User can take advantage of the feature by installing Voice of the Customer solution. The Solution is available globally for Microsoft Dynamics CRM Online subscriptions.
1. Access the link, https://portal.office.com/ and click on the ‘Admin’ tile. User must be logged into the Office 365 Administrator account.
2. Click on Admin Center and select Dynamics 365.
3. Select the instance (organization) for which you want to install Voice of Cutomer and click on
the Edit button, next to Solutions.
4. Select the Voice of the Customer and click on Install.

Note: When a solution is installed in CRM, the CRM Online site goes into maintenance mode and will be offline for a short period of time. It is advisable to install the solution in outside office hours.
2.5 CRM Hub InstallationTo enable UCI client and related features, end user need to install CRM Hub Installation.
1. Go to https://portal.office.com/ and click on the ‘Admin’ tile. User must be logged into the Office 365 Administrator account.
2. Click on ‘Admin Center’ and select ‘Dynamics 365’.
3. Select the instance (organization) for which you want to install ‘CRM Hub’ and click on the ‘Edit’ button, next to Solutions.
4. Select ‘Crm Hub’ from the list and click on the ‘Install’ button.

5. Click on ‘Install’ button in the pop-up.
6. The Status changes to ‘Installed’.
7. Navigate to Dynamics 365 CRM Organization to verify and validate if the Managed solution for the “Crm Hub” is installed with the above steps.
2.6 Portal Installation and ConfigurationA portal is an independent running application that exposes specific CRM data and functionality to the respective users. It can be leveraged to model business processes that aren’t easily modeled inside CRM or to provide a higher level of integration between your CRM and your clients. Users can range from full CRM users to external clients with minimal rights and access. Below is the step by step process to install and configure the portal:
1. Go to https://portal.office.com/ and click on the ‘Admin’ tile. User must be logged into the Office 365 Administrator account.
2. Click on ‘Admin Center’ and select ‘Dynamics 365’.

3. Select the instance (organization) for which you want to install ‘Custom Portal’ and click on the ‘ Edit’ button, next to Solutions.
4. Select ‘Custom Portal’ from the list and click on the ‘Install’ button.
5. Click on ‘Install’ button in the pop-up.

6. The Status changes to ‘Installed’.
7. Navigate to Dynamics 365 CRM Organization to verify and validate all the Managed solution for the Custom portal installed with the above steps.
8. Access the website https://portal.office.com, select ‘Admin Center’ and ‘Dynamics 365’ and click on ‘Application’ tab.

9. On the ‘Configure your Portal’, enter the necessary information. Enter the below details:a. Name, URL for the portalb. Portal Audience: Customerc. Portal Binding: Custom
10. Click on ‘Accept’ in the Permissions pop up for Dynamics 365 Portal.

11. Navigate to ‘Portal Details’. As appearing in the below message, it might take time to configure the portal, check back in some time and the ‘Custom Portal’ will be ready for use.
12. Once the portal set up is complete the page wil display the below set of options.
13. Click on the ‘Base Portal URL’, a new window will open and the Dynamics 365 Custom Portal is ready for Branding.

2.7 System Settings
As a part of deployment process, the following changes are required in the general tab of system setting. To access system settings, navigate to Setting - > Administration - > System Settings:
Navigate to general tab - > Set blocked extensions for attachments. Remove JS from the extensions.

2.8 Group Policy Set upBelow settings are required to run the script and power shell commands for setting up IMS Apps from Package deployer
Execute the “gpedit.msc” in windows run and open the Group Policy Settings as shown in the below screenshot.
Click on Ok
Navigate to Computer Configuration -> Administrative Templates ->Windows Components -> Windows PowerShell as shown below

Open “Turn on Script Execution” and change the settings as shown below
Now the script execution state changes from Not configured to Enabled as shown below
2.9 Windows PowerShell Open PowerShell window from windows as shown below

It opens the below PowerShell window
Run the below Commands
“Set-ExecutionPolicy RemoteSigned” as shown below
The following question appears on screen, “Do you want to change the execution policy” type “Y” and click enter

Run the command “Install-Module AzureRM” as shown below
Type “Y” and click enter Run the command “Import-Module AzureRm” as shown below
Wait to execute the import module azureRM until shows the next line as shown below
2.10 Azure Setup
Use the below link to get more information about the azure subscription
https://azure.microsoft.com/en-in/features/azure-portal/
Login to azure portal using https://portal.azure.com Sign-In to portal using service admin/co-admin role
How to get the Subscription Id ?
Search for Subscriptions like showing below .
Select the required subscription from the list below

On click of the subscription we can find the subscription id
How to find Login User role/Powershell script executing user role ?
Click on Subscription name and select AccessControl(IAM) from left navigation links
Find the user and his roles like above (powershell script executing user has to be under co-admin/service admin role )
How To find the Resource Group ?
Click on Subscription name and select ResourceGroups from left navigation links

3. Install IMS App PackageAlert: This solution import may impact any of the existing CRM functionalities already there in the system. It is advised to do this on New/Vanilla instance of CRM.
Go through the below link and click on “GET IT NOW” as shown below https://appsource.microsoft.com/enus/product/dynamics365/microsoft_labs.d365immigrationmanagementsystem-preview?flightCodes=d365immigramtionmanagementsystem
On Click on “GET IT NOW” shows below image
Select the check box to agree the Microsoft terms and privacy policy , Also validate the organization username on which crm you are going to install the IMS App and Click on Continue will install the IMS App in your CRM as shown below.

Solution import will take time from 60 – 90 minutes. Post solution import, data import will be performed for approximately 90 – 120 minutes based on the network bandwidth. During this window of importing features, background operations will be happening on the CRM instance, some of the feature’s may not work as appropriate. Once the solution is imported and available in solutions. check for the data import for entities from the list shown below.
1. Queue 2. Business Process Flows 3. Business Process Flow Stages 4. Web Form 5. Web Form Step 6. Case Type 7. Questionnaire Configuration 8. Country 9. Email Template Staging 10. Master Forms 11. Master Case Configuration 12. Configuration Steps for Questionnarie 13. Business Unit 14. Category15. Master Documents 16. Master Letters 17. Master Steps 18. Case Steps Config 19. Case Tabs Config 20. Configuration 21. Integrations Config 22. Master Attorney Configuration 23. US Embassy24. Task Categories 25. Tags 26. Entity Form

27. Entity List 28. Web Template 29. Page Template 30. Web Page 31. Web File 32. Note33. Site Marker 34. Site Setting35. Content Snippet 36. Web Role37. Entity Permission38. Web Form Metadata39. Entity Form Metadata40. Team 41. Documents Config 42. Stage Queue Mapping
In case of any issue in data import perform the below steps as troubleshooting to resolve issues.
1. Re-install the IMS App Package from the AppSource from the same link mentioned above, which will try to resolve any of the import issues and update the relationships for data in entity records.
2. In case of any issues with above #1, run the executable provided in the GitHub (https://github.com/microsoftappsource/IMS/tree/master/IMSAppDataEXE ), which will re-do the data import upsert operation.
Navigate to Downloaded “IMS-master” Folder -> IMSAppDataExe

Open the “IMSAppAzurePackage” Application shown in above image will run the application as shown below
Enter the Organization Service URL, UserName and PassWord of CRM
Organization URL
Navigate to CRM -> Settings -> Customizations ->Developer Resources

Creating the records In CRM as shown below and closes the application once the records are created in CRM
4. Download IMS App Azure Components Go through the below link
https://github.com/microsoftappsource/IMS
Download the components as shown below
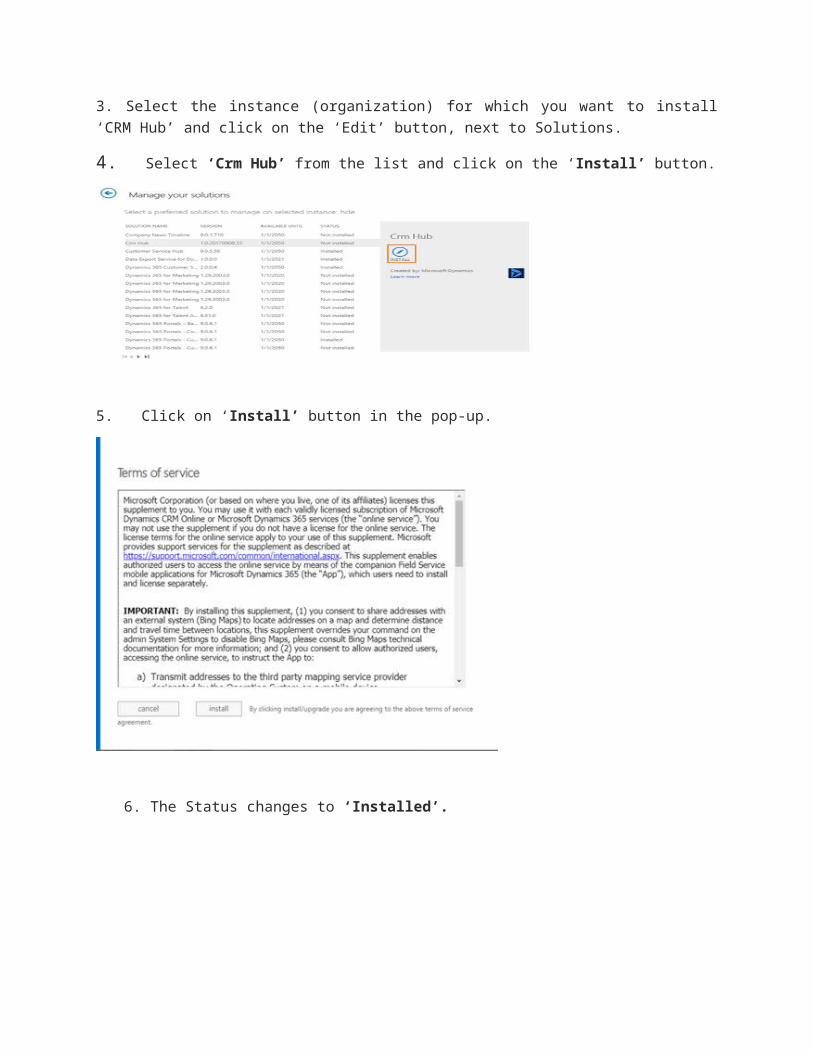
Unblock the zip file which you downloaded from github as shown below Navigate to Zip File -> Properties

Click on Properties and check the unblock checkbox and click on “Ok”as shown below
Extract the folder which contains all the IMS App Components

Open the “IMS-master” Folder and find the “PreInformationData.xml” File and Open as shown below.
Enter the ResourceGroup , SubscriptionId and Organization UniqueName as shown below
How to get Organisation Unique Name ?
In CRM Navigate to Settings - > Customizations -> Developer resources as shown below:
Resource Group Name and Subscription Id are mentioned in 2.10 Azure Setup Mention the “ResourceGroupName” , “SubscriptionId” and Organisation uniqueName as shown
below image

Update the above file with Resource Group,SubscriptionId ,Organization Name values save and close the file.
Open the folder “IMS-master” and Open the folder “IMSAppExe” and Run the “IMSAppAzurePackage” as shown below
Open the IMSAppAzurePackage Application will shows the command prompt as shown below
And prompt you an azure login window as shown below Login to azure using service admin/co-admin role to deploy web applications
Enter the azure UserName and click on Next shows below screen

After Azure login was successful, It creates the WebApplications in azure takes some time and shows the below screen
In Order to Publish the Azure Web Applications, again asks you to login azure as below Login to azure using service admin/co-admin role to deploy web applications
Enter the azure Username and click on Next shows below screen
After completing the azure Login , azure components will be published
Below applications will be created in azure
Note: If your organization name is “org123456789” then <xxxxx> will <12345>
App Service plan
1) IMSAppServicePlan
This is the Appservice Plan for all the azure components.
WebApp
2) “IMSAppPrintAll<xxxxx>”
This is used to download multiple extension document files and convert them to single pdf.
3) “IMSAppBinder<xxxxx>”
This is used to download selected files and convert them into single pdf in user defined sequence.
4) “IMSAppForms<xxxxx>”
This is used to Populate data into forms from CRM and portal.
5) “IMSAppWebJob<xxxxx>”
This app is placeholder for all the web jobs required to update data back in CRM.
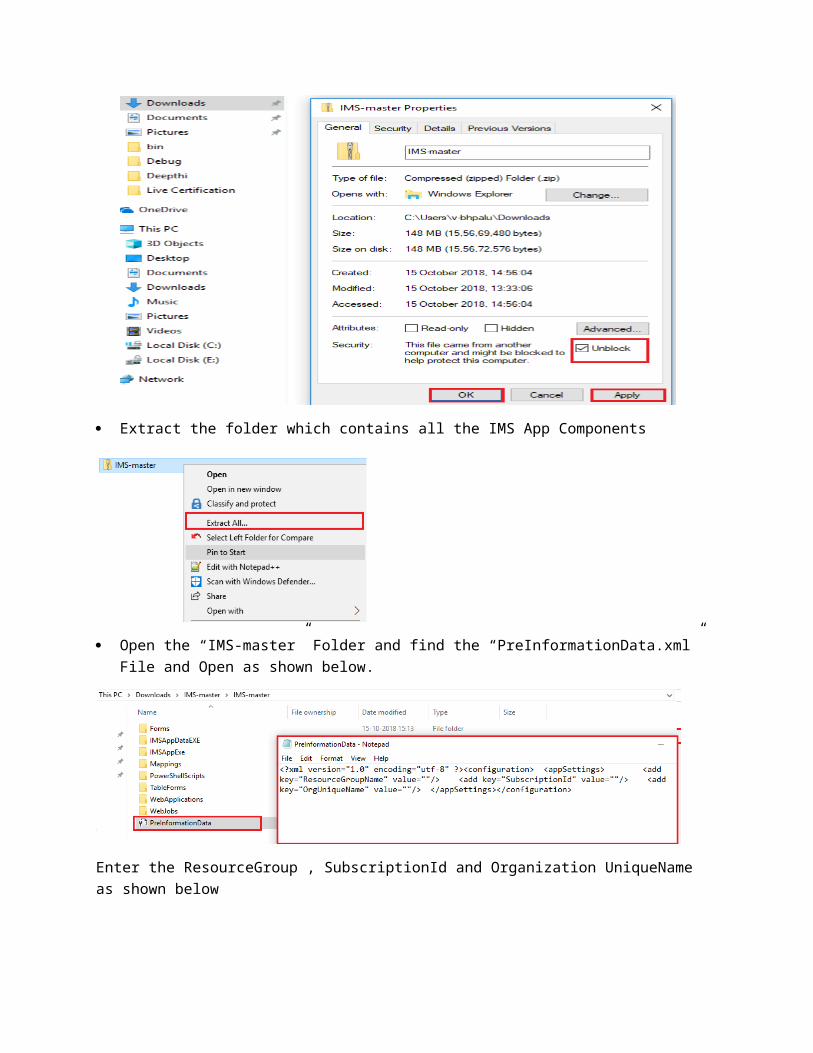
Storage Account
6) “imsappformstrg<xxxxx>”
This holds all the forms and mappings on the blobs and maintain forms, form versions and form version history under tables.

7) ”imsappstorageacc<xxxxx>”
All the attachments saved in CRM documents are stored here.
KeyVault
8) “ImsAppKeyVaults<xxxxx>”
All the username passwords and sensitive information related to the organization will be stored here.
App Insight
9) “ImsAppInsight<xxxxx>”
It will maintain all the logs related to AppService storage account.

Note: Follow troubleshooting steps in case of any of the above applications failed during deployment.
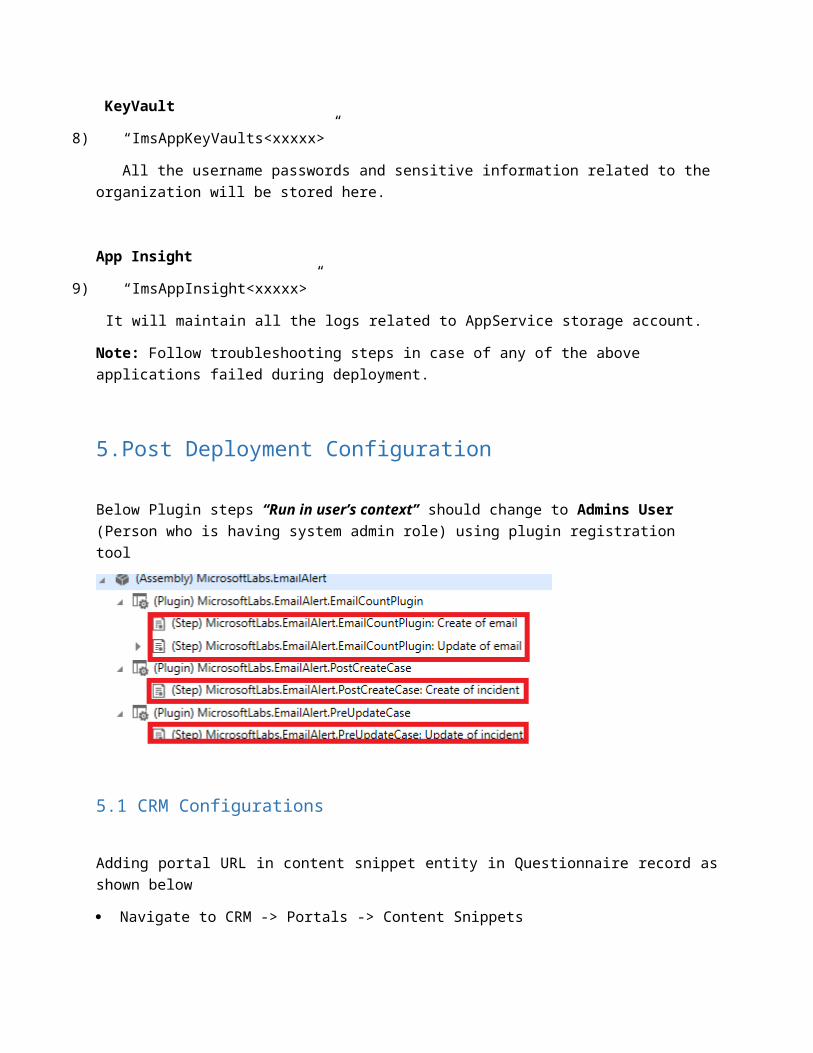
5.Post Deployment Configuration
Below Plugin steps “Run in user’s context” should change to Admins User (Person who is having system admin role) using plugin registration tool
5.1 CRM Configurations
Adding portal URL in content snippet entity in Questionnaire record as shown below
Navigate to CRM -> Portals -> Content Snippets Open “Questionnarie” record and update the value field as shown below
Change the URL with your organization configured CRM portal as given below “CRM Portal URL”/Questionnaire?id= Example: https://<your portal >.microsoftcrmportals.com/Questionnaire?id=

Update “Integration Config”
Navigate to CRM -> Settings -> IntegrationsConfig Open “OrgUrl” record and update the Config Value field with organization URL as shown below
Queue and MailBox Configuration
Configure below queue and mailbox for all the communication through IMS CRM instance , update the Incoming mail with your organization email .
QR Code Update for Binder
Create Word Template in CRM as shown below Navigate to CRM -> Settings -> Templates -> Document Templates

Download the QRCODE Document from the GITHUB (https://github.com/microsoftappsource/IMS/tree/master/DocumentTemplates ) and Upload the document.
Workflow Activation:
Go to CRM settings solutions open “IMSAppSourceV2” select “processes” under components as shown in below screen.
Note all draft processes and now go to settings processes and activate them.
Activation of Workflows:
Please follow the below steps to activate the draft workflows.
1. On Contact Create:
1a. Click set Properties in the step which is showing error.
1b. Remove the value in the configuration field and add the value again.
1c. Save and close the window after adding the value into configuration field.
1d. Activate the workflow.
2. Case - Update Case Type on Template name Update
2a. Click set Properties in the step which is showing error.
2b. Remove the value in the configuration field and add the value again.

2c. Save and close the window after adding the value into configuration field.
2d. Activate the workflow.
3. Employee Documents - Assign Pending Status Documents To Integreon :

3a. Click set Properties in the step which is showing error.
3b. Set the Value of the queue field to Process Team 1.
3c. Save and close the window, now the step should not show any error.

3d. Activate the workflow.
4. Generate Letter Document from Word Template

4a. Click set Properties in the step which is showing error. Save and close the window.
4b. Activate the Workflow
5. Generate QR Document from Word Template
5a. Click set Properties in the step which is showing error.

5b. Check if the selected template is QRCODE, If it is not filled fill it with QR code.
5c. Save and close the window.
5d. Activate the workflow
6) Send Invitation
6a. Open “Set properties” of Update FN Portal role step.

6b. Check if the web role field is filled. If not, set the field to “IMS Portal Admin”. Save and close the form.
6c. Activate the workflow.
7. SendQuestionnaireEXTsAndSendEmail
7a. Open Set Properties of send email step.

7b. Check if the From field is filled. If not, fill the field with “IMS US Immigration”. Save and close the form.
8. Assign Owner - CanTracker Cases
8a. Click on the lookup button as shown in the below screenshot.
8b. Fill the field with “Process Team1”.

8c. Activate the workflow.
Documents Storage:
Navigate to CRM -> Settings -> Extensions -> Integration Config Update the below config name values
NOTE : Azure component names appear on document are same but on azure portal component names will end with your CRM Organization Unique Name (for ex:your CRM org name:org12345678 , on the Azure portal component names end with ComponentName12345 like : IMSAppPrintAll12345)
1. App Insights Instrumentation Key
Navigate to Azure Open the Resource “IMSAppStorageAppInsight<xxxxx>” as shown below

Copy the Instrumentation Key and update the Config Value in App Insights Instrumentation Key as shown below
2. Azure Storage Account key
Navigate to Azure Open the Resource “imsappstorageacc<xxxxx>” as shown below Go to Access Keys under Settings, Copy key1 val

Navigate to Settings -> Integrations Config Entity and Update the Key Value in Azure Storage Account key Record “config value” field as shown below
3. Azure Storage Account Name
Navigate to Azure Open the Resource “imsappstorageacc<xxxxx>” as shown below Copy the storage account name as shown in below screenshot
Navigate to Settings -> Integrations Config Entity and Update the Account Name Value in Azure Storage Account Name Record “config value” field as shown below

4. Azure Storage Container
Navigate to Azure Open the Resource “imsappstorageacc<xxxxx>” as shown below Go To Blobs in Blob Service and create the container as below
Provide name[user defined] and click on ok. name [user define] update on azure storage container “config value” on CRM

Copy the Container Name
Navigate to CRM -> settings -> Integrations Entity Update Azure Storage Container Record “config value” field as shown below
5. Forms Service API URL:
Navigate to Azure Open the Resource “imsappforms<xxxxx>” as shown below On overview select the URL as shown in below screenshot, paste it on Forms Service API URL
records “config value” field

After URL, add /api/v1/forms/ for Config Value
ex: https://imsappforms82f09.azurewebsites.net /api/v1/forms/
6) Secured SAS Token
Navigate to imsappstorage<xxxxx> resource and go to shared access signature under settings tab.
Please ensure that start date and end date fields are filled with valid dates and end date is greater than the current date.
Click on Generate SAS and connection string.
Select the SAS token value as shown in below screenshots, paste it on “Secured SAS” field of SAS record in Integrations config in CRM.
If the SAS Key is expired , then Re Generate SAS key in azure and update the above record in crm .

5.2 Azure ConfigurationsNOTE : Azure component names appear on document are same but on azure portal component
names will end with your CRM Organization Unique Name (for ex:your CRM org name:org12345678 , on the Azure portal component names end with ComponentName12345 like : IMSAppPrintAll12345)
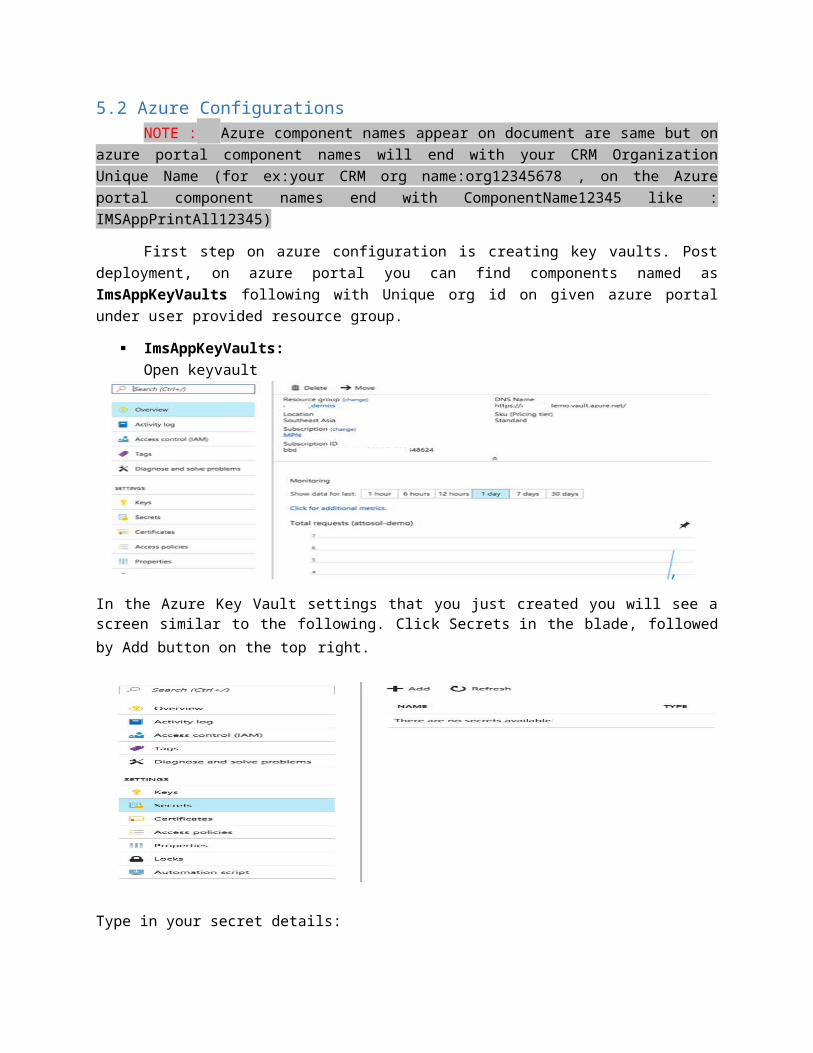
First step on azure configuration is creating key vaults. Post deployment, on azure portal you can find components named as ImsAppKeyVaults following with Unique org id on given azure portal under user provided resource group.
ImsAppKeyVaults: Open keyvault

In the Azure Key Vault settings that you just created you will see a screen similar to the following. Click Secrets in the blade, followed by Add button on the top right.
Type in your secret details:
Secret details name should be as follows(yellow highlighted)
1. Name : BinderAdminUser Value :[provide binder application Run as username] ex:[email protected]. Name : BinderPassword Value :[provide binder application password]3. Name : MIMSCRMOrgUrl Value :[Target CRM instance organization url]
On CRM : Settings Customization Developer Resource
4. Name : PrintAllAdminUser Value :[provide printall application Run as username] ex:[email protected]. Name : PrintAllPassword Value :[provide printall application password]

6. Name : MIMSAppSourceAdmin Value :[provide web job applications Run as username] 7. Name : MIMSAppSourceCRMPwd Value :[provide web job applications password]
On part on Azure Configuration now we are going to configure for IMSAppPrintAll following with Unique org id (web app) and IMSAppBinder following with Unique org id (web app) . Below steps to create/modify.
Managed Service IdentityGoto Settings and select Managed Service Identity.
If is ON , don’t change anything. If it is Off, change it to On and save. (After clicking on save it will take some time, wait till it save.)
Application Settings
For application settings we need to create below parameters:
1) KeyVaultAppClientId : 2) keyvaultclientId3) keyvaultclientsecretId
Azure Portal > Azure Active Directory > App Registrations > New Application Registration

Note down your details. Remember, your client id is same as Application ID.
Click on Settings in the above image and navigate to keys section as shown below
While Generating the key for any app registration Provide some user defined name in the description and select “Never expires” as the duration and save the record. A key will be generated. Take this key as the keyvaultclientsecretId.
4) keyvaulturl Azure portal > ImsAppKeyVaults following with Unique org id > Overview > Take DNS Name
5) SecretUrlUserIdAzure portal > ImsAppKeyVaults following with Unique org id > Overview > Take DNS NameRemove last charecter (/) from url
The above setting configurations are as shown below , after enter the required application settings and save it.

Now Go to Keyvault [ ImsAppKeyVaults<xxxxx> ]--> access policies --> click on add access policy and provide the application on select principal field Select the application and provide the permissions except purge and click on ok.Now save the access policies
Finally, you will see the access policy like below

For Binder and Web Job App Services also we need to follow the same procedure
1) On and save managed service Identity
2) Azure active directory application registration binder/webjob
3) application settings – adding keyvalut url, application and secret ids.
3) Adding application to access policy of keyvault..
CRM Configuration for Printall :
Navigate to Settings integration Configuration search for “PrintAllApplicationURL“
For Config Value : Azure portal > IMSAppPrintAll following with Unique org id > Overview > URL
CRM Configuration for Binder :
Settings integration Configuration search for “PrintBinderURL“
For Config Value : Azure portal > IMSAppBinder following with Unique org id > Overview > URL + /CreateBinderPrint.aspx?ID=
Ex: https://imsappbinder820f9.azurewebsites.net/CreateBinderPrint.aspx?ID=
Form Configurations:
1) For Forms App (IMSAppForms) service need to add below items on app settings:
AIKey : (navigation : IMSAppStorageAppInsight<xxxxx>-- overview – Instrumentation key)a. CloudStorageConnectionString: (navigation : imsappformstrge<xxxxx> – Access keys –
Connectionstring)b. Save the Settings.
Note: Remove text “;EndpointSuffix=core.windows.net” form the CloudStorageConnectionString
Adding Application Settings on App service.
IMP Note: Target CRM instance URL must declare under Forms App (IMSAppForms) ss CORS
CRM side Form Management related configuration :
Settings integration Configuration search for “App Insights Instrumentation Key “
For the “App Insights Instrumentation Key” record we should provide “Config Value”
For Config Value :

Azure portal > IMSAppStorageAppInsight following with Unique org id > Overview > Instrumentation Key
Settings integration Configuration search for “Forms Service API URL“
For the “Forms Service API URL” record we should provide “Config Value”
For Config Value :
Azure portal > IMSAppForms following with Unique org id > overview > URL
After url add /api/v1/forms/ for Confiig Value
ex: https://imsappforms82f09.azurewebsites.net /api/v1/forms/
Update Master Forms Records :
Get all the Master Forms with “FormType” value Equals to “MasterForm” as shown below
To change the URL, follow below steps
1) Take new Master Form and fill all the fields as it is except URL field
2) Save the form (Do Not Click “Save and Close” Button)
Follow the step 1 and 2 for all the Master Forms
Now able to see the URL with forms azure application name as below
Example : “G-28” Master Form

6.TroubleShooting DetailsFollow below steps if any of the required components were not installed appropriately during deployment. Failures may occur if any of the pre-requisites not provided, network disconnections, Azure components take more time than anticipated to deploy on cloud or any other unexpected failures. Follow the below steps to resolve them manually if not completed automatically by Dynamics CRM OOB tool Package Deployer.
6.2 Azure Applications6.2.1 Web Service PlanIf IMSAppServicePlan application is not created in azure as shown below
Create the AppService Plan with name of ‘IMSAppServicePlan’ as shown below

6.2.2 Web Jobs
If IMSAppWebJobs followed by CRM organization unique name application is not created in azure as shown below
Create new webapp as shown below
Go To -> All Resources -> Web -> Web App

Create new application with name as below
IMSAppWebJobs followed by five characters of an organisation unique name as shown below
Example: Organisation unique name is “orgdc536fg”, and then the application name is like
“IMSAppWebJobsdc536” as shown below
Navigate to “IMSAppWebJobs<xxxxx>” -> Webjobs as shown below

Create the below web jobs and upload the folders as shown below. All the web jobs exist in “WebJobs” Folder from GitHub
(https://github.com/microsoftappsource/IMS/tree/master/WebJobs ). They need to be uploaded while creating web jobs.
1. CreateTaskOnDepenedentAgeChang
ON File Upload -> upload the webjob file.. Created the webjob as shown below.

Select the WebJob and Click on Run Button to execute the WebJob.
Repeat the steps for all the below webjobs in the ”WebJobs” Folder
2. ExpireTodayValidToDocuments3. SendDocExpirationNotification4. SLARemainingTime5. UpdateAttorneyInFNandCases6. UpdateSlaFlagonActiveCases

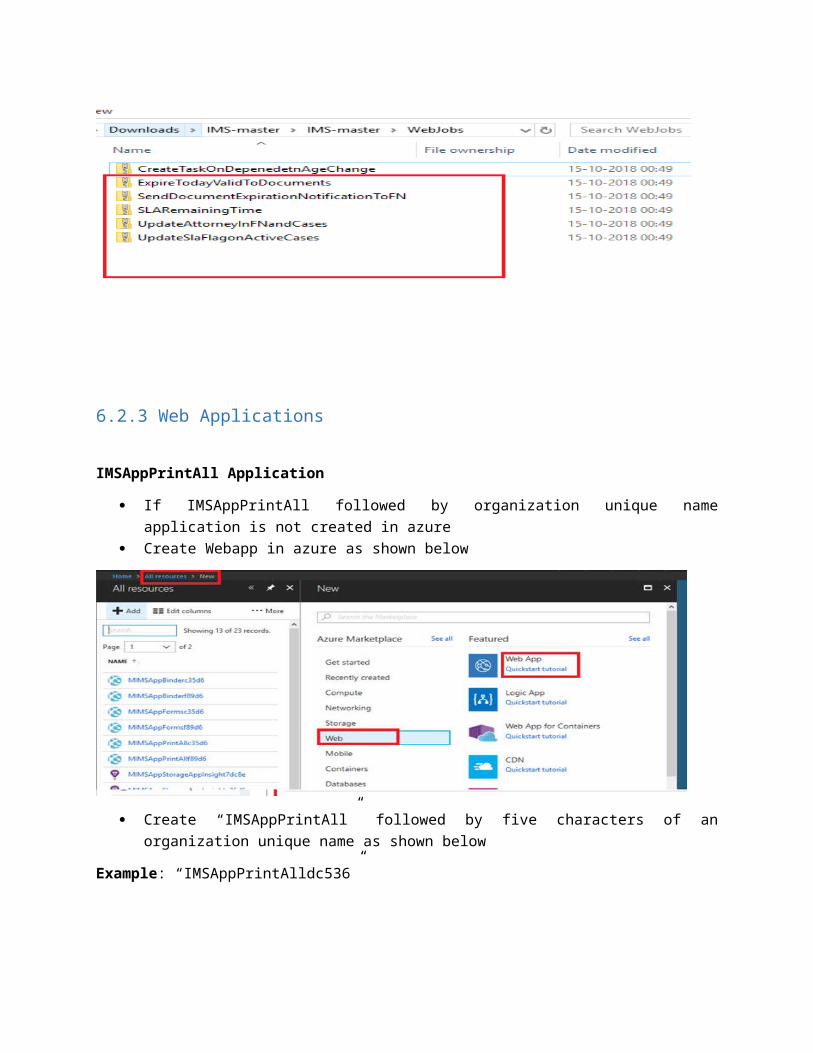
6.2.3 Web Applications
IMSAppPrintAll Application
If IMSAppPrintAll followed by organization unique name application is not created in azure Create Webapp in azure as shown below
Create “IMSAppPrintAll” followed by five characters of an organization unique name as shown below
Example: “IMSAppPrintAlldc536”

Run the below PowerShell command as shown below
$subscriptionId = '' #Azure Subscription ID
$resourceGroupName = '' #Azure Resource Group Name
$IMSAppSourcePrintAll_Path = '' # Print All Application Path from WebApplications folder downloaded from the GitHub (https://github.com/microsoftappsource/IMS ) as shown below image
$IMSAppPrintAll ='' # Print All Application name, Example: 'IMSAppPrintAlldc536'
Add-AzureAccount
Select-AzureSubscription -SubscriptionId $subscriptionId
Publish-AzureWebsiteProject -name $IMSAppPrintAll –package $IMSAppSourcePrintAll_Path
Script has to be executed without getting error in PowerShell
IMSAppBinder Application

If IMSAppBinder followed by organization unique name application is not created in azure Create Webapp in azure as shown below
Create “IMSAppBinder” followed by five characters of an organization unique name as shown
below
Example: “IMSAppBinderdc536”
Run the below PowerShell command as shown below
$subscriptionId = '' #Azure Subscription ID
$resourceGroupName = '' #Azure Resource Group Name

$IMSAppSourceBinder_Path = '' # Binder Application Path from WebApplications folder downloaded from the GitHub (https://github.com/microsoftappsource/IMS ) as shown below imag
$IMSAppBinder ='' # Binder Application name, Example: 'IMSAppBinderdc536'
Add-AzureAccount
Select-AzureSubscription -SubscriptionId $subscriptionId
Publish-AzureWebsiteProject -name $IMSAppBinder –package $IMSAppSourceBinder_Path
Script has to be executed without getting error in PowerShell
IMSAppForms Application
If IMSAppForms followed by organization unique name application is not created in azure Create Webapp in azure as shown below
Create “IMSAppForms” followed by five characters of an organization unique name as shown below
Example: “IMSAppFormsdc536”

Run the below PowerShell command as shown below
$subscriptionId = '' #Azure Subscription ID
$resourceGroupName = '' #Azure Resource Group Name
$IMSAppSourceForms_Path = '' #Forms Application Path from WebApplications folder downloaded from the GitHub (https://github.com/microsoftappsource/IMS ) as shown below image
$IMSAppForms ='' #Forms Application name, Example: 'IMSAppFormsdc536'
Add-AzureAccount
Select-AzureSubscription -SubscriptionId $subscriptionId
Publish-AzureWebsiteProject -name $IMSAppForms –package $IMSAppSourceForms_Path

6.3 FN Portal1. Not able to see the Foreign National Cases as shown below
Resolution:
Navigate to CRM -> Portals -> Web Roles -> Administrators -> Foreign Nationals Add the Foreign National to the administrator role Navigate to CRM -> Portals -> Web Roles -> Administrators -> Entity Permissions Add the "FN - Cases" Entity Permission to the administrator role Repeat all the above steps for the Documents, FAQ, Family and Tasks when you are not able to
see the related entity records
6.4 Questionnaire Portal
1. Not able to create record through portal and getting the permissions issues as shown below

Resolution:
Navigate to CRM -> Portals -> Entity Permissions Open “Birth & Passport Information” Entity Permission record Add the Administrator Web Role to the “Birth & Passport Information” Entity Permission record
7.Uninstalling Immigration AppSource System
Navigate to CRM -> Settings -> Solutions Select the “IMSAppSource” solution and delete the solution
The Solution related entities data will be deleted by the solution.
Note: Portal related records should delete by the user manually.
8. Aspose License SetUp Aspose license adding to application process: Once license purchased we need to add "Aspose.Total.lic" file to the "IMSAppPrintAll" &
"IMSAppBinder" application Publish the application.
To download the file:
1) Go to My Orders and Quotes.
This page lists your order history with Aspose. In the end of column of the grid next to each order is a Review link.
2) Click Review for the order you want to download a license for.
The details for that order are displayed.
3) At the bottom of the page will be a link titled Download License.
4) Click Download License at the bottom of the page.
A dialogue appears to allow you to select where to save the license.
https://purchase.aspose.com/policies/download-license
Once file downloaded unzip "IMSAppPrintAll" & "IMSAppBinder" applications and place the file as shown in below path location.
Product: Aspose. Total for .NET
License file name : Aspose.Total.lic
End of Document