Tenable.io Container Security · Docker). REGISTRY_ USERNAME Yourusernameforauthenticatingtothe...
65
Tenable.io Container Security Last Updated: February 22, 2019
Transcript of Tenable.io Container Security · Docker). REGISTRY_ USERNAME Yourusernameforauthenticatingtothe...

Tenable.io Container Security
Last Updated: February 22, 2019

Table of Contents
Tenable.io Container Security 1
Welcome to Tenable.io Container Security 4
Get Started with Tenable.io Container Security 6
Glossary of Terms 7
Log in to Tenable.io Container Security 9
Navigate Tenable.io Container Security 10
How To 11
Pull a Container Image from the Docker Registry 12
Push a Container Image to Tenable.io Container Security 13
Import Container Images From a Registry 15
Tenable.io Container Security Scanner 17
Tenable.io CS Scanner System Requirements 18
Download the CS Scanner 19
Configure and Run the Tenable.io CS Scanner 21
Configure and Run the Tenable.io CS Scanner Locally 23
Configure and Run the Tenable.io CS Scanner Locally Examples 25
Configure and Run the Tenable.io CS Scanner in Kubernetes 27
Configure and Deploy a Kubernetes Namespace 32
Configure and Deploy Secrets in Kubernetes 34
Manage Image Repositories 36
Manage Policies 38
Add a Policy 39
Copyright © 2019 Tenable, Inc. All rights reserved. Tenable, Tenable.io, Tenable Network Security, Nessus, SecurityCenter, SecurityCenter Continuous View and Log Correlation Engine are registered trade-marks of Tenable, Inc.. Tenable.sc, Lumin, Assure, and the Cyber Exposure Company are trademarks of Tenable, Inc. All other products or services are trademarks of their respective owners.

Edit a Policy 40
Delete a Policy 42
Policy Condition Settings 43
Policy Enforcement Settings 44
View Scan Results for Container Images 45
Integration Guides 47
Bamboo 48
CircleCI 49
Codeship 53
Distelli 54
Drone.io 55
Jenkins 56
Shippable 58
Solano Labs 60
Travis CI 62
Wercker 64
Troubleshooting 65
Copyright © 2019 Tenable, Inc. All rights reserved. Tenable, Tenable.io, Tenable Network Security, Nessus, SecurityCenter, SecurityCenter Continuous View and Log Correlation Engine are registered trade-marks of Tenable, Inc.. Tenable.sc, Lumin, Assure, and the Cyber Exposure Company are trademarks of Tenable, Inc. All other products or services are trademarks of their respective owners.

Welcome to Tenable.io Container Security
Last Updated: February 22, 2019
This user guide describes Tenable.io Container Security. Tenable.io Container Security stores andscans container images as the images are built, before production. It provides vulnerability and mal-ware detection, along with continuous monitoring of container images. By integrating with the con-tinuous integration and continuous deployment (CI/CD) systems that build container images,Tenable.io Container Security ensures every container reaching production is secure and compliantwith enterprise policy.
Tip: If you are new to Tenable.io Container Security, see the workflow to get started.
Other Tenable.io Products
Tenable.io Vulnerability Management
See the User Guide
Tenable.io Vulnerability Management allows security and audit teams to share multiple Nessus scan-ners, scan schedules, scan policies, and scan results with an unlimited set of users or groups.
By making multiple resources available for sharing among users and groups, Tenable.io VulnerabilityManagement provides endless possibilities for creating customized workflows for vulnerability man-agement programs, while accommodating the numerous regulatory or compliance drivers thatdemand you keep your business secure.
Tenable.io Vulnerability Management can schedule scans, push policies, view scan findings, and con-trol multiple Nessus scanners from the cloud. This enables the deployment of Nessus scannersthroughout networks to both public clouds, private clouds, and physical locations.
Tenable.io Web Application Scanning
See the User Guide
Tenable.io Web Application Scanning offers significant improvements over the existing Web Applic-ation Tests policy template provided by the Nessus scanner which is incompatible with modern webapplications that rely on Javascript and are built on HTML5. This leaves you with an incomplete under-standing of your web application security posture.
Tenable.io Web Application Scanning provides comprehensive vulnerability scanning for modern webapplications. Tenable.io Web Application Scanning has accurate vulnerability coverage that minimizes
Copyright © 2019 Tenable, Inc. All rights reserved. Tenable, Tenable.io, Tenable Network Security, Nessus, SecurityCenter, SecurityCenter Continuous View and Log Correlation Engine are registered trade-marks of Tenable, Inc.. Tenable.sc, Lumin, Assure, and the Cyber Exposure Company are trademarks of Tenable, Inc. All other products or services are trademarks of their respective owners.

false positives and false negatives, ensuring that security teams understand the true security risks intheir web applications. The product offers safe external scanning that ensures production web applic-ations are not disrupted or delayed, including those built using HTML5 and AJAX frameworks.
Copyright © 2019 Tenable, Inc. All rights reserved. Tenable, Tenable.io, Tenable Network Security, Nessus, SecurityCenter, SecurityCenter Continuous View and Log Correlation Engine are registered trade-marks of Tenable, Inc.. Tenable.sc, Lumin, Assure, and the Cyber Exposure Company are trademarks of Tenable, Inc. All other products or services are trademarks of their respective owners.

Get Started with Tenable.io Container Security
Complete the following tasks in the order listed to get started with Tenable.io Container Security.
1. Review the container terminology.
2. Activate your account and log in to the web portal.
3. Generate Access and Secret keys for the Tenable.io API.
After you complete the getting started tasks, you can import and scan your container images.
l If you want to import a specific image to Tenable.io Container Security for scanning, pull theimage from your registry, or Docker Hub, and then push it to the Tenable.io Container Securityregistry.
l If you want to import all the images from a registry to Tenable.io Container Security for scanning,Import an image from a registry.
l If you want to scan an image directly from your organization's local registry, or from yourmachine, download and run the Tenable.io Container Security Scanner.
After Tenable.io Container Security scans your container images, you can view the scan results in theTenable.io Container Security dashboard.
Copyright © 2019 Tenable, Inc. All rights reserved. Tenable, Tenable.io, Tenable Network Security, Nessus, SecurityCenter, SecurityCenter Continuous View and Log Correlation Engine are registered trade-marks of Tenable, Inc.. Tenable.sc, Lumin, Assure, and the Cyber Exposure Company are trademarks of Tenable, Inc. All other products or services are trademarks of their respective owners.

Glossary of Terms
Tenable.io Container Security product documentation uses the following terms:
Term Description
CD System A Continuous Deployment system. Typically used to monitor for successful buildsthat have passed tests, and to take those successful builds and push them to pro-duction environments, thus automating the deployment of the successful builds.
CI System A Continuous Integration system. Typically used to monitor source control com-mits, such as merged pull requests in GitHub, to automatically trigger a build (totest) as the change in source control is detected.
CI/CD Sys-tem
A Continuous Integration and Continuous Deployment system. Typically used tomonitor source control commits, such as merged pull requests in GitHub, to auto-matically trigger a build (to test) as the change in source control is detected, andupon successful completion of the build and test phase, to take those successfulbuilds and push them to production environments, thus automating the deploy-ment of the successful build.
Container A running instance of a container image. A container image that has been startedor otherwise executed.
ContainerImage
An application hosted inside of a container image file (for example, ubuntu:14.04).
ContainerImage Tag
A specific release or version of an application hosted inside of a container (forexample, 14.04).
ContainerRegistry
A storage location for Container Images. Provides developers and continuousintegration systems the ability to store containers that are pushed.
ContinuousDeployment
A development practice where operations (or DevOps) automatically push suc-cessfully tested builds to production environments, making them immediatelyavailable.
ContinuousIntegration
A development practice where developers integrate code into a shared source con-trol repository, regularly, as changes are made.
Image An application hosted inside of a container image file (for example, ubuntu:14.04).
Image Tag A specific release or version of an application hosted inside of a container (for
Copyright © 2019 Tenable, Inc. All rights reserved. Tenable, Tenable.io, Tenable Network Security, Nessus, SecurityCenter, SecurityCenter Continuous View and Log Correlation Engine are registered trade-marks of Tenable, Inc.. Tenable.sc, Lumin, Assure, and the Cyber Exposure Company are trademarks of Tenable, Inc. All other products or services are trademarks of their respective owners.

Term Description
example, 14.04).
OrganizationAdmin
The role assigned to the first user registering for Tenable.io Container Security, atthe time the Organization is created. If you have registered without an invitation,you were automatically assigned the role of Organization Admin and a new Organ-ization was created for your account.
Registry A storage location for Container Images. Provides developers and continuousintegration systems the ability to store containers that are pushed.
Repository A storage location or namespace, within the registry, for an image (for example,/org/tenable_io_container_security/approved/).
Tag A specific release or version of an application hosted inside of a container (forexample, 14.04).
User The role assigned to invited users registering for Tenable.io Container Security,for pre-existing Organizations. If you have registered via an invitation, you wereautomatically assigned the role of User and you were added to the same Organ-ization of the user who invited you.
Copyright © 2019 Tenable, Inc. All rights reserved. Tenable, Tenable.io, Tenable Network Security, Nessus, SecurityCenter, SecurityCenter Continuous View and Log Correlation Engine are registered trade-marks of Tenable, Inc.. Tenable.sc, Lumin, Assure, and the Cyber Exposure Company are trademarks of Tenable, Inc. All other products or services are trademarks of their respective owners.

Log in to Tenable.io Container Security
Log in to the Web Console
1. In a browser, access https://cloud.tenable.com.
The Tenable.io login page appears.
2. Type the user name and password that you defined during registration.
3. To remain logged in until you click Log Out or close the browser, select the Remember Mecheck box. Otherwise, you will be logged out after a period of inactivity.
4. Click Log In.
Tenable.io Container Security Dashboard page appears.
-or-
If you have a Tenable.io Vulnerability Management subscription, the Tenable.io Vulnerability Man-agement Dashboards page appears. To access Tenable.io Container Security, in the top nav-igation bar, click Vulnerability Management > Container Security.
Log in Via DockerYou can log in to Tenable.io Container Security using the docker login command:
$ docker login -u $TENABLE_IO_ACCESS_KEY -p $TENABLE_IO_SECRET_KEYregistry.cloud.tenable.comWARNING: login credentials saved in /home/user/.docker/config.jsonLogin Succeeded
Copyright © 2019 Tenable, Inc. All rights reserved. Tenable, Tenable.io, Tenable Network Security, Nessus, SecurityCenter, SecurityCenter Continuous View and Log Correlation Engine are registered trade-marks of Tenable, Inc.. Tenable.sc, Lumin, Assure, and the Cyber Exposure Company are trademarks of Tenable, Inc. All other products or services are trademarks of their respective owners.

Navigate Tenable.io Container Security
The Container Security dashboard acts as landing page for Tenable.io Container Security. This dash-board displays usage and security metrics for the container images hosted in your registry.
Tip: If you are new to Tenable.io Container Security, see the workflow for the steps to perform to pop-ulate the metrics on this page.
From the widgets on the Container Security dashboard, you can access pages with data tables thatcontain details about items in the dashboard.
Note: Tenable.io Container Security uses the new Tenable.io interface. For more information about nav-igating the new interface, see:
l Filter a Table in the New Tenable.io Interface
l Search a Table in the New Tenable.io Interface
l Log Out of the New Tenable.io Interface
Copyright © 2019 Tenable, Inc. All rights reserved. Tenable, Tenable.io, Tenable Network Security, Nessus, SecurityCenter, SecurityCenter Continuous View and Log Correlation Engine are registered trade-marks of Tenable, Inc.. Tenable.sc, Lumin, Assure, and the Cyber Exposure Company are trademarks of Tenable, Inc. All other products or services are trademarks of their respective owners.
How To
This section describes how to perform the following primary functions of Tenable.io Container Secur-ity:
l Pull a Container Image from the Docker Registry
l Push a Container Image to Tenable.io Container Security
l Import Container Images From a Registry
l Tenable.io Container Security Scanner
l Manage Image Repositories
l Manage Policies
l View Scan Results for Container Images
Copyright © 2019 Tenable, Inc. All rights reserved. Tenable, Tenable.io, Tenable Network Security, Nessus, SecurityCenter, SecurityCenter Continuous View and Log Correlation Engine are registered trade-marks of Tenable, Inc.. Tenable.sc, Lumin, Assure, and the Cyber Exposure Company are trademarks of Tenable, Inc. All other products or services are trademarks of their respective owners.

Pull a Container Image from the Docker Registry
Use the docker pull command to download an image from the Docker Hub registry. For moreinformation about pulling images, see theDocker Documentation.
Note: This procedure assumes your docker image is hosted at Docker Hub. If your organization hosts adocker registry, obtain the docker image using a method appropriate for your organization.
Before you begin:
l Activate your Tenable.io Container Security account and log in to the web portal, as described inLog in to Tenable.io Container Security.
l Generate your access and secret keys for the Tenable.io API, as described in Generate an APIKey.
To pull a container image from Docker:
l Download the image from the Docker registry using the image name as it appears in Docker(e.g., rabbitmq).
For example:
$ docker login -u $TENABLE_IO_ACCESS_KEY -p $TENABLE_IO_SECRET_KEYregistry.cloud.tenable.comWARNING: login credentials saved in /home/user/.docker/config.jsonLogin Succeeded$ docker pull registry.cloud.tenable.com/rabbitmq/rabbitmq:latestUsing default tag: latestlatest: Pulling from rabbitmq/rabbitmqDigest: sha256:aa6f181d836ce0e91dfeaf08ca671b4e997926919f141c10b2abd37c2af42fe1Status: Image is up to date forregistry.cloud.tenable.com/rabbitmq/rabbitmq:latest
What to do next:
l Push the image to the Tenable.io Container Security registry, as described in Push a ContainerImage to Tenable.io Container Security.
Copyright © 2019 Tenable, Inc. All rights reserved. Tenable, Tenable.io, Tenable Network Security, Nessus, SecurityCenter, SecurityCenter Continuous View and Log Correlation Engine are registered trade-marks of Tenable, Inc.. Tenable.sc, Lumin, Assure, and the Cyber Exposure Company are trademarks of Tenable, Inc. All other products or services are trademarks of their respective owners.

Push a Container Image to Tenable.io Container Security
Before you begin:
l Generate your access and secret keys for the Tenable.io API, as described in Generate an APIKey.
l Pull the container image from Docker Hub, as described in Pull a Container Image from theDocker Registry.
To push a container image to Tenable.io Container Security:
1. Use the docker login command with your Tenable.io API Access and Secret keys to authen-ticate with Tenable.io Container Security.
For example:
$ sudo docker login -u $TENABLE_IO_ACCESS_KEY -p $TENABLE_IO_SECRET_KEYregistry.cloud.tenable.com
WARNING: login credentials saved in /home/user/.docker/config.jsonLogin Succeeded$
2. Tag the container image for the Tenable.io Container Security registry.
For example:
$ sudo docker tag rabbitmq:latestregistry.cloud.tenable.com/rabbitmq/rabbitmq:latest$
Tip: By default, images are automatically pushed to Docker's central registry. When you tag animage with registry.cloud.tenable.com, you can push the image to the Tenable.io ContainerSecurity registry.
3. Use the docker push command to push the tagged image to Tenable.io Container Security. Forexample:
$ sudo docker push registry.cloud.tenable.com/rabbitmq/rabbitmq:latest
Copyright © 2019 Tenable, Inc. All rights reserved. Tenable, Tenable.io, Tenable Network Security, Nessus, SecurityCenter, SecurityCenter Continuous View and Log Correlation Engine are registered trade-marks of Tenable, Inc.. Tenable.sc, Lumin, Assure, and the Cyber Exposure Company are trademarks of Tenable, Inc. All other products or services are trademarks of their respective owners.

The push refers to a repository [registry.cloud.tenable.com/rabbitmq/rabbitmq](len: 1)de0397c6625e: Pushedf8016aaf3b9f: Pushed83758cb91f4f: Pushedc9d5389102ad: Pusheda5e498845191: Pushed1683aa1aee8b: Pushede1253242cc77: Pushedb102fbc1499f: Pushed36a89f2fe626: Pushedca89d4e16f6d: Pushed3318a6a8de2c: Pushed6dcbaff01d16: Pushed7d39e0a61f2e: Pushed523ef1d23f22: Pushedlatest: digest:abc123:de4f567f891gh2i34jklmn56op789q1r234567891s234t56u7vwx89y1za23bc4 size:35888$
Docker pushes the image to Tenable.io Container Security. Tenable.io Container Security scansthe image for vulnerabilities.
What to do next:
l View the results of your scan, as described in View Scan Results for Container Images.
Copyright © 2019 Tenable, Inc. All rights reserved. Tenable, Tenable.io, Tenable Network Security, Nessus, SecurityCenter, SecurityCenter Continuous View and Log Correlation Engine are registered trade-marks of Tenable, Inc.. Tenable.sc, Lumin, Assure, and the Cyber Exposure Company are trademarks of Tenable, Inc. All other products or services are trademarks of their respective owners.

Import Container Images From a Registry
Connectors act as links to local or third-party registries from which you can import image data intoTenable.io Container Security. To import and analyze container images, you must configure a con-nector to a registry or, in certain cases, to the registry's own connector.
Note: Tenable.io Container Security does not support registry import from Docker Hub.
Before you begin:
l Activate your account and log in to the web portal, as described in Log in to Tenable.io Con-tainer Security.
l Confirm the images you want to import are stored in your organization's container registry.
To configure a connector to a local container registry:1. In the Connectors section of the Container Security dashboard, click Import.
The Select a Connector plane appears.
2. In the Container Security section, click the name of the type of container registry you want touse. Alternatively, type the name of the registry in the search box.
Note: If you want to use a container registry that is not listed, contact Tenable Support to let Ten-able know that you want your container registry to be officially supported. In the meantime,select Docker Registry, a generic placeholder for a variety of container registries.
3. In the URL box, type your registry's URL.
4. In the Port box, type your registry's port ID.
5. In the Username box, type your username.
6. In the Password box, type your password.
7. Select or clear the Requires SSL check box as necessary.
Note: Make sure the account you choose has the necessary permissions to pull the containerimages out of the registry.
8. Click Import.
Copyright © 2019 Tenable, Inc. All rights reserved. Tenable, Tenable.io, Tenable Network Security, Nessus, SecurityCenter, SecurityCenter Continuous View and Log Correlation Engine are registered trade-marks of Tenable, Inc.. Tenable.sc, Lumin, Assure, and the Cyber Exposure Company are trademarks of Tenable, Inc. All other products or services are trademarks of their respective owners.

The container images appear in Tenable.io Container Security with scan results.
To configure a connector to an AWS Elastic Container Registry:These steps assume your container image exists in an Amazon Web Services (AWS) Elastic ContainerRegistry (ECR) deployment hosted within the AWS Elastic Container Service (ECS).
Note: AWS ECR passwords expire every 12 hours. You must refresh your AWS token if more than 12 hourspasses between imports of the same registry.
1. In the Connectors section of the Container Security dashboard, click Import.
The Select a Connector plane appears.
2. In the Data Source box, select AWS Elastic Container Registry.
3. In the URL box, type the fully-qualified domain name of your ECR deployment (e.g.,579133718396.dkr.ecr.us-east-2.amazonaws.com).
4. In the Port box, type 443.
5. In the User Name box, type AWS.
6. In the Password box, type the base64-encoded password used in the docker login command,which is generated by AWS CLI.
Tip: If your ECR is in the us-east-2 region, you can run the aws ecr get-login --region us-east-2 command to get the docker login command.
7. Select the Requires SSL check box.
8. Click Import.
The container images appear in Tenable.io Container Security with scan results.
What to do next:
l View the results of your scan, as described in View Scan Results for Container Images.
Copyright © 2019 Tenable, Inc. All rights reserved. Tenable, Tenable.io, Tenable Network Security, Nessus, SecurityCenter, SecurityCenter Continuous View and Log Correlation Engine are registered trade-marks of Tenable, Inc.. Tenable.sc, Lumin, Assure, and the Cyber Exposure Company are trademarks of Tenable, Inc. All other products or services are trademarks of their respective owners.

Tenable.io Container Security Scanner
The Tenable.io Container Security Scanner (Tenable.io CS Scanner) allows you to securely scan con-tainer images without sending the images outside your organization's network. The Tenable.ioCS Scanner takes an initial inventory, or snapshot, of the image you want to scan and sends the invent-ory to Tenable.io for analysis. You can then view scan data for the image alongside data for imagesimported normally to Tenable.io.
With the Tenable.io CS Scanner, you can scan:
l Images stored in your network's internal registries.
l Images stored locally on the machine where you install the scanner.
You can configure and run the Tenable.io CS Scanner on any machine that meets the system require-ments.
First, download the Tenable.io CS Scanner to your machine. Then, configure and run the Tenable.ioCS Scanner locally or in Kubernetes.
After your scan completes, you can view the scan results in the Tenable.io Container Security dash-board.
Copyright © 2019 Tenable, Inc. All rights reserved. Tenable, Tenable.io, Tenable Network Security, Nessus, SecurityCenter, SecurityCenter Continuous View and Log Correlation Engine are registered trade-marks of Tenable, Inc.. Tenable.sc, Lumin, Assure, and the Cyber Exposure Company are trademarks of Tenable, Inc. All other products or services are trademarks of their respective owners.

Tenable.io CS Scanner System Requirements
The machine where you want to run the CS Scanner must meet the following requirements:
Local Deploy
Software Requirements RAM Temporary Storage CPU
Able to run Linux containers (e.g., Docker) 2 GB 15 GB Not required
Kubernetes Deploy
Software Requirements RAM Temporary Storage CPU
Able to run Linux containers (e.g., Docker) 2 GiB 15 GB 1.5 GHz
Caution: If you use the CS Scanner in Kubernetes and your organization requires Certificate Authority(CA) authentication, the registry you want to import images from must have an SSL certificate signed bya trusted Certificate Authority. Refer to your registry's documentation for adding an SSL certificate.
Copyright © 2019 Tenable, Inc. All rights reserved. Tenable, Tenable.io, Tenable Network Security, Nessus, SecurityCenter, SecurityCenter Continuous View and Log Correlation Engine are registered trade-marks of Tenable, Inc.. Tenable.sc, Lumin, Assure, and the Cyber Exposure Company are trademarks of Tenable, Inc. All other products or services are trademarks of their respective owners.

Download the CS Scanner
Download the Tenable.io CS Scanner Docker image to the machine where you want to configure andrun the Tenable.io CS Scanner.
Before you begin:
l Confirm your machine meets the system requirements, as described in CS Scanner SystemRequirements.
To download the CS Scanner:
1. In the Connectors section of the Container Security dashboard, click Import.
The Select a Connector plane appears.
2. Under CONTAINER SECURITY, click CS Scanner.
The CS Scanner plane appears with login credentials.
3. Copy or take a screenshot of the credentials to use later in the download process.
4. In the command line interface (CLI) on the machine where you want to download the Tenable.ioCS Scanner, type:
docker login tenableio-docker-consec-local.jfrog.io
5. Press Enter.
The CLI prompts you to provide a username and password.
6. Update the fields using the credentials provided on the CS Scanner plane.
7. Press Enter.
You are logged in to the CS Scanner.
8. Type the following to pull the latest version of the CS Scanner image:
docker pull tenableio-docker-consec-local.jfrog.io/cs-scanner:latest
9. Press Enter.
Copyright © 2019 Tenable, Inc. All rights reserved. Tenable, Tenable.io, Tenable Network Security, Nessus, SecurityCenter, SecurityCenter Continuous View and Log Correlation Engine are registered trade-marks of Tenable, Inc.. Tenable.sc, Lumin, Assure, and the Cyber Exposure Company are trademarks of Tenable, Inc. All other products or services are trademarks of their respective owners.

What to do next:
l Configure and run the Tenable.io CS Scanner, as described in Configure and Run the CS Scan-ner.
Copyright © 2019 Tenable, Inc. All rights reserved. Tenable, Tenable.io, Tenable Network Security, Nessus, SecurityCenter, SecurityCenter Continuous View and Log Correlation Engine are registered trade-marks of Tenable, Inc.. Tenable.sc, Lumin, Assure, and the Cyber Exposure Company are trademarks of Tenable, Inc. All other products or services are trademarks of their respective owners.

Configure and Run the Tenable.io CS Scanner
To scan images using the Tenable.io CS Scanner, you must use the CLI to configure the environmentvariables and deploy the scanner. The steps to configure and run the Tenable.io CS Scanner differdepending on how you want to deploy it.
l If you want to deploy the Tenable.io CS Scanner locally, see Configure and Run the CS ScannerLocally.
l If you want to deploy the Tenable.io CS Scanner in Kubernetes, see Configure and Run the CSScanner in Kubernetes.
You can configure and run the Tenable.io CS Scanner as many times as necessary, using any com-bination of registries and registry sources.
Environment Parameters
Parameter Description TypeRequired Con-figuration?
TENABLE_ACCESS_KEY
Your Tenable.io API access key. String Yes.
TENABLE_SECRET_KEY
Your Tenable.io API secret key. String Yes.
IMPORT_REPO_NAME
The name of the Tenable.io CS Scannerrepository where you want to import theimage. This name cannot contain spaces.
String Yes.
REGISTRY_URI
The URI of the registry from which you wantto import the image.
String Yes, if you are pullingimages from an intern-ally-hosted registry (e.g.,Docker).
REGISTRY_USERNAME
Your username for authenticating to theregistry from which you want to import theimage.
String Yes, if you want toauthenticate to theregistry.
Copyright © 2019 Tenable, Inc. All rights reserved. Tenable, Tenable.io, Tenable Network Security, Nessus, SecurityCenter, SecurityCenter Continuous View and Log Correlation Engine are registered trade-marks of Tenable, Inc.. Tenable.sc, Lumin, Assure, and the Cyber Exposure Company are trademarks of Tenable, Inc. All other products or services are trademarks of their respective owners.

REGISTRY_PASSWORD
Your password for authenticating to theregistry from which you want to import theimage.
String Yes, if you wantto authen-ticate to the registry.
IMPORT_INTERVAL_MINUTES
The frequency, in minutes, you want theTenable.io CS Scanner to import the imagefrom the selected registry.
Integer Yes, if you want the scanto run repeatedly at setintervals.
Copyright © 2019 Tenable, Inc. All rights reserved. Tenable, Tenable.io, Tenable Network Security, Nessus, SecurityCenter, SecurityCenter Continuous View and Log Correlation Engine are registered trade-marks of Tenable, Inc.. Tenable.sc, Lumin, Assure, and the Cyber Exposure Company are trademarks of Tenable, Inc. All other products or services are trademarks of their respective owners.
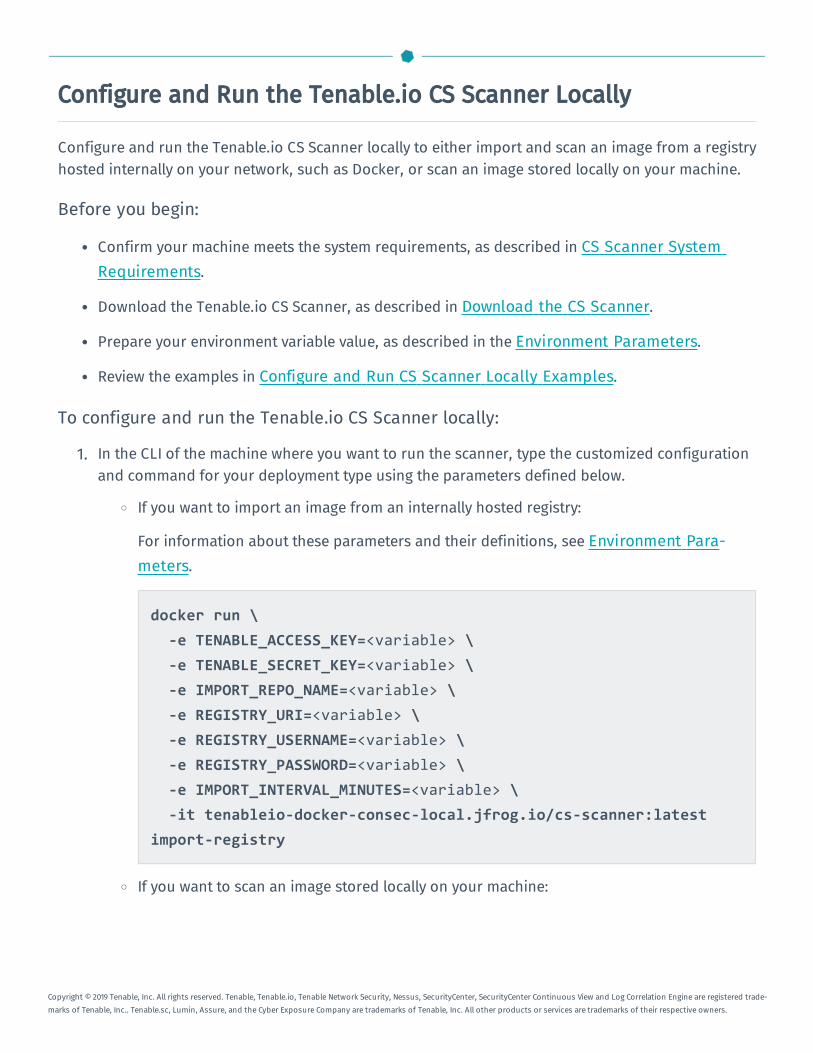
Configure and Run the Tenable.io CS Scanner Locally
Configure and run the Tenable.io CS Scanner locally to either import and scan an image from a registryhosted internally on your network, such as Docker, or scan an image stored locally on your machine.
Before you begin:
l Confirm your machine meets the system requirements, as described in CS Scanner SystemRequirements.
l Download the Tenable.io CS Scanner, as described in Download the CS Scanner.
l Prepare your environment variable value, as described in the Environment Parameters.
l Review the examples in Configure and Run CS Scanner Locally Examples.
To configure and run the Tenable.io CS Scanner locally:
1. In the CLI of the machine where you want to run the scanner, type the customized configurationand command for your deployment type using the parameters defined below.
o If you want to import an image from an internally hosted registry:
For information about these parameters and their definitions, see Environment Para-meters.
docker run \-e TENABLE_ACCESS_KEY=<variable> \-e TENABLE_SECRET_KEY=<variable> \-e IMPORT_REPO_NAME=<variable> \-e REGISTRY_URI=<variable> \-e REGISTRY_USERNAME=<variable> \-e REGISTRY_PASSWORD=<variable> \-e IMPORT_INTERVAL_MINUTES=<variable> \-it tenableio-docker-consec-local.jfrog.io/cs-scanner:latest
import-registry
o If you want to scan an image stored locally on your machine:
Copyright © 2019 Tenable, Inc. All rights reserved. Tenable, Tenable.io, Tenable Network Security, Nessus, SecurityCenter, SecurityCenter Continuous View and Log Correlation Engine are registered trade-marks of Tenable, Inc.. Tenable.sc, Lumin, Assure, and the Cyber Exposure Company are trademarks of Tenable, Inc. All other products or services are trademarks of their respective owners.

For information about these parameters and their definitions, see Environment Para-meters.
docker save <Image name or ID> | docker run \-e TENABLE_ACCESS_KEY=<variable> \-e TENABLE_SECRET_KEY=<variable> \-e IMPORT_REPO_NAME=<variable> \-i tenableio-docker-consec-local.jfrog.io/cs-scanner:latest
inspect-image <Image name as you want it to appear in Tenable.io>
2. Press Enter.
The Tenable.io CS Scanner scans the images.
What to do next:
l View the results of your scan, as described in View Scan Results for Container Images.
Copyright © 2019 Tenable, Inc. All rights reserved. Tenable, Tenable.io, Tenable Network Security, Nessus, SecurityCenter, SecurityCenter Continuous View and Log Correlation Engine are registered trade-marks of Tenable, Inc.. Tenable.sc, Lumin, Assure, and the Cyber Exposure Company are trademarks of Tenable, Inc. All other products or services are trademarks of their respective owners.

Configure and Run the Tenable.io CS Scanner Locally Examples
When you use the Tenable.io CS Scanner to scan images locally, your configuration varies dependingon several factors, including the image location (imported from an internally hosted registry orscanned locally from your macine), whether authentication is required, and whether you want torepeat the import or scan at set intervals.
Internal Registry Import Configuration When Authentication isRequiredThe following example configures a recurring import that requires a username and password andrepeats every three hours.
docker run \ -e TENABLE_ACCESS_KEY=ab123c4d5678912e3f456g78h912ijk34l5m6nopqr7s89t12u34567vw89x1yz2 \
-e TENABLE_SECRET_KEY=12a345b6c78d9ef12g3h4i5j67891234kl567m891234no56789p12345qr67stu \
-e IMPORT_REPO_NAME=production-registry-artifactory \-e REGISTRY_URI=https://registry.mycompany.com \-e REGISTRY_USERNAME=build \-e REGISTRY_PASSWORD=Password123 \-e IMPORT_INTERVAL_MINUTES=180 -it tenableio-docker-consec-
local.jfrog.io/cs-scanner:latest import-registry
Internal Registry Import Configuration When No Authentication isRequiredThe following example configures a single import that does not repeat and does not require a user-name or password.
docker run \-e TENABLE_ACCESS_
KEY=ab123c4d5678912e3f456g78h912ijk34l5m6nopqr7s89t12u34567vw89x1yz2 \-e TENABLE_SECRET_
Copyright © 2019 Tenable, Inc. All rights reserved. Tenable, Tenable.io, Tenable Network Security, Nessus, SecurityCenter, SecurityCenter Continuous View and Log Correlation Engine are registered trade-marks of Tenable, Inc.. Tenable.sc, Lumin, Assure, and the Cyber Exposure Company are trademarks of Tenable, Inc. All other products or services are trademarks of their respective owners.

KEY=12a345b6c78d9ef12g3h4i5j67891234kl567m891234no56789p12345qr67stu \-e IMPORT_REPO_NAME=production-registry-artifactory \-e REGISTRY_URI=https://registry.mycompany.com \ -it tenableio-docker-
consec-local.jfrog.io/cs-scanner:latest import-registry
Configuration for Scanning an Image Stored Locally on Your MachineThe following example configures a single scan that does not repeat for an image stored locally on themachine where you downloaded the scanner.
Note: You do not need to include a registry URI, username, or password for scans of images stored onyour machine.
docker save Image1234 | docker run \-e TENABLE_ACCESS_
KEY=ab123c4d5678912e3f456g78h912ijk34l5m6nopqr7s89t12u34567vw89x1yz2; \-e TENABLE_SECRET_
KEY=12a345b6c78d9ef12g3h4i5j67891234kl567m891234no56789p12345qr67stu \-e IMPORT_REPO_NAME=production-registry-artifactory \-i tenableio-docker-consec-local.jfrog.io/cs-scanner:latest inspect-
image Image_Jan0119
Copyright © 2019 Tenable, Inc. All rights reserved. Tenable, Tenable.io, Tenable Network Security, Nessus, SecurityCenter, SecurityCenter Continuous View and Log Correlation Engine are registered trade-marks of Tenable, Inc.. Tenable.sc, Lumin, Assure, and the Cyber Exposure Company are trademarks of Tenable, Inc. All other products or services are trademarks of their respective owners.

Configure and Run the Tenable.io CS Scanner in Kubernetes
To scan images with the Tenable.io CS Scanner in Kubernetes, create a Kubernetes deployment fileand deploy the file via the CLI on the machine where you want to run the scan.
Before you begin:
l Confirm your machine meets the system requirements, as described in CS Scanner SystemRequirements.
l Download the Tenable.io CS Scanner, as described in Download the CS Scanner.
l Configure and deploy your Kubernetes namespace, as described in Configure and DeployKubernetes Namespace.
l Configure and deploy your secrets in Kubernetes, as described in Configure and DeploySecrets in Kubernetes.
To configure and run the Tenable.io CS Scanner in Kubernetes:
1. In a text editor, open a new file.
2. Save the file as tiocsscanner-deployment.yaml.
3. Copy and paste the following text into the file, typing your specific variables where applicable:
For information about these variables and their definitions, see Environment Parameters.
apiVersion: v1kind: Servicemetadata:
name: tiocsscannernamespace: tiocsscannerlabels:
app: tiocsscannerspec:
selector:app: tiocsscanner
Copyright © 2019 Tenable, Inc. All rights reserved. Tenable, Tenable.io, Tenable Network Security, Nessus, SecurityCenter, SecurityCenter Continuous View and Log Correlation Engine are registered trade-marks of Tenable, Inc.. Tenable.sc, Lumin, Assure, and the Cyber Exposure Company are trademarks of Tenable, Inc. All other products or services are trademarks of their respective owners.

type: ClusterIPports:- name: http
protocol: TCPport: 5000
---apiVersion: extensions/v1beta1kind: Deploymentmetadata:
labels:app: tiocsscanner
name: tiocsscannernamespace: tiocsscanner
spec:minReadySeconds: 10replicas: 1selector:
matchLabels:app: tiocsscanner
strategy:rollingUpdate:
maxSurge: 1maxUnavailable: 1
type: RollingUpdatetemplate:
metadata:labels:
app: tiocsscannerspec:
containers:- image: "tenableio-docker-consec-local.jfrog.io/cs-
Copyright © 2019 Tenable, Inc. All rights reserved. Tenable, Tenable.io, Tenable Network Security, Nessus, SecurityCenter, SecurityCenter Continuous View and Log Correlation Engine are registered trade-marks of Tenable, Inc.. Tenable.sc, Lumin, Assure, and the Cyber Exposure Company are trademarks of Tenable, Inc. All other products or services are trademarks of their respective owners.

scanner:latest"name: tiocsscannerresources:
limits:cpu: "3"
requests:cpu: "1.5"memory: "2Gi"
args:- import-registry
env:- name: TENABLE_ACCESS_KEY
valueFrom:secretKeyRef:
name: tiokey: username
- name: TENABLE_SECRET_KEYvalueFrom:
secretKeyRef:name: tiokey: password
- name: REGISTRY_USERNAMEvalueFrom:
secretKeyRef:name: private-registrykey: username
- name: REGISTRY_PASSWORDvalueFrom:
secretKeyRef:name: private-registrykey: password
Copyright © 2019 Tenable, Inc. All rights reserved. Tenable, Tenable.io, Tenable Network Security, Nessus, SecurityCenter, SecurityCenter Continuous View and Log Correlation Engine are registered trade-marks of Tenable, Inc.. Tenable.sc, Lumin, Assure, and the Cyber Exposure Company are trademarks of Tenable, Inc. All other products or services are trademarks of their respective owners.

- name: REGISTRY_NAMEvalue: "<variable>"
- name: REGISTRY_URIvalue: "<variable>"
- name: IMPORT_INTERVAL_MINUTESvalue: "<variable>"
Note: If you are not pulling the image directly from the repository where it is hosted, append thefollowing command to the end of the file, starting on a new line after the last variable:
imagePullSecrets-name: jfrog-tio
4. Save and close the file.
5. In the CLI on the machine where you want to run the scan, type the following to deploy the file:
kubectl apply -f tiocsscanner-deployment.yaml
Note: The above command works only if the file is saved to the current working directory. If thefile is saved somewhere other than the working directory, include the full path directory in thecommand. For example:
/home/jsmith/images/tiocsscanner-namespace.yaml
6. Press Enter.
The Tenable.io CS Scanner runs on Kubernetes.
7. Run the following command to confirm the scan ran successfully:
kubectl get pods --namespace=tiocsscanner
The scan status log appears.
Note: If you receive error messages in the scan data, follow the error prompts to correct theissue.
What to do next:
Copyright © 2019 Tenable, Inc. All rights reserved. Tenable, Tenable.io, Tenable Network Security, Nessus, SecurityCenter, SecurityCenter Continuous View and Log Correlation Engine are registered trade-marks of Tenable, Inc.. Tenable.sc, Lumin, Assure, and the Cyber Exposure Company are trademarks of Tenable, Inc. All other products or services are trademarks of their respective owners.

l View the results of your scan, as described in View Scan Results for Container Images.
Copyright © 2019 Tenable, Inc. All rights reserved. Tenable, Tenable.io, Tenable Network Security, Nessus, SecurityCenter, SecurityCenter Continuous View and Log Correlation Engine are registered trade-marks of Tenable, Inc.. Tenable.sc, Lumin, Assure, and the Cyber Exposure Company are trademarks of Tenable, Inc. All other products or services are trademarks of their respective owners.

Configure and Deploy a Kubernetes Namespace
Configure and deploy a namespace (a virtual data cluster that represents your stored data objects) forthe Tenable.io CS Scanner on the machine where you have the scanner installed.
For more information about namepaces in Kubernetes, see https://kuber-netes.io/docs/concepts/overview/working-with-objects/namespaces/.
Before you begin:
l Confirm your machine meets the system requirements, as described in CS Scanner SystemRequirements.
l Download the Tenable.io CS Scanner, as described in Download the CS Scanner.
To configure and deploy a namespace in Kubernetes:
1. In a text editor, open a new file.
2. Save the file as tiocsscanner-namespace.yaml.
3. Copy and paste the following text into the file:
apiVersion: v1kind: Namespacemetadata:
name: tiocsscannerlabels:
name: tiocsscanner
4. Save and close the file.
5. In the CLI on the machine where you want to run the Tenable.io CS Scanner, type the followingto deploy the file to Kubernetes:
kubectl apply -f tiocsscanner-namespace.yaml
Note: The above command works only if the file is saved to the current working directory. If thefile is saved somewhere other than the working directory, include the full path directory in the
Copyright © 2019 Tenable, Inc. All rights reserved. Tenable, Tenable.io, Tenable Network Security, Nessus, SecurityCenter, SecurityCenter Continuous View and Log Correlation Engine are registered trade-marks of Tenable, Inc.. Tenable.sc, Lumin, Assure, and the Cyber Exposure Company are trademarks of Tenable, Inc. All other products or services are trademarks of their respective owners.

command. For example:
/home/jsmith/images/tiocsscanner-namespace.yaml
6. Press Enter.
The namespace is deployed to Kubernetes.
What to do next:
l Configure and deploy your secrets in Kubernetes, as described in Configure and DeploySecrets in Kubernetes.
l Configure and run the Tenable.io CS Scanner in Kubernetes, as described in Configure and Runthe CS Scanner in Kubernetes.
Copyright © 2019 Tenable, Inc. All rights reserved. Tenable, Tenable.io, Tenable Network Security, Nessus, SecurityCenter, SecurityCenter Continuous View and Log Correlation Engine are registered trade-marks of Tenable, Inc.. Tenable.sc, Lumin, Assure, and the Cyber Exposure Company are trademarks of Tenable, Inc. All other products or services are trademarks of their respective owners.

Configure and Deploy Secrets in Kubernetes
Configure your secrets (data objects that contain sensitive information) and deploy them to theregistry where the image you want to scan is stored to enable the Tenable.io CS Scanner to authen-ticate and securely configure and run an import in Kubernetes.
For more information about secrets in Kubernetes, see https://kuber-netes.io/docs/concepts/configuration/secret/.
Before you begin:
l Configure and deploy your Kubernetes namespace, as described in Configure and DeployKubernetes Namespace.
To configure and deploy secrets in Kubernetes:
1. In the CLI, copy and paste the following text to configure the Tenable.io secret key, typing yourspecific variables where applicable:
kubectl create secret generic tio--from-literal=username='<Your Tenable.io access key>'--from-literal=password='<Your Tenable.io access key>'--namespace=tiocsscanner
2. Copy and paste the following to configure the private registry username and password secrets,typing the variables for the private registry where the image you want to scan is stored whereapplicable:
kubectl create secret generic private_registry--from-literal=username='<Your private registry username>'--from-literal=password='<Your registry password>'--namespace=tiocsscanner
3. Copy and paste the following text to pull the image to be scanned from the registry, typing yourspecific variables where applicable:
Copyright © 2019 Tenable, Inc. All rights reserved. Tenable, Tenable.io, Tenable Network Security, Nessus, SecurityCenter, SecurityCenter Continuous View and Log Correlation Engine are registered trade-marks of Tenable, Inc.. Tenable.sc, Lumin, Assure, and the Cyber Exposure Company are trademarks of Tenable, Inc. All other products or services are trademarks of their respective owners.

kubectl create secret docker-registry jfrog-tio--docker-server=https://tenableio-docker-consec-local.jfrog.io--docker-username=<Your username from the Tenable.io ContainerSecurity console>--docker-password=<Your password from the Tenable.io ContainerSecurity console>--docker-email=<Your email address>--namespace=tiocsscanner
4. Press Enter.
Your secrets are configured and deployed to the private registry where the image you want toimport and scan is stored.
What to do next:
l Configure and run the Tenable.io CS Scanner in Kubernetes, as described in Configure and Runthe CS Scanner in Kubernetes.
Copyright © 2019 Tenable, Inc. All rights reserved. Tenable, Tenable.io, Tenable Network Security, Nessus, SecurityCenter, SecurityCenter Continuous View and Log Correlation Engine are registered trade-marks of Tenable, Inc.. Tenable.sc, Lumin, Assure, and the Cyber Exposure Company are trademarks of Tenable, Inc. All other products or services are trademarks of their respective owners.

Manage Image Repositories
You automatically create an image repository when you push an image to the registry.
To manage image repositories in Tenable.io Container Security:
1. In the Statistics section of the Container Security dashboard, click the Repositories widget.
The Repositories page appears, displaying an overview description of the repository.
2. In the repositories table, you can:
l Search the table.a. In the text box, type your search term or terms.
b. Click the button.
Tenable.io filters the table by your search criteria.
Tip: In the top navigation bar, click a link in the breadcrumb trail to return to a pre-vious page.
l View details for an image in the repository.a. In the repositories table, click the row of the repository that contains the image you
want to view.
The Repository Details page appears with an overview description of the repos-itory. On the Repository Details page, the Container Images table appears, listingeach image stored in the repository.
b. In the Container Images table, click an image row to view additional details.
The Tags page appears.
c. In the Container Tag table, click a row to expand the Activity Log details plane forthat tag.
Tip: In the top navigation bar, click a link in the breadcrumb trail to return to a pre-vious page.
l Delete an image repository.
Copyright © 2019 Tenable, Inc. All rights reserved. Tenable, Tenable.io, Tenable Network Security, Nessus, SecurityCenter, SecurityCenter Continuous View and Log Correlation Engine are registered trade-marks of Tenable, Inc.. Tenable.sc, Lumin, Assure, and the Cyber Exposure Company are trademarks of Tenable, Inc. All other products or services are trademarks of their respective owners.

a. In the repositories table, click the row of the repository you want to delete.
The Repository Details page appears.
b. In the details section next to Action, click the button.
A confirmation window appears.
c. Click Delete to confirm.
Tip: In the top navigation bar, click a link in the breadcrumb trail to return to a pre-vious page.
Copyright © 2019 Tenable, Inc. All rights reserved. Tenable, Tenable.io, Tenable Network Security, Nessus, SecurityCenter, SecurityCenter Continuous View and Log Correlation Engine are registered trade-marks of Tenable, Inc.. Tenable.sc, Lumin, Assure, and the Cyber Exposure Company are trademarks of Tenable, Inc. All other products or services are trademarks of their respective owners.

Manage Policies
To manage policies in Tenable.io Container Security:
1. In the Statistics section of the Container Security dashboard, click the Policies widget.
The Policies page appears. This page contains a table that lists the policies Tenable.io ContainerSecurity uses to evaluate container images.
The table lists the policies in order of priority, as determined by Tenable.io Container Security.
2. In the policies table, you can:
l Add a policy.
l Edit an existing policy.
l Delete a policy.
Copyright © 2019 Tenable, Inc. All rights reserved. Tenable, Tenable.io, Tenable Network Security, Nessus, SecurityCenter, SecurityCenter Continuous View and Log Correlation Engine are registered trade-marks of Tenable, Inc.. Tenable.sc, Lumin, Assure, and the Cyber Exposure Company are trademarks of Tenable, Inc. All other products or services are trademarks of their respective owners.

Add a Policy
To add a policy in Tenable.io Container Security:
1. In the Statistics section of the Container Security dashboard, click the Policies widget.
The Policies page appears. This page contains a table that lists the policies Tenable.io ContainerSecurity uses to evaluate container images.
The table lists the policies in order of priority, as determined by Tenable.io Container Security.
2. Next to the Policies heading, click the button.
The add policy plane appears.
3. In the text box, type a meaningful name for the policy.
4. In the Repositories section, select the repositories where Tenable.io Container Security appliesthe policy:
l To apply the policy to all repositories, select All Repositories.
l To apply the policy to one repository:
a. Select Specific Repository.
b. In the drop-down box, type the name of the repository where you want to apply thepolicy.
c. Select the repository.
5. In the Conditions section, set the condition that triggers the policy.
6. In the Enforcement Action section, select a policy enforcement setting.
7. Click Create Policy.
The new policy appears at the top of policy list on the Policies page.
Note: By default, the system assigns the policy the highest priority (1). If you want to modify thepriority setting, edit the policy.
Tip: In the top navigation bar, click a link in the breadcrumb trail to return to a previous page.
Copyright © 2019 Tenable, Inc. All rights reserved. Tenable, Tenable.io, Tenable Network Security, Nessus, SecurityCenter, SecurityCenter Continuous View and Log Correlation Engine are registered trade-marks of Tenable, Inc.. Tenable.sc, Lumin, Assure, and the Cyber Exposure Company are trademarks of Tenable, Inc. All other products or services are trademarks of their respective owners.

Edit a Policy
To edit a policy in Tenable.io Container Security:
1. In the Statistics section of the Container Security dashboard, click the Policies widget.
The Policies page appears. This page contains a table that lists the policies Tenable.io ContainerSecurity uses to evaluate container images.
The table lists the policies in order of priority, as determined by Tenable.io Container Security.
2. In the policies table, click a policy row.
The edit policy plane appears.
3. Edit the policy name.
4. In the Priority box, type a number representing the priority for the policy.
Tenable.io Container Security evaluates container images against policies in the priority orderyou specify.
If you type a priority number that is already associated to another policy, the system accepts thenew priority number and lowers the priority numbers for all policies below it.
5. In the Repositories section, select the repositories where Tenable.io Container Security appliesthe policy:
l To apply the policy to all repositories, select All Repositories.
l To apply the policy to one repository:
a. Select Specific Repository.
b. In the drop-down box, type the name of the repository where you want to apply thepolicy.
c. Select the repository.
6. In the Conditions section, set the condition that triggers the policy.
7. In the Enforcement Action section, select a policy enforcement setting.
8. Click Save.
Tenable.io Container Security saves your changes and displays the updated information on the
Copyright © 2019 Tenable, Inc. All rights reserved. Tenable, Tenable.io, Tenable Network Security, Nessus, SecurityCenter, SecurityCenter Continuous View and Log Correlation Engine are registered trade-marks of Tenable, Inc.. Tenable.sc, Lumin, Assure, and the Cyber Exposure Company are trademarks of Tenable, Inc. All other products or services are trademarks of their respective owners.

Policies page.
Tip: In the top navigation bar, click a link in the breadcrumb trail to return to a previous page.
Copyright © 2019 Tenable, Inc. All rights reserved. Tenable, Tenable.io, Tenable Network Security, Nessus, SecurityCenter, SecurityCenter Continuous View and Log Correlation Engine are registered trade-marks of Tenable, Inc.. Tenable.sc, Lumin, Assure, and the Cyber Exposure Company are trademarks of Tenable, Inc. All other products or services are trademarks of their respective owners.

Delete a Policy
To delete a policy in the policies table:1. In the Statistics section of the Container Security dashboard, click the Policies widget.
The Policies page appears. This page contains a table that lists the policies Tenable.io ContainerSecurity uses to evaluate container images.
The table lists the policies in order of priority, as determined by Tenable.io Container Security.
2. In the policies table, click the button next to the policy you want to delete.
Tip: Roll over the policy row to reveal the button for that policy.
3. Click Delete to confirm the deletion.
To delete a policy while viewing the policy configuration:1. In the Statistics section of the Container Security dashboard, click the Policies widget.
The Policies page appears. This page contains a table that lists the policies Tenable.io ContainerSecurity uses to evaluate container images.
The table lists the policies in order of priority, as determined by Tenable.io Container Security.
2. In the policies table, click the row of the policy you want to delete.
The Edit Policy plane appears.
3. In the Actions section, click the button.
4. Click Delete to confirm the deletion.
Tip: In the top navigation bar, click a link in the breadcrumb trail to return to a previous page.
Copyright © 2019 Tenable, Inc. All rights reserved. Tenable, Tenable.io, Tenable Network Security, Nessus, SecurityCenter, SecurityCenter Continuous View and Log Correlation Engine are registered trade-marks of Tenable, Inc.. Tenable.sc, Lumin, Assure, and the Cyber Exposure Company are trademarks of Tenable, Inc. All other products or services are trademarks of their respective owners.

Policy Condition Settings
You can set one of the following conditions to trigger a policy in Tenable.io Container Security:
Option Description
CVSS To set the maximum CVSS value that triggers the policy:
1. Click Max CVSS Value.
2. Select an operator from the drop-down box.
3. Type the CVSS trigger value.
CVE To set a CVE or CVEs that trigger the policy:
1. Click CVE.
2. In the text box, type one or more CVE values (separated by commas).
Malware To set the policy to trigger on malware:
1. Click Malware.
2. Select True in the drop-down box.
Copyright © 2019 Tenable, Inc. All rights reserved. Tenable, Tenable.io, Tenable Network Security, Nessus, SecurityCenter, SecurityCenter Continuous View and Log Correlation Engine are registered trade-marks of Tenable, Inc.. Tenable.sc, Lumin, Assure, and the Cyber Exposure Company are trademarks of Tenable, Inc. All other products or services are trademarks of their respective owners.

Policy Enforcement Settings
You can select one of the following enforcement actions for a policy in Tenable.io Container Security:
Option Description
Set Com-pliance Statusto False
Use this action if you want to query Tenable.io Container Security for the policycompliance status of scanned container images.
If a scan of a container image identifies the condition specified in the policy, anyAPI queries for the policy compliance status of the container image receive afalse response (security test failed). For more information, see the description ofthe /policycompliance endpoint in the Tenable.io Container Security APIguide.
This action is useful if you integrate Tenable.io Container Security with yourCI/CD pipeline. For example, you can configure Jenkins to mark a build unstableif a container receives a failed compliance status from Tenable.io ContainerSecurity.
Prevent/Block"docker pull"
Use this action if you want to block pulls from the Tenable.io Container Securityregistry of any container image where a scan has identified the condition spe-cified in the policy. For more information, see Pull from the Registry.
Copyright © 2019 Tenable, Inc. All rights reserved. Tenable, Tenable.io, Tenable Network Security, Nessus, SecurityCenter, SecurityCenter Continuous View and Log Correlation Engine are registered trade-marks of Tenable, Inc.. Tenable.sc, Lumin, Assure, and the Cyber Exposure Company are trademarks of Tenable, Inc. All other products or services are trademarks of their respective owners.

View Scan Results for Container Images
After Tenable.io Container Security scans your container images, you can view the detailed scan resultson the Tenable.io Container Security dashboard.
Before you begin:
l Scan your container images using one or more of the following processes:
l Pull an individual image from your repository and then push the image to Tenable.io Con-tainer Security, as described in Pull a Container Image from the Docker Registry andPush a Container Image to Tenable.io Container Security.
l Import container images stored in your organization's local registry, as described inImport an Image from the Registry.
l Scan your images directly from your organization's local registry or your machine using theTenable.io Container Security Scanner, as described in Tenable.io Container SecurityScanner.
To view scan results for container images:
Tip: In the top navigation bar, click a link in the breadcrumb trail to return to a previous page.
1. In the Statistics section of the Container Security dashboard, click the Images widget.
The Images page appears.
2. In the images table, you can:
l Filter the images table.
l Search the images table.
l View details for the image:
a. In the images table, click an image row.
The image details page appears.
b. On the image details page, you can:
Copyright © 2019 Tenable, Inc. All rights reserved. Tenable, Tenable.io, Tenable Network Security, Nessus, SecurityCenter, SecurityCenter Continuous View and Log Correlation Engine are registered trade-marks of Tenable, Inc.. Tenable.sc, Lumin, Assure, and the Cyber Exposure Company are trademarks of Tenable, Inc. All other products or services are trademarks of their respective owners.

Tab Action
Vulnerabilities l View vulnerability details for each vulnerability iden-tified in the image:
l View the Severity rating.
l View the Vulnerability ID.
l View the Risk Score.
l View the Release Date for the vulnerability.
l Click a row in the vulnerabilities table.
A vulnerability details plane appears, containing detailsand remediation recommendations for the vul-nerability.
Malware l View details about malware identified in the image:
l View the Infected Files column for a list of infec-ted files in the image.
l View the File Type for each infected file.
l View theMD5 hash algorithm for each infectedfile.
l View the SHA256 hash algorithm for each infectedfile.
PackageInventory
l View the Package Name for each package in the image.
l View the Package Version for each package in theimage.
Layer Digest l View the Digest IDs for each layer in the image.
Copyright © 2019 Tenable, Inc. All rights reserved. Tenable, Tenable.io, Tenable Network Security, Nessus, SecurityCenter, SecurityCenter Continuous View and Log Correlation Engine are registered trade-marks of Tenable, Inc.. Tenable.sc, Lumin, Assure, and the Cyber Exposure Company are trademarks of Tenable, Inc. All other products or services are trademarks of their respective owners.

Integration Guides
This section describes how Tenable.io Container Security integrates with the following major CI/CD sys-tems:
l Bamboo
l CircleCI
l Codeship
l Distelli
l Drone.io
l Jenkins
l Shippable
l Solano Labs
l Travis CI
l Wercker
Copyright © 2019 Tenable, Inc. All rights reserved. Tenable, Tenable.io, Tenable Network Security, Nessus, SecurityCenter, SecurityCenter Continuous View and Log Correlation Engine are registered trade-marks of Tenable, Inc.. Tenable.sc, Lumin, Assure, and the Cyber Exposure Company are trademarks of Tenable, Inc. All other products or services are trademarks of their respective owners.

Bamboo
Before You BeginThese instructions describe how to push a Docker image from Bamboo to Tenable.io Container Secur-ity.
These steps assume you are already comfortable using Bamboo and are already pushing Dockerimages to a public or private registry. If you are already using Bamboo, but have not built Docker con-tainer images, familiarize yourself with the Bamboo documentation Configuring the Docker task inBamboo.
Steps1. Create a new Docker task for the relevant job.
2. In the Task box, type a description for the task.
3. Depending on whether you want the task to run, select or clear the Disable this task check box.
4. Select Push a Docker image to a Docker registry command and complete the settings.
Bamboo builds are sent to Tenable.io Container Security for storage, distribution, vulnerabilityscanning, and malicious code scanning.
Copyright © 2019 Tenable, Inc. All rights reserved. Tenable, Tenable.io, Tenable Network Security, Nessus, SecurityCenter, SecurityCenter Continuous View and Log Correlation Engine are registered trade-marks of Tenable, Inc.. Tenable.sc, Lumin, Assure, and the Cyber Exposure Company are trademarks of Tenable, Inc. All other products or services are trademarks of their respective owners.

CircleCI
Before You BeginThese instructions describe how to push a Docker image from CircleCI to Tenable.io Container Secur-ity.
These steps assume you are already comfortable using CircleCI and are already pushing Dockerimages to a public or private registry. If you are already using CircleCI, but have not built Docker con-tainer images, familiarize yourself with the CircleCI documentation Continuous Integration and Deliv-ery with Docker.
Click here for information about the circle.yml file.If you are using CircleCI to build Docker container images, you should have a circle.yml file in yourproject source control repository that looks similar to the following example:
machine:services:- docker
dependencies:override:- docker info- docker build -t circleci/elasticsearch .
test:override:- docker run -d -p 9200:9200 circleci/elasticsearch; sleep 10- curl --retry 10 --retry-delay 5 -v http://localhost:9200
deployment:hub:branch: mastercommands:- docker push circleci/elasticsearch
The following lines in circle.yml instruct CircleCI to leverage Docker for the build process:
machine:
Copyright © 2019 Tenable, Inc. All rights reserved. Tenable, Tenable.io, Tenable Network Security, Nessus, SecurityCenter, SecurityCenter Continuous View and Log Correlation Engine are registered trade-marks of Tenable, Inc.. Tenable.sc, Lumin, Assure, and the Cyber Exposure Company are trademarks of Tenable, Inc. All other products or services are trademarks of their respective owners.

services:- docker
The following lines in circle.yml instruct CircleCI to build the elasticsearch image in the circleci/repository:
dependencies:override:- docker info- docker build -t circleci/elasticsearch .
The following are the most important lines for adding Tenable.io Container Security integration toCircleCI environments. These lines instruct CircleCI to use Docker to log in to the registry (in this caseto Docker Hub, since no private registry is specified) and push cicleci/elasticsearch to theregistry:
deployment:hub:branch: mastercommands:- docker login -u $DOCKER_USER -p $DOCKER_PASS- docker push circleci/elasticsearch
Steps
1. To add environment variables for the project in the CircleCI console, open the project, click Pro-ject Settings, then click Environment Variables.
2. Define the following variables:
Variable Description
TENABLE_IO_CONTAINER_SECURITY_EMAIL
The email that you use to log in to Tenable.io Container Security.
TENABLE_IO_CONTAINER_
The user name that you use to log in to Tenable.io Container Secur-ity. You can find this on the Settings page in Tenable.io Container
Copyright © 2019 Tenable, Inc. All rights reserved. Tenable, Tenable.io, Tenable Network Security, Nessus, SecurityCenter, SecurityCenter Continuous View and Log Correlation Engine are registered trade-marks of Tenable, Inc.. Tenable.sc, Lumin, Assure, and the Cyber Exposure Company are trademarks of Tenable, Inc. All other products or services are trademarks of their respective owners.

Variable Description
SECURITY_USER Security.
TENABLE_IO_CONTAINER_SECURITY_ENDPOINT
For hosted cloud users of Tenable.io Container Security, this valueis registry.cloud.tenable.com.
3. To add support for Tenable.io Container Security, update the circle.yml file as follows:
machine:environment:VERSION: 2.1.1TAG: ${VERSION}services:- docker
dependencies:override:- docker info- docker version- docker build -t $TENABLE_IO_CONTAINER_SECURITY_ENDPOINT/circleci/elasticsearch .
test:override:- docker run -d -p 9200:9200 $TENABLE_IO_CONTAINER_SECURITY_ENDPOINT/circleci/elasticsearch; sleep 10- curl --retry 10 --retry-delay 5 -v registry.cloud.tenable.com
deployment:hub:branch: mastercommands:- docker login -u $TENABLE_IO_ACCESS_KEY -p $TENABLE_IO_SECRET_KEY- docker tag $TENABLE_IO_CONTAINER_SECURITY_ENDPOINT/circleci/elasticsearch$TENABLE_IO_CONTAINER_SECURITY_ENDPOINT/circleci/elasticsearch:${TAG}- docker push $TENABLE_IO_CONTAINER_SECURITY_ENDPOINT/circleci/elasticsearch:${TAG}- docker logout
Copyright © 2019 Tenable, Inc. All rights reserved. Tenable, Tenable.io, Tenable Network Security, Nessus, SecurityCenter, SecurityCenter Continuous View and Log Correlation Engine are registered trade-marks of Tenable, Inc.. Tenable.sc, Lumin, Assure, and the Cyber Exposure Company are trademarks of Tenable, Inc. All other products or services are trademarks of their respective owners.
CircleCI builds are sent to Tenable.io Container Security for storage, distribution, vulnerabilityscanning, and malicious code scanning.
Copyright © 2019 Tenable, Inc. All rights reserved. Tenable, Tenable.io, Tenable Network Security, Nessus, SecurityCenter, SecurityCenter Continuous View and Log Correlation Engine are registered trade-marks of Tenable, Inc.. Tenable.sc, Lumin, Assure, and the Cyber Exposure Company are trademarks of Tenable, Inc. All other products or services are trademarks of their respective owners.

Codeship
Before You BeginThese instructions describe how to push a Docker image from Codeship to Tenable.io Container Secur-ity.
These steps assume you are already comfortable using Codeship and are already pushing Dockerimages to a public or private registry. If you are already using Codeship, but have not built Docker con-tainer images, familiarize yourself with the Codeship documentation Pushing to a remote registry.
Steps1. Edit the codeship-services.yml file to use the repository name and image name specified in
Tenable.io Container Security.
app:build:image: repository_name/image_namedockerfile_path: Dockerfile
Note: If this is the first time you are pushing an image into the repository, there is not a pre-configured image name. The image name is added automatically after the push from Codeship.
2. Edit the service section of the the codeship-steps.yml file to look similar to the followingexample:
service:app type: pushimage_name: repository_name/image_nameregistry: registry.cloud.tenable.comencrypted_dockercfg_path: dockercfg.encrypted
Codeship builds are sent to Tenable.io Container Security for storage, distribution, vulnerabilityscanning, and malicious code scanning.
Copyright © 2019 Tenable, Inc. All rights reserved. Tenable, Tenable.io, Tenable Network Security, Nessus, SecurityCenter, SecurityCenter Continuous View and Log Correlation Engine are registered trade-marks of Tenable, Inc.. Tenable.sc, Lumin, Assure, and the Cyber Exposure Company are trademarks of Tenable, Inc. All other products or services are trademarks of their respective owners.

Distelli
Before You BeginThese instructions describe how to push a Docker image from Distelli to Tenable.io Container Securityusing the Distelli WebUI Manifest.
These steps assume you are already comfortable using Distelli and are already pushing Docker imagesto a public or private registry. If you are already using Distelli, but have not built Docker containerimages, familiarize yourself with the Distelli documentation on the Distelli Manifest. You can use theDistelli manifest file by either using the Distelli WebUI Manifest, or by editing the distelli-mani-fest.yml file directly.
Steps1. Log in to Distelli and navigate to an application.
2. Click theManifest tab.
The Build section displays content similar to the following example:
docker build --quiet=false -t $DOCKER_REPO:$DISTELLI_BUILDNUM .docker login -u $DOCKER_USERNAME -p $DOCKER_PWdocker push $DOCKER_REPO:$DISTELLI_BUILDNUM
3. To add support for Tenable.io Container Security, modify the Build section to look like the fol-lowing example:
bash docker build --quiet=false -t $TENABLE_IO_CONTAINER_SECURITY_REPO:$DISTELLI_BUILDNUM . docker login -u $TENABLE_IO_ACCESS_KEY -p $TENABLE_IO_SECRET_KEY registry.cloud.tenable.com docker push $TENABLE_IO_CONTAINER_SECURITY_REPO:$DISTELLI_BUILDNUM
This modification adds the Tenable.io Container Security URI to docker login.
Distelli builds are sent to Tenable.io Container Security for storage, distribution, vulnerabilityscanning, and malicious code scanning.
Copyright © 2019 Tenable, Inc. All rights reserved. Tenable, Tenable.io, Tenable Network Security, Nessus, SecurityCenter, SecurityCenter Continuous View and Log Correlation Engine are registered trade-marks of Tenable, Inc.. Tenable.sc, Lumin, Assure, and the Cyber Exposure Company are trademarks of Tenable, Inc. All other products or services are trademarks of their respective owners.
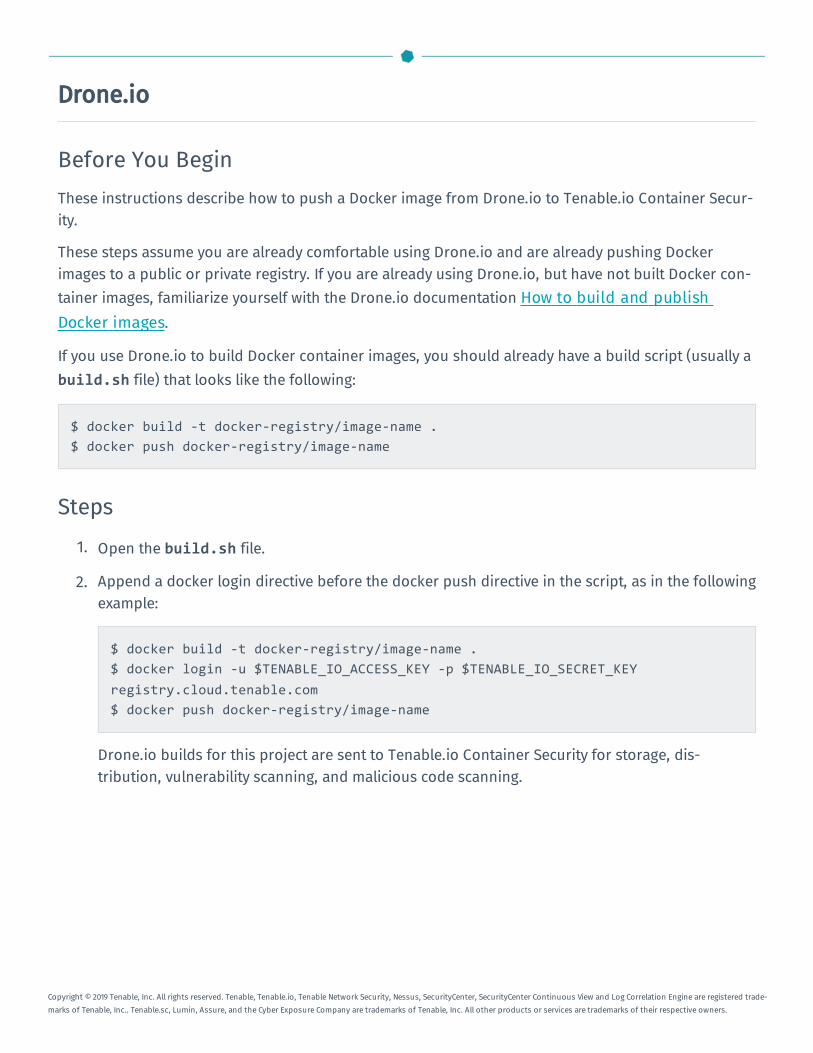
Drone.io
Before You BeginThese instructions describe how to push a Docker image from Drone.io to Tenable.io Container Secur-ity.
These steps assume you are already comfortable using Drone.io and are already pushing Dockerimages to a public or private registry. If you are already using Drone.io, but have not built Docker con-tainer images, familiarize yourself with the Drone.io documentation How to build and publishDocker images.
If you use Drone.io to build Docker container images, you should already have a build script (usually abuild.sh file) that looks like the following:
$ docker build -t docker-registry/image-name .$ docker push docker-registry/image-name
Steps1. Open the build.sh file.
2. Append a docker login directive before the docker push directive in the script, as in the followingexample:
$ docker build -t docker-registry/image-name .$ docker login -u $TENABLE_IO_ACCESS_KEY -p $TENABLE_IO_SECRET_KEYregistry.cloud.tenable.com$ docker push docker-registry/image-name
Drone.io builds for this project are sent to Tenable.io Container Security for storage, dis-tribution, vulnerability scanning, and malicious code scanning.
Copyright © 2019 Tenable, Inc. All rights reserved. Tenable, Tenable.io, Tenable Network Security, Nessus, SecurityCenter, SecurityCenter Continuous View and Log Correlation Engine are registered trade-marks of Tenable, Inc.. Tenable.sc, Lumin, Assure, and the Cyber Exposure Company are trademarks of Tenable, Inc. All other products or services are trademarks of their respective owners.
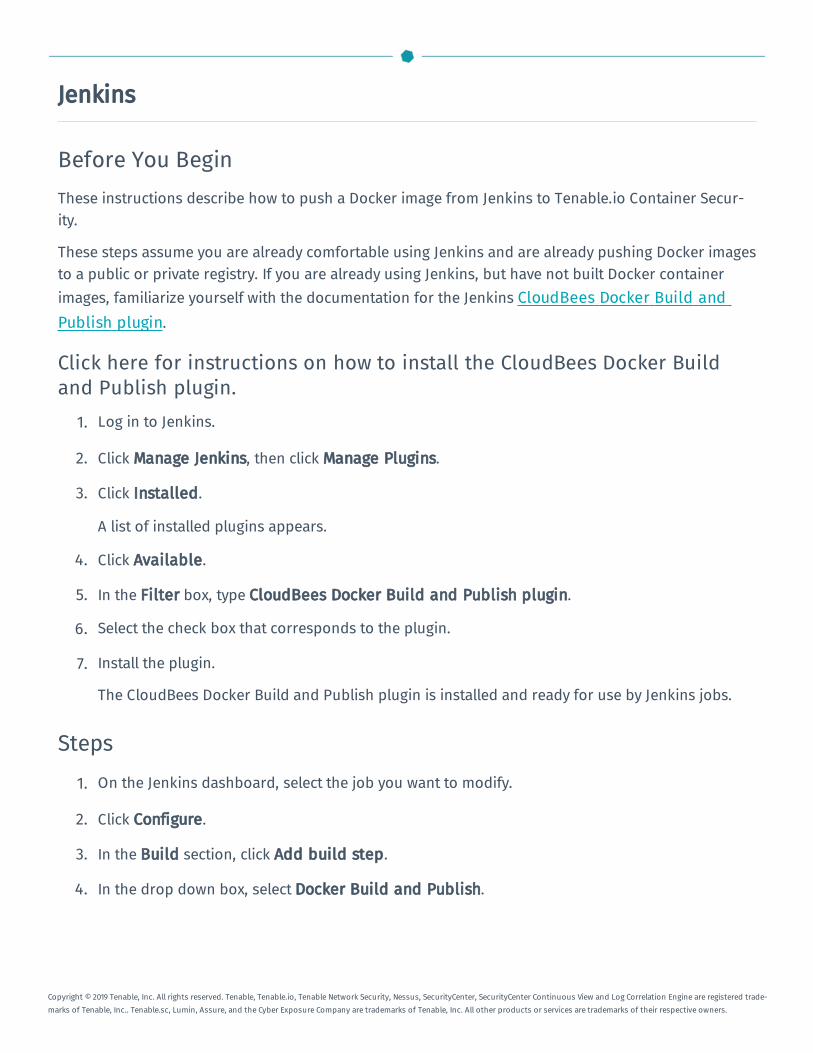
Jenkins
Before You BeginThese instructions describe how to push a Docker image from Jenkins to Tenable.io Container Secur-ity.
These steps assume you are already comfortable using Jenkins and are already pushing Docker imagesto a public or private registry. If you are already using Jenkins, but have not built Docker containerimages, familiarize yourself with the documentation for the Jenkins CloudBees Docker Build andPublish plugin.
Click here for instructions on how to install the CloudBees Docker Buildand Publish plugin.
1. Log in to Jenkins.
2. Click Manage Jenkins, then click Manage Plugins.
3. Click Installed.
A list of installed plugins appears.
4. Click Available.
5. In the Filter box, type CloudBees Docker Build and Publish plugin.
6. Select the check box that corresponds to the plugin.
7. Install the plugin.
The CloudBees Docker Build and Publish plugin is installed and ready for use by Jenkins jobs.
Steps1. On the Jenkins dashboard, select the job you want to modify.
2. Click Configure.
3. In the Build section, click Add build step.
4. In the drop down box, select Docker Build and Publish.
Copyright © 2019 Tenable, Inc. All rights reserved. Tenable, Tenable.io, Tenable Network Security, Nessus, SecurityCenter, SecurityCenter Continuous View and Log Correlation Engine are registered trade-marks of Tenable, Inc.. Tenable.sc, Lumin, Assure, and the Cyber Exposure Company are trademarks of Tenable, Inc. All other products or services are trademarks of their respective owners.

5. Type the details for the following configuration parameters:
l Repository Name: The repository name and image name. For example, if you build a rab-bitmq container image, you can name the repository rabbitmq and the image rabbitmq. Inthis example, in the Repository Name box, type rabbitmq/rabbitmq.
l Tag: The tag name. The simplest tag name to use is latest.
l Docker Host URI: The Jenkins path to the Docker Host. If the Docker Host is running onlocalhost, then in the Docker Host URI box, type tcp://127.0.0.1:4243.
l Docker registry URL: The Tenable.io Container Security API endpoint, which in this case isregistry.cloud.tenable.com.
l Registry credentials: The registry credentials that you select from the box.
Adding registry credentials1. Click Add.
2. Click Username with password.
3. In the Username box, type your Tenable.io Container Security user name.
4. In the Password box, type your Tenable.io Container Security password.
5. Click Add.
The credentials are added.
6. Click Save.
Jenkins builds are sent to Tenable.io Container Security for storage, distribution, vulnerabilityscanning, and malicious code scanning.
Copyright © 2019 Tenable, Inc. All rights reserved. Tenable, Tenable.io, Tenable Network Security, Nessus, SecurityCenter, SecurityCenter Continuous View and Log Correlation Engine are registered trade-marks of Tenable, Inc.. Tenable.sc, Lumin, Assure, and the Cyber Exposure Company are trademarks of Tenable, Inc. All other products or services are trademarks of their respective owners.

Shippable
Before You BeginThese instructions describe how to push a Docker image from Shippable to Tenable.io Container Secur-ity.
These steps assume you are already comfortable using Shippable and are already pushing Dockerimages to a public or private registry. If you are already using Shippable, but have not built Docker con-tainer images, familiarize yourself with the Shippable documentation Building a Docker image.
Steps1. Log in to Shippable.
2. In the upper right corner of the screen, click the Account Settings button.
3. Click Integrations, and then click Add Integration.
4. In theMaster Integration section, click Private Docker Registry.
5. In the Name box, type Tenable.io Container Security.
6. In the URL box, type registry.cloud.tenable.com.
7. In the Username box, type your Tenable.io Container Security user name.
8. In the Password box, type your Tenable.io Container Security password.
9. In the Email box, type the email address associated with your Tenable.io Container Securityaccount.
10. Click Save.
Your Tenable.io Container Security account is now available for hosting container images builtby Shippable.
11. Access your project page, and click Settings.
12. Click Hub, and select the Tenable.io Container Security integration that you just created.
13. In the Push Build field, click Yes.
Copyright © 2019 Tenable, Inc. All rights reserved. Tenable, Tenable.io, Tenable Network Security, Nessus, SecurityCenter, SecurityCenter Continuous View and Log Correlation Engine are registered trade-marks of Tenable, Inc.. Tenable.sc, Lumin, Assure, and the Cyber Exposure Company are trademarks of Tenable, Inc. All other products or services are trademarks of their respective owners.

14. In the Push image to box, type the name of your repository and image in Tenable.io ContainerSecurity (e.g., testrepo/nodejs).
15. In the Push Image Tag box, select from the following options: default, commitsha, or latest.
16. Click Save.
Shippable builds are sent to Tenable.io Container Security for storage, distribution, vulnerabilityscanning, and malicious code scanning.
Copyright © 2019 Tenable, Inc. All rights reserved. Tenable, Tenable.io, Tenable Network Security, Nessus, SecurityCenter, SecurityCenter Continuous View and Log Correlation Engine are registered trade-marks of Tenable, Inc.. Tenable.sc, Lumin, Assure, and the Cyber Exposure Company are trademarks of Tenable, Inc. All other products or services are trademarks of their respective owners.

Solano Labs
Before You BeginThese instructions describe how to push a Docker image from Solano Labs to Tenable.io ContainerSecurity.
These steps assume you are already comfortable using Solano Labs and are already pushing Dockerimages to a public or private registry. If you are already using Solano Labs, but have not built Dockercontainer images, familiarize yourself with the Solano Labs documentation.
Note: Solano Labs support for building Docker container images is in private beta. For customers inter-ested in participating, Solano Labs recommends contacting Solano Labs support.
Steps1. Open the solano.yml file, which should look similar to the following example:
# Use docker-enabled workers (currently private beta - [email protected])system:docker: truepython:python_version: 2.7hooks:pre_setup: |set -exsudo apt-get update -qqsudo docker pull jenkinssudo docker build -t myrepo/jenkins-dsl-ready:my .tests:- python -m doctest build/resolve_jenkins_plugins_dependencies.py
2. Add a post_build phase with your Tenable.io Container Security user name.
# Use docker-enabled workers (currently private beta - [email protected])system:docker: true
Copyright © 2019 Tenable, Inc. All rights reserved. Tenable, Tenable.io, Tenable Network Security, Nessus, SecurityCenter, SecurityCenter Continuous View and Log Correlation Engine are registered trade-marks of Tenable, Inc.. Tenable.sc, Lumin, Assure, and the Cyber Exposure Company are trademarks of Tenable, Inc. All other products or services are trademarks of their respective owners.

python:python_version: 2.7hooks:pre_setup: |set -exsudo apt-get update -qqsudo docker pull jenkinssudo docker build -t myrepo/jenkins-dsl-ready .post_build: |docker login -u $TENABLE_IO_ACCESS_KEY -p $TENABLE_IO_SECRET_KEYregistry.cloud.tenable.comdocker push myrepo/jenkins-dsl-readytests:- python -m doctest build/resolve_jenkins_plugins_dependencies.py
Solano Labs builds are sent to Tenable.io Container Security for storage, distribution, vul-nerability scanning, and malicious code scanning.
Copyright © 2019 Tenable, Inc. All rights reserved. Tenable, Tenable.io, Tenable Network Security, Nessus, SecurityCenter, SecurityCenter Continuous View and Log Correlation Engine are registered trade-marks of Tenable, Inc.. Tenable.sc, Lumin, Assure, and the Cyber Exposure Company are trademarks of Tenable, Inc. All other products or services are trademarks of their respective owners.
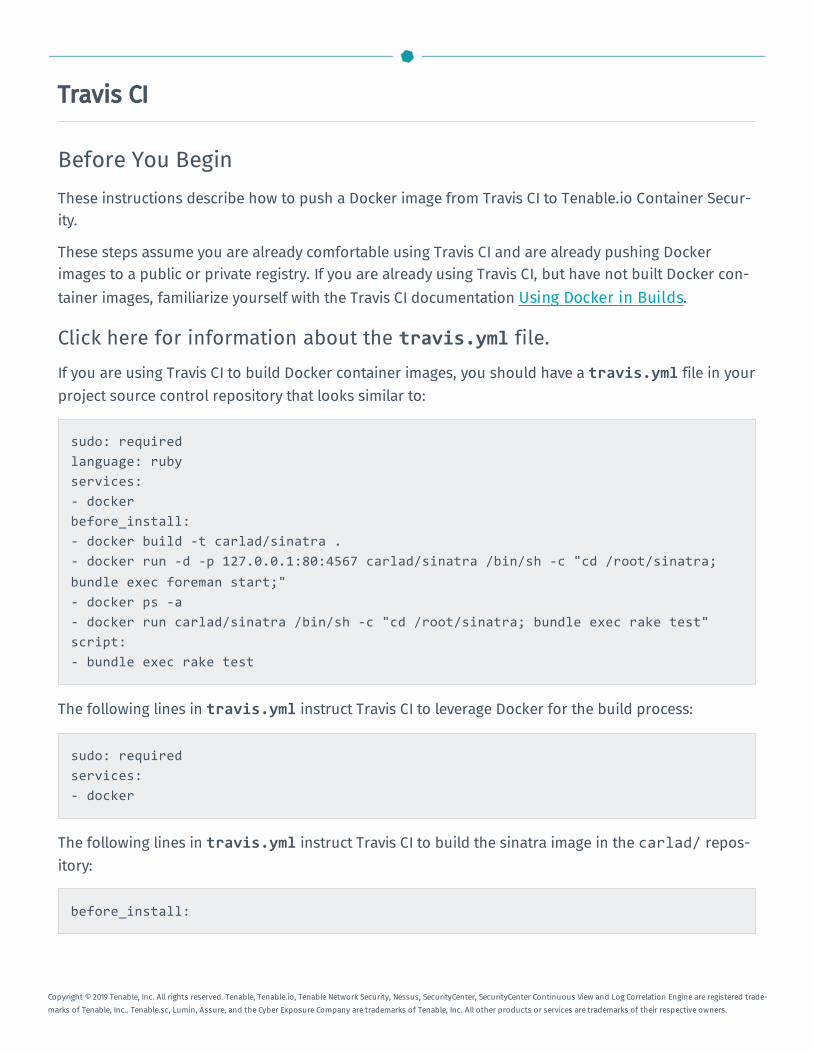
Travis CI
Before You BeginThese instructions describe how to push a Docker image from Travis CI to Tenable.io Container Secur-ity.
These steps assume you are already comfortable using Travis CI and are already pushing Dockerimages to a public or private registry. If you are already using Travis CI, but have not built Docker con-tainer images, familiarize yourself with the Travis CI documentation Using Docker in Builds.
Click here for information about the travis.yml file.If you are using Travis CI to build Docker container images, you should have a travis.yml file in yourproject source control repository that looks similar to:
sudo: requiredlanguage: rubyservices:- dockerbefore_install:- docker build -t carlad/sinatra .- docker run -d -p 127.0.0.1:80:4567 carlad/sinatra /bin/sh -c "cd /root/sinatra;bundle exec foreman start;"- docker ps -a- docker run carlad/sinatra /bin/sh -c "cd /root/sinatra; bundle exec rake test"script:- bundle exec rake test
The following lines in travis.yml instruct Travis CI to leverage Docker for the build process:
sudo: requiredservices:- docker
The following lines in travis.yml instruct Travis CI to build the sinatra image in the carlad/ repos-itory:
before_install:
Copyright © 2019 Tenable, Inc. All rights reserved. Tenable, Tenable.io, Tenable Network Security, Nessus, SecurityCenter, SecurityCenter Continuous View and Log Correlation Engine are registered trade-marks of Tenable, Inc.. Tenable.sc, Lumin, Assure, and the Cyber Exposure Company are trademarks of Tenable, Inc. All other products or services are trademarks of their respective owners.

- docker build -t carlad/sinatra .
Steps1. Open the travis.yml file.
2. Add your Tenable.io Container Security credentials.
$ travis encrypt [email protected]$ travis encrypt TENABLE_IO_CONTAINER_SECURITY_USER=username$ travis encrypt TENABLE_IO_CONTAINER_SECURITY_PASSWORD=password
3. Add your environment variables.
env:global:- secure: "UkF2CHX0lUZ...VI/LE=" # TENABLE_IO_CONTAINER_SECURITY_EMAIL- secure: "Z3fdBNPt5hR...VI/LE=" # TENABLE_IO_CONTAINER_SECURITY_USER- secure: "F4XbD6WybHC...VI/LE=" # TENABLE_IO_CONTAINER_SECURITY_PASSWORD- COMMIT=${TRAVIS_COMMIT::8}
4. Add your connection information.
after_success:- docker login -u $TENABLE_IO_ACCESS_KEY -p $TENABLE_IO_SECRET_KEYregistry.cloud.tenable.com- export REPO=sebestblog/travis-demo- export TAG=`if [ "$TRAVIS_BRANCH" == "master" ]; then echo "latest"; elseecho $TRAVIS_BRANCH ; fi`- docker build -f Dockerfile -t $REPO:$COMMIT .- docker tag $REPO:$COMMIT $REPO:$TAG- docker tag $REPO:$COMMIT $REPO:travis-$TRAVIS_BUILD_NUMBER- docker push $REPO
Travis CI builds are sent to Tenable.io Container Security for storage, distribution, vulnerabilityscanning, and malicious code scanning.
Copyright © 2019 Tenable, Inc. All rights reserved. Tenable, Tenable.io, Tenable Network Security, Nessus, SecurityCenter, SecurityCenter Continuous View and Log Correlation Engine are registered trade-marks of Tenable, Inc.. Tenable.sc, Lumin, Assure, and the Cyber Exposure Company are trademarks of Tenable, Inc. All other products or services are trademarks of their respective owners.

Wercker
Before You BeginThese instructions describe how to push a Docker image from Wercker to Tenable.io Container Secur-ity.
These steps assume you are already comfortable using Wercker and are already pushing Dockerimages to a public or private registry. If you are already using Wercker, but have not built Docker con-tainer images, familiarize yourself with the Wercker documentation Containers.
Steps1. In your project source control repository, open the wercker.yml file.
2. Add support for Tenable.io Container Security by changing the deploy directive as follows:
deploy:steps:- internal/docker-push:username: $USERNAMEpassword: $PASSWORDtag: my-amazing-tagrepository: turing/barregistry: registry.cloud.tenable.com
Wercker builds for this project are sent to Tenable.io Container Security for storage, distribution,vulnerability scanning, and malicious code scanning.
Copyright © 2019 Tenable, Inc. All rights reserved. Tenable, Tenable.io, Tenable Network Security, Nessus, SecurityCenter, SecurityCenter Continuous View and Log Correlation Engine are registered trade-marks of Tenable, Inc.. Tenable.sc, Lumin, Assure, and the Cyber Exposure Company are trademarks of Tenable, Inc. All other products or services are trademarks of their respective owners.
Troubleshooting
Scan Result MissingIf you have successfully created a new repository and pushed a container image, you may want to viewthe scan result for the container image or for one or more of its layers. If you cannot find the reportyou want to view, sort by date/timestamp to see the most recent reports made available to you.
If you still cannot find the report you want to view, it could be because program analysis of (poten-tially) large container images (and layers) can take time. Tenable.io Container Security is the fastestcontainer image scanning service, but it is possible to look for a report faster than it is made available.On average, Tenable.io Container Security analyzes new container images in approximately 30seconds. If a few minutes have already passed, ensure that the image was pushed correctly by check-ing the Repositories page and refreshing the Scan Results page. If you still have trouble, contact [email protected].
Copyright © 2019 Tenable, Inc. All rights reserved. Tenable, Tenable.io, Tenable Network Security, Nessus, SecurityCenter, SecurityCenter Continuous View and Log Correlation Engine are registered trade-marks of Tenable, Inc.. Tenable.sc, Lumin, Assure, and the Cyber Exposure Company are trademarks of Tenable, Inc. All other products or services are trademarks of their respective owners.