CONTACT Sage Pro Manual (Insurance and Investment Contact
34
CONTACT Sage Pro Manual (Insurance and Investment Contact Management System) Version 2.3 TABLE OF CONTENTS: Introduction ….. 2 Using the Contact Sage Pro ….. 4 Design, Controls ….. 5 Start Screen ….. 5 Main Menu ….. 6 Daily Activities ….. 6 Expense Tracker ….. 7 Contact Information Screen ….. 7 Duplicate Contact ….. 8 Client Family ….. 8 Balance Sheet ….. 9 User Defined Fields ….. 9 PIP/BIP ….. 9 Find box ….. 10 Contact Profile ….. 10 Link Area ….. 11 Product Area ….. 11 Policy/Investment ….. 12 Remarks ….. 13 Notes ….. 13 File Links ….. 14 URL Links ….. 14 Session Timer ….. 14 Marketing Tracks ….. 15 Find Contact ….. 15 Contact List ….. 17 Appointment System ….. 18 To Do List System ….. 20 Report Menu ….. 21 Contact Report Setup ….. 22 Commission Report Setup ….. 23 Premium Report Setup ….. 24 Status Menu ….. 24 Utility Menu ….. 25 Setup ….. 25 Users ….. 27 Data Field Choices ….. 27 User Defined Field Choices ….. 28 Marketing Track Setup ….. 28 Email Setup ….. 29 Report Parameters ….. 29 Backup Database ….. 30 Edit Merge Files List ….. 30 Addin Menu ….. 30 Investment Update ….. 31 Screen Design ….. 32 Search Guide ….. 33 New Functions ….. 34 Contact Sage Pro for Advisors features are discussed in the Contact Sage Pro for Advisors Supplemental Manual. B & I Computer Consultants, Inc. www.bandisoftware.com (866) 842-7806 CONTACT Sage Pro By B & I Computer Consultants, Inc. (www.BandISoftware.com) 1
Transcript of CONTACT Sage Pro Manual (Insurance and Investment Contact

CONTACT Sage Pro Manual (Insurance and Investment Contact Management System) Version 2.3 TABLE OF CONTENTS:
Introduction ….. 2Using the Contact Sage Pro ….. 4Design, Controls ….. 5Start Screen ….. 5Main Menu ….. 6Daily Activities ….. 6Expense Tracker ….. 7Contact Information Screen ….. 7 Duplicate Contact ….. 8 Client Family ….. 8 Balance Sheet ….. 9 User Defined Fields ….. 9 PIP/BIP ….. 9 Find box ….. 10 Contact Profile ….. 10 Link Area ….. 11 Product Area ….. 11Policy/Investment ….. 12Remarks ….. 13Notes ….. 13File Links ….. 14URL Links ….. 14Session Timer ….. 14Marketing Tracks ….. 15Find Contact ….. 15Contact List ….. 17Appointment System ….. 18To Do List System ….. 20Report Menu ….. 21 Contact Report Setup ….. 22 Commission Report Setup ….. 23 Premium Report Setup ….. 24 Status Menu ….. 24Utility Menu ….. 25 Setup ….. 25 Users ….. 27 Data Field Choices ….. 27 User Defined Field Choices ….. 28 Marketing Track Setup ….. 28 Email Setup ….. 29 Report Parameters ….. 29 Backup Database ….. 30 Edit Merge Files List ….. 30Addin Menu ….. 30 Investment Update ….. 31Screen Design ….. 32Search Guide ….. 33New Functions ….. 34
Contact Sage Pro for Advisors features are discussed in the Contact Sage Pro for Advisors Supplemental Manual.
B & I Computer Consultants, Inc. www.bandisoftware.com (866) 842-7806
CONTACT Sage Pro By B & I Computer Consultants, Inc. (www.BandISoftware.com)
1
CONTACT Sage Pro By B & I Computer Consultants, Inc. (www.BandISoftware.com)
2
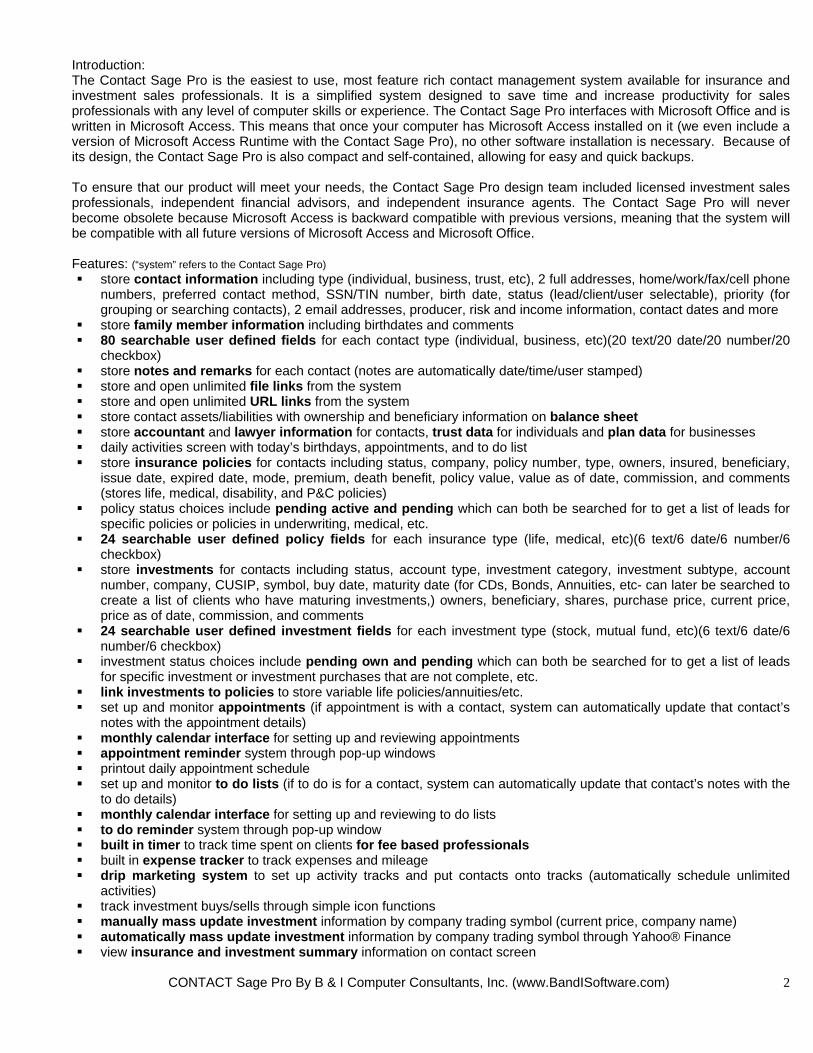
Introduction: The Contact Sage Pro is the easiest to use, most feature rich contact management system available for insurance and investment sales professionals. It is a simplified system designed to save time and increase productivity for sales professionals with any level of computer skills or experience. The Contact Sage Pro interfaces with Microsoft Office and is written in Microsoft Access. This means that once your computer has Microsoft Access installed on it (we even include a version of Microsoft Access Runtime with the Contact Sage Pro), no other software installation is necessary. Because of its design, the Contact Sage Pro is also compact and self-contained, allowing for easy and quick backups. To ensure that our product will meet your needs, the Contact Sage Pro design team included licensed investment sales professionals, independent financial advisors, and independent insurance agents. The Contact Sage Pro will never become obsolete because Microsoft Access is backward compatible with previous versions, meaning that the system will be compatible with all future versions of Microsoft Access and Microsoft Office. Features: (“system” refers to the Contact Sage Pro) store contact information including type (individual, business, trust, etc), 2 full addresses, home/work/fax/cell phone
numbers, preferred contact method, SSN/TIN number, birth date, status (lead/client/user selectable), priority (for grouping or searching contacts), 2 email addresses, producer, risk and income information, contact dates and more
store family member information including birthdates and comments 80 searchable user defined fields for each contact type (individual, business, etc)(20 text/20 date/20 number/20
checkbox) store notes and remarks for each contact (notes are automatically date/time/user stamped) store and open unlimited file links from the system store and open unlimited URL links from the system store contact assets/liabilities with ownership and beneficiary information on balance sheet store accountant and lawyer information for contacts, trust data for individuals and plan data for businesses daily activities screen with today’s birthdays, appointments, and to do list store insurance policies for contacts including status, company, policy number, type, owners, insured, beneficiary,
issue date, expired date, mode, premium, death benefit, policy value, value as of date, commission, and comments (stores life, medical, disability, and P&C policies)
policy status choices include pending active and pending which can both be searched for to get a list of leads for specific policies or policies in underwriting, medical, etc.
24 searchable user defined policy fields for each insurance type (life, medical, etc)(6 text/6 date/6 number/6 checkbox)
store investments for contacts including status, account type, investment category, investment subtype, account number, company, CUSIP, symbol, buy date, maturity date (for CDs, Bonds, Annuities, etc- can later be searched to create a list of clients who have maturing investments,) owners, beneficiary, shares, purchase price, current price, price as of date, commission, and comments
24 searchable user defined investment fields for each investment type (stock, mutual fund, etc)(6 text/6 date/6 number/6 checkbox)
investment status choices include pending own and pending which can both be searched for to get a list of leads for specific investment or investment purchases that are not complete, etc.
link investments to policies to store variable life policies/annuities/etc. set up and monitor appointments (if appointment is with a contact, system can automatically update that contact’s
notes with the appointment details) monthly calendar interface for setting up and reviewing appointments appointment reminder system through pop-up windows printout daily appointment schedule set up and monitor to do lists (if to do is for a contact, system can automatically update that contact’s notes with the
to do details) monthly calendar interface for setting up and reviewing to do lists to do reminder system through pop-up window built in timer to track time spent on clients for fee based professionals built in expense tracker to track expenses and mileage drip marketing system to set up activity tracks and put contacts onto tracks (automatically schedule unlimited
activities) track investment buys/sells through simple icon functions manually mass update investment information by company trading symbol (current price, company name) automatically mass update investment information by company trading symbol through Yahoo® Finance view insurance and investment summary information on contact screen
CONTACT Sage Pro By B & I Computer Consultants, Inc. (www.BandISoftware.com)
3
set up links between contacts (lets you link family/coworkers/etc.) and specify relationship in link duplicate selected contact information for spouses, etc set up unlimited producers and assign contacts to them automatically filter contacts, appointments, and to do list by producer and user automatically track status change dates for contacts (used to track contact/client progression through underwriting
or client acquisition process) find contacts through any combination of information stored in the system
(contact/policy/investment/note/remark/appointment/to do list/user defined fields) scroll through the contact list returned from the search function simultaneously perform 2 searches automatically fill in e-mail address/subject/body for a contact or a contact group into the default windows e-mail
program (Microsoft Outlook/Outlook Express/etc.) interface with group email programs to send personalized emails to contacts automatically fill contact information into Microsoft Word mail merge documents accessed through the system user selectable contact report generator that lets you create a grouped contact based report with/without contact
notes, remarks, appointments, policies/investments, user fields, that are output to Microsoft Notepad, Word, or Excel (you can select which information is output and also the order that the information is arranged in for all reports)
user selectable pending business reports user selectable commission report generator (features of report above plus monthly commission tracking) user selectable premium report generator (features of report above plus monthly/annual premium tracking) automatically backup database daily/weekly set up email addresses/subjects/bodies, mail merge files set up insurance policy drop box choices used to fill out policy information set up investment drop box choices used to fill out investment information full database cleanup and management utilities arrange unique contact data display for each system user password protect the system with general passwords (different passwords to control user access to system
functions), or user specific passwords dial any telephone number on the screen (requires a modem) networkable out of the box synchronize all system data with your Palm or Pocket PC PDA (included module)
To facilitate ease-of-use, the Contact Sage Pro does not have a traditional Windows menu system and can be used without a mouse. The normal horizontal menu at the top of the screen has been replaced by an on-screen function limited icon system. You can only access system functions that are on the screen, meaning that you will never again have to waste time looking for functions in multiple menus. CONTACT Sage Pro Information: B & I Computer Consultants can transfer most contact system data into the Contact Sage Pro for a nominal fee. Hardware requirements: The Contact Sage Pro works through and requires Microsoft Access 2000 or newer. The system itself is distributed on a CD-ROM that includes the Contact Sage Pro program, Contact Sage Pro Backup program, sample word letters, Contact Sage Pro Manual, User’s Guide, Tutorials, and versions of Microsoft Access 2000 Runtime and 2002/XP Runtime in the event that you do not already have Microsoft Access 2000 or newer. The recommended system requirements are: 233 MHz Pentium class machine or higher, 64 MB of RAM or higher, Windows 95 or newer Our systems interface with programs from Microsoft Office, Microsoft Outlook, Email Programs, Group Mail Programs, Image Viewer Programs, and PDA sync programs and applications. Many of our users also set up our systems on networks so that multiple users can use the same system at the same time. We cannot provide support for software that we did not create, even if our systems can interface and use that software. Further, because of the complexities involved in setting up a network, we cannot provide support for setting up network systems. Our systems are designed to only pass data to outside programs. Please direct all support questions about outside programs to the developers of those programs. We reserve the right to change the cost of the Contact Sage Pro and the Annual Support without prior notice. However, the Annual Support price will always remain at the level that it was at when the software was purchased.

CONTACT Sage Pro By B & I Computer Consultants, Inc. (www.BandISoftware.com)
4
Using the Contact Sage Pro: The Contact Sage Pro is a very flexible system that can be setup to meet the needs of any advisor or agent. We get many questions from new users about how to best learn the features in the Contact Sage Pro and how to set up the system to meet their needs. The following is a short step by step list designed to get you up to speed in using and setting up the Contact Sage Pro as quickly as possible. Please keep in mind that due to the many features available in the Contact Sage Pro, it is best to learn the system the same way you would peel an onion, in layers. You should first learn the major functions such as entering contact data, entering notes and remarks, setting up the user defined fields, and setting up appointments and to do’s. You should then learn the next set of functions including searching for data, creating reports, and linking contacts. Finally, you should learn the other functions such as the file and url links, marketing tracks, form letters, form emails, and PDA functionality. Steps to learn the Contact Sage Pro:
1) watch the Audio/Video tutorials to understand how to move around in the system 2) spend an hour or so playing with the trial version filled with sample data. Since the data isn’t real, click each
button and try every functions to see how they work. Use this manual as a reference to lookup functions and features that you have questions about.
3) install the retail Contact Sage Pro 4) read this manual to familiarize yourself with the different screens and buttons in the Contact Sage Pro 5) read the User’s Guide to help you customize the Setup screen 6) initially customize the system for system drop boxes (you can select the value of a field from a list) and user
defined contact and product data If you have any questions, please call us.

CONTACT Sage Pro Manual (Contact Management System) Controls: A mouse is not needed to use the Contact Sage Pro. Tab: move in between fields and buttons F6: switch panes (panes are sections of the screen separated by horizontal grey lines) Alt + letter under button: click that button Alt + down arrow: see drop down box choices Common Functions- Figure 1:
All Contact Sage Pro screens have a common menu at the top of the application window. The button functions are: Dial Number: Dials highlighted telephone number (requires a modem) Save Settings: Saves resized screens (to resize a screen, simply click on the screen border and drag it up or down) Undox: Undoes last data change Fill Color: Changes backcolor of text boxes on form design screen Help: open the Contact Sage Pro help web page Contact Sage Pro Start Screen- Figure 2:
This is the first screen in the Contact Sage Pro system. For the automatic backup to function, you must exit the Contact Sage Pro from this screen. Quit: closes the Contact Sage Pro Start: has two functions: recognize the user, ask for a user password, and assign appropriate permissions, or if the user is not recognized, ask for the user and their password, or a general system password (discussed in password entry below) open the main menu
Figure 3: Figure 4:
The administrator (or any user who has system permission) has the option of password protecting the Contact Sage Pro. (discussed in the Setup Screen section)
CONTACT Sage Pro By B & I Computer Consultants, Inc. (www.BandISoftware.com)
5
If the administrator password protects the Contact Sage Pro, the system will automatically determine who is logged on to the PC from which the system is run. If that user has been entered into the system (discussed in the Users Screen section), the password entry box will pop up asking for that user’s password. If the user is not recognized by the system,

the password entry box pops up asking for the user id of the current user. If the user types in an invalid username and/or password, the system will ask the user if they would like to try again. The user has 3 chances to enter a valid password. After each invalid password entry, the user is given the option to quit the Contact Sage Pro. Main Menu screen- Figure 5:
From this screen, you can choose to look at contact data, daily activities, enter the expense tracker, report menu, or enter the system utilities menu. The system utilities menu will only display options that you have permission to choose (see password protection above). Activities: opens the Activities screen Contacts: opens the contact information screen Reports: opens the report menu Utilities: opens the utilities menu Expenses: opens the expense tracker screen Close: goes back to the start screen If you want to open the program manual or user’s guide, make sure that the Microsoft Word directory is correct on the Setup Screen. (You can click Automatically Fill-In File Directory Settings to verify that the directory settings on the Setup screen are correct.) Activities- Figure 6:
The Daily Activities screen shows what needs to be done for the current day. Birthdays for contacts and family members, appointments, and a to do list are all tied to the date displayed in yellow at the top right of the screen. You can change the current date being shown by clicking a new day from the calendar in the top right of the screen. Contact Birthdays show birthdays for the date shown for contacts only. Family Member Birthdays show birthdays from the Family List for the date shown. To access the Family Member Birthday list, you should search the Family criteria on the Find Contacts screen.
CONTACT Sage Pro By B & I Computer Consultants, Inc. (www.BandISoftware.com)
6

The To Do List Days drop box lets you select the date range for the to do list. If you select a number greater than 1, the to do list will show dates between the current date shown and the selected days after the date shown. If you select All, all to do items will be displayed regardless of the date shown. The to do list is grouped by date and to do type. The Producer selector works on birthdays, appointments, and to do items. You must assign contacts to a producer for the correct birthdays, appointments, and to do items to appear once a producer is selected. Once you assign a contact to a producer, all of the contact’s appointments and to do items are automatically assigned to that producer. The User selector works on the appointments and to do list only. You must select a user for each appointment and to do item for this selector to work properly. Expense Tracking screen- Figure 7:
You can record expenses that you incure in the course of your business including miles, meals, etc. Yellow box: the day for which expenses are displayed User Filter: shows the expenses for a specific system user only Date Period Filter: shows the expenses that occured on or after the FROM date to the TO date All: turns off the criteria to the left of the ALL button Add: prepares the screen to add a new expense Delete: deletes the current expense Print: prints the expenses displayed on the screen. If there is a filter active (user and/or period), then only those expenses are printed. Close: opens the main menu. Contact Information screen- Figure 8:
CONTACT Sage Pro By B & I Computer Consultants, Inc. (www.BandISoftware.com)
7

This screen shows individual contact information, contact family information, client policy and investment information, client link information, and selectable notes and remarks. From this screen, you can access the appointments, remarks, notes, file links, URL links, balance sheet, investments and policies for the current contact (the contact currently displayed,) marketing tracks, and open the find contact and calendar screens. All of the mentioned screens will be discussed in their sections. There are command buttons along the top and bottom of the screen. The command buttons on top have the following functions: << first contact in the list < previous contact > next contact >> last contact in the list (the list is sorted alphabetically or by next contact date depending on the filter entered) Search: opens the Find Contacts screen (Figure 42) List: opens the Contact List screen filtered by criteria in the Find Contacts screen, or lists all of the contacts in the system Appt (with calendar icon): opens the Appointment Calendar screen (Figure 50) To Do (with calendar icon): opens the To Do List Calendar screen (Figure 55) Add: clears the screen to add a new contact Duplicate Contact screen- Figure 9:
Copy: lets you copy a contact by selecting fields to duplicate, selecting a link type automatically creates a link between the original and new contact
Delete: removes the current contact as well as all related contact information from the system. It is very important that you understand that the delete button not only removes the contact’s information from the system, but also removes all links, appointments, remarks, notes, policies, investments, user fields and balance sheet fields that belong to the contact from the system, and is irreversible Appts: opens the appointments screen and displays the appointments for the current contact in reverse chronological order (if the Appts label is green, there are future appointments scheduled with the current contact.) To Do: opens the to do list screen and displays the to do list for the current contact in reverse chronological order (if the To Do label is green, there are future to do items scheduled for the current contact.) Remks: opens the remarks screen for the current contact (if the Remks label is green, there are remarks for the current contact that are not shown on this screen.) Notes: opens the notes screen for the current contact (if the Notes label is green, there are notes for the current contact that are not shown on this screen.) Files: opens the file links screen for the current contact (if the Files label is green, there are file links for the current contact stored in the system.) URLs: opens the URL link screen for the current contact (if the URLs label is green, the current contact has URL links.) Family: replaces the notes area with a list of family members for the current contact. (If the Family label is green, the current contact has Family member information in the system.) To add new family members, simply type into the table.
Figure 10:
CONTACT Sage Pro By B & I Computer Consultants, Inc. (www.BandISoftware.com)
8

Balnc: opens the balance sheet screen for the current contact. All of the asset and liability categories are setup on the Balance Fields setup screen opened from the Utility Menu. (Figure 77)
Figure 11:
Policy: opens the policies list screen (Figure 30) for the current contact (the color matched box to the right of the policies button counts how many active policies are stored in the system for the current contact) Invstmt: opens the investments list screen (Figure 31) for the current contact (the color matched box to the right of the investments button counts how many own status investments are stored in the system for the current contact) User Fields: (top center) opens the user defined fields screen for the current contact. (The fields types are color coded) Fields are setup on the User Defined Fields Setup screen. (Figure 74)
Figure 12:
PIP/BIP: The Personal and Business Information Pages are formatted areas to store additional contact information. Most of the fields on these screens were previously set up as user defined fields. These screens are designed as reference only and cannot be searched on or printed through the main system reports.
Figure 13: Figure 14:
Appt (with alarm clock): opens the appointment reminder screen if there are current appointments in the reminder queue (if the Appt label is green, there are current appointment reminders in the system.) To Do (with alarm clock): opens the to do list reminder screen if there are current to do items in the reminder queue (if the To Do label is green, there are current to do reminders in the system.) Fill Merge: fills a table with the name/address, contact dates and user fields for the current contact. (Microsoft Word accesses the filled table for the mail merge feature. This feature is explained in the Contact List section.)
Figure 15:
Mail Merge Dear Line – selects the form of the dear line in the mail merge letters- T (Title), F (First name), N (Nickname), SL (Salutation + Last name) Address Choice- you can store 2 different addresses in the Contact Sage Pro for each contact. Home/Business in the top row of figure 15 lets you choose which address to use for labels, mail merges, and reports for the current contact. Each of the 2 addresses can be individually named in the combo box under the Address label. The system will automatically use the last clicked address column for reports, labels, and form letters.
CONTACT Sage Pro By B & I Computer Consultants, Inc. (www.BandISoftware.com)
9
Email Choice- you can store 2 different email addresses in the Contact Sage Pro for each contact. Pers/Bus in the bottom row of figure 15 lets you choose which address to use for system emails and reports involving the current contact. Each of the 2 email addresses can be individually named in the combo box to the right of the email entry box. The system will automatically use the last clicked email column for email functions and reports.

E-mail: opens the default e-mail program and prefills the e-mail address for the current contact and the subject and body selected. Status Filter: filters the contacts by status. Rolodex: Top Half: displays the lastname rolodex in the notes area. Picking a letter filters the contacts by lastname. Rolodex: Bottom Half: displays the contact selector pop up box. The filters can be used together or separately. You can use the arrow buttons at the top left of the screen to advance through the filtered contact list. The All buttons removes the last name filter and the status filter, respectively. Tracks: opens the drip marketing/tracks screen to put the current contact onto the tracks (Figure 41) Timer: open the session timer screen. This function is used to keep track of time spent on contacts for fee based professionals. Find: opens the find box (below) Figure 16:
Figure 17:
If a search is performed and contacts are filtered, a blue F for filtered appears next to the contact selectors. If a search by next contact date is run from the Find Contacts screen, the contacts are ordered by next contact date in reverse chronological order and a blue O for ordered appears. If a search includes a Producer or User, blue boxes for P and U appear.
Please refer to the search guide for search rules. (At the end of this manual.) History: opens the Find History screen that keeps a list of all previous Find box searches Search Guide: displays the field search rules Profile 1- Figure 18: Profile 2- Figure 19: Investment Profile- Figure 20:
opens a profile preview for the current contact that includes all contact information stored in the system
opens a profile preview for the current contact’s investments grouped by account and then by mutual fund family.
Opens an investment report that groups investments by category and mutual finds by fund company
Close: goes back to the main menu. The entry boxes on the contact information screen are mostly self-explanatory. The following is an explanation of the more entry boxes. When you leave the mouse pointer on any of the entry boxes, a pop up note appears with a description of the entry box. white box to the left of firstname: salutation for contact white box to the right of lastname: suffix for contact Contact ID: Social Security number of contact or system generated ID consisting of contact name and telephone number (you must have a contact id to add notes, links, appointments, remarks, policies, and investments for the current contact.) Preference: how the contact wishes to be contacted Status: allows contacts to be categorized by contact, lead, other (other categories can be added on the Data Choices screen accessed from the utility menu.)
CONTACT Sage Pro By B & I Computer Consultants, Inc. (www.BandISoftware.com)
10Priority: importance of contact (importance can refer to assets, potential, etc.) choices are 1-5

Call Freq: how often a contact should be called (depending on the setup screen options, call frequency can be used to automatically set up appointments) list box under Address label: the address type for the current address The area of the screen between contact information and the bottom icons displays remarks and notes, respectively, which are checked to appear on the contact information screen. Link area: Figure 21: Figure 22:
The contact link area displays relationships between contacts. These relationships can include spouses, family members, co-workers, etc. <, > brings up the previous and next link, respectively New: opens the link edit screen and readies it for link entry Goto: goto the contact in the same row Edit: opens the link edit screen with the current link (right) Spouse: toggles between spouse records When adding a new link, the system will automatically add the last contact viewed to the link on the first contact row. Click Add from the bottom of the screen to add new contacts to the link, and then select the new contact in the next empty contact row. (The box to the right of the contact name on the Link Edit screen lets you select contacts by lastname.) Link Edit: (Figure 22) (bottom of the screen) Delete: deletes the current link Close: goes back to the contact information screen
Add: lets you add contacts to the current link Delete: only works if the link has more than 1 contact. If the link has 1 contact, the link itself must be deleted. This is done so that orphan links cannot exist in the system.
Product Area Selector- Figure 23:
Depending on whether the current contact has policies and/or investments, the product area selector will change.
No Policies No Investments
No Policies Investments
Policies No Investments
Policies Investments
Selecting a choice from the product area selector will display the following in the product area: View Policies Figure 24: (Policy)
View Policy Total Figure 25: (P Total)
View Investments Figure 26: (Invest)
View Investment Total Figure 27: (I Total)
The arrow buttons in the top left of the area allow you to cycle among the products owned by the current contact. < brings up the previous product > brings up the next product Edit: opens the product edit screen with the current product data (below)
CONTACT Sage Pro By B & I Computer Consultants, Inc. (www.BandISoftware.com)
11New: opens the product edit screen to enter new product records

Policy Edit- Figure 28: Investment Edit- Figure 29:
The record selectors at the top left of the screens let you scroll between products for the current client. Maturity Dates entered into investments can later be searched to create a list of contacts who have maturing investments. (This can be used for CD, Bonds, Annuities, etc.) Investment Part/Policy Part- you can link investments to a policy to store investment product components of variable insurance and annuity products. You cannot link previously added investments to policies. To add an investment link, click Investment Part from the Policy Edit screen. If there are no other investment links for the current policy, a new investment record opens prefilled with the account number, account type, and buy date that match the policy information. If there are already investments linked to the policy, you will be given the choice to toggle between the policy and linked investment/s, or to create an additional linked investment. A policy can have unlimited investments linked to it, but an investment can only have 1 policy linked to it. If the current policy or investment has a corresponding investment or policy link, the Investment Part/Policy Part button labels will be highlighted in green, and there will be an Unlink From Investments or an Unlink From Policy button at the top right of the Policy and Investment Edit screens, respectively. Also keep in mind that if policies and investments are linked, deleting one will also delete the other. If you want to keep the linked products, unlink the part you want to delete before clicking Delete. Sell: lets you sell all or a part of the current investment. You will be prompted to enter the number of shares and share price, after which, a new investment record will be created prefilled with the current investment information, today’s date, and the number of shares and share sale price entered. (Don’t forget to enter a sell commission if applicable.) Buy +: lets you buy more of the current investment. You will be prompted to enter the number of shares and share price, after which, a new investment record will be created prefilled with the current investment information, today’s date, and the number of shares and share sale price entered (keep in mind that the share price is not updated for other investments of the same company and symbol, you must manually update the prices in the Investment Update screen- discussed at the end) (Don’t forget to enter a buy commission if applicable.) Delete: delete the current policy/investment Close: goes back to the contact information screen Policies List- Figure 30:
CONTACT Sage Pro By B & I Computer Consultants, Inc. (www.BandISoftware.com)
12

E: display the current policy on the policy edit screen Add: add a new policy Delete: deletes the current policy Print: prints the policy screen Invstmt: toggles to the Investment List for the current contact Close: goes back to the contact information screen Investments List- Figure 31:
E: display the current investment on the investment edit screen Policy: toggles to the Policy List for the current contact Remarks screen- Figure 32: Expanded Remark screen- Figure 33:
Show: displays the current remark on the contact information screen Add on this screen: lets you enter in new remarks on this screen. Add on expanded screen: lets you enter in new remarks on the expanded remark entry screen (carriage returns allowed) Delete: deletes the current remark Print: prints the remarks screen Close: goes back to the contact information screen E: displays the current remark on the expanded remark screen (figure 33) Notes screen- Figure 34: Expanded Note- Figure 35:
Show: displays the current note on the contact information screen Add: lets you enter in new notes on the expanded note entry screen (carriage returns allowed)
CONTACT Sage Pro By B & I Computer Consultants, Inc. (www.BandISoftware.com)
13

Delete: deletes the current note Print: prints the notes screen Close: goes back to the contact information screen E: displays the current note on the expanded note screen (figure 35) File Links Screen- Figure 36: Expanded File Link- Figure 37:
Open: open the file with the application selected on figure 37 Contact File Directory: you can create a separate file directory for each contact under the master file link directory by filling in the path to the contact subdirectory.
File links let you associate files with contacts. You can link emails (that were saved in the email program,) documents (saved in Microsoft Word,) reports and charts (that were saved in Microsoft Word or Excel,) and document scans. (This replaces the costly document scanning feature in other contact management systems. You simply use the scanning software that came with your scanner and save the scanned image. You can then open the image from within the system after you specify which program will open images on the Setup screen.) All files that can be linked must be put into the either the Master File Directory or the Contact subdirectory in the Master File Directory. Keeping all of the files that can be linked in one master directory and subdirectories makes backup much simpler and much more efficient. URL Link screen- Figure 38: Expanded URL Link screen- Figure 39:
You can open unlimited URL links for each client by setting up the links on the Expanded URL Link screen. URL links can point to contact employer web sites, homepage sites, personal sites, or sites of interest to the contact.
Session Timer screen- Figure 40:
You can record the amount of time you spend working on a contact’s portfolio through the Session Timer Screen. This function was created for the fee based financial professional but can also be utililized by any user to track how much time they spend working on specific contact’s accounts. You can have an unlimited number of timed sessions counting simultaneously. You can also pause any timed session and restart that session at any point. The Session Timer works in the same way as a recorder. Yellow box (under Timed Sessions title): the day for which sessions are displayed Contact Filter: shows the sessions for a specific contact only User Filter: shows the sessions for a specific system user only Date Period Filter: shows the sessions that started on or after the FROM date and ended on or before the TO date All: turns off the criteria to the left of the ALL button
CONTACT Sage Pro By B & I Computer Consultants, Inc. (www.BandISoftware.com)
14

Start New: starts a new timed session with the current contact. Once a session is started, you can Stop, or Pause and then Restart the session. The time Elapsed (in yellow) will show how many minutes have elapsed since the session was started minus pause times. The time elapsed will not change while you are viewing this screen. It will only change when you close and then reopen ths Session Timer Screen. Start: restarts a Paused Session Pause: pauses the current session. A session will remain paused even if you exit this screen, and/or the system. Keep in mind that the session timer works on the system time, not the system date. Therefore if you restart the timer on a different day than when it was paused, the duration will not be correct. Stop: stops the current session and locks all fields for the current session except the description. You cannot change the date, time, or duration values for a session once it is stopped. Delete: deletes the current session Add Session to Notes: Copies the session information to the session contact’s notes. Print: prints the sessions displayed on the screen. If there is a filter active (contact, user and/or day), then only those sessions are printed. Close: Hide this screen. Marketing Tracks screen- Figure 41:
Once you setup Marketing Tracks from the Utility menu, you can assign unlimited tracks to any contact. Don’t forget to click Add before you add a new Track. The track start date is when you want the contact to go onto the track. Track Activities are scheduled by assuming a track reference start date of 1/1/2004. Activities are then scheduled into the future. (For example, if you schedule an activity on 1/8/2004, the time period for this activity will be 7 days after the track start date.) The contact’s track start date then becomes the starting point for the track. In the example above, the track start is 1/8/2004 which means the activity will be scheduled for 1/15/2004.) Find Contact screen- Figure 42:
CONTACT Sage Pro By B & I Computer Consultants, Inc. (www.BandISoftware.com)
15

You have the option of searching for contacts in the system via a combination of any of the white boxes on the find contact screen. For example, you can look for contacts who have a birth date in February, have income more than $150,000, have bought policies worth at least $1 million dollars combined, and that have paid an investment commission of at least $5,000 on 1 investment product (to search investment commissions, click the More Fields button in the Investments area). The system will search the database for contacts matching the description. If only one contact is found, that contact is displayed on the contact information screen. If more than one contact matches the criteria selected, the contact list (discussed below) screen will come up and you will have the option of choosing which contact's information you want to see, or you can scroll through the filtered contacts on the contact information screen (discussed in the contact list screen section below). The Find Contacts screen is an exact copy of the contact information screen. This is done to give you familiarity with the information layout. If criteria is entered and you click search, the system remembers all of the search criteria until reset is clicked or the system is restarted. (This is useful if you run a search that is not specific enough and you want to add more criteria.) Figure 43: Figure 44:
Figure 45:
Figure 46:
Figure 47:
Press the More Fields button in the Policies Area to search in more policy fields.
Press the More Fields button in the Investments Area to search in more investment fields.
Press the User Fields button in the Command Area to search in user defined contact fields. (Figure 45) Press the User Fields button in the Policies Area to search in user defined policy fields. (Figure 46) Press the More Fields button in the Investments Area to search in user defined investment fields. (Figure 47)
The User Fields buttons will be surrounded in green if there is search criteria entered for the corresponding product or user defined fields, respectively; click Reset to clear all search criteria.) Please refer to the search guide for search rules. Search: creates a filter based on your entries and applies that filter to the database. If only one contact is found, that contact is displayed on the contacts information screen. If more than one contact is found, the contact list screen displays a list of all of the contacts found that match the criteria entered. List: opens up the contact list screen without applying any filters. All of the contacts in the system are available for you to pick from. Search Guide: displays the field search rules Reset: clears all criteria entered on this screen. Y: automatically fills in the next contact box with “<= (today's date)” Close: goes back to the contact information screen
CONTACT Sage Pro By B & I Computer Consultants, Inc. (www.BandISoftware.com)
16
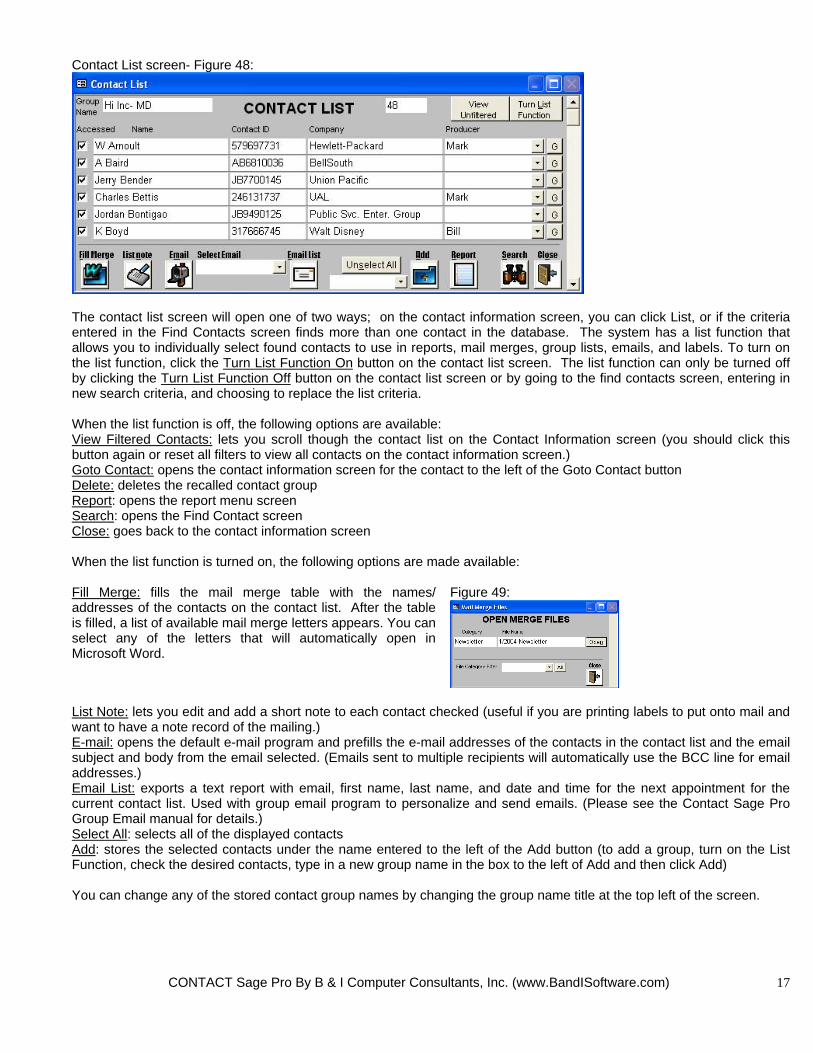
Contact List screen- Figure 48:
The contact list screen will open one of two ways; on the contact information screen, you can click List, or if the criteria entered in the Find Contacts screen finds more than one contact in the database. The system has a list function that allows you to individually select found contacts to use in reports, mail merges, group lists, emails, and labels. To turn on the list function, click the Turn List Function On button on the contact list screen. The list function can only be turned off by clicking the Turn List Function Off button on the contact list screen or by going to the find contacts screen, entering in new search criteria, and choosing to replace the list criteria. When the list function is off, the following options are available: View Filtered Contacts: lets you scroll though the contact list on the Contact Information screen (you should click this button again or reset all filters to view all contacts on the contact information screen.) Goto Contact: opens the contact information screen for the contact to the left of the Goto Contact button Delete: deletes the recalled contact group Report: opens the report menu screen Search: opens the Find Contact screen Close: goes back to the contact information screen When the list function is turned on, the following options are made available: Fill Merge: fills the mail merge table with the names/ addresses of the contacts on the contact list. After the table is filled, a list of available mail merge letters appears. You can select any of the letters that will automatically open in Microsoft Word.
Figure 49:
List Note: lets you edit and add a short note to each contact checked (useful if you are printing labels to put onto mail and want to have a note record of the mailing.) E-mail: opens the default e-mail program and prefills the e-mail addresses of the contacts in the contact list and the email subject and body from the email selected. (Emails sent to multiple recipients will automatically use the BCC line for email addresses.) Email List: exports a text report with email, first name, last name, and date and time for the next appointment for the current contact list. Used with group email program to personalize and send emails. (Please see the Contact Sage Pro Group Email manual for details.) Select All: selects all of the displayed contacts Add: stores the selected contacts under the name entered to the left of the Add button (to add a group, turn on the List Function, check the desired contacts, type in a new group name in the box to the left of Add and then click Add) You can change any of the stored contact group names by changing the group name title at the top left of the screen.
CONTACT Sage Pro By B & I Computer Consultants, Inc. (www.BandISoftware.com)
17

Calendar screen- Figure 50: Figure 51:
The calendar screen graphically displays how many appointments you (or the selected producer and/or user) have for each day of the month. The values next to the year and month labels under the calendar title specify which year and month is being shown. The buttons in each of the day boxes reflect a count of the total number of appointments for that day. A star next to the appointment count for any of the days shown means that you have an appointment with the last contact viewed on the contact information screen on that day. By clicking on any of the appointment count buttons on the calendar screen, the appointments for that day will be displayed in the appointments list on the right half of the screen. drop boxes next to the year and month labels at the bottom left of the screen set the calendar display arrow buttons next to the entry boxes let you move between the year and month, respectively. Month: displays all of the appointments for the month chosen on the appointments screen (figure 52) View Appointments for: Week (1..6): displays all of the appointments for the week chosen on the appointments screen (figure 52) Appt Bar: Week (1..6): displays committed time for the week selected on the Appointments for the Week screen (figure 51) Enter: opens the appointment screen for the date in the date entry box To Do: (with calendar icon) toggles to the To Do list calendar Close: goes back to the contact information screen Add: opens the expanded appointment entry screen to add a new appointment. The date for the new appointment will be filled in with the date being shown. (Figure 53) Delete: removes the appointment highlighted (just click on any box in the appointment row you want to delete) Add Appt to notes: automatically adds an appointment description note to the contact with the appointment (this only works when a contact has been selected in the white box under contact) Add LM to notes: automatically adds a left message note to the contact with the appointment (this only works when a contact has been selected in the white box under contact) Schedule: prints an hourly appointment schedule for the day shown Print: opens the appointment report C: lets you graphically select dates (on the appointment list on the calendar screen, you must click C again after you select a new date from the date selector screen.) Away: is the appointment out of the office? (the appointment bar uses 3 colors, white- free time, violet- appointment in the office, red- appointment out of the office) E: displays the current appointment on the expanded appointment screen G: opens the contact information screen for the contact to the left of the button Daily Ruler/Appointment Bar: the white and violet/red bar visually shows when you have appointments scheduled for the current day (the appointment bar uses 3 colors, white- free time, violet- appointment in the office, red- appointment out of the office)
CONTACT Sage Pro By B & I Computer Consultants, Inc. (www.BandISoftware.com)
18
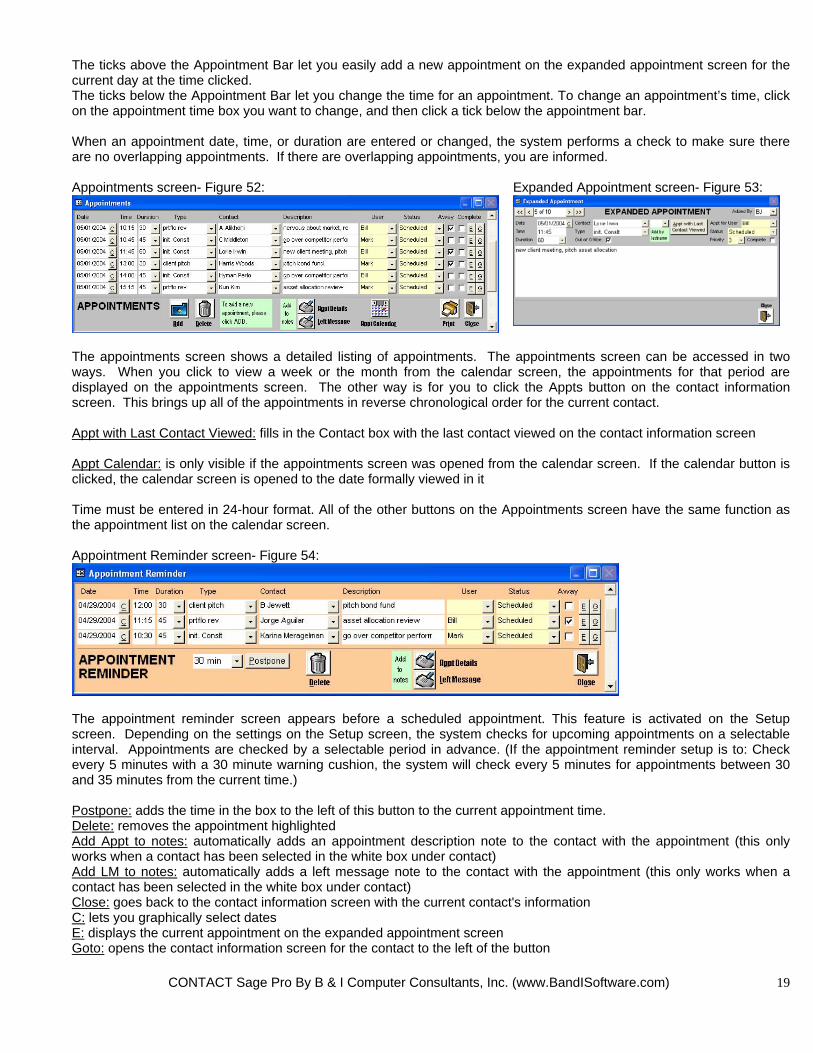
The ticks above the Appointment Bar let you easily add a new appointment on the expanded appointment screen for the current day at the time clicked. The ticks below the Appointment Bar let you change the time for an appointment. To change an appointment’s time, click on the appointment time box you want to change, and then click a tick below the appointment bar. When an appointment date, time, or duration are entered or changed, the system performs a check to make sure there are no overlapping appointments. If there are overlapping appointments, you are informed. Appointments screen- Figure 52: Expanded Appointment screen- Figure 53:
The appointments screen shows a detailed listing of appointments. The appointments screen can be accessed in two ways. When you click to view a week or the month from the calendar screen, the appointments for that period are displayed on the appointments screen. The other way is for you to click the Appts button on the contact information screen. This brings up all of the appointments in reverse chronological order for the current contact. Appt with Last Contact Viewed: fills in the Contact box with the last contact viewed on the contact information screen Appt Calendar: is only visible if the appointments screen was opened from the calendar screen. If the calendar button is clicked, the calendar screen is opened to the date formally viewed in it Time must be entered in 24-hour format. All of the other buttons on the Appointments screen have the same function as the appointment list on the calendar screen. Appointment Reminder screen- Figure 54:
The appointment reminder screen appears before a scheduled appointment. This feature is activated on the Setup screen. Depending on the settings on the Setup screen, the system checks for upcoming appointments on a selectable interval. Appointments are checked by a selectable period in advance. (If the appointment reminder setup is to: Check every 5 minutes with a 30 minute warning cushion, the system will check every 5 minutes for appointments between 30 and 35 minutes from the current time.) Postpone: adds the time in the box to the left of this button to the current appointment time. Delete: removes the appointment highlighted Add Appt to notes: automatically adds an appointment description note to the contact with the appointment (this only works when a contact has been selected in the white box under contact) Add LM to notes: automatically adds a left message note to the contact with the appointment (this only works when a contact has been selected in the white box under contact) Close: goes back to the contact information screen with the current contact's information C: lets you graphically select dates E: displays the current appointment on the expanded appointment screen Goto: opens the contact information screen for the contact to the left of the button
CONTACT Sage Pro By B & I Computer Consultants, Inc. (www.BandISoftware.com)
19

When an appointment date, time, or duration is entered or changed, the system performs a check to make sure there are no overlapping appointments. If there are overlapping appointments, you are informed. To Do List Calendar screen- Figure 55:
The to do list calendar screen graphically displays how many to do’s you (or the selected producer and/or user) have for each day of the month. The values next to the year and month labels under the calendar title specify which year and month is being shown. The buttons in each of the day boxes reflect a count of the total number of to do’s for that day. A star next to the to do count for any of the days shown means that you have a to do for the last contact viewed on the contact information screen on that day. By clicking on any of the to do count buttons on the calendar screen, the to do list for that day will be displayed on the right half of the screen. drop boxes next to the year and month labels at the bottom left of the screen set the calendar display arrow buttons next to the entry boxes let you move between the year and month, respectively. Month: displays the to do list for the month chosen on the to do calendar screen (figure 56) View To Do List for: Week (1..6): displays the to do list for the week chosen on the To Do List screen (figure 56) Enter: opens the to do list screen for the date in the date entry box Close: goes back to the contact information screen Add: opens the expanded to do item entry screen to add a new item. The date for the new to do will be filled in with the date being shown. (Figure 57) Delete: removes the to do item highlighted (just click on any box in the to do item row you want to delete) Add to notes: automatically adds a to do description note to the contact that the to do item is for (this only works when a contact has been selected in the white box under contact) Print: opens the to do list report C: lets you graphically select dates (on the to do list on the calendar screen, you must click C again after you select a new date from the date selector screen.) E: displays the current to do item on the expanded to do item screen G: opens the contact information screen for the contact to the left of the button To Do List screen- Figure 56: Expanded To Do screen- Figure 57:
CONTACT Sage Pro By B & I Computer Consultants, Inc. (www.BandISoftware.com)
20

The to do list screen can be accessed in two ways. When you click to view a week or the month from the calendar screen, the to do list for that period is displayed on the to do list screen. The other way is for you to click the To Do button on the contact information screen. This brings up the to do list in reverse chronological order for the current contact. To Do Calendar: is only visible if the to do list screen was opened from the calendar screen. If the calendar button is clicked, the calendar screen is opened to the date formally viewed in it The To Do List has a Rollover checkbox. If checked, that to do item will continue to rollover to the current date until it is deleted. To Do with Last Contact Viewed: fills in the Contact box with the last contact viewed on the contact information screen To Do Reminder screen- Figure 58:
The to do reminder screen appears when you first open the Contact information screen if the option is selected on the setup screen. Delete: removes the to do item highlighted Add to notes: automatically adds a to do item description note to the contact with the to do item (this only works when a contact has been selected in the white box under contact) Close: goes back to the contact information screen with the current contact's information C: lets you graphically select dates E: displays the current to do item on the expanded to do screen G: opens the contact information screen for the contact to the left of the button Report Menu- Figure 59:
The report menu lets you access all of the system reports. Contact Report: opens the contact report setup screen Contact list/Current contact selector: selects which contacts appear on the printed labels Labels: opens the label screen formatted by label type selected Commission Report: opens the commission report setup screen Premium Report: opens the premium report setup screen Status Report: opens the status report setup screen If you will be outputting reports to Microsoft Word, you should install a macro that will automatically format the Word report. The procedure is simple. For instructions, open c:\cisage\sagewordmacro.doc
CONTACT Sage Pro By B & I Computer Consultants, Inc. (www.BandISoftware.com)
21

Contact Report Setup- Figure 60: Figure 61:
Figure 62:
To add user defined screens to the contact report, click the checkbox to the left of User Defined on the Contact Report Setup Screen and then select which User Defined fields you want for the report. Each checkbox will be replaced by the column order of the user defined fields in the report.
The contact report setup screen lets you create a text report that contains contact information with/without appointments, notes, remarks, or policies and/or investments. You have the ability to save and name report settings and recall those anytime. The report setup screen is broken down into sections. The contact section lets you pick which contact data will be displayed on the report and the order of the data. Clicking on any of the fields (contact id, city, home phone, etc.) in the contact section causes the checkbox to be replaced by the column order number for that field. The current contact/contact list/all contacts selection next to the contact checkbox selects which contacts will be displayed in the report. Current contact only displays the last contact viewed on the contact information screen. Contact list displays the list checked on the contact list screen after the list function is turned on. The Grouping and Sorting area in the lower left of the screen lets you sort contact information by three different fields. Last name is always the default last field sorted by. (If you sort by city, the sort applied will be city then last name.) The Product Filters area in the lower left of the screen lets you enter policy and investment criteria to filter the product output. The checkboxes let you specify the status of the products that will be output. You can select only one report type (contact/user defined/appointments/notes/remarks/family/policies and investments count as one report type) at a time. The fields in the user defined, appointments, notes, family, and policies/investments sections let you pick which additional data in addition to the core data is displayed in the report. (Core data such as appointment date and appointment description are automatically displayed in the report if the appointments report is chosen. User Defined, Policies and Investments don’t have core data.) The Future/Current/All Appts choice beside the appointments section lets you choose which appointments are displayed. Future appointments only display appointments scheduled today or in the future. Current appointments only display appointments for the last day selected from the calendar screen. If user defined, appointments, notes, remarks, or policies/investments reports are chosen, you also have the option of selecting whether all contacts are displayed, or only contacts that have the requested information are displayed. (A contact with no appointments will not be displayed if the Only Contacts With Requested Info choice is selected and the appointment report is selected.)
CONTACT Sage Pro By B & I Computer Consultants, Inc. (www.BandISoftware.com)
22
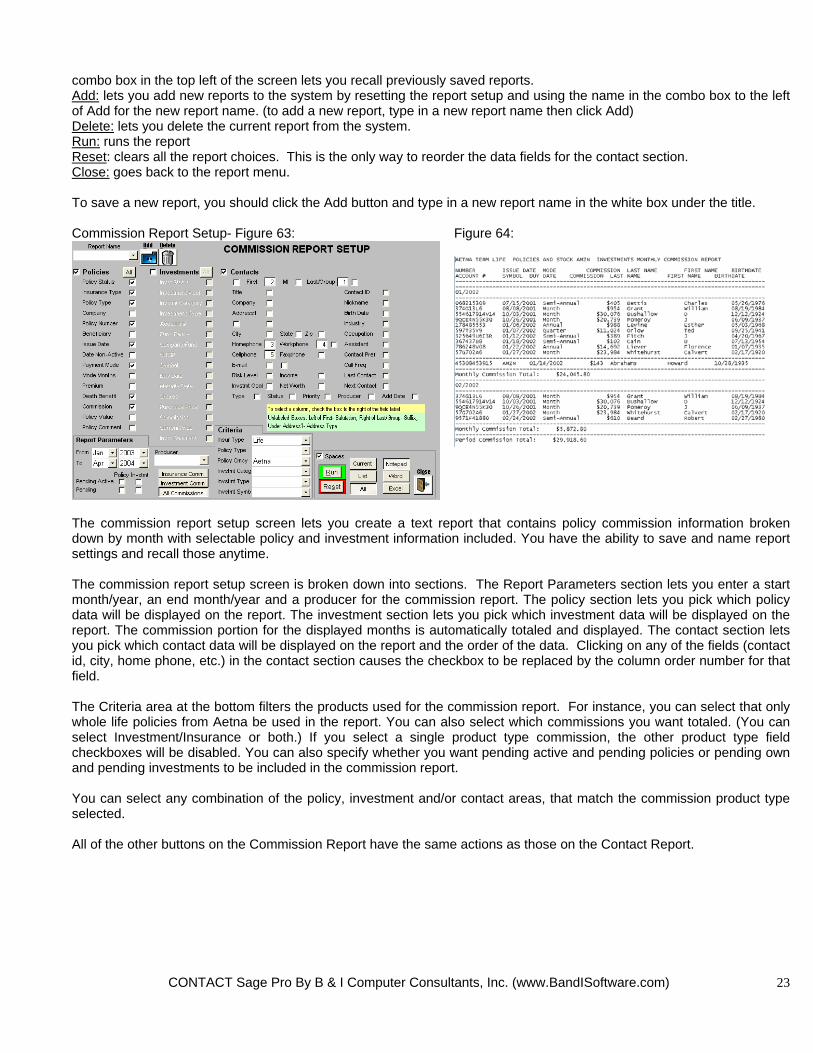
combo box in the top left of the screen lets you recall previously saved reports. Add: lets you add new reports to the system by resetting the report setup and using the name in the combo box to the left of Add for the new report name. (to add a new report, type in a new report name then click Add) Delete: lets you delete the current report from the system. Run: runs the report Reset: clears all the report choices. This is the only way to reorder the data fields for the contact section. Close: goes back to the report menu. To save a new report, you should click the Add button and type in a new report name in the white box under the title. Commission Report Setup- Figure 63: Figure 64:
The commission report setup screen lets you create a text report that contains policy commission information broken down by month with selectable policy and investment information included. You have the ability to save and name report settings and recall those anytime. The commission report setup screen is broken down into sections. The Report Parameters section lets you enter a start month/year, an end month/year and a producer for the commission report. The policy section lets you pick which policy data will be displayed on the report. The investment section lets you pick which investment data will be displayed on the report. The commission portion for the displayed months is automatically totaled and displayed. The contact section lets you pick which contact data will be displayed on the report and the order of the data. Clicking on any of the fields (contact id, city, home phone, etc.) in the contact section causes the checkbox to be replaced by the column order number for that field. The Criteria area at the bottom filters the products used for the commission report. For instance, you can select that only whole life policies from Aetna be used in the report. You can also select which commissions you want totaled. (You can select Investment/Insurance or both.) If you select a single product type commission, the other product type field checkboxes will be disabled. You can also specify whether you want pending active and pending policies or pending own and pending investments to be included in the commission report. You can select any combination of the policy, investment and/or contact areas, that match the commission product type selected. All of the other buttons on the Commission Report have the same actions as those on the Contact Report.
CONTACT Sage Pro By B & I Computer Consultants, Inc. (www.BandISoftware.com)
23

Premium Report Setup- Figure 65: Figure 66:
The premium report setup screen lets you create a text report that contains policy premium information broken down by client and time period, with selectable policy and contact information included. You have the ability to save and name report settings and recall those anytime. The premium report setup screen is broken down into sections. The period section lets you enter a start month/year, an end month/year, a producer, and a grouping time period for the premium report. The policy section lets you pick which policy data will be displayed on the report. The contact section lets you pick which contact data will be displayed on the report and the column order of the data. The premium portion for the displayed time periods is automatically totaled and displayed. Clicking on any of the fields (contact id, city, home phone, etc.) in the contact section causes the checkbox to be replaced by the column order number for that field. The combo list boxes at the bottom left filter the policies used for the premium report. For instance, you can select that only whole life policies from Aetna be used in the report. You can select any combination of the policy and contact areas. All of the other buttons on the Premium Report have the same actions as those on the Contact Report. Status Report Setup- Figure 67:
The status field for a contact can be used to track the dates that a contact goes through the various stages of the underwriting or client acquisition process. The status tracker is enabled on the setup screen (below).
CONTACT Sage Pro By B & I Computer Consultants, Inc. (www.BandISoftware.com)
24

Utility Menu- Figure 68:
Setup: opens the setup screen Users: opens the user screen Cleanup Database: repairs data entry errors Word Merge Files: opens the edit merge files screen Emails: opens the email setup screen Report Display Setup: opens the report display setup screen Backup Database: runs the backup program Compact/Repair DB: compacts and repairs the system, this should be done weekly or monthly to improve system perfomance Update Versions: runs the update version program Data Field Choices: opens the Screen Choices screen User Defined Fields: opens the user defined contact fields setup screen User Balance Fields: opens the user defined balance fields setup screen Marketing Tracks: opens the marketing track setup screen Screen Design: opens the data layout screen design Add-In Modules: opens the Add-In Module screen. For some of the Add-in modules, you must install the appropriate files before those functions will work. Insurance Choices: opens the insurance choices edit screen User Policy Fields: opens the user defined policy fields setup screen Investment Choices: opens the investment choices edit screen User Investment Fields: opens the user defined investment fields setup screen
Setup Screen- Figure 69: The system setup screen in the utilities menu lets the administrator setup password protection for the system, select the directories for applications the system uses, and setup the appointment reminder, system message settings, auto appointment, auto backup, and status note systems.
CONTACT Sage Pro By B & I Computer Consultants, Inc. (www.BandISoftware.com)
25
If the automatic user ID is not used or the user ID is unknown, a user has the option of entering in a generic password on the start screen. Certain functions in the Contact Sage Pro can be password protected. Specifically, access to the system, adding data, changing data, deleting data and accessing the system setup screens, can all be separately granted through multiple passwords. The password on/off option enables and disables the password protection features of the Contact Sage Pro. The row to the right of each functional password explains the functions allowable under each password.

CONTACT Sage Pro By B & I Computer Consultants, Inc. (www.BandISoftware.com)
26
Directory Label Path To Problems if directory invalid Access directory Microsoft Access not be able to run the backup or update Word directory Microsoft Word not be able to run word reports or open mail merge files from the system Excel directory Microsoft Excel not be able to run contact, premium, or commission reports to Excel Notepad directory Microsoft Notepad not be able to run contact, premium, or commission reports to Notepad Contact Sage cisage.mdb the backup program and version update programs will not work Network directory network cisage.mdb the backup program will not work from a remote machine Form Letter word templates form letters will not open Network directory word templates form letters will not open from a remote machine Master Files contact files directory contact file links will not open Network directory contact files directory contact file links will not open from a remote machine User File Link 1 user file application 1 not be able to open file links with user defined application User File Link 2 user file application 2 not be able to open file links with user defined application The System Message Settings lets you turn system messages on/off. As a user becomes more familiar with the Contact Sage Pro, the Comment and Confirmation Messages can be disabled. The Error messages should be left on for most users. Show Addl Info Labels lets you disable the label highlighting feature on the Contact Information screen. (Labels such as notes, remarks, url, file, appt, etc will be highlighted in green if there are records for those features in the system for the current contact.) You can also select whether you want the investment or policy information to automatically appear when you view contact information. However, once you change the option in the product area selector, the system will remember that choice, until it is restarted. Automatically Fill In File Directory Settings: lets the system look for necessary files and lets you choose from the files found to fill in the directory settings. Appointment Reminder Settings: checkbox enables/disables the pop-up appointment reminder window. Initial Appt Reminder enables/disables the automatic appointment reminder box that pops up when you first open the Contact Information Screen. (The reminder system will work normally afterwards.) The appointment reminder interval establishes the time period that the system waits between checking for appointments. The appointment reminder time sets the time period that an appointment reminder box appears before an appointment. Daily To Do Reminder: checkbox enables/disables the pop-up to do reminder window when the Contact Information Screen is first opened. The Auto Appointment checkbox is used to turn the master auto appointment feature on/off. The auto appointment feature automatically sets up an appointment based on the call frequency selected for each contact. You can turn the auto appointment checkbox on/off for each contact. The Track Appointment checkbox is used to turn the master Marketing Track scheduling feature on/off. The Marketing Track will automatically schedule appointments as the appropriate Track Activity date is reached. If you will be synchronizing the system with a PDA (Palm or Pocket PC), you must click the appropriate device type for the synchronization to work. The Contact Sage Pro gives you the option of having the system automatically remind you to backup daily or weekly. The Contact Type/Insurance Type/Investment Category selectors select which user defined product field labels will be displayed for a new product or a product type that has not been setup with its own user defined field labels. Export Email List- Enables the Group Mail export function. (Please see Contact Sage Pro Group Email manual.) Automatically Show Notes: All notes and remarks in the system can be checked to appear on the contact information screen. This feature was designed because there is limited space for notes and remarks on the contact information
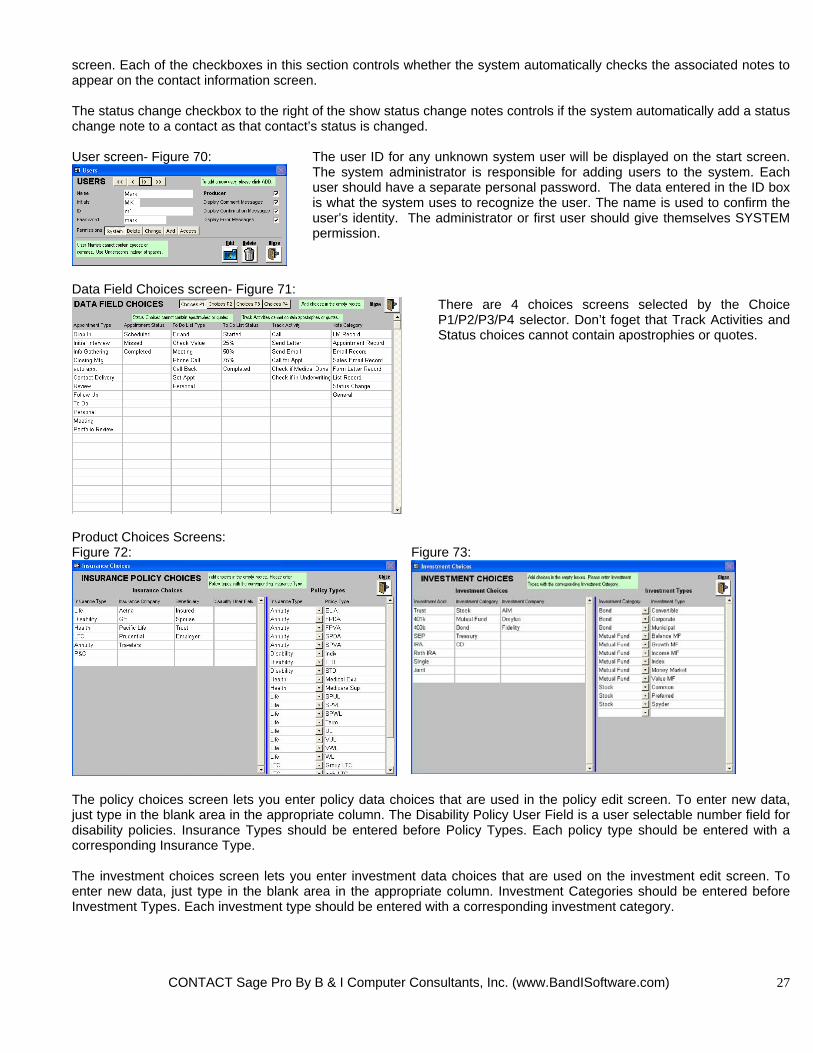
screen. Each of the checkboxes in this section controls whether the system automatically checks the associated notes to appear on the contact information screen. The status change checkbox to the right of the show status change notes controls if the system automatically add a status change note to a contact as that contact’s status is changed. User screen- Figure 70:
The user ID for any unknown system user will be displayed on the start screen. The system administrator is responsible for adding users to the system. Each user should have a separate personal password. The data entered in the ID box is what the system uses to recognize the user. The name is used to confirm the user’s identity. The administrator or first user should give themselves SYSTEM permission.
Data Field Choices screen- Figure 71:
There are 4 choices screens selected by the Choice P1/P2/P3/P4 selector. Don’t foget that Track Activities and Status choices cannot contain apostrophies or quotes.
Product Choices Screens: Figure 72: Figure 73:
The policy choices screen lets you enter policy data choices that are used in the policy edit screen. To enter new data, just type in the blank area in the appropriate column. The Disability Policy User Field is a user selectable number field for disability policies. Insurance Types should be entered before Policy Types. Each policy type should be entered with a corresponding Insurance Type. The investment choices screen lets you enter investment data choices that are used on the investment edit screen. To enter new data, just type in the blank area in the appropriate column. Investment Categories should be entered before Investment Types. Each investment type should be entered with a corresponding investment category.
CONTACT Sage Pro By B & I Computer Consultants, Inc. (www.BandISoftware.com)
27

User Defined Field Choices Figure 74:
User Defined Policy/Investments Fields Figure 75,76:
You can setup separate user defined field labels for each Contact Type, Insurance Type and Investment Category. Before you can add new fields for different Contact Types, Insurance Types or Investment Categories, you must add the Contact Types on the Data Field Choices screen and the Insurance Types and Investment Categories onto the corresponding product choices screen. To add new fields, click Add, select the Contact or Product type in the upper left corner, and then fill in the labels. User defined fields will only appear for labels that have been filled in. The width column sets the width of the field using the following conversion: 1440 = 1 inch of field entry box. The width does not refer to Characters. User Defined Balance Fields Setup Figure 77:
You can setup the asset and liability field labels that will appear on the balance sheet for each contact. Asset and Liability fields will appear for corresponding labels that have been filled in. Marketing Tracks Setup- Figure 78:
CONTACT Sage Pro By B & I Computer Consultants, Inc. (www.BandISoftware.com)
28

The Contact Sage Pro includes a track marketing system that lets you put contacts onto a track, and then reminds you of track activities by creating appointments. Before adding track activities, you should name and describe the Marteking Track. To add track activities, click EXP in the appropriate track row. Marketing Track Activities Setup- Figure 79:
Track activities are added to the marketing tracks by describing the start date, frequency, end date, activity and description for each activity. If the activity includes a merge file or email, you can also select the file or email that needs to be sent for that activity. Start Date: when the activity should occur after the track is started (calculated in number of days.) Days is calculated by determining the number of elapsed days between the Activity Start Date on this screen and 1/1/2004. Frequency: how often the activity should occur (1- once or R-recurring.) If the activity is recurring, you can also fill in the End date. End Date: only works if the Frequency is R. Tells the system when the activity should stop recurring. If the frequency is R and there is no End Date, the activity will keep recurring until the contact is taken off the track, or until the track is changed. Emails Setup Screen- Figure 80:
You can store unlimited emails in the system. To move to the next line in the email body box, press enter. Reports Parameters screen- Figure 81:
CONTACT Sage Pro By B & I Computer Consultants, Inc. (www.BandISoftware.com)
29

The report parameter screen lets you change the field column name and width that appear in the report generator output. The width of each column is determined by the greater of the column width entered or the character count in the column name. Backup Database- Figure 82:
The Contact Sage Pro has a built in backup system that can be setup to automatically run daily or weekly. You can choose to compress the backup file when you use the backup to a disk function. The compression function uses Winzip. To install Winzip onto your computer, you need to:
1. download and install Winzip 8.0 or newer (http://www.winzip.com/downau81.cgi?winzip81.exe) 2. download and install the Command Line Support Add-On for Winzip (http://www.winzip.com/wzcline.htm) 3. copy the wzzip.exe file from c:\program files\winzip\ to c:\cisage\
Keep in mind, if you plan to use this function, please purchase and register Winzip. Edit Merge Files List Screen- Figure 83:
The name of the merge file is displayed on the Open Merge Files screen. All merge files must be copied to the Form Letter directory. The file name of the merge file must be exact and must also include the file extension. (File names cannot contain SPACES, we suggest using underscores.) Clicking on the down arrow displays a list of the *.doc files in the mailmerge directory for you to choose from. The sample merge file name is mailmergedemo.doc. Add-In Menu Screen- Figure 84:
Import Zip Codes: loads the zip code table to automatically fill in city/state/zip when entering new contacts (optional) Update Investments: opens the Investment Update screen (The PDA components of the Contact Sage Pro are thoroughly explained in the Contact Sage Pro PDA Manual) Output Data to PDA: opens the PDA Sync screen
CONTACT Sage Pro By B & I Computer Consultants, Inc. (www.BandISoftware.com)
30
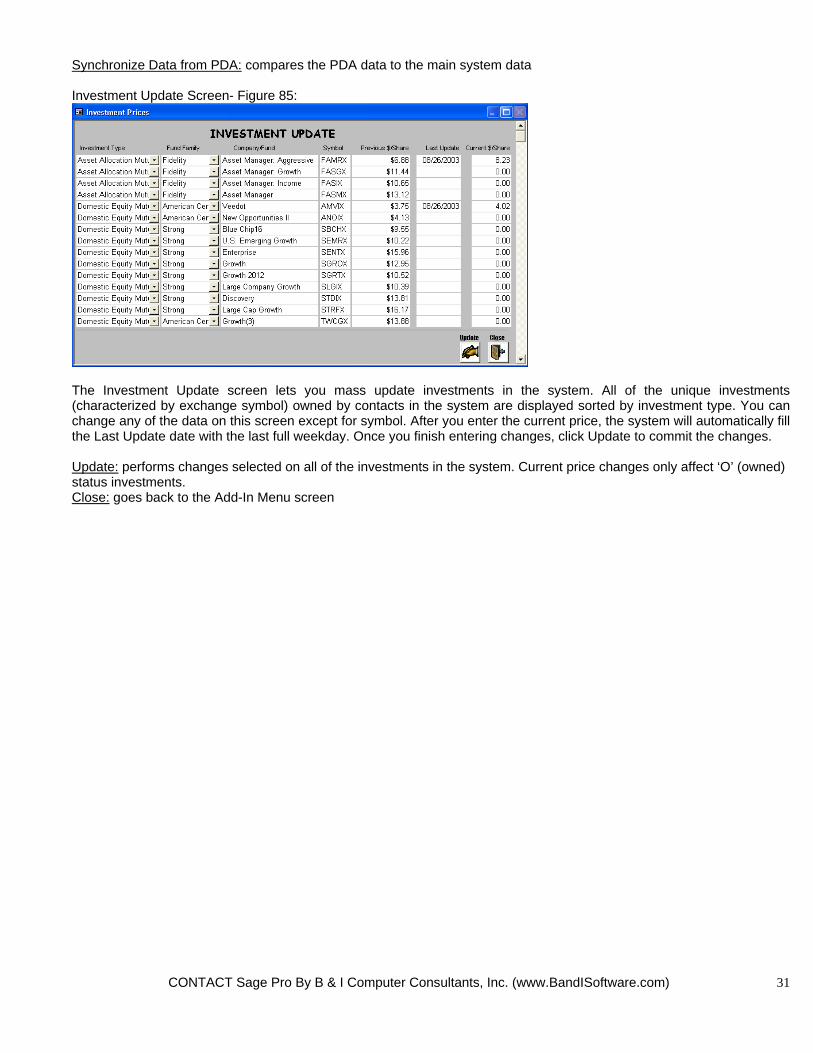
Synchronize Data from PDA: compares the PDA data to the main system data Investment Update Screen- Figure 85:
The Investment Update screen lets you mass update investments in the system. All of the unique investments (characterized by exchange symbol) owned by contacts in the system are displayed sorted by investment type. You can change any of the data on this screen except for symbol. After you enter the current price, the system will automatically fill the Last Update date with the last full weekday. Once you finish entering changes, click Update to commit the changes. Update: performs changes selected on all of the investments in the system. Current price changes only affect ‘O’ (owned) status investments. Close: goes back to the Add-In Menu screen
CONTACT Sage Pro By B & I Computer Consultants, Inc. (www.BandISoftware.com)
31

Form Design Screen- Figure 86:
Each user in the system can customize their own data screen layout. Each user can delete unneeded fields, edit field labels, change the position and width of any field or label, and also change the background color for each text box. To delete a field or label, simply click on that item and press the delete key. To move any item, click and drag that item to the desired location. To change the width of any item, click on that item, and then drag its borders. To change the color of any of the text boxes (in white), click on the box and then choose the color by clicking the down arrow to the right of the paint can icon at the top of this screen.
You cannot move any item to the other side of the blue line. Before saving changes, the system will check to make sure that no items are outside the allowed boundaries. Load Orig Design: If the system asks you to save changes to the form design, you should always click NO. If you do save the changes, you will not be able to reset the design screen to its original design. Click this button to reload the original design screen. Reset: If you are unsatisfied with the changes you have made you can reset the design screen to its original design. Delete: If you are happy with the original screen layout, do not save the same layout, as this will slow down the system. This button will remove the current users screen layout from the system. Save Design: Saves position, width, and color for all screen items. Also runs check to make sure no items are outside allowed boundaries.
CONTACT Sage Pro By B & I Computer Consultants, Inc. (www.BandISoftware.com)
32

CONTACT Sage Pro By B & I Computer Consultants, Inc. (www.BandISoftware.com)
33
Search Guide You can search on any data stored in the system. From the Contact Information screen, you can search in any single field. From the Find Contacts screen, you can search among multiple fields. All searches return a list of contacts/clients that match the search criteria. The system uses symbols to specify ranges and values:
Symbol Meaning Field types for symbols , search for multiple values in a field (value 1 or value 2) All fields ; search for range values in a field (value 1 and value 2) Number, Date fields * wildcard before or after search string in field Text fields, Dates (PLUS search) > greater than (value 1 > search string) Number, Date fields < less than (value 1 < search string) Number, Date fields = Equal to (value 1 = search string) (for text fields, omit =) Number, Date fields <> not equal to (value 1 < > search string) Number, Date, Text fields >= greater than or equal to (value 1 >= search string) Number, Date fields <= less than or equal to (value 1 <= search string) Number, Date fields + PLUS Search: use wildcards for dates or add all
values for each contact together for numbers Number, Date fields
Null empty (<> null - not empty) Text, Date (use 0 for Number) fields Examples:
Field Search String Meaning Last name a,b,c find all last names beginning with “a” or “b” or “c” Firstname steve,mike Find all first names that are “steve” or “mike” Birthdate >= 1/1/1950;<= 12/31/1964 find all birthdates from 1/1/1950 to 12/31/1964 Birthdate + 2/*/* find all birthdates in February Birthdate + 2/*/*;<= 12/31/1960 find all February birthdates in or before 1960 Note prospect Find notes starting with “prospect” Note *401k find “401k” anywhere in notes Phone null find all blank phone numbers Phone 301 Find phone numbers with area code “301” Balance >= 1000 Find all single account balances greater than or equal
to 1000 Balance + >= 1000 Find all combined account balances for each contact
greater than or equal to 1000 Commission > 1000;+ > 5000 Find combined commission greater than 5000 and at
least one product commission greater than 1000 Plus number searches for policies and investments will only search active policies and owned investments. All text fields automatically have * after the search string. You must separate symbols and values with a space.

CONTACT Sage Pro By B & I Computer Consultants, Inc. (www.BandISoftware.com)
34
New Functions: