Consent2Share Version 2 Development Guide · Consent2Share Version 2 Development Guide, Page 1...
62
Substance Abuse and Mental Health Services Administration (SAMHSA) Behavioral Health Information Technology and Standards (BHITS) Project Consent2Share Version 2 Development Guide Version: 10/2016
Transcript of Consent2Share Version 2 Development Guide · Consent2Share Version 2 Development Guide, Page 1...

Beta Testing Work Plan, Page i
Substance Abuse and Mental Health Services Administration (SAMHSA)
Behavioral Health Information Technology and Standards (BHITS) Project
Consent2Share Version 2 Development Guide
Version: 10/2016

Consent2Share Version 2 Development Guide, Page i
This Consent2Share Development Guide was developed by FEi Systems for the Substance Abuse and Mental Health Services Administration (SAMHSA) Behavioral Health Information Technologies and Standards (BHITS) Project (Contract No. HSN316201200139W/HHSS270201400001W).
Consent2Share Version 2 Development Guide, Page ii
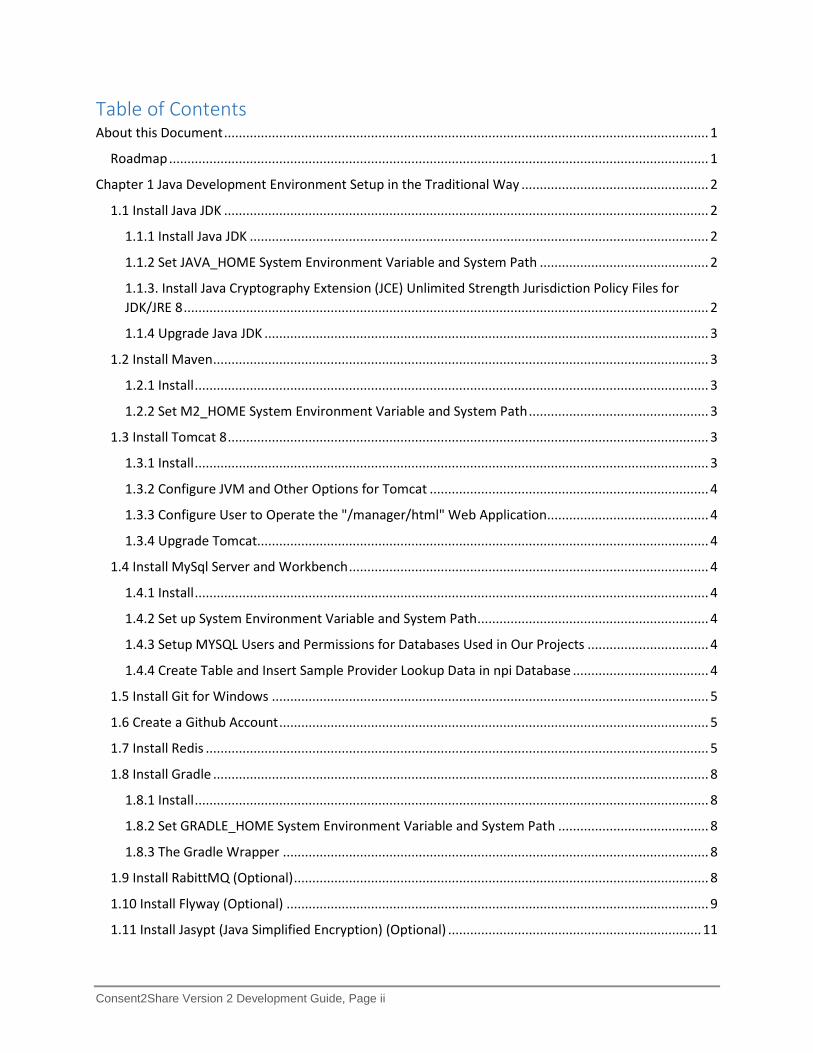
Table of Contents About this Document .................................................................................................................................... 1
Roadmap ................................................................................................................................................... 1
Chapter 1 Java Development Environment Setup in the Traditional Way ................................................... 2
1.1 Install Java JDK .................................................................................................................................... 2
1.1.1 Install Java JDK ............................................................................................................................. 2
1.1.2 Set JAVA_HOME System Environment Variable and System Path .............................................. 2
1.1.3. Install Java Cryptography Extension (JCE) Unlimited Strength Jurisdiction Policy Files for JDK/JRE 8 ............................................................................................................................................... 2
1.1.4 Upgrade Java JDK ......................................................................................................................... 3
1.2 Install Maven ....................................................................................................................................... 3
1.2.1 Install ............................................................................................................................................ 3
1.2.2 Set M2_HOME System Environment Variable and System Path ................................................. 3
1.3 Install Tomcat 8 ................................................................................................................................... 3
1.3.1 Install ............................................................................................................................................ 3
1.3.2 Configure JVM and Other Options for Tomcat ............................................................................ 4
1.3.3 Configure User to Operate the "/manager/html" Web Application ............................................ 4
1.3.4 Upgrade Tomcat........................................................................................................................... 4
1.4 Install MySql Server and Workbench .................................................................................................. 4
1.4.1 Install ............................................................................................................................................ 4
1.4.2 Set up System Environment Variable and System Path ............................................................... 4
1.4.3 Setup MYSQL Users and Permissions for Databases Used in Our Projects ................................. 4
1.4.4 Create Table and Insert Sample Provider Lookup Data in npi Database ..................................... 4
1.5 Install Git for Windows ....................................................................................................................... 5
1.6 Create a Github Account ..................................................................................................................... 5
1.7 Install Redis ......................................................................................................................................... 5
1.8 Install Gradle ....................................................................................................................................... 8
1.8.1 Install ............................................................................................................................................ 8
1.8.2 Set GRADLE_HOME System Environment Variable and System Path ......................................... 8
1.8.3 The Gradle Wrapper .................................................................................................................... 8
1.9 Install RabittMQ (Optional) ................................................................................................................. 8
1.10 Install Flyway (Optional) ................................................................................................................... 9
1.11 Install Jasypt (Java Simplified Encryption) (Optional) ..................................................................... 11
Consent2Share Version 2 Development Guide, Page iii
1.12 Configure SMTP............................................................................................................................... 11
1.13 Install and Configure ClamAV in Windows ..................................................................................... 12
Chapter 2 Frontend Development Environment Setup the Traditional Way ............................................. 14
2.1 Install Platform - Node.js .................................................................................................................. 14
2.2 Install grunt globally .......................................................................................................................... 14
Chapter 3 Enable SSL................................................................................................................................... 15
3.1 Enable SSL While Running as a JAR ................................................................................................... 15
3.1 Enable SSL While Running as a Docker Container ............................................................................ 15
3.3 Override Java CA Certificates Store in Docker Environment ............................................................ 16
Chapter 4 Install, Configure, and Use IntelliJ IDEA to Run and Debug C2S ................................................ 17
4.1 Install ................................................................................................................................................. 17
4.2 Configure ........................................................................................................................................... 18
4.2.1 Configure/Update JDK ............................................................................................................... 18
4.2.2 Configure Maven ........................................................................................................................ 18
4.2.3 Set Up Tomcat ............................................................................................................................ 19
4.2.4 Configure Git (Optional) ............................................................................................................. 19
4.2.5 Configure Github (Optional) ...................................................................................................... 20
4.2.6 Configure for Frontend Development ....................................................................................... 20
4.3 Install Lombok Plugin ........................................................................................................................ 21
For Intellij Plugin Installation: ............................................................................................................. 21
4.4 Open Multiple Projects in the Same Window ................................................................................... 21
4.4.1 Create an Empty Project to House Other Projects as Modules ................................................. 22
4.4.2 Import admin-portal-ui Server Maven Project .......................................................................... 22
4.4.3 Import admin-portal-ui Client Project ....................................................................................... 24
4.4.4 Add Unregistered Roots for New Modules Under Git Source Control ...................................... 27
4.5 Run/Debug Source Code the Traditional Way .................................................................................. 27
4.5.1 Run/Debug Configuration with Tomcat ..................................................................................... 28
4.5.2 Use Multirun Plugin to Run C2S ................................................................................................. 30
4.5.3 Develop C2S Portal UI Projects .................................................................................................. 32
4.6 Configure and Deploy Logback ......................................................................................................... 34
4.7 Deploy and Configure Guvnor ..................................................................................................... 35
Chapter 5 Development Environment Setup the Docker Way ................................................................... 38
5.1 Introduction ...................................................................................................................................... 38
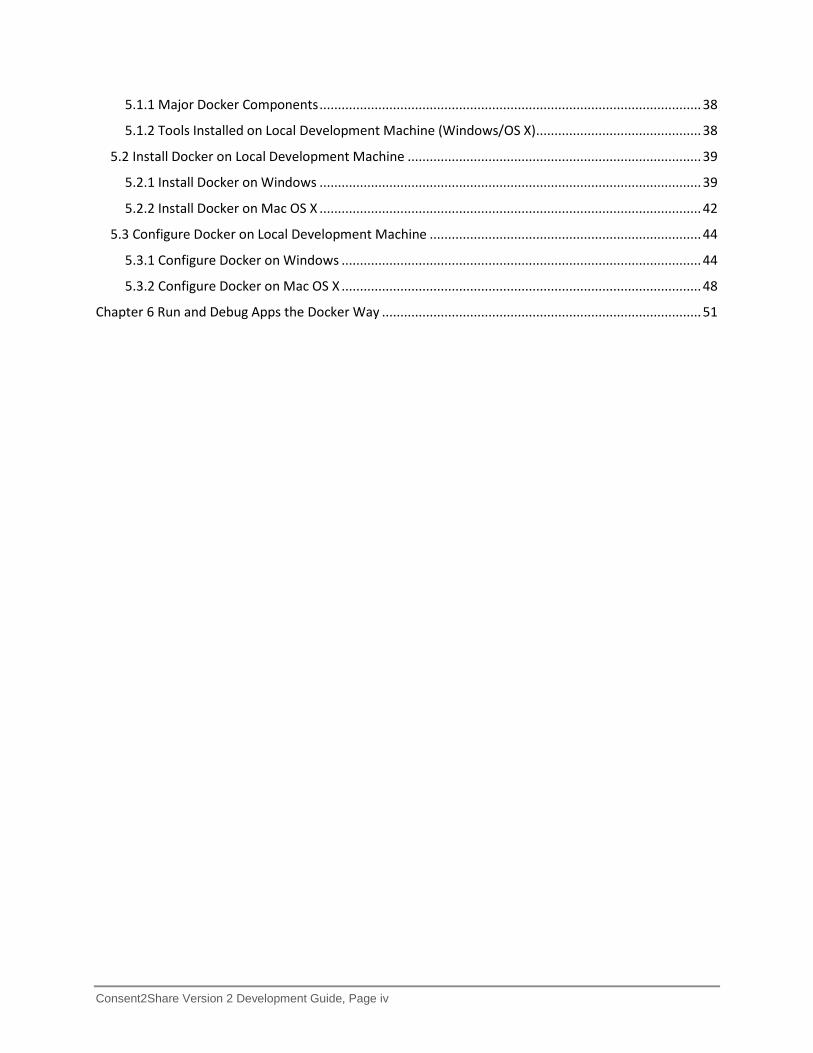
Consent2Share Version 2 Development Guide, Page iv
5.1.1 Major Docker Components ........................................................................................................ 38
5.1.2 Tools Installed on Local Development Machine (Windows/OS X) ............................................. 38
5.2 Install Docker on Local Development Machine ................................................................................ 39
5.2.1 Install Docker on Windows ........................................................................................................ 39
5.2.2 Install Docker on Mac OS X ........................................................................................................ 42
5.3 Configure Docker on Local Development Machine .......................................................................... 44
5.3.1 Configure Docker on Windows .................................................................................................. 44
5.3.2 Configure Docker on Mac OS X .................................................................................................. 48
Chapter 6 Run and Debug Apps the Docker Way ....................................................................................... 51

Consent2Share Version 2 Development Guide, Page 1
About this Document The purpose of this Consent2Share (C2S) Version 2 Development Guide is to provide clear directions to developers to quickly set up their development machines to start focusing on coding for the applications.
The eventual goal is to get a fast, repeatable, and reliable environment set up to quickly start writing code with a few commands or even one command by utilizing infrastructure as code.
Roadmap This document is divided into several chapters.
Chapter 1—Java Development Environment Setup in the Traditional Way describes steps to set up the Java (Backend) development environment in the traditional way: installing all the tools manually directly on the development machine
Chapter 2—Frontend Development Environment Setup in the Traditional Way describes steps to set up the frontend development environment in the traditional way: installing all the tools manually directly on the development machine
Chapter 3—Using HTTPS for web applications has become standard. It is a good practice to have HTTPS enabled in the development environment as real as possible. This chapter describes configuring SSL for Edge Server of C2S.
Note: Once you complete the first three chapters, you should be able to do development work.
Chapter 4—Install, Configure, and use IntelliJ IDEA to Run/Debug C2S. This chapter reviews how to use IntelliJ IDEA to load C2S projects, write codes, and run/debug source codes.
Chapter 5—Development Environment Setup the Docker Way introduces Docker
Chapter 6—Run and Debug Apps the Docker Way explains how to run and debug C2S the Docker way
Importantly, this development guide is dynamic and will be continually updated over time.
Consent2Share Version 2 Development Guide, Page 2
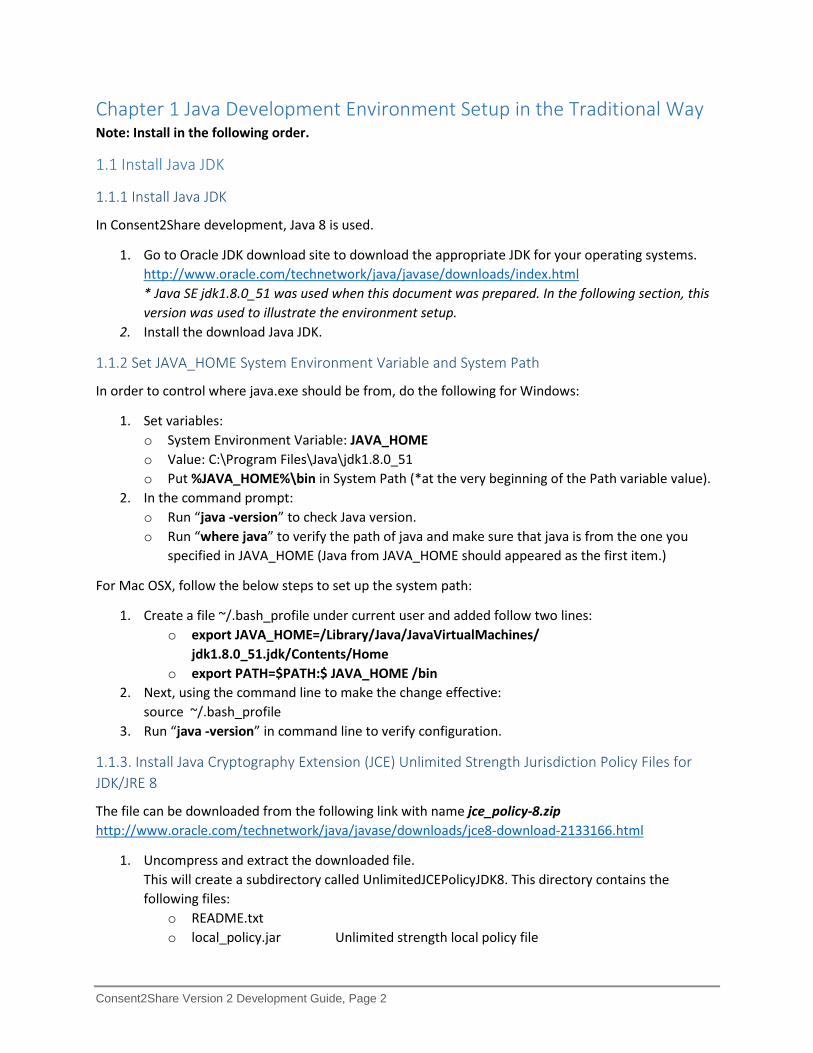
Chapter 1 Java Development Environment Setup in the Traditional Way Note: Install in the following order.
1.1 Install Java JDK 1.1.1 Install Java JDK
In Consent2Share development, Java 8 is used.
1. Go to Oracle JDK download site to download the appropriate JDK for your operating systems. http://www.oracle.com/technetwork/java/javase/downloads/index.html * Java SE jdk1.8.0_51 was used when this document was prepared. In the following section, this version was used to illustrate the environment setup.
2. Install the download Java JDK.
1.1.2 Set JAVA_HOME System Environment Variable and System Path
In order to control where java.exe should be from, do the following for Windows:
1. Set variables: o System Environment Variable: JAVA_HOME o Value: C:\Program Files\Java\jdk1.8.0_51 o Put %JAVA_HOME%\bin in System Path (*at the very beginning of the Path variable value).
2. In the command prompt: o Run “java -version” to check Java version. o Run “where java” to verify the path of java and make sure that java is from the one you
specified in JAVA_HOME (Java from JAVA_HOME should appeared as the first item.)
For Mac OSX, follow the below steps to set up the system path:
1. Create a file ~/.bash_profile under current user and added follow two lines: o export JAVA_HOME=/Library/Java/JavaVirtualMachines/
jdk1.8.0_51.jdk/Contents/Home o export PATH=$PATH:$ JAVA_HOME /bin
2. Next, using the command line to make the change effective: source ~/.bash_profile
3. Run “java -version” in command line to verify configuration.
1.1.3. Install Java Cryptography Extension (JCE) Unlimited Strength Jurisdiction Policy Files for JDK/JRE 8
The file can be downloaded from the following link with name jce_policy-8.zip http://www.oracle.com/technetwork/java/javase/downloads/jce8-download-2133166.html
1. Uncompress and extract the downloaded file. This will create a subdirectory called UnlimitedJCEPolicyJDK8. This directory contains the following files:
o README.txt o local_policy.jar Unlimited strength local policy file
Consent2Share Version 2 Development Guide, Page 3
o US_export_policy.jar Unlimited strength US export policy file 2. Install the unlimited strength policy JAR files.
In case you later decide to revert to the original "strong" but limited policy versions, first make a copy of the original JCE policy files (US_export_policy.jar and local_policy.jar). Then replace the strong policy files with the unlimited strength versions extracted in the previous step. The standard place for JCE jurisdiction policy JAR files is: %JAVA_HOME%\jre\lib\security [Windows]
1.1.4 Upgrade Java JDK When upgrading to a new version of JDK, make sure to follow the above steps. Remember to reconfigure SDK in IntelliJ IDEA IDE. See instructions in the Install/Configure IntelliJ IDEA section.
1.2 Install Maven 1.2.1 Install
1. Download the latest version from https://maven.apache.org/download.cgi * Apache-maven-3.3.3 was used when this document was prepared. In the following section, this version is used to illustrate the environment setup.
2. Extract the download maven, such as apache-maven-3.3.3-bin.zip, to the c:\java folder.
1.2.2 Set M2_HOME System Environment Variable and System Path For Windows,
1. Set M2_HOME system environment variable: o Variable: M2_HOME o Value: C:\java\apache-maven-3.3.3
2. Put %M2_HOME%\bin in system environment variable Path. 3. Run “mvn -version” to verify
For Mac OSX, follow the steps below to set up the system path:
1. Create a file ~/.bash_profile under current user (example: =/Users/XXX) and added: o export M2_HOME=/Users/XXX/springsource/apache-maven-3.3.3 o export PATH=$PATH:$M2_HOME/bin
2. After that, using command line to make the change effective: source ~/.bash_profile
3. Run “mvn -version” in command line to verify configuration.
1.3 Install Tomcat 8 1.3.1 Install
1. Directly download from: • https://tomcat.apache.org/download-80.cgi (the Tomcat 8 download site)
* Apache-tomcat-8.0.26-windows-x64 was used when this document was prepared.
2. Unzip to your local drive e.g. c:\java folder.
Consent2Share Version 2 Development Guide, Page 4
1.3.2 Configure JVM and Other Options for Tomcat You can configure JVM and other options for Tomcat. Go to bin folder of the Tomcat installation and open catlina.bat/catlina.sh based on your operation system to see how you can configure.
By default, Tomcat runs on JVM pointed by the JAVA_HOME environment variable.
1.3.3 Configure User to Operate the "/manager/html" Web Application Go to the conf folder of the Tomcat installation path, open tomcat-users.xml file and add the following line inside of tomcat-users element:
<user username="admin" password="admin" roles="manager-gui"/>
1.3.4 Upgrade Tomcat When upgrading to a new version of Tomcat, make sure to follow the above steps. Remember to reconfigure the Tomcat application server in IntelliJ IDEA IDE. See instructions in the Install IntelliJ IDEA section.
1.4 Install MySql Server and Workbench 1.4.1 Install
1. Directly download from http://dev.mysql.com/downloads/mysql/ * mysql-installer-community-5.6.27.0.msi was downloaded and installed when this document was prepared.
2. Install MySql. 3. Set up username (root) and password (admin) as admin to access local MySql Server.
1.4.2 Set up System Environment Variable and System Path For Windows,
1. Set MYSQL_HOME System Environment Variable: • Variable: MYSQL_HOME • Value: C:\Program Files\MySQL\MySQL Server 5.6
2. Append path system variable with %MYSQL_HOME%\bin
1.4.3 Setup MYSQL Users and Permissions for Databases Used in Our Projects By default, C2S applications were given all root permissions. Please revise the permissions based your environments.
Create empty schemas: pcm, phr, patient-user, uaa, npi.
1.4.4 Create Table and Insert Sample Provider Lookup Data in npi Database
1. Find the sql script in the following folder https://github.com/bhits/pls-api/blob/master/npi-db-sample/npi-db-sample.sql
2. Run the sql script in MySql Workbench, which will create npi table in npi schema with 10 providers.
Consent2Share Version 2 Development Guide, Page 5
1.5 Install Git for Windows Download and install Git. Git can be downloaded from: https://github.com/msysgit/msysgit/releases/download/Git-1.9.5-preview20141217/Git-1.9.5-preview20141217.exe * Git-1.9.5-preview20141217.exe was downloaded and installed when this document was prepared.
Note:
1. Do not install Git for Window 2.x because it has certain inconveniences, such as there is no longer a system-level gitconfig
2. To handle line ending issue, issue the following command: git config --global core.autocrlf true
1.6 Create a Github Account Once you create a GitHub account, you can access our public Source Code repositories from: https://github.com/bhits/
1. Remember to set up a Git global username and email. Otherwise, your commit will not be appropriately credited.
2. To setup global username: git config --global user.name “your username” (make sure you enter double ‘-’ before global).
3. To setup global email address: git config --global user.email “your email address”
4. To verify your username and email set up: git config --global user.name git config --global user.email
1.7 Install Redis Windows Installation:
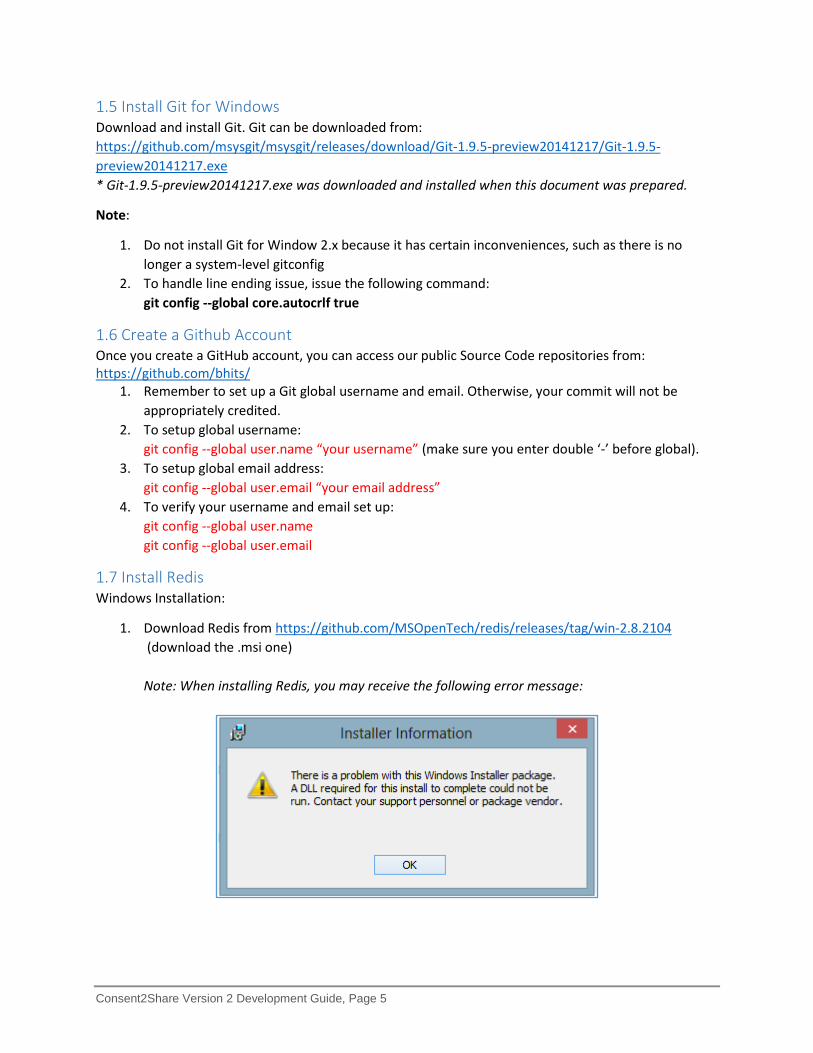
1. Download Redis from https://github.com/MSOpenTech/redis/releases/tag/win-2.8.2104 (download the .msi one) Note: When installing Redis, you may receive the following error message:

Consent2Share Version 2 Development Guide, Page 6
This error may arise for the following reasons: Not full access to the folder: C:\Users\<username>\AppData\Local\Microsoft\Windows\ or C:\Users\<username>\AppData\Local\Temp\ The solution to solve this error is: change the permissions to full access to: C:\Users\<username>\AppData\Local\Microsoft\Windows\ or C:\Users\<username>\AppData\Local\Temp\
1. Make sure that the hidden files and folders are shown in Windows: 1.1. Open the Control Panel in Windows. 1.2. Click on Folder Options to open the Folder Options pop-up. 1.3. In the tab View under the section Advanced settings, click Show hidden files, folders and drives. 1.4. Click OK.
2. Open Windows Explorer and locate the folder mentioned above. 3. Right click on the folder. The Local Properties pop-up window will appear. 4. Select the tab Security. 5. Click Edit and the Permissions for Local pop up window will open. 6. On Group or user names, select the desired user. 7. Ensure that the Allow check box for Full control is activated, if not, activate it. 8. On the Permissions for Local pop up window, click OK (if no changes were made) or click Apply (if changes were made). 9. On the Local Properties pop up window, click OK (if no changes were made) or click Apply (if changes were made).
2. Follow the installation instruction and check the option to put the redis installation folder in
system path environment variable 3. When you get to the memory limit page check “Set the Max Memory and MaxHeap limits” 4. Change the numbers accordingly ( “250” for MaxMemory, 375 for MaxHeap)
Consent2Share Version 2 Development Guide, Page 7
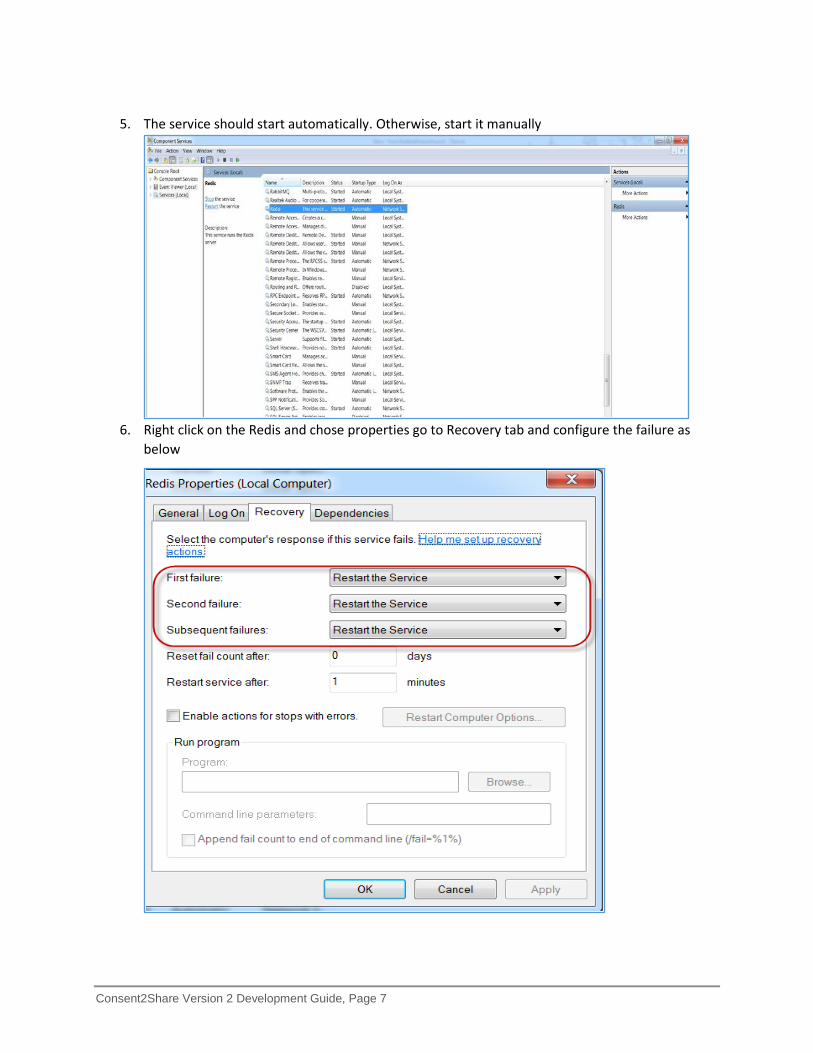
5. The service should start automatically. Otherwise, start it manually
6. Right click on the Redis and chose properties go to Recovery tab and configure the failure as
below
Consent2Share Version 2 Development Guide, Page 8
7. Run the following commands to verify the installation redis-cli --version redis-server --version
1.8 Install Gradle 1.8.1 Install
1. Downloaded gradle from https://gradle.org/gradle-download/ * gradle -2.8-all.zip was used when this document was prepared.
2. Extract gradle from gradle-2.8-all.zip to the c:\java folder.
1.8.2 Set GRADLE_HOME System Environment Variable and System Path 1. Set GRADLE_HOME system environment variable:
o Variable: GRADLE_HOME o Value: C:\java\gradle-2.8 (Based on your directory) o Put %GRADLE_HOME%\bin in System Path.
2. Run “gradle -version” to verify
1.8.3 The Gradle Wrapper The Gradle Wrapper is the preferred way of starting a Gradle build. The wrapper is a batch script on Windows and a shell script for other operating systems. When you start a Gradle build via the wrapper, Gradle will be automatically downloaded and used to run the build.
Check the wrapper into version control. By distributing the wrapper with your project, anyone can work with it without needing to install Gradle beforehand. Even better, users of the build are guaranteed to use the version of Gradle that the build was designed to work with. Of course, this is also great for continuous integration servers (i.e. servers that regularly build your project) as it requires no configuration on the server.
1.9 Install RabittMQ (Optional) Installing on Windows: https://www.rabbitmq.com/install-windows.html
1. Uninstall previous versions for Erlang Windows Binary File and RabbitMQ. 2. Run Erlang Windows Binary File (otp_win64_18.3.exe). 3. Install RabbitMQ server: Run rabbitmq-server-3.5.5.exe to set RabbitMQ up and running as a
service with default configuration. *Please note as of 04/18/2016, the latest rabbitmq-server-3.6.1.exe which is 64 bit rather than 32 bit has some installation issues and doesn’t work.
4. Enable Management Plugin: Start Menu RabbitMQ Server RabbitMQ Command Prompt (sbin dir), then run the following command in the command prompt: rabbitmq-plugins enable rabbitmq_management
5. Then stop and start RabbitMQ Service from Start Menu RabbitMQ Server. You should be able to browse http://localhost:15672/ and you can use guest/guest to login.
Steps for installing RabbitMQ on Mac:
1. Download RabbitMQ for Mac: https://www.rabbitmq.com/releases/rabbitmq-server/v3.1.3/rabbitmq-server-mac-standalone-3.1.3.tar.gz
2. Move the downloaded file to the user folder using this command in terminal:
Consent2Share Version 2 Development Guide, Page 9
mv ~/Downloads/rabbitmq-server-mac-standalone-3.1.3.tar.gz ~ 3. Extract the file:
tar zxvf ~/rabbitmq-server-mac-standalone-3.1.3.tar.gz 4. Change directory to RabbitMQ:
cd ~/rabbitmq_server-3.1.3/sbin/ 5. Install plugins:
./rabbitmq-plugins enable rabbitmq_management 6. You can either run the server in normal mode:
./rabbitmq-server In normal mode, you have to keep the terminal open while the server is running. To stop the server, use Ctrl+C.
7. Or detached mode: ./rabbitmq-server -detached In detached mode, the server is running as a background service, you need to use: ./rabbitmqctl stop
8. This will stop the server. The server will automatically start when computer restarted. 9. When server started, browse http://localhost:15672/ and use guest/guest to login.
1.10 Install Flyway (Optional)
Prerequisites:
1. Flyway 3.2.1 and mysql-connector-java-5.1.26-bin.jar. 2. download from internet:
http://flywaydb.org/getstarted/download.html http://mvnrepository.com/artifact/mysql/mysql-connector-java/5.1.26
Windows Installation:
1. Copy and unzip ‘flyway-commandline-3.2.1-windows-x64.zip’ to your machine 2. Set FLYWAY_HOME system environment variable and system path (Optional)
o Variable: FLYWAY_HOME o Value: C:\java\flyway-3.2.1 (Based on your directory) o Put %FLYWAY_HOME% in System Path. o Run flyway -version to check Flyway version.
3. Copy mysql-connector-java-5.1.26-bin.jar to flyway-3.2.1\jars 4. Go to directory flyway-3.2.1\conf directory and set up configuration
o flyway.url=jdbc:mysql://localhost:3306/consent2share-bl o flyway.user=username o flyway.password=password
5. Go to command prompt by typing “flyway info” command to verify if the flyway works.

Consent2Share Version 2 Development Guide, Page 10
6. For more, please read: http://flywaydb.org/documentation/commandline/
Linux Installation:
1. Create a directory flyway under user: mkdir flyway 2. Set Get the latest flyway binaries (refer to http://flywaydb.org/getstarted/download.html).
sudo wget https://bintray.com/artifact/download/business/maven/flyway-commandline-3.2.1-linux-x64.tar.gz
3. Untar the gz under flyway directory. This will create a flyway-3.2.1 directory under /usr/flyway: sudo tar -zxvf flyway-commandline-3.2.1-linux-x64.tar.gz
4. Remove the tar.gz: rm -rf flyway-commandline-3.2.1-linux-x64.tar.gz
5. Create a softlink to the path /usr/flyway/flyway-3.2.1 as /usr/flyway/latest: ln -s /usr/flyway/flyway-3.2.1/ /usr/flyway/latest
6. Create a file called flyway.sh with following contents under /etc/profile.d: #! /bin/sh #! Set FLYWAY_HOME environment variable to point to latest FLYWAY path export FLYWAY_HOME=/usr/flyway/latest export FLYWAY_HOME PATH=$PATH:$FLYWAY_HOME export PATH
7. Copy ‘mysql-connector-java-5.1.26-bin.jar’ to flyway-3.2.1\drivers
8. Go to directory flyway-3.2.1\conf directory and set up configuration Note: following is using local information for sample
Consent2Share Version 2 Development Guide, Page 11
o flyway.url=jdbc:mysql://localhost:3306/ehn2_consent2share-bl o flyway.user=username o flyway.password=password
9. Navigate to /usr/flyway/latest and execute the following sudo chmod +x flyway
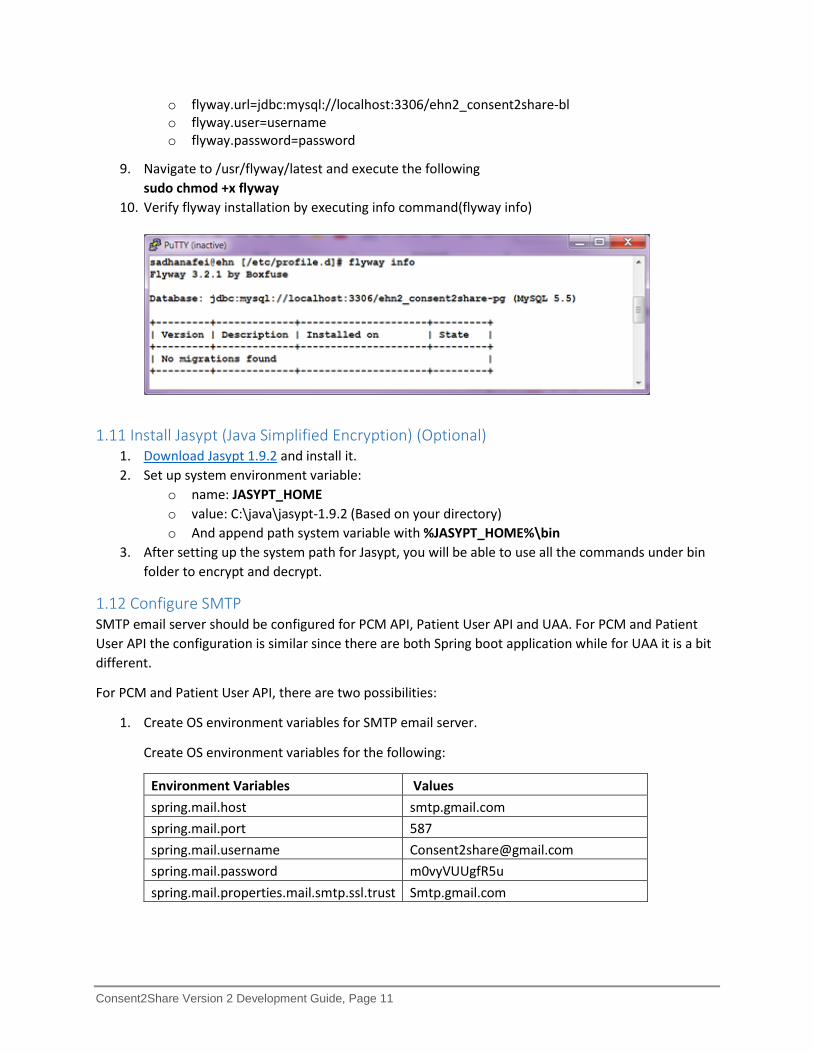
10. Verify flyway installation by executing info command(flyway info)
1.11 Install Jasypt (Java Simplified Encryption) (Optional) 1. Download Jasypt 1.9.2 and install it. 2. Set up system environment variable:
o name: JASYPT_HOME o value: C:\java\jasypt-1.9.2 (Based on your directory) o And append path system variable with %JASYPT_HOME%\bin
3. After setting up the system path for Jasypt, you will be able to use all the commands under bin folder to encrypt and decrypt.
1.12 Configure SMTP SMTP email server should be configured for PCM API, Patient User API and UAA. For PCM and Patient User API the configuration is similar since there are both Spring boot application while for UAA it is a bit different.
For PCM and Patient User API, there are two possibilities:
1. Create OS environment variables for SMTP email server.
Create OS environment variables for the following:
Environment Variables Values spring.mail.host smtp.gmail.com spring.mail.port 587 spring.mail.username [email protected] spring.mail.password m0vyVUUgfR5u spring.mail.properties.mail.smtp.ssl.trust Smtp.gmail.com
Consent2Share Version 2 Development Guide, Page 12
2. Pass SMTP email server configuration as Program Arguments in IntelliJ.
See section 4.5.2.1.
For UAA you can configure the SMTP email server in Tomcat. See section 4.5.1.1
1.13 Install and Configure ClamAV in Windows 1. Download the Win64 version of ClamAV to your local machine. 2. Create the following folders to be used by ClamAV:
a. C:\ClamAV-x64 b. C:\ClamAV-x64\db c. C:\ClamAV-x64\log
3. Run the executable that you just downloaded and remember to specify the installation path to: C:\ClamAV-x64
4. Create clamd.conf and freshclam.conf in the C:\ClamAV-x64 folder with content as below: a) For clamd.conf add this content
TCPAddr 127.0.0.1
TCPSocket 3310
MaxThreads 2
LogTime true
LogFile c:\ClamAV-x64\log\clamd.log
DatabaseDirectory C:\ClamAV-x64\db
b) For freshclam.conf add this content # URL of server where database updates are to be downloaded from # If this option is given multiple times, each will be tried in # the order given until an update is successfully downloaded #MAKE SYU DatabaseDirectory "c:/ClamAV-x64/db/" DatabaseMirror database.clamav.net # Number of times to try each mirror before moving to the next one MaxAttempts 3 #LogFile c:/ClamAV-x64/log/freshclam.log NotifyClamd c:/ClamAV-x64/clamd.conf LogFileMaxSize 20480000 LogTime true UpdateLogFile c:/ClamAV-x64/log/freshclam.log
5) Navigate to the ClamAV installation path C:\ClamAV-x64 and click on C:\ClamAV-x64\freshclam.exe to create the Database.
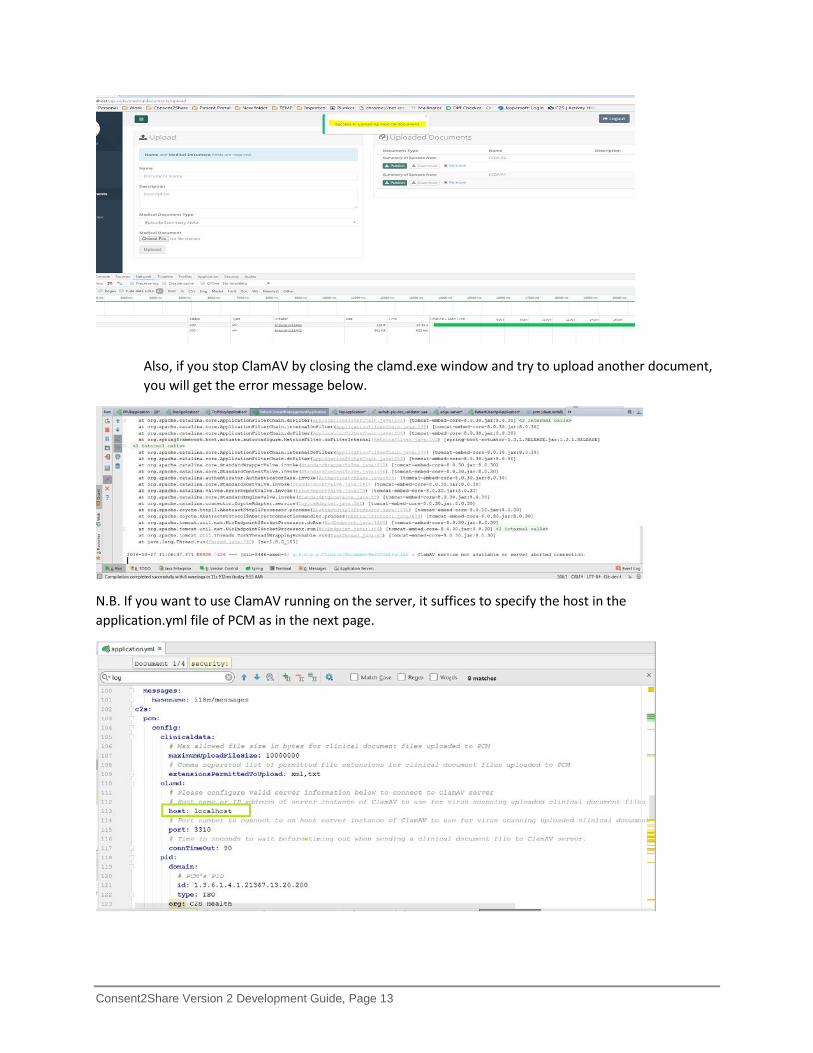
6) Start ClamAV by clicking on C:\ClamAV-x64\clamd.exe. 7) To verify installation, run C2S patient portal and in upload a document in Medical Document
section. You will get a success message as shown below.
Consent2Share Version 2 Development Guide, Page 13
Also, if you stop ClamAV by closing the clamd.exe window and try to upload another document, you will get the error message below.
N.B. If you want to use ClamAV running on the server, it suffices to specify the host in the application.yml file of PCM as in the next page.

Consent2Share Version 2 Development Guide, Page 14
Chapter 2 Frontend Development Environment Setup the Traditional Way 2.1 Install Platform - Node.js Go to https://nodejs.org/, download node.js for your operating system. Along with node.js, npm is installed as well.
Verify the installation by issuing the following commands:
o $ node --version o $ npm --version
2.2 Install grunt globally First, run the following command: $ npm install -g grunt-cli
Next, verify the installation by issuing the following command: $ grunt --version

Consent2Share Version 2 Development Guide, Page 15
Chapter 3 Enable SSL The use of HTTPS is commonplace and used by all web application. To get a real HTTPS experience for the local development environment, a SSL certificate, signed by the specific Certificate Authority, need to be generated. The steps of the SSL certificate generation will not be addressed in this guide.
For simplicity in development and testing environments, SSL is NOT enabled by default in configurations in Consent2Share components. Please follow the instructions given in particular microservice documentations in Github for enabling SSL if needed to do so in your particular deployment environment.
Also, please be mindful for overriding the target endpoints in the default configurations to use HTTPS for SSL enabled services. This chapter only provides an example to apply SSL in edge-server during the development progress.
* The Edge Server acts as a gatekeeper to the outside world. It keeps unauthorized external requests from passing through.
3.1 Enable SSL While Running as a JAR • java -jar edge-server-x.x.x-SNAPSHOT.jar --spring.profiles.active=ssl --
server.ssl.key-store=/path/to/ssl_keystore.keystore --server.ssl.key-store-password=strongkeystorepassword
3.1 Enable SSL While Running as a Docker Container Note: Docker Container will be Introduced in Chapter 5
• docker run -d -v "/path/on/dockerhost/ssl_keystore.keystore:/path/to/ssl_keystore.keystore" bhits/edge-server:latest --spring.profiles.active=ssl --server.ssl.key-store=/path/to/ssl_keystore.keystore --server.ssl.key-store-password=strongkeystorepassword
• In a docker-compose.yml, this can be provided as:
version: '2' services: ... edge-server.c2s.com: image: "bhits/edge-server:latest" command: ["--spring.profiles.active=ssl","--server.ssl.key-store=/path/to/ssl_keystore.keystore", "--server.ssl.key-store-password=strongkeystorepassword"] volumes: - /path/on/dockerhost/ssl_keystore.keystore:/path/to/ssl_keystore.keystore ... NOTE: As seen in the examples above, /path/to/ssl_keystore.keystore is made available to the container via a volume mounted from the Docker host running this container.
Consent2Share Version 2 Development Guide, Page 16
3.3 Override Java CA Certificates Store in Docker Environment Java has a default CA Certificates Store that allows it to trust well-known certificate authorities. For development and testing purposes, one might want to trust additional self-signed certificates. In order to override the default Java CA Certificates Store in a Docker container, one can mount a custom cacerts file over the default one in the Docker image as docker run -d -v "/path/on/dockerhost/to/custom/cacerts:/etc/ssl/certs/java/cacerts" bhits/edge-server:latest NOTE: The cacerts references given in the both sides of volume mapping above are files, not directories.
Consent2Share Version 2 Development Guide, Page 17
Chapter 4 Install, Configure, and Use IntelliJ IDEA to Run and Debug C2S 4.1 Install
1. Download latest IntelliJ IDEA Community or Ultimate from: https://www.jetbrains.com/idea/download. * The community version is free, but it has a lot of limitations regarding integration and supports, such as Java application server, Sprint support and plugins (NodeJS, AngualrJS, Lombok etc). * The Ultimate version is not free and requires a license. * The Ultimate version was used to develop C2S and this chapter is based on the Ultimate version.
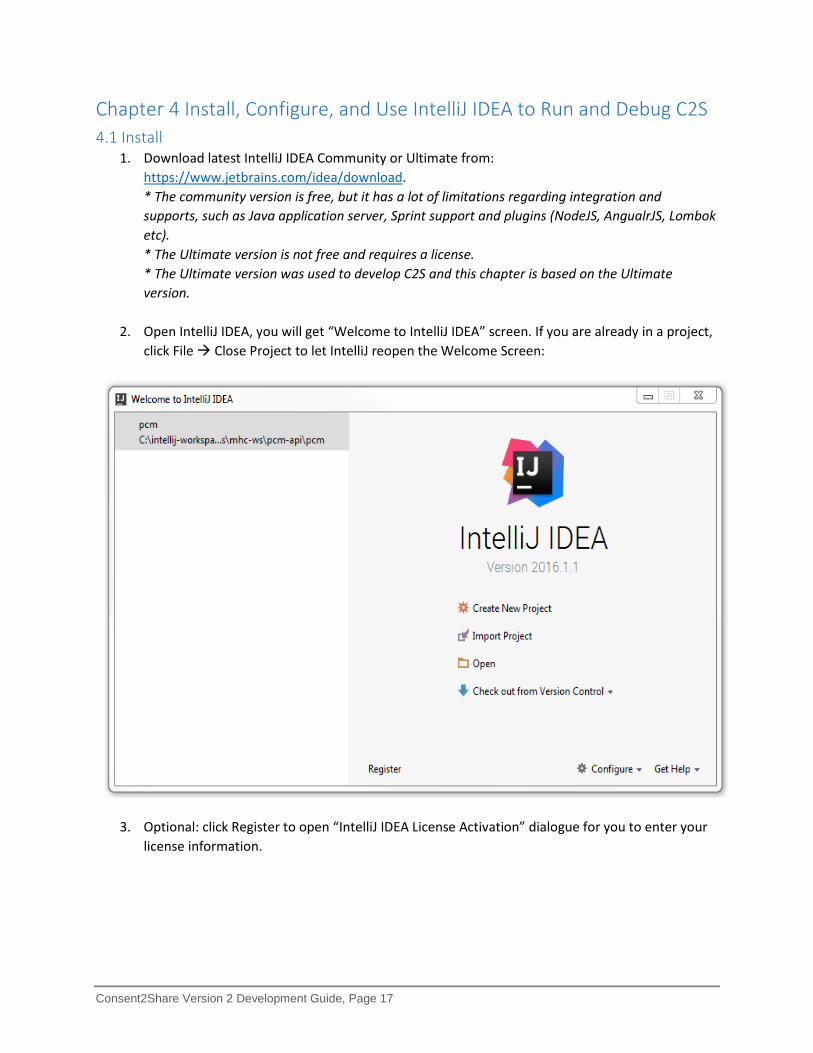
2. Open IntelliJ IDEA, you will get “Welcome to IntelliJ IDEA” screen. If you are already in a project, click File Close Project to let IntelliJ reopen the Welcome Screen:
3. Optional: click Register to open “IntelliJ IDEA License Activation” dialogue for you to enter your
license information.
Consent2Share Version 2 Development Guide, Page 18
4.2 Configure 4.2.1 Configure/Update JDK Refer to https://www.jetbrains.com/help/idea/2016.1/configuring-global-project-and-module-sdks.html
4.2.1.1 Configure SDKs at the Global (IDE) Level 1. Open the Default Project Structure dialog (from Welcome Screen Configure Project
Defaults Project Structure, or from File Other Settings Default Project Structure). 2. In the left-hand pane, under Platform Settings, click SDKs. 3. To add a new SDK, click Add and select the desired SDK type. 4. In the dialog that opens, select the SDK home directory and click OK. 5. As a result, a new SDK is added to IntelliJ IDEA and its settings are shown on the SDK page in the
right-hand part of the dialog. 6. Optionally, edit the SDK name and contents. 7. If necessary, add more SDKs as described above. 8. Click OK in the Project Structure dialog.
4.2.1.2 Configure a Project SDK 1. Open the Project Structure dialog (e.g. Ctrl+Shift+Alt+S, or from File Project Structure). 2. In the left-hand pane, under Project Settings, click Project. 3. On the page that opens in the right-hand part of the dialog, select the necessary SDK from the
Project SDK list. 4. If the desired SDK is not present in the list, click New and select the necessary SDK type. In the
dialog that opens, select the SDK home directory and click OK. As a result, a new SDK is added to IntelliJ IDEA as Global Platform Settings and selected as the project SDK.
5. To view or edit the SDK name and contents, click Edit. (The SDK page will open.) 6. Click OK in the Project Structure dialog.
4.2.1.3 Configure a Module SDK * If there is no project opened in the IntelliJ, please open a project first to configure the module.
1. Open the Project Structure dialog (e.g. Ctrl+Shift+Alt+S, or from File Project Structure). 2. In the left-hand pane, under Project Settings, click Modules. 3. In the middle pane, select the module of interest. 4. In the right-hand part of the dialog, on the Module page, select the Dependencies tab. 5. Select the SDK from the Module SDK list. (To select the project SDK, select Project SDK. Note
that if you change the project SDK later, the module SDK will change accordingly.) 6. If the desired SDK is not present in the list, click New and select the necessary SDK type. In the
dialog that opens, select the SDK home directory and click OK. As a result, a new SDK is added to IntelliJ IDEA as Global Platform Settings and selected as the project SDK
7. To view or edit the SDK name and contents, click Edit. (The SDK page will open.) 8. Click OK in the Project Structure dialog.
4.2.2 Configure Maven 4.2.2.1 Configure Maven at the Global (IDE) level
1. Open the Default Settings dialog (from Welcome Screen Configure Project Defaults Settings, or from File Other Settings Default Settings).
Consent2Share Version 2 Development Guide, Page 19
2. In the left-hand pane, under Build, Execution, Deployment Build Tools, click Maven. 3. In the right-hand pane, set Maven home directory to the Maven directory, which is the parent
folder of bin folder. 4. Click OK in the Default Settings dialog.
4.2.2.2 Configure Maven for a Project 1. Open the Settings dialog (from File Settings). 2. In the left-hand pane, under Build, Execution, Deployment Build Tools, click Maven. 3. In the right-hand pane, set Maven home directory to the Maven directory, which is the parent
folder of bin folder. 4. Click OK in the Settings dialog.
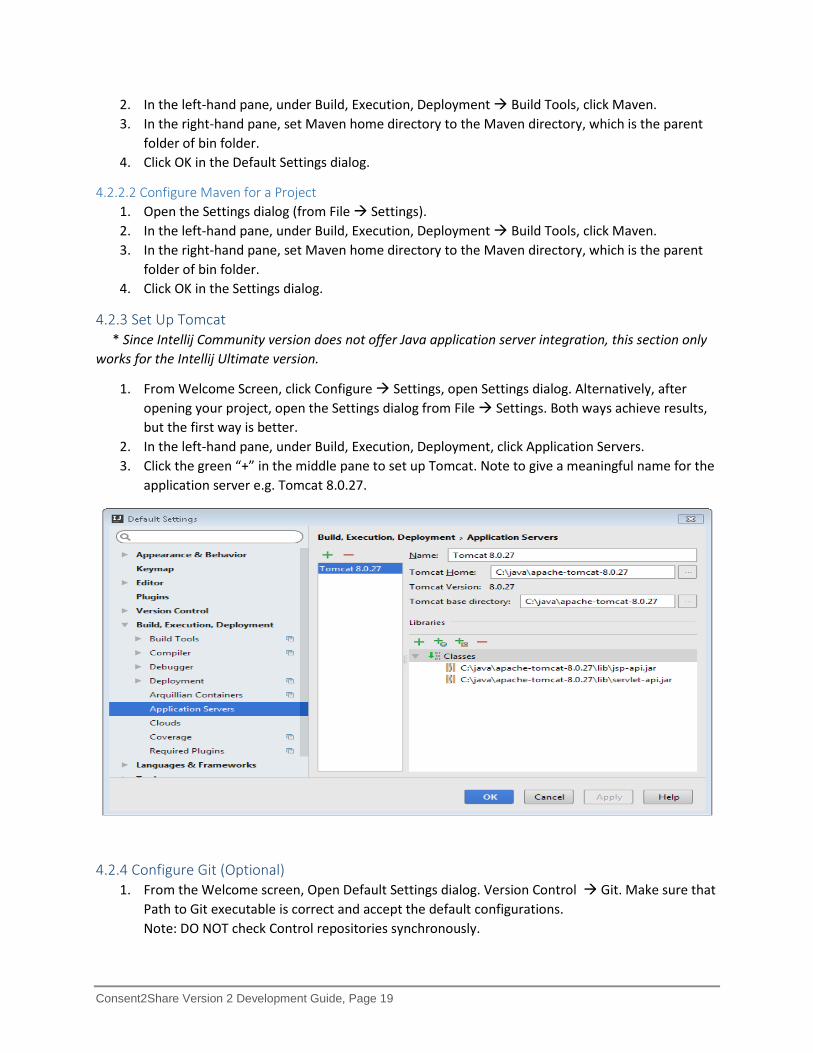
4.2.3 Set Up Tomcat * Since Intellij Community version does not offer Java application server integration, this section only works for the Intellij Ultimate version.
1. From Welcome Screen, click Configure Settings, open Settings dialog. Alternatively, after opening your project, open the Settings dialog from File Settings. Both ways achieve results, but the first way is better.
2. In the left-hand pane, under Build, Execution, Deployment, click Application Servers. 3. Click the green “+” in the middle pane to set up Tomcat. Note to give a meaningful name for the
application server e.g. Tomcat 8.0.27.
4.2.4 Configure Git (Optional) 1. From the Welcome screen, Open Default Settings dialog. Version Control Git. Make sure that
Path to Git executable is correct and accept the default configurations. Note: DO NOT check Control repositories synchronously.
Consent2Share Version 2 Development Guide, Page 20
2. Selecting this configuration means that the Synchronous branch control is enabled. If you have several Git roots in the project, they all are checked out at the same branch.
3. For this project, at least at this stage, we want to control branches for each project module (Microservice) in different roots separately.
4. Once you have loaded a project with several modules source controlled by Git, to let IntelliJ IDEA know the root of every Git repository, select each module in the Project tool window, then click VCS Enable Version Control Integration...., in the Enable Version Control Integration Dialog, select Git in the drop down, click OK. Alternatively, you can open Settings dialogue by clicking File Settings…, in the left-hand pane, select Version Control, in the right pane you can add/remove/edit VCS Directory Mapping.
4.2.5 Configure Github (Optional) 1. From the Welcome screen, Open the Default Settings dialog. Version Control Github. Select
and enter the followings in the right-pane. o Host: github.com o Auth Type: Password o Login: your-user-name o Password: your-password
4.2.6 Configure for Frontend Development 4.2.6.1 Install NodeJS Plugin Note: only Intellij Ultimate version supports this plugin.
1. In the Welcome Screen, click Configure --> Settings --> Plugins --> Browse repositories… --> type node.js to find NodeJS plugin --> Install plugin.
2. Then you will be able to using Run --> Edit Configuration…. to open Run/Debug Configurations and configure to run Node.JS.
4.2.6.2 Install Karma Plugin Note: only Intellij Ultimate version supports this plugin.
In the Welcome Screen, click Configure --> Settings --> Plugins --> Install JetBrains plugin… --> type karma to find Karma plugin --> click the green “Install Plugin” button to install.
4.2.6.3 Install AngularJS Plugin Note: only Intellij Ultimate version supports this plugin.
In the Welcome Screen, click Configure --> Settings --> Plugins --> Install JetBrains plugin… --> type angular to find AngularJS plugin --> click the green “Install Plugin” button to install.
4.2.6.4 Install John Papa’s Angular File Templates and Live Templates 1. Download John Papa’s Angular File templates and Live Templates settings jar archive for
WebStorm from http://jpapa.me/ngstormtmpl, which is names as fileTemplateSettings.jar. 2. Copy fileTemplateSettings.jar to your local computer. 3. Export and backup your local setting first, go to File --> Export Settings…, save the jar to your
backup folder. And it is a good idea to source control this jar file. 4. Import John Papa’s fileTemplateSettings.jar, go to File --> Import Settings… and browse to the
file fileTemplateSettings.jar to import it.
Consent2Share Version 2 Development Guide, Page 21
5. Once the John Papa’s settings are imported, you will see in the Angular related file templates in the New menu. e.g. go to File --> New, you will see serval Angular related file templates.
4.3 Install Lombok Plugin Lombok is a framework that generates boilerplate code in an annotation-driven fashion and it has been utilized in several C2S services. The projects will successfully build if the Lombok is on classpath (as a Maven dependency), however one needs to also install a plugin to IDE to prevent IDE based errors.
For Intellij Plugin Installation: 1. Go to: File > Settings > Plugins 2. Search for “Lombok” to see if it is already installed or not 3. If it is already installed, no additional steps are required. If it is not installed, click “Search in
repositories” link. 4. Select “Lombok Plugin” and click “Install” button. Potentially, you might need to restart the IDE
after installation. 5. See https://projectlombok.org/ for details including documentation and support for other IDEs.
4.4 Open Multiple Projects in the Same Window If your system include multiple projects, it is very convenient to open these projects in the same window for easy development.
There are several ways to do so. You can randomly open one project, which is treated as a host project, and add other projects as modules for this host project. Alternatively, you can create an empty project as a host project to host other projects as modules. The latter method is better.
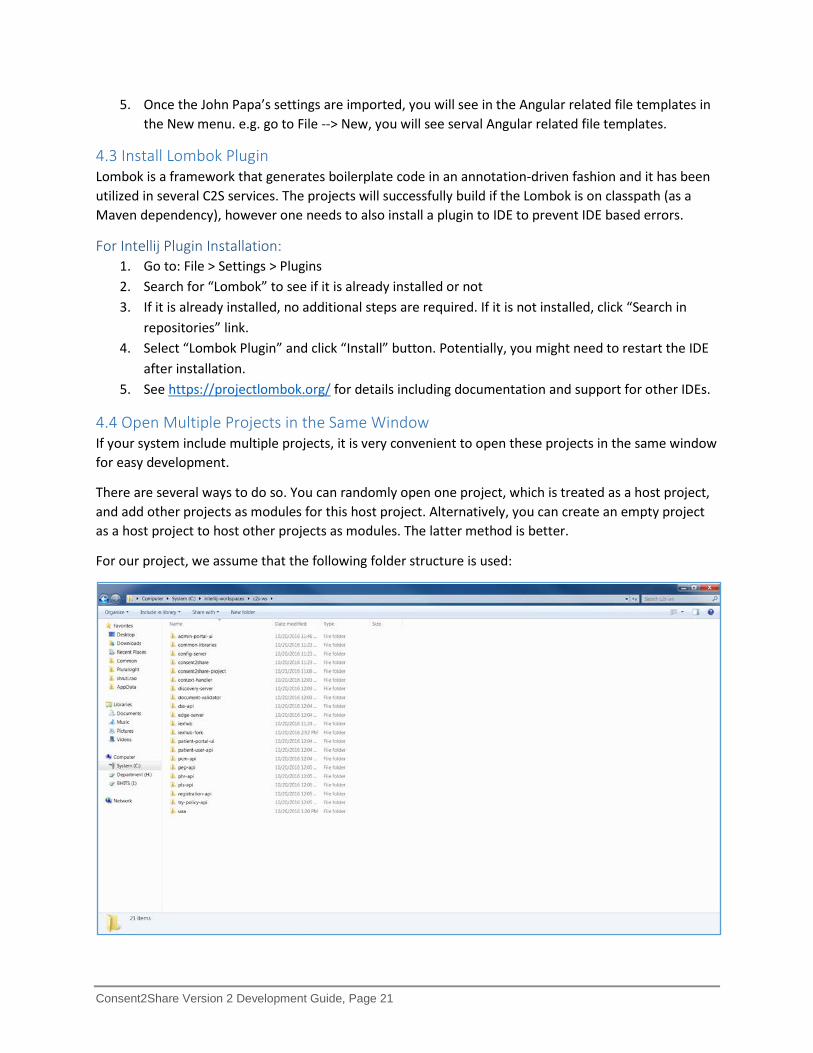
For our project, we assume that the following folder structure is used:
Consent2Share Version 2 Development Guide, Page 22
4.4.1 Create an Empty Project to House Other Projects as Modules 1. In your C:\ drive, create a new folder: intellij-workspaces 2. Inside this folder, create another empty folder: c2s-ws 3. Open IntelliJ 4. From Welcome Screen click “Create New Project” or File New Project to Open New Project
dialog. 5. In the left-hand pane, select Empty Project, then click Next button. 6. Give the name of the project something like mysystem-intellij-projects, then click Finish button
to open Project Structure dialog. 7. In your intellij-workspaces folder, at the SAME level as the c2s-ws folder,
clone ~/subrepo-management using the SSH option from github. 8. Double click on the main.bat script in the intellij-workspaces\subrepo-management folder.
*NOTE: o The main.bat script is customizable, see the GitHub page for instructions o When it prompts you for “Select the operating system type on this computer:”, make
your selection. o Next, select “Clone” or “Pull latest from GitHub…” operation. Select “Clone” option if
you’re setting up the project for the very first time. o When it prompts you to use HTTPS or SSH, make your selection. o It will give you a list of projects to download. Select the ones you need and then hit 0 on
your keyboard to finish. o This will clone all the selected projects into the intellij-workspaces\c2s-ws folder you
created earlier. 9. Now you have to manually import all of the projects we just pulled using: File -> New -> Module
from Existing Sources. 10. When using the Import Module, make sure that you select the right folder that contains project
related files like pom.xml, build.gradle and so on. The module project may not contain project related files other than source code. If so, select the folder that contains all the source code.
11. Once a folder is selected and click OK button to open Import Module dialog, choose CORRECT option here based on the module project folder that you selected.
12. In the following sub-sections, we will show several examples to import modules.
There are several ways to manage project modules:
1. You can use File Project Structure… to open Project Structure dialog to manage project Modules.
2. If the project is Maven project, you can use View Tools Windows Maven Projects to open Maven Projects tool windows to add Maven Projects as Modules.
3. File New Module … to add new project Module from scratch. File New Module from Existing Sources… to add new project Module from existing sources.
4.4.2 Import admin-portal-ui Server Maven Project Use File New Module from Existing Sources… to open “Select File or Directory to Import” dialog:
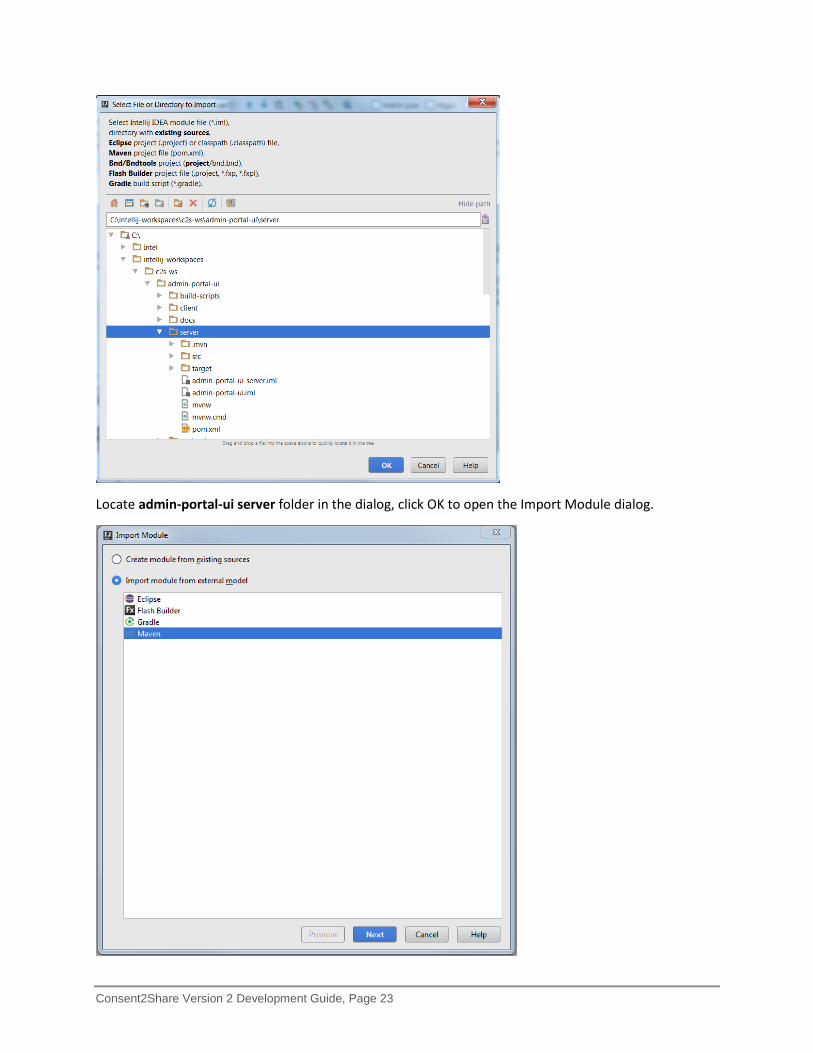
Consent2Share Version 2 Development Guide, Page 23
Locate admin-portal-ui server folder in the dialog, click OK to open the Import Module dialog.
Consent2Share Version 2 Development Guide, Page 24
Since the admin-portal-ui server is a Maven project, in the dialog, select “Import module from external model”, then select Maven and click Next. Review settings in the following steps, click the Next buttons, and finally, click the Finish button to finish the dialog.
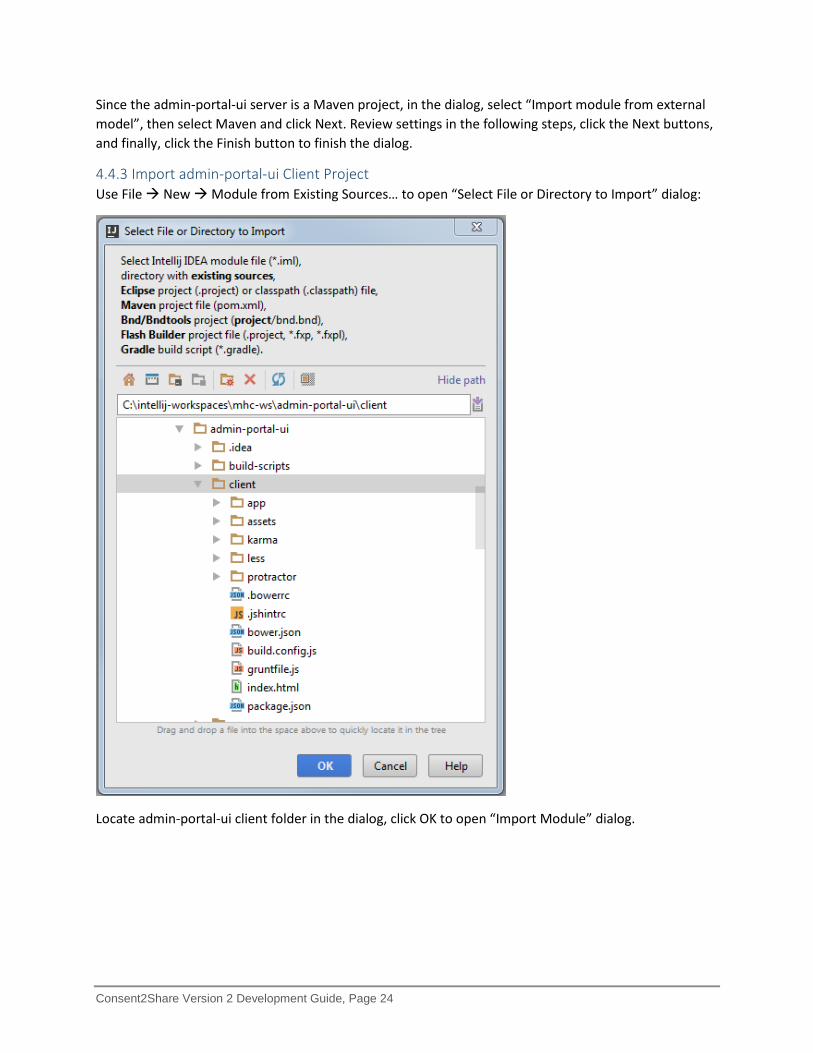
4.4.3 Import admin-portal-ui Client Project Use File New Module from Existing Sources… to open “Select File or Directory to Import” dialog:
Locate admin-portal-ui client folder in the dialog, click OK to open “Import Module” dialog.
Consent2Share Version 2 Development Guide, Page 25
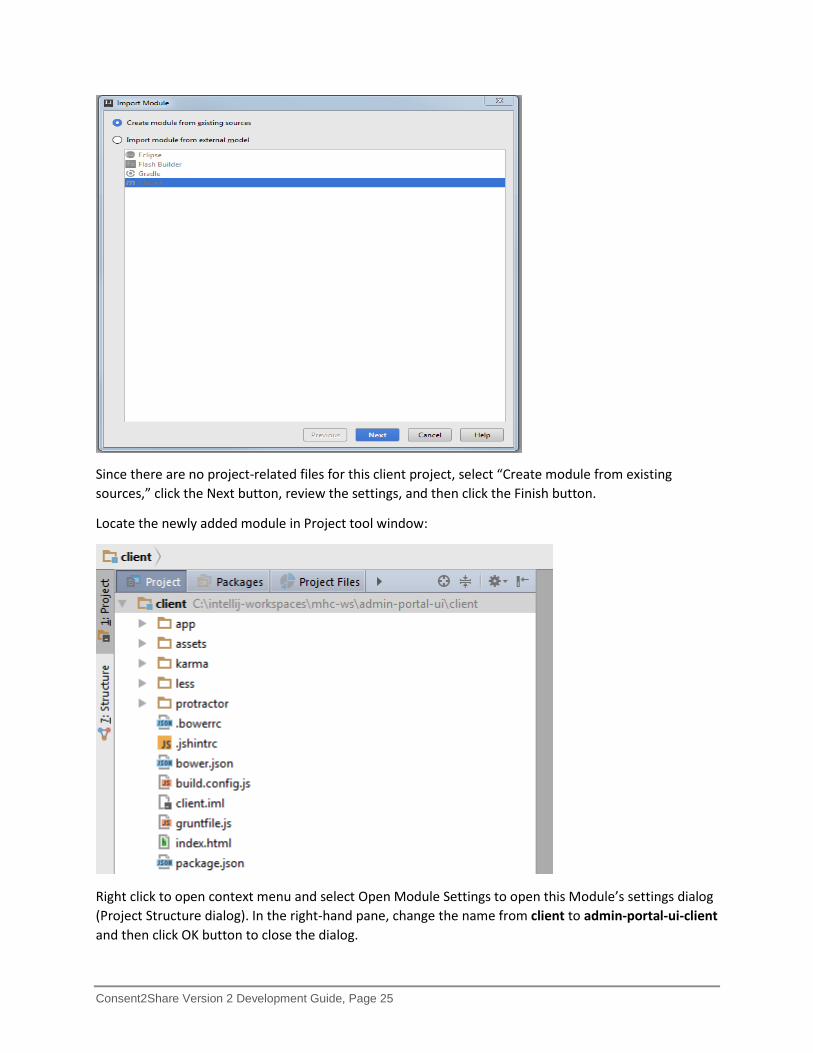
Since there are no project-related files for this client project, select “Create module from existing sources,” click the Next button, review the settings, and then click the Finish button.
Locate the newly added module in Project tool window:
Right click to open context menu and select Open Module Settings to open this Module’s settings dialog (Project Structure dialog). In the right-hand pane, change the name from client to admin-portal-ui-client and then click OK button to close the dialog.

Consent2Share Version 2 Development Guide, Page 26
*Note: when you import pp-ui client, you need rename the name of the module as well. Rename the module name for this project to patient-portal-ui-client.
*Note: For our project, the following structure is showed in IntelliJ, when projects served as modules are hosted by the project like c2s-intellij-projects.
Consent2Share Version 2 Development Guide, Page 27
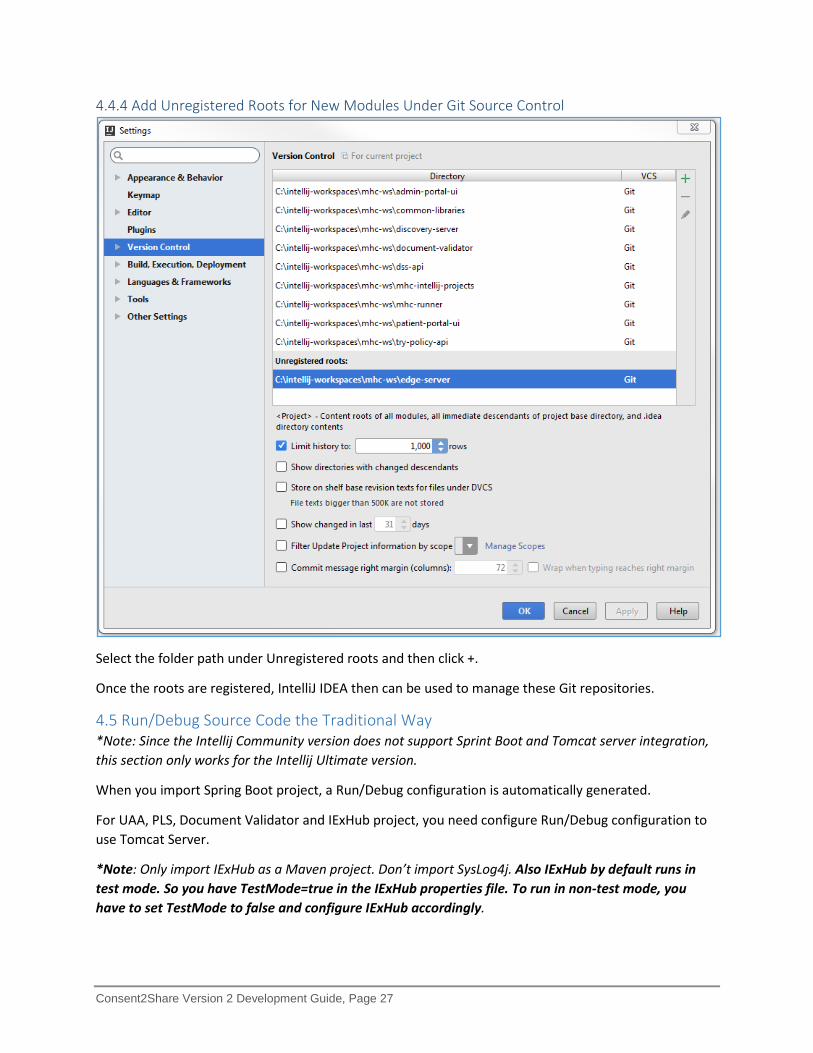
4.4.4 Add Unregistered Roots for New Modules Under Git Source Control
Select the folder path under Unregistered roots and then click +.
Once the roots are registered, IntelliJ IDEA then can be used to manage these Git repositories.
4.5 Run/Debug Source Code the Traditional Way *Note: Since the Intellij Community version does not support Sprint Boot and Tomcat server integration, this section only works for the Intellij Ultimate version.
When you import Spring Boot project, a Run/Debug configuration is automatically generated.
For UAA, PLS, Document Validator and IExHub project, you need configure Run/Debug configuration to use Tomcat Server.
*Note: Only import IExHub as a Maven project. Don’t import SysLog4j. Also IExHub by default runs in test mode. So you have TestMode=true in the IExHub properties file. To run in non-test mode, you have to set TestMode to false and configure IExHub accordingly.
Consent2Share Version 2 Development Guide, Page 28
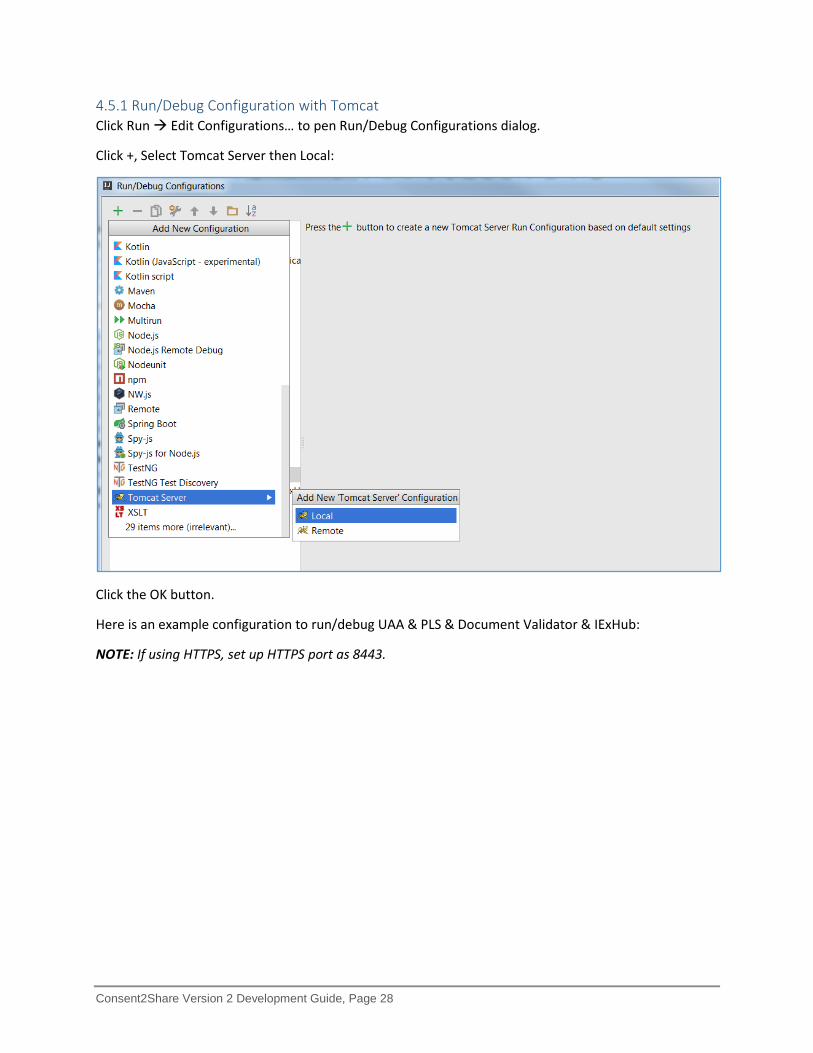
4.5.1 Run/Debug Configuration with Tomcat Click Run Edit Configurations… to pen Run/Debug Configurations dialog.
Click +, Select Tomcat Server then Local:
Click the OK button.
Here is an example configuration to run/debug UAA & PLS & Document Validator & IExHub:
NOTE: If using HTTPS, set up HTTPS port as 8443.
Consent2Share Version 2 Development Guide, Page 29
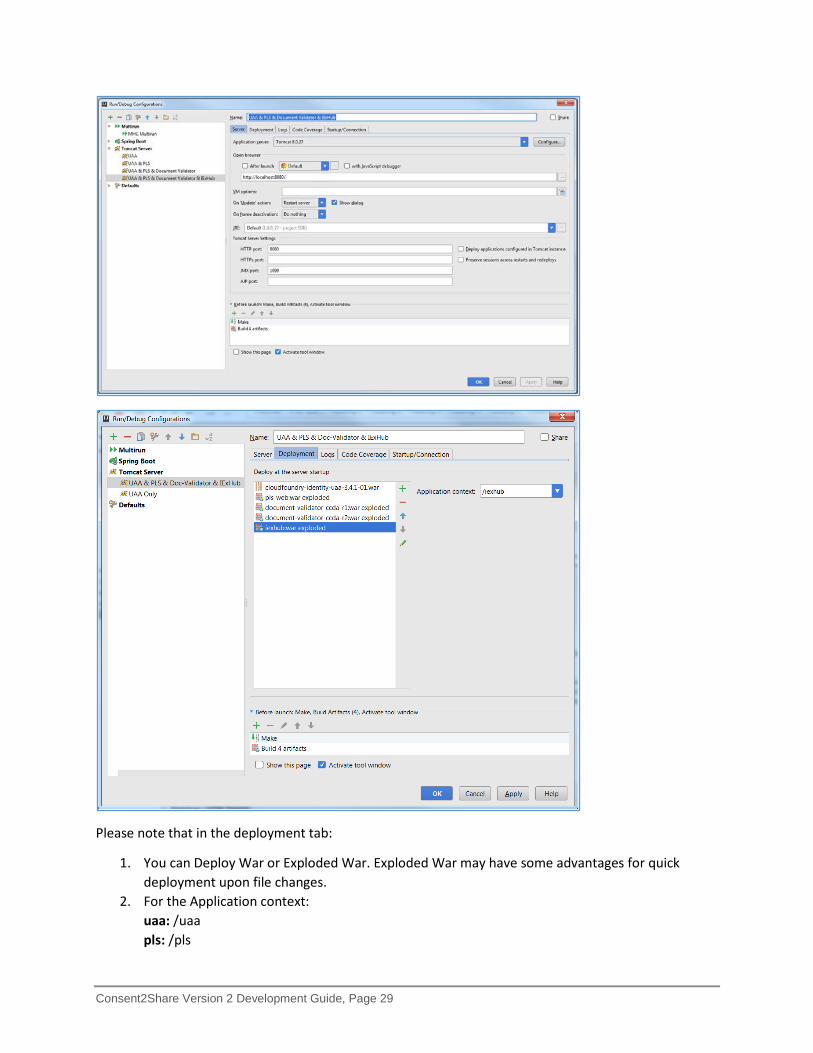
Please note that in the deployment tab:
1. You can Deploy War or Exploded War. Exploded War may have some advantages for quick deployment upon file changes.
2. For the Application context: uaa: /uaa pls: /pls
Consent2Share Version 2 Development Guide, Page 30
document-validator: There are two artifacts, set them as: /documentValidator/r2 and /documentValidator/r1 Iexhub: /iexhub
3. Append the following configuration to the file of “catalina.properties” under the directory of tomcat. For instant, C:\java\apache-tomcat-8.0.27\conf C2S_KEY=9HPcr8z634 C2S_PROPS=C:\\intellij-workspaces\\c2s-ws AUTO_SCAN=true SCAN_PERIOD=30 seconds UAA_CONFIG_PATH=C:\\intellij-workspaces\\c2s-ws\\uaa\\config-template Note: the path of above configuration is based on your directory.
4.5.1.1 UAA Configuration for SMTP Email Server To configure SMTP email server for UAA, add the following key-value pair in the “catalina.properties” files in Tomcat: UAA_SMTP_HOST=smtp.gmail.com UAA_SMTP_PORT=587 [email protected] UAA_SMTP_PASSWORD=m0vyVUUgfR5u
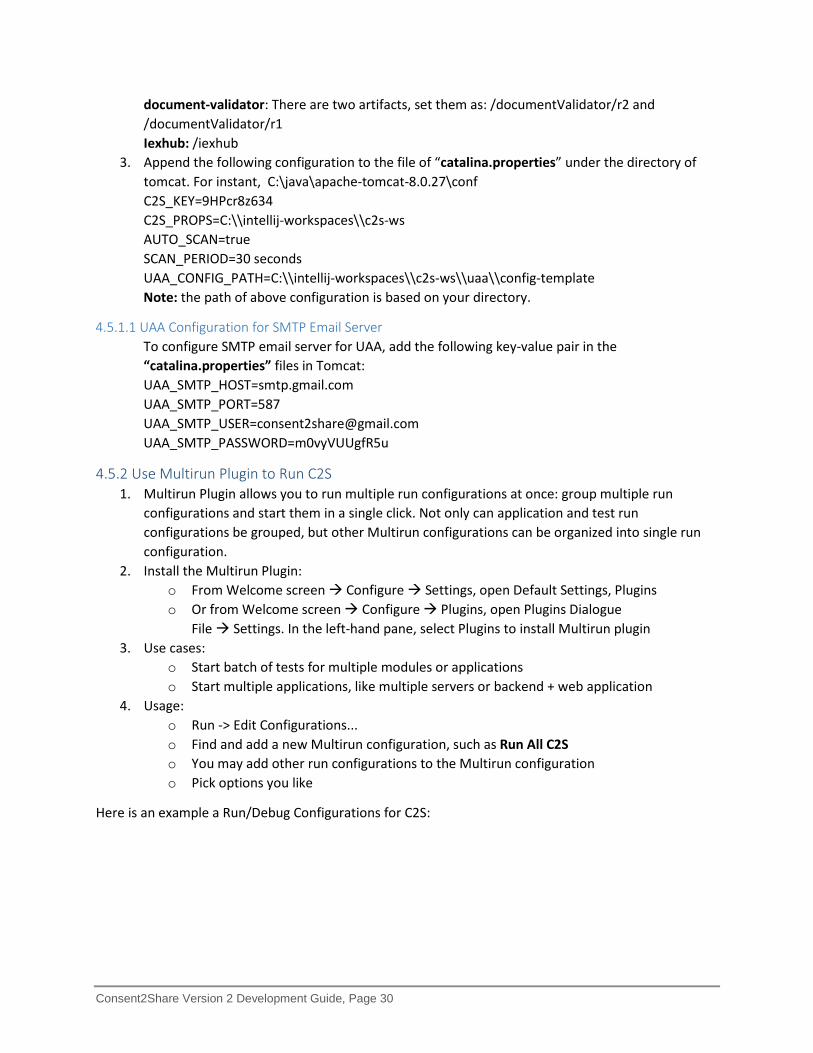
4.5.2 Use Multirun Plugin to Run C2S 1. Multirun Plugin allows you to run multiple run configurations at once: group multiple run
configurations and start them in a single click. Not only can application and test run configurations be grouped, but other Multirun configurations can be organized into single run configuration.
2. Install the Multirun Plugin: o From Welcome screen Configure Settings, open Default Settings, Plugins o Or from Welcome screen Configure Plugins, open Plugins Dialogue
File Settings. In the left-hand pane, select Plugins to install Multirun plugin 3. Use cases:
o Start batch of tests for multiple modules or applications o Start multiple applications, like multiple servers or backend + web application
4. Usage: o Run -> Edit Configurations... o Find and add a new Multirun configuration, such as Run All C2S o You may add other run configurations to the Multirun configuration o Pick options you like
Here is an example a Run/Debug Configurations for C2S:
Consent2Share Version 2 Development Guide, Page 31
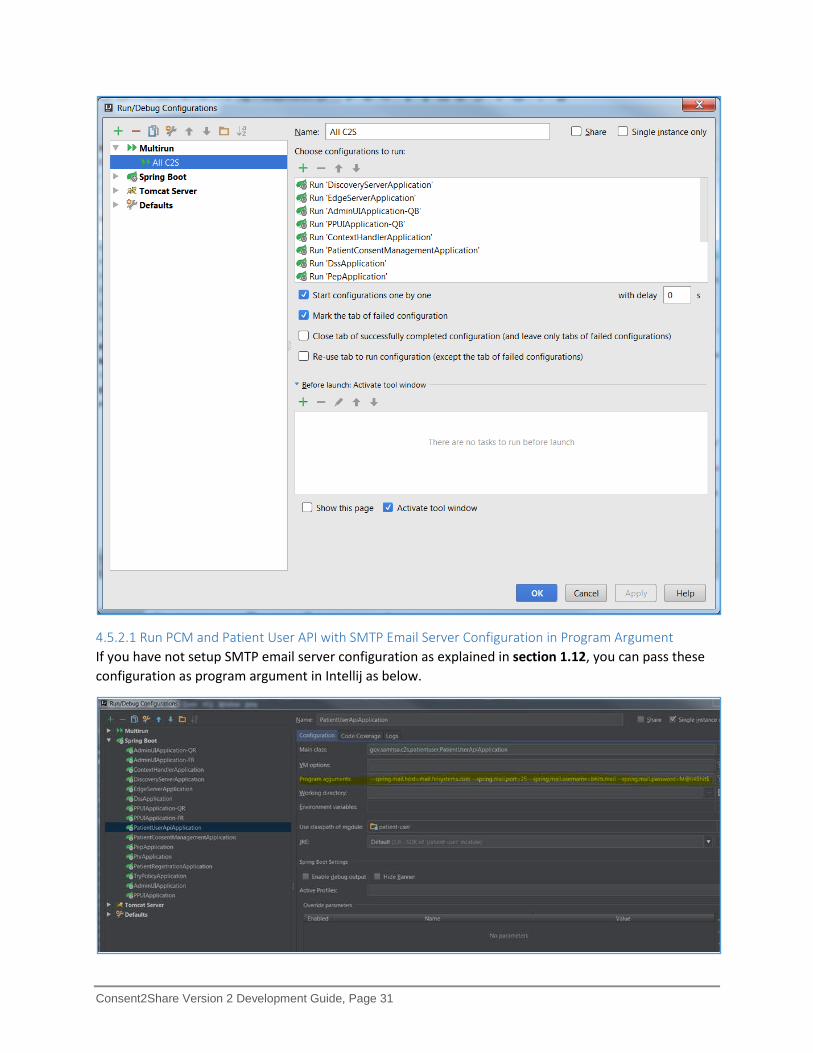
4.5.2.1 Run PCM and Patient User API with SMTP Email Server Configuration in Program Argument If you have not setup SMTP email server configuration as explained in section 1.12, you can pass these configuration as program argument in Intellij as below.

Consent2Share Version 2 Development Guide, Page 32
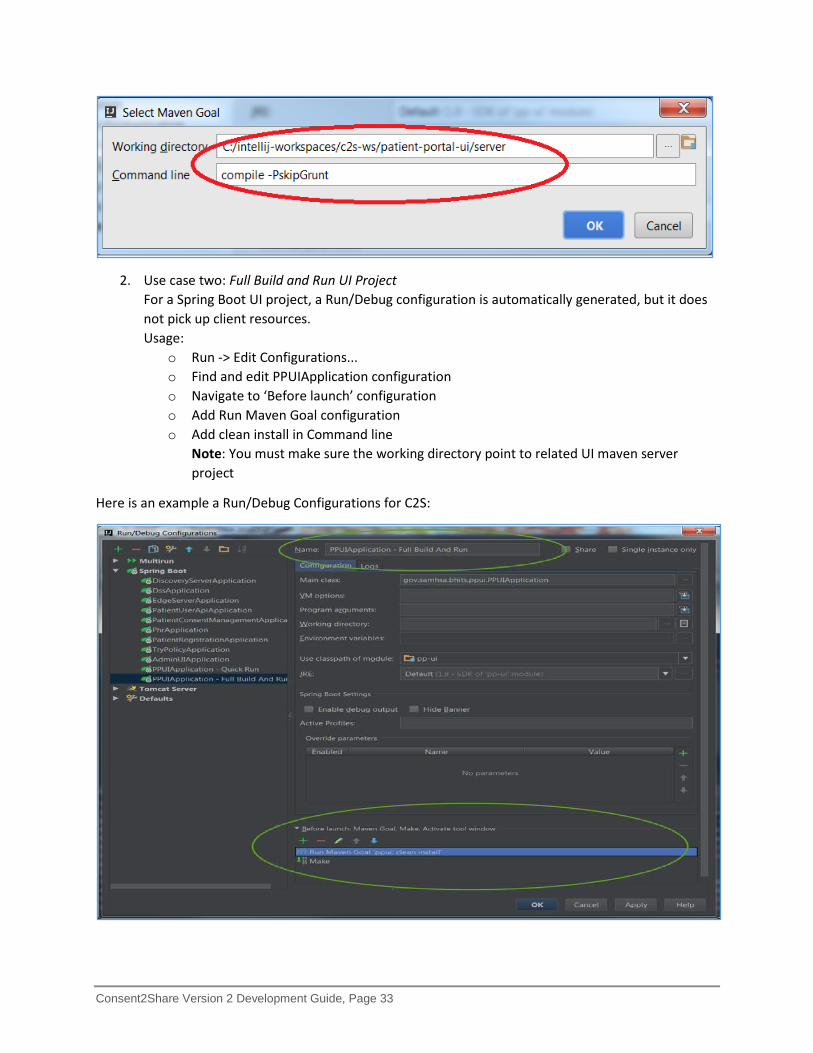
4.5.3 Develop C2S Portal UI Projects When you work on Spring Boot UI project, in order to quick build and run by using Grunt build or watch, you need configure Run/Debug configuration as following:
1. Use case one: Quick to Build and Run UI Project Use grunt watch or dev/qa build + spring boot run. You can use grunt watch or run grunt dev/qa build whenever you make changes in UI project and then restart related sprint boot run Usage:
o Run -> Edit Configurations... o Find and edit PPUIApplication configuration o Navigate to ‘Before launch’ configuration o Add Run Maven Goal configuration o Add compile -PskipGrunt in Command line
Note: You must make sure the working directory point to related UI maven server project
Here is an example a Run/Debug Configurations for C2S:
Consent2Share Version 2 Development Guide, Page 33
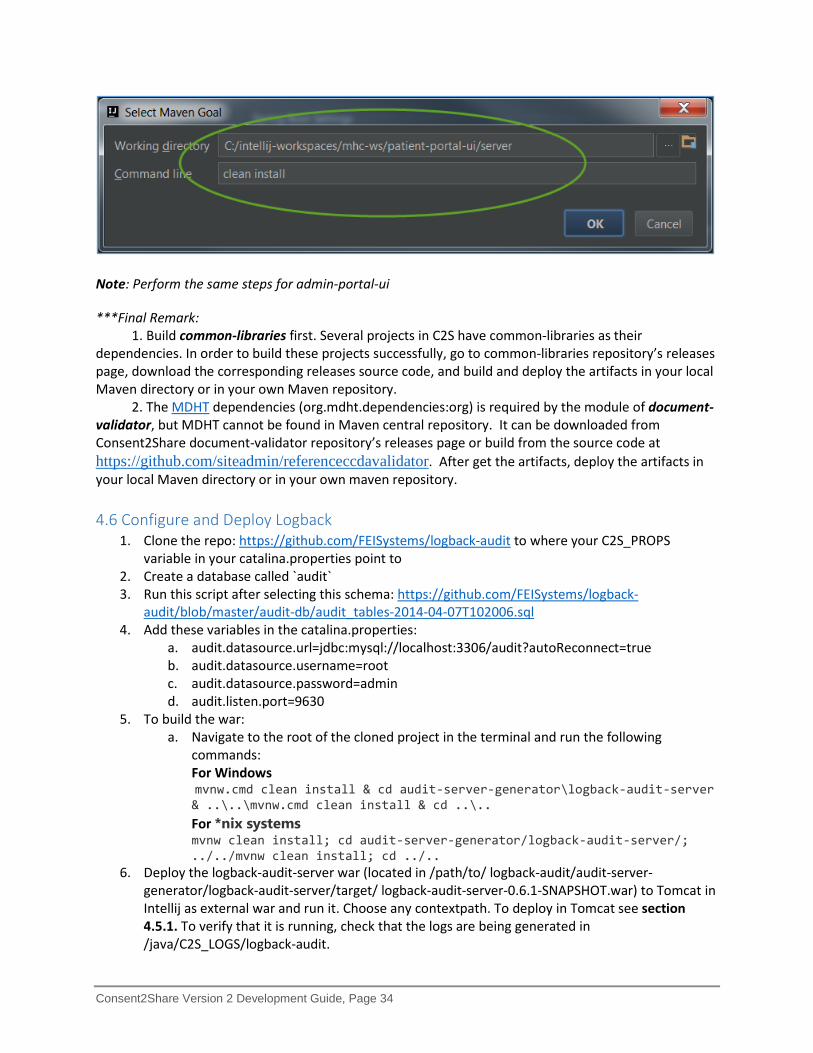
2. Use case two: Full Build and Run UI Project For a Spring Boot UI project, a Run/Debug configuration is automatically generated, but it does not pick up client resources. Usage:
o Run -> Edit Configurations... o Find and edit PPUIApplication configuration o Navigate to ‘Before launch’ configuration o Add Run Maven Goal configuration o Add clean install in Command line
Note: You must make sure the working directory point to related UI maven server project
Here is an example a Run/Debug Configurations for C2S:
Consent2Share Version 2 Development Guide, Page 34
Note: Perform the same steps for admin-portal-ui
***Final Remark: 1. Build common-libraries first. Several projects in C2S have common-libraries as their
dependencies. In order to build these projects successfully, go to common-libraries repository’s releases page, download the corresponding releases source code, and build and deploy the artifacts in your local Maven directory or in your own Maven repository.
2. The MDHT dependencies (org.mdht.dependencies:org) is required by the module of document-validator, but MDHT cannot be found in Maven central repository. It can be downloaded from Consent2Share document-validator repository’s releases page or build from the source code at https://github.com/siteadmin/referenceccdavalidator. After get the artifacts, deploy the artifacts in your local Maven directory or in your own maven repository. 4.6 Configure and Deploy Logback
1. Clone the repo: https://github.com/FEISystems/logback-audit to where your C2S_PROPS variable in your catalina.properties point to
2. Create a database called `audit` 3. Run this script after selecting this schema: https://github.com/FEISystems/logback-
audit/blob/master/audit-db/audit_tables-2014-04-07T102006.sql 4. Add these variables in the catalina.properties:
a. audit.datasource.url=jdbc:mysql://localhost:3306/audit?autoReconnect=true b. audit.datasource.username=root c. audit.datasource.password=admin d. audit.listen.port=9630
5. To build the war: a. Navigate to the root of the cloned project in the terminal and run the following
commands: For Windows mvnw.cmd clean install & cd audit-server-generator\logback-audit-server & ..\..\mvnw.cmd clean install & cd ..\.. For *nix systems mvnw clean install; cd audit-server-generator/logback-audit-server/; ../../mvnw clean install; cd ../..
6. Deploy the logback-audit-server war (located in /path/to/ logback-audit/audit-server-generator/logback-audit-server/target/ logback-audit-server-0.6.1-SNAPSHOT.war) to Tomcat in Intellij as external war and run it. Choose any contextpath. To deploy in Tomcat see section 4.5.1. To verify that it is running, check that the logs are being generated in /java/C2S_LOGS/logback-audit.
Consent2Share Version 2 Development Guide, Page 35
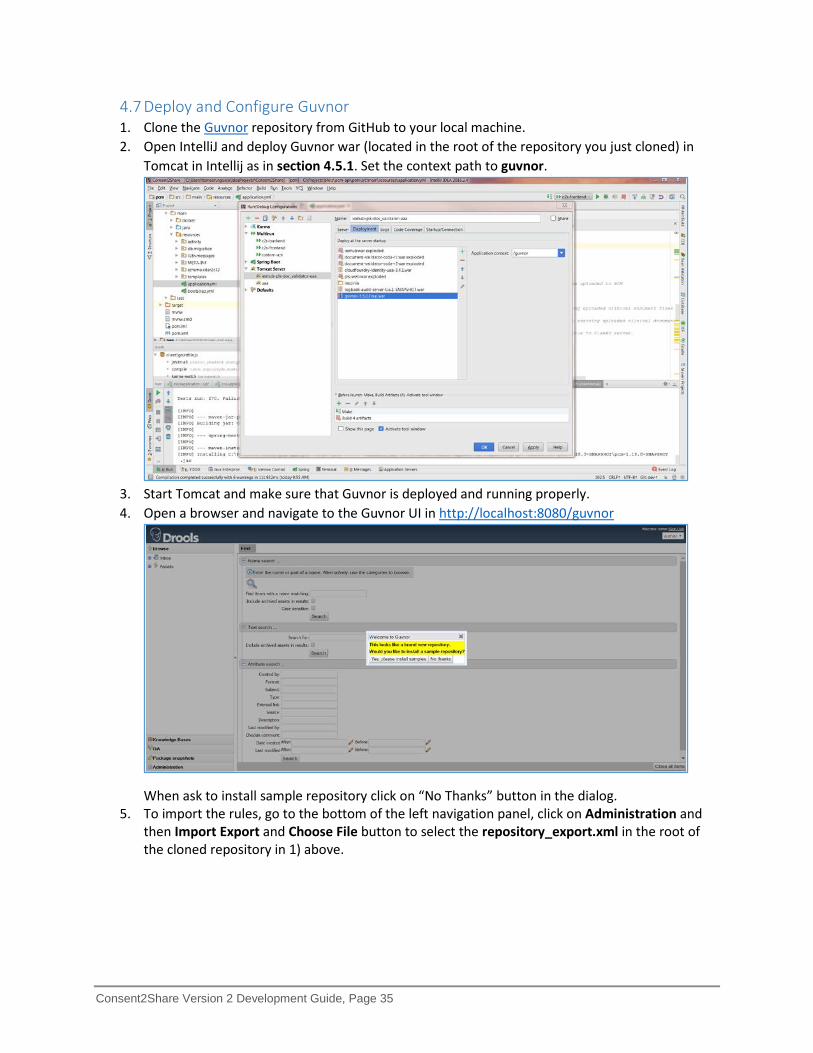
4.7 Deploy and Configure Guvnor 1. Clone the Guvnor repository from GitHub to your local machine. 2. Open IntelliJ and deploy Guvnor war (located in the root of the repository you just cloned) in
Tomcat in Intellij as in section 4.5.1. Set the context path to guvnor.
3. Start Tomcat and make sure that Guvnor is deployed and running properly. 4. Open a browser and navigate to the Guvnor UI in http://localhost:8080/guvnor
When ask to install sample repository click on “No Thanks” button in the dialog. 5. To import the rules, go to the bottom of the left navigation panel, click on Administration and
then Import Export and Choose File button to select the repository_export.xml in the root of the cloned repository in 1) above.

Consent2Share Version 2 Development Guide, Page 36
6. Click on import. This will import the repository and the system will show you a dialog as below when successful.
7. At the bottom of the left navigation, if you click on QA, Test Scenarios in packages and then AnnotationRules to the screen below where you can see all the rules.
Consent2Share Version 2 Development Guide, Page 37
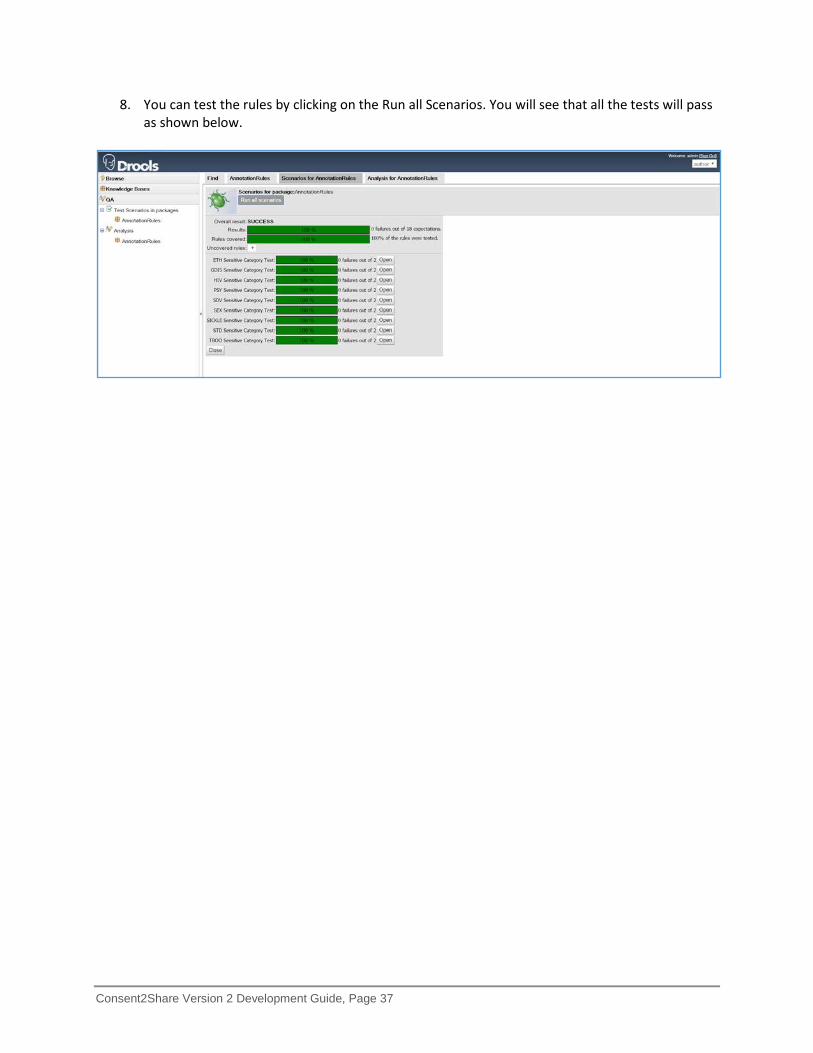
8. You can test the rules by clicking on the Run all Scenarios. You will see that all the tests will pass as shown below.
Consent2Share Version 2 Development Guide, Page 38
Chapter 5 Development Environment Setup the Docker Way 5.1 Introduction 5.1.1 Major Docker Components Understanding the following concepts and their roles is very important when using the Docker ecosystem:
• Docker Engine (Docker Runtime, Docker Daemon) – Shipping Yard • Images (Templates, Recipes) – Shipping Manifests (Build Time) • Containers – (Run Time) • Index, Registries and Repositories
5.1.2 Tools Installed on Local Development Machine (Windows/OS X) When installing Docker on a local development machine for Windows/OS X, tools are installed in two environments:
a) Windows/OS X environment which serves as the Virtual Machine Host. docker-machine command, docker command, docker-compose command, Kitematic GUI, and Docker QuickStart shell are installed in this environment.
• docker-machine command is the CLI to create and manage virtual machines running docker, such as creating VM (with Docker Daemon installed), setting active VM, and etc.
• docker command is the Docker CLI client to connect to Docker Daemon as well as Docker Registry to manage images and containers.
• docker-compose command is the CLI to define and run multi-container applications with Docker.
• Kitematic is the GUI version of docker command line.
b) Boot2Docker lightweight Linux virtual machine, which serves as the Docker Host. • Docker Daemon is installed in this environment. • Images are pulled from Docker registry to the Docker host or built from Dockerfile to the
Docker host. • Containers are in this host as well.
Consent2Share Version 2 Development Guide, Page 39
5.2 Install Docker on Local Development Machine 5.2.1 Install Docker on Windows 5.2.1.1 Prerequisites
1. Install VirtualBox: You can download VirtualBox binary package from https://www.virtualbox.org/wiki/Downloads for Windows hosts (x86/amd64). Follow instructions to install VirtualBox.
2. Install Git for Windows: We are using Git 1.x not 2.x for Windows. It should already be installed on developers’ Windows machine.
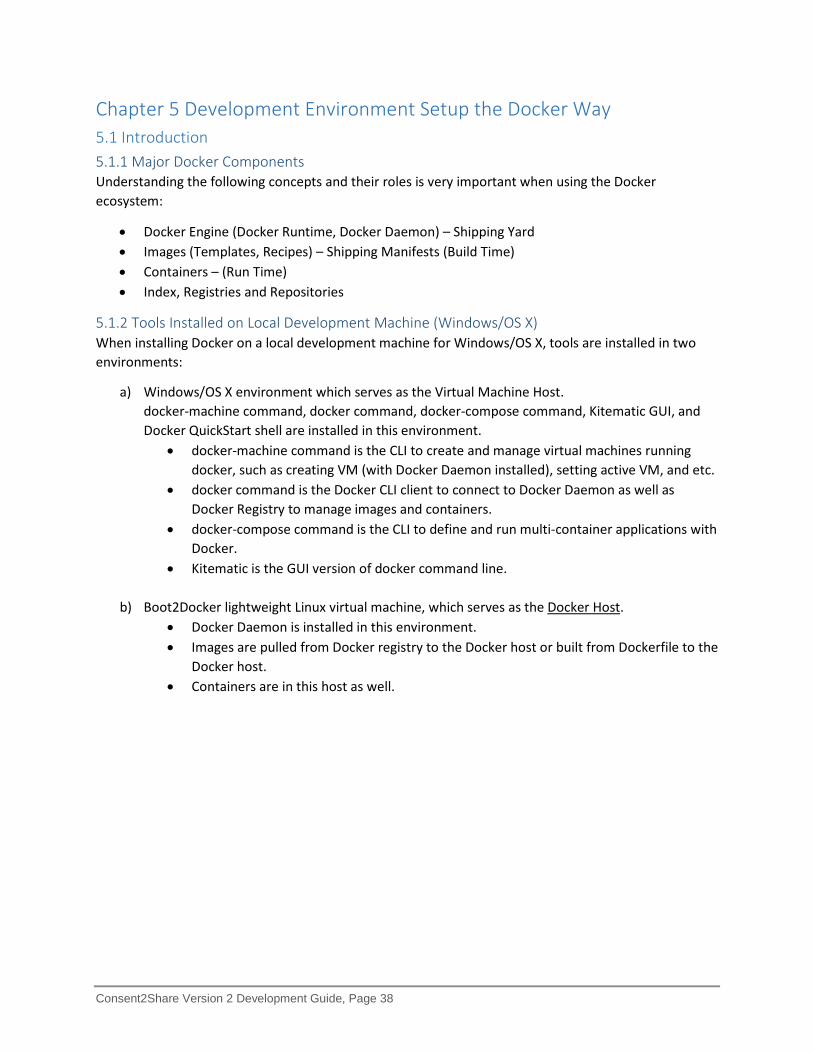
5.2.1.2 Install Docker ToolBox 1. Go to the Docker Toolbox page (https://www.docker.com/products/docker-toolbox). 2. Download the installer for Windows. 3. Run the installer and follow the instructions. Make sure you make the following changes to the
default options in the installation wizard. 4. In the dialog of Select Components, uncheck VirtualBox and Git for Windows.
5. After finishing the installation, since we did not check Git for Windows, you need fix the path to
Git for Windows in the Docker Quickstart Terminal. Right click Docker Quickstart Terminal, click Properties in the context menu and open the dialog.

Consent2Share Version 2 Development Guide, Page 40
6. Change the path as shown in the following screenshot and then click OK to save and quit.
Consent2Share Version 2 Development Guide, Page 41
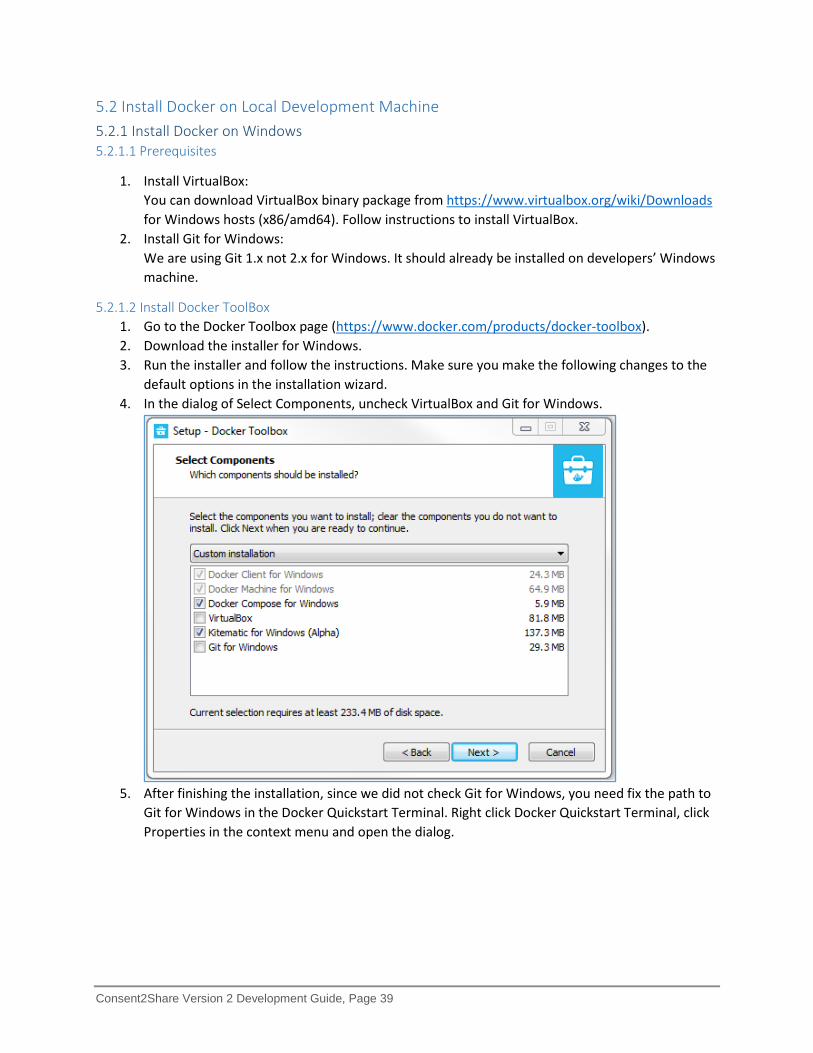
7. Next, double-click the Docker Quickstart Terminal shortcut to open the terminal. It may not run correctly and you may get the following screen:
Don’t worry, just close this window and run Docker Quickstart Terminal shortcut again. You will bet the following:
8. To verify the installation, type the following commands in the Docker Quick Start Terminal (you should see the output shown in the screenshot below for each command):

Consent2Share Version 2 Development Guide, Page 42
9. Open the Oracle VM Virtual Box Manager. You should see that the Docker host named “default”
is running as well. 10. You should also be able to run the command docker images to connect to the Docker daemon
running on the VM named “default.” 11. Keep the Docker host running and open the Window Batch Command Line. You should be able
to run all of the commands in the screenshot above (i.e. “docker-machine --version", “docker --version", “docker-compose --version", “docker-machine ls”) without error. However, if you run the command docker images, you will get the error in the below screenshot:
The reason for this error is because the Docker client doesn’t know the location of the Docker host. In Section 5.3, we will discuss how to resolve this error.
If you want to know more details about installing Docker, please refer to the “Install Docker for Windows” page here: https://docs.docker.com/windows/step_one/.
5.2.2 Install Docker on Mac OS X 5.2.2.1 Prerequisites Install VirtualBox:
You can directly download VirtualBox to install, or you can use Homebrew to install. Using the OS X package manger Homebrew is the preferred way to install VirtualBox. If you do not have Homebrew installed on your Mac, you can obtain it by following the instructions on the Homebrew website.
Consent2Share Version 2 Development Guide, Page 43
To Install VirtualBox Using Homebrew:
First, reset the permissions of /usr/local and Homebrew's caches to the current user: sudo chown -R $USER:admin /usr/local /Library/Caches/Homebrew Then use the following command to install VirtualBox: brew cask install virtualbox
Install Git:
Git should be already installed on a developers’ Mac machine, so you should not have to install Git yourself.
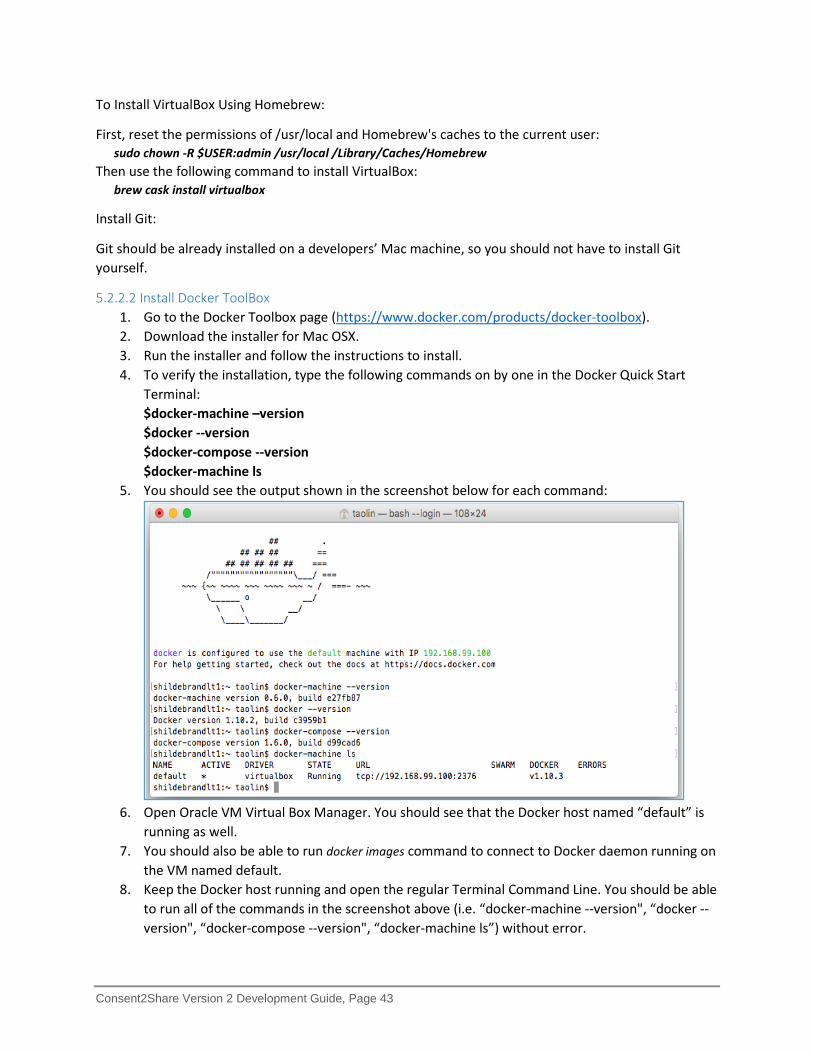
5.2.2.2 Install Docker ToolBox 1. Go to the Docker Toolbox page (https://www.docker.com/products/docker-toolbox). 2. Download the installer for Mac OSX. 3. Run the installer and follow the instructions to install. 4. To verify the installation, type the following commands on by one in the Docker Quick Start
Terminal: $docker-machine –version $docker --version $docker-compose --version $docker-machine ls
5. You should see the output shown in the screenshot below for each command:
6. Open Oracle VM Virtual Box Manager. You should see that the Docker host named “default” is
running as well. 7. You should also be able to run docker images command to connect to Docker daemon running on
the VM named default. 8. Keep the Docker host running and open the regular Terminal Command Line. You should be able
to run all of the commands in the screenshot above (i.e. “docker-machine --version", “docker --version", “docker-compose --version", “docker-machine ls”) without error.
Consent2Share Version 2 Development Guide, Page 44
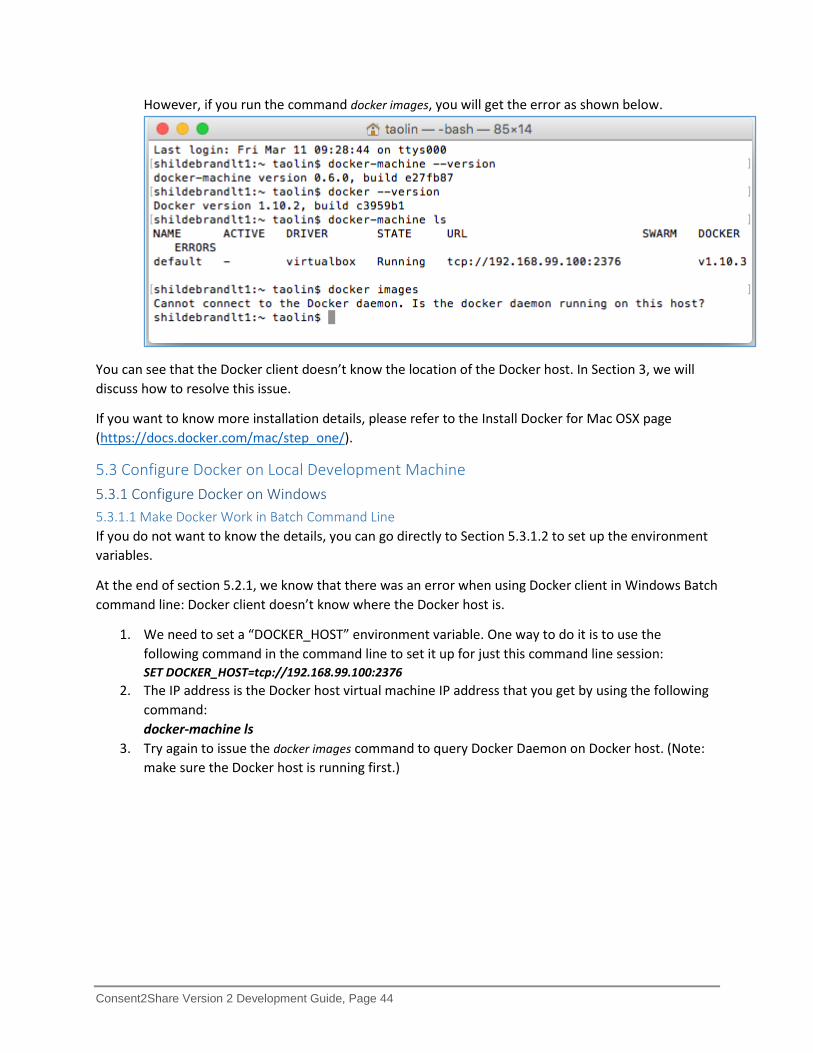
However, if you run the command docker images, you will get the error as shown below.
You can see that the Docker client doesn’t know the location of the Docker host. In Section 3, we will discuss how to resolve this issue.
If you want to know more installation details, please refer to the Install Docker for Mac OSX page (https://docs.docker.com/mac/step_one/).
5.3 Configure Docker on Local Development Machine 5.3.1 Configure Docker on Windows 5.3.1.1 Make Docker Work in Batch Command Line If you do not want to know the details, you can go directly to Section 5.3.1.2 to set up the environment variables.
At the end of section 5.2.1, we know that there was an error when using Docker client in Windows Batch command line: Docker client doesn’t know where the Docker host is.
1. We need to set a “DOCKER_HOST” environment variable. One way to do it is to use the following command in the command line to set it up for just this command line session: SET DOCKER_HOST=tcp://192.168.99.100:2376
2. The IP address is the Docker host virtual machine IP address that you get by using the following command: docker-machine ls
3. Try again to issue the docker images command to query Docker Daemon on Docker host. (Note: make sure the Docker host is running first.)
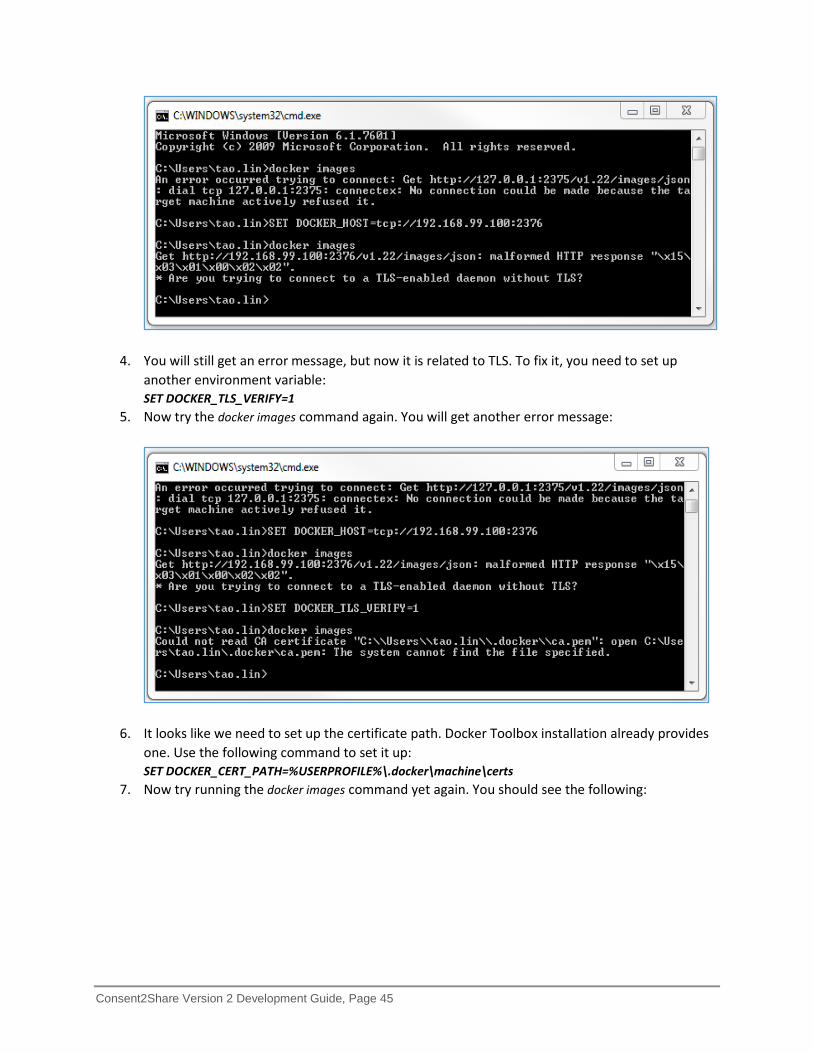
Consent2Share Version 2 Development Guide, Page 45
4. You will still get an error message, but now it is related to TLS. To fix it, you need to set up another environment variable: SET DOCKER_TLS_VERIFY=1
5. Now try the docker images command again. You will get another error message:
6. It looks like we need to set up the certificate path. Docker Toolbox installation already provides one. Use the following command to set it up: SET DOCKER_CERT_PATH=%USERPROFILE%\.docker\machine\certs
7. Now try running the docker images command yet again. You should see the following:
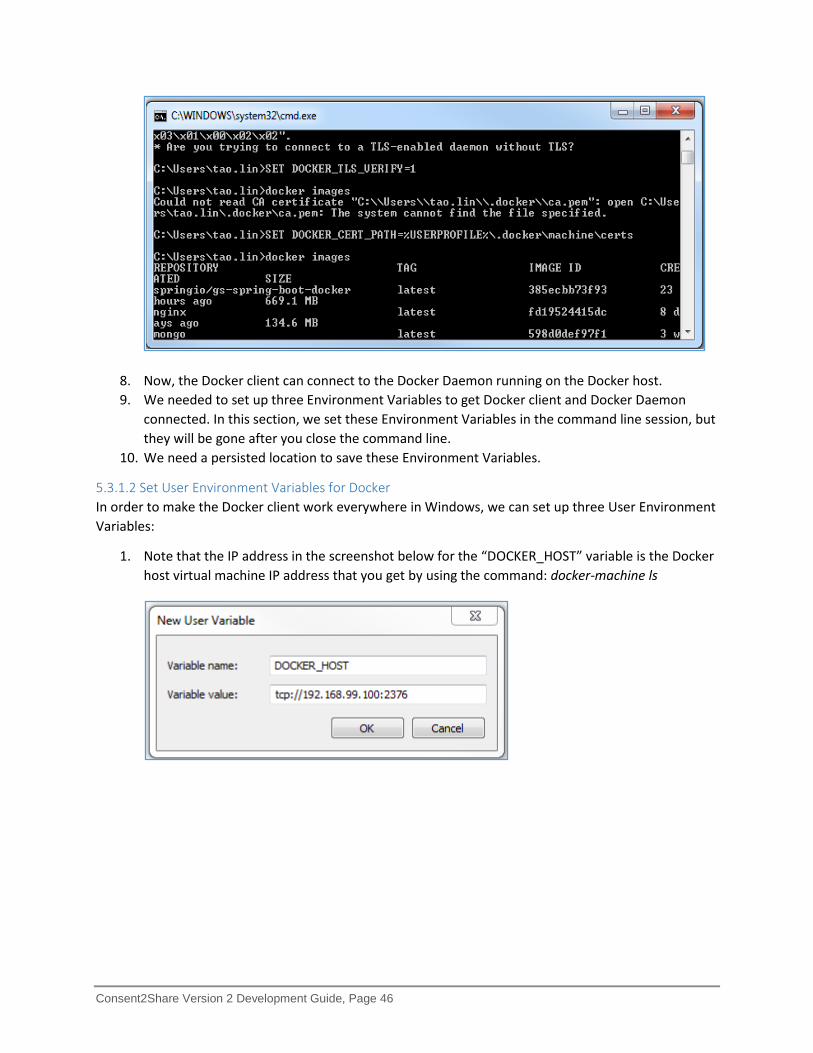
Consent2Share Version 2 Development Guide, Page 46
8. Now, the Docker client can connect to the Docker Daemon running on the Docker host. 9. We needed to set up three Environment Variables to get Docker client and Docker Daemon
connected. In this section, we set these Environment Variables in the command line session, but they will be gone after you close the command line.
10. We need a persisted location to save these Environment Variables.
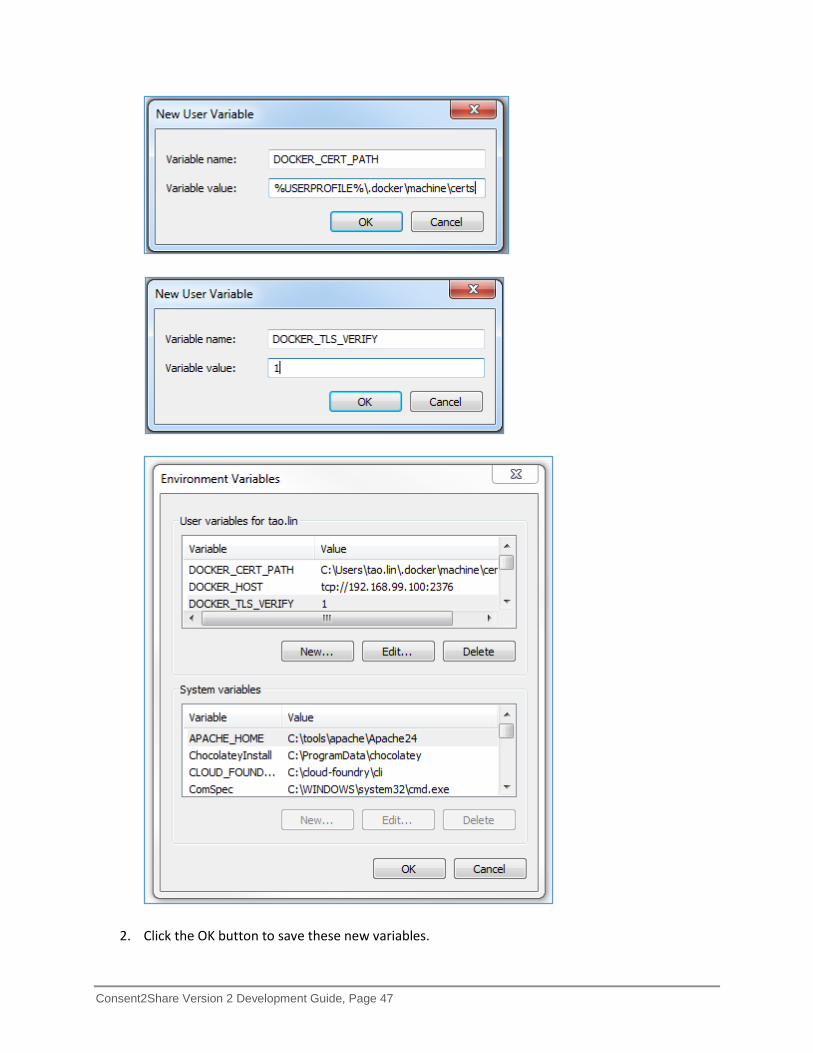
5.3.1.2 Set User Environment Variables for Docker In order to make the Docker client work everywhere in Windows, we can set up three User Environment Variables:
1. Note that the IP address in the screenshot below for the “DOCKER_HOST” variable is the Docker host virtual machine IP address that you get by using the command: docker-machine ls
Consent2Share Version 2 Development Guide, Page 47
2. Click the OK button to save these new variables.
Consent2Share Version 2 Development Guide, Page 48
3. Open Windows Batch command line and issue the docker images command. As long as the Docker host is running, you should get a response from Docker Daemon.
5.3.2 Configure Docker on Mac OS X 5.3.2.1 Make Docker Work in Terminal Command Line If you do not want to know the details, you can go directly to Section 5.3.2.2 to set up the environment variables.
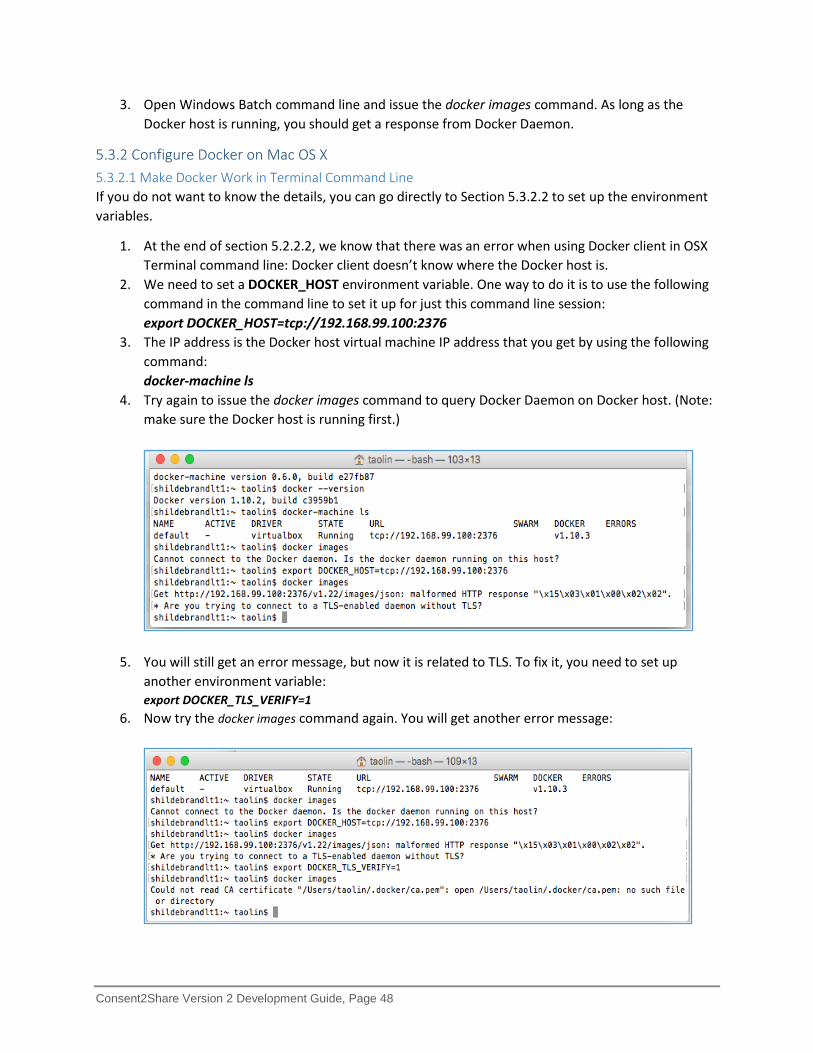
1. At the end of section 5.2.2.2, we know that there was an error when using Docker client in OSX Terminal command line: Docker client doesn’t know where the Docker host is.
2. We need to set a DOCKER_HOST environment variable. One way to do it is to use the following command in the command line to set it up for just this command line session: export DOCKER_HOST=tcp://192.168.99.100:2376
3. The IP address is the Docker host virtual machine IP address that you get by using the following command: docker-machine ls
4. Try again to issue the docker images command to query Docker Daemon on Docker host. (Note: make sure the Docker host is running first.)
5. You will still get an error message, but now it is related to TLS. To fix it, you need to set up another environment variable: export DOCKER_TLS_VERIFY=1
6. Now try the docker images command again. You will get another error message:
Consent2Share Version 2 Development Guide, Page 49
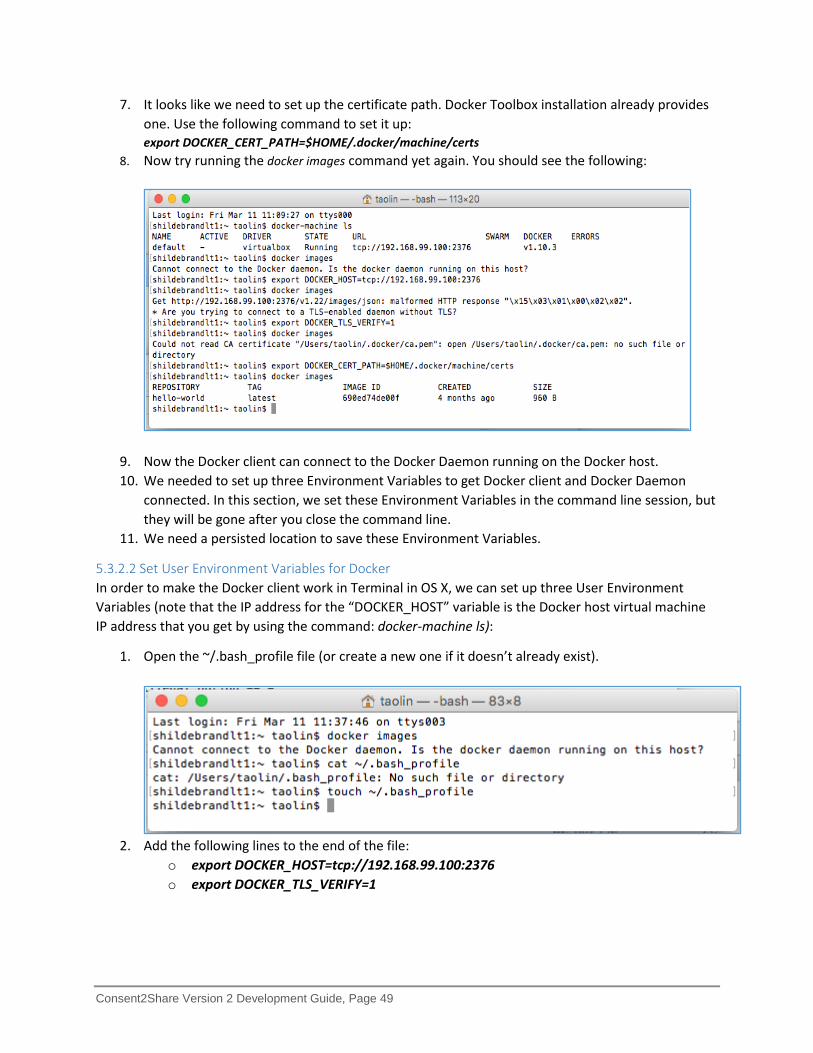
7. It looks like we need to set up the certificate path. Docker Toolbox installation already provides one. Use the following command to set it up: export DOCKER_CERT_PATH=$HOME/.docker/machine/certs
8. Now try running the docker images command yet again. You should see the following:
9. Now the Docker client can connect to the Docker Daemon running on the Docker host. 10. We needed to set up three Environment Variables to get Docker client and Docker Daemon
connected. In this section, we set these Environment Variables in the command line session, but they will be gone after you close the command line.
11. We need a persisted location to save these Environment Variables.
5.3.2.2 Set User Environment Variables for Docker In order to make the Docker client work in Terminal in OS X, we can set up three User Environment Variables (note that the IP address for the “DOCKER_HOST” variable is the Docker host virtual machine IP address that you get by using the command: docker-machine ls):
1. Open the ~/.bash_profile file (or create a new one if it doesn’t already exist).
2. Add the following lines to the end of the file:
o export DOCKER_HOST=tcp://192.168.99.100:2376 o export DOCKER_TLS_VERIFY=1

Consent2Share Version 2 Development Guide, Page 50
o export DOCKER_CERT_PATH=$HOME/.docker/machine/certs
Save the ~/.bash_profile file, and then close the terminal window. Reopen a new terminal and issue the command docker images; you will get response from Docker Daemon on local host.
Consent2Share Version 2 Development Guide, Page 51
Chapter 6 Run and Debug Apps the Docker Way Note: This document is used to run C2S application using Docker.
Prerequisite:
Install Docker: “Setup, Configure, and Use Docker on Local Dev Machine”.
Note: if some commands not run on windows shell, try to run in git bash, docker terminal, or Cygwin.
Steps to Run C2S Application with Docker
1. Pull all C2S project from git repository to your local workspace. https://github.com/orgs/FEISystems/dashboard
2. Add dockerhost to hosts under C:\Windows\System32\drivers\etc Example: 192.168.99.100 dockerhost
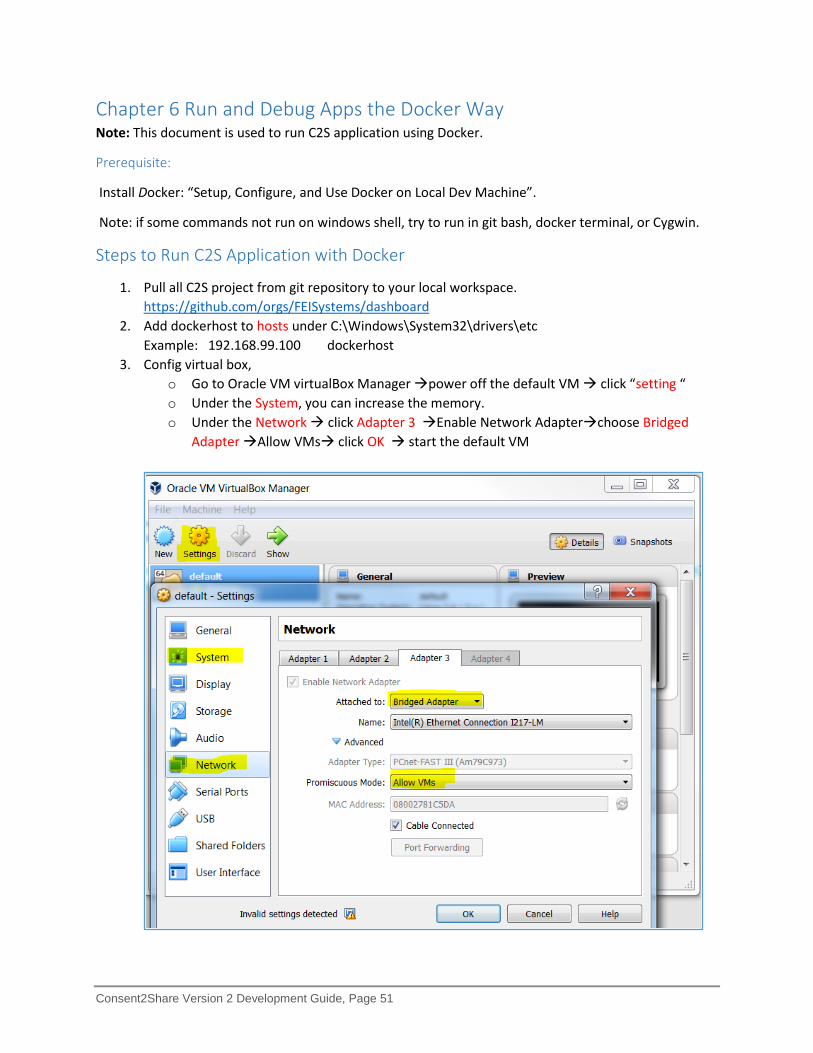
3. Config virtual box, o Go to Oracle VM virtualBox Manager power off the default VM click “setting “ o Under the System, you can increase the memory. o Under the Network click Adapter 3 Enable Network Adapterchoose Bridged
Adapter Allow VMs click OK start the default VM
Consent2Share Version 2 Development Guide, Page 52
4. Create images form project * Pease refer the infrastructure folder in GitHub for standing up a C2S running instance and related infrastructure usingDocker and Docker Compose.
o Go to ~\consent2share\infrastructure\scripts, run build-all.sh in git bash to create all C2S application images.
5. Manual build each images. o For each project,
run “mvn clean package docker:build” o For patient-portal-ui and admin-portal-ui
run “mvn clean package -Pdocker docker:build” o For uaa,
• run “gradlew install” • copy war under uaa/build/libs/*.war to docker/uaa.war; • go to docker folder, run “docker build -t uaa
6. images operation in Docker. o check images: “docker images” o remove image: “docker rmi <image name or id>”
7. Run images in container. o Run all applications:
Go to ~\consent2share\infrastructure\developmentproject and run “docker-compose up” in command line.
o Run each application using docker-compose: • To Run container using scale: (including create and start container) “docker-compose scale <service name in docker-compose.yml>=1” Example : docker-compose scale uaa.c2s.com=1 • To destroy container: (including stop and remove container) “docker-compose scale < service name in docker-compose.yml>=0” Example: docker-compose scale uaa.c2s.com=1 • To start container: (container already created) “docker-compose start < service name in docker-compose.yml>” Example : docker-compose start uaa.c2s.com • To stop container: (including stop and remove container) “docker-compose stop < service name in docker-compose.yml>”
Examples: docker-compose stop uaa.c2s.com o Docker operations
• list containers: “docker ps” or “docker ps -a” (including stopped containers) • Remove containers: “docker rm <container name or id>” • run container from images: docker run –d <image name> Example : “docker run –d --name pcm pcm”
8. Enable remote debug C2S applications: o For spring boot application:
• copy the entrypoint line from Dockfile.
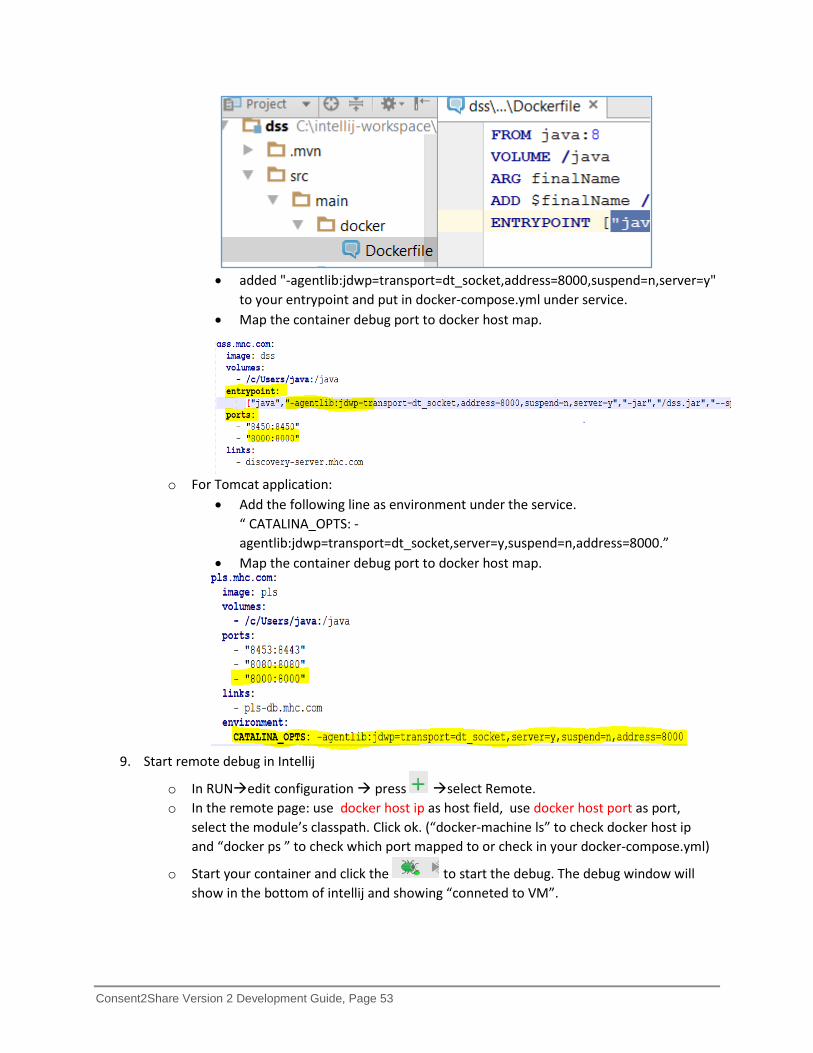
Consent2Share Version 2 Development Guide, Page 53
• added "-agentlib:jdwp=transport=dt_socket,address=8000,suspend=n,server=y"
to your entrypoint and put in docker-compose.yml under service. • Map the container debug port to docker host map.
o For Tomcat application:
• Add the following line as environment under the service. “ CATALINA_OPTS: -agentlib:jdwp=transport=dt_socket,server=y,suspend=n,address=8000.”
• Map the container debug port to docker host map.
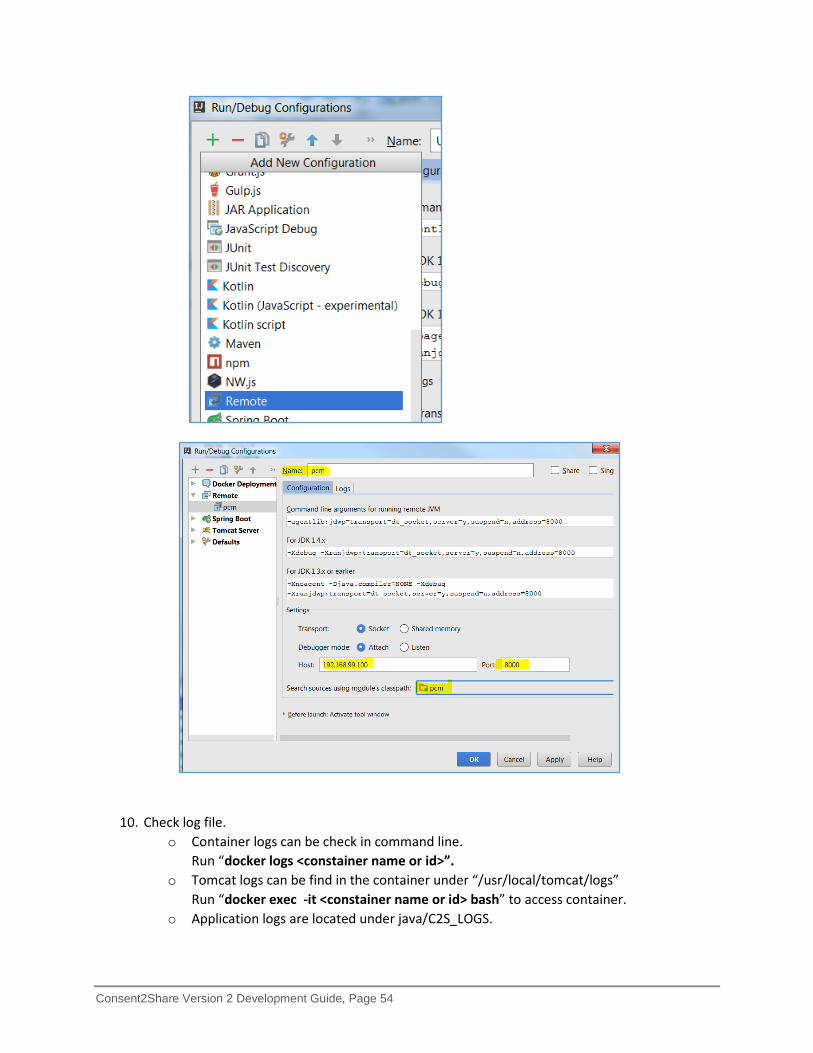
9. Start remote debug in Intellij
o In RUNedit configuration press select Remote. o In the remote page: use docker host ip as host field, use docker host port as port,
select the module’s classpath. Click ok. (“docker-machine ls” to check docker host ip and “docker ps ” to check which port mapped to or check in your docker-compose.yml)
o Start your container and click the to start the debug. The debug window will show in the bottom of intellij and showing “conneted to VM”.
Consent2Share Version 2 Development Guide, Page 54
10. Check log file. o Container logs can be check in command line.
Run “docker logs <constainer name or id>”. o Tomcat logs can be find in the container under “/usr/local/tomcat/logs”
Run “docker exec -it <constainer name or id> bash” to access container. o Application logs are located under java/C2S_LOGS.
Consent2Share Version 2 Development Guide, Page 55
11. Useful Docker command: o Stop all running containers: docker ps -a -q | xargs docker stop o Remove all containers: docker ps -a -q | xargs docker rm o Remove all images: docker images -a -q | xargs docker rmi o Remove all dangling images: docker images -qf dangling=true | xargs docker rmi
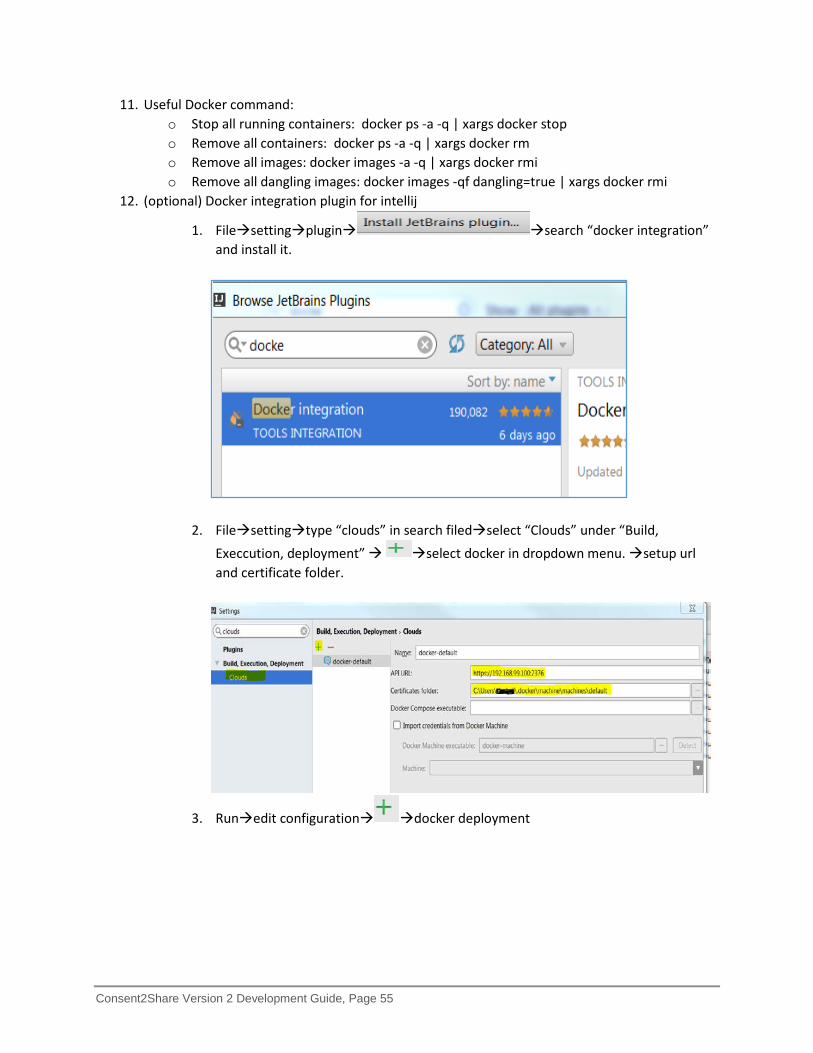
12. (optional) Docker integration plugin for intellij
1. Filesettingplugin search “docker integration” and install it.
2. Filesettingtype “clouds” in search filedselect “Clouds” under “Build, Execcution, deployment” select docker in dropdown menu. setup url and certificate folder.
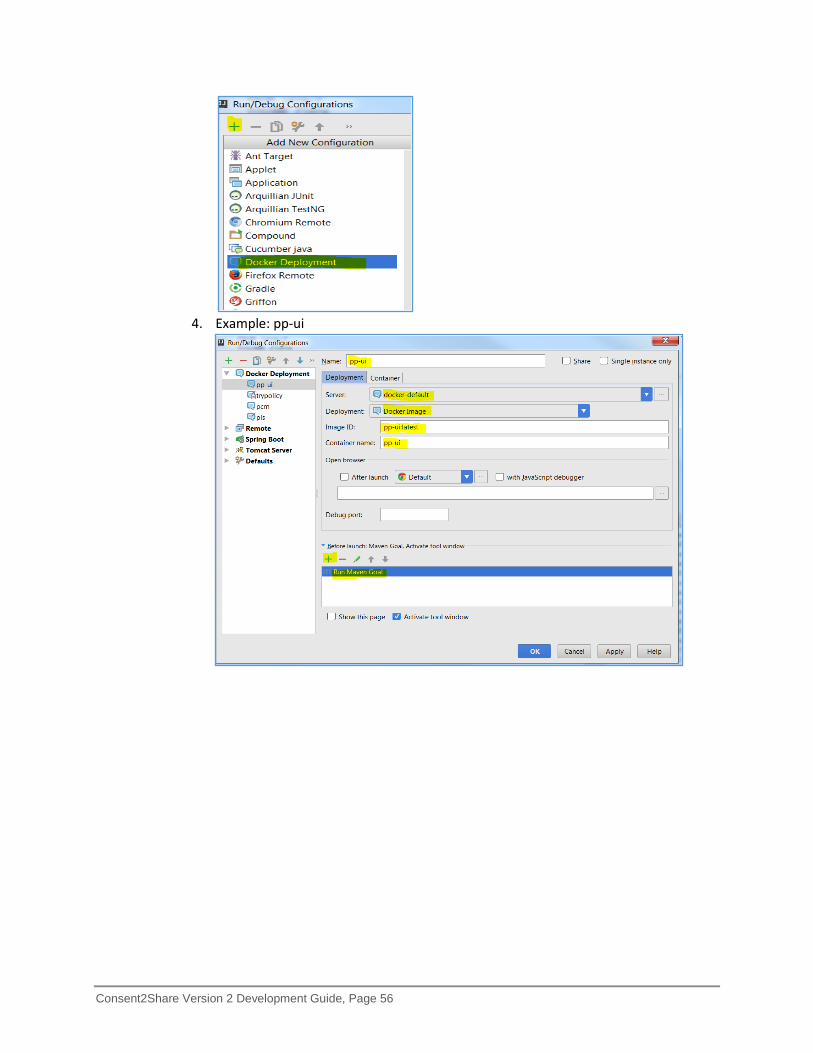
3. Runedit configuration docker deployment
Consent2Share Version 2 Development Guide, Page 56
4. Example: pp-ui
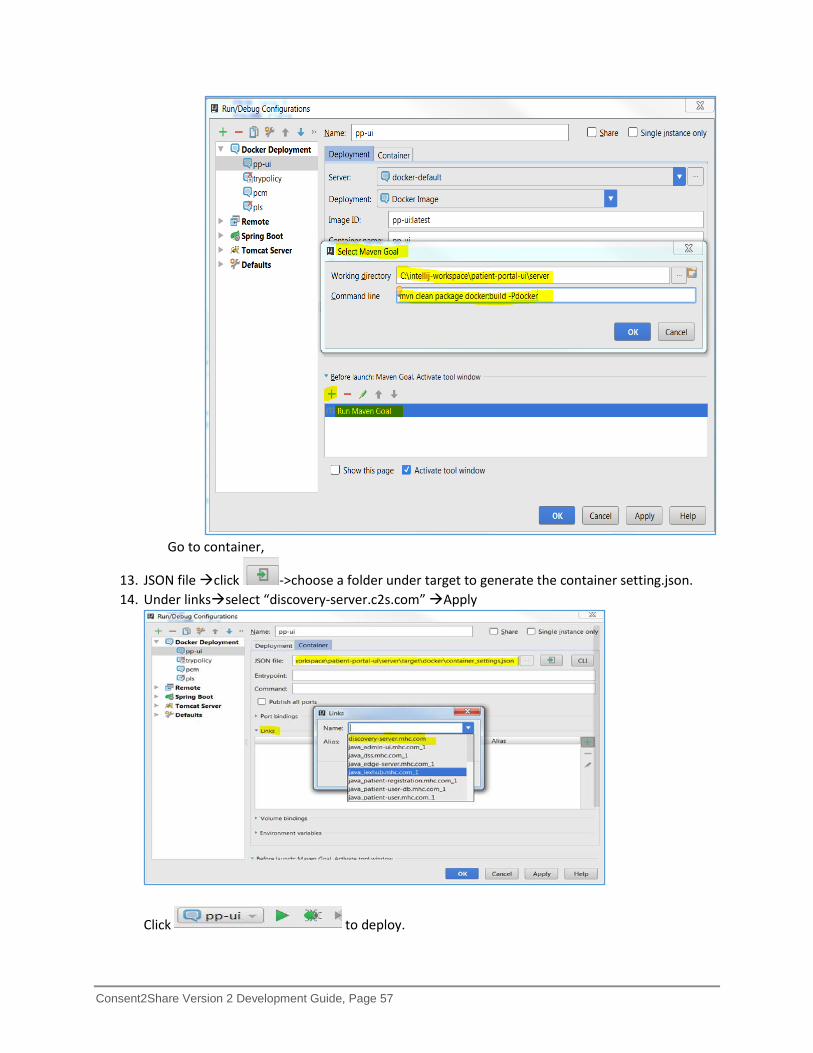
Consent2Share Version 2 Development Guide, Page 57
Go to container,
13. JSON file click ->choose a folder under target to generate the container setting.json. 14. Under linksselect “discovery-server.c2s.com” Apply
Click to deploy.