![DENT...Porcelain and cast restorations; prosthodontics (fixed partial dentures [bridges], removable partial dentures, and complete dentures); implants; etc. CLASS IV: ORTHODONTICS](https://static.fdocuments.in/doc/165x107/5ed5609cf98bb3308d2fa371/dent-porcelain-and-cast-restorations-prosthodontics-fixed-partial-dentures.jpg)
Connectors in Fixed Partial Dentures
55
INDEX INTRODUCTION TERMINOLOGY PRINCIPLES OF CONNECTOR DESIGN CONNECTORS I. RIGID CONNECTORS CAST CONNECTORS SOLDERED CONNECTORS WELDED CONNECTORS LOOP CONNECTORS II. NON-RIGID CONNECTORS KEY AND KEYWAY SPLIT PONTIC CROSS PIN AND WING CONNECTORS FOR- 1. TEMPORARY RESTORATIONS 2. ALL METALLIC F.P.DS 3. METAL CERAMIC F.P.DS 4. ALL CERAMIC F.P.DS 5. TOOTH IMPLANT SUPPORTED PROSTHESIS 6. SPECIAL SITUATIONS -PIER ABUTMENTS -TILTED MOLARS -CANTILEVERED BRIDGES 1
-
Upload
mrunal-doiphode -
Category
Documents
-
view
555 -
download
4
description
Connectors in Fixed Partial Dentures
Transcript of Connectors in Fixed Partial Dentures
INDEX
INTRODUCTION
TERMINOLOGY
PRINCIPLES OF CONNECTOR DESIGN
CONNECTORS
I. RIGID CONNECTORS
CAST CONNECTORS
SOLDERED CONNECTORS
WELDED CONNECTORS
LOOP CONNECTORS
II. NON-RIGID CONNECTORS
KEY AND KEYWAY
SPLIT PONTIC
CROSS PIN AND WING
CONNECTORS FOR-
1. TEMPORARY RESTORATIONS
2. ALL METALLIC F.P.DS
3. METAL CERAMIC F.P.DS
4. ALL CERAMIC F.P.DS
5. TOOTH IMPLANT SUPPORTED PROSTHESIS
6. SPECIAL SITUATIONS
-PIER ABUTMENTS
-TILTED MOLARS
-CANTILEVERED BRIDGES
CONNECTOR FAILURES AND REMEDIES
CONCLUSION
REFERENCES
1
2
INTRODUCTION
Connectors basically link different parts of fixed partial dentures
(i.e. pontic and retainers). Thus constitute an important part of F.P.D.
Their designing determines the fate of periodontal ligament under
F.P.D. They may be either rigid /non-rigid type of connectors.
TERMINOLOGY
1. Connector- the portion of fixed partial denture that unites the
retainer’s and pontics.
2. Rigid connector: - a cast, soldered /fused union between the
retainers and pontic.
3. Non-rigid connector: - a connector that permits limited movement
between otherwise independent members of a fixed partial denture.
4. Internal connector: - a non-rigid connector of varying geometric
design’s using a matrix to unite the members of a F.P.D.
5. Sub-occlusal connectors: - an interproximal non-rigid connector
positioned apical to and not in communication with the occlusal plane.
6. Soldering: - to unite, bring into/restore to a firm union, the act of
uniting two pieces of metal by the proper alloy of metals.
PRINCIPLES OF CONNECTOR DESIGN
The connector design determines the success of F.P.D to a
certain extent. The factors to be observed while fabricating a
connector are: -
Type of connector
-Rigid connector
-Non-rigid connector.
Size of connector
Shape of connector
3
Type of connectors
1. Rigid connector-they are the ideal choice of connectors for F.P.D’s.
They provide maximum rigidity and accurately transfer occlusal forces
to abutment teeth.
2. Non rigid connector- they are usually used for pier abutments due to
differences in physiologic tooth movement and difference in arch
position of abutment. It provides a scope for flexing of mandible during
opening and closing movements but it is technically sensitive.
Size of connector
The size of connector is important in maintaining the periodontal
health of the abutment teeth. The recommended occusogingival height
of connector is, ideally 3-4 mm. It should be sufficiently large to
prevent distortion /fracture during function. It should not be too large
which interfere with effective plaque control. Pulp size and crown
height (young teeth) may be a problem in designing non-rigid
connector.
Shape of connector
Connector’s should have a concave shape mesiodistally (appear
as meniscus) and
Convex buccolingually4. In cross section it appears as ellipse. For
effective functioning the long axis of ellipse should be parallel to
direction of force, this leads to encroachment of gingival embrasure, so
usually the long axis of ellipse is placed perpendicular to long axis of
force. It should be highly polished.
For anterior teeth connector should be placed lingual and use of
large connector /inappropriately shaped connector result in display of
metal leading to esthetic failure of F.P.D.
CLASSIFICATION OF CONNECTORS
Connectors are basically classified as: -
4
1. Rigid connectors-
Cast connectors
Soldered connectors
Welded connectors
Loop connectors
2. Non rigid connectors
Key & keyway (dovetail)
Split pontic
Cross pin and wing
RIGID CONNECTORS
Cast Connectors
They are commonly used type of connector,
simple in processing.
They are usually indicated for 3-unit F.P.D, full veneer
preparations.
Contraindications: -
1. F.P.D’s more than 3 units
2. Partial veneer F.P.D’s
Preparation: -
Cast connectors are prepared by waxing the interproximal area
before reflowing the margins and investing the pattern. There should
be 1 mm of gap between connector and gingiva.
Disadvantages: -
1. Difficulty in reflowing proximal margins.
2. Access for proximal margins impeded so removal of patterns from
die is difficult.
3. Simple in fabrication but difficult in seating.
5
4. No opportunity to verify fit of individual retainers in mouth.
Precautions in processing of cast connectors:-
1. Any F.P.D greater than 3 units should be cast in 2 piece and
soldered.
2. Use of bench set with thermal expansion is better than hygroscopic
expansion.
3. It is advisable to use large casting ring (60 mm), which produces
more uniform expansion.
4. Investment expansion and pattern distortion can affect fit of
castings.
5. If F.P.D do not seat properly after routine adjustments then: -
- It is better to cut the connector and resolder.
- Cut the pontic and recast the cut parts 21
(J.Prosthet.dent 55(2), 195-197,1986)
Burno Es et all (1985) 9: - studied the accuracy of different length
of multiunit F.P.D cast in a Ceramo-metal gold alloy. They used 3, 4, 5
unit fpds. Initially were prepared as cast, then sectioned and seated
with duralay resin. The vertical marginal discrepancies and dimension
at gingival axial line angle’s were measure before and after. The
mean vertical discrepancy found with as cast specimens were: -
4 units F.P.D – 176 m highest
3 units F.P.D – 20 m lowest.
The greatest amount of opening was found at mesial finish line of
mesial abutment and distal finish line of distal abutment. So the
distortion is not uniform across the fpd. Increased number of units
caused increased amount of mean marginal opening (54,92,105 m).
They advised use of oval casting ring than cylindrical casting ring. 50%
improvement in seating was found after sectioning. And oval casting
ring preferable (uniform expansion) than round casting ring. With
normal casting procedure the castings are larger facio-lingual
6
dimension, less medio-distal dimension(casting contracted mesio-
distally).
Loop Connectors
They are rarely used and indicated when existing diestema is to
be retained. It contains a lingual loop and designing should include
adequate plaque control. Loop is cast using sprue wax /shaped from
platinum-gold –palladium alloy.
Soldered Connectors
Soldering - is joining of 2 metal parts using a filler metal with melting
point <4500 c.
Brazing - is joining of 2 metal parts using a filler metal with melting
point >4500 c
But for theoretical purposes brazing is regarded as soldering.
The most common connector after cast connectors are soldered
connectors. They are commonly indicated for F.P.D’s more than 3
units; when F.P.D’s with cast connectors are exhibiting high marginal
discrepancy, repair of fractured connectors.
Hong So Yang et al(1999): - studied the stress levels in the teeth and
supporting structures of F.P.D and alteration of stress with addition of
multiple abutments (finite element analysis study)
They found that –
1. Increased number of abutments did not solve the mechanical
problems of long span F.P.D.
2. High stress concentration was found at connector (215.8-298.9
kg /cm 2)
3. The connector material should nave high yield strength and rigidity.
4. Connectors in long span fpd’s should be of greater dimensions.
Dental Solders
They are intermediate filler alloy used to join parent metal parts.
7
Requirements of dental solders: -
1. Corrosion resistance (minimum 580 fineness)
2. Lower fusion temperature than alloy (600 less)
3. Non –pitting (pitting occur due to over heating which cause
vaporization of components
5. Strength should be similar to a parent metal.
6. It should have free flow
Silver –increases flow
Copper –decreases flow
High fusion solder –show high flow
Low fusing solder show decreased flow
6. It should have same color as parent metal.
Commonly used dental solders are: -
1) Gold solders-
Composition: -Gold –49-73%-corrosion resistance
Silver –17.5 –9%- flow
Copper –23-12.5%
Tin-4.5-2.5 %
Zinc –6.0- 3.0%
Fineness- 490,585,615,650,730.
If solder is indicated as-
585 fine – fineness of solder
180 carat –to be used with 18-carat parent metal
Pre- ceramic soldering.
Fusion temperature of gold solders –780-8300c
They are commonly used with gold alloys.
2) Silver solder: -
Composition –Silver
Copper
Zinc &cadmium-decrease the fusion temperature.
Fusion temperature is 600-7500 c
8

They are commonly used for base metal alloys.
Soldering Flux (Flow)
They are used to provide a clean surface for soldering and increase
wetting of solder they are available as powder, liquid and pastes.
Types of fluxes: -
1. Surface protective – cover metal surface and prevent access to
oxygen.
2. Reducing agent –reduces any oxides present
3. Solvent –dissolves and carry away any surface oxides present.
Commonly used soldering fluxes are
Borax Flux: -(Na2 B4 O7) it is commonly used for pre soldering, as they
are too fluid in nature. They have type I and II function. They are used
with noble metal alloys due to high affinity for copper
Composition; - Borax glass – 55%
Boric acid –35%
Silica-10%
Fluoride Flux: - They are used with base metal alloys. They are
available as powder, liquid and pastes. They dissolve Co,Cr,Ni oxides
Composition: - Borate
Fluoride.
Soldering Antiflux
They limit spread of solder to unwanted areas.
Commonly used antifluxes are:
Graphite –economical & evaporates at high temperature.
Iron oxide (rouge) +turpentine –it is painted on casting with small bristle
brush.
Soldering Investment
9
Composition of soldering investment is similar to routinely used
gypsum and phosphate-bonded investment. But the refractory
component used is fused quartz (it shows least thermal expansion.-
<0.1% at temp >7000 c.
Heat Source
It is needed to melt the filler metal. Different type of heat
source used are: - 1) Flame
2) Oven
3) Infrared light.
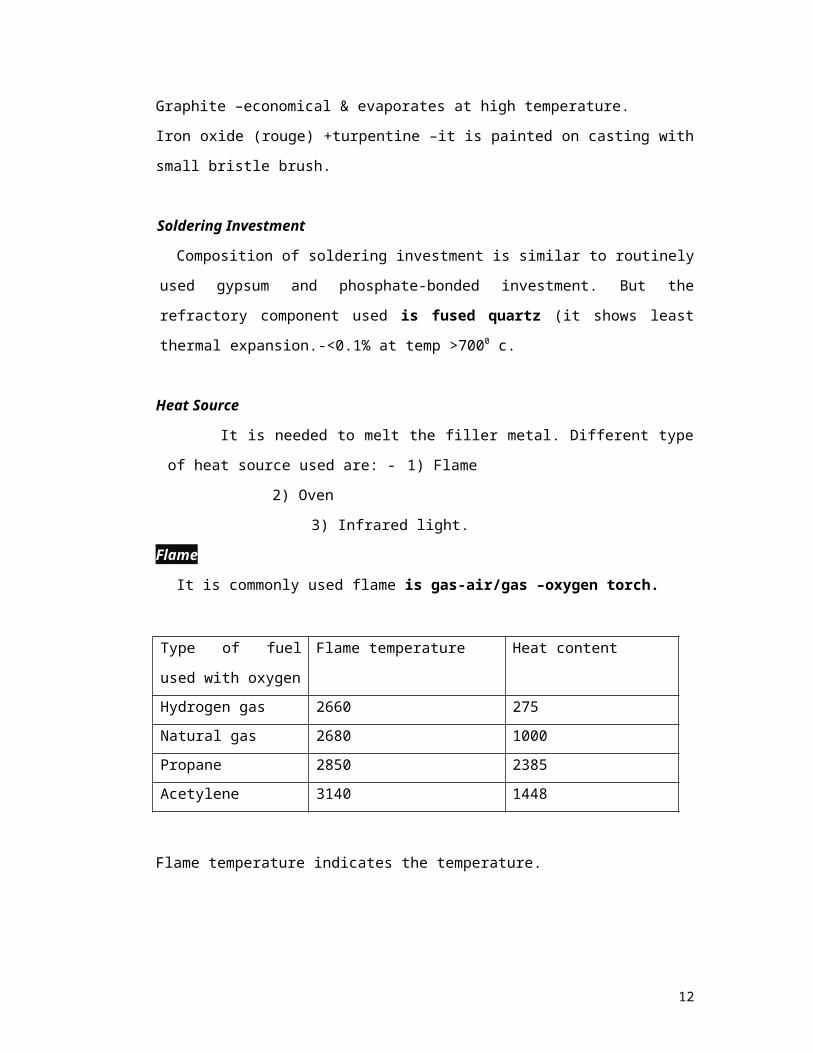
Flame
It is commonly used flame is gas-air/gas –oxygen torch.
Flame temperature indicates the temperature.
Heat content –amount of heat /cubic feet of flame (calories /cubic foot).
Lower heat content indicates need of long time to melt the alloy.
Different types of flame torches: -
1) Gas –air
2) Gas –air
3) multi-orifice.
Always melting is to be done with reducing zone. When gas- air torch
is used to melt solder, metal –ceramic restorations are preheated to
avoid porcelain cracking. To prevent uneven heat distribution flame
should never be concentrated in one area.
Type of fuel used
with oxygen
Flame temperature Heat content
Hydrogen gas 2660 275
Natural gas 2680 1000
Propane 2850 2385
Acetylene 3140 1448
10
Oven
Furnace /oven soldering is done under vacuum /air .the soldering
assembly is placed in horizontal muffle with affixed floor, temperature is
raised above fusion point of solder. Then muffle is opened and solder is
fed unto joint space.
Infrared Soldering
It is used with low fusing connectors, preceramic soldered joints. It
needs specially designed apparatus and requires more processing time.
Connector area of soldering assembly must be positioned precisely
relative to the focal point of the reflector that concentrates the heat,
infrared energy from tungsten iodide lamp –34000 c. the operator
observes soldering procedure through protective dark screen and stops
electric supply once solder flows .the joints produced have similar
strength as conventional soldering.
Gerard .b. et all (1992): - compared accuracy of fit of castings (F.P.Ds)
with as cast connectors and infrared soldering. They found that mean
marginal gap was –
65.2(for cast connectors)
18.9(infrared soldered connector)
it was also observed the F.P.Ds with infrared soldered connectors showed
better fit than as cast connectors and to similar to single retainer
castings .
Soldering
Basic steps of soldering involve –
1. Cleaning and preparing the surface (smoothening done using abrasive
discs) to be joined.
2. Assembling the parts to be joined (gap width).
3. Preparation and fluxing the gap surfaces between the parts.
4. Maintain proper position of parts.
5. Control of time to ensure adequate flow of solder.
11
Factors affecting soldering: -
1. Gap width – an average of 0.2 mm wide gap should be present
between adjacent parts with surfaces parallel to each other. With
increase gap width there is decreased capillary action, decreased
strength due to increased amount of solder. With decreased gap width
there is increase flux inclusion, increased porosities.
2. Flame –reducing zone is to be used for soldering.
3. Temperature –50-600c less than melting point of parent metal. If flow
temperature is very near/higher than solidus temperature of parent
mental it causes alloying and decreased strength. If flow temp is very
low it shows low wetting.
4.time –flame should be used till the solder flows and little tome more to
remove flux on parent metal. If soldered for longer duration it causes
alloying .if done for less time it causes incomplete flow.
Selection Of Soldering Technique
Selection of appropriate soldering technique needs a through
understanding of fusion ranges of all materials involved in F.P.D.
Soldering All-Metallic F.P.Ds
Bade metal alloys are difficult to solder due to easy oxidation of its
elements (silver solders). Mid pontic soldering, recasting of cut parts may
be used to increase strength of joint in base metals. Type III & IV gold
retainers are soldered –using gold solders (615 –650 fine) and gas-air
torch /furnace.
Metal-Ceramic F.P.Ds
Soldering of metal –ceramic restorations involves two techniques: -
1) Pre-ceramic soldering
2) Post-ceramic soldering.
Pre-Ceramic Soldering
12
The procedure of soldering before application of porcelain .it mainly
needs gas-oxygen torch. The main advantages are metal try-in can be
done in unglazed state; proximal embrasure in porcelain can be
adjusted. Its main disadvantage is when porcelain is applied to long
structure; the framework should have high sag resistance. High
palladium alloy and base metals have high sag resistance. But gold
alloys have a low sag resistance.
Post-Ceramic Soldering
It involves soldering done after porcelain application and glazing. It is
done using gas-air torch. Its main disadvantages is, if contour
correction of porcelain is needed the joint has to be separated.
Soldering All-Metallic F.P.Ds
Indexing -maintains the relationship between parts of F.P.D till soldering
investment is done. Various materials used are plaster, sticky wax, auto
polymerizing acrylic resin (cause polymerization shrinkage), 4-meta,
ZnO-eugenol, Polyether, polyvinyl siloxane polymer (putty).
Harper r j et al (1979) 25: - determined the accuracy of different indexing
materials. They reported that ZnO Eugenol indexing system produced a
narrow range and significantly smallest mean distortion than other
indexing system. Mean distortion than other indexing system (in mm): -
ZOE:- 0.033
Polyether –0.052
Plaster 0.061
Stone 0.055
Sticky wax 0.088
Acrylic resin:-0. 052
After wax pattern is prepared and casted, they are finished properly, the
temporary restoration is removed and the parts of F.P.D are checked in
mouth for individual fit and occlusion is corrected. Then using pop as
index material index is prepared.
Indexing
13
A two-piece casting can be used to fabricate a fixed partial denture
with a solid pontic; such as a hygienic .The technique described is used
for soldering three unit posterior fixed partial dentures. The pontic is cast
with the smaller retainer. Then the retainer- pontic unit is soldered to the
larger retainer, utilizing an index of the relationship of the fixed partial
denture components in the patient’s mouth. This provides for the most
accurate relationship between the retainers and between the retainers
and between each retainer and its abutment tooth. The index must
accurately maintain that relationship until the parts if the fixed partial
denture have been embedded in soldering investment. Numerous
materials have been described for transferring the relationship of the
fixed partial denture components from mouth to laboratory bench;
plaster, sticky wax, auto polymerizing acrylic resin (duralay); 4-META
adhesive resin and zinc oxide- Eugenol, which has been shown to be a
highly accurate material for indexing. If plaster is used, the most
accurate and consistent results will be obtained if the castings are not
removed from the index prior to investing. Resin indices are as accurate
as those made of plaster if the components are separated from and
reseated in the plaster. However excess bulk of a resin index will
diminish accuracy because of additional polymerization shrinkage.
Procedure
Remove the provisional restoration from the patient’s mouth and make
certain that there are no traces of temporary cement left on the tooth
preparations. Try in the single retainer first and then the retainer- pontic
combination. On the first try in for each, do not leave the other unit in
place. Verify the marginal fit of each retainer first. Make sure that there
is a small gap between the pontic and the retainer to which it has not yet
been soldered. Adjust the occlusion wit green stones or other
appropriate abrasives. Perform preliminary finishing procedures on the
retainer margins, if they are accessible. Smooth off the occlusal surface
with a rubber sulci disc. The rough surface left on the casting by a
greenstone index. Into polish the castings at this point, since polishing
14
rouge is iron oxide a specific anti-flux for soldering. Mix a small amount
of fast setting impression plaster. Place it on a plastic index tray or a
thoroughly wet tongue depressor. Arrange the index material on the
carrier so that sharp ridge of material runs the length of the depressor or
tray. This ridge facilities getting index material into the central grooves
of the casting. Carefully position the index on the occlusal surface of the
castings, vibrating gently as you seat it. When the material has set
remove the index. If the casings come out with it so much the better. A
plaster index is most accurate when the crowns stay in it. Carefully trims
it with a laboratory knife with a no.25 blade so that all margins are
exposed by at least 1.0 mm. The index should extend at least 3 mm
easily and distally past the crowns being soldered. This guarantees a
symmetric Uniform bulk of investment surrounding the units to be
soldered and should minimize distortion .the plaster index should be
approximately 6mm thick.
If the crowns separate from the index when it is removed from the cast,
trim off excess that might prevent the casting from seating completely
back into the imprints. Trim the area around the imprints enough so that
a substantial part of the axial walls will be covered by investment. Then
clean the index thoroughly with compressed air .the slightest bit of
debris between the index and crown will keep the crown from seating in
the index and will make the relationship inaccurate. Scrub the occlusal
surface of the crowns and clean them in the ultrasonic cleaner before
repositioning them in the index. Place the index on the bench and
carefully try the castings in their respective imprints. If the castings
touch there is a likelihood of increased distortion. For this reason, it has
been suggested that there be a gap of at least .005 inch between the
pontic and the retainer. A conflict arises in determining the proper gap
dimension for a solder joint. The wider the solder joint gap, the stronger
the joint apparently because there is less porosity in the joint. Therefore
a gap width of .012 inch is recommended for strength.
15
In another study, however it was determined that increased gap width
produced an increase in distortion. A gap width of .006 inch is
recommended for some greatest accuracy. Obviously there is a need for
some compromise. A gap width of .008 inch would appear to be optimum
since it is intermediate between the narrow in distorted joint and the
wide string joint. Indeed some investigators have used this distance as a
standard. Furthermore, it can be determined easily by inserting a
business card into the gap , since the average business card is 0.008
inch thick.
The opposing surfaces of the retainer and pontic on either side of the
solder joint should parallel and each other. In these surfaces diverge; the
resulting wedge shape of the solder joint may produce distortion. In
addition wherever there is contact, there will be harder to solder since
capillary action is more difficult to achieve .as a result, solder will be
more likely to stick to one surface or the other, instead of filing the gap
and adhering to both surfaces.
Investing
Pontics and retainers that have come off the index should be luted
back on the index with sticky wax. It is often necessary to use a no.8 bur
to cut small ‘well’ on the facial and lingual edges of each imprint in the
ices. This permits pace for a bulk of sticky wax without forcing it over the
margins. Separate the tongue depressor from the index if they have not
already come apart. Use a cast trimmer to remove excess from the edge
of the index, leaving approximately 3.0mm all around the perimeter.
Allow the index to dry, and apply sticky wax to each casting using the
PKT no.1 instrument. Do not allow the sticky wax to cover occlusal
margins (if any) on the facial surfaces. Flow utility wax into the joint with
a PKT no.2 instrument to prevent the joint area from being filled with
investment. The waxed area should be slightly larger than the solder
joint will be. Any margin covered by wax at this point will not be covered
by soldering investment. This could cause the margin to melt when
heated by the bow pipe during soldering. Run a triangular-shaped
16
extension of utility wax from the lingual side of the solder joint area of
the index. There should be a slightly smaller one on the facial. These wax
wedges will be narrow in the solder joint area than at the edge of the
index. Check again to make sure that the castings are completely
seated.
A separating medium (super-sep, err dental manufacturing co,
Romulus, MI) may be painted over the index outside the castings to
insure easy separation later. Place boxing wax around the index. There
should be 3.0mm of space between the castings and the boxing wax. Mix
a small amount of soldering investment. Paint into the castings and
carefully vibrate it into the castings and carefully vibrate it into the
boxed area. Hold the index so that there is a finger between it and the
vibrator. Overzealous vibrating could jar one of the castings loose.
Allow the investment to set for 1 hr and then remove the boxing wax.
Run hot water over the investment and index to soften the sticky wax.
Separate the index and the investment with a heavy laboratory knife.
Inspect the block of investment containing the fixed partial denture
castings. The investment should measure 2.5cm top to bottom. If it is
more, trim off the excess from the bottom on a cast trimmer. Use of
laboratory knife with ano.25 blade to cut a v- shaped notch buccal and
lingual to the solder joint.
The wax extension placed on the lingual earlier will facilitate this step.
The lingual notch is larger than the facial, because the solder will be fed
into the joint area from the lingual. The facial notch is necessary to gain
access for heating the castings during soldering. If either of these
notches is not placed, an incomplete solder joint is likely to result. Flush
out the remaining wax with boiling water from a boil-out tank. Use a
nop.2 pencil to draw heavy line across the marginal ridges adjacent to
the solder joint area. This will act as an antiflux and will prevent solder
from flowing onto the occlusal surfaces. While the castings are still
warm, add flux paste with an explorer. It will melt, and capillary action
will draw it through the entire solder joint. If flux is applied later when
17
the castings are hot, it will bubble up and stick where it is applied rather
than flowing into the joint where it is needed. Also, surface oxidation
may occur before the protective flux is applied.
Soldering -
the invested castings should be preheated to insure even heating. If
the castings are not preheated, the uneven heat distribution that will
occur when the blowpipe is applied to a cold block may produce
distortion of the finished joint. The investment block can be placed in an
oven and brought from room temperature to 8150c. In an alternative
method of preheating the invested castings, they are set on a tripod and
screen over a fisher burner. Continue to preheat the castings for 10-15
min.
Begin heating with the blowpipe, and brush the flame over the entire
investment block repeatedly until it is so hot that the castings glow red
when the flame is held on throughout this process. Wedge two or three
pieces of solder 2*3mm, covered with flux, into the lingual embrasure of
the joint area. They will be milted by the heat of the castings, and not by
the blowpipe. If too much solder is used, it may run onto the occlusal
surface, and a larger bulk of solder is more likely to produce distortion.
If the blowpipe is used to melt the solder directly the following
difficulties can be expected; the solder will “ball up” and not flow at all,
or it will not flow through the entire joint.
Aim the blowpipe obliquely at the investment, since an obliquely
directed flame results in more even heating and less distortion.
Concentrate the tip of the blue cone on the buccal side of the block near
the open space between retainer and pontic. The solder on the lingual
side of the casting will flow toward the source of heat on the facial. When
the solder starts to flow, direct the torch into the buccal notch and keep
it there while the solder flows through the joint. Leave the flame there a
few seconds longer while the solder shimmers and appears to “ roll” in
the joint. Turn off the flame.
18
Remove the investment block from the tripod with casting tongs and
place it someplace where there is no chance or someone picking it up
and getting burned. The bottom of a casting well is good for this
purpose. If you must place it on a bench top , select an area where there
is little traffic and be sure the surface is heat resistant. Leave a
conspicuous sign to earn off “ lab lizards” who wander around picking up
other people’s work. Do not quench immediately. Quenching shortly
after soldering will produce thermal stresses that will result in distortion.
On the other hand, allowing the investment block to cool slowly to
room temperature may produce excessively recrystallization and grain
growth. The resulting solder joint will be weaker. If the invested fixed
partial denture is allowed to bench cool for 5 minutes and is then
quenched, distortion should be minimized. This allows time for the gold
and solder to respond to an ordering heat treatment, which will increase
hardness and strength while reducing elongation. Place the invested
block in water and remove the investment. That which does not flake off
should be picked off with a sharp instrument and an old toothbrush.
Examine the solder joint to make sure that it is pit free. Evaluate the
size. If it is too bulky, it can be trimmed down with a carborundum disc.
Inadequate bulk or the presence of pits requires reinvestment and
resoldering. Air abrade the castings with 50m aluminum oxide. The
fixed partial denture is ready to be finished and tried in the patient’s
mouth.
Soldering Metal –Ceramic Alloys
Although an effort is made to fabricate metal-ceramic fixed partial
dentures as a single unit. It is sometimes necessary to solder the units
together. This may occur is; 1) there is distortion in a single –piece fixed
partial denture castings; 2) one retainer has inadequate margins and
must be redone; 3) the fixed partial denture length is too great for an
accurate single- piece casting; or 4) type III partial veneer retainers are
used in an other wise metal- ceramic fixed partial denture.
19
If all units of the fixed partial denture requiring soldering are of a
metal- ceramic alloy, the fixed partial denture may be assembled in one
of two ways. Pre-veneer soldering uses a high-fusing solder that is
melted by torch before porcelain is added. Pre-ceramic pontic soldering
allows a diagonal joint through the middle of a pontic, which produces
stronger joints than soldering in the interproximal connector area, and it
is technically easier. In post-veneer soldering, a low-fusing solder is
molted in the oven after porcelain has been baked on the fixed partial
denture. Post-ceramic soldering compensates for any tooth movement in
the mouth between final impression and restoration and it eliminates the
significance of any distortion that might occur during porcelain firing.
If the fixed partial denture includes a type III gold alloy retainer, it can
be assembled only by post-veneer soldering. The high temperatures
reached during the porcelain firing cycle would melt the type III gold
alloy if it were soldered to the fixed partial denture before the porcelain
and been added.
For many years, soldering was done with a gas- air blowpipe. With the
development metal-ceramic restorations, a need for oven soldering
developed. Oven soldered post-veneer solder joints are at least as strong
as torch-soldered pre-veneer solder joints, and several investigators
found that post-veneer joints to be stronger. Certainly, post-veneer
soldering does present special problems. Soldering investment, flux, and
solder just be kept from contacting the porcelain to prevent discoloration
or fracture of the porcelain.
In recent years a third method of soldering has been developed that
utilized as infrared soldering machine. The device focuses a
concentrated beam of infrared energy from a tungsten iodine lamp that
operates at 3,4000 c in a closed chamber in porosity and strength have
been found between torch-soldered and infrared-soldered joints although
infrared soldering has been found to require more time than torch
soldering.
Pre-veneer Metal-Ceramic Alloy Soldering
20
Although some investigators have found post-veneer to be stronger
than pre-veneer solder joints. Pre-veneer soldering remains more
popular with ceramists. This is because post-veneer soldering takes more
time, skill and attention to detail to keep the investment, flux and solder
from touching porcelain, which in turn can require the reapplication of
porcelain and resoldering. The apparent superiority of the post-veneer
solder joints also may be offset by the fact that unlike the standardized
joint size in the laboratory studies clinical post-veneer joints frequently
are smaller because of the ceramist’s fear of causing damage to the
ceramic by contacting it with solder.
The example demonstrated her is of a six-unit metal-ceramic fixed
partial denture with two retainers at one end, fabricated as a five-unit
FPD’S (canine to lateral incisor ) with the second retainer, a canine,
made separately to facilitate margination of the proximal surfaces of the
contiguous retainers. These restorations should be fabricated so that
there will be parallel surface in the solder joint area, with adequate
separation for a solder joint with optimum strength and minimum
distortion.
To accurately transfer the segments to be joined to the laboratory
bench, tack them together with an auto polymerizing acrylic resin index.
Place monomer and polymer in separate dappen dishes or medicine
cups. Make sure that the segments of the fpd are completely seated and
stable in the mouth, if one is not stable; hold it down with a finger. Dry
the area with compressed air and isolate it with cotton rolls. Use a
disposable brush to apply a few drops of monomer between the two
retainers. Then dip the brush in polymer and apply a small amount of
powder to the joint. Continue alternating small quantities of liquid and
powder, making sure that the material between the retainers is always
wet. Build the index as that it extends onto adjacent surfaces of the two
retainers.
Make a backup plaster index on a tongue depressor. Mix quick-setting
plaster and place it on wet depressor, creating a ridge of plaster that
21
extends the length of the tongue depressor. Apply it to the teeth while
plaster is still fluid. If any cracks appear in the plaster, remove the
material, wash the FPD thoroughly, and remake the index. Hold the index
until the plaster is completely set index. Hold the index until the plaster
is completely set. If left untended, it could shift or slip, necessitating a
remake. Remove the index along the path of insertion of the abutment
preparations. Examine it thoroughly to see if the components are
securely embedded.
Carve the surface of the index surrounding the fpd exposing the
pontics and retainers. Very carefully expose each pontic and retainer.
Cut around, but do not disturb the resin. If the components are still firmly
embedded in the plaster, they can be left there and invested from the
plaster index using the technique previously described. The resin will
serve as filler in the solder joint.
Those who are more experienced at soldering may prefer to lift the
components from the plaster. If the resin remains intact, mix some
investment and gently vibrate it into the retainers. Use your fingers as a
cushion between the vibrator and the fpd components. Place a quantity
of investment large enough to contain the fpd on a ceramic or hard resin
tile.
Invert the framework, whose retainers and filled with investment, and
place it into the top of the soft mound of the investment. With light finger
pressure, partially submerge the luted- together castings into the
investment; the incisal half of the castings (approximately) should
protrude from the investment. Add a little investment over the units that
will not be directly involved in soldering. Allow the investment to set
hard. When it does, trim the periphery to produce a near-even bulk of
investment around the castings. Preheat the invested castings in a
burnout furnace at 650-8150c. When the invested block has reached the
desired temperature, use casting tongs to transfer it to the mesh or
some other area that will not be damaged by flame. Several 2*3 mm
pieces of solder in a hemostat can be fed into the embrasure after it gets
22
hot. The solder used should have melting range within 1,050-1,1500c.
Brush the investment with a gas-oxygen flame until the block glows if
the flame is held in one spot for a few seconds. Hold the flame on the
lingual surface of the block of investment. Then direct the torch into the
lingual notch, as solder is red into the facial notch. Heat will draw the
solder through joint area.
Remove the soldered FPD from the tripod and place it in a casting well
or some other safe place where someone will not be able to touch it and
be burned, when it has cooled to room temperature, break the
investment by pickling it up with casting tongs and tapping it on the
bottom of the casting well or a heat resistant bench top. Retrieve the fpd
from among the bits of soldering investment and clean it up. Air abrade
the surface 50m aluminum oxide.
When the restoration is tried in all margins should be closed without
any special force needing to be applied anywhere. Check for any
encroachment on the interdental papilla on the facial or especially on the
lingual; aspect. If there is any, remove the restoration from the mouth
and relieve the affected area.
Post-veneer Metal-Ceramic Alloy Soldering
The technique that follows is for the soldering of a gold-palladium
alloy. All phases of the porcelain addition, including glazing, must be
completed before the soldering process. The solder has a melting range
of 710-7400c and it is used with flux.
Try the units in the mouth and make whatever adjustments are
necessary. This technique is often employed without prior intent; i.e. a
fixed partial denture is carried to completion in expectation of cementing
it without any type of try-in, only to find that it does not seat. The best
joint esthetically, strength wise, or both, is selected for separation, using
a very thin (0.009 in 0r 0.23 mm) disk.
Remove the fpd from the mouth, cut the joint using the disk on a lathe.
This allows the use of both hands to hold the fpd, and the disks are very
easily broken. After separation of the two parts of the prosthesis, try the
23
retainers in the mouth to see if they fit individually. If they do, continue
with the soldering procedure. A soldering index can be made of quick-
setting impression plaster, resin, or zinc oxide-Eugenol bite registration
paste as previously described.
Finish those areas of the crown that are to be soldered with extra-fine
sandpaper discs. Use no rouge or polishing compounds. Outline the area
to be soldered with ano.2 pencil, which will serve as an antiflux. Reseat
the components of the fixed partial denture in the mouth. With the two
parts of the fpd firmly seated, pour monomer and polymer into separate
containers. Dry the area with compressed air and isolate it with cotton
rolls. Use a disposable brush to apply monomer between the retainer and
the pontic.
Next dip the brush in polymer and apply a small amount to the joint.
Continue alternating small quantities of liquid and powder, making sure
that the material between the retainer and the pontic is always wet.
Build the index so that it extends onto adjacent surfaces of the two
castings.
Fabricate a secondary plaster index on a tongue depressor. Arrange
quick –setting plaster on a wet depressor, making a ridge of plaster that
extends the length of the length of the tongue depressor. Apply it to the
teeth while the plaster is fluid. Stabilize the index until the plaster is
completely set. Remove the index along the path of insertion of the
abutment preparations.
Carve the surface of the index around the fpd components, creating a
flat surface with shallow imprints. Rearrange the parts of the fpd on the
plaster index. if the resin index has come loose, make sure that it is back
in place between segments of the fpd, without any spaces. Squeeze a
cyanoacrylate liquid resin in and around the joint while holding the parts
securely. Then spray the zapit accelerator over the joint. Zapit is the
material of choice when indexing on a cast in the laboratory, but it
should not be used in oral cavity because it’s safety has not been
proven. Duralay is the material of choice for use in the mouth.
24
To prevent investment from contaminating the ceramic veneer
covering mush of the fixed partial denture, place a 1.0mm thick layer of
ivory wax over the gingival one half to two-thirds of the facial surfaces of
the retainers and pontic. The wax for this step and those following should
overlap the metal by 1.0mm. Turn the restoration over and apply a coat
of wax to the gingival and lingual aspects of the pontic. Be sure to apply
wax to any exposed ceramic that is part of a porcelain shoulder , add
wax to the joint area to insure access for the solder after the restoration
has been invested.
Mix a small amount of soldering investment and carefully vibrate it into
the crowns are filled completely with investment. Since this is the major
support for the crowns in the block, avoid vibrating the castings directly
to prevent the cr0wn from being loosened. Build a mound of investment
on a flat surface and set the inverted margins first, into the investment.
Push up a ridge of investment with a spatula to cover most of the lingual
surfaces of the retainers and pontic,
When the investment has set, trim it to within 30.mm of the castings.
Create a wide bevel around the entire periphery of the invested block
with a laboratory knife equipped with a no.25 blade. Then carve a v-
shaped notch on the lingual aspect to insure adequate access to the
solder joint. Flush out the wax with boiling water. When the fps was
embedded in investment, the wax prevented contact between
investment and porcelain. After the wax has been removed, there is a
space surrounding the porcelain, including any all-porcelain shoulders.
Place the invested castings in front of a porcelain oven to warm slowly
for 10 minutes. Open the muffle of the oven and warm the castings for 5/
or more minutes.
Add a couple of 2*3mm pieces of fluxed solder to the solder joint,
making surf that they contact only the metal framework of the fixed
partial denture. Place the castings in the oven, turn on the vacuum, and
raise the temperature to 8150c at the rate of 420c/min. check the castings
for completion of soldering. If the solder has not yet fused, continue
25
raising the temperature in the oven until it reaches 8700c. The final
temperature used will vary with different solders. Be sure to use the
solder recommended by the manufactures for the specific ally being
used.
Break the vacuum and remove the invested fixed partial denture from
the oven. Allow the casting to cool to room temperature. The castings
cannot be quenched, as the porcelain may fracture. When the fixed
partial denture has cooled, remove the investment. Cover the porcelain
with masking tape and air abrade the fpd.
Soldering can be done on abase metal fixed partial denture with gold
solder n a manner similar to that used for gold-palladium metal-ceramic
alloys. While restorations of base metal alloys can be soldered, they tend
to be quite technique sensitive, with variable results. Overheating of the
metal substrate and excessive flux have been faults, while others have
blamed surface oxides. Closed vacuum furnaces were suggested as a
solution for this problem and testing by lima verds and stein confirmed
that soldering under vacuum resulted in mean tensile strengths that
were as much as 40% greater than those soldered in air. High and low-
temperature solders are capable of producing joints with adequate
tensile strength that will not lose that strength in a corrosive
environment. Gold solder use with high resistance nickel-chromium alloy
prevents corrosion. While silver solder use on the same alloy permits
corrosion. Silver solder joints become porous from corrosion along the
interface between the solder and the nickel-chromium substrate. This
does not occur with gold solder.
Welded connectors
In 1967 orange memorial hospital was started at Florida, 1970 Gordon
te28 1st demonstrated use of laser welding form fpd’s, using neodymium
lasers. They found that the results were satisfactory.
26
CPTI: - Forms an o2 layer at higher temperature. So soldering is
ineffective. Laser welding has low thermal influence on parts and is
effective. High power neodymium laser with very high power is used.
Parts:-
Glove-hax –laser tip.
Argon gas source.
Stereomicroscope with lens cross hairs for precise alignment of laser
beam.
They have a maximum penetration depth of 2.5mm. They do not cause
damage to ceramic /polymer material.
J d Preston et al (1975) 18: - studied the laser fusion of selected dental
casting alloys. He evaluated the optimum energy levels needed for
fusing ceramic compatible alloys
Precious alloys- (C) a
Non-precious alloy - (U) a
Type III gold alloy – (F) a
They found that laser fusion of non-precious alloys could yield union that
is superior to those in a conventional manner. The tensile strength of
joints by laser > conventional soldering. The laser used was neodymium
glass laser unit.
The energy values were-
(C) a- 4 joules / 6msec.
(U) a- 4jooules / 4msec.
Sjogren g et al (1980) 9: - studied effect of laser on titanium properties
and found decrease in % elongation and increase in tensile strength.
NON RIGID CONNECTORS
There are several situations when rigid connectors are not suitable. Then
non-rigid connectors are to be used. They are mainly indicated when two
abutments cannot be prepared for common path of insertion, for 5-unit
fpd with a pier abutment and if one of designated abutment has good
27
gold cast restoration and key and can be used. But are mainly
contraindicated when the abutment tooth show significant mobility.
Douglas Clark et al (1989) 15 advised the use of non-rigid connectors
following periodontal therapy. The loss of attachment increase crown:
root ratio and tooth mobility due to bone loss. Anterior teeth show
increase movement in buccolingual movement than mesiodistal
direction. Maxillary canine have shown good prognosis after periodontal
treatment. And can be use as abutment using non-rigid connectors.
Goodkind r j et al (1973) 17: - “mandibular flexure in opening and
closing movements”.
Studied the amount of mandibular flexural that occurs during
mandibular movement. It was found that mandible width decreased
during wide opening movements. The mean amount of flexure was
0.0768mm in 2nd molar region and 0.0316 mm in 1st bicuspid region. This
defines the need to use non-rigid connector in FPD connecting anterior
and posterior mandibualr segments.
There are different types of non-rigid connectors: -
1. Key and keyway- precision attachment.
- Semi-precious attachment.
2. Split pontic.
3. Cross pin and wing.
Key and keyway
When a fixed partial denture is fabricated with a non-rigid connector, it is
necessary to align the path of insertion of the keyway with that of the
distal abutment. This technique is best suited for relieving stress at mid
span on long pontics.
The wax pattern for the retainer on the pier abutment is fabricated on
the working cast. When a plastic pattern is used for the key and keyway,
a deep box form is carved into the distal surface of the wax pattern to
28
create space for the placement of the plastic keyway pattern. Adequate
depth and a parallel path of insertion are essential when preparing the
box form in the distal of this abutment.
Place the working cast, with the wax pattern seated, on the table of a
surveyor. Assemble the key and keyway portions of the connector, and
lock the mandrel that extends from the top of the key portion of the
pattern into the vertical spindle of the surveying instrument. Manipulate
the surveying instrument. Manipulate the surveyor table until the
mandrel and attachments are parallel with the path of insertion of the
distal preparation. Then lower the plastic pattern to the middle retainer
wax pattern and lute it in place with sticky was. Remove the key portion
and complete the middle retainer wax pattern by blending the distal
surface with the keyway.
The pattern is then invested, burned out, and cast. After the casting has
been cleaned and air abraded, carefully cut off any part of the keyway
portion of the attachment that protrudes above the occlusal surface.
Place the casting on the working cast, and place the prefabricated plastic
pattern for the key into the keyway. T this point the pontic wax pattern is
attached to the pontic key. The pontic pattern is completed, removed
from the working cast, invested, burned out and cast. After the casting is
recovered from the investment, the mandrel and any excess on the top
portion of the key are carefully reduced so the key and keyway are flush.
For a semiprecious attachment, the wax pattern for the middle retainer
is first completed. Cut a keyway or t- shaped preparation in the distal
surface of the wax pattern with a no-170l bur. The path of insertion of
the keyway can be checked against the path of insertion of the tooth
preparation for the distal retainer by use of a surveyor or by visual
examination. After the prepared wax pattern has been cast in gold,
return it to the working cast. Refine and finish the tapered keyway
preparation in the casting with and no.169 l or no.170 l bur. lubricate the
casting and form the key by placing acrylic resin in the keyway. After the
acrylic key has polymerized, attach it to the wax pontic. The pontic wax
29

pattern, incorporating the resin key, is then removed, invested, burned
out, and cast. Because a precise fit is essential to prevent undue
movement and stress in this ling-span fixed partial denture, the rigid
three-unit anterior segment is joined before try-in.
At the time of try-in verify the fir of each individual unit. Then trial set all
of the units; the three-unit anterior combination with the distal pontic
keyed into it, the pier abutment retainer, and the distal retainer. Make a
soldering index of all the units with zinc oxide –Eugenol bite registration
paste or fast-setting impression plaster. Place the distal two units in their
respective imprints and invest for soldering.
Try in the finished soldering components in the mouth again at a
subsequent appointment and make occlusal adjustments if necessary.
When the restoration is cemented, place the mesial three-unit portion
immediately afterward. No cement should be placed in the keyway.
Moulding m b (1992) 10: - “An alternate orientation of non-rigid
connector in FPD”.
Conventional orientation: - keyway within distal surface of anterior
retainer of mesial segment. Keyway opening on occlusal surface with
taper diverging occlusally. The mesial segment is delivered 1st and then
distal segment is seated with the key sliding in the keyway of the
anterior retainer.
The main disadvantage of this system is need of increased tooth
reduction on distal surface of anterior abutment/ leads to over
contouring of distal surface of mesial retainer.
The author described an alternative orientation by reversing key and
keyway. Key is attached to distal surface of anterior retainer and is
inverted so that it taper converges occlusaly. The keyway is also inverted
and incorporated in the mesial surface of the pontic, with the pontic; the
mesial segment is seated first at delivery followed by distal segment,
with the keyway sliding over the key of the anterior retainer.
Advantages: -
30
1) Conservative tooth preparation: - as key is place extracoronally,
improves retention, stability and maintain pulpal integrity.
2) Physiologic axial contour: - prevents over contouring of distalaxial
surface of anterior retain. A flat emergence profile and physiologic
contour of gingival 1/3rd can be developed.
3) Flexibility of angulations: - the problem of paralleling the non-rigid
connector to a mesially inclined posterior abutment can be resulted with
the inverted orientation. The key is cantilevered distally on a structure of
metal that becomes the connector and the keyway is positioned more
distally within the pontic. This inverted orientation allows more flexibility
in positioning the angled connector while maintaining the desired
embrasure facially, lingually and gingivally. The principles of biologic
contours are then realized with physiologic emergence angles.
4) Esthetic potential- inverted orientation of non-rigid connection can
be more esthetically pleasing in PFM FPD’S. Since the keyway opening is
open the tissue surface of pontic the only visual evidence do the
connector is the interface between the metal guiding planes of the two
segments. This surface can be concealed by placing the guide planes at
occlusal embrasure between the retainer and pontic. However, with
porcelain coverage. Caution must be exercised to ensure that no contact
occurs between the porcelain of the 2 segments. The porcelain can
fracture as a result of shear stresses because of the slight unavoidable
movement of the non-rigid connector
Moulding (1998) demonstrated no significant difference exists in stress
patterns with reverse orientation of key and keyway with photoelastic
analysis study.
Disadvantage- the opening of key and key-way, the porcelain metal
junction are positioned on tissue surface of pontic with tissue- containing
pontics the sprue between the key and the keyway is an area for plaque
retention and resultant tissue irritation. This can be avoided b use non
tissue-contacting pontic.
Pier abutments: -
31
Moulding m b et al (1988) 8: - “photo elastic analysis of supporting
alveolar bone as modified by non-rigid connector”
The study was done to qualitively compare the stress induced in
periodontium of abutment teeth of 5-unit pier abutment fps with non-
rigid connector on stress pattern loading conditions.
The rigid fpd distributed stress vertically and evenly. The non-rigid
distal on canines and non-rigid mesial of molar designs distributed stress
almost similar to rigid fpd. They also resisted rotational movements and
resultant horizontal stress better than other non-rigid designed. The non-
rigid connector at pier abutment showed greater apical and horizontal
stress especially with 1-point loading on the pier.
The pattern of non-rigid connector orientation at distal aspect of pier
abutment has no effect on stress pattern. The placement of non-rigid
connector on least desirable on mesial aspect of pier abutment.
Split pontic
This is an attachment that in placed entirely within the pontic. it is
particularly useful in tilted abutment cases, where the use of a
conventional dovetail would necessitate the preparation of a very drastic
box in the distal aspect of the pier abutment. The wax pattern of the
anterior three-unit segment (mesial retainer-pontic –pier retainer) is
fabricated first, with a distal arm attached to the tissue-contacting area
of a pontic. A surveyor is used to position either the key or the keyway
segment of fpd pattern, pointing occlusally. This segment must align
with the distal abutment preparation.
Invest, burnout and cast the mesial three-and –a-half –unit segment.
After preliminary finishing, seat the cast segment on the working cast.
Place the plastic pattern down into it (if the keyway is in the casting), or
down onto it (if the key was left facing upward on the pontic base). Wax
the distal retainer and the disto-occlusal two-thirds of the pontic pattern.
The pontic can be meta-ceramic, periphery of the ceramic section. Try it
on the prepared teeth I the mouth, making adjustments as necessary.
32
Cement the mesial segment first, followed immediately by the distal
segment. No cement should be placed between the two segments of the
pontic.
Cross-pin and wing
The cross pin and wing are the working elements of a two-piece pontic
system that allows two segments to be rigidly fixed after the retainers
nave been cemented on their respective abutment preparations. The
design will find use primarily in accommodating abutment teeth with
disparate long axes. The path of insertion of each tooth preparation is
made to parallel the long axis of that tooth.
Attach a vertical wing, cut out of a piece of base plate wax, to the
mesial surface of the distal retainer wax pattern. The wing should
parallel the path of insertion of the mesial abutment preparation, extend
out 3.0mm mesially from the distal retainer, have a 1.0mm thickness
faciolingually, be 1.0mm short of the occlusal surface, and have an
undersurface that follows the intended contour of the underside of the
pontic.
Invest, burnout, and cast the distal retainer, with wing. Seat the
retainer on the cast, and drill a 0.7mm hole through the wing with a twist
drill in a hand piece. Place a 0.7mm diameter pencil lead through the
hole and build the wax pattern around the lead and the wing. Remove
the lead, with draw the retainer-pontic wax pattern, and replace the
0.7mm lead in the pontic pattern to maintain the patency of the hole
during investing and casting.
Assemble the two parts of the fixed partial denture on the working
cast. Use a tapered8/0 machinist reamer to ream a smooth, tapered hole
through pontic and wing, following he pilot hole produced by the 0.7mm
pencil lead.Fabricate a pin of the same alloy used for the fixed partial
denture casting. A mold can be made by drilling a hole in apiece of
aluminum with the machinist reamer and filling the hole with auto
polymerizing resin. An impression of the reamer can be made with
polyvinylsiloxane impression material and filled with resin or molten wax.
33
Invest, burnout, and cast it. It must be long enough to extend all the way
through the pontic –wing assembly. Try the pin for fit in the components
on the cast.Cement the retainer with the wing first followed by the
retainer-pontic segment. Seat the pin in the hole with a punch and
mallet. Remove excess length from the pin both facially and lingually. If
it is ever necessary to remove part of this fixed partial denture, the pin
can be taped out and the parts dealt with separately. This technique
requires no special patterns and does allow for a completely rigid
prosthesis when completed.
Connectors for provisional restorations: -
The connectors for provisional restorations should be carefully
fabricated due to the low strength of the material usually used. They
should be slightly overcontoured for increasing strengthening. Decrease
the sharpness at the junction this relieves the stress concentration which
may lead to fatigue failure of restoration. Use high strength materials
such cast metals, heat-processed resin fiber reinforced.
Connectors for all ceramic fpd’s: -
Failure of all ceramic fpd’s was analyzed on model (1995) 12 it was found
that the fracture commonly occurred at core veneer interface (70-78%).
This is mainly due to Hertzian stress state, which is the propagation of
localized contact damage crack system.
Kamposiora p et al (1996) 11 studied the stress concentration of all ceramic posterior fpd’s
maximum stress found was
Material Diameter of connector Maximum stress
Gold 3mm 20.5
4mm 12.7
Dicor 3mm 19.4
4mm 12.5
Inceram 3mm 12.5
4mm 7.0
34
It was found that stress concentration was found more in region of
force applied and at connector region. And stress levels were higher in
3.0mm than in 4.00 mm at connector. Higher stress was found in the
apical region of connector & least in middle part of connector. So they
advised to increase the height of connector to increase the bulk and
have good stress distribution, and have smooth geometry as compared
to angulated geometry in short connectors. It was recommended to use
4*4mm connector size for ceramic 2*3mm for metal.
Connectors for metal ceramic: -
Berger Robert (1989) 16 described the esthetic and physiologic
consideration in metal framework design
The amount of beam distortion 1
L2 * D3
There should be no beam distortion to prevent porcelain fracture. So for
long span fpd’s connectors size should be increased. The interproximal
zone should have adequate span for porcelain and connector placed
lingually.
Connectors for cantilever bridges: -
Hong so yand et al (1996) 13: - stress analysis of a cantilevered fps with
normal and reduced bone support.
Studied the mechanical behavior of a cantilever fpd with normal and
reduced bone support. They found high stress concentrations were found
around the connector of fpd. Design of fpd should be such that occlusal
forces are limited to the connector’s ability to accept them. Greatest
stress was seen in distal cantilevered prosthesis and stress was seen
distal to the most distal retainer and fracture may occur at this location.
Cantilevered fpds should limit to replacement single tooth only and also
use splinting of abutments.
Connectors for tooth implant supported fpd’s: -
Mahamoud h et al (2000) 7 performed a 14 yr comparison of connected
and non-connected tooth-implant fpd’s. The difference in mobility of
tooth (50-200m) and implant (10m). This difference can lead to
35
intrusion of abutment, fracture of abutment teeth, fracture of implant
component, increased marginal bone loss and loss of Osseo integration.
Rangert et al (1997) stated that implant connected to tooth will act as
cantilever.
Cohen s r et al (1994) advocate use of non-rigid connection between
teeth and implants. To limit cantilever forces and direct occlusal loads
axially to the implant.
Modifications of implant system to combat mobility difference:-
1) Imz implants- intra-mobile zylender of polyoxymethelene.
2) Complaint keeper systems with silicon ‘o’ ring.
The study resulted in a finding with no difference between rigid and
non-rigid connection with respect to long-term outcome.
Benefits of connecting teeth to implant: -
1) Some occlusal support and relief of the tooth load on the teeth.
2) Input of periodontal ligament mechanoreceptors.
3) Reduction of the number of implant abutment needed for restoration.
4) Assistance in splinting of teeth.
James v altieri(1995)14 – proposed augmentation of popular tooth –
numbering system addressing pontic, implants and restoration
connector. He described modification in nomenclature of tooth
numbering system to include, tooth supported connected fpd, pontic
implants, implant supported crown. For implant supported fpd
i. i endosseous implant
ii. p pontic`
iii. - (hypen) denotes the connector
CONNECTOR FAILURES
A connector between an abutment retainer and a pontic or between
two pontics can fracture under occlusal forces, failures of both cast and
soldered connections have been observed and are generally caused by
internal porosity that has weakened the metal.
36
When fracture occurs, pontics are placed in a cantilevered relationship
with the retainer casting, and this can allow excessive forces to be
developed on the abutment tooth. For this reason, the prosthesis should
be removed and remade as soon as possible. Occasionally, an inlay like
dovetailed preparation can be developed in the metal to span the
fracture site, and a casting can be cemented to stabilize the prosthesis.
If this is not possible, and a remake cannot be removed by cutting
through the intact connectors. A temporary removable partial denture
can then be inserted to maintain the existing space and satisfy esthetic
requirements.
Modified sanitary pontic design gives optimum connector design with
least gingival irritation. The main causes of connector failure:-
- Improper design
- Weak framework
- Incomplete flow /crystallization of the soldered joints.
- Porosities can result in either soldered/ cast connectors that may
lead to failures.
If abutment castings can be removed, they can be indexed, resoldered
and recemented. If removal is unsuccessful it may be necessary to be
remade some/ all of the units of the restoration. In special situations /
where extensive restorations are involved an innovative techniques may
be used with good results.
David c Appleby(2001)6 : - “repair of fractured connectors in provisional
fpd”.
Fracture connectors cause dislodgement of retainer, occlusal
disharmony, food impaction, esthetic embrassement, and violation all
the stated goals.
Preventive care of fracture:-
1) Increase dimension of connector( rosensteil)
2) Reinforce connector with metal wire/plate
3) Fabricate connector with heat polymerized acrylic resin
4) Acrylic resin reinforce with cast metal substrate.
37
5) Auto polymerizing acrylic resin with cast metal
Common methods for repair broken provision fps connector.
1) Brush paint on technique (bead –brush technique).
2) Slot technique- remove fractured provisional restoration and traces of
provisional cement. Return then back in mouth, mark the location of
adjacent contact on either side of fracture. Remove the provisional
components and prepare a class II preparation in each toot adjacent
to the fracture in the marked area of contact (done extra orally).
Place the parts of restoration back in mouth and fill both cavities
simultaneously with auto polymerizing resin. Then do the finishing
and polishing.
Thaxter k miller, Keith e Thayer (1971) 20: - “described the intraoral
repair of complex cast restorations fracture”
A case report was published who had a fracture between 11 and 21
(pontics) of a complex restoration. The following innovative idea was wth
the following steps.
A special impression tray was fabricated. The area pontic was prepared
for parallel pin repair. Porcelain and gold was removed from gingival 1/3 rd
of lingual surface of fractured area. The depression created 4mm wide,
concave occluso-gingivally extending two teeth on either side of
fractured joint. Depth of 1.5- 1mm in center of concave area no pinholes
are placed at this time.
Secondary impression was made covering prepared area and fractured
joint. Jaw relation record was made and articulation of master cast was
done.
Pin location was determined with 4 pins planned for pontic and on
abutment care was taken to prevent pulp exposure.
A matrix with sleeves / brushings parallel to each other are placed
using mandrel to position than (cold cure matrix) with sticky wax. Drill
holes with hand in master cast with chips of stone dust frequently
cleaned. Matrix is removed. Pins are inserted in master cast holes and
38
resin is poured over all pins and a matrix + pin assembly is recovered
and checked for parallelism. The margins are refined with inlay wax. The
matrix + pin + inlay wax is sprued, casted and finished.
The matrix containing the paralleling sleeve is placed in-patient.
Drilling on pontic and abutment done using Ney’s parallel pin drive
assembly at slow speed. After completely pinholes are made the casted
repair is cemented using zinc phosphate cement.
CONCLUSION
Every part of the prosthesis has its own role in the long-term success.
The connector also plays a vital role in the success of the prosthesis. The
design features of the connector are to be kept in mind while fabricating
the prosthesis. This helps in avoiding long-term complications and
embrassement before the patient.
REFERENCES
1) Shillinburg.h.t, hobo.s, whisett ld “Fundamental of fixed
prosthodontics” 3rd edition quint.pub 1997,509- 535.
2) Rosenstiel s.f , land mr , fujimotot j “Contemporary fixed
prosthodontics” 3rd
Edition, mosby –harcourt heath science company, 2001 ,707- 731.
3) Dykema rw ,goodarcrre cj, plillips rw “Crown and bridge–johnston”
w.b.saunders ,company ,4th edition ,394.
4) Thyer ke “fixed prosthodontics “Year book medical pub .inc .1st
edition, 222-223.
5) Hong –so- uang et all “Finite element analysis on the effect of
splinting in fixed partial denture” J.Prosthet .dent 81(6),721-8,1999.
6) David .c.Appleby “Repair of fractured connectors in provisional
F.P.D” J.Prosthet .dent 86(4),449-50,2001.
39
7) Mahamoud .h.et all “Within subject comparison between connected
and non connected tooth –implant fixed partial prosthesis up to 14 year
follow up study”
IJP2000, 13,340-346.
8) Moulding mb et al “Photo elastic analysis of supporting alveolar
bone as modified by non-rigid connectors" J.Prosthet. Dent 263-
274,59,1988
9) Brumo es et al “Comparison of accuracy of multiunit one-piece
castings” J.Prosthet. Dent 54(6)770-76,1985
10)Moulding mb “An alternative orientation of non-rigid connectors in
F.P.D” J.Prosthet. Dent68, 236-8,1992
11)Kamposiore et al “Stress concentration in all-ceramic posterior
F.P.D” Qint .int 27(10),701-706
12) “Failure of all ceramic F.P.D, in vitro and in vivo- analysis and
modeling” J.Dent.Res 74(6), 1253-1258,1995.
13)Hong so yuand et al “Stress analysis of a cantilevered fps with
normal and reduced bone support” j.prosthet dent 76(4) 424 1996
14) James y altieri “Proposed augmentation of popular tooth numbering
system addressing pontics, implants and restoration connector” Int J
Maxillofac Implant 10 (5) 244 1995
15)Douglas c “The use of non-rigid connectors following periodontal
therapy” Gen dent 37(4) 308-309 1989.
16)Berger r “Esthetic and physiologic consideration in metallic
framework design” DCNA 1989 33(2) 293-299.
17)Goldking f j et al “Mandibular flexure in opening and closing
movements” j prosthet dent 30 134-138-1973
18)Preston j d et al “Laser fusion of selected dental casting alloys” j dent
res 1975 54 232
19)Foester j g et al “Mid-pontic soldering of modified sanitary pontic” j
prosthet dent 1994 71 541
20)Miller t h, Theyer k e “Intra-oral repair of fpd” j prosthet dent 1971
25(4) 382-388
40
21)Fehling a w “Cast connectors an alternative to soldering base metal
alloys” j prosthet dent 1986 55(2) 195
22)Shillingug h t, Fisher d w “Non-rigid connectors for fixed partial
dentures” JADA 87 1195-1199 1973
23)O’connor r p et al “Use of split pontic non-rigid connector with the
tilted molar abutment” j prosthet dent 1986 56 241-251
24)Eichiniller f c, Parry e f “Taper cross pin attachment for fixed
bridges” Operta detn 1994 19 740
25)Harper f j, Nicholls j I “Distortion in indexing methods and investing
media for soldering and remount procedures” j prosthet dent 42(2) 172-
179 1979
26)Ferenca j l, “Tensile strength of mid-pontic soldering” j prosthet dent
57(6) 696-703 1987
27) “Glossary of prosthetic terms” j prosthet dent 81(1) 48-106 1999
28)Gordon t e, smith d l, “Laser welding of prosthesis an initial report “j
prosthet dent 24(4) 472-476 1970
29)Sjogren g, Andersson m and Bergman m “Laser welding of titanium
in dentistry” ACTA Odontol Sacnd 46 247-253 1988
30)Byrne g et al “The fit of fixed partial dentures joined by infrared
soldering” j prosthet dent 68(4) 591-596 1992.
41