Connections: JMP® and ODBC
20
Connections: JMP ® and ODBC
Transcript of Connections: JMP® and ODBC

Connections:JMP® and ODBC


Table of Contents:
Executive Summary....................................................................................................... 1 ODBC Overview ............................................................................................................. 1
ODBC Drivers .............................................................................................................. 1 Data Sources ............................................................................................................... 2
Connecting to a database ............................................................................................. 2 Accessing Tables .......................................................................................................... 4
Using SQL Queries ...................................................................................................... 5 SQL Editor.................................................................................................................... 7 Import Example ............................................................................................................ 8
Saving JMP® data tables ............................................................................................. 11 Saving Example ......................................................................................................... 12
JMP® Scripting Language ........................................................................................... 12 Importing via JSL ....................................................................................................... 12 Saving JMP® data tables via JSL ............................................................................... 14
Conclusion ................................................................................................................... 15

Wendy K. Murphrey, SAS Institute, April 2005

Connections: JMP® and ODBC
1
Executive Summary
While JMP® software offers the ability to import a variety of file types, JMP also implements a method for connecting to databases to extract the data needed for further analysis. The intent of this paper is to provide a general overview of how Open Database Connectivity (ODBC) works, explain how to connect to a database from within JMP, access database tables, create custom queries, save JMP data tables to databases, and use the JMP Scripting Language (JSL) to automate the process.
For simplicity, this paper was written based upon JMP 6 for Windows. The included examples and screenshots are taken from this release and operating system. While database access via ODBC has been supported on JMP for Windows for quite some time, beginning with JMP 6, it will be supported on all three available operating systems: Windows, Linux, and Macintosh. Detailed information regarding the Linux operating system can be found in a separate article entitled, Enabling ODBC on JMP for Linux.
ODBC Overview
ODBC is a standard application programming interface (API) that allows an application, such as JMP, to access data on a relational or non-relational database. There are two components of ODBC which are required in order for an ODBC enabled application to connect to a database; these are ODBC drivers and data sources.
ODBC Drivers
Through the use of ODBC drivers, requests are submitted from the application to the database and results are returned to the application. The driver accepts queries written in Structured Query Language (SQL) and translates them to the database so that the desired results are returned.
Individual ODBC drivers will need to be installed for each database you intend to access. If they are not already included with your operating system, these can typically be obtained from the database administrator for the database you are using. The driver will also need to be set up for use.

Connections: JMP® and ODBC
Data Sources
The database or file to be accessed by the ODBC driver is referred to as the data source. There are three types of data sources: user, system, and file. User data sources are specific to the current user on a local machine. System data sources are specific to a local machine, regardless of authorized user. Because both user and system data sources are specific to a local machine, they are referred to as machine data sources. Connection string information is stored in the registry for machine data sources.
Finally, file data sources store the connection string information in a file that can be shared among many users with the appropriate authorization and ODBC drivers. File data sources will have a filename followed by a .dsn extension.
Connecting to a database
A connection can be made from JMP to any database for which you have access, as long as an ODBC driver exists. Once your data sources and ODBC drivers are set up, you can attempt to connect to the desired databases from within JMP. To begin, either click on the Open Database Table button from the JMP Starter window or select the Database -> Open Table item from the File main menu. A window similar to the Database Open Table window in Figure 3.1 should appear:
Figure 3.1
2

Connections: JMP® and ODBC
NOTE: Open Database options will not be displayed on Macintosh systems if no ODBC drivers are installed.
In the Connections section of this window, there are three buttons. The Connect button is used to instantiate a connection to a database. The data source name of each active connection will be included in the Connections list to the left of the Connect button. The Disconnect button is used to terminate any connection highlighted in the Connections list. And the Refresh Connections button is used to refresh the list of active database connections.
Clicking on the Connect button will begin the connection process. A window will appear to prompt you to select a data source:
Figure 3.2
In the Select Data Source window, notice the two tabs: File Data Source and Machine Data Source. Switch between these two tabs to locate and select the data source representing the desired ODBC driver and database. If it is not found, a new data source can be added by clicking on the New button found on either tab.
Depending upon the type of database you are attempting to connect to, additional windows to navigate to the appropriate file may be presented, such as those found in Figure 3.3 below. Also, if a password is required to complete the connection, as is typical for an Oracle database, a subsequent window may appear to prompt you for the login information.
3

Connections: JMP® and ODBC
Figure 3.3
Once a connection has been made, the Connections list in the Database Open Table window will be populated with the data source name. If the Log window is not already open, click on the View menu and select Log. Notice the Database Connection Information that is displayed in the Log. This connection information will be useful when using JSL to create a script that will automatically connect to the database. This topic will be covered in more detail later in this paper.
Accessing Tables
Depending upon your settings, the Tables section of the Database Open Table window will be populated with a list of available tables, views, and synonyms in the selected database. To customize the list, simply place or remove check marks in the boxes contained in the Include in Table List section of the window. The options include:
• User Tables – tables that are only available to the specific user that is logged on
• Views – a virtual table similar to a query in that data is not stored in a view, but rather extracts data from one or more existing database tables
• System Tables – tables that are available to a broader group of users
• Synonyms – reference names, or nicknames, assigned specifically to Oracle tables or views
4

Connections: JMP® and ODBC
Figure 4.1
There are four buttons in the Tables section of the Database Open Table window. After a table is highlighted in the Tables list, clicking on the Open Table button will cause JMP to open the entire database table into a JMP data table, allowing you to begin analyzing the data. The Refresh Tables button is used to update the Tables list with the most current available tables, views and synonyms in the database. The Advanced… button is used when you would like to have more control over the data that is imported and provides additional options for customizing queries. Clicking on the Help button will cause JMP to display additional information about importing data from a database.
Using SQL Queries
Since many users would prefer to control the data that is imported from a database rather than importing an entire database table, JMP provides a method for entering, importing, or creating customized SQL queries. The SQL query is sent to the database via the ODBC driver, which translates it so that the desired data is returned to JMP.
Click on the Advanced… button from the Database Open Table window. The resulting window contains a list of tables in the current database, a list of all column names that appear in the corresponding selected table, and may contain a section called Procedures, a listing of available stored procedures.
Stored procedures are essentially a group of precompiled SQL statements that are stored in the database. Beginning with JMP 6, clicking on a procedure name will cause the procedure name to appear in an Execute statement in the SQL section of this window. The Execute SQL statement causes the database to execute the SQL contained in the stored procedure.
5

Connections: JMP® and ODBC
When a table is highlighted in the Tables list, by default, all the column names in the table are also highlighted and a default SQL query is displayed in the SQL section of the window. The default query consists of a Select statement that includes all columns and all rows in the selected table. For example:
SELECT * FROM SCOTT.EMP
If you plan to import all the rows but only a subset of columns, hold the Ctrl button while selecting the desired columns in the column list and the Select statement will automatically be altered to reflect the selected columns, as shown in Figure 5.1 below:
Figure 5.1
JMP also allows you to manually enter any valid SQL statement by directly editing the displayed SQL thereby, giving you freedom to create and execute customized SQL statements. The six buttons on the above window (Figure 5.1) act as guides to aid you in building customized SQL statements. The first is the Execute SQL button, which causes the displayed SQL query (customized or default) to be used in the import of the selected table. If you have a predefined SQL query that is saved in a text file format, the Import SQL button will prompt you to navigate to the appropriate file location and retrieve the file, placing the query in the SQL section of the above window (Figure 5.1). If you would like to save the query just created or modified, clicking on the Export SQL button will prompt to save the query as a text file which can be retrieved for later use.
The next button is the Where... button which causes the SQL Editor to be invoked. The SQL Editor is used to assist you in building a Where clause using standard SQL syntax. More information about the SQL Editor can be found in the following section.
The final two buttons on the Database Open Table window are the Go Back and Help buttons. Clicking on the Go Back button will take you back to the previous window where another connection can be made or chosen. The Help button causes JMP Help to be invoked and you will be presented with information about retrieving data using SQL queries and a brief SQL reference.
6

Connections: JMP® and ODBC
SQL Editor
The SQL Editor is a new feature that has been added in JMP 6 and can be accessed after a database connection has been made by clicking on the Advanced… button on the Database Open Table window, then in the subsequent window click on the Where... button. While the SQL Editor looks similar to the Formula Editor, its purpose is to assist you in creating a customized Where clause by building expressions using common functions.
Figure 6.1
In the SQL Editor window (Figure 6.1), there are four primary sections. The largest section, at the bottom, is the Where condition editing area. This is where you can build and view the expression to be used in the Where clause portion of the SQL query. In the upper left section, there is the name of the table and a list of column names. Clicking on the table name drop down menu will allow you to change to a different database table. Next to the list of column names, is the keypad which is comprised of buttons representing common operators.
The last section is the SQL function browser. This section contains various functions that are organized by type. While SQL is an ANSI (American National Standards Institute) and ISO (International Organization for Standardization) standard, many databases include their own proprietary functions and operators. By clicking on the function drop down menu you can switch to other database specific functions. Although many database specific functions are included, the options provided are to be used as a guide and are not intended to be comprehensive.
7

Connections: JMP® and ODBC
Import Example
The following example shows how to connect to one of the sample Oracle tables included in a default Oracle installation, SCOTT.EMP, and import only a portion of the data by using the SQL Editor to construct a Where clause for a customized SQL query. The data in this example is comprised of a list of employees and includes each employee number, name, job title, manager’s employee number, hire date, salary, commission, and department number. Figure 6.2 contains an image of the entire database table:
Figure 6.2
Rather than importing all of the data, the following steps outline how to import specific columns for all the salesmen who earn between 1700 and 2000 in total salary plus commissions:
1. From the File main menu, click on Database -> Open Table.
2. In the Database Open Table window, click on the Connect button.
3. In the Select Data Source window, locate and click on the data source for Oracle files.
4. Back on the Database Open Table window, click on the Advanced… button.
5. Click on the SCOTT.EMP sample table name in the Tables list and select the following column names in the Column list by pressing Ctrl while clicking on the column names:
o EMPNO
o ENAME
o JOB
o SAL
8
Connections: JMP® and ODBC
o COMM
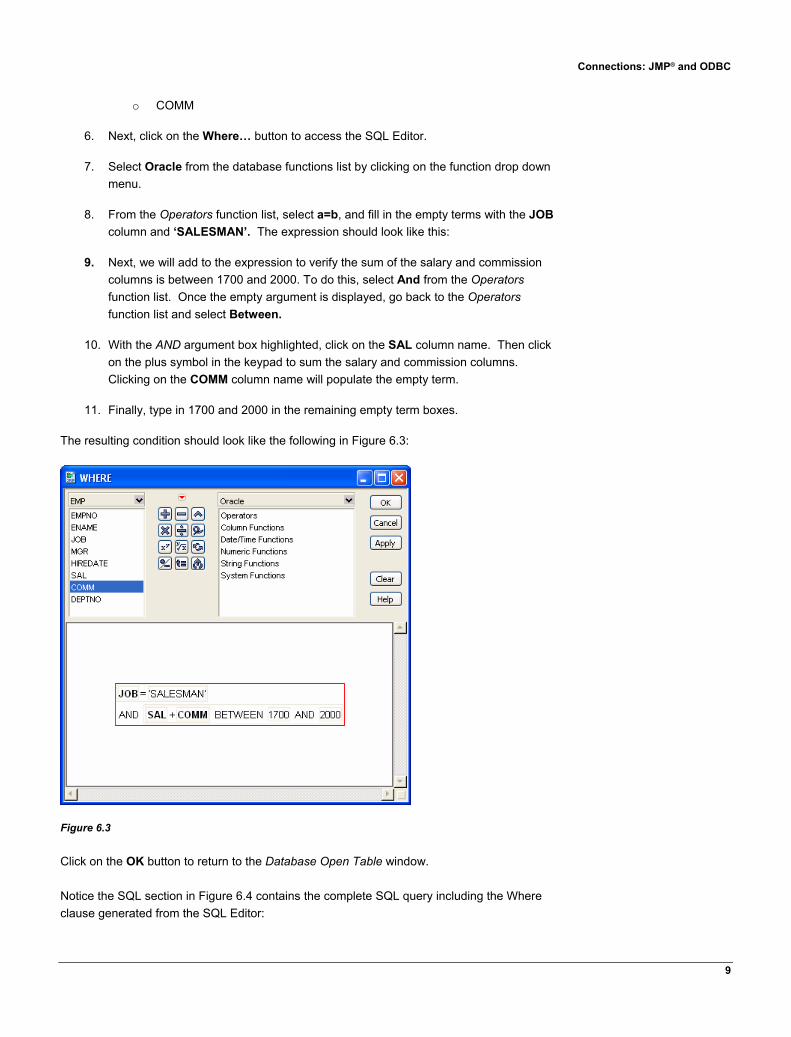
6. Next, click on the Where… button to access the SQL Editor.
7. Select Oracle from the database functions list by clicking on the function drop down menu.
8. From the Operators function list, select a=b, and fill in the empty terms with the JOB column and ‘SALESMAN’. The expression should look like this:
9. Next, we will add to the expression to verify the sum of the salary and commission columns is between 1700 and 2000. To do this, select And from the Operators function list. Once the empty argument is displayed, go back to the Operators function list and select Between.
10. With the AND argument box highlighted, click on the SAL column name. Then click on the plus symbol in the keypad to sum the salary and commission columns. Clicking on the COMM column name will populate the empty term.
11. Finally, type in 1700 and 2000 in the remaining empty term boxes.
The resulting condition should look like the following in Figure 6.3:
Figure 6.3
Click on the OK button to return to the Database Open Table window.
Notice the SQL section in Figure 6.4 contains the complete SQL query including the Where clause generated from the SQL Editor:
9

Connections: JMP® and ODBC
Figure 6.4
At this point, you can choose to execute the SQL query to return a JMP data table consisting of the two employees who met all the criteria (Figure 6.5), or the query can be exported for use again in the future by clicking on the Export SQL… button.
Figure 6.5
Notice the SQL Table Variable (circled) in the resulting JMP data table (Figure 6.5). This Table Variable contains the entire SQL query that was used to create the JMP data table. Clicking on the word SELECT will cause a pop up window to appear containing the SQL query.
10

Connections: JMP® and ODBC
Saving JMP® data tables
The process for saving a JMP data table to a database is very similar to importing a database table. With a JMP data table as the active window, click on the File main menu and select Database -> Save Table. A window called Database Save Table will appear that is similar to the initial Database Open Table window:
Figure 7.1
The primary differences between the Database Open Table and the Database Save Table (Figure 7.1) windows are found in the Tables section. First, there are two buttons that are different: Save Table and Drop Table. Clicking on the Save Table button will cause JMP to save the JMP data table to the database, assuming you have the appropriate database permissions. It is recommended that you always create a new database table rather than replacing an existing one. Certain ODBC drivers may not allow you to save a new table with the same name as an existing database table and will generate a database error. However, if you need to replace a table that already exists in the database and the ODBC driver prevents the save from completing, the Drop Table button can be used to delete the selected database table. Again, this assumes you have the appropriate database permissions. Note that it is very important that the Drop Table button be used with caution.
Also on the Database Save Table window are two additional options below the Help button. The first field, JMP data table to be saved, allows you to select which JMP data table should be saved to the database. While the Save to database table field requires you to enter the new database table name.
11

Connections: JMP® and ODBC
12
Saving Example
In the previous example, we imported a list of employees in Sales who earned between 1700 and 2000 in total salary plus commission. Now that those employees have been identified in the JMP data table in Figure 6.5, the management staff would like to save this data in a separate database table in the same database from which the data was imported.
1. From the File main menu, click on Database -> Save Table.
2. If a connection to the desired database does not already exist, click on the Connect button and locate and select the data source for Oracle files.
3. Back on the Database Save Table window, select the EMP JMP data table in the JMP data table to be saved field.
4. In the Save to database table field, enter EMP_BONUS.
5. Click the Save Table button.
Finally, you can click the Refresh Tables button to see the newly created database table called EMP_BONUS in the Tables list.
JMP® Scripting Language
Since many users want to automate regularly scheduled analyses, JMP offers the JMP Scripting Language (JSL) which allows users to automate and recreate highly customized JMP output. Importing data and saving JMP data tables to databases can be automated via JSL. All the same initial setup of ODBC drivers and data sources will need to be completed first.
Importing via JSL
The Open Database command is designed to allow you to connect to and import data from a database. The basic syntax for this command is as follows:
dt = Open Database(“connection information”, “SQL query”, “output table name”);

Connections: JMP® and ODBC
The first argument, listed as “connection information,” can have two different forms: the literal, “Connect Dialog”, or the actual connection information. If the author of the script wants the user to be prompted to select a database, the literal string “Connect Dialog” should be used as the first argument. Using this string will cause the Select Data Source window to appear, Figure 3.2. Once the user selects a data source, the additional windows required to locate the appropriate file, including ID and password prompts, will also appear. After the user has satisfactorily responded to any additional windows, JMP will execute the SQL query listed as the second argument to the Open Database command and return a new JMP data table.
In the “Connecting to a Database” section of this paper, it was suggested that you open the Log window and attention was drawn to the Database Connection Information that was displayed. If the author of the script prefers to specify the data source in the script, the actual connection information will need to be entered as the first argument of the Open Database command. This entire string can be copied from the Log and pasted directly into the script. Figure 8.1 contains an example of a script written to open the entire Bigclass.xls sample data file and assigns an output table name. (Note: The connection information shown in Figure 8.1 may need to be replaced with the actual connection information for your location, as found in your log.)
Figure 8.1
After running the JSL script, the resulting JMP data table will appear.
13

Connections: JMP® and ODBC
Figure 8.2
The second argument to the Open Database command, listed as “SQL query” in the basic syntax, can be one of three different forms:
• “SQL query” – This can be made up of any valid SQL statement. The example in Figure 8.1 uses this form.
• “table name” – The actual table name. From the example in the “Import Example” section of this paper, the table name would be:
dt = Open Database(“Connect Dialog”, “SCOTT.EMP”);
• “SQLFile=<path_to_text_file>” – This allows you to specify an existing text file that contains an SQL query. For example:
dt = Open Database(“Connect Dialog”,
“SQLFile=C:\MySQLQueries\SelectFromEMP.txt”);
The output table name is an optional third argument for the Open Database command which assigns the specified name to the JMP data table.
Saving JMP® data tables via JSL
The Save Database command is designed to allow you to save a JMP data table to a database. The basic syntax for this command is similar to that of the Open Database command and is as follows:
14
Connections: JMP® and ODBC
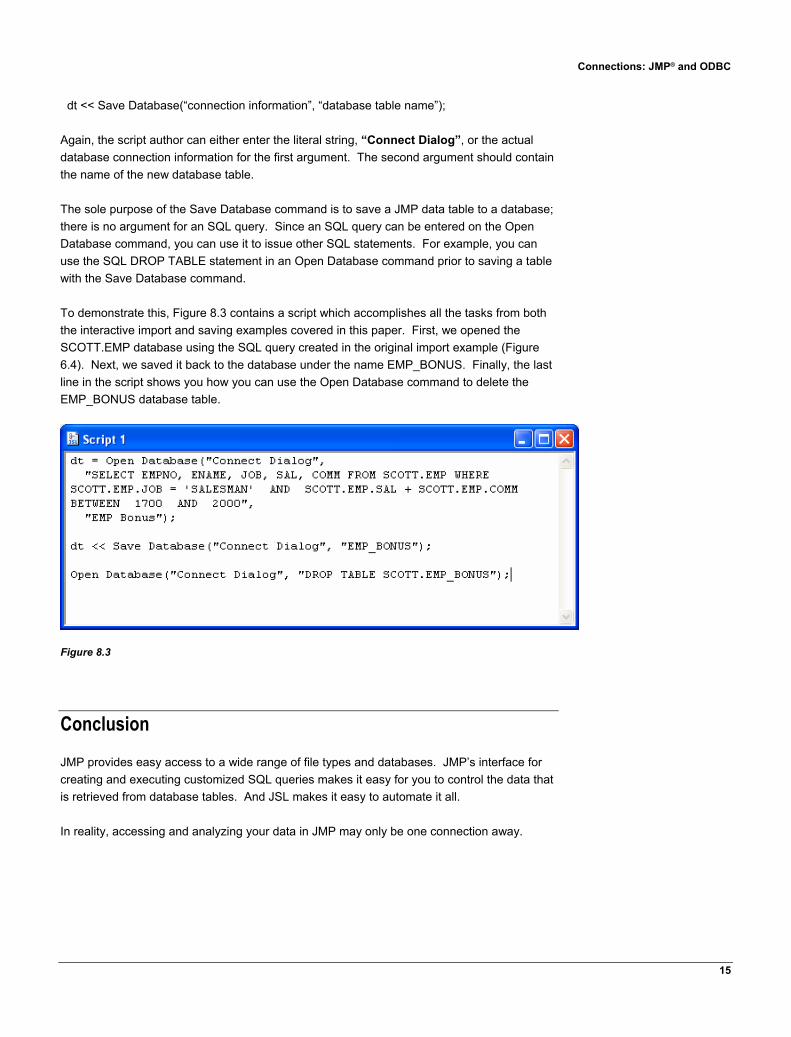
dt << Save Database(“connection information”, “database table name”);
Again, the script author can either enter the literal string, “Connect Dialog”, or the actual database connection information for the first argument. The second argument should contain the name of the new database table.
The sole purpose of the Save Database command is to save a JMP data table to a database; there is no argument for an SQL query. Since an SQL query can be entered on the Open Database command, you can use it to issue other SQL statements. For example, you can use the SQL DROP TABLE statement in an Open Database command prior to saving a table with the Save Database command.
To demonstrate this, Figure 8.3 contains a script which accomplishes all the tasks from both the interactive import and saving examples covered in this paper. First, we opened the SCOTT.EMP database using the SQL query created in the original import example (Figure 6.4). Next, we saved it back to the database under the name EMP_BONUS. Finally, the last line in the script shows you how you can use the Open Database command to delete the EMP_BONUS database table.
Figure 8.3
Conclusion
JMP provides easy access to a wide range of file types and databases. JMP’s interface for creating and executing customized SQL queries makes it easy for you to control the data that is retrieved from database tables. And JSL makes it easy to automate it all.
In reality, accessing and analyzing your data in JMP may only be one connection away.
15

SAS, JMP and all other SAS Institute Inc. product or service names are registered trademarks or trademarks of SAS Institute Inc. in the USA and other countries. ® indicates USA registration. Six Sigma is a registered trademark of Motorola, Inc. Other brand and product names are trademarks of their respective companies. Copyright © 2006 SAS Institute Inc. All Rights Reserved. 336174US_0106
JMP HeadquartersSAS Institute Inc.SAS Campus DriveCary, NC 27513 USATel: +1 919.677.8000Fax: +1 [email protected]
JMP EuropeSAS InstituteHenley RoadMedmenhamMarlowSL7 2EBUnited Kingdom Tel: +44 (0)1628 486 933Fax: +44 (0)1628 483 [email protected]
JMP JapanSAS Japan Head OfficeInui Bldg. Kachidoki1-13-1 KachidokiChuo-ku Tokyo 104-0054JapanTel: +81 3 3533 3887Fax: +81 3 3533 [email protected]/japan
JMP ChinaSAS China25/F POS Plaza 1600 Century AvenuePudong New DistrictShanghai 200122PRCTel: + 86 21 6876 5353Fax: + 86 21 6876 [email protected]


![Safari ODBC Installation 64-Bit - The Hamilton … ODBC Installation...Configure Connections Click [Start] > All Programs > Safari BI Plus > Safari InfoTools > ODBC 64 Administrator](https://static.fdocuments.in/doc/165x107/5ade540a7f8b9a8f298b7785/safari-odbc-installation-64-bit-the-hamilton-odbc-installationconfigure.jpg)