
Connect to: for use with SharePoint 2010 and 2013 v1.0 User Guide
60
June 2014 Issue 1.0 User Guide Connect to: for use with SharePoint 2010 and 2013 version 1.0
Transcript of Connect to: for use with SharePoint 2010 and 2013 v1.0 User Guide

June 2014 Issue 1.0
User Guide
Connect to: for use with SharePoint 2010 and 2013
version 1.0

Page 2 Connect to: for use with SharePoint 2010 and 2013 v1.0 User Guide
Fuji Xerox Australia
101 Waterloo Road
North Ryde NSW 2113
For technical queries please contact the Fuji Xerox Australia Customer Support Centre on: 1800 028 962
© Fuji Xerox Australia Pty Limited. All rights reserved.
Xerox and the sphere of connectivity design are trademarks or registered trademarks of Xerox Corporation in the U.S. and/or other countries.
Note: By using this document you acknowledge that you have read and agree to the terms and conditions in the Connect to: for SharePoint Software Licence Agreement.
Updates This document is subject to continual updating and improvement. You are strongly advised to check the Fuji Xerox web-site to ensure that you have the most recent version:
http://www.fujixerox.com.au/
Issue History
Date Issue Description
Jun 2014 1.0 First Issue

Connect to: for use with SharePoint 2010 and 2013 v1.0 User Guide Page 3
Contents Introduction ................................................................................................................................................................................ 5
Overview ....................................................................................................................................................................................... 5
Help Desk ..................................................................................................................................................................................... 5
Prerequisites ................................................................................................................................................................................ 6
Getting Started .......................................................................................................................................................................... 7
Logging in as Device Admin ............................................................................................................................................. 9
Setting up Servers ............................................................................................................................................................. 11
To Add a New Server ................................................................................................................................................... 11
To Edit Details of an Existing Server ..................................................................................................................... 13
To Delete an Existing Server .................................................................................................................................... 15
Licensing the software .................................................................................................................................................... 16
Setting up the tab order ................................................................................................................................................. 17
Logging in as SharePoint User .......................................................................................................................................... 19
Searching Sites or Documents on My Site and Sites tabs ................................................................................. 23
Most Used tab .................................................................................................................................................................... 24
Scan ................................................................................................................................................................................... 25
Print ................................................................................................................................................................................... 27
My Site tab .......................................................................................................................................................................... 28
Scan ................................................................................................................................................................................... 28
Print ................................................................................................................................................................................... 28
Scan New Document ................................................................................................................................................... 29
Settings tab ......................................................................................................................................................................... 30
Logging Out ............................................................................................................................................................................. 32
Troubleshooting ..................................................................................................................................................................... 34
Appendix A – How to Add Scope Rule ............................................................................................................................ 37
Appendix B – How to Modify the Search Option ....................................................................................................... 40
Appendix C – How to Start Crawl Service ..................................................................................................................... 44
Appendix D – How to Configure the File Types .......................................................................................................... 47
Appendix E – How to Configure Alternate Access Mappings ................................................................................ 52
Appendix F – How to Configure IIS Authentication Settings ............................................................................... 55
Appendix G – How to Configure Site Naming Format for My Site Settings .................................................... 58

Page 4 Connect to: for use with SharePoint 2010 and 2013 v1.0 User Guide

Connect to: for use with SharePoint 2010 and 2013 v1.0 User Guide Page 5
Introduction This guide provides help information required for the users to work on the Connect to: for SharePoint application. It includes detailed user information about the various functionalities of this application.
Overview The Connect to: for SharePoint application assists the Fuji Xerox Australia customers in managing the documents in their Site Collections on SharePoint in an efficient manner. It allows them to print the desired documents from a Site Collection, scan new documents to a specific Site Collection and also scan existing documents to the desired Site Collection.
Help Desk If you require further assistance, please contact Fuji Xerox Australia Customer Support Centre on:
1800 028 962

Page 6 Connect to: for use with SharePoint 2010 and 2013 v1.0 User Guide
Prerequisites
Note:
• The Connect to: for SharePoint application supports only Team Sites.
• The application supports only basic authentication.
• The application does not work if the SharePoint application runs on the default ports, 80 or 443.
• The application does not support Foundation Server.
• The SharePoint versions supported are SharePoint 2010 and SharePoint 2013.
Following are the prerequisites to access the user interface of the Connect to: for SharePoint application:
• The multi-function device (MFD) must be compatible with the Connect to: for SharePoint – ApeosPort Device and eXtensible Customised Platform (XCP)-enabled Authentication module.
• The Connect to: for SharePoint application must be installed on the MFD.
Following is the list of Fuji Xerox MFDs on which the application can run:
• ApeosPort IV 2275/3373/3375/4475/5575
• ApeosPort IV 6080/7080
• ApeosPort V C3373/C3375/C4475/C5575/C6675/C7775
• ApeosPort V C5580/C6680/C7780
Before starting to work on the Connect to: for SharePoint application, ensure that the following prerequisite configurations are also set up:
• Add scope rule. (applicable only for SharePoint 2010) For information on how to add a scope rule, refer to Appendix A.
• Modify the search option. (applicable only for SharePoint 2010) For information on how to change the search option, refer to Appendix B.
• Start crawl service. For information on how to start crawl service, refer to Appendix C.
• Configure file types. (required only when you want to open file types other than the default file types supported by the application) For information on how to configure the file types, refer to Appendix D.
• Configure alternate access mappings. (required only when you want to access the application using both the IP address and a fully-qualified domain name) For information on how to configure alternate access mappings, refer to Appendix E.
• Configure Internet Information Services (IIS) Authentication Settings. For information on how to configure IIS authentication settings, refer to Appendix F.
Connect to: for use with SharePoint 2010 and 2013 v1.0 User Guide Page 7
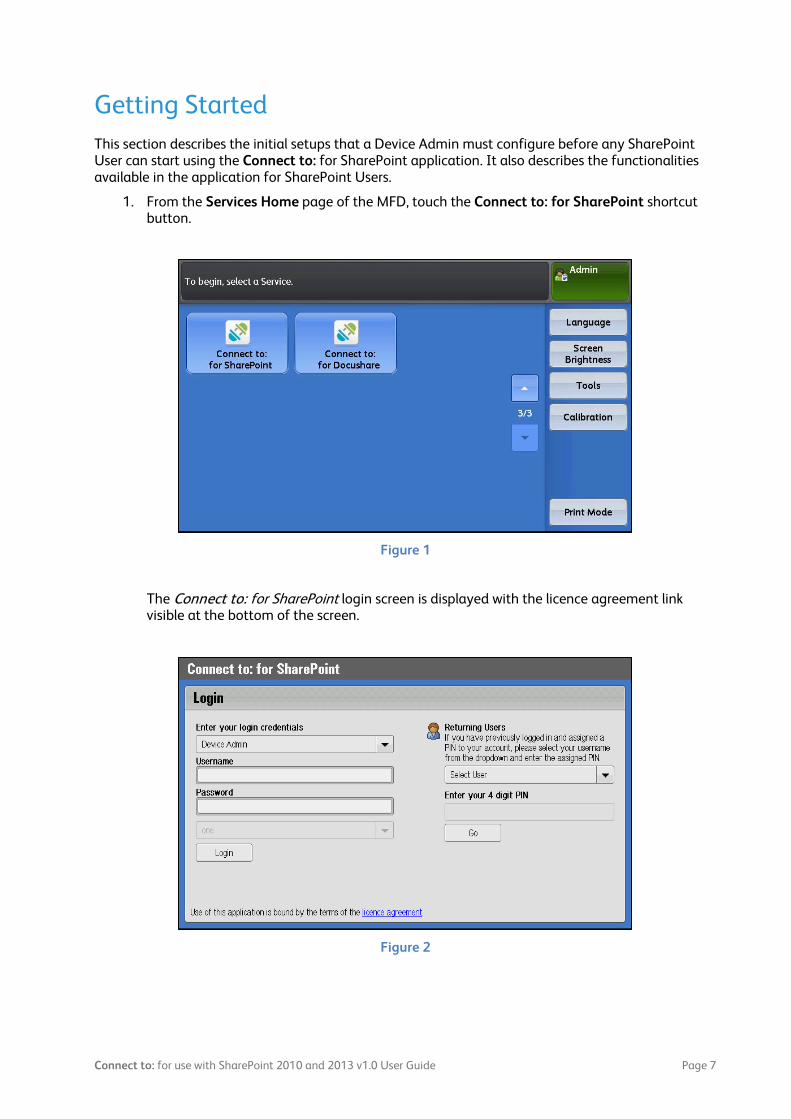
Getting Started This section describes the initial setups that a Device Admin must configure before any SharePoint User can start using the Connect to: for SharePoint application. It also describes the functionalities available in the application for SharePoint Users.
1. From the Services Home page of the MFD, touch the Connect to: for SharePoint shortcut button.
Figure 1
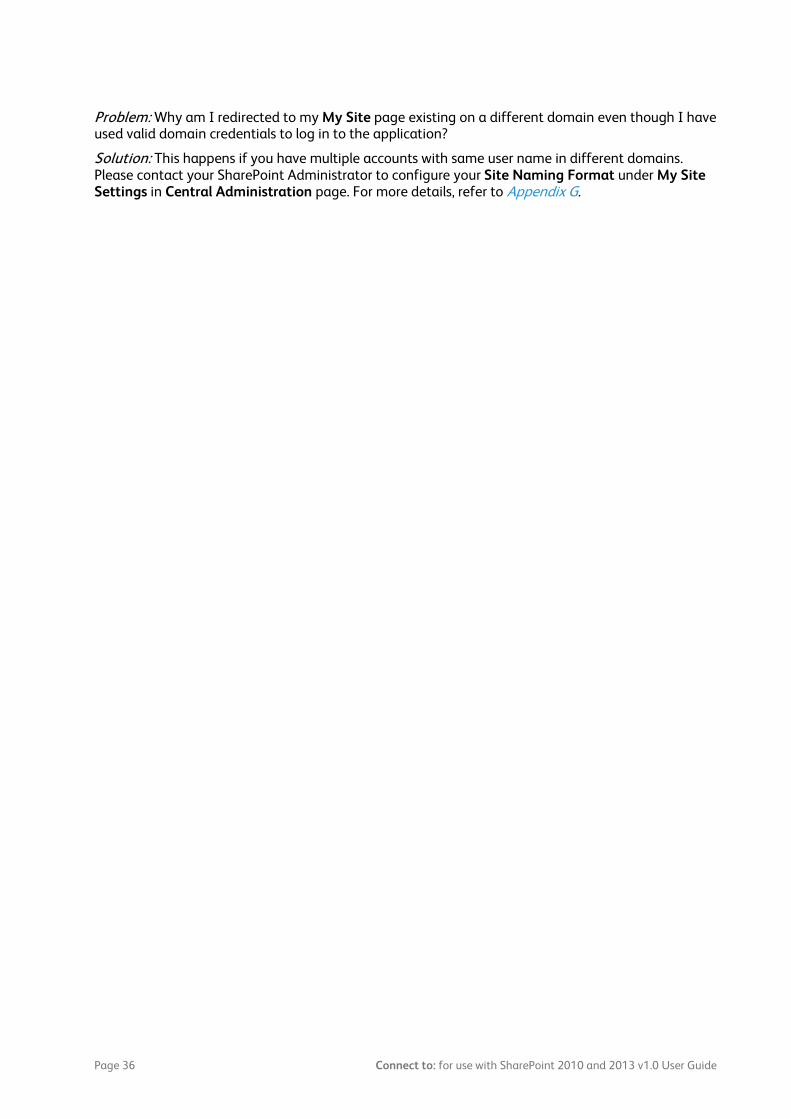
The Connect to: for SharePoint login screen is displayed with the licence agreement link visible at the bottom of the screen.
Figure 2

Page 8 Connect to: for use with SharePoint 2010 and 2013 v1.0 User Guide
2. Click the licence agreement link.
The following screen is displayed:
Figure 3
You can scroll down to read the complete licence agreement.
3. Click Close to return to the login screen of the application.

Connect to: for use with SharePoint 2010 and 2013 v1.0 User Guide Page 9
Logging in as Device Admin This section describes how to access the Connect to: for SharePoint application interface as a Device Admin and the available functionalities.
To log in to the Connect to: for SharePoint application interface as a SharePoint Device Admin:
1. From the Connect to: for SharePoint login screen, select Device Admin in the first drop-down list under the Login section.
Figure 4
2. Type valid Username and Password in the respective fields.
To type these details, you must use the alphanumeric keyboard that pops up when you touch the fields. The standard device keyboard is disabled after you open the login page.
Figure 5

Page 10 Connect to: for use with SharePoint 2010 and 2013 v1.0 User Guide
3. Touch Login.
The Servers tab is displayed.
Figure 6

Connect to: for use with SharePoint 2010 and 2013 v1.0 User Guide Page 11
Setting up Servers The Servers tab displays the details of the servers added earlier and their Uniform Resource Locators (URL) in a table.
1. Log in to Connect to: for SharePoint as Device Admin.
The Servers tab is displayed:
Figure 7
Device Admins can Add new servers and can Edit or Delete the existing servers from the Servers tab.
To Add a New Server 1. Touch Add Server on the Servers tab. (Refer to Figure 5.)
The following screen is displayed:
Figure 8

Page 12 Connect to: for use with SharePoint 2010 and 2013 v1.0 User Guide
2. Type the Server Name, Server URL and MySite URL in the respective fields.
You must type appropriate URLs of the SharePoint server in the Server URL and MySite URL fields as configured by you before accessing the application. The URLs can be in any one of the following two formats:
o http://<IP address>:<port number> o http://<host name>.<fully qualified domain name>:<port number>
The communication protocol http or https depends on the native server configuration.
Note: For more information on how to configure alternate access mapping URLs, refer to Appendix E.
3. Type the SharePoint Admin Username and Password specific to the Site Collection you want to access and touch Add. (If you do not want to add a server, touch Cancel.)
After the server is added, the following confirmation screen is displayed:
Figure 9

Connect to: for use with SharePoint 2010 and 2013 v1.0 User Guide Page 13
To Edit Details of an Existing Server 1. Touch Edit on the Servers tab. (Refer to Figure 5.)
The Edit Server screen is displayed.
Figure 10
2. Edit the Server Name, Server URL and MySite URL in the respective fields.
3. Type the Admin Username and Password specific to the web application you want to access and touch Save. (If you do not want to edit the details, touch Cancel.)
The following warning screen is displayed:
Figure 11

Page 14 Connect to: for use with SharePoint 2010 and 2013 v1.0 User Guide
4. Touch Yes to edit the server details. (If you do not want to edit the server details, touch No.)
After the server details are edited, the following confirmation screen is displayed:
Figure 12

Connect to: for use with SharePoint 2010 and 2013 v1.0 User Guide Page 15
To Delete an Existing Server 1. Touch the Delete button corresponding to the server you want to delete. (Refer to Figure 5.)
The following screen is displayed:
Figure 13
2. Touch Yes to delete the server from the list. (If you do not want to delete the server, touch No.)
After the server is deleted, the following confirmation screen is displayed:
Figure 14

Page 16 Connect to: for use with SharePoint 2010 and 2013 v1.0 User Guide
Licensing the software This tab is displayed only when you log in as a Device Admin.
1. Log in to Connect to: for SharePoint as Device Admin.
2. Touch the Licence Key tab.
The following screen is displayed:
Figure 15
3. Type the licence key in the Enter the 30 digit licence key field and touch Save.
The licence key is updated and the following confirmation screen is displayed:
Figure 16

Connect to: for use with SharePoint 2010 and 2013 v1.0 User Guide Page 17
Setting up the tab order As a Device Admin, you can rearrange the order of the tabs visible to the SharePoint User.
1. Log in to Connect to: for SharePoint as Device Admin.
2. Touch the Settings tab on the home page.
The following screen is displayed:
Figure 17
3. Select a tab and touch either Move Up or Move Down to change its order.
Figure 18

Page 18 Connect to: for use with SharePoint 2010 and 2013 v1.0 User Guide
4. Touch Save.
The tabs are rearranged and the following confirmation screen is displayed:
Figure 19

Connect to: for use with SharePoint 2010 and 2013 v1.0 User Guide Page 19
Logging in as SharePoint User This section describes how to access the Connect to: for SharePoint application interface as a SharePoint User and the available functionalities for SharePoint Users.
To log in to the Connect to: for SharePoint user interface as a SharePoint User:
1. From the Connect to: for SharePoint login screen, select SharePoint User in the first drop-down list under the Login section.
Figure 20
2. Type valid Username and Password in the respective fields and select the appropriate server from the Select Server drop-down list.
To type these details, you must use the alphanumeric keyboard that pops up when you touch the fields. The standard device keyboard is disabled after you open the login page.
Figure 21

Page 20 Connect to: for use with SharePoint 2010 and 2013 v1.0 User Guide
3. Touch Login.
The Assign PIN screen is displayed.
Figure 22
4. You have the following two options:
a. If you do not want to assign a PIN to your username now, touch Cancel. (You can assign a PIN any time from the Settings page.) In this case, the home page (with Most Used tab open) is displayed.
Figure 23
Note: The time stamp displayed against the files corresponds to the time retrieved from the SharePoint server. The timestamp on the SharePoint server is without the daylight savings adjustment whereas that on the SharePoint web page is adjusted for daylight savings.

Connect to: for use with SharePoint 2010 and 2013 v1.0 User Guide Page 21
b. If you want to assign a PIN to your user name, enter a four-digit numeric PIN of your choice in the Enter your 4 digit PIN field using the numeric keyboard that is displayed when you touch inside the field and touch Save. To close the keyboard, touch Done.
Figure 24
This action ensures that you do not need to enter your user credentials next time (second time onwards) when you log in to Connect to: for SharePoint using this device. Instead, you select your username from the Select User drop-down list, enter the assigned PIN in the Enter your 4 digit PIN field, and touch Go to log in, as shown in the Returning Users section in the following screenshot:
Figure 25

Page 22 Connect to: for use with SharePoint 2010 and 2013 v1.0 User Guide
Note:
• While you log in with four-digit PIN, after you select a user from the Select User drop-down list (under the Returning Users section), the Server details specific for the user selected are displayed.
• If your password has changed but you remember your valid PIN, you cannot log in with your PIN. You must log in with your user name and the changed password. The password will be updated, and from next login onwards, you can log in with your PIN.
• After three consecutive invalid attempts, your PIN is discarded and your user name is deleted from the Select User drop-down list under the Returning Users section. In that case, you must log in with your assigned user name and password and assign a new PIN to your user name. You must register as a new member.
The home page is displayed as shown in Figure 21.
You can see the Most Used folder open and the latest documents are displayed over the pages by default.
Note: The folders and the files or documents on the Sites tab are displayed in seven rows for screen resolution of 600 pixels and in five rows for screen resolution of 480 pixels.

Connect to: for use with SharePoint 2010 and 2013 v1.0 User Guide Page 23
Searching Sites or Documents on My Site and Sites tabs You can search for specific sites or documents on My Site and Sites tabs of the Connect to: for SharePoint application.
1. Type a search term (that is, the name of the document you want to search) in the text box as shown in the following screenshot:
Figure 26
2. Touch Search.
The search results are displayed. The following screenshot displays the search results for the search term, Parent:
Figure 27

Page 24 Connect to: for use with SharePoint 2010 and 2013 v1.0 User Guide
Note:
• The search results do not include document libraries and folders.
• If you search for sites or documents in a tab, the search action derives results from that particular tab and the results are also displayed only in that tab.
Most Used tab 1. Log in to the Connect to: for SharePoint application.
After successful login, the Most Used tab is displayed by default.
Figure 28
You can view the recently used sites or documents in this tab. You can perform scan and print operations from this tab.

Connect to: for use with SharePoint 2010 and 2013 v1.0 User Guide Page 25
Scan 1. Touch Scan to scan a file to an existing document. (Refer to Figure 26.)
The following screen is displayed:
Figure 29
2. Select the appropriate workflows to initiate them for the file being scanned.
Figure 30
3. Touch Skip if you do not want to initiate any workflow. Touch Yes to continue to scan.

Page 26 Connect to: for use with SharePoint 2010 and 2013 v1.0 User Guide
4. If you touch Yes, the Scan To Existing Document screen is displayed.
Figure 31
You can modify the following settings before you scan the file:
o File Format: Select the appropriate output format for the scanned document out of the available formats. The supported formats are PDF, JPEG, TIFF, DocuWorks, Searchable PDF, DOC and XLS.
Note: You cannot see the DOC and XLS file types if the device does not have the required options enabled.
o Colour Mode: Select the appropriate colour settings for the scanned output from the available modes, such as Auto, Colour, Gray Scale and Black & White.
o Resolution: Select the appropriate resolution from the drop-down list.
o 2 Sided/1 Sided: Select the appropriate paper duplexing type, 1 Sided or 2 Sided.
o Orientation: Select the appropriate paper orientation, Portrait or Landscape.
5. Select the Preview Scanned Document check box only if you want to see the preview of the document before the completion of scan job.
6. Touch Scan to scan the file. Touch Cancel if you do not want to scan it.

Connect to: for use with SharePoint 2010 and 2013 v1.0 User Guide Page 27
Note: The print option is enabled only for the ready-to-print file types, which include Text, PDF, JPEG, TIFF and DocuWorks.
1. Touch Print to print a document. (Refer to Figure 26.)
The Print Document screen is displayed.
Figure 32
You can modify the following settings before you print the document: o Copies: Specify the number of print copies by using the + or – sign.
Note: The maximum copies limit for print is 9999.
o Colour Mode: Select the appropriate colour mode for the scanned output from the
available modes, such as Auto, Colour, Gray Scale and Black & White. o 2 Sided/1 Sided: Select the appropriate paper duplexing type, 1 Sided or 2 Sided. o Orientation: Select the appropriate paper orientation, Portrait or Landscape.
Note: The landscape feature is disabled for print.
2. Touch Print to print the document. Touch Cancel if you do not want to print it.

Page 28 Connect to: for use with SharePoint 2010 and 2013 v1.0 User Guide
My Site tab 1. Log in to the Connect to: for SharePoint application.
2. Touch the My Site tab.
The following screen is displayed:
Figure 33
You can navigate to the desired page using the first, previous, next and last page icons.
3. Touch a specific folder to see the documents and the sub-folders inside that.
The documents or sub-folders are listed in the order they are modified last.
Scan The Scan option works in the same way as described in the Scan section under the Most Used tab.
Print The Print option works in the same way as described in the Print section under the Most Used tab.

Connect to: for use with SharePoint 2010 and 2013 v1.0 User Guide Page 29
Scan New Document 1. Touch Scan new document to scan a document placed on the tray of the MFD. (Refer to
Figure 31.)
The workflow initiation screen is displayed. (Refer to Figure 27.)
2. Select the appropriate workflows to initiate them for the file being scanned and touch Yes. (Refer to Figure 28.) If you do not want to initiate any workflow, touch Skip.
The Scan New Document screen is displayed.
Figure 34
3. Read the following instructions and perform the required actions on the screen: o Type the following details in the corresponding fields:
Title: Type a title for the document. This is a mandatory field. Summary: Type a summary of the document if required. This is not a
mandatory field. o Select the Preview Scanned Document check box if you want to view the document
before finishing the scan operation. o Touch Scan.
You can modify the following settings before you scan the document:
o File Format: Select the appropriate output format for the scanned document out of the available formats. The supported formats are PDF, JPEG, TIFF, DocuWorks, Searchable PDF, DOC and XLS.
Note: You cannot see the DOC and XLS file types if the device does not have the required options enabled.
o Colour Mode: Select the appropriate colour settings for the scanned output from the available modes, such as Auto, Colour, Gray Scale and Black & White.
o Resolution: Select the appropriate resolution from the drop-down list.

Page 30 Connect to: for use with SharePoint 2010 and 2013 v1.0 User Guide
o 2 Sided/1 Sided: Select the appropriate paper duplexing type, 1 Sided or 2 Sided.
o Orientation: Select the appropriate paper orientation, Portrait or Landscape.
4. Touch Scan to scan the document. Touch Cancel if you do not want to scan it.
Settings tab As a SharePoint User, you can only update the login PIN from the Settings tab.
To change the login PIN:
1. Log in to Connect to: for SharePoint as a SharePoint User.
2. Touch the Settings tab on the home page.
The following screen is displayed:
Figure 35
3. Type your desired PIN in the New PIN field and type the PIN again in the Confirm PIN field.
Figure 36

Connect to: for use with SharePoint 2010 and 2013 v1.0 User Guide Page 31
4. Touch Save.
The following confirmation screen is displayed:
Figure 37

Page 32 Connect to: for use with SharePoint 2010 and 2013 v1.0 User Guide
Logging Out To log out of the Connect to: for SharePoint application:
1. Touch Logout on the top right corner of the screen.
Following is the screenshot for Device Admin:
Figure 38
Following is the screenshot for SharePoint User:
Figure 39
Note: If the Connect to: for SharePoint application remains idle for more than five minutes, you will be logged out automatically.

Connect to: for use with SharePoint 2010 and 2013 v1.0 User Guide Page 33
The application closes and the Services Home page of the MFD is displayed.
Figure 40

Page 34 Connect to: for use with SharePoint 2010 and 2013 v1.0 User Guide
Troubleshooting This section lists common questions, which users might encounter while using Connect to: for SharePoint, and their resolutions.
Problem: While performing a task on the MFD, if the message Invalid device admin credentials. Please contact your Administrator is displayed, what should I do?
Solution: This message is displayed when the admin credentials (KO credentials) entered for an MFD have changed. To avoid this, your System Administrator must log in to the MFD as an administrator with the updated Admin credentials. After successful login, these new credentials are captured or updated. So, from next login onwards, the Connect to: will communicate to the MFD with the new credentials. Hence, there will not be any issue while scanning a document or doing any other activity.
Problem: While performing a scan operation on the MFD, if the message Document upload is failed is displayed, what should I do?
Solution: Verify if the Extended Passive Mode (EPSV) terminal is connected to the MFD. If it is connected, verify whether you are logged in to the terminal. If not, log in with valid credentials or valid card and retry the scan operation.
Problem: While working on the application, the message error while retrieving the workflow is displayed on the screen. What should I do?
Solution: This happens in either of the following two cases:
• The Connect to: for SharePoint application tries to initiate the workflow on the server, but the server is busy due to multiple operations.
• The site you are trying to access is not a Team Site.
Verify the type of site you are accessing. If it is a Team Site, you can wait for some time and retry the operation.
Problem: The message displayed on the screen reads Personal URL is not configured for My Site. What should I do?
Solution: This happens in either of the following two cases:
• My Site is not configured for the Site Collection being accessed currently. • You have never opened My Site in the native application (that is, using the web URL).
You must configure My Site for the specific Site Collection you are accessing. Or you must log in to My Site at least once after the installation of the application using the web URL.
Problem: The message displayed on the screen reads You do not have permissions for this site. What should I do?
Solution: This happens if you do not have rights to access that particular Site Collection. Please contact the SharePoint Site Administrator for access rights.

Connect to: for use with SharePoint 2010 and 2013 v1.0 User Guide Page 35
Problem: I am unable to save the server details. What should I do?
Solution: This happens if the Admin User has entered incorrect server details while adding or editing the server details.
Problem: I am unable to log in with the four-digit PIN. What should I do?
Solution: This happens if the PIN you type is wrong. Follow the steps below to assign a new PIN:
1. Log in with incorrect PINs for three times consecutively.
The user name is deleted from the Select User drop-down list.
2. Type valid Connect to: for SharePoint Username and Password in the respective fields.
The Assign PIN screen is displayed.
3. Assign a new PIN for your login ID.
Problem: Why am I not able to see the recent document I uploaded in the Most Used tab?
Solution: This happens if the crawl services have not restarted after you have updated or uploaded the document. You can wait for the crawl services to restart after which the document will be visible in the Most Used tab.
Problem: Why am I not able to configure the server using either the host name or IP address?
Solution: This happens if you have not configured the alternate access mappings, which is one of the prerequisites before working on the application. Please refer to Appendix E for configuring the alternate access mappings.
Problem: The message displayed on the screen reads Document upload failed. What should I do?
Solution: This happens in either of the following two cases:
• The file size is bigger than 35 MB (Connect to: supports files of sizes below 35 MB.) • The SharePoint Server is busy due to multiple operations.
Ensure that the size of the file you are uploading is below 35 MB. Else, wait for some time and retry the operation.
Problem: Why am I not able to view the contents in the Most Used tab?
Solution: This happens if you have not modified the search option, which is one of the prerequisites before working on the application. Please refer to Appendix B for modifying the search option.
Problem: Why am I not able to view the files of a particular format on the application?
Solution: This happens if you have not configured specific file types, which is one of the prerequisites before working on the application. Please refer to Appendix D for configuring the file types.
Page 36 Connect to: for use with SharePoint 2010 and 2013 v1.0 User Guide
Problem: Why am I redirected to my My Site page existing on a different domain even though I have used valid domain credentials to log in to the application?
Solution: This happens if you have multiple accounts with same user name in different domains. Please contact your SharePoint Administrator to configure your Site Naming Format under My Site Settings in Central Administration page. For more details, refer to Appendix G.

Connect to: for use with SharePoint 2010 and 2013 v1.0 User Guide Page 37
Appendix A – How to Add Scope Rule
Note: Adding scope rule is a prerequisite only for SharePoint 2010 before starting to work on the Connect to: for SharePoint application.
To add scope rule:
1. Log in as SharePoint Admin.
2. From your Site Collection, click the Site Actions drop-down list and select Site Settings.
Figure 41
3. From the Site Settings page, in the Site Collection Administration group, click Search scopes.
Figure 42

Page 38 Connect to: for use with SharePoint 2010 and 2013 v1.0 User Guide
4. From the View Scopes page, click New Scope.
Figure 43
5. From the Create Scope page, for the Title, type All Documents.
6. Select both Search Dropdown and Advanced Search options in the Display Groups section.
That makes the scope available in the Search Dropdown list and Advanced Search page.
7. Click OK.
Figure 44

Connect to: for use with SharePoint 2010 and 2013 v1.0 User Guide Page 39
8. From the View Scopes page, locate your new All Documents scope, click the associated Add rules link.
Figure 45
9. From the Add Scope Rule page, for the Scope Rule Type, select the Property Query option.
10. In the Add property restrictions drop-down list, select the contentclass option.
11. For the contentclass value, type STS_ListItem_DocumentLibrary and click OK.
Figure 46

Page 40 Connect to: for use with SharePoint 2010 and 2013 v1.0 User Guide
Appendix B – How to Modify the Search Option
Note: Modifying the search option is a prerequisite only for SharePoint 2010 before starting to work on the Connect to: for SharePoint application.
To modify the search option:
1. Log in as SharePoint Admin.
2. From the Central Administration page, click Manage service applications under Application Management.
Figure 47
3. Click Search Service Application.
Figure 48

Connect to: for use with SharePoint 2010 and 2013 v1.0 User Guide Page 41
4. Click the Federated Locations link present on the left side of the screen.
Figure 49
5. Click the appropriate search option you want to modify, for example, Local Search Results on the following screenshot:
Figure 50

Page 42 Connect to: for use with SharePoint 2010 and 2013 v1.0 User Guide
6. Look for Location Information and click to expand it.
Figure 51
7. Edit the Query Template name by adding an asterisk (*) after it: [{searchTerms}* on the screenshot]
Figure 52

Connect to: for use with SharePoint 2010 and 2013 v1.0 User Guide Page 43
8. Edit the “More Results” Link Template name by adding an asterisk (*) after it: [results.aspx?k={searchTerms}* on the screenshot]. If you are using some other page, edit the details for that page too. Then, click OK.
Figure 53

Page 44 Connect to: for use with SharePoint 2010 and 2013 v1.0 User Guide
Appendix C – How to Start Crawl Service
Note: Sample screenshots included in this section are specific to SharePoint 2010. The user interface and navigation might differ slightly for SharePoint 2013.
To start crawl service:
1. Log in as SharePoint Admin.
2. From the Central Administration page, click Manage Service Applications under Application Management.
Figure 54
3. Click Search Service Application.
Figure 55

Connect to: for use with SharePoint 2010 and 2013 v1.0 User Guide Page 45
4. Click Content Sources under Crawling on the left side.
Figure 56
5. Click Start all crawls.
Figure 57

Page 46 Connect to: for use with SharePoint 2010 and 2013 v1.0 User Guide
Alternatively, you can start the crawls by clicking the Start Full Crawl option from the Local SharePoint sites drop-down list as shown in the following screenshot:
Figure 58

Connect to: for use with SharePoint 2010 and 2013 v1.0 User Guide Page 47
Appendix D – How to Configure the File Types
Note: Sample screenshots included in this section are specific to SharePoint 2010. The user interface and navigation might differ slightly for SharePoint 2013.
To configure the file types:
1. Log in as SharePoint Admin.
2. From the Central Administration page, click Manage Service Applications under Application Management.
Figure 59
The following screen is displayed:
Figure 60

Page 48 Connect to: for use with SharePoint 2010 and 2013 v1.0 User Guide
3. Click Search Service Application.
The following screen is displayed:
Figure 61
4. Click File Types under Crawling in the left pane.
The following screen is displayed:
Figure 62

Connect to: for use with SharePoint 2010 and 2013 v1.0 User Guide Page 49
5. If the desired file type is not listed, click New File Type.
The following screen is displayed:
Figure 63
6. Type the desired file extension in the File extension field and click OK.
7. Log in to the SharePoint Server and from the Services panel under Administrative Tools:
• For SharePoint 2010, right-click SharePoint Server Search 14 and click Restart.
Figure 64

Page 50 Connect to: for use with SharePoint 2010 and 2013 v1.0 User Guide
• For SharePoint 2013, right-click SharePoint Server Search 15 and click Restart.
Figure 65
8. On the Search Service Application page (refer to Step 3), click Index Reset under Crawling on left side.
Figure 66

Connect to: for use with SharePoint 2010 and 2013 v1.0 User Guide Page 51
9. Click Reset Now.
Figure 67
10. Start all crawls using the procedure explained in Appendix C.

Page 52 Connect to: for use with SharePoint 2010 and 2013 v1.0 User Guide
Appendix E – How to Configure Alternate Access Mappings
Note: Sample screenshots included in this section are specific to SharePoint 2010. The user interface and navigation differ slightly for SharePoint 2013.
To configure alternate access mappings:
1. Log in as SharePoint Admin.
2. On the Central Administration page, click Configure alternate access mappings under System Settings.
Figure 68
3. On the Alternate Access Mappings page, click Add Internal URLs.
Figure 69

Connect to: for use with SharePoint 2010 and 2013 v1.0 User Guide Page 53
4. From the Alternate Access Mapping Collection drop-down list, select Change Alternate Access Mapping Collection.
Figure 70
5. Select the desired name from the Select An Alternate Access Mapping Collection.
Figure 71
The following screen is displayed:
Figure 72

Page 54 Connect to: for use with SharePoint 2010 and 2013 v1.0 User Guide
6. You can configure the alternate access mapping by typing either a corresponding IP address or a fully qualified domain name (host name followed by its domain name) in the URL protocol, host and port field as shown in the following screenshots:
Screenshot for IP address:
Figure 73
Screenshot for fully qualified domain name:
Figure 74
7. Click Save.
You can see the Internal URL added on the Alternate Access Mappings page.
Figure 75

Connect to: for use with SharePoint 2010 and 2013 v1.0 User Guide Page 55
Appendix F – How to Configure IIS Authentication Settings To configure IIS authentication settings:
1. Log in as SharePoint Admin.
2. On the Central Administration page, click Manage web applications under Application Management.
Figure 76

Page 56 Connect to: for use with SharePoint 2010 and 2013 v1.0 User Guide
The following page is displayed:
Figure 77
3. Select the appropriate web application and click Authentication Providers.
Figure 78
4. Click Default on the Authentication Providers pop-up screen.
Figure 79

Connect to: for use with SharePoint 2010 and 2013 v1.0 User Guide Page 57
5. On the Edit Authentication page, scroll down and select the Basic Authentication (password is sent in clear text) check box under IIS Authentication Settings and click Save.
Figure 80

Page 58 Connect to: for use with SharePoint 2010 and 2013 v1.0 User Guide
Appendix G – How to Configure Site Naming Format for My Site Settings To configure Site Naming Format from My Site Settings:
1. Log in as SharePoint Admin.
2. On the Central Administration page, click Manage service applications under Application Management.
Figure 81
3. On the Manage service applications page, scroll down and click User Profile Service Application.
Figure 82

Connect to: for use with SharePoint 2010 and 2013 v1.0 User Guide Page 59
4. Click Setup My Sites under My Site Settings on the User Profile Service Application page.
Figure 83
The My Site Settings screen is displayed:
Figure 84

Page 60 Connect to: for use with SharePoint 2010 and 2013 v1.0 User Guide
5. Scroll down and select the Domain and user name (will not have conflicts) option under Site Naming Format and click OK.
Figure 85


