
Congratulations - Pella Windows and Doors | Wood ... on your purchase of Pella ® Impervia products!...
25
Congratulations on your purchase of Pella ® Impervia ® products! You have joined a select group of homeowners who have made their homes more beautiful and comfortable with Pella products for more than 80 years. With proper installation, care and operation, your Pella Impervia windows and patio doors will provide years of enjoyment and make every day a little easier. Read this manual thoroughly during your first few days of ownership so you feel comfortable operating, cleaning and maintaining your Pella Impervia products. Then refer to it in the future should a question arise. Pella Impervia windows and patio doors are made from Duracast ® . This material has a powder-coat paint finish to provide you with years of outstanding performance and beauty. Finally, rest assured that Pella will be here for you today … and for years to come. Your complete satisfaction is of utmost importance to us. If you have any questions or concerns, or would like to learn more about exclusive options available for your Pella products, help is as close as your local Pella Window and Door Showroom or pella.com. A commitment to service that’s as strong as our windows and doors. Just another way Pella is creating a better view.
Transcript of Congratulations - Pella Windows and Doors | Wood ... on your purchase of Pella ® Impervia products!...

Congratulations on your purchase of Pella® Impervia® products! You have joined
a select group of homeowners who have made their homes more beautiful and comfortable with
Pella products for more than 80 years. With proper installation, care and operation, your Pella
Impervia windows and patio doors will provide years of enjoyment and make every day a little
easier. Read this manual thoroughly during your first few days of ownership so you feel comfortable
operating, cleaning and maintaining your Pella Impervia products. Then refer to it in the future
should a question arise.
Pella Impervia windows and patio doors are made from Duracast®. This material has a
powder-coat paint finish to provide you with years of outstanding performance and beauty.
Finally, rest assured that Pella will be here for you today … and for years to come. Your
complete satisfaction is of utmost importance to us. If you have any questions or concerns, or
would like to learn more about exclusive options available for your Pella products, help is as close
as your local Pella Window and Door Showroom or pella.com. A commitment to service that’s as
strong as our windows and doors. Just another way Pella is creating a better view.
Casement and awning windows
1.1 Operation
1.1 Screens
1.1 Cleaning
1.1 Cleaning the glass
1.2 Spot-cleaning stubborn materials on all glass
1.2 Spot-cleaning marks on a SunDefense™ Dual Low-E room-facing glass surface
1.2 Cleaning egress windows
1.3 Cleaning flat screens
1.3 Cleaning the interior frame and sash material
1.3 Cleaning the exterior frame and sash material
1.3 Cleaning the weatherstrip
1.3 Cleaning the hinge slide
1.3 Cleaning the hardware finish
sliding windows
2.1 Operation
2.1 Screens
2.1 Grilles
2.1 Cleaning
2.1 Cleaning the glass
2.2 Cleaning the exterior glass from the interior
2.2 Spot-cleaning stubborn materials on all glass
2.2 Spot-cleaning marks on a SunDefense Dual Low-E room-facing glass surface
2.3 Cleaning flat screens
2.3 Cleaning the track and weep valve assemblies
2.3 Cleaning the interior and exterior frame and sash material
2.3 Cleaning the hardware finish
single-Hung windows
3.1 Operation
3.1 Screens
3.1 Grilles
3.1 Cleaning
3.1 Cleaning the glass
3.2 Cleaning the exterior glass from the interior
3.2 Spot-cleaning stubborn materials on all glass
3.2 Spot-cleaning marks on a SunDefense Dual Low-E room-facing glass surface
3.3 Cleaning flat screens
3.3 Cleaning the weep system
3.3 Cleaning the interior and exterior frame and sash material
3.3 Cleaning the hardware finish
double-Hung windows
4.1 Operation
4.1 Screens
4.1 Flat screens (half)
4.2 Flat screens (full)
4.2 Grilles
4.3 Cleaning
4.3 Cleaning the glass
4.3 Cleaning the exterior glass from the interior
4.3 Spot-cleaning stubborn materials on all glass
4.4 Spot-cleaning marks on a SunDefense Dual Low-E room-facing glass surface
4.4 Cleaning flat screens
4.4 Cleaning the sill
4.4 Cleaning the interior and exterior frame and sash material
4.4 Cleaning the hardware finish
How to Use/Table of Contents owner’s manual
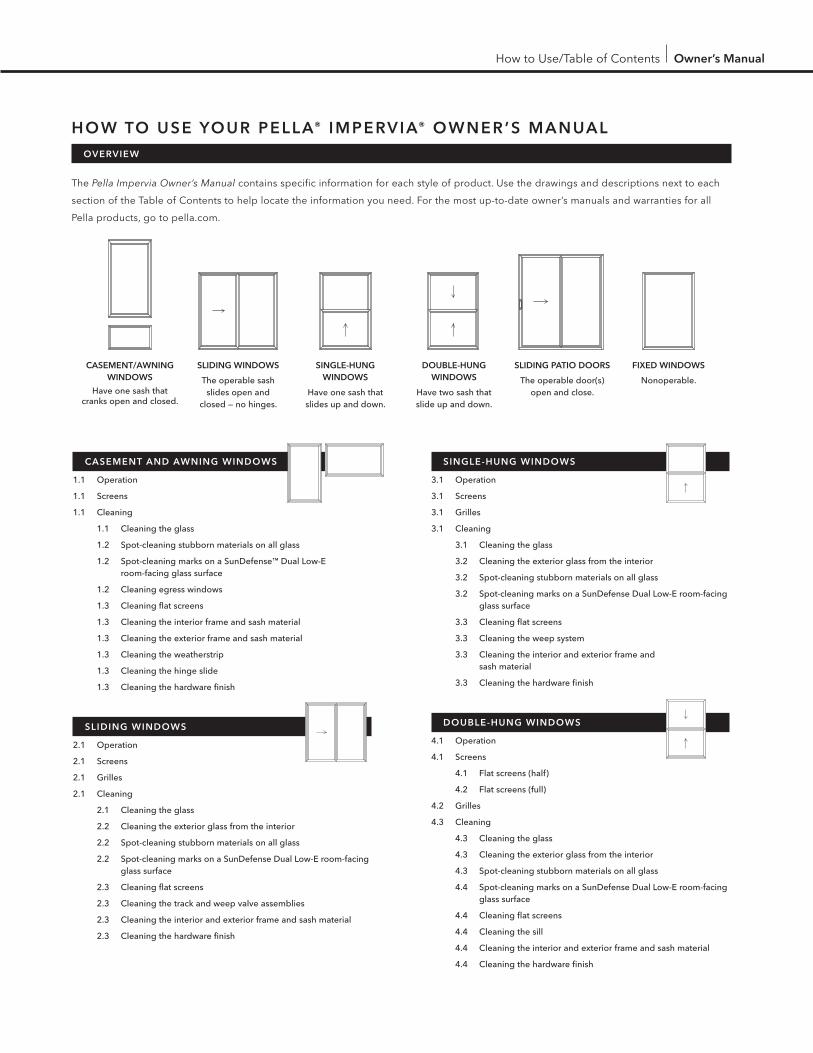
How to use Your pella® imperVia® owner’s manualoVerView
The Pella Impervia Owner’s Manual contains specific information for each style of product. Use the drawings and descriptions next to each
section of the Table of Contents to help locate the information you need. For the most up-to-date owner’s manuals and warranties for all
Pella products, go to pella.com.
double-Hung windows
Have two sash that slide up and down.
single-Hung windows
Have one sash that slides up and down.
Casement/awning windows
Have one sash that cranks open and closed.
sliding windows
The operable sash slides open and
closed — no hinges.
Fixed windows
Nonoperable.
sliding patio doors
The operable door(s) open and close.
owner’s manual Table of Contents
sliding patio doors
5.1 Operation
5.1 Screens
5.1 Grilles
5.2 Cleaning
5.2 Cleaning the glass
5.2 Spot-cleaning stubborn materials on all glass
5.2 Spot-cleaning marks on a SunDefense™ Dual Low-E room-facing glass surface
5.3 Cleaning flat screens
5.3 Cleaning the interior and exterior frame and sash material
5.3 Cleaning the hardware finish
Fixed windows
6.1 Operation/Cleaning
reCommended maintenanCe
6.1 Overview
6.1 Exterior
6.1 Interior finish
6.1 Cleaning the weatherstrip
6.2 Double- and single-hung windows
6.2 Sliding windows
6.2 Sliding patio doors
6.2 Sliding screen doors
6.2 Salt spray environments
troublesHooting
7.1 Overview
7.1 Glass breakage/damage
7.1 Sliding windows
7.1 Single-hung windows
7.2 Double-hung windows
7.2 Sliding patio doors
7.2 Sliding screen doors
7.2 Preventing condensation
7.4 EIFS/synthetic stucco
7.4 NFRC label
7.4 Pella® Impervia® Unit ID Number: Service made simpler
pella warrantY
Please visit http://warranty.pella.com.
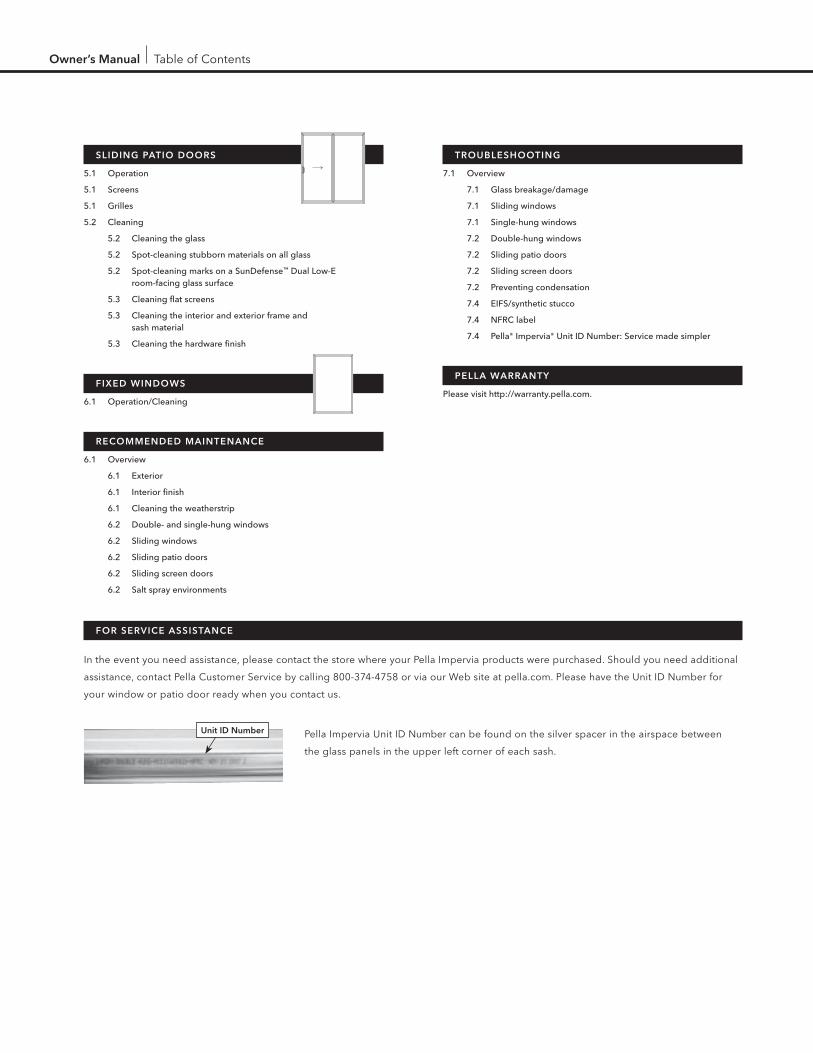
For serViCe assistanCe
In the event you need assistance, please contact the store where your Pella Impervia products were purchased. Should you need additional
assistance, contact Pella Customer Service by calling 800-374-4758 or via our Web site at pella.com. Please have the Unit ID Number for
your window or patio door ready when you contact us.
Pella Impervia Unit ID Number can be found on the silver spacer in the airspace between
the glass panels in the upper left corner of each sash.
unit id number
Operation/Screens/Cleaning Casement and awning windows
1.1
Casement and awning windowsoperation
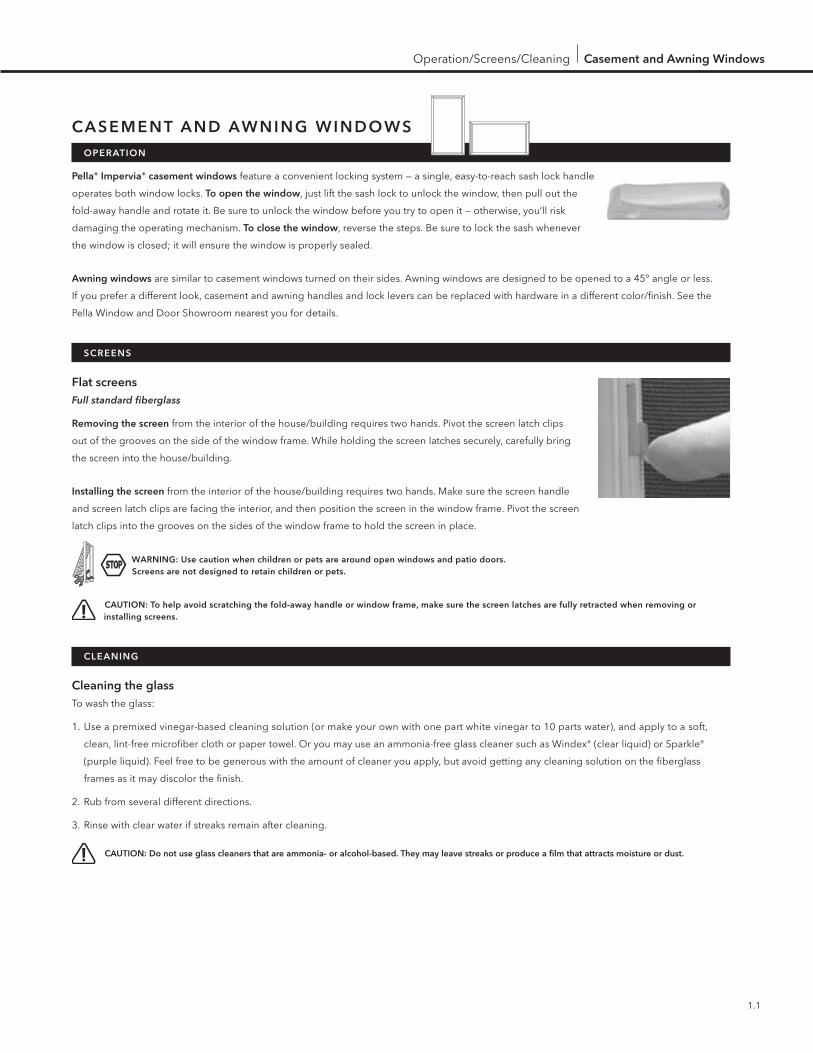
pella® impervia® casement windows feature a convenient locking system — a single, easy-to-reach sash lock handle
operates both window locks. to open the window, just lift the sash lock to unlock the window, then pull out the
fold-away handle and rotate it. Be sure to unlock the window before you try to open it — otherwise, you’ll risk
damaging the operating mechanism. to close the window, reverse the steps. Be sure to lock the sash whenever
the window is closed; it will ensure the window is properly sealed.
awning windows are similar to casement windows turned on their sides. Awning windows are designed to be opened to a 45° angle or less.
If you prefer a different look, casement and awning handles and lock levers can be replaced with hardware in a different color/finish. See the
Pella Window and Door Showroom nearest you for details.
sCreens
Flat screensFull standard fiberglass
removing the screen from the interior of the house/building requires two hands. Pivot the screen latch clips
out of the grooves on the side of the window frame. While holding the screen latches securely, carefully bring
the screen into the house/building.
installing the screen from the interior of the house/building requires two hands. Make sure the screen handle
and screen latch clips are facing the interior, and then position the screen in the window frame. Pivot the screen
latch clips into the grooves on the sides of the window frame to hold the screen in place.
warning: use caution when children or pets are around open windows and patio doors. screens are not designed to retain children or pets.
Caution: to help avoid scratching the fold-away handle or window frame, make sure the screen latches are fully retracted when removing or installing screens.
Cleaning
Cleaning the glassTo wash the glass:
1. Use a premixed vinegar-based cleaning solution (or make your own with one part white vinegar to 10 parts water), and apply to a soft,
clean, lint-free microfiber cloth or paper towel. Or you may use an ammonia-free glass cleaner such as Windex® (clear liquid) or Sparkle®
(purple liquid). Feel free to be generous with the amount of cleaner you apply, but avoid getting any cleaning solution on the fiberglass
frames as it may discolor the finish.
2. Rub from several different directions.
3. Rinse with clear water if streaks remain after cleaning.
Caution: do not use glass cleaners that are ammonia- or alcohol-based. they may leave streaks or produce a film that attracts moisture or dust.
1.2
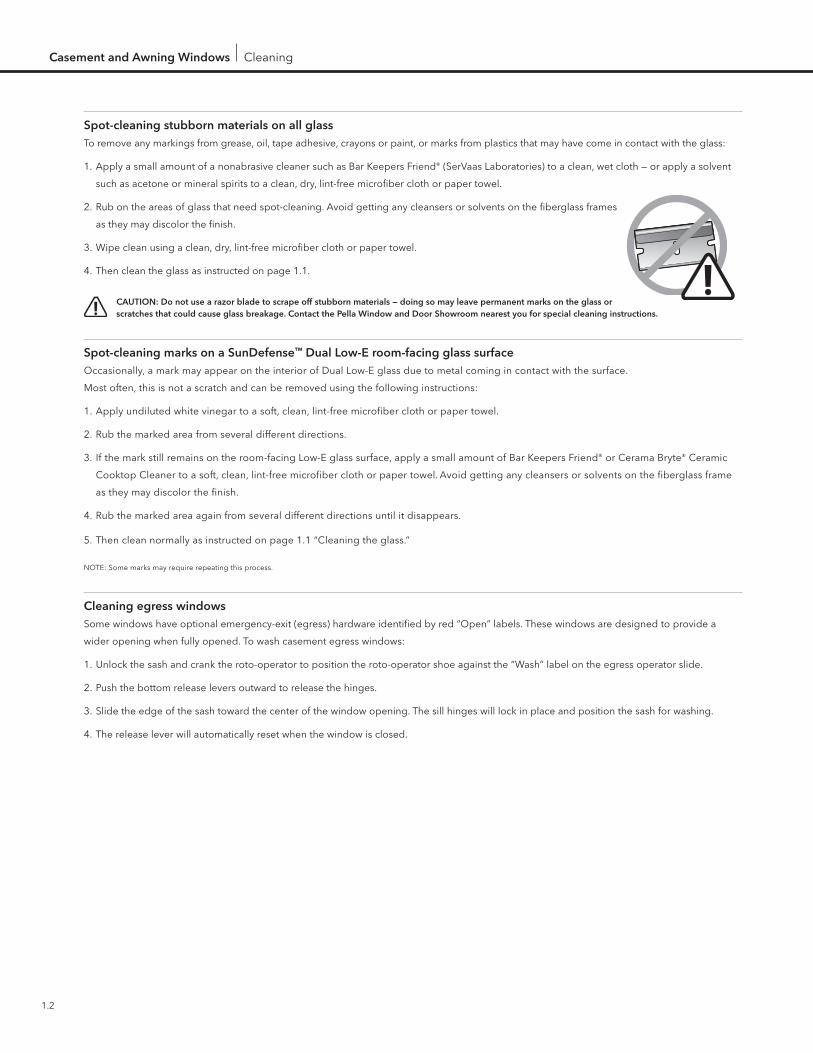
spot-cleaning stubborn materials on all glassTo remove any markings from grease, oil, tape adhesive, crayons or paint, or marks from plastics that may have come in contact with the glass:
1. Apply a small amount of a nonabrasive cleaner such as Bar Keepers Friend® (SerVaas Laboratories) to a clean, wet cloth — or apply a solvent
such as acetone or mineral spirits to a clean, dry, lint-free microfiber cloth or paper towel.
2. Rub on the areas of glass that need spot-cleaning. Avoid getting any cleansers or solvents on the fiberglass frames
as they may discolor the finish.
3. Wipe clean using a clean, dry, lint-free microfiber cloth or paper towel.
4. Then clean the glass as instructed on page 1.1.
Caution: do not use a razor blade to scrape off stubborn materials — doing so may leave permanent marks on the glass or scratches that could cause glass breakage. Contact the pella window and door showroom nearest you for special cleaning instructions.
spot-cleaning marks on a sundefense™ dual low-e room-facing glass surfaceOccasionally, a mark may appear on the interior of Dual Low-E glass due to metal coming in contact with the surface.
Most often, this is not a scratch and can be removed using the following instructions:
1. Apply undiluted white vinegar to a soft, clean, lint-free microfiber cloth or paper towel.
2. Rub the marked area from several different directions.
3. If the mark still remains on the room-facing Low-E glass surface, apply a small amount of Bar Keepers Friend® or Cerama Bryte® Ceramic
Cooktop Cleaner to a soft, clean, lint-free microfiber cloth or paper towel. Avoid getting any cleansers or solvents on the fiberglass frame
as they may discolor the finish.
4. Rub the marked area again from several different directions until it disappears.
5. Then clean normally as instructed on page 1.1 “Cleaning the glass.”
NOTE: Some marks may require repeating this process.
Cleaning egress windowsSome windows have optional emergency-exit (egress) hardware identified by red “Open” labels. These windows are designed to provide a
wider opening when fully opened. To wash casement egress windows:
1. Unlock the sash and crank the roto-operator to position the roto-operator shoe against the “Wash” label on the egress operator slide.
2. Push the bottom release levers outward to release the hinges.
3. Slide the edge of the sash toward the center of the window opening. The sill hinges will lock in place and position the sash for washing.
4. The release lever will automatically reset when the window is closed.
Casement and awning windows Cleaning
Cleaning Casement and awning windows
1.3
Cleaning flat screensFull standard fiberglass
To clean a flat fiberglass screen, either remove the screen (see page 1.1) and gently wash it with soap and water, or use the drapery brush
attachment on your vacuum cleaner.
Vivid View® high-transparency screens
To clean Vivid View screens, remove them from your windows and hose them off with water.
note: the ultrafine screen material is more delicate than fiberglass or aluminum screens and should be handled with care.
warning: use caution when children or pets are around open windows and patio doors. screens are not designed to retain children or pets.
Caution: do not power-wash.
Cleaning the interior frame and sash material To remove any markings from grease, oil, tape adhesive, crayons or paint, or marks from plastics that may have come in contact with the
interior of your frame and sash material, clean the surface with warm, soapy water. For best results on stubborn stains, Pine-Sol® should be
applied with a clean, dry cloth or towel. Should you need it, touch-up paint is available at the Pella Window and Door Showroom nearest you.
warning: do not use abrasives. do not scrape or use tools that might damage the surface.
Cleaning the exterior frame and sash material Clean the surface with warm, soapy water. Stubborn stains and deposits may be removed with mineral spirits. Should you need it, touch-up paint
is available at the Pella Window and Door Showroom nearest you.
warning: do not use abrasives. do not scrape or use tools that might damage the surface. do not power-wash.
Cleaning the weatherstrip Frame weatherstrip and sash rainstrip should be wiped down with warm soapy water annually to ensure maximum window performance.
Cleaning the hinge slide The hinge slide at the sill (bottom) of casement windows and on the side of awning windows should be lubricated twice a year to remove dirt
and debris. The hinge slide should be lubricated with WD-40 penetrating oil or silicone dry film lubricant to ensure smooth operation.
Cleaning the hardware finish A soft cloth and mild cleaner may be used on all hardware finishes for Pella® windows.
note: oil-rubbed bronze window hardware is a living finish that will develop its own unique patina with use, care and handling.

2.1
sliding windows Operation/Screens/Grilles/Cleaning
sl iding windowsoperation
to open the window, unlock the lock located in the middle of the venting sash. Larger windows may have two
locks. Push or pull at the center of the venting sash to open the window. to close the window, push or pull at
the center of the venting sash to return it to the closed position and lock the window. Reengaging the lock will
automatically align and center the sash together for a tight seal.
sCreens
removing a screen will take two hands. To remove the screen from the interior of the house/building, fully
open the venting sash. Holding the screen handle with two hands, push the screen frame left or right toward
the center of the unit and then push the bottom of the screen frame toward the exterior of the house/building.
This should release the screen from the track. Carefully tilt and turn the screen so it fits through the open
window. Then pass the screen through the window to the inside of the house/building.
to replace a screen, reverse the process above and make sure the handle is engaged.
warning: use caution when children or pets are around open windows and patio doors. screens are not designed to retain children or pets.
grilles
permanent grillesAluminum grilles-between-the-glass
The aluminum grilles-between-the-glass are permanently installed between panes of glass, so they stay clean and never need to be removed.
Cleaning
Cleaning the glassTo wash the glass:
1. Use a premixed vinegar-based cleaning solution (or make your own with one part white vinegar to 10 parts water), and apply to a soft,
clean, lint-free microfiber cloth or paper towel. Or you may use an ammonia-free glass cleaner such as Windex® (clear liquid) or Sparkle®
(purple liquid). Feel free to be generous with the amount of cleaner you apply, but avoid getting any cleaning solution on the fiberglass
frames as it may discolor the finish.
2. Rub from several different directions.
3. Rinse with clear water if streaks remain after cleaning.
Caution: do not use glass cleaners that are ammonia- or alcohol-based. they may leave streaks or produce a film that attracts moisture or dust.

2.2
Cleaning the exterior glass from the interiorYou can remove the venting sash of the sliding window for easy cleaning.
Unlock the window and slide to the fully opened position (1). Make sure that
the sash has cleared the anti-lift clip, which is a security feature that prevents
removal of sash when closed, located at the top of the frame (2). Lift the sash
up and out of the bottom track, then tilt in the bottom of the sash until it
clears the frame (3).
Caution: sash may be heavy.
Lay sash flat to wash the exterior glass on the vent panel. To wash the fixed panel from the interior of the
building, remove the screen and reach out to wash the exterior glass.
Caution: do not extend your body out of the window. if the entire glass of the fixed panel cannot be reached from the interior of the house/building, wash the fixed panel from the exterior of the house/building.
When reinstalling the sash, be sure to insert the top of the panel into the frame in the fully open position
so that you clear the anti-lift clips, then rotate the bottom into position. Close and lock the sash a few times to ensure proper operation.
For exterior glass-cleaning solution, follow the “Cleaning the glass” steps on page 2.1.
spot-cleaning stubborn materials on all glassTo remove any markings from grease, oil, tape adhesive, crayons or paint, or marks from plastics that may have come in contact with the glass:
1. Apply a small amount of a nonabrasive cleaner such as Bar Keepers Friend® (SerVaas Laboratories) to a clean, wet cloth — or apply a solvent
such as acetone or mineral spirits to a clean, dry, lint-free microfiber cloth or paper towel.
2. Rub on the areas of glass that need spot-cleaning. Avoid getting any cleansers or solvents on the fiberglass frames as they may discolor
the finish.
3. Wipe clean using a clean, dry, lint-free microfiber cloth or paper towel.
4. Then clean the glass as instructed on page 2.1.
Caution: do not use a razor blade to scrape off stubborn materials — doing so may leave permanent marks on the glass or scratches that could cause glass breakage. Contact the pella window and door showroom nearest you for special cleaning instructions.
spot-cleaning marks on a sundefense™ dual low-e room-facing glass surfaceOccasionally, a mark may appear on the interior of Dual Low-E glass due to metal coming in contact with the surface.
Most often, this is not a scratch and can be removed using the following instructions:
1. Apply undiluted white vinegar to a soft, clean, lint-free microfiber cloth or paper towel.
2. Rub the marked area from several different directions.
3. If the mark still remains on the room-facing Low-E glass surface, apply a small amount of Bar Keepers Friend® or Cerama Bryte® Ceramic
Cooktop Cleaner to a soft, clean, lint-free microfiber cloth or paper towel. Avoid getting any cleansers or solvents on the fiberglass frame
as they may discolor the finish.
4. Rub the marked area again from several different directions until it disappears.
5. Then clean normally as instructed on page 2.1 “Cleaning the glass.”
NOTE: Some marks may require repeating this process.
21
3
Cleaning sliding windows

2.3
sliding windows Cleaning
Cleaning flat screens
To clean a flat fiberglass screen, either remove the screen (see page 2.1) and gently wash it with soap and water,
or simply use the drapery brush attachment on your vacuum cleaner.
warning: use caution when children or pets are around open windows and patio doors. screens are not designed to retain children or pets.
Cleaning the track and weep valve assembliesTo remove dirt or debris on the track of the window, unlock the window and •
slide the operating sash panel to the fully opened position (1). Make sure
that the sash has cleared the anti-lift clips located at the top of the frame (2).
With both hands, lift the sash up and out of the bottom track. Set the sash •
in a safe place until you are ready to reinstall (3).
Caution: sash may be heavy.
Locate the sill track in the bottom inside channel of the window. If you use a
vacuum cleaner with the brush attachment to clean out the debris in the track,
the sash will be easier to operate.
Insert a stiff-bladed putty knife between the interior of the frame and the sill •
track, and pry upward to start removal (4). Once started, grab the sill track and
lift upward to complete the removal of the track (5).
Vacuum out any debris and thoroughly clean the sill channel with warm, •
soapy water prior to reinstalling the sill track. Flush out the weep system by
slowly pouring a few quarts of rinse water into the sill channel (6). The water
should drain readily to the exterior (7).
Starting at one end and continuing along the entire length, push the •
sill track down to snap into place (8). Be sure that both the interior and
exterior sides of the sill track are snapped fully into place. Lightly tapping
a block of wood with a rubber mallet along the entire length will help
ensure that the sill track is in place. Reinstall the sash by inserting the top of
the sash up into the frame and down into the bottom. Close and lock the sash
a few times to ensure proper operation.
note: when reinstalling the sash, be sure to insert the panel into the frame in the fully open position so that you clear the anti-lift clips (2). Cleaning the weep valve assemblies with water must be completed when the temperature has been above freezing for at least 48 hours to ensure water does not freeze in the assembly.
Cleaning the interior and exterior frame and sash materialClean the surface with warm, soapy water. Stubborn stains and deposits may be removed with mineral spirits. Should you need it, touch-up paint
is available at the Pella Window and Door Showroom nearest you.
warning: do not use abrasives. do not scrape or use tools that might damage the surface. do not power-wash.
Cleaning the hardware finishA soft cloth and mild cleaner may be used on all hardware finishes for Pella® Impervia® sliding windows.
note: oil-rubbed bronze window hardware is a living finish that will develop its own unique patina with use, care and handling.
43
65
87
21
weep Hole
3.1
single- Hung windowsoperation
to open the window, unlock the lock located on the top of the venting (lower) sash and lift. Larger windows may have two locks.
to close the window, push the sash back to the closed position and lock the window. Reengaging the lock will automatically align
and center the sash together for a tight seal.
sCreens
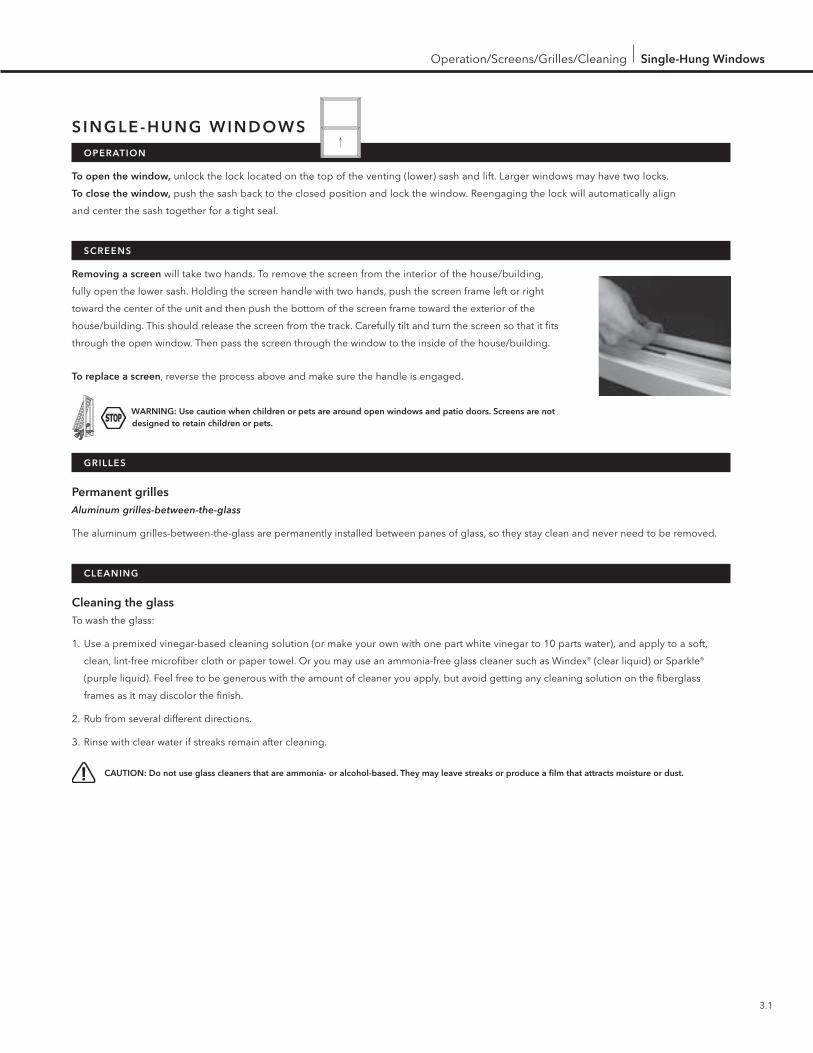
removing a screen will take two hands. To remove the screen from the interior of the house/building,
fully open the lower sash. Holding the screen handle with two hands, push the screen frame left or right
toward the center of the unit and then push the bottom of the screen frame toward the exterior of the
house/building. This should release the screen from the track. Carefully tilt and turn the screen so that it fits
through the open window. Then pass the screen through the window to the inside of the house/building.
to replace a screen, reverse the process above and make sure the handle is engaged.
warning: use caution when children or pets are around open windows and patio doors. screens are not designed to retain children or pets.
grilles
permanent grillesAluminum grilles-between-the-glass
The aluminum grilles-between-the-glass are permanently installed between panes of glass, so they stay clean and never need to be removed.
Cleaning
Cleaning the glassTo wash the glass:
1. Use a premixed vinegar-based cleaning solution (or make your own with one part white vinegar to 10 parts water), and apply to a soft,
clean, lint-free microfiber cloth or paper towel. Or you may use an ammonia-free glass cleaner such as Windex® (clear liquid) or Sparkle®
(purple liquid). Feel free to be generous with the amount of cleaner you apply, but avoid getting any cleaning solution on the fiberglass
frames as it may discolor the finish.
2. Rub from several different directions.
3. Rinse with clear water if streaks remain after cleaning.
Caution: do not use glass cleaners that are ammonia- or alcohol-based. they may leave streaks or produce a film that attracts moisture or dust.
Operation/Screens/Grilles/Cleaning single-Hung windows
3.2
single-Hung windows Cleaning
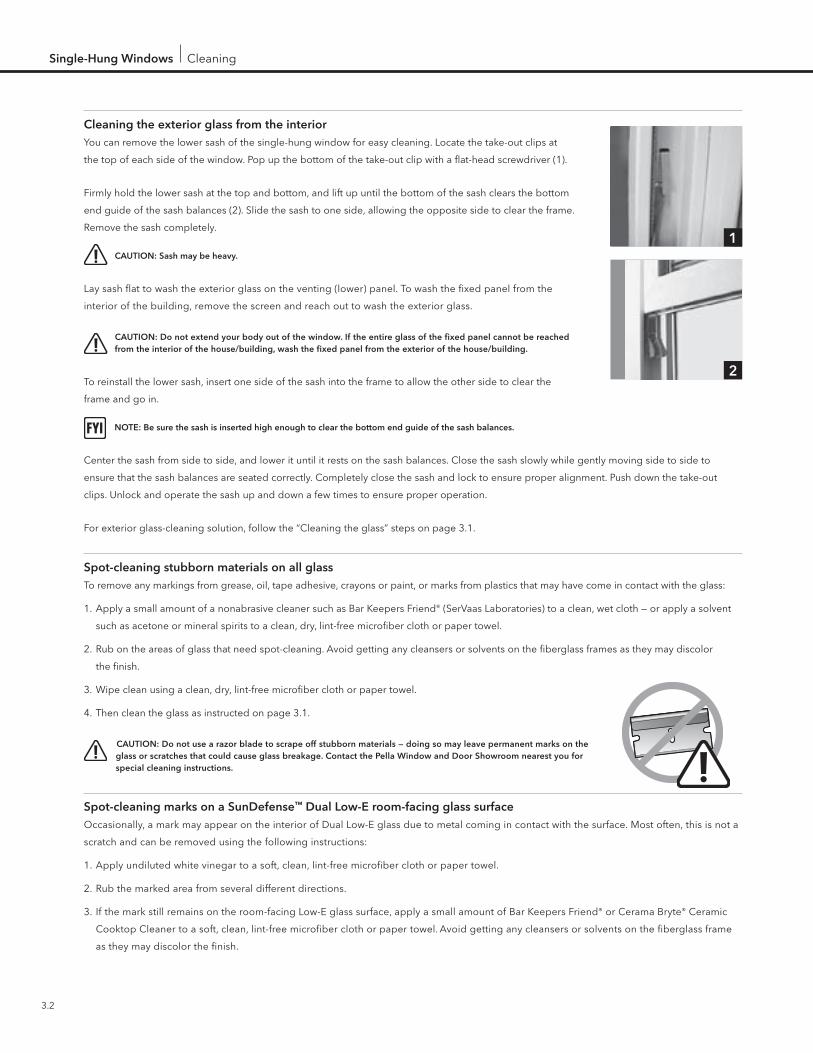
Cleaning the exterior glass from the interiorYou can remove the lower sash of the single-hung window for easy cleaning. Locate the take-out clips at
the top of each side of the window. Pop up the bottom of the take-out clip with a flat-head screwdriver (1).
Firmly hold the lower sash at the top and bottom, and lift up until the bottom of the sash clears the bottom
end guide of the sash balances (2). Slide the sash to one side, allowing the opposite side to clear the frame.
Remove the sash completely.
Caution: sash may be heavy.
Lay sash flat to wash the exterior glass on the venting (lower) panel. To wash the fixed panel from the
interior of the building, remove the screen and reach out to wash the exterior glass.
Caution: do not extend your body out of the window. if the entire glass of the fixed panel cannot be reached from the interior of the house/building, wash the fixed panel from the exterior of the house/building.
To reinstall the lower sash, insert one side of the sash into the frame to allow the other side to clear the
frame and go in.
note: be sure the sash is inserted high enough to clear the bottom end guide of the sash balances.
Center the sash from side to side, and lower it until it rests on the sash balances. Close the sash slowly while gently moving side to side to
ensure that the sash balances are seated correctly. Completely close the sash and lock to ensure proper alignment. Push down the take-out
clips. Unlock and operate the sash up and down a few times to ensure proper operation.
For exterior glass-cleaning solution, follow the “Cleaning the glass” steps on page 3.1.
spot-cleaning stubborn materials on all glassTo remove any markings from grease, oil, tape adhesive, crayons or paint, or marks from plastics that may have come in contact with the glass:
1. Apply a small amount of a nonabrasive cleaner such as Bar Keepers Friend® (SerVaas Laboratories) to a clean, wet cloth — or apply a solvent
such as acetone or mineral spirits to a clean, dry, lint-free microfiber cloth or paper towel.
2. Rub on the areas of glass that need spot-cleaning. Avoid getting any cleansers or solvents on the fiberglass frames as they may discolor
the finish.
3. Wipe clean using a clean, dry, lint-free microfiber cloth or paper towel.
4. Then clean the glass as instructed on page 3.1.
Caution: do not use a razor blade to scrape off stubborn materials — doing so may leave permanent marks on the glass or scratches that could cause glass breakage. Contact the pella window and door showroom nearest you for special cleaning instructions.
spot-cleaning marks on a sundefense™ dual low-e room-facing glass surfaceOccasionally, a mark may appear on the interior of Dual Low-E glass due to metal coming in contact with the surface. Most often, this is not a
scratch and can be removed using the following instructions:
1. Apply undiluted white vinegar to a soft, clean, lint-free microfiber cloth or paper towel.
2. Rub the marked area from several different directions.
3. If the mark still remains on the room-facing Low-E glass surface, apply a small amount of Bar Keepers Friend® or Cerama Bryte® Ceramic
Cooktop Cleaner to a soft, clean, lint-free microfiber cloth or paper towel. Avoid getting any cleansers or solvents on the fiberglass frame
as they may discolor the finish.
2
1
3.3
4. Rub the marked area again from several different directions until it disappears.
5. Then clean normally as instructed on page 3.1 “Cleaning the glass.”
NOTE: Some marks may require repeating this process.
Cleaning flat screensTo clean a flat fiberglass screen, either remove the screen (see page 3.1) and gently wash it with soap and water,
or use the drapery brush attachment on your vacuum cleaner.
warning: use caution when children or pets are around open windows and patio doors. screens are not designed to retain children or pets.
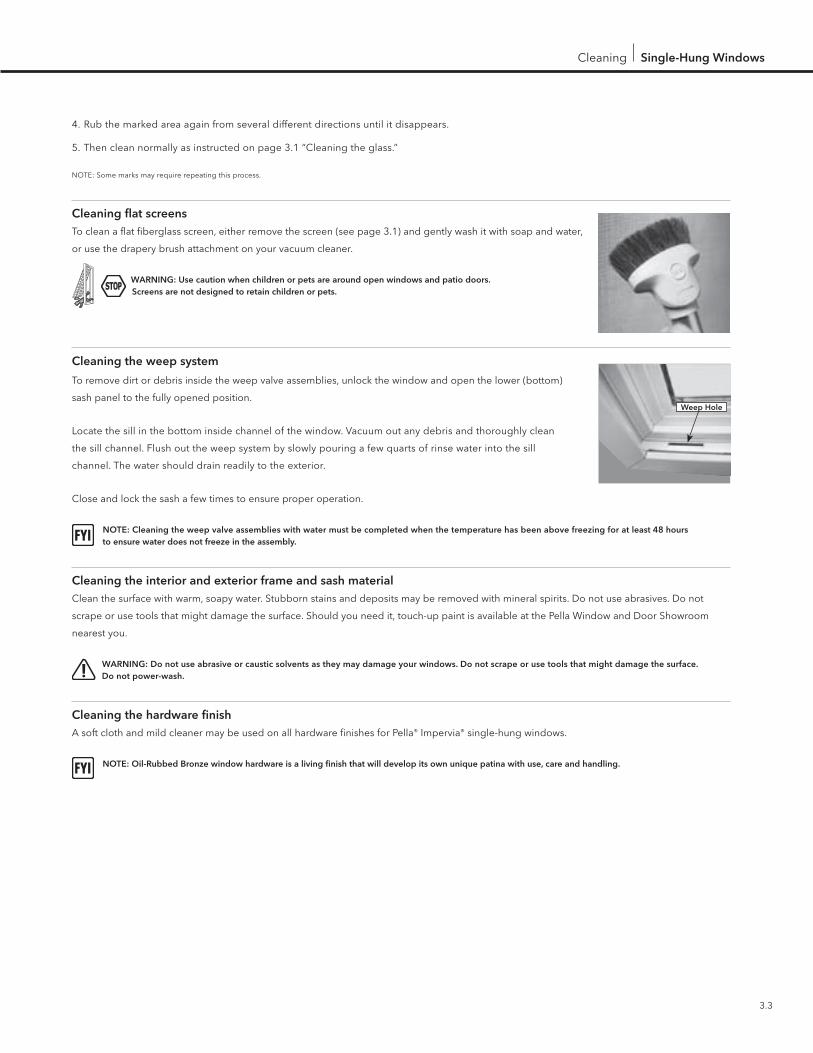
Cleaning the weep system
To remove dirt or debris inside the weep valve assemblies, unlock the window and open the lower (bottom)
sash panel to the fully opened position.
Locate the sill in the bottom inside channel of the window. Vacuum out any debris and thoroughly clean
the sill channel. Flush out the weep system by slowly pouring a few quarts of rinse water into the sill
channel. The water should drain readily to the exterior.
Close and lock the sash a few times to ensure proper operation.
note: Cleaning the weep valve assemblies with water must be completed when the temperature has been above freezing for at least 48 hours to ensure water does not freeze in the assembly.
Cleaning the interior and exterior frame and sash materialClean the surface with warm, soapy water. Stubborn stains and deposits may be removed with mineral spirits. Do not use abrasives. Do not
scrape or use tools that might damage the surface. Should you need it, touch-up paint is available at the Pella Window and Door Showroom
nearest you.
warning: do not use abrasive or caustic solvents as they may damage your windows. do not scrape or use tools that might damage the surface. do not power-wash.
Cleaning the hardware finishA soft cloth and mild cleaner may be used on all hardware finishes for Pella® Impervia® single-hung windows.
note: oil-rubbed bronze window hardware is a living finish that will develop its own unique patina with use, care and handling.
Cleaning single-Hung windows
weep Hole

4.1
double-Hung windows Operation/Screens
double- Hung windowsoperation
to open the window, unlock the lock located on the top of the lower sash. Larger windows may have two locks. You can open either the upper
or lower sash, or both, depending on your preference. To create good air circulation in a room, open both the upper and lower sash a few
inches. to close the window, push the sash back to the closed position and lock the window. Reengaging the lock will automatically align and
center the sash together for a tight seal.
warning: when the window is not locked, the sash are not secured and can tilt under pressure.
warning: use caution when children or pets are around open windows and patio doors. screens are not designed to retain children or pets.
sCreens
Flat screensHalf
removing a half-screen will take two hands. To remove the screen from
the interior of the house/building, unlock the window and raise the lower
sash (1). Holding the screen handle with one hand, unhook the screen clips
that hold the screen to the window frame (2). To bring the screen into the
house/building through the window, carefully tilt and turn the screen so that
it fits through the open window. Then pass the screen through the window
to the inside (3).
to replace a half-screen, unlock the window and raise the lower sash (1).
Carefully pass the screen through the window opening with the handle on
the bottom and the clips facing the interior (3). Press the screen handle and
one of the clips to pull the screen into the frame (4). Hold the screen against
the frame using the screen handle, and press the screen clips into the frame.
When the half-screen is correctly installed, the mohair at the top of the half-
screen will press against the meeting rail of the upper sash (5). Close the
window by lowering the lower sash, and then lock the window.
warning: use caution when children or pets are around open windows and patio doors. screens are not designed to retain children or pets.
1 2
3 4
5
4.2
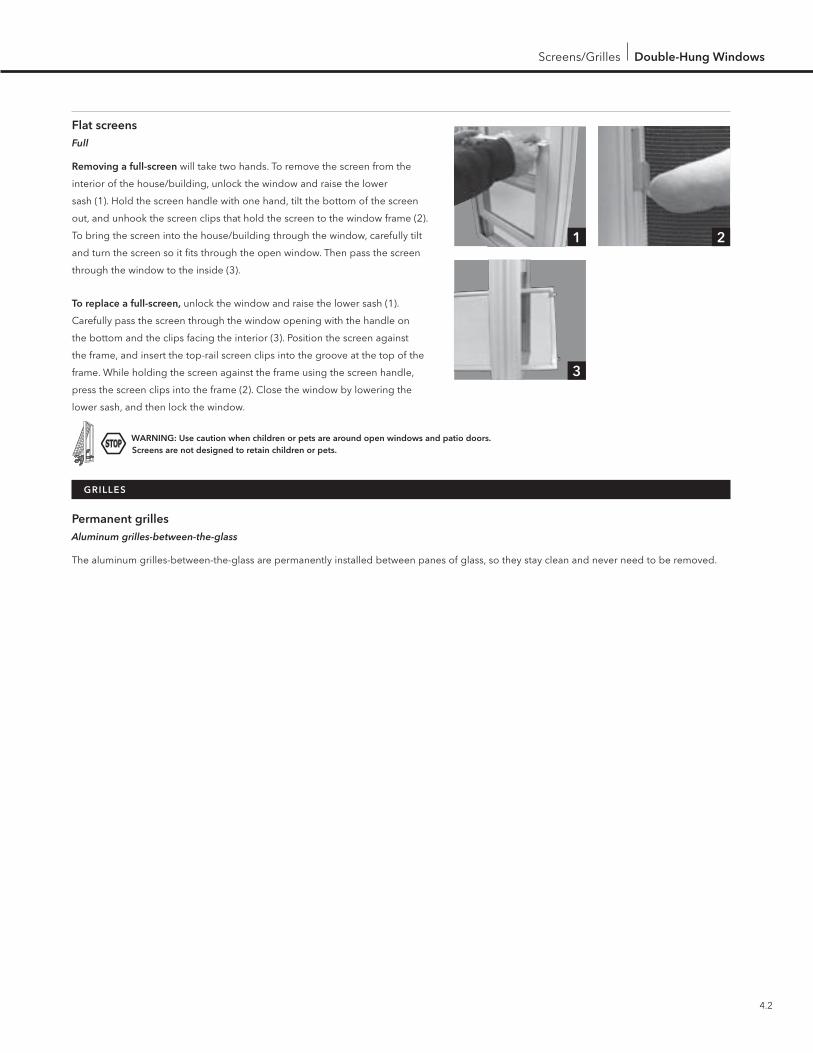
Flat screensFull
removing a full-screen will take two hands. To remove the screen from the
interior of the house/building, unlock the window and raise the lower
sash (1). Hold the screen handle with one hand, tilt the bottom of the screen
out, and unhook the screen clips that hold the screen to the window frame (2).
To bring the screen into the house/building through the window, carefully tilt
and turn the screen so it fits through the open window. Then pass the screen
through the window to the inside (3).
to replace a full-screen, unlock the window and raise the lower sash (1).
Carefully pass the screen through the window opening with the handle on
the bottom and the clips facing the interior (3). Position the screen against
the frame, and insert the top-rail screen clips into the groove at the top of the
frame. While holding the screen against the frame using the screen handle,
press the screen clips into the frame (2). Close the window by lowering the
lower sash, and then lock the window.
warning: use caution when children or pets are around open windows and patio doors. screens are not designed to retain children or pets.
grilles
permanent grillesAluminum grilles-between-the-glass
The aluminum grilles-between-the-glass are permanently installed between panes of glass, so they stay clean and never need to be removed.
1 2
3
Screens/Grilles double-Hung windows
4.3
double-Hung windows Cleaning
Cleaning
Cleaning the glassTo wash the glass:
1. Use a premixed vinegar-based cleaning solution (or make your own with one part white vinegar to 10 parts water), and apply to a soft,
clean, lint-free microfiber cloth or paper towel. Or you may use an ammonia-free glass cleaner such as Windex® (clear liquid) or Sparkle®
(purple liquid). Feel free to be generous with the amount of cleaner you apply, but avoid getting any cleaning solution on the fiberglass
frames as it may discolor the finish.
2. Rub from several different directions.
3. Rinse with clear water if streaks remain after cleaning.
Caution: do not use glass cleaners that are ammonia- or alcohol-based. they may leave streaks or produce a film that attracts moisture or dust.
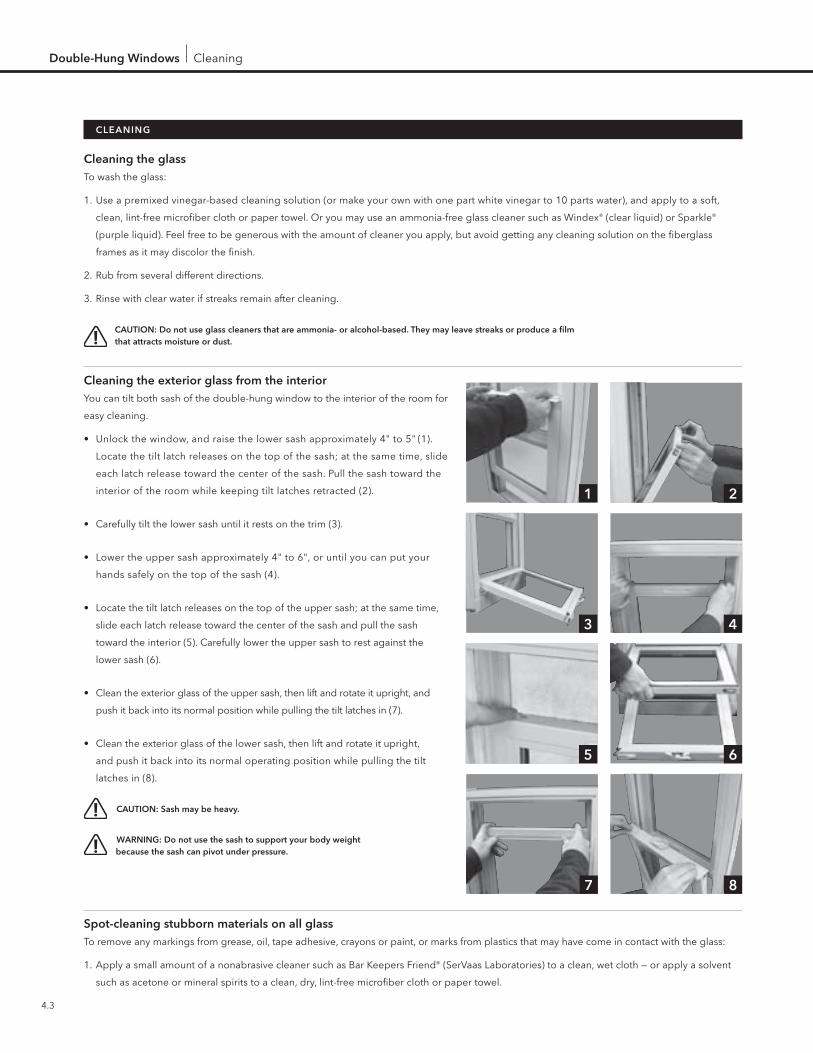
Cleaning the exterior glass from the interiorYou can tilt both sash of the double-hung window to the interior of the room for
easy cleaning.
• Unlockthewindow,andraisethelowersashapproximately4"to5"(1).
Locate the tilt latch releases on the top of the sash; at the same time, slide
each latch release toward the center of the sash. Pull the sash toward the
interior of the room while keeping tilt latches retracted (2).
• Carefullytiltthelowersashuntilitrestsonthetrim(3).
• Lowertheuppersashapproximately4"to6",oruntilyoucanputyour
hands safely on the top of the sash (4).
• Locatethetiltlatchreleasesonthetopoftheuppersash;atthesametime,
slide each latch release toward the center of the sash and pull the sash
toward the interior (5). Carefully lower the upper sash to rest against the
lower sash (6).
• Cleantheexteriorglassoftheuppersash,thenliftandrotateitupright,and
push it back into its normal position while pulling the tilt latches in (7).
• Cleantheexteriorglassofthelowersash,thenliftandrotateitupright,
and push it back into its normal operating position while pulling the tilt
latches in (8).
Caution: sash may be heavy.
warning: do not use the sash to support your body weight because the sash can pivot under pressure.
spot-cleaning stubborn materials on all glassTo remove any markings from grease, oil, tape adhesive, crayons or paint, or marks from plastics that may have come in contact with the glass:
1. Apply a small amount of a nonabrasive cleaner such as Bar Keepers Friend® (SerVaas Laboratories) to a clean, wet cloth — or apply a solvent
such as acetone or mineral spirits to a clean, dry, lint-free microfiber cloth or paper towel.
1 2
3 4
5 6
7 8
4.4
2. Rub on the areas of glass that need spot-cleaning. Avoid getting any cleansers or solvents on the fiberglass frames as they may discolor
the finish.
3. Wipe clean using a clean, dry, lint-free microfiber cloth or paper towel.
4. Then clean the glass as instructed on page 4.3.
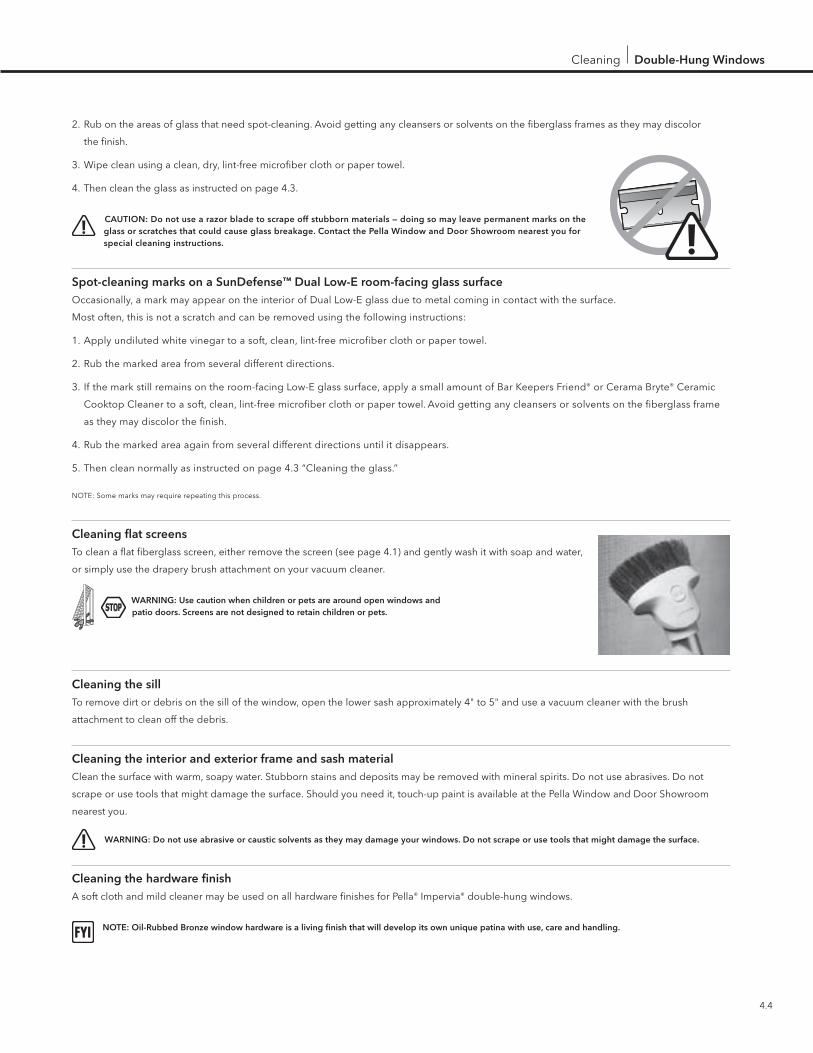
Caution: do not use a razor blade to scrape off stubborn materials — doing so may leave permanent marks on the glass or scratches that could cause glass breakage. Contact the pella window and door showroom nearest you for special cleaning instructions.
spot-cleaning marks on a sundefense™ dual low-e room-facing glass surfaceOccasionally, a mark may appear on the interior of Dual Low-E glass due to metal coming in contact with the surface.
Most often, this is not a scratch and can be removed using the following instructions:
1. Apply undiluted white vinegar to a soft, clean, lint-free microfiber cloth or paper towel.
2. Rub the marked area from several different directions.
3. If the mark still remains on the room-facing Low-E glass surface, apply a small amount of Bar Keepers Friend® or Cerama Bryte® Ceramic
Cooktop Cleaner to a soft, clean, lint-free microfiber cloth or paper towel. Avoid getting any cleansers or solvents on the fiberglass frame
as they may discolor the finish.
4. Rub the marked area again from several different directions until it disappears.
5. Then clean normally as instructed on page 4.3 “Cleaning the glass.”
NOTE: Some marks may require repeating this process.
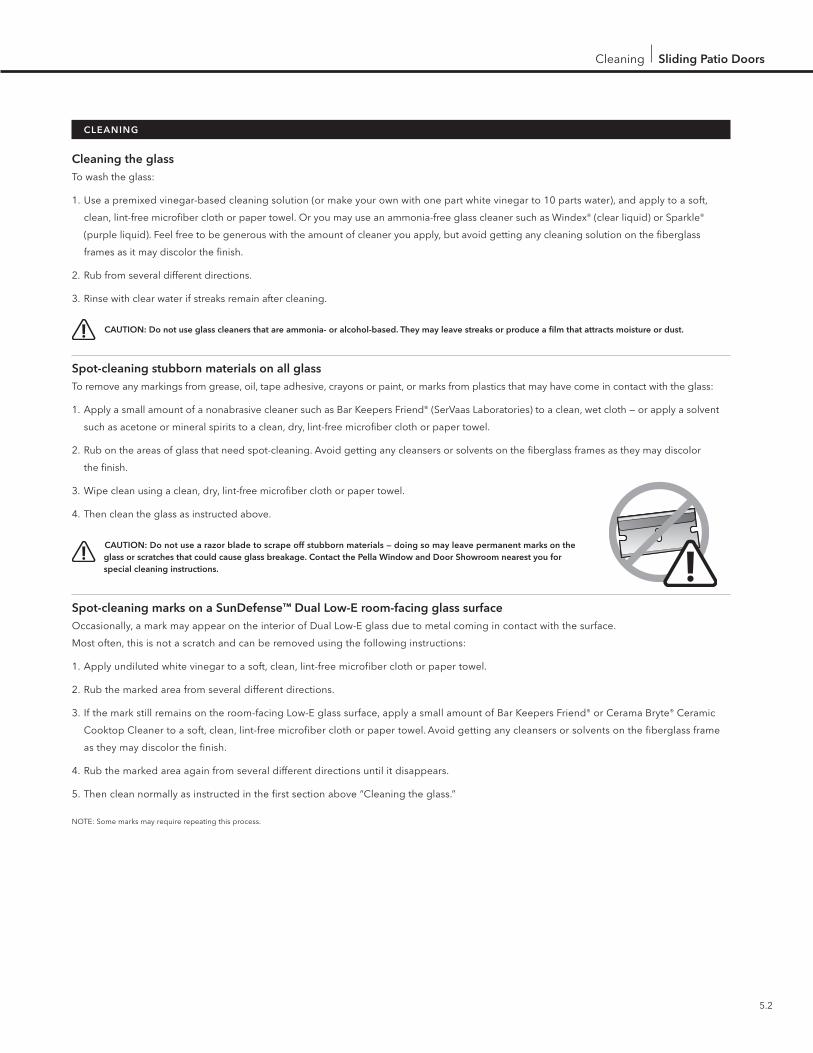
Cleaning flat screensTo clean a flat fiberglass screen, either remove the screen (see page 4.1) and gently wash it with soap and water,
or simply use the drapery brush attachment on your vacuum cleaner.
warning: use caution when children or pets are around open windows and patio doors. screens are not designed to retain children or pets.
Cleaning the sillToremovedirtordebrisonthesillofthewindow,openthelowersashapproximately4"to5"anduseavacuumcleanerwiththebrush
attachment to clean off the debris.
Cleaning the interior and exterior frame and sash materialClean the surface with warm, soapy water. Stubborn stains and deposits may be removed with mineral spirits. Do not use abrasives. Do not
scrape or use tools that might damage the surface. Should you need it, touch-up paint is available at the Pella Window and Door Showroom
nearest you.
warning: do not use abrasive or caustic solvents as they may damage your windows. do not scrape or use tools that might damage the surface.
Cleaning the hardware finishA soft cloth and mild cleaner may be used on all hardware finishes for Pella® Impervia® double-hung windows.
note: oil-rubbed bronze window hardware is a living finish that will develop its own unique patina with use, care and handling.
Cleaning double-Hung windows

5.1
sliding patio doors Operation/Screens/Grilles
sl iding patio doorsoperation
thumbturn locking systemYou can find the thumbturn lock on the interior side of the flat panel behind
the door handle. to lock the door, fully close the sliding panel and turn
the thumbturn to a vertical locked position. to unlock the door, turn the
thumbturn in the opposite direction.
sCreens
Pella® Impervia® sliding screen doors are top-hung, which should provide years of easy operation because dirt and debris will not build up in the
head track like it can on bottom tracks.
to remove the screen door for storage, remove the two screen hanger
screws in the top rail of the screen with a Phillips screwdriver (1). Tilt the
top toward the interior, then lift up until the bottom guide is out of the sill-
frame track (2).
to install the screen door, insert the bottom screen guide in the sill of
the frame track. Keep the guide in the frame track, and tilt the top of the
screen up against the door panel. Align the two screen hanger screws with the holes in the screen carrier. Turn each screw approximately twice
to adjust them (1). Turn the screw clockwise to raise the screen until the pile insect strip on the exterior of the screen’s top rail touches the screen
track.Slidethescreentowithin1"ofthelocksideofthedoor.Thespacebetweenthescreenandthelocksideofthedoorshouldbeequal
from the top to the bottom of the screen. If the space is not equal, adjust the screen hanger screws.
note: do not adjust too high or too low, or the screen will not slide properly.
Check the screen operation. Ensure the screen operates and latches smoothly.
The lock on Pella Impervia sliding patio screen doors is operated manually. Slide the lever down to lock
and up to unlock.
warning: use caution when children or pets are around open windows and patio doors. screens are not designed to retain children or pets.
grilles
permanent grillesAluminum grilles-between-the-glass
The aluminum grilles-between-the-glass are permanently installed between panes of glass, so they stay clean and never need to be removed.
1 2
unlocked locked
5.2
Cleaning
Cleaning the glassTo wash the glass:
1. Use a premixed vinegar-based cleaning solution (or make your own with one part white vinegar to 10 parts water), and apply to a soft,
clean, lint-free microfiber cloth or paper towel. Or you may use an ammonia-free glass cleaner such as Windex® (clear liquid) or Sparkle®
(purple liquid). Feel free to be generous with the amount of cleaner you apply, but avoid getting any cleaning solution on the fiberglass
frames as it may discolor the finish.
2. Rub from several different directions.
3. Rinse with clear water if streaks remain after cleaning.
Caution: do not use glass cleaners that are ammonia- or alcohol-based. they may leave streaks or produce a film that attracts moisture or dust.
spot-cleaning stubborn materials on all glassTo remove any markings from grease, oil, tape adhesive, crayons or paint, or marks from plastics that may have come in contact with the glass:
1. Apply a small amount of a nonabrasive cleaner such as Bar Keepers Friend® (SerVaas Laboratories) to a clean, wet cloth — or apply a solvent
such as acetone or mineral spirits to a clean, dry, lint-free microfiber cloth or paper towel.
2. Rub on the areas of glass that need spot-cleaning. Avoid getting any cleansers or solvents on the fiberglass frames as they may discolor
the finish.
3. Wipe clean using a clean, dry, lint-free microfiber cloth or paper towel.
4. Then clean the glass as instructed above.
Caution: do not use a razor blade to scrape off stubborn materials — doing so may leave permanent marks on the glass or scratches that could cause glass breakage. Contact the pella window and door showroom nearest you for special cleaning instructions.
spot-cleaning marks on a sundefense™ dual low-e room-facing glass surfaceOccasionally, a mark may appear on the interior of Dual Low-E glass due to metal coming in contact with the surface.
Most often, this is not a scratch and can be removed using the following instructions:
1. Apply undiluted white vinegar to a soft, clean, lint-free microfiber cloth or paper towel.
2. Rub the marked area from several different directions.
3. If the mark still remains on the room-facing Low-E glass surface, apply a small amount of Bar Keepers Friend® or Cerama Bryte® Ceramic
Cooktop Cleaner to a soft, clean, lint-free microfiber cloth or paper towel. Avoid getting any cleansers or solvents on the fiberglass frame
as they may discolor the finish.
4. Rub the marked area again from several different directions until it disappears.
5. Then clean normally as instructed in the first section above “Cleaning the glass.”
NOTE: Some marks may require repeating this process.
Cleaning sliding patio doors

5.3
sliding patio doors Cleaning
Cleaning flat screensTo clean a flat fiberglass screen, use the drapery brush attachment on your vacuum cleaner.
warning: use caution when children or pets are around open windows and patio doors. screens are not designed to retain children or pets.
Cleaning the interior and exterior frame and sash materialClean the surface with warm, soapy water. Stubborn stains and deposits may be removed with mineral spirits. Do not use abrasives.
Do not scrape or use tools that might damage the surface. Should you need it, touch-up paint is available at the Pella Window and Door
Showroom nearest you.
warning: do not use abrasive or caustic solvents as they may damage your patio door. do not scrape or use tools that might damage the surface. do not power-wash.
Cleaning the hardware finishA soft cloth and mild cleaner may be used on all hardware finishes for Pella® Impervia® sliding patio doors.
Fixed windows/recommended maintenance
6.1
Fixed windowsoperation/Cleaning
Fixed windows are nonventing or nonoperable. Since the sash cannot be removed, the exterior must be cleaned from the outside.
For additional cleaning instructions, please reference previous sections.
reCommended m aintenanCeoVerView
Pella® Impervia® Windows and Patio Doors
Pella recommends you inspect your windows and doors at least annually as part of a home checkup. Recommended maintenance can prolong
the life of your Pella Impervia windows and patio doors and will help ensure maximum warranty coverage. As needed, clean your windows
and patio doors, and recaulk around the perimeter to help maintain optimal performance. Also be sure to check for leaks regularly, improper
drainage above or around vents, and sprinkler systems that may subject your windows and doors to prolonged water exposure. With
recommended care, Pella Impervia windows and patio doors and Special Shape windows can reward you with many years of beauty and
performance.
exteriorAn annual checkup can help preserve and maintain the beauty of your Pella Impervia products for years to come.
Inspect the sealant/caulking on the exterior perimeter of your windows and patio doors at least once a year. The sealant/caulking helps create
a watertight seal between the window and door frames and the exterior siding (whether it is vinyl, cedar, aluminum, brick, etc.) or stucco.
It is extremely important that the sealant/caulking remains intact and in good condition at all times. Pay particular attention to the caulking at the
lower corners of windows and under joints between windows in combinations (a grouping of individual windows). The sealant material should
not be cracked, broken or missing — or it may cause premature failure of your Pella Impervia products or other parts of your home. Deterioration
that occurs as a result of improper or insufficient maintenance is not covered by the Pella Impervia Limited Lifetime Warranty.*
Pella Impervia windows and patio doors arrive prefinished. Check the paint, and if the surface is damaged, the exposed areas must be repaired
immediately to prevent further damage. Should you need it, touch-up paint is available at the Pella Window and Door Showroom nearest
you. If you need further assistance, contact your local Pella representative. Please note that if you do paint over the factory finish, Pella’s paint
warranty is voided.
interior finishAt least once per year, inspect the interior finish of your windows and/or doors to make certain that the finish is in good condition. UV rays
from the sun can break down the finish and compromise its protective features.
Pella Impervia windows and patio doors arrive prefinished. Check the paint, and if the surface is damaged, the exposed areas must be repaired
immediately to prevent further damage. Should you need it, touch-up paint is available at the Pella Window and Door Showroom nearest
you. If you need further assistance, contact your local Pella representative. Please note that if you do paint over the factory finish, Pella’s paint
warranty is voided.
Cleaning the weatherstripTo remove any deposits — such as grease, oil or stains — that may have come in contact with the weatherstrip, apply a small amount of
concentrated fabric cleaner or carpet cleaner — such as Spray-n-Wash®, OxiClean® Fabric Cleaner or Resolve® Carpet Cleaner — to the
weatherstrip. Scrub the cleaner into the weatherstrip with a toothbrush or similar applicator. Continue applying cleaner until the deposits are no
longer visible. Rinse the weatherstrip with clean water, and dry with a paper towel.
* See written warranty for complete details on Pella Impervia products, or visit http://warranty.pella.com.

6.2
double- and single-hung windowsTo remove any deposits — such as grease, oil or stains — that may have come in contact with the weatherstrip, apply a
small amount of concentrated fabric cleaner or carpet cleaner — such as Spray-n-Wash®, OxiClean® Fabric Cleaner
or Resolve® Carpet Cleaner — to the weatherstrip. Scrub the cleaner into the weatherstrip with a toothbrush or similar applicator. Continue
applying cleaner until the deposits are no longer visible. Rinse the weatherstrip with clean water, and dry with a paper towel. do not use oily
lubricants to clean the weatherstrip; they attract dust and grime, which will eventually restrict the window’s movement.
sliding windowsUse the drapery brush attachment on your vacuum cleaner to clean the track. do not use oily lubricants to clean the track;
they attract dust and grime, which will eventually restrict the window’s movement.
sliding patio doorsFor proper operation, keep the door track free of debris. The thumbturn lock and strike and rollers on the venting panel are
adjustable to improve operation. Keep the weatherstrip clean and lubricated to enable the panel to operate smoothly.
You may want to apply a thin coat of paraffin or other dry lubricant (Teflon® Dry Lubricant or Gulf Wax®, available at most home improvement
stores, works well) to prevent sticking. do not use oily lubricants to clean the track; they attract dust and grime, which will eventually restrict the
door’s movement.
sliding screen doorsPella® screen doors are top-hung — it is important to keep the upper and lower door track free of dirt and debris. The rollers
on the top of the screen can be adjusted if necessary. (See page 5.1 for detailed instructions.) If the screen becomes dirty, you
can clean it using a vacuum cleaner with the drapery brush attachment. do not use oily lubricants to clean the track; they attract dust and grime,
which will eventually restrict the door’s movement.
salt spray environments The seacoast environment is extremely hard on all sorts of products (automobiles, recreational vehicles, building products, etc.). Any product
used in a seacoast location will require more frequent inspection and maintenance to help it last as long as possible in this harsh environment.
Windows and doors are no different from other products in this respect.
If your home is in a coastal environment and is subjected to wind-driven salt spray or salt fog, use a mild detergent soap and water to clean
the exteriors, including operating hardware, at least quarterly — and more often if necessary — to prevent salt or other abrasive materials from
building up on the exterior surfaces.
Caution: do not power-wash.
recommended maintenance
7.1
troubleshooting
troublesHootingoVerView
If you have a concern with your Pella® Impervia® product or need additional assistance from an experienced professional, consult your
Yellow Pages (under “Windows”) for the pella window and door showroom nearest you or use the store finder at pella.com.
glass breakage/damageIn the event of glass breakage, consult the Pella Window and Door Showroom nearest you for assistance. Be sure to have your Pella Unit ID
Number handy (see page 7.4). For safety reasons and to ensure optimum performance, we strongly advise you to consult a professional for
glass replacement.
U.S. federal law and most local codes require the use of tempered glass in doors and other specific applications. Tempered glass can
withstand greater impact than ordinary glass, but it is sensitive to scratches. Scratches can cause immediate or delayed breakage. If the
glass is tempered, it will break into small, rounded pieces. If tempered glass is broken, likely by law it must be reglazed or replaced with
tempered glass.
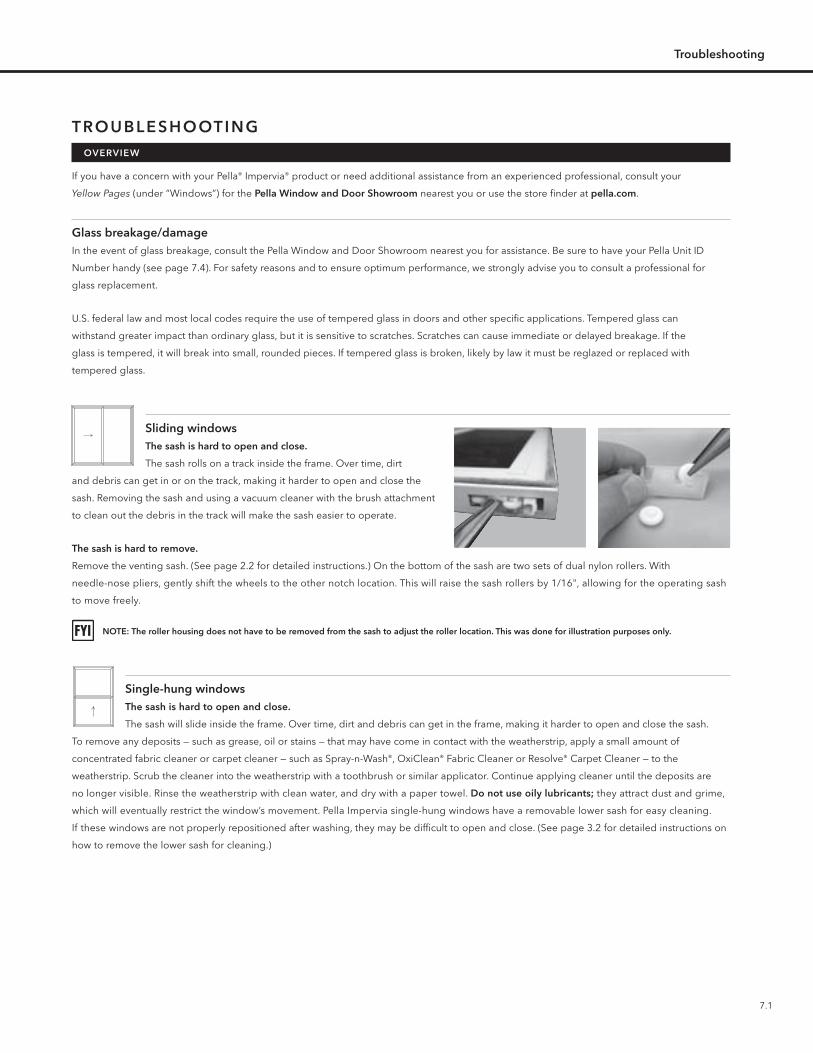
sliding windowsthe sash is hard to open and close.
The sash rolls on a track inside the frame. Over time, dirt
and debris can get in or on the track, making it harder to open and close the
sash. Removing the sash and using a vacuum cleaner with the brush attachment
to clean out the debris in the track will make the sash easier to operate.
the sash is hard to remove.
Remove the venting sash. (See page 2.2 for detailed instructions.) On the bottom of the sash are two sets of dual nylon rollers. With
needle-nosepliers,gentlyshiftthewheelstotheothernotchlocation.Thiswillraisethesashrollersby1/16",allowingfortheoperatingsash
to move freely.
note: the roller housing does not have to be removed from the sash to adjust the roller location. this was done for illustration purposes only.
single-hung windowsthe sash is hard to open and close.
The sash will slide inside the frame. Over time, dirt and debris can get in the frame, making it harder to open and close the sash.
To remove any deposits — such as grease, oil or stains — that may have come in contact with the weatherstrip, apply a small amount of
concentrated fabric cleaner or carpet cleaner — such as Spray-n-Wash®, OxiClean® Fabric Cleaner or Resolve® Carpet Cleaner — to the
weatherstrip. Scrub the cleaner into the weatherstrip with a toothbrush or similar applicator. Continue applying cleaner until the deposits are
no longer visible. Rinse the weatherstrip with clean water, and dry with a paper towel. do not use oily lubricants; they attract dust and grime,
which will eventually restrict the window’s movement. Pella Impervia single-hung windows have a removable lower sash for easy cleaning.
If these windows are not properly repositioned after washing, they may be difficult to open and close. (See page 3.2 for detailed instructions on
how to remove the lower sash for cleaning.)
7.2
troubleshooting
double-hung windowsthe sash is hard to open and close.
The sash will slide inside the frame. Over time, dirt and debris can get in the frame, making it harder to open and close the sash.
To remove any deposits — such as grease, oil or stains — that may have come in contact with the weatherstrip, apply a small amount of concentrated
fabric cleaner or carpet cleaner — such as Spray-n-Wash®, OxiClean® Fabric Cleaner or Resolve® Carpet Cleaner — to the weatherstrip. Scrub the
cleaner into the weatherstrip with a toothbrush or similar applicator. Continue applying cleaner until the deposits are no longer visible. Rinse the
weatherstrip with clean water, and dry with a paper towel. do not use oily lubricants; they attract dust and grime, which will eventually restrict
the window’s movement. Pella® Impervia® double-hung windows tilt toward the interior of the home/building for cleaning. If these windows are
not properly repositioned after washing, they may be difficult to open and close.
sliding patio doors
the door latch does not always latch.
The lock and strike are adjustable. Turn each of the four screws counterclockwise two turns. Adjust the strike up or down as
necessary, and tighten the screws. The lock latch is adjustable to the left and right.
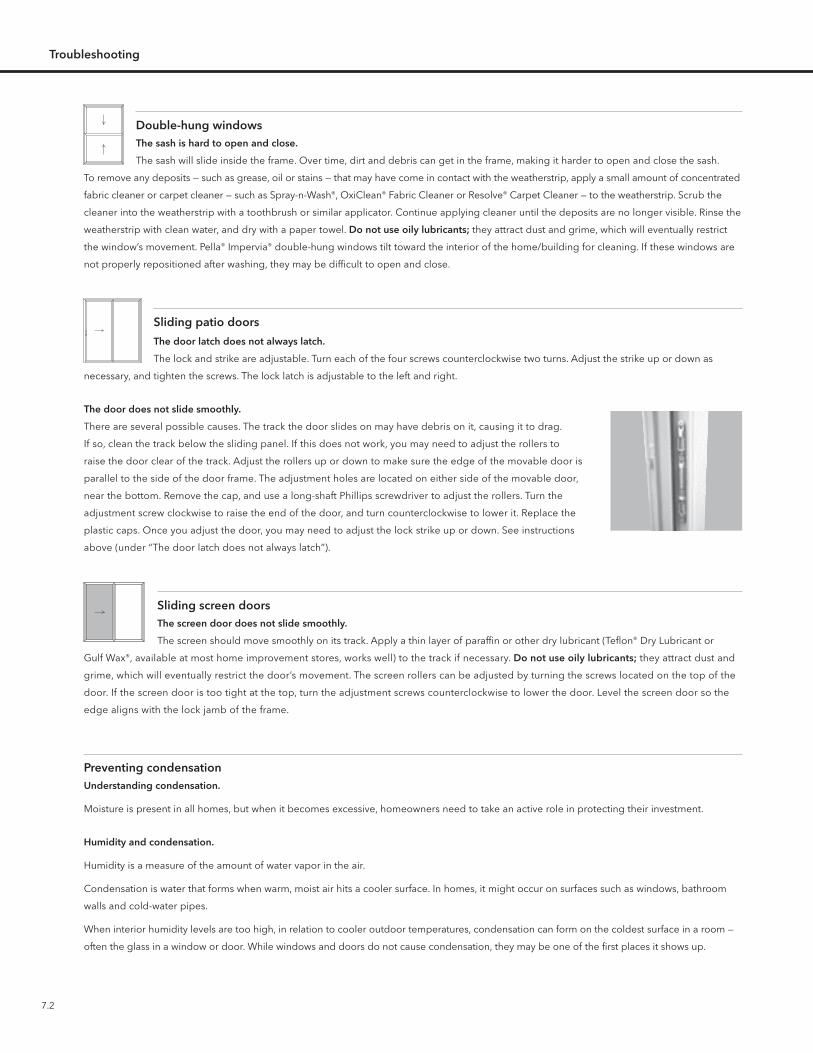
the door does not slide smoothly.
There are several possible causes. The track the door slides on may have debris on it, causing it to drag.
If so, clean the track below the sliding panel. If this does not work, you may need to adjust the rollers to
raise the door clear of the track. Adjust the rollers up or down to make sure the edge of the movable door is
parallel to the side of the door frame. The adjustment holes are located on either side of the movable door,
near the bottom. Remove the cap, and use a long-shaft Phillips screwdriver to adjust the rollers. Turn the
adjustment screw clockwise to raise the end of the door, and turn counterclockwise to lower it. Replace the
plastic caps. Once you adjust the door, you may need to adjust the lock strike up or down. See instructions
above (under “The door latch does not always latch”).
sliding screen doorsthe screen door does not slide smoothly.
The screen should move smoothly on its track. Apply a thin layer of paraffin or other dry lubricant (Teflon® Dry Lubricant or
Gulf Wax®, available at most home improvement stores, works well) to the track if necessary. do not use oily lubricants; they attract dust and
grime, which will eventually restrict the door’s movement. The screen rollers can be adjusted by turning the screws located on the top of the
door. If the screen door is too tight at the top, turn the adjustment screws counterclockwise to lower the door. Level the screen door so the
edge aligns with the lock jamb of the frame.
preventing condensationunderstanding condensation.
Moisture is present in all homes, but when it becomes excessive, homeowners need to take an active role in protecting their investment.
Humidity and condensation.
Humidity is a measure of the amount of water vapor in the air.
Condensation is water that forms when warm, moist air hits a cooler surface. In homes, it might occur on surfaces such as windows, bathroom
walls and cold-water pipes.
When interior humidity levels are too high, in relation to cooler outdoor temperatures, condensation can form on the coldest surface in a room —
often the glass in a window or door. While windows and doors do not cause condensation, they may be one of the first places it shows up.

7.3
troubleshooting
what causes condensation?
Excess humidity is typically the cause of condensation. There are many sources for moisture in a home: showers, dishwashers, clothes washers
and dryers, house plants, humans and pets, among others. In newly built homes, additional moisture may escape from building materials such
as lumber, plaster and masonry for up to three heating seasons — even with proper airflow and temperature management.
older vs. newer homes.
Condensation may be less of an issue in older homes if conditions allow for more air exchange between indoors and out, often from around
aging, loose or poorly installed windows and doors. However, the tradeoff is higher energy bills. When replacement windows are properly
installed and the airflow around the window decreases, condensation may form on the glass of the new windows.
Newer homes, on the other hand, are more airtight and energy-efficient. Many have vapor barriers — plastic within the wall cavity blocking
moisture passage in either direction. With tighter-fitting doors and windows, vapor barriers and increased insulation, energy costs are lower, but
humidity levels must be monitored more closely.
No matter when your home was built, the key is to strike the right balance when it comes to humidity levels. Air that’s too dry can cause furniture
to dry out and crack, joints and studs to shrink and twist, and paint and plaster to crack. Excessive moisture in the home can cause paint to peel
and insulation to deteriorate, and condensation on windows and doors can damage sills and trim.
measuring and controlling humidity.
To determine how much humidity is present in your home, you can purchase a humidity
gauge from a hardware store or home center. Invest in a quality unit for greater potential
accuracy in assessing humidity levels, or consult an expert. Another way to monitor
the interior humidity level is to watch your windows. When interior condensation
begins to form, wipe it off. To reduce the humidity, open windows, run exhaust fans or
dehumidifiers, or minimize sources of moisture.
The University of Minnesota Laboratories provides a chart showing recommended relative
humidity levels for the home.
exterior condensation.
Exterior condensation on windows occurs primarily in the morning when days are warm and humid, but nights are cool. Typically, it clears as
the day warms. Exterior condensation can occur at any time, especially in warm, humid climates where interior temperatures are cooler than
outdoor conditions. Exterior condensation means that windows are doing their job properly. However, if you spot excessive condensation on
the inside of your windows, check your inside humidity — it may be a signal of potential problems if not addressed.
tips for wintertime moisture management.
• Openwindowcoverings—suchasblinds,shades,drapesandcurtains—duringdaylighthourstoincreaseairflowovertheglass.
• Closelymonitorthefurnacehumidifierandanyotherhumidifyingdevices.
• Besurelouversandventsfortheattic,basementand/orcrawlspaceareopen,adequatelysizedandcross-ventilated.
• Runexhaustfansforthekitchen,bathroomandlaundryroomsforlongerperiods.
• Makesureexhaustfansventdirectlyoutside,notintoatticsorcrawlspaces.
• Besurechimneysarefreeandclear,somoistureincombustiongasescanescape.
• Followthemanufacturer’sinstructionsforventinggasappliances.Inmostcases,thatwillmeandirectingventstotheoutsideof
the home.
• Makesureyourfurnaceisinproperworkingorderandisservicedregularly.
• Storefirewoodoutsideorinthegarage—aswooddries,itgivesoffmoisture.
• Installenergy-efficientwindows,suchasthosethathaveearnedtheENERGYSTAR®.
maximum recommended Humidity levels
outside temperature inside Humidity
20º F to 40º F Not over 40%
10º F to 20º F Not over 35%
0º F to 10º F Not over 30%
-10º F to 0º F Not over 25%
-20º F to -10º F Not over 20%
-20º F or below Not over 15%
based on engineering studies at 70º F conducted at the university of minnesota laboratories.
troubleshooting
7.4
For more information on condensation in the home, consult the following:
• BuildingResearchCouncilattheSchoolofArchitecture,UniversityofIllinoisatUrbana-Champaign,http://brc.arch.uiuc.edu/f62.htm
• HomeMoistureProblems(Series1437),publishedbytheOregonStateUniversityExtensionServices,http://extension.oregonstate.edu/catalog
• TheUniversityofMinnesotaLaboratories,http://www.pella.com/maint/troubleshooting/preventing.asp?path=/maint.troubleshooting/preventing
eiFs/synthetic stuccoPella® products should not be used in barrier wall systems that do not allow for proper management of moisture within the wall systems, such
as Exterior Insulation Finish Systems (EIFS) (also known as synthetic stucco) or similar systems. Except in the states of California, New Mexico,
Arizona, Nevada, Utah and Colorado, Pella makes no warranty of any kind on and assumes no responsibility for pella impervia® windows
and patio doors installed in barrier wall systems. in the states listed above, the installation of pella products in eiFs or similar barrier
systems must be in accordance with pella’s instructions for that type of construction.
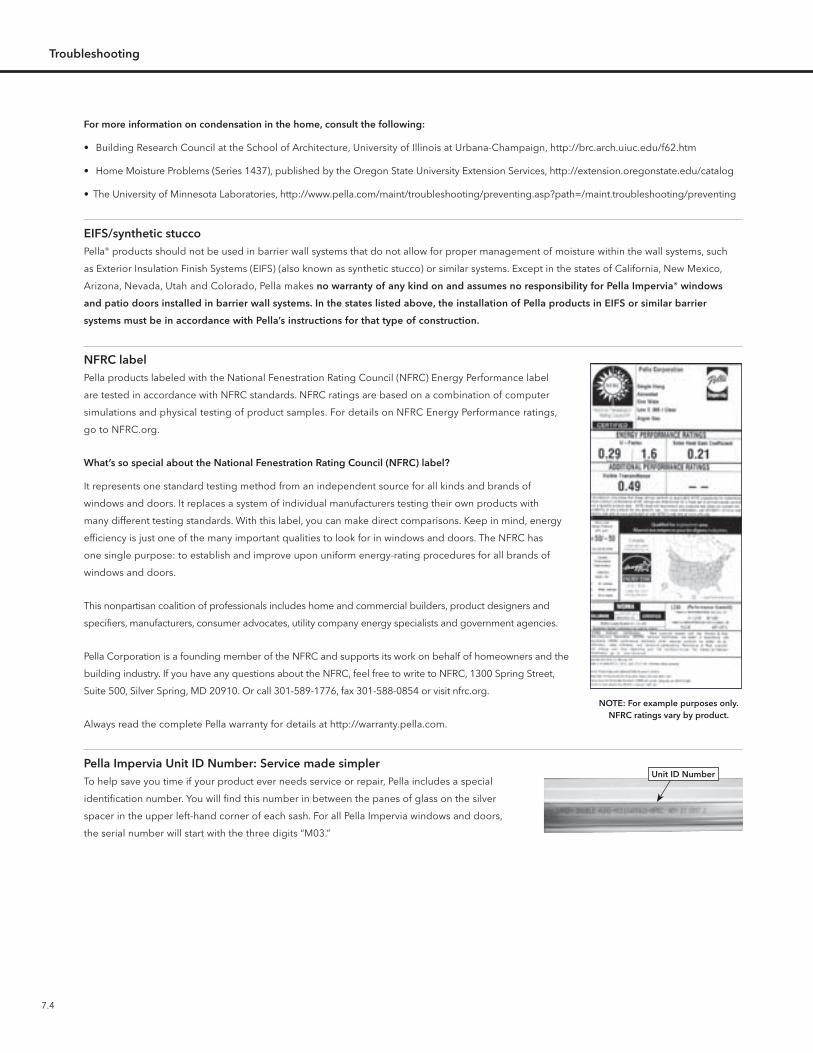
nFrC labelPella products labeled with the National Fenestration Rating Council (NFRC) Energy Performance label
are tested in accordance with NFRC standards. NFRC ratings are based on a combination of computer
simulations and physical testing of product samples. For details on NFRC Energy Performance ratings,
go to NFRC.org.
what’s so special about the national Fenestration rating Council (nFrC) label?
It represents one standard testing method from an independent source for all kinds and brands of
windows and doors. It replaces a system of individual manufacturers testing their own products with
many different testing standards. With this label, you can make direct comparisons. Keep in mind, energy
efficiency is just one of the many important qualities to look for in windows and doors. The NFRC has
one single purpose: to establish and improve upon uniform energy-rating procedures for all brands of
windows and doors.
This nonpartisan coalition of professionals includes home and commercial builders, product designers and
specifiers, manufacturers, consumer advocates, utility company energy specialists and government agencies.
Pella Corporation is a founding member of the NFRC and supports its work on behalf of homeowners and the
building industry. If you have any questions about the NFRC, feel free to write to NFRC, 1300 Spring Street,
Suite 500, Silver Spring, MD 20910. Or call 301-589-1776, fax 301-588-0854 or visit nfrc.org.
Always read the complete Pella warranty for details at http://warranty.pella.com.
pella impervia unit id number: service made simplerTo help save you time if your product ever needs service or repair, Pella includes a special
identification number. You will find this number in between the panes of glass on the silver
spacer in the upper left-hand corner of each sash. For all Pella Impervia windows and doors,
the serial number will start with the three digits “M03.”
unit id number
note: For example purposes only. nFrC ratings vary by product.


