Configuring Windows USB Virtual COM Portssupport.technologicalarts.ca/docs/USB Boards...Configuring...
2
Configuring Windows USB Virtual COM Ports The various USB interface modules made by Technological Arts are based on the popular FTDI chip, FT232RL. Usually, Windows will recognize them when you plug them into a USB port on your computer. If it doesn't, you will need to download and install the appropriate driver from the FTDI website ( www.ftdichip.com). Drivers are provided for various versions of Windows. Download and install the correct version for your computer’s configuration before proceeding. This article will assume you are using XP. Now connect a USB cable between a USB port on your PC and the USB interface module you are using. Win- dows should report a new device has been found and proceed to initialize it. To determine which virtual COMport it has been assigned to, right click the MyComputer icon on your Windows desktop, and select Properties from the popup menu. Next, click on the Hardware tab, and click on the Device Manager button. Click on the + sign next to Ports (COM & LPT). The list of avail- able ports will be revealed. You will see one entitled USB Serial Port, with the assigned COM port number identified in brackets. To work with most of the tools you are likely to use with microcontrollers, the COM port should be 1, 2, 3, or 4. If it is higher than COM4, you’ll probably want to change it. Do this by right-clicking the line USB Serial Port and select Properties from the popup menu. Click on the Port Settings tab, and then click the Advanced... Button.
Transcript of Configuring Windows USB Virtual COM Portssupport.technologicalarts.ca/docs/USB Boards...Configuring...
Configuring Windows USB Virtual COM PortsThe various USB interface modules made by Technological Arts are based on the popular FTDI chip,FT232RL. Usually, Windows will recognize them when you plug them into a USB port on your computer. If itdoesn't, you will need to download and install the appropriate driver from the FTDI website(www.ftdichip.com). Drivers are provided for various versions of Windows. Download and install the correctversion for your computer’s configuration before proceeding. This article will assume you are using XP.
Now connect a USB cable between a USB port on your PC and the USB interface module you are using. Win-dows should report a new device has been found and proceed to initialize it.
To determine which virtual COMport it has been assigned to, rightclick the MyComputer icon on your Windows desktop, and selectProperties from the popup menu. Next, click on the Hardware tab,and click on the Device Manager button.
Click on the + sign next to Ports(COM & LPT). The list of avail-able ports will be revealed. Youwill see one entitled USB SerialPort, with the assigned COM portnumber identified in brackets.
To work with most of the tools you are likely to use with microcontrollers, the COM port should be 1, 2, 3, or 4.If it is higher than COM4, you’ll probably want to change it. Do this by right-clicking the line USB Serial Portand select Properties from the popup menu.
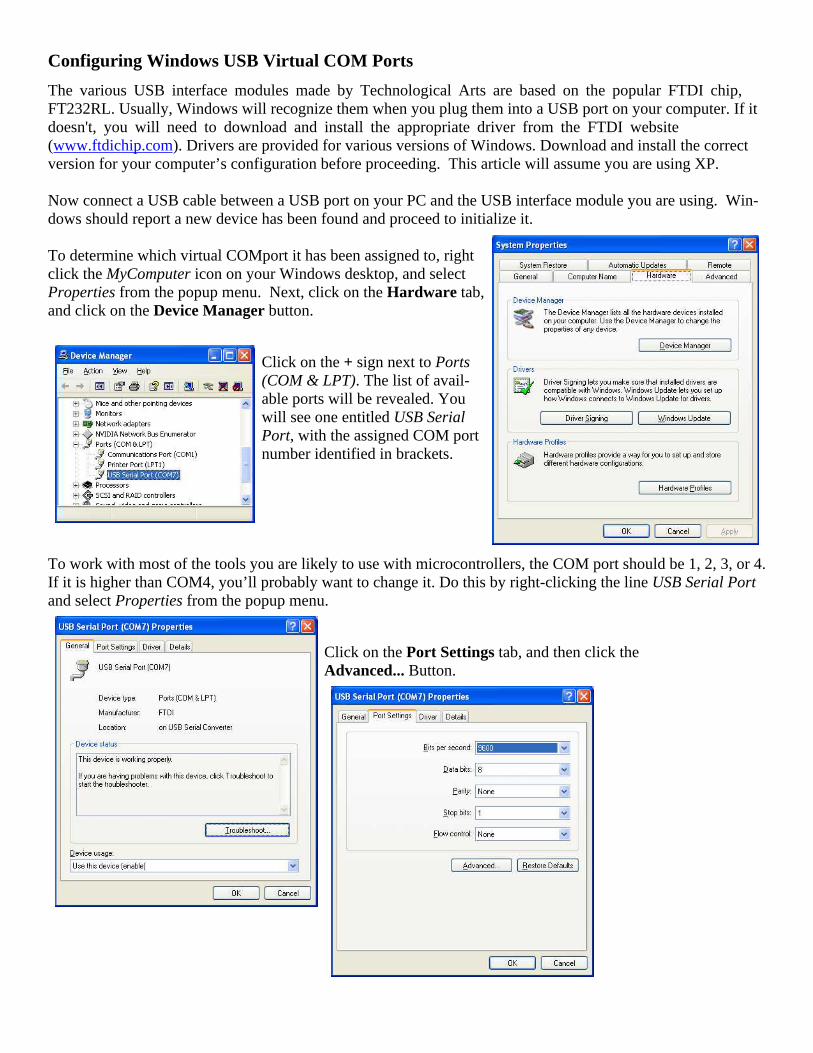
Click on the Port Settings tab, and then click theAdvanced... Button.

Select the COM port Number dropdown box and select a COM port number 2, 3, or 4 (usually COM1 is alreadyin use).
The port number may be reported as in use but you can disregard that at this point, if you know that nothing iscurrently using it.
Click OK, and if Windows warns you about a duplicate, ignore the warning and click Yes. Click OK and thenOK to the port settings. Then close the Device Manager window. If you want to confirm the port change hasindeed been made, click on Device Manager again and check the listed Ports. Now close the System Proper-ties window.
At this point, you are ready to use the virtual COM port in any application!
Note that, if you unplug the USB device and plug it back in later, Windows will still remember the COM portassignment, so you won't need to go through this procedure again.
Rev. 0www.TechnologicalArts.com