Configuring Cisco Unity Express 8.6 Using the GUIConfiguring Cisco Unity Express 8.6 Using the GUI...
238
Cisco Systems, Inc. www.cisco.com Cisco has more than 200 offices worldwide. Addresses, phone numbers, and fax numbers are listed on the Cisco website at www.cisco.com/go/offices. Configuring Cisco Unity Express 8.6 Using the GUI First Published: June 20, 2011 Last Updated: November 11, 2013 Text Part Number: OL-24779-02
Transcript of Configuring Cisco Unity Express 8.6 Using the GUIConfiguring Cisco Unity Express 8.6 Using the GUI...

Configuring Cisco Unity Express 8.6 Using the GUIFirst Published: June 20, 2011 Last Updated: November 11, 2013
Cisco Systems, Inc. www.cisco.com
Cisco has more than 200 offices worldwide. Addresses, phone numbers, and fax numbers are listed on the Cisco website at www.cisco.com/go/offices.
Text Part Number: OL-24779-02

THE SPECIFICATIONS AND INFORMATION REGARDING THE PRODUCTS IN THIS MANUAL ARE SUBJECT TO CHANGE WITHOUT NOTICE. ALL STATEMENTS, INFORMATION, AND RECOMMENDATIONS IN THIS MANUAL ARE BELIEVED TO BE ACCURATE BUT ARE PRESENTED WITHOUT WARRANTY OF ANY KIND, EXPRESS OR IMPLIED. USERS MUST TAKE FULL RESPONSIBILITY FOR THEIR APPLICATION OF ANY PRODUCTS.
THE SOFTWARE LICENSE AND LIMITED WARRANTY FOR THE ACCOMPANYING PRODUCT ARE SET FORTH IN THE INFORMATION PACKET THAT SHIPPED WITH THE PRODUCT AND ARE INCORPORATED HEREIN BY THIS REFERENCE. IF YOU ARE UNABLE TO LOCATE THE SOFTWARE LICENSE OR LIMITED WARRANTY, CONTACT YOUR CISCO REPRESENTATIVE FOR A COPY.
The Cisco implementation of TCP header compression is an adaptation of a program developed by the University of California, Berkeley (UCB) as part of UCB’s public domain version of the UNIX operating system. All rights reserved. Copyright © 1981, Regents of the University of California.
NOTWITHSTANDING ANY OTHER WARRANTY HEREIN, ALL DOCUMENT FILES AND SOFTWARE OF THESE SUPPLIERS ARE PROVIDED “AS IS” WITH ALL FAULTS. CISCO AND THE ABOVE-NAMED SUPPLIERS DISCLAIM ALL WARRANTIES, EXPRESSED OR IMPLIED, INCLUDING, WITHOUT LIMITATION, THOSE OF MERCHANTABILITY, FITNESS FOR A PARTICULAR PURPOSE AND NONINFRINGEMENT OR ARISING FROM A COURSE OF DEALING, USAGE, OR TRADE PRACTICE.
IN NO EVENT SHALL CISCO OR ITS SUPPLIERS BE LIABLE FOR ANY INDIRECT, SPECIAL, CONSEQUENTIAL, OR INCIDENTAL DAMAGES, INCLUDING, WITHOUT LIMITATION, LOST PROFITS OR LOSS OR DAMAGE TO DATA ARISING OUT OF THE USE OR INABILITY TO USE THIS MANUAL, EVEN IF CISCO OR ITS SUPPLIERS HAVE BEEN ADVISED OF THE POSSIBILITY OF SUCH DAMAGES.
DISCLAIMER: The use of monitoring, recording, or listening devices to eavesdrop, monitor, retrieve, or record phone conversations or other sound activities, whether or not contemporaneous with transmission, may be illegal in certain circumstances under federal, state and/or local laws. Legal advice should be sought prior to implementing any practice that monitors or records any phone conversation. Some laws require some form of notification to all parties to a phone conversation, such as by using a beep tone or other notification method or requiring the consent of all parties to the phone conversation, prior to monitoring or recording the phone conversation. Some of these laws incorporate strict penalties. In cases where local laws require a periodic beep while a conversation is being recorded, the Cisco Unity Express voice-mail system provides a user with the option of activating "the beep." Prior to activating the Cisco Unity Express live record function, check the laws of all applicable jurisdictions. This is not legal advice and should not take the place of obtaining legal advice from a lawyer. IN ADDITION TO THE GENERAL DISCLAIMER THAT ACCOMPANIES THIS CISCO UNITY EXPRESS PRODUCT, CISCO ADDITIONALLY DISCLAIMS ANY AND ALL LIABILITY, BOTH CIVIL AND CRIMINAL, AND ASSUMES NO RESPONSIBILITY FOR THE UNAUTHORIZED AND/OR ILLEGAL USE OF THIS CISCO UNITY EXPRESS PRODUCT. THIS DISCLAIMER OF LIABILITY INCLUDES, BUT IS NOT NECESSARILY LIMITED TO, THE UNAUTHORIZED AND/OR ILLEGAL RECORDING AND MONITORING OF TELEPHONE CONVERSATIONS IN VIOLATION OF APPLICABLE FEDERAL, STATE AND/OR LOCAL LAWS.
Cisco and the Cisco logo are trademarks or registered trademarks of Cisco and/or its affiliates in the U.S. and other countries. To view a list of Cisco trademarks, go to this URL: www.cisco.com/go/trademarks. Third-party trademarks mentioned are the property of their respective owners. The use of the word partner does not imply a partnership relationship between Cisco and any other company. (1110R)
Any Internet Protocol (IP) addresses used in this document are not intended to be actual addresses. Any examples, command display output, and figures included in the document are shown for illustrative purposes only. Any use of actual IP addresses in illustrative content is unintentional and coincidental.
Configuring Cisco Unity Express 8.6 Using the GUI © 2007-2013 Cisco Systems, Inc. All rights reserved.

OL-24779-02
C O N T E N T S
Welcome to Cisco Unity Express 9
Changing Your Password 11
Configure Tab >
Starting the Initialization Wizard for Cisco Unified Communications Manager (CUCM) 15
Call Agent Integration 15
Current Settings 16
Overview 16
Cisco Unified Communications Manager Login 17
Importing Cisco Unified Communications Manager Users 17
Configuring System Defaults 18
Configuring Call Handling 18
Committing Your Information 19
Viewing the Status 20
Starting the Initialization Wizard for Cisco Unified Communications Manager Express (CUCME) 21
Call Agent Integration 21
Current Settings 22
Overview 22
Cisco Unified Communications Manager Express Login 23
Importing Cisco Unified Communications Manager Express Users 24
Configuring System Defaults 25
Configuring Call Handling 25
Committing Your Information 26
Related Topics 26
Viewing the Status 26
Configuring Users for Cisco Unified Communications Manager (CUCM) 29
Viewing a List of Users 29
Adding a New User 30
1Configuring Cisco Unity Express 8.6 Using the GUI

Contents
Importing a User from CUCM 30
Displaying or Modifying a User Profile 31
Displaying or Modifying Group Subscriptions 32
Finding a User 32
Deleting a User 33
Configuring Users for Cisco Unified Communications Manager Express (CUCME) 35
Viewing a List of Users 35
Adding a New User 36
Selecting a Phone for a User 37
Selecting an Extension for a User 37
Displaying or Modifying a User Profile 38
Displaying or Modifying Group Subscriptions 39
Finding a User 39
Deleting a User 40
Configuring Groups 41
Viewing a List of Groups 41
Adding a New User Group 42
Subscribing Members to a Group 43
Subscribing Owners to a Group 44
Unsubscribing Members and Owners from a Group 44
Displaying or Modifying Group Parameters 45
Viewing Owners and Members of a Group 45
Viewing Group Membership in Another Group 45
Modifying Group Ownership and Membership in Other Groups 46
Deleting a Group 46
Finding a Group 47
Setting User Defaults 49
Configuring Password and PIN Options 49
Configuring Account Lockout Policy 50
Configuring Supervisors 51
Viewing a List of Supervisors 51
Adding Supervisors 51
Editing Supervisors 52
2Configuring Cisco Unity Express 8.6 Using the GUI
OL-24779-02

Contents
Configuring Privileges 53
Overview 53
Creating a New Privilege 58
Customizing an Existing Privilege 58
Deleting a Privilege 59
Configuring Authentication, Authorization, and Accounting 61
Configuring the AAA Authentication Server 61
About the Authentication Order 61
About Authentication Failover 62
About Unreachable Failover 62
Example of Authentication Sequence 62
Configuring Connection Parameters for the AAA Authentication Server 63
Specifying the Policy that Controls the Behavior of Authentication and Authorization 63
Configuring the AAA Accounting Server 64
Overview 64
AAA Accounting Event Logging 64
Configuring the AAA Accounting Server 65
Configuring Accounting Event Logging 65
Configuring Network Locations 67
Viewing a List of Network Locations 67
Adding a Network Location 68
Displaying or Modifying a Network Location 69
Deleting a Network Location 71
Configuring Remote Users 73
Viewing a List of Remote Users 73
Adding a New Remote User 74
Displaying or Modifying a Remote User 74
Deleting a Remote User 75
Configuring the Cisco Unified Communications Manager System 77
Configuring the Cisco Unified Communications Manager Express System 79
Viewing Cisco Unified Communications Manager Express Settings 79
Adding a Site Name 80
Editing a Site 80
Deleting a Site 81
3Configuring Cisco Unity Express 8.6 Using the GUI
OL-24779-02

Contents
Entering the SIP Provider Hostname 81
Configuring Voice-Mail Prompts 83
Viewing a List of Prompts 83
Displaying or Modifying a Prompt 84
Uploading a Prompt 84
Downloading a Prompt 84
Deleting a Prompt 85
Changing Prompt Languages 85
System Tab >
Configuring System Scripts Using Editor Express 89
Viewing a List of Scripts 89
Creating a New Script with Editor Express 90
Uploading Scripts 93
Editing Scripts 94
Deleting Scripts 94
Downloading Scripts 94
Configuring Business Hours Settings 95
Displaying or Modifying a Business Hours Schedule 95
Adding a Business Hours Schedule 95
Copying Business Hour Days 96
Deleting a Business Hours Schedule 96
Configuring Holiday Settings 97
Viewing a List of Holidays 97
Adding a Holiday 97
Displaying or Modifying a Holiday 98
Deleting a Holiday 99
Configuring Call-In Numbers 101
Viewing a List of Call-in Numbers 101
Displaying or Modifying Call-in Numbers 102
Adding a Call-in Number 102
Using Wildcard Trigger Patterns 103
4Configuring Cisco Unity Express 8.6 Using the GUI
OL-24779-02

Contents
Configuring CTI Ports for Cisco Unified Communications Manager 105
Configuring Language Settings 107
Configuring Fax Settings 109
Configuring Domain Name Settings 111
Changing a DNS Server 111
Adding a DNS Server 112
Deleting a DNS Server 112
Configuring the System Login Banner 113
Configuring Network Time and Time Zone Settings 115
Configuring Restriction Tables 117
Configuring Restriction Table Parameters 117
Adding a New Restriction Table 117
Adding Call Patterns to a Restriction Table 118
Editing Restriction Table Entries 118
Deleting Restriction Table Entries 119
Deleting Restriction Tables 119
Configuring SMTP 121
Importing SMTP Settings 121
Configuring the SMTP Server 121
Testing the SMTP Connection 122
Voice Mail Tab >
Configuring Mailboxes 125
Viewing a List of Mailboxes 125
Adding a New Mailbox 126
Displaying or Modifying a Mailbox 127
General Tab 127
Greetings Tab 128
Caller Input Tab 129
Unlocking a Mailbox 130
Deleting a Mailbox 131
Finding a Mailbox 131
5Configuring Cisco Unity Express 8.6 Using the GUI
OL-24779-02

Contents
Configuring Distribution Lists 133
Viewing a List of Public Distribution Lists 133
Adding a Public Distribution List 134
Adding Members to a Distribution List 134
Adding a Non Subscriber to a Distribution List 135
Deleting Members of a Distribution List 136
Adding Owners to a Public Distribution List 136
Deleting Owners of a Public Distribution List 137
Displaying or Modifying a Public Distribution List 138
Deleting a Public Distribution List 138
Viewing a List of Private Distribution Lists 138
Adding a Private Distribution List 139
Displaying or Modifying a Private Distribution List 139
Deleting a Private Distribution List 140
Viewing a List of Other Users' Private Distribution Lists 140
Viewing Other Users' Private List Profiles 140
Voice Mail Message Waiting Indicators for Cisco Unified Communications Manager (CUCM) 143
Refreshing the Message Waiting Indicator 143
Modifying Message Waiting Indicator Settings 143
MWI Configuration Examples 144
Voice Mail Message Waiting Indicators for Cisco Unified Communications Manager Express (CUCME) 145
Refreshing the Message Waiting Indicator 145
Modifying Message Waiting Indicator Settings 146
MWI Configuration Examples 146
Configuring a Voice Mail Auto Attendant 149
Adding an Auto Attendant 149
Configuring Auto-Attendant Script Parameters 150
Selecting an Auto Attendant 152
Uploading Scripts 152
Configuring Auto-Attendant Call Handling 152
Viewing a List of Auto Attendants 153
Editing an Auto Attendant 153
Deleting an Auto Attendant 154
6Configuring Cisco Unity Express 8.6 Using the GUI
OL-24779-02

Contents
Setting Voice Mailbox Defaults 155
Configuring Voice Mail 157
Configuring Voice-Mail Call-Handling Parameters 161
Configuring Message Notification 163
Notification Administration 163
Enabling Subscriber Notification 164
Configuring Notification Devices 164
Setting Up the Notification Schedule 165
Configuring My Notification Devices 167
Configuring Integrated Messaging (IMAP) 169
Configuring VoiceView Express 171
Configuring the VoiceView Express Service 171
Terminating VoiceView Express Sessions 171
IVR Tab >
Configuring IVR 175
Configuring IVR Applications 175
Configuring HTTP Triggers 177
Configuring VoiceXML Applications 179
Configuring the Enterprise Database Subsystem 180
Configuring the IVR E-Mail Subsystem 181
Managing IVR Documents 181
Administration Tab >
Synchronizing Cisco Unified Communications Manager Express with Cisco Unity Express 187
Configuring Backup and Restore 189
Configuring the Backup Server 190
Viewing Scheduled Backups 190
Adding a Scheduled Backup 191
Configuring Backup Schedule Notification 192
Modifying a Scheduled Backup 193
Manually Starting a Backup 193
Disabling a Scheduled Backup 194
7Configuring Cisco Unity Express 8.6 Using the GUI
OL-24779-02
Contents
Starting a Restore 194
Using the Administration Control Panel for Cisco Unified Communications Manager (CUCM) 197
Switching the Call Agent to Cisco Unified Communications Manager Express 197
Saving or Reloading Cisco Unity Express 198
Using the Administration Control Panel for Cisco Unified Communications Manager Express (CUCME) 199
Saving Cisco Unified Communications Manager Express 199
Creating Cisco Unified CME Configuration Files 199
Switching the Call Agent to Cisco Unified Communications Manager 200
Saving or Reloading Cisco Unity Express 200
Displaying Cisco Unity Express License Information 203
Configuring Trace Settings 205
Reports Tab >
Configuring Historical Reporting 209
Configuring Historical Reporting 209
Configuring Purge Settings 209
Reports 211
Viewing Voice-Mail Reports 211
Viewing Mailboxes 213
Viewing the Backup History Report 213
Viewing the Restore History Report 213
Viewing the Network Time Protocol Report 214
Real Time Reporting 214
Help 215
About Help 215
Viewing System Reports 216 1
Index
8Configuring Cisco Unity Express 8.6 Using the GUI
OL-24779-02

Welcome to Cisco Unity Express
Welcome to the online help pages for Cisco Unity Express. To search for help topics in this file, choose Search in the menu at the top of this page. For information on using help, choose Using Help.
For more information about Cisco Unity Express, see the Cisco Unity Express software and related documentation at the following URL:
http://www.cisco.com/en/US/products/sw/voicesw/ps5520/tsd_products_support_series_home.html
Note The online help pages describe both user and administrator features of Cisco Unity Express. If you are a user, the GUI displays only a subset of all of the features and parameters described in the online help.
Tip When you use Cisco Unity Express, you can use the Back and Forward buttons on your browser to view information in another window, but if you make changes in that window and submit your changes, you will receive an error and your changes will not be saved. Do not submit information after using your browser's navigation tools to move to another window. Click the appropriate button or menu to reach the window in which you want to enter information.
9Configuring Cisco Unity Express 8.6 Using the GUI
OL-24779-02

Welcome to Cisco Unity Express
10Configuring Cisco Unity Express 8.6 Using the GUI
OL-24779-02

Changing Your Password
Guidelines
• Passwords should be at least 3 and no more than 32 alphanumeric characters in length.
• Use a mixture of uppercase and lowercase letters and numbers.
• Spaces are not allowed.
Changing an Expired Password
To change your password if you have reached the Expired Password prompt:
Step 1 Enter your old password. If it was not set by the system administrator, leave this field blank.
Step 2 Enter your new password.
Step 3 Enter your new password again for verification and click Apply.
Additional Changing Password Procedures
Change your password by performing the following tasks:
Step 1 Choose Configure > Users.
Step 2 Click your name in the list of users.
Step 3 Ensure that Password specified below is selected in the Password options field.
Step 4 Enter your new password.
Step 5 Enter your new password again for verification and click Apply.
11Configuring Cisco Unity Express 8.6 Using the GUI
OL-24779-02

Changing Your Password
12Configuring Cisco Unity Express 8.6 Using the GUI
OL-24779-02
P A R T 1
Configure Tab


Starting the Initialization Wizard for Cisco Unified Communications Manager (CUCM)
This window appears the first time you log in to the system after installing the Cisco Unity Express software. Perform the following tasks:
• Call Agent Integration—Use this option to change the call agent from Cisco Unified Communications Manager (CUCM) to Cisco Unified Communications Manager Express (CUCME).
• View Current Settings—Use this option to display several system parameters that were defined when the Cisco Unified Communications Manager software was installed. Also displays the default Cisco Unity Express settings.
• Run the Initialization Wizard. See Overview.
Note You cannot run the Initialization Wizard after choosing the following option.
• Skip Initialization Wizard and Log off—Use this option only if you are using the Cisco Unity Express command-line interface to configure the system parameters.
• Log Off (Run Initialization Wizard Later)
Call Agent IntegrationThis pull-down menu enables you to change the call agent. For example, you can change the call agent from Cisco Unified Communications Manager (CUCM) to Cisco Unified Communications Manager Express (CUCME).
Note Use this option with caution. Changing the call agent will permanently delete all non-local site related configuration and reboot the system automatically.
Step 1 Select the call agent from the pull-down menu.
You will receive a warning notifying you that changing the call agent will permanently delete all non-local site related configuration and reboot the system automatically.
15Configuring Cisco Unity Express 8.6 Using the GUI
OL-24779-02

Starting the Initialization Wizard for Cisco Unified Communications Manager (CUCM) Current Settings
Step 2 Click Ok to continue or Cancel to cancel the operation.
The system reloads. Once the system reload is complete, you will receive a notice that the system is not initialized, and that only Administrator logins are allowed.
Step 3 Log in to the administrative interface using your User Name and Password.
Current SettingsThis window displays current system settings that were configured when the Cisco Unified Communications Manager application was installed. It also displays the Cisco Unity Express settings configured at the time of installation. You cannot change the system settings from this window. Run the Initialization Wizard to change the values. See the Glossary for explanations of the fields shown in this window.
• Language
• Mailbox Size
• Maximum Caller Message Size
• Message Expiry Time
• Voice Mail Number (CUCM)
• Voice Mail Number (SRST)
• Auto Attendant Access Number (CUCM)
• Auto Attendant Access Number (SRST)
• Voice Mail Operator Extension
• Auto Attendant Operator Extension
• Administration via Telephone Call-in number (CUCM)
• Administration via Telephone Call-in number (SRST)
• SIP MWI Notification Mechanism
OverviewWhen logging in to the system for the first time, use the Initialization Wizard to configure your system. The Initialization Wizard is a software tool that has a series of windows that help you configure Cisco Unity Express. The wizard starts automatically the first time you log in to the graphical user interface (GUI).
Some of the information shown on the wizard windows comes from system parameters that were configured during the installation of the Cisco Unified Communications Manager system and the Cisco Unity Express software.
16Configuring Cisco Unity Express 8.6 Using the GUI
OL-24779-02
Starting the Initialization Wizard for Cisco Unified Communications Manager (CUCM)Cisco Unified Communications Manager Login
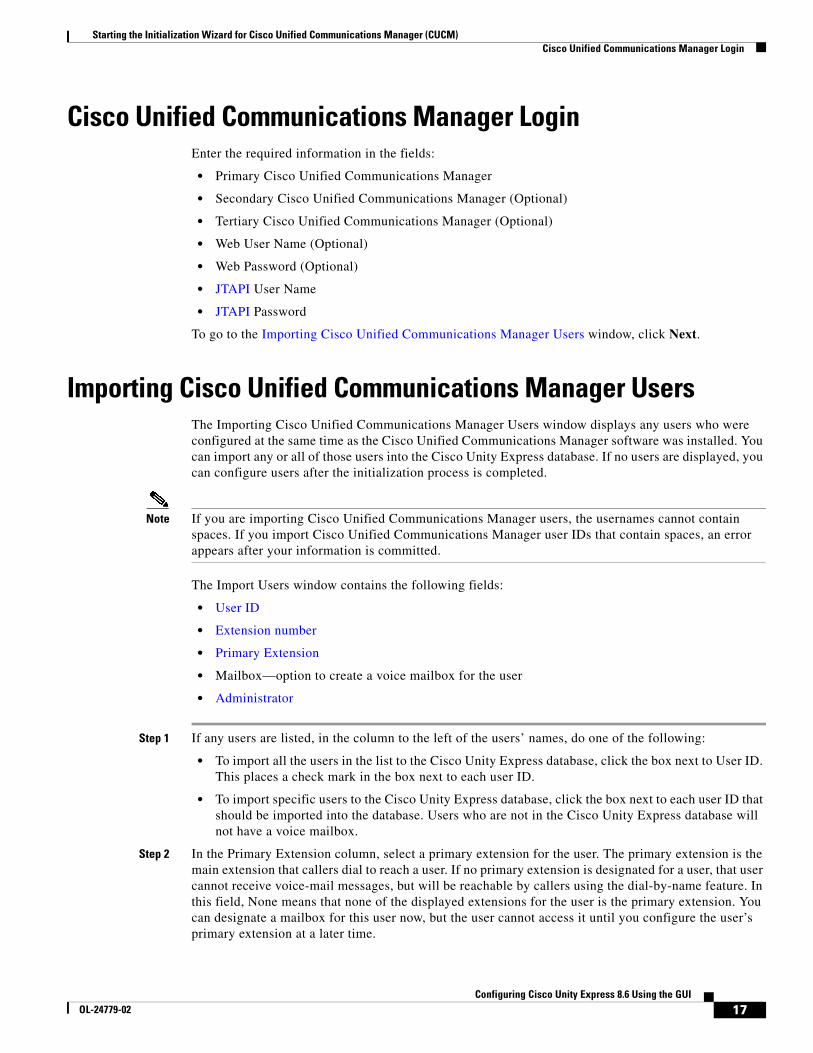
Cisco Unified Communications Manager LoginEnter the required information in the fields:
• Primary Cisco Unified Communications Manager
• Secondary Cisco Unified Communications Manager (Optional)
• Tertiary Cisco Unified Communications Manager (Optional)
• Web User Name (Optional)
• Web Password (Optional)
• JTAPI User Name
• JTAPI Password
To go to the Importing Cisco Unified Communications Manager Users window, click Next.
Importing Cisco Unified Communications Manager UsersThe Importing Cisco Unified Communications Manager Users window displays any users who were configured at the same time as the Cisco Unified Communications Manager software was installed. You can import any or all of those users into the Cisco Unity Express database. If no users are displayed, you can configure users after the initialization process is completed.
Note If you are importing Cisco Unified Communications Manager users, the usernames cannot contain spaces. If you import Cisco Unified Communications Manager user IDs that contain spaces, an error appears after your information is committed.
The Import Users window contains the following fields:
• User ID
• Extension number
• Primary Extension
• Mailbox—option to create a voice mailbox for the user
• Administrator
Step 1 If any users are listed, in the column to the left of the users’ names, do one of the following:
• To import all the users in the list to the Cisco Unity Express database, click the box next to User ID. This places a check mark in the box next to each user ID.
• To import specific users to the Cisco Unity Express database, click the box next to each user ID that should be imported into the database. Users who are not in the Cisco Unity Express database will not have a voice mailbox.
Step 2 In the Primary Extension column, select a primary extension for the user. The primary extension is the main extension that callers dial to reach a user. If no primary extension is designated for a user, that user cannot receive voice-mail messages, but will be reachable by callers using the dial-by-name feature. In this field, None means that none of the displayed extensions for the user is the primary extension. You can designate a mailbox for this user now, but the user cannot access it until you configure the user’s primary extension at a later time.
17Configuring Cisco Unity Express 8.6 Using the GUI
OL-24779-02

Starting the Initialization Wizard for Cisco Unified Communications Manager (CUCM) Configuring System Defaults
Step 3 In the Mailbox column, do one of the following:
• To create a mailbox for all users, click the box next to Mailbox. This places a check mark in each user’s box in the column. Cisco Unity Express creates the mailbox when the initialization process is complete.
Note Clicking this box creates a mailbox for all users displayed in the list. If you selected specific users in Step 2, do not click this box.
• To create a mailbox for specific users, click the box in the Mailbox column for each user who should have a mailbox.
Step 4 In the Administrator column, do one of the following:
• To assign administrative privileges to all users, click the box next to Administrator. Note: If you selected specific users in Step 2, do not click this box.
• To assign administrative privileges to specific users, click the box in the Administrator column for each user who should have this permission.
Step 5 To go to the Configuring System Defaults window, click Next.
Configuring System DefaultsUse this procedure to configure system defaults when running the Initialization Wizard. The values shown in this window are Cisco Unity Express default values. These values affect all users and mailboxes in the voice-mail system. To change values for individual users, see Configuring Users for Cisco Unified Communications Manager (CUCM).
The Defaults window displays following fields. If necessary, enter new values into the fields.
• System default Language
• Password and PIN Options:
– Password options
– Personal identification number (PIN)
• Mailbox Defaults:
– Mailbox Size
– Maximum Caller Message Size
– Message Expiry Time
To go to the Configuring Call Handling window, click Next.
Configuring Call HandlingUse this procedure to configure call handling when running the Initialization Wizard. You can change these values later by Configuring Voice-Mail Call-Handling Parameters.
18Configuring Cisco Unity Express 8.6 Using the GUI
OL-24779-02

Starting the Initialization Wizard for Cisco Unified Communications Manager (CUCM)Committing Your Information
Tip The Voice Mail number, Auto Attendant number, and Greeting Management number fields should not contain the same telephone number. However, the operator extensions can be the same for these systems.
The Voice Mail Call Handling window displays the following fields. If necessary, enter the Call in Numbers for Voice Mail, Auto Attendant and the Administration via telephone (AVT) system.
• Voice Mail Phone Number
• Voice-Mail Operator extension
• Auto attendant access number
• Auto attendant operator extension
• Administration via Telephone (AvT) number
• SIP MWI notification mechanism
To go to the Committing Your Information window, click Next.
Committing Your InformationThe Commit window displays the values that you set up using the Initialization Wizard. Use the scroll bar to view additional parameters. At this point, none of these values has been saved to the Cisco Unity Express database.
Procedure
Step 1 If any value is not correct, click Back to return to the appropriate screen and change the value.
Step 2 If you want to save these values as the default startup system configuration, click the box to the left of “Finally, save to startup configuration....”.
Step 3 If all the values are correct, click Finish to save the values and complete the initialization. The status window appears (see Viewing the Status). The default values are stored in the Cisco Unity Express database, and users designated as administrators are added to the Administrator group.
Note If you are importing Cisco Unified Communications Manager users, the usernames cannot contain spaces. If you import Cisco Unified Communications Manager user IDs that contain spaces, an error appears after your information has been committed.
You can change default parameters later. See the related topics.
Related Topics
• Configuring Domain Name Settings
• Adding a New User
• Adding a New Mailbox
19Configuring Cisco Unity Express 8.6 Using the GUI
OL-24779-02
Starting the Initialization Wizard for Cisco Unified Communications Manager (CUCM) Viewing the Status
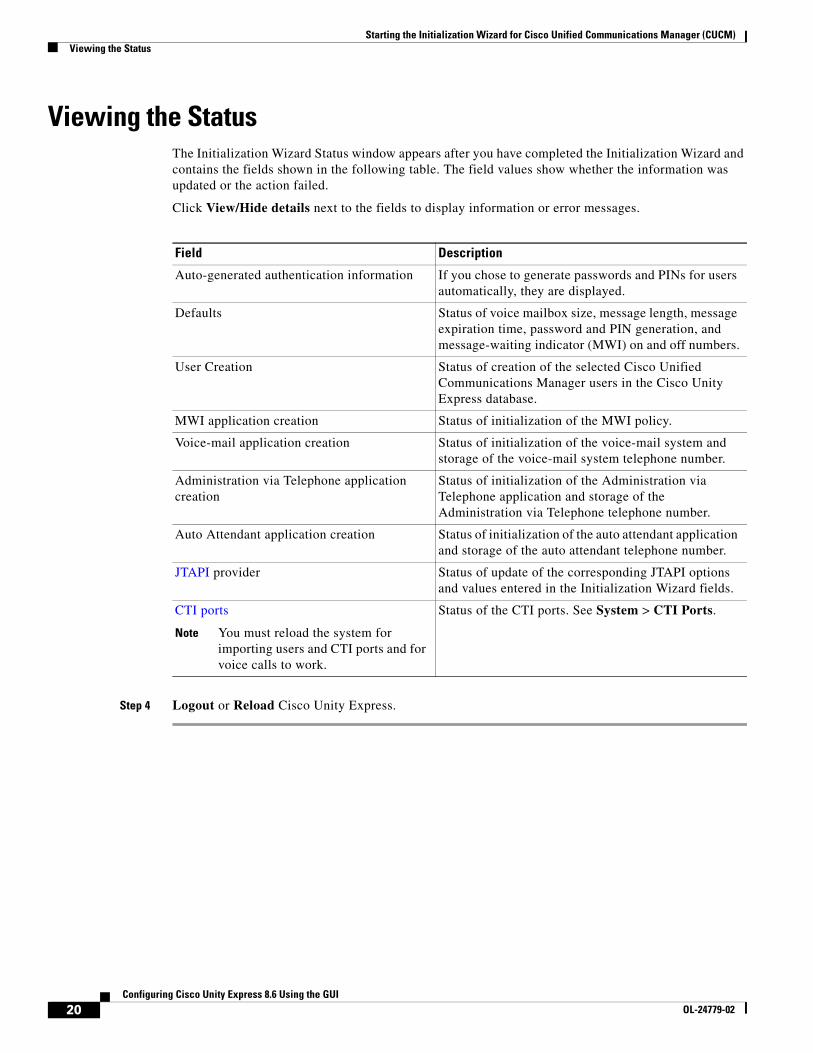
Viewing the StatusThe Initialization Wizard Status window appears after you have completed the Initialization Wizard and contains the fields shown in the following table. The field values show whether the information was updated or the action failed.
Click View/Hide details next to the fields to display information or error messages.
Field Description
Auto-generated authentication information If you chose to generate passwords and PINs for users automatically, they are displayed.
Defaults Status of voice mailbox size, message length, message expiration time, password and PIN generation, and message-waiting indicator (MWI) on and off numbers.
User Creation Status of creation of the selected Cisco Unified Communications Manager users in the Cisco Unity Express database.
MWI application creation Status of initialization of the MWI policy.
Voice-mail application creation Status of initialization of the voice-mail system and storage of the voice-mail system telephone number.
Administration via Telephone application creation
Status of initialization of the Administration via Telephone application and storage of the Administration via Telephone telephone number.
Auto Attendant application creation Status of initialization of the auto attendant application and storage of the auto attendant telephone number.
JTAPI provider Status of update of the corresponding JTAPI options and values entered in the Initialization Wizard fields.
CTI ports
Note You must reload the system for importing users and CTI ports and for voice calls to work.
Status of the CTI ports. See System > CTI Ports.
Step 4 Logout or Reload Cisco Unity Express.
20Configuring Cisco Unity Express 8.6 Using the GUI
OL-24779-02

Starting the Initialization Wizard for Cisco Unified Communications Manager Express (CUCME)
This window appears the first time you log in to the system after installing the Cisco Unity Express software. Perform the following tasks:
• Call Agent Integration—Use this option to change the call agent from Cisco Unified Communications Manager Express (CUCME) to Cisco Unified Communications Manager (CUCM).
• View Current Settings—Use this option to display several system parameters that were defined when the Cisco Unified CME software was installed. Also displays the default Cisco Unity Express settings.
• Run the Initialization Wizard. See Overview.
Note You cannot run the Initialization Wizard after choosing the following option.
• Skip Initialization Wizard and Log off—Use this option only if you are using the Cisco Unity Express command-line interface to configure the system parameters.
• Log Off (Run Initialization Wizard Later)
Call Agent IntegrationThis drop-down menu enables you to change the call agent. For example, you can change the call agent from Cisco Unified Communications Manager Express to Cisco Unified Communications Manager.
Note Use this option with caution. Changing the call agent will permanently delete all non-local site related configuration and reboot the system automatically.
Step 1 Select the call agent from the drop-down menu.
You will receive a warning notifying you that changing the call agent will permanently delete all non-local site related configuration and reboot the system automatically.
Step 2 Click Ok to continue or Cancel to cancel the operation.
21Configuring Cisco Unity Express 8.6 Using the GUI
OL-24779-02

Starting the Initialization Wizard for Cisco Unified Communications Manager Express (CUCME) Current Settings
The system reloads. Once the system reload is complete, you will receive a notice that the system is not initialized, and that only Administrator logins are allowed.
Step 3 Log in to the administrative interface using your User Name and Password.
Current SettingsThis window displays current system settings that were configured when the Cisco Unified CME application was installed. It also displays the Cisco Unity Express settings configured at the time of installation. You cannot change the system settings from this window. Run the Initialization Wizard to change the values.
OverviewWhen logging in to the system for the first time, use the Initialization Wizard to configure your system. The Initialization Wizard is a software tool that has a series of windows that help you configure Cisco Unity Express. The wizard starts automatically the first time you log in to the graphical user interface (GUI).
Some of the information shown on the wizard windows comes from system parameters that were configured during the installation of the Cisco Unified CME system and the Cisco Unity Express software.
Multi-Site Deployment
If you are configuring a multi-site deployment, the Initialization Wizard GUI prompts you for the details of each branch one by one and validates the data. There is an enhanced list of tasks on the left side of the Initialization Wizard screen that shows which branch you are currently working on.
Prerequisites
Before starting the Initialization Wizard, you need the following information:
Web Administrator username (Cisco Unified Communications Manager Express) and password.
Telephone user information—Some users may have been configured when the Cisco Unified CME software was installed. You may copy some or all of these users into the Cisco Unity Express database. Some users or extensions may not require a voice mailbox. (For example, a lobby extension, a conference room extension, or a visitor office extension should not be assigned a mailbox.) Review the purpose of each extension carefully so that mailbox storage space is used efficiently.
You will need the following user information:
• Name
• User ID
• Extension number
• Primary Extension
• If user requires a Voice mailbox
• If user will be made an Administrator
Telephone numbers for the following:
• Voice-mail system
22Configuring Cisco Unity Express 8.6 Using the GUI
OL-24779-02

Starting the Initialization Wizard for Cisco Unified Communications Manager Express (CUCME)Cisco Unified Communications Manager Express Login
• Auto attendant
• Operator extension
• Administration via Telephone system
Other Information
• Policy for handling the users’ Password and Personal identification number (PIN)
• Default Mailbox Size
• Maximum Caller Message Size
• Message Expiry Time
Note The Initialization Wizard information-write is updated to communicate with up to ten Sites (Cisco Unified CMEs). There can be a significant delay while the system communicates with the configured sites. Support for multiple Cisco Unified CME sites is only supported on selected platforms. See the Cisco Unity Express Release Notes for detailed support information.
Cisco Unified Communications Manager Express LoginUse this procedure to log in to Cisco Unified CME. If you have multiple sites (Cisco Unified CMEs) in your configuration, you will repeat these steps for each site. In this procedure you will enter the details of the Cisco Unified CME that Cisco Unity Express will connect to. The username and password is used to authenticate while retrieving information from each Cisco Unified CME. The Site Name field indicates which Cisco Unified CME you are connecting to in multiple-site configurations.
Step 1 In the Cisco Unified CME login screen, enter the Host Name IP address.
Step 2 Enter the Web User Name.
Step 3 Enter the Web password.
Step 4 Enter the XML User Name.
Step 5 Enter the XML password.
Step 6 If you have an NME-CUE, SM-SRE or ISM-SRE module, you can also optionally select the number of Cisco Unified CME sites.
Step 7 To go to the Importing Cisco Unified Communications Manager Express Users window, click Next.
Step 8 If you selected the option to have more than one site, return to Step 1 as many times as needed to configure each site.
23Configuring Cisco Unity Express 8.6 Using the GUI
OL-24779-02

Starting the Initialization Wizard for Cisco Unified Communications Manager Express (CUCME) Importing Cisco Unified Communications Manager Express Users
Importing Cisco Unified Communications Manager Express Users
The Importing Cisco Unified CME Users window displays any users who were configured at the same time as the Cisco Unified CME software was installed. You can import any or all of those users into the Cisco Unity Express database. If no users are displayed, you can configure users after the initialization process is completed.
Note Cisco Unified CME usernames cannot contain spaces. If you import Cisco Unified CME user IDs that contain spaces, an error appears after your information is committed.
The Import Users window contains the following fields:
• User ID
• Extension number
• Primary Extension
• Mailbox—option to create a voice mailbox for the user
• Administrator
• Set Call forward no answer (CFNA)/call forward busy (CFB)
Step 1 If any users are listed in the column to the left of the users’ names, do one of the following:
• Import all the users in the list to the Cisco Unity Express database—Click the box next to User ID. This places a check mark in the box next to each user ID.
• Import specific users to the Cisco Unity Express database—Click the box next to each user ID that should be imported into the database. Users who are not in the Cisco Unity Express database will not have a voice mailbox.
Step 2 In the Primary Extension column, select a primary extension for the user. The primary extension is the main extension that callers dial to reach a user. If no primary extension is designated for a user, that user cannot receive voice-mail messages, but will be reachable by callers using the dial-by-name feature. In this field, None means that none of the displayed extensions for the user is the primary extension. You can designate a mailbox for this user now, but the user cannot access it until you configure the user’s primary extension at a later time.
Step 3 In the Mailbox column, do one of the following:
• Create a mailbox for all users—Click the box next to Mailbox. This places a check mark in each user’s box in the column. Cisco Unity Express creates the mailbox when the initialization process is complete.
Note Clicking this box creates a mailbox for all users displayed in the list. If you selected specific users in Step 2, do not click this box.
• Create a mailbox for specific users—Click the box in the Mailbox column for each user who should have a mailbox.
Step 4 In the Administrator column, do one of the following:
24Configuring Cisco Unity Express 8.6 Using the GUI
OL-24779-02

Starting the Initialization Wizard for Cisco Unified Communications Manager Express (CUCME)Configuring System Defaults
• Assign administrative privileges to all users—Click the box next to Administrator. Note: If you selected specific users in Step 2, do not click this box.
• Assign administrative privileges to specific users—Click the box in the Administrator column for each user who should have this permission.
Step 5 To go to the Configuring System Defaults window, click Next.
Configuring System DefaultsUse this procedure to configure system defaults when running the Initialization Wizard. The values shown in this window are Cisco Unity Express default values. These values affect all users and mailboxes in the voice-mail system. To change values for individual users, see Displaying or Modifying a User Profile.
The Defaults window displays the following fields. If necessary, enter new values into the fields.
• Language
• Password options
• Personal identification number (PIN) options
• Mailbox Size
• Maximum Caller Message Size
• Message Expiry Time
To go to the Configuring Call Handling window, click Next.
Configuring Call HandlingUse this procedure to configure call handling when running the Initialization Wizard. You can change these values later by Configuring Voice-Mail Call-Handling Parameters.
Tip The Voice Mail number, Auto Attendant number, and Greeting Management number fields should not contain the same telephone number. However, the operator extensions can be the same for these systems.
The Voice Mail Call Handling window displays the following fields. If necessary, enter new values into the fields.
• Voice Mail Phone Number
• Voice-mail Operator extension
• Auto attendant access number
• Auto attendant operator extension
• Administration via Telephone (AvT) number
• SIP MWI notification mechanism
• MWI on number (if outcalling notification mechanism is selected)
25Configuring Cisco Unity Express 8.6 Using the GUI
OL-24779-02

Starting the Initialization Wizard for Cisco Unified Communications Manager Express (CUCME) Committing Your Information
• MWI off number (if outcalling notification mechanism is selected)
To go to the Committing Your Information window, click Next.
Committing Your InformationThe Commit window displays the values that you set up using the Initialization Wizard. Use the scroll bar to view additional parameters. At this point, none of these values has been saved to the Cisco Unity Express database.
Procedure
Step 1 If any value is not correct, click Back to return to the appropriate screen and change the value.
Step 2 If you want to save these values as the default startup system configuration, click the box to the left of “Finally, save to startup configuration....”.
Note You can click to save to startup configuration before continuing to the next step.
Step 3 If all the values are correct, click Finish to save the values and complete the initialization. The status window appears (see Viewing the Status). The default values are stored in the Cisco Unity Express database, and users designated as administrators are added to the Administrator group.
You can change default parameters later. See Related Topics.
Related Topics • Configuring Domain Name Settings
• Adding a New User
• Adding a New Mailbox
Viewing the StatusThe Initialization Wizard Status window appears after you have completed the Initialization Wizard. The following table contains an example of the fields that you can configure. The field values show whether the information was updated or the action failed.
Field Description
Auto-generated authentication information If you chose to generate passwords and PINs for users automatically, they are displayed.
Defaults Status of voice mailbox size, message length, message expiration time, password and PIN generation, and message-waiting indicator (MWI) on and off numbers.
26Configuring Cisco Unity Express 8.6 Using the GUI
OL-24779-02

Starting the Initialization Wizard for Cisco Unified Communications Manager Express (CUCME)Viewing the Status
User Creation Status of creation of the selected Cisco Unified CME users in the Cisco Unity Express database.
Mailbox Creation Status of creation of voice mailboxes for the selected users.
Voice-mail application creation Status of initialization of the voice-mail system and storage of the voice-mail system telephone number.
Auto Attendant application creation Status of initialization of the auto attendant application and storage of the auto attendant telephone number.
Administration via Telephone application creation
Status of initialization of the Administration via Telephone application and storage of the Administration via Telephone telephone number.
MWI application creation Status of initialization of the MWI policy.
Cisco IOS CLI update Status of update of the corresponding Cisco IOS CLI commands with the options and values entered in the Initialization Wizard fields.
Save to startup configuration Status of the saving of the options and values entered in the Initialization Wizard fields to the startup configuration database.
Field Description
27Configuring Cisco Unity Express 8.6 Using the GUI
OL-24779-02

Starting the Initialization Wizard for Cisco Unified Communications Manager Express (CUCME) Viewing the Status
28Configuring Cisco Unity Express 8.6 Using the GUI
OL-24779-02

Configuring Users for Cisco Unified Communications Manager (CUCM)
Perform the following tasks in the Configure Users window:
• Viewing a List of Users
• Adding a New User
• Importing a User from CUCM
• Displaying or Modifying a User Profile
• Displaying or Modifying Group Subscriptions
• Finding a User
• Deleting a User
Viewing a List of UsersUse this procedure to view a list of users in the system.
Step 1 Choose Configure > Users. The Configure Users window appears and contains the following fields:
• User ID—By default, the system displays users in alphabetical order by user ID. To sort from A to Z, click User ID.
• Display Name—To display the list of users in order by display name, click Display Name.
• Primary Extension—To display the list of users in order by primary extension, click Primary Extension.
• Use the dialog box to change the number of rows displayed per window.
29Configuring Cisco Unity Express 8.6 Using the GUI
OL-24779-02

Configuring Users for Cisco Unified Communications Manager (CUCM) Adding a New User
Adding a New UserUse this procedure to add a new user to the system.
Step 1 Choose Configure > Users. The Configure Users window appears:
Step 2 Click Add. The Add a New User window appears.
Step 3 Enter information into the following fields:
• User ID
• First Name and Last Name
• Nick Name
• Display Name
• Primary Extension
• Primary E.164 number
• Fax number
• Language
• Password options
• Password
• Confirm password—Enter the password again for confirmation.
• PIN options
• Personal identification number (PIN)
• Confirm PIN—Enter the PIN again for confirmation.
• Create mailbox—Click to create a voice mailbox for this new user. See Adding a New Mailbox.
Step 4 Click Add to save your changes. The Add a New Mailbox window appears. Proceed to Adding a New Mailbox.
Note If you selected a random password or PIN, a message appears with the new password or PIN. Write these values in a secure place to give to the user. They are also displayed on the user profile page (see Displaying or Modifying a User Profile).
Importing a User from CUCMUse this procedure to select a user to import.
Note You must first configure the Cisco Unified Communications Manager Web Administrator Username.
Step 1 Choose Configure > Users > Import. The Import Cisco CUCM Users window appears.
Step 2 Click on Find. The Cisco CUCM User Search window appears.
30Configuring Cisco Unity Express 8.6 Using the GUI
OL-24779-02

Configuring Users for Cisco Unified Communications Manager (CUCM)Displaying or Modifying a User Profile
Step 3 Specify User IDs in the field separated by a space, comma, or a new line.
Tip You can enter a maximum of 200 user IDs.
Step 4 Click Find. The Search Results window appears with the results listed. You have the option to View/Hide details of your search.
Displaying or Modifying a User ProfileUse this procedure to display or modify a user profile.
Step 1 To view a user's profile, click Configure > Users. The Configure Users window appears.
Note If you do not see the user, click Find to search for the user (see Finding a User). You can also select All from the drop-down menu in the Rows Per Page field at the bottom of the Configure Users window.
Step 2 Click the user ID of the person whose profile you want to see. The user’s profile window appears with the following fields shown:
• User ID
• First Name and Last name
• Nick Name
• Display Name
• Primary Extension
• Primary E.164 number
• Fax Number
• Language
• Password Login (enabled by default)
• Password options
• Password
• Confirm password—Enter the password again for confirmation.
• PIN login (enabled by default)
• PIN options
• Personal identification number (PIN)
• Confirm PIN—Enter the PIN again for confirmation.
Step 3 Click to enable notification for this user profile.
31Configuring Cisco Unity Express 8.6 Using the GUI
OL-24779-02

Configuring Users for Cisco Unified Communications Manager (CUCM) Displaying or Modifying Group Subscriptions
Additional User Profile Options
In this window, you can also click the following tabs:
• Groups—Change a user's groups. See Displaying or Modifying Group Subscriptions.
• Mailboxes—Display or modify a user's mailbox information. See Displaying or Modifying a Mailbox.
• Notification—Configure notification of received voice-mail messages to be sent to a user’s phone, pager, or email. See Configuring Notification Devices.
Displaying or Modifying Group SubscriptionsUse this procedure to modify the groups to which a user is assigned.
Step 1 Choose Configure > Users. The Configure Users window appears.
Step 2 Click the name of the user whose group subscription you want to view or modify. The User Profile window appears.
Step 3 Click the Groups tab. The following fields are displayed:
• Group ID
• Rights—member or owner
• Description
• Primary extension—primary extension of the general-delivery mailbox assigned to the group.
Step 4 To subscribe the user as the owner of another group, click Subscribe as owner. The Find window appears. Enter the group ID, description, or extension number in the Find window and click Find.
Or
Step 5 To subscribe the user as a member of another group, click Subscribe as member. The Find window appears. Enter the group ID, description, or extension number in the Find window and click Find.
Step 6 Click the box next to the group that this user should join and click Select Rows.
Step 7 (Optional) To unsubscribe the user from a group, click the box next to the Group Name and click Unsubscribe.
See Configuring Groups for more information.
Finding a UserUse this procedure to search for a user.
Step 1 Choose Configure > Users. The Configure Users window appears.
Step 2 Click Find. The following fields appear:
• User ID
• Name
• Extension
32Configuring Cisco Unity Express 8.6 Using the GUI
OL-24779-02

Configuring Users for Cisco Unified Communications Manager (CUCM)Deleting a User
Note All fields are optional.
Step 3 Enter the search criteria in one or more fields and click Find. The User Configuration window displays the results of your search.
Deleting a UserTo delete a user from Cisco Unity Express, use this procedure. Deleting a user in the Cisco Unity Express GUI also deletes the user's mailbox. Deleting a user in the command-line interface leaves the user's mailbox orphaned.
Step 1 Choose Configure > Users.
Step 2 Click the box next to the user ID that you want to delete.
Step 3 Click Delete.
Step 4 Click Ok to confirm the deletion.
33Configuring Cisco Unity Express 8.6 Using the GUI
OL-24779-02

Configuring Users for Cisco Unified Communications Manager (CUCM) Deleting a User
34Configuring Cisco Unity Express 8.6 Using the GUI
OL-24779-02

Configuring Users for Cisco Unified Communications Manager Express (CUCME)
Perform the following tasks in the Configure User window:
• Viewing a List of Users
• Adding a New User
• Selecting a Phone for a User
• Selecting an Extension for a User
• Displaying or Modifying a User Profile
• Displaying or Modifying Group Subscriptions
• Finding a User
• Deleting a User
Viewing a List of UsersUse this procedure to view a list of users in the system.
Step 1 Choose Configure > Users. The Users window appears and contains the following fields:
• User ID—By default, the system displays users in alphabetical order by user ID. To sort from A to Z, click User ID.
• Display Name—To display the list of users in order by display name, click Display Name.
• Primary Extension—To display the list of users in order by primary extension, click Primary Extension.
• Use the dialog box to change the number of rows displayed per window.
35Configuring Cisco Unity Express 8.6 Using the GUI
OL-24779-02
Configuring Users for Cisco Unified Communications Manager Express (CUCME) Adding a New User
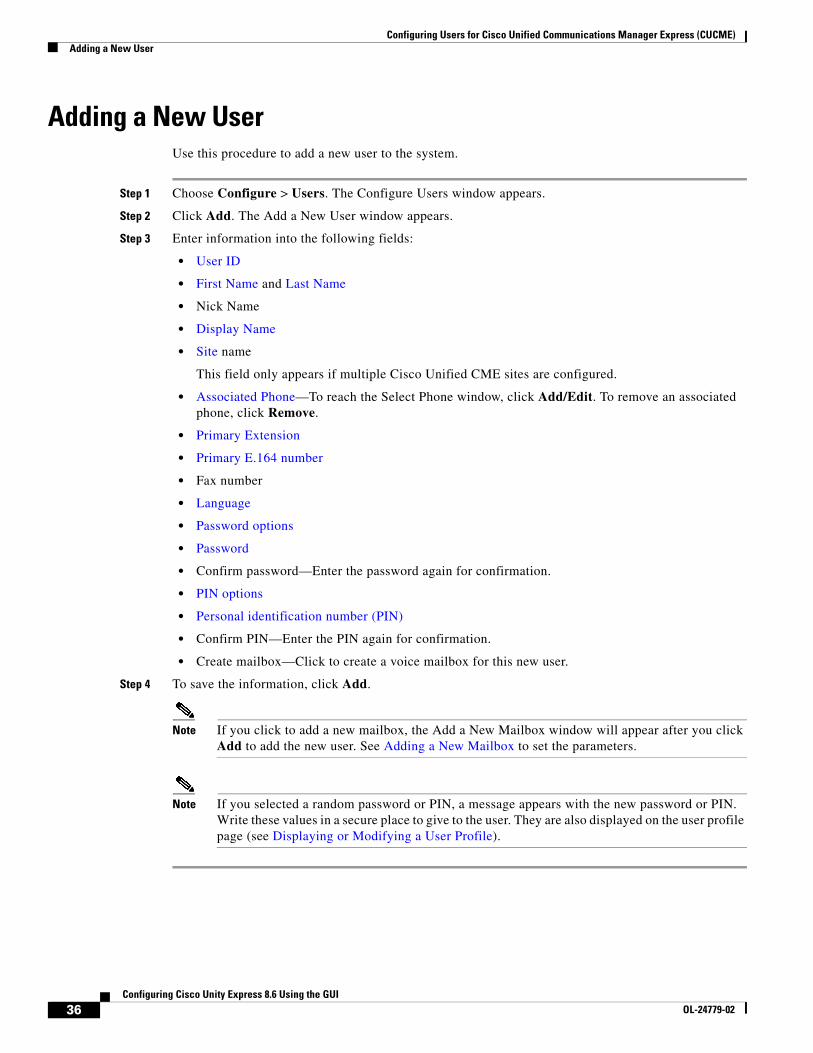
Adding a New UserUse this procedure to add a new user to the system.
Step 1 Choose Configure > Users. The Configure Users window appears.
Step 2 Click Add. The Add a New User window appears.
Step 3 Enter information into the following fields:
• User ID
• First Name and Last Name
• Nick Name
• Display Name
• Site name
This field only appears if multiple Cisco Unified CME sites are configured.
• Associated Phone—To reach the Select Phone window, click Add/Edit. To remove an associated phone, click Remove.
• Primary Extension
• Primary E.164 number
• Fax number
• Language
• Password options
• Password
• Confirm password—Enter the password again for confirmation.
• PIN options
• Personal identification number (PIN)
• Confirm PIN—Enter the PIN again for confirmation.
• Create mailbox—Click to create a voice mailbox for this new user.
Step 4 To save the information, click Add.
Note If you click to add a new mailbox, the Add a New Mailbox window will appear after you click Add to add the new user. See Adding a New Mailbox to set the parameters.
Note If you selected a random password or PIN, a message appears with the new password or PIN. Write these values in a secure place to give to the user. They are also displayed on the user profile page (see Displaying or Modifying a User Profile).
36Configuring Cisco Unity Express 8.6 Using the GUI
OL-24779-02

Configuring Users for Cisco Unified Communications Manager Express (CUCME)Selecting a Phone for a User
Selecting a Phone for a UserTo select a phone for a user, use this procedure.
Step 1 Choose Configure > Users. The Configure Users window appears.
Step 2 In the User ID field, click on the user for whom you want to select a phone. The User Profile window appears.
Step 3 In the Associated Phone field, click Add/Edit. The Select Phone window appears and shows the sequence number, hardware address, and extensions of all unassociated phones. These phones are available to assign to users.
Step 4 Click the button next to the phone that you want to assign to the user and click Select Phone. You are returned to the User Profile window.
Note A user may only be assigned one phone.
Selecting an Extension for a UserTo select an extension for a user, use this procedure.
Step 1 Choose Configure > Users. The Configure Users window appears.
Step 2 Click Add. The Add a New User window appears.
Step 3 In the Primary Extension field, do one of the following:
a. Click Other then type in the extension in the field.
b. Click Other then click on the magnifying glass icon. The Select Extension window appears and shows all unassociated extensions. These extensions are available to assign to users.
Step 4 Click the button next to the extension that you want to assign to the user and click Select Extension. You are returned to the User Profile window.
Step 5 Click Apply to save the extension selection for that user.
Note A user may only be assigned one extension.
37Configuring Cisco Unity Express 8.6 Using the GUI
OL-24779-02

Configuring Users for Cisco Unified Communications Manager Express (CUCME) Displaying or Modifying a User Profile
Displaying or Modifying a User ProfileUse this procedure to display or modify a user profile.
Step 1 To view a user's profile, click Configure > Users. The Configure Users window appears.
Step 2 If you do not see the user, click Find to search for the user (See Finding a User). You can also select All in the Rows Per Page field.
Step 3 Click the user ID of the person whose profile you want to see. The User Profile window appears with the following fields shown:
• User ID
• First Name and Last Name
• Nick Name
• Display Name
• Associated Phone—To reach the Select Phone window, click Add/Edit. To remove an associated phone, click Remove.
• Primary Extension
• Primary E.164 number
• Fax Number
• Language
• Password options
• Password
• Confirm password—Enter the password again for confirmation.
• PIN login (enabled by default)
• PIN options
• Personal identification number (PIN)
• Confirm PIN—Enter the PIN again for confirmation.
Step 4 Click to modify this user profile.
Additional User Profile Options
You can also click the following tabs in the Configure Users window:
• Groups—Change a user's groups. See Displaying or Modifying Group Subscriptions.
• Mailboxes—Display or modify a user's mailbox information. See Displaying or Modifying a Mailbox.
• Notification—Configure notification of received voice-mail messages to be sent to a user’s phone, pager, or email. See Configuring Notification Devices.
• Set Cascade options—Set your cascade settings to notify specified recipients after any specified time.
• Set notification devices:
– Device type
38Configuring Cisco Unity Express 8.6 Using the GUI
OL-24779-02

Configuring Users for Cisco Unified Communications Manager Express (CUCME)Displaying or Modifying Group Subscriptions
– Destination
– Click to enable the device type.
• Apply Call forward no answer (CFNA)/call forward busy (CFB) to voice-mail number if a primary extension is configured. Click Ok to accept the changes. See Selecting an Extension for a User.
Displaying or Modifying Group SubscriptionsUse this procedure to modify the groups to which a user is assigned.
Step 1 Choose Configure > Users. The Configure Users window appears.
Step 2 Click the name of the user whose group subscription you want to view or modify. The User Profile window appears.
Step 3 Click the Groups tab. The following fields are displayed:
• Group ID
• Rights—member or owner
• Description
• Primary extension—primary extension of the general-delivery mailbox assigned to the group.
Step 4 To subscribe the user as the owner of another group, click Subscribe as owner. To subscribe the user as a member of another group, click Subscribe as member. The Find window appears.
Step 5 Enter the group ID, description, or extension number and click Search.
Step 6 Click the box next to the group that this user should join and click Select Rows.
Step 7 (Optional) To unsubscribe the user from a group, click the box next to the Group Name and click Unsubscribe.
See Configuring Groups for more information.
Finding a UserUse this procedure to search for a user.
Step 1 Choose Configure > Users. The Configure Users window appears.
Step 2 Click Find. The following fields appear:
• User ID
• Name
• Extension
Note All fields are optional.
39Configuring Cisco Unity Express 8.6 Using the GUI
OL-24779-02

Configuring Users for Cisco Unified Communications Manager Express (CUCME) Deleting a User
Step 3 Enter the search criteria in one or more fields and click Find. The User Configuration window displays the results of your search.
Deleting a UserTo delete a user from Cisco Unity Express, use this procedure. Deleting a user in the Cisco Unity Express GUI also deletes the user's mailbox. Deleting a user in the command-line interface leaves the user's mailbox orphaned.
Step 1 Choose Configure > Users. The Configure Users window appears.
Step 2 Click the box next to the user ID that you want to delete.
Step 3 Click Delete.
Step 4 Click Ok to confirm the deletion.
40Configuring Cisco Unity Express 8.6 Using the GUI
OL-24779-02

Configuring Groups
Perform the following tasks in the Configure Groups window:
• Viewing a List of Groups
• Adding a New User Group
• Subscribing Members to a Group
• Subscribing Owners to a Group
• Unsubscribing Members and Owners from a Group
• Displaying or Modifying Group Parameters
• Viewing Owners and Members of a Group
• Viewing Group Membership in Another Group
• Modifying Group Ownership and Membership in Other Groups
• Deleting a Group
• Finding a Group
Viewing a List of GroupsUse this procedure to view a list of groups:
Step 1 Choose Configure > Groups. The Configure Groups window appears and contains the following fields:
• Group ID—By default, the group list is sorted alphabetically by group ID. To sort from Z to A, click Group ID.
• Display Name—To sort by description in alphabetical order, click Display Name. To sort from Z to A, click Display Name again.
• Primary Extension for the group’s general-delivery mailbox. To sort numerically by primary extension, click Primary Extension. To sort from high to low, click Primary Extension again.
• Privileges—Lists the various specified group privileges that have been assigned.
• Use the dialog box to change the number of rows displayed per window.
41Configuring Cisco Unity Express 8.6 Using the GUI
OL-24779-02

Configuring Groups Adding a New User Group
Adding a New User GroupUse this procedure to create a new group to which users can belong.
Before You Begin
Configuring one or more groups is optional. Many businesses find that having a mailbox for a group, called a general-delivery mailbox, is very convenient. Members of a group can retrieve voice messages left in the general-delivery mailbox. For example, a Customer Service mailbox could be configured to receive messages from customers, and anyone assigned to a Customer Service group could retrieve the messages. Members of the general-delivery mailbox can be individual users or other groups. Individual users also have their individual mailboxes, and groups that are members of another group have their own mailboxes.
Be sure to have the following information available:
• The Extension number to be assigned to the group. Ensure that this extension is active.
• The maximum number of seconds for voice messages that this mailbox can hold.
• The maximum length, in seconds, for any voice message that is stored in this mailbox.
• The length of time, in days, that messages can remain in this mailbox.
Procedure
Step 1 To add a new user group, choose Configure > Groups. The Configure Groups window appears.
Step 2 Click Add. The Add a New Group window appears.
Step 3 Enter information into the fields shown below:
• Group ID
• Full Name
• Description—The word “group” is automatically added to the Group ID entry. You can add more text to this description.
• Primary Extension for the group’s general-delivery mailbox
• Primary E.164 number
• Fax number
Step 4 Click to create mailbox—Click to create a general-delivery mailbox for this new group. See Adding a New Mailbox.
Capabilities
Check the boxes for capabilities, or privileges, to assign to the group. See Privileges for detailed information.
Step 5 Click Add. The Add a New Mailbox window appears. Enter or select the following information:
• Owner
• Description—Description of the mailbox.
• Zero-out number (operator assistance)
• Mailbox Size
• Maximum Caller Message Size
42Configuring Cisco Unity Express 8.6 Using the GUI
OL-24779-02

Configuring GroupsSubscribing Members to a Group
• Message Expiry Time
• Play Tutorial
• Allow Login Without PIN
• Enabled—Indicates that the mailbox will be activated immediately. Unchecking this box deactivates the mailbox.
• Fax enabled
• Enable notification for this user or group
See Configuring Mailboxes for more information.
Step 6 To save the information, click Add. The Configure Groups window reappears with the new Group ID in the table.
Subscribing Members to a GroupUse this procedure to add members to a group. When you add members to a group, each member has access to the voice messages that are stored in the group's mailbox.
Step 1 Choose Configure > Groups. The Configure Groups window appears.
Step 2 Click the name of the group to which you are adding new members. The Group Profile window appears. Current information about the group is displayed in the fields.
Step 3 Click Owners/Members. The window displays all members of the group.
Step 4 To add a new member, click Subscribe Member. The Find window appears.
Step 5 Enter the ID, name, or extension of the person or group that you want to add to this group. All fields are optional.
Step 6 Click Find. All users that meet the search criteria appear.
Step 7 Remaining in the Find window, do one of the following:
• Add one or more members to the group by checking the box next to each selected member's name and click Select Rows. The Group window appears with the new member added.
• Look for other people to add but clicking Back to Find without checking a box next to any name. The Find window appears. Return to Step 5 and continue.
Step 8 To add more members to the group, repeat Step 4 through Step 7.
43Configuring Cisco Unity Express 8.6 Using the GUI
OL-24779-02
Configuring Groups Subscribing Owners to a Group
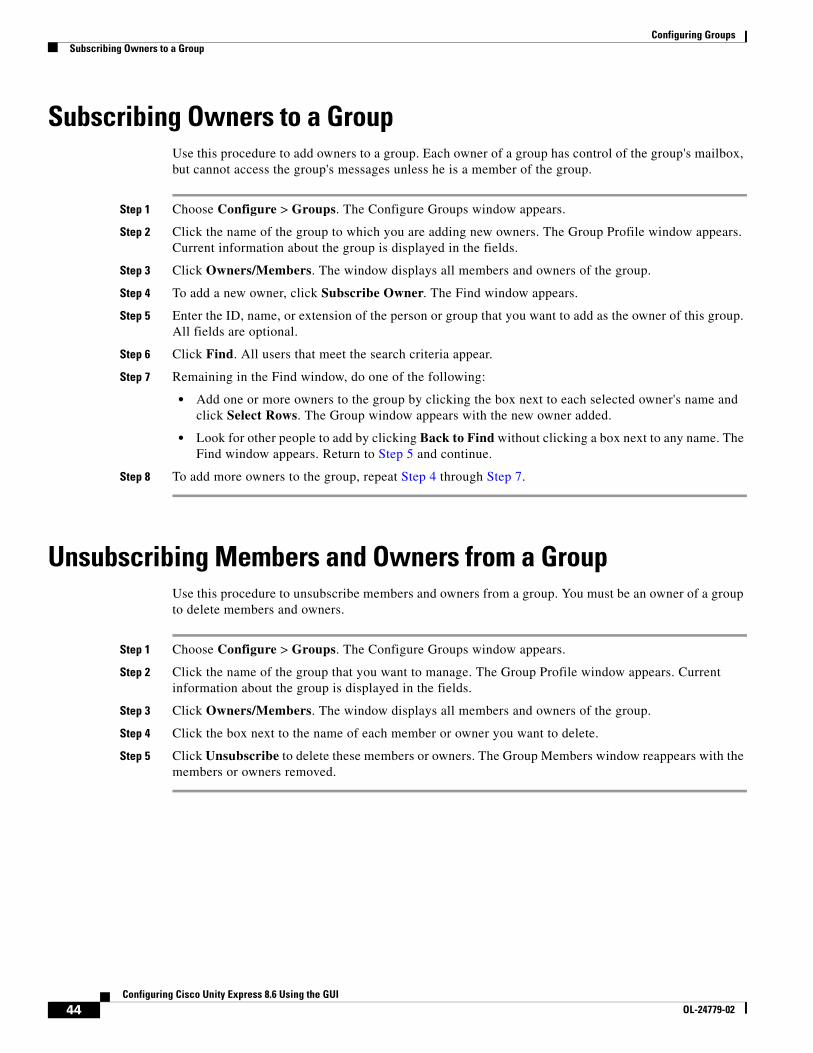
Subscribing Owners to a GroupUse this procedure to add owners to a group. Each owner of a group has control of the group's mailbox, but cannot access the group's messages unless he is a member of the group.
Step 1 Choose Configure > Groups. The Configure Groups window appears.
Step 2 Click the name of the group to which you are adding new owners. The Group Profile window appears. Current information about the group is displayed in the fields.
Step 3 Click Owners/Members. The window displays all members and owners of the group.
Step 4 To add a new owner, click Subscribe Owner. The Find window appears.
Step 5 Enter the ID, name, or extension of the person or group that you want to add as the owner of this group. All fields are optional.
Step 6 Click Find. All users that meet the search criteria appear.
Step 7 Remaining in the Find window, do one of the following:
• Add one or more owners to the group by clicking the box next to each selected owner's name and click Select Rows. The Group window appears with the new owner added.
• Look for other people to add by clicking Back to Find without clicking a box next to any name. The Find window appears. Return to Step 5 and continue.
Step 8 To add more owners to the group, repeat Step 4 through Step 7.
Unsubscribing Members and Owners from a GroupUse this procedure to unsubscribe members and owners from a group. You must be an owner of a group to delete members and owners.
Step 1 Choose Configure > Groups. The Configure Groups window appears.
Step 2 Click the name of the group that you want to manage. The Group Profile window appears. Current information about the group is displayed in the fields.
Step 3 Click Owners/Members. The window displays all members and owners of the group.
Step 4 Click the box next to the name of each member or owner you want to delete.
Step 5 Click Unsubscribe to delete these members or owners. The Group Members window reappears with the members or owners removed.
44Configuring Cisco Unity Express 8.6 Using the GUI
OL-24779-02
Configuring GroupsDisplaying or Modifying Group Parameters
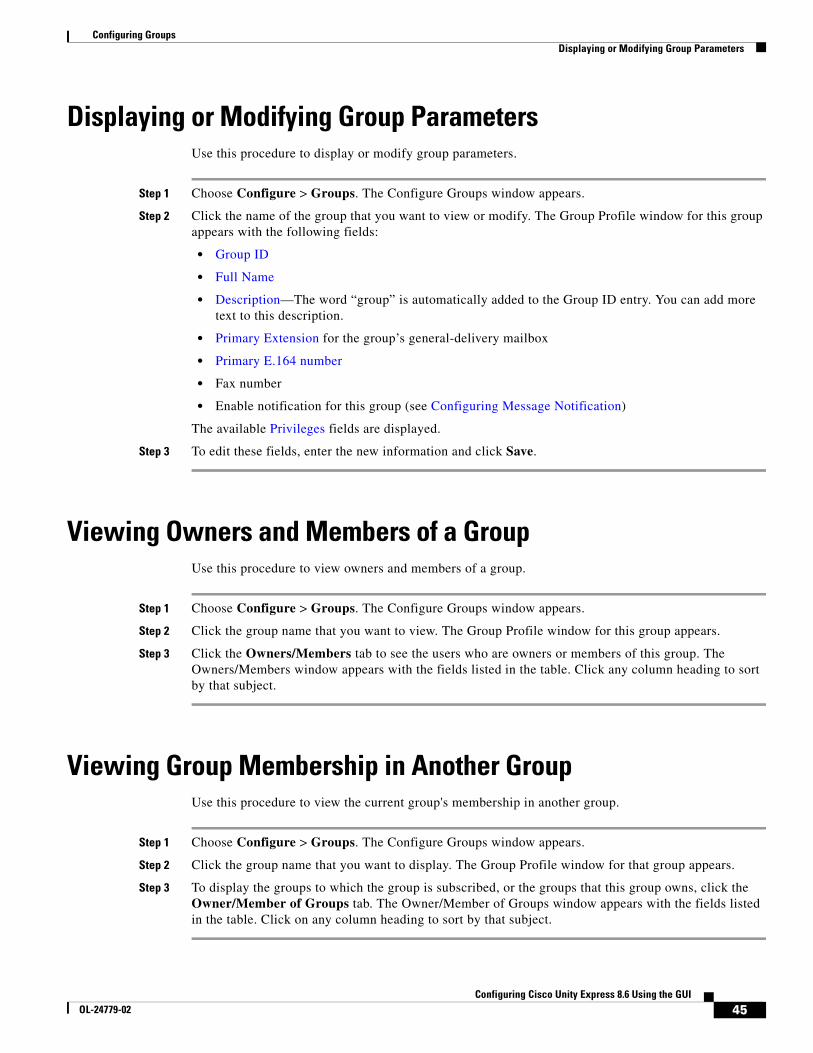
Displaying or Modifying Group ParametersUse this procedure to display or modify group parameters.
Step 1 Choose Configure > Groups. The Configure Groups window appears.
Step 2 Click the name of the group that you want to view or modify. The Group Profile window for this group appears with the following fields:
• Group ID
• Full Name
• Description—The word “group” is automatically added to the Group ID entry. You can add more text to this description.
• Primary Extension for the group’s general-delivery mailbox
• Primary E.164 number
• Fax number
• Enable notification for this group (see Configuring Message Notification)
The available Privileges fields are displayed.
Step 3 To edit these fields, enter the new information and click Save.
Viewing Owners and Members of a GroupUse this procedure to view owners and members of a group.
Step 1 Choose Configure > Groups. The Configure Groups window appears.
Step 2 Click the group name that you want to view. The Group Profile window for this group appears.
Step 3 Click the Owners/Members tab to see the users who are owners or members of this group. The Owners/Members window appears with the fields listed in the table. Click any column heading to sort by that subject.
Viewing Group Membership in Another GroupUse this procedure to view the current group's membership in another group.
Step 1 Choose Configure > Groups. The Configure Groups window appears.
Step 2 Click the group name that you want to display. The Group Profile window for that group appears.
Step 3 To display the groups to which the group is subscribed, or the groups that this group owns, click the Owner/Member of Groups tab. The Owner/Member of Groups window appears with the fields listed in the table. Click on any column heading to sort by that subject.
45Configuring Cisco Unity Express 8.6 Using the GUI
OL-24779-02
Configuring Groups Modifying Group Ownership and Membership in Other Groups
Modifying Group Ownership and Membership in Other GroupsA group has its own set of members, but a group can also be assigned as a member or an owner of one or more other groups. If a group is assigned as an owner of another group, any individual member of the owner group has privileges as an owner of the owned group. For example, if the Administrator group is added as an owner of the Technical Support group, any individual member of the Administrator group can add, modify, or delete members of the Technical Support group. Additionally, individual users that do not belong to another group can be added as owners of the Technical Support group.
Use this procedure to modify a group's ownership and membership in other groups.
Step 1 Choose Configure > Groups. The Configure Groups window appears.
Step 2 Click the name of the group whose membership you want to modify. The Group Profile window for this group appears.
Step 3 Click Owner/Member of Groups. The Owner/Member of Groups window appears.
Step 4 To designate your group as an owner of another group, click Subscribe as owner. To subscribe your group as a member of another group, click Subscribe as member. The Find window appears.
Step 5 In the Find window, enter the group ID, description, or extension of the groups that you want to find.
Step 6 Click Find. All groups that meet the search criteria appear.
Step 7 To select one or more groups, click the box next to each group's name and click Select Rows. The new groups are added to the list of groups in the Owner/Member of Groups window.
Deleting a GroupUse this procedure to delete a group from Cisco Unity Express. Deleting a group will delete the group's mailbox. However, members of the group (individual members or other groups) will not be deleted from Cisco Unity Express.
Step 1 Choose Configure > Groups. The Configure Groups window appears.
Step 2 Select the box next to the name of the group that you want to delete and click Delete.
Step 3 At the prompt, click Ok to delete the group.
46Configuring Cisco Unity Express 8.6 Using the GUI
OL-24779-02

Configuring GroupsFinding a Group
Finding a GroupUse this procedure to search for a group.
Step 1 Choose Configure > Groups. The Configure Groups window appears.
Step 2 Click Find. The following fields appear in the Find Groups window:
• Group ID
• Description
• Extension—Extension for the group's general-delivery mailbox.
Note All fields are optional.
Step 3 Enter the search criteria in one or more fields and click Find. The Find Groups window closes and the Configure Groups window displays the results of your search.
47Configuring Cisco Unity Express 8.6 Using the GUI
OL-24779-02

Configuring Groups Finding a Group
48Configuring Cisco Unity Express 8.6 Using the GUI
OL-24779-02
Setting User Defaults
When you create a user, the defaults that you set in the Configure User window take effect. Use these procedures to specify the default global password and PIN policy settings for all users. This default set of parameters is applied when a new user is created.
Perform the following tasks from the Configure User Defaults window:
• Configuring Password and PIN Options
• Configuring Account Lockout Policy
Configuring Password and PIN OptionsIf you chose to generate passwords and PINs for users automatically, they are configured in the following steps.
Procedure
Step 1 Choose Configure > User Defaults.
The system displays the Configure User Defaults page.
Step 2 Choose the default language from the drop-down menu.
Step 3 Configure password and PIN options by performing the following tasks in the Password and Pin columns:
a. (Optional) Select whether the auto-generation policy will be random or blank.
b. (Optional) Check Enable expiry (days) to set an expiration date for the password. The range is 3 to 365.
c. Set the history depth. The range is 1 to 10.
d. Select the minimum length of the password and PIN. The range for the password is 3 to 32 and the range for the PIN is 3 to 16.
Step 4 Click Apply.
49Configuring Cisco Unity Express 8.6 Using the GUI
OL-24779-02

Setting User Defaults Configuring Account Lockout Policy
Configuring Account Lockout PolicyThe account lockout policy determines how the system acts when a user tries to log in and fails.
Procedure
Step 1 Choose Configure > User Defaults.
The system displays the Configure User Defaults page.
Step 2 Choose one of the following lockout policy types for the Password and PIN fields:
• Disable lockout—The user can continue to try to login with no consequences for failing.
• Permanent—The user is permanently locked out after a certain number of failed login attempts. Enter the maximum number of failed attempts. The range is 1 to 200.
• Temporary—The user is temporarily locked out of the system. Enter values for the following:
– Number of allowable attempts. The range is 1 to 200.
– Temporary lockout duration. Pick any number in minutes.
– Maximum number of failed attempts. The range is 1 to 200.
Step 3 Click Apply to save your settings.
50Configuring Cisco Unity Express 8.6 Using the GUI
OL-24779-02

Configuring Supervisors
You can perform the following tasks when configuring Supervisors:
• Viewing a List of Supervisors
• Adding Supervisors
• Editing Supervisors
Viewing a List of SupervisorsUse this procedure to view a list of configured Supervisors.
Step 1 Choose Configure > Supervisors.
The Configure Supervisors window appears with a list of configured Supervisors that shows their user IDs.
Step 2 To configure Supervisors, you can either:
• Edit the list of primary and secondary reports for a Supervisor by clicking on the link for user ID.
• To add a new Supervisor, click Designate.
• To delete a Supervisor, click Undesignate.
Adding SupervisorsUse this procedure to add a new Supervisor.
Step 1 Enter the user ID of the user that you want to be a Supervisor or click the search icon to the right of the field and click Find to display a list of users.
Step 2 Click Designate to save your settings.
51Configuring Cisco Unity Express 8.6 Using the GUI
OL-24779-02

Configuring Supervisors Editing Supervisors
Editing SupervisorsUse this procedure to edit the configuration of an existing Supervisor.
Step 1 Choose the tab for Primary reports or Secondary reports.
Step 2 Click Add Employee.
Step 3 Enter the user ID of the user that you want to add or click the search icon to the right of the field and click Find to display a list of users.
Step 4 Click Add Employee to save your changes.
Step 5 Repeat Steps 3, 4, and 5 as many times as necessary to add all of reports that you want.
Step 6 If needed, change the display name or the user ID of the user that you want to be a Supervisor or click the search icon to the right of the field and click Find to display a list of users.
Step 7 Click Designate to save your settings.
52Configuring Cisco Unity Express 8.6 Using the GUI
OL-24779-02

Configuring Privileges
This chapter contains the following sections:
• Overview
• Creating a New Privilege
• Customizing an Existing Privilege
• Deleting a Privilege
OverviewCisco Unity Express software provides several predefined privileges that you can assign to groups. You can also create your own privileges and modify the predefined privileges.
When you assign a privilege to a group, any member of the group is granted the privilege rights. An administrator group is created automatically by the software initialization process from the imported subscribers designated as administrators. You can assign subscribers to an existing group using CLI commands or the GUI option Configure > Users.
When you create or modify privileges, you add or delete the operations allowed by that privilege. Operations define the CLI commands and GUI functions that are allowed. Most operations include only one CLI command and GUI function. In addition to adding operations to a privilege, you can also configure a privilege to have another privilege nested inside of it. A privilege configured with a nested privilege includes all operations configured for the nested privilege.
Table 1 describes the predefined privileges provided with the Cisco Unity Express software and the operations associated with them. Table 2 describes all available operations that you can add to privileges.
Note You cannot modify the superuser privilege. The superuser privilege includes all the operations.
To configure privileges, see Creating a New Privilege.
To display a list of privileges, use the show privileges command in Cisco Unity Express EXEC mode. To display detailed information about a specific privilege, use the show privilege detail command.
53Configuring Cisco Unity Express 8.6 Using the GUI
OL-24779-02
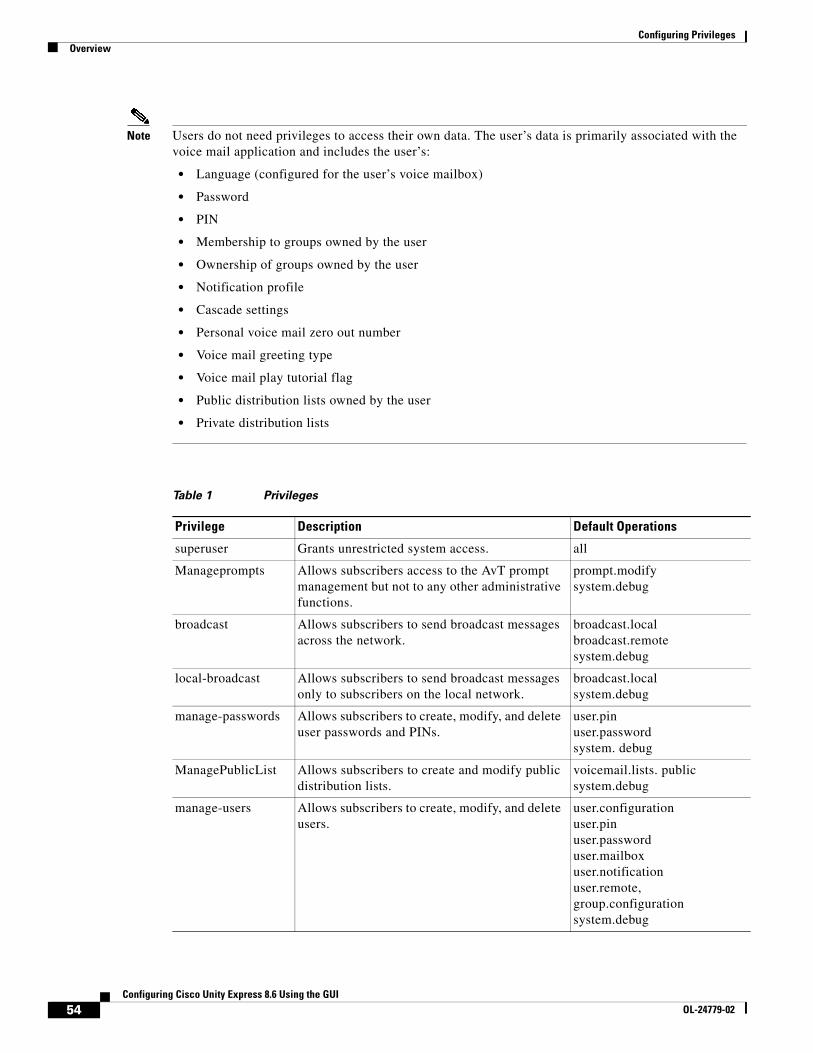
Configuring Privileges Overview
Note Users do not need privileges to access their own data. The user’s data is primarily associated with the voice mail application and includes the user’s:
• Language (configured for the user’s voice mailbox)
• Password
• PIN
• Membership to groups owned by the user
• Ownership of groups owned by the user
• Notification profile
• Cascade settings
• Personal voice mail zero out number
• Voice mail greeting type
• Voice mail play tutorial flag
• Public distribution lists owned by the user
• Private distribution lists
Table 1 Privileges
Privilege Description Default Operations
superuser Grants unrestricted system access. all
Manageprompts Allows subscribers access to the AvT prompt management but not to any other administrative functions.
prompt.modify system.debug
broadcast Allows subscribers to send broadcast messages across the network.
broadcast.local broadcast.remote system.debug
local-broadcast Allows subscribers to send broadcast messages only to subscribers on the local network.
broadcast.local system.debug
manage-passwords Allows subscribers to create, modify, and delete user passwords and PINs.
user.pin user.password system. debug
ManagePublicList Allows subscribers to create and modify public distribution lists.
voicemail.lists. public system.debug
manage-users Allows subscribers to create, modify, and delete users.
user.configuration user.pin user.password user.mailbox user.notification user.remote, group.configuration system.debug
54Configuring Cisco Unity Express 8.6 Using the GUI
OL-24779-02
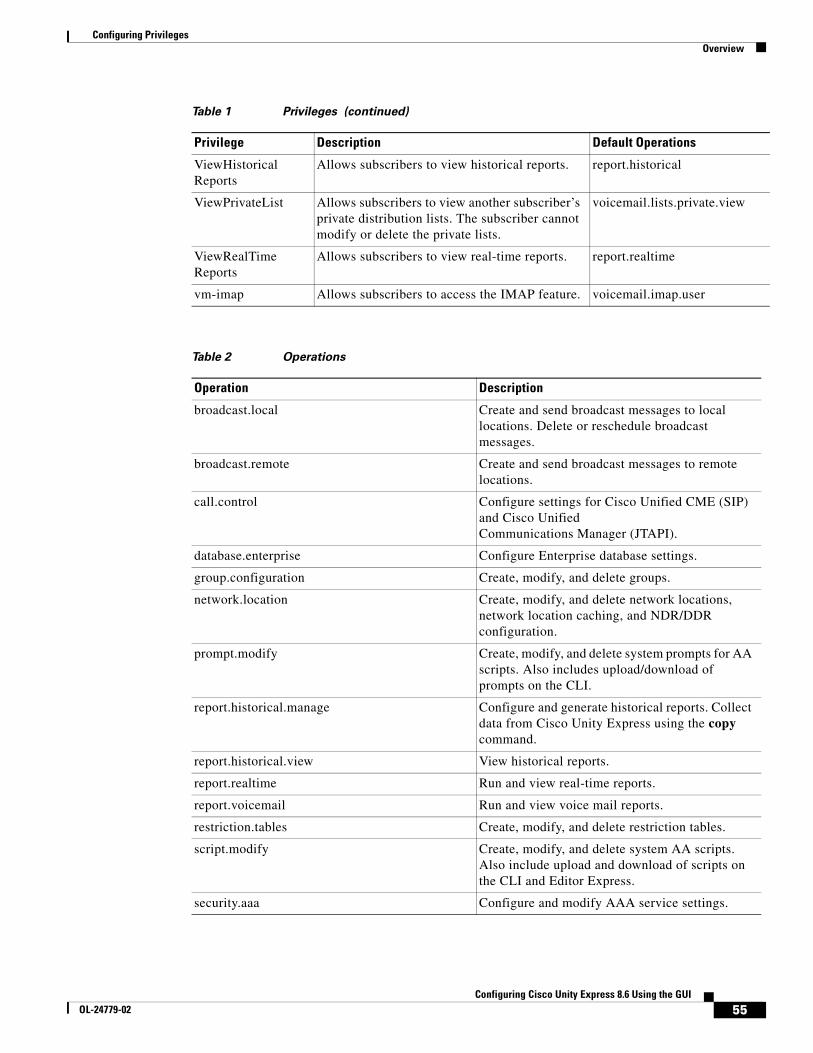
Configuring PrivilegesOverview
ViewHistorical Reports
Allows subscribers to view historical reports. report.historical
ViewPrivateList Allows subscribers to view another subscriber’s private distribution lists. The subscriber cannot modify or delete the private lists.
voicemail.lists.private.view
ViewRealTime Reports
Allows subscribers to view real-time reports. report.realtime
vm-imap Allows subscribers to access the IMAP feature. voicemail.imap.user
Table 1 Privileges (continued)
Privilege Description Default Operations
Table 2 Operations
Operation Description
broadcast.local Create and send broadcast messages to local locations. Delete or reschedule broadcast messages.
broadcast.remote Create and send broadcast messages to remote locations.
call.control Configure settings for Cisco Unified CME (SIP) and Cisco Unified Communications Manager (JTAPI).
database.enterprise Configure Enterprise database settings.
group.configuration Create, modify, and delete groups.
network.location Create, modify, and delete network locations, network location caching, and NDR/DDR configuration.
prompt.modify Create, modify, and delete system prompts for AA scripts. Also includes upload/download of prompts on the CLI.
report.historical.manage Configure and generate historical reports. Collect data from Cisco Unity Express using the copy command.
report.historical.view View historical reports.
report.realtime Run and view real-time reports.
report.voicemail Run and view voice mail reports.
restriction.tables Create, modify, and delete restriction tables.
script.modify Create, modify, and delete system AA scripts. Also include upload and download of scripts on the CLI and Editor Express.
security.aaa Configure and modify AAA service settings.
55Configuring Cisco Unity Express 8.6 Using the GUI
OL-24779-02
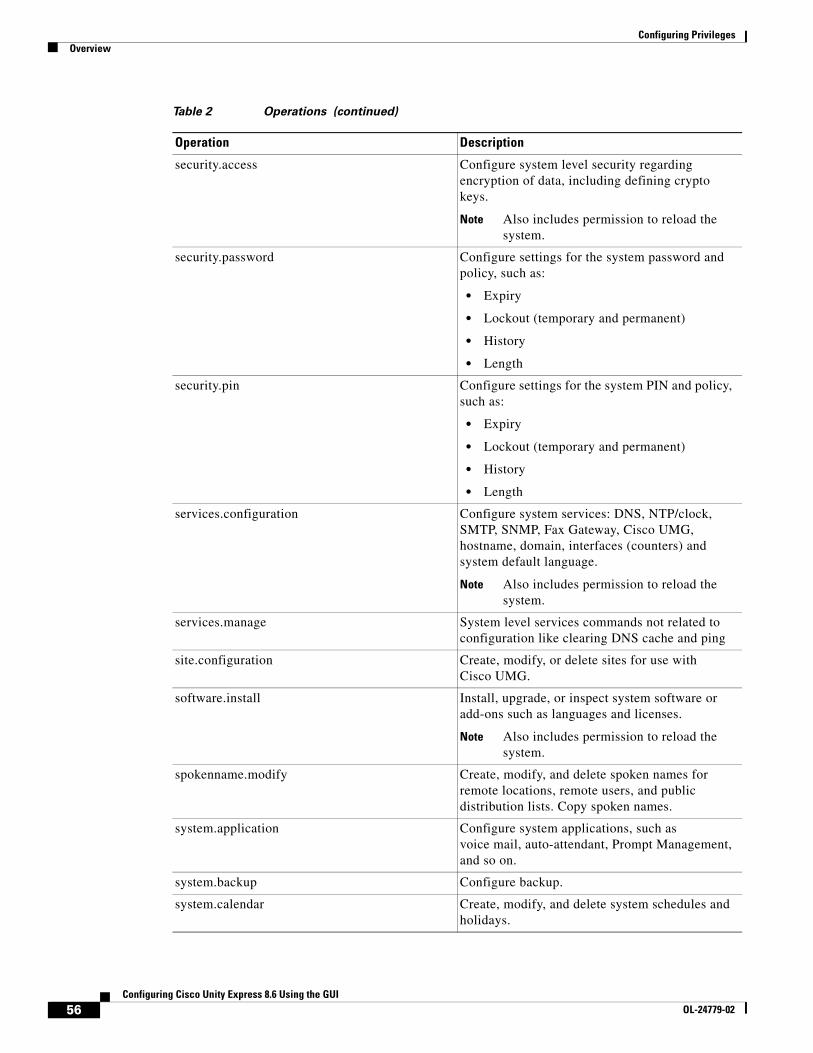
Configuring Privileges Overview
security.access Configure system level security regarding encryption of data, including defining crypto keys.
Note Also includes permission to reload the system.
security.password Configure settings for the system password and policy, such as:
• Expiry
• Lockout (temporary and permanent)
• History
• Length
security.pin Configure settings for the system PIN and policy, such as:
• Expiry
• Lockout (temporary and permanent)
• History
• Length
services.configuration Configure system services: DNS, NTP/clock, SMTP, SNMP, Fax Gateway, Cisco UMG, hostname, domain, interfaces (counters) and system default language.
Note Also includes permission to reload the system.
services.manage System level services commands not related to configuration like clearing DNS cache and ping
site.configuration Create, modify, or delete sites for use with Cisco UMG.
software.install Install, upgrade, or inspect system software or add-ons such as languages and licenses.
Note Also includes permission to reload the system.
spokenname.modify Create, modify, and delete spoken names for remote locations, remote users, and public distribution lists. Copy spoken names.
system.application Configure system applications, such as voice mail, auto-attendant, Prompt Management, and so on.
system.backup Configure backup.
system.calendar Create, modify, and delete system schedules and holidays.
Table 2 Operations (continued)
Operation Description
56Configuring Cisco Unity Express 8.6 Using the GUI
OL-24779-02
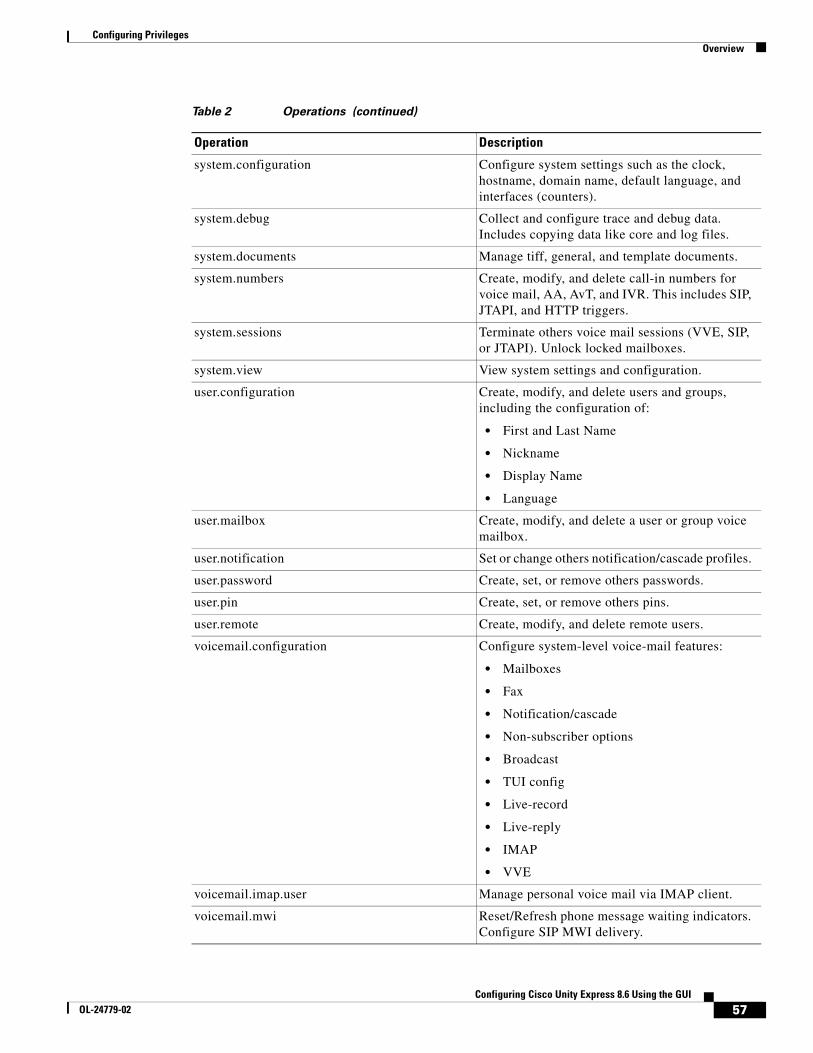
Configuring PrivilegesOverview
system.configuration Configure system settings such as the clock, hostname, domain name, default language, and interfaces (counters).
system.debug Collect and configure trace and debug data. Includes copying data like core and log files.
system.documents Manage tiff, general, and template documents.
system.numbers Create, modify, and delete call-in numbers for voice mail, AA, AvT, and IVR. This includes SIP, JTAPI, and HTTP triggers.
system.sessions Terminate others voice mail sessions (VVE, SIP, or JTAPI). Unlock locked mailboxes.
system.view View system settings and configuration.
user.configuration Create, modify, and delete users and groups, including the configuration of:
• First and Last Name
• Nickname
• Display Name
• Language
user.mailbox Create, modify, and delete a user or group voice mailbox.
user.notification Set or change others notification/cascade profiles.
user.password Create, set, or remove others passwords.
user.pin Create, set, or remove others pins.
user.remote Create, modify, and delete remote users.
voicemail.configuration Configure system-level voice-mail features:
• Mailboxes
• Fax
• Notification/cascade
• Non-subscriber options
• Broadcast
• TUI config
• Live-record
• Live-reply
• IMAP
• VVE
voicemail.imap.user Manage personal voice mail via IMAP client.
voicemail.mwi Reset/Refresh phone message waiting indicators. Configure SIP MWI delivery.
Table 2 Operations (continued)
Operation Description
57Configuring Cisco Unity Express 8.6 Using the GUI
OL-24779-02

Configuring Privileges Creating a New Privilege
Creating a New PrivilegeUse this procedure to create a new privilege and or specify which operations are included in it.
Step 1 Choose Configure > Privileges. The Privileges Configuration window appears.
Step 2 Click Add.
Step 3 Enter a name and description for the privilege.
Step 4 Select the operations that you want to add to the privilege.
Step 5 Click Add.
Step 6 Click Ok to save your changes.
Customizing an Existing PrivilegeUse this procedure to change or display which operations are included a privilege.
Step 1 Choose Configure > Privileges. The Privileges Configuration window appears.
Step 2 Select the privilege that you want to customize.
You might have to change the number of rows per page or select a different page to see the privilege that you want to change.
Step 3 Select the operations that you want to add to the privilege or deselect the operations that you want to remove.
Note Some operations are mandatory and cannot be removed.
Step 4 Click Apply.
Step 5 Click Ok to save your changes.
voicemail.lists.public Create, modify, and delete public voice mail distribution lists.
voicemail.lists.private.view (GUI Only) View others private voice mail lists.
webapp.modify Deploy web applications on Cisco Unity Express.
webapp.control Start, stop, or restart web applications.
Table 2 Operations (continued)
Operation Description
58Configuring Cisco Unity Express 8.6 Using the GUI
OL-24779-02

Configuring PrivilegesDeleting a Privilege
Deleting a PrivilegeUse this procedure to delete a privilege.
Step 1 Choose Configure > Privileges. The Privileges Configuration window appears.
Step 2 Select the privilege that you want to delete.
Step 3 Click Delete.
Step 4 Click Ok to save your changes.
59Configuring Cisco Unity Express 8.6 Using the GUI
OL-24779-02

Configuring Privileges Deleting a Privilege
60Configuring Cisco Unity Express 8.6 Using the GUI
OL-24779-02

Configuring Authentication, Authorization, and Accounting
This chapter contains procedures for:
• Configuring the AAA Authentication Server
• Specifying the Policy that Controls the Behavior of Authentication and Authorization
• Configuring the AAA Accounting Server
Configuring the AAA Authentication ServerThe two procedures for configuring AAA authentication consist of:
• Configuring connection parameters for the AAA authentication server
• Configuring whether the authentication servers or local authentication database will be queried first
Note To help protect the cryptographic information of the RADIUS server, you must view the running configuration to see this information.
• About the Authentication Order
• About Authentication Failover
• About Unreachable Failover
• Example of Authentication Sequence
• Configuring Connection Parameters for the AAA Authentication Server
About the Authentication OrderThe AAA policy specifies the failover functionality that you can optionally configure for the authentication server. You can use these two types of failover functionality separately or in combination:
• Authentication failover
• Unreachable failover
61Configuring Cisco Unity Express 8.6 Using the GUI
OL-24779-02

Configuring Authentication, Authorization, and Accounting Configuring the AAA Authentication Server
About Authentication FailoverThe authentication failover feature enables you to optionally use a remote RADIUS server for user login authentication, in addition to the local database. The procedure in this section configures the order in which authentication is resolved. You can configure authentication to use:
• The local database only
• The remote server only
• The local database first, then the remote server
• The remote server first, then the local database
When using both local and remote authentication, you can also configure whether you want the user attributes that are retrieved from a remote RADIUS AAA server to be merged with the attributes found in the local user database for the same username.
Note The authentication failover feature has the following limitations:
• Authentication with a RADIUS server is available only when accessing the GUI or CLI interface and requires only a user ID and password. Authentication for the TUI, VVE, AvT, and IMAP interfaces can use only the local database. Therefore, to gain access, users of the TUI, VVE, AvT, and IMAP interfaces must be configured locally. The auto-attendant interface does not require authentication because it is user independent.
• Login information is not synchronized between the local system and the remote server. Therefore:
– Any security features such, as password expiration, must be configured separately for Cisco Unity Express and the RADIUS server.
– Cisco Unity Express users are not prompted when security events, such as password expiration or account lockout, occur on the RADIUS server.
– RADIUS server users are not prompted when security events, such as password expiration or account lockout, occur on Cisco Unity Express.
About Unreachable FailoverThe Unreachable Failover feature is used only with RADIUS servers. This feature enables you to configure up to two addresses that can be used to access RADIUS servers.
As Cisco Unity Express attempts to authenticate a user with the RADIUS servers, the system sends messages to users to notify them when a RADIUS server either cannot be reached or fails to authenticate the user.
Example of Authentication SequenceIn this example, authentication is performed by the remote server first, then by the local database. Also, two addresses are configured for the remote RADIUS server.
This sequence of events could occur during authentication for this example:
1. Cisco Unity Express tries to contact the first remote RADIUS server.
62Configuring Cisco Unity Express 8.6 Using the GUI
OL-24779-02
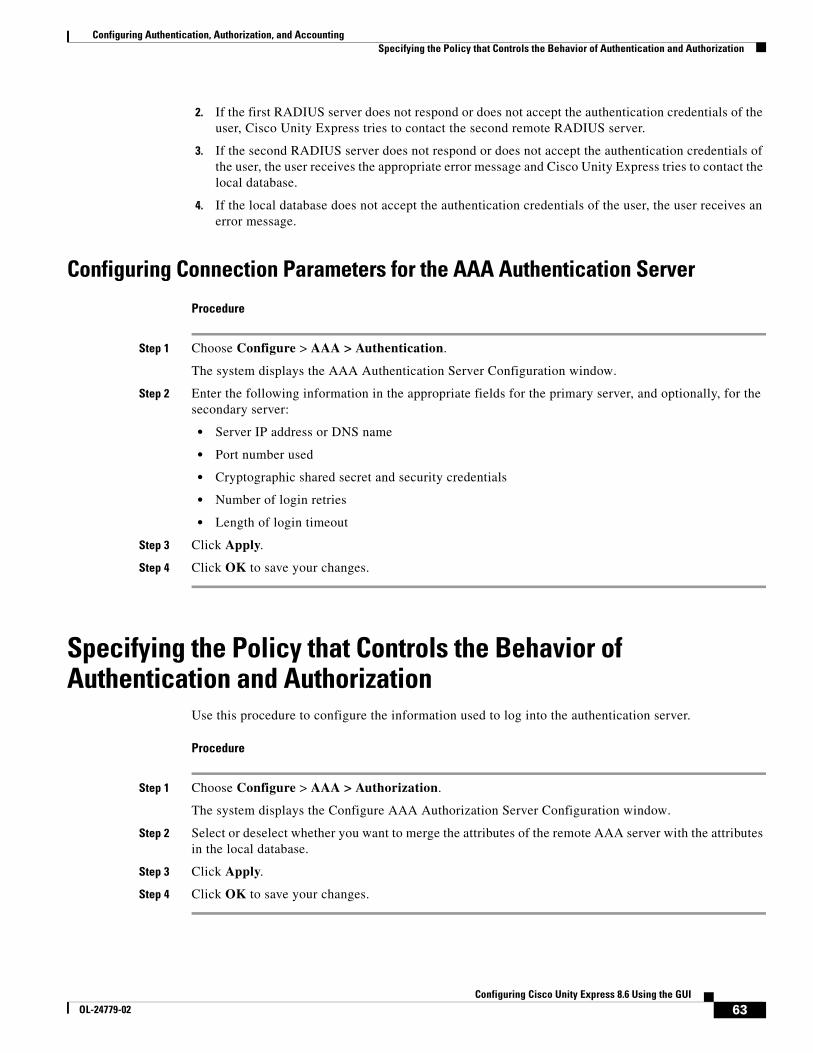
Configuring Authentication, Authorization, and AccountingSpecifying the Policy that Controls the Behavior of Authentication and Authorization
2. If the first RADIUS server does not respond or does not accept the authentication credentials of the user, Cisco Unity Express tries to contact the second remote RADIUS server.
3. If the second RADIUS server does not respond or does not accept the authentication credentials of the user, the user receives the appropriate error message and Cisco Unity Express tries to contact the local database.
4. If the local database does not accept the authentication credentials of the user, the user receives an error message.
Configuring Connection Parameters for the AAA Authentication Server
Procedure
Step 1 Choose Configure > AAA > Authentication.
The system displays the AAA Authentication Server Configuration window.
Step 2 Enter the following information in the appropriate fields for the primary server, and optionally, for the secondary server:
• Server IP address or DNS name
• Port number used
• Cryptographic shared secret and security credentials
• Number of login retries
• Length of login timeout
Step 3 Click Apply.
Step 4 Click OK to save your changes.
Specifying the Policy that Controls the Behavior of Authentication and Authorization
Use this procedure to configure the information used to log into the authentication server.
Procedure
Step 1 Choose Configure > AAA > Authorization.
The system displays the Configure AAA Authorization Server Configuration window.
Step 2 Select or deselect whether you want to merge the attributes of the remote AAA server with the attributes in the local database.
Step 3 Click Apply.
Step 4 Click OK to save your changes.
63Configuring Cisco Unity Express 8.6 Using the GUI
OL-24779-02
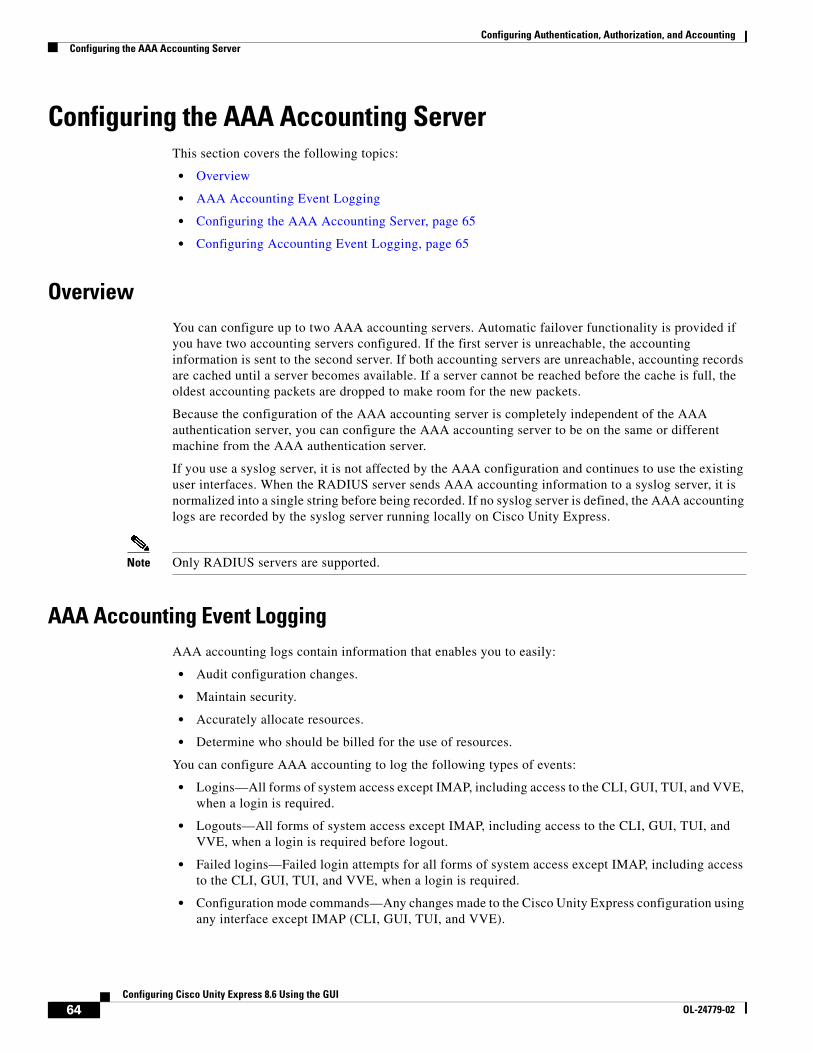
Configuring Authentication, Authorization, and Accounting Configuring the AAA Accounting Server
Configuring the AAA Accounting ServerThis section covers the following topics:
• Overview
• AAA Accounting Event Logging
• Configuring the AAA Accounting Server, page 65
• Configuring Accounting Event Logging, page 65
OverviewYou can configure up to two AAA accounting servers. Automatic failover functionality is provided if you have two accounting servers configured. If the first server is unreachable, the accounting information is sent to the second server. If both accounting servers are unreachable, accounting records are cached until a server becomes available. If a server cannot be reached before the cache is full, the oldest accounting packets are dropped to make room for the new packets.
Because the configuration of the AAA accounting server is completely independent of the AAA authentication server, you can configure the AAA accounting server to be on the same or different machine from the AAA authentication server.
If you use a syslog server, it is not affected by the AAA configuration and continues to use the existing user interfaces. When the RADIUS server sends AAA accounting information to a syslog server, it is normalized into a single string before being recorded. If no syslog server is defined, the AAA accounting logs are recorded by the syslog server running locally on Cisco Unity Express.
Note Only RADIUS servers are supported.
AAA Accounting Event LoggingAAA accounting logs contain information that enables you to easily:
• Audit configuration changes.
• Maintain security.
• Accurately allocate resources.
• Determine who should be billed for the use of resources.
You can configure AAA accounting to log the following types of events:
• Logins—All forms of system access except IMAP, including access to the CLI, GUI, TUI, and VVE, when a login is required.
• Logouts—All forms of system access except IMAP, including access to the CLI, GUI, TUI, and VVE, when a login is required before logout.
• Failed logins—Failed login attempts for all forms of system access except IMAP, including access to the CLI, GUI, TUI, and VVE, when a login is required.
• Configuration mode commands—Any changes made to the Cisco Unity Express configuration using any interface except IMAP (CLI, GUI, TUI, and VVE).
64Configuring Cisco Unity Express 8.6 Using the GUI
OL-24779-02

Configuring Authentication, Authorization, and AccountingConfiguring the AAA Accounting Server
• EXEC mode commands—Any commands entered in Cisco Unity Express EXEC mode using any interface except IMAP (CLI, GUI, TUI, and VVE).
• System startups—System startups, which include information about the system’s software version, installed licenses, installed packages, installed languages, and so on.
• System shutdowns—System shutdowns, which include information about the system’s software version, installed licenses, installed packages, installed languages, and so on.
• IMAP—Access to the IMAP system.
In addition to information specific to the type of action performed, the accounting logs also indicate the following:
• User that authored the action
• Time when the action was executed
• Time when the accounting record was sent to the server
Note Account logging is not performed during the system power-up playback of the startup configuration. When the system boots up, the startup-config commands are not recorded.
Configuring the AAA Accounting ServerUse this procedure to configure the information used to log into the accounting server.
Procedure
Step 1 Choose Configure > AAA > Accounting.
The AAA Accounting Server Configuration window appears.
Step 2 Click Accounting Enabled.
Step 3 Enter the following information in the appropriate field for the primary server, and optionally, for the secondary server:
• Server IP address or DNS name
• Port number used
• Cryptographic shared secret and security credentials
• Number of login retries
• Length of login timeout
Step 4 Click Apply.
Step 5 Click OK to save your changes.
Configuring Accounting Event LoggingUse this procedure to configure which event types to log for AAA accounting.
65Configuring Cisco Unity Express 8.6 Using the GUI
OL-24779-02

Configuring Authentication, Authorization, and Accounting Configuring the AAA Accounting Server
Procedure
Step 1 Choose Configure > AAA > Accounting.
The system displays the Accounting Server Configuration window.
Step 2 Select the log events that you want to include in the log and deselect those you do not want to include.
Step 3 Click Apply to save your changes.
66Configuring Cisco Unity Express 8.6 Using the GUI
OL-24779-02

Configuring Network Locations
Perform the following tasks from the Configure Network Locations window:
• Viewing a List of Network Locations
• Adding a Network Location
• Displaying or Modifying a Network Location
• Deleting a Network Location
Viewing a List of Network LocationsUse this procedure to view a list of network locations.
Step 1 Choose Configure > Network Locations. The Configure Network Locations window appears.
Step 2 The local location ID is displayed first. One of the network locations must be entered in this field to enable networking. To display or modify the local location configuration, click View Location Profile next to the Local Location ID. If no Local Location ID is listed, see Adding a Network Location.
Step 3 A list of locations is displayed with the following fields:
• Location ID
• Location name
• Abbreviation—Alphanumeric abbreviation for the location that is spelled to a user (if there is no spoken name) when the user performs addressing functions in the telephone user interface.
• Domain Name—Email domain name or IP address for the location. This information is added when sending a VPIM message to the remote location (for example, “[email protected]”). A domain name or IP address must be configured or networking is disabled at this location.
Step 4 If no Local Location ID is listed, proceed to Displaying or Modifying a Network Location to create a new one.
67Configuring Cisco Unity Express 8.6 Using the GUI
OL-24779-02

Configuring Network Locations Adding a Network Location
Adding a Network LocationUse this procedure to add a network location.
Step 1 Choose Configure > Network Locations. The Configure Network Locations window appears.
Step 2 Click Add. The Add a New Location window appears
Step 3 Enter information into the following fields:
• Location ID
• Location name
• Abbreviation—Alphanumeric abbreviation for the location that is spelled to a user (if there is no spoken name) when the user performs addressing functions in the telephone user interface.
• Domain Name/IP Address—Email domain name or IP address for the location. This information is added when sending a Voice Profile for Internet Mail (VPIM) message to the remote location (for example, “[email protected]”). A domain name or IP address must be configured or networking is disabled at this location.
• Phone Prefix—Prefix that is added to an extension to create a VPIM address for a user at the location. A prefix is required only if an email domain services multiple locations, and extensions between the locations are not unique. Valid values: 1 to 15 digits.
• VPIM Broadcast ID—You must enter a VPIM broadcast ID to enable sending and receiving of broadcast messages. The default value, “vpim-broadcast,” can be used for remote locations that have unique domain names. If more than one of the remote locations has the same domain name, you must enter a unique ID for each of those locations. For remote locations that are networked to a Cisco Unity system, enter a numeric VPIM broadcast ID that is compatible with the Cisco Unity system. To send broadcast messages from Cisco Unity to Cisco Unity Express, the VPIM ID must match on both systems.
• Calling Number Rule Prefix Digits—Any digits are supplied to this command are prepended to the E.164 phone number derived using the calling-number-rule before dialing the digits for a live-reply to a network delivered voice-mail message.
• Minimum Extension Length (required)—Minimum number of digits for extensions at the remote location. Valid values are 2 to 15; default is 2.
• Maximum Extension Length (required)—Maximum number of digits for extensions at the remote location. Valid values are 2 to 15; default is 15.
• Voicemail Encoding—Configures the encoding method used to transfer voice-mail messages from this location. You can select one of the following:
– Dynamic—Cisco Unity Express negotiates with the receiving location to determine the encoding method
– G711ulaw—Cisco Unity Express always sends messages as G711ulaw .wav files. Set this only if the receiving system supports G711 ulaw encoding (such as Cisco Unity).
– G726—Cisco Unity Express always sends messages as G726 (32K ADPCM). Use for low-bandwidth connections or when the system to which Cisco Unity Express is connecting does not support G711ulaw
• Send Spoken Name—Enables sending the spoken name of the voice-mail originator as part of the message that is sent to the remote location. If the spoken name is sent, it is played as the first part of the received message.
68Configuring Cisco Unity Express 8.6 Using the GUI
OL-24779-02

Configuring Network LocationsDisplaying or Modifying a Network Location
• Send vCard Information—Enables sending vCard information in VPIM messages. User information from the vCard is added to the remote user directory cache (called the least recently used [LRU] cache). The LRU cache is updated with user information (such as the user's first and last name) whenever new vCards are received. The cache is used to provide addressing confirmation.
• Enabled—Indicates networking is enabled for this location. Check the box to enable networking, or uncheck it to disable networking.
• Enable Secure Messages—Indicates secure messaging is enabled for this location.
Step 4 Click Add. The Network Locations window reappears with the new location added.
Displaying or Modifying a Network LocationUse this procedures to display or modify network locations, including configuring the local location ID:
• Configuring the Local Location ID
• Displaying or Modifying Locations
Configuring the Local Location ID
Step 1 Choose Configure > Network Locations. The Configure Network Locations window appears.
Step 2 To configure the local location ID, enter the location ID number. You must designate one of your network locations as the local location and enter it in this field to enable networking.
Step 3 Click Apply.
Step 4 Click Ok at the information prompt.
Displaying or Modifying Locations
Step 1 Choose Configure > Network Locations. The Configure Network Locations window appears.
Step 2 To display or modify the local location configuration, click View Location Profile next to the Local Location ID. To display or modify a remote location configuration, click its location ID in the list of locations.
Step 3 The Location Profile window appears with the following fields:
• Location ID
• Location name
• Abbreviation—Alphanumeric abbreviation for the location that is spelled to a user (if there is no spoken name) when the user performs addressing functions in the telephone user interface.
• Domain Name/IP Address—Email domain name or IP address for the location. This information is added when sending a Voice Profile for Internet Mail (VPIM) message to the remote location (for example, “[email protected]”). A domain name or IP address must be configured or networking is disabled at this location.
• Phone Prefix—Prefix that is added to an extension to create a VPIM address for a user at the location. A prefix is required only if an email domain services multiple locations, and extensions between the locations are not unique. Valid values: 1 to 15 digits.
69Configuring Cisco Unity Express 8.6 Using the GUI
OL-24779-02

Configuring Network Locations Displaying or Modifying a Network Location
• VPIM Broadcast ID—You must enter a VPIM broadcast ID to enable sending and receiving of broadcast messages. The default value, “vpim-broadcast,” can be used for remote locations that have unique domain names. If more than one of the remote locations has the same domain name, you must enter a unique ID for each of those locations. For remote locations that are networked to a Cisco Unity system, enter a numeric VPIM broadcast ID that is compatible with the Cisco Unity system. To send broadcast messages from Cisco Unity to Cisco Unity Express, the VPIM ID must match on both systems.
• Calling Number Rule Prefix Digits—Any digits are supplied to this command will be prepended to the E.164 phone number derived using the calling-number-rule before dialing the digits for a live-reply to a network delivered voice-mail message.
• Minimum Extension Length—Minimum number of digits for extensions at the remote location. Valid values are 2 to 15; the default value is 2.
• Maximum Extension Length—Maximum number of digits for extensions at the remote location. Valid values are 2 to 15; the default value is 15.
• Voicemail encoding—Configures the encoding method used to transfer voice-mail messages from this location. You can select one of the following:
– Dynamic—Cisco Unity Express negotiates with the receiving location to determine the encoding method
– G711ulaw—Cisco Unity Express always sends messages as G711ulaw .wav files. Set this only if the receiving system supports G711 ulaw encoding (such as Cisco Unity).
– G726—Cisco Unity Express always sends messages as G726 (32K ADPCM). Use for low-bandwidth connections or when the system to which Cisco Unity Express is connecting does not support G711ulaw
• Send Spoken Name—Enables sending the spoken name of the voice-mail originator as part of the message that is sent to the remote location. If the spoken name is sent, it is played as the first part of the received message.
• Send vCard Information—Enables sending vCard information in VPIM messages. User information from the vCard is added to the remote user directory cache (called the least recently used [LRU] cache). The LRU cache is updated with user information (such as the user's first and last name) whenever new vCards are received. The cache is used to provide addressing confirmation.
• Enabled—Indicates networking is enabled for this location. Check the box to enable networking, or uncheck it to disable networking.
• Enable Secure Messages—Indicates secure messaging is enabled for this location.
Step 4 After making any changes, click Save.
Step 5 Click Ok at the information prompt.
70Configuring Cisco Unity Express 8.6 Using the GUI
OL-24779-02

Configuring Network LocationsDeleting a Network Location
Deleting a Network LocationUse this procedure to delete a network location from Cisco Unity Express.
Caution Deleting a location disables networking to and from that location. Deleting the location designated as the local location disables networking for the entire Cisco Unity Express system. If you delete the location designated as the local location, you must add a new network location and designate it as the local location to reenable networking.
Step 1 Choose Configure > Network Locations. The Configure Network Locations window appears.
Step 2 Click the box next to the location ID of the location that you want to delete and click Delete.
Step 3 At the prompt, click Ok to delete the location.
71Configuring Cisco Unity Express 8.6 Using the GUI
OL-24779-02

Configuring Network Locations Deleting a Network Location
72Configuring Cisco Unity Express 8.6 Using the GUI
OL-24779-02

Configuring Remote Users
Perform the following tasks in the Configure Remote Users window:
• Viewing a List of Remote Users
• Adding a New Remote User
• Displaying or Modifying a Remote User
• Deleting a Remote User
Viewing a List of Remote UsersUse this procedure to view a list of users at remote locations.
Note You must have at least one remote network location configured before you can add, modify, or view a list of remote users. See Configuring Network Locations for more information.
Choose Configure > Remote Users. The Configure Remote Users window appears and contains the following fields:
• User ID—By default, the system displays users in alphabetical order by user ID. To sort from A to Z, click User ID.
• Display Name—To display the list of users in order by display name, click Display Name.
• Location ID—To display the list of users in order by Location ID, click Location ID.
• Primary Extension—To display the list of users in order by primary extension, click Primary Extension.
• Use the dialog box to change the number of rows displayed per window.
73Configuring Cisco Unity Express 8.6 Using the GUI
OL-24779-02

Configuring Remote Users Adding a New Remote User
Adding a New Remote UserUse this procedure to add a new remote user to the system directory. Remote users are users whose voice mailboxes are located at a remote network location. Remote users who are added to the system directory can be reached using the dial-by-name feature, and senders receive address and spoken name confirmation when sending messages to remote users.
Note The system administrator can record a spoken name for remote users using the Administration via Telephone (AvT) interface. Spoken name information is also retrieved from the Voice Profile for Internet Mail (VPIM) messages received by the system from the remote user and the system directory is updated accordingly.
The number of users supported depends on the Cisco Unity Express module being used. See the Cisco Unity Express Release Notes for detailed support information.
Note You must add the remote user's location before adding the remote user to the system.
Step 1 Choose Configure > Remote Users. The Configure Remote Users window appears.
Step 2 Click Add. The Add a New Remote User window appears.
Step 3 Enter information into the following fields:
• User ID
• First Name and Last Name
• Display Name
• Primary Extension
• Location: Choose one of the following to identify the location:
– Location ID
– Abbreviation—Alphanumeric abbreviation for the location.
Step 4 To save the information, click Add.
Displaying or Modifying a Remote UserUse this procedure to display or modify the profile of a remote user in the system directory. Remote users are users whose voice mailboxes are located at a remote network location. Remote users who are added to the system directory can be reached using the dial-by-name feature, and senders receive address and spoken name confirmation when sending messages to remote users.
Note The system administrator can record a spoken name for remote users using the Administration via Telephone (AvT) interface. Spoken name information is also retrieved from the VPIM messages received by the system from the remote user and the system directory is updated accordingly.
74Configuring Cisco Unity Express 8.6 Using the GUI
OL-24779-02
Configuring Remote UsersDeleting a Remote User
The number of users supported depends on the Cisco Unity Express module being used. See the Cisco Unity Express Release Notes for further support information.
Step 1 Choose Configure > Remote Users. The Configure Remote Users window appears.
Step 2 Click the name of the remote user whose profile you want to view. The Remote User Profile Window appears with the following fields shown that you can change:
• First Name and Last Name
• Display Name
• Primary Extension
• Location: Choose one of the following to identify the location:
– Location ID
– Abbreviation—Alphanumeric abbreviation for the location.
Step 3 After making any changes, click Apply.
Step 4 Click Ok at the information prompt.
Deleting a Remote UserUse this procedure to delete a remote user from the system directory.
Step 1 Choose Configure > Remote Users. The Configure Remote Users window appears.
Step 2 Check the box next to the user ID that you want to delete.
Step 3 Click Delete.
Step 4 Click Ok to confirm the deletion.
75Configuring Cisco Unity Express 8.6 Using the GUI
OL-24779-02

Configuring Remote Users Deleting a Remote User
76Configuring Cisco Unity Express 8.6 Using the GUI
OL-24779-02

Configuring the Cisco Unified Communications Manager System
Use this procedure to modify the Java Telephony API (JTAPI) provider (on Cisco Unified Communications Manager) information in Cisco Unity Express.
Note Any changes to the JTAPI provider on Cisco Unified Communications Manager require a software reload of Cisco Unity Express. You must save your Cisco Unity Express configuration and reload for the changes to take effect.
Use this procedure to configure the Cisco Unified Communications Manager (CUCM).
Step 1 Choose Configure > Communications Manager. The Configure CUCM window appears.
Step 2 Enter the information in the following fields:
• Primary Communications Manager—IP address or hostname of the primary Cisco Unified Communications Manager system.
• Secondary Communications Manager—IP address or hostname of the first alternate Cisco Communications Manager system.
• Tertiary Communications Manager—IP address or hostname of the second alternate Cisco Unified Communications Manager system.
• Web User Name—Username to log in to the Cisco Unified Communications Manager system.
• Web Password—Password to log in to the Cisco Unified Communications Manager system.
• JTAPI user ID and password
Step 3 Click Apply to save the information.
Step 4 Click Verify to test the connection between Cisco Unified Communications Manager and Cisco Unity Express.
Step 5 Click Reload Unity Express to reload the software after you make configuration changes.
77Configuring Cisco Unity Express 8.6 Using the GUI
OL-24779-02

Configuring the Cisco Unified Communications Manager System
78Configuring Cisco Unity Express 8.6 Using the GUI
OL-24779-02

Configuring the Cisco Unified Communications Manager Express System
Use this procedure to enter information about the Cisco Unified Communications Manager Express (CUCME) system to which the Cisco Unity Express system connects, including the Cisco Unified CME GUI system administrator's name and password.
Note The system administrator account information in this window is for the Cisco Unified Communications Manager Express GUI system administrator account only.
Perform the following tasks from the Configure CUCME window:
• Viewing Cisco Unified Communications Manager Express Settings
• Adding a Site Name
• Editing a Site
• Deleting a Site
• Entering the SIP Provider Hostname
Viewing Cisco Unified Communications Manager Express Settings
Choose Configure > CUCME. In the Sites window, the current site names are listed with the following fields displayed:
• Hostname
• Web User Name
• Web Password
• XML User Name
• XML Password
• Phone Authentication User Name
• Phone Authentication Password
• SIP gateway hostname
79Configuring Cisco Unity Express 8.6 Using the GUI
OL-24779-02

Configuring the Cisco Unified Communications Manager Express System Adding a Site Name
The number of sites visible may depend on the Cisco Unity Express hardware installed. Some hardware modules support adding multiple sites while other hardware modules support only one site. See Adding a Site Name.
Adding a Site NameCentralized Cisco Unity Express allows you to add multiple Sites for each Cisco Unity Express installation on selected platforms only. The Local site is the default and cannot be deleted.
Use this procedure to add a site to the Cisco Unified Communications Manager Express that the system is registered to.
Step 1 Choose Configure > CUCME. The Configure CUCME window appears.
Step 2 Click Add Site. The Add Site window appears.
• Enter the Site Name.
• Enter the Description.
Step 3 Enter the hostname or IP address of the router on which Cisco Unified CME is installed.
Step 4 Enter the Web username for the Cisco Unified CME system administrator's GUI account.
Step 5 Enter the Web password for the Cisco Unified CME system administrator's GUI account.
Step 6 Enter the XML username.
Step 7 Enter the XML password.
Step 8 Enter the Phone Authentication User Name.
Step 9 Enter the Phone Authentication User Password.
Step 10 Click Apply to save your settings. The Configure CUCME window reappears and the new site is added to the table.
Editing a SiteUse this procedure to edit a site that is registered to the Cisco Unified CME system.
Step 1 Choose Configure > CUCME. The Configure CUCME window appears.
Step 2 Click on the site name in the Name field. The Configure CUCME Edit window appears.
Step 3 Edit the information in the fields and click Apply to save your changes.
80Configuring Cisco Unity Express 8.6 Using the GUI
OL-24779-02

Configuring the Cisco Unified Communications Manager Express SystemDeleting a Site
Deleting a SiteUse this procedure to delete a site that is registered to the Cisco Unified CME system.
Step 1 Choose Configure > CUCME. The Configure CUCME window appears.
Step 2 Check the box next to the site name in the Name field and click Delete. Click Ok at the prompt. The Configure CUCME window reappears and the site is removed from the table.
Entering the SIP Provider HostnameUse this procedure to enter the SIP provider hostname.
Step 1 Choose Configure > CUCME. The Configure CUCME window appears.
Step 2 Enter the hostname or IP address of the router that provides SIP call control. (This is often the same router on which Cisco Unified CME is installed.)
Step 3 Click Apply.
Step 4 Click Ok.
81Configuring Cisco Unity Express 8.6 Using the GUI
OL-24779-02

Configuring the Cisco Unified Communications Manager Express System Entering the SIP Provider Hostname
82Configuring Cisco Unity Express 8.6 Using the GUI
OL-24779-02

Configuring Voice-Mail Prompts
Caution: This section is for advanced users.
Perform the following tasks from the System Prompts window:
• Viewing a List of Prompts
• Displaying or Modifying a Prompt
• Uploading a Prompt
• Downloading a Prompt
• Deleting a Prompt
• Changing Prompt Languages
Viewing a List of PromptsUse this procedure to view a list of voice-mail prompts.
Step 1 Choose System > Prompts. The System Prompts window appears and displays the following fields:
• Prompt Name—Filename of the prompt. To sort the table by prompt name, click Prompt Name.
• Creation Date—Date on which the .wav file was created. To sort the table by creation date, click Creation Date.
• Size (Bytes)—Size, in bytes, of the prompt file. To sort the table by size in bytes, click Size (Bytes).
• Length (Seconds)—Length, in seconds, of the prompt file. To sort the table by length in seconds, click Length (Seconds).
• To increase the number of rows shown on the page, click Rows by Page and choose the number you want to show.
Step 2 From the Languages list, select the Language for the Cisco Unity Express prompts. The Prompts window refreshes and displays all of the prompts available for the language you selected.
83Configuring Cisco Unity Express 8.6 Using the GUI
OL-24779-02

Configuring Voice-Mail Prompts Displaying or Modifying a Prompt
Displaying or Modifying a PromptUse this procedure to display or modify a voice-mail prompt.
Step 1 Choose System > Prompts. The System Prompts window appears.
Step 2 Click the name of the prompt you want to display or modify. The Prompt Profile window appears. You can edit the prompt filename only.
Step 3 After editing, click Apply.
Step 4 Click Ok to save your changes.
Uploading a PromptUse this procedure to upload new voice-mail prompts.
Step 1 Choose System > Prompts. The System Prompts window appears.
Step 2 Click Upload. See also Configuring Auto-Attendant Script Parameters.
Step 3 Enter information in the following fields:
• Language
• Source File Name—path to the file you want to upload. Click the Browse button to help you find the directory with the file you want to upload.
• Destination File Name—Enter the same filename as shown in the Source Filename field or a new filename for the prompt. This file should be in .wav format.
• Click to overwrite the destination file, if it exists.
Step 4 Click Upload to save your changes.
Downloading a PromptUse this procedure to download a prompt.
Step 1 Choose System > Prompts. The System Prompts window appears.
Step 2 Check the box next to the prompt that you want to download.
Step 3 Click Download. The File Download window appears.
Step 4 In the File Download window, click Open and select an application on your computer, or click Save to save the file to your computer.
Step 5 In the Save As window, navigate to the folder where you want to save the file and click Save.
84Configuring Cisco Unity Express 8.6 Using the GUI
OL-24779-02

Configuring Voice-Mail PromptsDeleting a Prompt
Deleting a PromptUse this procedure to delete a prompt.
Step 1 Choose System > Prompts. The System Prompts window appears.
Step 2 Click the box next to the prompt that you want to delete.
Step 3 Click Delete.
Step 4 Click Ok to confirm the deletion.
Changing Prompt LanguagesUse this procedure to change the language of voice-mail prompts.
Step 1 Choose System > Prompts. The System Prompts window appears.
Step 2 From the Languages list, select the language for the Cisco Unity Express prompts. The Prompts window refreshes and displays all of the prompts available for the language you selected.
85Configuring Cisco Unity Express 8.6 Using the GUI
OL-24779-02

Configuring Voice-Mail Prompts Changing Prompt Languages
86Configuring Cisco Unity Express 8.6 Using the GUI
OL-24779-02

P A R T 2
System Tab


Configuring System Scripts Using Editor Express
Perform the following tasks from the System Scripts menu:
• Viewing a List of Scripts
• Creating a New Script with Editor Express
• Uploading Scripts
• Editing Scripts
• Deleting Scripts
• Downloading Scripts
Viewing a List of ScriptsUse this procedure to view a list of scripts. For more information on Cisco Unity Express scripts, see the Cisco Unity Express Maintain and Operate Guides at the following URL: http://www.cisco.com/en/US/products/sw/voicesw/ps5520/prod_maintenance_guides_list.html.
Step 1 Choose System > Scripts. The window displays a list of non-system scripts, showing the following fields:
• Script Name—Filename of the script. To sort the table by script name, click Script Name.
• Type—AA or IVR.
• Creation Date—Date on which the script file was created. This information is read from the script file properties. To sort the table by creation date, click Creation Date.
• Last Modified Date—Date on which the script was last modified. This information is read from the script file properties. To sort the table by the date last modified, click Last Modified Date.
• Size (Bytes)—Size of the script. This information is read from the script file properties. To sort the table by size in bytes, click Size (Bytes).
To increase the number of rows shown on the page, click Rows per Page and choose the number you want to show.
Step 2 Click on Show system scripts to display the system scripts.
Note System scripts are indicated with an asterisk and cannot be modified or deleted. Scripts that you create do not have an asterisk and can be edited. See Editing Scripts for more information.
89Configuring Cisco Unity Express 8.6 Using the GUI
OL-24779-02

Configuring System Scripts Using Editor Express Creating a New Script with Editor Express
Step 3 Click on Hide system scripts to hide the system scripts.
Creating a New Script with Editor ExpressPerform the following tasks in the Editor Express window:
• Configuring Settings for a New Script
• Configuring the Call Flow for a Script
• Show/Hide Settings
• Closing Editor Express
Configuring Settings for a New Script
Use this procedure to configure settings for a new script.
Step 1 Choose System > Scripts > New. The Editor Express window opens with an untitled.aef (unsaved) script.
Step 2 Configure the new script settings by selecting any combination of the following options:
a. Click the box to allow dial-by-extension at any time during the main menu.
b. Click the box to allow menu options to overlap with the extension dial-plan.
c. Enter the desired extension length.
d. Click the box to allow external transfers.
e. If your system supports multiple languages, click the box to enable the Language selection menu. If selected, the language selection menu displays in the Call Flow window.
f. Click the box to enable an alternate main menu for business closed hours. If selected, the Business Closed Menu options display in the Call Flow window.
Step 3 Click Save. A pop-up window appears prompting you to enter a script name.
Step 4 Enter a script name and save the file (an .aef extension is automatically added if you save the file).
Step 5 Click Ok to save your settings or click Cancel.
Proceed to the next section for Configuring the Call Flow for a Script.
90Configuring Cisco Unity Express 8.6 Using the GUI
OL-24779-02
Configuring System Scripts Using Editor ExpressCreating a New Script with Editor Express
Configuring the Call Flow for a Script
Use this procedure to configure the call flow from the Editor Express window.
Step 1 Choose System > Scripts > New or select an existing script by clicking the Edit button. The Editor Express window opens.
Step 2 Click the box to play the alternate (emergency) greeting.
Step 3 Choose an audio prompt file from the drop-down menu for the following prompts:
• Welcome prompt
• Language Menu prompt
Select the prompt from the drop-down menu and click Add/ Remove Choice >>> . In the Add Language Choice window, select the key and assign it to a language. Click Ok. Repeat for each key to be assigned a language. To remove the language from a key, select the key and select Clear choice and click Ok.
Note The maximum number of languages allowed is three. Only installed languages are displayed.
• Holiday prompt
• Business schedule: select a Business Schedule name from the drop-down menu.
– Business open prompt
– Business closed prompt
Step 4 Configure the actions for the following menus:
• Main Menu
• Business Closed Menu
a. Select the prompt to be used for each menu.
b. Assign additional keys and menu actions by clicking Add Action. The Add Menu Action window appears.
c. Select the Key from the drop-down list to assign a Key to an Action. You can choose the numbers 0-9, the “*” symbol, or the “#” symbol.
d. Select the action from the drop-down list to assign an action to the key. You can choose from one of the following actions:
– Play message
– Dial-by-name
– Dial-by-extension
– Transfer to extension
– Transfer to mail box number
– Sub-menu. You can add another action from this level.
– Disconnect call
Click Ok to save your settings or Cancel. The action is added to the script. Configure the additional settings for each action. See Table 3 for more information.
91Configuring Cisco Unity Express 8.6 Using the GUI
OL-24779-02

Configuring System Scripts Using Editor Express Creating a New Script with Editor Express
Continue to add menu actions by clicking the Add Action button and repeating this step. To remove an action from the menu, click Delete.
Step 5 Configure the Good-bye prompt.
a. Select the Good bye prompt name from the drop-down menu.
b. Click Add action. The Add Good-bye Action window appears.
c. Select the action from the drop-down list. You can choose one of the following actions:
– Transfer to extension
– Transfer to mail box number
See Table 3 for more information.
d. Click Ok to save your settings or Cancel. The action is added.
Step 6 Click Save to save your script.
Table 3 lists the Main Menu prompt and Goodbye prompt actions.
Table 3 Main Menu Prompt and Goodbye Prompt Actions
Action Supported for: Instructions for Setting Action
Play Prompt Main Menu prompt Select the prompt audio file from the drop-down menu.
1.
then
Select one of the following options:2.
• Repeat Main Menu
• Disconnect Call
Dial By Name Main Menu prompt Select the search style:
• First - Last Name
• Last - First Name
Dial By Extension Main Menu prompt None.
Transfer to Extension Main Menu prompt
Goodbye prompt
Enter the extension subscribers will be transferred to.
Transfer to Mailbox Number
Main Menu prompt
Goodbye prompt
Enter the mailbox number subscribers will be transferred to.
Sub-Menu Main Menu prompt Select the prompt audio file from the drop-down menu.
1.
Add actions for the sub-menu.2.
Disconnect Call Main Menu prompt None.
92Configuring Cisco Unity Express 8.6 Using the GUI
OL-24779-02

Configuring System Scripts Using Editor ExpressUploading Scripts
Uploading a New Prompt
Use this procedure to upload a new prompt from the Editor Express window.
Step 1 Choose System > Scripts > New. The Editor Express window appears.
Step 2 Click Upload Prompt. The Upload window appears.
Step 3 In the Upload dialog box, perform the following tasks:
a. Choose the language.
b. Enter the source filename, or path to the file you want to upload. Click the Browse button to help you find the directory with the file you want to upload.
c. Enter the destination filename (required). Enter the same filename as shown in the Source Filename field or a new filename for the prompt.
d. Click the box to overwrite the destination file, if desired, if the file already exists.
Step 4 Click Upload to save your changes.
Show/Hide Settings
You can choose to show or hide the Call Flow window by clicking on Show/Hide Settings.
Closing Editor Express
To close the Editor Express window, click Close.
Uploading ScriptsUse this procedure to upload a new script.
Step 1 Choose System > Scripts. The System Scripts window appears.
Step 2 Click Upload. The Upload window appears.
Step 3 In the Upload dialog box, perform the following tasks:
a. Enter the source filename, or path to the file you want to upload. Click the Browse button to help you find the directory with the file you want to upload.
b. Enter the destination filename (required). Enter the same filename as shown in the Source Filename field or a new filename for the script.
c. Click the box to overwrite the destination file, if the file already exists.
Step 4 Click Upload to save your changes.
93Configuring Cisco Unity Express 8.6 Using the GUI
OL-24779-02

Configuring System Scripts Using Editor Express Editing Scripts
Editing ScriptsOnly scripts that are created with Editor Express may be edited using the Web GUI interface in the browser window. These scripts appear in the System Scripts table with an Edit button next to the script name. Scripts created with the windows Cisco Unity Express editor are only editable on the windows editor and do not have an Edit button next to the script name.
Editing Editor Express Scripts
Use this procedure to edit scripts.
Step 1 Choose System > Scripts. The System Scripts window appears.
Step 2 In the Script Name field, edit an existing script (the Edit button is present) by clicking the Edit button. The Editor Express window appears.
Step 3 Follow the procedures to configure Editor Express in Creating a New Script with Editor Express.
Step 4 Click Save to save your settings.
Deleting ScriptsUse this procedure to delete a script.
Step 1 Choose System > Scripts. The System Scripts window appears.
Step 2 Select at least one entry to delete from the Script Name table.
Step 3 Click Delete.
Step 4 Click Ok or Cancel to complete the task.
Downloading ScriptsUse this procedure to download new scripts.
Step 1 Choose System > Scripts. The System Scripts window appears.
Step 2 Select the script that you want to download from list and click Download. Your system download window appears. You can save the file to disk or download the file using the default application.
94Configuring Cisco Unity Express 8.6 Using the GUI
OL-24779-02

Configuring Business Hours Settings
Perform the following actions in the System Business Hours Settings window:
• Displaying or Modifying a Business Hours Schedule
• Adding a Business Hours Schedule
• Copying Business Hour Days
• Deleting a Business Hours Schedule
Displaying or Modifying a Business Hours ScheduleUse this procedure to display or modify a business hours schedule.
Step 1 Choose System > Business Hours Settings. The System Business Hours window appears.
Step 2 Choose the Business Hours schedule you want to view or modify from the drop-down list.
Step 3 Click the box for each half-hour increment to check or uncheck it. A gray box indicates that the business is closed during that time period. A checked box indicates that the business is open.
Step 4 Click Apply to save your changes.
Adding a Business Hours ScheduleUse this procedure to create a Business hours schedule.
Step 1 Choose System > Business Hours Settings. The System Business Hours window appears.
Step 2 Choose the Business Hours schedule you want to modify from the drop-down list, or, if you do not have a business hours schedule, click Add to create one.
Step 3 Click the box for each half-hour increment to check or uncheck it. A gray box indicates that the business is closed during that time period. A checked box indicates that the business is open.
Step 4 Click Apply to save your changes.
95Configuring Cisco Unity Express 8.6 Using the GUI
OL-24779-02

Configuring Business Hours Settings Copying Business Hour Days
Copying Business Hour DaysCopy the business hours schedule from one day to another day, or range of days. For example, if you have a business that is open Monday through Friday for the same hours, you can configure first the hours for Monday, and copy Monday's schedule to all weekdays.
Use this procedure to copy the business hours schedule for a day.
Step 1 Choose System > Business Hours Settings. The System Business Hours window appears.
Step 2 Configure the day you want to copy and choose it from the drop-down list at the bottom of the Business Hours Settings window.
Step 3 Choose either the day to which you want to copy the configured schedule, or one of the following from the drop-down list on the right:
• All weekdays—copies the schedule for the configured day to all weekdays.
• Weekend—copies the schedule for the configured day to all weekend days.
Tip For a business that is open regular business hours on Monday through Friday, configure Monday's hours and copy Monday's hours to all weekdays, then configure Saturday's hours, and copy to Sunday.
Step 4 Click Copy Schedule.
Step 5 Click Apply to save your changes.
Deleting a Business Hours ScheduleUse this procedure to delete a Business hours schedule.
Step 1 Choose System > Business Hours Settings. The System Business Hours window appears.
Step 2 Choose the schedule that you want to delete from the Business Hours Schedule drop-down list.
Step 3 Click Delete.
Step 4 Click Ok at the information prompt.
96Configuring Cisco Unity Express 8.6 Using the GUI
OL-24779-02

Configuring Holiday Settings
Perform the following tasks from the System Holiday Settings window:
• Viewing a List of Holidays
• Adding a Holiday
• Displaying or Modifying a Holiday
• Deleting a Holiday
Viewing a List of HolidaysUse this procedure to view a list of Holidays.
Step 1 Choose System > Holiday Settings. The holiday settings for the current year are displayed. If no holidays are configured, proceed to Adding a Holiday.
Step 2 Choose the year for which you want to display the list of holidays from the drop-down list, or choose All Holidays to display all years.
Step 3 The list of holidays shows the date and description of each holiday.
Adding a HolidayUse the following procedures to add Holidays:
• Adding Fixed Holidays
• Adding Regular Holidays
• Copying Holidays
Adding Fixed Holidays
Fixed holidays are holidays that occur on the same date every year, such as New Year’s Day or Christmas. Fixed holidays are automatically added to future years. Use this procedure to add fixed holidays.
97Configuring Cisco Unity Express 8.6 Using the GUI
OL-24779-02
Configuring Holiday Settings Displaying or Modifying a Holiday
Step 1 Choose System > Holiday Settings.
Step 2 Select Fixed Holidays from the drop-down list. The Add a New Holiday screen displays.
Step 3 Select the date by clicking on the calendar icon.
Step 4 Enter the holiday description (for example, “New Year's Eve”). This field is optional.
Step 5 Click Add.
Adding Regular Holidays
Regular holidays are holidays that occur on a different date each year. Use this procedure to add regular holidays.
Step 1 Choose System > Holiday Settings.
Step 2 Choose the year for which you want to add holiday settings from the drop-down list. The Add a New Holiday screen displays.
Note You can add holidays only for the current year and next year.
Step 3 Select the date by clicking on the calendar icon.
Step 4 Enter the holiday description (for example, “New Year's Eve”). This field is optional.
Step 5 Click Add.
Copying Holidays
To copy a holiday from one calendar year to another, configure holidays for the year and choose Copy All to Next Year.
Displaying or Modifying a HolidayUse this procedure to display or modify Holidays.
Step 1 Choose System > Holiday Settings. The holiday settings for the current year are displayed.
Step 2 Choose the year for which you want to display or modify holidays from the drop-down list, or choose All Holidays to display all years.
Step 3 Click the holiday to edit the description.
Step 4 Click Save to save the changes.
Step 5 Click Ok at the information prompt.
Tip To change the date of a holiday, you must delete it and add it under the new date.
98Configuring Cisco Unity Express 8.6 Using the GUI
OL-24779-02

Configuring Holiday SettingsDeleting a Holiday
Copying Holidays
To copy a holiday from one calendar year to another, configure holidays for the year and choose Copy All to Next Year.
Deleting a HolidayUse this procedure to delete a holiday.
Step 1 Choose System > Holiday Settings.
Step 2 Choose the year for which you want to delete holidays from the drop-down list, or choose All Holidays to display all years.
Step 3 Check the box next to the holiday or holidays and click Delete.
Step 4 Click Ok at the information prompt.
99Configuring Cisco Unity Express 8.6 Using the GUI
OL-24779-02

Configuring Holiday Settings Deleting a Holiday
100Configuring Cisco Unity Express 8.6 Using the GUI
OL-24779-02
Configuring Call-In Numbers
Perform the following tasks from the System Call-in Number window:
• Viewing a List of Call-in Numbers
• Displaying or Modifying Call-in Numbers
• Adding a Call-in Number
• Using Wildcard Trigger Patterns
Viewing a List of Call-in NumbersUse this procedure to view a list of the numbers that callers dial to reach system applications, such as voice mail, the auto attendant, and the Administration via Telephone (AvT) system.
Step 1 Choose System > Call-in Numbers.
Step 2 The window shows the configured call-in numbers with the fields shown below:
• Call-in Number—Extension that the caller dials to access a system application. These numbers can also be entered when configuring the auto attendant (see Configuring Voice-Mail Call-Handling Parameters) or configuring call-handling voice-mail parameters (see Configuring Voice-Mail Call-Handling Parameters).
You can also use wildcard trigger patterns when configuring call-in numbers (see Using Wildcard Trigger Patterns).
• Application—Application reached when the call-in number is dialed. Valid values are any custom applications you have created, and the system defaults:
– voicemail—Default voice-mail application.
– autoattendant—Default auto attendant application.
– promptmgmt—Default Administration via Telephone (AvT) application
• Enabled—Shows whether the application is enabled.
• Maximum Sessions
• Language
101Configuring Cisco Unity Express 8.6 Using the GUI
OL-24779-02

Configuring Call-In Numbers Displaying or Modifying Call-in Numbers
Displaying or Modifying Call-in NumbersUse this procedure to display or modify the numbers that callers dial to reach system applications, such as voice mail, the auto attendant, and the Administration via Telephone (AvT) system.
Step 1 Choose System > Call-in Numbers.
Step 2 Click the call-in number that you want to modify or view. The Call-in Number Profile window displays the following fields:
Step 3 To modify, edit the following fields:
• Call-in Number—Extension that the caller dials to access a system application. These numbers can also be entered when configuring the auto attendant (see Configuring Voice-Mail Call-Handling Parameters) or configuring call-handling voice-mail parameters (see Configuring Voice-Mail Call-Handling Parameters).
You can also use wildcard trigger patterns when configuring call-in numbers (see Using Wildcard Trigger Patterns).
• Application—Application reached when the call-in number is dialed. Valid values are any custom applications you have created, and the system defaults:
– voicemail—Default voice-mail application.
– autoattendant—Default auto attendant application.
– promptmgmt—Default Administration via Telephone (AvT) application
• Enabled—Shows whether the application is enabled.
• Maximum Sessions
• Language
Step 4 Click Apply.
Step 5 Click Ok to save.
Adding a Call-in NumberUse this procedure to add a call-in number, or a number that callers dial to reach system applications. These applications include voice mail, the auto attendant, and the Administration via Telephone (AvT) system.
Step 1 Choose System > Call-in Numbers.
Step 2 Click Add.
Step 3 Enter the data in the following fields:
• Application—Application reached when the call-in number is dialed. Valid values are any custom applications you have created, and the system defaults:
– voicemail—Default voice mail application.
– autoattendant—Default auto attendant application.
– promptmgmt—Default Administration via Telephone (AvT) application.
102Configuring Cisco Unity Express 8.6 Using the GUI
OL-24779-02

Configuring Call-In NumbersUsing Wildcard Trigger Patterns
• Call-in Number—Extension that the caller dials to access a system application. These numbers can also be entered when configuring the auto attendant (see Configuring a Voice Mail Auto Attendant) or configuring call-handling voice-mail parameters (see Configuring Voice-Mail Call-Handling Parameters).
You can also use wildcard trigger patterns when configuring call-in numbers (see Using Wildcard Trigger Patterns).
• Maximum Sessions
• Enabled—Shows whether the application is enabled.
• Language
Step 4 Click Add.
Step 5 Click Ok to save.
Using Wildcard Trigger PatternsYou can configure a trigger to specify a number pattern instead of a single number. Incoming calls targeted to a number that matches the pattern cause the associated script to be invoked. The script determines which number was dialed by inspecting the called number attribute associated with the call. Cisco Unity Express supports a limit of 32 characters in the trigger pattern.
Wildcard patterns are based on Cisco Unified Communications Manager route patterns. The rules for choosing between multiple wildcard patterns matching an incoming call are similar to those used by Cisco Unified Communications Manager. For each pattern that is a candidate match for the dial string, Cisco Unity Express calculates the number of other dial strings of the same length as the input dial string that would match each pattern, and then selects the pattern that has the fewest alternative dial string matches.
Table 4 shows the trigger pattern wildcards and special characters supported in Cisco Unity Express.
Table 4 Trigger Pattern Wildcards and Special Characters
Character Description Examples
X The X wildcard matches any single digit in the range 0 through 9.
The trigger pattern 9XXX matches all numbers in the range 9000 through 9999.
! The exclamation point (!) wildcard matches one or more digits in the range 0 through 9.
The trigger pattern 91! matches all numbers in the range 910 through 91999999999999999999999999999999.
? The question mark (?) wildcard matches zero or more occurrences of the preceding digit or wildcard value.
The trigger pattern 91X? matches all numbers in the range 91 through 91999999999999999999999999999999.
+ The plus sign (+) wildcard matches one or more occurrences of the preceding digit or wildcard value.
The trigger pattern 91X+ matches all numbers in the range 910 through 91999999999999999999999999999999.
[ ] The square bracket ([ ]) characters enclose a range of values.
The trigger pattern 813510[012345] matches all numbers in the range 8135100 through 8135105.
103Configuring Cisco Unity Express 8.6 Using the GUI
OL-24779-02

Configuring Call-In Numbers Using Wildcard Trigger Patterns
- The hyphen (-) character, used with the square brackets, denotes a range of values.
The trigger pattern 813510[0-5] matches all numbers in the range 8135100 through 8135105.
^ The circumflex (^) character, used with the square brackets, negates a range of values. Ensure that it is the first character following the opening bracket ([).
Each trigger pattern can have only one ^ character.
The trigger pattern 813510[^0-5] matches all numbers in the range 8135106 through 8135109.
Table 4 Trigger Pattern Wildcards and Special Characters (continued)
Character Description Examples
104Configuring Cisco Unity Express 8.6 Using the GUI
OL-24779-02

Configuring CTI Ports for Cisco Unified Communications Manager
Use this procedure to import a new set of computer telephony integration (CTI ports) configured on Cisco Unified Communications Manager for use by Cisco Unity Express (in addition to the CTI ports already in use), or to remove or change CTI ports that are already in use. Typically you have one port for each application configured, such as voice mail, automated attendant, and the Administration via Telephone (AvT) system.
Step 1 Choose System > CTI Ports. The System CTI Ports window appears containing a list of CTI ports configured on Cisco Unity Express displays.
Step 2 To use a CTI port for Cisco Unity Express, leave the box next to it checked. To remove it from use by Cisco Unity Express, uncheck the box next to it. If you make changes, click Apply to save; unchecked ports will be deleted.
Step 3 To import all the CTI ports that are configured on the Cisco Unified Communications Manager associated with the current Java Telephony API (JTAPI) user, click Expand to also show available ports on Cisco Unified Communications Manager. A list of all CTI ports displays. To use a port for Cisco Unity Express, check the box next to the port and click Apply.
Note The maximum number of CTI ports that can be used concurrently by Cisco Unity Express depends on your user license.
105Configuring Cisco Unity Express 8.6 Using the GUI
OL-24779-02

Configuring CTI Ports for Cisco Unified Communications Manager
106Configuring Cisco Unity Express 8.6 Using the GUI
OL-24779-02

Configuring Language Settings
Use this procedure to configure your language settings.
Step 1 Choose System > Language Settings.
Step 2 Select the System Default Language from the drop-down list.
Step 3 Click Apply to save your settings.
107Configuring Cisco Unity Express 8.6 Using the GUI
OL-24779-02

Configuring Language Settings
108Configuring Cisco Unity Express 8.6 Using the GUI
OL-24779-02

Configuring Fax Settings
Note The Cisco IOS gateways must be configured to handle fax calls.
Use this procedure to configure your fax settings.
Step 1 Choose System > Fax Settings. The System Fax Settings window appears.
Step 2 Enter the hostname for the outgoing Cisco IOS fax gateway. Fax printing is allowed only when the outgoing gateway is input.
Step 3 Enter a “From” e-mail address to use as the default. Use the format [email protected].
Step 4 Select the fax number restriction table from the drop-down list.
Note If no restriction tables are configured in the drop-down list, see Configuring Restriction Tables.
Step 5 Enter the fax printing number. Enter numbers without spaces, dashes, or parenthesis.
Note If multiple Sites (multiple Cisco Unified CMEs) are configured, a table will be present with a list of configured sites and their fax numbers that you can configure and modify.
Step 6 Enter the hostname for the incoming Cisco IOS fax gateway and click Add. Up to ten faxes/Cisco IOS gateways can be added.
Note If you omit the incoming gateway input, the receiving fax is automatically disabled on the system.
Step 7 Click Apply to save your settings.
109Configuring Cisco Unity Express 8.6 Using the GUI
OL-24779-02

Configuring Fax Settings
110Configuring Cisco Unity Express 8.6 Using the GUI
OL-24779-02

Configuring Domain Name Settings
Perform the following tasks from the System Domain Name Settings page:
• Specify a domain and hostname in which Cisco Unity Express is located. See Changing a DNS Server.
• Add Domain Name Settings (DNS) servers. See Adding a DNS Server.
• Delete DNS servers. See Deleting a DNS Server.
Note After changing the domain name, you must reload the Cisco Unity Express software.
Changing a DNS ServerUse this procedure to change one or both of the DNS servers if their names or IP addresses have changed since running the Initialization Wizard.
Before You Begin
Gather the following information:
• The hostname of Cisco Unity Express.
• The domain name and IP address of the DNS server.
Procedure
Step 1 Choose System > Domain Name Settings.
The system displays the Domain Name Settings page.
Step 2 Enter a hostname or the name of the server that stores the Cisco Unity Express application files.
Step 3 Enter the hostname of Cisco Unity Express.
Step 4 Click Apply.
111Configuring Cisco Unity Express 8.6 Using the GUI
OL-24779-02

Configuring Domain Name Settings Adding a DNS Server
Adding a DNS ServerEnter additional DNS servers as alternate server destinations, to be used if the system cannot access the primary domain name server.
Restriction
You can have a maximum of four DNS servers.
Procedure
Step 1 Choose System > Domain Name Settings.
The system displays the Domain Name Settings page.
Step 2 Click Add under Domain Name Service (DNS) Servers.
The system displays the Add a DNS server page.
Step 3 Enter the IP address of the server.
Step 4 Click Add.
Deleting a DNS ServerUse this procedure to delete a DNS server.
Procedure
Step 1 Choose System > Domain Name Settings.
The system displays the Domain Name Settings page.
Step 2 Check the checkbox next to the DNS server that you want to delete.
Step 3 Click Delete.
Step 4 At the prompt, click OK.
112Configuring Cisco Unity Express 8.6 Using the GUI
OL-24779-02

Configuring the System Login Banner
Use this procedure to configure your system login banner.
Step 1 Choose System > Login Banner. The Login Banner window appears.
Step 2 Enter the text for the login banner.
Step 3 Click Apply to save your settings.
113Configuring Cisco Unity Express 8.6 Using the GUI
OL-24779-02

Configuring the System Login Banner
114Configuring Cisco Unity Express 8.6 Using the GUI
OL-24779-02

Configuring Network Time and Time Zone Settings
Use these procedures to ensure that voice messages and system processes are identified with the correct day and time.
Configure the following features from this window:
• Adding an NTP Server
• Deleting an NTP Server
• Changing the Time Zone
Before You Begin
These parameters are required to ensure that voice messages and system processes are identified with the correct day and time:
• Current day and time
• Time zone for your company or branch
• Network time protocol (NTP) server address
Note Reload the Cisco Unity Express software after any NTP changes to ensure that the server information is updated.
Adding an NTP Server
Use this procedure to add an NTP server.
Step 1 Choose System > Network Time and Time Zone Settings. The Network Time and Time Zone Settings window appears.
Step 2 Click Add. The Add a NTP Server window appears.
Step 3 Enter the hostname or IP address for the NTP server. To make it the primary NTP server, check the box next to “Preferred”.
Step 4 Click Add. The Network Time and Time Zone Settings screen appears with the new server listed in the table.
115Configuring Cisco Unity Express 8.6 Using the GUI
OL-24779-02

Configuring Network Time and Time Zone Settings
Deleting an NTP Server
Use this procedure to delete an NTP server.
Step 1 Choose System > Network Time and Time Zone Settings. The Network Time and Time Zone Settings window appears.
Step 2 To delete an NTP server, click the box next to the server to be removed and click Delete.
Step 3 Click Ok at the prompt. The window appears without the server listed.
Changing the Time Zone
Use this procedure to change the time zone.
Step 1 Choose System > Network Time and Time Zone Settings. The Network Time and Time Zone Settings window appears.
Step 2 Use the drop-down menu to select the correct country.
Step 3 Use the drop-down menu to select the correct time zone.
Step 4 To activate the changes, click Apply.
Step 5 Click Ok at the information prompt.
116Configuring Cisco Unity Express 8.6 Using the GUI
OL-24779-02

Configuring Restriction Tables
Perform the following tasks from the System Restriction Tables window:
• Configuring Restriction Table Parameters
• Adding a New Restriction Table
• Adding Call Patterns to a Restriction Table
• Editing Restriction Table Entries
• Deleting Restriction Table Entries
• Deleting Restriction Tables
Configuring Restriction Table ParametersUse this procedure to configure restriction table parameters.
Step 1 Choose System > Restriction Tables.
Step 2 Choose the restriction table name from the drop-down list. If there is no name indicated in the list, proceed to Adding a New Restriction Table.
Step 3 Choose the minimum digits allowed. Range:1-30. Default:1.
Step 4 Choose the maximum digits allowed. Range: 1-30. Default: 30.
Step 5 Click Apply to save your settings.
Adding a New Restriction TableUse this procedure to add a new restriction table.
Step 1 Choose System > Restriction Tables
Step 2 Click Add.
Step 3 Choose a name for your new restriction table by entering the name in the field.
117Configuring Cisco Unity Express 8.6 Using the GUI
OL-24779-02

Configuring Restriction Tables Adding Call Patterns to a Restriction Table
Step 4 Click Add to save your changes.
Adding Call Patterns to a Restriction TableIf desired, add up to 10 dial strings in the Call Pattern list. For each dial string, you must configure a call pattern and specify whether numbers matching the pattern are allowed or disallowed. External and long distance access codes should be specified. Digits 0 to 9 and the following special characters are allowed:
• *—Match zero or more digits
• .—Match exactly one digit. Each “.” serves as a placeholder for one digit.
• 91555* (Allowed)
• 9011* (Not allowed)
Use this procedure to add call patterns to a restriction table.
Step 1 Choose System > Restriction Tables.
Step 2 In the Call Pattern window, enter the call pattern in the field. Valid patterns can include digits 0 to 9, asterisk (*), and dot (.). The * indicates a match of zero or more digits. Each dot serves as a placeholder for 1 digit.
Step 3 Choose whether the call pattern is to be allowed in the restriction table by clicking Yes or No.
Step 4 Click Add to save your settings.
(Optional) To change the location of a dial string in the comparison sequence, click Move Up or Move Down. Notification numbers that the user configures are compared against dial strings in the order that the strings are listed in the Call Pattern box. See Restriction Table Examples for more information.
Step 5 Click Yes or No to allow or not allow the call pattern.
Editing Restriction Table EntriesUse this procedure to edit call pattern entries in a restriction table.
Step 1 Choose System > Restriction Tables.
Step 2 Select the call pattern from the drop-down list and click Edit.
Step 3 In the pop-up window, choose whether the call pattern is to be allowed by clicking Yes or No.
Step 4 Click Apply to save your settings.
118Configuring Cisco Unity Express 8.6 Using the GUI
OL-24779-02

Configuring Restriction TablesDeleting Restriction Table Entries
Deleting Restriction Table EntriesUse this procedure to delete call pattern entries in a restriction table.
Step 1 Choose System > Restriction Tables.
Step 2 Select the call pattern from the list and click the Delete button.
Step 3 Click Apply to save your settings.
Deleting Restriction TablesUse this procedure to delete a restriction table.
Note Deleting a restriction table will cause unrestricted outgoing calls to be allowed by any features using that restriction table.
Step 1 Choose System > Restriction Tables.
Step 2 Select the restriction table from the Restriction Table Name drop-down list and click Delete. A warning message appears asking if you wish to continue.
Step 3 Click Yes or No to complete the task.
Restriction Table Examples
To restrict international and long distance numbers:
Step 1 Enter 9011* in the Call Pattern field, select No, and click Add.
Step 2 Enter 91.......... in the Call pattern field, select No, and click Add.
To disallow a specific area code, except for one phone number within the area code:
Step 1 Enter 9011* in the Call Pattern field, select No, and click Add.
Step 2 Enter 915551212 in the Call Pattern field, select Yes, and click Add.
Step 3 Enter 91555....... in the Call Pattern field, select No, and click Add.
The system would first check against the * string, which allows any digits. Therefore, the configuration of any notification number would be permitted, because the 91555* and 9011* strings would not be reached. Moving the * string down to the end of the list would permit any numbers except those that matched in the first two dial strings.
119Configuring Cisco Unity Express 8.6 Using the GUI
OL-24779-02

Configuring Restriction Tables Deleting Restriction Tables
120Configuring Cisco Unity Express 8.6 Using the GUI
OL-24779-02

Configuring SMTP
Set up Cisco Unity Express to notify users of voice-mail events by phone, pager, or email. Cisco Unity Express contacts these devices to let users know that they have received a voice-mail message. This feature is not enabled by default, and is enabled on a system-wide basis. See Configuring Message Notification.
Notifications for email and text pager devices are sent using a Simple Mail Transfer Protocol (SMTP) server. You must configure the SMTP server for these notification types to work.
Importing SMTP SettingsYou can import SMTP settings from email clients.
Use this procedure to import SMTP settings from an email client.
Step 1 Choose System > SMTP Settings. The System SMTP Settings window appears.
Step 2 From the Import SMTP Settings drop-down menu, select the email client.
Step 3 Click Apply to save your settings.
Configuring the SMTP ServerUse this procedure to configure the SMTP server.
Step 1 Choose System > SMTP Settings. The System SMTP Settings window appears.
Step 2 Enter the hostname or IP address of the external SMTP server.
Step 3 Select the security mode from the drop-down menu. Select one of the following:
• None: No security setting is enabled.
• SSL: Specifies that SSL is enabled.
• STARTTLS: Specifies that STARTTLS is enabled.
Step 4 Enter the port number used to connect to the SMTP server.
Step 5 Enter the username and password for the server.
121Configuring Cisco Unity Express 8.6 Using the GUI
OL-24779-02

Configuring SMTP
Step 6 Click Apply to save your settings.
Testing the SMTP ConnectionUse this procedure to test the SMTP connection to an email address.
Step 1 Choose System > SMTP Settings. The System SMTP Settings window appears.
Step 2 Enter the Test Email Address.
Step 3 Click Send Test Email.
122Configuring Cisco Unity Express 8.6 Using the GUI
OL-24779-02

P A R T 3
Voice Mail Tab


Configuring Mailboxes
Perform the following tasks from the Voice Mail Mailboxes window:
• Viewing a List of Mailboxes
• Adding a New Mailbox
• Displaying or Modifying a Mailbox
• Unlocking a Mailbox
• Deleting a Mailbox
• Finding a Mailbox
Viewing a List of MailboxesUse this procedure to view a list of mailboxes in the system.
Step 1 Choose Voice Mail > Mailboxes. The Voice Mail Mailboxes window appears and contains the following fields:
• Mailbox Owner (User/Group ID)—By default, the system displays mailboxes in alphabetical order by owner. To display a list of owners from Z to A, click Mailbox Owner.
• Primary Extension—To display a list of mailboxes in order by primary owner extension, click Primary Extension.
• Mailbox type—To display a list of mailboxes by mailbox type, click Mailbox Type.
• Description—To display a list of mailboxes in order by description, click Description.
• Use the dialog box to change the number of rows displayed per window.
125Configuring Cisco Unity Express 8.6 Using the GUI
OL-24779-02

Configuring Mailboxes Adding a New Mailbox
Adding a New MailboxUse the following procedures to add one of the following types of mailboxes:
• Personal (User) Mailbox
• General-Delivery Mailbox.
Personal (User) Mailbox
An individual user may be assigned to a telephone connected to your telephone network. You can assign a mailbox to an individual user.
General-Delivery Mailbox
One or more people in the company can access a general-delivery mailbox. A caller leaves a message in the mailbox, and members of the group can log into the mailbox and retrieve the message. Any member can delete a message from the general-delivery mailbox.
Note Before you can configure a general-delivery mailbox, you must create the group. See Configuring Groups.
Use this procedure to add a new personal or general-delivery mailbox.
Step 1 Choose Voice Mail > Mailboxes. The Voice Mail Mailboxes window appears.
Step 2 Click Add. The Add a New Mailbox window appears.
Step 3 Enter or select the following information:
• Owner
Tip Click on the magnifying glass icon to open the Find window to search for an owner.
• Description—Description of the mailbox
• Announcement Only (cannot take messages)
• Mailbox Size
• Maximum Caller Message Size
• Message Expiry Time
• Play Tutorial
• Allow Login Without PIN (this feature is enabled only for Personal mailboxes and is not selectable for a general delivery mailbox). If you are adding a personal mailbox, the following options are available from the drop-down menu:
– No
– Yes - from subscriber’s number
– Yes - from any phone number
• Enabled—Indicates that the mailbox will be activated immediately. Unchecking this box deactivates the mailbox
• Fax enabled
126Configuring Cisco Unity Express 8.6 Using the GUI
OL-24779-02
Configuring MailboxesDisplaying or Modifying a Mailbox
• Enable notification for this user or group
Step 4 To save the information, click Add.
Displaying or Modifying a MailboxMailbox attributes are organized by the following tabs:
• General Tab
• Greetings Tab
• Caller Input Tab
General TabUse this procedure to display or modify the general parameters of a personal (user) or general-delivery mailbox.
Step 1 Choose Voice Mail > Mailboxes.
Step 2 In the Mailbox Owner (User/Group ID) field, click the user ID or group ID. The General tab for that user or group appears with the following fields:
• Description—Description of the mailbox
• Announcement Only (cannot take messages)
• Mailbox Size
• Maximum Caller Message Size
• Message Expiry Time
• Play Tutorial
• Greeting Type (general-delivery mailbox only)
• Allow Login Without PIN
– No
– Yes - From Subscriber’s Number
– Yes - From Any Phone Number
• Enabled—Indicates that the mailbox will be activated immediately. Unchecking this box deactivates the mailbox
• Fax enabled
• Secure Outgoing Messages. This setting applies only to this mailbox.
– Default—The default Secure Outgoing Messages setting configured for the entire voicemail system. See Configuring Voice Mail.
– Never—Subscribers do not have the option to mark outgoing messages as secure
– Ask—Outgoing messages are only marked secure when subscribers mark them as secure.
– Always—All outgoing messages are automatically marked secure
127Configuring Cisco Unity Express 8.6 Using the GUI
OL-24779-02

Configuring Mailboxes Displaying or Modifying a Mailbox
– Private—All outgoing messages marked Private are always secure
• Secure Incoming Messages. This setting applies only to this mailbox.
– All—All messages in this mailbox are marked secure.
– None—All incoming messages to this mailbox are unsecure.
Step 3 To edit these fields, enter the new information and click Apply.
This window also contains informational fields that cannot be edited:
• Created or Last Accessed
• Total Time Used
• Total messages
• New messages
• Saved messages
• Deleted messages
• Mailbox Usage
• Broadcast messages
• Future messages
• Fax messages
• In use
Greetings TabGreetings fall into the following three categories:
• Standard greetings
• State-based greetings:
This category includes the following types of greetings:
– Busy
– Closed
– Internal
• Alternate greetings
This category includes the following types of greetings:
– Alternate
– Meeting
– Vacation
– Extended absence
By default, the standard greeting is enabled but none of the alternate or state-based greetings are enabled. The standard greeting is always enabled but if one of the alternate greetings is enabled, it takes precedence over the standard and state-based greetings.
128Configuring Cisco Unity Express 8.6 Using the GUI
OL-24779-02

Configuring MailboxesDisplaying or Modifying a Mailbox
You can enable one or all of the state-based greetings. These greetings are played when no alternate greeting is enabled and the following conditions apply:
• When the system is busy, the busy greeting is played. When enabled, the busy greeting has precedence over the other state-based greetings.
• During non-business hours, the closed greeting is played.
• When the call is from an internal number, the internal greeting is played.
Use this procedure to display or modify the Greetings tab of a personal mailbox.
Step 1 Choose Voice Mail > Mailboxes. The Voice Mail Mailboxes window appears.
Step 2 Select the Greetings tab. The Greetings window appears.
Step 3 To configure one of the following types of greetings, click the link for the greeting:
• Standard
• Closed
• Internal
• Busy
• Alternate
• Meeting
• Vacation
• Extended Absence
Step 4 Choose whether the greeting is either:
• Disabled
• Enabled indefinitely
• Enabled until a specified date and time
Step 5 Choose one of the following sources of the greeting:
• System default
• Personal recording (Click Upload and browse to the location of the file.)
• Nothing (This is an empty greeting and can be selected if you want no greeting to be played.)
Note To replace the uploaded greeting, you should have playback and recording devices available on the system and should be in enabled state.
Step 6 Click Ok to save your configuration.
Caller Input TabCustomize how the call flow precedes in response to keys pressed by the caller during a call. For each mailbox, the mailbox owner or system administrator can assign one of the following actions to the keys input by the caller:
129Configuring Cisco Unity Express 8.6 Using the GUI
OL-24779-02
Configuring Mailboxes Unlocking a Mailbox
• Ignore the input
• Skip the greeting
• Repeat the greeting
• Transfer the call to another number
• Connect to the operator
• Play good bye
• Proceed with subscriber sign-in
These actions can be assigned only to single digit input by the user, such as the numbers zero through nine (0 - 9), the asterisk (*), or the pound sign (#).
You can also optionally restrict the use of the caller input feature by configuring a caller call-flow restriction table.
Use this procedure to display or modify the Caller Input tab of a personal mailbox.
Step 1 Choose Voice Mail > Mailboxes. The Voice Mail Mailboxes window appears.
Step 2 Select the Caller Input tab. The Caller Input window appears.
Step 3 For each of the possible caller inputs, the numbers zero through nine (0 - 9), the asterisk (*), or the pound sign (#), select one of the following actions:
• Ignore the input
• Skip the greeting
• Repeat the greeting
• Transfer the call to another number
• Connect to the operator
• Play good bye
• Proceed with subscriber sign-in
Step 4 Click Apply to save your configuration.
Unlocking a MailboxOccasionally, a mailbox becomes locked, and the owner cannot access the stored messages. A “mailbox is currently in use” message is typically played when a user tries to access a mailbox that is locked.
Use this procedure to unlock a mailbox.
Step 1 Choose Voice Mail > Mailboxes. The Voice Mail Mailboxes window appears.
Step 2 Click the box next to the mailbox that you want to unlock.
Step 3 To unlock the mailbox, click Unlock.
130Configuring Cisco Unity Express 8.6 Using the GUI
OL-24779-02

Configuring MailboxesDeleting a Mailbox
Deleting a MailboxBefore deleting a mailbox, you must erase the messages stored in the mailbox. The mailbox is removed from the user or group profile of any user or group that uses the mailbox.
Use this procedure to delete a mailbox.
Step 1 Choose Voice Mail > Mailboxes. The Voice Mail Mailboxes window appears.
Step 2 Click the box next to the mailbox that you want to delete.
Step 3 Click Delete.
Step 4 At the prompt, click Ok. The Voice Mail Mailboxes window reappears, and the mailbox is removed.
Finding a MailboxUse this procedure to search for a mailbox.
Step 1 Choose Voice Mail > Mailboxes. The Voice Mail Mailboxes window appears.
Step 2 Click Find in the Mailboxes window. The following fields appear:
• Mailbox Owner ID
• Mailbox Type—Personal delivery (belongs to a user) or general delivery (belongs to a group).
Note All fields are optional.
Step 3 Enter the search criteria in one or more fields and click Find. The Voice Mail Mailboxes window reappears and displays the results of your search.
131Configuring Cisco Unity Express 8.6 Using the GUI
OL-24779-02

Configuring Mailboxes Finding a Mailbox
132Configuring Cisco Unity Express 8.6 Using the GUI
OL-24779-02
Configuring Distribution Lists
Perform the following tasks from the Voice Mail Distribution Lists window.
• Viewing a List of Public Distribution Lists
• Adding a Public Distribution List
• Adding Members to a Distribution List
• Adding a Non Subscriber to a Distribution List
• Deleting Members of a Distribution List
• Adding Owners to a Public Distribution List
• Deleting Owners of a Public Distribution List
• Displaying or Modifying a Public Distribution List
• Deleting a Public Distribution List
• Viewing a List of Private Distribution Lists
• Adding a Private Distribution List
• Displaying or Modifying a Private Distribution List
• Deleting a Private Distribution List
• Viewing a List of Other Users' Private Distribution Lists
• Viewing Other Users' Private List Profiles
Viewing a List of Public Distribution ListsA Distribution list is used to send a voice-mail message to multiple users at the same time.
Note You cannot modify the default public distribution list, named “everyone,” that contains all users in the system. You must be a member of the administrators group, an owner of a list, or a member of a group with Public list manager capability to perform this action.
133Configuring Cisco Unity Express 8.6 Using the GUI
OL-24779-02

Configuring Distribution Lists Adding a Public Distribution List
Use this procedure to view a list of public distribution lists.
Step 1 Choose Voice Mail > Distribution Lists > Public Lists. The Voice Mail Distribution Lists Public Lists window appears with the following fields:
• Name—List name.
• Number—Number of the distribution list. This number must be unique to the list of public distribution lists.
• Description (optional)
• Member count
Adding a Public Distribution ListDepending on your configuration, Cisco Unity Express supports up to a maximum of 25 public distribution lists and 1,000 members or owners total across all of these public distribution lists. See the Cisco Unity Express Release Notes for detailed support information.
Note You must be a member of the administrators group or a member of a group with Public list manager capability to perform this action.
Use this procedure to add a public distribution list.
Step 1 Choose Voice Mail > Distribution Lists > Public Lists. The Public Lists window appears.
Step 2 Click Add. The Add a Public Distribution List window appears.
Step 3 Enter information into the following fields:
• Name—List name.
• Number—Number of the distribution list. This number must be unique to the list of public distribution lists and cannot be longer than fifteen digits.
• Description (optional)
Step 4 Click Add.
Step 5 Proceed to Adding Members to a Distribution List.
Adding Members to a Distribution ListUse this procedure to add members to your distribution lists.
Note Only administrators can add members to their own private distribution lists or to public distribution lists that they own.
134Configuring Cisco Unity Express 8.6 Using the GUI
OL-24779-02
Configuring Distribution ListsAdding a Non Subscriber to a Distribution List
Step 1 Choose Voice Mail > Distribution Lists and choose either Public Lists or My Private Lists.
Step 2 Click the name of the list.
Step 3 Click the Members tab.
Step 4 Click Add Member and one of the following choices:
• Add by voice-mail mailbox number. Enter the exact voice-mail mailbox number and click Find.
Note If searching for a remote user or Blind address, enter the location ID and the extension with no delimiters. Wildcard searching is not supported.
• Search for a member by user ID, name, description, or number. Click the button next to the search criteria you want to use. A wildcard search is performed regardless of what is entered in the search criteria text field, so results are not exact matches.
Tip To return a large list of results (and add a large list of members at one time), leave the search criteria text field blank. Check the box at the top of the list results page to select all of the results displayed on that page. To display all search results on the same page, and check the boxes next to all of the search results, choose All from the Rows Per Page drop-down list.
Step 5 Select the rows you want to add as members and click Select row(s).
Adding a Non Subscriber to a Distribution ListUse this procedure to add a non-subscriber to a distribution list.
Step 1 Choose Voice Mail > Distribution Lists and choose either Public Lists or My Private Lists.
Step 2 Click a distribution list name in the Name field. The Public List window or Private List window for that distribution list name appears.
Step 3 Click the Members tab.
Step 4 Click Add Non Subscriber and enter the phone number in the field.
Step 5 Click Add Member. The new non subscriber phone number appears in the Members field of the Public or Private list window for the distribution list name. The Type is listed as Non Subscriber.
135Configuring Cisco Unity Express 8.6 Using the GUI
OL-24779-02

Configuring Distribution Lists Deleting Members of a Distribution List
Deleting Members of a Distribution ListUse these procedures to delete members of a public or private Distribution list:
• Deleting Members of a Public Distribution List
• Deleting Members of a Private Distribution List
Deleting Members of a Public Distribution List
You must be a member of the administrators group or a member of a group with Public list manager capability to perform this action.
To delete members of a public distribution list:
Step 1 Choose Voice Mail > Distribution Lists > Public Lists. The Public Lists window appears.
Step 2 Click the name of the list from which you want to delete members. The Public List window for that name appears.
Step 3 Click the Members tab.
Step 4 Check the box next to the name of the members you want to delete and click Remove.
Deleting Members of a Private Distribution List
You can only delete members of private distribution lists which you own.
To delete members of a private distribution list:
Step 1 Choose Voice Mail > Distribution Lists > My Private Lists. The My Private Lists window appears.
Step 2 Click the name of the list from which you want to delete members. The My Private Lists window for that name appears.
Step 3 Click the Members tab.
Step 4 Check the box next to the name of the members you want to delete and click Remove.
Adding Owners to a Public Distribution ListDepending on your configuration, Cisco Unity Express supports up to a maximum of 25 public distribution lists and 1,000 members or owners total across all of these public distribution lists. See the Cisco Unity Express Release Notes for detailed support information.
A list owner can be either an individual local user, or a group. If a list is owned by a group, all members of that group are owners of the list.
Note You must be a member of the administrators group or an owner of a list to be able to add owners to it.
136Configuring Cisco Unity Express 8.6 Using the GUI
OL-24779-02

Configuring Distribution ListsDeleting Owners of a Public Distribution List
Use this procedure to add owners to a public Distribution list.
Step 1 Choose Voice Mail > Distribution Lists > Public Lists. The Public Lists window appears.
Step 2 In the Name field, click the name of the list. The Public List window for that name appears.
Step 3 Click the Owners tab.
Step 4 Click Add Owner and either:
• Add by voice-mail mailbox number. Enter the exact voice-mail mailbox number and click Find.
Note Wildcard searching is not supported.
• Search for a owner by user ID, name, description, or number. Click the button next to the search criteria you want to use. A wildcard search is performed regardless of what is entered in the search criteria text field, so results are not exact matches.
Tip To return a large list of results (and add a large list of owners at one time), leave the search criteria text field blank. Check the box at the top of the list results page to select all of the results displayed on that page. To display all search results on the same page, and check the boxes next to all of the search results, choose All from the Rows Per Page drop-down list.
Step 5 Select the rows you want to add as owners and click Select row(s).
Deleting Owners of a Public Distribution ListUse this procedure to delete owners of a public Distribution list.
Note You must be a member of the administrators group or a member of a group with Public list manager capability to perform this action.
Step 1 Choose Voice Mail > Distribution Lists > Public Lists. The Public Lists window appears.
Step 2 In the Name field, click the name of the list from which you want to delete owners. The Public List window for that name appears.
Step 3 Click the Owners tab.
Step 4 Check the box next to the name of the owners you want to delete and click Remove.
137Configuring Cisco Unity Express 8.6 Using the GUI
OL-24779-02

Configuring Distribution Lists Displaying or Modifying a Public Distribution List
Displaying or Modifying a Public Distribution ListUse this procedure to display or modify a public Distribution list.
Note You must be a member of the administrators group, an owner of the list, or a member of a group with Public list manager capability to perform this action.
Depending on your configuration, Cisco Unity Express supports up to a maximum of 25 public distribution lists and 1000 members or owners total across all of these public distribution lists. See the Cisco Unity Express Release Notes for detailed support information.
Step 1 Choose Voice Mail > Distribution Lists > Public Lists. The Public Lists window appears.
Step 2 In the Name field, click the name of the list to display or modify it. The Public List window for that name appears.
Note You cannot modify the default public distribution list, named “everyone,” that contains all users in the system.
Step 3 To add owners to a list, click the Owners tab. See Adding Owners to a Public Distribution List. To add members to a list, click the Members tab. See Adding Members to a Distribution List.
Deleting a Public Distribution ListUse this procedure to delete a public Distribution list.
Note You must be a member of the administrators group, an owner of the list, or a member of a group with Public list manager capability to perform this action.
Step 1 Choose Voice Mail > Distribution Lists > Public Lists. The Public Lists window appears.
Step 2 Check the box next to the list(s) you want to delete.
Step 3 Click Delete.
Step 4 Click Ok to confirm.
Viewing a List of Private Distribution ListsUse this procedure to view a list of private distribution lists. A Distribution list is used to send a voice-mail message to multiple users at the same time. Private distribution lists are configured and maintained by you. You can own up to five private lists.
138Configuring Cisco Unity Express 8.6 Using the GUI
OL-24779-02

Configuring Distribution ListsAdding a Private Distribution List
Step 1 Choose Voice Mail > Distribution Lists > My Private Lists. The My Private Lists window appears.
Step 2 The My Private Lists window appears and displays the following fields:
• Name—List name.
• Number—Number of the distribution list. This number must be unique to the list of public distribution lists.
• Description (optional)
• Member count
Adding a Private Distribution ListUse this procedure to add a private distribution list. Distribution lists are used to send a voice-mail message to multiple users at the same time.
Step 1 Choose Voice Mail > Distribution Lists > My Private Lists. The My Private Lists window appears.
Step 2 Click Add.
Step 3 Enter information into the following fields:
• Name—List name.
• Number—Number of the distribution list. This number must be unique to the list of public distribution lists.
• Description (optional)
Step 4 Click Add.
Step 5 Click the name of the list to add members to the distribution list.
Displaying or Modifying a Private Distribution ListCisco Unity Express supports a maximum of 5 private distribution lists for each user, and 50 members total across all of the private lists belonging to a single user. Private distribution lists are configured and maintained by you. See the Cisco Unity Express Release Notes for detailed support information.
Use this procedure to display or modify a private Distribution list.
Step 1 Choose Voice Mail > Distribution Lists > My Private Lists. The Voice Mail Distribution Lists My Private Lists window appears.
Step 2 Click the name of the list to display or modify it. The My Private Lists window for that name appears.
Step 3 To add members to the list, click the Members tab. See Adding Members to a Distribution List.
139Configuring Cisco Unity Express 8.6 Using the GUI
OL-24779-02

Configuring Distribution Lists Deleting a Private Distribution List
Deleting a Private Distribution ListUse this procedure to delete a private distribution list.
Note You can only delete private distribution lists which you own.
Step 1 Choose Voice Mail > Distribution Lists > My Private Lists. The My Private Lists window appears.
Step 2 Check the box next to the list(s) you want to delete.
Step 3 Click Delete.
Step 4 Click Ok to confirm.
Viewing a List of Other Users' Private Distribution ListsUse this procedure to view a list of other users' private distribution lists. Distribution lists are used to send a voice-mail message to multiple users at the same time. Private distribution lists are configured and maintained by their owners.
Step 1 Choose Voice Mail > Distribution Lists > Other Users' Private Lists. The Others' Private Lists window appears.
Step 2 Enter the user ID of the user whose lists you want to view and click Find.
Note You must enter the exact user ID. Wildcard searching is not supported.
Step 3 The system displays the private distribution lists belonging to the user and shows the following fields:
• Name—List name.
• Number—Number of the distribution list. This number must be unique to the list of public distribution lists.
• Description (optional)
• Member count
Step 4 Click the name of the list to view the profile of the private distribution list.
Viewing Other Users' Private List ProfilesUse this procedure to view other users' private distribution list profiles. Distribution lists are used to send a voice-mail message to multiple users at the same time. Private distribution lists are configured and maintained by their owners.
140Configuring Cisco Unity Express 8.6 Using the GUI
OL-24779-02
Configuring Distribution ListsViewing Other Users' Private List Profiles
Note You can view other users' private distribution list profiles, but you cannot modify them or make changes to list members. You must be a member of the administrators group, an owner of a list, or a member of a group with Private list viewer capability to view other users' private distribution lists. If you try to view them and do not have the proper permissions, you receive a message, “You do not have permission to view other users' private lists.”
Step 1 Choose Voice Mail > Distribution Lists > Other Users' Private Lists. The Others' Private Lists window appears.
Step 2 Enter the user ID of the user whose lists you want to view and click Find.
Note You must enter the exact user ID. Wildcard searching is not supported.
Step 3 The system displays a list of the private distribution lists belonging to the user.
Step 4 Click the name of the list to view its profile. The Profile tab displays the following fields:
• Name—List name.
• Number—Number of the distribution list. This number must be unique to the list of public distribution lists.
• Description (optional)
• Member count
Step 5 Click the Members tab to display members of the private distribution list.
141Configuring Cisco Unity Express 8.6 Using the GUI
OL-24779-02

Configuring Distribution Lists Viewing Other Users' Private List Profiles
142Configuring Cisco Unity Express 8.6 Using the GUI
OL-24779-02

Voice Mail Message Waiting Indicators for Cisco Unified Communications Manager (CUCM)
Perform the following tasks from the Voice Mail Waiting Indicators window:
• Refreshing the Message Waiting Indicator
• Modifying Message Waiting Indicator Settings
Refreshing the Message Waiting IndicatorThe MWI is a light indicator on a Cisco IP phone to notify the phone user that a voice-mail message is pending.
Occasionally, the MWI setting for a telephone can be out of synchronization with the user's message status in the voice-mail database. For example, a user could have pending messages, but the MWI would not be turned on. You can refresh the MWI light so that the light reflects the current message status in the voice-mail database.
Use this procedure to refresh the message waiting indicator (MWI) for a single mailbox or for all mailboxes.
Step 1 Choose Voice Mail > Message Waiting Indicators > Refresh.
Step 2 To refresh one mailbox, check the box next to mailbox owner's user or group ID and click Refresh Selected. To refresh all mailboxes, click Refresh All.
Modifying Message Waiting Indicator SettingsUse this procedure to modify message waiting indicator settings.
Step 1 Choose Voice Mail > Message Waiting Indicators > Settings. The SIP MWI notification mechanism window appears. Select one or all of the following:
• Subscribe Notify—Cisco Unified Communications Manager subscribes to Cisco Unity Express using SUBCRIBE/NOTIFY SIP messages for MWI notification for each of the ephone-dns registered to receive MWI notifications. See MWI Configuration Examples.
143Configuring Cisco Unity Express 8.6 Using the GUI
OL-24779-02

Voice Mail Message Waiting Indicators for Cisco Unified Communications Manager (CUCM) Modifying Message Waiting Indicator Settings
– Check the box to include envelope information in the notifications.
• Unsolicited Notify—Cisco Unified Communications Manager is not required to send a subscription request for each ephone-dn to Cisco Unity Express for MWI notification. Cisco Unity Express sends NOTIFY SIP messages to Cisco Unified Communications Manager whenever there is a change in the MWI status for any ephone-dn.
Step 2 Click Apply to save your settings.
MWI Configuration Examples
Subscribe/Notify Notification Example
The following example shows the configuration required to support the subscribe/notify method of MWI notification.
telephony-service … … mwi sip-server 1.100.9.6 transport udp port 5060ephone-dn 35 number 2010 … mwi sip
144Configuring Cisco Unity Express 8.6 Using the GUI
OL-24779-02

Voice Mail Message Waiting Indicators for Cisco Unified Communications Manager Express (CUCME)
Perform the following tasks from the Voice Mail Waiting Indicators window:
• Refreshing the Message Waiting Indicator
• Modifying Message Waiting Indicator Settings
Refreshing the Message Waiting IndicatorThe MWI is a light indicator on a Cisco IP phone to notify the phone user that a voice-mail message is pending.
Occasionally, the MWI setting for a telephone can be out of synchronization with the user's message status in the voice-mail database. For example, a user could have pending messages, but the MWI would not be turned on. You can refresh the MWI light so that the light reflects the current message status in the voice-mail database.
Use this procedure to refresh the Message Waiting Indication (MWI) extension for a single mailbox or for all mailboxes. The MWI is a light indicator on a Cisco IP phone to notify the phone user that a voice-mail message is pending.
Step 1 Choose Voice Mail > Message Waiting Indicators > Refresh.
Step 2 To refresh one mailbox, check the box next to mailbox owner's user or group ID and click Refresh Selected.
Step 3 To refresh all mailboxes, click Refresh All.
145Configuring Cisco Unity Express 8.6 Using the GUI
OL-24779-02

Voice Mail Message Waiting Indicators for Cisco Unified Communications Manager Express (CUCME) Modifying Message Waiting Indicator Settings
Modifying Message Waiting Indicator SettingsUse this procedure to modify MWI settings.
Step 1 Choose Voice Mail > Message Waiting Indicators > Settings. The SIP MWI notification mechanism window appears. Select one or a combination of the following:
• Subscribe Notify—Cisco Unified Communications Manager Express (CME) subscribes to Cisco Unity Express using SUBCRIBE/NOTIFY SIP messages for MWI notification for each of the ephone-dns registered to receive MWI notifications. See MWI Configuration Examples.
– Check the box to include envelope information in the notifications.
• Unsolicited Notify—Cisco Unified CME is not required to send a subscription request for each ephone-dn to Cisco Unity Express for MWI notification. Cisco Unity Express sends NOTIFY SIP messages to Cisco Unified CME whenever there is a change in the MWI status for any ephone-dn.
• Outcalling—Used for legacy Cisco Unified CME configurations; incompatible with SRST. Cisco recommends changing to the Subscribe - Notify method to ensure the correct MWI status is reflected on phones after interrupted phone service is restored.
Note If you have chosen Outcalling as the notification method, you must enter the MWI on number and the MWI off number.
Note Do not use the voice-mail or auto attendant operator extensions for these MWI fields. Choose Configure > Extensions to display currently configured extensions.
If no numbers are shown in this window, you must configure the appropriate MWI dial numbers (ephone-dns) in Cisco Unified CME. When you configure the ephone-dn pairs in Cisco Unified CME, you must add wildcard characters (.) to the ephone-dns to represent the length of a telephone extension number. Cisco Unity Express requires these wildcards when importing the MWI ephone-dns from Cisco Unified CME during the Initialization Wizard. See MWI Configuration Examples.
Step 2 Click Apply to save your settings.
MWI Configuration Examples
Subscribe/Notify Notification Example
The following example shows the configuration required to support the subscribe/notify method of MWI notification.
telephony-service … … mwi sip-server 1.100.9.6 transport udp port 5060ephone-dn 35 number 2010 … mwi sip
146Configuring Cisco Unity Express 8.6 Using the GUI
OL-24779-02

Voice Mail Message Waiting Indicators for Cisco Unified Communications Manager Express (CUCME)Modifying Message Waiting Indicator Settings
Outcalling Notification Example
Note Subscribe/Notify is the preferred MWI method; this information is for legacy systems only.
The following example shows a valid MWI ephone-dn configuration for 4-digit extension ranges on Cisco Unified CME:
ephone-dn 8
number 8000....
mwi on
!
!
ephone-dn 9
number 8001....
mwi off
If wildcards are not configured in Cisco Unified CME, the ephone-dns will not show up as available choices in the MWI extension field in the Cisco Unity Express GUI.
After configuring the MWI DNs in Cisco Unified CME, log back into the GUI and choose Administration > Synchronize Information. The numbers can then be configured in the Voice Mail > Message Waiting Indicators > Settings window. See also Synchronizing Cisco Unified Communications Manager Express with Cisco Unity Express.
147Configuring Cisco Unity Express 8.6 Using the GUI
OL-24779-02

Voice Mail Message Waiting Indicators for Cisco Unified Communications Manager Express (CUCME) Modifying Message Waiting Indicator Settings
148Configuring Cisco Unity Express 8.6 Using the GUI
OL-24779-02

Configuring a Voice Mail Auto Attendant
Perform the following tasks from the Voice Mail Auto Attendant window:
• Adding an Auto Attendant
• Configuring Auto-Attendant Script Parameters
• Selecting an Auto Attendant
• Uploading Scripts
• Configuring Auto-Attendant Call Handling
• Viewing a List of Auto Attendants
• Editing an Auto Attendant
• Deleting an Auto Attendant
Adding an Auto AttendantAn Auto attendant allows you to create and change greetings that callers hear when your telephone system answers incoming calls.
A standard welcome greeting and other system messages are provided as part of the auto attendant included with Cisco Unity Express. Use this procedure to add a custom auto attendant. You can record a different welcome greeting to use in place of the standard greeting.
Before You Begin
You need the following information:
• The name of the .wav file containing the prerecorded welcome greeting. This file must be stored on the system so that it can be located and saved in the auto attendant script. This file should be recorded using ITU-T mu law and be an 8Khz/8 bit mono file.
Note For more information on recording auto attendant greetings, see the Cisco Unity Express Maintain and Operate Guides at the following URL: http://www.cisco.com/en/US/products/sw/voicesw/ps5520/prod_maintenance_guides_list.html.
• The number of times the auto attendant will replay instructions to a caller before the call is disconnected. This count begins when the caller moves past the main menu and hears instructions for a submenu. The main menu will play five times; then, if the caller makes no choice or makes incorrect choices, the call is transferred to the operator.
149Configuring Cisco Unity Express 8.6 Using the GUI
OL-24779-02

Configuring a Voice Mail Auto Attendant Configuring Auto-Attendant Script Parameters
• The Auto attendant operator extension.
• The Auto attendant access number.
• The Maximum Sessions for your system.
Use the following procedure to add an auto attendant.
Step 1 Choose Voice Mail > Auto Attendant. The Auto Attendant window appears.
Step 2 Click Add. Enter the necessary information into the fields.
Note You must enter a valid numeric string into the operExtn field to add an auto attendant.
Step 3 Click Add to save your settings.
Step 4 Proceed to Configuring Auto-Attendant Script Parameters—You can upload welcome prompts from this window for the auto attendant to use.
Configuring Auto-Attendant Script ParametersAfter you select an automated attendant, the Script Parameters window appears and shows the parameters in the automated attendant script that you have selected.
Field Description
allowExternalTransfers True or false. Permits the caller to transfer to an external number. To prevent toll fraud, set this option to “false.”
busClosedPrompt Name of the .wav file containing the message that the caller hears after the welcome prompt if the business is closed at that time.
businessSchedule Name of the business schedule the system uses to determine the open and closed hours for the business.
busOpenPrompt Name of the .wav file containing the message that the caller hears after the welcome prompt if the business is open at that time.
dialByExtnAnytime True or false. Allows a caller to enter a extension number directly when the welcome or menu prompt is being played out. The call is then transferred to that extension.
dialByExtnAnytimeInputLength How many digits to collect as a part of dialByExtnAnytime.
dialByFirstName True or false. For dial-by-name, using the first-last-name (instead of the regular last-first-name order).
150Configuring Cisco Unity Express 8.6 Using the GUI
OL-24779-02
Configuring a Voice Mail Auto AttendantConfiguring Auto-Attendant Script Parameters
If you have written and uploaded custom auto attendant scripts to Cisco Unity Express, the fields displayed in this window may be different. For more information on Cisco Unity Express auto attendant scripts, including field definitions, see the Cisco Unity Express Maintain and Operate Guides at the following URL: http://www.cisco.com/en/US/products/sw/voicesw/ps5520/prod_maintenance_guides_list.html
Use this procedure to configure auto attendant script parameters.
Step 1 Choose Voice Mail > Auto Attendant. The Auto Attendant window appears.
Step 2 Click on the name of the auto attendant that you wish to configure. The Edit window appears.
Step 3 Enter the information into the following fields:
• Call-in number
• Script
• Language
• Maximum Sessions
• Click the box to enable.
Step 4 Click Apply to save your changes.
Step 5 Modify the welcome greeting script parameters by clicking Upload next to each parameter. The upload screen appears. Enter the following information in the Upload screen:
• Source Filename
• Destination Filename
• Click the box to overwrite if the destination file already exists.
• Click Upload. After uploading, the new file appears on the welcomePrompt list. See Configuring Voice-Mail Call-Handling Parameters.
disconnectAfterMenu True or false. If true, then the call is disconnected after the menu. If false, then the call is transferred to the operator extension after the menu.
holidayPrompt Name of the .wav file containing the message that the caller hears after the welcome prompt if the current day is a holiday.
MaxRetry Number of times that the auto attendant will replay submenu instructions to the caller before disconnecting the call.
operExtn Auto attendant operator extension
welcomePrompt Name of the .wav file containing the message that the caller hears when the auto attendant begins to play.
Field Description
151Configuring Cisco Unity Express 8.6 Using the GUI
OL-24779-02

Configuring a Voice Mail Auto Attendant Selecting an Auto Attendant
Selecting an Auto AttendantUse this procedure to select an auto attendant script to modify or view.
Step 1 Choose Voice Mail > Auto Attendant. The Auto Attendant window appears.
Step 2 Click on the name of the auto attendant that you wish to configure. The Auto Attendant Edit window appears.
Step 3 Select the filename of the auto attendant script that you want to view or modify. The script contains prerecorded messages for various auto attendant options that the caller hears.
Note The application name is displayed; you do not need to change this value.
Step 4 To upload a new script to use with the auto attendant, click Upload.
Step 5 From the Language drop-down list, select the language for the Cisco Unity Express prompts.
Step 6 To go to the Script Parameters window, click Next. See Configuring Auto-Attendant Script Parameters.
Uploading ScriptsUse this procedure to upload voice-mail scripts.
Step 1 Choose Voice Mail > Auto Attendant. The Auto Attendant window appears.
Step 2 In the Name field, click on the name of the auto attendant that you wish to configure. The Auto Attendant Edit window appears.
Step 3 Click Upload at the Script entry field(s). The Upload window appears.
Step 4 Enter the source filename, or path to the file that you want to upload or click the Browse button to help you find the directory with the file you want to upload.
Step 5 Enter the destination filename. Enter the same filename as shown in the Source Filename field or a new filename for the script. If you use the same filename, the existing script will be overwritten.
Step 6 Check the box to overwrite if the destination filename already exists.
Step 7 Click Upload.
Configuring Auto-Attendant Call HandlingUse this procedure to configure auto-attendant call handling. After you configure script parameters, the Call Handling window appears, containing the following fields:
• Call-in Number—Auto attendant access number
• Maximum Sessions
152Configuring Cisco Unity Express 8.6 Using the GUI
OL-24779-02
Configuring a Voice Mail Auto AttendantViewing a List of Auto Attendants
• Enabled—Enables the auto attendant. Click Yes to enable the auto attendant. Click No to disable the auto attendant. Callers will hear a message that the auto attendant system is unavailable.
Step 1 Choose Voice Mail > Auto Attendant. The Auto Attendant window appears.
Step 2 Click on the name of the auto attendant that you wish to configure. The Auto Attendant Edit window appears.
Step 3 Enter the data in the fields.
Note You can change these values later by configuring voice mail call handling. See Configuring Voice-Mail Call-Handling Parameters.
Step 4 To save the data, click Apply. The auto attendant window appears with the new or revised auto attendant entry listed.
Viewing a List of Auto AttendantsUse this procedure to view a list of configured automated attendants (auto attendants).
Step 1 Choose Voice Mail > Auto Attendant. The Auto Attendant window appears and contains a list of auto attendants and the following fields for each auto attendant. The system auto attendant is denoted by an asterisk.
• Name—Name of the auto attendant.
• Number—Auto attendant access number.
• Maximum Sessions
• Enabled—Whether the auto attendant is enabled.
Editing an Auto AttendantUse this procedure to edit an auto attendant.
Step 1 Choose Voice Mail > Auto Attendant. The Auto Attendant window appears.
Step 2 In the Name field, click the name of the auto attendant that you want to modify. The Voice Mail Auto Attendant Edit window appears.
Step 3 Enter information that you want to change.
Note You cannot change the name of the auto attendant from this window. See Selecting an Auto Attendant.
153Configuring Cisco Unity Express 8.6 Using the GUI
OL-24779-02
Configuring a Voice Mail Auto Attendant Deleting an Auto Attendant
Step 4 Enter information you want to change in the Script Parameters window. You can upload welcome prompts from this window for the auto attendant to use. See Configuring Auto-Attendant Script Parameters.
Step 5 Enter information you want to change in the Call Handling window. See Configuring Voice-Mail Call-Handling Parameters.
Step 6 Click Apply to save your data.
Step 7 See Configuring Auto-Attendant Script Parameters
Deleting an Auto AttendantUse this procedure to delete an auto attendant.
Step 1 Choose Voice Mail > Auto Attendant. The Auto Attendant window appears.
Step 2 Check the box next to the auto attendant that you want to delete.
Step 3 Click Delete.
Step 4 Click Ok to confirm the deletion.
154Configuring Cisco Unity Express 8.6 Using the GUI
OL-24779-02

Setting Voice Mailbox Defaults
When you create a mailbox, the defaults that you set in the Defaults Mailbox window take effect. Use this procedure to specify the default maximum mailbox size, the maximum caller message size, and the message expiry time. This default set of parameters is applied when a new mailbox is created.
Step 1 Choose Voice Mail > VM Defaults. The Voice Mail VM Defaults window appears.
Step 2 Enter the information in the following fields:
• Mailbox Size, in seconds
• Maximum Caller Message Size, in seconds
• Message Expiry Time, in days
Step 3 To save your entries, click Apply.
155Configuring Cisco Unity Express 8.6 Using the GUI
OL-24779-02

Setting Voice Mailbox Defaults
156Configuring Cisco Unity Express 8.6 Using the GUI
OL-24779-02
Configuring Voice Mail
When you create a user, the defaults that you set in the Defaults Voice Mail window apply to that user. Now you can configure voice mail settings.
Use this procedure to configure the voice-mail application.
Step 1 Choose Voice Mail > VM Configuration. The Voice Mail VM Configuration window appears.
Step 2 Enter information in the following fields:
• Maximum voice message store, in minutes.
• Maximum subscriber recording size, in seconds.
• Maximum broadcast message size, in seconds.
• Broadcast message expiry time, in days.
Note The following selections are optional.
• Prompt language.
• Use Message Waiting Indication (MWI) extension for Broadcast messages:
– Yes—When a broadcast message is received by the system, the message waiting indicator (MWI) light is turned on the users' phones.
– No—When a broadcast message is received by the system, the MWI light is not turned on the users' phones.
• Play caller ID for external callers:
– Yes—If a message from an external caller is received, and the ID of the external caller is available from the system, the telephone number of the caller is played in the envelope information when the voice-mail recipient listens to the message.
– No—If a message from an external caller is received, the system plays an “unknown caller” prompt in the envelope information when the voice-mail recipient listens to the message.
• Enable remote user information cache:
– Yes—Enables collection of vCard and spoken name information from remote voice-mail users to be added to the directory cache (called the least recently used [LRU] cache on the local system. The LRU cache is updated with user information (such as the user's first and last name) whenever new messages are received. The cache is used to provide addressing confirmation.
157Configuring Cisco Unity Express 8.6 Using the GUI
OL-24779-02

Configuring Voice Mail
– No—Disables collection of vCard and spoken name information from remote voice-mail users for the LRU cache.
• Mandatory message expiry—Choosing Yes allows an administrator to force a user to delete messages upon expiry, therefore not allowing the user to choose to save the message again.
• Mailbox Selection. Choose from the following:
– Last Redirecting Party
– Original Called Party
• Outgoing e-mail “from” address.
• Non-subscriber Delivery Restriction Table. Choose no restriction table or select from a list of configured restriction tables.
• Caller Call Flow Restriction Table
• Business Hours Schedule for Greetings
• Click to enable Live Reply
• Live Reply Network Precedence—Choose from the following:
– Disabled—Turn off live reply to network delivered voice-mail messages.
– Calling Number Rule—Use the calling number rule to determine live reply number for a network delivered voice-mail.
– E.164 number—Use the E.164 number in the voice-mail header when using live reply for a network delivered voice-mail.
– E.164 number-Calling Number rule—Use the E.164 number in the voice-mail header if available otherwise use the calling number rule for live reply.
• Live Reply Calling Number Rule—Choose from the following:
– Extension—Use extension in network voice-mail header for live reply.
– Prefix-Extension—Use network location prefix then extension in network voice-mail header for live reply.
– Location-Extension—Use network location id then extension in network voice-mail header for live reply.
– Location-Prefix-Extension—Combine network location id, prefix, and voice-mail extension for live reply.
– Prefix-Location-Extension—Combine network location prefix, id, and voice-mail extension for live reply.
• Live Reply Restriction Table. Choose no restriction table or select from a list of configured restriction tables.
• Live Record Pilot Number.
• Click to enable Live Record Beep.
• Enter the Live Record Beep Duration. Range is 50 to 1000 milliseconds.
• Enter the Live Record Beep Interval. Range is 1 to 30 seconds.
• Select the option for Secure Messages. This setting applies to all Cisco Unity Express subscribers who are logged into the voicemail application.
– Never—Subscribers do not have the option to mark outgoing messages as secure.
– Ask—Outgoing messages are only marked secure when subscribers mark them as secure.
158Configuring Cisco Unity Express 8.6 Using the GUI
OL-24779-02

Configuring Voice Mail
– Always—All outgoing messages are automatically marked secure.
– Private—All outgoing messages marked Private are always secure. This is the default value.
Step 3 To save your changes, click Apply.
159Configuring Cisco Unity Express 8.6 Using the GUI
OL-24779-02

Configuring Voice Mail
160Configuring Cisco Unity Express 8.6 Using the GUI
OL-24779-02
Configuring Voice-Mail Call-Handling Parameters
Use this procedure to configure call-handling parameters.
Step 1 Click Voice Mail > Call Handling. The Voice Mail Call Handling window appears.
Step 2 Enter the data in the following fields:
• Voice Mail Phone Number
• Voice Mail Language
• Maximum Sessions
• Voice Mail Operator Number
• Application Parameter Settings Script
• Administration via Telephone (AvT) call-in number
• Administration via Telephone (AvT) prompt language
Step 3 Click Apply to save your changes.
161Configuring Cisco Unity Express 8.6 Using the GUI
OL-24779-02

Configuring Voice-Mail Call-Handling Parameters
162Configuring Cisco Unity Express 8.6 Using the GUI
OL-24779-02

Configuring Message Notification
Set up Cisco Unity Express to notify users of voice-mail events by phone, pager, or email. Cisco Unity Express contacts these devices to let users know that they have received a voice-mail message. This feature is not enabled by default, and is enabled on a system-wide basis.
Note If this feature is enabled system-wide, configured for specific users, and then disabled system-wide, upon enabling it again, the specific user configurations are restored.
Perform the following tasks from the Voice Mail Message Notification window:
• Notification Administration
• Enabling Subscriber Notification
• Enabling Subscriber Notification
• Configuring Notification Devices
To configure notification by email and for text paging devices, you must also configure an SMTP server. See Configuring SMTP.
Notification AdministrationUse these procedures to configure notification.
Step 1 Choose Voice Mail > Message Notification > Notification Administration. The Notification Configuration window appears.
Step 2 Check the box to enable system-wide notification and choose one of the following message notification types from the drop-down list:
• Urgent Messages—Notifications are only sent for voice-mail messages marked “urgent” by the sender.
• All Messages—Notifications are sent for all voice-mail messages.
Step 3 Check the box to enable system-wide notification for live recordings.
Step 4 Check the box to allow a user to log in to the voice mailbox to retrieve voice-mail messages after notification.
163Configuring Cisco Unity Express 8.6 Using the GUI
OL-24779-02

Configuring Message Notification Enabling Subscriber Notification
Step 5 Enter voicemail notification text:
• Enter the text that will precede the voicemail message notification. The maximum message length is 250 characters.
• Enter the signature text that will follow the voicemail message notification. The maximum message length is 250 characters.
Step 6 Check the box to send voice messages as .wav file attachments to email notification messages.
Step 7 Check the box to enable cascading notifications.
Step 8 Enter the number of seconds after which a call is considered failed. The range is 12 to 96.
Step 9 Choose a restriction table name from the drop-down menu. See Configuring Restriction Tables.
Step 10 Click Apply to save your settings.
Enabling Subscriber NotificationUse this procedure to enable or disable notification for selected subscribers.
Step 1 Choose Voice Mail > Message Notification > Subscriber Notification Management.
Step 2 If the subscribers for which you want to configure notification are not listed, click Find and enter the User or Group ID. Use * for wildcard searching.
Or
Step 3 If the subscribers are listed, check the box next to their user or group ID and click Enable Notification or Disable Notification. The User Profile window appears with the Notification Tab active.
Step 4 A list of notification devices is displayed. Click the box next to specific devices to enable them. To configure a notification device, see Configuring Notification Devices.
Note The check boxes are not enabled if notification has been disabled on a system-wide basis. See Notification Administration.
Configuring Notification DevicesUse this procedure to configure a specific notification device.
Step 1 Choose Voice Mail > Message Notification > Subscriber Notification Management and click the user’s name in the list of users.
Step 2 In the Notification Device window, click the name of the device that you want to configure.
Step 3 Enter data into the following fields. The fields shown depend on the type of device that you have selected.
• Device phone number
164Configuring Cisco Unity Express 8.6 Using the GUI
OL-24779-02

Configuring Message NotificationConfiguring Notification Devices
• Extra digits (such as access codes)
• To: (Email address)—Enter the email address to which to send notifications.
• Text for pager/text for email—Enter the text to display on the pager or in the email when the notification is sent. Note: Special characters, including the “?,” are not allowed.
• If the ability to send a copy of the voice-mail message as an email attachment is enabled system-wide (see Notification Administration), you can check the box to allow this feature for the user.
• Notification preferences—Choose one of the following from the drop-down menu:
– Urgent Messages—Notifications are only sent for voice-mail messages marked “urgent” by the sender.
– All Messages—Notifications are sent for all voice-mail messages. Note: If you select “All,” but the system-wide notification preference is “Urgent,” you are not allowed to select “All” for an individual user. See Notification Administration.
• Notification schedule—See Setting Up the Notification Schedule.
Step 4 Click Apply to save your data.
Setting Up the Notification ScheduleWhen configuring a specific notification device, a calendar with the days of the week and the time, in half-hour increments, is shown.
Configure the following features in this window:
• Select Notification Manually
• Set Notifications for a Day
Select Notification Manually
Use this procedure to manually select notification dates and times.
Step 1 Choose Voice Mail > Message Notification > Subscriber Notification Management and click the user’s name in the list of users.
Step 2 Click on a name in the User/Group ID field. The User Profile window appears.
Step 3 Check the boxes under the day and time. A checked box indicates a time period when notifications will be sent to the user.
Step 4 Set Cascade options—Set your cascade settings to notify specified recipients after any specified time.
Step 5 Click Apply to save your changes.
Set Notifications for a Day
Use this procedure to quickly set notifications for an entire day.
Step 1 In the Quick Add box, select the day, start time, and end time.
Step 2 Click Add.
165Configuring Cisco Unity Express 8.6 Using the GUI
OL-24779-02

Configuring Message Notification Configuring Notification Devices
Timesaver To copy a day’s notification schedule, select the day to copy in the drop-down list, then click Copy.
Step 3 Click Apply to save your changes.
166Configuring Cisco Unity Express 8.6 Using the GUI
OL-24779-02

Configuring My Notification Devices
You can configure notify yourself of voice-mail events by phone, pager, or email. Cisco Unity Express contacts these devices to let you know that you have received a voice-mail message. This feature is not enabled by default, and must be enabled on a system-wide basis by the system administrator before you can configure notifications.
Cascading Settings
Cisco Unity Express supports Cascading Message Notification, which allows you to set up a series of notifications to a widening circle of recipients at various time intervals if your message is not immediately responded to.
In the Voice Mail > Message Notification > My Notification Devices window, set your cascade settings to notify specified recipients after a specified time. Range is 5 to 10080 minutes.
Use this procedure to configure notify yourself of voice-mail events by phone, pager, or email.
Step 1 Choose Voice Mail > Message Notification > My Notification Devices.
Step 2 In the Notification Device window, click the name of the device that you want to configure.
Step 3 Enter data into the following fields. The fields shown depend on the type of device that you have selected.
• Device phone number
• Extra digits (such as access codes)
• To: (Email address)—Enter the email address to which to send notifications.
• Text for pager/text for email—Enter the text to display on the pager or in the email when the notification is sent. Note: Special characters, including the “?,” are not allowed.
• If the ability to send a copy of the voice-mail message as an email attachment is enabled system-wide, you can check the box to enable this feature.
• Notification preferences—Choose one of the following from the drop-down menu:
– Urgent Messages—Notifications are only sent for voice-mail messages marked “urgent” by the sender.
– All Messages—Notifications are sent for all voice-mail messages.
Note If you select “All,” but the system-wide notification preference is “Urgent,” you are not allowed to select “All” for an individual user.
167Configuring Cisco Unity Express 8.6 Using the GUI
OL-24779-02

Configuring My Notification Devices
• Notification schedule—See Setting Up the Notification Schedule.
Step 4 Click Apply to save your data.
168Configuring Cisco Unity Express 8.6 Using the GUI
OL-24779-02

Configuring Integrated Messaging (IMAP)
Integrated messaging is a feature for Cisco Unity Express that allows users to manage voice-mail messages by using an Integrated Messaging Access Protocol (IMAP)-compatible email client. The following clients are supported:
• Cisco Mobile 8.0
• IBM Lotus Notes (8.5, 8.0 and 7.0)
• Microsoft Entourage 2008 (for MacOS)
• Microsoft Outlook (2010, 2007, 2003)
• Microsoft Outlook Express 6.0
• Microsoft Windows Live Mail 12.0
• Iphone third party clients
Voice messages are received as email attachments in the form of .wav files. After it is enabled in Integrated Messaging Service Configuration, IMAP works automatically on a system-wide basis when you open your email client to check incoming voice-mail.
Note Integrated messaging is available for personal mailboxes only.
Configure the following features from this window:
• Integrated Messaging Service Configuration
• Viewing Integrated Messaging Sessions
Integrated Messaging Service Configuration
Use this procedure to configure system-wide integrated messaging.
Step 1 Choose Voice Mail > Integrated Messaging > Service Configuration.
Step 2 Check the box next to Enable Integrated Messaging.
Step 3 Enter the session idle timeout value, in minutes. When a user’s integrated message session has been idle for this time period, the session is timed out and the user must restart. Range is 30 to 120.
169Configuring Cisco Unity Express 8.6 Using the GUI
OL-24779-02

Configuring Integrated Messaging (IMAP)
Enter the maximum session allowed value, or the number of concurrent integrated message sessions that can run on the Cisco Unity Express system. The number of sessions supported depends on the Cisco Unity Express module being used. See the Cisco Unity Express Release Notes for detailed support information.
Step 4 Select the security mode from the drop-down menu:
• None: Only non-SSL connections are permitted.
• Secure Sockets Layer (SSL): Only SSL connections are permitted.
• Mixed: Both non-SSL and SSL connections are permitted.
Step 5 Click Apply to save your settings. You must restart Integrated Messaging Service for configuration changes to take effect.
Viewing Integrated Messaging Sessions
Use this procedure to view IMAP sessions.
Step 1 Choose Voice Mail > Integrated Messaging > Sessions.
If IMAP sessions have been enabled on the system, the statistics will appear in this window. If no sessions are present, you will see the “There are no active IMAP sessions” message.
170Configuring Cisco Unity Express 8.6 Using the GUI
OL-24779-02
Configuring VoiceView Express
VoiceView Express allows voice-mail users to browse, listen to, and manage new and saved voice-mail messages using their Cisco IP Phone display and soft-keys available on the phone. Users can compose and send voice-mail messages to other users and manage their personal mailbox options using VoiceView Express.
Perform the following tasks from the System Voice View Express window:
• Configuring the VoiceView Express Service
• Terminating VoiceView Express Sessions
Configuring the VoiceView Express ServiceUse this procedure to configure the VoiceView Express service.
Step 1 Choose System > VoiceView Express > Service Configuration. The VoiceView Express Service Configuration window appears.
Step 2 Click the check box to enable VoiceView Express (VVE).
Step 3 Enter the session idle timeout value. This is the interval after which an idle VoiceView Express session is automatically closed. The range is 5 to 30 minutes, and the default value is 5 minutes.
Step 4 (For CUCME configurations only): If you have multiple authentication servers on your network, you can enter a fallback authentication server to be used if the VoiceView Express authentication server is unable to authenticate. For example, if you have multiple phone services configured in CUCME that require authentication, you can specify one of those servers to use as the fallback server for VoiceView Express. Enter the URL of the fallback authentication server.
Step 5 Click Apply to save your changes.
Terminating VoiceView Express SessionsUse this procedure to terminate VoiceView Express (VVE) sessions.
Step 1 Choose System > VoiceView Express > Sessions. The VoiceView Express Sessions window appears.
Step 2 The session window displays all active VoiceView Express sessions.
171Configuring Cisco Unity Express 8.6 Using the GUI
OL-24779-02

Configuring VoiceView Express Terminating VoiceView Express Sessions
Step 3 To terminate a VoiceView Express session, check the box next to the session and click Terminate.
172Configuring Cisco Unity Express 8.6 Using the GUI
OL-24779-02

P A R T 4
IVR Tab


Configuring IVR
The Interactive Voice Response (IVR) option is a separately licensed option that integrates with Cisco Unity Express. IVR allows a telephone caller to select options from a voice menu and otherwise interact with the Cisco Unified Express system. The Cisco Unity Express IVR applications work with Cisco Unified Communications Manager Express or Cisco Unified Communications Manager. After the system plays a pre-recorded voice prompt, the caller presses a number on a telephone keypad to select an option.
If your system is configured with IVR, the GUI screen will have an IVR tab that you can select to configure IVR features.
Perform the following tasks from the Interactive Voice Response (IVR) menu:
• Configuring IVR Applications
• Configuring HTTP Triggers
• Configuring VoiceXML Applications
• Configuring the Enterprise Database Subsystem
• Configuring the IVR E-Mail Subsystem
• Managing IVR Documents
Configuring IVR ApplicationsPerform the following tasks from the IVR Applications window:
• Adding IVR Applications
• Configuring Script Parameters
• Deleting a Script
Adding IVR Applications
Use this procedure to add IVR applications.
Step 1 Choose IVR > IVR Applications. The IVR Applications window appears.
Step 2 Click Add to begin adding IVR applications. The Add window appears.
Step 3 Enter the application name in lower case.
Step 4 Select one of the following trigger types:
• Call-in number—A number to dial in to the application.
175Configuring Cisco Unity Express 8.6 Using the GUI
OL-24779-02

Configuring IVR Configuring IVR Applications
• HTTP trigger—Enter a new URI. A corresponding HTTP trigger is created.
Note Entering information in this next step automatically selects Script parameter choices in the Configuring Script Parameters section.
Step 5 Select the script information from the drop-down list.
Step 6 (Optional) Add a new script by clicking Upload. The Upload dialog box appears where you can upload a script. You can also manage scripts using System > Scripts. See Configuring System Scripts Using Editor Express for more information about scripts.
Step 7 Select the language.
Step 8 Enter the Maximum Sessions.
Step 9 Click to enable.
Step 10 Click Apply to save your changes.
Note You must enter a valid string in the operExtn field to save your changes.
Configuring Script Parameters
Use this procedure to configure script parameters.
Note All the steps in this section are required.
Step 1 Choose IVR > IVR Applications. The IVR Applications window appears.
Step 2 Click Add to begin configuring IVR script parameters.
or
Step 3 Click on the name of an existing IVR application. The Edit window appears.
The list of script parameters, generated dynamically, depends on your installation. The following types of scripts may be available in your installation:
• busClosedPrompt
• holidayPrompt
• welcomePrompt
• disconnectAfterMenu
• dialByFirstName
• allowExternalTransfers
• MaxRetry
• dialByExtnAnytime
• busOpenPrompt
• businessSchedule
• dialByExtnAnytimeInputLength
176Configuring Cisco Unity Express 8.6 Using the GUI
OL-24779-02
Configuring IVRConfiguring HTTP Triggers
• operExtn*:
Step 4 For each script parameter in your installation, select the appropriate script from the drop-down list.
Step 5 Click Upload. The Upload dialog box appears.
Step 6 In the Upload dialog box:
a. Enter the source filename, or path to the file you want to upload.
Tip Click the Browse button to help you find the directory with the file you want to upload.
b. Enter the destination filename. Enter the same filename as shown in the Source Filename field or a new filename for the script.
c. Click the box to overwrite the destination file, if the file already exists.
d. Click Upload to save your settings. You can also manage scripts using System > Scripts. See Configuring System Scripts Using Editor Express.
Step 7 Click Add in the IVR Applications window to save your settings.
Deleting a Script
Use this procedure to delete a script.
Step 1 Choose IVR > IVR Applications. The IVR Applications window appears.
Step 2 Check the box of the file to delete from list and click Delete.
Step 3 Click Ok or Cancel to complete the task.
Configuring HTTP TriggersPerform the following tasks from the IVR HTTP Triggers window:
• Adding HTTP Triggers
• Deleting HTTP Triggers
• Editing HTTP Triggers
• Viewing HTTP Triggers
Adding HTTP Triggers
Use this procedure to add IVR HTTP triggers.
Step 1 Choose IVR > HTTP Triggers. The IVR HTTP Triggers window appears.
Step 2 Click Add. The Add an HTTP Trigger window appears.
Step 3 Choose an application from the drop-down list. The list of applications, generated dynamically, depends on your installation.
Step 4 Enter the URL. Use the format, http://:8080/<suffix>
177Configuring Cisco Unity Express 8.6 Using the GUI
OL-24779-02

Configuring IVR Configuring HTTP Triggers
Step 5 Enter the Maximum Sessions.
Step 6 Choose Yes or No to indicate whether you would like this HTTP trigger to be enabled.
Step 7 Select the language.
Step 8 Click Add to save your settings.
Deleting HTTP Triggers
Use this procedure to delete an HTTP trigger.
Step 1 Choose IVR > HTTP Triggers.
Step 2 Click in the box next to the trigger that you want to delete.
Step 3 Click Delete from the menu at the top of the screen.
Step 4 Click Ok to delete the file.
Editing HTTP Triggers
Use this procedure to edit an HTTP trigger.
Step 1 To edit an HTTP trigger, go to the IVR > HTTP Triggers window.
Step 2 Click the HTTP trigger name. The selected HTTP trigger profile window opens.
Step 3 Edit the Application, Maximum Sessions, and Language fields as needed.
Step 4 Click Yes or No whether you want this HTTP trigger to be configured.
Step 5 Click Apply to save your settings.
Viewing HTTP Triggers
Use this procedure to view a list of configured HTTP triggers.
Step 1 Choose IVR > HTTP Triggers. The IVR HTTP Triggers window appears and contains a list of HTTP triggers and the following fields for each HTTP trigger.
• Name—Name of the application suffix.
• Application—Name of the application.
• Enabled—Whether the auto attendant is enabled.
• Maximum Sessions
• Language
178Configuring Cisco Unity Express 8.6 Using the GUI
OL-24779-02

Configuring IVRConfiguring VoiceXML Applications
Configuring VoiceXML ApplicationsPerform the following tasks from the IVR VXML Applications window:
• Adding VoiceXML Applications
• Deleting VoiceXML Applications
• Starting VoiceXML Applications
• Stopping VoiceXML Applications
• Restarting VoiceXML Applications
Adding VoiceXML Applications
Use these procedures to add VoiceXML applications.
Step 1 Choose IVR > VXML Applications. If no VXML applications are configured, you must configure a new file.
Step 2 Click Deploy to add a new VXML application file. The Upload window appears.
Note The following steps are required.
Step 3 In the Upload window, enter the source filename.
Tip You can search for a file on your hard drive by clicking the Browse button.
Step 4 Enter the name for your source file.
Step 5 Click Upload to save your settings.
Deleting VoiceXML Applications
Use this procedure to delete VXML applications.
Step 1 Choose IVR > VXML Applications.
Step 2 Click the box to select the application to delete.
Step 3 Click Delete. The system asks if you are sure that you want to delete the application.
Step 4 Click Ok or Cancel to complete the task.
Starting VoiceXML Applications
Use this procedure to start VXML applications.
Step 1 Choose IVR > VXML Applications.
Step 2 Click the box to select the application you want to start.
179Configuring Cisco Unity Express 8.6 Using the GUI
OL-24779-02

Configuring IVR Configuring the Enterprise Database Subsystem
Step 3 Click Start. The status of the selected application appears in the Status field.
Stopping VoiceXML Applications
Use this procedure to stop VXML applications.
Step 1 Choose IVR > VXML Applications.
Step 2 Click the box to select the application that you want to stop.
Step 3 Click Stop. The status of the selected application appears in the Status field.
Restarting VoiceXML Applications
Use this procedure to restart VXML applications.
Step 1 Choose IVR > VXML Applications.
Step 2 Click the box to select the application to restart.
Step 3 Click Restart. The status of the selected application appears in the Status field.
Configuring the Enterprise Database SubsystemPerform the following tasks from the IVR Enterprise Data Subsystem window:
• Adding a Database (DB) Profile
• Adding and Deleting Optional Database Driver Parameters
Adding a Database (DB) Profile
Use this procedure to add a database profile.
Step 1 Choose IVR > Enterprise Database Subsystem. If no database profiles are found, you must add a new profile.
Step 2 Click Add to add a new profile. The Add DB Profile window appears.
Step 3 In the Add DB Profile window, enter the name of the profile.
Step 4 Enter the profile description.
Step 5 Enter the hostname. You can enter any valid hostname or IP address.
Step 6 Enter the port number.
Step 7 Enter the database type. Choose one of the following from the drop-down menu:
• IBM DB2
• Microsoft SQL or MSDE (default)
• Oracle
• Sybase
180Configuring Cisco Unity Express 8.6 Using the GUI
OL-24779-02

Configuring IVRConfiguring the IVR E-Mail Subsystem
Step 8 Enter the database name.
Step 9 Enter your username.
Step 10 Enter your password.
Step 11 Enter the number of maximum connections.
Step 12 Click Add to save your changes. The Enabled box is checked default.
Adding and Deleting Optional Database Driver Parameters
Use this optional procedure to add or delete database driver parameters.
Step 1 Choose IVR > Enterprise Database Subsystem.
Step 2 Click Add. The Add DB Profile window appears.
Step 3 In the Add DB Profile window, enter the name of the database driver parameter in the Name field.
Step 4 Enter the value of the database driver parameter in the Value field.
Step 5 Click Add More if you would like to add more driver parameters. Additional blank fields appear. Repeat Step 3 and Step 4.
Step 6 Delete driver parameters by checking the box next to the parameter in the list and clicking Delete.
Step 7 Click Add to save your changes.
Configuring the IVR E-Mail SubsystemUse this procedure to configure your IVR e-mail subsystem.
Step 1 Choose IVR > E-mail Subsystem.
Step 2 Enter the default “From” e-mail address. Default is [email protected]. When Cisco Unity Express sends an e-mail it uses that e-mail as its own e-mail ID. Use any standard e-mail address.
Step 3 Click Apply to save your settings.
Managing IVR DocumentsYou can manage the following IVR document types from the IVR Document Management window:
• Templates—Plain text documents that have a “.txt” extension.
• TIFF Images—Image files typically used for fax that have a “.tif” or “.tiff” extension.
• Generic Files—Any document in any format, even plain text and TIFF files (for example, PDF, GIF, and BMP).
Perform the following tasks from the IVR Document Management window:
• Configuring IVR Templates
181Configuring Cisco Unity Express 8.6 Using the GUI
OL-24779-02

Configuring IVR Managing IVR Documents
• Configuring IVR TIFF Images
• Configuring IVR Generic Files
Configuring IVR Templates
Use this procedure to configure IVR templates.
Step 1 Choose IVR > Document Management > Templates. If no documents are found, you must upload a new document.
Step 2 Click Upload. The Upload dialog box appears.
Step 3 In the Upload dialog box:
a. Select the language.
a. Enter the source filename, or path to the file you want to upload.
Tip Click the Browse button to help you find the directory with the file you want to upload.
b. Enter the destination filename. Enter the same filename as shown in the Source File name field or a new filename for the template.
c. Click the box to overwrite the destination file, if the file already exists.
d. Click Upload to save your settings.
Step 4 Click Ok to save your changes.
Configuring IVR TIFF Images
Use this procedure to configure IVR TIFF images.
Step 1 Choose IVR > Document Management > TIFF Images. If no documents are found, you must upload a new document.
Step 2 Click Upload. The Upload dialog box appears.
Step 3 In the Upload dialog box, perform the following tasks:
a. Select the language from the drop-down list.
a. Enter the source filename, or path to the file you want to upload.
Tip Click the Browse button to help you find the directory with the file you want to upload.
b. Enter the destination filename. Enter the same filename as shown in the Source Filename field or a new filename for the image.
c. Click the box to overwrite the destination file, if the file already exists.
d. Click Upload to save your settings.
Step 4 Click Ok to save your changes.
182Configuring Cisco Unity Express 8.6 Using the GUI
OL-24779-02

Configuring IVRManaging IVR Documents
Configuring IVR Generic Files
Use this procedure to configure IVR generic files.
Step 1 Choose IVR > Document Management > Generic Files. If no documents are found, you must upload a new document.
Step 2 Click Upload. The Upload dialog box appears.
Step 3 In the Upload dialog box, perform the following tasks:
a. Select the language from the drop-down list.
b. Enter the source filename, or path to the file you want to upload.
Tip Click the Browse button to help you find the directory with the file you want to upload.
c. Enter the destination filename. Enter the same filename as shown in the Source Filename field or a new filename for the file.
d. Click the box to overwrite the destination file, if the file already exists.
e. Click Upload to save your settings.
Step 4 Click Ok to save your changes.
183Configuring Cisco Unity Express 8.6 Using the GUI
OL-24779-02

Configuring IVR Managing IVR Documents
184Configuring Cisco Unity Express 8.6 Using the GUI
OL-24779-02
P A R T 5
Administration Tab


Synchronizing Cisco Unified Communications Manager Express with Cisco Unity Express
Use this procedure to synchronize information stored in Cisco Unified Communications Manager Express (CME) with information stored in the Cisco Unity Express database.
Cisco Unity Express has two types of synchronization:
• Automatic synchronization: Occurs without user input. Updates Cisco Unity Express with message waiting indicator (MWI)-related configuration changes that occur on Cisco Unified CME.
• Manual synchronization: Necessary to cause new users and user changes, changes to the voice-mail pilot number, and CFNA/CFB changes to propagate from Cisco Unified CME to Cisco Unity Express.
You can update the following fields:
• User creation
• Primary extension
• Mailbox
• Administrator
• CFNA/CFB
Manual Synchronization
Use this procedure to perform manual synchronization.
Step 1 Choose Administration > Synchronize Information. The Administration Synchronize Information window appears. The system automatically displays any unsynchronized information.
Step 2 Synchronize these databases by checking the box next to any number of User IDs and clicking Synchronize. The Synchronization Summary window appears and shows auto-generated authentication information. Any unsuccessful synchronization attempts are also shown. To see details of the failure, click View/Hide Details next to the parameter.
Step 3 In the User ID field, create and synchronize users on Cisco Unity Express by checking the boxes of the selected users and clicking Synchronize. The Synchronization Summary window appears with the auto-generated authentication information.
187Configuring Cisco Unity Express 8.6 Using the GUI
OL-24779-02

Synchronizing Cisco Unified Communications Manager Express with Cisco Unity Express
188Configuring Cisco Unity Express 8.6 Using the GUI
OL-24779-02

Configuring Backup and Restore
Perform the following tasks from the Administration Backup/Restore window:
• Configuring the Backup Server
• Viewing Scheduled Backups
• Adding a Scheduled Backup
• Configuring Backup Schedule Notification
• Modifying a Scheduled Backup
• Manually Starting a Backup
• Disabling a Scheduled Backup
• Starting a Restore
Note When a Scheduled Backup occurs, it automatically takes the system to the offline mode, and brings it back online after backup is done. To manually perform a backup, you must manually take the system offline. In offline mode, the system continues to accept and process incoming calls and fax messages and also continues to support access to messages through the IMAP, TUI and VVE interfaces. However, in offline mode, CLI configuration commands are not available, the GUI only displays the backup progress bar, and the user login for the GUI is disabled. The following interfaces are also disabled:
• Settings > Options in the TUI
• Everything in AvT
• My Options in VVE
189Configuring Cisco Unity Express 8.6 Using the GUI
OL-24779-02

Configuring Backup and Restore Configuring the Backup Server
Configuring the Backup ServerBefore you begin the backup process from the Administration Backup/Restore Start Backup window, you must first set the parameters in this window.
Use this procedure to configure the backup server.
Step 1 Choose Administration > Backup/Restore > Configuration.
Step 2 Enter the information shown in the following fields:
• Server URL—The URL of the server on the network where backup files are stored. The format should be ftp://server/directory/ where server is the IP address or hostname of the server.
• User ID—The account name or user ID on the backup server. You must have an account on the system to which you are backing up your data. Do not use an anonymous user ID.
• Password—The password for the account name or user ID on the backup server.
• Confirm Password—The password entered again.
• Maximum Revisions—The maximum number of revisions of the backup data that you want to keep on the server. The maximum number is 50. The default value is 5.
Step 3 Click Apply to save the information.
Viewing Scheduled BackupsTo view your scheduled backups, choose Administration > Backup/Restore > Scheduled Backups.
The Scheduled Backups window appears. From this window, you can see the following information about the backups:
• Name
• Description
• Schedule
• Next Run
• Categories of backup, or type of data to save
From this window, you can perform the following actions:
• To add a new scheduled backup, click Schedule Backup.
• To modify an existing scheduled backup, click the link for the schedule name.
• To disable all existing scheduled backups, click Bulk Disable. See Disabling a Scheduled Backup.
190Configuring Cisco Unity Express 8.6 Using the GUI
OL-24779-02

Configuring Backup and RestoreAdding a Scheduled Backup
Adding a Scheduled BackupYou must do the following before starting a backup:
• Configure the server used to back up the data. See Configuring the Backup Server.
• Save your configuration.
You can configure scheduled backups to occur once or recurring jobs that repeat:
• Every N days at a specific time
• Every N weeks on specific day and time
• Every N months on a specific day of the month and time
• Every N years on specific day and time
Use this procedure to add a new scheduled backup.
Step 1 Choose Administration > Backup/Restore > Scheduled Backups.
The Scheduled Backup tab appears.
Step 2 Enter a name for the scheduled backup.
Step 3 Enter a description of the scheduled backup; for example, “backupdata6-2-04.”
Step 4 Select the categories of backup, or type of data that you want to save:
• Configuration—Saves the configurations of the system and applications.
• Data—Saves your voice-mail messages.
• Historical Reporting Data—See Configuring Historical Reporting for more information.
Step 5 Select whether the scheduled backup will occur:
• Once
• Daily
• Weekly
• Monthly
• Yearly
Step 6 Select whether the scheduled backup will start:
• Once
• On a specific date and time
Step 7 To save the scheduled backup, click Apply.
Step 8 To configure users who will be notified of the scheduled backup status, click the Notification tab. See Configuring Backup Schedule Notification.
191Configuring Cisco Unity Express 8.6 Using the GUI
OL-24779-02

Configuring Backup and Restore Configuring Backup Schedule Notification
Configuring Backup Schedule NotificationWhen configuring a scheduled backup, you can configure the system to notify selected users about the backup status.
Adding a Backup Schedule Notification
Use this procedure to add a backup schedule notification.
Step 1 Choose Administration > Backup/Restore > Scheduled Backups.
The Scheduled Backup tab appears.
Step 2 Click Schedule Backup to create a new scheduled backup, or select an existing scheduled backup.
Step 3 Click the Notification tab.
Step 4 Click Insert.
a. Select the Condition from the pull-down menu:
– Success—Notify the target only if the scheduled backup is completed successfully.
– Failure—Notify the target only if the scheduled backup fails.
– Both—Notify the target when a scheduled backup either succeeds or fails.
b. Select the Device for notification:
– E-mail—Notify by email
– Text Page—Notify by text page
– Voice Mail—Notify by voicemail
c. Enter the Username or E-mail address to be notified.
Step 5 Click Insert.
Deleting a Backup Schedule Notification
Use this procedure to delete a backup schedule notification.
Step 1 Choose Administration > Backup/Restore > Scheduled Backups.
The Scheduled Backup tab appears.
Step 2 Click the Notification tab.
Step 3 Select the notification to be deleted.
Step 4 Click Delete.
192Configuring Cisco Unity Express 8.6 Using the GUI
OL-24779-02

Configuring Backup and RestoreModifying a Scheduled Backup
Modifying a Scheduled BackupTo modify a scheduled backup, choose Administration > Backup/Restore > Scheduled Backups and click the name of a scheduled backup.
The Modify Scheduled Backup window appears. From this window, you can modify the following fields:
• Description
• Which categories, or type of data to backup:
– Configuration—Saves the configurations of the system and applications.
– Data—Saves your voice-mail messages.
– Historical Reporting Data—See Configuring Historical Reporting for more information.
• Whether the scheduled backup will occur:
– Once
– Daily
– Weekly
– Monthly
– Yearly
• Whether the scheduled backup will start:
– Once
– On a specific date and time
To save your changes, click Apply.
Manually Starting a BackupYou must do the following before starting a backup:
• Configure the server used to back up the data. See Configuring the Backup Server.
• Save your configuration.
Note To manually perform a backup, you must take manually the system offline. In offline mode, the system continues to accept and process incoming calls and fax messages and also continues to support access to messages through the IMAP, TUI and VVE interfaces. However, in offline mode, CLI configuration commands are not available, the GUI only displays the backup progress bar, and the user login for the GUI is disabled. The following interfaces are also disabled:
• Settings > Options in the TUI
• Everything in AvT
• My Options in VVE
Use this procedure to begin the data backup process.
193Configuring Cisco Unity Express 8.6 Using the GUI
OL-24779-02
Configuring Backup and Restore Disabling a Scheduled Backup
Step 1 Click Administration > Backup/Restore > Start Backup. The Start Backup window appears and the system automatically generates a backup ID. The backup ID number increases by 1 every time you back up the server.
Step 2 Enter a description of the backup file; for example, “backupdata6-2-04.”
Step 3 Select the categories of backup, or type of data that you want to save:
• Configuration—Saves the configurations of the system and applications.
• Data—Saves your voice-mail messages.
• Historical Reporting Data—Saves your historical reporting information.
Warning It is recommended that you save your Cisco Unity Express configuration. The backup will put the system in offline mode.
Step 4 To execute the backup, click Start Backup.
Disabling a Scheduled BackupTo disable a scheduled backup, choose Administration > Backup/Restore > Scheduled Backups. The Scheduled Backups window appears.
• To disable an existing scheduled backup, click the name of a scheduled backup. The Modify Scheduled Backup window appears. Click the Disabled checkbox and click Apply.
• To disable all existing scheduled backups, click Bulk Disable. Select whether all scheduled backups should be always enabled, or select a date range for when the disabling of the scheduled backup will begin and end. Click Apply. All existing scheduled backups are disabled.
Click on the Back To List button to return to the scheduled backup list without disabling all the scheduled backups.
Starting a RestoreAfter you have backed up your voice-mail and configuration data to the server, you can restore it for every new installation or upgrade. Use this procedure to restore previous data or a previous configuration on your system.
Note If you restore a previously existing configuration, you cannot run the Initialization Wizard again. You will log in using the same administrative privileges that existed in the restored configuration.
194Configuring Cisco Unity Express 8.6 Using the GUI
OL-24779-02

Configuring Backup and RestoreStarting a Restore
Use this procedure to start a restore.
Step 1 Choose Administration > Backup/Restore > Start Restore. The window appears containing the following fields:
• Backup ID and Description—The backup ID and description of previous backups.
• Categories—The type of data that you want to restore. Choose:
– Configuration—Saves the configurations of the system and applications.
– Data—Saves your voice-mail messages.
– Historical Reporting Data—Saves your historical reporting information.
Step 2 Select the row containing the configuration that you want to restore.
Note If you have backed up both the configuration and the data, you can restore both the categories, or select one to restore.
Step 3 Click Start Restore.
195Configuring Cisco Unity Express 8.6 Using the GUI
OL-24779-02

Configuring Backup and Restore Starting a Restore
196Configuring Cisco Unity Express 8.6 Using the GUI
OL-24779-02

Using the Administration Control Panel for Cisco Unified Communications Manager (CUCM)
Perform the following task from the Administration Control Panel window:
• Switching the Call Agent to Cisco Unified Communications Manager Express
• Saving or Reloading Cisco Unity Express
Switching the Call Agent to Cisco Unified Communications Manager Express
Use this procedure to switch the call agent to Cisco Unified Communications Manager Express.
Step 1 Choose Administration > Control Panel.
Step 2 Under the Call Agent Integration: CUCM label, click Switch to CUCME.
A warning box appears indicating:
“Warning: This operation will a. permanently delete all non-local site related configuration b. reboot the system automatically Do you wish to continue?
Step 3 Click Ok to switch to Cisco Unified Communications Manager Express or click Cancel.
To save or reload Cisco Unity Express, see Saving or Reloading Cisco Unity Express.
197Configuring Cisco Unity Express 8.6 Using the GUI
OL-24779-02
Using the Administration Control Panel for Cisco Unified Communications Manager (CUCM) Saving or Reloading Cisco Unity Express
Saving or Reloading Cisco Unity Express
Note Tis operation takes a few moments to complete.
Use this procedure to save or reload Cisco Unity Express.
Step 1 Choose Administration > Control Panel.
Step 2 Click Save Configuration.
Step 3 Click Ok at the prompt.
Step 4 Click Reload Cisco Unity Express. A dialog box appears warning you that reloading the system will terminate all end user sessions and that any unsaved configuration data will be lost.
Step 5 Click Ok or Cancel to complete the task.
To switch the call agent to Cisco Unified Communications Manager Express, see Switching the Call Agent to Cisco Unified Communications Manager Express.
198Configuring Cisco Unity Express 8.6 Using the GUI
OL-24779-02

Using the Administration Control Panel for Cisco Unified Communications Manager Express (CUCME)
Perform the following tasks from the Administration Control Panel window:
• Saving Cisco Unified Communications Manager Express
• Switching the Call Agent to Cisco Unified Communications Manager
• Saving or Reloading Cisco Unity Express
Saving Cisco Unified Communications Manager ExpressUse this procedure to save Cisco Unified CME.
Step 1 Choose Administration > Control Panel.
Step 2 Under the Cisco Unified Communications Manager Express label, click Save Configuration.
Step 3 Click Ok at the prompt.
To create Cisco Unified CME configuration files, see Creating Cisco Unified CME Configuration Files. To save or reload Cisco Unity Express, see Saving or Reloading Cisco Unity Express. To switch the call agent to Cisco Unified Communications Manager, see Switching the Call Agent to Cisco Unified Communications Manager.
Creating Cisco Unified CME Configuration FilesCisco Unified CME configuration files are eXtensible Markup Language (XML) configuration files that are required for IP phones. When new IP phones are added in CME, the new configuration files need to be created.
Use this procedure to create Cisco Unified CME configuration files.
Step 1 Choose Administration > Control Panel.
199Configuring Cisco Unity Express 8.6 Using the GUI
OL-24779-02

Using the Administration Control Panel for Cisco Unified Communications Manager Express (CUCME) Switching the Call Agent to Cisco Unified Communications Manager
Step 2 Under the Cisco Unified Communications Manager Express label, click Create CNF Files.
A confirmation dialog box will appear if the configuration files are created successfully.
To save Cisco Unified Communications Manager Express, see Saving Cisco Unified Communications Manager Express. To save or reload Cisco Unity Express, see Saving or Reloading Cisco Unity Express. To switch the call agent to Cisco Unified Communications Manager, see Switching the Call Agent to Cisco Unified Communications Manager.
Switching the Call Agent to Cisco Unified Communications Manager
Use this procedure to switch the call agent to Cisco Unified Communications Manager.
Step 1 Choose Administration > Control Panel.
Step 2 Under the Call Agent Integration: CUCME label, click Switch to CUCM.
A warning box appears indicating:
“Warning: This operation will a. permanently delete all non-local site related configuration b. reboot the system automatically Do you wish to continue?
Step 3 Click Ok to switch to Cisco Unified Communications Manager or click Cancel.
To save Cisco Unified Communications Manager Express, see Saving Cisco Unified Communications Manager Express. To create Cisco Unified CME configuration files, see Creating Cisco Unified CME Configuration Files. To save or reload Cisco Unity Express, see Saving or Reloading Cisco Unity Express.
Saving or Reloading Cisco Unity ExpressUse this procedure to save or reload Cisco Unity Express.
Step 1 Choose Administration > Control Panel.
Step 2 Under the Cisco Unity Express - Administration label, click Save Configuration.
Step 3 Click Ok at the prompt.
Step 4 Click Reload Cisco Unity Express. A dialog box appears warning you that reloading the system will terminate all end user sessions and that any unsaved configuration data will be lost.
Step 5 Click Ok or Cancel to complete the task.
200Configuring Cisco Unity Express 8.6 Using the GUI
OL-24779-02

Using the Administration Control Panel for Cisco Unified Communications Manager Express (CUCME)Saving or Reloading Cisco Unity Express
To save Cisco Unified Communications Manager Express, see Saving Cisco Unified Communications Manager Express. To create Cisco Unified CME configuration files, see Creating Cisco Unified CME Configuration Files. To switch the call agent to Cisco Unified Communications Manager, see Switching the Call Agent to Cisco Unified Communications Manager.
201Configuring Cisco Unity Express 8.6 Using the GUI
OL-24779-02

Using the Administration Control Panel for Cisco Unified Communications Manager Express (CUCME) Saving or Reloading Cisco Unity Express
202Configuring Cisco Unity Express 8.6 Using the GUI
OL-24779-02

Displaying Cisco Unity Express License Information
Use this procedure to display Cisco Unity Express license information:
Step 1 Choose Administration > Licenses.
The Licenses display appears, showing the following fields:
• Product ID—The Cisco Unity Express hardware installed
• Serial Number—The serial number for the Cisco Unity Express hardware
• Feature—The installed license feature
• Description—Description of the license, such as voice mail mailboxes or IVR
• Type—Whether the license is a permanent or evaluation license
• State—Whether the license is Active, Inactive, In Use, or Not in Use
• Priority—The priority of the license, either High, Medium, or Low
• Usage—The number of the license that is used
• Validity Left—Days left that the license is valid (evaluation licenses only)
203Configuring Cisco Unity Express 8.6 Using the GUI
OL-24779-02

Displaying Cisco Unity Express License Information
204Configuring Cisco Unity Express 8.6 Using the GUI
OL-24779-02

Configuring Trace Settings
Use this procedure to enable traces, or debug message output, for components in Cisco Unity Express. Components are modules, entities, and activities in the system. For more information, see the Cisco Unity Express Maintain and Operate Guides at the following URL: http://www.cisco.com/en/US/products/sw/voicesw/ps5520/prod_maintenance_guides_list.html.
Step 1 Choose Administration > Traces. The window displays a hierarchical listing of the system components.
Step 2 To enable a trace on a system component, click the check box next to the name of the component.
• To expand the listing of components, click the + sign next to the upper-level components.
• Check the box next to an upper-level component (a module or entity) to enable the traces for all of the components under that component.
• Uncheck the box next to an upper-level component to disable the traces for all of the components under that component.
Step 3 Click Apply to save your changes.
Step 4 Click Ok in the confirmation window.
205Configuring Cisco Unity Express 8.6 Using the GUI
OL-24779-02

Configuring Trace Settings
206Configuring Cisco Unity Express 8.6 Using the GUI
OL-24779-02

P A R T 6
Reports Tab

Configuring Historical Reporting
Historical reporting consists of collecting information about call and application activities and related statistics and sorts and sends the information to local or remote databases. Historical statistics database maintenance components consist of a database purging service that periodically removes older historical statistics data and a database synchronization service that simultaneously updates the local and remote databases. The remote database is typically able to store a larger amount of historical data.
Perform the following tasks from the Historical Reporting menu:
• Configuring Historical Reporting
• Configuring Purge Settings
Configuring Historical ReportingUse this procedure to configure historical reporting.
Step 1 Choose Administration > Historical Reporting > Configuration.
Step 2 Check the box to enable historical reporting.
Step 3 Click Apply to save your settings.
Configuring Purge SettingsPerform the following tasks from the Purge Settings window:
• Configuring Purge Scheduling
• Configuring Purge Notification
• On-Demand Purging
Configuring Purge Scheduling
Use this procedure to configure the purge schedule.
Step 1 Choose Administration > Historical Reporting > Purge Settings.
209Configuring Cisco Unity Express 8.6 Using the GUI
OL-24779-02

Configuring Historical Reporting Configuring Purge Settings
Note The following steps are required.
Step 2 The system purges the historical reporting data every day. Choose a time when the system is relatively idle. Enter in hours and minutes the time that you want the system to be purged daily. You can enter any combination of hours and minutes within a 24-hour period in HH:MM format.
Step 3 The system periodically purges old data from the system. Enter the number of days when to purge data from the system. You can enter any number up to 1000.
Step 4 Purge the oldest data first when the system reaches a specified percent of capacity.
a. Enter the oldest data to purge, in number of days. You can choose any number.
b. Enter the percentage at which the database reaches capacity. You can choose any number up to 95.
Step 5 Click Apply to save your settings.
Configuring Purge Notification
Use this procedure to configure purge notification settings.
Step 1 Choose Administration > Historical Reporting > Purge Settings.
Step 2 Specify to whom to send purge notifications by entering the recipient’s full e-mail address.
The system notifies the e-mail recipient when the database size exceeds a specified percent of capacity. This step is required. Enter in number the percent at which the database reaches notification capacity. Range: 0-95.
Step 3 Click Apply to save your settings.
On-Demand Purging
Use this procedure to enable on-demand purging.
Step 1 Choose Administration > Historical Reporting > Purge Settings.
Step 2 Purge data older than a specified number of days by entering any number.
Step 3 Click the Purge Now button.
Note A warning dialog box appears alerting you that this operation is not reversible and that the action may delete historical reporting data.
Step 4 Select Ok or Cancel to complete the task.
210Configuring Cisco Unity Express 8.6 Using the GUI
OL-24779-02

Reports
Perform the following tasks from the Reports window:
• Viewing Voice-Mail Reports
• Viewing Mailboxes
• Viewing the Backup History Report
• Viewing the Restore History Report
• Viewing the Network Time Protocol Report
• Real Time Reporting
Viewing Voice-Mail ReportsThe Voice Mail Report window allows you to view the number of mailboxes currently configured, allocated mailbox space, time allotted for messages and greetings, and the total number of stored messages and greetings.
Step 1 Choose Reports > Voice Mail. The Voice Mail Report contains the information shown in the following table. You cannot modify any information in this window.
211Configuring Cisco Unity Express 8.6 Using the GUI
OL-24779-02

Reports Viewing Voice-Mail Reports
Field Description
# general delivery mailboxes Number of group mailboxes that are configured.
# personal mailboxes Number of individual mailboxes that are configured.
# orphaned mailboxes Number of configured mailboxes that are not assigned to an individual or group.
Total message time (seconds) Amount of time that is used for currently stored voice messages.
Total number of messages The total number of voice messages that are stored.
Average message length (seconds) Average length of voice messages that are stored.
Total greeting time (seconds) The total amount of time used by the configured greetings.
Total number of greetings The total number of greetings that are configured.
Average greeting time (seconds) Average length of greetings that are configured.
Maximum voice message store (minutes) Maximum storage capacity that is available for voice messages.
Total allocated space (minutes) Amount of space that is allocated to the configured mailboxes.
Broadcast message count Number of active broadcast messages in the system.
Future message count The total number of future message queues.
Networking message count Number of network messages in the network queue.
Messages left since boot Number of messages left since the last reboot of the system.
Messages played since boot Number of messages played since the last reboot of the system.
Messages deleted since boot Number of messages deleted since the last reboot of the system.
212Configuring Cisco Unity Express 8.6 Using the GUI
OL-24779-02

ReportsViewing Mailboxes
Viewing MailboxesUse this procedure to view Mailbox Reports.
Step 1 Choose Reports > Mailboxes. The window contains the following fields:
• Owner
• Number of messages
• New messages
• Saved messages
• Deleted messages
• Broadcast messages
• Future messages
• Faxes
• Time (in seconds)
• Used (percentage of the mailbox size that is in use)
Step 2 (Optional) You can select the number of rows to view per page from the drop-down in the lower left corner of the screen
.
Viewing the Backup History ReportUse this procedure to view the Backup History Report.
Step 1 Choose Reports > Backup History. The Backup History report contains the following fields:
• ID—ID of the backup.
• Server URL—The server where the backup history is stored.
• Backup Time and Date—Date and time when the system was last backed up.
• Result—Status of the last backup procedure. Result shows Success or Fail.
Viewing the Restore History ReportUse this procedure to view the Restore History Report.
Step 1 Choose Reports > Restore History. The Restore History Report shows the history of all the restore processes done on the current system since installation.
213Configuring Cisco Unity Express 8.6 Using the GUI
OL-24779-02

Reports Viewing the Network Time Protocol Report
Viewing the Network Time Protocol ReportUse this procedure to view the Network time protocol (NTP) report.
Step 1 Choose Reports > Network Time Protocol. The report contains the following fields:
• NTP Server—IP address or hostname of the NTP server.
• Status—Indicates if the NTP server connected with Cisco Unity Express or if it was rejected.
• Time Difference (secs)—Time offset between the NTP server and the client.
• Time Jitter (secs)—Estimated time error of the system clock, measured as an exponential average of RMS time differences.
Real Time ReportingThe Real time reporting (RTR) subsystem maintains real time statistics for various call-related and application-related events. You can configure various thresholds for system usage and these thresholds are used for displaying the system summary reports. These thresholds can be configured from the RTR applet only. If changed, the changed values will take effect immediately. Once configured, the threshold values will be saved by the subsystem and will persist across system reloads. The statistics are maintained in memory so a system reload will cause the statistics to get lost.
Use this procedure to initiate Real Time Reporting.
Step 1 Choose Reports > Real Time Reports. Select from the following options:
• Reports—Displays a summary of the statistics, active contacts or applications, and database usage
• Tools—Choose from manual statistics reset options
• Settings—Configure polling related options and customize the look and feel of the applet. Allows you to configure the thresholds for system summary reports. These thresholds are used by the various System Summary report charts to delineate the color scheme. Green, yellow and red color codes to indicate normal, warning, and critical levels.
• System Summary—Displays active statistics and a summary of the statistics since last midnight.
214Configuring Cisco Unity Express 8.6 Using the GUI
OL-24779-02

Help
Perform the following tasks from the Help window:
• About Help
• Viewing System Reports
About HelpIf you have multiple Site names configured on the system, they will be listed in the About Cisco Communications Manager Express table.
Use this procedure to view operating system information.
Step 1 Choose About. The About window appears and contains the following information for your system:
• Cisco Unity Express version
Cisco Unified Communications Manager Express information (CUCME mode only)
• Cisco Unified Communications Manager Express information includes the following:
– Site Name
– Operating System Router
– Cisco IOS Software version
– Cisco Unified CME version
– Feature Package/Cisco IOS Image
Licensing Information
• Licensing information includes the following:
– Default number of personal mailboxes
– Default number of general delivery mailboxes
– Maximum number of configurable mailboxes
– Maximum message space, in minutes
– Maximum number of telephony ports
– Maximum number of voice-mail (VM)/auto attendant (AA) ports
– Maximum number of IVR ports
215Configuring Cisco Unity Express 8.6 Using the GUI
OL-24779-02

Help Viewing System Reports
– Installed packets
– Installed languages
Viewing System ReportsUse this procedure to view system reports.
Step 1 Choose Help > System Information.
The following system specifications can be viewed from the System Information window:
• CPU Model
• CPU Speed (MHz)
• CPU Cache (KB)
• System Uptime
• Chassis Type
• Chassis Serial
• Module Type
• Module Serial
216Configuring Cisco Unity Express 8.6 Using the GUI
OL-24779-02

OL-24779-02
G L O S S A R Y
A
Administration via
Telephone (AvT) The Administration via Telephone System telephone user interface allows administrative users to remotely change system greetings and prompts.
Administration via
Telephone (AvT)
capability
In Cisco Unity Express, when this capability if configured for a group, allows members in this group to log in to the AvT system using their extension and PIN. Members of the Superuser group automatically have AvT privileges. You do not need to make them members of a separate group with AvT privileges.
Administration via
Telephone (AvT)
number
Number that users dial to access the Administration via Telephone System telephone user interface.
Administrator In Cisco Unity Express, administrators have full access to all the voice-mail and auto attendant parameters. Non-administrative voice-mail users have access only to their profile and user-specific Cisco Unified CME information.
Administrator
username (Cisco
Unified
Communications
Manager Express)
Cisco Unified CME requires an administrator to configure the router and other system components. When the Cisco Unity Express software is installed initially, you must create an administrator user ID and password to enable logging in to the system and setting up the Cisco Unified CME hardware and software parameters. Cisco Unified CME does not treat this administrator as a telephone user.
Administrator
username (Cisco
Unity Express)
Username of the Cisco Unity Express system administrator. This can be the same as the username of the Cisco Unified Communications Manager Express system administrator.
Administration via
Telephone system
System that administrators dial into to manage system greetings.
AIM2 Advanced integration module (AIM2-CUE). Supports 15 public distribution lists and 200 members depending on the license SKU. See the Cisco Unity Express Release Notes.
Associated Phone Hardware address of the telephone associated with the user.
Auto-answer This field is for intercom extension types. If you turn off the auto-answer feature at one end of an intercom extension, the intercom becomes a one-way intercom instead of a two-way or bidirectional intercom.
GL-1Configuring Cisco Unity Express 8.6 Using the GUI

Glossary
Auto-line selection Configures the way phone lines are chosen for incoming or outgoing calls.
In/Out—Picking up the handset answers the first ringing line, or, if no line is ringing, selects the first idle line to dial out.
Incoming—Automatically selects a line for incoming calls. To place an outgoing call, users must press a line button.
Disable—Pressing the Answer soft key answers the first ringing line, and pressing a line button selects a line for an outgoing call. Picking up the handset does not answer calls or provide a dial tone.
Auto attendant An automated attendant (auto attendant) allows you to create and change greetings that callers hear when your telephone system answers incoming calls. A welcome greeting is the first message that a caller hears when calling your company. A standard welcome greeting and other system messages are provided as part of the auto attendant included with Cisco Unity Express. These messages are collected into a script that guides the caller in performing various functions, such as pressing buttons to reach various departments and entering the extension for an employee.
Auto attendant
access number
Telephone number that callers dial to access the auto attendant. In many cases, this number is the last four digits of your company telephone number.
Auto attendant
operator extension
Telephone extension for the operator in the auto attendant system. This number is dialed when an auto attendant caller presses 0 for the operator.
B
Barge-in This field is for intercom extension types. Specifies that an intercom call on this extension will force an existing call on the associated extension into a call-hold state and allow the intercom call to be immediately answered.
Blind address A blind address is a phone number at a remote site for which there is no identifying information in the local database, and for which no address confirmation is provided.
Block caller ID Calling-party information that appears on calls originating from an extension that has this option selected (depending on the type of public switched telephone network telephone interface used). To block caller ID from being sent on outbound calls, click Yes for this field when configuring an extension.
Note: Block Caller ID is not supported for calls that access the PSTN through simple analog subscriber lines (for example, on FXO ports), because caller ID for subscriber lines is controlled by the PSTN service provider or telephone company.
Broadcast message A voice-mail message that is sent to all phones at a location.
Broadcast message
expiry time
Time, in days, for a broadcast message to remain active on the system.
GL-2Configuring Cisco Unity Express 8.6 Using the GUI
OL-24779-02

Glossary
Broadcaster
capability
Members in a group with voice-mail broadcaster privileges can send broadcast messages to voice-mail users. Members with local broadcaster privileges can send broadcast messages only to all users at their local network location. Members with local and network broadcaster privileges can send messages to all network locations, including their local location.
Business hours
schedule
Schedule of hours that a business is open and closed that is used by the default auto attendant script to determine how to handle an incoming call (for example, the system plays a greeting stating that the business is closed during “closed” hours). Greetings can be customized by uploading new prompts and configuring the auto attendant script. You can have up to four different business hours schedules.
You can also use this feature in a custom auto attendant script that you have created. For more information on Cisco Unity Express scripts, see the Cisco Unity Express Maintain and Operate Guides at the following URL: http://www.cisco.com/en/US/products/sw/voicesw/ps5520/prod_maintenance_guides_list.html.
C
Call blocking Call blocking prevents unauthorized use of phones by matching a pattern of specified digits during a specified time of day, day of week, or date, and blocking calls to those numbers. Call blocking applies to all IP phones in a Cisco Unified CME system unless you exempt individual IP phones. Also, you can allow phone users to log in to their phones and override time-of-day-based call blocking. To override call blocking, click Exempt. If you click Non Exempt, the configured call-blocking rules are applied to the IP phone. IP phone users can log in to their phones to temporarily disable time-of-day-based call blocking; for example, when an employee works after normal office hours
Call forward
permanent
Forwards all incoming calls to another number.
Call forward busy Redirects incoming calls to another number when the extension is busy, unless call waiting is active.
Call forward no
answer
Forwards incoming calls to another telephone number if they are not answered before the timeout interval expires.
Call forward no
answer (CFNA)/call
forward busy (CFB)
If Call Forward No Answer and Call Forward Busy are configured on the primary extension associated with a user, and the user has a configured voice mailbox, checking this box in the Cisco Unity Express GUI forwards this user's calls to the main voice-mail number if the line is busy or if there is no answer. The main voice-mail number is displayed next to this field.
CTI ports Computer telephony integration (CTI) ports configured on Cisco Unified Communications Manager for use by Cisco Unity Express. Typically there is one port for each application configured, such as voice mail, automated attendant, and the Administration via Telephone (AvT) system.
D
Description Description that appears in the top line in the phone display. The description is an alphanumeric character string, up to 40 characters in length. The string is truncated to 14 characters in the Cisco IP phone display.
Display Name User’s name displayed within Cisco Unity Express applications.
GL-3Configuring Cisco Unity Express 8.6 Using the GUI
OL-24779-02

Glossary
Distribution list Distribution lists are used to send a voice-mail message to multiple users at the same time. A list member can be an individual local user, remote user, general-delivery mailbox, group, a public distribution list, or a Blind address.
Domain name
system (DNS) server
Cisco Unity Express uses a DNS server to provide translation from hostnames to IP addresses.
E
E.164 registration Registers the extension number with an H.323 gatekeeper.
Both Reg—Registers both the primary and secondary extension numbers.
Primary No Reg—Registers only the secondary extension number.
Secondary No Reg—Registers only the primary extension number.
Neither Reg—Does not register either the primary or the secondary extension number.
Extension number Internal telephone number that is associated with a phone line. An extension number is the number that other phones in the system dial to reach the line. Enter an extension number that is no more than 16 digits in length. If the extension is an intercom extension, the alphabetic characters A, B, C, and D can be included for security. Using one or more of these characters in an intercom number ensures that the number can be dialed only from the one other intercom number that is programmed to dial this number. The number cannot be dialed from a normal phone if it contains an alphabetic character.
Extension number
(secondary)
For MWI extension types. Maximum of 16 digits. When the MWI extension is set up for on-off operation, the MWI (primary) extension number is used to turn the MWI light on, and the secondary extension number is used to turn the MWI light off.
F
First Name First name of a user. Callers use these names to access the extension using the dial-by-name feature. These fields cannot contain special characters, spaces, or numbers.
Full Name Full group name. Callers use the full name to access the extension using the dial-by-name feature.
G
General-delivery
mailbox
One or more people in the company can access a general-delivery mailbox. A caller leaves a message in the mailbox, and members of the group can log into the mailbox and retrieve the message. Any member can delete a message from the general-delivery mailbox.
Group ID Name of a group of users, usually created to assign members to a general-delivery mailbox.
Greeting Type Type of greeting that users select to be played to callers reaching their voice mailboxes. Select Standard to play the system standard greeting when callers reach the personal mailbox. Select Alternate to play the user’s alternate greeting when callers reach the personal mailbox.
GL-4Configuring Cisco Unity Express 8.6 Using the GUI
OL-24779-02

Glossary
H
Historical reporting Collecting information about call and application activities and related statistics and sorting and sending the information to local or remote databases. Historical statistics database maintenance components consist of a database purging service that periodically removes older historical statistics data and a database synchronization service that simultaneously updates the local and remote databases. The remote database is typically able to store a larger amount of historical data.
History Depth The history depth is used to force all users to choose a password/PIN that is not in their password/PIN history lists. The administrator specifies how many of the user’s previous passwords/PINs are compared to the new password/PIN. This value is the “depth” and is an integer ranging from 1 to 10.
Hold-alert Audible alert notification on the Cisco IP phone for alerting the user about on-hold calls.
Originator—Generates a one-second burst of ringing on the phone that placed the call in the hold state if the phone is in the idle state. If the phone is in use on another call, an audible beep (call-waiting tone) is generated.
Idle—Generates a one-second burst of ringing on the IP phone that placed the call in the hold state if the phone is in the idle state. If the phone is in active use, no on-hold alert is generated.
Shared—Generates a one-second burst of ringing for all the idle phones that share the same line configuration. If the phones are in use, users do not hear an audible beep. Only the user who initiated the call and is on another call hears a call-waiting beep when another calling party attempts to ring the same line.
Holidays On days specified as holidays in Cisco Unity Express, the auto attendant script plays a special greeting to callers. Cisco Unity Express supports a maximum of 26 holidays per calendar year and provides holiday configuration for three calendar years: the previous, current, and next calendar years. You cannot add holidays to a previous year.
HTTP trigger Hypertext Transfer Protocol (HTTP). World wide web protocol. A relative URL that a user enters into the client browser to start the application. You can upload either eXtensible Style Language Transformation (XSLT) templates or Java Server Pages (JSP) templates to serve as your HTTP trigger.
Hunt stop Prevents incoming calls from searching (hunting) for alternative destinations when the exact called number or extension is busy. Huntstop is used to control call-coverage call paths. Disabling huntstop allows you to create hunt groups in which the call-routing mechanism searches for alternative destinations that are supported by your system.
Hunt stop channel For dual-line extensions.
On—Enables channel huntstop, which keeps a call from hunting to the next channel of an extension if the first channel is busy or does not answer.
Off—Disables channel huntstop.
Use the hunt stop channel to reserve the second channel of a dual-line extension for outgoing calls. This helps guarantee the availability of the second channel for functions like conferencing and call transfer with consultation. If an outgoing channel is not available during a call, you may be unable to invoke the conference and call transfer with consultation features. Also use the hunt stop channel when you assign an extension to a hunt group. This causes incoming calls to hunt to the first available idle extension in the hunt group, instead of presenting the call in call-waiting mode on an extension that is already in use. Hunt stop channel can be used independently of the hunt stop option.
GL-5Configuring Cisco Unity Express 8.6 Using the GUI
OL-24779-02

Glossary
I
Integrated
Messaging Access
Protocol (IMAP)
Feature for Cisco Unity Express that allows users to manage voice-mail messages by using an Internet Message Access Protocol (IMAP)-compatible email client.
Intercom extension Cisco Unified CME supports intercom functionality for press-to-answer voice connections by using specially configured intercom buttons (from the command-line interface or the Cisco Unified CME graphical user interface). When an intercom speed-dial button is pressed, a call is placed to the selected extension. The called extension automatically answers the call in speakerphone mode and mute is activated, providing a one-way voice path from the initiator to the recipient. A beep sounds when the call is automatically answered to alert the recipient to the incoming call.
Intercom number This field is for intercom extension types. Enter the number of the telephone that is speed-dialed when the intercom feature is used on this phone.
IP multicast address
and port
Optional fields for paging extension types when multicast paging is selected instead of unicast paging. You must enter a unique multicast broadcast IP address and UDP port number. When multiple paging numbers are configured, each paging number must use a unique IP multicast address. IP multicast addresses can be in the range 225.x.x.x to 239.x.x.x and must not conflict with other IP multicast addresses in use within your data network. Port 2000 is recommended because it is already used for normal nonmulticast RTP media streams between phones and the Cisco Unified CME router.
Note: Cisco IP phones do not support multicast at 224.x.x.x addresses.
Interactive Voice
Response (IVR)Cisco IP IVR provides speech enabled voice response and leverages web-based content by incorporating VoiceXML support.
ISM-SRE Internal Service Module Service Ready Engine module (ISM-SRE-300-K9). Supports 25 public distribution lists and 880-1000 members depending on the license SKU. Also supports up to 50 sessions and 200 users. See the Cisco Unity Express Release Notes.
J
JTAPI Java Telephony API (JTAPI) supports telephony call control. It is an extensible API designed to scale for use in a range of domains, from first-party call control in a consumer device to third-party call control in large distributed call centers.
L
Label Text label assigned to an extension. Use this feature when you want to display a text label instead of an extension number next the phone's line button. For example, you may prefer to display the text “Lobby,” rather than the extension number of the Lobby phone. The maximum number of characters accepted is 40, and the number of characters displayed on the phone is based on phone type and language choice.
Language In Cisco Unity Express, the language in which prompts are spoken to the voice-mail users. The languages available depend on the version of Cisco Unity Express that you have installed.
GL-6Configuring Cisco Unity Express 8.6 Using the GUI
OL-24779-02
Glossary
Last Name Last name of a user. Callers use these names to access the extension using the dial-by-name feature. These fields cannot contain special characters, spaces, or numbers.
Line mode Specifies if an extension supports a single call or has a dual line that allows for two calls to be active on one button.
Single—Makes one call connection at a time by using one phone line button (one call per button: Key System mode). Single-line mode is required for lines that are dedicated to intercom, paging, or MWI.
Dual—Permits two simultaneous calls on an extension. Dual-line Mode is required for call waiting, call transfer, and conferencing abilities on a line. Alternatively, you can configure multiple line buttons per phone to support dual-call operations.
Location ID Unique numeric ID assigned to a voice-mail location. This number is used to identify the location and is entered when a user performs addressing functions in the telephone user interface.
Login Without PIN Allows voice-mail subscribers to login to their mailbox without any PIN using either TUI or VoiceView Express (VVE). A subscriber can login into his mailbox with out a PIN either from his primary extension or from any other phone based on the “PINless login” configuration for that subscriber. For personal mailboxes only.
M
Mailbox The space allotted to a user to store voice-mail messages. Personal mailboxes are assigned to individual users, or user IDs. General-delivery mailboxes are assigned to groups, or group IDs.
Mailbox Size Maximum number of seconds of stored messages allowed for the voice mailbox. To check the maximum number of voice message storage minutes permitted on your Cisco Unity Express system, choose Help > About and look at the Licensing Information fields.
Maximum
broadcast message
size
Maximum duration, in seconds, of a broadcast message that can be sent by a caller in the voice-mail system. The default value is 5 minutes and the maximum value is one hour.
Maximum Caller
Message Size
Maximum size, in seconds, of a message that can be left by a caller in the voice-mail system.
Maximum Sessions Maximum number of callers that the auto attendant can handle simultaneously. The Maximum Sessions number is limited by the number of auto attendant ports purchased with Cisco Unity Express. Choose Help > About and look at the Maximum Telephony Ports field to see the number of ports that are available on your system.
Maximum
subscriber
recording size
Maximum size, in seconds, of a message that can be left by a caller in the voice-mail system. This default value is assigned by the system to a newly created user. When this limit is reached, the caller is notified that no more time is available for the message or that the mailbox is full. The caller hears prompts to listen to the message, to rerecord the message, or to send the message.
Maximum voice
message store
The length of time, in minutes, for which voice-mail storage is available for the entire system. The maximum number of mailboxes that your system can create determines how many minutes of voice-mail messages can be stored at a given time.
Member count Number of users (individual or group) who belong to a distribution list.
GL-7Configuring Cisco Unity Express 8.6 Using the GUI
OL-24779-02

Glossary
Message Expiry
Time
Number of days for which messages are stored. After a message has been stored for the specified length of time, the user can resave the message or delete it.
Max notify count This field is for park-slot extension types. Sets a limit for the number of reminder timeouts and reminder rings for a parked call. For example, a Max Notify Count value of 10 sends 10 reminder rings to the phone at intervals specified in the Notify Interval field. When a limit is set, a call parked at this slot is disconnected after the limit has been reached. Range is from 1 to 65535. There is no default value.
Message Waiting
Indication (MWI)
extension
For outcalling SIP MWI notification mechanism only. Defines an extension that receives special notification calls that are used to turn on the light indicator on a Cisco IP phone to notify the phone user that a voice-mail message is pending. The MWI fields are automatically populated with the dialed number (DN) pairs originally configured in Cisco Unified CME. When you configure the DN pairs in Cisco Unified CME, you must add wildcard characters (.) to the DNs to represent the length of a telephone extension number. Cisco Unity Express requires these wildcards when importing the MWI DNs from Cisco Unified CME during the Initialization Wizard. If wildcards are not configured in Cisco Unified CME, the DNs will not show up as available choices in the MWI extension field in the Cisco Unity Express GUI. The following example shows a valid MWI DN configuration for 4-digit extension ranges on Cisco Unified CME:
ephone-dn 8number 8000....mwi on!!ephone-dn 9number 8001....mwi off
You need to configure an MWI on number and an MWI off number.
MWI mode For message-waiting indication (MWI) extension types.
On—Uses the MWI extension to turn on the MWI if the called number matches either the primary or the secondary MWI extension number.
Off—Uses the MWI extension to turn off the MWI if the called number matches either the primary or the secondary MWI number.
On-Off—Uses the MWI extension to turn on the MWI light if the called number matches the MWI primary extension number. The MWI light is turned off if the called number matches the secondary extension number.
MWI on number For outcalling SIP MWI notification mechanism only. The Cisco Unified CME ephone-dn number used with a user’s extension to turn a user’s message-waiting indicator (MWI) light on. The MWI dialed numbers (DNs) are used by the voice-mail system to activate and deactivate the MWIs. These numbers should be unique and should not be assigned to any phone. Use wildcards (“.”) in the primary or secondary number to match a range of extension numbers. For example use “8000….” so that a MWI notification call from your voice-mail system to “80005001” turns on or off the MWI for extension “5001.”
GL-8Configuring Cisco Unity Express 8.6 Using the GUI
OL-24779-02

Glossary
MWI off number For outcalling SIP MWI notification mechanism only. The Cisco Unified CME ephone-dn number used with a user’s extension to turn a user’s message-waiting indicator (MWI) light off. The MWI dialed numbers (DNs) are used by the voice-mail system to activate and deactivate the MWIs. These numbers should be unique and should not be assigned to any phone. Use wildcards (“.”) in the primary or secondary number to match a range of extension numbers. For example use “8000….” so that a MWI notification call from your voice-mail system to “80005001” turns on or off the MWI for extension “5001.”
MWI refresh Occasionally, the MWI setting for a telephone can be out of synchronization with the user's message status in the voice-mail database. For example, a user could have pending messages, but the MWI would not be turned on. You can refresh the MWI light so that the light reflects the current message status in the voice-mail database.
N
Name In Cisco Unity Express, name usually identifies the name of a user that is associated with an extension. The name is used for caller ID (calling line identification) purposes and also appears in the local directory with the extension number.
Network time
protocol (NTP)
In Cisco Unity Express, Network Time Protocol (NTP) is used to set the system time to avoid manual configuration of the time. Using NTP helps Cisco Unity Express to keep the system time in synchronization with the NTP server in case there is a drift in the system clock. Typically Cisco Unity Express uses the host router as the NTP server, but you can also use other standard public NTP servers. NTP typically provides accuracy within a millisecond on LANs and up to a few tens of milliseconds on WANs relative to Coordinated Universal Time. Typical NTP configurations utilize multiple redundant servers and diverse network paths to achieve high accuracy and reliability.
New messages Voice-mail messages that have not been listened to or that have been marked as new after a user listens to them.
Night service bell The phone at this extension will ring with a unique ring pattern during the time period when night service is active.
NME Network Module Enhanced-Cisco Unity Express (NME-CUE). Supports 25 public distribution lists and 880-1000 members depending on the license SKU. Also supports up to 50 sessions and 300 users. See the Cisco Unity Express Release Notes.
Normal extension A regular extension line assigned to a phone.
Notification send-to This field is for park slot extension types.
Originator—Sends a reminder ring only to the phone that parked the call.
Notify Destination—Sends a reminder ring to the extension specified in the Notify Destination field.
Both Originator and Notify Destination—Sends a reminder ring to both the phone that parked the call and the extension specified in the Notify Destination field.
GL-9Configuring Cisco Unity Express 8.6 Using the GUI
OL-24779-02
Glossary
Notify destination
(additional)This field is for park slot extension types. Sends a reminder ring to the additional specified extension.
Notify interval For park slot extension types—the interval at which the phone sends a reminder ring to the extension that parked the call. The Notify Interval field sets the call park reminder timeout interval, in seconds. Range is from 0 to 65535. There is no default value. By default, notify interval is not enabled.
O
Operator extension Extension that callers can dial to reach the operator from the auto attendant and voice-mail systems. (Note: Callers can also reach the operator by other methods.)
Owner User or group ID of the user or group that owns a mailbox. Mailbox owners can add or delete users to and from a general-delivery mailbox and can delete the general-delivery mailbox.
Note: If you assign a group as the owner of a general-delivery mailbox, all members in that group have owner privileges for the mailbox.
P
Paging Defines a paging extension that receives incoming calls and broadcasts audio paging to idle Cisco IP phones that have been set up to receive paging. Audio paging provides a one-way voice path to multiple IP phones simultaneously, but does not have a press-to-answer option like the intercom feature. You can create a paging group by using an extension that is configured to receive paging calls, and that extension can be associated with any number of local IP phones. The paging extension number can be dialed from anywhere, including from PSTN and VoIP.
Unicast— By default, audio paging transmits audio simultaneously to multiple IP phones using IP multicast. In cases where you are unable to use IP multicast within your network, you can transmit the audio page to up to ten IP phones individually by using IP unicast.
Note: Cisco IP phones do not support multicast at 224.x.x.x addresses.
Paging extension The number that people call to initiate a page.
Park-slot extension Designates an extension for use as a park slot, or a floating extension not bound to a physical phone. Calls can be sent to the park slot and are held until retrieval by anyone on the system. Each call-park slot occupies one extension, and each call-park slot can hold one call at a time.
Password A Cisco Unity Express password consists of letters and numbers and is at least 3 characters but not more than 32 characters long.
Password options For the password used by the user to access the Cisco Unity Express GUI, select one of the following:
Generate a Random Password—To have Cisco Unity Express generate a random password.
Blank Password—To leave the password blank.
Password Specified Below—To specify a password for this user.
GL-10Configuring Cisco Unity Express 8.6 Using the GUI
OL-24779-02
Glossary
Personal
identification
number (PIN)
A PIN consists of numbers only and is at least 3 digits but not more than 16 digits. Do not use the asterisk (*) or pound sign (#).
The initial PIN value is changed by the user when the user dials in to voice mail for the first time.
Phone physical ID MAC address of the phone. The MAC address of the phone is usually printed on a sticker located on the back or underside of the phone. It should look similar to this: 000E.1234.ABCD.
PIN options For the PIN used to access the Cisco Unity Express TUI, select one of the following:
Generate a Random PIN—To have Cisco Unity Express generate a random PIN.
Blank PIN—To leave the PIN blank.
PIN specified below—To specify a PIN for this user.
Pickup group Allows extensions to be placed in a common group for ease of answering calls within that group. Users can answer calls within their group using group pickup or answer calls within another group using group pickup plus the group number. Place phones located near one another into the same pickup group.
To pick up calls, press the GPickUp softkey and dial the pickup group number. To perform a local group pick up for phones within the same pickup group, press the GPickUp softkey, followed by the star key. If you define only one pickup group within your system, you do not need to dial the pickup group number when using the GPickUp softkey.
Play Tutorial When configuring mailboxes, clicking Yes in the play tutorial field plays a tutorial the first time a user logs into the mailbox. The tutorial provides instructions on setting up greetings and a password.
Preference The order in which individual lines are selected to answer an incoming call when multiple lines have the same extension number. You can set the preference number from 0 to 10. The lower the preference value, the higher the selection priority. Normally, hunt stop must be disabled for the preference value to be effective.
Preference
(secondary)
The secondary preference value is assigned to the secondary number that is associated with an extension. You can set the preference number from 0 to 10. The lower the preference value, the higher the selection priority. Normally, hunt stop must be disabled for the preference value to be effective.
Primary E.164
number
User or group’s primary telephone number, including area code.
Primary Extension A user or group's primary extension, which is associated with a phone line. Other extensions are associated with the user or group and not with the phone. The primary extension is the main extension that callers dial to reach a user, or members of a group dial to reach a general-delivery mailbox. If no primary extension is designated for a user, that user cannot receive voice-mail messages, but will be reachable by callers using the dial-by-name feature.
Private list viewer
capability
Members in a group with private list viewer capability can view other users’ private distribution lists.
Public list manager
capability
Members in a group with public list manager capability can modify and delete public distribution lists.
GL-11Configuring Cisco Unity Express 8.6 Using the GUI
OL-24779-02

Glossary
R
Real time reporting
(RTR)
Maintains real time statistics for various call-related and application-related events.
Ring mode Ring mode of a phone associated with a button on the IP phone.
Normal Ring—For incoming calls, the phone produces audible ringing, a flashing ((< icon in the phone display, and a flashing red light on the handset. On the Cisco IP Phone Expansion Module 7914, a flashing yellow light also accompanies incoming calls.
Silent—Lines do not produce an audible ring when they receive incoming calls.
Silent w/ CW Beep—An audible ring is suppressed for incoming calls, but call-waiting (CW) beeps are allowed. Visible cues are the same as described for normal ring.
Feature Ring—Triple-pulse cadence differentiates incoming calls on a line from incoming calls on other lines on the phone.
Monitor—Select Monitor for a shared line. Visible line status indicates if a line is in use or not. You cannot use the line on this phone to make or receive calls.
Overlay—Multiple extensions share a single button, up to a maximum of 10 extensions on a button, separated by commas.
S
Saved messages Voice-mail messages that a user has marked as saved.
Secondary number For normal extension types. Second telephone number that is associated with a primary extension, so that the IP phone line can be called by dialing either the primary or the secondary phone number. This number is useful for creating simple call-coverage configurations. Maximum of 16 digits.
Secure Sockets
Layer (SSL)Accepted standard for Web security.
Sequence number Unique number that represents the relative placement of a phone in the Cisco IOS configuration. The sequence number provides a mechanism to allow you to distinguish between multiple extension instances that are configured with the same extension telephone number. For example, you can configure a set of extension lines that all have the same extension number, and use a sequence number to uniquely select a specific extension to edit or delete within this set of lines.
GL-12Configuring Cisco Unity Express 8.6 Using the GUI
OL-24779-02
Glossary
SIP MWI notification
mechanism
Cisco Unity Express supports the following methods of generating MWI notifications:
Subscribe - Notify—Cisco Unified Communications Manager Express subscribes to Cisco Unity Express using SUBCRIBE/NOTIFY SIP messages for MWI notification for each of the ephone-dns registered to receive MWI notifications. Supports Cisco Survivable Remote Site Telephony (SRST).
Unsolicited Notify—Cisco Unified Communications Manager Express is not required to send a subscription request for each ephone-dn to Cisco Unity Express for MWI notification. Cisco Unity Express sends NOTIFY SIP messages to Cisco Unified Communications Manager Express whenever there is a change in the MWI status for any ephone-dn. Supports Cisco SRST.
Outcalling—Used for legacy Cisco Unified Communications Manager Express configurations; incompatible with Cisco SRST. Cisco recommends changing to the “Subscribe/Notify” method to ensure the correct MWI status is reflected on phones after interrupted phone service is restored.
Site An individual Cisco Unified Communications Manager Express (Cisco Unified CME) installation. Centralized Cisco Unity Express (CUE) allows multiple Cisco Unified CME installations per Cisco Unity Express on NME and SM-SRE platforms only. If a system configuration has more than one site configured per Cisco Unity Express installation, an enhanced table appears in the configuration GUI screen from which you can select individual sites, or Cisco Unified CMEs, to configure.
SM-SRE Service Module Service Ready Engine modules (SM-SRE-700-K9 and SM-SRE-900-K9). Supports 25 public distribution lists and 880-1000 members depending on the license SKU. Also supports up to 250 sessions and 500 users. See the Cisco Unity Express Release Notes.
SMTP Simple Mail Transfer Protocol (SMTP). standard for e-mail transmissions across the Internet. Formally SMTP is defined in RFC 821 (STD 10) as amended by RFC 1123 (STD 3) chapter 5. The protocol used today is also known as ESMTP and defined in RFC 2821.
Speed dial You can configure IP phone buttons for one-touch speed dialing. Buttons on your phone that are not used for phone lines and that have been designated for use as speed-dial buttons by your system administrator can be programmed with speed-dial numbers. Your phone may support flexible assignment of the phone buttons for use either as telephone lines or as speed-dial buttons. The total number of physical buttons on your phone may limit the total number of lines and speed-dial buttons. For example, if your phone has buttons that are configured as additional phone lines, you may have a reduced number of available buttons for speed-dial use. The first available speed-dial button is the one after the last phone button that has been assigned as a phone line.
To configure a speed dial, enter a number and the label you want displayed on the phone for that speed-dial number.
This field applies only to Cisco IP Phones 7940, 7960 or 7914 for the four fixed-function speed-dial numbers, or to Cisco IP Phone 7910 for the two fixed-function speed-dial numbers.
Superuser In Cisco Unity Express, when applied to a group, gives Administrator privileges to any users in this group.
T
TUI telephone user interface.
GL-13Configuring Cisco Unity Express 8.6 Using the GUI
OL-24779-02

Glossary
Total Time Used Total amount of stored message time that is currently used in the mailbox.
Total messages Number of messages that are stored in the mailbox.
U
URI Uniform resource identifier.
User ID Alphanumeric user identifier.
Username In Cisco Unity Express, an alphanumeric identifier for a user or group.
V
vCard A standard format for an electronic business card that includes fields for the phone number, text name, and e-mail address of the message sender.
Voice mailbox A storage space on the system for an individual user’s voice messages. See also General-delivery mailbox.
Voice Mail Phone
Number
Telephone number that users dial to retrieve their voice messages. It should not contain spaces, dashes, or periods.
Voice-mail system Cisco Unity Express system that users call to access voice-mail information, such as voice messages.
Voice Profile for
Internet Mail (VPIM)
Protocol for exchanging MIME-encoded voice messages between messaging systems by using SMTP as a transport mechanism.
VoiceView Express
(VVE)
VoiceView Express is an IP phone application that allows voice-mail users to browse, listen to, and manage new and saved voice-mail messages using their Cisco IP Phone display and soft-keys available on the phone. Users can compose and send voice-mail messages to other users and manage their personal mailbox options using VoiceView Express.
VPIM Broadcast ID The ID of the VPIM address that receives broadcast messages at the remote location and distributes the messages to all users.
VXML Voice Extensible Markup Language (VoiceXML). VoiceXML is an open-standard markup language used to create voice-enabled Web browsers and interactive-voice-response (IVR) applications.
Z
Zero-out number Number to which callers are transferred when they press 0 at a voice-mail greeting. If you want callers to reach the operator when they press 0, enter the operator extension in this field.
GL-14Configuring Cisco Unity Express 8.6 Using the GUI
OL-24779-02

OL-24779-02
I N D E X
A
AAA
accounting event logging 64
configuring the accounting server 64
configuring the authentication server 61
adding a new user 30, 36
Administration Control Panel window 197, 199
auto attendant
adding 149
configuring call handling 152
configuring script parameters 150
modifying 152
uploading voice-mail scripts 152
auto attendants
viewing a list of 153
B
Backup History Report 213
backups
adding a scheduled backup 191
configuring 189
configuring backup schedule notification 192
configuring the backup server 190
disabling a scheduled backup 194
manually starting a backup 193
modifying a scheduled backup 193
viewing scheduled backups 190
business hour schedule
copying business hour days 96
deleting 96
business hours schedule
adding 95
modifying 95
settings 95
C
caller input 129
call-in numbers
adding 102
modifying 102
viewing 101
wildcard trigger patterns 103
cascading message notification settings 167
changing an expired password 11
changing the time zone 116
Cisco Unified CM
switching the call agent to Cisco Unified Communications Manager Express 197
Cisco Unified CME 80
adding sites 80
configuring 79
creating configuration files 199
deleting a site 81
entering the SIP provider hostname 81
saving 199
switching the call agent to Cisco Unified Communications Manager 200
synchronizing with Cisco Unity Express 187
Cisco Unity Express
reloading 198, 200
saving 198, 200
configuring backup and restore 189
configuring Cisco Unified Communications Manager 77
configuring CTI ports 105
IN-1Configuring Cisco Unity Express 8.6 Using the GUI

Index
configuring distribution lists 133
configuring fax settings 109
configuring groups 41
configuring historical reporting 209
configuring language settings 107
configuring the backup server 190
configuring trace settings 205
configuring users 29, 35
configuring voice mail 157
configuring voice-mail message waiting indicators 143, 145
configuring VoiceXML (VXML) applications 179
customizing the caller input 129
D
deleting a group 46
deleting a mailbox 131
deleting an auto attendant 154
deleting a user 33, 40
displaying a user profile 31, 38
displaying Cisco Unity Express license information 203
displaying group subscriptions 32, 39
displaying or modifying group parameters 45
distribution lists
adding members 134
adding non-subscribers 135
configuring 133
deleting members 136
private
adding 139
deleting 140
modifying 139
viewing 138
public
adding 134
adding owners 136
deleting 138
deleting owners 137
IN-2Configuring Cisco Unity Express 8.6 Using the GUI
modifying 138
viewing 133
viewing a list of other users’ private lists 140
viewing other users’ private list profiles 140
Domain Name Server (DNS)
adding 112
changing settings 111
configuring 111
deleting 112
E
editing an auto attendant 153
editing sites 80
Editor Express
configuring call flow for scripts 91
creating scripts 90
uploading a new voice-mail prompt 93
F
failover
authentication 62
unreachable 62
fax settings 109
G
greetings 128
groups
adding a new user group 42
configuring 41
deleting 46
modifying group parameters 45
modifying group subscriptions 32, 39
modifying membership in other groups 46
modifying owners in other groups 46
searching 47
subscribing members 43
OL-24779-02

Index
subscribing owners 44
unsubscribing members and owners 44
viewing group membership in other groups 45
viewing owners and members 45
H
historical reporting 209
purge settings 209
holidays
adding 97
deleting 99
list 97
modifying 98
I
importing a user 30, 37
Initialization Wizard
changing the call agent 15, 21
committing your changes 19, 26
configuring system defaults 18, 25
configuring voice mail call handling 25
configuring voice-mail call handling 18
importing Cisco Unified Communications Manager Express users 24
importing Cisco Unified Communications Manager users 17
initial window 15, 21
logging in for the first time 16, 22
logging into Cisco Unified Communications Manager 17
logging into Cisco Unified Communications Manager Express 23
starting 15, 21
viewing current settings 16, 22
viewing the status 20, 26
integrated messaging (IMAP), configuring system-wide 169
Interactive Voice Response
OL-24779-02
stopping VoiceXML applications 180
Interactive Voice Response (IVR) 175
adding applications 175
adding Voice XML applications 179
configuring generic files 183
configuring HTTP triggers 177
configuring script parameters 176
configuring the E-Mail subsystem 181
configuring TIFF images 182
deleting a script 177
deleting HTTP triggers 178
deleting VoiceXML applications 179
editing an HTTP trigger 178
Enterprise Database Subsystem 180
managing documents 181
managing templates 182
restarting VoiceXML applications 180
starting VoiceXML applications 179
viewing HTTP triggers 178
L
language settings 107
M
mailboxes
adding 126
deleting 131
greetings tab 128
modifying 127
searching for 131
unlocking 130
viewing 125
viewing reports 213
message notification configuration 163
message waiting indicator (MWI)
modifying settings 143, 146
refreshing 143, 145
IN-3Configuring Cisco Unity Express 8.6 Using the GUI
Index
modifying a user profile 31, 38
modifying group subscriptions 32, 39
modifying the JTAPI provider 77
N
network locations
adding 68
deleting 71
displaying 69
list 67
modifying 69
Network Time Protocol (NTP) report 214
network time settings 115
adding an NTP server 115
deleting an NTP server 116
notification devices 164
notification schedule 165
O
overview of privileges 53
P
password
changing an expired 11
privileges
creating 58
customizing 58
deleting 59
overview 53
R
Real Time Reporting (RTR) 214
reloading Cisco Unity Express 198, 200
remote users
adding 74
IN-4Configuring Cisco Unity Express 8.6 Using the GUI
deleting 75
displaying 74
modifying 74
viewing 73
reports
Backup History Report 213
mailboxes 213
Network Time Protocol (NTP) 214
Real Time Reporting (RTR) 214
Restore History Report 213
restore, starting 194
Restore History Report 213
restriction tables
adding 117
adding call patterns 118
configuring 117
configuring parameters 117
deleting 119
deleting call-pattern entries 119
editing call-pattern entries 118
S
saving Cisco Unified CME 199
saving Cisco Unity Express 198, 200
scripts
configuring 89
configuring call flow from Editor Express 91
creating with Editor Express 90
deleting 94
downloading 94
editing using Editor Express 94
uploading 93
uploading a new voice-mail prompt from Editor Express 93
uploading to an auto attendant 152
viewing a list of 89
selecting an extension for a user 37
setting user defaults 49
OL-24779-02

Index
setting voice mailbox defaults 155
SMTP connection testing 122
SMTP server configuration 121
importing SMTP settings 121
subscriber notification, enabling or disabling 164
subscribing members to a group 43
subscribing owners to a group 44
supervisors
adding 51
editing the configuration 52
viewing a list 51
synchronizing Cisco Unified CME with Cisco Unity Express 187
system defaults
setting user 49
system login banner, configuring 113
T
time zone
changing 116
time zone settings 115
trace settings, configuring 205
U
unlocking a mailbox 130
unreachable failover 62
unsubscribing members and owners from a group 44
users
adding 30, 36
adding remote users 74
configuring 29, 35
finding 32, 39
importing 37
modifying a user profile 31, 38
modifying group subscriptions 32, 39
selecting an extension 37
selecting a phone for 37
OL-24779-02
viewing list of 29, 35
viewing remote user list 73
V
viewing a list of groups 41
viewing a list of users 29, 35
viewing mailboxes reports 213
viewing the Backup History Report 213
viewing the Network Time Protocol (NTP) report 214
viewing the Restore History Report 213
voice mailbox default settings 155
voice-mail call-handling parameters, configuring 161
voice mail configuration 157
voice-mail prompts
changing the language 85
deleting 85
downloading 84
modifying 84
uploading 84
viewing 83
VoiceView Express
configuring 171
terminating sessions 171
VoiceXML applications
adding 179
deleting 179
restarting 180
starting 179
stopping 180
W
wildcard trigger patterns 103
IN-5Configuring Cisco Unity Express 8.6 Using the GUI

Index
IN-6Configuring Cisco Unity Express 8.6 Using the GUI
OL-24779-02