Configuring a Cisco SA 500 to accept a VPN connection … · Configuring a Cisco SA 500 to accept a...
16
Application Note © 2008 Cisco Systems, Inc. All rights reserved. This document is Cisco Public Information. Page 1 of 16 Configuring a Cisco SA 500 to accept a VPN connection from a Shrew Soft VPN client. This document provides information on how to configure a SA 500 security router to work with the Shrew Soft VPN client. The Cisco SA 500 is a small business security router that can provide SSL VPN connections and VPN connections through Cisco Quick VPN Client. If a different IPSec client is required for compatibility reasons, this guide will give the steps of configuring the SA 500 to work with a third- party client, specifically Shrew Soft VPN Client. Contents Scope and Assumptions 2 SA 500 Configuration via the VPN Wizard 2 Adding Additional Subnets on the SA 500 5 Shrew Soft Client Configuration 8
-
Upload
truongtuong -
Category
Documents
-
view
245 -
download
0
Transcript of Configuring a Cisco SA 500 to accept a VPN connection … · Configuring a Cisco SA 500 to accept a...

Application Note
© 2008 Cisco Systems, Inc. All rights reserved. This document is Cisco Public Information. Page 1 of 16
Configuring a Cisco SA 500 to accept a VPN connection from a Shrew Soft VPN client.
This document provides information on how to configure a SA 500 security router to work with the Shrew Soft VPN client.
The Cisco SA 500 is a small business security router that can provide SSL VPN connections and VPN connections through Cisco Quick VPN Client. If a different IPSec client is required for compatibility reasons, this guide will give the steps of configuring the SA 500 to work with a third- party client, specifically Shrew Soft VPN Client.
Contents
Scope and Assumptions 2
SA 500 Configuration via the VPN Wizard 2
Adding Additional Subnets on the SA 500 5
Shrew Soft Client Configuration 8

Configuring a SA 500 to Accept a VPN Connection from a Shrew Soft VPN Client Application Note
© 2008 Cisco Systems, Inc. All rights reserved. This document is Cisco Proprietary Information. Page 2 of 16
Scope and Assumptions
The procedures and guidelines in this Application Note assume that the Cisco SA 500 system has been set up for internet connectivity with and has a basic configuration. This document was written for use with the SA 500 running 1.1.21 firmware and Shrew Soft client running 2.1.15. Using different versions may have slightly different screens and configurations. Administrations working on this system should have a basic working knowledge of IPSec VPNs.
Before continuing, a list of users, user passwords, and the preshared key should be determined.
SA 500 Configuration via the VPN Wizard
The SA 500 VPN Wizard will configure the SA 500 quickly to allow for VPN Client to connect with minimal manual changes to the configuration. To run the VPN Wizard, you must have administrator access to the SA 500.
Running the Wizard Step 1. To access the VPN Wizard, access the SA 500 and login as administrator. By default, the
url is https://192.168.75.1. Default username and password are cisco/cisco.
Step 2. Click on the VPN menu, then IPSEC, and then VPN Wizard.
Step 3. Configure settings as described below.
Step 4. Under Select VPN Type, change the option to Remote Access. This will change the menu on the page below.
For the VPN Connection Name, type in a name that will help identify the VPN that you are setting up. In the example provided, this was set to MyVPNClient.
For the Preshared Key, type in a preshared key selected for the VPN Clients. For this example, a basic key of 1234567890 is used.
For the Local WAN Interface, select the Dedicated WAN.
For Remote Gateway Type, select FQDN. The selection of IP Address would only allow a single user from that IP Address to connect at a time. This is not a recommended configuration when configuring IPSec VPN clients.
For Remote WAN’s IP Address/FQDN, type in a domain such as remote.com. This is an identifier used in IPSec to verify the identity of the other IPSec device. In this case, it is the IPSec client. You will need the domain entered here for the client configuration later. For this example, remote.com is used as the domain.
For Local Gateway Type, select FQDN. The selection of IP Address requires a static IP on the SA 500 Dedicated WAN interface. Either configuration should work without issue. For the example, we are using FQDN.
For Local WAN’s IP Address/FQDN, type in a domain such as local.com. This is an identifier used in IPSec to very this IPSec device. The VPN Client will also need this information. If IP Address was selected as the Local Gateway Type, type in the WAN IP Address of the Dedicated WAN. This configuration requires a static IP on the Dedicated WAN interface. For the example, local.com is used as the domain.
Step 5. Click Apply. The SA 500 will take the configuration and apply it creating a VPN Policy and an IKE Policy. Refer to Figure 1 for an example configuration.

Configuring a SA 500 to Accept a VPN Connection from a Shrew Soft VPN Client Application Note
Figure 1 SA 500 VPN Wizard
Changing the IKE Policy Follow these steps to change the IKE policy.
Step 1. Click on VPN Policies in the left menu.
Step 2. Find the newly created VPN Policy. It should have the same name as the Connection Name that was setup in the VPN Wizard.
Step 3. Select the check box next to it, and click disable at the bottom.
Step 4. Click on IKE Policies in the left menu. Find the newly created IKE Policy. It should have the same name as the Connection Name that was setup in the VPN Wizard. Click on the edit button located to the right of the of the IKE Policy name.
Step 5. Scroll down to the bottom. Under Extended Authentication, change the XAUTH Configuration to Edge Device. This change requires the individual users to login to the system.
Step 6. Change the Authentication Type to User Database. This change configures the users to authenticate locally to the system. These users are added under the IPSec Users page.
Step 7. Click Apply to save the changes. Refer to Figure 2 for an example of the IKE Policy Configuration.
© 2008 Cisco Systems, Inc. All rights reserved. This document is Cisco Proprietary Information. Page 3 of 16

Configuring a SA 500 to Accept a VPN Connection from a Shrew Soft VPN Client Application Note
Figure 2 IKE Policy Configuration
Adding IPSec Users Step 1. Click on the IPSec Users menu on the left menu. Click Add to add IPSec Users to the
system.
Step 2. For the User Name, type in the username of the IPSec VPN user you are adding.
Step 3. For Remote Peer Type, select Standard IPSec (XAuth).
Step 4. Enter the password for the user and confirm it as well.
Step 5. Click Apply to save the user. Add additional users at this time. Refer to Figure 3Error! Reference source not found. for the example configuration.
© 2008 Cisco Systems, Inc. All rights reserved. This document is Cisco Proprietary Information. Page 4 of 16

Configuring a SA 500 to Accept a VPN Connection from a Shrew Soft VPN Client Application Note
Figure 3 IPSec Users
Step 6. Click on the VPN Policies on the left menu. Find the VPN Policy that was disabled and enable it.
At this point, if you are only using the single, you can continue to the Shrew Soft Client Configuration portion of this document.
If you need to add more subnets, continue with the section “Adding Additional Subnets on the SA 500” on page 5.
Adding Additional Subnets on the SA 500
If the SA 500 has additional subnets that are configured as VLANs on the device or has routes to local subnets, you may wish to make this subnets available to the IPSec VPN users. To do so, you must have a list of subnets you wish the users to have access to from the VPN. If different users require access to different subnets, new IKE and VPN Policies are required for different types of access.
To add an additional subnet configured, you must configure a VPN Policy for that subnet. Each additional subnet will require another VPN Policy.
Step 1. On the top menu select VPN. On the left menu, select VPN Policies.
Step 2. Click Add to add an additional VPN policy.
Step 3. Configure the VPN policy as described below.
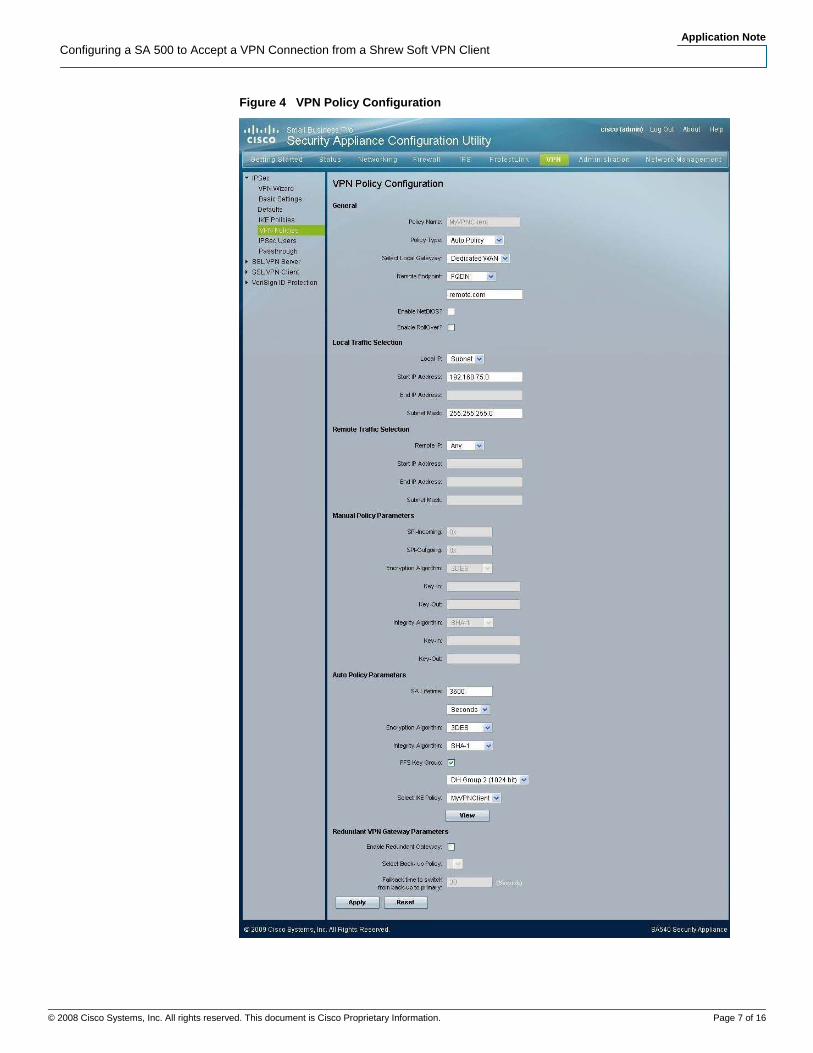
For the Policy Name, type in a name that will help you identify the name this VPN policy.
For Policy Type, select Auto Policy. This will allow for a much simpler configuration.
For Select Local Gateway, select the interface that was used during the Wizard. For this example, we selected Dedicated WAN.
For Remote Endpoint, select FQDN. Below that, type in the domain used during the
© 2008 Cisco Systems, Inc. All rights reserved. This document is Cisco Proprietary Information. Page 5 of 16

Configuring a SA 500 to Accept a VPN Connection from a Shrew Soft VPN Client Application Note
© 2008 Cisco Systems, Inc. All rights reserved. This document is Cisco Proprietary Information. Page 6 of 16
VPN Wizard for setup for the Remote WAN FQDN. In our example, this is remote.com.
Under Local Traffic Selection, change Local IP to Subnet. Other options can be used here, such as host. The VPN client must have the same configuration of subnets and hosts that are entered on the VPN Policies.
Under Start IP Address, type in the subnet that you wish to add to the IPSec VPN. For this example, it is 192.168.5.0.
Under Subnet Mask, type in the netmask of the subnet you are adding. For this example, it is 255.255.255.0.
Under Remote Traffic Selection, change the Remote IP to Any. This will gray out the rest of the boxes for this section.
Under Auto Policy Parameters, change the Select IKE Policy to the name of the VPN Client IKE policy that was created when running the VPN Wizard. For this example, it is MyVPNClient.
Step 4. Click Apply to save the changes. Refer to Figure 4 for an example.
Configuring a SA 500 to Accept a VPN Connection from a Shrew Soft VPN Client Application Note
Figure 4 VPN Policy Configuration
© 2008 Cisco Systems, Inc. All rights reserved. This document is Cisco Proprietary Information. Page 7 of 16

Configuring a SA 500 to Accept a VPN Connection from a Shrew Soft VPN Client Application Note
Step 5. Add the extra subnets into the Shrew Soft Client to complete the configuration.
Shrew Soft Client Configuration
The Shrew Soft Client is a free IPSec VPN Client. It is available at http://www.shrew.net. This section will go through the configuration of the Shrew Soft Client to work with the SA 500 configuration described earlier in this document.
Once Shrew Soft has been installed on the client, start up the Shrew Soft VPN Access Manager. Click Add to start adding a new site. The first tab that will come up is the General tab. Here, type in the IP address of the SA 500 router. Under Local Host and under Address Method, change the drop down to Use an existing adapter and current address.
Figure 5 General Tab, VPN Site Configuration Dialog
The next tab is the Client tab. The only edit made to this page is to disable dead peer detection. While it is possible to enable dead peer detection on the system, it is not required and was not used during the example configuration.
© 2008 Cisco Systems, Inc. All rights reserved. This document is Cisco Proprietary Information. Page 8 of 16

Configuring a SA 500 to Accept a VPN Connection from a Shrew Soft VPN Client Application Note
Figure 6 Client Tab
The next tab is the Name Resolution tab. For name resolution, you can change enable DNS and type in the DNS Server Address. The system will not automatically receive an DNS IP address, so the Obtain Automatically box should be disabled, as shown in Figure 7.
© 2008 Cisco Systems, Inc. All rights reserved. This document is Cisco Proprietary Information. Page 9 of 16

Configuring a SA 500 to Accept a VPN Connection from a Shrew Soft VPN Client Application Note
Figure 7 Name Resolution Tab
The next tab is the Authentication tab. For Authentication, select Mutual PSK + XAuth. Under Local Identity and for Identification Type, select Fully Qualified Domain Name. Under FQDN, select remote.com. This corresponds to the Remote FQDN described earlier in the document on the SA 500 VPN Wizard. If remote.com was not used there, use the value you selected for Remote FQDN on the SA 500 VPN Wizard.
© 2008 Cisco Systems, Inc. All rights reserved. This document is Cisco Proprietary Information. Page 10 of 16

Configuring a SA 500 to Accept a VPN Connection from a Shrew Soft VPN Client Application Note
Figure 8 Local Identity Subtab
Under the Remote Identity subtab, select Fully Qualified Domain Name for Identification Type. For FQDN string, select local.com. This correspond to the VPN Wizard on the SA 500 for the Local FQDN. If local.com was not used there, enter the value that you selected for Local FQDN on the SA 500 VPN Wizard.
© 2008 Cisco Systems, Inc. All rights reserved. This document is Cisco Proprietary Information. Page 11 of 16

Configuring a SA 500 to Accept a VPN Connection from a Shrew Soft VPN Client Application Note
Figure 9 Remote Identity Subtab
On the Credentials subtab, enter the preshared key from the VPN Wizard. In the example, 1234567890 was used as the key. For testing, this key is acceptable, but this key should be changed for a production environment.
© 2008 Cisco Systems, Inc. All rights reserved. This document is Cisco Proprietary Information. Page 12 of 16

Configuring a SA 500 to Accept a VPN Connection from a Shrew Soft VPN Client Application Note
Figure 10 Credentials Subtab
On the Phase 1 tab, the defaults are acceptable.
Figure 11 Phase 1 Tab
© 2008 Cisco Systems, Inc. All rights reserved. This document is Cisco Proprietary Information. Page 13 of 16

Configuring a SA 500 to Accept a VPN Connection from a Shrew Soft VPN Client Application Note
On the Phase 2 tab, the Transform Algorithm should be esp-3des.
The HMAC Algorithm should be set to sha1.
The other settings can be left as default.
Figure 12 Phase 2 tab
On the Policy tab, make sure that Maintain Persistent Security Associations is unchecked.
Obtain Topology Automatically or Tunnel All in this example is unchecked. If you do not wish to allow split tunneling, you should check this box. If you check this box, you will not be able to add networks in the next step.
Click the add button. On the popup window, select Type as Include. For Address and Netmask, select `192.168.75.0 and 255.255.255.0 respectively. If you have changed the data network to something else, use that network for this configuration. Add other networks here if you added other networks in the Adding Additional Subnets portion of this document.
© 2008 Cisco Systems, Inc. All rights reserved. This document is Cisco Proprietary Information. Page 14 of 16

Configuring a SA 500 to Accept a VPN Connection from a Shrew Soft VPN Client Application Note
Figure 13 Policy Tab
Click the Save button. On the Access Manager open the site that was created. This site in this document is named Example VPN. When you open this, it should give you a prompt asking for Username and Password. Here, enter the username and password that was added during the Adding IPSec Users portion of the document.
Figure 14 Shrew Soft VPN Connect - Connect Tab
© 2008 Cisco Systems, Inc. All rights reserved. This document is Cisco Proprietary Information. Page 15 of 16

Configuring a SA 500 to Accept a VPN Connection from a Shrew Soft VPN Client Application Note
© 2008 Cisco Systems, Inc. All rights reserved. This document is Cisco Proprietary Information. Page 16 of 16
The VPN should connect.
CCDE, CCENT, CCSI, Cisco Eos, Cisco Explorer, Cisco HealthPresence, Cisco IronPort, the Cisco logo, Cisco Nurse Connect, Cisco Pulse, Cisco SensorBase, Cisco StackPower, Cisco StadiumVision, Cisco TelePresence, Cisco TrustSec, Cisco Unified Computing System, Cisco WebEx, DCE, Flip Channels, Flip for Good, Flip Mino, Flipshare (Design), Flip Ultra, Flip Video, Flip Video (Design), Instant Broadband, and Welcome to the Human Network are trademarks; Changing the Way We Work, Live, Play, and Learn, Cisco Capital, Cisco Capital (Design), Cisco:Financed (Stylized), Cisco Store, Flip Gift Card, and One Million Acts of Green are service marks; and Access Registrar, Aironet, AllTouch, AsyncOS, Bringing the Meeting To You, Catalyst, CCDA, CCDP, CCIE, CCIP, CCNA, CCNP, CCSP, CCVP, Cisco, the Cisco Certified Internetwork Expert logo, Cisco IOS, Cisco Lumin, Cisco Nexus, Cisco Press, Cisco Systems, Cisco Systems Capital, the Cisco Systems logo, Cisco Unity, Collaboration Without Limitation, Continuum, EtherFast, EtherSwitch, Event Center, Explorer, Follow Me Browsing, GainMaker, iLYNX, IOS, iPhone, IronPort, the IronPort logo, Laser Link, LightStream, Linksys, MeetingPlace, MeetingPlace Chime Sound, MGX, Networkers, Networking Academy, PCNow, PIX, PowerKEY, PowerPanels, PowerTV, PowerTV (Design), PowerVu, Prisma, ProConnect, ROSA, SenderBase, SMARTnet, Spectrum Expert, StackWise, WebEx, and the WebEx logo are registered trademarks of Cisco and/or its affiliates in the United States and certain other countries.
All other trademarks mentioned in this document or website are the property of their respective owners. The use of the word partner does not imply a partnership relationship between Cisco and any other company. (1002R)
© 2010 Cisco Systems, Inc. All rights reserved.