Configuration and Administration Guide...2.3.5 userApplication with Oracle RAC Instances and...
160
J2S0-0416-01ENZ0(02) August 2014 Oracle Solaris PRIMECLUSTER Wizard for Oracle 4.3 Configuration and Administration Guide
Transcript of Configuration and Administration Guide...2.3.5 userApplication with Oracle RAC Instances and...
J2S0-0416-01ENZ0(02)August 2014
Oracle Solaris
PRIMECLUSTER Wizard for Oracle 4.3
Configuration and AdministrationGuide

Preface
Purpose
The purpose of the document is to outline functions of PRIMECLUSTER Wizard for Oracle. Further, it describes the procedures frominstallation to operation management.
Readers
This document is intended for system engineers and system administrators who design, configure, and manage PRIMECLUSTER systems.The reader should have expertise in the PRIMECLUSTER and Oracle system.
Outline
The document consists of the following six chapters and seven appendices:
Chapter 1 Feature
Chapter 2 Environment setup
Chapter 3 Operation
Chapter 4 Command
Chapter 5 Notice
Chapter 6 Message
Appendix A Failure case studies
Appendix B Change Oracle Resource Settings
Appendix C Oracle Grid Infrastructure Installation and ASM instance, Oracle Database Creation
Appendix D Using Oracle Database software on shared disks
Appendix E Using PRIMECLUSTER Wizard for Oracle with an Oracle Solaris Zones Environment
Appendix F Single-Node Cluster Operation
Appendix G (Information) Action Definition File
Technical term
For technical words related to clusters in this document, see the manual. Oracle Solaris might be described as Solaris, Solaris Operating System, or Solaris OS. Unless otherwise specified, the following words are used for Oracle products. For details, see the Oracle manuals.
Oracle instance:
Referred to as “instance”, “Oracle instance”, or “Oracle RAC instance” in this document.
Oracle listener:
Referred to as “Listener”, or “Oracle listener” in this document.
Oracle Database:
Referred to as "Oracle Database", "Oracle" or "Oracle Version Release" in this document.
Oracle Real Application Clusters:
Referred to as “RAC”, “Oracle RAC”, or “Oracle RAC Version Release” in this document.
Oracle Clusterware:
Referred to as “Oracle Clusterware” in this document.
Refer to "Software Release Guide PRIMECLUSTER Wizard for Oracle for Oracle Solaris" for the version and the release of Oracle RealApplication Clusters supported with this product.
Oracle Automatic Storage Management:
- i -
Referred to as "Oracle ASM" or "ASM" in this document.
Oracle user:
Referred to “Oracle user” in this document.An operating system user account belonging to OSDBA group to operate and manage Oracle system.
Notational convention
The document conforms to the following notational conventions:
Point
Contains important information about the subject at hand.
Information
Describes information a user can refer to.
See
Provides the names of manuals to be referenced.
Note
Describes points where a user should take notice.
Example
Describes settings using an example.
Export Controls
Exportation/release of this document may require necessary procedures in accordance with the regulations of your resident countryand/or US export control laws.
Trademarks
PRIMECLUSTER is a trademark of Fujitsu Limited.Oracle and Java are registered trademarks of Oracle and/or its affiliates. Other names may be trademarks of their respective owners.Other product and brand names are trademarks or registered trademarks of their respective owners.
Requests
No part of this document may be reproduced or copied without permission of FUJITSU LIMITED.The contents of this document may be revised without prior notice.
Date of publication and edition
Date of publication and edition Manual code
August 2014, 1.2 edition J2S0-0416-01ENZ0(02)/J2S0-0416-01ENZ2(02)
May 2013, 1.1 edition J2S0-0416-01ENZ0(01)/J2S0-0416-01ENZ2(01)
- ii -
February 2013, First edition J2S0-0416-01ENZ0(00)/J2S0-0416-01ENZ2(00)
Copyright notice
Copyright FUJITSU LIMITED 2013-2014
Editing Record
Additions and changes Section Edition
Added the description whenconfiguration single-node cluster
1.2 Operating Environment3.1.3 Single-Node Cluster OperationAppendix B Change Oracle Resource SettingsAppendix F Single-Node Cluster Operation
1.2
Added the notes on using ASM ofOracle 11g R2
1.2 Operating Environment2.2 Standby Operation2.4.2.2 Environment configuration with Oracle 11g R25. NoticeAppendix C Oracle Grid Infrastructure Installation and ASM instance, OracleDatabase Creation
Added the notes on PreOnlineScript,PostOnlineScript, PreOfflineScript,PostOfflineScript, FaultScript
2.2.7 userApplication Edit2.3.4 userApplication with Oracle Clusterware2.3.5 userApplication with Oracle RAC Instances and Listeners2.4.1 Oracle Online/Offline Script
Changed the notes on using ASM ofOracle 10g R2/11g R1.
2.4.2.1 Environment configuration with Oracle 10g R2/11g R1 1.1
Changed the notes on using ASM ofOracle 11g R2.
2.4.2.2 Environment configuration with Oracle 11g R2
- iii -

ContentsChapter 1 Feature....................................................................................................................................................................1
1.1 Feature outline.....................................................................................................................................................................................11.2 Operating Environment........................................................................................................................................................................1
Chapter 2 Environment setup...................................................................................................................................................52.1 Oracle Environment Setting.................................................................................................................................................................52.2 Standby Operation...............................................................................................................................................................................5
2.2.1 PRIMECLUSTER Installation and Configuration.......................................................................................................................62.2.2 Oracle Installation and Configuration...........................................................................................................................................62.2.3 userApplication Creation..............................................................................................................................................................82.2.4 userApplication with No Oracle Resources..................................................................................................................................9
2.2.4.1 userApplication Creation.....................................................................................................................................................102.2.4.2 Configuration-Generate and Configuration-Activate..........................................................................................................10
2.2.5 userApplication Operation Check...............................................................................................................................................102.2.6 Oracle Database Creation and Setting........................................................................................................................................112.2.7 userApplication Edit...................................................................................................................................................................16
2.2.7.1 userApplication Deletion.....................................................................................................................................................172.2.7.2 Oracle Resource Creation....................................................................................................................................................182.2.7.3 Other Resource Creation......................................................................................................................................................272.2.7.4 userApplication Creation.....................................................................................................................................................272.2.7.5 Other userApplication Creation...........................................................................................................................................282.2.7.6 Configuration-Generate and Configuration-Activate..........................................................................................................28
2.2.8 userApplication Operation Check...............................................................................................................................................292.3 Scalable Operation with Oracle RAC 11g R2...................................................................................................................................30
2.3.1 PRIMECLUSTER Installation and Configuration.....................................................................................................................302.3.2 Oracle Software Installation and Configuration.........................................................................................................................312.3.3 userApplication and Resource Configuration.............................................................................................................................342.3.4 userApplication with Oracle Clusterware...................................................................................................................................402.3.5 userApplication with Oracle RAC Instances and Listeners........................................................................................................462.3.6 Other Resource and userApplication Registration......................................................................................................................612.3.7 Configuration-Generate and Configuration-Activate.................................................................................................................612.3.8 userApplication Operation Check...............................................................................................................................................63
2.4 Information........................................................................................................................................................................................652.4.1 Oracle Online/Offline Script.......................................................................................................................................................652.4.2 ASM (Automatic Storage Management)....................................................................................................................................68
2.4.2.1 Environment configuration with Oracle 10g R2/11g R1.....................................................................................................692.4.2.2 Environment configuration with Oracle 11g R2..................................................................................................................722.4.2.3 Precaution for ASM operation.............................................................................................................................................74
Chapter 3 Operation...............................................................................................................................................................753.1 Oracle Control through PRIMECLUSTER Wizard for Oracle.........................................................................................................75
3.1.1 Standby Operation......................................................................................................................................................................753.1.2 Scalable Operation with Oracle RAC.........................................................................................................................................783.1.3 Single-Node Cluster Operation...................................................................................................................................................79
3.2 Oracle Maintenance...........................................................................................................................................................................793.2.1 Oracle Setting Change................................................................................................................................................................81
3.2.1.1 Oracle must be stopped........................................................................................................................................................813.2.2 Patch Application........................................................................................................................................................................82
3.2.2.1 Patch Application by In-place upgrade................................................................................................................................823.2.2.2 Patch Application by Out-of-place upgrade (Standby Operation, Single-Node Cluster Operation)...................................84
3.2.3 Backup........................................................................................................................................................................................873.2.3.1 Cold backup.........................................................................................................................................................................873.2.3.2 Hot backup...........................................................................................................................................................................88
3.2.4 Recovery.....................................................................................................................................................................................893.2.4.1 Oracle must be stopped........................................................................................................................................................89
- iv -
3.2.4.2 Oracle does not need to be stopped.....................................................................................................................................903.3 Oracle SYSTEM User Password Change .........................................................................................................................................903.4 Corrective Action against Failover....................................................................................................................................................913.5 Troubleshooting Information.............................................................................................................................................................923.6 Log Files............................................................................................................................................................................................93
Chapter 4 Command..............................................................................................................................................................954.1 hvoradisable - Discontinue Monitoring Resources............................................................................................................................954.2 hvoraenable - Restart Monitoring Resources.....................................................................................................................................964.3 clorapass - Register Password for Monitoring...................................................................................................................................974.4 cloracpy - Create Backup File for Oracle Database Setup................................................................................................................984.5 clgetoralog - Collect Troubleshooting Information...........................................................................................................................994.6 clorainfo - Display Resource Configuration and Monitoring Status...............................................................................................1014.7 clorabr - Integrated Backup and Restoration of Configuration Files...............................................................................................102
Chapter 5 Notice...................................................................................................................................................................104
Chapter 6 Message..............................................................................................................................................................107
Appendix A Failure case studies..........................................................................................................................................123A.1 Oracle instances..............................................................................................................................................................................123
A.1.1 Startup/stop failure...................................................................................................................................................................123A.1.2 AutoRecover or Failover..........................................................................................................................................................124A.1.3 Warning state...........................................................................................................................................................................125
A.2 Oracle listeners................................................................................................................................................................................126A.2.1 Startup/stop failure...................................................................................................................................................................126A.2.2 AutoRecover or Failover..........................................................................................................................................................128A.2.3 Warning state...........................................................................................................................................................................128
Appendix B Change Oracle Resource Settings....................................................................................................................130B.1 Resource Additional Creation.........................................................................................................................................................130
B.1.1 Respectively.............................................................................................................................................................................130B.1.2 In a Group................................................................................................................................................................................131
B.2 Change Resource Settings...............................................................................................................................................................132B.3 Resource Deletion...........................................................................................................................................................................134
B.3.1 Respectively.............................................................................................................................................................................134B.3.2 In a Group................................................................................................................................................................................135
Appendix C Oracle Grid Infrastructure Installation and ASM instance, Oracle Database Creation.....................................136
Appendix D Using Oracle Database software on shared disks............................................................................................142
Appendix E Using PRIMECLUSTER Wizard for Oracle with an Oracle Solaris Zones Environment...................................147E.1 Notice of System Configuration......................................................................................................................................................147E.2 Construction Procedure...................................................................................................................................................................147
E.2.1 Wizard for Oracle Installation..................................................................................................................................................147E.2.2 Oracle Installation and Oracle Database Creation...................................................................................................................147
E.3 Maintenance Procedure...................................................................................................................................................................148E.3.1 Oracle Maintenance..................................................................................................................................................................148E.3.2 Patch Application to Wizard for Oracle...................................................................................................................................148E.3.3 Troubleshooting Information...................................................................................................................................................148
E.4 Uninstallation Procedure.................................................................................................................................................................148
Appendix F Single-Node Cluster Operation.........................................................................................................................149F.1 Oracle ASM not used......................................................................................................................................................................150F.2 Oracle ASM of Oracle 10g R2/11g R1 used...................................................................................................................................151F.3 Oracle ASM of Oracle 11g R2 used................................................................................................................................................152
Appendix G (Information) Action Definition File....................................................................................................................154
- v -
Chapter 1 Feature
1.1 Feature outlinePRIMECLUSTER Wizard for Oracle is a software product that facilitates cluster operation management for Oracle operating on aPRIMECLUSTER system.The scalable operation requires Oracle Real Application Clusters (RAC, Oracle RAC). The standby operation requires Oracle cold standbyinstances. The single-node cluster operation requires an operation node in which a cluster consists of one node.
Module structure
The modules for operating Oracle on PRIMECLUSTER are as follows:
Environment setup Wizard Environment setup tool to enable Oracle operation on
PRIMECLUSTER
Detector Module to monitor Oracle
Scripts Control Oracle startup and stop
Setup/operation command Commands used to set up and operate
Environment setup
The environment setup tool provides “ORACLE” Wizard that generates userApplication in the environment configuration by executingthe “userApplication Configuration Wizard” of PRIMECLUSTER.
Monitoring
A detector monitors Oracle instances and Oracle listeners.
The detector connects itself to Oracle as a SYSTEM user to monitor the Oracle instance. Then, it periodically creates, updates, and deletesa table, which is created in the SYSTEM user’s default tablespace by executing the SQL command so that it can monitor the process stateof the Oracle instance as well as logical failures. If the Oracle instance hangs and SQL operation is not returned within a specified time,then the detector will regard it as resource failure.
The two types of monitoring the Oracle listener are process detection and the “tnsping” command.
In operation with Oracle RAC, a detector monitors Oracle instances and Oracle listeners. If the Oracle instances and listeners fail, theywill be recovered by Oracle Clusterware.
Startup and stop control
Along with the state transition of a cluster system, scripts automatically start or stop Oracle instances or Oracle listeners. These scriptsfirst check and then start up the Oracle instances. If damage occurs, the scripts automatically recover the Oracle instances. For example,if the Oracle instance fails during online backup, the scripts automatically execute “end backup” to start up the Oracle instance (Whenthe AutoRecover is set to “Yes”.) When stopping the Oracle instance, the scripts stop it in the immediate mode (default). If this does notoccur properly, the scripts will stop the instance in the abort mode. This means operating node switchover can be performed at high-speed.
In operation with Oracle RAC, start and stop of Oracle Clusterware are managed.
1.2 Operating Environment
- 1 -

Scalable operation
In scalable operation with Oracle RAC, Oracle is operated on all nodes. The clients can access to the database regardless of which nodethey are connected to.
- 2 -
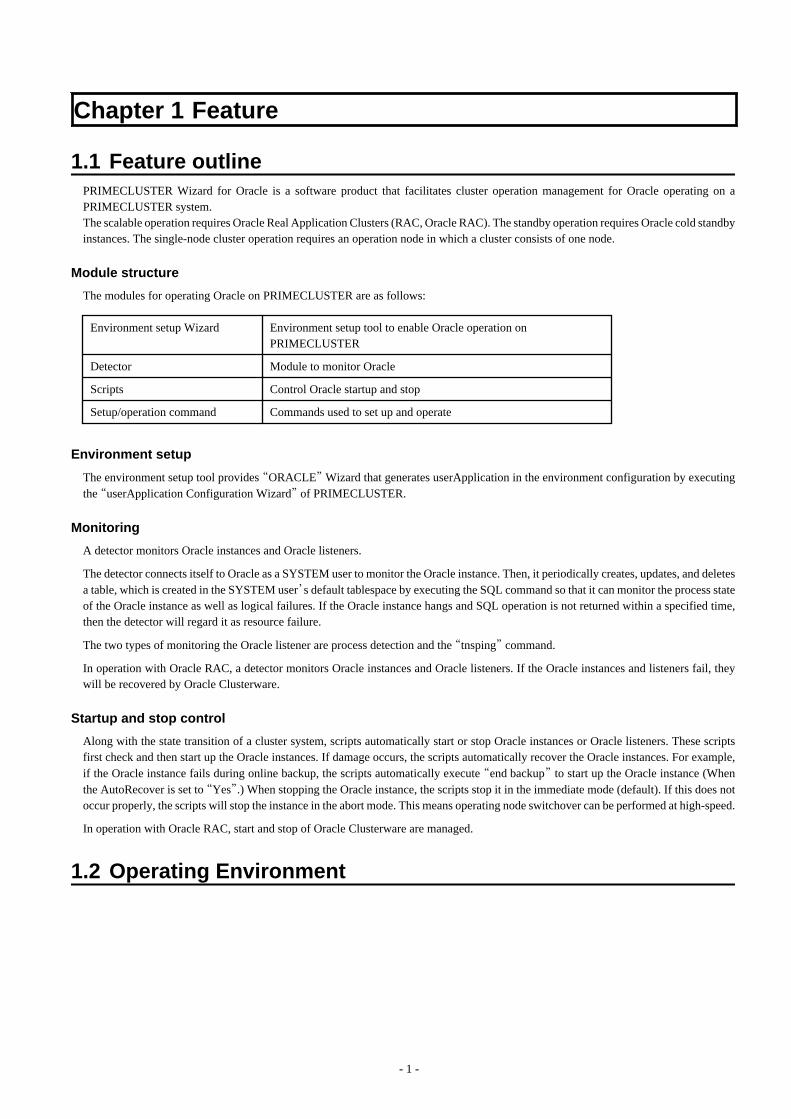
Standby operation
In standby operation, a cluster system consists of an operating node and standby nodes. On the operating node, the resources such as Oracleapplications, a logical IP address and shared disks are active. On the standby node, these resources are inactive. In the event of a failure,userApplication is switched to the standby node, and the resources on this standby node become activated. Then, the client can connectitself to the operating node using the logical IP address without changing any settings.
Note
- In order to use Oracle Automatic Storage Management(ASM) of Oracle 11g R2, it is necessary to install Oracle Grid Infrastructure.When installing Oracle Grid Infrastructure, the composition which separates the installation user of Oracle Database and the installationuser of Oracle Grid Infrastructure is supported. The composition which creating one user is not supported.A different directory must be assigned respectively for an ORACLE_BASE of the installation user of Oracle Database and anORACLE_BASE of the installation user of Oracle Grid Infrastructure.
- When using ASM of Oracle 11g R2 in standby operation, Oracle service resource is not available.
- When using PRIMECLUSTER Wizard for Oracle with an Oracle Solaris Zones environment, refer to "Appendix E UsingPRIMECLUSTER Wizard for Oracle with an Oracle Solaris Zones Environment".
- 3 -
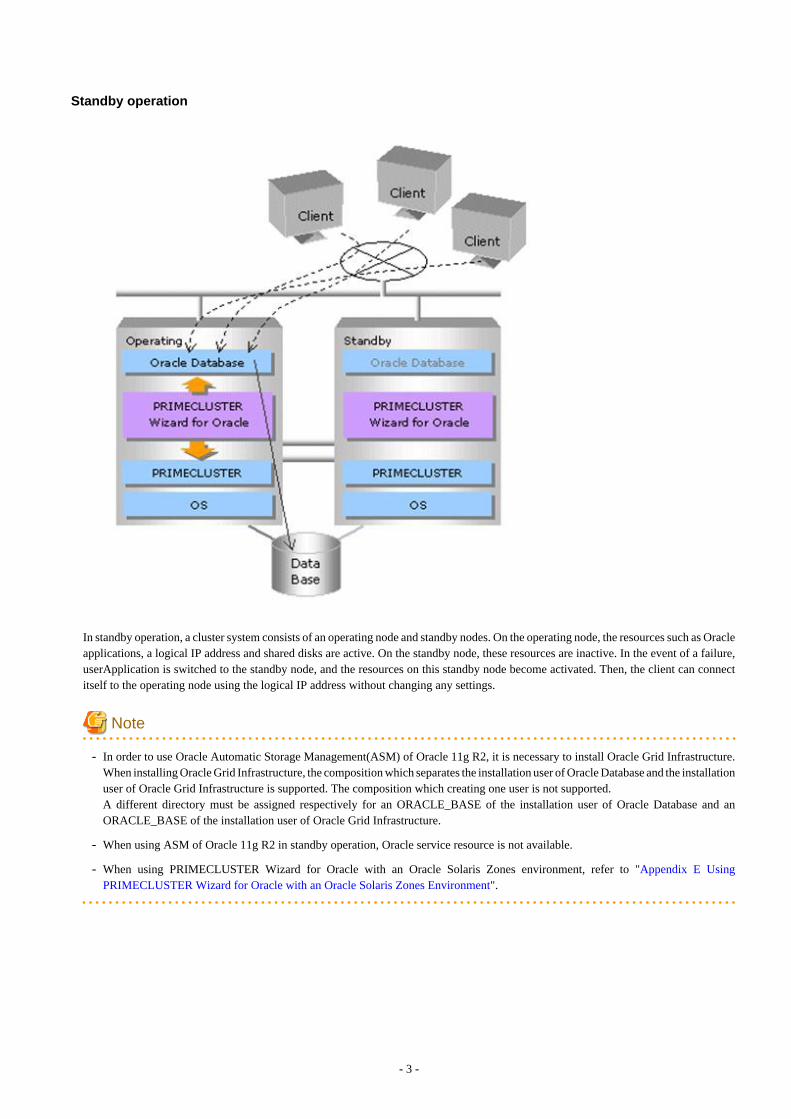
Single-Node Cluster operation
In Single-Node Cluster operation, a cluster system consists of one node.
The status of Oracle is monitored. Oracle operation can be continued by restarting Oracle automatically if Oracle failures are detected.
Note
- In order to use Oracle Automatic Storage Management(ASM) of Oracle 11g R2, it is necessary to install Oracle Grid Infrastructure.When installing Oracle Grid Infrastructure, the composition which separates the installation user of Oracle Database and the installationuser of Oracle Grid Infrastructure is supported. The composition which creating one user is not supported.A different directory must be assigned respectively for an ORACLE_BASE of the installation user of Oracle Database and anORACLE_BASE of the installation user of Oracle Grid Infrastructure.
- When using ASM of Oracle 11g R2 in single-node cluster operation, Oracle service resource is not available.
- When using PRIMECLUSTER Wizard for Oracle with an Oracle Solaris Zones environment, refer to "Appendix E UsingPRIMECLUSTER Wizard for Oracle with an Oracle Solaris Zones Environment".
Information
For further details about the operation modes of Scalable operation, Standby operation and Single-Node Cluster operation, refer to "Part1 Planning" of the "PRIMECLUSTER Installation and Administration Guide".
- 4 -
Chapter 2 Environment setup
2.1 Oracle Environment SettingThis section explains a general setup procedure of Oracle operating on a PRIMECLUSTER system.
Note
Setup procedures in “Chapter 2” explain how to create userApplication newly. If environment has been created in earlier version, in thecase of upgrading to 4.3A20, see “Software Release Guide PRIMECLUSTER Wizard for Oracle for Oracle Solaris”.
Standby operation
NoProcedure
Operating node Standby node
1 Install and configure PRIMECLUSTER Install and configure PRIMECLUSTER
2 Install PRIMECLUSTER Wizard for Oracle Install PRIMECLUSTER Wizard for Oracle
3 Install and configure Oracle software Install and configure Oracle software
4 Create userApplication -
5 Create and set up an Oracle Database -
6 - Set up an Oracle Database
7 Create and set up Oracle resources -
For details, see “2.2 Standby Operation”.
Scalable operation (Oracle RAC)
NoProcedure
One arbitrary node Other nodes
1 Install and configure PRIMECLUSTER Install and configure PRIMECLUSTER
2 Install PRIMECLUSTER Wizard for Oracle Install PRIMECLUSTER Wizard for Oracle
3 Install and configure Oracle softwareInstall and configure Oracle software(*Installation automatically done)
4 Create and set up an Oracle Database -
5 Create and set up Oracle resources -
For details, see “2.3 Scalable Operation with Oracle RAC 11g R2”.
Single-node cluster operation
For details, see "Appendix F Single-Node Cluster Operation".
2.2 Standby OperationThis section describes how to configure an environment for standby operation.
For the configuration procedure for scalable operation with Oracle RAC, see “2.3 Scalable Operation with Oracle RAC 11g R2”.
- 5 -
Note
- In order to use ASM of Oracle 11g R2, it is necessary to install Oracle Grid Infrastructure. When installing Oracle Grid Infrastructure,the composition which separates the installation user of Oracle Database and the installation user of Oracle Grid Infrastructure issupported. The composition which creating one user is not supported. A different directory must be assigned respectively for anORACLE_BASE of the installation user of Oracle Database and an ORACLE_BASE of the installation user of Oracle GridInfrastructure. The install user of Oracle Database is described "Oracle user" and the install user of Oracle Grid Infrastructure is described "Griduser" in this document.
- When using ASM of Oracle 11g R2 in standby operation, Oracle service resource is not available.
2.2.1 PRIMECLUSTER Installation and Configuration
Set up hardware
Set up hardware required for PRIMECLUSTER. The shared disk is also required to create an Oracle Database.
Install software
Install PRIMECLUSTER first, referring to the “PRIMECLUSTER Software Release Guide”.
For Scalable operation, PRIMECLUSTER Enterprise Edition is required.For Standby operation, PRIMECLUSTER Enterprise Edition, HA Server or Clustering Base is required.
Next, install PRIMECLUSTER Wizard for Oracle following the instructions of the “Software Release Guide PRIMECLUSTER Wizardfor Oracle for Oracle Solaris”.Standby operation requires the following editions:
- PRIMECLUSTER Enterprise Edition
- PRIMECLUSTER HA Server
- PRIMECLUSTER Clustering Base
Configure a cluster system
Configure a cluster system including network systems and shared disk units according to the PRIMECLUSTER manual.GDS is set as “switching disk”.
Information
For further details, refer to “Part 2 Installation” of the “PRIMECLUSTER Installation and Administration Guide”.
2.2.2 Oracle Installation and ConfigurationThis section explains how to install and configure Oracle.
Note
- Install only Oracle software to all nodes. Do not create a database in this section (Database creation is performed in "2.2.6 OracleDatabase Creation and Setting").
- If you install Oracle software on the shared disk, using ASM is not supported. Install the Oracle software on a local disk of each nodewhen you use ASM.
- If multiple Oracle homes are configured on one server, a different user name must be assigned for each Oracle home.
- 6 -

- If you install Oracle Grid Infrastructure to use ASM on Oracle 11g R2, you must create install user for the Oracle Grid Infrastructureand the Oracle Database installations separately. For information on how to install this configuration, see "2.4.2 ASM (AutomaticStorage Management)".
- Confirm the contents of "Chapter 5 Notice" before Installing.
Initial setup
Set up the kernel parameter
Set up values in the “/etc/system” file for Oracle in addition to the values for PRIMECLUSTER.The kernel parameter values vary depending on the implemented Oracle versions.Refer to the Oracle installation guide. The parameter values should be the same on all the nodes.
Note
For semopm, specify a value of 4 or more.
Oracle User
Create an operating system user account belonging to OSDBA group to allow users to install and operate Oracle. The user ID and thegroup ID must be the same on all the nodes.
Example
# groupadd -g <groupID> dba
# groupadd -g <groupID> oinstall
# useradd -u <userID> -g oinstall -G dba -d /home/oracle -s /bin/sh -m oracle
# passwd oracle
Normally, the group name should be “dba” and “oinstall”.
Set up an environment variable of Oracle user.
Example
(.profile)
ORACLE_BASE=/opt/oracle; export ORACLE_BASE
ORACLE_HOME=/opt/oracle/product/11.2.0; export ORACLE_HOME
ORACLE_SID=ora; export ORACLE_SID
LD_LIBRARY_PATH=$ORACLE_HOME/lib; export LD_LIBRARY_PATH
PATH=$ORACLE_HOME/bin:/usr/bin:/usr/ccs/bin:/usr/ucb; export PATH
When “/usr/ucb” is contained in PATH, it needs to be set up after “/usr/ccs/bin”.
Information
For further details, refer to the Oracle manual.
Note
PRIMECLUSTER Wizard for Oracle controls Oracle as the operating system user belonging to OSDBA group(Oracle user).
- 7 -

- Be sure to include “$ORACLE_HOME/bin” in the PATH environment variable of the Oracle user.
- Check if root user access privileges can switch the user to the Oracle user, using the su(1M) command.
# su - <Oracle user>
- A command (e.g. script) that has interactive mode should not be described in Oracle user's profile. (e.g. /etc/profile, .bash_profile, .cshrc, .profile) It may cause failure of resource monitoring or userApplication startup or shutdown.
- Environment that Oracle user's home directory and profile are located on the shared disk is not supported. Oracle user's home directoryand profile must be located on the local disk of each node.
Installation
If you install it on the local disk, refer to the Oracle manual.
If you install it on the shared disk, refer to "Appendix D Using Oracle Database software on shared disks”. The database needs to be created on the shared disk when configuration of the cluster system is completed, not when Oracle is installed.The details will be described later in this document(2.2.6 Oracle Database Creation and Setting).
2.2.3 userApplication CreationOperating userApplication is configured as follows:
userApplication Description Resources
app1 userApplication on all operation nodes Oracle resource (instance, listener)Gds resourceFsystem resourceGls resource
- 8 -

Information
The following setup values are recommended for userApplication app1. The other attributes not described below are optional.
Attributes Values
Operation method Standby
AutoSwitchOver HostFailure|ResourceFailure|ShutDown
PersistentFault 1
HaltFlag yes
The flow of userApplication creation is as follows:
1 userApplication with No Oracle Resources
userApplication Operation Check2.2.4 userApplication with No Oracle Resources
2.2.5 userApplication Operation Check
2 Oracle Database Creation and Setting 2.2.6 Oracle Database Creation and Setting
3 userApplication with Oracle ResourcesuserApplication Operation Check
2.2.7 userApplication Edit
2.2.8 userApplication Operation Check
Information
PersistentFault remains the same resource status (Faulted) even after RMS is restarted in the event of a resource failure. Users are supposedto locate the fault and check completion of recovery processing then start userApplication manually. For example, if a failure occurs, userscan detect which userApplication failed even after server reboot. Even though AutoStartUp setup is set, userApplication will not be started,and automatic startup will prevent recurrence of the failure.
2.2.4 userApplication with No Oracle ResourcesThis section discusses the configuration of userApplication that does not include Oracle resources.
- 9 -

GDS setup
It is possible to prepare the disk class for Oracle SYSTEM tablespace and other Oracle data respectively, and the MONITORONLYattribute of the disk class is set to “NO” for the Oracle SYSTEM tablespace and “YES” for the other Oracle data.
Information
For further details of GDS resources, refer to “6.6.1 Setting Up Resources” of the “PRIMECLUSTER Installation and AdministrationGuide”.
2.2.4.1 userApplication CreationCreate userApplication using the userApplication Configuration Wizard. See “6.6 Setting Up Cluster Applications” of the“PRIMECLUSTER Installation and Administration Guide”. Set up userApplication using the userApplication Configuration Wizard. The userApplication Configuration Wizard uses the format thatallows you to select information in the menu.
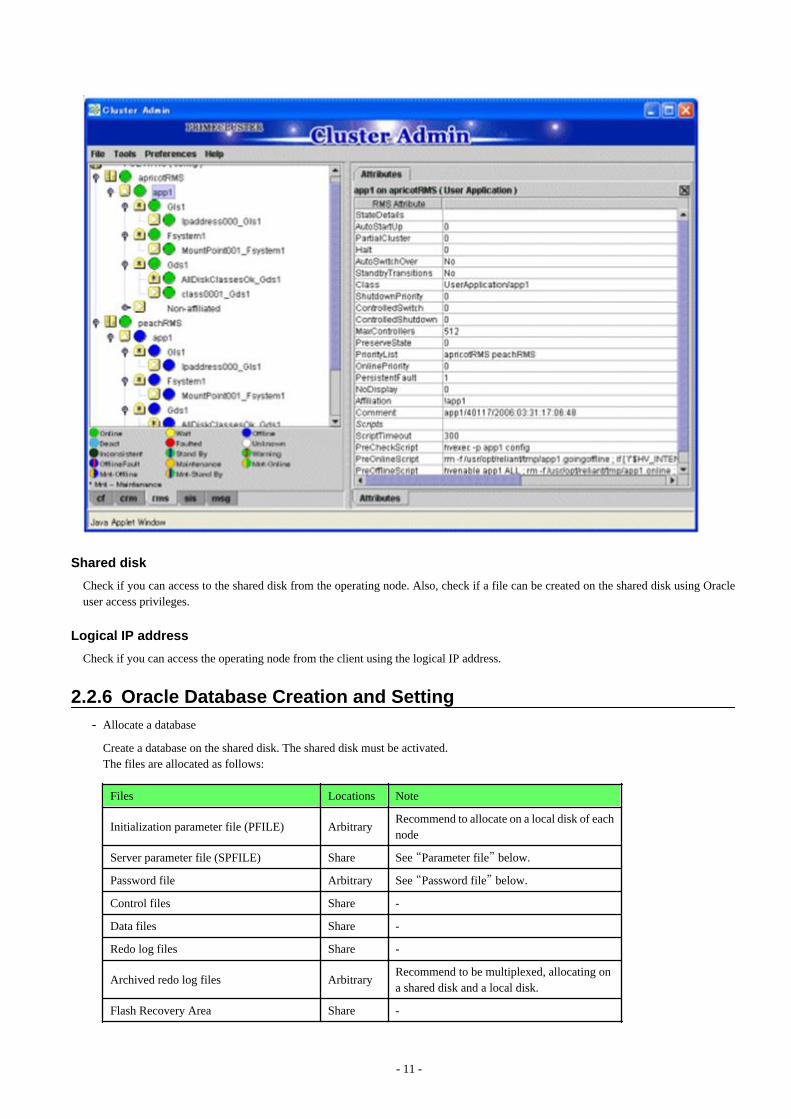
2.2.4.2 Configuration-Generate and Configuration-ActivateCheck the set contents and then generate and activate the configuration. The image screens after activation are as follows:
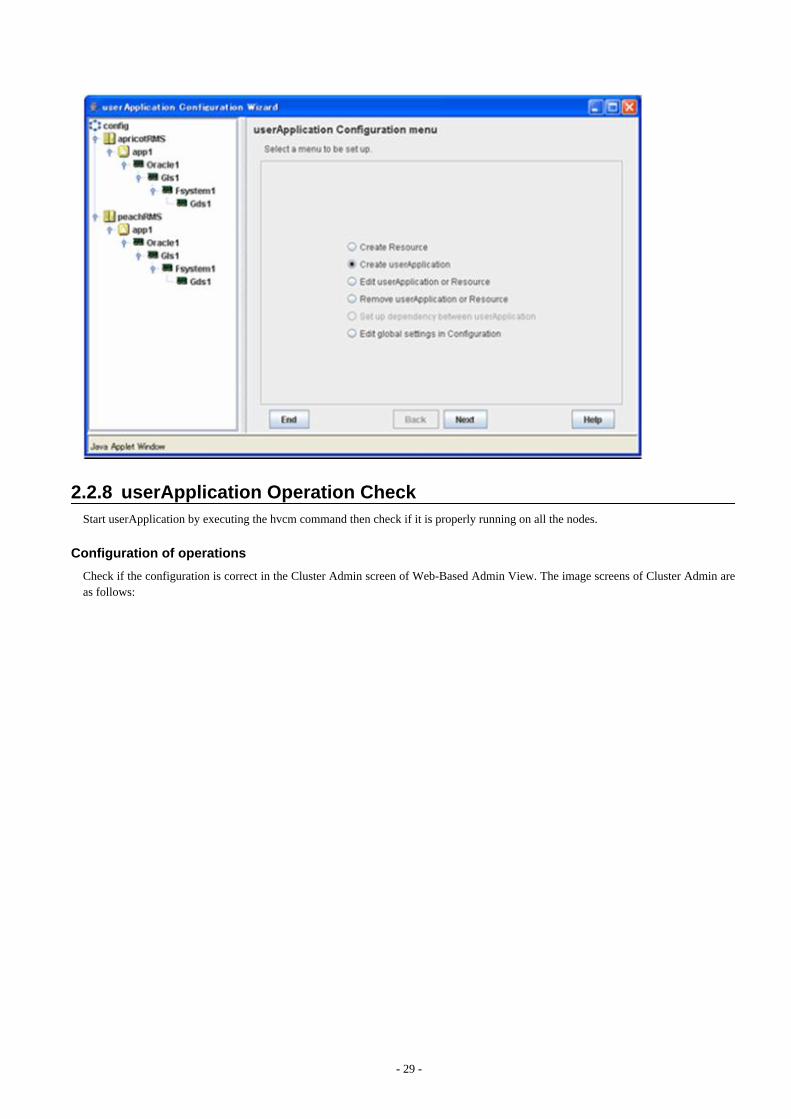
2.2.5 userApplication Operation CheckStart up userApplication and check if it is normally running on all the nodes by.
Configuration of operations
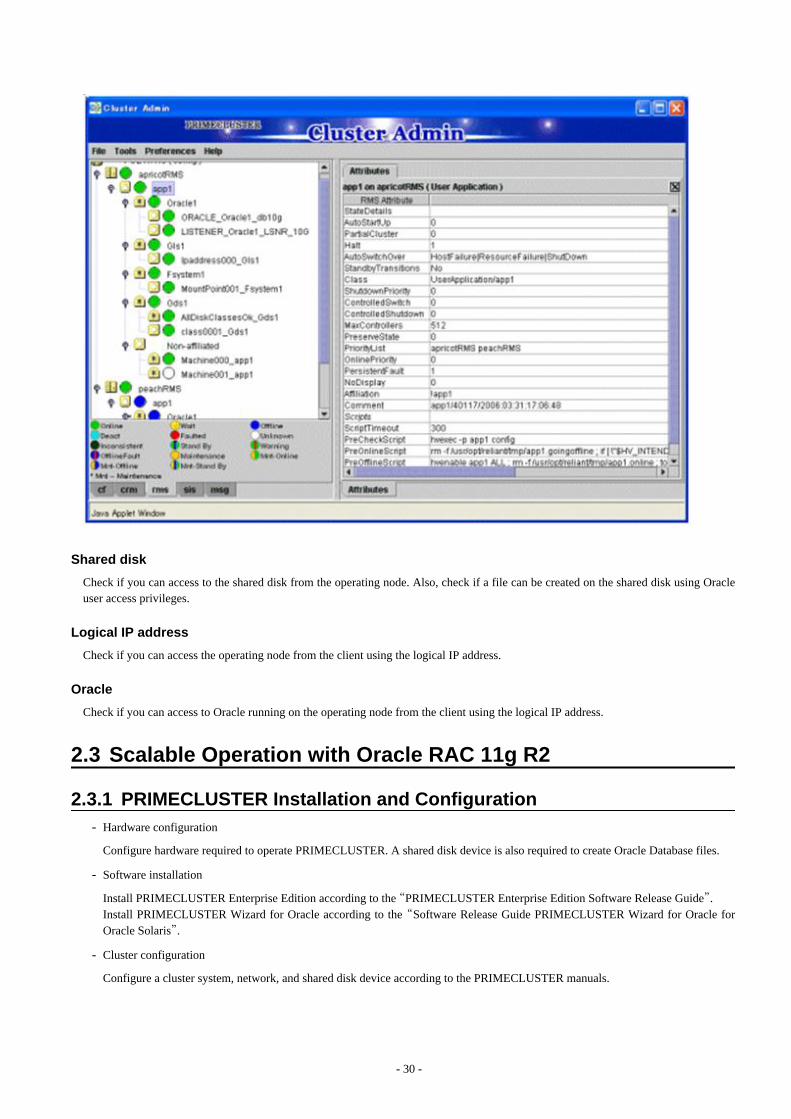
Check if the configuration is correct in the Cluster Admin screen of Web-Based Admin View. The image screens of Cluster Admin areas follows:
- 10 -
Shared disk
Check if you can access to the shared disk from the operating node. Also, check if a file can be created on the shared disk using Oracleuser access privileges.
Logical IP address
Check if you can access the operating node from the client using the logical IP address.
2.2.6 Oracle Database Creation and Setting- Allocate a database
Create a database on the shared disk. The shared disk must be activated. The files are allocated as follows:
Files Locations Note
Initialization parameter file (PFILE) ArbitraryRecommend to allocate on a local disk of eachnode
Server parameter file (SPFILE) Share See “Parameter file” below.
Password file Arbitrary See “Password file” below.
Control files Share -
Data files Share -
Redo log files Share -
Archived redo log files ArbitraryRecommend to be multiplexed, allocating ona shared disk and a local disk.
Flash Recovery Area Share -
- 11 -
log files
audit_file_dest Local
To be gathered surely for trouble investigation,allocate them on a local disk of each node.
background_dump_dest Local
core_dump_dest Local
user_dump_dest Local
diagnostic_dest(Oracle 11g or later)
Local
Note
Note that there is sufficient space to archive for archived redo log files if they are located on shared disks. If there is insufficient space,and data updating processing through monitoring SQL hangs, an oracle resource might fail. Afterwards, the service might stop finallyon both operating node and standby node, because the space of shared disk is insufficient and the failover of userApplication fails onthe standby node.
Information
- Check if the Oracle user has privileges to write in a shared disk before creating the database.
- If you use ASM (Automatic Storage Management), it is necessary to register the ASM as an RMS resource. See “2.4.2 ASM(Automatic Storage Management)”.
- Create a database (Standby operation)
- Operation node
Create a database on the operating node. The database must be accessible from the standby nodes.
Note
If multiple Oracle homes are configured on one server, a different Oracle instance name must be assigned for each Oracle home.
Information
Refer to the Oracle manual.
- Standby node
Set up the standby nodes in the same configuration (directory creation, file copy, and links) as the operating node.
- Under <$ORACLE_HOME>/dbs
- Under <$ORACLE_BASE>/admin/<$ORACLE_SID>
- Under <$ORACLE_BASE>/diag (Oracle 11g R1/11g R2)
- Under <$ORACLE_HOME>/network/admin
The access privilege to the directories and files must be also the same as that on the operating node.If you set where archived redo log is output on the operating node, it is necessary to set the same on the standby nodes.
Information
The required files on the operating node can be backed up in the tar format with the “cloracpy” command. See “4.4 cloracpy -Create Backup File for Oracle Database Setup”.
- 12 -
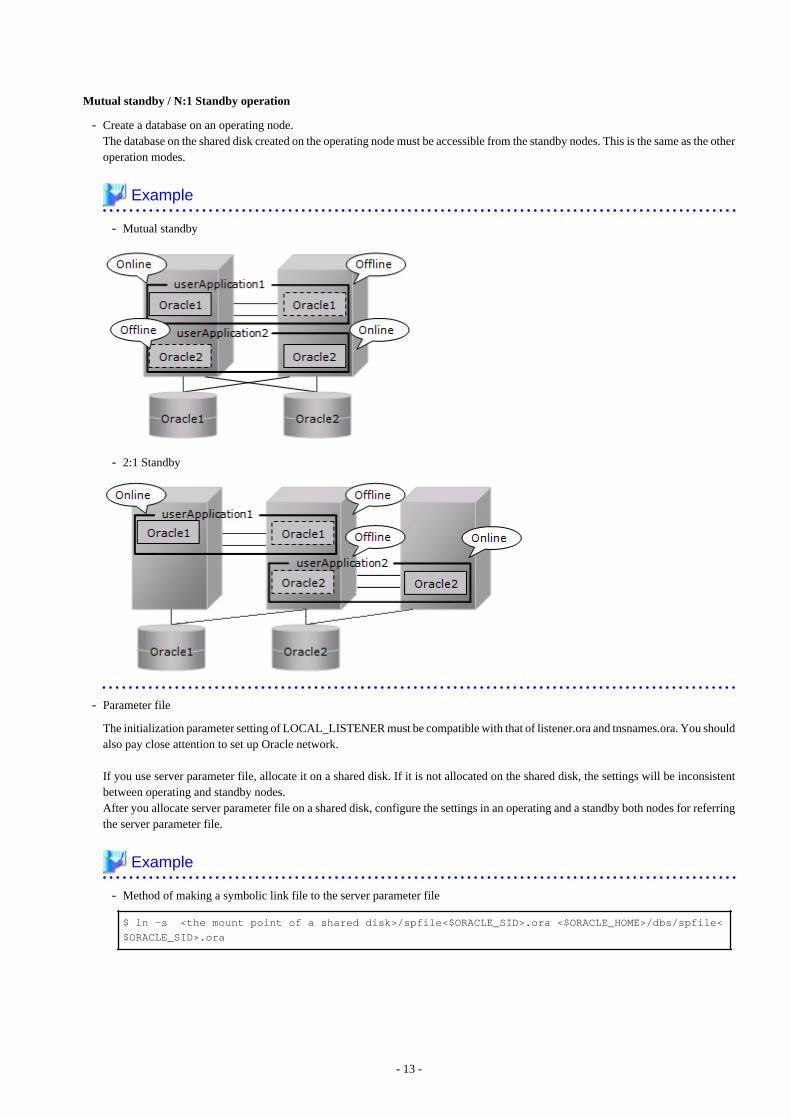
Mutual standby / N:1 Standby operation
- Create a database on an operating node. The database on the shared disk created on the operating node must be accessible from the standby nodes. This is the same as the otheroperation modes.
Example
- Mutual standby
- 2:1 Standby
- Parameter file
The initialization parameter setting of LOCAL_LISTENER must be compatible with that of listener.ora and tnsnames.ora. You shouldalso pay close attention to set up Oracle network.
If you use server parameter file, allocate it on a shared disk. If it is not allocated on the shared disk, the settings will be inconsistentbetween operating and standby nodes.After you allocate server parameter file on a shared disk, configure the settings in an operating and a standby both nodes for referringthe server parameter file.
Example
- Method of making a symbolic link file to the server parameter file
$ ln -s <the mount point of a shared disk>/spfile<$ORACLE_SID>.ora <$ORACLE_HOME>/dbs/spfile<
$ORACLE_SID>.ora
- 13 -
- Method to write the path of the server parameter file in initialization parameter file(initialization parameter file: $ORACLE_HOME>/dbs/init<$ORACLE_SID>.ora)
spfile = <the mount point of a shared disk>/spfile<$ORACLE_SID>.ora
Note
If you create a database using DBCA (Database Configuration Assistant), you might not be able to specify where the server parameterfile is stored. If this occurs, move the server parameter file to the shared disk after creating the database as follows:
1. Mount the shared disk if it is not mounted. Start userApplication that is created at “2.2.4 userApplication with No OracleResources”.
2. Move the server parameter file to the shared disk.
# mv <$ORACLE_HOME>/dbs/spfile<$ORACLE_SID>.ora <shared disk>/spfile<$ORACLE_SID>.ora
3. Configure the settings for referring the server parameter file. (see Example above)
Execute step 3 on both of the operating node and standby nodes.You can also use the cloracpy command to execute it on the standby nodes after the operating node.
- Password file
Allocate Password file on either a local disk or a shared disk. Decide which to allocate it to, refer to the following.
- Local disk
When allocate Password file on a local disk, it is necessary to edit it of each node. Therefore, the maintenance efficiency decreasescompared with the case allocated on a shared disk.
- Shared disk
When allocate Password file on a shared disk, it only has to edit on a shared disk. Therefore, the maintenance efficiency improvescompared with the case allocated on a local disk.
If you allocate Password file on a shared disk, create a Password file on the operating node and move it on a shared disk.
$ orapwd file=<$ORACLE_HOME>/dbs/orapw<SID> password=password force=y
$ mv <$ORACLE_HOME>/dbs/orapw<SID> <shared disk>/orapw<SID>
Make a symbolic link file under the "$ORACLE_HOME/dbs" of all nodes.
$ ln -s <shared disk>/orapw<SID> <$ORACLE_HOME>/dbs/orapw<SID>
- Network setup
The files are allocated as follows:
Files Locations Note
listener.ora ArbitraryFor placement of the file, refer to the below"information".
tnsnames.ora Arbitrary Same as above
<LISTENER>.log Local
Information
Allocate listener.ora file and tnsnames.ora file on either a local disk or a shared disk. To which allocate them, refer to the following.
- Local diskWhen allocate those files on a local disk, it is necessary to edit them of each node. Therefore, the maintenance efficiency decreases
- 14 -
compared with the case allocated on a shared disk. In one side, it is possible to gather the files surely when the trouble is investigatedbecause the influence of the state of the mount of a shared disk is not received.
- Shared diskWhen allocate those files on a shared disk, it only has to edit them on a shared disk. Therefore, the maintenance efficiency improvescompared with the case allocated on a local disk. In one side, when the mount is not done, a shared disk might not be able to gatherthe necessary files for the trouble is investigated.When allocate those files on a shared disk, make a symbolic link file under the “$ORACLE_HOME/network/admin” of eachnode.
- In the case of listener.ora
$ ln -s <the mount point of a shared disk>/listener.ora <$ORACLE_HOME>/network/admin/
listener.ora
- In the case of tnsnames.ora
$ ln -s <the mount point of a shared disk>/tnsnames.ora <$ORACLE_HOME>/network/admin/
tnsnames.ora
- listener.ora
If you use Oracle listener switching operation using a logical IP address, specify the logical IP address for the IP address of theOracle listener.
Example
LISTENER =
(DESCRIPTION =
(ADDRESS = (PROTOCOL = TCP)(HOST = <logical IP address>)(PORT = 1521))
)
SID_LIST_LISTENER =
(SID_LIST =
(SID_DESC =
(GLOBAL_DBNAME = ora)
(ORACLE_HOME = /u01/app/oracle/product/db)
(SID_NAME = ora)
)
)
Note
- Operating system authentication (OS authentication) of Listener must be enabled.OS authentication is enabled in default. If the following parameter is defined in listener.ora file, OS authentication is enabled.
LOCAL_OS_AUTHENTICATION_<LISTENER_NAME> = ON
- If multiple Oracle homes are configured on one server, a different listener name must be assigned for each Oracle home.
- tnsnames.ora
If the Oracle listener is monitored through tnsping, set up the “tnsnames.ora” file. Then, specify the network service name set fortnsnames.ora in the environment setting of the Oracle listener of PRIMECLUSTER Wizard for Oracle. In that case,ORACLE_SID, host (logical IP address), and port number must be the same as those of the Oracle listener.
- 15 -

Example
Network service name =
(DESCRIPTION =
(ADDRESS = (PROTOCOL = TCP)(HOST = <logical IP address>)(PORT = 1521))
(CONNECT_DATA = (SID = ora))
)
- SYSTEM user password
PRIMECLUSTER Wizard for Oracle accesses and monitors Oracle as the Oracle SYSTEM user. Therefore, the SYSTEM user'spassword must be registered in PRIMECLUSTER Wizard for Oracle. See “4.3 clorapass - Register Password for Monitoring” toregister the password.
- Define the full path of the log file
Define the full path of the alert log and the listener log in /opt/FJSVclora/etc/clgetoralog.conf. See the Note in “4.5 clgetoralog -Collect Troubleshooting Information" for details.
- Check Oracle operation
Check if Oracle is properly running by starting and stopping the Oracle instance and Oracle listener manually.
Note
- The Oracle “TWO_TASK” environment variable must not be used. It is used to add a connect identifier to connect to Oracle then automatically connect to network. In PRIMECLUSTER Wizardfor Oracle, network connection is not supported. Users are supposed to connect to Oracle in local connection (“ / as sysdba”). Ifnetwork connection is required, specify “@connect identifier” instead of using the “TWO_TASK” environment variable whenconnecting at the connecting.
- The processes other than definition of system environment variables must not be added to login.sql of Oracle DBA users. SQL can be described in the SQL*Plus profile login.sql. However, it might automatically be executed and affect ongoingoperations because Oracle is controlled through SQL*Plus in PRIMECLUSTER Wizard for Oracle.It is available to setup the system environment variables to login.sql by SET command.
2.2.7 userApplication EditRegister Oracle resources in userApplication that is created at “2.2.4 userApplication with No Oracle Resources”.
In standby operation, userApplication is configured as follows.
Note that resource (Ora_App1) is being created and added.
- 16 -
Note
Check if Oracle is properly running by starting and stopping manually before starting Oracle Resource Creation and Setting.
Before starting this procedure, Oracle instances, Oracle listeners and RMS on all the cluster nodes should stop.
Do not create multiple resources for the same Oracle instance or Listener.
userApplication is edited using the userApplication Configuration Wizard.
The flow of userApplication creation is as follows:
1 userApplication deletion 2.2.7.1 userApplication Deletion
2 Oracle resources creation 2.2.7.2 Oracle Resource Creation
3 Other resources creation 2.2.7.3 Other Resource Creation
4 userApplication creation 2.2.7.4 userApplication Creation
5 Other userApplication creation 2.2.7.5 Other userApplication Creation
6 Configuration-Generate and Configuration-Activate 2.2.7.6 Configuration-Generate andConfiguration-Activate
2.2.7.1 userApplication DeletionDelete only the userApplication that was created in "2.2.4 userApplication with No Oracle Resources" using the userApplicationConfiguration Wizard. Do not delete resources that are included in the userApplication.
- 17 -

Information
For further details, refer to “8.1.1 Changing the Cluster Application Configuration” of the “PRIMECLUSTER Installation andAdministration Guide”.
2.2.7.2 Oracle Resource CreationThis section describes how to create an Oracle resource.
1. Select “Create Resource” in the “userApplication Configuration” menu.
- 18 -
2. Select “Oracle” in the “Resource Type” menu.
3. Add the Oracle instance and Oracle listener in the “Set up Resource” menu.
The settings are as follows:
Attributes Description
ApplilcationName Change the application name.The default is “Oracle1”.
AdditionalInstance Add an Oracle instance resource.
AdditionalListener Add an Oracle listener resource.
AdditionalRAC11gR2Instance Not used.
AdditionalRAC11gR2Listener Not used.
- 19 -

AdditionalOracle11gR2Clusterware Not used.
StartPriority Set up the startup order of the Oracle instance andOracle listener. The default is “Simultaneousstartup”.
Information
A resource name on RMS is based on the application name (SubApplicationName) entered in “ApplilcationName” on this step.
- Oracle instance resource/ASM instance resourceORACLE_<SubApplicationName>_<OracleSID>
- Oracle listener resourceLISTENER_<SubApplicationName>_<ListenerName>
These resource names have the following convention and rules.
- Characters per resource name must be up to 39 characters.
- “ORACLE_” and “LISTENER_” are fixed words.
Note
If you create and register an ASM instance resource, refer to "2.4.2 ASM (Automatic Storage Management)".
Example
If a shared server configuration or dynamic service information is used, specify “Listener” for the StartPriority attribute.
4. Set up the Oracle instance as follows:
Enter ORACLE_SID.
- 20 -

5. Oracle instance settings
To change the settings, select setting item and click “Next” button.To change the advanced settings, check “Advanced setup”.
- 21 -

The settings for Oracle instance resource are as follows:
Attributes Description
OracleSID ORACLE_SID
OracleUser - Oracle instance resource, ASM instance resource(Oracle 10gR2/11g R1)- Operating system user which belongs to OSDBA group. (refer to“Oracle User” of “2.2.2 Oracle Installation and Configuration”.)
- ASM instance resource(Oracle 11g R2)- Grid user
StartTimeout Timeout (sec) duration of Oracle startup.Default: 600 (300 - 86400)
StopTimeout Timeout (sec) duration of Oracle stop.Default: 180 (60 - 86400)
AbortTimeout Timeout (sec) duration of forced termination in the event of an Oraclestop error.
Default: 60 (60 - 86400)
StopModeStop Oracle stop mode in normal time.Default: Immediate mode (abort, immediate, transactional)
StopModeFail Oracle stop mode in the event of a failure.Default: Abort mode (abort, immediate)
Interval Monitoring interval (sec) of Oracle instance.
Default: 30 (5 - 86400)
WatchTimeout No response time (sec) during monitoring Oracle.
Default: 300 (30 - 3600)
The advanced settings are as follows. These settings are optional:
Attributes Description
PreOnlineScript Executed before online processing.The script must be entered with a full path name. If you arespecifying arguments, separate the arguments with "blanks".Optional
PostOnlineScript Executed after online processing.The script must be entered with a full path name. If you arespecifying arguments, separate the arguments with "blanks".Optional
PreOfflineScript Executed before offline processing.The script must be entered with a full path name. If you arespecifying arguments, separate the arguments with "blanks".Optional
PostOfflineScript Executed after offline processing.The script must be entered with a full path name. If you arespecifying arguments, separate the arguments with "blanks".Optional
FaultScript Executed when a fault occurs.The script must be entered with a full path name. If you arespecifying arguments, separate the arguments with "blanks".Optional
- 22 -
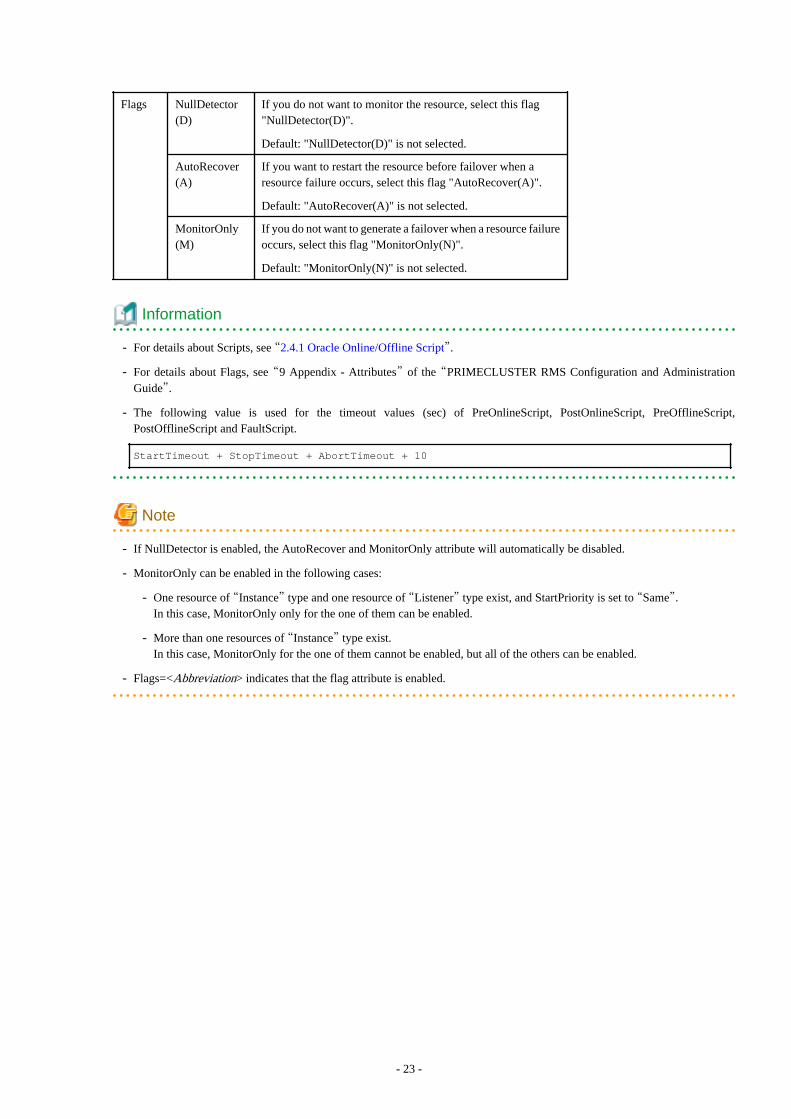
Flags NullDetector(D)
If you do not want to monitor the resource, select this flag"NullDetector(D)".
Default: "NullDetector(D)" is not selected.
AutoRecover(A)
If you want to restart the resource before failover when aresource failure occurs, select this flag "AutoRecover(A)".
Default: "AutoRecover(A)" is not selected.
MonitorOnly(M)
If you do not want to generate a failover when a resource failureoccurs, select this flag "MonitorOnly(N)".
Default: "MonitorOnly(N)" is not selected.
Information
- For details about Scripts, see “2.4.1 Oracle Online/Offline Script”.
- For details about Flags, see “9 Appendix - Attributes” of the “PRIMECLUSTER RMS Configuration and AdministrationGuide”.
- The following value is used for the timeout values (sec) of PreOnlineScript, PostOnlineScript, PreOfflineScript,PostOfflineScript and FaultScript.
StartTimeout + StopTimeout + AbortTimeout + 10
Note
- If NullDetector is enabled, the AutoRecover and MonitorOnly attribute will automatically be disabled.
- MonitorOnly can be enabled in the following cases:
- One resource of “Instance” type and one resource of “Listener” type exist, and StartPriority is set to “Same”.In this case, MonitorOnly only for the one of them can be enabled.
- More than one resources of “Instance” type exist.In this case, MonitorOnly for the one of them cannot be enabled, but all of the others can be enabled.
- Flags=<Abbreviation> indicates that the flag attribute is enabled.
- 23 -
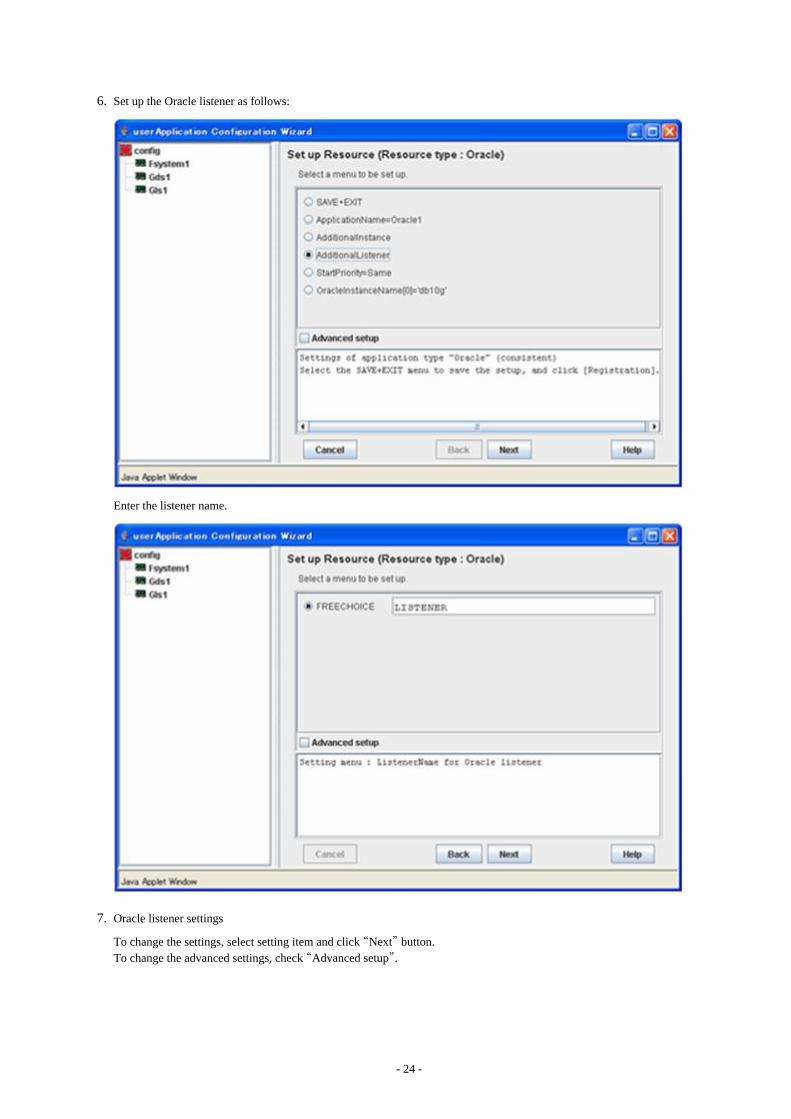
6. Set up the Oracle listener as follows:
Enter the listener name.
7. Oracle listener settings
To change the settings, select setting item and click “Next” button.To change the advanced settings, check “Advanced setup”.
- 24 -

The settings for Oracle listener resource are as follows:
Attributes Description
ListenerName Listener name
OracleUser - Oracle listener resource(Oracle 10g R2/11g R1), Oracle listenerresource(ASM is not used with Oracle 11g R2)- Operating system user for Listener control.
- Oracle listener resource(ASM is used with Oracle 11g R2)- Grid user
StartTimeout Timeout (sec) duration of Oracle startup.Default: 180 (120 - 86400)
StopTimeout Timeout (sec) duration of Oracle stop.Default: 60 (60 - 86400)
Interval Monitoring interval (sec) of Oracle instance.Default: 30 (5 - 86400)
WatchTimeout No response time (sec) during monitoring Oracle.Default: 300 (30 - 3600)
The advanced settings are as follows. These settings are optional:
Attributes Description
TNSName Network service for listener monitoring Execute the tnsping command to monitor the Oracle listenerwhen TNSName is set (tnsnames.ora). If the TNSName isomitted, process monitoring of the Oracle listener will only beperformed.
- 25 -

PreOnlineScript Executed before online processing.The script must be entered with a full path name. If you arespecifying arguments, separate the arguments with "blanks".Optional
PostOnlineScript Executed after online processing.The script must be entered with a full path name. If you arespecifying arguments, separate the arguments with "blanks".Optional
PreOfflineScript Executed before offline processing.The script must be entered with a full path name. If you arespecifying arguments, separate the arguments with "blanks".Optional
PostOfflineScript Executed after offline processing.The script must be entered with a full path name. If you arespecifying arguments, separate the arguments with "blanks".Optional
FaultScript Executed when a fault occurs.The script must be entered with a full path name. If you arespecifying arguments, separate the arguments with "blanks".Optional
Flags NullDetector(D)
If you do not want to monitor the resource, select this flag"NullDetector(D)".
Default: "NullDetector(D)" is not selected.
AutoRecover(A)
If you want to restart the resource before failover when aresource failure occurs, select this flag "AutoRecover(A)".
Default: "AutoRecover(A)" is selected.
MonitorOnly(M)
If you do not want to generate a failover when a resource failureoccurs, select this flag "MonitorOnly(N)".
Default: "MonitorOnly(N)" is not selected.
Information
- For details about Scripts, see “2.4.1 Oracle Online/Offline Script”.
- For details about Flags, see “9 Appendix - Attributes” of the “PRIMECLUSTER RMS Configuration and AdministrationGuide”.
- The following value is used for the timeout values (sec) of PreOnlineScript, PostOnlineScript, PreOfflineScript,PostOfflineScript and FaultScript.
StartTimeout + StopTimeout + 10
Note
- If NullDetector is enabled, the AutoRecover and MonitorOnly attribute will automatically be disabled.
- MonitorOnly can be enabled in the following cases:
- One resource of “Instance” type and one resource of “Listener” type exist, and StartPriority is set to “Same”.In this case, MonitorOnly only for the one of them can be enabled.
- More than one resources of “Listener” type exist.In this case, MonitorOnly for the one of them cannot be enabled, but all of the others can be enabled.
- 26 -
- Flags=<Abbreviation> indicates that the flag attribute is enabled.
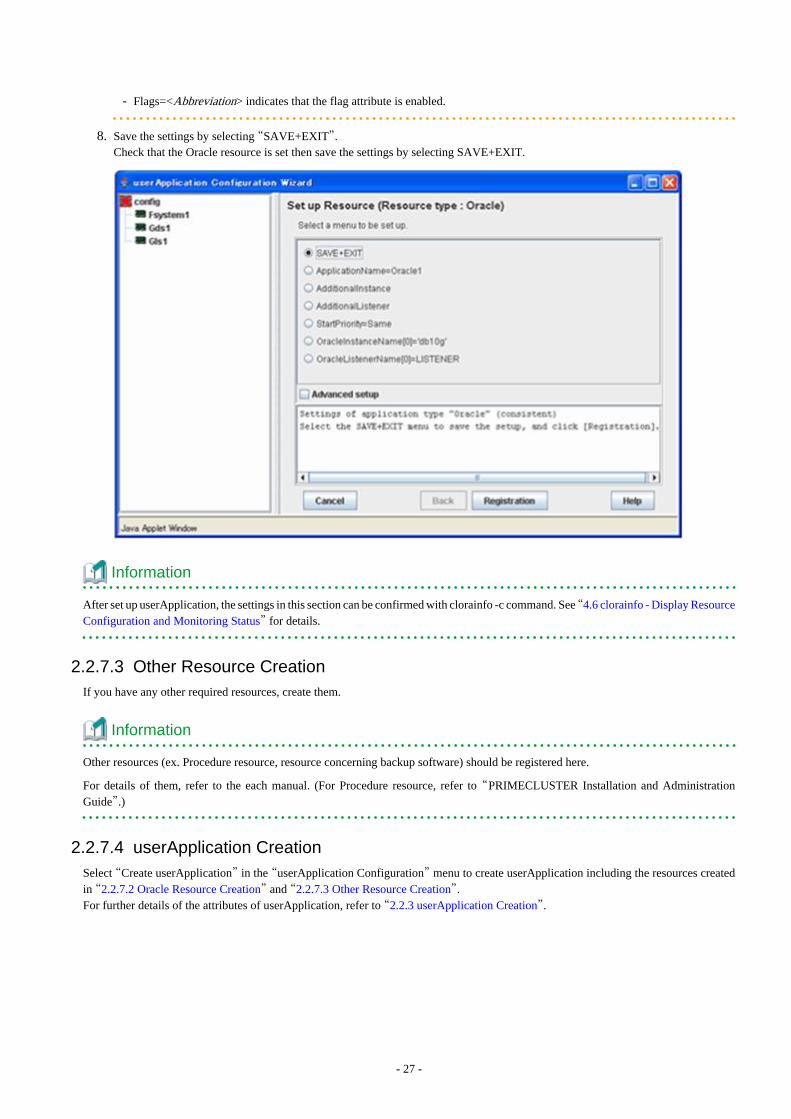
8. Save the settings by selecting “SAVE+EXIT”. Check that the Oracle resource is set then save the settings by selecting SAVE+EXIT.
Information
After set up userApplication, the settings in this section can be confirmed with clorainfo -c command. See “4.6 clorainfo - Display ResourceConfiguration and Monitoring Status” for details.
2.2.7.3 Other Resource CreationIf you have any other required resources, create them.
Information
Other resources (ex. Procedure resource, resource concerning backup software) should be registered here.
For details of them, refer to the each manual. (For Procedure resource, refer to “PRIMECLUSTER Installation and AdministrationGuide”.)
2.2.7.4 userApplication CreationSelect “Create userApplication” in the “userApplication Configuration” menu to create userApplication including the resources createdin “2.2.7.2 Oracle Resource Creation” and “2.2.7.3 Other Resource Creation”.For further details of the attributes of userApplication, refer to “2.2.3 userApplication Creation”.
- 27 -
Note
HELP description is common to GUI and CUI, so a part of them includes a description about CUI.
2.2.7.5 Other userApplication CreationIf you have any other required userApplications at "2.2.7.4 userApplication Creation", create them using the userApplication ConfigurationWizard.
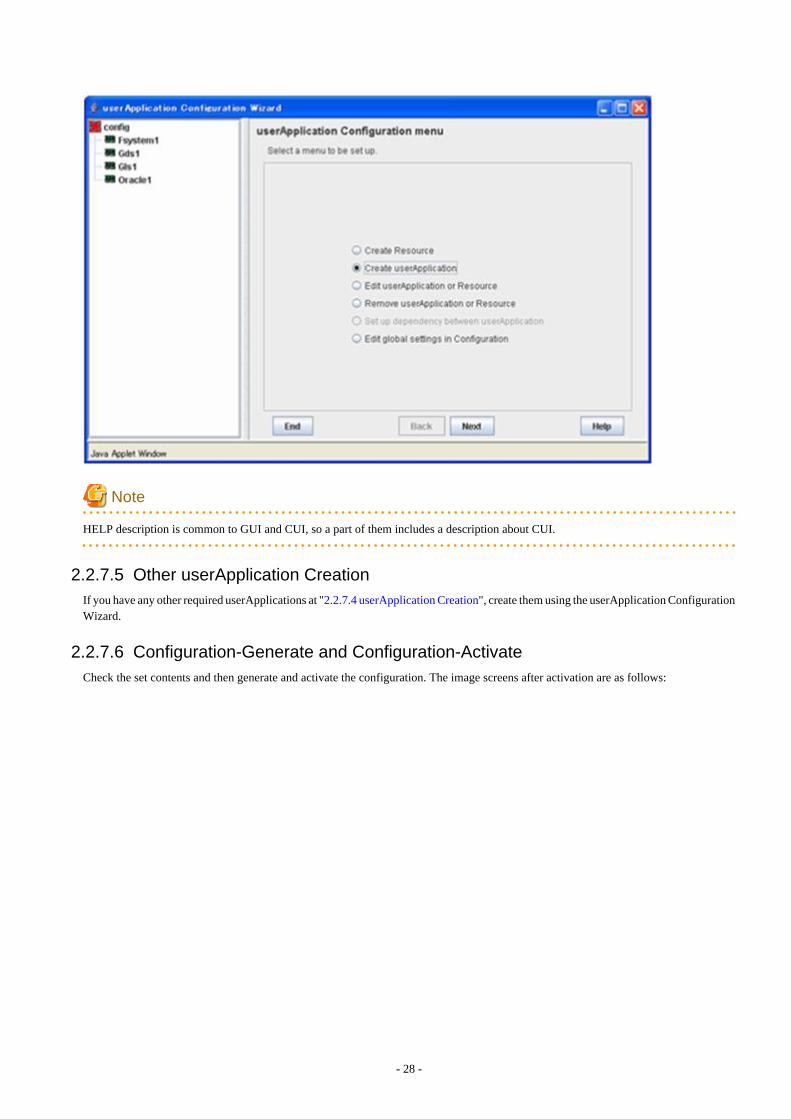
2.2.7.6 Configuration-Generate and Configuration-ActivateCheck the set contents and then generate and activate the configuration. The image screens after activation are as follows:
- 28 -
2.2.8 userApplication Operation CheckStart userApplication by executing the hvcm command then check if it is properly running on all the nodes.
Configuration of operations
Check if the configuration is correct in the Cluster Admin screen of Web-Based Admin View. The image screens of Cluster Admin areas follows:
- 29 -
Shared disk
Check if you can access to the shared disk from the operating node. Also, check if a file can be created on the shared disk using Oracleuser access privileges.
Logical IP address
Check if you can access the operating node from the client using the logical IP address.
Oracle
Check if you can access to Oracle running on the operating node from the client using the logical IP address.
2.3 Scalable Operation with Oracle RAC 11g R2
2.3.1 PRIMECLUSTER Installation and Configuration- Hardware configuration
Configure hardware required to operate PRIMECLUSTER. A shared disk device is also required to create Oracle Database files.
- Software installation
Install PRIMECLUSTER Enterprise Edition according to the “PRIMECLUSTER Enterprise Edition Software Release Guide”.Install PRIMECLUSTER Wizard for Oracle according to the “Software Release Guide PRIMECLUSTER Wizard for Oracle forOracle Solaris”.
- Cluster configuration
Configure a cluster system, network, and shared disk device according to the PRIMECLUSTER manuals.
- 30 -

- Startup method of Oracle Clusterware
There are two methods of starting up Oracle Clusterware as follows. For details, refer to “2.3.3 userApplication and ResourceConfiguration”. (Recommended operation is 1.)
1. Registering Oracle Clusterware in a PRIMECLUSTER RMS resource and starting along with userApplication startup.
2. Automatic starting along with OS startup without registering Oracle Clusterware in a PRIMECLUSTER RMS resource.
Note
If you choose 2, be aware that Oracle Clusterware accesses a shared disk device as soon as it is activated. A volume on the shareddisk must be active when the Oracle Clusterware is activated.
2.3.2 Oracle Software Installation and Configuration
Site Preparation
Install Oracle Grid Infrastructure and Oracle Database referring to Oracle manuals and installation guides.
- Kernel parameters
For semopm, specify a value of 4 or more.
- Install Users
Create an install user for the Oracle Grid Infrastructure and another install user for Oracle Database.It is possible to use the same install user to install both of them, but creating different ones is recommended by Oracle.PRIMECLUSTER Wizard for Oracle supports both of the methods.Also, make sure that user ID and group ID are identical on all the nodes.
Note
This document is described for creating different users. In the case of creating one user, it is necessary to replace “Grid user” with“Oracle user”.
Oracle Grid Infrastructure installation
Install Oracle Grid Infrastructure by referring to the Oracle manual and installation guide.
Note
- Install Oracle Grid Infrastructure on a local disk of all nodes.
- Check if root user access privileges can switch the user to the Grid user, using the su(1M) command.
# su - <Grid user>
- A command (e.g. script) that has interactive mode should not be described in Grid user's profile. (e.g. /etc/profile, .bash_profile, .cshrc, .profile) It may cause failure of resource monitoring or userApplication startup or shutdown.
- Environment that Grid user's home directory and profile are located on the shared disk is not supported. Grid user's home directoryand profile must be located on the local disk of each node.
Oracle Database installation
Install Oracle Database by referring to the Oracle manual and installation guide.
- 31 -
Note
- Install Oracle Database on a local disk of all nodes.
- Check if root user access privileges can switch the user to the Oracle user, using the su(1M) command.
# su - <Oracle user>
- A command (e.g. script) that has interactive mode should not be described in Oracle user's profile. (e.g. /etc/profile, .bash_profile, .cshrc, .profile) It may cause failure of resource monitoring or userApplication startup or shutdown.
- Environment that Oracle user's home directory and profile are located on the shared disk is not supported. Oracle user's home directoryand profile must be located on the local disk of each node.
Database creating and settings
Create a database by referring to the Oracle manual and installation guide.
Note
- If multiple Oracle homes are configured on one server, a different Oracle RAC instance name must be assigned for each Oracle home.
- If multiple Oracle homes are configured on one server, a different listener name must be assigned for each Oracle home.
Information
In scalable operation with Oracle RAC 11g R2, the RMS resource name is generated based on the resource name of Oracle RAC as follows:
- Oracle RAC instance resource
<SubApplicationName>_<SID>.i
- Oracle listener resource
<SubApplicationName>_<lsnr_name>.l
The default value of <lsnr_name> is “LISTENER”.
- Oracle Clusterware resource
<SubApplicationName>_Clusterware
These resource names have the following convention and rules.
- RMS resource name must be up to 39 characters.
- For information on how to set up <SubApplicationName>, see “2.3.4 userApplication with Oracle Clusterware” and “2.3.5userApplication with Oracle RAC Instances and Listeners”.
- SYSTEM user password
PRIMECLUSTER Wizard for Oracle accesses and monitors Oracle as the Oracle SYSTEM user. Therefore, the SYSTEM user'spassword must be registered in PRIMECLUSTER Wizard for Oracle. See “4.3 clorapass - Register Password for Monitoring” toregister the password.
Setting change
- Disabling automatic startup of Oracle Clusterware
Disable automatic startup of Oracle Clusterware by executing the following command on each node with super user access privileges.
- 32 -
Example
See the following setup example:
# <ORACLE_HOME>/bin/crsctl disable crs
<ORACLE_HOME> is the directory path where the Oracle Grid Infrastructure was installed.
Note
This setup is required when the Oracle Clusterware is registered in an RMS resource (Configuration A or Configuration B).
- Disabling automatic startup of CRS resource
Disable automatic startup of Oracle RAC instance.This is because the Oracle RAC instance is registered as an RMS resource and its startup is controlled by userApplication, not OracleClusterware.
See the following setup example:
$ srvctl modify database -d $DB_NAME -y manual
Information
For detail of editing, refer to Oracle manuals.
Operation check
Check if Oracle RAC instances and listeners are properly operating. Also, check if crsctl status resource command can be executed byGrid user, and srvctl config database command can be executed by Oracle user.
Example
The following example shows the operation results:
# su - <Grid user>
$ crsctl status resource -t
-------------------------------------------------------------------
NAME TARGET STATE SERVER STATE_DETAILS
-------------------------------------------------------------------
Local Resources
-------------------------------------------------------------------
ora.DATA.dg
ONLINE ONLINE node1
ONLINE ONLINE node2
ora.LISTENER.lsnr
ONLINE ONLINE node1
ONLINE ONLINE node2
ora.asm
ONLINE ONLINE node1
ONLINE ONLINE node2
ora.eons
ONLINE ONLINE node1
ONLINE ONLINE node2
ora.gsd
OFFLINE OFFLINE node1
OFFLINE OFFLINE node2
ora.net1.network
ONLINE ONLINE node1
- 33 -
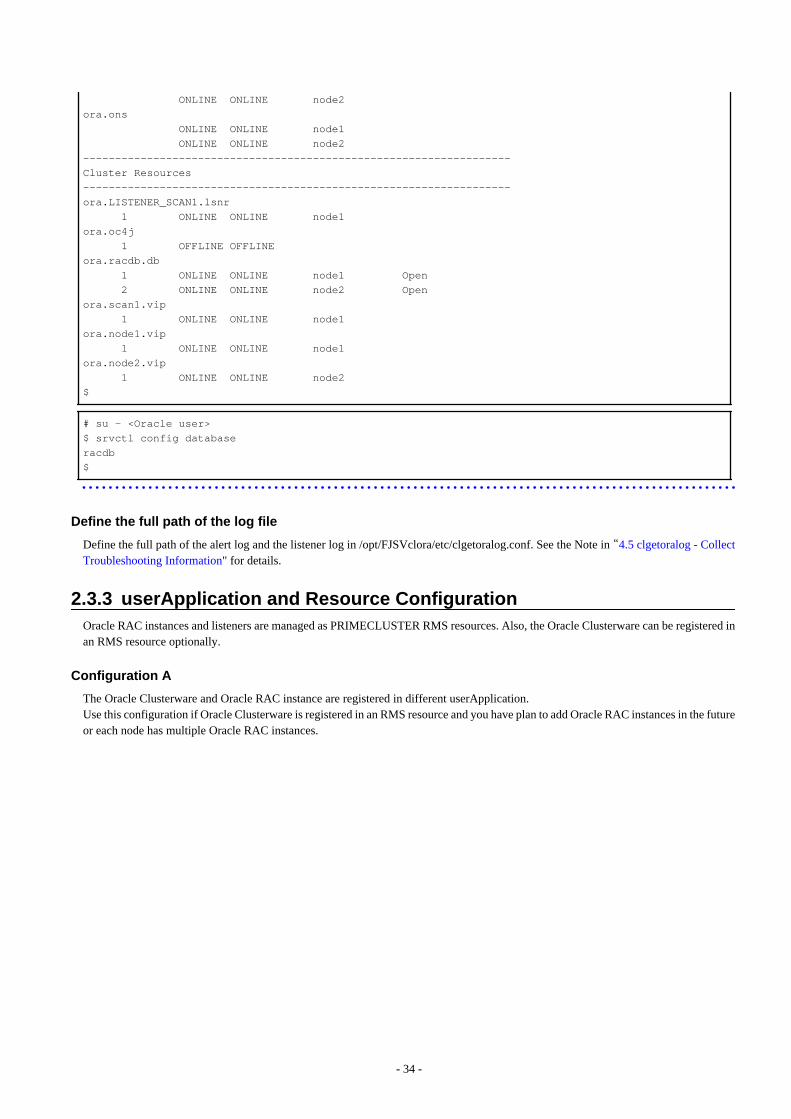
ONLINE ONLINE node2
ora.ons
ONLINE ONLINE node1
ONLINE ONLINE node2
-------------------------------------------------------------------
Cluster Resources
-------------------------------------------------------------------
ora.LISTENER_SCAN1.lsnr
1 ONLINE ONLINE node1
ora.oc4j
1 OFFLINE OFFLINE
ora.racdb.db
1 ONLINE ONLINE node1 Open
2 ONLINE ONLINE node2 Open
ora.scan1.vip
1 ONLINE ONLINE node1
ora.node1.vip
1 ONLINE ONLINE node1
ora.node2.vip
1 ONLINE ONLINE node2
$
# su - <Oracle user>
$ srvctl config database
racdb
$
Define the full path of the log file
Define the full path of the alert log and the listener log in /opt/FJSVclora/etc/clgetoralog.conf. See the Note in “4.5 clgetoralog - CollectTroubleshooting Information" for details.
2.3.3 userApplication and Resource ConfigurationOracle RAC instances and listeners are managed as PRIMECLUSTER RMS resources. Also, the Oracle Clusterware can be registered inan RMS resource optionally.
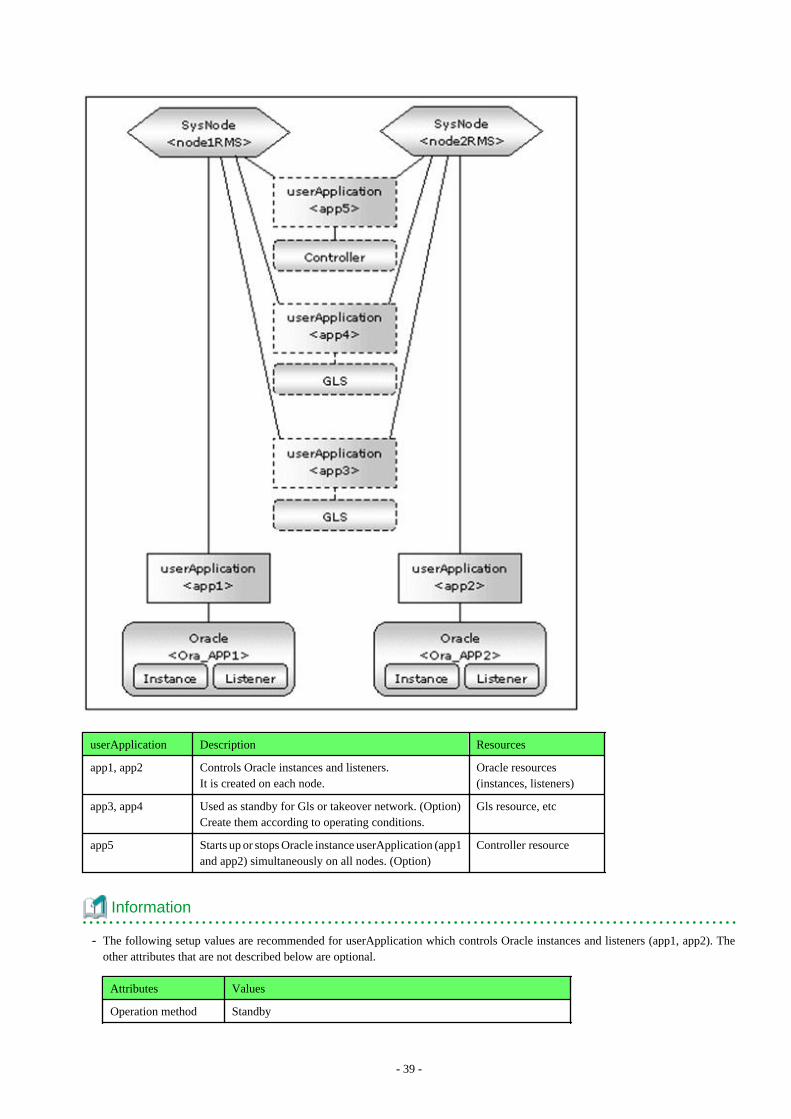
Configuration A
The Oracle Clusterware and Oracle RAC instance are registered in different userApplication.Use this configuration if Oracle Clusterware is registered in an RMS resource and you have plan to add Oracle RAC instances in the futureor each node has multiple Oracle RAC instances.
- 34 -
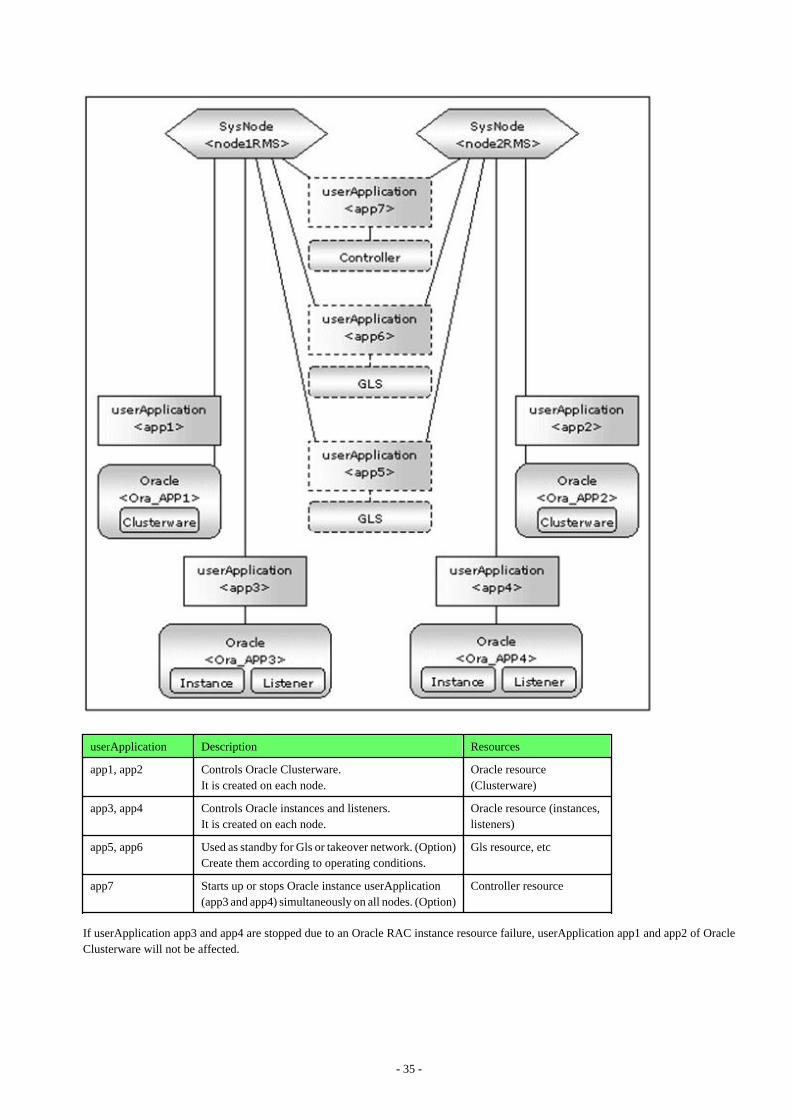
userApplication Description Resources
app1, app2 Controls Oracle Clusterware.It is created on each node.
Oracle resource(Clusterware)
app3, app4 Controls Oracle instances and listeners. It is created on each node.
Oracle resource (instances,listeners)
app5, app6 Used as standby for Gls or takeover network. (Option)Create them according to operating conditions.
Gls resource, etc
app7 Starts up or stops Oracle instance userApplication(app3 and app4) simultaneously on all nodes. (Option)
Controller resource
If userApplication app3 and app4 are stopped due to an Oracle RAC instance resource failure, userApplication app1 and app2 of OracleClusterware will not be affected.
- 35 -
Information
- The following setup values are recommended for userApplication which controls Oracle Clusterware (app1, app2). The other attributesthat are not described below are optional.
Attributes Values
Operation method Standby
AutoSwitchOver No
PersistentFault 1
- The following setup values are recommended for userApplication which controls Oracle instances and listeners (app3, app4). Theother attributes that are not described below are optional.
Attributes Values
Operation method Standby
AutoStartUp If you control userApplication startup and stop on all nodes by usingthe controlling userApplication, be sure to specify No.
AutoSwitchOver No
PersistentFault 1
Note
If the “KeepOnline” flag of Oracle Clusterware resource is disabled, the userApplication which controls Oracle instances should be stoppedfirst, and then the userApplication which controls Oracle Clusterware should be stopped.(In the above image, app3 should be stopped before app1 stopping. app4 should be stopped before app2 stopping.)For further details of the “KeepOnline” flag, refer to “2.3.4 userApplication with Oracle Clusterware”.
Configuration B
The Oracle Clusterware and Oracle RAC instance are registered in the same userApplication.Use this configuration if Oracle Clusterware is registered in an RMS resource and only one Oracle RAC instance exists on a node andhaving no plan to add Oracle RAC instances in the future.
- 36 -
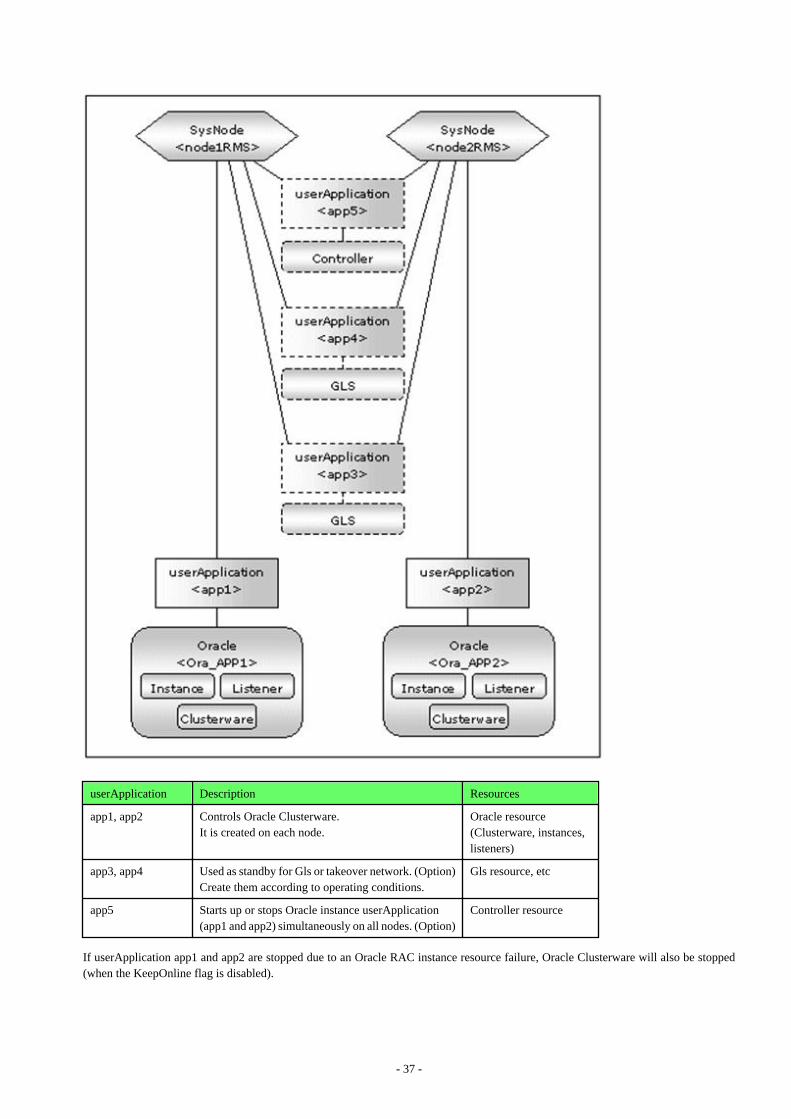
userApplication Description Resources
app1, app2 Controls Oracle Clusterware.It is created on each node.
Oracle resource(Clusterware, instances,listeners)
app3, app4 Used as standby for Gls or takeover network. (Option)Create them according to operating conditions.
Gls resource, etc
app5 Starts up or stops Oracle instance userApplication(app1 and app2) simultaneously on all nodes. (Option)
Controller resource
If userApplication app1 and app2 are stopped due to an Oracle RAC instance resource failure, Oracle Clusterware will also be stopped(when the KeepOnline flag is disabled).
- 37 -
Information
- The following setup values are recommended for userApplication which controls Oracle Clusterware, Oracle instance and listener(app1, app2). The other attributes that are not described below are optional.
Attributes Values
Operation method Standby
AutoStartUp If you control userApplication startup and stop on all nodes by usingthe controlling userApplication, be sure to specify No.
AutoSwitchOver No
PersistentFault 1
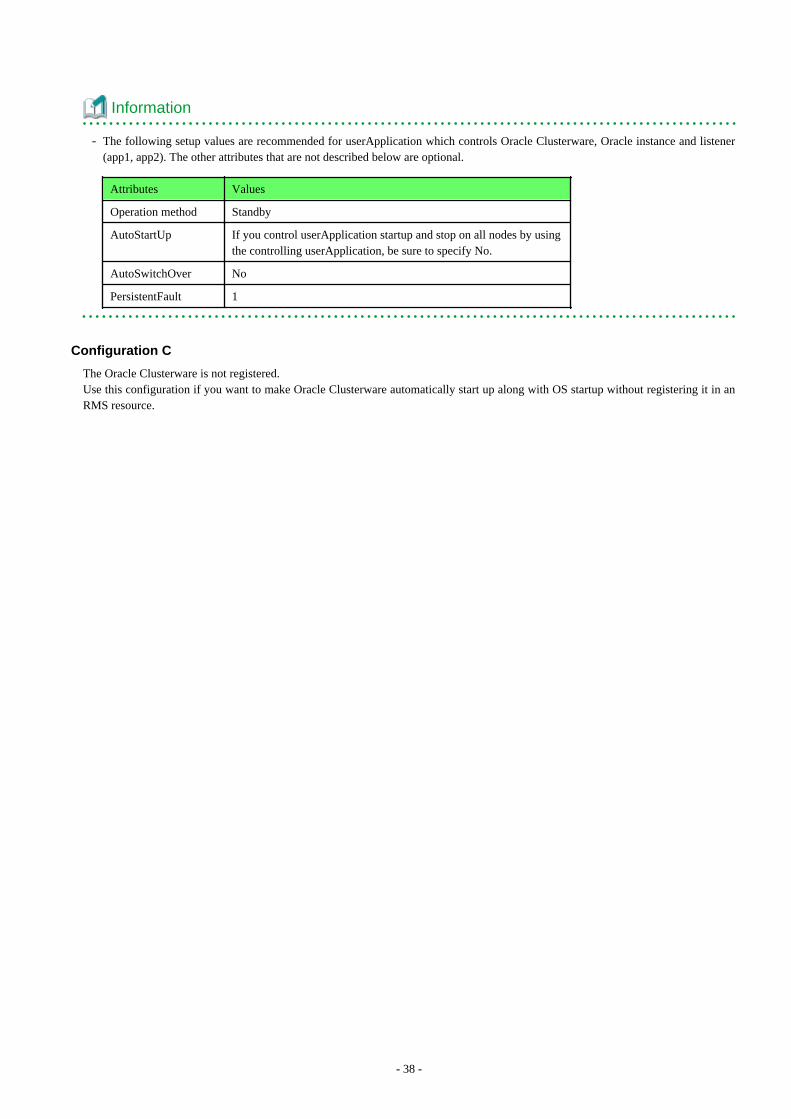
Configuration C
The Oracle Clusterware is not registered.Use this configuration if you want to make Oracle Clusterware automatically start up along with OS startup without registering it in anRMS resource.
- 38 -
userApplication Description Resources
app1, app2 Controls Oracle instances and listeners.It is created on each node.
Oracle resources(instances, listeners)
app3, app4 Used as standby for Gls or takeover network. (Option)Create them according to operating conditions.
Gls resource, etc
app5 Starts up or stops Oracle instance userApplication (app1and app2) simultaneously on all nodes. (Option)
Controller resource
Information
- The following setup values are recommended for userApplication which controls Oracle instances and listeners (app1, app2). Theother attributes that are not described below are optional.
Attributes Values
Operation method Standby
- 39 -
AutoStartUp No.
AutoSwitchOver No
PersistentFault 1
- Confirm Oracle Clusterware has already been started when you start userApplication (app1,app2). It fails in the start of the Oracleinstance resources when Oracle Clusterware is starting or Oracle Clusterware has stopped.
The flow of userApplication creation is as follows:
1 Register Oracle Clusterware resources 2.3.4 userApplication with Oracle Clusterware
2 Register Oracle instance and listener resources 2.3.5 userApplication with Oracle RAC Instances andListeners
3 Register the other required resources 2.3.6 Other Resource and userApplication Registration
4 Create userApplication 2.3.7 Configuration-Generate and Configuration-Activate2.3.8 userApplication Operation Check
userApplication is configured with the userApplication Configuration Wizard. This userApplication Configuration Wizard forms Wizardformat as follows:Menu -> Settings -> Next button
Information
- For setting the userApplication Configuration Wizard, see “Chapter 6 Cluster application configuration” of the “PRIMECLUSTERInstallation/Administration Guide”.
- PersistentFault remains the same resource status (Faulted) even after RMS is restarted in the event of a resource failure. Users aresupposed to locate the fault and check completion of recovery processing then start userApplication manually. For example, if a failureoccurs, users can detect which userApplication failed even after server reboot. Even though AutoStartUp setup is set, userApplicationwill not be started, and automatic startup will prevent recurrence of the failure.
Note
Do not create multiple resources for the same Oracle RAC instance, Listener or Oracle Clusterware.
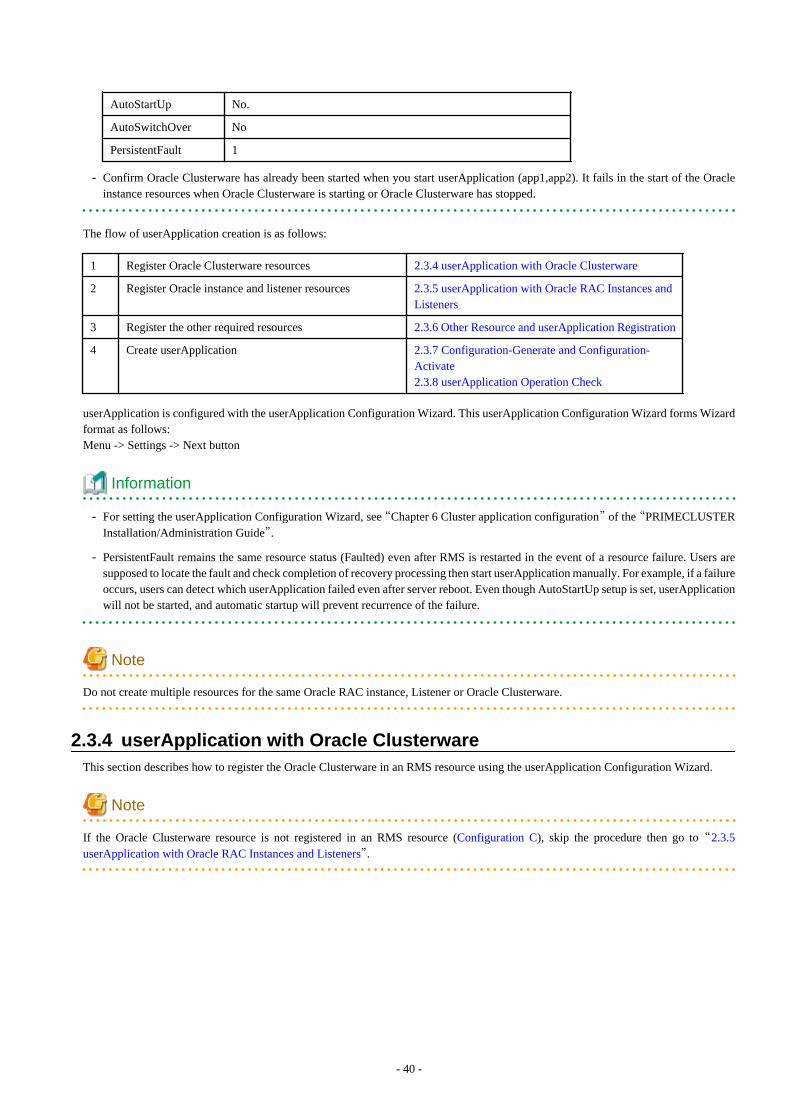
2.3.4 userApplication with Oracle ClusterwareThis section describes how to register the Oracle Clusterware in an RMS resource using the userApplication Configuration Wizard.
Note
If the Oracle Clusterware resource is not registered in an RMS resource (Configuration C), skip the procedure then go to “2.3.5userApplication with Oracle RAC Instances and Listeners”.
- 40 -
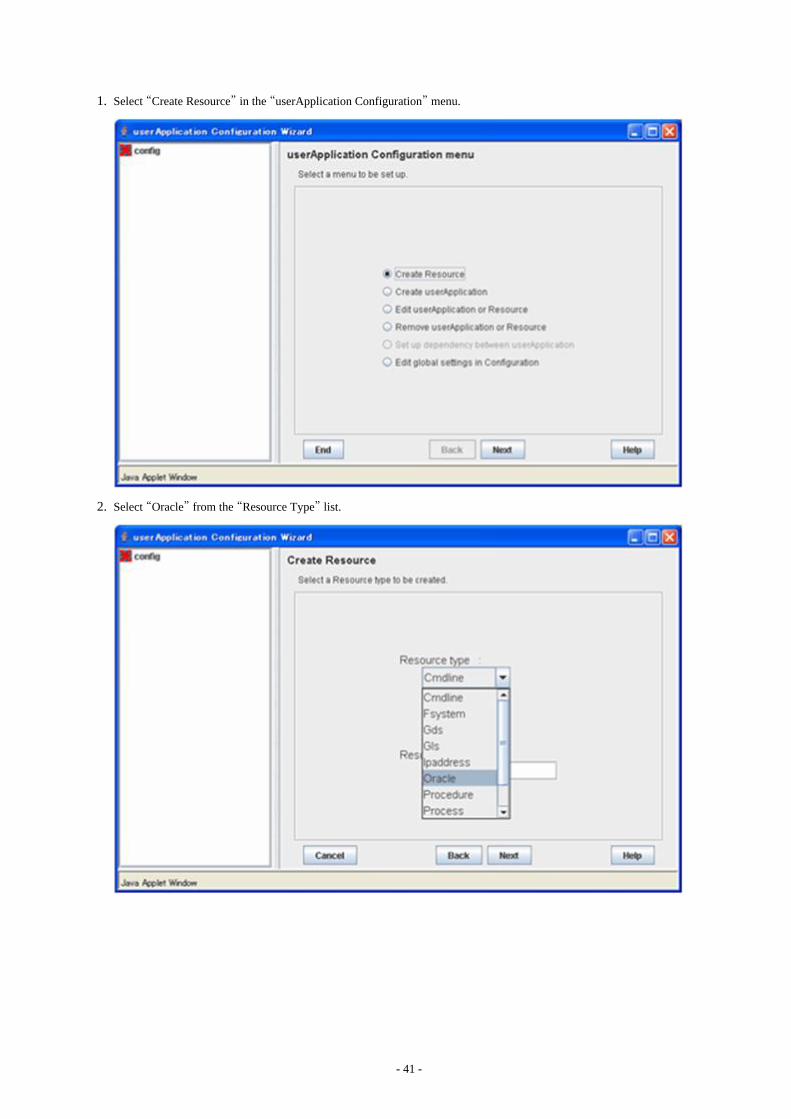
1. Select “Create Resource” in the “userApplication Configuration” menu.
2. Select “Oracle” from the “Resource Type” list.
- 41 -
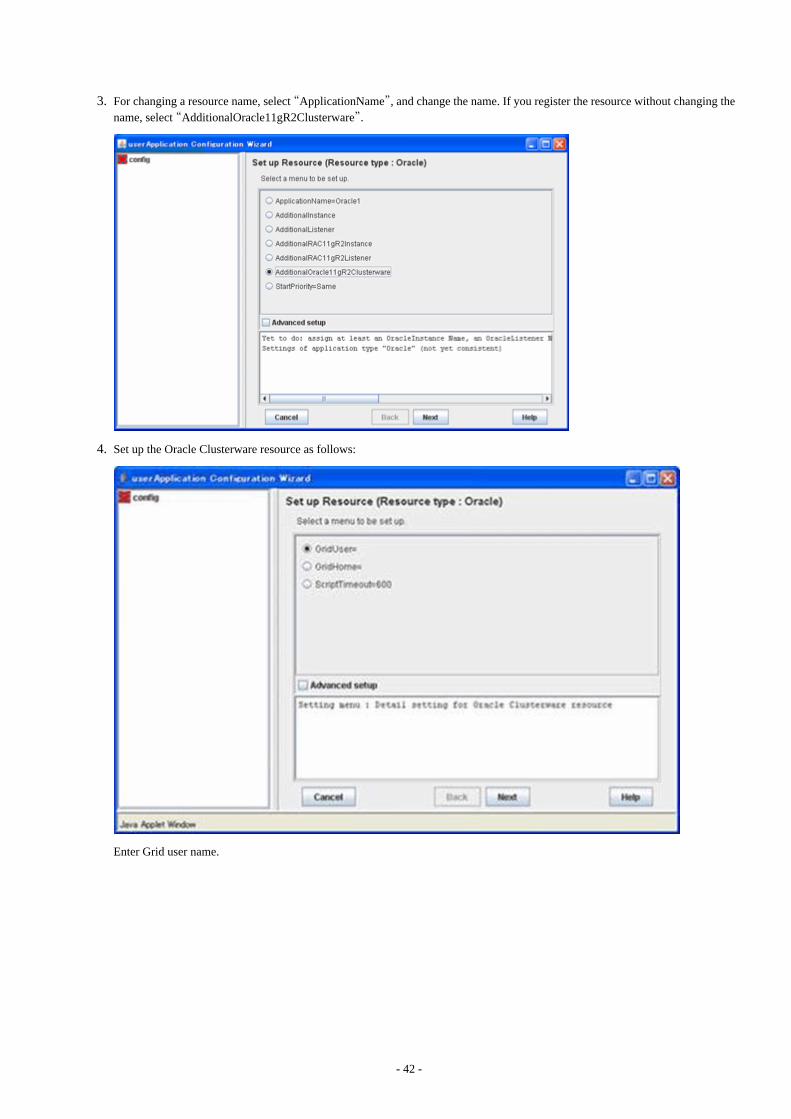
3. For changing a resource name, select “ApplicationName”, and change the name. If you register the resource without changing thename, select “AdditionalOracle11gR2Clusterware”.
4. Set up the Oracle Clusterware resource as follows:
Enter Grid user name.
- 42 -
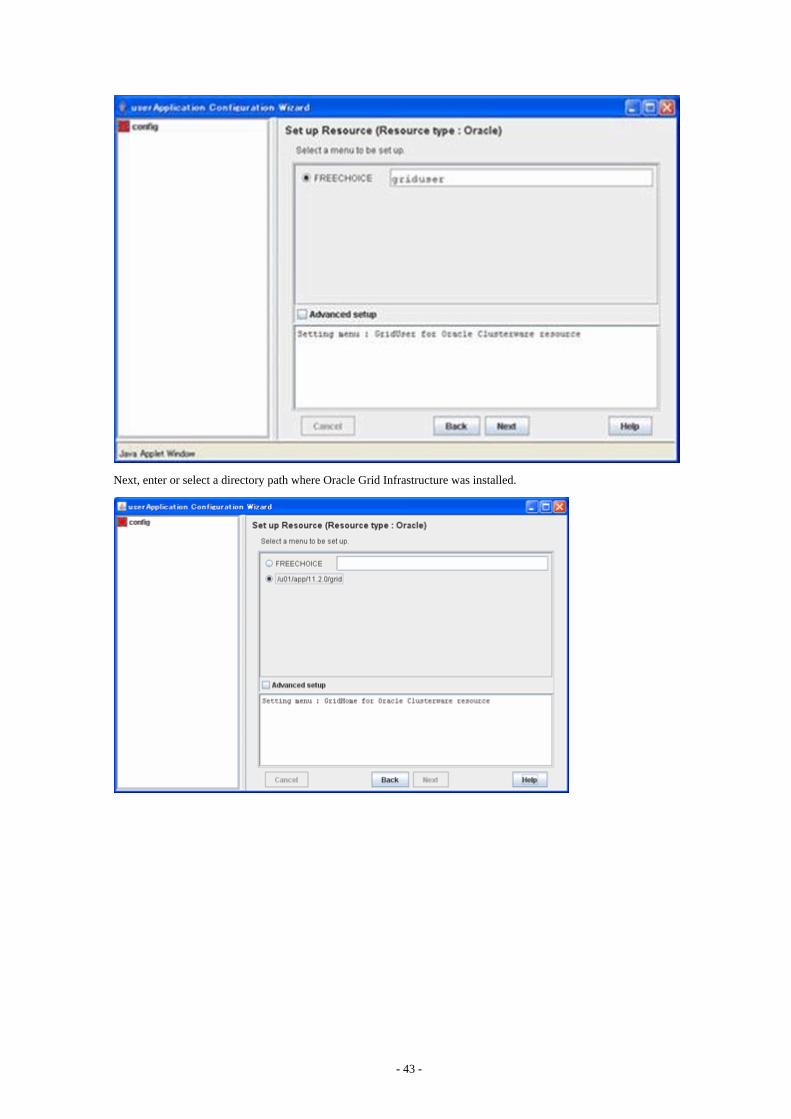
Next, enter or select a directory path where Oracle Grid Infrastructure was installed.
- 43 -
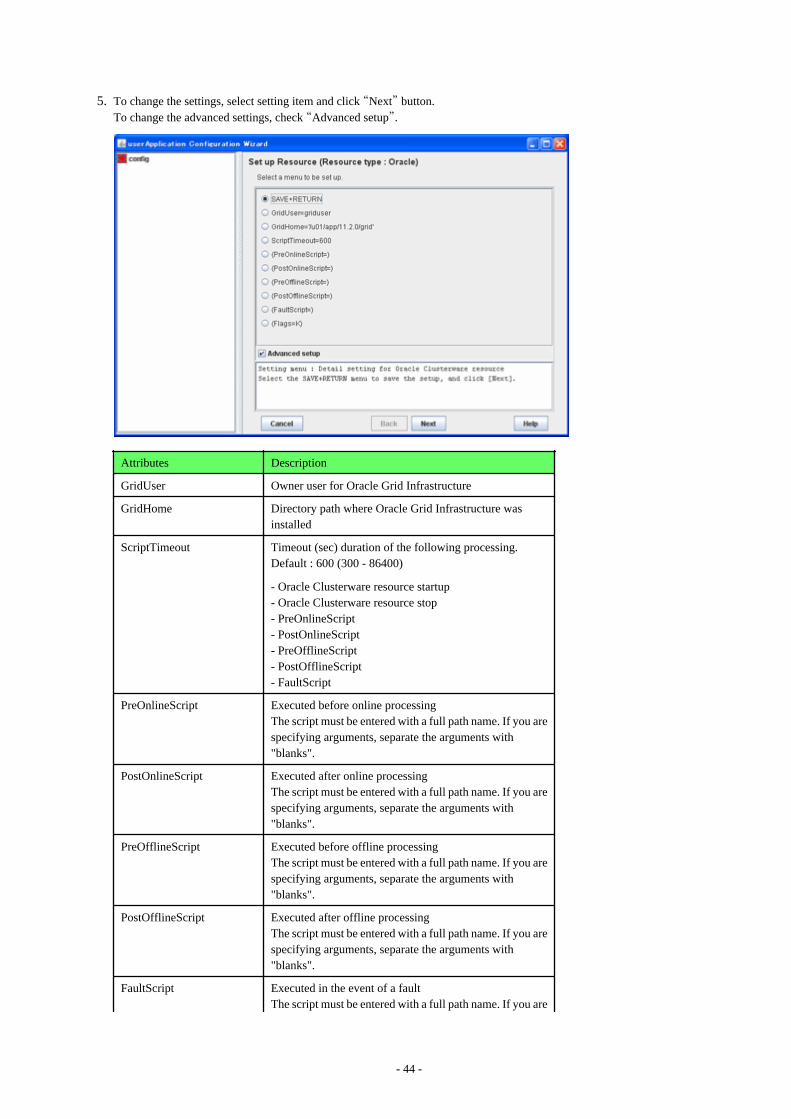
5. To change the settings, select setting item and click “Next” button.To change the advanced settings, check “Advanced setup”.
Attributes Description
GridUser Owner user for Oracle Grid Infrastructure
GridHome Directory path where Oracle Grid Infrastructure wasinstalled
ScriptTimeout Timeout (sec) duration of the following processing.Default : 600 (300 - 86400)
- Oracle Clusterware resource startup- Oracle Clusterware resource stop- PreOnlineScript- PostOnlineScript- PreOfflineScript- PostOfflineScript- FaultScript
PreOnlineScript Executed before online processingThe script must be entered with a full path name. If you arespecifying arguments, separate the arguments with"blanks".
PostOnlineScript Executed after online processingThe script must be entered with a full path name. If you arespecifying arguments, separate the arguments with"blanks".
PreOfflineScript Executed before offline processingThe script must be entered with a full path name. If you arespecifying arguments, separate the arguments with"blanks".
PostOfflineScript Executed after offline processingThe script must be entered with a full path name. If you arespecifying arguments, separate the arguments with"blanks".
FaultScript Executed in the event of a faultThe script must be entered with a full path name. If you are
- 44 -

specifying arguments, separate the arguments with"blanks".
Flags KeepOnline(K)
If you do not want to stop the resource when theuserApplication is stopped, select "Flags=K".
In this case, the status of the resource is maintained"Online".
Default: "Flags=K" is selected.
Information
- For details about Scripts, see “2.4.1 Oracle Online/Offline Script”.
- For details about Flags, see “9 Appendix - Attributes” of the “PRIMECLUSTER RMS Configuration and AdministrationGuide”.
Note
- Flags=<Abbreviation> indicates that the flag attribute is enabled.
- If the “KeepOnline” flag is enabled, and userApplication is stopped, an Oracle Clusterware resource will look Offline on theCluster admin view but resource itself remains active.
- Stop of userApplication with Oracle RAC instance resource by PreOfflineScript
Set the following script to PreOfflineScript of the Oracle Clusterware resource, when the Oracle Clusterware and Oracle RACinstance are registered in different userApplication ("Configuration A" in "2.3.3 userApplication and ResourceConfiguration".) and the "KeepOnline" flag is disabled.
/opt/FJSVclora/sbin/clorastopwait <userApplication with Oracle RAC instance>
<userApplication with Oracle RAC instance> is as follows.
- specify app3 when you create app1
- specify app4 when you create app2
If there are multiple userApplications on the same node, delimit in space and specify all of <userApplication with Oracle RACinstance>.
The clorastopwait script stops the userApplications and waits for them until entering their states other than "Online" and "Wait".The userApplications with Oracle RAC instance stop earlier than the userApplications with Oracle Clusterware becausePreOfflineScript is set.
- In ScriptTimeout, set time to have added at least 30 or more (second) to the largest one among as follows.
- The startup time of the Oracle Clusterware (confirm Oracle Clusterware log file)
- The stop time of the Oracle Clusterware (confirm Oracle Clusterware log file)
- The stop time of the <userApplication with Oracle RAC instance> specified for clorastopwait script in PreOfflineScript(confirm RMS log file)
If you specify two or more <userApplication with Oracle RAC instance>, use the userApplication that the stop time is thelongest.
- 45 -
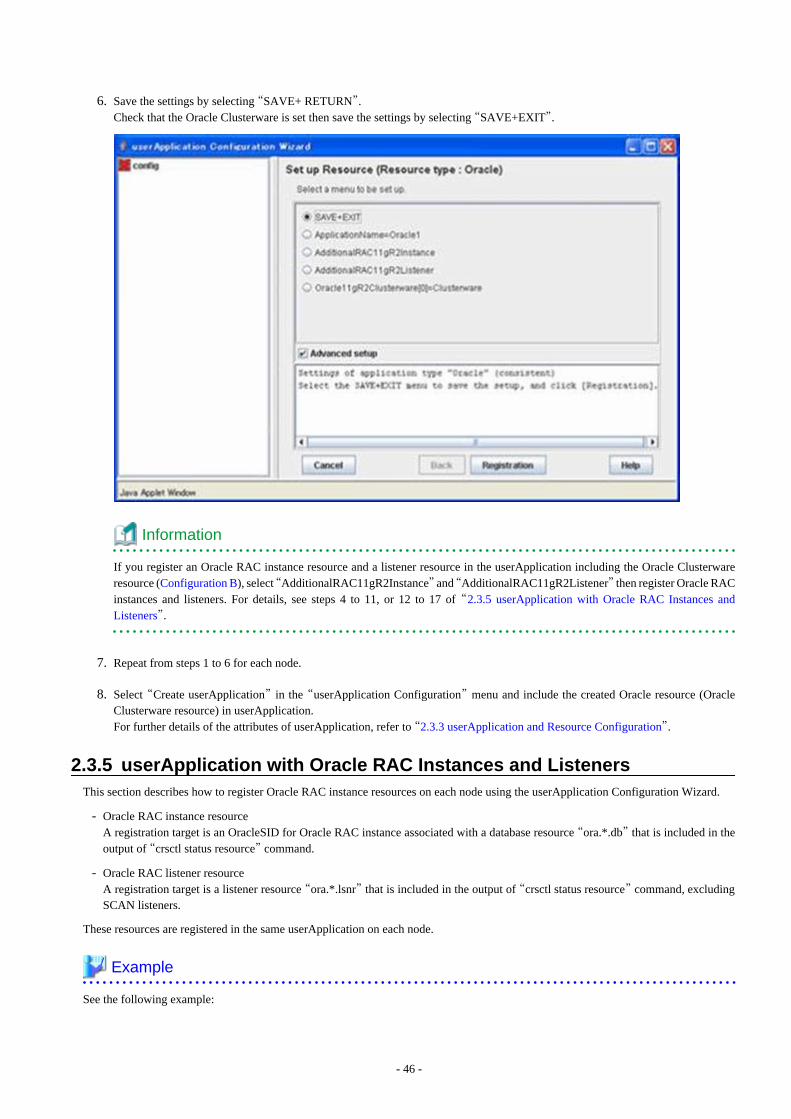
6. Save the settings by selecting “SAVE+ RETURN”. Check that the Oracle Clusterware is set then save the settings by selecting “SAVE+EXIT”.
Information
If you register an Oracle RAC instance resource and a listener resource in the userApplication including the Oracle Clusterwareresource (Configuration B), select “AdditionalRAC11gR2Instance” and “AdditionalRAC11gR2Listener” then register Oracle RACinstances and listeners. For details, see steps 4 to 11, or 12 to 17 of “2.3.5 userApplication with Oracle RAC Instances andListeners”.
7. Repeat from steps 1 to 6 for each node.
8. Select “Create userApplication” in the “userApplication Configuration” menu and include the created Oracle resource (OracleClusterware resource) in userApplication.For further details of the attributes of userApplication, refer to “2.3.3 userApplication and Resource Configuration”.
2.3.5 userApplication with Oracle RAC Instances and ListenersThis section describes how to register Oracle RAC instance resources on each node using the userApplication Configuration Wizard.
- Oracle RAC instance resourceA registration target is an OracleSID for Oracle RAC instance associated with a database resource “ora.*.db” that is included in theoutput of “crsctl status resource” command.
- Oracle RAC listener resourceA registration target is a listener resource “ora.*.lsnr” that is included in the output of “crsctl status resource” command, excludingSCAN listeners.
These resources are registered in the same userApplication on each node.
Example
See the following example:
- 46 -

# su - <Grid user>
$ crsctl status resource -t
-------------------------------------------------------------------
NAME TARGET STATE SERVER STATE_DETAILS
-------------------------------------------------------------------
Local Resources
-------------------------------------------------------------------
ora.DATA.dg
ONLINE ONLINE node1
ONLINE ONLINE node2
ora.LISTENER.lsnr
ONLINE ONLINE node1
ONLINE ONLINE node2
ora.asm
ONLINE ONLINE node1
ONLINE ONLINE node2
ora.eons
ONLINE ONLINE node1
ONLINE ONLINE node2
ora.gsd
OFFLINE OFFLINE node1
OFFLINE OFFLINE node2
ora.net1.network
ONLINE ONLINE node1
ONLINE ONLINE node2
ora.ons
ONLINE ONLINE node1
ONLINE ONLINE node2
-------------------------------------------------------------------
Cluster Resources
-------------------------------------------------------------------
ora.LISTENER_SCAN1.lsnr
1 ONLINE ONLINE node1
ora.oc4j
1 OFFLINE OFFLINE
ora.racdb.db
1 ONLINE ONLINE node1 Open
2 ONLINE ONLINE node2 Open
ora.scan1.vip
1 ONLINE ONLINE node1
ora.node1.vip
1 ONLINE ONLINE node1
ora.node2.vip
1 ONLINE ONLINE node2
$
In the above configuration, listeners for “ora.LISTENER.lsnr” and OracleSIDs for Oracle RAC instances associated with “ora.racdb.db”are registered as a resource respectively.
Note
Before configuring userApplication, make sure that Oracle Clusterware has been activated on all nodes, so the “crsctl status resource”command can be executed correctly with Grid user.
If Oracle Clusterware has not been activated, execute the following command as a root user.
# <ORACLE_HOME>/bin/crsctl start crs
<ORACLE_HOME> is the directory path where the Oracle Grid Infrastructure was installed.
When Oracle Clusterware startup is completed, be sure to confirm that the “crsctl status resource” command can be executed correctly.
- 47 -
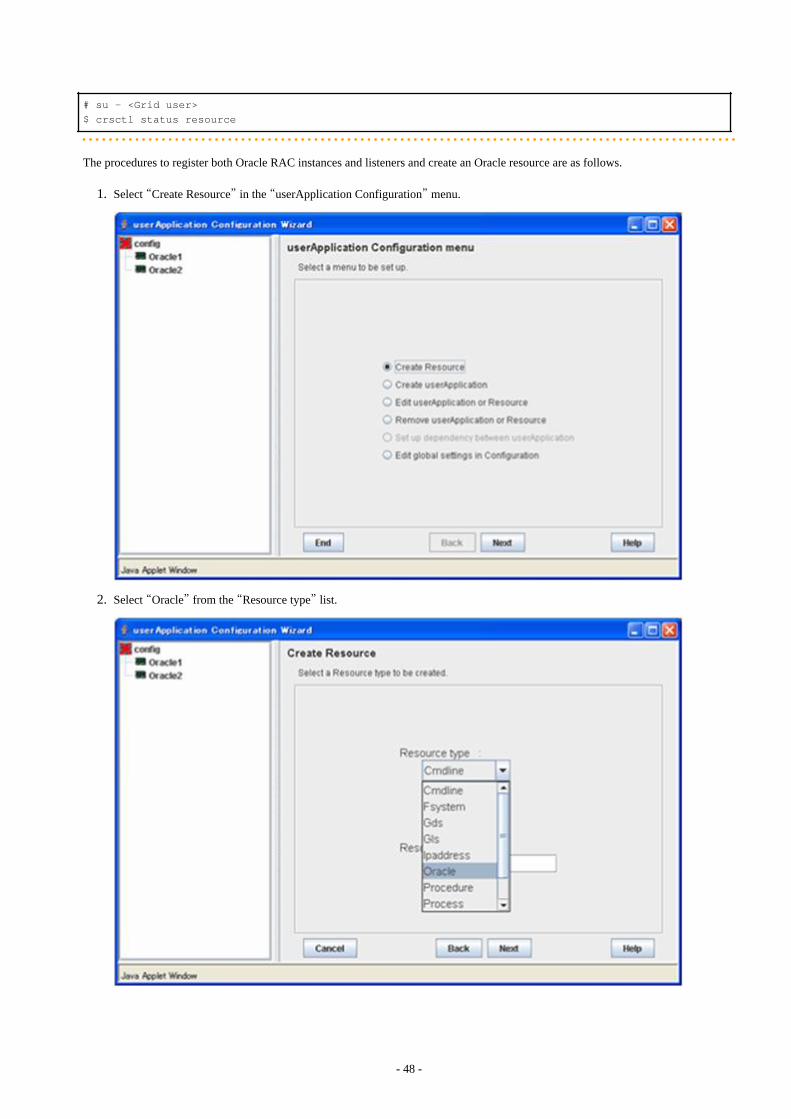
# su - <Grid user>
$ crsctl status resource
The procedures to register both Oracle RAC instances and listeners and create an Oracle resource are as follows.
1. Select “Create Resource” in the “userApplication Configuration” menu.
2. Select “Oracle” from the “Resource type” list.
- 48 -
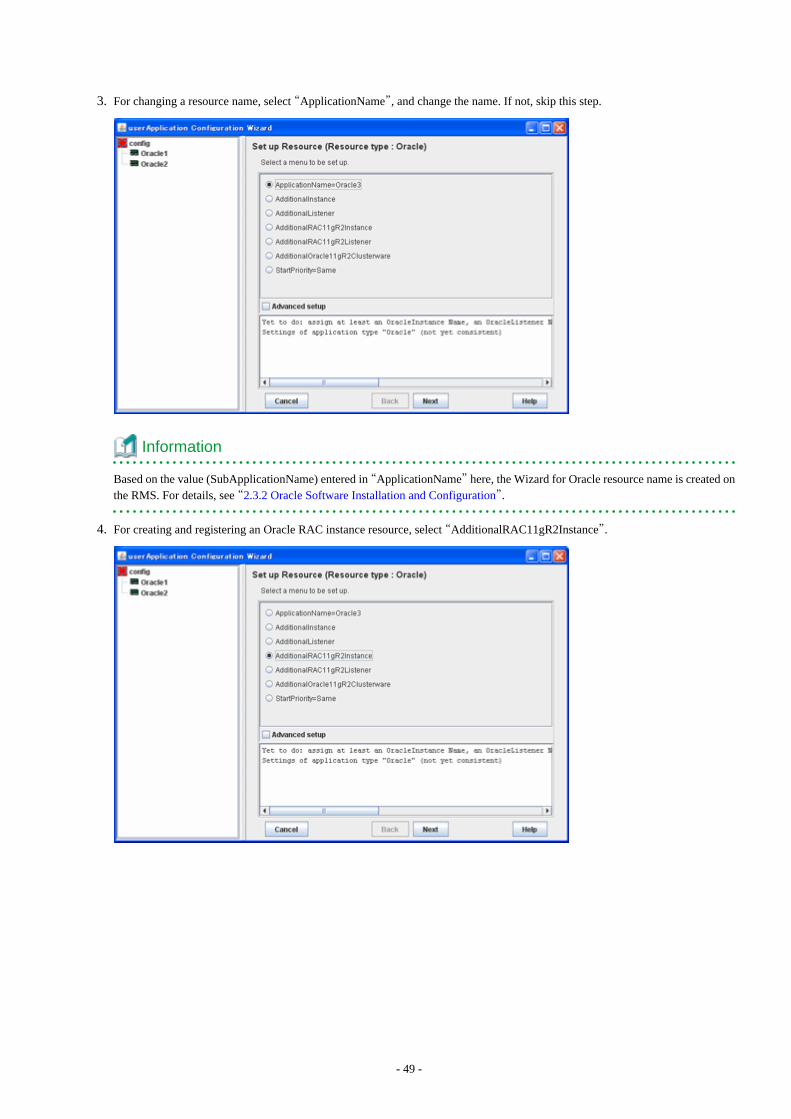
3. For changing a resource name, select “ApplicationName”, and change the name. If not, skip this step.
Information
Based on the value (SubApplicationName) entered in “ApplicationName” here, the Wizard for Oracle resource name is created onthe RMS. For details, see “2.3.2 Oracle Software Installation and Configuration”.
4. For creating and registering an Oracle RAC instance resource, select “AdditionalRAC11gR2Instance”.
- 49 -
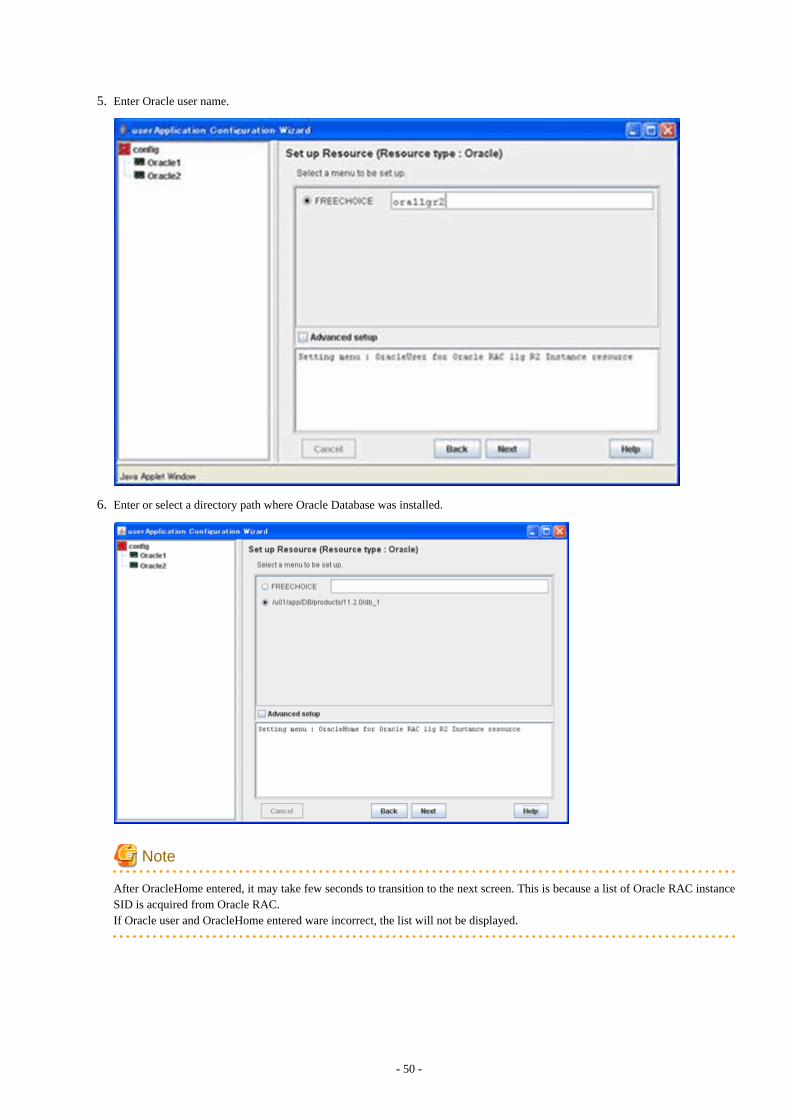
5. Enter Oracle user name.
6. Enter or select a directory path where Oracle Database was installed.
Note
After OracleHome entered, it may take few seconds to transition to the next screen. This is because a list of Oracle RAC instanceSID is acquired from Oracle RAC.If Oracle user and OracleHome entered ware incorrect, the list will not be displayed.
- 50 -

7. A list of registerable Oracle RAC instance SID is displayed. Check “Advanced setup”, then specify a node with “ScopeFilter”.
Input the name of a host where Oracle RAC instance SID that will be registered belongs to.
- 51 -

8. Select Oracle RAC instance SID.
9. Enter Grid user name.
Note
If your Oracle RAC environment has one user for the Oracle Grid Infrastructure and the Oracle Database installations, enter Oracleuser here.
Next, enter or select a directory path where Oracle Grid Infrastructure was installed.
- 52 -
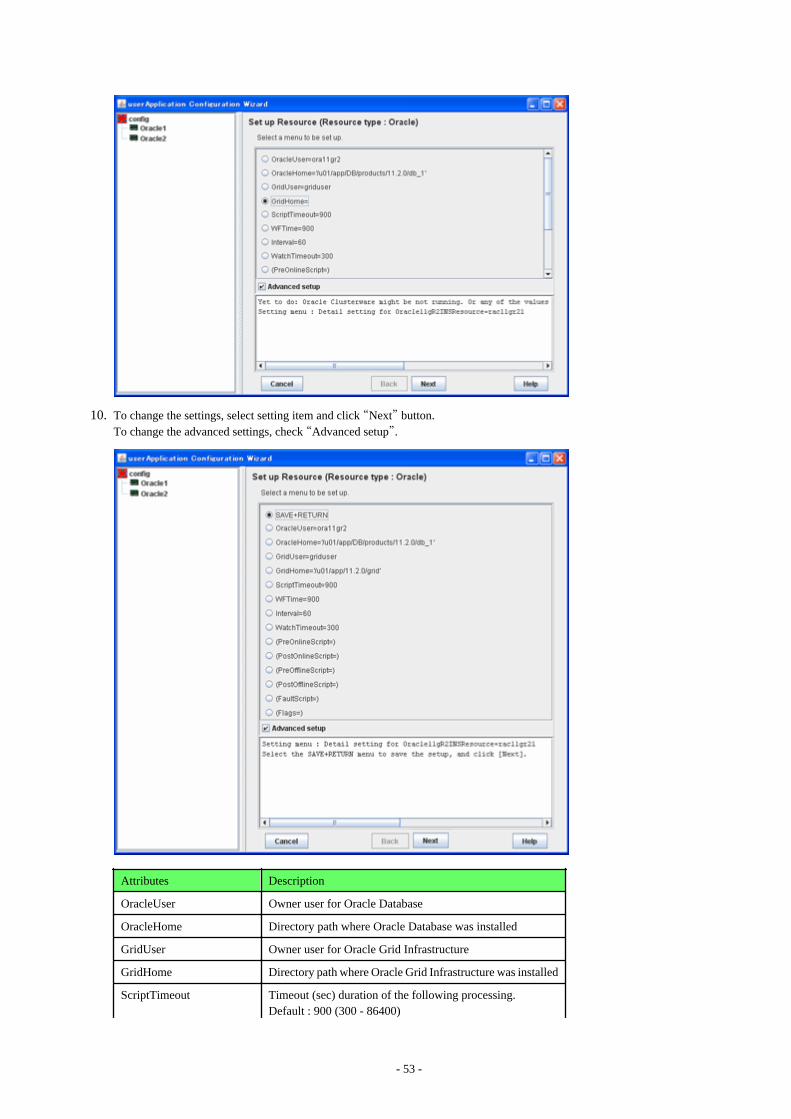
10. To change the settings, select setting item and click “Next” button.To change the advanced settings, check “Advanced setup”.
Attributes Description
OracleUser Owner user for Oracle Database
OracleHome Directory path where Oracle Database was installed
GridUser Owner user for Oracle Grid Infrastructure
GridHome Directory path where Oracle Grid Infrastructure was installed
ScriptTimeout Timeout (sec) duration of the following processing.Default : 900 (300 - 86400)
- 53 -
- Oracle RAC instance resource startup- Oracle RAC instance resource stop- PreOnlineScript- PostOnlineScript- PreOfflineScript- PostOfflineScript- FaultScript
WFTime Waiting time for resource failure recovery through OracleClusterware- PersistentWarning : Notifies Warning until resource recovery- ImmediateFault : Notifies Faulted without waiting resource recovery- (sec) 60 - 86400Default : 900
Interval Monitoring interval (sec) of Oracle RAC instance.Default : 60 (5 - 86400)
WatchTimeout No response time (sec) during monitoring Oracle RACinstance.Default : 300 (30 - 3600)
PreOnlineScript Executed before online processing.The script must be entered with a full path name. If you arespecifying arguments, separate the arguments with "blanks".Optional
PostOnlineScript Executed after online processing.The script must be entered with a full path name. If you arespecifying arguments, separate the arguments with "blanks".Optional
PreOfflineScript Executed before offline processing.The script must be entered with a full path name. If you arespecifying arguments, separate the arguments with "blanks".Optional
PostOfflineScript Executed after offline processing.The script must be entered with a full path name. If you arespecifying arguments, separate the arguments with "blanks".Optional
FaultScript Executed when a fault occurs.The script must be entered with a full path name. If you arespecifying arguments, separate the arguments with "blanks".Optional
Flags NullDetector(D)
If you do not want to monitor the resource, select this flag"NullDetector(D)".
Default: "NullDetector(D)" is not selected.
Information
- For details about Scripts, see “2.4.1 Oracle Online/Offline Script”.
- For details about Flags, see “9 Appendix - Attributes” of the “PRIMECLUSTER RMS Configuration and AdministrationGuide”.
- 54 -
Note
- Startup of Oracle Clusterware userApplication through PreOnlineScriptIf Oracle Clusterware and Oracle RAC instance are registered in different userApplication (Configuration A), set up thefollowing script in PreOnlineScript of the Oracle RAC instance resource;
/opt/FJSVclora/sbin/clorastartwait <userApplication with Oracle Clusterware>
Specify the following userApplication:For app3 : app1For app4 : app2
This setting enables that a userApplication including Oracle Clusterware resource starts up before starting up of userApplicationincluding Oracle RAC instance resources.
- In ScriptTimeout, set time to have added at least 30 or more (second) to the largest one among as follows.
- The startup time of the Oracle RAC instance (confirm Oracle alert log)
- The stop time of the Oracle RAC instance (confirm Oracle alert log)
- The start time of the <userApplication with Oracle Clusterware> specified for clorastartwait script in PreOnlineScript(confirm RMS log file)
- WFTime In Oracle RAC 11g R2, Oracle Clusterware will recover a failure of an Oracle RAC instance or a listener instance. InPRIMECLUSTER Wizard for Oracle, the wait time for the failure recovery can be set for WFTime.
If WFTime=PersistentWarning is set, completion of the failure recovery will be waited forever. In the meantime, an RMSresource will enter Warning, so userApplication will not be degenerated. As soon as recovery is detected, the RMS resourcewill get back to Online.
If WFTime=ImmediateFault is set, completion of the failure recovery will not be waited but an RMS resource will be consideredas fault. As soon as the RMS resource fails, userApplication will be degenerated.
WFTime=<second> is set, completion of the failure recovery will be waited for a certain period of time. After the predeterminedamount of wait time passes, an RMS resource will be considered as fault then userApplication will be degenerated. During thewait time, the RMS resource indicates Warning. If recovery is detected within the wait time, the RMS resource will get backto Online.
- The relation between WFTime and WatchTimeout
If the response from the Oracle RAC instance is not received before WatchTimeout, the RMS resource and the userApplicationwill be as follows.
- If WFTime=PersistentWarning is set, the userApplication will not be degenerated in the state of Warning even if the watchtimeout is continuously generated. As soon as recovery is detected, the RMS resource will get back to Online.
- If WFTime=ImmediateFault is set, the RMS resource will be considered as fault when the watch timeout is generatedcontinuousness two times. As soon as the RMS resource fails, userApplication will be degenerated.
- WFTime=<second> is set, when the watch timeout is generated continuousness two times, the RMS resource and theuserApplication will be as follows.If the accumulation of time without the response from the Oracle RAC instance is shorter than WFTime, the RMS resourcewill get back to Warning.If the accumulation time is longer than WFTime, the RMS resource will be considered as fault. As soon as the RMS resourcefails, userApplication will be degenerated.
- FlagsFlags=<Abbreviation> indicates that the flag attribute is enabled.
- 55 -
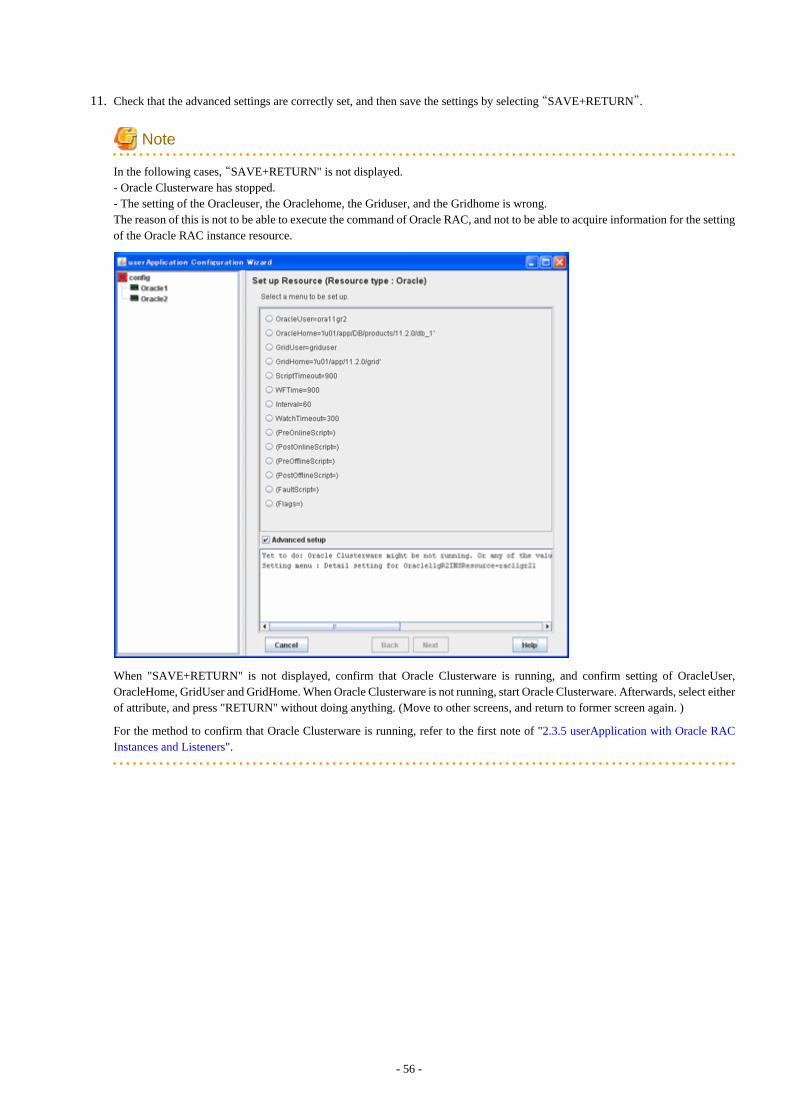
11. Check that the advanced settings are correctly set, and then save the settings by selecting “SAVE+RETURN”.
Note
In the following cases, “SAVE+RETURN" is not displayed.- Oracle Clusterware has stopped.- The setting of the Oracleuser, the Oraclehome, the Griduser, and the Gridhome is wrong.The reason of this is not to be able to execute the command of Oracle RAC, and not to be able to acquire information for the settingof the Oracle RAC instance resource.
When "SAVE+RETURN" is not displayed, confirm that Oracle Clusterware is running, and confirm setting of OracleUser,OracleHome, GridUser and GridHome. When Oracle Clusterware is not running, start Oracle Clusterware. Afterwards, select eitherof attribute, and press "RETURN" without doing anything. (Move to other screens, and return to former screen again. )
For the method to confirm that Oracle Clusterware is running, refer to the first note of "2.3.5 userApplication with Oracle RACInstances and Listeners".
- 56 -

12. For creating and registering an Oracle RAC listener resource, select “AdditionalRAC11gR2Listener”.
13. Enter Grid user name.
- 57 -

14. Enter or select a directory path where Oracle Grid Infrastructure was installed.
15. Select Oracle RAC listener.
- 58 -

16. To change the settings, select setting item and click “Next” button.To change the advanced settings, check “Advanced setup”.
Attributes Description
GridUser Owner user for Oracle Grid Infrastructure
GridHome Directory path where Oracle Grid Infrastructure was installed
ScriptTimeout Timeout (sec) duration of the following processing.Default : 900 (300 - 86400)- Oracle RAC listener resource startup- Oracle RAC listener resource stop- PreOnlineScript- PostOnlineScript- PreOfflineScript- PostOfflineScript- FaultScript
WFTime Waiting time for resource failure recovery through OracleClusterware- PersistentWarning : Notifies Warning until resource recovery- ImmediateFault : Notifies Faulted without waiting resource recovery- (sec) 60 - 86400Default value: PersistentWarning
Interval Monitoring interval (sec) of Oracle RAC instance.Default : 60 (5 - 86400)
WatchTimeout No response time (sec) during monitoring Oracle RACinstance. Default : 300 (30 - 3600)
- 59 -
PreOnlineScript Executed before online processing.The script must be entered with a full path name. If you arespecifying arguments, separate the arguments with "blanks".Optional
PostOnlineScript Executed after online processing.The script must be entered with a full path name. If you arespecifying arguments, separate the arguments with "blanks".Optional
PreOfflineScript Executed before offline processing.The script must be entered with a full path name. If you arespecifying arguments, separate the arguments with "blanks".Optional
PostOfflineScript Executed after offline processing.The script must be entered with a full path name. If you arespecifying arguments, separate the arguments with "blanks".Optional
FaultScript Executed when a fault occurs.The script must be entered with a full path name. If you arespecifying arguments, separate the arguments with "blanks".Optional
Flags NullDetector(D)
If you do not want to monitor the resource, select this flag"NullDetector(D)".
Default: "NullDetector(D)" is not selected.
Information
- For details about Scripts, see “2.4.1 Oracle Online/Offline Script”.
- For details about Flags, see “9 Appendix - Attributes” of the “PRIMECLUSTER RMS Configuration and AdministrationGuide”.
Note
- WFTime This is the same as Oracle RAC instance resource. For details, see the Note of step 10.
- FlagsFlags=<Abbreviation> indicates that the flag attribute is enabled.
17. Check that the advanced settings are correctly set, and then save the settings by selecting “SAVE+RETURN”.
- 60 -
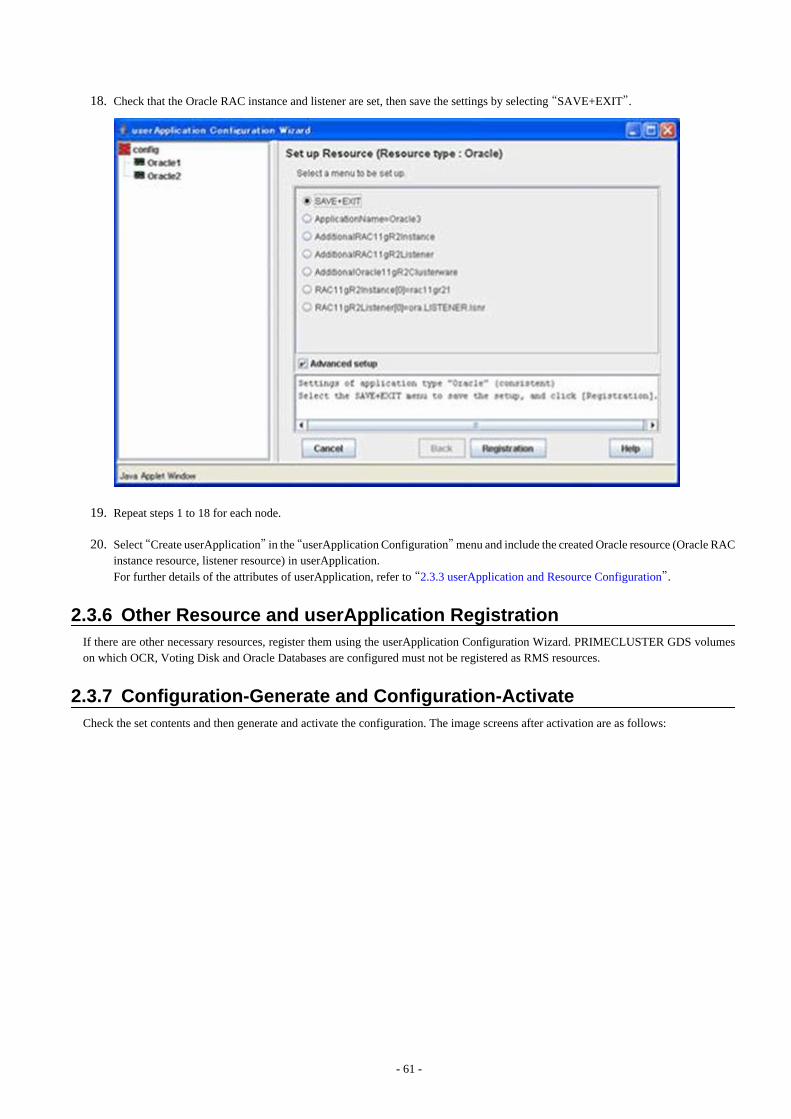
18. Check that the Oracle RAC instance and listener are set, then save the settings by selecting “SAVE+EXIT”.
19. Repeat steps 1 to 18 for each node.
20. Select “Create userApplication” in the “userApplication Configuration” menu and include the created Oracle resource (Oracle RACinstance resource, listener resource) in userApplication.For further details of the attributes of userApplication, refer to “2.3.3 userApplication and Resource Configuration”.
2.3.6 Other Resource and userApplication RegistrationIf there are other necessary resources, register them using the userApplication Configuration Wizard. PRIMECLUSTER GDS volumeson which OCR, Voting Disk and Oracle Databases are configured must not be registered as RMS resources.
2.3.7 Configuration-Generate and Configuration-ActivateCheck the set contents and then generate and activate the configuration. The image screens after activation are as follows:
- 61 -
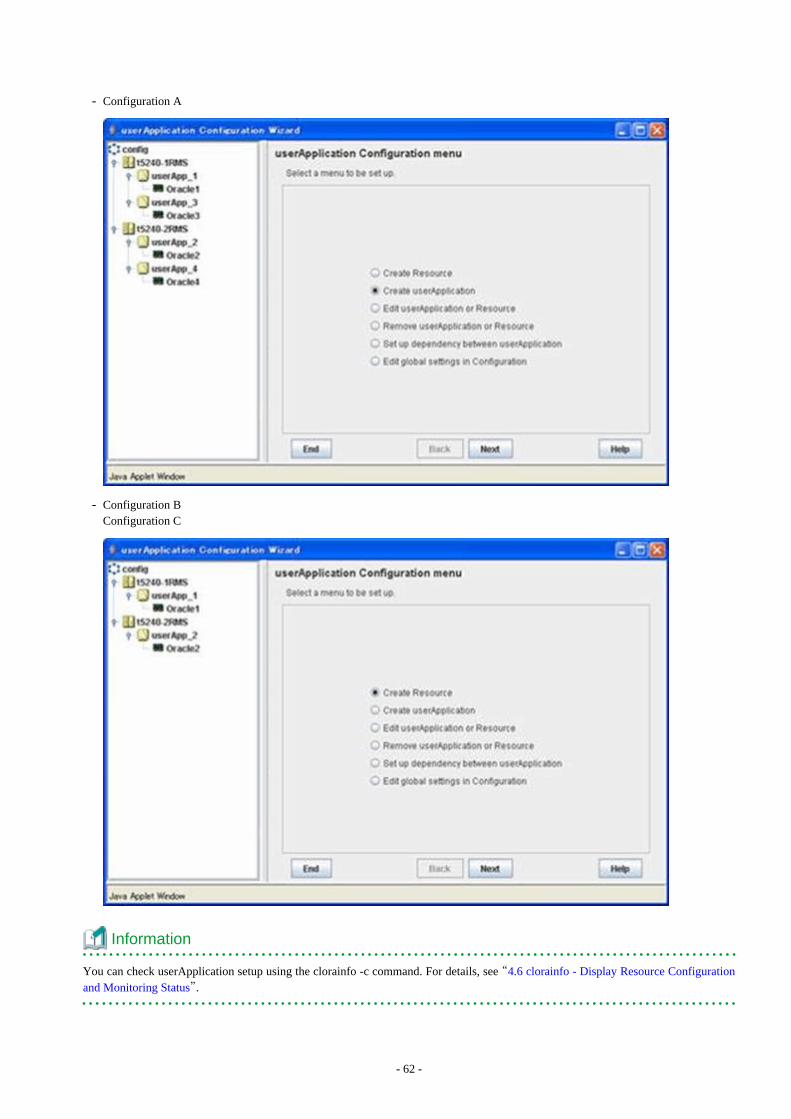
- Configuration A
- Configuration BConfiguration C
Information
You can check userApplication setup using the clorainfo -c command. For details, see “4.6 clorainfo - Display Resource Configurationand Monitoring Status”.
- 62 -
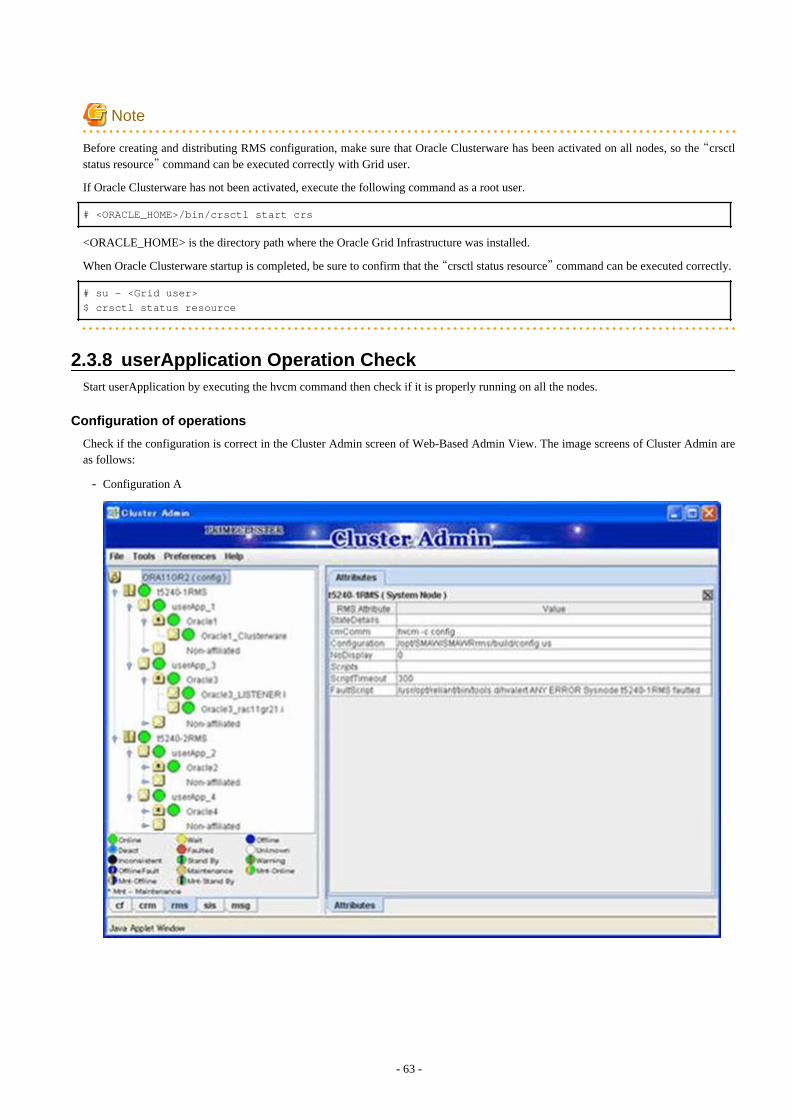
Note
Before creating and distributing RMS configuration, make sure that Oracle Clusterware has been activated on all nodes, so the “crsctlstatus resource” command can be executed correctly with Grid user.
If Oracle Clusterware has not been activated, execute the following command as a root user.
# <ORACLE_HOME>/bin/crsctl start crs
<ORACLE_HOME> is the directory path where the Oracle Grid Infrastructure was installed.
When Oracle Clusterware startup is completed, be sure to confirm that the “crsctl status resource” command can be executed correctly.
# su - <Grid user>
$ crsctl status resource
2.3.8 userApplication Operation CheckStart userApplication by executing the hvcm command then check if it is properly running on all the nodes.
Configuration of operations
Check if the configuration is correct in the Cluster Admin screen of Web-Based Admin View. The image screens of Cluster Admin areas follows:
- Configuration A
- 63 -
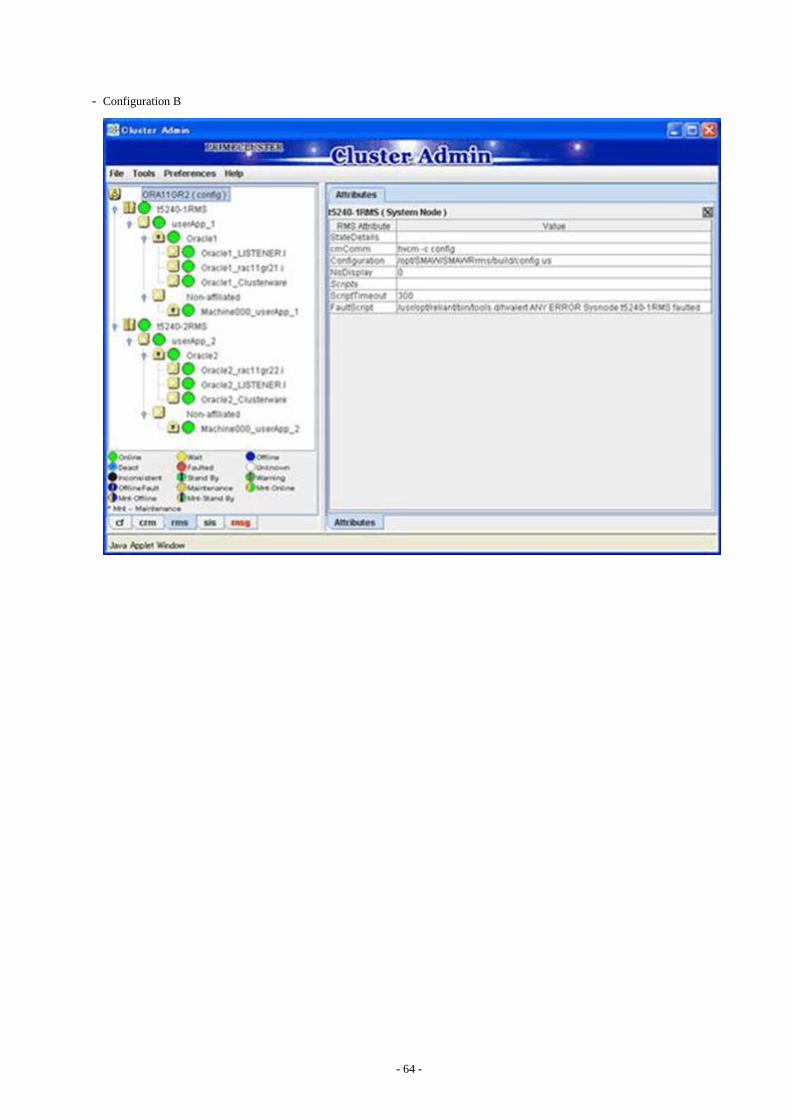
- Configuration B
- 64 -
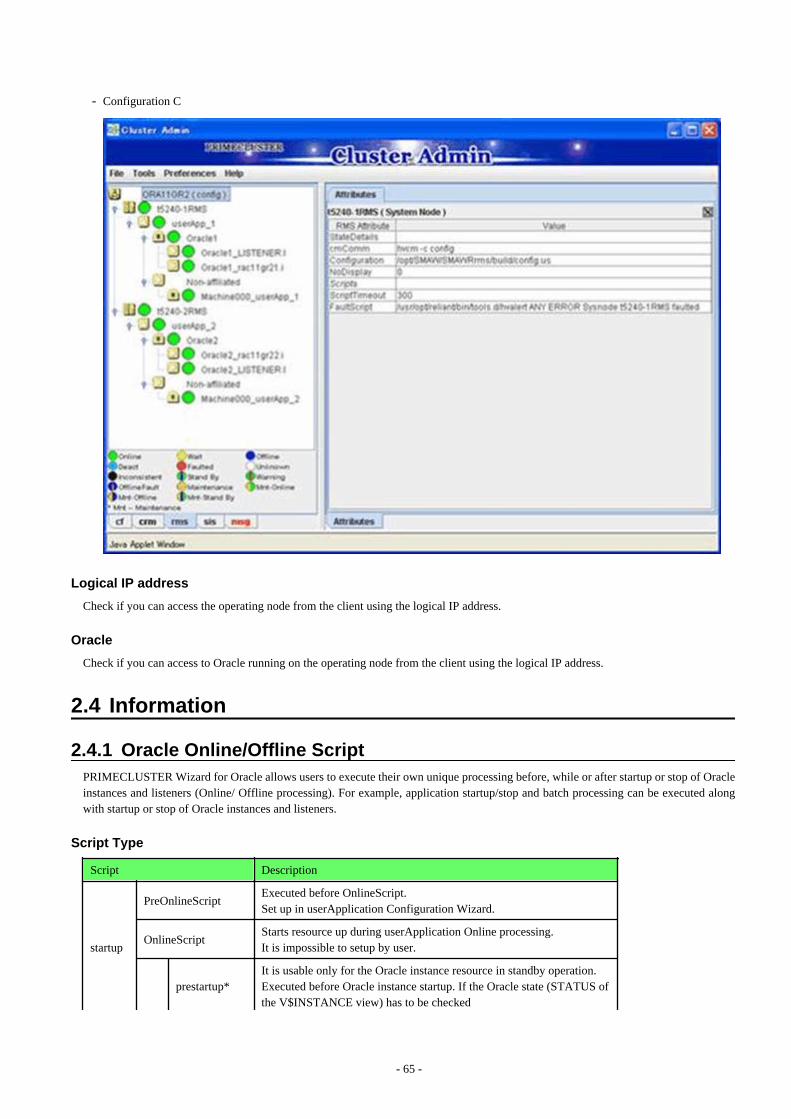
- Configuration C
Logical IP address
Check if you can access the operating node from the client using the logical IP address.
Oracle
Check if you can access to Oracle running on the operating node from the client using the logical IP address.
2.4 Information
2.4.1 Oracle Online/Offline ScriptPRIMECLUSTER Wizard for Oracle allows users to execute their own unique processing before, while or after startup or stop of Oracleinstances and listeners (Online/ Offline processing). For example, application startup/stop and batch processing can be executed alongwith startup or stop of Oracle instances and listeners.
Script Type
Script Description
startup
PreOnlineScriptExecuted before OnlineScript.Set up in userApplication Configuration Wizard.
OnlineScriptStarts resource up during userApplication Online processing.It is impossible to setup by user.
prestartup*It is usable only for the Oracle instance resource in standby operation.Executed before Oracle instance startup. If the Oracle state (STATUS ofthe V$INSTANCE view) has to be checked
- 65 -

Put the executable file that begins with "prestartup" in the "/opt/FJSVclora/usr" directory.
nomount*
It is usable only for the Oracle instance resource in standby operation.Executed when the Oracle status (STATUS column in V$INSTANCEview) is "STARTED" during Oracle startup. Put the executable file thatbegins with "nomount" in the "/opt/FJSVclora/usr" directory.
mount*
It is usable only for the Oracle instance resource in standby operation.Executed when the Oracle status (STATUS column in V$INSTANCEview) is "MOUNTED" during Oracle startup. Put the executable file thatbegins with "mount" in the "/opt/FJSVclora/usr" directory.
PostOnlineScriptExecuted after OnlineScript.Set up in userApplication Configuration Wizard.
stop
PreOfflineScriptExecuted before OfflineScript.Set up in userApplication Configuration Wizard.
OfflineScriptStops resource down during userApplication Offline processing.It is impossible to setup by user.
PostOfflineScriptExecuted after OfflineScript.Set up in userApplication Configuration Wizard.
other FaultScriptExecuted when failures occur.Set up in userApplication Configuration Wizard.
See
For information on how to set up the scripts below, see the step 5 or 7 of “2.2.7.2 Oracle Resource Creation”, the step 5 of “2.3.4userApplication with Oracle Clusterware”, or the step 7 or 10 of “2.3.5 userApplication with Oracle RAC Instances and Listeners”.
- PreOnlineScript
- PostOnlineScript
- PreOfflineScript
- PostOfflineScript
- FaultScript
For detail of these scripts below, refer to "3.1 Oracle Control through PRIMECLUSTER Wizard for Oracle".
- OnlineScript
- OfflineScript
Execution Sequence
Script userApplication
startupresourceAutoRecover
userApplicationstop(normal)
userApplicationstop(resourcefailure)
startup
PreOnlineScript 1 - - -
OnlineScript 2 1 - -
prestartup* 3 2 - -
nomount* 4 3 - -
mount* 5 4 - -
PostOnlineScript 6 5 - -
- 66 -

stop
PreOfflineScript - - 1 2
OfflineScript - - 2 3
PostOfflineScript - - 3 4
other FaultScript - - - 1
Example
A sample of execution sequence where an Oracle instance resource and a listener resource are registered in the standby operation andStartPriority is set as "Listener" is described below.
- userApplication startup
Note that all PreOnlineScript are executed firstly.
1. PreOnlineScript of Listener resource
2. PreOnlineScript of Oracle instance resource
3. OnlineScript of Listener resource
4. PostOnlineScript of Listener resource
5. OnlineScript (including startup*, nomount*, mount*) of Oracle instance resource
6. PostOnlineScript of Oracle instance resource
- Listener resource AutoRecover
Note that PreOnlineScript of Listener resource is not executed.
1. OnlineScript of Listener resource
2. PostOnlineScript of Listener resource
- normal userApplication stop (user operation)
Note that all PreOfflineScript are executed firstly.
1. PreOfflineScript of Oracle instance resource
2. PreOfflineScript of Listener resource
3. OfflineScript of Oracle instance resource
4. PostOfflineScript of Oracle instance resource
5. OfflineScript of Listener resource
6. PostOfflineScript of Listener resource
- userApplication stop caused by Listener resource failure
Note that not only FaultScript of Listener resource but also FaultScript of Oracle instance resource are executed.
1. FaultScript of Listener resource
2. FaultScript of Oracle instance resource
3. PreOfflineScript of Oracle instance resource
4. PreOfflineScript of Listener resource
5. OfflineScript of Oracle instance resource
6. PostOfflineScript of Oracle instance resource
7. OfflineScript of Listener resource
- 67 -
8. PostOfflineScript of Listener resource
Notice (PreOnlineScript, PostOnlineScript, PreOfflineScript, PostOfflineScript, FaultScript)
- Execute the scripts using root privileges.
- The exit code 0 indicates normal termination. The value other than 0 indicates abnormal termination or Online processing or Offlineprocessing of userApplication failure.
- If the script exceeds the maximum execution time (ScriptTimeout), Online processing or Offline processing of userApplication willfail.
- Each script has the environment variable defined in RMS.
- The script must be entered with a full path name. If you are specifying arguments, separate the arguments with "blanks".
See
For details of each script, see “2.6.3 Script” of the “PRIMECLUSTER RMS Configuration and Administration Guide”.
Notice (prestartup*, nomount*, mount*)
- The file is stored in /opt/FJSVclora/usr. If there are two or more files, they will be executed in alphabetical order of the file name.
- A return code of 0 indicates normal termination. A return code of other than 0 indicates abnormal termination. If the script terminatesabnormally, Oracle instance startup will also fail.
- root privileges are used for script execution.
- The parameters are as follows:$1 : $ORACLE_HOME$2 : $ORACLE_SID$3 : Oracle user name
- If the script is not completed within the timeout period for Oracle instance startup, it will be considered as abnormal exit. Refer tostep 5 of "2.2.7.2 Oracle Resource Creation".
- Using of the "su -" command is not supported for user scripts(prestartup*, nomount*, mount*) under /opt/FJSVclora/usr.
Note
These scripts are enabled with Oracle instance resources in standby operation. Note that they cannot be used with resources other than Oracle instance resources, and cannot also be used in scalable operation withOracle RAC.
2.4.2 ASM (Automatic Storage Management)Automatic Storage Management (hereafter ASM) can be used for standby operation or scalable operation.
Standby operation
Create an ASM instance resource.The ASM instance will not be monitored, but only started or stopped.If the ASM instance fails, an Oracle instance resource error will be detected, so userApplication will be switched to the standby node, andongoing operations will never be disrupted.
About notes on building the environment, in case of Oracle 10g R2/11g R1, refer to "2.4.2.1 Environment configuration with Oracle 10gR2/11g R1", and in case of Oracle 11g R2, refer to "2.4.2.2 Environment configuration with Oracle 11g R2".
- 68 -

Scalable operation
Do not create an ASM instance resource if ASM is used for Oracle RAC. The ASM instance will be controlled by Oracle Clusterware.
2.4.2.1 Environment configuration with Oracle 10g R2/11g R1Notes in the case of using ASM of Oracle 10g R2/11g R1 in standby operation are as follows.
Creation and configuration of ASM instances
- Operation node
The ASM instance and database are only created on the operating node. The standby nodes will only operate the database on the shareddisk of the operating node.
Note
- ASM instance name must begin with “+”. The default name is “+ASM”.
If multiple ASM instances are configured on one server, a different ASM instance name must be assigned for ASM instance.
- If multiple Oracle homes are configured on one server, a different Oracle instance name must be assigned for each Oracle home.
- The relation between ASM instance and database should become 1:1 or 1:n.
- ASM instance : database = 1:1
- ASM instance : database = 1:n
- 69 -
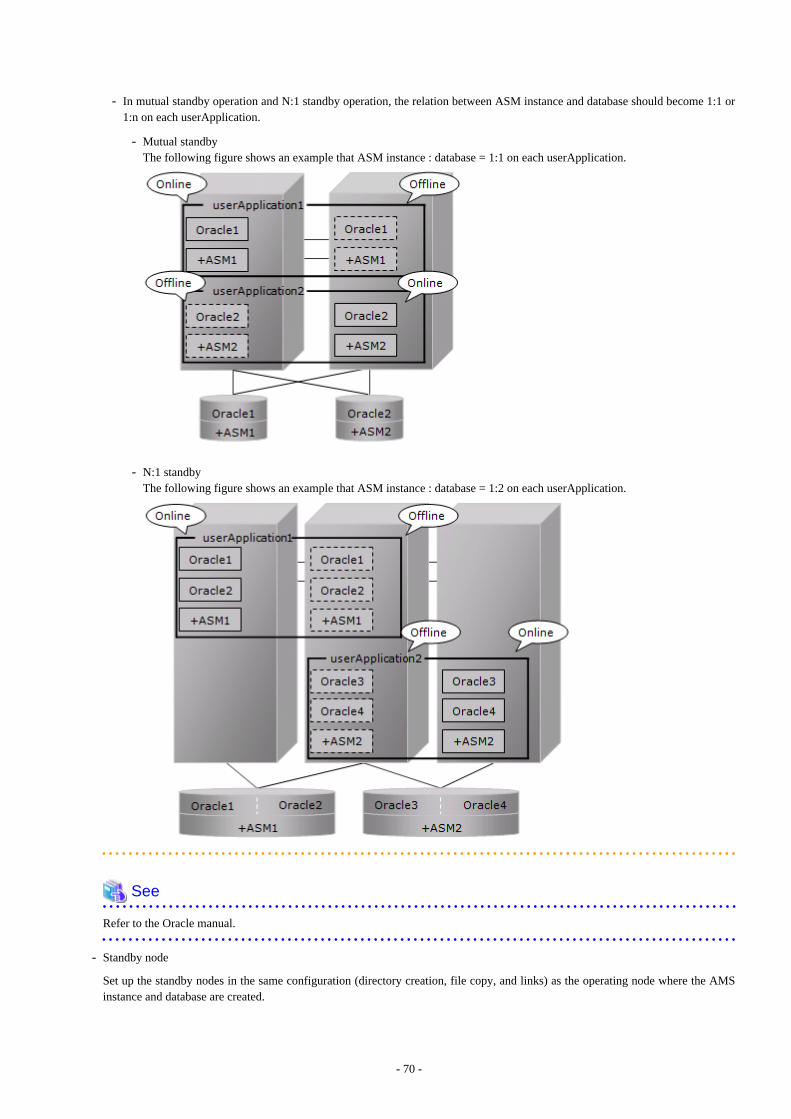
- In mutual standby operation and N:1 standby operation, the relation between ASM instance and database should become 1:1 or1:n on each userApplication.
- Mutual standbyThe following figure shows an example that ASM instance : database = 1:1 on each userApplication.
- N:1 standbyThe following figure shows an example that ASM instance : database = 1:2 on each userApplication.
See
Refer to the Oracle manual.
- Standby node
Set up the standby nodes in the same configuration (directory creation, file copy, and links) as the operating node where the AMSinstance and database are created.
- 70 -
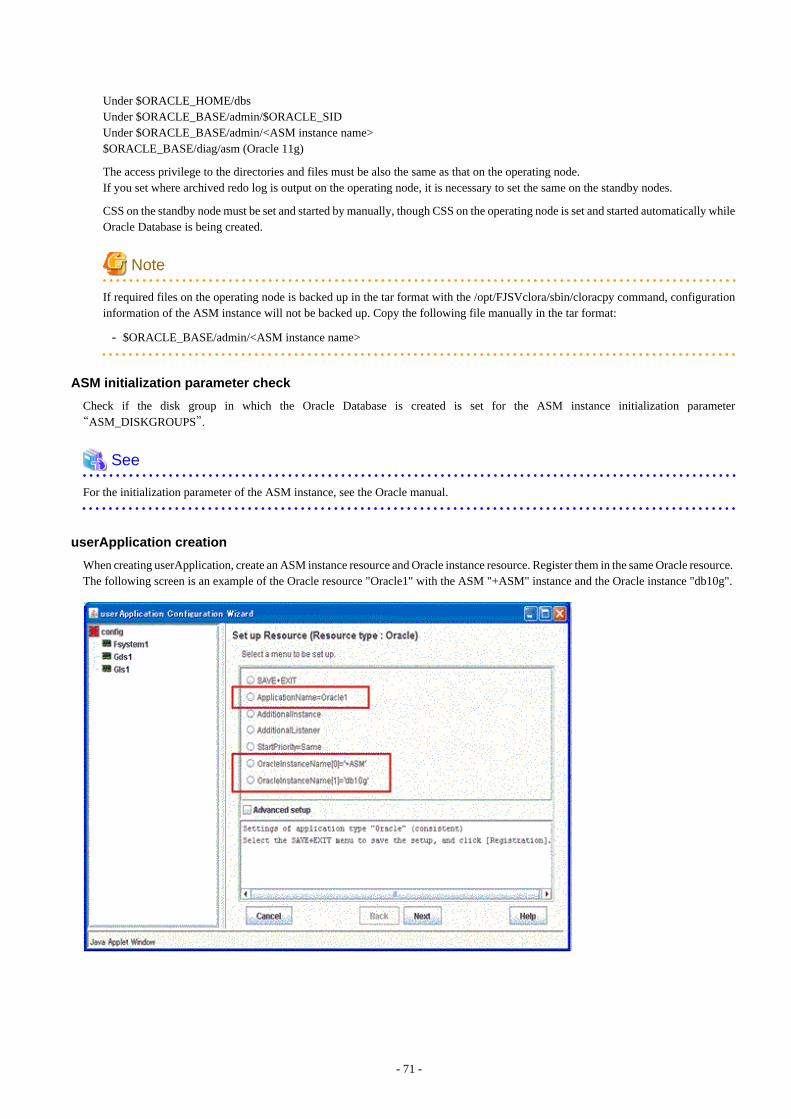
Under $ORACLE_HOME/dbsUnder $ORACLE_BASE/admin/$ORACLE_SIDUnder $ORACLE_BASE/admin/<ASM instance name>$ORACLE_BASE/diag/asm (Oracle 11g)
The access privilege to the directories and files must be also the same as that on the operating node.If you set where archived redo log is output on the operating node, it is necessary to set the same on the standby nodes.
CSS on the standby node must be set and started by manually, though CSS on the operating node is set and started automatically whileOracle Database is being created.
Note
If required files on the operating node is backed up in the tar format with the /opt/FJSVclora/sbin/cloracpy command, configurationinformation of the ASM instance will not be backed up. Copy the following file manually in the tar format:
- $ORACLE_BASE/admin/<ASM instance name>
ASM initialization parameter check
Check if the disk group in which the Oracle Database is created is set for the ASM instance initialization parameter“ASM_DISKGROUPS”.
See
For the initialization parameter of the ASM instance, see the Oracle manual.
userApplication creation
When creating userApplication, create an ASM instance resource and Oracle instance resource. Register them in the same Oracle resource. The following screen is an example of the Oracle resource "Oracle1" with the ASM "+ASM" instance and the Oracle instance "db10g".
- 71 -
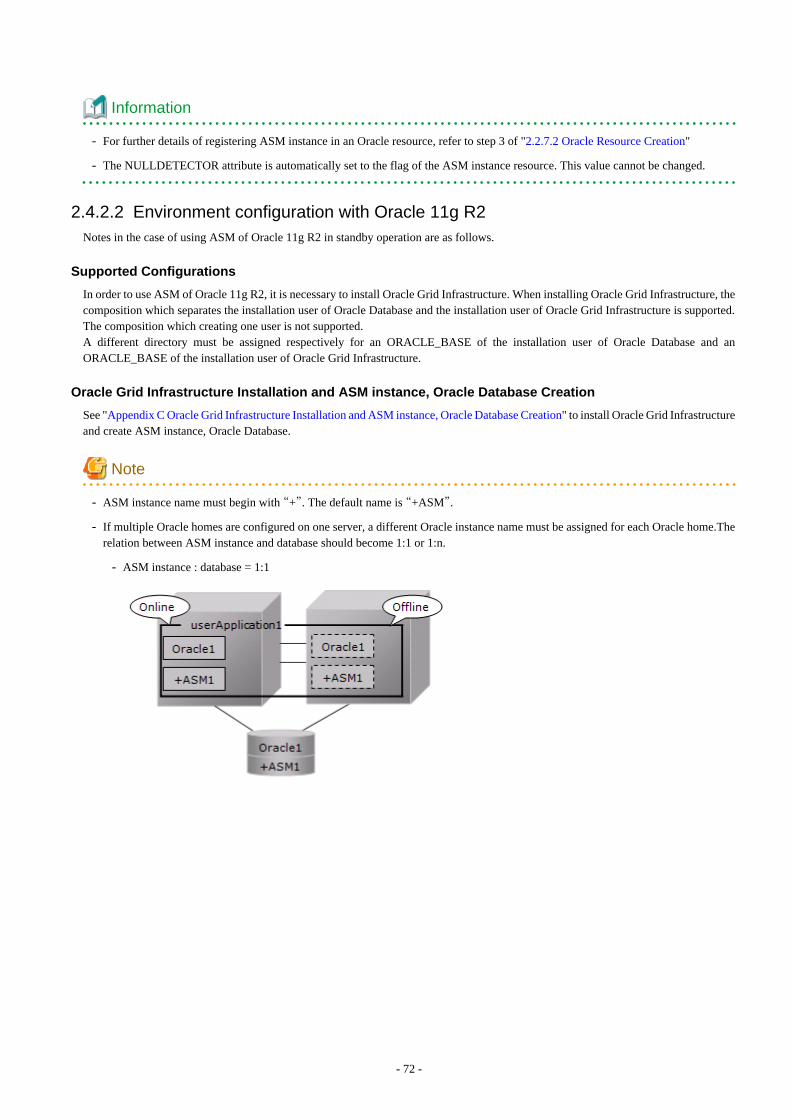
Information
- For further details of registering ASM instance in an Oracle resource, refer to step 3 of "2.2.7.2 Oracle Resource Creation"
- The NULLDETECTOR attribute is automatically set to the flag of the ASM instance resource. This value cannot be changed.
2.4.2.2 Environment configuration with Oracle 11g R2Notes in the case of using ASM of Oracle 11g R2 in standby operation are as follows.
Supported Configurations
In order to use ASM of Oracle 11g R2, it is necessary to install Oracle Grid Infrastructure. When installing Oracle Grid Infrastructure, thecomposition which separates the installation user of Oracle Database and the installation user of Oracle Grid Infrastructure is supported.The composition which creating one user is not supported. A different directory must be assigned respectively for an ORACLE_BASE of the installation user of Oracle Database and anORACLE_BASE of the installation user of Oracle Grid Infrastructure.
Oracle Grid Infrastructure Installation and ASM instance, Oracle Database Creation
See "Appendix C Oracle Grid Infrastructure Installation and ASM instance, Oracle Database Creation" to install Oracle Grid Infrastructureand create ASM instance, Oracle Database.
Note
- ASM instance name must begin with “+”. The default name is “+ASM”.
- If multiple Oracle homes are configured on one server, a different Oracle instance name must be assigned for each Oracle home.Therelation between ASM instance and database should become 1:1 or 1:n.
- ASM instance : database = 1:1
- 72 -
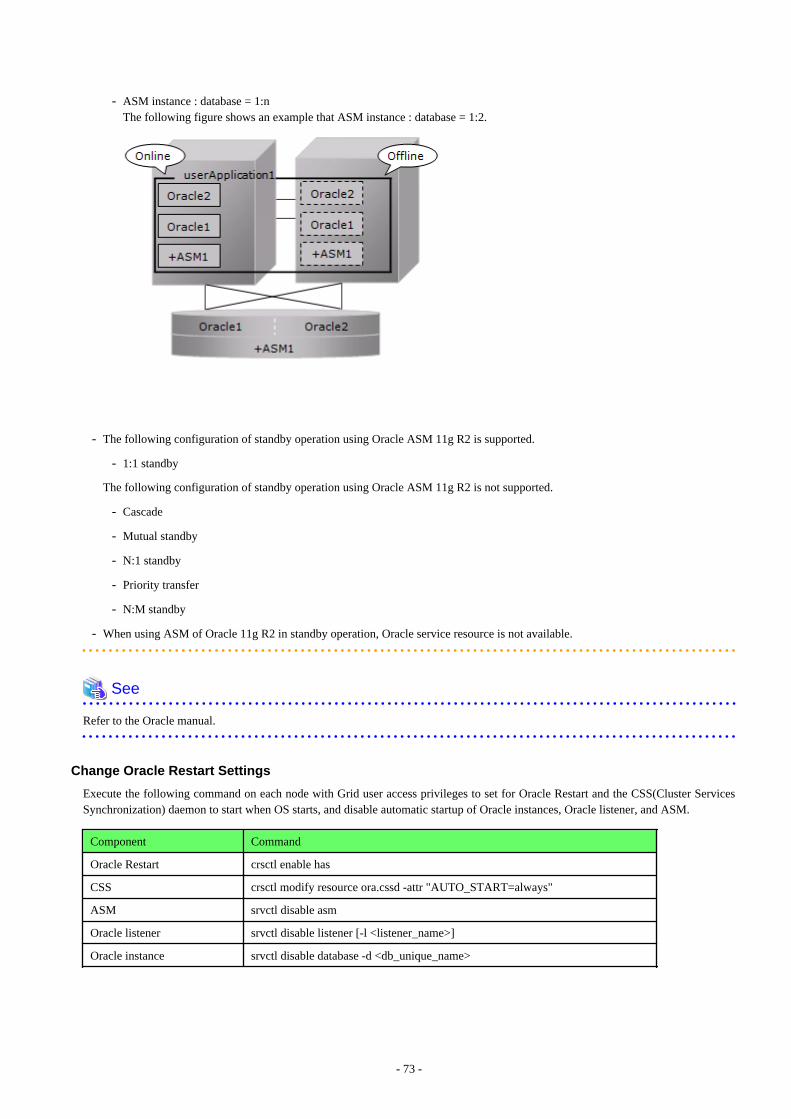
- ASM instance : database = 1:nThe following figure shows an example that ASM instance : database = 1:2.
- The following configuration of standby operation using Oracle ASM 11g R2 is supported.
- 1:1 standby
The following configuration of standby operation using Oracle ASM 11g R2 is not supported.
- Cascade
- Mutual standby
- N:1 standby
- Priority transfer
- N:M standby
- When using ASM of Oracle 11g R2 in standby operation, Oracle service resource is not available.
See
Refer to the Oracle manual.
Change Oracle Restart Settings
Execute the following command on each node with Grid user access privileges to set for Oracle Restart and the CSS(Cluster ServicesSynchronization) daemon to start when OS starts, and disable automatic startup of Oracle instances, Oracle listener, and ASM.
Component Command
Oracle Restart crsctl enable has
CSS crsctl modify resource ora.cssd -attr "AUTO_START=always"
ASM srvctl disable asm
Oracle listener srvctl disable listener [-l <listener_name>]
Oracle instance srvctl disable database -d <db_unique_name>
- 73 -

userApplication Create
When creating userApplication, create an ASM instance resource and Oracle instance resource. Register them in the same Oracle resource. The following screen is an example of the Oracle resource "Oracle1" with the ASM "+ASM" instance and the Oracle instance "db11g".
Information
- For further details of registering ASM instance in a Oracle resource, refer to step 3 of "2.2.7.2 Oracle Resource Creation"
- The NULLDETECTOR attribute is automatically set to the flag of the ASM instance resource. This value cannot be changed.
Note
- Set up Grid user to ASM instance resource and Oracle listener resource, Oracle user to Oracle instance resource.
- Set up the following script in PreOnlineScript of the ASM instance resource to start ASM after CSS started.
/opt/FJSVclora/sbin/cloracsswait <Grid user>
2.4.2.3 Precaution for ASM operationA disk group that is used for the ASM instance must not be mounted or unmounted manually. If the disk group is mounted, the followingmessage might be output to the console when the ASM resource is activated, but no action needs to be taken.
ORA-15032: not all alterations performedORA-15017: diskgroup “diskgroup name” cannot be mountedORA-15030: diskgroup name “diskgroup name” is in use by another diskgroup
- 74 -
Chapter 3 Operation
3.1 Oracle Control through PRIMECLUSTER Wizard for Oracle
3.1.1 Standby OperationThis section discusses how PRIMECLUSTER Wizard for Oracle controls Oracle in standby operation.
Oracle startup
Oracle is started through a shell script. The startup procedure is as follows:
1. su - <Oracle user>
2. sqlplus / nolog
3. connect / as sysdba
4. startup nomount or startup mount
5. alter database mount (if “startup nomount” was executed at step 4.)
6. alter database open
- Initialization parameter file and server parameter file
The initialization parameter file is not specified for Oracle startup through PRIMECLUSTER Wizard for Oracle, so the defaultinitialization parameter file will be used instead. Specify the initialization parameter file for the following default path (symbolic link).
<$ORACLE_HOME>/dbs/init<$ORACLE_SID>.ora
A server parameter file should be located in the shared disk because the file contents are changed dynamically. When a server parameterfile is used, enter the full path of the server parameter file in an initialization parameter file.It is recommended that the same values for initialization parameters are set between cluster nodes.
The server parameter file must be located on the shared disk device because it is dynamically changed. When you use the serverparameter file, enter the full path for the initialization parameter file. See “2.2.6 Oracle Database Creation and Setting”.
It is recommended that the initialization parameter file settings are the same on the operating nodes and standby nodes.
- Recovery processing
PRIMECLUSTER Wizard for Oracle recovers the Oracle instance in the following cases:1. When there is ACTIVE tablespace in the V$BACKUP view.2. When there are files required to be recovered in the V$RECOVER_FILE view.
- DBA authentication
PRIMECLUSTER Wizard for Oracle connects to Oracle instance with SYSDBA system privilege to start up or stop Oracle instance/database. In this case, local connection in operating system authentication is used.
Oracle shutdown
Oracle is shut down through a shell script.
- When users shut down and switch userApplication, the procedure is as follows:
1. su - <Oracle user>
2. sqlplus / nolog
3. connect / as sysdba
4. shutdown <immediate / abort / transactional> (Setup with StopModeStop)Default : immediate
- 75 -
5. If Oracle is not stopped at step 4 (except for abort), use shutdown abort.
6. If Oracle is not stopped at step 4 or step 5, shut it down forcibly by sending SIGKILL to the background process.
- The procedure of stopping failed Oracle resources including non-Oracle resources is as follows:
1. su - <Oracle user>
2. sqlplus / nolog
3. connect / as sysdba
4. shutdown <immediate / abort / transactional> (Setup with StopModeFail)Default : abort
5. If Oracle is not stopped at step 4 (except for abort), use shutdown abort.
6. If Oracle is not stopped at step 4, shut it down forcibly by sending SIGKILL to the background process.
Oracle monitoring
Oracle is monitored through binary programs. The monitoring procedure is as follows:
1. Check the background process (PMON, SMON) periodically. If the process status can be confirmed, go to step 2.
2. su - <Oracle user>
3. Local connection to the Oracle instance as a SYSTEM user
4. Check if Oracle status is OPEN
5. Check if the background process (PMON, SMON, DBWn, LGWR, CKPT) are alive.
6. Check if "INSERT", "UPDATE", "DELETE" and "COMMIT" can be properly executed using the monitoring table on the SYSTEMuser's default tablespace.
7. Oracle is reconnected once every 24 hours.
If Oracle is stopped, 1 is executed at a 30 second interval (static). If Oracle gets activated, 2 or after is executed. If node startup is completedthen the node is operating, only 5 and 6 are executed at a regular interval. The default value is 30 seconds, and can be changed. Note that“6” is executed at a 60-second interval at least.
- SYSTEM user password
PRIMECLUSTER Wizard for Oracle monitors Oracle as a SYSTEM user. Register the SYSTEM user’s password. See “2.2.6 OracleDatabase Creation and Setting”.
- Monitoring table (FAILSAFEORACLE_<ORACLE_SID>)
PRIMECLUSTER Wizard for Oracle creates a monitoring table on the SYSTEM user’s default tablespace if the monitoring tabledoes not exist. The table is only a few bites, and will not be deleted.
- Warning notification
If the following symptoms are detected, PRIMECLUSTER Wizard for Oracle will notify RMS of the warning state. It is not the Faultstate, so a failover will not occur.
- Oracle cannot be connected due to incorrect SYSTEM user’s password that is registered with the “clorapass” command.(ORA-01017 detected)
- Since the SYSTEM user's account is locked, so Oracle connection is not allowed. (ORA-28000 detected)
- When the max session or max process error occurs, so Oracle connection is not allowed.
- While monitoring SQL (e.g. insert and update) is not replied for a certain period of time, but Oracle connection is allowed, andthe Oracle status is OPEN.
- Since the SYSTEM user's password has expired, so Oracle connection is not allowed. (ORA-28001 detected)
- 76 -
- Monitoring timeout
If monitoring SQL (insert, update) is released, and there is no reply from Oracle after a certain period of time, the monitoring timeoutwill be considered then the Oracle instance resource will be put into Warning. If the monitoring timeout occurs for twice in a row, aresource will be considered as fault then a failover or degradation will be performed.The monitoring timeout (the wait time from Oracle) can be changed with WatchTimeout.
Listener startup
Listener is started through a shell script. The startup procedure is as follows:
1. su - <Oracle user>
2. lsnrctl start <ListenerName>
3. Make sure that a listener process does exist.
Listener shutdown
Listener is shutdown through a shell script. The shutdown procedure is as follows:
1. su - <Oracle user>
2. lsnrctl stop <ListenerName>
3. Make sure that a listener process does not exist.
4. If Listener is not stopped at step 3, shut it down forcibly by sending SIGKILL to the background process.
Listener monitoring
Listener is monitored through binary programs. The monitoring procedure is as follows:
1. Make sure that a listener process does not exist.
2. Make sure that the net service name is valid with tnsping if TNSName is set.
If a listener of a standby node is stopped, execute 1 at regular time intervals. If the listener gets activated and becomes an operating node,execute 1. and 2. at regular time intervals. The default interval time is 30 seconds, and it can be changed with Interval. Note that 2. isexecuted at a 60-second interval at least.
ASM instance startup
ASM instance startup procedure is as follows:
1. su - <Oracle user>
2. sqlplus /nolog
3. connect / as sysdba (In case of Oracle 11g or later, "connect / as sysasm")
4. startup mount (When the state is already STARTED, "alter diskgroup all mount;")
ASM instance shutdown
ASM instance shutdown procedure is as follows:
- At the shutdown of manual shutdown and switch userApplication by operator
1. su - <Oracle user>
2. sqlplus /nolog
3. connect / as sysdba (In case of Oracle 11g or later, "connect / as sysasm")
4. shutdown <immediate/abort/transactional> (Setup by "StopModeStop")default : immediate
5. If ASM has not stopped in "4", execute "shutdown abort". (When choosing excluding "abort" in "4")
- 77 -

6. If ASM has not stopped in "4" or "5", abort the background process by sending SIGKILL.
- At the shutdown in the event of a resource failure (resource failure of excluding ASM is included)
1. su - <Oracle user>
2. sqlplus /nolog
3. connect / as sysdba (In case of Oracle 11g or later, "connect / as sysasm")
4. shutdown <immediate/abort> (Setup by "StopModeFail")default : abort
5. If ASM has not stopped in "4", execute "shutdown abort". (When choosing excluding "abort" in "4")
6. If ASM has not stopped in "4" or "5", abort the background process by sending SIGKILL.
ASM instance monitoring
PRIMECLUSTER Wizard for Oracle does not monitor ASM instance. NullDetector flag is automatically enabled.
3.1.2 Scalable Operation with Oracle RACIn Oracle RAC, the Oracle instances and listeners are automatically started, monitored, and recovered through the Oracle Clusterware. IfPRIMECLUSTER Wizard for Oracle detects a resource failure, it will notify RMS of the “Warning” state then ask Oracle Clusterwareto generate a failover or recover the failed resource (depending on the WFTime setting).
Also, the resources are started or stopped along with userApplication startup and stop.
Oracle RAC instance startup
Start an Oracle RAC instance as follows:
1. su - <Oracle user>
2. srvctl start instance -d $DB_NAME -i $ORACLE_SID
Oracle RAC instance stop
Stop an Oracle RAC instance as follows:
1. su - <Oracle user>
2. srvctl stop instance -d $DB_NAME -i $ORACLE_SID
Oracle RAC instance monitoring
The monitoring of an Oracle RAC instance is the same as standby operation. However, the default value of monitoring interval is 60 seconds. For details, see “Oracle monitoring” of “3.1.1 Standby Operation”.
Listener startup
Listener startup depends on Oracle Clusterware, and PRIMECLUSTER Wizard for Oracle also starts the listener.
Start listener as follows:
1. su - <Grid user>
2. srvctl start listener -n $NODE_NAME -l $LSNR_NAME
Listener shutdown
Listener stop depends on Oracle Clusterware, not PRIMECLUSTER Wizard for Oracle.
Listener monitoring
The Oracle monitoring setup is the same as standby operation.
- 78 -
However, tnsping monitoring is not performed, and the default value of monitoring interval is 60 seconds.
For details, see “Oracle monitoring” of “3.1.1 Standby Operation”.
Oracle Clusterware startup
Start Oracle Clusterware as follows:
1. Start up Oracle Clusterware using “crsctl start crs”.
2. Check if Oracle Clusterware is activated using “crsctl status resource -t”.
Oracle Clusterware stop
Stop Oracle Clusterware as follows:
1. Shut down Oracle Clusterware using “crsctl stop crs”.
Oracle Clusterware monitoring
PRIMECLUSTER Wizard for Oracle does not monitor Oracle Clusterware. NullDetector flag is automatically enabled.
Note
- If you want to startup, stop, or switch Oracle instances, execute hvswitch and hvutil on RMS userApplication. If you execute theOracle Clusterware srvctl command or shutdown command to the Oracle instance directly, PRIMECLUSETR will consider that theinstance fails, and recovery processing might be initiated for the Oracle instance. To executing the command, put userApplicationinto maintenance mode.
- Stop userApplication and RMS before shutting down or restarting the OS for maintenance. When shutting down or restarting the OS,the Oracle Clusterware, the Oracle instance, and the listener stop. Therefore, the Oracle instance resource and the listener resourcefailure will occur when userApplication is Online state.
3.1.3 Single-Node Cluster OperationIn single-node cluster operation, PRIMECLUSTER Wizard for Oracle controls Oracle in the same way as standby operation. For details,see "3.1.1 Standby Operation".
Note
In single-node cluster operation, the procedure of "Initialization parameter file and server parameter file" in "3.1.1 Standby Operation" isnot necessary.
3.2 Oracle MaintenanceThis section discusses how to change Oracle settings, apply Oracle patches, backup and recover Oracle Databases. In a cluster system,the shared disk device in which Oracle data is stored is activated and deactivated along with Oracle startup and stop.
- Oracle is monitored during userApplication operation. If Oracle is stopped manually, then the cluster system will consider that theOracle resource fails, so Oracle will be restarted or Oracle operation will be switched to the standby node.
- While userApplication is not running, the shared disk is deactivated.
If you need to control Oracle manually for Oracle cold backup or other maintenance tasks, put PRIMECLUSTER in maintenance mode,and stop monitoring the Oracle instances and listeners temporarily.
General procedure
The general maintenance procedure is as follows:
- 79 -
1. Start userApplication
Start userApplication that includes the Oracle instance resource if it is stopped.
2. Put userApplication into maintenance mode and stop monitoring
Put userApplication into maintenance mode.Next, stop monitoring the Oracle instance and listener resources by executing the “hvoradisable” command.
3. Confirmation of maintenance mode and stop of monitoring
Confirm that changing into maintenance mode and stop of monitoring have been successfully done.(Refer to note of "4.1 hvoradisable - Discontinue Monitoring Resources".)
4. Stop Oracle-dependent resources
If there are Oracle-dependent resources, stop them manually before stopping Oracle.
5. Stop Oracle
Stop Oracle manually.
6. Do maintenance on Oracle
Change the Oracle settings, apply Oracle patches, backup and recovery Oracle Databases.
7. Start Oracle
After the maintenance is completed, start Oracle. Restart the Oracle listener, if it is also stopped. Before going on to the next step,be sure to check that Oracle instance and listener are properly running. The Oracle instance must be OPEN.
8. Start Oracle-dependent resources
If Oracle-dependent resources are stopped, start them manually.
9. Restart resource monitoring and stop maintenance mode
Restart monitoring the Oracle instance and listener resources again using the hvoraenable command.Next, stop maintenance mode of userApplication.
10. Confirmation of restart of monitoring and maintenance mode
Confirm that restart of monitoring and changing out of maintenance mode have been successfully done.(Refer to note of "4.2 hvoraenable - Restart Monitoring Resources".)
Information
- About Discontinue Monitoring, Restart Monitoring
For stopping Oracle while userApplication is running, use function of "Discontinue Monitoring" of PRIMECLUSTER Wizard forOracle.Function of "Discontinue Monitoring" discontinue only Oracle monitoring. Therefore, note that the failover occurs due to the failureof the resource other than Oracle.
- Oracle RAC
To operate Oracle RAC resources, control RMS userApplication without using the srvctl or shutdown command. If you execute thesecommands to the Oracle instance directly, PRIMECLUSETR will consider that the resource fails, and recovery processing might beinitiated for the Oracle resource. To execute these commands, put userApplication into maintenance mode.
- Maintenance mode of userApplication
If you put userApplication into maintenance mode, resource failure is ignored. It means that userApplication failover and resourceautorecovery do not occur even if Oracle is manually stopped. This enables maintenance work of resources including Oracle resources.For information on how to put userApplication into maintenance mode, see “5.4.11 Maintenance mode” of the “PRIMECLUSTERRMS Configuration and Administration Guide”.
- Oracle instance and listener monitoring
hvoradisable and hvoraenable commands enable to discontinue and restart monitoring Oracle instances and Oracle listener resources.If you put userApplication into maintenance mode only, Oracle session for monitoring remains. If you execute hvoradisable command
- 80 -
additionally, the Oracle session is killed. This enables executing shutdown command with “normal” option in Oracle manual stop.For information on how to cancel or restart monitoring the Oracle instance and listener resources, see “4.1 hvoradisable - DiscontinueMonitoring Resources” and “4.2 hvoraenable - Restart Monitoring Resources”.
Note
- Monitoring restart
If Oracle instances and Oracle listeners are stopped manually after resource monitoring disruption, start them manually before startingresource monitoring again. If you restart resource monitoring with the Oracle resources inactive, the Oracle resources may fail.
- Resource state during monitoring
If the “hvoradisable” command properly stops monitoring the resources, they will enter Warning.
- Plan the maintenance procedure according to the operation environment and the maintenance requirement. Refer to the proceduresdescribed in this section and the Oracle documents.
3.2.1 Oracle Setting ChangeYou can change Oracle settings such as initialization parameters and data files using the procedures described below.
Note
Oracle must be stopped depending on the settings. For details, see the Oracle manual.
3.2.1.1 Oracle must be stoppedIf Oracle must be stopped, change the settings as follows:
1. Maintenance mode / Monitoring disruption
# /opt/SMAW/SMAWRrms/bin/hvutil -m on <userApplication> (Maintenance mode)
# /opt/FJSVclora/sbin/hvoradisable -a <userApplication> (Monitoring disruption)
2. Confirmation of maintenance mode and stop of monitoring
Confirm that changing into maintenance mode and stop of monitoring have been successfully done.(Refer to note of "4.1 hvoradisable - Discontinue Monitoring Resources".)
3. Oracle stop
# su - <Oracle user>
$ sqlplus /nolog
SQL> connect / as sysdba
SQL> shutdown immediate
4. Setup change
Change Oracle settings such as initialization parameters and path of data files.
5. Oracle startup
# su - <Oracle use>
$ sqlplus /nolog
SQL> connect / as sysdba
SQL> startup
- 81 -

6. Monitoring restart / Maintenance mode stop
# /opt/FJSVclora/sbin/hvoraenable -a <userApplication> (Monitoring restart)
# /opt/SMAW/SMAWRrms/bin/hvutil -m off <userApplication> (Maintenance mode stop)
7. Confirmation of restart of monitoring and maintenance mode
Confirm that restart of monitoring and changing out of maintenance mode has been successfully done.(Refer to note of "4.2 hvoraenable - Restart Monitoring Resources".)
3.2.2 Patch ApplicationThe method of applying an Oracle patch (e.g. Oracle PSR: Patch Set Release) varies depending on database mounting.
If a database does not need to be mounted before and after patch application, be sure to stop RMS before applying a patch.
If a database needs to be mounted before and after patch application, monitoring must be cancelled before applying a patch as follows:
Information
The following are offered from Oracle 11g R2 as a method of applying Oracle PSR (Patch Set Release).
- In-place upgrade
It is a method of installing PSR on an existing Oracle home by the superscription. It is offered from previous version.For further details, refer to "3.2.2.1 Patch Application by In-place upgrade"
- Out-of-place upgrade
It is a method of installing PSR in a new Oracle home which is different from an existing Oracle home. It is offered from Oracle 11gR2.
For further details, refer to "3.2.2.2 Patch Application by Out-of-place upgrade (Standby Operation, Single-Node ClusterOperation)"
3.2.2.1 Patch Application by In-place upgradeThis section discusses how to apply PSR by In-place upgrade in Oracle 11g R2 or previous version of Oracle 11g R1.
1. Start userApplication (Operation node)
Start userApplication that includes the Oracle instance and listener resources if it is stopped.
2. Maintenance mode (Operation node)
Start maintenance mode for userApplication on operation node.
Example
If you start maintenance mode for all userApplication, execute the following command.
# /opt/SMAW/SMAWRrms/bin/hvutil -M on
Confirm that state of userApplication has become "Maintenance" on all nodes.
3. Monitoring disruption of Oracle resource (All nodes)
Stop monitoring the Oracle instance and listener resources by executing the "hvoradisable" command on all nodes.
Example
If you stop monitoring all the Oracle resources on a local node, execute the following command.
- 82 -
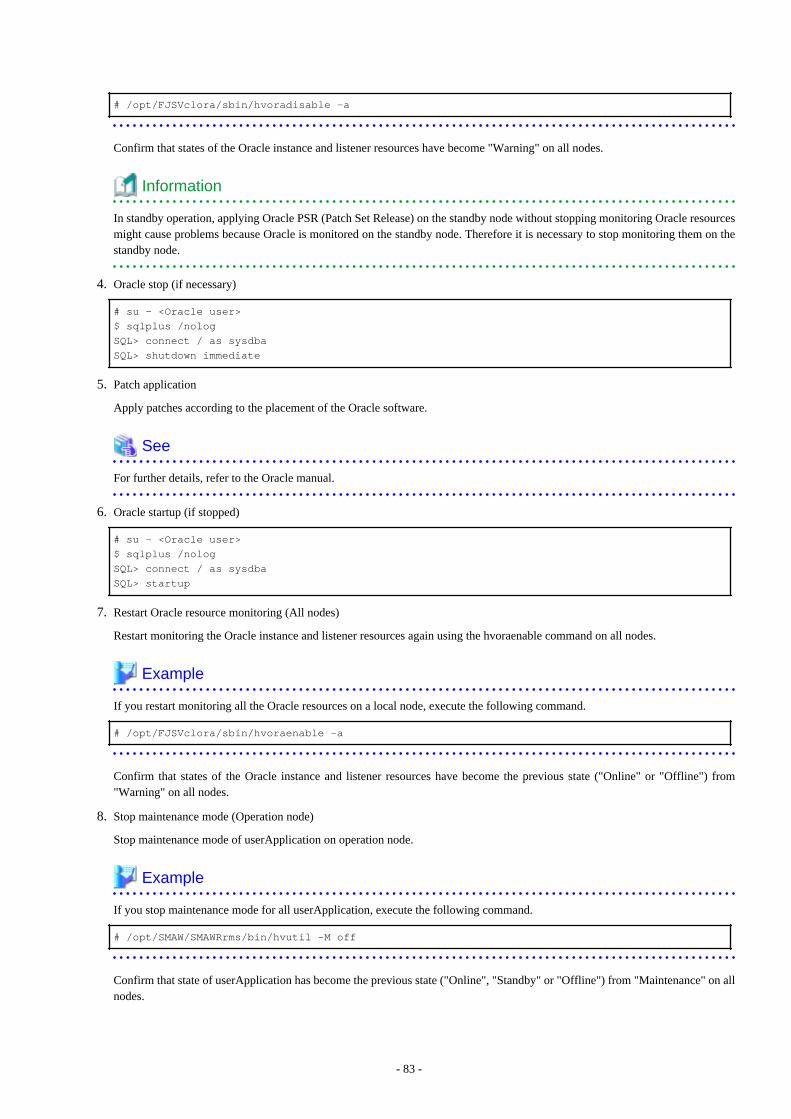
# /opt/FJSVclora/sbin/hvoradisable -a
Confirm that states of the Oracle instance and listener resources have become "Warning" on all nodes.
Information
In standby operation, applying Oracle PSR (Patch Set Release) on the standby node without stopping monitoring Oracle resourcesmight cause problems because Oracle is monitored on the standby node. Therefore it is necessary to stop monitoring them on thestandby node.
4. Oracle stop (if necessary)
# su - <Oracle user>
$ sqlplus /nolog
SQL> connect / as sysdba
SQL> shutdown immediate
5. Patch application
Apply patches according to the placement of the Oracle software.
See
For further details, refer to the Oracle manual.
6. Oracle startup (if stopped)
# su - <Oracle user>
$ sqlplus /nolog
SQL> connect / as sysdba
SQL> startup
7. Restart Oracle resource monitoring (All nodes)
Restart monitoring the Oracle instance and listener resources again using the hvoraenable command on all nodes.
Example
If you restart monitoring all the Oracle resources on a local node, execute the following command.
# /opt/FJSVclora/sbin/hvoraenable -a
Confirm that states of the Oracle instance and listener resources have become the previous state ("Online" or "Offline") from"Warning" on all nodes.
8. Stop maintenance mode (Operation node)
Stop maintenance mode of userApplication on operation node.
Example
If you stop maintenance mode for all userApplication, execute the following command.
# /opt/SMAW/SMAWRrms/bin/hvutil -M off
Confirm that state of userApplication has become the previous state ("Online", "Standby" or "Offline") from "Maintenance" on allnodes.
- 83 -
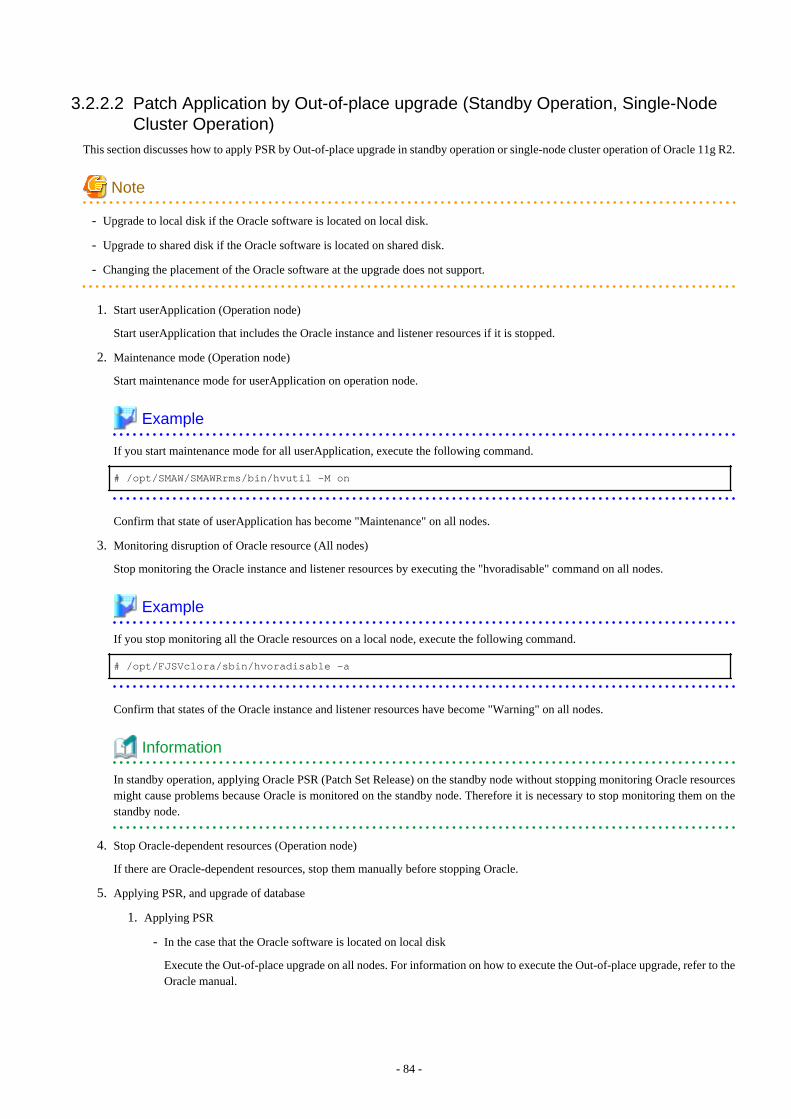
3.2.2.2 Patch Application by Out-of-place upgrade (Standby Operation, Single-NodeCluster Operation)
This section discusses how to apply PSR by Out-of-place upgrade in standby operation or single-node cluster operation of Oracle 11g R2.
Note
- Upgrade to local disk if the Oracle software is located on local disk.
- Upgrade to shared disk if the Oracle software is located on shared disk.
- Changing the placement of the Oracle software at the upgrade does not support.
1. Start userApplication (Operation node)
Start userApplication that includes the Oracle instance and listener resources if it is stopped.
2. Maintenance mode (Operation node)
Start maintenance mode for userApplication on operation node.
Example
If you start maintenance mode for all userApplication, execute the following command.
# /opt/SMAW/SMAWRrms/bin/hvutil -M on
Confirm that state of userApplication has become "Maintenance" on all nodes.
3. Monitoring disruption of Oracle resource (All nodes)
Stop monitoring the Oracle instance and listener resources by executing the "hvoradisable" command on all nodes.
Example
If you stop monitoring all the Oracle resources on a local node, execute the following command.
# /opt/FJSVclora/sbin/hvoradisable -a
Confirm that states of the Oracle instance and listener resources have become "Warning" on all nodes.
Information
In standby operation, applying Oracle PSR (Patch Set Release) on the standby node without stopping monitoring Oracle resourcesmight cause problems because Oracle is monitored on the standby node. Therefore it is necessary to stop monitoring them on thestandby node.
4. Stop Oracle-dependent resources (Operation node)
If there are Oracle-dependent resources, stop them manually before stopping Oracle.
5. Applying PSR, and upgrade of database
1. Applying PSR
- In the case that the Oracle software is located on local disk
Execute the Out-of-place upgrade on all nodes. For information on how to execute the Out-of-place upgrade, refer to theOracle manual.
- 84 -

- In the case that the Oracle software is located on shared disk
Execute the Out-of-place upgrade on operation node. For information on how to execute the Out-of-place upgrade, referto the Oracle manual.
Note
- Select "Install database software only" on the "Select Installation Option" screen.
- For details, refer to the Oracle manual.
2. Upgrade of database (Operation node)
Execute dbua (Database Upgrade Assistant) on operation node, and upgrade the database.
Note
- Execute "<New ORACLE_HOME>/bin/dbua".
- For details, refer to the Oracle manual.
3. Move the SPFILE to the shared disk (Operation node)
Move the SPFILE (server parameter file) to the shared disk when it is newly generated on a local disk after the upgrade ofthe database is executed. Afterwards, specify SPFILE path to PFILE (the initialization parameter file "<NewORACLE_HOME>/dbs/init<SID>.ora") or make a symbolic link file to SPFILE.
Note
If Oracle Software is located in shared disk, this step is not necessary.
See
For details, see "2.2.6 Oracle Database Creation and Setting".
6. PRIMECLUSTER Wizard for Oracle Settings
1. Login profile Setting Change (All nodes)
Open Oracle user's login profile with editor (e.g. vi), and change the setting of the ORACLE_BASE and ORACLE_HOMEenvironment variable to new path. Execute this procedure on all nodes.
Example
- Before changes
ORACLE_HOME=/u01/app/oracle/product/11.2.0/dbhome_1
- After changes
ORACLE_HOME=/u01/app/oracle/product/11.2.0/dbhome_2
See
For details, see "2.2.2 Oracle Installation and Configuration".
- 85 -

2. Transfer PFILE to standby nodes (Operation node, Standby node)
Create tar archive file from "<New ORACLE_HOME>/dbs" on operation node.
Example
# su - oracle
$ tar cfpvP /tmp/dbs.tar <New ORACLE_HOME>/dbs
After that, transfer the archive file from operation node to standby node by FTP, and expand it.
Example
# su - oracle
$ tar xfpvP /tmp/dbs.tar
Note
- If Oracle Software is located in shared disk, this step is not necessary.
- This step is not necessary for single-node cluster operation.
- Do not use the cloracpy command of PRIMECLUSTER Wizard for Oracle on this step.
- Set the access privilege of files which are expanded on the standby node same as the files on operating node.
See
For details, see "2.2.6 Oracle Database Creation and Setting".
3. The allocation of Oracle Net Services configuration file
Copy the Oracle Net Services configuration file from under the <Old ORACLE_HOME> to under the <NewORACLE_HOME>. Execute this procedure on all nodes
- In the case that the Oracle software is located on local diskExecute this procedure on all nodes
- In the case that the Oracle software is located on shared diskExecute this procedure on operation node
Example
$ cp -p <Old ORACLE_HOME>/network/admin/*.ora <New ORACLE_HOME>/network/admin/
Note
- Edit "<New ORACLE_HOME>/network/admin/*.ora" file when there are parameters depending on ORACLE_BASEand ORACLE_HOME in the Oracle Net Services configuration file after copy.
- Do not use the cloracpy command of PRIMECLUSTER Wizard for Oracle on this step.
7. Confirming Oracle Startup (Operation node)
Confirm that Oracle instance and Listener started. If not, start up them manually.
- 86 -

Note
- The Oracle instance should start in the state of OPEN.
- Confirm the process of the listener is as "<New ORACLE_HOME>/bin/tnslsnr".If the process of the listener is as "<Old ORACLE_HOME>/bin/tnslsnr", stop it and start as "<New ORACLE_HOME>/bin/tnslsnr".
8. Start resources dependent on Oracle (Operation node)
If resources that are dependent on Oracle had been stopped on step 4, start them manually.
9. Restart Oracle resource monitoring (All nodes)
Restart monitoring the Oracle instance and listener resources again using the hvoraenable command on all nodes
Example
If you restart monitoring all the Oracle resources on a local node, execute the following command.
# /opt/FJSVclora/sbin/hvoraenable -a
Confirm that states of the Oracle instance and listener resources have become the previous state ("Online" or "Offline") from"Warning" on all nodes.
10. Stop maintenance mode (Operation node)
Stop maintenance mode of userApplication on operation node.
Example
If you stop maintenance mode for all userApplication, execute the following command.
# /opt/SMAW/SMAWRrms/bin/hvutil -M off
Confirm that state of userApplication has become the previous state ("Online", "Standby" or "Offline") from "Maintenance" on allnodes.
11. Confirming of switch to the standby node
Confirm the switch of userApplication to the standby node, and the correct start.
Note
- This step is not necessary for single-node cluster operation.
- Confirm step 6 when you cannot correctly start userApplication on the standby node.
12. Restart service
Switch userApplication to the operation node if necessary, and restart service.
3.2.3 BackupThis section discusses how to backup Oracle Databases.
3.2.3.1 Cold backupYou can perform Oracle cold backup (offline backup) as follows. If there are Oracle-dependent resources (e.g. SAP R/3), a resource failuremight occur during Oracle stop, so it is necessary to stop them manually in advance.
- 87 -

1. Maintenance mode / Monitoring disruption
# /opt/SMAW/SMAWRrms/bin/hvutil -m on <userApplication> (Maintenance mode)
# /opt/FJSVclora/sbin/hvoradisable -a <userApplication> (Monitoring disruption)
2. Confirmation of maintenance mode and stop of monitoring
Confirm that changing into maintenance mode and stop of monitoring have been successfully done.(Refer to note of "4.1 hvoradisable - Discontinue Monitoring Resources".)
3. Oracle stop
# su - <Oracle user>
$ sqlplus /nolog
SQL> connect / as sysdba
SQL> shutdown immediate
4. Cold backup
Perform cold backup of the database.
5. Oracle startup
# su - <Oracle user>
$ sqlplus /nolog
SQL> connect / as sysdba
SQL> startup
6. Monitoring restart / Maintenance mode stop
# /opt/FJSVclora/sbin/hvoraenable -a <userApplication> (Monitoring restart)
# /opt/SMAW/SMAWRrms/bin/hvutil -m off <userApplication> (Maintenance mode stop)
7. Confirmation of restart of monitoring and maintenance mode
Confirm that restart of monitoring and changing out of maintenance mode has been successfully done.(Refer to note of "4.2 hvoraenable - Restart Monitoring Resources".)
3.2.3.2 Hot backupYou can perform Oracle hot backup (online backup) as follows.
1. Maintenance mode / Monitoring disruption
# /opt/SMAW/SMAWRrms/bin/hvutil -m on <userApplication> (Maintenance mode)
# /opt/FJSVclora/sbin/hvoradisable -a <userApplication> (Monitoring disruption)
2. Confirmation of maintenance mode and stop of monitoring
Confirm that changing into maintenance mode and stop of monitoring have been successfully done.(Refer to note of "4.1 hvoradisable - Discontinue Monitoring Resources".)
3. Hot backup
Perform hot backup of the database. Be sure to check that the Oracle instance and listener are properly running before going on tothe next step.
4. Monitoring restart / Maintenance mode stop
# /opt/FJSVclora/sbin/hvoraenable -a <userApplication> (Monitoring restart)
# /opt/SMAW/SMAWRrms/bin/hvutil -m off <userApplication> (Maintenance mode stop)
- 88 -
5. Confirmation of restart of monitoring and maintenance mode
Confirm that restart of monitoring and changing out of maintenance mode has been successfully done.(Refer to note of "4.2 hvoraenable - Restart Monitoring Resources".)
3.2.4 RecoveryRecover the Oracle Database according to the necessity of Oracle stop.
Information
When Oracle must be stopped to recover the Oracle Database:
- The data file belongs to SYSTEM tablespace or UNDO tablespace
- The whole database is recovered
- Incomplete recovery is performed
When Oracle does not have to be stopped to recover the Oracle Database:
- The data file does not belong to SYSTEM tablespace or UNDO tablespace
- Complete recovery is performed
For details, see the Oracle manual
3.2.4.1 Oracle must be stoppedIf Oracle must be stopped, recovery the Oracle Database as follows. If there are Oracle-dependent resources (e.g. SAP R/3), a resourcefailure might occur during Oracle stop, so it is necessary to stop them manually in advance.
1. userApplication stop
# /opt/SMAW/SMAWRrms/bin/hvutil -f <userApplication>
2. Monitoring disruption
Resource which monitoring is stopped by hvoradisable command will not start up even if the userApplication starts up. Using thisfunction, the resources other than Oracle can start up.
# /opt/FJSVclora/sbin/hvoradisable -a <userApplication>
3. Confirmation of stop of monitoring
Confirm that stop of monitoring has been successfully done.(Refer to note of "4.1 hvoradisable - Discontinue Monitoring Resources".)
4. userApplication startup
# /opt/SMAW/SMAWRrms/bin/hvswitch <userApplication>
5. Recovery
Recover the database.
6. Oracle instance and listener startup
# su - <Oracle user>
$ lsnrctl start <Listener>
$ sqlplus /nolog
SQL> connect / as sysdba
SQL> startup
- 89 -

7. Monitoring restart
# /opt/FJSVclora/sbin/hvoraenable -a <userApplication>
8. Confirmation of restart of monitoring
Confirm that restart of monitoring has been successfully done.(Refer to note of "4.2 hvoraenable - Restart Monitoring Resources".)
3.2.4.2 Oracle does not need to be stoppedIf the Oracle does not need to be stopped, recover the Oracle Database as follows;
1. Maintenance mode / Monitoring disruption
# /opt/SMAW/SMAWRrms/bin/hvutil -m on <userApplication> (Maintenance mode)
# /opt/FJSVclora/sbin/hvoradisable -a <userApplication> (Monitoring disruption)
2. Confirmation of maintenance mode and stop of monitoring
Confirm that changing into maintenance mode and stop of monitoring have been successfully done.(Refer to note of "4.1 hvoradisable - Discontinue Monitoring Resources".)
3. Recovery
Recover the database. Be sure to check if the Oracle instance and listener are properly running before going on to the next step.
4. Monitoring restart / Maintenance mode stop
# /opt/FJSVclora/sbin/hvoraenable -a <userApplication> (Monitoring restart)
# /opt/SMAW/SMAWRrms/bin/hvutil -m off <userApplication> (Maintenance mode stop)
5. Confirmation of restart of monitoring and maintenance mode
Confirm that restart of monitoring and changing out of maintenance mode has been successfully done.(Refer to note of "4.2 hvoraenable - Restart Monitoring Resources".)
3.3 Oracle SYSTEM User Password ChangeYou can change the Oracle SYSTEM user password without stopping operation by using the following steps on the node whereuserApplication is Online.
1. Discontinue monitoring the Oracle instance resources.
Execute the following command to stop monitoring Oracle resources. In standby operation, execute it on the operating node. Inscalable operation with Oracle RAC, execute it on all the cluster nodes. In single-node cluster operation, execute it on the one node.
# /opt/FJSVclora/sbin/hvoradisable -a <userApplication>
Be sure to check the following message in syslog before going to the next step:
INFO: 0101: Fault Watching is disable
or
INFO: 0101: Fault Watching is disabled
2. Change the Oracle SYSTEM user password
Change the Oracle SYSTEM user password. In standby operation, change the password on the operating node. In scalable operation with Oracle RAC, change the password onany one of the nodes. In single-node cluster operation, change the password on the one node.
- 90 -
Example
The following example shows how to change password to “oracle”.
# su - <Oracle user>
$ sqlplus /nolog
SQL> connect / as sysdba
SQL> alter user system identified by oracle;
SQL> exit
3. Register the Oracle SYSTEM user password to PRIMECLUSTER Wizard for Oracle
Register the Oracle SYSTEM user password to PRIMECLUSTER Wizard for Oracle using the clorapass command. In standby operation, register the password on the operating node. In scalable operation with Oracle RAC, register the passwordsfor each instance on any one of the nodes. In single-node cluster operation, execute it on the one node.
# /opt/FJSVclora/sbin/clorapass
Enter OracleSID > sid (Enter ORACLE_SID)
Enter Password > ******* (Enter “oracle” for password.)
Re-enter Password > ******* (Re-enter “oracle” for password.)
Finished
4. Restart monitoring the Oracle instance resources
Execute the following command to restart monitoring Oracle resources. In standby operation, execute it on the operation node. Inscalable operation with Oracle RAC, execute it on all the cluster nodes. In single-node cluster operation, execute it on the one node.
# /opt/FJSVclora/sbin/hvoraenable -a <userApplication>
Be sure to check the following message in syslog after execution:
INFO: 0102: Fault Watching is enable
or
INFO: 0102: Fault Watching is enabled
Information
- For the hvoradisable or hvoraenable command, see “4.1 hvoradisable - Discontinue Monitoring Resources”, “4.2 hvoraenable - RestartMonitoring Resources”.
- For information on how to change the Oracle SYSTEM user password, refer to the Oracle manual.
- For the clorapass command, refer to “4.3 clorapass - Register Password for Monitoring”.
- When passwords of Oracle user, Grid user, and Oracle SYS user are changed, the setting of PRIMECLUSTER Wizard for Oracleneed not be changed.
3.4 Corrective Action against Failover
Oracle logging
If a failover or degeneration occurs in the event of a failure in PRIMECLUSTER operation with Oracle, solve the problem referring tothe Oracle alert log or trace log.
- 91 -
PRIMECLUSTER Wizard for Oracle logging
PRIMECLUSTER Wizard for Oracle provides information what kind of failure is detected and what corrective action should be taken inthe following log files:
/var/opt/reliant/log/FJSVclora_<OracleSID>*.log
/var/opt/reliant/log/FJSVclora_<ListenerName>*.log
The log file formats are as follows:
Date/type/ID/text
2002/04/25 15:18:40 [Info] [1101] Starting Oracle detector
2002/04/25 15:18:40 [Info] [1102] Connected to Oracle
2002/04/25 15:18:40 [Error] [1299] ORA-01034 Oracle not available.
- DateOutput in the format of YYYY/MM/DD HH:MM:SS.
- TypeIndicates classification. (Information, Error, Warning)
- IDIndicates a message number.
- TextIndicates message content.
Note
There is no restriction of space or memory for log files. RMS manages the log files.
The log files will be used for troubleshooting. Do not delete or edit them.
3.5 Troubleshooting InformationIf you encounter any problems with PRIMECLUSTER Wizard for Oracle operation you will need to conduct troubleshooting from logfiles and setup files of PRIMECLUSTER Wizard for Oracle and its related products.
You may use the following files:
Oracle information
- Configuration files
$ORACLE_HOME/network/admin/*.ora$ORACLE_HOME/dbs/*.ora$ORACLE_BASE/admin/$ORACLE_SID/pfile/*.ora
- Log files
$ORACLE_HOME/rdbms/log/alert_$ORACLE_SID.log$ORACLE_BASE/admin/$ORACLE_SID/bdump/alert_$ORACLE_SID.logUnder $ORACLE_BASE/diag (Oracle 11g)$ORACLE_HOME/network/log/<ListenerName>.log$ORA_CRS_HOME/crs/log/<nodename>.log (Oracle RAC)
PRIMECLUSTER information
Refer to "Appendix C Troubleshooting " in the “PRIMECLUSTER Configuration and Administration Guide”.
- 92 -
PRIMECLUSTER Wizard for Oracle information
- Configuration files
/opt/FJSVclora/etc/*/usr/opt/reliant/etc/hvgdconfig/usr/opt/reliant/build/<RMS configuration name>.usfiles/*
- Log files
/var/opt/reliant/log/*
Information
You can collect troubleshooting information for Oracle and PRIMECLUSTER Wizard for Oracle using the fjsnap command. The fjsnapcommand is a system information tool and is included in ESF (Enhanced Support Facility). If an error occurs on a PRIMECLUSER system,the command will collect required information to solve the problem. Oracle information can be collected only if PRIMECLUSTER Wizardfor Oracle is correctly set.
For information on how to collect troubleshooting information of PRIMECLUSTER Wizard for Oracle only, see “4.5 clgetoralog - CollectTroubleshooting Information”.
3.6 Log FilesPRIMECLUSTER Wizard for Oracle generates log files under the following directory.
- /var/opt/reliant/log
Log files having information about startup/stop are stored in this directory.Disk space for the directory is managed by PRIMECLUSTER.
Information
Refer to “PRIMECLUSTER Installation and Administration Guide”.
- /var/opt/FJSVclora
Log files having information about monitoring are stored in this directory.Required disk space for the directory is described below;
- Oracle instance resource :
5.5 MB per resource
- Listener resource :
4.5 MB per resource
- ASM instance resource :
0.0 MB per resource (no output)
- Oracle Clusterware resource :
0.0 MB per resource (no output)
However, when the watch timeout is detected, the following log files are made by the write-once type.
- FJSVclora_<SID>_idto.trclog
- FJSVclora_<LISTENER>_ldto.trclog
These increase by 62 bytes about one watch timeout. In addition, the amount of consumption management by RMS is not performedbecause these logs are management outside in RMS.
- 93 -

Note
Do not remove these log files. They will be used for troubleshooting.
- 94 -
Chapter 4 Command
4.1 hvoradisable - Discontinue Monitoring ResourcesUser
Super user
Format
/opt/FJSVclora/sbin/hvoradisable userApplication Resource/opt/FJSVclora/sbin/hvoradisable -a [userApplication ]
Function
hvoradisable discontinues monitoring the Oracle instance and Oracle listener resources on the local node where the command isexecuted. The command is used to stop the Oracle instances or Oracle listeners for maintenance. Also, it is available regardless ofwhether userApplication is activated or deactivated.
If the command is executed while userApplication is stopped, and then it is started, the Oracle resources will enter Warning withoutbeing started.
If the command is executed while userApplication is running, it will disable resource monitoring. The Oracle resources will enterWarning. Even though the Oracle instance and Oracle listener are stopped, they will remain Warning. When you execute the commandwhile userApplication is running, be sure to check the resource state is Warning the stop the Oracle instance and Oracle listener.
Stopping userApplication, or clearing faulted state of userApplication will automatically restart monitoring resource.
Information
The ASM instance resource and Oracle Clusterware resource are not monitored, so it is not necessary to discontinue monitoring theresource with the command. For further details about ASM instance resources, see “2.4.2 ASM (Automatic Storage Management)”.
Parameter
userApplication Resource
Specify userApplication including Oracle resources that will be disrupted monitoring.
Specify either of the Oracle instance or Oracle listener that will be disrupted monitoring.
userApplication and Resource that are specified as parameters should exist on the local node.
-a [userApplication ]
The option discontinues monitoring all Oracle instance and listener resources that belong to userApplication that is running on alocal node and is specified for userApplication.
If userApplication is omitted, the option will discontinue monitoring all the Oracle resources on the local node.
Exit status
0: Normal termination
1: Abnormal termination
2: Abnormal termination (disruption of resource monitoring with the -a option fails)
Note
Note that execution timing. Unexpected resource failure or userApplication failover might be caused.
- Do not execute the command while state transition of userApplication is in progress.
- Do not execute the command while RMS is not running.
- 95 -
- Do not operate userApplications right after execution of the command. (At least a five-second interval is necessary.)
- Operate Oracle instances and listeners, after confirming that stop of monitoring has become effective.Confirm the stop of monitoring by using one of the following ways before the Oracle operation.
- Output of message “INFO: 0101: Fault Watching is disable” or “INFO: 0101: Fault Watching is disabled” in syslog
- Transition of resources onto Warning
- Output of clorainfo -m command is “disable”.
4.2 hvoraenable - Restart Monitoring ResourcesUser
Super user
Format
/opt/FJSVclora/sbin/hvoraenable userApplication Resource/opt/FJSVclora/sbin/hvoraenable -a [ userApplication ]
Function
hvoraenable restarts monitoring the Oracle instance and Oracle listener resources on the local node where resource monitoring isdisrupted. It is available regardless of whether userApplication is activated or deactivated.
If the command is executed while userApplication is stopped, disabling resource monitoring with hvoradisable will be cancelled. .
If the command is executed while userApplication is running, it will restart resource monitoring.
The command must be executed after the Oracle instance and Oracle listener are started manually. Be sure to check the resource stateis changed from Warning to Online.
Information
The ASM instance resource and Oracle Clusterware resource are not monitored, so it is not necessary to cancel resource monitoringwith the command. For further details about ASM instance resources, see “2.4.2 ASM (Automatic Storage Management)”.
Parameter
userApplication Resource
Specify userApplication including Oracle resources that will be restarted monitoring.
Specify either of the Oracle instance or Oracle listener that will be restarted monitoring.
userApplication and Resource that are specified as parameters should exist on the local node.
-a [ userApplication ]
The option restarts monitoring all Oracle instance and listener resources that belong to userApplication that is running on a localnode and is specified for userApplication.
If userApplication is omitted, the option will restart monitoring all the Oracle resources on the local node.
Exit status
0: Normal termination
1: Abnormal termination
2: Abnormal termination (restart of resource monitoring with the -a option fails)
Note
Note that execution timing. Unexpected resource failure or userApplication failover might be caused.
- 96 -
- Do not execute the command while state transition of userApplication is in progress.
- Do not operate userApplications right after execution of the command. (At least a five-second interval is necessary.)
- If Oracle instances or listeners have been stopped manually while stop of monitoring, start them up manually before the execution ofthis command.
- Confirm the restart of monitoring using one of the following ways.
- Output of message “INFO: 0102: Fault Watching is enable” or “INFO: 0102: Fault Watching is enabled” in syslog.
- Transition of resources onto the previous state("Online", "Offline").
- Output of clorainfo -m command is “enable”.
4.3 clorapass - Register Password for MonitoringUser
Super user
Format
/opt/FJSVclora/sbin/clorapass
Function
clorapass registers the Oracle SYSTEM user password for PRIMECLUSTER Wizard for Oracle. The detector monitors Oracleinstances using the SYSTEM user privileges, so it requires the SYSTEM user password.
If the password is not registered, the detector will use “manager” as the SYSTEM user password.
Execute the command on any one of the nodes. In scalable operation (RAC) with multiple Oracle instances, execute the command foreach Oracle instance then set the Oracle SYSTEM user password.
Parameter
None.
Exit status
0: Normal termination
Non-0: Abnormal termination
Information
- For information on how to change the password of the Oracle SYSTEM operating on a cluster system, see “3.3 Oracle SYSTEM UserPassword Change ”.
- The password character string that the "clorapass" command handles is explained below.
- ASCII character; hexadecimal digit 21, 23-3f and 41-7e (decimal digit 33,35-63 and 65-126)
- Nonquoted identifiers; alphanumeric characters, underscore (_), dollar sign ($) and pound sign (#)
abcdefghijklmnopqrstuvwxyzABCDEFGHIJKLMNOPQRSTUVWXYZ0123456789_$#
- The following characters in quoted identifiers
!%&'()*+,-./:;<=>?[\]^`{|}~
- It can not contain spaces, tabs, "at" signs(@) and multibyte characters.
- If it contains quoted characters or it begins with a character except alphabetical characters, you do not have to enclose the passwordin double quotation marks(").
- It can be as long as 63 characters. (In Oracle Database, the name can be as long as 30 characters)
- 97 -
Note
For scalable operation, the Oracle SYSTEM user password needs to be registered for each Oracle RAC instance. Example: In case of DB_NAME=ora, ORACLE_SID=ora1, ORACLE_SID=ora2, Execute the command twice then register password for ora1 and ora2 respectively.
4.4 cloracpy - Create Backup File for Oracle Database SetupUser
Oracle DBA user
Format
/opt/FJSVclora/sbin/cloracpy
Function
cloracpy enables users to backup files required for Oracle Database setup on the operating node in the tar format. Also, the users cancopy the file and set links by extracting the backup data on the standby nodes.
- The command can be used in the following cases:
- Standby operation
- Oracle Software is located on local disk of each node.
- The $ORACLE_HOME and $ORACLE_BASE settings are the same between the operating node and the standby nodes.
- The Oracle configuration is the same between the operating node and the standby nodes.
- Database creation and setup is already completed on the operating node.
- The command is executed with Oracle user access privileges
- $ORACLE_BASE, $ORACLE_HOME, and $ORACLE_SID are set in the Oracle user environment variables.
- The following backup files can be created in the tar format:
- All files under $ORACLE_HOME/dbs
- All files under $ORACLE_BASE/admin/$ORACLE_SID
- All files under $ORACLE_HOME/network/admin
- All files under $ORACLE_BASE/diag
The files on the operating node will be stored in the “/tmp/oracle.$ORACLE_SID.tar” file. Transfer the file to standby nodes andexecute “tar xvf /tmp/oracle.$ORACLE_SID.tar” command there, then the archived files will be deployed on the standby nodes.
Information
tar command on standby nodes should be executed with root user or Oracle user.If executed with root user, specify “xvfPp” options. (tar xvfp /tmp/oracle.<$ORACLE_SID>.tar)If executed with Oracle user, specify “xvfP” options. (tar xvf /tmp/oracle.<$ORACLE_SID>.tar)
Note
Since cloracpy creates and deploy the backup files in the tar format using the full path, it cannot be used if the “$ORACLE_BASE”and “$ORACLE_HOME” settings are incompatible between the operating and standby nodes.
Also, if the operation method is different between the operating node and standby nodes such as mutual or N:1 standby operation, thecommand cannot be used. If a file with the same name exists, it will be overridden.
- 98 -
Parameter
None.
Exit status
0: Normal termination
Non-0: Abnormal termination
4.5 clgetoralog - Collect Troubleshooting InformationUser
Super user
Format
/opt/FJSVclora/bin/clgetoralog [ -n RMSconfiguration ] [ -d output_directory ] [ -a ]
Function
clgetoralog collects Oracle information for troubleshooting. The “clgetoralog” command collects Oracle setup information and logfiles on a PRIMECLUSTER system.The information will be collected in the “<hostname>_<yymmddHHMMSS>_clgetoralog.tar” file.
The “clgetoralog” command collects
- Initialization parameter file$ORACLE_HOME/dbs/*.ora$ORACLE_BASE/admin/$ORACLE_SID/pfile/*.ora
- Oracle alert logbackground_dump_dest/*.log$ORACLE_BASE/admin/$ORACLE_SID/bdump/*.log$ORACLE_HOME/rdbms/log/*.log$ORACLE_HOME/dbs/*.logUnder $ORACLE_BASE/diag
- listener.ora, tnsnames.ora$ORACLE_HOME/network/admin/*.ora
- Listener log$ORACLE_HOME/network/log/*.log
- Oracle Clusterware Information$ORA_CRS_HOME/crs/admin/*$ORA_CRS_HOME/crs/log/* ($ORA_CRS_HOME/log/<hostname>/crsd/*)
- V/L, configuration, and log files of PRIMECLUSTER Wizard for Oracle
- V/L and log files (switchlog) of RMS
- V/L, configuration, and patch information of PRIMECLUSTER
- System informationuname -a (system basic information)uptime (system operating time)psrinfo -v/usr/platform/`arch -k`/sbin/prtdiagcat /etc/release (Solaris version)cat /var/sadm/system/admin/CLUSTER (Solaris software group)cat /var/sadm/ptf/newprev/Rcontents (PTF information)grep -h “Install Solaris” /var/sadm/install_data/*OK (RSPC information)pkgparam -v FJSVbse (ESF information)isainfo -b, isainfo -v (instruction set architectures information)
- 99 -

sysdef -i (kernel parameter)ipcs (shared resources)swap -l (swap information)ptree -a, ps -efZ, ps -efL -o (process information)zonename, zoneadm list -vc (zone information)ntpq -p (NTP information)/var/adm/messages files
- System information (Solaris 10 only)showrev -p (patch information)
Information
The fjsnap command can also be used to collect troubleshooting information. (When -a or -h option is specified.)
Parameter
[ -n RMSconfiguration ]
Specify RMS configuration name for RMSconfiguration.If this option is specified, clgetoralog command collects RMS configuration information in addition to the information describedin “Function”. When the cluster application has been built by using GUI (userApplication Configuration Wizard), the RMSconfiguration name is “config”. The RMS configuration name can be confirmed by the following command while RMS is running.
# /opt/SMAW/SMAWRrms/bin/hvdisp -a | grep Configuration
Configuration: /opt/SMAW/SMAWRrms/build/config.us
If this option is not specified, clgetoralog command collects only information described in “Function“.
[ -d output_directory ]
Specify the directory where information is collected. Then, the command will store the “<hostname>_<yymmddHHMMSS>_clgetoralog.tar” file in the directory. If the directoryspecified does not exist, it will automatically be created.If this option is omitted, the command will store the “<hostname>_<yymmddHHMMSS>_clgetoralog.tar” file under the defaultdirectory (/var/tmp).
[ -a ]
The option will collect the following information in addition to the information described in [Function]:
- Group of currently active RMS configuration files (all RMS configuration files with the -n option)
- RMS log files (/var/opt/reliant/log/*)
- RMS environment variable configuration file (/usr/opt/reliant/bin/hvenv.local)
- /var/adm/messages*
- /etc/hosts, /etc/inet/hosts
- /etc/passwd
- /etc/services, /etc/inet/services
- /etc/system
- /etc/vfstab
- /etc/vfstab.pcl
- showrev -p
Exit status
0: Normal termination
Non-0: Abnormal termination
- 100 -

Note
This command gets the value of background_dump_dest or diagnostic_dest parameter from the initialization parameter file or the serverparameter file, and searches the Oracle alert log and listener log. However, if these parameter files can not be read(e.g. the server parameterfile exists on a shared disk that is not mounted), the logs are not also collected.
To prevent it, define the alert log and listener log in /opt/FJSVclora/etc/clgetoralog.conf using the full path so that you can securely collectthem. Where they are stored is defined in background_dump_dest parameter. (background_dump_dest/diagnostic_dest parameter can befound in the initialization parameter file or the server parameter file. It can be also displayed by SQL “show parameter dest”.)
The following shows how to define /opt/FJSVclora/etc/clgetoralog.conf. (Example: background_dump_dest is "/oracle/admin/orclsid/bdump"):
COLLECTOBJ=/oracle/admin/orclsid/bdump/alert_orclsid.log
COLLECTOBJ=/oracle/product/network/log/listener.log
* background_dump_dest = /oracle/admin/orclsid/bdump
Start with “COLLECTOBJ=” and specify the file name using the full path after “=”.
Wild card characters “*” cannot be used in the middle of the path name.
COLLECTOBJ=/oracle/admin/orclsid/bdump/*.trc [OK]
COLLECTOBJ=/oracle/admin/*/bdump/*.trc [NG]
If the size of the troubleshooting information including the information which defined /opt/FJSVclora/etc/clgetoralog.conf exceeds 10MB,the troubleshooting information is collected except for the information which defined /opt/FJSVclora/etc/clgetoralog.conf.The -a option will collect the troubleshooting information including the information which defined /opt/FJSVclora/etc/clgetoralog.confeven if the size exceeds 10MB.
4.6 clorainfo - Display Resource Configuration and MonitoringStatus
User
Super user
Format
/opt/FJSVclora/bin/clorainfo { -c [ RMSconfiguration ] | -e | -m [ ResourceName ] | -v }
Function
clorainfo displays configuration information and monitoring state of Wizard for Oracle.
Parameter
-c [ RMSconfiguration ]
The option displays setup information of Wizard for Oracle resources that are defined in the specified RMS configuration. Specifythe RMS configuration name for RMSconfiguration
If RMSconfiguration s omitted, setup information of Wizard for Oracle resources that are currently active in the RMS configurationwill be displayed.
-e
The option displays kernel parameter values and Oracle setup information on the local node.
Information
When a Listener resource created in Oracle RAC scalable operation, it is impossible to set TNSName attribute of the resource even if“TNS name registered in RMS” item is displayed by “clorainfo -e” command.
- 101 -

# /opt/FJSVclora/bin/clorainfo -e
:
node1 : Ora_APP1_LISTENER_NODE1.l
----------------------------------------------------------------
User registered in RMS (uid) : oracle (504)
User Group (gid) : oinstall (504)
: dba (505)
ORACLE_HOME : /u01/app/oracle/product/db
Listener registered in RMS : LISTENER_NODE1
Protocol Addresses : (DESCRIPTION=(ADDRESS=(PROTOCOL=TCP)...
: (DESCRIPTION=(ADDRESS=(PROTOCOL=TCP)...
TNS name registered in RMS : ----
:
-m [ ResourceName ]
The option displays whether or not Wizard for Oracle resources are being monitored (enable: monitoring is active, disable:monitoring is inactive).
If ResourceName is specified, it will check the status of resource monitoring and returns the one of the following codes:
0: Monitoring is active (RMS is running)2: Monitoring is inactive (RMS is running)10: Monitoring is active (RMS is not running)12: Monitoring is inactive (RMS is not running)
The resource name of Wizard for Oracle (ResourceName) must exist on the local node.
If ResourceName is omitted, whether or not all the resources of Wizard for Oracle on the local node are monitored will be displayed.
-v
The option displays package information of Wizard for Oracle that is installed on the local node.
Exit status
0: Normal termination or RMS is running and resource monitoring is active (“-m ResourceName” specified)2: RMS is running and resource monitoring is inactive (“-m ResourceName” specified)10: RMS is stopped, and resource monitoring is active (“-m ResourceName” specified)12: RMS is stopped, and resource monitoring is inactive (“-m ResourceName” specified) Other than the above values: Abnormaltermination
4.7 clorabr - Integrated Backup and Restoration of ConfigurationFiles
User
Super user
Format
/opt/FJSVclora/bin/clorabr { backup | restore } [ -d backup_directory ]
Function
PRIMECLUSTER Wizard for Oracle supports integrated backup and restoration (cfbackup/cfrestore) of PRIMECLUSTER systems.The clorabr command can only backup and restore PRIMECLUSTER Wizard for Oracle configuration information.
Note
For integrated backup and restoration of PRIMECLUSTER systems, refer to “Chapter 11 Backing Up and Restoring aPRIMECLUSTER System” of the “PRIMECLUSTER Installation and Administration Guide”.
The following files can be backed up and restored:
- 102 -
- /opt/FJSVclora/etc/FJSVclora.pwd
- /opt/FJSVclora/etc/clgetoralog.conf
- /opt/FJSVclora/usr/*
Parameter
backup
Backs up PRIMECLUSTER Wizard for Oracle configuration information. With this option, a list of configuration files that willbe backed up in standard output is displayed. The configuration information will be stored in FJSVclora on the specified directoryor the directory (current directory) that is created with the clorabr command. For example, if this command is executed when thecurrent directory is /var/tmp, the backup information will be stored in /var/tmp/FJSVclora.
restore
Restores the PRIMECLUSTER Wizard for Oracle configuration information that has previously been configured. With this option,a list of configuration files that will be restored in standard output is displayed. Check that backed up configuration information isstored in the specified directory or in FJSVclora in the directory (current directory) that is created with the clorabr command. Forexample, if the backup information is stored in /var/tmp/FJSVclora, execute the command after moving it to /var/tmp.
Note
The following versions of PRIMECLUSTER Wizard for Oracle are permitted to be restored.
- 4.2A00
- 4.2A01
- 4.2A02
- 4.3A10
- 4.3A20
[ -d backup_directory ]
Specifies the directory where data will be backed up or restored using the full path. With the backup option, the FJSVclora directorywill be created on the specified directory, and data will be stored in the FJSVclora. With the restore option, data will be restoredfrom the FJSVclora.Without this option, data will be backed up or restored in the current directory where the command is executed.
Exit status
0: Normal termination
Non-0: Abnormal termination
- 103 -

Chapter 5 NoticeParticular attention must be given to the operation of PRIMECLUSTER Wizard for Oracle.
Prerequisites and requirements
PRIMECLUSTER Wizard for Oracle has specific system requirements and component prerequisites that need to be understood prior tooperation.
- More than one Oracle product which version/release is different can be installed on the same node. However, the version and releaseshould be same on an operating node and standby nodes. For the Oracle products supported, see “Software Release Guide” and “Handbook”.
- A user name, user ID, group name, and group ID should be identical on all the nodes to install Oracle.
- If multiple Oracle homes are configured on one server, a different user name must be assigned for each Oracle home.
- An Oracle Database must be configured on the shared disk.
- Setting Oracle log output on the shared disk is not recommended. When a disk device fails, log is not output, and the trouble may beunable to be investigated.
- Note of location of archived redo logs.
- Located on local disksIf Oracle recovery is required, the archived redo logs on both nodes should be put together.
- Located on shared disksNote that there is sufficient space to archive for archived redo log files. If there is insufficient space, and data updating processingthrough monitoring SQL hangs, an oracle resource might fail.Afterwards, the service might stop finally on both operating node and standby node, because the space of shared disk is insufficientand the failover of userApplication fails on the standby node.
- The Oracle “TWO_TASK” environment variable cannot be used. For details, see “2.2.6 Oracle Database Creation and Setting”.
- The setting to connect to an Oracle Database must not be described in login.sql of an Oracle user. For details, see “2.2.6 OracleDatabase Creation and Setting”.
- The password file authentication cannot be used. Use OS authentication.
- PRIMECLUSTER Wizard for Oracle connects to Oracle instance with SYSDBA system privilege to start up or stop Oracle instance/database. In this case, local connection in operating system authentication is used. Therefore, the following requirements should besatisfied. (If not, startup and stop of Oracle instance/database might fail.)
- Oracle user that is set for Oracle instance resource in “2.2.7.2 Oracle Resource Creation” or “2.3.5 userApplication with OracleRAC Instances and Listeners” should belong to OSDBA group.
- SQLNET.AUTHENTICATION_SERVICES parameter should not be defined in sqlnet.ora file.
The other connections (e.g. user own connection for maintenance) can use the password file authentication.
- A command (e.g. script) that has interactive mode should not be described in Oracle user's profile(e.g. /etc/profile, .bash_profile, .cshrc, .profile). It may cause failure of resource monitoring or userApplication startup or shutdown.For details, refer to “2.2.2 Oracle Installation and Configuration” or “2.3.2 Oracle Software Installation and Configuration”.
- Environment that Oracle user's home directory and profile are located on the shared disk is not supported. Oracle user's home directoryand profile must be located on the local disk of each node.
- Operating system authentication of Listener should be enabled. For details, refer to “2.2.6 Oracle Database Creation and Setting”.
- Oracle user should have access privileges for /tmp directory. The programs of PRIMECLUSTER Wizard for Oracle working with Oracle user use /tmp directory. If Oracle user does not haveaccess privileges for /tmp directory, the programs do not work correctly and startup or shutdown of Oracle fails.
- In order to use ASM of Oracle 11g R2, it is necessary to install Oracle Grid Infrastructure. When installing Oracle Grid Infrastructure,the composition which separates the installation user of Oracle Database and the installation user of Oracle Grid Infrastructure issupported. The composition which creating one user is not supported.
- 104 -

- In order to use ASM of Oracle 11g R2, a different directory must be assigned respectively for an ORACLE_BASE of the installationuser of Oracle Database and an ORACLE_BASE of the installation user of Oracle Grid Infrastructure.
- When using ASM of Oracle 11g R2 in standby node or single-node cluster, Oracle service resource is not available.
- Upgrade to local disk if the Oracle software is located on local disk.Upgrade to shared disk if the Oracle software is located on shared disk.Changing the placement of the Oracle software at the upgrade does not support.
- Using of the "su -" command is not supported for user scripts(prestartup*, nomount*, mount*) under /opt/FJSVclora/usr.
- In scalable operation, install Oracle Grid Infrastructure and Oracle Database on a local disk of all nodes.
Features and functions
Below are guidelines and precautions to be taken in using the features and functions provided by PRIMECLUSTER Wizard for Oracle.
- The detector connects itself to the database using SYSTEM user access privileges to monitor Oracle instances. It also monitors Oracleoperation by creating a monitoring table on the SYSTEM user default tablespace. The size of the table is only a few bytes. The tabledata is periodically updated, so the REDO log is updated, and the archived redo log data is output.
- Stopping an Oracle instance in the “immediate” mode fails while Oracle Online backup is running. In this case, the Oracle instance will be stopped in "abort" mode.
- The time required for Oracle instance startup and stop varies depending on the database size. The default startup timeout is 10 minutes.The default stop timeout is 3 minutes.The RMS command “hvshut” has its own timeout. Even though hvshut times out, userApplication stop processing will be continuedalong with RMS stop.
- In standby operation or single-node cluster operation, PRIMECLUSTER Wizard for Oracle recovers Oracle instance automaticallyfrom backup mode or media failure when the errors are detected during the startup of Oracle instance.In scalable operation with Oracle RAC, PRIMECLUSTER Wizard for Oracle does not recover it automatically from the errors.
- In scalable operation with Oracle RAC, an RMS resource is created based on the resource name of Oracle RAC or OracleSID. Fordetails, see “2.3.2 Oracle Software Installation and Configuration”.
- MonitorOnly can be enabled in the following cases. For details, see “2.2.7.2 Oracle Resource Creation”.
- One resource of “Instance” type and one resource of “Listener” type exist, and StartPriority is set to “Same”. In this case,MonitorOnly only for the one of them can be enabled.
- More than one resources of “Instance” type exist. In this case, MonitorOnly for the one of them cannot be enabled, but all of theothers can be enabled.
- More than one resources of “Listener” type exist. In this case, MonitorOnly for the one of them cannot be enabled, but all of theothers can be enabled.
- Do not execute “srvctl” or “sqlplus” commands to shut down Oracle instance. It might cause mismatched status between RMS andOracle RAC.
Configuration
Below are guidelines and precautions to be taken in configuring an environment that allows for PRIMECLUSTER Wizard for Oracleoperations.
- Be aware of the exit code and timeout duration when the following scripts are set:PreOnlineScript, PostOnlineScript, PreOfflineScript, PostOfflineScript, and FaultScript.For details, see “2.4.1 Oracle Online/Offline Script”.
Operations
Users need to take a special precaution when changing the system password for PRIMECLUSTER Wizard for Oracle as follows:
- For information on how to change the Oracle SYSTEM user password while a cluster system is running, see “3.3 Oracle SYSTEMUser Password Change ”.
- 105 -

When passwords of Oracle user, Grid user, and Oracle SYS user are changed, the setting of PRIMECLUSTER Wizard for Oracleneed not be changed.
Others
Users need to take the following special precaution when operating PRIMECLUSTER Wizard for Oracle:
- If an Oracle instance is stopped in the abort mode, it will automatically be recovered at the next instance startup.
- 106 -

Chapter 6 MessageThis chapter describes messages generated by PRIMECLUSTER Wizard for Oracle and lists the possible causes and actions you can taketo resolve any problems indicated by a message.
The following messages appear in syslog (daemon.err).
- Oracle instance resource messages
- Oracle listener resource messages
- Common messages
The following messages appear in command execution screen.
- clgetoralog messages
- clorainfo messages
- hvoradisable/hvoraenable messages
- cloracpy messages
- clorapass messages
Oracle instance resource messages
ERROR: 1202: Cannot map shared memory or get semaphore [Content]
A system error occurred. Acquisition of shared memory or semaphores failed.
[Corrective action]
The problem might be due to insufficient system resource. Check the system environment.
ERROR: 1203: Cannot open actionlist [Content]
The action definition file cannot be opened.
[Corrective action]
Check if the action definition file already exists, or file access privileges have been changed.
ERROR: 1204: Corrupted actionlist: Invalid errno, line=xx [Content]
The “errno” setting of the action definition file is incorrect.
[Corrective action]
Check the “errno” setting of “line=%d” in the action definition file.
ERROR: 1205: Corrupted actionlist: Invalid status, line=xx [Content]
The “status” setting of the action definition file is incorrect.
[Corrective action]
Check the “status” setting of “line=%d” in the action definition file.
- 107 -

ERROR: 1206: Corrupted actionlist: Invalid action, line=xx [Content]
The “action” setting of the action definition file is incorrect.
[Corrective action]
Check the “action” setting of “line=%d” in the action definition file.
ERROR: 1208: <Oracle process> process error [Content]
An Oracle process error was detected.
[Corrective action]
Check if Oracle is properly running by referring to the Oracle alert log.
ERROR: 1213: Action error detected: Offline [Content]
The “Offline” state of the resource will be notified.
[Corrective action]
Check if Oracle is properly running by referring to the Oracle alert log.
ERROR: 1214: Action error detected: Faulted [Content]
The “Faulted” state of the resource will be notified.
[Corrective action]
Check if Oracle is properly running by referring to the Oracle alert log.
ERROR: 1215: Action error detected: Restart [Content]
Monitoring will be retried.
[Corrective action]
Check if Oracle is properly running by referring to the Oracle alert log.
ERROR: 1219: Cannot read hvgdconfig [Content]
The RMS configuration file (hvgdconfig file) cannot be read.
[Corrective action]
If you modify the RMS configuration file manually, check the settings.
ERROR: 1220: Not Found xx setting in hvgdconfig [Content]
The “%s” setting of the RMS configuration file (hvgdconfig file) is incorrect.
[Corrective action]
If you modify the RMS configuration file manually, check the settings.
- 108 -
ERROR: 1223: Not found AttributeName in hvgdconfig [Content]
The “AttributeName” setting of the RMS configuration file (hvgdconfig file) is incorrect.
[Corrective action]
If you modify the RMS configuration file manually, check the settings.
ERROR: 1224: Receiving of monitoring instruction failed (detail) [Content]
An internal error occurred. Acquisition of shared memory or semaphores failed.
[Corrective action]
Contact system administrators.
ERROR: 1225: Reporting of monitoring result failed : status [Content]
An internal error occurred. Notification of monitoring result failed.
[Corrective action]
Contact system administrators.
ERROR: 1226: Checking existence of Detector process failed [Content]
An internal error occurred. Checking whether or not the detector process is alive failed.
[Corrective action]
Contact system administrators.
ERROR: 1227: Invalid setting in hvgdconfig : AttributeName [Content]
The “AttributeName” setting of the RMS configuration file (hvgdconfig file) is incorrect.
[Corrective action]
If you modify the RMS configuration file manually, check the settings.
ERROR: 1299: ORA-xxxxx [Content]
An Oracle error “ORA-xxxxx” is output.
[Corrective action]
Check if Oracle is properly running by referring to the Oracle alert log.
WARNING: 1302: Action error detected: Warning [Content]
The warning state of the resource will be notified.
[Corrective action]
Check if Oracle is properly running by referring to the Oracle alert log.
- 109 -
ERROR: 3402: clorainstance detected Oracle error! (ORA-xxxxx: ) [Content]
An Oracle error occurred while Oracle startup or shutdown was in progress (svrmgrl).
[Corrective action]
Check if Oracle is properly running by referring to the Oracle alert log.
ERROR: 3403: clorainstance detected Oracle error! (ORA-xxxxx: )ERROR: 7301: clasminstance detected Oracle error! (ORA-xxxxx: ) [Content]
An Oracle error occurred while Oracle startup or shutdown was in progress (sqlplus).
[Corrective action]
Check if Oracle is properly running by referring to the Oracle alert log.
ERROR: 6227: cloranap terminates the startup of Oracle RAC instance resource "ResourceName",because UNKNOWN state of ASM was detected. (detail) Please check ASM. [Content]
Startup of Oracle RAC instance has been terminated because UNKNOWN state of ASM was detected during the startup process ofthe Oracle RAC instance. Information about ASM is described in the detail. (ASM resource name, status)This message may appear in the environment of Oracle RAC using ASM.
[Corrective action]
Check the status of ASM described in the detail, and resolves a problem.
Oracle listener resource messages
ERROR: 2202: Cannot map shared memory or get semaphore [Content]
A system error occurred. Acquisition of shared memory or semaphores failed.
[Corrective action]
The problem might be due to insufficient system resource. Check the system environment.
ERROR: 2203: Cannot get ORACLE_HOME [Content]
ORACLE_HOME cannot be acquired.
[Corrective action]
Check if ORACLE_HOME is correctly set for the environment variable.
ERROR: 2204: Cannot read hvgdconfig [Content]
The RMS configuration file (hvgdconfig file) cannot be read.
[Corrective action]
Modify the RMS configuration file manually then check the file settings.
ERROR: 2205: Not Found xx setting in hvgdconfig
- 110 -
[Content]
The “%s” setting of the RMS configuration file (hvgdconfig file) is incorrect.
[Corrective action]
If you modify the RMS configuration file manually, check the settings.
ERROR: 2206: Not Found AttributeName in hvgdconfig [Content]
The “AttributeName” setting of the RMS configuration file (hvgdconfig file) is incorrect.
[Corrective action]
If you modify the RMS configuration file manually, check the settings.
ERROR: 2210: Tnsping detected the error (xx) [Content]
Listener monitoring with the tnsping command failed.
[Corrective action]
Check the Listener log and if the Listener is properly running.
ERROR: 2211: The listener name is invalid [Content]
The Oracle listener name is incorrect.
[Corrective action]
Check the Listener settings such as listener.ora and tnsnames.ora.
ERROR: 2214: The process of the listener does not exist [Content]
An Oracle listener process failure was detected. It will be output along with userApplication stop.
[Corrective action]
If the error is output during userApplication is online, check the Listener log and if the Listener is properly running.
ERROR: 2215: Process ID of the listener is not found [Content]
The Listener process ID is unknown.
[Corrective action]
Check the Listener log and if the Listener is properly running.
ERROR: 2219: Reporting of monitoring result failed : status [Content]
An internal error occurred. Notification of monitoring result failed.
[Corrective action]
Contact system administrators.
ERROR: 2220: System error occurred(detail)
- 111 -

[Content]
A system error occurred.
[Corrective action]
The problem might be due to insufficient system resource. Check the system environment.
ERROR: 2221: Receiving of monitoring instruction failed (detail) [Content]
An internal error occurred. Acquisition of shared memory or semaphores failed.
[Corrective action]
Contact system administrators.
ERROR: 2222: Checking existence of Detector process failed [Content]
An internal error occurred. Checking whether or not the detector process is alive failed.
[Corrective action]
Contact system administrators.
Common messages
INFO: 0101: Fault Watching is disable INFO: 0101: Fault Watching is disabled [Content]
Monitoring resource was discontinued after the hvoradisable was executed.
[Corrective action]
None. Execute the hvoraenable command to restart resource monitoring.
INFO: 0102: Fault Watching is enableINFO: 0102: Fault Watching is enabled [Content]
Resource monitoring was restarted after the “hvoraenable” command was executed.
[Corrective action]
None.
Information
For details of the commands, see “4.1 hvoradisable - Discontinue Monitoring Resources”, “4.2 hvoraenable - Restart MonitoringResources”.
ERROR: 0207: Cannot allocate memory for hvgdconfig : AttributeName [Content]
A system error occurred. Acquisition of memory failed.
[Corrective action]
The problem might be due to insufficient system resource. Check the system environment.
- 112 -
ERROR: 0208: Data init error [Content]
A system error occurred. Acquisition of semaphore failed.
[Corrective action]
The problem might be due to insufficient system resource. Check the system environment.
ERROR: 0209: Fork error [Content]
A system error occurred. Generation of process failed.
[Corrective action]
The problem might be due to insufficient system resource. Check the system environment.
ERROR: 0211: User xx not found. [Content]
The Oracle user settings are incorrect.
[Corrective action]
Check if Oracle user information (e.g. username) is correct.
ERROR: 0212: Cannot create log xx [Content]
Log files cannot be created.
[Corrective action]
The problem might be due to insufficient system resource. Check the system environment.
ERROR: 0213: Library init error [Content]
A system error occurred. Initialization failed.
[Corrective action]
The problem might be due to insufficient system resource. Check the system environment.
ERROR: 0219: Detector aborted [Content]
A system error occurred. The detector will be terminated.
[Corrective action]
The problem might be due to insufficient system resource. Check the system environment.
ERROR: 0220: Not found <AttributeName> in hvgdconfig. [Content]
The “AttributeName” setting of the RMS configuration file (hvgdconfig file) is not set.
[Corrective action]
If you modify the RMS configuration file manually, check the settings.
- 113 -
ERROR: 0221: Invalid setting in hvgdconfig : AttributeName [Content]
The “AttributeName” setting of the RMS configuration file (hvgdconfig file) is incorrect.
[Corrective action]
If you modify the RMS configuration file manually, check the settings.
ERROR: 0222: Checking permission of resource monitoring failed [Content]
An internal error occurred. Checking monitoring disruption failed.
[Corrective action]
Contact system administrators.
ERROR: 0223: Checking existence of fault monitor process failed [Content]
An internal error occurred. Checking whether or not the monitoring process is alive failed.
[Corrective action]
Contact system administrators.
ERROR: 0224: Sending monitoring instruction failed (detail) [Content]
A system error occurred. Acquisition of shared memory or semaphores failed.
[Corrective action]
Contact system administrators.
ERROR: 0225: Receiving of monitoring result failed (detail) [Content]
A system error occurred. Acquisition of shared memory or semaphores failed.
[Corrective action]
Contact system administrators.
ERROR: 0226: Watch Timeout occurred (count) [Content]
Since there’s no response from Oracle or Listener, timeout occurs.
[Corrective action]
Check if Oracle or Listener is properly running by referring to the Oracle alert log or Listener log.
ERROR: 0227: Receiving of Script notice failed [Content]
An internal error occurred. Communication with the script failed.
[Corrective action]
Contact system administrators.
- 114 -

ERROR: 0228: Starting fault monitor failed [Content]
Startup of the monitoring process failed.
[Corrective action]
Contact system administrators.
ERROR: 0229: Pipe error [Content]
A system error occurred. Creation of output pipe failed.
[Corrective action]
The problem might be due to insufficient system resource. Check the system environment.
Note
PRIMECLUSTER Wizard for Oracle outputs error messages to system console other than messages described above if error in Oracleinstance startup occurs.
clgetoralog messages
clgetoralog [ERROR] Creation of temporary directory failed! (directory_name) [Content]
Cannot make a temporary directory.
[Corrective action]
Check the system environment.
clgetoralog [ERROR] Invalid RMS Configuration name! (RMS_configuration) [Content]
The specified RMS configuration RMS_configuration does not exist.
[Corrective action]
Retry with a correct RMS configuration name.
clgetoralog [ERROR] No space in path_name (details)! [Content]
Not enough disk space in path_name.
[Corrective action]
Check the system environment.
clgetoralog [ERROR] Creation of directory failed! (directory_name) [Content]
Cannot make a directory directory_name where collected information is stored.
[Corrective action]
Check the system environment.
- 115 -
clgetoralog [ERROR] "file_name" already exists! [Content]
Cannot make file_name because the same name file already exists.
[Corrective action]
The directory where the collected information has been stored is shown in the following message. Create an archive file from thedirectory manually with other file name.
clgetoralog [ERROR] Creation of "file_name" failed! [Content]
Cannot create an archive file file_name.
[Corrective action]
The directory where the collected information has been stored is shown in the following message. Create an archive file from thedirectory manually.
clgetoralog [WARN] Obtaining local SysNode Name failed! [Content]
Cannot get local SysNode name, but clgetoralog continues collecting information.
[Corrective action]
None.
clgetoralog [WARN] Execution of hvw failed! [Content]
Cannot execute an RMS command hvw(1M) correctly, but clgetoralog continues collecting information.
[Corrective action]
None.
clgetoralog [WARN] Result of hvw is invalid! [Content]
An RMS command hvw(1M) has returned unexpected result, but clgetoralog continues collecting information.
[Corrective action]
None.
clgetoralog [WARN] Wizard for Oracle resources not found in hvgdconfig! [Content]
There are no definitions of Wizard for Oracle resources in hvgdconfig file, but clgetoralog continues collecting information.
[Corrective action]
None.
clgetoralog [WARN] Obtaining RMS Configuration name from CONFIG.rms failed! [Content]
Cannot get RMS configuration name, but clgetoralog continue collecting information.
- 116 -
[Corrective action]
None.
clgetoralog [WARN] Invalid RMS Configuration name! (RMS_configuration) [Content]
Cannot get RMS configuration name, but clgetoralog continue collecting information.
[Corrective action]
None.
clorainfo messages
clorainfo: ERROR: Obtaining local SysNode Name failed! [Content]
Cannot get a local SysNode name.
[Corrective action]
Check if CF (Cluster Foundation) has been configured and is “UP” state.
clorainfo: ERROR: Checking RMS running status failed! (details) [Content]
Cannot check if RMS is running or not.
[Corrective action]
Check if PRIMECLUSTER installation, cluster setup and building a cluster application (userApplication) have been completed.
clorainfo: ERROR: Obtaining RMS configuration name failed! (details) [Content]
Cannot get an RMS configuration name.
[Corrective action]
Check if building a userApplication (cluster application) has been completed.
clorainfo: ERROR: CONFIG.rms does not exist! (details) [Content]
CONFIG.rms file does not exist.
[Corrective action]
Check if building a userApplication (cluster application) has been completed.
clorainfo: ERROR: Wizard for Oracle resources not found [Content]
There is no Wizard for Oracle resources in a build userApplication (cluster application).
[Corrective action]
Check if building a userApplication (cluster application) has been completed or Oracle instance resources or Listener resources areincluded in the userApplication.
clorainfo: ERROR: The specified resource does not exist on this SysNode (SysNode_name), or does notbelong to Wizard for Oracle! - resource_name
- 117 -
[Content]
The specified resource resource_name does not exist on the local node SysNode_name, or is not a Wizard for Oracle resource.
[Corrective action]
Retry with a correct resource name.
clorainfo: ERROR: Resource does not belong to Wizard for Oracle - resource_name [Content]
The specified resource resource_name is not a Wizard for Oracle resource.
[Corrective action]
Retry with a correct resource name.
clorainfo: ERROR: Invalid RMS Configuration. [Content]
RMS configuration is invalid.
[Corrective action]
Check if building a userApplication (cluster application) has been completed.
clorainfo: ERROR: RMS_configuration does not exist. [Content]
The specified RMS configuration does not exist.
[Corrective action]
Retry with a correct RMS configuration name.
hvoradisable/hvoraenable messages
command: ERROR: Internal error! (details) [Content]
Internal error occurred.
[Corrective action]
Contact your system administrator.
command: ERROR: Failed to disable/enable resource monitoring - resource_name [Content]
Cannot disable or enable monitoring.
[Corrective action]
Contact your system administrator.
command: ERROR: hvgdconfig does not exist! [Content]
hvgdconfig file does not exist.
[Corrective action]
Check if building a userApplication (cluster application) has been completed.
- 118 -
command: ERROR: Obtaining local SysNode Name failed! [Content]
Cannot get a local SysNode name.
[Corrective action]
Check if CF (Cluster Foundation) has been configured and is “UP” state.
command: ERROR: Obtaining RMS configuration Name failed! [Content]
Cannot get an RMS configuration name.
[Corrective action]
Check if building a userApplication (cluster application) has been completed.
command: ERROR: Execution of hvw failed! [Content]
Cannot execute an RMS command hvw(1M) correctly.
[Corrective action]
Check if building a userApplication (cluster application) has been completed.
command: ERROR: Result of hvw is invalid! [Content]
Cannot execute an RMS command hvw(1M) correctly.
[Corrective action]
Check if building a userApplication (cluster application) has been completed.
command: ERROR: Failed to disable/enable resource monitoring! (details) [Content]
Cannot disable or enable monitoring because of details.
[Corrective action]
Check if PRIMECLUSTER installation, cluster setup and building a cluster application (userApplication) have been completed.
command: ERROR: No Wizard for Oracle resources belong to specified userApplication! -userApplication_name [Content]
There is no Wizard for Oracle resources in the specified userApplication userApplication_name.
[Corrective action]
Retry with a correct userApplication name.
command: ERROR: No Wizard for Oracle resources are in the current RMS configuration! [Content]
There is no Wizard for Oracle resources in the current RMS configuration.
- 119 -

[Corrective action]
Check if building a userApplication (cluster application) has been completed or Oracle instance resources or Listener resources areincluded in the userApplication.
command: ERROR: No Wizard for Oracle resources exist on this node! - SysNode_name [Content]
There is no Wizard for Oracle resources on a local node SysNode_name.
[Corrective action]
Check if building a userApplication (cluster application) has been completed or Oracle instance resources or Listener resources areincluded in the userApplication.
command: ERROR: Invalid userApplication or Resource! [Content]
The specified userApplication name or resource name is invalid.
[Corrective action]
Retry with a correct userApplication name and resource name.
command: ERROR: The specified resource does not exist on SysNode_name! - resource_name [Content]
The specified resource does not exist on a local node SysNode_name.
[Corrective action]
Retry with a correct resource name or retry on a correct node.
command: WARNING: RMS is not running, but the monitoring of resource_name is disabled/enabled. [Content]
The monitoring is disabled or enabled although RMS is not running.
[Corrective action]
This setting will become effective in the next RMS startup.
cloracpy messages
ORACLE_SID not found. [Content]
ORACLE_SID cannot be acquired.
[Corrective action]
Check if ORACLE_SID is correctly set for the environment variable.
ORACLE_HOME not found. [Content]
ORACLE_HOME cannot be acquired.
[Corrective action]
Check if ORACLE_HOME is correctly set for the environment variable.
ORACLE_BASE not found.
- 120 -
[Content]
ORACLE_BASE cannot be acquired.
[Corrective action]
Check if ORACLE_BASE is correctly set for the environment variable.
ORACLE_HOME/dbs is invalid. [Content]
ORACLE_HOME/dbs directory does not exist.
[Corrective action]
Check if the directory exists.
ORACLE_HOME/network/admin is invalid. [Content]
ORACLE_HOME/network/admin directory does not exist.
[Corrective action]
Check if the directory exists.
ORACLE_BASE/admin/ORACLE_SID is invalid. [Content]
ORACLE_BASE/admin/ORACLE_SID directory does not exist.
[Corrective action]
Check if the directory exists.
cloracpy:tar is error.(EXIT_CODE). [Content]
Cannot execute tar(1) command correctly.
[Corrective action]
Check the disk space or authority of /tmp directory.
clorapass messages
Cannot read password_file. [Content]
Cannot read the password file.
[Corrective action]
Check the password file.
File format error password_file. [Content]
Password file occurred format error.
[Corrective action]
Delete the password file, set password again. If more than one password was registered in the file, set all of them.
- 121 -
Cannot allocate memory. [Content]
A system error occurred. Acquisition of memory failed.
[Corrective action]
The problem might be due to insufficient system resource. Check the system environment.
Cannot write password_file. [Content]
Cannot write the password file.
[Corrective action]
Check the password file.
Password not match. [Content]
An incorrect password was entered.
[Corrective action]
Enter a correct password.
- 122 -

Appendix A Failure case studiesMost of Oracle instance startup failures or cluster failover failures are due to Oracle instance down invents. Sometimes, the same or similarproblems can occur due to setup or evaluation mistakes made by users.
This section discusses possible causes, corrective and preventive action of problems caused by improper settings or mistaken evaluations
Oracle instances Startup/stop failure A.1.1 Startup/stop failure
AutoRecover or Failover A.1.2 AutoRecover or Failover
Warning status A.1.3 Warning state
Oracle listeners Startup/stop failure A.2.1 Startup/stop failure
AutoRecover or Failover A.2.2 AutoRecover or Failover
Warning status A.2.3 Warning state
A.1 Oracle instances
A.1.1 Startup/stop failureOracle instance startup or stop failed.
[Case 1] (Standby Operation, Scalable Operation with Oracle RAC, Single-Node Cluster Operation)
Oracle instance startup or stop fails when the PRIMECLUSTER RMS resource settings are invalid.
Check the resource setup information by executing the “clorainfo -c” command. See “4.6 clorainfo - Display Resource Configuration andMonitoring Status”.
- Oracle user
- OracleSID
- Scripts (e.g. PreOnlineScript)A correct path must be set.The script must have execution permission.The script must behave correctly.
If your setup information is incorrect, set proper values again. See “Chapter 2 Environment setup”.
[Case 2] (Standby Operation, Single-Node Cluster Operation)
Oracle instance startup or stop fails when user script settings in /opt/FJSVclora/usr are incorrect (standby operation only).
Check if the user scripts behave correctly.
[Case 3] (Standby Operation, Scalable Operation with Oracle RAC, Single-Node Cluster Operation)
Oracle instance startup or stop fails when Oracle settings are invalid.
Check the Oracle alert log, so you might be able to detect the cause of the failure.Also, check if Oracle can be started or stopped properly. If you discontinue Oracle instance resource monitoring, you can operate Oraclemanually. See “3.2.4.1 Oracle must be stopped”.
[Case 4] (Scalable Operation with Oracle RAC)
When starting userApplication with Oracle RAC Instances resource in the state where Oracle Clusterware is not running, the resourcestate enters Wait until exceeds the time set as ScriptTimeout (refer to step 10 of “2.3.5 userApplication with Oracle RAC Instances andListeners”). If it exceeds the time set as ScriptTimeout with the resource state maintain Wait, the resource state will enter Faulted.
Execute the following methods according to each pattern.
- 123 -

- In the case of configuration that the Oracle Clusterware and Oracle RAC instance are registered in different userApplication. (Itmatches “Configuration A” in “2.3.3 userApplication and Resource Configuration”.)
At first, check whether Oracle Clusterware is running.
The following command execution, you can check whether Oracle Clusterware is running.
# su - <Grid user>
$ crsctl status resource
When the following message is outputted, Oracle Clusterware may be not running.
CRS-0184: Cannot communicate with the CRS daemon.
When Oracle Clusterware is not running, there is a possibility that the setting that Oracle Clusterware starts earlier than Oracle RACInstance is incorrect.
Check whether the script which starts Oracle Clusterware resource is set as the PreOnlineScript of Oracle RAC Instance (refer to“note” of step 10 of “2.3.5 userApplication with Oracle RAC Instances and Listeners”).
- In the case of configuration that the Oracle Clusterware and Oracle RAC instance are registered in the same userApplication. (Itmatches “Configuration B” in “2.3.3 userApplication and Resource Configuration”.)
There is a possibility that starting of Oracle RAC Instance resource is failed.
Check whether you have no mistakes in setting of Oracle RAC Instance resource (“2.3.5 userApplication with Oracle RAC Instancesand Listeners”).
In addition, check whether you have no mistakes in setting of PRIMECLUSTER RMS and Oracle (refer to “Case 1” and “Case 3”).
- In the case of configuration that the Oracle Clusterware is not registered. (It matches “Configuration C” in “2.3.3 userApplicationand Resource Configuration”.)
Check whether Oracle Clusterware is running.
The following command execution, you can check whether Oracle Clusterware is running.
# su - <Grid user>
$ crsctl status resource
When the following messages are outputted, Oracle Clusterware may be not running.
CRS-0184: Cannot communicate with the CRS daemon.
Clear Faulted state of the resource, after that, execute the following commands and start Oracle Clusterware.
# <Grid user's $ORACLE_HOME>/crsctl start crs
After that, start userApplication.
[Case 5] (Scalable Operation with Oracle RAC)
In the case of userApplication or the resources setting is changed when Oracle Clusterware has stopped, Oracle RAC instance startup orstop fails. Start Oracle Clusterware on all nodes beforehand when you do the setting change of userApplication or the resources. (Referto “2.3.7 Configuration-Generate and Configuration-Activate” in the case of the Oracle RAC 11g R2 Scalable Operation.)
A.1.2 AutoRecover or FailoverAutoRecover, userApplication failover or degeneration occurred because of an Oracle instance resource failure.
[Case 1] (Standby Operation, Scalable Operation with Oracle RAC, Single-Node Cluster Operation)
If there is insufficient space to archive, and data updating processing through monitoring SQL hangs, an oracle resource might fail.
Afterwards, the service might stop finally on both operating node and standby node, because the space of shared disk is insufficient andthe failover of userApplication fails on the standby node.
- 124 -

Check the Oracle alert log, so you might be able to detect the cause of the failure.Also, backup archived redo logs then reserve enough disk space.
[Case 2] (Standby Operation, Scalable Operation with Oracle RAC, Single-Node Cluster Operation)
If monitoring timeout occurs twice in a row, a resource failure will occur. If the following error message is output to syslog, you candetermine the cause of this problem: “ERROR: 0226: Watch Timeout occurred”
Take corrective action on Oracle.
In Oracle instance monitoring of PRIMECLUSTER Wizard for Oracle, if there is no reply from Oracle within a specified time, monitoringtimeout will be considered. At the first monitoring timeout, the resource will only enter Warning, however, if it occurs twice in a row, aresource failure will be determined.
A.1.3 Warning stateOracle has been activated, but an Oracle instance resource has entered Warning.
[Case 1] (Standby Operation, Scalable Operation with Oracle RAC, Single-Node Cluster Operation)
An Oracle instance resource enters Warning when
- The Oracle SYSTEM user password is not registered in PRIMECLUSTER Wizard for Oracle,
- The Oracle SYSTEM user password is registered in PRIMECLUSTER Wizard for Oracle, but it is incorrect, or
- The correct Oracle SYSTEM user password is registered in PRIMECLUSTER Wizard for Oracle, but it is disabled.
If ORA-01017 is output to syslog, you can determine the cause of this problem. Register the correct SYSTEM user password again. See “3.3 Oracle SYSTEM User Password Change ”.
[Case 2] (Standby Operation, Scalable Operation with Oracle RAC, Single-Node Cluster Operation)
An Oracle instance resource enters Warning when the Oracle SYSTEM user account is locked, so you are not allowed to connect to Oracle.
If ORA-28000 is output to syslog, you can determine the cause of this problem.
You can also check the SYSTEM user account by referring to the following SQL.
If the “account_status” column indicates “LOCKED(TIMED)” or “LOCKED”, you can determine the cause of this problem.
# su - <Oracle user>
$ sqlplus /nolog
SQL> connect / as sysdba
SQL> select username, account_status from dba_users;
Access Oracle using sysdba privileges then release account locking of the SYSTEM user.
# su - <Oracle user>
$ sqlplus /nolog
SQL> connect / as sysdba
SQL> alter user system account unlock;
If ORA-01017 is output to syslog as well as ORA-28000, an incorrect password might have been registered. In this case, correct theSYSTEM user password. See “3.3 Oracle SYSTEM User Password Change ”. Then, release account locking using the procedure above.
[Case 3] (Standby Operation, Scalable Operation with Oracle RAC, Single-Node Cluster Operation)
An Oracle instance resource enters Warning when instance monitoring is discontinued. Check the monitoring status by executing the “clorainfo -m” command. See “4.6 clorainfo - Display Resource Configuration andMonitoring Status”. If instance monitoring has been discontinued, check if the Oracle instance has been activated with the OPEN status then restart monitoring.See “4.2 hvoraenable - Restart Monitoring Resources”.
- 125 -
[Case 4] (Standby Operation, Scalable Operation with Oracle RAC, Single-Node Cluster Operation)
In Oracle instance monitoring, an Oracle instance resource enters Warning if there is no reply from SQL (e.g. insert, update, etc.) withina specified time, but you can access Oracle, and the instance indicates OPEN. “ERROR: 0226: Watch Timeout occurred” message willalso be output to syslog.Take corrective action on Oracle. In Oracle instance monitoring of PRIMECLUSTER Wizard for Oracle, if there is no reply from Oracle within a specified time, monitoringtimeout will be considered. At the first monitoring timeout, the resource will only enter Warning, however, if it occurs twice in a row, aresource failure will be determined.
[Case 5] (Standby Operation, Scalable Operation with Oracle RAC, Single-Node Cluster Operation)
In Oracle instance monitoring, an Oracle instance resource enters Warning if you cannot access Oracle because of a max session error ormax process error. If ORA-00018 or ORA-00020 is output to syslog, you can determine the cause of this problem. For the maximum number of sessions that are set in the Oracle SESSIONS parameter, or the maximum number of processes that are setin the PROCESSES parameter, estimate enough values considering monitoring sessions for PRIMECLUSTER Wizard for Oracle.
For details see the Oracle manual.
[Case 6] (Standby Operation, Scalable Operation with Oracle RAC, Single-Node Cluster Operation)
An Oracle instance resource enters Warning when the SYSTEM user's password has expired, so Oracle connection is not allowed. If ORA-28001 is output to syslog, you can determine the cause of this problem. You can also check it by referring to the following SQL statement. If the ORA-28001 error message appears, you can determine the causeof this problem.
# su - <Oracle user>
$ sqlplus /nolog
SQL> connect system/password
ERROR:
ORA-28001: the password has expired
Changing password for system
New password:
In this case, change the SYSTEM user's password. After that, register the password with “clorapass” command. Refer to “3.3 OracleSYSTEM User Password Change ”.
[Case 7] (Scalable Operation with Oracle RAC)
The monitoring of Oracle RAC instance resource becomes failure when setting of WFTime is the followings, the resource state enterWarning until it is recovered by Oracle Clusterware.
- [PersistentWarning]
- [<second>]
It is possible to check setting of WFTime by the “clorainfo -c” command. (For detail of “WFTime”, refer to step 10 of “2.3.5 userApplicationwith Oracle RAC Instances and Listeners”).Check the Oracle alert log, so you might be able to detect the cause of the failure.
A.2 Oracle listeners
A.2.1 Startup/stop failureOracle listener startup or stop failed.
- 126 -
[Case 1] (Standby Operation, Scalable Operation with Oracle RAC, Single-Node Cluster Operation)
Oracle listener startup or stop fails when the PRIMECLUSTER RMS resource settings are invalid. Check the following resource setup information by executing the “clorainfo -c” command. See “4.6 clorainfo - Display ResourceConfiguration and Monitoring Status”.
- Oracle user name
- Listener name
- TNSName (net service name)
- Scripts (e.g. PreOnlineScript)
A correct path must be set.The script must have execution permission.The script must behave correctly.
If your setup information is incorrect, set proper values again. See “Chapter 2 Environment setup”.
[Case 2] (Standby Operation, Single-Node Cluster Operation)
Oracle listener startup or stop fails when the listener settings such as IP address and port number are incorrect.
Check listener logs, so you might be able to detect the cause of the failure.
Check if the settings of listener.ora are correct.
Also, check if the listener can be started or stopped properly. If you discontinue Oracle instance resource monitoring, you can operateOracle manually. See “3.2.4.1 Oracle must be stopped”.
[Case 3] (Scalable Operation with Oracle RAC)
When starting userApplication with listener resource in the state where Oracle Clusterware is not running, the resource state enters Warninguntil exceeds the time set as ScriptTimeout (refer to step 16 of “2.3.5 userApplication with Oracle RAC Instances and Listeners”). If itexceeds the time set as ScriptTimeout with the resource state maintain Wait, the resource state will enter Faulted.
Execute the following methods according to each pattern.
- In the case of configuration that the Oracle Clusterware and Oracle RAC instance are registered in different userApplication. (Itmatches “Configuration A” in “2.3.3 userApplication and Resource Configuration”.)
At first, check whether Oracle Clusterware is running.
The following command execution, you can check whether Oracle Clusterware is running.
# su - <Grid user>
$ crsctl status resource
When the following message is outputted, Oracle Clusterware may be not running.
CRS-0184: Cannot communicate with the CRS daemon.
When Oracle Clusterware is not running, there is a possibility that the setting that Oracle Clusterware starts earlier than Oracle RACInstance is incorrect.
Check whether the script which starts Oracle Clusterware resource is set as the PreOnlineScript of Oracle RAC Instance (refer to“note” of step 10 of “2.3.5 userApplication with Oracle RAC Instances and Listeners”).
- In the case of configuration that the Oracle Clusterware and Oracle RAC instance are registered in the same userApplication. (Itmatches “Configuration B” in “2.3.3 userApplication and Resource Configuration”.)There is a possibility that starting of listener resource is failed.
Check whether you have no mistakes in setting of listener resource (“2.3.5 userApplication with Oracle RAC Instances andListeners”).
In addition, check whether you have no mistakes in setting of listener (refer to “Case 2”).
- 127 -

- In the case of configuration that the Oracle Clusterware is not registered. (It matches “Configuration C” in “2.3.3 userApplicationand Resource Configuration”.)
Check whether Oracle Clusterware is running.
The following command execution, you can check whether Oracle Clusterware is running.
# su - <Grid user>
$ crsctl status resource
When the following messages are outputted, Oracle Clusterware may be not running.
CRS-0184: Cannot communicate with the CRS daemon.
Clear Faulted state of the resource, after that, execute the following commands and start Oracle Clusterware.
# <Grid user's $ORACLE_HOME>/crsctl start crs
After that, start userApplication.
A.2.2 AutoRecover or FailoverA userApplication failover or degeneration occurred because of Oracle listener resource failure.
[Case 1] (Standby Operation, Scalable Operation with Oracle RAC, Single-Node Cluster Operation)
A userApplication failover or degeneration occurs when the PRIMECLUSTER RMS resource settings (especially TNSName) are invalid. Check the following resource setup information by executing the “clorainfo -c” command. See “4.6 clorainfo - Display ResourceConfiguration and Monitoring Status”.
- Oracle user name
- Listener name
- TNSName (net service name)
If your setup information is incorrect, set proper values again. See “Chapter 2 Environment setup”.
[Case 2] (Standby Operation, Single-Node Cluster Operation)
userApplication failover or cluster degeneration occurs when the net service name of tnsnames.ora is incorrect. Check the net service name in tnsnames.ora file.
A.2.3 Warning stateA listener resource has entered Warning.
[Case 1] (Standby Operation, Scalable Operation with Oracle RAC, Single-Node Cluster Operation)
A listener resource enters Warning when listener monitoring is discontinued. Check the monitoring status by executing the “clorainfo -m” command. Refer to “4.6 clorainfo - Display Resource Configuration andMonitoring Status”.
If listener monitoring has been discontinued, check if the listener has been activated then restart monitoring. Refer to “4.2 hvoraenable -Restart Monitoring Resources”.
[Case 2] (Standby Operation, Single-Node Cluster Operation)
In listener monitoring using the tnsping command of the Oracle, when constant time did not have the reply of the tnsping command, theresource enters Warning (WatchTimeout).If the following error message is output to syslog, you can confirm the cause of this problem: “ERROR: 0226: Watch Timeout occurred”
Check the listener log, and investigate and handle it.In listener monitoring of PRIMECLUSTER Wizard for Oracle, if there is no reply from tnsping within a specified time, monitoring timeout
- 128 -

will be considered. At the first monitoring timeout, the resource will only enter Warning, however, if it occurs twice in a row, a resourcefailure will be determined.
[Case 3] (Scalable Operation with Oracle RAC)
The monitoring of listener resource becomes failure when setting of WFTime is the followings, the resource state enter Warning until itis recovered by Oracle Clusterware.
- [PersistentWarning]
- [<second>]
It is possible to check setting of WFTime by the “clorainfo -c” command. (For detail of “WFTime”, refer to step 16 of “2.3.5 userApplicationwith Oracle RAC Instances and Listeners”).Check whether the cause of resource failure is reported referring to the listener log or log files.
- 129 -
Appendix B Change Oracle Resource SettingsThis section explains how to change the Oracle resource settings.
B.1 Resource Additional Creation
B.1.1 RespectivelyThis section explains how to create an Oracle resource newly and register it to an existing userApplication that includes an Oracle resourcealready.
Example
To create a Listener “LISTENER_2” newly and register it to an existing userApplication including an Oracle instance resource and aListener resource “LISTENER” already.
1. Stop RMS on all nodes.
2. Start up userApplication Configuration Wizard.
Note
If you create and register an Oracle RAC instance resource or a Listener resource in the Oracle RAC Scalable Operation, start upOracle Clusterware on all nodes.For details, see “2.3.5 userApplication with Oracle RAC Instances and Listeners” in the case of the Oracle RAC 11g R2 ScalableOperation.
3. Select “Edit userApplication or Resource” in the “userApplication Configuration menu” screen, and click “Next”.
4. Select the target resource (e.g. Oracle1) from the list in the “List of userApplication and resource” screen, and click “Next”.
5. Select a resource that one wants to create from the menu in the “Set up Resource” screen, and click “Next”.
- In the Standby OperationIf you create and register an Oracle instance resource or an ASM instance resource, select “AdditionalInstance” here, and click“Next”. After that, create and set the resource according to the steps 4, 5 of “2.2.7.2 Oracle Resource Creation”.If you create and register a Listener resource, select “AdditionalListener” here, and click “Next”. After that, create and set theresource according to the steps 6, 7 of “2.2.7.2 Oracle Resource Creation”.
- In the Oracle RAC 11g R2 Scalable OperationIf you create and register an Oracle Clusterware resource, select “AdditionalOracle11gR2Clusterware” here, and click “Next”.After that, create and set the resource according to the steps 3 to 5 of “2.3.4 userApplication with Oracle Clusterware”.If you create and register an Oracle RAC instance resource, select “AdditionalRAC11gR2Instance” here, and click “Next”.After that, create and set the resource according to the steps 7 to 11 of “2.3.5 userApplication with Oracle RAC Instances andListeners”.If you create and register an Oracle RAC listener resource, select “AdditionalRAC11gR2Listener” here, and click “Next”.After that, create and set the resource according to the steps 13 to 17 of “2.3.5 userApplication with Oracle RAC Instances andListeners”.
- In the Single-Node Cluster OperationIf you create and register an Oracle instance resource or an ASM instance resource, select “AdditionalInstance” here, and click“Next”. After that, create and set the resource according to the steps 4, 5 of “2.2.7.2 Oracle Resource Creation”.If you create and register a Listener resource, select “AdditionalListener” here, and click “Next”. After that, create and set theresource according to the steps 6, 7 of “2.2.7.2 Oracle Resource Creation”.
- 130 -

The setting of AutoRecover Flag is recommended for Oracle instance resources and Oracle Listener resources.The availability is increased by restarting Oracle instance resources and Oracle Listener resources automatically when an erroris detected.
Attributes Values
Flags AutoRecover (A)
6. Repeat the step 5 if need to create and register resources else.
7. After completion, select “SAVE+EXIT” in the “Set up Resource” screen, and click “Registration”.After that, reply “Yes” to the displayed message “0803 Do you want to register setup in a cluster system?”
8. Reply “Yes” to the displayed message “0817 Do you want to distribute RMS Configuration?”
9. Click “End” in the “userApplication Configuration menu” screen, and terminate userApplication Configuration Wizard.
B.1.2 In a GroupThis section explains how to create an Oracle resource newly and register it to an existing userApplication that does not include any Oracleinstance resource and Listener resource.
Example
To create an Oracle instance resource and(or) a Listener resource newly and register them(it) to an existing userApplication includingGds, Fsystem and Gls resources already. In the standby operation, it is the same as the procedure in “2.2.7.2 Oracle Resource Creation”.
1. Stop RMS on all nodes.
2. Start up userApplication Configuration Wizard.
Note
If you create and register an Oracle RAC instance resource or a Listener resource in the Oracle RAC Scalable Operation, start upOracle Clusterware on all nodes.For details, see “2.3.5 userApplication with Oracle RAC Instances and Listeners”.
3. Select “Remove userApplication or Resource” in the “userApplication Configuration menu” screen, and click “Next”.
4. Select the existing userApplication (e.g. userApp_1) from the list in the “List of userApplication and resource” screen, and click“Remove”.After that, click “userApplication” to reply to the displayed message “0807 Do you want to remove only selected userApplication(userApplication_name)? Do you want to remove all the resources userApplication?”
Note
Do not click “All” to reply to the message. Not only the userApplication but also existing resources will be removed.
5. Select “Create Resource” in the “userApplication Configuration menu” screen, and click “Next”.
6. Select “Oracle” from the “Resource type” list in the “Create Resource” screen, and click “Next”.
- 131 -
7. Select a resource that one wants to create from the menu in the “Set up Resource” screen, and click “Next”.
- In the Standby OperationIf you create and register an Oracle instance resource or an ASM instance resource, select “AdditionalInstance” here, and click“Next”. After that, create and set the resource according to the steps 4, 5 of “2.2.7.2 Oracle Resource Creation”.If you create and register a Listener resource, select “AdditionalListener” here, and click “Next”. After that, create and set theresource according to the steps 6, 7 of “2.2.7.2 Oracle Resource Creation”.
- In the Oracle RAC 11g R2 Scalable OperationIf you create and register an Oracle Clusterware resource, select “AdditionalOracle11gR2Clusterware” here, and click “Next”.After that, create and set the resource according to the steps 3 to 5 of “2.3.4 userApplication with Oracle Clusterware”.If you create and register an Oracle RAC instance resource, select “AdditionalRAC11gR2Instance” here, and click “Next”.After that, create and set the resource according to the steps 7 to 11 of “2.3.5 userApplication with Oracle RAC Instances andListeners”.If you create and register an Oracle RAC listener resource, select “AdditionalRAC11gR2Listener” here, and click “Next”.After that, create and set the resource according to the steps 13 to 17 of “2.3.5 userApplication with Oracle RAC Instances andListeners”.
- In the Single-Node Cluster OperationIf you create and register an Oracle instance resource or an ASM instance resource, select “AdditionalInstance” here, and click“Next”. After that, create and set the resource according to the steps 4, 5 of “2.2.7.2 Oracle Resource Creation”.If you create and register a Listener resource, select “AdditionalListener” here, and click “Next”. After that, create and set theresource according to the steps 6, 7 of “2.2.7.2 Oracle Resource Creation”.The setting of AutoRecover Flag is recommended for Oracle instance resources and Oracle Listener resources.The availability is increased by restarting Oracle instance resources and Oracle Listener resources automatically when an erroris detected.
Attributes Values
Flags AutoRecover (A)
8. Repeat the step 7 as many times as needed.
9. Select “Create userApplication” in the “userApplication Configuration menu” screen, and click “Next”.After that, create a userApplication including the Oracle resource.
- In the Standby OperationFor further details of the attributes of userApplication, refer to “2.2.3 userApplication Creation”.
- In the Oracle RAC 11g R2 Scalable OperationFor further details of the attributes of userApplication, refer to “2.3.3 userApplication and Resource Configuration”.
- In the Single-Node Cluster OperationThe settings for userApplication are as follows. For the attribute of the others, see the PRIMECLUTSER manuals.
Attributes Values
AutoSwitchOver Do not set the values.
PersistentFault 1
HaltFlag no
ShutdownPriority Do not set the values.
OnlinePriority Do not set the values.
10. Click “End” in the “userApplication Configuration menu” screen, and terminate userApplication Configuration Wizard.
B.2 Change Resource SettingsThis section explains how to change settings of an existing resource.
- 132 -
Example
To change “Interval” attribute of an existing Oracle instance resource, from “60” to “30”.
1. Stop RMS on all nodes.
2. Start up userApplication Configuration Wizard.
Note
If you create and register an Oracle RAC instance resource or a Listener resource in the Oracle RAC Scalable Operation, start upOracle Clusterware on all nodes.For details, see “2.3.5 userApplication with Oracle RAC Instances and Listeners”.
3. Select “Edit userApplication or Resource” in the “userApplication Configuration menu” screen, and click “Next”.
4. Select the resource (e.g. Oracle1) which includes the resource (Oracle Clusterware resource, Oracle instance resource or the Listenerresource) that one wants to modify from the list in the “List of userApplication and resource” screen, and click “Next”.
5. Select the existing resource that one wants to modify from the menu in the “Set up Resource” screen, and click “Next”.
- In the Standby Operation or the Single-Node Cluster OperationIf you modify an Oracle instance resource or an ASM instance resource, select “OracleInstanceName[n]='OracleSID'” here,and click “Next”. In the next screen, select “SELECTED='OracleSID'”, and click “Next”.If you modify an Oracle listener resource, select “OracleListenerName[n]=LISTENER” here, and click “Next”. In the nextscreen, select “SELECTED=LISTENER”, and click “Next”.
- In the Oracle RAC 11g R2 Scalable OperationIf you modify an Oracle Clusterware resource, select “Oracle11gR2Clusterware[n]=Clusterware” here, and click “Next”. Inthe next screen, select “SELECTED=Clusterware”, and click “Next”.If you modify an Oracle RAC instance resource, select “RAC11gR2Instance[n]=OracleSID” here, and click “Next”. In thenext screen, select “SELECTED=OracleSID”, and click “Next”.If you modify an Oracle RAC listener resource, select “RAC11gR2Listener[n]=CRS resource name” here, and click “Next”.In the next screen, select “SELECTED=CRS resource name”, and click “Next”.
6. Change settings in the “Set up Resource” screen.
- In the Standby Operation or the Single-Node Cluster OperationIn the case of an Oracle instance resource or an ASM instance resource, change settings according to the step 5 of “2.2.7.2Oracle Resource Creation”.In the case of a Listener resource, change settings according to the step 7 of “2.2.7.2 Oracle Resource Creation”.
- In the Oracle RAC 11g R2 Scalable OperationIn the case of an Oracle Clusterware resource, change settings according to the step 5 of “2.3.4 userApplication with OracleClusterware”.In the case of an Oracle RAC instance resource, change settings according to the step 10 of “2.3.5 userApplication with OracleRAC Instances and Listeners”.In the case of an Oracle RAC listener resource, change settings according to the step 16 of “2.3.5 userApplication with OracleRAC Instances and Listeners”.
7. Select “SAVE+RETURN” in the “Set up Resource” screen after completed.
8. Repeat the steps 5 to 7 if need to change resources else.
- 133 -
9. After completion, select “SAVE+EXIT” in the “Set up Resource” screen, and click “Registration”.After that, reply “Yes” to the displayed message “0803 Do you want to register setup in a cluster system?”
10. Reply “Yes” to the displayed message “0817 Do you want to distribute RMS Configuration?”
11. Click “End” in the “userApplication Configuration menu” screen, and terminate userApplication Configuration Wizard.
B.3 Resource Deletion
B.3.1 RespectivelyThis section explains how to delete an Oracle instance or a Listener resource from an existing userApplication that includes an Oracleresource already.
Example
To delete only a Listener resource from an existing userApplication including an Oracle instance resource and a Listener resource alreadyin standby operation.
1. Stop RMS on all nodes.
2. Start up userApplication Configuration Wizard.
3. Select “Edit userApplication or Resource” in the “userApplication Configuration menu” screen, and click “Next”.
4. Select the resource (e.g. Oracle1) which includes the resource (Oracle Clusterware resource, Oracle instance resource or the Listenerresource) that one wants to delete from the list in the “List of userApplication and resource” screen, and click “Next”.
5. Select the existing resource that one wants to delete from the menu in the “Set up Resource” screen, and click “Next”.
- In the Standby Operation or the Single-Node Cluster OperationIf you modify an Oracle instance resource or an ASM instance resource, select “OracleInstanceName[n]='OracleSID'” here,and click “Next”. In the next screen, select “NONE”, and click “Next”.If you modify an Oracle listener resource, select “OracleListenerName[n]=LISTENER” here, and click “Next”. In the nextscreen, select “NONE”, and click “Next”.
- In the Oracle RAC 11g R2 Scalable OperationIf you modify an Oracle Clusterware resource, select “Oracle11gR2Clusterware[n]=Clusterware” here, and click “Next”. Inthe next screen, select “NONE”, and click “Next”.If you modify an Oracle RAC instance resource, select “RAC11gR2Instance[n]=OracleSID” here, and click “Next”. In thenext screen, select “NONE”, and click “Next”.If you modify an Oracle RAC listener resource, select “RAC11gR2Listener[n]=CRS resource name” here, and click “Next”.In the next screen, select “NONE”, and click “Next”.
6. Repeat the step 5 if need to delete resources else.
Note
You may not delete all the resources included in the Oracle resource (e.g.Oracle1). At least one or more resources (Oracle Clusterwareresource, Oracle instance resource or Listener resource) should exist in the Oracle resource.If you need to delete all the resources included in the Oracle resource, perform the steps in “B.3.2 In a Group”.
7. After completion, select “SAVE+EXIT” in the “Set up Resource” screen, and click “Registration”.After that, reply “Yes” to the displayed message “0803 Do you want to register setup in a cluster system?”
8. Reply “Yes” to the displayed message “0817 Do you want to distribute RMS Configuration?”
- 134 -

9. Click “End” in the “userApplication Configuration menu” screen, and terminate userApplication Configuration Wizard.
B.3.2 In a GroupThis section explains how to delete an Oracle resource and a Listener resource in a group from an existing userApplication including themalready.
Example
When delete an Oracle resource and a Listener resource in a group from an existing userApplication including them already in standbyoperation.
1. Stop RMS on all nodes.
2. Start up userApplication Configuration Wizard.
3. Select “Remove userApplication or Resource” in the “userApplication Configuration menu” screen, and click “Next”.
4. Select the existing userApplication (e.g. userApp_1) from the list in the “List of userApplication and resource” screen, and click“Remove”.After that, click “userApplication” to reply to the displayed message “0807 Do you want to remove only selected userApplication(userApplication_name)? Do you want to remove all the resources userApplication?”
Note
Do not click “All” to reply to the message. Not only the userApplication but also existing resources will be removed.
5. Select “Remove userApplication or Resource” in the “userApplication Configuration menu” screen, and click “Next”.
6. Select the target resource (e.g. Oracle1) from the list in the “List of userApplication and resource” screen, and click “Remove”.After that, reply “Yes” to the displayed message “0808 Do you want to remove only selected Resource (Resource_name) and allthe resources under Resource?”
7. Select “Create userApplication” in the “userApplication Configuration menu” screen, and click “Next”.After that, create a userApplication that includes the remaining resources.
8. Click “End” in the “userApplication Configuration menu” screen, and terminate userApplication Configuration Wizard.
- 135 -

Appendix C Oracle Grid Infrastructure Installation andASM instance, Oracle Database Creation
This section describes how to install Oracle Grid Infrastructure and Oracle Database when you use ASM of Oracle 11g R2.
Point
When ASM of Oracle 11g R2 is used in standby operation, it is necessary to install Oracle Grid Infrastructure.
Note
- In order to use ASM of Oracle 11g R2, it is necessary to install Oracle Grid Infrastructure. When installing Oracle Grid Infrastructure,the composition which separates the installation user of Oracle Database and the installation user of Oracle Grid Infrastructure issupported. The composition which creating one user is not supported. A different directory must be assigned respectively for an ORACLE_BASE of the installation user of Oracle Database and anORACLE_BASE of the installation user of Oracle Grid Infrastructure.
- When using ASM of Oracle 11g R2 in standby operation, Oracle service resource is not available.
Install Oracle Grid Infrastructure and Oracle Database on the local disk of each node.
The ASM instance and database are only created on the operating node. The standby node will only set the ASM instance and the databasemade by the operation node.
The table below shows the common method of installation and settings of Oracle Grid Infrastructure and Oracle Database.
NoOverview
Operating node Standby node
1 Set up the kernel parameter Set up the kernel parameter
2 Create Grid user, Oracle user Create Grid user, Oracle user
3 Set up shared disk units
4Create userApplication with No OracleResources
Create userApplication with No OracleResources
5 userApplication startup
6 Install Oracle Grid Infrastructure
7 Install Oracle Database
8 Create Oracle Database
9 Change IP address of the Oracle listener
10 Check SPFILE of ASM
11 Check parameter file of the database
12 Stop Oracle Database, ASM, Oracle listener
13 userApplication switch
14 Install Oracle Grid Infrastructure
15 Install Oracle Database
16 Copy directory of Oracle Copy directory of Oracle
17 Restart the Oracle listener
18 Change SPFILE of ASM
- 136 -

19 Stop temporary diskgroup
20 Restart the ASM
21 Delete temporary diskgroup
22 Register Oracle Database resource
23 Start Oracle Database resource
24 Stop Oracle Database, ASM, Oracle listener
For details of each step as follows.
1. Set up the kernel parameterSet up values in the “/etc/system” file for Oracle in addition to the values for PRIMECLUSTER.The kernel parameter values vary depending on the implemented Oracle versions.Refer to the Oracle installation guide. The parameter values should be the same on all the nodes.For semopm, specify a value of 4 or more.
2. Create Grid user, Oracle userCreate separate users, Grid user and Oracle user. Grid user is for installation of Oracle Grid Infrastructure and Oracle user is forOracle Database.Set a different directory for an ORACLE_BASE of the installation user of Oracle Database and an ORACLE_BASE of theinstallation user of Oracle Grid Infrastructure, respectively.Set ORACLE_HOME of Oracle Grid Infrastructure to Grid user's ORACLE_HOME environment variable.Set ORACLE_HOME of Oracle Database to Oracle user's ORACLE_HOME environment variable.Set ORACLE_SID of Oracle Grid Infrastructure to Grid user's ORACLE_SID environment variable.Set ORACLE_SID of Oracle Database to Oracle user's ORACLE_SID environment variable.The user ID, the group ID and environment variable must be the same on all nodes.
Example
The example of setting Oracle user's environment variable.(.profile)
ORACLE_BASE=/u01/app/oracle; export ORACLE_BASE
ORACLE_HOME=/u01/app/oracle/product/db; export ORACLE_HOME
ORACLE_SID=ora; export ORACLE_SID
LD_LIBRARY_PATH=$ORACLE_HOME/lib; export LD_LIBRARY_PATH
PATH=$ORACLE_HOME/bin:/usr/bin:/usr/ccs/bin:/usr/ucb; export PATH
When “/usr/ucb” is contained in PATH, it needs to be set up after “/usr/ccs/bin”.
Example
The example of setting Grid user's environment variable.
(.profile)
ORACLE_BASE=/u01/app/grid; export ORACLE_BASE
ORACLE_HOME=/u01/app/grid/product/db; export ORACLE_HOME
ORACLE_SID=+ASM; export ORACLE_SID
PATH=$ORACLE_HOME/bin:/usr/bin:/usr/ccs/bin:/usr/ucb; export PATH
When “/usr/ucb” is contained in PATH, it needs to be set up after “/usr/ccs/bin”.
3. Set up shared disk unitsSet shared disk units that are managed by ASM. At this time, create at least more than two volumes (devices) on share disk. Thesevolumes are used for storing database or making temporary diskgroup on the step 14. Set the Grid user to the owner of the devicefiles of the shared disk.
- 137 -
4. Create userApplication with No Oracle ResourcesCreate userApplication that does not include Oracle resources before installing Oracle Grid Infrastructure. For information on how to create the userApplication, see following.
- 2.2.3 userApplication Creation
- 2.2.4 userApplication with No Oracle Resources
- 2.2.5 userApplication Operation Check
5. userApplication startup on operation nodeStart userApplication on operation node, and verify the shared disk units and the takeover IP address are enabled.
6. Install Oracle Grid Infrastructure on operation nodeInstall Oracle Grid Infrastructure to the local disks on operation node with Grid user by referring to the Oracle manual and installationguide.
- Oracle 11g R2Select "Configure Oracle Grid Infrastructure for a Standalone Server" for the option when Oracle Grid Infrastructure is installedand create the ASM instance and diskgroup which stores the database.
ASM instance name must begin with “+”. The default name is “+ASM”.
7. Install Oracle Database on operation nodeInstall Oracle Database to the local disks on operation node with Oracle user by referring to the Oracle manual and installationguide. Install only Oracle software, and do not create the database in this step.
8. Create Oracle Database on operation nodeOn operation node, create Oracle Database on diskgroup made at step 6.
9. Change IP address of the Oracle listenerIf you use Oracle listener switching operation using a logical IP address, specify the logical IP address for the IP address of theOracle listener.
- <Grid user’s $ORACLE_HOME>/network/admin/listener.ora
If the Oracle listener is monitored through tnsping, set up the following file.
- <Oracle user’s $ORACLE_HOME>/network/admin/tnsnames.ora
- <Grid user’s $ORACLE_HOME>/network/admin/tnsnames.ora
For information on how to modify, see “2.2.6 Oracle Database Creation and Setting”.
10. Check SPFILE of ASMExecute the following command as a Grid user on operation node and record the location of the Oracle ASM SPFILE.
# su - <Grid user>
$ ORACLE_SID=+ASM
$ asmcmd spget
+DATA/asm/asmparameterfile/registry.xxx <-- record this line
11. Check parameter file of the databaseExecute the following command as a Grid user on operation node and record the location of the SPFILE.
# su - <Grid user>
$ crsctl status resource <Oracle Database resource name> -p | grep SPFILE
SPFILE=+DATA/xxxx/spfilexxxx.ora <-- record after "SPFILE =" of this line
Example
You can confirm <Oracle Database resource name> using "crsctl status resource -t" command.
# su - <Grid user>
$ crsctl status resource -t
--------------------------------------------------------------------------------
NAME TARGET STATE SERVER STATE_DETAILS
- 138 -

--------------------------------------------------------------------------------
Local Resources
--------------------------------------------------------------------------------
ora.DATA.dg
ONLINE ONLINE node1
ora.LISTENER.lsnr
ONLINE ONLINE node1
ora.asm
ONLINE ONLINE node1 Started
ora.ons
OFFLINE OFFLINE node1
--------------------------------------------------------------------------------
Cluster Resources
--------------------------------------------------------------------------------
ora.orcl.db
1 ONLINE ONLINE node1 Open
ora.cssd
1 ONLINE ONLINE node1
ora.diskmon
1 OFFLINE OFFLINE
ora.evmd
1 ONLINE ONLINE node1
$
In the above configuration, <Oracle Database resource name> is "ora.racdb.db".
12. Stop Oracle Database, ASM, Oracle listenerExecute the following command as a Grid user on operation node to stop Oracle instance, ASM, Oracle listener. Specify the databasename made at step 8 for <db_name>. Specify the Diskgroup made at step 6 for <diskgroup_name>.
# su - <Grid user>
$ srvctl stop database -d <db_name>
$ srvctl stop diskgroup -g <diskgroup_name>
$ srvctl stop asm
$ srvctl stop listener
13. userApplication switchSwitch userApplication to the standby node, and verify the shared disk units and the takeover IP address are enabled.
14. Install Oracle Grid Infrastructure on standby nodeInstall Oracle Database to the local disks on standby node with Grid user by referring to the Oracle manual and installation guide.
- Oracle 11g R2Select "Configure Oracle Grid Infrastructure for a Standalone Server" for the option when Oracle Grid Infrastructure is installedand create ASM instance, temporary diskgroup.
Specify the ASM instance name. The ASM instance name must be same made at step 6.Specify the temporary diskgroup name. The temporary diskgroup name must be different name made at step 6.
15. Install Oracle Database on standby nodeInstall Oracle Database to the local disks on standby node with Oracle user by referring to the Oracle manual and installation guide.Install only Oracle software, and do not create the database in this step.
16. Copy directory of OracleCopy the following directories of the operation node to the standby node.
- Under <Oracle user’s $ORACLE_HOME>/dbs
- Under <$ORACLE_BASE>/admin/$ORACLE_SID
- Under <$ORACLE_BASE>/diag
- Under <Grid user’s $ORACLE_HOME>/network/admin
The access privilege to the directories and files must be also the same as that on the operating node.
- 139 -

Information
The required files on the operating node can be backed up in the tar format with the “cloracpy” command. See “4.4 cloracpy -Create Backup File for Oracle Database Setup”.
If you use the “cloracpy” command, you must execute respectively by the Oracle user and the Grid user.
17. Restart the Oracle listenerExecute the following command as a Grid user on standby node and verify that the Oracle listener restarts.
# su - <Grid user>
$ srvctl stop listener
$ srvctl start listener
18. Change SPFILE of ASMSet the location of the Oracle ASM SPFILE recorded at step 10.
- Oracle 11g R2Execute the following command as a Grid user on standby node.
# su - <Grid user>
$ export ORACLE_SID=<ASM SID>
$ asmcmd spset <SPFILE PATH>
19. Stop temporary diskgroupExecute the following command as a Grid user on standby node to stop temporary diskgroup.Specify the temporary diskgroup name made at step 14 for <diskgroup_name>.
# su - <Grid user>
$ srvctl stop diskgroup -g <diskgroup_name>
20. Restart the ASMExecute the following command as a Grid user on standby node to restart the ASM.
# su - <Grid user>
$ srvctl stop asm
$ srvctl start asm
21. Delete temporary diskgroupExecute the following command as a Grid user on standby node to delete temporary diskgroup.Specify the temporary diskgroup name made at step 14 for <diskgroup_name>.
# su - <Grid user>
$ srvctl remove diskgroup -g <diskgroup_name>
22. Register Oracle Database resourceExecute the following command as an Oracle user on standby node to register database resource made at step 8 to Oracle Restartof the standby node.Specify the database name made at step 8 for <db_unique_name>, <db_name>.Specify the Oracle user's ORACLE_HOME for <oracle_home>.Specify the SPFILE recorded at step 11 for <SPFILE PATH>Specify the Diskgroup made at step 6 for <disk_group_list>.
# su - <Oracle user>
$ srvctl add database -d <db_unique_name> -o <oracle_home> -p <SPFILE PATH> -n <db_name> -a
<disk_group_list>
- 140 -

23. Start Oracle Database resource on standby nodeExecute the following command as a Grid user on standby node and verify the Oracle Database can be started. Specify the databasename made at step 8 for <db_name>.
# su - <Grid user>
$ srvctl start database -d <db_name>
24. Stop Oracle Database, ASM, Oracle listenerExecute the following command as a Grid user on standby node to stop Oracle Database, ASM and Oracle listener. Specify thedatabase name made at step 8 for <db_name>. Specify the Diskgroup made at step 6 for <diskgroup_name>.
# su - <Grid user>
$ srvctl stop database -d <db_name>
$ srvctl stop diskgroup -g <diskgroup_name>
$ srvctl stop asm
$ srvctl stop listener
After the installation of Oracle Grid Infrastructure and Oracle Database is completed, change Oracle Restart Settings and createuserApplication. For details, see “2.4.2.2 Environment configuration with Oracle 11g R2”.
- 141 -
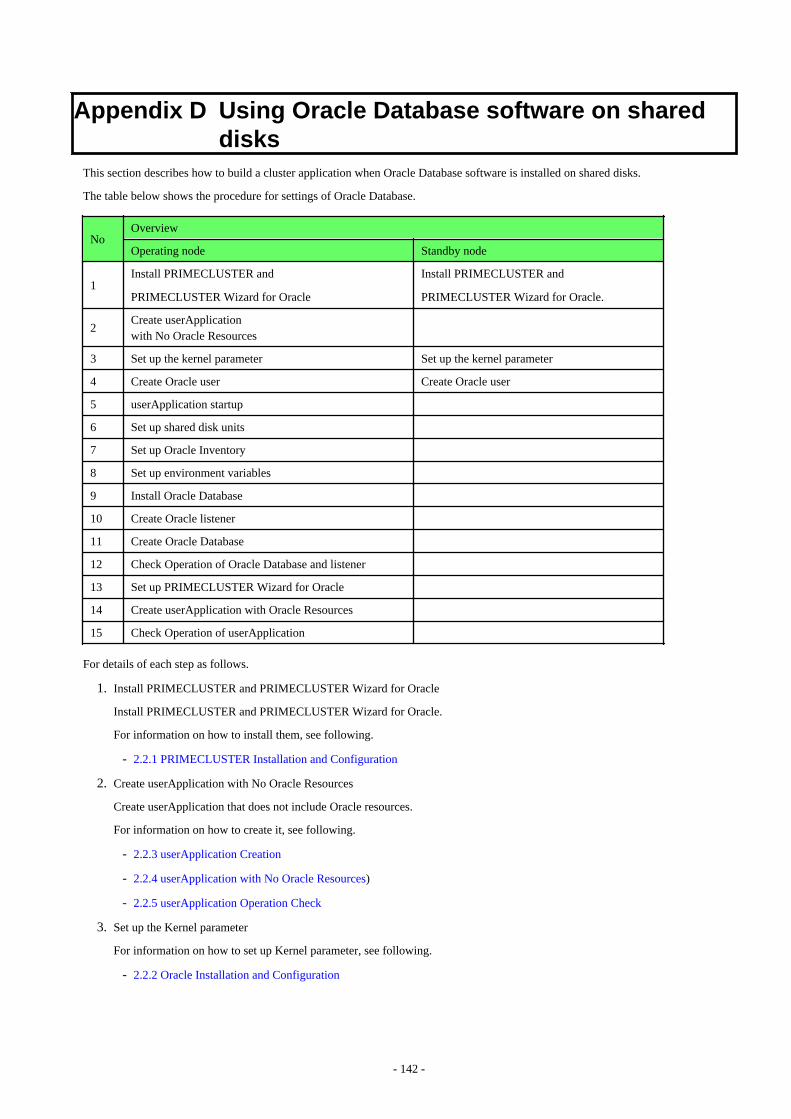
Appendix D Using Oracle Database software on shareddisks
This section describes how to build a cluster application when Oracle Database software is installed on shared disks.
The table below shows the procedure for settings of Oracle Database.
NoOverview
Operating node Standby node
1Install PRIMECLUSTER and
PRIMECLUSTER Wizard for Oracle
Install PRIMECLUSTER and
PRIMECLUSTER Wizard for Oracle.
2Create userApplication with No Oracle Resources
3 Set up the kernel parameter Set up the kernel parameter
4 Create Oracle user Create Oracle user
5 userApplication startup
6 Set up shared disk units
7 Set up Oracle Inventory
8 Set up environment variables
9 Install Oracle Database
10 Create Oracle listener
11 Create Oracle Database
12 Check Operation of Oracle Database and listener
13 Set up PRIMECLUSTER Wizard for Oracle
14 Create userApplication with Oracle Resources
15 Check Operation of userApplication
For details of each step as follows.
1. Install PRIMECLUSTER and PRIMECLUSTER Wizard for Oracle
Install PRIMECLUSTER and PRIMECLUSTER Wizard for Oracle.
For information on how to install them, see following.
- 2.2.1 PRIMECLUSTER Installation and Configuration
2. Create userApplication with No Oracle Resources
Create userApplication that does not include Oracle resources.
For information on how to create it, see following.
- 2.2.3 userApplication Creation
- 2.2.4 userApplication with No Oracle Resources)
- 2.2.5 userApplication Operation Check
3. Set up the Kernel parameter
For information on how to set up Kernel parameter, see following.
- 2.2.2 Oracle Installation and Configuration
- 142 -

4. Create Oracle user
For information on how to create Oracle user, see following.
- 2.2.2 Oracle Installation and Configuration
Note
Set the path names(on shared disk) of the Oracle base directory and the Oracle home directory in Oracle user's login profile.
5. userApplication startup
Start up userApplication on operation node, and verify the shared disk units and the takeover IP address are enabled.
6. Set up shared disk units
Set the write permission for Oracle user to the shared disk.
7. Set up Oracle Inventory
Create Oracle Inventory directory in ORACLE_HOME on the shared disk.
$ mkdir -p $ORACLE_BASE/product/11.2.0/db_1/oraInventory
Create oraInst.loc on the shared disk.
$ cat $ORACLE_BASE/etc/oraInst.loc
inventory_loc=$ORACLE_BASE/product/11.2.0/db_1/oraInventory
inst_group=oinstall
8. Set up environment variables
Set up environment variables before Oracle Universal Installer(OUI) starts.
$ unset TZ PERL
$ export ORACLE_HOSTNAME=<logical IP address>
9. Install Oracle Database
Install Oracle Database by Oracle Universal Installer(OUI).
$ runInstaller -invPtrLoc $ORACLE_BASE/etc/oraInst.loc ORACLE_HOSTNAME=<logical IP address > [-
debug]
Specify the full path of the oraInst.loc made at step 7 for the argument "$ORACLE_BASE/etc/oraInst.loc" of "-invPtrLoc".
Specify logical IP address for "ORACLE_HOSTNAME".
The "-debug" is optional.
Proceed with the installation by following the OUI prompt.
- Oracle 11g R2
In "Select Installation Option " screen, select the "Install database software only".
- Oracle 11g R1
In "Select Installation Method " screen, uncheck " Create Starter Database".
10. Create Oracle listenerThe files are allocated as follows:
Files Locations Note
listener.ora Share -
tnsnames.ora Share -
<LISTENER>.log Share -
- 143 -
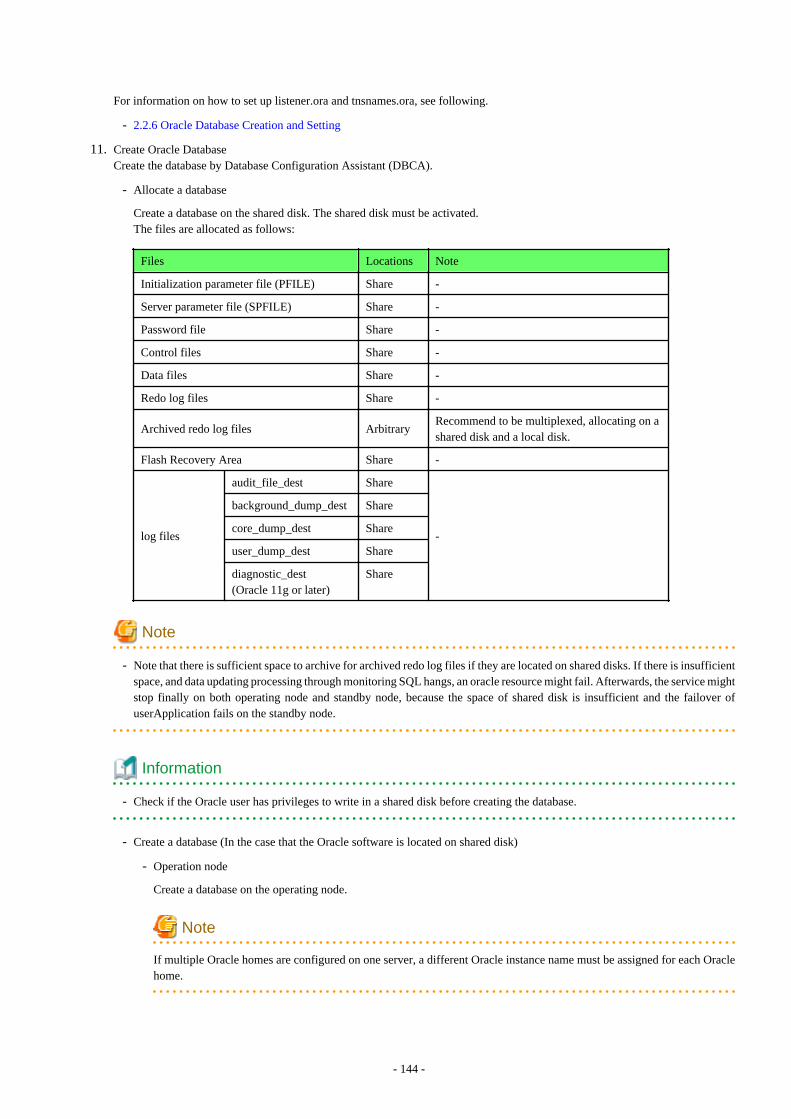
For information on how to set up listener.ora and tnsnames.ora, see following.
- 2.2.6 Oracle Database Creation and Setting
11. Create Oracle DatabaseCreate the database by Database Configuration Assistant (DBCA).
- Allocate a database
Create a database on the shared disk. The shared disk must be activated.The files are allocated as follows:
Files Locations Note
Initialization parameter file (PFILE) Share -
Server parameter file (SPFILE) Share -
Password file Share -
Control files Share -
Data files Share -
Redo log files Share -
Archived redo log files ArbitraryRecommend to be multiplexed, allocating on ashared disk and a local disk.
Flash Recovery Area Share -
log files
audit_file_dest Share
-
background_dump_dest Share
core_dump_dest Share
user_dump_dest Share
diagnostic_dest(Oracle 11g or later)
Share
Note
- Note that there is sufficient space to archive for archived redo log files if they are located on shared disks. If there is insufficientspace, and data updating processing through monitoring SQL hangs, an oracle resource might fail. Afterwards, the service mightstop finally on both operating node and standby node, because the space of shared disk is insufficient and the failover ofuserApplication fails on the standby node.
Information
- Check if the Oracle user has privileges to write in a shared disk before creating the database.
- Create a database (In the case that the Oracle software is located on shared disk)
- Operation node
Create a database on the operating node.
Note
If multiple Oracle homes are configured on one server, a different Oracle instance name must be assigned for each Oraclehome.
- 144 -
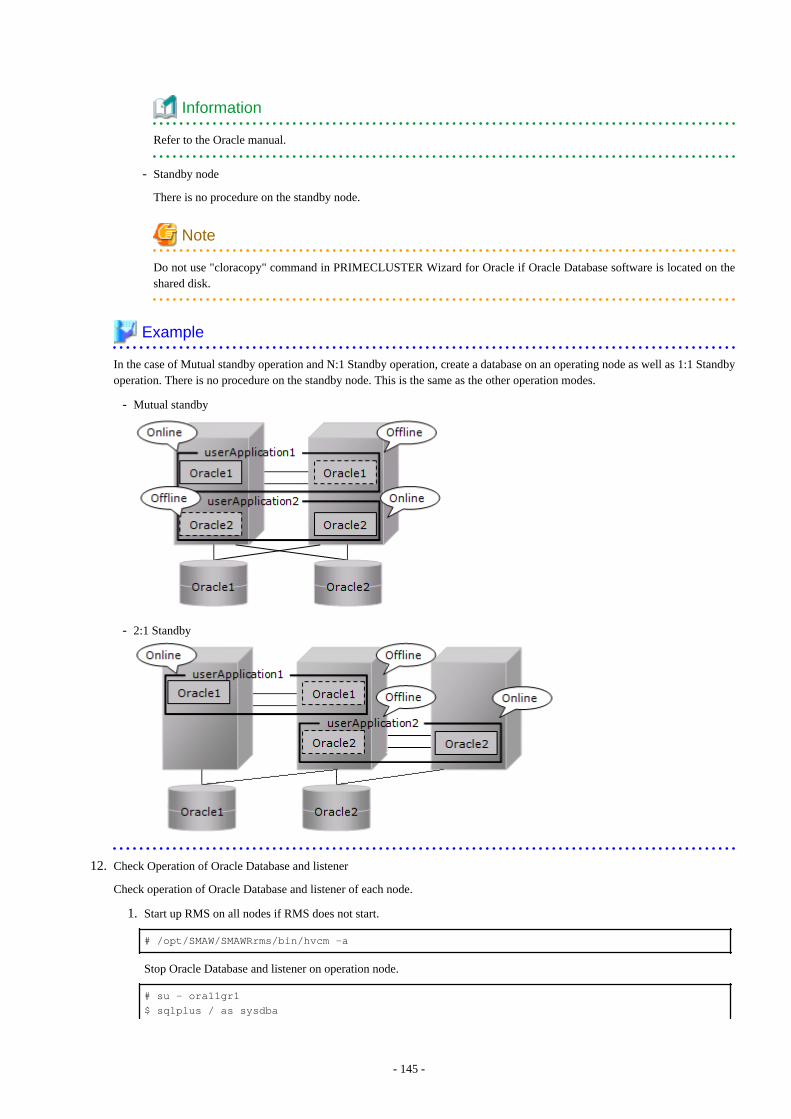
Information
Refer to the Oracle manual.
- Standby node
There is no procedure on the standby node.
Note
Do not use "cloracopy" command in PRIMECLUSTER Wizard for Oracle if Oracle Database software is located on theshared disk.
Example
In the case of Mutual standby operation and N:1 Standby operation, create a database on an operating node as well as 1:1 Standbyoperation. There is no procedure on the standby node. This is the same as the other operation modes.
- Mutual standby
- 2:1 Standby
12. Check Operation of Oracle Database and listener
Check operation of Oracle Database and listener of each node.
1. Start up RMS on all nodes if RMS does not start.
# /opt/SMAW/SMAWRrms/bin/hvcm -a
Stop Oracle Database and listener on operation node.
# su - ora11gr1
$ sqlplus / as sysdba
- 145 -
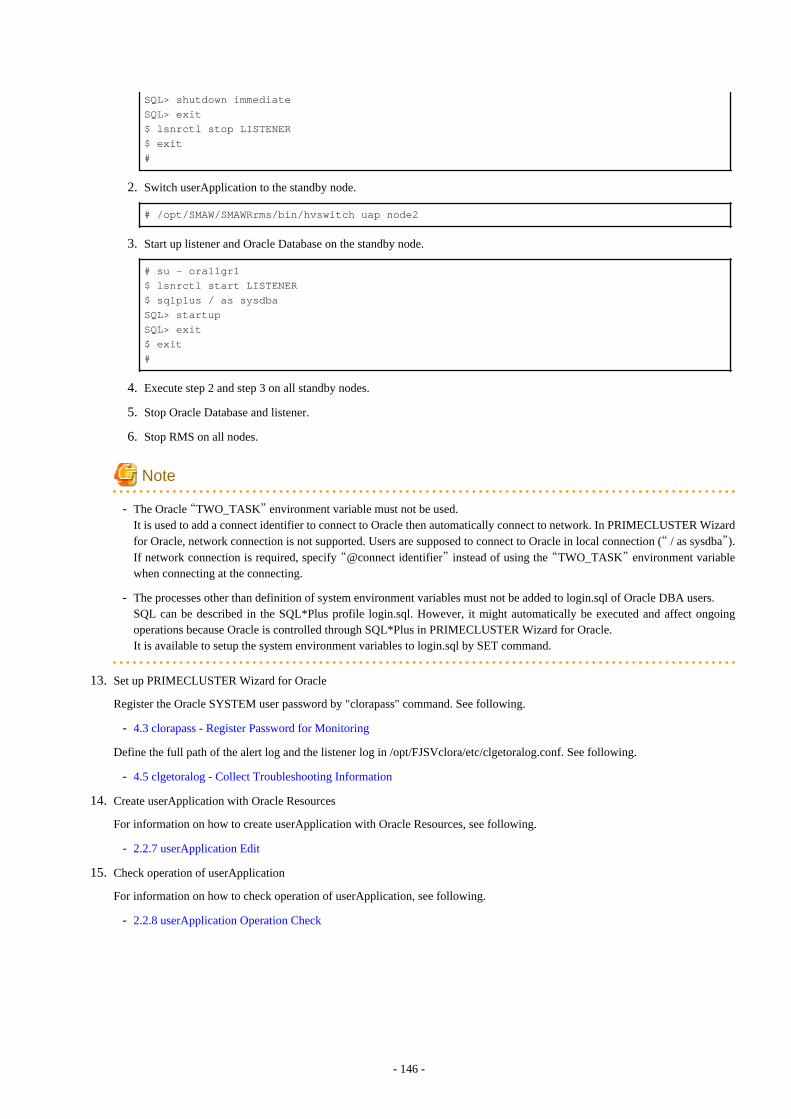
SQL> shutdown immediate
SQL> exit
$ lsnrctl stop LISTENER
$ exit
#
2. Switch userApplication to the standby node.
# /opt/SMAW/SMAWRrms/bin/hvswitch uap node2
3. Start up listener and Oracle Database on the standby node.
# su - ora11gr1
$ lsnrctl start LISTENER
$ sqlplus / as sysdba
SQL> startup
SQL> exit
$ exit
#
4. Execute step 2 and step 3 on all standby nodes.
5. Stop Oracle Database and listener.
6. Stop RMS on all nodes.
Note
- The Oracle “TWO_TASK” environment variable must not be used. It is used to add a connect identifier to connect to Oracle then automatically connect to network. In PRIMECLUSTER Wizardfor Oracle, network connection is not supported. Users are supposed to connect to Oracle in local connection (“ / as sysdba”).If network connection is required, specify “@connect identifier” instead of using the “TWO_TASK” environment variablewhen connecting at the connecting.
- The processes other than definition of system environment variables must not be added to login.sql of Oracle DBA users. SQL can be described in the SQL*Plus profile login.sql. However, it might automatically be executed and affect ongoingoperations because Oracle is controlled through SQL*Plus in PRIMECLUSTER Wizard for Oracle.It is available to setup the system environment variables to login.sql by SET command.
13. Set up PRIMECLUSTER Wizard for Oracle
Register the Oracle SYSTEM user password by "clorapass" command. See following.
- 4.3 clorapass - Register Password for Monitoring
Define the full path of the alert log and the listener log in /opt/FJSVclora/etc/clgetoralog.conf. See following.
- 4.5 clgetoralog - Collect Troubleshooting Information
14. Create userApplication with Oracle Resources
For information on how to create userApplication with Oracle Resources, see following.
- 2.2.7 userApplication Edit
15. Check operation of userApplication
For information on how to check operation of userApplication, see following.
- 2.2.8 userApplication Operation Check
- 146 -
Appendix E Using PRIMECLUSTER Wizard for Oracle withan Oracle Solaris Zones Environment
This section explains notices, configuration procedures, and maintenance procedures in the case of using PRIMECLUSTER Wizard forOracle with an Oracle Solaris Zones environment.
Note
To build single-node cluster operations on Oracle Solaris Zones environment, see "Appendix F Single-Node Cluster Operation". For the maintenance procedure of single-node cluster operations on Oracle Solaris Zones environment, see "E.3 MaintenanceProcedure".
Information
About the method of installing PRIMECLUSTER in Oracle Solaris Zones environment, refer to "Appendix H Using PRIMECLUSTERwith an Oracle Solaris Zones Environment" of the "PRIMECLUSTER Installation and Administration Guide".
E.1 Notice of System Configuration- Oracle RAC cannot be made a cluster in non-global zone.
- When you allocate the image of non-global zone on shared disks, create the volume for Oracle Database allocated on the shared diskclass for non-global zone where Oracle is installed.When you allocate the image of non-global zone on a local disk, create the volume for Oracle Database allocated on shared disk class,and enable it to access from non-global zone.
E.2 Construction ProcedureThis section explains construction procedure of Oracle and Wizard for Oracle in non-global zone.It needs to be beforehand completed to the setup of PRIMECLUSTER in non-global zone. (Before "4-12. Setup of Non-Global ZoneCluster Applications" of "H.3.4 Creating Non-Global Zones" of "PRIMECLUSTER Installation and Administration Guide")
E.2.1 Wizard for Oracle InstallationMount the media of Wizard for Oracle on non-global zone, or copy to non-global zone, and install Wizard for Oracle. About the installationprocedure of Wizard for Oracle, refer to the Software Release Guide Wizard for Oracle for Oracle Solaris.
E.2.2 Oracle Installation and Oracle Database CreationInstall Oracle software and create Oracle Database. Refer to the following chapters.
- 2.2.2 Oracle Installation and Configuration
- 2.2.6 Oracle Database Creation and Setting
Note
Be careful of the following points at the time of Oracle installation, and database creation.
- About the allocation of Oracle software and a database, read description of the above-mentioned chapter as follows.
- It is necessary to replace "local disk" with "Volume for root file system of non-global zone".
- It is necessary to replace "shared disk" with "Volume for Oracle data allocation".
- 147 -

- When non-global zone image is shared, because the operation node and standby node shares the root file system of non-global zone,installation/setup of Oracle software, and creation/setup of a database are only once carried out by operation node.When non-global zone image is not shared, installation/setup of Oracle software are carried out by all the nodes. creation/setup ofdatabase are only once carried out by operation node, and database setup of operation node is copied to standby node using the cloracpycommand.
- Carry out registration of the SYSTEM user’s password by the clorapass command in every non-global zone.
- Oracle listeners' IP address is set up according to the use existence or nonexistence of the Gls resource on non-global zone. When youdon't use Gls resource, specify the IP address of non-global zone. When you use a Gls resource, specify the virtual IP (taking overIP).
- In order to use ASM in Oracle Solaris Zones environment, for the specification of Oracle Database, it is necessary to add a procpriocntl privilege toward non-global zone in advance.Execute the following commands on the global zone before installing Oracle software.
# zonecfg -z <zone name> set limitpriv=default,proc_priocntl
E.3 Maintenance ProcedureThis section explains maintenance procedure of Oracle and Wizard for Oracle in non-global zone.
E.3.1 Oracle MaintenanceTo stop Oracle of non-global zone for maintenance work, such as cold backup, it is necessary to interrupt Oracle monitoring temporarily.Refer to the following chapter.
- 3.2 Oracle Maintenance
Note
Note at the time of the Oracle maintenance work in non-global zone.
- In the above-mentioned chapter, although it is indicated that both the maintenance mode of PRIMECLUSTER and stop monitoring /restart monitoring command of Wizard for Oracle(hvoradisable, hvoraenable) are used, use only command of Wizard forOracle(hvoradisable, hvoraenable) in non-global zone.
E.3.2 Patch Application to Wizard for OracleWhen applying a patch to Wizard for Oracle in non-global zone, set non-global zone as single user mode. At this time, use maintenance mode in global zone. Refer to "H.5.1 Maintenance Operations on the Non-Global Zone" of"PRIMECLUSTER Installation and Administration Guide".
E.3.3 Troubleshooting InformationIf the failure about Oracle and Wizard for Oracle that are operated in non-global zone occur, login the non-global zone by zlogin from aglobal zone, and collect troubleshooting Information using the clgetoralog command. Refer to the following chapters.
- 4.5 clgetoralog - Collect Troubleshooting Information
E.4 Uninstallation ProcedureAbout the uninstallation procedure of Wizard for Oracle, refer to the "Software Release Guide Wizard for Oracle for Oracle Solaris".About the back out procedure of patch, refer to README contained in the patch.
- 148 -

Appendix F Single-Node Cluster OperationThis section explains construction procedures and maintenance procedures in the case of using PRIMECLUSTER Wizard for Oracle withSingle-node cluster operation.
Configuration Procedure
Configuration procedures depend on whether Oracle ASM is used and the version of Oracle ASM. Configure it by the following proceduresaccording to your environment. Configuration procedures of single-node cluster operation on the Oracle Solaris Zones environment isalso the following.
- Oracle ASM not used
No Procedure
1 Install and configure PRIMECLUSTER
2 Install PRIMECLUSTER Wizard for Oracle
3 Install and configure Oracle software
4 Create userApplication with No Oracle resources
5 Create and set up an Oracle Database
6 Edit userApplication
7 Check Operation of userApplication
For details, see “F.1 Oracle ASM not used”.
- Oracle ASM of Oracle 10g R2/11g R1 used
No Procedure
1 Install and configure PRIMECLUSTER
2 Install PRIMECLUSTER Wizard for Oracle
3 Install and configure Oracle software
4 Create userApplication with No Oracle resources
5 Create and set up an Oracle Database
6 Edit userApplication
7 Check Operation of userApplication
For details, see “F.2 Oracle ASM of Oracle 10g R2/11g R1 used”.
- Oracle ASM of Oracle 11g R2 used
No Procedure
1 Install and configure PRIMECLUSTER
2 Install PRIMECLUSTER Wizard for Oracle
3 Set up the kernel parameter
4 Create Grid user, Oracle user
5 Set up shared disk units
6 Create userApplication with No Oracle resources
7 Start userApplication
8 Install Oracle Grid Infrastructure software
9 Install Oracle software
- 149 -

10 Create and set up an Oracle Database
11 Edit userApplication
12 Check Operation of userApplication
For details, see “F.3 Oracle ASM of Oracle 11g R2 used”.
Note
- In order to use Oracle ASM of Oracle 11g R2, it is necessary to install Oracle Grid Infrastructure. When installing Oracle GridInfrastructure, the composition which separates the installation user of Oracle Database and the installation user of Oracle GridInfrastructure is supported. The composition which creating one user is not supported.
- A different directory must be assigned respectively for an ORACLE_BASE of the installation user of Oracle Database and anORACLE_BASE of the installation user of Oracle Grid Infrastructure.
- When using Oracle ASM of Oracle 11g R2 in single-node cluster operation, Oracle services resource is not available.
Maintenance Procedures
For maintenance procedures for single-node cluster operation, see "Chapter 3 Operation". For maintenance procedures for single-nodecluster operation on Oracle Solaris Zones, see "E.3 Maintenance Procedure".
F.1 Oracle ASM not used1. Install and configure PRIMECLUSTER
Install and configure PRIMECLUSTER according to Software Release Guides and manuals of PRIMECLUSTER.
2. Install PRIMECLUSTER Wizard for OracleInstall PRIMECLUSTER Wizard for Oracle according to a Software Release Guide of PRIMECLUSTER Wizard for Oracle.
3. Install and configure Oracle softwareSet up the kernel parameter, create Oracle user and install Oracle software. See "2.2.2 Oracle Installation and Configuration".
4. Create userApplication with No Oracle resourcesCreate userApplication with No Oracle resources and check the operation of userApplication. See the following:
- 2.2.4 userApplication with No Oracle Resources
- 2.2.5 userApplication Operation Check
In single-node cluster operation, the settings for userApplication are as follows. For the attribute of the others, see thePRIMECLUTSER manuals.
Attributes Values
AutoSwitchOver Do not set the values.
PersistentFault 1
HaltFlag no
ShutdownPriority Do not set the values.
OnlinePriority Do not set the values.
5. Create and set up an Oracle Database
- In single-node cluster operation, create and set up an Oracle DatabaseCreate Oracle databases and Oracle listeners according to the Oracle manuals.
- SYSTEM user passwordRegister the Oracle SYSTEM user password. See "4.3 clorapass - Register Password for Monitoring".
- 150 -

- Define the full path of the log fileDefine the full path of the alert log and the listener log in /opt/FJSVclora/etc/clgetoralog.conf. See "4.5 clgetoralog - CollectTroubleshooting Information".
- Check Oracle operationCheck if the Oracle operation is properly running by executing start and stop of Oracle instances and Oracle listeners manually.
6. Edit userApplicationRegister Oracle instance resources and Oracle listener resources to userApplication that is created at the step 4. See "2.2.7userApplication Edit". The setting of AutoRecover Flag is recommended for Oracle instance resources and Oracle listener resources. The availability isincreased by restarting Oracle instance resources and Oracle listener resources automatically when an error is detected.
Attributes Values
Flags AutoRecover (A)
7. Check Operation of userApplicationCheck the operation of userApplication including Oracle resources. See "2.2.8 userApplication Operation Check".
F.2 Oracle ASM of Oracle 10g R2/11g R1 used1. Install and configure PRIMECLUSTER
Install and configure PRIMECLUSTER according to Software Release Guides and manuals of PRIMECLUSTER.
2. Install PRIMECLUSTER Wizard for OracleInstall PRIMECLUSTER Wizard for Oracle according to a Software Release Guide of .PRIMECLUSTER Wizard for Oracle.
3. Install and configure Oracle softwareSet up the kernel parameter, create Oracle user and install Oracle software. See "2.2.2 Oracle Installation and Configuration".
Note
In order to use Oracle ASM in Oracle Solaris Zones environment, for the specification of Oracle Database, it is necessary to add aproc priocntl privilege to non-global zone in advance.Execute the following commands on the global zone before installing Oracle software.
# zonecfg -z <zone name> set limitpriv=default,proc_priocntl
4. Create userApplication with No Oracle resourcesCreate userApplication with No Oracle resources and check the operation of userApplication. See the following:
- 2.2.4 userApplication with No Oracle Resources
- 2.2.5 userApplication Operation Check
In single-node cluster operation, the settings for userApplication are as follows. For the attribute of the others, see thePRIMECLUTSER manuals.
Attributes Values
AutoSwitchOver Do not set the values.
PersistentFault 1
HaltFlag no
ShutdownPriority Do not set the values.
OnlinePriority Do not set the values.
- 151 -
5. Create and set up an Oracle Database
- In single-node cluster operation, create and set up an Oracle DatabaseCreate Oracle databases and Oracle listeners according to the Oracle manuals.
- SYSTEM user passwordRegister the Oracle SYSTEM user password. See "4.3 clorapass - Register Password for Monitoring".
- Define the full path of the log fileDefine the full path of the alert log and the listener log in /opt/FJSVclora/etc/clgetoralog.conf. See "4.5 clgetoralog - CollectTroubleshooting Information".
- Check Oracle operationCheck if the Oracle operation is properly running by executing start and stop of Oracle instances and Oracle listeners manually.
6. Edit userApplicationRegister the Oracle instance resources, the Oracle ASM resource and the Oracle listener resources to userApplication that is createdat the step 4. See "2.4.2.1 Environment configuration with Oracle 10g R2/11g R1".The setting of AutoRecover Flag is recommended for Oracle instance resources and Oracle listener resources. The availability isincreased by restarting Oracle instance resources and Oracle listener resources automatically when an error is detected.
Attributes Values
Flags AutoRecover (A)
7. Check Operation of userApplicationCheck the operation of userApplication including Oracle resources. See "2.2.8 userApplication Operation Check".
F.3 Oracle ASM of Oracle 11g R2 used1. Install and configure PRIMECLUSTER
Install and configure PRIMECLUSTER according to Software Release Guides and manuals of PRIMECLUSTER.
2. Install PRIMECLUSTER Wizard for OracleInstall and configure PRIMECLUSTER according to Software Release Guides and manuals of PRIMECLUSTER Wizard forOracle.
3. Set up the kernel parameterSet up the kernel parameter. See the step 1 of "Appendix C Oracle Grid Infrastructure Installation and ASM instance, Oracle DatabaseCreation".
4. Create Grid user, Oracle userCreate and set up the Oracle user and Grid user. See the step 2 of "Appendix C Oracle Grid Infrastructure Installation and ASMinstance, Oracle Database Creation".
5. Set up shared disk unitsSet shared disk units that are managed by Oracle ASM. Set the Grid user to the owner of the device files of the shared disk.
6. Create userApplication with No Oracle resourcesCreate userApplication with No Oracle resources and check the operation of userApplication. See the following:
- 2.2.4 userApplication with No Oracle Resources
- 2.2.5 userApplication Operation Check
In single-node cluster operation, the settings for userApplication are as follows. For the attribute of the others, see thePRIMECLUTSER manuals.
Attributes Values
AutoSwitchOver Do not set the values.
PersistentFault 1
HaltFlag no
- 152 -
ShutdownPriority Do not set the values.
OnlinePriority Do not set the values.
7. Start userApplicationStart userApplication on operation node, and verify the shared disk units and the takeover IP address are enabled.
8. Install Oracle Grid Infrastructure softwareIt is necessary to install Oracle Grid Infrastructure software and Oracle Database software.Install Oracle Grid Infrastructure software. See the step 6 of "Appendix C Oracle Grid Infrastructure Installation and ASM instance,Oracle Database Creation".
Note
In order to use Oracle ASM in Oracle Solaris Zones environment, for the specification of Oracle Database, it is necessary to add aproc priocntl privilege to non-global zone in advance.Execute the following commands on the global zone before installing Oracle software.
# zonecfg -z <zone name> set limitpriv=default,proc_priocntl
9. Install Oracle softwareInstall Oracle Database software. See the step 7 of "Appendix C Oracle Grid Infrastructure Installation and ASM instance, OracleDatabase Creation".
10. Create and set up an Oracle Database
- In single-node cluster operation, create and set up an Oracle DatabaseCreate Oracle databases and Oracle listeners according to the Oracle manuals.
- SYSTEM user passwordRegister the Oracle SYSTEM user password. See "4.3 clorapass - Register Password for Monitoring".
- Define the full path of the log fileDefine the full path of the alert log and the listener log in /opt/FJSVclora/etc/clgetoralog.conf. See "4.5 clgetoralog - CollectTroubleshooting Information".
- Check Oracle operationCheck if the Oracle operation is properly running by executing start and stop of Oracle instances and Oracle listeners manually.
11. Edit userApplicationChange the setting of Oracle Restart. Then register The Oracle instance resources, the Oracle ASM resource and the Oracle listenerresources to userApplication that is created at the step 3. See "2.4.2.2 Environment configuration with Oracle 11g R2".The setting of AutoRecover Flag is recommended for Oracle instance resources and Oracle listener resources. The availability isincreased by restarting Oracle instance resources and Oracle listener resources automatically when an error is detected.
Attributes Values
Flags AutoRecover (A)
12. Check Operation of userApplicationCheck the operation of userApplication including Oracle resources. See "2.2.8 userApplication Operation Check".
- 153 -
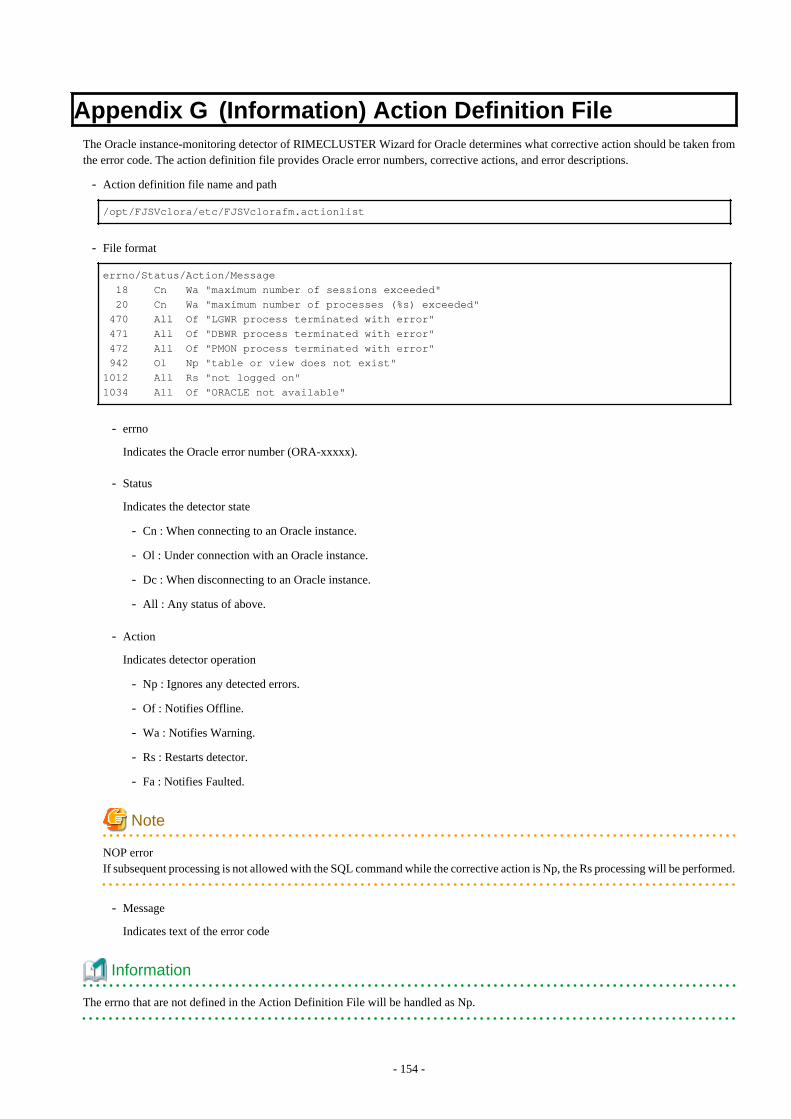
Appendix G (Information) Action Definition FileThe Oracle instance-monitoring detector of RIMECLUSTER Wizard for Oracle determines what corrective action should be taken fromthe error code. The action definition file provides Oracle error numbers, corrective actions, and error descriptions.
- Action definition file name and path
/opt/FJSVclora/etc/FJSVclorafm.actionlist
- File format
errno/Status/Action/Message
18 Cn Wa "maximum number of sessions exceeded"
20 Cn Wa "maximum number of processes (%s) exceeded"
470 All Of "LGWR process terminated with error"
471 All Of "DBWR process terminated with error"
472 All Of "PMON process terminated with error"
942 Ol Np "table or view does not exist"
1012 All Rs "not logged on"
1034 All Of "ORACLE not available"
- errno
Indicates the Oracle error number (ORA-xxxxx).
- Status
Indicates the detector state
- Cn : When connecting to an Oracle instance.
- Ol : Under connection with an Oracle instance.
- Dc : When disconnecting to an Oracle instance.
- All : Any status of above.
- Action
Indicates detector operation
- Np : Ignores any detected errors.
- Of : Notifies Offline.
- Wa : Notifies Warning.
- Rs : Restarts detector.
- Fa : Notifies Faulted.
Note
NOP errorIf subsequent processing is not allowed with the SQL command while the corrective action is Np, the Rs processing will be performed.
- Message
Indicates text of the error code
Information
The errno that are not defined in the Action Definition File will be handled as Np.
- 154 -