conexa - 258413772373414384.s3. · PDF filedimensions of the tear. (Figure 9) ... tendon...
8
Rotator Cuff Repair Using Conexa ™ Reconstructive Tissue Matrix Surgical Technique Surgical Technique Described by John Sperling, M.D. conexa TM reconstructive t i s s u e m a t r i x
Transcript of conexa - 258413772373414384.s3. · PDF filedimensions of the tear. (Figure 9) ... tendon...

Rotator Cuff Repair Using Conexa™ Reconstructive Tissue Matrix
Surgical Technique
Surgical Technique Described by John Sperling, M.D. conexaTM
r e c o n s t r u c t i v e t i s s u e m a t r i x
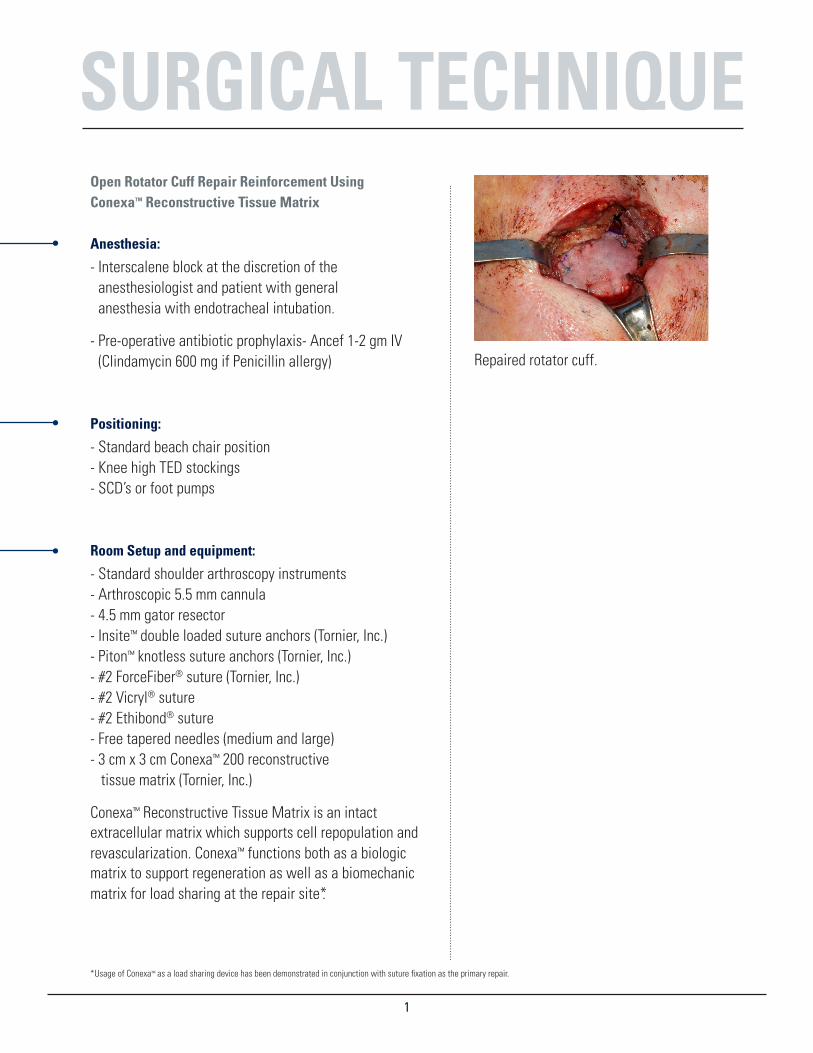
SURGICAL TECHNIQUEOpen Rotator Cuff Repair Reinforcement Using Conexa™ Reconstructive Tissue Matrix
Anesthesia:
- Interscalene block at the discretion of the anesthesiologist and patient with general anesthesia with endotracheal intubation.
- Pre-operative antibiotic prophylaxis- Ancef 1-2 gm IV (Clindamycin 600 mg if Penicillin allergy)
Positioning:
- Standard beach chair position- Knee high TED stockings- SCD’s or foot pumps
Room Setup and equipment:
- Standard shoulder arthroscopy instruments- Arthroscopic 5.5 mm cannula- 4.5 mm gator resector- Insite™ double loaded suture anchors (Tornier, Inc.)- Piton™ knotless suture anchors (Tornier, Inc.) - #2 ForceFiber® suture (Tornier, Inc.)- #2 Vicryl® suture- #2 Ethibond® suture- Free tapered needles (medium and large)- 3 cm x 3 cm Conexa™ 200 reconstructive tissue matrix (Tornier, Inc.)
Conexa™ Reconstructive Tissue Matrix is an intact extracellular matrix which supports cell repopulation and revascularization. Conexa™ functions both as a biologic matrix to support regeneration as well as a biomechanic matrix for load sharing at the repair site*.
11
Repaired rotator cuff.
*Usage of Conexa™ as a load sharing device has been demonstrated in conjunction with suture fixation as the primary repair.

SURGICAL TECHNIQUEProcedure:
After induction of general anesthesia and appropriate beach chair positioning, the operative shoulder is prepped using ChloraPrep® and sterile drapes are applied in the standard fashion (2 impervious U-Drapes, shoulder drape, sterile impervious stocking, loban™ around edges). Glenohumeral arthroscopy is performed using a standard posterior portal. An anterior portal is made through the rotator interval using a 5 mm cannula. Intraarticular pathology as addressed as needed (biceps tendon, superior labrum, anterior labrum, etc.) using a 4 mm shaver. The rotator cuff is assessed and the size and location of the tear, as well as the degree of retraction and mobility is assessed.
An incision is made from the midpoint of the acromion 1 cm medial to the lateral edge extending 4-5 cm anteriorly. (Figure 1) Sharp dissection is carried down to the level of the deltoid fascia. Medial and lateral flaps are raised to expose the acromion to the level of the acromioclavicular joint and laterally approximately 3 cm from the edge of the acromion. The insertion of the deltoid is detached using electrocautery from the anterior aspect of the acromion and extended posteriorly along the lateral margin of the acromion for approximately 1.5 cm. A lateral split 1.5 cm in length is then made in line with the fibers. A stitch is placed to prevent propagation of the deltoid split. (Figure 2) Care is taken to release the deltoid tendon off the bone leaving adequate soft tissue for later repair. The apex of the posterior corner of the detached deltoid is tagged with a Vicryl® suture to ensure later anatomic repair. Following release of the deltoid the subacromial bursa is debrided and an acromioplasty is performed as needed with a micro sagittal saw using a Darrach Retractor™ to depress the humeral head.
2
Fig. 2
Fig. 1

SURGICAL TECHNIQUETraction sutures (#2 Ethibond®) are placed into the rotator cuff tear and releases are performed as necessary.
(Figures 3 and 4) The orientation of the tear is examined and margin convergence stitches are placed starting medial and working lateral to connect the anterior and posterior aspects of the tear as needed. The sutures are tied starting with the most medial and working lateral. (Figure 5)
The footprint of the greater tuberosity is prepared by removing all soft tissue and decorticating to punctate bleeding bone without violating the entire subchondral bone plate. The cuff repair can be medialized by removing 2-3 mm of cartilage from the articular margin. Two double loaded Insite™ Suture Anchors (Tornier, Inc.) are placed at the articular margin. (Figure 6) The anchors should be spaced with at least 8-10 mm between the anchors.
The sutures from the anchors are passed through the cuff in a horizontal mattress fashion starting from posterior and working anteriorly (Figures 7 and 8). The sutures from the posterior anchor should be used for the posterior flap and the anterior anchor for the anterior flap. The sutures are left untied and tagged in an orderly fashion to keep the correct orientation from the most posterior to the most anterior.
3
Fig. 3
Fig. 4
Fig. 5
Fig. 6
Fig. 7
Fig. 8

SURGICAL TECHNIQUEOnce all of the sutures have been passed the remaining cuff tendon is pulled as far lateral as possible with gentle traction. The length and width of the remaining defect (which usually has the shape of a triangle or crescent) is measured using a ruler to allow for adequate coverage, a 3 cm x 3 cm Conexa™ 200 graft is opened and trimmed to a size that is approximately 8-10 mm larger than the dimensions of the tear. (Figure 9) The corners of the medial aspect of the patch are then trimmed to create a semi-circular shape. This should allow adequate coverage of the defect with about 3-5 mm of overlap with the native tendon in all directions.
Once the graft preparation is complete, the sutures are arranged from posterior to anterior taking note of the spacing of the sutures as they pass through the native cuff. The limbs of the sutures are then passed through the graft 3-5 mm from the edge using a free tapered needle taking care to recreate the same spacing in the graft as the native tendon to ensure that the graft sits flat on the native cuff tissue. (Figure 10) Once all the sutures have been passed, the graft is slid into place keeping tension on the medial suture limbs in a “parachute” fashion. The suture pairs from the anchors are individually tied starting from posterior and working anterior.
4
Fig. 9
Fig. 10

SURGICAL TECHNIQUEAfter the medial sutures have all been tied a free #2 Force Fiber® (Tornier, Inc.) suture is placed in an inverted hori-zontal mattress fashion 3-5 mm medial to the lateral edge of the graft near the center from anterior to posterior. The lateral aspect of the graft is tensioned and the limbs of the inverted mattress suture are secured using a Piton™ knotless anchor (Tonier, Inc.). Several knotless anchors are used to tension the graft laterally (Figure 11 and 12).The Piton™ anchors allow the surgeon to go back and individually tighten each anchor to ensure proper tension (Figure 13). The correct position and security of the graft are confirmed and additional simple sutures are added as needed to secure the patch to the native cuff tissue (Figure 14).
Conexa™ should be sutured to the repair site under tension. Suturing of the graft continues circumferentially around the tendon. Any excess graft material should be trimmed as necessary. Reinforcement of a standard rotator cuff repair using Conexa™ has been shown to reduce gap formation at the rotator cuff footprint and significantly increase the failure strength of the repair under cyclic loading and load to failure conditions 1.
Closure:The wound is irrigated and the deltoid is repaired to the acromion using #2 Vicryl® sutures starting with the posterior corner which was marked earlier in the case and working anteriorly to the acromioclavicular joint. Excellent purchase can be obtained through the remaining intact tendon insertion of the posterior deltoid and the acromio-clavicular joint capsule anteriorly (Figure 15). The wound is closed in a layered fashion with buried absorbable suture and Steri-Strips™ are applied followed by a dry sterile dressing and a sling.
5
Fig. 11
Fig. 12
Fig. 13
Fig. 14
Fig. 15
SURGICAL TECHNIQUEPost Operative Care:
Passive motion of the arm is performed (Post op weeks 1-4)
Pulley and wand exercises (Post op weeks 4-7)
At 8 weeks, the patient discontinues the sling and begins gentle isometric strengthening exercises
Summary:
Conexa™ Reconstructive Tissue Matrix provides biomechanical support for the repaired tendon. It also supports tissue regeneration instead of scarring at the repair site.
Conexa™ should be sutured to the repair site under tension to provide supplemental load sharing across the standard tendon repair to reinforce the initial stiffness of the repair and minimize early gap formation.
Conexa Reconstructive Tissue Matrix can also be used for repair of the following tendons:
- Biceps Tendon
- Patellar Tendon
- Quadriceps Tendon
- Achilles Tendon
References:
1: “Rotator Cuff Repair Reinforcement using a New Xenograft Matrix,” White Paper Series, Volume 1, Tornier, BAW-0737, Rev: A.
NOTES
6

Tornier is a registered trademark of Tornier, SA.
This product is covered by US patent: 5,460.962. Additional patent(s) pending.
Distributed by :
Tornier, Inc.Edina, MN 55435USA+1 888 867 6437+1 281 494 7900www.tornier.com/us
Manufactured by :
LifeCell , Corp.One Mil lennium WayBranchburg, NJ 08876 USA
CAW-2397 Rev. A
Product Item No. Product Description
conexa™ 100
BCP 020410 Conexa 100 – 2cm x 4cm
BCP 040410 Conexa 100 – 4cm x 4cm
BCP 060610 Conexa 100 – 6cm x 6cm
BCP 051010 Conexa 100 – 5cm x 10cm
conexa™ 200
BCP 030320 Conexa 200 – 3cm x 3cm
BCP 050520 Conexa 200 – 5cm x 5cm
BCP 051020 Conexa 200 – 5cm x 10cm
conexa™ reconstructive tissue matrix