Manchester OpenStack Meetup: I have an OpenStack Cloud, now what? OpenStack 101

OpenStack Documentat ion Team
Red Hat Enterprise Linux OpenStackPlatform 5Deploying OpenStack: Proof-of-Concept Environments (PackStack)
Gett ing Started with Red Hat Enterprise Linux OpenStack Plat form


Red Hat Enterprise Linux OpenStack Plat form 5 Deploying OpenStack:Proof-of-Concept Environments (PackStack)
Gett ing Started with Red Hat Enterprise Linux OpenStack Plat form
OpenStack Documentation TeamRed Hat Customer Content [email protected]

Legal Notice
Copyright © 2012-2015 Red Hat, Inc.
This document is licensed by Red Hat under the Creative Commons Attribution-ShareAlike 3.0Unported License. If you distribute this document, o r a modified version o f it, you must provideattribution to Red Hat, Inc. and provide a link to the original. If the document is modified, all RedHat trademarks must be removed.
Red Hat, as the licensor o f this document, waives the right to enforce, and agrees not to assert,Section 4d o f CC-BY-SA to the fullest extent permitted by applicable law.
Red Hat, Red Hat Enterprise Linux, the Shadowman logo, JBoss, MetaMatrix, Fedora, the InfinityLogo, and RHCE are trademarks o f Red Hat, Inc., registered in the United States and o thercountries.
Linux ® is the registered trademark o f Linus Torvalds in the United States and o ther countries.
Java ® is a registered trademark o f Oracle and/or its affiliates.
XFS ® is a trademark o f Silicon Graphics International Corp. or its subsidiaries in the UnitedStates and/or o ther countries.
MySQL ® is a registered trademark o f MySQL AB in the United States, the European Union andother countries.
Node.js ® is an o fficial trademark o f Joyent. Red Hat Software Collections is not fo rmallyrelated to or endorsed by the o fficial Joyent Node.js open source or commercial pro ject.
The OpenStack ® Word Mark and OpenStack Logo are either registered trademarks/servicemarks or trademarks/service marks o f the OpenStack Foundation, in the United States and o thercountries and are used with the OpenStack Foundation's permission. We are not affiliated with,endorsed or sponsored by the OpenStack Foundation, or the OpenStack community.
All o ther trademarks are the property o f their respective owners.
AbstractThis guide covers the basic getting started tasks for Red Hat Enterprise Linux OpenStackPlatform 5. The deployment method described here uses PackStack for proof o f conceptdeployments, and is not meant fo r production environments. PackStack can be used for singlenode, proof-o f-concept deployments. On such deployments, you can use the Dashboard toload disk images, create a network, launch instances, or perform other basic OpenStack tasks.

. . . . . . . . . . . . . . . . . . . . . . . . . . . . . . . . . . . . . . . . . . . . . . . . . . . . . . . . . . . . . . . . . . . . . . . . . . . . . . . . . . . . . . . . . . . . . . . . . . . . . . . . . . . . . . . . . . . . . . . . . . . . . . . . . . . . . . . . . . . . . . . . . . . . . . . . . . . . . . . . . . . . . . . . . . . . . . . . . . . . . . . . . . . . . . . . . . . . . . . . . . . . . . . . . . . . . . . . . . . . . . . . . . . . . . . . . . . . . . . . . . . . . . . . . . . . . . . . . . . . . . . . . . . . . . . . . . . . . . . .
. . . . . . . . . . . . . . . . . . . . . . . . . . . . . . . . . . . . . . . . . . . . . . . . . . . . . . . . . . . . . . . . . . . . . . . . . . . . . . . . . . . . . . . . . . . . . . . . . . . . . . . . . . . . . . . . . . . . . . . . . . . . . . . . . . . . . . . . . . . . . . . . . . . . . . . . . . . . . . . . . . . . . . . . . . . . . . . . . . . . . . . . . . . . . . . . . . . . . . . . . . . . . . . . . . . . . . . . . . . . . . . . . . . . . . . . . . . . . . . . . . . . . . . . . . . . . . . . . . . . . . . . . . . . . . . . . . . . . . . .
. . . . . . . . . . . . . . . . . . . . . . . . . . . . . . . . . . . . . . . . . . . . . . . . . . . . . . . . . . . . . . . . . . . . . . . . . . . . . . . . . . . . . . . . . . . . . . . . . . . . . . . . . . . . . . . . . . . . . . . . . . . . . . . . . . . . . . . . . . . . . . . . . . . . . . . . . . . . . . . . . . . . . . . . . . . . . . . . . . . . . . . . . . . . . . . . . . . . . . . . . . . . . . . . . . . . . . . . . . . . . . . . . . . . . . . . . . . . . . . . . . . . . . . . . . . . . . . . . . . . . . . . . . . . . . . . . . . . . . . .
. . . . . . . . . . . . . . . . . . . . . . . . . . . . . . . . . . . . . . . . . . . . . . . . . . . . . . . . . . . . . . . . . . . . . . . . . . . . . . . . . . . . . . . . . . . . . . . . . . . . . . . . . . . . . . . . . . . . . . . . . . . . . . . . . . . . . . . . . . . . . . . . . . . . . . . . . . . . . . . . . . . . . . . . . . . . . . . . . . . . . . . . . . . . . . . . . . . . . . . . . . . . . . . . . . . . . . . . . . . . . . . . . . . . . . . . . . . . . . . . . . . . . . . . . . . . . . . . . . . . . . . . . . . . . . . . . . . . . . . .
. . . . . . . . . . . . . . . . . . . . . . . . . . . . . . . . . . . . . . . . . . . . . . . . . . . . . . . . . . . . . . . . . . . . . . . . . . . . . . . . . . . . . . . . . . . . . . . . . . . . . . . . . . . . . . . . . . . . . . . . . . . . . . . . . . . . . . . . . . . . . . . . . . . . . . . . . . . . . . . . . . . . . . . . . . . . . . . . . . . . . . . . . . . . . . . . . . . . . . . . . . . . . . . . . . . . . . . . . . . . . . . . . . . . . . . . . . . . . . . . . . . . . . . . . . . . . . . . . . . . . . . . . . . . . . . . . . . . . . . .
. . . . . . . . . . . . . . . . . . . . . . . . . . . . . . . . . . . . . . . . . . . . . . . . . . . . . . . . . . . . . . . . . . . . . . . . . . . . . . . . . . . . . . . . . . . . . . . . . . . . . . . . . . . . . . . . . . . . . . . . . . . . . . . . . . . . . . . . . . . . . . . . . . . . . . . . . . . . . . . . . . . . . . . . . . . . . . . . . . . . . . . . . . . . . . . . . . . . . . . . . . . . . . . . . . . . . . . . . . . . . . . . . . . . . . . . . . . . . . . . . . . . . . . . . . . . . . . . . . . . . . . . . . . . . . . . . . . . . . . .
. . . . . . . . . . . . . . . . . . . . . . . . . . . . . . . . . . . . . . . . . . . . . . . . . . . . . . . . . . . . . . . . . . . . . . . . . . . . . . . . . . . . . . . . . . . . . . . . . . . . . . . . . . . . . . . . . . . . . . . . . . . . . . . . . . . . . . . . . . . . . . . . . . . . . . . . . . . . . . . . . . . . . . . . . . . . . . . . . . . . . . . . . . . . . . . . . . . . . . . . . . . . . . . . . . . . . . . . . . . . . . . . . . . . . . . . . . . . . . . . . . . . . . . . . . . . . . . . . . . . . . . . . . . . . . . . . . . . . . . .
. . . . . . . . . . . . . . . . . . . . . . . . . . . . . . . . . . . . . . . . . . . . . . . . . . . . . . . . . . . . . . . . . . . . . . . . . . . . . . . . . . . . . . . . . . . . . . . . . . . . . . . . . . . . . . . . . . . . . . . . . . . . . . . . . . . . . . . . . . . . . . . . . . . . . . . . . . . . . . . . . . . . . . . . . . . . . . . . . . . . . . . . . . . . . . . . . . . . . . . . . . . . . . . . . . . . . . . . . . . . . . . . . . . . . . . . . . . . . . . . . . . . . . . . . . . . . . . . . . . . . . . . . . . . . . . . . . . . . . . .
. . . . . . . . . . . . . . . . . . . . . . . . . . . . . . . . . . . . . . . . . . . . . . . . . . . . . . . . . . . . . . . . . . . . . . . . . . . . . . . . . . . . . . . . . . . . . . . . . . . . . . . . . . . . . . . . . . . . . . . . . . . . . . . . . . . . . . . . . . . . . . . . . . . . . . . . . . . . . . . . . . . . . . . . . . . . . . . . . . . . . . . . . . . . . . . . . . . . . . . . . . . . . . . . . . . . . . . . . . . . . . . . . . . . . . . . . . . . . . . . . . . . . . . . . . . . . . . . . . . . . . . . . . . . . . . . . . . . . . . .
. . . . . . . . . . . . . . . . . . . . . . . . . . . . . . . . . . . . . . . . . . . . . . . . . . . . . . . . . . . . . . . . . . . . . . . . . . . . . . . . . . . . . . . . . . . . . . . . . . . . . . . . . . . . . . . . . . . . . . . . . . . . . . . . . . . . . . . . . . . . . . . . . . . . . . . . . . . . . . . . . . . . . . . . . . . . . . . . . . . . . . . . . . . . . . . . . . . . . . . . . . . . . . . . . . . . . . . . . . . . . . . . . . . . . . . . . . . . . . . . . . . . . . . . . . . . . . . . . . . . . . . . . . . . . . . . . . . . . . . .
. . . . . . . . . . . . . . . . . . . . . . . . . . . . . . . . . . . . . . . . . . . . . . . . . . . . . . . . . . . . . . . . . . . . . . . . . . . . . . . . . . . . . . . . . . . . . . . . . . . . . . . . . . . . . . . . . . . . . . . . . . . . . . . . . . . . . . . . . . . . . . . . . . . . . . . . . . . . . . . . . . . . . . . . . . . . . . . . . . . . . . . . . . . . . . . . . . . . . . . . . . . . . . . . . . . . . . . . . . . . . . . . . . . . . . . . . . . . . . . . . . . . . . . . . . . . . . . . . . . . . . . . . . . . . . . . . . . . . . . .
. . . . . . . . . . . . . . . . . . . . . . . . . . . . . . . . . . . . . . . . . . . . . . . . . . . . . . . . . . . . . . . . . . . . . . . . . . . . . . . . . . . . . . . . . . . . . . . . . . . . . . . . . . . . . . . . . . . . . . . . . . . . . . . . . . . . . . . . . . . . . . . . . . . . . . . . . . . . . . . . . . . . . . . . . . . . . . . . . . . . . . . . . . . . . . . . . . . . . . . . . . . . . . . . . . . . . . . . . . . . . . . . . . . . . . . . . . . . . . . . . . . . . . . . . . . . . . . . . . . . . . . . . . . . . . . . . . . . . . . .
. . . . . . . . . . . . . . . . . . . . . . . . . . . . . . . . . . . . . . . . . . . . . . . . . . . . . . . . . . . . . . . . . . . . . . . . . . . . . . . . . . . . . . . . . . . . . . . . . . . . . . . . . . . . . . . . . . . . . . . . . . . . . . . . . . . . . . . . . . . . . . . . . . . . . . . . . . . . . . . . . . . . . . . . . . . . . . . . . . . . . . . . . . . . . . . . . . . . . . . . . . . . . . . . . . . . . . . . . . . . . . . . . . . . . . . . . . . . . . . . . . . . . . . . . . . . . . . . . . . . . . . . . . . . . . . . . . . . . . . .
Table of Contents
Preface
Part I. Int roduct ion
Chapt er 1 . Product Int roduct ion1.1. Overview1.2. Architecture1.3. The Packstack Dep lo yment Uti l i ty1.4. Sup p o rted Virtual Machine Op erating Systems
Chapt er 2 . Product Requirement s2.1. So ftware Req uirements2.2. Hard ware Req uirements2.3. Co nfig uring Sto rag e
Part II. Deploying OpenSt ack using PackSt ack
Chapt er 3. Select ing Component s t o Deploy
Chapt er 4 . Inst alling PackSt ack
Chapt er 5. Running PackSt ack5.1. Quick Start Dep lo yment using PackStack5.2. Running PackStack Interactively5.3. Running PackStack No n-interactively
Chapt er 6 . PackSt ack and Passwords6 .1. Passwo rd Lo catio ns6 .2. Co mmand s to Chang e Passwo rd s
Part III. Using OpenSt ack
Chapt er 7 . A First St art : Launching an Inst ance7.1. Accessing the Dashb o ard7.2. Up lo ad ing a Disk Imag e7.3. Creating a Keyp air7.4. Creating an Op enStack Netwo rk7.5. Launching an Instance7.6 . Creating a Vo lume
Removing PackSt ack Deployment sA.1. Co mp letely remo ving Op enStack, ap p licatio n d ata and all p ackag esA.2. Remo ving o nly Op enStack sp ecific ap p licatio n d ata and p ackag es
Revision Hist ory
2
3
44456
77
1719
2 1
2 2
2 3
2 4253049
6 96 96 9
7 1
7 272747677788 2
8 48 48 5
8 7
T able of Cont ent s
1

Preface
Red Hat Ent erprise Linux OpenSt ack Plat form 5 Deploying OpenSt ack: Proof- of- Concept Environment s (PackSt ack)
2

Part I. Introduction
Part I. Int roduct ion
3

Chapter 1. Product Introduction
1.1. Overview
Red Hat Enterprise Linux OpenStack Platform provides the foundation to build a private or publicInfrastructure-as-a-Service (IaaS) cloud on top of Red Hat Enterprise Linux. It offers a massivelyscalable, fault-tolerant platform for the development of cloud-enabled workloads.
The current Red Hat system is based on OpenStack Icehouse, and packaged so that availablephysical hardware can be turned into a private, public, or hybrid cloud platform including:
Fully distributed object storage
Persistent block-level storage
Virtual-machine provisioning engine and image storage
Authentication and authorization mechanism
Integrated networking
Web browser-based GUI for both users and administration.
The Red Hat Enterprise Linux OpenStack Platform IaaS cloud is implemented by a collection ofinteracting services that control its computing, storage, and networking resources. The cloud ismanaged using a web-based interface which allows administrators to control, provision, andautomate OpenStack resources. Additionally, the OpenStack infrastructure is facilitated through anextensive API, which is also available to end users of the cloud.
1.2. Architecture
The following diagram provides a high-level overview of the OpenStack architecture.
Figure 1.1. OpenStack Architecture
Red Hat Ent erprise Linux OpenSt ack Plat form 5 Deploying OpenSt ack: Proof- of- Concept Environment s (PackSt ack)
4

Each OpenStack service has a code name, which is reflected in the names of configuration files andcommand-line utility programs. For example, the Identity service has a configuration file called keystone.conf.
Table 1.1. Services
Service Code Name Descript ionDashboard Horizon A web-based dashboard for managing OpenStack
services.Identity Keystone A centralized Identity service that provides authentication
and authorization for other services, and manages users,tenants, and roles.
OpenStackNetworking
Neutron A networking service that provides connectivity between theinterfaces of other OpenStack services.
Block Storage Cinder A service that manages persistent block storage volumesfor virtual machines.
Compute Nova A service that manages and provisions virtual machinesrunning on hypervisor nodes.
Image Glance A registry service for storing resources such as virtualmachine images and Cinder snapshots.
Object Storage Swift A service providing object storage which allows users tostore and retrieve files (arbitrary data).
Telemetry Ceilometer A service providing measurements of cloud resources.
Orchestration Heat A service providing a template-based orchestration engine,which supports the automatic creation of resource stacks.
Each OpenStack service is comprised of a collection of Linux services, MariaDB databases, or othercomponents, which together provide a functional group. For example, the glance-api and glance-registry Linux services, together with a MariaDB database, implement the Image service.
For a more detailed overview of each OpenStack service, see the relevant section on the service inDeploying OpenStack: Learning Environments (Manual Setup) at:
https://access.redhat.com/site/documentation/en-US/Red_Hat_Enterprise_Linux_OpenStack_Platform/
1.3. The Packstack Deployment Ut ilit y
Packstack is a command-line utility that uses Puppet modules to enable rapid deployment ofOpenStack on existing servers over an SSH connection. Deployment options are provided eitherinteractively, via the command line, or non-interactively by means of a text file containing a set ofpreconfigured values for OpenStack parameters.
Packstack is suitable for deploying the following types of configurations:
Single-node proof-of-concept installations, where all controller services and your virtualmachines run on a single physical host. This is referred to as an all-in-one install.
Proof-of-concept installations where there is a single controller node and multiple computenodes. This is similar to the all-in-one install above, except you may use one or more additionalhardware nodes for running virtual machines.
Chapt er 1 . Product Int roduct ion
5

Important
Packstack is designed for proof-of-concept deployments, and is not suitable as a productiondeployment tool. Packstack makes many assumptions in its configuration to simplify theinstallation process, and cannot deploy services in a highly available (HA) or load balancedconfiguration, nor provide the flexibility required for configuring complex networking. SeeDeploying OpenStack: Enterprise Environments (Red Hat Enterprise Linux OpenStack PlatformInstaller) for more information on using the Red Hat Enterprise Linux OpenStack Platforminstaller to deploy production environments.
1.4 . Supported Virtual Machine Operat ing Systems
All guest operating systems that are certified with KVM in Red Hat Enterprise Linux 6 and Red HatEnterprise Linux 7 are supported by RHEL OpenStack Platform 5. A detailed list of the supportedguest operating systems can be found here: Certified Guest Operating Systems in Red Hat EnterpriseLinux OpenStack Platform and Red Hat Enterprise Virtualization.
Red Hat Ent erprise Linux OpenSt ack Plat form 5 Deploying OpenSt ack: Proof- of- Concept Environment s (PackSt ack)
6

Chapter 2. Product Requirements
2.1. Software Requirements
2.1.1. Operat ing System Requirements
This version of Red Hat Enterprise Linux OpenStack Platform is supported on:
Red Hat Enterprise Linux 7
For further information on configuring your subscription and the required repositories, see:
Section 2.1.2.2, “Customer Portal Subscription Management”
Section 2.1.2.4, “Red Hat Enterprise Linux Repository Configuration”
Section 2.1.2.5, “Red Hat Enterprise Linux OpenStack Platform Repository Configuration”
For detailed information on installing Red Hat Enterprise Linux, see the corresponding installationguide at:
https://access.redhat.com/site/documentation/en-US/Red_Hat_Enterprise_Linux/
2.1.2. Configure Software Repositories
2.1 .2 .1 . Assigning Fully Qualified Do main Names
It is recommended that systems used to host OpenStack API endpoints are assigned fixed IPaddresses or fully qualified domain names (FQDN).
If OpenStack API endpoints are hosted on systems that have their IP addresses dynamicallyassigned by a DHCP server, there is a loss of service if the assigned address changes. When thisoccurs, you would have to manually update the endpoint definitions stored in the database of theIdentity service.
To avoid this problem, before registering to Red Hat Network, set the HOSTNAME in the /etc/sysconfig/network file on each system that will host an OpenStack API endpoint.
HOSTNAME=myhost.parentdomain
2.1 .2 .2 . Cust o mer Po rt al Subscript io n Management
Red Hat Enterprise Linux OpenStack Platform requires that each system in the OpenStackenvironment be running Red Hat Enterprise Linux Server and that all systems be signed up to receiveupdates from the Customer Portal Subscription Management using Subscription Manager. Forfurther information on managing Red Hat subscriptions, see the Red Hat Subscription Managementdocumentation at the following link:
https://access.redhat.com/site/documentation/en-US/Red_Hat_Subscription_Management/
All steps in this procedure must be executed while logged in to the account of the root user on thesystem being registered.
Procedure 2.1. Registering a Red Hat Enterprise Linux system using Subscript ionManagement
Chapt er 2 . Product Requirement s
7

1. Run the subscription-manager register command to register the system withCustomer Portal Subscription Management.
# subscription-manager register
2. Enter your Red Hat Customer Portal user name when prompted.
Username: [email protected]
Important
Your Red Hat Subscription must have Red Hat Enterprise Linux OpenStack Platformentitlements. If your subscription does not have Red Hat Enterprise Linux OpenStackentitlements then you may register for access to the evaluation program athttp://www.redhat.com/products/enterprise-linux/openstack-platform/.
3. Enter your Red Hat Customer Portal password when prompted.
Password:
4. When registration completes successfully the system is assigned a unique identifier.
The system has been registered with id: IDENTIFIER
The system has been registered with Customer Portal Subscription Management and is ready to beattached to specific software subscriptions.
2.1 .2 .3. RHN/CDN Channels
This section discusses channel and repository settings required for deploying Red Hat EnterpriseLinux OpenStack Platform 5.
Warning
Although older Red Hat OpenStack repositories are available, you must ensure that yoursystem can no longer access them before installing Red Hat Enterprise Linux OpenStackPlatform 5. For example, for CDN, unsubscribe from or disable the following:
Red Hat OpenStack 1.0 (Essex) -- rhel-server-ost-6-preview-rpmsRed Hat OpenStack 2.1 (Folsom) -- rhel-server-ost-6-folsom-rpmsRed Hat Enterprise Linux OpenStack Platform 3 (Grizzly) -- rhel-server-ost-6-3-rpmsRed Hat Enterprise Linux OpenStack Platform 4 Beta (Havana) -- rhel-6-server-openstack-beta-rpmsRed Hat Enterprise Linux OpenStack Platform 4 (Havana) -- rhel-6-server-openstack-4.0-rpms
Red Hat Ent erprise Linux OpenSt ack Plat form 5 Deploying OpenSt ack: Proof- of- Concept Environment s (PackSt ack)
8

Note
The Red Hat Common for RHEL Server channel is recommended for use if creating custom RedHat Enterprise Linux guest images that require cloud-init.
For Red Hat Enterprise Linux 7, run:
# subscription-manager repos \ --enable=rhel-7-server-rh-common-rpms
2.1.2.3.1. Content Delivery Network Channels
You can install Red Hat Enterprise Linux OpenStack Platform 5 through the Content Delivery Network(CDN). To do so, configure subscript ion-manager to use the correct channels.
Run the following command to enable a CDN channel:
# subscription-manager repos --enable=[reponame]
Run the following command to disable a CDN channel:
# subscription-manager repos --disable=[reponame]
Red Hat Enterprise Linux 7
The following tables outline the channels for Red Hat Enterprise Linux 7.
Table 2.1. Required Channels
Channel Repository NameRed Hat Enterprise Linux 7 Server (RPMS) rhel-7-server-rpms
Red Hat OpenStack 5.0 for Server 7 (RPMS) rhel-7-server-openstack-5.0-rpms
Table 2.2. Opt ional Channels
Channel Repository NameRed Hat Enterprise Linux 7 Server - Optional rhel-7-server-optional-rpms
Red Hat Enterprise Linux OpenStack Plat form Installer
The following tables outline the channels for the Red Hat Enterprise Linux OpenStack Platforminstaller.
Table 2.3. Required Channels
Channel Repository NameForeman-RHEL-6 rhel-6-server-openstack-
foreman-rpms
Red Hat Enterprise Linux 6 Server (RPMS) rhel-6-server-rpms
Chapt er 2 . Product Requirement s
9

Red Hat Software Collections RPMs for Red Hat EnterpriseLinux 6 Server
rhel-server-rhscl-6-rpms
Channel Repository Name
Disable Channels
The following table outlines the channels you must disable to ensure Red Hat Enterprise LinuxOpenStack Platform 5 functions correctly.
Table 2.4 . Disable Channels
Channel Repository NameRed Hat CloudForms Management Engine "cf-me-*"
Red Hat CloudForms Tools for RHEL 6 "rhel-6-server-cf-*"
Red Hat Enterprise Virtualization "rhel-6-server-rhev*"
Red Hat Enterprise Linux 6 Server - Extended UpdateSupport
"*-eus-rpms"
2.1.2.3.2. Red Hat Network (RHN) Channels
You can install Red Hat Enterprise Linux OpenStack Platform 5 through Red Hat Network (RHN).
Run the following to add a channel via RHN:
# rhn-channel --add --channel=[reponame]
Run the following to remove a channel via RHN:
# rhn-channel --remove --channel=[reponame]
Note
Red Hat Network is only available via Red Hat Satellite on Red Hat Enterprise Linux 7.1. Formore information on this product, see:
https://access.redhat.com/site/documentation/en-US/Red_Hat_Satellite/6.0/html/User_Guide/index.html
Red Hat Enterprise Linux 7
The following tables outline the channels for Red Hat Enterprise Linux 7.1.
Table 2.5. Required Channels
Channel Repository NameRed Hat OpenStack 5.0 for Server 7.1 rhel-x86_64-server-7-ost-5
Red Hat Enterprise Linux Server (v7 for 64-bit AMD64 /Intel64)
rhel-x86_64-server-7
Table 2.6 . Opt ional Channels
Red Hat Ent erprise Linux OpenSt ack Plat form 5 Deploying OpenSt ack: Proof- of- Concept Environment s (PackSt ack)
10

Channel Repository NameRed Hat Enterprise MRG Messaging v. 2 (for RHEL 7Server x86_64)
rhel-x86_64-server-7-mrg-messaging-2
2.1 .2 .4 . Red Hat Ent erprise Linux Repo sit o ry Co nfigurat io n
Log in as the root user and follow the steps in this procedure to configure a Red Hat EnterpriseLinux system to receive updates from Red Hat Network. Repeat these steps on each system in theOpenStack environment.
Procedure 2.2. At taching Pool IDs to your subscript ion
1. Use the subscription-manager list command to locate the pool identifier of the RedHat Enterprise Linux subscription.
# subscription-manager list --available+-------------------------------------------+ Available Subscriptions+-------------------------------------------+
Product Name: Red Hat Enterprise Linux ServerProduct Id: 69Pool Id: POOLIDQuantity: 1Service Level: NoneService Type: NoneMulti-Entitlement: NoExpires: 01/01/2022Machine Type: physical...
The pool identifier is indicated in the Pool Id field associated with the Red Hat Enterprise Linux Server product. The identifier will be unique to your subscription.Take note of this identifier as it will be required to perform the next step.
Note
The output displayed in this step has been truncated to conserve space. All otheravailable subscriptions will also be listed in the output of the command.
2. Use the subscription-manager attach command to attach the subscription identified inthe previous step.
# subscription-manager attach --pool=POOLIDSuccessfully attached a subscription for Red Hat Enterprise Linux Server.
Replace POOLID with the unique identifier associated with your Red Hat Enterprise LinuxServer subscription. This is the identifier that was located in the previous step.
3. Run the yum repolist command. This command ensures that the repository configurationfile /etc/yum.repos.d/redhat.repo exists and is up to date.
Chapt er 2 . Product Requirement s
11
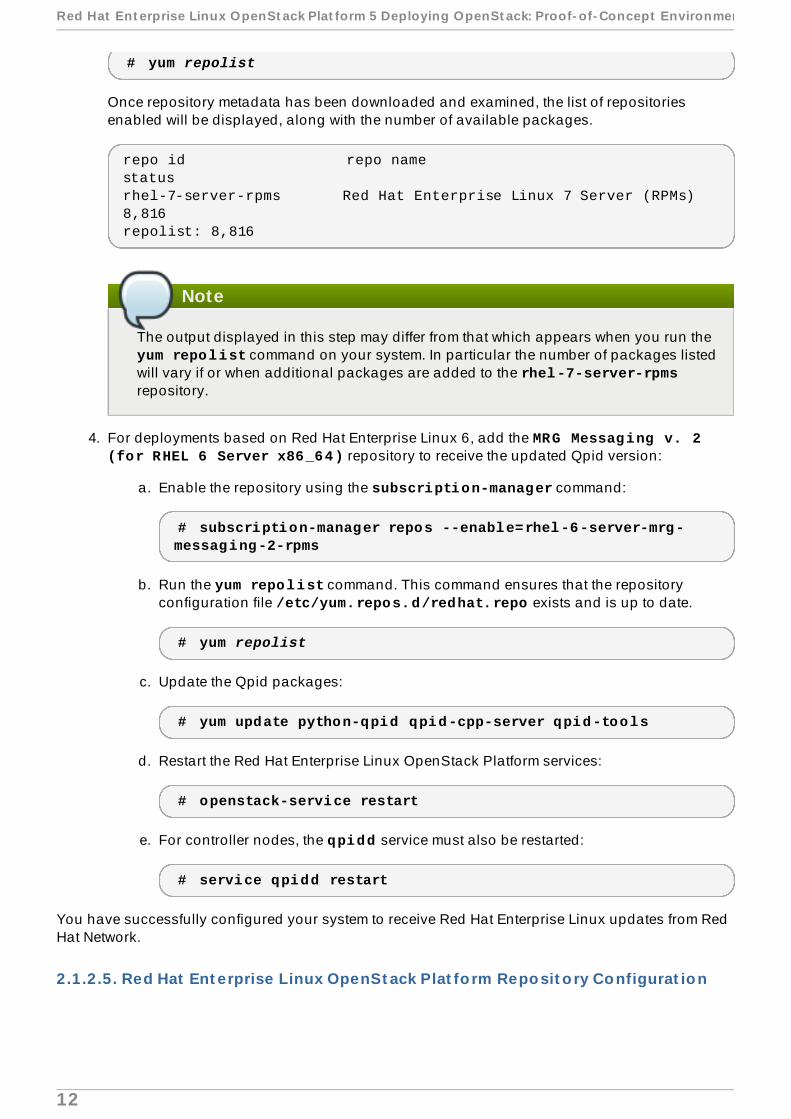
# yum repolist
Once repository metadata has been downloaded and examined, the list of repositoriesenabled will be displayed, along with the number of available packages.
repo id repo name statusrhel-7-server-rpms Red Hat Enterprise Linux 7 Server (RPMs) 8,816repolist: 8,816
Note
The output displayed in this step may differ from that which appears when you run the yum repolist command on your system. In particular the number of packages listedwill vary if or when additional packages are added to the rhel-7-server-rpmsrepository.
4. For deployments based on Red Hat Enterprise Linux 6, add the MRG Messaging v. 2 (for RHEL 6 Server x86_64) repository to receive the updated Qpid version:
a. Enable the repository using the subscription-manager command:
# subscription-manager repos --enable=rhel-6-server-mrg-messaging-2-rpms
b. Run the yum repolist command. This command ensures that the repositoryconfiguration file /etc/yum.repos.d/redhat.repo exists and is up to date.
# yum repolist
c. Update the Qpid packages:
# yum update python-qpid qpid-cpp-server qpid-tools
d. Restart the Red Hat Enterprise Linux OpenStack Platform services:
# openstack-service restart
e. For controller nodes, the qpidd service must also be restarted:
# service qpidd restart
You have successfully configured your system to receive Red Hat Enterprise Linux updates from RedHat Network.
2.1 .2 .5 . Red Hat Ent erprise Linux OpenSt ack Plat fo rm Repo sit o ry Co nfigurat io n
Red Hat Ent erprise Linux OpenSt ack Plat form 5 Deploying OpenSt ack: Proof- of- Concept Environment s (PackSt ack)
12
Follow the steps in this procedure to configure a Red Hat Enterprise Linux system to receiveOpenStack packages and updates from Content Delivery Network or Red Hat Network. Access to aRed Hat software entitlement that includes Red Hat Enterprise Linux OpenStack Platform is required,such entitlements include:
Red Hat Cloud Infrastructure
Red Hat Cloud Infrastructure (without Guest OS)
Red Hat Enterprise Linux OpenStack Platform
Red Hat Enterprise Linux OpenStack Platform Preview
Red Hat Enterprise Linux OpenStack Platform (without Guest OS)
Important
Required and optional repository names for each version are listed in Section 2.1.2.3,“RHN/CDN Channels” .
These steps must be run while logged in as the root user. Repeat these steps on each system in theenvironment.
Procedure 2.3. At taching Pool IDs to your subscript ion
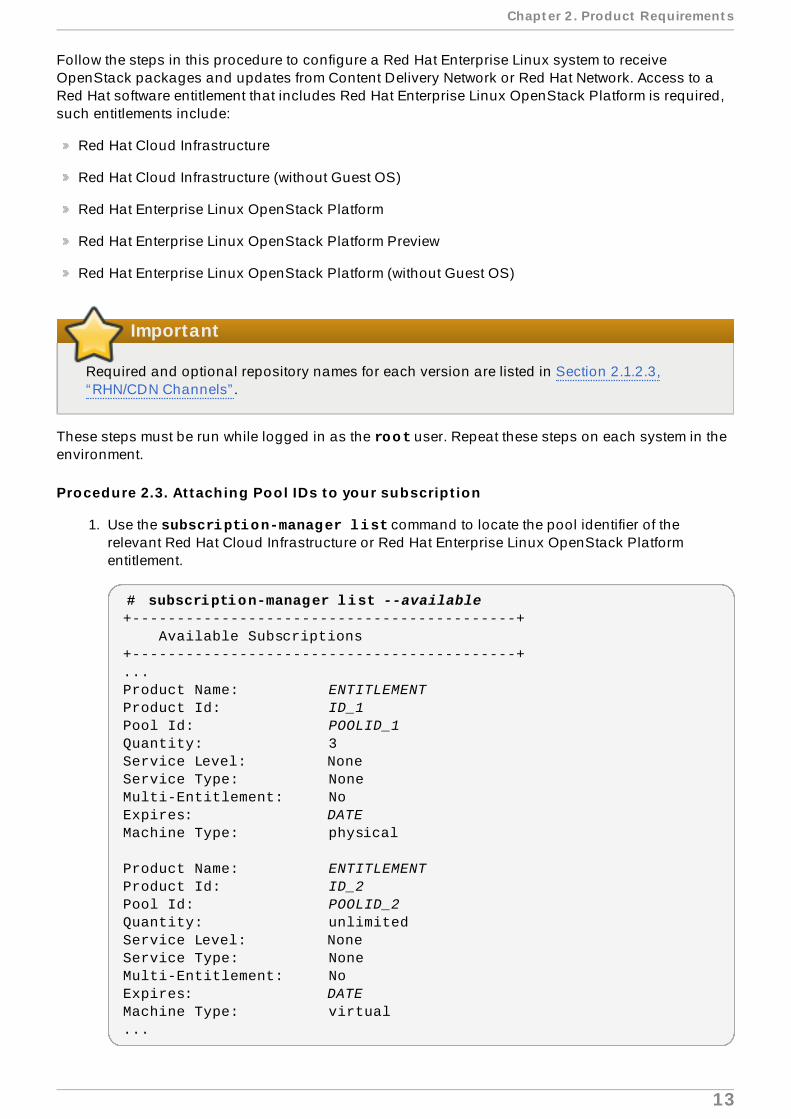
1. Use the subscription-manager list command to locate the pool identifier of therelevant Red Hat Cloud Infrastructure or Red Hat Enterprise Linux OpenStack Platformentitlement.
# subscription-manager list --available+-------------------------------------------+ Available Subscriptions+-------------------------------------------+...Product Name: ENTITLEMENTProduct Id: ID_1Pool Id: POOLID_1Quantity: 3Service Level: NoneService Type: NoneMulti-Entitlement: NoExpires: DATEMachine Type: physical
Product Name: ENTITLEMENTProduct Id: ID_2Pool Id: POOLID_2Quantity: unlimitedService Level: NoneService Type: NoneMulti-Entitlement: NoExpires: DATEMachine Type: virtual...
Chapt er 2 . Product Requirement s
13

Locate the entry in the list where the Product Name matches the name of the entitlement thatwill be used to access Red Hat Enterprise Linux OpenStack Platform packages. Take note ofthe pool identifier associated with the entitlement, this value is indicated in the Pool Idfield. The pool identifier is unique to your subscription and will be required to complete thenext step.
Note
The output displayed in this step has been truncated to conserve space. All otheravailable subscriptions will also be listed in the output of the command.
2. Use the subscription-manager attach command to attach the subscription identified inthe previous step.
# subscription-manager attach --pool=POOLIDSuccessfully attached a subscription for ENTITLEMENT.
Replace POOLID with the unique identifier associated with your Red Hat Cloud Infrastructureor Red Hat Enterprise Linux OpenStack Platform entitlement. This is the identifier that waslocated in the previous step.
3. Use either the subscription-manager or yum-config-manager commands to enable ordisable the appropriate software repositories (channels).
For example, to ensure that the repository for Red Hat Enterprise Linux OpenStack Platform 3(Grizzly) has been disabled, run:
# subscription-manager repos --disable rhel-server-ost-6-3-rpmsLoaded plugins: product-id ==== repo: rhel-server-ost-6-3-rpms ====[rhel-server-ost-6-3-rpms]bandwidth = 0base_persistdir = /var/lib/yum/repos/x86_64/6Serverbaseurl = https://cdn.redhat.com/content/dist/rhel/server/6/6Server/x86_64/openstack/3/oscache = 0cachedir = /var/cache/yum/x86_64/6Server/rhel-server-ost-6-3-rpmscost = 1000enabled = False...
Note
The values True and 1 are equivalent. As a result the output on your system mayinstead contain this string:
enabled = 1
Red Hat Ent erprise Linux OpenSt ack Plat form 5 Deploying OpenSt ack: Proof- of- Concept Environment s (PackSt ack)
14

4. Run the yum repolist command. This command ensures that the repository configurationfile /etc/yum.repos.d/redhat.repo exists and is up to date.
# yum repolist
Once repository metadata has been downloaded and examined, the current list of enabledrepositories will be displayed, along with the number of available packages. For example:
repo id repo name status rhel-7-server-rpms Red Hat Enterprise Linux 7 Server (RPMs) 11,610+460rhel-7-server-openstack-5.0-rpms \Red Hat OpenStack 5.0 for Server 7 (RPMS) 487+143
5. Use the subscription-manager command to enable the Red Hat Enterprise LinuxOpenStack Platform repository.
# subscription-manager repos --enable=[reponame]
Replace [reponame] with the appropriate repository name. For details, see Section 2.1.2.3,“RHN/CDN Channels” .
6. Install the yum-plugin-priorities package provided by the rhel-6-server-optional-rpmschannel for Red Hat Enterprise Linux 6.6 or the rhel-7-server-optional-rpms channelfor Red Hat Enterprise Linux 7.1:
# yum install yum-plugin-priorities
7. If not yet installed, use the following to install yum-config-manager:
# yum install yum-utils
8. Use the yum-config-manager command to set the priority of the Red Hat Enterprise LinuxOpenStack Platform software repository to 1. This is the highest priority value supported bythe yum-plugin-priorities plug-in.
# yum-config-manager --enable [reponame] --setopt="[reponame].priority=1"
For example:
# yum-config-manager --enable rhel-7-server-openstack-5.0-rpms \ --setopt="rhel-7-server-openstack-5.0-rpms.priority=1"Loaded plugins: product-id ==== repo: rhel-7-server-openstack-5.0-rpms ====[rhel-7-server-openstack-5.0-rpms]bandwidth = 0base_persistdir = /var/lib/yum/repos/x86_64/6Server...cost = 1000
Chapt er 2 . Product Requirement s
15

enabled = True...priority = 1...
9. Run the yum update command and reboot to ensure that the most up-to-date packages,including the kernel, are installed and running.
# yum update# reboot
You have successfully configured your system to receive Red Hat Enterprise Linux OpenStackPlatform packages. You may use the yum repolist command to confirm the repositoryconfiguration again at any time.
2.1.3. Disable Network Manager
OpenStack Networking currently does not work on systems that have the Network Manager(NetworkManager) service enabled.
Follow the steps listed in this procedure while logged in as the root user on each system in theenvironment that will handle network traffic. This includes the system that will host the OpenStackNetworking service, all network nodes, and all compute nodes.
These steps determine the state of the NetworkManager service, disable it from running, and replaceit with the standard network service:
Procedure 2.4 . Disabling the Network Manager service
1. Verify Network Manager is currently enabled using the systemctl command.
# systemctl status NetworkManager.service | grep Active:
The output indicates whether or not the Network Manager service is enabled.
A. The system displays an error if the Network Manager service is not currently installed:
error reading information on service NetworkManager: No such file or directory
If this error is displayed then no further action is required to disable the Network Managerservice.
B. The system displays Active: active (running) if Network Manager is running, or Active: inactive (dead) if it is not.
For example, if Network Manager is active:
Active: active (running) since Thu 2014-06-26 19:34:00 EDT; 2s ago
If Network Manager is inactive, then no further action is required.
2. If Network Manager is running, then you must first stop it:
Red Hat Ent erprise Linux OpenSt ack Plat form 5 Deploying OpenSt ack: Proof- of- Concept Environment s (PackSt ack)
16

# systemctl stop NetworkManager.service
3. Then disable Network Manager:
# systemctl disable NetworkManager.service
4. Open each interface configuration file on the system in a text editor. Interface configurationfiles are found in the /etc/sysconfig/network-scripts/ directory and have names ofthe form ifcfg-X where X is replaced by the name of the interface. Valid interface namesinclude eth0 , p1p5, and em1.
In each file ensure that the NM_CONTROLLED configuration key is set to no and the ONBOOTconfiguration key is set to yes. Add these keys manually if they do not already exist in eachfile.
NM_CONTROLLED=noONBOOT=yes
This action ensures that the standard network service will take control of the interfaces andautomatically activate them on boot.
5. Ensure that the standard network service is started using the systemctl command:
# systemctl start network.service
6. Ensure that the network service is enabled:
# systemctl enable network.service
The Network Manager service has been disabled. The standard network service has been enabledand configured to control the required network interfaces.
2.2. Hardware Requirements
The system requirements for an OpenStack deployment vary based on the scale and workload of theenvironment being deployed.
This guide provides the recommended minimum system requirements for only proof-of-conceptdeployment scenarios.
Chapt er 2 . Product Requirement s
17

Important
To verify that the processor of a system running Red Hat Enterprise Linux has the requiredCPU extensions and that they are enabled check the contents of the /proc/cpuinfo file:
# grep -E 'svm|vmx' /proc/cpuinfo | grep nx
If any output is shown, the processor is hardware virtualization capable. If no output is shownit is still possible that your processor supports hardware virtualization. In some circumstancesmanufacturers disable the virtualization extensions in the BIOS. Where you believe this to bethe case consult the system's BIOS and the motherboard manual provided by themanufacturer.
2.2.1. Single Node ("All in One") Deployments
In this configuration all services are installed and run on a single system. This simplifies thedeployment process and is suitable for evaluation purposes. Such a deployment is not howeversuitable for use in a production environment.
Processor
64-bit x86 processor with support for the Intel 64 or AMD64 CPU extensions, and the AMD-Vor Intel VT hardware virtualization extensions enabled.
Memory
A minimum of 2 GB of RAM is recommended.
Add additional RAM to this requirement based on the amount of memory that you intend tomake available to virtual machine instances.
Disk Space
A minimum of 50 GB of available disk space is recommended.
Add additional disk space to this requirement based on the amount of space that youintend to make available to virtual machine instances. This figure varies based on both thesize of each disk image you intend to create and whether you intend to share one or moredisk images between multiple instances.
1 TB of disk space is recommended for a realistic environment capable of hosting multipleinstances of varying sizes.
Network In terface Cards
1 x 1 Gbps Network Interface Card.
2.2.2. Cloud Cont roller Deployment with One or More Compute Nodes
In this configuration one system acts as the cloud controller by hosting services including theCompute database and API server.
Other available systems are used as Compute nodes on which virtual machine instances are run.Support services such as image storage are provided on either the cloud controller or one or more ofthe Compute nodes.
Red Hat Ent erprise Linux OpenSt ack Plat form 5 Deploying OpenSt ack: Proof- of- Concept Environment s (PackSt ack)
18

Cloud Contro ller
Processor
64-bit x86 processor with support for the Intel 64 or AMD64 CPU extensions, and the AMD-Vor Intel VT hardware virtualization extensions enabled.
Memory
A minimum of 2 GB of RAM is recommended.
Disk Space
A minimum of 50 GB of available disk space is recommended.
Add additional disk space to this requirement based on the amount of space that youintend to make available to virtual machine instances. This figure varies based on both thesize of each disk image you intend to create and whether you intend to share one or moredisk images between multiple instances.
1 TB of disk space is recommended for a realistic environment capable of hosting multipleinstances of varying sizes.
Network In terface Cards
2 x 1 Gbps Network Interface Cards.
Compute Nodes
Processor
64-bit x86 processor with support for the Intel 64 or AMD64 CPU extensions, and the AMD-Vor Intel VT hardware virtualization extensions enabled.
Memory
A minimum of 2 GB of RAM is recommended.
Add additional RAM to this requirement based on the amount of memory that you intend tomake available to virtual machine instances.
Disk Space
A minimum of 50 GB of available disk space is recommended.
Add additional disk space to this requirement based on the amount of space that youintend to make available to virtual machine instances. This figure varies based on both thesize of each disk image you intend to create and whether you intend to share one or moredisk images between multiple instances.
1 TB of disk space is recommended for a realistic environment capable of hosting multipleinstances of varying sizes.
Network In terface Cards
2 x 1 Gbps Network Interface Cards.
2.3. Configuring Storage
Block Storage
Chapt er 2 . Product Requirement s
19

Block Storage uses volume groups to identify attached volumes. By default, PackStackcreates:
An example storage volume for testing. It is placed in /var/lib/cinder and installedas a loopback storage device on the host for the Block Storage service.
The cinder-volumes volume group (configured in volume_group in /etc/cinder/cinder.conf).
To avoid the creation of loopback devices, you must initialize your volume manually for theBlock Storage service before installing and deploying OpenStack using PackStack.
Example 2.1. Create Volume Group
Initialize the volume manager as a physical volume, and then use it to create the cinder-volumes volume group:
# pvcreate /dev/sdX# vgcreate cinder-volumes /dev/sdX
Object Storage
Instead of installing a volume for Object Storage, PackStack adds a device to an ObjectStorage ringfile. On the Object Storage host, the device is represented by a directory in /srv/. Ideally, the directory for the Object Storage device should be a separate file system.
If you do not have a separate file system, or just want to test Object Storage, thenPackStack creates a small loopback storage device in place of a separate partition.Otherwise, you must manually configure your system using PackStack's answer file (seeSection 5.3.2, “Editing a PackStack Answer File” ).
Example 2.2. Conf igure Storage Devices using PackStack Answer File
Configure Object Storage with /dev/sdb1 and /dev/sdc1 (no testing loopbackdevice):
CONFIG_SWIFT_STORAGE_HOSTS=192.0.43.10/sdb1,192.0.43.10/sdc1
Red Hat Ent erprise Linux OpenSt ack Plat form 5 Deploying OpenSt ack: Proof- of- Concept Environment s (PackSt ack)
20

Part II. Deploying OpenStack using PackStack
PackStack is a command line utility that uses Puppet (http://www.puppetlabs.com/) modules tosupport rapid deployment of OpenStack on existing servers over an SSH connection. PackStack issuitable for deploying single-node proof-of-concept installations. Such deployments are notsuitable for product ion environments .
Deployment options are provided either interactively, via the command line, or via a text filecontaining preconfigured answers to the questions PackStack asks.
Part II. Deploying OpenSt ack using PackSt ack
21

Chapter 3. Selecting Components to Deploy
In OpenStack, there are different options available to achieve similar results. This chapter discussesyour networking deployment options.
OpenStack Networking versus Compute networking
OpenStack networks can be deployed using either OpenStack Networking (Neutron) or Computenetworking:
OpenStack Networking is a service which provides Networking-as-a-Service functionality inOpenStack. It can be configured for advanced virtual network topologies, such as per-tenantprivate networks and more. It is able to virtualize and manage both Layer 2 (logical) and Layer3 (network) of the OSI network model. Each tenant has a virtual neutron router with one ormore private networks, which can communicate with the outside world. This allows full routingisolation for each tenant private network. OpenStack Networking functions can be performedusing either the dashboard or the command line interface.
OpenStack Networking uses namespaces (netns), which virtualize access to networkresources, giving each group of processes the network access it requires. Red Hat EnterpriseLinux OpenStack Platform includes a custom Red Hat Enterprise Linux kernel that supports theuse of network namespaces.
Important
This kernel must be installed on all OpenStack nodes. Additionally, the Open vSwitchplug-in requires a kernel with the version 2.6.32-431.el6.x86_64 or later.
To check if you have the required netns enabled kernel installed, you can install the packageiproute-2.6.32-130.el6ost.netns.2.x86_64 and run the command:
# ip netns
Compute networking accepts networking tasks such as setting up bridging interfaces orchanging iptables rules from the queue and performs them to manipulate the network. It is ableto virtualize and manage simple Layer 3 virtualization. When you deploy OpenStack usingnova-network, all network related commands must be done using the command line interface.
Red Hat Ent erprise Linux OpenSt ack Plat form 5 Deploying OpenSt ack: Proof- of- Concept Environment s (PackSt ack)
22
Chapter 4. Installing PackStack
PackStack is provided by the openstack-packstack package. Follow this procedure to install theopenstack-packstack package.
Procedure 4 .1. Installing PackStack
1. Use the yum command to install the openstack-packstack package.
# yum install -y openstack-packstack
2. Use the which command to verify that the PackStack utility is now available.
# which packstack/usr/bin/packstack
The openstack-packstack package which provides the PackStack utility is now installed. Proceed toChapter 5, Running PackStack for information on prerequisites and running PackStack for the firsttime.
Chapt er 4 . Inst alling PackSt ack
23

Chapter 5. Running PackStack
PackStack supports a variety of different deployment modes:
Quick Start
When run with the --allinone or --install-hosts arguments, PackStack performs asingle node or multiple node deployment respectively. These deployments are performedusing default configuration values and are recommended for initial testing of Red HatEnterprise Linux OpenStack Platform. Users requiring more customized deploymentsshould consider the other deployment modes.
See Section 5.1, “Quick Start Deployment using PackStack” for more information onrunning PackStack using the --allinone or --install-hosts options.
In teract ively
When run interactively, PackStack provides prompts for entry of each configuration valuerequired to complete deployment. Alternatively you may accept the provided default value.
See Section 5.2, “Running PackStack Interactively” for more information on runningPackStack interactively.
Non- interact ively
When run non-interactively, PackStack expects an "answer" file to be provided as acommand line option. This file contains the desired settings for all configuration values thatare required to complete deployment.
See Section 5.3, “Running PackStack Non-interactively” for more information ongenerating an answer file and using it to run PackStack non-interactively.
Important
To deploy OpenStack using PackStack each machine targeted for deployment must beconfigured to allow access using the account of the root user over SSH on port 22.
Important
By default PackStack will configure a volume group named cinder-volumes on the systemtargeted for Volume Storage deployment if one does not already exist. This volume group willbe backed by a loopback device and is not appropriate for production use.
If you intend to use physical storage for the cinder-volumes volume group then you mustcreate the volume group in advance on the system to be used for Volume Storage.
Red Hat Ent erprise Linux OpenSt ack Plat form 5 Deploying OpenSt ack: Proof- of- Concept Environment s (PackSt ack)
24

Important
It is strongly recommended that each Compute node has two network interfaces available. Onefor access to the public network and one for the internal Compute network. While it is possibleto use a single interface for both purposes, this approach may result in virtual machineinstances obtaining addresses from the wrong DHCP server.
Note
There is no automated uninstall process for undoing a PackStack install. If you have apreviously installed version of OpenStack, you will need to uninstall it first, before installingwith PackStack. For more information, see Appendix A, Removing PackStack Deployments
5.1. Quick Start Deployment using PackStack
The quickest way to deploy an OpenStack environment using PackStack is to provide a host, or listof hosts, on the command line. The first host listed is deployed as a Controller node; subsequenthosts are deployed as Compute nodes.
When using this deployment method, PackStack uses default values for all other deployment optionsunless they are overridden on the command line.
For a list of available command-line options, see Section 5.3.2, “Editing a PackStack Answer File” .
Procedure 5.1. Quick Start Deployment using PackStack
1. A. Single-node Deployment
Run PackStack with the --allinone parameter to perform an "all in one" deployment onthe local host. You are prompted to enter the password of the root user to facilitate SSHkey installation.
Example 5.1. Single-node Deployment using OpenStack Networking(default )
In this example, PackStack is instructed to deploy an "all in one" installation to thelocal system, which results in the following:
OpenStack Networking is enabled by default.
An admin Identity service tenant is created along with a keystonerc_admin file.The admin password and other information are stored in the keystonerc_adminfile, which is located in the /root directory, and also in the directory from whichPackStack is run, if different from /root. The admin password is also stored as CONFIG_KEYSTONE_ADMIN_PW in PackStack's answer file.
A demo Identity service tenant is created, with its associated keystonerc_demofile, which can be sourced like the keystonerc_admin file. The demo password isalso stored as CONFIG_KEYSTONE_DEMO_PW in PackStack's answer file.
Chapt er 5. Running PackSt ack
25

The keys CONFIG_PROVISION_DEMO and CONFIG_PROVISION_ALL_IN_ONE_OVS_BRIDGE are automatically enabled inPackStack's answer file. This answer file will have a file name similar to /root/packstack-answers-20130306-051043.txt.
The OpenStack Dashboard is automatcially installed. After the installation isfinished, you should log into the Dashboard using the demo account instead of the admin account due to the ownership of the private and public networks.
# packstack --allinone
Example 5.2. Single-Node Deployment without OpenStack Networking
In this example, PackStack is instructed to deploy an "all in one" installation to thelocal system, but using only Compute networking.
# packstack --allinone --os-neutron-install=n
B. Mult ip le-node Deployment
Important
Red Hat Enterprise Linux OpenStack Platform requires that each system in theOpenStack environment is running Red Hat Enterprise Linux Server, and that allsystems are signed up to receive updates from Red Hat Network using SubscriptionManager.
See Section 2.1.2.2, “Customer Portal Subscription Management” for informationon registering to Red Hat Network.
You can ssh into each node and register it, attach an OpenStack subscription,and enable the required OpenStack repository. This allows PackStack to installOpenStack on each node.Alternatively, you can get PackStack to generate an answer file, then edit theanswer file to contain your Red Hat subscription username and password,using the parameters CONFIG_RH_USER and CONFIG_RH_PW. RunningPackStack with this answer file configures each node to receive updates fromRed Hat Network using Subscription Manager. This allows PackStack to installOpenStack on each node.
For instructions on generating and editing an answer file, see Section 5.3.1,“Generating a PackStack Answer File” .
Run PackStack with the --install-hosts parameter. The parameter expects a comma-separated list of IP addresses. You will be prompted to enter the password of the rootuser of each system to facilitate SSH key installation.
# packstack --install-hosts=CONTROLLER_ADDRESS,NODE_ADDRESSES
Red Hat Ent erprise Linux OpenSt ack Plat form 5 Deploying OpenSt ack: Proof- of- Concept Environment s (PackSt ack)
26

Replace CONTROLLER_ADDRESS with the IP address of the system that you intend to useas a Controller node. Replace NODE_ADDRESSES with IP addresses of the systems thatyou intend to use as Compute nodes.
Example 5.3. Mult ip le Node Deployment
In this example, PackStack is instructed to deploy a controller node on the system withIP address 192.168.43.10 .
Additional Compute nodes are deployed on the systems with IP addresses 192.168.43.11 and 192.168.43.12.
# packstack --install-hosts=192.168.43.10,192.168.43.11,192.168.43.12
2. PackStack will prompt you to enter the password of the root user for each system in thedeployment. This is required to connect to the system and install Puppet which is the toolused to facilitate the rest of the deployment.
[email protected]'s password:
3. The Puppet manifests used to deploy each component will be run on each of the targetsystems. The amount of time this takes to complete varies based on the hardware andexisting workload of each system. The time can be significant.
PackStack provides continuous updates indicating which manifests are being deployed as itprogresses through the deployment process. Once the process is completed, a confirmationmessage similar to the one shown below will be displayed:
**** Installation completed successfully ******
Additional information regarding the locations of the answer file and other files is given.Depending on the options you chose, the following screen's content will vary:
Additional information: * A new answerfile was created in: /root/packstack-answers-20131205-155916.txt * Time synchronization installation was skipped. Please note that unsynchronized time on server instances might be problem for some OpenStack components. * File /root/keystonerc_admin has been created on OpenStack client host 192.168.43.10. To use the command line tools you need to source the file. * To use the console, browse to http://192.168.43.10/dashboard * To use Nagios, browse to http://192.168.43.10/nagios username : nagiosadmin, password : abcdefgh12345678 * The installation log file is available at: /var/tmp/packstack/20131205-155915-tZ0BTD/openstack-setup.log * The generated manifests are available at: /var/tmp/packstack/20131205-155915-tZ0BTD/manifests
Procedure 5.2. Viewing the created network
Chapt er 5. Running PackSt ack
27

1. Retrieve the URL shown in the "Additional information" output shown above, and the demotenant password in /root/keystonerc_demo .
2. Type the URL into a browser to access the Dashboard:
http://HOSTNAME/dashboard/
Replace HOSTNAME with the host name or IP address of the server on which you ranPackStack.
Figure 5.1. Log In Screen
3. Type demo as the User Name and the password in /root/keystonerc_demo as the Password .
4. Click Sign In.
5. After signing in to the Dashboard, you can see details of the "all in one" deployment. Forexample, to see the basic network set-up, select the Project tab and choose Network Topology.
Red Hat Ent erprise Linux OpenSt ack Plat form 5 Deploying OpenSt ack: Proof- of- Concept Environment s (PackSt ack)
28
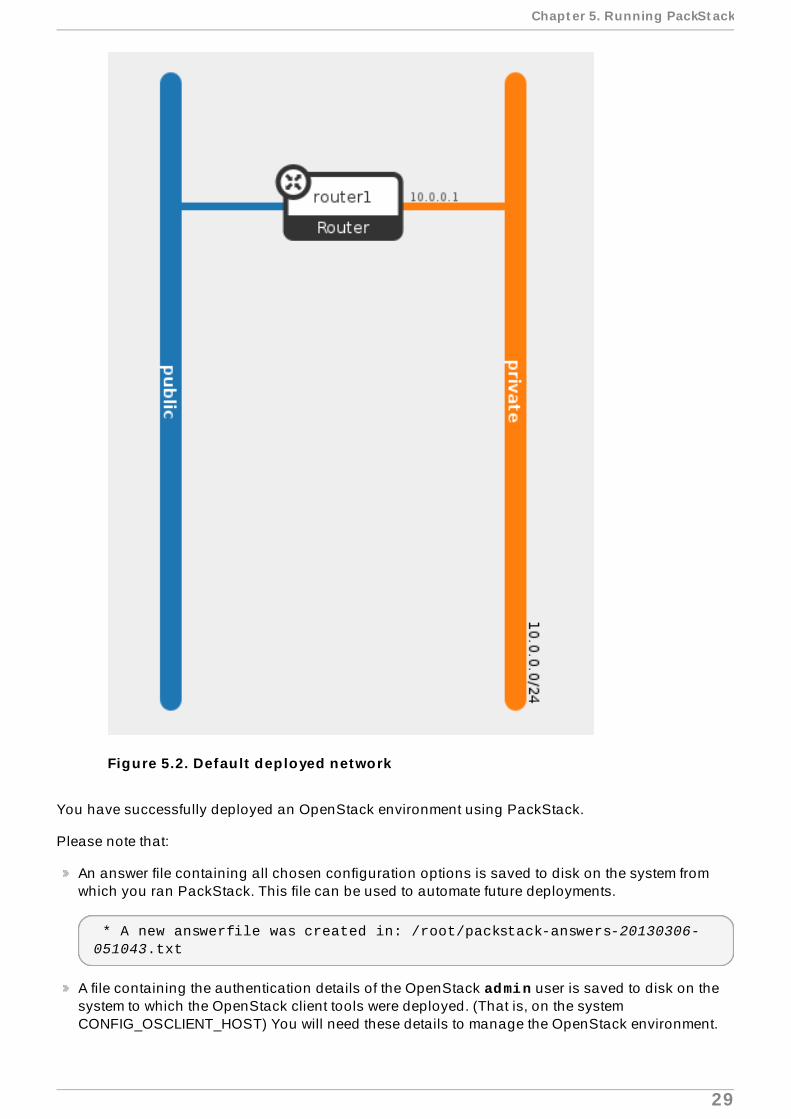
Figure 5.2. Default deployed network
You have successfully deployed an OpenStack environment using PackStack.
Please note that:
An answer file containing all chosen configuration options is saved to disk on the system fromwhich you ran PackStack. This file can be used to automate future deployments.
* A new answerfile was created in: /root/packstack-answers-20130306-051043.txt
A file containing the authentication details of the OpenStack admin user is saved to disk on thesystem to which the OpenStack client tools were deployed. (That is, on the systemCONFIG_OSCLIENT_HOST) You will need these details to manage the OpenStack environment.
Chapt er 5. Running PackSt ack
29

* To use the command-line tools you need to source the file /root/keystonerc_admin created on 192.168.43.10
This is just the basic setup. You will now need to configure the network and run up instances, usingeither the Dashboard or the command-line interface.
See Part III, “Using OpenStack” for further instructions to begin using your OpenStack environment.
5.2. Running PackStack Interact ively
OpenStack can be deployed by running PackStack interactively. PackStack supports the creation ofboth single node and multiple node OpenStack deployments.
Note
The procedure below lists all the questions that PackStack prompts you to answer. Based onthe choices you make, some of these options might be skipped during the setup.
Procedure 5.3. Running PackStack In teract ively
1. Running PackStack
Run the packstack command to commence the deployment process. Optionally append the --debug parameter to enable additional logging.
# packstack
Important
You are not required to log in as the root user to run the packstack command itself.However you will be required to provide root credentials for each machine to whichyou choose to deploy services.
2. Conf iguring the Public Key
Each server involved in the OpenStack deployment is configured for key-basedauthentication. If you already have a public key that you wish to use for this, enter the path toit. If you do not, then press Enter and the utility will generate one for you and save it to ~/.ssh/id_rsa.pub.
Enter the path to your ssh Public key to install on servers:
3. Select ing the MySQL Database
PackStack will prompt you to choose if you want to install MySQL database on the same hostor on a remote host.
Should Packstack install MySQL DB [y|n] [y] :
Red Hat Ent erprise Linux OpenSt ack Plat form 5 Deploying OpenSt ack: Proof- of- Concept Environment s (PackSt ack)
30

Note
PackStack is capable of installing a single MySQL database node. On the other hand,PackStack does not handle MySQL cluster installation, but it allows you to work with aMySQL cluster that you have set up separately.
If you choose n, PackStack asks you for credentials and uses CONFIG_MYSQL_HOST as agiven remote database.
4. Select ing the Services to Install
The PackStack script will prompt you to select the OpenStack services that you want to installand configure. At each prompt enter y to install the service, enter n to skip the service, orpress Enter to select the default option listed in square brackets ([, ]).
Should Packstack install OpenStack Image service (Glance) [y|n] [y] :Should Packstack install OpenStack Block Storage service (Cinder) [y|n] [y] :Should Packstack install OpenStack Compute service (Nova) [y|n] [y] :Should Packstack install OpenStack Networking service (Neutron) [y|n] [y] :Should Packstack install OpenStack Dashboard service (Horizon) [y|n] [y] :Should Packstack install OpenStack Object Storage service (Swift) [y|n] [n] :Should Packstack install OpenStack Telemetry service (Ceilometer) [y|n] [y] :Should Packstack install OpenStack Orchestration (Heat) [y|n] [n] :
Note
Depending on which services you selected for installation, the ensuing prompts in thisprocedure will vary.
Each selected service can be deployed on either a local or remote system. Where each servicedeploys to will be determined based on the IP addresses you provide later in the deploymentprocess.
5. OpenStack includes a number of client tools. Enter y to install the client tools. A filecontaining the authentication values of the administrative user will also be created.
Should Packstack install OpenStack client tools [y|n] [y] :
6. Optionally, the PackStack script will configure all servers in the deployment to retrieve dateand time information using Network Time Protocol (NTP). To use this facility enter a commaseparated pool of NTP servers.
Enter a comma separated list of NTP server(s). Leave plain if Packstack should not install ntpd on instances.:
Chapt er 5. Running PackSt ack
31

Example 5.4 . Using the Default Red Hat Enterprise Linux NTP Servers
Enter list of NTP server(s). Leave plain if packstack should not install ntpd on instances.: 0.rhel.pool.ntp.org, 1.rhel.pool.ntp.org
7. Optionally, the PackStack script will install and configure Nagios to provide advancedfacilities for monitoring the nodes in the OpenStack environment.
Should Packstack install Nagios to monitor openstack hosts [y|n] [n] :
8. If you have existing servers that have been configured previously, and you do not wantPackStack to overwrite their configurations, you can specify the IP addresses of the serversto be excluded.
Enter a comma separated list of server(s) to be excluded. Leave plain if you don't need to exclude any server.:
9. Select whether you want to run OpenStack services in debug mode.
Do you want to run OpenStack services in debug mode [y|n] [n]:
10. Select whether you want to use VMware vCenter as hypervisor and datastore.
Do you want to use VMware vCenter as hypervisor and datastore [y|n] [n]:
11. Conf iguring the MySQL Instance
OpenStack services require a MySQL database to store data in. To configure the database:
a. Enter the IP address of the server to deploy the MySQL database server on.
Enter the IP address of the MySQL server [192.0.43.10] :
b. Enter the password to use for the MySQL administrative user. If you do not enter avalue it will be randomly generated. The generated password will be available both inthe ~/.my.cnf file of the current user and in the answer file.
Enter the password for the MySQL admin user :
12. Conf iguring the AMQP service
OpenStack services by default use the RabbitMQ messaging system to communicate.RabbitMQ is the recommended messaging system.
a. You can choose between RabbitMQ or Qpid.
Set the server for the AMQP service (qpid, rabbitmq)? [qpid|rabbitmq] [rabbitmq] :
Red Hat Ent erprise Linux OpenSt ack Plat form 5 Deploying OpenSt ack: Proof- of- Concept Environment s (PackSt ack)
32

b. Enter the IP address of the AMQP service.
Enter the IP address of the AMQP service [192.0.43.10] :
c. Choose whether to enable SSL for the AMQP service.
Enable SSL for the AMQP service? [y|n] [n] :
d. Choose whether to enable authentication for the AMQP service.
Enable Authentication for the AMQP service? [y|n] [n] :
13. Conf iguring the Ident ity service
OpenStack uses the Identity service (openstack-keystone) for identity, token, catalog, andpolicy services.
a. If Identity service installation was selected, then you must enter the IP address of theserver to deploy Identity on.
Enter the IP address of the Keystone server [192.0.43.10] :
b. A Keystone admin user is created when the Identity service is installed. This userrequires a password. The password and other information is stored in the keystonerc_admin file, which is located in the /root directory. In case of multi-host installation, keystonerc_admin is located only in /root on the CONFIG_OSCLIENT_HOST host.The admin password is also stored in PackStack'sanswer file.
Enter the password for the Keystone admin user.
Enter the password for the Keystone admin user :
c. A demo Keystone tenant is also created along with a keystonerc_demo file, whichcan be sourced like the existing keystonerc_admin file. Creating this user enablesthe keys CONFIG_PROVISION_DEMO and CONFIG_PROVISION_ALL_IN_ONE_OVS_BRIDGE in PackStack's answer file. Thisanswer file will have a file name similar to /root/packstack-answers-20130306-051043.txt.
Enter the password for the Keystone demo user.
Enter the password for the Keystone demo user :
14. Conf iguring the Image service
OpenStack uses the Image service (openstack-g lance- *) to store, discover, and retrievevirtual machine images. If Image service installation was selected then enter the IP address ofthe server to deploy Image service on when prompted.
Enter the IP address of the Glance server [192.0.43.10] :
15. Conf iguring the Volume service
Chapt er 5. Running PackSt ack
33

OpenStack uses the Volume service (openstack-cinder- *) to provide volume storageservices.
a. If Volume service installation was selected, enter the IP address of the server to deploythe Volume service on.
Enter the IP address of the Cinder server [192.0.43.10] :
b. OpenStack Block Storage requires some back-end storage that the service is built on.The default implementation is to use Logical Volume Management (LVM) to create aLogical Volume Group called cinder-volumes. Alternatives are Red Hat Storage(gluster) or Network File System (NFS).
Enter the Cinder backend to be configured [lvm|gluster|nfs] [lvm]:
c. If you chose LVM, PackStack expects storage for use with Volume to be available on avolume group named cinder-volumes.
i. If this volume group does not already exist then you will be asked if you wantit to be created automatically.
Answering yes means that PackStack will create a raw disk image in the /var/lib/cinder and mount it for use by Volume using a loopback device.
Should Cinder's volumes group be created (for proof-of-concept installation)? [y|n] [y]:
ii. If you elected to have PackStack create the cinder-volumes volume groupfor you then you will be prompted to enter the size of it in gigabytes (GB).
Enter Cinder's volumes group size [20G] :
Important
The amount of space selected must be available on the device used for /var/lib/cinder.
Remember that the size of the Volume service's volume group willrestrict the amount of disk space that you can expose to Computeinstances.
d. If you chose gluster, you do not need to create a local volume. Instead you need tochoose the gluster volume to mount.
i. Enter a gluster volume for use with Cinder, for example ip-address:/vol-name.
Enter a single or comma separated list of gluster volume shares to use with Cinder [^'([\d]{1,3}\.){3}[\d]{1,3}:/.*']:
16. Conf iguring the Compute service
Red Hat Ent erprise Linux OpenSt ack Plat form 5 Deploying OpenSt ack: Proof- of- Concept Environment s (PackSt ack)
34

Compute is made up of a number of complementary services that must be deployed. Ifinstallation of the Compute services was selected then these additional configuration promptswill be presented.
a. The Compute API service (openstack-nova-api) provides web service endpoints forauthenticating and interacting with the OpenStack environment over HTTP or HTTPS.Enter the IP address of the server to deploy the Compute API service on.
Enter the IP address of the Nova API service [192.0.43.10] :
b. Compute includes a certificate management service (openstack-nova-cert ). Enterthe IP address of the server to deploy the Compute certificate management service on.
Enter the IP address of the Nova Cert service [192.0.43.10] :
c. The Compute VNC proxy provides facilities for connecting users of the Computeservice to their instances running in the OpenStack cloud. Enter the IP address for theserver to deploy the Compute VNC proxy on.
Enter the IP address of the Nova VNC proxy [192.0.43.10] :
d. The PackStack script is able to deploy one or more Compute nodes. Enter a commaseparated list containing the IP addresses or hostnames of all of the nodes that youwish to deploy Compute services on.
Enter a comma separated list of IP addresses on which to install the Nova Compute services [192.0.43.10] :
e. The Conductor service (openstack-nova-conductor) provides database querysupport to the Compute service. Enter the IP address of the server to deploy theConductor service on.
Enter the IP address of the Nova Conductor service [192.0.43.10]:
f. The Compute scheduler (openstack-nova-scheduler) is used to map Compute'srequests to Compute resources. Enter the IP address of the server to deploy theCompute scheduler on.
Enter the IP address of the Nova Scheduler service [192.0.43.10] :
g. In the default configuration, Compute allows for overcommitment of physical CPU andmemory resources. This means that more of these resources are made available forrunning instances than actually physically exist on the Compute node.
The amount of overcommitment that is permitted is configurable.
i. The default level of CPU overcommitment allows 16 virtual CPUs to beallocated for each physical CPU socket or core that exists on the physicalCompute node. Press Enter to accept the default or enter a different value ifdesired.
Chapt er 5. Running PackSt ack
35
Enter the CPU overcommitment ratio. Set to 1.0 to disable CPU overcommitment [16.0] :
ii. The default level of memory overcommitment allows up to 50% more virtualmemory to be allocated than exists on the physical Compute node. Press Enter to accept the default or enter a different value if desired.
Enter the RAM overcommitment ratio. Set to 1.0 to disable RAM overcommitment [1.5] :
h. A private interface must be configured to provide DHCP services on the Computenodes. Enter the name of the private interface to use.
Enter the Private interface for Flat DHCP on the Nova compute servers [eth1] :
i. The Compute networking service (openstack-nova-network) provides networkservices for Compute instances. Enter the IP address of the server to deploy theCompute networking service on.
Enter the IP address of the Nova Network service [192.0.43.10] :
Important
The Compute networking service is incompatible with the OpenStack Networkservice added since the Folsom release.
j. The Compute network manager can be selected to be VLAN Manager, Flat Manager orFlat DHCP manager. Type VlanManager, FlatManager, or FlatDHCPManager to replacethe final term Manager in the expression nova.network.manager.Manager asrequired. Flat DHCP is the default.
Enter the Nova network manager [nova.network.manager.FlatDHCPManager] :
k. A public interface must be configured to allow connections from other nodes andclients. Enter the name of the public interface to use. Examples are eth0, eth1, and soon, or em1, em2 and so on, or p1p1, p1p2, p2p1 and so on.
Enter the Public interface on the Nova network server [eth0] :
l. A private interface must be configured to provide DHCP services on the Computenetwork server. Enter the name of the private interface to use.
Enter the Private interface for Flat DHCP on the Nova network server [eth1] :
m. All Compute instances are automatically assigned a private IP address. Enter therange from which these private IP addresses must be assigned.
Red Hat Ent erprise Linux OpenSt ack Plat form 5 Deploying OpenSt ack: Proof- of- Concept Environment s (PackSt ack)
36
Enter the IP Range for network manager [192.168.32.0/22] :
n. Compute instances can optionally be assigned publicly accessible floating IPaddresses. Enter the range from which floating IP addresses will be assigned.
Enter the IP Range for Floating IP's [10.3.4.0/22] :
o. The default floating pool needs to be named. Enter the name for the default floatingpool
What should the default floating pool be called? [nova] :
p. All Compute instances are assigned a floating point IP. Enter y to automaticallyassign floating point IP address.
Should new instances automatically have a floating IP assigned? [y|n] [n] :
17. Conf iguring OpenStack Networking
OpenStack Networking service provides a scalable and API-driven system for managing thenetwork connectivity, addressing, and services within an OpenStack IaaS cloud deployment.
a. Enter the IP address of the OpenStack Networking Server.
Enter the IP address of the Neutron server [192.0.43.10] :
b. OpenStack Networking uses namespaces (netns).
The OpenStack Networking namespaces virtualize access to network resources,giving each group of processes the network access it requires. The groups ofprocesses are referred to as containers. Red Hat Enterprise Linux OpenStack Platformincludes a custom Red Hat Enterprise Linux kernel that supports the use of networknamespaces.
Important
This kernel must be installed on all OpenStack nodes. Additionally, the OpenvSwitch plug-in requires a kernel with the version 2.6.32-431.el6.x86_64 or later.
Enter y to select the use of namespaces.
Should Neutron use network namespaces? [y|n] [y] :
c. OpenStack Networking sets up the Neutron L3 agent.
The L3 agent acts as an abstract L3 router that can connect to and provide gatewayservices for multiple L2 networks. Usually the L3 agent will run on the network node. Ifthere is no network node it should run on the controller node. The nodes on which theL3 agent will be hosted must have a range of IP addresses from the external network
Chapt er 5. Running PackSt ack
37

that are available for use by OpenStack Networking. These IP addresses will beassigned to the routers that provide the link between the internal and externalnetworks.
Enter the IP addresses on which the Neutron L3 Agent should be set up.
Note
The range selected must be large enough to provide a unique IP address foreach router in the deployment as well as each desired floating IP.
Enter a comma separated list of IP addresses on which to install the Neutron L3 agent [192.0.43.10]
d. In order to have OpenStack Networking set up a bridge for external traffic, you need tospecify a name for this bridge. The Neutron L3 agent will use this bridge for externaltraffic, giving the node it is running on access to, for example, the internet. There is nospecific naming convention but it is recommended to give the bridge a meaningfulname, such as br-ex. If you do not enter a name, the external bridge will by defaultbe named br-ex. If you intend to use a provider network to handle external traffic,enter the special value provider.
Enter the name of the bridge that the Neutron L3 agent will use for external traffic [br-ex]
e. OpenStack Networking sets up the Neutron DHCP agent.
This agent is capable of allocating IP addresses to virtual machines running on thenetwork. The DHCP agent runs on the network node. If there is no network node theDHCP agent should run on the controller node. Enter the list of IP addresses onwhich you want Neutron DHCP set up.
Enter a comma separated list of IP addresses on which to install Neutron DHCP agent [192.0.43.10] :
f. Enter the name of the L2 plugin to be used with OpenStack Networking. Valid optionsare:
linuxbridge: Choose this option if you need a simple bridge and do not requiresupport for VLANs or GRE. Example linuxbridge names would be 'br1' or 'br100'.
openvswitch: Choose this option if you wish to have configurable ports on amanaged switch or will require VLAN or GRE support.
Enter the name of the L2 plugin to be used with Neutron [linuxbridge|openvswitch] [openvswitch] :
g. The OpenStack Compute service allows virtual machines to query metadataassociated with a VM by making a web request to a special IP address. OpenStackNetworking supports proxying those requests to nova-api , even when the requestsare made from isolated networks, or from multiple networks that use overlapping IP
Red Hat Ent erprise Linux OpenSt ack Plat form 5 Deploying OpenSt ack: Proof- of- Concept Environment s (PackSt ack)
38

addresses. In order to use this functionality, OpenStack Networking must install themetadata agent. Enter the IP addresses on which the metadata agent should be setup.
Enter a comma separated list of IP addresses on which to install the Neutron metadata agent [192.0.43.10] :
h. OpenStack Networking allocates tenant networks. Enter the type of network to allocateto the tenant networks.
The use of local tenant networks is recommended for all-in-one deployments. Theuse of vlan tenant networks is recommended for multi-node deployments. The OpenvSwitch Neutron plugin supports GRE tunneling, and you can select gre as long asthe installed kernel (version 2.6.32-431.el6.x86_64 or later) and Open vSwitchuserspace support GRE tunneling too.
Enter the type of network to allocate for tenant networks [local|vlan|gre|vxlan] [local] :
i. Enter a list of VLAN ranges for use with the selected plug-in.
Each tuple in the list is expected to be in the format PHYSICAL:START:END. Note thatPHYSICAL is just a user-provided label for a network name, not necessarily a physicaldevice. Replace PHYSICAL with the name of a network, replace START with the start ofthe VLAN range to identify with it, and replace END with the end of the VLAN range toassociate with it.
For example, with a network called "physnet1" that has a VLAN range from 1 to 1000,you would specify "physnet1:1:1000".
Enter a comma separated list of VLAN ranges for the Neutron openvswitch plugin:
j. Enter a list of bridge mappings for the OpenStack Networking Open vSwitch plugin.
Each tuple in the list is expected to be in the format PHYSICAL:BRIDGE. ReplacePHYSICAL with the name of a network, and replace BRIDGE with the name of the OpenvSwitch bridge that will be used to connect to the network.
Continuing the example above, with physnet1 using the interface called "br-eth1", youcould use the default option so physnet1 consists of VLANs 1 to 1000 on bridge br-eth1.
Enter a comma separated list of bridge mappings for the Neutron openvswitch plugin [physnet1:br-eth1] :
18. Conf iguring Client Tools
If installation of the client tools was selected then enter the IP address of the server to installthe client tools on when prompted.
Enter the IP address of the client server [192.0.43.10] :
An "rc" file containing administrative credentials will also be created on this host.
Chapt er 5. Running PackSt ack
39

19. Conf iguring the Dashboard
OpenStack uses the Dashboard service (openstack-dashboard ) to provide a web-baseduser interface or Dashboard for accessing OpenStack services including Volume, Compute,Object Storage, and Identity. If installation of the Dashboard was selected then theseadditional configuration values will be requested.
a. Enter the IP address of the server to deploy Dashboard on.
Enter the IP address of the Horizon server [192.0.43.10] :
b. To enable HTTPS communication with the Dashboard enter y when prompted.Enabling this option ensures that your access to the Dashboard is encrypted.
Would you like to set up Horizon communication over https [y|n] [n] :
20. Conf iguring Object Storage
If installation of Object Storage was selected then these additional configuration values willbe requested.
a. Enter the IP address of the server that is to act as the Object Storage proxy. Thisserver will act as the public link between clients and the Object Storage.
Enter the IP address of the Swift proxy service [192.0.43.10] :
b. Enter a comma separated list of devices that Object Storage will use to store objects.Each entry must be specified in HOST/DEVICE format where HOST is replaced by theIP address of the host the device is attached to, and DEVICE is replaced by the path tothe device.
Enter the Swift Storage servers e.g. host/dev,host/dev [192.0.43.10] :
c. Object Storage uses zones to ensure that each replica of a given object is storedseparately. A zone might represent an individual disk drive or array, a server, all theservers in a rack, or even an entire data center.
When prompted enter the number of storage zones that must be defined. Note that thenumber provided must not be bigger than the number of individual devices specified.
Enter the number of swift storage zones, MUST be no bigger than the number of storage devices configured [1] :
d. Object Storage relies on replication to maintain the state of objects even in the eventof a storage outage in one or more of the configured storage zones. Enter the numberof replicas that Object Storage must keep of each object when prompted.
A minimum of three (3) replicas is recommended to ensure a reasonable degree offault tolerance in the object store. Note however that the number of replicas specifiedmust not be greater than the number of storage zones as this would result in one ormore of the zones containing multiple replicas of the same object.
Red Hat Ent erprise Linux OpenSt ack Plat form 5 Deploying OpenSt ack: Proof- of- Concept Environment s (PackSt ack)
4 0

Enter the number of swift storage replicas, MUST be no bigger than the number of storage zones configured [1] :
e. Currently PackStack supports the use of either Ext4 or XFS filesystems for objectstorage. The default and recommended choice is Ext4. Enter the desired value whenprompted.
Enter FileSystem type for storage nodes [xfs|ext4] [ext4] :
21. Conf iguring Demo a User and Test ing
PackStack allows you to provision a demo user and a testing suite.
a. PackStack allows you to optionally configure a demo user and testing. Select y or nto make your choice.
Would you like to provision for demo usage and testing? [y|n] [n] :
b. If you choose to provision a demo user, then enter a network address for the floatingIP subnet.
Enter the network address for the floating IP subnet: [192.168.32.0/22] :
c. Tempest is the OpenStack Integration test suite. It runs tests using a simpleconfiguration file that describes the test environment. The tests are run against allOpenStack service endpoints by exercising API calls and validates the responses.
If you choose to configure the demo user and testing, would you like to configure theOpenStack test suite.
Would you like to configure Tempest (OpenStack test suite)? [y|n] [n] :
d. For the demo user and testing, would you like to configure the external OVS bridge.
Would you like to configure the external ovs bridge? [y|n] [n] :
22. Conf iguring the Orchest rat ion Service
The Orchestration service provides a template-based orchestration for describing a cloudapplication by running OpenStack API calls to generate running cloud applications. Thesoftware integrates other core components of OpenStack into a one-file template system.
a. The CloudWatch API can be used to do the following functionality: list alarms, listmetrics etc. Enter y to install the Heat CloudWatch API.
Should Packstack install Heat CloudWatch API [y|n] [n] :
Chapt er 5. Running PackSt ack
4 1

b. Heat endeavors to provide compatibility with the AWS CloudFormation templateformat, so that many existing CloudFormation templates can be launched onOpenStack. Heat provides both an OpenStack-native REST API and aCloudFormation-compatible Query API. Enter y to install Heat CloudFormation API.
Should Packstack install the Heat CloudFormation API [y|n] [n] :
Note
For more information on how to use the Dashboard and CLI commands to create andmanage stacks using templates, see the section "Launch and manage stacks" in theRed Hat Enterprise Linux OpenStack Platform End User Guide, at this link: Launch andmanage stacks.
23. Conf iguring the Telemetry Service
The Telemetry service is the unique point of contact for billing systems to acquire all of themeasurements they need to establish customer billing, across all current OpenStack corecomponents. Enter the IP address of the server on which the Telemetry service has to beinstalled.
Enter the IP address of the Ceilometer server [192.0.43.10] :
Note
For more information on the CLI commands required to use the Telemetry commands,see the section "Measure cloud resources" in the Red Hat Enterprise Linux OpenStackPlatform End User Guide, at this link: Measure cloud resources.
24. Conf iguring EPEL
PackStack allows you to subscribe each server to Extra Packages for Enterprise Linux(EPEL).
To subscribe each server to EPEL enter "y" [y|n] [n] :
25. Conf iguring Sof tware Sources
PackStack allows you to configure the target servers to retrieve software packages from anumber of sources.
a. Enabling Custom Sof tware Repositories
PackStack allows you to optionally configure each server to retrieve updates fromadditional custom software repositories. Enter the URL for the directory containing the repodata folder of each desired repository at the prompt, separated by a comma.
Enter a comma separated list of URLs to any additional yum repositories to install:
Red Hat Ent erprise Linux OpenSt ack Plat form 5 Deploying OpenSt ack: Proof- of- Concept Environment s (PackSt ack)
4 2

b. Enabling Red Hat Network Subscript ion
Enter your Red Hat Network account details when prompted. This will ensure eachserver involved in the deployment is subscribed to receive updates from Red HatNetwork.
To subscribe each server to Red Hat enter a username here:
To subscribe each server to Red Hat enter your password here:
Important
PackStack registers systems to Red Hat Network using Subscription Manageror Red Hat Network Satellite. You may encounter problems if your systems havealready been registered and subscribed to the Red Hat OpenStack channelsusing RHN Classic.
c. Enabling the Red Hat Enterprise Linux Beta Channel
To enable the Red Hat Enterprise Linux Beta channel enter y when prompted. Notethat selecting this option is not recommended at this time but may be required byfuture Red Hat Enterprise Linux OpenStack Platform preview releases.
To subscribe each server to Red Hat Enterprise Linux 6 Server Beta channel (only needed for Preview versions of RHOS) enter "y" [y|n] [n] :
d. Enabling Red Hat Network Satellite
PackStack allows you to optionally configure each server to retrieve updates from aRed Hat Network Satellite server.
Enter the URL of the Red Hat Network Satellite server that you wish to use whenprompted. If you do not wish to use a Red Hat Satellite server then do not enter avalue.
To subscribe each server with RHN Satellite enter RHN Satellite server URL :
If an RHN Satellite URL is provided a number of follow up prompts will be displayed.
i. Red Hat Network Satellite supports authentication using a user name andpassword or an activation key. If your Satellite administrator provided youwith a user name and password enter them when prompted. If your Satelliteadministrator provided you with an access key then do not enter a value.
Enter RHN Satellite username or leave plain if you will use activation key instead :
Chapt er 5. Running PackSt ack
4 3

Enter RHN Satellite password or leave plain if you will use activation key instead :
ii. If your Satellite administrator provided you with an access key then enter itwhen prompted. Otherwise do not enter a value.
Enter RHN Satellite activation key or leave plain if you used username/password instead :
iii. Specify the path to the certificate of the certificate authority that is used toverify that the connection with the Satellite server is secure.
Specify a path or URL to a SSL CA certificate to use :
iv. Specify the profile name that must be used to identify the system in Red HatNetwork. This is optional.
If required specify the profile name that should be used as an identifier for the system in RHN Satellite :
v. Specify the HTTP proxy that must be used when connecting to the Satelliteserver. If no proxy is required then do not enter a value.
Specify a HTTP proxy to use with RHN Satellite :
vi. Specify the user name for authenticating with the HTTP proxy that must beused when connecting to the Satellite server. If no proxy is required or thechosen proxy does not require authentication then do not enter a value.
Specify a username to use with an authenticated HTTP proxy :
vii. Specify the password for authenticating with the HTTP proxy server that mustbe used when connecting to the Satellite server. If no proxy is required or thechosen proxy does not require authentication then do not enter a value.
Specify a password to use with an authenticated HTTP proxy. :
viii. Specify any additional Satellite flags that you need to be passed to the rhnreg_ks command when it is run on each system. This configuration keyaccepts a comma separated list of flags. Valid flags are novirtinfo , norhnsd , and nopackages.
See the Red Hat Satellite documentation for more information. If unsure do notenter a value.
Enter comma separated list of flags passed to rhnreg_ks :
26. Verify Parameters and Conf irm
Red Hat Ent erprise Linux OpenSt ack Plat form 5 Deploying OpenSt ack: Proof- of- Concept Environment s (PackSt ack)
4 4

At this point you will be asked to confirm the deployment details that you provided. Type yesand press Enter to continue with the deployment.
Depending on the options you chose, the following screen's content will vary.
Installer will be installed using the following configuration:==============================================================ssh-public-key: /root/.ssh/id_rsa.pubos-mysql-install: yos-glance-install: yos-cinder-install: yos-nova-install: yos-neutron-install: yos-horizon-install: yos-swift-install: nos-ceilometer-install: yos-heat-install: nos-client-install: yntp-servers:nagios-install: nexclude-servers:os-debug-mode: nos-vmware: nmysql-host: 192.0.43.10mysql-pw: ********amqp-server rabbitmqamqp-host: 192.0.43.10amqp-enable-ssl: namqp-enable-auth: nkeystone-host: 192.0.43.10keystone-admin-passwd: ********keystone-demo-passwd: ********glance-host: 192.0.43.10cinder-host: 192.0.43.10cinder-backend: lvmcinder-volumes-create: ycinder-volumes-size: 20Gnovaapi-host: 192.0.43.10novacert-host: 192.0.43.10novavncproxy-hosts: 192.0.43.10novacompute-hosts: 192.0.43.10novaconductor-host: 192.0.43.10nova-db-passwd: ********nova-ks-passwd: ********novasched-host: 192.0.43.10novasched-cpu-allocation-ratio:16.0novasched-ram-allocation-ratio:1.5novacompute-privif: eth1novanetwork-host: 192.0.43.10novanetwork-pubif: eth0novanetwork-privif: eth1novanetwork-fixed-range: 192.168.32.0/22novanetwork-floating-range: 10.3.4.0/22novasched-host: 192.0.43.10novasched-cpu-allocation-ratio:16.0novasched-ram-allocation-ratio:1.5
Chapt er 5. Running PackSt ack
4 5

neutron-server-host: 192.0.43.10neutron-use-namespaces: yneutron-l3-hosts: 192.0.43.10neutron-l3-ext-bridge: br-exneutron-dhcp-hosts: 192.0.43.10neutron-l2-plugin: openvswitchneutron-metadata-hosts: 192.0.43.10neutron-l2-agent: openvswitchneutron-ovs-tenant-network-type:localneutron-ovs-vlan-ranges: neutron-ovs-bridge-mappings: physnet1:1000:2000neutron-ovs-bridge-interfaces:osclient-host: 192.0.43.10os-horizon-host: 192.0.43.10os-horizon-ssl: nos-swift-proxy: 192.0.43.10os-swift-storage: 192.0.43.10os-swift-storage-zones: 1os-swift-storage-replicas: 1os-swift-storage-fstype: ext4os-swift-storage-size: 2Gprovision-demo: nprovision-tempest: nprovision-demo-floatrange: 192.168.32.0/22provision-tempest-repo-uri: https://github.com/openstack/tempest.gitprovision-tempest-repo-revision:masterprovision-all-in-one-ovs-bridge:nos-heat-cloudwatch-install: nos-heat-cfn-install: nceilometer-host: 192.0.43.10mongodb-host: 192.0.43.10use-epel: nadditional-repo: rh-username: [email protected]: ********rh-beta-repo: nrhn-satellite-server: Proceed with the configuration listed above? (yes|no): yes
Red Hat Ent erprise Linux OpenSt ack Plat form 5 Deploying OpenSt ack: Proof- of- Concept Environment s (PackSt ack)
4 6

Important
At this stage, if you need to change any of the parameter values there are two ways todo so.
Choose no , the installation then starts from Step 1 prompting you to enter valuesfrom the beginning, but this time the default values displayed are the ones you hadpreviously entered. You can now change the values of the parameters andcomplete the installation by choosing yes when prompted, after the screen of newparameters is displayed.Choose yes, the installation begins and an answer file is created. But this couldresult in error if there is an issue with the parameters. You can then modify theparameters in the answer file (packstack-answers-xxxx.txt) and re-run with thefollowing command.
# packstack --answer-file=packstack-answers-xxxx.txt
27. At this point PackStack will commence deployment. Note that when PackStack is setting upSSH keys it will prompt you to enter the root password to connect to machines that are notalready configured to use key authentication.
Depending on the options you chose, the following screen's content will vary.
Installing:Clean Up... [ DONE ]Setting up ssh keys... [ DONE ]Discovering hosts' details... [ DONE ]Disabling NetworkManager... [ DONE ]Adding pre install manifest entries... [ DONE ]Adding MySQL manifest entries... [ DONE ]Adding AMQP manifest entries... [ DONE ]Adding Keystone manifest entries... [ DONE ]Adding Glance Keystone manifest entries... [ DONE ]Adding Glance manifest entries... [ DONE ]Installing dependencies for Cinder... [ DONE ]Adding Cinder Keystone manifest entries... [ DONE ]Adding Cinder manifest entries... [ DONE ]Checking if the Cinder server has a cinder-volumes vg... [ DONE ]Creating Cinder manifest... [ DONE ]Adding Nova API manifest entries... [ DONE ]Adding Nova Keystone manifest entries... [ DONE ]Adding Nova Cert manifest entries... [ DONE ]Adding Nova Conductor manifest entries... [ DONE ]Adding Nova Compute manifest entries... [ DONE ]Adding Nova Network manifest entries... [ DONE ]Adding Nova Scheduler manifest entries... [ DONE ]Adding Nova VNC Proxy manifest entries... [ DONE ]Adding Nova Common manifest entries... [ DONE ]Adding Openstack Network-related Nova manifest entries...[ DONE ]Adding Neutron API manifest entries... [ DONE ]Adding Neutron Keystone manifest entries... [ DONE ]Adding Neutron L3 manifest entries... [ DONE ]Adding Neutron L2 Agent manifest entries... [ DONE ]Adding Neutron DHCP Agent manifest entries... [ DONE ]
Chapt er 5. Running PackSt ack
4 7

Adding Neutron Metadata Agent manifest entries... [ DONE ]Adding OpenStack Client manifest entries... [ DONE ]Adding Horizon manifest entries... [ DONE ]Adding Swift Keystone manifest entries [ DONE ]Adding Swift builder manifest entries [ DONE ]Adding Swift proxy manifest entries [ DONE ]Adding Swift storage manifest entries [ DONE ]Adding Swift common manifest entries [ DONE ]Adding Provisioning manifest entries [ DONE ]Adding MongoDB manifest entries [ DONE ]Adding Ceilometer manifest entries [ DONE ]Adding Ceilometer Keystone manifest entries [ DONE ]Adding post install manifest entries [ DONE ]Preparing servers [ DONE ]Installing Dependencies [ DONE ]Copying Puppet modules and manifests [ DONE ]Applying Puppet manifests...
28. Applying the Puppet manifests to all machines involved in the deployment takes a significantamount of time. PackStack provides continuous updates indicating which manifests arebeing deployed as it progresses through the deployment process. Once the processcompletes a confirmation message similar to the one shown below will be displayed.
Depending on the options you chose, the following screen's content will vary.
**** Installation completed successfully ******
(Please allow Installer a few moments to start up.....)
Additional information:* A new answerfile was created in: /root/packstack-answers-20130613-133303.txt* Time synchronization installation was skipped. Please note that unsynchronized time on server instances might be problem for some OpenStack components.* To use the command line tools you need to source the file /root/keystonerc_admin created on 192.0.43.10* To use the console, browse to http://192.0.43.10/dashboard* To use Nagios, browse to http://192.0.43.10/nagios username : nagiosadmin, password: abcdefgh12345678* Kernel package with netns support has been installed on host 192.0.43.10. Because of the kernel update host mentioned above requires reboot.* The installation log file is available at: /var/tmp/packstack/20130613-133302-5UY8KB/openstack-setup.logYou have mail in /var/spool/mail/root
29. Reboot all the nodes in the environment to ensure that the kernel change takes effect.
PackStack deploys a new kernel with network namespaces enabled for all the nodes. Youmust reboot the environment to ensure that the change takes effect.
# reboot
You have successfully deployed OpenStack using PackStack.
Red Hat Ent erprise Linux OpenSt ack Plat form 5 Deploying OpenSt ack: Proof- of- Concept Environment s (PackSt ack)
4 8

The configuration details that you provided are also recorded in an "Answer file" that can be used torecreate the deployment in future. The Answer file is stored in the user's home directory, and is givena file name containing the date and time, for example ~/packstack-answers-20140214-133303.txt.
See Section 5.3, “Running PackStack Non-interactively” for more information on using answer filesto automate deployment.
Warning
The Answer file also contains a number of required configuration values that are automaticallygenerated if you choose not to provide them, including the administrative password forMySQL. It is recommended that you store the Answer file in a secure location.
5.3. Running PackStack Non-interact ively
PackStack supports being run non-interactively. When you run the packstack command non-interactively you must provide your configuration options via a text file, referred to as an answer file,instead of via standard input.
To do this you must:
Use PackStack to generate a default answer file.
Edit the answer file inserting your desired configuration values.
Run the packstack command providing the completed answer file as a command line argument.
PackStack will then attempt to complete the deployment using the configuration options provided inthe answer file.
Important
Red Hat Enterprise Linux OpenStack Platform requires that each system in the OpenStackenvironment is running Red Hat Enterprise Linux Server and that all systems are signed up toreceive updates from Red Hat Network using Subscription Manager.
See Section 2.1.2.2, “Customer Portal Subscription Management” for information onregistering to Red Hat Network.
You can ssh into each node and register it, attach an OpenStack subscription, and enablethe required OpenStack repository. This will allow PackStack to install OpenStack on eachnode.Alternatively, you can get PackStack to generate an answer file, then edit the answer file tocontain your Red Hat subscription username and password, using the parameters CONFIG_RH_USER and CONFIG_RH_PW. Running PackStack with this answer fileconfigures each node to receive updates from Red Hat Network using SubscriptionManager. This will allow PackStack to install OpenStack on each node.
5.3.1. Generat ing a PackStack Answer File
Chapt er 5. Running PackSt ack
4 9

PackStack is able to generate a generic answer file which you are then able to customize to suit yourspecific deployment needs.
Procedure 5.4 . Generat ing a PackStack Answer File
Run the packstack command with the --gen-answer-file=FILE argument to generate ananswer file. Replace FILE with the name of the file you wish to use to store the answer file.
# packstack --gen-answer-file=FILE
Example 5.5. Generat ing a PackStack Answer File
In this example, a PackStack answer file is generated and saved to the file ~/answers.cfg .
# packstack --gen-answer-file=~/answers.cfg
You have successfully generated an answer file and are ready to begin customizing it for yourdeployment.
5.3.2. Edit ing a PackStack Answer File
PackStack answer files are editable in any text editor. Lines preceded with a # character are treatedas comments and are ignored.
The table presented here lists the configuration keys available. Configuration values are provided inthe answer files as key-value pairs of the form:
KEY=VALUE
Where a key accepts multiple comma separated values, that is noted in the description of theconfiguration key. Some configuration keys also have command line equivalents, allowing them tobe provided directly as arguments to the invocation of the packstack command. Where this is thecase the command line argument is also listed in the table.
Table 5.1. PackStack Answer File Conf igurat ion Keys
Conf igurat ion Key Command LineArgument
DefaultValue
Descript ion
CONFIG_SSH_KEY --ssh-public-key /root/.ssh/id_rsa.pub
Path to a Public key toinstall on servers. If ausable key has not beeninstalled on the remoteservers you will beprompted for a passwordand this key will beinstalled so the passwordwill not be required again.
Red Hat Ent erprise Linux OpenSt ack Plat form 5 Deploying OpenSt ack: Proof- of- Concept Environment s (PackSt ack)
50

CONFIG_MYSQL_INSTALL
--mysql-install y Set to y if you would likePackstack to installMySQL.
Note
PackStack iscapable ofinstalling a singleMySQL databasenode. On the otherhand, PackStackdoes not handleMySQL clusterinstallation, but itallows you to workwith a MySQLcluster that youhave set upseparately.
If you choose n,PackStack asks you forcredentials and uses CONFIG_MYSQL_HOST asa given remote database.
CONFIG_GLANCE_INSTALL
--os-glance-install y Set to y if you would likePackStack to install theImage service.
CONFIG_CINDER_INSTALL
--os-cinder-install y Set to y if you would likePackStack to install theVolume service.
CONFIG_NOVA_INSTALL --os-nova-install y Set to y if you would likePackStack to install theCompute service.
CONFIG_NEUTRON_INSTALL
--os-neutron-install y Set to y if you would likePackStack to install theOpenStack Networkingservice.
CONFIG_HORIZON_INSTALL
--os-horizon-install
y Set to y if you would likePackStack to install theDashboard service.
CONFIG_SWIFT_INSTALL
--os-swift-install y Set to y if you would likePackStack to install ObjectStorage.
Conf igurat ion Key Command LineArgument
DefaultValue
Descript ion
Chapt er 5. Running PackSt ack
51

CONFIG_CEILOMETER_INSTALL
--os-ceilometer-install
y Set to y if you would likePackStack to install theTelemetry service.
CONFIG_HEAT_INSTALL --os-heat-install n Set to y if you would likePackStack to install theOrchestration service.
CONFIG_CLIENT_INSTALL
--os-client-install y Set to y if you would likePackStack to install theOpenStack clientpackages. An admin "rc"file will also be installed.
CONFIG_NTP_SERVERS --ntp-servers Comma separated list ofNTP servers. Leave plain ifPackStack should notinstall ntpd on instances.
CONFIG_NAGIOS_INSTALL
--nagios-install y Set to y if you would like toinstall Nagios. Nagiosprovides additional toolsfor monitoring theOpenStack environment.
EXCLUDE_SERVERS --exclude-servers If you have existingservers that have beenconfigured previously, andyou do not wantPackStack to overwritetheir configurations, youcan specify a list of IPaddresses of the servers tobe excluded.
Leave plain if you do notneed to exclude anyserver.
CONFIG_DEBUG_MODE --os-debug-mode n Set to y if you want to runOpenStack services indebug mode. Otherwise setto n.
CONFIG_CONTROLLER_HOST
--os-controller-host 192.0.43.10 The IP address of theserver on which to installOpenStack servicesspecific to the controllerrole, such as API servers,Horizon, etc.
CONFIG_COMPUTE_HOSTS
--os-compute-hosts 192.0.43.10 The list of IP addresses ofthe servers on which toinstall the Nova computeservice.
CONFIG_NETWORK_HOSTS
--os-network-hosts 192.0.43.10 The list of IP addresses ofthe servers on which toinstall the network servicesuch as Nova network orNeutron.
Conf igurat ion Key Command LineArgument
DefaultValue
Descript ion
Red Hat Ent erprise Linux OpenSt ack Plat form 5 Deploying OpenSt ack: Proof- of- Concept Environment s (PackSt ack)
52

CONFIG_VMWARE_BACKEND
--os-vmware n Set to y if you want to useVMware vCenter ashypervisor and storage.Otherwise set to n.
CONFIG_VCENTER_HOST --vcenter-host 192.0.43.10 The IP address of theVMware vCenter server.
CONFIG_VCENTER_USER --vcenter-username The username toauthenticate to VMwarevCenter server.
CONFIG_VCENTER_PASSWORD
--vcenter-password The password toauthenticate to VMwarevCenter server.
CONFIG_VCENTER_CLUSTER_NAME
--vcenter-cluster The name of the vCentercluster.
CONFIG_USE_EPEL --use-epel n To subscribe each serverto EPEL enter y.
CONFIG_REPO --additional-repo A comma separated list ofURLs to any additionalyum repositories to install.
CONFIG_RH_USER --rh-username To subscribe each serverwith Red Hat SubscriptionManager, include this with CONFIG_RH_PW.
CONFIG_RH_PW --rh-password To subscribe each serverwith Red Hat SubscriptionManager, include this with CONFIG_RH_USER .
CONFIG_RH_OPTIONAL --rhn-enable-optional
y To enable RHEL optionalrepos enter y.
CONFIG_SATELLITE_URL
--rhn-satellite-server
To subscribe each serverto receive updates from aSatellite server provide theURL of the Satellite server.You must also provide auser name(CONFIG_SATELLITE_USERNAME) and password(CONFIG_SATELLITE_PASSWORD ) or an accesskey(CONFIG_SATELLITE_AKEY ) for authentication.
Conf igurat ion Key Command LineArgument
DefaultValue
Descript ion
Chapt er 5. Running PackSt ack
53

CONFIG_SATELLITE_USER
--rhn-satellite-user Satellite servers require auser name forauthentication. If usingSatellite to distributepackages to your systemsthen you must set thisconfiguration key to yourSatellite user name orprovide an access key forauthentication.
If you intend to use anaccess key for Satelliteauthentication then leavethis configuration keyblank.
CONFIG_SATELLITE_PW --rhn-satellite-password
Satellite servers require apassword forauthentication. If usingSatellite to distributepackages to your systemsthen you must set thisconfiguration key to yourSatellite password orprovide an access key forauthentication.
If you intend to use anaccess key for Satelliteauthentication then leavethis configuration keyblank.
CONFIG_SATELLITE_AKEY
--rhn-satellite-activation-key
Satellite servers are able toaccept an access key forauthentication. Set thisconfiguration key to yourSatellite access key if youhave one.
If you intend to use a username and password forSatellite authenticationthen leave thisconfiguration key blank.
Conf igurat ion Key Command LineArgument
DefaultValue
Descript ion
Red Hat Ent erprise Linux OpenSt ack Plat form 5 Deploying OpenSt ack: Proof- of- Concept Environment s (PackSt ack)
54

CONFIG_SATELLITE_CACERT
--rhn-satellite-cacert
Specify the path to thecertificate of the certificateauthority that is used toverify that the connectionwith the Satellite server issecure. Leave thisconfiguration key blank ifyou are not using Satellitein your deployment.
CONFIG_SATELLITE_PROFILE
--rhn-satellite-profile
Specify the profile namethat must be used toidentify the system in RedHat Network, if you requireone.
CONFIG_SATELLITE_FLAGS
--rhn-satellite-flags
Specify any additionalSatellite flags that youneed to be passed to the rhnreg_ks command.This configuration keyaccepts a commaseparated list of flags.Valid flags are novirtinfo , norhnsd ,and nopackages.
See the Red Hat Satellitedocumentation for moreinformation.
CONFIG_SATELLITE_PROXY
--rhn-satellite-proxy-host
Specify the HTTP proxythat must be used whenconnecting to the Satelliteserver, if required.
CONFIG_SATELLITE_PROXY_USER
--rhn-satellite-proxy-username
Specify the user name forauthenticating with theHTTP proxy that must beused when connecting tothe Satellite server, ifrequired.
CONFIG_SATELLITE_PROXY_PW
--rhn-satellite-proxy-password
Specify the password forauthenticating with theHTTP proxy server thatmust be used whenconnecting to the Satelliteserver, if required.
CONFIG_AMQP_BACKEND --amqp-backend rabbitmq Set the AMQP servicebackend. Allowed valuesare: qpid, rabbitmq.
CONFIG_AMQP_HOST --amqp-host 192.0.43.10 The IP address of theserver on which to installthe AMQP service.
Conf igurat ion Key Command LineArgument
DefaultValue
Descript ion
Chapt er 5. Running PackSt ack
55

CONFIG_AMQP_ENABLE_SSL
--amqp-enable-ssl n Enable SSL for the AMQPservice. Set to y to enableSSL.
CONFIG_AMQP_ENABLE_AUTH
--amqp-enable-auth n Enable authentication forthe AMQP service. Set to yto enable authentication.
CONFIG_AMQP_NSS_CERTDB_PW
--amqp-nss-certdb-pw The password for the NSScertificate database of theAMQP service.
CONFIG_AMQP_SSL_PORT
--amqp-ssl-port 5671 The port on which theAMQP service listens forSSL connections.
CONFIG_AMQP_SSL_CERT_FILE
--amqp-ssl-cert-file /etc/pki/tls/certs/amqp_selfcert.pem
The filename of thecertificate that the AMQPservice is going to use.
CONFIG_AMQP_SSL_KEY_FILE
--amqp-ssl-key-file /etc/pki/tls/private/amqp_selfkey.pem
The filename of the privatekey that the AMQP serviceis going to use.
CONFIG_AMQP_SSL_SELF_SIGNED
--amqp-ssl-self-signed
y Automatically generates aself signed SSL certificateand key. Set to y toautomatically generate anSSL certificate and key.
CONFIG_AMQP_AUTH_USER
--amqp-auth-user amqp_user The user for AMQPauthentication.
CONFIG_AMQP_AUTH_PASSWORD
--amqp-auth-password The password used forAMQP authentication.
CONFIG_MYSQL_HOST --mysql-host 192.0.43.10 The IP address of theserver on which to installMySQL, or alternatively theIP address of the DBserver to use if MySQLinstallation was notselected.
CONFIG_MYSQL_USER --mysql-user root User name for the MySQLadministrative user.
CONFIG_MYSQL_PW --mysql-pw Password for the MySQLadministrative user. Thisvalue is randomlygenerated if you do notprovide it.
CONFIG_KEYSTONE_DB_PW
--keystone-db-passwd The password to use forIdentity to access thedatabase. This value israndomly generated if youdo not provide it.
CONFIG_KEYSTONE_ADMIN_TOKEN
--keystone-admin-token
The token to use for theIdentity service API. Thisvalue is randomlygenerated if you do notprovide it.
Conf igurat ion Key Command LineArgument
DefaultValue
Descript ion
Red Hat Ent erprise Linux OpenSt ack Plat form 5 Deploying OpenSt ack: Proof- of- Concept Environment s (PackSt ack)
56

CONFIG_KEYSTONE_ADMIN_PW
--keystone-admin-passwd
The password to use forthe Identity administrativeuser. This value israndomly generated if youdo not provide it.
CONFIG_KEYSTONE_DEMO_PW
--keystone-demo-passwd
The password to use forthe demo tenant. Thisvalue is randomlygenerated if you do notprovide it. Only used ifCONFIG_PROVISION_DEMO=y
CONFIG_KEYSTONE_TOKEN_FORMAT
--keystone-token-format
PKI PackStack allows a choiceof the token format to beused by Identity, either PKIor UUID. Therecommended format fornew deployments is PKI.
CONFIG_GLANCE_DB_PW --glance-db-passwd The password to use forthe Image service toaccess database. Thisvalue is randomlygenerated if you do notprovide it.
CONFIG_GLANCE_KS_PW --glance-ks-passwd The password to use forthe Image service toauthenticate with Identity.This value is randomlygenerated if you do notprovide it.
CONFIG_CINDER_DB_PW --cinder-db-passwd The password to use forthe Volume service toaccess database. Thisvalue is randomlygenerated if you do notprovide it.
CONFIG_CINDER_KS_PW --cinder-ks-passwd The password to use forthe Volume service toauthenticate with Identity.This value is randomlygenerated if you do notprovide it.
CONFIG_CINDER_BACKEND
--cinder-backend lvm Cinder backend to use,valid options are: lvm,gluster, nfs
Conf igurat ion Key Command LineArgument
DefaultValue
Descript ion
Chapt er 5. Running PackSt ack
57

CONFIG_CINDER_VOLUMES_CREATE
--cinder-volumes-create
y PackStack expectsstorage for use with theVolume service to beavailable on a volumegroup named cinder-volumes. If this volumegroup does not alreadyexist then PackStack isable to create itautomatically.
Note
This should only bedone for testing ona proof-of-conceptinstallation ofVolume service.This will create afile-backed volumegroup and is notsuitable forproduction usage.
Selecting y means thatPackStack will create rawdisk image in the /var/lib/cinder andmount it for use by theVolume service using aloopback device.
CONFIG_CINDER_VOLUMES_SIZE
--cinder-volumes-size
20G If you elected to havePackStack create the cinder-volumes volumegroup for you then you willneed to provide thedesired size of it ingigabytes (GB). Actualvolume size will beextended with 3% morespace for VG metadata.
CONFIG_CINDER_GLUSTER_MOUNTS
--cinder-gluster-mounts
A single or commaseparated list of glustervolume shares to mount,for example: ip-address:/vol-name,domain:/vol-name
Conf igurat ion Key Command LineArgument
DefaultValue
Descript ion
Red Hat Ent erprise Linux OpenSt ack Plat form 5 Deploying OpenSt ack: Proof- of- Concept Environment s (PackSt ack)
58

CONFIG_CINDER_NFS_MOUNTS
--cinder-nfs-mounts 20G A single or commaseparated list of NFSexports to mount, eg: ip-address:/export-name
CONFIG_NOVA_DB_PW --nova-db-passwd The password to use forCompute to access thedatabase. This value israndomly generated if youdo not provide it.
CONFIG_NOVA_KS_PW --nova-ks-passwd The password to use forCompute to authenticatewith Identity. This value israndomly generated if youdo not provide it.
CONFIG_NOVA_SCHED_CPU_ALLOC_RATIO
--novasched-cpu-allocation-ratio
16.0 The overcommitment ratiofor virtual to physicalCPUs. Set to 1.0 to disableCPU overcommitment.
CONFIG_NOVA_SCHED_RAM_ALLOC_RATIO
--novasched-ram-allocation-ratio
1.5 The overcommitment ratiofor virtual to physical RAM.Set to 1.0 to disable RAMovercommitment.
CONFIG_NOVA_COMPUTE_PRIVIF
--novacompute-privif eth1 Private interface for FlatDHCP on the Computeservers.
CONFIG_NOVA_NETWORK_MANAGER
--novanetwork-manager
Compute NetworkManager.
CONFIG_NOVA_NETWORK_PUBIF
--novanetwork-pubif eth0 Public interface on theCompute network server.
CONFIG_NOVA_NETWORK_PRIVIF
--novanetwork-privif eth1 Private interface for FlatDHCP on the Computenetwork server.
CONFIG_NOVA_NETWORK_FIXEDRANGE
--novanetwork-fixed-range
192.168.32.0/22
IP Range for Flat DHCP.
CONFIG_NOVA_NETWORK_FLOATRANGE
--nova-network-floating-range
10.3.4.0/22 IP Range for Floating IPaddresses.
CONFIG_NOVA_NETWORK_DEFAULTFLOATINGPOOL
--novanetwork-default-floating-pool
nova Name of the defaultfloating pool to which thespecified floating rangesare added to.
CONFIG_NOVA_NETWORK_AUTOASSIGNFLOATINGIP
--novanetwork-auto-assign-floating-ip
n Automatically assign afloating IP to newinstances.
CONFIG_NOVA_NETWORK_VLAN_START
--novanetwork-vlan-start
First VLAN for privatenetworks.
CONFIG_NOVA_NETWORK_NUMBER
--novanetwork-num-networks
n Number of networks tosupport.
CONFIG_NOVA_NETWORK_SIZE
--novanetwork-network-size
n Number of addresses ineach private subnet.
Conf igurat ion Key Command LineArgument
DefaultValue
Descript ion
Chapt er 5. Running PackSt ack
59

CONFIG_NEUTRON_USE_NAMESPACES
--os-neutron-use-namespaces
y Enable networknamespaces forOpenStack Networking.
CONFIG_NEUTRON_KS_PW
--os-neutron-ks-password
The password to use forOpenStack Networking toauthenticate with Identity.
CONFIG_NEUTRON_DB_PW
--os-neutron-db-password
The password to use forOpenStack Networking toaccess database.
CONFIG_NEUTRON_L3_EXT_BRIDGE
--os-neutron-l3-ext-bridge
br-ex The name of the bridgethat the OpenStackNetworking L3 agent willuse for external traffic. Use provider if you intend touse a provider network tohandle external traffic.
CONFIG_NEUTRON_L2_PLUGIN
--os-neutron-l2-plugin
openvswitch The name of the L2 pluginto be used with OpenStackNetworking.
CONFIG_NEUTRON_METADATA_PW
--os-neutron-metadata-pw
Password for OpenStackNetworking metadataagent.
CONFIG_LBAAS_INSTALL
--os-neutron-lbaas-install
n Set to y if you would likePackStack to installOpenStack NetworkingLBaaS.
CONFIG_NEUTRON_METERING_AGENT_INSTALL
--os-neutron-metering-agent-install
n Set to y if you would likePackStack to installOpenStack NetworkingMetering agent.
CONFIG_NEUTRON_FWAAS
--neutron-fwaas n Set to y if you would like toconfigure Neutron firewallas a service.
CONFIG_NEUTRON_ML2_TYPE_DRIVERS
--os-neutron-ml2-type-drivers
vxlan A comma separated list ofnetwork type driver entrypoints to be loaded fromtheneutron.ml2.type_driversnamespace.
CONFIG_NEUTRON_ML2_TENANT_NETWORK_TYPES
--os-neutron-ml2-tenant-network-types
vxlan A comma separatedordered list of networktypes to allocate as tenantnetworks. The value local is only useful forsingle-box testing butprovides no connectivitybetween hosts.
Conf igurat ion Key Command LineArgument
DefaultValue
Descript ion
Red Hat Ent erprise Linux OpenSt ack Plat form 5 Deploying OpenSt ack: Proof- of- Concept Environment s (PackSt ack)
60

CONFIG_NEUTRON_ML2_MECHANISM_DRIVERS
--os-neutron-ml2-mechanism-drivers
openvswitch A comma separatedordered list of networkingmechanism driver entrypoints to be loaded fromtheneutron.ml2.mechanism_drivers namespace.
CONFIG_NEUTRON_ML2_FLAT_NETWORKS
--os-neutron-ml2-flat-networks
* A comma separated list ofphysical_network nameswith which flat networkscan be created. Use * toallow flat networks witharbitrary physical networknames.
CONFIG_NEUTRON_ML2_VLAN_RANGES
--os-neutron-ml2-vlan-ranges
A comma separated list of physical_network:vlan_min:vlan_max or physical_networkspecifyingphysical_network namesusable for VLAN providerand tenant networks, aswell as ranges of VLANtags on each available forallocation to tenantnetworks.
CONFIG_NEUTRON_ML2_TUNNEL_ID_RANGES
--os-neutron-ml2-tunnel-id-ranges
A comma separated list of tun_min:tun_max tuplesenumerating ranges ofGRE tunnel IDs that areavailable for tenantnetwork allocation. It mustbe an array with tun_max+1 - tun_min > 1,000,000
CONFIG_NEUTRON_ML2_VXLAN_GROUP
--os-neutron-ml2-vxlan-group
Multicast group for VXLAN.If not set, disables VXLANfrom sending allocatedbroadcast traffic to thismulticast group. When leftunconfigured, will disablemulticast VXLAN mode.Must be a Multicast IP (v4or v6) address.
CONFIG_NEUTRON_ML2_VNI_RANGES
--os-neutron-ml2-vni-ranges
n:m A comma separated list of vni_min:vni_maxtuples enumerating rangesof VXLAN VNI IDs that areavailable for tenantnetwork allocation.Minimum value is 0 andmaximum value is16777215.
Conf igurat ion Key Command LineArgument
DefaultValue
Descript ion
Chapt er 5. Running PackSt ack
61

CONFIG_NEUTRON_L2_AGENT
--os-neutron-l2-agent
openvswitch The name of the L2 agentto be used with OpenStackNetworking.
CONFIG_NEUTRON_LB_TENANT_NETWORK_TYPE
--os-neutron-lb-tenant-network-type
local The type of network toallocate for tenantnetworks. Supportedvalues are local and vlan. For multi-nodedeployments vlan isrecommended.
CONFIG_NEUTRON_LB_VLAN_RANGES
--os-neutron-lb-vlan-ranges
A comma separated list ofVLAN ranges for theOpenStack Networkinglinuxbridge plugin. Eachtuple in the list is expectedto be in the formatPHYSICAL:START:END.Replace PHYSICAL with thename of a physicalnetwork, replace STARTwith the start of the VLANrange to identify with it,and replace END with theend of the VLAN range toassociate with it. (Forexample:physnet1:1:4094,physnet2,physnet3:3000:3999)
CONFIG_NEUTRON_LB_INTERFACE_MAPPINGS
--os-neutron-lb-interface-mappings
A comma separated list ofinterface mappings for theOpenStack Networkinglinuxbridge plugin. Eachtuple in the list is expectedto be in the formatPHYSICAL:INTERFACE.Replace PHYSICAL with thename of a physicalnetwork, and replaceINTERFACE with the nameof the network interfacethat will be used toconnect to the physicalnetwork.
CONFIG_NEUTRON_OVS_TENANT_NETWORK_TYPE
--os-neutron-ovs-tenant-network-type
vxlan The type of network toallocate for tenantnetworks. Supportedvalues are vlan, local, gre, vxlan.
Conf igurat ion Key Command LineArgument
DefaultValue
Descript ion
Red Hat Ent erprise Linux OpenSt ack Plat form 5 Deploying OpenSt ack: Proof- of- Concept Environment s (PackSt ack)
62

CONFIG_NEUTRON_OVS_VLAN_RANGES
--os-neutron-ovs-vlan-ranges
A comma separated list ofVLAN ranges for theOpenStack Networkingopenvswitch plugin. Eachtuple in the list is expectedto be in the formatPHYSICAL:START:END.Replace PHYSICAL with thename of a physicalnetwork, replace STARTwith the start of the VLANrange to identify with it,and replace END with theend of the VLAN range toassociate with it. (Forexamplephysnet1:1:4094,physnet2,physnet3:3000:3999)
CONFIG_NEUTRON_OVS_BRIDGE_MAPPINGS
--os-neutron-ovs-bridge-mappings
physnet1:br-eth1
A comma separated list ofbridge mappings for theOpenStack Networkingopenvswitch plugin. Eachtuple in the list is expectedto be in the formatPHYSICAL:BRIDGE.Replace PHYSICAL with thename of a physicalnetwork, and replaceBRIDGE with the name ofthe Open vSwitch bridgethat will be used toconnect to the physicalnetwork. (For examplephysnet1:br-eth1,physnet2:br-eth2,physnet3:br-eth3)
CONFIG_NEUTRON_OVS_BRIDGE_IFACES
--os-neutron-ovs-bridge-interfaces
A comma separated list ofcolon-separated OVSbridge:interface pairs. Theinterface will be added tothe associated bridge.
CONFIG_NEUTRON_OVS_TUNNEL_RANGES
--os-neutron-ovs-tunnel-ranges
A comma separated list oftunnel ranges for theNeutron openvswitchplugin.
CONFIG_NEUTRON_OVS_TUNNEL_IF
--os-neutron-ovs-tunnel-if
The interface for the OVStunnel. Packstack willoverride the IP addressused for tunnels on thishypervisor to the IP foundon the specified interface.(eg. eth1).
Conf igurat ion Key Command LineArgument
DefaultValue
Descript ion
Chapt er 5. Running PackSt ack
63

CONFIG_NEUTRON_OVS_VXLAN_UDP_PORT
--os-neutron-ovs-vxlan-udp-port
4789 The vxlan UDP port.
CONFIG_HORIZON_SSL --os-horizon-ssl n To set up Dashboardcommunication overHTTPS set this parameterto y.
CONFIG_SSL_CERT --os-ssl-cert PEM encoded certificate tobe used for SSLconnections to the HTTPSserver, leave blank if oneshould be generated. Thiscertificate must not requirea passphrase.
CONFIG_SSL_KEY --os-ssl-key Keyfile corresponding tothe certificate if one wasprovided.
CONFIG_SSL_CACHAIN --os-ssl-key PEM encoded CAcertificates from which thecertificate chain of theserver certificate can beassembled.
CONFIG_SWIFT_KS_PW --os-swift-ks-passwd The password to use forObject Storage toauthenticate with Identity.This value is randomlygenerated if you do notprovide it.
CONFIG_SWIFT_STORAGES
--os-swift-storages A comma separated list ofdevices which to use asObject Storage device.Each entry must take theformat /path/to/dev, forexample /dev/vdb willinstall /dev/vdb as ObjectStorage device(PackStack does notcreate the filesystem, youmust do this first). If thevalue is omitted PackStackwill create a loopbackdevice for a test setup.
CONFIG_SWIFT_STORAGE_ZONES
--os-swift-storage-zones
1 Number of Object Storagezones, this number mustbe no bigger than thenumber of storage devicesconfigured.
CONFIG_SWIFT_STORAGE_REPLICAS
--os-swift-storage-replicas
1 Number of Object Storagereplicas, this numbermust be no bigger thanthe number of storagezones configured.
Conf igurat ion Key Command LineArgument
DefaultValue
Descript ion
Red Hat Ent erprise Linux OpenSt ack Plat form 5 Deploying OpenSt ack: Proof- of- Concept Environment s (PackSt ack)
64

CONFIG_SWIFT_STORAGE_FSTYPE
--os-swift-storage-fstype
ext4 FileSystem type for storagenodes. Supported valuesare ext4 and xfs at thistime.
CONFIG_SWIFT_HASH --os-swift-hash The custom seed numberfollowing this commandwill be used to setswift_hash_suffix inswift.conf.
CONFIG_SWIFT_STORAGE_SIZE
--os-swift-storage-size
2G The size of the ObjectStorage loopback filestorage device.
CONFIG_PROVISION_DEMO
--provision-demo n (y forallinone)
PackStack can provisionfor demo usage andtesting. This key selectswhether to provision demoOpenStack Networkingnetworks, subnets androuters. Set to y if youwant to provision for demousage and testing. ItrequiresCONFIG_NEUTRON_INSTALL=y andCONFIG_NEUTRON_USE_NAMESPACES=y.CONFIG_PROVISION_DEMO will be enabled if yourun packstack --allinone andCONFIG_NEUTRON_INSTALL=y, which it is bydefault.
CONFIG_PROVISION_DEMO_FLOATRANGE
--provision-demo-floatrange
The CIDR network addressfor the floating IP subnet.
CONFIG_PROVISION_TEMPEST
--provision-tempest n PackStack can configureTempest (OpenStack testsuite) for running testsagainst the OpenStackinstall. Set to y if you wantto configure Tempest fortesting. It requiresCONFIG_NEUTRON_INSTALL=y andCONFIG_NEUTRON_USE_NAMESPACES=y
CONFIG_PROVISION_TEMPEST_USER
--provision-tempest-user
The name of the TempestProvisioning user. If youdo not provide a username, Tempest will beconfigured in astandalone mode.
Conf igurat ion Key Command LineArgument
DefaultValue
Descript ion
Chapt er 5. Running PackSt ack
65

CONFIG_PROVISION_TEMPEST_USER_PW
--provision-tempest-user-passwd
The password to use forthe Tempest Provisioninguser.
CONFIG_PROVISION_TEMPEST_REPO_URI
--provision-tempest-repo-uri
The uri of the tempest gitrepository to use.
CONFIG_PROVISION_TEMPEST_REPO_REVISION
--provision-tempest-repo-revision
The revision of the tempestgit repository to use.
CONFIG_PROVISION_ALL_IN_ONE_OVS_BRIDGE
--provision-all-in-one-ovs-bridge
n (y forallinone)
PackStack allows you toconfigure the external OVSbridge in an all-in-onedeployment. This sets upthe L3 external bridge withthe appropriate IP addressto act as the gateway forVirtual Machines. Set to yif you want to configure theexternal OVS bridge.CONFIG_PROVISION_ALL_IN_ONE_OVS_BRIDGEwill be enabled if you run packstack --allinone andCONFIG_NEUTRON_INSTALL=y, which it is bydefault.
CONFIG_HEAT_DB_PW --os-heat-mysql-password
The password used byHeat user to authenticateagainst MySQL.
CONFIG_HEAT_AUTH_ENC_KEY
--heat-auth-encryption-key
The encryption key to usefor authentication info indatabase.
CONFIG_HEAT_KS_PW --os-heat-ks-passwd The password to use forthe Heat service toauthenticate with Identity.
CONFIG_HEAT_CLOUDWATCH_INSTALL
--os-heat-cloudwatch-install
n Set to y if you would likePackstack to install HeatCloudWatch API.
CONFIG_HEAT_CFN_INSTALL
--os-heat-cfn-install
n Set to y if you would likePackstack to install HeatCloudFormation API.
CONFIG_HEAT_DOMAIN --os-heat-domain heat The name of the Identitydomain for Orchestration.
CONFIG_HEAT_DOMAIN_ADMIN
--os-heat-domain-admin
heat-admin The name of the Identitydomain admin user forOrchestration.
CONFIG_HEAT_DOMAIN_PASSWORD
--os-heat-domain-password
The password for theIdentity domain adminuser for Orchestration.
CONFIG_CEILOMETER_SECRET
--ceilometer-secret Secret key for signingTelemetry messages.
Conf igurat ion Key Command LineArgument
DefaultValue
Descript ion
Red Hat Ent erprise Linux OpenSt ack Plat form 5 Deploying OpenSt ack: Proof- of- Concept Environment s (PackSt ack)
66

CONFIG_CEILOMETER_KS_PW
--ceilometer-ks-passwd
The password to use forCeilometer to authenticatewith Identity.
CONFIG_MONGODB_HOST --mongodb-host 192.0.43.10 The IP address of theserver on which to installMongoDB.
CONFIG_NAGIOS_PW --nagios-passwd The password of the nagiosadmin user onthe Nagios server. Thisvalue will be randomlygenerated if it is notprovided.
Conf igurat ion Key Command LineArgument
DefaultValue
Descript ion
Important
The amount of space selected for CINDER_VOLUMES_SIZE must be available on the deviceused for /var/lib/cinder.
Important
Remember that the size of the volume group will restrict the amount of disk space that you canexpose to Compute instances.
Important
PackStack registers systems to Red Hat Network using Subscription Manager. You mayencounter problems if your systems have already been registered and subscribed to the RedHat OpenStack channels using RHN Classic.
5.3.3. Running PackStack with an Answer File
Once an answer file has been created and customized it can be used to run the packstackcommand non-interactively.
Procedure 5.5. Running PackStack with an Answer File
1. Run the packstack command with the --answer-file=FILE parameter to specify ananswer file. Replace FILE with the path to the answer file.
# packstack --answer-file=FILE
Example 5.6 . Running PackStack with an Answer File
In this example, PackStack is run using an answer file stored in ~/answers.cfg .
Chapt er 5. Running PackSt ack
67

# packstack --answer-file=~/answers.cfg
2. PackStack will attempt to deploy OpenStack using Puppet manifests. This process may takea significant amount of time depending on the deployment options selected. When thedeployment is complete PackStack will display this message:
**** Installation completed successfully ******
Additional information about your environment including the location of the keystonerccontaining your OpenStack administrator authentication token and the URL of thedashboard, if configured, will also be displayed.
3. Reboot all the nodes in the environment to ensure that the kernel change takes effect.
PackStack deploys a new kernel with network namespaces enabled for all the nodes. Youmust reboot the environment to ensure that the change takes effect.
# reboot
You have successfully deployed OpenStack using a PackStack answer file.
Note
A log file containing the details of each PackStack run is stored in a uniquely named folder inthe /var/tmp/packstack/ directory.
Red Hat Ent erprise Linux OpenSt ack Plat form 5 Deploying OpenSt ack: Proof- of- Concept Environment s (PackSt ack)
68

Chapter 6. PackStack and Passwords
When PackStack deploys OpenStack, it generates passwords for each of the services. You will beusing a subset of these passwords for authentication. This chapter describes the location of thepasswords and also the steps to be followed in order to change them.
6.1. Password Locat ions
This section describes the location of the passwords for each service.
Table 6 .1. PackStack Passwords locat ions
Service Locat ion of the PasswordsIdentity ~/keystonerc_admin
Compute /etc/nova/nova.conf
OpenStack Networking /etc/neutron/neutron.conf
Image /etc/glance/glance-api.conf
Block Storage /etc/cinder/cinder.conf
Object Storage /etc/swift/proxy-server.conf
MySQL Database ~/.my.cnf
Telemetry /etc/ceilometer/ceilometer.conf
Orchestration /etc/heat/heat.conf
Nagios /etc/nagios/passwd
Note
Most of the config files also contain the MySQL passwords for the service in the followingformat. For example, for the Image service, sql_connection = mysql://glance:[email protected]/glance where,
12345678abcdefgh is the MySQL password for the Image servicefirst instance of glance is the user namethe second instance of glance is the database name
6.2. Commands to Change Passwords
This section describes the commands that you can use to update the passwords for the services.
Dashboard Login
# keystone user-password-update admin
MySQL
# mysqladmin -u root -pOLDPASS password NEWPASS
Replace OLDPASS with the existing password, leaving no space between -p and the password,and NEWPASS with the new password.
Chapt er 6 . PackSt ack and Passwords
69

Nagios
# htpasswd /etc/nagios/passwd nagiosadmin
Replace the nagiosadmin by the non-admin user name to change the password for a user.
To change Identity's authentication passwords on the Identity server, use the following command:
# keystone user-password-update USERNAME
Replace USERNAME with the name of the service-user you want to change the password for. You willhave to enter the new password when prompted.
The locations of Identity's authentication passwords for OpenStack services are shown in the tablein Section 6.1, “Password Locations” .
Important
Using the user-password-update command changes the passwords only on the Identityserver. Ensure that you also manually update the config files for the services after changingthe passwords.
Red Hat Ent erprise Linux OpenSt ack Plat form 5 Deploying OpenSt ack: Proof- of- Concept Environment s (PackSt ack)
70

Part III. Using OpenStack
Once OpenStack is deployed, interacting with the environment is primarily done using either theDashboard or the command line interface. This part of the guide provides procedures for performingsome common tasks using the Dashboard.
With the goal of launching an instance in mind, this chapter discusses the procedures to create akeypair, upload an image, create a network with a subnet, launching an instance and creating avolume.
For more procedures on using the Dashboard and CLI clients, refer Red Hat Enterprise LinuxOpenStack Platform 5 End User Guide and Red Hat Enterprise Linux OpenStack Platform 5 AdmininistrationUser Guide at https://access.redhat.com/site/documentation/en-US/Red_Hat_Enterprise_Linux_OpenStack_Platform/.
Part III. Using OpenSt ack
71

Chapter 7. A First Start: Launching an Instance
7.1. Accessing the Dashboard
Dashboard is the web-based UI for managing an OpenStack installation. To access the Dashboardyou must have first:
Installed the Dashboard service.
Obtain the hostname and login password.
HOSTNAME is the host name or IP address of the server on which you installed the Dashboard.
For logging in as admin, the password stored as export OS_PASSWORD= in the ~/keystonerc_admin file.
If you have enabled the demo Identity (Keystone) tenant, for example by running packstack --allinone, you should log into the Dashboard using the demo account instead of the admin. The demo password is stored as export OS_PASSWORD= in the ~/keystonerc_demo file.
Procedure 7.1. Accessing the Dashboard
Log in to the Dashboard.
In your browser, open the link for your configuration to access the Dashboard for the first time.
http://HOSTNAME/dashboard/
Replace HOSTNAME with the host name or IP address of the server on which you installed theDashboard.
Red Hat Ent erprise Linux OpenSt ack Plat form 5 Deploying OpenSt ack: Proof- of- Concept Environment s (PackSt ack)
72
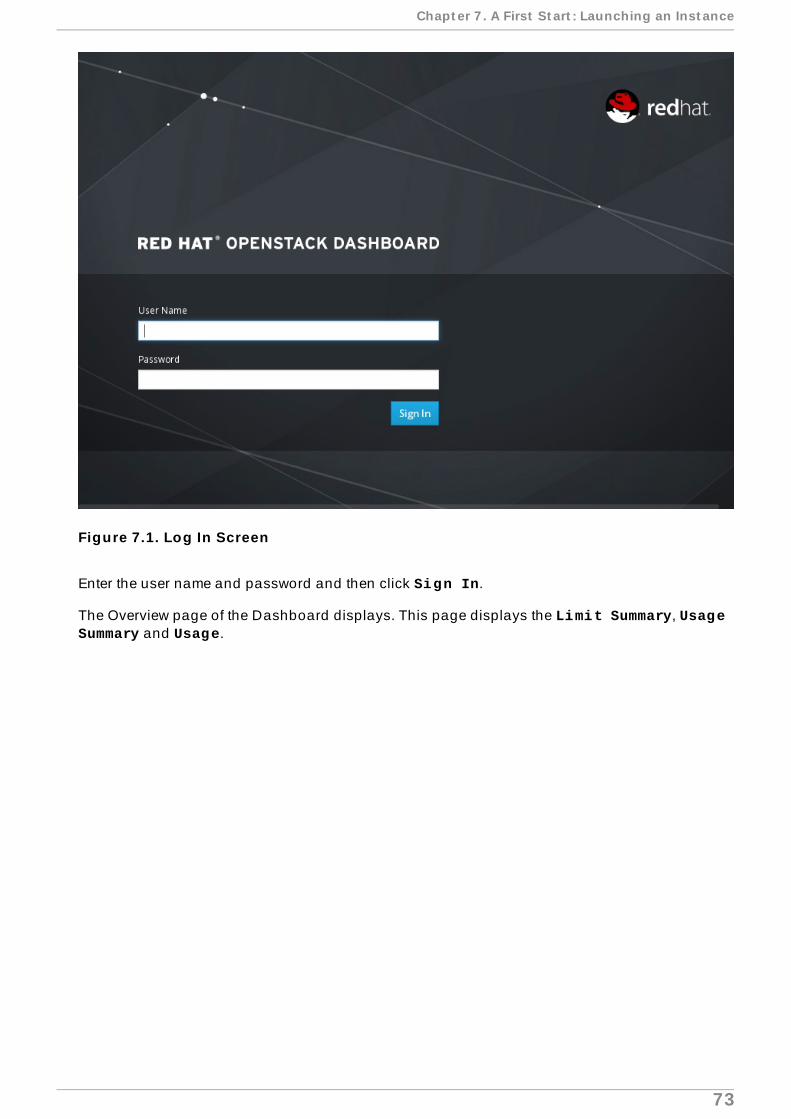
Figure 7.1. Log In Screen
Enter the user name and password and then click Sign In.
The Overview page of the Dashboard displays. This page displays the Limit Summary, Usage Summary and Usage.
Chapt er 7 . A First St art : Launching an Inst ance
73

Figure 7.2. Dashboard - Pro ject Tab
7.2. Uploading a Disk Image
To launch instances based on images stored in the OpenStack Image service, you must first haveeither downloaded or created suitable images to use in an OpenStack environment.
The simplest way is to download an image. Log in tohttps://rhn.redhat.com/rhn/software/channel/downloads/Download.do?cid=16952 with yourCustomer Portal user name and password. Download the 'KVM Guest Image'.
Note
Deploying OpenStack using packstack --allinone creates a default cirros image. Youcan use this to launch instances.
To upload an image using the Dashboard you must have first:
Installed the Dashboard service.
Procedure 7.2. Uploading an Image using the Dashboard
Red Hat Ent erprise Linux OpenSt ack Plat form 5 Deploying OpenSt ack: Proof- of- Concept Environment s (PackSt ack)
74

1. Log in to the Dashboard.
2. In the Project tab, click on Images under the Compute menu.
3. Click the Create Image button. The Create An Image dialog is displayed.
Figure 7.3. Create An Image Dialog
4. Configure the settings that define your image.
a. Enter a name for the image.
b. Enter a brief description about the image.
Chapt er 7 . A First St art : Launching an Inst ance
75

c. Choose the image source from the dropdown list. Your choices are Image Location and Image File.
d. Based on your selection, there is an Image Location or Image File field. Youcan include the location URL or browse to the image file on your file system andinclude it.
e. Select the correct type from the dropdown menu in the Format field (for example, QCOW2).
f. Leave the Minimum Disk (GB) and Minimum RAM (MB) fields empty.
These values provide guidance to OpenStack as to the appropriate default flavor (forexample, tiny or medium) for new instances using this image. These fields areoptional.
g. Select the Public checkbox, to let other users access the image.
h. Select the Protected checkbox, to keep the image protected from being accidentallydeleted.
i. Click the Create Image button.
You have successfully uploaded an image. As a result of this procedure, the image is placed in aqueue to be uploaded. It may take some time before the Status of the image changes from Queuedto Active.
7.3. Creat ing a Keypair
When a Compute instance is launched, a keypair must be specified, which allows the secure loggingin of users into the instance. This section details the steps to create a keypair using the Dashboard;this means you must have first installed the Dashboard.
Procedure 7.3. Creat ing a Keypair Using the Dashboard
1. Log in to the Dashboard.
2. In the Project tab, click on Access & Security under the Manage Compute menu.
3. On the Keypairs tab, click the Create Keypair button. The Create Keypair dialog isdisplayed.
Red Hat Ent erprise Linux OpenSt ack Plat form 5 Deploying OpenSt ack: Proof- of- Concept Environment s (PackSt ack)
76

Figure 7.4 . Create Keypair
4. Specify a name in the Keypair Name field, and click the Create Keypair button.
This creates the keypair, which can be used when launching an instance.
Note
When a keypair is created, a keypair file is automatically downloaded through thebrowser. You can optionally load this file into ssh, for command-line sshconnections, by executing:
# ssh-add ~/.ssh/NAME.pem
To delete an existing keypair, click the keypair's Delete Keypair button on the Keypairs tab.
7.4 . Creat ing an OpenStack Network
This procedure lets you use the dashboard to create a virtual network for use by your instances. Afterdeploying OpenStack with packstack --allinone, a default private network is created. Youcan use that network for creating an instance or create a new one.
By default, packstack --allinone installs OpenStack Networking (neutron) service. Forinformation on Nova Networking, see Deploying OpenStack: Learning Environments (Manual Setup) athttps://access.redhat.com/site/documentation/en-US/Red_Hat_Enterprise_Linux_OpenStack_Platform/.
Note
You do not have to initially specify a subnet. But to launch an instance, a network with subnetshould be created. So this procedure discusses the steps to create subnet.
To create a network from the Dashboard, you must have first:
Installed the Dashboard service.
Installed OpenStack Networking services.
Procedure 7.4 . Creat ing a Network Using the Dashboard
1. Log in to the Dashboard.
2. In the Project tab, click on Networks under the Network menu.
3. Click the Create Network button. The Create Network dialog is displayed.
Chapt er 7 . A First St art : Launching an Inst ance
77

Figure 7.5. Create Network: Network Tab
4. By default, the dialog opens to the Network tab. You have the option of specifying a networkname.
Note
If you do not define a specific subnet, clear the Create Subnet check box.
5. Click on the Subnet tab and enter the following values:
a. Enter the Subnet name.
b. Enter the IP address for the network.
c. Select the IP Version from the drop down list.
d. Enter the Gateway IP address.
6. To specify additional attributes for the subnet, click on the Subnet Detail tab and enterallocation pools, DNS name servers and host routes.
7. Click the Create button.
You have successfully created a new network. Use the Network Topology tab to verify the newlycreated network and subnets.
7.5. Launching an Instance
This procedure discusses how to use the dashboard to create a new virtual machine instance. Tolaunch an instance from the Dashboard you must have first:
Installed the Dashboard service.
Have an image available. For more information, see Section 7.2, “Uploading a Disk Image” .
Red Hat Ent erprise Linux OpenSt ack Plat form 5 Deploying OpenSt ack: Proof- of- Concept Environment s (PackSt ack)
78

Have a network available. For more information, see Section 7.4, “Creating an OpenStackNetwork” .
Procedure 7.5. Launching an Instance using the Dashboard
1. Log in to the Dashboard.
2. In the Project tab, click on Instances under the Compute menu.
3. Click the Launch Instance button. The Launch Instance dialog is displayed.
Figure 7.6 . Launch Instance: Details Tab
4. By default, the dialog opens to the Details tab.
a. Select an Availability Zone for your instance from the dropdown list. Thedefault option is nova.
b. Enter an Instance Name to identify your instance.
Chapt er 7 . A First St art : Launching an Inst ance
79

c. Select a Flavor for your instance. The flavor determines the compute resourcesavailable to your instance. After a flavor is selected, their resources are displayed inthe Flavor Details pane for preview.
Note
The default flavor is selected based on the minimum RAM and CPU settings onthe selected image.
d. Enter an Instance Count. This determines how many instances to launch using theselected options.
e. Select a boot option from the Instance Boot Source dropdown list.
You have the following boot options:
Boot from image - If you choose this option, a new field for Image Name isdisplayed. You can select the image from the dropdown list.
Boot from snapshot - If you choose this option, a new field for Instance Snapshot is displayed. You can select the snapshot from the dropdown list.
Boot from volume - If you choose this option, a new field for Volume isdisplayed. You can select the volume from the dropdown list.
Boot from image (creates a new volume) - With this option, you canboot from an image and create a volume by choosing Device Size and Device Name for your volume. Click the Delete on Terminate option todelete the volume on terminating the instance.
Boot from volume snapshot (creates a new volume) - Using thisoption, you can boot from a volume snapshot and create a new volume bychoosing Volume Snapshot from a dropdown list and adding a Device Namefor your volume. Click the Delete on Terminate option to delete the volume onterminating the instance.
5. Click the Access & Security tab and configure the security settings for your instance.
Red Hat Ent erprise Linux OpenSt ack Plat form 5 Deploying OpenSt ack: Proof- of- Concept Environment s (PackSt ack)
80

Figure 7.7. Launch Instance: Access & Security Tab
a. Select an existing keypair from the Keypair dropdown box or click the + button toupload a new keypair. For more information, see Section 7.3, “Creating a Keypair” .
b. Select the Security Groups that you wish to apply to your instances. By defaultonly the default security group will be available.
6. Click the Networking tab and select the network for the instance by clicking on thenetwork's + sign.
If you have logged in as the demo Identity (Keystone) tenant, choose the private network.
Figure 7.8. Launch Instance: Networking Tab
Chapt er 7 . A First St art : Launching an Inst ance
81

7. Click the Launch button.
You have just created a Compute instance.
To view the instance console from the Dashboard:
1. On the Instances tab, click the name of your instance. The Instance Detail page isdisplayed.
2. Click the Console tab on the resultant page.
A VNC session to the instance's console is run within the browser.
7.6. Creat ing a Volume
Compute instances support the attachment and detachment of Block Storage volumes. Thisprocedure details the steps involved in creating a logical volume using the Dashboard.
To create a volume from the Dashboard, you must have first:
Installed the Dashboard service.
Installed the Block Storage service.
Procedure 7.6 . Creat ing a Volume using the Dashboard
1. Log in to the Dashboard.
2. In the Project tab, click on Volumes under the Manage Compute menu.
3. Click the Create Volume button. The Create Volume dialog is displayed.
Red Hat Ent erprise Linux OpenSt ack Plat form 5 Deploying OpenSt ack: Proof- of- Concept Environment s (PackSt ack)
82

Figure 7.9 . Create Volume Dialog
4. Configure the values that will define your new volume.
a. Enter a Volume Name to identify your new volume.
b. Enter a Description to further describe your new volume.
c. Enter the Size of your new volume in gigabytes (GB).
d. Choose a source for your volume from the Volume Source dropdown list. You canchoose to load an empty volume or from an image.
Important
Your new volume will be allocated from the cinder-volumes volume group. Theremust be enough free disk space in the cinder-volumes volume group for your newvolume to be allocated.
5. Click the Create Volume button to create the new volume.
You have successfully created a volume using the Dashboard.
Chapt er 7 . A First St art : Launching an Inst ance
83

Removing PackStack Deployments
There is no automated uninstall process for undoing a PackStack install. If you have a previouslyinstalled version of OpenStack, you will need to uninstall it first, before installing with PackStack.
You can use either of the following scripts:
The first procedure removes OpenStack, all application data and all packages installed on abase system.
The second procedure removes only OpenStack specific application data and packages,although it may also leave some OpenStack related data behind.
Important
These procedures must be carried out on all OpenStack hosts as a root user.
Note
Some of the commands may give errors if the information which the script is attempting todelete was not created in the first place.
A.1. Completely removing OpenStack, applicat ion data and allpackages
To completely uninstall a deployment made using PackStack, including all application data and allpackages which are installed on a base system, run the script in the following procedure.
Warning
This script will remove packages including Puppet, httpd, Nagios and others which you mayrequire for other packages. The script will also delete all MySQL databases and Nagiosapplication data.
Procedure A.1. Removing OpenStack, all applicat ion data and all packages installed ona base system
Copy the following script into a file and then run it.
#!/usr/bin/bash# Warning! Dangerous step! Destroys VMsfor x in $(virsh list --all | grep instance- | awk '{print $2}') ; do virsh destroy $x ; virsh undefine $x ;done ;
# Warning! Dangerous step! Removes lots of packages, including many
Red Hat Ent erprise Linux OpenSt ack Plat form 5 Deploying OpenSt ack: Proof- of- Concept Environment s (PackSt ack)
84

# which may be unrelated to RDO.yum remove -y nrpe "*nagios*" puppet ntp ntp-perl ntpdate "*openstack*" \"*nova*" "*keystone*" "*glance*" "*cinder*" "*swift*" \mysql mysql-server httpd "*memcache*" scsi-target-utils \iscsi-initiator-utils perl-DBI perl-DBD-MySQL ;
ps -ef | grep -i repli | grep swift | awk '{print $2}' | xargs kill ;
# Warning! Dangerous step! Deletes local application datarm -rf /etc/nagios /etc/yum.repos.d/packstack_* /root/.my.cnf \/var/lib/mysql/ /var/lib/glance /var/lib/nova /etc/nova /etc/swift \/srv/node/device*/* /var/lib/cinder/ /etc/rsync.d/frag* \/var/cache/swift /var/log/keystone ;
umount /srv/node/device* ;killall -9 dnsmasq tgtd httpd ;setenforce 1 ;vgremove -f cinder-volumes ;losetup -a | sed -e 's/:.*//g' | xargs losetup -d ;find /etc/pki/tls -name "ssl_ps*" | xargs rm -rf ;for x in $(df | grep "/lib/" | sed -e 's/.* //g') ; do umount $x ;done
You have now completely uninstalled the OpenStack deployment made using PackStack, includingall application data and all packages.
A.2. Removing only OpenStack specific applicat ion data and packages
To uninstall only OpenStack specific application data and packages, run the script in the followingprocedure.
Important
After running this script, there will still be some OpenStack related data left behind.
Procedure A.2. Removing OpenStack specif ic applicat ion data and packages
Copy the following script into a file and then run it.
#!/usr/bin/bash# Warning! Dangerous step! Destroys VMsfor x in $(virsh list --all | grep instance- | awk '{print $2}') ; do virsh destroy $x ; virsh undefine $x ;done ;
yum remove -y "*openstack*" "*nova*" "*keystone*" "*glance*" "*cinder*" "*swift*" "*rdo-release*";
# Optional - makes database cleanup cleaner.
Removing PackSt ack Deployment s
85
# If you do this bit, the database cleanup stuff below is superfluous.# yum remove -y "*mysql*"
ps -ef | grep -i repli | grep swift | awk '{print $2}' | xargs kill ;
rm -rf /etc/yum.repos.d/packstack_* /var/lib/glance /var/lib/nova /etc/nova /etc/swift \/srv/node/device*/* /var/lib/cinder/ /etc/rsync.d/frag* \/var/cache/swift /var/log/keystone /tmp/keystone-signing-nova ;
# Ensure there is a root user and that we know the passwordservice mysql stopcat > /tmp/set_mysql_root_pwd << EOFUPDATE mysql.user SET Password=PASSWORD('MyNewPass') WHERE User='root';FLUSH PRIVILEGES;EOF
# mysql cleanup/usr/bin/mysqld_safe --init-file=/tmp/set_mysql_root_pwd &rm /tmp/set_mysql_root_pwdmysql -uroot -pMyNewPass -e "drop database nova; drop database cinder; drop database keystone; drop database glance;"
umount /srv/node/device* ;vgremove -f cinder-volumes ;losetup -a | sed -e 's/:.*//g' | xargs losetup -d ;find /etc/pki/tls -name "ssl_ps*" | xargs rm -rf ;for x in $(df | grep "/lib/" | sed -e 's/.* //g') ; do umount $x ;done
You have now uninstalled only OpenStack specific application data and packages.
Red Hat Ent erprise Linux OpenSt ack Plat form 5 Deploying OpenSt ack: Proof- of- Concept Environment s (PackSt ack)
86

Revision History
Revision 5.0.0-31 Thu Apr 16 2015 Summer LongUpdated base OS from 7.0 to 7.1.
Revision 5.0.0-30 Wed Feb 11 2015 Andrew DahmsCorrected the description of configuring channels.
Revision 5.0.0-29 Wed Feb 11 2015 Andrew DahmsCorrected a description of the product version.
Revision 5.0.0-28 Wed Feb 11 2015 Andrew DahmsUpdated the link to the article outlining supported guest operating systems.
Revision 5.0.0-27 Tue Jan 20 2015 Andrew DahmsCorrected a reference to the Red Hat Enterprise Linux OpenStack Platform installer.
Revision 5.0.0-26 Fri Jan 16 2015 Don DomingoBZ#1122258 - Updated the syntax of subscription manager commands.
Revision 5.0.0-25 Tue Oct 14 2014 Andrew DahmsBZ#1150796 - Removed an unnecessary note stating a restriction on changing database userpasswords.
Revision 5.0.0-24 Tue Oct 14 2014 Mart in LopesBZ#1124984 - Added procedure for updating Qpid packages.
Revision 5.0.0-23 Fri Oct 03 2014 Andrew DahmsBZ#1145397 - Updated the command for changing a database user password.
Revision 5.0.0-22 Fri Aug 29 2014 Bruce ReelerBZ#1134234 - Corrected description of CONFIG_VMWARE_BACKEND in table PackStack Answer FileConfiguration Keys.
Revision 5.0.0-21 Fri Aug 22 2014 Bruce ReelerBZ#1131744 - Corrected Notes in Orchestration and Telemetry steps in Running PackStackInteractively section.BZ#1131798 - Changed section on PackStack and Passwords, updated refs to table of config files,updated notes and clarified some steps.BZ#1127042 - Replaced references to installation guides with new titles and changed thisdocument's title from GSG to Deploying OS: PoC Environments (PackStack).
Revision 5.0.0-20 Thu Jul 24 2014 Andrew DahmsBZ#1120446 - Added a reference to the Red Hat Enterprise Linux OpenStack Platform Installer andForeman Guide.
Revision 5.0.0-19 Fri Ju l 18 2014 Bruce ReelerBZ#1118112 and BZ#1118110 - Updated table ""PackStack Answer File Configuration Keys" insection "Running PackStack Non-interactively" . Added note that RabbitMQ is recommended AMQPservice.
Revision 5.0.0-18 Mon Jul 7 2014 Don Domingo
Revision Hist ory
87

Red Hat Enterprise Linux OpenStack 5.0 (for Red Hat Enterprise Linux 7.0) GA release build.
Revision 5.0.0-17 Fri Ju l 4 2014 Bruce ReelerBZ#1105430 - Edited multiple sections based on doc QE. Amongst others: Removed OpenStackservice details section. Moved 'Supported Virtual Machine Operating Systems' section to ProductRequirements. Changed Configure Software Repositories. Replaced chkconfig with systemctl in'Disable Network Manager' section.BZ#1040519 - Standardized use of subscription-manager and yum-config-manager.BZ#1093198 - Changed from Qpid to rabbitMQ as default message broker.BZ#1105440 - Multiple edits and fixes to 'Using PackStack' and appendices based on doc QE.
Revision 5.0.0-13 Tue Jun 24 2014 Don DomingoApplied new recommended publication settings based on new documentation portal features.
Revision 5.0.0-12 Mon Jun 23 2014 Don DomingoApplied new recommended publication settings based on new supported build features.
Revision 5.0.0-11 Wed Jun 18 2014 Don DomingoApplied recommended build settings as per updates tohttps://access.redhat.com/site/documentation/.
Revision 5.0.0-10 Tue Jun 17 2014 Bruce ReelerBZ#1065160 - Updated Abstract to summarize that GSG is for PackStack and what the outcome isafter running PackStack.BZ#1040519 - Updated the section on configuring software repositories to be more consistent usingconfiguration-manager and changed procedure names and steps to be more consistent.BZ#1064085 - Corrected various typos and ambiguities found during translation.
Revision 5.0.0-9 Mon May 26 2014 Bruce ReelerBZ#964184 - Added examples of options when running PackStack interactively.BZ#1022873 - Added option of configuring a custom hash for Object Storage instead of the hardcoded one.BZ#1038865 - Updated storage location of answer file.BZ#1064044 - Fixed table formatting problems.BZ#1066192 - Added deployment utilities to Product Introduction section.BZ#1071107 - Updated Dashboard output when creating a network.BZ#1072204 - Included a note in the 'Launching an Instance' section to indicate that the flavors areselected based on the image source.BZ#1084834 - Added Trove as tech preview in introduction.BZ#1095246 - Updated Dashboard screen capture.BZ#1092694 - Added information about using the Answer File to manually configure storage.
Revision 5.0.0-8 Mon May 12 2014 Deept i NavaleBZ#1072204 - Included a note regarding the selection of flavors based on resources allocated in theimage.BZ#1095246 - Updated the dashboard image in section 'Dashboard Service' in the intro chapter.Updates to the 'Using OpenStack with the Dashboard' chapter based on RHEL OpenStack Platform5 changes.BZ#1071107 - Updated 'Note' in the Creating a Network section. When subnet is not created, thestatus of the network still changes to Active.
Revision 5.0.0-5 Fri May 9 2014 Bruce Reeler
Red Hat Ent erprise Linux OpenSt ack Plat form 5 Deploying OpenSt ack: Proof- of- Concept Environment s (PackSt ack)
88

BZ#1022873 - Added CONFIG_SWIFT_HASH key and config option --os-swift-hash, for creating acustom hash, to table of PackStack Configuration Keys in answerfile.BZ#964184 - Added examples of interfaces and bridges to Running PackStack Interactively section.BZ#1066192 - Added section on deployment utilities.BZ#1092687 - Added missing instruction in Procedure 2.1 Disabling NetworkManager to addNM_CONTROLLED key, corrected typos.
Revision 5.0.0-3 Tue May 6 2014 Summer LongBZ#1092694 - Restructured and updated Configuring Storage section.
Revision 5.0.0-2 Thu Apr 24 2014 Summer LongRed Hat Enterprise Linux OpenStack Platform 5.0 - Beta preview.
Revision Hist ory
89