Concealed Power Digital Invertor Generator - Northern ToolConcealed Power Digital Invertor Generator...
29
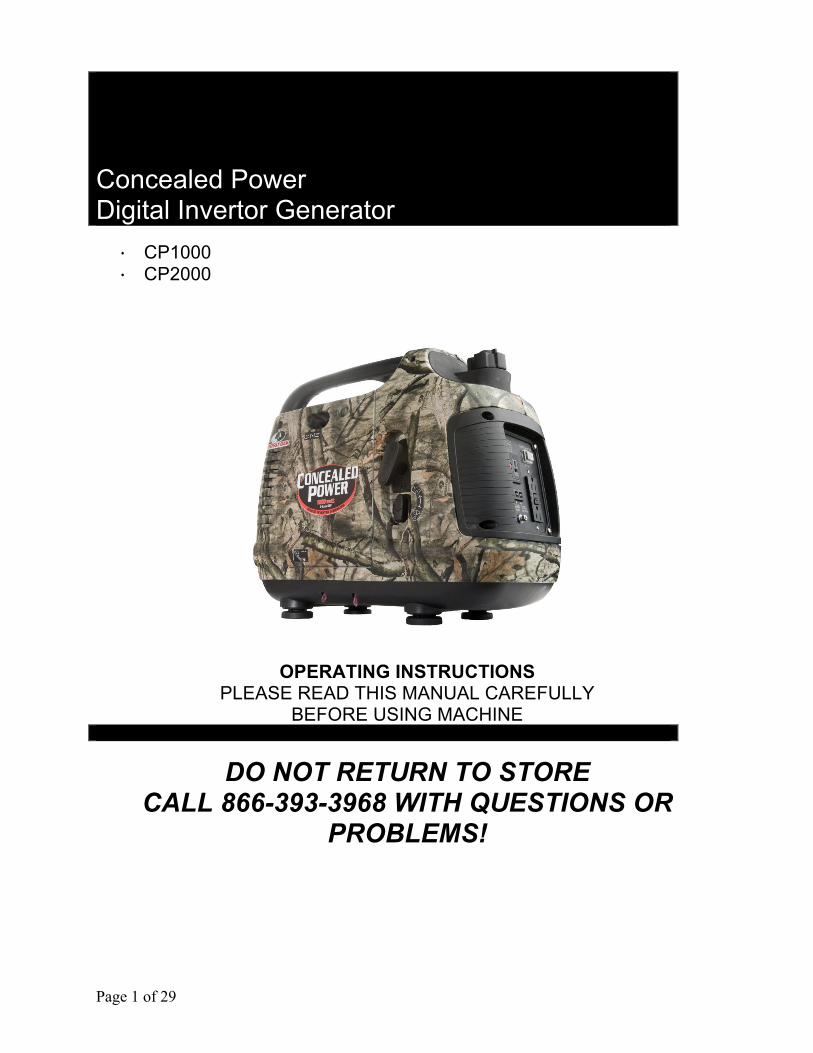
Page 1 of 29 Concealed Power Digital Invertor Generator · CP1000 · CP2000 OPERATING INSTRUCTIONS PLEASE READ THIS MANUAL CAREFULLY BEFORE USING MACHINE DO NOT RETURN TO STORE CALL 866-393-3968 WITH QUESTIONS OR PROBLEMS!
Transcript of Concealed Power Digital Invertor Generator - Northern ToolConcealed Power Digital Invertor Generator...
Page 1 of 29
Concealed Power Digital Invertor Generator · CP1000 · CP2000
OPERATING INSTRUCTIONS PLEASE READ THIS MANUAL CAREFULLY
BEFORE USING MACHINE
DO NOT RETURN TO STORE CALL 866-393-3968 WITH QUESTIONS OR
PROBLEMS!
Page 2 of 29
PREFACE This manual covers operation and maintenance of CP1000 and CP2000 series generators. All information in this publication is based on the latest product information available at the time of printing. We reserve the right to change, alter or otherwise improve the product and this manual at any time without prior notice. Some products may differ slightly in appearance from those depicted in this manual. This manual should be considered a permanent part of the generator and should remain with it, especially if resold. This product is for household use only. Pay special attention to all statements in the manual that are preceded by the following words:
WARNING
It indicates a strong possibility of equipment damage or personal injury if instructions are not followed.
CAUTION
It indicates a strong possibility of severe personal injury or death if instructions are not followed. If a problem should arise, or if you have any questions about the generator, consult an authorized dealer, or call U.S. product support at (866) 393-3968.
BE CAREFUL These generators are designed to give safe and dependable service if operated according to instructions. Read and understand the Owner’s Manual before operating the generator. Failure to do so could result in personal injury or equipment damage.

Page 3 of 29
SAFETY INSTRUCTIONS
WARNING The generator is designed to give safe and dependable service if operated according to instructions. Read and understand this manual carefully before operating the generator, or it may cause serious injury and equipment damage.
WARNING Exhaust contains poisonous carbon monoxide. Do not operate generator in a confined environment or with an exhaust system extension. Only use outdoors and away from open windows, doors, or vents. Breathing exhaust can lead to loss of consciousness or even death. If you feel sick or dizzy immediately shut off generator and move to well ventilated area and/or outside.
WARNING The engine exhaust system becomes very hot during operating and remains hot for a while after stopping the engine. Be careful not to touch the muffler while it is hot. Allow the engine to cool before storing the generator indoors.
BE CAREFUL This generator is not designed for operation in parallel. Do not connect to a power system containing any other generators. Do not use any modified or nonstandard jacks, or it may cause an electrical shock.
WARNING: This product contains chemicals, including lead, known to the State of California to cause cancer, and birth defects or other reproductive harm. Wash hand after handling. Engine exhaust contains chemicals known, in certain quantities, to cause cancer, birth defects or other reproductive harm. Breathing exhaust fumes will cause injury or death! Engine exhaust contains carbon monoxide, an odorless and deadly gas. Operate in a well ventilated area. Avoid enclosed areas such as garages, basements, closed rooms, etc. Never operate in a location occupied by people or animals. WARNING: THIS PRODUCT IS EQUIPPED WITH A SPARK ARRESTERING MUFFLER. Spark arrester are required when this generator will be used around flammable material or on land covered with materials such as agricultural crops, forest,

Page 4 of 29
brush, grass or other similar items, then an approved spark arrestor must be installed and is legally required in the State of California. It is a violation of California statues section 130050 and/or sections 4442 and 4443 of the California Public Resources Code, unless the engine is equipped with a spark arrester, as defined in section 4442, and maintained in effective working order. Spark arresters are also required on U.S. Forest Service land and may also be legally required under other statues and ordinances.
WARNING Gasoline is extremely flammable and is explosive under certain conditions. Refuel in a well ventilated area with engine stopped. Immediately wipe up any spilled fuel. Keep away from cigarettes, smoke and sparks when refueling the generator.
WARNING Connection for standby power to a building electrical system must be made by a qualified electrician. The connection must isolate the generator from utility power, and must comply with all applicable laws and electrical codes. Improper connections to a building electrical system can allow electrical current from the generator to feed back into the utility lines. Such feedback may electrocute utility company workers or others who contact lines during a power outage, and the generator may explode or cause fires when utility power is restored.
WARNING · To avoid accidents and equipment damage, carefully check
generator every time before starting engine. · Keep the generator at least 1 meter/3 feet (apart from other
equipment, buildings, or any other obstruction during operation. · Keep the generator horizontal when running. If generator is
tilted, it may cause fuel spillage. · Generator operators must be trained in how to stop the
generator quickly and understand the operation of all controllable parts.
· Untrained operators should not be allowed to use this equipment.
· Keep children and pet away from operation area. · Keep clear of any moving parts during operation. · The generator is a potential source of electrical shock when
misused. Do not operate it with wet hands or in any damp location.
· Do not operate the generator outside in rain or snow or let it get wet.

Page 5 of 29
TABLE OF CONTENTS
1 COMPONENT IDENTIFICATION 6 2 SAFETY INSTRUCTIONS 8 3 PRE-OPERATION CHECK 9 3.1 Check the engine oil level 9 3.2 Check the fuel system 10 3.3 Check the air cleaner 11 3.4 Cleaning 12 4 ENGINE USE 13 4.1 Starting the engine 13 4.2 High altitude operation 15 4.3 Stopping the engine 15 5 GENERATOR USE 16 5.1 Output, Overload, and Oil Alarm indicators 17 5.2 Smart Throttle 18 5.3 AC Applications 19 5.4 DC applications 20 6 MAINTENANCE 22 6.1 Engine Oil Replacement 23 6.2 Spark plug service 24 6.3 Muffler spark arrestor service 24 7 TRANSPORT AND STORAGE 25 7.1 Transporting the generator 25 7.2 Long term storage 25 8 TROUBLESHOOTING 26 9 SPECIFICATIONS 28

Page 6 of 29
CAUTION
Study this manual carefully before operating the generator. Any power tool should never be stored or used without following all safety precautions. Do not pass your generator on to another person without these instructions.
1 COMPONENT IDENTIFICATION
MAIN CONTROLS

Page 7 of 29
SIDE CONTROLS
CONTROL PANEL
ENGINE CONTROLS
Page 8 of 29
2 SAFETY INSTRUCTIONS
· The generator is designed to give safe and dependable service if operated according to instructions.
· Read and understand the Owner’s Manual before operating the generator. Failure to do so could result in personal injury or equipment damage.
· Exhaust gas contains carbon monoxide, an invisible poisonous gas. Never run the generator in an enclosed area. Be sure to provide adequate ventilation.
· The engine exhaust system and muffler become very hot during operation and remains hot for a while after stopping the engine. Be careful not to touch the muffler or engine exhaust system while they are hot. Allow the engine to cool before moving or storing the generator.
· Gasoline is extremely flammable, and explosive under certain conditions. Refuel in a well ventilated area with the engine stopped.
· Keep away from cigarettes, smoke, and sparks when re-fuelling the generator. · Spilled gasoline or its vapors may ignite. Wipe up any spilled fuel immediately. · Connections to a building’s electrical system must be made by a qualified electrician and must
comply with all applicable laws and electric codes. Improper connections may allow electrical current from the generator to feed into utility lines. Such feedback may electrocute utility workers or any others who contact the lines during a power outage. When utility power is restored, the generator may explode, burn, or cause fires in the building electrical system.
· Always make a pre-operation inspection before you start the engine. You may prevent an accident or equipment damage.
· Place the generator at least 1 meter (3 feet) away from building or other equipment during operation.
· Operate the generator on a level surface. If the generator is tilted, fuel spillage may result. · Know how to stop the generator quickly and understand operation of all the controls. Never
permit anyone to operate the generator without proper instructions. · Keep children and pets away from the generator when it is in operation. · Keep away from rotating parts while the generator is running. · The generator is a potential source of electrical shocks when misused. Do not operate with wet
hands. · Do not operate the generator outside in rain or snow and do not let it get wet.

Page 9 of 29
3 PRE-OPERATION CHECK
Only use the generator on a level surface. Make sure the area around the generator is clear from any obstructions or other items. Please keep generator at least 1 meter from buildings or equipment.
3.1 Check the engine oil level
ATTENTION: Your new generator is shipped from the factory without engine oil. Please fill with approved oil before use. Operating the engine without oil will cause severe equipment damage. Using non-detergent oil or 2-stroke engine oil could shorten the engine’s service life
· Use premium quality 4-stroke engine oil with detergent, certified to meet or exceed US
automobile manufacturer’s requirements. · Recommended oil viscosity is either SAE30 or 10W30. · Loosen the cover screws and remove the maintenance cover. Remove the oil filler cap, and wipe
the dipstick with a clean rag. Check the oil level by inserting the dipstick in the filler hole without screwing it in.
· If the oil level is below the end of the dipstick, refill with oil up to the top of the oil filler neck.

Page 10 of 29
3.2 Check the fuel system
Fuels containing alcohol are not recommended! Fuel system damage or engine performance problems resulting from the use of fuels that contain alcohol are not covered under the warranty.
· Tighten the fuel filler cap and close fuel cap vent before transporting or moving generator. · Fuel cap vent must be OPEN to run engine. · Do not refill fuel tank while engine is running or hot. · Use unleaded automotive fuel only. · Never use an oil / gasoline mixture or dirty gasoline. · Avoid getting dirt, dust, or water in the fuel tank. · After filling, tighten the fuel filler cap securely. · Gasoline is extremely flammable and is explosive under certain conditions. · Refuel in a well-ventilated area with the engine stopped. · Do not smoke or allow flames or sparks in the area where the engine is refueled or where
gasoline is stored. · Do not overfill the fuel tank. After refueling, make sure the tank cap is closed properly and
securely. · Be careful not to spill fuel when refueling. Spilled fuel or vapor may ignite. If any fuel is spilled,
make sure the area is dry before starting the engine. · Avoid repeated or prolonged skin contact with fuel or exposure to fuel vapor. KEEP ALL FUEL
OUT OF REACH OF CHILDREN. · Check the fuel by visual check. Remove the fuel cap and fuel filter screen to check fuel levels. · Replace the fuel filter screen before use or before refueling. · Fill only to the base of the filter housing. Do not fill to the tip of the tank.
Page 11 of 29
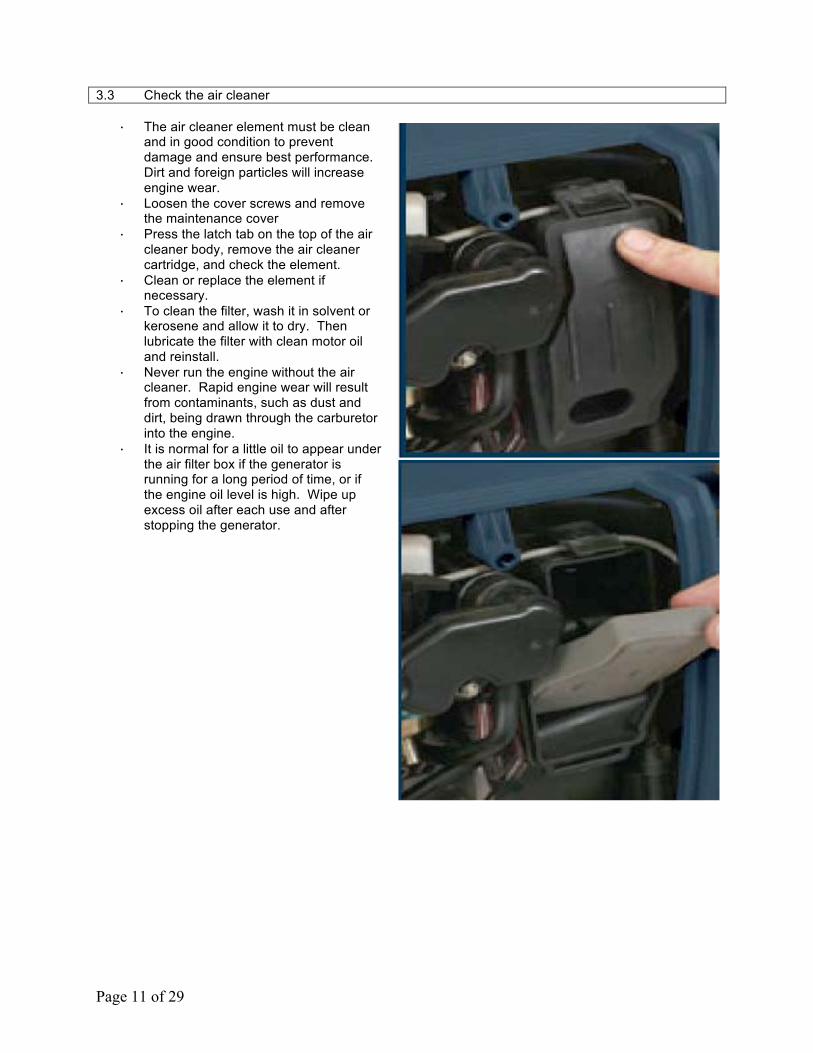
3.3 Check the air cleaner
· The air cleaner element must be clean and in good condition to prevent damage and ensure best performance. Dirt and foreign particles will increase engine wear.
· Loosen the cover screws and remove the maintenance cover
· Press the latch tab on the top of the air cleaner body, remove the air cleaner cartridge, and check the element.
· Clean or replace the element if necessary.
· To clean the filter, wash it in solvent or kerosene and allow it to dry. Then lubricate the filter with clean motor oil and reinstall.
· Never run the engine without the air cleaner. Rapid engine wear will result from contaminants, such as dust and dirt, being drawn through the carburetor into the engine.
· It is normal for a little oil to appear under the air filter box if the generator is running for a long period of time, or if the engine oil level is high. Wipe up excess oil after each use and after stopping the generator.

Page 12 of 29
3.4 Cleaning
· Keep your machine clean. The outside of your generator may be cleaned using a damp soft cloth with a mild detergent. Never use a hose or washer to clean the generator as it may cause damage to internal parts.
· Some maintenance products and solvents may damage the plastic parts. Never use products containing benzene, trichloroethylene, chlorine, or ammonia.
· Use a vacuum to clean air inlet and outlet louvers of the alternator. · Take special care to keep the ventilation inlets and outlets free from obstruction. Clean with a
soft brush and compressed air if necessary. · Wear eye protection when cleaning your generator.
Page 13 of 29
4 Engine Use
Before starting the engine, disconnect any load from the AC or DC receptacles. Starting the generator with appliances attached may cause equipment damage, accident, or injury.
4.1 Starting the engine
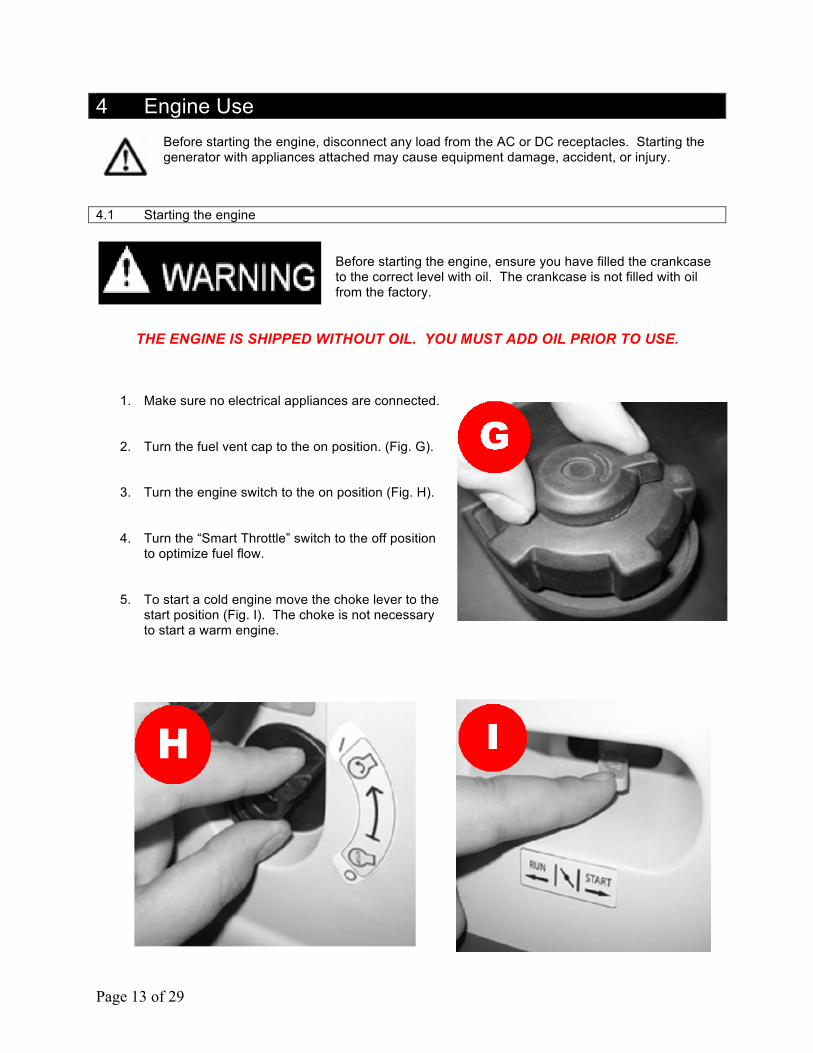
Before starting the engine, ensure you have filled the crankcase to the correct level with oil. The crankcase is not filled with oil from the factory.
THE ENGINE IS SHIPPED WITHOUT OIL. YOU MUST ADD OIL PRIOR TO USE.
1. Make sure no electrical appliances are connected.
2. Turn the fuel vent cap to the on position. (Fig. G).
3. Turn the engine switch to the on position (Fig. H).
4. Turn the “Smart Throttle” switch to the off position to optimize fuel flow.
5. To start a cold engine move the choke lever to the start position (Fig. I). The choke is not necessary to start a warm engine.
Page 14 of 29
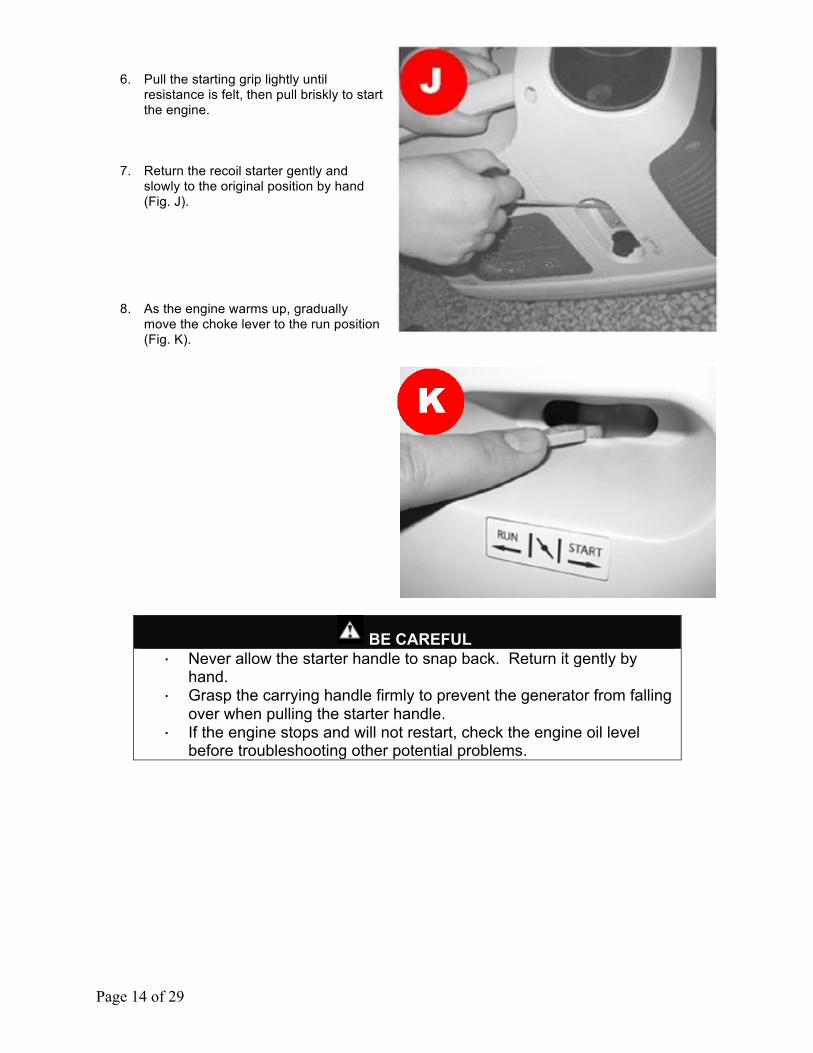
6. Pull the starting grip lightly until resistance is felt, then pull briskly to start the engine.
7. Return the recoil starter gently and slowly to the original position by hand (Fig. J).
8. As the engine warms up, gradually move the choke lever to the run position (Fig. K).
BE CAREFUL · Never allow the starter handle to snap back. Return it gently by
hand. · Grasp the carrying handle firmly to prevent the generator from falling
over when pulling the starter handle. · If the engine stops and will not restart, check the engine oil level
before troubleshooting other potential problems.

Page 15 of 29
4.2 High Altitude Operation At high altitudes, the standard carburetor air – fuel mixture will be excessively rich. Performance will decrease, and fuel consumption will increase. High altitude performance can be improved by installing a smaller diameter main fuel jet in the carburetor and readjusting the slow tempo screws. If you always operate the generator at altitudes higher than 1,500 m (5,000 feet) above sea level, have an experienced mechanic perform these carburetor modifications. Even with suitable carburetor jetting, engine horsepower will decrease approximately 3.5% for each 300m (1,000 feet) increase in altitude. The effect of altitude on engine performance will be greater than this if no carburetor modification is made.
Operation of the generator at an altitude lower than the carburetor is jetted for may result in reduced performance, overheating, and serious engine damage caused by an excessively lean air/fuel mixture..
4.3 Stopping the Engine
To stop the engine in an emergency, turn the engine switch to the OFF position.
Normal Use
1. Switch off the connected equipment and remove the plugs of any connected appliances.
2. Turn the engine switch to the “off” position (Fig. L).
3. Turn the fuel vent lever to the “off” position (Fig. M).
Be sure to check for a tight fuel cap and that the engine switch is OFF when stopping, transporting, or storing the generator.

Page 16 of 29
5 Generator Use
To prevent electrical shock from faulty appliances, the generator should be grounded. Connect an electric cable at least 1 mm in diameter between the generator’s ground terminal (Fig. 20) and an external ground source. It is not recommended to run any unit over its rated output for longer than 20 minutes.
· Connections to a building’s electrical system must be made by a qualified electrician and must comply with all applicable laws and electric codes. Improper connections may allow electrical current from the generator to feed into utility lines. Such feedback may electrocute utility workers or any others who contact the lines during a power outage. When utility power is restored, the generator may explode, burn, or cause fires in the building electrical system.
· Limit operation requiring maximum power to 30 minutes. For continuous operation, do not exceed the rated power.
· Do not exceed the current limit specified for any one receptacle. · Do not connect the generator to a household circuit. This could cause damage to the generator
or to electrical appliances in the house. · Do not modify the generator or use the generator for any other purpose than it is intended for. · Do not connect generators in parallel · Do not connect an extension to the exhaust pipe. · Use of any extension cable longer than 60 m (100 feet) is not recommended. · The DC receptacle can be used while AC power is in use. Do not exceed total rated power when
using both at the same time.
Before connecting an appliance to the generator, check that it is in good order, and that its electrical rating does not exceed that of the generator. Be sure any appliance is turned off before plugging its power cord into the generator.

Page 17 of 29
5.1 Output, Overload, and Low Oil Alert indicator
· The output indicator light (green) will remain lit during normal operating conditions. · If the generator is overloaded or if there is a short in the connected appliance, the output indicator
light (green) will go OFF, the overload indicator light (red) will go ON, and the engine will be automatically stopped. Investigate the overload source, and check to ensure that the total load is within the generator’s rated output.
· Stop the engine if the oil alarm indicator light (red) turns on, and check the oil level. Refill if necessary.
· Equipment that requires greater starting power than running power, such as electric motors, may cause both the overload indicator light (red) and the output indicator light (green) to go on simultaneously. This is normal if the overload indicator light (red) goes off after about four seconds.
· Discontinue use of appliance if output indicator light (green) and overload indicator light (red) remain lit.
· Consult your dealer if indicator light (green) and overload indicator light (red) remain lit when no electrical load is connected.

Page 18 of 29
5.2 Smart Throttle
· Smart Throttle automatically adjusts engine speed in response to the electrical load requirements. It is kept at idle when no electrical loads are connected.
· When electrical appliances are being used, the proper engine speed of the electrical load is used. This feature is recommended to minimize the fuel consumption during operation.
· The Smart Throttle switch should be in the OFF position to start the engine. This ensures the engine will receive optimum fuel flow while starting.
CAUTION · Smart Throttle is not recommended for appliances that require increased starting
power, such as electric motors, air conditioners, power tools, etc. Please operate these uses at full power.
· When connecting electrical loads, turn the Smart Throttle off to reduce transient voltage change.
· In DC operation, turn the Smart Throttle switch to the OFF position.

Page 19 of 29
6.3 AC applications
Before connecting an appliance to the generator, check that it is in good working order and that its electrical rating does not exceed the capacity of the generator.
Start the generator before plugging in appliances. Be sure that all equipment is turned off before plugging in its power cord. Equipment that is switched ON will begin operation when plugged in, and injuries or accidents may be caused.
· Start the engine and make sure the output indicator light (green) illuminates. This may take up to
3 seconds. · Allow the motor to run for a couple of minutes to warm up prior to connecting any appliances to
the generator. · Confirm that the appliance to be used is switched off, and plug in the appliance.
· Substantial overloading that continuously lights the overload indicator light (red) may damage the generator. Marginal overloading that temporarily lights the overload indicator light (red) may shorten the service life of the generator.
· Be sure that all appliances are in good working order before connecting them to the generator. If an appliance begins to operate abnormally, becomes sluggish, or stops suddenly, turn off the generator engine switch immediately. Then disconnect the appliance, and examine it for signs of malfunction.
· It is highly recommended that a surge protector be used with the generator at all times. · Once appliances are plugged in and turned on, Smart Throttle may be turned on to maximize fuel
efficiency.
Page 20 of 29
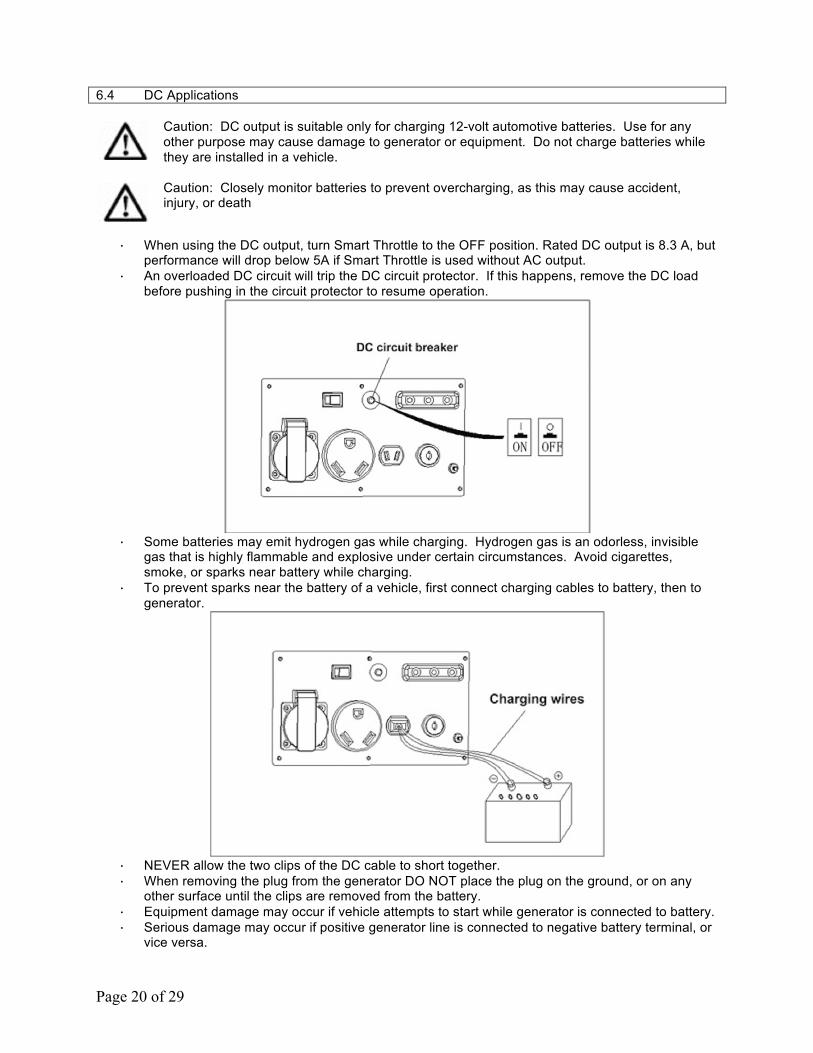
6.4 DC Applications
Caution: DC output is suitable only for charging 12-volt automotive batteries. Use for any other purpose may cause damage to generator or equipment. Do not charge batteries while they are installed in a vehicle.
Caution: Closely monitor batteries to prevent overcharging, as this may cause accident, injury, or death
· When using the DC output, turn Smart Throttle to the OFF position. Rated DC output is 8.3 A, but
performance will drop below 5A if Smart Throttle is used without AC output. · An overloaded DC circuit will trip the DC circuit protector. If this happens, remove the DC load
before pushing in the circuit protector to resume operation.
· Some batteries may emit hydrogen gas while charging. Hydrogen gas is an odorless, invisible
gas that is highly flammable and explosive under certain circumstances. Avoid cigarettes, smoke, or sparks near battery while charging.
· To prevent sparks near the battery of a vehicle, first connect charging cables to battery, then to generator.
· NEVER allow the two clips of the DC cable to short together. · When removing the plug from the generator DO NOT place the plug on the ground, or on any
other surface until the clips are removed from the battery. · Equipment damage may occur if vehicle attempts to start while generator is connected to battery. · Serious damage may occur if positive generator line is connected to negative battery terminal, or
vice versa.
Page 21 of 29
· Many batteries contain an electrolyte liquid whose major ingredient is sulfuric acid. Battery electrolyte is poisonous and caustic. Contact with skin or eyes may cause severe burns. Wear protective eyewear when performing vehicle maintenance.
· If electrolyte gets on your skin, flush with water. Consult a physician if necessary. · If electrolyte gets in your eyes, flush with water for at least 15 minutes and consult a physician
immediately. · If swallowed, do NOT induce vomiting. If victim is conscious and alert, give 2-4 cupfuls of milk or
water. Never give anything by mouth to an unconscious person. Get medical help immediately. The American Association of Poison Control Centers maintains a 24-hour hotline at 1-800-222-1222.
· KEEP OUT OF THE REACH OF CHILDREN. NEVER ALLOW UNTRAINED PERSON TO OPERATE GENERATOR.
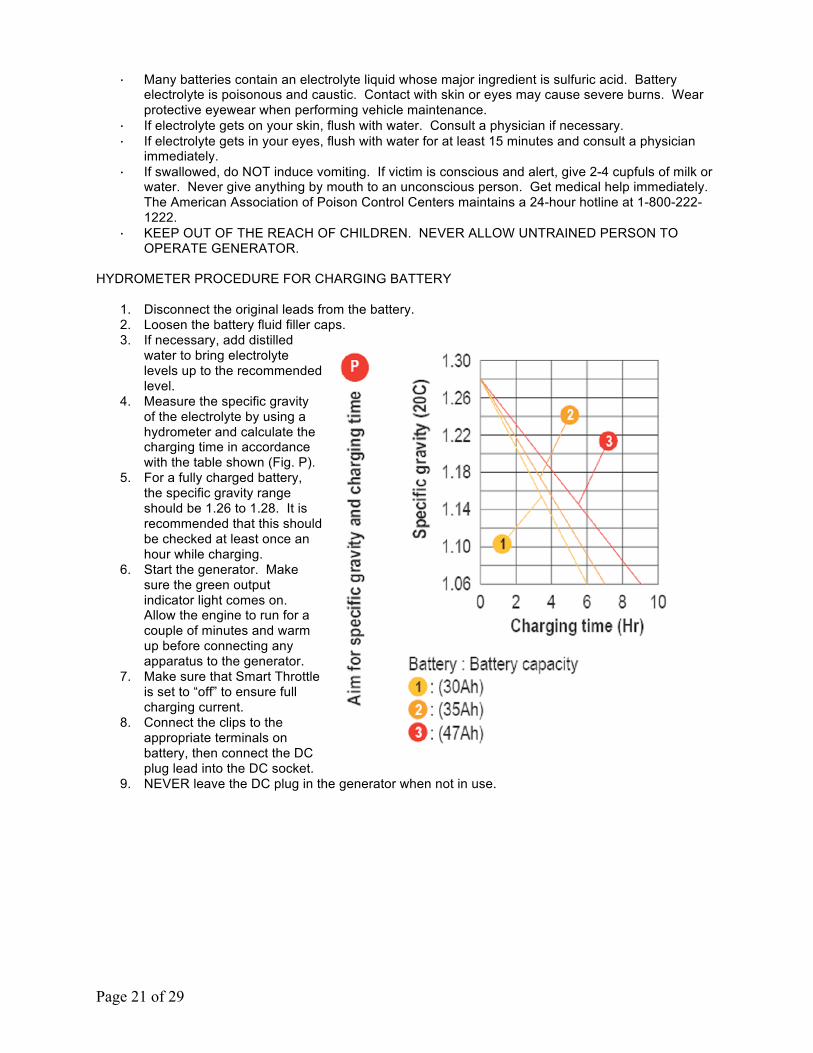
HYDROMETER PROCEDURE FOR CHARGING BATTERY
1. Disconnect the original leads from the battery. 2. Loosen the battery fluid filler caps. 3. If necessary, add distilled
water to bring electrolyte levels up to the recommended level.
4. Measure the specific gravity of the electrolyte by using a hydrometer and calculate the charging time in accordance with the table shown (Fig. P).
5. For a fully charged battery, the specific gravity range should be 1.26 to 1.28. It is recommended that this should be checked at least once an hour while charging.
6. Start the generator. Make sure the green output indicator light comes on. Allow the engine to run for a couple of minutes and warm up before connecting any apparatus to the generator.
7. Make sure that Smart Throttle is set to “off” to ensure full charging current.
8. Connect the clips to the appropriate terminals on battery, then connect the DC plug lead into the DC socket.
9. NEVER leave the DC plug in the generator when not in use.

Page 22 of 29
6 MAINTENANCE
Shut off the engine before performing any maintenance. If the engine must be run, make sure the area is well ventilated. Engine exhaust contains poisonous carbon monoxide gas.
Use authorized parts or their equivalent. The use of replacement parts which are not of equivalent quality may damage the generator.
MAINTENANCE SCHEDULE

Page 23 of 29
6.1 Engine oil replacement
Make sure to turn the engine switch and the fuel cap vent lever OFF before draining oil.
1. Place the generator on a level surface and drain the oil while the engine is still warm to assure rapid and complete draining
2. Remove the cover screws and open the maintenance access panel. 3. Remove the oil filler cap. 4. Drain dirty oil into a container by tilting the engine toward the oil filler neck. 5. Once emptied, tilt the generator back up and place into the upright position. 6. Refill with recommended oil up to the upper limit of the filler neck (Fig. U). 7. Recommended 4 stroke engine oils are either SAE30 (single viscosity) or 10W30 (multi viscosity)
4 stroke oil. 8. CAUTION: be sure that no foreign material, debris, or dust enters the crankcase. 9. Reinstall the oil filler cap. 10. Reinstall the side maintenance cover and tighten the cover screws.
Please dispose of used motor oil in a manner that is compatible with the environment. We suggest you take it in a sealed container to your local service station for recycling. Do not throw it in the trash or pour it on the ground.
Page 24 of 29
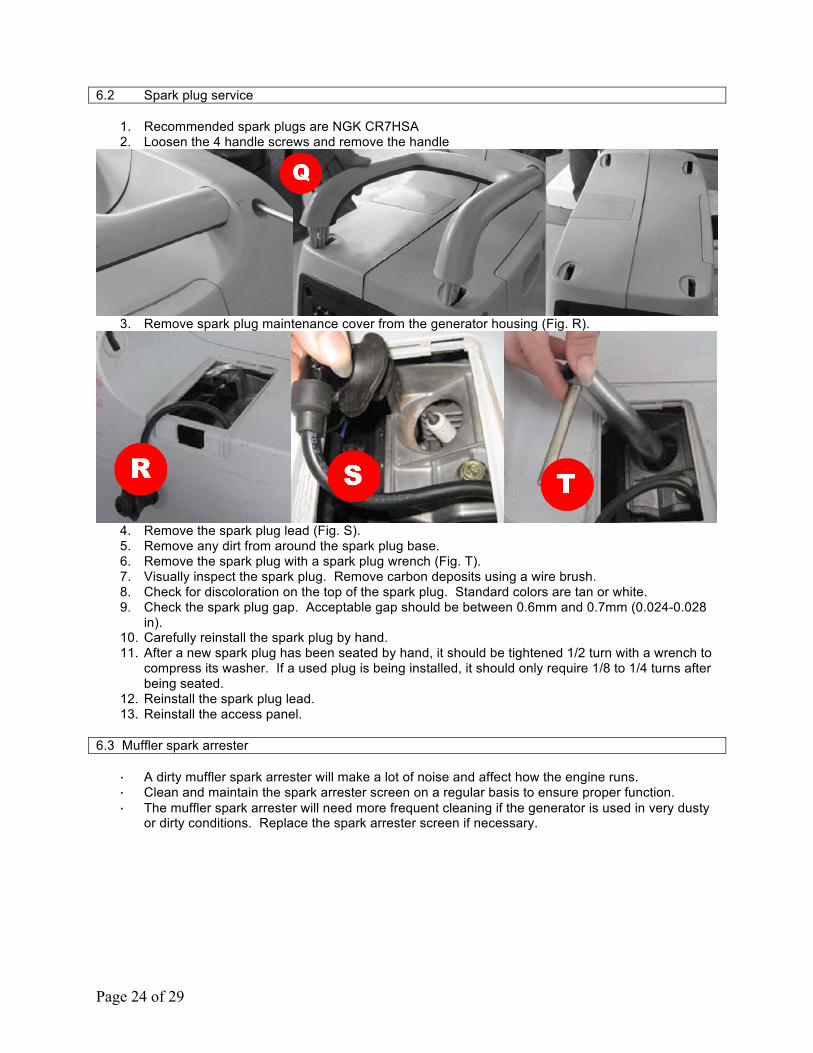
6.2 Spark plug service
1. Recommended spark plugs are NGK CR7HSA 2. Loosen the 4 handle screws and remove the handle
3. Remove spark plug maintenance cover from the generator housing (Fig. R).
4. Remove the spark plug lead (Fig. S). 5. Remove any dirt from around the spark plug base. 6. Remove the spark plug with a spark plug wrench (Fig. T). 7. Visually inspect the spark plug. Remove carbon deposits using a wire brush. 8. Check for discoloration on the top of the spark plug. Standard colors are tan or white. 9. Check the spark plug gap. Acceptable gap should be between 0.6mm and 0.7mm (0.024-0.028
in). 10. Carefully reinstall the spark plug by hand. 11. After a new spark plug has been seated by hand, it should be tightened 1/2 turn with a wrench to
compress its washer. If a used plug is being installed, it should only require 1/8 to 1/4 turns after being seated.
12. Reinstall the spark plug lead. 13. Reinstall the access panel.
6.3 Muffler spark arrester
· A dirty muffler spark arrester will make a lot of noise and affect how the engine runs. · Clean and maintain the spark arrester screen on a regular basis to ensure proper function. · The muffler spark arrester will need more frequent cleaning if the generator is used in very dusty
or dirty conditions. Replace the spark arrester screen if necessary.

Page 25 of 29
7 Transportation and Storage
To prevent fuel spillage when transporting generator or during temporary storage, the generator should be kept upright in its normal operating condition, with the engine switch and fuel valve OFF.
The fuel cap vent lever should be turned to the OFF position after the engine has been allowed to cool
7.1 Safe Transportation
· Do not overfill the tank. There should be no fuel in the filler neck. · Do not operate the generator while on a vehicle. · Do not transport the generator in direct sunlight or in other hot places. If the generator is left
inside a hot vehicle for several hours, the hot temperature could cause fuel to vaporize, resulting in a danger of explosion.
· Drain the fuel if transport will be over rough road or other adverse conditions.
Gasoline is extremely flammable and explosive under certain conditions. Do not smoke or allow flames or sparks in the area.
7.2 Long Term Storage
· Be sure the storage area is free from excessive humidity or dust. · Remove the screws and open the maintenance access panel. · Open the fuel drain screw and drain fuel into an approved container. Wipe up any spilled fuel and
remove the gasoline container to a safe distance. Then start the engine and run the generator until it is completely dry and the engine stops.
· Drain the crankcase oil. · Remove spark plug and fill the cylinder with 2cc fresh oil (1/2 teaspoon). Pull the start motor 3-4
times to discharge remaining oil. Then reinstall the spark plug. · Pull the starting cord slowly until resistance is strong. At this time, the piston is moving to the top
of the top of the compression stroke and the valves will be closed.
Page 26 of 29
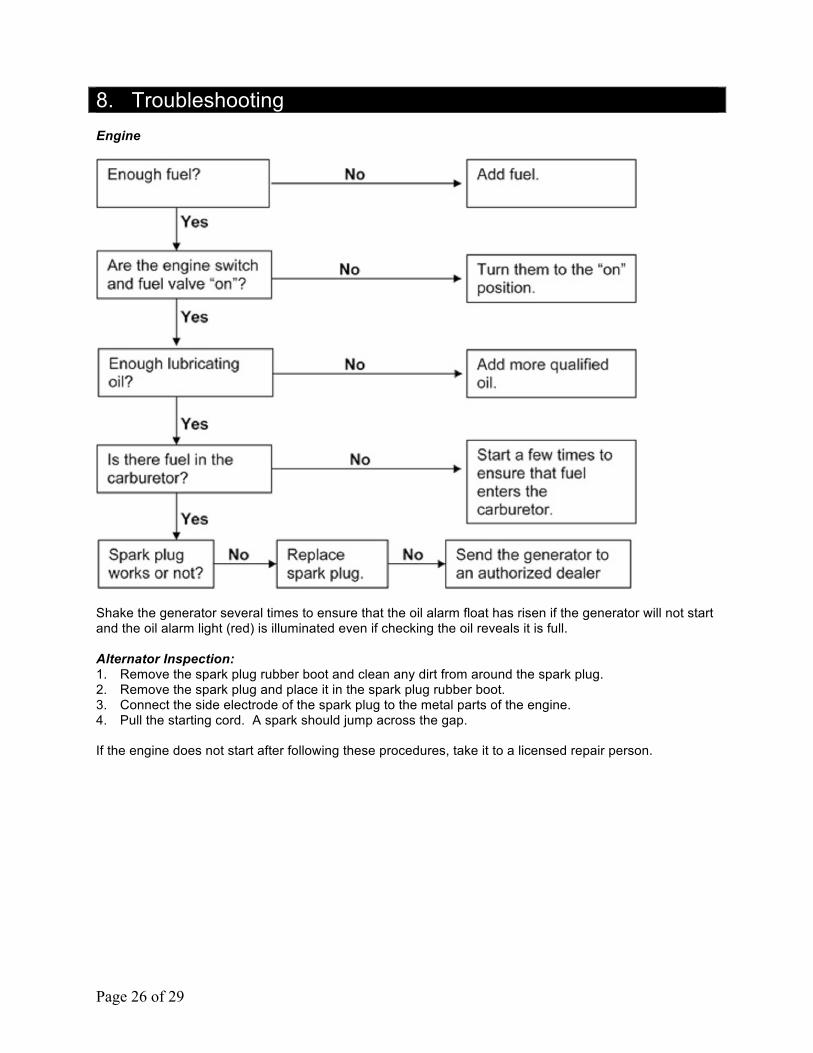
8. Troubleshooting Engine
Shake the generator several times to ensure that the oil alarm float has risen if the generator will not start and the oil alarm light (red) is illuminated even if checking the oil reveals it is full. Alternator Inspection: 1. Remove the spark plug rubber boot and clean any dirt from around the spark plug. 2. Remove the spark plug and place it in the spark plug rubber boot. 3. Connect the side electrode of the spark plug to the metal parts of the engine. 4. Pull the starting cord. A spark should jump across the gap. If the engine does not start after following these procedures, take it to a licensed repair person.

Page 27 of 29
If you encounter any additional difficulties not listed, please call our customer service number at 866-393-3968 for help.
Page 28 of 29
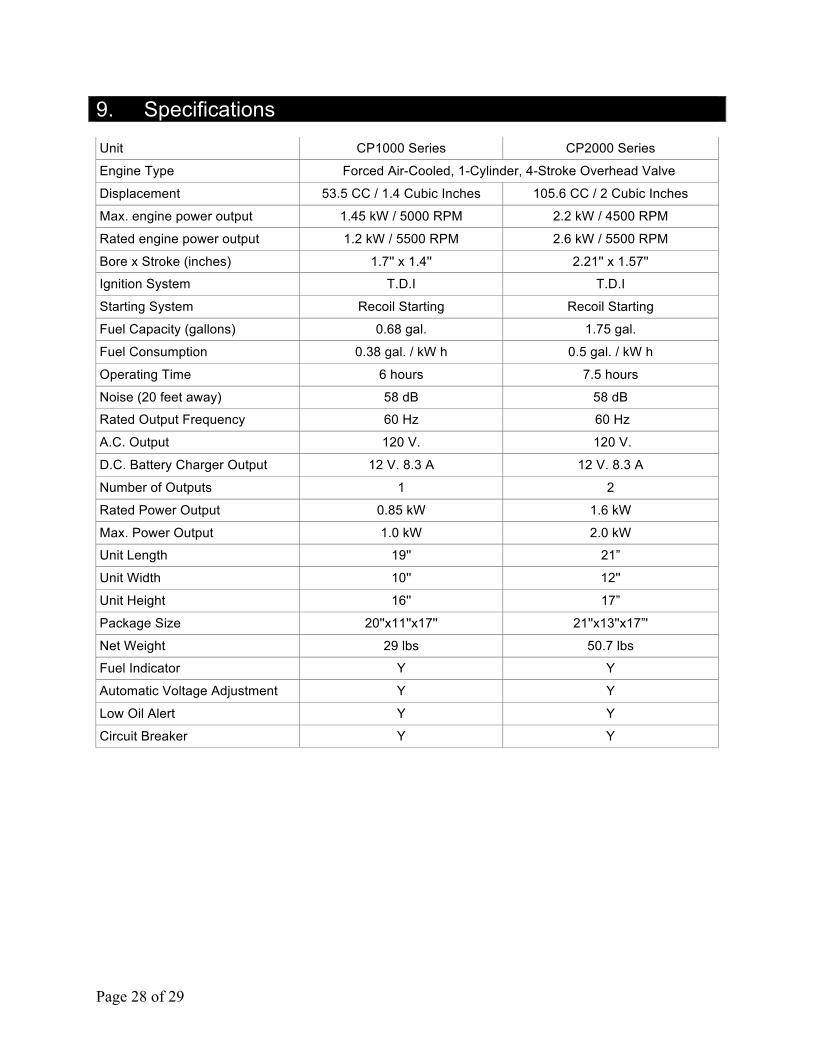
9. Specifications Unit CP1000 Series CP2000 Series
Engine Type Forced Air-Cooled, 1-Cylinder, 4-Stroke Overhead Valve
Displacement 53.5 CC / 1.4 Cubic Inches 105.6 CC / 2 Cubic Inches
Max. engine power output 1.45 kW / 5000 RPM 2.2 kW / 4500 RPM
Rated engine power output 1.2 kW / 5500 RPM 2.6 kW / 5500 RPM
Bore x Stroke (inches) 1.7'' x 1.4'' 2.21'' x 1.57''
Ignition System T.D.I T.D.I
Starting System Recoil Starting Recoil Starting
Fuel Capacity (gallons) 0.68 gal. 1.75 gal.
Fuel Consumption 0.38 gal. / kW h 0.5 gal. / kW h
Operating Time 6 hours 7.5 hours
Noise (20 feet away) 58 dB 58 dB
Rated Output Frequency 60 Hz 60 Hz
A.C. Output 120 V. 120 V.
D.C. Battery Charger Output 12 V. 8.3 A 12 V. 8.3 A
Number of Outputs 1 2
Rated Power Output 0.85 kW 1.6 kW
Max. Power Output 1.0 kW 2.0 kW
Unit Length 19'' 21”
Unit Width 10'' 12''
Unit Height 16'' 17”
Package Size 20''x11''x17'' 21''x13''x17”'
Net Weight 29 lbs 50.7 lbs
Fuel Indicator Y Y
Automatic Voltage Adjustment Y Y
Low Oil Alert Y Y
Circuit Breaker Y Y
Page 29 of 29
Air Filter It is very important to maintain the air filter in proper condition. Damage to the generator may arise if the filter has not been cleaned and maintained properly. TO CLEAN THE AIR FILTER:
1. Remove the side maintenance cover. Y 2. Remove the air filter cover by first pushing down on the tab in the top of the air
cleaner house. 3. Once the air filter cover tab has been released from the filter housing, continue to
detach the air filter housing by raising the housing cover up and detaching it from the bottom tab.
4. Remove the air filter by pulling it out towards you. 5. Wash the air filter in solvent or kerosene and allow to dry. 6. Lubricate the filter using clean motor oil. 7. Thoroughly squeeze the filter to remove excess oil. 8. Replace air filter into the housing and place back into the engine. 9. Reinstall the air filter cover. 10. Reinstall the side maintenance cover.
IMPORTANT: Never run the generator without the air filter in place. Checking and cleaning the Spark Arrester. Spark arrester are required when this generator will be used around flammable material or on land covered with materials such as agricultural crops, forest, brush, grass or other similar items and is legally required in the State of California. It is a violation of California statues section 130050 and/or sections 4442 and 4443 of the California Public Resources Code, unless the engine is equipped with a spark arrester, as defined in section 4442, and maintained in effective working order. Spark arresters are also required on U.S. Forest Service land and may also be legally required under other statues and ordinances. The spark arrester must be cleaned regular to keep it functioning properly. A clogged spark arrester prevents the flow of the exhaust gases, reduces engine output, increases fuel consumption and makes starting difficult. PLEASE ALLOW THE GENERATOR TO COOL BEFORE CLEANING THE SPARK ARRESTER.
1. Remove the 4 bolts from the muffler cover and remove the cover. 2. Remove the special screw from the spark arrester and remove the arrester from
the muffler. 3. Use a wire brush to remove carbon deposits from the screen. Be careful not to
damage the screen. The spark arrester must be free of holes and breaks 4. Replace the spark arrester by reversing steps 1 and 2 above. 5. If you need a new spark arrester please call customer service at 866-393-3968.