Computer Engineering Final Project Facultat de Matemàtiques Universitat...
71
Computer Engineering Final Project Facultat de Matemàtiques Universitat de Barcelona DESIGN AND IMPLEMENTATION OF AN ACTION-RPG IN UNREAL ENGINE 4 ROGER RODRÍGUEZ CAMPRUBI Tutor: Oriol Pujol
Transcript of Computer Engineering Final Project Facultat de Matemàtiques Universitat...

Computer Engineering Final Project
Facultat de Matemàtiques
Universitat de Barcelona
DESIGN AND IMPLEMENTATION OF AN
ACTION-RPG IN UNREAL ENGINE 4
ROGER RODRÍGUEZ CAMPRUBI
Tutor: Oriol Pujol
Design and Implementation of an A-RPG in UE4 Roger Rodríguez Camprubi
1
Table of contents:
1. ABSTRACT
2. INTRODUCTION
a. Motivation
b. Objectives
c. Goals achieved
d. Memory structure
3. ANALYSIS
a. Game design
i. Concept Paper
ii. Game Design Document (GDD)
iii. Story Document
iv. Plot Document
v. Game Specifications
1. Weapons
2. Abilities
b. Technology
i. Unreal Engine and Epic Games
ii. Blueprint Technology
iii. File types
4. DESIGN
a. Project Structure
i. Classes structure
b. Level design
5. IMPLEMENTATION and TESTING
a. Wish I would have known
b. Task scheduling
c. Versions
d. Bugs
e. The BUG
6. CONCLUSIONS
a. What is
b. What should be and isn’t
c. What may be
d. What will become
7. BIBLIOGRAPHY
Design and Implementation of an A-RPG in UE4 Roger Rodríguez Camprubi
2
1 - ABSTRACT This report you are about to read is a chronicle of how Iron and Time was developed. Iron and Time is an Action-RPG videogame developed using Unreal Engine 4, a videogame engine from Epic Games, and more precisely with its Blueprint Visual Scripting technology. If you are unfamiliar with more than three words from the couple of sentences above this is a great place to be! Through the report, we will take a deep look into Unreal Engine, we will learn how to use it, what are blueprints, how do we script with them and why did we chose it to develop this game. We will also take a look at the project structure to understand not only how could it be made but also, and more important, how it is actually made. We will also explore some difficulties we came across, including a very critical one (see THE BUG) to finally reach some conclusions about the project itself and its future. But I couldn’t start without giving my most sincere gratitude to several people whose help has meant an invaluable asset. I would first like to thank this project’s tutor, Dr. Oriol Pujol Vila, who has always trusted my decisions and has offered his help in whatever I’ve needed. To my girlfriend, who, despite disliking videogames, has listened thousands of times about the game design, game story and game development, even contributing herself with her own ideas. Finally to my parents, who one day thought it would be a good idea to give me a purple Gameboy for Christmas.
Design and Implementation of an A-RPG in UE4 Roger Rodríguez Camprubi
3
2 - INTRODUCTION
Design and Implementation of an A-RPG in UE4 Roger Rodríguez Camprubi
4
2.a – Motivations
To properly cover this point, let me first introduce myself briefly. As everyone, there are lots of things I enjoy, from playing the guitar to travelling, all the way through singing, songwriting, reading, programming, surfing the web, going out with friends… All those things have made a spot into my hobbies/like-to-do-things through trial and error. One day, after watching lots of guitar playing videos on Youtube I decided to try out how it was, and did so with a classical one. While it was a good experience I wouldn’t define it as game-changing. Things evolved and I got myself an electric guitar and started a band with some friends. Some time passed and I also decided to start taking singing lessons. Today I still write, play and sing songs for the same band of friends, and while we are not great at what we do, that’s something I enjoy and is definitely an important part of my life. “Hey man, what’s all this about, this a project memory! Go tell that to someone else and stay focused here. What was all that speech about?” Glad you ask! See, with the example above, I present an important part of my life that successfully became what it is now, just as many others didn’t (I used to like swimming, for example, but eventually left it aside). Videogames were not like that, as soon as I was given my first gaming device (it was a purple game boy color that was just released that year) that became instantly a core part of my life. I could sink you in a boredom paradise explaining all the afternoons spent in front of my N64, playing the games that would define what videogames are today. My name is Roger Rodríguez Camprubi, that’s how most people call me, and the reason I skipped starting with my name when I said I would introduce myself is because that hasn’t been my only name for a long time now. I’m also known as Necrobooder or Booder by a lot of people who, like I do, share videogames as a very important part in our lives. I’m sure I don’t have to put effort in convincing you of my passion for games after what you’ve just read, and it is that, my passion for games, where it lies the motivation for this project. I enrolled Computer Engineering with a clear goal in my mind: becoming a game developer. I was afraid initially, with the obvious common doubts: OK, love playing, what happens if by the time you are able to program a game yourself you realize you don’t actually like it? Fortunately, I didn’t have much time to think about it. Sooner than I thought, I was programming my first Tower Defense game in my 2nd year of degree. From then on, I have had a clear aim: I will become a great game designer, and this project is to be my very first important step in the career of my dreams.
Design and Implementation of an A-RPG in UE4 Roger Rodríguez Camprubi
5
2.b – Objectives There are several goals intended in this projects and while each one leads to another one, it is worth to mention them all instead of placing the final product as the one and only aim. First of all, let me mention the initial goals I had with this subject, which are previous to the election of the specific project:
Get to know a professional game engine.
Create a game that would serve as a presentation card for me, so I end the degree with a solid portfolio to begin with.
After talking about this objectives with my tutor, we both decided that the best option was to choose Unreal Engine, and agreed that the genre would be something in the lines of an RPG. This decision came with a bunch of requisites that were converted also into objectives of game design.
The game must present an inventory, where the user can interact with objects picked up in the in-game world.
The game must provide some sort of progression for the character. And with global and specific objectives written we have only the micro-objectives to be considered. These are the ones which are assumed by the others but are used as an immediate goal in development to have something more specific to work towards. Learning objectives This are the pre-requisites to start developing.
Learn the very first basis of game design, so the project does not start with a mess of crazy ideas but a well-organized documentation about crazy ideas.
Learn about Unreal Engine 4, what is it used for and how does it work in general terms.
Learn about the blueprint technology and master it enough to build a game with it.
Learn about animation management (not creating animations) in UE4.
Learn about level management and level creation in UE4.
Learn about cinematics and audio treatment in UE4. Design objectives While we could put all game design here and set it as an objective, there are some main features that represent the whole of it.
The progression system will be based on weapons, and there will be 5 ranks of them.
The game will provide a weapon-combination system
The character will have different abilities depending on the weapon wielded.
There will be an engaging plot, with its basis in a solid fantasy world that drives the player from the beginning till the very end.
Technical objectives This are the ones everybody would expect from a game like this, but it’s important to acknowledge them, for they are key to the implementation process.
The game platform will be the computer.
The player will be able to fully control the character.
The camera will be set above and behind the character, pointing its back from what would be ~10m in real life and will NOT rotate with the character.
Design and Implementation of an A-RPG in UE4 Roger Rodríguez Camprubi
6
There will be enemies controlled by a simple artificial intelligence.
There will be an inventory to store picked up or looted items.
The player will be granted a GUI to interact with the inventory.
The player will be granted a GUI to combine weapons.
There will be illuminations, animations, particle effects and sound effects to grant a proper immersion level to the game.
There are parts of game developing which I will not cover which are mostly the artistic sections (such as modeling and animation). I will get the models, animations, and textures (including raw images) from the Epic Games marketplace.
2.c – Goals achieved If there’s something we can tell about the previous section is that the project itself is ambitious for someone who know nothing about the tools he is going to work with. So, before beginning to explain about the process, it is important to know where we arrived: Did I achieve all the goals? Simple answer, no I did not. Explanation below. It will be covered in its own section in this paper, but I had to stop working on the project on December 11th due to what seems to be a bug in UE4 editor. This means I lost way more than a month, which would have been enough to get the project perfect (objective-wise). Reasons apart, where did we arrive? We get to a point where the core part of the game is working. We have:
A basic but still complete scenario.
Final models for both the main character and the friendly and enemy NPC’s
All interfaces working, including o Description panel (when you mouse-over a character, item or ability) o Inventory UI o Forge UI (weapon combination system) o Resources managing UI (health and resource bars, abilities bar) o Pause menu
Fully functional IA, both for enemy and friendly NPC’s
All items and weapons in the database, with its thumbnail, model and features
All level 1 and level 2 abilities implemented (12)(remember, there were 5 levels with a total of 52 abilities)
Fully working level, with triggered events. The best way to keep a track of how the project was going with my tutor was via videos, which I recorded and uploaded to Youtube. This is the latest one, which corresponds to a version of few days before the project collapsed.
https://www.youtube.com/watch?v=9pA-7spR_M0
So, that’s what we have. What I’d like to do now is to make a difference between a finished product and the desired final product, for they are different things in this case. Although I will expand on this in its own section, I’d like to state a few things before we continue. A finished product is something that has a meaning on its own. It may not be the initially thought product, but it will be unnoticeable to anyone who does not know what the initial idea was. Our desired final product is summarized by the objectives in the previous section and would need to accomplish all of them.
Design and Implementation of an A-RPG in UE4 Roger Rodríguez Camprubi
7
What would make the current version a finished product? Actually, the things that would achieve this are the ones I was working on. The current version would need this to be considered a final product:
Dialog system, so the friendly NPC can provide the player instructions in what to do
Audio, both ambient music and sound effects.
Possibility to save and load the game. What would make the current version a final product? As I said, I will expand on this later, but to be quick, it lacks the following, aside from the 3 points stated above:
Plot integration, and this would come with more levels and storytelling (and probably cinematics too).
Implementation of the rest of the abilities (I only implemented the ones that were obtainable in the tutorial level, so because there is no way to obtain more advanced weapons (more levels would be needed for that) there was no need to implement yet their abilities)
What I was trying to say with all this, is that the game is missing the game itself. It has the mechanics scripted, the GUIs working and all the core functionalities in good shape, but it just has a tutorial level to test a very little part of them. To close the section: This was not the state the project was intended to end and nevertheless, it still is a good piece of software to show what I’ve learnt and how far I could have arrived with 6+ more weeks of effective time.
2.d – Memory Structure
As it is stated in the table of contents, this memory consists of 7 parts. Aside from the abstract and the introductions, which we have already covered, it has:
ANALYSIS: Everything about game design is covered here, also, all the technical knowledge about UE4 and its features is also explained in this section. When we end the analysis we should know everything needed (both design-wise and tech-wise) to start.
DESIGN: This section covers the architecture of the project, what classes do what, and generally how all the previously learnt knowledge is structured to become a game.
IMPLEMENTATION and TESTING: This part covers the development process, the order in which things were implemented, what versions were generated, technical concepts I learnt during development phase and the troubles and bugs encountered.
CONCLUSIONS: This last section deeply explains, what was achieved, what should have been done to be a better project, what ways could we expand this game and how the game is intended to evolve after it is delivered.
BIBLIOGRAPHY: Although there were not a lot, this final part states all the information sources used and tires to state every single asset source to give them credit for their work. Finally it includes a “Thanks to:” section.

Design and Implementation of an A-RPG in UE4 Roger Rodríguez Camprubi
8
3 – ANALYSIS
Design and Implementation of an A-RPG in UE4 Roger Rodríguez Camprubi
9
3.a – Game design
The first stage of the game (even previous to the technical learning process) was to design the game. We had two choices here:
Develop an idea briefly, to have something to work on (designing the camera, the control and a few key features as the inventory), start implementing and, once the core is done, start designing additions like the progress system, enemy differentiation, friendly NPC’s etc.
Fully design and document a game without opening the editor and start working only when about an 80+% of the design is done.
Both of them have their pros and cons but since I wanted to put a lot of importance in game design instead of focusing purely in game programming (remember I have said earlier that my final goal is to become a game designer, not a game programmer) I chose the second choice. The very first thing I did when designing the game was finding the key game mechanic. I already had a few ideas written down (as I normally write my ideas so I don’t forget), but none of them was the proper one. I came across weapon combination; it was something I’ve enjoyed a lot in the games I’ve played that implement some kind of it, and I decided to do it the main progression system. Then I started brainstorming to see some different ways it could be implemented and I actually write down the first concept of what later would become this game’s GDD (Game Design Document). After that, I tried to learn a little about game design process and early documentation, and I came with lots of theories, most of which had some common points. Using this knowledge and taking into account that I was not working in a team where every single detail must be written down to ensure ambiguous meanings don’t lead to a fail, I decided to structure my design documentation in the following way:
1. Concept paper: Game design is all about the experience. How the game will provide the player the intended experience is the game designer’s main job, and a concept paper consists of the key features the game will have to achieve that. It does not cover in-game mechanics, lore or level-design. It is the first document to be done and it contains the basis all the other game design will use.
2. Game Design Document: This document is the bible of the game. In a professional level EVERYTHING must be written here, from the character gender to the position of the “resume” option in the pause menu. Since most of the sources agreed that the most valuable game design document is the one that is actually useful, I decided to limit a lot what would be in it. In my case it contains all game features, not the way they will exactly be placed in the game, but the logic behind them.
3. Story document (Lore): It was important for me to set the plot in a contextualized fantasy world. If I was to create and engaging story it couldn’t come from nothing. In this document I tell the story of the world in which the game takes place. Lots of stories could have its place here, and this game’s plot is only one of them.
4. Plot document: This document contains the plot of the story, everything in here is what the player will be doing while playing the game.
5. Game specifications: Normally these would be part (or could be part) of the GDD, but since they are closed concepts they are more useful in their own documents, it covers the abilities, the weapons and few other in-game concepts.

Design and Implementation of an A-RPG in UE4 Roger Rodríguez Camprubi
10
It was not until I almost finished the game-mechanics design that I start thinking about the story and the name of the game. Believe it or not, the way I came up with the name is pretty unorthodox. I am very bad at both 2D and 3D art but still needed a good game logo, so I wrote down some names that could fit well in a fantasy title, things like fire, nether, soul etc. Then I googled for copy-right free images of that name and the word “Iron” just happened to have a cool typo in a flat image. I started from there and thought about the big picture of the lore. After that, I came with the final title for the game: Iron and Time. Lastly, I finished the lore document and thought about the story of the game itself, but I wouldn’t write it down until I had enough experience with the editor and the language to know how far I could reach. The following sections are the documents mentioned previously as they were written mid-September, there are things that can’t be seen at the game, but if they’ll most likely be once I can finish the game. They do not have title names for each section, instead the documents’ name is written in the header of each page.
11
Iron and Time – Concept paper Roger Rodríguez Camprubi
IRON AND TIME – CONCEPT PAPER
Iron ant Time is a 3D action RPG, with a 3th person camera that looks similar to games like
diablo.
As an RPG it has a progression system which is based in weapon upgrading instead of character
level progression.
It has a strong, deep storytelling that reinforces the gameplay and gives it coherence.
The game has a big map, with 3 environments which offer interaction between the world and
the player.
The combat system is the classic Arpg horde-style. Lots of ‘weak’ enemies attacking at once or
few stronger ones. It includes 4 epic boss battles.
The main feature of the game is the ability system which relies entirely on the weapon
wielded.
A player can gain expertise with different weapons (and will need to) in order to customize
their abilities and progress his/her way to the end boss.
Weapons can be combined with other weapons to enhance their skills or upgraded via
amplifications.
All the art is medieval-like, except some enemies.
The combat system is engaging, fun and fully customizable.
12
Iron and Time – Game Design Roger Rodríguez Camprubi
QUICK INTRODUCTION:
Character is able to wield various types of weapons, and they (the weapons) will be the main progress system and the main feature of the game.
Weapons split in Types and families. There are 3 types with 3 families in each one. - Melee
Axes Knives Swords
- Distance Bows Crossbows Lances
- Magic Staffs Wands Tomes
Character progression is based in his expertise with each weapon family, NOT in the character itself.
PROGRESSION SYSTEM
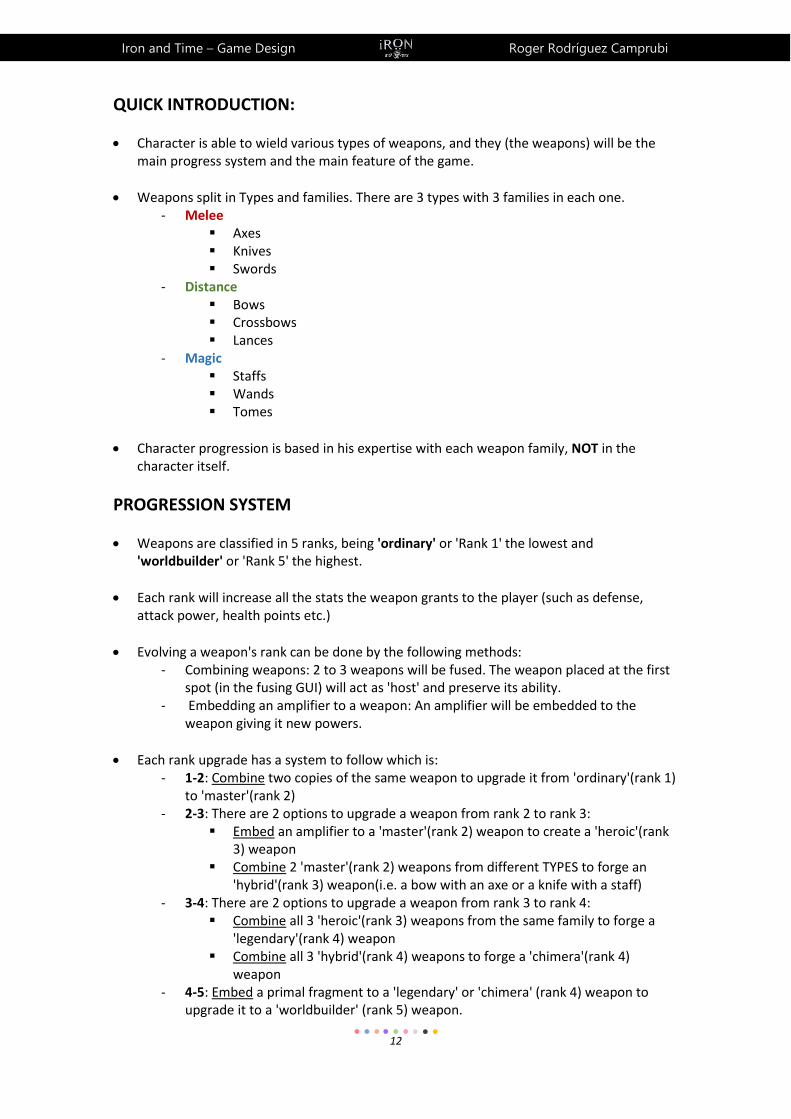
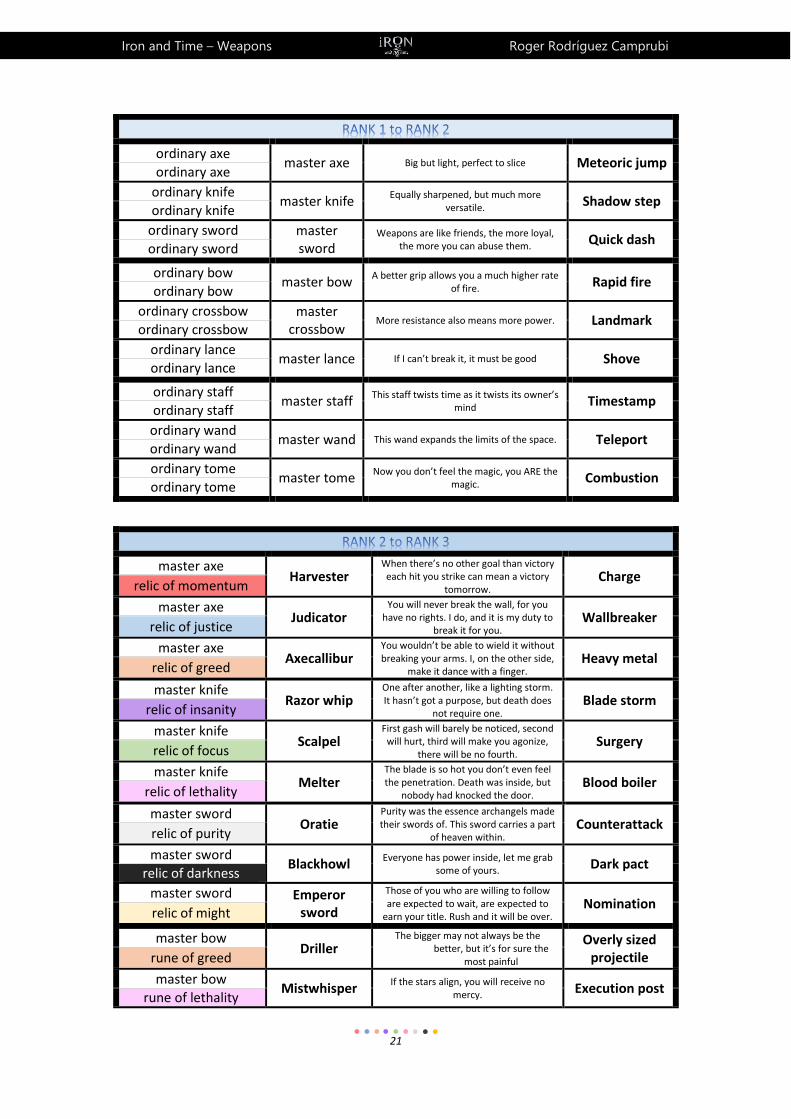
Weapons are classified in 5 ranks, being 'ordinary' or 'Rank 1' the lowest and 'worldbuilder' or 'Rank 5' the highest.
Each rank will increase all the stats the weapon grants to the player (such as defense, attack power, health points etc.)
Evolving a weapon's rank can be done by the following methods: - Combining weapons: 2 to 3 weapons will be fused. The weapon placed at the first
spot (in the fusing GUI) will act as 'host' and preserve its ability. - Embedding an amplifier to a weapon: An amplifier will be embedded to the
weapon giving it new powers.
Each rank upgrade has a system to follow which is: - 1-2: Combine two copies of the same weapon to upgrade it from 'ordinary'(rank 1)
to 'master'(rank 2) - 2-3: There are 2 options to upgrade a weapon from rank 2 to rank 3:
Embed an amplifier to a 'master'(rank 2) weapon to create a 'heroic'(rank 3) weapon
Combine 2 'master'(rank 2) weapons from different TYPES to forge an 'hybrid'(rank 3) weapon(i.e. a bow with an axe or a knife with a staff)
- 3-4: There are 2 options to upgrade a weapon from rank 3 to rank 4: Combine all 3 'heroic'(rank 3) weapons from the same family to forge a
'legendary'(rank 4) weapon Combine all 3 'hybrid'(rank 4) weapons to forge a 'chimera'(rank 4)
weapon - 4-5: Embed a primal fragment to a 'legendary' or 'chimera' (rank 4) weapon to
upgrade it to a 'worldbuilder' (rank 5) weapon.
13
Iron and Time – Game Design Roger Rodríguez Camprubi
Additionally each upgrade requires the character a certain amount of expertise with the 'host' weapon.
Crafting materials: - 'ordinary' weapons will be obtainable from all kind of sources (mobs, treasures,
vendor) - Amplifiers will require to be crafted, as explained in the following section.
Amplifiers: - All of them need to be crafted from:
farmed materials (like copper ore or dry wood, obtainable from world sources)
mob resources (like skeleton bones' dust, obtainable from killing mobs) purchasable items (like soft rosin)
- There are 2 kinds of them: Artifacts of power (AoP): are used to upgrade a 'master' weapon to a
'heroic' weapon. Consist of 3 parts:
Essence: the essence contained within the artifact. There are 9 essences obtainable by killing enemies:
o Essence of Momentum o Essence of Justice o Essence of Greed o Essence of Insanity o Essence of Focus o Essence of Lethality o Essence of Purity o Essence of Darkness o Essence of Might
Retainer: Acts as an essence recipient and transfers its powers to a weapon. There are 3 types which can be crafted from farmed materials:
o Relics - used to capture essences into Melee weapons o Runes - used to capture essences into Ranged weapons o Blessings - used to capture essences into Magic weapons
Example of a 'worldbuilder' weapon crafting path
14
Iron and Time – Game Design Roger Rodríguez Camprubi
Catalyst: Captures an essence in a retainer. Can be bought from NPC’s.
Each retainer type can capture any type of essence, giving 27 total possibilities. Primal fragments: are used to upgrade 'legendary' or 'chimera' weapons to
'worldbuilder' weapons. As Artifacts of power, they need a specific retainer (which will use all types of materials in the game to be built), Primal Essences, which can only be obtained from higher level mobs, and a Catalyst that can be obtained by certain NPC’s.
ABILITIES SYSTEM
Each weapon type will hold its own combat resource system: - Melee: While in combat, a melee weapon wielder will generate fury over time
during combat, when using autoattacks and when receiving damage. This fury shall be spent in abilities. In a normal off-combat situation player has no fury.
- Distance: Distance weapon wielders will gain clarity whenever they move, which they will use to cast their shots. In a normal off-combat situation player has full clarity.
- Magic: Magic weapon wielders will use mana as they resource to cast magic spells. Mana will slowly regenerate over time and will recover a lot faster after 3 seconds of dealing no spell damage. In a normal off-combat situation player has full mana.
Character has 2 to 4 abilities which rely on which weapon is he wielding and follows this structure:
- '1' ability is specific to the weapon type. - '2' ability is specific to EACH rank 2 weapon. - '3' ability is specific to EACH rank 3 weapon. - '4' ability is specific to EACH rank 5 weapon.
Additionally, the character will continuously auto-attack (assuming it is in range) the targeted enemy.
All the ability configurations will manage to work out in a way that abilities interact with each other. This example shows abilities that ARE NOT related and don’t create synchrony.
1. ranged skillshot 2. surround-aoe 3. mobility
This example shows abilities that ARE related and create synchrony. 1. Charges a big fire ball on the player. 2. Sends the fireball in a straight line 3. Explode the fireball around its current position.
This way you can use '1+3' to cause a great explosion around you or '1+2' to shoot a charged ball to a distance, '2' to shoot a tiny ball or even '1+2+3' to cause a great explosion at a distance.
Using this system you get Rank 1 and 2 abilities early in the game, so you have a non-boring gameplay experience while you get familiar with the weapon system and the weapon type specific resource. Once we know a little bit of everything and can choose with a fair knowledge about choices, we get our 'heroic' weapon and get a full-operative
15
Iron and Time – Game Design Roger Rodríguez Camprubi
Set of abilities that combine with each other in a different way than another 'heroic' weapon of the same family would have. At the end we get our 'worldbuilder' weapon and our 4th ability which is like an ultimate spell that identifies the weapon family (The BEST sword technique ever or the most destructive spell ever casted from a tome) and fulfill the need to feel powerful.
This system lets the player feel different when wielding a 'darkness sword' from when wielding a ‘lethality knife’, although they are both melee weapons which use the same resource.
BIG PICTURE
This way we will have the following set of choices: - RANK 1: 9 'ordinary' weapons with 3 rank 1 abilities - RANK 2: 9 'master' weapons with 9 rank 2 abilities - RANK 3: 27 'heroic' weapons and 3 'hybrid' weapons with 30 rank 3 abilities - RANK 4: 9 'legendary' weapons and 1 'chimera' weapon and NO rank 4 abilities - RANK 5: 10 'worldbuilder' weapons and 10 rank 5 abilities
This leaves us with a total of 68 weapons and 52 abilities BUT it opens us an incredible level of customization. IE: "One player can have 2 'identical' weapons that only share 1 ability. It would be the case of the hybrid 'worldbuilder weapon'. We can get there starting from a knife and getting: Melee rank 1 ability, Knife rank 2 ability, weapon-specific 'Heroic' rank 3 ability and 'Chimera worldbuilder' ability. OR we could go wand and getting: Magic rank 1 ability, Wand rank 2 ability, weapon-specific 'Heroic' rank 3 ability and 'Chimera worldbuilder' ability. This way we would end up with 2 copies of the same weapon with two completely different sets of abilities.
16
Iron and Time – Lore
Roger Rodríguez Camprubi
THE LEGEND OF IRON AND TIME Ages ago, much before life was created, the so called “worldbuilders” were a group of beings whose origin was unclear even to themselves. They were blessed with the gift of creation, and they were able to materialize their minds. Therefore, it must be said they were very primitive creatures and although their powers are beyond the imaginable, their thoughts were small and their methods loose. With time they learned to improve their skills but they also acknowledged their limits. They learned that only truly comprehended things can be created, and not everything was comprehensible; at least, not for everyone. They did not have such thing as a name, but for the sake of coherence, we, mortals, have given them many names through the years. There was Gyvenimas, who brought life to things. Organas, who was capable of shaping its mind and give it a body. Zinios, who gifts with knowledge and self-conscience and Galia, who infuses power on creations. Centuries went through and they realized nothing would come from working alone and started collaborating together to create what would be called “worlds”. Each world was better than the previous, but still they knew, even at the beginning, that no perfect world would ever be created. Their perceived perfection as the greatest thing they could imagine: themselves. Creating a life-being that could inherit the gift of creation and break the limits each one of them had become their greatest goal, and as their progressed in building worlds they also started to develop a plan to achieve their milestone. They would create an iron orb and set it at the very center of a planet, then they would merge themselves with the orb, creating what we know as ‘the orb of creation’. With time, harmonic energy would emanate from the orb cleansing the planet of any imperfection, and, once it reached the surface, it would start creating the first beings of a new race. The one which should be the definitive. They were convinced on the plan despite it would mean their end, but a better generation of worldbuilders was to born and the price seemed insignificant for the gain. The project worked really well, but Gyvenimas, who valued its ‘life’ more than it had suspected until the time, could not control the impulse of breaking out of the orb moments before it was sealed. That move would not only sentence their relatives but it would also prevent the new race from receiving the gift of creation, as it could not be inherited without the gift of every single one the worldbuilders. Without Gyvenimas essence the races on that planet would born as mortals, with a time set for their deaths. And here we are, the imperfect sons of greatness. Condemned to an unplanned fate that will
forever doom our race.
17
Iron and Time – Lore
Roger Rodríguez Camprubi
ESSENCES
The gift of creation was not transmitted to mortals, but that does not mean it disappeared. Each and every race that existed in the planet before the creation of the orb has been altered by the emanating forces of the iron of creation, imbuing themselves with one of the essence of creation. This essences are:
Essence of Momentum: Contains unlimited rage in a controlled attack. Unstoppable, unceasing but still, clever.
Essence of Justice: Contains the essence of the Executioner, the right choice can be a hard one, but it must be done with honor.
Essence of Greed: Contains an unlimited hunger for power. The bigger the better, the deadliest the best.
Essence of Insanity: Contains death without control, without limits, unconscious.
Essence of Focus: Contains precision an agility. It may take 5 stabs to take it down, but if no more are needed no more will be served.
Essence of Lethality: Merciless, it can take time, and pain, and suffering, and agony. They'll witness their own decay.
Essence of Purity: Contains de will to protect, patient but unbreakable.
Essence of Darkness: Contains pure evilness, it's corrupted and it will corrupt.
Essence of Might: Contains the soul of those privileged, proud and confident, almost arrogant.
THE BIG BAD GUY The role of the villain is obviously reserved for Gyvenimas who, after quitting the orb was not able to escape the world and hides from creation at Eldora cavern. It has secretly been extracting the essence of Organas, Zinios and Galia from the orb and capturing them into mortal bodies.
18
Iron and Time – Plot
Roger Rodríguez Camprubi
PLOT PROLOGUE A young man wakes up. It’s midnight and he’s swearing. Again. Over time, he has faced his fears alone, for he had no one else. But this feeling in the air has been around for weeks now… what is it? Too vague to be real, yet too real to be a mind trick. There’s something there, and he knows he’s not in the position to do anything. He grabs the old wood piece he found years ago, in the place of the forest his house used to be, he stares at it and reads the two only words written on it: “you are”. He knows anxiety will not disappear and tries to calm down. He turns around and lies down again, and just before closing his eyes, a voice from the dark side of the room whispers:
- Good night – the voice doesn’t convey fear, and it happens to be relaxing somehow – it’s the time you come with me.
- What do you want from me? - I want nothing, I’m just a messenger. - Then who is behind this? - This is not the right question. Perhaps “what” would have fitted better. Destiny is calling
you and it’s not known for its patience. The Iron Council awaits you. - I have no interest in it. - And this isn’t the right answer.
A light turns on and he realizes what’s happening before falling to the ground. The whole room is full of poisonous gas. It barely smells, but once it reacts to fire, it quickly knocks him off. He is undamaged, but he’s also unconscious. He wakes up again, no swear this time, no darkness and no fear. He unexpectedly stands in the middle of a room. It’s not a huge room but ceiling is way too high to be seen properly. One man speaks:
- Are you in disposition to listen? - I guess so – he answers. - What do you know about the gift of creation? - I’ve never believed in those who think we were supposed to be gifted, but accidentally
aren’t. - Have you heard about the Legend of Iron and Time? - Have you heard about the monkey merchant fable? - Have you heard about what “disposition to listen” means? - … - That was a good one – Hell… I don’t get to choose right? Go on old man.
The man nods <- The Legend of Iron and Time->
- What’s the point of this? – The man asks – was I brought here to listen stories? - Gyvenimas is alive and in this world. - Oh man, things start to get better – joked the man - And we suspect you might be the last man alive with reminiscences of the gift. - What? You just can’t believe what you’re saying. - I don’t expect you to understand… - How would you? I thought loneliness made me crazy, but it’s a relief to see it didn’t. - You don’t understand. - What should I understand? This is not an epic, where you send your minion hero to a
long journey with an “It’s dangerous to go alone, take this…” - YOU DON’T UNDERSTAND. - And I’m not even willing to! Look, I’m no hero, and even if I was I’m not interested in
your tales at all.
19
Iron and Time – Plot
Roger Rodríguez Camprubi
- You. Don’t. Understand. - What’s this?! I never asked for it! Nobody needed me till they did. And what am I
expected to do? The world has given nothing to me, and that what he’ll get back. I’m not playing hero.
- You are not the hero, you are just the catalyst. It was not mystical at all, there was no burning fire, no flashy magic. A knife cut his throat before he could even notice.
This part of story serves as a prologue, lore introduction and controls tutorial to the game. During the very first part of it (the part when the man wakes up) the story is told in a frame in the screen and possibly voice-acted. When the story reaches the point where the man grabs the wood piece, the player must move the character from the bed to wherever the wood piece it is, pick it up, and return to the bed. After that, the player gets to talk with the messenger and then the scene fades. All the second part should be a cinematic. And at the end of it, the game title “Iron and Time” is presented.
The story resumes with a man talking to the Iron Council man.
- Have you understand? – asks the old man. - I do, I guess everyone relies on me now. - Not just everyone, everything, the entire fate of our kind depends on you. The whole
universe awaits your success. - Ok old man, count on me. Gotta prepare if I want to make it out of the forest alive, and
there are a couple of things I will need to know if I intend to take this challenge. - You don’t need to hurry, a solid step is more valuable than a fragile sprint. - Yeah, whatever… See you again then!
The player enters a portal and it teleports him to the tutorial level.
The tutorial teaches the player the basics about using abilities, equipping weapons and combining them to get more powerful ones. At the end of it, the player is given a note which specifies its concrete objective: The Iron Council needs a rare item which they call a “primal fragment”. It is supposed to contain the purest source of the gift of creation available, but it is uncertain where it lies. Eventually the character will find out that Organas, Galia and Zinios have been revived into mortal bodies under the command of Gyvenimas, and that it is by defeating them how he’ll be able to obtain the primal fragment. The whole map will be based in 3 different environments (magma, forest and glacier) and each one will be the room of one of the Worldbuilders. The player will only be able to access to Organas area in the magma zone if he’s wielding a worldbuilder (rank5) melee weapon, Galia in the forest zone if he has a worldbuilder ranged weapon equipped and Zinios in the frozen zone if it has a worldbuilder Magic weapon equipped. If he has equipped a chimera worldbuilder weapon he will have to fight a combination of all in a special zone he will enter from any of the other zones.
20
Iron and Time – Plot
Roger Rodríguez Camprubi
Just to clarify, the player will be able and will have to go to all 3 zones in order to evolve its weapon, just that the part where the boss is will be blocked until a weapon of the specified characteristics is equipped. After defeating the mortal body of any of them, the real worldbuilder within will make his way out and reveal the prologue story to the character, stating that the Catalyst he has is in fact the result of subjugating the last gifted man’s soul, and it will also tell him about their initial intention and how they failed to believe they could create a specie capable of controlling the entire power of the gift of creation and apologizes for how naïve they were. Finally it states:
- You are certainly chosen, everybody is. But not by the Iron Council, neither by me, or any of the other Worldbuilders… Sukürimas is how we call the force that rules the universe, it created us to create your people, and it wanted your people to create you. You are the one who decides. Once you strike Gyvenimas you will be chosen one to take the ultimate choice. The Iron orb will finally be completed and it is in your hands to decide whether creation should rely on Entropy, by destroying the orb, or in what you humans call “God”, by claiming its power. Arrived the moment you will have no time to think, so I suggest you think about it.
Then the worldbuilder will fade and so will do the scene. The player will appear at the Iron Council catacombs with the Primal fragment. After conveniently explaining the story to the old man he will tell that the Iron Council has located where Gyvenimas could be and explain that an unstable vortex originated at a forest. Once the player gets to that place he will find a wood piece with an inscription on it “You are”. It means that place is where the parents of the “catalyst” man and he himself lived years ago. Gyvenimas was there to erase the last bit of gifted people in the earth but did not know the couple had a son that was not in the house at that time. All this is by the player to figure out. After entering the portal, the player will face some of the most powerful enemies in the game, and finally Gyvenimas. After defeating him he will say the following:
- How could I ever agree to destroy myself, I am Gyvenimas, I am life! I was created to live, not to sacrifice! … Is it all written? Was I expected to flip the coin, to become death? Do our choices matter? I regret nothing, this is what I am, and if you take the orb, you take its meanings. I will not attempt a change myself again, this time Sukürimas will be the one deciding… At the end of the day, it has always been this way. Are we really responsible of who we become? … Huge responsibility in your hands kid. Don’t waste the time, and ensure you are the one who makes the decision. Do not hesitate… not this time.
And the game ends.
21
Iron and Time – Weapons
Roger Rodríguez Camprubi
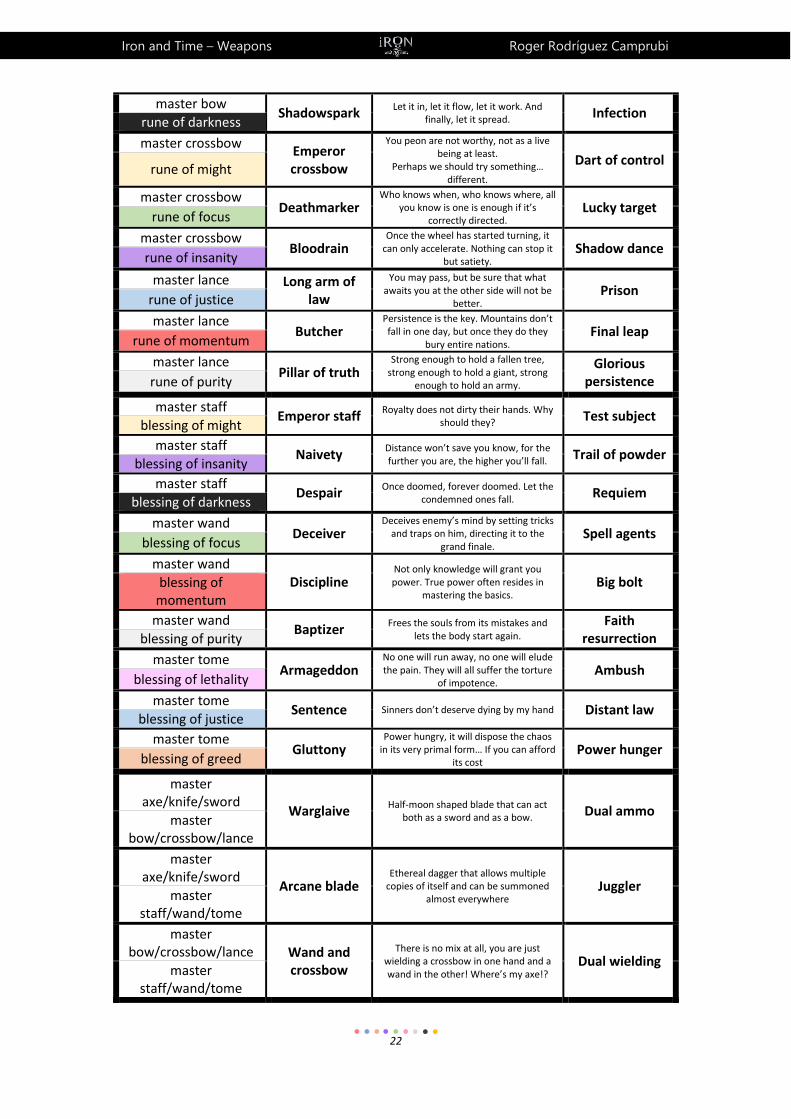
ordinary axe master axe Big but light, perfect to slice Meteoric jump
ordinary axe
ordinary knife master knife
Equally sharpened, but much more versatile. Shadow step
ordinary knife
ordinary sword master sword
Weapons are like friends, the more loyal, the more you can abuse them. Quick dash
ordinary sword
ordinary bow master bow
A better grip allows you a much higher rate of fire. Rapid fire
ordinary bow
ordinary crossbow master crossbow
More resistance also means more power. Landmark ordinary crossbow
ordinary lance master lance If I can’t break it, it must be good Shove
ordinary lance
ordinary staff master staff
This staff twists time as it twists its owner’s mind Timestamp
ordinary staff
ordinary wand master wand This wand expands the limits of the space. Teleport
ordinary wand
ordinary tome master tome
Now you don’t feel the magic, you ARE the magic. Combustion
ordinary tome
master axe Harvester
When there’s no other goal than victory each hit you strike can mean a victory
tomorrow. Charge
relic of momentum
master axe Judicator
You will never break the wall, for you have no rights. I do, and it is my duty to
break it for you. Wallbreaker
relic of justice
master axe Axecallibur
You wouldn’t be able to wield it without breaking your arms. I, on the other side,
make it dance with a finger. Heavy metal
relic of greed
master knife Razor whip
One after another, like a lighting storm. It hasn’t got a purpose, but death does
not require one. Blade storm
relic of insanity
master knife Scalpel
First gash will barely be noticed, second will hurt, third will make you agonize,
there will be no fourth. Surgery
relic of focus
master knife Melter
The blade is so hot you don’t even feel the penetration. Death was inside, but
nobody had knocked the door. Blood boiler
relic of lethality
master sword Oratie
Purity was the essence archangels made their swords of. This sword carries a part
of heaven within. Counterattack
relic of purity
master sword Blackhowl
Everyone has power inside, let me grab some of yours. Dark pact
relic of darkness
master sword Emperor sword
Those of you who are willing to follow are expected to wait, are expected to
earn your title. Rush and it will be over. Nomination
relic of might
master bow Driller
The bigger may not always be the better, but it’s for sure the
most painful
Overly sized projectile rune of greed
master bow Mistwhisper
If the stars align, you will receive no mercy. Execution post
rune of lethality
22
Iron and Time – Weapons
Roger Rodríguez Camprubi
master bow Shadowspark
Let it in, let it flow, let it work. And finally, let it spread. Infection
rune of darkness
master crossbow Emperor crossbow
You peon are not worthy, not as a live being at least.
Perhaps we should try something… different.
Dart of control rune of might
master crossbow Deathmarker
Who knows when, who knows where, all you know is one is enough if it’s
correctly directed. Lucky target
rune of focus
master crossbow Bloodrain
Once the wheel has started turning, it can only accelerate. Nothing can stop it
but satiety. Shadow dance
rune of insanity
master lance Long arm of law
You may pass, but be sure that what awaits you at the other side will not be
better. Prison
rune of justice
master lance Butcher
Persistence is the key. Mountains don’t fall in one day, but once they do they
bury entire nations. Final leap
rune of momentum
master lance Pillar of truth
Strong enough to hold a fallen tree, strong enough to hold a giant, strong
enough to hold an army.
Glorious persistence rune of purity
master staff Emperor staff
Royalty does not dirty their hands. Why should they? Test subject
blessing of might
master staff Naivety
Distance won’t save you know, for the further you are, the higher you’ll fall. Trail of powder
blessing of insanity
master staff Despair
Once doomed, forever doomed. Let the condemned ones fall. Requiem
blessing of darkness
master wand Deceiver
Deceives enemy’s mind by setting tricks and traps on him, directing it to the
grand finale. Spell agents
blessing of focus
master wand Discipline
Not only knowledge will grant you power. True power often resides in
mastering the basics. Big bolt blessing of
momentum
master wand Baptizer
Frees the souls from its mistakes and lets the body start again.
Faith resurrection blessing of purity
master tome Armageddon
No one will run away, no one will elude the pain. They will all suffer the torture
of impotence. Ambush
blessing of lethality
master tome Sentence Sinners don’t deserve dying by my hand Distant law
blessing of justice
master tome Gluttony
Power hungry, it will dispose the chaos in its very primal form… If you can afford
its cost Power hunger
blessing of greed
master axe/knife/sword
Warglaive Half-moon shaped blade that can act
both as a sword and as a bow. Dual ammo master
bow/crossbow/lance
master axe/knife/sword
Arcane blade Ethereal dagger that allows multiple
copies of itself and can be summoned almost everywhere
Juggler master
staff/wand/tome
master bow/crossbow/lance Wand and
crossbow
There is no mix at all, you are just wielding a crossbow in one hand and a wand in the other! Where’s my axe!?
Dual wielding master
staff/wand/tome

23
Iron and Time – Weapons
Roger Rodríguez Camprubi
RANK 3 to RANK 4
Harvester
Vähendama The physical concept of an axe, nothing will stand, the
swing of Vähendama. Judicator
Axecallibur
Razor whip
Löikama The physical concept of a knife, there are no places
Löikama doesn’t sneak into. Scalpel
Melter
Oratie
Mööka The physical concept of a sword, nothing lasts more
than the will of Mööka. Blackhowl
Emperor sword
Driller
Kummardus
The physical concept of a bow, if it exists it can be hit, if it does not, Kummardus
will hit it anyway
Mistwhisper
Shadowspark
Emperor crossbow
Kahurikuul
The physical concept of a crossbow, be ready for a
long corpse check, for Kahurikuul leaves no
witness.
Deathmarker
Bloodrain
Long arm or law
Tokama
The physical concept of a lance, one can easily forget
the physics matter if it relies in Tokama’s prominence.
Butcher
Pillar of truth
Emperor staff
Väntel
The physical concept of a staff, born a thousand times from within the land, Väntel
will rise again.
Naivety
Despair
Deceiver
Völukepp
The physical concept of a wand, magic seems
powerless when consumed by Völukepp’s might.
Discipline
Baptizer
Armageddon
Arveraamat
The physical concept of a tome, despite the power it
emanates all pages of Arveraamat are empty.
Sentence
Gluttony
Warglaive
Kimäär
We are restricted by rules, by limits, by bounds…
Kimäär is not. Power has no limits.
Arcane blade
Wand and crossbow
24
Iron and Time – Weapons
Roger Rodríguez Camprubi
RANK 4 to RANK 5
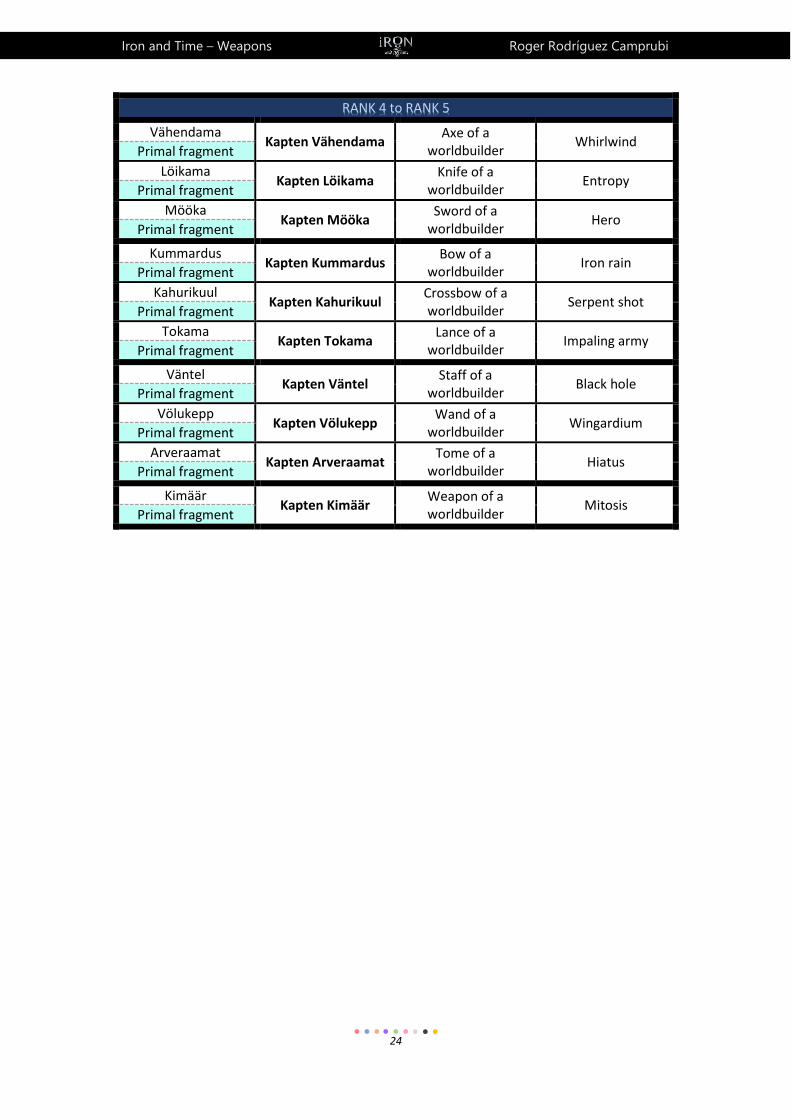
Vähendama Kapten Vähendama
Axe of a worldbuilder
Whirlwind Primal fragment
Löikama Kapten Löikama
Knife of a worldbuilder
Entropy Primal fragment
Mööka Kapten Mööka
Sword of a worldbuilder
Hero Primal fragment
Kummardus Kapten Kummardus
Bow of a worldbuilder
Iron rain Primal fragment
Kahurikuul Kapten Kahurikuul
Crossbow of a worldbuilder
Serpent shot Primal fragment
Tokama Kapten Tokama
Lance of a worldbuilder
Impaling army Primal fragment
Väntel Kapten Väntel
Staff of a worldbuilder
Black hole Primal fragment
Völukepp Kapten Völukepp
Wand of a worldbuilder
Wingardium Primal fragment
Arveraamat Kapten Arveraamat
Tome of a worldbuilder
Hiatus Primal fragment
Kimäär Kapten Kimäär
Weapon of a worldbuilder
Mitosis Primal fragment
25
Iron and Time – Abilities
Roger Rodríguez Camprubi
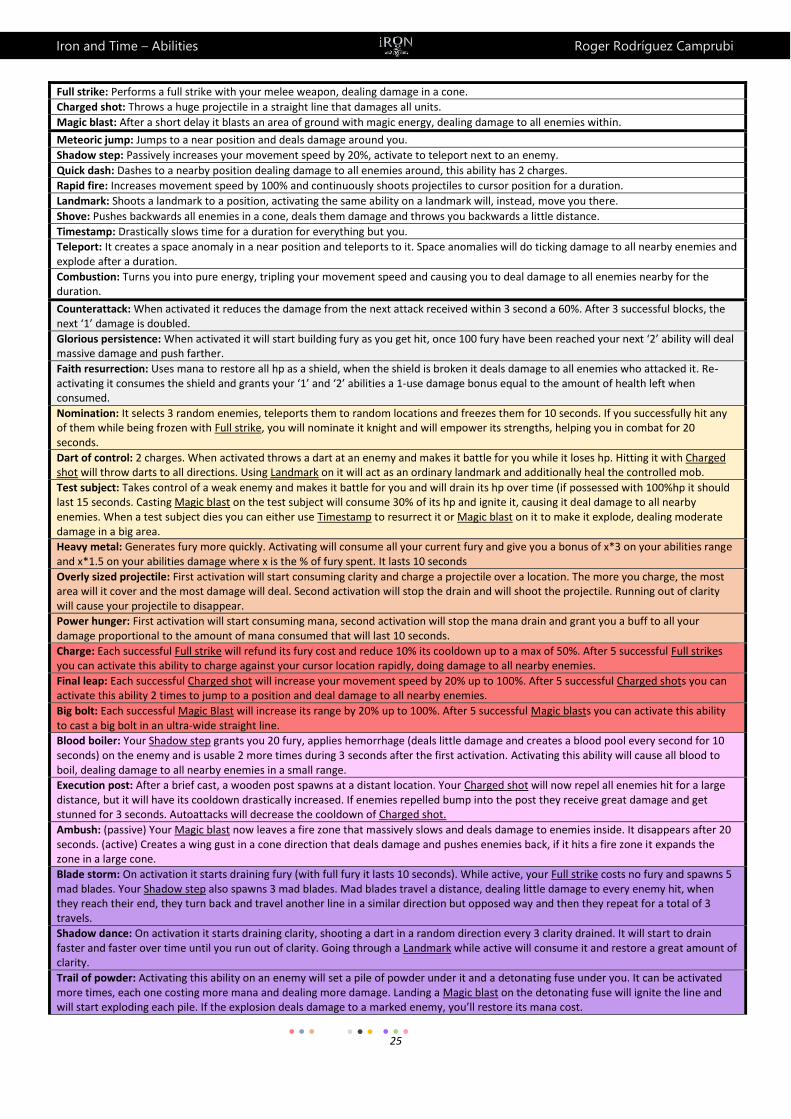
Full strike: Performs a full strike with your melee weapon, dealing damage in a cone.
Charged shot: Throws a huge projectile in a straight line that damages all units.
Magic blast: After a short delay it blasts an area of ground with magic energy, dealing damage to all enemies within.
Meteoric jump: Jumps to a near position and deals damage around you.
Shadow step: Passively increases your movement speed by 20%, activate to teleport next to an enemy.
Quick dash: Dashes to a nearby position dealing damage to all enemies around, this ability has 2 charges.
Rapid fire: Increases movement speed by 100% and continuously shoots projectiles to cursor position for a duration.
Landmark: Shoots a landmark to a position, activating the same ability on a landmark will, instead, move you there.
Shove: Pushes backwards all enemies in a cone, deals them damage and throws you backwards a little distance.
Timestamp: Drastically slows time for a duration for everything but you.
Teleport: It creates a space anomaly in a near position and teleports to it. Space anomalies will do ticking damage to all nearby enemies and explode after a duration.
Combustion: Turns you into pure energy, tripling your movement speed and causing you to deal damage to all enemies nearby for the duration.
Counterattack: When activated it reduces the damage from the next attack received within 3 second a 60%. After 3 successful blocks, the next ‘1’ damage is doubled.
Glorious persistence: When activated it will start building fury as you get hit, once 100 fury have been reached your next ‘2’ ability will deal massive damage and push farther.
Faith resurrection: Uses mana to restore all hp as a shield, when the shield is broken it deals damage to all enemies who attacked it. Re-activating it consumes the shield and grants your ‘1’ and ‘2’ abilities a 1-use damage bonus equal to the amount of health left when consumed.
Nomination: It selects 3 random enemies, teleports them to random locations and freezes them for 10 seconds. If you successfully hit any of them while being frozen with Full strike, you will nominate it knight and will empower its strengths, helping you in combat for 20 seconds.
Dart of control: 2 charges. When activated throws a dart at an enemy and makes it battle for you while it loses hp. Hitting it with Charged shot will throw darts to all directions. Using Landmark on it will act as an ordinary landmark and additionally heal the controlled mob.
Test subject: Takes control of a weak enemy and makes it battle for you and will drain its hp over time (if possessed with 100%hp it should last 15 seconds. Casting Magic blast on the test subject will consume 30% of its hp and ignite it, causing it deal damage to all nearby enemies. When a test subject dies you can either use Timestamp to resurrect it or Magic blast on it to make it explode, dealing moderate damage in a big area.
Heavy metal: Generates fury more quickly. Activating will consume all your current fury and give you a bonus of x*3 on your abilities range and x*1.5 on your abilities damage where x is the % of fury spent. It lasts 10 seconds
Overly sized projectile: First activation will start consuming clarity and charge a projectile over a location. The more you charge, the most area will it cover and the most damage will deal. Second activation will stop the drain and will shoot the projectile. Running out of clarity will cause your projectile to disappear.
Power hunger: First activation will start consuming mana, second activation will stop the mana drain and grant you a buff to all your damage proportional to the amount of mana consumed that will last 10 seconds.
Charge: Each successful Full strike will refund its fury cost and reduce 10% its cooldown up to a max of 50%. After 5 successful Full strikes you can activate this ability to charge against your cursor location rapidly, doing damage to all nearby enemies. Final leap: Each successful Charged shot will increase your movement speed by 20% up to 100%. After 5 successful Charged shots you can activate this ability 2 times to jump to a position and deal damage to all nearby enemies.
Big bolt: Each successful Magic Blast will increase its range by 20% up to 100%. After 5 successful Magic blasts you can activate this ability to cast a big bolt in an ultra-wide straight line.
Blood boiler: Your Shadow step grants you 20 fury, applies hemorrhage (deals little damage and creates a blood pool every second for 10 seconds) on the enemy and is usable 2 more times during 3 seconds after the first activation. Activating this ability will cause all blood to boil, dealing damage to all nearby enemies in a small range.
Execution post: After a brief cast, a wooden post spawns at a distant location. Your Charged shot will now repel all enemies hit for a large distance, but it will have its cooldown drastically increased. If enemies repelled bump into the post they receive great damage and get stunned for 3 seconds. Autoattacks will decrease the cooldown of Charged shot.
Ambush: (passive) Your Magic blast now leaves a fire zone that massively slows and deals damage to enemies inside. It disappears after 20 seconds. (active) Creates a wing gust in a cone direction that deals damage and pushes enemies back, if it hits a fire zone it expands the zone in a large cone.
Blade storm: On activation it starts draining fury (with full fury it lasts 10 seconds). While active, your Full strike costs no fury and spawns 5 mad blades. Your Shadow step also spawns 3 mad blades. Mad blades travel a distance, dealing little damage to every enemy hit, when they reach their end, they turn back and travel another line in a similar direction but opposed way and then they repeat for a total of 3 travels.
Shadow dance: On activation it starts draining clarity, shooting a dart in a random direction every 3 clarity drained. It will start to drain faster and faster over time until you run out of clarity. Going through a Landmark while active will consume it and restore a great amount of clarity.
Trail of powder: Activating this ability on an enemy will set a pile of powder under it and a detonating fuse under you. It can be activated more times, each one costing more mana and dealing more damage. Landing a Magic blast on the detonating fuse will ignite the line and will start exploding each pile. If the explosion deals damage to a marked enemy, you’ll restore its mana cost.
26
Iron and Time – Abilities
Roger Rodríguez Camprubi
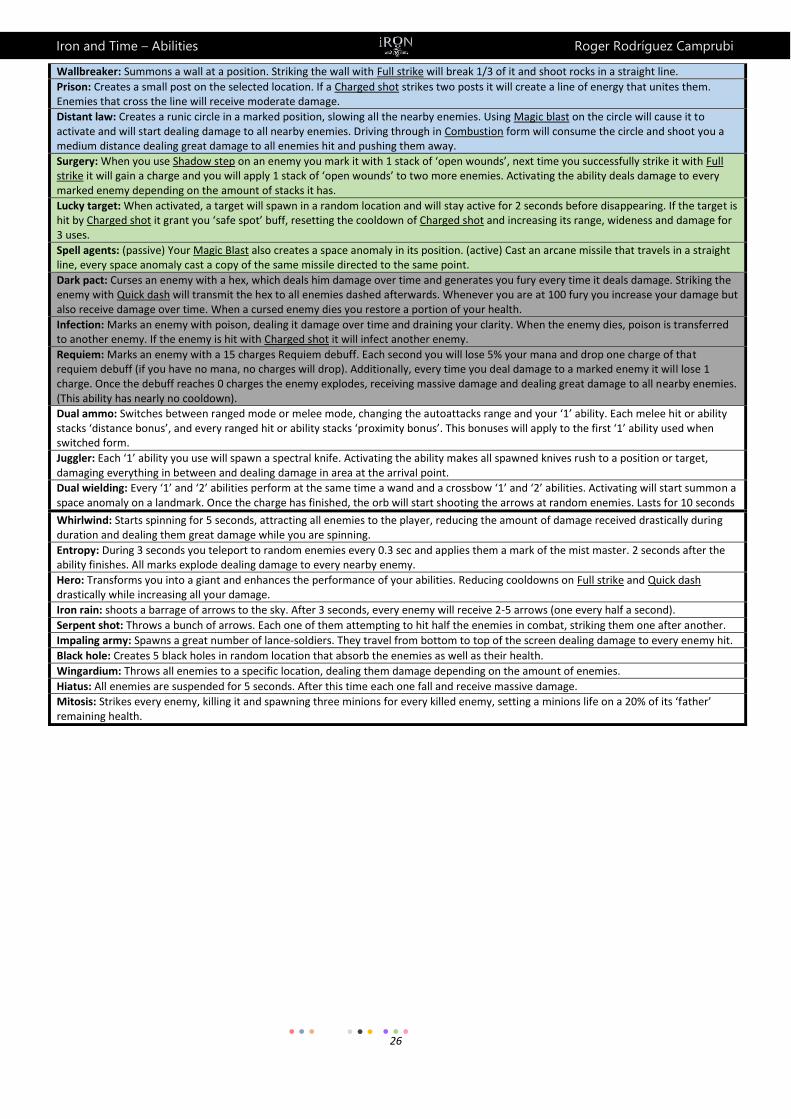
Wallbreaker: Summons a wall at a position. Striking the wall with Full strike will break 1/3 of it and shoot rocks in a straight line.
Prison: Creates a small post on the selected location. If a Charged shot strikes two posts it will create a line of energy that unites them. Enemies that cross the line will receive moderate damage.
Distant law: Creates a runic circle in a marked position, slowing all the nearby enemies. Using Magic blast on the circle will cause it to activate and will start dealing damage to all nearby enemies. Driving through in Combustion form will consume the circle and shoot you a medium distance dealing great damage to all enemies hit and pushing them away.
Surgery: When you use Shadow step on an enemy you mark it with 1 stack of ‘open wounds’, next time you successfully strike it with Full strike it will gain a charge and you will apply 1 stack of ‘open wounds’ to two more enemies. Activating the ability deals damage to every marked enemy depending on the amount of stacks it has.
Lucky target: When activated, a target will spawn in a random location and will stay active for 2 seconds before disappearing. If the target is hit by Charged shot it grant you ‘safe spot’ buff, resetting the cooldown of Charged shot and increasing its range, wideness and damage for 3 uses.
Spell agents: (passive) Your Magic Blast also creates a space anomaly in its position. (active) Cast an arcane missile that travels in a straight line, every space anomaly cast a copy of the same missile directed to the same point.
Dark pact: Curses an enemy with a hex, which deals him damage over time and generates you fury every time it deals damage. Striking the enemy with Quick dash will transmit the hex to all enemies dashed afterwards. Whenever you are at 100 fury you increase your damage but also receive damage over time. When a cursed enemy dies you restore a portion of your health.
Infection: Marks an enemy with poison, dealing it damage over time and draining your clarity. When the enemy dies, poison is transferred to another enemy. If the enemy is hit with Charged shot it will infect another enemy.
Requiem: Marks an enemy with a 15 charges Requiem debuff. Each second you will lose 5% your mana and drop one charge of that requiem debuff (if you have no mana, no charges will drop). Additionally, every time you deal damage to a marked enemy it will lose 1 charge. Once the debuff reaches 0 charges the enemy explodes, receiving massive damage and dealing great damage to all nearby enemies. (This ability has nearly no cooldown).
Dual ammo: Switches between ranged mode or melee mode, changing the autoattacks range and your ‘1’ ability. Each melee hit or ability stacks ‘distance bonus’, and every ranged hit or ability stacks ‘proximity bonus’. This bonuses will apply to the first ‘1’ ability used when switched form.
Juggler: Each ‘1’ ability you use will spawn a spectral knife. Activating the ability makes all spawned knives rush to a position or target, damaging everything in between and dealing damage in area at the arrival point.
Dual wielding: Every ‘1’ and ‘2’ abilities perform at the same time a wand and a crossbow ‘1’ and ‘2’ abilities. Activating will start summon a space anomaly on a landmark. Once the charge has finished, the orb will start shooting the arrows at random enemies. Lasts for 10 seconds
Whirlwind: Starts spinning for 5 seconds, attracting all enemies to the player, reducing the amount of damage received drastically during duration and dealing them great damage while you are spinning.
Entropy: During 3 seconds you teleport to random enemies every 0.3 sec and applies them a mark of the mist master. 2 seconds after the ability finishes. All marks explode dealing damage to every nearby enemy.
Hero: Transforms you into a giant and enhances the performance of your abilities. Reducing cooldowns on Full strike and Quick dash drastically while increasing all your damage.
Iron rain: shoots a barrage of arrows to the sky. After 3 seconds, every enemy will receive 2-5 arrows (one every half a second).
Serpent shot: Throws a bunch of arrows. Each one of them attempting to hit half the enemies in combat, striking them one after another.
Impaling army: Spawns a great number of lance-soldiers. They travel from bottom to top of the screen dealing damage to every enemy hit.
Black hole: Creates 5 black holes in random location that absorb the enemies as well as their health.
Wingardium: Throws all enemies to a specific location, dealing them damage depending on the amount of enemies.
Hiatus: All enemies are suspended for 5 seconds. After this time each one fall and receive massive damage.
Mitosis: Strikes every enemy, killing it and spawning three minions for every killed enemy, setting a minions life on a 20% of its ‘father’ remaining health.
Design and Implementation of an A-RPG in UE4 Roger Rodríguez Camprubi
27
3.b – Technology
Before talking about technology let’s first introduce the concept of Game Engine. This information is very well known and very well documented across the net, so we will keep it very simple here: A game engine is a software framework that performs as a middleware for game developers, enabling them to focus on the actual game scripting rather than physics, graphic rendering, audio playing and many other features. Their use became popular early 2000’s. Since then, the complexity of the games was not high enough to justify an entire software framework development. They were initially perceived mostly as a one-use software, limiting its functionalities to the needs of the targeted game. As time passed, and complexity in videogame programming raised, their initial concept changed, and now a company usually owned their own rendering engine, and add up some other functionalities depending on the specific targeted game. Nowadays, the scenario is very diverse, and while some games still “require” a brand new game engine, most of them can recycle tools, to the extent that some Game Engines has been released to the market as a generic purpose game engine, often giving access to source code to adapt it to the games that require it.
3.b.i – Epic Games and Unreal Engine Epic Games is an American video game development company. Founded in 1991 under the name of “Potomac Computer Systems”, they get themselves to know after the release of the ANSI-based game ZZT that same year. During ZTT’s life span time the company became known as Epic MegaGames. During several years, the company released numerous popular shareware games, and it was until 1998, after the acquirement of Safari Software, that they launched Unreal, a 3D 3th FPS (first person shooter) developed with the very first Unreal Engine. From then on they kept up with the series and released various Unreal games. After officially changing the company name to Epic Games in 1999, they released their best seller game, Gears of War, in 2006, which was expanded afterwards with Gears of War 2 (2008) and Gears of War 3 (2011). Game-wise their subsidiary studio chAIR, released Infinity Blade (2010) for iOS devices and Fortnite (2011). In July 2012, Chinese company Tencent Holdings acquired about 40% of Epic Games, and soon after in the same year some of the most known names of the company, like the Gears of War lead design director Cliff Bleszinski, left it. Some of their subsidiaries closed soon after too, and their bestselling series license Gears of War was sold to Microsoft. Recently they released Unreal Tournament, the continuation of their Unreal Tournament series, and focused on enabling the community to mod the game as much as they could so it would become a game made by players for player. They are also expected to release Paragon during first half of 2016. Obviously we wouldn’t be talking that much about them if they were the creators of the engine used in this project: UNREAL ENGINE. Let’s have a brief look on its history:

Design and Implementation of an A-RPG in UE4 Roger Rodríguez Camprubi
28
As mentioned, the first version of the engine was released with the name that give it its name in 1998, and it immediately became available for external studios under a Proprietary license. November 2000 bring with it the last stable version of the engine along with the first Unreal
Tournament. This version was programmed in C++, Assembly and UnrealScript. This last, along with the modularity of its architecture and the cross-platform feature, made the engine very popular, and quickly started to be designed in a way to be extensible and improved over various generations of games. Unreal Engine 2 was released early-2001, it was written in C++ and assembly and it included Nintendo’s Game Cube, Sony’s Play Station 2 and Microsoft’s X-Box as developing platforms. One of the most well-known games developed with UE2 is Killing floor.
Unreal Engine 3 was released March 2004, and it settled a breakpoint in the way the industry understands game engines. Big companies that would have built their own engine, started developing with UE3, and huge titles like Bioshock Infinite were launched under the flag of Unreal Engine. Epic Games released in 2009 a free (for non-commercial use) version of the current UE3’s SDK under the name of Unreal Dev Kit. UE3 was built to be heavily modded, and releasing a free copy of its SDK turned into what was the next logic step: Unreal Engine 4 was shown to the masses during GDC (Game Dev Conference) 2012, with an impressive demo that was thought to be a cinematic until Epic Games demonstrated it was actual gameplay footage. It wasn’t until 2014 that Unreal Engine 4 was released under a subscription fee + 5% of gross revenue resulting from any commercial use of products built using UE4. The engine improved greatly in real-time global illumination, and it left the Unreal Script that featured all the older engines to introduce Blueprint Scripting, a visual scripting system that uses C++ and enables for live debugging, making it the ultimate tool for prototyping. A year later, in March 2015, Unreal Engine became available for everyone for free along with all its future updates, with the only cost of a selective royalty schedule. Unreal Engine 4 has become a very powerful source both for indie and professional development, being a great choice to begin but also a powerful engine for AAA games. Prove of it is all the awards it has received. After being announced and even way before its launch, it received 3 awards: “Best Taste of Next-Gen” by GamesRadar, “Coolest Tech” by IGN, and “Best Tech” by Game Informer. After its launch it was awarded with “Best Game Engine” by both Develop Industry Excellence Awards and Develop 100: The Tech List. Along with them, UE4 entered the Guinness World Record as “Most Successful Videogame Engine” in its release year, 2014.
Design and Implementation of an A-RPG in UE4 Roger Rodríguez Camprubi
29
3.b.ii – Unreal Engine’s blueprint technology This project was built using UE4’s blueprint technology, we’ll get deeper in the “what” in a moment, but let’s first explain “why”. Initially, the intention was to build the project in full C++, although being far from decent at programming in this language, I was in disposition to take the challenge, so it is one of those things I’ll have to learn sooner or later. Before starting to code I needed to learn the engine, and I decided to start with one of the excellent-quality tutorials Unreal Engine has in its Youtube channel. It was about getting started at UE4, developing a very simple project with blueprints. It took about 2 hours to complete the tutorial, and by the end of it I was completely sure that that was the way to go. I’m not saying that blueprints are better in any way than C++ pure coding, they simply serve different purposes. While C++ will always be solider and easier to manage in a programming team, Blueprints are very good for prototypes and one-man scripting. They are great for getting things done quickly and in an easier-to-understand way and, more importantly for this case, they are a perfect tool for learning the engine. I’m now convinced that my next project will be in C++ traditional coding, but I wouldn’t change bugs) aside, I think the results speak for themselves. Now let’s get into what they are, and there’s nobody who can define them better than Unreal Engine themselves:
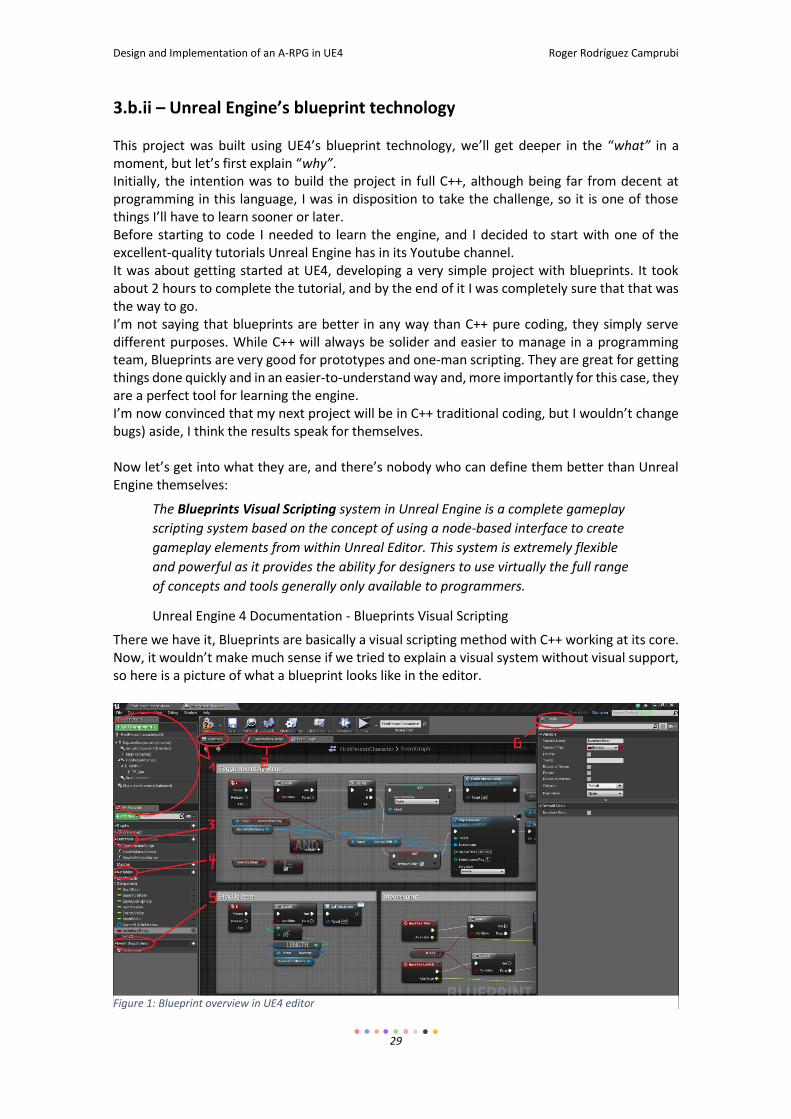
There we have it, Blueprints are basically a visual scripting method with C++ working at its core. Now, it wouldn’t make much sense if we tried to explain a visual system without visual support, so here is a picture of what a blueprint looks like in the editor.
The Blueprints Visual Scripting system in Unreal Engine is a complete gameplay
scripting system based on the concept of using a node-based interface to create
gameplay elements from within Unreal Editor. This system is extremely flexible
and powerful as it provides the ability for designers to use virtually the full range
of concepts and tools generally only available to programmers.
Unreal Engine 4 Documentation - Blueprints Visual Scripting
Figure 1: Blueprint overview in UE4 editor
Design and Implementation of an A-RPG in UE4 Roger Rodríguez Camprubi
30
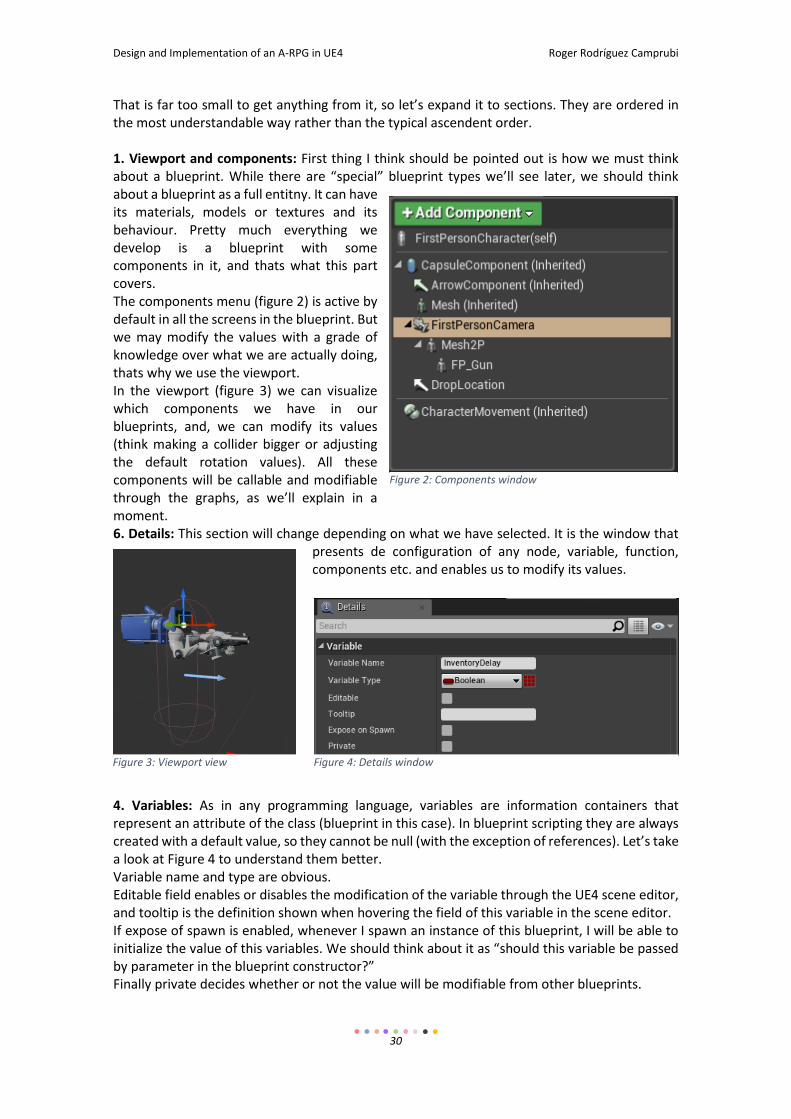
That is far too small to get anything from it, so let’s expand it to sections. They are ordered in the most understandable way rather than the typical ascendent order. 1. Viewport and components: First thing I think should be pointed out is how we must think about a blueprint. While there are “special” blueprint types we’ll see later, we should think about a blueprint as a full entitny. It can have its materials, models or textures and its behaviour. Pretty much everything we develop is a blueprint with some components in it, and thats what this part covers. The components menu (figure 2) is active by default in all the screens in the blueprint. But we may modify the values with a grade of knowledge over what we are actually doing, thats why we use the viewport. In the viewport (figure 3) we can visualize which components we have in our blueprints, and, we can modify its values (think making a collider bigger or adjusting the default rotation values). All these components will be callable and modifiable through the graphs, as we’ll explain in a moment. 6. Details: This section will change depending on what we have selected. It is the window that
presents de configuration of any node, variable, function, components etc. and enables us to modify its values.
4. Variables: As in any programming language, variables are information containers that represent an attribute of the class (blueprint in this case). In blueprint scripting they are always created with a default value, so they cannot be null (with the exception of references). Let’s take a look at Figure 4 to understand them better. Variable name and type are obvious. Editable field enables or disables the modification of the variable through the UE4 scene editor, and tooltip is the definition shown when hovering the field of this variable in the scene editor. If expose of spawn is enabled, whenever I spawn an instance of this blueprint, I will be able to initialize the value of this variables. We should think about it as “should this variable be passed by parameter in the blueprint constructor?” Finally private decides whether or not the value will be modifiable from other blueprints.
Figure 2: Components window
Figure 3: Viewport view Figure 4: Details window
Design and Implementation of an A-RPG in UE4 Roger Rodríguez Camprubi
31
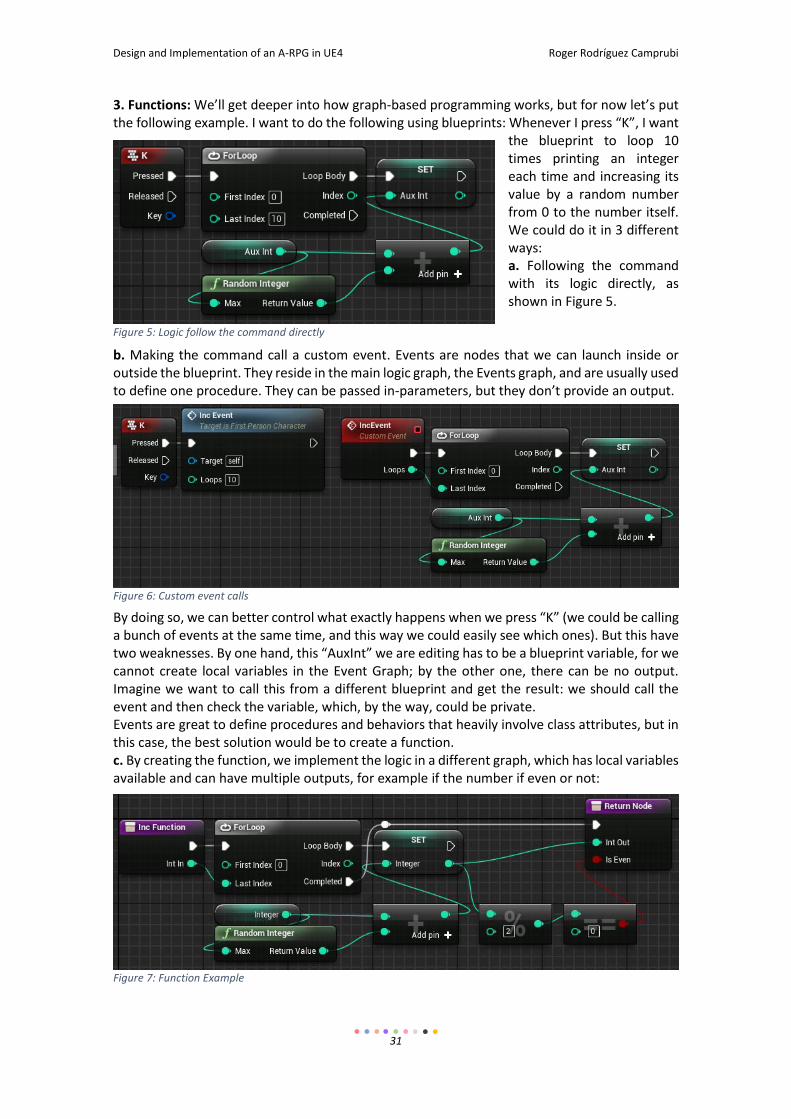
3. Functions: We’ll get deeper into how graph-based programming works, but for now let’s put the following example. I want to do the following using blueprints: Whenever I press “K”, I want
the blueprint to loop 10 times printing an integer each time and increasing its value by a random number from 0 to the number itself. We could do it in 3 different ways: a. Following the command with its logic directly, as shown in Figure 5.
b. Making the command call a custom event. Events are nodes that we can launch inside or outside the blueprint. They reside in the main logic graph, the Events graph, and are usually used to define one procedure. They can be passed in-parameters, but they don’t provide an output.
By doing so, we can better control what exactly happens when we press “K” (we could be calling a bunch of events at the same time, and this way we could easily see which ones). But this have two weaknesses. By one hand, this “AuxInt” we are editing has to be a blueprint variable, for we cannot create local variables in the Event Graph; by the other one, there can be no output. Imagine we want to call this from a different blueprint and get the result: we should call the event and then check the variable, which, by the way, could be private. Events are great to define procedures and behaviors that heavily involve class attributes, but in this case, the best solution would be to create a function. c. By creating the function, we implement the logic in a different graph, which has local variables available and can have multiple outputs, for example if the number if even or not:
Figure 5: Logic follow the command directly
Figure 6: Custom event calls
Figure 7: Function Example
Design and Implementation of an A-RPG in UE4 Roger Rodríguez Camprubi
32
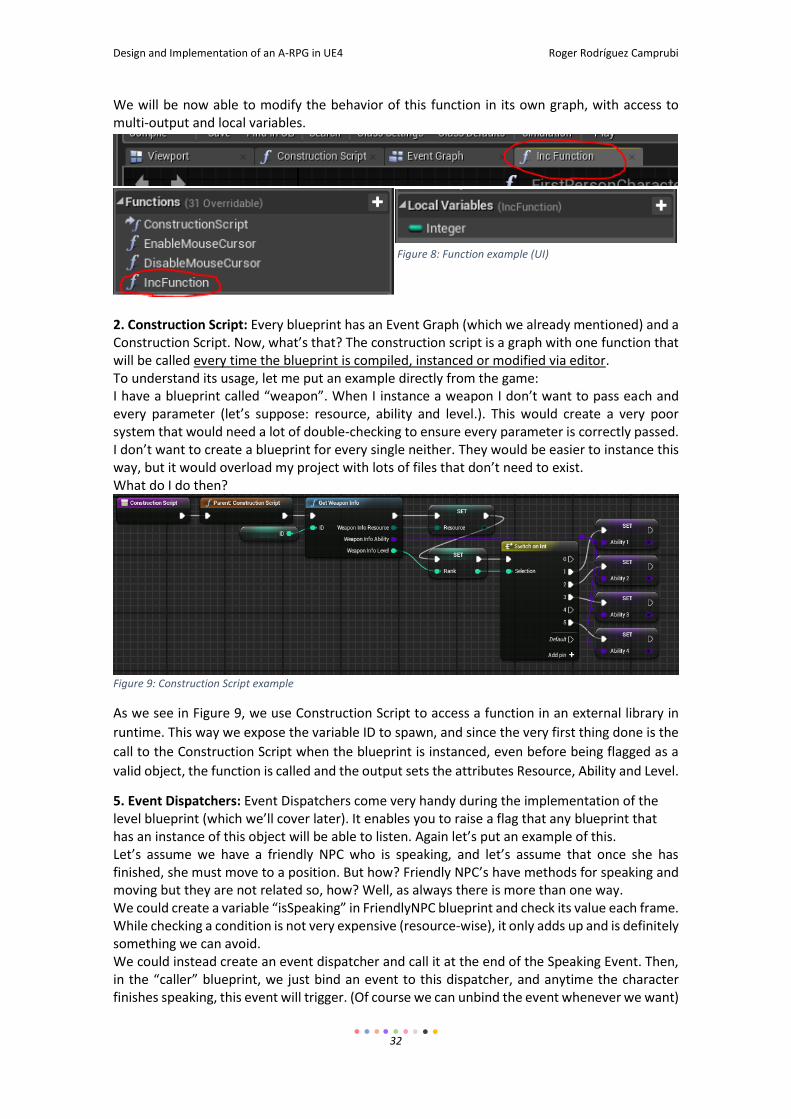
We will be now able to modify the behavior of this function in its own graph, with access to multi-output and local variables.
2. Construction Script: Every blueprint has an Event Graph (which we already mentioned) and a Construction Script. Now, what’s that? The construction script is a graph with one function that will be called every time the blueprint is compiled, instanced or modified via editor. To understand its usage, let me put an example directly from the game: I have a blueprint called “weapon”. When I instance a weapon I don’t want to pass each and every parameter (let’s suppose: resource, ability and level.). This would create a very poor system that would need a lot of double-checking to ensure every parameter is correctly passed. I don’t want to create a blueprint for every single neither. They would be easier to instance this way, but it would overload my project with lots of files that don’t need to exist. What do I do then?
Figure 9: Construction Script example
As we see in Figure 9, we use Construction Script to access a function in an external library in
runtime. This way we expose the variable ID to spawn, and since the very first thing done is the
call to the Construction Script when the blueprint is instanced, even before being flagged as a
valid object, the function is called and the output sets the attributes Resource, Ability and Level.
5. Event Dispatchers: Event Dispatchers come very handy during the implementation of the level blueprint (which we’ll cover later). It enables you to raise a flag that any blueprint that has an instance of this object will be able to listen. Again let’s put an example of this. Let’s assume we have a friendly NPC who is speaking, and let’s assume that once she has finished, she must move to a position. But how? Friendly NPC’s have methods for speaking and moving but they are not related so, how? Well, as always there is more than one way. We could create a variable “isSpeaking” in FriendlyNPC blueprint and check its value each frame. While checking a condition is not very expensive (resource-wise), it only adds up and is definitely something we can avoid. We could instead create an event dispatcher and call it at the end of the Speaking Event. Then, in the “caller” blueprint, we just bind an event to this dispatcher, and anytime the character finishes speaking, this event will trigger. (Of course we can unbind the event whenever we want)
Figure 8: Function example (UI)
Design and Implementation of an A-RPG in UE4 Roger Rodríguez Camprubi
33
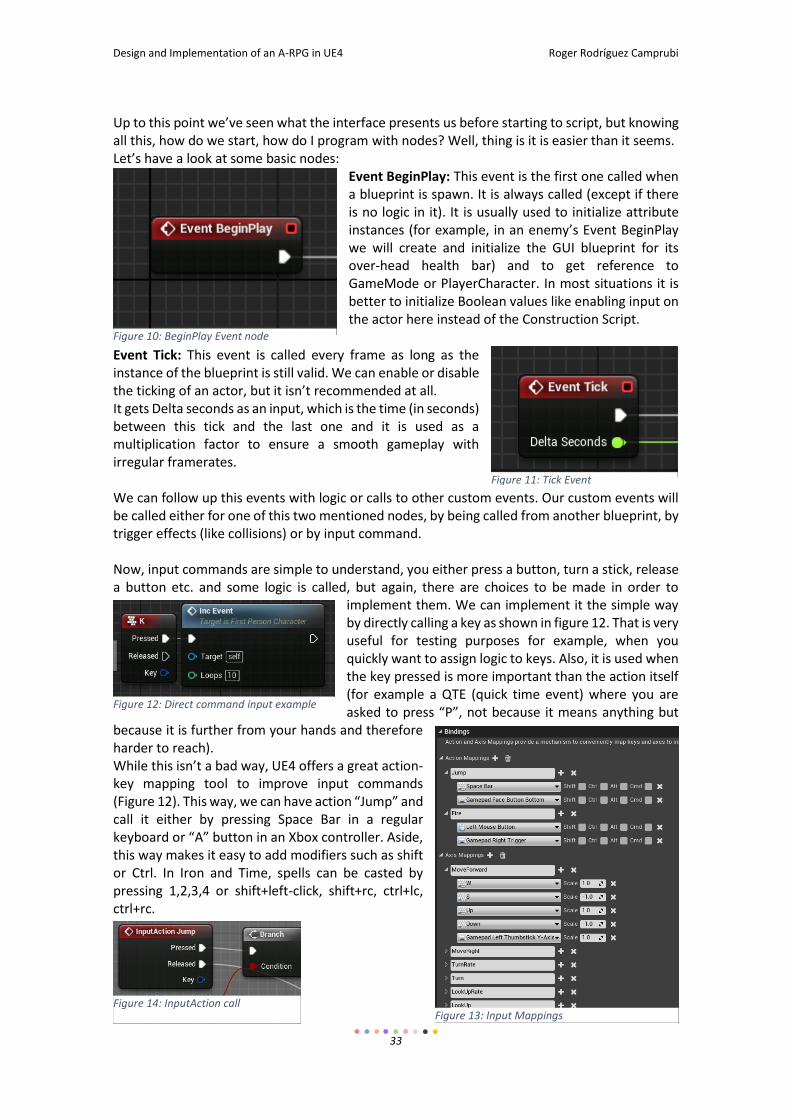
Up to this point we’ve seen what the interface presents us before starting to script, but knowing all this, how do we start, how do I program with nodes? Well, thing is it is easier than it seems. Let’s have a look at some basic nodes:
Event BeginPlay: This event is the first one called when a blueprint is spawn. It is always called (except if there is no logic in it). It is usually used to initialize attribute instances (for example, in an enemy’s Event BeginPlay we will create and initialize the GUI blueprint for its over-head health bar) and to get reference to GameMode or PlayerCharacter. In most situations it is better to initialize Boolean values like enabling input on the actor here instead of the Construction Script.
Event Tick: This event is called every frame as long as the instance of the blueprint is still valid. We can enable or disable the ticking of an actor, but it isn’t recommended at all. It gets Delta seconds as an input, which is the time (in seconds) between this tick and the last one and it is used as a multiplication factor to ensure a smooth gameplay with irregular framerates. We can follow up this events with logic or calls to other custom events. Our custom events will be called either for one of this two mentioned nodes, by being called from another blueprint, by trigger effects (like collisions) or by input command. Now, input commands are simple to understand, you either press a button, turn a stick, release a button etc. and some logic is called, but again, there are choices to be made in order to
implement them. We can implement it the simple way by directly calling a key as shown in figure 12. That is very useful for testing purposes for example, when you quickly want to assign logic to keys. Also, it is used when the key pressed is more important than the action itself (for example a QTE (quick time event) where you are asked to press “P”, not because it means anything but
because it is further from your hands and therefore harder to reach). While this isn’t a bad way, UE4 offers a great action-key mapping tool to improve input commands (Figure 12). This way, we can have action “Jump” and call it either by pressing Space Bar in a regular keyboard or “A” button in an Xbox controller. Aside, this way makes it easy to add modifiers such as shift or Ctrl. In Iron and Time, spells can be casted by pressing 1,2,3,4 or shift+left-click, shift+rc, ctrl+lc, ctrl+rc.
Figure 10: BeginPlay Event node
Figure 11: Tick Event
Figure 12: Direct command input example
Figure 13: Input Mappings Figure 14: InputAction call

Design and Implementation of an A-RPG in UE4 Roger Rodríguez Camprubi
34
Now we know how events are called, but how are they structured? Let’s take a look at an example.
Figure 15: Flow example
We see the implementation of “TestEvent”. This event will be called somehow (we don’t really bother here), and once done, it will call the events “ExecuteTask1”, “ExecuteTask2” and “ExecuteTask3” in this order. To do so we must connect the flow connector from the event into the starting flow connector of the event we want to call as pointed with the red circles. Once a node gets its call it will call all the logic used to get its values. This is an important part of blueprint scripting: There are nodes that are flow conditioning (like events, functions, setters, conditionals, loops etc.) and other that are flow contributes (getters, value checks, variable calculations etc.). In this example ExecuteTask1 calls a getter for Health Value (which is a blueprint attribute), if ExecuteTask1 wasn’t called, this getter wouldn’t be neither. ExecuteTask2 gets the GameHUDReference and checks if it is valid (the equivalent for Null or None in other languages). ExecuteTask3 creates an array of strings. I found nothing as a blueprint organization agreement, so I decided that, whenever I could, I would put the value nodes used by a node directly below it (as seen in the example). Now, there are some modifiers that can alter the flow line.
Branch: It is the typical “if-else” of any other programming language, it receives a Boolean as input parameter and whether it is true or false it will execute one of the flow-output branches or the other. (Fig 16)
Loops: As expected, we have loops functions in blueprint scripting, aside from the two ‘for-loop’ forms in Fig 17, there’s also ‘while-loop’ nodes. They receive an array or two integers as input and have two flow-output pins. Loop Body will be the one that will define the logic in each iteration, completed will be the one called after the loop is finished. All very obvious, but it’s easy to mess up and continue your code in the loop body branch if you don’t pay attention.
Figure 16: Branch example
Figure 17: Loop example
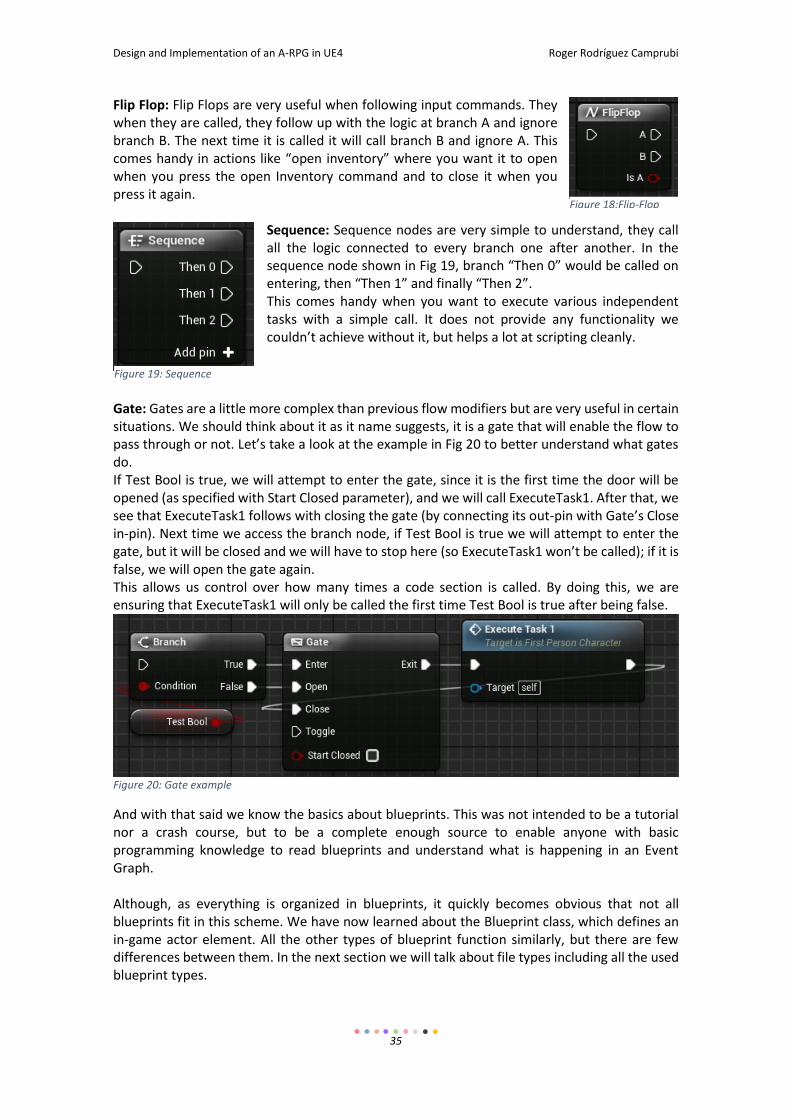
Design and Implementation of an A-RPG in UE4 Roger Rodríguez Camprubi
35
Flip Flop: Flip Flops are very useful when following input commands. They when they are called, they follow up with the logic at branch A and ignore branch B. The next time it is called it will call branch B and ignore A. This comes handy in actions like “open inventory” where you want it to open when you press the open Inventory command and to close it when you press it again.
Sequence: Sequence nodes are very simple to understand, they call all the logic connected to every branch one after another. In the sequence node shown in Fig 19, branch “Then 0” would be called on entering, then “Then 1” and finally “Then 2”. This comes handy when you want to execute various independent tasks with a simple call. It does not provide any functionality we couldn’t achieve without it, but helps a lot at scripting cleanly.
Gate: Gates are a little more complex than previous flow modifiers but are very useful in certain situations. We should think about it as it name suggests, it is a gate that will enable the flow to pass through or not. Let’s take a look at the example in Fig 20 to better understand what gates do. If Test Bool is true, we will attempt to enter the gate, since it is the first time the door will be opened (as specified with Start Closed parameter), and we will call ExecuteTask1. After that, we see that ExecuteTask1 follows with closing the gate (by connecting its out-pin with Gate’s Close in-pin). Next time we access the branch node, if Test Bool is true we will attempt to enter the gate, but it will be closed and we will have to stop here (so ExecuteTask1 won’t be called); if it is false, we will open the gate again. This allows us control over how many times a code section is called. By doing this, we are ensuring that ExecuteTask1 will only be called the first time Test Bool is true after being false.
Figure 20: Gate example
And with that said we know the basics about blueprints. This was not intended to be a tutorial nor a crash course, but to be a complete enough source to enable anyone with basic programming knowledge to read blueprints and understand what is happening in an Event Graph. Although, as everything is organized in blueprints, it quickly becomes obvious that not all blueprints fit in this scheme. We have now learned about the Blueprint class, which defines an in-game actor element. All the other types of blueprint function similarly, but there are few differences between them. In the next section we will talk about file types including all the used blueprint types.
Figure 18:Flip-Flop
Figure 19: Sequence
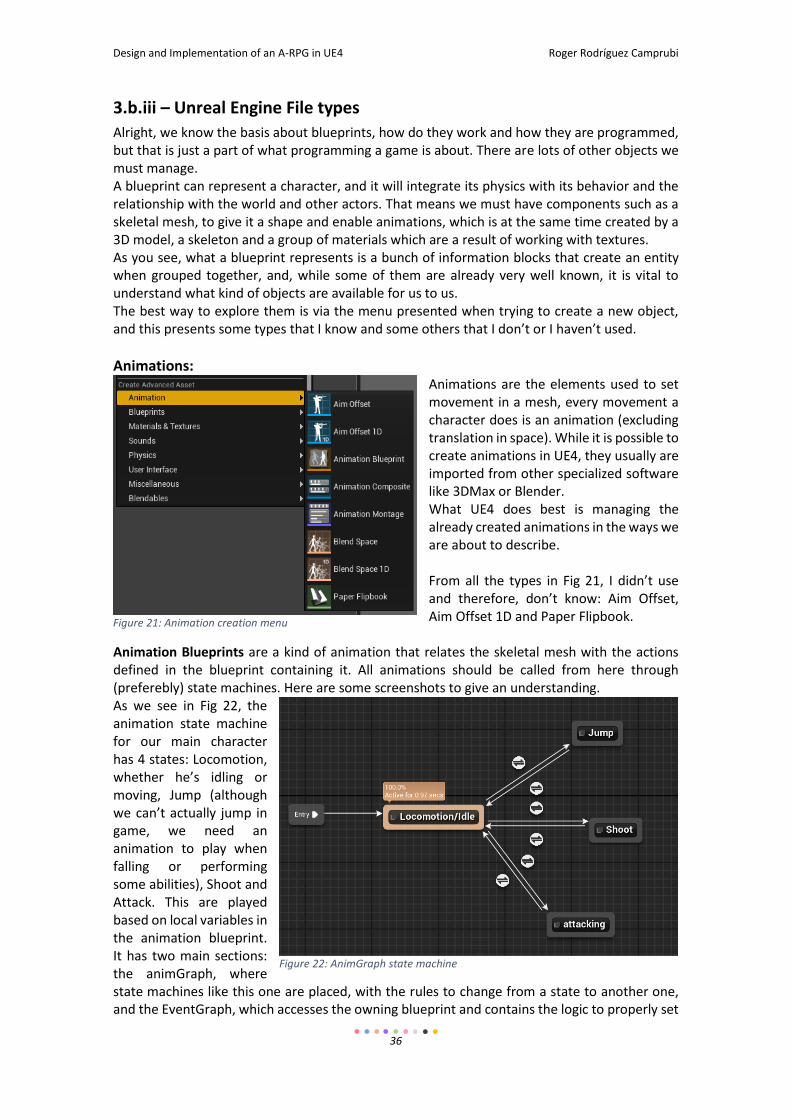
Design and Implementation of an A-RPG in UE4 Roger Rodríguez Camprubi
36
3.b.iii – Unreal Engine File types
Alright, we know the basis about blueprints, how do they work and how they are programmed, but that is just a part of what programming a game is about. There are lots of other objects we must manage. A blueprint can represent a character, and it will integrate its physics with its behavior and the relationship with the world and other actors. That means we must have components such as a skeletal mesh, to give it a shape and enable animations, which is at the same time created by a 3D model, a skeleton and a group of materials which are a result of working with textures. As you see, what a blueprint represents is a bunch of information blocks that create an entity when grouped together, and, while some of them are already very well known, it is vital to understand what kind of objects are available for us to us. The best way to explore them is via the menu presented when trying to create a new object, and this presents some types that I know and some others that I don’t or I haven’t used.
Animations: Animations are the elements used to set movement in a mesh, every movement a character does is an animation (excluding translation in space). While it is possible to create animations in UE4, they usually are imported from other specialized software like 3DMax or Blender. What UE4 does best is managing the already created animations in the ways we are about to describe. From all the types in Fig 21, I didn’t use and therefore, don’t know: Aim Offset, Aim Offset 1D and Paper Flipbook.
Animation Blueprints are a kind of animation that relates the skeletal mesh with the actions defined in the blueprint containing it. All animations should be called from here through (preferebly) state machines. Here are some screenshots to give an understanding. As we see in Fig 22, the animation state machine for our main character has 4 states: Locomotion, whether he’s idling or moving, Jump (although we can’t actually jump in game, we need an animation to play when falling or performing some abilities), Shoot and Attack. This are played based on local variables in the animation blueprint. It has two main sections: the animGraph, where state machines like this one are placed, with the rules to change from a state to another one, and the EventGraph, which accesses the owning blueprint and contains the logic to properly set
Figure 21: Animation creation menu
Figure 22: AnimGraph state machine
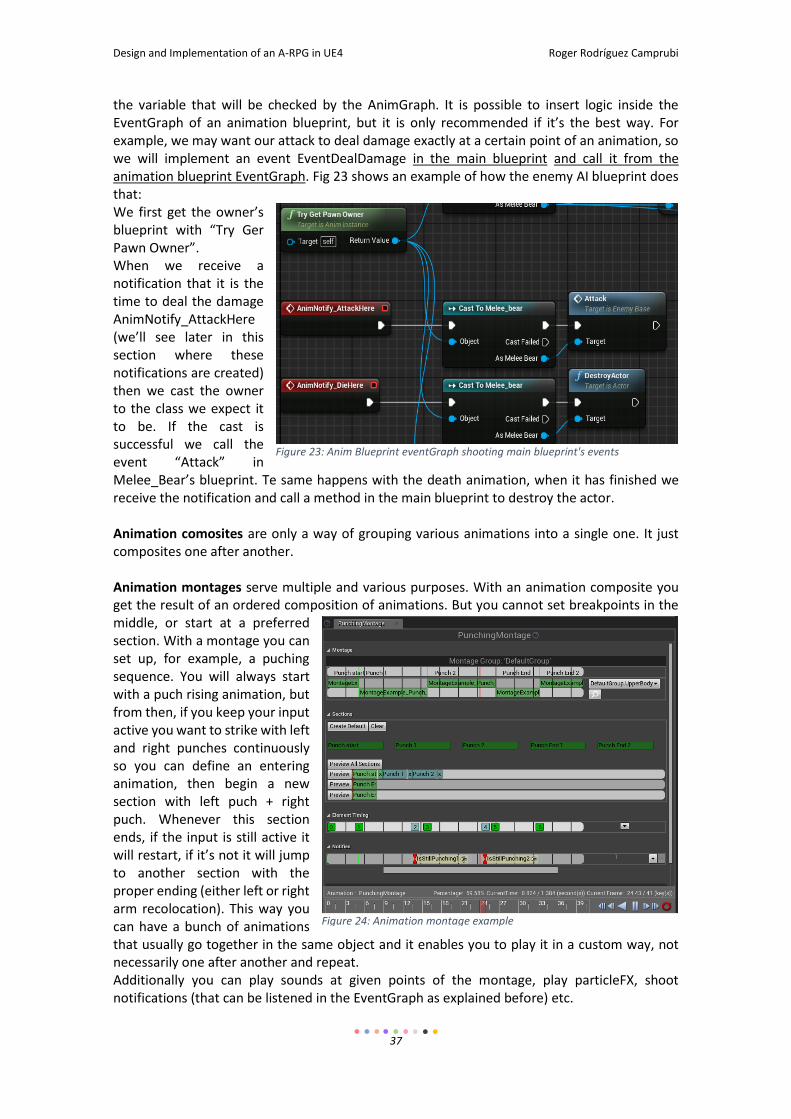
Design and Implementation of an A-RPG in UE4 Roger Rodríguez Camprubi
37
the variable that will be checked by the AnimGraph. It is possible to insert logic inside the EventGraph of an animation blueprint, but it is only recommended if it’s the best way. For example, we may want our attack to deal damage exactly at a certain point of an animation, so we will implement an event EventDealDamage in the main blueprint and call it from the animation blueprint EventGraph. Fig 23 shows an example of how the enemy AI blueprint does that: We first get the owner’s blueprint with “Try Ger Pawn Owner”. When we receive a notification that it is the time to deal the damage AnimNotify_AttackHere (we’ll see later in this section where these notifications are created) then we cast the owner to the class we expect it to be. If the cast is successful we call the event “Attack” in Melee_Bear’s blueprint. Te same happens with the death animation, when it has finished we receive the notification and call a method in the main blueprint to destroy the actor. Animation comosites are only a way of grouping various animations into a single one. It just composites one after another. Animation montages serve multiple and various purposes. With an animation composite you get the result of an ordered composition of animations. But you cannot set breakpoints in the middle, or start at a preferred section. With a montage you can set up, for example, a puching sequence. You will always start with a puch rising animation, but from then, if you keep your input active you want to strike with left and right punches continuously so you can define an entering animation, then begin a new section with left puch + right puch. Whenever this section ends, if the input is still active it will restart, if it’s not it will jump to another section with the proper ending (either left or right arm recolocation). This way you can have a bunch of animations that usually go together in the same object and it enables you to play it in a custom way, not necessarily one after another and repeat. Additionally you can play sounds at given points of the montage, play particleFX, shoot notifications (that can be listened in the EventGraph as explained before) etc.
Figure 23: Anim Blueprint eventGraph shooting main blueprint's events
Figure 24: Animation montage example
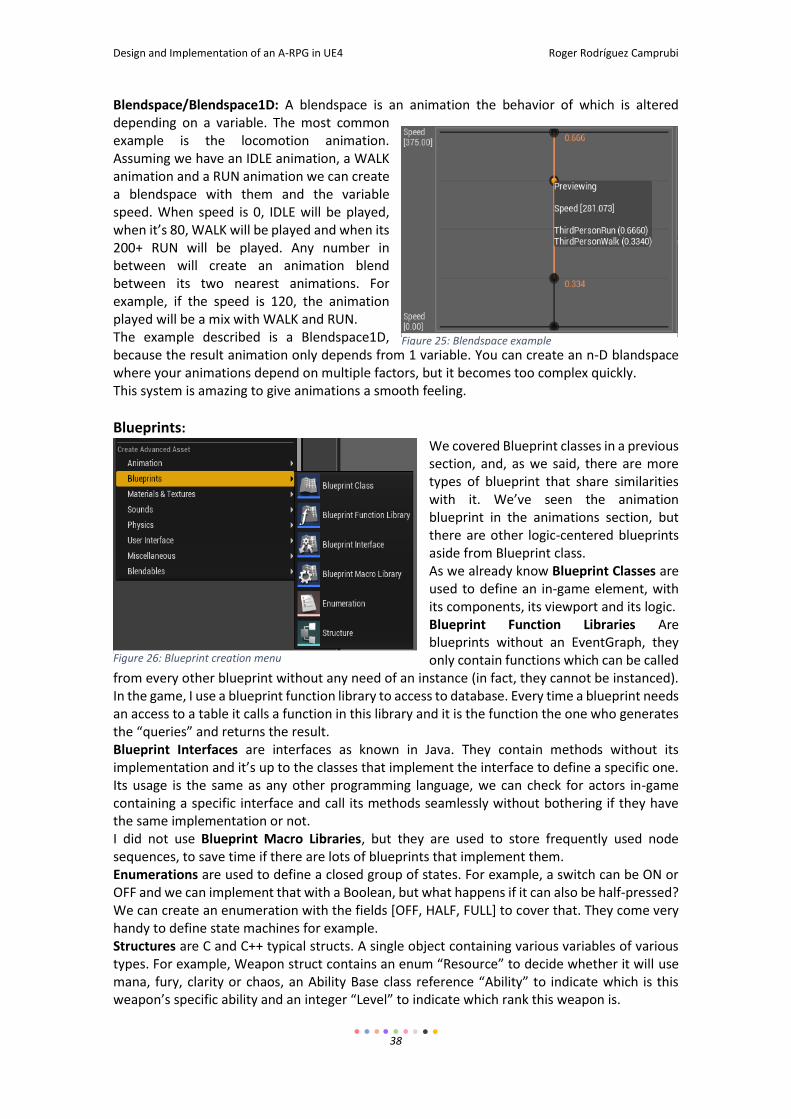
Design and Implementation of an A-RPG in UE4 Roger Rodríguez Camprubi
38
Blendspace/Blendspace1D: A blendspace is an animation the behavior of which is altered depending on a variable. The most common example is the locomotion animation. Assuming we have an IDLE animation, a WALK animation and a RUN animation we can create a blendspace with them and the variable speed. When speed is 0, IDLE will be played, when it’s 80, WALK will be played and when its 200+ RUN will be played. Any number in between will create an animation blend between its two nearest animations. For example, if the speed is 120, the animation played will be a mix with WALK and RUN. The example described is a Blendspace1D, because the result animation only depends from 1 variable. You can create an n-D blandspace where your animations depend on multiple factors, but it becomes too complex quickly. This system is amazing to give animations a smooth feeling.
Blueprints: We covered Blueprint classes in a previous section, and, as we said, there are more types of blueprint that share similarities with it. We’ve seen the animation blueprint in the animations section, but there are other logic-centered blueprints aside from Blueprint class. As we already know Blueprint Classes are used to define an in-game element, with its components, its viewport and its logic. Blueprint Function Libraries Are blueprints without an EventGraph, they only contain functions which can be called
from every other blueprint without any need of an instance (in fact, they cannot be instanced). In the game, I use a blueprint function library to access to database. Every time a blueprint needs an access to a table it calls a function in this library and it is the function the one who generates the “queries” and returns the result. Blueprint Interfaces are interfaces as known in Java. They contain methods without its implementation and it’s up to the classes that implement the interface to define a specific one. Its usage is the same as any other programming language, we can check for actors in-game containing a specific interface and call its methods seamlessly without bothering if they have the same implementation or not. I did not use Blueprint Macro Libraries, but they are used to store frequently used node sequences, to save time if there are lots of blueprints that implement them. Enumerations are used to define a closed group of states. For example, a switch can be ON or OFF and we can implement that with a Boolean, but what happens if it can also be half-pressed? We can create an enumeration with the fields [OFF, HALF, FULL] to cover that. They come very handy to define state machines for example. Structures are C and C++ typical structs. A single object containing various variables of various types. For example, Weapon struct contains an enum “Resource” to decide whether it will use mana, fury, clarity or chaos, an Ability Base class reference “Ability” to indicate which is this weapon’s specific ability and an integer “Level” to indicate which rank this weapon is.
Figure 25: Blendspace example
Figure 26: Blueprint creation menu
Design and Implementation of an A-RPG in UE4 Roger Rodríguez Camprubi
39
Materials and Textures I got all my artistic assets from external sources so that’s not really my field. Even though, there are a couple of things I needed to work with, and those are Materials and Material instances. Materials are the objects that decide the final color on the objects they are applied on. They save information about how is the texture on it and how does it relate with light, this way we can have a shiny but non reflective wood based textured material that stands for wood or a very transparent, and very reflective blueish textured material that stands for water. They are created and modified in a graph based scripting environment (the Material Editor).
To keep it simple, a material instance is a copy of a given material (it is created from a material) and can be used to modify some of its values. For example, let’s say I want some leaves to be green and some others to be yellow. I don’t need to create two copies of a material, instead I create what would be the parent material and 2 material instances, one for green and one for yellow, and modify the only parameter that varies. This way less resources are wasted, as the instances only save the changed information relative to its material.
Sound Unfortunately, I had to stop the development before reaching the point in which sound was added. I was leaving it for the final part, and due to this I’m not familiar with any of the types available. I intended to add voice acting and music composition done by myself to the game if I had been fine on schedule, but none of that has been possible.
Physics only contain the type “Physic material” which enables a material to store some information about the way it should interact with the world (such as weight, bounce ability etc.)
Figure 27: Materials and Textures creation menu
Figure 28: Sound creation menu
Figure 29: Physics creation menu
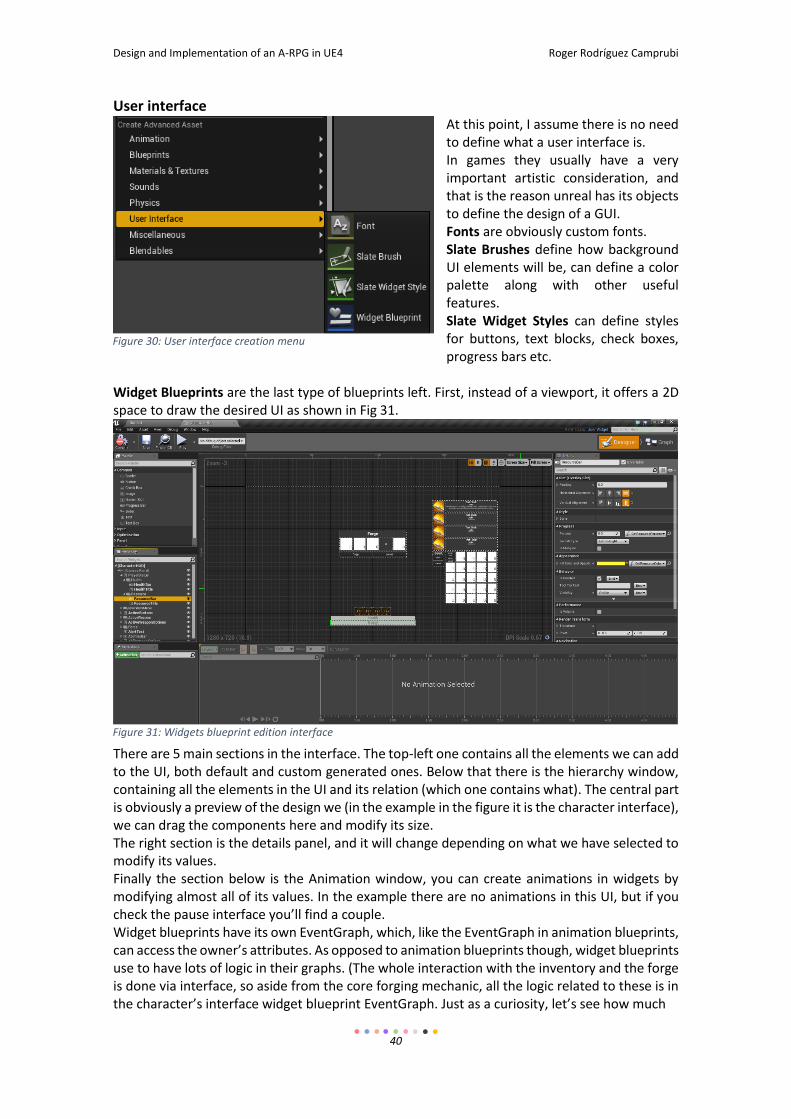
Design and Implementation of an A-RPG in UE4 Roger Rodríguez Camprubi
40
User interface At this point, I assume there is no need to define what a user interface is. In games they usually have a very important artistic consideration, and that is the reason unreal has its objects to define the design of a GUI. Fonts are obviously custom fonts. Slate Brushes define how background UI elements will be, can define a color palette along with other useful features. Slate Widget Styles can define styles for buttons, text blocks, check boxes, progress bars etc.
Widget Blueprints are the last type of blueprints left. First, instead of a viewport, it offers a 2D space to draw the desired UI as shown in Fig 31.
There are 5 main sections in the interface. The top-left one contains all the elements we can add to the UI, both default and custom generated ones. Below that there is the hierarchy window, containing all the elements in the UI and its relation (which one contains what). The central part is obviously a preview of the design we (in the example in the figure it is the character interface), we can drag the components here and modify its size. The right section is the details panel, and it will change depending on what we have selected to modify its values. Finally the section below is the Animation window, you can create animations in widgets by modifying almost all of its values. In the example there are no animations in this UI, but if you check the pause interface you’ll find a couple. Widget blueprints have its own EventGraph, which, like the EventGraph in animation blueprints, can access the owner’s attributes. As opposed to animation blueprints though, widget blueprints use to have lots of logic in their graphs. (The whole interaction with the inventory and the forge is done via interface, so aside from the core forging mechanic, all the logic related to these is in the character’s interface widget blueprint EventGraph. Just as a curiosity, let’s see how much
Figure 30: User interface creation menu
Figure 31: Widgets blueprint edition interface
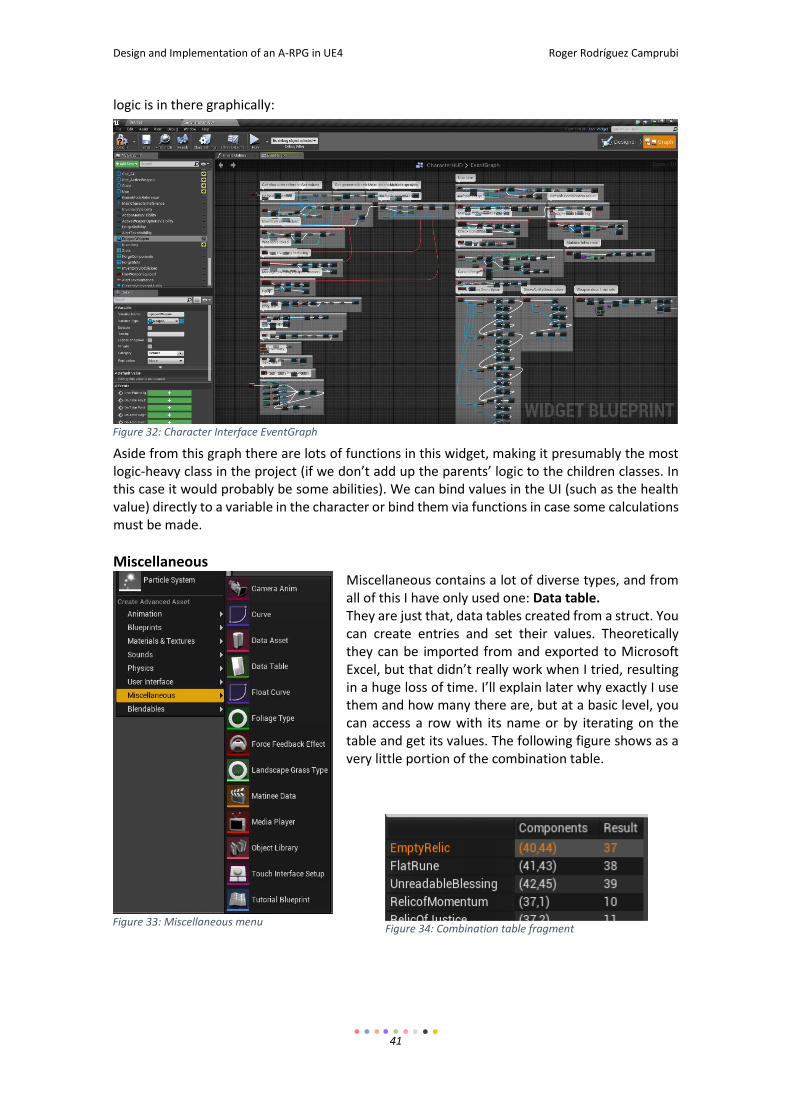
Design and Implementation of an A-RPG in UE4 Roger Rodríguez Camprubi
41
logic is in there graphically:
Aside from this graph there are lots of functions in this widget, making it presumably the most logic-heavy class in the project (if we don’t add up the parents’ logic to the children classes. In this case it would probably be some abilities). We can bind values in the UI (such as the health value) directly to a variable in the character or bind them via functions in case some calculations must be made.
Miscellaneous Miscellaneous contains a lot of diverse types, and from all of this I have only used one: Data table. They are just that, data tables created from a struct. You can create entries and set their values. Theoretically they can be imported from and exported to Microsoft Excel, but that didn’t really work when I tried, resulting in a huge loss of time. I’ll explain later why exactly I use them and how many there are, but at a basic level, you can access a row with its name or by iterating on the table and get its values. The following figure shows as a very little portion of the combination table.
Figure 32: Character Interface EventGraph
Figure 33: Miscellaneous menu Figure 34: Combination table fragment
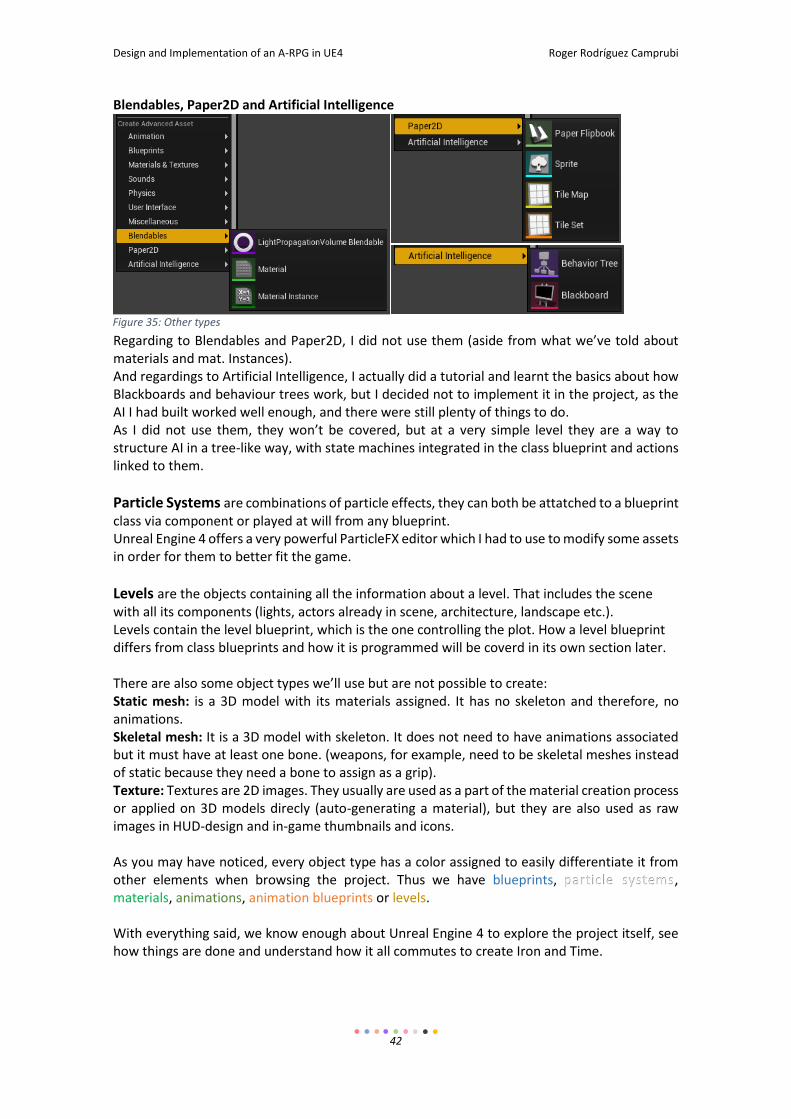
Design and Implementation of an A-RPG in UE4 Roger Rodríguez Camprubi
42
Blendables, Paper2D and Artificial Intelligence
Regarding to Blendables and Paper2D, I did not use them (aside from what we’ve told about materials and mat. Instances). And regardings to Artificial Intelligence, I actually did a tutorial and learnt the basics about how Blackboards and behaviour trees work, but I decided not to implement it in the project, as the AI I had built worked well enough, and there were still plenty of things to do. As I did not use them, they won’t be covered, but at a very simple level they are a way to structure AI in a tree-like way, with state machines integrated in the class blueprint and actions linked to them.
Particle Systems are combinations of particle effects, they can both be attatched to a blueprint class via component or played at will from any blueprint. Unreal Engine 4 offers a very powerful ParticleFX editor which I had to use to modify some assets in order for them to better fit the game.
Levels are the objects containing all the information about a level. That includes the scene with all its components (lights, actors already in scene, architecture, landscape etc.). Levels contain the level blueprint, which is the one controlling the plot. How a level blueprint differs from class blueprints and how it is programmed will be coverd in its own section later. There are also some object types we’ll use but are not possible to create: Static mesh: is a 3D model with its materials assigned. It has no skeleton and therefore, no animations. Skeletal mesh: It is a 3D model with skeleton. It does not need to have animations associated but it must have at least one bone. (weapons, for example, need to be skeletal meshes instead of static because they need a bone to assign as a grip). Texture: Textures are 2D images. They usually are used as a part of the material creation process or applied on 3D models direcly (auto-generating a material), but they are also used as raw images in HUD-design and in-game thumbnails and icons. As you may have noticed, every object type has a color assigned to easily differentiate it from other elements when browsing the project. Thus we have blueprints, particle systems, materials, animations, animation blueprints or levels. With everything said, we know enough about Unreal Engine 4 to explore the project itself, see how things are done and understand how it all commutes to create Iron and Time.
Figure 35: Other types
Design and Implementation of an A-RPG in UE4 Roger Rodríguez Camprubi
43
4 - DESIGN
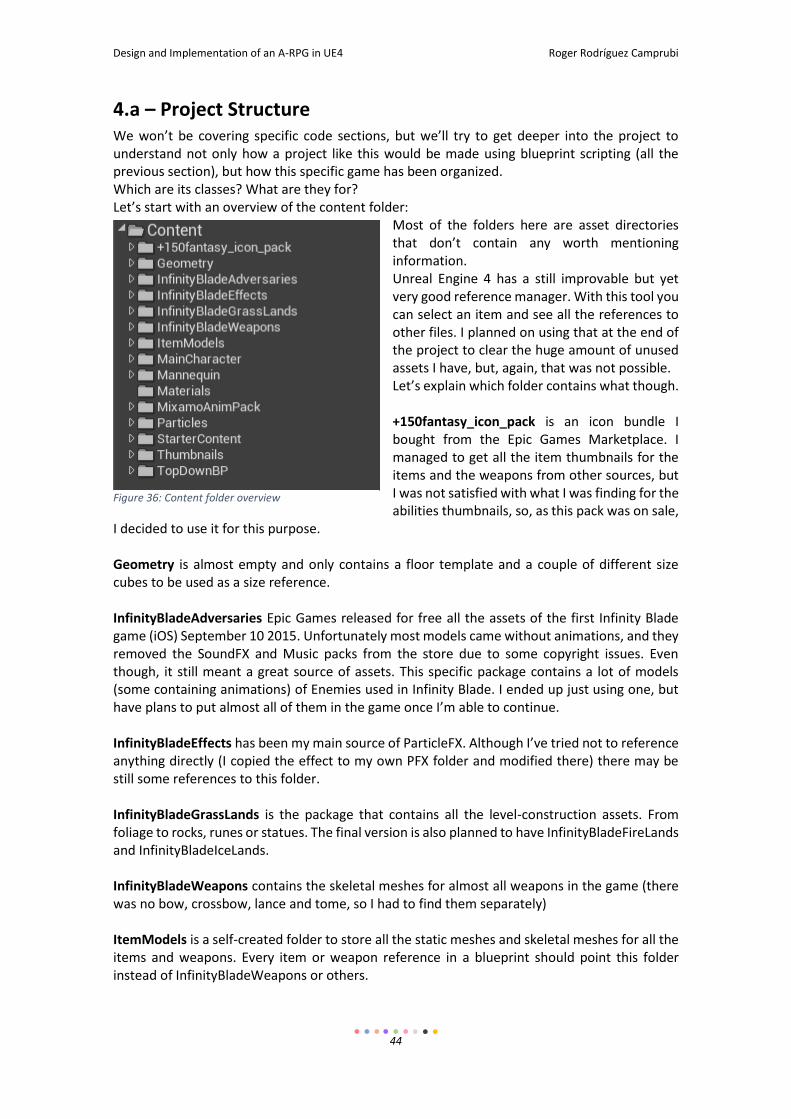
Design and Implementation of an A-RPG in UE4 Roger Rodríguez Camprubi
44
4.a – Project Structure
We won’t be covering specific code sections, but we’ll try to get deeper into the project to understand not only how a project like this would be made using blueprint scripting (all the previous section), but how this specific game has been organized. Which are its classes? What are they for? Let’s start with an overview of the content folder:
Most of the folders here are asset directories that don’t contain any worth mentioning information. Unreal Engine 4 has a still improvable but yet very good reference manager. With this tool you can select an item and see all the references to other files. I planned on using that at the end of the project to clear the huge amount of unused assets I have, but, again, that was not possible. Let’s explain which folder contains what though. +150fantasy_icon_pack is an icon bundle I bought from the Epic Games Marketplace. I managed to get all the item thumbnails for the items and the weapons from other sources, but I was not satisfied with what I was finding for the abilities thumbnails, so, as this pack was on sale,
I decided to use it for this purpose. Geometry is almost empty and only contains a floor template and a couple of different size cubes to be used as a size reference. InfinityBladeAdversaries Epic Games released for free all the assets of the first Infinity Blade game (iOS) September 10 2015. Unfortunately most models came without animations, and they removed the SoundFX and Music packs from the store due to some copyright issues. Even though, it still meant a great source of assets. This specific package contains a lot of models (some containing animations) of Enemies used in Infinity Blade. I ended up just using one, but have plans to put almost all of them in the game once I’m able to continue. InfinityBladeEffects has been my main source of ParticleFX. Although I’ve tried not to reference anything directly (I copied the effect to my own PFX folder and modified there) there may be still some references to this folder. InfinityBladeGrassLands is the package that contains all the level-construction assets. From foliage to rocks, runes or statues. The final version is also planned to have InfinityBladeFireLands and InfinityBladeIceLands. InfinityBladeWeapons contains the skeletal meshes for almost all weapons in the game (there was no bow, crossbow, lance and tome, so I had to find them separately) ItemModels is a self-created folder to store all the static meshes and skeletal meshes for all the items and weapons. Every item or weapon reference in a blueprint should point this folder instead of InfinityBladeWeapons or others.
Figure 36: Content folder overview
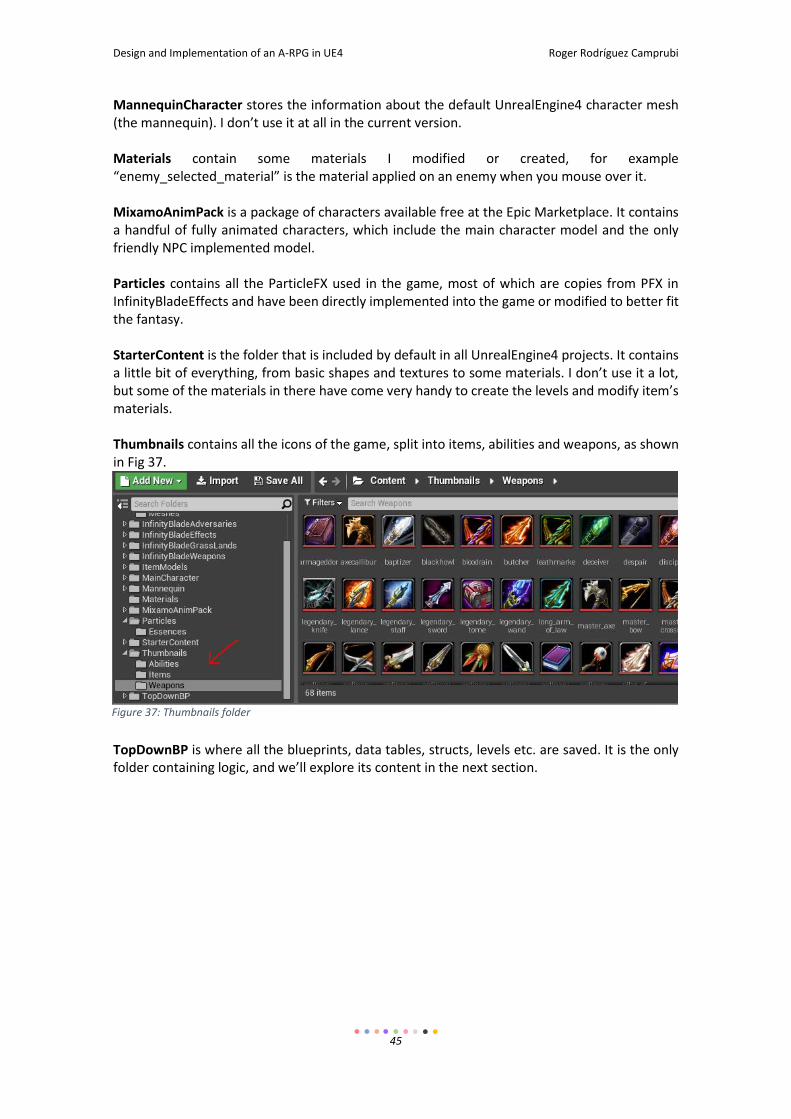
Design and Implementation of an A-RPG in UE4 Roger Rodríguez Camprubi
45
MannequinCharacter stores the information about the default UnrealEngine4 character mesh (the mannequin). I don’t use it at all in the current version. Materials contain some materials I modified or created, for example “enemy_selected_material” is the material applied on an enemy when you mouse over it. MixamoAnimPack is a package of characters available free at the Epic Marketplace. It contains a handful of fully animated characters, which include the main character model and the only friendly NPC implemented model. Particles contains all the ParticleFX used in the game, most of which are copies from PFX in InfinityBladeEffects and have been directly implemented into the game or modified to better fit the fantasy. StarterContent is the folder that is included by default in all UnrealEngine4 projects. It contains a little bit of everything, from basic shapes and textures to some materials. I don’t use it a lot, but some of the materials in there have come very handy to create the levels and modify item’s materials. Thumbnails contains all the icons of the game, split into items, abilities and weapons, as shown in Fig 37.
TopDownBP is where all the blueprints, data tables, structs, levels etc. are saved. It is the only folder containing logic, and we’ll explore its content in the next section.
Figure 37: Thumbnails folder
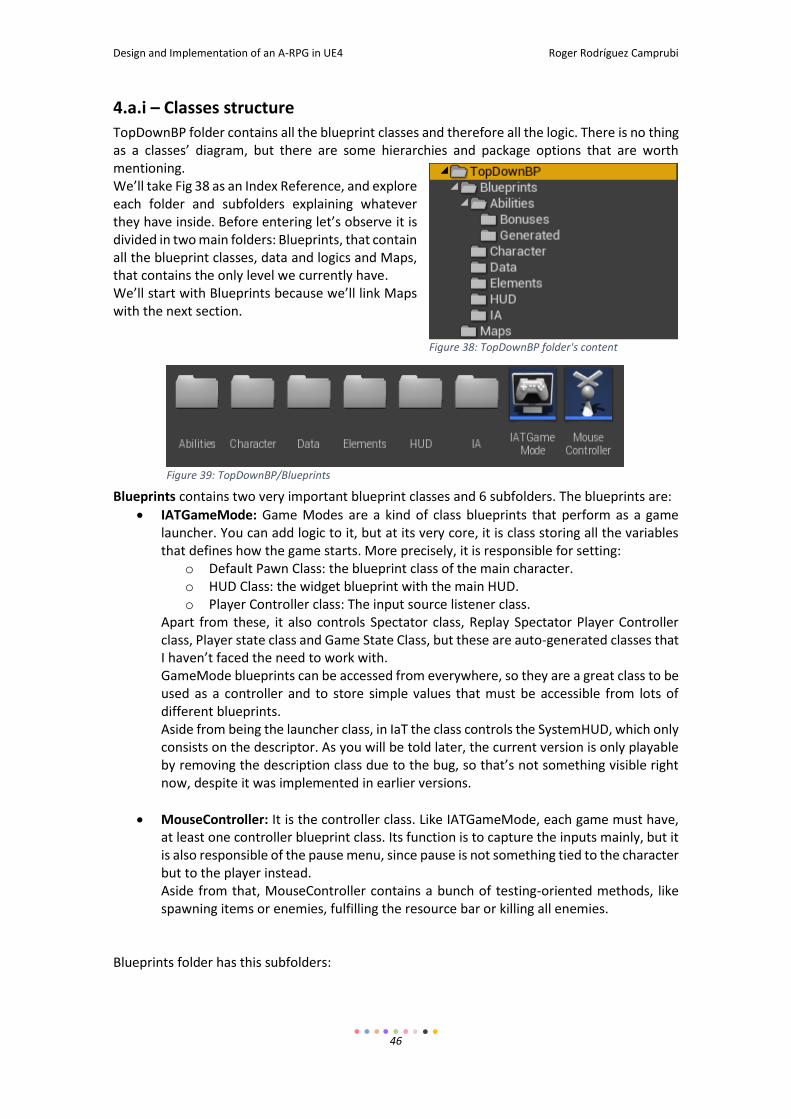
Design and Implementation of an A-RPG in UE4 Roger Rodríguez Camprubi
46
4.a.i – Classes structure
TopDownBP folder contains all the blueprint classes and therefore all the logic. There is no thing as a classes’ diagram, but there are some hierarchies and package options that are worth mentioning. We’ll take Fig 38 as an Index Reference, and explore each folder and subfolders explaining whatever they have inside. Before entering let’s observe it is divided in two main folders: Blueprints, that contain all the blueprint classes, data and logics and Maps, that contains the only level we currently have. We’ll start with Blueprints because we’ll link Maps with the next section.
Blueprints contains two very important blueprint classes and 6 subfolders. The blueprints are:
IATGameMode: Game Modes are a kind of class blueprints that perform as a game launcher. You can add logic to it, but at its very core, it is class storing all the variables that defines how the game starts. More precisely, it is responsible for setting:
o Default Pawn Class: the blueprint class of the main character. o HUD Class: the widget blueprint with the main HUD. o Player Controller class: The input source listener class.
Apart from these, it also controls Spectator class, Replay Spectator Player Controller class, Player state class and Game State Class, but these are auto-generated classes that I haven’t faced the need to work with. GameMode blueprints can be accessed from everywhere, so they are a great class to be used as a controller and to store simple values that must be accessible from lots of different blueprints. Aside from being the launcher class, in IaT the class controls the SystemHUD, which only consists on the descriptor. As you will be told later, the current version is only playable by removing the description class due to the bug, so that’s not something visible right now, despite it was implemented in earlier versions.
MouseController: It is the controller class. Like IATGameMode, each game must have, at least one controller blueprint class. Its function is to capture the inputs mainly, but it is also responsible of the pause menu, since pause is not something tied to the character but to the player instead. Aside from that, MouseController contains a bunch of testing-oriented methods, like spawning items or enemies, fulfilling the resource bar or killing all enemies.
Blueprints folder has this subfolders:
Figure 38: TopDownBP folder's content
Figure 39: TopDownBP/Blueprints
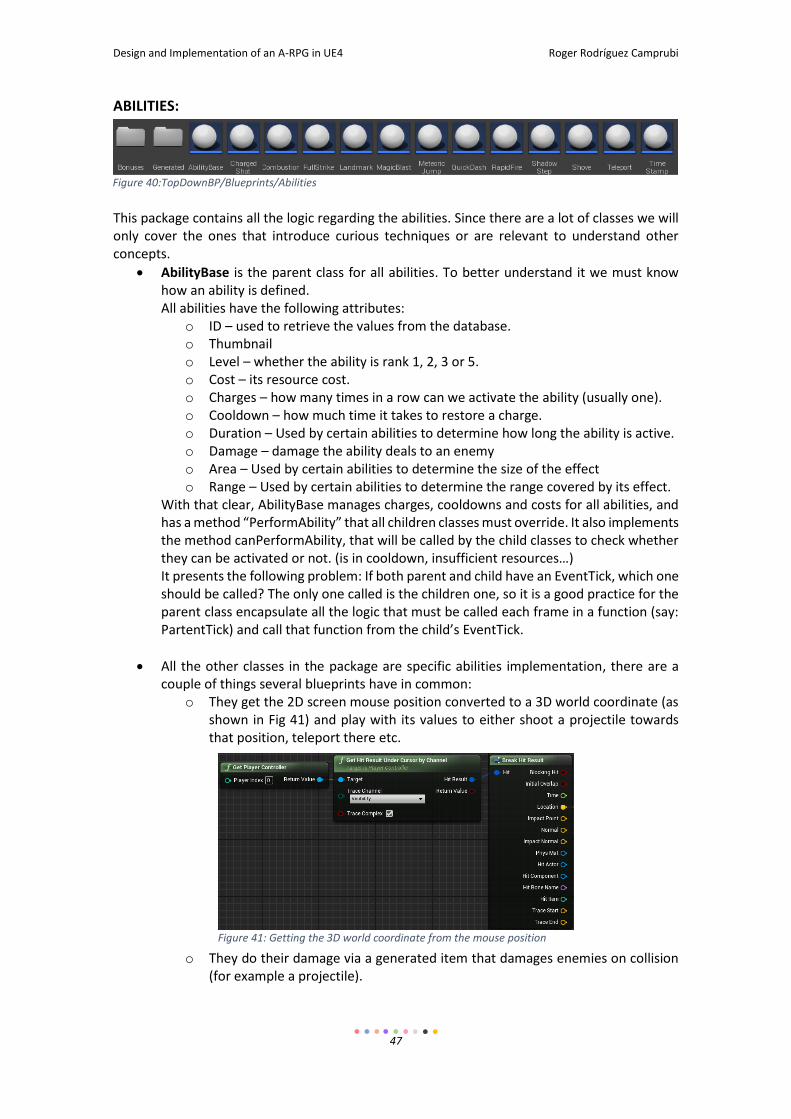
Design and Implementation of an A-RPG in UE4 Roger Rodríguez Camprubi
47
ABILITIES:
This package contains all the logic regarding the abilities. Since there are a lot of classes we will only cover the ones that introduce curious techniques or are relevant to understand other concepts.
AbilityBase is the parent class for all abilities. To better understand it we must know how an ability is defined. All abilities have the following attributes:
o ID – used to retrieve the values from the database. o Thumbnail o Level – whether the ability is rank 1, 2, 3 or 5. o Cost – its resource cost. o Charges – how many times in a row can we activate the ability (usually one). o Cooldown – how much time it takes to restore a charge. o Duration – Used by certain abilities to determine how long the ability is active. o Damage – damage the ability deals to an enemy o Area – Used by certain abilities to determine the size of the effect o Range – Used by certain abilities to determine the range covered by its effect.
With that clear, AbilityBase manages charges, cooldowns and costs for all abilities, and has a method “PerformAbility” that all children classes must override. It also implements the method canPerformAbility, that will be called by the child classes to check whether they can be activated or not. (is in cooldown, insufficient resources…) It presents the following problem: If both parent and child have an EventTick, which one should be called? The only one called is the children one, so it is a good practice for the parent class encapsulate all the logic that must be called each frame in a function (say: PartentTick) and call that function from the child’s EventTick.
All the other classes in the package are specific abilities implementation, there are a couple of things several blueprints have in common:
o They get the 2D screen mouse position converted to a 3D world coordinate (as shown in Fig 41) and play with its values to either shoot a projectile towards that position, teleport there etc.
o They do their damage via a generated item that damages enemies on collision (for example a projectile).
Figure 40:TopDownBP/Blueprints/Abilities
Figure 41: Getting the 3D world coordinate from the mouse position
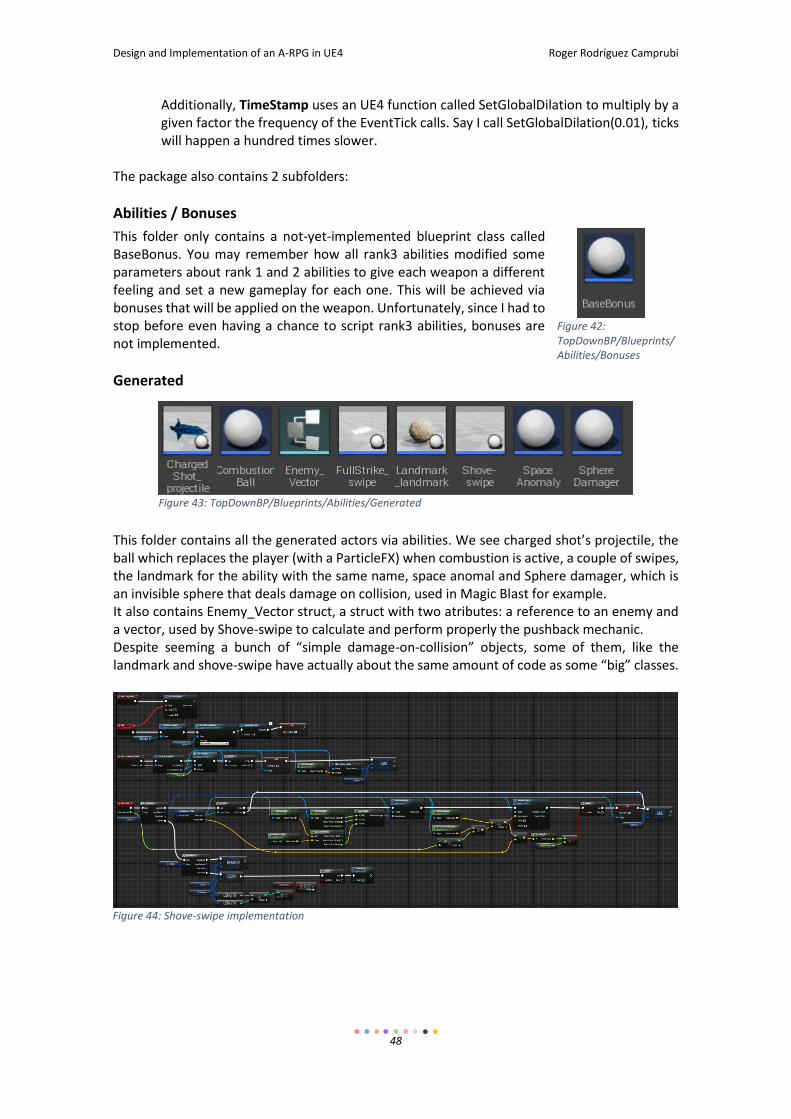
Design and Implementation of an A-RPG in UE4 Roger Rodríguez Camprubi
48
Additionally, TimeStamp uses an UE4 function called SetGlobalDilation to multiply by a given factor the frequency of the EventTick calls. Say I call SetGlobalDilation(0.01), ticks will happen a hundred times slower.
The package also contains 2 subfolders:
Abilities / Bonuses
This folder only contains a not-yet-implemented blueprint class called BaseBonus. You may remember how all rank3 abilities modified some parameters about rank 1 and 2 abilities to give each weapon a different feeling and set a new gameplay for each one. This will be achieved via bonuses that will be applied on the weapon. Unfortunately, since I had to stop before even having a chance to script rank3 abilities, bonuses are not implemented.
Generated
This folder contains all the generated actors via abilities. We see charged shot’s projectile, the ball which replaces the player (with a ParticleFX) when combustion is active, a couple of swipes, the landmark for the ability with the same name, space anomal and Sphere damager, which is an invisible sphere that deals damage on collision, used in Magic Blast for example. It also contains Enemy_Vector struct, a struct with two atributes: a reference to an enemy and a vector, used by Shove-swipe to calculate and perform properly the pushback mechanic. Despite seeming a bunch of “simple damage-on-collision” objects, some of them, like the landmark and shove-swipe have actually about the same amount of code as some “big” classes.
Figure 42: TopDownBP/Blueprints/Abilities/Bonuses
Figure 43: TopDownBP/Blueprints/Abilities/Generated
Figure 44: Shove-swipe implementation
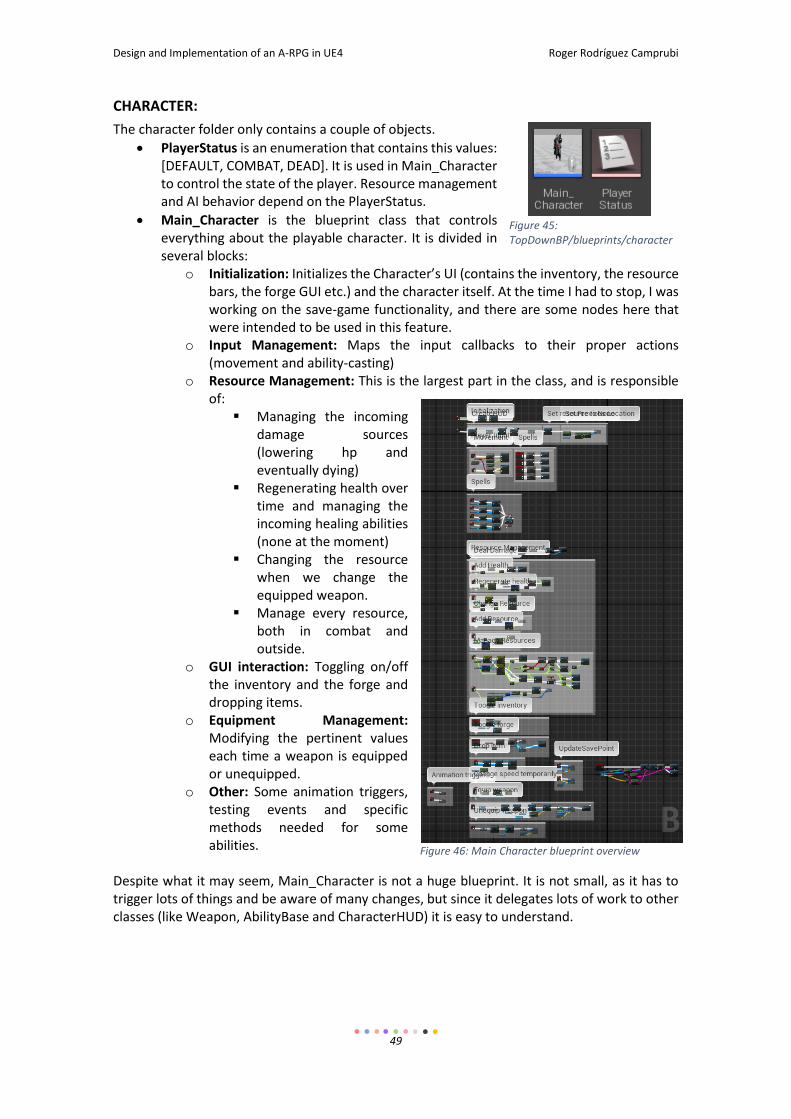
Design and Implementation of an A-RPG in UE4 Roger Rodríguez Camprubi
49
CHARACTER:
The character folder only contains a couple of objects.
PlayerStatus is an enumeration that contains this values: [DEFAULT, COMBAT, DEAD]. It is used in Main_Character to control the state of the player. Resource management and AI behavior depend on the PlayerStatus.
Main_Character is the blueprint class that controls everything about the playable character. It is divided in several blocks:
o Initialization: Initializes the Character’s UI (contains the inventory, the resource bars, the forge GUI etc.) and the character itself. At the time I had to stop, I was working on the save-game functionality, and there are some nodes here that were intended to be used in this feature.
o Input Management: Maps the input callbacks to their proper actions (movement and ability-casting)
o Resource Management: This is the largest part in the class, and is responsible of:
Managing the incoming damage sources (lowering hp and eventually dying)
Regenerating health over time and managing the incoming healing abilities (none at the moment)
Changing the resource when we change the equipped weapon.
Manage every resource, both in combat and outside.
o GUI interaction: Toggling on/off the inventory and the forge and dropping items.
o Equipment Management: Modifying the pertinent values each time a weapon is equipped or unequipped.
o Other: Some animation triggers, testing events and specific methods needed for some abilities.
Despite what it may seem, Main_Character is not a huge blueprint. It is not small, as it has to trigger lots of things and be aware of many changes, but since it delegates lots of work to other classes (like Weapon, AbilityBase and CharacterHUD) it is easy to understand.
Figure 45: TopDownBP/blueprints/character
Figure 46: Main Character blueprint overview
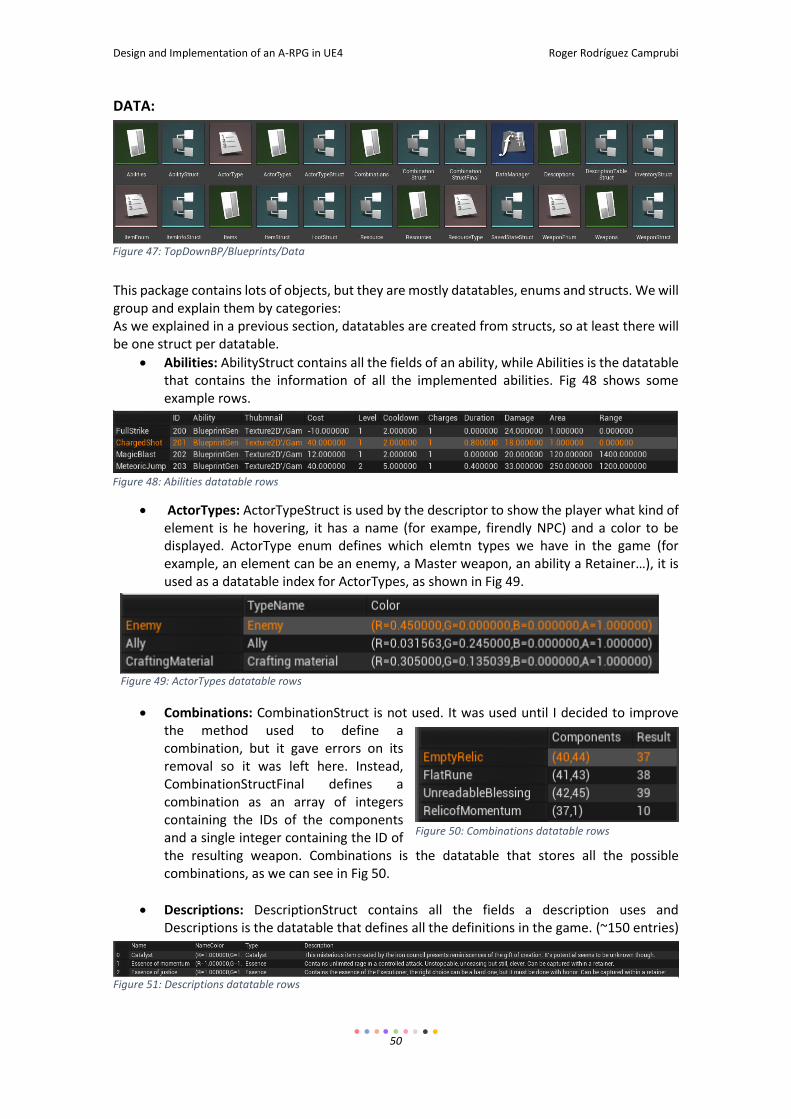
Design and Implementation of an A-RPG in UE4 Roger Rodríguez Camprubi
50
DATA:
This package contains lots of objects, but they are mostly datatables, enums and structs. We will group and explain them by categories: As we explained in a previous section, datatables are created from structs, so at least there will be one struct per datatable.
Abilities: AbilityStruct contains all the fields of an ability, while Abilities is the datatable that contains the information of all the implemented abilities. Fig 48 shows some example rows.
ActorTypes: ActorTypeStruct is used by the descriptor to show the player what kind of element is he hovering, it has a name (for exampe, firendly NPC) and a color to be displayed. ActorType enum defines which elemtn types we have in the game (for example, an element can be an enemy, a Master weapon, an ability a Retainer…), it is used as a datatable index for ActorTypes, as shown in Fig 49.
Combinations: CombinationStruct is not used. It was used until I decided to improve the method used to define a combination, but it gave errors on its removal so it was left here. Instead, CombinationStructFinal defines a combination as an array of integers containing the IDs of the components and a single integer containing the ID of the resulting weapon. Combinations is the datatable that stores all the possible combinations, as we can see in Fig 50.
Descriptions: DescriptionStruct contains all the fields a description uses and Descriptions is the datatable that defines all the definitions in the game. (~150 entries)
Figure 47: TopDownBP/Blueprints/Data
Figure 48: Abilities datatable rows
Figure 49: ActorTypes datatable rows
Figure 50: Combinations datatable rows
Figure 51: Descriptions datatable rows
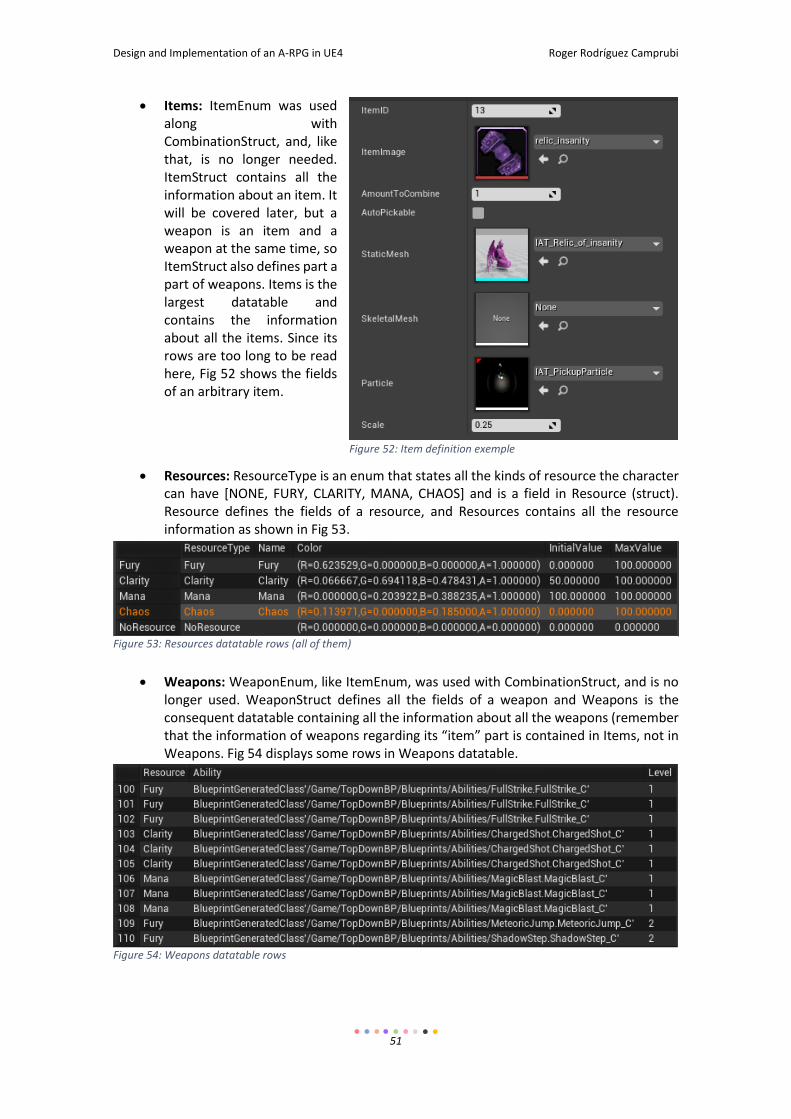
Design and Implementation of an A-RPG in UE4 Roger Rodríguez Camprubi
51
Items: ItemEnum was used along with CombinationStruct, and, like that, is no longer needed. ItemStruct contains all the information about an item. It will be covered later, but a weapon is an item and a weapon at the same time, so ItemStruct also defines part a part of weapons. Items is the largest datatable and contains the information about all the items. Since its rows are too long to be read here, Fig 52 shows the fields of an arbitrary item.
Resources: ResourceType is an enum that states all the kinds of resource the character can have [NONE, FURY, CLARITY, MANA, CHAOS] and is a field in Resource (struct). Resource defines the fields of a resource, and Resources contains all the resource information as shown in Fig 53.
Weapons: WeaponEnum, like ItemEnum, was used with CombinationStruct, and is no longer used. WeaponStruct defines all the fields of a weapon and Weapons is the consequent datatable containing all the information about all the weapons (remember that the information of weapons regarding its “item” part is contained in Items, not in Weapons. Fig 54 displays some rows in Weapons datatable.
Figure 52: Item definition exemple
Figure 53: Resources datatable rows (all of them)
Figure 54: Weapons datatable rows
Design and Implementation of an A-RPG in UE4 Roger Rodríguez Camprubi
52
As you may have noticed, we skipped several structs that do not translate directly into datatables. These are InventoryStruct and ItemInfoStruct, which are used by CharacterHUD to manage the inventory, LootStruct, which defines loot by stating which item will drop and how many (random in a range) and SavedStateStruct, which was supposed to be the struct containing all the information about a save-point to and is meant to be used to implement the saving feature. Together with all these data-objects, there is a Function Library Blueprint: DataManager is a library used to manage all data in the game, and everything that is related to information contained in databases should be asked to DataManager ONLY. It contains the following functions:
GetItemInfo returns an ItemStruct and a Description of an item given its ID.
CheckCombination is a complex function that, given an array of components returns an integer, being this -1 if the components passed don’t result in a valid combination or, otherwise, the result weapon ID. It is one of the algorithms I’m proudest of.
GetDescription gets an element description given its ID.
GetResource returns a Resource (struct) given its proper ResourceType (enum).
GetWeaponInfo returns a WeaponStruct given its ID.
CreateInvisibleItemFromID is a method needed to create the combination weapons. Since to create a weapon we must spawn it in the world, this method spawns an invisible collision-less copy of the weapon. This way the new weapon will be in our inventory, and we’ll not see its physical copy (just like any other weapon in our inventory).
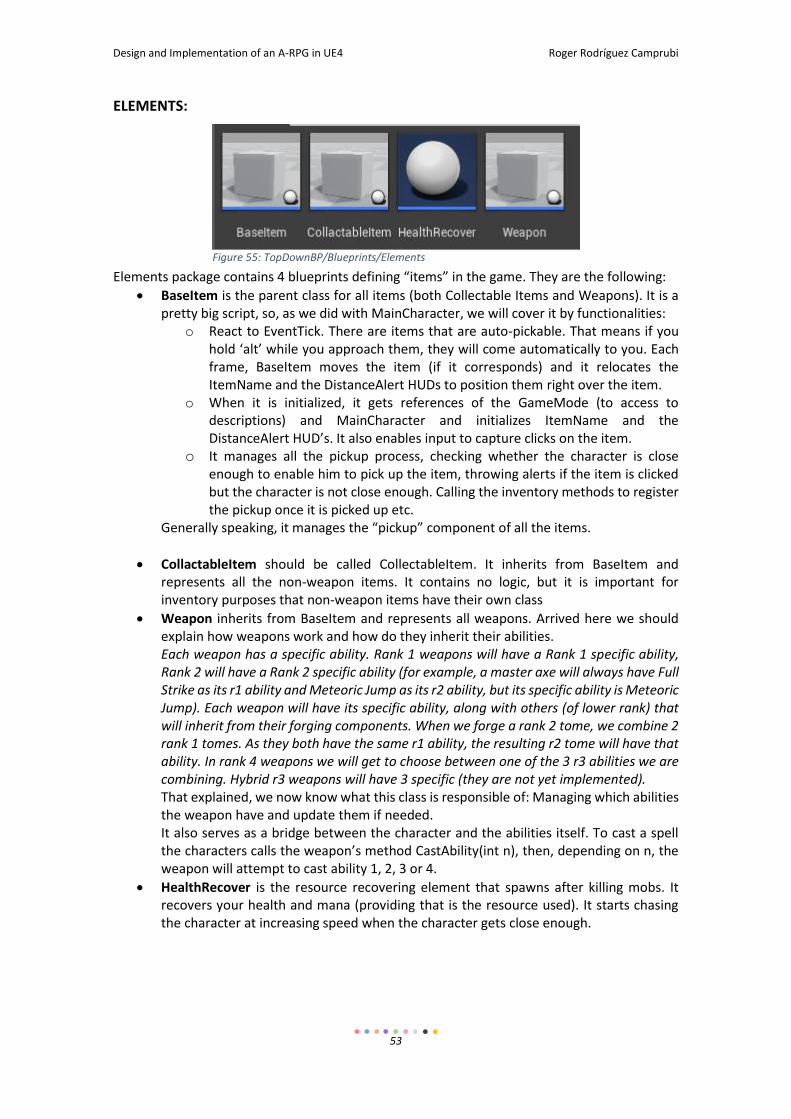
Design and Implementation of an A-RPG in UE4 Roger Rodríguez Camprubi
53
ELEMENTS:
Elements package contains 4 blueprints defining “items” in the game. They are the following:
BaseItem is the parent class for all items (both Collectable Items and Weapons). It is a pretty big script, so, as we did with MainCharacter, we will cover it by functionalities:
o React to EventTick. There are items that are auto-pickable. That means if you hold ‘alt’ while you approach them, they will come automatically to you. Each frame, BaseItem moves the item (if it corresponds) and it relocates the ItemName and the DistanceAlert HUDs to position them right over the item.
o When it is initialized, it gets references of the GameMode (to access to descriptions) and MainCharacter and initializes ItemName and the DistanceAlert HUD’s. It also enables input to capture clicks on the item.
o It manages all the pickup process, checking whether the character is close enough to enable him to pick up the item, throwing alerts if the item is clicked but the character is not close enough. Calling the inventory methods to register the pickup once it is picked up etc.
Generally speaking, it manages the “pickup” component of all the items.
CollactableItem should be called CollectableItem. It inherits from BaseItem and represents all the non-weapon items. It contains no logic, but it is important for inventory purposes that non-weapon items have their own class
Weapon inherits from BaseItem and represents all weapons. Arrived here we should explain how weapons work and how do they inherit their abilities. Each weapon has a specific ability. Rank 1 weapons will have a Rank 1 specific ability, Rank 2 will have a Rank 2 specific ability (for example, a master axe will always have Full Strike as its r1 ability and Meteoric Jump as its r2 ability, but its specific ability is Meteoric Jump). Each weapon will have its specific ability, along with others (of lower rank) that will inherit from their forging components. When we forge a rank 2 tome, we combine 2 rank 1 tomes. As they both have the same r1 ability, the resulting r2 tome will have that ability. In rank 4 weapons we will get to choose between one of the 3 r3 abilities we are combining. Hybrid r3 weapons will have 3 specific (they are not yet implemented). That explained, we now know what this class is responsible of: Managing which abilities the weapon have and update them if needed. It also serves as a bridge between the character and the abilities itself. To cast a spell the characters calls the weapon’s method CastAbility(int n), then, depending on n, the weapon will attempt to cast ability 1, 2, 3 or 4.
HealthRecover is the resource recovering element that spawns after killing mobs. It recovers your health and mana (providing that is the resource used). It starts chasing the character at increasing speed when the character gets close enough.
Figure 55: TopDownBP/Blueprints/Elements
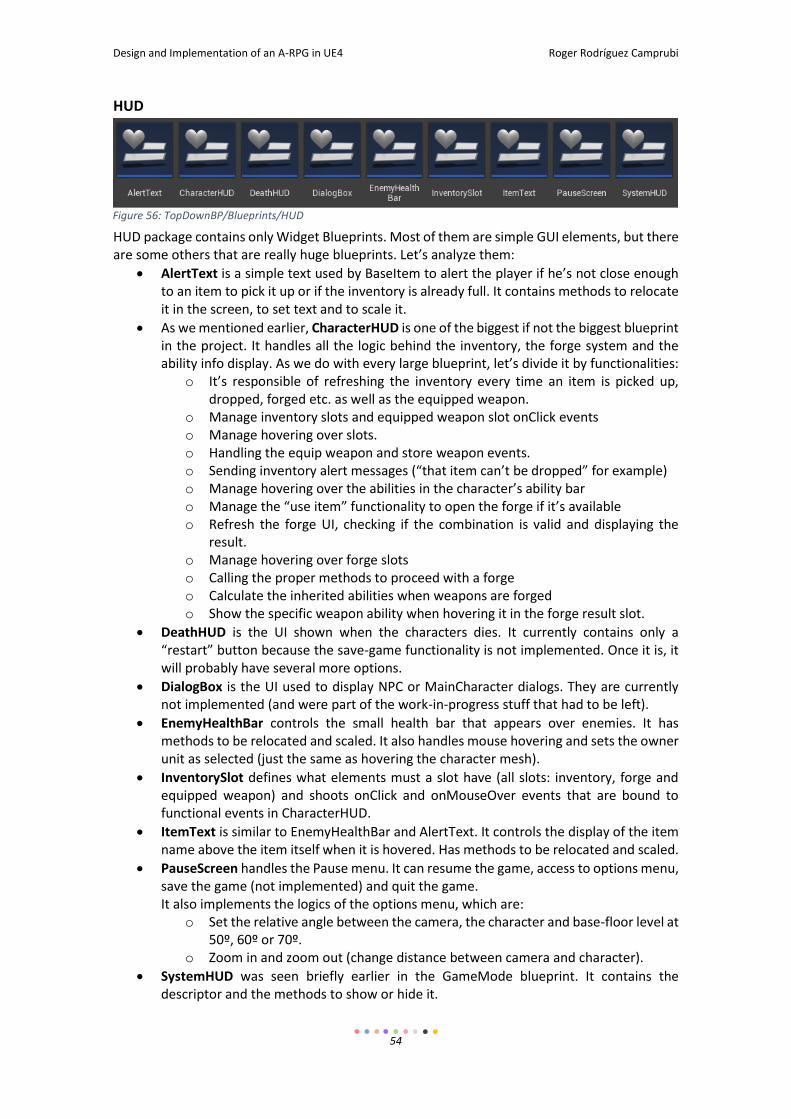
Design and Implementation of an A-RPG in UE4 Roger Rodríguez Camprubi
54
HUD
HUD package contains only Widget Blueprints. Most of them are simple GUI elements, but there are some others that are really huge blueprints. Let’s analyze them:
AlertText is a simple text used by BaseItem to alert the player if he’s not close enough to an item to pick it up or if the inventory is already full. It contains methods to relocate it in the screen, to set text and to scale it.
As we mentioned earlier, CharacterHUD is one of the biggest if not the biggest blueprint in the project. It handles all the logic behind the inventory, the forge system and the ability info display. As we do with every large blueprint, let’s divide it by functionalities:
o It’s responsible of refreshing the inventory every time an item is picked up, dropped, forged etc. as well as the equipped weapon.
o Manage inventory slots and equipped weapon slot onClick events o Manage hovering over slots. o Handling the equip weapon and store weapon events. o Sending inventory alert messages (“that item can’t be dropped” for example) o Manage hovering over the abilities in the character’s ability bar o Manage the “use item” functionality to open the forge if it’s available o Refresh the forge UI, checking if the combination is valid and displaying the
result. o Manage hovering over forge slots o Calling the proper methods to proceed with a forge o Calculate the inherited abilities when weapons are forged o Show the specific weapon ability when hovering it in the forge result slot.
DeathHUD is the UI shown when the characters dies. It currently contains only a “restart” button because the save-game functionality is not implemented. Once it is, it will probably have several more options.
DialogBox is the UI used to display NPC or MainCharacter dialogs. They are currently not implemented (and were part of the work-in-progress stuff that had to be left).
EnemyHealthBar controls the small health bar that appears over enemies. It has methods to be relocated and scaled. It also handles mouse hovering and sets the owner unit as selected (just the same as hovering the character mesh).
InventorySlot defines what elements must a slot have (all slots: inventory, forge and equipped weapon) and shoots onClick and onMouseOver events that are bound to functional events in CharacterHUD.
ItemText is similar to EnemyHealthBar and AlertText. It controls the display of the item name above the item itself when it is hovered. Has methods to be relocated and scaled.
PauseScreen handles the Pause menu. It can resume the game, access to options menu, save the game (not implemented) and quit the game. It also implements the logics of the options menu, which are:
o Set the relative angle between the camera, the character and base-floor level at 50º, 60º or 70º.
o Zoom in and zoom out (change distance between camera and character).
SystemHUD was seen briefly earlier in the GameMode blueprint. It contains the descriptor and the methods to show or hide it.
Figure 56: TopDownBP/Blueprints/HUD
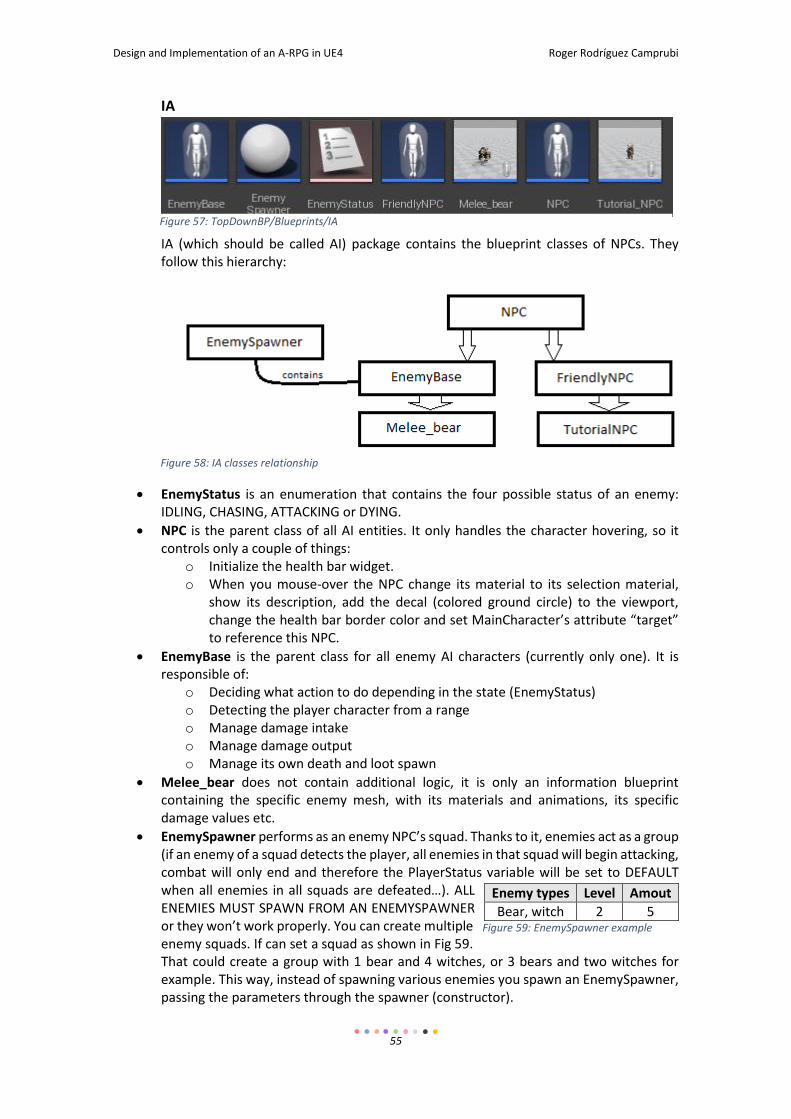
Design and Implementation of an A-RPG in UE4 Roger Rodríguez Camprubi
55
IA
IA (which should be called AI) package contains the blueprint classes of NPCs. They follow this hierarchy:
EnemyStatus is an enumeration that contains the four possible status of an enemy: IDLING, CHASING, ATTACKING or DYING.
NPC is the parent class of all AI entities. It only handles the character hovering, so it controls only a couple of things:
o Initialize the health bar widget. o When you mouse-over the NPC change its material to its selection material,
show its description, add the decal (colored ground circle) to the viewport, change the health bar border color and set MainCharacter’s attribute “target” to reference this NPC.
EnemyBase is the parent class for all enemy AI characters (currently only one). It is responsible of:
o Deciding what action to do depending in the state (EnemyStatus) o Detecting the player character from a range o Manage damage intake o Manage damage output o Manage its own death and loot spawn
Melee_bear does not contain additional logic, it is only an information blueprint containing the specific enemy mesh, with its materials and animations, its specific damage values etc.
EnemySpawner performs as an enemy NPC’s squad. Thanks to it, enemies act as a group (if an enemy of a squad detects the player, all enemies in that squad will begin attacking, combat will only end and therefore the PlayerStatus variable will be set to DEFAULT when all enemies in all squads are defeated…). ALL ENEMIES MUST SPAWN FROM AN ENEMYSPAWNER or they won’t work properly. You can create multiple enemy squads. If can set a squad as shown in Fig 59. That could create a group with 1 bear and 4 witches, or 3 bears and two witches for example. This way, instead of spawning various enemies you spawn an EnemySpawner, passing the parameters through the spawner (constructor).
Enemy types Level Amout
Bear, witch 2 5 Figure 59: EnemySpawner example
Figure 57: TopDownBP/Blueprints/IA
Figure 58: IA classes relationship
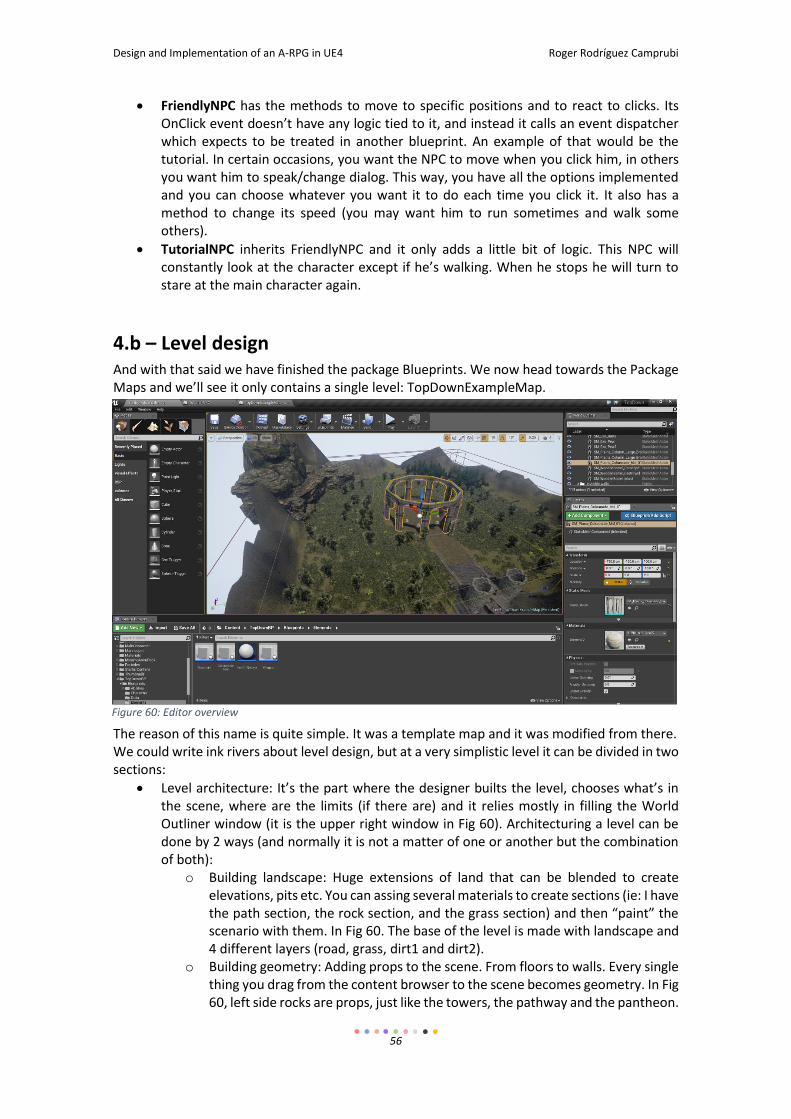
Design and Implementation of an A-RPG in UE4 Roger Rodríguez Camprubi
56
FriendlyNPC has the methods to move to specific positions and to react to clicks. Its OnClick event doesn’t have any logic tied to it, and instead it calls an event dispatcher which expects to be treated in another blueprint. An example of that would be the tutorial. In certain occasions, you want the NPC to move when you click him, in others you want him to speak/change dialog. This way, you have all the options implemented and you can choose whatever you want it to do each time you click it. It also has a method to change its speed (you may want him to run sometimes and walk some others).
TutorialNPC inherits FriendlyNPC and it only adds a little bit of logic. This NPC will constantly look at the character except if he’s walking. When he stops he will turn to stare at the main character again.
4.b – Level design
And with that said we have finished the package Blueprints. We now head towards the Package Maps and we’ll see it only contains a single level: TopDownExampleMap.
The reason of this name is quite simple. It was a template map and it was modified from there. We could write ink rivers about level design, but at a very simplistic level it can be divided in two sections:
Level architecture: It’s the part where the designer builts the level, chooses what’s in the scene, where are the limits (if there are) and it relies mostly in filling the World Outliner window (it is the upper right window in Fig 60). Architecturing a level can be done by 2 ways (and normally it is not a matter of one or another but the combination of both):
o Building landscape: Huge extensions of land that can be blended to create elevations, pits etc. You can assing several materials to create sections (ie: I have the path section, the rock section, and the grass section) and then “paint” the scenario with them. In Fig 60. The base of the level is made with landscape and 4 different layers (road, grass, dirt1 and dirt2).
o Building geometry: Adding props to the scene. From floors to walls. Every single thing you drag from the content browser to the scene becomes geometry. In Fig 60, left side rocks are props, just like the towers, the pathway and the pantheon.
Figure 60: Editor overview
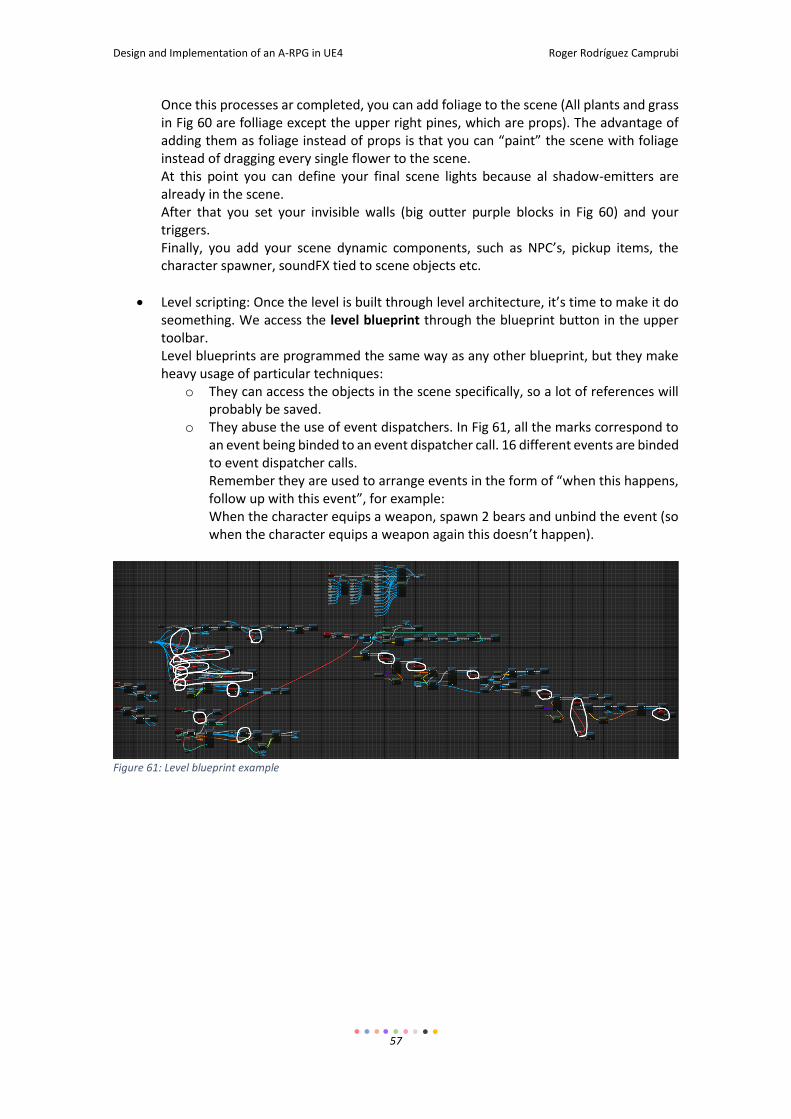
Design and Implementation of an A-RPG in UE4 Roger Rodríguez Camprubi
57
Once this processes ar completed, you can add foliage to the scene (All plants and grass in Fig 60 are folliage except the upper right pines, which are props). The advantage of adding them as foliage instead of props is that you can “paint” the scene with foliage instead of dragging every single flower to the scene. At this point you can define your final scene lights because al shadow-emitters are already in the scene. After that you set your invisible walls (big outter purple blocks in Fig 60) and your triggers. Finally, you add your scene dynamic components, such as NPC’s, pickup items, the character spawner, soundFX tied to scene objects etc.
Level scripting: Once the level is built through level architecture, it’s time to make it do seomething. We access the level blueprint through the blueprint button in the upper toolbar. Level blueprints are programmed the same way as any other blueprint, but they make heavy usage of particular techniques:
o They can access the objects in the scene specifically, so a lot of references will probably be saved.
o They abuse the use of event dispatchers. In Fig 61, all the marks correspond to an event being binded to an event dispatcher call. 16 different events are binded to event dispatcher calls. Remember they are used to arrange events in the form of “when this happens, follow up with this event”, for example: When the character equips a weapon, spawn 2 bears and unbind the event (so when the character equips a weapon again this doesn’t happen).
Figure 61: Level blueprint example

Design and Implementation of an A-RPG in UE4 Roger Rodríguez Camprubi
58
5 - IMPLEMENTATION and TESTING
Design and Implementation of an A-RPG in UE4 Roger Rodríguez Camprubi
59
We explained all the project structure, covering all the classes and the scripts are there to be seen, so we are not covering specific code here, instead we will talk about how it was implemented. With all what we learned through the previous sections we should now be able to start a new game, but I did not know almost any of the things we’ve talked about by September 14, so I had to figure out a way to begin the learning process and the project itself. What we are about to cover is the development process itself, things that would have come handy if I learned them sooner, how I iterated versions in the project, what problems I faced and overtook and which one could me.
5.a – Whish I would have known… This section will be very short and simple. It covers the couple of concepts I which I would have known before programming.
Data structures: I initially knew nothing about how UE4 integrated data structures, so I figured out that the best way to do it was to have a class initializating everything when the game was launched and then save it in IATGameMode. I had massive functions in DataManager to initialize objects. DataManager was, by far, the largest blueprint, with each of its functions being larger than any of the classes. Then I discovered datatables and DataManager functions became just accesses to database. This issue was a huge time sink. Not less than 40 hours were spent in implementing and refactoring data management.
I initially didn’t know how to call a class spawner with parameters, and after researching about it, I ended up with the conclusion that there were no ‘constuctors’ in blueprints. It wasn’t until later (a month in) that I discovered the “expose on spawn” checkbutton in variable details and I started working how it should be done. Seeing it from a perspective, that wasn’t critical, and, at the time, I remembered all the specific places where I missed that, so it was just a few hours to refactor.
5.b – Task scheduling
There was not a formal planned schedule in this project, mainly because it was a new technology and I could not predict when would I be able to implements the design, but also because working alone provides a certain freedom degree that enables you to handle things as they appear and plan ahead what you are most enthusiast about. This will only be a list of ordered tasks. All of them are self-explanatory so there should be no problem at all.
1. Design a. Main mechanic b. Main features c. Game specifics (weapons and abilities) d. Game Lore e. Plot
2. Follow some of tutorials a. 3rd person Game with Blueprints b. Inventory UI with UMG c. UE4 blueprints mouse events d. Watched lots more, but instead of following the whole process and creating a
project, I just watched them and picked what was useful for me. 3. Start the project with a template 4. Implement character controls and camera
Design and Implementation of an A-RPG in UE4 Roger Rodríguez Camprubi
60
5. Implement a basic AI 6. Add simple HUD elements (player resources bar and enemy health bar) 7. Implement Pickup items (BasePickUp) 8. Manage selection and hovering over elements 9. Implement inventory 10. Implement equipped weapon UI 11. Create data entries for items (version 1) 12. Implement data retrieving functions in DataManager (version 1) 13. Implement descriptions and descriptor 14. Upload assets: thumbnails for all items and weapons 15. Create data entries for weapons (version 1) 16. Implement Forge 17. Implement auto-pickable items and testing methods to test all the items and the Forge 18. Implement EnemySpawner 19. Implement pause screen 20. Implement specific abilities 21. Implement AbilityBase and relate it to weapon 22. Re-implement all data structures (version 2[final]) 23. Implement all HUD support for abilities 24. Upload level design assets 25. Build the level architecture 26. Add final models to weapons, items and characters 27. Implement level blueprint 28. Implement Friendly NPC and edit the level to include him and his actions. 29. – CRASH—
5.c – Versions
In this project there are two ways we define a version:
By one hand, I worked using GitLab code repository, and tried to commit every single significant addition (whenever a feature was finished or a bug corrected or a significant amount of assets added etc.) This way, we could call almost every single commit a version. Nevertheless, there are a lot of commits tagged as “unsafe commits” that performed as mere safety copies when I was doing huge refactoring (like the database massive change or some inventory structure heavy refactor).
By the other hand, Oriol (my tutor) and me, had to be in contact and he needed to know how the project was at any given point. There is a problem though, if I’m programming in windows I can’t deploy for Mac OS systems, and, unfortunately, I had no portable device to bring to meetings and show him. That’s why I decided to upload videos reporting the current state of the game. I made 4 of them, and they are explained in catalan.
The first one was mad a month in, and covers design, inventory and main setup. Can be found at: https://www.youtube.com/watch?v=l_li1eQxOdw
Figure 62: First Iron and Time Report cover

Design and Implementation of an A-RPG in UE4 Roger Rodríguez Camprubi
61
Second one was a few days later and it covers the first iteration of the forge and the weapon system. Can be found at: https://www.youtube.com/watch?v=DOU4zIrXAdA
Third one was released a couple of weeks later, and it covered the first implementation of the 12 first skills (the only ones present in the current version). It can be found at: https://www.youtube.com/watch?v=XYHbvUel_h8
The last one does not have voice coverage, since it was intended to be done once the level was fully finished (a state closer to the one we had when the crash occurred), but I realized a month passed without any video upload, so I recorded very quickly an overview of what I was working on. Who would have guessed that would be the last prove of how advanced in development was Iron and Time by the beginning of December... It can be found at: https://www.youtube.com/watch?v=9pA-7spR_M0
5.d – Bugs
This section intends to cover some of the problems I encountered during the development phase and could not figure out by myself what was going on. Fortunately, Unreal Engine has its own portal to post doubts and the community and the staff are there to help. It’s called UE4 Answerhub and it works very similar to the very well-known StackOverflow. I posted there several questions, as shown in Fig 66. I’ll explain all bugs in its order of appearance (so the opposed of the image). Healthbars disappearing when AI goes offscreen was a bug I had for a long time. Thanks to a user called ‘jaragoondoo’ I realised that widget blueprint don’t trigger their EventTick when they are outside of the viewport. So once they dissapeared from the screen they never relocated again. To solve this, I update the widgets from it’s owner EventTick. This specific bug post can be found here: https://answers.unrealengine.com/questions/316420/healthbars-disappearing-when-ai-goes-offscreen.html
Figure 63: Iron and Time Report - FORGE cover
Figure 64: Iron and Time Repor - ABILITIES cover
Figure 65: Iron and Time Report: tutorial map preview

Design and Implementation of an A-RPG in UE4 Roger Rodríguez Camprubi
62
Why doesn’t the camera follow the main character properly in new levels? and New level camera issues are actually the same bug posted twice. The first one didn’t get responses, so I posted it again later on. Even though, I only got one response the second time and it didn’t solve my doubt. Links two both posts here: https://answers.unrealengine.com/questions/334158/why-does-the-camera-follow-the-main-character-prop.html https://answers.unrealengine.com/questions/347569/new-level-camera-issues.html How to destroy an actor and its shadow was resolved by a user called ‘Jacky’. I had some pillars in my level casting shadows when they were destroyed. Thanks to him I realized you have to set the object to movable instead of static, because if it is in the static, the engine only calculates its interaction with static lights once. URL to this post here: https://answers.unrealengine.com/questions/346746/how-to-destroy-an-actor-and-its-shadow.html The next one is the one that crashed the editor. It’s not a problem but an UE4 bug, and its severity makes it worth of its own section.
Figure 66: UE4 Answerhub questions
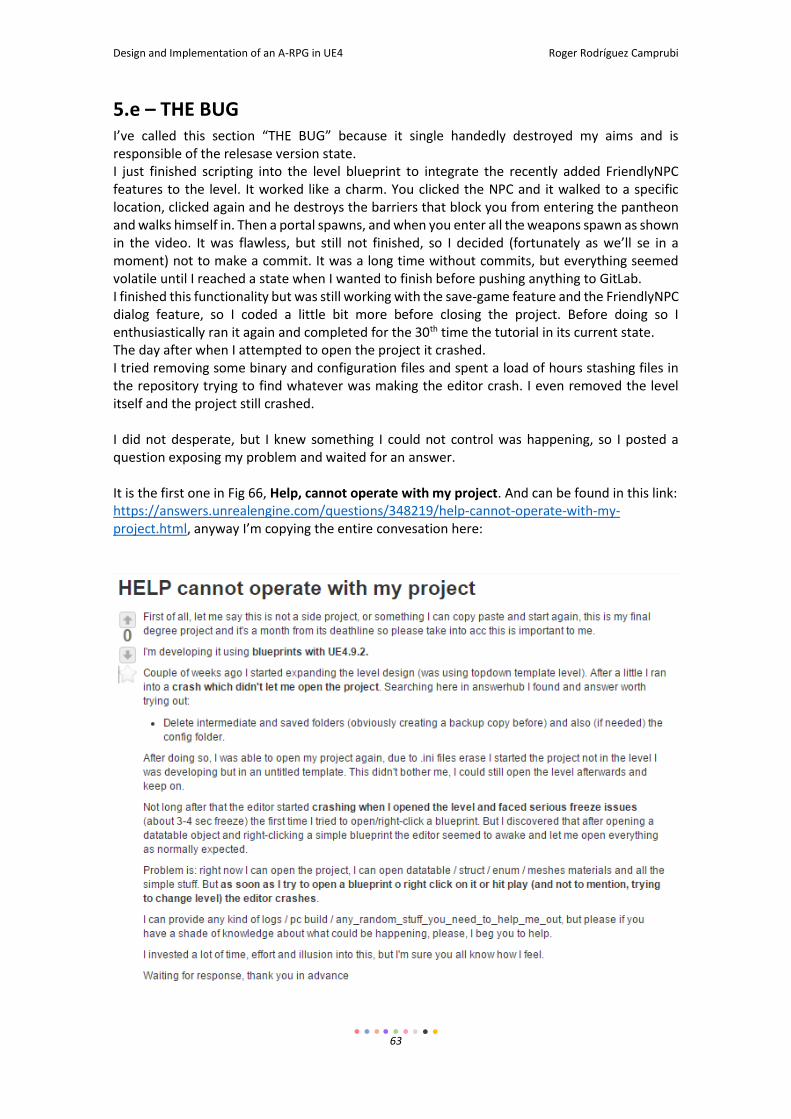
Design and Implementation of an A-RPG in UE4 Roger Rodríguez Camprubi
63
5.e – THE BUG
I’ve called this section “THE BUG” because it single handedly destroyed my aims and is responsible of the relesase version state. I just finished scripting into the level blueprint to integrate the recently added FriendlyNPC features to the level. It worked like a charm. You clicked the NPC and it walked to a specific location, clicked again and he destroys the barriers that block you from entering the pantheon and walks himself in. Then a portal spawns, and when you enter all the weapons spawn as shown in the video. It was flawless, but still not finished, so I decided (fortunately as we’ll se in a moment) not to make a commit. It was a long time without commits, but everything seemed volatile until I reached a state when I wanted to finish before pushing anything to GitLab. I finished this functionality but was still working with the save-game feature and the FriendlyNPC dialog feature, so I coded a little bit more before closing the project. Before doing so I enthusiastically ran it again and completed for the 30th time the tutorial in its current state. The day after when I attempted to open the project it crashed. I tried removing some binary and configuration files and spent a load of hours stashing files in the repository trying to find whatever was making the editor crash. I even removed the level itself and the project still crashed. I did not desperate, but I knew something I could not control was happening, so I posted a question exposing my problem and waited for an answer. It is the first one in Fig 66, Help, cannot operate with my project. And can be found in this link: https://answers.unrealengine.com/questions/348219/help-cannot-operate-with-my-project.html, anyway I’m copying the entire convesation here:
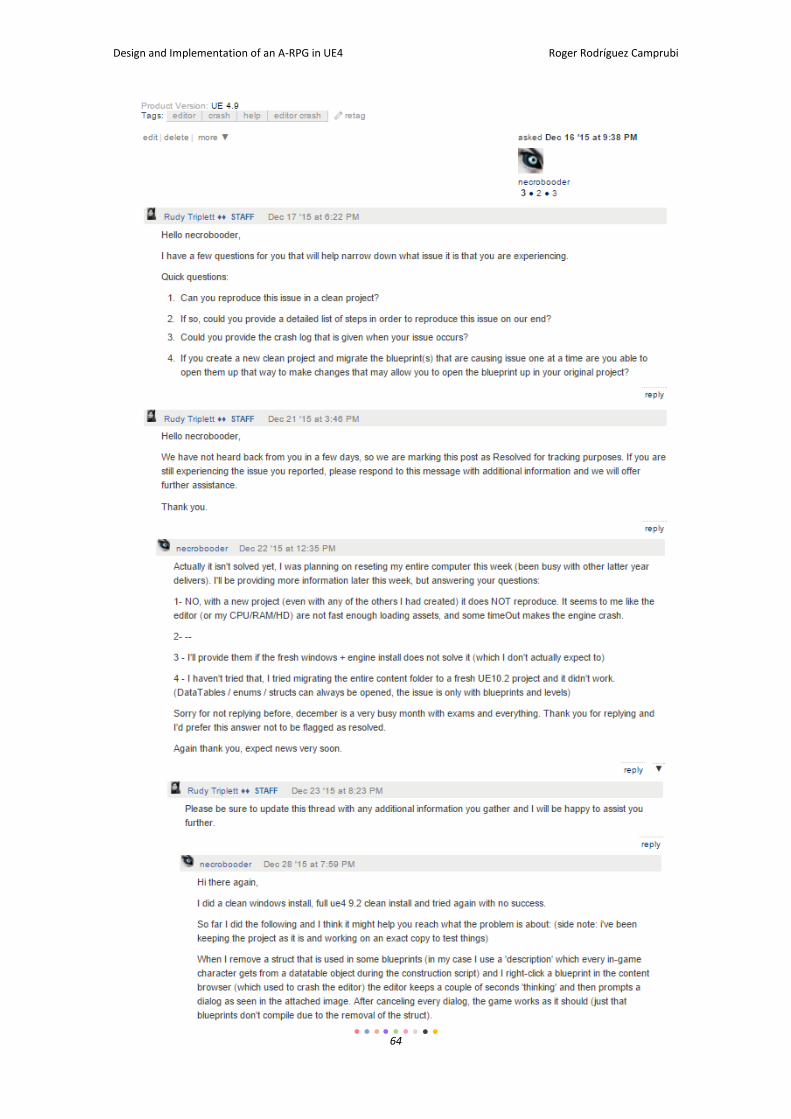
Design and Implementation of an A-RPG in UE4 Roger Rodríguez Camprubi
64

Design and Implementation of an A-RPG in UE4 Roger Rodríguez Camprubi
65
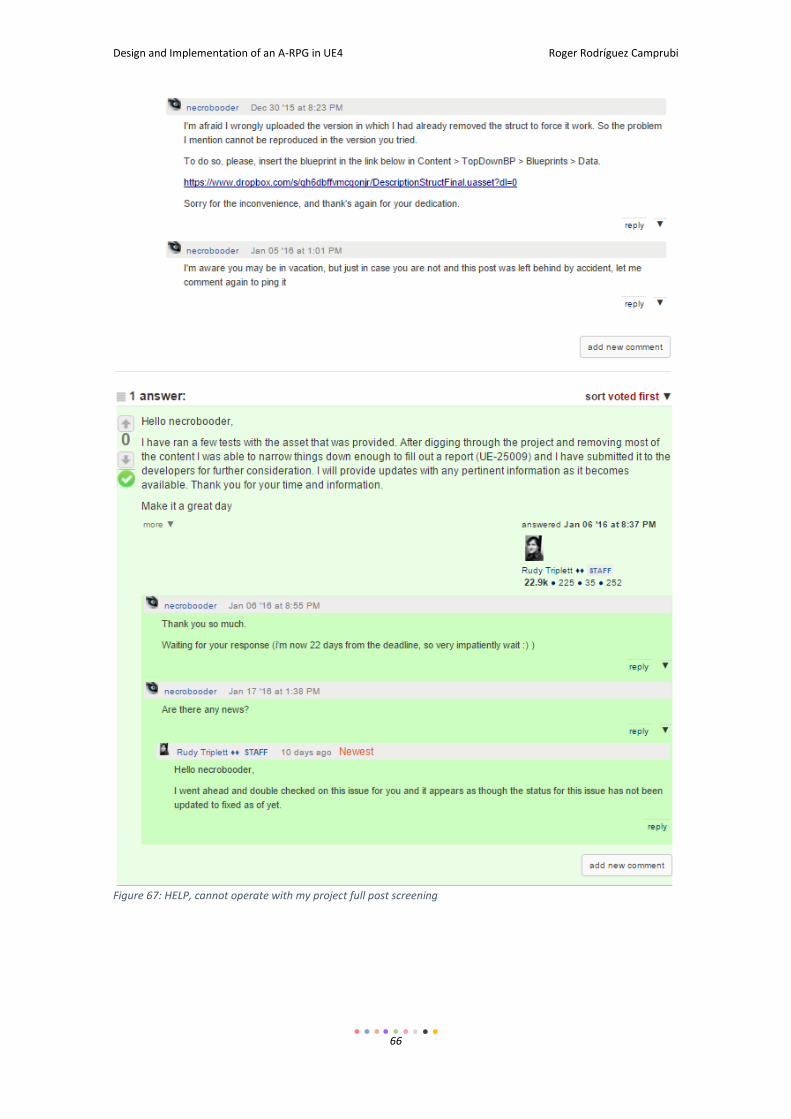
Design and Implementation of an A-RPG in UE4 Roger Rodríguez Camprubi
66
Figure 67: HELP, cannot operate with my project full post screening
Design and Implementation of an A-RPG in UE4 Roger Rodríguez Camprubi
67
6 - CONCLUSIONS
Design and Implementation of an A-RPG in UE4 Roger Rodríguez Camprubi
68
6.a – What it is Being totally honest here. It is a decent display of what can be achieved with passion and bad luck. If I have had only the time I was able to spend in the project (September 14 to December 15, being a total of 3 months instead of the expected 4 and a half) I could have made really better project. What I’m trying to say is that having to stop midway has a very punishing disadvantage. About half of my work isn’t visible in the project. And I’m not talking about assets. Forge was implemented paying strong attention to rank 3 and 4 weapons for example, and they are not obtainable. Abilities and AI (to give a couple of examples) were structured in a way to make it easy to expand, so it meant an important effort that never payed of, given that we only had about a quarter of the abilities, a fifth of the weapons and only one enemy (I expected to have 10 to 20 different enemies). And don’t make me talk about design. No story, no plot, no advanced gameplay mechanics. Nothing of what made the design special is in the game. When I first posted the bug I expected it to be solved within a week. At the end of the day I wasn’t working in any very specific risky fields, so I supposed it was a frequent error with a generic solution. It is maybe due to the fact that disappointment has been increased gradually rather than all-at-a-time that now I can stay calm and release this version as it is. I can’t hide my feelings, I was very passionate at this, spending 8+ hours a day (and have a 6 hours/day job) in the project for more than two months and about 4-5 hours a day for another month (when university duties required to slow down) but now I feel a huge disappointment: what was supposed to become my first project and my presentation card to enter the videogame industry ended up awfully. Leaving the perceptions aside. As a final degree project I feel I have learnt a lot of useful knowledge that will surely come handy further in my career. Besides, the project itself is not near its end, but I think it is still very good as a university project (taking into account part of the project was getting familiar with the environment).
6.b – What should be and isn’t I want this point and the next one to be very brief. The Idea of the “What should be and isn’t” section is to illustrate how this project should improve to achieve a release-ready state without expanding its contents. There are a few things that should be done if the current version was the one to deliver.
Add sounds and music (what is a videogame without them anyway?)
Implement the two functionalities I was working on: Save-game feature and FriendlyNPC’s dialogs.
Actually cook the project (transform it into an executable file to make it available to all those who don’t have UE4 installed)
Add a launcher menu
Design and Implementation of an A-RPG in UE4 Roger Rodríguez Camprubi
69
6.c – What may be Realistically speaking, I was unsure about the actual chances of finishing all the project as it was designed. This is “what may be”, the full implementation of the design. I had lots of ideas for fight mechanics, I was very impatient to reach the number balance phase and truly configure how a certain gameplay is rewarded instead of just spamming one ability. What it may be is THE final product. Not A final product but THE final one. Developer-wise speaking, most of the logic was already made. The only “pure logic” parts missing are the rest of the abilities and enemy/combat specific mechanics, the rest is level design and implementation of weapons final models for example. The thing here is that early December I reached the point when it all began to happen very quickly, because the core was already built, and the rest was mainly creative work, so, even if it was a lot, it is a very rewarding work to do and therefore a job in which is easy to spend hours and don’t get bored, so I felt confident about finishing the game and adding some cinematics and voice acting before the deadline.
6.d – What will become I wanted to write this section here to state that I haven’t given up with this project. I will keep in touch with the developers, and as soon as they reply, I will resume it where I left it and work hard to eventually come up with THE final product or even a better one. I plan to publish this on some platform (probably Steam Greenlight) once it is finished, so if there’s only one thing you can get from this paper, take the game’s name: Iron and Time, because it definitely doesn’t end here and perhaps you could hear about it in some point in the future.
Design and Implementation of an A-RPG in UE4 Roger Rodríguez Camprubi
70
7 – BIBLIOGRAPHY Due to its creative nature, there is not a huge amount of sources. Although there are some blogs, Youtube channels and wikis I used during both design and development phases. Creating a great design Tzvi Freeman Article about the philosophy of design documentation as well as tips and guidelines for GDD (Game design documentation) http://www.gamasutra.com/view/feature/131632/creating_a_great_design_document.php 3rd person game with blueprints Unreal Engine Video tutorial to introduce UE4 blueprints https://www.youtube.com/playlist?list=PLZlv_N0_O1ga0IoRrpI4xkX4qmCrhGu56 Inventory UI with UMG Unreal Engine Video tutorial to introduce to UMG through the development of an inventory https://www.youtube.com/playlist?list=PLZlv_N0_O1gZalvQWYs8sc7RP_-8eSr3i Introduction to UE4 Level Creation Unreal Engine Video tutorial to introduce to UE4 Level geometry (architecture) Tesla Dev Youtube channel TeslaDev Youtube channel with lots of short tutorials about Unreal Engine 4. https://www.youtube.com/user/TeslaUE4/feed UE4 Answerhub Unreal Engine Unreal Engine’s portal to enable the community to share doubts and help each other in UE4 development https://answers.unrealengine.com/index.html UE4 Documentation Unreal Engine Unreal Engine’s official documentation site. https://docs.unrealengine.com/latest/INT/index.html The Art of Game Design Jesse Schell The so-called bible of game design. A great book about what game design is about and how it shoud be done Wikipedia articles I used Wikipedia to search about Epic Games, Unreal Engine and Game Engines. https://en.wikipedia.org/wiki/Epic_Games https://en.wikipedia.org/wiki/Unreal_Engine https://en.wikipedia.org/wiki/Game_engine