Computer-aided Software Engineering in a Computer Supported
31
Computer-aided Software Engineering in a Computer Supported Cooperative Work Environment * Technical Report 96-13 Jonathan D. Fouss Department of Computer Science & Engineering 107 Dunstan Hall Auburn University Auburn, AL 36849-5347 USA November 13, 1996 * This work is supported, in part, by the U.S. Department of Commerce, National Institute of Standards and Technology, under contract No. 70NANB5H0117.
Transcript of Computer-aided Software Engineering in a Computer Supported

Computer-aided Software Engineering in a ComputerSupported Cooperative Work Environment *
Technical Report 96-13
Jonathan D. Fouss
Department of Computer Science & Engineering
107 Dunstan Hall
Auburn University
Auburn, AL 36849-5347 USA
November 13, 1996
* This work is supported, in part, by the U.S. Department of Commerce, National Institute ofStandards and Technology, under contract No. 70NANB5H0117.
ii
REPORT ABSTRACT
Computer-aided Software Engineering in a Computer
Supported Cooperative Work Environment
Jonathan D. Fouss
Department of Computer Science & Engineering
107 Dunstan Hall
Auburn University
Auburn, AL 36849-5347 USA
ABSTRACT
Most of today’s applications have been targeted at making individuals more productive. It
is quite common, however, for groups of individuals to collaborate on a project. Computers
support the individual work done by group members but provide only token support for group
interaction. There is a need for new tools that provide an environment where a group can
cooperate on a project. Most work done in this area has thus far been targeted toward office
automation and communication. However, there has been very little done to provide a group tool
that supports the engineering design process. The objective of the computer supported
cooperative work (CSCW) project is to provide an environment that supports this process. In
particular, this environment provides collaborative tools that support computer-aided design

iii
(CAD) and computer-aided software engineering (CASE). A CSCW environment has been
developed by a team of faculty and students at Auburn University. This system is an expansion of
an earlier project that focused on collaborative writing, called Distributed Collaborative Writing
Aid (DCWA). The CSCW project has added support for CAD and CASE. This paper discusses
the method used to implement the CASE support. In particular, it addresses how group members
can simultaneously work on coding a program and then integrate their work to form a single
program.

iv
TABLE OF CONTENTS
1. INTRODUCTION............................................................................................................................................ 1
2. PROBLEM....................................................................................................................................................... 2
3. SOLUTION ...................................................................................................................................................... 4
4. IMPLEMENTATION...................................................................................................................................... 6
5. DEMONSTRATION...................................................................................................................................... 13
6. CONCLUSION............................................................................................................................................... 25

v
TABLE OF FIGURES
FIG. 1 DCWA’S LOGICAL VIEW ............................................................................................................................... 2FIG. 2 INTEGRATING CODE SEGMENTS...................................................................................................................... 3FIG. 3 CREATING A CODE NODE................................................................................................................................ 6FIG. 4 THE FIRST CODE NODE................................................................................................................................... 9FIG. 5 CREATING A COLLABORATION ..................................................................................................................... 14FIG. 6 THE INITIAL LOGICAL VIEW.......................................................................................................................... 15FIG. 7 FOUR NEW NODES ....................................................................................................................................... 15FIG. 8 SETTING A NODE’S ATTRIBUTES ................................................................................................................... 16FIG. 9 LOGICAL VIEW AFTER FIRST CODE NODE IS CREATED ..................................................................................... 17FIG. 10 DEFAULT FOR DEMO.MASTER.CC................................................................................................................ 17FIG. 11 DEFAULT FOR DEMO.GLOBAL.CC................................................................................................................ 18FIG. 12 DEFAULT FOR DEMO.MAKEFILE ................................................................................................................. 18FIG. 13 DEFAULT FOR INIT.CC................................................................................................................................ 19FIG. 14 INIT.CC AFTER CODE IS ENTERED ................................................................................................................ 20FIG. 15 THE UPDATE COMMAND ............................................................................................................................. 21FIG. 16 CHOOSING CODE NODES ............................................................................................................................ 21FIG. 17 THE UPDATED DEMO.MASTER.CC................................................................................................................ 22FIG. 18 THE UPDATED DEMO.MAKEFILE ................................................................................................................. 22FIG. 19 DEMO.MASTER.CC AFTER MAIN PROCEDURE HAS BEEN CODED...................................................................... 23FIG. 20 THE MAKE COMMAND ................................................................................................................................ 24FIG. 21 MAKE UTILITY’S OUTPUT ............................................................................................................................ 24FIG. 22 EXECUTION OF DEMO.CC ........................................................................................................................... 25

1
1. IntroductionThe computer has become an invaluable tool throughout the corporate world and has
greatly enhanced productivity. However, most applications have been targeted at making
individuals more productive. With the development of networks, computers have expanded their
role somewhat and now provide easy ways to communicate, share data, and share applications.
Still, the environment provided by most computer systems is largely targeted at the individual. It
is quite common, however, for groups of individuals to collaborate on a project. Computers
support the individual work done by group members but provide only token support for group
interaction. The details of this interaction is left for the users to organize. There is a need for
new tools that provide an environment where a group can cooperate on a project. Most work
done in this area has thus far been targeted toward office automation and communication.
However, there has been very little done to provide a group tool that supports the engineering
design process. The objective of the computer supported cooperative work (CSCW) project is to
provide an environment that supports this process. In particular, this environment provides
collaborative tools that support computer-aided design (CAD) and computer-aided software
engineering (CASE). [1]
A CSCW environment has been developed by a team of faculty and students at Auburn
University. This system is an expansion of an earlier project that focused on collaborative writing,
called Distributed Collaborative Writing Aid (DCWA). The CSCW project has added
functionality so that it supports CAD and CASE. The central idea behind the system is that a
collaborative project can be represented as a tree. When using the system, each group member
views this tree from their own workstation. The tree also known as the logical view (Figure 1) is

2
Fig. 1 DCWA’s logical view
located in DCWA's main window. From the logical view, the group can manipulate the tree
structure to organize the project. The leaf nodes of the tree contain the data of the project and
can be text or graphics. Leaf node contents can be edited by any group member who clicks on the
appropriate node. Color changes of the node indicate to all members when a node is being edited
and is locked. Through this system group members can work on different parts of the project
simultaneously. DCWA does allow multiple group members to view a locked node's contents.
This means the group members can discuss that part of project. Communication between
members is facilitated by DCWA's video conferencing system. [4]
2. ProblemOne of the objectives of DCWA is to allow groups to collaborate on software
development. The intention is to give users a single place to perform all the steps of the typical

3
software engineering development process. Text and graphic nodes provide the means to
generate documents, graphs, charts, and other deliverables for the analysis and design phases. A
new type of node, the simulation or code node, is needed to provide the means for software
implementation and/or prototyping. Once these code nodes have been created, DCWA integrates
them together and generates an executable. (Figure 2)
Fig. 2 Integrating code segments
Three basic problems must be addressed by any procedure that attempts to implement this
feature. First, there must be a method to unite the code segments in a proper sequence. DCWA
allows much freedom when creating a tree structure for a collaboration. There is therefore no
guarantee that the tree structure presented in the logical view will have the code segments in the
necessary order. Furthermore, simply "gluing" segments together would make it difficult to
implement flow control in the program.
A second problem that must be investigated is naming conventions. Anytime several
individuals work on a programming project, there is a chance that there will be conflicts with
4
variable names. The same name could easily end up being used to identify different variables.
Likewise it is possible that a single variable may be identified by several different names. The
solution must be able to handle these type of situations.
The third problem is that of global data structures. It is likely that there will be some data
structure unique to the program and that this structure will be used in several of the code nodes.
It would be undesirable to force users to define the structure in every node that uses it. So there
should be a way that the structure can be defined once and that all of the code nodes can use it.
3. SolutionThe basic approach used by DCWA is to force users to adhere to some common practices
when developing software in C++. Normally when developing a large program, code is broken
down into several files. The code files are then combined through the use of #INCLUDE
directives in the actual code files and of some make utility. This technique is used for several
reasons. One, it is simply easier to edit and debug smaller files. For example, if a program had
fifty functions, it would be much easier to find a particular function if related functions are
grouped together in a file with a reasonably descriptive file name. Two, it would be difficult for
several people to edit a single file. Breaking a program in to several files allows several
individuals to simultaneously work on the same program. Three, splitting a program in to several
files saves on compiler time. If the program was contained in a single file, the whole program
would have to be recompiled whenever a change was made. By splitting the program, only the
altered file must be compiled. [5]
The first part of the approach is to define precisely what is allowed in code nodes. Instead
of simply allowing any fragment of code, DCWA specifies that the content of code nodes should
be black box functions. This means the code segments in the nodes should be complete, self-

5
contained functions with a single, distinct point of entry for the data it needs and a single, distinct
point where it places its output. Complete means that the node contains the whole function and
not a piece of it. Self-contained indicates the node needs only the appropriate data to operate
correctly and will not make calls to other code nodes. Requiring data to enter and leave the
function at a well defined point essentially means that the users should attempt to avoid global
variables if possible. The only information a user of the function needs to know is its name, its
parameters, and its return type(if any). Anyone using the function should not need intimate
knowledge of how the function was implemented.
By enforcing this constraint on the content in code nodes, the nodes essentially become
building blocks. After all the building blocks have been completed, a single user can organize
them and create the desired program. This integration code is stored in the collaboration's
"master" file. DCWA automatically creates the master file and places the necessary code (e.g.
include statements) to allow the code node functions to be used. It is normally a single user's
responsibility to write the main program with any necessary flow control and output. In this
manner, the problem of ordering is solved. The problem of name conventions is also solved since
the variables in each code node will have scope only in that node.
To address the problem of shared data structures, DCWA uses a "global" file for each
collaboration. In the global file, users can define any data structures to which multiple code nodes
and the master file need access. DCWA then performs the necessary processing to make these
definitions available. This file can also be used to place #INCLUDE and/or #DEFINE directives
that may be needed by several nodes. It is important to note that this file can not be used to
define global variables and that this approach encourages users to avoid their use. It is still
6
possible to use global variables, but they must be first defined in the master file. The user must
then redefine the global variables in the code nodes with the EXTERN command. [5]
To produce the executable, DCWA produces a "make" file. The make file contains all the
required information needed to compile the program. The user can edit the make file to make any
customizations needed. For example, the user may need to define the appropriate directories for
any libraries that are used. At the user's request, DCWA runs the make file through the UNIX
make utility to create the executable code.
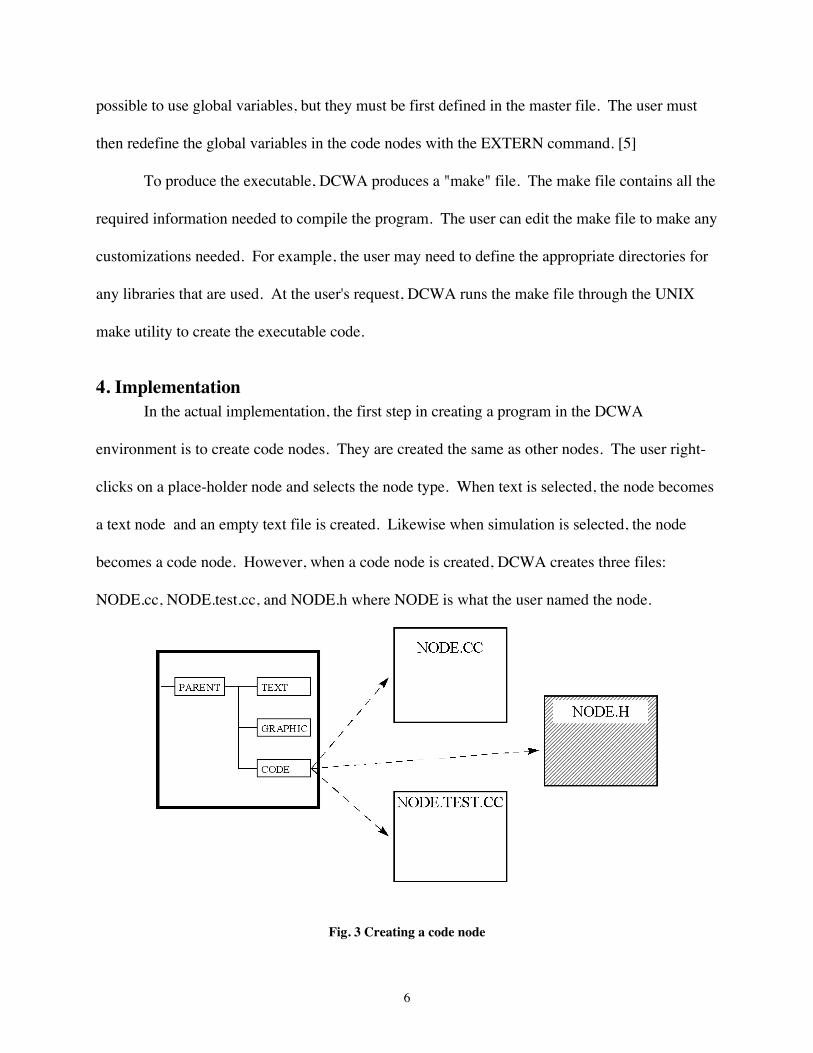
4. ImplementationIn the actual implementation, the first step in creating a program in the DCWA
environment is to create code nodes. They are created the same as other nodes. The user right-
clicks on a place-holder node and selects the node type. When text is selected, the node becomes
a text node and an empty text file is created. Likewise when simulation is selected, the node
becomes a code node. However, when a code node is created, DCWA creates three files:
NODE.cc, NODE.test.cc, and NODE.h where NODE is what the user named the node.
Fig. 3 Creating a code node

7
The white boxes in Figure 3 indicate that the files can be edited by the user while the gray box can
not. The editable code files are accessed like the other types of node files. The user simply left-
clicks on the desired node, and the file is loaded into the appropriate editor. One slight difference
is that since two editable files are associated with a code node, two text editors are loaded so the
user can work on both files. DCWA will make the appropriate locks so other users can view the
file but not edit it.
Neither of the editable files are empty upon creation but are actually worksheets, or
templates, that the user must fill out. Various markers in the template are then sought out and
replaced to customize the template for the node and collaboration. For example, one such marker
is <GLOBAL_HEADER_FILE>. This marker is replaced by the collaboration's global header file
(e.g. COLLAB.global.h). This altered template is then written to the newly created node file.
NODE.cc is the main node file and is where the user will define the black box function for
the node. The default template for a NODE.cc file follows.
#include "<GLOBAL_HEADER_FILE>"/** REPLACE THIS LINE WITH THE PROTOTYPE FOR YOUR FUNCTION!!! **//* PLACE DESCRIPTIVE COMMENTS ABOUT YOUR FUNCTION AND HOW TO CALL IT PROPERLY HERE!!!*//** PLEASE DO NOT REMOVE OR ALTER THIS LINE!!! **/
/***** * PLACE CODE FOR YOUR FUNCTION HERE *****/
/************************************************** * NOTE TO THE USER: * * For the program to function properly it is * * important to place the prototype for your * * function above the 'DO NOT REMOVE' line and * * to NOT remove or alter the 'DO NOT REMOVE' * * line. * * * * Note that the comments you place in the area * * marked for comments will be copied to the * * master file to help the author of that file * * connect the various functions together. * **************************************************/
The template generated for this file has three purposes. First, the template inserts a special
line that divided the file into two sections. The marker states "PLEASE DO NOT REMOVE...".

8
This file marker is used by DCWA when processing the node file and as the line suggests should
not be altered by the user. Second, it has several comments explaining how code should be
placed in the file. The comments inform the user that he should place a prototype for the node's
function and some descriptive comments of that function in the section above the file marker.
They also instruct the user to place the code for his function below the file marker. Third, it
includes the global header file so that global definitions may be used in the function. When the
user saves the node file, DCWA reads the file starting with the line after the global include
statement and ending with the line before the file marker. In this manner the function prototype
and comments will be read. DCWA places this information in the node header file. The node
header file is used when updating the master file and will be explained later.
The purpose of NODE.test.cc is to allow a code node's author to test and debug his
function before it is incorporated into the master file. The template for this file contains necessary
statements to make the global definitions and the node function available for use in
NODE.test.cc. The default template for a NODE.test.cc file follows.
#include "<GLOBAL_HEADER_FILE>"#include "<NODE_HEADER_FILE>"
main(){}
It also contains an empty main() procedure. The user can write a simple program in this file that
tests his function.
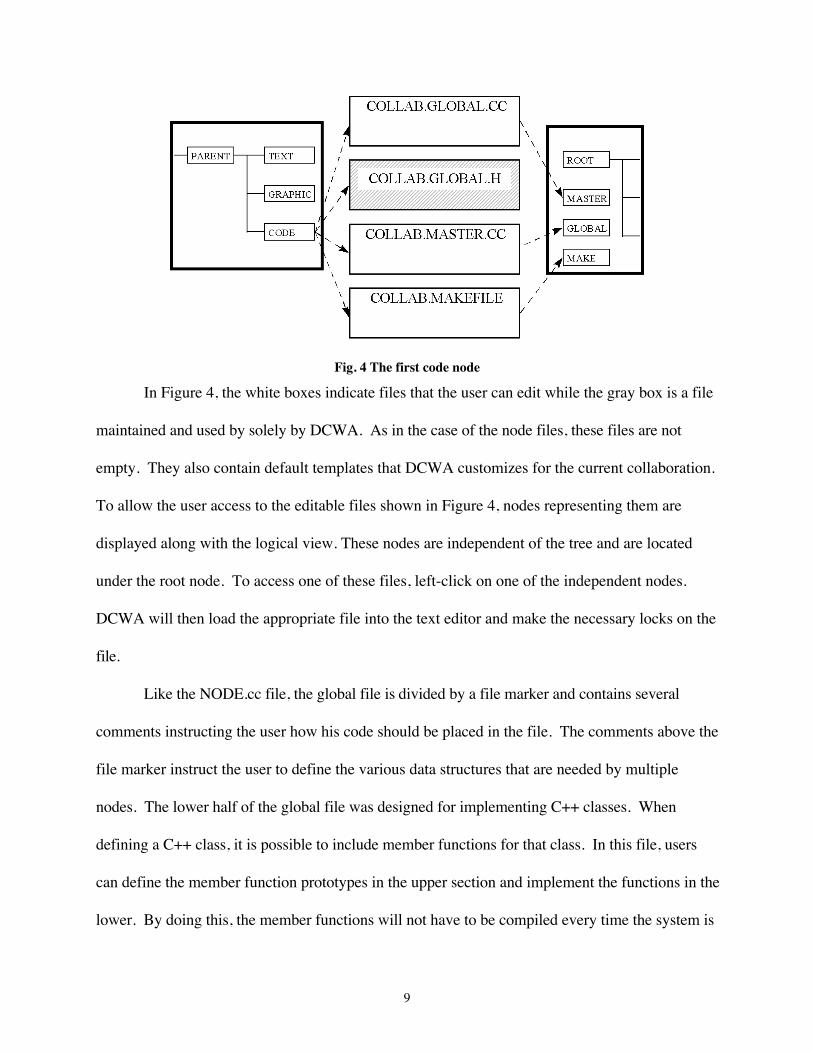
Once the code nodes have been completed, the next step is to combine them. This process
begins when the collaboration's first code node is created. This first code node indicates the users
will be using this collaboration for software development. Therefore DCWA creates four files:
COLLAB.global.cc, COLLAB.global.h, COLLAB.master.cc, and COLLAB.Makefile where
COLLAB is the name of the collaboration.
9
Fig. 4 The first code node
In Figure 4, the white boxes indicate files that the user can edit while the gray box is a file
maintained and used by solely by DCWA. As in the case of the node files, these files are not
empty. They also contain default templates that DCWA customizes for the current collaboration.
To allow the user access to the editable files shown in Figure 4, nodes representing them are
displayed along with the logical view. These nodes are independent of the tree and are located
under the root node. To access one of these files, left-click on one of the independent nodes.
DCWA will then load the appropriate file into the text editor and make the necessary locks on the
file.
Like the NODE.cc file, the global file is divided by a file marker and contains several
comments instructing the user how his code should be placed in the file. The comments above the
file marker instruct the user to define the various data structures that are needed by multiple
nodes. The lower half of the global file was designed for implementing C++ classes. When
defining a C++ class, it is possible to include member functions for that class. In this file, users
can define the member function prototypes in the upper section and implement the functions in the
lower. By doing this, the member functions will not have to be compiled every time the system is

10
compiled. During compilation, object code is created from the global.cc file and linked with the
other files. The default template for COLLAB.global.cc follows.
/*DEFINE GLOBAL CLASSES, STRUCTURES, ETC. INTHIS AREA BEFORE THE 'DO NOT REMOVE' LINE. THIS ISALSO A GOOD PLACE TO PUT #include STATEMENTSNEEDED BY MULTIPLE NODES
*/
/** PLEASE DO NOT REMOVE OR ALTER THIS LINE!!! **/
/* * DEFINE MEMBER FUNCTIONS FOR YOUR CLASSES HERE...BELOW * THE 'DO NOT REMOVE' LINE.*/
/************************************************** * NOTE TO THE USER: * * For the program to function properly it is * * important to follow the above directions. * **************************************************/
The master.cc file is also divided by a file marker. Unlike the files discussed previously,
the top section of this file is maintained by DCWA. In this section, DCWA will place the
necessary statements to allow the functions defined in code nodes to be used. This updating
process will be discussed later in this section. The master.cc default template follows.
#include "<GLOBAL_HEADER_FILE>"
/** Do NOT change this line or the lines above!!! **/
int main(int argc, char *argv[]){
return 0;}
Below the divider is where the user inserts the code necessary to link the nodes together in
an appropriate order. DCWA automatically creates an empty main procedure when the master
file is initialized, but the user must institute the flow control that is needed and handle the output
that is deemed necessary. DCWA's maintenance of the top section does not affect the code below
the file marker.
DCWA uses a make file to generate the executable. Again, DCWA creates a default make
file customized from its templates. When the user issues the appropriate command to generate

11
the executable, this make file is run through the UNIX make utility. The commands in the make
file cause the necessary compile commands to be issued to the system. There is no file marker in
the make file, but comments instructing the user on the use of the file divide it logically into three
sections. The COLLAB.Makefile default template follows.
<COLLABORATION = >
NODES =NODES_C =NODES_O =
##################### BEGIN USER CUSTOMIZATION AREA ###################
# Set CC equal to your compiler name--Sparc Compiler C++ (default)CC = CC
# Set CFLAGS to any special options you wish to pass to your compiler.# By default, information needed by the debugger is included by the -g option.# See the documentation for your compiler for information about options that# you can pass to it.CFLAGS = -g
# Set CPPFLAGS to any options needed by the preprocessor. This will most# often be the include paths (of any library header files) not searched# by default by your compiler. For example, the line:# CPPFLAGS = -I/opt/openwin/include# tells the preprocessor where to find header files for the X Window system.# See the documentation for your compiler to determine what paths are# automatically searched.CPPFLAGS =
# Set LDLIBS to any options needed by the linker. This will most often# include directories and library names not linked by default by the# linker. For example, CC does not normally link in the X libraries, but# LDLIBS = -L/opt/openwin/lib -lXt -lX11# tells the linker to look in the specified directory and get the Xt and X11# libraries. See your compiler's documentation for information on# options that can be passed to the linker.LDLIBS =
###################### END USER CUSTOMIZATION AREA ####################
# The rest of this file should not, in general, be modified by the user.
EXECUTABLE = $(COLLABORATION).exe
ALL_H = $(COLLABORATION).global.h
ALL_C = $(COLLABORATION).master.cc \$(COLLABORATION).global.cc \$(NODES_C)
ALL_O = $(COLLABORATION).master.o \$(COLLABORATION).global.o \$(NODES_O)
# Generate an executable from simulation nodes, master file, and globals$(EXECUTABLE): $(ALL_O)
$(CC) -o $@ $(ALL_O) $(LDLIBS)chmod 770 $@

12
# Generate an object file from a C/C++ file%.o: %.cc
$(CC) $(CFLAGS) $(CPPFLAGS) -c $<chmod 660 $@
# Compile and link the test driver for a simulation node. The resulting# file will be [nodename].test and will be located in the same directory# as the simulation node
%.test: %.test.cc$(CC) $(CFLAGS) $(CPPFLAGS) -o $@ [email protected]
The top section is the most important part of the file and is maintained by DCWA. The three
node lines ("NODES =", "NODES_C =", and "NODES_O =") in this section define what code
nodes are included in the program so that they can be compiled.
The middle section is where the user can customize the compilation process to suit his
needs. For example, the program may make use of a particular library. The user would then need
to inform the compiler where the appropriate header files and libraries are located. This section
is heavily commented to guide the user in making the customizations. The bottom section
contains the actual compilation commands. These commands use the information defined in the
upper sections to generate an executable.
One of the choices on the main menu of the logical view window is CASE, and the user is
proffered two choices from this menu: UPDATE and MAKE. When the user selects Update, a
dialog box containing a list of all the code nodes is displayed. This list is generated by searching
the logical tree and finding all the code nodes. Once this is done, DCWA reads the top section of
the collaboration's make file. Code nodes that appear in this section are indicated by highlighting
them in the dialog box. The user can then select and/or deselect code nodes in the list. When
finished, the user clicks on the OK button in the dialog box. This action causes global.h,
master.cc, and makefile to be updated.
In the update process, DCWA first updates global.h by reading the top section of global.cc
and writing it to global.h. Then to update the master file, DCWA creates a new file. First, the
13
#INCLUDE directive for global.h is written to this new file. Next, the header file (NODE.h) of
each of the nodes selected is copied into the file. Finally, DCWA copies the bottom half of the
master file into the new file. DCWA then makes a backup of the current master file and turns the
new file in to the master file. In this manner, the prototypes and descriptive comments for each of
the selected code nodes are included in master.cc. This process provides master.cc with the
appropriate statements needed for compiling. By writing out the prototypes and comments, it is
hoped that the composer of master.cc will be able to use the functions without having to refer
back to the individual nodes.
To update the makefile, DCWA first constructs the new node lines from the code nodes
selected by the user. It then reads the current makefile into a string and searches this string for
the node lines. The current node lines are replaced with new ones. Finally, this string is written
back to the file replacing the old contents.
Once the code is ready for compilation, the user can choose MAKE to compile the entire
program. This function simply invokes the UNIX make utility with the following command:
make -f COLLAB.Makefile
The resulting output is piped to a dialog box for the user to view. Assuming the compilation is
successful, DCWA creates an executable file named COLLAB.exe. This file can be run at the
user's leisure.
5. DemonstrationTo further explain this process, a sample run using the system follows. In the sample run,
a collaboration will be created and used to implement a simple program. The collaboration will
only contain code nodes and will demonstrate how these nodes are created and then integrated
together to build an executable program.

14
The first step is to create a new collaboration. In Figure 5, DCWA has been started and
the option to create a new collaboration has been selected. The name of this collaboration will be
demo and it will have three group members, the creator and two others. Once the initial
parameters have been set, the START button is selected. At this time the system will create a
appropriate files for the collaboration and start the session. In Figure 6, the collaboration has
been started and the logical view has been loaded with the root node.
Fig. 5 Creating a collaboration

15
Fig. 6 The initial logical view
The next step is to create the structure for this project. Collaboration demo will be a simple
project. It will only contain four code nodes. Figure 7 shows the placement of the nodes.
Fig. 7 Four new nodes

16
Fig. 8 Setting a node’s attributes
In Figure 8, the user has right-clicked on a node and brought up the node attributes dialog
box. In this box, the user sets the node type and names the node. In this test run, assume
simulation is selected. When the first simulation node is created, DCWA recognizes the user's
intent for software development. It therefore creates the files needed for the CASE system and
the nodes needed to access them (Figure 9).

17
Fig. 9 Logical view after first code node is created
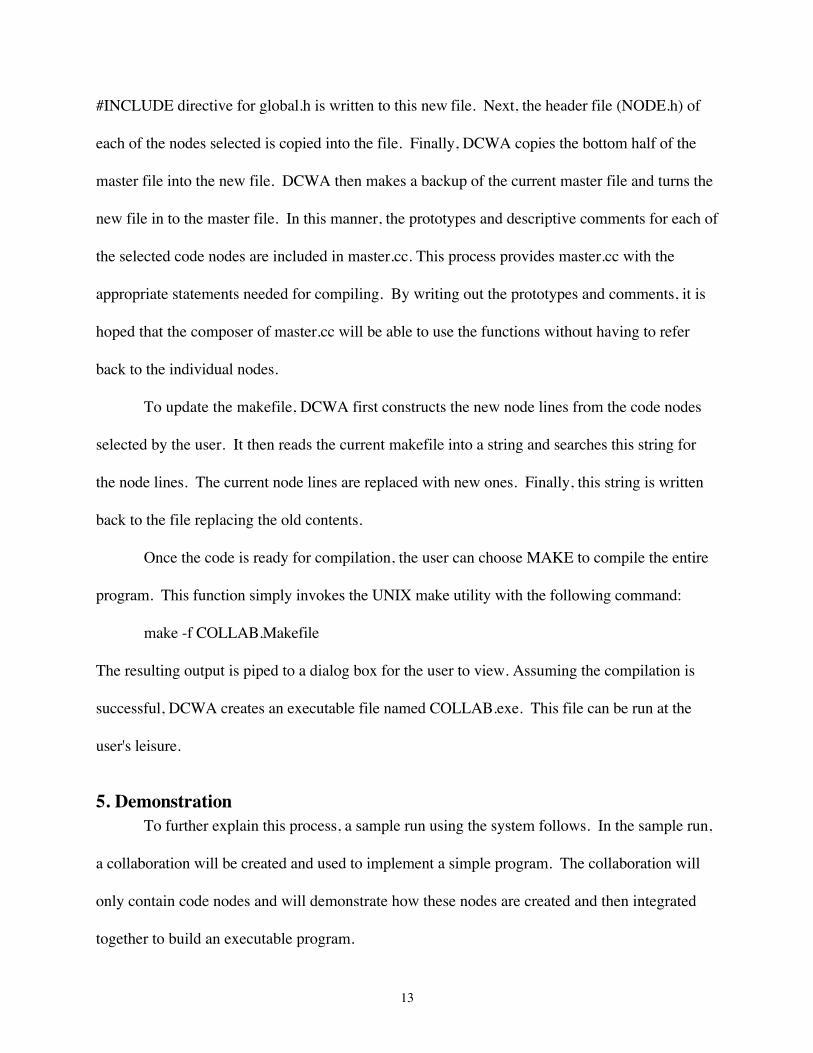
Figures 10-12 show the default templates for the CASE files that DCWA created. Figure 13
shows the default NODE.cc file for the code node named 'init'.
Fig. 10 Default for demo.master.cc

18
Fig. 11 Default for demo.global.cc
Fig. 12 Default for demo.Makefile
19
Fig. 13 Default for init.cc
The user then places his black box function in the node (Figure 14) following the instructions laid
out by the template (Figure 13).

20
Fig. 14 init.cc after code is entered
Once all of the codes are complete, the user issues the update command to the DCWA (Figure
15).

21
Fig. 15 The update command
This command loads the names of the code nodes into a list box. From this box, the user can
select and deselect which nodes should be included in the main program (Figure 16). When the
nodes have been selected, DCWA places appropriate information in the master and make files
(Figures 17-18) and does the necessary behind the scenes processing on the global file.
Fig. 16 Choosing code nodes

22
Fig. 17 The updated demo.master.cc
Fig. 18 The updated demo.Makefile

23
The next step is to write the code for the main procedure in the master file. This code will call the
functions, implement any necessary flow control, and perform any needed output (Figure 19).
Fig. 19 demo.master.cc after main procedure has been coded
For this example there is no need to do any customization in the make file; so the user can issue
the make command (Figure 20) when the main procedure is complete. Output from this
command will be displayed in a dialog box (Figure 21).

24
Fig. 20 The make command
Fig. 21 make utility’s output
If any error messages are displayed in the box, the user must correct them and then attempt the
make again. Otherwise, the executable file demo.exe is created. This file can be run from the
command prompt (Figure 22).

25
Fig. 22 Execution of demo.cc
6. ConclusionThis paper discusses a method in which computer-aided software engineering can be
incorporated in a computer supported collaborative work environment. Research in this area
indicates that DCWA is the first system to provide this capability. While the technique used could
not be called revolutionary, it does use existing technology and utilities in some unique ways. The
most important result of this prototype is that is has greatly helped isolate the problems and
requirements that a CASE system in a CSCW environment must consider. From these
considerations it is possible to define the criteria for which similar systems in the future should
strive. For example, the paper refers to the individual chunks of code as building blocks. Future
systems will still need to maintain this idea, but perhaps they will be more visually oriented.
Future systems may allow users to take these building blocks and draw a flowchart to connect
them instead of using code. Also, DCWA limits the code to C++, but future systems should allow
users to code the building blocks in different languages and still be able to integrate them. There
are many ways that DCWA can be expanded, but regardless the direction it evolves, DCWA
should be a solid platform on which future research can be based.

7. References
[1] Chang, K., Y. Gong, S. Gajiwala, and A. Wear, "On Computer Supported CollaborativeWriting Tools for Distributed Environments," Proceedings of 1995 ACM ComputerScience Conference, Feb. 28-Mar. 2, 1995, Nashville, TN, pp. 222-229.
[2] Dollar II, Timothy D, “A Method for Maintaining Spatial Relationships Among GraphicalObjects in a Distributed Collaborative Writing Environment”, Auburn University,Department of Computer Science & Engineering, Thesis, March 17, 1995.
[3] Gong, Y., A. Wear, and K. Chang, "Database Management for Multimedia DistributedCollaborative Writing," Proceedings of 33rd ACM Southeast Conference, March 17-18,1995, Clemson, SC, pp. 42-51.
[4] Lee, Byong G., “Design and Development of Distributed Collaborative Writing Aid andIts Integration”, Auburn University, Department of Computer Science & Engineering,Thesis, August 30, 1996.
[5] Liberty, Jesse and J. Mark Hord, Teach Yourself ANSI C++ in 21 Days, pp. 609-621,SAMS Publishing, Indianapolis, IN, 1996.