Comprehensive Study and Technical Overview of...
13
International Journal of Computer Applications (0975 – 8887) Volume 64– No.19, February 2013 9 Comprehensive Study and Technical Overview of Application Development in iOS, Android and Window Phone 8 Anuja H. Vaidya Asst. Professor, Computer Science, Uka Tarsadia University, Bardoli, Gujarat, India. Sapan Naik Asst. Professor, Computer Science, Uka Tarsadia University, Bardoli, Gujarat, India. ABSTRACT Today the whole world is moving towards mobility, and majority of us must be having smart phone, which is we can say replacement of computers or laptop. Today’s smart phone also having Operating system like we do have in laptop and computer for multitask and better performance. So here in this paper, we have given brief overview of iOS, Android and Window Phone 8 mobile operating system, and shown the comparison of them. In later section of the paper we shown how to develop application in all this three platform. Keywords: Mobile Application, Android, iOS, Window Phone 8, Window Phone 7, iPhone 1. Introduction We have included three different mobile OS for development of Mobile Application. iOS- it is mainly used for iPhone Application development. Android- it is used to create application that can run on an android base device. Windows: it is used to create an application that can be run on mobile having windows OS. Here in this paper, there are five sections as follows. Section 1 contains Basic of Mobile Operating System. Section 2 contains application development in iOS. Section 3 contains application development in Android Section 4 includes application development in Window Phone OS Section 5 comprises conclusion. 2. Basics of Mobile Operating System What is iOS, Android and Window mobile OS[3,22,23]? iOS : iOS is a mobile operating system developed and distributed by Apple Inc, released in 2007 for the iPhone and iPad Touch. Unlike Microsoft’s Windows Phone (Windows CE) and Google’s Android, Apple does not allow non-apple hardware to install license iOS[1]. The user interface of iOS is based on the concept of Direct Manipulation, using multi- touch gesture which consists of sliders, switches and buttons. iOS is divided into four different layers such as the Core OS layer, the Core Service layer, the media layer and the Cocoa Touch layer[2]. Features those are provided by iOS are as follow: Home Screen, Folders, Notification Center, Multitasking, Switching Application, Siri, Game Center. iOS application must be written and compiled specifically for iOS and the ARM architecture. XCode is the development environment for the iOS SDK and application are written in Objective-C language. Figure 1: snapshot of iOS 6.0 running on iPhone 4. Android: Android is a linux based operating system designed for touch screen mobile device such as smartphones and tablets. Android is an open source and google releases the code under Apache License[4]. Android application written in a customized version of the java programming language[5]. Android’s user interface is based on direct manipulation using touch input by user[6]. The response to the user input provides immediate a fluid touch interface. Android device boot to the home screen. Android homscreen are typically made up of app icons and widgets. Android consist of a kernel based on linux kernel version 2.4 and from ice cream sandwich version 4.0 onwards, with middleware, libraries and API written in C and application is running on an application framework which includes java compatible libraries based on apache harmony. Android is designed to manage RAM to keep power consumption at minimum. Android manages the apps stored in memory automatically. Android application run on SandBox, an isolated area of system that does not allow the rest of the system’s resource, unless permission has granted
Transcript of Comprehensive Study and Technical Overview of...

International Journal of Computer Applications (0975 – 8887)
Volume 64– No.19, February 2013
9
Comprehensive Study and Technical Overview of
Application Development in iOS, Android and
Window Phone 8
Anuja H. Vaidya Asst. Professor, Computer Science,
Uka Tarsadia University, Bardoli, Gujarat, India.
Sapan Naik Asst. Professor, Computer Science,
Uka Tarsadia University, Bardoli, Gujarat, India.
ABSTRACT
Today the whole world is moving towards mobility, and
majority of us must be having smart phone, which is we can
say replacement of computers or laptop. Today’s smart phone
also having Operating system like we do have in laptop and
computer for multitask and better performance. So here in this
paper, we have given brief overview of iOS, Android and
Window Phone 8 mobile operating system, and shown the
comparison of them. In later section of the paper we shown
how to develop application in all this three platform.
Keywords: Mobile Application, Android, iOS, Window
Phone 8, Window Phone 7, iPhone
1. Introduction
We have included three different mobile OS for development
of Mobile Application. iOS- it is mainly used for iPhone
Application development. Android- it is used to create
application that can run on an android base device. Windows:
it is used to create an application that can be run on mobile
having windows OS. Here in this paper, there are five sections
as follows.
Section 1 contains Basic of Mobile Operating System.
Section 2 contains application development in iOS.
Section 3 contains application development in Android
Section 4 includes application development in Window Phone
OS
Section 5 comprises conclusion.
2. Basics of Mobile Operating System
What is iOS, Android and Window mobile OS[3,22,23]?
iOS : iOS is a mobile operating system developed and
distributed by Apple Inc, released in 2007 for the iPhone and
iPad Touch. Unlike Microsoft’s Windows Phone (Windows
CE) and Google’s Android, Apple does not allow non-apple
hardware to install license iOS[1]. The user interface of iOS is
based on the concept of Direct Manipulation, using multi-
touch gesture which consists of sliders, switches and buttons.
iOS is divided into four different layers such as the Core OS
layer, the Core Service layer, the media layer and the Cocoa
Touch layer[2]. Features those are provided by iOS are as
follow: Home Screen, Folders, Notification Center,
Multitasking, Switching Application, Siri, Game Center. iOS
application must be written and compiled specifically for iOS
and the ARM architecture. XCode is the development
environment for the iOS SDK and application are written in
Objective-C language.
Figure 1: snapshot of iOS 6.0 running on iPhone 4.
Android: Android is a linux based operating system designed
for touch screen mobile device such as smartphones and
tablets. Android is an open source and google releases the
code under Apache License[4]. Android application written in
a customized version of the java programming language[5].
Android’s user interface is based on direct manipulation using
touch input by user[6]. The response to the user input
provides immediate a fluid touch interface. Android device
boot to the home screen. Android homscreen are typically
made up of app icons and widgets. Android consist of a kernel
based on linux kernel version 2.4 and from ice cream
sandwich version 4.0 onwards, with middleware, libraries and
API written in C and application is running on an application
framework which includes java compatible libraries based on
apache harmony. Android is designed to manage RAM to
keep power consumption at minimum. Android manages the
apps stored in memory automatically. Android application run
on SandBox, an isolated area of system that does not allow the
rest of the system’s resource, unless permission has granted

International Journal of Computer Applications (0975 – 8887)
Volume 64– No.19, February 2013
10
by user when application is installed.
Figure 2: snapshot of home screen on jelly bean android
OS running on Galaxy Note II
Windows Phone 8: Windows phone 8 is the second
generation of the windows phone mobile OS from Microsoft.
Windows phone 8 is developed by Microsoft. It was released
on October 29th, 2012. Its interface is known as Modern UI.
Windows phone 8 replaces its CE based architecture with
windows NT kernel found on windows 8 components. Current
window phone 7.x cannot run or upate application that is
developed for windows 8.x mobile and vice versa[7]. Nokia
announced partnership with Microsoft on February 2011,
making window phone OS as the primary operating system
on nokia device[8]. Window phone 8 allows device with the
following features: device with larger screen, multi core
processor, NFC, backward compatibility with windows phone
7 apps, support for removable storage, home screen with
resizable tiles across the entire screen, nokia map integration,
a new wallet hub, integration of VoIP application and
BitLocker encryption[9].
Figure 3: snapshot of windows phone 8 start screen.
Advantages and Disadvantages of iOS, android and
windows phone 8 OS.
Advantages[10,11,12,13] Disadvantages[10,11,12,13]
iOS
Allows you to interact and
manipulate your screen in
variety of ways.
One won’t be able to run flash
or shockwaves videos.
Provides the smart phones
the unique interface.
One cannot interact with the
screen if you’re wearing
regular gloves.
Tight integration with social
networking and
sophisticated music
experience.
Lack of customization.
Android
Free to customize any
application.
Android software containing
application often hang or
crashed
Android smart phone can be
used as a USB storage
device.
Inconsistence in application
design.
Ease of notification Continuous internet
connection required.
Any application can be
downloaded from google
android app market that is
too free of cost.
One can easily access a
variety of setting quickly
and easily using widgets.
Window Phone 8
Support for multi core
processor
It is a generation shift
technology, which means it
won’t run existing hardware
with the new start screen and
update.
It’s new start screen , the
interface is embedded with
live tiles that can be
configured in 3 different
size
Comparison between iOS, Android and Window Phone 8 OS.
Feature iOS Android Window
Phone
Company Apple Google Microsoft
Current
version
6.0.2(iPhone
5 and ipad
mini only)
6.0.1
4.2.1 8
OS Family Darwin Linux Windows

International Journal of Computer Applications (0975 – 8887)
Volume 64– No.19, February 2013
11
NT 8+[14]
Supported
CPU
Architecture
ARM ARM, MIPS,
Power
Architecture,
x86
ARM
Programmed
in
C, C++,
Objective-C
C, C++ and
java
XNA(.NET
C#),
VB.NET,
Silverlight,
native
C/C++,
WinRTP,
DirectX[15]
License Proprietary
EULA
except for
open source
component
Free and
open source
Proprietary
Package
Manager
iTunes APK Zune
Software
Multi-user No 4.2+ (only
for
tablets)[16]
No
Alternative
input
methods
Available on
jailbroken
devices[17].
Yes No
Search all
fields of
internal
objects
6+ Search only
contacts
name
Contacts
can be
searched by
name, nick
name and
company
name only.
External
storage
encryption
External
storage not
supported.
No No
Undo Yes No Yes
3. Application Development using iOS[18]
To create iOS app basic need is Xcode and iOS SDK, which
is a tools provided by Apple. Also you need to learn Objectiv-
C, the language that powers all iOS apps and frameworks, and
explore Cocoa Touch Framework. Xcode, Apple’s integrated
development environment(IDE), provides everything that we
need to create app for iPhone, iPad and and iPod Touch,
includes a source editor, a graphical user interface editor.
To get started
1. Download the latest version of Xcode.
2. Enroll as an apple developer in the iOS developer
program.
Figure 4: snapshot of setup to create Apple app.
The tutorial First iOS app introduce the tools, the fundamental
design patterns, and the application development process.
Here we are creating an app which accepts user’s text input
and prints on the screen.
As you can see above, there are three main interface elements
as follow.
A text field (in which the user enters information)
A label (in which app displays the information)
A button (which causes the app to display information on
label)
To create the iOS app in this tutorial, you need Xcode 4.3 or
later.
Step 1: Create and test a new project.
Open Xcode. When you open the Xcode you will find
welcome to Xcode window similar to this.
In the welcome to Xcode window, click on “create a new
Xcode project” (or choose File > New > New Project). It will
open one dialog box using which you can choose a template.
In the iOS section at the left side of the dialog, select single
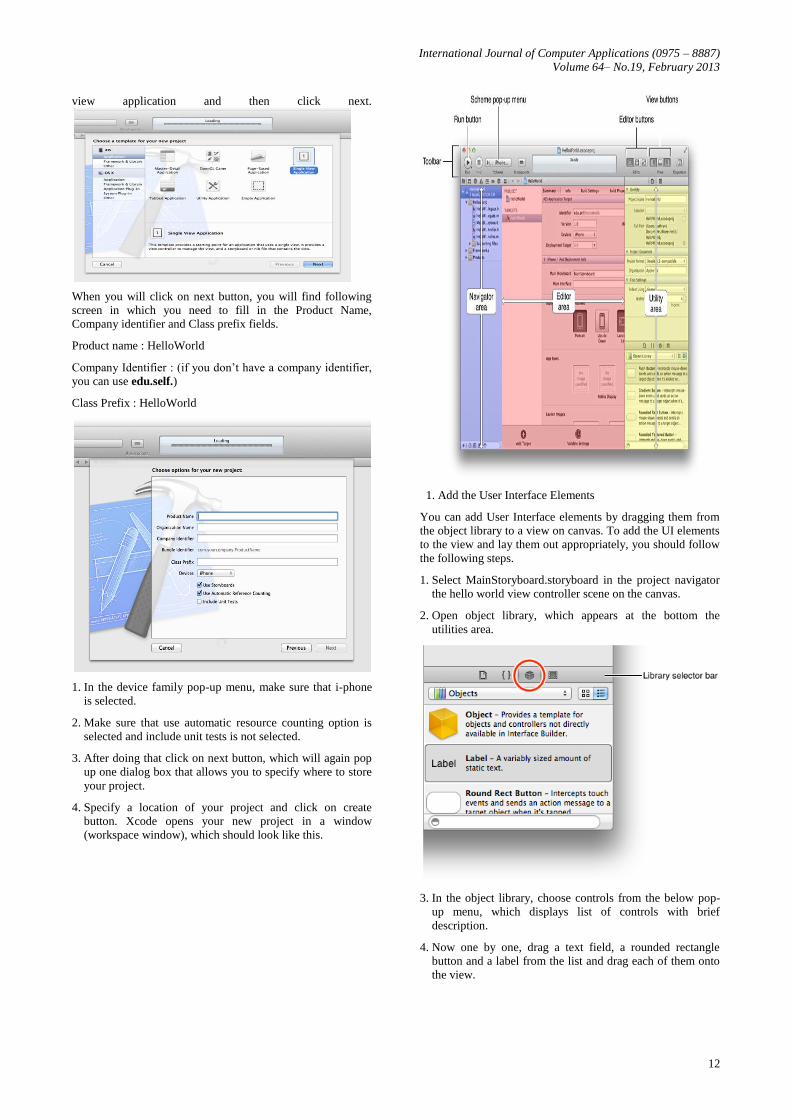
International Journal of Computer Applications (0975 – 8887)
Volume 64– No.19, February 2013
12
view application and then click next.
When you will click on next button, you will find following
screen in which you need to fill in the Product Name,
Company identifier and Class prefix fields.
Product name : HelloWorld
Company Identifier : (if you don’t have a company identifier,
you can use edu.self.)
Class Prefix : HelloWorld
1. In the device family pop-up menu, make sure that i-phone
is selected.
2. Make sure that use automatic resource counting option is
selected and include unit tests is not selected.
3. After doing that click on next button, which will again pop
up one dialog box that allows you to specify where to store
your project.
4. Specify a location of your project and click on create
button. Xcode opens your new project in a window
(workspace window), which should look like this.
1. Add the User Interface Elements
You can add User Interface elements by dragging them from
the object library to a view on canvas. To add the UI elements
to the view and lay them out appropriately, you should follow
the following steps.
1. Select MainStoryboard.storyboard in the project navigator
the hello world view controller scene on the canvas.
2. Open object library, which appears at the bottom the
utilities area.
3. In the object library, choose controls from the below pop-
up menu, which displays list of controls with brief
description.
4. Now one by one, drag a text field, a rounded rectangle
button and a label from the list and drag each of them onto
the view.

International Journal of Computer Applications (0975 – 8887)
Volume 64– No.19, February 2013
13
5. As you can there is a text “your name” in text field, to do
that we have placeholder field in Text Field Attribute
Inspector. And alignment option for centering the text in
text field. The Text Field Attribute Inspector should look
something like this.
6. In the label Attribute inspector, click middle alignment
button (to center a text within a label)
7. Drag a button on a canvas, double click on button and enter
the text Hello. When you double click the button in the
view, you should see something like this.
2. Create an action for the button In this tutorial, when user
taps the hello button, we want it to send a “change the
greeting” message (the action) to the view controller (the
target). The view controller responds to this message by
changing the string (i.e. the model object) that it manages.
Then, the view controller updates the text that’s displayed
in the label to reflect the change in the model object’s
value.
Steps to add an action for the button.
1. If necessary, select mainstoryboard.storyboard in the
project navigator to display the scene on the canvas.
2. In Xcode toolbar, hide utilities area by click on
Utilities button, and click the assistant button
to display the assistant editor, which looks like
this:
3. Make sure that the assistant displays the view
controller’s implementation file (i.e.
HelloWorldViewController.m)
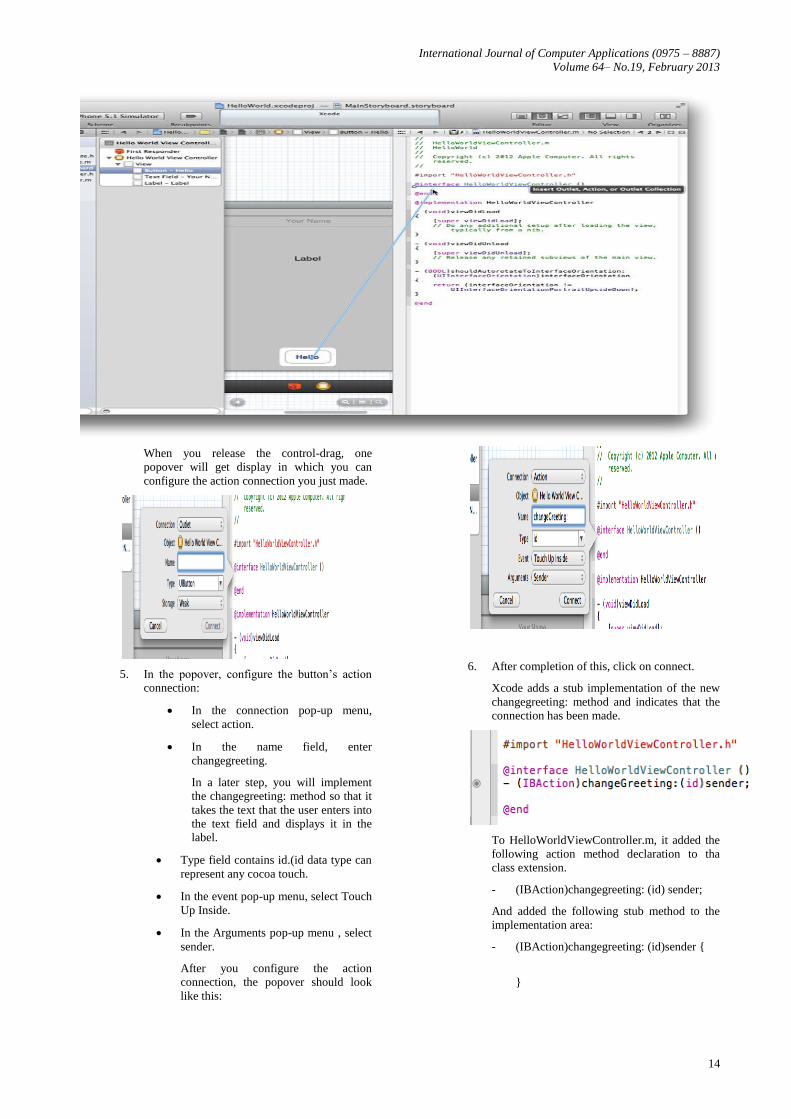
4. On the canvas, control-drag from the hello
button to the class extension in
HelloWorldViewController.m
In the hello world project, the class extension
looks like this:
To control-drag, press and hold the control key
while you drag from the button to the
implementation file in the assistant editor pane.
As control-drag, you should see something like
this:
International Journal of Computer Applications (0975 – 8887)
Volume 64– No.19, February 2013
14
When you release the control-drag, one
popover will get display in which you can
configure the action connection you just made.
5. In the popover, configure the button’s action
connection:
In the connection pop-up menu,
select action.
In the name field, enter
changegreeting.
In a later step, you will implement
the changegreeting: method so that it
takes the text that the user enters into
the text field and displays it in the
label.
Type field contains id.(id data type can
represent any cocoa touch.
In the event pop-up menu, select Touch
Up Inside.
In the Arguments pop-up menu , select
sender.
After you configure the action
connection, the popover should look
like this:
6. After completion of this, click on connect.
Xcode adds a stub implementation of the new
changegreeting: method and indicates that the
connection has been made.
To HelloWorldViewController.m, it added the
following action method declaration to tha
class extension.
- (IBAction)changegreeting: (id) sender;
And added the following stub method to the
implementation area:
- (IBAction)changegreeting: (id)sender {
}

International Journal of Computer Applications (0975 – 8887)
Volume 64– No.19, February 2013
15
(Note: IBAction is a keyword, used to
inform you that Xcode will treat this
method as an for target-action command,
is defined to void)
3. Create Outlets for the Text field and the Label
An outlet describes a connection between two
objects. In this tutorial, you want the view controller
to get the user’s text from text field and then display
the text into label. To ensure that your view
controller can communicate with these objects, you
need to create an outlet connection between text
field and label.
Add an outlet for the text field
1. Control-drag from the text field in the view to
the class extension in the implementation file.
When you do that you should see something
like this:
2. In the popover that appears when you release
the control-drag, configure the text field’s
connection as follow. And then click on
connect.
Through these steps, Xcode establish the
connection between view controller and Text
field.
3. Same steps should be followed for establish the
connection between label and view controller.
At this point, you have created three connections to
view controller.
- An action connection for the button.
- An outlet connection for text field.
- An outlet connection for label.
You can verify all these connection using connector
inspector.
4. To open the connection inspector for the view
controller, you need to follow following steps.
1. Switch to standard editor view. It looks like
2. Click the utilities view button.
3. Select hello world view controller in the
outline view.
4. Show the connections inspector in the
utilities area.
4. Make the text field’s delegate connection:
You need to specify a delegate objects for the text
field, just because text fields sends a message to its
delegate when the user done with input through
keyboard.
1. In the view, control-drag from the text field to
the yellow sphere in the scene dock. When you
release control-drag, you should see something
like this:

International Journal of Computer Applications (0975 – 8887)
Volume 64– No.19, February 2013
16
2. Select “delegate” in the outlet section from the
popup.
5. Add a property for the user’s name
1. In the project navigator, select
HelloWorldViewController.h
2. Before the @end statement, write an
@propertry statement for the string.
6. Implementing changegreeting:Method
Changegreeting:method should retrieve the string
from the text field and set the view controller’s
property to this string. Create new string that is
based on the username property and display it in the
label. To do this write the following code in
HelloWorldViewController.m, in which we are
already having changegreeting stub implementation.
In an iOS app, the keyboard is shown automatically
when an element that allows text entry becomes the
first responder; it is dismissed automatically when
the element loses first responder status.
The UITextFieldDelegate protocol is defined by the
UIKit framework, and it includes
the textFieldShouldReturn: method that the text
field calls when the user taps the Return button.
7. Test the app.
Click run to test your app.
Application Development using Android [19, 20].
Before developing android app, first we need to check it out
that whether we have add library for android SDK or not. To
create any app using android OS, we will be using Eclipse
IDE, in which we will be setting the reference of android
SDK. When you are adding android SDK references into
eclipse, you should see something like this.
1. Set android SDK reference.
Click on window menu and select last option preferences.
Once you select preferences option, you should see something
like this.

International Journal of Computer Applications (0975 – 8887)
Volume 64– No.19, February 2013
17
In SDK location, we need to give location to the android
SDK. Once you provide a location, you will be having
different list of android platforms through which we can
create android app. These steps will set your references. Now
to create new android project, click (file > New > Android
Project). You should see something like this.
2. Create new android project
1. On the next page to configure project, leave the
default settings.
2. The next screen will help you to create a
launcher icon for your project.
3. The next screen will help you to select an
activity template for your project. Leave it
blank for your project. And click finish. Your
android project is now set up.
As here we are going to develop one application in which we
will be having one text box and button. When we click on
button, text written in text box will get fetched and we will
display it in one popup window. For this first we have created
one android project as mention above. Now follow the below
steps.
1. Go to HelloWorld > res > values > string.xml
In this file add one string for button “click me”.
When you do that you should see something like
this.
2. Now go to HelloWorld > res > layout > main.xal
file. In this file we are going to add Edit Text and
Button control as per our requirements. When you
add those two controls, you should see something
like this.
International Journal of Computer Applications (0975 – 8887)
Volume 64– No.19, February 2013
18
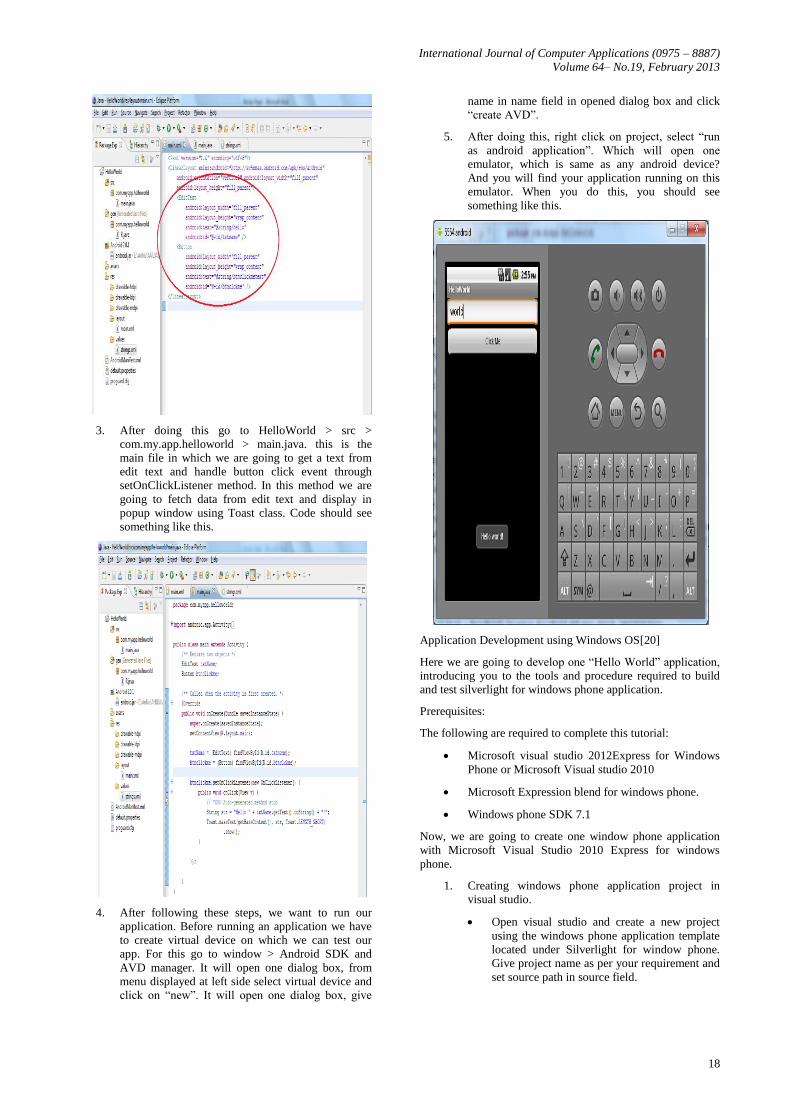
3. After doing this go to HelloWorld > src >
com.my.app.helloworld > main.java. this is the
main file in which we are going to get a text from
edit text and handle button click event through
setOnClickListener method. In this method we are
going to fetch data from edit text and display in
popup window using Toast class. Code should see
something like this.
4. After following these steps, we want to run our
application. Before running an application we have
to create virtual device on which we can test our
app. For this go to window > Android SDK and
AVD manager. It will open one dialog box, from
menu displayed at left side select virtual device and
click on “new”. It will open one dialog box, give
name in name field in opened dialog box and click
“create AVD”.
5. After doing this, right click on project, select “run
as android application”. Which will open one
emulator, which is same as any android device?
And you will find your application running on this
emulator. When you do this, you should see
something like this.
Application Development using Windows OS[20]
Here we are going to develop one “Hello World” application,
introducing you to the tools and procedure required to build
and test silverlight for windows phone application.
Prerequisites:
The following are required to complete this tutorial:
Microsoft visual studio 2012Express for Windows
Phone or Microsoft Visual studio 2010
Microsoft Expression blend for windows phone.
Windows phone SDK 7.1
Now, we are going to create one window phone application
with Microsoft Visual Studio 2010 Express for windows
phone.
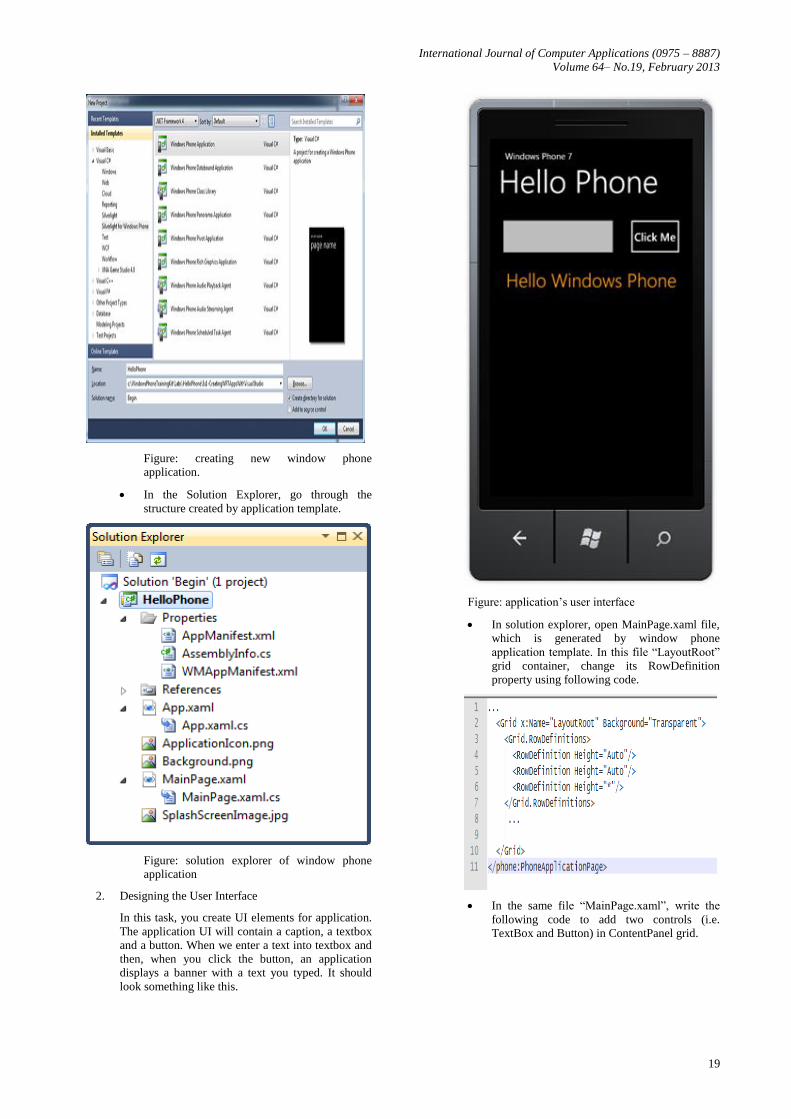
1. Creating windows phone application project in
visual studio.
Open visual studio and create a new project
using the windows phone application template
located under Silverlight for window phone.
Give project name as per your requirement and
set source path in source field.
International Journal of Computer Applications (0975 – 8887)
Volume 64– No.19, February 2013
19
Figure: creating new window phone
application.
In the Solution Explorer, go through the
structure created by application template.
Figure: solution explorer of window phone
application
2. Designing the User Interface
In this task, you create UI elements for application.
The application UI will contain a caption, a textbox
and a button. When we enter a text into textbox and
then, when you click the button, an application
displays a banner with a text you typed. It should
look something like this.
Figure: application’s user interface
In solution explorer, open MainPage.xaml file,
which is generated by window phone
application template. In this file “LayoutRoot”
grid container, change its RowDefinition
property using following code.
In the same file “MainPage.xaml”, write the
following code to add two controls (i.e.
TextBox and Button) in ContentPanel grid.

International Journal of Computer Applications (0975 – 8887)
Volume 64– No.19, February 2013
20
To complete the design of the page, add a third
row to contain banner with the message
entered by the user. To create this row, insert
the following code.
3. Handling events from the user interface.
Here, we are going the event handler that
responds to action from the user interface. To
add this event handler, click the button labeled
“Click Me”, go to event tab, in “Click” event
type ClickMeButton_Click in the textbox.
Figure: creating an event handler for the button.
Code changed in MainPage.xaml file.
Figure: Xaml view showing the new handler bound
to click event
The method implementation is in the
MainPage.xaml.cs file. Insert the following
code inside the body of the
ClickMeButton_Click method.
4. Building and Testing the application in Window
Phone Emulator
Build the project. The project should compile
without any error.
Verify that target of deployment is Window
Phone Emulator, ensure that Window Phone 7
Emulator is selected. Click on start button to
start debugging of your project.
Press F5 to run an application. When you
run an application, the emulator shows the
start page and shortly thereafter, your
application will get loaded in emulator.
International Journal of Computer Applications (0975 – 8887)
Volume 64– No.19, February 2013
21
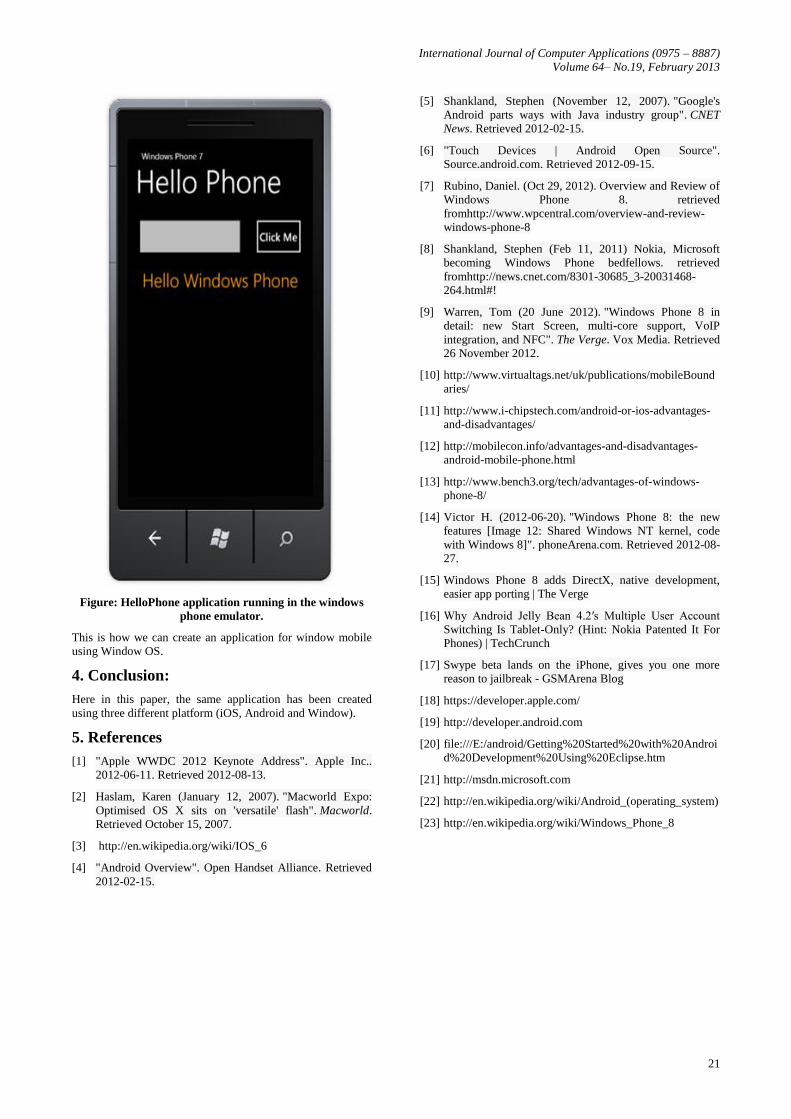
Figure: HelloPhone application running in the windows
phone emulator.
This is how we can create an application for window mobile
using Window OS.
4. Conclusion:
Here in this paper, the same application has been created
using three different platform (iOS, Android and Window).
5. References
[1] "Apple WWDC 2012 Keynote Address". Apple Inc..
2012-06-11. Retrieved 2012-08-13.
[2] Haslam, Karen (January 12, 2007). "Macworld Expo:
Optimised OS X sits on 'versatile' flash". Macworld.
Retrieved October 15, 2007.
[3] http://en.wikipedia.org/wiki/IOS_6
[4] "Android Overview". Open Handset Alliance. Retrieved
2012-02-15.
[5] Shankland, Stephen (November 12, 2007). "Google's
Android parts ways with Java industry group". CNET
News. Retrieved 2012-02-15.
[6] "Touch Devices | Android Open Source".
Source.android.com. Retrieved 2012-09-15.
[7] Rubino, Daniel. (Oct 29, 2012). Overview and Review of
Windows Phone 8. retrieved
fromhttp://www.wpcentral.com/overview-and-review-
windows-phone-8
[8] Shankland, Stephen (Feb 11, 2011) Nokia, Microsoft
becoming Windows Phone bedfellows. retrieved
fromhttp://news.cnet.com/8301-30685_3-20031468-
264.html#!
[9] Warren, Tom (20 June 2012). "Windows Phone 8 in
detail: new Start Screen, multi-core support, VoIP
integration, and NFC". The Verge. Vox Media. Retrieved
26 November 2012.
[10] http://www.virtualtags.net/uk/publications/mobileBound
aries/
[11] http://www.i-chipstech.com/android-or-ios-advantages-
and-disadvantages/
[12] http://mobilecon.info/advantages-and-disadvantages-
android-mobile-phone.html
[13] http://www.bench3.org/tech/advantages-of-windows-
phone-8/
[14] Victor H. (2012-06-20). "Windows Phone 8: the new
features [Image 12: Shared Windows NT kernel, code
with Windows 8]". phoneArena.com. Retrieved 2012-08-
27.
[15] Windows Phone 8 adds DirectX, native development,
easier app porting | The Verge
[16] Why Android Jelly Bean 4.2′s Multiple User Account
Switching Is Tablet-Only? (Hint: Nokia Patented It For
Phones) | TechCrunch
[17] Swype beta lands on the iPhone, gives you one more
reason to jailbreak - GSMArena Blog
[18] https://developer.apple.com/
[19] http://developer.android.com
[20] file:///E:/android/Getting%20Started%20with%20Androi
d%20Development%20Using%20Eclipse.htm
[21] http://msdn.microsoft.com
[22] http://en.wikipedia.org/wiki/Android_(operating_system)
[23] http://en.wikipedia.org/wiki/Windows_Phone_8