Compiere 3.6 Release Notes · Database Oracle XE, Oracle 10gR2, Oracle 11g, or EnterpriseDB...
47
Compiere 3.6 Release Notes March 24, 2010 Copyright © 2010 Compiere, inc. All rights reserved www.compiere.com
Transcript of Compiere 3.6 Release Notes · Database Oracle XE, Oracle 10gR2, Oracle 11g, or EnterpriseDB...
Compiere 36 Release Notes
March 24 2010
Copyright copy 2010 Compiere inc All rights reserved wwwcompierecom
Copyright copy 2010 Compiere Inc ndash All rights reserved 2
Tab le o f Con t en t s Compiere 36 Release Notes
Compiere 36 Release Summary _______________________________________________________________________________ 3 Audience ____________________________________________________________________________________________________________ 3 Prerequisites _________________________________________________________________________________________________________ 3
Software Management _______________________________________________________________________________________ 3 Previous Installations ___________________________________________________________________________________________________ 3 Recommended Infrastructure _____________________________________________________________________________________________ 3 Process to Log Support Requests _________________________________________________________________________________________ 3 UpdateMigration Procedure _____________________________________________________________________________________________ 3 Install Procedure ______________________________________________________________________________________________________ 3 Application Extensions __________________________________________________________________________________________________ 3 Command Line Scripts __________________________________________________________________________________________________ 3
New In Compiere 36 _________________________________________________________________________________________________ 4 Manufacturing ndash Warehouse Management Integration _________________________________________________________________________ 4 Print Format Editor Compiere Enterprise Edition _____________________________________________ 4 Visual Editor Enhancements Compiere Enterprise Edition _____________________________________________ 4 Bulk Updates ndash Performance Improvement __________________________________________________________________________________ 4 Sequence Cache ndash Performance Improvement _______________________________________________________________________________ 5 Other Enhancements and tech stack changes ________________________________________________________________________________ 5 Web User Interface Compiere Professional Edition _________________________________________________________________________ 5
Product Enhancements for Compiere 36 ________________________________________________________________________________ 6 Fixed Issues for Compiere 36 _________________________________________________________________________________________ 6 Known Issues in the Migration Process ________________________________________________________________________________ 10 Known Issues in the Install Process ___________________________________________________________________________________ 10 Known Issues in Compiere 36 _______________________________________________________________________________________ 12
Appendix A _______________________________________________________________________________________________ 13 Compiere 36 Migration Instructions ___________________________________________________________________________________ 14
Prerequisites ________________________________________________________________________________________________________ 14 Preserving Customizations ______________________________________________________________________________________________ 14 Migration Steps ______________________________________________________________________________________________________ 14 Preparation __________________________________________________________________________________________________________ 15
Test Mode (optional) ___________________________________________________________________________________________ 15 Migrate to a New Release ______________________________________________________________________________________________ 15 Multi-Server Installation Compiere Enterprise Edition ________________________________________________ 25 Post Migration Steps for RMARTV _______________________________________________________________________________________ 26
Appendix B _______________________________________________________________________________________________ 27 Compiere 36 Installation Instructions _________________________________________________________________________________ 28
Prerequisites ________________________________________________________________________________________________________ 28 Database Installation __________________________________________________________________________________________________ 28 Java Installation ______________________________________________________________________________________________________ 28 Download Compiere ___________________________________________________________________________________________________ 28 Run Application Server _________________________________________________________________________________________________ 37 Start Compiere _______________________________________________________________________________________________________ 38
Appendix C _______________________________________________________________________________________________ 39 Compiere 36 Application Extensions - Compiere Partners ________________________________________________________________ 40
Registration of Application Extensions ndash Application Provider (Partner) ___________________________________________________________ 40 Creation of Application car file ndash Application Provider (Partner) _________________________________________________________________ 42 Installation ndash Application Consumer (Customer) _____________________________________________________________________________ 44
Appendix D _______________________________________________________________________________________________ 45 Command Line Scripts ______________________________________________________________________________________________ 46
Copyright copy 2010 Compiere Inc ndash All rights reserved 3
Compiere 36 Release Summary
Compiere 36 introduces the new Manufacturing and Warehouse Management integration Visual Editor Enhancements a new print format editor based on a flash interface and significant performance improvements Compiere 36 also includes more than 60 customerpartner bug fixes
Certain features in Compiere 36 require a Compiere Professional or Enterprise Edition subscription Contact a Compiere Authorized Partner or Compiere Sales (httpwwwcompierecomcompanycontact-usphp) to acquire Compiere subscription
Compiere 36 may include certain prototype features and beta functionality as indicated in their respective user interfaces with a beta checkbox These are not recommended for production They are intended only for evaluation as beta functionality
Audience
This guide is designed for Compiere Business Partners and Customers It provides essential information for current Compiere administrators planning to install or migrate (upgrade) to Compiere 36
Prerequisites
Working knowledge of Compiere ERP and CRM
Compiere Web Store Access
Sun Java JDK 160 Update 5 or Later
Database Oracle XE Oracle 10gR2 Oracle 11g or EnterpriseDB Postgres Plus Advanced Server 83
Software Management
Previous Installations
You can download the Compiere 36 from httpwwwcompierecomwstore The migration tool will bring you up directly to Compiere 36 plus all the cumulative fixes included in the service packs without having to migrate to an intermediate release
Recommended Infrastructure
Sun Java JDK 6 Update 5 or Later (not just JRE) - also known as Sun Java SDK
Database Oracle XE Oracle 10gR2 Oracle 11g or EnterpriseDB Postgres Plus Advanced Server 83
Tip It is Mandatory to use a Unicode character set
Database approved Linux Operating System Windows 2003 or Windows XP
TCPIP connection and Internet access
Disk Space gt 5 GB (includes database)
Swap Space gt 1GB
Memory gt 1 GB
Firefox Browser 3035 is recommended for Web User Interface
Process to Log Support Requests
To ensure timely service for any issues please use the Compieres Case Management system For details please review the Support Requests page on our website
UpdateMigration Procedure
See Appendix A
Install Procedure
See Appendix B
Application Extensions
See Appendix C
Command Line Scripts
See Appendix D
Copyright copy 2010 Compiere Inc ndash All rights reserved 4
New In Compiere 36 The following is a detailed description of the enhancements made available in Compiere 36
Manufacturing ndash Warehouse Management Integration Enables you to use WMS rules to pick components required for Work Order execution Create a wave by using the Wave Planning (Work Order Selection) window to select work order operations from In Progress Work Orders for which components need to be picked Only components that have a Supply Type of Push may be picked Specify a Work Order Sort Criteria to indicate how the matching work order operations must be sorted Select a Work Order Fulfillment rule to indicate if the wave should be generated based on ability to issue components for the entire work order the entire operation the entire component line or product availability Once the Wave is created you can release the wave and complete tasks Once a task is completed a Component Issue work order transaction is automatically generated and completed You will need to provide a staging locator where components once picked will be staged until they are issued to the work order The Handler Performance report has been updated to include work order information in addition to sales order information A new Work Order Monitoring report has been added to provide details about work orders at various stages of fulfillment
Print Format Editor Compiere Enterprise Edition Print Format Editor allows you to use a sleek drag-and-drop Flash interface to design your form-based report layout exactly the way you want Set colors styles relative or absolute positions and more We recommend that you create a copy of an existing print format and then update it to suit your purposes
Visual Editor Enhancements Compiere Enterprise Edition
Visual Dictionary Editor provides you with a sleek Flash interface to customize your data setup or transaction windows Use drag-n-drop to design your window layout exactly the way you want You can customize field labels hide fields you don‟t want pre-populate field values and mark fields as mandatory or read only The Visual Dictionary Editor lets you see the user‟s view of the window as you work on it making layout design intuitive and error-free
The Visual Editor has been enhanced to allow you to update properties for table columns linked to the window fields You can also add new fields and columns to the application dictionary and database This makes the Visual Editor a one-stop shop for many of your Application Dictionary tasks
For more details about the Visual Editor see
Demo httpwwwcompierecomresourcesproduct-demostourvisual-editorphp
Documentation httpwikicompierecomdisplaydocsVisual+Dictionary+Editor+35
Bulk Updates ndash Performance Improvement
Bulk Updates project is to improve the overall system throughput by reducing the database record-locking contention on key tables such as M_Storage The amount of time a record is locked for update is directly dependent on the amount of time it takes the entire transaction to either commit or rollback With the application of the new ldquobulk updaterdquo architecture the elapsed time of each transaction should be substantially reduced leading to significant improvements in the overall system throughput
Furthermore the reduction in Oracle SGA memory consumption means that more SGA memory can be allocated by the database for the management of buffer cache and statement cursors for functional areas beyond the ones where the code has been specifically refactored to use the ldquobulk updaterdquo architecture This also serves to improve the overall database system performance
Testing has shown great promise in the expected performance improvements The average improvements for the documents comparing Compiere 35 to 36 is about 70
Bulk updates have been enabled for the following processes Orders Invoices Warehouse Tasks Shipments and receipts processing
Copyright copy 2010 Compiere Inc ndash All rights reserved 5
Sequence Cache ndash Performance Improvement
A new ldquoGaplessrdquo flag has been added for the ID and document sequences When the flag is checked sequences continue working in the same way as in previous releases where the sequence row is locked until the transaction is committed allowing it to keep the sequence numbers without gaps even if the process fails This fulfills a legal requirement in some countries where document numbers must be consecutive and auditable but it generates contention issues when multiple users try to create the same type of documents As an alternative for customers that can allow to have gaps in their document numbers you can deselect the ldquoGaplessrdquo flag to allow a more efficient and without contention management of the sequence numbers similar to the database dependent sequences
By default for new instances all the document sequences continue being gapless and internal ID sequences (usually for columns with the name Table_ID) won‟t be gapless to improve performance
For existing instances migrating to 36 all existing tenant sequences will have the gapless flag unchecked with better performance but with the possibility of losing sequence numbers in case of process or environment failures
IMPORTANT Please review the accounting and legal requirements in your country If it is mandatory to have gapless document numbers please be sure to check the gapless flag for your document sequences If it is not mandatory and your business allows the possibility of having gaps in the document numbers we recommend that you uncheck the flag for all sequences Notice that most tables have two sequences one called ltTablegt for the internal IDs and another DocumentNo_ltTablegt for the document numbers
Other Enhancements and tech stack changes
Web UI is now based on Google Web Toolkit (GWT) 201
Important Notes from previous releases
o Jasper Reports for EnterpriseDB (Postgres Plus AS) Compiere does not support Business View
Layer Component on EnterpriseDB due to some technical constraints to enforce the Compiere
security model You can get Jasper Reports to work in EnterpriseDB by setting up the Jasper reports
directly on Compiere Schema but the report developer will need to manually apply the security rules
The following reports can be used as an example to setup Jasper Reports in EDB Trial Balance
Profit and Loss Statement and Balance Sheet
o The Payflow Pro integration provided by Compiere to process payments has been updated to use the
new Payflow Pro SDK and updates to the payment processor data from the bank window are
required If you continue to use outdated SDKs after January 2010 your payment processing will
stop
Web User Interface Compiere Professional Edition
In order to get properly acquainted with the Web User Interface please read the section on ldquoUsing the Web Applicationrdquo in the user documentation
At present there are still some known features available in the ldquoJava Swingrdquo User Interface that are not yet available in Web User Interface Most of these features are scheduled for a future release
The following features are currently Not Available in the Web User Interface However they are fully functional in the ldquoJava Swingrdquo User Interface
Resource amp Schedule Info Windows ndash Info Window available from the bdquoView‟ menu to view Scheduled Resources
Resource Assignment ndash A Form used to schedule a resource accessed from the Assigned Resource field in a Sales Order Project or Expense Report
Personal lock ndash A security feature accessible from the toolbar used to lock a specific record to keep the record
Copyright copy 2010 Compiere Inc ndash All rights reserved 6
private It is also used as a method to set security access rules for specific records
Archive Viewer ndash A window used to view the Archived Records Records or Documents can be archived via the toolbar from the document viewer or automatically via a setting available in the tenant window
Ability to print mass shipments ndash A process available from the Main Menu used to print multiple shipments
Print from info windows ndash A button accessible from any Info window used to print a screen shot of the information
Ability to email documentsreports as attachment ndash A button available from the toolbar of any report or document that opens an e-mail dialog box with the report attached as a pdf file allowing users to send the report via e-mail
Product attribute grid ndash A form available from the Main Menu which allows users to select an Attribute and view a grid of which products are available with the selected attributes
Important The Firefox Browser 3035 is recommended when using Compiere with the web user interface
When using Internet Explorer verify the options ldquoAlways switch to new tabs when they are createdrdquo and ldquoA new tab in the current windowrdquo are enabled Under Toolsgt Internet Optionsgt General Tab open the Tab settings
Product Enhancements for Compiere 36
The following is a list of the enhancement requests that have been completed in Compiere 36
Document No
Summary
10020376 In window tab amp field if you use the field sequence to order the fields it is not reflected in the change audit window and so cannot be marked as customization for migration
10021523 New Info Window Access under Role These are standard Info Windows that are available under the View menu Based on the Read-Write option a role can either see the Info Window or not Note If the customer has added a new Info Window and wants to control the access then he needs to add the AD_InfoWindow_ID to the Dynamic Validation which controls the access of this Info Window and they also have to make the changes in the code
10021761 Warehouse Task List header has 2 new fields 1 Status - valid values are 1 In Progress (default status) 2 Completed 3 Voided 2 Date Completed - Date field - optional - default is ltnullgt Fields will only be updated if you completevoid the task using task management (not directly in the task window)
10021220 Select all records across multiple pages in the web UI
Fixed Issues for Compiere 36
Document No
Summary
10017090 One cannot zoom from a vendor receipt on the transactions tab on the product window
10019195 When amending the Business Partner Group field on a Business Partner the Purchase Price List and PO Discount Schema fields are set according to the new BP Group However the Default Accounting groups are not Should Compiere change all data or none
10020595 Transaction Problems Shipment (Customer) Outgoing shipments with docstatus Invalid can cause transaction problems in M_Storage records
10020636 M_Storage records created and updated for service products when completing M_Production or M_Movement documents
10020683 Problems in exception management of import Example with BPImport
10020930 Display heading only (see attached) We are trying to use the setting Heading only field without column to display text information in webUI without the need to create a field in the db However this option does not seem to work
Copyright copy 2010 Compiere Inc ndash All rights reserved 7
10021307 To copy an order copy columns that should not be as isApproved and c_doctype_id By copying the column isApproved you can bypass a process of validation by copying an approved order and completing it
10021422 When installing application extensions the version info displayed is from the Compiere system instead of the entity type
10021442 Following on from 10020634 SWING only Putting large value in a numeric field causes unexpected results Enter the value of say 99999999999999 in the following fields (as an example) - Business Partner gt Employee field - Business Partner gt Share field - Locator gt Picking Sequence
10021550 Import of default AccountingUScsv file works However if I take the equivalent AccountingUSxls file and open in Excel 2007 and save back as csv (I have checked file with notepad and it looks fine) I cannot import the accounts though it is the same information
10021563 Financial Management -gt GL Journal If one goes to EditCopy Record to create a new record from the previous it does not reset the Total Debit and Total Credit amounts to 00 but instead uses the value from the record that is being copied
10021571 I am getting a db error when trying to save a record in a new Window that I have created Record not saved Database Error ERROR null value in column xx_activeingredients_id violates not-null constraint ERROR null value in column xx_activeingredients_id violates not-null constraint Click OK to keep current value or Cancel to refresh the page
10021794 Fields Last PO Price Last Invoice Price and Actual Delivery Time not updated on Purchasing tab on Product level
10021797 Deleting system records (Tenant=System) with non System Admin role (GardenAdmin) In the Swing UI it is posible to delete System records (AD_Client_ID=0) with other tenant role (for example with GardenAdmin)
10021885 15s Timeout on Workflow node when condition on worfklow node is false there is a 15seconds time out that slows down the whole workflow How can we avoid this timeout see our settings in Worflow PO vs SOpdf error in timeoutjpg and incorrect result in empty order typejpg
10021915 Generate PO from project does not link PO to project
10021932 Tax Calculations based on the ship-to address and should calculated automatically on new sales orders
10021958 Issue with Material Receipt WEB UI Updating quantity in grid view doesnrsquot update the quantity
10021996 Reports references amp translation For the table based column this does not seem to work Even though a _Trl table exists the translated values are not used
10022001 Voiding GL Journal When a GL Journal with DocStatus Drafted is voided the amounts are not set to 000 After voiding the document it can be posted The fact accts are based on the GL Journal as if its a completed document
10022026 Setup a new Cost Element to capture landed cost for product
10022059 AmtInWord issues The amount in word for spanish send to patch have some errors when 1000 is says MIL instead of UN MIL (correct way) ocurres with next millon etc please check with 100 instead of above it must say CIEN and not UN CIEN
10022062 Web UI - changing the address in the Warehouse window When the address is changed in the Warehouse window the data is not updated in the address field of the Warehouse window
10022063 Web UI - read only access to material receipt window Even if a role have only read only access to this window (the ReadWrite checkbox are not selected) the New Record button is active
10022064 Web UI - adding new details to completed documents It is possible to add new records to completed documents
10022065 Web UI - navigating with the TAB key -gt automatic field text selection When the user navigate around the fields with the TAB key and if the leaving field call a callout the text in the destination field are not selected
10022066 Web UI - usability of Payment Allocation window (form)
Copyright copy 2010 Compiere Inc ndash All rights reserved 8
This windowform is not usable in web UI The applied amount on the invoice cannot be filled The number entered by the user is rounded and or displayed partially
10022070 Web UI - product enhancement - decimal separator For an easy input of numeric values from the keyboard numeric keys the decimal separator should be dot (and not coma)
10022073 Very Urgent Issue - PO loading sequence problem Because the Model Package for Dictionary Entity Type is orgcompieremodel and in the MTablegetPackages(Ctx ctx) methode the loading sequence is 1 MEntityTypegetPackages(ctx) 2 s_packagesDefault the extended POs from the compieremodel package (extend project) are not used
10022075 Issue with Standard Cost Update process When running the Standard Cost Update process the system 1 Retrieves all products for the nominated product category or all if no product category selected 2 Copies the nominated price from the price list to the current cost andor future cost Problems 1 If there is only one product in the price list but 20000 products the process takes a long time because it processes 20000 products not just 1 2 For 19999 products it overwrites the current future cost to zero when it should ignore the record (JP - not sure if this is true) 3 System reports that 20000 products updated when only 1 is
10022079 Error when clicking on Zoom accross Delivery Note from Sales Order ===========gt ZoomTargetgetZoomTargets SELECT DISTINCT MovementType FROM M_InOut WHERE C_Order_ID=1002475 [12] javasqlSQLSyntaxErrorException ORA-00936 expression absente State=42000 ErrorCode=936
10022100 Custom Workflow not working after migration
10022102 System doesnt create a wave if the inventory of the product is increased either by Physical Inventory or Internal Use Inventory
10022105 Problem with create lines from in Material receipt the list of locators is not consistent with header information
10022115 How to close a sales order that is not completely shipped Business case 1-we made a sale order with 3 lines and the shippment option is availaibility we complete the sales order 2-we have created the shipment but just 2 lines are availiable 3-we have created the invoice (we invoice the 3 lines) 4-the customers says that he doesnt want to wait for the product not shipped
10022144 When the first field on a tab is involved in a dynamic validation of another field (with field) the callouts of those fields are called when saving the record
10022156 In Product view -Product search field- the product name alc I search for should be between In 35 version completes just one alc
10022163 Web UI - error when opening a window with large id ( gt 2140000000) This is a very urgent issue for us because all our windows and other dictionary records have IDs greater than 2140000000
10022198 Synchronize Terminology -gt Info Window Columns are skipped The Synchronize Terminology process does not update the Info Window Columns even if the Centraly Maintained option is set
10022200 JBOSS ERROR [STDERR] 4 nov 2009 131048 orgcompierewebCompiereMonitorFilter init
10022281 Able to deactive a locator which has stock with no error message If deactivating a product which has stock an error message is displayed Would expect a similar message when deactivating a locator
10022285 Product Identifier is not being applied correctly in the following windows - Internal Use Inventory Inventory Move Physical Inventory It shows the product name not identifier
10022297 Counter Documents When creating an AP Invoice from an AR Invoice the sales order field is copied across when it shouldnt be
10022338 When clicking on the report button in the swing ui the list of reports includes inactive print format Same thing once we are in the viewer the list includes reports that are inactive
Copyright copy 2010 Compiere Inc ndash All rights reserved 9
10022381 Deadlock detected (Compiere 341 Vanilla) when two users are running Generate Shipment (Manual) process at the same time
10022408 The Auto Allocation process is not working as expected A Invoice and a Payment for the same customer and amount are outstanding and are not being allocated when I run the Auto Allocation process
10022411 While searching for an invoice on swing ui Compiere keeps the field access (or grayed outnot grayed) from the previous record you were on and not the record you searched for
10022439 In FinReportgetPrintFormat() the Record_ID is added to the sorting of the lines in the financial report every time that a report is run
10022462 User window does not allow changing the password of the user
10022472 Payment Allocation sorting error
10022502 Customer invoice is not allocated in newly created counter AR receipt against AP payment (when customer invoice document creates its counter vendor invoice)
10022503 IS Delivered flag on SO screen is set to yes in case of partial shipment
10022504 Grand total amount on the Counter vendor invoice is not equal to Grand total amount on the Customer Invoice
10022506 I am trying to create a web service entry for the GL Journal Header however it is failing
10022570 Table IP_xx should not be in the list of tables of import_delete process
10022593 Is it possible and fully supported in Compiere to attach a chart of account to a summary organization
10022648 How to hide remove the unconfirmed qty in article detail view to avoid the following warning -----------gt SysEnvsaveError Error - CMFG is not installed Please contact Compiere Inc or a Compiere Authorized Partner to learn more about this product [21]
10022651 Setup Summary Level Tax Rate (Sales Tax) with two children Tax Rates (Austin amp Dallas) The two child tax rates are for taxes in two different regions based on zip code When I create a Sales Order and select Sales Tax both child tax rates are applied even though the Bill-To and Ship-To customer are clearly in Dallas
10022675 Created a new table calls C_TaxAuth and added this as a tab for Tax Rate window I cannot save new records to this table - I am getting the error INSERT INTO C_TaxAuth (AD_Client_IDAD_Org_IDC_Tax_IDCreatedCreatedByentityIsActiveRateUpdatedUpdatedBy) VALUES () [null] [11] javasqlSQLException ERROR null value in column c_taxauth_id violates not-null constraint State=23502 ErrorCode=0
10022749 When an invoice line Description only is generated automatically the description cannot be modified because there is no Tax and it is not possible to save the modification
10022772 When importing business partners with multiple contacts and addresses a problem occurs when the Contacts have different phone numbers
Copyright copy 2010 Compiere Inc ndash All rights reserved 10
Known Issues in the Migration Process
Warnings and Error Messages you may see during the Migration steps
Migration Issues ndash WarningError Messages Database Comments
ORA-00001 unique constraint violated All
This might indicate referential issues in your pre-migration data Review the problem data
ORA-01408 such column list already indexed All This is an acceptable warning message
ORA-01440 column to be modified must be empty to decrease precision or scale All This is an acceptable warning message
ORA-02296 cannot enable All
This might indicate referential issues in your pre-migration data Review the problem data
ORA-02275 such a referential constraint already exists in the table All
This might indicate referential issues in your pre-migration data Review the problem data This is an acceptable warning when upgrading CBIZ and getting errors for the tables AD_Dashboard
ALTER TABLE S_ResourceType MODIFY ChargeableQty NUMBER(10) DEFAULT NULL Failed sql statements ERROR cannot alter type of a column used by a view or rule Detail rule _RETURN on view rv_asset_delivery depends on column lot - ALTER TABLE A_Asset_Delivery ALTER Lot TYPE VARCHAR(255) ALTER Lot SET DEFAULT NULL
EnterpriseDB This is an acceptable warning message
No Key amp No Parent - Table AD_RecentItem All This is an acceptable warning message
While executing RUN_Setup refreshing an existing instance ===========gt DB_PostgreSQLgetDataSource DB_EnterpriseDB[null] [12] javalangIllegalArgumentException DataSource with name CompiereDS already exists
EnterpriseDB This is an acceptable warning message
While executing RUN_Setup -----------gt ModelValidationEngineaddClasses GardenWorld compieremodelMyValidator - javalangClassNotFoundException compieremodelMyValidator [12] -----------gt ModelValidationEngineaddClasses Extended Units of Measure orgcompierexuomXUOMModelValidator - javalangClassNo tFoundException orgcompierexuomXUOMModelValidator [12]
All This is an acceptable warning message
ORA-01452 cannot CREATE UNIQUE INDEX duplicate keys found - CREATE UNIQUE INDEX AD_PrintformatItem_Unique ON AD_PrintFormatItem (AD_PrintFormat_IDName)
All Migration of additional components (car) with print format items won‟t work as expected
Known Issues in the Install Process
Warnings and Error Messages you may see during the Import steps
Install Issues ndash WarningError Messages Database Comments
-----------gt ga DROP SEQUENCE T_Spool_Seq -----------gt ga ORA-02289 sequence does not exist
All This is an acceptable warning message
-----------gt DB_PostgreSQLconvertStatement Convert error Converted statement Number=2 (CREATE OR REPLACE VIEW hellip
EnterpriseDB This is an acceptable warning message
-----------gt DBsaveError DBExecuteError - ORA-00001 unique constraint (COMPIEREC_REGION_NAME) violated [15] -----------gt MRegionsaveNewInsertSQL Not inserted - C_Region [15] -----------gt ProgressPanelpublish Unable to import Region requires UNICODE database [15] ===========gt DBexecuteUpdate INSERT INTO C_Region
All
These are acceptable if your database is not set for Unicode
Copyright copy 2010 Compiere Inc ndash All rights reserved 11
Install Issues ndash WarningError Messages Database Comments
(AD_Client_IDAD_Org_IDC_Country_IDC_Region_IDCreatedCreatedByDescriptionIsActiveIsDefaultNameUpdatedUpdatedBy) VALUES (00216438TO_DATE(2006-02-23 154334YYYY-MM-DD HH24MISS)0(Miyasaki)YNTO_DATE(2006-02-23 154334YYYY-MM-DD HH24MISS)0) [null] [15] javasqlSQLException ORA-00001 unique constraint (COMPIERE263C_REGION_NAME) violated State=23000 ErrorCode=1 at oraclejdbcdriverDatabaseErrorthrowSqlException(DatabaseErrorjava125) at oraclejdbcdriverT4CTTIoerprocessError(T4CTTIoerjava305) at oraclejdbcdriverT4CTTIoerprocessError(T4CTTIoerjava272)
At the very end of the install process or when manually executing utilsRUN_Support 130755094 Compierestartup Client lap-fr10104139177 CCompiere2 - Java HotSpot(TM) Client VM 150_11-b03 - Windows XP 5 1 Service Pack 2 [15] Exception in thread AWT-EventQueue-0 javalangNullPointerException at javaxswingplafbasicBasicScrollBarUIlayoutHScrollbar(BasicScrollBarUIjava676)
All No effect on the functionality You may ignore this error
Error after clicking Save on the RUN_Setup window ===========gt CConnectioncreateConnection jdbcoraclethinlap-fr1521xe (1) AutoCommit=trueTrxIso=READ_COMMITTED - ORA-010 17 invalid usernamepassword logon denied [12] -----------gt CPreparedStatementltinitgt ALTER TABLE AD_System MODIFY Summary NVARCHAR2(2000) [12] javalangUnsupportedOperationException No DBConnection at orgcompiereutilDBgetConnectionRW(DBjava228)
All No effect on the functionality You may ignore this error
Error installing the sample application extension XUOM Failed sql statements ORA-00955 name is already used by an existing object - CREATE INDEX M_Product_ProductCategory ON M_Product (M_Product_Category_ID) - javasqlSQLException ORA-00955 name is already used by an existing object
All This is an acceptable warning message
Error installing the sample application extension XUOM Create Views Starting to create views for entity XUOM Created view 1 for entity XUOM Failed sql statements ltltERROR ERROR relation m_product_expensetype already exists - CREATE UNIQUE INDEX M_Product_ExpenseType ON M_Product (S_ExpenseType_ID) - javasqlSQLException ERROR relation m_product_expensetype already existsgtgt hellip same error for other indexeshellip ltltERROR ERROR constraint fk208_10919 for relation m_product already exists - ALTER TABLE M_Product ADD CONSTRAINT FK208_10919 FOREIGN KEY (C_SubscriptionType_ID) REFERENCES C_SubscriptionType (C_SubscriptionType_ID) - javasqlSQLException ERROR constraint fk208_10919 for relation m_product already existsgtgt hellipsame error for other constraintshellip
All This is an acceptable warning message
Copyright copy 2010 Compiere Inc ndash All rights reserved 12
Known Issues in Compiere 36
Issues you may encounter using Compiere 36
Issue Database Solution
Null pointer exception when creating CAR file in Web UI Use Swing
Web UI Description is not available in workflow editor Process requisition workflow
You should be able to see the description (ex 10 Total Lines gt100
Web UI When any of the Workflow Review (ie Initial Tenant Setup Review) windows are
displayed and then the menu tree is expanded over the workflow review the icons for the steps in the workflow overwrite the menu options
Web UI There is no button Panel at the bottom of the page for workflow Navigation in workflow editor window
This is now possible except the ldquosomethingrdquohellipError when executing BVL reports
on EnterpriseDB
JasperReportServerstartReport BVL Schema does not exist
EnterpriseDB BVL is currently not supported on EDB
Firefox only
Error message when uploading an attachment to a window An error occurred while uploading the attachment Please reload the record
and try again
The attachment as such works but only gives an error In order to see the attachment to a record reopen the window
For a current list of open issues please query the list of public requests from our request system httpwwwcompierecomsupportsupport-requestsphp
Copyright copy 2010 Compiere Inc ndash All rights reserved 13
Appendix A
Compiere 36 ndash Migration Instructions
Copyright copy 2010 Compiere Inc ndash All rights reserved 14
Compiere 36 Migration Instructions
Prerequisites
- A valid Support contract - Sun Java JDK 6 (SDK) ndash Update 5 or later (not just JRE) - Database Oracle XE Oracle 10gR2 Oracle 11g or EnterpriseDB Postgres Plus Advanced Server 83
Preserving Customizations
Compiere will not modify any customizations - as long as the customizations are marked appropriately By default all added records in the dictionary will have the entity type User Maintained
- In the Change Audit window mark the changes as Customizations before running the migration Tip Alternatively changes may be applied manually
- Before performing the migration run it in the test mode to ensure all customizations will be preserved
Migration Steps
Migration Consists of the Following steps
Preparation
Test Mode
Migrate to a New Release
Post Migration Steps
Copyright copy 2010 Compiere Inc ndash All rights reserved 15
Preparation
Use the following steps to prepare for the Migration
Server needs to have access to the Internet
Stop the application server by executing utilsRUN_Server2Stop
Backup the database
If you are running EnterpriseDB 82 or older you must upgrade to EnterpriseDB Postgres Plus
Advanced Server 83
Rename COMPIERE_HOMEjboss directory
Delete COMPIERE_HOMEdatacompiere_CPROcar and compiere_XUOMcar files (filename including single quotes from older versions)
Test Mode (optional)
First run the Migration Program in Test mode This allows the ability to evaluate the actions taken when running it against the database Please note that the first step (resolve ID conflicts) will not show the correct future IDs in test mode
If the program marks certain wanted tables for deletion then create the table in the data dictionary (Window TableColumn) with the Entity Type User or Application
If the program marks certain wanted columns for deletion make sure that the column has the Entity Type User or Application If the wanted column has the Entity Type Data Dictionary or Compiere and it is marked for deletion then copy it under another name and mark the new column as Custom or Application
The same applies to windows tabs fields etc
Mandatory User or Application Columns must have a default value defined in the database eg ALTER TABLE someTable MODIFY (myColumn DEFAULT myDefault) otherwise adding new records will result in an error
Check List
Server has HTTP (port 80) access to the Internet
Compiere web store Asset - Support Contract
System Operation Steps
Resolve ID Conflicts from CustomizationsExtensions
Synchronize Data Structure (TableColumnIndexConstraints)
Synchronize Data Content
Migrate to a New Release
Use the following steps on the Application Server box for migrating to the new release
1) When upgrading from 321 or older delete or rename the existing jboss subdirectory (due to different JBoss version and configuration files) Download and unzipuntar the distribution file (eg Compiere_3XXXzip) Tip It is also possible to extract the distribution file into a new directory and copy your configuration files Then change the COMPIERE_HOME environment variable to the new directory
2) Execute RUN_setup Verify all your environment settings and click Save to continue If you get any errors in the parameters validation you‟ll see a red icon right next to the parameter with the problem make the required changes click Test to run the validation again and then click Save to continue
Copyright copy 2010 Compiere Inc ndash All rights reserved 16
Note The screen shots show version 320_Beta but these also apply for 36
3) The Compiere Public License Opens Click ldquoYes I Understand and Acceptrdquo to continue
Copyright copy 2010 Compiere Inc ndash All rights reserved 17
4) The following prompt will display describing your new Security Key Click bdquoOk‟ to continue
5) The Next step is to provide the Subscriber Information Current customers should provide the subscriber information (System Name Email and Password) exactly as it was registered in the Compiere Web Store to get a complete list of applications
Click Check Available Applications to get a list of applications that are available to be installed
Note To install additional applications once you have installed or migrated to the latest Compiere Core version you must select Compiere Core plus any additional applications to install and then run Migration
6) Select the applications that you want to migrate and select the action ReinstallMigrate Compiere Standard is the core application that must always be installed or migrated to the latest release but you also may choose additional applications provided by Compiere or any of our authorized partners Tip If you do not wish to install or migrate any of the applications listed be sure to change the action to ndash
Copyright copy 2010 Compiere Inc ndash All rights reserved 18
None- To install new applications change the action to New Install IMPORTANT If you don‟t provide the correct emailpassword or if you don‟t have Internet connection you won‟t be able to select Compiere Professional or any of the other optional components
7) Next read and accept the Compiere Public License agreement Hint You might get more than one license agreement depending on the applications that you are installing Notice that XUOM is a sample application extension
Copyright copy 2010 Compiere Inc ndash All rights reserved 19
8) If you are installing Compiere Professional you will receive a Commercial license agreement Please read and accept the license agreement in order to continue Hint You might get more than one license agreement depending on the applications that you are installing
9) Click on Start File Installation
Copyright copy 2010 Compiere Inc ndash All rights reserved 20
10) When the File Installation has completed click on Start Migrate Database
Copyright copy 2010 Compiere Inc ndash All rights reserved 21
11) Provide the following information exactly as it was registered in the Compiere Web store and click Check License to validate your asset information (Note This information may already be populated if it was entered in the system window)
- System Name
- Registered Email
- Password
Tip If you get the ldquoCore Invalidrdquo error after selecting the bdquoCheck License‟ button that is an indication that you did not select the appropriate action for the Core component in step 5 In this case Exit the setup and support windows and execute RUN_setup again selecting the Core plus any other components to install
12) Click on ldquoStart Migrationrdquo
Copyright copy 2010 Compiere Inc ndash All rights reserved 22
13) At the Compiere Version Migration Prompt click ldquoYesrdquo to proceed with the Migration
14) Unselect the ldquoTest Onlyrdquo option and click Start
Copyright copy 2010 Compiere Inc ndash All rights reserved 23
15) Confirm that you have a current back up of your database
16) Confirm that the Source and Target database versions from the Compiere Version Migration window are correct
17) Verify that the migration finish with no errors and the message ldquoAfter Migration - DONErdquo is displayed In case you get any errors please be sure to review the list of known issues listed in this document before logging a service request
Copyright copy 2010 Compiere Inc ndash All rights reserved 24
18) Verify the following log files for errors a migrate_2010_mm_dd_hh_mi_sslog complete log b migrate_2010_mm_dd_hh_mi_sserrlog subset of log with just errors c 2010-mm-dd_log possible additional errors not printed to the migration log (search for the file with the text Compiere Migration 36)
19) If you have a Compiere Professional or Enterprise Edition license execute utilsRUN_Support and click ldquoCheck Licenserdquo to activate your license Tip There is no need to click the start migration button
20) After you have pressed the Check License button you should be able to see if your Professional License has been activated
21) After Compiere Professional license has been updated you may click the ldquoXrdquo to close the window
Copyright copy 2010 Compiere Inc ndash All rights reserved 25
Hint It is NOT necessary to click the Start Migration at this point
22) Start the Apps Server using the script utilsRUN_Server2
23) To start Compiere in the Web UI after migration it is required that all Web UI users clear their browser cache first
Multi-Server Installation Compiere Enterprise Edition
On a multi-server installation after upgrading the main application server and database you need to run the following on the additional application servers that are used to load balance the web UI connections
1) Unzip the binary distribution to update the Compiere2 folder
2) Copy the template for the configuration file Compiere2utilsCommandLineCLConfigurationTemplateshbat To Compiere2utilsCommandLineCLConfigurationshbat and configure it so the Apps Server is the local server where you are doing this installation but the database server is the box where you already installed Compiere
3) Execute the following script to run only the file installation cd Compiere2utilsCommandLine CLFileInstall CLConfigurationsh IMPORTANT Be sure to use the CLFileInstall script If you use CLInstall it will drop your database user
4) Delete the files COMPIERE_HOMEjbossservercompieredeploycompiereRootear to ensure that there won‟t be conflicts by having multiple accounting request etc processors
5) Start the apps server
6) Configure your load balancing solution to distribute part the load to the additional servers Be sure to use sticky sessions to ensure that all requests from a session go to the same application server
Support for this feature is only available for customers using Enterprise Edition For more details about the different
Compiere Editions please see our website
Note After migration (re-) apply the language packs when needed
Copyright copy 2010 Compiere Inc ndash All rights reserved 26
Post Migration Steps for RMARTV
This step is only relevant if you plan to use the new returns functionality and you are migrating from 263 or older
Compiere now has explicit return transactions We discontinued the previously seeded Return Material functionality
In the Document Type window you need to do the following for every TenantClient
1) Delete or de-activate the document types
Return Material
MM Customer Return Hint This is discontinued functionality
If you choose to deactivate the obsolete document types (as opposed to deleting them) please rename the document type MM Customer Return to an alternate name (For eg MM Customer Return Do Not Use ) so you can successfully create the new document types detailed below
2) Create Return Document Types
MM Vendor Return
- Copy MM Receipt and set Name
- Select Return Transaction
- De-Select Counter Document flags
- Optionally select Confirmations
Vendor RMA
- Copy Purchase Order and set Name
- Select Return Transaction
- De-Select Counter Document flags
MM Customer Return
- Copy MM Shipment and set Name
- Select Return Transaction
- De-Select Counter Document flags
- Optionally create a special Document Sequence and or Confirmations
Customer RMA (Copy Standard Order
- Copy Standard Order and set Name
- Select Return Transaction
- De-Select Counter Document flags
- Select AR Credit Memo for Invoice Document Type
- Select the created MM Customer Return for Shipment Document Type
- Optionally create a special Document Sequence
Unfortunately we cannot do the above steps automatically as this is configuration specific user data
Tip For an example of a set-up please check GardenWorld in a fresh install or in a newly created Tenant
Copyright copy 2009 Compiere Inc ndash All rights reserved 27
Appendix B
Compiere 36 ndash Installation Instructions
Copyright copy 2009 Compiere Inc ndash All rights reserved 28
Compiere 36 Installation Instructions This is for a new installation of Compiere If you already have installed a previous version of Compiere please refer to the Migration instructions
Prerequisites
- Database Oracle XE Oracle 10gR2 Oracle 11g or EnterpriseDB Postgres Plus Advanced Server 83 Important It is mandatory to use a Unicode character set - Database approved Linux Operating System Windows 2003 or Windows XP - Disk Space gt 5 GB (includes database)
- Swap Space gt 1GB - Memory gt 512 MB - Recommended gt 1 GB - TCPIP connection - Network setup with DNS server and a domain Tip Do not use IP addresses - Internet access
Hint Notice that the screenshots in this document refer to the installation on Windows but the process is the same for Linux except for the paths (eg CCompiere2 vs Compiere2) and the extension of the scripts (bat vs sh)
Database Installation
Install Database ndash For the instructions on how to install Oracle XE and EnterpriseDB on Windows and Linux please use the install guide on the Compiere website httpwwwcompiereorgsupportinstallationphp
If you are using Oracle XE you need to modify the following database parameters
Start SQLPlus (Start =gt Programs =gt Oracle Database 10g Express Edition =gt Run SQL Command Line)
connect systemcompiere
alter system set processes=100 scope=spfile
alter system set sessions=100 scope=spfile
Re-start the database (Start =gt Programs =gt Oracle Database 10g Express Edition =gt Stop DB amp then Start DB)
Java Installation
1 Download and install Sun Java JDK 6 (SDK) update 5 or higher Important The Compiere Server requires the JDK (not just JRE)
2 For installation instructions see the JDK section on this page httpjavasuncomjavase6webnotesinstallindexhtml
Download Compiere
3 Install Setup Compiere Server (this includes the Client as well)
1) Download the current version of Compiere Web Store (for current customers) or free Community Edition and Professional Trials
2) Extract the zip file The steps shown assume that you extract to the root directory resulting in a COMPIERE_HOME of CCompiere2 in Windows or Compiere2 in Linux
3) Verify that the bin directory for your database executables is included in the PATH Also if using Oracle XE on Linux run $ORACLE_HOMEbinoracle_envsh To update the PATH in Windows right click on My Computer and choose Properties Then move to the advanced tab and click on Environment Variables Find the PATH variable and click Edit
4) Verify that the path to the JAVA_HOME is set up in the Environment Variables To update the JAVA_HOME in Windows right click on My Computer and choose Properties Then move to the advanced tab and click on Environment Variables Find the JAVA_HOME variable and click Edit
5) Execute the script $COMPIERE_HOMERUN_Setup
Copyright copy 2009 Compiere Inc ndash All rights reserved 29
Tip if the following window does not display please ensure that the following are updated
Add the bin folder where you have installed JDK 16 at the beginning of the PATH system environment variable
Set the JAVA_HOME system variable to the location of your java installation (eg bdquoCProgram FilesJavajdk160_05‟)
Set the COMPIERE_HOME system variable to the path of your Compiere installation (eg bdquoCCompiere2‟)
Note Compiere requires Internet connection for installation If you are using a proxy server then you need to modify the script RUN_setup to set your proxy options
Copyright copy 2009 Compiere Inc ndash All rights reserved 30
6) Select Database Type Oracle XE Oracle (for Standard or Enterprise Editions) or PostgreSQL (for EnterpriseDB)
7) For System Password enter the System database User password (eg manager)
8) For Database Password enter the Compiere database user password (eg bdquocompiere‟)
9) For Server Names ie Application Database and Mail use the DNS name of the server Hint Do not use localhost (127001) or IP addresses
10) Enter or update any other parameters as necessary
11) Select the Help button for information on any field
12) Select the Test button to check the parameters Tip The parameters will only save after they have been verified
13) If an entry is unverifiable it will display with a red X Correct the entry and re-select Test
14) Once all fields are verified click the Save button to proceed
Copyright copy 2009 Compiere Inc ndash All rights reserved 31
15) The Compiere Public License Opens Click ldquoYes I understand and Acceptrdquo to continue
16) The following prompt will display describing your new Security Key Click bdquoOk‟ to continue
17) The Next step is to provide the Subscriber Information Current customers should provide the subscriber information (System Name Email and Password) exactly as it was registered in the Compiere Web Store to get a complete list of applications Click Check Available Applications to get a list of applications that are available to be installed Tip Community Edition users may leave the fields blank and click ldquoCheck available componentsrdquo to install the Community Edition
Copyright copy 2009 Compiere Inc ndash All rights reserved 32
18) Select the applications that you would like to install You can include additional applications by using the button Add Application By default all available applications will be installed If you do not wish to install one of them you should change the action field from ldquoNew Installrdquo to ldquo-None-ldquo Notice that Compiere Core is a Mandatory Prerequisite and must be selected Select the OK button to continue
19) Next read and accept the Compiere Public License agreement Hint You might get more than one license agreement depending on the applications that you are installing
Copyright copy 2009 Compiere Inc ndash All rights reserved 33
20) Then read and accept the Compiere Commercial License agreement Hint You might get more than one license agreement depending on the applications that you are installing
Copyright copy 2009 Compiere Inc ndash All rights reserved 34
21) After accepting the license agreement the following window will display
22) Select Start File Installation
Important At this point you must be connected to the internet to continue or the installation will not succeed
23) Once the file installation is complete select Start Create New Database
Note If you already have a Compiere database in your system you will be presented with a split panel after bdquoStart Server Installrdquo Click the left panel (Start DROP OLD and create NEW Database) if you want to replace the existing database with the new database
24) At the prompt select bdquoYes‟ to Drop the existing Database and create a new database
Copyright copy 2009 Compiere Inc ndash All rights reserved 35
Warning If you choose to replace the existing database all data in the existing database will be removed
25) Verify that you see a ‟10 Finished‟ message at the end of this step Then a new window should pop-up to do the license validation
26) The Compiere Support window opens Complete the necessary fields in order to validate your assets
Hint If you only intend to use the Community Edition of Compiere 30 you may skip the following steps and go to the Application Server section Important For customers with a valid support contract with Compiere this is a required step to ensure that the features associated with the support level are enabled If you are a customer and do not have a web store login please contact your system administrator or Compiere Support first If you are not a customer and would like to obtain a trial license for the Professional Edition please Contact Us and request the files for the Professional
Edition
27) Provide the following information exactly as it was registered in the Compiere Web store and click Check License to validate your asset information
- System Name (name provided in the web store registration)
- Registered Email (email address provided in the web store registration)
- Password (web store password)
Copyright copy 2009 Compiere Inc ndash All rights reserved 36
28) To verify your license click the ldquoCheck Licenserdquo button Tip Do not click Start Migration Notice that internet access is required to validate the license information
29) Next review that your license information has been validated If you have a trial license for Compiere Professional but you currently don‟t have a license with Compiere you will see that the license for Standard is invalid This is expected as the trial doesn‟t include Standard and you may ignore the error
30) After Compiere Professional license has been verified click the ldquoXrdquo to close the window
Note If you get the error ldquoYou do not have an appropriate license to use this featurerdquo when starting the web UI then login to the server and execute utilsRUN_Support to validate again your license and restart the application server When using the Swing client ensure that your database connection information matches exactly the information in the
Copyright copy 2009 Compiere Inc ndash All rights reserved 37
target URL in RUN_Support (including the fully qualified server name)
31) Close any additional Setup and or Support windows
Run Application Server
4 Start the Compiere Application Server
1) Execute utilsRUN_Server2
2) There should be no errors Check the logs in $COMPIERE_HOMEjbossservercompierelog to verify this
3) Common problems include ports already in use
- 174109085 ERROR [NamingService] Could not start on port 1099 javanetBindException Address already in use JVM_Bind at javanetPlainSocketImplsocketBind(Native Method)
- There is another program using port 1099 Stop it and restart Run_Server2 or setup Compiere to use another port in RUN_setup Likely port conflicts
80 - Other web server running (or you need privileges under LinuxUnix)
8080 ndash Used by Oracle Database
1099 - Often used by IDEs for debugging or by internet messengers (Skype Gtalk etc)
Copyright copy 2010 Compiere Inc ndash All rights reserved 38
Start Compiere
5 Start the Compiere Client
1) Start the Swing client by double clicking on the Compiere shortcut in your desktop or by executing
RUN_Compiere2 from the $COMPIERE_HOME directory Default users and passwords for the sample Garden World application
- GardenUserGardenUser
- GardenAdminGardenAdmin
- SystemSystem
- SuperUserSystem
2) Alternatively if you have access to the Professional Edition you can launch the application from the browser by using the URL httpserverportapps (eg httpmycompanycom80apps) Tip For optimal performance the Firefox browser is recommended for using the Compiere Web User Interface
Information For additional information see the Compiere home page httpwwwcompierecom
Copyright copy 2010 Compiere Inc ndash All rights reserved 39
Appendix C
Compiere 36 ndash Application Extensions
Copyright copy 2010 Compiere Inc ndash All rights reserved 40
Compiere 36 Application Extensions - Compiere Partners This section is for Application Extensions in Compiere available as functionality in 36 is for Partners only This framework will allow Partners to create application extensions that include both reference data and code and can be distributed to their customers through Compiere
Registration of Application Extensions ndash Application Provider (Partner)
Use the steps below to register for Application Extensions
1) To register an Application Extension log a Support Request with Compiere
2) Login with the System Administrator role
3) Open the Entity Type window (Application Dictionary =gt Entity Type) and create a new record
Hint Be careful not to modify the entities C D CPRO or XUOM
Important Complete all the mandatory fields For entity type notice that names beginning with ldquoCrdquo and ldquoXrdquo are reserved for Compiere and you must use four characters
Copyright copy 2010 Compiere Inc ndash All rights reserved 41
Comments about optional fields
- Version The version of your extension Usually 10 for the first version
- Prerequisite version The Compiere Core version that is required for this extension eg 330 You need to use the exact text as defined for the entity type D
- Prerequisite applications The entity type of the applications that need to be installed in order to install this extension For example set it to CPRO if the extension must be applied on top of the professional edition
- Classpath List of additional jar files required for this extension
- Model package Specific model package from the jar files listed in the classpath field
4) You do not need to enter any information on the Version Modification or Migration Step tabs
5) Ensure that your System window contains your up to date information for your system and web store emailpassword information
6) Click ldquoRegister Applicationrdquo to send your request to Compiere Tip If an entity type with the same name has already been registered you‟ll get an error ldquoError Already registered XXXXrdquo You will have to create a new record with the new entity type Verify with Compiere that the new entity type that you plan to use is available
7) Click bdquoOk‟ to start process
8) Leave the defaults in place and click bdquoOk‟ to continue
9) At this point the status will be pending approval from Compiere Please log a support request in our case management system requesting the approval of your component including a long description and license type
Copyright copy 2010 Compiere Inc ndash All rights reserved 42
Creation of Application car file ndash Application Provider (Partner)
Follow the steps below to create the Applicationcar file
1) Make all the application dictionary changes using the entity type that you registered in the previous step
2) Generate jar files for the custom code required by your extension
3) After having your new Entity Type approved by Compiere login to Compiere with the System Administrator role and query the entity type that you registered in the previous step and click ldquoCreate Application Filerdquo
4) Click bdquoOk‟ to start process
Copyright copy 2010 Compiere Inc ndash All rights reserved 43
5) Provide the directory for the jar file listed in the field classpath
6) The car file will be generated in the COMPIERE_HOMEdata directory The newly generated car file will have a name of compiere_XXXXcar
Important The naming convention for car files has changed (eg compiere_‟CPRO‟car from 30 and 31 is now compiere_CPROcar in 33 ie without quotes in the file name) If a customer unzipps the Compiere installation files into the same directory it is possible to end up with both compiere_‟CPRO‟car as well as compiere_CPROcar This in turn will cause Compiere Professional to show up twice in the installation window To avoid this situation customers will need to manually delete compiere_‟CPRO‟car and compiere_‟XUOM‟car from COMPIERE_HOMEdata directory These are the only two car files that Compiere has distributed prior to 32 If a customer has created any additional car files prior to 32 it is necessary to follow the same procedure for those car files as well
Copyright copy 2010 Compiere Inc ndash All rights reserved 44
Installation ndash Application Consumer (Customer)
Follow the steps below to install the Application
1) After obtaining the car file for the application extension copy it to the directory COMPIERE_HOMEdata
2) Execute RUN_Setup (see Appendix A for details on the setup information) Important Be sure to have internet connection available to be able to get the license terms for the application extensions that you plan to install
3) When you get to the window to select the applications besides the application extension that you need to install also select the option ReinstallMigrate for Compiere Core 33
4) Then continue with the MIGRATION steps as usual (See Appendix A for more details)
Copyright copy 2010 Compiere Inc ndash All rights reserved 45
Appendix D
Compiere 36 ndash Command Line Scripts
Copyright copy 2010 Compiere Inc ndash All rights reserved 46
Command Line Scripts Scripts are provided in the $COMPIERE_HOMEutilsCommandLine directory for experienced Compiere users who would like to perform Compiere instance creation and maintenance via command line or using automated scripts
CLInstall
Purpose To create a new Compiere installation When this script is run a new Compiere instance is created on the database specified via configuration file Please note that existing Compiere database instance is dropped and a fresh new Compiere instance is created when this script is run
The script validates the components that can be installed against Compiere License server and hence need to be connected to internet while running and have the appropriate license to allow you to install the components The script also updates the License information after the instance is created
All the component car files present in $COMPIERE_HOMEdata will be installed as long as you provide the correct subscriber information otherwise only the standard application will be installed
1) Environment Variables $COMPIERE_HOME $JAVA_HOME need to be set
2) The configuration parameters to CLInstall are provided via a configuration file A template CLConfiguartionTemplate is provided in the same directory which you can make a copy and edit the configuration parameters for your specific installation All the parameters have one to one correspondence with the parameters on the first window that comes up when running RUN_setup
Subscriber information for License validation CL_SYSTEM_NAME CL_WEBSTORE_EMAIL CL_WEBSTORE_PASS
Homes CL_COMPIERE_HOME CL_JAVA_HOME CL_JAVA_TYPE
Database CL_COMPIERE_DB_TYPE CL_COMPIERE_DB_SERVER CL_COMPIERE_DB_PORT CL_COMPIERE_DB_NAME CL_COMPIERE_DB_SYSTEM CL_COMPIERE_DB_USER CL_COMPIERE_DB_PASSWORD
Apps Server CL_COMPIERE_APPS_TYPE CL_COMPIERE_APPS_SERVER CL_APPS_SERVER_DEPLOY_DIR CL_COMPIERE_JNP_PORT CL_COMPIERE_WEB_PORT
SSL Settings CL_COMPIERE_SSL_PORT CL_COMPIERE_KEYSTOREPASS
Mail CL_MAIL_SERVER CL_ADMIN_EMAIL CL_MAIL_USER CL_MAIL_PASSWORD
3) Running
CLInstall takes in the configuration file as a parameter Sample Usage gtCLInstallbat CLConfigurationbat
Errors while running the script are displayed onto the console window and are also written to log files within the same directory
CLMigrate
This is very similar to CLInstallbat except that it performs the migration of a Compiere instance instead of dropping and recreating a new instance
CLUpdateLicense
This script can be run to update the license information instead of executing RUN_Support The script can be only run in a successful Compiere installation created via RUN_Setup or installationmigration via command line The script can be edited to provide different subscriber information for license validation
Copyright copy 2010 Compiere Inc ndash All rights reserved 47
The following line in CLUpdateLicensebat COMPIERE_JAVA COMPIERE_JAVA_OPTIONS -cp CLASSPATH comcompiereclientUpdateLicense
can be be changed as follows to pass in the subscriber information COMPIERE_JAVA COMPIERE_JAVA_OPTIONS -cp CLASSPATH comcompiereclientUpdateLicense --sysname xxx --email xxx --password xxx
If the parameters are not specified the subscriber information at the time of installation will be used to update the Licenses
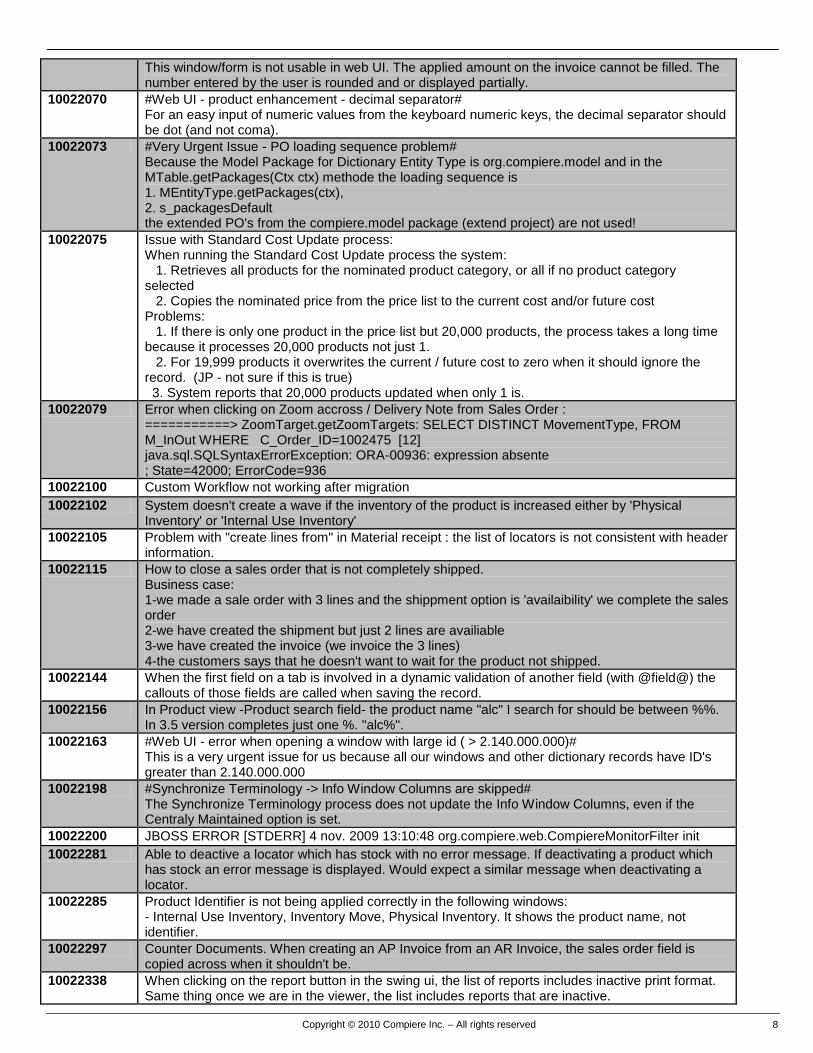
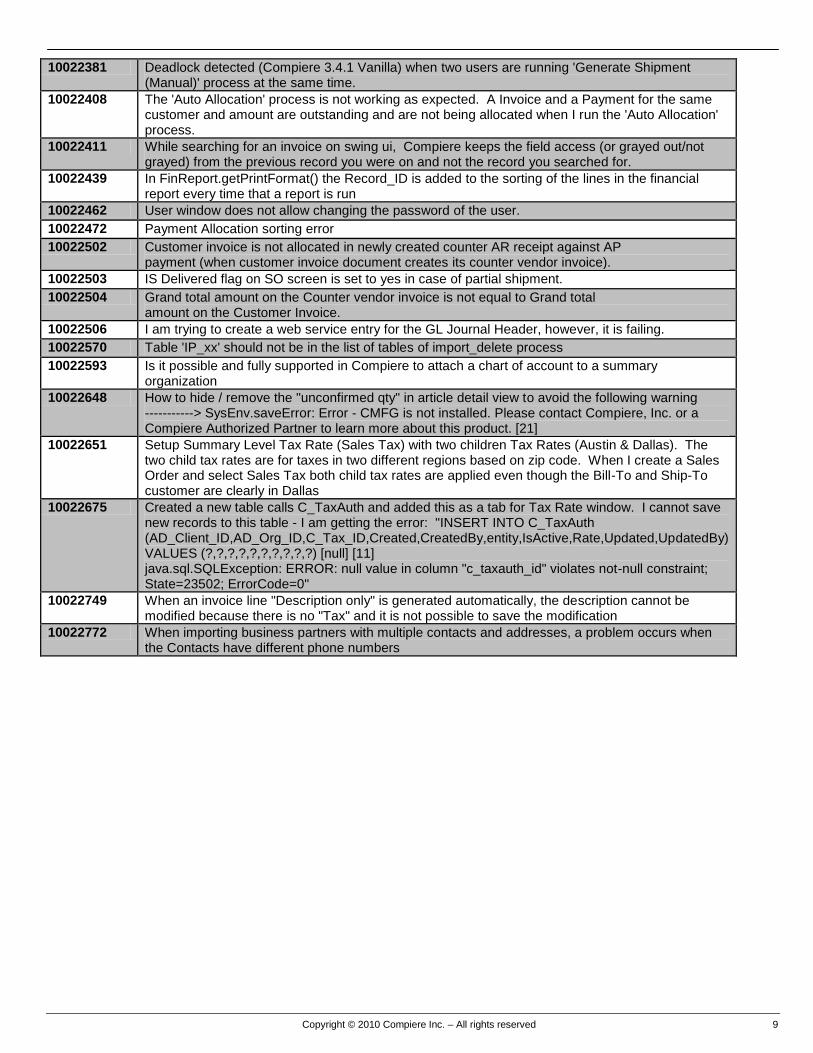
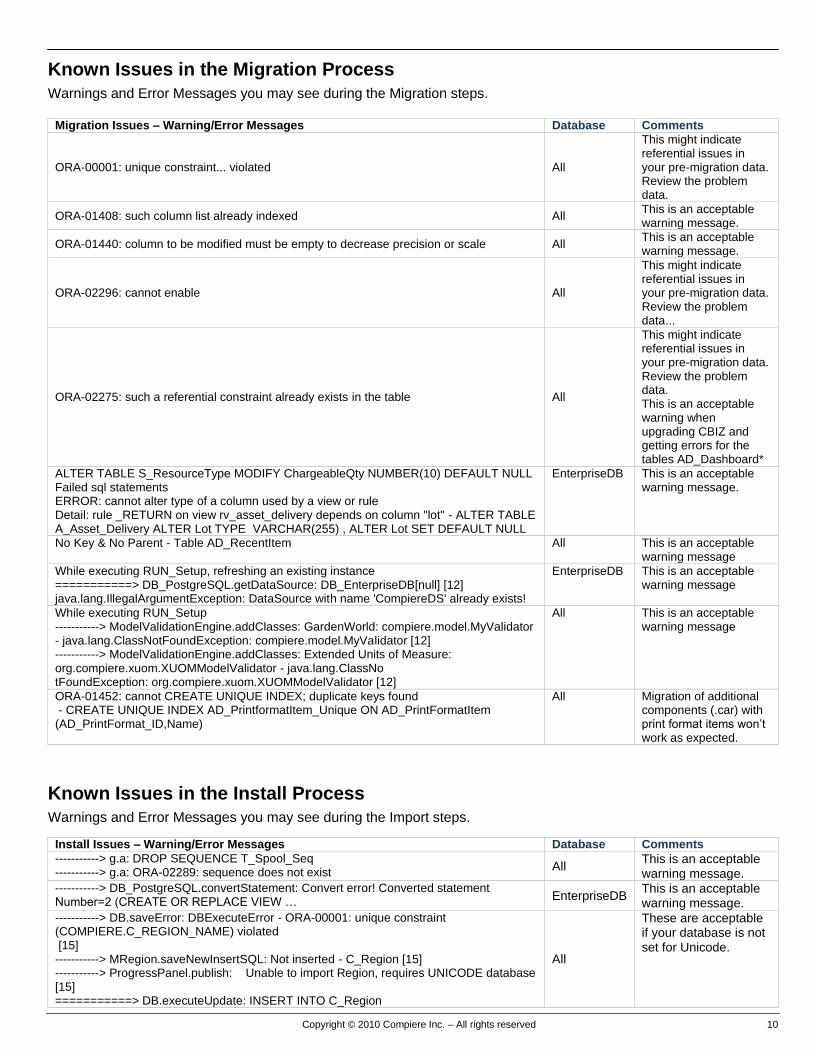
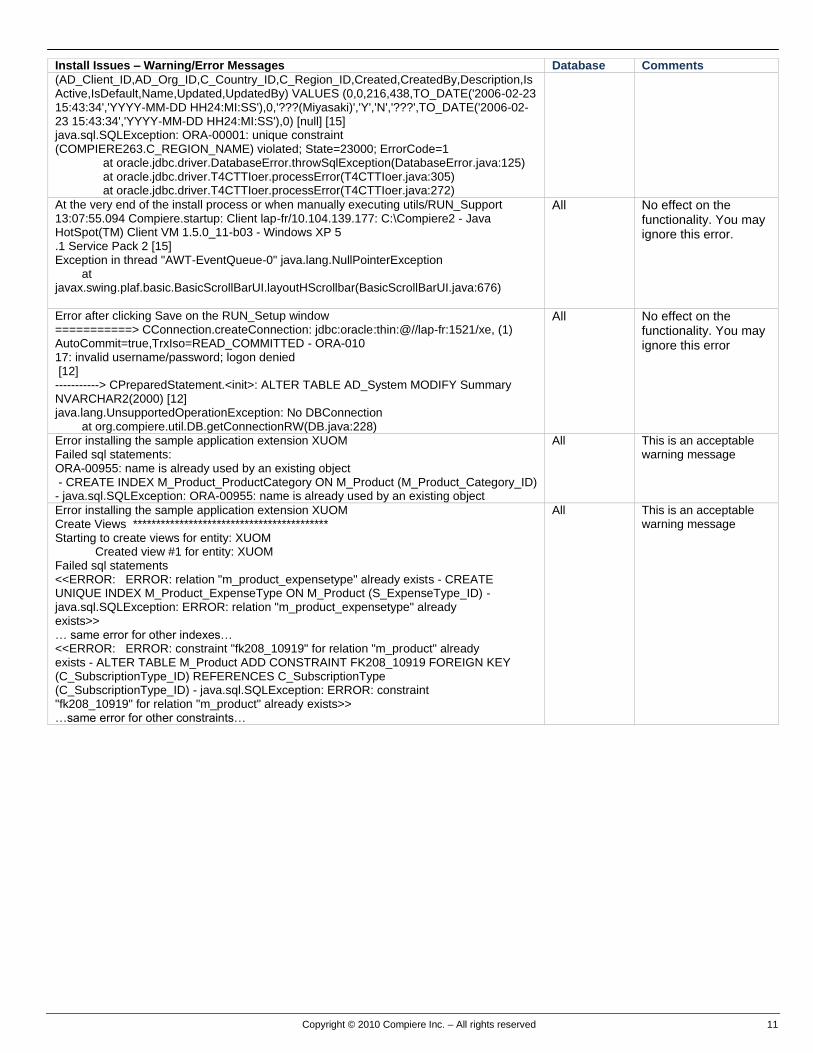
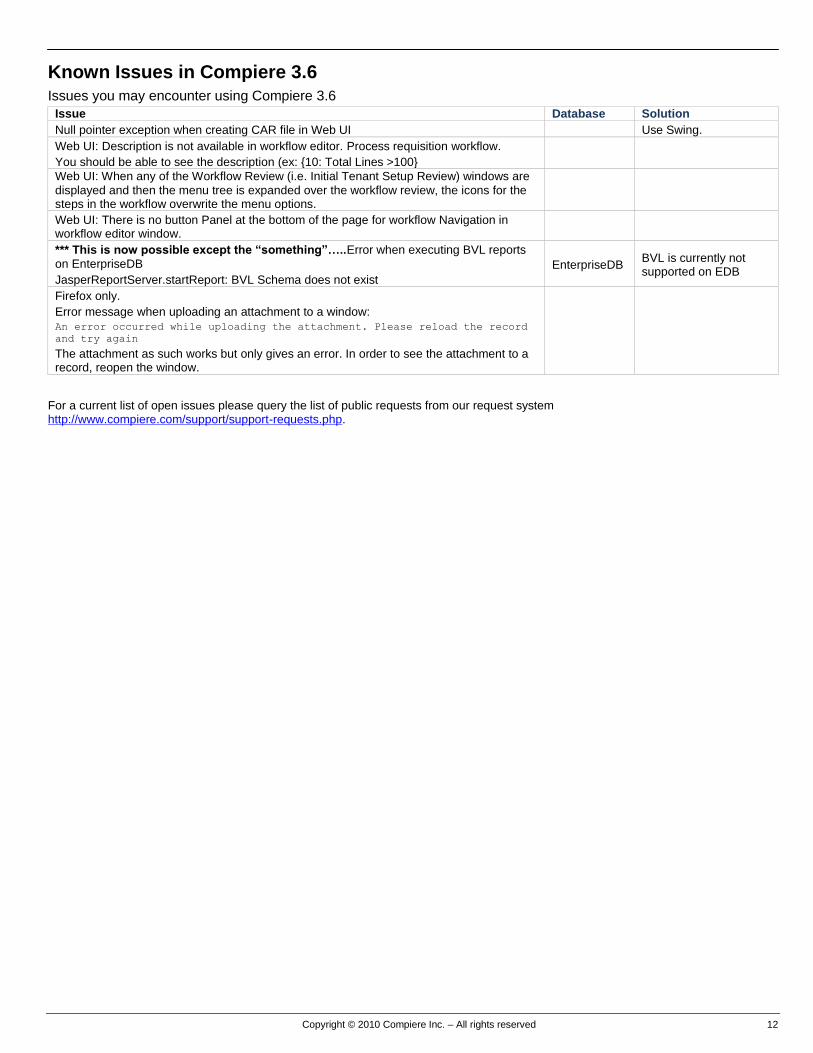
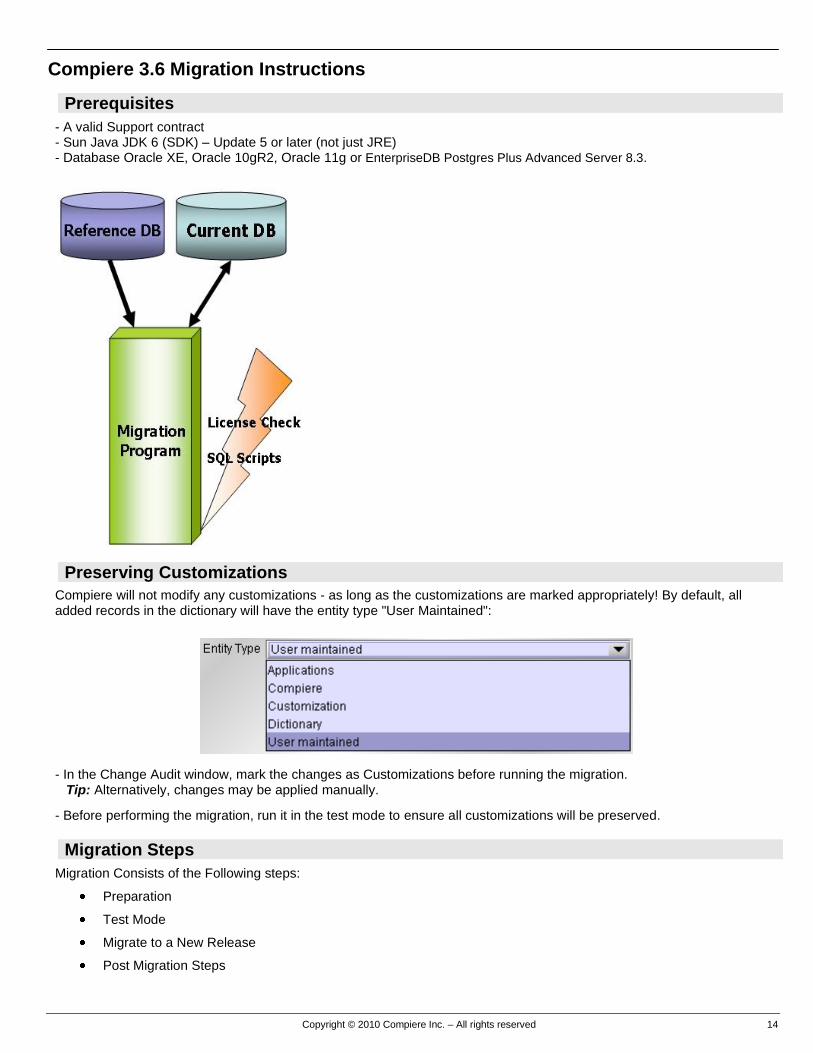
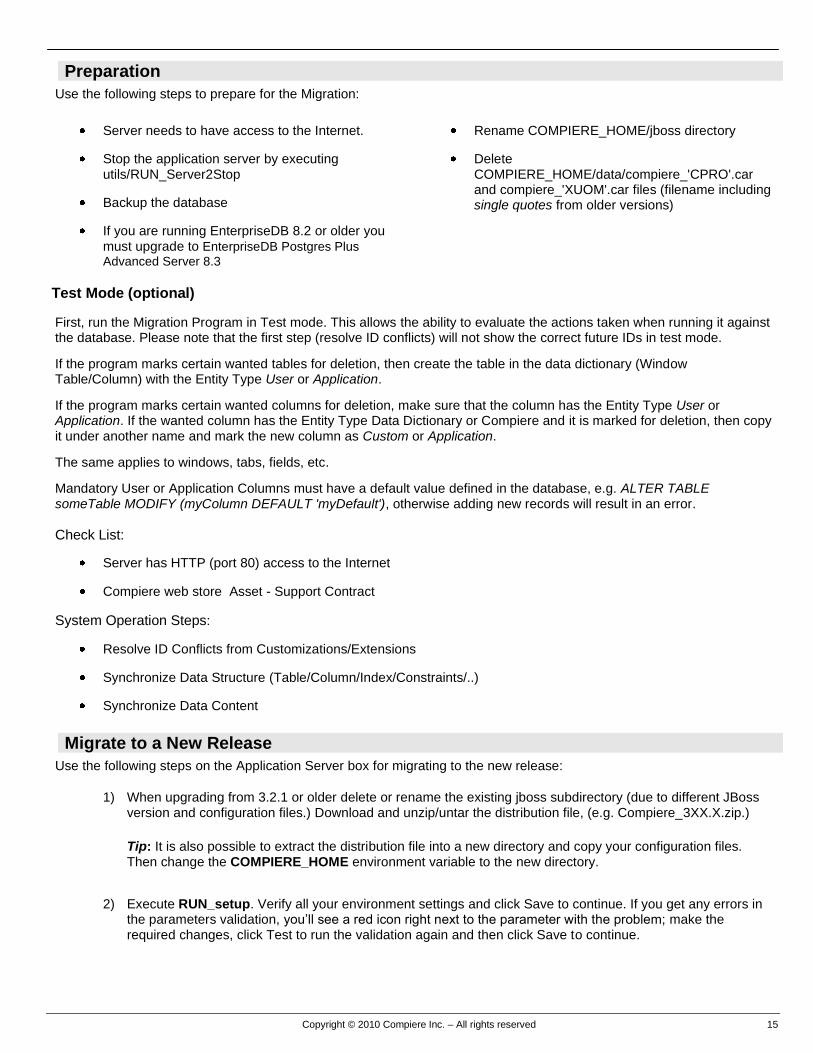
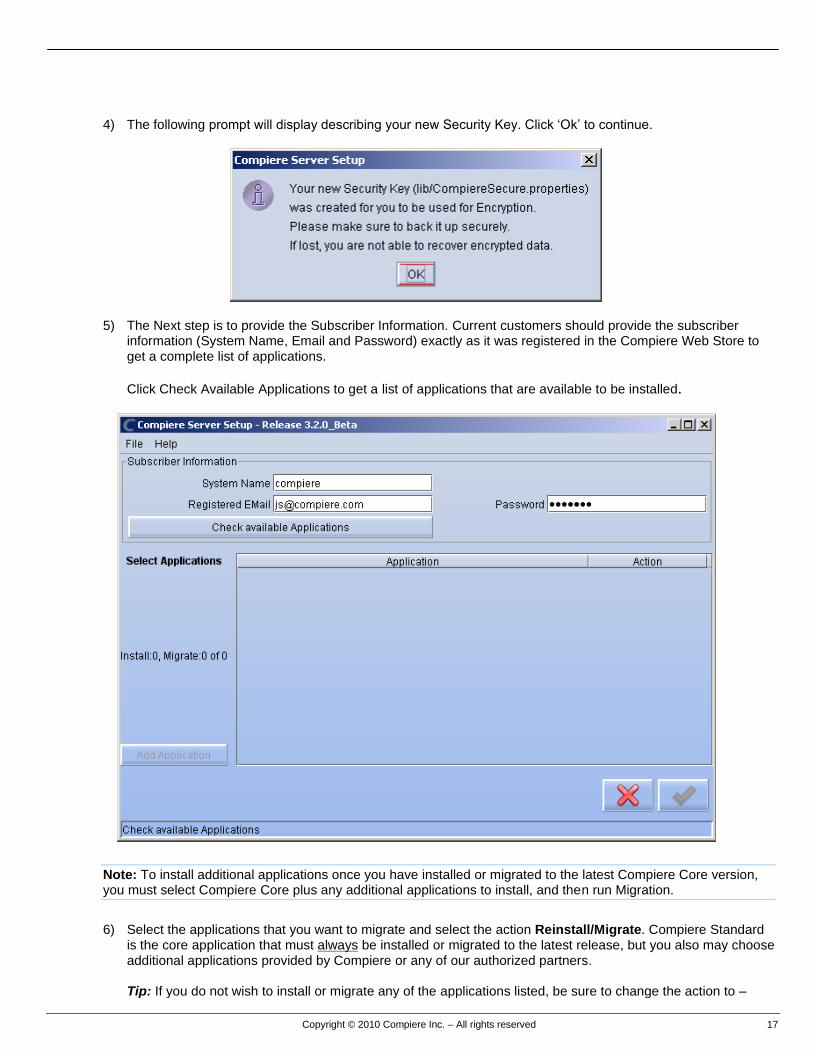
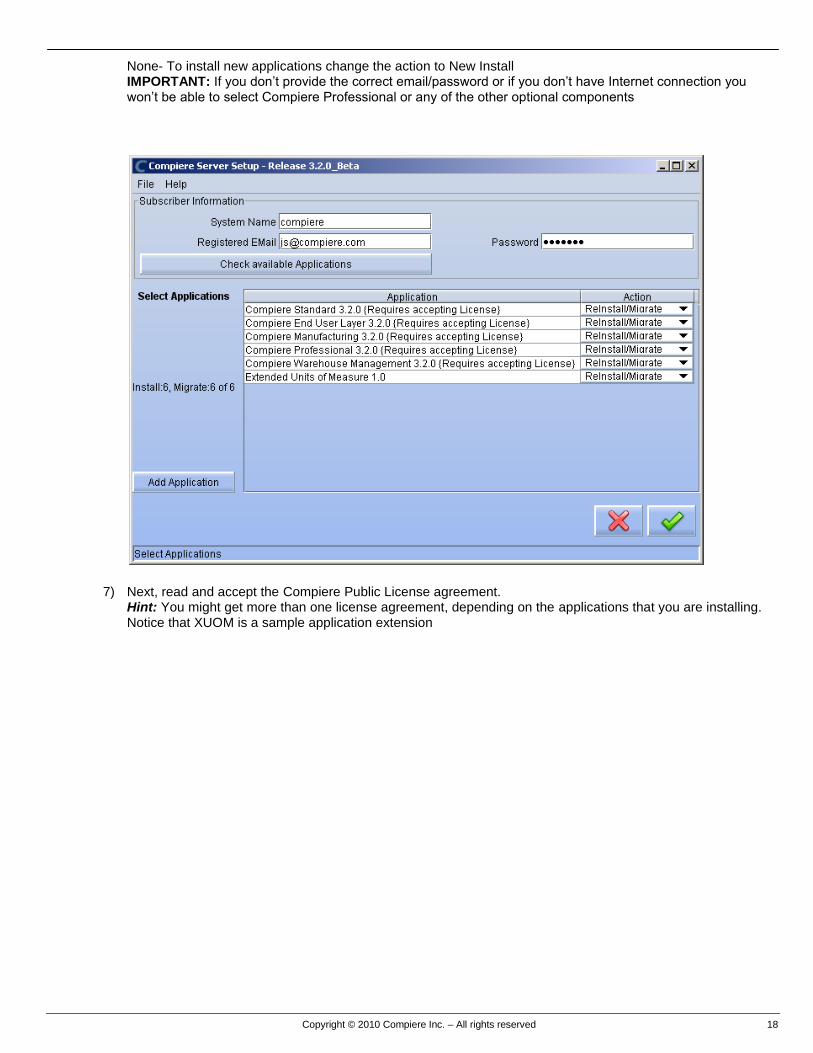
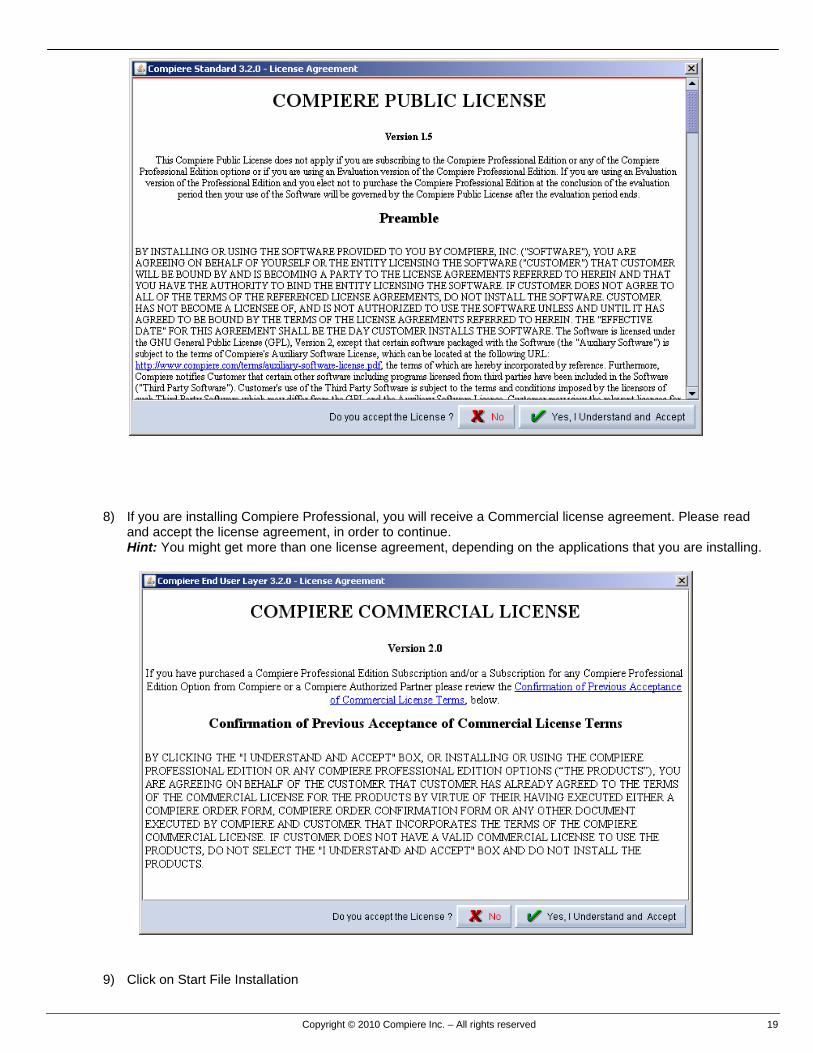
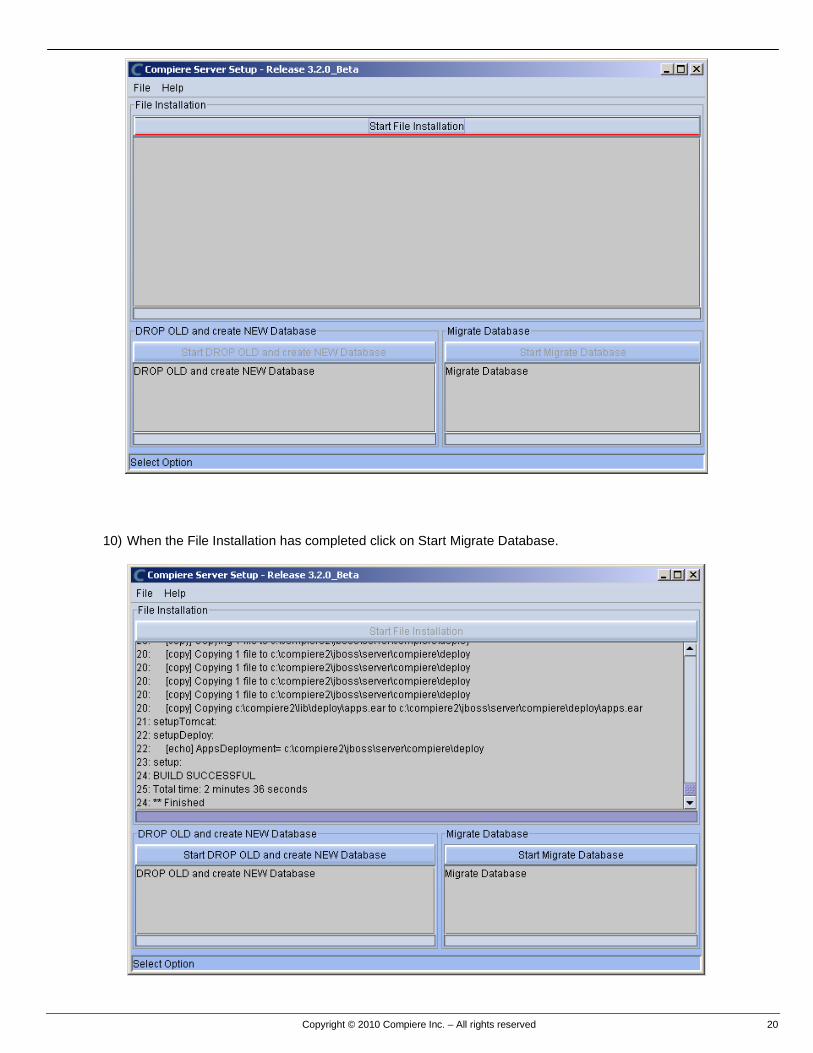
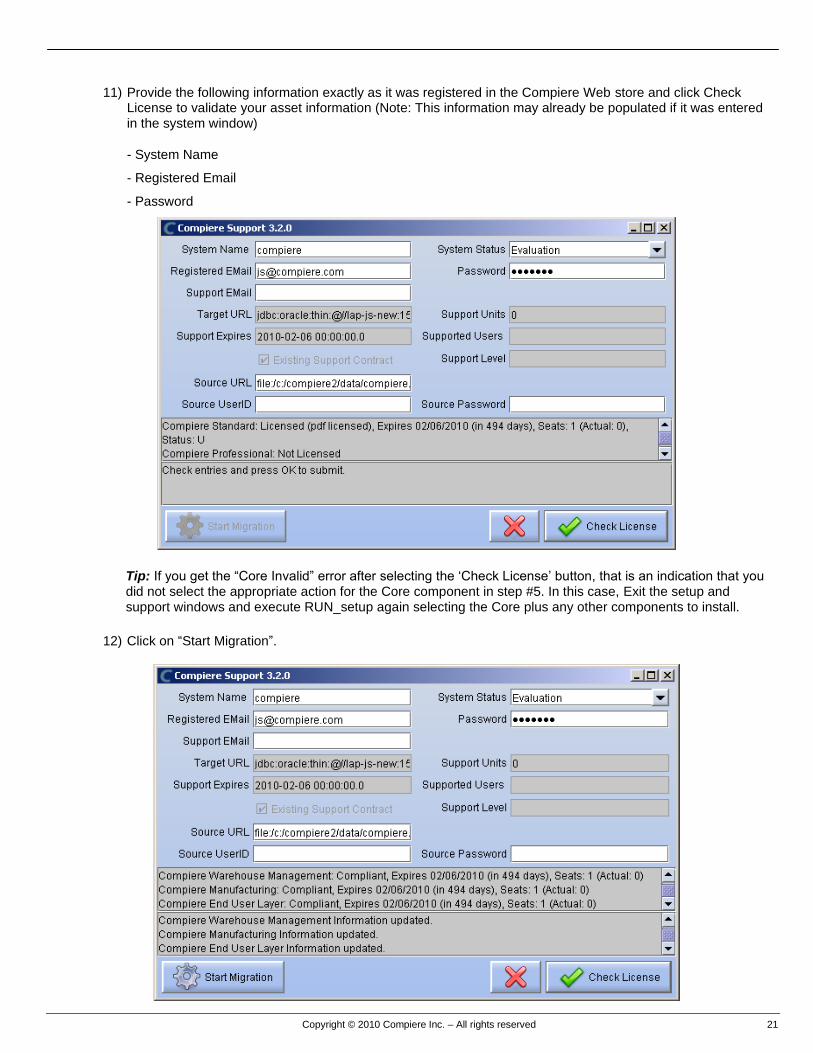
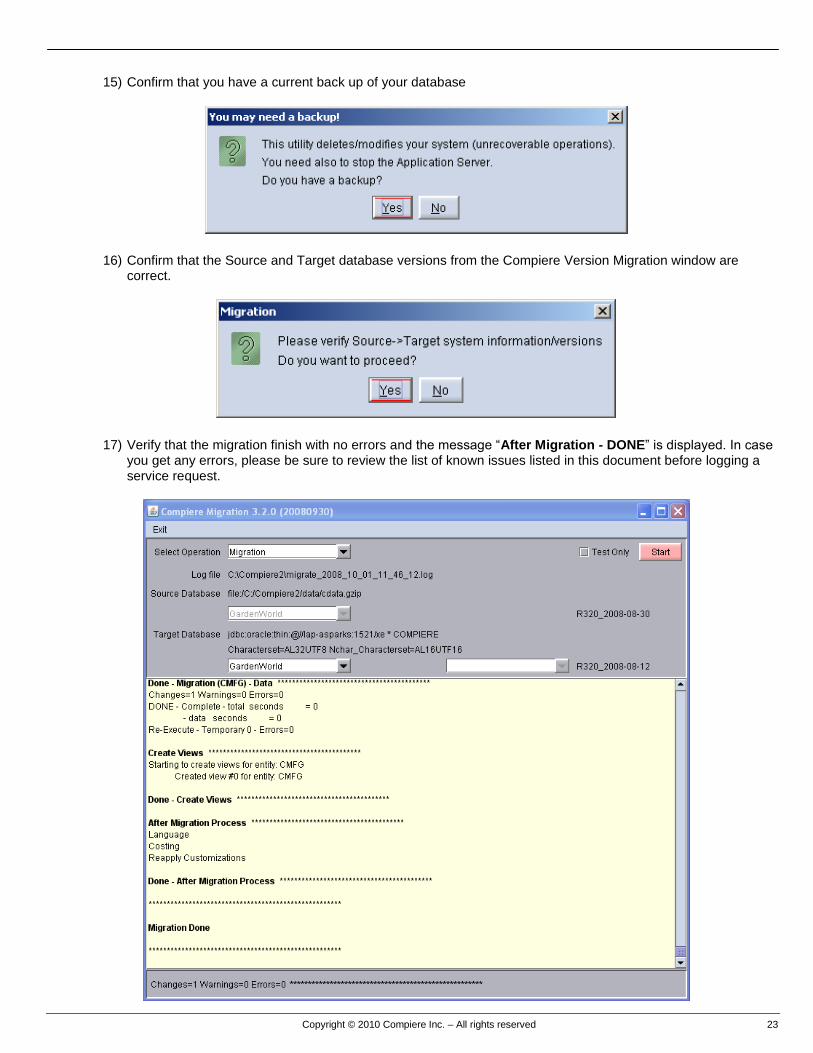
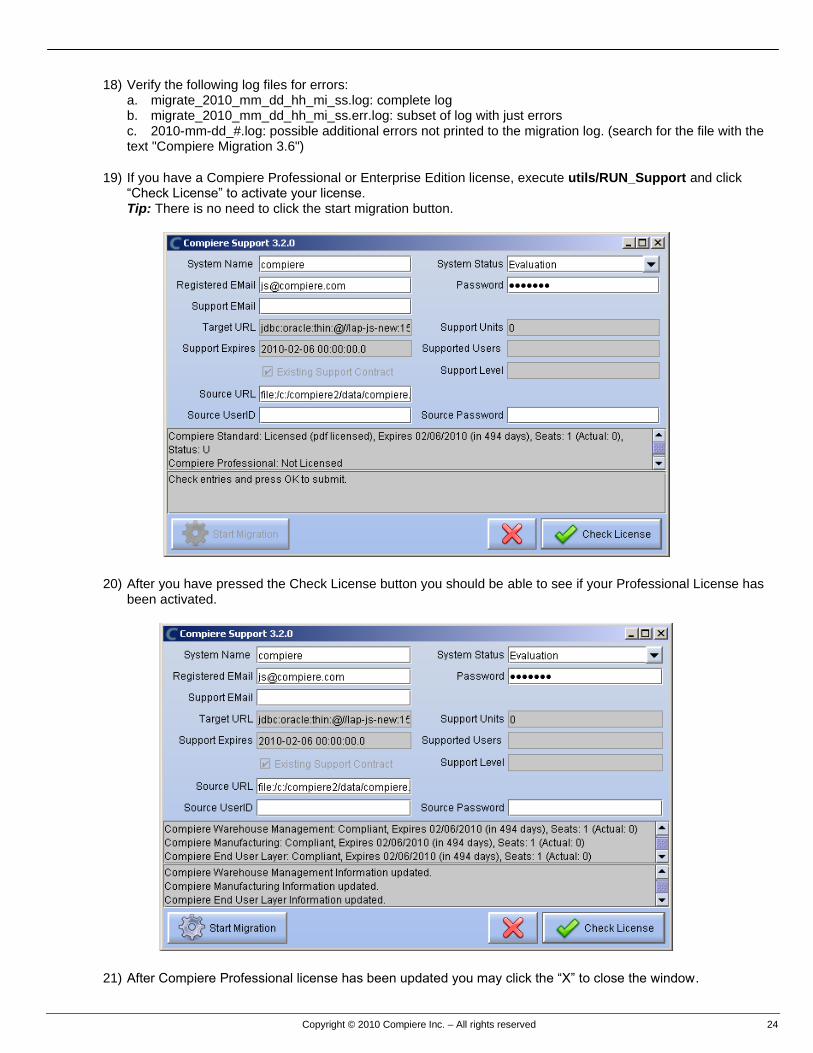
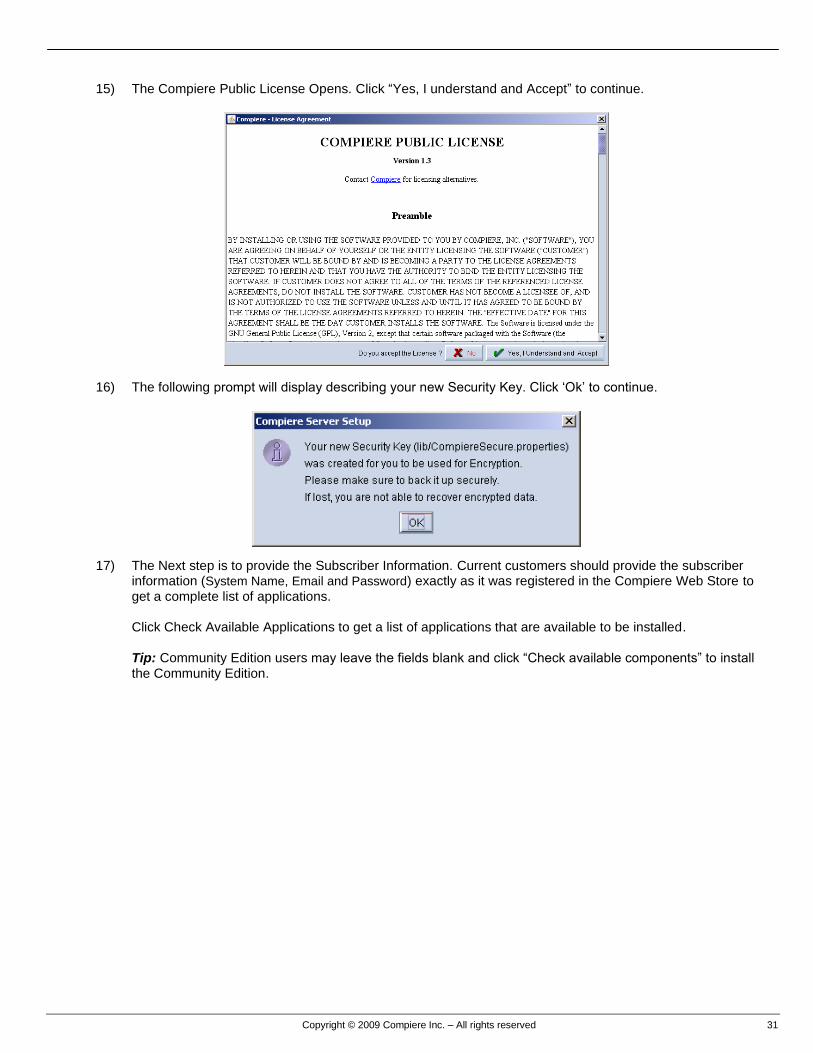
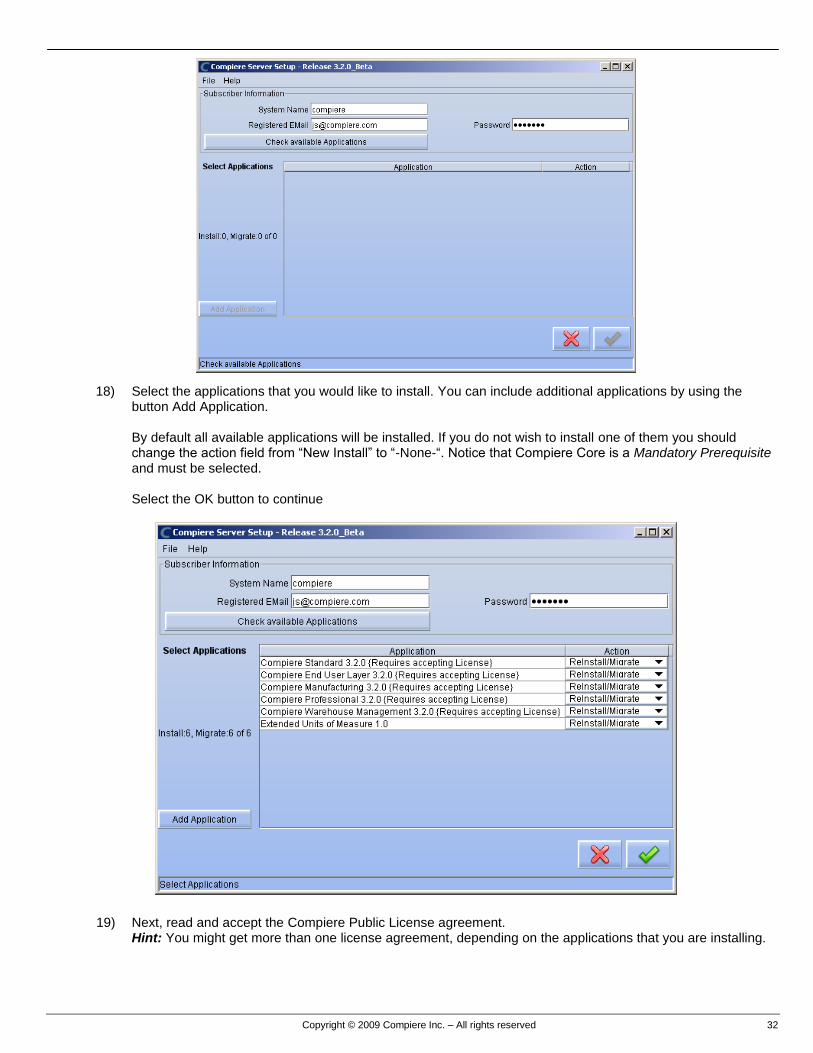
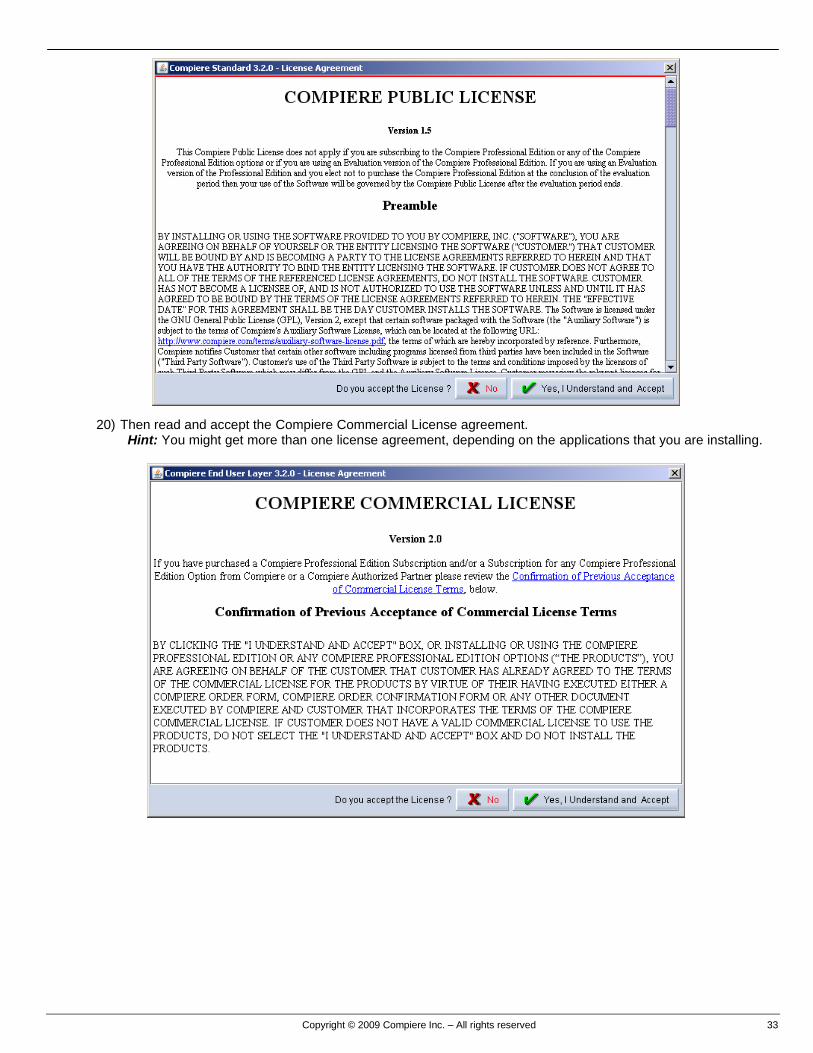
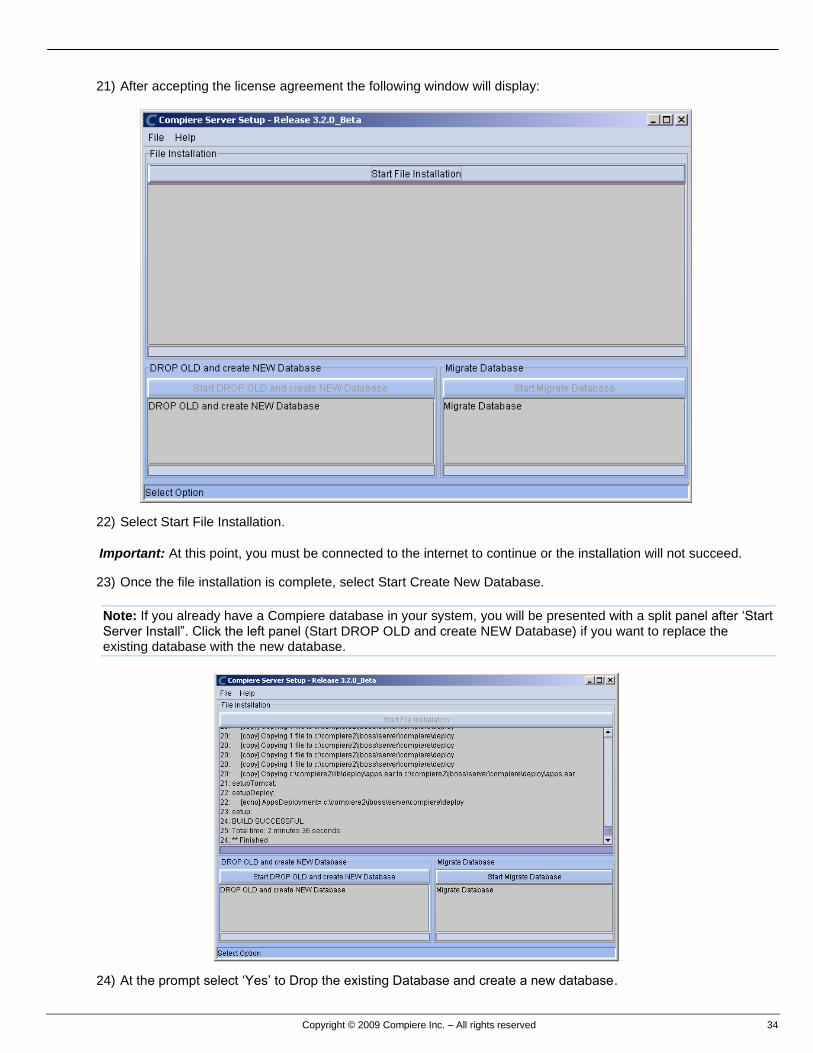
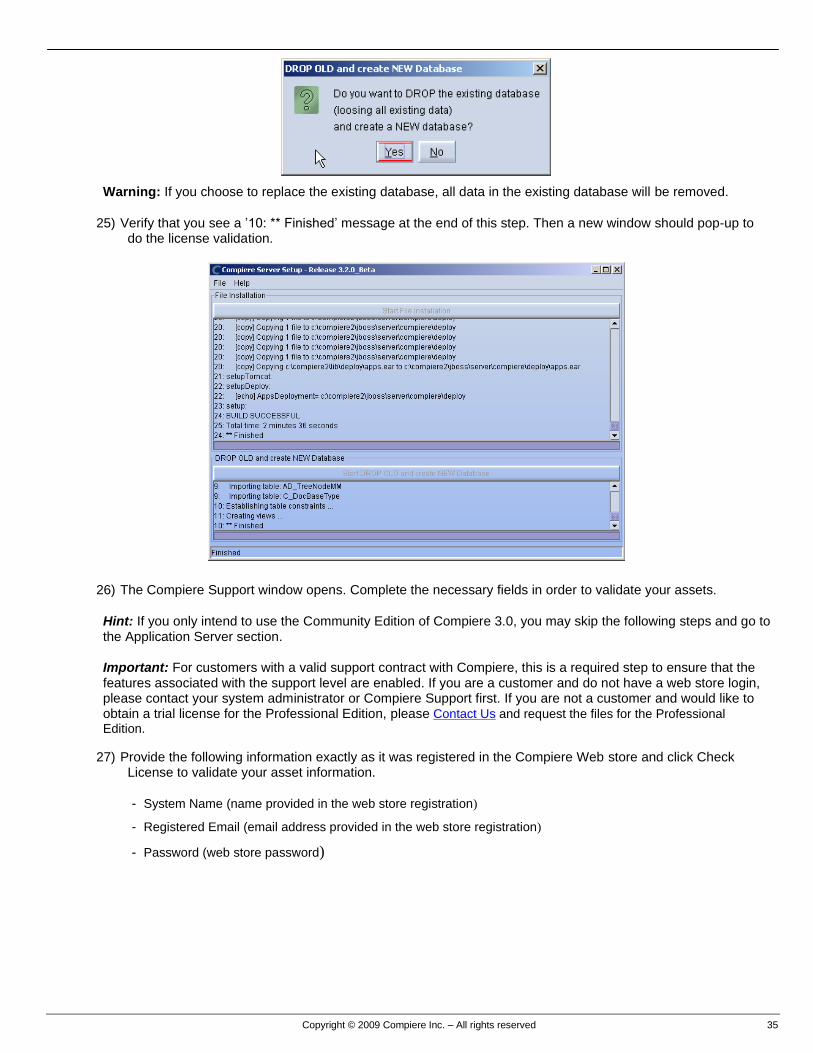
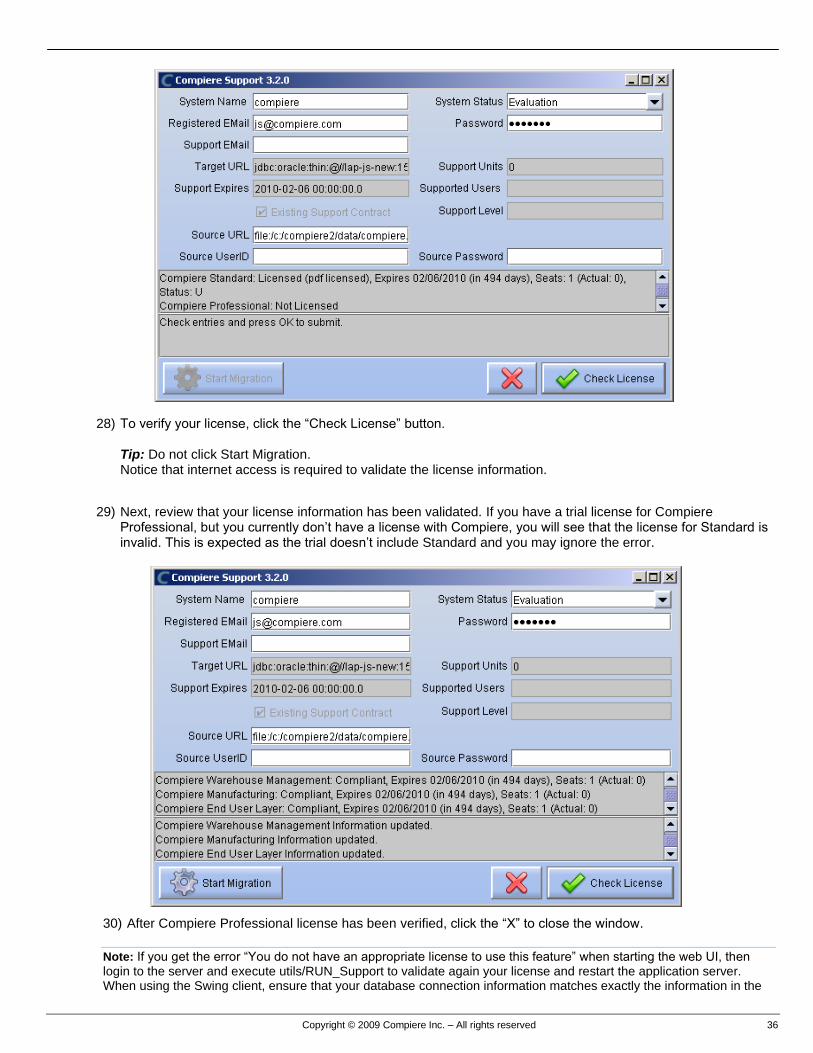
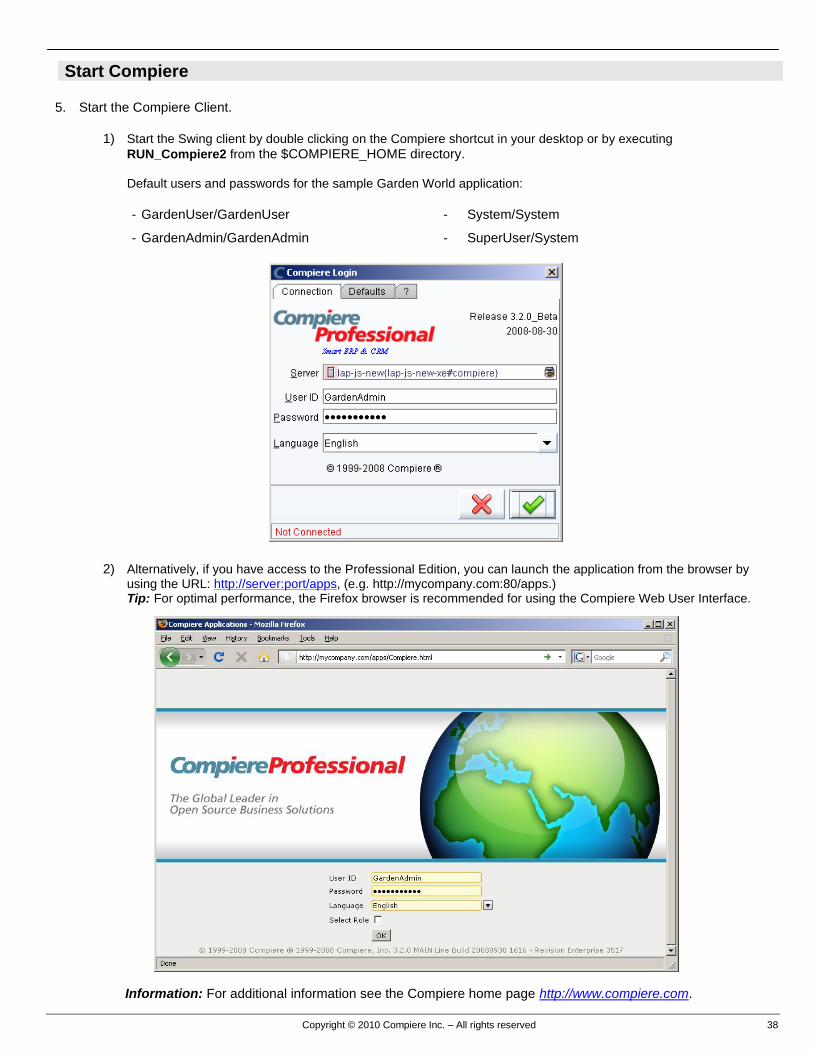
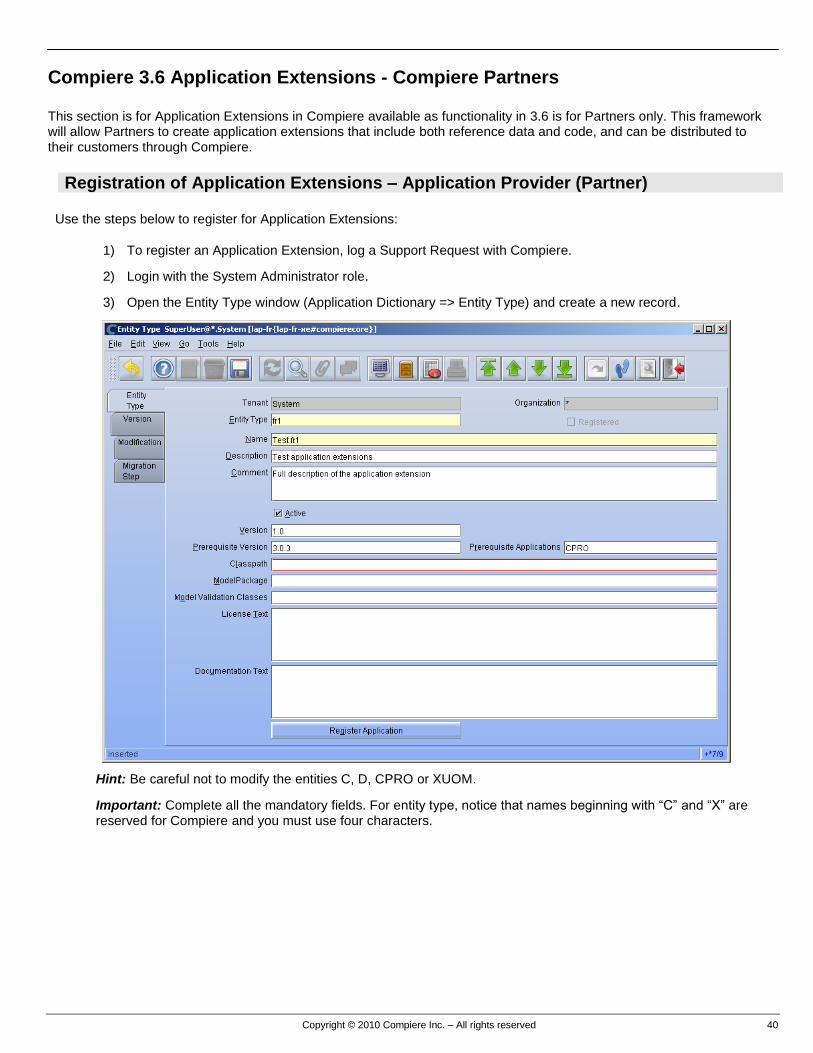
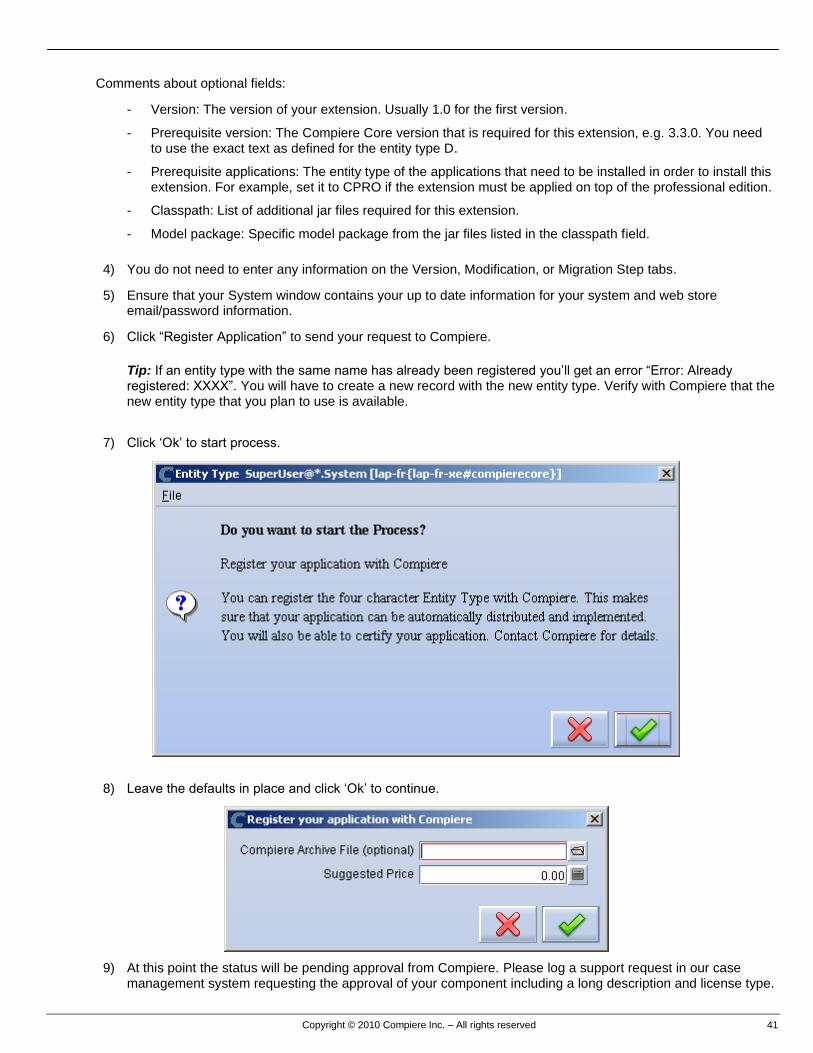
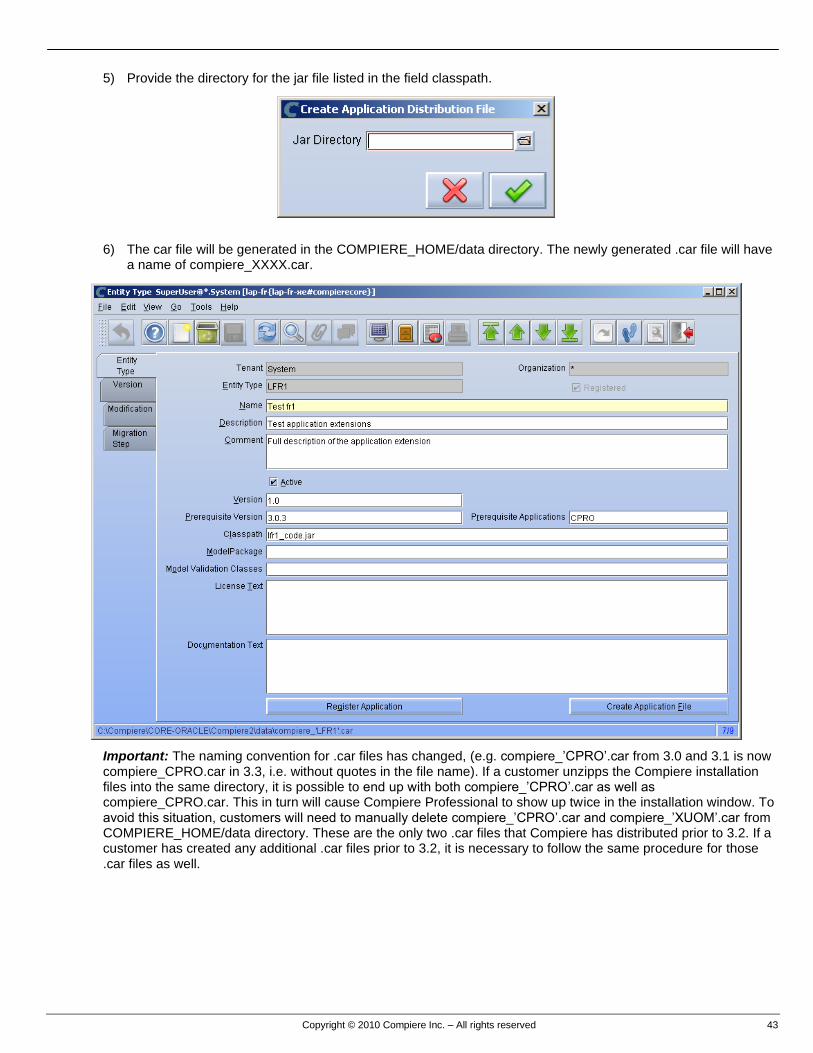
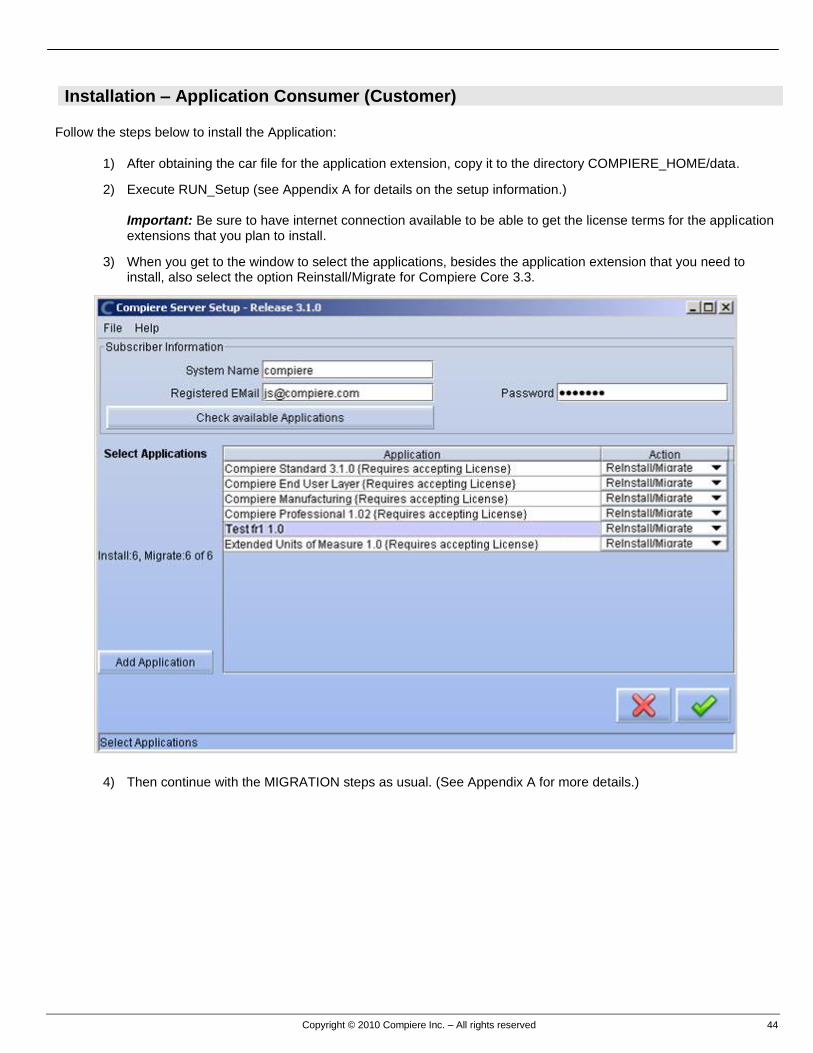