COMPEX 3 USER MANUAL - DJOglobalstorage.djoglobal.eu/en_EU/Compex/DPF/Manuals/841402_Mode_d_e… ·...
49
COMPEX 3 USER MANUAL COMPEX 3 USER MANUAL
Transcript of COMPEX 3 USER MANUAL - DJOglobalstorage.djoglobal.eu/en_EU/Compex/DPF/Manuals/841402_Mode_d_e… ·...
COMPEX 3 USER MANUALCOMPEX 3 USER MANUAL

© Compex Médical SA - 01/07 - All rights reserved - Art. 841402 / V.1
3
COMPEX
3UserMan
ual
FOREWARD
Please read this manually carefully prior to using your Compex3 stimulator.
We strongly recommend that you familiarize yourself with thecontent of chapter 1 (warnings) and the specific instructionschapter in the accompanying Practical Guide.
The Compex 3 stimulator is designed to be used byhealth professionals.

4COMPEX
3UserMan
ual
ESPAÑAMediCompex Ibérica, S.L.Rambla Catalunya 2,1° DerechaE - 08007 BarcelonaHotline: 0900 801 280(número gratuito)Fax: +34 93 342 42 33E-mail: [email protected]
EXPORT DEPARTMENTCompex19, avenue du Pré de ChallesF - 74940 Annecy-le-vieuxTél.: +33 (0) 4 50 10 24 80Fax: +33 (0) 4 50 09 25 70Email: [email protected]
SUISSE/SCHWEIZ/SVIZZERA & ÖSTERREICHCompex Medical SAZ.I. “ Larges Pièces A ”Chemin du DéventCH - 1024 EcublensFax: +41 (0) 21 695 23 61E-mail: [email protected]
Suisse/Schweiz/SvizzeraHotline/FR: 0848 11 13 12(tarif interurbain)Hotline/DE: 0848 11 13 13(Fernbereich)E-mail: [email protected]
ÖsterreichHotline: 0810 102515 19(Orstarif)E-mail: [email protected]
FRANCECompex19, avenue du Pré de ChallesF - 74940 Annecy-le-vieuxHotline: 0811 02 02 74(prix appel local à partir d’un poste fixe)Fax: +33 (0) 4 50 09 25 70Email: [email protected]
ITALIACompex Italia SrlVia Algardi, 4I - 20148 MilanoTel.: +39 02 30412057Fax: +39 02 30412058E-mail: [email protected]
BENELUXCompex19, avenue du Pré de ChallesF - 74940 Annecy-le-vieuxFax: +33 (0) 4 50 09 25 70
Belgique/BelgïeHotline: 0800 99 104(numéro gratuit/gratis nummer)E-mail: [email protected]
NederlandHotline 0800 022 2593(Gratis nummer)E-mail: [email protected]
Luxembourg/LuxemburgHotline: +33 450 10 24 63E-mail: [email protected]
DEUTSCHLANDCompex Medical GmbHHotline: 0185 266 739(€ 0.12 pro Minute)Fax: + 49 (0) 611 690 7474E-mail: [email protected]
Customer support…
Compex Médical SA - Switzerland - compex-professional.com
5
COMPEX
3UserMan
ual
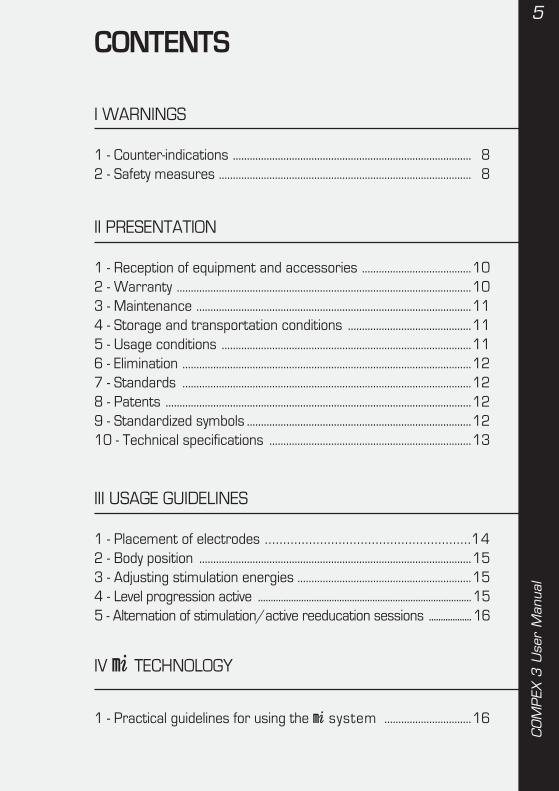
CONTENTS
I WARNINGS
1 - Counter-indications ..................................................................................... 82 - Safety measures .......................................................................................... 8
II PRESENTATION
1 - Reception of equipment and accessories .......................................102 - Warranty .........................................................................................................103 - Maintenance ..................................................................................................114 - Storage and transportation conditions ............................................115 - Usage conditions .........................................................................................116 - Elimination .......................................................................................................127 - Standards .......................................................................................................128 - Patents .............................................................................................................129 - Standardized symbols ................................................................................1210 - Technical specifications ........................................................................13
III USAGE GUIDELINES
1 - Placement of electrodes .... . . . . . . . . . . . . . . . . . . . . . . . . . . . . . . . . . . . . . . . . . . . . . . . . . . . .142 - Body position .................................................................................................153 - Adjusting stimulation energies ..............................................................154 - Level progression active ....................................................................................155 - Alternation of stimulation/active reeducation sessions ..................16
IV m TECHNOLOGY
1 - Practical guidelines for using the m system ...............................16

6COMPEX
3UserMan
ual
V USING THE STIMULATOR
1 - Description of stimulator ........................................................................... 192 - Connections
A) Connecting the cables ..................................................................... 20B) Connecting the motor point pen ................................................. 20C) Connecting the charger ................................................................. 21
3 - Preliminary settingsA) Date and time ..................................................................................... 21B) Language, contrast, volume ......................................................... 22
4 - Neurostimulation programmesA) Choosing a type of treatment ...................................................... 22B) Choosing a programme category ............................................. 23C) Choosing a programme ................................................................. 23D) Personalising a programme ........................................................ 23E) During the stimulation session ................................................... 24F) Using the Intelligent TENS function ............................................. 27
5 - Direct currentsA) Iontophoresis ....................................................................................... 28B) Hyperhidrosis ...................................................................................... 29C) Oedema ................................................................................................. 29
6 - Denervated programmesA) Automatic mode ................................................................................ 31B) Manual mode ....................................................................................... 31
7 - Electricity consumption and rechargingA) Battery life ............................................................................................. 33B) Recharging ........................................................................................... 33
8 - TroubleshootingA) Electrode error ................................................................................... 34B) Memory full .......................................................................................... 34
VI LIST OF PROGRAMMES 35

7
COMPEX
3UserMan
ual
VII COMPEX 3 SOFTWARE
1 - ScopeA) Creating a patient list .................................................................. 38B) Creating a patient history .......................................................... 38C) Creating a personalised programme .................................. 38
2 - Mode of operationA) Creating a patient file .................................................................. 39B) Preparing data to transfer to Compex 3 ........................... 42C) Synchronising the stimulator ................................................... 44D) Tools .................................................................................................... 45
3 - Using the Compex 3 stimulator with a patient listA) Using the Compex 3 stimulator with a patient list............... 48B) Creating a new patient in the Compex 3 stimulator ............. 48

8COMPEX
3UserMan
ual
I WARNINGS
1 - Counter-indications
2 - Safety measures
• Cardiac stimulator (pacemaker).• Pregnancy (do not use in abdominal
region).• Troubles Serious arterial circulation
disorders in lower limbs.• Abdominal or inguinal hernia.
Important!
• Never use Compex 3 on patients whohave sensitivity problems or who areunable to let you know if they feel anydiscomfort, however slight.
• Read this manual and theaccompanying Practical Guide carefully.
Important points to take intoaccount when using Compex 3 andthe m system
• Do not use the Compex 3 stimulator orthe m-4 system in water or humidenvironments (saunas, hydrotherapypools, etc.).
• Do not use the stimulator or m-4system in oxygen-rich environments.
• Never carry out the first 5 minutes ofany stimulation session on a patient whois standing. Make sure they are seatedor lying down. In rare instances, people ofa nervous disposition may experience avasovagal reaction. This is apsychological response triggered by fearof the procedure and the shock of seeingone of their muscles contractinvoluntarily. A vasovagal reactioncauses a patient’s heart to slow downand blood pressure to drop, which canmake them feel weak and faint. Shouldthis happen, simply interrupt the sessionand help the patient to lie down with theirlegs raised until the feeling disappears(5 to 10 minutes).
• Contractions should always be isometric.Never allow active muscle contractionsduring a stimulation session.
• Do not use the stimulator or m-4system on a patient who is connected toa high-frequency surgical instrument asthis could cause skin irritation or burnsunder the electrodes.
• Do not use the stimulator or m-4system within 1 metre of short wave ormicrowave devices as this could alter thecurrents generated by the stimulator.
• Do not use the stimulator or m-4system in areas where unprotecteddevices are used to emitelectromagnetic radiation. Portablecommunications equipment caninterfere with electrical medicalequipment.
• Only use stimulation cables supplied byCompex.
• Always switch off the stimulator beforedisconnecting any stimulation cablesduring a session.
• Never connect the stimulation cables toan external power source due to risk ofelectric shock.
• Only use rechargeable battery unitssupplied by Compex.
9
COMPEX
3UserMan
ual
• Never recharge the stimulator withoutfirst disconnecting all stimulation cables.
• Do not recharge the battery with acharger other than that supplied byCompex.
• Do use the Compex 3 stimulator, dockingstation, or charger if any of the elementsare damaged (case, cables, etc.) or if thebattery compartment is open. There is arisk of electric shock.
• Unplug the charger immediately if yourCompex 3 emits a continuous beepingsound or if you notice any abnormal heat,smells, or smoke from either thecharger or the stimulator.
• Never recharge the battery in a confinedspace (carrying case, etc.) as this couldcause a fire or electric shock.
• Keep Compex 3 and its accessories outof the reach of children.
• Keep the stimulator, batterycompartment, docking station, andcharger free of foreign matter (soil,water, metal, etc.)
• Sudden temperature changes can causecondensation to build up inside thestimulator. To prevent this, allow it toreach ambient temperature before use.
• Do not use your Compex 3 while drivingor operating machinery.
• Do not use the stimulator at altitudes ofover 3,000 metres.
Never use the electrodes orthe motor point pen:
• In the vicinity of the head.
• Counter-laterally, i.e. do not use twopoles connected to the same channel onopposite sides of the body.
• On or near skin lesions of any kind(wounds, swelling, burns, irritation,eczema, etc.).
Precautions when using them-4 system
• To access Compex 3’s m functions, makesure that the stimulation cable fitted withthe m-4 is connected before youturn on the stimulator.
• Do not connect the m-4 cable whilethe Compex 3 is connected.
• Do not disconnect the m-4 cablewhile the sensor is being used.
• The m-4 system may not workcorrectly if restrained or subject topressure in any way.
Precautions when using theelectrodes and the motor point pen
• Only use electrodes and pens supplied byCompex. Other electrodes and pens mayhave electrical properties that areincompatible with the Compex 3stimulator.
• Always turn off the stimulator beforemoving or removing any electrodes duringa session.
• Do not place the electrodes or the pen inwater.
• Do not apply solvents of any kind to theelectrodes or pen.
• For optimal results, wash and clean theskin of any oil and dry it before attachingthe electrodes.
• Attach the electrodes in a such a way thattheir entire surface is in contact with theskin.
• For hygiene reasons, each patient musthave his own set of electrodes. Never usethe same electrodes on different patients.
• Never use a set of adhesive electrodes formore than 15 sessions as their stickingpower deteriorates with time and optimalcontact is very important for both usercomfort and treatment efficacy.
• Some people with very sensitive skin mayexperience redness under the electrodesafter a session. This redness is generallyharmless and normally disappears within10 to 20 minutes. Never start anotherstimulation session in the same area,however, if the redness is still visible.
• Clean and disinfect the tip of the motorpoint pen that comes in contact with theskin before each use.
10COMPEX
3UserMan
ual
II PRESENTATION
1 - Reception of equipmentand accessories
Your kit contains:
513000 1 stimulator683028 1 docking station683010 1 battery charger601131 1 set of black snap connectors forelectrodes, colour-coded (blue, green,yellow, red)601132 1 set of grey 2.1 mm pin connec-tors for electrodes, colour-coded (blue,green, yellow, and red)601161 1 adapter cable for probe601160 4 black electrodes cables fittedwith the m-4 system601162 1 USB cable602076 3 bags of small electrodes(5x5 cm)602077 3 bags of large electrodes(5x10 cm)
602110 1 set of denervated electrodes642110 1 set of iontophoresis electrodes842302 1 directions for use manualincluding:
820002 1 folder841402 1 user manual841302 1 practical guide880042 1 electrode placement booklet880307 1 software/docking stationinstallation leaflet880308 1 EMC Compex 3 leaflet
880041 1 Compex 3 Software CD980020 1 motor point pen602047 1 bottle of gel (260 g)690001 1 protective cover949000 1 belt clip680031 1 carrying case
2 - Warranty
Your Compex 3 stimulator is guaranteedfor a period of 2 years from the date ofpurchase. The warranty covers thestimulator and the stimulation cables fittedwith the m-4 system (material andworkmanship) but not the battery unit,other cables, or battery unit. All defectsarising from substandard material orworkmanship are covered. The warrantydoes not cover damage resulting fromimpact, accident, improper use, insufficientprotection against damp, immersion inwater, or repair work conducted byunauthorized personnel.
This warranty is valid only if accompaniedby proof of purchase.
Your legal rights are not affected by thiswarranty.

11
COMPEX
3UserMan
ual
3 - Maintenance
4 - Storage and transportation conditions
Do not sterilize the stimulator.Clean with a soft cloth and an alcohol-based, solvent-free cleaning product.Use only a minimum amount of liquid whencleaning the unit. unit should not beexposed to excessive fluids duringcleaning).Do not attempt to repair the stimulator orany of its accessories. Do not disassemblethe stimulator, docking station, or chargeras these all contain high-voltagecomponents that could cause electricshock.Compex Médical SA declines allresponsibility for any damages orconsequences resulting from unauthorizedattempts to open, modify, or repair thestimulator. This may only be done bypersons or repair services authorized byCompex Médical SA.Your stimulator does not requirecalibration. All Compex 3 units aresystematically tested and validated prior todistribution. Their characteristics do notvary under normal conditions.
Nonetheless, as Compex 3 is a high-qualityelectrical instrument, its life span dependson the use that is made of it and the careand maintenance it receives during itslifetime. If your stimulator contains partsthat seem worn or defective, pleasecontact your nearest Compex Médical SAcustomer service centre (see page 4 inthis manual) regarding an upgrade.Medical and health professionals areobliged to service the unit in compliancewith relevant national laws and regulation.This involves testing performance andsafety parameters at regular intervals.
The Compex 3 contains rechargeablebatteries and so the storage andtransportation conditions must not exceedthe following figures:
• Storage and transportation temperature:-20°C to 45°C
• Maximum relative humidity: 75%• Atmospheric pressure: 700 hPa
to 1060 hPa
5 - Usage conditions
Temperature: 0°C to 40°CRelative humidity: 30% to 75%Atmospheric pressure: 700 hPa to1060 hPa.
Do not use in an explosion risk area.
12COMPEX
3UserMan
ual
6 - Elimination
The main purpose of the Directive2002/96/EEC is to prevent the creationof waste electrical and electronicequipment (WEEE) and to reduce theamount of waste to be disposed of byencouraging reuse, recycling, and otherforms of recovery. Any products bearingthe WEEE marking (a crossed-out wheeledbin) must be separated from ordinaryhousehold waste and sent to specialcollection facilities for recycling and
recovery. By doing so, you will becontributing to the safeguarding of naturalresources and health.Batteries must be disposed of incompliance with relevant nationalregulatory requirements.
7 - Standards
8 - Patents
9 - Standardized symbols
Compex 3 is designed for use by healthprofessionals and as such complies withrelevant medical standards and regulatoryrequirements.
To guarantee your safety, Compex 3 hasbeen designed, manufactured, anddistributed in compliance with therequirements of the European Directive93/42/EEC on medical devices.
Compex 3 also complies with the IEC60601-1 standard on general safetyrequirements for medical electricaldevices, the IEC 60601-1-2 standard onelectromagnetic compatibility, and the IEC
60601-2-10 standard on particular safetyrequirements for nerve and musclestimulators. International standards (IEC60601-2-10-am1 2001) require that awarning be given concerning theapplication of electrodes to the thorax(increased risk of cardiac fibrillation).Compex 3 also complies with Directive2002/96/EEC on waste electrical andelectronic equipment (WEEE).
The Compex 3 incorporates severalinnovations with patents pending.
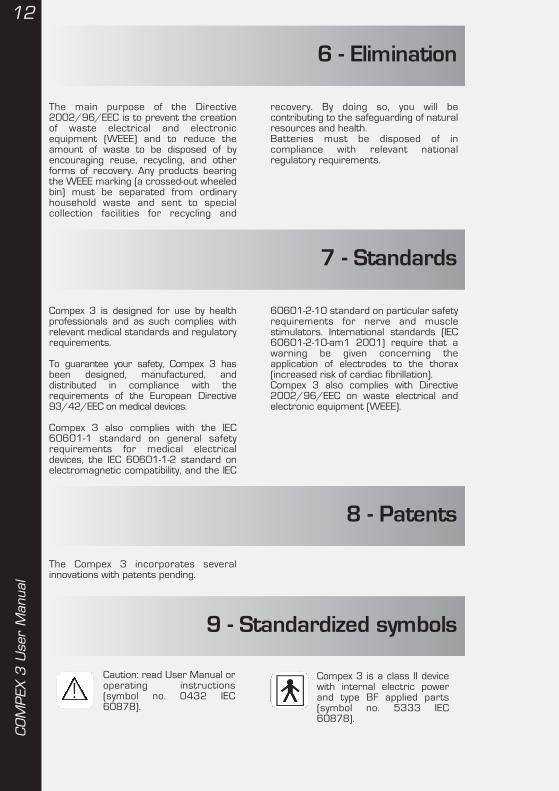
Caution: read User Manual oroperating instructions(symbol no. 0432 IEC60878).
Compex 3 is a class II devicewith internal electric powerand type BF applied parts(symbol no. 5333 IEC60878).

13
COMPEX
3UserMan
ual
Waste electrical andelectronic equipment (WEEE)marking according to EN50419 standard.
The On/Off switch is a multi-function key (symbol no. 5009IEC 60878)Functions• On/Off (2 positions, stable)• Waiting or preparation for
part of the unit• Off (turns system off)
10 - Technical specifications
A) General information
941210 Power: Nickel metal hydride(NiMH) rechargeable battery (4.8 ≈ V 1200mA/h).
Battery chargers: Only battery chargersbearing the following information can beused to recharge the batteries supplied withCompex 3 stimulators.
Europe683010Type TR1509-06-E-133A03Input 90-264 VAC /47-64 Hz/0.5 A max.Output 9 V/1.4 A/15 W
USA683016Type TR1509-06-A-133A03Input 90-264 VAC /47-64 Hz / 0.5 A max.Output 9 V/1.4 A/15 W
UK683012Type TR1509-06-U-133A03Input 90-264 VAC /47-64 Hz / 0.5 A max.Output 9 V/1.4 A /15 W
B) Neurostimulation
All electrical specifications are given for animpedance of 500-1000 Ohm per channel.
Channels: Four independent and individuallyadjustable channels that are electrically iso-lated from each other and earthed.
Impulse shape: Constant rectangular currentwith pulse compensation to eliminate anydirect current component to prevent residualpolarization at skin level.
Maximum pulse intensity: 120 mA
Pulse intensity increments: Manual adjust-ment of stimulation intensity:0-999 (energy units) – Minimum increment:0.5 mA
Pulse width: 30 to 400 microsecondsMaximum electrical charge per pulse: 96microcoulombs (2 x 48 µC, compensated)
Standard pulse ramp-up time:3 microseconds (20%-80% of maximumcurrent)
Pulse frequency: 1-150 Hz.
C) Denervated currents
Impulse shape: Compensated, rectangular,or triangularMaximum pulse intensity: 30 mAMinimum intensity increment: 0.25 mAPulse width: 10 ms – 1000 msPulse frequency: 1/30 Hz – 10 Hz
D) Direct currents
Iontophoresis and Hyperhidrosis:Continuous currentMaximum intensity: 20 mAMinimum intensity increment: 0.125 mAOedema:Rectangular, non-compensated currentPulse width: 150 µSMaximum intensity: 120 mAMinimum intensity increment: 1 mAPulse frequency: 100 Hz
E) General technicalspecifications
601131 Snap-connector stimulationcablesMachine connector: 6 polesElectrode connector: Female snapconnectorLength: 1500 mm
14COMPEX
3UserMan
ual
601132 Pin-connector stimulation cablesMachine connector: 6 polesElectrode connector: 2.1 mm pinsLength: 1500 mm
601161 Adapter cable for probeMachine connector: 6 polesProbe connector: DIN 41524 female, 3 polesLength: 750 mm
601160 stimulation cables fitted withm-4 system.Machine connector: 6 polesElectrode connector: Female snap connectorLength: 1500 mm
601162 USB cableMachine connector: 4 polesPC connector: USBLength: 1500 mm
IPX0 protection rating (IEC 60529)
III USAGE GUIDELINES
The usage guidelines described in thissection are valid only for Compex 3’sneurostimulation programmes. Pleaseconsult separate guidelines for theDenervated, Iontophoresis, and Oedema
programmes. In all cases, read theinformation and recommendations in thePractical Guide carefully.
1 - Placement of electrodes(neurostimulation programmes)
For optimal results, use the electrodepositions recommended by Compex. Forthe placement of electrodes, refer to theelectrode placement booklet.
Each stimulation cable has two poles:
• positive pole (+) = red connection• negative pole (-) = black connection
A different electrode must be connected toeach pole.
NOTE: When working with largeelectrodes, there are cases where just 1of the 2 connections are used. This isperfectly normal.
Depending on the characteristics of thecurrent, efficacy can be optimized incertain programmes by placing theelectrodes connected to the positive pole(red connection) “strategically”.
When working with a muscle stimulationprogramme (programme involving musclecontractions), it is important to place thepositive electrode on the motor point of themuscle.
It is crucial to choose the right sizeelectrodes (large or small) and correctlyposition these on the muscle group youwant to stimulate to ensure the efficacy ofthe treatment. To do this, always use thesizes and positions shown in thepictograms unless otherwise required bymedical needs. Where necessary, look forthe best possible position by slowly movingthe positive electrode over the muscle untilyou find the point that will produce the bestcontraction or the most comfort for thepatient.
These recommended positions are alsothe optimal positions for the m-4system, and as such should be followedclosely.
Compex disclaims all responsibilityfor consequences arising from electrodesplaced in other positions.
15
COMPEX
3UserMan
ual
2 - Body position
4 - Level progression
3 - Adjusting stimulation energies(neurostimulation programmes)
Refer to the pictograms and pictures in theelectrode placement booklet to determinethe stimulation position for your patientdepending on the placement of theelectrodes and the chosen program..
This position will vary depending on theposition of the electrodes, the muscle groupyou wish to stimulate, and the programmeyou are using.When working with programmes involvingmuscle contractions (prolonged, or tetanic,contractions), always make the muscle work
isometrically as this will prevent cramps andserious muscle soreness after the session.For example, when stimulating thequadriceps, place the patient in a seatedposition with his ankles strapped in place toprevent him from extending his knees. Forprogrammes that do not involve musclecontractions (Analgesic programmes, forexample), make sure that the patient is ascomfortable as possible.
The number of fibres recruited in astimulated muscle depends on thestimulation energies used. It is thereforeextremely important to use maximumstimulation energies where possible in orderto recruit the maximum number of fibres. Ifthe stimulation energy is too low, too fewfibres will be obliged to work and theimprovement in muscle quality will benegligible.
The more fibres that are recruited, thegreater the improvement that will be seen.For example, if only 10% of the fibres in amuscle are stimulated, only this 10% willimprove. The improvement will obviously bemuch greater if 60%, 70%, or even 80% ofthe fibres are stimulated. It is crucialtherefore to work with maximum stimulationenergy levels, i.e. the maximum levels that a
patient can tolerate. It takes at least3 sessions to reach this maximum energylevel. The first few sessions serve tointroduce progressive increments instimulation energy (and muscle contraction)levels and to help the patient to become usedto the method.After an initial warm-up period, which shouldproduce very clear muscle twitches, increasethe stimulation energies gradually,contraction by contraction, for the durationof the session. Also seek to progressivelyincrease energy levels from session tosession.
Generally speaking, it is not advisable to tryand reach maximum stimulation levels tooquickly. The different levels in eachstimulation programme are designed toreeducate the muscle gradually.We recommend you prioritize thestimulation energies at each level to recruitas many fibres as possible before movingon to the next level.
Ideally, therefore, you should start at level 1,maintain this level for an entire stimulationcycle, and only move up to the next levelwhen you start a new cycle.For maintenance purposes, it is a good ideato hold one session per week with theenergy level you used in the previous cycle.
16COMPEX
3UserMan
ual
5 - Alternation of stimulation/active reeducation sessions
1 - Practical guidelines for using
the m system
Stimulation sessions are mostly used aspart of a reeducation programme.If you wish to combine a reeducationsession involving voluntary muscle trainingwith a muscle stimulation session, wegenerally recommend you schedule the
reeducation session first. This ensuresthat the patient does not have to work ontired muscle fibres.
Compex’s m technology providespractitioners with specific information ondifferent muscles and allows them toadapt each stimulation session to theneeds of their patients.
The corresponding data is transferredautomatically from the sensor to thestimulator!
IV m TECHNOLOGY
To access the m functions, makesure that the stimulation cable fitted withthe m-4 is connected to thestimulator before this is turned on.
Do not connect the m-4 cable if thestimulator is already on.The m-4 system may not workproperly if restrained or subject topressure in any way.
The m-4 must be connected to anadhesive electrode at all times during astimulation session.
m-4 ____________________
This is a small sensor that links thestimulator to the electrodes. It performs akey function in that it measures certainphysiological characteristics of the muscleto be stimulated and transfers this data tothe stimulator, which, in turn, analyses thedata and adapts its parametersaccordingly. This tailoring of eachprogramme to the changing condition ofthe muscle clearly enhances both patientcomfort and therapeutic efficacy.
m-3 ______________________
Just before beginning a stimulation session,the m-3 analyses the excitability of themuscle to be stimulated. The m-3determines the chronaxy of the muscle inapproximately 12 seconds and sends thisdata to the stimulator so that it can adaptthe pulse width (duration) accordingly.Adapting the pulse width to the chronaxy ofthe muscle to be stimulated allows thesame muscle response to be achieved withless energy.
NOTE: The m-3 function is enabled onlywhen a cable fitted with the m-4system is connected to the stimulator.
As many as 4 different chronaxymeasurements – corresponding to4 different muscle groups – can be takenper session. The number ofmeasurements depends on how manysensors are connected to the stimulator.

17
COMPEX
3UserMan
ual
Each channel that is connected to astandard cable receives the same data asa channel connected to a m-4 cable(see below).
Before a programme is executed, thesensor scans the muscle briefly. Duringthis time, a horizontal bar will move up anddown the figure on the left of the screen.
It is essential that the patient remainscompletely still and relaxed while thesemeasurements are being taken. Them-4 system is very sensitive and theslightest contraction or movement couldinterfere with its results.
Note that certain people might feel anunpleasant tingling sensation during thetest.
Once the test is complete, a symbol willappear on the screen indicating thatthe programme can be started.
m-1 _____________________
m-1 is a work mode in which thepatient triggers an electrically inducedstimulation by voluntarily contracting oneof his muscles. The stimulation contractionis therefore controlled by the patient.
For a patient to fully benefitfrom the m-1 training mode, hismuscles must be well developed.Insufficiently developed muscles may, insomecase, prevent the triggering of theelectrically induced contraction.
Programmes run in m-1 mode offer anumber of distinct benefits:
• They require the active participation ofpatients and encourage them to becomefully involved in their treatment.
• They allow patients to control theircontractions, allowing them to feel moreat ease with the system.
• They optimize performance by combiningvoluntary and electrical stimulationexercises, which results in a moreintensive recruitment of muscle fibres.
• They help to retone the body andfacilitate motor reeducation in patientswith neuromuscular disorders.
• They integrate the stimulation ofstabilising muscles into a broaderfunctional exercise plan.
The m-1 mode is only available forcertain programmes.
Programmes run in m-1 mode arealways preceded by a m-3 test.
The m-1 mode is enabled only duringwork sequences (not during warm-up andrelaxation sequences).The first muscle contraction in the worksequence is triggered automatically.This is followed by an active rest phaseconsisting of a series of muscle twitches.Le déclenchement volontaire d’une nouvellecontraction n’est possible qu’après un tempsde repos minimum, qui varie selon leprogramme. A new contraction can only betriggered after a minimum rest time, whichvaries from programme to programme. Thestimulator emits a signal to notify the patientwhen he can trigger another contraction.
This signal can take different forms:
• A series of increasingly fast short beeps:voluntary contraction possible.
• A continuous beep: ideal moment forvoluntary contraction.
• A series of increasingly slow beeps:voluntary contraction still possible andwork rate still satisfactory.
• If no voluntary contractions are detectedwithin a certain time (this varies fromprogramme to programme), the stimulatorwill automatically enter Standby mode.
18COMPEX
3UserMan
ual
NOTE: The m-4 system needs to recordthe muscle twitches in the active rest phasein order to offer optimal results.If the twitches are not sufficiently intenseduring this phase, the stimulator will emit aseries of beeps and a sign will appearon the screen.Note that these muscle twitches will onlyoccur if the muscles are sufficientlyrelaxed. Patients should therefore beencouraged to adopt a position in whichthey will be as relaxed as possible at theend of each contraction phase.
In contrast to CommonTreatment programmes in which thestimulator adjusts the stimulation energiesduring the rest phase, these energiesoften need to be increased manually whenin m-1 mode.
m-5 ______________________
The m-5 function can be used toconsiderably reduce the number ofunwanted muscular contractions,enhancing both user comfort andtreatment efficacy.
It is available only for the TENS, ModulatedTENS, Epicondylitis and Arthralgiaprogrammes.When enabled, the m-5 functioncontrols stimulation energies by keepingthem at an effective level and reducing thenumber of unwanted contractions.
It works by performing a series of shortmeasurement tests (lasting 2 to 3seconds) at regular intervals throughoutthe entire programme.
A test is automatically launched wheneverthe stimulation energies are increased.The subject must remain perfectly stillduring the test to ensure optimal results.
Depending on the results, the stimulatormay automatically reduce the stimulationenergies slightly.
NOTE: It is important to ensure thatpatients adopt the most comfortableposition possible during stimulation,remain still, and do not contract any of themuscles in the stimulation area.
m-6 _____________________
The m-6 function is used inprogrammes which depend on thetriggering of vigorous muscle twitches toindicate the optimal stimulation energyrange.
It is therefore only available inprogrammes that use low stimulationfrequencies (less than 10 Hz).
When the m-6 function is enabled, thestimulator will check whether you areworking in the optimal energy range. If thelevel is too low, it will prompt you toincrease the level by displaying a series of
signs on the screen.
Once the stimulator has detected the idealenergy range, a square bracket will appearto the right of the bar graph correspondingto the stimulation channel the m-4 isconnected to. The figures enclosed by thisbracket indicate the range you must workin in order to achieve optimal results.
If you set the energy level below this range,the stimulator will prompt you to increaseit by flashing a series of signs on thescreen.

19
COMPEX
3UserMan
ual
V USING THE STIMULATOR
You are strongly advised tocarefully read the counter-indications andsafety measures described at the
beginning of this manual (chapter 1“Warnings”) prior to using your stimulator
1 - DESCRIPTION OF STIMULATOR
A - On/Off button
B - i button. This is used to:• Increase stimulation energies in several
channels simultaneously.• Access the Top 5 menu (showing 5 most
recently used programs• Access the contraction info menu
(showing number of contractions andtotal contraction time).
• Access parameter info menu forpersonalised programmes.
• Access electrode placement info (forHyperhidrosis menu only).
C - Sockets for 4 stimulation cables
D - Stimulation cablesChannel 1 = blue Channel 2 = greenChannel 3 = yellow Channel 4 = red
E - Stimulation cables fitted with m-4system
F - +/- buttons for 4 stimulation channels
G - Rechargeable battery compartment
H - Belt clip socket

20COMPEX
3UserMan
ual
2 - Connections
A) Connecting the cablesThe stimulator cables plug into the 4sockets on the base of the device.All 4 cables can be connected simultaneously.Both the sockets and the cables arecolour-coded to simplify use and facilitateidentification of the different channels:
blue=channel 1 green = channel 2yellow = channel 3 red = channel 4
The kit includes four snap-connectorcables and four 2,1 mm pin-connectorcables.
NOTE: The pin-connector cables aredesigned for use only with Denervated,Iontophoresis and Hyperhidrosisprogrammes.
To connect a snap-connector cable to anelectrode, simply insert the snap end of thecable into the electrode eyelet and twist ita quarter turn.
In addition to these standard cables,Compex 3 comes with 2 special cablesfitted with the m-4 system.These cables can be connected to any ofthe 4 sockets for the stimulation channels,on the base of the stimulator. Just like thestandard cables, they must also beconnected to 2 electrodes.
B) Connecting the motorpoint pen
Never use the motor point pen for anypurposes other than locating the motorpoint of the muscle. Follow the instructionsin this manual. Clean and disinfect the tip ofthe motor point pen that comes in contactwith the skin before each use.
Apply a small amount of Compex gel to theskin when looking for the motor point toenhance patient comfort.
All Compex 3 stimulators are supplied witha motor point pen designed to help you tofind the exact location of the motor point ofthe muscle group(s) you wish to stimulate.Refer to the picture below to see how toconnect the pen.
Connect the tip of the motor point pen tothe positive connector (red). The othersnap connector (black) must be connectedto a negative electrode already on themuscle to be stimulated.
For details on how to use the motor pointpen, refer to the chapter “Specificindications” in the Practical Guide.
COMPEX 3
21
COMPEX
3UserMan
ual
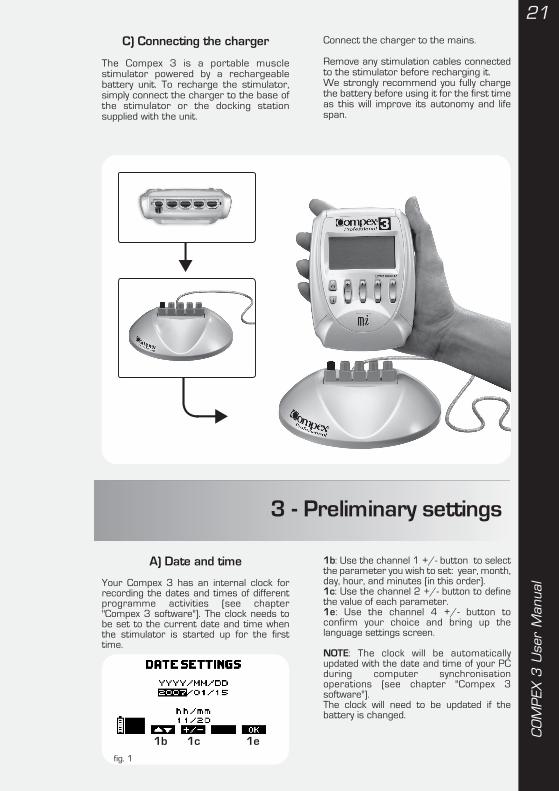
C) Connecting the charger
The Compex 3 is a portable musclestimulator powered by a rechargeablebattery unit. To recharge the stimulator,simply connect the charger to the base ofthe stimulator or the docking stationsupplied with the unit.
Connect the charger to the mains.
Remove any stimulation cables connectedto the stimulator before recharging it.We strongly recommend you fully chargethe battery before using it for the first timeas this will improve its autonomy and lifespan.
3 - Preliminary settings
A) Date and time
Your Compex 3 has an internal clock forrecording the dates and times of differentprogramme activities (see chapter"Compex 3 software"). The clock needs tobe set to the current date and time whenthe stimulator is started up for the firsttime.
1b: Use the channel 1 +/- button to selectthe parameter you wish to set: year, month,day, hour, and minutes (in this order).1c: Use the channel 2 +/- button to definethe value of each parameter.1e: Use the channel 4 +/- button toconfirm your choice and bring up thelanguage settings screen.
NOTE: The clock will be automaticallyupdated with the date and time of your PCduring computer synchronisationoperations (see chapter "Compex 3software").The clock will need to be updated if thebattery is changed.
fig. 1
1b 1c 1e

22COMPEX
3UserMan
ual
B) Language, contrast, volume
When you start up the stimulator for thefirst time, you will need to choose theinterface language you wish to use from theoptions screen. See below for instructionson how to proceed. There are a range ofsettings that you can adjust to suit yourneeds (interface language, display contrast,backlighting, volume). To change any ofthese settings, bring up the options screenby holding the On/Off button on the front ofthe stimulator for a few seconds.
2b: Use the channel 1 +/- button to choosethe language you wish to use.2c: Use the channel 2 +/- button to adjustthe contrast of the screen.2d: Use the channel 3 +/- button to adjustthe volume.2e: Use the channel 4 +/- button to adjustthe backlighting.On: Backlighting always onOff: Backlighting always offAuto: Backlighting activated whenever abutton is pressed.2a: Use the On/Off button to confirm andsave your choices. The settings will beapplied immediately.
fig. 2
4 - Neurostimulation programmes
The presence of osteosynthesisequipment (metallic equipment in contactwith the bone: pins, screws, plates,prostheses, etc.) is not a counter-indicationfor the use of Compex programmes. Theelectrical current of the Compex isspecially designed to have no harmfuleffect with regard to osteosynthesisequipment.
To start the stimulator, press the On/Offbutton. To choose a programme, you mustfirst choose a type of treatment and aprogramme category.
NOTE: There is a table summarizing thedifferent programmes and their functionsat the end of this manual.
A) Choosing a type of treatment
Common treatment
Specific treatment
Conditioning
The default type of treatment isCOMMON.
3a: Press the On/Off button to turn off theunit.3b - 3d: Use the channel 1 and 3 +/-buttons to choose another type oftreatment menu (Specific Treatment orConditioning).3e: Press the channel 4 +/- button toconfirm your choice and access theprogramme category selection screen.Press the i button to access the Top 5menu.
fig. 3
2a 2b 2c 2d 2e
3a 3b 3d 3e
23
COMPEX
3UserMan
ual
B) Choosing a programmecategory
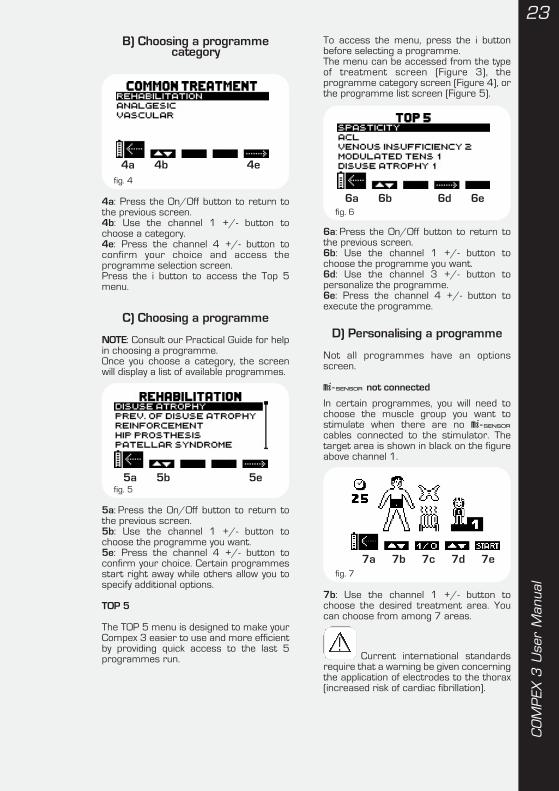
4a: Press the On/Off button to return tothe previous screen.4b: Use the channel 1 +/- button tochoose a category.4e: Press the channel 4 +/- button toconfirm your choice and access theprogramme selection screen.Press the i button to access the Top 5menu.
C) Choosing a programme
NOTE: Consult our Practical Guide for helpin choosing a programme.Once you choose a category, the screenwill display a list of available programmes.
5a: Press the On/Off button to return tothe previous screen.5b: Use the channel 1 +/- button tochoose the programme you want.5e: Press the channel 4 +/- button toconfirm your choice. Certain programmesstart right away while others allow you tospecify additional options.
TOP 5
The TOP 5 menu is designed to make yourCompex 3 easier to use and more efficientby providing quick access to the last 5programmes run.
To access the menu, press the i buttonbefore selecting a programme.The menu can be accessed from the typeof treatment screen (Figure 3), theprogramme category screen (Figure 4), orthe programme list screen (Figure 5).
6a: Press the On/Off button to return tothe previous screen.6b: Use the channel 1 +/- button tochoose the programme you want.6d: Use the channel 3 +/- button topersonalize the programme.6e: Press the channel 4 +/- button toexecute the programme.
D) Personalising a programme
Not all programmes have an optionsscreen.
m-4 not connected
In certain programmes, you will need tochoose the muscle group you want tostimulate when there are no m-4cables connected to the stimulator. Thetarget area is shown in black on the figureabove channel 1.
7b: Use the channel 1 +/- button tochoose the desired treatment area. Youcan choose from among 7 areas.
Current international standardsrequire that a warning be given concerningthe application of electrodes to the thorax(increased risk of cardiac fibrillation).
fig. 4
fig. 6
fig. 5
fig. 7
4a 4b 4e
6a 6b 6d 6e
5a 5b 5e
7a 7b 7c 7d 7e

24COMPEX
3UserMan
ual
m-4 connected
The stimulator will automatically select themuscle group to be stimulated when am-4 cable is connected to the unit.
Reminder: The m-3 function will activateautomatically in programmes thataccommodate this function when at least1 m-4 cable is connected to thestimulator.
8b: Use the channel 1 +/- button to enablethe m-1 function. When the function isenabled, the screen will display the wordON rather than OFF. When in ON mode, itis the patient who triggers the stimulation.Reminder: Not all motor nerve stimulationprogrammes use the m-1 function. Ifthe m-1 function is not available, therewill be no symbol above channel 1.7- 8c: Press the channel 2 +/- button toenable the TENS function. When enabled,channels 1 and 2 are used for theprogramme chosen, and channels 3 and 4for the TENS treatment.
NOTE: When the TENS function is enabled,the m-1 cannot be activated and thecorresponding symbol will disappearautomatically from the screen.
Use the channel 2 - button to delete thedefault warm-up period.
7 - 8d: Use the channel 3 +/- button tochoose the programme difficulty level.7 - 8a: Press the On/Off button to returnto the previous screen.7 - 8e: Use the channel 4 +/- button toconfirm your choices and launch theprogramme.
E) During the stimulation session
Preliminary m-3 test
This test is launched only if a cable fittedwith the m-4 system is alreadyconnected to the stimulator when this isturned on!
It is essential that the patientremains completely still and relaxed duringthe entire test.
If the m-4 cable is connected, the testwill begin as soon as you choose andpersonalise your programme.
NOTE: The test is not launched if youchoose a programme that does notrequire the preselection of a muscle group.
9e: The m logo above channel 4 indicatesthat the m-4 cable is connected to thestimulator. The figures in channel 4 willautomatically change during the test asthe sensor records differentmeasurements.
NOTE: When several sensors areconnected simultaneously, the m-3 testis performed progressively, one m-4connected channel after the other. Thechannel being scanned is easily identifiedby its changing numbers and the mi logoabove the channel.The 4 +/- buttons will be disabled for theduration of the test.
9a: Press the On/Off button to interruptthe test at any moment. To relaunch thetest from the start, press any of the 4 +/-buttons.Press the On/Off button a second time toreturn to the list of programmes.
Once the test is complete, you willautomatically be taken to the defaultprogramme start screen and prompted toincrease the stimulation energies.
Session duration(in min.)
TENS programme enabled Combination without TENS programme
fig. 8
fig. 9
no warm-up sequence warm-up sequence
8a 8b 8c 8d 8e
9a 9e

25
COMPEX
3UserMan
ual
Adjusting stimulation energies
When you start a programme, you will beprompted to increase the stimulationenergies. This is key to the success of anytreatment.
10a: Press the On/Off button to return tothe previous screen.10 b c d e: The unit will beep and thesymbols for the 4 channels will alternatebetween + and 000.The energy level for the 4 channels is at 0.To start the programme, you will need toincrease the energy levels in the channelsyou are going to use.To do this, use the corresponding +buttons.
NOTE: If you want to increase the energylevels in all 4 channels simultaneously,press the i button. Press it twice toincrease the levels in the first 3 channels,and 3 times to increase the levels in thefirst 2 channels.
Interdependent channels will be highlightedin white against a black background.
Programme progression
11 b c d e: The different energies reachedduring the contraction phase are shown by aseries of black bar graphs. Active rest phaseenergies are shown by hatched bar graphs.
NOTE: Active rest phase stimulationenergies are automatically set at 50% ofcontraction intensities but can be modifiedduring the rest phase. Once modified, theywill be totally independent of thecontraction intensities.
11a: Press the On/Off button to interruptthe programme momentarily To restart it,simply press the channel 4 +/– button(11e). The session will resume at 80% ofthe energy levels that were being usedprior to the interruption.
NOTE: If your Compex 3 emits a beepingsound and the + symbols under the activechannels begin to flash, the stimulator issuggesting you increase the level of thestimulation energies. If you are working atthe patient’s maximum tolerance level,simply ignore this message.
Contraction information
When working with a muscle contractionprogramme, you can access thecontraction info screen at any time toconsult the number of contractions andtotal contraction time.
To access the screen, simply hold downthe i button.
SKIP function
In certain programmes, the SKIP functionallows you to end the current programmephase and move on to the next one. ForSKIP function to work, the unit must be inPause mode.
Session duration (in min.)
Heat waves depictingthe warm-up sequencefig. 10
Session sequencesWarm-up Work period Relaxation
Time bar showing contractiontime and active rest time.
Shown only during work sequence.
fig. 11
Contraction time
Number of contractions
fig. 12
10a 10b 10c 10d 10e
11a 11b 11c 11d 11e
26COMPEX
3UserMan
ual
13a: Press the On/Off button to return tothe list of programmes in the category youare working with.13d: Use the channel 3 +/- button to skipa particular sequence of a programme.When you do this, the unit will beep and thecursor under the progress bar will move tothe beginning of the next sequence.13e: Use the channel 4 +/- button toresume the programme at the chosensequence.
NOTE: The SKIP function is not available forall programmes. It should also be notedthat this function can reduce theeffectiveness of a programme if used toshorten the work sequence excessively.
Statistics
The Compex 3 stimulator includes astatistics menu containing importantprogramme information that can beconsulted in real time. To access thestatistics screen, you must place thestimulator in pause mode or wait for theprogramme to end.
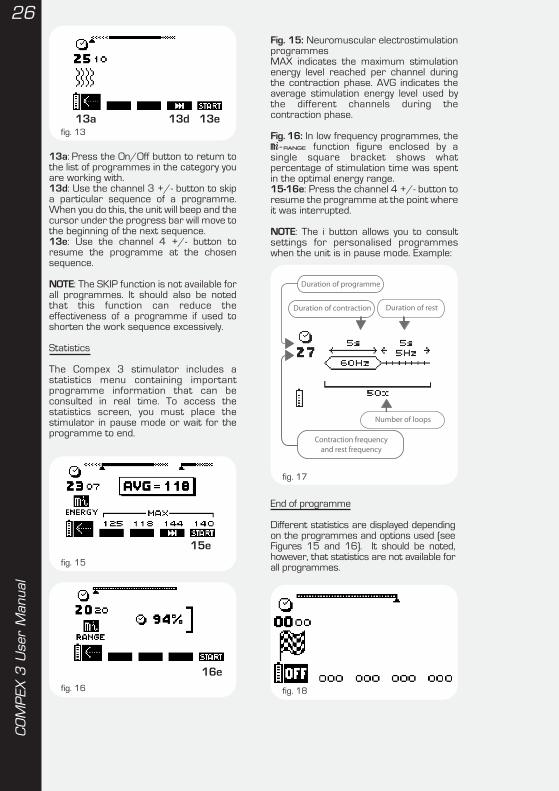
Fig. 15: Neuromuscular electrostimulationprogrammesMAX indicates the maximum stimulationenergy level reached per channel duringthe contraction phase. AVG indicates theaverage stimulation energy level used bythe different channels during thecontraction phase.
Fig. 16: In low frequency programmes, them-6 function figure enclosed by asingle square bracket shows whatpercentage of stimulation time was spentin the optimal energy range.15-16e: Press the channel 4 +/- button toresume the programme at the point whereit was interrupted.
NOTE: The i button allows you to consultsettings for personalised programmeswhen the unit is in pause mode. Example:
Duration of programme
Contraction frequencyand rest frequency
Duration of contraction Duration of rest
Number of loops
fig. 15
fig. 16
fig. 17
fig. 13
End of programme
Different statistics are displayed dependingon the programmes and options used (seeFigures 15 and 16). It should be noted,however, that statistics are not available forall programmes.
fig. 18
13a 13d 13e
15e
16e

27
COMPEX
3UserMan
ual
F) Using the Intelligent TENSfunction
When you choose a TENS programmefrom the Analgesic programme category,you will automatically be shown an optionsscreen where you can specify yourpatient’s sensitivity level.
There are 3 sensitivity levels. To tailor thelevel to your patient, choose one of theselevels manually or activate the IntelligentTENS function. This measures the patient’ssensitivity threshold automatically andensures that each programme is perfectlyadapted to the patient’s needs.
19a: Press the On/Off button to return tothe previous screen.19b: Press the channel 1 +/- button toenable the Intelligent TENS function.When enabled, the term ON will replaceOFF above channel 1.19d: Use the channel 3 +/- button tochoose the Tens sensitivity level manually.1 = TENS for patients with a low sensitivitythreshold.2 = TENS for patients with a normalsensitivity threshold3 = TENS for patients with a high sensitivitythreshold.19e: Press the channel 4 +/- button toconfirm your choice:• The TENS Analgesic programme will be
launched.• If you have chosen the sensitivity level
manually, and the sensitivity thresholdtest if you have chosen the IntelligentTENS function.
Using the Intelligent TENS function
Once you have enabled the IntelligentTENS function in the corresponding optionsscreen and confirmed your choice, thesensitivity test will start automatically. TheMEMO symbol will appear over anychannels that are connected.
NOTE: If no channels are connected, theelectrode error symbol will be displayed onthe screen.
When your patient feels the first signs oftingling, press any MEMO button. Theprogramme will start automatically.
20a: Press the On/Off button to stop theprogramme.20 b d e: Press any of the active channel+/- buttons (any but number 2 in theexample above) to register your patient’ssensitivity threshold.
The programme will begin automatically.
You can use any of the active +/- buttonsto adjust the stimulation energies in thedifferent channels during a TENStreatment session.
fig. 19
fig. 20
At the end of each session, a small flag willbe displayed on the screen and a shortmelody will be played.
NOTE: Press the i button to access thecontraction info screen.
To turn off the stimulator, press theON/OFF button.
19a 19b 19d 19e
20a 20b 20d 20e
28COMPEX
3UserMan
ual
5 - Direct currents
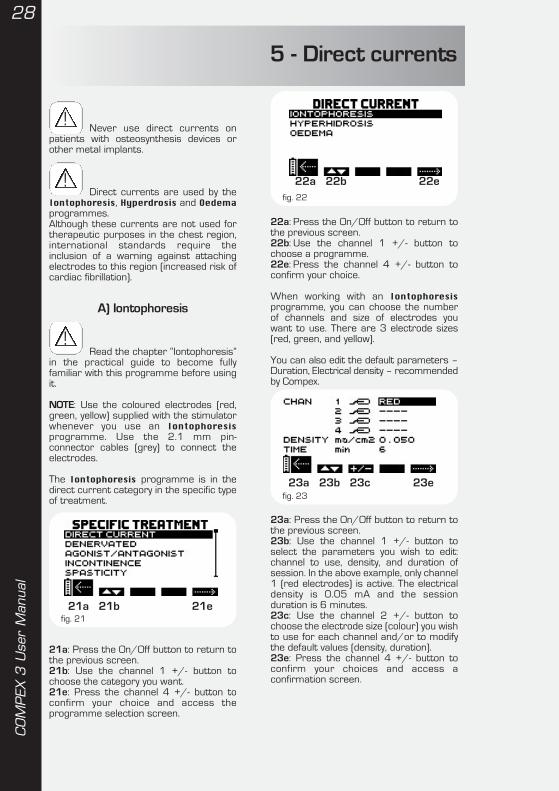
Never use direct currents onpatients with osteosynthesis devices orother metal implants.
Direct currents are used by theIontophoresis, Hyperdrosis and Oedemaprogrammes.Although these currents are not used fortherapeutic purposes in the chest region,international standards require theinclusion of a warning against attachingelectrodes to this region (increased risk ofcardiac fibrillation).
A) Iontophoresis
Read the chapter “Iontophoresis”in the practical guide to become fullyfamiliar with this programme before usingit.
NOTE: Use the coloured electrodes (red,green, yellow) supplied with the stimulatorwhenever you use an Iontophoresisprogramme. Use the 2.1 mm pin-connector cables (grey) to connect theelectrodes.
The Iontophoresis programme is in thedirect current category in the specific typeof treatment.
21a: Press the On/Off button to return tothe previous screen.21b: Use the channel 1 +/- button tochoose the category you want.21e: Press the channel 4 +/- button toconfirm your choice and access theprogramme selection screen.
22a: Press the On/Off button to return tothe previous screen.22b: Use the channel 1 +/- button tochoose a programme.22e: Press the channel 4 +/- button toconfirm your choice.
When working with an Iontophoresisprogramme, you can choose the numberof channels and size of electrodes youwant to use. There are 3 electrode sizes(red, green, and yellow).
You can also edit the default parameters –Duration, Electrical density – recommendedby Compex.
23a: Press the On/Off button to return tothe previous screen.23b: Use the channel 1 +/- button toselect the parameters you wish to edit:channel to use, density, and duration ofsession. In the above example, only channel1 (red electrodes) is active. The electricaldensity is 0.05 mA and the sessionduration is 6 minutes.23c: Use the channel 2 +/- button tochoose the electrode size (colour) you wishto use for each channel and/or to modifythe default values (density, duration).23e: Press the channel 4 +/- button toconfirm your choices and access aconfirmation screen.
fig. 21
fig. 22
fig. 23
21a 21b 21e
23a 23b 23c 23e
22a 22b 22e
29
COMPEX
3UserMan
ual
24a: Press the On/Off button to return tothe previous screen24e: Use the channel 4 +/- button to confirm your choices and launch theprogramme.
NOTE: Current intensity is automaticallycalculated in line with the size of electrodeused. Electrode size is determined bycolour. Make sure you choose the correctcolour before running the programme.
Press the i button from the stimulationscreen or the end of programme screen toaccess the programme parameters.
B) Hyperhidrosis
Read the chapter “Hyperhidrosis”in the Practical Guide to become fullyfamiliar with this programme before usingit.
NOTE: The Hyperhidrosis programmeshould always be run in channel 1 with thelarge (red) iontophoresis electrodessupplied with the stimulator.Use the 2.1 mm pin-connector cables(grey) to connect the electrodes
The Hyperhidrosis programme is in theDirect Current category of the SpecificTreatment type.
25a: Press the On/Off button to return tothe previous screen.25b: Use the channel 1 +/- button tochoose a programme.25e: Press the channel 4 +/- button toconfirm your choice and execute theprogramme.
26a: Press the On/Off button to return tothe previous screen.26c: Use the channel 2 +/- button tochange the default electrical density value.26e: Press the channel 4 +/- button toconfirm your choices and access aconfirmation screen.
Use the i button to access the electrodeplacement pictogram.
The Hyperhidrosis programme lasts for12 minutes and can only be run on channel1. Only use the red electrodes with thisprogramme. Other electrodes will causecurrent intensity calculation errors.
27a: Press the On/Off button to return tothe previous screen.27e: Press the channel 4 +/- button toconfirm your choices and launch theprogramme.Use the i button to access the electrodeplacement pictogram.
NOTE: Press the i button from thestimulation screen or the end ofprogramme screen to access theprogramme parameters.
C) Oedema
Read the chapter “Oedema” inthe Practical Guide to become fully familiarwith this programme before using it.
The Oedema programme is in the DirectCurrent category of the SpecificTreatment type.
fig. 24
fig. 25
fig. 26
fig. 27
24a 24e
25a 25b 25e
26a 26c 26e
27a 27e

30COMPEX
3UserMan
ual
28a: Press the On/Off button to return tothe previous screen.28b: Use the channel 1 +/- button tochoose a programme.28e: Press the channel 4 +/- button toconfirm your choice and execute theprogramme.
The Oedema programme begins by lookingfor the motor evoked potential (MEP)threshold in order to calculate the currentintensity that will offer optimal therapeuticefficacy. While this is happening, theMEMO symbol will be displayed over anychannels that are connected. To confirmthe MEP threshold, press any of the active+/- buttons as soon as you see or feel amotor response.
29a: Press the On/Off button to stop theprogramme or return to the previousscreen.29 b c d e: Press any of the active +/-buttons to confirm the MEP threshold.Once confirmed, the programme will startautomatically with the optimal stimulationenergy.
NOTE: If no channels are connected, theelectrode error symbol will be displayed.
fig. 28 fig. 29
6 - Denervated programmes
The Denervated programmesare of the Specific Treatment type.Although these currents are not used fortherapeutic purposes in the chest region,international standards require theinclusion of a warning against attachingelectrodes to this region (increased risk ofcardiac fibrillation).
Compex 3 Denervated programmesare not contraindicated in patients withosteosynthesis devices or other metalimplants
Denervated programmes shouldonly be run with 2.1 mm pin-connectorcables (grey cables supplied withstimulator) and carbon electrodes (blackelectrodes supplied with stimulator). Foroptimal results, apply conductor gel to theelectrodes before use.
Do not use snap-connector cables or self-adhesive electrodes for Denervatedprogrammes.
There are 4 types of Denervatedtreatments.
30a: Press the On/Off button to return tothe previous screen.30b: Use the channel 1 +/- button tochoose a programme.30e: Press the channel 4 +/- button toconfirm your choice.
fig. 30
28a 28b 28e 29a 29b 29c 29d 29e
30a 30b 30e

31
COMPEX
3UserMan
ual
A) Automatic mode
he stimulator will automatically detectwhich channels are connected when inautomatic mode.
Total automatic
Full denervation with fixed parameters:Pulse width: 100 msPeriod: 2000 msProgramme duration: 8 min
NOTE: These are the default valuesrecommended in the Total manual mode.
Partial automatic
Partial denervation, with automaticcalculation of initial current ramp. Thewidth of the pulse before validation of theramp is 100 ms.
How it works
When you start the programme,stimulation will automatically begin throughthe first channel you are using. As soon asyou perceive a muscle response, confirmthe ramp by pressing the corresponding+/- button (under the MEMO symbol).The stimulator will display the value for thischannel (see Figure 31 below) andautomatically begin the search for the nextchannel.
The Compex 3 can calculate and manage4 different initial current ramps.
displayed above channel whereramp search is being performed
displayed above inactive channels(channels that are not connected).
displayed once intensity value forcorresponding channel has been validated.
31a: Press the On/Off button to stop theprogramme and return to the previousscreen.31b: Press the +/- button under theMEMO symbol to confirm the currentintensity calculated during the rampsearch process. The width of the current(pulse length) does not change during this
search. In the above example, the search isbeing performed in channel 1. Once theramp is validated, the √ symbol will replacethe MEMO symbol and, where applicable,the search will begin in the other channels.31 c d e: the +/- buttons for the otherchannels remain inactive while a search isbeing performed.
When all the ramps for the active channelshave been calculated, the programme willstart automatically.
When you increase the stimulationintensity, the pulse width will automaticallybe modified to maintain the appropriateinitial ramp.
B) Manual mode
Total manual
Full denervation programme. Thisprogramme works with rectangular pulsesand allows the following parameters to bemodified:
• Pulse width• Period• Programme duration
32a: Press the On/Off button to return tothe previous screen.32b: Use the channel 1 +/- button toselect the parameter you wish to edit:pulse width for each channel, period, orprogramme duration.32c: Use the channel 2 +/- button to editthe value of the parameter you haveselected.32e: Press the channel 4 +/- button toconfirm you wish to exit the programme.
NOTE: The default values of the Totalmanual programme are the same as thedefault values of the Total automaticprogramme.
Partial manual
Partial denervation with choice ofstimulation parameters to define thedesired ramp.
fig. 31
fig. 32
31a 31b 31c 31d 31e
32a 32b 32c 31e

32COMPEX
3UserMan
ual
How it works
To use a ramp of your choice, first selectthe pulse width option in the correspondingchannel. Confirm your choice and increasethe stimulation intensity to the desiredlevel.
33a: Press the On/Off button to return tothe previous screen.33b: Use the channel 1 +/- button toselect the parameter you wish to edit:pulse width for each channel, period, orprogramme duration.
33c: Use the channel 2 +/- button to editthe value of parameter you have selected.33e: Press the channel 4 +/- button toconfirm your choice.
NOTE: Hold down the i button when in thestimulation or end of programme screento access the parameters for theprogramme you are using.
fig. 3333a 33b 33c 33e

33
COMPEX
3UserMan
ual
7 - Electricity consumptionand recharging
Never recharge the stimulator withoutfirst disconnecting the stimulation cables.Never recharge the battery with a chargerother than that supplied by Compex.
The Compex 3 is powered by arechargeable battery unit. The battery’s lifevaries according to the programmes andstimulation energies used.We strongly recommend you fully chargethe battery before using it for the first timeas this will extend its battery life and lifespan. If you do not use your stimulator forlong periods of time, remember torecharge the battery regularly.
A) Electricity consumption
The charge state of the battery is indicatedby a small battery icon on the screen.If the battery icon contains just two lines,this means that power is running low. Stopthe session and recharge the unit.
If the START symbol normally displayedabove the channel 4 +/– button is notvisible and the battery icon is flashing, thismeans that the battery is completelydischarged. The stimulator can no longerbe used. Recharge immediately.
B) Recharging
Remove all stimulation cables from thestimulator before recharging it. Connectthe charger to the mains and thenconnect the stimulator to the charger. Thecharge menu shown below willautomatically appear on the screen.
The duration of the recharging operationis displayed on the screen. The quickcharger supplied with the stimulator fullyrecharges the stimulator within 60 to 90minutes;
The battery icon is animated while thebattery is recharging. When fully charged,the icon will be full and the total time takento recharge the battery will flash on thescreen. Simply disconnect the charger andthe Compex 3 will turn off automatically.
NOTE: You can also use the dockingstation supplied with the Compex 3 torecharge your stimulator. (See chapter"Compex 3 Software").
Battery charge state icon
fig. 34
fig. 35
34COMPEX
3UserMan
ual
8 - Troubleshooting
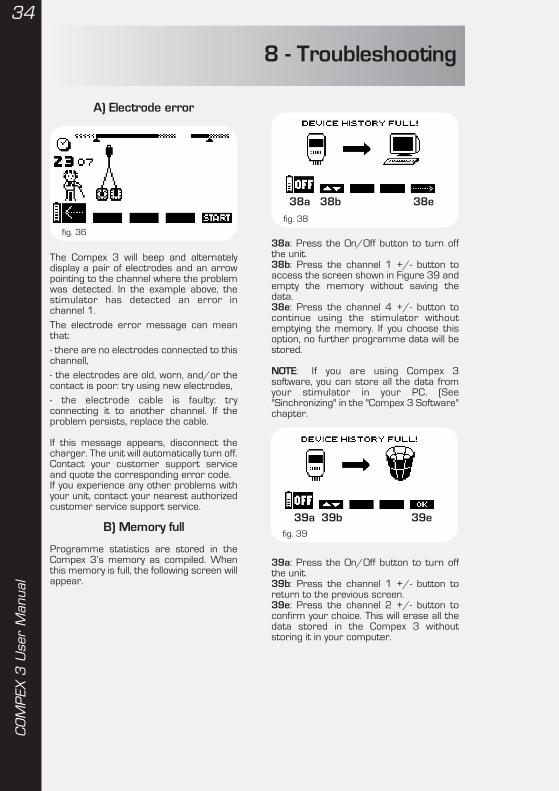
A) Electrode error
The Compex 3 will beep and alternatelydisplay a pair of electrodes and an arrowpointing to the channel where the problemwas detected. In the example above, thestimulator has detected an error inchannel 1.The electrode error message can meanthat:- there are no electrodes connected to thischannell,- the electrodes are old, worn, and/or thecontact is poor: try using new electrodes,- the electrode cable is faulty: tryconnecting it to another channel. If theproblem persists, replace the cable.
If this message appears, disconnect thecharger. The unit will automatically turn off.Contact your customer support serviceand quote the corresponding error code.If you experience any other problems withyour unit, contact your nearest authorizedcustomer service support service.
B) Memory full
Programme statistics are stored in theCompex 3’s memory as compiled. Whenthis memory is full, the following screen willappear.
38a: Press the On/Off button to turn offthe unit.38b: Press the channel 1 +/- button toaccess the screen shown in Figure 39 andempty the memory without saving thedata.38e: Press the channel 4 +/- button tocontinue using the stimulator withoutemptying the memory. If you choose thisoption, no further programme data will bestored.
NOTE: If you are using Compex 3software, you can store all the data fromyour stimulator in your PC. (See"Sinchronizing" in the "Compex 3 Software"chapter.
39a: Press the On/Off button to turn offthe unit.39b: Press the channel 1 +/- button toreturn to the previous screen.39e: Press the channel 2 +/- button toconfirm your choice. This will erase all thedata stored in the Compex 3 withoutstoring it in your computer.
fig. 36
fig. 38
fig. 39
38a 38b 38e
39a 39b 39e
35
COMPEX
3UserMan
ual
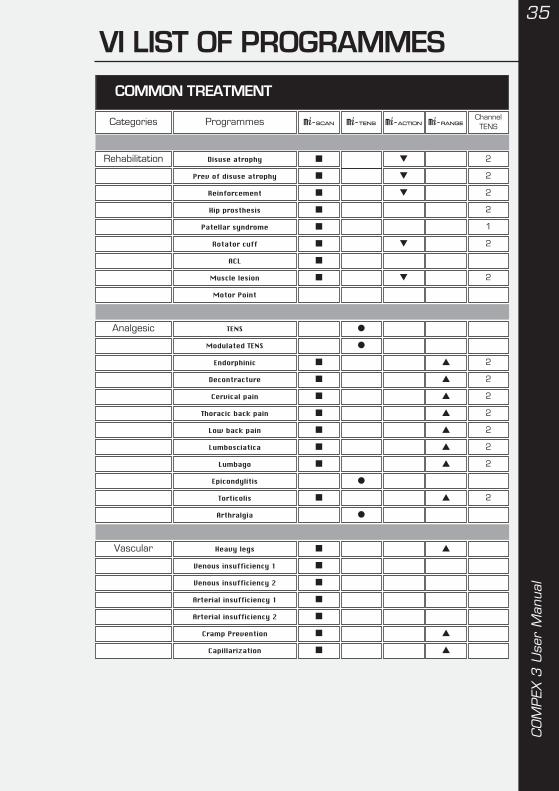
VI LIST OF PROGRAMMES
Categories Programmes m-3 m-5 m-1 m-6 ChannelTENS
COMMON TREATMENT
Rehabilitation Disuse atrophy � � 2
Prev of disuse atrophy � � 2
Reinforcement � � 2
Hip prosthesis � 2
Patellar syndrome � 1
Rotator cuff � � 2
ACL �
Muscle lesion � � 2
Motor Point
Analgesic TENS �
Modulated TENS �
Endorphinic � � 2
Decontracture � � 2
Cervical pain � � 2
Thoracic back pain � � 2
Low back pain � � 2
Lumbosciatica � � 2
Lumbago � � 2
Epicondylitis �
Torticolis � � 2
Arthralgia �
Vascular Heavy legs � �
Venous insufficiency 1 �
Venous insufficiency 2 �
Arterial insufficiency 1 �
Arterial insufficiency 2 �
Cramp Prevention � �
Capillarization � �
36COMPEX
3UserMan
ual
Categories Programmes m-3 m-5 m-1 m-6 ChannelTENS
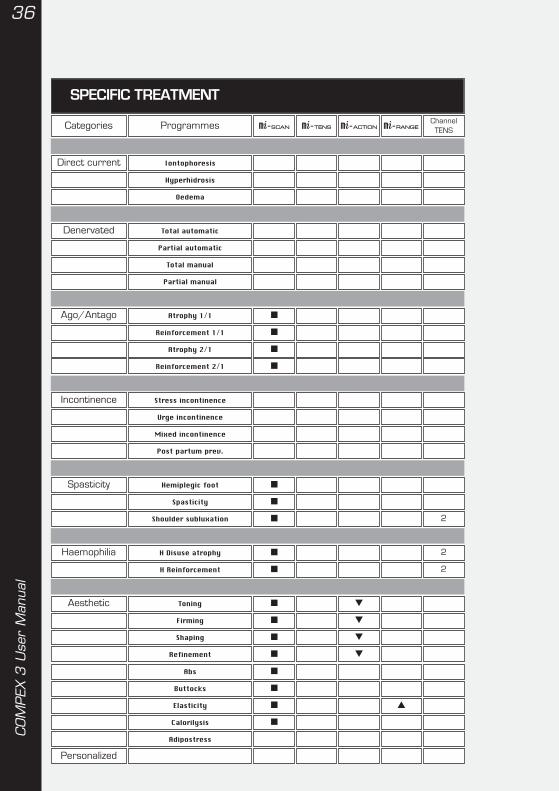
SPECIFIC TREATMENT
Direct current Iontophoresis
Hyperhidrosis
Oedema
Denervated Total automatic
Partial automatic
Total manual
Partial manual
Reinforcement 1/1 �
Ago/Antago Atrophy 1/1 �
Atrophy 2/1 �
Reinforcement 2/1 �
Incontinence Stress incontinence
Urge incontinence
Mixed incontinence
Post partum prev.
Spasticity Hemiplegic foot �
Spasticity �
Shoulder subluxation � 2
Haemophilia H Disuse atrophy � 2
H Reinforcement � 2
Aesthetic Toning � �
Firming � �
Shaping � �
Refinement � �
Abs �
Buttocks �
Elasticity � �
Calorilysis �
Adipostress
Personalized
37
COMPEX
3UserMan
ual
Categories Programmes m-3 m-5 m-1 m-6 ChannellTENS
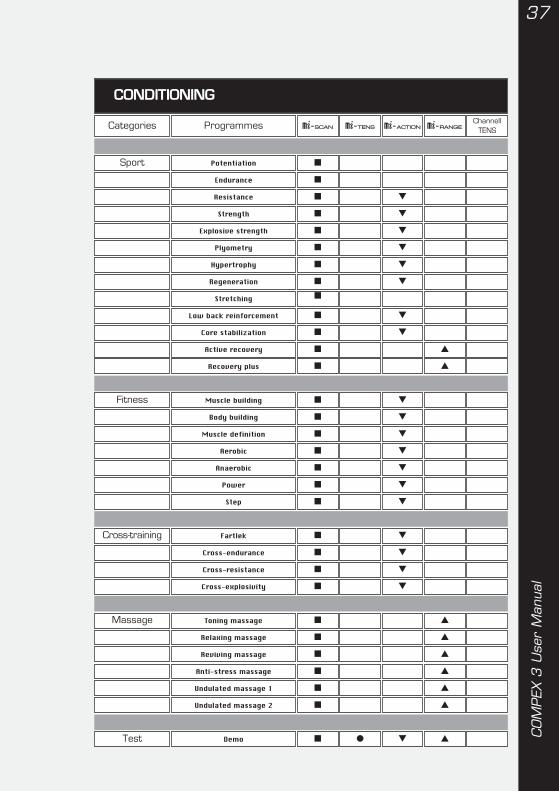
CONDITIONING
Sport Potentiation �
Endurance �
Resistance � �
Strength � �
Explosive strength � �
Plyometry � �
Hypertrophy � �
Regeneration � �
Stretching �
Core stabilization � �
Low back reinforcement � �
Active recovery � �
Recovery plus � �
Fitness Muscle building � �
Body building � �
Muscle definition � �
Aerobic � �
Anaerobic � �
Power � �
Step � �
Cross-endurance � �
Cross-training Fartlek � �
Cross-resistance � �
Cross-explosivity � �
Massage Toning massage � �
Relaxing massage � �
Reviving massage � �
Anti-stress massage � �
Undulated massage 1 � �
Undulated massage 2 � �
Test Demo � � � �

38COMPEX
3UserMan
ual
VII COMPEX 3 SOFTWARE
1 - Scope
Your Compex 3 stimulator comes with aCompex 3 software programme that willhelp you to manage your patients.
The programme offers 3 main featuresthat will allow you to:• Create a list of patients under treatment• Create a patient history• Create personalised programmes
A) Creating a patient list
Compex 3 software allows you to create alist of patients on your computer andassign each patient a list of treatments tobe performed. You can then transfer thisinformation to the Compex 3 stimulator,where you will have direct access topriority treatments and be able to ensurethat the treatments performed, by you or acolleague, are consistent with yourtherapeutic choices.The option also allows you to initiate anelectrotherapy session without having tofirst consult the patient’s file on yourcomputer.
B) Creating a patient history
Any treatments performed on a patientare recorded by the stimulator and canthen be transferred to the patient’s historyfile stored on the computer.In addition to creating a patient history, youcan also consult statistics on stimulatoruse and check which treatments havebeen used most.
C) Creating a personalisedprogramme
The software also allows you to design yourown treatment programmes, which canthen be transferred to the stimulator andused like any other programmes.
NOTE: Compex 3 software is optional. It isnot a requirement for using the Compex 3stimulator.
39
COMPEX
3UserMan
ual
2 - Mode of operation
Once the software is installed on yourcomputer, you will see the following taskbar on your screen.
This bar allows you to access the differentfeatures of the programme.
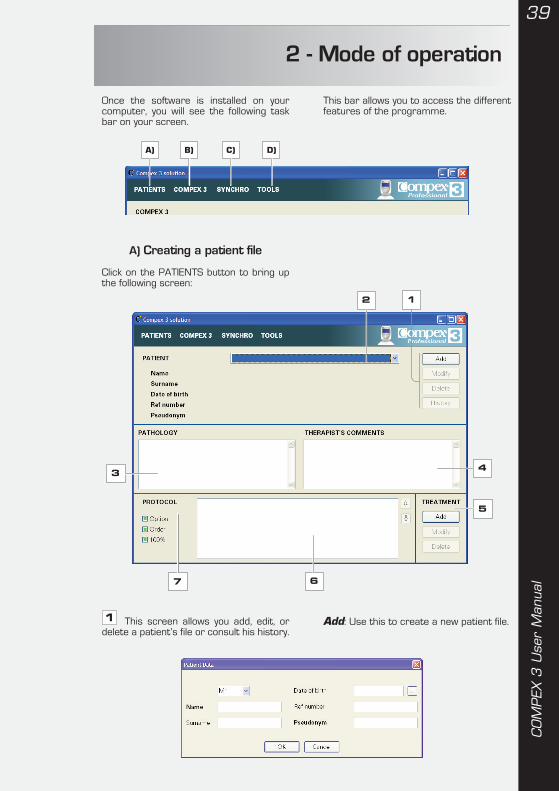
A) Creating a patient file
Click on the PATIENTS button to bring upthe following screen:
A) B) C) D)
12
3 4
5
67
This screen allows you add, edit, ordelete a patient’s file or consult his history.
Add: Use this to create a new patient file.1

40COMPEX
3UserMan
ual
Two of the fields in the patient file areobligatory:- the patient’s surname- l the user name that you wish to use in thestimulator. The programme willautomatically propose a user nameconsisting of the patient’s surname andthe first letter of his first name. If the namealready exists, you will be asked to changeit. You can assign any user name you wishas long as it does not exceed 20characters (including spaces).All of the other fields are optional.
OK: Click this to create a new patient.
Cancel: Click this to cancel the creation ofa new patient.
Edit: Click this to modify a new patient file.
Delete: Click this to permanently removea patient file from the computer’s memory.
History: Click this to consult a patient’shistory.
These files are stored in your computerand can be used to define theelectrotherapy treatments (type oftreatment and number of sessions) youwish to assign to each patient.
To select a patient, click and choose thename you want from the drop-down list.
NOTE: To make it easier to find a particularpatient, key in the first letter of his name orright click to search by surname, first name,or user name.
Use this box to enter details of thepatient’s pathology.
Use this box to enter any additionalcomments.
Use these options to add, edit, or delete atreatment from the patient’s protocol (if youadd a treatment, it will be added to area no. 6).
Add: Click this to add a new treatment.
Select all: Click this to assign all thechecked treatments to your patient.You can also assign treatments manuallyby double clicking on the correspondingline.
Delete: Click this to delete checkedtreatments.
View: Click this to view details of checkedtreatments:• normal mode shows the patient’s
personal details, treatments received,and any comments added by thetherapist.
• detailed mode shows the sameinformation as above in addition todetails of maximum and average energylevels and programme parameters.
NOTE: You can print or save any of the filesyou view.
Close: Click this to close the window.
NOTE: Click the heading of thecorresponding column to sort the entriesby date or treatment.
Use option 2 to select a patient.The patient list contains a list of all thepatients for whom you have created a fileusing the Compex 3 software programme.
2
3
4
5

41
COMPEX
3UserMan
ual
a
b
c
d
e
f
The window on the left of this screencontains a list of standard programmesand their respective categories.Personalised programmes are at the endof the list.Click on any of the plus signs to view a listof options within the correspondingcategory.
Once you have selected a programme (byclicking on its name), you will be able todefine different usage parameters by usingthe arrows (For meaning of symbols, referto chapter "Neurosimulation programmes,Personalising a programme" in page 23.
a) choose muscle groupb) choose warm-upc) choose level of workd) choose TENS optione) choose m-1 or Personalised TENSoptionf) choose number of times you wish eachtreatment to be performed
OK: Click this to create a new treatment.
Cancel: Click this to exit without savingyour changes.
Edit: Click this to edit the parameters forthe treatment that is highlighted in theprotocol.
Delete: Click this to remove the treatmentthat is highlighted in the protocol.
This window allows you to view thecontents of a patient’s protocol.
To change the order of treatments, use theprogramme’s drag and drop option. Inother words, left click on the treatment youwish to move, drag it to its new position,and release the mouse button.
NOTE: maximum of 50 treatments can beadded to any protocol.
Option 7 allows you to personalise apatient’s entire protocol.
Option menu access: This option, whichis enabled by default, allows the user toaccess the stimulator’s treatment optionsscreen and edit the corresponding options(muscle group, warm-up, level of work, etc.).If you wish to prevent access to this menu,uncheck the corresponding box.
Fixed execution order: This option,which is unchecked by default, can be usedto execute treatments in the order youwant. By checking this box, you will ensurethat the treatments in the list are executedin the order shown (starting from the top).
100% treatment executioncompulsory: This option, which isunchecked by default, can be used to addtreatments that have only been 100%completed to the patient’s history. If leftunchecked, any treatment that has been10% completed will be added. This option isparticularly useful when the stimulator isgiven to a patient to use at home.
6
7

42COMPEX
3UserMan
ual
B) Preparing data to transferto Compex 3
Once you have created a patient list usingCompex 3 software, it is a good idea totransfer a list of patients that are currentlybeing treated, together with theirtreatment protocol, to the Compex 3
stimulator. It does not make much sense totransfer all the patients in the computer’sdatabase to the stimulator.Click on the COMPEX 3 button to bring upthe following screen.
21
3
This screen allows you to view thepatients that will be transferred to the stim-ulator during the next synchronisationprocess. The user names in this list willappear on the stimulator’s screen followingsynchronisation.
NOTE: A maximum of 50 patients can betransferred to the stimulator.
Edit: Click this to edit the list, i.e. add orremove patients.
1
43
COMPEX
3UserMan
ual
Double click on the lines containing thepatients you wish to transfer to yourstimulator. Their names will appear in area1. To remove a patient from the list simplyuncheck the corresponding box.
OK: Click this to confirm your choices.
Cancel: Click this to exit without savingyour changes.
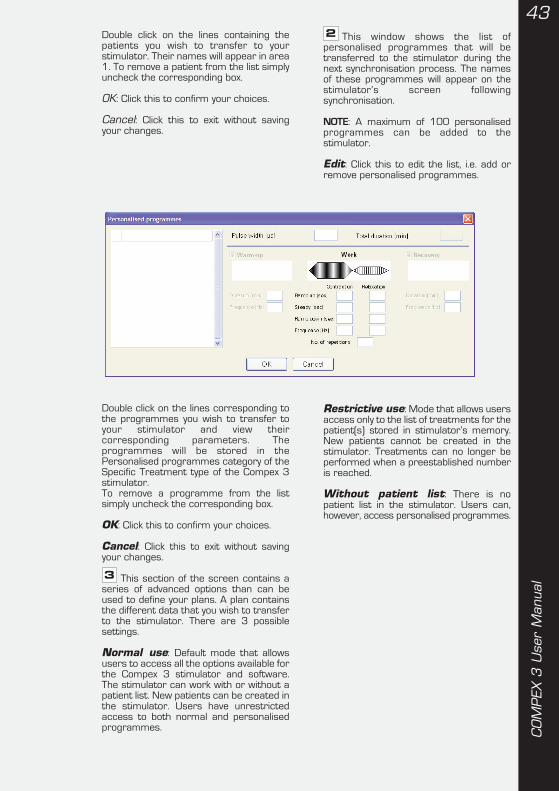
This window shows the list ofpersonalised programmes that will betransferred to the stimulator during thenext synchronisation process. The namesof these programmes will appear on thestimulator’s screen followingsynchronisation.
NOTE: A maximum of 100 personalisedprogrammes can be added to thestimulator.
Edit: Click this to edit the list, i.e. add orremove personalised programmes.
Double click on the lines corresponding tothe programmes you wish to transfer toyour stimulator and view theircorresponding parameters. Theprogrammes will be stored in thePersonalised programmes category of theSpecific Treatment type of the Compex 3stimulator.To remove a programme from the listsimply uncheck the corresponding box.
OK: Click this to confirm your choices.
Cancel: Click this to exit without savingyour changes.
This section of the screen contains aseries of advanced options than can beused to define your plans. A plan containsthe different data that you wish to transferto the stimulator. There are 3 possiblesettings.
Normal use: Default mode that allowsusers to access all the options available forthe Compex 3 stimulator and software.The stimulator can work with or without apatient list. New patients can be created inthe stimulator. Users have unrestrictedaccess to both normal and personalisedprogrammes.
Restrictive use: Mode that allows usersaccess only to the list of treatments for thepatient(s) stored in stimulator’s memory.New patients cannot be created in thestimulator. Treatments can no longer beperformed when a preestablished numberis reached.
Without patient list: There is nopatient list in the stimulator. Users can,however, access personalised programmes.
2
3

44COMPEX
3UserMan
ual
C) Synchronising the stimulator
When the stimulator is connected to yourcomputer, either via the docking station ordirectly, via a USB cable, you can transferdata from the computer to the stimulatorand vice versa.
The software retrieves the data stored inthe stimulator since the lastsynchronisation and updates the data onthe computer by recording the content ofthe stimulator’s history file.It then updates the patient list on thestimulator so that it coincides with the liston the computer.
Click the SYNCHRO button to bring up thefollowing screen:
1
This screen allows you to lock thestimulator (anti-theft system).Compex 3 software allows you to block thestimulator after a fixed number of days. Todo this, check the corresponding box andenter the number of days you wish it tooperate for.When the lock option is checked, thestimulator will only function for the numberof days you have specified. The days arecounted from the moment ofsynchronisation. After this time, the userwill not be able to execute any treatmentsand the stimulator will only function againonce it has been resynchronised. Torelease the lock function, the stimulatormust be synchronised with the samecomputer that was used to lock it.
OK: Click this to start the synchronisationprocess.
Annuler: Click this to cancel thesynchronisation process.
A message will appear on the screenindicating the successful completion of theprocess.
NOTE: When working in multi-plan mode(see D) Tools, Plans settings), you will beasked to choose which plan you wish tosynchronise.
When should you synchronisea stimulator ?Synchronisation is necessary whenever youwish to modify the list of patients in thestimulator, when you wish to update yourpatients’ treatment histories, or when youwish to transfer a new set of personalisedprogrammes to the stimulator.
When should you synchronise severalstimulators at the same time?When you are using several Compex 3stimulators, we recommend that yousynchronise these regularly in order tokeep the patients’ treatment histories up todate. When synchronising severalstimulators at a time, first synchroniseeach stimulator to retrieve the informationstored in their memories, and then repeatthe process to ensure that they are allupdated with the same data.
Synchronising with another computerIf you attempt to synchronise yourstimulator with a computer other than theone you normally use, the following screenwill appear.
You can choose to abort or continue theprocess. If you continue, however, bear inmind that you will lose any data stored inthe stimulator’s history file since the lastsynchronisation. You will also be updatingthe stimulator with the data contained inthe software on the computer you areusing.
NOTE: Compex 3 software is only compati-ble with the Compex 3 stimulator. It cannotbe used to synchronise other stimulators.
1
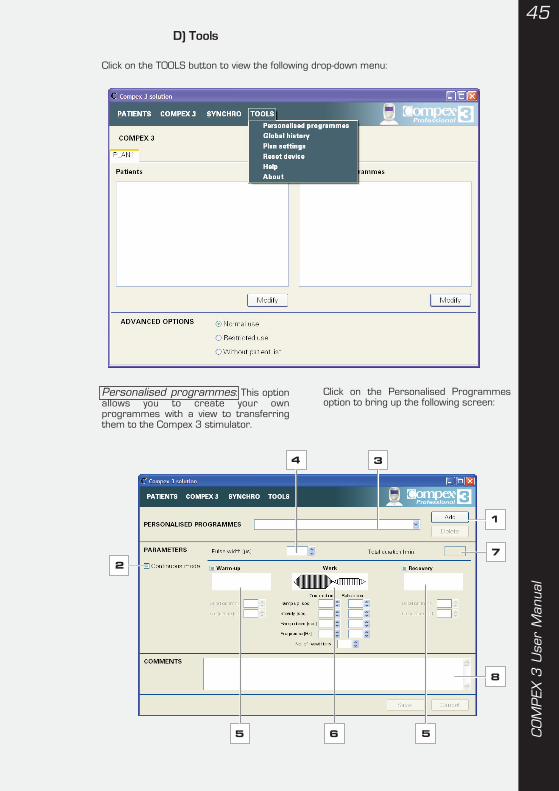
45
COMPEX
3UserMan
ual
D) Tools
Click on the TOOLS button to view the following drop-down menu:
Personalised programmes: This optionallows you to create your ownprogrammes with a view to transferringthem to the Compex 3 stimulator.
Click on the Personalised Programmesoption to bring up the following screen:
1
3
2
4
5 56
7
8

46COMPEX
3UserMan
ual
These 2 buttons allow you to add ordelete personalised programmes.
Add: Click this to choose from among 2programming modes:- Normal mode (default mode). This allowsyou to create programmes with 3sequences: warm-up, work, and recovery. Ifthe warm-up and recovery sequences arenot required, simply uncheck thecorresponding boxes.- Continuous mode. This is particularlyindicated for Analgesic programmes.Check the corresponding box to select thismode (see point 2).
Checking the Continuous mode box willgive you access to a programming modeconsisting of just one sequence (warm-upand recovery sequences are disabled).
Use this drop-down menu to select aprogramme to edit.NOTE: Type in the first letter of theprogramme you are looking for to facilitateyour search.
Use this option to adjust pulse width.
This option allows you to choose thefollowing options for the warm-up andrecovery sequences:- frequency- duration
You can use this section to define thefollowing parameters for each of the 2sequences (contraction/relaxation):- current ramp-up time- steady current duration- current ramp-down time- frequency- number of times each contraction/relaxation sequence is repeated.
This box shows the total duration ofthe programme. This is calculatedautomatically depending on the optionschosen (warm-up sequence, recoverysequence, number of repetitions in worksequence, etc.).
This box can be used to enter relevantcomments.
Save: Click this to save the personalisedprogramme you have created..
Cancel: Click this to exit without savingyour changes.
NOTE: m functions are disabled inpersonalised programmes;
Global history: This option allows you toaccess the global history corresponding tothe patient lists in your Compex 3software. The list is orderedchronologically. Click on Global History tobring up the following screen:
1
2
3
4
5
6
7
8

47
COMPEX
3UserMan
ual
Double click on the lines of any entries youwish you wish to print or delete.
Print: Click this to print the checkedentries on the screen.
Delete: Click this to delete the checkedentries.
NOTE: Click the heading of thecorresponding column to sort entries bydate, patient, or treatment.Remember that you can also consult apatient’s history in the Compex 3 patient fileon the computer (see A) Creating a patienthistory, point 1).
Plan setting: This window allows you toprogramme and manage up to 8 differentplans on 8 different stimulators. Click onPlan Setting to bring up the followingscreen:
Double click on any entries you wish youwish to print or delete. To change the nameof the plan, simply click on its name. Anynew plans will be added to the screen ofyour Compex 3 stimulator (see B)Preparing data to transfer to Compex 3).
OK: Click this to confirm the number ofplans.
Cancel: Click this to exit without savingyour changes.
NOTE: Working in multi-plan mode is usefulwhen you wish to install different plans ondifferent stimulators. However, if you wishto install the same plan on severalstimulators, you can work in mono-planmode.
OK: Click this to confirm you wish torestore the original settings.
Cancel: Click here to cancel the operationand return to the previous screen.
Help: The help section provides you withaccess to the different Compex 3 manuals(User Manual, Practical Guide, and theelectrode placement video).
Reset the device: Use this option torestore your stimulator to its originalsettings (settings prior to firstsynchronisation). This will delete the patientlist and any personalised programmesinstalled on the stimulator. It will also deletethe lock option (See C) Sinchronising thestimulator, point 1).

48COMPEX
3UserMan
ual
When you synchronise your Compex 3stimulator with the Compex 3 software forthe first time, you will transfer any patientsyou have selected, together with theirprotocols, to the stimulator.
A) Using the Compex 3stimulator with a patient list
When the transfer is complete, theCompex 3 screen will appear as follows:
40a: Press the On/Off button to turn offthe unit.40b: Use the channel 1 +/- button toselect a patient from the list.40c: Use the channel 2 +/- button toremove the patient list and access thedifferent types of treatment (commontreatments, specific treatments, andconditioning). When you use this button,the treatment you execute will not berecorded under the name of a patient.40d: Use the channel 3 +/- button tocreate a new patient.40e: Use the channel 4 +/- button toaccess the patient’s programme list andbring up the following screen.
NOTE: Channel 2 and 3 +/- buttons aredisabled if the restrictive mode is selected(see B) Preparing data to transfer toCompex 3, point 3).
41a: Press the On/Off button to go backto the previous screen.41b: Use the channel 1 +/- button toselect a programme from the list.41c: Use the channel 2 +/- button toaccess a programme that is not on the list.41d: Use the channel 3 +/- button toaccess the programme options menu.41e: Press the channel 4 +/- button tostart the programme.
NOTE: Press the I button to access thehistory of treatments performed on thepatient.
B) Creating a new patient in theCompex 3 stimulator
This function allows you to start anelectrotherapy treatment for a new patientand store his history without having to firstcreate the patient file on the computer.
42a: Press the On/Off button to turn offthe unit.42c: Use the channel 2 +/- button toremove the patient list and access thedifferent types of treatment (commontreatments, specific treatments, andconditioning).42d: Use the channel 3 +/- button toconfirm the creation of a new patient andbring up the following screen.
3 - Using the Compex 3 stimulatorwith a patient list
fig. 40
fig. 41
fig. 42
40a 40b 40c 40d 40e
42a 42c 42d
41a 41b 41c 41d 41e
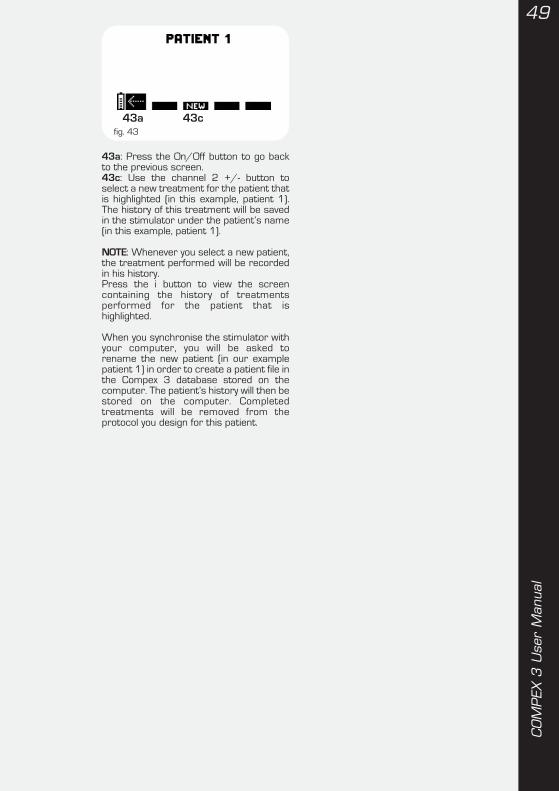
49
COMPEX
3UserMan
ual
43a: Press the On/Off button to go backto the previous screen.43c: Use the channel 2 +/- button toselect a new treatment for the patient thatis highlighted (in this example, patient 1).The history of this treatment will be savedin the stimulator under the patient’s name(in this example, patient 1).
NOTE: Whenever you select a new patient,the treatment performed will be recordedin his history.Press the i button to view the screencontaining the history of treatmentsperformed for the patient that ishighlighted.
When you synchronise the stimulator withyour computer, you will be asked torename the new patient (in our examplepatient 1) in order to create a patient file inthe Compex 3 database stored on thecomputer. The patient’s history will then bestored on the computer. Completedtreatments will be removed from theprotocol you design for this patient.
fig. 4343a 43c