
Company registration guideline rjsc
13
REGISTRATION Company Registration Guideline Joint Stock Company
Transcript of Company registration guideline rjsc

REGISTRATION
Company Registration Guideline Joint Stock Company

Application User Manual, Vol -2: Guidelines for Internet Users
1
3. REGISTRATION
Having name clearance (Foreign Company and Partnership Firm, however, do not require name
clearance) promoters have to apply for Registration of a new entity.
a) Registration Application
i. Click ‘Apply for Registration’ option under the Registration broad heading in the RJSC
Internet Home Page.
ii. Provide User Name and Password and click button in the User Sign In page.
You will see the Registration page:
iii. Select your entity type by clicking first the drop-down arrow button at the right of Entity Type
option, and then by clicking the applicable entity type from the drop-down list.
iv. In case of Foreign Company or Partnership Firm, select your registration office by clicking the
applicable one from the drop-down list at the right of the add-in field ‘Registration Office’.
v. In case of Private Company or Public Company or Trade Organization or Society, enter the
Name Clearance Submission No. and Name Clearance Letter No. in the add-in fields
Submission No. and Clearance Letter No. respectively.
vii. Click the button, and you will see the Apply for Registration page:
Log In
Continue
Application User Manual, Vol -2: Guidelines for Internet Users
2
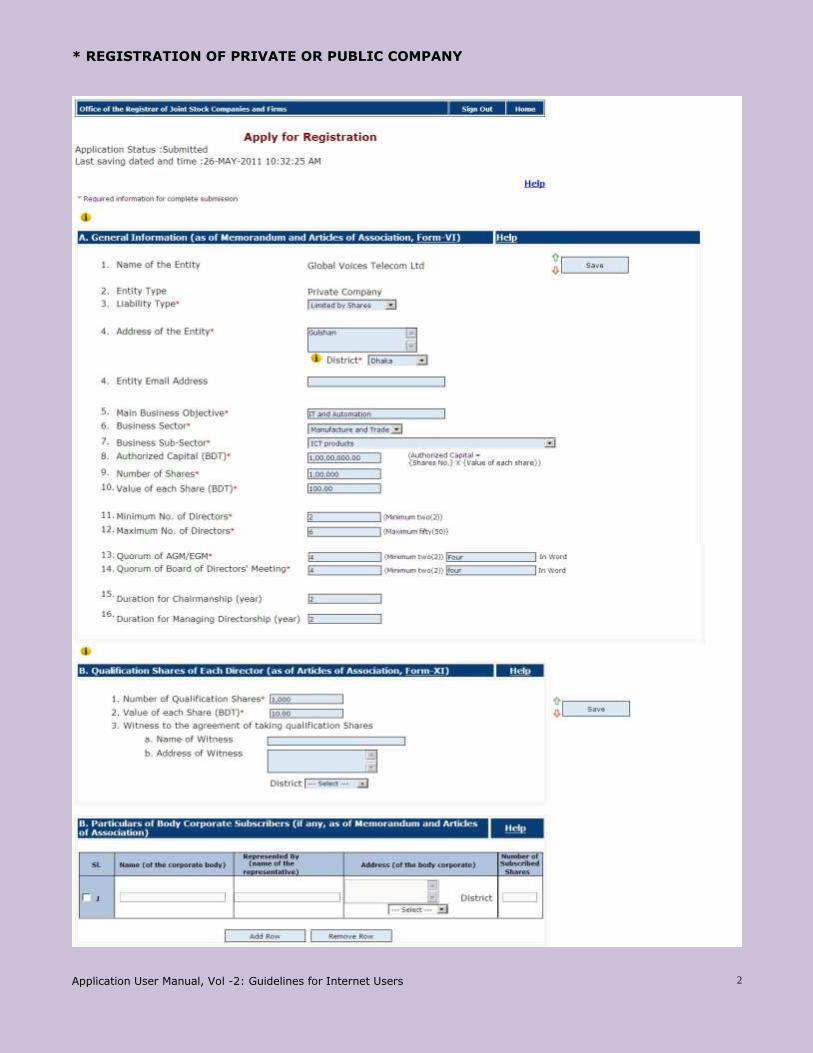
* REGISTRATION OF PRIVATE OR PUBLIC COMPANY

Application User Manual, Vol -2: Guidelines for Internet Users
3

Application User Manual, Vol -2: Guidelines for Internet Users
4
Follow the top-down guidelines hereinafter for preparing the prescribed Registration Application:
(A. General Information ….)
i. Select the liability type of your company by clicking the appropriate one from the drop-down
list at the right of Liability Type option.
ii. Write full address of your entity in the Address of the Entity text box and select the
district applicable to the address by clicking the district drop-down list at the right of
District option
iii. Write main business objective at the Main Business Objective text box and select the
Business Sector and Sub-sector by clicking the respective drop-down list
iv. Enter the Authorized Capital (BDT), Number of Shares and Value of each Share (BDT)
in the respective field.
v. Enter the Minimum No. of Directors and Maximum No. of Directors in the respective
field.
vi. Next enter the Quorum of AGM/EGM, Quorum of Board of Directors’ Meeting, Duration
for Chairmanship (year), Duration for Managing Directorship (year), Number of
Qualification Shares, Value of each Share (BDT) in the respective field.
(B. Particulars of Body Corporate…..)
vii. Write Name, Represented By, Address and Number of Subscribed Shares of one Corporate
Subscriber (if any) in the ‘Particulars of Body Corporate…’ table. Click the
button to enter similar information of other corporate subscriber(s) one by one. To delete
Add Row
Application User Manual, Vol -2: Guidelines for Internet Users
5
entered information of a corporate subscriber, select the respective row by clicking the
check box at the left and then click the button
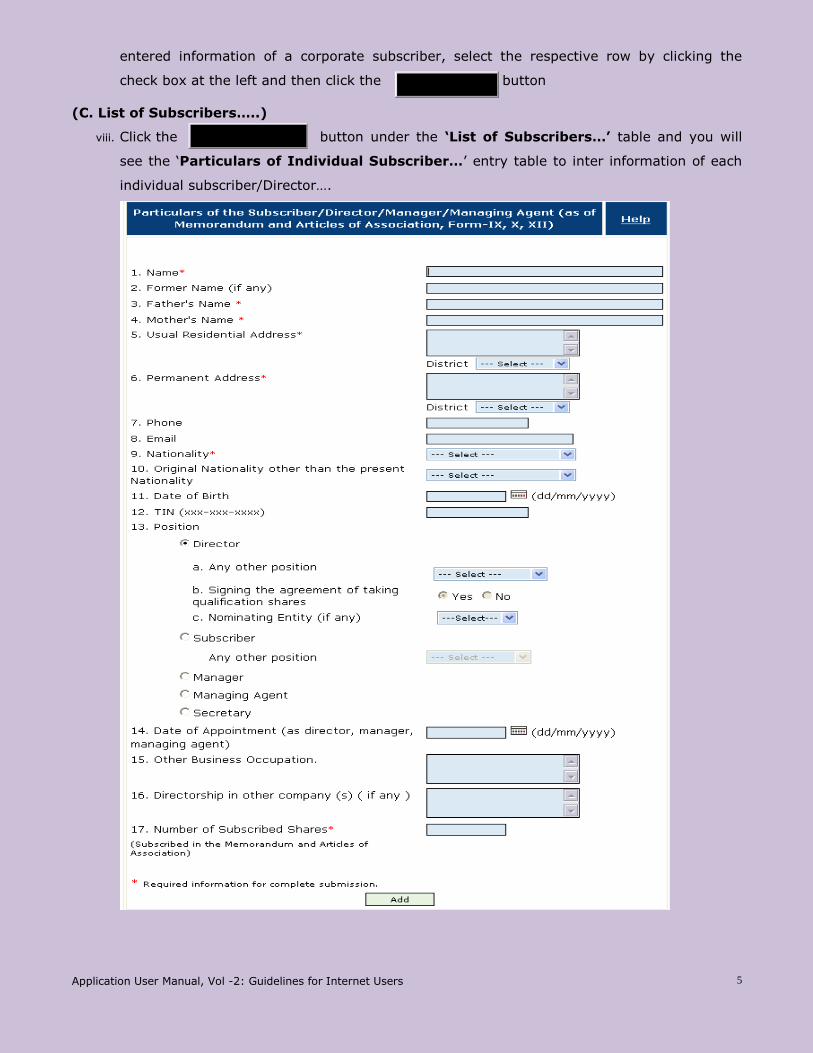
(C. List of Subscribers…..)
viii. Click the button under the ‘List of Subscribers…’ table and you will
see the ‘Particulars of Individual Subscriber…’ entry table to inter information of each
individual subscriber/Director….
Remove Row
Enter Information
Application User Manual, Vol -2: Guidelines for Internet Users
6
ix. Fill in all the fields for one individual, and then click the button to enter similar
information of other individual (s) Subscriber/Director… one by one.
x. To delete entered information of one individual Subscriber/Director…., select the respective
row by clicking the check box at the left and then click the button.
xi. To edit entered information of one individual Subscriber/Director…., select the respective
row by clicking the check box at the left and then click button. Do the
necessary editing.
(D. Forms/Documents…..)
xii. Enter your (Filer) full name in the Name text box, your position in the entity by clicking the
drop-down box at the right of the Position option and your full address in Address text
box.
(E. Declaration on Registration…..)
xiii. Similarly write your (Declarer) name in the Name text box, your position in/in respect of
the entity by clicking the drop-down box at the right of the Position, your organization (for
advocate only) name in the Organization and your full address in Address text box.
xiv. Enter and save all the information of original registration application page then click "Enter
Memorandum of Association (MOA)"
xv. Write objective then Click the button to enter similar objective one by one.
To delete entered information of a objective, select the respective row by clicking the check
box at the left and then click the button after complete the "MOA" page
press button to back Registration Application page.
xvi. In registration application page you find new link "Edit MOA Information", click "Edit MOA
Information" you can edit MOA.
Add
Edit Information
Remove Row
Remove Row
Add
Submit

Application User Manual, Vol -2: Guidelines for Internet Users
7
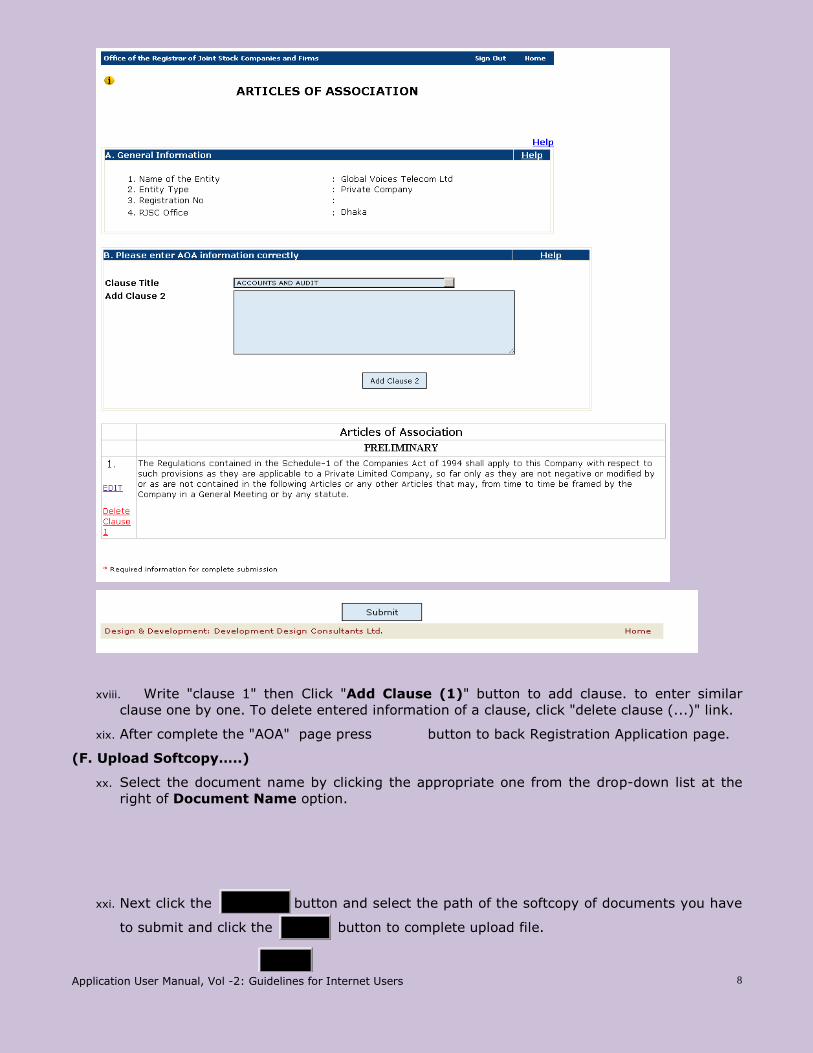
xvii. After enter MOA information then click "Enter AOA Information"
Application User Manual, Vol -2: Guidelines for Internet Users
8
xviii. Write "clause 1" then Click "Add Clause (1)" button to add clause. to enter similar
clause one by one. To delete entered information of a clause, click "delete clause (...)" link.
xix. After complete the "AOA" page press button to back Registration Application page.
(F. Upload Softcopy…..)
xx. Select the document name by clicking the appropriate one from the drop-down list at the
right of Document Name option.
xxi. Next click the button and select the path of the softcopy of documents you have
to submit and click the button to complete upload file.
Browse...
Upload
Submit
Application User Manual, Vol -2: Guidelines for Internet Users
9
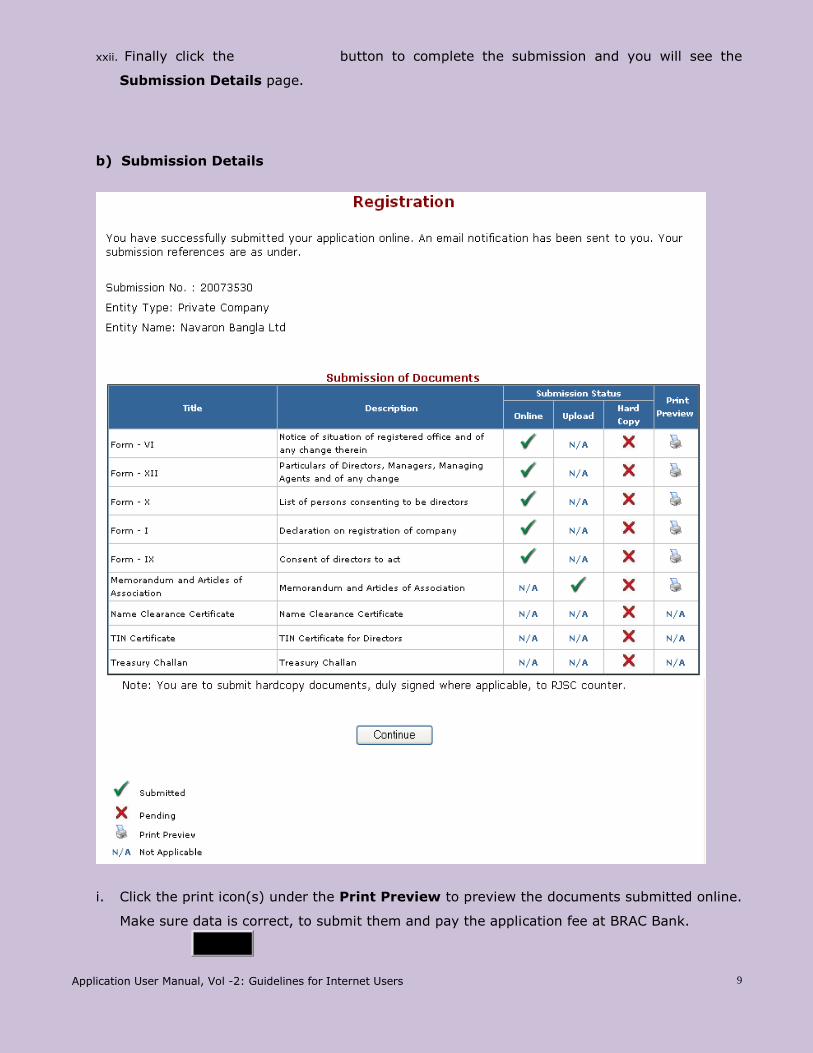
xxii. Finally click the button to complete the submission and you will see the
Submission Details page.
b) Submission Details
i. Click the print icon(s) under the Print Preview to preview the documents submitted online.
Make sure data is correct, to submit them and pay the application fee at BRAC Bank.
Continue
Application User Manual, Vol -2: Guidelines for Internet Users
10
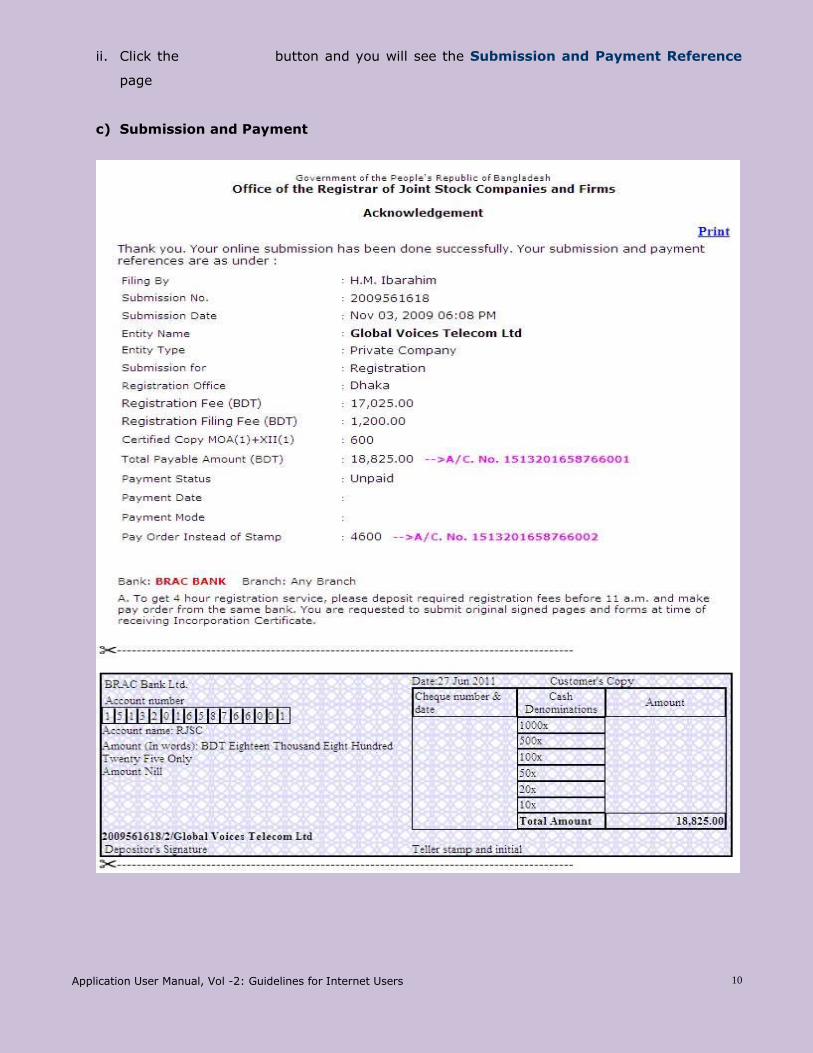
ii. Click the button and you will see the Submission and Payment Reference
page
c) Submission and Payment

Application User Manual, Vol -2: Guidelines for Internet Users
11
Congratulations! You have successfully completed the online submission of Registration
Application.
Please retain this submission reference for future reference.
You can Edit your submission (if you so decide) prior to submission documents.
Click Back to Home to go the home page.
Application User Manual, Vol -2: Guidelines for Internet Users
12
d) Edit
You can edit your submission (if you so decide) prior to submitted documents before RJSC
receive your submissions. For editing please follow the guidelines hereinafter:
i. Click the ‘View/Edit Registration Application’ option under Registration of home page.
ii. As prompted, enter your submission number and you will be given the option for editing.
iii. After submitting the Registration application, you can print your submitted documents.
Print Submissions
For printing, please follow the guidelines hereinafter:
a. Click the ‘Print Registration Documents’ option under Registration of home page.
b. As prompted, enter your submission number and you will be given the option for
printing.


![Registrar of Joint Stock Companies and Firms [RJSC]alemco.net/Registration of companies.pdf · 2010-06-29 · • (For a Private Limited Company forms no. I, VI, IX, X, XII) • (For](https://static.fdocuments.in/doc/165x107/5f2109dfd5a7ac42600048a2/registrar-of-joint-stock-companies-and-firms-rjsc-of-companiespdf-2010-06-29.jpg)

![Registrar of Joint Stock Companies and Firms [RJSC] of companies.pdfRegistrar of Joint Stock Companies and Firms [RJSC] Certificate of Incorporation 24-25 Dilkusha C/A, Dhaka 1000](https://static.fdocuments.in/doc/165x107/5a9ecf287f8b9a62178bd7d3/pdfregistrar-of-joint-stock-companies-and-firms-rjsc-of-companiespdfregistrar.jpg)


