Comodo Internet Security 2012 Ver5.9-5.10 User Guide 031512
353
Comodo Internet Security 2012 Software Version 5.9/5.10 User Guide Guide Version 5.9.031312 Comodo Security Solutions 525 Washington Blvd. Jersey City, NJ 07310
-
Upload
kutapurusha -
Category
Documents
-
view
48 -
download
0
Transcript of Comodo Internet Security 2012 Ver5.9-5.10 User Guide 031512

ComodoInternet Security 2012
Software Version 5.9/5.10
User GuideGuide Version 5.9.031312
Comodo Security Solutions525 Washington Blvd.Jersey City, NJ 07310

Comodo Internet Security 2012 - User Guide
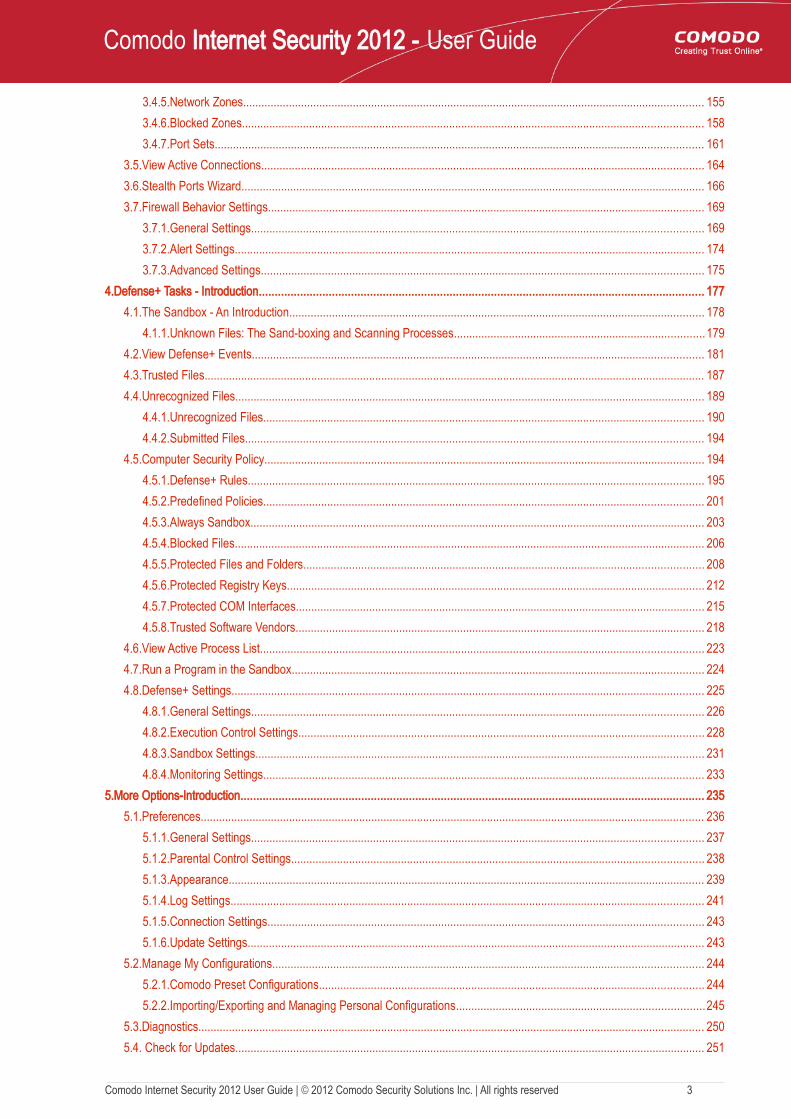
Table of Contents1.Introduction to Comodo Internet Security............................................................................................................................... 5
1.1.Special Features................................................................................................................................................................. 91.2.System Requirements....................................................................................................................................................... 111.3.Installation......................................................................................................................................................................... 12
1.3.1.CIS Premium - Installation........................................................................................................................................ 121.3.2.CIS Pro - Installation and Activation......................................................................................................................... 221.3.3.CIS Complete - Installation and Activation .............................................................................................................. 33
1.3.3.1.Installing Comodo Internet Security 2012 Complete.......................................................................................351.3.3.2.Activating Online Backup, TrustConnect and Guarantee................................................................................451.3.3.3.Installing Comodo Backup.............................................................................................................................. 481.3.3.4.Installing Comodo TrustConnect..................................................................................................................... 53
1.3.4.Activating CIS Pro/Complete Services after Installation ..........................................................................................601.3.4.1.Activating Your License................................................................................................................................... 601.3.4.2.Activating Your Guarantee Coverage.............................................................................................................. 631.3.4.3.Renewal of Your License................................................................................................................................. 69
1.4.Starting Comodo Internet Security.................................................................................................................................... 701.5.Overview of Summary Screens......................................................................................................................................... 72
1.5.1.Comodo Internet Security - Summary...................................................................................................................... 721.5.2.Comodo Antivirus - Summary................................................................................................................................... 741.5.3.Comodo Firewall - Summary.................................................................................................................................... 76
1.6.Comodo Internet Security - Navigation ............................................................................................................................. 771.7.Understanding Alerts......................................................................................................................................................... 78
2.Antivirus Tasks - Introduction............................................................................................................................................... 902.1.Run a Scan....................................................................................................................................................................... 912.2.Update Virus Database................................................................................................................................................... 1002.3.Quarantined Items........................................................................................................................................................... 1012.4.View Antivirus Events...................................................................................................................................................... 1022.5.Submit Files to Comodo for Analysis............................................................................................................................... 1142.6.Scheduled Scans............................................................................................................................................................. 1162.7.Scan Profiles................................................................................................................................................................... 1182.8.Scanner Settings............................................................................................................................................................. 121
2.8.1.Real Time Scanning .............................................................................................................................................. 1222.8.2.Manual Scanning................................................................................................................................................... 1242.8.3.Scheduled Scanning ............................................................................................................................................. 1262.8.4.Exclusions.............................................................................................................................................................. 128
3.Firewall Tasks - Introduction............................................................................................................................................... 1293.1.View Firewall Events....................................................................................................................................................... 1303.2.Define a New Trusted Application.................................................................................................................................... 1383.3.Define a New Blocked Application................................................................................................................................... 1393.4.Network Security Policy................................................................................................................................................... 140
3.4.1.General Navigation................................................................................................................................................ 1413.4.2.Application Rules................................................................................................................................................... 1413.4.3.Global Rules........................................................................................................................................................... 1523.4.4.Predefined Policies................................................................................................................................................ 153
Comodo Internet Security 2012 User Guide | © 2012 Comodo Security Solutions Inc. | All rights reserved 2
Comodo Internet Security 2012 - User Guide
3.4.5.Network Zones....................................................................................................................................................... 1553.4.6.Blocked Zones....................................................................................................................................................... 1583.4.7.Port Sets................................................................................................................................................................ 161
3.5.View Active Connections................................................................................................................................................. 1643.6.Stealth Ports Wizard........................................................................................................................................................ 1663.7.Firewall Behavior Settings............................................................................................................................................... 169
3.7.1.General Settings.................................................................................................................................................... 1693.7.2.Alert Settings.......................................................................................................................................................... 1743.7.3.Advanced Settings................................................................................................................................................. 175
4.Defense+ Tasks - Introduction............................................................................................................................................ 1774.1.The Sandbox - An Introduction........................................................................................................................................ 178
4.1.1.Unknown Files: The Sand-boxing and Scanning Processes..................................................................................1794.2.View Defense+ Events.................................................................................................................................................... 1814.3.Trusted Files.................................................................................................................................................................... 1874.4.Unrecognized Files.......................................................................................................................................................... 189
4.4.1.Unrecognized Files................................................................................................................................................ 1904.4.2.Submitted Files...................................................................................................................................................... 194
4.5.Computer Security Policy................................................................................................................................................ 1944.5.1.Defense+ Rules..................................................................................................................................................... 1954.5.2.Predefined Policies................................................................................................................................................ 2014.5.3.Always Sandbox..................................................................................................................................................... 2034.5.4.Blocked Files.......................................................................................................................................................... 2064.5.5.Protected Files and Folders................................................................................................................................... 2084.5.6.Protected Registry Keys......................................................................................................................................... 2124.5.7.Protected COM Interfaces...................................................................................................................................... 2154.5.8.Trusted Software Vendors...................................................................................................................................... 218
4.6.View Active Process List................................................................................................................................................. 2234.7.Run a Program in the Sandbox....................................................................................................................................... 2244.8.Defense+ Settings........................................................................................................................................................... 225
4.8.1.General Settings.................................................................................................................................................... 2264.8.2.Execution Control Settings..................................................................................................................................... 2284.8.3.Sandbox Settings................................................................................................................................................... 2314.8.4.Monitoring Settings................................................................................................................................................ 233
5.More Options-Introduction.................................................................................................................................................. 2355.1.Preferences..................................................................................................................................................................... 236
5.1.1.General Settings.................................................................................................................................................... 2375.1.2.Parental Control Settings....................................................................................................................................... 2385.1.3.Appearance............................................................................................................................................................ 2395.1.4.Log Settings........................................................................................................................................................... 2415.1.5.Connection Settings............................................................................................................................................... 2435.1.6.Update Settings...................................................................................................................................................... 243
5.2.Manage My Configurations............................................................................................................................................. 2445.2.1.Comodo Preset Configurations.............................................................................................................................. 2445.2.2.Importing/Exporting and Managing Personal Configurations.................................................................................245
5.3.Diagnostics...................................................................................................................................................................... 2505.4. Check for Updates.......................................................................................................................................................... 251
Comodo Internet Security 2012 User Guide | © 2012 Comodo Security Solutions Inc. | All rights reserved 3

Comodo Internet Security 2012 - User Guide
5.5.Manage This Endpoint.................................................................................................................................................... 2545.6.Browse Support Forums.................................................................................................................................................. 2555.7.Help ................................................................................................................................................................................ 2565.8.About............................................................................................................................................................................... 257
6.Comodo GeekBuddy......................................................................................................................................................... 2586.1.Overview of Services....................................................................................................................................................... 2596.2.Launching the Client and Using the Service.................................................................................................................... 2596.3.Accepting Remote Desktop Requests............................................................................................................................. 2616.4.Registration..................................................................................................................................................................... 2636.5.Activation of Service........................................................................................................................................................ 2646.6.Uninstalling Comodo GeekBuddy.................................................................................................................................... 266
7.TrustConnect Overview..................................................................................................................................................... 2687.1.Microsoft Windows - Configuration and Connection ....................................................................................................... 2697.2.Mac OS X - Configuration and Connection .................................................................................................................... 2727.3.Linux / Open VPN - Configuration and Connection ........................................................................................................ 2737.4.Apple iPhone / iPod Touch - Configuration and Connection............................................................................................2747.5.TrustConnect FAQ........................................................................................................................................................... 276
8.Comodo Dragon................................................................................................................................................................ 283Appendix 1 CIS How to... Tutorials........................................................................................................................................ 286
Setting up Security Levels Easily.......................................................................................................................................... 286Setting up the Firewall For Maximum Security and Usability................................................................................................. 290Blocking Internet Access while Allowing Local Area Network (LAN) Access .........................................................................297Setting up Defense+ for Maximum Security and Usability ....................................................................................................302How to Password Protect Your CIS Settings......................................................................................................................... 305How to Reset Forgotten Password (Advanced) .................................................................................................................... 308Running an Instant Antivirus Scan on Selected Items........................................................................................................... 311Creating an Antivirus Scanning Schedule............................................................................................................................. 313Running an Untrusted Program Inside Sandbox................................................................................................................... 315Restoring Incorrectly Quarantined Item(s)............................................................................................................................. 316Submitting Quarantined Items to Comodo for Analysis......................................................................................................... 317Enabling File Sharing Applications like BitTorrent and Emule ..............................................................................................319Blocking Any Downloads of a Specific File Type................................................................................................................... 324Disabling Defense+ and Sandboxing For Specific Files Selectively......................................................................................327Switching Between Complete CIS Suite and Individual Components (just AV or FW)..........................................................330Switch Off Automatic Antivirus and Software Updates.......................................................................................................... 333Suppressing CIS Alerts Temporarily while Playing Games.................................................................................................... 337
Appendix 2 Comodo Secure DNS Service............................................................................................................................. 339Router - Manually Enabling or Disabling Comodo Secure DNS Service...............................................................................339Windows XP - Manually Enabling or Disabling Comodo Secure DNS Service......................................................................341Windows Vista - Manually Enabling or Disabling Comodo Secure DNS Service..................................................................345
Appendix 3 CIS Versions...................................................................................................................................................... 352About Comodo..................................................................................................................................................................... 353
Comodo Internet Security 2012 User Guide | © 2012 Comodo Security Solutions Inc. | All rights reserved 4

Comodo Internet Security 2012 - User Guide
1.Introduction to Comodo Internet SecurityOverview
Comodo Internet Security 2012 offers 360° protection against internal and external threats by combining a powerful Antivirus protection, an enterprise class packet filtering firewall, and an advanced host intrusion prevention system called Defense+.
CIS is available in Premium (free), Pro and Complete editions. While the core CIS software is identical for all three versions, the Pro and Complete packages each offer a range of additional services. The Pro version includes Comodo GeekBuddy (Comodo support experts available 24/7 to fix any problem with your computer) and the Virus Free Guarantee (if your computer becomes damaged as a result of malware and Comodo support services cannot return it to a working condition then we'll pay the costs of getting it repaired. Please see the End User License Agreement for full details). CIS Complete includes Comodo GeekBuddy, Virus Free Guarantee, TrustConnect (secure Internet proxy service that ensures 128 bit encrypted connectivity from any public wireless hotspot) and a Comodo Online Backup account (10GB of online storage space).
When used individually, each of the Antivirus, Firewall and Defense+ components deliver superior protection against their specific threat challenge. When used together as a full suite they provide a complete 'prevention, detection and cure' security system for your computer.
Comodo Internet Security Features:• Antivirus - The proactive antivirus system that automatically detects and eliminates viruses, Worms and Trojan
horses. • Firewall - The Firewall that constantly defends your system from inbound and outbound Internet attacks with a
highly effective packet filtering firewall. • Defense+ - A rules based intrusion prevention system that protects your critical operating system files from
malicious processes, internal attacks and blocks unknown malware before it ever gets a chance to install.
Comodo Internet Security 2012 User Guide | © 2012 Comodo Security Solutions Inc. | All rights reserved 5

Comodo Internet Security 2012 - User Guide
Defense+ now features automated sandboxing of unknown applications. The sandbox ensures untrusted (but harmless) applications are allowed freedom to operate whilst untrusted (and genuinely malicious) applications are prevented from accessing or infecting your computer.
• Comodo Dragon - Fast and versatile Internet Browser based on Chromium, infused with Comodo's unparalleled level of Security.
• GeekBuddy (Pro and Complete versions only ) - 24 x 7 online support service in which Comodo experts remotely access your computer when you need it, for: • Virus & Malware Removal • Internet and Online Identity Security • Printer or Email Account Setup • Software Activation • General PC Troubleshooting • Computer Power Setting Optimization • Comodo Software Installation and Set up • Comodo Account Questions
• Users can immediately start Geekbuddy by clicking the 'Chat Now' button .
• Secure Wireless Internet Connectivity (Complete version only) - TrustConnect makes surfing the web safe from any public Wi-Fi location (10 GB per month)
• Comodo Guarantee (Pro and Complete versions only) - If your computer becomes damaged as a result of malware and Comodo support services cannot return it to a working condition then well pay the costs of getting it repaired. Please see the End User License Agreement for full details.
• Online BackUp (Complete version only) - Back-up your important data to Comodo's highly secure servers. Data is encrypted and can accessed only by the user from any Internet connected computer in the world (10GB storage space).
Comodo Internet Security can be used 'out of the box' - so even the most inexperienced users need not have to deal with complex configuration issues after installation.
Comodo Internet Security alerts you whenever potential malware attempts to attack or gain access to your system. The alerts are displayed as pop-ups at the right hand corner of your screen and allow you to allow or block the unrecognized activities, processes and connection attempts of running applications (CIS now even protects against 'drive-by-download' buffer overflow attacks.)
Guide StructureThis introduction is intended to provide an overview of the basics of Comodo Internet Security and should be of interest to all users.
• Introduction• Special Features • System Requirements• Installation
• CIS Premium - Installation• CIS Pro - Installation and Activation• CIS Complete - Installation and Activation
• Starting Comodo Internet Security • General Navigation • Understanding Alerts
The next four sections of the guide cover every aspect of the configuration of Comodo Internet Security. The final two sections contain configuration and technical help for the GeekBuddy and TrustConnect.
• Antivirus Task Center• Run a Scan • Update a Virus Database • Quarantined Items
Comodo Internet Security 2012 User Guide | © 2012 Comodo Security Solutions Inc. | All rights reserved 6

Comodo Internet Security 2012 - User Guide
• Viewing Antivirus Events • Submit Files to Comodo for Analysis• Scheduled Scans • Scan Profiles • Scanner Settings
• Real Time Scanning• Manual Scanning• Scheduled Scanning• Exclusions
• Firewall Task Center• Overview of Task Interface • View Firewall Events • Define a New Trusted Application • Define a New Blocked Application • Network Security Policy
• General Navigation• Application Rules• Global Rules• Predefined Policies• Network Zones• Blocked Zones• Port Sets
• View Active Connections• Stealth Ports Wizard • Firewall Behavior Settings
• General Settings• Alert Settings• Advanced Settings
• Defense+ Task Center• Overview of Task Interface
• The Sandbox - An Introduction• View Defense+ Events • Trusted Files• Unrecognized Files
• Unrecognized Files• Submitted Files
• Computer Security Policy• Defense+ Rules• Predefined Policies• Always Sandbox• Blocked Files• Protected Files and Folders• Protected Registry Keys• Protected COM Interfaces• Trusted Software Vendors
• View Active Process List • Run a Program in the Sandbox• Defense+ Settings
Comodo Internet Security 2012 User Guide | © 2012 Comodo Security Solutions Inc. | All rights reserved 7

Comodo Internet Security 2012 - User Guide
• General Settings• Execution Control Settings• Sandbox Settings• Monitoring Settings
• More... Options• Preferences
• General Settings• Parental Control Settings• Appearance• Log Settings• Connection Settings• Update Settings
• Manage My Configuration• Diagnostics• Check For Updates • Manage This Endpoint• Browse Support Forums • Help • About
• Comodo GeekBuddy• Overview of Services• Launching the Client and Using the Service• Accepting Remote Desktop Requests• Registration• Activation of Service• Uninstalling Comodo GeekBuddy
• TrustConnect• TrustConnect Overview • Windows Configuration • Mac OS X Configuration • Linux / OpenVPN Configuration • Apple iPhone / iPod Touch Configuration • TrustConnect FAQ
• Comodo Dragon• Appendix 1 CIS 'How to...' Tutorials
• Setup security levels easily • Setup the Firewall for maximum security and usability • Block Internet Access while allowing local network (LAN) Access• Setup Defense+ for maximum security and usability • Password protect your CIS settings • Reset a Forgotten Password (Advanced) • Run an instant Antivirus scan on selected items• Create an Antivirus scanning schedule• Run an untrusted program inside sandbox • Restore incorrectly quarantined item(s) • Submit quarantined items to Comodo for analysis • Enable file sharing applications like BitTorrent and Emule
Comodo Internet Security 2012 User Guide | © 2012 Comodo Security Solutions Inc. | All rights reserved 8

Comodo Internet Security 2012 - User Guide
• Block any downloads of a specific file type • Selectively disable Defense+ and Sandboxing for specific files• Switch between complete CIS suite and individual components (just AV or FW) • Switch Off Automatic Antivirus And Software Updates• Temporarily suppress alerts when playing games
• Appendix 2 Comodo Secure DNS Service• Comodo Secure DNS Overview • Router Manually Enabling or Disabling Comodo Secure DNS Service • Windows XP Manually Enabling or Disabling Comodo Secure DNS Service • Windows Vista Manually Enabling or Disabling Comodo Secure DNS Service
• Appendix 3 CIS Versions
1.1.Special FeaturesDefense+ Host Intrusion Prevention System
• Virtually Bulletproof protection against root-kits, inter-process memory injections, key-loggers and more; • Authenticates the integrity of every program before allowing it to load into your computer's memory; • Performs Cloud Based Behavior Analysis for immediate identification of Malware;• Alerts you every time an unknown or untrusted applications attempts to run or install; • Blocks Viruses, Trojans and Spy-ware before they can ever get onto your system; • Prevents unauthorized modification of critical operating system files and registry entries;• Includes new Sandbox feature to completely isolate untrusted files from the rest of your computer
Advanced Network Firewall EngineThe Firewall component of Comodo Internet Security offers the highest levels of perimeter security against inbound and outbound threats - meaning you get the strongest possible protection against hackers, malware and identity thieves. Now we've improved it again by adding new features like,
• Stealth Mode to make your PC completely invisible to opportunistic port scans; • Wizard based auto-detection of trusted zones; • Predefined Firewall policies allow you to quickly implement security rules; • Diagnostics to analyze your system for potential conflicts with the firewall and much more.
Comprehensive Antivirus Protection• Detects and eliminates viruses from desktops, laptops and network workstations; • Performs Cloud based Antivirus Scanning; • Employs heuristic techniques to identify previously unknown viruses and Trojans; • Scans even Windows Registry and System Files for possible spyware infection and cleans them;• Constantly protects with real-time, On-Access scanning; • Comodo AV shows the percentage of the completed scanning; • Rootkit scanner detects and identifies hidden malicious files and registry keys stored by rootkits;• Highly configurable On-Demand scanner allows you to run instant checks on any file, folder or drive;• Comodo AV realtime scanning performance in Stateful mode; • Seamless integration into the Windows operating system allows scanning specific objects 'on the fly'; • Daily, automatic updates of virus definitions; • Isolates suspicious files in quarantine preventing further infection;• Built in scheduler allows you to run scans at a time that suits you;• Simple to use - install it and forget it - Comodo AV protects you in the background.
Intuitive Graphical User Interface• Summary screen gives an at-a-glance snapshot of your security settings; • Easy and quick navigation between each module of the firewall, Antivirus and Defense+;
Comodo Internet Security 2012 User Guide | © 2012 Comodo Security Solutions Inc. | All rights reserved 9

Comodo Internet Security 2012 - User Guide
• Simple point and click configuration - no steep learning curves; • New completely redesigned security rules interface - you can quickly set granular access rights and privileges on
a global or per application. The firewall also contains preset policies and wizards that help simplify the rule setting process.
Comodo GeekBuddy (Pro, Complete versions only and Premium version)CIS Pro and Complete customers receive Comodo GeekBuddy - Live expert remote support for virtually all personal computer issues. Pro and Complete users benefit from the convenience of having a computer security expert on tap 24/7 to help them fix problems right in front of their eyes.
The services include:
• Virus & Malware Removal• Internet and Online Identity Security• Printer or Email Account Setup• Software Activation• General PC Troubleshooting• Computer Power Setting Optimization• Comodo Software Installation and Set up• Comodo Account Questions.
Please visit http://www.geekbuddy.com/ for full product details.
Note: To use the GeekBuddy service on a continuous basis, you have to purchase the product at http://www.geekbuddy.com/, register and activate your account.
Comodo TrustConnectIncluded with a Complete subscription, Comodo TrustConnect is a fast, secure Internet proxy service that makes surfing the web safe -
• At Coffee shops, Hotels and Airports;• At any other public Wi-Fi location;• At your home location;• For Enterprises with remote workers and road-warriors that need secure access to internal networks.
Comodo DragonFast and versatile Internet Browser based on Chromium, infused with Comodo's unparalleled level of Security.
• Improved Privacy over Chromium • Easy SSL Certificate Identification • Fast Website Access • Greater Stability and Less Memory Bloat • Incognito Mode Stops Cookies, Improves Privacy • Very easy to switch from your Browser to the Dragon
Comodo Internet Security - Extended FeaturesHighly Configurable Security Rules Interface
Comodo Internet Security offers more control over security settings than ever before. Users can quickly set granular Internet access rights and privileges on a global or per application basis using the flexible and easy to understand GUI. Comodo Internet Security now supports seamless integration with COMODO Endpoint Security Manager(ESM). Any CIS endpoint can be instantly turned into a centrally managed endpoint from the clients. This version also sees the introduction of preset security policies which allow you to deploy a sophisticated hierarchy of firewall rules with a couple of mouse clicks.
Application Behavior Analysis
Comodo Internet Security features an advanced protocol driver level protection - essential for the defense of your PC against
Comodo Internet Security 2012 User Guide | © 2012 Comodo Security Solutions Inc. | All rights reserved 10

Comodo Internet Security 2012 - User Guide
Trojans that run their own protocol drivers.
Cloud Based Behavior Analysis
Comodo Internet Security features a cloud based analysis of unrecognized files, in which any file that is not recognized and not in Comodo's white-list will be sent to Comodo Instant Malware Analysis (CIMA) server for behavior analysis. Each file is executed in a virtual environment on Comodo servers and tested to determine whether it contains any malicious code. The results will be sent back to your computer in around 15 minutes.
Event logging
Comodo Internet Security features a vastly improved log management module - allowing users to export records of Antivirus, Firewall and Defense+ activities according to several user-defined filters. Beginners and advanced users alike are greatly benefited from this essential troubleshooting feature.
Memory Firewall Integration
Comodo Internet Security includes the buffer-overflow protection of Comodo Memory Firewall. On the attempt of a buffer overflow attack, CIS raises a pop-up alert. This provides protection against data theft, computer crashes and system damage, which are possible consequences of a buffer overflow attack.
'Training Mode' and 'Clean PC' Mode
These modes enable the firewall and host intrusion prevention systems to automatically create 'allow' rules for new components of applications you have decided to trust, so you won't receive pointless alerts for those programs you trust. The firewall learns how they work and only warn you when it detects truly suspicious behavior.
Application Recognition Database (Extensive and proprietary application safe list)
The Firewall includes an extensive white-list of safe executables called the 'Comodo Safe-List Database'. This database checks the integrity of every executable and the Firewall alerts you of potentially damaging applications before they are installed. This level of protection is new because traditionally firewalls only detect harmful applications from a blacklist of known malware - often-missing new forms of malware as might be launched in day zero attacks.
The Firewall is continually updated and currently over 1,000,000 applications are in Comodo Safe list, representing virtually one of the largest safe lists within the security industry.
Self Protection against Critical Process Termination
Viruses and Trojans often try to disable your computer's security applications so that they can operate without detection. CIS protects its own registry entries, system files and processes so malware can never shut it down or sabotage the installation.
Sandboxing as a security feature
Comodo Internet Security's new sandbox is an isolated operating environment for unknown and untrusted applications. Running an application in the sandbox means that it cannot make permanent changes to other processes, programs or data on your 'real' system. Comodo have integrated sandboxing technology directly into the security architecture of CIS to complement and strengthen the Firewall, Defense+ and Antivirus modules.
Submit Suspicious Files to Comodo
Are you the first victim of a brand new type of spyware? Users can help combat zero-hour threats by using the built in submit feature to send files to Comodo for analysis. Comodo then analyzes the files for any potential threats and update our database for all users.
1.2.System RequirementsTo ensure optimal performance of Comodo Internet Security, please ensure that your PC complies with the minimum system requirements as stated below:
• Windows 7 (Both 32-bit and 64-bit versions), Windows Vista (Both 32-bit and 64-bit versions) or Windows XP (Both 32-bit and 64-bit versions)
• Internet Explorer Version 5.1 or above • 128 MB available RAM • 210 MB hard disk space for both 32-bit and 64-bit versions
Comodo Internet Security 2012 User Guide | © 2012 Comodo Security Solutions Inc. | All rights reserved 11

Comodo Internet Security 2012 - User Guide
1.3.InstallationBefore you install Comodo Internet Security, read the installation instructions carefully and also review the system requirements. Additional services and features such as activation of your LivePCSupport account and/or Comodo Guarantee are carried out after the base installation has been completed.
Please note - the CIS software itself is identical for all customers regardless of the package type. All versions (including free) include all security features, technologies and updates. The difference between the package types lies in the availability of additional services such as LivePCSupport, TrustConnect, Online Storage and the Comodo Guarantee. Activation of additional services is carried out after the base installation has been completed.
Note - Before beginning installation, please ensure you have uninstalled any other antivirus and firewall products that are on your computer. More specifically, remove any other products of the same type as those Comodo products you plan to install. For example, if you plan to install only the firewall then you do not need to remove 3rd party antivirus solutions and vice-versa. If you are installing full CIS (both FW and AV) then you need to remove both types of product if they are present on your system. Failure to remove products of the same type could cause conflicts that mean CIS will not function correctly. Users should consult their vendor’s documentation for precise uninstallation guidelines, however the following rough steps will help most Windows users:
• Click the Start button to open the Windows Start menu• Select Control Panel > Programs and Features (Win 7, Vista); Control Panel > Add or Remove Programs (XP)• Select your current antivirus or firewall program(s) from the list• Click Remove/Uninstall button• Repeat process until all required programs have been removed
Click the links below for detailed explanations:
• CIS Premium - Installation• CIS Pro - Installation• CIS Complete - Installation
1.3.1. CIS Premium - InstallationNote - Before beginning installation, please ensure you have uninstalled any other antivirus and firewall products that are on your computer. More specifically, remove any other products of the same type as those Comodo products you plan to install. For example, if you plan to install only the firewall then you do not need to remove 3rd party antivirus solutions and vice-versa. If you are installing full CIS (both FW and AV) then you need to remove both types of product if they are present on your system. Failure to remove products of the same type could cause conflicts that mean CIS will not function correctly. Users should consult their vendor’s documentation for precise uninstallation guidelines, however the following rough steps will help most Windows users:
• Click the Start button to open the Windows Start menu• Select Control Panel > Programs and Features (Win 7, Vista); Control Panel > Add or Remove Programs (XP)• Select your current antivirus or firewall program(s) from the list• Click Remove/Uninstall button• Repeat process until all required programs have been removed
In order to install Comodo Internet Security - Premium, you need to download the setup file from http://www.comodo.com/home/download/download.php?prod=cis.
• Choose whether you want the 32 or 64 bit version of CIS then click 'download'• If you are unsure which version you need, select the 32/64-bit Windows Installer. This executable contains BOTH 32
and 64 bit installers. The setup routine will automatically detect which version of Windows you have and install the appropriate version. Please note, the Universal Windows Installer is a much larger download than the individual 32 or 64 bit setup files.
After downloading the required Comodo Internet Security setup file to your local hard drive, double click on it to start the
Comodo Internet Security 2012 User Guide | © 2012 Comodo Security Solutions Inc. | All rights reserved 12

Comodo Internet Security 2012 - User Guide
installation wizard. Please note, Comodo TrustConnect (secure wireless connectivity service) will be installed along with CIS . With TrustConnect installed, you are automatically warned whenever CIS detects that you have joined an unsecured/publc wireless network and offered the opportunity to activate/login to your account.
Step 1 - Choosing the Interface Language
The installation wizard starts automatically and the 'Select the language' dialog is displayed. Comodo Internet Security is available in several languages.
• Select the language in which you want Comodo Internet Security to be installed from the drop-down menu and click 'OK'.
Step 2 - Installation Configuration
The installation configuration screen will be displayed.
• Please review and/or modify the settings in the dialog. Once you are satisfied with your settings, click ‘Agree and Install’ to begin installation.
• If you click ‘Customize Installer’ then you can choose advanced options . These include which CIS components you wish to install, the ability to choose CIS installation path and other advanced CIS configuration settings.
Receive Comodo News and Notifications
Comodo Internet Security 2012 User Guide | © 2012 Comodo Security Solutions Inc. | All rights reserved 13

Comodo Internet Security 2012 - User Guide
Comodo Internet Security Premium is activated free of cost for lifetime usage. If you wish to sign up for news about Comodo products then enter your email address in the space provided. This is optional.
DNS Settings
Comodo Secure DNS service replaces your existing Recursive DNS Servers and resolves all your DNS requests exclusively through Comodo's proprietary Directory Services Platform. Comodo's worldwide network of redundant DNS servers provide fast and secure Internet browsing experience without any hardware or software installation.
In addition, Comodo's Secure DNS ensures safety against attacks in the form of malware, spyware, phishing etc., by blocking access to malware-hosting sites, by any program running in your system.
In this step of installation of Comodo Internet Security, the DNS settings of your computer can be changed automatically to direct to our DNS servers. You can disable the service at anytime and revert to your previous settings.
For more details on Comodo Secure DNS Service and to know how to enable or disable the service, refer to Appendix 2 Comodo Secure DNS Service.
To enable Comodo Secure DNS, select ‘Change my DNS Servers to COMODO SecureDNS Servers. Click the 'What is this' link to know more about Comodo Secure DNS servers.
Cloud Based Behavior Analysis
Any file that is identified as unrecognized is sent to the Comodo Instant Malware Analysis (CIMA) server for behavior analysis. Each file is executed in a virtual environment on Comodo servers and tested to determine whether it contains any malicious code. The results will be sent back to your computer in around 15 minutes. Comodo recommends users leave this setting enabled. Read the privacy policy by clicking the 'Privacy Policy' link.
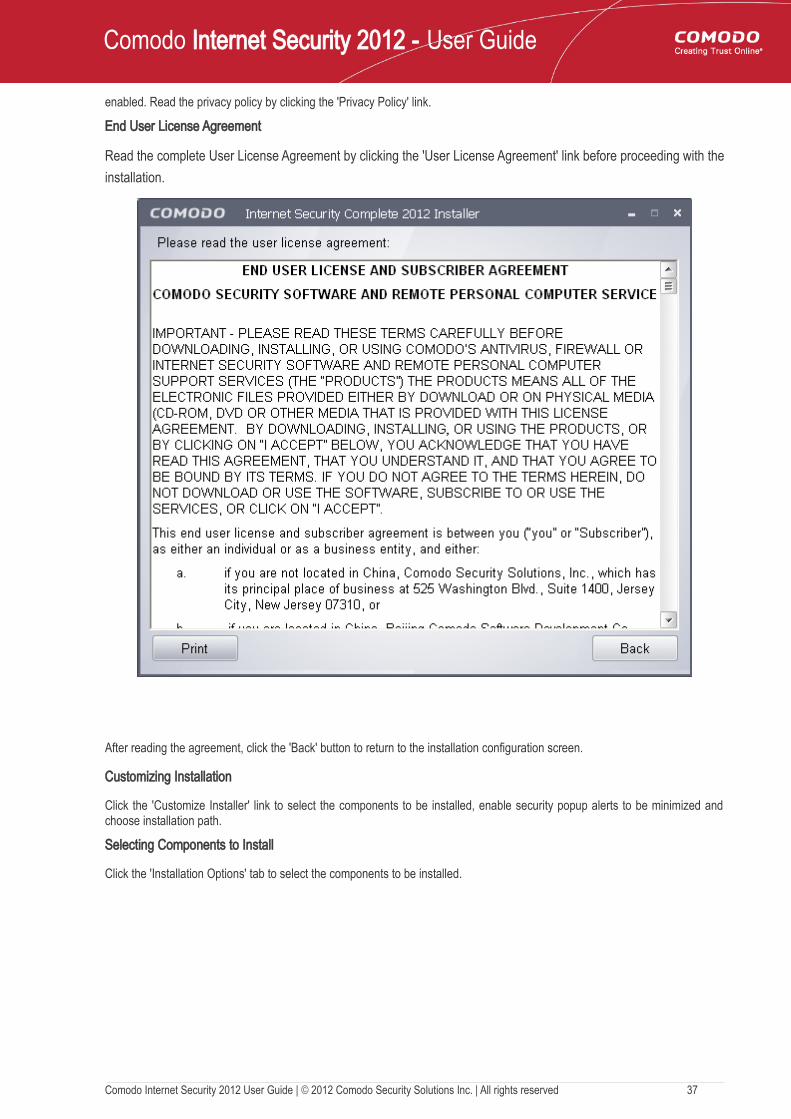
End User License Agreement
Read the complete User License Agreement by clicking the 'User License Agreement' link before proceeding with the installation.
After reading the agreement, click the 'Back' button to return to the installation configuration screen.
Once back at the main installer screen, if you wish to configure advanced options, click ‘Customize Installer’ . Otherwise, click ‘Agree and Install’ to begin installation .
Comodo Internet Security 2012 User Guide | © 2012 Comodo Security Solutions Inc. | All rights reserved 14

Comodo Internet Security 2012 - User Guide
Customizing Installation
Clicking the 'Customize Installer' link opens an advanced options interface that enables you to choose which elements you would like to install, configure security popup alerts and choose the installation path. In order to obtain maximum protection, Comodo recommends that you uninstall any third party personal Firewall and Antivirus in your system and select all the components to get the full benefit of the product.
Select Components to Install (Click to go back to Step 2)
Click the 'Installation Options' tab to select the components to be installed.
• Install COMODO Firewall - Selecting this option installs Comodo Firewall and Defense+ components. De-select this option, if you already have third party Firewall protection activated in your computer system. Installing Comodo Firewall is a mandatory requirement if you are a Pro or Complete customer.
• Install COMODO Antivirus - Selecting this option installs Comodo Antivirus and Defense+ components. De-select this option, if you already have a third party virus protection activated in your computer system. Installing Comodo Antivirus is a mandatory requirement if you are a Pro or Complete customer.
• Install COMODO GeekBuddy - Selecting this option installs a version of GeekBuddy, a 24 x 7 Remote assistance support service in which Comodo experts remotely access your computer when you need it for getting help with computer related problems. Refer to the section Comodo GeekBuddy for more details.
• Install COMODO Dragon - Selecting this option installs Comodo Dragon, a fast and versatile Internet browser based on Chromium technology and infused with Comodo's unparalleled level of security. Refer to the section Comodo Dragon for more details.
Configuration Options
Click the ‘Configuration Options’ tab to configure Defense+ and pop-up alert options.
Comodo Internet Security 2012 User Guide | © 2012 Comodo Security Solutions Inc. | All rights reserved 15

Comodo Internet Security 2012 - User Guide
• Defense+ - The Defense+ component of Comodo Internet Security is a host intrusion prevention system that constantly monitors the activities of all executable files on your PC. With Defense+ activated, the user is warned EVERY time an unknown application executable (.exe, .dll, .sys, .bat etc) attempts to run. The only executables that are allowed to run are the ones you give permission to. Comodo recommends this option be enabled.
• Security Popup alerts - When this option is selected, CIS is configured to automatically deal with most issues in a secure manner without raising a popup alert - thus minimizing user intervention. Most users should leave this option at the default state of enabled. Advanced users wishing to gain greater insight into CIS actions and/or to have more control over security decisions may wish to disable this option.
Choosing Installation Location
Click the 'Files Locations' tab to choose the installation path.
Comodo Internet Security 2012 User Guide | © 2012 Comodo Security Solutions Inc. | All rights reserved 16

Comodo Internet Security 2012 - User Guide
This screen allows you to select the folder in your hard drive for installing Comodo Internet Security. The default path is C:\Program Files\COMODO\COMODO Internet Security. If you want to install the application in a location other than the default location, click 'Browse' to choose a different location.
After customizing your installation, click the 'Back' button to return to the installation configuration screen.
Click the 'Agree and Install' button to proceed with the installation.
Step 3 - Installation Progress (Click to go back to Step 2)
The installation progress will be displayed...
Comodo Internet Security 2012 User Guide | © 2012 Comodo Security Solutions Inc. | All rights reserved 17

Comodo Internet Security 2012 - User Guide
...and on completion, the restart dialog will be displayed.
Step 4 - Restarting Your System
In order for the installation to take effect, your computer needs to be restarted.
Please save any unsaved data and click 'Yes' to restart the system. If you want to restart the system at a later time, click 'No'.
Note: The installation will take effect only on the next restart of the computer.
Step 5 - After Restarting Your System
After restarting, a ‘thankyou’ screen will appear. This contains a summary of the components you chose to install as well as some friendly advice.
Comodo Internet Security 2012 User Guide | © 2012 Comodo Security Solutions Inc. | All rights reserved 18

Comodo Internet Security 2012 - User Guide
This screen will appear every time you start your system. If you do not want the screen to be displayed on every start up, select the check box 'Do not show this window again' before closing the window.
If your computer is connected to a home or work network, then you are prompted to configure it at the 'New Network Detected!' dialog. At the top of the dialog, the connectivity mode will be displayed, whether wired or wireless.
Comodo Internet Security 2012 User Guide | © 2012 Comodo Security Solutions Inc. | All rights reserved 19

Comodo Internet Security 2012 - User Guide
• Select your location from the three options above• Select 'Do not automatically detect new networks' If you are an experienced user that wishes to manually set-up their
own trusted networks (this can be done in 'Network Zones' and through the 'Stealth Ports Wizard')
CIS checks if the new network is an unencrypted WIFI network or not and if it is, the following warning will be displayed:
Select your choice from the two options above. If you select, 'Secure communication with TrustConnect', you will be presented with the opportunity to login into your existing account or create a new account:
Refer to the section TrustConnect Overview for more details.
Comodo Internet Security 2012 User Guide | © 2012 Comodo Security Solutions Inc. | All rights reserved 20

Comodo Internet Security 2012 - User Guide
If you do not want to encrypt your traffic between you and the Internet using TrustConnect, select the second option, 'Continue Unsecured.
The virus database will be updated automatically for the first time after installation.
The antivirus scanning will commence automatically after the virus database has been updated.
If you do not want the scan to continue at this time, click the ‘Stop Scan’ button.
After the scanning is complete, a warning screen will be displayed if any threats are detected.
Comodo Internet Security 2012 User Guide | © 2012 Comodo Security Solutions Inc. | All rights reserved 21

Comodo Internet Security 2012 - User Guide
• Click 'Yes, I want an expert to clean it' if you would like to engage a GeekBuddy support operative to remotely clean the infections for you. Geekbuddy is an ‘always on’ chat based support service that gives you real time access to a human support technician, 24/7. Apart from thoroughly cleaning your computer of viruses and other threats, our technicians can also perform a wide range of other services should as PC optimization and software/hardware troubleshooting. All you need to do is ask them through the dedicate IM chat window and they will be immediately available to provide fast help and advice on any PC problem.
This ‘warning’ is only to promote the advantages of having a such a dedicated operative on hand to personally help out with issues such as these. Any users alarmed by this message should be reassured that the CIS antivirus engine is perfectly capable of removing any detected threats.
• If you choose,''No…’ when threats are detected then please immediately proceed to the CIS interface where you will be able to clean all infections.
1.3.2. CIS Pro - Installation and ActivationNote – Before beginning installation, please ensure you have uninstalled any other antivirus and/or firewall products that are on your computer. Failure to do so could cause conflicts that mean CIS will not function correctly and could invalidate any warranty and/or virus-free guarantees that came with your purchase. Users should consult their vendor’s documentation for precise uninstallation guidelines, however the following rough steps will help most Windows users:
• Click the Start button to open the Windows Start menu• Select Control Panel > Programs and Features (Win 7, Vista) or Control Panel > Add or Remove Programs (XP)• Select your current antivirus or firewall program(s) from the list• Click Remove/Uninstall button• Repeat process until all required programs have been removed
Comodo Internet Security 2012 Pro can be downloaded from http://www.comodo.com/home/download/download.php?prod=cis-
Comodo Internet Security 2012 User Guide | © 2012 Comodo Security Solutions Inc. | All rights reserved 22

Comodo Internet Security 2012 - User Guide
pro after signing up for subscription and includes, Comodo Dragon, GeekBuddy and the Comodo Guarantee.
• Choose whether you want the 32 or 64 bit version of CIS then click 'download'• If you are unsure which version you need, select the 32/64-bit Windows Installer. This executable contains BOTH 32
and 64 bit installers. The setup routine will automatically detect which version of Windows you have and install the appropriate version. Please note, the Universal Windows Installer is a much larger download than the individual 32 or 64 bit setup files.
After downloading the required Comodo Internet Security setup file to your local hard drive, double click on it to start the installation wizard. Please note, Comodo TrustConnect (secure wireless connectivity service) will be installed along with CIS Pro. With TrustConnect installed, you are automatically warned whenever CIS Pro detects that you have joined an unsecured/publc wireless network and offered the opportunity to login to your account.
Step 1 - Choosing the Interface Language
The installation wizard starts automatically and the 'Select the language' dialog is displayed. Comodo Internet Security is available in several languages.
• Select the language in which you want Comodo Internet Security to be installed from the drop-down menu and click 'OK'.
Step 2 - Validating Your License and Installation Configuration
The next step is entering the License key and configuring the installation. You should have received your License key through email.
Comodo Internet Security 2012 User Guide | © 2012 Comodo Security Solutions Inc. | All rights reserved 23

Comodo Internet Security 2012 - User Guide
Tip: If you don't have the subscription key handy at the time of installation, you can activate your subscription and guarantee at a later time from the main interface of CIS. For more details refer to Activating your CIS Pro and CIS Complete Services after Installation'.
• Please review and/or modify the settings in the dialog. Once you are satisfied with your settings, click ‘Agree and Install’ to begin installation.
• If you click ‘Customize Installer’ then you can choose advanced options . These include which CIS components you wish to install, the ability to choose CIS installation path and other advanced CIS configuration settings.
DNS Settings
Comodo Secure DNS service replaces your existing Recursive DNS Servers and resolves all your DNS requests exclusively through Comodo's proprietary Directory Services Platform. Comodo's worldwide network of redundant DNS servers provide fast and secure Internet browsing experience without any hardware or software installation.
In addition, Comodo's Secure DNS ensures safety against attacks in the form of malware, spyware, phishing etc., by blocking access to malware-hosting sites, by any program running in your system.
In this step of installation of Comodo Internet Security, the DNS settings of your computer can be changed automatically to direct to our DNS servers. You can disable the service at anytime and revert to your previous settings.
For more details on Comodo Secure DNS Service and to know how to enable or disable the service, refer to Appendix 2 Comodo Secure DNS Service.
To enable Comodo Secure DNS, select ‘Change my DNS Servers to COMODO SecureDNS Servers. Click the 'What is this' link to know more about Comodo Secure DNS servers.
Cloud Based Behavior Analysis
Any file that is identified as unrecognized is sent to the Comodo Instant Malware Analysis (CIMA) server for behavior analysis. Each file is executed in a virtual environment on Comodo servers and tested to determine whether it contains
Comodo Internet Security 2012 User Guide | © 2012 Comodo Security Solutions Inc. | All rights reserved 24

Comodo Internet Security 2012 - User Guide
any malicious code. The results will be sent back to your computer in around 15 minutes. Comodo recommends users leave this setting enabled. Read the privacy policy by clicking the 'Privacy Policy' link.
End User License Agreement
Read the complete User License Agreement by clicking the 'User License Agreement' link before proceeding with the installation.
After reading the agreement, click the 'Back' button to return to the installation configuration screen.
Once back at the main installer screen, if you wish to configure advanced options, click ‘Customize Installer’. Otherwise, click ‘Agree and Install’ to begin installation .
Customizing Installation
Clicking the 'Customize Installer' link opens an advanced options interface that enables you to choose which elements you would like to install, configure security popup alerts and choose the installation path. In order to obtain maximum protection, Comodo recommends that you uninstall any third party personal Firewall and Antivirus in your system and select all the components to get the maximum benefit from Comodo Internet Security Pro 2012.
Select the Components to Install (Click to go back to Step 2)
Click the 'Installation Options' tab to select the components to be installed.
Comodo Internet Security 2012 User Guide | © 2012 Comodo Security Solutions Inc. | All rights reserved 25

Comodo Internet Security 2012 - User Guide
• Install COMODO Internet Security Pro 2012 - Selecting this option installs Comodo Antivirus, Comodo Firewall and Defense+ components. Installing CIS Pro 2012 is a mandatory requirement if you are a Pro or Complete customer.
• Install COMODO GeekBuddy - Selecting this option a version of GeekBuddy, a 24 x 7 Remote assistance support service in which Comodo experts remotely access your computer when you need it for getting help with computer related problems. Refer to the section Comodo GeekBuddy for more details.
• Install COMODO Dragon - Selecting this option installs Comodo Dragon, a fast and versatile Internet browser based on Chromium technology and infused with Comodo's unparalleled level of security. Refer to the section Comodo Dragon for more details.
Configuration Options
Click the ‘Configuration Options’ tab to configure Defense+ and pop-up alert options.
Comodo Internet Security 2012 User Guide | © 2012 Comodo Security Solutions Inc. | All rights reserved 26

Comodo Internet Security 2012 - User Guide
• Defense+ - The Defense+ component of Comodo Internet Security is a host intrusion prevention system that constantly monitors the activities of all executable files on your PC. With Defense+ activated, the user is warned EVERY time an unknown application executable (.exe, .dll, .sys, .bat etc) attempts to run. The only executables that are allowed to run are the ones you give permission to. Comodo recommends this option be enabled.
• Security Popup alerts - When this option is selected, CIS is configured to automatically deal with most issues in a secure manner without raising a popup alert - thus minimizing user intervention. Most users should leave this option at the default state of enabled. Advanced users wishing to gain greater insight into CIS actions and/or to have more control over security decisions may wish to disable this option.
Choose the Installation Location
Click the 'Files Locations' tab to choose the installation path.
Comodo Internet Security 2012 User Guide | © 2012 Comodo Security Solutions Inc. | All rights reserved 27

Comodo Internet Security 2012 - User Guide
This screen allows you to select the folder in your hard drive for installing Comodo Internet Security. The default path is C:\Program Files\COMODO\COMODO Internet Security. If you want to install the application in a location other than the default location, click 'Browse' to choose a different location.
After customizing your installation, click the 'Back' button to return to the installation configuration screen.
Enter the License key that you received through email.
Copy and save your licence key in a safe place, as you will need it for installation in other machines (your license entitiles you for installing the product and obtaining the services on upto three machines).
Click the 'Agree and Install' button to proceed with the installation.
Step 3 - Installation Progress (Click to go back to Step 2)
Your License key will be validated and the installation progress will be displayed...
Comodo Internet Security 2012 User Guide | © 2012 Comodo Security Solutions Inc. | All rights reserved 28

Comodo Internet Security 2012 - User Guide
...and on completion, the restart dialog will be displayed.
Step 4 - Restarting Your System
In order for the installation to take effect, your computer needs to be restarted.
Please save any unsaved data and click 'Yes' to restart the system. If you want to restart the system at a later time, click 'No'.
Note: The installation will take effect only on the next restart of the computer.
Step 5 - After Restarting Your System
After restarting, a ‘thankyou’ screen will appear. This contains a summary of the components you chose to install as well as some friendly advice. You can also purchase license key from this screen if you have not done so already.
Comodo Internet Security 2012 User Guide | © 2012 Comodo Security Solutions Inc. | All rights reserved 29

Comodo Internet Security 2012 - User Guide
This screen will appear every time you start your system. If you do not want the screen to be displayed on every start up, select the check box 'Do not show this window again' before closing the window.
If your computer is connected to a home or work network, then you are prompted to configure it at the 'New Network Detected!' dialog. At the top of the dialog, the connectivity mode will be displayed, whether wired or wireless.
Comodo Internet Security 2012 User Guide | © 2012 Comodo Security Solutions Inc. | All rights reserved 30

Comodo Internet Security 2012 - User Guide
• Select your location from the three options above • Select 'Do not automatically detect new networks' If you are an experienced user that wishes to manually set-up their
own trusted networks (this can be done in 'Network Zones' and through the 'Stealth Ports Wizard')
CIS checks if the new network is an unencrypted WIFI network or not and if it is, the following warning will be displayed:
Select your choice from the two options above. If you select, 'Secure communication with TrustConnect', you will be presented with the opportunity to login into your existing account or create a new account:
Comodo Internet Security 2012 User Guide | © 2012 Comodo Security Solutions Inc. | All rights reserved 31

Comodo Internet Security 2012 - User Guide
Refer to the section TrustConnect Overview for more details.
If you do not want to encrypt your traffic between you and the Internet using TrustConnect, select the second option, 'Continue Unsecured'.
The virus database will be updated automatically for the first time after installation.
The antivirus scanning will commence automatically after the virus database has been updated.
Comodo Internet Security 2012 User Guide | © 2012 Comodo Security Solutions Inc. | All rights reserved 32

Comodo Internet Security 2012 - User Guide
If you do not want the scan to continue at this time, click the ‘Stop Scan’ button.
After the scanning is complete, click the 'Results' button to view the scan results.
Important Note: In order to get your Guarantee coverage, you need to activate your guarantee after successful installation of the application suite and activation of the license.
• For full explanation on activation of license after installation of the product, refer to Activating Your License.• For full explanation on activation of your guarantee, refer to Activating Your Guarantee Coverage.
1.3.3. CIS Complete - Installation and Activation Note - Before beginning installation, please ensure you have uninstalled any other antivirus and/or firewall products that are on your computer. Failure to do so could cause conflicts that mean CIS will not function correctly and could invalidate any warranty and/or virus-free guarantees that came with your purchase. Users should consult their vendor’s documentation for precise uninstallation guidelines, however the following rough steps will help most Windows users:
• Click the Start button to open the Windows Start menu• Select Control Panel > Programs and Features (Win 7, Vista) or Control Panel > Add or Remove Programs (XP)• Select your current antivirus or firewall program(s) from the list• Click Remove/Uninstall button• Repeat process until all required programs have been removed
Comodo Internet Security 2012 Complete is distributed on DVD and includes Comodo GeekBuddy, Online BackUp, TrustConnect, Comodo Dragon and the Comodo Guarantee.
After inserting the DVD, the setup program will start automatically.
Tip: If the setup program does not start automatically, click Start > My Computer and double click on the your DVD drive in the Windows Explorer window.
The Language selection dialog will be displayed.
Comodo Internet Security 2012 User Guide | © 2012 Comodo Security Solutions Inc. | All rights reserved 33

Comodo Internet Security 2012 - User Guide
Comodo Internet Security is available in several languages.
• Select the language in which you wish the wizard should continue and Comodo Internet Security Complete is to be installed, from the drop-down menu and click 'OK'.
The following window is displayed.
Install Internet Security Complete 2012 - If you have not yet installed CIS then you should first select 'Install Comodo Internet Security Complete 2012'.
• Click here for more details on installing Comodo Internet Security 2012 CompleteActivate Online Backup and TrustConnect - Begins the activation processes for your online storage space account, TrustConnect account and for your Comodo Guarantee. Please locate your License Key before starting (this is either printed on the DVD itself or printed on an insert included in the box packaging). After entering a valid license key, you will be taken to a Comodo web-form to start the account registration process.
• Click here for full details on services activation
Install Online Backup - Begins the Comodo BackUp installation procedure. Once installed, you will be able to schedule regular backups to local and network drives. You also get 10GB of secure online backup space (access this by entering your Comodo account username and password in the Comodo BackUp interface).
• Click here for more details on installing Comdo Backup
Comodo Internet Security 2012 User Guide | © 2012 Comodo Security Solutions Inc. | All rights reserved 34

Comodo Internet Security 2012 - User Guide
• Click here if you wish to view the Comodo BackUp User Guide
Install TrustConnect - Begins the Comodo TrustConnect setup procedure. TrustConnect usage can be managed by logging into your account at https://accounts.comodo.com.
• Click here to read more about TrustConnect• Click here for more details on Installing Comodo TrustConnect.
1.3.3.1. Installing Comodo Internet Security 2012 CompleteClick 'Install Internet Security Complete 2012' from the main Comodo Internet Security 2012 Complete Installer screen. The installation wizard for CIS 2012 , GeekBuddy and Dragon will start immediately.
Step 1 – Validating your License and Installation Configuration
The initial phase of installation requires validating your license and configuring the installation of CIS Complete.
The License key is printed on the DVD itself or printed on an insert included in the box packaging.
Enter the license key fully.
Comodo Internet Security 2012 User Guide | © 2012 Comodo Security Solutions Inc. | All rights reserved 35

Comodo Internet Security 2012 - User Guide
Your License key will be validated immediately. On successful validation of the entered key, a green check mark will be displayed.
Tip: You can skip this step if you don't have the subscription key handy or you are not connected to Internet at the time of installation. In order to continue the installation without entering the key, proceed with configuring the installation as explained below and clicking 'Agree ans Install'. You can activate your subscription and guarantee at a later time from the main interface of CIS. For more details refer to Activating your CIS Pro and CIS Complete Services after Installation'.
DNS Settings
Comodo Secure DNS service replaces your existing Recursive DNS Servers and resolves all your DNS requests exclusively through Comodo's proprietary Directory Services Platform. Comodo's worldwide network of redundant DNS servers provide fast and secure Internet browsing experience without any hardware or software installation.
In addition, Comodo's Secure DNS ensures safety against attacks in the form of malware, spyware, phishing etc., by blocking access to malware-hosting sites, by any program running in your system.
For more details on Comodo Secure DNS Service and to know how to enable or disable the service, refer to Appendix 2 Comodo Secure DNS Service.
In this step of installation of CIS Complete, the DNS settings of your computer can be changed automatically to direct to our DNS servers. You can disable the service at anytime and revert to your previous settings.
To enable Comodo Secure DNS, select ‘Change my DNS Servers to COMODO SecureDNS Servers. Click the 'What is this' link to know more about Comodo Secure DNS servers.
Cloud Based Behavior Analysis
Any file that is identified as unrecognized is sent to the Comodo Instant Malware Analysis (CIMA) server for behavior analysis. Each file is executed in a virtual environment on Comodo servers and tested to determine whether it contains any malicious code. The results will be sent back to your computer in around 15 minutes. Comodo recommends users leave this setting
Comodo Internet Security 2012 User Guide | © 2012 Comodo Security Solutions Inc. | All rights reserved 36
Comodo Internet Security 2012 - User Guide
enabled. Read the privacy policy by clicking the 'Privacy Policy' link.
End User License Agreement
Read the complete User License Agreement by clicking the 'User License Agreement' link before proceeding with the installation.
After reading the agreement, click the 'Back' button to return to the installation configuration screen.
Customizing Installation
Click the 'Customize Installer' link to select the components to be installed, enable security popup alerts to be minimized and choose installation path.
Selecting Components to Install
Click the 'Installation Options' tab to select the components to be installed.
Comodo Internet Security 2012 User Guide | © 2012 Comodo Security Solutions Inc. | All rights reserved 37

Comodo Internet Security 2012 - User Guide
• Install COMODO Internet Security Complete 2011 - Selecting this option installs full internet security suite consisting of Comodo Antivirus, Comodo Firewall and Defense+ components.
• Install COMODO GeekBuddy - Selecting this option installs a version of GeekBuddy, a 24 x 7 Remote assistance support service in which Comodo experts remotely access your computer when you need it for getting help with computer related problems. Refer to the section Comodo GeekBuddy for more details.
• Install COMODO Dragon - Selecting this option installs Comodo Dragon, a fast and versatile Internet browser based on Chromium technology and infused with Comodo's unparalleled level of security. Refer to the section Comodo Dragon for more details.
Configuration Options
Click the ‘Configuration Options’ tab to configure Defense+ and pop-up alert options.
Comodo Internet Security 2012 User Guide | © 2012 Comodo Security Solutions Inc. | All rights reserved 38

Comodo Internet Security 2012 - User Guide
• Defense+ - The Defense+ component of Comodo Internet Security is a host intrusion prevention system that constantly monitors the activities of all executable files on your PC. With Defense+ activated, the user is warned EVERY time an unknown application executable (.exe, .dll, .sys, .bat etc) attempts to run. The only executables that are allowed to run are the ones you give permission to. Comodo recommends this option be enabled.
• Security Popup alerts - When this option is selected, CIS is configured to automatically deal with most issues in a secure manner without raising a popup alert - thus minimizing user intervention. Most users should leave this option at the default state of enabled. Advanced users wishing to gain greater insight into CIS actions and/or to have more control over security decisions may wish to disable this option.
Choosing Installation Location
Click the 'Files Locations' tab to choose the installation path.
Comodo Internet Security 2012 User Guide | © 2012 Comodo Security Solutions Inc. | All rights reserved 39

Comodo Internet Security 2012 - User Guide
This interface allows you to set the installation folder for Comodo Internet Security. The default path is C:\Program Files\COMODO\COMODO Internet Security. If you want to install the application in a location other than the default location, click 'Browse' to choose a different location.
After customizing your installation, click the 'Back' button to return to the installation configuration screen.
Click the 'Agree and Install' button to proceed with the installation.
Step 2 – Installation progress
The next step is installation of the product and activation of the license. The progress will be displayed...
Comodo Internet Security 2012 User Guide | © 2012 Comodo Security Solutions Inc. | All rights reserved 40

Comodo Internet Security 2012 - User Guide
...and on completion, the restart dialog will be displayed.
Step 3 - Restarting Your System
In order for the installation to take effect, your computer needs to be restarted.
Please save any unsaved data and click 'Yes' to restart the system. If you want to restart the system at a later time, click 'No'.
Note: The installation will take effect only on the next restart of the computer.
Step 4 - After Restarting Your System
After restarting, a ‘thankyou’ screen will appear. This contains a summary of the components you chose to install as well as
Comodo Internet Security 2012 User Guide | © 2012 Comodo Security Solutions Inc. | All rights reserved 41

Comodo Internet Security 2012 - User Guide
some friendly advice.
This screen will appear every time you start your system. If you do not want the screen to be displayed on every start up, select the check box 'Do not show this window again' before closing the window.
If your computer is connected to a home or work network, then you are prompted to configure it at the 'New Network Detected!' dialog. At the top of the dialog, the connectivity mode will be displayed, whether wired or wireless.
Comodo Internet Security 2012 User Guide | © 2012 Comodo Security Solutions Inc. | All rights reserved 42

Comodo Internet Security 2012 - User Guide
• Select your location from the three options above • Select 'Do not automatically detect new networks' If you are an experienced user that wishes to manually set-up their
own trusted networks (this can be done in 'Network Zones' and through the 'Stealth Ports Wizard').CIS checks if the new network is an unencrypted WIFI network or not and if it is, the following warning will be displayed:
Select your choice from the two options above. If you select, 'Secure communication with TrustConnect', you will be presented with the opportunity to login into your existing account or create a new account:
Comodo Internet Security 2012 User Guide | © 2012 Comodo Security Solutions Inc. | All rights reserved 43

Comodo Internet Security 2012 - User Guide
Refer to the section TrustConnect Overview for more details.
If you do not want to encrypt your traffic between you and the Internet using TrustConnect, select the second option, 'Continue Unsecured'.
The virus database will be updated automatically for the first time after installation.
The antivirus scanning will commence automatically after the virus database has been updated.
Comodo Internet Security 2012 User Guide | © 2012 Comodo Security Solutions Inc. | All rights reserved 44

Comodo Internet Security 2012 - User Guide
If you do not want the scan to continue at this time, click the ‘Stop Scan’ button.
After the scanning is complete, click the 'Results' button to view the scan results.
1.3.3.2. Activating Online Backup, TrustConnect and GuaranteeIn order to utilize your 10GB online storage space and TrustConnect services, you need to activate the services. Keep the license key handy, before starting this process.
• Reinsert the DVD and click 'Activate Online Backup and TrustConnect' from the main Comodo Internet Security 2012 Complete Installer screen after selecting the language. You will be prompted to enter the your license key.
• Enter the license key provided to you with the CIS product. The license key will be validated.
After the License key is verified, the Comodo Sign-Up Page will be displayed.
Comodo Internet Security 2012 User Guide | © 2012 Comodo Security Solutions Inc. | All rights reserved 45

Comodo Internet Security 2012 - User Guide
Comodo Internet Security 2012 User Guide | © 2012 Comodo Security Solutions Inc. | All rights reserved 46

Comodo Internet Security 2012 - User Guide
Fill up the required field details and click 'Sign Up' button after selecting the 'I accept the Terms and Conditions' checkbox. The page for Activation Confirmation is displayed. Click the 'Confirm' button to activate the service.
Clicking the 'Confirm' button displays the Activation Confirmation page. The page displays the Activation Confirmation number, your details that you entered while registering, the services you have ordered for, links for downloading the software, your license key and other login details. You will also receive an email regarding the activation of services.
You can now login to your account at https://accounts.comodo.com, with the login details you specified during sign-up.
Comodo Internet Security 2012 User Guide | © 2012 Comodo Security Solutions Inc. | All rights reserved 47

Comodo Internet Security 2012 - User Guide
• For using TrustConnect services, you need the Service login and Service Password generated for you. For more details, refer to the chapter TrustConnect Overview.
• For using Online Storage Services, you can use the same login and password you specified during Signing-up for Comodo Account. See Start Using Online Storage Space for more details.
1.3.3.3. Installing Comodo BackupIn order to store your valuable files to Comodo online storage space for safe-keeping, you need Comodo Backup application installed in your system.
To install Comodo Backup• Reinsert the DVD and click 'Install Online Backup' from the main Comodo Internet Security 2012 Complete
Installer screen after selecting the language. The installation wizard of Comodo Backup will start immediately. Step 1 - Choosing the Interface Language The Select Setup language dialog is displayed. Comodo BackUp is available in several languages.
Step 2 - End User License Agreement
Complete the initialization phase by reading and accepting the End User License Agreement (EULA).
Comodo Internet Security 2012 User Guide | © 2012 Comodo Security Solutions Inc. | All rights reserved 48

Comodo Internet Security 2012 - User Guide
• Click 'I Agree' to continue installation. If you want to cancel the installation, click 'Cancel'. Step 3 - Select Installation FolderThe next screen allows you to select the folder in your hard drive for installing Comodo BackUp. The default path is C:\Program Files\Comodo\Comodo BackUp.
If you want to install the application in a location other than the default location, click 'Browse' to choose a different location.
• Click the 'Back' button to review / change any of settings you specified before or press 'Install' to continue with installation process.
Comodo Internet Security 2012 User Guide | © 2012 Comodo Security Solutions Inc. | All rights reserved 49

Comodo Internet Security 2012 - User Guide
Step 4 - Setup ProgressA setup status dialog box is displayed. You can see a progress bar indicating that the files are being installed.
Step 5 - Product ActivationOn completion of Installation, the product Activation dialog is displayed. Comodo BackUp is activated at free of cost for lifetime usage. If you wish to sign up for news about Comodo products then enter your email address in the space provided and select Sign me up for news about Comodo products.
This is optional. Click 'Next'.
Step 6 - Installation Complete
Comodo Internet Security 2012 User Guide | © 2012 Comodo Security Solutions Inc. | All rights reserved 50

Comodo Internet Security 2012 - User Guide
The Installation Completion dialog is displayed indicating the successful completion of installation. For the installation to take effect, the system has to be restarted.
Please save any unsaved data, leave 'Reboot now' checkbox selected and click 'Finish'. If you want to restart the system at a later time, uncheck 'Reboot now' checkbox click 'Finish'.
Note: The installation will take effect only after restarting the computer.
Start Using Your Online Storage SpaceAfter successful installation of Comodo Backup, start the application and click Online Storage from Left Hand Side Navigation of its main interface.
Comodo Internet Security 2012 User Guide | © 2012 Comodo Security Solutions Inc. | All rights reserved 51

Comodo Internet Security 2012 - User Guide
The Online Backup interface will open.
• Sign in using the login and password that you specifed in the User Details area of the Comodo Sign-Up page .
Comodo Internet Security 2012 User Guide | © 2012 Comodo Security Solutions Inc. | All rights reserved 52

Comodo Internet Security 2012 - User Guide
After successful login, your username is displayed at the top of the interface. Your local disks, files and folders are displayed in the left hand pane while your online storage files/folder are displayed in the right hand side pane. You can drag and drop files and folders between the two windows.
Comodo BackUp can also be used to create scheduled backups to your online space and offers a wide range of backup types - including synchronized, differential and incremental backup.
Full details on using Comodo BackUp can be found in the Comodo BackUp user-guide available at http://help.comodo.com/product-9-Comodo-Backup.html
1.3.3.4. Installing Comodo TrustConnectTrustConnect makes surfiing secure from public Wi-Fi locations such as Internet cafes and airports. To install and activate the application, please follow these instructions:
• Click 'Install TrustConnect' from the main Comodo Internet Security 2012 Complete Installer screen. The installation wizard of Comodo TrustConnect will start immediately.
Step 1 - Welcome ScreenThe welcome screen of the wizard will be displayed.
Comodo Internet Security 2012 User Guide | © 2012 Comodo Security Solutions Inc. | All rights reserved 53

Comodo Internet Security 2012 - User Guide
Click 'Next' to continue.
Step 2 - Subscriber License AgreementComplete the initialization phase by reading and accepting the License Agreement.
Comodo Internet Security 2012 User Guide | © 2012 Comodo Security Solutions Inc. | All rights reserved 54

Comodo Internet Security 2012 - User Guide
• Select 'I Agree' to continue the installation.• If you want to cancel the installation at this stage, select 'I Do Not Agree'.
Click 'Next' to continue.
Step 3 - Additional Options
The next stage allows you to select for creation of TrustConnect Desktop icon and TrustConnect quick launch icon, for starting the client from the system tray.
Make your selections and click 'Next' to continue.
Step 4 - Select Installation Folder
The next screen allows you to select the folder in your hard drive for installing Comodo TrustConnect. The default path is C:\Program Files\Comodo\TrustConnect.
Comodo Internet Security 2012 User Guide | © 2012 Comodo Security Solutions Inc. | All rights reserved 55

Comodo Internet Security 2012 - User Guide
If you want to install the client in a location other than the default location, click 'Browse' to choose a different location.
• Click 'Next' to continue.
Step 5 - Installation ProgressAfter completing the configuration options to your satisfaction the setup wizard will ask for confirmation before commencing the installation procedure.
Comodo Internet Security 2012 User Guide | © 2012 Comodo Security Solutions Inc. | All rights reserved 56

Comodo Internet Security 2012 - User Guide
• Click the 'Back' button to review and/or modify any of settings you have previously specified. To confirm your choices and begin the installation of Comodo Internet Security, click 'Next'.
The installation progress will be displayed.
Comodo Internet Security 2012 User Guide | © 2012 Comodo Security Solutions Inc. | All rights reserved 57

Comodo Internet Security 2012 - User Guide
• If any Hardware Installation dialog appears, click 'Continue Anyway'
On completion, the Installation Complete dialog will be displayed.
• If you have already registered for TrustConnect service through Activate Online Backup and TrustConnect, uncheck the checkbox Register Comodo Trust Connect and click 'Close'. The Installation will be completed.
• If you haven't registered for TrustConnect service through Activate Online Backup and TrustConnect, keep the checkbox Register Comodo Trust Connect checked and click 'Close'. The Registration dialog will be displayed.
Comodo Internet Security 2012 User Guide | © 2012 Comodo Security Solutions Inc. | All rights reserved 58

Comodo Internet Security 2012 - User Guide
• Enter your License Key and click 'Next'.Your key will be validated and activated.
Comodo Internet Security 2012 User Guide | © 2012 Comodo Security Solutions Inc. | All rights reserved 59

Comodo Internet Security 2012 - User Guide
Store the account details in a safe place. You can use TrustConnect in another computer with the same credentials.
• Click 'Finish' to complete the installation. 'Comodo TrustConnect' is now successfully installed in your system.
Full details on using Comodo TrustConnect can be found in the TrustConnect section of this guide.
1.3.4. Activating CIS Pro/Complete Services after Installation CIS Pro and CIS Complete enable activation of the license and guarantee coverage even after installation. Ths is useful in cases where you skipped the process of validating your license during the installation process. Click the links below for detailed explanations:
• Activating Your License;• Activating Your Guarantee Coverage;• Renewal of Your License.
1.3.4.1. Activating Your License• Start the Comodo Internet Security application as explained in the section Starting Comodo Internet Security.
Step 1: To activate your License, click 'Activate Now' beside 'License' from the bottom left corner of the main interface.
Comodo Internet Security 2012 User Guide | © 2012 Comodo Security Solutions Inc. | All rights reserved 60
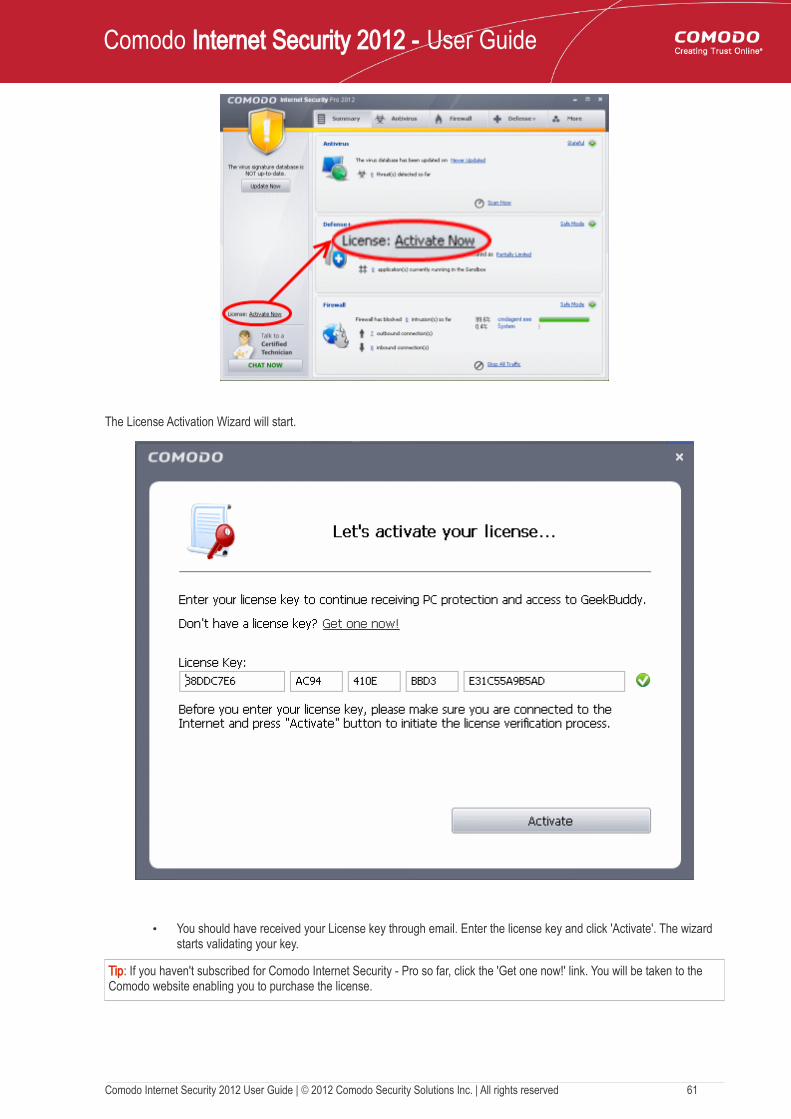
Comodo Internet Security 2012 - User Guide
The License Activation Wizard will start.
• You should have received your License key through email. Enter the license key and click 'Activate'. The wizard starts validating your key.
Tip: If you haven't subscribed for Comodo Internet Security - Pro so far, click the 'Get one now!' link. You will be taken to the Comodo website enabling you to purchase the license.
Comodo Internet Security 2012 User Guide | © 2012 Comodo Security Solutions Inc. | All rights reserved 61

Comodo Internet Security 2012 - User Guide
On successful validation, your subscription will be activated and a confirmation screen will be displayed.
Click 'Ok' to exit the wizard.
Comodo Internet Security 2012 User Guide | © 2012 Comodo Security Solutions Inc. | All rights reserved 62

Comodo Internet Security 2012 - User Guide
Tip: You can also enter your activation key by clicking the link 'Enter a license key' in the About dialog, accessible by clicking More > About from the main interface. Refer to About for more details.
1.3.4.2. Activating Your Guarantee CoverageThe Comodo Guarantee is available to customers of CIS Pro and CIS Complete versions. Before enabling guarantee coverage, customers should first have activated their licence. Full details on activating the license for CIS Pro can be found in CIS Pro - Installation and Activation and CIS Complete - Installation and Activation and in Activating Your License.
• Please note that if you wish to use and activate the Comodo guarantee then you must have installed Comodo Internet Security (both Antivirus and Firewall components) and Comodo GeekBuddy. You must also have run and passed a Comodo Antivirus scan using the latest signature database. Please see the End User License Agreement (EULA) for full details.
Limits: The guarantee is limited to the lesser of:• The actual cost of the computer;• An aggregate total of $500 for all claims paid under a single license key, and• The actual cost of a Comodo specified and authorized third party provider to repair the computer to an
operating condition ('Guarantee Limit').• The guarantee is limited to repairing the computer over the Internet to an operational state and excludes all
claims for lost or expected profits, lost or corrupted data, lost or deleted work, or lost or damaged personal files. Comodo does not guarantee against the loss of any file or information. The guarantee is void if you breached this agreement, failed to follow the procedures described in this Section 3 of the EULA or failed to pay any fees applicable to your use of the Software.
• Full Terms and Conditions on the Comodo Guarantee Coverage can be read in Section 3 of CIS EULA (Step 2 of the Installation process for CIS Pro and Step 1 for CIS Complete).
Important Note: Before activating the guarantee, it is essential to run a full computer AV scan with the latest version of the Comodo Virus database in order to ensure that your system is eligible for the Guarantee coverage. Make sure that the virus database of your CIS installation has been updated to the latest one. The update status is indicated next to 'Last Update' in the 'Virus Defense' box of the CIS main interface and with a green tick mark and the text 'All Systems are active and running' in the lower left corner of the main interface. If your virus database is not up-to-date, click the link next to 'Last Update' in the 'Virus Defense' box to update to the latest version. Then run a full computer scan from the Antivirus Tasks interface of the CIS. For more details on running an Antivirus Scan Click here.
Step 1: To activate your guarantee coverage, click 'Not Activated' beside 'Guarantee:' from the bottom left corner of the main interface.
If you have not yet run a full virus scan with the latest signature database (as mentioned above), you will be asked to do so. A
Comodo Internet Security 2012 User Guide | © 2012 Comodo Security Solutions Inc. | All rights reserved 63

Comodo Internet Security 2012 - User Guide
full system scan to remove all known viruses is a mandatory requirement if your computer is to be eligible for guarantee coverage. If this step has already been performed (and your system is clean), then the process moves to step 2.
Click 'Yes' to start the scanning. The application checks for AV database updates and if available, updates the virus database in your system...
... and then starts scanning your complete system.
This may take some time depending upon the size of your hard disks. Wait till the scanning is completed. On completion of scanning, the 'scanning completed' window is displayed.
Comodo Internet Security 2012 User Guide | © 2012 Comodo Security Solutions Inc. | All rights reserved 64

Comodo Internet Security 2012 - User Guide
• Click 'Results' to view the Scan Results window. If malicious executables are discovered on your system, the scan results window displays the number of objects scanned and the number of threats (Viruses, Malware and so on).
The detected threats are to be removed in order to activate your guarantee.
• Click 'Clean' to remove the threats from your computer.• If No threats are found, click the 'Close' button to return to the main CIS interface.
Step 2: The next stage is to run the Guarantee Activation Wizard again.
• Click 'Not Activated' beside 'Guarantee:' again. The Guarantee Activation Wizard will start.
Comodo Internet Security 2012 User Guide | © 2012 Comodo Security Solutions Inc. | All rights reserved 65

Comodo Internet Security 2012 - User Guide
• Click Next to continue. The wizard will check whether your computer meets the prerequisites for guarantee coverage. The prerequisites are: • Comodo Internet Security 2012 (Pro or Complete) is fully installed (both Firewall and Antivirus)• Comodo GeekBuddy is installed • That your computer has undergone and passed a full virus scan using the latest signature database
If any of the items listed above are not detected then the next stage of the wizard will implement them (for example, it will install any missing components and start a full virus scan). If all components are present then the process moves to step 3.
Step 3: Registering Your Guarantee
• Fill up the registration form with the login details and password of your Comodo Accounts Manager (CAM) account.
Comodo Internet Security 2012 User Guide | © 2012 Comodo Security Solutions Inc. | All rights reserved 66

Comodo Internet Security 2012 - User Guide
Field Description
Name Enter your first name
Last Name Enter your last name
Email Enter your email address
Address Enter your address
City Enter your city name
Country Select your country from the drop-down box
State Select your state from the drop-down box
Create a new COMODO Account
� Enter the login (your email address) and password you submitted while signing up for CIS Pro/Complete 2012� If you have not signed up for an account, enter your username and password to create a new Comodo account with
Comodo Accounts Manager (CAM)
• Click NextYour guarantee coverage will be registered...
Comodo Internet Security 2012 User Guide | © 2012 Comodo Security Solutions Inc. | All rights reserved 67

Comodo Internet Security 2012 - User Guide
... and on completion, a final confirmation screen indicating successful activation of the Guarantee will be displayed.
Comodo Internet Security 2012 User Guide | © 2012 Comodo Security Solutions Inc. | All rights reserved 68

Comodo Internet Security 2012 - User Guide
• Click 'Finish' to complete the activation wizard.Successfully activating your Guarantee will change the information displayed in the botom left of the main interface.
1.3.4.3. Renewal of Your LicenseIn order to enjoy continuous services from Comodo after the license period of your CIS Pro/Complete has expired, you need to renew your License.
To renew your license, click 'Activate Now' beside 'License:' from the bottom left corner of the main interface.
The Product Activation Wizard will start.
Comodo Internet Security 2012 User Guide | © 2012 Comodo Security Solutions Inc. | All rights reserved 69

Comodo Internet Security 2012 - User Guide
• Click the 'Get one now!' link. You will be taken to https://secure.comodo.com/home/purchase.php?afl=Comodo&rs=7&pid=9&cid=RkJEMUZENjMzQUM4RDlDNDE4MzBDQjc1NDlENUIzRkY&lid=& .
• Select your CIS Package.• Select 'returning user' in the 'Sign-up Information' area, enter your login and password and complete the payment
procedures.• The License key will be sent to you by email. Activate your License using the new key to enjoy the continued services.
1.4.Starting Comodo Internet SecurityAfter installation, Comodo Internet Security automatically starts whenever you start Windows. In order to configure and view settings within Comodo Internet Security, you need to access the management interface.
There are 3 different ways to access the management interface of Comodo Internet Security:
• Windows Start Menu• Windows Desktop• System Tray Icon
Start MenuYou can also access Comodo Internet Security via the Windows Start Menu.
• Click Start and select All Programs > Comodo > COMODO Internet Security > COMODO Internet Security.
Comodo Internet Security 2012 User Guide | © 2012 Comodo Security Solutions Inc. | All rights reserved 70

Comodo Internet Security 2012 - User Guide
Windows Desktop• Just double click the shield icon in the desktop to start Comodo Internet Security.
CIS Tray Icon• Just double click the shield icon to start the main interface.
By right-clicking on the tray icon, you can access short cuts to selected settings such as Antivirus Security Level, Firewall security Level, Defense+ Security Level, Sandbox Security Level, Configuration including Game Mode option.
Antivirus Security Level - Click here for more details on Antivirus Security Level setting
Firewall Security Level - Click here for more details on Firewall security Level setting
Defense+ Security Level - Click here for more details on Defense+ Security Level setting
Sandbox Security Level - Click here for more details on Sandbox Security Level
Configuration - Click here for more details on Configuration settings
Game Mode - Switches CIS 2012 to Game Mode to enable you to play your games without any interruptions from various alerts in your computer. The operations that can interfere with users' gaming experience are either suppressed or postponed.
In game mode:• Defense+/Firewall alerts are suppressed as if they are in training mode;• AV database updates and scheduled scans are postponed until the gaming is over;• Automatic isolation of unknown applications and real-time virus detection are still functional.
Deactivate Game Mode to resume alerts and scheduled scans.
Comodo Internet Security 2012 User Guide | © 2012 Comodo Security Solutions Inc. | All rights reserved 71

Comodo Internet Security 2012 - User Guide
1.5.Overview of Summary Screens
By default, the management interface displays the 'Summary' area information. You can access this area at any time by selecting the 'Summary' tab as shown in General Navigation.
The specific layout of the summary screen that you see is dependent on the type of installation you chose. Click the links below to view an outline of the summary screen that applies to your installation:
• COMODO Internet Security with both Antivirus and Firewall• COMODO Firewall only or • COMODO Antivirus only
1.5.1. Comodo Internet Security - Summary
Summary screen shows the following
1. System Status
The upper left hand side of the interface displays highly visible messages regarding the overall security of your system. If everything is OK then you should see a green shield with a checkmark. If there is something that requires your attention then the shield will turn yellow and the reason will be stated underneath. Reasons can include outdated virus databases or because you have not yet run a full antivirus scan. Such warning notifications are accompanied by a button that allows you to quickly address the issue.
2. Antivirus
The Antivirus summary box contains:
i. The Status of Realtime Virus Scanning The status of the virus scanning setting is displayed as a link (Stateful in this example). On clicking this link, the Real-Time Scanning level drop-down box opens to allow you to quickly select the desired level. For more
Comodo Internet Security 2012 User Guide | © 2012 Comodo Security Solutions Inc. | All rights reserved 72

Comodo Internet Security 2012 - User Guide
details on Virus Scanner Settings, refer Scanner Settings.
ii. When the Virus Database was Last Updated The day and time at which the virus database was last updated is displayed as a link. On clicking the link, the update of the virus database is started and the current date and time are displayed on completion of the process.
iii. Number of Detected Threats The number of threats detected so far from the start of the current session of Comodo Antivirus is displayed here as a link. On clicking the link, Antivirus Events panel is opened. For more details on viewing Antivirus events, refer Antivirus Events.
iv. Scan Now The 'Scan Now' link in this box allows you to Run a Scan, when clicked.
3. Defense+
The Defense+ summary box contains:
i. Number of Blocked Suspicious AttemptsThe number of suspicious attempts blocked by Defense+ from the start of the current session is displayed as a link . On clicking this link, View Defense+ events is opened. For more details on viewing Defense+ events, refer View Defense+ events.
ii. Your Current Defense+ Security LevelYour current Defense+ security level (or Defense+ setting) is displayed as a link (Safe Mode in this example). On clicking this link, the Defense+ Security level settings drop-down box opens to allow you to quickly customize the Defense+ security level by selecting it from the drop-down box. For a more details on Defense+ settings, refer Defense+ Settings.
iii. Number of Unrecognized FilesA numerical summary of all the unrecognized files that are running on your computer is displayed here as a link and how the files are to be treated as set in Execution Control Settings. On clicking the numerical link, Unrecognized Files pop-up is displayed with details of each process/application.
You can see in-depth details of all running processes by clicking View Active Processes in Defense+ center.
iv. Number of Applications Running in the Sandbox The number of files that are currently running in the sandbox is displayed here. For more details on this refer to the sections Always Sandbox and Run a Program in the Sandbox.
4. Firewall
The Firewall summary box contains:
i. Number of Blocked Intrusion AttemptsThe total number of intrusion attempts blocked by firewall since start of current session of Comodo Internet Security is displayed here as a link. On clicking the link, Firewall Events panel is opened. For more details on viewing Firewall events, refer View Firewall Events.
ii. Current Firewall Security LevelYour current Firewall Security Level (or 'Firewall Behavior Setting') is displayed as a link (Safe Mode in this example). On clicking this link, the Firewall Behavior Security level drop-down box opens to allow you to quickly customize the firewall security by selecting it to preset security levels. For more details on Firewall settings, refer Firewall Behavior Settings.
iii. Inbound/Outbound ConnectionsA numerical summary of currently active inbound and outbound connections to and from your computer is displayed here. The numbers are displayed as links. On clicking any number, Active Connections panel is opened. For more details on viewing active connections, refer View Active Connections.
iv. TrafficThe Traffic area in the Summary screen of Comodo Firewall displays a bar graph showing the applications that are currently connected to the Internet and are sending or receiving data. The summary also displays the % of total traffic each application is responsible for and the file name of the executable. Clicking on any application name opens View Active Connections interface.
Comodo Internet Security 2012 User Guide | © 2012 Comodo Security Solutions Inc. | All rights reserved 73

Comodo Internet Security 2012 - User Guide
v. Stop All Traffic/Restore All TrafficThis link allows you to toggle network activity between on and off. Specifically, clicking Stop All Traffic instantly blocks all incoming and outgoing network connections, placing the firewall in the 'Block All Mode' of Firewall Behavior Settings. Similarly, clicking Restore All Traffic re-implements your previous Firewall Security Level.
5. Live Support
The bottom left corner of the interface has a live support area that enables the user to get support/ assistance from competent and friendly computer experts at Comodo, when a necessity occurs. Clicking the 'CHAT NOW' button launches the GeekBuddy to start a chat session for getting personal computer support service provided by skilled technicians at Comodo. Refer to Comodo GeekBuddy for more details.
1.5.2. Comodo Antivirus - Summary
Summary screen shows the following1. System Status
The upper left hand side of the interface displays highly visible messages regarding the overall security of your system. If everything is OK then you should see a green shield with a checkmark. If there is something that requires your attention then the shield will turn yellow and the reason will be stated underneath. Reasons can include outdated virus databases or because you have not yet run a full antivirus scan. Such warning notifications are accompanied by a button that allows you to quickly address the issue.
2. Antivirus
The Antivirus summary area contains:
i. The Status of Realtime Virus Scanning The status of the virus scanning setting is displayed as a link (Stateful in this example). On clicking this link,
Comodo Internet Security 2012 User Guide | © 2012 Comodo Security Solutions Inc. | All rights reserved 74

Comodo Internet Security 2012 - User Guide
the Real-Time Scanning level drop-down box opens to allow you to quickly select the desired level. For more details on Virus Scanner Settings, refer to Scanner Settings.
ii. When the Virus Database was Last Updated The day and time at which the virus database was last updated is displayed as a link. On clicking the link, the update of the virus database is started and the current date and time are displayed on completion of the process.
iii. Number of Detected Threats The number of threats detected so far from the start of the current session of Comodo Antivirus is displayed here as a link. On clicking the link, Antivirus Events panel is opened. For more details on viewing Antivirus events, refer Antivirus Events.
iv. Scan Now The 'Scan Now' link in this box allows you to Run a Scan, when clicked.
3. Defense+
The Defense+ summary box contains:
i. Number of Blocked Suspicious AttemptsThe number of suspicious attempts blocked by Defense+ from the start of the current session is displayed as a link . On clicking this link, View Defense+ events is opened. For more details on viewing Defense+ events, refer View Defense+ events.
ii. Your Current Defense+ Security LevelYour current Defense+ security level (or Defense+ setting) is displayed as a link (Safe Mode in this example). On clicking this link, the Defense+ Security level settings drop-down box opens to allow you to quickly customize the Defense+ security level by selecting it from the drop-down box. For a more details on Defense+ settings, refer Defense+ Settings.
iii. Number of Unrecognized FilesA numerical summary of all the unrecognized files that are running on your computer is displayed here as a link and how the files are to be treated as set in Execution Control Settings. On clicking the numerical link, Unrecognized Files pop-up is displayed with details of each process/application.
You can see in-depth details of all running processes by clicking View Active Processes in Defense+ center.
iv. Number of Applications Running in the Sandbox The number of files that are running currently in the sandbox is displayed here. For more details on this refer Always Sandbox and Run a Program in the Sandbox.
4. Live Support
The bottom left corner of the interface has a live support area that enables the user to get support/ assistance from competent and friendly computer experts at Comodo, when a necessity occurs. Clicking the 'CHAT NOW' button launches the GeekBuddy to start a chat session for getting personal computer support service provided by skilled technicians at Comodo. Refer to Comodo GeekBuddy for more details.
Comodo Internet Security 2012 User Guide | © 2012 Comodo Security Solutions Inc. | All rights reserved 75

Comodo Internet Security 2012 - User Guide
1.5.3. Comodo Firewall - Summary
Summary screen shows the following1. System Status
The upper left hand side of the interface displays highly visible messages regarding the overall security of your system. If everything is OK then you should see a green shield with a checkmark. If there is something that requires your attention then the shield will turn yellow and the reason will be stated underneath (for example, if the firewall is currently disabled). Such warning notifications are accompanied by a button that allows you to quickly address the issue.
2. Firewall
The Firewall summary box contains:
i. Number of Blocked Intrusion AttemptsThe total number of intrusion attempts blocked by firewall since start of current session of Comodo Internet Security is displayed here as a link. On clicking the link, Firewall Events panel is opened. For more details on viewing Firewall events, refer View Firewall Events.
ii. Current Firewall Security LevelYour current Firewall Security Level (or 'Firewall Behavior Setting') is displayed as a link (Safe Mode in this example). On clicking this link, the Firewall Behavior Security level drop-down box opens to allow you to quickly customize the firewall security by selecting it to preset security levels. For more details on Firewall settings, refer Firewall Behavior Settings.
iii. Inbound/Outbound ConnectionsA numerical summary of currently active inbound and outbound connections to and from your computer is displayed here. The numbers are displayed as links. On clicking any number, Active Connections panel is opened. For more details on viewing active connections, refer View Active Connections.
iv. TrafficThe Traffic area in the Summary screen of Comodo Firewall displays a bar graph showing the applications
Comodo Internet Security 2012 User Guide | © 2012 Comodo Security Solutions Inc. | All rights reserved 76

Comodo Internet Security 2012 - User Guide
that are currently connected to the Internet and are sending or receiving data. The summary also displays the % of total traffic each application is responsible for and the file name of the executable. Clicking on any application name opens View Active Connections interface.
v. Stop All Traffic/Restore All TrafficThis link allows you to toggle network activity between on and off. Specifically, clicking Stop All Traffic instantly blocks all incoming and outgoing network connections, placing the firewall in the 'Block All Mode' of Firewall Behavior Settings. Similarly, clicking Restore All Traffic re-implements your previous Firewall Security Level.
3. Defense+
The Defense+ summary box contains:
i. Number of Blocked Suspicious AttemptsThe number of suspicious attempts blocked by Defense+ from the start of the current session is displayed as a link . On clicking this link, View Defense+ events is opened. For more details on viewing Defense+ events, refer View Defense+ events.
ii. Your Current Defense+ Security LevelYour current Defense+ security level (or Defense+ setting) is displayed as a link (Safe Mode in this example). On clicking this link, the Defense+ Security level settings drop-down box opens to allow you to quickly customize the Defense+ security level by selecting it from the drop-down box. For a more details on Defense+ settings, refer Defense+ Settings.
iii. Number of Unrecognized FilesA numerical summary of all the unrecognized files that are running on your computer is displayed here as a link and how the files are to be treated as set in Execution Control Settings. On clicking the numerical link, Unrecognized Files pop-up is displayed with details of each process/application.
You can see in-depth details of all running processes by clicking View Active Processes in Defense+ center.
iv. Number of Applications Running in the SandboxThe number of files that are currently running in the sandbox is displayed here. For more details on this refer Always Sandbox and Run a Program in the Sandbox.
4. Live Support
The bottom left corner of the interface has a live support area that enables the user to get support/ assistance from competent and friendly computer experts at Comodo, when a necessity occurs. Clicking the 'CHAT NOW' button launches the GeekBuddy to start a chat session for getting personal computer support service provided by skilled technicians at Comodo. Refer to Comodo GeekBuddy for more details.
1.6.Comodo Internet Security - Navigation After installation, Comodo Internet Security automatically protects any computer on which it is installed. You do not have to start the program to be protected.
See Starting Comodo Internet Security if you are unsure of how to access the main interface.
Persistent NavigationComodo Internet Security is divided into five main areas indicated by the tabs with respective icons at the top right hand side of the main interface screen.
• Summary • Antivirus • Firewall • Defense+ • More
Each of these areas contains several sub-sections that provide total control over configuration of the security Suite. These icons are ever-present and can be accessed at all times.
Comodo Internet Security 2012 User Guide | © 2012 Comodo Security Solutions Inc. | All rights reserved 77

Comodo Internet Security 2012 - User Guide
• Summary - Contains at-a-glance details of important settings, activity and other information. The summary screen differs for different types of installation, namely: • Comodo Internet Security • Comodo Antivirus • Comodo Firewall
See the Overview of summary screens section for more details on this area.
• Antivirus - Clicking this icon opens Antivirus Tasks configuration screen. • Firewall - Clicking this icon opens Firewall Tasks configuration screen. Advanced users are advised to first visit
the Network Security Policy area for an introduction to firewall policies and rule creation. • Defense+ - Clicking this icon opens Defense+ Tasks configuration screen. Advanced users are advised to first
visit the Computer Security Policy area for an introduction to Defense+ policies, rule creation and Sandboxing features.
• More - Clicking this icon opens More options screen which contains several options relating to overall configuration of Comodo Internet Security.
1.7.Understanding AlertsAfter first installing Comodo Internet Security, it is likely to see a number of pop-up alerts. This is perfectly normal and indicates that the security suite is learning the behavior of your applications and establishing which programs need privileges such as Internet access and file access rights. Each alert provides information and options that enable you to make an informed decision on whether you want to allow or block a request or activity. Alerts also allow you to instruct Comodo Internet Security on how it should behave in future when it encounters activities of the same type.
Buffer Overflow Protection Feature - Buffer overflow attack occurs when a malicious program or script deliberately sends more data to its memory buffer than the buffer can handle. Defense+ provides alerts on attempt of most types of buffer overflow attacks and provides protection against data theft, computer crashes and system damage. For more details, please refer Defense+ Settings > Execution Control Settings > Detect Shell Code Injections.
Alerts OverviewComodo Internet Security alerts come in four main varieties, namely:
• Antivirus Alerts• Firewall Alerts • Defense+ Alerts (including Elevated Privilege Alerts)• Sandbox Alerts
Broadly speaking, Antivirus alerts inform you when a virus or malware is executed into your system, Firewall alerts inform you about network connection attempts and Defense+ alerts tell you about the behavior of application on your system. In all the three cases, the alert can contain very important security warnings or may simply occur because you are running an application for the first time. Your reaction should depend on the information that is presented at the alert.
An example alert is shown below.
Comodo Internet Security 2012 User Guide | © 2012 Comodo Security Solutions Inc. | All rights reserved 78

Comodo Internet Security 2012 - User Guide
Type of Alert
Can be Firewall, Defense+ or Antivirus
Color indicates severity of the Alert
Both firewall and Defense+ alerts are
color coded to the risk level
Description of activity or connection attempt
High visibility icons quickly inform you which applications and techniques are involved in an alert. Clicking the name of the executables here opens a window containing more information about the application in question
The information area contains advice to user on how to react to the alert.
Select these choices as required. These
options are explained below
Clicking More Options expands the lower panel and displays more options to react to the alert
Click these buttons to allow or block the request
Severity LevelThe upper strip of both Defense+ and Firewall alerts are color coded according to risk level. This provides a fast, at-a-glance, indicator of the severity of the alert. However, it cannot be stressed enough that you should still read the 'Security Considerations' section in order to reach an informed decision on allowing or blocking the activity.
Note: Antivirus alerts are not ranked in this way. They always appear with a red upper strip.
Comodo Internet Security 2012 User Guide | © 2012 Comodo Security Solutions Inc. | All rights reserved 79

Comodo Internet Security 2012 - User Guide
• Yellow Alerts - Low Severity - In most cases, you can safely approve these connection request or activity. The 'Remember my answer for this application' option is automatically pre-selected for safe requests
• Orange Alerts - Medium Severity - Carefully read the 'Security Considerations section before making a decision. These alerts could be the result of a harmless process or activity by a trusted program or an indication of an attack by malware. If you know the application to be safe, then it is usually okay to allow the request. If you do not recognize the application performing the activity or connection request then you should block it.
• Red Alerts - High Severity - These alerts indicate highly suspicious behavior that is consistent with the activity of a Trojan horse, virus or other malware program. Carefully read the information provided when deciding whether to allow it to proceed.
Information on the Alert
Security Considerations: The Security Considerations area contains a description of the nature of the alert. It tells you the name of the software/executable that caused the alert; the action that it is attempting to perform and how that action could potentially affect your system. You can also find helpful advice about how you should respond.
• Remember my answer - Select this option if you want Firewall to implement the same decision for identical requests in future - meaning you are not prompted if same type of activity or connection attempt arises in future. The response you made this time is applied automatically to the all the similar activities or connection attempts.
More OptionsClicking the More Options in the Firewall alert expands the lower panel and displays more options for reacting to the alert.
Comodo Internet Security 2012 User Guide | © 2012 Comodo Security Solutions Inc. | All rights reserved 80

Comodo Internet Security 2012 - User Guide
The first three options enable you to select your reaction to the activity or connection attempt requested.
• Allow this request - Allows the requested activity or connection attempt• Block this request - Denies the requested activity or connection attempt.• Treat this application as - Enables you to select a predefined security policy to be deployed on to the application
in question. Select this option and select a predefined policy depending on the trustworthiness and type of the application.
Refer to Predefined Firewall Policies and Predefined Computer Security Policies for more details.
• Submit the files to COMODO for analysis - Select this option if you suspect that that the application that has raised this alert as a malware. Comodo Internet Security sends the application to Comodo automatically, irrespective of your Allow or Block response. Comodo analyzes the application and includes it in the safe list or black list accordingly.
• Create a "Windows" system restore point - Selecting this option instructs your Windows Operating System to create a restore point. This enables you to safely rollback your system to the previous system state if you encounter problems because of allowing or blocking this request.• If you have Comodo Time Machine (CTM) installed then CIS creates a Time Machine restore point. • If you do not have Comodo Time Machine installed, then CIS creates a regular Windows System Restore
point.
Note: This option is only available if Windows System Restore is enabled in your system. You can check whether system restore is enabled by visiting the Windows control panel:
• Click here if you are using Windows 7• Click here if you are using Windows Vista• Click here if you are using Windows XP
Windows 7To ensure that Windows system restore is enabled
1. Click Start > Control Panel > System > System Protection
2. Make sure that the Protection status of the hard disk drive partition(s) is set to 'On' under 'Protection Settings'.
Comodo Internet Security 2012 User Guide | © 2012 Comodo Security Solutions Inc. | All rights reserved 81

Comodo Internet Security 2012 - User Guide
Windows VistaTo ensure that Windows system restore is enabled
1. Click Start > Control Panel > System > System Protection
2. Make sure that the checkbox(es) beside the hard disk drive partition(s) under 'Automatic restore points > Create restore points automatically on the selected disks'' are selected.
Comodo Internet Security 2012 User Guide | © 2012 Comodo Security Solutions Inc. | All rights reserved 82

Comodo Internet Security 2012 - User Guide
Windows XPTo ensure that Windows system restore is enabled
1. Click Start > Control Panel > System > System Restore tab
2. Make sure that the checkbox 'Turn off System Restore on all drives' is NOT selected.
If Comodo Time Machine (CTM) is installed in your system, the restore point is created by it irrespective of whether the Windows Restore Point is enabled in your system or not.
Background Note: Comodo Time Machine is a powerful system rollback utility that allows you to quickly restore your computer to an earlier point in time. The software is free of charge and allows you to quickly recover your computer to its last working state in the event of malware attacks or system crashes. Find out more and download the application from http://www.comodo.com/home/data-storage-encryption/data-recovery.php.
Now that we've outlined the basic construction of an alert, lets look at how you should react to them:
Answering an Antivirus AlertComodo Internet Security generates an Antivirus alert whenever a virus or malware tries to be copied or executed without your knowledge and displays the alert at the bottom right hand side of your computer screen. These alerts are a valuable source of real-time information that helps the user to immediately identify which particular files are infected or are causing problems and the choices for actions to be taken.
The alert contains the name of the virus detected and the location of the file or application infected by it.
You can take one of the following steps to answer the Antivirus alert.
• Disinfect the file if there exists a disinfection routine for the detected file or move the file or application to Quarantined Items for later analysis.
• Ignore the alert only if you trust the application or the source of application by clicking 'Ignore'.
Comodo Internet Security 2012 User Guide | © 2012 Comodo Security Solutions Inc. | All rights reserved 83

Comodo Internet Security 2012 - User Guide
To disinfect the file or application
• Click the 'Clean' button.
Comodo Internet Security will disinfect and clean the file or application. If the threat detected is new one and the disinfection routine does not exist, then CIS will move the file/application to Quarantined Items for later analysis. You can submit the file/application to Comodo for analysis from the Quarantine. Refer to Quarantined Items for more details.
To ignore the alert if you trust the file/application
• Click 'Ignore'. Selecting Ignore provides you with four options.
• Once. If you click 'Once', the virus is ignored only at that time only. If the same application invokes again, an Antivirus alert is displayed.
• Add to Trusted Files. If you click 'Add to Trusted Files', the virus is moved to Trusted Files area. The alert is not generated if the same application invokes again.
• Report this to COMODO as a False Alert. If you are sure that the file is safe, select 'Report this to COMODO as a False Alert'. The Antivirus sends the file to Comodo for analysis. If the file is trustworthy, it is added to the Comodo safe list.
• Add to Exclusions. If you click 'Add to Exclusions', the virus is moved to Exclusions list. The alert is not generated if the same application invokes again.
Comodo Internet Security 2012 User Guide | © 2012 Comodo Security Solutions Inc. | All rights reserved 84

Comodo Internet Security 2012 - User Guide
Answering Firewall AlertsComodo Internet Security generates a Firewall alert on network connection attempts. The followings steps will help you answer a Firewall alert: :
1. Carefully read the 'Security Considerations' section. The Firewall can recognize thousands of safe applications. (For example, Internet Explorer and Outlook are safe applications). If the application is known to be safe - it is written directly in the security considerations section along with advice that it is safe to proceed. Similarly, if the application is unknown and cannot be recognized you are informed of this.
If it is one of your everyday applications that you want to grant Internet access to then you should select Allow This Request (it may be the case that the application has not yet been added to the safe application database yet).
If you don't recognize the application then we recommend you select Block This Request, but do not select the Remember My Answer option.
In all cases, clicking on the name of the application opens a properties window that can help you determine whether or not to proceed:
2. If you are sure that it is one of your everyday application, try to use the Treat This Application As option as much as possible. This deploys a predefined firewall policy on the target application. For example, you may choose to apply the policy Web Browser to the known and trusted applications 'Internet Explorer', 'Firefox' and 'Opera'. Each predefined policy has been specifically designed by Comodo to optimize the security level of a certain type of application.
Comodo Internet Security 2012 User Guide | © 2012 Comodo Security Solutions Inc. | All rights reserved 85

Comodo Internet Security 2012 - User Guide
If you do not see the Treat this Application As option, you should click More Options. Remember to check the box Remember My Answer.
3. If the Firewall alert reports a behavior, consistent with that of a malware in the security considerations section, then you should block the request AND click Remember My Answer to make the setting permanent.
Answering Defense+ AlertsComodo Internet Security generates a Defense+ Alert based on behavior of applications running in your system. Following are the steps to be followed to answer a Defense+ alert:
1. As with Firewall Alerts, carefully read the 'Security Considerations' section. Comodo Internet Security can recognize thousands of safe applications. If the application is known to be safe - it is written directly in the security considerations section along with advice that it is safe to proceed. Similarly, if the application is unknown and cannot be recognized you are informed of this.
If it is one of your everyday applications that you want to grant execution rights to then you should select Allow This Request.
If you don't recognize the application then we recommend you select Block This Request but do not select Remember My Answer check box.
2. Avoid using the Installer or Updater policy if you are not installing an application. This is because treating an application as an 'Installer or Updater' grants maximum possible privileges onto to an application - something that is not required by most 'already installed' applications. If you select 'Installer or Updater', you may consider using it temporarily with Remember My Answer left unchecked.
3. Pay special attention to Device Driver Installation and Physical Memory Access alerts. Again, not many legitimate applications would cause such an alert and this is usually a good indicator of malware/rootkit like behavior. Unless you know for a fact that the application performing the activity is legitimate, then Comodo recommends blocking these requests.
4. Protected Registry Key Alerts usually occur when you install a new application. If you haven't been installing a new program and do not recognize the application requesting the access , then a 'Protected Registry Key Alert' should be a cause for concern.
Comodo Internet Security 2012 User Guide | © 2012 Comodo Security Solutions Inc. | All rights reserved 86

Comodo Internet Security 2012 - User Guide
5. Run with elevated Privileges. CIS will display this kind of alert when the installer of an unknown application requires administrator, or elevated, privileges to run. An installer that is allowed to run with elevated privileges is permitted to make changes to important areas of your computer such as the registry.
• If you have good reason to trust the publisher of the software then you can click the 'Allow' button. This will grant the elevated privilege request and allow the installer to run.
• If you are unsure of the safety of the software, then Comodo recommends that you run it in the sandbox by clicking the 'Sandbox' button.
• If this alert is unexpected then you should abort the installation by clicking the 'Block' button (for example, you have not proactively started to install an application and the executable does not belong to an updater program that you recognize)
• If you select 'Always trust the publisher of this file' then CIS will treat all files from this installer as safe and no future alerts will be generated when you run executables by this publisher.
• In all cases, please remember to select 'Submit this file to Comodo for analysis' so that our researchers can establish whether the application is safe or not. If it is found to be safe, we shall add it to the global safelist (whitelist). If it is found to be malicious we will add it to our global list of malware signatures (blacklist). Comodo will then distribute the updated lists to all users of CIS.
You will see this type of alert if:
• The sandbox is enabled and
• 'Automatically detect and run installers outside the sandbox' is enabled. These settings can be modified in Defense+ Tasks > Defense+ Settings > Sandbox Settings.
There are two versions of this alert - one for unknown installers that are not digitally signed and the second for unknown installers that are digitally signed but the publisher of the software has not yet been white-listed (they are not yet a 'Trusted Software Vendor').
Comodo Internet Security 2012 User Guide | © 2012 Comodo Security Solutions Inc. | All rights reserved 87

Comodo Internet Security 2012 - User Guide
• Unknown and unsigned installers should be either sandboxed or blocked.• Unknown but signed installers can be allowed to run if you trust the publisher, or may be sandboxed if you would
like to evaluate the behavior of the application.• In both instances, select 'Submit the file to Comodo for analysis' so that we can effectively categorize the file and
add it to to our global white-list or blacklist.Also see:
• 'Answering a Sandbox Alert' to see how CIS handles unknown applications that are not detected as being an installer or updater program.
• 'Unknown Files: The Sand-boxing and Scanning Processes' - to understand the decision making process behind why CIS chooses to sandbox certain applications.
• 'Trusted Software Vendors' - for an explanation of digitally signed files and 'Trusted Software Vendors'.
6. Protected File Alerts usually occur when you try to download or copy files or when you update an already installed application.
Were you installing new software or trying to download an application from the Internet? If you are downloading a file from the 'net, try to use Allow without Remembering option to cut down on the creation of unnecessary rules within the firewall.
If an application is trying to create an executable file in the Windows directory (or any of its subdirectories) then pay special attention. The Windows directory is a favorite target of malware applications. If you are not installing any new applications or updating Windows then make sure you recognize the application in question. If you don't, then select Block This Request without selecting Remember My Answer option.
If an application is trying to create a new file with a random file name e.g. "hughbasd.dll" then it is probably a virus and you should block it permanently by selecting Treat As Isolated Application (fourth down in the graphic below).
Comodo Internet Security 2012 User Guide | © 2012 Comodo Security Solutions Inc. | All rights reserved 88

Comodo Internet Security 2012 - User Guide
7. A Buffer overflow Alert is generated when an application tries to send more data to its memory buffer than that the buffer can handle. This may be a possible hacking attempt.
If you click Terminate, the application is denied access to execute.
If you click Skip, the application is excluded from monitoring for the moment and is allowed access. But on the next attempt of attack the alert is generated again.
If you select 'Skip this application in the future', and click Skip, the application is excluded from monitoring permanently and allowed access all the times. Do this only of the application is from a trusted vendor.
8. If a Defense+ alert reports a malware behavior in the security considerations area then you should Block the request permanently by selecting Remember My Answer option. As this is probably a virus, you should also submit the application in question, to Comodo for analysis.
9. Unrecognized applications are not always bad. Your best loved applications may very well be safe but not yet included in the Comodo certified application database. If the security considerations section says “If xxx is one of your everyday applications, you can allow this request”, you may allow the request permanently if you are sure it is not a virus. You may report it to Comodo for further analysis and inclusion in the certified application database.
10. If Defense+ is in Clean PC Mode, you probably are seeing the alerts for any new applications introduced to the system - but not for the ones you have already installed. You may review the 'Unrecognized Files' section for your newly installed applications and remove them from the list for them to be considered as clean.
11. Avoid using Trusted Application or Windows System Application policies for you email clients, web browsers, IM or P2P applications. These applications do not need such powerful access rights.
Answering a Sandbox AlertBy default, CIS will display an alert whenever it runs an unknown application in the sandbox:
Comodo Internet Security 2012 User Guide | © 2012 Comodo Security Solutions Inc. | All rights reserved 89

Comodo Internet Security 2012 - User Guide
The alert will show the name of the executable that has been isolated in the sandbox. The application will be automatically added to Unrecognized Files list.
• Clicking the name of the application will open the Unrecognized Files interface, that displays a list of the unrecognized files including the currently sandboxed application.
• Clicking Don't isolate it again removes the application from the Unrecognized Files list and adds it to the Trusted Files list, enabling the application to run outside the sandbox. Choose this option if you are absolutely sure that the executable is safe.
Users are also reminded that they should submit such unknown applications to Comodo via the 'Unrecognized Files' interface. This will allow Comodo to analyze the executable and, if it is found to be safe, to add it to the global safe list. This will ensure that unknown but ultimately safe applications are quickly white-listed for all users.
Also see:
• 'Run with elevated Privileges' alerts.
• 'Unknown Files: The Sand-boxing and Scanning Processes' - to understand the decision making process behind why CIS chooses to sandbox certain applications.
2.Antivirus Tasks - IntroductionThe Antivirus Task Center allows you to quickly and easily configure all aspects of the Antivirus component of Comodo Internet Security (hereafter known simply as 'Comodo Antivirus').
Comodo Antivirus leverages multiple technologies, including Real-time/On-Access Scanning, On Demand Scanning and a fully featured Scan Scheduler to immediately start cleaning or quarantining suspicious files from your hard drives, shared disks, emails, downloads and system memory. The application also allows users to create custom scan profiles which can be re-used across all scan types and features full event logging, quarantine and file submission facilities.
Comodo Antivirus detects and removes threats that are present on your machine and forms an additional layer of security on top of the threat prevention offered by the Firewall and Defense+ components. The heuristics scanning capability of the application identifies previously unknown viruses and Trojans.
Real-Time/On Access scanning feature scans each and every file accessed and the system memory continuously when the computer is in use at the background. If any threat or intrusion is found, the antivirus blocks it and displays an alert immediately. The alert enables you to get the help through GeekBuddy for removing the threat or to remove it by yourself. Refer to the section The Results for more details.
In order to maintain maximum security levels, Comodo advises you to run regular Antivirus scans.
On-Demand scanning is also seamlessly integrated into the Windows operating system. Users can scan specific objects 'on the fly' by simply right-clicking on a file, folder or drive and selecting Scan with Comodo AntiVirus from the context sensitive menu.
The Antivirus tasks center can be accessed at all times by clicking on the Antivirus tab from the navigation panel.
Comodo Internet Security 2012 User Guide | © 2012 Comodo Security Solutions Inc. | All rights reserved 90

Comodo Internet Security 2012 - User Guide
The Antivirus main configuration area provides easy access to all the features. Click the links below to see detailed explanations of each area in this section.
• Run a Scan• Update Virus Database• Quarantined Items• View Antivirus Events• Submit Files• Scheduled Scans• Scan Profiles• Scanner Settings
2.1.Run a ScanWhen you want to check a disk or folder for possible infection from viruses and malware, you can launch an On-Demand Scan using the Run a Scan option. This executes an instant virus scan on the selected item. You can also check a wide range of removable storage devices such as CD's, DVD's, external hard-drives, USB connected drives, digital cameras - even your iPod!!
You have two options available when you choose to run an On-Demand Scan:
1. Scan a preselected area; or
2. Define a custom scan of the areas you choose, by creating a Scan Profile.
• Apart from running an On-Demand scan from Run a Scan interface, you can also scan specific objects using Context Sensitive Scan.
Scanning Preselected Areas
Comodo Antivirus has two pre-defined scan profiles to run On-Demand Scan on preselected areas on your system. These predefined profiles cannot be edited or removed. They are:
Comodo Internet Security 2012 User Guide | © 2012 Comodo Security Solutions Inc. | All rights reserved 91

Comodo Internet Security 2012 - User Guide
i. My Computer (Default) - When this Profile is selected, Comodo Antivirus scans every local drive, folder and file on your system.
ii. Smart Scan - When this profile is selected, Comodo Antivirus runs a quick scan on the critical areas in your system which are highly prone to infection from viruses, rootkits and other malware. The areas scanned include system memory, autorun entries, hidden services, boot sectors and other critical areas like crucial registry keys in Windows registry, system files and system configuration. These areas are highly responsible for the stability of your computer and keeping them clean and sanitized is essential to keep your computer healthy and running.
Custom ScanYou can run the virus scan on selected disks or folders by setting the scan profiles beforehand. For more details on Scan profiles, refer to Antivirus Tasks > Scan Profiles. You can also Create a Scan Profile from the Run a Scan option.
Comodo Antivirus also scans the archive files such as .ZIP, .RAR, and so on, on running an on-demand scanning.
To start an On-Demand scanning1. Click 'Run a Scan' in the main Antivirus Tasks interface.
Tip: You can also start an on-demand scan by clicking 'Scan Now' link in the Antivirus area of the CIS summary screen.
The 'Run a Scan' panel appears.
From the 'Run a Scan' panel you can
• Run a scan one of the items listed in the panel • Add a new item to scan by creating a new scan profile • Save the Scan results as text file • Disinfect any infected files, folders or applications • Exclude an application you consider as safe from the threat list
To scan your system for viruses and malware1. Click 'Run a Scan' in the Antivirus screen.
2. Select a Scan Profile name and click 'Scan'.
Comodo Antivirus checks for AV database updates and if available, updates the virus database in your system.
Comodo Internet Security 2012 User Guide | © 2012 Comodo Security Solutions Inc. | All rights reserved 92

Comodo Internet Security 2012 - User Guide
Note: Comodo Antivirus updates its Virus Database only if the option Automaticallu update the virus database before scanning is selected in the Scanner Settings > Antivirus Behavior Settings > Manual Scanning tab. If you do not want the application everytime you run a scan, you can disable this option.
Then Comodo Antivirus starts to scan the items, based on the scan profile you have selected.
You can Pause/Resume the scan as you wish during the scan. If you want to terminate the scanning, click 'Stop Scan'.
The ResultsOn completion of scanning, if any threats are found, an alert screen will be displayed. The alert will display the number of threats/infections discovered by the scanning and provide you the options for cleaning.
Comodo Internet Security 2012 User Guide | © 2012 Comodo Security Solutions Inc. | All rights reserved 93

Comodo Internet Security 2012 - User Guide
• If you wish to have a skilled professional from Comodo to access your system and perform an efficient disinfection, click 'Yes, I want an expert to clean it'. If you are a first-time user, you will be taken to Comodo GeekBuddy webpage to sign-up for a GeekBuddy subscription. If you have already signed-up for GeekBuddy services, the GeekBuddy chat session will start and a skilled technician will offer to clean your system. For more details on GeekBuddy, refer to the section Comodo GeekBuddy.
• If you wish to clean the infections yourself, select 'No, I will try to clean it myself'. The scan results screen will be displayed.
The scan results window displays the number of objects scanned and the number of threats (Viruses, Rootkits, Malware and so
Comodo Internet Security 2012 User Guide | © 2012 Comodo Security Solutions Inc. | All rights reserved 94

Comodo Internet Security 2012 - User Guide
on).
Tip: You can sort the scan results by alphabetical order by clicking the 'Threat Name' column header. Similarly you can sort the scan results based on the risk level by clicking the 'Risk' column header. To select all the entries for actions such as moving them to quarantine or disinfect, select the check box beside the 'Threat name'.
To save the Scan Results as a Text File1. Click 'Save Results' and enter the location in the 'Save As' dialog box.
To disinfect an application detected with a threat1. Select the application from the results.
Tip: You can select multiple items at once by pressing and holding the Shift or Ctrl key while selecting the items. To select all the items at once, select the 'All?' checkbox at the top left of the interface.
Comodo Internet Security 2012 User Guide | © 2012 Comodo Security Solutions Inc. | All rights reserved 95

Comodo Internet Security 2012 - User Guide
2. Click 'Clean'.
If a disinfection routine is available for the selected intection(s), Comodo Antivirus will disinfect the application and retain the application safe. If the disinfection routine is anot available, Comodo Antivirus will move the infections to Quarantine for later analysis and restoring/removal of the files. For more details on quarantine feature, refer to Quarantined Items.
A confirmation dialog will be displayed for disinfecting or moving the threat to quarantine.
3. Click 'Yes'.
To ignore an application / file you consider as safe from the threat list
1. Select the application from the results.
Tip: You can select multiple items at once by pressing and holding the Shift or Ctrl key while selecting the items. To select all the items at once, select the 'All?' checkbox at the top left of the interface.
2. Click 'Ignore'.
Comodo Internet Security 2012 User Guide | © 2012 Comodo Security Solutions Inc. | All rights reserved 96

Comodo Internet Security 2012 - User Guide
Selecting Ignore provides you with four options.
• Once - If you click 'Once', the virus is ignored only at that time only. If the same application invokes again, an Antivirus alert is displayed.
• Add to Trusted Files - If you click 'Add to Trusted Files', the virus is moved to Trusted Files area. The alert is not generated if the same application invokes again.
• Report this to COMODO as a False Alert - If you are sure that the file is safe, select 'Report this to COMODO as a False Alert'. The Antivirus sends the file to Comodo for analysis. If the file is trustworthy, it is added to the Comodo safelist.
• Add to Exclusions - If you click 'Add to Exclusions', the virus is moved to Exclusions list. The alert is not generated if the same application invokes again.
Creating a Scan profile
Scan Profiles are the user-defined profiles containing specific areas on your system that you wish to scan and can be re-used for all future scans.
To create a new scan profile
1. Click 'Create New Scan' in the 'Run a Scan' interface.
Comodo Internet Security 2012 User Guide | © 2012 Comodo Security Solutions Inc. | All rights reserved 97

Comodo Internet Security 2012 - User Guide
The 'Scan Profile' configuration appears.
2. Type a name for the scan profile to be created in the 'Name' box.
3. Click 'Add'.
A configuration screen appears, prompting you to select the locations to be scanned when the newly created scan profile is selected.
Comodo Internet Security 2012 User Guide | © 2012 Comodo Security Solutions Inc. | All rights reserved 98

Comodo Internet Security 2012 - User Guide
4. Select the locations from the left column, drag and drop to the right column or select the locations and click right arrow to move selected folders to right column.
5. Click 'Apply'.
6. Repeat the process to create more Scan Profiles.
Note: You can also create new Scan Profiles by accessing Scan Profiles in the Antivirus Screen.
Context Sensitive Scan
You can right click any item i.e. a drive, folder or a file in Windows Explorer and select 'Scan with COMODO Antivirus' from the context sensitive menu to perform a virus scan selectively on the item. This is useful when you suspect a particular item might contain virus due to newly downloaded or copied folder/file.
Comodo Internet Security 2012 User Guide | © 2012 Comodo Security Solutions Inc. | All rights reserved 99

Comodo Internet Security 2012 - User Guide
2.2.Update Virus DatabaseIn order to guarantee the relevance of your antivirus software, it is imperative that your virus databases are updated as regularly as possible.
Our antivirus database is maintained and updated around the clock by a team of dedicated technicians, providing you with the solutions to the latest virus outbreaks. Updates can be downloaded to your system manually or automatically from Comodo's update servers.
To manually check for the latest virus Database and then download the updates1. Click on the 'Update Virus Database' from the main Antivirus Tasks interface.
Note: You must be connected to Internet to download the updates.
A dialog box appears, showing you the progress of update process.
Comodo Internet Security 2012 User Guide | © 2012 Comodo Security Solutions Inc. | All rights reserved 100

Comodo Internet Security 2012 - User Guide
On completion, your virus database is made up to date.
When infected or possibly infected files are found, if the antivirus database has been not updated for a critically long time, or your computer has not been scanned for a long time, the main window of Comodo Antivirus recommends a course of action and gives a supporting explanation. We have customized our application to achieve optimal performance based on the extensive expertise of Comodo in the antivirus protection business.
Automatic Updates
Comodo AntiVirus checks for latest virus database updates from Comodo website and downloads the updates automatically. You can configure Comodo Antivirus to download updates automatically in the Scanner Settings for Real Time Scanning (On-Access Scanning) and Scheduled Scanning. Refer to Real Time Scanning Settings and Scheduled Scanning Settings.
2.3.Quarantined ItemsThe quarantine facility removes and isolates suspicious files into a safe location before analyzing them for possible infection. Any files transferred in this fashion are encrypted- meaning they cannot be run or executed. This isolation prevents infected files from affecting the rest of your PC. If a file cannot be disinfected, then it provides a reliable safe-house until the virus database is updated- neutralizing the impact of any new virus.
For adding executables to Quarantined items, refer to Antivirus Tasks > Run a Scan. You can also:
• Manually add applications, executables or other files, that you do not trust, as a Quarantined item • Delete a selected quarantined item from the system• Restore a quarantined item• Delete all quarantined items • Submit selected quarantined items to Comodo for analysis
To view the list of Quarantined Items• Click 'Quarantined Items' from the main Antivirus Tasks interface.
Comodo Internet Security 2012 User Guide | © 2012 Comodo Security Solutions Inc. | All rights reserved 101

Comodo Internet Security 2012 - User Guide
Column Descriptions• Item - Indicates which application or process propagated the event;• Location - Indicates the location where the application or the file is stored;• Date/Time - Indicates date and time, when the item is moved to quarantine.
Manually adding files as Quarantined ItemsIf you have a file, folder or drive that you suspect may contain a virus and not been detected by the scanner, then you have the option to isolate that item in quarantine.
To manually add a Quarantined Item• Click Add and select the file from Open dialog box.
To delete a quarantined item from the system• Select the item and Click 'Delete'.
This deletes the file from the system permanently.
To restore a quarantined item to its original location• Select the item and click 'Restore'.
If the restored item does not contain a malware, it operates as usual. But if it contains a malware, it is detected as a threat immediately, if the Real Time Scanning is enabled or during the next scan.
To remove all the quarantined items permanently• Click 'Clear'.
This deletes all the quarantined items from the system permanently.
To submit selected quarantined items to Comodo for analysis• Select the item from the list and click 'Submit'.
Note: Quarantined files are stored using a special format and do not constitute any danger to your computer.
2.4.View Antivirus EventsComodo Antivirus documents the results of all actions performed by it in extensive but easy to understand reports. A detailed scan report contains statistics of all scanned objects, settings used for each task and the history of actions performed on each individual file. Reports are also generated during real-time protection, and after updating the antivirus database and application modules.
By default, CIS stores the log file in Support DataBase (SDB) format as cislogs.sdb file which is located in C:\Documents and Settings\All Users\Application Data\Comodo\Firewall Pro. Logs stored in this file can be extracted by using a suitable application. Logs can also be exported to html by clicking 'More.. > File > Export'.
To view a log of Antivirus Events
Comodo Internet Security 2012 User Guide | © 2012 Comodo Security Solutions Inc. | All rights reserved 102

Comodo Internet Security 2012 - User Guide
• Click 'View Antivirus Events' from the main Antivirus Tasks interface.
Column Descriptions• Location - Indicates the location where the application detected with a threat is stored.• Malware Name - Name of the malware event that has been detected.• Action - Indicates action taken against the malware through Antivirus.• Status - Gives the status of the action taken. It can be either 'Success' or 'Fail'.• Date - Indicates the date of the event.
Click 'More' to load the full, Comodo Internet Security Log Viewer module. Alternatively, this module can be opened by double-clicking the 'cfplogvw' exe file that is stored in the installation path of the CIS application. Usually the path is C:\Program Files\COMODO\COMODO Internet Security.
This window contains a full history of logged events in two categories: Logs per Module and Other Logs.
It also allows you to build custom log files based on specific filters and to export log files for archiving or troubleshooting purposes.
Comodo Internet Security 2012 User Guide | © 2012 Comodo Security Solutions Inc. | All rights reserved 103

Comodo Internet Security 2012 - User Guide
The Log Viewer Module is divided into three sections. The top panel displays a set of handy, predefined time Filters. The left panel displays the types of Logs. The right hand side panel displays the actual events that were logged for the time period you selected in the top panel and the type of log selected in the left panel (or the events that correspond to the filtering criteria you selected).
The Logs per Module option contains the logged events of Firewall, Defense+ and Antivirus modules and Other Logs options contains logged events of the following:
• Alerts Displayed: Displays the list of various alerts that were displayed to the user, the response given by the user to those alerts and other related details of the alert.
• Tasks Launched: Displays the various Antivirus tasks such as updates and scans that have taken place. This area will contain a log of all on demand and scheduled AV scans and the result of that scan.
• Configuration Changes: Displays a log of all configuration changes made by the user in the CIS application. Filtering Log FilesComodo Internet Security allows you to create custom views of all logged events according to user defined criteria.
Preset Time Filters:
Clicking on any of the preset filters in the top panel alters the display in the right hand panel in the following ways:
• Today - Displays all logged events for today.• Current Week - Displays all logged events during the current week. (The current week is calculated from the
Sunday to Saturday that holds the current date.)• Current Month - Displays all logged events during the month that holds the current date.• Entire Period - Displays every event logged since Comodo Internet Security was installed. (If you have cleared
the log history since installation, this option shows all logs created since that clearance).The example below shows an example display when the Antivirus Events for 'Today' are displayed.
Comodo Internet Security 2012 User Guide | © 2012 Comodo Security Solutions Inc. | All rights reserved 104

Comodo Internet Security 2012 - User Guide
Note: The type of events logged by the Antivirus, Firewall and Defense+ modules of Comodo Internet Security differ from each other. This means that the information and the columns displayed in the right hand side panel change depending on which type of log you have selected in the top and left hand side panel. For more details on the data shown in the columns, see View Firewall Events or View Defense+ Events.
User Defined Filters:
Having chosen a preset time filter from the top panel, you can further refine the displayed events according to specific filters. The type of filters available for Firewall logs differ to those available for Defense+ logs. The table below provides a summary of available filters and their meanings:
Available Filters - Logs per Module
Antivirus Filter Firewall Filters Defense+ Filters
Action - Displays events according to the response (or action taken) by the Antivirus
Action - Displays events according to the response (or action taken) by the firewall
Application - Displays only the events propagated by a specific application
Location - Displays only the events logged from a specific location
Application - Displays only the events propagated by a specific application
Flags - Displays events according to the response (or action taken) by Defense+
Malware Name - Displays only the events logged corresponding to a specific malware
Destination IP - Displays only the events with a specific target IP address
Target - Displays only the events that involved a specified target application
Comodo Internet Security 2012 User Guide | © 2012 Comodo Security Solutions Inc. | All rights reserved 105

Comodo Internet Security 2012 - User Guide
Available Filters - Logs per Module
Status - Displays the events according to the status after the action taken. It can be either 'Success' or 'Fail'
Destination Port - Displays only the events with a specific target port number
Direction - Indicates if the event was an Inbound or Outbound connection
Protocol - Displays only the events that involved a specific protocol
Source IP address - Displays only the events that originated from a specific IP address
Source Port - Displays only the events that originated from a specific port number
Creating Custom FiltersCustom Filters can be created through the Advanced Filter Interface. You can open the Advanced Filter interface either by using the View option in the menu bar or using the context sensitive menu.
• Click View > Advanced Filter to open the 'Advanced Filter' configuration area.Or
• Right click on any event and select 'Advanced Filter' option to open the corresponding configuration area.The 'Advanced Filter' configuration area is displayed in the top half of the interface whilst the lower half displays the Events, Alerts, Tasks or Configuration Changes that the user has selected from the upper left pane. If you wish to view and filter event logs for other modules then simply click log name in the tree on the upper left hand pane.
The Advanced Log filter displays different fields and options depending on the log type chosen from the left hand pane (Antivirus, Defense+, Firewall).
This section will deal with Advanced Event Filters related to 'Antivirus Events' and will also cover the custom filtering that can be applied to the 'Other Logs' (namely 'Alerts Displayed', 'Tasks' Launched' and 'Configuration Changes'). The Firewall and Defense+ Advanced Event Filters are dealt with in their respective sections.
Antivirus Events - Advanced Filters
To configure Advanced Filters for Antivirus events1. Select 'View > Advanced Filter'
2. Select 'Antivirus Events' under 'Logs Per Module'
You have 4 categories of filter that you can add. Each of these categories can be further refined by either selecting or deselecting specific filter parameters or by the user typing a filter string in the field provided.
3. Click the 'Add' button when you have chosen the category upon which you wish to filter.
Comodo Internet Security 2012 User Guide | © 2012 Comodo Security Solutions Inc. | All rights reserved 106

Comodo Internet Security 2012 - User Guide
Following are the options available in the 'Add' drop-down:
i. Action: Selecting the 'Action' option displays a drop down field and a set of specific filter parameters that can be selected or deselected.
a) Select 'Equal' or 'Not Equal' option from the drop down. 'Not Equal' will invert your selected choice. b) Now select the checkboxes of the specific filter parameters to refine your search. The parameter available are:• Quarantine: Displays events where the user chose to quarantine a file • Remove: Displays events where the user chose to delete an item • Ignore: Displays events where the user chose to ignore an item • Detect: Displays events for detection of a malware • Ask: Displays events when user was asked by alert concerning some Defense+, Firewall or Antivirus event • Restore: Displays events of the applications that were quarantined and restored.
The filtered entries are shown directly underneath.
For example, if you checked the 'Quarantine' box then selected 'Not Equal', you would see only those Events where the Quarantine Action was not selected at the virus notification alert.
ii. Location: Selecting the 'Location' option displays a drop-down field and text entry field.
Comodo Internet Security 2012 User Guide | © 2012 Comodo Security Solutions Inc. | All rights reserved 107

Comodo Internet Security 2012 - User Guide
a) Select 'Contains' or 'Does Not Contain' option from the drop-down field.b) Enter the text or word that needs to be filtered.
The filtered entries are shown directly underneath.
For example, if you select 'Contains' option from the drop-down field and enter the word 'unclassifiedMalware' in the text field, then all events containing the word 'unclassifiedMalware' in the Location field will be displayed directly underneath. If you select 'Does Not Contain' option from the drop-down field and enter the word 'System' in the text field, then all events that do not have the word 'System' will be displayed directly underneath.
iii. Malware Name: Selecting the 'Malware' option displays a dropdown field and text entry field.
a) Select 'Contains' or 'Does Not Contain' option from the drop-down field.b) Enter the text or word that needs to be filtered.
The filtered entries are shown directly underneath.
Refer to the example given for 'Location' option for better understanding.
iv. Status: Selecting the 'Status' option displays a drop-down field and a set of specific filter parameters that can be selected or deselected.
a) Select 'Equal' or 'Not Equal' option from the dropdown field. 'Not Equal' will invert your selected choice. b) Now select the checkboxes of the specific filter parameters to refine your search. The parameter available are:
• Success: Displays Events that successfully executed (for example, the database was successfully updated)
• Failure: Displays Events that failed to execute (for example, the database failure to update correctly)
The filtered entries are shown directly underneath.
Refer to the example given for 'Action' option for better understanding.
Note: More than one filter can be added in the 'Advanced Filter' pane. After adding one filter type, the option to select the next filter type automatically appears. You can also remove a filter type by clicking the 'Remove' option at the end of every filter option.
Other Logs - Advanced FiltersThe Advanced Filter function for Alerts Displayed, Tasks Launched and Configuration Changes are the same in Antivirus interface, Firewall interface and Defense+ Interface.
To configure Advanced Filters for Alerts Displayed1. Select 'View > Advanced Filter'.
2. Under 'Other Logs', select 'Alerts Displayed'.
This will open the Advanced Filter pane to the upper right. From here, you can chose the category of filter from a drop down box. Each of these categories can be further refined by either selecting or deselecting specific filter parameters or by the user typing a filter string in the field provided.
3. Click 'Add' when you have chosen the category upon which you wish to filter.
Comodo Internet Security 2012 User Guide | © 2012 Comodo Security Solutions Inc. | All rights reserved 108

Comodo Internet Security 2012 - User Guide
The following table lists the various filter categories and parameters for 'Alerts Displayed'.
Available Filters - Other Logs - Alerts Displayed
Filter Option Description
Type Displays the type of alert. It can be a Firewall, Defense+ or Antivirus alert
Description Displays the name of the event
Advice Suggests an advice that can be executed by the user for that event
Answered Displays the date and time on which the alert was answered
Flags Filters the events based on the flags set for them.
Answer Displays the answer that was given by you for the alert
Treat As Displays the type of policy, if any, for the corresponding event type
To configure Advanced Filters for Tasks Launched1. Select 'View > Advanced Filter'.
2. Under 'Other Logs', select 'Tasks Launched'.
This will open the Advanced Filter pane to the upper right. From here, you can chose the category of filter from a drop
Comodo Internet Security 2012 User Guide | © 2012 Comodo Security Solutions Inc. | All rights reserved 109

Comodo Internet Security 2012 - User Guide
down box. Each of these categories can be further refined by either selecting or deselecting specific filter parameters or by the user typing a filter string in the field provided.
3. Click 'Add' when you have chosen the category upon which you wish to filter.
The following table lists the various filter categories and parameters for 'Tasks Launched'.
Available Filters - Other Logs - Tasks Launched
Filter Option Description
Type Displays the type of task. It can be an antivirus update or scan type.
Parameter Displays the name of the scan profile. This column is populated only if 'Av Scan' option is displayed in 'Type' column.
Completed Displays the date and time at which the task was executed.
Code Displays a code value if the task was not performed successfully and for task updates it shows a standard value: 0x00000001 if base is up to date
To configure Advanced Filters for 'Configuration Changes'1. Select 'View' > 'Advanced Filter'
2. Under 'Other Logs', select 'Configuration Changes'
This will open the Advanced Filter pane to the upper right. From here, you can chose the category of filter from a drop down box. Each of these categories can be further refined by either selecting or deselecting specific filter parameters
Comodo Internet Security 2012 User Guide | © 2012 Comodo Security Solutions Inc. | All rights reserved 110

Comodo Internet Security 2012 - User Guide
or by the user typing a filter string in the field provided.
3. Click 'Add' when you have chosen the category upon which you wish to filter.
The following table lists the various filter categories and parameters for 'Configuration Changes'.
Available Filters - Other Logs - Configuration Changes
Filter Option Description
Action Displays events according to the response (or action taken) by Defense+
Modifier Displays events sorted based on whether the configuration was changed by the User, Antivirus alert, Firewall alert or Defense+ alert. It could also be a Buffer Overflow alert, Auto learn or Execution alert.
Object Displays the object for which the configuration change took place.
Name Displays the name of the configuration entry, if it can be determined
Date FilterThe Date Filter can be seen in the lower left hand pane. Using the Date Filter you can easily see the events on a particular date or on a date range.
Comodo Internet Security 2012 User Guide | © 2012 Comodo Security Solutions Inc. | All rights reserved 111

Comodo Internet Security 2012 - User Guide
To view the events on a particular date1. Click the right arrow or the left arrow to select the required month and year.
2. Now, click the required date. The events on that particular date is displayed.
Comodo Internet Security 2012 User Guide | © 2012 Comodo Security Solutions Inc. | All rights reserved 112

Comodo Internet Security 2012 - User Guide
To view the events on a date range 1. Click the right arrow or the left arrow to select the required month and year.2. Select the start date from which you wish to view the events. Hold the shift key and click the end date till which you
wish to view the events. The events for that particular date range is displayed.
To close the Date Filter• Click the 'X' symbol in Date Filter.
Or• Click 'View' in the menu bar and click the 'Date Filter' option. This is a toggle command and you can repeat this
step to make the Date Filter appear.
Comodo Internet Security 2012 User Guide | © 2012 Comodo Security Solutions Inc. | All rights reserved 113

Comodo Internet Security 2012 - User Guide
Exporting Log Files to HTMLExporting log files is useful for archiving and troubleshooting purposes. After making your choice and setting the filters. the log displayed can be directly exported as HTML file. There are two ways to export log files in the Log Viewer interface - using the context sensitive menu and via the 'File' menu option.
i. File Menu1. Select the event for which the log report is to be taken.
2. Click 'Export' from the File menu.
3. Select the location where the log report has to be saved, provide a file name and click 'Save'.
ii. Context Sensitive Menu
1. Right click in the log display window to export the currently displayed log file to HTML.
You can export a custom view that you created using the available Filters by right clicking and selecting 'Export' from the context sensitive menu. Again, you are asked to provide a file name and save location for the file.
2.5.Submit Files to Comodo for AnalysisFiles which are not in the Comodo safe list and are also unknown to the user can be submitted directly to Comodo for analysis and possible addition to the safe list. Files can also be submitted by clicking 'Submit' button in the Unrecognized Files interface.
You can submit the files which you suspect to be a malware or the files which you consider as safe but identified as malware by Comodo Antivirus (False Positives). The files are analyzed by experts in Comodo and added to white list or black list accordingly.
To submit files to Comodo1. Click on the 'Submit Files' link from the main Antivirus Tasks interface. The Browser dialog opens.
Comodo Internet Security 2012 User Guide | © 2012 Comodo Security Solutions Inc. | All rights reserved 114

Comodo Internet Security 2012 - User Guide
2. Select the items (files or folders) you wish to submit to Comodo for analysis from the right hand pane and move them to left hand pane by clicking the right arrow one by one. (If you want to revert a file, select the file from the left hand pane and click the left arrow)
3. Click 'Submit As' and select :
• 'False-Positive' for files you consider to be safe or• 'Suspicious' for files you suspect to be malware from the submit options.
Progress bars indicate the progress of the files submission to Comodo.
When a file is first submitted, Comodo's online file look-up service will check whether the file is already queued for analysis by our technicians. The results screen displays these results:
Comodo Internet Security 2012 User Guide | © 2012 Comodo Security Solutions Inc. | All rights reserved 115
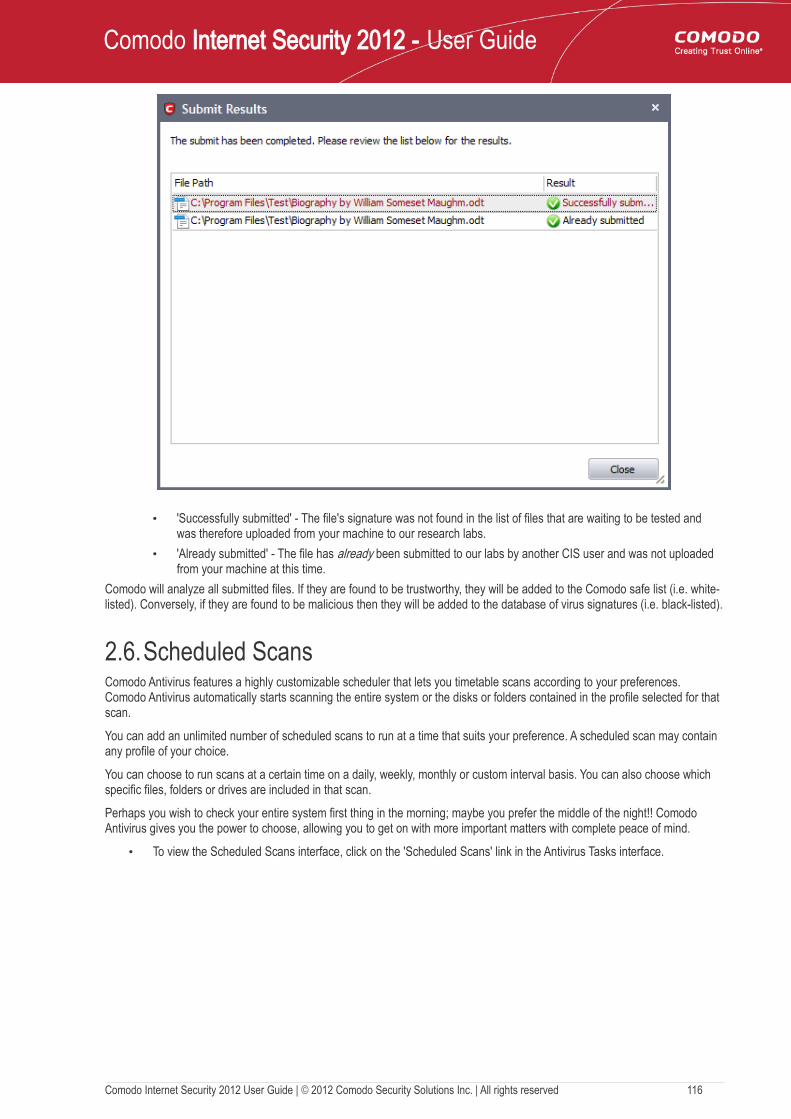
Comodo Internet Security 2012 - User Guide
• 'Successfully submitted' - The file's signature was not found in the list of files that are waiting to be tested and was therefore uploaded from your machine to our research labs.
• 'Already submitted' - The file has already been submitted to our labs by another CIS user and was not uploaded from your machine at this time.
Comodo will analyze all submitted files. If they are found to be trustworthy, they will be added to the Comodo safe list (i.e. white-listed). Conversely, if they are found to be malicious then they will be added to the database of virus signatures (i.e. black-listed).
2.6.Scheduled ScansComodo Antivirus features a highly customizable scheduler that lets you timetable scans according to your preferences. Comodo Antivirus automatically starts scanning the entire system or the disks or folders contained in the profile selected for that scan.
You can add an unlimited number of scheduled scans to run at a time that suits your preference. A scheduled scan may contain any profile of your choice.
You can choose to run scans at a certain time on a daily, weekly, monthly or custom interval basis. You can also choose which specific files, folders or drives are included in that scan.
Perhaps you wish to check your entire system first thing in the morning; maybe you prefer the middle of the night!! Comodo Antivirus gives you the power to choose, allowing you to get on with more important matters with complete peace of mind.
• To view the Scheduled Scans interface, click on the 'Scheduled Scans' link in the Antivirus Tasks interface.
Comodo Internet Security 2012 User Guide | © 2012 Comodo Security Solutions Inc. | All rights reserved 116

Comodo Internet Security 2012 - User Guide
Comodo Antivirus is shipped with two default schedules 'Weekly Virus Scanning #1' and 'Weekly Virus Scanning #2' to scan your computer on every Sunday at 12:00 am and every Wednesday at 12:00 am respectively. You can edit these schedules by selecting it and clicking the 'Edit' button.
From the 'Scheduled Scans' panel, you can
• Set a new scheduled scan• Edit a pre-scheduled scan and • Cancel a pre-scheduled scan
The detection settings for the Scheduled Scans can be configured under the Scheduled Scanning tab of the Scanner Settings interface.
To add a new scan schedule
1. Click 'Add' from 'Scheduled Scans' interface. The 'Scan Schedule' panel will open.
Comodo Internet Security 2012 User Guide | © 2012 Comodo Security Solutions Inc. | All rights reserved 117

Comodo Internet Security 2012 - User Guide
2. Type a name for the newly scheduled scan in the 'Name' box.
3. Select a scanning profile from the list of preset scanning profiles by clicking at the drop-down arrow, in the 'Profile' box. (For more details on creating a custom Scan Profile that can be selected in a scheduled scan, see Antivirus Tasks > Scan Profiles.
4. Select the days of the week you wish to schedule the scanning from 'Days of the Week' check boxes.
5. Set the starting time for the scan in the selected days in the 'Start time' drop-down boxes.
6. Click 'Apply'.
Repeat the process to schedule more scans with different scan profiles.
To edit a Scheduled Scan
1. Select the schedule from the list.
2. Click 'Edit' in the 'Scheduled Scans' setting panel.
3. Edit the necessary fields in the 'Scan Schedule' panel.
4. Click 'Apply'.
To cancel a pre-scheduled scan1. Select the Scan Schedule you wish to cancel in the 'Scheduled Scans' settings panel.
2. Click 'Remove'.
2.7.Scan ProfilesCreating a Scan Profile allows you to instruct Comodo Antivirus scan selected areas, folders or selected drives of your system. You will be asked to select a profile whenever you click the 'Scan Now' link on the Summary Screen.
You can create custom scan profiles, to define selected disks or folders to be scanned and the created scan profile can be re-used for any desired scan event i.e. Run a Scan (On-Demand Scanning) and Scheduled Scans. You can create as many number of custom scan profiles as you wish according to the usage of your system. A Scan Profile allows you to scan only a selected area of your storage, saving time and resources.
Comodo Internet Security 2012 User Guide | © 2012 Comodo Security Solutions Inc. | All rights reserved 118

Comodo Internet Security 2012 - User Guide
• New scan profiles can be created by clicking the 'Create New Scan' button in the 'Run a Scan' panel or by clicking the 'Add button' in the 'Scan Profiles' area.
• New scan profiles can then be referenced when creating a new 'Scheduled Scan' and as the target of an on-demand scan in the 'Run a scan' area.
Just to clarify, AntiVirus scan profiles are purely concerned with the location of a scan, not the parameters of the scan. All scan profiles use the parameters as determined in the specific 'Scanner Settings' tab of that type of scan.
To access the Scan Profiles interface
• Click 'Scan Profiles' from the main Antivirus Tasks interface.
Comodo Antivirus contains two default Scan Profiles 'My Computer' and 'Smart Scan'. These profiles are predefined and cannot be edited or removed.
i. My Computer (Default) – On selecting this, the Antivirus scans all drives on your machine.ii. Smart Scan – On selecting this, the Antivirus runs a quick scan on the critical areas in your system which are
highly prone to infection from viruses, rootkits and other malware. The areas scanned include system memory, autorun entries, hidden services, boot sectors and other critical areas like crucial registry keys in Windows registry, system files and system configuration. These areas are highly responsible for the stability of your computer and keeping them clean and sanitized is essential to keep your computer healthy and running.
You can select any one of these Scan Profiles if you want to scan the respective areas.
To create a new scan profile from Scan Profiles option
1. Click 'Scan Profiles' from the main Antivirus Tasks interface.
2. Click 'Add'. The 'Scan Profile' dialog appears.
3. Type a name for the scan profile to be created in the 'Name' box and click 'Add'.
Comodo Internet Security 2012 User Guide | © 2012 Comodo Security Solutions Inc. | All rights reserved 119

Comodo Internet Security 2012 - User Guide
A configuration screen appears, prompting you to select the locations to be scanned when the newly created scan profile is selected. The left column displays all possible items (drives, folders and files) on your system for which scanning is available.
4. Browse to the folder location in the left column and select the folder.
5. Drag and drop all the files, folders and/or drives you require, into the right hand panel or select the files or folders and move them to left-hand pane by clicking the right arrow one by one. (If you want to revert a file, select the file from the left hand pane and click the left arrow).
6. Click 'Apply'.
7. Repeat the process to create more Scan Profiles.
8. Click 'Apply' in the Scan Profile interface for the created profiles to take effect.
You can see that the Scan Profile you have created, appearing as a target profile in the 'Run a Scan' panel...
Comodo Internet Security 2012 User Guide | © 2012 Comodo Security Solutions Inc. | All rights reserved 120

Comodo Internet Security 2012 - User Guide
...and is also available for selection during a scheduled scan in the drop-down.
• To edit a Scan Profile, select the profile and click 'Edit'.• To delete a Scan Profile, select the profile and click 'Remove'.
2.8.Scanner SettingsThe Settings configuration panel allows you to customize various options related to Real Time Scanning (On-Access Scanning), Manual Scanning, Scheduled Scanning and Exclusions (a list containing the files you considered safe and ignored the alert during a virus scan).
• The settings made for each type of the scan applies to all future scans of that type. • All items listed and all items added to the 'Exclusions' list is excluded from all future scans of all types.
To open Virus Scanner Settings panel• Click on 'Scanner Settings' link in the Antivirus Tasks interface.
Comodo Internet Security 2012 User Guide | © 2012 Comodo Security Solutions Inc. | All rights reserved 121

Comodo Internet Security 2012 - User Guide
The options that can be configured using the settings panel are
• Real Time Scanning - To set the parameters for on-access scanning; • Manual Scanning - To set the parameters for manual Scanning (Run a Scan); • Scheduled Scanning - To set the parameters for scheduled scanning; • Exclusions - To see the list of ignored threats and to set the parameters for Exclusions.
2.8.1. Real Time Scanning The Real time Scanning (aka 'On-Access Scanning') is always ON and checks files in real time when they are created, opened or copied. (as soon as you interact with a file, Comodo Antivirus checks it). This instant detection of viruses assures you, the user, that your system is perpetually monitored for malware and enjoys the highest level of protection.
The Real Time Scanner also scans the system memory on start. If you launch a program or file which creates destructive anomalies, then the scanner blocks it and alerts you immediately - giving you real time protection against threats.
You also have options to automatically remove the threats found during scanning and to update virus database before scanning. It is highly recommended that you enable the Real Time Scanner to ensure your system remains continually free of infection.
The Real Time Scanning setting allows you to switch the On Access scanning between Disabled, Stateful and On Access and allows you to specify detection settings and other parameters that are deployed during on-access scans.
To set the Real Time Scanning level• Click on the 'Real Time Scanning' tab in the 'Scanner Settings' panel.
Comodo Internet Security 2012 User Guide | © 2012 Comodo Security Solutions Inc. | All rights reserved 122

Comodo Internet Security 2012 - User Guide
• Drag the real time Scanning slider to the required level. The choices available are Disabled (not recommended), Stateful (default) and On Access. The setting you choose here are also displayed in the Summary screen.
• On Access - Provides the highest level of On Access Scanning and protection. Any file opened is scanned before it is run and the threats are detected before they get a chance to be executed.
• Stateful (Default) - Not only is Comodo Internet Security one of the most thorough and effective AV solutions available, it is also very fast. CIS employs a feature called Stateful File Inspection for real time virus scanning to minimize the effects of on-access scanning on the system performance. Selecting the 'Stateful' option means CIS scans only files that have not been scanned since the last virus update - greatly improving the speed, relevancy and effectiveness of the scanning.
• Disabled - The Real time scanning is disabled. Antivirus does not perform any scanning and the threats cannot be detected before they impart any harm to the system.
Detection Settings
• Scan memory on start - When this check box is selected, the Antivirus scans the system memory during system start-up (Default = Disabled).
• Do not show antivirus alerts - This option allows you to configure whether or not to show antivirus alerts when malware is encountered. Choosing 'Do not show antivirus alerts' will minimize disturbances but at some loss of user awareness. If you choose not to show alerts then you have a choice of default responses that CIS should automatically take – either 'Block Threats' or 'Quarantine Threats'. (Default = Enabled and 'Block Threats’)
Note: Comodo Antivirus will handle the threats/infections based on the option selected from the drop-down, if the user selects 'No, I will try to clean myself' in the alert screen that is displayed whenever a threat/infection is discovered by real-time/on
Comodo Internet Security 2012 User Guide | © 2012 Comodo Security Solutions Inc. | All rights reserved 123

Comodo Internet Security 2012 - User Guide
access scanning.
• Automatically update virus database - When this check box is selected, Comodo Internet Security checks for latest virus database updates from Comodo website and downloads the updates automatically, on system start-up and subsequently at regular intervals (Default = Enabled).
• Show notification messages - Alerts are the pop-up notifications that appear in the lower right hand of the screen whenever the on-access scanner discovers a virus on your system. These alerts are a valuable source of real-time information that helps the user to immediately identify which particular files are infected or are causing problems. Disabling alerts does not affect the scanning process itself and Comodo Antivirus still continues to identify and deals with threats in the background. For more details on Antivirus alerts, click here (Default = Enabled).
• Heuristics Scanning Level - Comodo AntiVirus employs various heuristic techniques to identify previously unknown viruses and Trojans. 'Heuristics' describes the method of analyzing the code of a file to ascertain whether it contains code typical of a virus. If it is found to do so then the application deletes the file or recommends it for quarantine. Heuristics is about detecting virus-like behavior or attributes rather than looking for a precise virus signature that matches a signature on the virus blacklist.
This is a quantum leap in the battle against malicious scripts and programs as it allows the engine to 'predict' the existence of new viruses - even if it is not contained in the current virus database.
The drop-down menu allows you to select the level of Heuristic scanning from the four levels:
• Off - Selecting this option disables heuristic scanning. This means that virus scans only uses the 'traditional' virus signature database to determine whether a file is malicious or not.
• Low (Default) - 'Lowest' sensitivity to detecting unknown threats but will also generate the fewest false positives. This setting combines an extremely high level of security and protection with a low rate of false positives. Comodo recommends this setting for most users.
• Medium - Detects unknown threats with greater sensitivity than the 'Low' setting but with a corresponding rise in the possibility of false positives.
• High - Highest sensitivity to detecting unknown threats but this also raises the possibility of more false positives too.
• Do not scan files larger than - This box allows you to set a maximum size (in MB) for the individual files to be scanned during on-access scanning. Files larger than the size specified here, are not scanned. (Default = 40 MB) .
• Keep an alert on the screen for - This box allows you to set the time period (in seconds) for which the alert message should stay on the screen (Default = 120 seconds).
• Do not scan script files larger than - This box allows you to set a maximum size (in MB) for the script files to be scanned during on-access scanning. Files larger than the size specified here, are not scanned. (Default = 4 MB) .
Click 'OK' for the settings to take effect.
2.8.2. Manual ScanningThe Manual Scanning setting allows you to set the properties and parameters for Run a Scan (On Demand Scan).
Comodo Internet Security 2012 User Guide | © 2012 Comodo Security Solutions Inc. | All rights reserved 124

Comodo Internet Security 2012 - User Guide
• Scan memory on start - When this check box is selected, the Antivirus scans the system memory while starting a manual scan i.e. Run a Scan option (Default = Disabled).
• Scan archive files - When this check box is selected, the Antivirus scans archive files such as .ZIP and .RAR files. You are alerted to the presence of viruses in compressed files before you even open them. These include RAR, WinRAR, ZIP, WinZIP ARJ, WinARJ and CAB archives (Default = Enabled) .
• Automatically update virus database before scanning - Instructs Comodo Internet Security to check for latest virus database updates from Comodo website and download the updates automatically before starting an on-demand scanning (Default = Enabled) .
• Enable cloud scanning - Instructs Comodo Internet Security to perform cloud based antivirus scanning. Selecting this option enables CIS to detect the very latest viruses more accurately because the local scan is augmented with a real-time look-up of Comodo's online signature database. With Cloud Scanning enabled your system is capable of detecting zero-day malware even if your local anitvirus database is out-dated. (Default = Disabled).• Submit unknown files for analysis - Files which are identified as 'unknown' i.e. the files are neither in the
safe-list or black list, from the cloud based scanning to Comodo for analysis. The files will be analyzed by experts at Comodo and added to the white list or black list accordingly. This will help maintaining the white list and black list more up-to-date and benefit all the users of CIS. (Default = Disabled)
• Enable rootkit scanning - Instructs Comodo Internet Security to scan the file system and Windows registry for (malicious) files or registry values that have been hidden by rootkits. If any such Rootkits are found, they are listed in the scan results - enabling you to remove them from your system (Default = Disabled).
Background Note:A rootkit is a type of malware that is designed to conceal the fact that the user's system has been compromised. Once installed, they camouflage themselves as (for example) standard operating system files, security tools and APIs used for diagnosis, scanning, and monitoring. Rootkits then store hidden malicious files into the Window's file system and/or store
Comodo Internet Security 2012 User Guide | © 2012 Comodo Security Solutions Inc. | All rights reserved 125

Comodo Internet Security 2012 - User Guide
hidden registry values into the Window's Registry. These malicious files and registry values can be used by hackers to steal user passwords, credit card information, computing resources, or conduct other unauthorized activities.Rootkits are usually not detectable by normal virus scanners as they camouflage themselves as system files. However, Comodo AntiVirus features a dedicated Rootkit detection scanner that identifies rootkits and, if any, the hidden files and the registry keys stored by them. Any discovered rootkits, hidden malicious files or registry values are listed along with the Antivirus Scan results at the end of each manual scan.
• Heuristics Scanning Level - Comodo Internet Security employs various heuristic techniques to identify previously unknown viruses and Trojans. 'Heuristics' describes the method of analyzing the code of a file to ascertain whether it contains code typical of a virus. If it is found to do so then the application deletes the file or recommend it for quarantine. Heuristics is about detecting virus-like behavior or attributes rather than looking for a precise virus signature that matches a signature on the virus blacklist. This is a quantum leap in the battle against malicious scripts and programs as it allows the engine to 'predict' the existence of new viruses - even if it is not contained in the current virus database.
The drop-down menu allows you to select the level of Heuristic scanning from the four levels:
• Off - Selecting this option disables heuristic scanning. This means that virus scans only uses the 'traditional' virus signature database to determine whether a file is malicious or not.
• Low (Default) - 'Lowest' sensitivity to detecting unknown threats but will also generate the fewest false positives. This setting combines an extremely high level of security and protection with a low rate of false positives. Comodo recommends this setting for most users.
• Medium - Detects unknown threats with greater sensitivity than the 'Low' setting but with a corresponding rise in the possibility of false positives.
• High - Highest sensitivity to detecting unknown threats but this also raises the possibility of more false positives too.
• Do not scan files larger than - This box allows you to set a maximum size (in MB) for the individual files to be scanned during manual scanning. Files larger than the size specified here, are not scanned (Default = 40 MB).
Click 'OK' for the settings to take effect .
2.8.3. Scheduled Scanning The Scheduled Scanning setting panel allows you to customize the scheduler that lets you timetable scans according to your preferences.
Comodo Internet Security 2012 User Guide | © 2012 Comodo Security Solutions Inc. | All rights reserved 126

Comodo Internet Security 2012 - User Guide
You can choose to run scheduled scans at a certain time on a daily, weekly, monthly or custom interval basis. You can also choose which specific files, folders or drives are included in that scan by choosing the scan profiles.
The detection settings are as follows:
• Scan memory on start - When this check box is selected, the Antivirus scans the system memory during the start of any scheduled scan (Default = Enabled).
• Scan archive files - When this check box is selected, the Antivirus scans archive files such as .ZIP and .RAR files during any scheduled scan. You are alerted to the presence of viruses in compressed files before you even open them. These include RAR, WinRAR, ZIP, WinZIP ARJ, WinARJ and CAB archives (Default = Enabled).
• Automatically quarantine threats found during scanning - When this check box is selected, the Antivirus moves the file detected to be containing the malware, to Quarantined Items. From the quarantined items the files can be restored or deleted at your will (Default = Disabled).
• Automatically update virus database before scanning - When this check box is selected, Comodo Internet Security checks for latest virus database updates from Comodo website and downloads the updates automatically, before the start of every scheduled scan (Default = Enabled).
• Show scanning progress - When this check box is selected, a progress bar is displayed on start of a scheduled scan. Clear this box if you do not want to see the progress bar (Default = Enabled).
• Enable cloud scanning - Instructs Comodo Internet Security to perform cloud based antivirus scanning. Selecting this option enables CIS to detect the very latest viruses more accurately because the local scan is augmented with a real-time look-up of Comodo's online signature database. With Cloud Scanning enabled your system is capable of detecting zero-day malware even if your local anitvirus database is out-dated. (Default = Disabled). • Submit unknown files for analysis - Files which are identified as 'unknown' i.e. the files are neither in the
safe-list or black list, from the cloud based scanning to Comodo for analysis. The files will be analyzed by
Comodo Internet Security 2012 User Guide | © 2012 Comodo Security Solutions Inc. | All rights reserved 127

Comodo Internet Security 2012 - User Guide
experts at Comodo and added to the white list or black list accordingly. This will help maintaining the white list and black list more up-to-date and benefit all the users of CIS. (Default = Disabled)
• Enable rootkit scanning - Instructs Comodo Internet Security to scan the file system and Windows registry for (malicious) files or registry values that have been hidden by rootkits. If any such Rootkits are found, they are listed in the scan results - enabling you to remove them from your system (Default = Disabled).
Background Note:A rootkit is a type of malware that is designed to conceal the fact that the user's system has been compromised. Once installed, they camouflage themselves as (for example) standard operating system files, security tools and APIs used for diagnosis, scanning, and monitoring. Rootkits then store hidden malicious files into the Window's file system and/or store hidden registry values into the Window's Registry. These malicious files and registry values can be used by hackers to steal user passwords, credit card information, computing resources, or conduct other unauthorized activities.Rootkits are usually not detectable by normal virus scanners as they camouflage themselves as system files. However, Comodo AntiVirus features a dedicated Rootkit detection scanner that identifies rootkits and, if any, the hidden files and the registry keys stored by them. Any discovered rootkits, hidden malicious files or registry values are listed along with the Antivirus Scan results at the end of each manual scan.
• Heuristics Scanning Level - Comodo Internet Security employs various heuristic techniques to identify previously unknown viruses and Trojans. 'Heuristics' describes the method of analyzing the code of a file to ascertain whether it contains code typical of a virus. If it is found to do so then the application deletes the file or recommends it for quarantine. Heuristics is about detecting virus-like behavior or attributes rather than looking for a precise virus signature that matches a signature on the virus blacklist.
This is a quantum leap in the battle against malicious scripts and programs as it allows the engine to 'predict' the existence of new viruses - even if it is not contained in the current virus database.
The drop-down menu allows you to select the level of Heuristic scanning from the four levels:
• Off - Selecting this option disables heuristic scanning. This means that virus scans only uses the 'traditional' virus signature database to determine whether a file is malicious or not.
• Low (Default) - 'Lowest' sensitivity to detecting unknown threats but will also generate the fewest false positives. This setting combines an extremely high level of security and protection with a low rate of false positives. Comodo recommends this setting for most users.
• Medium - Detects unknown threats with greater sensitivity than the 'Low' setting but with a corresponding rise in the possibility of false positives.
• High - Highest sensitivity to detecting unknown threats but this also raises the possibility of more false positives too.
• Do not scan files larger than - This box allows you to set a maximum size (in MB) for the individual files to be scanned during scheduled scanning. Files larger than the size specified here, are not scanned (Default = 40 MB).
Click 'OK' for the settings to take effect.
2.8.4. ExclusionsThe Exclusions tab in the Scanner Settings panel displays a list of applications/files for which you have selected Ignore in the Scan Results window of Run a Scan option or added to the Exclusions from an antivirus alert.
Comodo Internet Security 2012 User Guide | © 2012 Comodo Security Solutions Inc. | All rights reserved 128

Comodo Internet Security 2012 - User Guide
All items listed and all items added to the 'Exclusions' list is excluded from all future scans of all types.
Also, you can manually define trusted files or applications to be excluded from a scan .
To define a file/application as trusted and to be excluded from scanning1. Click 'Add'.
You now have 2 methods available to choose the application that you want to trust - 'Browse Files...' and 'Browse Running Processes'.
• Browse Files... - This option is the easiest for most users and simply allows you to browse the files which you want to exclude from a virus scan.
• Browse Running Processes - As the name suggests, this option allows you to choose the target application from a list of processes that are currently running on your PC.
When you have chosen the application using one of the methods above, the application name appears along with its location.
2. Click 'OK' for the settings to take effect.
3.Firewall Tasks - IntroductionThe Firewall component of Comodo Internet Security (hereafter known simply as Comodo Firewall) offers the highest levels of security against inbound and outbound threats, stealths your computer's ports against hackers and blocks malicious software from transmitting your confidential data over the Internet. Comodo Firewall makes it easy for you
Comodo Internet Security 2012 User Guide | © 2012 Comodo Security Solutions Inc. | All rights reserved 129

Comodo Internet Security 2012 - User Guide
to specify exactly which applications are allowed to connect to the Internet and immediately warns you when there is suspicious activity.
It can be accessed at all times by clicking on the Firewall tab from the Navigation panel.
The Firewall main configuration area provides easy access to all the features and allows you to create rules for applications and network connections through a series of shortcuts and wizards. Click on the links below to see detailed explanations of each area in this section.
• View Firewall Events• Define a New Trusted Application• Define a New Blocked Application• Network Security Policy• View Active Connections• Stealth Port Wizard• Firewall Behavior Settings
3.1.View Firewall EventsComodo Internet Security records a history of all actions taken by the firewall. These can be viewed by clicking 'View Firewall Events' from the ' Firewall Tasks' area. Firewall 'Events' are generated and recorded for various reasons - including whenever an application or process makes a connection attempt that contravenes a rule in your Network Security Policy or whenever there is a change in Firewall settings.
By default, CIS stores the log file in Support DataBase (SDB) format as cislogs.sdb file which is located in C:\Documents and Settings\All Users\Application Data\Comodo\Firewall Pro. Logs stored in this file can be extracted by using a suitable application. Logs can also be exported to html by clicking 'More.. > File > Export'.
Comodo Internet Security 2012 User Guide | © 2012 Comodo Security Solutions Inc. | All rights reserved 130

Comodo Internet Security 2012 - User Guide
To view Firewall events• Click 'View Firewall Events' in the common tasks of 'Firewall tasks' interface.
Column Descriptions1. Application - Indicates which application or process propagated the event. If the application has no icon, the default
system icon for executable files are used;
2. Action - Indicates how the firewall has reacted to the connection attempt.
3. Protocol - Represents the Protocol application attempted to use to create the connection. This is usually TCP/IP or UDP - which are the most heavily used networking protocols.
4. Source IP - States the IP address of the host that made the connection attempt. This is usually the IP address of your computer for outbound connections.
5. Source Port - States the port number on the host at the source IP which was used to make this connection attempt.
6. Destination IP - States the IP address of the host to which the connection attempt was made. This is usually the IP address of your computer for inbound connections.
7. Destination Port - States the port number on the host at the destination IP to which the connection attempt was made.
8. Date/Time - Contains precise details of the date and time of the connection attempt.
• Click 'Refresh' to reload and update the displayed list, to include all events generated since the time you first accessed the 'Firewall Events' area.
• Click 'More' to load the full, Comodo Internet Security Log Viewer module. See below for more details on this module.
Log Viewer ModuleClick 'More' to load the full, Comodo Internet Security Log Viewer module. Alternatively, this module can be opened by double-clicking the 'cfplogvw' exe file that is stored in the installation path of the CIS application. Usually the path is C:\Program Files\COMODO\COMODO Internet Security.
This window contains a full history of logged events in two categories: Logs per Module and Other Logs.
It also allows you to build custom log files based on specific filters and to export log files for archiving or troubleshooting
Comodo Internet Security 2012 User Guide | © 2012 Comodo Security Solutions Inc. | All rights reserved 131

Comodo Internet Security 2012 - User Guide
purposes.
The Log Viewer Module is divided into three sections. The top panel displays a set of handy, predefined time Filters. The left panel the types of Logs. The right hand side panel displays the actual events that were logged for the time period you selected in the top panel and the type of log selected in the left panel (or the events that correspond to the filtering criteria you selected).
The Logs per Module option contains the logged events of Firewall, Defense+ and Antivirus modules and Other Logs options contains logged events of the following:
• Alerts Displayed: Displays the list of various alerts that were displayed to the user, the response given by the user to those alerts and other related details of the alert.
• Tasks Launched: Displays the various Antivirus tasks such as updates and scans that have taken place. This area will contain a log of all on demand and scheduled AV scans and the result of that scan.
• Configuration Changes: Displays a log of all configuration changes made by the user in the CIS application. Filtering Log FilesComodo Internet Security allows you to create custom views of all logged events according to user defined criteria.
Preset Time Filters:
Clicking on any of the preset filters in the top panel alters the display in the right hand panel in the following ways:
• Today - Displays all logged events for today.• Current Week - Displays all logged events during the current week. (The current week is calculated from the
Comodo Internet Security 2012 User Guide | © 2012 Comodo Security Solutions Inc. | All rights reserved 132

Comodo Internet Security 2012 - User Guide
Sunday to Saturday that holds the current date.)• Current Month - Displays all logged events during the month that holds the current date.• Entire Period - Displays every event logged since Comodo Internet Security was installed. (If you have cleared
the log history since installation, this option shows all logs created since that clearance).The example below shows an example display when the Firewall Events for 'Today' are displayed.
Note: The type of events logged by the Antivirus, Firewall and Defense+ modules of Comodo Internet Security differ from each other. This means that the information and the columns displayed in the right hand side panel change depending on which type of log you have selected in the top and left hand side panel. For more details on the data shown in the columns, see View Antivirus Events or View Defense+ Events.
User Defined Filters:
Having chosen a preset time filter from the top panel, you can further refine the displayed events according to specific filters. The type of filters available for Firewall logs differ to those available for Defense+ logs. The table below provides a summary of available filters and their meanings:
Available Filters - Logs per Module
Antivirus Filter Firewall Filters Defense+ Filters
Action - Displays events according to the response (or action taken) by
Action - Displays events according to the response (or action taken) by the
Application - Displays only the events propagated by a specific application
Comodo Internet Security 2012 User Guide | © 2012 Comodo Security Solutions Inc. | All rights reserved 133

Comodo Internet Security 2012 - User Guide
Available Filters - Logs per Module
the Antivirus firewall
Location - Displays only the events logged from a specific location
Application - Displays only the events propagated by a specific application
Flags - Displays events according to the response (or action taken) by Defense+
Malware Name - Displays only the events logged corresponding to a specific malware
Destination IP - Displays only the events with a specific target IP address
Target - Displays only the events that involved a specified target application
Status - Displays the events according to the status after the action taken. It can be either 'Success' or 'Fail'
Destination Port - Displays only the events with a specific target port number
Direction - Indicates if the event was an Inbound or Outbound connection
Protocol - Displays only the events that involved a specific protocol
Source IP - Displays only the events that originated from a specific IP address
Source Port - Displays only the events that originated from a specific port number
Creating Custom FiltersCustom Filters can be created through the Advanced Filter Interface. You can open the Advanced Filter interface either by using the View option in the menu bar or using the context sensitive menu.
• Click View > Advanced Filter to open the 'Advanced Filter' configuration area.Or
• Right click on any event and select 'Advanced Filter' option to open the corresponding configuration area.The 'Advanced Filter' configuration area is displayed in the top half of the interface whilst the lower half displays the Events, Alerts, Tasks or Configuration Changes that the user has selected from the upper left pane. If you wish to view and filter event logs for other modules then simply click log name in the tree on the upper left hand pane.
The Advanced Log filter displays different fields and options depending on the log type chosen from the left hand pane (Antivirus, Defense+, Firewall).
This section will deal with Advanced Event Filters related to 'Firewall Events' and will also cover the custom filtering that can be applied to the 'Other Logs' (namely 'Alerts Displayed', 'Tasks' Launched' and 'Configuration Changes'). The Antivirus and Defense+ Advanced Event Filters are dealt with in their respective sections.
Firewall Events - Advanced Filters
To configure Advanced Filters for Firewall events1. Select 'View > Advanced Filter'
2. Select 'Firewall Events' under 'Logs Per Module'
You have 8 categories of filter that you can add. Each of these categories can be further refined by either selecting or
Comodo Internet Security 2012 User Guide | © 2012 Comodo Security Solutions Inc. | All rights reserved 134

Comodo Internet Security 2012 - User Guide
deselecting specific filter parameters or by the user typing a filter string in the field provided.
3. Click the 'Add' button when you have chosen the category upon which you wish to filter.
Following are the options available in the 'Add' drop-down:
i. Action: Selecting the 'Action' option displays a drop-down box and a set of specific filter parameters that can be selected or deselected.
a) Select 'Equal' or 'Not Equal' option from the drop-down box. 'Not Equal' will invert your selected choice. b) Now select the checkboxes of the specific filter parameters to refine your search. The parameter available are:
• Blocked: Displays list of events that were blocked• Allowed: Displays list of events that were allowed• Asked: Displays list of events that were asked to the user• Suppressed: Displays list of events that were suppressed by the user
The filtered entries are shown directly underneath.
Comodo Internet Security 2012 User Guide | © 2012 Comodo Security Solutions Inc. | All rights reserved 135

Comodo Internet Security 2012 - User Guide
ii. Application: Selecting the 'Application' option displays a drop-down box and text entry field.
a) Select 'Contains' or 'Does Not Contain' option from the drop-down box.b) Enter the text or word that needs to be filtered.
The filtered entries are shown directly underneath.
iii. Destination IP: Selecting the 'Destination IP' option displays two drop-down boxes and a text entry field.
a) Select 'Equal' or 'Not Equal' option from the drop-down box. 'Not Equal' will invert your selected choice.b) Select 'IPv4' or 'IPv6' from the drop-down box.c) Enter the destination system's IP address that needs to be filtered.
The filtered entries are shown directly underneath.
iv. Destination Port: Selecting the 'Destination Port' option displays a drop-down box and text entry field.
a) Select any one of the following option the drop-down box. • Equal • Greater than• Greater than or Equal• Less than• Less than or Equal• Not Equal
b) Now enter the destination port number in the text entry field. The filtered entries are shown directly underneath.
v. Direction: Selecting the 'Direction' option displays a drop-down box and a set of specific filter parameters that can be selected or deselected.
a) Select 'Equal' or 'Not Equal' option from the drop-down box. 'Not Equal' will invert your selected choice. b) Now select the check box of the specific filter parameters to refine your search. The parameter available are:
• In: Displays a list of events that were directed into the system• Out: Displays a list of events that were directed out of the system
The filtered entries are shown directly underneath.
vi. Protocol: Selecting the 'Protocol option displays a drop-down box and a set of specific filter parameters that can be selected or deselected.
a) Select 'Equal' or 'Not Equal' option from the drop-down box. 'Not Equal' will invert your selected choice.
Comodo Internet Security 2012 User Guide | © 2012 Comodo Security Solutions Inc. | All rights reserved 136

Comodo Internet Security 2012 - User Guide
b) Now select the checkboxes of the specific filter parameters to refine your search. The parameter available are:• TCP• UDP• ICMP• IPV4• IGMP• GGP• PUP• IDP• IPV6• ICMPV6• ND
The filtered entries are shown directly underneath.
vii. Source IP: Selecting the 'Source IP' option displays two drop-down boxes and a set specific filter parameters that can be selected or deselected.
a) Select 'Equal' or 'Not Equal' option from the drop-down box. 'Not Equal' will invert your selected choice. b) Select 'IPv4' or 'IPv6' from the drop-down box.c) Enter the source system's IP address that needs to be filtered.
The filtered entries are shown directly underneath.
viii. Source Port: Selecting the 'Status' option displays a drop-down box and a set specific filter parameters that can be selected or deselected.
a) Select any one of the following option the drop-down box. • Equal • Greater than• Greater than or Equal• Less than• Less than or Equal• Not Equal
b) Now enter the source port number in the text entry field. The filtered entries are shown directly underneath.
Note: More than one filters can be added in the 'Advanced Filter' pane. After adding one filter type, the option to select the next filter type automatically appears. You can also remove a filter type by clicking the 'Remove' option at the end of every filter option.
Other Logs - Advanced Filters
Refer to Antivirus Tasks > View Antivirus Events > Log Viewer > Creating Custom Filters > Other Logs - Advanced Filters for the process of Creating Custom Filters for Alerts Displayed, Task Launched and Configuration Changes.
Date Filter
Comodo Internet Security 2012 User Guide | © 2012 Comodo Security Solutions Inc. | All rights reserved 137

Comodo Internet Security 2012 - User Guide
Click here to know more about Date Filter functionality.
Exporting Log Files to HTMLExporting log files is useful for archiving and troubleshooting purposes. There are two ways to export log files in the Log Viewer interface - using the context sensitive menu and via the 'File' menu option. After making your choice, you are asked to specify a name for the exported HTML file and the location you wish to save it to.
i. File Menu1. Select the event for which the log report is to be taken.
2. Click 'Export' from the File menu.
3. Select the location where the log report has to be saved, provide a file name and click 'Save'.
ii. Context Sensitive Menu 1. Right click in the log display window to export the currently displayed log file to HTML.
You can export a custom view that you created using the available Filters by right clicking and selecting 'Export' from the context sensitive menu. You will be asked to provide a file name and save location for the file.
3.2.Define a New Trusted ApplicationComodo Firewall allows you to prepare a list of trusted applications and configure their access rights to networks and the Internet. This shortcut represents a convenient way to create an automatic 'Allow Requests' rule for an individual application - meaning that inbound and outbound connections are automatically permitted.
Advanced users can reconfigure the parameters of this rule in the section 'Network Security Policy'.
To begin defining a new trusted application 1. Click on 'Define a New Trusted Application' link in Firewall Tasks .
2. A dialog box appears prompting you to select the application you want to trust.
3. Click the 'Select' button.
4. You now have 3 methods available to choose the application that you want to trust - 'File Groups'; 'Running Processes' and 'Browse...'.
• File Groups - Choosing this option allows you to choose your application from a category of pre-set files or folders. For example, selecting 'Executables' would enable you to create an allow rule for any file that attempts to connect to the Internet with the extensions .exe .dll .sys .ocx .bat .pif .scr .cpl . Other such categories available include 'Windows System Applications' , 'Windows Updater Applications' , 'Start Up Folders' and so on - each of
Comodo Internet Security 2012 User Guide | © 2012 Comodo Security Solutions Inc. | All rights reserved 138

Comodo Internet Security 2012 - User Guide
which provide a fast and convenient way to batch select important files and folders. • Running Processes - as the name suggests, this option allows you to choose the target application from a list of
processes that are currently running on your PC.• Browse... - this option is the easiest for most users and simply allows you to browse to the location of the
application which you want to trust.When you have chosen the application using one of the methods above, the application name appears along with its location:
5. Click 'Apply' to confirm your choice.
3.3.Define a New Blocked ApplicationComodo Firewall allows you to prepare a list of blocked applications that you do not want to access the Internet. This shortcut represents a convenient way to create such an automatic 'block and log' rule - meaning that inbound and outbound connections are automatically blocked to this application. Any connection attempts by the application is also logged in the View Firewall Events interface.
Advanced users can view and edit the parameters of this new rule in 'Network Security Policy'. (for example, you later realize that a program really ought to be allowed some level of Internet access)
To begin defining a new blocked application1. Click the 'Define a New Blocked Application' link in Firewall Tasks.
2. A dialog box appears prompting you to select the application that you want to be blocked.
3. Click the 'Select' button:
4. You now have 3 methods available to choose the application that you want to block - 'File Groups'; 'Running Processes' and 'Browse...'.
Comodo Internet Security 2012 User Guide | © 2012 Comodo Security Solutions Inc. | All rights reserved 139

Comodo Internet Security 2012 - User Guide
• File Groups - Choosing this option allows you to choose your application from a category of pre-set files or folders. For example, selecting 'Executables' would enable you to create a block rule for any file that attempts to connect to the Internet with the extensions .exe .dll .sys .ocx .bat .pif .scr .cpl . Other such categories available include 'Windows System Applications' , 'Windows Updater Applications' , 'Start Up Folders' and so on - each of which provide a fast and convenient way to batch select important files and folders.
• Running Processes - as the name suggests, this option allows you to choose the target application from a list of processes that are currently running on your PC.
• Browse... - this option is the easiest for most users and simply allows you to browse to the location of the application which you want to block.
5. When you have chosen the application using one of the methods above, the application name appears along with its location:
6. Click 'Apply' to confirm your choice. The new block and log rule for the application takes effect immediately. When this application seeks Internet access, Comodo Internet Security automatically denies it and records an entry in the View Firewall Events interface.
3.4.Network Security PolicyThe Network Security Policy interface is the nerve center of Comodo Firewall and allows advanced users to configure and deploy traffic filtering rules and policies on an application specific and global basis.
Both application rules and global rules are consulted when the firewall is determining whether or not to allow or block a connection attempt.
• For Outgoing connection attempts, the application rules are consulted first and then the global rules.• For Incoming connection attempts, the global rules are consulted first and then application specific rules.
The Network Security Policy interface also allows users to define the Network Zones for specifying access privileges on them and Port Sets, which are predefined groupings of one or more ports of the system that can be deployed across multiple traffic filtering rules.
The interface is divided into six main sections - Application Rules, Global Rules, Predefined Polices, Network Zones, Blocked Zones and Port Sets.
The Application Rules tab allows users to view, manage and define the network and Internet access rights of applications on your system.
The Global Rules tab allows users view, manage and define overall network policy that applies to your computer and is independent of application rules.
The Predefined Policies tab allows users to view and manage a set of one or more individual network control rules that have been saved and can be re-used and deployed on multiple applications.
The Network Zones tab allows the users to define the network zones for applying access privileges for them.
The Blocked Zones tab allows the user the configure settings to allow only the desired and trusted networks.
The Port Sets tab allows the users to define groups of ports for deploying application specific and global rules.
Comodo Internet Security 2012 User Guide | © 2012 Comodo Security Solutions Inc. | All rights reserved 140

Comodo Internet Security 2012 - User Guide
• See General Navigation for a summary of the navigational options available from the Application Rules and Global Rules tabs of Network Security Policy interface.
• See the section 'Application Rules' for help to configure application rules and policies. • See the section 'Global Rules' for help to configure global rules and to understand the interaction between global
and application rules.• See the section Predefined Policies for help to configure predefined firewall policies.• See the section Network Zones for information and help on defining the network zones.• See the section Blocked Zones for information and help of configuring the networks to be blocked from accessing
your computer. • See the section Port Sets for information and help on defining port groups.
3.4.1. General Navigation• Add... - On the Application Rules tab this button allows the user to Add a new Application to the list then create
it's policy. On the Global Rules tab it enables you to add and configure a new global rule using the Network Control Rule interface.
• Edit... - Allows the user to modify the selected rule or application policy. See Overview of Policies and Rules, Creating and Modifying Network Policy and Understanding Network Control Rules
• Remove... - Deletes the currently highlighted policy or rule• Move Up - Raises the currently selected rule or policy up one row in the priority list. Users can also re-prioritize
policies or re-assign individual rules to another application's policy by dragging and dropping.• Move Down - Lowers the currently selected rule or policy down one row in the priority list. Users can also re-
prioritize policies or re-assign individual rules to another application's policy by dragging and dropping.• Purge - Runs a system check to verify that all the applications for which policies are listed are actually installed
on the host machine at the path specified. If not, the policy is removed, or 'purged', from the list.Users can re-order the priority of policies by simply dragging and dropping the rule in question. Alternatively, select the rule you wish to re-prioritize and click either the 'Move Up' or 'Move Down' button.
3.4.2. Application Rules• See Overview of Policies and Rules for an explanation of rule and policy structure and how these are represented
in the main Application Rules interface
Comodo Internet Security 2012 User Guide | © 2012 Comodo Security Solutions Inc. | All rights reserved 141

Comodo Internet Security 2012 - User Guide
• See Application Network Access Control interface for an introduction to the rule setting interface• See Creating and Modifying Network Policies to learn how to create and edit network policies• See Understanding Network Control Rules for an overview of the meaning, construction and importance of
individual rules• See Adding and Editing a Network Control Rule for an explanation of individual rule configuration
Overview of Policies and Rules
Whenever an application makes a request for Internet or network access, Comodo Firewall allows or denies this request based upon the Firewall Policy that has been specified for that application. Firewall Policies are, in turn, made up from one or more individual network access rules. Each individual network access rule contains instructions that determine whether the application should be allowed or blocked; which protocols it is allowed to use; which ports it is allowed to use and so forth.
If you wish to modify the firewall policy for an application:
• Double click on the application name to begin 'Creating or Modifying Network Policy'• Select the application name, right-click and choose 'Edit' to begin 'Creating or Modifying Network Policy'• Select the application name and click the 'Edit...' button on the right to begin 'Creating or Modifying Network
Policy'If you wish to modify an individual rule within the policy:
• Double click on the specific rule to begin 'Adding and Editing a Network Control Rule'• Select the specific rule right-click then choose 'Edit' to begin 'Adding and Editing a Network Control Rule'• Select the specific rule and click the 'Edit...' button on the right to begin 'Adding and Editing a Network Control
Rule' Users can also re-prioritize policies or re-assign individual rules to another application's policy by dragging and dropping.
Although each policy can be defined from the ground up by individually configuring its constituent rules, this practice would be time consuming if it had to be performed for every single program on your system. For this reason, Comodo Firewall contains a selection of predefined policies according to broad application category. For example, you may choose to apply the policy 'Web Browser' to the applications like 'Internet Explorer', 'Firefox' and 'Opera'. Each predefined policy has been specifically designed by Comodo Firewall to optimize the security level of a certain type of application. Users can, of course, modify these predefined policies to suit their environment and requirements. For more details, see Predefined Policies.
Application Network Access Control interface
Network control rules can be added/modified/removed and re-ordered through the Application Network Access Control interface. Any rules created using Adding and Editing a Network Control Rule is displayed in this list.
Comodo Internet Security 2012 User Guide | © 2012 Comodo Security Solutions Inc. | All rights reserved 142

Comodo Internet Security 2012 - User Guide
Comodo Firewall applies rules on a per packet basis and applies the first rule that matches that packet type to be filtered (see Understanding Network Control Rules for more information). If there are a number of rules in the list relating to a packet type then one nearer the top of the list is applied.
Users can re-order the priority of rules by simply dragging and dropping the rule in question. Alternatively, select the rule you wish to re-prioritize and click either the 'Move Up' or 'Move Down' button. To begin creating network policies, first read 'Overview of Policies and Rules' then 'Creating and Modifying Network Policies'
Creating and Modifying Network Policies
To begin defining an application's network policy, you need take two basic steps.
1. Select the application that you wish the policy to apply to.
2. Configure the rules for this application's policy.
1. Select the application that you wish the policy to apply to
If you wish to define a policy for a new application ( i.e. one that is not already listed) then click the 'Add...' button in the main application rules interface. This brings up the 'Application Network Access Control' interface shown below:
Comodo Internet Security 2012 User Guide | © 2012 Comodo Security Solutions Inc. | All rights reserved 143

Comodo Internet Security 2012 - User Guide
Because this is a new application, the 'Application Path' field is blank. (If you are modifying an existing policy, then this interface shows the individual rules for that application's policy).
• Click 'Select' button.
You now have 3 methods available to choose the application for which you wish to create a policy - File Groups; Running Processes and Browse...
i. File Groups - choosing this option allows you to create firewall policy for a category of pre-set files or folders. For example, selecting 'Executables' would enable you to create a firewall policy for any file that attempts to connect to the Internet with the extensions .exe .dll .sys .ocx .bat .pif .scr .cpl . Other such categories available include 'Windows System Applications' , 'Windows Updater Applications' , 'Start Up Folders' etc - each of which provide a fast and convenient way to apply a generic policy to important files and folders. To view the file types and folders that are affected by choosing one of these options, you need to visit the Defense+ area of Comodo Internet Security by navigating to: Defense+ > Protected Files and Folders> Groups...
More details on Files and File Groupings is available in this help guide in the Protected Files and Folders and Blocked Files sections.
ii. Running Processes - as the name suggests, this option allows you to create and deploy firewall policy for any process that is currently running on your PC.
Comodo Internet Security 2012 User Guide | © 2012 Comodo Security Solutions Inc. | All rights reserved 144

Comodo Internet Security 2012 - User Guide
You can choose an individual process (shown above) or the parent process of a set of running processes. Click 'Select' to confirm your choice.
Note: A more detailed and powerful 'View Active Process List' is available in the Defense+ Tasks.
iii. Browse... - this option is the easiest for most users and simply allows you to browse to the location of the application for which you want to deploy the firewall policy. In the example below, we have decided to create a firewall policy for the Opera web browser.
Comodo Internet Security 2012 User Guide | © 2012 Comodo Security Solutions Inc. | All rights reserved 145

Comodo Internet Security 2012 - User Guide
Having selected the individual application, running process or file group, the next stage is to Configure the rules for this application's policy.
(2) Configure the rules for this application's policy
There are two broad options available for creating a policy that applies to an application - Use a Predefined Policy or Use a Custom Policy.
• Use a Predefined Policy - Selecting this option allows the user to quickly deploy a existing policy on to the target application. Choose the policy you wish to use from the drop-down menu. In the example below, we have chosen 'Web Browser' because we are creating a policy for the 'Opera' browser. The name of the predefined policy you choose is displayed in the Treat As column for that application in the interface (Default = Disabled).
Note: Predefined Policies, once chosen, cannot be modified directly from this interface - they can only be modified and defined using the Predefined Policies interface. If you require the ability to add or modify rules for an application then you are effectively creating a new, custom policy and should choose the more flexible Use Custom Policy option instead.
Comodo Internet Security 2012 User Guide | © 2012 Comodo Security Solutions Inc. | All rights reserved 146

Comodo Internet Security 2012 - User Guide
• Use a Custom Policy - designed for more experienced users, the Custom Policy option enables full control over the configuration of firewall policy and the parameters of each rule within that policy (Default = Enabled).
You can create an entirely new policy or use a predefined policy as a starting point by:
• Clicking the 'Add...' button to add individual network control rules. See 'Adding and Editing a Network Control Rule' for an overview of the process.
• Use the 'Copy From' button to populate the list with the network control rules of a Predefined Firewall Policy.• Use the 'Copy From' button to populate the list with the network control rules of another application's policy.
Comodo Internet Security 2012 User Guide | © 2012 Comodo Security Solutions Inc. | All rights reserved 147

Comodo Internet Security 2012 - User Guide
General Tips: • If you wish to create a reusable policy for deployment on multiple applications, we advise you add a new
Predefined Firewall Policy (or modify one of the existing ones to suit your needs) - then come back to this section and use the 'Use Predefined Policy' option to roll it out.
• If you want to build a bespoke policy for maybe one or two specific applications, then we advise you choose the 'Use a Custom Policy' option and create your policy either from scratch by adding individual rules (click the 'Add...' button) or by using one of the built-in policies as a starting point.
Understanding Network Control Rules
At their core, each network control rule can be thought of as a simple IF THEN trigger - a set of conditions (or attributes) pertaining to a packet of data from a particular application and an action it that is enforced if those conditions are met.
As a packet filtering firewall, Comodo Firewall analyzes the attributes of every single packet of data that attempts to enter or leave your computer. Attributes of a packet include the application that is sending or receiving the packet, the protocol it is using, the direction in which it is traveling, the source and destination IP addresses and the ports it is attempting to traverse. The firewall then tries to find a network control rule that matches all the conditional attributes of this packet in order to determine whether or not it should be allowed to proceed. If there is no corresponding network control rule, then the connection is automatically blocked until a rule is created.
The actual conditions (attributes) you see* on a particular Network Control Rule are determined by the protocol chosen in Adding and Editing a Network Control Rule
If you chose 'TCP' , 'UDP' or 'TCP and 'UDP', then the rule has the form: Action | Protocol | Direction |Source Address | Destination Address | Source Port | Destination Port
If you chose 'ICMP', then the rule has the form: Action | Protocol | Direction |Source Address | Destination Address | ICMP Details
If you chose 'IP', then the rule has the form: Action | Protocol | Direction |Source Address | Destination Address | IP Details
Action: The action the firewall takes when the conditions of the rule are met. The rule shows 'Allow', 'Block' or 'Ask'.**
Protocol: States the protocol that the target application must be attempting to use when sending or receiving packets of data. The rule shows 'TCP', 'UDP', 'TCP or UDP', 'ICMP' or 'IP'
Direction: States the direction of traffic that the data packet must be attempting to negotiate. The rule shows 'In', 'Out' or 'In/Out'
Source Address: States the source address of the connection attempt. The rule shows 'From' followed by one of the following: IP , IP range , IP Mask , Network Zone , Host Name or Mac Address
Destination Address: States the address of the connection attempt. The rule shows 'To' followed by one of the following: IP , IP range , IP Mask , Network Zone , Host Name or Mac Address
Source Port: States the port(s) that the application must be attempting to send packets of data through. Shows 'Where Source Port Is' followed by one of the following: 'Any', 'Port #', 'Port Range' or 'Port Set'
Destination Port: States the port(s) on the remote entity that the application must be attempting to send to. Shows 'Where Source Port Is' followed by one of the following: 'Any', 'Port #', 'Port Range' or 'Port Set
ICMP Details: States the ICMP message that must be detected to trigger the action. See Adding and Editing a Network Control Rule for details of available messages that can be displayed.IP Details: States the type of IP protocol that must be detected to trigger the action: See Adding and Editing a Network Control Rule to see the list of available IP protocols that can be displayed here.
Comodo Internet Security 2012 User Guide | © 2012 Comodo Security Solutions Inc. | All rights reserved 148

Comodo Internet Security 2012 - User Guide
Once a rule is applied, Comodo Firewall monitors all network traffic relating to the chosen application and take the specified action if the conditions are met. Users should also see the section 'Global Rules' to understand the interaction between Application Rules and Global Rules.* If you chose to add a descriptive name when creating the rule then this name is displayed here rather than it's full parameters. See the next section, 'Adding and Editing a Network Control Rule', for more details.
** If you selected 'Log as a firewall event if this rule is fired' then the action is postfixed with 'Log'. (e.g. Block & Log) Adding and Editing a Network Control Rule
The Network Control Rule Interface is used to configure the actions and conditions of an individual network control rule. If you are not an experienced firewall user or are unsure about the settings in this area, we advise you first gain some background knowledge by reading the sections 'Understanding Network Control Rules', 'Overview of Rules and Policies' and 'Creating and Modifying Network Policies'
General Settings
Action: Define the action the firewall takes when the conditions of the rule are met. Options available via the drop down menu are 'Allow' (Default), 'Block' or 'Ask'.
Protocol: Allows the user to specify which protocol the data packet should be using. Options available via the drop down menu are 'TCP', 'UDP', 'TCP or UDP' (Default), 'ICMP' or 'IP' .
Note: Your choice here alters the choices available to you in the tab structure on the lower half of the interface.
Direction: Allows the user to define which direction the packets should be traveling. Options available via the drop down menu are 'In', 'Out' or 'In/Out' (Default).Log as a firewall event if this rule is fired: Checking this option creates an entry in the firewall event log viewer whenever this rule is called into operation. (i.e. when ALL conditions have been met) (Default = Disabled).Description: Allows you to type a friendly name for the rule. Some users find it more intuitive to name a rule by it's intended purpose. ( 'Allow Outgoing HTTP requests'). If you create a friendly name, then this is displayed to represent instead of the full actions/conditions in the main Application Rules interface and the Application Network Access Control interface.
Protocol
i. TCP', 'UPD' or 'TCP or UDP'If you select 'TCP', 'UPD' or 'TCP or UDP' as the Protocol for your network, then you have to define the source and destination IP addresses and ports receiving and sending the information.
Comodo Internet Security 2012 User Guide | © 2012 Comodo Security Solutions Inc. | All rights reserved 149

Comodo Internet Security 2012 - User Guide
Source Address and Destination Address:
1. You can choose any IP Address by selecting Any Address in the Type drop-down box. This menu defaults to an IP range of 0.0.0.0- 255.255.255.255 to allow connection from all IP addresses.
2. You can choose a named host by selecting a Host Name which denotes your IP address.
3. You can choose an IPv4 Range by selecting IPv4 Address Range - for example the range in your private network and entering the IP addresses in the Start Range and End Range text boxes.
4. You can choose a Single IPv4 address by selecting IPv4 Single Address and entering the IP address in the IP address text box, e.g., 192.168.200.113.
5. You can choose IPv4 Mask by selecting IPv4 Subnet Mask. IP networks can be divided into smaller networks called sub-networks (or subnets). An IP address/ Mask is a subnet defined by IP address and mask of the network. Enter the IP address and Mask of the network.
6. You can choose a Single IPv6 address by selecting IPv6 Single Address and entering the IP address in the IP address text box, e.g., 3ffe:1900:4545:3:200:f8ff:fe21:67cf.
7. You can choose IPv6 Mask by selecting IPv6 Subnet Mask. IP networks can be divided into smaller networks called sub-networks (or subnets). An IP address/ Mask is a subnet defined by IP address and mask of the network. Enter the IP address and Mask of the network.
8. You can choose a MAC Address by selecting MAC Address and entering the address in the address text box.
9. You can choose an entire network zone by selecting Zone .This menu defaults to Local Area Network. But you can also define your own zone by first creating a Zone through the 'Network Zones' area.
• Exclude (i.e. NOT the choice below): The opposite of what you specify is applicable. For example, if you are creating an Allow rule and you check the Exclude box in the Source IP tab and enter values for the IP range, then that IP range is excluded. You have to create a separate Allow rule for the range of IP addresses that you DO want to use.
Source Port and Destination Port:
Enter the source and destination Port in the text box.
Comodo Internet Security 2012 User Guide | © 2012 Comodo Security Solutions Inc. | All rights reserved 150

Comodo Internet Security 2012 - User Guide
1. You can choose any port number by selecting Any - set by default , 0- 65535.
2. You can choose a Single Port number by selecting Single Port and selecting the single port numbers from the list.
3. You can choose a Port Range by selecting Port Range and selecting the port numbers from the From and To list.
4. You can choose a predefined Port Set by choosing A Set of Ports. If you wish to create a port set then please see the section 'Port Sets'.
ii. ICMPWhen you select ICMP as the protocol in General Settings, you are shown a list of ICMP message types in the 'ICMP Details' tab alongside the Destination Address tabs. The last two tabs are configured identically to the explanation above. You cannot see the source and destination port tabs.
• ICMP DetailsICMP (Internet Control Message Protocol) packets contain error and control information which is used to announce network errors, network congestion, timeouts, and to assist in troubleshooting. It is used mainly for performing traces and pings. Pinging is frequently used to perform a quick test before attempting to initiate communications. If you are using or have used a peer-to-peer file-sharing program, you might find yourself being pinged a lot. So you can create rules to allow / block specific types of ping requests. With Comodo Firewall you can create rules to allow/ deny inbound ICMP packets that provide you with information and minimize security risk.
1. Type in the source/ destination IP address. Source IP is the IP address from which the traffic originated and destination IP is the IP address of the computer that is receiving packets of information.
2. Specify ICMP Message , Types and Codes. An ICMP message includes a Message that specifies the type, that is, the format of the ICMP message.When you select a particular ICMP message , the menu defaults to set its code and type as well. If you select the ICMP message type 'Custom' then you are asked to specify the code and type.
iii. IPWhen you select IP as the protocol in General Settings, you are shown a list of IP message type in the 'IP Details' tab
Comodo Internet Security 2012 User Guide | © 2012 Comodo Security Solutions Inc. | All rights reserved 151

Comodo Internet Security 2012 - User Guide
alongside the Source Address and Destination Address tabs. The last two tabs are configured identically to the explanation above. You cannot see the source and destination port tabs.
• IP DetailsSelect the types of IP protocol that you wish to allow, from the ones that are listed.
3.4.3. Global RulesUnlike Application rules, which are applied to and triggered by traffic relating to a specific application, Global Rules are applied to all traffic traveling in and out of your computer.
Comodo Firewall analyzes every packet of data in and out of your PC using combination of Application and Global Rules.
• For Outgoing connection attempts, the application rules are consulted first and then the global rules second.• For Incoming connection attempts, the global rules are consulted first and then the application rules second.
Comodo Internet Security 2012 User Guide | © 2012 Comodo Security Solutions Inc. | All rights reserved 152

Comodo Internet Security 2012 - User Guide
Therefore, outgoing traffic has to 'pass' both the application rule then any global rules before it is allowed out of your system. Similarly, incoming traffic has to 'pass' any global rules first then application specific rules that may apply to the packet.
Global Rules are mainly, but not exclusively, used to filter incoming traffic for protocols other than TCP or UDP.
The configuration of Global Rules is identical to that for application rules. To add a global rule, click the 'Add...' button on the right. To edit an existing global rule, right click and select 'edit'.
• See Application Network Access Control interface for an introduction to the rule setting interface.• See Understanding Network Control Rules for an overview of the meaning, construction and importance of individual
rules.• See Adding and Editing a Network Control Rule for an explanation of individual rule configuration.
3.4.4. Predefined PoliciesAs the name suggests, a predefined firewall policy is a set of one or more individual network control rules that have been saved and can be re-used and deployed on multiple applications.
Note: This section is for advanced and experienced users. If you are a novice user or are new to Comodo Firewall, we advise you first read the explanations for Network Security Policies, if you have not already done so.
Although each application's firewall policy could be defined from the ground up by individually configuring its constituent rules, this practice may prove time consuming if it had to be performed for every single program on your system. For this reason, Comodo Firewall contains a selection of predefined policies according to broad application category. For example, you may choose to apply the policy 'Web Browser' to the applications 'Internet Explorer', 'Firefox' and 'Opera'. Each predefined policy has been specifically designed by Comodo to optimize the security level of a certain type of application. Users can, of course, modify these predefined policies to suit their environment and requirements. (for example, you may wish to keep the 'Web Browsers' name but wish to redefine the parameters of it rules).
To access the Predefined Policies interface 1. Click 'Predefined Policies' tab from Firewall Tasks > Network Security Policy interface.
Comodo Internet Security 2012 User Guide | © 2012 Comodo Security Solutions Inc. | All rights reserved 153

Comodo Internet Security 2012 - User Guide
To view or edit an existing predefined policy• Double click on the Policy Name in the list• Select the Policy Name in the list, right-click and choose 'Edit' • Select the Policy Name and click the 'Edit...' button on the right • Details of the process from this point on can be found here.
To add a new predefined policy• Click the 'Add...' button. This launches the policy creation dialog shown below.
Comodo Internet Security 2012 User Guide | © 2012 Comodo Security Solutions Inc. | All rights reserved 154

Comodo Internet Security 2012 - User Guide
• As this is a new predefined policy, you need to name it in the text field at the top. It is advised that you choose a name that accurately describes the category/type of application you wish to define policy for. Next you should add and configure the individual rules for this policy. See 'Adding and Editing a Network Control Rule' for more advice on this.
Once created, this policy can be quickly called as a 'Predefined Policy' when creating or modifying a network policy.
3.4.5. Network ZonesComodo Firewall allows you to define 'Network Zones' and to specify the access privileges of these zones. A 'Network Zone' can consist of an individual machine (including a single home computer connected to Internet) or a network of thousands of machines to which access can be granted or denied.
Background Note: A computer network is a connection between computers through a cable or some type of wireless connection. It enables users to share information and devices between computers and other users within the network. Obviously, there are certain computer networks where you need to grant access to, including your home or work network. Conversely, there may be other networks where you want to restrict communication with - or even block entirely.
To access the Network Zones interface • Click 'Network Zones' tab from Firewall Tasks > Network Security Policy interface.
Note 1: Adding a zone to this area does not, in itself, define any permission levels or access rights to the zone. This area allows to define the zones so you can quickly assign such permissions in other areas of the firewall.Note 2: A network zone can be designated as 'Trusted' and allowed access by using the 'Stealth Ports Wizard' (An example
Comodo Internet Security 2012 User Guide | © 2012 Comodo Security Solutions Inc. | All rights reserved 155

Comodo Internet Security 2012 - User Guide
would be your home computer or network). Note 3: A network zone can be designated as 'Blocked' and denied access by using the 'Blocked Zones' interface. (An example would be a known spyware site).Note 4: An application can be assigned specific access rights to and from a network zone when defining an Application Rule. Similarly, a custom Global Rule can be assigned to a network zone to all activity from a zone.Note 5: By default, Comodo Firewall automatically detects any new networks (LAN, Wireless etc). This can be disabled in the More > Preferences area of the application.
To add a New Network Zone1. Define a name for the zone.
2. Select the addresses to be included in this zone.
To define a name for the zone1. Click 'Add...' button and select 'A New Network Zone...'.
A dialog box will appear, prompting you to specify a name for the new zone.
2. Choose a name that accurately describes the network you are creating.
3. Click 'Apply' to confirm your zone name.
This adds the name of your new zone to the Network Zones list.
Comodo Internet Security 2012 User Guide | © 2012 Comodo Security Solutions Inc. | All rights reserved 156

Comodo Internet Security 2012 - User Guide
To select the addresses to be included in this zone1. Select the network name, right click on the name of the new zone and select 'Add...' from the menu.
The 'Add a New Address' dialog allows you to select an address from the Type drop-down box shown below (Default = Any Address). The Exclude check box will be enabled only if any other choice is selected from the drop-down box.
2. Click 'Apply' to confirm your choice.
3. Click 'OK' in the 'Network Zones' interface.
The new zone now appears in the main list along with the addresses you assigned to it.
Once created, a network zone can be:
• Quickly called as 'Zone' when creating or modifying a network policy
Comodo Internet Security 2012 User Guide | © 2012 Comodo Security Solutions Inc. | All rights reserved 157

Comodo Internet Security 2012 - User Guide
• Quickly called and designated as a trusted zone from the 'Network Zones' interface• Quickly called and designated as a blocked zone from the 'Blocked Zones' interface
To edit the name of an existing Network Zone1. Select the name of the zone in the list (e.g. Home).
2. Select 'Edit...' to bring up the naming dialog.
To add more addresses to an existing Network Zone• Right click on the zone name and click 'Add...' or,• Select the zone name and click the 'Add...' button on the right and select 'A New Address...' from the drop-down
menu.To modify or change the existing address in a zone
• Right click on the address (not the zone name) and select 'Edit...' or • Select the actual address (not the zone name) and click the 'Edit...' button on the right.
3.4.6. Blocked ZonesA computer network enables users to share information and devices between computers and other users within the network. Obviously, there are certain computer networks that you need to 'trust' and grant access to - for example your home or work network. Unfortunately, there may be other, untrustworthy networks that you want to restrict communication with - or even block entirely.
Note: We advise new or inexperienced users to first read 'Network Zones' , 'Stealth Ports Wizard' and 'Network Security Policy' before blocking zones using this interface.
The 'Blocked Network Zones' area allows you to:
• Deny access to a specific network by selecting a pre-existing network zone and designating it as blocked• Deny access to a specific network by manually defining a new blocked zone
To access the Blocked Zones interface • Click 'Blocked Zones' tab from Firewall Tasks > Network Security Policy interface.
Comodo Internet Security 2012 User Guide | © 2012 Comodo Security Solutions Inc. | All rights reserved 158

Comodo Internet Security 2012 - User Guide
Note 1: You must create a zone before you can block it. There are two ways to do this;1. Using 'Network Zones' to name and specify the network you want to block.
2. Directly from this interface using 'New blocked address...'
Note 2: You cannot reconfigure pre-existing network zones from this interface. (e.g., to add or modify IP addresses). You need to use 'Network Zones' if you want to change the settings of existing zones.
To deny access to a specific network by selecting a pre-existing network zone and designating it as blocked1. Click the 'Add' button at the top right and select 'Network Zones' then the particular zone you wish to block.
The selected zone appears in the main interface.
Comodo Internet Security 2012 User Guide | © 2012 Comodo Security Solutions Inc. | All rights reserved 159

Comodo Internet Security 2012 - User Guide
2. Click 'Apply' to confirm your choice. All traffic intended for and originating from computer or devices in this zone are now blocked.
To deny access to a specific network by manually defining a new blocked zone1. Click the 'Add' button at the top right and select 'A New Blocked Address' (Default = Any Address). The Exclude check
box will be enabled only if any other choice is selected from the drop-down box. This launches the following dialog where you can select the IP address(es), IP Subnet Masks, Host Name or MAC address that you wish to block from the Type drop-down box.
2. Enter the IP address that you wish to block.
Comodo Internet Security 2012 User Guide | © 2012 Comodo Security Solutions Inc. | All rights reserved 160

Comodo Internet Security 2012 - User Guide
After clicking 'Apply' to confirm your choice, the address(es) you blocked appears in the main interface. You can modify these addresses at any time by selecting the entry and clicking 'Edit'.
3. Click 'OK' to confirm your choice. All traffic intended for and originating from computer or devices in this zone are now blocked.
Special Note: Creating a blocked network zone implements a 'block all' global rule for the zone in question. However, unlike when you create a 'Trusted Zone', this rule is not displayed or editable from the global rules tab of the Network Security Policy interface. This is because you are likely to be trusting only a few zones, there is the potential that you may have to block many. The constant addition of such block rules would make the interface unmanageable for most users.
3.4.7. Port SetsPort Sets are handy, predefined groupings of one or more ports that can be re-used and deployed across multiple Application Rules and Global Rules.
To access the 'Port Sets' interface 1. Click 'Port Sets' tab from Firewall Tasks > Network Security Policy interface.
Comodo Internet Security 2012 User Guide | © 2012 Comodo Security Solutions Inc. | All rights reserved 161

Comodo Internet Security 2012 - User Guide
The name of the port set is shown above the actual port numbers that belong to that set. The default port sets shipped with Comodo Internet Security:
• HTTP Ports: 80 and 443. These are the default ports for http traffic. Your Internet browser uses this ports to connect to the Internet and other networks.
• POP3/SMTP Ports: 110, 25, 143, 995, 465. These are the ports that are typically used by mail clients like Outlook Express and WinMail for communication using the POP3, SMTP and IMAP protocols.
• Privileged Ports: 0-1024. This set can be deployed if you wish to create a rule that allows or blocks access to the privileged port range of 0-1024. Privileged ports are so called because it is usually desirable to prevent users from running services on these ports. Network admins usually reserve or prohibit the use of these ports.
To add a new port set1. Define a name for the set.
2. Select the port numbers you want to belong to this named set.
To define a name for the set1. Click the 'Add' button on the right hand side and select 'A New Port Set...' from the drop-down menu.
2. Type a name for the port set. In the example below, we have chosen to name our port set A test port set.
Comodo Internet Security 2012 User Guide | © 2012 Comodo Security Solutions Inc. | All rights reserved 162

Comodo Internet Security 2012 - User Guide
3. Click 'Apply'. The new port set appears in the main port set list:
4. Select the port numbers you want to belong to this named set by right clicking on the name of the new port set and select 'Add...' from the menu.
This opens the port selection dialog.
Comodo Internet Security 2012 User Guide | © 2012 Comodo Security Solutions Inc. | All rights reserved 163

Comodo Internet Security 2012 - User Guide
5. Select the ports by selecting:
• Any, to choose all ports; • A single port and defining the port in the combo box beside; • A port range and typing the start and end port numbers in the respective combo boxes.
6. Click 'Apply'.
7. Click 'OK' in the Port Sets interface
If you wish to add more ports to this set then repeat the process from the fourth step.
To edit the name of an existing port set• Select the name of the set in the list (e.g. HTTP Ports) and click 'Edit...' to bring up the naming dialog.
To add port numbers to an existing port set• Right click on the set name and click 'Add...' or select the port set name, right click the 'Add...' button and select 'A
new port' from the drop-down menu.To modify or change the existing port numbers in a port set
• Right click on the port number you wish to change and select 'Edit...' OR select the actual port number (not the port set name), right click on it and Select 'Edit...'.
When defining or modifying a network control rule, any port sets listed in this interface, including any new ones you create are available for selection and deployment in the Source Port and Destination Port tabs on selecting A set of Ports.
3.5.View Active ConnectionsThe Active Connections interface contains an at-a-glance summary of all currently active connections on a per-application basis. You can view all the applications that are connected; all the individual connections that each application is responsible for; the
Comodo Internet Security 2012 User Guide | © 2012 Comodo Security Solutions Inc. | All rights reserved 164

Comodo Internet Security 2012 - User Guide
direction of the traffic; the source IP and port and the destination IP and port. You can also see the total amount of traffic that has passed in and out of your system over each connection.
This list is updated in real time whenever an application creates a new connection or drops an existing connection. The View Active Connections is an extremely useful aid when testing firewall configuration; troubleshooting new firewall policies and rules; monitoring the connection activity of individual applications and your system as a whole and for terminating any unwanted connections.
To Access View active connections1. Click on View Active Connections link in Firewall Tasks.
Column Description
• Protocol - Shows the application that is making the connection, the protocol it is using and the direction of the traffic . Each application may have more than one connection at any time.
• Source (IP : Port) - The source IP Address and source port that the application is connecting through. If the application is waiting for communication and the port is open, it is described as 'Listening'.
• Destination (IP : Port) - The destination IP Address and destination port address that the application is connecting to. This is blank if the 'Source' column is 'Listening'.
• Bytes In - Represents the total bytes of incoming data since this connection was first allowed• Bytes Out - Represents the total bytes of outgoing data since this connection was first allowed
Context Sensitive Menu
1. Right click on items in the list to see the context sensitive menu.
Comodo Internet Security 2012 User Guide | © 2012 Comodo Security Solutions Inc. | All rights reserved 165

Comodo Internet Security 2012 - User Guide
2. If you wish to view the full path of the application, right click on the application name and select 'Show Full Path'.
3. If you wish to terminate a connection belonging to an application, right click on the specific connection and click 'Terminate Connection'.
3.6.Stealth Ports WizardPort Stealthing is a security feature whereby ports on an Internet connected PC are hidden from sight, evoking no response to opportunistic port scans.
General Note: Your computer sends and receives data to other computers and to the Internet through an interface called a 'port'. There are over 65,000 numbered ports on every computer - with certain ports being traditionally reserved for certain services. For example, your machine almost definitely connects to Internet using port 80 and port 443. Your e-mail application connects to your mail server through port 25. A 'port scanning' attack consists of sending a message to each of your computer ports, one at a time. This information gathering technique is used by hackers to find out which ports are open and which ports are being used by services on your machine. With this knowledge, a hacker can determine which attacks are likely to work if used against your machine.
Stealthing a port effectively makes it invisible to a port scan. This differs from simply 'closing' a port as NO response is given to any connection attempts ('closed' ports respond with a 'closed' reply- revealing to the hacker that there is actually a PC in existence.) This provides an extremely high level of security to your PC. If a hacker or automated scanner cannot 'see' your computers ports then they presumes it is offline and move on to other targets. You can still be able to connect to Internet and transfer information as usual but remain invisible to outside threats. Comodo Firewall provides the user with flexible stealthing options:
1. Click on 'Stealth Ports Wizard' in Firewall Tasks.
2. You have three options to choose from:
• Define a new trusted network• Alert me to incoming connections• Block all incoming connections
Comodo Internet Security 2012 User Guide | © 2012 Comodo Security Solutions Inc. | All rights reserved 166

Comodo Internet Security 2012 - User Guide
Click the option you would like more details on:
• Define a new trusted network and make my ports stealth for everyone else• Alert me to incoming connections and make my ports stealth on a per-case basis• Block all incoming connections and make my ports stealth for everyone
Define a New Trusted Network and Make my Ports Stealth for Everyone Else
By selecting this option your machine's ports is stealthed (invisible) to everyone EXCEPT those networks that you specify as trusted.
To begin the wizard1. Click 'Define a New Trusted Network and make my ports stealth for everyone else' link.
A dialog box appears, asking you to choose the new trusted zone:
2. If you have already configured a network zone then leave the upper option selected, choose your desired network from the 'Zone Name' drop-down box and click 'OK'.
If you have not yet defined a zone you wish to trust, you can do so in 'Network Zones' area in Network Security Policy interface of the firewall or manually define and trust a new zone from this dialog box.
To manually define and trust a new zone from this dialog box
Comodo Internet Security 2012 User Guide | © 2012 Comodo Security Solutions Inc. | All rights reserved 167

Comodo Internet Security 2012 - User Guide
1. Select 'I would like to define and trust a new network zone'.
2. Enter the IP range for the zone for which you want your computer to be visible - starting from the Start IP to the End IP (or specify a Subnet Mask)
3. Click 'OK' to create the new Zone rule.
If you wish to add more than one zone, simply repeat this procedure.
Using the 'Define a new trusted network and make my ports stealth for everyone else' option creates a new trusted zone by adding the following rules in the 'Global Rules' interface:
The specific parameters of the descriptive rule name above are:
Allow | IP | Out | From Any IP Address | To <ZONE> | Where Protocol is ANY
Allow | IP | In | From <ZONE> | To Any IP Address | Where Protocol is ANY
If you would like more information on the meaning and construction of rules, please click here.
Alert me to incoming connections and make my ports stealth on a per-case basisYou see a firewall alert every time there is a request for an incoming connection. The alert asks your permission on whether or not you wish the connection to proceed. This can be useful for applications such as Peer to Peer networking and Remote desktop applications that require port visibility in order to connect to your machine. Specifically, this option adds the following rule in the 'Global Rules' interface:
Comodo Internet Security 2012 User Guide | © 2012 Comodo Security Solutions Inc. | All rights reserved 168

Comodo Internet Security 2012 - User Guide
Block | ICMP | In | From Any IP Address | To Any IP Address | Where Message is ECHO REQUEST
If you would like more information on the meaning and construction of rules, please click here.
Block all incoming connections and make my ports stealth for everyoneSelecting this option means your computer's ports are invisible to all networks, irrespective of whether you trust them or not. The average home user (using a single computer that is not part of a home LAN) finds this option the more convenient and secure. You are not alerted when the incoming connection is blocked, but the rule adds an entry in the firewall event log file. Specifically, this option adds the following rule in the 'Global Rules' interface:
Block And Log | IP | In | From Any IP Address | To Any IP Address | Where Protocol is Any
If you would like more information on the meaning and construction of rules, please click here.
3.7.Firewall Behavior SettingsFirewall Behavior Settings allows you to quickly configure the security of your computer and the frequency of alerts that are generated. This dialog box can be accessed in the 'Firewall Tasks' and, more immediately, by clicking on security level setting that is displayed (e.g. Safe Mode) in the Summary Screen (shown below).
These settings can be done using the tabs listed below.
• General Settings tab• Alert Settings tab• Advaced Settings tab
3.7.1. General SettingsComodo Firewall allows you to customize firewall security by using the Firewall Security Level slider to change preset security levels.
The choices available are:
• Block All• Custom Policy• Safe Mode (Default)• Training • Disabled
The setting you choose here is also displayed on the summary screen.
Comodo Internet Security 2012 User Guide | © 2012 Comodo Security Solutions Inc. | All rights reserved 169

Comodo Internet Security 2012 - User Guide
• Block All Mode: The firewall blocks all traffic in and out of your computer regardless of any user-defined configuration and rules. The firewall does not attempt to learn the behavior of any applications and does not automatically create traffic rules for any applications. Choosing this option effectively prevents your computer from accessing any networks, including the Internet.
• Custom Policy Mode: The firewall applies ONLY the custom security configurations and network traffic policies specified by the user. New users may want to think of this as the 'Do Not Learn' setting because the firewall does not attempt to learn the behavior of any applications. Nor does it automatically create network traffic rules for those applications. You will receive alerts every time there is a connection attempt by an application - even for applications on the Comodo Safe list (unless, of course, you have specified rules and policies that instruct the firewall to trust the application's connection attempt).
If any application tries to make a connection to the outside, the firewall audits all the loaded components and checks each against the list of components already allowed or blocked. If a component is found to be blocked, the entire application is denied Internet access and an alert is generated. This setting is advised for experienced firewall users that wish to maximize the visibility and control over traffic in and out of their computer.
• Safe Mode (Default): While filtering network traffic, the firewall automatically creates rules that allow all traffic for the components of applications certified as 'Safe' by Comodo, if the checkbox Create rules for safe applications is selected. For non-certified new applications, you will receive an alert whenever that application attempts to access the network. Should you choose, you can grant that application Internet access by choosing 'Treat this application as a Trusted Application' at the alert. This deploys the predefined firewall policy 'Trusted Application' onto the application.
'Safe Mode' is the recommended setting for most users - combining the highest levels of security with an easy-to-
Comodo Internet Security 2012 User Guide | © 2012 Comodo Security Solutions Inc. | All rights reserved 170

Comodo Internet Security 2012 - User Guide
manage number of connection alerts.• Training Mode : The firewall monitors network traffic and create automatic allow rules for all new applications until the
security level is adjusted. You will not receive any alerts in 'Training Mode' mode. If you choose the 'Training Mode' setting, we advise that you are 100% sure that all applications installed on your computer are assigned the correct network access rights.
Tip: Use this setting temporarily while playing an online game for the first time. This suppresses all alerts while the firewall learns the components of the game that need Internet access and automatically create 'allow' rules for them. You can switch back to your previous mode later.
• Disabled: Disables the firewall and makes it inactive. All incoming and outgoing connections are allowed irrespective of the restrictions set by the user. Comodo strongly advise against this setting unless you are sure that you are not currently connected to any local or wireless networks.
Check boxes -
Keep an alert on screen for maximum (n) seconds
Determines how long the Firewall shows an alert for without any user intervention. By default, the timeout is set at 120 seconds. You may adjust this setting to your own preference.
Create rules for safe applications
Comodo Firewall trusts the applications if:
• The application/file is included in the Trusted Files list under Defense+ Tasks;• The application is from a vendor included in the Trusted Software Vendors list under Defense+ Tasks; • The application is included in the extensive and constantly updated Comodo safelist.
By default, CIS does not automatically create 'allow' rules for safe applications. This helps saving the resource usage, simplifies the rules interface by reducing the number of 'Allowed' rules in it, reduces the number of pop-up alerts and is beneficial to beginners who find difficulties in setting up the rules.
Enabling this checkbox instructs CIS to begin learning the behavior of safe applications so that it can automatically generate the 'Allow' rules. These rules are listed in the Network Security Policy > Application Rules interface. The Advanced users can edit/modify the rules as they wish (Default = Disabled).
Background Note: Prior to version 4.x , CIS would automatically add an allow rule for 'safe' files to the rules interface. This allowed advanced users to have granular control over rules but could also lead to a cluttered rules interface. The constant addition of these 'allow' rules and the corresponding requirement to learn the behavior of applications that are already considered 'safe' also took a toll on system resources. In version 4.x and above, 'allow' rules for applications considered 'safe' are not automatically created - simplifying the rules interface and cutting resource overhead with no loss in security. Advanced users can re-enable this setting if they require the ability to edit rules for safe applications (or, informally, if they preferred the way rules were created in CIS version 3.x).
Automatically detect new private networks – Instructs Comodo Firewall to keep monitoring whether your computer is connected to any new wired or wireless network. The firewall will display an alert as shown below on detecting a network, e.g. when you connect to a wired home or office local area network, a Wi-Fi network at an airport , cafeteria and so on.
Comodo Internet Security 2012 User Guide | © 2012 Comodo Security Solutions Inc. | All rights reserved 171

Comodo Internet Security 2012 - User Guide
You can select the type of new network you are connected to, so that the firewall configuration is optimized for the type of connection. Comodo recommends users to leave this option at its default, enabled setting (Default = Enabled).Show Trustconnect alerts for unsecured wireless networks - If you are connecting to Internet through a new wireless network, e.g. a Wi-Fi connection at a restaurant, the network needs to be encrypted and secure. Performing your Internet routed activities through an unsecure wireless network proves the risk of exposing your communication and revealing your confidential information to potential hackers.
On detection of your Internet connection through a new wireless network, Comodo Firewall checks whether the network is encrypted and secure. If the network is unsecure, the firewall will display an alert as shown below, if this option is enabled. (Default = Enabled).
Comodo Internet Security 2012 User Guide | © 2012 Comodo Security Solutions Inc. | All rights reserved 172
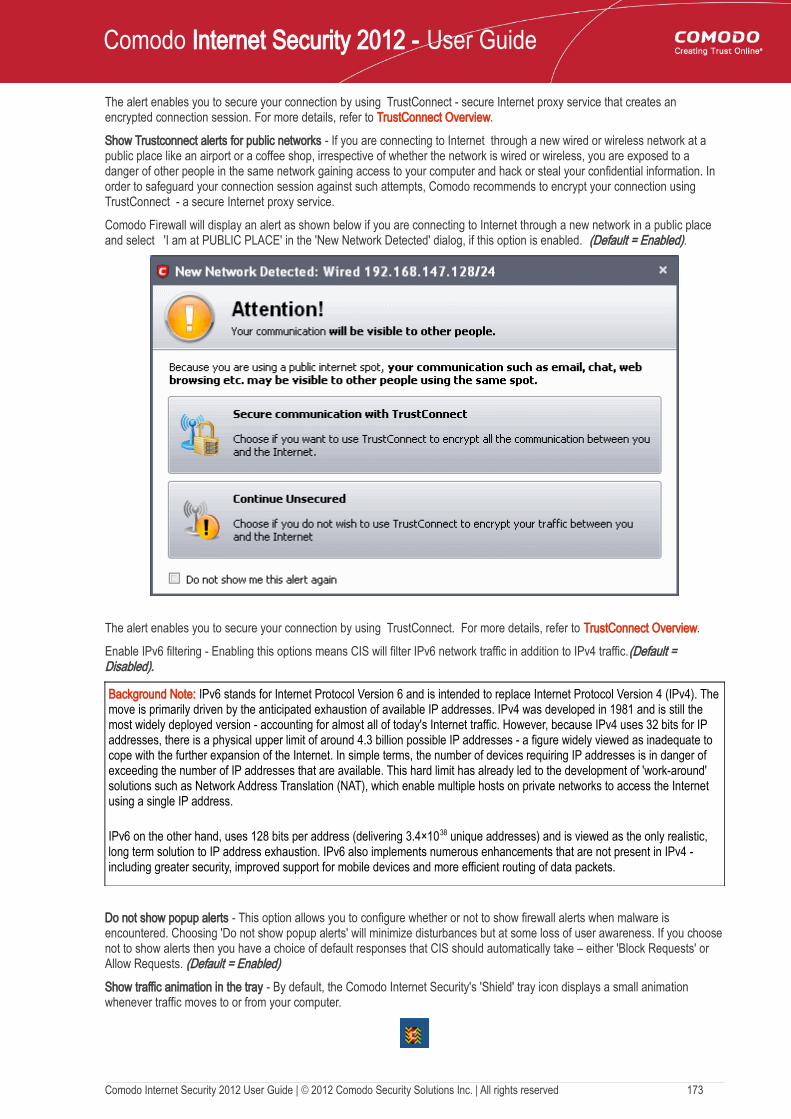
Comodo Internet Security 2012 - User Guide
The alert enables you to secure your connection by using TrustConnect - secure Internet proxy service that creates an encrypted connection session. For more details, refer to TrustConnect Overview.
Show Trustconnect alerts for public networks - If you are connecting to Internet through a new wired or wireless network at a public place like an airport or a coffee shop, irrespective of whether the network is wired or wireless, you are exposed to a danger of other people in the same network gaining access to your computer and hack or steal your confidential information. In order to safeguard your connection session against such attempts, Comodo recommends to encrypt your connection using TrustConnect - a secure Internet proxy service.
Comodo Firewall will display an alert as shown below if you are connecting to Internet through a new network in a public place and select 'I am at PUBLIC PLACE' in the 'New Network Detected' dialog, if this option is enabled. (Default = Enabled).
The alert enables you to secure your connection by using TrustConnect. For more details, refer to TrustConnect Overview.
Enable IPv6 filtering - Enabling this options means CIS will filter IPv6 network traffic in addition to IPv4 traffic.(Default = Disabled).
Background Note: IPv6 stands for Internet Protocol Version 6 and is intended to replace Internet Protocol Version 4 (IPv4). The move is primarily driven by the anticipated exhaustion of available IP addresses. IPv4 was developed in 1981 and is still the most widely deployed version - accounting for almost all of today's Internet traffic. However, because IPv4 uses 32 bits for IP addresses, there is a physical upper limit of around 4.3 billion possible IP addresses - a figure widely viewed as inadequate to cope with the further expansion of the Internet. In simple terms, the number of devices requiring IP addresses is in danger of exceeding the number of IP addresses that are available. This hard limit has already led to the development of 'work-around' solutions such as Network Address Translation (NAT), which enable multiple hosts on private networks to access the Internet using a single IP address.
IPv6 on the other hand, uses 128 bits per address (delivering 3.4×1038 unique addresses) and is viewed as the only realistic, long term solution to IP address exhaustion. IPv6 also implements numerous enhancements that are not present in IPv4 - including greater security, improved support for mobile devices and more efficient routing of data packets.
Do not show popup alerts - This option allows you to configure whether or not to show firewall alerts when malware is encountered. Choosing 'Do not show popup alerts' will minimize disturbances but at some loss of user awareness. If you choose not to show alerts then you have a choice of default responses that CIS should automatically take – either 'Block Requests' or Allow Requests. (Default = Enabled) Show traffic animation in the tray - By default, the Comodo Internet Security's 'Shield' tray icon displays a small animation whenever traffic moves to or from your computer.
Comodo Internet Security 2012 User Guide | © 2012 Comodo Security Solutions Inc. | All rights reserved 173

Comodo Internet Security 2012 - User Guide
If the traffic is outbound, you can see green arrows moving upwards on the right hand side of the shield. Similarly, for inbound traffic you can see red arrows moving down the left hand side. This provides a very useful indicator of the real-time movement of data in and out of your computer. Clear this check box If you would rather not see this animation (Default = Enabled).
3.7.2. Alert SettingsUsers can configure the amount of alerts that Comodo Firewall generates, using the slider on this tab. Raising or lowering the slider changes the amount of alerts accordingly. It should be noted that this does not affect your security, which is determined by the rules you have configured (for example, in 'Network Security Policy'). For the majority of users, the default setting of 'Low' is the perfect level - ensuring you are kept informed of connection attempts and suspicious behaviors whilst not overwhelming you with alert messages.
The Alert Frequency settings refer only to connection attempts by applications or from IP addresses that you have not (yet) decided to trust. For example, you could specify a very high alert frequency level, but not receive any alerts at all if you have chosen to trust the application that is making the connection attempt.
• Very High: The firewall shows separate alerts for outgoing and incoming connection requests for both TCP and UDP protocols on specific ports and for specific IP addresses, for an application. This setting provides the highest degree of visibility to inbound and outbound connection attempts but leads to a proliferation of firewall alerts. For example, using a browser to connect to your Internet home-page may generate as many as 5 separate alerts for an outgoing TCP connection alone.
• High: The firewall shows separate alerts for outgoing and incoming connection requests for both TCP and UDP protocols on specific ports for an application.
• Medium: The firewall shows alerts for outgoing and incoming connection requests for both TCP and UDP protocols for an application.
• Low (Default): The firewall shows alerts for outgoing and incoming connection requests for an application. This is the setting recommended by Comodo and is suitable for the majority of users.
• Very Low: The firewall shows only one alert for an application.
Comodo Internet Security 2012 User Guide | © 2012 Comodo Security Solutions Inc. | All rights reserved 174

Comodo Internet Security 2012 - User Guide
Check boxes
This computer is an internet connection gateway (i.e. an ICS server) - An Internet Connection Sharing Server (ICS) is a computer that shares its connection to the Internet with other computers that are connected to it by LAN. i.e. the other computers access the Internet through this computer (Default = Enabled).Designating a computer as an ICS server can be useful in some corporate and home environments that have more than one computer but which have only one connection to the Internet. For example, you might have 2 computers in your home but only one connection. Setting one as an ICS server allows both of them to access the Internet.
• Leave this box unchecked if no other computers connect to your computer via Local Area Network to share your connection. This is the situation for the vast majority of home and business users.
• Check this option if this computer has been configured as an Internet Connection Sharing server through which other computers connect to the Internet.
Note: If your computer is indeed an ICS server but you leave this box unchecked then you are likely to see an increase in Firewall alerts. Selecting this checkbox does not decrease the security but tells the firewall to handle ICS requests too. So it just activates some additional functionality and helps reduce the number of alerts.
Q: 'I have more than one computer in my home and both connect to the Internet. Should I check this box?'
A: In most cases no. Having more than one computer in your home, both of which connect to the 'net via a router or wireless connection, is not the same as 'sharing' a connection in the sense that we mean here. Only check this box if you know that you have designated this computer as an ICS server.
Enable alerts for TCP requests / Enable alerts for UDP requests / Enable alerts for ICMP requests/ Enable alerts for loopback requests - In conjunction with the slider, these checkboxes allow you to fine-tune the number of alerts you see according to protocol (Default = Enabled).
3.7.3. Advanced SettingsComodo Firewall features advanced detection settings to help protect your computer against common types of denial of service (DoS) attack. When launching a denial of service or 'flood' attack, an attacker bombards a target machine with so many connection requests that your computer is unable to accept legitimate connections, effectively shutting down your web, email, FTP or VPN server.
Comodo Internet Security 2012 User Guide | © 2012 Comodo Security Solutions Inc. | All rights reserved 175

Comodo Internet Security 2012 - User Guide
• Protect the ARP Cache - Checking this option makes Comodo Firewall to start performing stateful inspection of ARP (Address Resolution Protocol) connections. This blocks spoof ARP requests and protects your computer from ARP cache poisoning attacks (Default = Disabled).The ARP Cache (or ARP Table) is a record of IP addresses stored on your computer that is used to map IP addresses to MAC addresses. Stateful inspection involves the analysis of data within the lowest levels of the protocol stack and comparing the current session to previous ones in order to detect suspicious activity.
Background: Every device on a network has two addresses: a MAC (Media Access Control) address and an IP (Internet Protocol) address. The MAC address is the address of the physical network interface card inside the device, and never changes for the life of the device (in other words, the network card inside your PC has a hard coded MAC address that it keeps even if you install it in a different machine.) On the other hand, the IP address can change if the machine moves to another part of the network or the network uses DHCP to assign dynamic IP addresses. In order to correctly route a packet of data from a host to the destination network card it is essential to maintain a record of the correlation between a device's IP address and it's MAC address. The Address Resolution Protocol performs this function by matching an IP address to its appropriate MAC address (and vice versa). The ARP cache is a record of all the IP and MAC addresses that your computer has matched together.
Hackers can potentially alter a computer's ARP cache of matching IP/MAC address pairs to launch a variety of attacks including, Denial of Service attacks, Man in the Middle attacks and MAC address flooding and ARP request spoofing. It should be noted, that a successful ARP attack is almost always dependent on the hacker having physical access to your network or direct control of a machine on your network - therefore this setting is of more relevance to network administrators than home users.
• Block Gratuitous ARP frames - A gratuitous ARP frame is an ARP Reply that is broadcast to all machines in a network and is not in response to any ARP Request. When an ARP Reply is broadcast, all hosts are required to update their local ARP caches, whether or not the ARP Reply was in response to an ARP Request they had issued. Gratuitous ARP frames are important as they update your machine's ARP cache whenever there is a change to another machine on the network (for example, if a network card is replaced in a machine on the network, then a gratuitous ARP frame informs your machine of this change and requests to update your ARP
Comodo Internet Security 2012 User Guide | © 2012 Comodo Security Solutions Inc. | All rights reserved 176

Comodo Internet Security 2012 - User Guide
cache so that data can be correctly routed). Enabling this setting helps to block such requests - protecting the ARP cache from potentially malicious updates (Default = Disabled).
• Block Fragmented IP datagrams - When a connection is opened between two computers, they must agree on a Maximum Transmission Unit (MTU). IP Datagram fragmentation occurs when data passes through a router with an MTU less than the MTU you are using i.e when a datagram is larger than the MTU of the network over which it must be sent, it is divided into smaller 'fragments' which are each sent separately. Fragmented IP packets can create threats similar to a DOS attack. Moreover, these fragmentations can double the amount of time it takes to send a single packet and slow down your download time (Default = Disabled).Comodo Firewall is set by default to block fragmented IP datagrams i.e the option Block Fragmented IP datagrams is checked by default.
• Do protocol Analysis - Protocol Analysis is key to the detection of fake packets used in denial of service attacks. Checking this option means Comodo Firewall checks every packet conforms to that protocols standards. If not, then the packets are blocked (Default = Disabled).
• Monitor NDIS protocols other than TCP/IP - This forces Comodo Firewall to capture the packets belonging to any other protocol driver than TCP/IP. Trojans can potentially use their own protocol driver to send/receive packets. This option is useful to catch such attempts. This option is disabled by default: because it can reduce system performance and may be incompatible with some protocol drivers (Default = Disabled).
4.Defense+ Tasks - IntroductionThe Defense+ component of Comodo Internet Security (hereafter known simply as Defense+) is a host intrusion prevention system that constantly monitors the activities of all executable files on your PC. With Defense+ activated, the user is warned EVERY time an unknown application executable (.exe, .dll, .sys, .bat etc) attempts to run. The only executables that are allowed to run are the ones you give permission to.
Defense+ also protects against data theft, computer crashes and system damage by preventing most types of buffer overflow attacks. This type of attack occurs when a malicious program or script deliberately sends more data to its memory buffer than that the buffer can handle. It is at this point that a successful attack can create a back door to the system through which a hacker can gain access. The goal of most attacks is to install malware onto the compromised PC whereby the hacker can reformat the hard drive, steal sensitive user information, or even install programs that transform the machine into a Zombie PC. For more details refer Execution Control Settings.
Defense+ boasts a highly configurable security rules interface and prevents possible attacks from root-kits, inter-process memory injections, key-loggers and more. It blocks Viruses, Trojans and Spyware before they can ever get installed on your system and prevents unauthorized modification of critical operating system files and registry entries.
The Sandbox functionality of Defense+ allows you to run suspicious and unknown executables in an isolated environment to safeguard your system from the adverse effects of those executables. This is useful for software testers and users interested in testing out the new software available over Internet.
The Defense+ Tasks area can be accessed at all times by clicking on the Defense+ tab from the navigation panel.
Comodo Internet Security 2012 User Guide | © 2012 Comodo Security Solutions Inc. | All rights reserved 177

Comodo Internet Security 2012 - User Guide
The Defense+ main configuration area provides easy access to all the features and allows you to create rules for applications and sandbox through a series of shortcuts and wizards. Click on the links below to see detailed explanations of each area in this section.
• View Defense+ Events• Trusted Files• Unrecognized Files• Computer Security Policy• View Active Process List• Run a Program in the Sandbox• Defense+ Settings
4.1.The Sandbox - An IntroductionComodo Internet Security's new sandbox is an isolated operating environment for unknown and untrusted applications. Running an application in the sandbox means that it cannot make permanent changes to other processes, programs or data on your 'real' system. Comodo have integrated sandboxing technology directly into the security architecture of Comodo Internet Security to complement and strengthen the Firewall, Defense+ and Antivirus modules.
The smart application control mechanism performs security inspections whenever you start an application and automatically sandboxes any unknown application so that they can NOT do any harm to your system.
Applications in the sandbox are executed under a carefully selected set of privileges and write to a virtual file system and registry instead of the real system. This delivers the smoothest user experience possible by allowing unknown applications to run and operate as they normally would while denying them the potential to cause lasting damage.
After an unknown application has been placed in the sandbox, CIS also automatically queues it for submission to Comodo Cloud Scanners for automatic behavior analysis. Firstly, the files undergo another antivirus scan on our servers. If the scan discovers the file to be malicious, then it is designated as malware, the result is sent back to the local installation of CIS and the local black-list is updated. If the scan does not detect that the file is malicious then its behavior will be monitored by running it in a virtual environment within Comodo's Instant Malware Analysis (CIMA) servers and all its activities are recorded. If these behaviors are found to be malicious then the signature of the executable is automatically added to the antivirus black list. If no malicious behavior is recorded then the file is placed into 'Unrecognized Files' (for execution within the sandbox) and will be
Comodo Internet Security 2012 User Guide | © 2012 Comodo Security Solutions Inc. | All rights reserved 178

Comodo Internet Security 2012 - User Guide
submitted to our technicians for further checks. The cloud scanning processes take around 15 minutes to complete and report their results back to CIS.
By uniquely deploying 'sandboxing as security', CIS 2012 offers improved security, fewer pop-ups and greater ease of use than ever before.
Refer to the following sections for more details on sandbox:
• The Sand-boxing and Scanning Processes• Always Sandbox • Run a Program in the Sandbox• Sandbox Settings
4.1.1. Unknown Files: The Sand-boxing and Scanning Processes• When an executable is first run it passes through the following CIS security inspections:
• Antivirus scan• Defense+ Heuristic check• Buffer Overflow check
• If the processes above determine that the file is malware then the user is alerted and the file is quarantined or deleted
• An application can become recognized as 'safe' by CIS (and therefore not sandboxed or scanned in the cloud) in the following ways:• Because it is on the local Comodo White List of known safe applications
• Because the user has added the application to the local 'Trusted Files'
• By the user granting the installer elevated privileges (CIS detects if an executable requires administrative privileges. If it does, it asks the user. If they choose to trust, CIS regards the installer and all files generated by the installer as safe)
• Additionally, a file is not sandboxed or sent for analysis in the cloud if it is defined as an Installer or Updater in HIPS policy (See Computer Security Policy for more details)
• Cloud Scanning Part 1Files and processes that pass the security inspections above but are not yet recognized as 'safe' (white-listed) are 'Unrecognized' files. In order to try to establish whether a file is safe or not, CIS will first consult Comodo's File Look-Up Server (FLS) to check the very latest signature databases:• A digital hash of the unrecognized process or file is created.• These hashes are uploaded to the FLS to check whether the signature of the file is present on the
latest databases. This database contains the latest, global black list of the signatures of all known malware and a white list of the signatures of the 'safe' files.• First, our servers check these hashes against the latest available black-list• If the hash is discovered on this blacklist then it is malware• The result is sent back to the local installation of CIS
• If the hash is not on the latest black-list, it's signature is checked against the latest white-list• If the hash is discovered on this white-list then it is trusted• The result is sent back to local installation of CIS• The local white-list is updated
• The FLS checks detailed above are near instantaneous.
• Sandbox and Cloud Scanning Part 2If the hash is not on the latest black-list or white-list then it remains as 'unrecognized'. CIS simultaneously takes two distinct but complementary actions -
Comodo Internet Security 2012 User Guide | © 2012 Comodo Security Solutions Inc. | All rights reserved 179

Comodo Internet Security 2012 - User Guide
(1) It will run the unrecognized file in the local Sandbox so that it cannot access important operating system files or damage your computer, and
(2) It will leverage Comodo's Cloud Scanning technology to determine whether the file behaves in a malicious fashion.
• Unrecognized files and applications will be isolated and locally sandboxed. CIS will alert the user that it is going to run the application in the sandbox.
• Automatically sandboxed applications are run with 'Partially Limited' restrictions. More detail: Sandboxed applications are allowed to run under a specific set of conditions or privileges. In CIS, these are known as 'Restriction Levels'. There are four levels - Partially Limited, Limited, Restricted and Untrusted ('Partially Limited' is the default level for applications that are automatically placed in the sandbox). In part, sandbox restriction levels are implemented by enforcing or relaxing the native access rights that Windows can grant to an application. For example, the 'Limited' setting applies some of the supported operating system restrictions and grants it access rights similar to if the application was run under a non-admin user account. These restriction levels are fortified with certain Defense + restrictions that apply to all sandboxed applications (for example, they cannot key log or screen grab, set windows hooks, access protected COM interfaces or access non-sandboxed applications in memory. If the user enables virtualization, then sandboxed apps. can't modify registry keys or modify existing protected files either).
• Automatically sandboxed applications cannot be viewed or modified in the interface. Applications that were automatically sandboxed can only be removed if they become recognized as 'safe' by CIS (see conditions above).
• Unrecognized files are simultaneously uploaded to Comodo's Instant Malware Analysis servers for further checks:• Firstly, the files undergo another antivirus scan on our servers. • If the scan discovers the file to be malicious (for example, heuristics discover it is a brand new variant)
then it is designated as malware. This result is sent back to the local installation of CIS and the local and global black-list is updated.
• If the scan does not detect that the file is malicious then it passes onto the the next stage of inspection - behavior monitoring.
• The behavior analysis system is a cloud based service that is used to help determine whether a file exhibits malicious behavior. Once submitted to the system, the unknown executable will be automatically run in a virtual environment and all actions that it takes will be monitored. For example, processes spawned, files and registry key modifications, host state changes and network activity will be recorded.
• If these behaviors are found to be malicious then the signature of the executable is automatically added to the antivirus black list.
• If no malicious behavior is recorded then the file is placed into 'Unrecognized Files' and will be submitted to our technicians for further checks. Note: Behavior Analysis can identify malicious files and add to the global black list, but it cannot declare that a file is 'safe'. The status of 'safe' can only be given to a file after more in-depth checks by our technicians.
• In either case, the result is reported back to your CIS installation in approximately 15 minutes. If the executable was not found to be malicious then it will be run in the sandbox. It will simultaneously be added to the 'Unrecognized Files' list and uploaded to our technicians for analysis. If is discovered to be a threat then CIS will show an AV alert to the user. From this alert the user can opt to quarantine, clean (delete) or disinfect the malicious file. This new threat will be automatically added to the global black list database and therefore benefit all CIS users.
Comodo Internet Security 2012 User Guide | © 2012 Comodo Security Solutions Inc. | All rights reserved 180

Comodo Internet Security 2012 - User Guide
Sandbox - Other notes
• Applications can be placed in the sandbox automatically by CIS or by the Always Sandbox feature. Users also have the option to run an application in the sandbox on a 'one-off' basis.
• If a safe or installer application is executed by an application running inside the sandbox, the installer also runs in the sandbox no matter what
• If a user defines an application for sandboxing, this causes any applications (safe or installer) to also be executed inside the sandbox.
• In addition to the Sandbox restriction level set for an application, Defense + also implements the following restrictions. A sandboxed application cannot:• Access non-sandboxed applications in memory • Access protected COM interfaces • Key log or screen capture • Set windows hooks • Modify protected registry keys (if virtualization is enabled) • Modify EXISTING protected file (if virtualization is enabled).
4.2.View Defense+ EventsComodo Internet Security records a history of all actions taken by Defense+. These can be viewed by clicking 'View Defense+ Events' from the 'Defense+ Tasks' area. Defense+ 'Events' are generated and recorded for various reasons. Examples include changes in Defense+ settings, when an application or process attempts to access restricted areas or when an action occurs that contravenes your Computer Security Policy.
By default, CIS stores the log file in Support DataBase (SDB) format as cislogs.sdb file which is located in C:\Documents and Settings\All Users\Application Data\Comodo\Firewall Pro. Logs stored in this file can be extracted by using a suitable application. Logs can also be exported to html by clicking 'More.. > File > Export'.
To view a log of Defense+ Events• Click 'View Defense+ Events' from the Defense+ Tasks interface.
Column Descriptions
• Application - Indicates which application or process propagated the event. If the application has no icon, the default system icon for executable files are used.
Comodo Internet Security 2012 User Guide | © 2012 Comodo Security Solutions Inc. | All rights reserved 181

Comodo Internet Security 2012 - User Guide
• Flags - Indicates flags set for the kinds of actions against the event triggered by the file. • Target - Represents the location of the target file. • Date/Time - Contains precise details of the date and time of the access attempt.
• Click Refresh to reload and update the displayed list, to include all events generated since the time you first accessed the 'Defense+ Events' area.
• Click 'More ...' to load the full, Comodo Internet Security Log Viewer module. See below for more details on this module.
Log Viewer ModuleClick 'More' to load the full, Comodo Internet Security Log Viewer module. Alternatively, this module can be opened by double-clicking the 'cfplogvw' exe file that is stored in the installation path of the CIS application. Usually the path is C:\Program Files\COMODO\COMODO Internet Security.
This window contains a full history of logged events of Firewall, Defense+ and Antivirus modules. It also allows you to build custom log files based on specific filters and to export log file for archiving or troubleshooting purposes.
The Log Viewer Module is divided into two sections. The left hand panel displays a set of handy, pre-defined time Filters for Firewall, Defense+ and Antivirus event log files. The right hand panel displays the actual events that were logged for the time period you selected in the left hand panel (or the events that correspond to the filtering criteria you selected).
Filtering Log FilesComodo Internet Security allows you to create custom views of all logged events according to user defined criteria.
Preset Time Filters:
Clicking on any of the preset filters in the top panel alters the display in the right hand panel in the following ways:
• Today - Displays all logged events for today.• Current Week - Displays all logged events during the current week. (The current week is calculated from the
Sunday to Saturday that holds the current date.)• Current Month - Displays all logged events during the month that holds the current date.• Entire Period - Displays every event logged since Comodo Internet Security was installed. (If you have
cleared the log history since installation, this option shows all logs created since that clearance).
Comodo Internet Security 2012 User Guide | © 2012 Comodo Security Solutions Inc. | All rights reserved 182

Comodo Internet Security 2012 - User Guide
The example below shows an example display when the Defense+ Logs for 'Today' are displayed.
Note: The type of events logged by the Antivirus, Firewall and Defense+ modules of Comodo Internet Security differ from each other. This means that the information and the columns displayed in the right hand side panel change depending on which type of log you have selected in the top and left hand side panel. For more details on the data shown in the columns, see View Antivirus Events or View Firewall Events.
User Defined Filters:
Having chosen a preset time filter from the top panel, you can further refine the displayed events according to specific filters. The type of filters available for Firewall logs differ to those available for Defense+ logs. The table below provides a summary of available filters and their meanings:
Available Filters - Logs per Module
Antivirus Filter Firewall FiltersDefense+ Filters
Action - Displays events according to the response (or action taken) by the Antivirus
Action - Displays events according to the response (or action taken) by the firewall
Application - Displays only the events propagated by a specific application
Location - Displays only the events logged from a specific location
Application - Displays only the events propagated by a specific application
Flags - Displays events according to the response (or action taken) by Defense+
Malware Name - Displays only the events logged corresponding to a specific malware
Destination IP - Displays only the events with a specific target IP address
Target - Displays only the events that involved a specified target application
Status - Displays the events according to the status after the
Destination Port - Displays only the events with a specific target port
Comodo Internet Security 2012 User Guide | © 2012 Comodo Security Solutions Inc. | All rights reserved 183

Comodo Internet Security 2012 - User Guide
Available Filters - Logs per Module
action taken. It can be either 'Success' or 'Fail' number
Direction - Indicates if the event was an Inbound or Outbound connection
Protocol - Displays only the events that involved a specific protocol
Source IP address - Displays only the events that originated from a specific IP address
Source Port - Displays only the events that originated from a specific port number
Creating Custom FiltersCustom Filters can be created through the Advanced Filter Interface. You can open the Advanced Filter interface either by using the View option in the menu bar or using the context sensitive menu.
• Click View > Advanced Filter to open the 'Advanced Filter' configuration area.Or
• Right click on any event and select 'Advanced Filter' option to open the corresponding configuration area.The 'Advanced Filter' configuration area is displayed in the top half of the interface whilst the lower half displays the Events, Alerts, Tasks or Configuration Changes that the user has selected from the upper left pane. If you wish to view and filter event logs for other modules then simply click log name in the tree on the upper left hand pane.
The Advanced Log filter displays different fields and options depending on the log type chosen from the left hand pane (Antivirus, Defense+, Firewall).
This section will deal with Advanced Event Filters related to 'Defense+ Events' and will also cover the custom filtering that can be applied to the 'Other Logs' (namely 'Alerts Displayed', 'Tasks' Launched' and 'Configuration Changes').
Defense+ Events - Advanced FiltersTo configure Advanced Filters for Defense+ events
1. Select 'View > Advanced Filter'
2. Select 'Defense+ Events' under 'Logs Per Module'
You have 3 categories of filter that you can add. Each of these categories can be further refined by either selecting or deselecting specific filter parameters or by the user typing a filter string in the field provided.
3. Click the 'Add' link when you have chosen the category upon which you wish to filter.
Comodo Internet Security 2012 User Guide | © 2012 Comodo Security Solutions Inc. | All rights reserved 184

Comodo Internet Security 2012 - User Guide
Following are the options available in the 'Add' drop down menu:
i. Application: Selecting the 'Application' option displays a drop-down field and text entry field.
a) Select 'Contains' or 'Does Not Contain' option from the drop-down menu.b) Enter the text or word that needs to be filtered.
The filtered entries are shown directly underneath.
ii. Flags: Selecting the 'Flags' option displays a drop down menu and a set of specific filter parameters that can be selected or deselected.
c) Select 'Equal' or 'Not Equal' option from the drop down menu. 'Not Equal' will invert your selected choice. d) Now select the check-boxes of the specific filter parameters to refine your search. The parameter available
are:• Sandboxed As• Scanned Online and Found Safe• Scanned Online and Found Malicious• Access Memory• Create Process• Terminate Process• Modify Key• Modify File• Direct Memory Access• Direct Disk Access• Direct Keyboard Access
Comodo Internet Security 2012 User Guide | © 2012 Comodo Security Solutions Inc. | All rights reserved 185

Comodo Internet Security 2012 - User Guide
• Direct Monitor Access• Load Driver• Send Message• Install Hook• Access COM Interface• Execute Image• DNS/RPC Client Access• Change Defense+ Mode• Shellcode Injection• Block File• Suspicious• Hook• Alert Suppressed
The filtered entries are shown directly underneath.
iii. Target: Selecting the 'Target' option displays a drop-down menu and text entry field.
a) Select 'Contains' or 'Does Not Contain' option from the drop-down menu.b) Enter the text or word that needs to be filtered.
The filtered entries are shown directly underneath.
Note: More than one filters can be added in the 'Advanced Filter' pane. After adding one filter type, the option to select the next filter type automatically appears. You can also remove a filter type by clicking the 'Remove' option at the end of every filter option.
Other Logs - Advanced FiltersRefer to Antivirus Tasks Overview > View Antivirus Events > Log Viewer > Creating Custom Filters > Other Logs - Advanced Filters for the process of Creating Custom Filters for Alerts Displayed, Task Launched and Configuration Changes.
Date FilterClick here to know more about Date Filter functionality.
Exporting Log Files to HTMLExporting log files is useful for archiving and troubleshooting purposes. There are two ways to export log files in the Log Viewer interface - using the context sensitive menu and via the 'File' menu option. After making your choice, you are asked to specify a name for the exported HTML file and the location you wish to save it to.
i. File Menu1. Click 'File' Menu.
2. Move cursor to 'Export'
3. Click on anyone of 'Firewall Logs', 'Defense+ Logs', 'Antivirus Logs' and 'All', as required.
• Firewall Logs - Exports the Firewall log that is currently being displayed in the right hand side panel.
• Defense+ Logs - Exports the Defense+ log that is currently being displayed in the right hand side panel .
• Antivirus Logs - Exports Antivirus log that is currently being displayed in the right hand side panel. • All - Exports ALL logs for ALL TIME for Firewall, Defense+ and Antivirus logs as a single HTML file.
4. Select the location where the log has to be stored in the 'Save Firewall Log as' window and click 'Save'.
Comodo Internet Security 2012 User Guide | © 2012 Comodo Security Solutions Inc. | All rights reserved 186

Comodo Internet Security 2012 - User Guide
ii. Context Sensitive Menu 1. Right click in the log display window to export the currently displayed log file to HTML.
You can export a custom view that you created using the available Filters by right clicking and selecting 'Export' from the context sensitive menu. Again, you are asked to provide a filename and save location for the file.
4.3.Trusted FilesDefense+ allows you to define a personal safe list of files to complement the default Comodo safe list.
Files added to the Trusted Files area are automatically given Defense+ trusted status. If an executable is unknown to the Defense+ safe list then, ordinarily, it and all its active components generate Defense+ alerts when they run. Of course, you could choose the 'Treat this as a Trusted Application' option at the alert but it is often more convenient to classify entire directories of files as 'Trusted Files'.
By adding executables to this list (including sub folders containing many components) you can reduce the amount of alerts that Defense+ generates whilst maintaining a higher level of Defense+ security. This is particularly useful for developers that are creating new applications that, by their nature, are as yet unknown to the Comodo safe list. Files can be transferred into this module by clicking the 'Move to' button in the 'Unrecognized Files' area.
Adding files to Trusted Files list
Defense+ allows you to add files and executables to the list of Trusted Files so that those files will be given Trusted status. For the files added manually, it generates a hash or a digest of the file using a pre-defined algorithm and saves in its database. On access to any file, its digest is created instantly and compared against the list of stored hashes to decide on whether the file has 'Trusted' status. By this way, even if the file name is changed later, it will retain its Trusted status as the hash remains same. However you can also add files by their file names, but if you happen to change the file name later, it looses its 'Trusted' status.
To add new file(s) to Trusted Files list
• Click 'Add' from 'Trusted Files' interface
Comodo Internet Security 2012 User Guide | © 2012 Comodo Security Solutions Inc. | All rights reserved 187

Comodo Internet Security 2012 - User Guide
• Browse Files - Opens a drag and drop dialog that enables you to select the files/folders from the left and side pane and move them to the right hand side pane by clicking the right arrow.
• Include files from subfolders too - Select this option if you want all the files included in the subfolders to be added to Trusted files list in case you are selecting a folder from the left hand side pane.
• Use file names instead of file hashes - On selecting this option, the selected files will be stored in the database with the file names instead of file hashes. Use this option only for the files which should not be trusted if their file names are changed.
• Click 'Apply' for adding the files in the left hand side pane to the 'Trusted Files' list.• Browse Running Processes - Opens Choose a process dialog which allows you to select a currently running
process. On selecting a process, the parent application, which invoked the process will be added to 'Trusted Files' list.
Comodo Internet Security 2012 User Guide | © 2012 Comodo Security Solutions Inc. | All rights reserved 188

Comodo Internet Security 2012 - User Guide
• Select the process and click 'Select'. The parent application will be added to the 'Trusted Files' list.
To move an included entry to Unrecognized Files or Blocked Files
The 'Move to...' option allows you to transfer the selected files out of the 'Trusted Files' area into either the Unrecognized Files or Blocked Files areas of Defense+:
To remove an included entry from the Trusted Files list • Select the entry and click 'Remove' button. The file is only removed from the list and not deleted from your
system.To remove invalid entries (programs / files that are not present or uninstalled from your computer) automatically
• Select the entry and click 'Purge' button.
4.4.Unrecognized FilesOnce installed, Defense+ watches all file system activity on your computer. Every new executable file introduced to the computer, is first scanned against the Comodo certified safe files database. If they are not safe, they are added to the 'Unrecognized Files' for users to review and possibly submit to Comodo. Apart from new executables, any executables that are modified are also moved to the 'Unrecognized Files' area.
Comodo Internet Security 2012 User Guide | © 2012 Comodo Security Solutions Inc. | All rights reserved 189

Comodo Internet Security 2012 - User Guide
'Unrecognized Files' is specifically important while Defense+ is in 'Clean PC Mode'. In Clean PC Mode, the files in 'Unrecognized Files' are NOT considered clean. For more information, please check 'Clean PC Mode' on the Defense+ settings page.
The 'Unrecognized Files' Area allows the user to:
• Assess the pending files to determine whether or not they are to be trusted. If they are trustworthy, they can be moved to 'Trusted Files' using the 'Move to' button. Similarly, files that are suspicious can be moved to the 'Blocked Files' area.
• Use the 'Lookup...' feature to see if the master Comodo safe list contains more information.• Send the file to Comodo for analysis by clicking the 'Submit' button which automatically begins the file submission
process.• Manually add files to the pending list for look-ups or submitting to Comodo.• Use the 'Purge' feature to scan the list for files that no longer exist on your system and remove them from the
'Unrecognized Files' list. • Delete a selected file from the system by clicking 'Delete File' button
To access Unrecognized Files interface Files • Navigate to: Defense+ Tasks > Unrecognized Files.
This area contains two tabs:
• Unrecognized files - Displays a list of files identified as suspicious by Defense+ and the files added to this area manually.
• Submitted Files - Displays a list of files that were submitted to Comodo for analysis.
4.4.1. Unrecognized FilesThe Unrecognized Files tab displays the list files that are identified as suspicious by Defense+. Also you can manually add suspicious and unclassified files to this area for later submission to Comodo for analysis.
Comodo Internet Security 2012 User Guide | © 2012 Comodo Security Solutions Inc. | All rights reserved 190

Comodo Internet Security 2012 - User Guide
The 'Lookup...' button allows you to check for information on the files by consulting the master Comodo safe list, Select the file(s) you want to check and click the 'Lookup...' button. This contacts Comodo servers to conduct a search of Comodo's master safe list database to check if any information is available about the file in question. If no information is available, you are presented with the option to submit them to Comodo for analysis:
Comodo Internet Security 2012 User Guide | © 2012 Comodo Security Solutions Inc. | All rights reserved 191

Comodo Internet Security 2012 - User Guide
After sending the file to Comodo, our technicians determine whether or not it represents a threat to your security. If it is found to be trustworthy, it is added to the Comodo safe list. You can also directly submit the files to Comodo from this area.
To manually submit the files to Comodo• Select the file from the list and click 'Submit'...
Comodo Internet Security 2012 User Guide | © 2012 Comodo Security Solutions Inc. | All rights reserved 192

Comodo Internet Security 2012 - User Guide
You will see a progress of file submission and on completion, the submission results will be displayed. You can see the file under Submitted files tab.
You can manually add files to the 'Unrecognized Files' list by clicking the 'Add..' button and either browsing to their location on your hard drive or selecting a running process:
Comodo Internet Security 2012 User Guide | © 2012 Comodo Security Solutions Inc. | All rights reserved 193

Comodo Internet Security 2012 - User Guide
The 'Move to...' option allows you to transfer the files out of the 'My Pending Files' area and into either the Trusted Files or Blocked Files areas of Defense+:
Files can also be transferred into this module by clicking the 'Move to...' button in the 'Trusted Files' area.
4.4.2. Submitted FilesThe Submitted files tab in the Unrecognized Files area displays a list of files submitted to Comodo for analysis, both from the Defense+ Tasks > Unrecognized Files area and Antivirus tasks > Submit Files area.
4.5.Computer Security PolicyThe Computer Security Policy area allows the user to view manage and edit the Defense+ security policies that apply to applications, Predefined Security Policies, define protected Files and Folders, Registry Keys, COM interfaces, files to be always sandboxed or blocked, define a list of Trusted Software Vendors and so forth.
Comodo Internet Security 2012 User Guide | © 2012 Comodo Security Solutions Inc. | All rights reserved 194

Comodo Internet Security 2012 - User Guide
The default security policy in Defense+ is configured to provide maximum security universally for any usage environment by experts at Comodo. Hence the default configuration can be retained as such without any changes. The application enables advanced users, who understand the risks of modifying the configuration, to change the settings as they need.
• To access the Computer Security Policy area, click Defense+ Tasks > Computer Security Policy.An alert dialog will be displayed, indicating the risks involved in modifying the default policy.
If you are an advanced user and wish to continue, click 'Yes'. The 'Computer Security Policy' interface will be displayed.
The Computer Security Policy area contains the following tabs:
• Defense+ Rules• Predefined Policies• Always Sandbox• Blocked Files• Protected Files and Folders• Protected Registry Keys• Protected COM Interfaces• Trusted Software Vendors
4.5.1. Defense+ RulesThe Defense+ Rules tab lists the different groups of applications installed in your system and the security policies applied to them. You can change the policy applied to selected applications and also create custom policies to be applied to selected
Comodo Internet Security 2012 User Guide | © 2012 Comodo Security Solutions Inc. | All rights reserved 195

Comodo Internet Security 2012 - User Guide
applications.
The first column, Application Name, displays a list of the applications on your system for which a security policy has been deployed. If the application belongs to a file group, then all member applications assume the security policy of the file group. The second column, Treat as, column displays the name of the security policy assigned to the application or group of applications in column one.
General Navigation:
• Add... - Allows the user to Add a new Application to the list then create it's policy. See the section 'Creating or Modifying a Defense+ Security Policy'.
• Edit... - Allows the user to modify the Defense+ security policy of the selected application. See the section 'Creating or Modifying a Defense+ Security Policy'.
• Remove - Deletes the current policy.
Note: You cannot remove individual applications from a file group using this interface - you must use the ' File Groups' interface to do this.
• Purge - Runs a system check to verify that all the applications for which policies are listed are actually installed on the host machine at the path specified. If not, the policy is removed, or 'purged', from the list.
Users can re-order the priority of policies by simply dragging and dropping the application name or file group name in question. To alter the priority of applications that belong to a file group, you must use the 'File Groups' interface.
Creating or Modifying a Defense+ Security PolicyTo begin defining a application's Defense+ policy(1) Select the application or file group that you wish the policy to apply to.(2) Configure the security policy for this application.
(1) Select the application or file group that you wish the policy to apply to
If you wish to define a policy for a new application (i.e. one that is not already listed), click the ' Add...' button in the main Defense+ Rules interface.
This brings up the 'Application System Activity' Control interface shown below.
Comodo Internet Security 2012 User Guide | © 2012 Comodo Security Solutions Inc. | All rights reserved 196

Comodo Internet Security 2012 - User Guide
Because you are defining the Defense+ security settings for a new application, you can notice that the 'Application Path' box is blank. (If you were editing an existing policy instead, then this interface would show that policy's name and path.)
Click 'Select' to begin.
You now have 3 methods available to choose the application for which you wish to create a policy - File Groups; Running Processes and Browse.
1. File Groups - choosing this option allows you to create a Defense+ security policy for a category of pre-set files or folders. For example, selecting 'Executables' would enable you to create a Defense+ policy for all files with the extensions .exe .dll .sys .ocx .bat .pif .scr .cpl . Other such categories available include 'Windows System Applications' , 'Windows Updater Applications' , 'Start Up Folders' etc - each of which provide a fast and convenient way to apply a generic policy to important files and folders.
To view the file types and folders that are affected by choosing one of these options, you need to visit the 'File Groups' interface.
The ' File Groups interface can be accessed by the following method:
• Navigate to Defense+ > Computer Security Policy > Protected Files and Folders then click the 'Groups...' button.2. Running Processes - as the name suggests, this option allows you to create and deploy a Defense+ policy for any
process that is currently running on your PC.
Comodo Internet Security 2012 User Guide | © 2012 Comodo Security Solutions Inc. | All rights reserved 197

Comodo Internet Security 2012 - User Guide
You can choose an individual process (shown above) or the parent process of a set of running processes. Click 'Select' to confirm your choice.
3. Browse... - this option is the easiest for most users and simply allows you to browse to the location of the application for which you want to deploy the Defense+ security policy.
Comodo Internet Security 2012 User Guide | © 2012 Comodo Security Solutions Inc. | All rights reserved 198

Comodo Internet Security 2012 - User Guide
In the example below, we have decided to create a security policy for the Opera web browser.
Having selected the individual application, running process or file group, the next stage is to Configure the rules for this application's policy.
(2) Configure the security policy for this application
There are two broad options available for selecting a policy that applies to an application - Use a Pre-defined Policy or Use a Custom Policy.
1. Use a Predefined Policy - Selecting this option allows the user to quickly deploy a existing security policy on to the target application. Choose the policy you wish to use from the drop down menu. In the example below, we have chosen 'Limited Application'. The name of the predefined policy you choose is displayed in the 'Treat As' column for that application in the Computer Security Policy interface (Default = Disabled).
Note on 'Installer or Updater' Policy : Applying the Predefined Policy 'Installer or Updater' for an application defines it as a trusted installer and all the files created by the application will also be considered as as trusted files. Some of the applications may have hidden codes that may potentially impair the security of your computer if allowed to create files of its own. Comodo advises you to use this Predefined Policy - 'Installer or Updater' with caution. On applying this policy to any of the application, an alert dialog will be displayed, describing the risks involved.
General Note: Predefined Policies, once chosen, cannot be modified directly from this interface - they can only be modified and defined using the 'Predefined Policies' interface. If you require the ability to add or modify settings for an specific application then you are effectively creating a new, custom policy and should choose the more flexible Use Custom Policy option instead.
2. Use a Custom Policy- designed for more experienced users, the 'Custom Policy' option enables full control over the configuration specific security policy and the parameters of each rule within that policy. The Custom Policy has two main configuration areas - Access Rights and Protection Settings (Default = Enabled).
In simplistic terms 'Access Rights' determine what the application can do to other processes and objects whereas 'Protection Settings' determine what the application can have done to it by other processes.
i. Access Rights - The Process Access Rights interface allows you to determine what activities the applications in your custom policy are allowed to execute. These activities are called 'Access Names'.
Comodo Internet Security 2012 User Guide | © 2012 Comodo Security Solutions Inc. | All rights reserved 199

Comodo Internet Security 2012 - User Guide
Click here to view a list of definitions of the Action Names listed above and the implications of choosing to Ask, Allow or Block for each setting.
Exceptions to your choice of 'Ask', 'Allow' or 'Block' can be specified for the policy by clicking the 'Modify' link on the right.:
Select the 'Allowed Applications' or 'Blocked Applications' tab depending on the type of exception you wish to create.
Clicking 'Add' allows you to choose which applications or file groups you wish this exception to apply to. (click here for
Comodo Internet Security 2012 User Guide | © 2012 Comodo Security Solutions Inc. | All rights reserved 200

Comodo Internet Security 2012 - User Guide
an explanation of available options).
In the example above, the default action for 'Run as an executable' is 'Ask'. This means Defense+ generates an alert asking your permission if 'Opera.exe' tried to run another program. Clicking 'Modify' then adding 'oemig50.exe' to the 'Allowed Applications' tab creates an exception to this rule. Opera.exe is now allowed to run 'oemig50 .exe' but an alert is generated if it tries to run any other application.
ii. Protection Settings - Protection Settings determine how protected the application or file group in your policy is against activities by other processes. These protections are called 'Protection Types'.
Select 'Yes' to enable monitoring and protect the application or file group against the process listed in the ' Protection Type' column. Select 'No' to disable such protection.
Click here to view a list of definitions of the 'Protection Types' listed above and the implications of activating each setting.
Exceptions to your choice of 'Yes' or 'No' can be specified in the application's policy by clicking the 'Modify...' button on the right.
3. Click 'Apply' to confirm your setting.
4.5.2. Predefined PoliciesAs the name suggests, a predefined computer security policy is a set of access rights and protection settings that has been saved and can be re-used and deployed on multiple applications. Each policy is comprised of a number of 'Rules' and each of these 'Rules' is defined by a set of conditions/settings/parameters. 'Predefined Policies' is a set of policies that concern an application's access rights to memory, other programs, the registry etc.
Note: This section is for advanced and experienced users. If you are a novice user to Comodo Internet Security, we advise you first read the Computer Security Policy section in this help guide if you have not already done so.
Although each application's security policy could be defined from the ground up by individually configuring its constituent rules, this practice may prove time consuming if it had to be performed for every single program on your system. For this reason, Comodo Internet Security contains a selection of predefined policies according to broad application categories. Each predefined policy has been specifically designed by Comodo to optimize the security level of a certain type of application. Users can, of course, modify these predefined policies to suit their environment and requirements.
To configure this category• Navigate to: Defense+ Tasks > Computer Security Policy > Predefined Policies. There are four default security
policies listed under the Policy Name column.
Comodo Internet Security 2012 User Guide | © 2012 Comodo Security Solutions Inc. | All rights reserved 201

Comodo Internet Security 2012 - User Guide
To view or edit an existing predefined policy 1. Double click on the Policy Name in the list or
2. Select the Policy Name in the list, right-click and choose 'Edit' or
3. Select the Policy Name and click the 'Edit...' button on the right.
From here, you can modify a policy's name and, if desired, make changes to its 'Access Rights' and 'Protection Settings'. Any changes you make here are automatically rolled out to all applications currently under that policy.
To create a new predefined policy • Click the 'Add...' button, type a name for the policy, click 'Customize' link and then follow the same configuration
procedure as outlined for creating a custom, application specific policy. Click here to view.
• Click the 'Apply' button.
Comodo Internet Security 2012 User Guide | © 2012 Comodo Security Solutions Inc. | All rights reserved 202

Comodo Internet Security 2012 - User Guide
Once created, your policy is available for deployment onto specific application or file groups via the Computer Security Policy section of Defense+.
4.5.3. Always SandboxThe 'Always Sandbox' area lists those applications which the user has decided should be executed in the sandbox on a permanent or long term basis. This may include applications that the user suspects are not safe or has other concerns about (for example, you could test beta software by running it in the sandbox). These applications will appear as normal programs in your system but will be run in the sandbox under a restricted set of privileges. They will not be allowed to access files on your real system, alter operating system settings or alter the registry entries corresponding to other applications
To open the 'Always Sandbox' interface, Click Defense+ > Computer Security policy > Always Sandbox.
Comodo Internet Security 2012 User Guide | © 2012 Comodo Security Solutions Inc. | All rights reserved 203

Comodo Internet Security 2012 - User Guide
To (permanently) add programs into the sandbox1. Click 'Add...' from the 'Always Sandbox' interface. This will open the 'Add a Program to Sandbox' dialog.
2. Click 'Select' and browse to the file or currently running process that you wish to sandbox.
3. Click 'Open'. In the example below, we are adding opera.exe.
4. Choose 'Restriction Settings'
i. Untrusted - The application is not allowed to access any of the Operating system resources. The application is not allowed to execute more than 10 processes at a time and is run with very limited access rights. The restrictions on usage of system memory, operation with virtual file system and registry and execution time defined in Advanced Settings are imposed.
Comodo Internet Security 2012 User Guide | © 2012 Comodo Security Solutions Inc. | All rights reserved 204

Comodo Internet Security 2012 - User Guide
Note: Some of the applications that require user interaction may not work properly under this setting.
ii. Restricted - The application is allowed to access very few Operating system resources. The application is not allowed to execute more than 10 processes at a time and is run with very limited access rights. The restrictions on usage of system memory, operation with virtual file system and registry and execution time defined in Advanced Settings are imposed.
Note: Some of the applications like computer games may not work properly under this setting.
iii. Limited - Only selected Operating System resources can be accessed by the application. The application is not allowed to execute more than 10 processes at a time and is run with out Administrator account privileges. The restrictions on usage of system memory, operation with virtual file system and registry and execution time defined in Advanced Settings are imposed.
iv. Partially Limited (Default) - The application is allowed to access all the Operating system files and resources like clipboard. Modification of protected files/registry keys is not allowed. Privileged operations like loading drivers or debugging other applications are also not allowed. The restrictions on usage of system memory, operation with virtual file system and registry and execution time defined in Advanced Settings are imposed.
5. Choose 'Advanced Settings'
The Advanced Settings tab to configure the restrictions on system resource usage and access to other files. Available options are:
i. Limit maximum memory consumption - You can define how much of the system memory can be allocated for the application on execution by selecting this checkbox and entering the memory (in MB) in the combo box beside it (Default = Disabled).
ii. Limit the program execution time - You can define how long the program can be allowed to run by selecting this checkbox and entering the time (in seconds) in the combo box beside it (Default = Disabled).
iii. Enable file system virtualization -The sandboxed applications are not permitted to modify the files in your 'real' file system. Enabling file system virtualization instructs the Sandbox to create a virtual file system in your system. The application added to the sandbox writes any data only into the created virtual file system, instead of affecting and potentially causing damage to your real file system. If you disable this option, the application may not function correctly because it is not be to create the entries that it needs too (Default = Enabled).
Note for advanced users: The virtual file system is created inside the Sandbox working folder (e.g. c:\sandbox\<application name>) to execute the application within this file system.The virtual file system is not created even on enabling this setting here, if file system virtualization is disabled in Sandbox
Comodo Internet Security 2012 User Guide | © 2012 Comodo Security Solutions Inc. | All rights reserved 205

Comodo Internet Security 2012 - User Guide
Settings.
iv. Enable registry virtualization - The sandboxed applications are not permitted to access and modify the entries in your 'real' Window's Registry hives. Enabling registry virtualization instructs the Sandbox to create a virtual registry hive in your system. The application added to the Sandbox writes any entries pertaining to it only into the created registry hive, instead of affecting and potentially causing damage to your real registry hives. If you disable this option, the application may not function correctly because it is not able to create the entries that it needs too (Default = Enabled).
Note for advanced users: The virtual registry hive is created as HKEY_LOCAL_MACHINE\SYSTEM\Sandbox\ ... for the sandboxed applications to write their registry values.The virtual registry hive is not created even on enabling this setting here, if registry virtualization is disabled in Sandbox Settings.
6. Click 'OK' for your settings to take effect.
From this point onwards the application will be run in the sandbox. If you wish to remove it at a later date, simply highlight it in the list and click 'Remove'. If you wanted to run an application in the sandbox on a 'one off' basis instead, then please use 'Run a Program in the Sandbox' instead.
• To edit the restriction settings for an application included in the sandbox, select the application and click 'Edit'. • To remove an application from the sandbox, select the application and select 'Remove'. Next time you execute
this application it will run outside of the sandbox (presuming it is not then detected as malicious or automatically sandboxed as per the sandboxing process)
• To remove invalid entries (programs/files that are not present or uninstalled from your computer) automatically, click 'Purge'.
4.5.4. Blocked FilesDefense+ allows you to lock-down files and folders by completely denying all access rights to them from other processes or users - effectively cutting it off from the rest of your system. If the file you block is an executable, then neither you nor anything else is able to run that program. Unlike files that are placed in 'Protected Files and Folders', users cannot selectively allow any process access to a blocked file.
To access Blocked Files interface
• Navigate to: Defense+ Tasks > Computer Security Policy > Blocked Files.
Comodo Internet Security 2012 User Guide | © 2012 Comodo Security Solutions Inc. | All rights reserved 206

Comodo Internet Security 2012 - User Guide
To manually add an individual file, file group or process1. Click the 'Add' button. Click here for a description of the choices available when selecting a file.
Alternatively, files can be transferred into the 'Blocked Files' module using the 'Move to' button in the 'Unrecognized Files' and 'Trusted Files' areas.
To edit the file path of an included entry1. Select the entry and click 'Edit' button. The 'Edit' dialog opens for changing the file path.
Comodo Internet Security 2012 User Guide | © 2012 Comodo Security Solutions Inc. | All rights reserved 207

Comodo Internet Security 2012 - User Guide
2. Alter the file path as required and click 'Apply'.
To remove an included entry from Blocked Files• Select the entry and click 'Remove' button. The file is only removed from the list and not deleted from your
system.To permanently delete the individual file; file group or executable from your system
• Select the entry and click 'Delete File' button.To remove invalid entries (programs / files that are not present or uninstalled from your computer) automatically,
• Click 'Purge' button. • Click 'OK' to implement your settings.
4.5.5. Protected Files and FoldersProtected Files and Folders setting allows you to protect specific files and folders against unauthorized modification especially by malicious programs such as virus, Trojans and spyware. It is also useful for safeguarding very valuable files (spreadsheets, databases, documents) by denying anyone and any program the ability to modify the file - avoiding the possibility of accidental or deliberate sabotage. If a file is 'Protected' it can still be accessed and read by users, but not altered. A good example of a file that ought to be protected is the your 'hosts' file. (c:\windows\system32\drivers\etc\hosts). Placing this in the 'Protected Files and Folders' area would allow web browsers to access and read from the file as per normal. However, should any process attempt to modify it then Comodo Internet Security blocks this attempt and produce a 'Protected File Access' pop-up alert.
To access Protected Files, navigate to: Defense+ Tasks > Computer Security Policy > Protected Files and Folders.
To manually add an individual file, file group or process 1. Click the 'Add' button. Click here for a description of the choices available when selecting a file.
Comodo Internet Security 2012 User Guide | © 2012 Comodo Security Solutions Inc. | All rights reserved 208

Comodo Internet Security 2012 - User Guide
Exceptions
Users can choose to selectively allow another application (or file group) to modify a protected file by affording the appropriate Access Right in 'Computer Security Policy' . A simplistic example would be the imaginary file 'Accounts.ods'. You would want the Open Office Calc program to be able to modify this file as you are working on it, but you would not want it to be accessed by a potential malicious program. You would first add the spreadsheet to the 'Protected Files and Folders' area by clicking the 'Add' button then 'Browse...' to 'Accounts.ods'. Once added to 'Protected Files', you would go into 'Computer Security Policy' and create an exception for 'scalc' so that it alone could modify 'Accounts.ods'.
• First add Acconts.odt to Protected Files and Folders
• Then go to Defense+Rules tab and add it to the list of applications and click 'Edit'
Comodo Internet Security 2012 User Guide | © 2012 Comodo Security Solutions Inc. | All rights reserved 209

Comodo Internet Security 2012 - User Guide
• Click the 'Customize' link.
• Under the 'Access Right' tab, click the link Modify beside the entry Protected Files/Folders.
Comodo Internet Security 2012 User Guide | © 2012 Comodo Security Solutions Inc. | All rights reserved 210

Comodo Internet Security 2012 - User Guide
• Under the 'Allowed Files/Folders' tab click 'Add' then 'Browse...'. Add Accounts.odt and exceptions to the 'Ask' or 'Block' rule in the 'Access Rights'.
Another example of where protected files should be given selective access is the Windows system directory at 'c:\windows\system32'. Files in this folder should be off-limits to modification by anything except certain, Trusted, applications like Windows Updater Applications. In this case, you would add the directory c:\windows\system32\* to the 'Protected Files and Folders' area (* = all files in this directory). Next go to 'Computer Security Policy', locate the file group 'Windows Updater Applications' in the list and follow the same process outlined above to create an exception for that group of executables.
The 'Groups...' button allows the user to access the 'File Groups' interface.
Comodo Internet Security 2012 User Guide | © 2012 Comodo Security Solutions Inc. | All rights reserved 211

Comodo Internet Security 2012 - User Guide
File groups are handy, predefined groupings of one or more file types. Creating a file group allows you to quickly deploy a Computer Security Policy across multiple file types and applications.
This interface allows you to
• Create a new File Group by clicking the 'Add' button. • Edit the names of an Existing File Group or File by right-clicking and selecting the 'Edit' button. • Add a file to an existing file group by selecting the File Group name from the list then clicking Add > Select From
>....' • Re-assign files to another file group by dragging and dropping.
Note: This area is for the creation and modification of file groups only. You are not able to modify the security policy of any applications or files from here. To do that, you should use the Computer Security Policy interface or the Predefined Policies Interface.
4.5.6. Protected Registry KeysComodo Internet Security automatically protects system critical registry keys against modification. Irreversible damage can be caused to your system if important registry keys are corrupted or modified in any way. It is essential that your registry keys are protected against attack.
Comodo Internet Security 2012 User Guide | © 2012 Comodo Security Solutions Inc. | All rights reserved 212

Comodo Internet Security 2012 - User Guide
In order to access Protected Registry Keys interface, navigate to: Defense+ Tasks > Computer Security Policy > Protected Registry Keys.
You can import additional registry keys that you wish to protect by clicking the 'Add' button:
Comodo Internet Security 2012 User Guide | © 2012 Comodo Security Solutions Inc. | All rights reserved 213

Comodo Internet Security 2012 - User Guide
The 'Registry Groups' option allows you to batch select and import predefined groups of important registry keys. Comodo Internet Security provides a default selection of 'Automatic Startup' (keys), 'Comodo Keys', 'Internet Explorer Keys' and 'Important Keys'.
The 'Registry Entries...' option opens the Windows registry editor within the Comodo Internet Security interface and allow you to select individual keys.
You can add items manually by browsing the registry tree in the right hand pane. Drag & drop specific registry keys into the 'Selected Items' pane. To add item manually enter its name in the field and press the '+' button.
The 'Groups...' button allows the user to access the 'Registry Groups' interface.
Comodo Internet Security 2012 User Guide | © 2012 Comodo Security Solutions Inc. | All rights reserved 214

Comodo Internet Security 2012 - User Guide
Registry groups are handy, predefined groupings of important registry keys.
This interface allows you to:
• Create a new registry key Group by clicking the 'Add' button. • Add keys to your new group by selecting the Registry Group name from the list then clicking 'Add > Select From
> Registry Key...' • Add keys to a pre-existing group by selecting its name from the list then clicking 'Add > Select From > Registry
Key...' • Edit the names of existing registry key Group or individual key by right-clicking and selecting the 'Edit'. • Re-assign registry keys to another group by dragging and dropping.
4.5.7. Protected COM InterfacesComponent Object Model (COM) is Microsoft's object-oriented programming model that defines how objects interact within a single application or between applications - specifying how components work together and inter-operate. COM is used as the basis for Active X and OLE - two favorite targets of hackers and malicious programs to launch attacks on your computer. It is a critical part of any security system to restrict processes from accessing the Component Object Model - in other words, to protect the COM interfaces.
Comodo Internet Security automatically protects COM interfaces against against modification, corruption and manipulation by malicious processes. The predefined COM Interface groups can be accessed by clicking the 'Groups...' button.
In order to access 'Protected COM Components' Interface, navigate to: Defense+ Tasks > Computer Security Policy > Protected COM Interfaces.
Comodo Internet Security 2012 User Guide | © 2012 Comodo Security Solutions Inc. | All rights reserved 215

Comodo Internet Security 2012 - User Guide
You can import additional COM interfaces that you wish to protect by clicking the 'Add' button.
Comodo Internet Security 2012 User Guide | © 2012 Comodo Security Solutions Inc. | All rights reserved 216

Comodo Internet Security 2012 - User Guide
The 'COM Groups' option allows you to batch select and import predefined COM interfaces.
The 'COM Components....' option allows you to add individual COM components. You can add items manually by browsing the components in the right hand pane. Drag & drop specific components into the 'Selected Items' pane. To add manually add a component' enter its name in the field and press the '+' button.
To access 'COM Interface Groups'• Click on the 'Groups' button.
Comodo Internet Security 2012 User Guide | © 2012 Comodo Security Solutions Inc. | All rights reserved 217

Comodo Internet Security 2012 - User Guide
COM groups are handy, predefined groupings of COM interfaces.
This interface allows you to:
• Create a new COM Group by clicking the 'Add' button. • Add components to your new group by selecting the group name from the list then clicking 'Add > Select From >
COM components...' • Add keys to a pre-existing COM group by selecting its name from the list then clicking 'Add > Select From > COM
components...' • Edit the names of existing COM Group or individual component by right-clicking and selecting 'Edit'. • Re-assign COM components to another group by dragging and dropping.
4.5.8. Trusted Software VendorsIn Comodo Internet Security, there are two basic methods in which an application can be treated as safe. Either it has to be part of the 'Safe List' (of executables/software that is known to be safe) OR that application has to be signed by one of the vendors in the 'Trusted Software Vendor List'.
From this point:
• IF the vendor is on the Trusted Software Vendor List AND the user has enabled 'Trust Applications that are digitally signed by Trusted Software Vendors' THEN the application will be trusted and allowed to run.
• IF the vendor is not on the Trusted Software Vendor List OR the user has not enabled 'Trust Applications that are digitally signed by Trusted Software Vendors' THEN the application will be sandboxed. If the application in question is an installer then CIS will generate an elevated privilege alert.
Software publishers may be interested to know that they can have their signatures added, free of charge, to the 'master' Trusted Software Vendor List that ships to all users with CIS. Details about this can be found at the foot of this page.
The 'Trusted Software Vendors' area can be opened by navigating to Defense+ Tasks > Computer Security Policy > Trusted Software Vendors.
Comodo Internet Security 2012 User Guide | © 2012 Comodo Security Solutions Inc. | All rights reserved 218

Comodo Internet Security 2012 - User Guide
Click here to read background information on digitally signing software
Click here to learn how to Add / Define a user-trusted vendor
Software Vendors - click here to find out about getting your software added to the list
Background
Many software vendors digitally sign their software with a code signing certificate. This practice helps end-users to verify:
i. Content Source: The software they are downloading and are about to install really comes from the publisher that signed it.
ii. Content Integrity: That the software they are downloading and are about to install has not be modified or corrupted since it was signed.
In short, users benefit if software is digitally signed because they know who published the software and that the code hasn't been tampered with - that are are downloading and installing the genuine software.
The 'Vendors' that digitally sign the software to attest to it's probity are the software publishers. These are the company names you see listed in the first column in the graphic above.
However, companies can't just 'sign' their own software and expect it to be trusted. This is why each code signing certificate is counter-signed by an organization called a 'Trusted Certificate Authority'. 'Comodo CA Limited' and 'Verisign' are two examples of a Trusted CA's and are authorized to counter-sign 3rd party software. This counter-signature is critical to the trust process and a Trusted CA only counter-signs a vendor's certificate after it has conducted detailed checks that the vendor is a legitimate company.
If a file is signed by a Trusted Software Vendor and the user has enabled 'Trust Applications that are digitally signed by Trusted Software Vendors' then it will be automatically trusted by Comodo Internet Security (if you would like to read more about code signing certificates, see http://www.instantssl.com/code-signing/).
One way of telling whether an executable file has been digitally signed is checking the properties of the .exe file in question. For example, the main program executable for Comodo Internet Security is called 'cfp.exe' and has been digitally signed.
• Browse to the (default) installation directory of Comodo Internet Security.• Right click on the file cfp.exe.• Select 'Properties' from the menu.• Click the tab 'Digital Signatures (if there is no such tab then the software has not been signed).
This displays the name of the CA that signed the software as shown below:
Comodo Internet Security 2012 User Guide | © 2012 Comodo Security Solutions Inc. | All rights reserved 219

Comodo Internet Security 2012 - User Guide
Click the 'Details' button to view digital signature information. Click 'View Certificate' to inspect the actual code signing certificate. (see below).
It should be noted that the example above is a special case in that Comodo, as creator of 'cfp.exe', is both the signer of the software and, as a trusted CA, it is also the counter-signer (see the 'Countersignatures' box). In the vast majority of cases, the signer or the certificate (the vendor) and the counter-signer (the Trusted CA) are different. See this example for more details.
Adding and Defining a User-Trusted VendorA software vendor can be added to the local 'Trusted Software Vendors' list in two ways:
• By reading the vendor's signature from an executable file on your local drive• By reading the vendor's signature from an running process
Comodo Internet Security 2012 User Guide | © 2012 Comodo Security Solutions Inc. | All rights reserved 220

Comodo Internet Security 2012 - User Guide
Click the add button on the right hand side and select 'Read from a signed executable...'. Browse to the location of the executable your local drive. In the example below, we are adding the executable 'YahooMessenger.exe'.
After clicking 'Open', Comodo Internet Security checks that the .exe file is signed by the vendor and counter-signed by a Trusted CA. If so, the vendor (software signer) is added to the Trusted Vendor list (TVL):
In the example above, Comodo Internet Security was able to verify and trust the vendor signature on YahooMessenger.exe because it had been counter-signed by the trusted CA 'Verisign'. The software signer 'Yahoo! Inc.' is now a Trusted Software Vendor and is added to the list. All future software that is signed by the vendor 'Yahoo! Inc.' is automatically added to the Comodo Trusted Vendor list UNLESS you change this setting in Defense+ Settings > General Settings.
Comodo Internet Security also allows you to add a trusted vendor by selecting from processes that are currently running on your PC. To do this, click the 'Add...' button and select 'Read from a running process...':
Comodo Internet Security 2012 User Guide | © 2012 Comodo Security Solutions Inc. | All rights reserved 221

Comodo Internet Security 2012 - User Guide
Select the signed executable that you want to trust and click the 'Select' button. Comodo Internet Security performs the same certificate check as described above.
If Comodo Internet Security cannot verify that the software certificate is signed by a Trusted CA then it does not add the software vendor to the list of 'Trusted Vendors'. In this case, you can see the following error message.
Note: The 'Trusted Software Vendors' list displays two types of software vendors:• User defined trusted software vendors - As the name suggests, these are added by the user via one of the two
methods outlined earlier. These vendors can be removed by the user by selecting and clicking the 'Remove' button.
• Comodo defined trusted software vendors - These are the vendors that Comodo, in it's capacity as a Trusted CA, has independently validated as legitimate companies. If the user needs to remove any of these vendors from the list, it can be done by selecting the vendor, clicking 'Remove' and restarting the system. Please note that the removal will take effect only on restarting the system.
The Trusted Vendor Program for Software DevelopersSoftware vendors can have their software added to the default Trusted Vendor List that is shipped with Comodo Internet Security. This service is free of cost and is also open to vendors that have used code signing certificates from any Certificate Authority. Upon adding the software to the Trusted Vendor list, CIS automatically trusts the software and does not generate any warnings or alerts on installation or use of the software.
Comodo Internet Security 2012 User Guide | © 2012 Comodo Security Solutions Inc. | All rights reserved 222
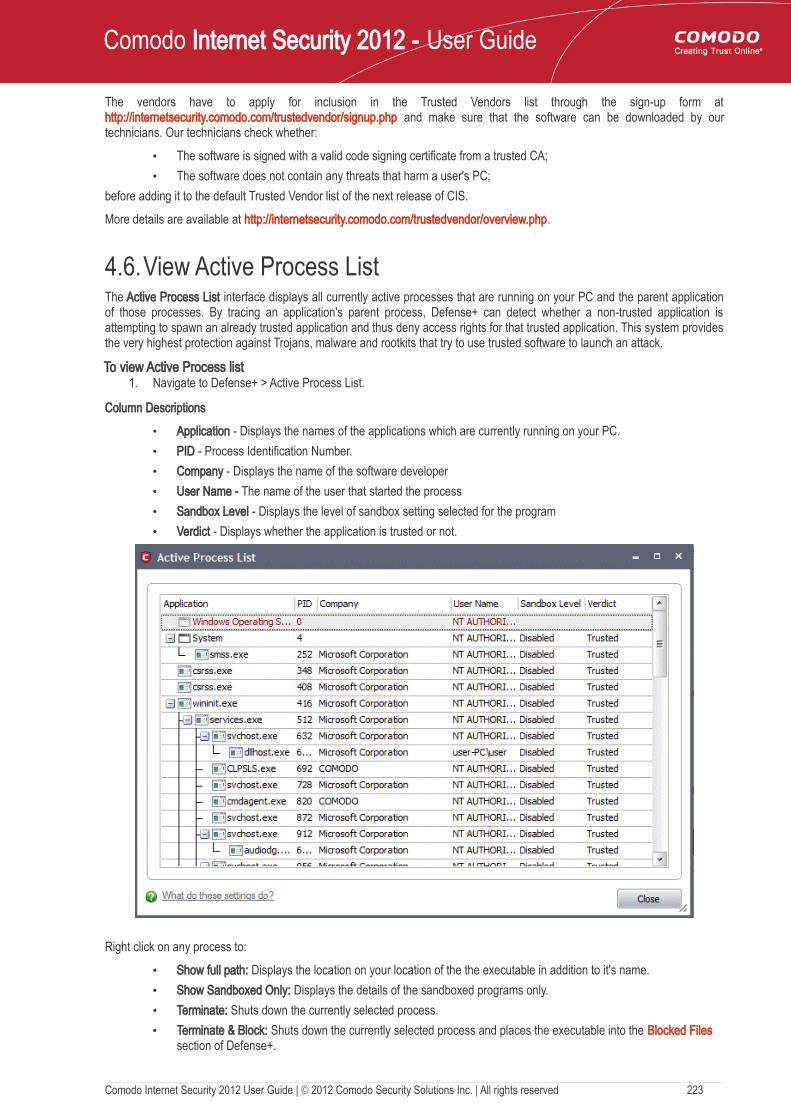
Comodo Internet Security 2012 - User Guide
The vendors have to apply for inclusion in the Trusted Vendors list through the sign-up form at http://internetsecurity.comodo.com/trustedvendor/signup.php and make sure that the software can be downloaded by our technicians. Our technicians check whether:
• The software is signed with a valid code signing certificate from a trusted CA; • The software does not contain any threats that harm a user's PC;
before adding it to the default Trusted Vendor list of the next release of CIS.
More details are available at http://internetsecurity.comodo.com/trustedvendor/overview.php.
4.6.View Active Process ListThe Active Process List interface displays all currently active processes that are running on your PC and the parent application of those processes. By tracing an application's parent process, Defense+ can detect whether a non-trusted application is attempting to spawn an already trusted application and thus deny access rights for that trusted application. This system provides the very highest protection against Trojans, malware and rootkits that try to use trusted software to launch an attack.
To view Active Process list1. Navigate to Defense+ > Active Process List.
Column Descriptions
• Application - Displays the names of the applications which are currently running on your PC.• PID - Process Identification Number.• Company - Displays the name of the software developer• User Name - The name of the user that started the process• Sandbox Level - Displays the level of sandbox setting selected for the program• Verdict - Displays whether the application is trusted or not.
Right click on any process to:
• Show full path: Displays the location on your location of the the executable in addition to it's name.• Show Sandboxed Only: Displays the details of the sandboxed programs only.• Terminate: Shuts down the currently selected process.• Terminate & Block: Shuts down the currently selected process and places the executable into the Blocked Files
section of Defense+.
Comodo Internet Security 2012 User Guide | © 2012 Comodo Security Solutions Inc. | All rights reserved 223

Comodo Internet Security 2012 - User Guide
• Add to Trusted Files: The selected program is added to Trusted Files list.• Online Lookup: The selected program is compared with the Comodo database of programs and results declared
whether it is safe or not.• Submit: The selected application will be sent to Comodo for analysis.
4.7.Run a Program in the SandboxComodo Internet Security allows you to run programs inside the Sandbox on a 'one-off' basis. This is helpful to test the behavior of new executables that you have downloaded or for applications that you are not sure that you trust. Adding a program in this way means that it will run in the Sandbox this time only. On subsequent executions it will not run in the sandbox (presuming it passes the sandboxing process). If you wish to run an application in the sandbox on a long-term/permanent basis then use the Always Sandbox interface.
To run an application in the Sandbox1. Click the 'Run a Program in the Sandbox' link in the Defense+ interface. The following dialog will open:
2. Click 'Select' to choose the program to be executed in the sandbox.
3. Browse to the application and click 'Open'. In the example above, opera.exe is chosen.
Comodo Internet Security 2012 User Guide | © 2012 Comodo Security Solutions Inc. | All rights reserved 224

Comodo Internet Security 2012 - User Guide
4. Click 'Run As' and select the restriction level you want to apply to the program from the menu.
• Untrusted - The application is not allowed to access any of the Operating system resources. The application is not allowed to execute more than 10 processes at a time and is run with very limited access rights.
Note: Some of the applications that require user interaction may not work properly under this setting.
• Restricted - The application is allowed to access very few operating system resources. The application is not allowed to execute more than 10 processes at a time and is run with very limited access rights.
Note: Some of the applications like computer games may not work properly under this setting.
• Limited - Only selected operating system resources can be accessed by the application. The application is not allowed to execute more than 10 processes at a time and is run with out Administrator account privileges.
• Partially Limited - The application is allowed to access all the Operating system files and resources like clipboard. Modification of protected files/registry keys is not allowed. Privileged operations like loading drivers or debugging other applications are also not allowed.
The program is executed within the sandbox with the access restriction level that you selected. It will run in the Sandbox on this occasion only.
4.8.Defense+ SettingsThe Defense+ component of Comodo Internet Security is a host intrusion prevention system that constantly monitors the activities of all executable files on your PC. With Defense+ activated, the user is warned EVERY time an unknown application executable (.exe, .dll, .sys, .bat etc) attempts to run. The only executables that are allowed to run are the ones you give permission to. An application can be given such permission to run in a variety of ways including; manually granting them execution rights in Computer Security Policy; by deciding to treat the executable as trusted at a Defense+ alert or simply because the application is on the Comodo safe list. Defense+ also automatically protects system-critical files and folders such as registry entries to prevent unauthorized modification. Such protection adds another layer of defense to Comodo Internet Security by preventing malware from ever running and by preventing any processes from making changes to vital system files.
Note for beginners: This page often refers to 'executables' (or 'executable files'). An 'executable' is a file that can instruct your computer to perform a task or function. Every program, application and device you run on your computer requires an executable file of some kind to start it. The most recognizable type of executable file is the '.exe' file. (e.g., when you start Microsoft Word, the executable file 'winword.exe' instructs your computer to start and run the Word application). Other types of executable files include those with extensions .cpl .dll, .drv, .inf, .ocx, .pf, .scr, .sys. Unfortunately, not all executables can be trusted. Some executables, broadly categorized as malware, can instruct your computer to delete valuable data; steal your identity; corrupt system files; give control of your PC to a hacker and much more. You may also have heard these referred to as Trojans, scripts and worms. Worse still, these programs are explicitly designed to run without you knowing about them. Defense+ is designed to make sure you DO know about them by blocking all unknown executables and alerting you whenever they try to run.
Comodo Internet Security 2012 User Guide | © 2012 Comodo Security Solutions Inc. | All rights reserved 225

Comodo Internet Security 2012 - User Guide
The Defense+ Settings area allows you to quickly configure the security level and behavior of Defense+ during operation. This settings area can be accessed in the 'Defense+' interface and, more immediately, by clicking on security level setting that is displayed (e.g., Safe Mode) in the Summary Screen (shown below).
These settings can be done using the tabs listed below.
• General Settings tab• Execution Control Settings tab• Sandbox Settings tab• Monitoring Settings tab
4.8.1. General SettingsSlider Options
Comodo Internet Security allows you to customize the behavior of Defense+ by adjusting a Security Level slider to switch between preset security levels.
The choices available are: Paranoid Mode, Safe Mode, Clean PC Mode, Training Mode and Disabled. The setting you choose here are also to be displayed on the CIS summary screen.
Comodo Internet Security 2012 User Guide | © 2012 Comodo Security Solutions Inc. | All rights reserved 226

Comodo Internet Security 2012 - User Guide
• Paranoid Mode: This is the highest security level setting and means that Defense+ monitors and controls all executable files apart from those that you have deemed safe. Comodo Internet Security does not attempt to learn the behavior of any applications - even those applications on the Comodo safe list and only uses your configuration settings to filter critical system activity. Similarly, the Comodo Internet Security does automatically create 'Allow' rules for any executables - although you still have the option to treat an application as 'Trusted' at the Defense+ alert. Choosing this option generates the most amount of Defense+ alerts and is recommended for advanced users that require complete awareness of activity on their system.
• Safe Mode (Default): While monitoring critical system activity, Defense+ automatically learns the activity of executables and applications certified as 'Safe' by Comodo. It also automatically creates 'Allow' rules these activities, if the checkbox 'Create rules for safe applications' is selected. For non-certified, unknown, applications, you will receive an alert whenever that application attempts to run. Should you choose, you can add that new application to the safe list by choosing 'Treat this application as a Trusted Application' at the alert. This instructs the Defense+ not to generate an alert the next time it runs. If your machine is not new or known to be free of malware and other threats as in 'Clean PC Mode' then 'Safe Mode' is recommended setting for most users - combining the highest levels of security with an easy-to-manage number of Defense+ alerts.
• Clean PC Mode: From the time you set the slider to 'Clean PC Mode', Defense+ learns the activities of the applications currently installed on the computer while all new executables introduced to the system are monitored and controlled. This patent-pending mode of operation is the recommended option on a new computer or one that the user knows to be clean of malware and other threats. From this point onwards Defense+ alerts the user whenever a new, unrecognized application is being installed. In this mode, the files in 'My Pending Files' are excluded from being considered as clean and are monitored and controlled.
• Training Mode: Defense+ monitors and learn the activity of any and all executables and create automatic 'Allow' rules until the security level is adjusted. You do not receive any Defense+ alerts in 'Training Mode'. If you choose the 'Training Mode' setting, we advise that you are 100% sure that all applications and executables installed on your computer are safe to run.
Tip: This mode can be used as the 'Gaming Mode'. It is handy to use this setting temporarily when you are running an (unknown but trusted) application or Games for the first time. This suppresses all Defense+ alerts while Comodo Internet Security learns the components of the application that need to run on your machine and automatically create 'Allow' rules for them. Afterward, you can switch back to 'Train with Safe Mode' mode).
• Disabled: Disables Defense+ protection. All executables and applications are allowed to run irrespective of your configuration settings. Comodo strongly advise against this setting unless you are confident that you have an alternative intrusion defense system installed on your computer.
Checkbox Options
• Keep an alert on screen for maximum (n) seconds - Determines how long Comodo Internet Security shows a Defense+ alert without any user intervention. By default, the timeout is set at 120 seconds. You may adjust this setting to your own preference (Default = 120 seconds).
• Block all unknown requests if the application is closed - Selecting this option blocks all unknown execution requests if Comodo Internet Security is not running/has been shut down. This is option is very strict indeed and in most cases should only be enabled on seriously infested or compromised machines while the user is working to resolve these issues. If you know your machine is already ‘clean’ and are looking just to enable the highest CIS security settings then it is OK to leave this box unchecked. (Default = Disabled).
• Enable adaptive mode under low system resources - Very rarely (and only in a heavily loaded system), low memory conditions might cause certain CIS functions to fail. With this option enabled, CIS will attempt to locate and utilize memory using adaptive techniques so that it can complete its pending tasks. However, the cost of enabling this option may be reduced performance in even lightly loaded systems (Default = Disabled).
• Deactivate the Defense+ permanently (Requires a system restart) - Shuts down the Defense+ Host Intrusion element of Comodo Internet Security PERMANENTLY. The firewall and antivirus are not affected and continues to protect your computer even if you deactivate Defense+. Comodo does not recommend users close Defense+ unless they are sure they have alternative Intrusion Prevention Systems installed (Default = Disabled).
• Create rules for safe applications - Automatically creates rules for safe applications in Computer Security Policy (Default = Disabled).
Note: Defense+ trusts the applications if:• The application/file is included in the Trusted Files list• The application is from a vendor included in the Trusted Software Vendors list
Comodo Internet Security 2012 User Guide | © 2012 Comodo Security Solutions Inc. | All rights reserved 227

Comodo Internet Security 2012 - User Guide
• The application is included in the extensive and constantly updated Comodo safelist.
By default, CIS does not automatically create 'allow' rules for safe applications. This helps saving the resource usage, simplifies the rules interface by reducing the number of 'Allowed' rules in it, reduces the number of pop-up alerts and is beneficial to beginners who find difficulties in setting up the rules.
Enabling this checkbox instructs CIS to begin learning the behavior of safe applications so that it can automatically generate the 'Allow' rules. These rules are listed in the Computer Security Policy interface. The Advanced users can edit / modify the rules as they wish.
Background Note: Prior to version 4.x , CIS would automatically add an allow rule for 'safe' files to the rules interface. This allowed advanced users to have granular control over rules but could also lead to a cluttered rules interface. The constant addition of these 'allow' rules and the corresponding requirement to learn the behavior of applications that are already considered 'safe' also took a toll on system resources. In version 4.x and above, 'allow' rules for applications considered 'safe' are not automatically created - simplifying the rules interface and cutting resource overhead with no loss in security. Advanced users can re-enable this setting if they require the ability to edit rules for safe applications (or, informally, if they preferred the way rules were created in CIS version 3.x).
• Do not show popup alerts - This option allows you to configure whether or not to show defense alerts when malware is encountered. Choosing 'Do not show popup alerts ' will minimize disturbances but at some loss of user awareness. If you choose not to show alerts then you have a choice of default responses that CIS should automatically take – either 'Block Requests' or Allow Requests. (Default = Disabled)
• Enable enhanced protection mode (Requires a system restart) - On 64 bit systems, enabling this mode will activate additional host intrusion prevention techniques in Defense+ to countermeasure extremely sophisticated malware that tries to bypass regular countermeasures. Because of limitations in Windows 7 x64, some HIPS functions in previous versions of CIS could theoretically be bypassed by malware. Enhanced Protection Mode implements several patent-pending ways to improve HIPS in Defense+. (Default = Disabled)
4.8.2. Execution Control SettingsImage Execution Control is an integral part of the Defense+ engine. If your Defense+ Security Level is set to 'Training Mode' or 'Clean PC Mode', then it is responsible for authenticating every executable image that is loaded into the memory.
Comodo Internet Security calculates the hash of an executable at the point it attempts to load into memory. It then compares this hash with the list of known / recognized applications that are on the Comodo safe list. If the hash matches the one on record for the executable, then the application is safe. If no matching hash is found on the safelist, then the executable is 'unrecognized' and you receive an alert.
This area allows you to quickly determine how proactive the monitor should be and which types of files it should check.
Background note: In this context, an 'image' means an 'Executable Image'. An executable image is a variation on file compression, such as ZIP or RAR files. For example, most program installers are contained in executable images.
Image Execution Control Level SliderThe control slider in the Settings interface allows you to switch the Image Execution settings between Enabled and Disabled states. The Image Execution Control is disabled irrespective of the settings in this slider, if Defense+ is permanently deactivated in the General Settings from the Defense+ Settings interface.
• Enabled (Default) - This setting instructs Defense+ to intercept all the files before they are loaded into memory and also Intercepts prefetching/caching attempts for the executable files.
• Disabled - No execution control is applied to the executable files.
Comodo Internet Security 2012 User Guide | © 2012 Comodo Security Solutions Inc. | All rights reserved 228

Comodo Internet Security 2012 - User Guide
Check BoxesTreat unrecognized files as - This has five options and the unrecognized files will be run as per the option selected.
• Partially Limited (Default) - The application is allowed to access all the Operating system files and resources like clipboard. Modification of protected files/registry keys is not allowed. Privileged operations like loading drivers or debugging other applications are also not allowed.
• Limited - Only selected operating system resources can be accessed by the application. The application is not allowed to execute more than 10 processes at a time and is run with out Administrator account privileges.
• Restricted - The application is allowed to access very few operating system resources. The application is not allowed to execute more than 10 processes at a time and is run with very limited access rights.
Note: Some of the applications like computer games may not work properly under this setting.
• Untrusted - The application is not allowed to access any of the Operating system resources. The application is not allowed to execute more than 10 processes at a time and is run with very limited access rights.
Note: Some of the applications that require user interaction may not work properly under this setting.
Comodo Internet Security 2012 User Guide | © 2012 Comodo Security Solutions Inc. | All rights reserved 229

Comodo Internet Security 2012 - User Guide
• Blocked - The application is not allowed to run at all.
Do heuristic command-line analysis for certain applications - Selecting this option instructs Comodo Internet Security to perform heuristic analysis of programs that are capable of executing code such as visual basic scripts and java applications. Example programs that are affected by enabling this option are wscript.exe, cmd.exe, java.exe and javaw.exe. For example, the program wscipt.exe can be made to execute visual basic scripts (.vbs file extension) via a command similar to 'wscipt.exe c:\tests\test.vbs'. If this option is selected, CIS detects c:\tests\test.vbs from the command-line and applies all security checks based on this file. If test.vbs attempts to connect to the internet, for example, the alert will state 'test.vbs' is attempting to connect to the internet (Default = Enabled).
If this option is disabled, the alert would only state 'wscript.exe' is trying to connect to the Internet'.
Background note: 'Heuristics' describes the method of analyzing a file to ascertain whether it contains codes typical of a virus. Heuristics is about detecting virus-like behavior or attributes rather than looking for a precise virus signature that matches a signature on the virus blacklist. This helps to identify previously unknown (new) viruses.
Perform cloud based behavior analysis of unrecognized files - When checked, any file that is marked as unrecognized and is sent to the Comodo Instant Malware Analysis (CIMA) server for behavior analysis. Each file is executed in a virtual environment on Comodo servers and tested to determine whether it contains any malicious code. The results will be sent back to your computer in around 15 minutes. Comodo recommends users leave this setting enabled (Default = Enabled).More details. The behavior analysis system is a cloud based service that is used to help determine whether an unknown file is safe or malicious. Once submitted to the system, the unknown executable will be automatically run in a virtual environment and all activities, host state changes and network activity will be recorded. The list of behaviors recorded during this analysis can include information about processes spawned, files and registry keys modified, network activity, and other changes. If these behaviors are found to be malicious then the signature of the executable is automatically added to the antivirus black list. If no malicious behavior is recorded then the file is placed into 'Unrecognized Files' (for execution within the sandbox) and will be submitted to our technicians for further checks. The behavior analysis system takes around 15 minutes to report its results back to CIS. If the executable is deemed a threat then it will be automatically quarantined or deleted. This threat report is also used to update the global black list databases and therefore benefit all CIS users.
Automatically scan unrecognized files in the cloud - Selecting this option will automatically submit unrecognized files to our File Lookup Server to check whether or not they are on the master Comodo white list or black-list (White list = files that are known to
Comodo Internet Security 2012 User Guide | © 2012 Comodo Security Solutions Inc. | All rights reserved 230

Comodo Internet Security 2012 - User Guide
be safe. Black list = files that are known to be malware) and the files are rated accordingly. The important features of the cloud based scanning are:
• Cloud based Whitelisting: Safe files and trusted vendors and trusted publishers can be easily identified; • Cloud based Anti virus: Malicious files can be detected even if the users do not have an up-to-date local antivirus
database or a local antivirus database at all;• Cloud Based Behavior Analysis: Zero-day malware can be instantly detected by Comodo's cloud based behavior
analysis system, CIMA.The cloud scanning, complemented by automatic sandboxing and application isolation technologies, is very extremely fast and powerful in preventing PC infection even without a traditional antivirus signature database while keeping the user interaction at minimal levels.
Comodo recommends users leave this setting enabled (Default = Enabled).Detect shellcode injections (i.e. Buffer overflow protection) - Enabling this setting turns-on the Buffer over flow protection.A buffer overflow is an anomalous condition where a process/executable attempts to store data beyond the boundaries of a fixed-length buffer. The result is that the extra data overwrites adjacent memory locations. The overwritten data may include other buffers, variables and program flow data and may cause a process to crash or produce incorrect results. They can be triggered by inputs specifically designed to execute malicious code or to make the program operate in an unintended way. As such, buffer overflows cause many software vulnerabilities and form the basis of many exploits.
Turning-on buffer overflow protection instructs the Comodo Internet Security to raise pop-up alerts in every event of a possible buffer overflow attack. You can allow or deny the requested activity raised by the process under execution depending on the reliability of the software and its vendor. Click here for more details on the alerts.
Comodo recommends that this setting to be maintained selected always (Default = Enabled).
To exclude some of the file types from being monitored under Detect Shellcode injections. 1. Click on the 'Exclusions' button.
2. Click 'Add' to include file groups or processes to the Exclusions list. Click here for an outline of the options available when adding file types.
3. Click 'Remove' to remove selected entries from the exclusions list
4. Click 'Purge' to remove invalid entries (programs that are not present or uninstalled from your computer) automatically.
Note: These settings are recommended for advanced users only.
5. Click 'Apply' to implement your settings.
4.8.3. Sandbox SettingsThe Sandbox Settings area allows you to configure the security level and the overall behavior of the sandbox. To access the Sandbox Settings interface, click 'Defense + Settings' then select the 'Sandbox Settings' tab. If you would like some background
Comodo Internet Security 2012 User Guide | © 2012 Comodo Security Solutions Inc. | All rights reserved 231

Comodo Internet Security 2012 - User Guide
information on the sandbox before changing these settings then please see section 4.1 - The Sandbox -An Introduction.
Sandbox Security Level SliderThe Security Level slider in the Settings interface allows you to switch the Sandbox between Enabled and Disabled states. The programs included in the Sandbox is executed with the set restrictions only if the Sandbox is in Enabled state. If disabled, the programs is run normally without any restrictions. The Sandbox is disabled irrespective of the settings in this slider, if Defense+ is permanently deactivated in the General Settings from the Defense+ Settings interface.
Check BoxesEnable file system virtualization - The sandboxed applications are not permitted to modify the files in your 'real' file system. Enabling file system virtualization instructs the Sandbox to create a virtual file system in your system. The sandboxed applications write any data only into the created virtual file system, instead of affecting and potentially causing damage to your real file system. If you disable this option, the sandboxed applications may not function correctly because they are not able to create the entries that they need too (Default = Enabled).
Note for advanced users: The virtual file system is created inside the Sandbox working folder (e.g. c:\sandbox\) to execute the applications within this file system.If you disable this option here, the virtual file system is not created even if you have enabled file system virtualization for individual applications within the Sandbox.
Enable registry virtualization -The sandboxed applications are not permitted to access and modify the entries in your 'real' Window's Registry hives. Enabling registry virtualization instructs the Sandbox to create a virtual registry hive in your system. The sandboxed applications write any entries pertaining to them only into the created registry hive, instead of affecting and potentially causing damage to your real registry hives. If you disable this option, the sandboxed applications may not function correctly because they are not able to create the entries that they need too (Default = Enabled).
Note for advanced users: The virtual registry hive is created as HKEY_LOCAL_MACHINE\SYSTEM\Sandbox\ ... for the
Comodo Internet Security 2012 User Guide | © 2012 Comodo Security Solutions Inc. | All rights reserved 232

Comodo Internet Security 2012 - User Guide
sandboxed applications to write their registry values. If you disable this option here, the virtual registry hive is not created even if you have enabled registry virtualization for individual applications within the Sandbox.
The table below explains the precedence of the file system virtualization and registry virtualization settings made through this interface and those through Computer Security Policy > Always Sandbox > Add > Always Sandbox > Advanced Settings.
Sandbox Settings Always Sandbox > Advanced Settings
Is the setting enabled for the specific application?
Yes Yes Yes
Yes No No
No Yes No
No No No
Automatically detect the installers / updaters and run them outside the Sandbox - On execution of an Installer or an Updater, the application is run outside the Sandbox. Select this option only if you are going to run installers / updaters from trusted vendors (Default = Enabled).Automatically trust the files from the trusted installers - Files that are generated by trusted installers are also trusted. This means that they will not be sandboxed (Default = Enabled).Show notifications for automatically sandboxed processes - By default, CIS will display an alert whenever it runs an unknown application in the sandbox. Use this control to enable or disable these alerts (Default = Enabled).Click 'OK' for your settings to take effect.
Additional information:
• See 'Sandbox Alerts' for a explanation of the options available at a Sandbox alert• See 'Unknown Files: The Sand-boxing and Scanning Processes' to understand the decision making process
behind why CIS chooses to sandbox certain applications.
4.8.4. Monitoring SettingsThe 'Monitoring Settings' tab allows you configure which activities, entities and objects should monitored by Defense+.
Note: The settings you choose here are universally applied.
• If you disable monitoring of an activity, entity or object using this interface it completely switches off monitoring of that activity on a global basis - effectively creating a universal 'Allow' rule for that activity . This 'Allow' setting over-rules any policy specific 'Block' or 'Ask' setting for that activity that you may have selected using the 'Access Rights' and 'Protection Settings' interface.
Comodo Internet Security 2012 User Guide | © 2012 Comodo Security Solutions Inc. | All rights reserved 233

Comodo Internet Security 2012 - User Guide
Activities To Monitor:
• Interprocess Memory Access - Malware programs use memory space modification to inject malicious code for numerous types of attacks, including recording your keyboard strokes; modifying the behavior of the invaded application; stealing confidential data by sending confidential information from one process to another process etc. One of the most serious aspects of memory-space breaches is the ability of the offending malware to take the identity of the invaded process, or 'impersonate' the application under attack. This makes life harder for traditional virus scanning software and intrusion-detection systems. Leave this box checked and Defense+ alerts you when an application attempts to modify the memory space allocated to another application (Default = Enabled) .
• Windows/WinEvent Hooks - In the Microsoft Windows® operating system, a hook is a mechanism by which a function can intercept events (messages, mouse actions, keystrokes) before they reach an application. The function can act on events and, in some cases, modify or discard them. Originally developed to allow legitimate software developers to develop more powerful and useful applications, hooks have also been exploited by hackers to create more powerful malware. Examples include malware that can record every stroke on your keyboard; record your mouse movements; monitor and modify all messages on your computer; take over control of your mouse and keyboard to remotely administer your computer. Leaving this box checked means that you are warned every time a hook is executed by an untrusted application (Default = Enabled).
• Device Driver Installations - Device drivers are small programs that allow applications and/or operating systems to interact with a hardware device on your computer. Hardware devices include your disk drives, graphics card, wireless and LAN network cards, CPU, mouse, USB devices, monitor, DVD player etc.. Even the installation of a perfectly well-intentioned device driver can lead to system instability if it conflicts with other drivers on your system. The installation of a malicious driver could, obviously, cause irreparable damage to your computer or even pass control of that device to a hacker. Leaving this box checked means Defense+ alerts you every time a device driver is installed on your machine by an untrusted application (Default = Enabled).
• Processes' Terminations - A process is a running instance of a program. (for example, the Comodo Internet Security process is called 'cfp.exe'. Press 'Ctrl+Alt+Delete' and click on 'Processes' to see the full list that are running on your system). Terminating a process, obviously, terminates the program. Viruses and Trojan horses often try to shut down the processes of any security software you have been running in order to bypass it. With this setting enabled,
Comodo Internet Security 2012 User Guide | © 2012 Comodo Security Solutions Inc. | All rights reserved 234

Comodo Internet Security 2012 - User Guide
Defense+ monitors and alerts you to all attempts by an untrusted application to close down another application (Default = Enabled).
• Windows Messages - This setting means Comodo Internet Security monitors and detects if one application attempts to send special Windows Messages to modify the behavior of another application (e.g. by using the WM_PASTE command) (Default = Enabled).
• DNS Client Service - This setting alerts you if an application attempts to access the 'Windows DNS service' - possibly in order to launch a DNS recursion attack. A DNS recursion attack is a type of Distributed Denial of Service attack whereby an malicious entity sends several thousand spoofed requests to a DNS server. The requests are spoofed in that they appear to come from the target or 'victim' server but in fact come from different sources - often a network of 'zombie' pc's which are sending out these requests without the owners knowledge. The DNS servers are tricked into sending all their replies to the victim server - overwhelming it with requests and causing it to crash. Leaving this setting enabled prevents malware from using the DNS Client Service to launch such an attack (Default = Enabled).
Background Note: DNS stands for Domain Name System. It is the part of the Internet infrastructure that translates a familiar domain name, such as 'example.com' to an IP address like 123.456.789.04. This is essential because the Internet routes messages to their destinations on the basis of this destination IP address, not the domain name. Whenever you type a domain name, your Internet browser contacts a DNS server and makes a 'DNS Query'. In simplistic terms, this query is 'What is the IP address of example.com?'. Once the IP address has been located, the DNS server replies to your computer, telling it to connect to the IP in question.
Objects To Monitor Against Modifications:
• Protected COM Interfaces enables monitoring of COM interfaces you specified here (Default = Enabled).• Protected Registry Keys enables monitoring of Registry keys you specified here (Default = Enabled).• Protected Files/Folders enables monitoring of files and folders you specified here (Default = Enabled).
Objects To Monitor Against Direct Access:
Determines whether or not Comodo Internet Security should monitor access to system critical objects on your computer.. Using direct access methods, malicious applications can obtain data from a storage devices, modify or infect other executable software, record keystrokes and more. Comodo advises the average user to leave these settings enabled:
• Physical Memory: Monitors your computer's memory for direct access by an applications and processes. Malicious programs attempt to access physical memory to run a wide range of exploits - the most famous being the 'Buffer Overflow' exploit. Buffer overruns occur when an interface designed to store a certain amount of data at a specific address in memory allows a malicious process to supply too much data to that address. This overwrites its internal structures and can be used by malware to force the system to execute its code (Default = Enabled).
• Computer Monitor: Comodo Internet Security raises an alert every time a process tries to directly access your computer monitor. Although legitimate applications sometimes require this access, there is also an emerging category of spyware-programs that use such access to monitor users' activities. (for example, to take screen shots of your current desktop; to record your browsing activities etc) (Default = Enabled).
• Disks: Monitors your local disk drives for direct access by running processes. This helps guard against malicious software that need this access to, for example, obtain data stored on the drives, destroy files on a hard disk, format the drive or corrupt the file system by writing junk data (Default = Enabled).
• Keyboard: Monitors your keyboard for access attempts. Malicious software, known as 'key loggers', can record every stroke you make on your keyboard and can be used to steal your passwords, credit card numbers and other personal data. With this setting checked, Comodo Internet Security alerts you every time an application attempts to establish direct access to your keyboard (Default = Enabled).
5.More Options-IntroductionThe More Options interface contains several areas relating to overall configuration as well as handy utilities and shortcuts to help enhance and improve your experience with Comodo Internet Security.
It can be accessed at all times by clicking on the 'More' link from the navigation panel.
Comodo Internet Security 2012 User Guide | © 2012 Comodo Security Solutions Inc. | All rights reserved 235

Comodo Internet Security 2012 - User Guide
Click the links below to see detailed explanations of each area in this section.
• Preferences: Allows the user to configure general Comodo Internet Security settings (password protection, update options, language, theme and so on.)
• Manage My Configurations: Allows the user to manage, import and export their Comodo Internet Security configuration profile.
• Diagnostics: Helps to identify any problems with your installation. • Check For Updates: Launches the Comodo Internet Security updater. • Manage This Endpoint: Connect Comodo Internet Security to Comodo Endpoint Security Manager • Browse Support Forums: Links to Comodo User Forums. • Help: Launches the online help guide. • About: Displays version and copy-right information about the product.
5.1.PreferencesThe Preferences menu in More section allows you to configure various options related to the operation of Comodo Internet Security.
To open Preferences dialog box• Click 'Preferences' in 'More' screen.
Comodo Internet Security 2012 User Guide | © 2012 Comodo Security Solutions Inc. | All rights reserved 236

Comodo Internet Security 2012 - User Guide
It has the following tabs to make your settings:
• General • Parental Control • Appearance • Logging• Connection • Update
5.1.1. General SettingsThe 'General Settings' tab allows you to configure the general behavior of Comodo Internet Security.
• Automatically check for the program updates - This option determines whether or not Comodo Internet Security should automatically contact Comodo servers for updates. With this option selected, Comodo Internet Security automatically checks for updates every 24 hours AND every time you start your computer. If updates are found, they are automatically downloaded and installed. We recommend that users leave this setting enabled to maintain the highest levels of protection. Users who choose to disable automatic updates can download them manually by clicking 'Check for Updates' in the 'More...' section (Default = Enabled).
• Show balloon messages - These are the notifications that appear in the bottom right hand corner of your screen - just above the tray icons. Usually these messages like ' Comodo Firewall is learning ' or 'Defense+ is learning ' and are generated when these modules are learning the activity of previously unknown components of trusted applications.
Comodo Internet Security 2012 User Guide | © 2012 Comodo Security Solutions Inc. | All rights reserved 237

Comodo Internet Security 2012 - User Guide
Clear this check box if you do not want to see these messages (Default = Disabled).• Enable Comodo Message Center - Comodo Internet Security displays Comodo Message Center window periodically if
this option is selected.
• The Comodo Message Center window contains information about Security Alerts and News related to Comodo Internet Security and latest critical security updates. Clicking the 'Learn More' link takes you to the Comodo Forums website at http://forums.comodo.com. Registration is free and you'll benefit from the expert contributions of developers and fellow users alike (Default = Enabled).
5.1.2. Parental Control SettingsThe 'Parental Control' tab allows you to configure password protection for Comodo Internet Security.
• Enable password protection for settings - Selecting this option activates password protection for all important configuration sections and wizards within the interface. If you choose this option, you must first specify and confirm a password by clicking the 'Change Password... ' button. You are asked for this password every time you try to access important configuration areas (for example, all sections in the Antivirus Tasks, Firewall Tasks and Defense+ Tasks areas require this password before allowing you to view or modify their settings).
Comodo Internet Security 2012 User Guide | © 2012 Comodo Security Solutions Inc. | All rights reserved 238

Comodo Internet Security 2012 - User Guide
This setting is of particular value to parents, network administrators and administrators of shared computers to prevent other users from modifying critical settings and exposing the machine to threats (Default = Disabled).
• Suppress Antivirus alerts when password protection is enabled - If selected, no Antivirus Alerts are displayed when password protection is enabled. Parents and network admins may want to enable this setting if they do not want users to be made aware when an Antivirus alert has been triggered. For example, a virus program may be attempting to copy itself and infect user's computer without permission or knowledge of the user. Usually, the Antivirus would generate an alert and ask the user how to proceed. If that user is a child or an inexperienced user then they may unwittingly click 'allow' just to 'get rid' of the alert and/or gain access to the website in question - thus exposing the machine to attack. Selecting this option blocks the activity of the virus but does not generate an alert (Default = Disabled).
• Suppress Firewall alerts when password protection is enabled - If selected, no Firewall Alerts are displayed when password protection is enabled. Parents and network admins may want to enable this setting if they do not want users to be made aware when a Firewall alert has been triggered. For example, a trojan horse program may be attempting to download itself or transmit private information to a third party. Usually, the firewall would generate an alert and ask the user how to proceed. If that user is a child or an inexperienced user then they may unwittingly click 'allow' just to 'get rid' of the alert and/or gain access to the website in question - thus exposing the machine to attack. Selecting this option blocks the connection but does not generate an alert (Default = Disabled).
• Suppress Defense+ alerts when password protection is enabled - If selected, no Defense+ Alerts are displayed when password protection is enabled. Parents and network admins may want to enable this setting if they do not want users to be made aware when a Defense+ alert has been triggered. For example, a malware program may be attempting to modify, terminate or delete a critical registry key in order to launch an attack on your machine. Usually, the Defense+ intrusion detection system would generate an alert and ask the user how to proceed. If that user is a child or an inexperienced user then they may unwittingly click 'allow' just to 'get rid' of the alert - thus exposing the machine to attack. Selecting this option blocks the activity of the suspected malware but does not generate an alert (Default = Disabled).
5.1.3. AppearanceThe Appearance tab allows you to choose the interface language and customize the look and feel of Comodo Internet Security according to your preferences. Use the drop-down menu to switch between installed themes.
Comodo Internet Security 2012 User Guide | © 2012 Comodo Security Solutions Inc. | All rights reserved 239

Comodo Internet Security 2012 - User Guide
Language Settings
Comodo Internet Security is available in multiple languages. You can switch between installed languages by selecting from the 'Language' drop-down menu (Default = English (United States)).
Themes
The 'Themes' drop-down allows you to choose the colors and appearance of the GUI as you prefer (Default = Comodo Default Normal).
In order for your language and/or theme choices to take effect, you must restart the Comodo Internet Security application.
Comodo Internet Security 2012 User Guide | © 2012 Comodo Security Solutions Inc. | All rights reserved 240

Comodo Internet Security 2012 - User Guide
• Click Yes to restart the application.You can also do this at a later time by either:
• Restarting your computer (recommended) ; or • Closing the application by right clicking on the shield tray icon and selecting 'Exit 'and then restarting it by
navigating through Start > Programs > COMODO > Comodo Internet Security or by double-clicking the desktop icon. The application is in your choice of language the next time you restart the application.
5.1.4. Log SettingsBy default, Comodo Internet Security maintains detailed logs of all Antivirus, Firewall and Defense+ events and stores the log file in Support DataBase (SDB) format as cislogs.sdb file. It is located in C:\Documents and Settings\All Users\Application Data\Comodo\Firewall Pro. Logs stored in this file can be extracted by using a suitable application. Logs can also be exported to html by clicking 'More.. > File > Export' in the Antivirus Events, Firewall Events and Defense+ Events interfaces.
These logs can be viewed by clicking 'View Events' in the 'tasks' area of each component:
• 'View Antivirus Events' from the Antivirus Tasks interface; • 'View Firewall Events' from the Firewall Tasks interface;• 'View Defense+ Events' from the Defense+ Tasks interface.
The 'Logging' tab of the 'Preferences' interface allows you to configure how CIS should behave once this log file reaches a certain size and also allows you to disable the logging of specific types of event.
If the log file's size exceeds (MB): Enables you to configure for deleting or moving the log file if it reaches a specified size in MB. You can decide on whether to maintain log files of larger sizes or to discard them depending on your future reference needs and the storage capacity of your hard drive.
• Specify the maximum limit for the log file size (in MB) in the text box beside 'If the log file's size exceeds (MB)' (Default = 20MB).
If you want to discard the log file if it reaches the maximum size, select 'Delete it and create a new file'. Once the log file reaches
Comodo Internet Security 2012 User Guide | © 2012 Comodo Security Solutions Inc. | All rights reserved 241

Comodo Internet Security 2012 - User Guide
the maximum size, it will be automatically deleted from your system and a new log file will be created with the log of events occurring from that instant (Default = Enabled).If you want to save the log file even if it reaches the maximum size, select 'Move it to' and select a destination folder for the log file (Default = Disabled).
The selected folder path will appear beside 'Move it to'.
Once the log file reaches the maximum size, it will be automatically moved to the selected folder and a new log file will be created with the log of events occurring from that instant.
Check Boxes:
Comodo Internet Security 2012 User Guide | © 2012 Comodo Security Solutions Inc. | All rights reserved 242

Comodo Internet Security 2012 - User Guide
The check boxes allow you to disable logging of events according to your preferences.
• Disable Antivirus logging - Instructs Comodo Internet Security to not to log Antivirus events (Default = Disabled).• Disable Firewall logging - Instructs Comodo Internet Security to not to log Firewall events (Default = Disabled).• Disable Defense+ logging - Instructs Comodo Internet Security to not to log Defense+ events (Default =
Disabled).
5.1.5. Connection SettingsThe Connection tab allows you to configure how Comodo Internet Security should connect to Comodo servers for receiving program updates etc. If you are using a Proxy server in your network and if you want CIS to use the Proxy Server, the Proxy settings can be configured through this settings interface.
• Select 'Use http proxy' if you want Comodo Internet Security to use the Proxy Server. Enter the proxy server IP address or name in the 'Server' text box and enter the port number in the 'Port' text box (Default = Disabled).
• If your Proxy Server needs authentication, Select 'Proxy server requires authorization'. Type your Login ID in the 'Login' text box and enter the password in the 'Password' text box (Default = Disabled).
• If you want Comodo Internet Security to acquire the proxy settings from your Internet Explorer, just click 'Import proxy settings from IE' link (Default = Disabled).
5.1.6. Update SettingsThe Update tab allows you enable/disable the CIS program updates and to select the host from which the updates are to be downloaded. By default, the URL of the Comodo Server is entered as an available host.
Comodo Internet Security 2012 User Guide | © 2012 Comodo Security Solutions Inc. | All rights reserved 243

Comodo Internet Security 2012 - User Guide
• If you want to download the updates always from the Comodo servers, you can leave the setting as it is (Default = Enabled).
• If you are connected to a local network and the CIS program updates are available at an HTTP Server or at any of the other computers in your network running Comodo Offline Updater, you can add the computers as hosts in this area.
Note: Comodo Offline Updater allows users to configure a local HTTP server to download and provision updates to networked machines. Advanced users can download the utility from http://enterprise.comodo.com/security-solutions/endpoint-security/endpoint-security-manager/free-trial.php
• To add a host click 'Add' and enter the url or IP address of the host in the next row that appears.• Repeat the process for adding multiple hosts.• Select the host by using the Move Up and Move Down buttons.• CIS will automatically check the host specified here and download the updates from the host even when you
are offline.• Click 'OK' for your settings to take effect.
Note: CIS program updates can also be checked manually. Click More Options > Check For Updates if you wish to update manually. Click here to view the help page on manual updates.
5.2.Manage My ConfigurationsComodo Internet Security allows you to maintain, save and export multiple configurations of your security settings. This is especially useful if you are a network administrator looking to roll out a standard security configuration across multiple computers. If you are upgrading your system and there is a need to uninstall and re-install Comodo Internet Security, you can export your configuration settings to a safe place before uninstallation. After re-installation, you can import the configuration settings to take effect in your newly installed Comodo Internet Security. This feature is also a great time saver for anyone with more than one computer because it allows you to quickly implement your security settings on other computers that you own without having to manually re-configure them.
• Comodo Preset Configurations• Importing/Exporting and Managing Personal Configurations
5.2.1. Comodo Preset ConfigurationsBy default Comodo Internet Security has three preset configurations available. Based on the installation option you have selected during setup, one of these choices is set as ACTIVE CONFIGURATION by default. You are able to switch between configurations at any time by right-clicking on the CIS tray icon.
Click the links below to find out more details on each configuration:
• COMODO - Internet Security• COMODO - Proactive Security • COMODO - Firewall Security
Important Note: Any changes you have made to the Comodo Internet Security settings since installation are recorded in this, active profile.
The detailed descriptions of the default security levels provided by the three preset choices are given below:
COMODO - Internet Security - This configuration is activated by default, when both Antivirus and Firewall components are installed, i.e. the complete installation. Firewall is always set to Safe mode. But according to the malware scanning results performed during the setup process, if no malware is found, Defense+ is set to Clean PC mode. Otherwise, the default is Safe mode. In this mode,
• Image Execution Control is disabled. • Computer Monitor/Disk/Keyboard/DNS Client access/Window Messages are NOT monitored.
Comodo Internet Security 2012 User Guide | © 2012 Comodo Security Solutions Inc. | All rights reserved 244

Comodo Internet Security 2012 - User Guide
• Only commonly infected files/folders are protected against infection. • Only commonly exploited COM interfaces are protected.• Defense+ is tuned to prevent infection of the system.
If you wish to switch to Internet Security option, you can select the option using My Configurations interface.
COMODO - Proactive Security - This configuration turns CIS into the ultimate protection machine. All possible protections are activated and all critical COM interfaces and files are protected. During the setup, if only Comodo Firewall installation option is selected, the next screen allows users to select this configuration as default CIS configuration. If selected, Firewall is always set to Safe mode. But according to the malware scanning results performed during the setup process, if no malware is found, Defense+ is set to Clean PC mode. Otherwise, the default is Safe mode.
If you wish to switch to Proactive Security option, you can select the option using My Configurations interface.
COMODO - Firewall Security - This configuration is activated when the user chooses to install Firewall only and selects optimum protection settings for Defense+ . Firewall is always set to Safe mode. But according to the malware scanning results performed during the setup process, if no malware is found, Defense+ is set to Clean PC mode. Otherwise, the default is Safe mode.
• Image Execution Control checks only applications that are not started manually by the user. • Computer Monitor/Disk/Keyboard is NOT monitored. • Only commonly infected files/folders are protected against infection. • Only commonly exploited COM interfaces are protected.• Defense+ is tuned to prevent infection of the system and detect Internet access request leaks even if it is
infected.If you wish to switch to Firewall Security option, you can select the option using My Configurations interface.
5.2.2. Importing/Exporting and Managing Personal Configurations
To access Configurations interface 1. Navigate to 'More > Manage My Configurations'.
If this is the first time you have accessed this interface you can see the three preset choices:
• COMODO - Internet Security• COMODO - Proactive Security
Comodo Internet Security 2012 User Guide | © 2012 Comodo Security Solutions Inc. | All rights reserved 245

Comodo Internet Security 2012 - User Guide
• COMODO - Firewall Security The currently active configuration is indicated as 'Active' in this interface.
2. Click the area on which you would like more information:
• Export my configuration to a file • Import a saved configuration from a file • Select a different active configuration setting • Delete a inactive configuration profile
Export my configuration to a file
To export your currently active configuration1. Click the 'Export' button .
2. Type a file name for the profile (e.g., 'My CIS Profile') and save to the location of your choice.
A confirmation dialog appears for the successful export of the configuration.
Import a saved configuration from a file
Importing a configuration profile allows you to store any profile within Comodo Internet Security. Any profiles you import do not
Comodo Internet Security 2012 User Guide | © 2012 Comodo Security Solutions Inc. | All rights reserved 246

Comodo Internet Security 2012 - User Guide
become active until you select them for use.
To import a profile1. Click the 'Import' button.
2. Browse to the location of the saved profile and click 'Open'.
3. In the 'Import As' dialog that appears, assign a name for the profile you wish to import and click 'OK'.
A confirmation dialog appears indicating the successful import of the profile.
Comodo Internet Security 2012 User Guide | © 2012 Comodo Security Solutions Inc. | All rights reserved 247

Comodo Internet Security 2012 - User Guide
Once imported, the configuration profile is available for deployment by selecting it.
Select and Implement a different configuration profileThe Activate option allows you to quickly switch between configuration profiles.
To select a different configuration1. Click on the profile you want to select and activate.
2. Click the 'Activate' button.
A confirmation dialog appears.
Comodo Internet Security 2012 User Guide | © 2012 Comodo Security Solutions Inc. | All rights reserved 248

Comodo Internet Security 2012 - User Guide
The selected configuration is activated.
Delete an inactive configuration profileYou can remove any unwanted configuration profiles using the 'Remove' button. You cannot delete the profile that Comodo Internet Security is currently using - only the inactive ones. For example if the COMODO - Internet Security is the active profile, you can only delete the inactive profiles, 'COMODO - Proactive Security, 'My_CIS_Configuration and so on.
To remove an unwanted profile1. Select the profile and click 'Remove' button. A confirmation dialog appears.
2. Click 'Yes' if you are sure to delete. The selected profile is removed from the list and a confirmation dialog appears.
Comodo Internet Security 2012 User Guide | © 2012 Comodo Security Solutions Inc. | All rights reserved 249

Comodo Internet Security 2012 - User Guide
5.3.DiagnosticsComodo Internet Security has it's own integrity checker. This checker scans your system to make sure that the application is installed correctly. It checks your computer's:
• File System - To check that all of Comodo's system files are present and have been correctly installed.• Registry - To check that all of Comodo's registry keys are present and in the correctly installed.• Checks for the presence of software that is known to have compatibility issues with Comodo Internet Security.
The results of the scan are shown in the following pop-up window. If your installation does not have any errors the following dialog is displayed.
If the diagnostics utility has found some errors in the installation, the following dialog is displayed.
Click 'Yes'. The diagnostics utility automatically fixes the problems and prompts you to restart the computer.
Comodo Internet Security 2012 User Guide | © 2012 Comodo Security Solutions Inc. | All rights reserved 250

Comodo Internet Security 2012 - User Guide
Restart your computer for the changes to take effect.
5.4. Check for UpdatesCIS updates can be checked for and downloaded manually by clicking the ‘Check for updates’ link in 'More' options.
To check for availability of updates• Click 'Start'.
Comodo Internet Security 2012 User Guide | © 2012 Comodo Security Solutions Inc. | All rights reserved 251

Comodo Internet Security 2012 - User Guide
On completion of checking, the panel shows the availability of updates.
The 'Update Details' link will lead you to the web page that provides release notes for the latest version of the application.
• Click 'Next' to start the process.
To initiate the update process• Click the 'Start' button in the panel.
Note: If you want to download and install the updates later, click the 'Cancel' button.
Comodo Internet Security 2012 User Guide | © 2012 Comodo Security Solutions Inc. | All rights reserved 252

Comodo Internet Security 2012 - User Guide
• The update progress will be displayed.
• On completion of checking, the panel shows the availability of updates.
• You are then asked to restart the system. Click 'Finish'.
Comodo Internet Security 2012 User Guide | © 2012 Comodo Security Solutions Inc. | All rights reserved 253

Comodo Internet Security 2012 - User Guide
5.5.Manage This Endpoint
The ‘Manage this endpoint’ features allows administrators to connect Comodo Internet Security to Comodo Endpoint Security Manager (CESM) so that the endpoint (computer) can be remotely managed. CESM allows businesses to centrally manage CIS protected computers and provides a single interface for installation, updates and virus response across an entire network. It has an easy to use dashboard that provide fingertip access to common tasks and a wealth of statistics and reports that deliver a comprehensive snapshot of a network’s security levels. Using CESM to manage nodes protected with CIS will help administrators to greatly improve overall security, simplify administration, increase awareness levels, reduce virus response times and could save thousands of man-hours per year.
This wizard will install the CESM agent and allow admins to specify the IP/Port of the CESM server.
• If you are interested in CESM for your business, please click here.• To enable central administration of this computer and connect to CESM, please continue reading:
For centrally managed and administered
• Click the 'More' button at the top of the navigation. Click 'Manage This Endpoint'
• Enter the hostname / IP address of the server in which the CESM service is installed in the ESM Server field. See configuration tool for more details.
• Change the port number from 80 to 57193 in the ESM Server Port field. (57193 is the default unless changed using the configuration tool.)
• Click 'Install' to begin installation of the agent.
Comodo Internet Security 2012 User Guide | © 2012 Comodo Security Solutions Inc. | All rights reserved 254

Comodo Internet Security 2012 - User Guide
• Once complete, you will be presented with a confirmation message in the 'Status' area. Click 'Close' to exit the wizard.
The endpoint should now be successfully connected to CESM service. Connection details can be viewed at the bottom left of the interface:
5.6.Browse Support ForumsThe fastest way to get further assistance on Comodo Internet Security is by posting your questions on Comodo Forums, a message board exclusively created for our users to discuss anything related to our products.
• Click the Browse Support Forums link to be taken straight to the website at http://forums.comodo.com. Registration is free and you'll benefit from the expert contributions of developers and fellow users alike.
Comodo Internet Security 2012 User Guide | © 2012 Comodo Security Solutions Inc. | All rights reserved 255

Comodo Internet Security 2012 - User Guide
Online Knowledge BaseWe also have an online knowledge base and support ticketing system at http://support.comodo.com. Registration is free.
5.7.Help Clicking the Help link in the More section opens the online help guide hosted at http://help.comodo.com/. Each area has its own dedicated page containing detailed descriptions of the application's functionality.
Comodo Internet Security 2012 User Guide | © 2012 Comodo Security Solutions Inc. | All rights reserved 256

Comodo Internet Security 2012 - User Guide
You can also print or download the help guide in the .pdf format from the webpage.
5.8.AboutClick the 'About' option in the 'More' Screen to view the 'About' information dialog.
The 'About' dialog displays the copyright information and the information on the version numbers of Comodo Internet Security and the Virus Signature Database installed on your computer If you have installed the Pro or Complete versions, the unique serial number of your installation is also displayed. The serial number is used to identify your installation and is necessary for support purposes.
Clicking the 'Upgrade to CIS Pro Full Now' takes you to the Comodo website for the purchase of CIS Pro version, if you have already installed Premium version.
Clicking the 'Enter a license key' link opens a license Activation dialog to activate your subscriptions for CIS Pro or Complete version.
Comodo Internet Security 2012 User Guide | © 2012 Comodo Security Solutions Inc. | All rights reserved 257

Comodo Internet Security 2012 - User Guide
Refer to Activating Your License for more details.
6.Comodo GeekBuddyComodo GeekBuddy is a personal computer support service provided by competent and friendly computer experts at Comodo who can establish a remote connection to your PC and fix your computer problems right in front of your eyes. No longer do you need to make time consuming calls to impatient help desk support staff. Instead, just sit back and relax while our friendly technicians do the work for you. Visit http://www.geekbuddy.com/ for more details.
One of new CIS advantages is that now you can immediately launch a chat with a qualified computer support technician by
clicking this button at the lower left of the interface.
GeekBuddy is included with CIS Pro and Complete versions and is available with CIS Premium. The GeekBuddy section of this guide is broken down into the following sections:
• Overview of the Services• Launching the Client and Using the Service• Accepting Remote Desktop Requests• Registration• Activation of Service• Uninstalling Comodo GeekBuddy
Comodo Internet Security 2012 User Guide | © 2012 Comodo Security Solutions Inc. | All rights reserved 258

Comodo Internet Security 2012 - User Guide
6.1.Overview of ServicesComodo GeekBuddy includes the following services:
• Virus & Malware Removal - Our technicians remotely clear any detected viruses or malware that is found on your PC.
• Internet and Online Identity Security - Optimization of your computer's security settings to prevent loss of sensitive data and identity theft.
• Printer or Email Account Setup - Installation or updating of printer software and/or drivers, checking ink levels and configuring your printer to work on a wireless or wired network. We set up your Internet-based email account - any provider, any account. Great for new computers and novice email users.
• Software Activation - Installation, configuration, and activation of third party software in your system.• General PC Troubleshooting - Detailed system check to identify and eliminate basic hardware and software
conflicts in your Windows PC. • Computer Power Setting Optimization - Optimization of your power management settings based on how you use
your computer. Your Geek will help you go green and save money on your electric bill. • Comodo Software Installation and Set up - Installation and support of software supplied by Comodo. • Comodo Account Questions - Clarification of any doubts regarding your account in Comodo.
6.2.Launching the Client and Using the ServiceThe GeekBuddy client required for the services is installed in your system automatically along with CIS Pro and Complete. For CIS Premium, it is installed automatically if you have selected the option Install Comodo GeekBuddy in Step 3 during installation .
You can start the client and start a live chat session with a GeekBuddy expert using any one of the following methods:
• Double click the GeekBuddy desktop icon
• Click the GeekBuddy system tray icon
• Launch a chat with a qualified computer support technician by clicking the button.
• Launch the GeekBuddy client directly from the Windows Start Menu - Click Start > All Programs > Comodo > Comodo GeekBuddy > Comodo GeekBuddy.
• You can also start the client by clicking the CHAT NOW button at the bottom left corner of the CIS interface at any time.
Comodo Internet Security 2012 User Guide | © 2012 Comodo Security Solutions Inc. | All rights reserved 259

Comodo Internet Security 2012 - User Guide
The GeekBuddy welcome dialog will be displayed:
Register - Click the 'Register' link from the Registration screen. You will be taken to the GeekBuddy sign up page. After you complete the sign up steps, your license key will be sent to you by email. Once you have registered, you have to activate your services. Click here for more details.
Activate your service - Start the GeekBuddy client and click 'Activate your service' from the welcome screen. Click here for more details.
Proceed to chat now - The easiest and fastest way to start chatting with an expert technician is by clicking the 'Proceed to chat now' link. Within seconds, a Comodo support technician will respond in a chat window and ask you to describe the problem.
Note for CIS Premium users: To use the GeekBuddy service on a continuous basis, you have to purchase the product at http://www.geekbuddy.com/, register and activate your account.
• Start chatting! Use the chat window to explain any problems you are having with your computer, or to request any of the GeekBuddy services. For your first chat, why not ask the technician to configure Comodo Internet Security (CIS), run a full antivirus check, then optimize your computer for security and performance.
Comodo Internet Security 2012 User Guide | © 2012 Comodo Security Solutions Inc. | All rights reserved 260

Comodo Internet Security 2012 - User Guide
• The technician may request for a remote desktop access of your computer. You need to accept the remote desktop access request to enable the technician to solve your problems.
• Occasionally, you will see friendly messages from GeekBuddy which offer to perform useful services such as improving the performance of your computer:
Clicking 'Yes' to these messages will connect you straight to a GeekBuddy operative as if you had clicked 'Proceed to chat now'. Comodo proactively offer these reminders to ensure our customers get the maximum value out of the services we offer.
6.3.Accepting Remote Desktop RequestsIn order to solve certain problems, the support technician may need to connect to your computer via remote desktop connection. This will allow them to directly perform the required services while you watch. Remote desktop control can only go ahead if you grant permission for this to happen. Our technicians will always request your permission via the chat window as shown below:
Comodo Internet Security 2012 User Guide | © 2012 Comodo Security Solutions Inc. | All rights reserved 261

Comodo Internet Security 2012 - User Guide
• Click the 'Accept' link to enable the technician to connect to your computer. The technician will take control over your computer through remote desktop connection and start fixing your problems or performing the service that you requested. The technician may also ask your permission to make other changes to your machine. Such changes might include installing programs, creating system restore points or deleting unnecessary or malicious files.
Comodo Internet Security 2012 User Guide | © 2012 Comodo Security Solutions Inc. | All rights reserved 262

Comodo Internet Security 2012 - User Guide
On completion of his/her work, the technician will disconnect from your computer, inform you that the requested tasks have been completed and ask whether you would like help with anything else.
Congratulations, you just finished your first GeekBuddy support session. We hope you enjoy using your trouble-free computer.
6.4.RegistrationTo become a paid subscriber of the Comodo GeekBuddy services, you need to register your account with Comodo using our online registration form.
To register your account
Comodo Internet Security 2012 User Guide | © 2012 Comodo Security Solutions Inc. | All rights reserved 263

Comodo Internet Security 2012 - User Guide
• Click the 'Register' link and you will be taken to the purchase order form. Fill in the details as required in the order form and follow the process.
Your account with GeekBuddy will be created and your License Key in the order confirmation will be sent to you to the email address provided in the purchase order form. You need to enter this License Key when you access the service for the first time.
Registration is a one time process for a single machine.
The Comodo GeekBuddy license entitles you to usage of the service on up to three machines. You need to enter the license key when you are installing the client and registering the account from a different machine. So keep the License Key in a safe place.
6.5.Activation of ServiceTo start using the Comodo GeekBuddy service, start the client using any of the methods explained above. Click on any of the service options and the activation screen will open.
To activate your service
Comodo Internet Security 2012 User Guide | © 2012 Comodo Security Solutions Inc. | All rights reserved 264

Comodo Internet Security 2012 - User Guide
• Click the 'Activate your service' link and enter the same license key that you used for activating CIS Pro/Complete or the license key that you received via email after registering and click 'Next'.
You account will be verified and activated. The verification and activation is a one time process. You need not enter the License
Comodo Internet Security 2012 User Guide | © 2012 Comodo Security Solutions Inc. | All rights reserved 265

Comodo Internet Security 2012 - User Guide
Key again.
Following activation, you will be connected to the GeekBuddy service...
...and within seconds, a Comodo Support Technician will respond in a chat window and ask you to describe the problem.
• Start chatting! Use the chat window to explain any problems you are having with your computer, or to request any of the GeekBuddy services.
6.6.Uninstalling Comodo GeekBuddyTo uninstall Comodo GeekBuddy:
• Click Start > Control Panel• In the Control Panel, double-click Add/Remove Programs• In the list of currently installed programs, click Comodo GeekBuddy • Click the 'Change/Remove' button.
Comodo Internet Security 2012 User Guide | © 2012 Comodo Security Solutions Inc. | All rights reserved 266

Comodo Internet Security 2012 - User Guide
Or
• Click Start > All Programs > Comodo > Comodo BackUp > Uninstall Comodo GeekBuddy
The un-installation wizard will start and the un-installation progress will be displayed...
Upon completion, the 'Uninstallation Complete' dialog will be displayed.
Comodo Internet Security 2012 User Guide | © 2012 Comodo Security Solutions Inc. | All rights reserved 267

Comodo Internet Security 2012 - User Guide
Click 'Close' to finish the process.
7.TrustConnect OverviewComodo TrustConnect is a secure Internet proxy service that creates an encrypted session when users are accessing the Internet over public wireless connections. Since these wireless sessions can be relatively easily intercepted, they present a significant data vulnerability gap for businesses and consumers alike. Whenever Comodo Internet Security detects unsecured wireless connections it will present you with the opportunity to use your TrustConnect account for the connection.
Comodo Internet Security 2012 User Guide | © 2012 Comodo Security Solutions Inc. | All rights reserved 268

Comodo Internet Security 2012 - User Guide
TrustConnect is designed to eliminate these types of data hijacks by preventing criminals from attacking or scanning your system from the local network that you are using to connect to the Internet. It also encrypts all of your traffic destined for the Internet (including Web site addresses, instant messaging conversations, personal information, plain text usernames and passwords and other important information). After connecting to the service, the TrustConnect software indicates that traffic is being encrypted as it leaves your system. Data thieves and hackers cannot 'sniff' or intercept your data - they can't even determine where your information is coming from because, as you are connecting to the Internet through a SSL secured VPN connection to the TrustConnect servers, your requests appear to come from our IP address. Ordinarily, cyber criminals could easily intercept these broadcasts.
Setting up Comodo TrustConnect is easy, as it works on most operating systems (Windows, Mac OS X) as well as with most firewall applications. Typical setup takes less than three minutes. TrustConnect clients are available for Windows, Mac OS, Linux and iPhone mobile devices and can be downloaded by logging into your account at https://accounts.comodo.com/account/login. Your Comodo Internet Security Complete confirmation email contains confirmation of your the username that you set up during initial sign up and a subscription ID for the service. Once logged in, click the TrustConnect tab to add subscriptions, change billing and contact information, and review the ongoing status of your service. Your Comodo Internet Security Complete TrustConnect account has a 10 GB/month data transfer limit.
Comodo Internet Security - Complete customers also receive the $99 value 'Live, Expert Computer Support' Comodo GeekBuddy. Please visit http://www.geekbuddy.com for full product details.
TrustConnect System Requirements• Windows Vista • Windows XP • Mac OS X • Linux (containing kernel 2.4 or later) • FreeBSD, OpenBSD
Setting up TrustConnect• Microsoft Windows• MAC OS X• Linux• iPhone / iPod Touch
7.1.Microsoft Windows - Configuration and Connection This section deals with the configuration and connection of TrustConnect and presumes you already have the software installed. If you have not yet installed the software then:
• Please run the CIS Complete installer and select 'Install TrustConnect' at the options menu• Alternatively, the TrustConnect client can be downloaded separately from http://www.comodo.com/trustconnect or
from the 'TrustConnect' area of your Comodo account at http://accounts.comodo.com/login• Installation of TrustConnect is dealt with in Section 1.3.3.4 Installing TrustConnect of this guide.
Establish a connection to TrustConnectOnce installation is complete, TrustConnect can be launched in one of the following ways:
• Via the Windows 'Start' menu. Click 'Start > Programs > Comodo > Trust Connect > Trust Connect'
• By double clicking the TrustConnect Tray Icon: • By right clicking on the TrustConnect Tray icon and selecting 'Connect':
Comodo Internet Security 2012 User Guide | © 2012 Comodo Security Solutions Inc. | All rights reserved 269

Comodo Internet Security 2012 - User Guide
By default, your TrustConnect client automatically selects the best TrustConnect access server from the servers distributed all over the world depending on your location, distance between you and the servers and their load. You can change the server you want to connect to, through Advanced Options explained at the foot of this page.
After starting TrustConnect you should enter your TrustConnect Service Login and Service Password at the client login box.
Note: This is not the same password as your Comodo Account password. It is a unique, random password that was generated during account creation to authenticate you to the TrustConnect servers. If required, you can change this password to something more memorable by using the 'Change Service Password' button on the right.
Click 'OK' to confirm and connect. After successful authentication of your user-name and password, the tray icon turns green to indicate that you are successfully connected to TrustConnect:
Comodo Internet Security 2012 User Guide | © 2012 Comodo Security Solutions Inc. | All rights reserved 270

Comodo Internet Security 2012 - User Guide
Not Connected to TrustConnect Attempting to connect to TrustConnect
Successfully connected to TrustConnect
Advanced OptionsComodo TrustConnect allows you to select the TrustConnect access server you want to connect to, through its advanced options. You can set TrustConnect to automatically select the best server, set a default server or choose to select the server manually every time.
To access the Advanced options panel, right click on the TrustConnect Tray icon and select 'Advanced Options'.
The panel displays your current location with the IP address.
You can configure the server selection from the options :
• Automatically select the best server;• I want to connect to server in;• Let me choose each time I connect.
Select the option and click the Select button for your settings to take effect.
Automatically select the best server - Instructs TrustConnect to select the best access server with optimal load and distance to connect to. Your TrustConnect client automatically finds a server nearest to your location and with optimal connection load. This is the default option and is recommended for all users.
I want to connect to server in: Allows you to choose a server and to set it as default, so that every time you start TrustConnect
Comodo Internet Security 2012 User Guide | © 2012 Comodo Security Solutions Inc. | All rights reserved 271

Comodo Internet Security 2012 - User Guide
service, you are connected to the selected server irrespective of your location. The drop-down box displays a list of TrustConnect access servers located at different places, all over the world. Each server is indicated with its location (country, state), distance from your current location and the load of the server in percentage.
• Select the server which you want to set as default and click the 'Select' button.
Note: It is always recommended to choose a server nearest to your location for quicker access.
A connection to the selected server is established every time you establish a connection to TrustConnect. You can change this setting anytime you want, by accessing the Advanced Options in TrustConnect.
Let me choose each time I connect - Allows you to select a different server each time you establishing a connection with TrustConnect.
Every time you start TrustConnect service, you are prompted to select the server which you wish to connect. On establishing a connection to TrustConnect, a 'Select access server' dialog appears.
The drop-down box displays a list of TrustConnect access servers located at different places, all over the world. Each server is indicated with its location (country, state), distance from your current location and the load of the server in percentage.
• Select the server to which you want to connect and click the 'Select' button. A connection with the selected access server is established.
Note: It is always recommended to choose a server nearest to your location for quicker access.
7.2.Mac OS X - Configuration and Connection Install and configure TrustConnect OpenVPN client
1. Download the TrustConnect OpenVPN client for Mac OS X 10.4 (or above) from the Tunnelblick project site - http://code.google.com/p/tunnelblick. The client can be download from the 'Featured downloads' section on the right hand side of the homepage.
Comodo Internet Security 2012 User Guide | © 2012 Comodo Security Solutions Inc. | All rights reserved 272

Comodo Internet Security 2012 - User Guide
Alternatively, it can be downloaded directly by clicking the following link: http://tunnelblick.googlecode.com/files/Tunnelblick_3.0b26.dmg
2. Install the client. Double click the .dmg file you downloaded in the step above to start the installation process. Once setup is complete, a 'Tunnelblick' icon should appear on your desktop. More details about the Tunnelblick application and its usage is available at the project website located at http://code.google.com/p/tunnelblick.
3. Download the correct client configuration file for your TrustConnect package:
• TrustConnect subscribers OR 7 day trialists, download:https://accounts.comodo.com/download/trustconnect/client.conf
• Users of TrustConnect FREE service should download:http://download.comodo.com/trustconnect/free_client.conf
4. Rename the file you just downloaded from either 'client.conf' or 'free_client.conf' to 'openvpn.conf'
5. Download the TrustConnect CA certificate.
6. Copy the renamed configuration file and the root CA certificate into the following directory: ~/Library/Application/Support/Tunnelblick/Configurations
7. Start Tunnelblick.app and choose Connect 'openvpn'.
8. Enter your TrustConnect login and password.
7.3.Linux / Open VPN - Configuration and Connection The following options are available for Linux users:
• Download and Install the OpenVPN Client• Download and Install the RedHat Client• Download and Install the Ubuntu Client
Download and Install the TrustConnect OpenVPN Client To connect to the TrustConnect service you must first download and install the TrustConnect OpenVPN client software.
1. Download the TrustConnect OpenVPN client for Linux. Click here to download the client directly.
2. Using the RPM package
If you are using a Linux distribution which supports RPM packages (SuSE, Fedora, Redhat, etc.), it's best to install using this mechanism. You can build your own binary RPM file:
rpmbuild -tb openvpn-[version].tar.gz
Once you have the RPM file, you can install it with:
rpm -ivh openvpn-[details].rpm
Installing OpenVPN from a binary RPM package has these dependencies:openssl, lzo, pam. LZO library can be downloaded here.
3. Without the RPM package
If you are using Debian, Gentoo, or a non RPM based Linux distribution, use your distribution specific packaging mechanism such as 'apt-get' on Debian or 'emerge' on Gentoo. It is also possible to install OpenVPN on Linux using the universal ./configure method.
First expand the .tar.gz file:
tar -xfz openvpn-[version].tar.gz
Then cd to the top level directory and type:
./configuremakemake install
For more details, visit the official OpenVPN 2.0 'How To' page
Configuring TrustConnect OpenVPN Client
Comodo Internet Security 2012 User Guide | © 2012 Comodo Security Solutions Inc. | All rights reserved 273

Comodo Internet Security 2012 - User Guide
1. Download the correct client configuration file for your TrustConnect package:
• TrustConnect subscribers OR 7 day trialists, download:https://accounts.comodo.com/download/trustconnect/client.conf
• Users of TrustConnect FREE service should download:http://download.comodo.com/trustconnect/free_client.conf
2. Download the TrustConnect CA certificate.
3. Copy root CA certificate and configuration file into OpenVPN configuration directory, for example into /etc/openvpn/.
4. Start TrustConnect OpenVPN client program:
openvpn--openvpn config /etc/openvpn/client.conf
5. Enter your TrustConnect login and password.
Download and Install the TrustConnect RedHat ClientTo install TrustConnect client for RedHat (Fedora, RHEL) system
1. Download RPM package here:
https://accounts.comodo.com/download/trustconnect/tcclient-1.0-1.noarch.rpm2. Start console, login as root and execute command:
# rpm -Uhv PATH/TO/RPM/tcclient-1.0-1.noarch.rpm
Client was tested on the RedHat Fedora 8, 9, 10
Note: The TrustConnect RedHat Client is not available for users of the free service. Users of the free service should download and install the OpenVPN client as detailed earlier in this document.
Download and Install the TrustConnect Ubuntu Client
To install TrustConnect client for Ubuntu system
1. Download DEB package here:
https://accounts.comodo.com/download/trustconnect/tcclient_1.0-1_all.deb
2. Start console, login as root and execute command:
# dpkg -i PATH/TO/DEB/tcclient_1.0-1_all.deb
Client was tested on the Ubuntu 8.0, 8.1
Usage:
Run trustconnect client: "Applications Menu" -> "Internet" -> "TrustConnect Client"
Note: The TrustConnect Ubuntu Client is not available for users of the free service. Users of the free service should download and install the OpenVPN client as detailed earlier in this document.
7.4.Apple iPhone / iPod Touch - Configuration and ConnectionOpen VPN account information page. Go to Setting > General > Network > VPN > Settings.
1. Select PPTP and enter TrustConnect VPN account information:
• In the 'Server' field, please use one of the following addresses: • us1.vpn.comodo.com (commercial subscription)• us2.vpn.comodo.com (commercial subscription)• us3.vpn.comodo.com (free subscription users only)
Comodo Internet Security 2012 User Guide | © 2012 Comodo Security Solutions Inc. | All rights reserved 274

Comodo Internet Security 2012 - User Guide
2. Enter your TrustConnect account and password.
3. Click the 'Save' button and go back to VPN main page (Setting > General > Network > VPN).
4. Start Trust Connect VPN connection. Switch 'VPN' to 'ON'.
Comodo Internet Security 2012 User Guide | © 2012 Comodo Security Solutions Inc. | All rights reserved 275

Comodo Internet Security 2012 - User Guide
7.5.TrustConnect FAQCommon QuestionsHow do I set up TrustConnect and Log on to the TrustConnect Server?
My User Name and Password don't work - why not?
What Operating Systems does TrustConnect support?
What clients should I use to connect to the TrustConnect Server?
All our Internet (HTTP & HTTPS) connections are via a proxy server. How do I connect using TrustConnect in this situation?
Why do I need a Secure Connection like Comodo TrustConnect?
What is a Sniffer?
What types of TrustConnect Accounts are available?
What Subscription Plans are available for the full service?
Can I buy additional traffic when I need it?
What is the difference between the free service and the paid license service?
How do I switch to a full account and remove these limitations?
Do I have to use a wireless connection to use Comodo TrustConnect?
I have a Wi-Fi at home with WEP turned on. Am I safe?
Is the TrustConnect license for only one computer, or can I install it on others in my home network?
What is the typical connection speed through TrustConnect?
What happens at the end of the TrustConnect Trial?
How do I cancel my account?
What security measures does TrustConnect use?
Can TrustConnect work on a PC behind a NAT-enabled router?
Windows ConfigurationWhat is the "TAP-Win32 Adapter" that appears in my "Network Connections"?
I'm sure I've done everything correctly but I still cannot connect to the server.
I can connect to the server, but cannot get access to any site. IPCONFIG /ALL shows IP 0.0.0.0 for the TAP adapter. What's wrong?
Do I need my Firewall up while connecting to the WEB via TrustConnect?
What port numbers are used by TrustConnect?
Windows Vista ConfigurationI cannot connect to the server. Log file contains the entry "All TAP-Win32 adapters on this system are currently in use." But I cannot find any adapters in my "Network Connections". What is the problem?
All adapters are located in correct place, but I still cannot connect to the server.
iPhone/iPod Client ConfigurationThe server did not respond when I try to connect.
What are the TrustConnect server addresses?
What port numbers are used by TrustConnect for iPod clients?
Common QuestionsHow do I set up TrustConnect and Log on to the TrustConnect Server?
1. Firstly, log into your Comodo Account at https://accounts.comodo.com with the user name and password that you created during the TrustConnect or CIS Complete enrollment process.
2. Click the 'TrustConnect' tab on the top navigation bar.
Comodo Internet Security 2012 User Guide | © 2012 Comodo Security Solutions Inc. | All rights reserved 276

Comodo Internet Security 2012 - User Guide
3. Download, install and configure the appropriate TrustConnect client software for your operating system. All necessary software and instructions are available on the right hand side of the 'TrustConnect' area of your account. Alternatively, please use the following links:
Windows
View TrustConnect Windows Client Configuration Guide
Download the Windows TrustConnect Client
MAC OS X
View TrustConnect MAC OS X Client Configuration Guide
Linux / OpenVPN
View TrustConnect Linux Client Configuration Guide
iPhone / iPod Touch
View TrustConnect iPod Client Configuration Guide
4. Once installed, start up the Trust Connect Client.
The following example shows how to connect using the Windows client:
Click Start > Programs > Comodo > Trust Connect > Trust Connect
Or, if TrustConnect is already running, right click on the tray icon and select 'Connect':
5. At the login box you should enter your TrustConnect Service Login and Service Password.
Note: This is not the same password as your Comodo Account password. It is a unique, random password that was generated during account creation to authenticate you to the TrustConnect servers. If required, you can change this password to something more memorable by using the 'Change Service Password' button on the right.
Comodo Internet Security 2012 User Guide | © 2012 Comodo Security Solutions Inc. | All rights reserved 277

Comodo Internet Security 2012 - User Guide
6. The TrustConnect tray icon turns green upon successful connection:
Not Connected to TrustConnect Attempting to connect to TrustConnect
Successfully connected to TrustConnect
My User Name and Password don't work - why not?
Make sure that you are entering the TrustConnect Service login details and NOT your Comodo Account Manager login details.
As a TrustConnect customer (or CIS Complete customer which includes TrustConnect service) you have two sets of login details:
Your Comodo Account Login Details. This user name and password enables you to log into your account at https://accounts.comodo.com to view and configure account details. You created this on the sign - up form when you enrolled for TrustConnect or CIS Complete.
Your TrustConnect Service Login Details. This user-name and password is used to connect to the TrustConnect server and should be entered at the client login box.
To view your TrustConnect Service Login details:
• Login at https://accounts.comodo.com with your Comodo Account Login Details• Click the 'TrustConnect' button on the top navigation• Your service login and password are listed. You can change this password at any time by clicking the 'Change
Service Password' button.What operating systems does TrustConnect support?
TrustConnect is successfully tested on Windows 2000, Windows XP, Windows Vista, Linux and Mac Os X. It supports mobile
Comodo Internet Security 2012 User Guide | © 2012 Comodo Security Solutions Inc. | All rights reserved 278

Comodo Internet Security 2012 - User Guide
devices like iPod/iPhone as well.
What clients should I use to connect to the TrustConnect server?
To start using TrustConnect you must first download and install the appropriate TrustConnect client software for your operating system. Client software for supported operating systems is available for download in the TrustConnect area of your account. Alternatively, use the following links:
Windows
View TrustConnect Windows Client Configuration Guide
Download the Windows TrustConnect Client
MAC OS X
View TrustConnect MAC OS X Client Configuration Guide
Linux / OpenVPN
View TrustConnect Linux Client Configuration Guide
iPhone / iPod Touch
View TrustConnect iPod Client Configuration Guide
All our Internet (HTTP & HTTPS) connections are via a proxy server. How do I connect using TrustConnect in this situation?
If you use the Windows client, you should:
i. Change the TrustConnect target (command) line:• Right click on 'TrustConnect' icon;• Select 'Properties' -> 'Shortcut';• Add the following text --allow_proxy 1 into the 'Target' field, so it looks like this:
"C:\Program Files\Comodo\TrustConnect\bin\TrustConnect.exe" --allow_proxy 1
ii. Start TrustConnect client iii. Set your proxy settings:
• Right click on 'TrustConnect' tray icon and select 'Proxy Settings';• Select 'Manual Configuration' and enter your proxy settings, for example:
HTTP proxy, Address: 192.168.0.1, Port: 3128
iv. Connect to TrustConnect.If you use the Linux/Unix or MAC OS X client, you need only add the http-proxy directive to the client configuration file. For example: http-proxy 192.168.0.1 3128.
If you use iPhone/iPod client:
• Set your proxy settings on the VPN settings: 'Setting' -> ' General' -> 'Network' -> 'VPN' -> 'Settings' -> 'Proxy' Why do I need a Secure Connection like Comodo TrustConnect?
If you are logging onto the Internet using Wi-Fi public hotspots, then all of your information is in a readable, plain text format that cyber criminals can sniff. In addition, many hotels have sniffable wired networks. When you're traveling, all of your information can be seen, including confidential company and personal information.
What is a Sniffer?
Typically, a computer only receives traffic aimed at its TCP/IP address. Sniffer software allows a computer to record traffic headed to (and from) every computer on the local network.
What are types of TrustConnect accounts are available?
There are 3 main 'types' of TrustConnect Account
• FULL - Subscription based. Users get access to all features of the TrustConnect service.• TRIAL - Unlimited 7 day trial which includes all the functionality that is available in the paid service.
Comodo Internet Security 2012 User Guide | © 2012 Comodo Security Solutions Inc. | All rights reserved 279

Comodo Internet Security 2012 - User Guide
• FREE - 'Free for life' service that includes certain service restrictions. For more details, see 'What's the Difference between the Free Service and the Paid License Service?'.
What Subscription Plans are Available for the full service?
The following plans are available for the TrustConnect service:
TrustConnect Packages
Daily Pass - $3.99 /24 hours Unlimited Service
$8.99 Monthly Unlimited
$19.95 Annual - 10 GB traffic
$29.95 Annual 50 GB traffic
$49.95 Annual 100 GB traffic
$99.95 Annual Unlimited
TrustConnect Corporate Packages
$25.00 Monthly Corporate 500 GB traffic, 5 users
$200.00 Annual Corporate 500 GB traffic, 5 users
Can I buy Additional traffic when I need it?
Yes. additional traffic limit can be added to your account at anytime.
• Login to your Comodo account at https://accounts.comodo.com with your user-name and password• Click the 'TrustConnect' tab on the top navigation bar (or select 'TrustConnect' from the 'Service' menu button• Click 'Buy extra traffic' on the right hand side then sign up for the plan that fits your requirements
What's the Difference between the Free Service and the Paid License Service?
The free service is:
• Limited to 10 GB of traffic per month • Location services are not available to free users (i.e. users are not able to select which server they connect to in
'Advanced Options')• Free service features small banner adverts • Free service does not allow certain protocols to be used. These include FTP, SMTP, NNTP and NTP
Note: POP3 and IMAP protocols ARE allowed, so you can check online mail accounts like Gmail or Yahoo mail. Instant Messengers such as MSN and ICQ can also be used.
• The proprietary TrustConnect client for RedHat and Ubuntu Linux distributions is not available for free users. Users are, of course, free to use the OpenVPN client to configure the service.
How do I switch to a full account and remove these limitations?
If you've already signed up for a free account and want to upgrade to the full service:
• Login to your Comodo account at https://accounts.comodo.com with your user-name and password• Click the 'TrustConnect' tab on the top navigation bar (or select 'TrustConnect' from the 'Service' menu button• Click 'Change Plan' then sign up for a subscription plan that fits your requirements
Do I have to use a wireless connection to use Comodo TrustConnect?
Not at all. Some networks, even if they are physically hard-wired and not wireless, do not have secure connections. You can use Comodo TrustConnect even from a wired connection if you need to encrypt your session or hide your destination. If you'd like another layer of protection, Comodo TrustConnect can provide it.
I have a Wi-Fi at home with WEP turned on. Am I safe?
No. Cyber criminals can break WEP encryption with easy-to-acquire tools that are available on the Internet. Computers without firewalls are even more vulnerable to attack. Comodo TrustConnect helps make your connection secure even on your home-based Wi-Fi connection.
Is the TrustConnect license for only one computer, or can I install it on others in my home network?
Comodo Internet Security 2012 User Guide | © 2012 Comodo Security Solutions Inc. | All rights reserved 280

Comodo Internet Security 2012 - User Guide
You may install TrustConnect client software on any amount of PCs you wish, but you are allowed to connect to TrustConnect service with one of them at a time. For example, you may install TrustConnect on work PC and on your own laptop and connect to TrustConnect from work computer or from laptop, but not simultaneously.
The license agreement can be read here: https://accounts.comodo.com/trustconnect/management/eula
What is the typical connection speed through TrustConnect?
All TrustConnect connections are made over 128 bit SSL encrypted connections so typical speeds are between 1.5 - 3.0 Mbps.
What happens at the end of the TrustConnect Trial?
Once your 7 day trial period is over you are automatically switched over to the full monthly or annual plan that you enrolled for.
How do I cancel my account?
If you would like to cancel your TrustConnect account at any time, please send your request to [email protected] Please remember to include your account user-name (login), email address and order number and a brief reason for cancellation.
What security measures does TrustConnect use?
All connections to TrustConnect are over 128-bit SSL encryption. Additionally, a private VPN session key is re-created every hour.
Can TrustConnect work on a PC behind a NAT-enabled router?
Yes. If your computer is connected to the Internet through a NAT-enabled router, you shouldn't have any problems connecting to the TrustConnect service.
Microsoft Windows QuestionsWhat is the "TAP-Win32 Adapter" that appears in my "Network Connections"?
The "TAP-Win32 Adapter" is virtual network card that is created by the TrustConnect client during installation. This adapter is required in order to establish a secure tunnel to the TrustConnect Server.
I'm sure I've done everything correctly but I still cannot connect to the server.
Make sure that you have been correctly entering your Service Login/Password. If it is incorrect you should visit https://accounts.comodo.com/trustconnect/management and check your Service Login.
I can connect to the server, but cannot get access to any site. IPCONFIG /ALL shows IP 0.0.0.0 for the TAP adapter. What is wrong?
The DHCP Client service MUST be enabled.
To enable this service, you need to:
1. Right click on the Windows "My Computer" icon.
2. Select "Manage" from the context sensitive menu to open the Windows 'Computer Management' utility.
3. Select 'Services and Applications' then 'Services'.
4. Double-click 'DHCP Client' from the list of services that are listed in the right hand pane. This opens the DHCP Client Properties dialog.
5. Make sure 'Start Up Type' is set to 'Automatic'.
6. Click 'OK' to confirm and save your changes.
Comodo Internet Security 2012 User Guide | © 2012 Comodo Security Solutions Inc. | All rights reserved 281

Comodo Internet Security 2012 - User Guide
• The 'Start the service' link is now available. Click on it to run the DHCP Client.
Do I need my Firewall up while connecting to the WEB via TrustConnect?
Yes. TrustConnect ensures secure wireless connectivity to the Internet but does not secure all your computers ports (it is not designed for this purpose). You still need an effective firewall to protect your ports when surfing the 'net. Comodo recommends users install Comodo Internet Security which contains an award winning packet filtering personal firewall and is completely free for home and business users.
What port numbers are used by TrustConnect?
TrustConnect uses only port 443.
Microsoft Windows Vista QuestionsI cannot connect to the server. The log file contains the entry "All TAP-Win32 adapters on this system are currently in use." - but I cannot find any adapters in my "Network Connections". What is the problem?
Comodo Internet Security 2012 User Guide | © 2012 Comodo Security Solutions Inc. | All rights reserved 282

Comodo Internet Security 2012 - User Guide
Always install and run TrustConnect under Administrator access rights.
All adapters are located in correct place, but I still cannot connect to the server.
You need to check the box against "Run this program as an administrator":
• Right click on TrustConnect icon;• Select 'Properties' --> 'Compatibility'.
OR run the application under the Windows Vista "Run As Admin" option.
iPhone/iPod Client QuestionsThe server did not respond when I try to connect.
Check your network settings and access to Internet.
What are the TrustConnect Server Addresses?
You may use the following addresses when configuring the iPod / iPhone client:
- us1.vpn.comodo.com (commercial subscription)
- us2.vpn.comodo.com (commercial subscription)
- us3.vpn.comodo.com (free subscription)
What port numbers are used by TrustConnect for iPod clients?
TrustConnect for iPod clients uses 1723 port (PPTP service).
8.Comodo DragonComodo Dragon is a fast and versatile Internet Browser based on Chromium and infused with Comodo's unparalleled level of security. To help make your Internet browsing experience even safer, Comodo Dragon is installed in your computer as a part of Comodo Internet Security 2012. Comodo Dragon gives you the complete compliment of features offered by Chromium with superior security and privacy.
• Comodo Dragon Features• Starting Comodo Dragon• Comodo Dragon Help
Comodo Internet Security 2012 User Guide | © 2012 Comodo Security Solutions Inc. | All rights reserved 283

Comodo Internet Security 2012 - User Guide
Features:
• Improved Privacy over Chromium • Easy SSL Certificate Identification • Fast Website Access • Greater Stability and Less Memory Bloat • Incognito Mode Stops Cookies, Improves Privacy • Very easy to switch from your Browser to the Dragon
Comodo Dragon Security:
• Has privacy enhancements that surpass those in Chromium's technology • Has Domain Validation technology that identifies and segregates superior SSL certificates from inferior ones • Stops cookies and other Web spies • Prevents all Browser download tracking to ensure your privacy
Starting Comodo Dragon
Comodo Dragon is installed in your computer along with Comodo Internet Security 2012. You can start the browser in two ways:
From the Start menu:
• Click Start > All Programs > Comodo > Dragon > Comodo Dragon:
Comodo Internet Security 2012 User Guide | © 2012 Comodo Security Solutions Inc. | All rights reserved 284

Comodo Internet Security 2012 - User Guide
From the Destop Icon:
• Double Click on the Comodo Dragon Desktop icon created during the installation:
Comodo Dragon Help
Comodo Dragon's intuitive multi-tabbed interface enables easy and fast access to sophisticated features of the browser. Please refer to the Comodo Dragon online help guide at http://help.comodo.com/topic-120-1-279-2524-Comodo-Dragon---Introduction.html for more details on using the browser.
Comodo Internet Security 2012 User Guide | © 2012 Comodo Security Solutions Inc. | All rights reserved 285

Comodo Internet Security 2012 - User Guide
Appendix 1 CIS How to... TutorialsThe 'How To...' section of the guide contains guidance on key tasks of Comodo Internet Security. Use the links below to go to each tutorial's page.
How to...:
• Setup security levels easily - Guidance on changing the current security levels of Antivirus, Firewall and Defense+. • Setup the Firewall for maximum security and usability - A brief outline of the setting up a secure connection to Internet • Block Internet Access while allowing local network (LAN) Access - guidance on configuring the Firewall to allow only
Intranet or LAN connection and to block Internet connection • Setup Defense+ for maximum security and usability - A brief outline of how to set Host intrusion Protection for the
optimum balance between security and usability • Password protect your CIS settings - Explains how to protect your CIS settings• Reset a Forgotten Password (Advanced) - Explains how to create a new password for CIS• Run an instant Antivirus scan on selected items - Guidance on initiating a manual scan on selected folders/files to
check for viruses and other malware.• Create an Antivirus scanning schedule - Guidance on time-table scheduling of antivirus scans to be run on selected
items at selected intervals• Run an untrusted program inside sandbox - Guidance on executing a program that you do not trust to be safe, inside
sandbox to protect any harmful effects of the program upon your system.• Restore incorrectly quarantined item(s) - Help to restore files and executables that were moved to quarantine by
mistake• Submit quarantined items to Comodo for analysis - Advice on how to send suspicious files/executables to Comodo for
analysis • Enable file sharing applications like BitTorrent and Emule - Explains how to configure Comodo Firewall for file sharing
through popular software• Block any downloads of a specific file type - Explains how to configure Defense+ to block downloads of files of a
specific type• Selectively disable Defense+ and Sandboxing for specific files - Explains how to exclude specific files or file types
from the sandboxing process• Switch between complete CIS suite and individual components (just AV or FW) - Explains how to uninstall or install
Firewall or Antivirus components after installation.• Switch Off Automatic Antivirus And Software Updates - Explains how to stop automatic software and virus updates• Temporarily suppress alerts when playing games - Helps you to switch off CIS pop-up alerts to avoid interruptions
while playing games
Setting up Security Levels Easily
Comodo Internet Security allows users to quickly view or change the current Antivirus, Firewall or Defense+ security level by right clicking on the system tray icon .
Comodo Internet Security 2012 User Guide | © 2012 Comodo Security Solutions Inc. | All rights reserved 286

Comodo Internet Security 2012 - User Guide
Antivirus
To set the Real time Scanning level for Antivirus1. Right click on the system tray icon
Comodo Internet Security 2012 User Guide | © 2012 Comodo Security Solutions Inc. | All rights reserved 287

Comodo Internet Security 2012 - User Guide
2. Move the mouse cursor over Antivirus Security Level
The preset Antivirus Security levels are displayed. The options available are:
• On Access;• Stateful; and• Disabled.
The currently active configuration is displayed with a checkmark next to it. For more details on these settings refer to Scanner Settings > Realtime Scanning.
3. Click on the required security level. The Antivirus will be set to the selected security level.
You can find the set security level also at the CIS Summary screen.
FirewallTo set the Firewall Security Level
1. Right click on the system tray icon
2. Move the mouse cursor over Firewall Security Level
The preset Firewall Security levels are listed. The currently set Firewall Security Level is indicated by a check mark beside it. For more details on the preset Firewall Security Levels refer to Firewall Behavior Settings.
Comodo Internet Security 2012 User Guide | © 2012 Comodo Security Solutions Inc. | All rights reserved 288

Comodo Internet Security 2012 - User Guide
3. Click on the required Firewall Security level.
You can find the set Firewall Security Level also at the CIS Summary screen.
Defense+
To set the Defense+ Security Level1. Right click on the system tray icon
2. Move the mouse cursor over Defense+ Security Level
The preset Defense+ Security levels are displayed as a list. The currently set Defense+ Security level is indicated by a check mark beside it. For more details on the preset Defense+ Security Levels refer to Defense+ Settings.
3. Click on the required Defense+ Security level.
Comodo Internet Security 2012 User Guide | © 2012 Comodo Security Solutions Inc. | All rights reserved 289

Comodo Internet Security 2012 - User Guide
You can find the set Defense+ Security Level also at the CIS Summary screen.
Setting up the Firewall For Maximum Security and UsabilityThis page outlines the functions of Comodo's Firewall and helps you to set up a secure connection to the Internet.
Stealth Ports SettingsPort Stealthing is a security feature whereby ports on an Internet connected PC are hidden from sight, sending no response to opportunistic port scans.
1. Click the 'Firewall' button along the top navigation
2. Click 'Stealth Ports Wizard' in Firewall Tasks menu
3. Select "Block All Incoming connections and make my ports stealth for everyone" to make computer's ports are invisible to all networks
4. Click 'Ok'.
Click here for more details on Stealth Port Wizard
Network Zones Settings
The Network Zones option allows you to configure the protection level for network connection to a Router/home network. (This is usually done automatically for you).
To view the configurations1. Click the 'Firewall' button along the top navigation
2. Click 'Network Security Policy' in Firewall Tasks menu
3. Click 'Network Zones' tab
Comodo Internet Security 2012 User Guide | © 2012 Comodo Security Solutions Inc. | All rights reserved 290

Comodo Internet Security 2012 - User Guide
Check the Loopback zone and Local Area Network #1. In most cases, the loopback zone IP address should be 127.0.01/255.0.0.0
In most cases, the IP address of the auto detected Network zone should be 192.168.1.100/255.255.255.0 . 4. Check these addressees and click 'OK'.
Click here for more details on Network Zones settings
Firewall Behavior SettingsThe Firewall Behavior Settings option allows you to configure the protection level for your Internet connection and the frequency of alerts generated.
To open Firewall Behavior Settings panel:1. Click the 'Firewall' button along the top navigation
2. Click 'Firewall Behavior Settings' in Firewall Tasks menu
General Settings1. Click on 'General Settings' tab to move the Firewall Security Level slider
2. Choose Safe mode
Safe Mode: While filtering network traffic, the firewall will automatically create rules that allow all traffic for the components of applications certified as 'Safe' by Comodo. For non-certified new applications, you will receive an alert whenever that application attempts to access the network. Should you choose, you can grant that application Internet access by choosing 'Treat this
Comodo Internet Security 2012 User Guide | © 2012 Comodo Security Solutions Inc. | All rights reserved 291

Comodo Internet Security 2012 - User Guide
application as a Trusted Application' at the alert. This will deploy the predefined firewall policy 'Trusted Application' onto the application.
3. Click 'OK' for the changes to take effect.
Alert Settings
1. Click the 'Alert Settings' tab in the same window.
Comodo Internet Security 2012 User Guide | © 2012 Comodo Security Solutions Inc. | All rights reserved 292

Comodo Internet Security 2012 - User Guide
2. Move the Alert Frequency Level slider to Low and select all the check boxes except 'This computer is an internet
connection gateway'. Only enable this box if your system is configured as an ICS server (your computer is connected to Internet and shares its single Internet connection with other computers connected to it by LAN).
At the 'Low' setting, the firewall shows alerts for outgoing and incoming connection requests for an application. This is the setting recommended by Comodo and is suitable for the majority of users.
Enabling 'This computer is an Internet connection gateway' (i.e. an ICS server) allows other computers access to the Internet through this computer.
Click here for more details on Firewall Behavior settings
Advanced Settings
Advanced Settings option allows you to configure the protection level against common types of denial of service (DoS) attack.
To open Advanced Settings panel:
1. Click the 'Advanced Settings' tab in the same window.
Comodo Internet Security 2012 User Guide | © 2012 Comodo Security Solutions Inc. | All rights reserved 293

Comodo Internet Security 2012 - User Guide
When launching a denial of service or 'flood' attack, an attacker bombards a target machine with so many connection requests that your computer is unable to accept legitimate connections, effectively shutting down your web, email, FTP or VPN server.
2. Select both the check boxes Protect the ARP Cache and Block Gratuitous ARP Frames
3. The option Block fragmented IP Datagrams is selected by default
• Block fragmented IP Datagrams - When a connection is opened between two computers, they must agree on a Maximum Transmission Unit (MTU). IP Datagram fragmentation occurs when data passes through a router with an MTU less than the MTU you are using i.e when a datagram is larger than the MTU of the network over which it must be sent, it is divided into smaller 'fragments' which are each sent separately. Fragmented IP packets can create threats similar to a DOS attack. Moreover, these fragmentations can double the amount of time it takes to send a single packet and slow down your download time.
4. Select the Do Protocol Analysis checkbox to detect fake packets used in denial of service attacks
5. Select the Monitor NDIS protocols other than TCP/IP checkbox to capture the packets belonging to any other protocol driver than TCP/IP
6. Click 'OK'.
Click here for more details on Advanced Settings
Setting-up Network Security PolicyThe Network Security Policy option allows you to configure and deploy traffic filtering rules and policies on an application specific and global basis.
To open Network Security Policy configuration panel:1. Click the 'Firewall' button along the top navigation
Comodo Internet Security 2012 User Guide | © 2012 Comodo Security Solutions Inc. | All rights reserved 294

Comodo Internet Security 2012 - User Guide
2. Click 'Network Security Policy' in Firewall Tasks menu
Application Rules 1. Click the 'Application Rules' tab in 'Network Security Policy' interface.
2. Click 'Add...'/'Edit...' rules for specific applications manually or 'Remove' them.
3. Click 'OK' for the change to take effect.
Click here for more details on Network Security Policy
Global RulesThe Global rules can be changed manually although the defaults are usually enough. (Earlier we chose to block all incoming connections and stealthed ports to everyone).
1. Click on 'Global rules' in 'Network Security Policy'.
2. Click 'Add...'/'Edit...' rules for specific applications manually or 'Remove' them
Comodo Internet Security 2012 User Guide | © 2012 Comodo Security Solutions Inc. | All rights reserved 295

Comodo Internet Security 2012 - User Guide
3. Click 'OK' for the change to take effect.
Click here for more details on Network Security Policy
Predefined Policies
To view Predefined Firewall Policies:1. Click the 'Predefined Policies' tab in the same window.
2. Click 'Edit' to view the restrictions placed by a particular policy
Comodo Internet Security 2012 User Guide | © 2012 Comodo Security Solutions Inc. | All rights reserved 296

Comodo Internet Security 2012 - User Guide
You need not make your own predefined policies, the defaults are usually enough.
Click here for more details on Predefined Firewall Policies
Blocking Internet Access while Allowing Local Area Network (LAN) Access You can configure Comodo Firewall to block Internet access while allowing free connections to an internal network (Intranet or LAN).
Example scenarios:
� In your network at home, you want your child's computer to connect to other computers at home but disable Internet access to them for safety reasons
� In your corporate network, you want your employee's computers to connect to your local network machines but disable
Comodo Internet Security 2012 User Guide | © 2012 Comodo Security Solutions Inc. | All rights reserved 297

Comodo Internet Security 2012 - User Guide
Internet access for them for bandwidth restrictions
To selectively block connection to Internet whilst allow connection to internal network you need to create a Global Rule under Network Security Policy and password protect your configuration to prevent others from altering it.
To create a Global Rule1. Click 'Firewall' from the top navigation pane and click 'Network Security Policy' from the Firewall Tasks interface
2. In the Network Security policy interface, click Global Rules tab...
… and click 'Add'. The 'Network Control Rule' interface will open for creating a new rule.
Comodo Internet Security 2012 User Guide | © 2012 Comodo Security Solutions Inc. | All rights reserved 298

Comodo Internet Security 2012 - User Guide
3. Choose the following options from the drop-down menus:
• Action: Block;• Protocol: IP;• Direction: Out.4. Enter a description for the new rule in the Description text box.
5. Click the 'Source Address' tab, choose 'IPv4 Single Address' or 'IPv6 Single address' as per your network and enter the IP address of the computer in the IP text box.
6. Click the 'Destination Address' tab, choose 'Network Zone' from the Type drop-down and choose your local area network from the 'Zone' drop-down.
7. Click the 'IP Details' tab and choose 'Any' from the 'IP Protocol' drop-down.
Comodo Internet Security 2012 User Guide | © 2012 Comodo Security Solutions Inc. | All rights reserved 299

Comodo Internet Security 2012 - User Guide
8. Click 'Apply'. The created policy will be listed in Network Security Policy > Global Rules.
9. Select the rule and click 'Move Up' repeatedly until the rule moves to the first position or drag the rule to the first position.
10. Click 'OK' for your configuration to take effect.
Your Firewall is now configured to allow access to internal network but to block Internet access. Now you need to password protect this configuration to prevent others from changing it.
To password protect your configuration1. Click More from the top navigation pane and click 'Preferences'.
2. Click 'Parental Control' tab from the 'Preferences' interface.
3. Select the check box 'Enable password protection for the settings'.
4. Click the 'Change Password' button.
Comodo Internet Security 2012 User Guide | © 2012 Comodo Security Solutions Inc. | All rights reserved 300

Comodo Internet Security 2012 - User Guide
5. Enter a password of your choice in the Enter the password text box and re-enter the same in the Re-type the password text box.
6. Click 'Apply'.
The configuration is now password protected. From the next attempt to change any configuration changes to CIS, you will be prompted to enter the password to proceed.
Comodo Internet Security 2012 User Guide | © 2012 Comodo Security Solutions Inc. | All rights reserved 301

Comodo Internet Security 2012 - User Guide
Setting up Defense+ for Maximum Security and Usability This page explains on configuring the Host Intrusion Prevention System (HIPS) component of CIS to provide maximum security from the malicious programs that try to execute from within your system and to protect your system from data theft, computer crashes and system damage by preventing most types of buffer overflow attacks, prevent possible attacks from root-kits, inter-process memory injections, key-loggers and more.
To configure Defense+1. Click 'Defense+' from the top navigation and click 'Defense+ Settings' from Defense+ Tasks interface. The Defense+
Settings interface will open.
2. Click the 'General Settings' tab and make the following settings:
Comodo Internet Security 2012 User Guide | © 2012 Comodo Security Solutions Inc. | All rights reserved 302

Comodo Internet Security 2012 - User Guide
• Move the Defense+ security Level slider to Safe Mode; Refer to Defense+ Settings > General Settings for more details on the Security Levels.
• Optional – Enable 'Block all unknown requests if the application is closed'. Selecting this option blocks all unknown execution requests if Comodo Internet Security is not running/has been shut down. This is option is very strict indeed and in most cases should only be enabled on seriously infested or compromised machines while the user is working to resolve these issues. If you know your machine is already ‘clean’ and are looking just to enable the highest CIS security settings then it is OK to leave this box unchecked.
• If you are using a 64-bit system, in order to maximize the security, it is important to select 'Enable enhanced protection mode (Requires a system restart)' – Enabling this mode will activate additional host intrusion prevention techniques in Defense+ to countermeasure extremely sophisticated malware that tries to bypass regular countermeasures. Because of limitations in Windows 7 x64, some HIPS functions in previous versions of CIS could theoretically be bypassed by malware. Enhanced Protection Mode implements several patent-pending ways to improve HIPS in Defense+
• Make sure that the check box 'Deactivate the Defense+ permanently' is not selected.3. Click the Execution Control Settings tab and make the following settings:
• Move the Execution Control Level slider to Enabled. Refer to Defense+ Settings > Execution Control Settings for more details.
Comodo Internet Security 2012 User Guide | © 2012 Comodo Security Solutions Inc. | All rights reserved 303

Comodo Internet Security 2012 - User Guide
• Make sure that the check box Treat unrecognized files as is selected and choose 'Partially Limited' from the drop-down menu.
• Make sure that all the check boxes:• Do heuristic command-line analysis for certain applications;• Perform cloud based behavior analysis of unrecognized files;• Automatically scan unrecognized files in the cloud; and • Detect shellcode injections (i.e. Buffer overflow protection).… are selected.
Refer to Defense+ Settings > Execution Control Settings for more details.
4. Click the 'Monitoring Settings' tab and make sure that all the check boxes are selected.
Comodo Internet Security 2012 User Guide | © 2012 Comodo Security Solutions Inc. | All rights reserved 304

Comodo Internet Security 2012 - User Guide
5. Click OK for your settings to take effect.
How to Password Protect Your CIS SettingsThis page explains how to password protect access to the CIS interface. Implementing the steps explained on this page means another user will not be able to access the CIS interface to modify or over-ride the security settings you have implemented.
Click here for more details on parental control.
To enable password protection
1. Click the 'More' button along the top navigation
2. Click 'Preferences' in 'More' menu
3. Click on 'Parental Control' tab
Comodo Internet Security 2012 User Guide | © 2012 Comodo Security Solutions Inc. | All rights reserved 305

Comodo Internet Security 2012 - User Guide
4. Select 'Enable password protection for the settings' checkbox to activate password protection
5. Click 'Change Password'
6. In the 'Change Password' dialog, type a password and retype the password in the respective text boxes
7. Click 'Apply'.
Enabling password protection will secure all of your important CIS settings and configurations. After setting a password, users will be asked for this password every time they try to access important configuration areas (e.g., in all the sections of the
Comodo Internet Security 2012 User Guide | © 2012 Comodo Security Solutions Inc. | All rights reserved 306

Comodo Internet Security 2012 - User Guide
Antivirus Tasks, Firewall Tasks and Defense+ Tasks areas).
Suppressing alerts whilst under password protectionWhen you select the 'Enable password protection for the settings' checkbox the following options are enabled.
• Suppress Antivirus alerts when password protection is enabled • Suppress Defense+ alerts when password protection is enabled • Suppress Firewall alerts when password protection is enabled
Selecting these options will suppress all Antivirus, Defense+ and Firewall alerts as well as automatically blocking the requested action. This is useful because it avoids the situation wherein an inexperienced user clicking 'Allow' simply to dismiss an alert (and inadvertently allowing a malicious action to proceed).
8. Select the component/s that you want to suppress the alerts and click 'OK'
If you choose to suppress alerts, you must remember to de-suppress them next time you log on. If you don't, then CIS will continue to silently block certain actions without notification.
Important Notes:• Due to the fact that this configuration suppresses and blocks all alerts, certain software updates may be unable to run
in this mode, unless the vendor of the application/updater is in COMODO's 'Trusted Software Vendors' list located in the Defense+ tab of CIS. A good idea is to create a preset configuration (called ''Updater Configuration" for example), and configure it to allow all of your updaters to install smoothly. This way, when switching to this configuration, you can perform maintenance on your PC, and afterward, switch it back to the parental configuration (which suppresses all alerts) so no one else can make changes. This method would prove very useful for tasks such as Microsoft Windows service pack updates, to ensure a proper installation is performed. Refer to 'Manage My Configurations' to know more about preset configurations.
• It is also recommended to set CIS to Proactive Security before configuring CIS with this tutorial. With Proactive Security, everything is protected on your PC by CIS. This is a stronger, more aggressive configuration than the default CIS configuration, so your PC will be better protected, but users will not notice the difference because we will be configuring CIS for ZERO alerts anyway.
• To make sure CIS is set to Proactive Security, navigate to More > Manage my Configurations > Select COMODO -
Comodo Internet Security 2012 User Guide | © 2012 Comodo Security Solutions Inc. | All rights reserved 307

Comodo Internet Security 2012 - User Guide
Proactive Security and click 'Activate'.• It is also recommended to have the firewall in CIS set to Safe Mode with this configuration. With the firewall in Safe
Mode, it will automatically allow and create rules for internet traffic related to applications that are certified as 'Safe' by Comodo. A non-certified, new application would normally generate an alert when attempting to access the network, but with this configuration, the firewall alerts are suppressed, so the attempt will automatically be blocked, preventing the establishment of any malicious or unwanted connections to your PC.
How to Reset Forgotten Password (Advanced) This page explains how to remove password protection/reset password just in case you forgot the password you had set for COMODO Internet Security.
Note: It is not possible to 'retrieve' a forgotten password - you can only reset it. To do this involves modification of the Windows registry and is only recommended for experienced users.
To disable password protection in CIS1. Click Start > Run, from the Windows Start menu.
2. Type 'regedit' in the text box and click 'OK'
3. Navigate to HKEY_LOCAL_MACHINE\SYSTEM\Software\Comodo\FirewallPro\Configurations\
Under the Configurations folder you will see sub-folders named 0,1,2,... depending on the number of preset configurations in CIS. These folders contain registry keys for the settings of the preset configurations in the order of the configurations displayed in More > Manage My Configurations interface. For example, the folder 0 contains the keys for COMODO - Internet Security, the folder 1 contains the keys for COMODO - Proactive Security and so on.
Comodo Internet Security 2012 User Guide | © 2012 Comodo Security Solutions Inc. | All rights reserved 308

Comodo Internet Security 2012 - User Guide
4. Select the folder corresponding to the configuration for which you wish to reset the password and navigate to Settings, for example, navigate to HKEY_LOCAL_MACHINE\SYSTEM\Software\Comodo\FirewallPro\Configurations\0\Settings to reset password in COMODO - Internet Security configuration.
5. Right-click 'PasswordEnabled' key and select 'Modify'
Comodo Internet Security 2012 User Guide | © 2012 Comodo Security Solutions Inc. | All rights reserved 309

Comodo Internet Security 2012 - User Guide
6. In the 'Edit DWORD Value dialog box, change the 'Value data' from 1 to 0
7. Click 'OK'
8. Right-click 'PasswordHash' and select 'Delete'
Comodo Internet Security 2012 User Guide | © 2012 Comodo Security Solutions Inc. | All rights reserved 310

Comodo Internet Security 2012 - User Guide
9. Restart the system for the changes to take effect
Now you should be able to access all settings, uninstall CIS and set a new password.
Note: If CIS doesn't allow regedit to change those registry items, try to boot in safe mode and repeat the above steps.
Running an Instant Antivirus Scan on Selected ItemsYou can run an instant antivirus scan on any selected area like disks, folders files etc. You can also check a wide range of removable storage devices such as CDs, DVDs, external hard-drives, USB connected drives, digital cameras - even your iPod and mobile phones too!! This is useful when you suspect a particular item might contain virus due to newly downloaded or copied folder/file.
Click here for more details on running on-demand scans.
To scan a selected item:1. Right-click on the selected item that you want to run a scan
2. Select 'Scan with COMODO Antivirus' from the context sensitive menu
Comodo Internet Security 2012 User Guide | © 2012 Comodo Security Solutions Inc. | All rights reserved 311

Comodo Internet Security 2012 - User Guide
The scanning process will commence...
...and on completion of scanning, the scan finished dialog be displayed with the number of threats found.
Comodo Internet Security 2012 User Guide | © 2012 Comodo Security Solutions Inc. | All rights reserved 312

Comodo Internet Security 2012 - User Guide
Click here for more details to take action on the infected item(s).
Creating an Antivirus Scanning ScheduleComodo Internet Security allows you to schedule Antivirus scans on your entire system or on specific areas according to your preferences.
To create an antivirus scanning schedule
1. Click the 'Antivirus' button along the top navigation.
2. Click 'Scheduled Scans' in the Antivirus menu.
3. Click the 'Add' button to begin creating your schedule.
4. Type a name for your schedule in the text box.
Comodo Internet Security 2012 User Guide | © 2012 Comodo Security Solutions Inc. | All rights reserved 313

Comodo Internet Security 2012 - User Guide
5. Select a scanning profile from the Profile drop-down menu. (Selecting a scanning profile will define the areas in your computer to be scanned during this schedule. For more details on Scanning profiles, refer to Antivirus Tasks > Scan Profiles).
6. Select the day(s) (Monday to Sunday) when you want the scan(s) to be run.
7. Select the time of the day when the scheduled scan is to be started.
8. Click 'Apply'.
Your new scan schedule will be listed in the 'Scheduled Scans' interface. You can modify or remove it at any time by clicking the 'Edit...' or Remove button.
Comodo Internet Security 2012 User Guide | © 2012 Comodo Security Solutions Inc. | All rights reserved 314

Comodo Internet Security 2012 - User Guide
Repeat the process to add new scan schedules.
For more details on the Scheduled Scans, refer Antivirus Tasks > Scheduled Scans.
Running an Untrusted Program Inside SandboxComodo Internet Security allows you to run programs inside the Sandbox on a 'one-off' basis. This is helpful to test the behavior of new executables that you have downloaded or for applications that you are not sure that you trust.
To run a program inside the sandbox1. Browse to the installation folder of the .exe file through Windows Explorer.
Comodo Internet Security 2012 User Guide | © 2012 Comodo Security Solutions Inc. | All rights reserved 315

Comodo Internet Security 2012 - User Guide
2. Right-click on the file and select Run in COMODO Sandbox from the context sensitive menu.
The program will be started, but will be run inside the Sandbox, with the privilege levels as dictated by settings made through Defense+ Settings > Sandbox Settings.
Restoring Incorrectly Quarantined Item(s)If you have incorrectly quarantined item(s) or you feel an item has been incorrectly quarantined by the application (a false positive) then you can restore it/them using the following procedure:
1. Click the 'Antivirus' button from the top navigation and click 'Quarantined Items' in the 'Antivirus Tasks interface
2. Select the items you wish to restore from the 'Quarantined Items'. For selecting multiple items, press and hold down the Ctrl key.
3. Click 'Restore' to begin restoring the item(s)
Comodo Internet Security 2012 User Guide | © 2012 Comodo Security Solutions Inc. | All rights reserved 316

Comodo Internet Security 2012 - User Guide
All the selected files will be restored to their original locations immediately.
4. Click 'Close' button to exit.
Click here for more details on the Quarantined Items.
Submitting Quarantined Items to Comodo for AnalysisItems which have been quarantined as a result of an On Access, On Demand or Scheduled Scans, can be sent to Comodo for Analysis. After the analysis, if the submitted item is found to be a False Positive, it will be added to Comodo Safe List. Conversely, if it is found to be a malware, it will be added to the anti-malware Black list. This helps Comodo to enhance its virus signature database and helps millions of other CIS users to benefit out of it. Click here for more details on Quarantined Items.
To submit Quarantined items1. Click the 'Antivirus' button from the top navigation and click 'Quarantined Items' in the 'Antivirus Tasks interface
2. Select the items you wish to submit for analysis from the 'Quarantined Items' interface. For selecting multiple items,
Comodo Internet Security 2012 User Guide | © 2012 Comodo Security Solutions Inc. | All rights reserved 317

Comodo Internet Security 2012 - User Guide
press and hold down the Ctrl key.
3. Click 'Submit'
The submission progress will be indicated.
On completion, the submission results will be displayed, indicating whether the file is successfully submitted or already submitted by other users and is pending for analysis.
Comodo Internet Security 2012 User Guide | © 2012 Comodo Security Solutions Inc. | All rights reserved 318
Comodo Internet Security 2012 - User Guide
Enabling File Sharing Applications like BitTorrent and Emule This page explains how to configure Comodo Firewall for file sharing applications like Shareaza/Emule and BitTorrent/UTorrent. To allow these file sharing applications, you must:
• Disable 'Do Protocol analysis' (disable, by default) • Create a 'Predefined Firewall Policy' for Shareaza/Emule • Create a 'Predefined Firewall Policy' for BitTorrent/Utorrent'.
To Create a 'Predefined Firewall Policy' for Shareaza/Emule 1. Click 'Firewall' from the top navigation pane and click 'Network Security Policy' from the Firewall Tasks interface
2. In the Network Security policy interface, click 'Predefined Policies' tab...
Comodo Internet Security 2012 User Guide | © 2012 Comodo Security Solutions Inc. | All rights reserved 319

Comodo Internet Security 2012 - User Guide
… and click 'Add'. The 'Application Network Access Control' interface will open for creating a new set of rules.
Comodo Internet Security 2012 User Guide | © 2012 Comodo Security Solutions Inc. | All rights reserved 320

Comodo Internet Security 2012 - User Guide
3. Enter a descriptive name for the new policy to be created in the 'Description' text box (for example: For allowing Shareaza/Emule).
4. Now you need to create six rules for the newly created security policy. To do so, click 'Add'. The 'Network Control Rule' interface will appear. For creating each rule, select the check box and choose the drop-down options under each tab as given below. After creating each rule, click Apply for the rule to be added and click 'Add' to create the next rule.
Comodo Internet Security 2012 User Guide | © 2012 Comodo Security Solutions Inc. | All rights reserved 321

Comodo Internet Security 2012 - User Guide
Rule 1
• Action : Allow • Protocol : TCP• Direction : In• Description : Rule for incoming TCP connections• Source Address : Any Address• Destination Address : Any Address• Source port : A Port Range : (Start Port = 1025 / End Port = 65535)• Destination port : A Single Port : (Port : Your TCP port of Shareaza/Emule)
Rule 2
• Action : Allow • Protocol : UDP• Direction : In• Description : Rule for incoming UDP connections• Source Address : Any Address• Destination Address : Any Address• Source port : A Port Range : (Start Port = 1025 / End Port = 65535)• Destination port : A Single Port : (Port : Your UDP port of Shareaza/Emule)
Rule 3
• Action : Allow • Protocol : TCP or UDP• Direction : Out• Description : Rule for outgoing TCP and UDP connections• Source Address : Any Address• Destination Address : Any Address• Source port : A port range : (start port = 1025 / end port = 65535)• Destination port : A port range : (start port = 1025 / end port = 65535)
Rule 4
• Action : Allow• Protocol : ICMP• Direction : Out• Description : Ping the server (edk network)• Source Address : Any Address• Destination Address : Any Address• ICMP Details : Message : ICMP Echo Request
Rule 5
• Action : Ask (Also select the check box 'Log as a firewall event if this rule is fired')• Protocol : TCP• Direction : Out• Description : Rule for HTTP requests• Source Address : Any Address• Destination Address : Any Address• Source port : A port range : (start port = 1025 / end port = 65535)• Destination port : Type : Single Port; (Port : 80)
Rule 6
• Action : Block (Also select the check box 'Log as a firewall event if this rule is fired')
Comodo Internet Security 2012 User Guide | © 2012 Comodo Security Solutions Inc. | All rights reserved 322

Comodo Internet Security 2012 - User Guide
• Protocol : IP• Direction : In/Out• Description : Block and Log All Unmatching Requests• Source Address : Any Address• Destination Address : Any Address• IP Details : IP Protocol : Any
5. Click 'Apply' in the 'Application Network Access Control' interface.
The new policy will be created and added as a Predefined Security Policy. Start Shareaza or Emule. When Comodo raises a pop-up alert, choose 'Treat this application as', select the descriptive name you gave for this rule (e.g. For allowing Shareaza/Emule) from the options and select 'Remember my answer'.
To create a 'Predefined Firewall Policy' for BitTorrent/Utorrent'1. Click 'Firewall' from the top navigation pane and click 'Network Security Policy' from the Firewall Tasks interface
2. In the Network Security policy interface, click 'Predefined Policies' tab and click 'Add'. The 'Application Network Access Control' interface will open for creating a new set of rules.
3. Enter a descriptive name for the new policy to be created in the 'Description' text box (for example: For allowing BitTorrent/Utorrent).
4. Now you need to create five rules for the newly created security policy. To do so, click 'Add'. The 'Network Control Rule' interface will appear. For creating each rule, select the check box and choose the drop-down options under each tab as given below. After creating each rule, click Apply for the rule to be added and click 'Add' to create the next rule.
Rule 1
• Action : Allow • Protocol : TCP or UDP• Direction : In• Description : Rule for incoming TCP and UDP connections• Source Address : Any Address• Destination Address : Any Address• Source port : A Port Range : (Start port = 1025 / End port = 65535)• Destination port : A Single Port (Port: The port of BitTorrent/Utorrent)
Rule 2
• Action : Allow • Protocol : TCP• Direction : Out• Description : Rule for outgoing TCP connections• Source Address : Any Address• Destination Address : Any Address• Source port : A Port Range : (Start port = 1025 / End port = 65535)• Destination port : A Port Range : (Start port = 1025 / End port = 65535)
Rule 3
• Action : Allow • Protocol : UDP• Direction : Out• Description : Rule for outgoing UDP connections• Source Address : Any Address• Destination Address : Any Address• Source port : A Single Port: Port: the port of utorrent
Comodo Internet Security 2012 User Guide | © 2012 Comodo Security Solutions Inc. | All rights reserved 323

Comodo Internet Security 2012 - User Guide
• Destination port : A Port Range : (Start port = 1025 / End port = 65535)Rule 4
• Action : Ask (Also select the check box 'Log as a firewall event if this rule is fired')• Protocol : TCP• Direction : Out• Description : Rule for HTTP requests• Source Address : Any Address• Destination Address : Any Address• Source port : A Port Range : (Start port = 1025 / End port = 65535)• Destination port ; A Single Port (Port = 80)
Rule 5
• Action : Block (Also select the check box 'Log as a firewall event if this rule is fired')• Protocol : IP• Direction : In/Out• Description : Block and Log All Unmatching Requests• Source Address : Any Address• Destination Address : Any Address• IP Details : IP Protocol : Any
5. Click 'Apply' in the 'Application Network Access Control' interface.
The new policy will be created and added as a Predefined Security Policy. Start BitTorrent or Utorrent. When Comodo raises a pop-up alert, choose 'Treat this application as', select the descriptive name you gave for this rule (e.g. For allowing BitTorrent/Utorrent) from the options and select 'Remember my answer'.
Blocking Any Downloads of a Specific File TypeComodo Internet Security can be configured to block downloads of specific types of file.
Example scenarios:
� Some malicious websites try to push downloads of malware in .exe file format. .exe files are programs which can execute commands on your computer. If the .exe is malicious in intent then these commands could include the installation of key logging programs, initiation of buffer overflow attacks or code to turn your PC into a zombie. For this reason, you may wish to block all downloads of files with a .exe file extension.
� You want to avoid downloading media files like audio files (e.g. files with extensions .wma, .mp3, .wav, .midi), video files (e.g. files with extensions .wmv, .avi, .mpeg, .swf ) or image files (e.g. files with extensions .bmp. .jpg, .png) for your disk space restrictions.
To selectively block downloading of specific file type, you need to configure Defense+ component of CIS to block the specific file type from the default download folder of your browser.
1. Click Defense+ from the top navigation and click 'Computer Security Policy' from the Defense+ Tasks interface.
2. Click Blocked Files tab of the Computer Security Policy Interface.
Comodo Internet Security 2012 User Guide | © 2012 Comodo Security Solutions Inc. | All rights reserved 324

Comodo Internet Security 2012 - User Guide
3. Click Add > Browse.
4. Browse to the default download folder of that particular file type of your Internet Browser in the LHS pane and move it to RHS pane.
• For example, the default download locations for some file types in Internet Explorer are given below:• Executable files - C:\Documents and Settings\user name\Local Settings\Temporary Internet Files\
Comodo Internet Security 2012 User Guide | © 2012 Comodo Security Solutions Inc. | All rights reserved 325

Comodo Internet Security 2012 - User Guide
• Document files - C:\Documents and Settings\user name\My Documents\• Image files - C:\Documents and Settings\user name\My Documents\My Pictures\• Music files - C:\Documents and Settings\user name\My Documents\My Music\• Video files - C:\Documents and Settings\user name\My Documents\My Videos\
5. Right click on the folder in the RHS pane and click 'Edit' from the context sensitive menu...
… and add the \*.file_extension” (e.g. \*.exe, \*.jpg) at the end of the folder path.
Comodo Internet Security 2012 User Guide | © 2012 Comodo Security Solutions Inc. | All rights reserved 326

Comodo Internet Security 2012 - User Guide
6. Click 'Apply'. The new entry with the path and file name *.file_extension will be added in the Blocked Files interface.
7. Click 'OK' in the 'Computer Security Policy' interface.
The download of the specific file type to the specified folder through the browser will be blocked. If you have more than one browser, repeat the same for the other browsers too.
Note: Blocking files in this way will only block the downloads of the specific file types in the specified folders. If you change the download destination while downloading a file through your web browser, the download will be allowed.
Tip: To unblock the download, Open the 'Computer Security Policy' > 'Blocked Files' interface, select the entry and click 'Remove'.
Disabling Defense+ and Sandboxing For Specific Files SelectivelyCIS will automatically run unknown executables in the sandbox and queue them for submission to Comodo Cloud scanners for behavior analysis. Users do, however, have the option to exclude specific files or file types from this sandboxing process. This is particularly useful for developers that are creating new applications which, by their nature, are as yet unknown to the Comodo safe list.
To disable the sandboxing selectively1. Click 'Defense+' button from the top navigation and click 'Defense+ Settings' from the in Defense+ Tasks interface.
2. Click 'Execution Control Settings' tab in the 'Defense+ Settings' interface.
Comodo Internet Security 2012 User Guide | © 2012 Comodo Security Solutions Inc. | All rights reserved 327

Comodo Internet Security 2012 - User Guide
3. Click on 'Exclusions' button.
4. Click Add > 'Browse...' in the 'Exclusions' interface.
Comodo Internet Security 2012 User Guide | © 2012 Comodo Security Solutions Inc. | All rights reserved 328

Comodo Internet Security 2012 - User Guide
5. Browse to the executable for which you wish to disable sandboxing in the LHS pane and move it to RHS pane.
6. Click 'Apply'. The file will be added to the 'Exclusions' list.
7. Click OK in the 'Defense+ Settings' interface.
The selected application will not be sandboxed on its execution.
Alternatively…
1. Add the files to the list of Defense+ Trusted Files
2. Digitally sign your files with a code signing certificate from a trusted CA then manually add your organization to the Trusted Software Vendors list
3. Switch off Sandboxing entirely by moving the Sandbox Security Level slider to 'Disabled'. Not recommended.
Comodo Internet Security 2012 User Guide | © 2012 Comodo Security Solutions Inc. | All rights reserved 329

Comodo Internet Security 2012 - User Guide
Switching Between Complete CIS Suite and Individual Components (just AV or FW)Comodo Internet Security provides the flexibility of installation as a complete security suite or as individual components. You can choose the installation type during the installation itself. Even after the installation, you can switch the installation type without the requirement of uninstallation of the software, retaining your configuration settings. You might have installed the CIS as complete suite initially but may want to retain the AV part or FW part and uninstall the other or vice versa. The inbuilt uninstaller of CIS enables to switch your installation type at any point of time.
To switch the installation type1. Click Start > All Programs > COMODO > COMODO Internet Security > Add and Remove Components
The Configuration Wizard will start.
2. Click 'Next'. The configuration selection screen will appear.
Comodo Internet Security 2012 User Guide | © 2012 Comodo Security Solutions Inc. | All rights reserved 330

Comodo Internet Security 2012 - User Guide
3. Select 'Change' button to change the installed features and click 'Next.' The Product Selection screen will appear.
Select the installation type.
• If you want the complete installation, select both Install COMODO Antivirus and Install COMODO Firewall. • If you want only the Antivirus part and not the Firewall part, select only the Install COMODO Antivirus and
uncheck Install COMODO Firewall. • If you want only the Firewall part and not the Antivirus part, select only the Install COMODO Firewall and
uncheck Install COMODO Antivirus. Click here for more details on the installation of individual components.
• Click 'Next'. Wait till the CIS is configured and is ready for the change.
Comodo Internet Security 2012 User Guide | © 2012 Comodo Security Solutions Inc. | All rights reserved 331

Comodo Internet Security 2012 - User Guide
4. Click 'Change' in the next screen. The change progress will be indicated...
… and on completion, Click the Finish button to exit the wizard.
Comodo Internet Security 2012 User Guide | © 2012 Comodo Security Solutions Inc. | All rights reserved 332

Comodo Internet Security 2012 - User Guide
In order for the configuration change to take effect, your computer needs to be restarted.
Please save any unsaved data and click 'Yes' to restart the system. If you want to restart the system at a later time, click 'No'.
Note: The change will take effect only on the next restart of the computer.
Switch Off Automatic Antivirus and Software UpdatesBy default, Comodo Internet Security will automatically check for software and Antivirus database updates. However, some users like to have control over what gets downloaded and when it gets downloaded. For example, network administrators may not wish to automatically download because it will take up to much bandwidth during the day. Similarly, users that have particularly heavy traffic loads may not want automatic updates because they conflict with their other download/upload activity.
CIS provides full control over virus and software updates. Click the appropriate link below to find out more:
• Switch off automatic software updates • Switch off automatic virus updates
To switch off automatic software updates:
1. Click the 'More' button from the top navigation and click 'Preferences' link from the 'More' Tasks interface.
2. Click 'General' tab from the 'Preferences' interface.
3. Deselect the check box 'Automatically check for program updates'
Comodo Internet Security 2012 User Guide | © 2012 Comodo Security Solutions Inc. | All rights reserved 333

Comodo Internet Security 2012 - User Guide
4. Click 'Ok'.
To switch off automatic Antivirus database updatesAutomatic virus updates can be completely switched off, or can be switched off for individual scans. Click the link appropriate to your requirements:
• Switch off automatic virus updates • Switch off updates prior to a Manual Scan • Switch off updates prior to a Scheduled scan
To Switch off automatic virus database updates 1. Click the 'Antivirus' button from the top navigation and click 'Scanner Settings' from the Antivirus Tasks interface.
2. Click the 'Real Time Scanning' tab from the 'Scanner Settings' interface
3. Deselect the checkbox 'Automatically update virus database'.
Comodo Internet Security 2012 User Guide | © 2012 Comodo Security Solutions Inc. | All rights reserved 334

Comodo Internet Security 2012 - User Guide
4. Click 'OK'.
The check and download of automatic Antivirus database updates executed during every system start-up and at regular intervals will be stopped.
To switch off virus database updates prior to a Manual Scan
1. Click the 'Antivirus' button from the top navigation and click 'Scanner Settings' from the Antivirus Tasks interface.
2. Click the 'Manual Scanning' tab from the 'Scanner Settings' interface
3. Deselect the checkbox 'Automatically update the virus database before scanning'.
Comodo Internet Security 2012 User Guide | © 2012 Comodo Security Solutions Inc. | All rights reserved 335

Comodo Internet Security 2012 - User Guide
4. Click 'OK'.
The check and download of automatic Antivirus database updates executed before every on-demand or manual scanning will be stopped.
To switch off virus database updates prior to a Scheduled Scan1. Click the 'Antivirus' button from the top navigation and click 'Scanner Settings' from the Antivirus Tasks interface.
2. Click the ' Scheduled Scanning' tab from the 'Scanner Settings' interface
3. Deselect the checkbox 'Automatically update the virus database before scanning'.
Comodo Internet Security 2012 User Guide | © 2012 Comodo Security Solutions Inc. | All rights reserved 336

Comodo Internet Security 2012 - User Guide
4. Click 'OK'.
The check and download of automatic Antivirus database updates executed before commencement of every scheduled scanning will be stopped.
Suppressing CIS Alerts Temporarily while Playing GamesBecause of continuous monitoring of all your system activities in granular level for implementing Default-Deny Protection, Comodo Internet Security generates pop-up alerts whenever it identifies any event appearing to be a malicious activity or execution of programs that require privileges like Internet access and file access rights. Each alert provides information and options that enable you to make an informed decision on whether you want to allow or block a request or activity. Alerts also to allow you to instruct Comodo Internet Security on how it should behave in future when it encounters activities of the same type.
But at times when you are involved in activities like playing computer games, where you do not want to be interfered with such alerts, you can temporarily stop them from being displayed. require undisturbed environment. During this time, the operations that can interfere with users' gaming experience are either suppressed or postponed.
To temporarily stop pop-up alerts1. Right click on the CIS System Tray icon
Comodo Internet Security 2012 User Guide | © 2012 Comodo Security Solutions Inc. | All rights reserved 337

Comodo Internet Security 2012 - User Guide
2. Select 'Game Mode' from the options.
The alerts are now suppressed. To resume alerts and scheduled scans, just de-activate Game Mode from the right click options.
Comodo Internet Security 2012 User Guide | © 2012 Comodo Security Solutions Inc. | All rights reserved 338

Comodo Internet Security 2012 - User Guide
Appendix 2 Comodo Secure DNS ServiceIntroductionComodo Secure DNS service replaces your existing Recursive DNS Servers and resolves all your DNS requests exclusively through Comodo's proprietary Directory Services Platform. Most of the networks use recursive DNS services that are provided by their ISP or that reside on their own set of small DNS servers but it becomes essential to have a secure and broadly distributed DNS service to have a faster and safe DNS resolution.
Background Note: Every device on the Internet is uniquely identified by a 32-bit number (IPv4) or a 128-bit number (Ipv6). While this is perfectly satisfactory for computers, humans are far more comfortable remembering names rather than a string of numbers. The Domain Name System (DNS) provides the translation between those names and numbers. Virtually every piece of software, device, and service on the Internet utilizes DNS to communicate with one another. DNS also makes this information available across the entire span of the Internet, allowing users to find information remotely.
Comodo Secure DNS is a broadly distributed Recursive DNS service that gives you full control to determine how your clients interact with the Internet. It requires no hardware or software and provides reliable, faster, smarter and safer Internet experience.
• Reliable - Comodo Secure DNS Directory Services Platform currently spans across five continents around the world. This allows us to offer you the most reliable fully redundant DNS service anywhere. Each node has multiple servers, and is connected by several Tier 1 carriers to the Internet.
• Faster - Our strategically placed nodes are located at the most optimal intersections of the Internet. Unlike most DNS providers, Comodo Secure DNS Directory Services Platform uses Anycast routing technology - which means that no matter where you are located in the world, your DNS requests are answered by the closest available Comodo Secure DNS set of servers. Combine this with our huge cache and we can get the answers you seek faster and more reliably than anyone else. Furthermore, our "name cache invalidation" solution signals the Comodo Secure DNS recursive servers anytime one of our authoritative customers or partners updates a DNS record, fundamentally eliminating the concept of a TTL.
• Smarter - Comodo's highly structured search and guide pages get you where you want to be, when you inadvertently attempt to go to a site that doesn't exist.
• Safer - As a leading provider of computer security solutions, Comodo is keenly aware of the dangers that plague the Internet today. Secure DNS helps users keep safe online with its malware domain filtering feature. Secure DNS references a real-time block list (RBL) of harmful websites (i.e. phishing sites, malware sites, spyware sites, excessive advertising sites, etc.) and will warn you whenever you attempt to access a site containing potentially threatening content. Additionally, our 'name cache invalidation' solution signals the Comodo Secure DNS recursive servers whenever a DNS record is updated - fundamentally eliminating the concept of a TTL. Directing your requests through highly secure servers can also reduce your exposure to the DNS Cache Poisoning attacks that may affect everybody else using your ISP.
To start Comodo Secure DNS service the DNS settings of your computer has to be modified to point to our server's IP addresses. Comodo Internet Security automatically modifies the DNS settings of your system during its installation to get the services. You can also modify the DNS settings of your system manually, if you haven't selected the option during installation. You can also revert to the previous settings if you want, at anytime.
Click the following links to get the instructions for manually modifying the DNS settings on your router or on your computer.
• Router• Windows XP• Windows Vista
Router - Manually Enabling or Disabling Comodo Secure DNS ServiceYou can manually enable or disable Comodo Secure DNS service in your Router by modifying the DNS settings accessible through DNS Server settings of your router. Comodo recommends making the change on your router so that with one change, all the computers on your network can benefit from Comodo Secure DNS.
To enable the Comodo Secure DNS service, modify the DNS server IP address settings to Comodo Secure DNS server IP
Comodo Internet Security 2012 User Guide | © 2012 Comodo Security Solutions Inc. | All rights reserved 339

Comodo Internet Security 2012 - User Guide
addresses. The IP address are:
Primary DNS : 8.26.56.26
Secondary DNS : 8.20.247.20
To stop Comodo Secure DNS service• Modify the DNS server IP address to your previous settings.
To modify the DNS settings1. Login to your router. To log in and configure your router, you can open it up in your web browser. If you don't know the
IP address for your router, don't worry, it is typically one of the following:
http://192.168.0.1http://192.168.1.1http://192.168.10.1
If you have forgotten your router's username and/or password, the most common username is "admin" and the password is either blank, "admin", or "password". If none of those work, you can often reset the password to the manufacturer default by pressing a button on the router itself, or in some cases access without a password if you try to access your router quickly after you've cycled the power to it.
2. Find the DNS Server Settings. Look for "DNS" next to a field which allows two or three sets of numbers (these fields may be empty).
3. Select the check box Use these DNS Servers, type the Comodo Secure DNS Server settings as your DNS server settings and click 'Save'/'Apply'.
Primary DNS server address for Comodo Secure DNS is: 8.26.56.26
Secondary DNS server address for Comodo Secure DNS is: 8.20.247.20
When you are done, the above example would look like this.
You can disable Comodo Secure DNS by:
• Deselecting the check box 'Use these DNS servers' address automatically'. This means that you use the DNS server provided by your ISP. This is the option that most home users should choose if they wish to disable the service.
or
• Entering different preferred and alternate DNS server IP addresses.
Comodo Internet Security 2012 User Guide | © 2012 Comodo Security Solutions Inc. | All rights reserved 340

Comodo Internet Security 2012 - User Guide
Windows XP - Manually Enabling or Disabling Comodo Secure DNS ServiceYou can manually enable or disable Comodo Secure DNS service in your Windows XP computer by modifying the DNS settings accessible through Control Panel > Network Connections.
To enable the Comodo Secure DNS service, modify the DNS server IP address settings to Comodo Secure DNS server IP addresses. The IP address are:
Preferred DNS : 8.26.56.26
Alternate DNS : 8.20.247.20
To stop Comodo Secure DNS service• Modify the DNS server IP address to your previous settings.
To modify the DNS settings1. Select the 'Control Panel' from the Start Menu.
2. Click 'Network Connections' from the Control Panel options.
Comodo Internet Security 2012 User Guide | © 2012 Comodo Security Solutions Inc. | All rights reserved 341

Comodo Internet Security 2012 - User Guide
3. Right click on your connection from the Network Connections window and click 'Properties'.
4. Select 'Internet Protocol (TCP/IP)' and click 'Properties'.
Comodo Internet Security 2012 User Guide | © 2012 Comodo Security Solutions Inc. | All rights reserved 342

Comodo Internet Security 2012 - User Guide
5. Click the radio button Use the following DNS server addresses and type in Comodo Secure DNS addresses in the Preferred DNS server and Alternate DNS server fields.
Please note down your current DNS settings before switching to Comodo Secure DNS, in case you want to return to your old settings for any reason.
Preferred DNS server address for Comodo Secure DNS is: 8.26.56.26
Alternate DNS server address for Comodo Secure DNS is: 8.20.247.20
Comodo Internet Security 2012 User Guide | © 2012 Comodo Security Solutions Inc. | All rights reserved 343

Comodo Internet Security 2012 - User Guide
You can disable Comodo Secure DNS by:
• Selecting 'Obtain DNS server address automatically'. This means that you use the DNS server provided by your ISP. This is the option that most home users should choose if they wish to disable the service.
or
• Entering different preferred and alternate DNS server IP addresses.
Comodo Internet Security 2012 User Guide | © 2012 Comodo Security Solutions Inc. | All rights reserved 344

Comodo Internet Security 2012 - User Guide
Windows Vista - Manually Enabling or Disabling Comodo Secure DNS ServiceYou can manually enable or disable Comodo Secure DNS service in your Windows Vista computer by modifying the DNS settings accessible through Control Panel > Network and Internet settings.
To enable the Comodo Secure DNS service, modify the DNS server IP address settings to Comodo Secure DNS server IP addresses. The IP address are:
Preferred DNS : 8.26.56.26
Alternate DNS : 8.20.247.20
To stop Comodo Secure DNS service• Modify the DNS server IP address to your previous settings.
To modify the DNS settings1. Click the 'Start', then select 'Control Panel'.
Comodo Internet Security 2012 User Guide | © 2012 Comodo Security Solutions Inc. | All rights reserved 345

Comodo Internet Security 2012 - User Guide
2. Click on 'View network status and tasks'.
3. Click on 'View Status'.
Comodo Internet Security 2012 User Guide | © 2012 Comodo Security Solutions Inc. | All rights reserved 346

Comodo Internet Security 2012 - User Guide
4. Click the 'Properties' button.
Comodo Internet Security 2012 User Guide | © 2012 Comodo Security Solutions Inc. | All rights reserved 347

Comodo Internet Security 2012 - User Guide
5. Vista may ask for your permission to make changes. If so, click the 'Continue' button.
6. Select 'Internet Protocol Version 4 (TCP/IPv4)', then click the 'Properties' button.
Comodo Internet Security 2012 User Guide | © 2012 Comodo Security Solutions Inc. | All rights reserved 348

Comodo Internet Security 2012 - User Guide
7. Click the radio button 'Use the following DNS server addresses' and type in Comodo Secure DNS addresses in the Preferred DNS server and Alternate DNS server fields.Please note down your current DNS settings before switching to Comodo Secure DNS, in case you want to return to your old settings for any reason.
Preferred DNS server address for Comodo Secure DNS is: 8.26.56.26
Alternate DNS server address for Comodo Secure DNS is: 8.20.247.20
Comodo Internet Security 2012 User Guide | © 2012 Comodo Security Solutions Inc. | All rights reserved 349

Comodo Internet Security 2012 - User Guide
You can disable Comodo Secure DNS by:
• Selecting 'Obtain DNS server address automatically'. This means that you use the DNS server provided by your ISP. This is the option that most home users should choose if they wish to disable the service.
or
• Entering different preferred and alternate DNS server IP addresses.
Comodo Internet Security 2012 User Guide | © 2012 Comodo Security Solutions Inc. | All rights reserved 350

Comodo Internet Security 2012 - User Guide
Comodo Internet Security 2012 User Guide | © 2012 Comodo Security Solutions Inc. | All rights reserved 351

Comodo Internet Security 2012 - User Guide
Appendix 3 CIS Versions
Product
Includes
Price*Antivirus Firewall GeekBuddy TrustConnect Online
Storage
Protection PlanVirus Free Guarantee
(VFG)/Identity
Protection (IDP)
Virus Removal Service
CIS Premium Version 5.x Free
CIS Pro 2012
$49.99/year or $4.95/month
CIS Complete 2012
(10 GB)
(10 GB)
$69.99/year or $6.95/month
CIS Plus 2012
$39.99 or $3.95/month
CIS Plus 2012 - International Edition
(10 GB) $19.99/year
CAV Free Free
CAV Advanced 2012 - 30 Day Trial
l Free for one
month
Comodo Firewall Free
* Most CIS products also have discounts for multi-year purchases
Comodo Internet Security 2012 User Guide | © 2012 Comodo Security Solutions Inc. | All rights reserved 352

Comodo Internet Security 2012 - User Guide
About ComodoThe Comodo companies are leading global providers of Security, Identity and Trust Assurance services on the Internet. Comodo CA offers a comprehensive array of PKI Digital Certificates and Management Services, Identity and Content Authentication (Two-Factor - Multi-Factor) software, and Network Vulnerability Scanning and PCI compliance solutions. In addition, with over 10,000,000 installations of its threat prevention products, Comodo Security Solutions maintains an extensive suite of endpoint security software and services for businesses and consumers.
Continual innovation, a core competence in PKI and a commitment to reversing the growth of Internet-crime distinguish the Comodo companies as vital players in the Internet's ongoing development. Comodo, with offices in the US, UK, China, India, Romania and the Ukraine, secures and authenticates the online transactions and communications for over 200,000 business customers and millions of consumers, providing the intelligent security, authentication and assurance services necessary for trust in on-line transactions.
Comodo Security Solutions, Inc. Comodo CA Limited
525 Washington Blvd. Jersey City,
NJ 07310
United States
Tel: +1.888.256.2608
Tel: +1.703.637.9361
Email: [email protected]
3rd Floor, 26 Office Village, Exchange Quay, Trafford Road, Salford, Greater Manchester M5 3EQ,
United Kingdom.
Tel : +44 (0) 161 874 7070
Fax : +44 (0) 161 877 1767
For additional information on Comodo - visit http://www.comodo.com.
Comodo Internet Security 2012 User Guide | © 2012 Comodo Security Solutions Inc. | All rights reserved 353