Community Seed Saving Training Manual
70
Training Tools for Pacific Island Communities COMMUNITY SEED SAVING Solomon Islands Kastom Gaden Association + Planting Material Network COMMUNITY SEED SAVING Emma Stone
-
Upload
terracircle -
Category
Documents
-
view
228 -
download
6
description
Written by Emma Stone who spent periods working with the Solomon Islands Planting Materials Network, a farmer’s seed saving and plant propagation network, to improve the operation of the Network.
Transcript of Community Seed Saving Training Manual
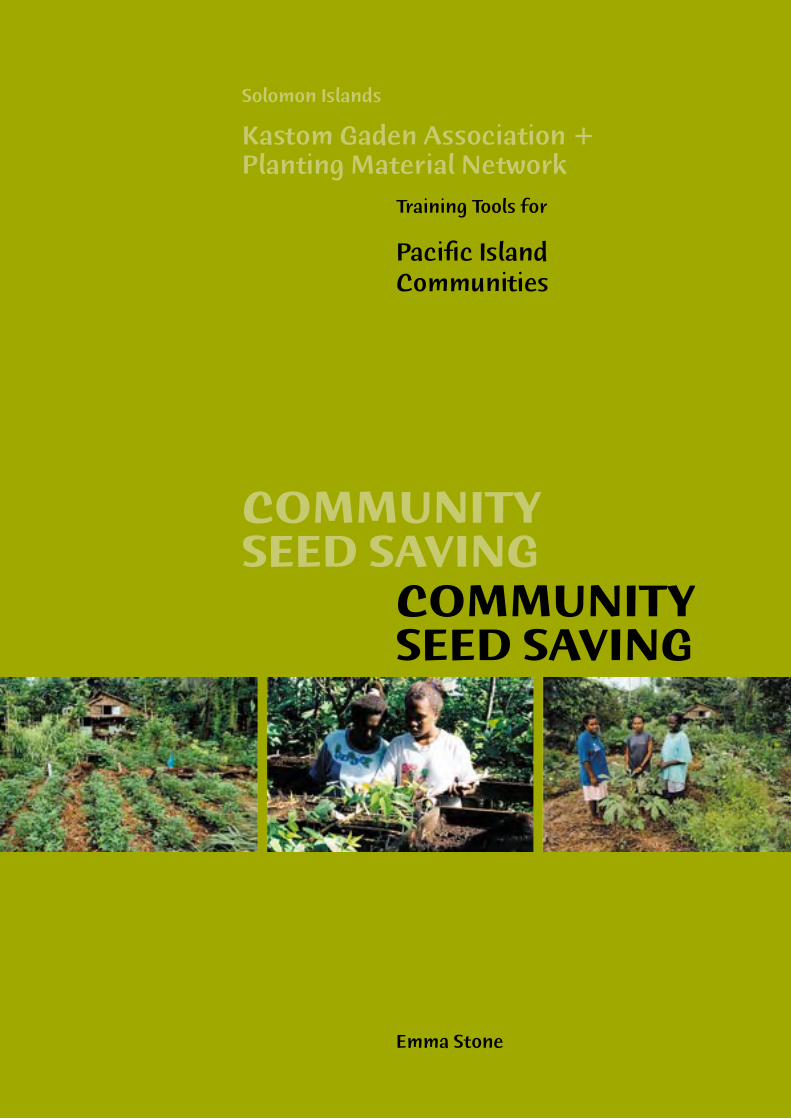
Training Tools for Pacific Island Communities
COMMUNITY SEED SAVING
Solomon Islands
Kastom Gaden Association + Planting Material Network
COMMUNITY SEED SAVING
Emma Stone

7COMMUNITY SEED SAVING—A SOUTH PACIFIC TRAINERS MANUAL

Training Tools for Pacific Island Communities
Community Seed Saving
Emma Stone 2002
2 Community SEEd Saving—a South PaCifiC trainErS manual
Community Seed Saving© 2002 Kastom Gaden Association
Published by Kastom Gaden Association in association with the Solomon Islands Planting Material Network, 2002.
Development aid agencies working to improve food security may copy part of the content of the Community Seed Saving manual with the permission of the Kastom Gaden Association.
Applications for such permission, with a statement of the purpose and extent of reproduction, should be addressed to the Kastom Gaden Association, PO Box 742, Honiara, Solomon Islands.
Although the authors and publisher of Community Seed Saving have taken care to include information which has been tested in the field, no responsibility can be accepted for the consequences of applying any of the information in the manual.
The PMN/KGA acknowledges:
• thesupportoftheAustralianAgencyfor International Development (AusAID) in funding the production stage of the Community Seed Saving manual
• thesupportontheEuropeanUnionMicro Projects Program in funding the printing of the Community Seed Saving manual.
�� � �
���
����
�
3Community SEEd Saving—a South PaCifiC trainErS manual
Acknowledgements
AuthorEmma Stone Seed Savers’ Network (Australia) trainer with the Solomon
Islands Planting Material Network, 1998
Solomon Islands Planting Material Network trainer, Australian Youth Ambassador scheme, 1999
Editors:Tony Jansen Kastom Garden Programme (KGP)/Kastom Gaden
Association manager, Solomon Islands
Russ Grayson PacificEdgeMedia (ex-KGP project manager, Sydney, Australia)
GraphicsIllustrator Stephen Amasi, Solomon Islands
Photography Russ Grayson, Tony Jansen
Design & productionPacific Edge Media PO Box 446, Kogarah NSW Australia 2217
4 Community SEEd Saving—a South PaCifiC trainErS manual
ContributorsThe instructional material in Community Seed SavingwaswrittenbyEmmaStone.
The manual contains input from a number of other people including:
Tony Jansen (Kastom Gaden Association)
Roselyn Kabu (Kastom Gaden Association)
Mary Timothy (Kastom Gaden Association)
FionaCampbell(PacificEdgeMedia)
RussGrayson(PacificEdgeMedia).
Biographical note— Emma StoneEmmaStone,theauthoroftheCommunity Seed Saving manual, is a resident of northern NSW where she works in seed saving, land rehabilitation and garden design and construction.
After training with Australia’s Seed Savers’ Network,Emmaspenttwoperiods—in1998and1999—trainingseedcuratorsfromtheSolomon Islands Planting Material Network and working with rural communities in seed saving and food production in the Solomon Islands.
5Community SEEd Saving—a South PaCifiC trainErS manual
Contents
Preface.....................................................................................................................7
Introduction ...........................................................................................................9
A tool for community seed centres ...............................................................15
Making a garden ................................................................................................ 23• Makeyourgarden ...................................................................................................................25• Improvingsoilfertility .............................................................................................................26• Integratedpestmanagement ..................................................................................................29• Pollination ................................................................................................................................31
The seed saving process ...................................................................................33• Seedharvestingguidelines .....................................................................................................35• Cleaningseed ..........................................................................................................................39• Dryingseed .............................................................................................................................41• Theseedtransferprocess .......................................................................................................45• Testingseedforviability .........................................................................................................47• Packagingseed ........................................................................................................................55• Seedstorageinthetropics .....................................................................................................57
Community plant register ................................................................................61
Contacts and references ................................................................................................65

7Community SEEd Saving—a South PaCifiC trainErS manual
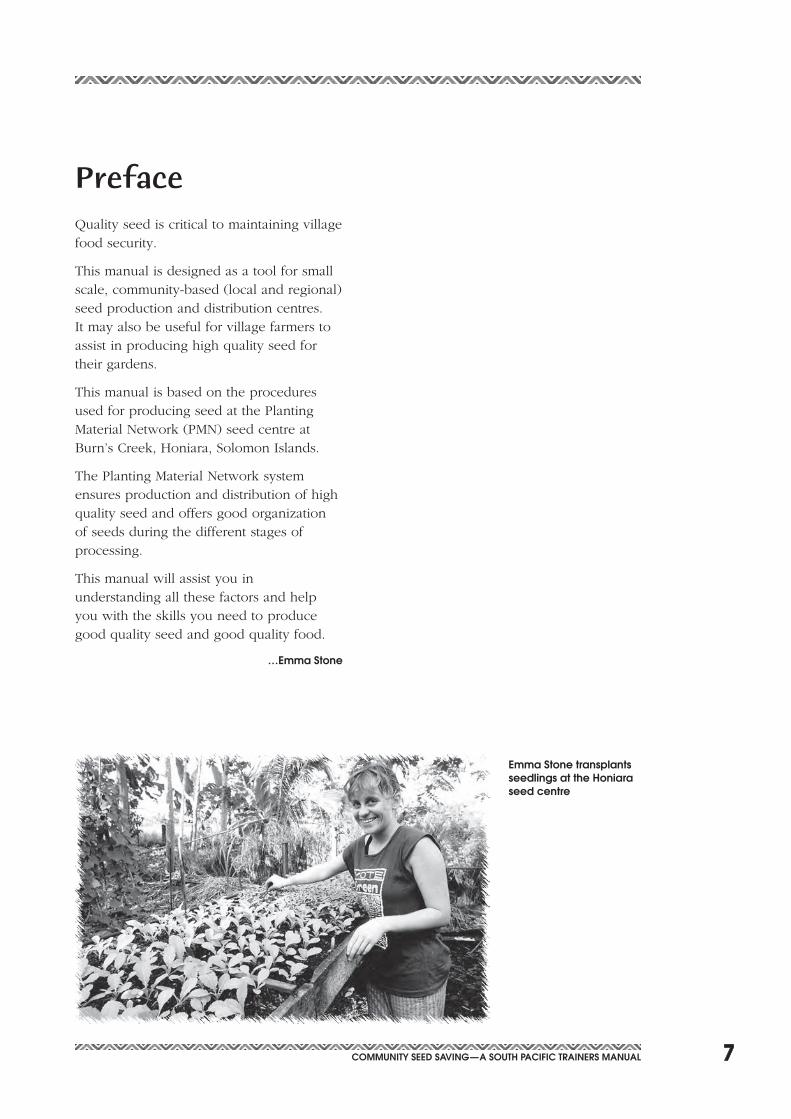
PrefaceQuality seed is critical to maintaining village food security.
This manual is designed as a tool for small scale, community-based (local and regional) seed production and distribution centres. It may also be useful for village farmers to assist in producing high quality seed for their gardens.
This manual is based on the procedures used for producing seed at the Planting Material Network (PMN) seed centre at Burn’s Creek, Honiara, Solomon Islands.
The Planting Material Network system ensures production and distribution of high quality seed and offers good organization of seeds during the different stages of processing.
This manual will assist you in understanding all these factors and help you with the skills you need to produce good quality seed and good quality food.
…Emma Stone
Emma Stone transplants seedlings at the honiara seed centre


11Community SEEd Saving—a South PaCifiC trainErS manual
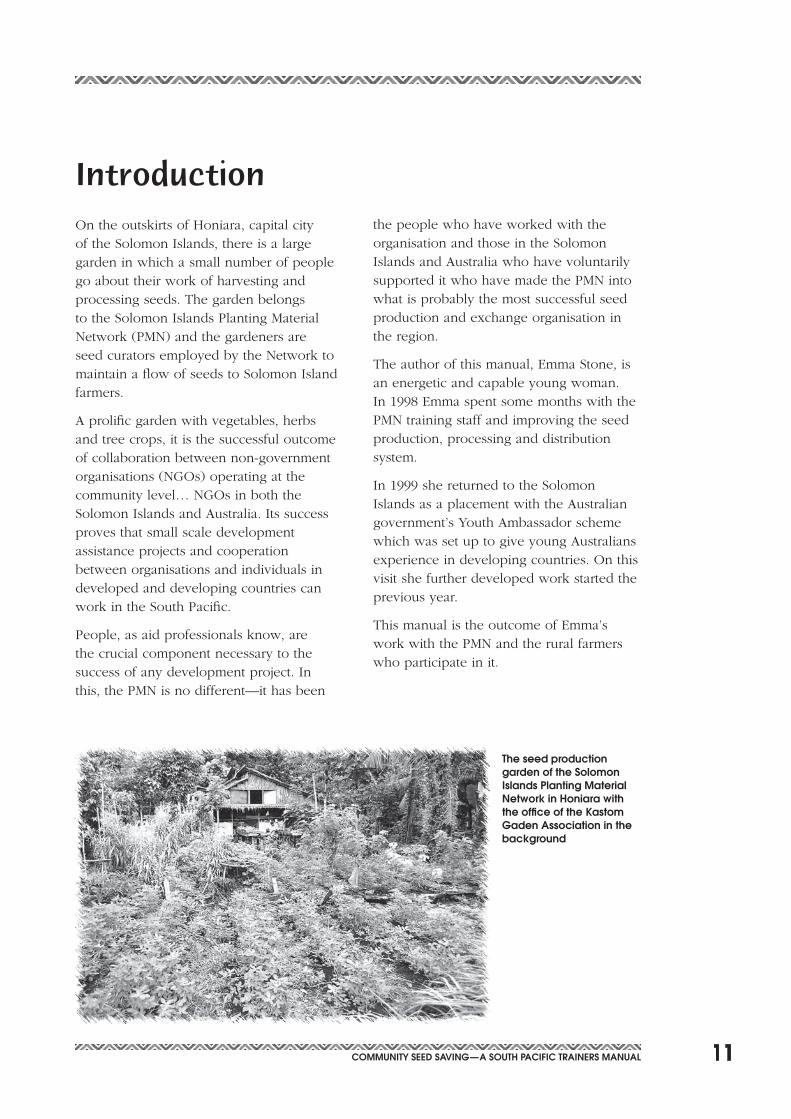
On the outskirts of Honiara, capital city of the Solomon Islands, there is a large garden in which a small number of people go about their work of harvesting and processing seeds. The garden belongs to the Solomon Islands Planting Material Network (PMN) and the gardeners are seed curators employed by the Network to maintain a flow of seeds to Solomon Island farmers.
A prolific garden with vegetables, herbs and tree crops, it is the successful outcome of collaboration between non-government organisations (NGOs) operating at the community level… NGOs in both the Solomon Islands and Australia. Its success proves that small scale development assistance projects and cooperation between organisations and individuals in developed and developing countries can work in the South Pacific.
People, as aid professionals know, are the crucial component necessary to the success of any development project. In this,thePMNisnodifferent—ithasbeen
the people who have worked with the organisation and those in the Solomon Islands and Australia who have voluntarily supported it who have made the PMN into what is probably the most successful seed production and exchange organisation in the region.
Theauthorofthismanual,EmmaStone,isan energetic and capable young woman. In1998EmmaspentsomemonthswiththePMN training staff and improving the seed production, processing and distribution system.
In 1999 she returned to the Solomon Islands as a placement with the Australian government’s Youth Ambassador scheme which was set up to give young Australians experience in developing countries. On this visit she further developed work started the previous year.
ThismanualistheoutcomeofEmma’swork with the PMN and the rural farmers who participate in it.
Introduction
the seed production garden of the Solomon islands Planting material network in honiara with the office of the Kastom gaden association in the background
12 Community SEEd Saving—a South PaCifiC trainErS manual
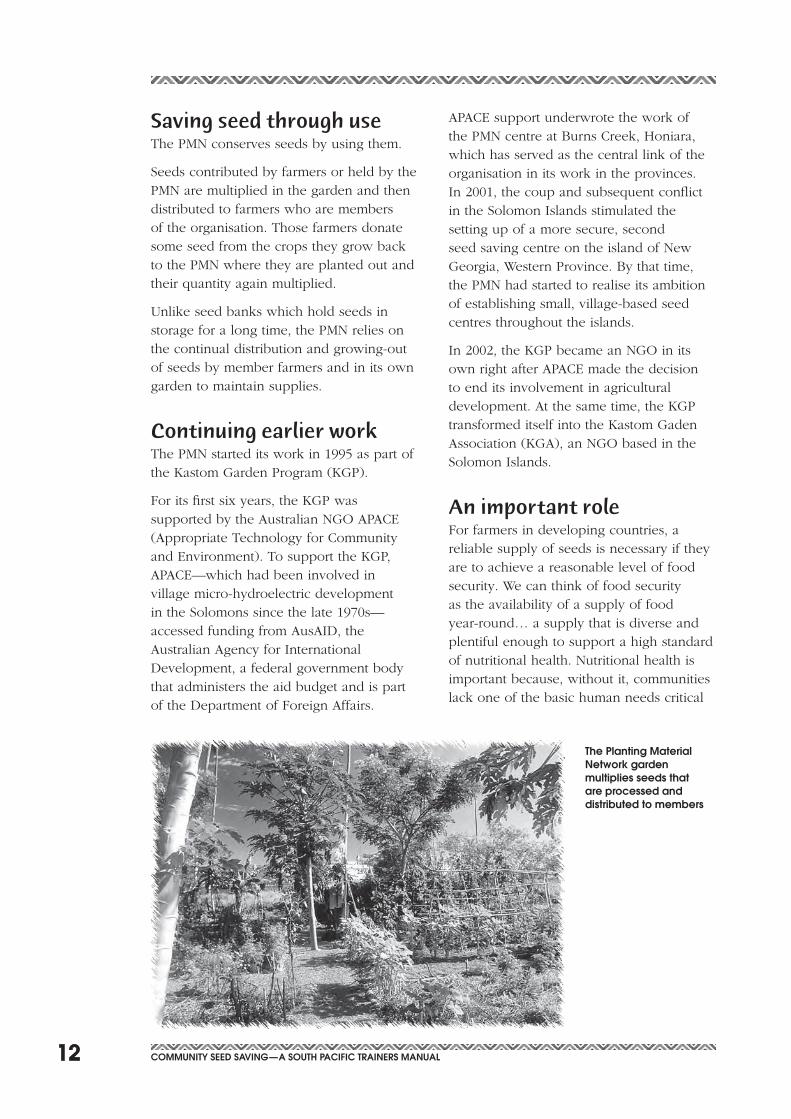
Saving seed through useThe PMN conserves seeds by using them.
Seeds contributed by farmers or held by the PMN are multiplied in the garden and then distributed to farmers who are members of the organisation. Those farmers donate some seed from the crops they grow back to the PMN where they are planted out and their quantity again multiplied.
Unlikeseedbankswhichholdseedsinstorage for a long time, the PMN relies on the continual distribution and growing-out of seeds by member farmers and in its own garden to maintain supplies.
Continuing earlier workThe PMN started its work in 1995 as part of the Kastom Garden Program (KGP).
For its first six years, the KGP was supportedbytheAustralianNGOAPACE(Appropriate Technology for Community andEnvironment).TosupporttheKGP,APACE—whichhadbeeninvolvedinvillage micro-hydroelectric development intheSolomonssincethelate1970s—accessed funding from AusAID, the Australian Agency for International Development, a federal government body that administers the aid budget and is part of the Department of Foreign Affairs.
APACEsupportunderwrotetheworkofthe PMN centre at Burns Creek, Honiara, which has served as the central link of the organisation in its work in the provinces. In 2001, the coup and subsequent conflict in the Solomon Islands stimulated the setting up of a more secure, second seed saving centre on the island of New Georgia, Western Province. By that time, the PMN had started to realise its ambition of establishing small, village-based seed centres throughout the islands.
In 2002, the KGP became an NGO in its ownrightafterAPACEmadethedecisionto end its involvement in agricultural development. At the same time, the KGP transformed itself into the Kastom Gaden Association (KGA), an NGO based in the Solomon Islands.
An important roleFor farmers in developing countries, a reliable supply of seeds is necessary if they are to achieve a reasonable level of food security. We can think of food security as the availability of a supply of food year-round… a supply that is diverse and plentiful enough to support a high standard of nutritional health. Nutritional health is important because, without it, communities lack one of the basic human needs critical
the Planting material network garden multiplies seeds that are processed and distributed to members
13Community SEEd Saving—a South PaCifiC trainErS manual
to any further development they might choose to take.
The availability of non-hybrid seed (seed that can be saved and planted to produce future crops) is also important in the approach to agricultural development used by the KGA. This approach is known as LowExternalInputSustainableAgriculture(LEISA).Itisusedbydevelopmentagencies and farming communities in many developing countries because it makes use of techniques and processes that are accessible to farmers who lack access to capital and credit.
Unlikewealthierfarmersindevelopingand in developed countries, financially-poor farmers cannot afford the so-called ‘improved’ seeds supplied by the big seed corporationsandthefarminginputs—suchasfertiliser,pesticideandherbicide—whichare necessary to successfully grow these seeds. Complicating their predicament is the fact that poor farmers frequently cultivate marginal, low quality land unsuited to the type of farm mechanisation and irrigation that large scale commercial farmers make use of. In many cases, the world’s marginal farmersproducefirstforsubsistence—consumptionbythefamily—andonlythen do they grow a surplus to sell at local markets. The availability of a local or regional supply of seeds is obviously crucial to such farmers.
A further benefit of using local varieties of non-hybrid seed is that the varieties can be conserved. Already adapted to local conditions of climate and soils, they remain available to farmers in the future who can continue to use them as food and for plant breeding.
One of the purposes of establishing seed saving and exchange networks is to improve both local and regional self-reliance in the supply of seeds. This is very important in countries where natural disaster, war or internal conflict could disrupt the availability of food and where agricultural production may have to be quickly boosted to cope with refugee movement or economic crisis.
visitors inspect the Solomon islands Planting material network garden
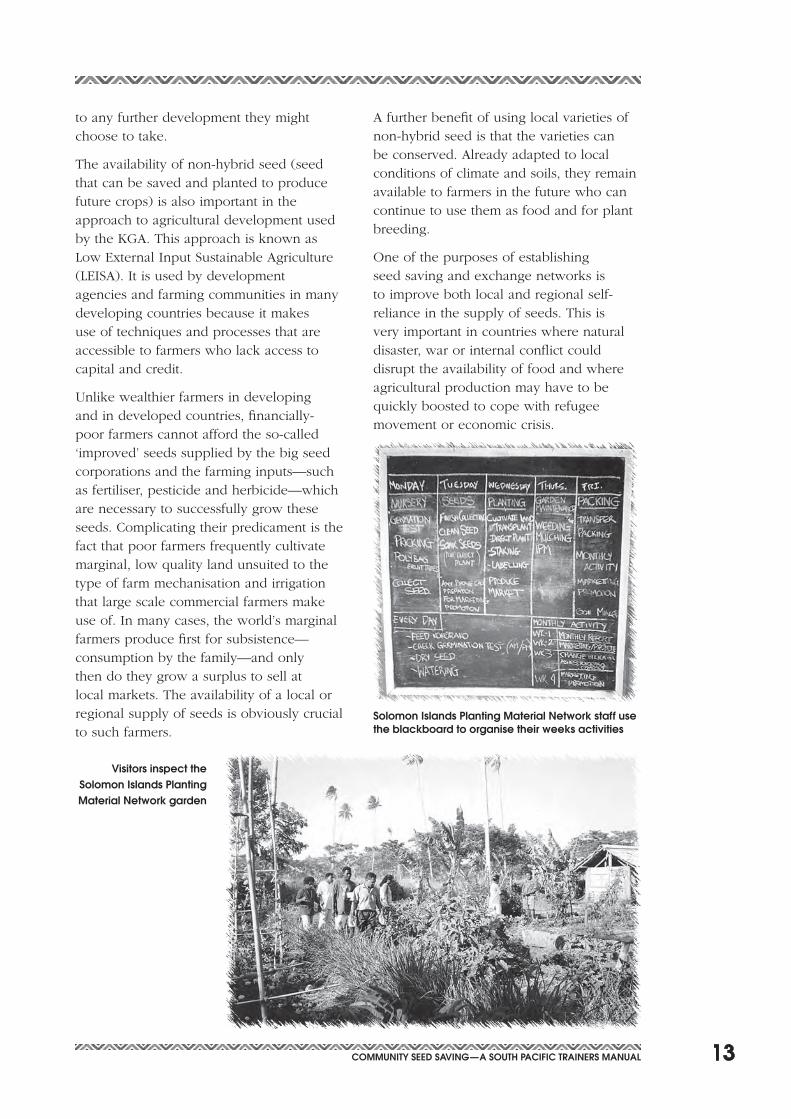
Solomon islands Planting material network staff use the blackboard to organise their weeks activities
14 Community SEEd Saving—a South PaCifiC trainErS manual
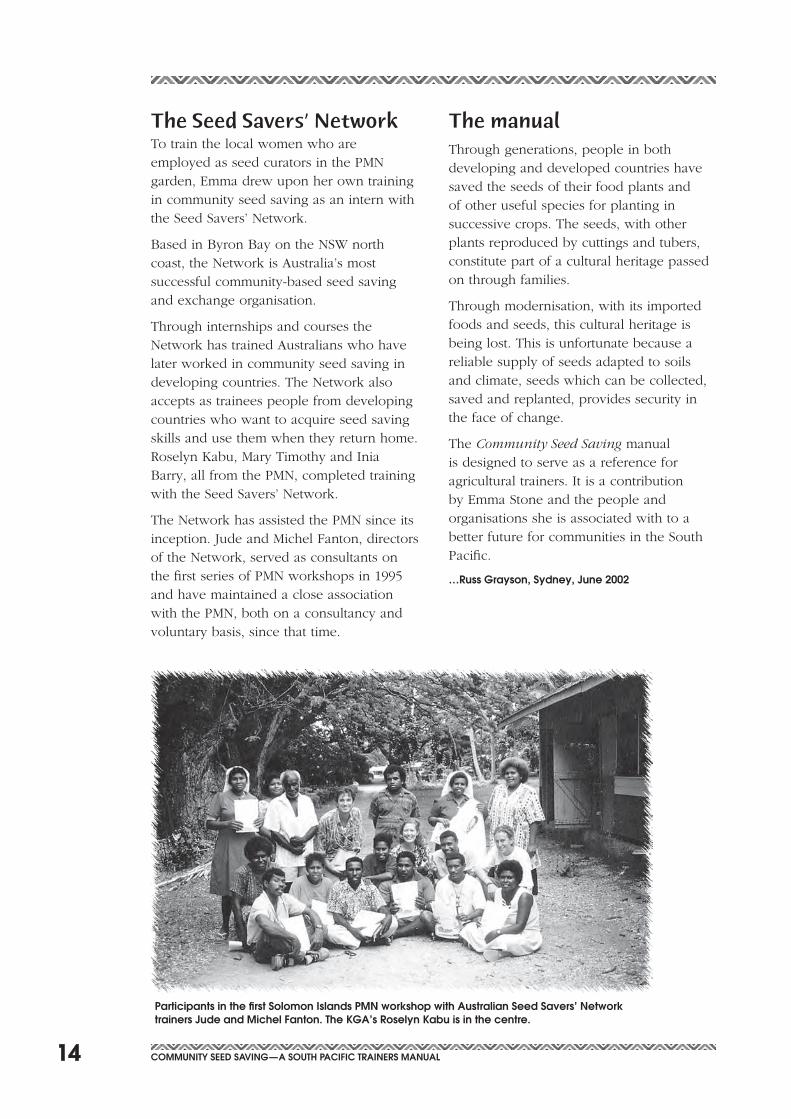
The Seed Savers’ NetworkTo train the local women who are employed as seed curators in the PMN garden,Emmadrewuponherowntrainingin community seed saving as an intern with the Seed Savers’ Network.
Based in Byron Bay on the NSW north coast, the Network is Australia’s most successful community-based seed saving and exchange organisation.
Through internships and courses the Network has trained Australians who have later worked in community seed saving in developing countries. The Network also accepts as trainees people from developing countries who want to acquire seed saving skills and use them when they return home. Roselyn Kabu, Mary Timothy and Inia Barry, all from the PMN, completed training with the Seed Savers’ Network.
The Network has assisted the PMN since its inception. Jude and Michel Fanton, directors of the Network, served as consultants on the first series of PMN workshops in 1995 and have maintained a close association with the PMN, both on a consultancy and voluntary basis, since that time.
The manualThrough generations, people in both developing and developed countries have saved the seeds of their food plants and of other useful species for planting in successive crops. The seeds, with other plants reproduced by cuttings and tubers, constitute part of a cultural heritage passed on through families.
Through modernisation, with its imported foods and seeds, this cultural heritage is being lost. This is unfortunate because a reliable supply of seeds adapted to soils and climate, seeds which can be collected, saved and replanted, provides security in the face of change.
The Community Seed Saving manual is designed to serve as a reference for agricultural trainers. It is a contribution byEmmaStoneandthepeopleandorganisations she is associated with to a better future for communities in the South Pacific.
…russ grayson, Sydney, June 2002
Participants in the first Solomon islands Pmn workshop with australian Seed Savers’ network trainers Jude and michel fanton. the Kga’s roselyn Kabu is in the centre.
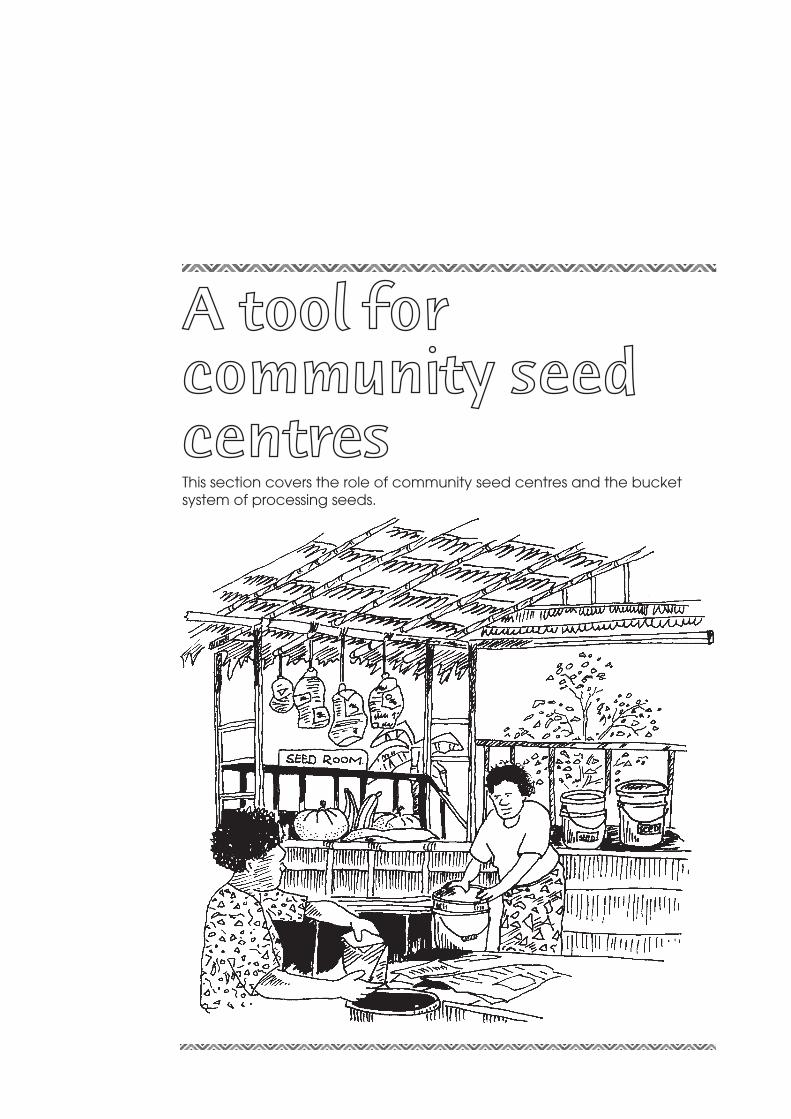
This section covers the role of community seed centres and the bucket system of processing seeds.

17Community SEEd Saving—a South PaCifiC trainErS manual
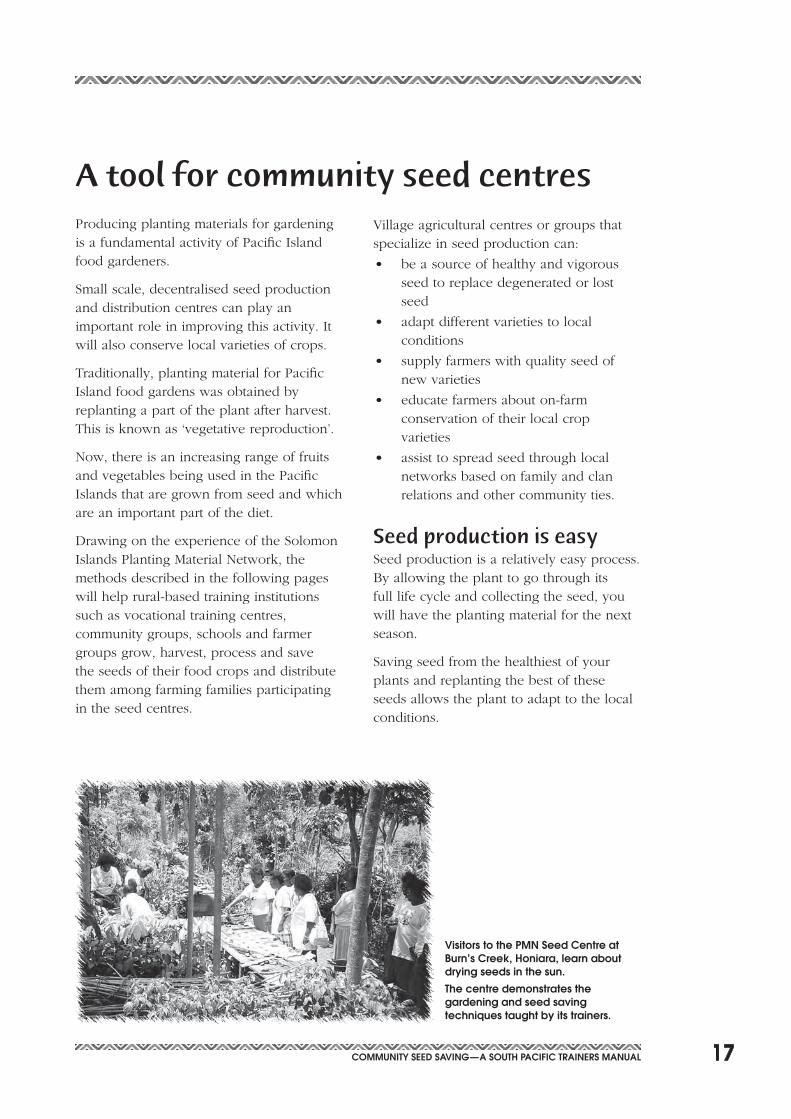
Producing planting materials for gardening is a fundamental activity of Pacific Island food gardeners.
Small scale, decentralised seed production and distribution centres can play an important role in improving this activity. It will also conserve local varieties of crops.
Traditionally, planting material for Pacific Island food gardens was obtained by replanting a part of the plant after harvest. This is known as ‘vegetative reproduction’.
Now, there is an increasing range of fruits and vegetables being used in the Pacific Islands that are grown from seed and which are an important part of the diet.
Drawing on the experience of the Solomon Islands Planting Material Network, the methods described in the following pages will help rural-based training institutions such as vocational training centres, community groups, schools and farmer groups grow, harvest, process and save the seeds of their food crops and distribute them among farming families participating in the seed centres.
Village agricultural centres or groups that specialize in seed production can:
• beasourceofhealthyandvigorousseed to replace degenerated or lost seed
• adaptdifferentvarietiestolocalconditions
• supplyfarmerswithqualityseedofnew varieties
• educatefarmersabouton-farmconservation of their local crop varieties
• assisttospreadseedthroughlocalnetworks based on family and clan relations and other community ties.
Seed production is easySeed production is a relatively easy process. By allowing the plant to go through its full life cycle and collecting the seed, you will have the planting material for the next season.
Saving seed from the healthiest of your plants and replanting the best of these seeds allows the plant to adapt to the local conditions.
A tool for community seed centres
visitors to the Pmn Seed Centre at Burn’s Creek, honiara, learn about drying seeds in the sun.
the centre demonstrates the gardening and seed saving techniques taught by its trainers.
18 Community SEEd Saving—a South PaCifiC trainErS manual
By collecting the seed of the best plants you slowly improve the suitability and quality of this plant variety each time it is selected and regrown.
Things to think aboutThere are some things we should consider to keep our varieties of plant pure and healthy and able to reproduce the same quality of seed.
These factors include:
• collectionandcleaningtechniquesthatvary from plant to plant
• adequatedryingandstorageoftheseed to keep it viable until planting
• awarenessofcrosspollinationtokeepa variety pure.
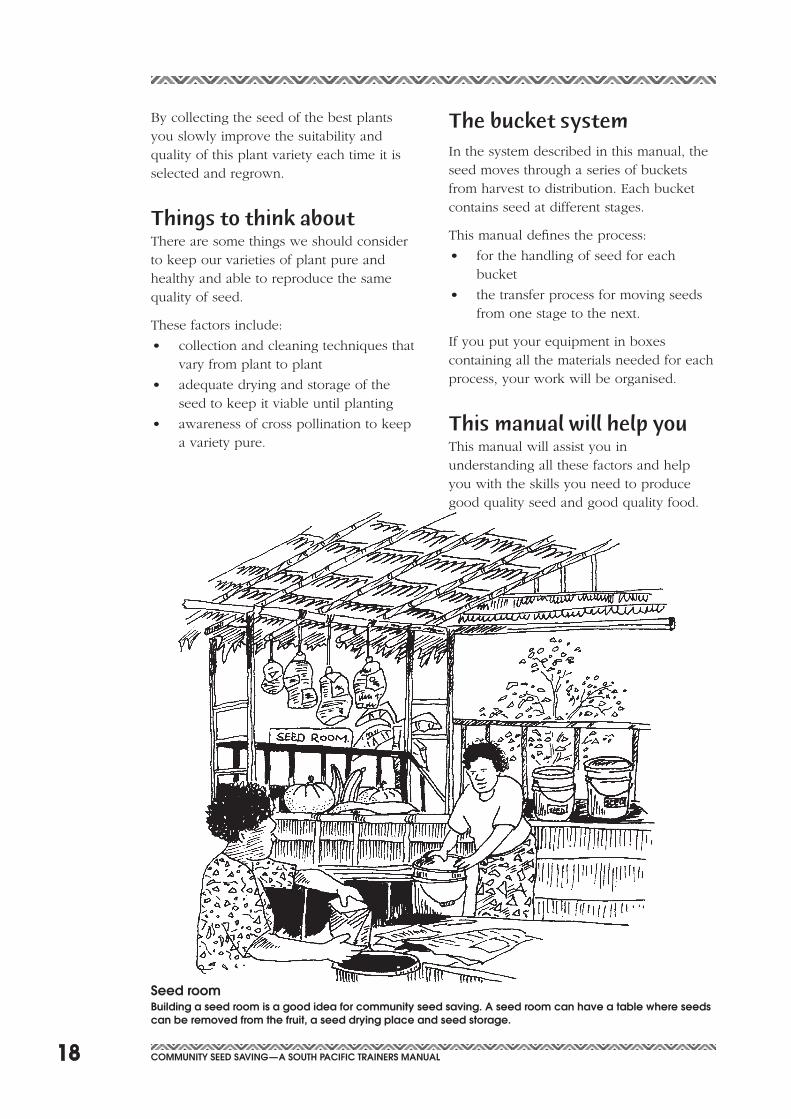
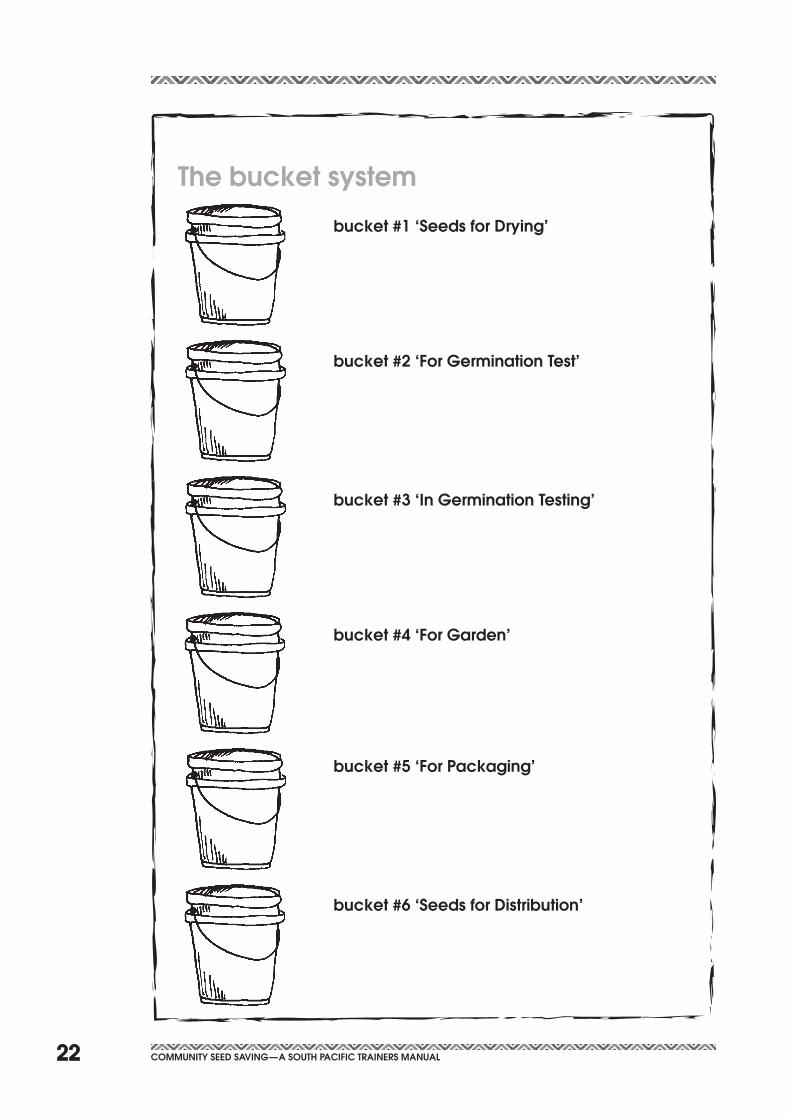
The bucket systemIn the system described in this manual, the seed moves through a series of buckets fromharvesttodistribution.Eachbucketcontains seed at different stages.
This manual defines the process:
• forthehandlingofseedforeachbucket
• thetransferprocessformovingseedsfrom one stage to the next.
If you put your equipment in boxes containing all the materials needed for each process, your work will be organised.
This manual will help youThis manual will assist you in understanding all these factors and help you with the skills you need to produce good quality seed and good quality food.
Seed roomBuilding a seed room is a good idea for community seed saving. a seed room can have a table where seeds can be removed from the fruit, a seed drying place and seed storage.
19Community SEEd Saving—a South PaCifiC trainErS manual
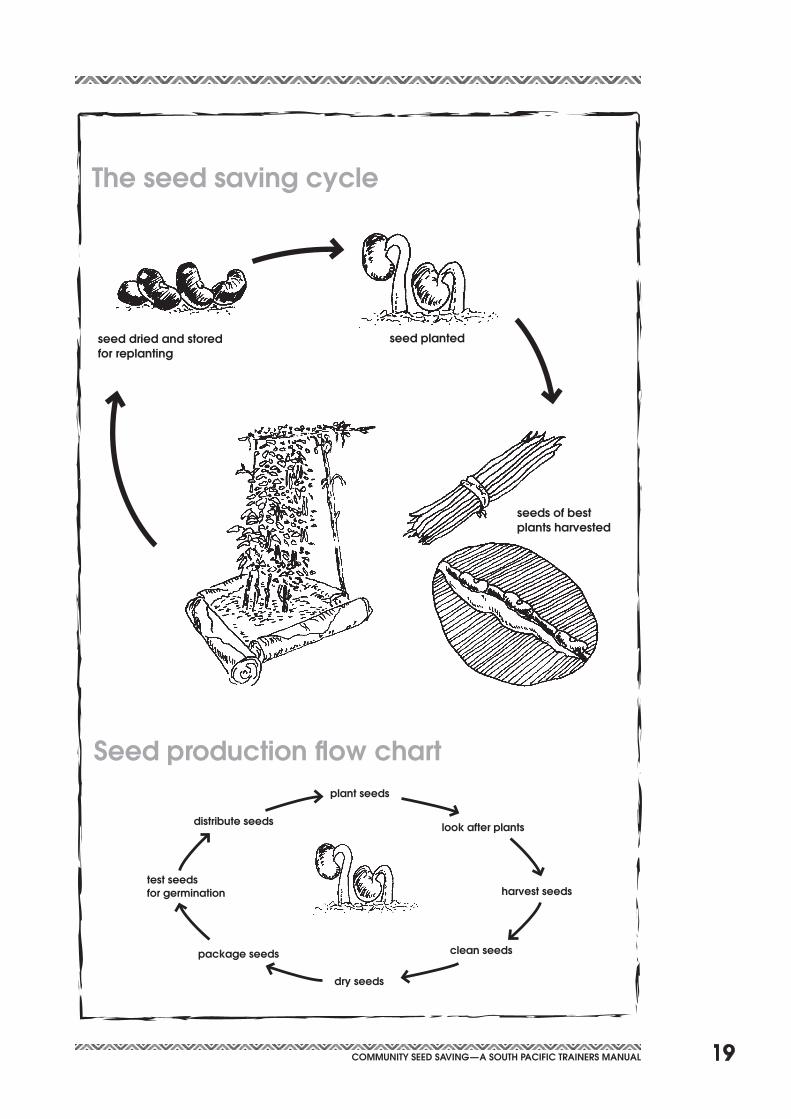
the seed saving cycle
seed planted
seeds of best plants harvested
seed dried and stored for replanting
Seed production flow chart
look after plants
plant seeds
test seeds for germination
distribute seeds
harvest seeds
clean seeds
dry seeds
package seeds
20 Community SEEd Saving—a South PaCifiC trainErS manual
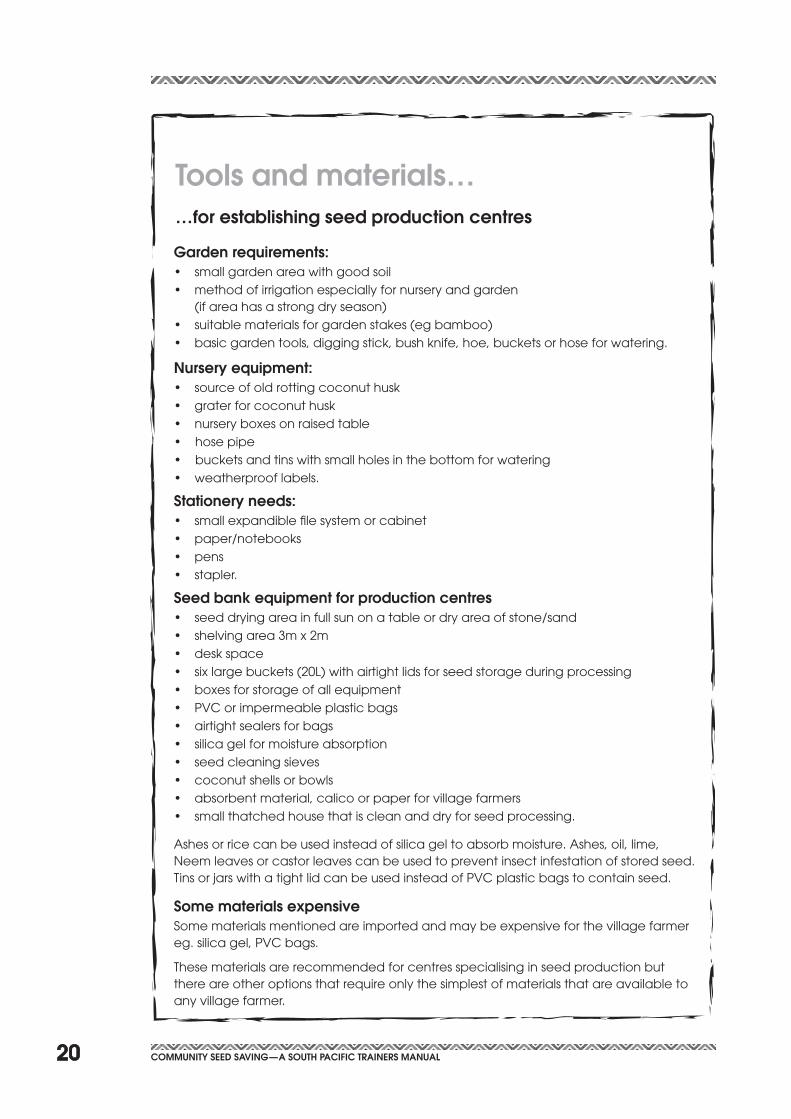
tools and materials……for establishing seed production centres
garden requirements:• smallgardenareawithgoodsoil• methodofirrigationespeciallyfornurseryandgarden
(if area has a strong dry season)• suitablematerialsforgardenstakes(egbamboo)• basicgardentools,diggingstick,bushknife,hoe,bucketsorhoseforwatering.
nursery equipment:• sourceofoldrottingcoconuthusk• graterforcoconuthusk• nurseryboxesonraisedtable•hosepipe•bucketsandtinswithsmallholesinthebottomforwatering• weatherprooflabels.
Stationery needs:• smallexpandiblefilesystemorcabinet• paper/notebooks• pens• stapler.
Seed bank equipment for production centres• seeddryingareainfullsunonatableordryareaofstone/sand• shelvingarea3mx2m• deskspace• sixlargebuckets(20L)withairtightlidsforseedstorageduringprocessing• boxesforstorageofallequipment• PVCorimpermeableplasticbags• airtightsealersforbags• silicagelformoistureabsorption• seedcleaningsieves• coconutshellsorbowls• absorbentmaterial,calicoorpaperforvillagefarmers• smallthatchedhousethatiscleananddryforseedprocessing.
Ashesorricecanbeusedinsteadofsilicageltoabsorbmoisture.Ashes,oil,lime,Neem leaves or castor leaves can be used to prevent insect infestation of stored seed. TinsorjarswithatightlidcanbeusedinsteadofPVCplasticbagstocontainseed.
Some materials expensiveSomematerialsmentionedareimportedandmaybeexpensiveforthevillagefarmereg.silicagel,PVCbags.
These materials are recommended for centres specialising in seed production but thereareotheroptionsthatrequireonlythesimplestofmaterialsthatareavailabletoany village farmer.
21Community SEEd Saving—a South PaCifiC trainErS manual
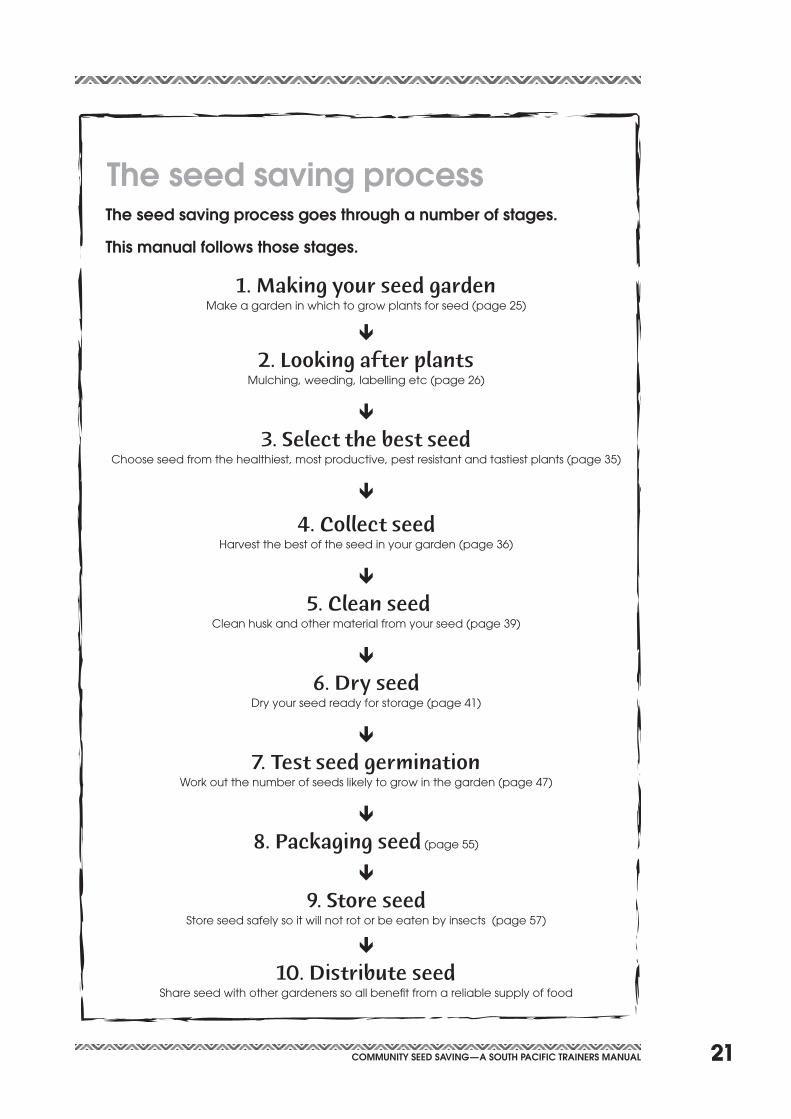
the seed saving processthe seed saving process goes through a number of stages.
this manual follows those stages.
1. Making your seed gardenMakeagardeninwhichtogrowplantsforseed(page25)
ê
2. Looking after plantsMulching,weeding,labellingetc(page26)
ê
3. Select the best seedChooseseedfromthehealthiest,mostproductive,pestresistantandtastiestplants(page35)
ê
4. Collect seedHarvestthebestoftheseedinyourgarden(page36)
ê
5. Clean seedCleanhuskandothermaterialfromyourseed(page39)
ê
6. Dry seedDry your seed ready for storage (page 41)
ê
7. Test seed germinationWorkoutthenumberofseedslikelytogrowinthegarden(page47)
ê
8. Packaging seed(page55)
ê
9. Store seedStoreseedsafelysoitwillnotrotorbeeatenbyinsects(page57)
ê
10. Distribute seedShareseedwithothergardenerssoallbenefitfromareliablesupplyoffood
22 Community SEEd Saving—a South PaCifiC trainErS manual
the bucket system
bucket #1 ‘Seeds for drying’
bucket #2 ‘for germination test’
bucket #3 ‘in germination testing’
bucket #4 ‘for garden’
bucket #5 ‘for Packaging’
bucket #6 ‘Seeds for distribution’
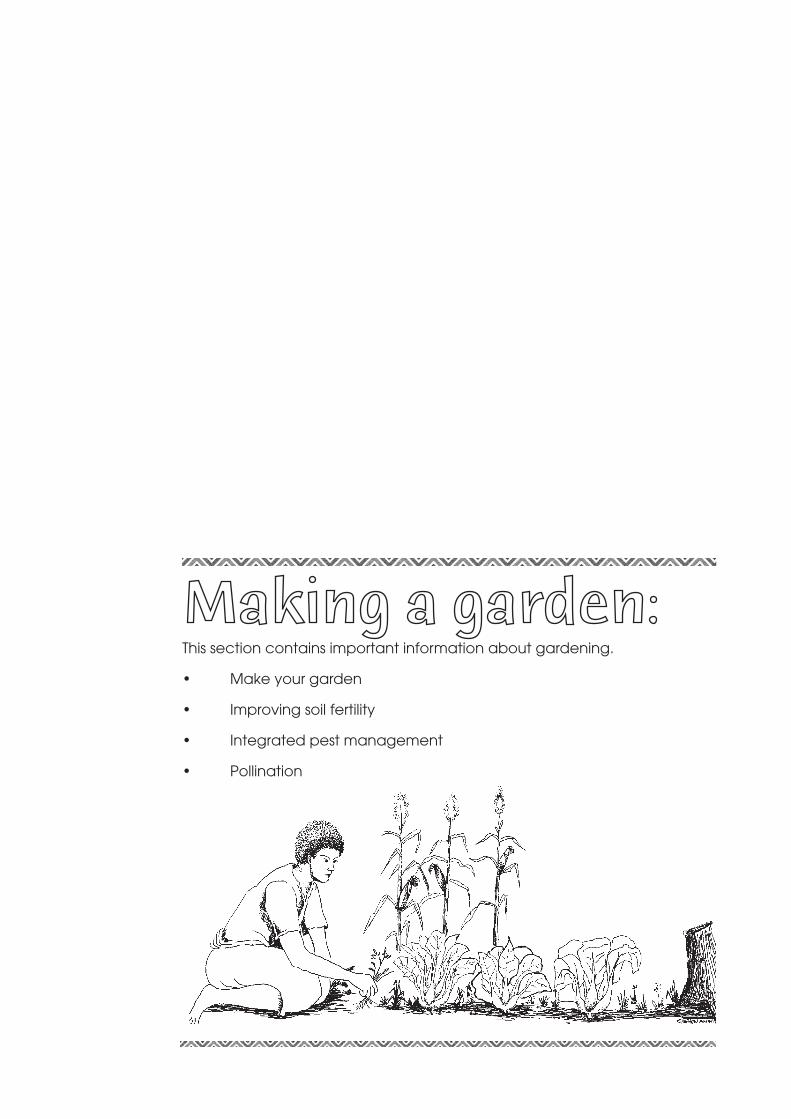
This section contains important information about gardening.
• Makeyourgarden
• Improvingsoilfertility
• Integratedpestmanagement
• Pollination


25Community SEEd Saving—a South PaCifiC trainErS manual
Choose an area with good sun close to the seed processing house.
Make a fenceIt is a good idea to have a fence around the garden to keep out animals.
You can plant a living fence with pineapples or other dense or spiky plants.
One of the best living fence plants is vetiver grass. If planted closely it will form dense clumps and stop anything from entering the garden.
Some people in the Solomon Islands have used other materials such as fishing net and old pieces of corrugated iron. This works very well if these materials are available.
Make as table gardenYou can also make a table garden.
This is made on raised timber boards with a low wall around the outside. The box needs to be at least 15cm deep.
The box is filled with rotten coconut husks with a layer of soil on top. This works well for Chinese cabbage, peppers, even tomato and beans.
Placing your plantsTo use maximum space in the sup sup garden:
• beansandsnakebeancanbegrownon sticks or bamboo
• eggplantcanbegrownintheshadeofother plants
• pawpawscanbeplantedaroundtheboundary of your garden.
Make your garden
table gardenthe table garden lifts vegetables above the reach of chickens, dogs and pigs.
living fence of vetiver grassvetiver grass is a stiff clumping grass which is planted close together to make a living fence.
the vetiver grass should be planted first and left to grow tall before
planting any seedlings. this will take about six months.
26 Community SEEd Saving—a South PaCifiC trainErS manual
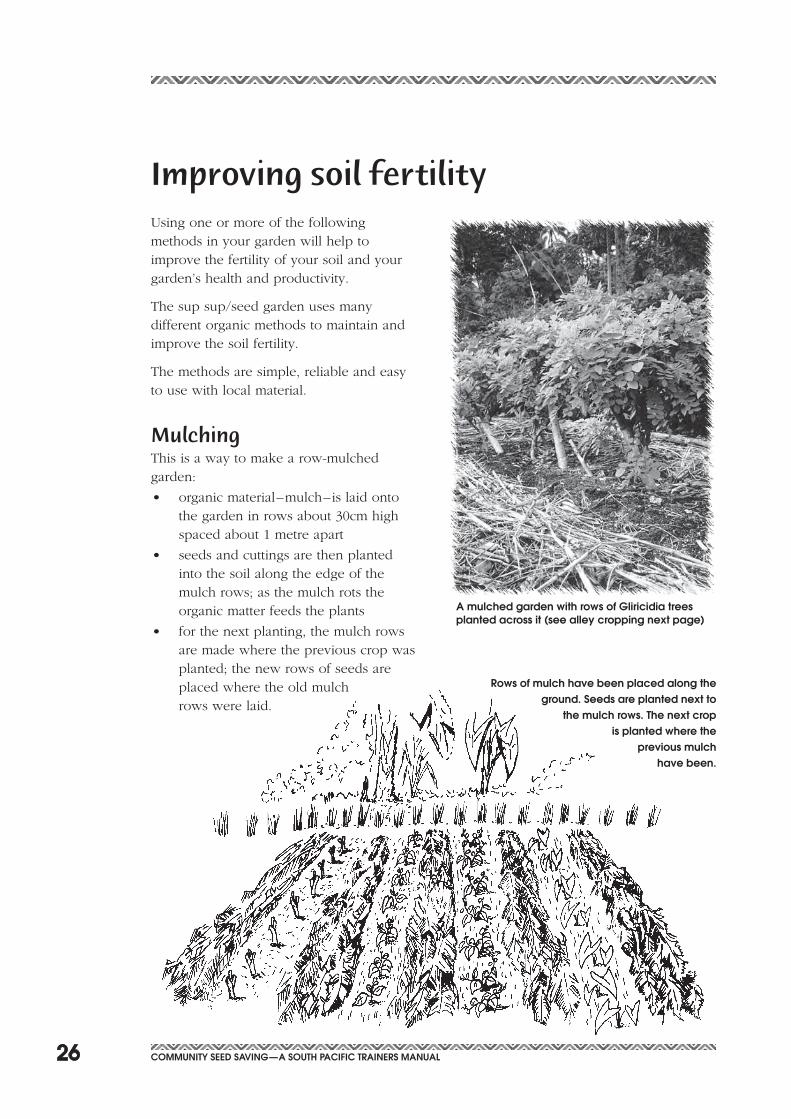
Usingoneormoreofthefollowingmethods in your garden will help to improve the fertility of your soil and your garden’s health and productivity.
The sup sup/seed garden uses many different organic methods to maintain and improve the soil fertility.
The methods are simple, reliable and easy to use with local material.
MulchingThis is a way to make a row-mulched garden:
• organicmaterial–mulch–islaidontothe garden in rows about 30cm high spaced about 1 metre apart
• seedsandcuttingsarethenplantedinto the soil along the edge of the mulch rows; as the mulch rots the organic matter feeds the plants
• forthenextplanting,themulchrowsare made where the previous crop was planted; the new rows of seeds are placed where the old mulch rows were laid.
Improving soil fertility
rows of mulch have been placed along the ground. Seeds are planted next to
the mulch rows. the next crop is planted where the
previous mulch have been.
a mulched garden with rows of gliricidia trees planted across it (see alley cropping next page)
27Community SEEd Saving—a South PaCifiC trainErS manual
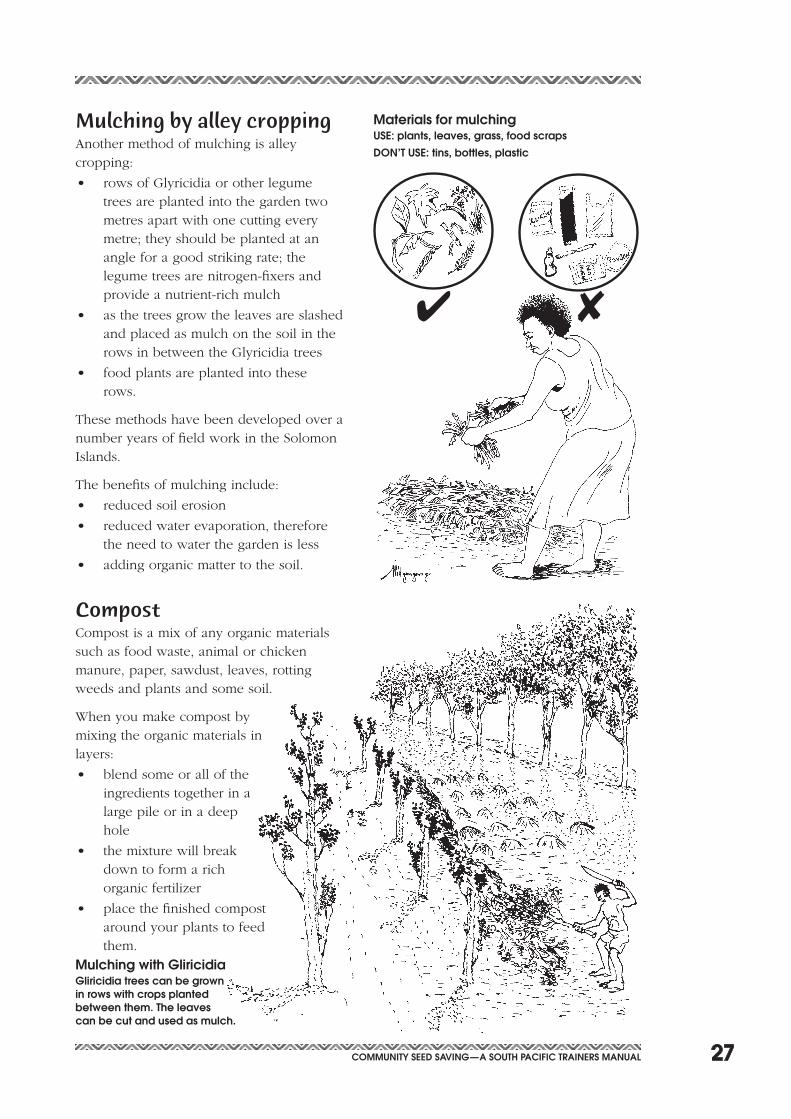
Mulching by alley croppingAnother method of mulching is alley cropping:
• rowsofGlyricidiaorotherlegumetrees are planted into the garden two metres apart with one cutting every metre; they should be planted at an angle for a good striking rate; the legume trees are nitrogen-fixers and provide a nutrient-rich mulch
• asthetreesgrowtheleavesareslashedand placed as mulch on the soil in the rows in between the Glyricidia trees
• foodplantsareplantedintotheserows.
These methods have been developed over a number years of field work in the Solomon Islands.
The benefits of mulching include:
• reducedsoilerosion
• reducedwaterevaporation,thereforethe need to water the garden is less
• addingorganicmattertothesoil.
CompostCompost is a mix of any organic materials such as food waste, animal or chicken manure, paper, sawdust, leaves, rotting weeds and plants and some soil.
When you make compost by mixing the organic materials in layers:
• blendsomeoralloftheingredients together in a large pile or in a deep hole
• themixturewillbreakdown to form a rich organic fertilizer
• placethefinishedcompostaround your plants to feed them.
materials for mulchinguSE: plants, leaves, grass, food scraps
don’t uSE: tins, bottles, plastic
mulching with gliricidiagliricidia trees can be grown in rows with crops planted between them. the leaves can be cut and used as mulch.
28 Community SEEd Saving—a South PaCifiC trainErS manual
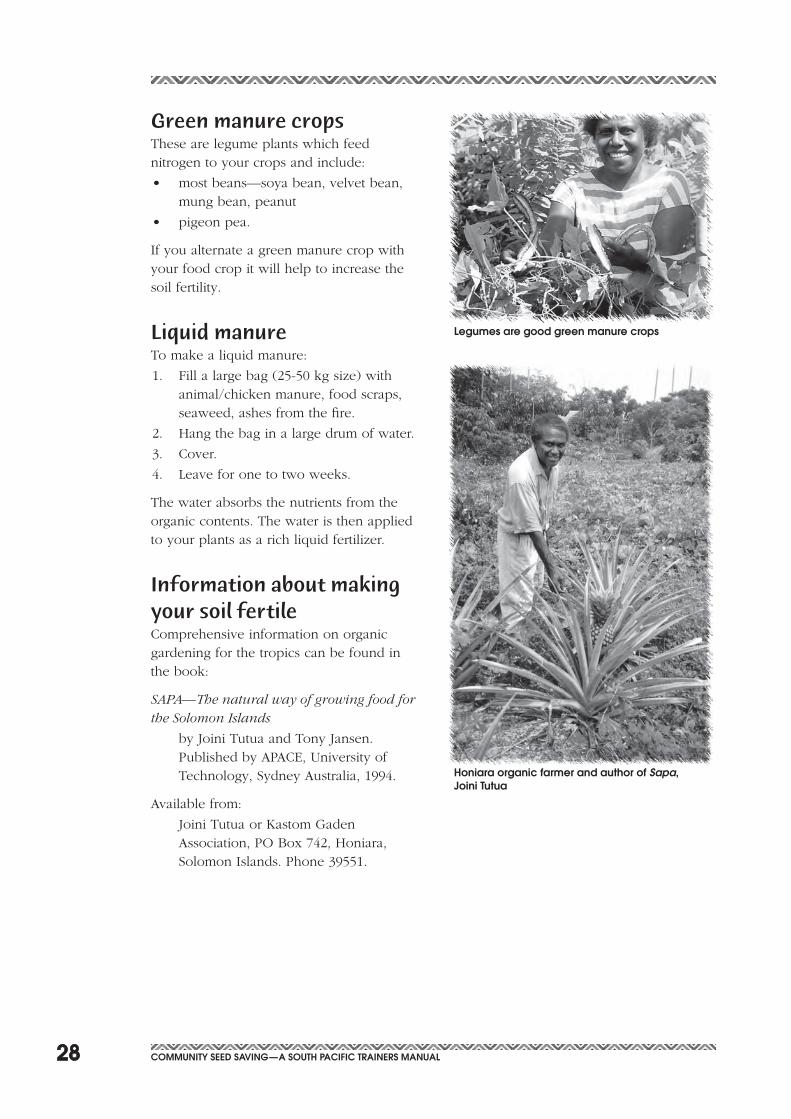
Green manure cropsThese are legume plants which feed nitrogen to your crops and include:
• mostbeans—soyabean,velvetbean,mung bean, peanut
• pigeonpea.
If you alternate a green manure crop with your food crop it will help to increase the soil fertility.
Liquid manureTo make a liquid manure:
1. Fill a large bag (25-50 kg size) with animal/chicken manure, food scraps, seaweed, ashes from the fire.
2. Hang the bag in a large drum of water.
3. Cover.
4. Leave for one to two weeks.
The water absorbs the nutrients from the organic contents. The water is then applied to your plants as a rich liquid fertilizer.
Information about making your soil fertileComprehensive information on organic gardening for the tropics can be found in the book:
SAPA—The natural way of growing food for the Solomon Islands
by Joini Tutua and Tony Jansen. PublishedbyAPACE,UniversityofTechnology, Sydney Australia, 1994.
Available from:
Joini Tutua or Kastom Gaden Association, PO Box 742, Honiara, Solomon Islands. Phone 39551.
honiara organic farmer and author of Sapa, Joini tutua
legumes are good green manure crops
29Community SEEd Saving—a South PaCifiC trainErS manual
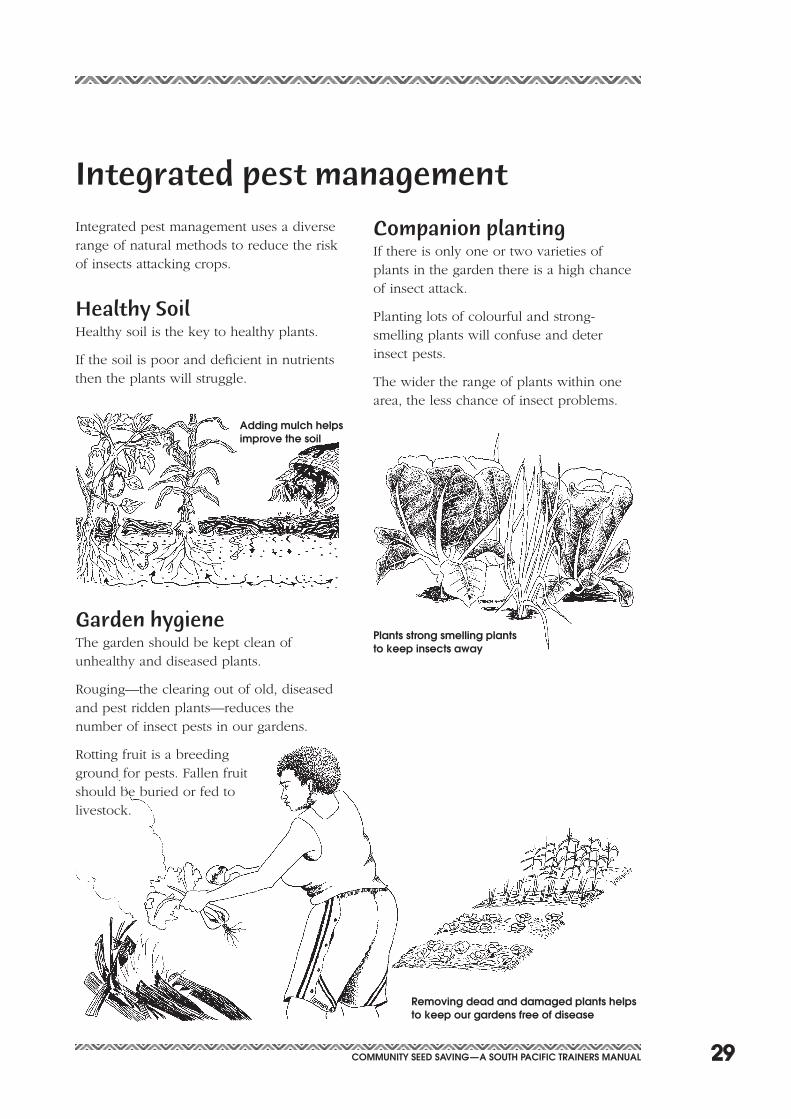
Integrated pest management uses a diverse range of natural methods to reduce the risk of insects attacking crops.
Healthy SoilHealthy soil is the key to healthy plants.
If the soil is poor and deficient in nutrients then the plants will struggle.
Garden hygieneThe garden should be kept clean of unhealthy and diseased plants.
Rouging—theclearingoutofold,diseasedandpestriddenplants—reducesthenumber of insect pests in our gardens.
Rotting fruit is a breeding ground for pests. Fallen fruit should be buried or fed to livestock.
Integrated pest management
Companion plantingIf there is only one or two varieties of plants in the garden there is a high chance of insect attack.
Planting lots of colourful and strong-smelling plants will confuse and deter insect pests.
The wider the range of plants within one area, the less chance of insect problems.
Plants strong smelling plants to keep insects away
removing dead and damaged plants helps to keep our gardens free of disease
adding mulch helps improve the soil
30 Community SEEd Saving—a South PaCifiC trainErS manual
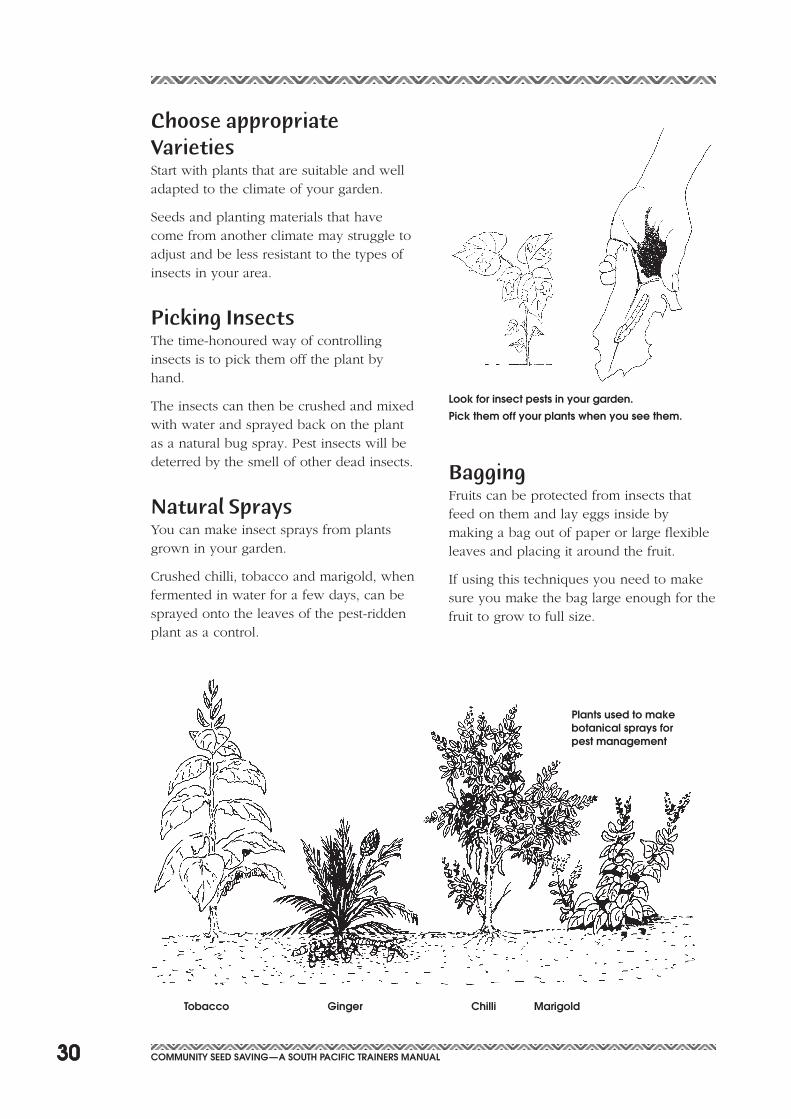
Choose appropriate VarietiesStart with plants that are suitable and well adapted to the climate of your garden.
Seeds and planting materials that have come from another climate may struggle to adjust and be less resistant to the types of insects in your area.
Picking InsectsThe time-honoured way of controlling insects is to pick them off the plant by hand.
The insects can then be crushed and mixed with water and sprayed back on the plant as a natural bug spray. Pest insects will be deterred by the smell of other dead insects.
Natural SpraysYou can make insect sprays from plants grown in your garden.
Crushed chilli, tobacco and marigold, when fermented in water for a few days, can be sprayed onto the leaves of the pest-ridden plant as a control.
BaggingFruits can be protected from insects that feed on them and lay eggs inside by making a bag out of paper or large flexible leaves and placing it around the fruit.
If using this techniques you need to make sure you make the bag large enough for the fruit to grow to full size.
Plants used to make botanical sprays for pest management
tobacco ginger Chilli marigold
look for insect pests in your garden.
Pick them off your plants when you see them.
31Community SEEd Saving—a South PaCifiC trainErS manual
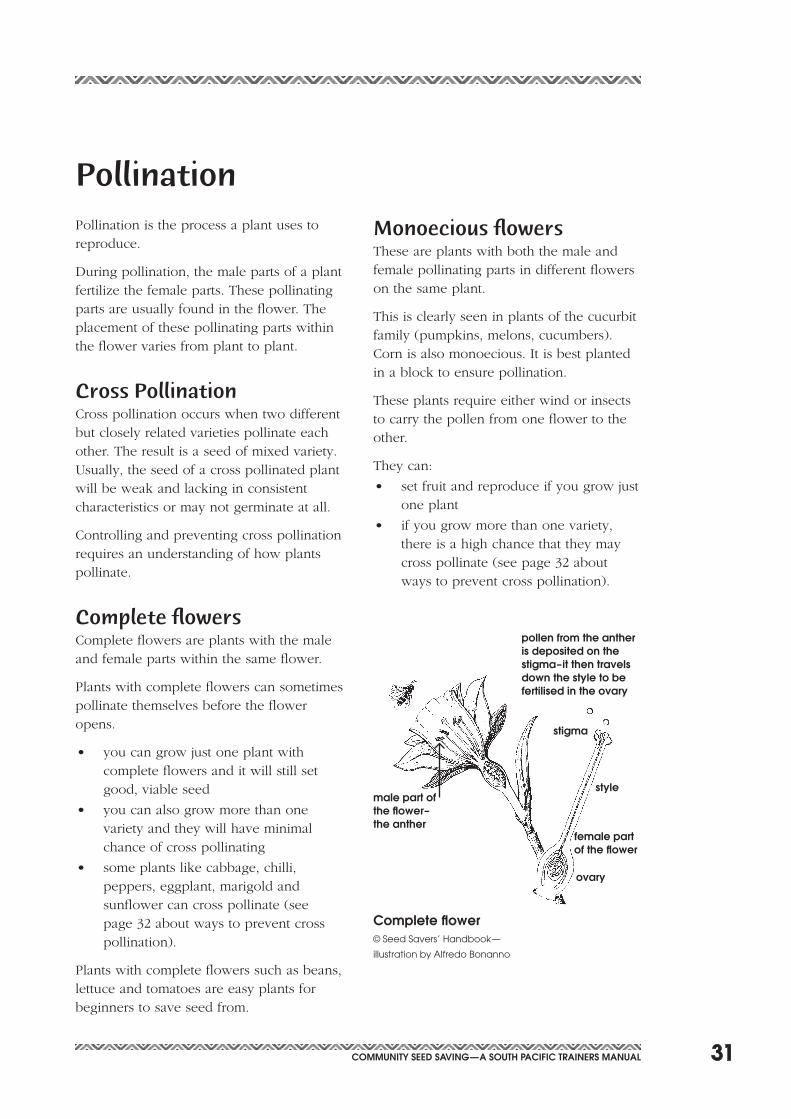
Pollination is the process a plant uses to reproduce.
During pollination, the male parts of a plant fertilize the female parts. These pollinating parts are usually found in the flower. The placement of these pollinating parts within the flower varies from plant to plant.
Cross PollinationCross pollination occurs when two different but closely related varieties pollinate each other. The result is a seed of mixed variety. Usually,theseedofacrosspollinatedplantwill be weak and lacking in consistent characteristics or may not germinate at all.
Controlling and preventing cross pollination requires an understanding of how plants pollinate.
Complete flowersComplete flowers are plants with the male and female parts within the same flower.
Plants with complete flowers can sometimes pollinate themselves before the flower opens.
• youcangrowjustoneplantwithcomplete flowers and it will still set good, viable seed
• youcanalsogrowmorethanonevariety and they will have minimal chance of cross pollinating
• someplantslikecabbage,chilli,peppers, eggplant, marigold and sunflower can cross pollinate (see page 32 about ways to prevent cross pollination).
Plants with complete flowers such as beans, lettuce and tomatoes are easy plants for beginners to save seed from.
Monoecious flowersThese are plants with both the male and female pollinating parts in different flowers on the same plant.
This is clearly seen in plants of the cucurbit family (pumpkins, melons, cucumbers). Corn is also monoecious. It is best planted in a block to ensure pollination.
These plants require either wind or insects to carry the pollen from one flower to the other.
They can:
• setfruitandreproduceifyougrowjustone plant
• ifyougrowmorethanonevariety,there is a high chance that they may cross pollinate (see page 32 about ways to prevent cross pollination).
Pollination
female part of the flower
style
stigma
male part of the flower– the anther
pollen from the anther is deposited on the stigma–it then travels down the style to be fertilised in the ovary
ovary
Complete flower© Seed Savers’ Handbook—
illustration by Alfredo Bonanno
32 Community SEEd Saving—a South PaCifiC trainErS manual
Dioecious flowersDioecious plants are those which have the male and female pollinating parts on different plants.
These plants require more than one plant to fruit and seed and have a high chance of cross pollinating.
Fruit trees are often dioecious (for example pawpaw).
hand pollination© Seed Savers’ Handbook—illustration by Alfredo Bonanno
rub the pollen of the male flower onto the female flower and then close the female flower
male flower
female flower
Prevention of cross pollinationIf you wish to collect seed from your plants it is necessary to prevent cross pollination to maintain those varieties that can cross pollinate.
There are a few strategies for doing this:
• Grow one variety at a time
This is the easiest method but insects and wind can carry pollen for a long way, so you must also consider what your neighbours are growing.
• Grow them apart
If you plant two similar varieties in different places in the garden with a lot of other plants in between this will reduce the chance of them crossing.
• Bag or cage the plants that you want to prevent from crossing
You can use a fine net such as a mosquito net to prevent insects from travelling from one variety to the other. Remember, though, that if the plant is dioecious you need both male and female plants
• Hand pollination
Rubbing the pollen of the male flower onto the female flower and then closing the female flower again until it wilts will ensure that the seed is true to type.
• Assisting self-pollinators
Tomatoes, peppers and beans, while self-pollinating, benefit from having bees and insects to assist with the pollination rate. High pollination rates in these plants usually improve the size, shape and number of seeds in the fruit.
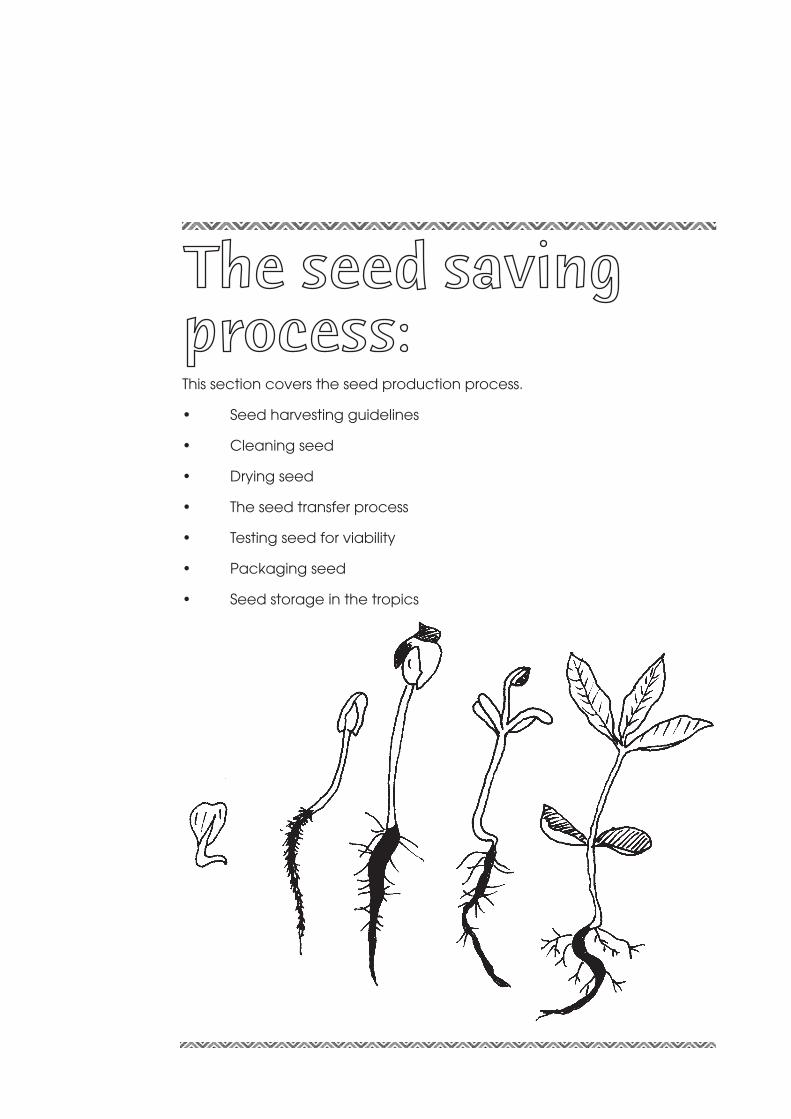
This section covers the seed production process.
• Seedharvestingguidelines
• Cleaningseed
• Dryingseed
• Theseedtransferprocess
• Testingseedforviability
• Packagingseed
• Seedstorageinthetropics

35Community SEEd Saving—a South PaCifiC trainErS manual
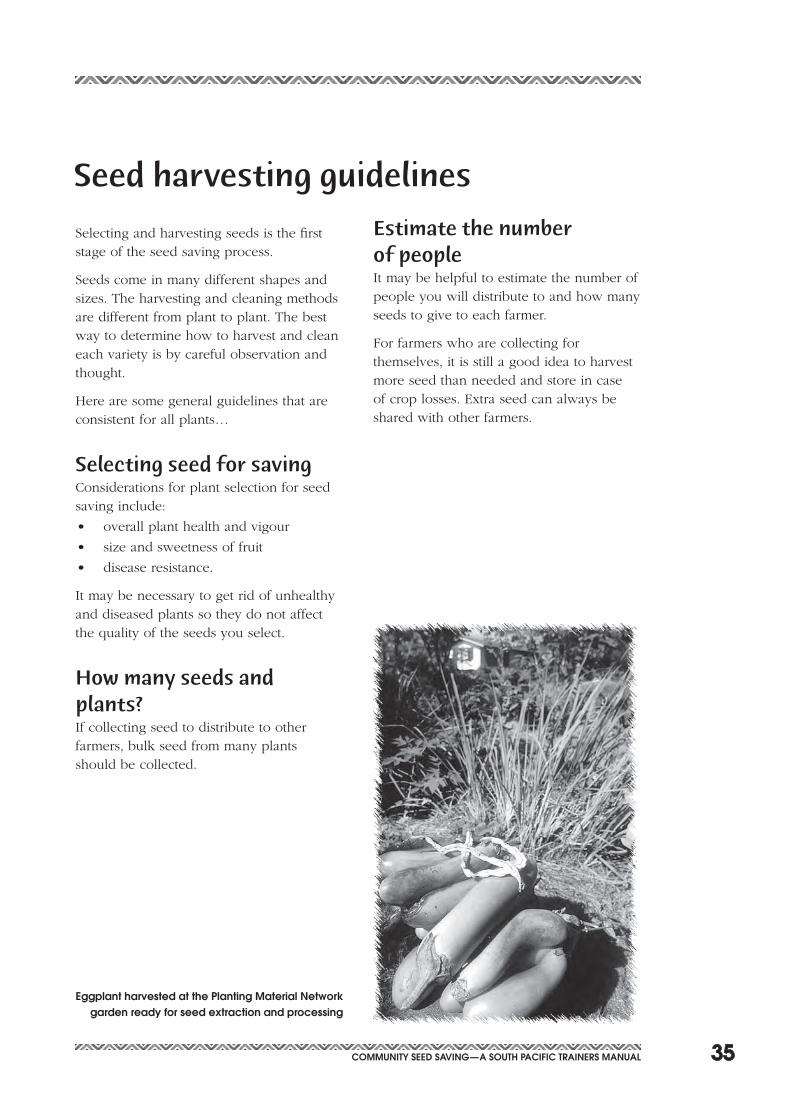
Estimate the number of peopleIt may be helpful to estimate the number of people you will distribute to and how many seeds to give to each farmer.
For farmers who are collecting for themselves, it is still a good idea to harvest more seed than needed and store in case ofcroplosses.Extraseedcanalwaysbeshared with other farmers.
Selecting and harvesting seeds is the first stage of the seed saving process.
Seeds come in many different shapes and sizes. The harvesting and cleaning methods are different from plant to plant. The best way to determine how to harvest and clean each variety is by careful observation and thought.
Here are some general guidelines that are consistent for all plants…
Selecting seed for saving Considerations for plant selection for seed saving include:
• overallplanthealthandvigour
• sizeandsweetnessoffruit
• diseaseresistance.
It may be necessary to get rid of unhealthy and diseased plants so they do not affect the quality of the seeds you select.
How many seeds and plants?If collecting seed to distribute to other farmers, bulk seed from many plants should be collected.
Seed harvesting guidelines
Eggplant harvested at the Planting material network garden ready for seed extraction and processing
36 Community SEEd Saving—a South PaCifiC trainErS manual
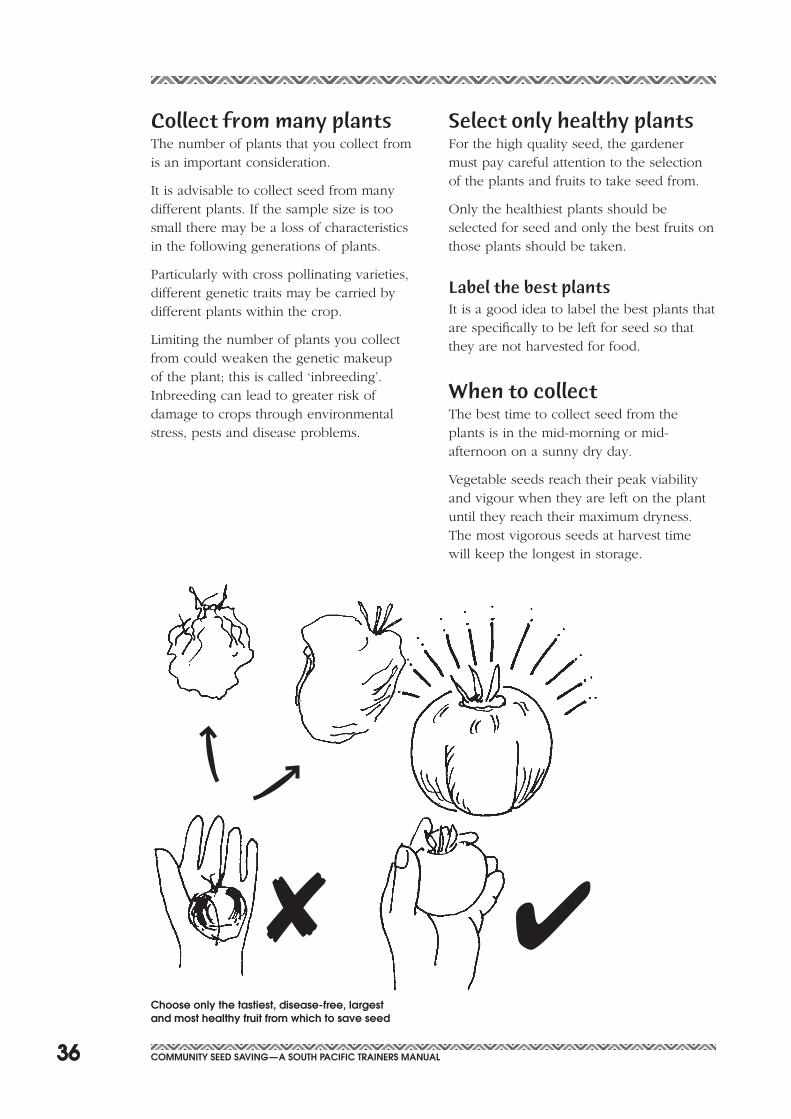
Collect from many plantsThe number of plants that you collect from is an important consideration.
It is advisable to collect seed from many different plants. If the sample size is too small there may be a loss of characteristics in the following generations of plants.
Particularly with cross pollinating varieties, different genetic traits may be carried by different plants within the crop.
Limiting the number of plants you collect from could weaken the genetic makeup of the plant; this is called ‘inbreeding’. Inbreeding can lead to greater risk of damage to crops through environmental stress, pests and disease problems.
Choose only the tastiest, disease-free, largest and most healthy fruit from which to save seed
Select only healthy plantsFor the high quality seed, the gardener must pay careful attention to the selection of the plants and fruits to take seed from.
Only the healthiest plants should be selected for seed and only the best fruits on those plants should be taken.
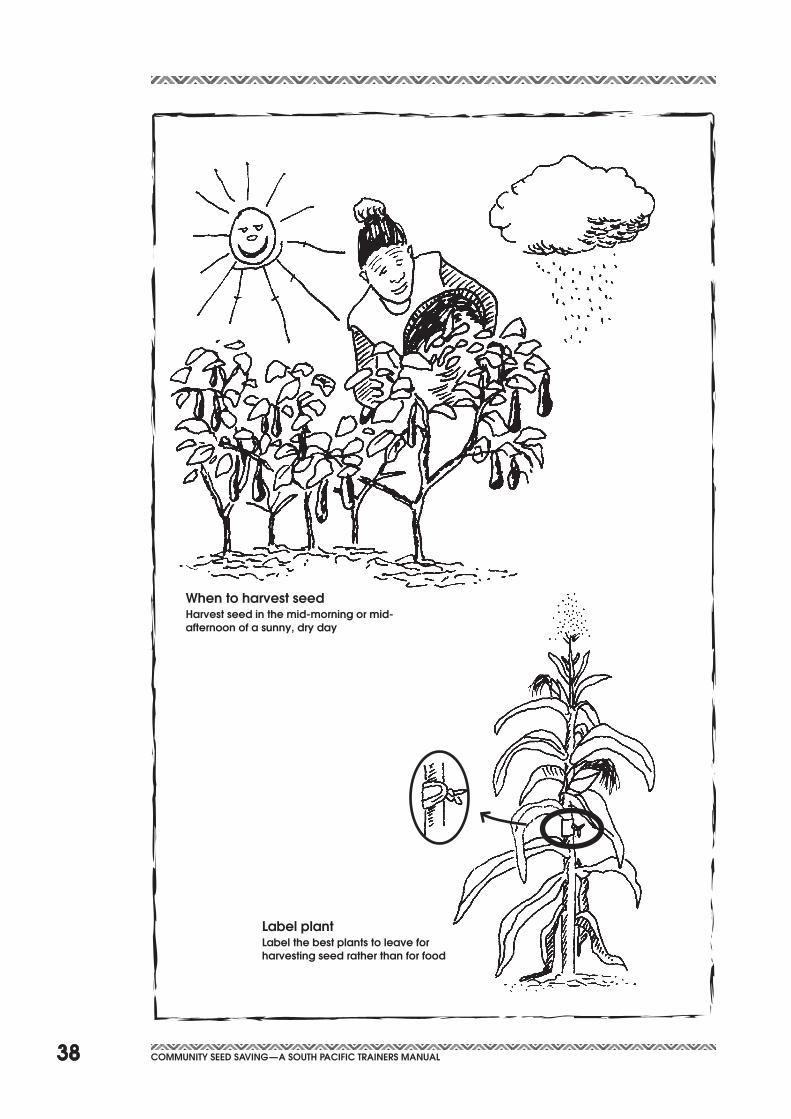
Label the best plantsIt is a good idea to label the best plants that are specifically to be left for seed so that they are not harvested for food.
When to collectThe best time to collect seed from the plants is in the mid-morning or mid-afternoon on a sunny dry day.
Vegetable seeds reach their peak viability and vigour when they are left on the plant until they reach their maximum dryness. The most vigorous seeds at harvest time will keep the longest in storage.
37Community SEEd Saving—a South PaCifiC trainErS manual
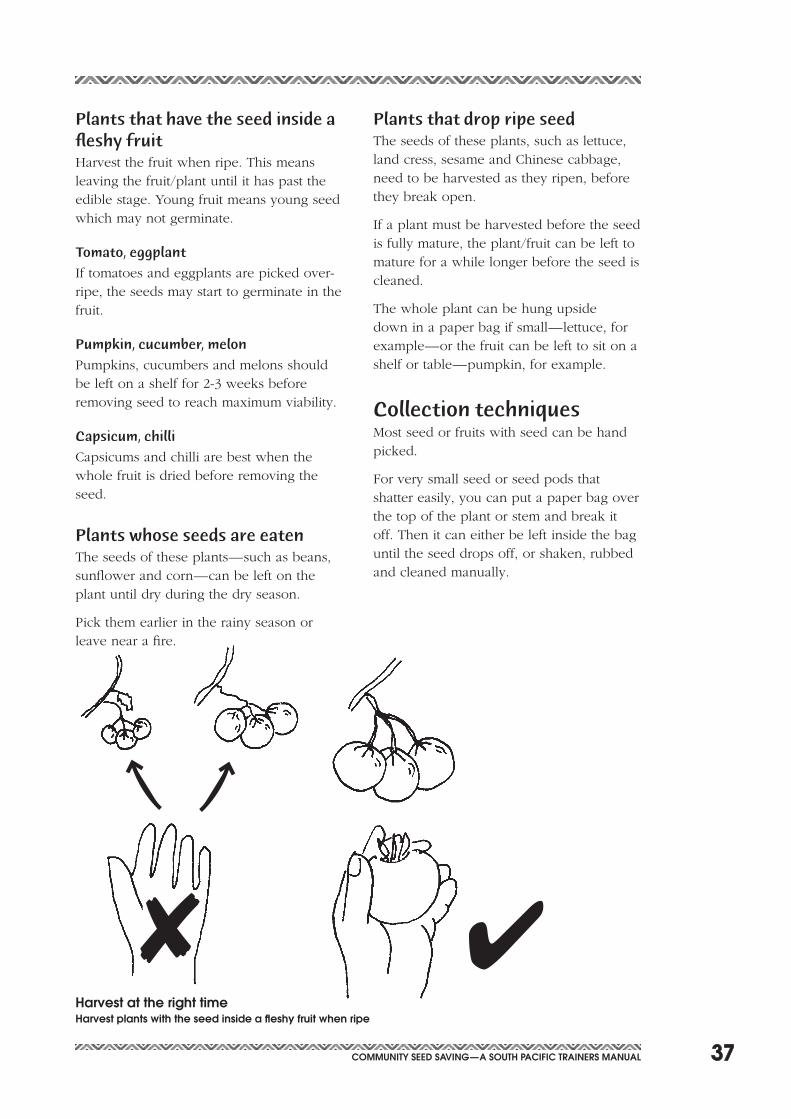
harvest at the right timeharvest plants with the seed inside a fleshy fruit when ripe
Plants that have the seed inside a fleshy fruitHarvest the fruit when ripe. This means leaving the fruit/plant until it has past the edible stage. Young fruit means young seed which may not germinate.
Tomato, eggplant
If tomatoes and eggplants are picked over-ripe, the seeds may start to germinate in the fruit.
Pumpkin, cucumber, melon
Pumpkins, cucumbers and melons should be left on a shelf for 2-3 weeks before removing seed to reach maximum viability.
Capsicum, chilli
Capsicums and chilli are best when the whole fruit is dried before removing the seed.
Plants whose seeds are eatenTheseedsoftheseplants—suchasbeans,sunflowerandcorn—canbeleftontheplant until dry during the dry season.
Pick them earlier in the rainy season or leave near a fire.
Plants that drop ripe seedThe seeds of these plants, such as lettuce, land cress, sesame and Chinese cabbage, need to be harvested as they ripen, before they break open.
If a plant must be harvested before the seed is fully mature, the plant/fruit can be left to mature for a while longer before the seed is cleaned.
The whole plant can be hung upside downinapaperbagifsmall—lettuce,forexample—orthefruitcanbelefttositonashelfortable—pumpkin,forexample.
Collection techniquesMost seed or fruits with seed can be hand picked.
For very small seed or seed pods that shatter easily, you can put a paper bag over the top of the plant or stem and break it off. Then it can either be left inside the bag until the seed drops off, or shaken, rubbed and cleaned manually.
38 Community SEEd Saving—a South PaCifiC trainErS manual
When to harvest seedharvest seed in the mid-morning or mid-afternoon of a sunny, dry day
label plantlabel the best plants to leave for harvesting seed rather than for food
39Community SEEd Saving—a South PaCifiC trainErS manual
After harvesting, seed must be cleaned and dried before storing for later use.
There are different methods of cleaning, depending on the type of fruit.
How to collect seedMost seed, or fruits with seed, can be hand picked.
For very small seed or for seed pods that shatter easily, you can put a bag over the top of the plant or stem and break it off.
Then the top of the plant can either be left inside the bag until the seeds drop off or shaken, rubbed and cleaned manually.
Plants with a seed inside a fleshy fruitThe seed and pulp can be scraped out and washed until the seed separates from the pulp.
A sieve and a bowl may be useful for this. Drain and rewash until the seed is clean.
Seeds that have a dry shell, husk or podThese include seeds such as beans, corn, okra and lettuce.
They can be cleaned by:
• openingandseparatingbyhand
• gentlyrollingorcrushingtheseedina bag and then cleaning off the husk with a sieve or by winnowing.
WinnowingWinnowing uses wind or breath to blow out the light husk:
• laytheseedinafinelywovenflatbasket or bowl
• tossgentlywhileblowingthroughitasit falls back into the basket.
The seed can also be put in a dish and shaken until the heavier seed falls to the bottom, then the husk gently blown off.
Cleaning seed
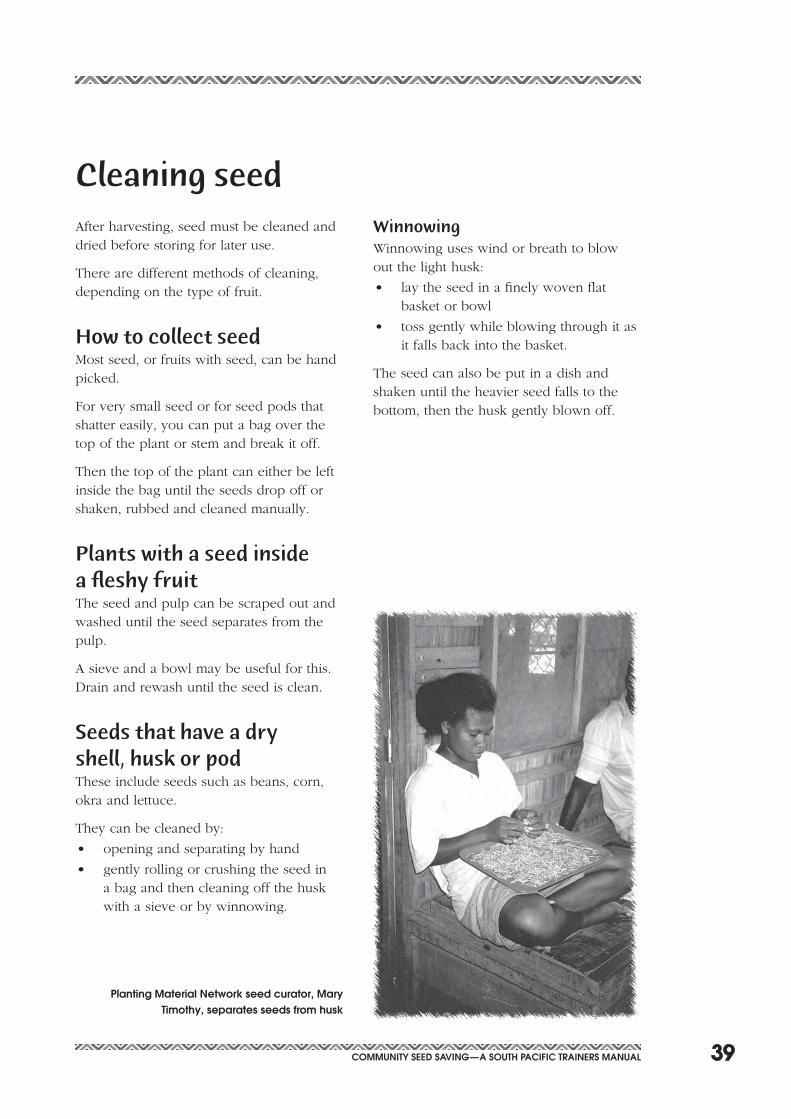
Planting material network seed curator, mary timothy, separates seeds from husk
40 Community SEEd Saving—a South PaCifiC trainErS manual
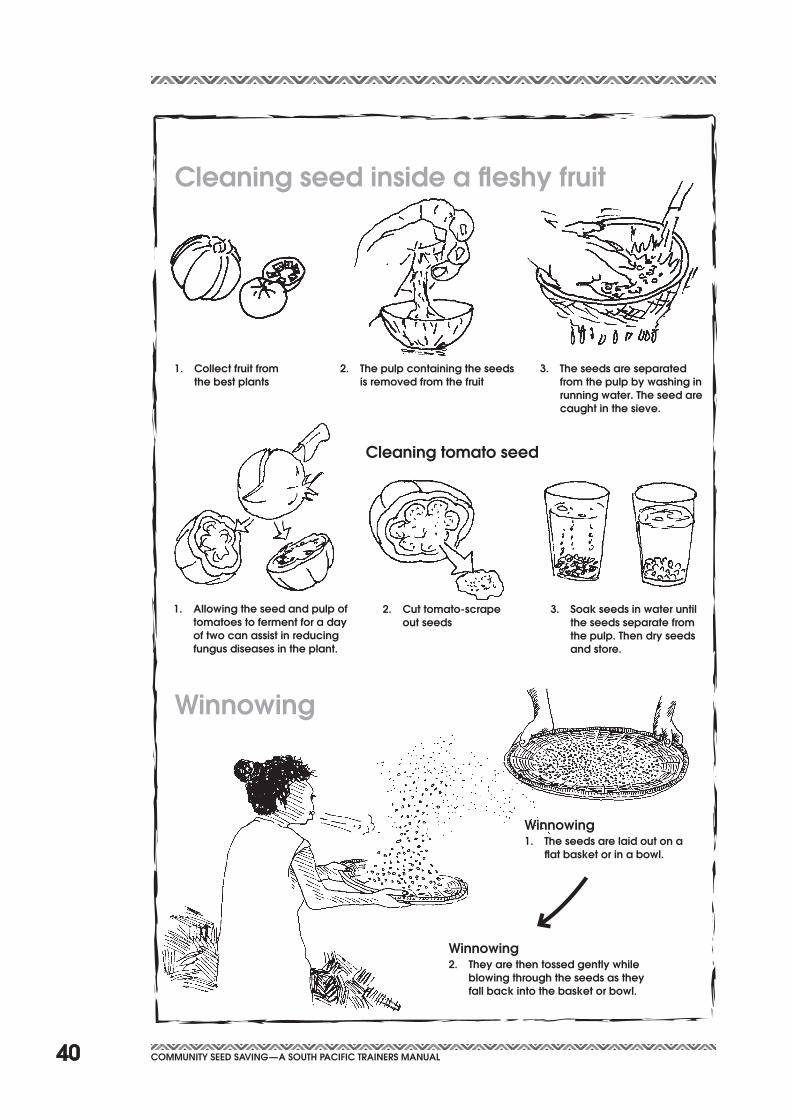
1. allowing the seed and pulp of tomatoes to ferment for a day of two can assist in reducing fungus diseases in the plant.
2. Cut tomato -scrape out seeds
3. Soak seeds in water until the seeds separate from the pulp. then dry seeds and store.
Cleaning seed inside a fleshy fruit
Winnowing2. they are then tossed gently while
blowing through the seeds as they fall back into the basket or bowl.
1. Collect fruit from the best plants
2. the pulp containing the seeds is removed from the fruit
3. the seeds are separated from the pulp by washing in running water. the seed are caught in the sieve.
Winnowing1. the seeds are laid out on a
flat basket or in a bowl.
Cleaning tomato seed
Winnowing
41Community SEEd Saving—a South PaCifiC trainErS manual
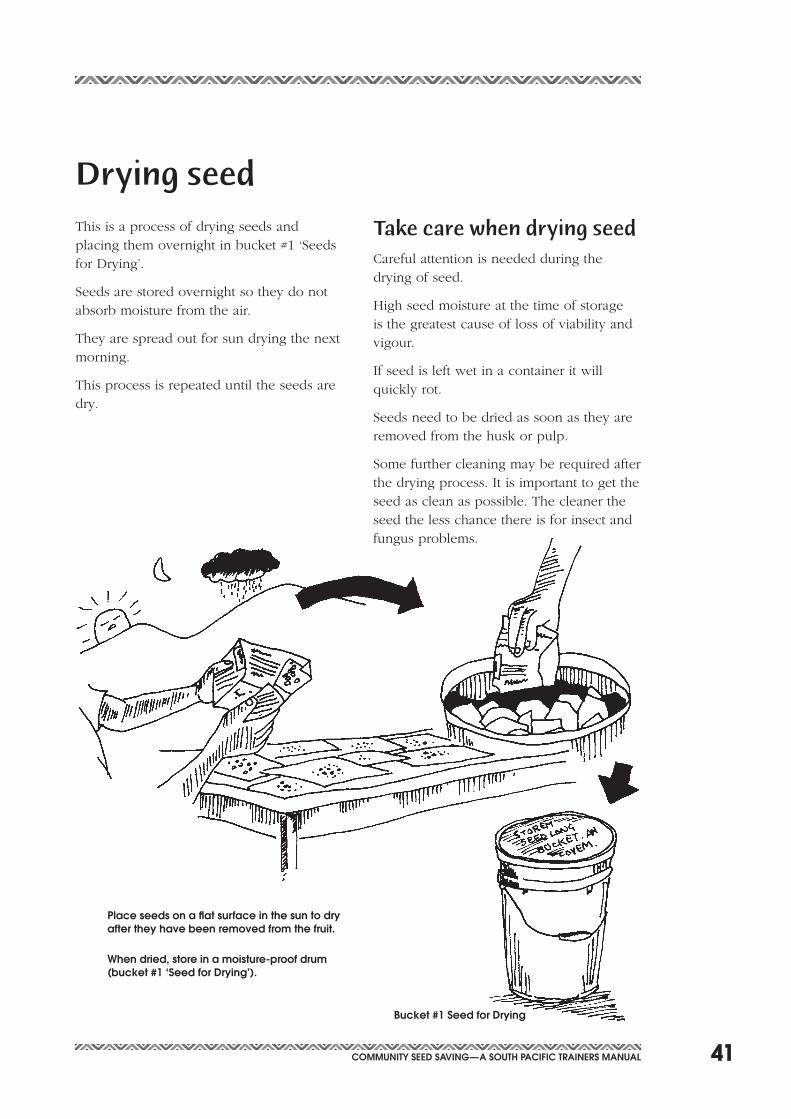
This is a process of drying seeds and placing them overnight in bucket #1 ‘Seeds for Drying’.
Seeds are stored overnight so they do not absorb moisture from the air.
They are spread out for sun drying the next morning.
This process is repeated until the seeds are dry.
Drying seed
Place seeds on a flat surface in the sun to dry after they have been removed from the fruit.
When dried, store in a moisture-proof drum (bucket #1 ‘Seed for drying’).
Take care when drying seedCareful attention is needed during the drying of seed.
High seed moisture at the time of storage is the greatest cause of loss of viability and vigour.
If seed is left wet in a container it will quickly rot.
Seeds need to be dried as soon as they are removed from the husk or pulp.
Some further cleaning may be required after the drying process. It is important to get the seed as clean as possible. The cleaner the seed the less chance there is for insect and fungus problems.
Bucket #1 Seed for drying
42 Community SEEd Saving—a South PaCifiC trainErS manual
Step by step—drying seed1. After cleaning, drain the seeds if
necessary and press off any excess moisture with a cloth.
2. Write variety name and date harvested on a large piece of paper or calico; lay seeds out thinly.
3. It is advisable to first air dry, in the shade any large seeds that have a high moisture content or seeds that has been immersed in water; direct sunlight will make the seed dry too quickly and cause damage to the seed.
Then…4. Put on a flat surface in the sun; this
place should be protected from the wind and needs good aeration; the best option is to put the paper on screens and raise them to allow air to circulate around them.
5. Stir seed during the day for equal drying.
6. In the late afternoon, fold the seed inside the paper/cloth and put into bucket #1 ‘Seed for Drying’; this is the first stage in the bucket system.
7. Seed must be put out again in the sun every morning until it is dry enough to store; this can take anywhere from two days to three weeks, depending on the size and moisture content of the seed.
Equipment1. Large piece of newspaper or calico.
2. Pens.
3. Flat surface for drying seeds in the sun.
4. Bucket #1 marked ‘Seeds for Drying’
In this bucket each night wrap seed in newspaper with variety name and date harvested written on the newspaper.
43Community SEEd Saving—a South PaCifiC trainErS manual
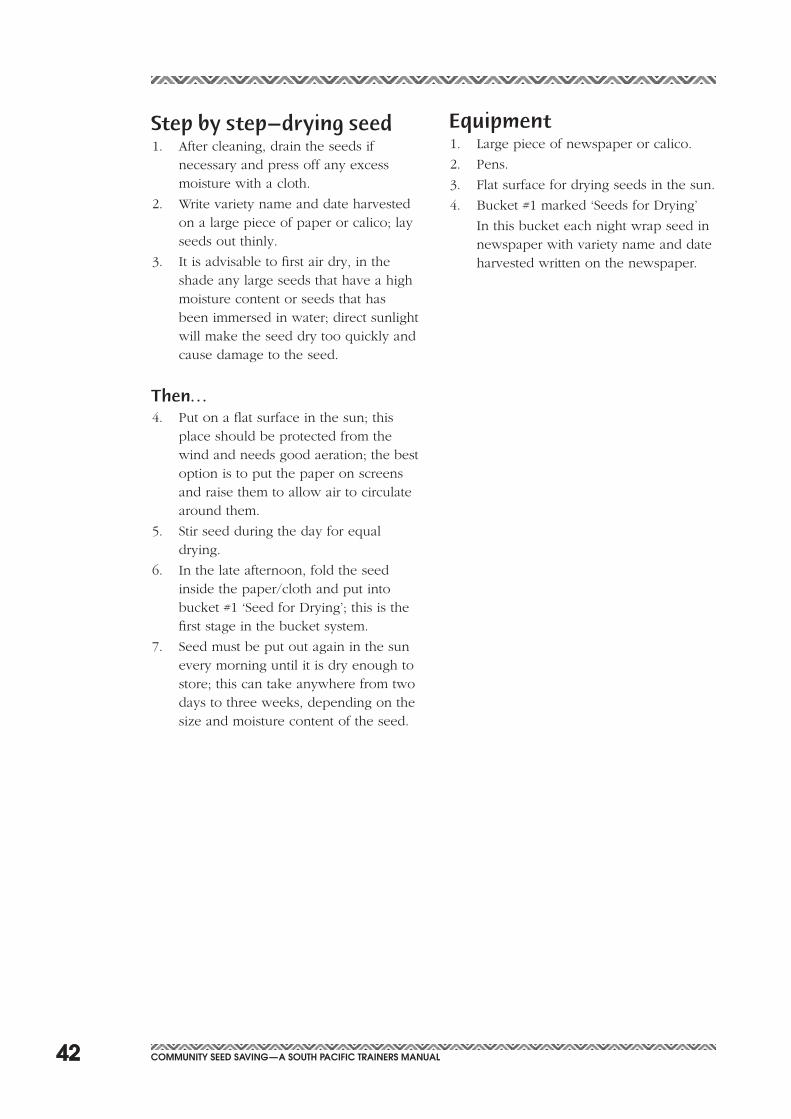
the traditional method of laying seed thinly in the sun has proven to be the easiest and most reliable method to dry seeds.
these photographs shows seeds being sun dried on newspaper at the Planting material network garden in honiara, Solomon islands.
hanging seed above the kitchen fire is another proven method for drying and storing small amounts of seed.
44 Community SEEd Saving—a South PaCifiC trainErS manual
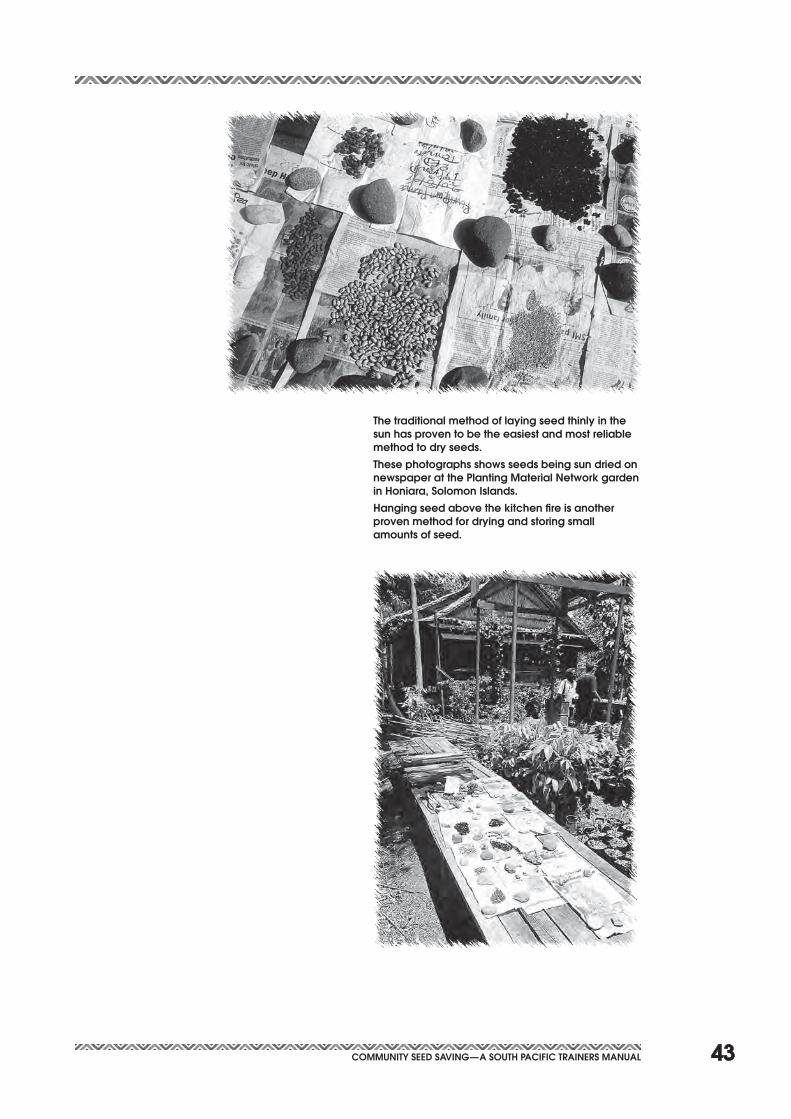
a seed drying house is useful in the wet season
chimney
leaf roof
double layer walling
screen trays for seed
pipe to funnel smoke
1/2 drum covered with soil for insulation
fire inside
Seed drying houseSeed drying houses are simple shelters to protect seeds from rain. They can be used during the wet season.
These drying houses use smoke or radiant heat to dry the seed.
Special consideration needs to made to ensure the temperature does not get too high and that there is adequate ventilation.
Seed drying house details
45Community SEEd Saving—a South PaCifiC trainErS manual
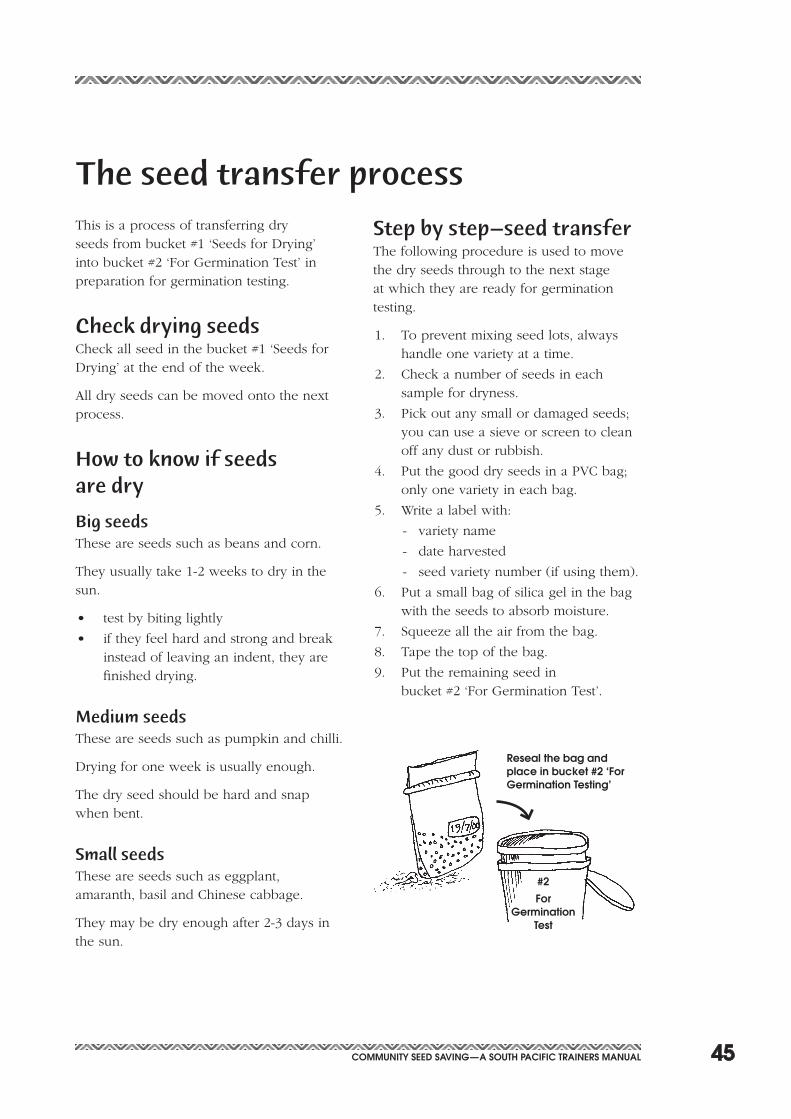
The seed transfer processThis is a process of transferring dry seeds from bucket #1 ‘Seeds for Drying’ into bucket #2 ‘For Germination Test’ in preparation for germination testing.
Check drying seedsCheck all seed in the bucket #1 ‘Seeds for Drying’ at the end of the week.
All dry seeds can be moved onto the next process.
How to know if seeds are dry
Big seedsThese are seeds such as beans and corn.
They usually take 1-2 weeks to dry in the sun.
• testbybitinglightly
• iftheyfeelhardandstrongandbreakinstead of leaving an indent, they are finished drying.
Medium seedsThese are seeds such as pumpkin and chilli.
Drying for one week is usually enough.
The dry seed should be hard and snap when bent.
Small seedsThese are seeds such as eggplant, amaranth, basil and Chinese cabbage.
They may be dry enough after 2-3 days in the sun.
Step by step—seed transferThe following procedure is used to move the dry seeds through to the next stage at which they are ready for germination testing.
1. To prevent mixing seed lots, always handle one variety at a time.
2. Check a number of seeds in each sample for dryness.
3. Pick out any small or damaged seeds; you can use a sieve or screen to clean off any dust or rubbish.
4. Put the good dry seeds in a PVC bag; only one variety in each bag.
5. Write a label with:
- variety name
- date harvested
- seed variety number (if using them).
6. Put a small bag of silica gel in the bag with the seeds to absorb moisture.
7. Squeeze all the air from the bag.
8. Tape the top of the bag.
9. Put the remaining seed in bucket #2 ‘For Germination Test’.
reseal the bag and place in bucket #2 ‘for germination testing’
#2
for germination
test
46 Community SEEd Saving—a South PaCifiC trainErS manual
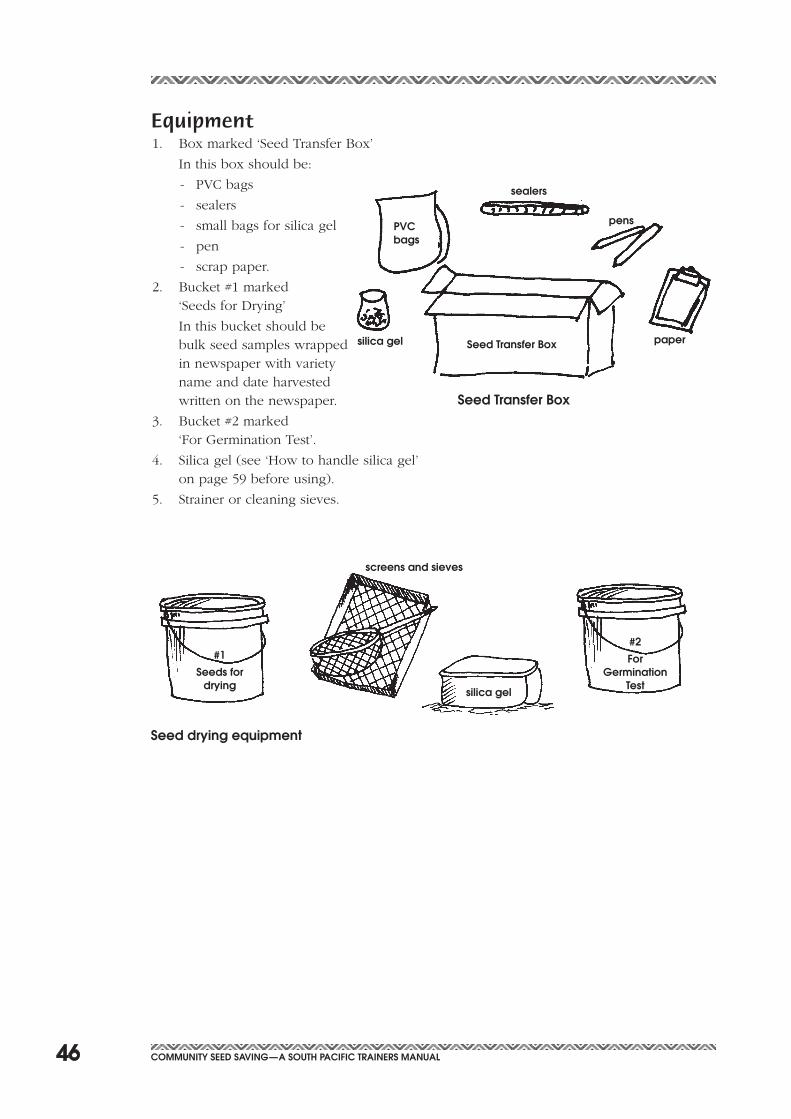
Equipment1. Box marked ‘Seed Transfer Box’
In this box should be:
- PVC bags
- sealers
- small bags for silica gel
- pen
- scrap paper.
2. Bucket #1 marked ‘Seeds for Drying’
In this bucket should be bulk seed samples wrapped in newspaper with variety name and date harvested written on the newspaper.
3. Bucket #2 marked ‘For Germination Test’.
4. Silica gel (see ‘How to handle silica gel’ on page 59 before using).
5. Strainer or cleaning sieves.
Seed drying equipment
Seed transfer Box
PvC bags
Seed transfer Box
sealers
pens
papersilica gel
#1
Seeds for drying
#2
for germination
testsilica gel
screens and sieves
47Community SEEd Saving—a South PaCifiC trainErS manual
This is a process of transferring dry seeds from bucket #2 ‘For Germination Test’ to bucket #3 ‘In Germination Testing’ with a label recording the date the germination test began.
You can choose any of the three different methods of seed germination testing:
• soiltestsinthenursery
• bowltests
• papertestsinplasticbags.
Good results of the germination test are written on the label and seed bags are moved to bucket #5 ‘For Packaging’.
Germination testingGermination tests are a way of testing the potential of seeds to grow. This important stage of the seed production process is to make sure that all seed distributed is good quality and will grow.
Germination testing can be done in many ways, from simple techniques up to highly technical methods. This manual uses simple methods and basic equipment suitable for village seed saving.
Testing seed for viabilityFor best results the person doing the test must also be reliable because seeds need to be checked, watered and counted every day. This is important as seeds are extremely vulnerable during the germination period. They may die if left to dry out for even one day.
Depending on the type of seed, it may take anywhere from four days to four weeks to complete germination testing.
Equipment• bucket#2‘ForGerminationTest’• bucket#3‘InGerminationTesting’• bucket#4‘ForGarden’• bucket#5‘ForPackaging’.
Also collect all equipment needed for germination testing and keep it in a box labelled‘GerminationTestingEquipment’.
In this box you put:• labellingmaterials(smalltags)• pens• calicoorabsorbentpaper• bowls(egclean,dryhalfcoconuts)• plasticbags(egbreadbags)• nurserymaterials
• gratedcoconuthusk;nurseryboxes• germinationrecordsheet.
#3
germination testing
#2 for
germination test
germination testing
Equipment
label
pens
germination record sheet
plastic bagscalico or absorbent paper
coconut husks for grating
nursery equipment
germination testing Equipment
48 Community SEEd Saving—a South PaCifiC trainErS manual
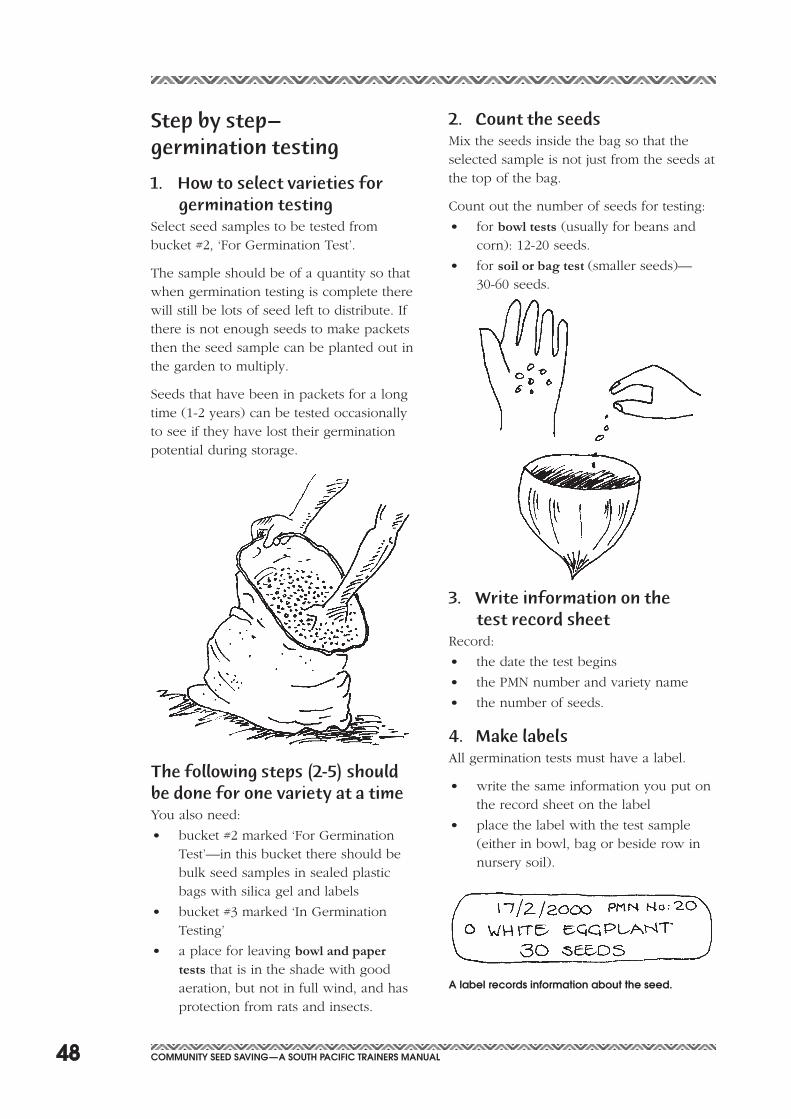
Step by step— germination testing
1. How to select varieties for germination testing
Select seed samples to be tested from bucket #2, ‘For Germination Test’.
The sample should be of a quantity so that when germination testing is complete there will still be lots of seed left to distribute. If there is not enough seeds to make packets then the seed sample can be planted out in the garden to multiply.
Seeds that have been in packets for a long time (1-2 years) can be tested occasionally to see if they have lost their germination potential during storage.
The following steps (2-5) should be done for one variety at a timeYou also need:
• bucket#2marked‘ForGerminationTest’—inthisbucketthereshouldbebulk seed samples in sealed plastic bags with silica gel and labels
• bucket#3marked‘InGerminationTesting’
• aplaceforleavingbowl and paper tests that is in the shade with good aeration, but not in full wind, and has protection from rats and insects.
2. Count the seedsMix the seeds inside the bag so that the selected sample is not just from the seeds at the top of the bag.
Count out the number of seeds for testing:
• forbowl tests (usually for beans and corn): 12-20 seeds.
• forsoil or bag test (smallerseeds)—30-60 seeds.
3. Write information on the test record sheet
Record:
• thedatethetestbegins
• thePMNnumberandvarietyname
• thenumberofseeds.
4. Make labelsAll germination tests must have a label.
• writethesameinformationyouputonthe record sheet on the label
• placethelabelwiththetestsample(either in bowl, bag or beside row in nursery soil).
a label records information about the seed.
49Community SEEd Saving—a South PaCifiC trainErS manual
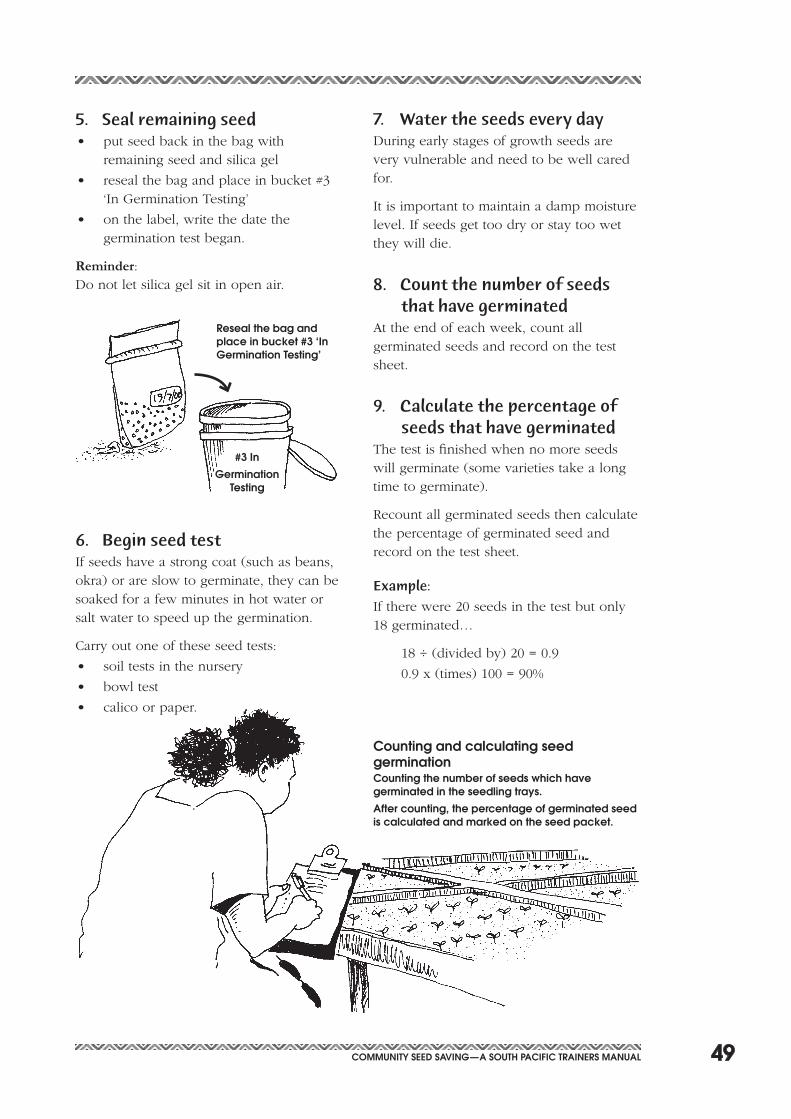
5. Seal remaining seed• putseedbackinthebagwith
remaining seed and silica gel
• resealthebagandplaceinbucket#3‘In Germination Testing’
• onthelabel,writethedatethegermination test began.
Reminder: Do not let silica gel sit in open air.
reseal the bag and place in bucket #3 ‘in germination testing’
#3 in
germination testing
7. Water the seeds every dayDuring early stages of growth seeds are very vulnerable and need to be well cared for.
It is important to maintain a damp moisture level. If seeds get too dry or stay too wet they will die.
8. Count the number of seeds that have germinated
At the end of each week, count all germinated seeds and record on the test sheet.
9. Calculate the percentage of seeds that have germinated
The test is finished when no more seeds will germinate (some varieties take a long time to germinate).
Recount all germinated seeds then calculate the percentage of germinated seed and record on the test sheet.
Example:
If there were 20 seeds in the test but only 18 germinated…
18 ÷ (divided by) 20 = 0.9
0.9 x (times) 100 = 90%
6. Begin seed testIf seeds have a strong coat (such as beans, okra) or are slow to germinate, they can be soaked for a few minutes in hot water or salt water to speed up the germination.
Carry out one of these seed tests:
• soiltestsinthenursery
• bowltest
• calicoorpaper.
Counting and calculating seed germinationCounting the number of seeds which have germinated in the seedling trays.
after counting, the percentage of germinated seed is calculated and marked on the seed packet.
50 Community SEEd Saving—a South PaCifiC trainErS manual
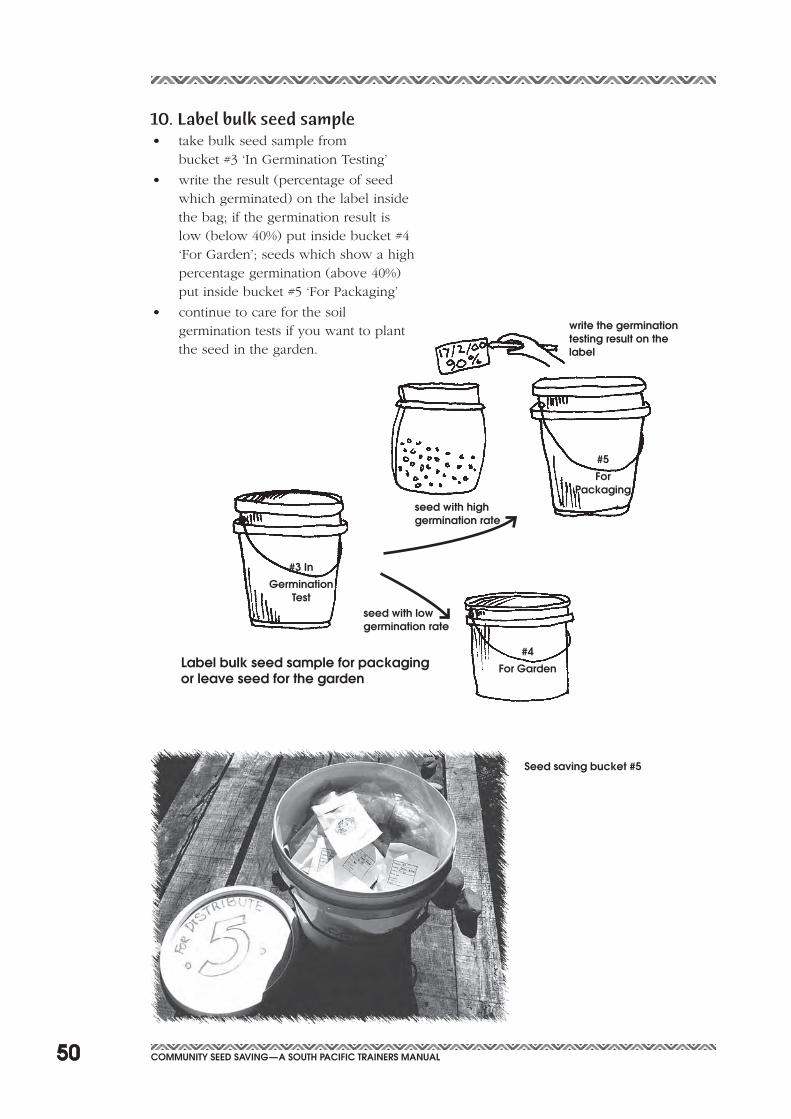
10. Label bulk seed sample• takebulkseedsamplefrom
bucket #3 ‘In Germination Testing’
• writetheresult(percentageofseedwhich germinated) on the label inside the bag; if the germination result is low (below 40%) put inside bucket #4 ‘For Garden’; seeds which show a high percentage germination (above 40%) put inside bucket #5 ‘For Packaging’
• continuetocareforthesoilgermination tests if you want to plant the seed in the garden.
label bulk seed sample for packaging or leave seed for the garden
#3 in
germination test
#5
for Packaging
write the germination testing result on the label
#4
for garden
Seed saving bucket #5
seed with high germination rate
seed with low germination rate
51Community SEEd Saving—a South PaCifiC trainErS manual
All seeds can be tested in the nursery.
growing mediumWesuggestusing100%gratedcoconuthuskbecauseitholdsmoisturewellandhasnoweedseeds.
Soilcanbeusedattheratioof2:1withcoconut husk if sterilized by pouring boiling wateroverit.
Procedure• fillnurseryboxwithgratedcoconuthusk/
soil
• makeashallowlineorrowtosprinkleseedsin(seesketchbelow)
• don’tplantseedstoodeep;plantingdepthistwicethewidthoftheseed
• covertheseedlightlywithgratedcoconut husk
• putyourlabelinnurserytray
• waterseedtraylightly
• maintainmoistureandencouragegerminationbyplacingawetcoprabag over the tray after soaking the bag inboilingwaterfirsttokillanyinsectsordiseases;removethebagaftertwodays.
grating rotting coconuts to make seed raising medium
Planting out seeds into propagating trays.
use your finger to measure the distance between seed.
Soil test in the nursery
mary and gwendolyn carry out germination testing at the Solomon islands Planting material network garden
52 Community SEEd Saving—a South PaCifiC trainErS manual
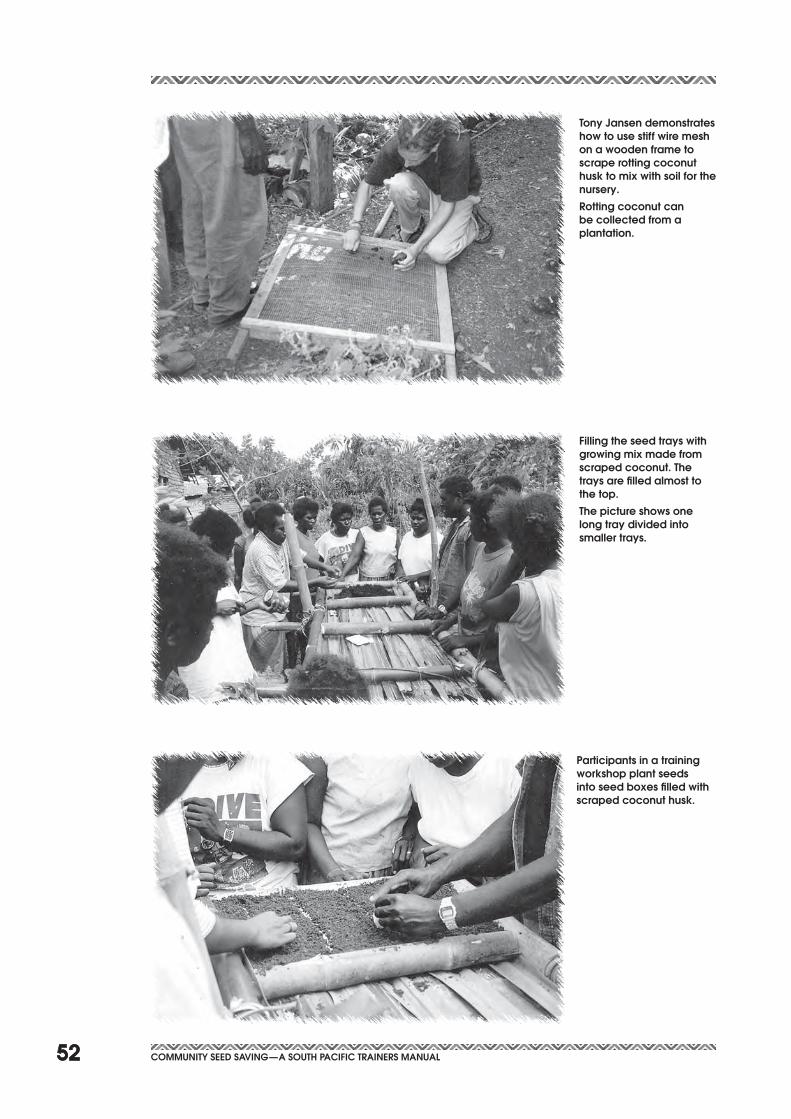
tony Jansen demonstrates how to use stiff wire mesh on a wooden frame to scrape rotting coconut husk to mix with soil for the nursery.
rotting coconut can be collected from a plantation.
filling the seed trays with growing mix made from scraped coconut. the trays are filled almost to the top.
the picture shows one long tray divided into smaller trays.
Participants in a training workshop plant seeds into seed boxes filled with scraped coconut husk.
53Community SEEd Saving—a South PaCifiC trainErS manual
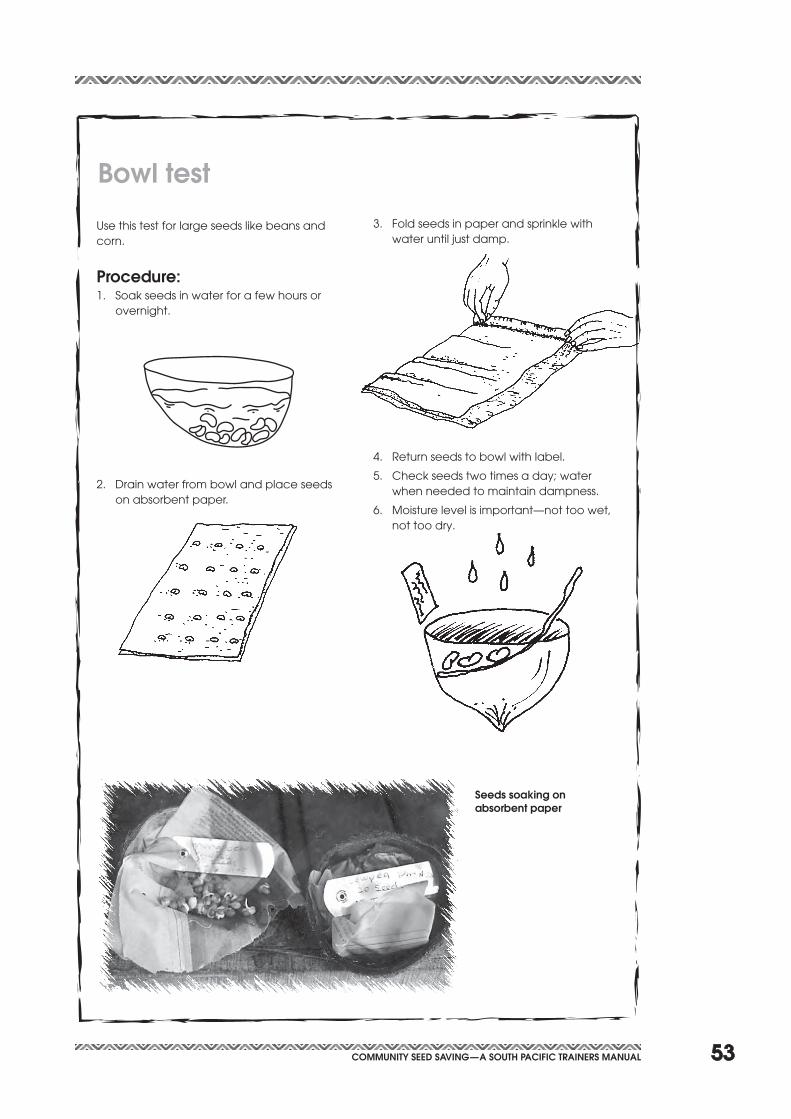
Bowl test
Use this test for large seeds like beans and corn.
Procedure:1. Soakseedsinwaterforafewhoursor
overnight.
2. Drainwaterfrombowlandplaceseedson absorbent paper.
3. Foldseedsinpaperandsprinklewithwateruntiljustdamp.
4. Returnseedstobowlwithlabel.
5. Checkseedstwotimesaday;waterwhenneededtomaintaindampness.
6. Moisturelevelisimportant—nottoowet,not too dry.
Seeds soaking on absorbent paper
54 Community SEEd Saving—a South PaCifiC trainErS manual
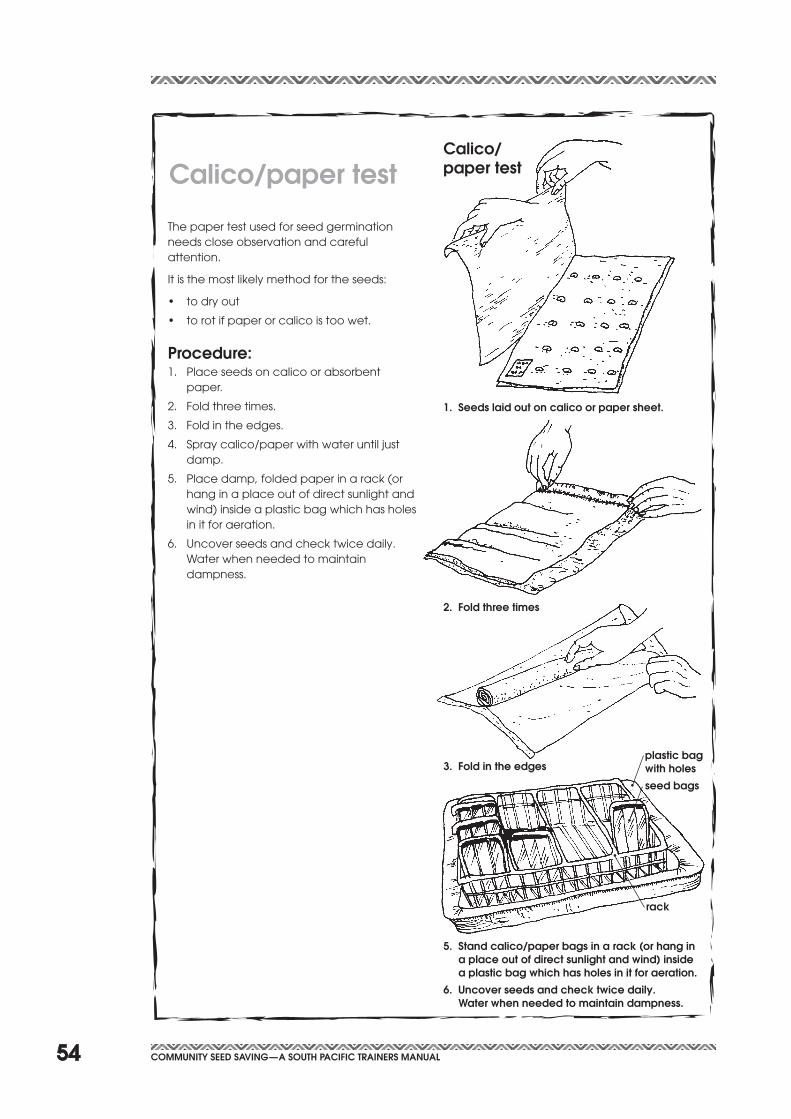
1. Seeds laid out on calico or paper sheet.
Calico/paper test
5. Stand calico/paper bags in a rack (or hang in a place out of direct sunlight and wind) inside a plastic bag which has holes in it for aeration.
6. uncover seeds and check twice daily. Water when needed to maintain dampness.
Calico/paper test
The paper test used for seed germination needs close observation and careful attention.
Itisthemostlikelymethodfortheseeds:
• todryout
• torotifpaperorcalicoistoowet.
Procedure:1. Placeseedsoncalicoorabsorbent
paper.
2. Foldthreetimes.
3. Foldintheedges.
4. Spraycalico/paperwithwateruntiljustdamp.
5. Placedamp,foldedpaperinarack(orhang in a place out of direct sunlight and wind)insideaplasticbagwhichhasholesin it for aeration.
6. Uncoverseedsandchecktwicedaily. Waterwhenneededtomaintaindampness.
2. fold three times
3. fold in the edges plastic bag with holes
seed bags
rack
55Community SEEd Saving—a South PaCifiC trainErS manual
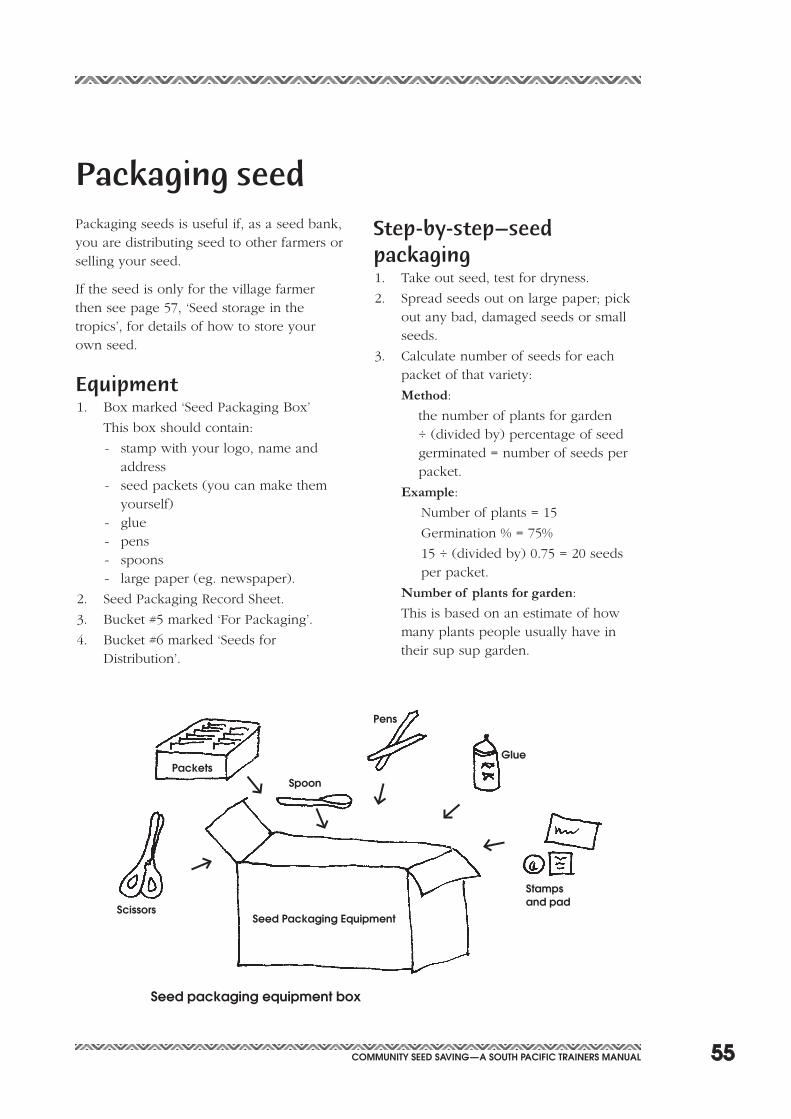
Packaging seeds is useful if, as a seed bank, you are distributing seed to other farmers or selling your seed.
If the seed is only for the village farmer then see page 57, ‘Seed storage in the tropics’, for details of how to store your own seed.
Equipment1. Box marked ‘Seed Packaging Box’
This box should contain:
- stamp with your logo, name and address
- seed packets (you can make them yourself)
- glue- pens- spoons- large paper (eg. newspaper).
2. Seed Packaging Record Sheet.
3. Bucket #5 marked ‘For Packaging’.
4. Bucket #6 marked ‘Seeds for Distribution’.
Packaging seed
Step-by-step—seed packaging1. Take out seed, test for dryness.
2. Spread seeds out on large paper; pick out any bad, damaged seeds or small seeds.
3. Calculate number of seeds for each packet of that variety:
Method:
the number of plants for garden ÷ (divided by) percentage of seed germinated = number of seeds per packet.
Example:
Number of plants = 15
Germination % = 75%
15 ÷ (divided by) 0.75 = 20 seeds per packet.
Number of plants for garden:
This is based on an estimate of how many plants people usually have in their sup sup garden.
Seed Packaging Equipment
Packets
Scissors
Spoon
Pens
glue
Stamps and pad
Seed packaging equipment box
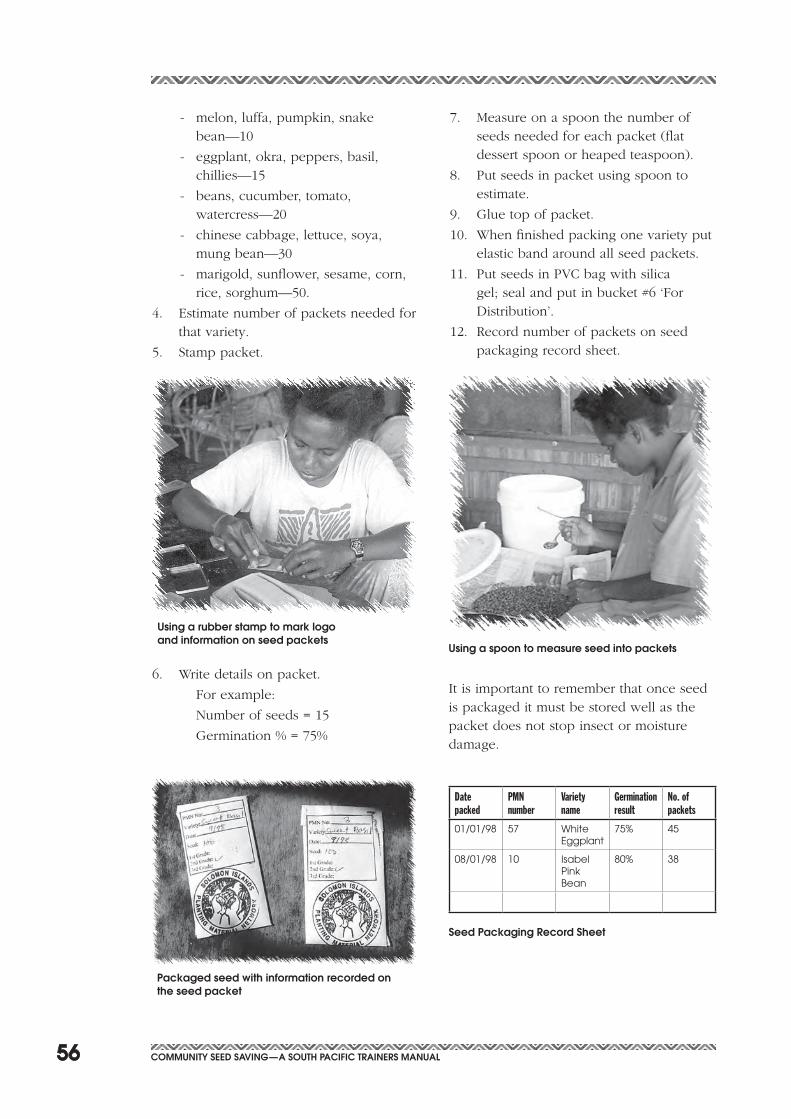
56 Community SEEd Saving—a South PaCifiC trainErS manual
Packaged seed with information recorded on the seed packet
using a spoon to measure seed into packets
using a rubber stamp to mark logo and information on seed packets
- melon, luffa, pumpkin, snake bean—10
- eggplant, okra, peppers, basil, chillies—15
- beans, cucumber, tomato, watercress—20
- chinese cabbage, lettuce, soya, mungbean—30
- marigold, sunflower, sesame, corn, rice,sorghum—50.
4. Estimatenumberofpacketsneededforthat variety.
5. Stamp packet.
6. Write details on packet.
For example:
Number of seeds = 15
Germination % = 75%
7. Measure on a spoon the number of seeds needed for each packet (flat dessert spoon or heaped teaspoon).
8. Put seeds in packet using spoon to estimate.
9. Glue top of packet.
10. When finished packing one variety put elastic band around all seed packets.
11. Put seeds in PVC bag with silica gel; seal and put in bucket #6 ‘For Distribution’.
12. Record number of packets on seed packaging record sheet.
It is important to remember that once seed is packaged it must be stored well as the packet does not stop insect or moisture damage.
Date packed
PMN number
Variety name
Germination result
No. of packets
01/01/98 57 White Eggplant
75% 45
08/01/98 10 IsabelPinkBean
80% 38
Seed Packaging record Sheet
57Community SEEd Saving—a South PaCifiC trainErS manual
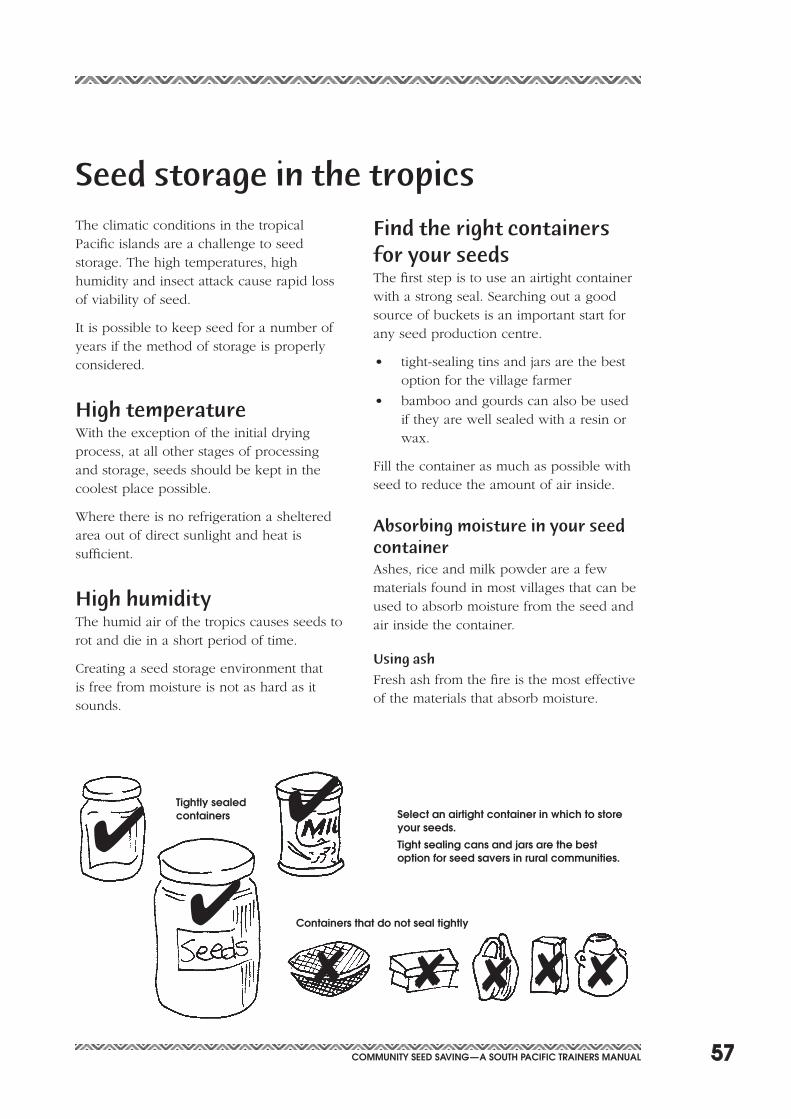
The climatic conditions in the tropical Pacific islands are a challenge to seed storage. The high temperatures, high humidity and insect attack cause rapid loss of viability of seed.
It is possible to keep seed for a number of years if the method of storage is properly considered.
High temperatureWith the exception of the initial drying process, at all other stages of processing and storage, seeds should be kept in the coolest place possible.
Where there is no refrigeration a sheltered area out of direct sunlight and heat is sufficient.
High humidity The humid air of the tropics causes seeds to rot and die in a short period of time.
Creating a seed storage environment that is free from moisture is not as hard as it sounds.
Seed storage in the tropics
Find the right containers for your seedsThe first step is to use an airtight container with a strong seal. Searching out a good source of buckets is an important start for any seed production centre.
• tight-sealingtinsandjarsarethebestoption for the village farmer
• bambooandgourdscanalsobeusedif they are well sealed with a resin or wax.
Fill the container as much as possible with seed to reduce the amount of air inside.
Absorbing moisture in your seed containerAshes, rice and milk powder are a few materials found in most villages that can be used to absorb moisture from the seed and air inside the container.
Using ash
Fresh ash from the fire is the most effective of the materials that absorb moisture.
Select an airtight container in which to store your seeds.
tight sealing cans and jars are the best option for seed savers in rural communities.
tightly sealed containers
Containers that do not seal tightly
58 Community SEEd Saving—a South PaCifiC trainErS manual
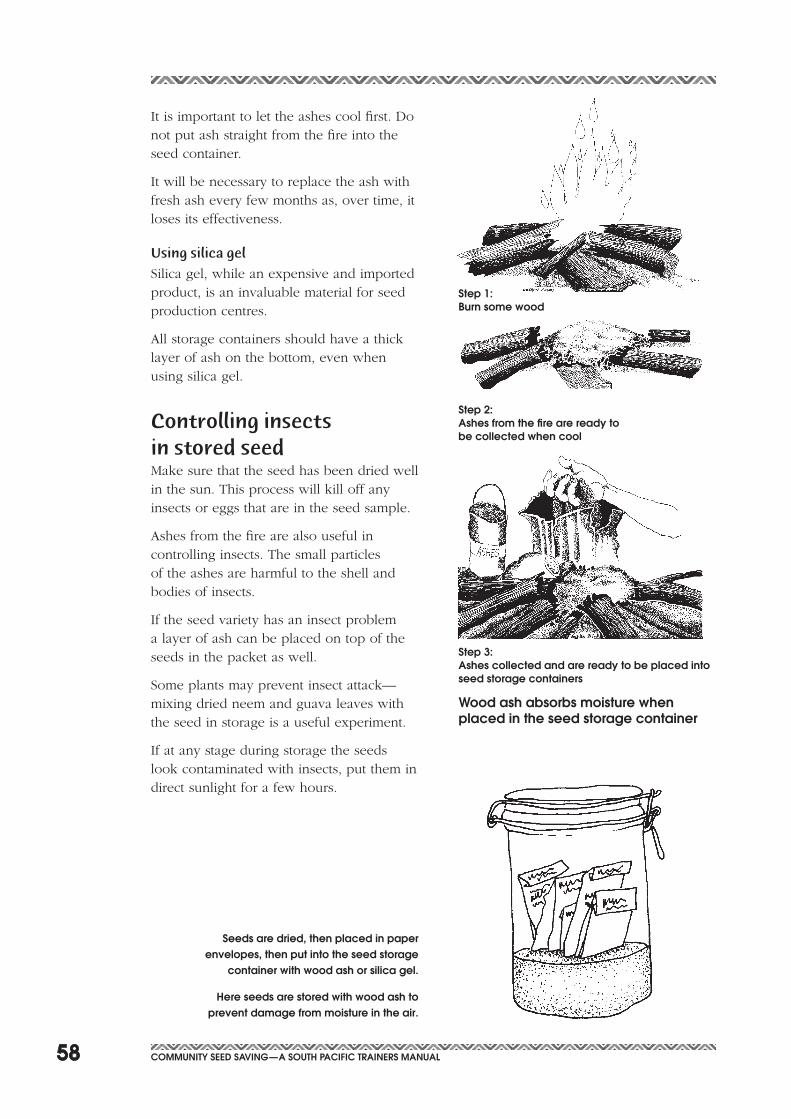
It is important to let the ashes cool first. Do not put ash straight from the fire into the seed container.
It will be necessary to replace the ash with fresh ash every few months as, over time, it loses its effectiveness.
Using silica gel
Silica gel, while an expensive and imported product, is an invaluable material for seed production centres.
All storage containers should have a thick layer of ash on the bottom, even when using silica gel.
Controlling insects in stored seedMake sure that the seed has been dried well in the sun. This process will kill off any insects or eggs that are in the seed sample.
Ashes from the fire are also useful in controlling insects. The small particles of the ashes are harmful to the shell and bodies of insects.
If the seed variety has an insect problem a layer of ash can be placed on top of the seeds in the packet as well.
Someplantsmaypreventinsectattack—mixing dried neem and guava leaves with the seed in storage is a useful experiment.
If at any stage during storage the seeds look contaminated with insects, put them in direct sunlight for a few hours.
Wood ash absorbs moisture when placed in the seed storage container
Seeds are dried, then placed in paper envelopes, then put into the seed storage
container with wood ash or silica gel.
here seeds are stored with wood ash to prevent damage from moisture in the air.
Step 1: Burn some wood
Step 2: ashes from the fire are ready to be collected when cool
Step 3: ashes collected and are ready to be placed into seed storage containers
59Community SEEd Saving—a South PaCifiC trainErS manual
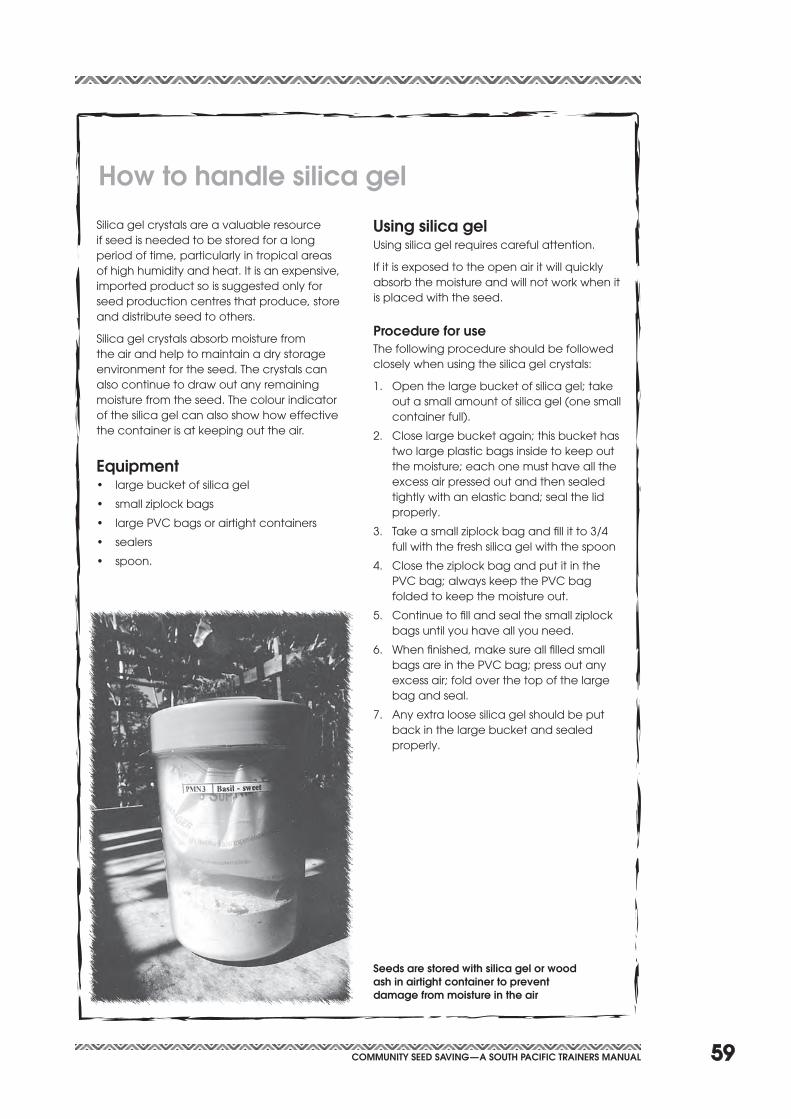
Silica gel crystals are a valuable resource if seed is needed to be stored for a long periodoftime,particularlyintropicalareasofhighhumidityandheat.Itisanexpensive,imported product so is suggested only for seedproductioncentresthatproduce,storeand distribute seed to others.
Silica gel crystals absorb moisture from the air and help to maintain a dry storage environment for the seed. The crystals can alsocontinuetodrawoutanyremainingmoisture from the seed. The colour indicator ofthesilicagelcanalsoshowhoweffectivethe container is at keeping out the air.
Equipment• largebucketofsilicagel
• smallziplockbags
• largePVCbagsorairtightcontainers
• sealers
• spoon.
how to handle silica gel
using silica gelUsingsilicagelrequirescarefulattention.
Ifitisexposedtotheopenairitwillquicklyabsorbthemoistureandwillnotworkwhenitisplacedwiththeseed.
Procedure for useThefollowingprocedureshouldbefollowedcloselywhenusingthesilicagelcrystals:
1. Openthelargebucketofsilicagel;takeout a small amount of silica gel (one small container full).
2. Closelargebucketagain;thisbuckethastwolargeplasticbagsinsidetokeepoutthemoisture;eachonemusthavealltheexcessairpressedoutandthensealedtightlywithanelasticband;sealthelidproperly.
3. Takeasmallziplockbagandfillitto3/4fullwiththefreshsilicagelwiththespoon
4. ClosetheziplockbagandputitinthePVCbag;alwayskeepthePVCbagfolded to keep the moisture out.
5. Continuetofillandsealthesmallziplockbags until you have all you need.
6. Whenfinished,makesureallfilledsmallbagsareinthePVCbag;pressoutanyexcessair;foldoverthetopofthelargebag and seal.
7. Anyextraloosesilicagelshouldbeputback in the large bucket and sealed properly.
Seeds are stored with silica gel or wood ash in airtight container to prevent damage from moisture in the air

60 Community SEEd Saving—a South PaCifiC trainErS manual
Silica gel crystals are heat-dried to reactivate them for reuse.
the crystals turn from pink to blue when dry.
a solar drier for reactivating silica gel crystals can be easily made
reactivating silica gel crystalsSilica gel is a re-useable product. The colour ofthecrystalsindicatehowmuchmoisturethey have absorbed.
Ifthecrystalsare:
• darkblue—theyarefreshanddry
• pink—theyhaveahighmoisturecontentand need to be heated and dried out before they can absorb more moisture.
Toreusesilicagel,itisnecessarytodriveoutthe moisture it has absorbed. This is done whenthecrystalsareapinkcolour.
Thecrystalsareheated—ideallyat175degreesC—inanovenorareheatedinasolaroven.Thisdrivesouttheabsorbedwaterand reactivates the crystals.
Procedure1 Laythepinksilicagelinathinlayerona
tray.
2 Placeinanovenorinasolardryer.
3 Heatuntilthecrystalsturndarkblue.
3 Transferquicklytothelargesilicagelbucket.
lay pink silica gel crystals in a thin layer on a tray and place on fire to be reactivated
glass
trays for silica gel
Side walls covered with reflective foil
Cardboard box inside painted black
Wooden frame to support racks
Wood frame

63Community SEEd Saving—a South PaCifiC trainErS manual
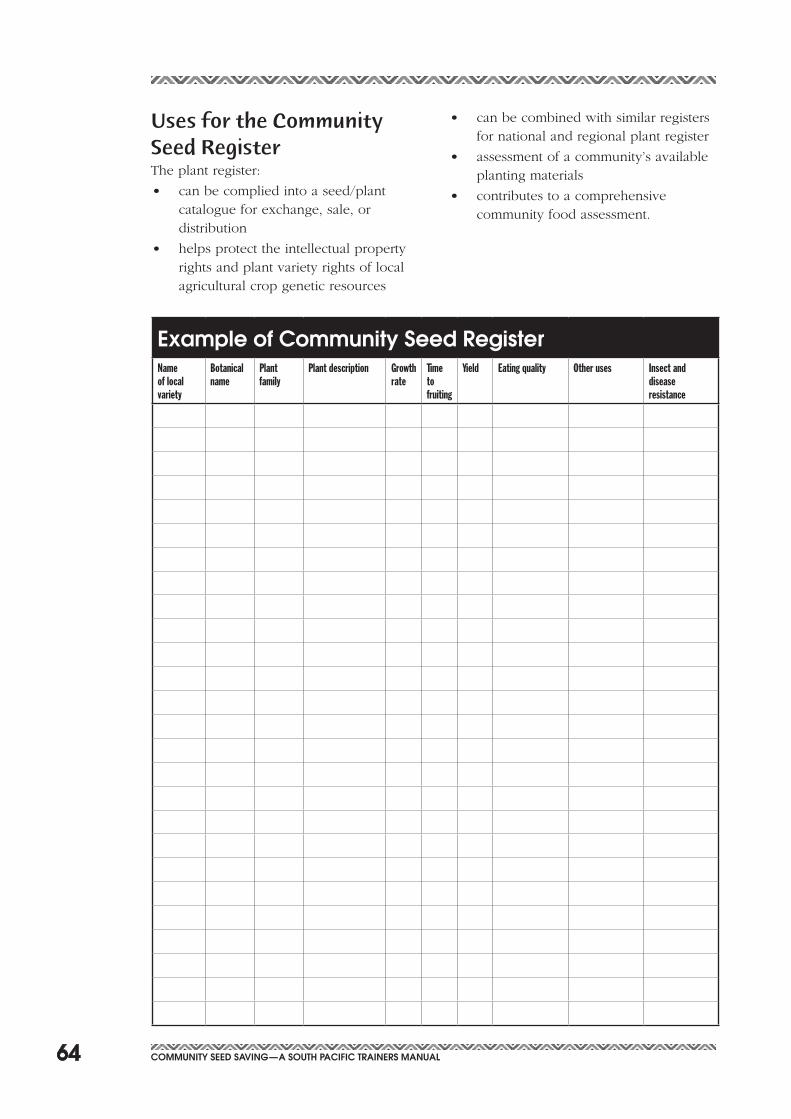
The community plant register is a document recording information about the local agriculturalbiodiversity—therangeofedible and otherwise useful plants used by the community.
The register is preferably made by local farmers.
Valuable information in a community seed register includes:
• nameofthelocalvariety
• botanicalname
• plantfamily(thegroupofrelatedplants to which the variety belongs)
• plantdescription(suchaswhetheratree, shrub, vegetable or root crop)
• growthhabit(suchaswhethertheplant grows as a tall/medium/short tree, shrub, ground cover)
• timetofruiting(howlongafterplanting as a seed until the plant bears fruit)
• yield(whethertheplantproducesalarge or small quantity of food)
• eatingquality(istheediblepartsweet,sour or bitter tasting; whether it is considered good to eat)
Community plant register• otheruses(suchasmedicine,building
material, food for chickens, food for young babies)
• insectanddiseaseresistance.
It may not be necessary to include all categories. However it is clear that the more that is recorded the greater the understanding and benefit.
ProcessThe process of documenting such details of each plant assists to:
• identifydifferencesinplantvarieties
• identifytherangeofqualitiesofvarieties (which demonstrates the importance of diversity)
• teachesbotanicalclassificationthroughpractical use
• identifysitesuitabilityfordifferentvarieties—whichplantsdobestinwhich locations.
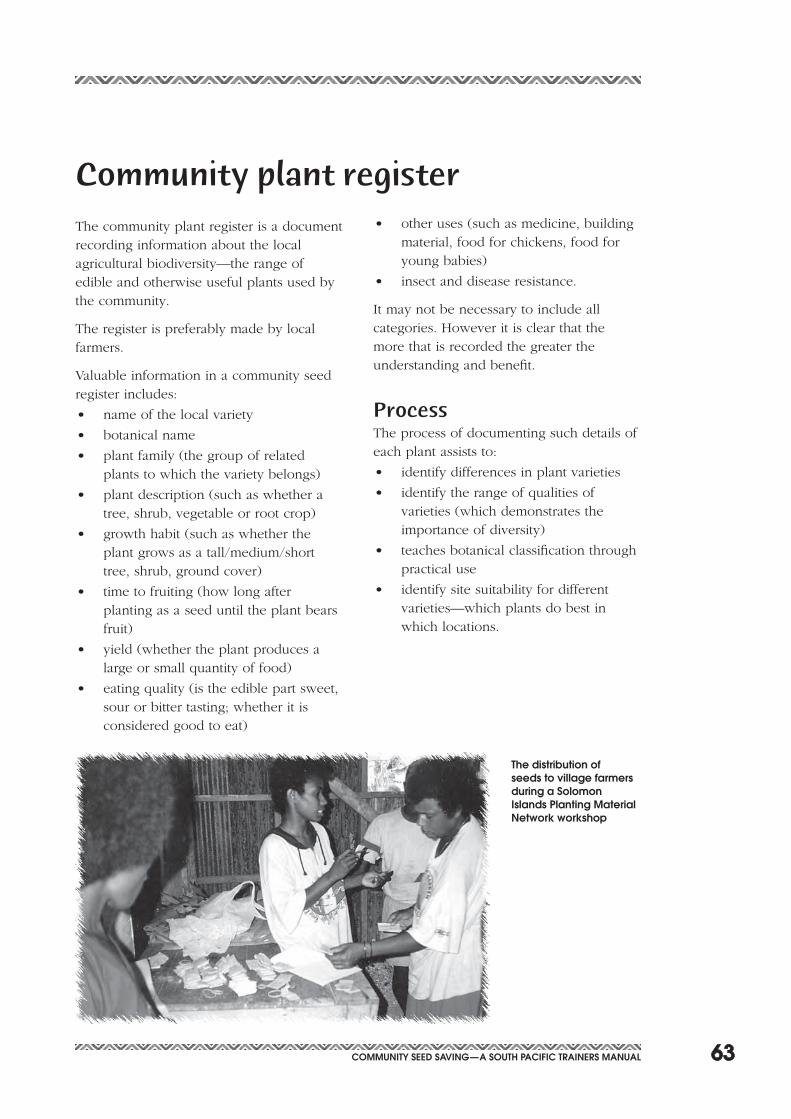
the distribution of seeds to village farmers during a Solomon islands Planting material network workshop
64 Community SEEd Saving—a South PaCifiC trainErS manual
Uses for the Community Seed RegisterThe plant register:
• canbecompliedintoaseed/plantcatalogue for exchange, sale, or distribution
• helpsprotecttheintellectualpropertyrights and plant variety rights of local agricultural crop genetic resources
Example of Community Seed registerName of local variety
Botanical name
Plant family
Plant description Growth rate
Time to fruiting
Yield Eating quality Other uses Insect and disease resistance
• canbecombinedwithsimilarregistersfor national and regional plant register
• assessmentofacommunity’savailableplanting materials
• contributestoacomprehensivecommunity food assessment.

Sources of useful information
rEfErEnCES

67Community SEEd Saving—a South PaCifiC trainErS manual
Reference materialThe Seed Savers Handbook - For Australia and New Zealand
by Michel and Jude Fanton
published by the Seed Savers’ Network Australia, 1993.
Seed Production for the Australian Home Gardener
by Allen and Christina Barry
published by The Henry Doubleday Research Association of Australia Inc, 1977.
In-site Conservation of Agricultural Biodiversity and Establishment of Community Seed Banks
written and published by The Research Foundation for Science, TechnologyandEcologyandNAVDANYA, 1997.
More informationSolomon Islands Planting Material Network
PO Box 742 Honiara Solomon Islands Phone (677) 39551 Fax (677) 21339
The Planting Material Network is an association of farmers, agricultural extension agencies and non-government organisations active in seed saving and agricultural training.
ReferencesKastom Gaden Association
PO Box 742 Honiara Solomon Islands Phone (677) 39551 Fax (677) 21339
The Kastom Gaden Association, based in the Solomon Islands, is a non-government organisation providing training in small scale agriculture.
The Association works closely with the Solomon Islands Planting Material Network.
The Seed Savers’ Network
PO Box 975 Byron Bay NSW 2481 Australia
Phone/Fax (61) 02 6685 6624
www.seedsavers.net.au
The Seed Savers’ Network supplies training and support for the Solomon Islands Planting Material Network.
Courses in community seed saving and training internships for seed savers from Australia and other countries may be available at the Network’s Byron Bay premises.
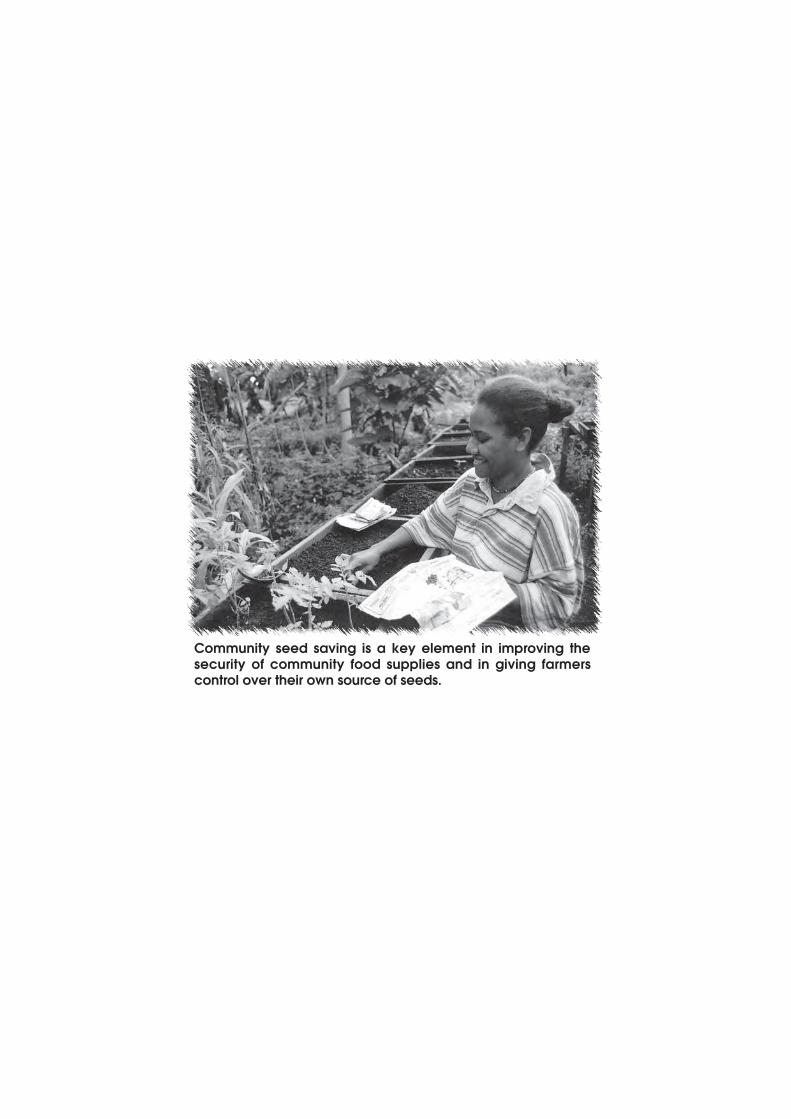
Community seed saving is a key element in improving the security of community food supplies and in giving farmers control over their own source of seeds.