
Community Provider Sites - Rutland Regional Medical … · Rutland Regional Medical Center...
99
RRMC Electronic Medical Record Community Provider Sites Training Guide
Transcript of Community Provider Sites - Rutland Regional Medical … · Rutland Regional Medical Center...
RRMC
Electronic Medical Record
Community Provider Sites
Training Guide

Table of Contents
PowerChart or WebConnect?. ....................................................................................... 1
SECTION 1: POWERCHART ..................................................................................... 1-1
SECTION 2: WEBCONNECT ..................................................................................... 2-1
SECTION 3: APPENDICES
APPENDIX 1: Definitions
APPENDIX 2: Initial Access Instructions
APPENDIX 3: Accessing The RRMC Train Domain for PowerChart
APPENDIX 4: Selecting a Different Printer
APPENDIX 5: Changing Your Password
APPENDIX 6: Potential Filters
APPENDIX 7: RRMC Resources
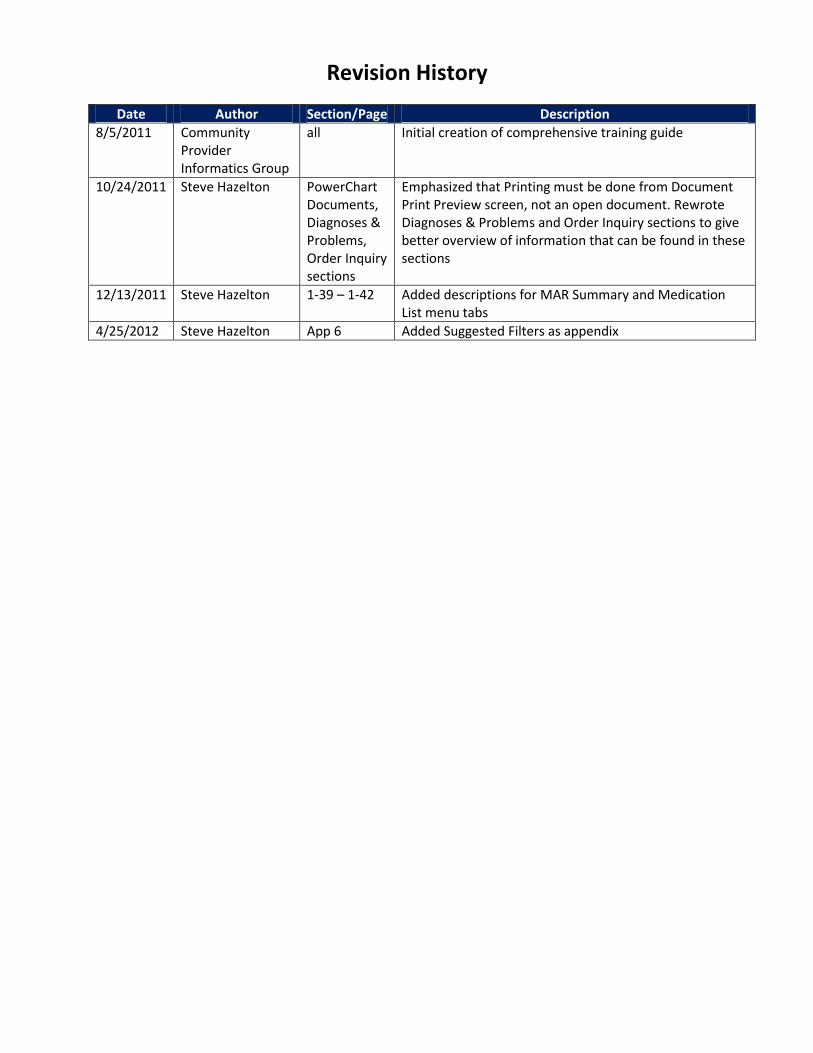
Revision History
Date Author Section/Page Description
8/5/2011 Community Provider Informatics Group
all Initial creation of comprehensive training guide
10/24/2011 Steve Hazelton PowerChart Documents, Diagnoses & Problems, Order Inquiry sections
Emphasized that Printing must be done from Document Print Preview screen, not an open document. Rewrote Diagnoses & Problems and Order Inquiry sections to give better overview of information that can be found in these sections
12/13/2011 Steve Hazelton 1-39 – 1-42 Added descriptions for MAR Summary and Medication List menu tabs
4/25/2012 Steve Hazelton App 6 Added Suggested Filters as appendix
PowerChart or WebConnect? Rutland Regional Medical Center currently has two ways for Community Provider Sites (private practices and nursing homes) to access the patient information in the RRMC Electronic Medical Record. The program you will use (PowerChart or WebConnect) will depend on the information you need.
PowerChart Advantages:
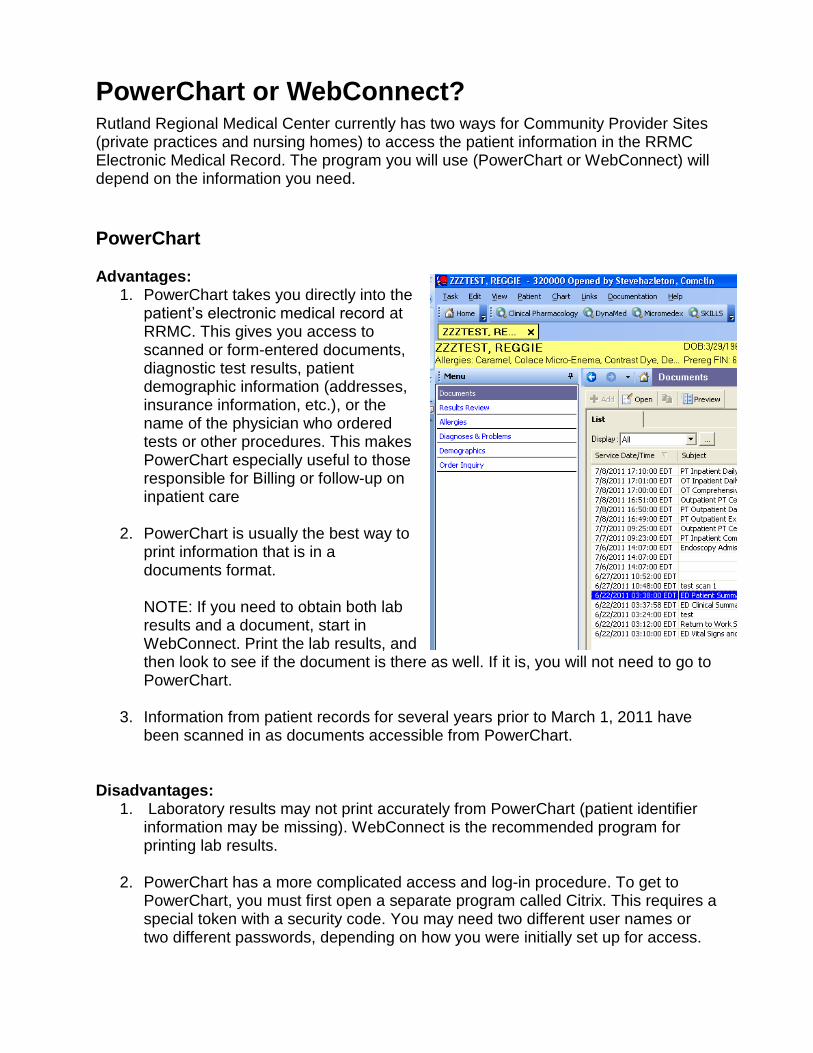
1. PowerChart takes you directly into the patient’s electronic medical record at RRMC. This gives you access to scanned or form-entered documents, diagnostic test results, patient demographic information (addresses, insurance information, etc.), or the name of the physician who ordered tests or other procedures. This makes PowerChart especially useful to those responsible for Billing or follow-up on inpatient care
2. PowerChart is usually the best way to
print information that is in a documents format. NOTE: If you need to obtain both lab results and a document, start in WebConnect. Print the lab results, and then look to see if the document is there as well. If it is, you will not need to go to PowerChart.
3. Information from patient records for several years prior to March 1, 2011 have been scanned in as documents accessible from PowerChart.
Disadvantages:
1. Laboratory results may not print accurately from PowerChart (patient identifier information may be missing). WebConnect is the recommended program for printing lab results.
2. PowerChart has a more complicated access and log-in procedure. To get to
PowerChart, you must first open a separate program called Citrix. This requires a special token with a security code. You may need two different user names or two different passwords, depending on how you were initially set up for access.
WebConnect Advantages:
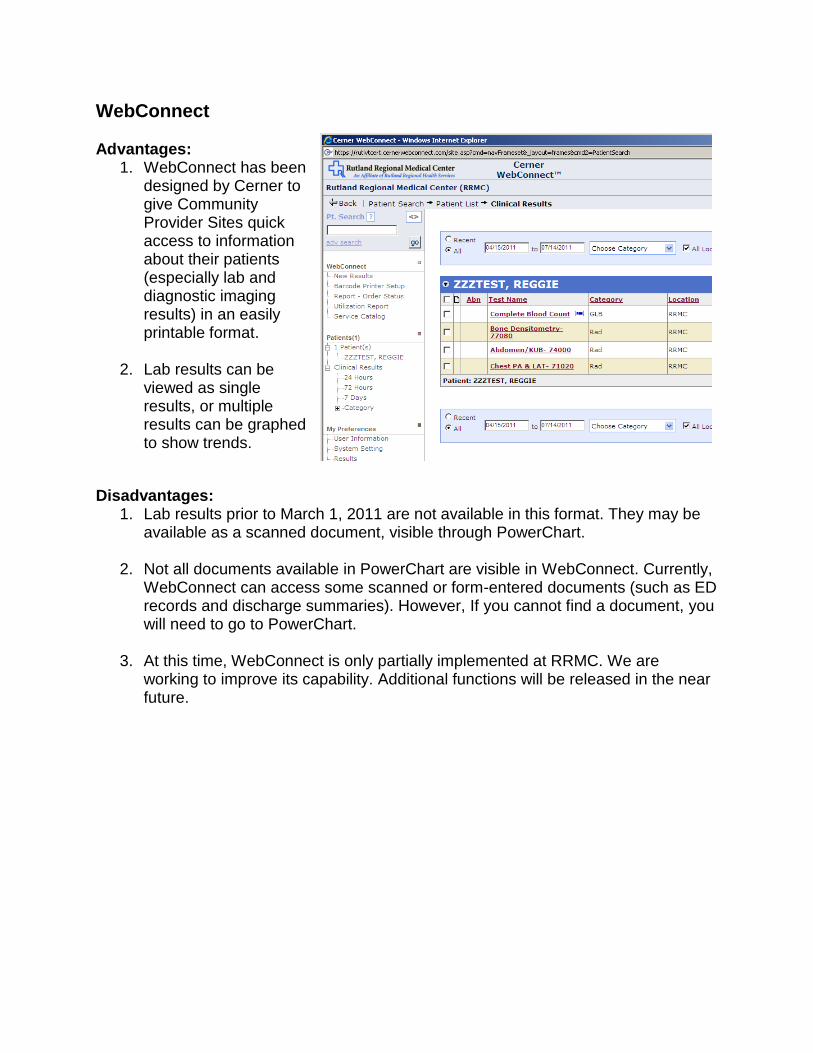
1. WebConnect has been designed by Cerner to give Community Provider Sites quick access to information about their patients (especially lab and diagnostic imaging results) in an easily printable format.
2. Lab results can be
viewed as single results, or multiple results can be graphed to show trends.
Disadvantages: 1. Lab results prior to March 1, 2011 are not available in this format. They may be
available as a scanned document, visible through PowerChart.
2. Not all documents available in PowerChart are visible in WebConnect. Currently, WebConnect can access some scanned or form-entered documents (such as ED records and discharge summaries). However, If you cannot find a document, you will need to go to PowerChart.
3. At this time, WebConnect is only partially implemented at RRMC. We are
working to improve its capability. Additional functions will be released in the near future.

Section 1:
PowerChart
Community Provider Sites

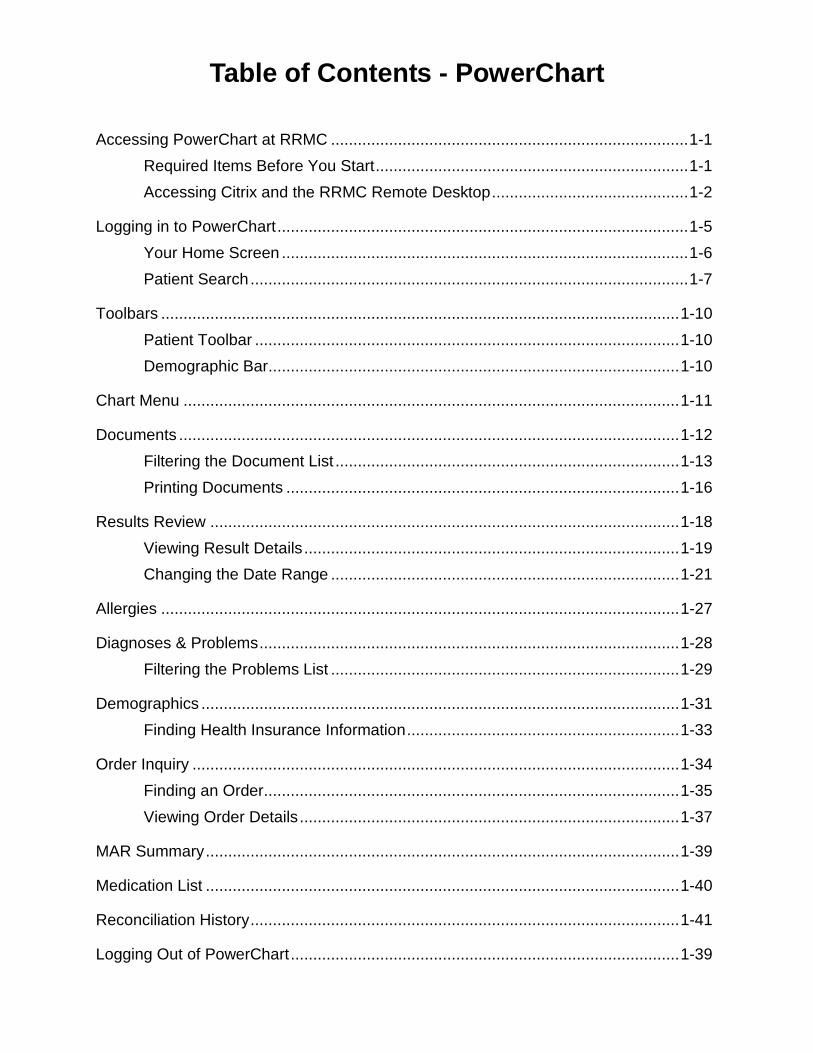
Table of Contents - PowerChart
Accessing PowerChart at RRMC ................................................................................ 1-1
Required Items Before You Start ...................................................................... 1-1
Accessing Citrix and the RRMC Remote Desktop ............................................ 1-2
Logging in to PowerChart ............................................................................................ 1-5
Your Home Screen ........................................................................................... 1-6
Patient Search .................................................................................................. 1-7
Toolbars .................................................................................................................... 1-10
Patient Toolbar ............................................................................................... 1-10
Demographic Bar ............................................................................................ 1-10
Chart Menu ............................................................................................................... 1-11
Documents ................................................................................................................ 1-12
Filtering the Document List ............................................................................. 1-13
Printing Documents ........................................................................................ 1-16
Results Review ......................................................................................................... 1-18
Viewing Result Details .................................................................................... 1-19
Changing the Date Range .............................................................................. 1-21
Allergies .................................................................................................................... 1-27
Diagnoses & Problems .............................................................................................. 1-28
Filtering the Problems List .............................................................................. 1-29
Demographics ........................................................................................................... 1-31
Finding Health Insurance Information ............................................................. 1-33
Order Inquiry ............................................................................................................. 1-34
Finding an Order ............................................................................................. 1-35
Viewing Order Details ..................................................................................... 1-37
MAR Summary .......................................................................................................... 1-39
Medication List .......................................................................................................... 1-40
Reconciliation History ................................................................................................ 1-41
Logging Out of PowerChart ....................................................................................... 1-39

RRMC EMR Section 1: PowerChart
Page 1-1 Rev. 12/13/2011
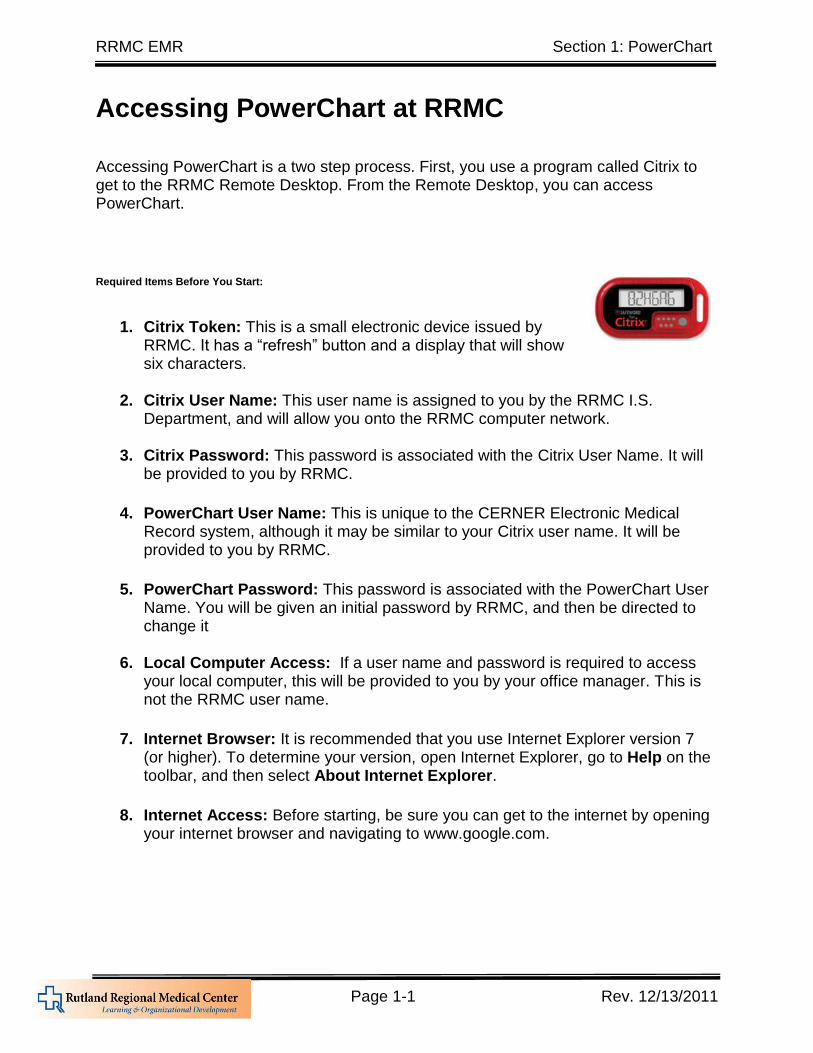
Accessing PowerChart at RRMC
Accessing PowerChart is a two step process. First, you use a program called Citrix to get to the RRMC Remote Desktop. From the Remote Desktop, you can access PowerChart.
Required Items Before You Start:
1. Citrix Token: This is a small electronic device issued by
RRMC. It has a “refresh” button and a display that will show six characters.
2. Citrix User Name: This user name is assigned to you by the RRMC I.S. Department, and will allow you onto the RRMC computer network.
3. Citrix Password: This password is associated with the Citrix User Name. It will be provided to you by RRMC.
4. PowerChart User Name: This is unique to the CERNER Electronic Medical Record system, although it may be similar to your Citrix user name. It will be provided to you by RRMC.
5. PowerChart Password: This password is associated with the PowerChart User Name. You will be given an initial password by RRMC, and then be directed to change it
6. Local Computer Access: If a user name and password is required to access
your local computer, this will be provided to you by your office manager. This is not the RRMC user name.
7. Internet Browser: It is recommended that you use Internet Explorer version 7 (or higher). To determine your version, open Internet Explorer, go to Help on the toolbar, and then select About Internet Explorer.
8. Internet Access: Before starting, be sure you can get to the internet by opening your internet browser and navigating to www.google.com.
RRMC EMR Section 1: PowerChart
Page 1-2 Rev. 12/13/2011
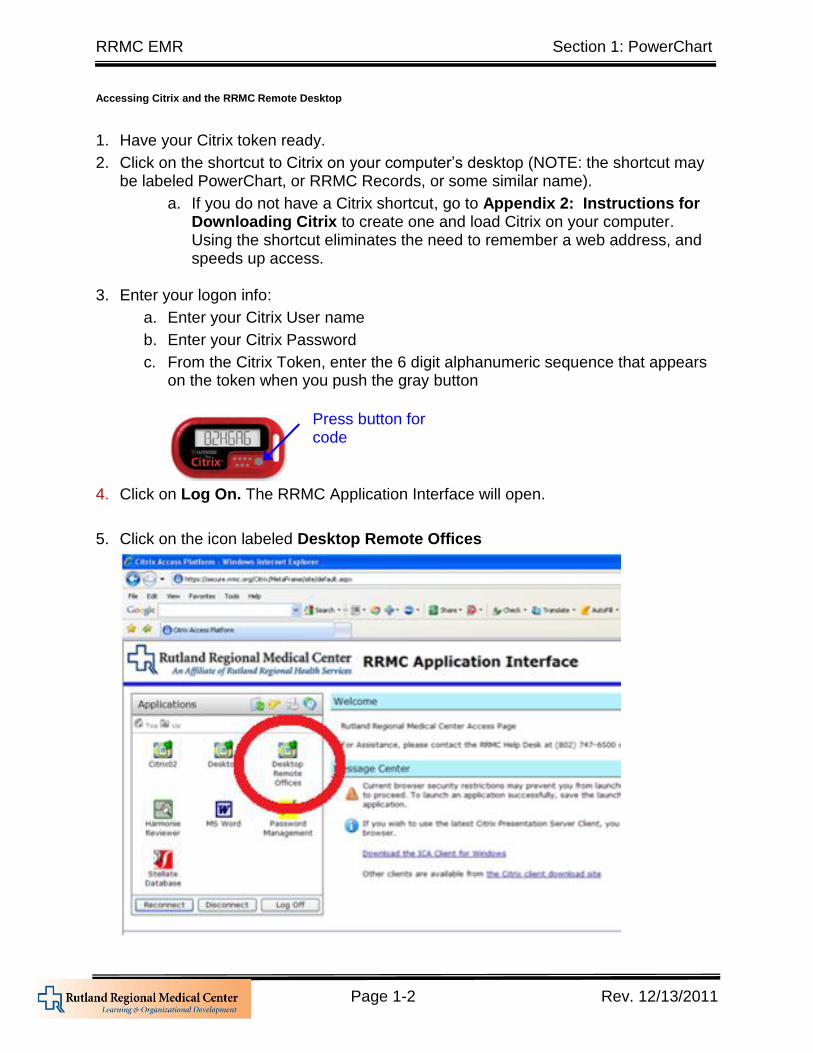
Accessing Citrix and the RRMC Remote Desktop
1. Have your Citrix token ready.
2. Click on the shortcut to Citrix on your computer’s desktop (NOTE: the shortcut may be labeled PowerChart, or RRMC Records, or some similar name).
a. If you do not have a Citrix shortcut, go to Appendix 2: Instructions for Downloading Citrix to create one and load Citrix on your computer. Using the shortcut eliminates the need to remember a web address, and speeds up access.
3. Enter your logon info:
a. Enter your Citrix User name
b. Enter your Citrix Password
c. From the Citrix Token, enter the 6 digit alphanumeric sequence that appears on the token when you push the gray button
4. Click on Log On. The RRMC Application Interface will open.
5. Click on the icon labeled Desktop Remote Offices
Press button for code
RRMC EMR Section 1: PowerChart
Page 1-3 Rev. 12/13/2011
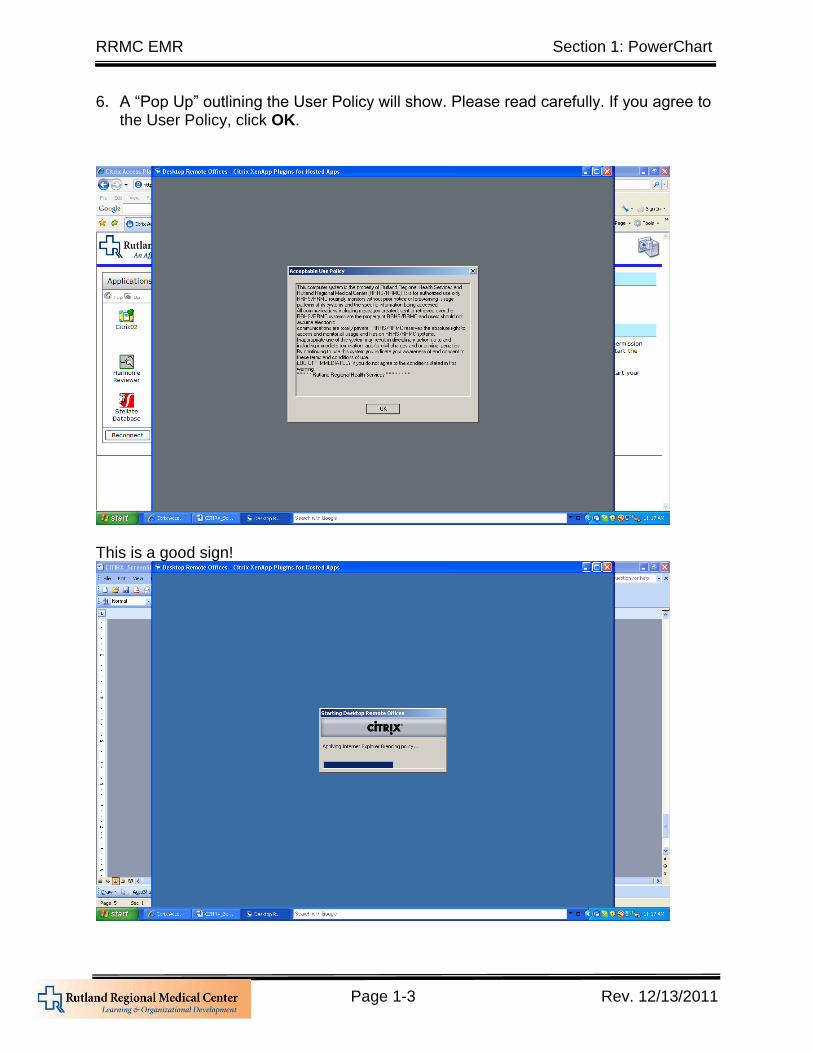
6. A “Pop Up” outlining the User Policy will show. Please read carefully. If you agree to the User Policy, click OK.
This is a good sign!
RRMC EMR Section 1: PowerChart
Page 1-4 Rev. 12/13/2011
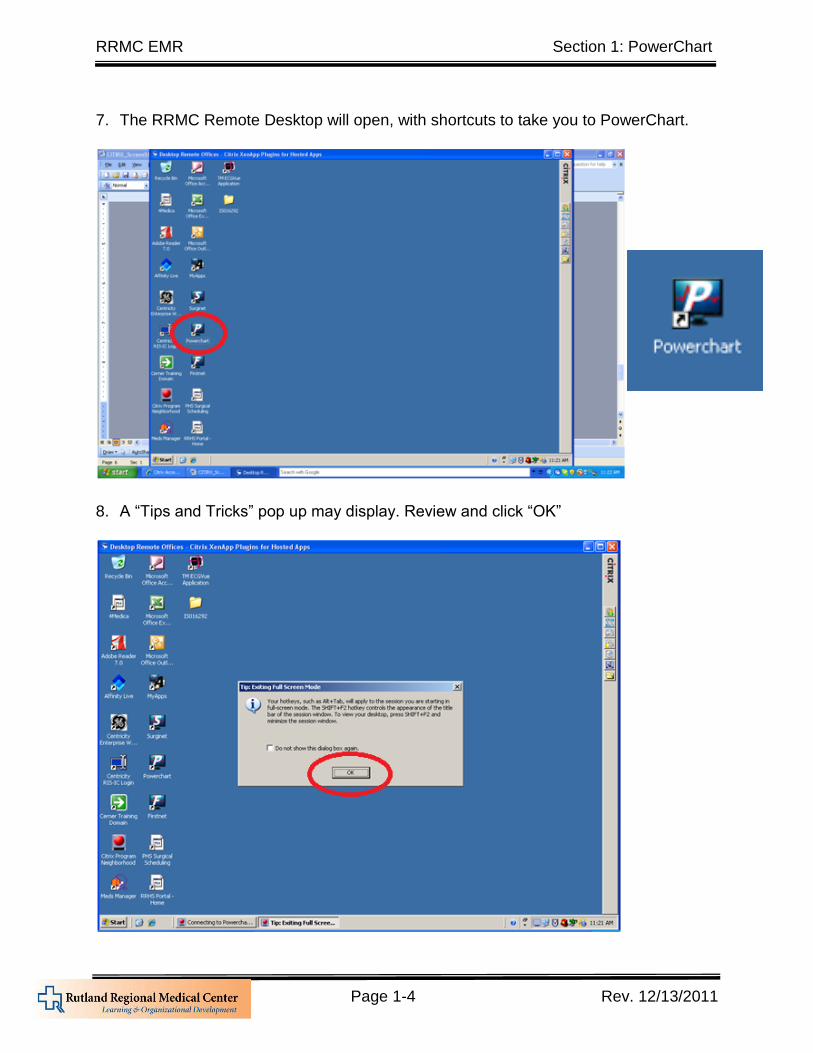
7. The RRMC Remote Desktop will open, with shortcuts to take you to PowerChart.
8. A “Tips and Tricks” pop up may display. Review and click “OK”
RRMC EMR Section 1: PowerChart
Page 1-5 Rev. 12/13/2011
Logging into PowerChart
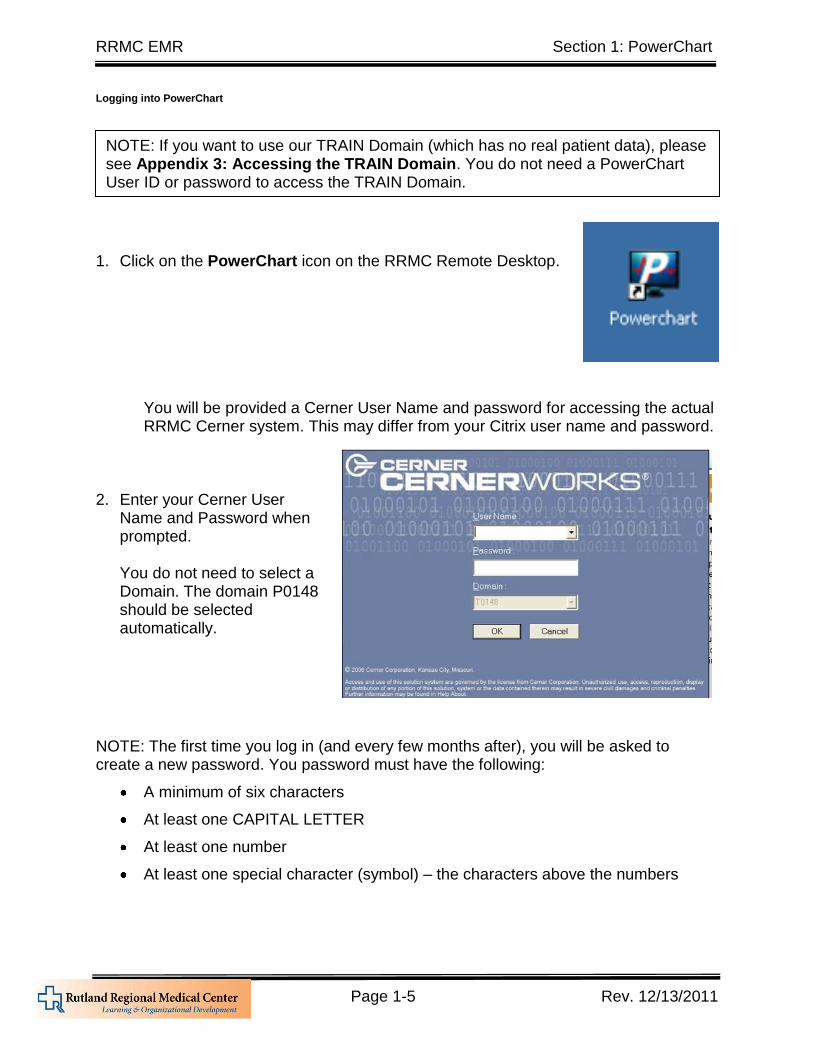
1. Click on the PowerChart icon on the RRMC Remote Desktop.
You will be provided a Cerner User Name and password for accessing the actual RRMC Cerner system. This may differ from your Citrix user name and password.
2. Enter your Cerner User
Name and Password when prompted.
You do not need to select a Domain. The domain P0148 should be selected automatically.
NOTE: The first time you log in (and every few months after), you will be asked to create a new password. You password must have the following:
A minimum of six characters
At least one CAPITAL LETTER
At least one number
At least one special character (symbol) – the characters above the numbers
NOTE: If you want to use our TRAIN Domain (which has no real patient data), please see Appendix 3: Accessing the TRAIN Domain. You do not need a PowerChart User ID or password to access the TRAIN Domain.
RRMC EMR Section 1: PowerChart
Page 1-6 Rev. 12/13/2011
Your Home Screen
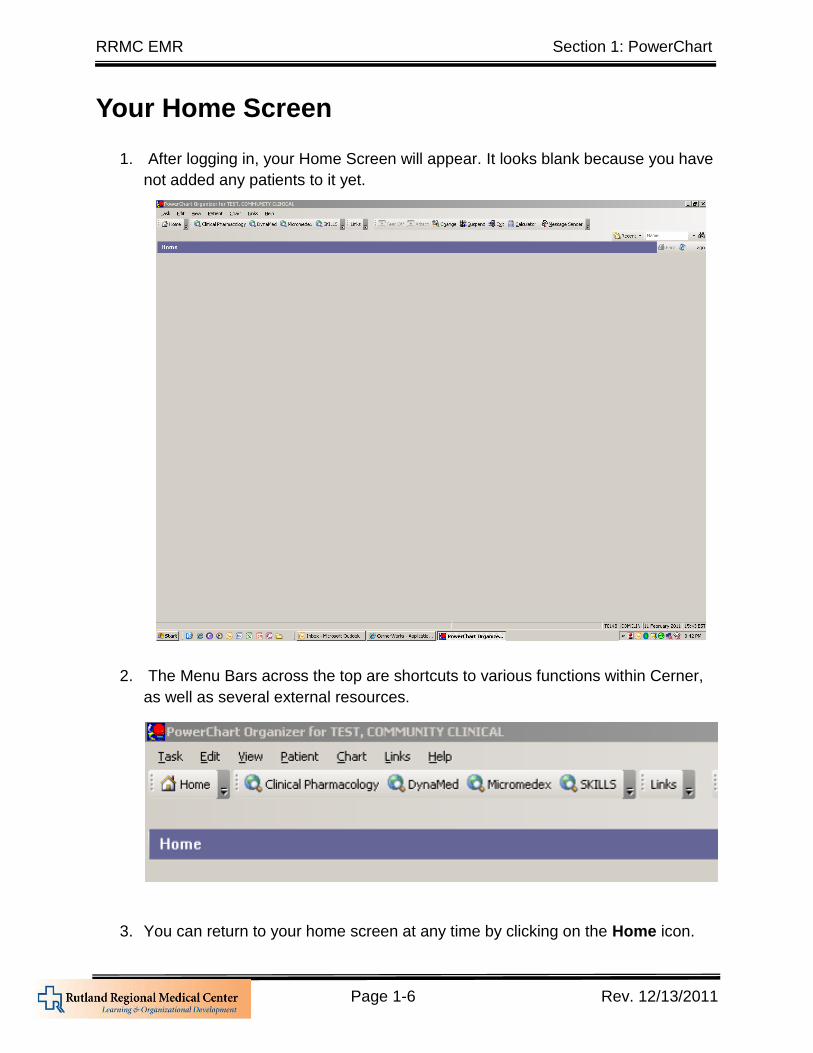
1. After logging in, your Home Screen will appear. It looks blank because you have
not added any patients to it yet.
2. The Menu Bars across the top are shortcuts to various functions within Cerner,
as well as several external resources.
3. You can return to your home screen at any time by clicking on the Home icon.
RRMC EMR Section 1: PowerChart
Page 1-7 Rev. 12/13/2011
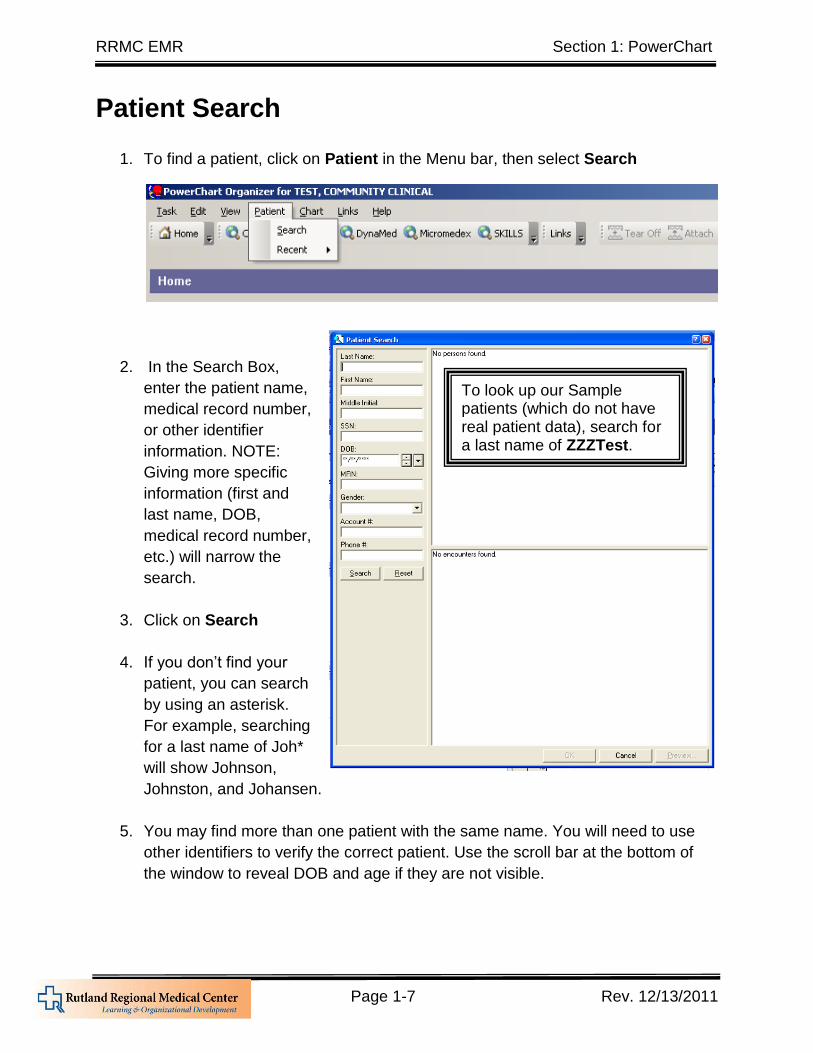
Patient Search
1. To find a patient, click on Patient in the Menu bar, then select Search
2. In the Search Box,
enter the patient name,
medical record number,
or other identifier
information. NOTE:
Giving more specific
information (first and
last name, DOB,
medical record number,
etc.) will narrow the
search.
3. Click on Search
4. If you don’t find your
patient, you can search
by using an asterisk.
For example, searching
for a last name of Joh*
will show Johnson,
Johnston, and Johansen.
5. You may find more than one patient with the same name. You will need to use
other identifiers to verify the correct patient. Use the scroll bar at the bottom of
the window to reveal DOB and age if they are not visible.
To look up our Sample patients (which do not have real patient data), search for a last name of ZZZTest.
RRMC EMR Section 1: PowerChart
Page 1-8 Rev. 12/13/2011
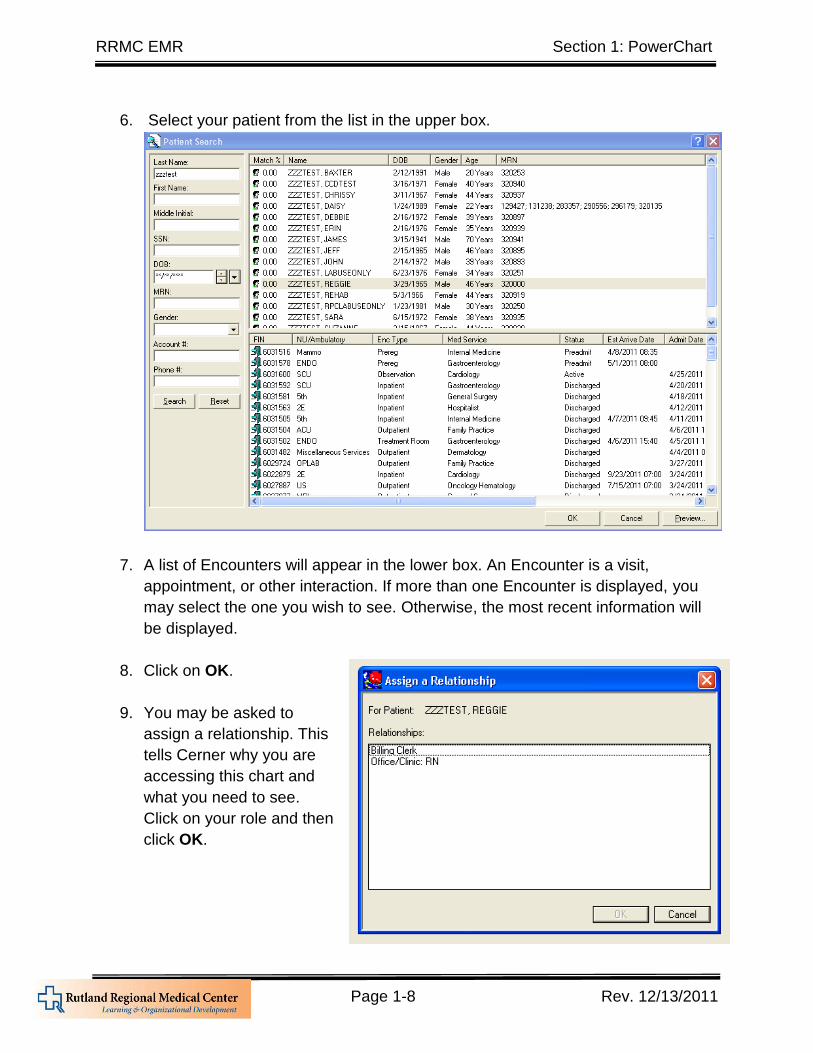
6. Select your patient from the list in the upper box.
7. A list of Encounters will appear in the lower box. An Encounter is a visit,
appointment, or other interaction. If more than one Encounter is displayed, you
may select the one you wish to see. Otherwise, the most recent information will
be displayed.
8. Click on OK.
9. You may be asked to
assign a relationship. This
tells Cerner why you are
accessing this chart and
what you need to see.
Click on your role and then
click OK.
RRMC EMR Section 1: PowerChart
Page 1-9 Rev. 12/13/2011
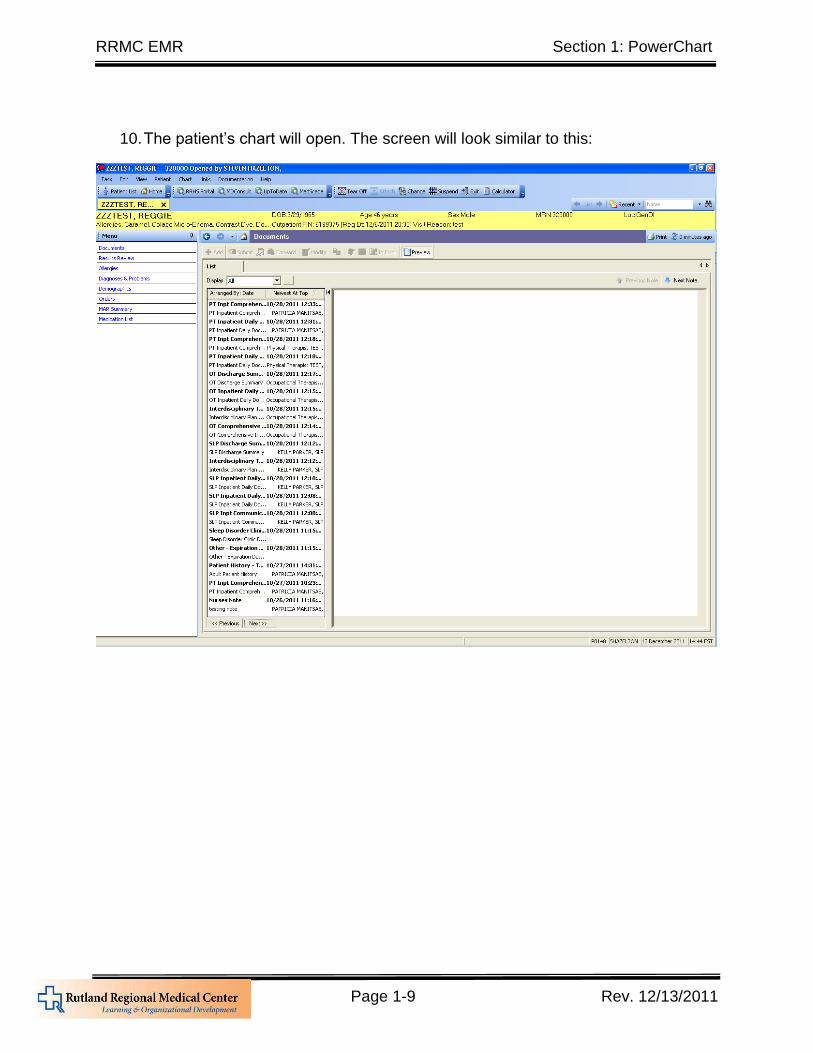
10. The patient’s chart will open. The screen will look similar to this:
RRMC EMR Section 1: PowerChart
Page 1-10 Rev. 12/13/2011
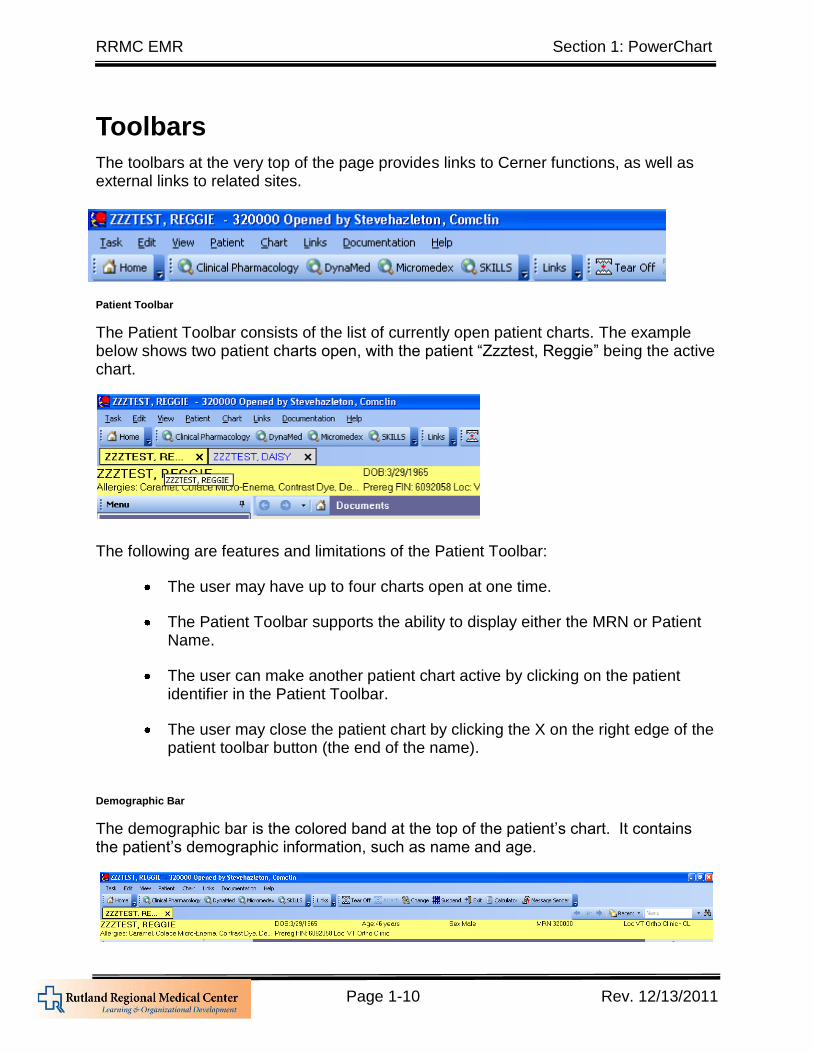
Toolbars
The toolbars at the very top of the page provides links to Cerner functions, as well as external links to related sites.
Patient Toolbar
The Patient Toolbar consists of the list of currently open patient charts. The example below shows two patient charts open, with the patient “Zzztest, Reggie” being the active chart.
The following are features and limitations of the Patient Toolbar:
The user may have up to four charts open at one time.
The Patient Toolbar supports the ability to display either the MRN or Patient Name.
The user can make another patient chart active by clicking on the patient identifier in the Patient Toolbar.
The user may close the patient chart by clicking the X on the right edge of the patient toolbar button (the end of the name).
Demographic Bar
The demographic bar is the colored band at the top of the patient’s chart. It contains the patient’s demographic information, such as name and age.
RRMC EMR Section 1: PowerChart
Page 1-11 Rev. 12/13/2011
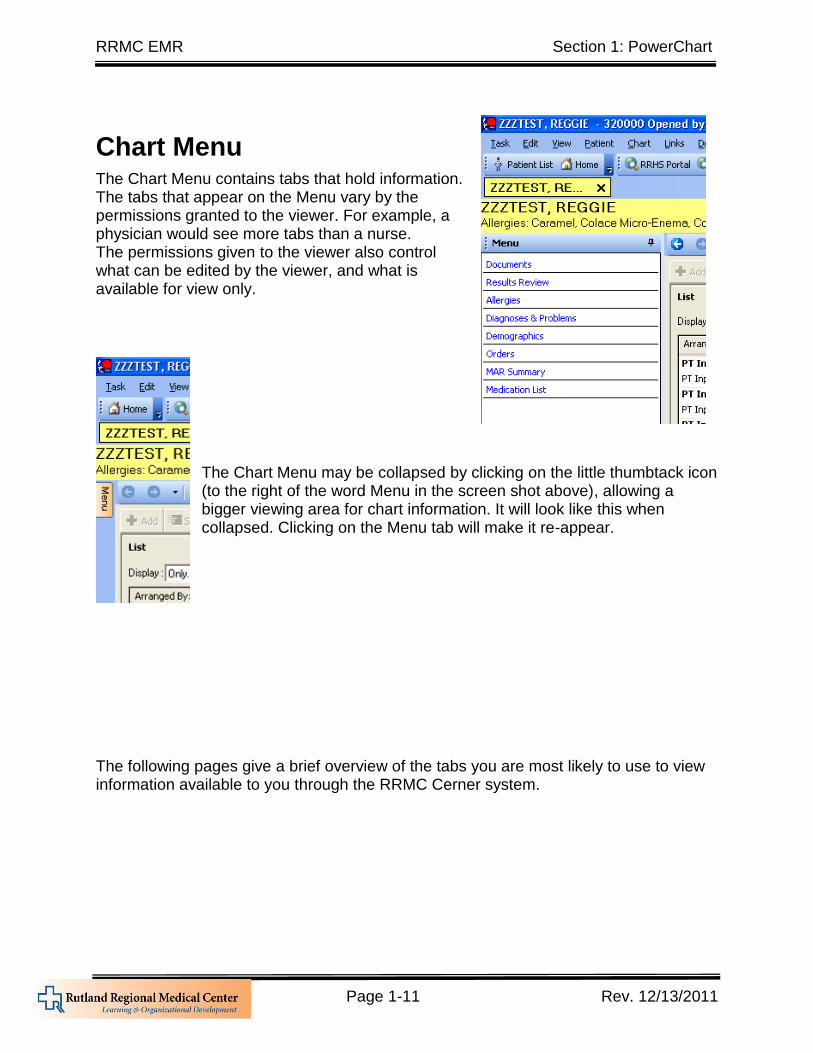
Chart Menu The Chart Menu contains tabs that hold information. The tabs that appear on the Menu vary by the permissions granted to the viewer. For example, a physician would see more tabs than a nurse. The permissions given to the viewer also control what can be edited by the viewer, and what is available for view only.
The Chart Menu may be collapsed by clicking on the little thumbtack icon (to the right of the word Menu in the screen shot above), allowing a bigger viewing area for chart information. It will look like this when collapsed. Clicking on the Menu tab will make it re-appear.
The following pages give a brief overview of the tabs you are most likely to use to view information available to you through the RRMC Cerner system.
RRMC EMR Section 1: PowerChart
Page 1-12 Rev. 12/13/2011
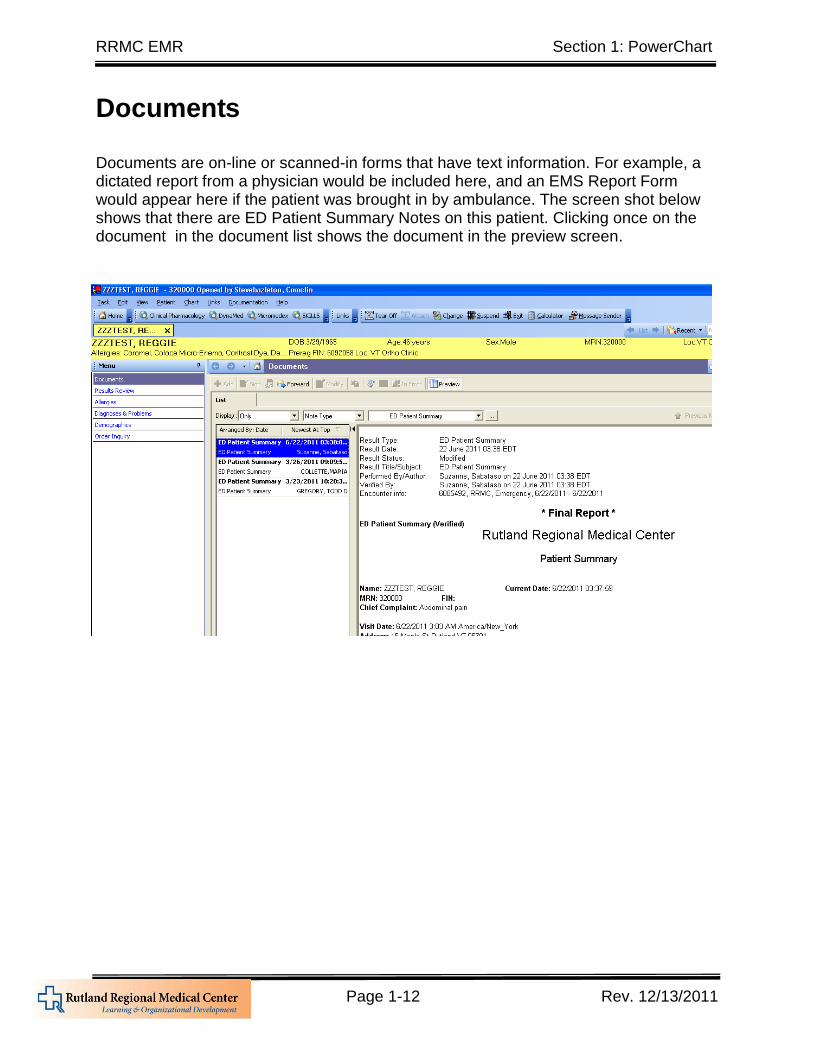
Documents Documents are on-line or scanned-in forms that have text information. For example, a dictated report from a physician would be included here, and an EMS Report Form would appear here if the patient was brought in by ambulance. The screen shot below shows that there are ED Patient Summary Notes on this patient. Clicking once on the document in the document list shows the document in the preview screen.
RRMC EMR Section 1: PowerChart
Page 1-13 Rev. 12/13/2011
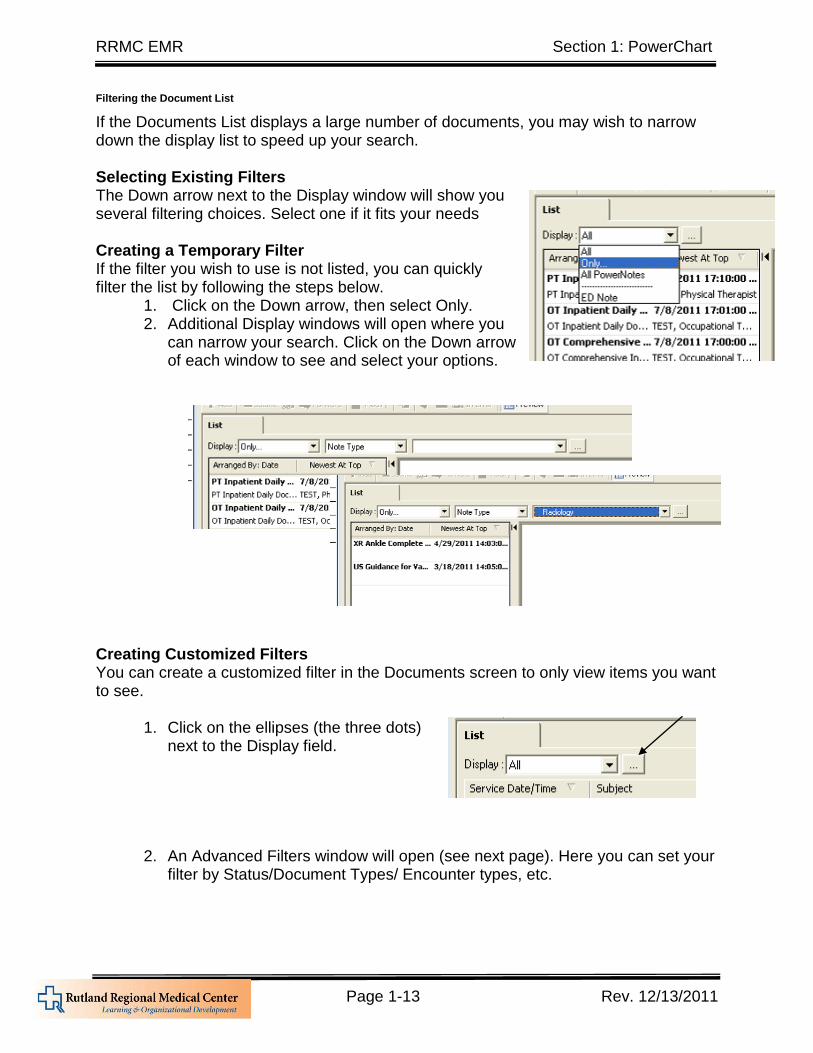
Filtering the Document List
If the Documents List displays a large number of documents, you may wish to narrow down the display list to speed up your search. Selecting Existing Filters The Down arrow next to the Display window will show you several filtering choices. Select one if it fits your needs Creating a Temporary Filter If the filter you wish to use is not listed, you can quickly filter the list by following the steps below.
1. Click on the Down arrow, then select Only. 2. Additional Display windows will open where you
can narrow your search. Click on the Down arrow of each window to see and select your options.
Creating Customized Filters You can create a customized filter in the Documents screen to only view items you want to see.
1. Click on the ellipses (the three dots) next to the Display field.
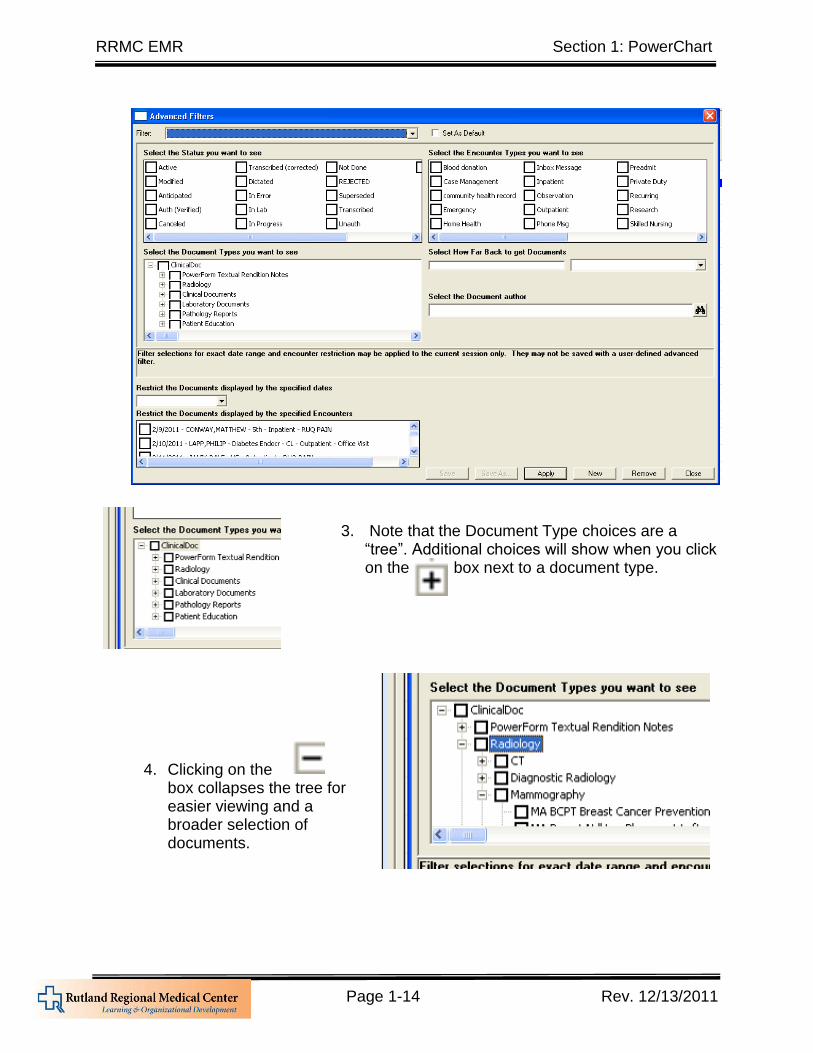
2. An Advanced Filters window will open (see next page). Here you can set your filter by Status/Document Types/ Encounter types, etc.
RRMC EMR Section 1: PowerChart
Page 1-14 Rev. 12/13/2011
3. Note that the Document Type choices are a “tree”. Additional choices will show when you click on the box next to a document type.
4. Clicking on the box collapses the tree for easier viewing and a broader selection of documents.
RRMC EMR Section 1: PowerChart
Page 1-15 Rev. 12/13/2011
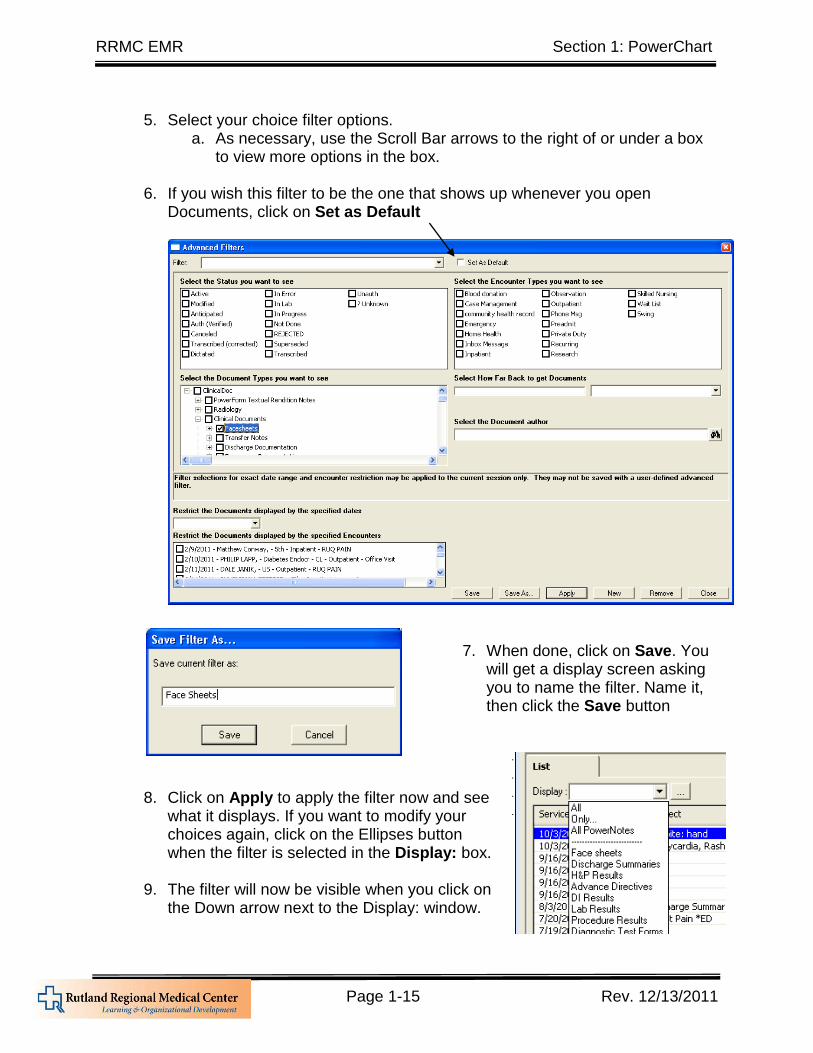
5. Select your choice filter options.
a. As necessary, use the Scroll Bar arrows to the right of or under a box to view more options in the box.
6. If you wish this filter to be the one that shows up whenever you open Documents, click on Set as Default
7. When done, click on Save. You will get a display screen asking you to name the filter. Name it, then click the Save button
8. Click on Apply to apply the filter now and see
what it displays. If you want to modify your choices again, click on the Ellipses button when the filter is selected in the Display: box.
9. The filter will now be visible when you click on the Down arrow next to the Display: window.
RRMC EMR Section 1: PowerChart
Page 1-16 Rev. 12/13/2011
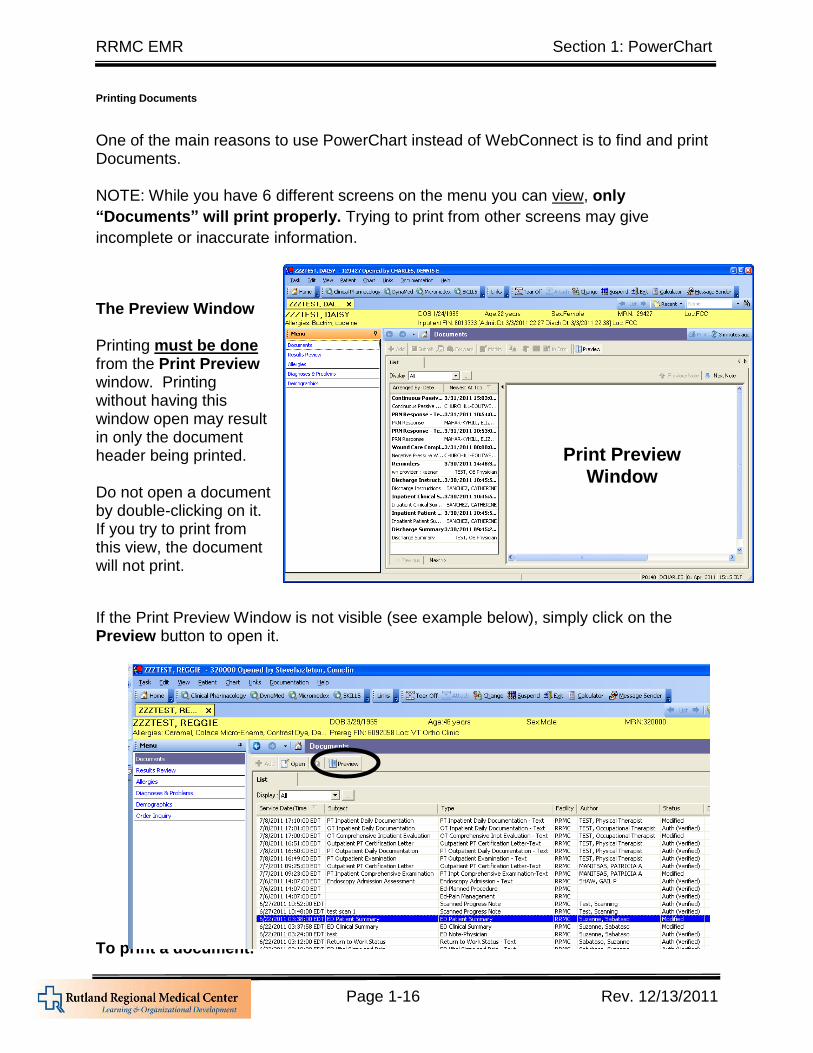
Printing Documents
One of the main reasons to use PowerChart instead of WebConnect is to find and print Documents. NOTE: While you have 6 different screens on the menu you can view, only
“Documents” will print properly. Trying to print from other screens may give
incomplete or inaccurate information.
The Preview Window Printing must be done from the Print Preview window. Printing without having this window open may result in only the document header being printed. Do not open a document by double-clicking on it. If you try to print from this view, the document will not print.
If the Print Preview Window is not visible (see example below), simply click on the Preview button to open it. To print a document:
Print Preview
Window
RRMC EMR Section 1: PowerChart
Page 1-17 Rev. 12/13/2011
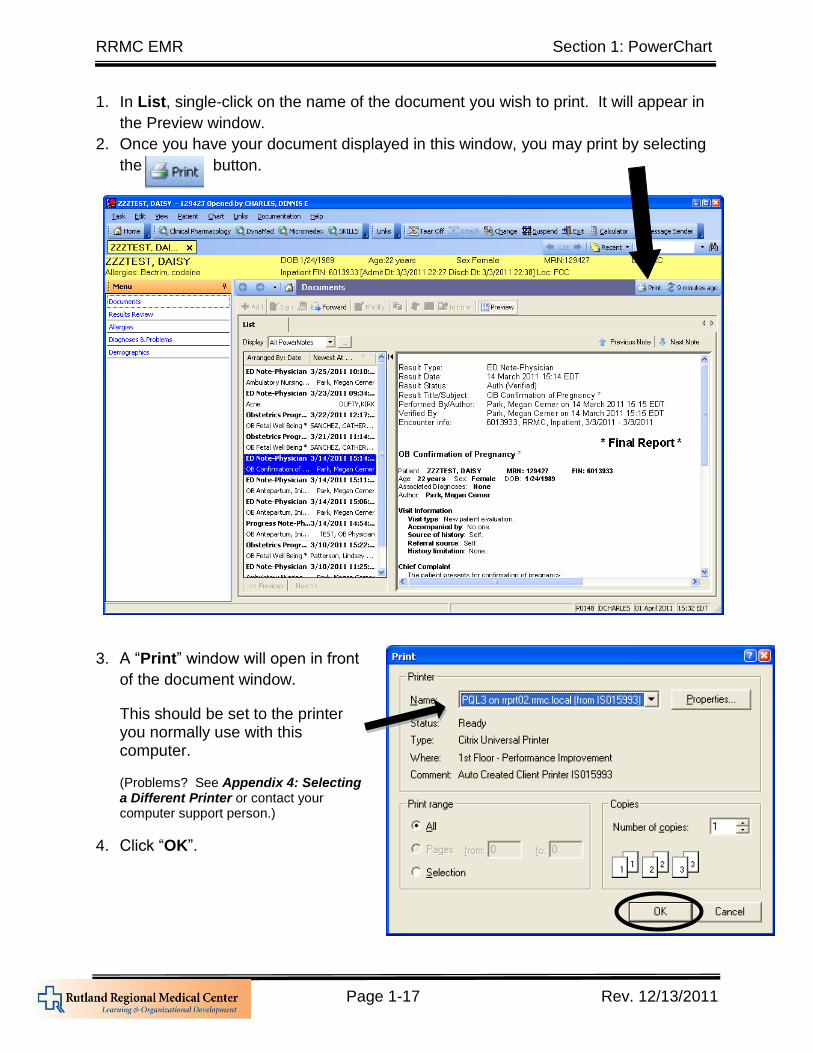
1. In List, single-click on the name of the document you wish to print. It will appear in
the Preview window.
2. Once you have your document displayed in this window, you may print by selecting
the button.
3. A “Print” window will open in front
of the document window.
This should be set to the printer you normally use with this computer.
(Problems? See Appendix 4: Selecting a Different Printer or contact your computer support person.)
4. Click “OK”.
RRMC EMR Section 1: PowerChart
Page 1-18 Rev. 12/13/2011
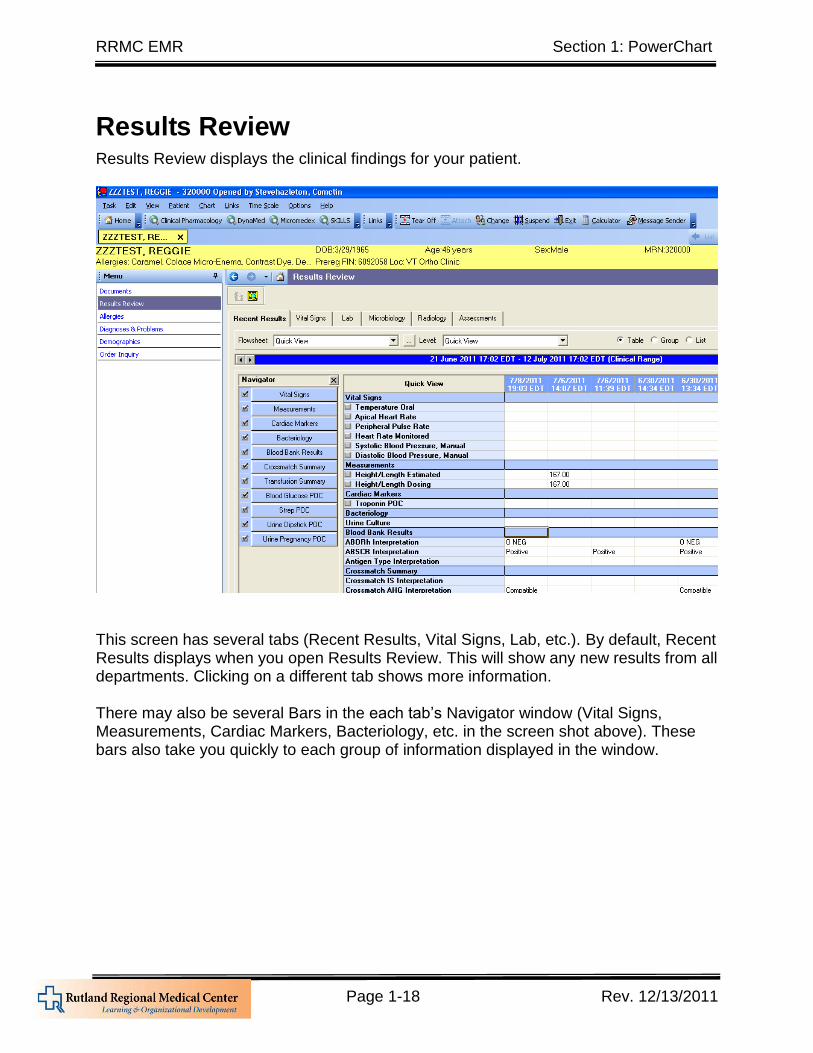
Results Review Results Review displays the clinical findings for your patient.
This screen has several tabs (Recent Results, Vital Signs, Lab, etc.). By default, Recent Results displays when you open Results Review. This will show any new results from all departments. Clicking on a different tab shows more information. There may also be several Bars in the each tab’s Navigator window (Vital Signs, Measurements, Cardiac Markers, Bacteriology, etc. in the screen shot above). These bars also take you quickly to each group of information displayed in the window.
RRMC EMR Section 1: PowerChart
Page 1-19 Rev. 12/13/2011
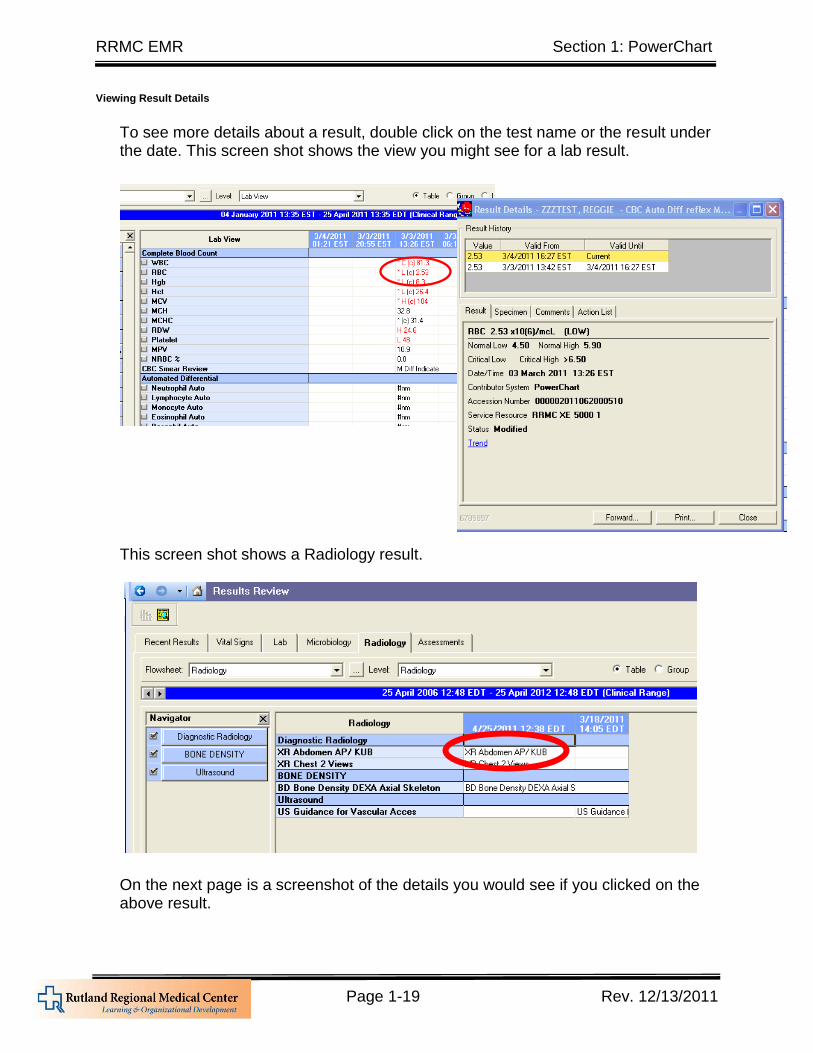
Viewing Result Details
To see more details about a result, double click on the test name or the result under the date. This screen shot shows the view you might see for a lab result. This screen shot shows a Radiology result. On the next page is a screenshot of the details you would see if you clicked on the above result.
RRMC EMR Section 1: PowerChart
Page 1-20 Rev. 12/13/2011
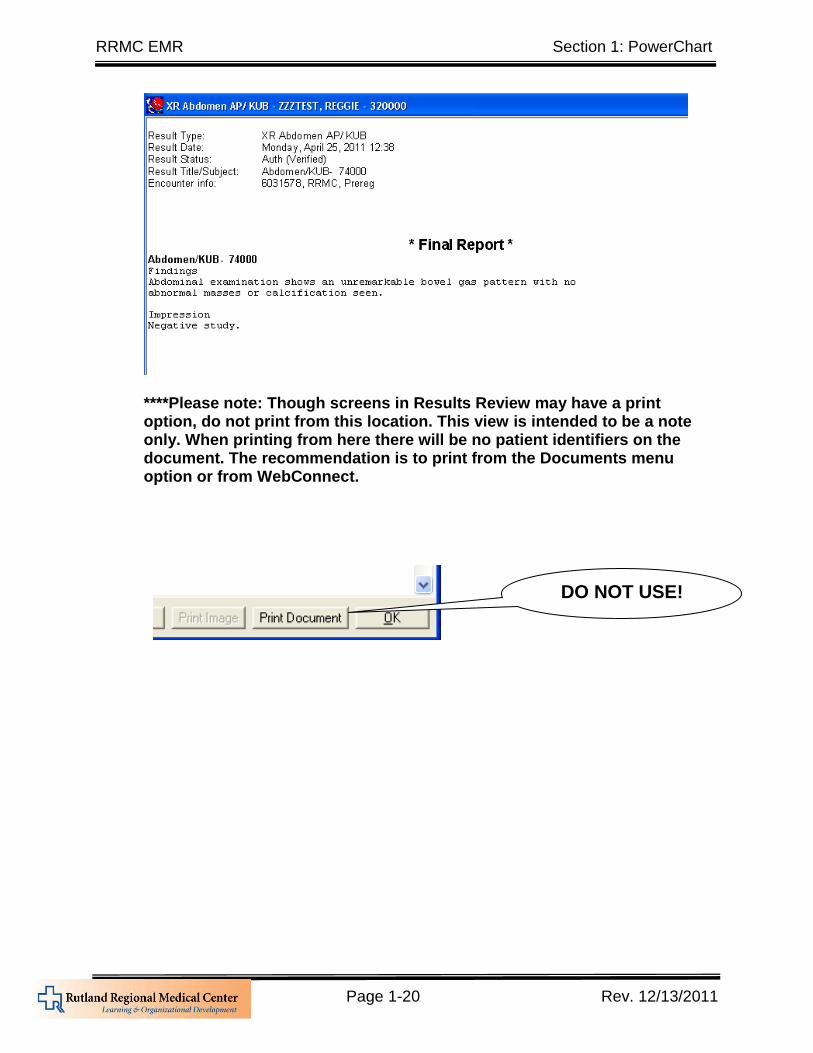
****Please note: Though screens in Results Review may have a print option, do not print from this location. This view is intended to be a note only. When printing from here there will be no patient identifiers on the document. The recommendation is to print from the Documents menu option or from WebConnect.
DO NOT USE!
RRMC EMR Section 1: PowerChart
Page 1-21 Rev. 12/13/2011
Changing the Date Range
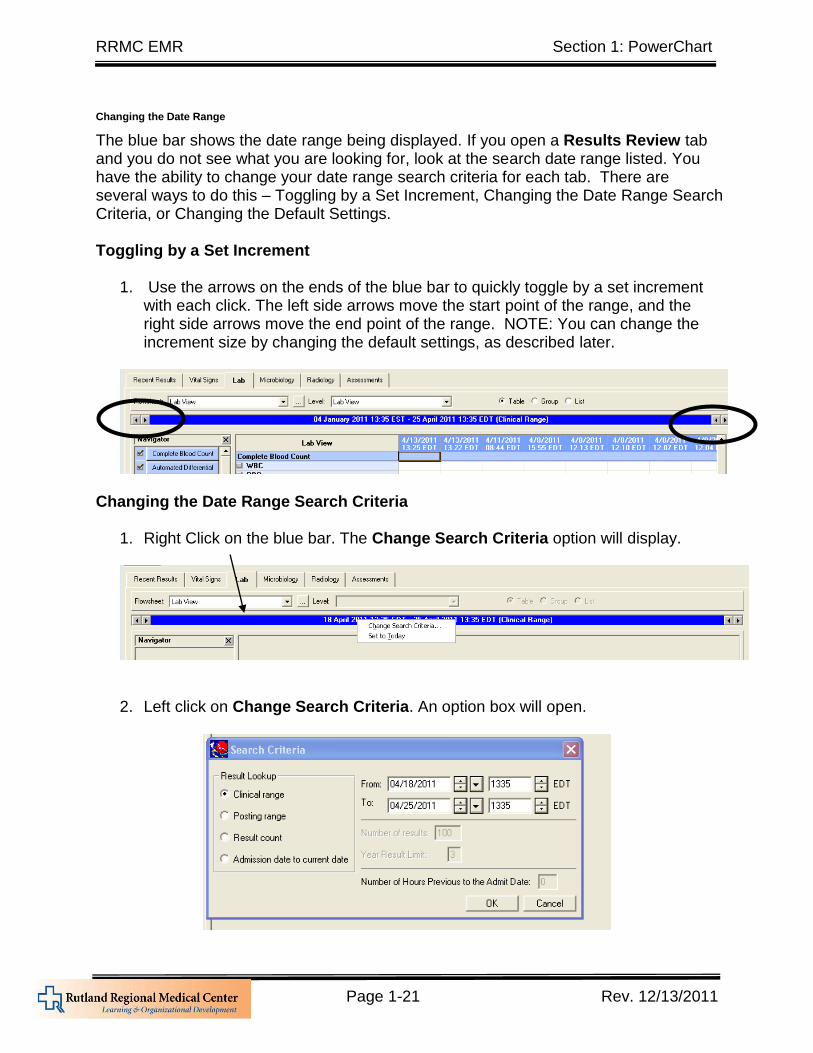
The blue bar shows the date range being displayed. If you open a Results Review tab and you do not see what you are looking for, look at the search date range listed. You have the ability to change your date range search criteria for each tab. There are several ways to do this – Toggling by a Set Increment, Changing the Date Range Search Criteria, or Changing the Default Settings. Toggling by a Set Increment
1. Use the arrows on the ends of the blue bar to quickly toggle by a set increment with each click. The left side arrows move the start point of the range, and the right side arrows move the end point of the range. NOTE: You can change the increment size by changing the default settings, as described later.
Changing the Date Range Search Criteria
1. Right Click on the blue bar. The Change Search Criteria option will display.
2. Left click on Change Search Criteria. An option box will open.
RRMC EMR Section 1: PowerChart
Page 1-22 Rev. 12/13/2011
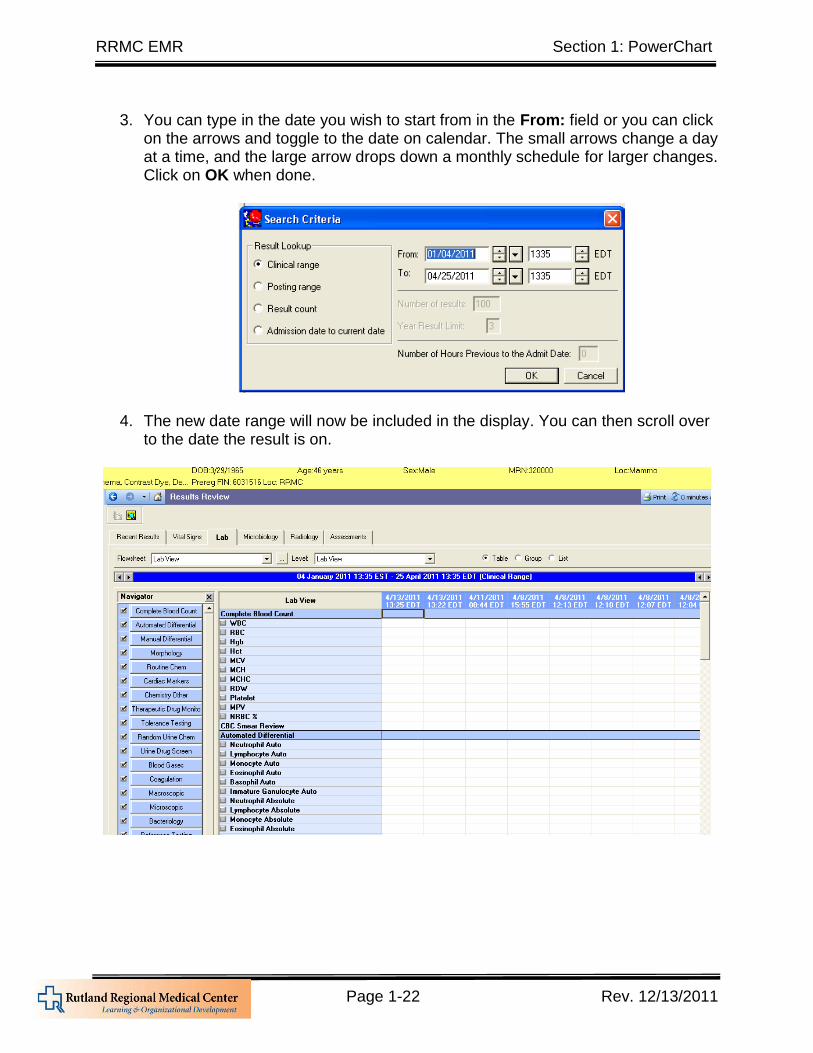
3. You can type in the date you wish to start from in the From: field or you can click
on the arrows and toggle to the date on calendar. The small arrows change a day at a time, and the large arrow drops down a monthly schedule for larger changes. Click on OK when done.
4. The new date range will now be included in the display. You can then scroll over to the date the result is on.
RRMC EMR Section 1: PowerChart
Page 1-23 Rev. 12/13/2011
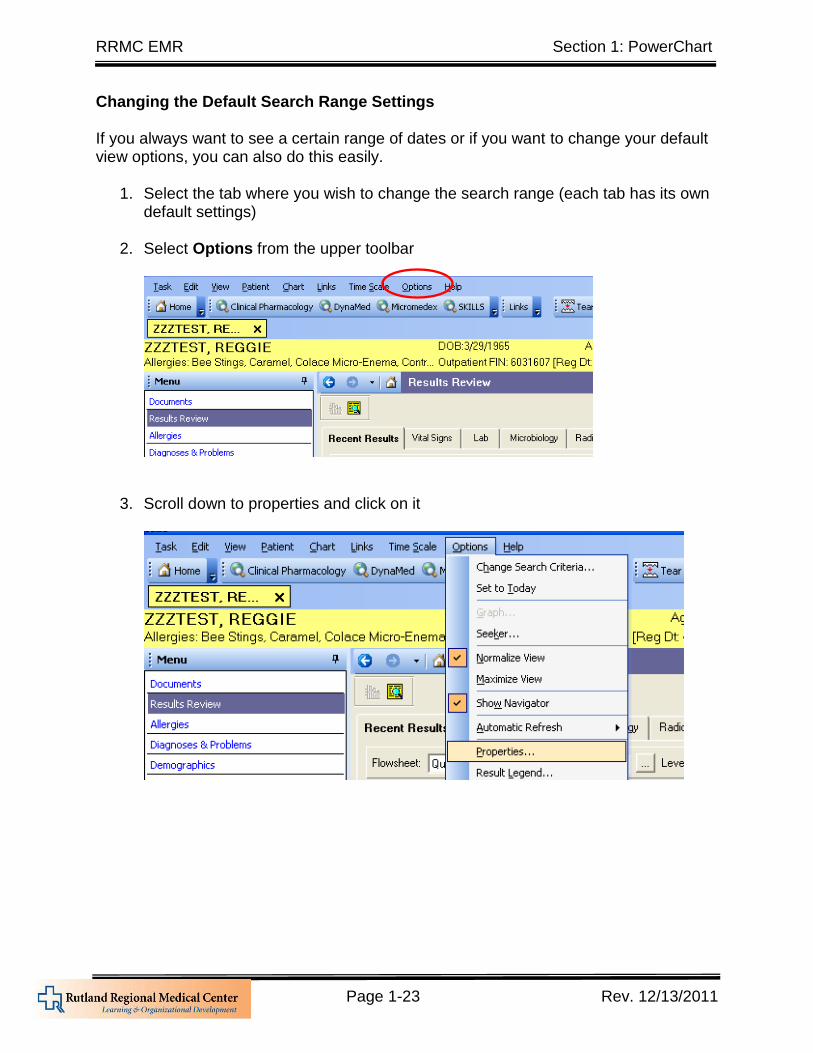
Changing the Default Search Range Settings If you always want to see a certain range of dates or if you want to change your default view options, you can also do this easily.
1. Select the tab where you wish to change the search range (each tab has its own default settings)
2. Select Options from the upper toolbar
3. Scroll down to properties and click on it
RRMC EMR Section 1: PowerChart
Page 1-24 Rev. 12/13/2011
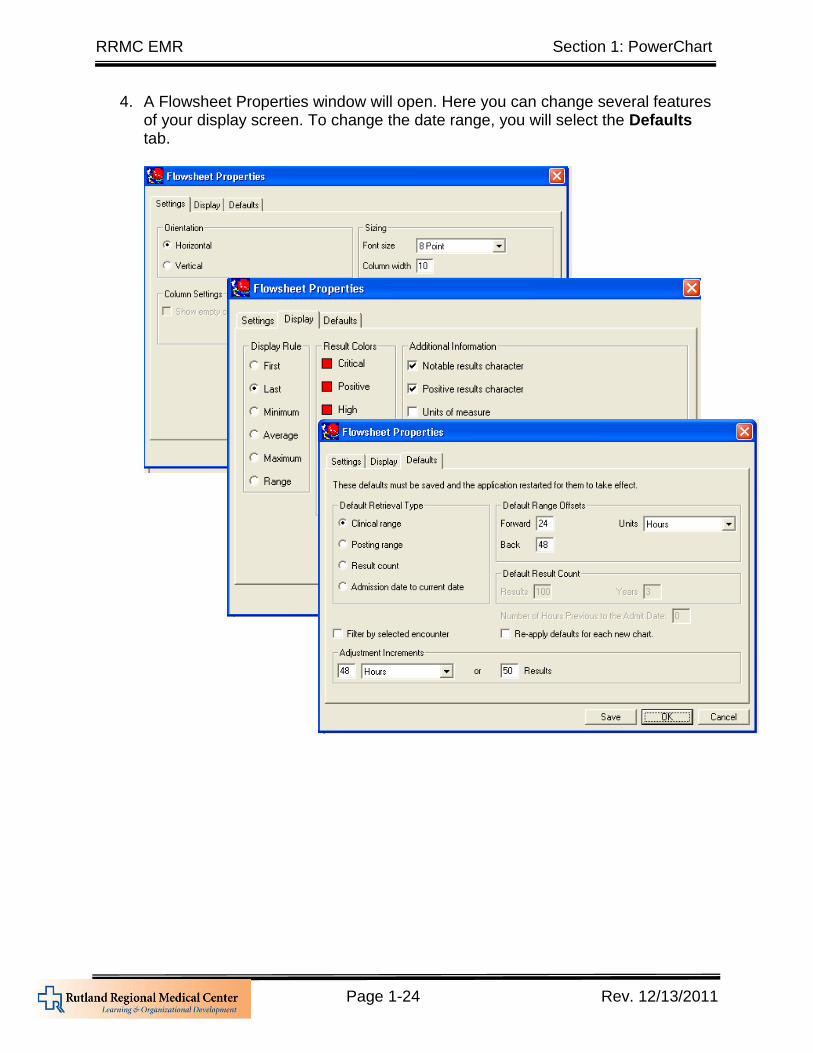
4. A Flowsheet Properties window will open. Here you can change several features of your display screen. To change the date range, you will select the Defaults tab.
RRMC EMR Section 1: PowerChart
Page 1-25 Rev. 12/13/2011
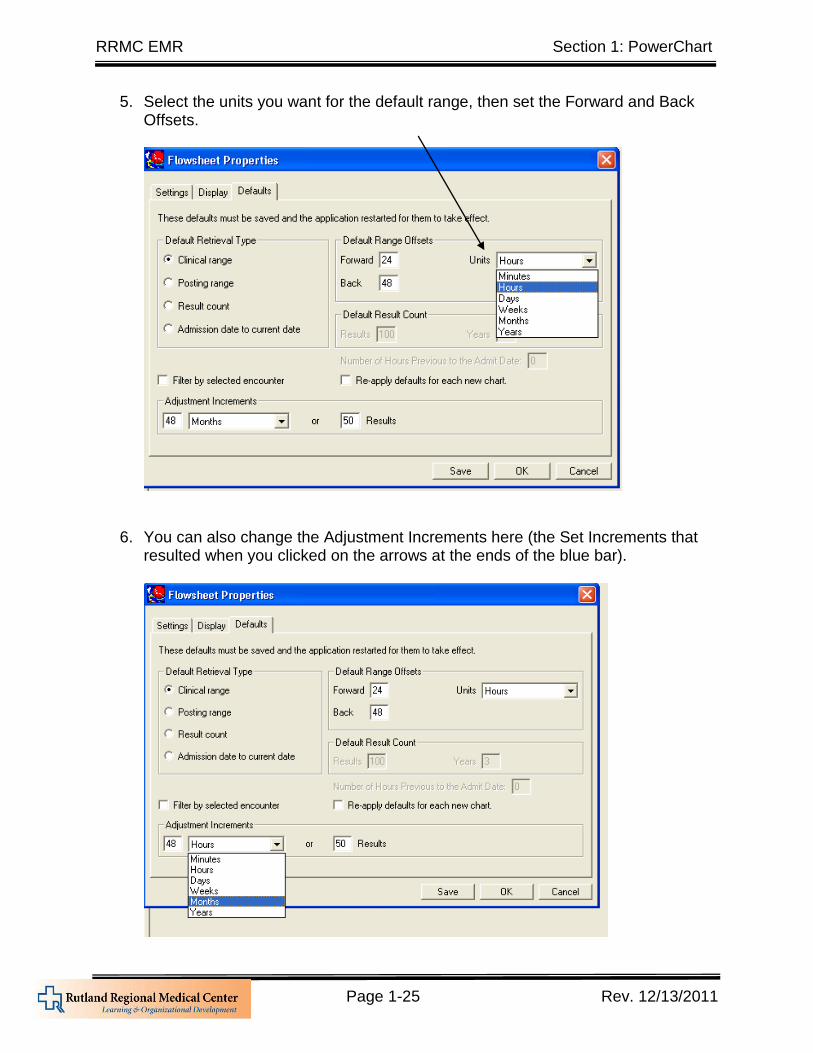
5. Select the units you want for the default range, then set the Forward and Back Offsets.
6. You can also change the Adjustment Increments here (the Set Increments that resulted when you clicked on the arrows at the ends of the blue bar).
RRMC EMR Section 1: PowerChart
Page 1-26 Rev. 12/13/2011
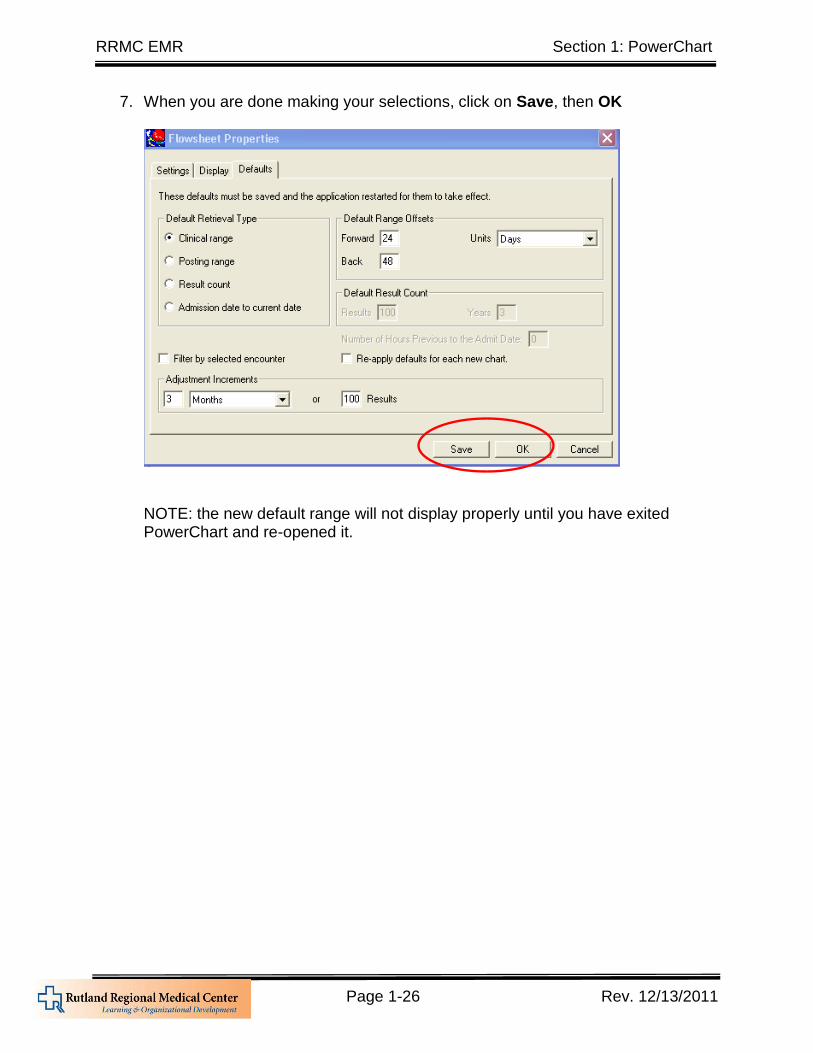
7. When you are done making your selections, click on Save, then OK
NOTE: the new default range will not display properly until you have exited PowerChart and re-opened it.
RRMC EMR Section 1: PowerChart
Page 1-27 Rev. 12/13/2011
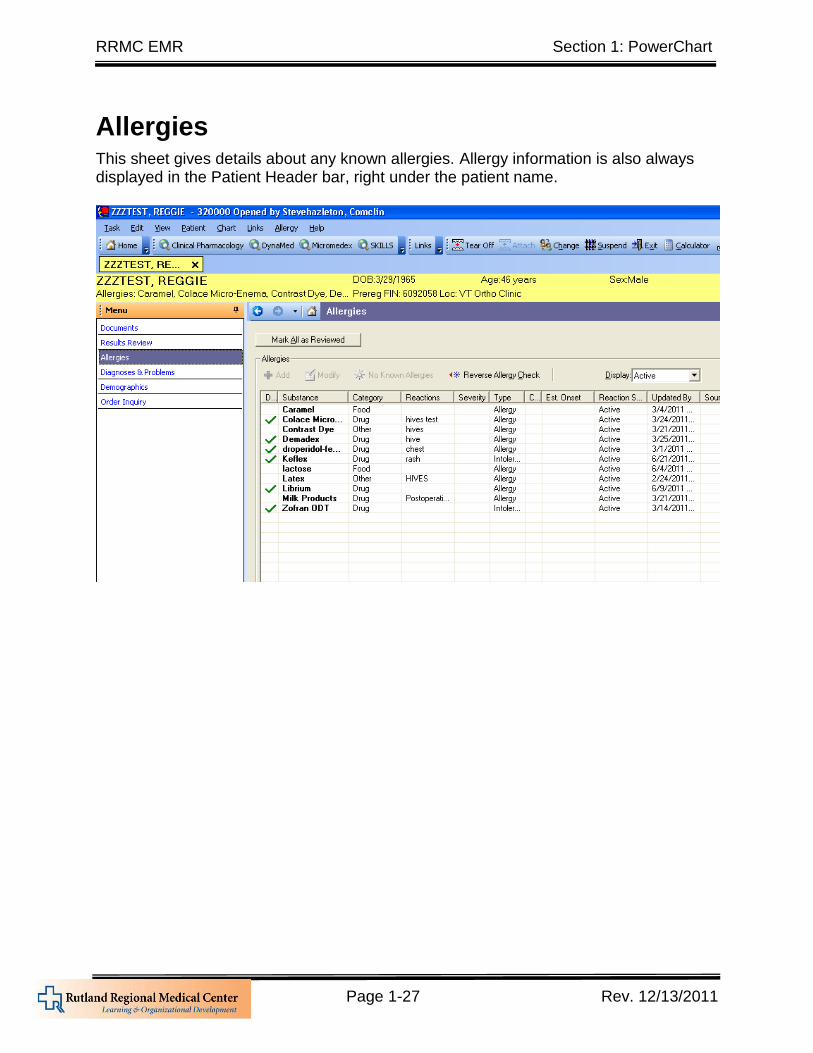
Allergies This sheet gives details about any known allergies. Allergy information is also always displayed in the Patient Header bar, right under the patient name.
RRMC EMR Section 1: PowerChart
Page 1-28 Rev. 12/13/2011
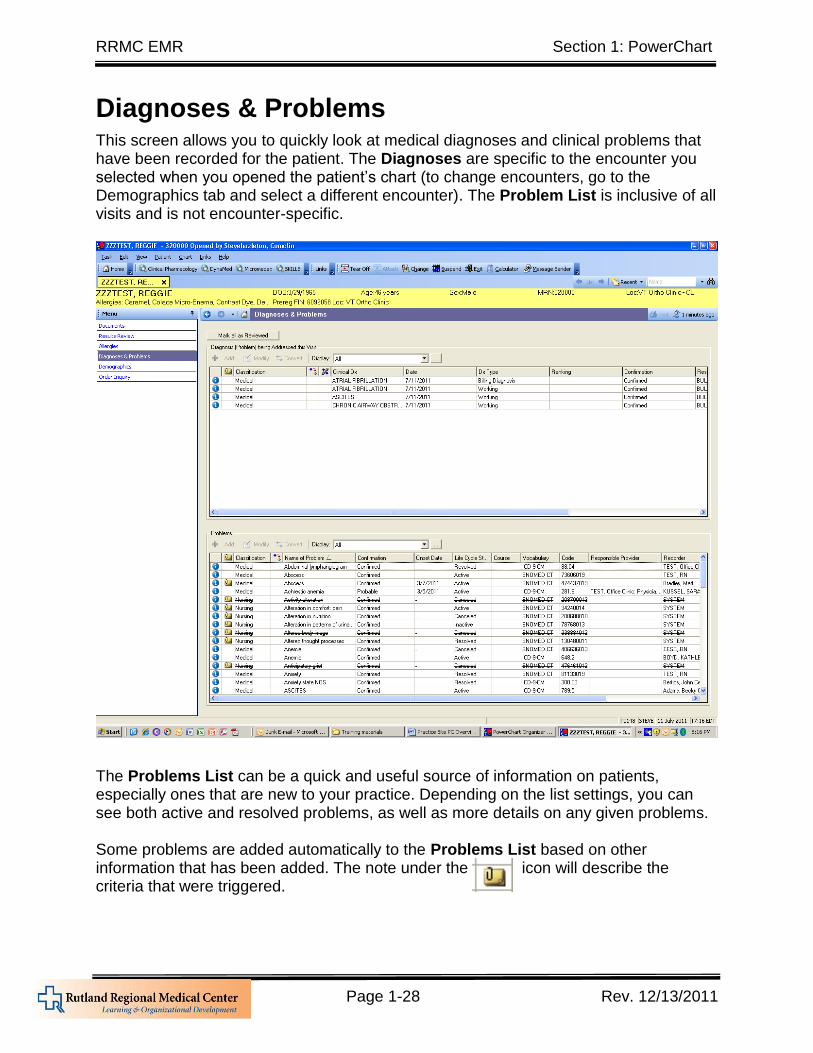
Diagnoses & Problems This screen allows you to quickly look at medical diagnoses and clinical problems that have been recorded for the patient. The Diagnoses are specific to the encounter you selected when you opened the patient’s chart (to change encounters, go to the Demographics tab and select a different encounter). The Problem List is inclusive of all visits and is not encounter-specific.
The Problems List can be a quick and useful source of information on patients, especially ones that are new to your practice. Depending on the list settings, you can see both active and resolved problems, as well as more details on any given problems. Some problems are added automatically to the Problems List based on other information that has been added. The note under the icon will describe the criteria that were triggered.
RRMC EMR Section 1: PowerChart
Page 1-29 Rev. 12/13/2011
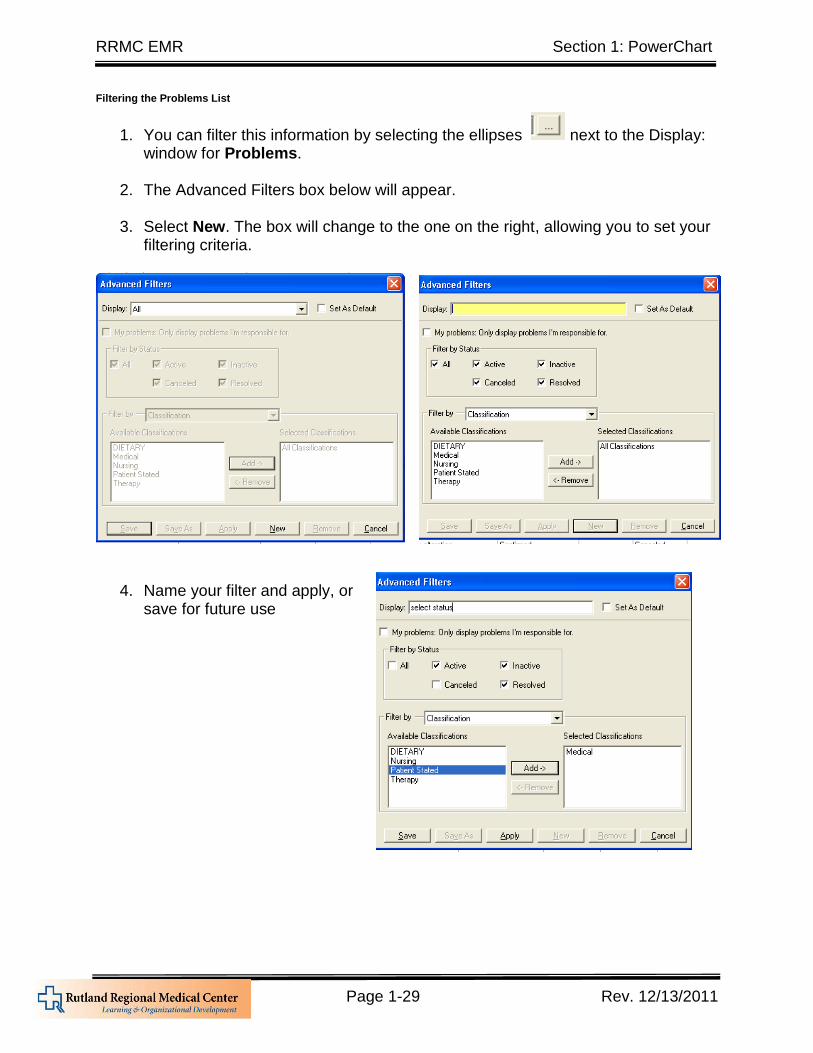
Filtering the Problems List
1. You can filter this information by selecting the ellipses next to the Display: window for Problems.
2. The Advanced Filters box below will appear.
3. Select New. The box will change to the one on the right, allowing you to set your
filtering criteria.
4. Name your filter and apply, or save for future use
RRMC EMR Section 1: PowerChart
Page 1-30 Rev. 12/13/2011
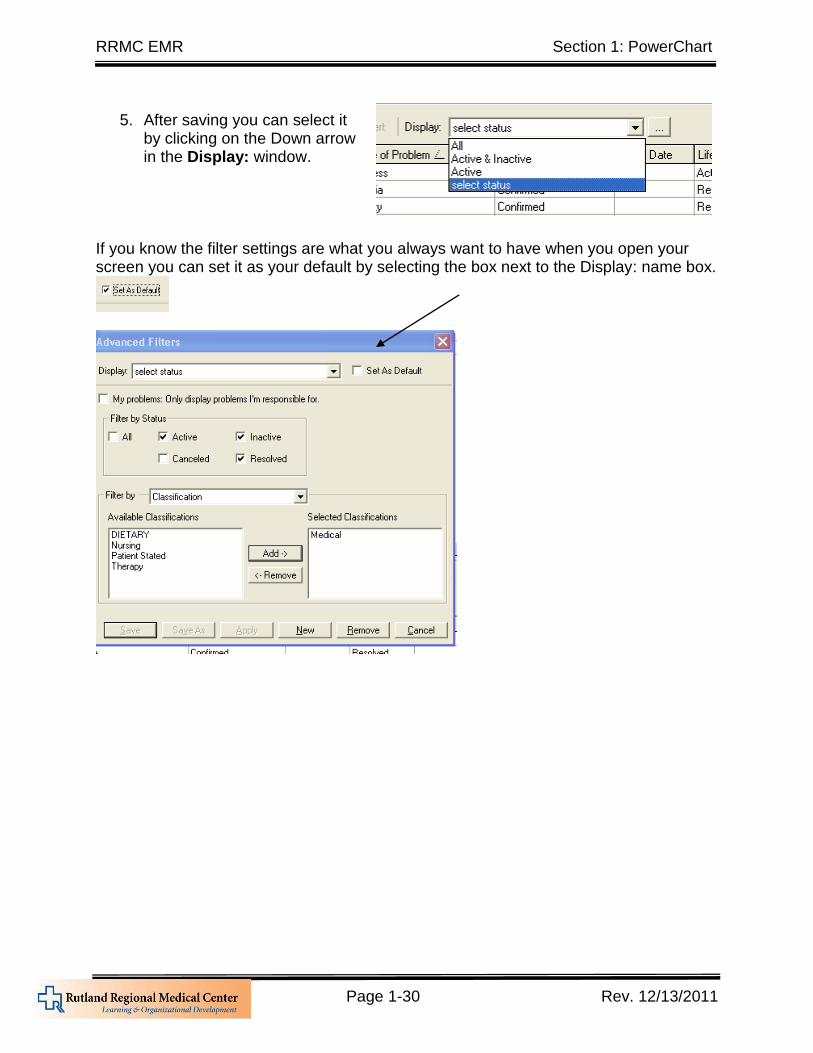
5. After saving you can select it
by clicking on the Down arrow in the Display: window.
If you know the filter settings are what you always want to have when you open your screen you can set it as your default by selecting the box next to the Display: name box.
RRMC EMR Section 1: PowerChart
Page 1-31 Rev. 12/13/2011
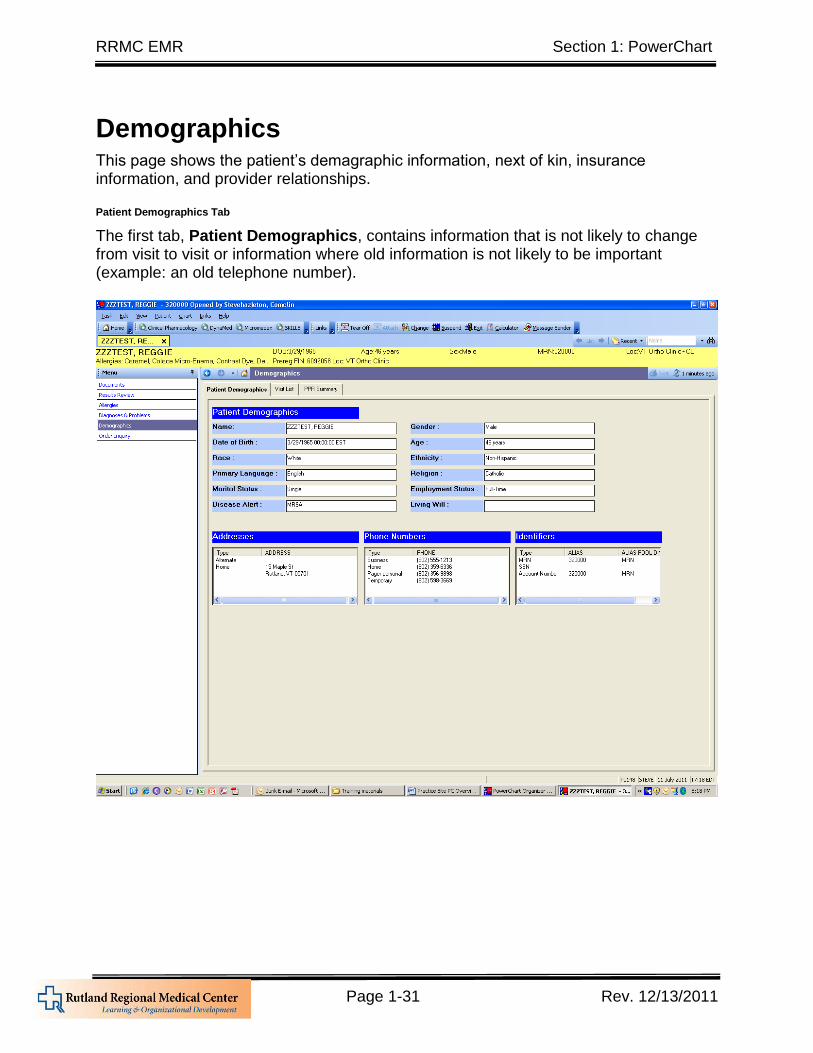
Demographics This page shows the patient’s demagraphic information, next of kin, insurance information, and provider relationships. Patient Demographics Tab
The first tab, Patient Demographics, contains information that is not likely to change from visit to visit or information where old information is not likely to be important (example: an old telephone number).
RRMC EMR Section 1: PowerChart
Page 1-32 Rev. 12/13/2011
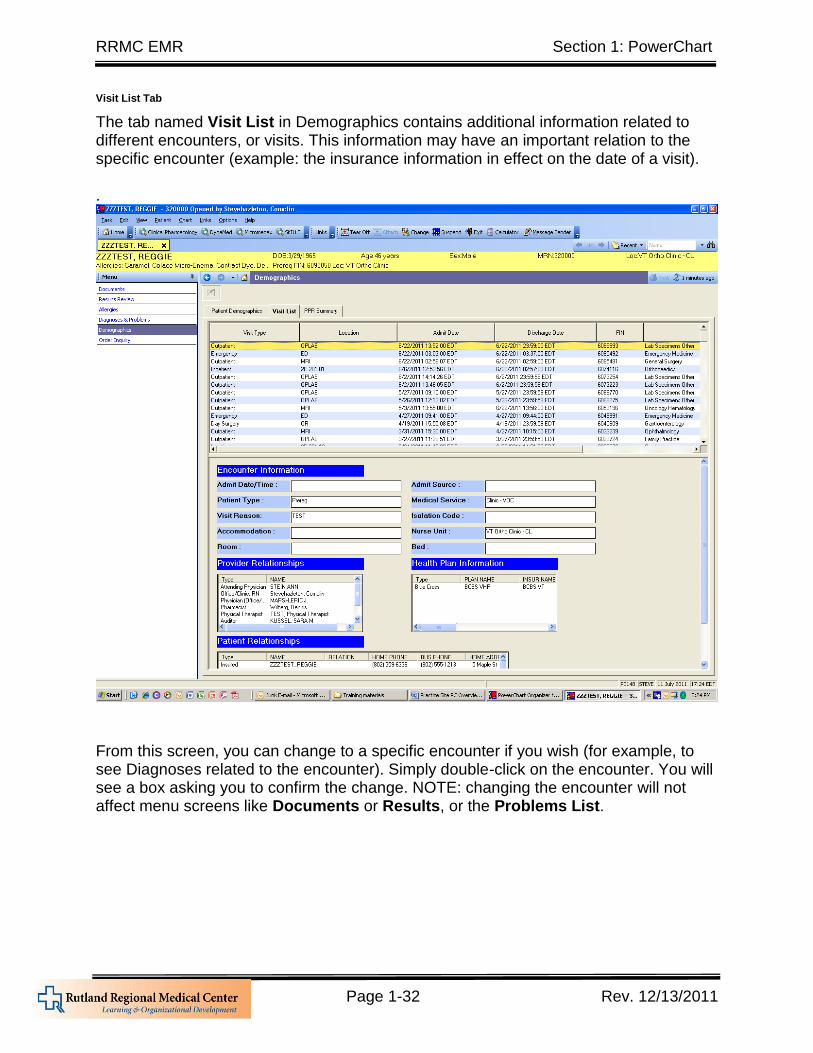
Visit List Tab
The tab named Visit List in Demographics contains additional information related to different encounters, or visits. This information may have an important relation to the specific encounter (example: the insurance information in effect on the date of a visit). .
From this screen, you can change to a specific encounter if you wish (for example, to see Diagnoses related to the encounter). Simply double-click on the encounter. You will see a box asking you to confirm the change. NOTE: changing the encounter will not affect menu screens like Documents or Results, or the Problems List.
RRMC EMR Section 1: PowerChart
Page 1-33 Rev. 12/13/2011
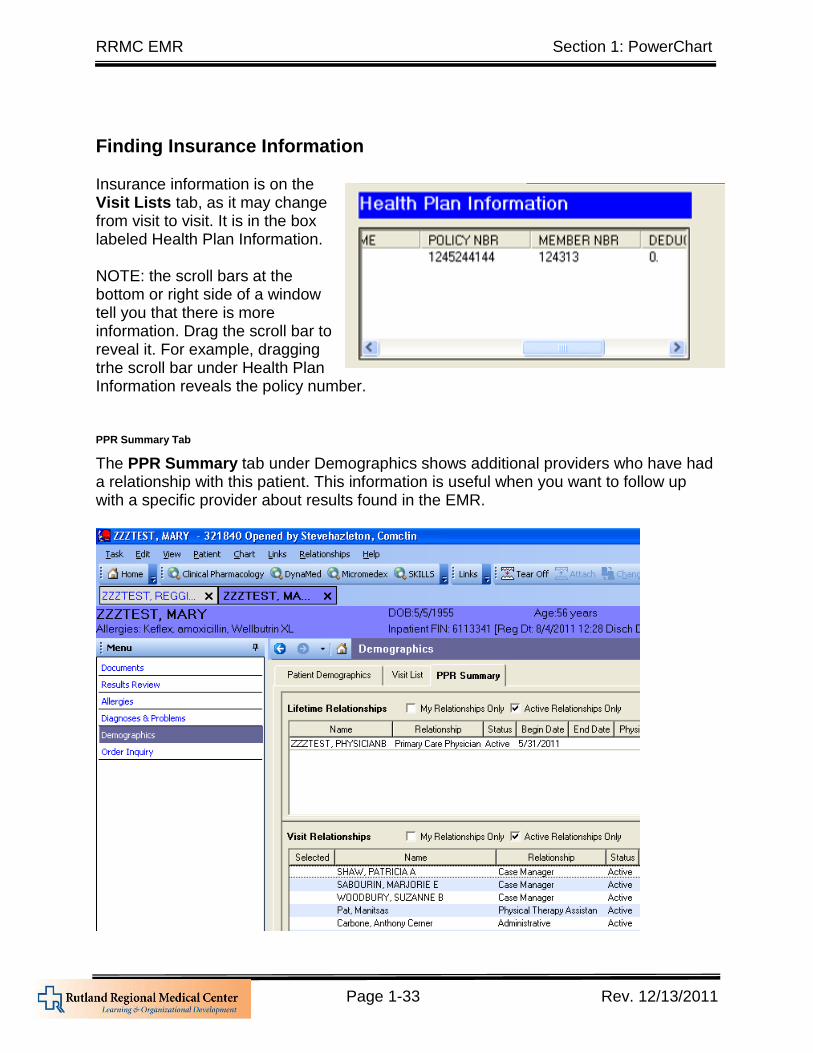
Finding Insurance Information Insurance information is on the Visit Lists tab, as it may change from visit to visit. It is in the box labeled Health Plan Information. NOTE: the scroll bars at the bottom or right side of a window tell you that there is more information. Drag the scroll bar to reveal it. For example, dragging trhe scroll bar under Health Plan Information reveals the policy number.
PPR Summary Tab
The PPR Summary tab under Demographics shows additional providers who have had a relationship with this patient. This information is useful when you want to follow up with a specific provider about results found in the EMR.
RRMC EMR Section 1: PowerChart
Page 1-34 Rev. 12/13/2011
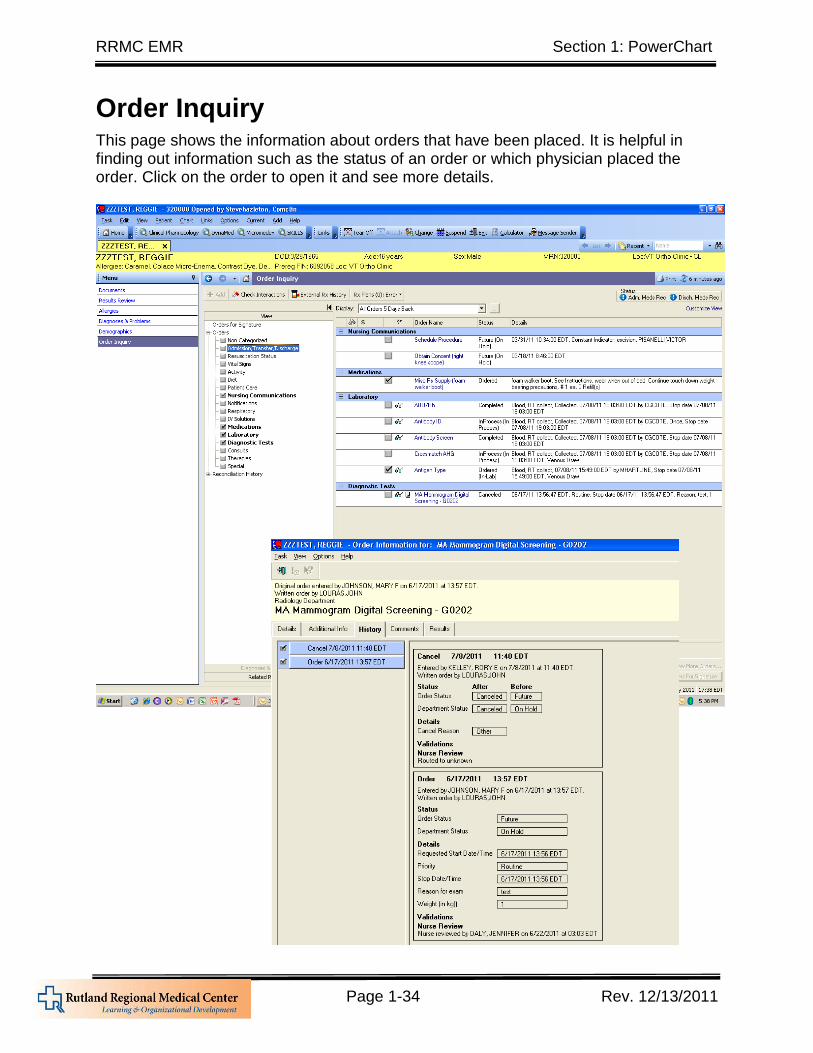
Order Inquiry This page shows the information about orders that have been placed. It is helpful in finding out information such as the status of an order or which physician placed the order. Click on the order to open it and see more details.
RRMC EMR Section 1: PowerChart
Page 1-35 Rev. 12/13/2011
Finding an Order
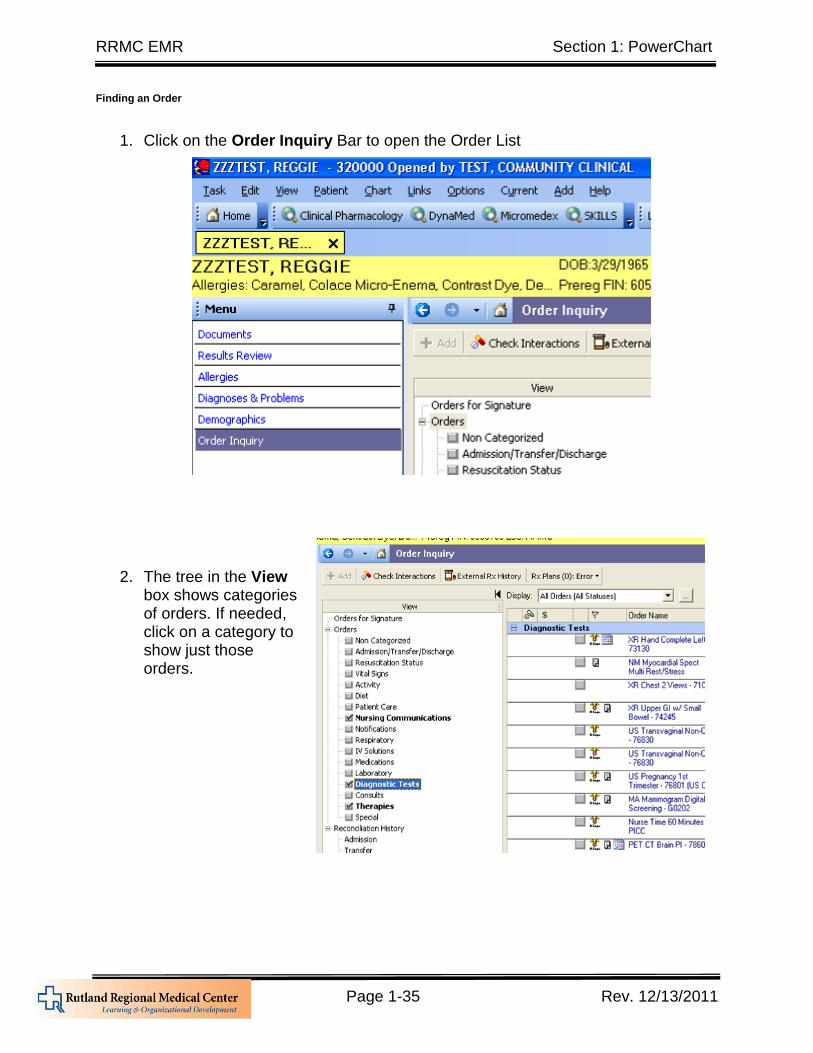
1. Click on the Order Inquiry Bar to open the Order List
2. The tree in the View box shows categories of orders. If needed, click on a category to show just those orders.
RRMC EMR Section 1: PowerChart
Page 1-36 Rev. 12/13/2011
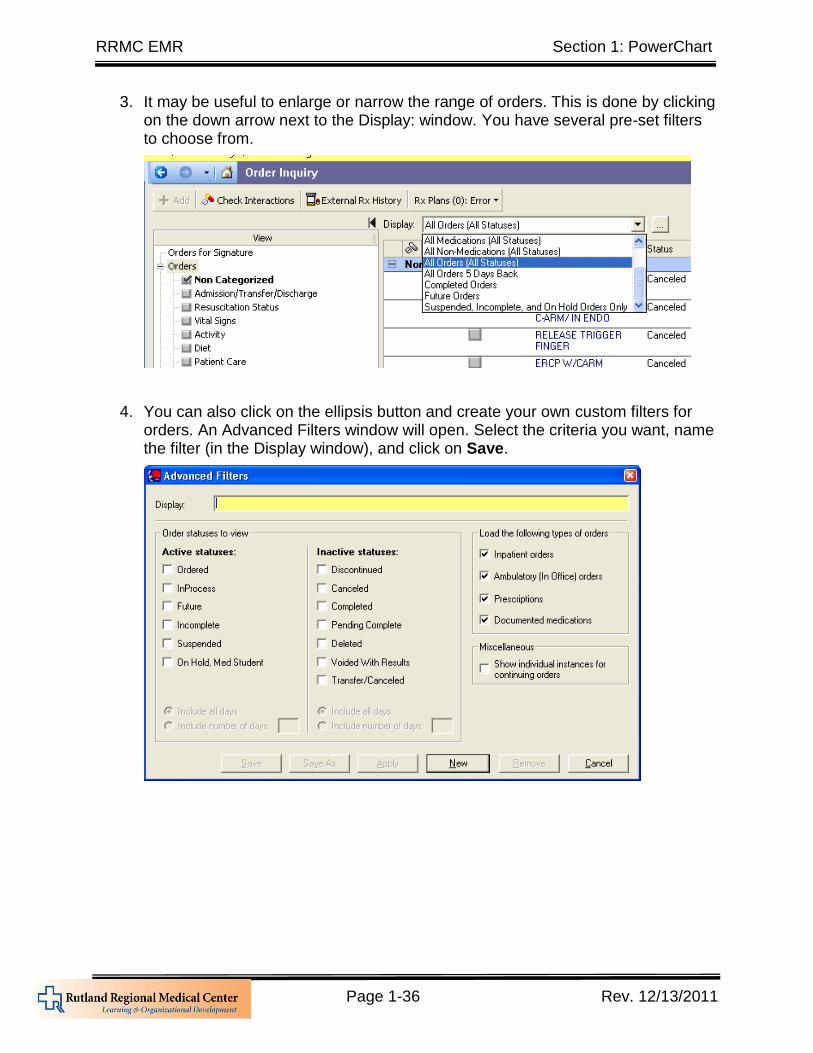
3. It may be useful to enlarge or narrow the range of orders. This is done by clicking on the down arrow next to the Display: window. You have several pre-set filters to choose from.
4. You can also click on the ellipsis button and create your own custom filters for orders. An Advanced Filters window will open. Select the criteria you want, name the filter (in the Display window), and click on Save.
RRMC EMR Section 1: PowerChart
Page 1-37 Rev. 12/13/2011
Viewing Order Details
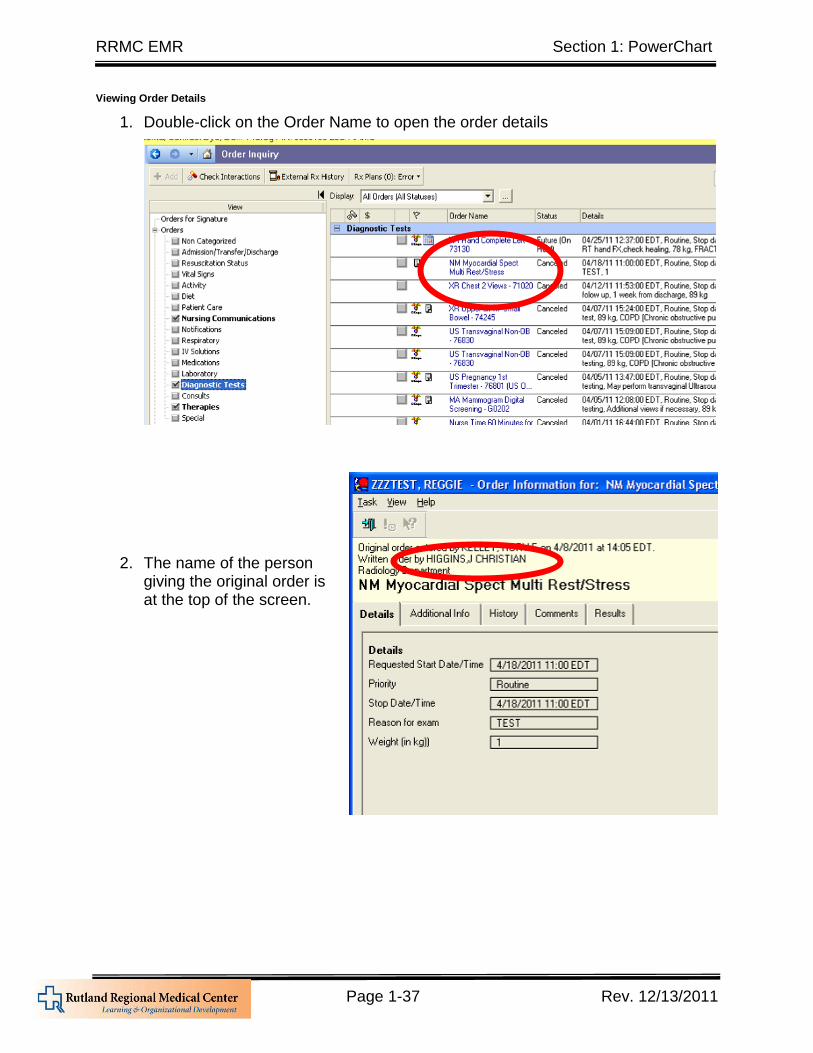
1. Double-click on the Order Name to open the order details
2. The name of the person giving the original order is at the top of the screen.
RRMC EMR Section 1: PowerChart
Page 1-38 Rev. 12/13/2011
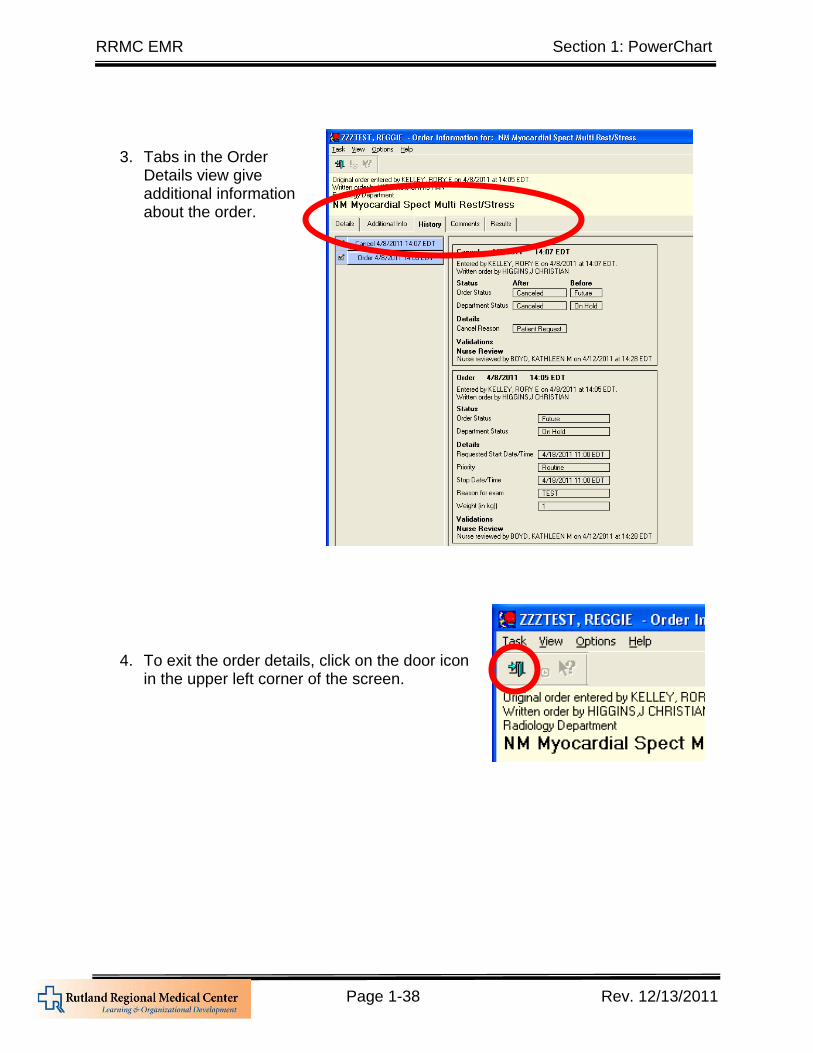
3. Tabs in the Order Details view give additional information about the order.
4. To exit the order details, click on the door icon in the upper left corner of the screen.
RRMC EMR Section 1: PowerChart
Page 1-39 Rev. 12/13/2011
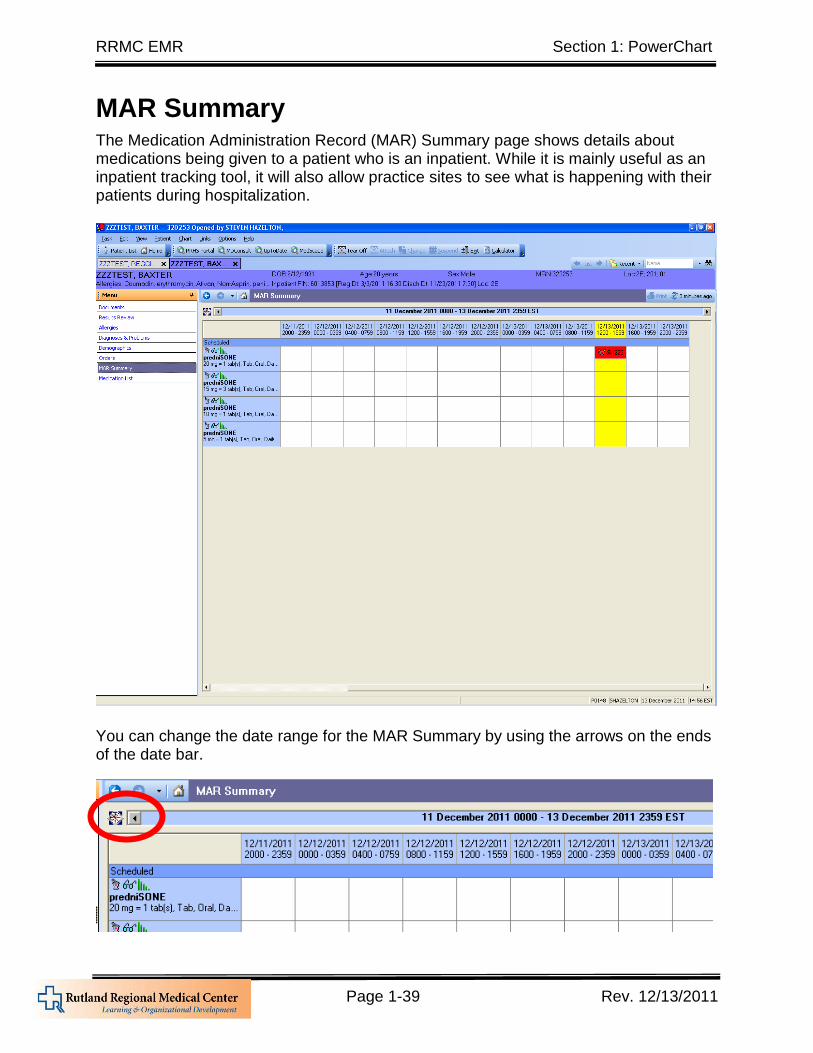
MAR Summary The Medication Administration Record (MAR) Summary page shows details about medications being given to a patient who is an inpatient. While it is mainly useful as an inpatient tracking tool, it will also allow practice sites to see what is happening with their patients during hospitalization.
You can change the date range for the MAR Summary by using the arrows on the ends of the date bar.
RRMC EMR Section 1: PowerChart
Page 1-40 Rev. 12/13/2011
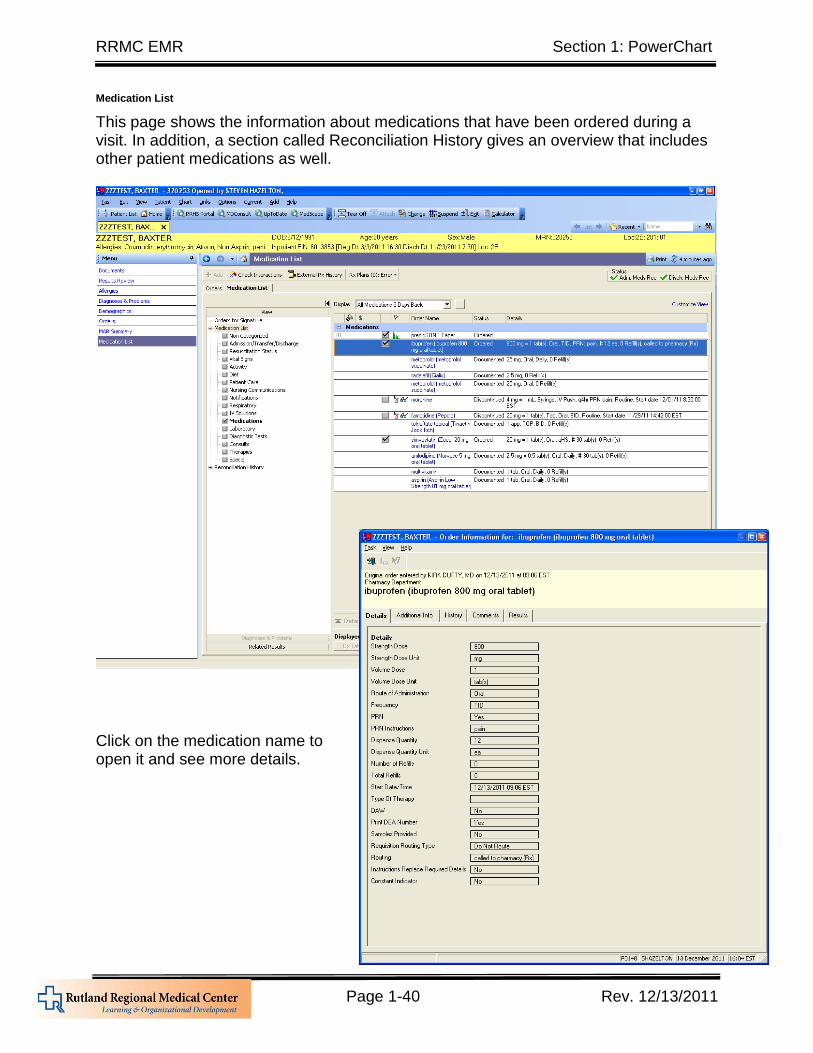
Medication List
This page shows the information about medications that have been ordered during a visit. In addition, a section called Reconciliation History gives an overview that includes other patient medications as well.
Click on the medication name to open it and see more details.

RRMC EMR Section 1: PowerChart
Page 1-41 Rev. 12/13/2011
Reconciliation History
Medication Reconciliation is a review of a patient’s medications to determine changes necessary because of an encounter (visit). For example, a patient being admitted for a medical problem might have the following changes made during their admission:
Two of their regular daily medications need to be stopped upon admission
Three new medications need to given during the admission
One of the three new medications will continue after discharge as a daily medication, replacing one of the medications stopped earlier
The dose of the other regular daily medication will change after discharge To view the Reconciliation History:
1. Click on the Medication List tab 2. Expand the Reconciliation History
category by clicking on the + sign 3. Select the Admission or Discharge
Encounter you with to view
4. The Reconcile History will display, showing the Reconciliation Actions for each medication
RRMC EMR Section 1: PowerChart
Page 1-42 Rev. 12/13/2011
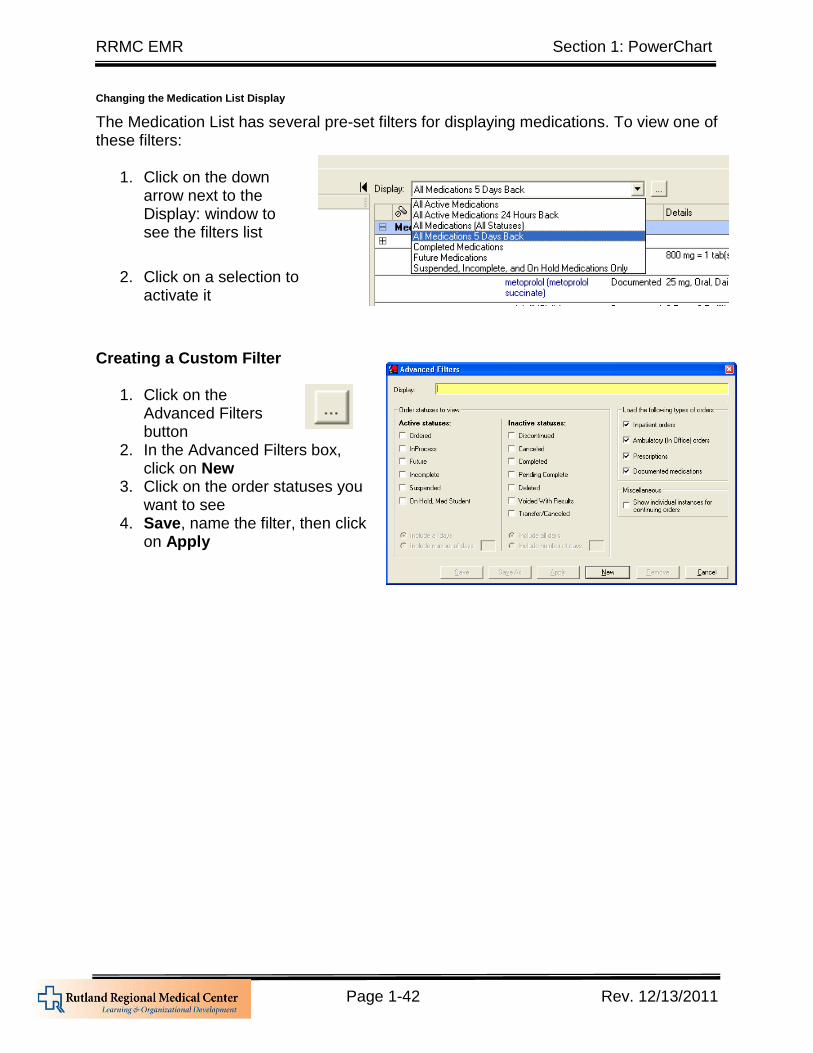
Changing the Medication List Display
The Medication List has several pre-set filters for displaying medications. To view one of these filters:
1. Click on the down arrow next to the Display: window to see the filters list
2. Click on a selection to
activate it
Creating a Custom Filter
1. Click on the Advanced Filters button
2. In the Advanced Filters box, click on New
3. Click on the order statuses you want to see
4. Save, name the filter, then click on Apply
RRMC EMR Section 1: PowerChart
Page 1-43 Rev. 12/13/2011
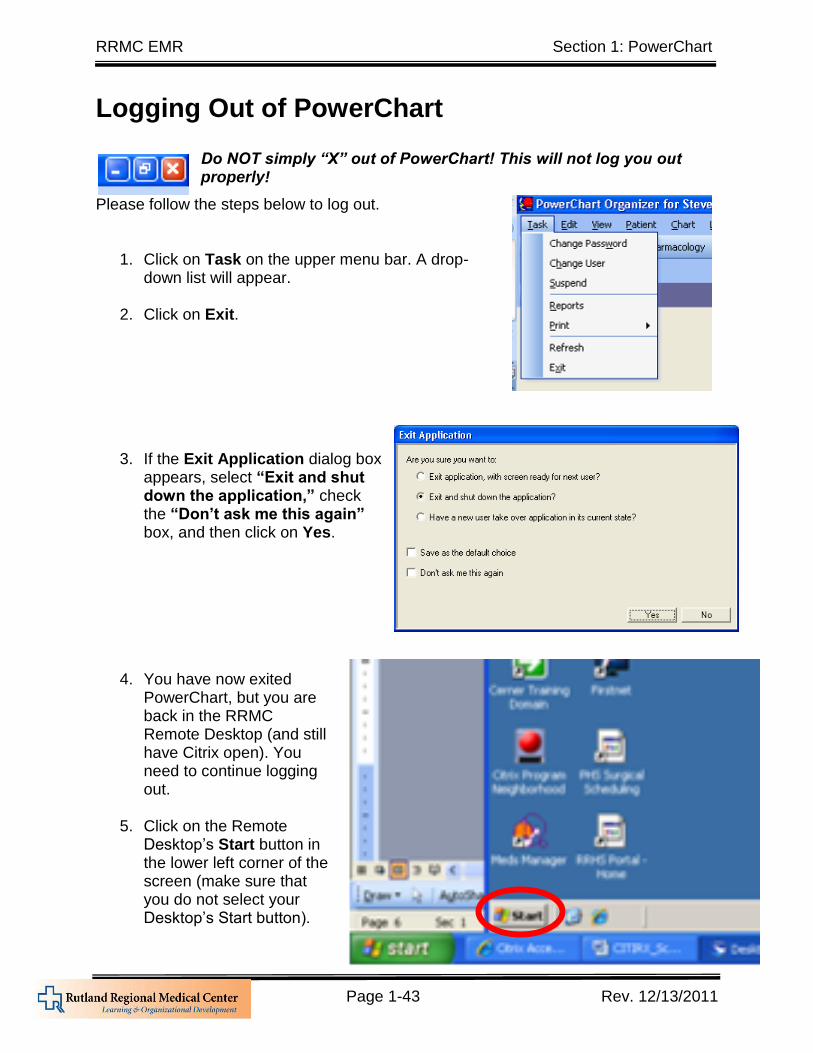
Logging Out of PowerChart
Do NOT simply “X” out of PowerChart! This will not log you out properly!
Please follow the steps below to log out.
1. Click on Task on the upper menu bar. A drop-
down list will appear.
2. Click on Exit.
3. If the Exit Application dialog box appears, select “Exit and shut down the application,” check the “Don’t ask me this again” box, and then click on Yes.
4. You have now exited PowerChart, but you are back in the RRMC Remote Desktop (and still have Citrix open). You need to continue logging out.
5. Click on the Remote Desktop’s Start button in the lower left corner of the screen (make sure that you do not select your Desktop’s Start button).
RRMC EMR Section 1: PowerChart
Page 1-44 Rev. 12/13/2011
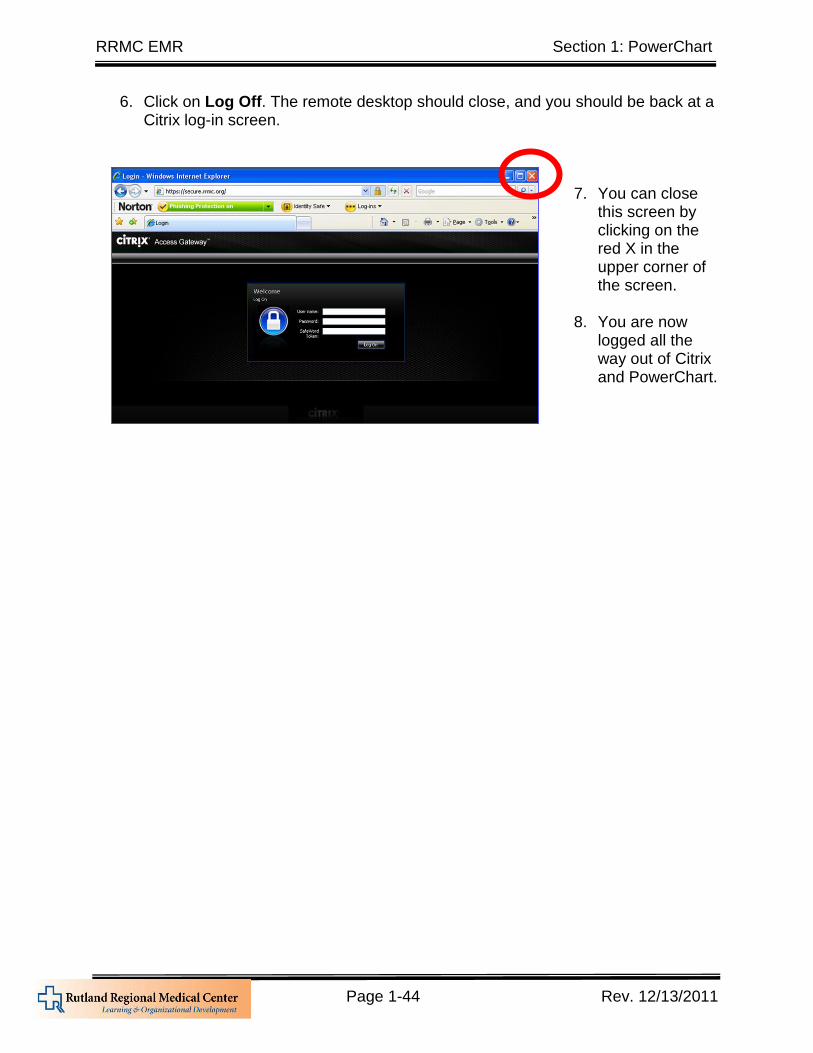
6. Click on Log Off. The remote desktop should close, and you should be back at a Citrix log-in screen.
7. You can close
this screen by clicking on the red X in the upper corner of the screen.
8. You are now
logged all the way out of Citrix and PowerChart.
Section 2:
WebConnect
Community Provider Sites

Table of Contents - WebConnect
Opening Cerner WebConnect ..................................................................................... 2-1
Finding Your Patient in WebConnect .......................................................................... 2-2
Finding Results - Filtering ............................................................................................ 2-3
Finding Results - Sorting ............................................................................................. 2-4
Viewing Results Details ............................................................................................... 2-5
Printing Results ........................................................................................................... 2-6
Logging Off From WebConnect ................................................................................... 2-8

RRMC EMR Section 2: WebConnect
Page 2-1 Rev. 8/5/2011
Opening Cerner WebConnect
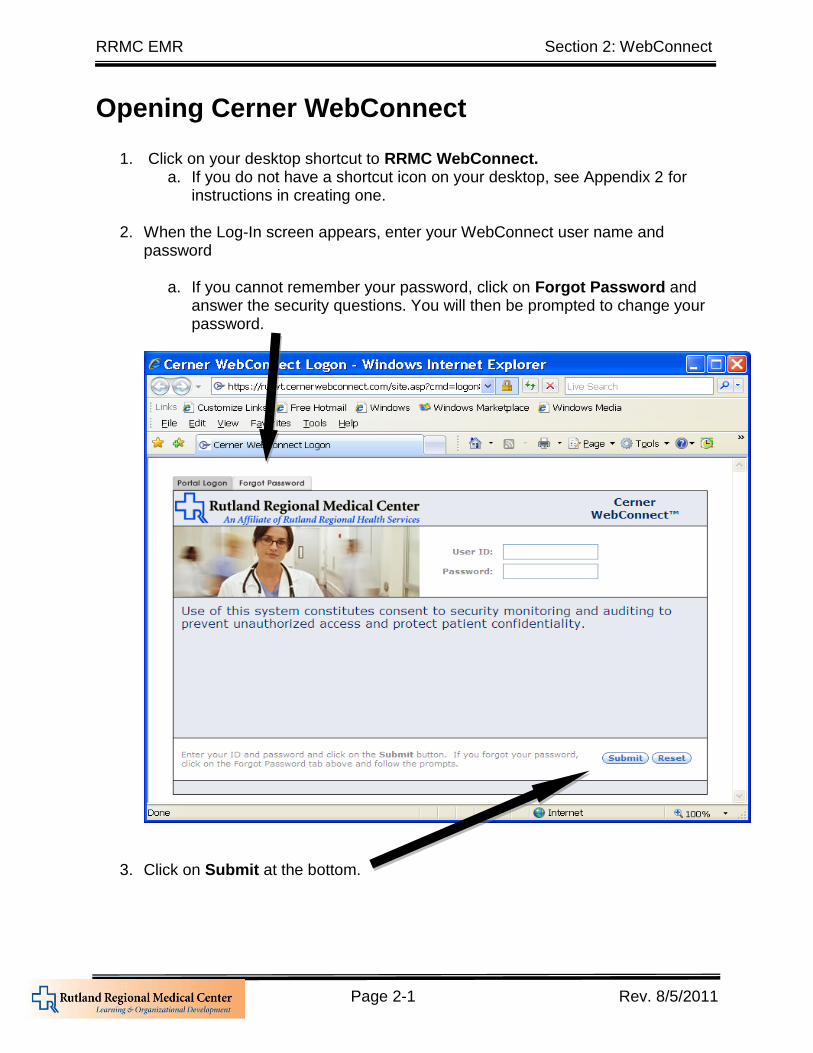
1. Click on your desktop shortcut to RRMC WebConnect. a. If you do not have a shortcut icon on your desktop, see Appendix 2 for
instructions in creating one.
2. When the Log-In screen appears, enter your WebConnect user name and password
a. If you cannot remember your password, click on Forgot Password and answer the security questions. You will then be prompted to change your password.
3. Click on Submit at the bottom.
RRMC EMR Section 2: WebConnect
Page 2-2 Rev. 8/5/2011
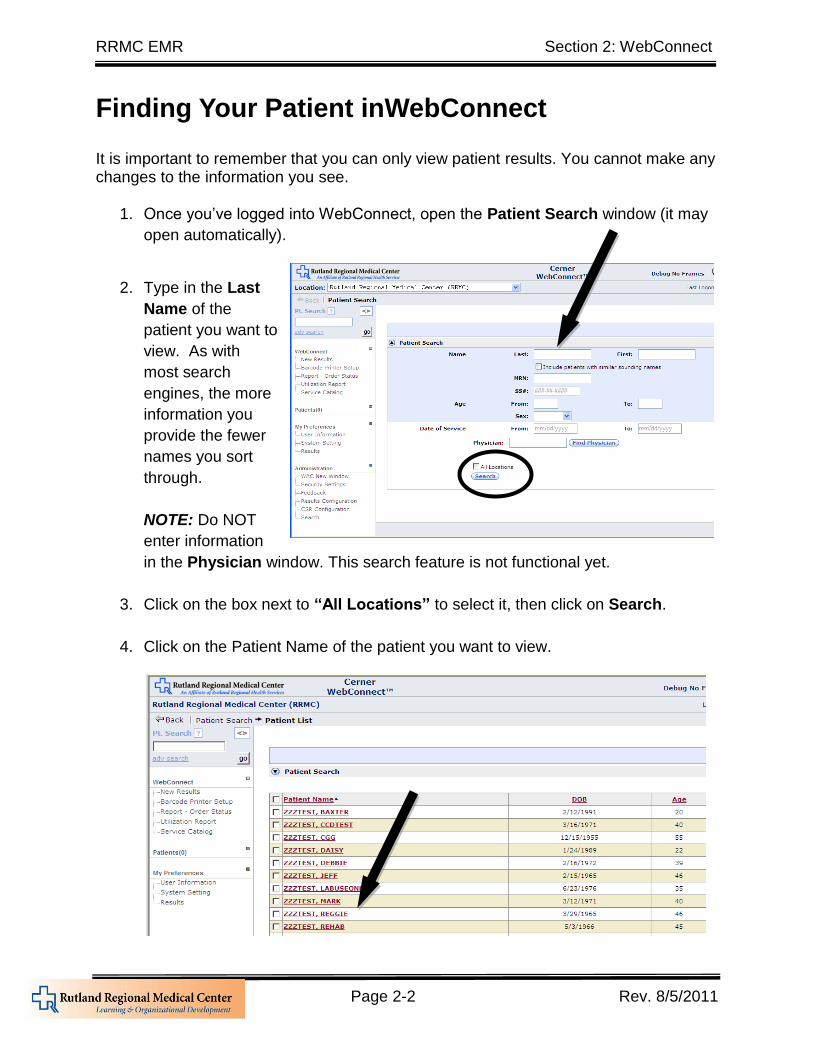
Finding Your Patient inWebConnect It is important to remember that you can only view patient results. You cannot make any changes to the information you see.
1. Once you’ve logged into WebConnect, open the Patient Search window (it may
open automatically).
2. Type in the Last
Name of the
patient you want to
view. As with
most search
engines, the more
information you
provide the fewer
names you sort
through.
NOTE: Do NOT
enter information
in the Physician window. This search feature is not functional yet.
3. Click on the box next to “All Locations” to select it, then click on Search.
4. Click on the Patient Name of the patient you want to view.
RRMC EMR Section 2: WebConnect
Page 2-3 Rev. 8/5/2011
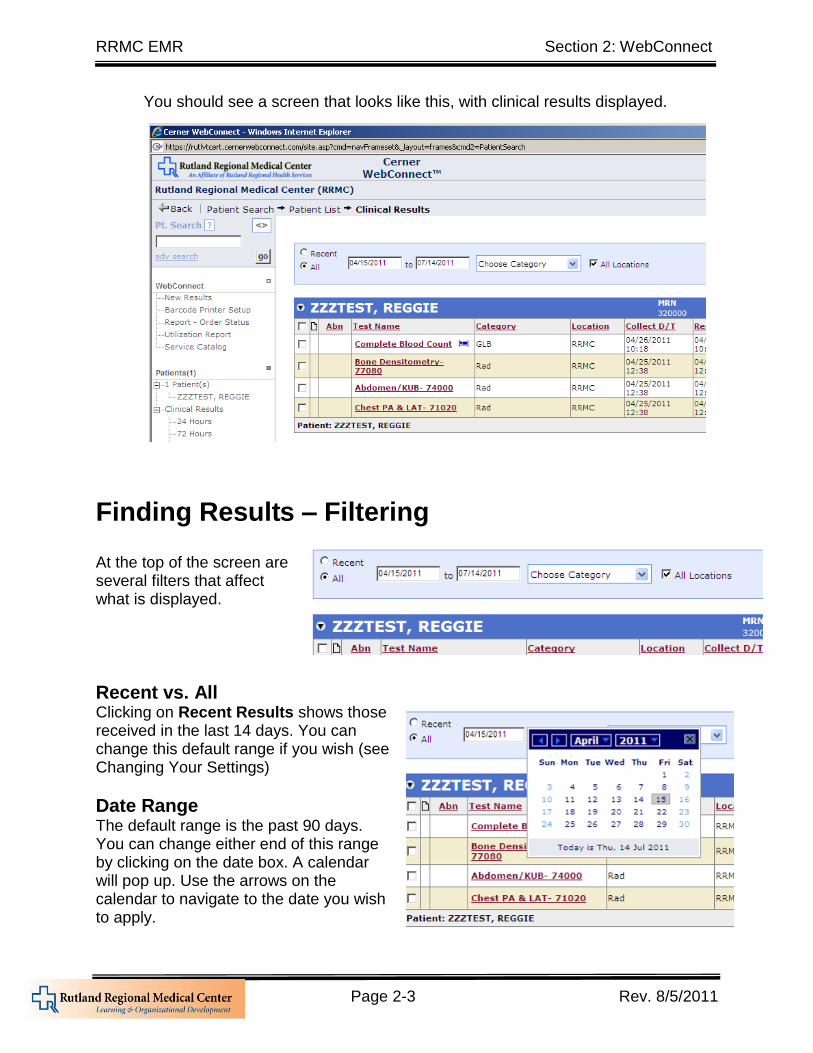
You should see a screen that looks like this, with clinical results displayed.
Finding Results – Filtering At the top of the screen are several filters that affect what is displayed.
Recent vs. All Clicking on Recent Results shows those received in the last 14 days. You can change this default range if you wish (see Changing Your Settings)
Date Range The default range is the past 90 days. You can change either end of this range by clicking on the date box. A calendar will pop up. Use the arrows on the calendar to navigate to the date you wish to apply.
RRMC EMR Section 2: WebConnect
Page 2-4 Rev. 8/5/2011
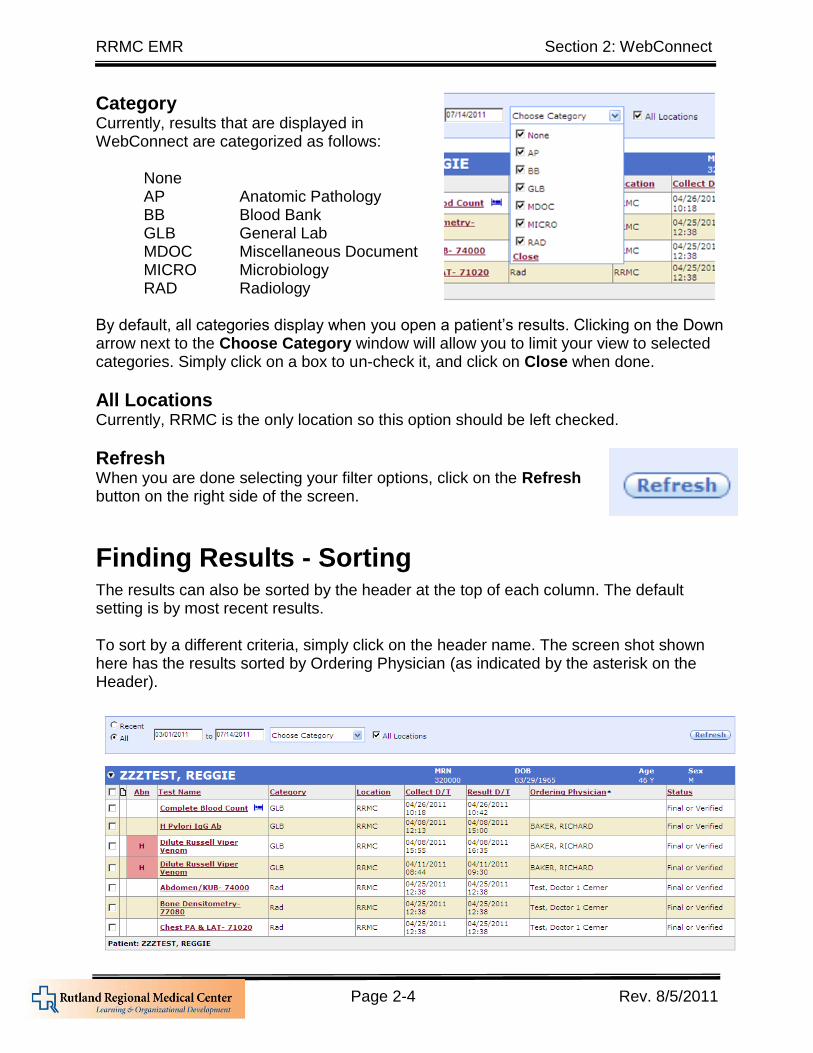
Category Currently, results that are displayed in WebConnect are categorized as follows:
None AP Anatomic Pathology BB Blood Bank GLB General Lab MDOC Miscellaneous Document MICRO Microbiology RAD Radiology
By default, all categories display when you open a patient’s results. Clicking on the Down arrow next to the Choose Category window will allow you to limit your view to selected categories. Simply click on a box to un-check it, and click on Close when done.
All Locations Currently, RRMC is the only location so this option should be left checked.
Refresh When you are done selecting your filter options, click on the Refresh button on the right side of the screen.
Finding Results - Sorting The results can also be sorted by the header at the top of each column. The default setting is by most recent results. To sort by a different criteria, simply click on the header name. The screen shot shown here has the results sorted by Ordering Physician (as indicated by the asterisk on the Header).
RRMC EMR Section 2: WebConnect
Page 2-5 Rev. 8/5/2011
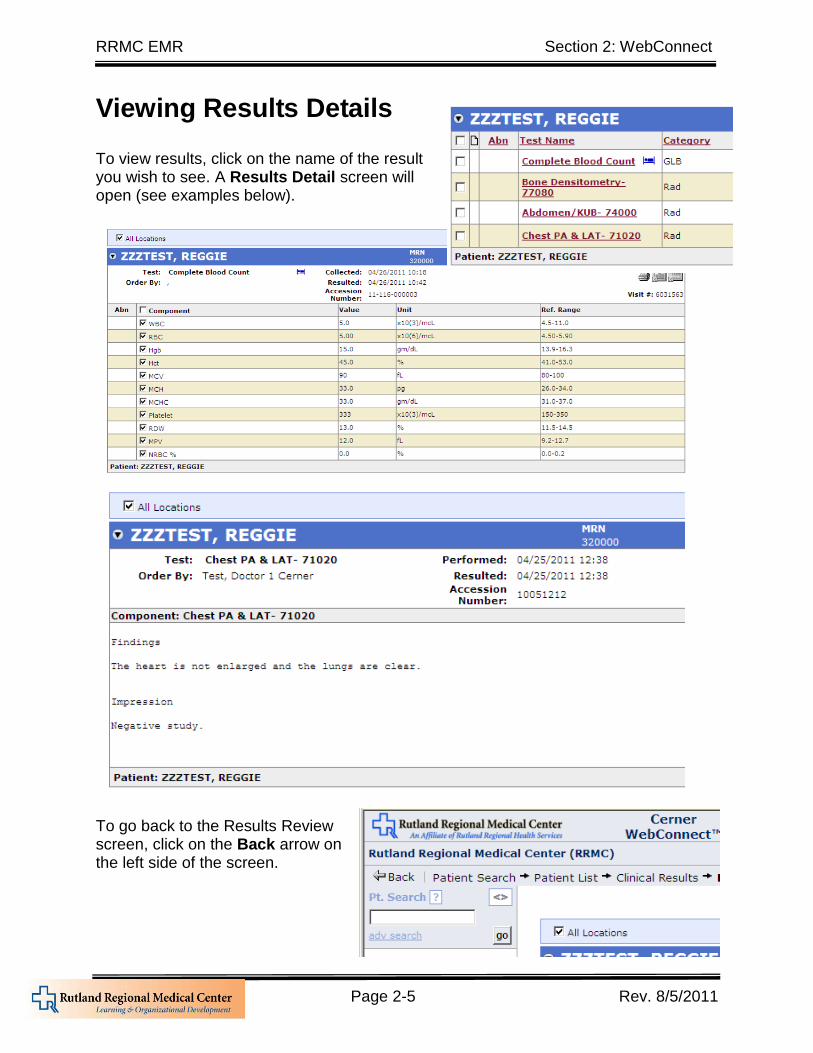
Viewing Results Details To view results, click on the name of the result you wish to see. A Results Detail screen will open (see examples below).
To go back to the Results Review screen, click on the Back arrow on the left side of the screen.

RRMC EMR Section 2: WebConnect
Page 2-6 Rev. 8/5/2011
Printing Results You can print results individually in table or graph format, or you can print all results in list format from WebConnect. 1. Select the Results
to be viewed or
printed by
checking the box
for the desired
row(s).
2. Click on “View
Selected” at the
bottom of the
screen
3. Choose one of the following icons:
(…or select Print All)
Print Graph
Trend
RRMC EMR Section 2: WebConnect
Page 2-7 Rev. 8/5/2011
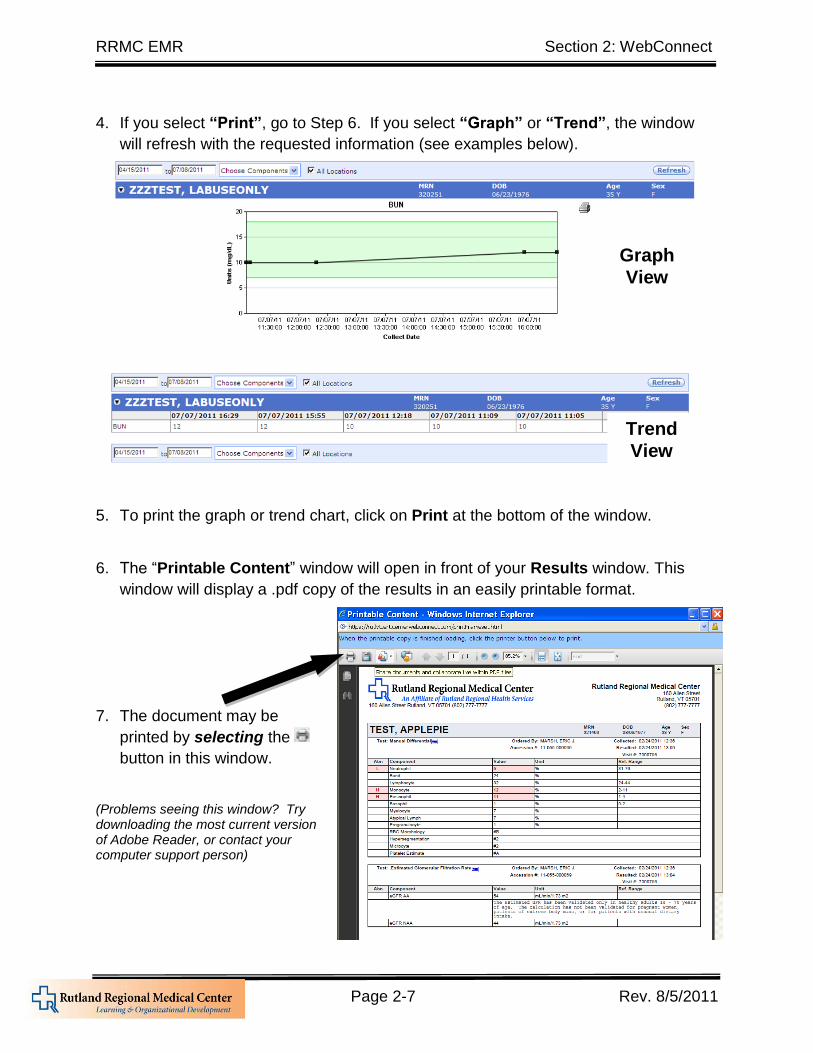
4. If you select “Print”, go to Step 6. If you select “Graph” or “Trend”, the window
will refresh with the requested information (see examples below).
5. To print the graph or trend chart, click on Print at the bottom of the window.
6. The “Printable Content” window will open in front of your Results window. This
window will display a .pdf copy of the results in an easily printable format.
7. The document may be
printed by selecting the
button in this window.
(Problems seeing this window? Try downloading the most current version of Adobe Reader, or contact your computer support person)
Graph
View
Trend
View
RRMC EMR Section 2: WebConnect
Page 2-8 Rev. 8/5/2011
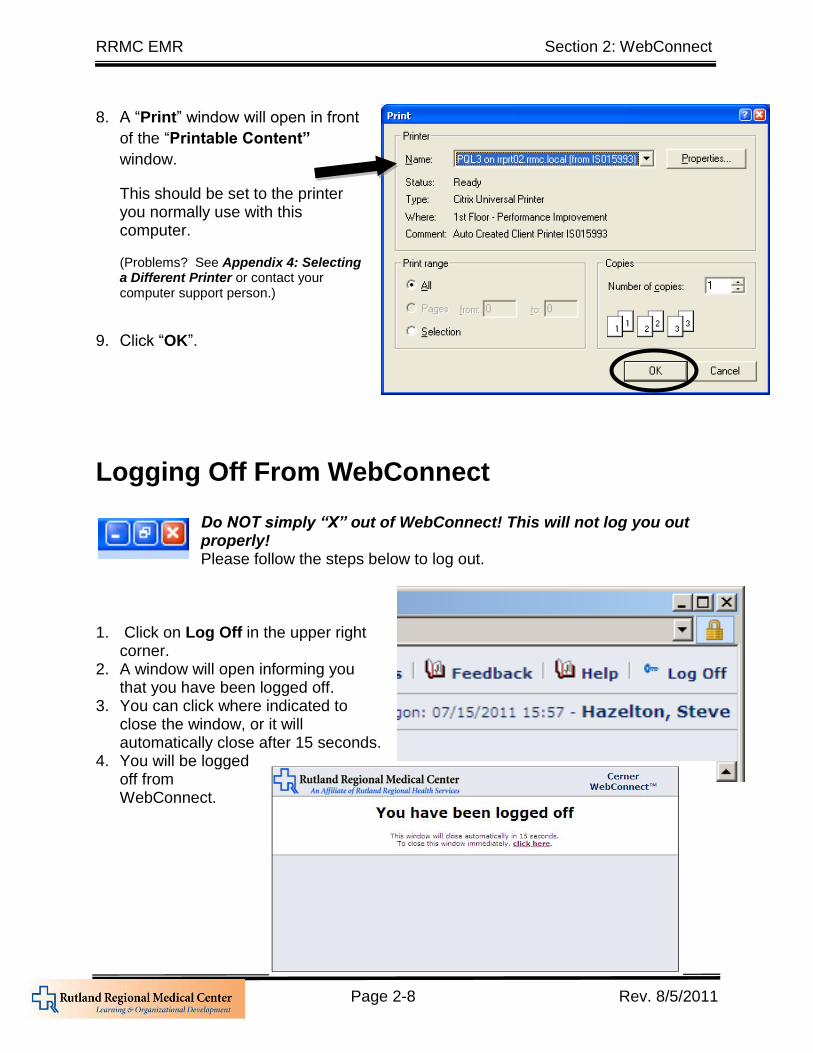
8. A “Print” window will open in front
of the “Printable Content”
window.
This should be set to the printer you normally use with this computer. (Problems? See Appendix 4: Selecting a Different Printer or contact your computer support person.)
9. Click “OK”.
Logging Off From WebConnect
Do NOT simply “X” out of WebConnect! This will not log you out properly! Please follow the steps below to log out.
1. Click on Log Off in the upper right
corner. 2. A window will open informing you
that you have been logged off. 3. You can click where indicated to
close the window, or it will automatically close after 15 seconds.
4. You will be logged off from WebConnect.
Section 3:
Appendices
Community Provider Sites
App. 1: Definitions
App. 2: Initial Access Instructions
Citrix (PowerChart)
WebConnect
App. 3: Accessing the RRMC TRAIN Domain
App. 4: Selecting a Different Printer
App. 5: Changing Your Password
App. 6: RRMC Resources

RRMC EMR Section 3, Appendix 1: Definitions
App 1 Page 1 Rev. 8/5/2011
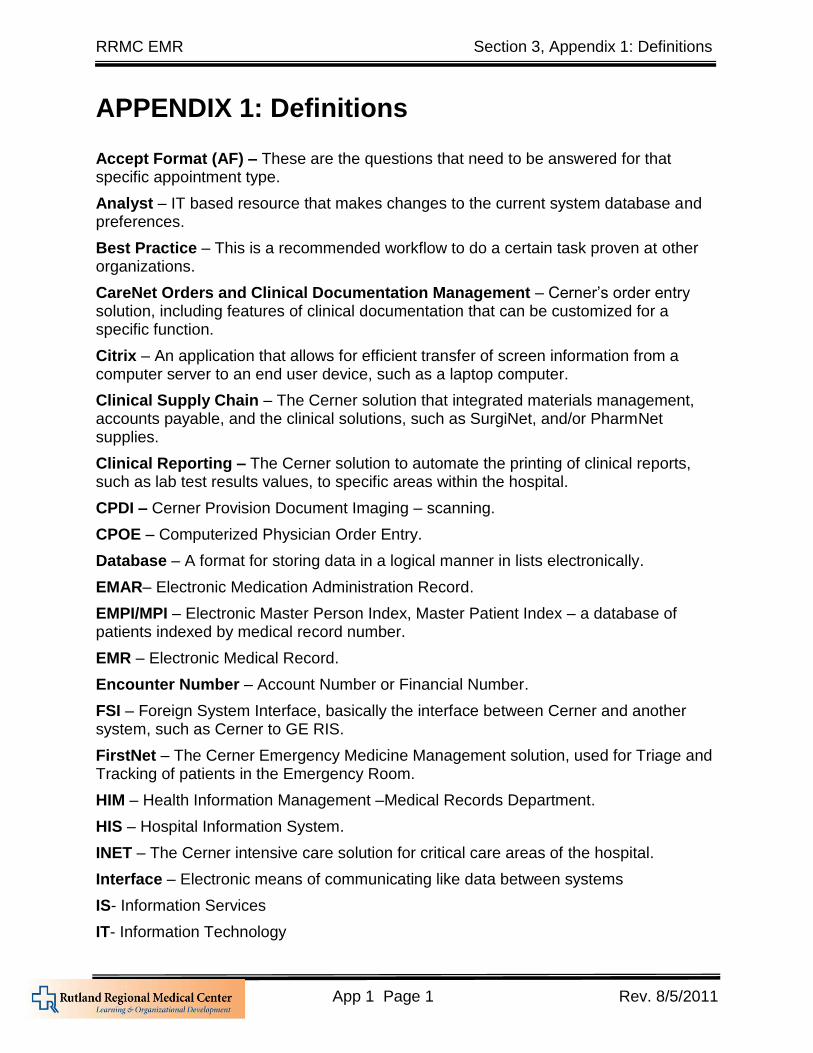
APPENDIX 1: Definitions Accept Format (AF) – These are the questions that need to be answered for that specific appointment type.
Analyst – IT based resource that makes changes to the current system database and preferences.
Best Practice – This is a recommended workflow to do a certain task proven at other organizations.
CareNet Orders and Clinical Documentation Management – Cerner’s order entry solution, including features of clinical documentation that can be customized for a specific function.
Citrix – An application that allows for efficient transfer of screen information from a computer server to an end user device, such as a laptop computer.
Clinical Supply Chain – The Cerner solution that integrated materials management, accounts payable, and the clinical solutions, such as SurgiNet, and/or PharmNet supplies.
Clinical Reporting – The Cerner solution to automate the printing of clinical reports, such as lab test results values, to specific areas within the hospital.
CPDI – Cerner Provision Document Imaging – scanning.
CPOE – Computerized Physician Order Entry.
Database – A format for storing data in a logical manner in lists electronically.
EMAR– Electronic Medication Administration Record.
EMPI/MPI – Electronic Master Person Index, Master Patient Index – a database of patients indexed by medical record number.
EMR – Electronic Medical Record.
Encounter Number – Account Number or Financial Number.
FSI – Foreign System Interface, basically the interface between Cerner and another system, such as Cerner to GE RIS.
FirstNet – The Cerner Emergency Medicine Management solution, used for Triage and Tracking of patients in the Emergency Room.
HIM – Health Information Management –Medical Records Department.
HIS – Hospital Information System.
INET – The Cerner intensive care solution for critical care areas of the hospital.
Interface – Electronic means of communicating like data between systems
IS- Information Services
IT- Information Technology
RRMC EMR Section 3, Appendix 1: Definitions
App 1 Page 2 Rev. 8/5/2011
Medical Service – Patient Service.
Order – 1) electronic order 2) faxed order to be scanned in system 3) specific test you need to select from the optional orders in the appointment attributes menu.
Order Entry Format (OEF) – These are the questions answered specifically for any given orderable.
Orderable – this is an order.
PathNet – The Cerner Lab Management Solution
PowerChart – The Cerner solution that logically lists results in a longitudinal fashion within a patient record, typically used in the inpatient hospital setting, also known as Acute EMR
PowerChart Office – The Cerner solution that logically lists results in a longitudinal fashion within a patient record, typically used in the outpatient setting also known as Ambulatory EMR.
ProFile – The Cerner Health Information Management, Medical Records Management solution.
ProFit – The Cerner Patient Billing Office solution
Registration Management (ERM) – Cerner’s solution for the hospital and outpatient clinic functions to register patients to the system.
Scheduling Management (ESM) – Cerner’s solution for the hospital and outpatient clinic functions to schedule patients in the system.
Subject Matter Expert (SME)-,referring to a person who is a Subject Matter Expert that offers advice in their area of expertise during the implementation of a system.
SurgiNet – The Cerner solution that automates the workflow processes in a hospital surgery department and includes scheduling and documentation management and clinical supply chain.
Workflow – the process that a resource takes to accomplish a specific task.
RRMC EMR Section 3, Appendix 2: Initial Access Instructions
App 2 Page 1 Rev. 8/5/2011
APPENDIX 2: Initial Access Instructions
Instructions for Downloading Citrix (first time access only)
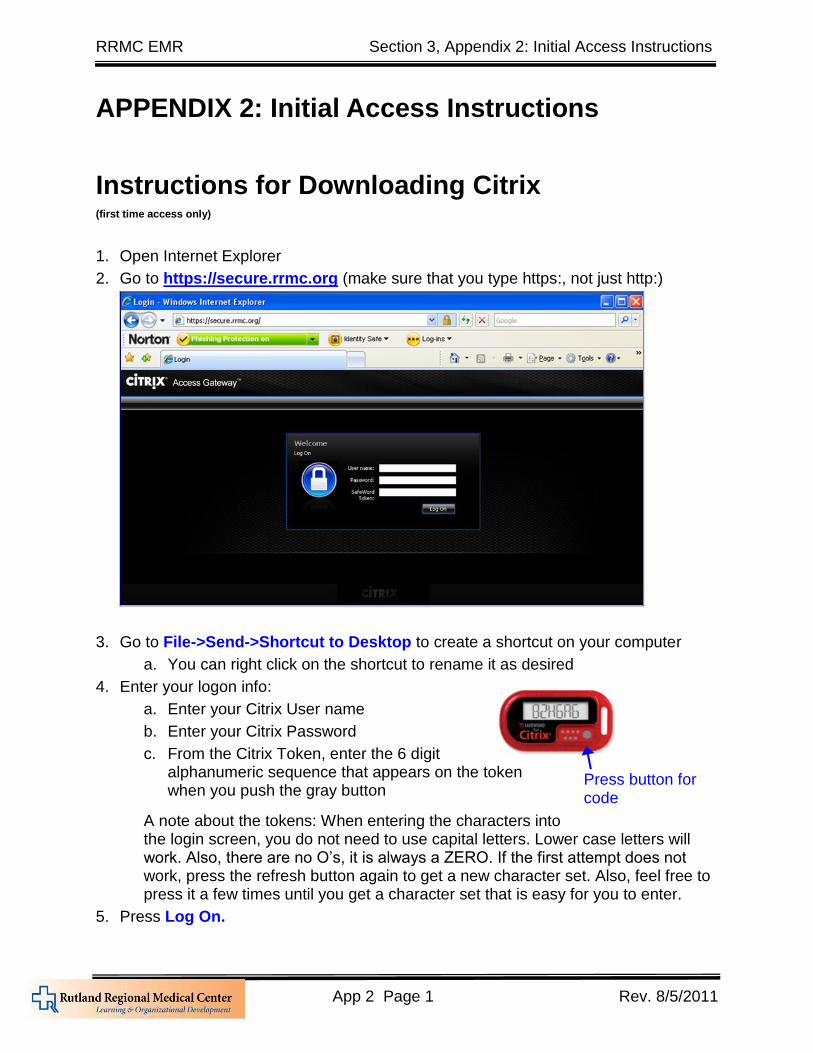
1. Open Internet Explorer
2. Go to https://secure.rrmc.org (make sure that you type https:, not just http:)
3. Go to File->Send->Shortcut to Desktop to create a shortcut on your computer
a. You can right click on the shortcut to rename it as desired
4. Enter your logon info:
a. Enter your Citrix User name
b. Enter your Citrix Password
c. From the Citrix Token, enter the 6 digit alphanumeric sequence that appears on the token when you push the gray button
A note about the tokens: When entering the characters into the login screen, you do not need to use capital letters. Lower case letters will work. Also, there are no O’s, it is always a ZERO. If the first attempt does not work, press the refresh button again to get a new character set. Also, feel free to press it a few times until you get a character set that is easy for you to enter.
5. Press Log On.
Press button for code
RRMC EMR Section 3, Appendix 2: Initial Access Instructions
App 2 Page 2 Rev. 8/5/2011
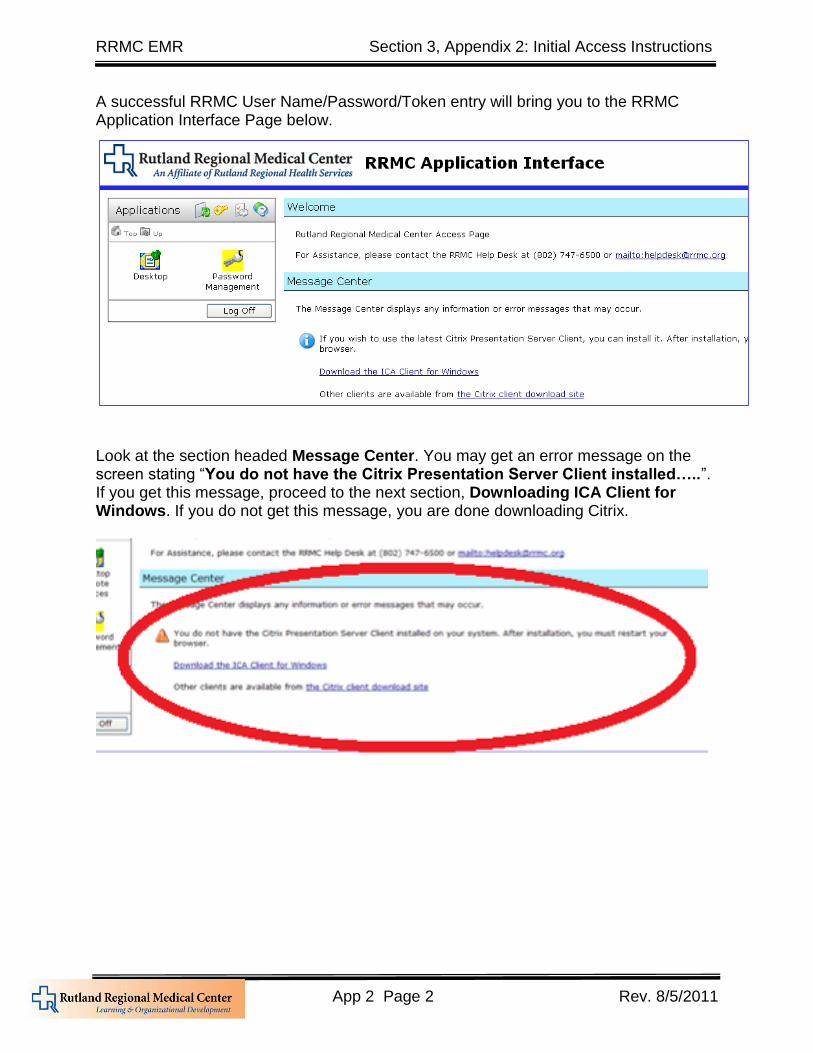
A successful RRMC User Name/Password/Token entry will bring you to the RRMC Application Interface Page below.
Look at the section headed Message Center. You may get an error message on the screen stating “You do not have the Citrix Presentation Server Client installed…..”. If you get this message, proceed to the next section, Downloading ICA Client for Windows. If you do not get this message, you are done downloading Citrix.
RRMC EMR Section 3, Appendix 2: Initial Access Instructions
App 2 Page 3 Rev. 8/5/2011
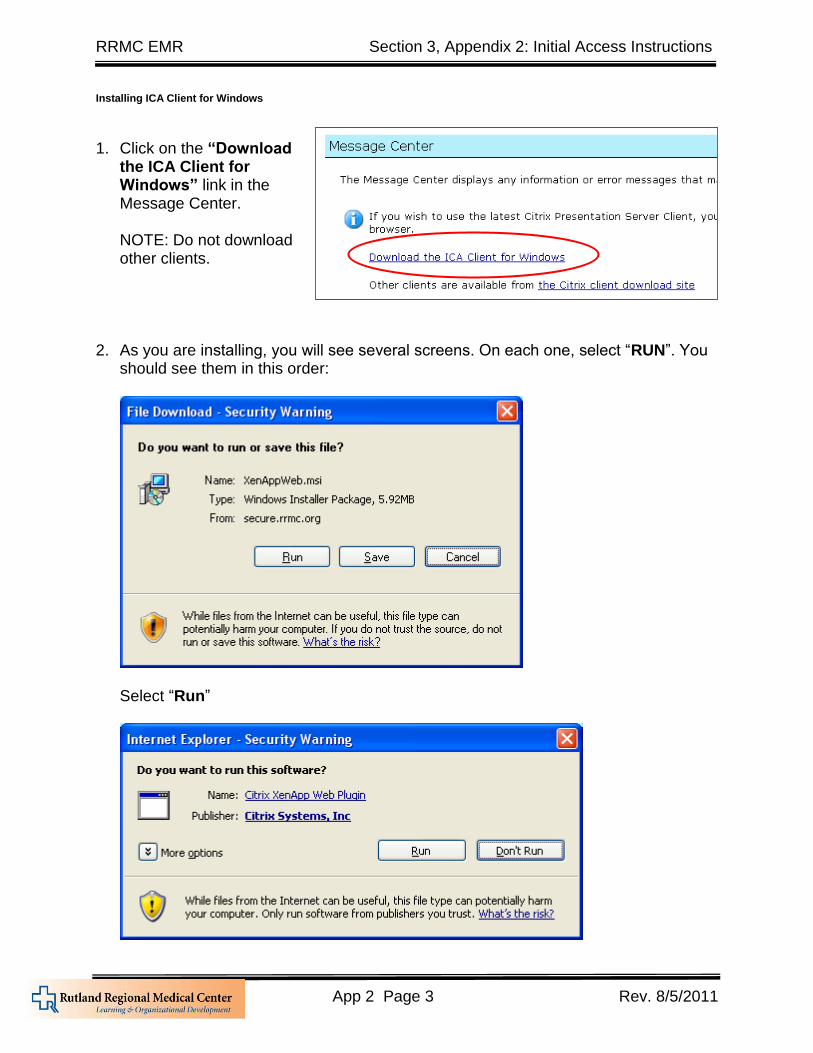
Installing ICA Client for Windows
1. Click on the “Download the ICA Client for Windows” link in the Message Center.
NOTE: Do not download other clients.
2. As you are installing, you will see several screens. On each one, select “RUN”. You
should see them in this order:
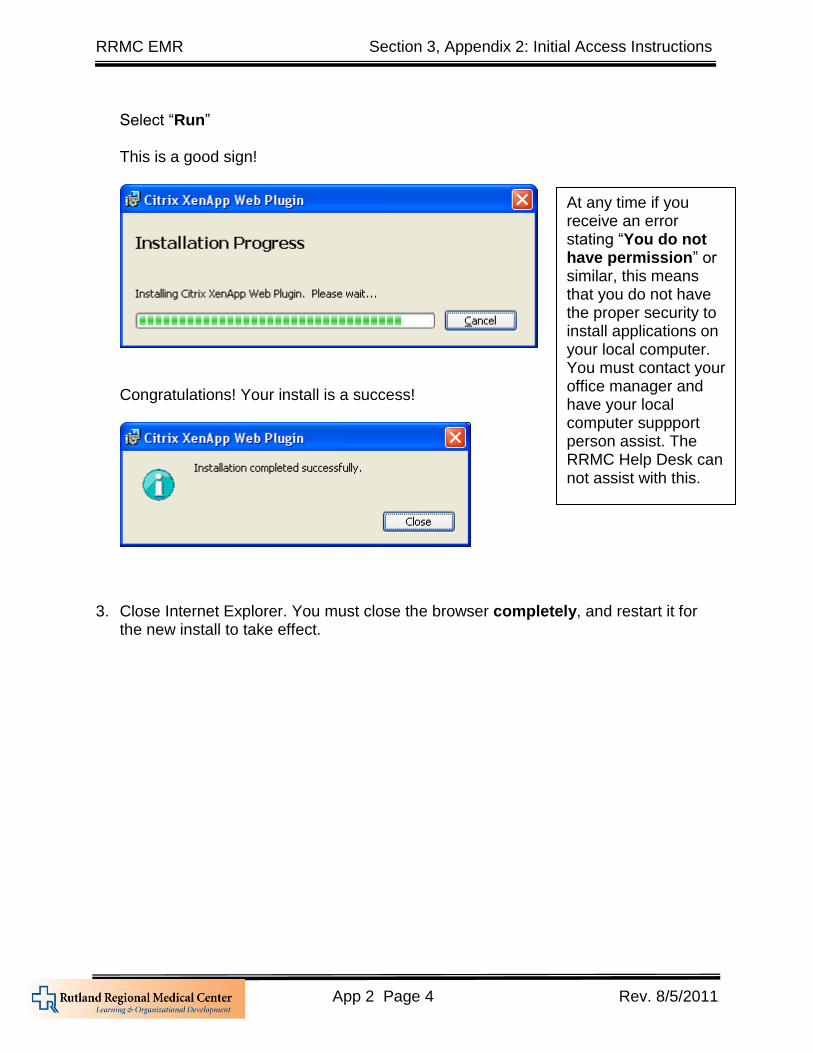
Select “Run”
RRMC EMR Section 3, Appendix 2: Initial Access Instructions
App 2 Page 4 Rev. 8/5/2011
Select “Run” This is a good sign!
Congratulations! Your install is a success!
3. Close Internet Explorer. You must close the browser completely, and restart it for
the new install to take effect.
At any time if you receive an error stating “You do not have permission” or similar, this means that you do not have the proper security to install applications on your local computer. You must contact your office manager and have your local computer suppport person assist. The RRMC Help Desk can not assist with this.
RRMC EMR Section 3, Appendix 2: Initial Access Instructions
App 2 Page 5 Rev. 8/5/2011
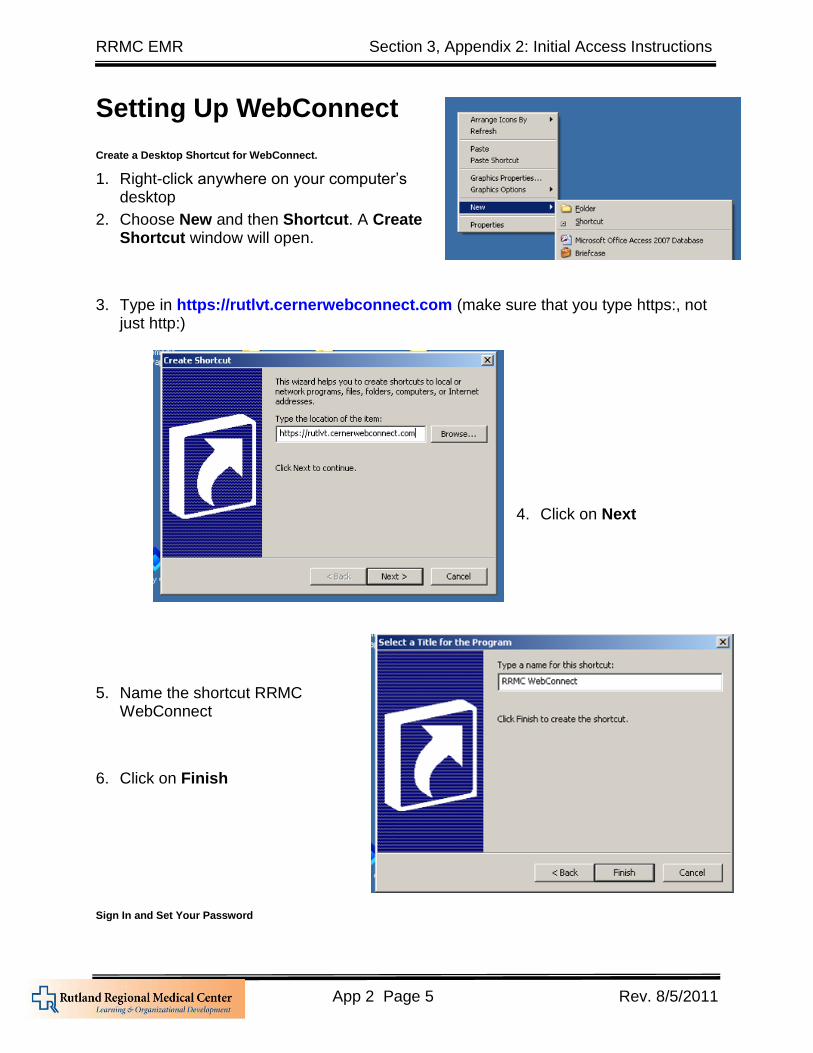
Setting Up WebConnect Create a Desktop Shortcut for WebConnect.
1. Right-click anywhere on your computer’s desktop
2. Choose New and then Shortcut. A Create Shortcut window will open.
3. Type in https://rutlvt.cernerwebconnect.com (make sure that you type https:, not just http:)
4. Click on Next
5. Name the shortcut RRMC WebConnect
6. Click on Finish
Sign In and Set Your Password
RRMC EMR Section 3, Appendix 2: Initial Access Instructions
App 2 Page 6 Rev. 8/5/2011
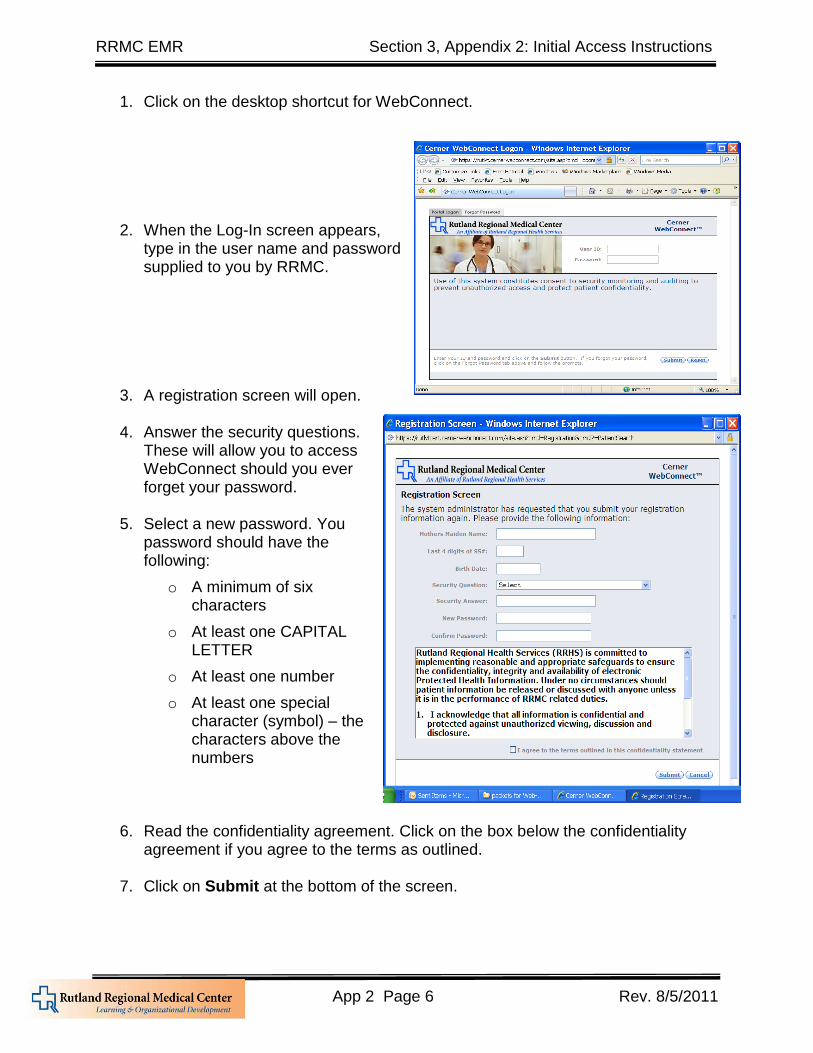
1. Click on the desktop shortcut for WebConnect.
2. When the Log-In screen appears, type in the user name and password supplied to you by RRMC.
3. A registration screen will open.
4. Answer the security questions. These will allow you to access WebConnect should you ever forget your password.
5. Select a new password. You password should have the following:
o A minimum of six characters
o At least one CAPITAL LETTER
o At least one number
o At least one special character (symbol) – the characters above the numbers
6. Read the confidentiality agreement. Click on the box below the confidentiality agreement if you agree to the terms as outlined.
7. Click on Submit at the bottom of the screen.
RRMC EMR Section 3, Appendix 2: Initial Access Instructions
App 2 Page 7 Rev. 8/5/2011
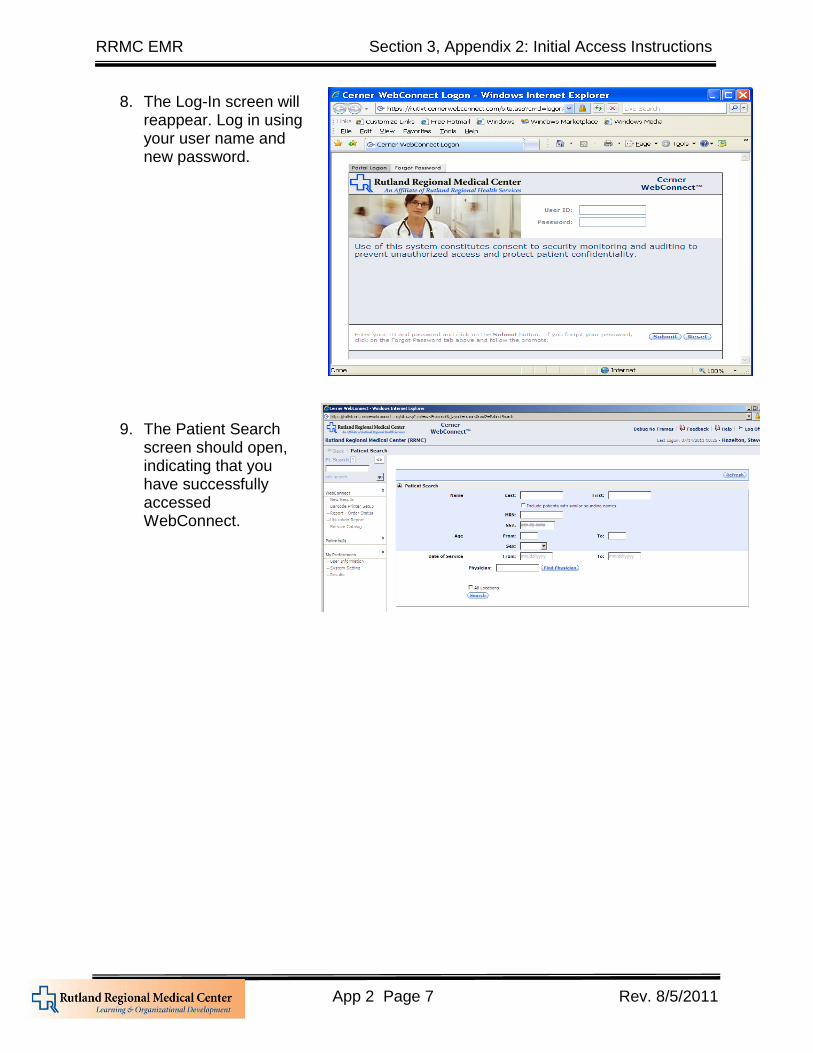
8. The Log-In screen will reappear. Log in using your user name and new password.
9. The Patient Search screen should open, indicating that you have successfully accessed WebConnect.
RRMC EMR Section 3, Appendix 2: Initial Access Instructions
App 2 Page 8 Rev. 8/5/2011
This page left blank intentionally
RRMC EMR Section 3, Appendix 3: Accessing the TRAIN Domain
App 3 Page 1 Rev. 8/5/2011
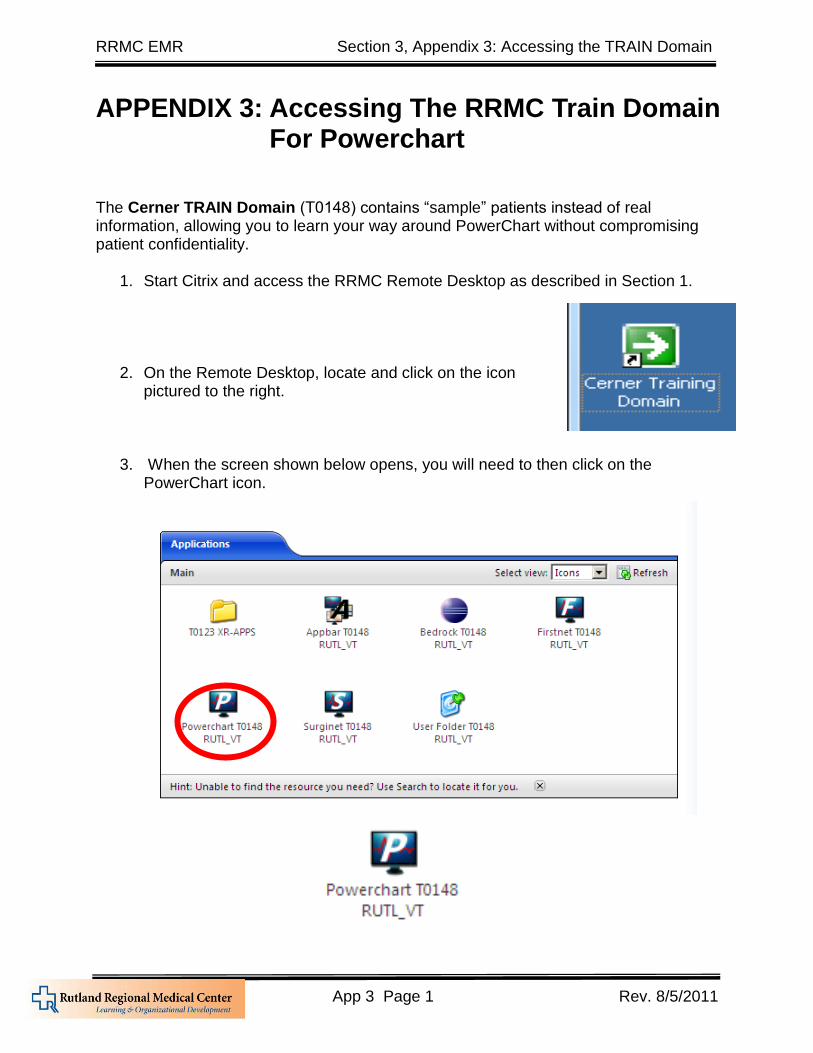
APPENDIX 3: Accessing The RRMC Train Domain For Powerchart
The Cerner TRAIN Domain (T0148) contains “sample” patients instead of real information, allowing you to learn your way around PowerChart without compromising patient confidentiality.
1. Start Citrix and access the RRMC Remote Desktop as described in Section 1.
2. On the Remote Desktop, locate and click on the icon pictured to the right.
3. When the screen shown below opens, you will need to then click on the PowerChart icon.
RRMC EMR Section 3, Appendix 3: Accessing the TRAIN Domain
App 3 Page 2 Rev. 8/5/2011
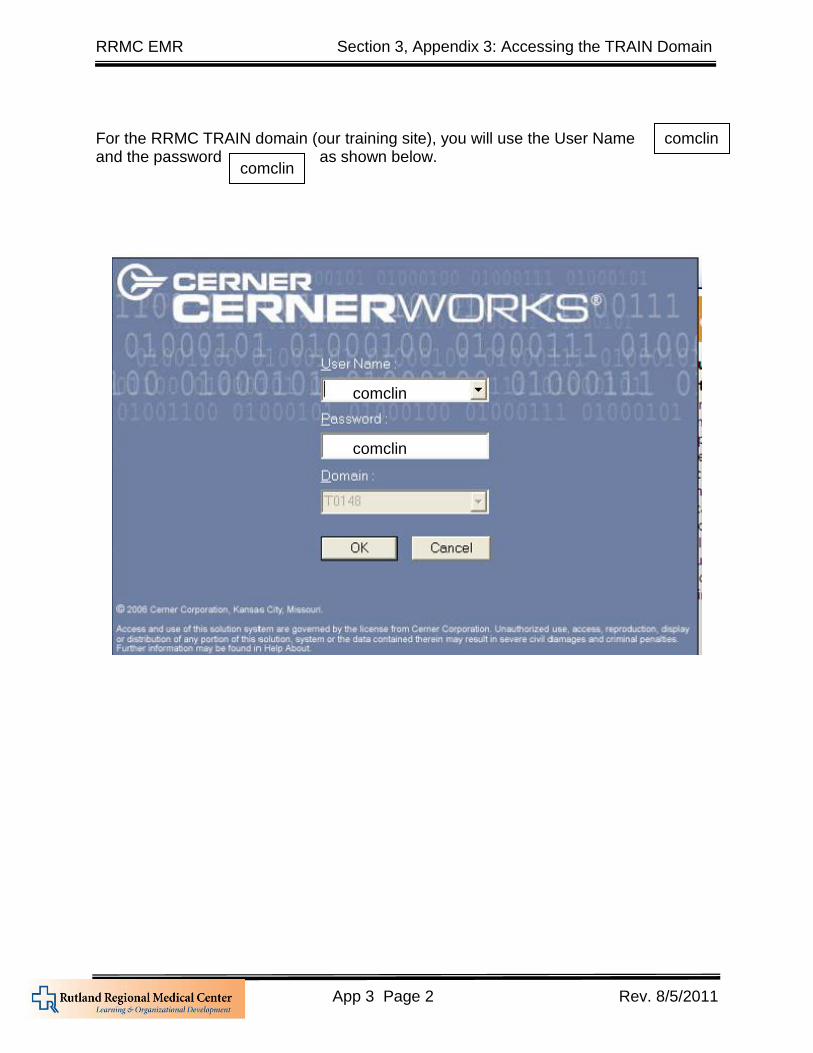
For the RRMC TRAIN domain (our training site), you will use the User Name and the password as shown below.
comclin
comclin
comclin
comclin
RRMC EMR Section 3, Appendix 4: Selecting a Different Printer
App 4 Page 1 Rev. 8/5/2011
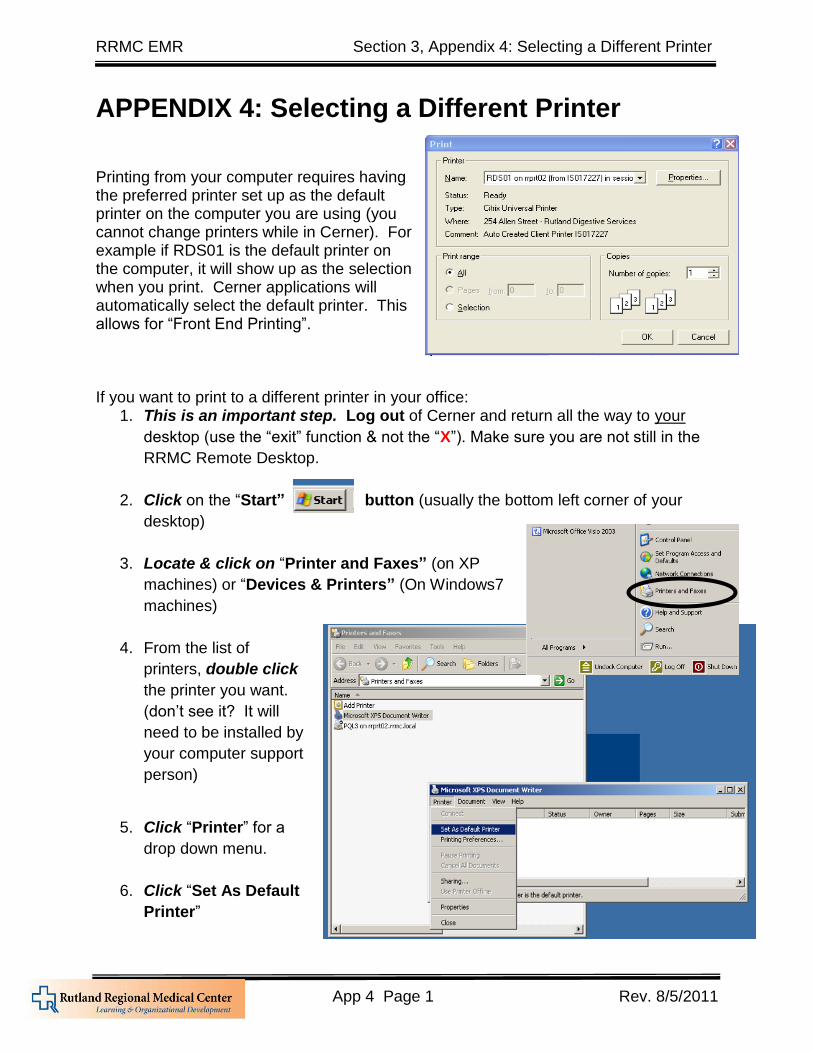
APPENDIX 4: Selecting a Different Printer Printing from your computer requires having the preferred printer set up as the default printer on the computer you are using (you cannot change printers while in Cerner). For example if RDS01 is the default printer on the computer, it will show up as the selection when you print. Cerner applications will automatically select the default printer. This allows for “Front End Printing”. If you want to print to a different printer in your office:
1. This is an important step. Log out of Cerner and return all the way to your
desktop (use the “exit” function & not the “X”). Make sure you are not still in the
RRMC Remote Desktop.
2. Click on the “Start” button (usually the bottom left corner of your
desktop)
3. Locate & click on “Printer and Faxes” (on XP
machines) or “Devices & Printers” (On Windows7
machines)
4. From the list of
printers, double click
the printer you want.
(don’t see it? It will
need to be installed by
your computer support
person)
5. Click “Printer” for a
drop down menu.
6. Click “Set As Default
Printer”
RRMC EMR Section 3, Appendix 4: Selecting a Different Printer
App 4 Page 2 Rev. 8/5/2011
7. Once you have chosen the new printer, log in to your Cerner application. The
print window will now pick this new printer up as the default printer.
8. Remember: to change back to your original printer you will need to repeat this
process and reassign that printer as the default.
Notes: 1. Changing the printer while in a Cerner Application such as Power Chart will not allow
you correctly establish the printer as a default printer that will work. To change the default printer on your computer you must be logged out of all Cerner applications.
2. When a computer itself does not have a default printer set up you will not have “front end printing” as an option within the Cerner application. Have your IS technician install the printer and set as default (RRMC staff cannot do this for you). This should be done while logged out of all the Cerner sessions.
3. If you’re using a Citrix Key to access Cerner PowerChart , the Citrix system may
also need to have the printer recognized as the default printer. 4. Sometimes, resetting the default will not work. Try Uninstalling (delete) the printer
and then installing it again (setting it as default).
RRMC EMR Section 3, Appendix 5: Changing Your Password
App 5 Page 1 Rev. 8/5/2011
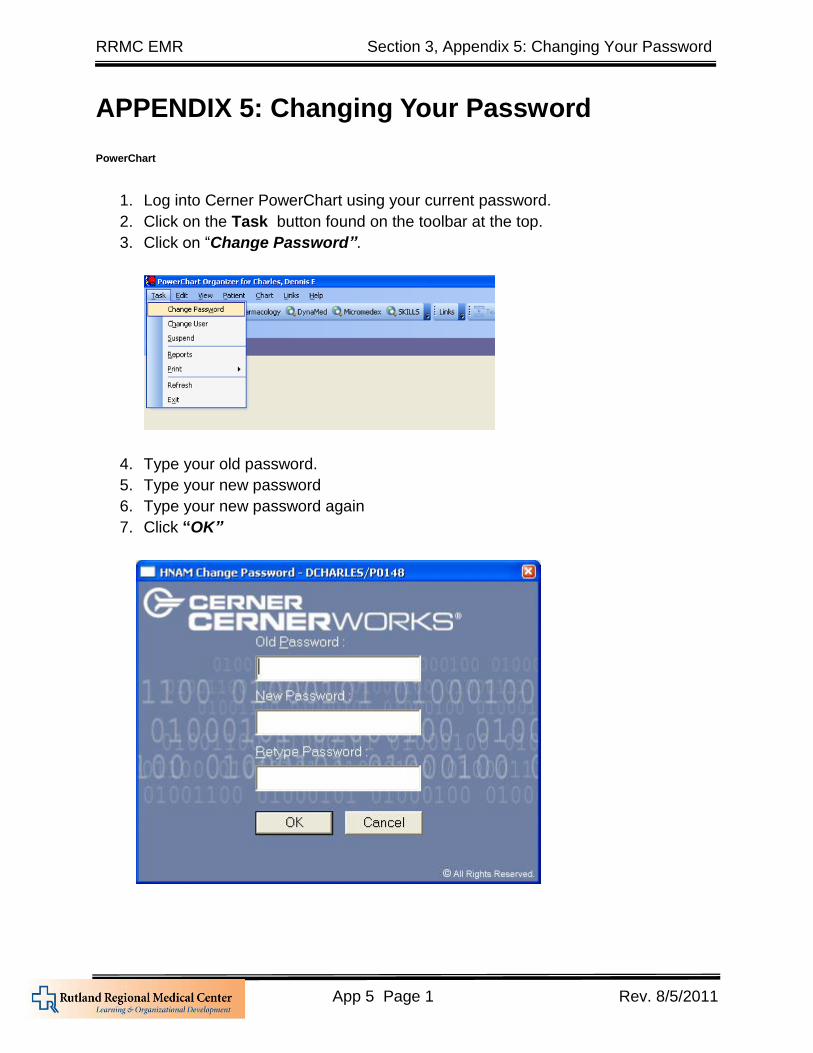
APPENDIX 5: Changing Your Password PowerChart
1. Log into Cerner PowerChart using your current password.
2. Click on the Task button found on the toolbar at the top.
3. Click on “Change Password”.
4. Type your old password.
5. Type your new password
6. Type your new password again
7. Click “OK”

RRMC EMR Section 3, Appendix 5: Changing Your Password
App 5 Page 2 Rev. 8/5/2011
WebConnect
1. Log in to WebConnect. The Patient
Search screen will open.
2. When the Patient Search screen appears, Click on System Settings under My Preferences.
3. The System Settings window will open.
4. Enter your old password, then enter and confirm (re-enter) your new password.
Reminder: Your password should have the following:
o A minimum of six characters
o At least one CAPITAL LETTER
o At least one number
o At least one special character (symbol) – the characters above the numbers
5. Click on Change Password
RRMC EMR Section 3, Appendix 7: RRMC Resources
App 7 Page 1 Rev. 8/5/2011
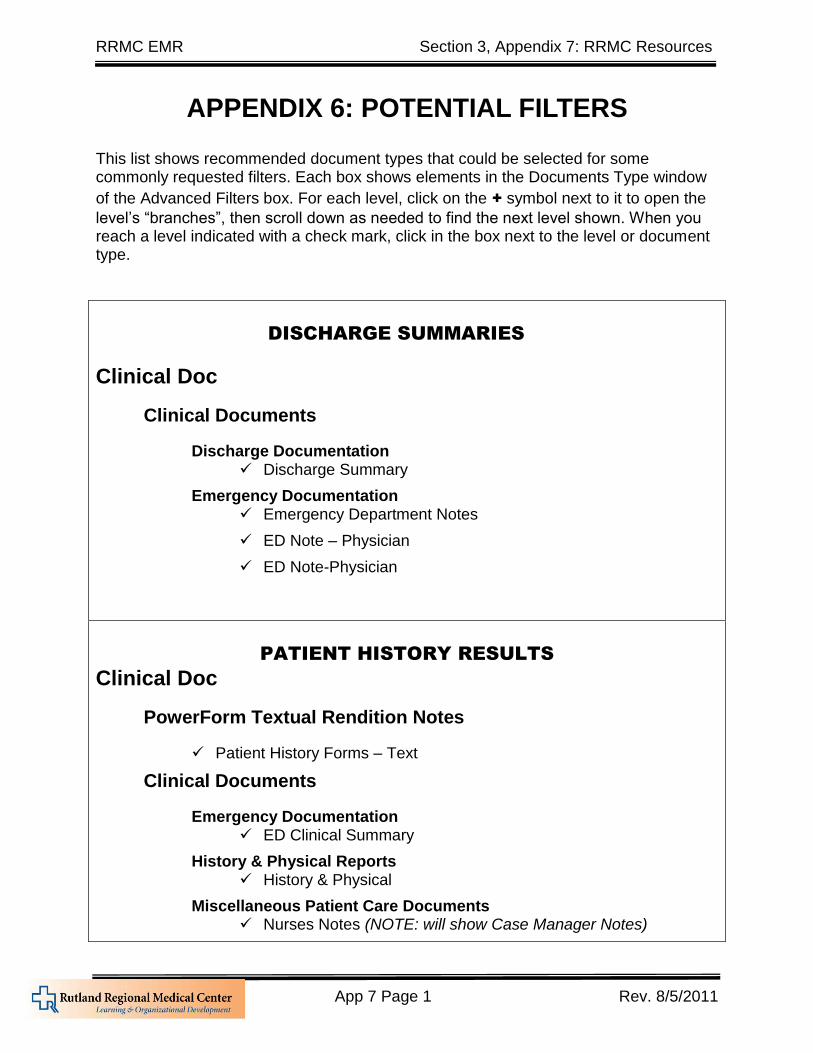
APPENDIX 6: POTENTIAL FILTERS This list shows recommended document types that could be selected for some commonly requested filters. Each box shows elements in the Documents Type window
of the Advanced Filters box. For each level, click on the + symbol next to it to open the
level’s “branches”, then scroll down as needed to find the next level shown. When you reach a level indicated with a check mark, click in the box next to the level or document type.
DISCHARGE SUMMARIES
Clinical Doc
Clinical Documents
Discharge Documentation Discharge Summary
Emergency Documentation Emergency Department Notes
ED Note – Physician
ED Note-Physician
PATIENT HISTORY RESULTS
Clinical Doc
PowerForm Textual Rendition Notes
Patient History Forms – Text
Clinical Documents
Emergency Documentation ED Clinical Summary
History & Physical Reports History & Physical
Miscellaneous Patient Care Documents Nurses Notes (NOTE: will show Case Manager Notes)
RRMC EMR Section 3, Appendix 7: RRMC Resources
App 7 Page 2 Rev. 8/5/2011
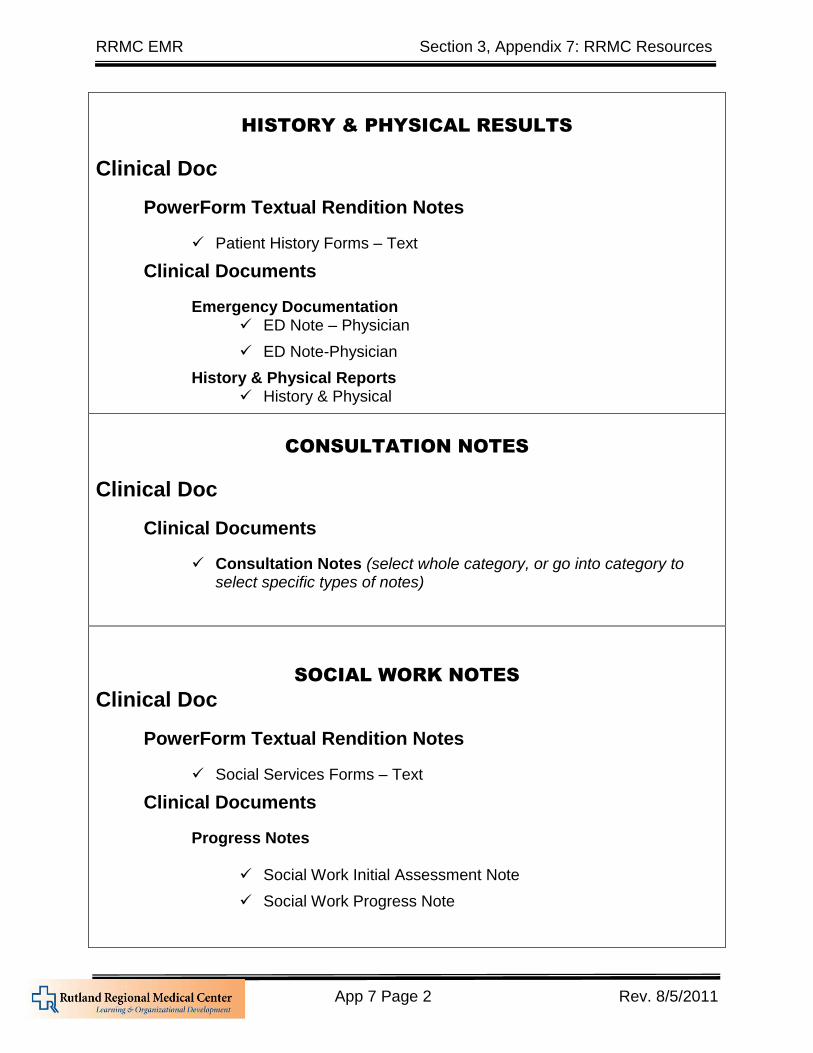
HISTORY & PHYSICAL RESULTS
Clinical Doc
PowerForm Textual Rendition Notes
Patient History Forms – Text
Clinical Documents
Emergency Documentation ED Note – Physician
ED Note-Physician
History & Physical Reports History & Physical
CONSULTATION NOTES
Clinical Doc
Clinical Documents
Consultation Notes (select whole category, or go into category to select specific types of notes)
SOCIAL WORK NOTES
Clinical Doc
PowerForm Textual Rendition Notes
Social Services Forms – Text
Clinical Documents
Progress Notes
Social Work Initial Assessment Note
Social Work Progress Note
RRMC EMR Section 3, Appendix 7: RRMC Resources
App 7 Page 3 Rev. 8/5/2011
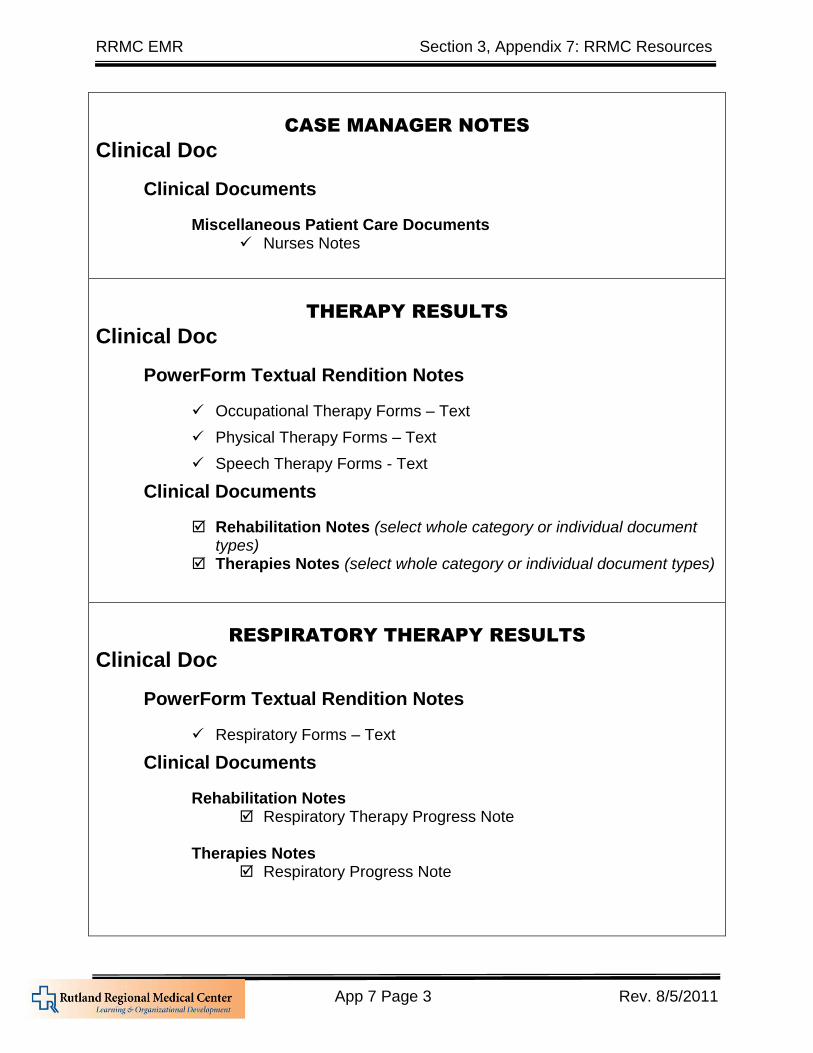
CASE MANAGER NOTES
Clinical Doc
Clinical Documents
Miscellaneous Patient Care Documents Nurses Notes
THERAPY RESULTS
Clinical Doc
PowerForm Textual Rendition Notes
Occupational Therapy Forms – Text
Physical Therapy Forms – Text
Speech Therapy Forms - Text
Clinical Documents
Rehabilitation Notes (select whole category or individual document types)
Therapies Notes (select whole category or individual document types)
RESPIRATORY THERAPY RESULTS
Clinical Doc
PowerForm Textual Rendition Notes
Respiratory Forms – Text
Clinical Documents
Rehabilitation Notes Respiratory Therapy Progress Note
Therapies Notes
Respiratory Progress Note
RRMC EMR Section 3, Appendix 7: RRMC Resources
App 7 Page 4 Rev. 8/5/2011
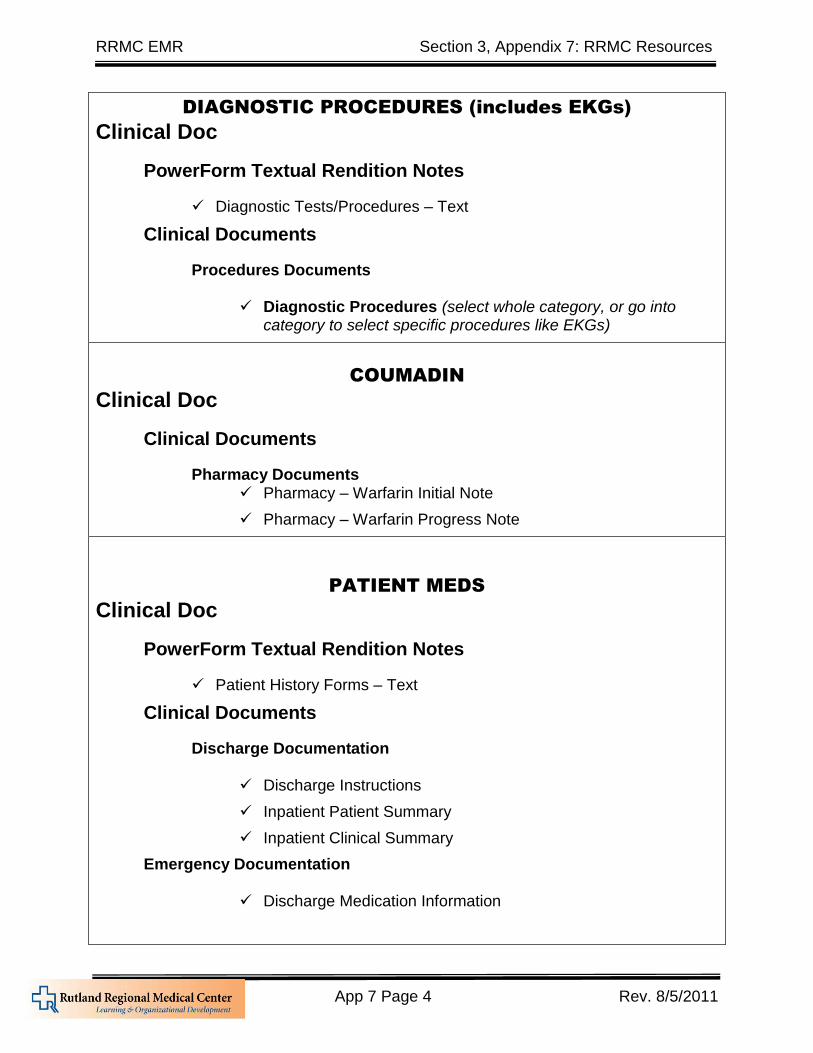
DIAGNOSTIC PROCEDURES (includes EKGs)
Clinical Doc
PowerForm Textual Rendition Notes
Diagnostic Tests/Procedures – Text
Clinical Documents
Procedures Documents
Diagnostic Procedures (select whole category, or go into category to select specific procedures like EKGs)
COUMADIN
Clinical Doc
Clinical Documents
Pharmacy Documents Pharmacy – Warfarin Initial Note
Pharmacy – Warfarin Progress Note
PATIENT MEDS
Clinical Doc
PowerForm Textual Rendition Notes
Patient History Forms – Text
Clinical Documents
Discharge Documentation
Discharge Instructions
Inpatient Patient Summary
Inpatient Clinical Summary
Emergency Documentation
Discharge Medication Information

RRMC EMR Section 3, Appendix 7: RRMC Resources
App 7 Page 5 Rev. 8/5/2011
DI REPORTS
Clinical Doc
Radiology (select whole category)
LAB DOCUMENTS
NOTE: Lab results are rarely transformed into Documents, and therefore are not
printable from PowerChart. To view lab results, go to the Results View menu
tab. To print lab results, use WebConnect instead of PowerChart.
PATHOLOGY REPORTS
Clinical Doc
Pathology Reports (select whole category)
FACE SHEETS
NOTE: Face sheets may not be present as a PowerChart document (and therefore available to Practice Sites) on all patients. The locations below will show any Face Sheet type documents that do exist, including as scanned-in signed documents.
Clinical Doc
Clinical Documents
Emergency Documentation Emergency Department Face Sheet
Face Sheets (select whole category)
RRMC EMR Section 3, Appendix 7: RRMC Resources
App 7 Page 6 Rev. 8/5/2011
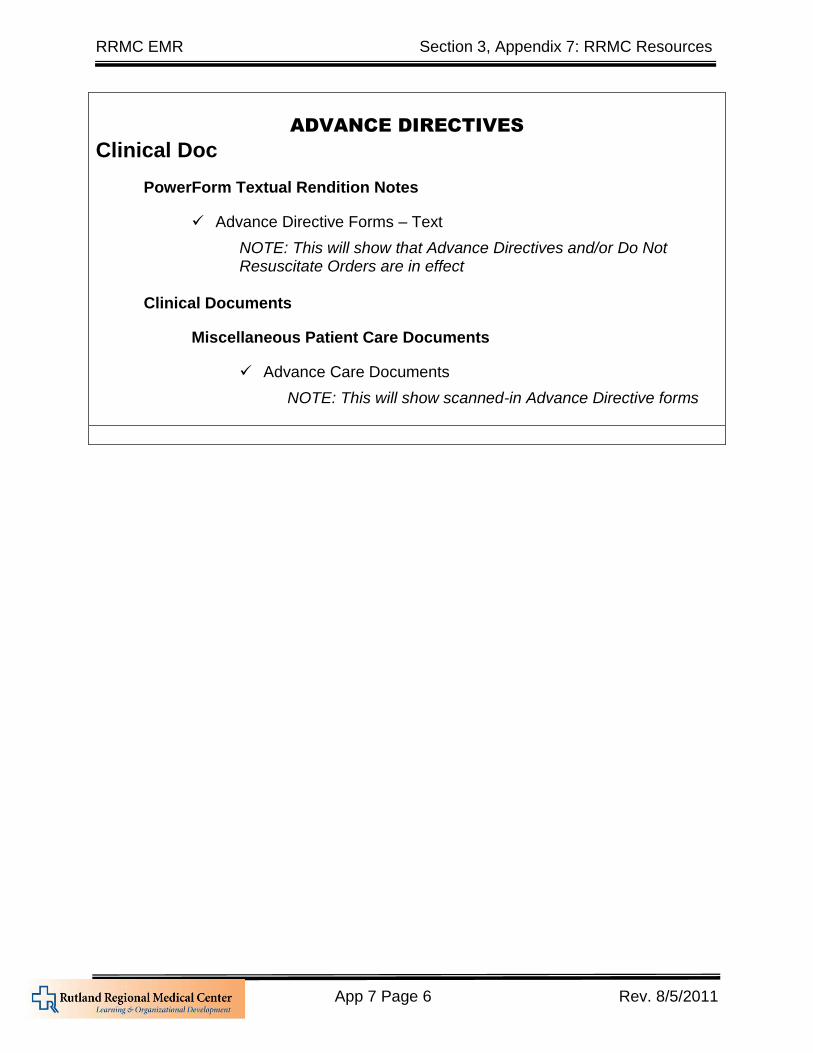
ADVANCE DIRECTIVES
Clinical Doc
PowerForm Textual Rendition Notes
Advance Directive Forms – Text
NOTE: This will show that Advance Directives and/or Do Not Resuscitate Orders are in effect
Clinical Documents
Miscellaneous Patient Care Documents
Advance Care Documents
NOTE: This will show scanned-in Advance Directive forms
RRMC EMR Section 3, Appendix 7: RRMC Resources
App 7 Page 7 Rev. 8/5/2011
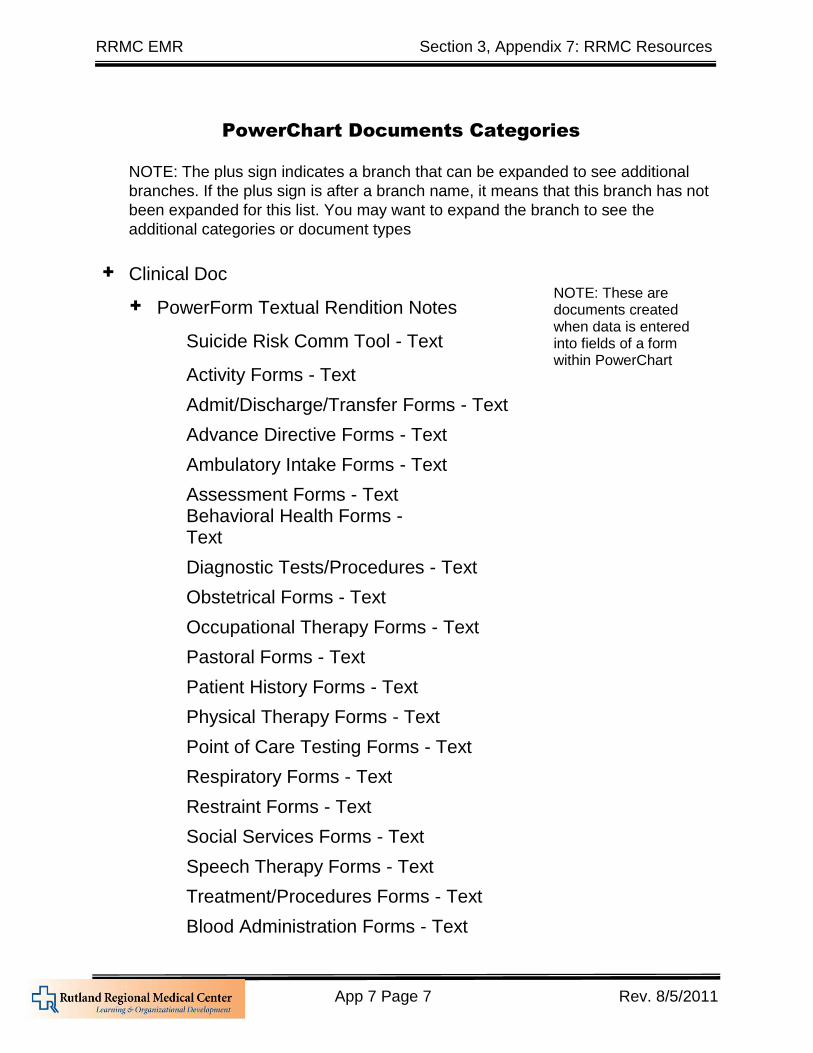
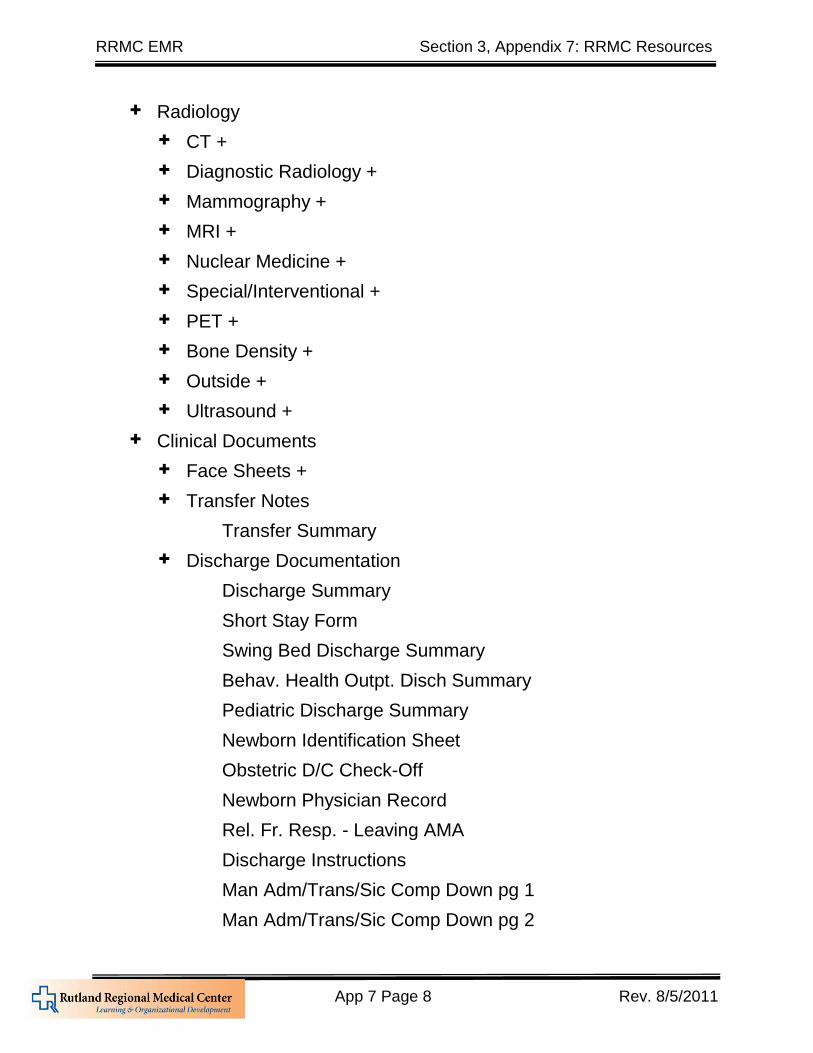
PowerChart Documents Categories
NOTE: The plus sign indicates a branch that can be expanded to see additional
branches. If the plus sign is after a branch name, it means that this branch has not
been expanded for this list. You may want to expand the branch to see the
additional categories or document types
+ Clinical Doc
+ PowerForm Textual Rendition Notes
NOTE: These are documents created
Suicide Risk Comm Tool - Text
when data is entered into fields of a form
Activity Forms - Text
within PowerChart
Admit/Discharge/Transfer Forms - Text
Advance Directive Forms - Text
Ambulatory Intake Forms - Text
Assessment Forms - Text
Behavioral Health Forms - Text
Diagnostic Tests/Procedures - Text
Obstetrical Forms - Text
Occupational Therapy Forms - Text
Pastoral Forms - Text
Patient History Forms - Text
Physical Therapy Forms - Text
Point of Care Testing Forms - Text
Respiratory Forms - Text
Restraint Forms - Text
Social Services Forms - Text
Speech Therapy Forms - Text
Treatment/Procedures Forms - Text
Blood Administration Forms - Text
RRMC EMR Section 3, Appendix 7: RRMC Resources
App 7 Page 8 Rev. 8/5/2011
+ Radiology
+ CT +
+ Diagnostic Radiology +
+ Mammography +
+ MRI +
+ Nuclear Medicine +
+ Special/Interventional +
+ PET +
+ Bone Density +
+ Outside +
+ Ultrasound +
+ Clinical Documents
+ Face Sheets +
+ Transfer Notes
Transfer Summary
+ Discharge Documentation
Discharge Summary
Short Stay Form
Swing Bed Discharge Summary
Behav. Health Outpt. Disch Summary
Pediatric Discharge Summary
Newborn Identification Sheet
Obstetric D/C Check-Off
Newborn Physician Record
Rel. Fr. Resp. - Leaving AMA
Discharge Instructions
Man Adm/Trans/Sic Comp Down pg 1
Man Adm/Trans/Sic Comp Down pg 2
RRMC EMR Section 3, Appendix 7: RRMC Resources
App 7 Page 9 Rev. 8/5/2011
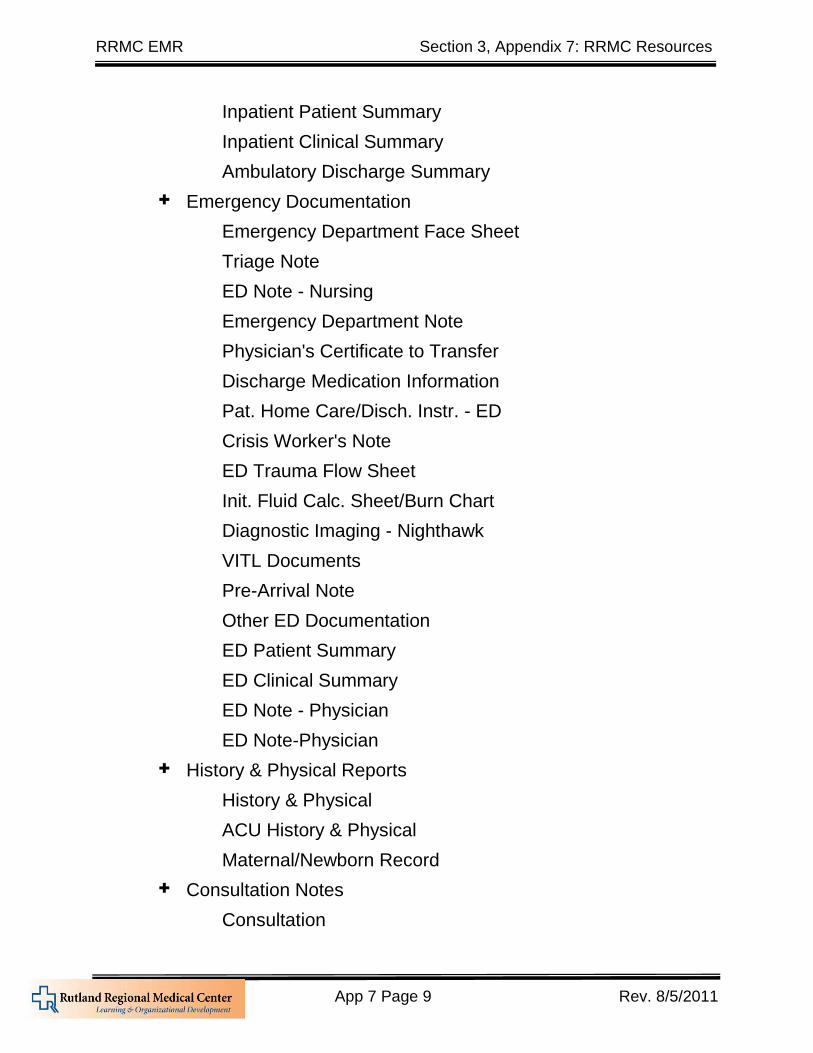
Inpatient Patient Summary
Inpatient Clinical Summary
Ambulatory Discharge Summary
+ Emergency Documentation
Emergency Department Face Sheet
Triage Note
ED Note - Nursing
Emergency Department Note
Physician's Certificate to Transfer
Discharge Medication Information
Pat. Home Care/Disch. Instr. - ED
Crisis Worker's Note
ED Trauma Flow Sheet
Init. Fluid Calc. Sheet/Burn Chart
Diagnostic Imaging - Nighthawk
VITL Documents
Pre-Arrival Note
Other ED Documentation
ED Patient Summary
ED Clinical Summary
ED Note - Physician
ED Note-Physician
+ History & Physical Reports
History & Physical
ACU History & Physical
Maternal/Newborn Record
+ Consultation Notes
Consultation
RRMC EMR Section 3, Appendix 7: RRMC Resources
App 7 Page 10 Rev. 8/5/2011
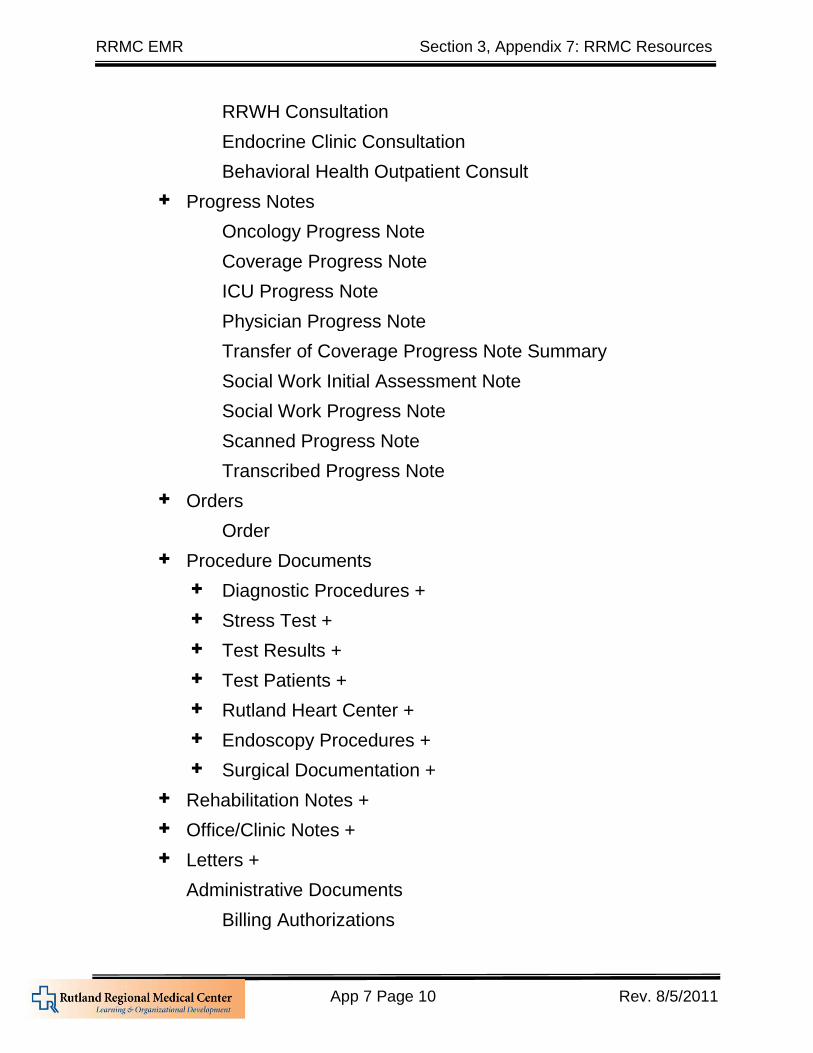
RRWH Consultation
Endocrine Clinic Consultation
Behavioral Health Outpatient Consult
+ Progress Notes
Oncology Progress Note
Coverage Progress Note
ICU Progress Note
Physician Progress Note
Transfer of Coverage Progress Note Summary
Social Work Initial Assessment Note
Social Work Progress Note
Scanned Progress Note
Transcribed Progress Note
+ Orders
Order
+ Procedure Documents
+ Diagnostic Procedures +
+ Stress Test +
+ Test Results +
+ Test Patients +
+ Rutland Heart Center +
+ Endoscopy Procedures +
+ Surgical Documentation +
+ Rehabilitation Notes +
+ Office/Clinic Notes +
+ Letters +
Administrative Documents
Billing Authorizations
RRMC EMR Section 3, Appendix 7: RRMC Resources
App 7 Page 11 Rev. 8/5/2011
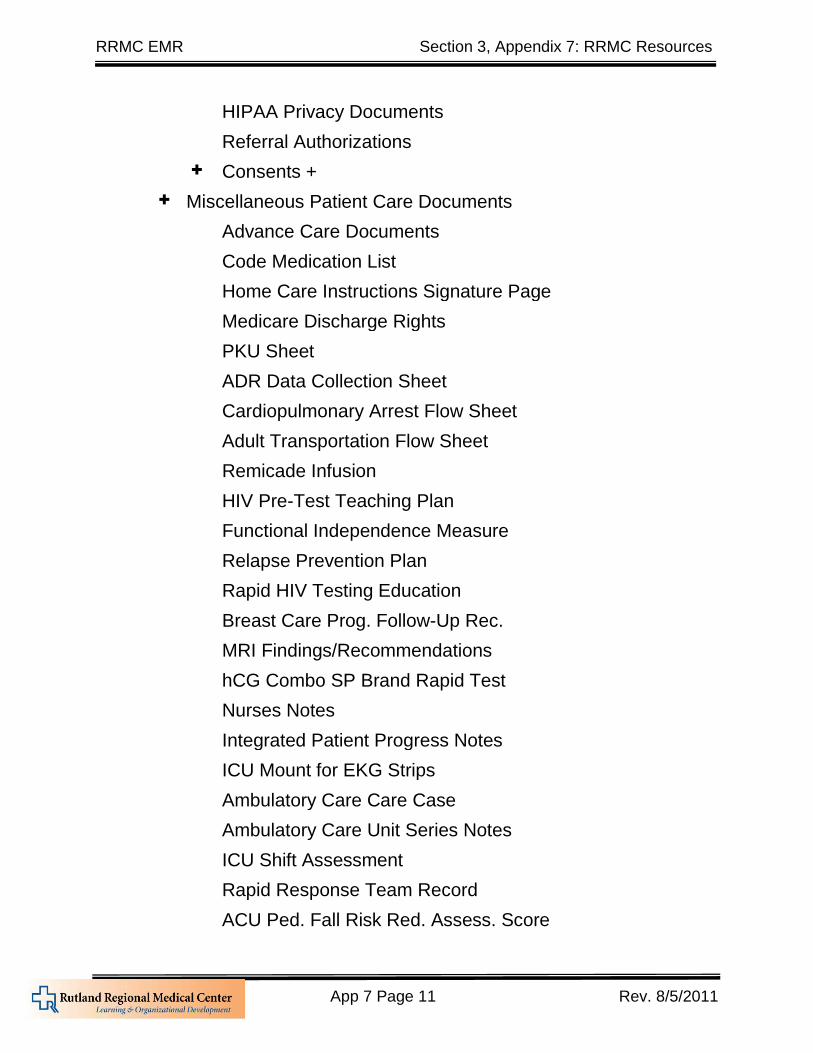
HIPAA Privacy Documents
Referral Authorizations
+ Consents +
+ Miscellaneous Patient Care Documents
Advance Care Documents
Code Medication List
Home Care Instructions Signature Page
Medicare Discharge Rights
PKU Sheet
ADR Data Collection Sheet
Cardiopulmonary Arrest Flow Sheet
Adult Transportation Flow Sheet
Remicade Infusion
HIV Pre-Test Teaching Plan
Functional Independence Measure
Relapse Prevention Plan
Rapid HIV Testing Education
Breast Care Prog. Follow-Up Rec.
MRI Findings/Recommendations
hCG Combo SP Brand Rapid Test
Nurses Notes
Integrated Patient Progress Notes
ICU Mount for EKG Strips
Ambulatory Care Care Case
Ambulatory Care Unit Series Notes
ICU Shift Assessment
Rapid Response Team Record
ACU Ped. Fall Risk Red. Assess. Score
RRMC EMR Section 3, Appendix 7: RRMC Resources
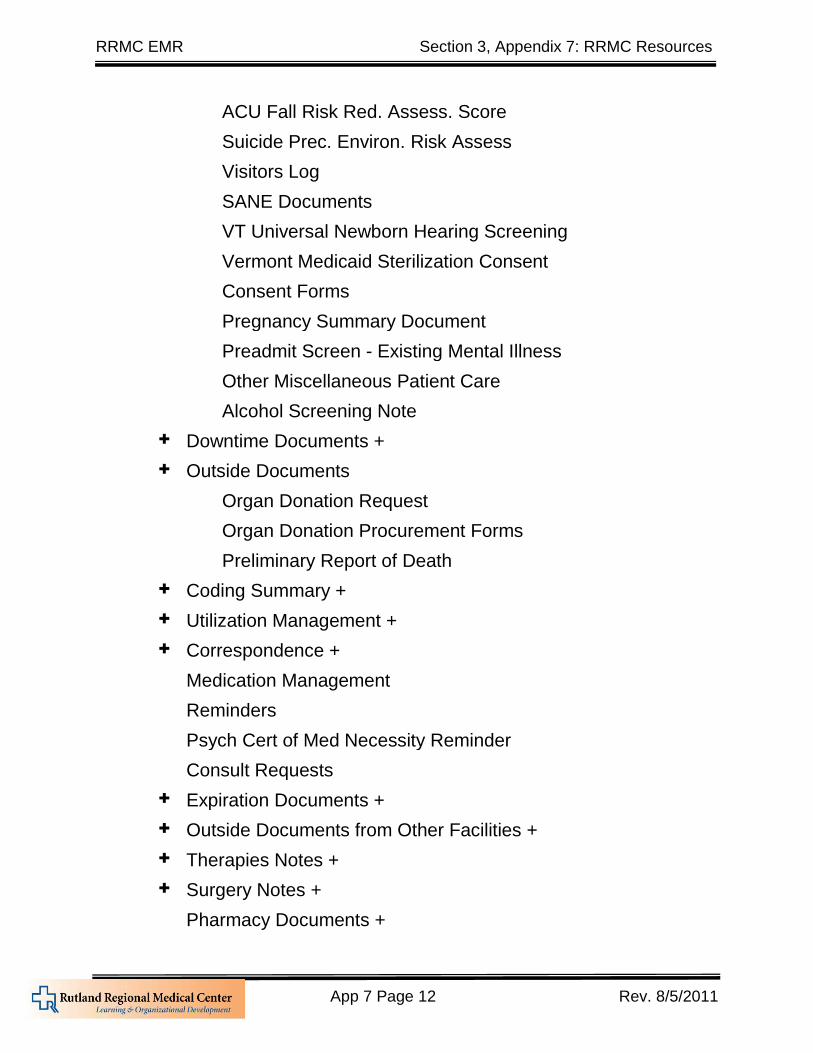
App 7 Page 12 Rev. 8/5/2011
ACU Fall Risk Red. Assess. Score
Suicide Prec. Environ. Risk Assess
Visitors Log
SANE Documents
VT Universal Newborn Hearing Screening
Vermont Medicaid Sterilization Consent
Consent Forms
Pregnancy Summary Document
Preadmit Screen - Existing Mental Illness
Other Miscellaneous Patient Care
Alcohol Screening Note
+ Downtime Documents +
+ Outside Documents
Organ Donation Request
Organ Donation Procurement Forms
Preliminary Report of Death
+ Coding Summary +
+ Utilization Management +
+ Correspondence +
Medication Management
Reminders
Psych Cert of Med Necessity Reminder
Consult Requests
+ Expiration Documents +
+ Outside Documents from Other Facilities +
+ Therapies Notes +
+ Surgery Notes +
Pharmacy Documents +
RRMC EMR Section 3, Appendix 7: RRMC Resources
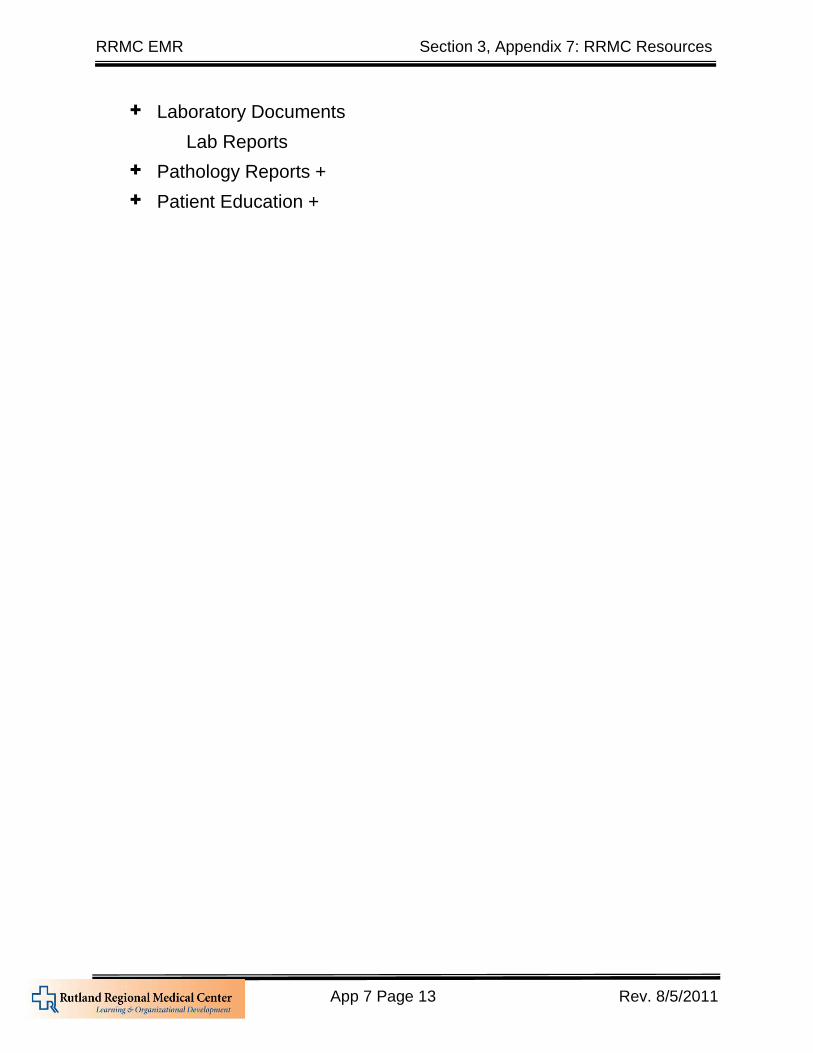
App 7 Page 13 Rev. 8/5/2011
+ Laboratory Documents
Lab Reports
+ Pathology Reports +
+ Patient Education +
RRMC EMR Section 3, Appendix 7: RRMC Resources
App 7 Page 14 Rev. 8/5/2011
RRMC EMR Section 3, Appendix 7: RRMC Resources
App 7 Page 1 Rev. 8/5/2011
APPENDIX 7: RRMC Resources
Information Services Resources
RRMC Help Desk RRMC Help Desk: (802) 747-6500 [email protected]
New Empoyee Access Obtaining a User Name and Password
1. Have the new employee complete and sign the RRMC Confidentiality Agreement form (copy page 3-x if needed).
2. Contact Lynne Spence in the RRMC Information Services department to schedule a time for initial access and training.
[email protected] (802) 772-2667
Departing Employees Employees who leave the Community Provider Site need to be removed from the RRMC system to prevent unauthorized access.
1. Obtain the Cerner Access Token from the employee. 2. E-mail or call Lynne Spence (see RRMC Resources) and inform her of
the need to remove all access rights for the employee. 3. Return the Cerner Access Token to the RRMC Information Services
Department.
Learning and Organizational Development Resources
Training Contact Steve Hazelton, Training Specialist Learning and Organizational Development Department Rutland Regional Medical Center (802) 747-3751 [email protected]


![Raven Rock Mountain Complex (RRMC) [redacted]](https://static.fdocuments.in/doc/165x107/619751d550ddca4322686ed5/raven-rock-mountain-complex-rrmc-redacted.jpg)


![Raven Rock Mountain Complex (RRMC) [redacted] · Department ofDefense INSTRUCTION NUMBER 5110.11 October4, 2010 DA&M SUBJECT: Raven Rock Mountain Complex (RRMC) References: See Enclosure](https://static.fdocuments.in/doc/165x107/5b9b86cf09d3f292798d4539/raven-rock-mountain-complex-rrmc-redacted-department-ofdefense-instruction.jpg)
