Common Sense RCcommonsenserc.com/product_instructions/ACDC-6_Manual.pdfCommon Sense RC ACDC-6 6S...
8
C Copyright 2009 Operating manual Common Sense RC ACDC-6 6S Balancing Charger ACDC-6
Transcript of Common Sense RCcommonsenserc.com/product_instructions/ACDC-6_Manual.pdfCommon Sense RC ACDC-6 6S...
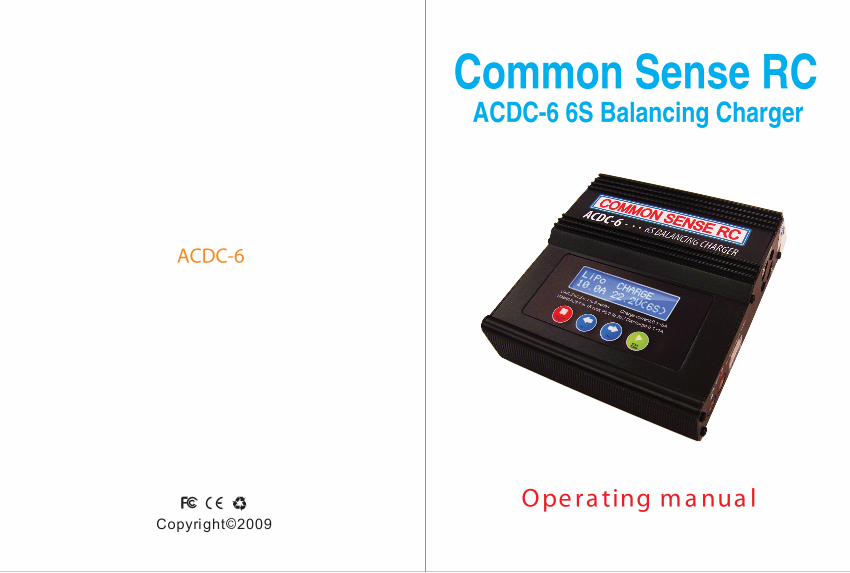
CCopyright 2009O pe ra ting m a nua l
Common Sense RC ACDC-6 6S Balancing Charger
ACDC-6
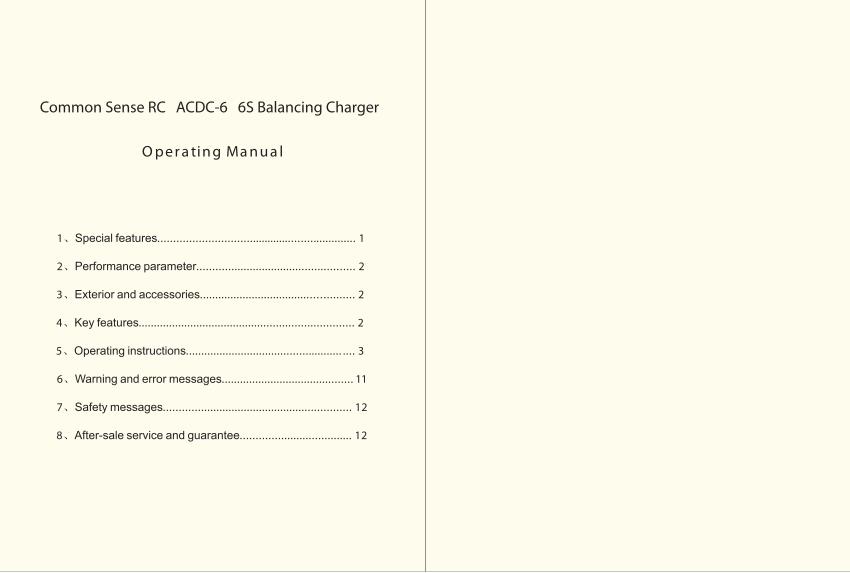
1、Special features. . . . . . . . . . . . . . . . . . . . . . . . . . . . . .............. . . . . . . . ............. . 1
2、Performance parameter. . . . . . . . . . . ....................... . . . . . ... . . . . . . . . . 2
3、Exterior and accessories. ................................... . . . . . . . . . . . . . . 2
4、Key features.......................................... . . . ..... . . . . . ... . . . . . . . . . . . . 2
5、Operating instructions. ................................ . . . . . . ............ .. . . 3
6、Warning and error messages. ................................... . . . . . . . 11
7、Safety messages. . . . . . . . . . . . ................................... . .. . . . . . . . . . . . 12
8、After-sale service and guarantee. . . . . . . . . . . . . .......... . . . . ......... 12
O pe r a tin g Ma n u a l
Common Sense RC ACDC-6 6S Balancing Charger
7.Safety message
Although the charger is designed to work in a stable environment to play a role, but in use, you still need careful maintenance, as long as these important tips to follow, that is easy and effective use of your charger!
When you start the process,especially the discharge process,the unit will become warm,please keep clear of the heat area and do not cover it by anything when using Do not keep it in a environment below 5 ℃ or above 50 ℃Use it carefully,do not use it in a wet or corrosive environment Keep all the inflammable volatile materials well away from operating area.Please don't let the charger get hurt through falling ,bumping,stiking , shaking, heavy press and so on.Do not attempt the voltage higher than the requirement by manufacturesEnsure the type of battery and the voltage of the battery pack is selected correctly.Donot use the different types or different capacities synchronously .The standard accessories can only support one battery pack.When you are willing to use multi- packs,please separately purchase the special accessories,never do a disassembly or alteration to the charger Do not attempt to charge/discharge the non-recharged batteryor damaged battery.Keep the charger away from children and pet at all time! Never leave the charger unsupervised when it is connected to its power supply.
1)
2)3)4)5)
6)7)
8)
9)
10)
8.After-sale service and guarantee
Thank you for purchasing this balance charger ,we will do our best to provide you with a comprehensive after-sale service and protect your rights andinterests.Since you purchase the unit,you can enjoy the lifelong guarantee service. We warrant this product for a period of one year from the date of purchase, if it has a quality problem itself, all guarantee will be free; In case customers can not provide an effective certificate of purchase, we will refer the date of machine’s internal . If it is over one year since the purchase date, an appropriate cost will be charged, users need to bear the transportation cost back and forth. User disassembly, alteration, or damage caused by improper use, they should bear the maintenance and transport costs.
After-sale procedure: When you can not use the product normally, please contact the local franchiser or the
after-sale service person. after products have been confirmed damaged orunable toconfirm the causes,youcansent it to the company directly or throughthe franchiser . W will normallyr epair completed and sent it to customers within five workinge
days after receivei t.
12
1.1 This charger employs an advanced charging calculation and design which allow multilayer
error to be compatible.It can create a safe charging condition and maximum reduce
the danger caused by negligence or setting error of user
1.2 This item adopt prevalent Synchronous buck & boost converter technology ,this makes
conversion efficiency up to 90%
1.3 Accept all types of R/C batteries:LiPo、LiIo、LiFe、NiMH、NiCd、Pb.
1.4 Simple and efficient user interface makes operation easy, with powerful function and abundant
content. Real-time shows you the battery voltage、charge current、temperature of batteries 、
capacity of charge/discharge、elapsed time、input voltage etc.,therefore, you can inquire the
present state and establish various safety-limited parameters conveniently.
1.5 This charger employs an individual-cell-voltage balancer to maintain your pack in balance
while charging/discharging.During the process,it can monitor and balance each cell of
the pack individually(Tolerance: 0.01V)
1.6 Accept individual battery charging/discharging, so you can extend the scope of application
of the charger.that is equally useful for the DIY battery.
1.7 Various of charging mode to meet different demand:charging-auto /balance charging/fast
charging/storage and cyclic charging etc.
1.8 For users convenience it can store and load maximum five data of different batteries. you can
establish the data contains program setting of the battery to charge or discharge continually.
these data can be called out at any time you need and the process can be executed without
program setting.
1.9 Perform 1-5 cycles of charge>discharge or discharge>charge continually for NiMH / NiCd
refreshing
1.10 You can connect a high-precision digital temperature sensor to protect the charger works in a
safety temperature .once a battery reaches the maximum temperature you set during charge/
discharge, the process will be terminated to protect the battery. this is very important for NiMH / NiCd
(separately purchased temperature sensor)
Separately purchased program kit(Ev-xxxA series)*
1. Special features:
1
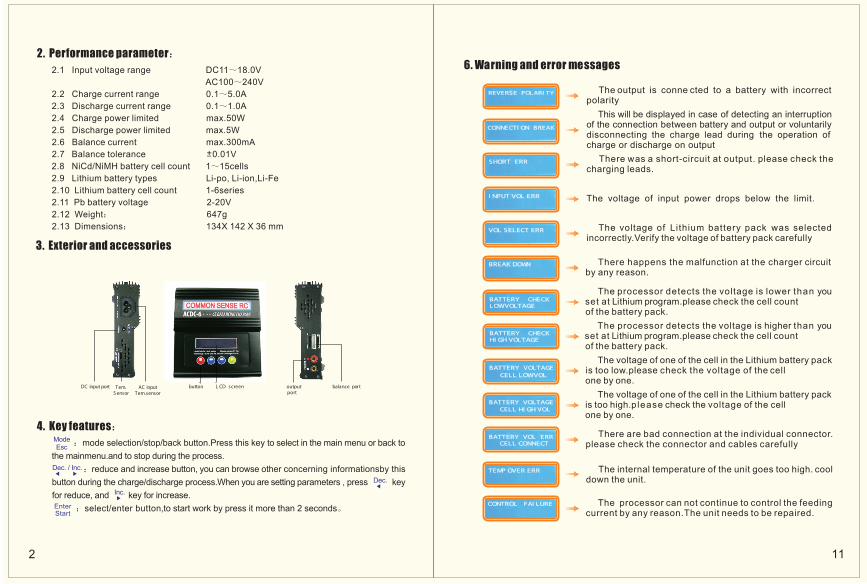
6. Warning and error messages
11
polarity
The output is conne cted to a battery with incorrect
There was a short-circuit at output. please check the charging leads.
The voltage of input power drops below the limit.
The voltage of Lithium battery pack was selected incorrectly.Verify the voltage of battery pack carefully
There happens the malfunction at the charger circuitby any reason.
The processor detects the voltage is lower than you set at Lithium program.please check the cell count of the battery pack.
The voltage of one of the cell in the Lithium battery packis too low.please check the voltage of the cell one by one. The voltage of one of the cell in the Lithium battery packis too high.please check the voltage of the cell one by one.
The processor detects the voltage is than youset at Lithium program.please check the cell count of the battery pack.
higher
This will be displayed in case of detecting an interruption of the connection between battery and output or voluntarily disconnecting the charge lead during the operation of charge or discharge on output
There are bad connection at the individual connector.please check the connector and cables carefully
The processor can not continue to control the feeding current by any reason.The unit needs to be repaired.
The internal temperature of the unit goes too high. cool down the unit.
REVERSE POLARI TY
CONNECTI ON BREAK
SHORT ERR
I NPUT VOL ERR
VOL SELECT ERR
BREAK DOWN
BATTERY CHECKLOW VOLTAGE
BATTERY VOLTAGE CELL LOW VOL
BATTERY VOLTAGE CELL HI GH VOL
BATTERY VOL ERR CELL CONNECT
CONTROL FAI LURE
TEMP OVER ERR
BATTERY CHECKHI GH VOLTAGE
2. Performance parameter:
3. Exterior and accessories
:mode selection/stop/back button.Press this key to the mainmenu.and to stop during the process. :reduce and increase button, you can browse other concerning informationsby this button during the charge/discharge process.When you are setting parameters , press key for reduce, and key for increase. :select/enter button,to start work by press it more than 2 seconds。
select in the main menu or back to
4. Key features:
2
ModeEsc
Dec. / Inc.
EnterStart
Dec.
Inc.
2.1 Input voltage range DC11~18.0V AC100~240V2.2 Charge current range 0.1~5.0A2.3 Discharge current range 0.1~1.0A2.4 Charge power limited max.50W2.5 Discharge power limited max.5W2.6 Balance current max.300mA
+2.7 Balance tolerance 0.01V2.8 NiCd/NiMH battery cell count 1~15cells2.9 Lithium battery types Li-po, Li-ion,Li-Fe2.10 Lithium battery cell count 1-6series2.11 Pb battery voltage 2-20V2.12 Weight: 647g2.13 Dimensions: 134X 142 X 36 mm
DC input port Tem.S ensor
balance p o r t outputport
AC input Tem.sensor
L CD screen button

10 3
5.5.1 charging Pb battery
5.5.2 discharging Pb battery
5.6 save data and load data program This charger can store/ lo ad up to 10 data of ,you can call out the data for the process without setting up the program again.
batteries
You can press key to select the data number when the field is blinking.
Press key for more than 2 seconds,it will shows you the left screen,loading the data
As you can see on left,you can set up the charge current onthe left .the nominal of the second line and voltage of the battery on the right of the second line .the charge current ranges from 0.1-10.0A and the voltage should be matched with the battery being charged.start the charge process by pressing key for more than 2 seconds.
EnterStart
Press key to the screen on the left,then p ress k eyt oe nter t hes ubmenu.
Mode Esc
EnterStart
(01)
EnterStart
Set discharge current on the left and final voltage on the right,the discharge current ranges from 0.1-5.0A and the voltage should be matched with the battery be in g d is charged.s tar t the discharge process by pressing key for more than 2 seconds.
The screen displays the current state of discharge.
EnterStart
Setting up charge/discharge current and final voltage.
To save the data,press key for more than 2 seconds.EnterStart
The screen displays the state of charging process. to stop charging forcibly,press key once.Mode
Esc
Press key to the screen on the left,then press key to enter into the submenu.
ModeEsc
EnterStart
Dec. / Inc.
The blinking shows you the data NO,you can press key to change it. Press key can select the type of battery,voltage,capacity ,and you can set them by pressing Key,thenpress key for more than 2 seconds to select the charge mode
EnterStart
EnterStart
Dec. / Inc.
Dec. / Inc.(01)
5.6.1 save data
PROGRAM SELECT
LOAD DATA
LOAD...
P CHARGE
4.0A 12.0V(6P)
P -6 4.0A 12.59V
CHG 022 43 00682
ModeEsc
Enter>2S
Start
:
P DISCHARGE
4.0A 12.0V(6P)
P -6 0.4A 12.59V
DSC 022 43 00682
ModeEsc
Enter>2S
Start
:
PROGRAM SELECT
SAVE DATA
SAVE (01) NiMH
14.4V 3000mAh
NiMH CHARGE AT
CUR LIMIT 5.0A
SAVE ...
*
5.6.2 load data
LOAD (01) NiMH
14.4V 3000mAh
EnterStart
Enter>2S
StartModeEsc
EnterStart
Enter>2S
Start
Enter>2S
Start
5. Operating instructions.:
5.1 main nenu
This shows you t he type of cha rger for 2s, press into the main menu after self-check OK
Lithium battery program
NiMH battery program
NiCd battery program
Pb battery program
V6AC
Ver 1.0
User set program,press key adown and key upward for circulatory choose.press key into subme nu.
Dec. EnterStart
ModeEsc
Save data program
Load program data
EnterStart
Mode/Esc
Dec.Mode/Esc
Dec.Mode/Esc
Dec.Mode/Esc
Dec.Mode/Esc
Dec.Mode/Esc
Dec.Mode/Esc
ModeEsc
Dec.
Dec.
PROGRAM SELECT
Li** BATT
PROGRAM SELECT
NiMH BATT
PROGRAM SELECT
NiCd BATT
PROGRAM SELECT
Pb BATT
PROGRAM SELECT
SAVE DATA
PROGRAM SELECT
LOAD DATA
USER SET
PROGRAM

P r e s s ke y to the sc reen on the le ft , the n presskey to into the submenu. You can switched at the same level menu to select the mode by Key. please refer the etailed flow chart on the left. When you are willing to alterthe parameter value in the program, press key to makeit blink, then change the value with key. the valuewill be stored by pressing key once . then press keyfor more than 2 seconds to start the process。Since the menuof NiMH are the same as NiCd, there is an example of NiMH only.
5.4 NiMH/NiCd battery program
DISCHARGE mode th e discharg e curre nt range s fro m 0.1A to 5.0A and the final voltage ranges from 0.1 to 25.0V,the operating method is similar as Lithium battery. The finalvoltage of NiMH battery is 1.0V/cell, and the NiCd is 0.85V/cell,please refer the recommend by the battery of manufacturer.
" "
CYCLE mode this charger c an p erform 1 -5 c ycle s of DCHG >CHG or CHG>DCHG contin uall y.You can sele ct i t fo r th e new NI* * ba tt e ry o r th e long-term pla cement NI* * bat tery .
To set the parameter please follow the previous charge/discharge menu
" "
ple ase set up care fu l l y,o r it will damage the battery!
5.4.1 After check all the mode,to start the process press key for more than 2 seconds
5.5 Pb battery program
This is programmed for chargin g Pb bat tery w it h nomin a l v o l ta g e fr o m 2 to 24V,
Pb bat tery can not be charged rap id ly . they can on ly de li ve r re la t iv e ly lo wer cu r ren t
compare to their capaci ty. the opt imal charge cur rent wil l be 1/10 of the capacity.please
always fol low the instruction supplied by the manufacturer o f bat tery.
9
EnterStart
EnterStart
EnterStart
EnterStart
Dec. / Inc.
Enter Start
Mode Esc
Dec. / Inc.
Dec. / Inc.
EnterStart
The screen displays the present state of process.
To stop it press key;Descript ion:①:the
type of battery,② :operating mode: CHG=charge、
DSC=discharge、 DCHG> C H GorCHG>DCHG=the
cyc lem o de;③ :ela psed tim e , ④ :charge/discharge
current of the battery,⑤:voltage of the battery
pack,⑥:capacity of charge/discharge
Y ou c a n inquire the temperatur e an d △V
continua lly by pre ss k e y
Mode Esc
Dec. / Inc.
"C HARG E" m ode th e defa ul t mode is "A UT " . In "AU T"mode,you need to set the upper limit of charge current to avoid fromhigher feeding current that may damage the battery. Becausesome batteries of low impedance and small capacity can leadto the higher charge current by the processor at automatic charge mode. But in "Man" mode, it will charge the battery withthe charge current you set at the display. Each mode can be switched by pressing start/enter key, when the current fieldis blinking, press Key for more than 1 second.
Dec.
Inc.
Enter
Mode/Esc
Dec.
PROGRAM SELECT
NiMH BATT
NiMH CHARGE Aut
CUR LIMIT 5.0A
NiMH DISCHARGE
1.0A 11.5V
NiMH CYCLE
DCHG CHG 3
Dec.
Inc.
Inc.
/Start
Mode/Esc
Enter>2SStart
NiMH CHARGE Aut
CUR LINIT 5.0A
NiMH CYCLE
DCHG CHG 3①② ③④ ⑤ ⑥
NiMH 2.0A 7.42V
CHG 022 45 00890
NiMH DISCHARGE
1.0A 11.5V :
5.2 Initial parameter set up
Tips: please set up correctly in the "user set" menu before into the job for the first time you use it
Press key to the first screen
on the left, then press key to enter the
into parameter setting menu.
When you are willing to alter the
parameter value in the program,press
key to makeit blink,then change
the value with key. the value will
be stored by press key once.
This charger c a n a c c e p t th r e e
types of Lithium batteries: LiPo/Li Io
/ LiFe ;
(Please refer
the table A)
This charger can recognise the cell
count of Lithium battery automatically
at the beginning of charge or discharge
process to avoid from erroneous setting
by user. But deeply discharged battery
can be perce iv ed incorrectly. To
prevent the error, you can set the
time term to verify the cell count by the
processor. (see the screen )
Normally, 10 min utes are enough
to perceive it correctly. For the battery
of larger capacity, you may extend
the time term.and for the battery of
smaller capacity, you may reducethe
term or use withthe default value
you have to check the battery
carefully and set it up c o rr e c t l y , o r
i t w i l l cause a explode!
A0
EnterStar t
Mode Esc
Dec. / Inc.
Dec. / Inc.
EnterStar t
EnterStar t
You can switched at the same level menu by key. please refer the detailed flow chart on the left
Dec.Inc.
Dec.Inc.
Dec.Inc.
Dec.Inc.
Dec.Inc.
Dec.Inc.
Mode/EscEnter
Dec.Inc.
A7
Dec.Inc.
Dec.Inc.
USER SET
PROGRAM
Lipo
V.TYPE 3.7V
LiIo
V.TYPE 3.6V
Lif
V.TYPE 3.3V
LiPo/Lilo/LiF
CHK Tim 10 min
NiMH S nsitivity
D.P ak D ault
NiCd S nsitivity
D.P ak D ault
USB/T mp S l ct
T mp Cut-o 80C USB Ena l
Wast Tim
CHG DCHG 5min
Capacity Cut-oON 500mAh
K y B p ON
Bu r ON
Input Pow r Low
Cut-o 10.5V
A8
A9
A6
A5
A4A3
A2
A1
A0
d
USB/T mp S l ct
zz
Sa ty Tim rON 120min
Inc.
Dec.
Dec.Inc.
Dec.Inc.
Back-light
100
NiMH NiCd P
Trickl 100mA
d
oo
A10
A11
4
58
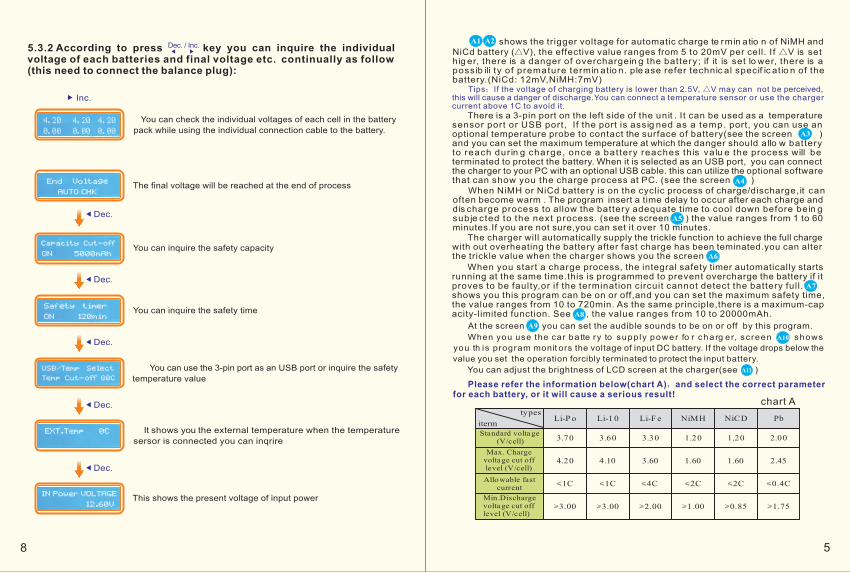
Please refer the information below(chart A),and select the correct parameterfor each battery, or it will cause a serious result!
types
itermLi-P o Li-1 0 Li-F e NiMH NiCD Pb
3.70
4.20
1C
3.00 3.00 2.00 1.00 0.85 1.75
1C 4C 2C 2C 0.4C
3.60 3.30 1.20 1.20 2.00
4.10 3.60 1.60 1.60 2.45
Standard volta ge (V/cell)
Max. Charge volta ge cut offlevel (V/cell)
Allo wable fastcurrent
Min.Dischargevolta ge cut offlevel (V/cell)
chart A
A4
A3
shows the trigger voltage for automatic charge te rmin atio n of NiMH andNiCd battery (△V), the effective value ranges from 5 to 20mV per cell. I f △V is set hig er, there is a danger of overchargein g the battery; if it is set lo wer, there is a possib ili ty of premature termin atio n. ple ase refer technic al specif ic atio n of the battery.(NiCd: 12mV,NiMH:7mV) Tips:If the voltage of charging battery is lower than 2.5V, △V may can not be perceived, this will cause a danger of discharge.You can connect a temperature sensor or use the charger current above 1C to avoid it. There is a sensor port or USB port, If the port is assig ned as a temp. port, you can use an optional temperature probe to contact the surface of battery(see the screen ) and you can set the maximum temperature at which the danger should allo w battery to reach dur in g charge, once a bat tery reaches th is valu e the process will be terminated to protect the battery. When it is selected as an USB port, you can connect the charger to your PC with an optional USB cable. this can utilize the optional software that can show you the charge process at PC. (see the screen )
3-pin port on the left side of the unit . It can be used as a temperature
When often become warm . The program insert a time delay to occur after each charge and dis charge process to allow the battery adequate time to cool down before bein g subje cted to the next process. (see the screen ) the value ranges from 1 to 60 minutes.If you are not sure,you can set it over 10 minutes.
NiMH or NiCd battery is on the cyclic process of charge/discharge,it can
When you start a charge process, the integral safety timer automatically startsrunning at the same time.this is programmed to prevent overcharge the battery if itproves to be faulty,or if the termination circuit cannot detect the battery full.shows you this program can be on or off,and you can set the maximum safety time,the value ranges from 10 to 720min. As the same principle,there is a maximum-capacity-limited function. See , the value ranges from 10 to 20000mAh.
A2A1
A5
A8
you can set the audible sounds to be on or off by this program.
When you use the car batte ry to supp ly power fo r cha rg er, screen shows
you th is program monit ors the voltage of input DC battery. If the voltage drops below the
value you set the operation forcibly terminated to protect the input battery.
A9
A4
A3
At the screen
A6
A7
A10
A11 You can adjust the brightness of LCD screen at the charger(see )
The charger will automatically supply the trickle function to achieve the full chargewith out overheating the battery after fast charge has been teminated.you can alter the trickle value when the charger shows you the screen
You can check the individual voltages of each cell in the battery
pack while using the individual connection cable to the battery.
The final voltage will be reached at the end of process
You can inquire the safety capacity
You can the safety timeinquire
You can use the 3-pin port as an USB port or the safety
temperature value
inquire
It shows the external temperature when the temperature
sersor is connected you can inqrire
you
This shows the present voltage of input power
5.3.2 According to press key you can inquire the individual voltage of each batteries and final voltage etc. continually as follow(this need to connect the balance plug):
Dec. / Inc.
Inc.
4.20 4.20 4.20
0.00 0.00 0.00
End Voltag
AUTO CHK
Capacity Cut-
ON 5000mAh
Sa ty tim r
ON 120min
USb/T mp S l ct
T mp Cut- 80C
EXT.T mp 0C
IN Pow r VOLTAGE
12.60V
Dec.
Dec.
Dec.
Dec.
Dec.
o
o
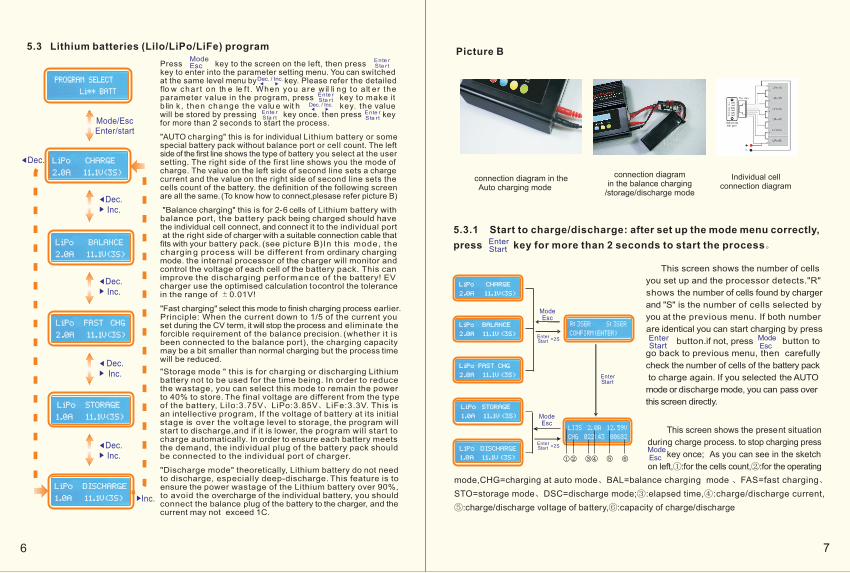
5.3 Lithium batteries (Lilo/LiPo/LiFe) program
"AUTO charging" this is for individual Lithium battery or somespecial battery pack without balance port or cell count. The leftside of the first line shows the type of battery you select at the usersetting. The right side of the first line shows you the mode ofcharge. The value on the left side of second line sets a chargecurrent and the value on the right side of second line sets thecells count of the battery. the definition of the following screenare all the same. (To know how to connect,plesase refer picture B)
this is for 2-6 cells of Lithium battery withbalance port, the battery pack being charged should have the individual cell connect, and connect it to the individual port at the right side of charger with a suitable connection cable that fits with your battery pack. (see picture B)In this mode, the chargin g process will be different from ordinary charging mode. the internal processor of the charger will monitor and control the voltage of each cell of the battery pack. This can improve the discharging performance of the battery! EV charger use the optimised calculation to control the tolerance in the range of 0.01V!
"Balance charging"
" " Principle: When the current down to 1/5 of the current youset during the CV term, it will stop the process and eliminate theforcible requirement of the balance precision. (whether it isbeen connected to the balance port), the charging capacitymay be a bit smaller than normal charging but the process timewill be reduced.
Fast charging select this mode to finish charging process earlier.
"Storage mode " this is for charging or discharging Lithium battery not to be used for the time being. In order to reducethe wastage, you can select this mode to remain the powerto 40% to store. The final voltage are different from the typeof the battery, LiIo:3.75V、LiPo:3.85V、LiFe:3.3V. This isan intellective program, If the voltage of battery at its initialstage is over the volt age level to storage, the program willstart to discharge,and if it is lower, the program will start tocharge automatically. In order to ensure each battery meetsthe demand, the individual plug of the battery pack shouldbe connected to the individual port of charger.
" "to discharge, especially deep-discharge. This feature is to ensure the power wastage of the Lithium battery over 90%, to avoid the overcharge of the individual battery, you shouldconnect the balance plug of the battery to the charger, and thecurrent may not exceed 1C.
Discharge mode theoretically, Lithium battery do not need
6
Press key to the screen on the left, then press key to enter into the parameter setting menu. You can switchedat the same level menu by key. Please refer the detailedflo w char t on th e le f t . When you a re w il li ng to a lt er the parameter value in the program, press key to make it b lin k , then change the valu e wit h key. the valuewill be stored by pressing key once. then press keyfor more than 2 seconds to start the process.
Dec. / Inc.
Ente rSta r t
Ente rSta r t
Ente rSta r t
ModeEsc
Dec. / Inc.
Ente rSta r t
Mode/EscEnter/start
Dec.Inc.
Dec.Inc.
Dec.Inc.
Dec.Inc.
LiPo CHARGE
2.0A 11.1V(3S)
PROGRAM SELECT
Li** BATT
LiPo BALANCE
2.0A 11.1V(3S)
LiPo FAST CHG
2.0A 11.1V(3S)
LiPo STORAGE
1.0A 11.1V(3S)
LiPo DISCHARGE
1.0A 11.1V(3S)
Dec.
Inc.
ModeEsc
5.3.1 Start to charge/discharge: after set up the mode menu correctly,
press key for more than 2 seconds to start the process。
Picture B
connection diagram in the Auto charging mode
connection diagram
in the balance charging/storage/discharge mode
Individual cell connection diagram
This screen shows the number of cells
you set up and the processor detects."R"
shows the number of cells found by charger
and "S" is the number of cells selected by
you at the previous menu. If both number
are identical you can start charging by press
button.if not, press button to
go back to previous menu, then carefully
check the number of cells of the battery pack
to charge again. If you selected the AUTO
mode or discharge mode, you can pass over
this screen directly.
7
EnterStart
EnterStart
This screen shows the present situation
during charge process. to stop charging press
key once; As you can see in the sketch
on left,①:for the cells count,②:for the operating
ModeEsc
mode,CHG=charging at auto mode、BAL=balance charging mode 、FAS=fast charging、
STO=storage mode、DSC=discharge mode;③:elapsed time,④:charge/discharge current,
⑤:charge/discharge voltage of battery,⑥:capacity of charge/discharge
Enter Start >2S
LiPo DISCHARGE
1.0A 11.1V (3S)
Li3s 2.0a 12.59v
chg 022:43 00682
①② ③④ ⑤ ⑥
LiPo STORAGE
1.0A 11.1V (3S)
LiPo FAST CHG
2.0A 11.1V (3S)
LiPo BALANCE
2.0A 11.1V (3S)
LiPo CHARGE
2.0A 11.1V(3S)
r:3ser s:3ser
Confirm(enter)
ModeEsc
ModeEsc
Enter Start >2S
Enter Start