Command Center v16.3 Getting StartedCommand Center Getting Started Quick Reference Guide Command...
14
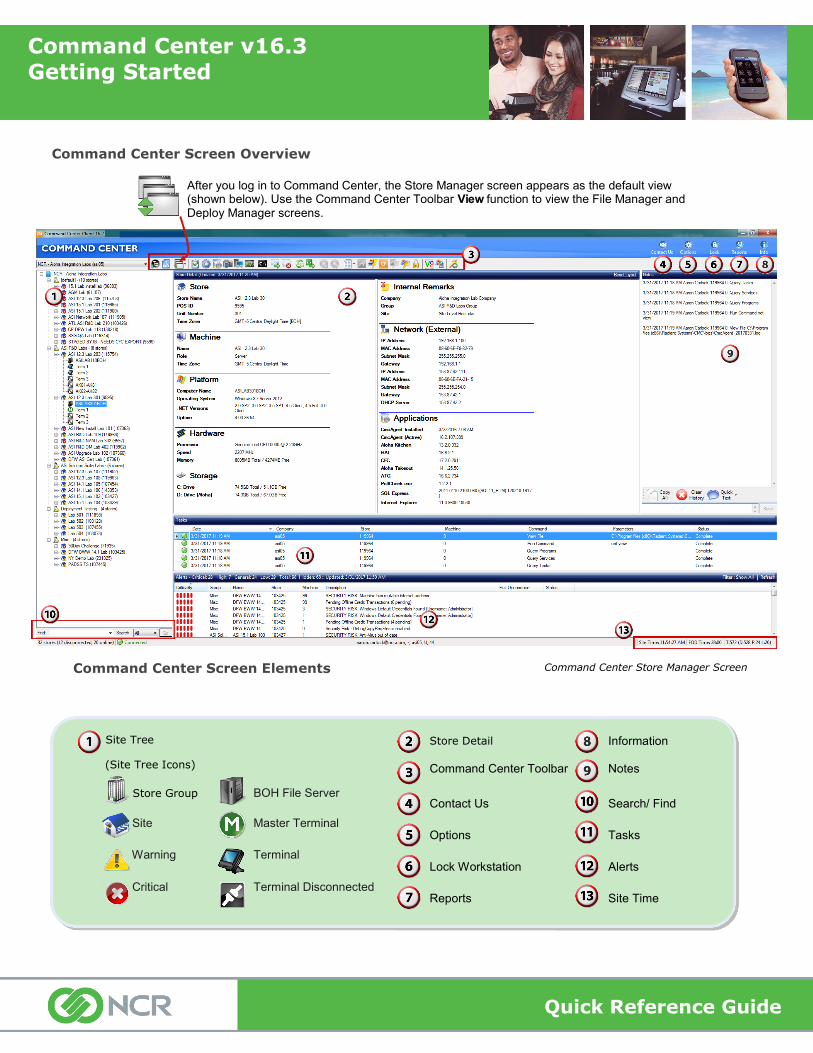
Command Center Screen Overview Command Center Screen Elements Store Detail Information Command Center Toolbar Notes Contact Us Search/ Find Options Tasks Lock Workstation Alerts Reports Site Time Store Group BOH File Server Site Master Terminal Warning Terminal Critical Terminal Disconnected Site Tree (Site Tree Icons) After you log in to Command Center, the Store Manager screen appears as the default view (shown below). Use the Command Center Toolbar View function to view the File Manager and Deploy Manager screens. Command Center Store Manager Screen Command Center v16.3 Getting Started Quick Reference Guide
Transcript of Command Center v16.3 Getting StartedCommand Center Getting Started Quick Reference Guide Command...
Command Center Screen Overview
Command Center Screen Elements
Store Detail Information
Command Center Toolbar Notes
Contact Us Search/ Find
Options Tasks
Lock Workstation Alerts
Reports Site Time
Store Group BOH File Server
Site Master Terminal
Warning Terminal
Critical Terminal Disconnected
Site Tree
(Site Tree Icons)
After you log in to Command Center, the Store Manager screen appears as the default view (shown below). Use the Command Center Toolbar View function to view the File Manager and Deploy Manager screens.
Command Center Store Manager Screen
Command Center v16.3
Getting Started
Quick Reference Guide
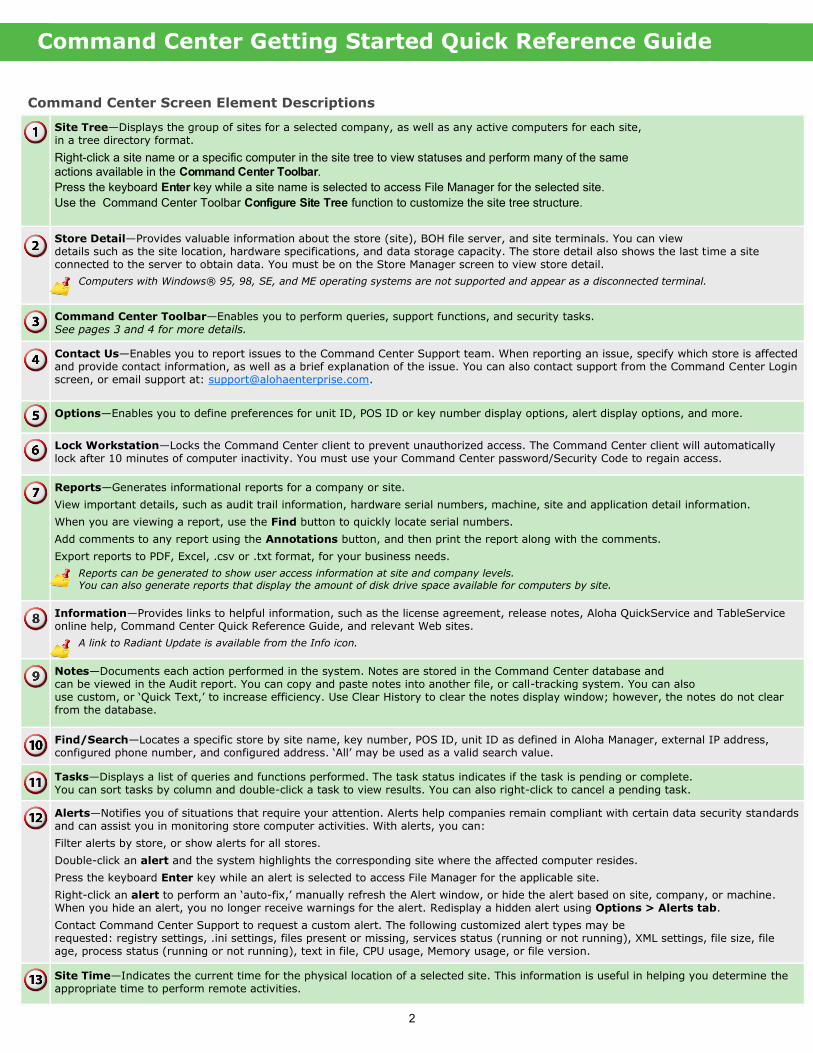
Command Center Screen Element Descriptions
Site Tree—Displays the group of sites for a selected company, as well as any active computers for each site, in a tree directory format.
Right-click a site name or a specific computer in the site tree to view statuses and perform many of the same
actions available in the Command Center Toolbar.
Press the keyboard Enter key while a site name is selected to access File Manager for the selected site.
Use the Command Center Toolbar Configure Site Tree function to customize the site tree structure.
Store Detail—Provides valuable information about the store (site), BOH file server, and site terminals. You can view details such as the site location, hardware specifications, and data storage capacity. The store detail also shows the last time a site connected to the server to obtain data. You must be on the Store Manager screen to view store detail.
Computers with Windows® 95, 98, SE, and ME operating systems are not supported and appear as a disconnected terminal.
Command Center Toolbar—Enables you to perform queries, support functions, and security tasks. See pages 3 and 4 for more details.
Contact Us—Enables you to report issues to the Command Center Support team. When reporting an issue, specify which store is affected and provide contact information, as well as a brief explanation of the issue. You can also contact support from the Command Center Login screen, or email support at: [email protected].
Options—Enables you to define preferences for unit ID, POS ID or key number display options, alert display options, and more.
Lock Workstation—Locks the Command Center client to prevent unauthorized access. The Command Center client will automatically lock after 10 minutes of computer inactivity. You must use your Command Center password/Security Code to regain access.
Reports—Generates informational reports for a company or site.
View important details, such as audit trail information, hardware serial numbers, machine, site and application detail information.
When you are viewing a report, use the Find button to quickly locate serial numbers.
Add comments to any report using the Annotations button, and then print the report along with the comments.
Export reports to PDF, Excel, .csv or .txt format, for your business needs.
Reports can be generated to show user access information at site and company levels. You can also generate reports that display the amount of disk drive space available for computers by site.
Information—Provides links to helpful information, such as the license agreement, release notes, Aloha QuickService and TableService online help, Command Center Quick Reference Guide, and relevant Web sites.
A link to Radiant Update is available from the Info icon.
Notes—Documents each action performed in the system. Notes are stored in the Command Center database and can be viewed in the Audit report. You can copy and paste notes into another file, or call-tracking system. You can also use custom, or ‘Quick Text,’ to increase efficiency. Use Clear History to clear the notes display window; however, the notes do not clear from the database.
Find/Search—Locates a specific store by site name, key number, POS ID, unit ID as defined in Aloha Manager, external IP address, configured phone number, and configured address. ‘All’ may be used as a valid search value.
Tasks—Displays a list of queries and functions performed. The task status indicates if the task is pending or complete. You can sort tasks by column and double-click a task to view results. You can also right-click to cancel a pending task.
Alerts—Notifies you of situations that require your attention. Alerts help companies remain compliant with certain data security standards and can assist you in monitoring store computer activities. With alerts, you can:
Filter alerts by store, or show alerts for all stores.
Double-click an alert and the system highlights the corresponding site where the affected computer resides.
Press the keyboard Enter key while an alert is selected to access File Manager for the applicable site.
Right-click an alert to perform an ‘auto-fix,’ manually refresh the Alert window, or hide the alert based on site, company, or machine. When you hide an alert, you no longer receive warnings for the alert. Redisplay a hidden alert using Options > Alerts tab.
Contact Command Center Support to request a custom alert. The following customized alert types may be requested: registry settings, .ini settings, files present or missing, services status (running or not running), XML settings, file size, file age, process status (running or not running), text in file, CPU usage, Memory usage, or file version.
Site Time—Indicates the current time for the physical location of a selected site. This information is useful in helping you determine the appropriate time to perform remote activities.
Command Center Getting Started Quick Reference Guide
2
Command Center Getting Started Quick Reference Guide
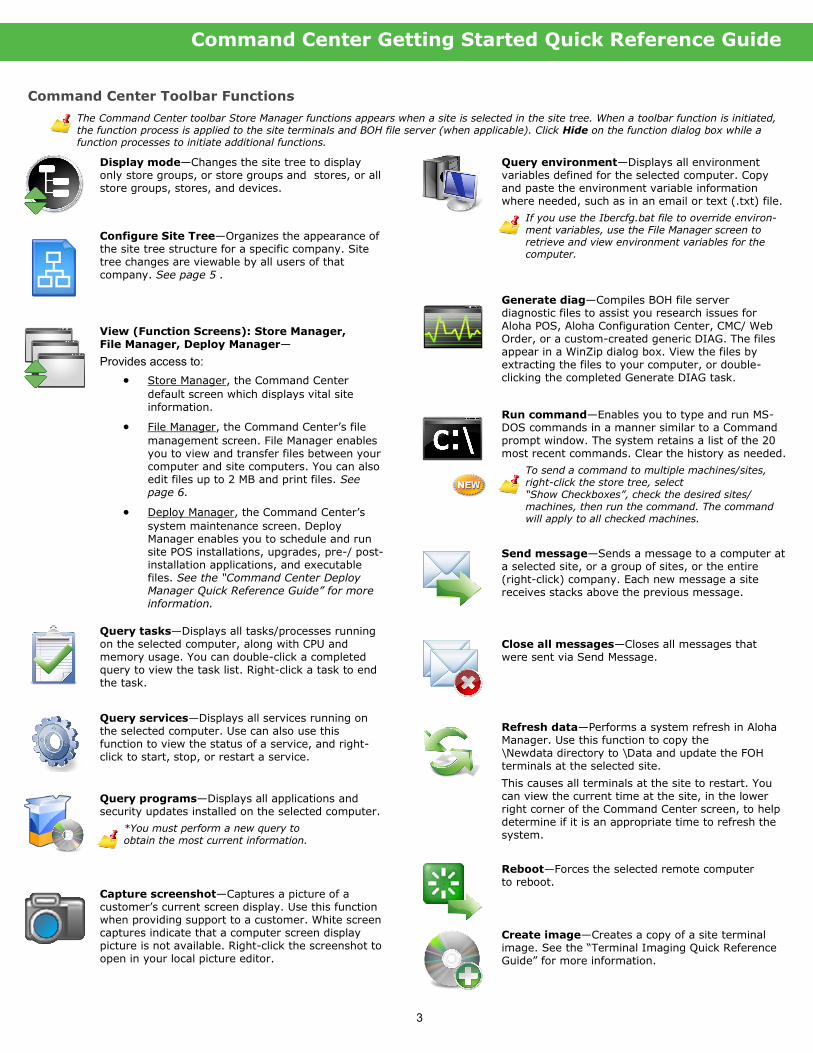
Query environment—Displays all environment variables defined for the selected computer. Copy and paste the environment variable information where needed, such as in an email or text (.txt) file.
If you use the Ibercfg.bat file to override environ-ment variables, use the File Manager screen to retrieve and view environment variables for the computer.
Generate diag—Compiles BOH file server diagnostic files to assist you research issues for Aloha POS, Aloha Configuration Center, CMC/ Web Order, or a custom-created generic DIAG. The files appear in a WinZip dialog box. View the files by extracting the files to your computer, or double-clicking the completed Generate DIAG task.
Run command—Enables you to type and run MS-DOS commands in a manner similar to a Command prompt window. The system retains a list of the 20 most recent commands. Clear the history as needed.
To send a command to multiple machines/sites, right-click the store tree, select “Show Checkboxes”, check the desired sites/machines, then run the command. The command will apply to all checked machines.
Send message—Sends a message to a computer at a selected site, or a group of sites, or the entire (right-click) company. Each new message a site receives stacks above the previous message.
Close all messages—Closes all messages that were sent via Send Message.
Refresh data—Performs a system refresh in Aloha Manager. Use this function to copy the \Newdata directory to \Data and update the FOH terminals at the selected site.
This causes all terminals at the site to restart. You can view the current time at the site, in the lower right corner of the Command Center screen, to help determine if it is an appropriate time to refresh the system.
Reboot—Forces the selected remote computer to reboot.
Create image—Creates a copy of a site terminal image. See the “Terminal Imaging Quick Reference Guide” for more information.
Command Center Toolbar Functions
The Command Center toolbar Store Manager functions appears when a site is selected in the site tree. When a toolbar function is initiated, the function process is applied to the site terminals and BOH file server (when applicable). Click Hide on the function dialog box while a function processes to initiate additional functions.
Display mode—Changes the site tree to display only store groups, or store groups and stores, or all store groups, stores, and devices.
Configure Site Tree—Organizes the appearance of the site tree structure for a specific company. Site tree changes are viewable by all users of that company. See page 5 .
View (Function Screens): Store Manager, File Manager, Deploy Manager—
Provides access to:
Store Manager, the Command Center
default screen which displays vital site information.
File Manager, the Command Center’s file
management screen. File Manager enables you to view and transfer files between your computer and site computers. You can also edit files up to 2 MB and print files. See page 6.
Deploy Manager, the Command Center’s
system maintenance screen. Deploy Manager enables you to schedule and run site POS installations, upgrades, pre-/ post-installation applications, and executable files. See the “Command Center Deploy Manager Quick Reference Guide” for more information.
Query tasks—Displays all tasks/processes running on the selected computer, along with CPU and memory usage. You can double-click a completed query to view the task list. Right-click a task to end the task.
Query services—Displays all services running on the selected computer. Use can also use this function to view the status of a service, and right-click to start, stop, or restart a service.
Query programs—Displays all applications and security updates installed on the selected computer.
*You must perform a new query to obtain the most current information.
Capture screenshot—Captures a picture of a customer’s current screen display. Use this function when providing support to a customer. White screen captures indicate that a computer screen display picture is not available. Right-click the screenshot to open in your local picture editor.
3
Command Center Getting Started Quick Reference Guide
Command Center Toolbar Options (continued)
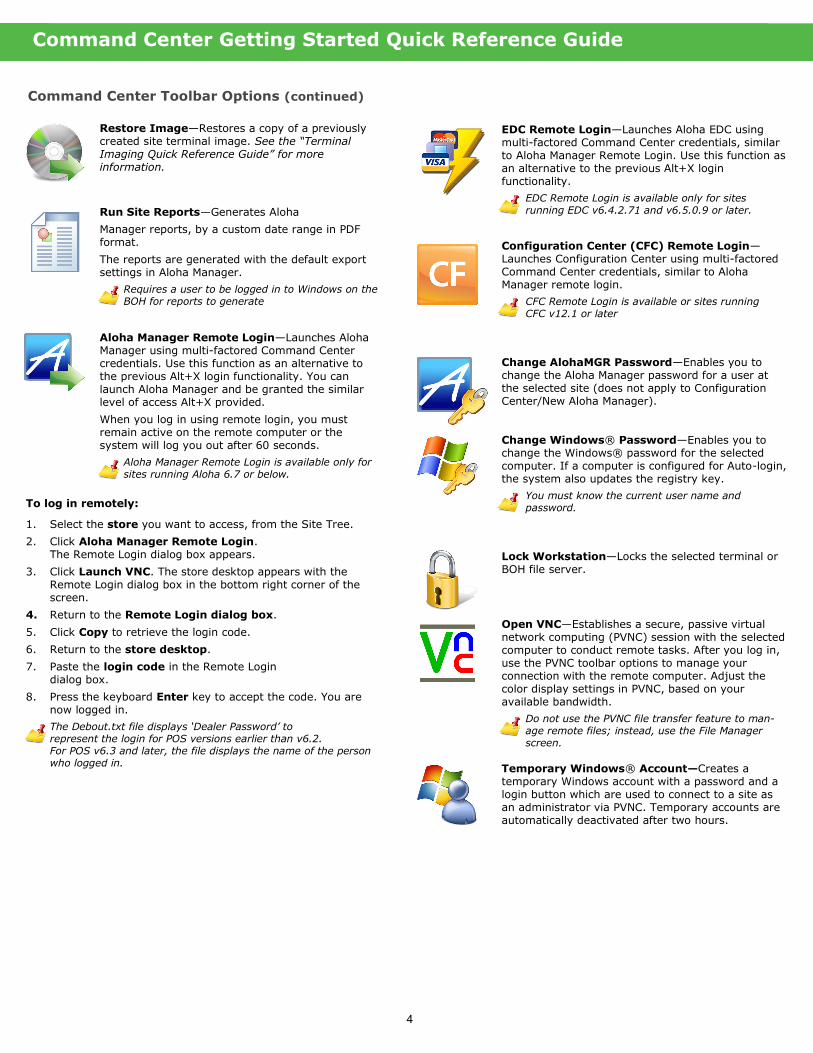
Restore Image—Restores a copy of a previously created site terminal image. See the “Terminal Imaging Quick Reference Guide” for more information.
Run Site Reports—Generates Aloha
Manager reports, by a custom date range in PDF format.
The reports are generated with the default export settings in Aloha Manager.
Requires a user to be logged in to Windows on the BOH for reports to generate
Aloha Manager Remote Login—Launches Aloha Manager using multi-factored Command Center credentials. Use this function as an alternative to the previous Alt+X login functionality. You can launch Aloha Manager and be granted the similar level of access Alt+X provided.
When you log in using remote login, you must remain active on the remote computer or the system will log you out after 60 seconds.
Aloha Manager Remote Login is available only for sites running Aloha 6.7 or below.
To log in remotely:
1. Select the store you want to access, from the Site Tree.
2. Click Aloha Manager Remote Login. The Remote Login dialog box appears.
3. Click Launch VNC. The store desktop appears with the Remote Login dialog box in the bottom right corner of the screen.
4. Return to the Remote Login dialog box.
5. Click Copy to retrieve the login code.
6. Return to the store desktop.
7. Paste the login code in the Remote Login dialog box.
8. Press the keyboard Enter key to accept the code. You are now logged in.
The Debout.txt file displays ‘Dealer Password’ to represent the login for POS versions earlier than v6.2. For POS v6.3 and later, the file displays the name of the person who logged in.
EDC Remote Login—Launches Aloha EDC using multi-factored Command Center credentials, similar to Aloha Manager Remote Login. Use this function as an alternative to the previous Alt+X login functionality.
EDC Remote Login is available only for sites running EDC v6.4.2.71 and v6.5.0.9 or later.
Configuration Center (CFC) Remote Login— Launches Configuration Center using multi-factored Command Center credentials, similar to Aloha Manager remote login.
CFC Remote Login is available or sites running CFC v12.1 or later
Change AlohaMGR Password—Enables you to change the Aloha Manager password for a user at the selected site (does not apply to Configuration Center/New Aloha Manager).
Change Windows® Password—Enables you to change the Windows® password for the selected computer. If a computer is configured for Auto-login, the system also updates the registry key.
You must know the current user name and password.
Lock Workstation—Locks the selected terminal or BOH file server.
Open VNC—Establishes a secure, passive virtual network computing (PVNC) session with the selected computer to conduct remote tasks. After you log in, use the PVNC toolbar options to manage your connection with the remote computer. Adjust the color display settings in PVNC, based on your available bandwidth.
Do not use the PVNC file transfer feature to man-age remote files; instead, use the File Manager screen.
Temporary Windows® Account—Creates a temporary Windows account with a password and a login button which are used to connect to a site as an administrator via PVNC. Temporary accounts are automatically deactivated after two hours.
4
Command Center Getting Started Quick Reference Guide
Managing Sites
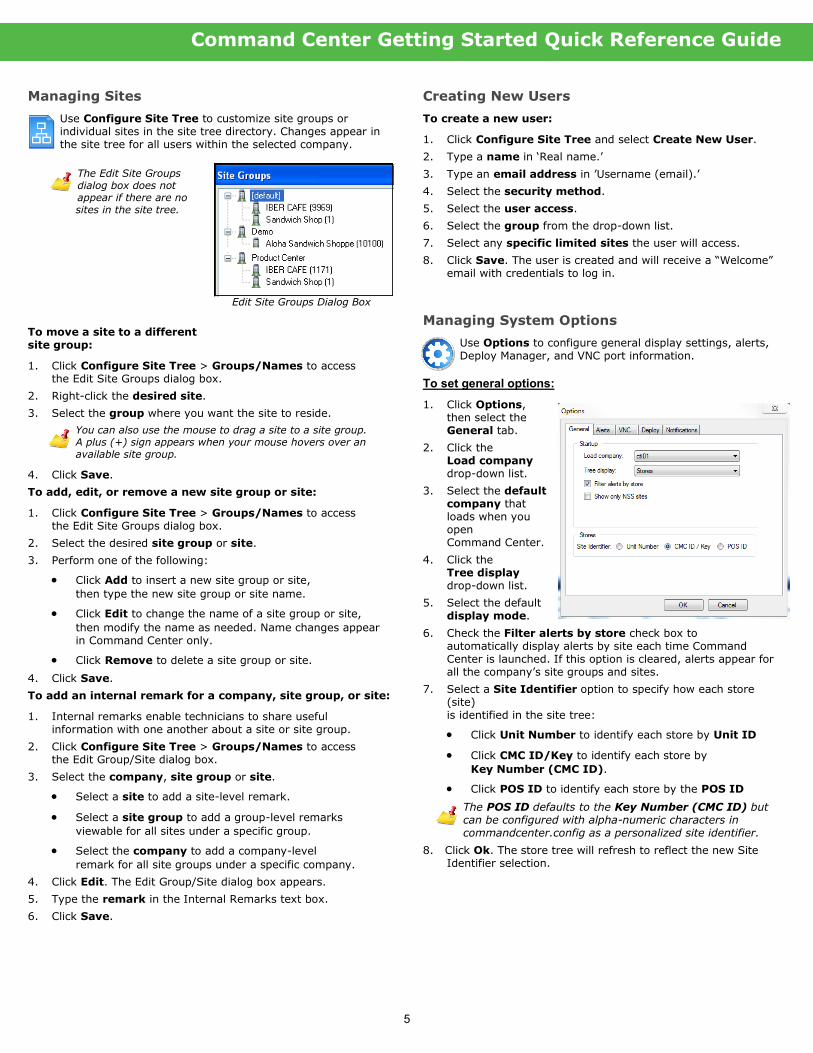
Use Configure Site Tree to customize site groups or individual sites in the site tree directory. Changes appear in the site tree for all users within the selected company.
The Edit Site Groups dialog box does not appear if there are no sites in the site tree.
To move a site to a different site group:
1. Click Configure Site Tree > Groups/Names to access the Edit Site Groups dialog box.
2. Right-click the desired site.
3. Select the group where you want the site to reside.
You can also use the mouse to drag a site to a site group. A plus (+) sign appears when your mouse hovers over an available site group.
4. Click Save.
To add, edit, or remove a new site group or site:
1. Click Configure Site Tree > Groups/Names to access the Edit Site Groups dialog box.
2. Select the desired site group or site.
3. Perform one of the following:
Click Add to insert a new site group or site,
then type the new site group or site name.
Click Edit to change the name of a site group or site,
then modify the name as needed. Name changes appear in Command Center only.
Click Remove to delete a site group or site.
4. Click Save.
To add an internal remark for a company, site group, or site:
1. Internal remarks enable technicians to share useful information with one another about a site or site group.
2. Click Configure Site Tree > Groups/Names to access the Edit Group/Site dialog box.
3. Select the company, site group or site.
Select a site to add a site-level remark.
Select a site group to add a group-level remarks
viewable for all sites under a specific group.
Select the company to add a company-level
remark for all site groups under a specific company.
4. Click Edit. The Edit Group/Site dialog box appears.
5. Type the remark in the Internal Remarks text box.
6. Click Save.
Creating New Users
To create a new user:
1. Click Configure Site Tree and select Create New User.
2. Type a name in ‘Real name.’
3. Type an email address in ’Username (email).’
4. Select the security method.
5. Select the user access.
6. Select the group from the drop-down list.
7. Select any specific limited sites the user will access.
8. Click Save. The user is created and will receive a “Welcome” email with credentials to log in.
Managing System Options
Use Options to configure general display settings, alerts, Deploy Manager, and VNC port information.
To set general options:
1. Click Options, then select the General tab.
2. Click the Load company drop-down list.
3. Select the default company that loads when you open Command Center.
4. Click the Tree display drop-down list.
5. Select the default display mode.
6. Check the Filter alerts by store check box to automatically display alerts by site each time Command Center is launched. If this option is cleared, alerts appear for all the company’s site groups and sites.
7. Select a Site Identifier option to specify how each store (site) is identified in the site tree:
Click Unit Number to identify each store by Unit ID
Click CMC ID/Key to identify each store by
Key Number (CMC ID).
Click POS ID to identify each store by the POS ID
The POS ID defaults to the Key Number (CMC ID) but can be configured with alpha-numeric characters in commandcenter.config as a personalized site identifier.
8. Click Ok. The store tree will refresh to reflect the new Site Identifier selection.
5
Edit Site Groups Dialog Box
Alternative load file methods include Auto Load, Reload, and Go.
Auto Load—Auto Load enables you to automatically use a
previously selected file path on different machines or sites in the site tree.
Reload—After accessing a directory on a machine,
click Reload to access the previously selected path.
Go—Type a file path in the remote panel, then
click Go to quickly access a file directory.
If the site tree store selection does not match the currently selected machine, the remote panel is grayed out and the machine information under the task bar turns red. Clicking the red text will return to the listed machine.
To view or edit a remote file:
A remote file must be loaded and appear in the remote panel file list before it can be viewed, edited or printed.
1. Right-click the desired file in the remote panel.
2. Perform one of the following:
Select View to open the file in its default application and
for printing to your local printer.
Select Edit to open the file in a CMC editor.
Make changes as needed, then Save the file to the original remote location (or elsewhere as needed).
Additional options, such as Move, Rename, and Delete, are available when you right-click a file.
To transfer one or more files:
A file must be loaded and appear in the File Manager screen before it can be transferred.
1. Perform one of the following:
To upload a file from your local computer to the remote
computer, right-click the file (in the local computer file panel), then click Upload, or drag to the remote panel.
To download a file from a remote computer to your local
computer, right-click the file (in the remote panel), then click Download, or drag the file to the local panel.
Press and hold the Shift key to select multiple files.
2. After the transfer is complete, the destination file directory (either the local computer file panel or the remote panel) will automatically refresh. The transferred files now appear in the appropriate panel list. Press F5 at any time to refresh.
While a file transfer is processing a status indicator will display a percentage complete (CMCAgent v14.1.2.84 and newer) for the task under the Tasks area. When the transfer is complete, the status changes to ‘Complete.’
Command Center Getting Started Quick Reference Guide
To display a hidden Deploy group:
1. Click Options, and then select the Deploy tab.
2. Click Show All.
3. Click Ok.
4. Press Refresh (F5) in the Deploy Manager to refresh the system and make Deploy changes take immediate effect.
To configure VNC port information:
1. Click Options, and then select the VNC tab.
2. If necessary, change the VNC port information to improve communication between the client and a site computer.
3. Click Ok.
Managing Remote Files
Use Function Screens to open the File Manager screen. File Manager enables you to view remote files and transfer files between your computer and site computers. You can also edit files up to 2 MB.
For example, you can work with a remote system’s XML configuration file while in Command Center without copying the file to your local computer.
To load a file for viewing, editing, or transferring:
1. Click Function Screens to open File Manager.
2. From the site tree, select the desired remote computer.
3. Click the Load List drop-down list.
4. Select the desired file directory path on the remote computer.
If a selected remote directory path does not exist, the directory location defaults to %IBERDIR% or C:\.
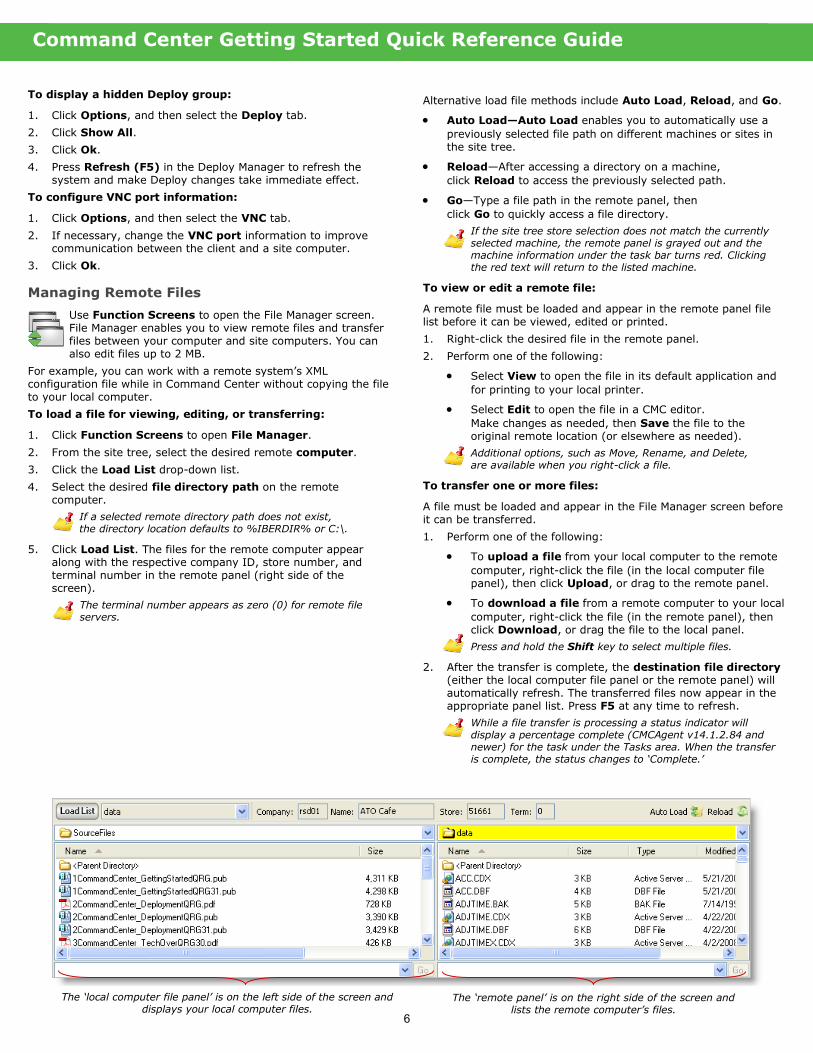
5. Click Load List. The files for the remote computer appear along with the respective company ID, store number, and terminal number in the remote panel (right side of the screen).
The terminal number appears as zero (0) for remote file servers.
6
The ‘local computer file panel’ is on the left side of the screen and displays your local computer files.
The ‘remote panel’ is on the right side of the screen and lists the remote computer’s files.

Managing Reports
Use Command Center Reports to generate reports with information for a specific site or company. For example, you can generate site and computer-level details for a consolidated inventory of hardware and software
information. This information can then be exported to Excel, .csv, or .txt formats for further analysis.
Command Center Reports
You can now create user access reports at the site and company levels using the User Access by Company and User Access by Site reports.
Use the Disk Space by Company report to view the amount of disc drive space available for all the computers at all sites in a company.
To generate a report:
1. Click Reports.
2. Select the desired report. The Report dialog box appears.
3. Select the report options, such as Start/ End Date or Time.
4. Click Run. The report and report toolbar appear.
To add comments to a report:
1. Click and drag the Annotation icon to the desired area of the report.
2. Right-click the Annotation.
3. Select Properties.
4. Type the comment.
Command Center Getting Started Quick Reference Guide
7
Report Toolbar
To export a report to Excel, .csv, or .txt format:
1. Click Reports.
2. Select the desired report. The Report dialog box appears.
3. Select the report options, such as Start/ End Date or Time.
4. Click Run. The report and report toolbar appear.
5. Click Export. The Export dialog box appears.
6. Type the file directory Export Path or click Browse (ellipses button) to locate the desired file directory path.
This file directory path specifies where the report is saved.
7. Optional: Type a new file name.
Export Dialog Box
8. Click Export.
9. Select the desired file format type.
10. Click Save. You can now access the report in the selected format.
For security reasons, the Audit by Company and Audit by Site reports are only available in PDF format.
Use the report toolbar to perform additional report tasks such as:
Managing the report view
Printing the report
Searching report results
Exporting report information
Command Center Getting Started Quick Reference Guide
8
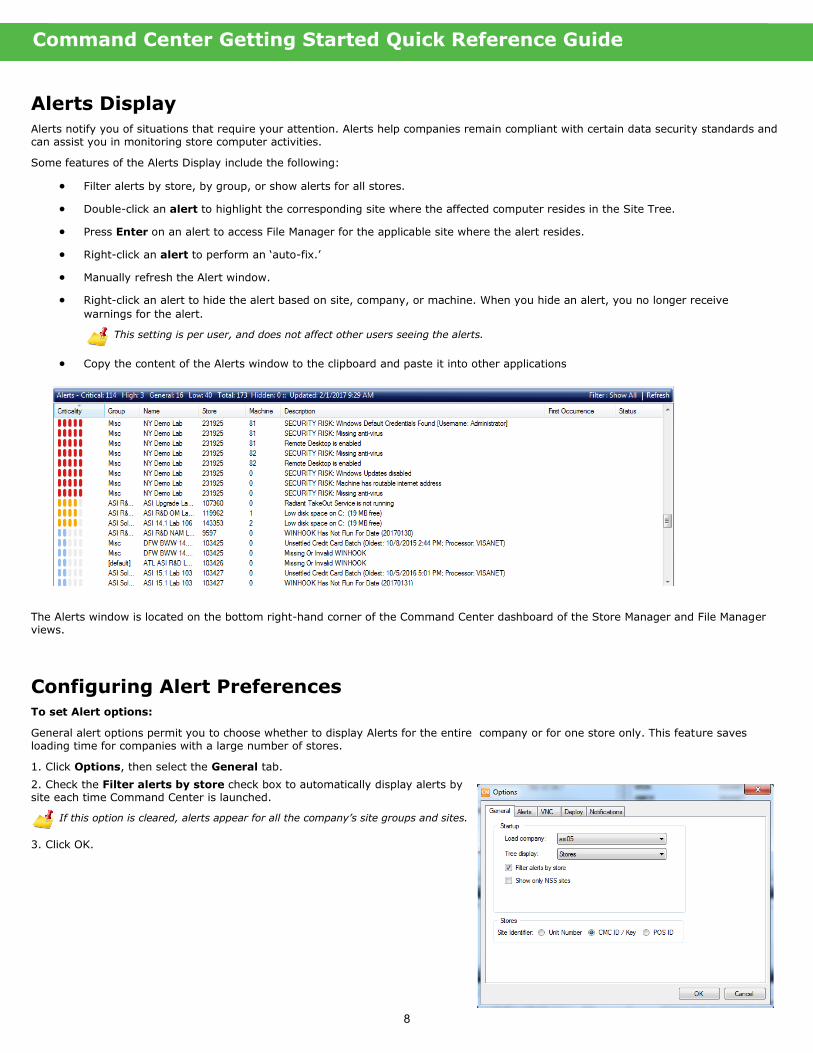
Alerts Display Alerts notify you of situations that require your attention. Alerts help companies remain compliant with certain data security standards and can assist you in monitoring store computer activities.
Some features of the Alerts Display include the following:
Filter alerts by store, by group, or show alerts for all stores.
Double-click an alert to highlight the corresponding site where the affected computer resides in the Site Tree.
Press Enter on an alert to access File Manager for the applicable site where the alert resides.
Right-click an alert to perform an ‘auto-fix.’
Manually refresh the Alert window.
Right-click an alert to hide the alert based on site, company, or machine. When you hide an alert, you no longer receive
warnings for the alert.
This setting is per user, and does not affect other users seeing the alerts.
Copy the content of the Alerts window to the clipboard and paste it into other applications
The Alerts window is located on the bottom right-hand corner of the Command Center dashboard of the Store Manager and File Manager views.
Configuring Alert Preferences To set Alert options:
General alert options permit you to choose whether to display Alerts for the entire company or for one store only. This feature saves loading time for companies with a large number of stores.
1. Click Options, then select the General tab.
2. Check the Filter alerts by store check box to automatically display alerts by site each time Command Center is launched.
If this option is cleared, alerts appear for all the company’s site groups and sites.
3. Click OK.
Command Center Getting Started Quick Reference Guide
9
Configuring Alert Preferences (continued)
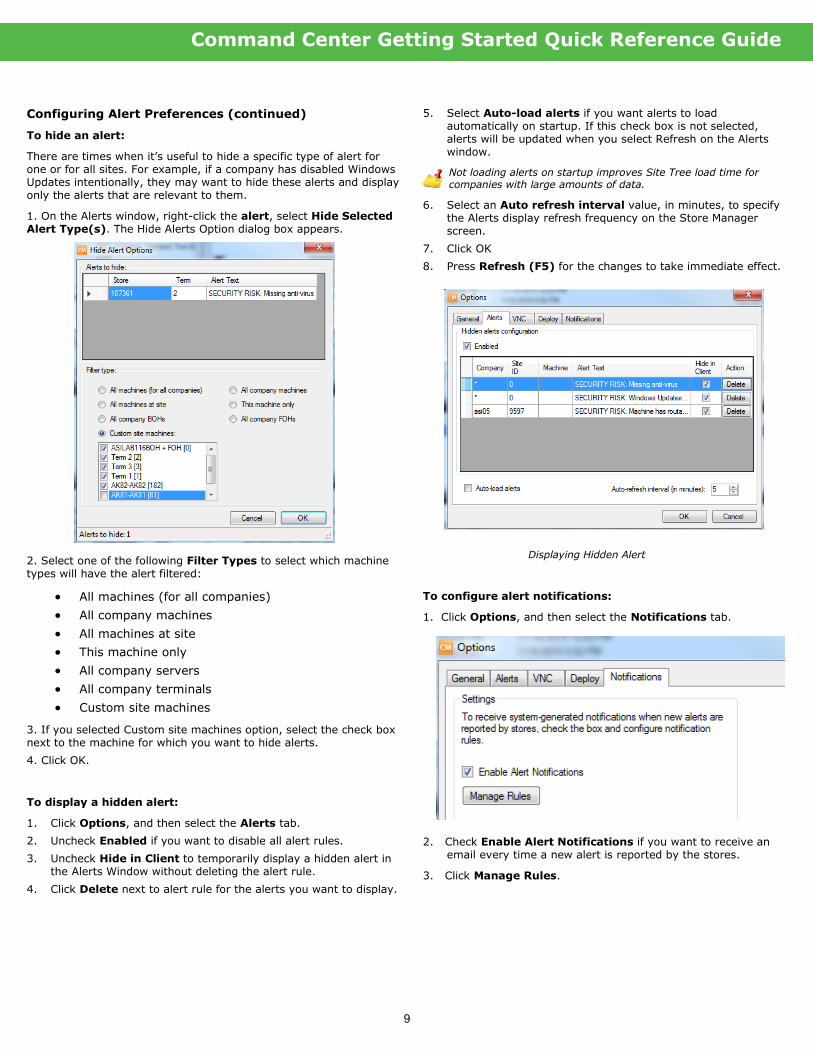
To hide an alert:
There are times when it’s useful to hide a specific type of alert for one or for all sites. For example, if a company has disabled Windows Updates intentionally, they may want to hide these alerts and display only the alerts that are relevant to them.
1. On the Alerts window, right-click the alert, select Hide Selected Alert Type(s). The Hide Alerts Option dialog box appears.
2. Select one of the following Filter Types to select which machine types will have the alert filtered:
All machines (for all companies)
All company machines
All machines at site
This machine only
All company servers
All company terminals
Custom site machines
3. If you selected Custom site machines option, select the check box next to the machine for which you want to hide alerts.
4. Click OK.
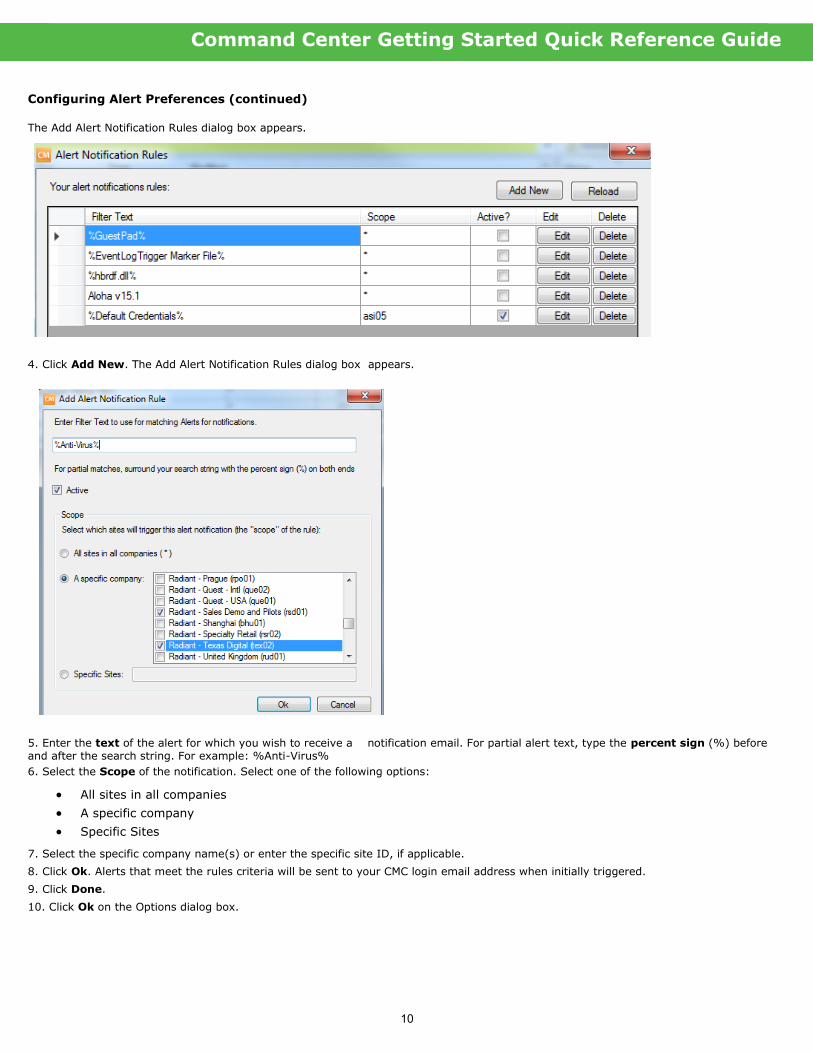
To display a hidden alert:
1. Click Options, and then select the Alerts tab.
2. Uncheck Enabled if you want to disable all alert rules.
3. Uncheck Hide in Client to temporarily display a hidden alert in the Alerts Window without deleting the alert rule.
4. Click Delete next to alert rule for the alerts you want to display.
5. Select Auto-load alerts if you want alerts to load automatically on startup. If this check box is not selected, alerts will be updated when you select Refresh on the Alerts window.
Not loading alerts on startup improves Site Tree load time for companies with large amounts of data.
6. Select an Auto refresh interval value, in minutes, to specify the Alerts display refresh frequency on the Store Manager screen.
7. Click OK
8. Press Refresh (F5) for the changes to take immediate effect.
Displaying Hidden Alert
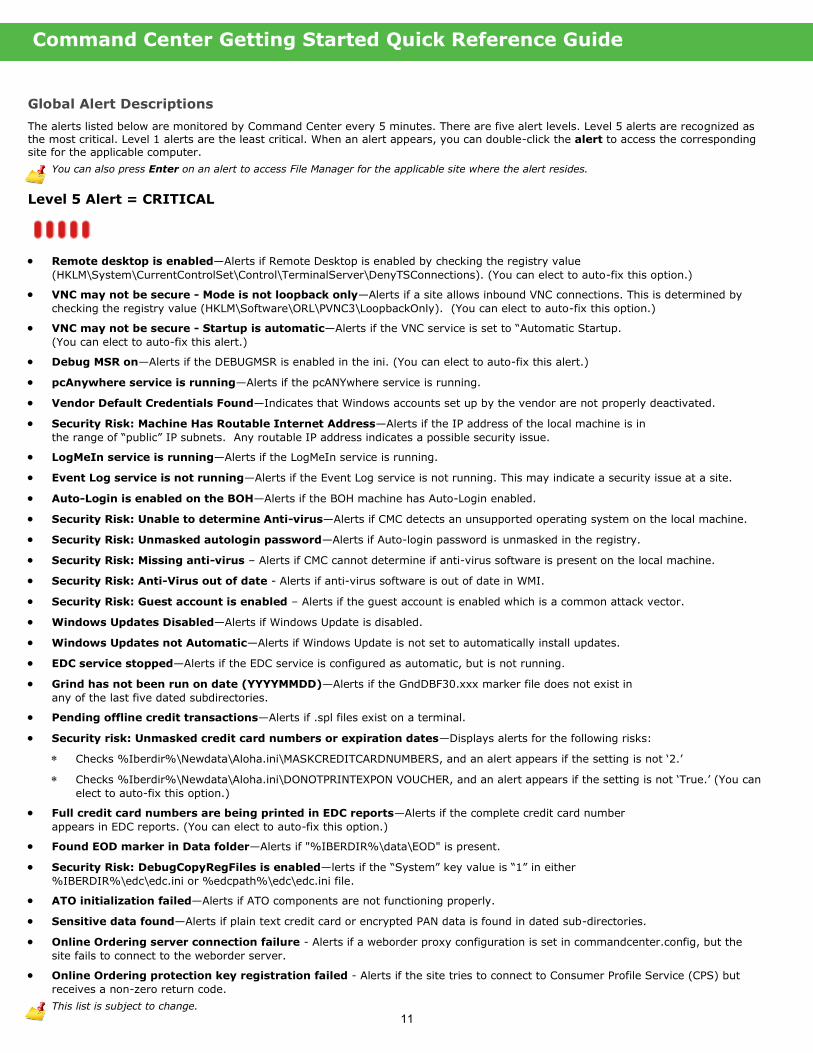
To configure alert notifications:
1. Click Options, and then select the Notifications tab.
2. Check Enable Alert Notifications if you want to receive an email every time a new alert is reported by the stores.
3. Click Manage Rules.
Command Center Getting Started Quick Reference Guide
10
Configuring Alert Preferences (continued)
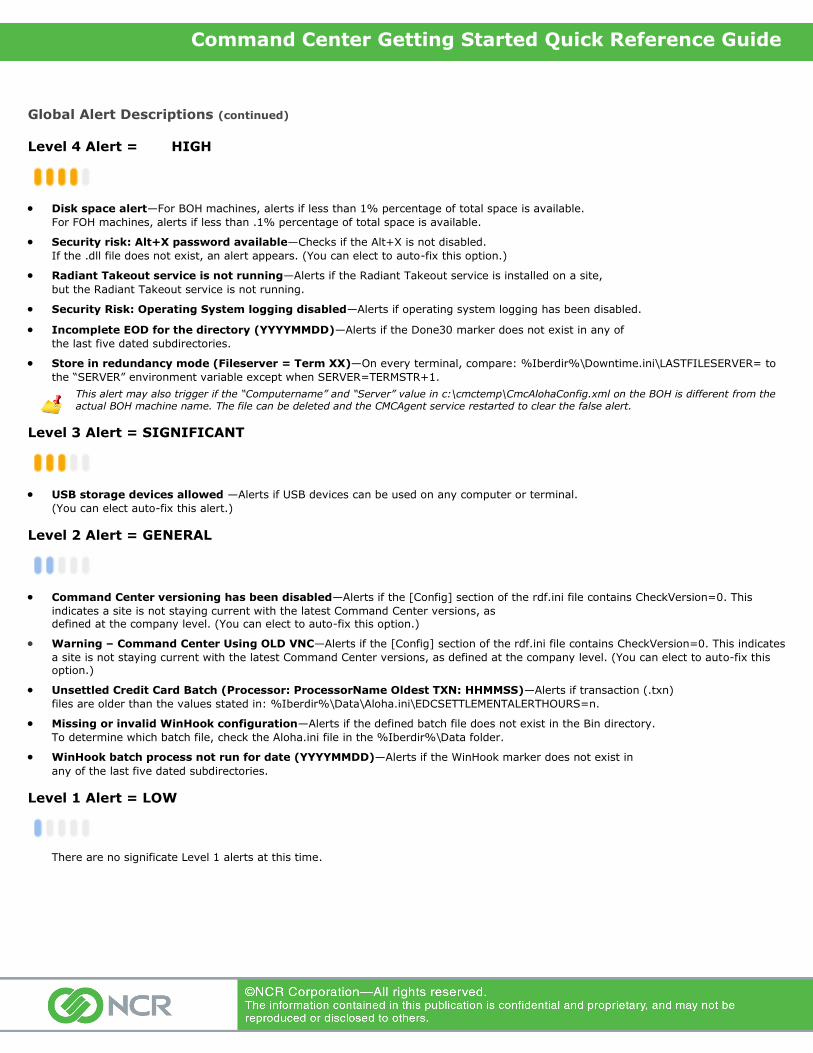
The Add Alert Notification Rules dialog box appears.
4. Click Add New. The Add Alert Notification Rules dialog box appears.
5. Enter the text of the alert for which you wish to receive a notification email. For partial alert text, type the percent sign (%) before and after the search string. For example: %Anti-Virus%
6. Select the Scope of the notification. Select one of the following options:
All sites in all companies
A specific company
Specific Sites
7. Select the specific company name(s) or enter the specific site ID, if applicable.
8. Click Ok. Alerts that meet the rules criteria will be sent to your CMC login email address when initially triggered.
9. Click Done.
10. Click Ok on the Options dialog box.
Global Alert Descriptions
The alerts listed below are monitored by Command Center every 5 minutes. There are five alert levels. Level 5 alerts are recognized as the most critical. Level 1 alerts are the least critical. When an alert appears, you can double-click the alert to access the corresponding site for the applicable computer.
You can also press Enter on an alert to access File Manager for the applicable site where the alert resides.
Level 5 Alert = CRITICAL
Remote desktop is enabled—Alerts if Remote Desktop is enabled by checking the registry value
(HKLM\System\CurrentControlSet\Control\TerminalServer\DenyTSConnections). (You can elect to auto-fix this option.)
VNC may not be secure - Mode is not loopback only—Alerts if a site allows inbound VNC connections. This is determined by
checking the registry value (HKLM\Software\ORL\PVNC3\LoopbackOnly). (You can elect to auto-fix this option.)
VNC may not be secure - Startup is automatic—Alerts if the VNC service is set to “Automatic Startup.
(You can elect to auto-fix this alert.)
Debug MSR on—Alerts if the DEBUGMSR is enabled in the ini. (You can elect to auto-fix this alert.)
pcAnywhere service is running—Alerts if the pcANYwhere service is running.
Vendor Default Credentials Found—Indicates that Windows accounts set up by the vendor are not properly deactivated.
Security Risk: Machine Has Routable Internet Address—Alerts if the IP address of the local machine is in
the range of “public” IP subnets. Any routable IP address indicates a possible security issue.
LogMeIn service is running—Alerts if the LogMeIn service is running.
Event Log service is not running—Alerts if the Event Log service is not running. This may indicate a security issue at a site.
Auto-Login is enabled on the BOH—Alerts if the BOH machine has Auto-Login enabled.
Security Risk: Unable to determine Anti-virus—Alerts if CMC detects an unsupported operating system on the local machine.
Security Risk: Unmasked autologin password—Alerts if Auto-login password is unmasked in the registry.
Security Risk: Missing anti-virus – Alerts if CMC cannot determine if anti-virus software is present on the local machine.
Security Risk: Anti-Virus out of date - Alerts if anti-virus software is out of date in WMI.
Security Risk: Guest account is enabled – Alerts if the guest account is enabled which is a common attack vector.
Windows Updates Disabled—Alerts if Windows Update is disabled.
Windows Updates not Automatic—Alerts if Windows Update is not set to automatically install updates.
EDC service stopped—Alerts if the EDC service is configured as automatic, but is not running.
Grind has not been run on date (YYYYMMDD)—Alerts if the GndDBF30.xxx marker file does not exist in
any of the last five dated subdirectories.
Pending offline credit transactions—Alerts if .spl files exist on a terminal.
Security risk: Unmasked credit card numbers or expiration dates—Displays alerts for the following risks:
Checks %Iberdir%\Newdata\Aloha.ini\MASKCREDITCARDNUMBERS, and an alert appears if the setting is not ‘2.’
Checks %Iberdir%\Newdata\Aloha.ini\DONOTPRINTEXPON VOUCHER, and an alert appears if the setting is not ‘True.’ (You can
elect to auto-fix this option.)
Full credit card numbers are being printed in EDC reports—Alerts if the complete credit card number
appears in EDC reports. (You can elect to auto-fix this option.)
Found EOD marker in Data folder—Alerts if "%IBERDIR%\data\EOD" is present.
Security Risk: DebugCopyRegFiles is enabled—lerts if the “System” key value is “1” in either
%IBERDIR%\edc\edc.ini or %edcpath%\edc\edc.ini file.
ATO initialization failed—Alerts if ATO components are not functioning properly.
Sensitive data found—Alerts if plain text credit card or encrypted PAN data is found in dated sub-directories.
Online Ordering server connection failure - Alerts if a weborder proxy configuration is set in commandcenter.config, but the
site fails to connect to the weborder server.
Online Ordering protection key registration failed - Alerts if the site tries to connect to Consumer Profile Service (CPS) but
receives a non-zero return code.
This list is subject to change.
Command Center Getting Started Quick Reference Guide
11
Global Alert Descriptions (continued)
Level 4 Alert = HIGH
Disk space alert—For BOH machines, alerts if less than 1% percentage of total space is available.
For FOH machines, alerts if less than .1% percentage of total space is available.
Security risk: Alt+X password available—Checks if the Alt+X is not disabled.
If the .dll file does not exist, an alert appears. (You can elect to auto-fix this option.)
Radiant Takeout service is not running—Alerts if the Radiant Takeout service is installed on a site,
but the Radiant Takeout service is not running.
Security Risk: Operating System logging disabled—Alerts if operating system logging has been disabled.
Incomplete EOD for the directory (YYYYMMDD)—Alerts if the Done30 marker does not exist in any of
the last five dated subdirectories.
Store in redundancy mode (Fileserver = Term XX)—On every terminal, compare: %Iberdir%\Downtime.ini\LASTFILESERVER= to
the “SERVER” environment variable except when SERVER=TERMSTR+1.
This alert may also trigger if the “Computername” and “Server” value in c:\cmctemp\CmcAlohaConfig.xml on the BOH is different from the actual BOH machine name. The file can be deleted and the CMCAgent service restarted to clear the false alert.
Level 3 Alert = SIGNIFICANT
USB storage devices allowed —Alerts if USB devices can be used on any computer or terminal.
(You can elect auto-fix this alert.)
Level 2 Alert = GENERAL
Command Center versioning has been disabled—Alerts if the [Config] section of the rdf.ini file contains CheckVersion=0. This
indicates a site is not staying current with the latest Command Center versions, as defined at the company level. (You can elect to auto-fix this option.)
Warning – Command Center Using OLD VNC—Alerts if the [Config] section of the rdf.ini file contains CheckVersion=0. This indicates
a site is not staying current with the latest Command Center versions, as defined at the company level. (You can elect to auto-fix this option.)
Unsettled Credit Card Batch (Processor: ProcessorName Oldest TXN: HHMMSS)—Alerts if transaction (.txn)
files are older than the values stated in: %Iberdir%\Data\Aloha.ini\EDCSETTLEMENTALERTHOURS=n.
Missing or invalid WinHook configuration—Alerts if the defined batch file does not exist in the Bin directory.
To determine which batch file, check the Aloha.ini file in the %Iberdir%\Data folder.
WinHook batch process not run for date (YYYYMMDD)—Alerts if the WinHook marker does not exist in
any of the last five dated subdirectories.
Level 1 Alert = LOW
There are no significate Level 1 alerts at this time.
Command Center Getting Started Quick Reference Guide
Command Center Getting Started Quick Reference Guide
Click Contact Us to email the Command Center support team with questions, issues, enhancement suggestions, and more.
You can also contact support from the Command Center Login screen.
Support
Custom Alerts
Command Center can be configured to check for certain system conditions and to provide custom alerts when defined conditions are met. To request a custom alert, email the Command Center Support Team and include the following information:
Trigger information (conditions that generate the alert)
Desired alert text
Scope—Is the alert applicable to the store server, node computers, or all computers running CMC?
Criticality level (1-5, where 5 is the highest level)
Auto-fix value (optional)
Command Center custom alert types include:
Presence or absence of a file—Alerts if a file is present or not present.
File Versions—Alerts if a file version is equal or not equal to a desired setting.
File Age—Alerts if a file age is greater than a set limit (24 hour increments).
File Size—Alerts if a file size is equal or not equal to a desired size.
Text in File—Alerts if specific text is found in a file. Not to be used for log files; only for files where the text can be changed to clear
the alert.
CPU Usage Limit—Alert if CPU usage goes above a specified limit for a specific time.
Memory Usage—Alert if RAM usage goes above a specified limit for a specific time.
INI File Configuration—Alert if an INI file setting is equal or not equal to a desired setting.
XML File Configuration—Alert if an XML file setting is equal or not equal to a desired setting.
Registry Settings—Alert if a registry setting is equal or not equal to a desired setting.
Service Status (running or not running)—Alert if a service is running or not running.
Process Status (running or not running)—Alert if a process is running or not running.
Alert on All Conditions—A combo alert made up of multiple other alert types. This alert will trigger if all conditions are met (Ex.: A
service is not running AND a file is present).
Alert on Any Condition—A combo alert made up of multiple other alert types. This alert will trigger if any condition is met (Ex.: A
service is not running OR a file is present).
Some custom alert types support a one-click Auto-fix feature. Registry, Service, and INI file setting alerts can be configured with an
automatic fix, allowing a technician to right-click the alert and select Auto-fix for a quick fix. For customized alert fixes, users can create a package (batch file, script, executable, installer, etc.) that will be uploaded as a “Custom Deployment” in the Deploy Manager. CMC Support will associate the “Custom Deployment” with the specified alert. During configuration, the user can choose to have the package deploy in one of three ways when the alert triggers:
1. Deploy and execute immediately upon triggering of the alert.
2. Schedule a deployment for after hours; deploy automatically.
3. Wait for a user to right-click the alert and select Auto-fix to deploy the uploaded package on demand.
Appendix A: CMCAgent Site ID External Auth Profile Enrollment For added security, starting in CMCAgent v14.1.2.84, all CMC Site IDs will be associated with a machine extended auth profile. When a BOH/Server machine with a minimum CMCAgent version connects to the Command Center datacenter for the first time (or when an existing site is updated to CMCAgent v14.1.2.84 or above), a machine extended auth profile is associated with the Site ID. The profile is based on several pieces of machine-specific criteria that make the connecting machine unique. If another machine is configured with a Site ID that is already enrolled, the socket request will be rejected and the machine will not show as “online” in the Command Center client. No user action is required for initial enrollment, the profile is cached automatically by the system.
If an enrolled Site ID is moving to another machine, the profile cache must be cleared by the Command Center support team or a
Command Center user with access to the Generate Site ID tool. This will happen in the following common situations:
1. Replacing the server at a site, using the same Site ID on the new server.
2. Moving a Site ID between machines, such as in a lab environment.
In lab environments, it is recommended that each “site” have a unique Site ID associated for easier operation. Contact the CMC Support team at [email protected] for assistance in generating Site IDs.
3. Uninstalling/Reinstalling CMCAgent on a server.
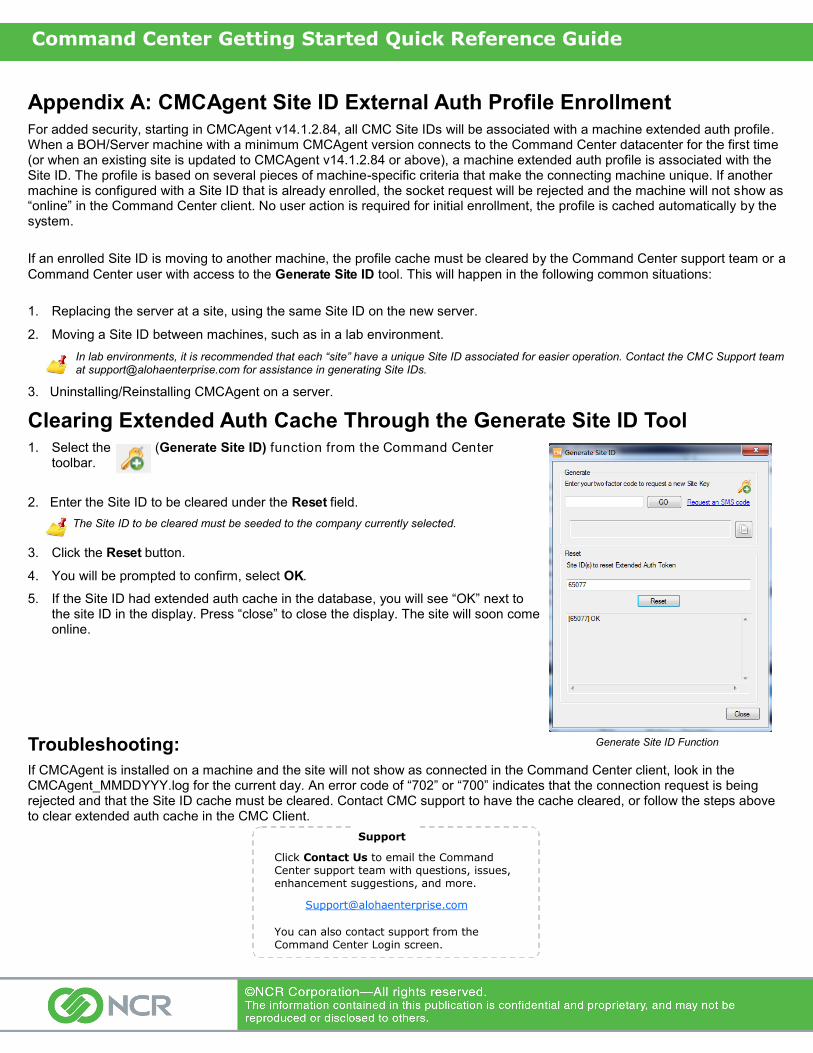
Clearing Extended Auth Cache Through the Generate Site ID Tool 1. Select the (Generate Site ID) function from the Command Center
toolbar.
2. Enter the Site ID to be cleared under the Reset field.
The Site ID to be cleared must be seeded to the company currently selected.
3. Click the Reset button.
4. You will be prompted to confirm, select OK.
5. If the Site ID had extended auth cache in the database, you will see “OK” next to the site ID in the display. Press “close” to close the display. The site will soon come online.
Troubleshooting:
If CMCAgent is installed on a machine and the site will not show as connected in the Command Center client, look in the CMCAgent_MMDDYYY.log for the current day. An error code of “702” or “700” indicates that the connection request is being rejected and that the Site ID cache must be cleared. Contact CMC support to have the cache cleared, or follow the steps above to clear extended auth cache in the CMC Client.
Click Contact Us to email the Command Center support team with questions, issues, enhancement suggestions, and more.
You can also contact support from the Command Center Login screen.
Support
Command Center Getting Started Quick Reference Guide
Generate Site ID Function