Combusting Candles V9 - Community Science Workshop · PDF file ·...
8
© 2012 Mission Science Workshop. All Rights Reserved worldwide. When linking to or using MSW content, images, or videos, credit MUST be included. Combusting Candles Category: Chemistry Type: Class Experiment (60 min) Materials List: Be careful! This activity involves working with open flames. Video: (youtubelink) How To: 2 Tealight candles 1 Nail 1 Glass Jar with a flat top, e.g jam jar 1 Lighter or matches Examine the candle. What is a candle made of? Part 1: Light one of the candles. Note three things that you see when the candle is burning.
Transcript of Combusting Candles V9 - Community Science Workshop · PDF file ·...

© 2012 Mission Science Workshop. All Rights Reserved worldwide. When linking to or using MSW content, images, or videos, credit MUST be included.
Combusting Candles
Category: Chemistry
Type: Class Experiment (60 min)
Materials List:
Be careful! This activity involves working with open flames.
Video: (youtubelink)
How To:
2 Tealight candles 1 Nail 1 Glass Jar with a flat top, e.g jam jar 1 Lighter or matches
Examine the candle. What is a candle made of?
Part 1: Light one of the candles. Note three things that you see when the candle is burning.
© 2012 Mission Science Workshop. All Rights Reserved worldwide. When linking to or using MSW content, images, or videos, credit MUST be included.
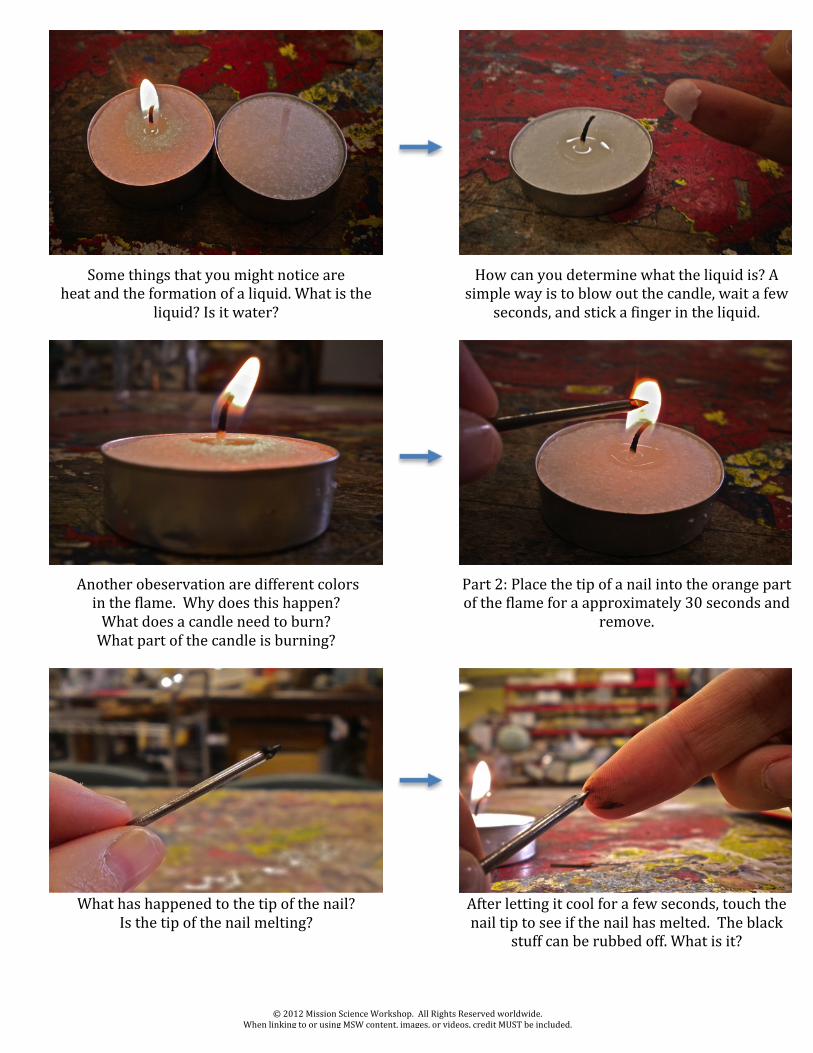
Some things that you might notice are
heat and the formation of a liquid. What is the liquid? Is it water?
How can you determine what the liquid is? A simple way is to blow out the candle, wait a few
seconds, and stick a finger in the liquid.
Another obeservation are different colors in the flame. Why does this happen? What does a candle need to burn? What part of the candle is burning?
Part 2: Place the tip of a nail into the orange part of the flame for a approximately 30 seconds and
remove.
What has happened to the tip of the nail?
Is the tip of the nail melting?
After letting it cool for a few seconds, touch the nail tip to see if the nail has melted. The black
stuff can be rubbed off. What is it?

© 2012 Mission Science Workshop. All Rights Reserved worldwide. When linking to or using MSW content, images, or videos, credit MUST be included.
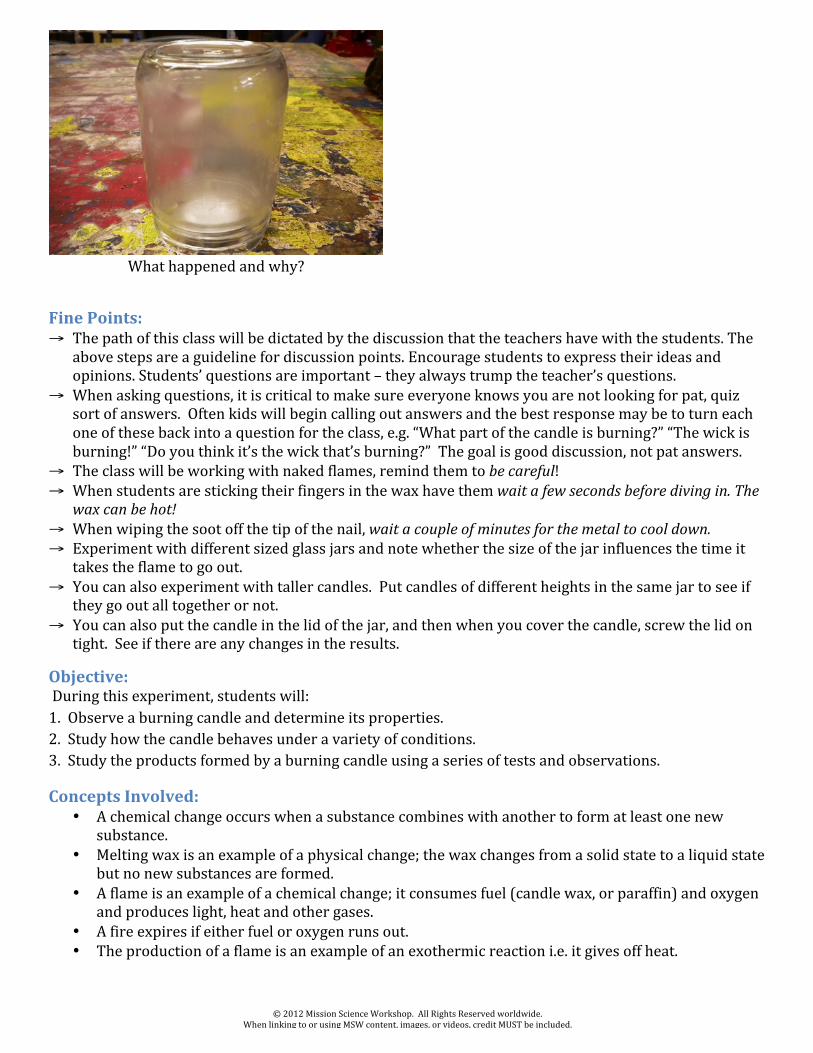
Part 3: What will happen if the candle is covered
with a glass jar?
Light and place two candles side by side. Cover one with the glass jar and observe what happens.
Two things will occur, first the candle will slowly go out and second a cloud will appear inside the jar. Why did the candle go out? What is the cloud
made of? Is it smoke?
Touch the inside of the jar, and you will see that the ‘cloud’ is water. Where did it come from? A chemical reaction has occured. The chemical equation above shows what has occurred.
Part 4: The lung test. Hold your breath for as long as possible. Funny faces are optional!
Release your breath into the glass jar and immediately place it over a lit candle.
© 2012 Mission Science Workshop. All Rights Reserved worldwide. When linking to or using MSW content, images, or videos, credit MUST be included.
Fine Points: → The path of this class will be dictated by the discussion that the teachers have with the students. The
above steps are a guideline for discussion points. Encourage students to express their ideas and opinions. Students’ questions are important – they always trump the teacher’s questions.
→ When asking questions, it is critical to make sure everyone knows you are not looking for pat, quiz sort of answers. Often kids will begin calling out answers and the best response may be to turn each one of these back into a question for the class, e.g. “What part of the candle is burning?” “The wick is burning!” “Do you think it’s the wick that’s burning?” The goal is good discussion, not pat answers.
→ The class will be working with naked flames, remind them to be careful! → When students are sticking their fingers in the wax have them wait a few seconds before diving in. The
wax can be hot! → When wiping the soot off the tip of the nail, wait a couple of minutes for the metal to cool down. → Experiment with different sized glass jars and note whether the size of the jar influences the time it
takes the flame to go out. → You can also experiment with taller candles. Put candles of different heights in the same jar to see if
they go out all together or not. → You can also put the candle in the lid of the jar, and then when you cover the candle, screw the lid on
tight. See if there are any changes in the results.
Objective: During this experiment, students will: 1. Observe a burning candle and determine its properties. 2. Study how the candle behaves under a variety of conditions. 3. Study the products formed by a burning candle using a series of tests and observations.
Concepts Involved: • A chemical change occurs when a substance combines with another to form at least one new
substance. • Melting wax is an example of a physical change; the wax changes from a solid state to a liquid state
but no new substances are formed. • A flame is an example of a chemical change; it consumes fuel (candle wax, or paraffin) and oxygen
and produces light, heat and other gases. • A fire expires if either fuel or oxygen runs out. • The production of a flame is an example of an exothermic reaction i.e. it gives off heat.
What happened and why?

© 2012 Mission Science Workshop. All Rights Reserved worldwide. When linking to or using MSW content, images, or videos, credit MUST be included.
Focus Questions: 1. What is required for a candle to burn? 2. What happens when a candle burns? 3. Why do you think the flame die slowly when placed under the glass jar? Does the flame die after the
same amount of time if a larger jar is placed over the candle?
Elaboration: Combustion is another name for burning or fire. It is a chemical reaction that produces heat and light. Combustion reactions require three things: oxygen, heat and fuel, and are normally accompanied by the production of heat and light in the form of flames. This activity is focused on observing a candle from a chemistry point of view. Using observations and some simple chemical tests, the students should try to determine what must be present in order for a candle to burn and what the products of combustion are. Part 1: What happens when a candle burns? The heat from the lighter used to light the candle melts and vaporizes a small amount of the wax, which is the fuel. Once vaporized, the fuel combines with oxygen in the atmosphere to form a flame. This flame provides sufficient heat to keep the candle burning; this happens because the heat of the flame melts the top of the solid wax. The liquefied wax then moves up through the wick by capillary action, vaporizes and burns within the flame. This will continue to happen until there is no more fuel for the flame. Thus the wick is just an instrument to introduce the liquid fuel to the flame in a slow, measured manner. In the end it burns up too, but it is not the primary fuel. A candle can be made to burn without a wick. It needs to be melted entirely and heated until paraffin vapor is coming off the top. This vapor can be lit. (This is a somewhat hazardous operation and not recommended for classroom use, lest students should be inspired to try it at home.) Within the candle's flame various colors can be seen because the burning of the wax occurs in several distinct places. In the blue region of the flame, hydrogen is being separated from the fuel and burned to form water vapor, and the brighter, yellow part of the flame is the remaining carbon being oxidized to form carbon dioxide (CO2). Part 2: Place a nail in the yellow part of the flame, when the nail is removed from the flame it is covered in a black residue, known as soot, which can be easily removed by rubbing it off. Soot is formed by the incomplete combustion of wood, coal, diesel oil, or other materials and is a powder-‐like form of carbon. Part 3: When a jar is placed over a candle, the flame will slowly die. For combustion to occur, air rich in oxygen is needed. Air is primarily three things: nitrogen (78%), oxygen (21%) and argon (1%). It also has around 2% water vapor depending on the current humidity (thus skewing the above mentioned ratios) and many other gases present in smaller portions. It is important to note that oxygen is different from air. A common misconception is that the candle uses up all the oxygen in the jar and that is why it burns out, but it should be noted that candles do not burn once air has lost about 30% of its oxygen. In this experiment it is unlikely that all the oxygen has been consumed, so this means that while there is still oxygen in the jar, it is just not at a high enough concentration to support combustion. The gases may also not be distributed evenly throughout the jar. The hot carbon dioxide created by the combustion will tend to gather at the top, and push down other gases. This is why a taller candle may go out first.

© 2012 Mission Science Workshop. All Rights Reserved worldwide. When linking to or using MSW content, images, or videos, credit MUST be included.
In this experiment, inside of the glass we see a ‘cloud’ of condensation. All chemical reactions have products, and when the paraffin of the candle reacts with the oxygen in the air it produces carbon dioxide and water steam, that is, water in gas form. The water (steam) is in gas form because it’s hot, but when it hits the colder walls of the jar, it will turn back into liquid water. The word for this is condensation; we say water “condenses” along the walls of the jar. If working with higher-‐grade levels, the chemical reaction can be addressed using the example discussed above. Every hydrocarbon combustion reaction from wood to alcohol has a hydrocarbon (CnHn) and oxygen on the left, and water as well as carbon and/or carbon compounds on the right. Heat and light are also produced, meaning energy is released. Part 4: When the students place the jar filled with their exhaled breath over the candle, they will see that the candle goes out immediately. This is because of the presence of a high amount of carbon dioxide. When we exhale our breath is composed of air slightly altered by our bodies. If we breathe normally the levels of carbon dioxide constitute roughly 4-‐5% of the gases exhaled, but if we hold our breath for a while the levels can increase up to 20%. This is the reason that the candle goes out immediately compared to the experiment in step 3. Carbon dioxide is really good at putting out fires; and is present in many forms of fire extinguisher. It is important to be entirely honest about what can be learned from this experiment. For example, we can’t prove the presence of oxygen or carbon dioxide, nor can we verify the percent of different gases in the air. We can’t confirm the reaction we drew on the board. We cannot even prove that the black is carbon. What we can conclude with confidence is this:
• Candles give light and heat. • Candles primarily burn the paraffin, not the wick. • If you stick a nail in the candle, it gets black with something produced by the candle. • One of the products of the candle is water. If you use a clean jar, you can even taste the water to be
sure it’s not some other liquid (though this would be teaching hazardous lab techniques). • The candle needs a steady supply of “fresh” air to burn. Take this supply away and it will die. • We also know that we humans need a steady supply of “fresh” air to live. Hold your breath too
long and you feel like you will die. (You will if you don’t get some fresh air.) So the air we blow out after holding our breath has been altered by our bodies.
• When we put a candle with this “used” air, it dies too. Thus we can see that both the candle and us mammals need some component of air to survive.
This is an amazing amount to conclude from a simple experiment! It’s an excellent example of how reality can and should be the teacher, and how books and other references should be used to back up the original observations of the students.
Links to k-‐12 CA Content Standards: Grades k-‐8 Standard Set Investigation and Experimentation: Scientific progress is made by asking meaningful questions and conducting careful investigations. As a basis for understanding this concept and addressing the content in the other strands, students should develop their own questions and perform investigations.

© 2012 Mission Science Workshop. All Rights Reserved worldwide. When linking to or using MSW content, images, or videos, credit MUST be included.
Grades k-‐12 Mathematical Reasoning: 1.0 Students make decisions about how to approach problems: 1.1 Analyze problems by identifying relationships, distinguishing relevant from irrelevant information,
sequencing and prioritizing information, and observing patterns. 1.2 Determine when and how to break a problem into simpler parts. 2.0 Students use strategies, skills, and concepts in finding solutions: 1.1 Use estimation to verify the reasonableness of calculated results. 1.2 2.2 Apply strategies and results from simpler problems to more complex problems. 1.3 Use a variety of methods, such as words, numbers, symbols, charts, graphs, tables, diagrams, and
models, to explain mathematical reasoning. 2.5 Indicate the relative advantages of exact and approximate solutions to problems and give answers to a specified degree of accuracy. 3.0 Students move beyond a particular problem by generalizing to other situations: 3.1 Evaluate the reasonableness of the solution in the context of the original situation. 3.2 Note the method of deriving the solution and demonstrate a conceptual understanding of the derivation by solving similar problems. 3.3 Develop generalizations of the results obtained and apply them in other circumstances. Grade 1 Standard Set 1. Physical Sciences Materials come in different forms (states), including solids, liquids, and gases. As a basis for understanding this concept: 1.a. Students know solids, liquids, and gases have different properties. 1.b. Students know the properties of substances can change when the substances are mixed, cooled, or heated. Grade 3 Standard Set 1. Physical Sciences Energy and matter have multiple forms and can be changed from one form to another. As a basis for understanding this concept: 1.b. Students know sources of stored energy take many forms, such as food, fuel, and batteries. 1.e. Students know matter has three forms: solid, liquid, and gas. 1.f. Students know evaporation and melting are changes that occur when the objects are heated. 1.g. Students know that when two or more substances are combined, a new substance may be formed with properties that are different from those of the original materials. Grade 5 Standard Set 1. Physical Sciences Elements and their combinations account for all the varied types of matter in the world. As a basis for understanding this concept: 1.a. Students know that during chemical reactions the atoms in the reactants rearrange to form products with different properties Grade 8 Standard Set 5. Reactions Chemical reactions are processes in which atoms are rearranged into different combinations of molecules. As a basis for understanding this concept: 5.a. Students know reactant atoms and molecules interact to form products with different chemical properties. 5.b. Students know the idea of atoms explains the conservation of matter: In chemical reactions the number of atoms stays the same no matter how they are arranged, so their total mass stays the same.
© 2012 Mission Science Workshop. All Rights Reserved worldwide. When linking to or using MSW content, images, or videos, credit MUST be included.
5.c. Students know chemical reactions usually liberate heat or absorb heat. 5.d. Students know physical processes include freezing and boiling, in which a material changes form with no chemical reaction. Grades 9-‐12 Set 7. Clinical Thermodynamics Energy is exchanged or transformed in all chemical reactions and physical changes of matter. As a basis for understanding this concept: 7.a. Students know how to describe temperature and heat flow in terms of the motion of molecules (or atoms). 7.b. Students know chemical processes can either release (exothermic) or absorb (endothermic) thermal energy.