Colour-Tramp - Artistic Licenceartisticlicence.com/WebSiteMaster/User Guides/colour-tramp...
104
Colour-Tramp User Guide Artistic Licence Engineering Ltd. Manual Revision V1.5 for Software Revision V1.65
Transcript of Colour-Tramp - Artistic Licenceartisticlicence.com/WebSiteMaster/User Guides/colour-tramp...

Colour-Tramp
User
Guide
Artistic Licence Engineering Ltd. Manual Revision V1.5 for Software Revision V1.65

Artistic Licence Engineering Ltd. Colour-Tramp User Guide 2 / 104

Artistic Licence Engineering Ltd. Colour-Tramp User Guide 3 / 104

Artistic Licence Engineering Ltd. Colour-Tramp User Guide 4 / 104

Artistic Licence Engineering Ltd. Colour-Tramp User Guide 5 / 104

Artistic Licence Engineering Ltd. Colour-Tramp User Guide 6 / 104
P R O D U C T
R E G I S T R A T I O N F O R M
Product: Colour-Tramp
Version No.
Serial No.
Date Purchased:
Supplier:
Output Device:
Name:
Company Name:
Address:
Post/Zip Code:
Phone No.
Comments:
Please return to: Artistic Licence Engineering Ltd.
The Mould Making Workshop, Soby Mews, Bovey Tracey, TQ13 9JG, UK
Fax: +44 (0) 20 84 26 05 51

Artistic Licence Engineering Ltd. Colour-Tramp User Guide 7 / 104

Artistic Licence Engineering Ltd. Colour-Tramp User Guide 8 / 104
PRODUCT REGISTRATION FORM ....................................................... 6
CONTENTS ................................................................................ 8
INTRODUCTION ......................................................................... 12
OVERVIEW ...................................................................................................................................... 12
PHYSICAL OUTPUT .................................................................................................................. 12
ART-NET .................................................................................................................................. 13
INSTALLATION ........................................................................................................................ 14
WINDOWS 2000, NT & XP USERS .................................................................................. 14
ADMINISTRATOR RIGHTS ............................................................................................... 15
SOFTWARE INSTALLATION ............................................................................................ 16
SOFTWARE REGISTRATION ............................................................................................ 17
CONFIGURATION ..................................................................................................................... 17
ART-NET .................................................................................................................................. 17
THE CONCEPTS .......................................................................... 19
OVERVIEW ...................................................................................................................................... 19
BUILDING A SHOW ..................................................................................................................... 19
LAYOUT THE WORKSPACE ................................................................................................... 20
LAYOUT WIZARD ................................................................................................................ 20
PATCH THE LAMPS .................................................................................................................. 24
CONFIGURE THE OUTPUTS.................................................................................................. 25
PROGRAM THE SEQUENCES ................................................................................................ 26
PLAYBACK THE SHOW ............................................................................................................ 28
THE WORKSPACE ........................................................................ 29
OVERVIEW ..................................................................................................................................... 29
THE TOOL BARS ......................................................................... 31
QUICK REFERENCE ....................................................................................................................... 31
FILE CONTROL .......................................................................................................................... 31
CLIPBOARD ................................................................................................................................ 32
ZOOM .......................................................................................................................................... 32
PALETTES ................................................................................................................................... 32
RECORDING ............................................................................................................................... 33
SELECTION................................................................................................................................ 33
PAINT .......................................................................................................................................... 34
BRUSHES ................................................................................................................................ 34
SELECT BY .............................................................................................................................. 36
MOVE ....................................................................................................................................... 37
WIPE ........................................................................................................................................ 40
PUSH ........................................................................................................................................ 44
C O N T E N T S

Artistic Licence Engineering Ltd. Colour-Tramp User Guide 9 / 104
LAYOUT ................................................................................................................................... 47
CELL SELECTION ......................................................................... 49
OVERVIEW ..................................................................................................................................... 49
PAINT WITH COLOUR............................................................................................................ 49
SELECT AND CHOOSE COLOUR .......................................................................................... 49
GROUP PALETTE BUTTON ......................................................................................................... 50
COLOURS .................................................................................. 51
OVERVIEW ...................................................................................................................................... 51
RGB GAMUT................................................................................................................................ 52
RGB FADE GAMUT .................................................................................................................... 52
RGB SATURATION GAMUT ................................................................................................... 52
R-W GAMUT ............................................................................................................................... 53
R-W FADE GAMUT ................................................................................................................... 53
R-W SATURATION GAMUT .................................................................................................. 53
R-W SATURATION GAMUT .................................................................................................. 54
RGB ADJUST ............................................................................................................................. 54
CMY ADJUST ............................................................................................................................. 54
SWATCH LIBRARY ................................................................................................................... 55
PALETTE LIBRARY ................................................................................................................... 55
PALETTE CONFIG................................................................................................................. 55
PAGE POPUP............................................................................................................................ 56
PALETTE POPUP .................................................................................................................... 58
STORES ................................................................................... 60
OVERVIEW ..................................................................................................................................... 60
RECORD BUTTON .......................................................................................................................... 61
POPUP MENUS ............................................................................................................................... 62
SEQUENCE HEADER ............................................................................................................... 62
SEQUENCE ENTRY .................................................................................................................. 64
SEQUENCE STEP ...................................................................................................................... 66
STACK HEADER ........................................................................................................................ 68
STACK ENTRY ........................................................................................................................... 68
STACK STEP ............................................................................................................................... 69
PAGE ............................................................................................................................................. 70
PAGE PLAYBACK ........................................................................................................................ 70
SEQUENCES ................................................................................................................................... 71
SEQUENCE SETTINGS ........................................................................................................... 71
SEQUENCE STEP SETTINGS ............................................................................................... 76
STACKS ........................................................................................................................................... 79
STACK SETTINGS ................................................................................................................... 79
STACK STEP CONFIG .............................................................................................................. 80
PLAYBACK ................................................................................. 83
OVERVIEW ..................................................................................................................................... 83
PLAYBACK PANEL ..................................................................................................................... 83
MASTER FADERS ................................................................................................................. 83
SEQUENCE PLAYBACK ............................................................................................................ 85
STACK PLAYBACK ..................................................................................................................... 89

Artistic Licence Engineering Ltd. Colour-Tramp User Guide 10 / 104
PREFERENCES ............................................................................ 91
OVERVIEW ...................................................................................................................................... 91
DIAGNOSTICS .......................................................................................................................... 91
OUTPUT ....................................................................................................................................... 92
SYSTEM START ........................................................................................................................ 92
INTERFACE SETTINGS ......................................................................................................... 93
VISUAL SETTINGS ................................................................................................................. 93
AUTOMATION ............................................................................ 94
OVERVIEW ..................................................................................................................................... 94
POWER ......................................................................................................................................... 94
SOFTWARE START ................................................................................................................. 95
SHOW RUN ................................................................................................................................ 95
EXPORT ................................................................................... 98
OVERVIEW ..................................................................................................................................... 98
CONVERSION TABLES .................................................................. 99
INDEX ................................................................................... 102

Artistic Licence Engineering Ltd. Colour-Tramp User Guide 11 / 104

Artistic Licence Engineering Ltd. Colour-Tramp User Guide 12 / 104
OVERVIEW
Throughout the development of Colour-Tramp we have attempted
to provide a user interface that will be familiar to lighting people
but also add the elegance of the Windows interface.
The intention behind Colour-Tramp is to use the power of the PC to
add flexibility to the control concepts used and proved by the last
generation of conventional lighting consoles.
Colour-Tramp has found many applications within the lighting
industry. Anywhere that you do not want a control room cluttered
by a huge console full of mechanical faders is the perfect place for
Colour-Tramp
To check for future software releases, go to:
www.ArtisticLicence.com/Download.htm
PHYSICAL
OUTPUT
Colour-Tramp is a sophisticated PC based lighting console that is
optimised for two and three dimensional arrays of colour changing
lamps. The output is Art-Net via the PC network card. Conversion to
DMX512 / RDM, three output devices are available:
1. Ether-Lynx (4 x DMX out of which two are RDM capable)
2.Net-Lynx O/P (2 x DMX / RDM outputs)
3.Down-Lynx O/P (2 x DMX / RDM outputs)
I N T R O D U C T I O N

Artistic Licence Engineering Ltd. Colour-Tramp User Guide 13 / 104
ART-NET
Art-Net is a new standard in Ethernet communication. The protocol
is a public domain standard that is supported by a number of
vendors including ADB, Avab Transtechnic, Avolites, Barco,
Cameleon, Compulite, Doug Fleenor Design, Electronics Diversified,
Flying Pig, Goddard Design Co, Green Hippo, High End Systems,
Horizon, IES, I-Light Group, Jands Electronics Pty, LewLight, MA
Lighting, Martin Professional, Medialon, Mediamation, Robe Show
Lighting, Stage Research, Theatrelight Ltd, Touchlight Systems
Ltd, VNR, Zero 88 and Artistic Licence.

Artistic Licence Engineering Ltd. Colour-Tramp User Guide 14 / 104
INSTALLATION
Colour-Tramp is a 32 bit application specifically designed to
operate with Windows XP. Whilst it will operate on Windows 98,
Windows ME, Windows NTv4 and Windows 2000, we advise that
Windows XP be used to run actual shows..
The minimum specification PC is:
Processor: Pentium
Speed: 133MHz
RAM: 512MB
Operating System : Windows 95 / 98 / ME / 2K / XP
Graphics: 1024 x 768 8 bit Colour
A significant improvement in performance will be seen with the
following specification:
Processor: Pentium
Speed 2.4GHz
RAM 2GB
Operating System: Windows XP
Graphics 1280 x 1024 32 bit Colour
Windows 2000, NT
& XP Users
The Windows 2000, Windows NT and Windows XP operating
systems provide the concept of User Rights. This allows different
users to be granted different access rights to the computer.
The highest level of access rights is called ‘Administrator’.
Colour-Tramp will NOT install correctly unless you are logged onto
the computer with Administrator rights.
If your computer is part of a network, you must ask your system
administrator to set the computer for Administrator rights.
If you are a single user, the following sequence shows how to
change the settings:

Artistic Licence Engineering Ltd. Colour-Tramp User Guide 15 / 104
Administrator
Rights
Administrator rights are
set in the Windows Users
& Passwords section:
To access this, select the
Start Menu – Settings –
Control Panel menu.
In the Control Panel,
double click on the Users &
Passwords icon. The
following dialogue will be
displayed:
Select the user who will
install Colour-Tramp. In
this example it is Benoit.
Then press the Properties
button.
The following dialogue will
then be displayed:
Select the ‘Other’
checkbox.
Select ‘Administrators’
from the pull down list.
Press OK. You should now
restart Windows and then
log on as the user name
that you have edited.

Artistic Licence Engineering Ltd. Colour-Tramp User Guide 16 / 104
Software
Installation
Colour-Tramp is supplied on CD. To install use the following
procedure:
If you are upgrading, first uninstall the existing copy of Colour-
Tramp and DMX-Workshop.
Shutdown any applications running on your computer
Insert the CD in drive.
Wait for CD to start, then select ‘Enter CD’.
Select the ‘Software’ button.
Select the ‘Colour-Tramp’ button.
Install Shield will then guide you through the remainder of the
procedure.
When the installation completes, return to the CD menu and
install DMX-Workshop.
Now follow the registration procedure.
If you are installing an upgrade, we recommend that you backup all
Colour-Tramp Data first.
The installation procedure is identical for installation of the
demonstration version and the licensed version.
Artistic Licence Engineering Ltd. Colour-Tramp User Guide 17 / 104
Software
Registration
If you have purchased the licensed version, plug the security
device into a free USB socket. After a short delay, the ‘Found
New Hardware’ dialogue will be displayed by Windows. All drivers
were installed with Colour-Tramp, so simply press the ‘NEXT’
button to accept all the default values. When it appears, press
the ‘FINISH’ button.
The number of available output DMX512 channels is set by the
USB security device. This number will be displayed in the status
bar when Colour-Tramp starts.
CONFIGURATION
Before starting to use the system you will need to configure your
chosen hardware. The process is very simple and is described
below.
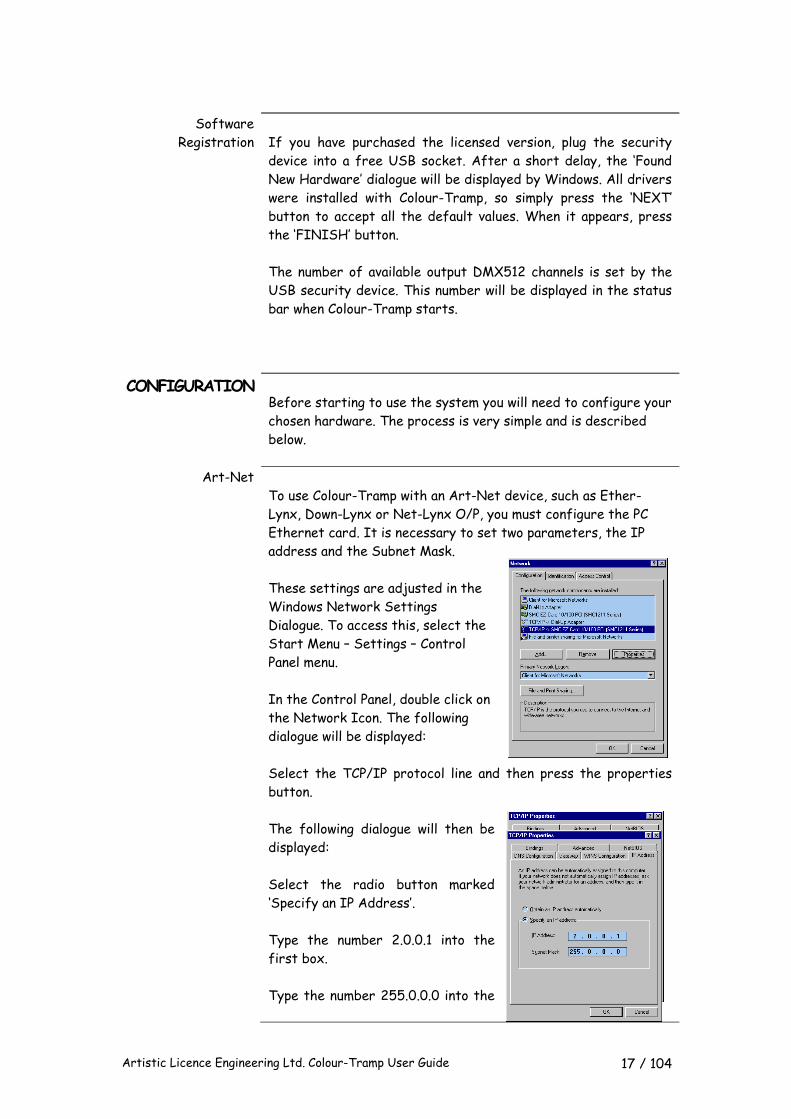
Art-Net
To use Colour-Tramp with an Art-Net device, such as Ether-
Lynx, Down-Lynx or Net-Lynx O/P, you must configure the PC
Ethernet card. It is necessary to set two parameters, the IP
address and the Subnet Mask.
These settings are adjusted in the
Windows Network Settings
Dialogue. To access this, select the
Start Menu – Settings – Control
Panel menu.
In the Control Panel, double click on
the Network Icon. The following
dialogue will be displayed:
Select the TCP/IP protocol line and then press the properties
button.
The following dialogue will then be
displayed:
Select the radio button marked
‘Specify an IP Address’.
Type the number 2.0.0.1 into the
first box.
Type the number 255.0.0.0 into the

Artistic Licence Engineering Ltd. Colour-Tramp User Guide 18 / 104
second box.
The display should be as follows:
Select the DNS Tab and click on
disable DNS.
Press the OK button but do not restart
the computer yet.
Double click on the ‘WSP
Client’ icon in control
panel.
Un-tick both boxes.
Press OK.
Now restart the
computer.
When using the Art-Net output, ensure that your network is not
connected to the Internet.

Artistic Licence Engineering Ltd. Colour-Tramp User Guide 19 / 104
T H E C O N C E P T S
OVERVIEW
This section is intended for those users who prefer to just ‘dig in’
to the software, and only pick up the manual for reference!
The following description provides the information necessary to
build a basic show and discusses some of the more important
concepts.
When first started, Colour-Tramp presents a large area called the
workspace. This represents the stage or building that you plan to
light.
Each cell shown in the workspace represents an RGB lamp.
BUILDING A
SHOW
There are five distinct tasks involved in building a lighting show
with Colour-Tramp:
Layout the Workspace
Patch the Lamps
Configure the Outputs
Program the Sequences
Playback the Show

Artistic Licence Engineering Ltd. Colour-Tramp User Guide 20 / 104
LAYOUT THE
WORKSPACE
This task assigns the visual cells of the Workspace such that they
form a geographical representation of the lighting array.
The accuracy with which this information is entered will largely
control the ease of show programming. More time spent on this
process will make all the other tasks simpler. This is particularly
true if you intend to use any of the graphic or video rendering
tools.
For the purposes of this example, we will light a 4 by 4 array of 16
lamps.
Layout starts with the Layout Wizard. This tool allows you to enter
symmetric grids of lamps. The Layout Wizard is accessed from the
Layout menu.
Layout Wizard
In this example we would like a 4 x 4 array of lamps. Programming is
simplified when gaps exist between each cell. Between the rows or
columns there will be 3 gaps, plus 2 gutters on either side.
The number of rows is calculated using:
Row Count = Required Lamp Rows + Gutters + Gaps
In our example this is:
Row Count = 4 + 3 + 2 = 9
The same is true for columns. A value of 9 is therefore entered in
this page of the wizard.

Artistic Licence Engineering Ltd. Colour-Tramp User Guide 21 / 104
The preview area on the right of the wizard shows the results thus
far.
We will enter two different row heights. The first height will be
for the gutters and gaps. The second height will be for the lamps.
In this example, we have arbitrarily used 4 & 24. These numbers
are in pixels. In a real application, you must ensure that the
relationship between the different heights match the actual lamp
size and placement.
We then follow the same logic for column width:
Note that the lamps are shown as green in the preview area. The
layout is taking shape, but we currently have lamps shown in all our
gap and gutter positions.
TIP

Artistic Licence Engineering Ltd. Colour-Tramp User Guide 22 / 104
The next two pages of the wizard set the relationship between
lamps and gaps.
The Next & Back buttons can be used at any time during the
wizard. This allows experimentation with the way that each page
interacts with the others. If the wizard is cancelled, any settings
entered will be retained.
The layout is now very close although our lamps are showing as gaps
and visa versa.
TIP

Artistic Licence Engineering Ltd. Colour-Tramp User Guide 23 / 104
The next page of the wizard is not required in this example.
Ticking the Invert button resolves the problem.
Press the Finish button to complete the wizard.

Artistic Licence Engineering Ltd. Colour-Tramp User Guide 24 / 104
After adjusting the zoom controls, the Workspace looks as follows.
Each cell represents a lamp.
PATCH THE
LAMPS
The next task is to assign patch addresses to the cells. This allows
the cell to control the actual lamp.
Right clicking on a cell produces a popup menu. From this, select
Fixture Patch. The following dialogue is displayed:
Two fields of this dialogue
are required; ‘DMX Start
Address’ and ‘DMX-Pipe’.
It is also sensible to enter
the ‘Cell / Fixture Name’ as
this is used by all of the
reporting functions.
The DMX Start Address is
a number in the range 1 to
512. It is the number that
is set on the actual lamp.
The DMX-Pipe is a group of 512 channels. It is analogous to a
DMX512 Universe.

Artistic Licence Engineering Ltd. Colour-Tramp User Guide 25 / 104
In Colour-Tramp, the terms DMX-Pipe and DMX-Universe have
subtly different meanings. The Pipe is internal to Colour-Tramp. The
Universe represents the Art-Net Universe to which the Pipe is
output. The Preferences dialogue is used to define the relationship
between Pipes and Universes. Pipes number from 1 to 16. Universes
number from 000 to 255. We will return to this subject in a
moment.
In our example, we will set all DMX-Pipes to ‘1’. The first cell will
have a DMX Start Address of ‘1’. Each cell requires three channels
for red, green and blue, so each consecutive start address
increases by three. The Start Addresses will be 1 ,4 ,7 ,10 etc.
CONFIGURE
THE OUTPUTS
This task assigns the relationship between Pipes and Universes (see
above for discussion of these terms).
This is achieved in the Preferences dialogue, which is displayed via
the Tools menu.
Click on the ‘+’ symbol
next to Outputs. The list
of all sixteen Pipe
assignments is then
displayed. Please note
that the number of these
that are active is
dependent upon the channel size of the purchased version. For
example: The Colour-Tramp 1024 system enables only the first two
entries.
In our example, we will accept the default assignment that Pipe 1
outputs to Universe 0.
Ensure that you do not unintentionally duplicate Universe numbers.
If two Pipes are configured to output on the same Universe, the
data will be merged by the network.
Now is a good time to save the show file to disc!
TIP

Artistic Licence Engineering Ltd. Colour-Tramp User Guide 26 / 104
PROGRAM THE
SEQUENCES
We have now configured the system and are ready to start
programming. At the simplest level this consists of selecting cells
and setting their colour.
To start, display the Colour Picker and Stores palettes by pressing
the tool bar buttons shown.
Now drag the cursor over the first column of cells and then click on
a colour (red) in the Colour Picker. This process first selects the
cells and then assigns them the colour red. The screen should now
look as follows:

Artistic Licence Engineering Ltd. Colour-Tramp User Guide 27 / 104
We will use this as the first step of a sequence. Click on the ‘+’
symbol next to Page 1 and then click on ‘Play 1’. Now press the
Record button.
This process had had three effects:
Created a new Sequence: Seq1.
Assigned ‘Seq1’ to the first playback of ‘Page 1’.
Recorded the Workspace to the first step of the new
sequence.
Programming the remainder of the sequence proceeds as follows:
Change the colour of the red cells by clicking on yellow in
the Colour Picker.
Select the next column by dragging the mouse over the
cells.
Change the new selection to red by clicking on the Colour-
Picker.
Record the step by pressing Record.
The results are shown below:

Artistic Licence Engineering Ltd. Colour-Tramp User Guide 28 / 104
PLAYBACK THE
SHOW
Playback is controlled by the Playback Panel as shown below:
The Playback Panel contains three Submasters, each of which can
playback a Sequence. The Playback Pages control the order in which
Sequences are assigned to Submasters.
Select the ‘Output’ tab on the Workspace control at the bottom of
the screen. The screen will now show the actual output that is being
transmitted to the lamps. Press the ‘In’ button for Submaster 1 to
start playback.

Artistic Licence Engineering Ltd. Colour-Tramp User Guide 29 / 104
T H E W O R K S P A C E
OVERVIEW
The screen shot below shows the key areas of the Colour-Tramp
screen. The table below provides an overview of each functional
area.
The Toolbars
The main
menu
The
Workspace
The
Workspace
Selector The current
colour
selection
The Status
Bar

Artistic Licence Engineering Ltd. Colour-Tramp User Guide 30 / 104
Area Purpose
Main Menu The main menu is used to access all functions in
Colour-Tramp.
Toolbars Provides shortcuts to the most frequently used
functions.
Workspace The Workspace is the core of Colour-Tramp. Its
function changes dependent upon the Workspace
Selector.
Workspace
Selector
The Workspace Selector controls the operation of
the Workspace as follows:
Workspace The area used to paint cell colours.
Preview Used to preview entities in the
Stores palette. Preview is
momentarily selected when a Stores
palette entry is clicked.
Output Shows the WYSIWYG output
generated by all submasters.
Diagnostics This mode is used with RDM capable
lamps. It displays green, amber or
red to indicate each lamp’s sensor
status.
Playback Shows the WYSIWYG output
generated by a single submaster.
This is particularly important when
subtractive or matte playback is
used.
Status Bar The Status Bar provides feedback on system status
and ongoing editing functions.
Colour
Selection
The Current Colour Selection is used when painting
in the Workspace.

Artistic Licence Engineering Ltd. Colour-Tramp User Guide 31 / 104
T H E T O O L B A R S
QUICK
REFERENCE
The regularly used controls are all accessed from the Speed-Bar.
This is the button area at the top of the screen. The functions can
also be accessed from the main menu.
There are seven separate tool bars that group individual buttons
by function. These are:
File Control
Clipboard
Zoom
Palettes
Recording
Selection
Paint
The following tables provides a summary of the functions that are
accessed from each tool bar:
FILE CONTROL The File Control tool bar provides shortcuts to
file load and save operations.
Icon Name Purpose
New Creates a new show. If existing edits have not
been saved, a warning dialogue is displayed.
Open Loads a show from disc. If existing edits have
not been saved, a warning dialogue is displayed.
Save Saves a show to disc. If the show has not been
previously saved, the Save As dialogue is
displayed.
Print The Print Function starts the Fixture Report
Wizard. This functionality is only available when
Microsoft Word is installed on the system. The
wizard provides reporting on the patch and
optionally, RDM status of lamps.
Artistic Licence Engineering Ltd. Colour-Tramp User Guide 32 / 104
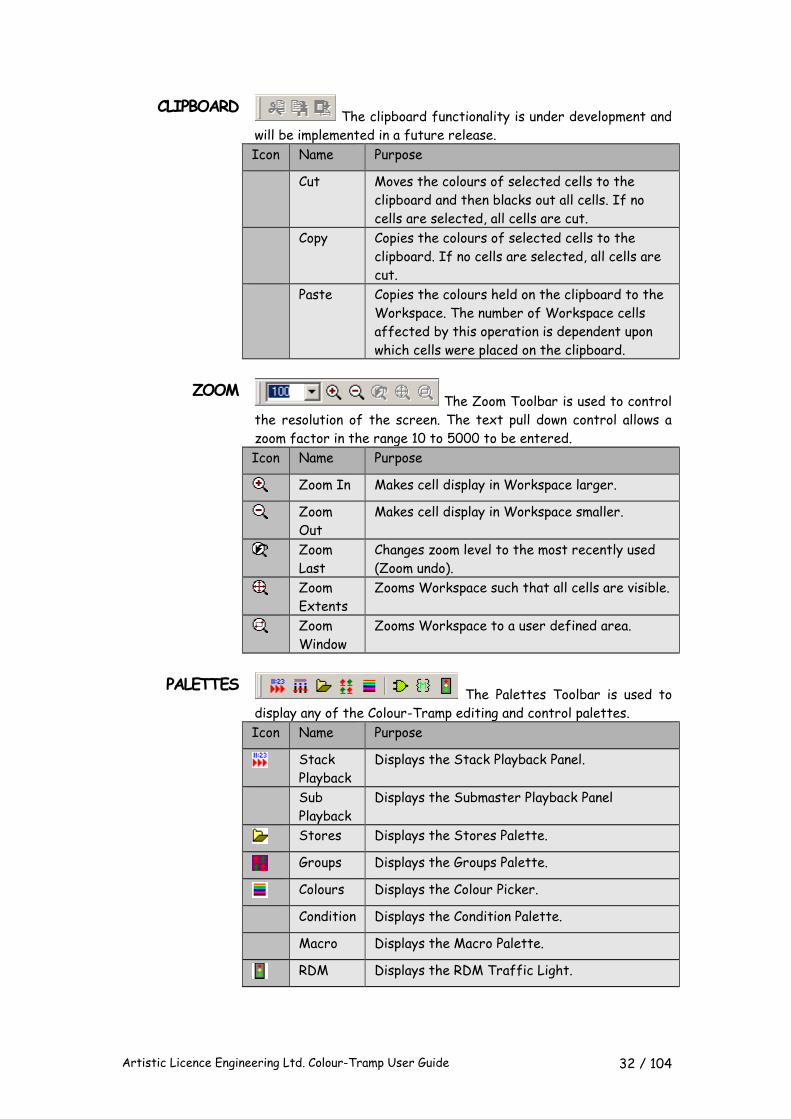
CLIPBOARD The clipboard functionality is under development and
will be implemented in a future release.
Icon Name Purpose
Cut Moves the colours of selected cells to the
clipboard and then blacks out all cells. If no
cells are selected, all cells are cut.
Copy Copies the colours of selected cells to the
clipboard. If no cells are selected, all cells are
cut.
Paste Copies the colours held on the clipboard to the
Workspace. The number of Workspace cells
affected by this operation is dependent upon
which cells were placed on the clipboard.
ZOOM The Zoom Toolbar is used to control
the resolution of the screen. The text pull down control allows a
zoom factor in the range 10 to 5000 to be entered.
Icon Name Purpose
Zoom In Makes cell display in Workspace larger.
Zoom
Out
Makes cell display in Workspace smaller.
Zoom
Last
Changes zoom level to the most recently used
(Zoom undo).
Zoom
Extents
Zooms Workspace such that all cells are visible.
Zoom
Window
Zooms Workspace to a user defined area.
PALETTES The Palettes Toolbar is used to
display any of the Colour-Tramp editing and control palettes.
Icon Name Purpose
Stack
Playback
Displays the Stack Playback Panel.
Sub
Playback
Displays the Submaster Playback Panel
Stores Displays the Stores Palette.
Groups Displays the Groups Palette.
Colours Displays the Colour Picker.
Condition Displays the Condition Palette.
Macro Displays the Macro Palette.
RDM Displays the RDM Traffic Light.

Artistic Licence Engineering Ltd. Colour-Tramp User Guide 33 / 104
RECORDING The Recording Toolbar is used record the workspace
to a store.
Icon Name Purpose
Record Records the current workspace to the entity
selected in the Stores palette.
Auto-
Record
Enables Auto-Record. In this mode, all editing
functions in the Move, Wipe and Push toolbars
will emulate pressing the Record button.
SELECTION The Selection Toolbar is used to control selection of cells within
the workspace.
Icon Name Purpose
Paint Sets ‘Paint with Mouse’ mode. In this mode, a
colour is selected first and then used to paint
in the Workspace.
Select Sets ‘Cell Select’ mode. In this mode, cells are
selected and then their colour is chosen.
Add Cell selections add to the workspace when a cell
is clicked.
Subtract Cell selections subtract from the workspace
when a cell is clicked.
Toggle Cell selections invert or toggle the existing
workspace selection when a cell is clicked.
Select
All
Selects all cells in the workspace.
Deselect
All
Deselects all cells in the workspace.
Toggle
All
Inverts the current workspace selections.
All Black Sets all workspace cells to black.
Selected
Black
Sets all selected cells in the workspace to
black.
Sticky
Colour
When ‘Sticky Colour’ is enabled, all editing tools
move colour with the cell selection. When
disabled it is only the selection that moves.
Crop
Extents
When enabled, the editing tools do not wrap
around the edges of the workspace.

Artistic Licence Engineering Ltd. Colour-Tramp User Guide 34 / 104
PAINT
The Paint Toolbar is used to control editing functions and select
paint brushes. The Toolbar is separated into eleven logical groups:
Brushes
Select By
Move
Wipe
Push
Roll
Intensity
Gradient
Drop Shadow
Render
Layout
Brushes
The Brushes Toolbar is used to select the paintbrush that will be
used to paint on the workspace. The current selection is shown to
the left of the toolbar, under the heading ‘Active’.
Icon Name Purpose
Single Cell A mouse click affects only the cell under the
mouse.
Poly Line A mouse drag draws connecting horizontal or
vertical lines of cells.
Vertical
Line
A mouse click draws a vertical line of cells.
Vertical
Parallel
A mouse drag draws two parallel vertical
lines of cells.
Horizontal
Line
A mouse click draws a horizontal line of
cells.
Horizontal
Parallel
A mouse drag draws two parallel vertical
lines of cells.
VH Cross A mouse click draws a vertical / horizontal
cross of cells.
Lead
Diagonal
A mouse click draws a south west to north
east diagonal line of cells.
Trail
Diagonal
A mouse click draws a north west to south
east diagonal line of cells.
Diagonal
Cross
A mouse click draws a diagonal cross of cells.

Artistic Licence Engineering Ltd. Colour-Tramp User Guide 35 / 104
Icon Name Purpose
Filled
Rectangle
A mouse drag draws a filled rectangle of
cells.
Open
Rectangle
A mouse drag draws an outline rectangle of
cells.
Filled Circle A mouse drag draws a filled circle of cells.
Click first on the centre and drag for radius.
Open Circle A mouse drag draws an outline circle of cells.
Click first on the centre and drag for radius.
Floating
Isosoles
Triangle
A mouse drag draws a filled isosoles triangle
of cells. Click first on the apex of the
triangle, drag for base extents. The long
axis flips from horizontal to vertical based
on the aspect ratio.
Vertical
Isosoles
Triangle
A mouse drag draws a filled isosoles triangle
of cells. Click first on the apex of the
triangle, drag for base extents. The long
axis fixed vertically.
Horizontal
Isosoles
Triangle
A mouse drag draws a filled isosoles triangle
of cells. Click first on the apex of the
triangle, drag for base extents. The long
axis fixed horizontally.
Floating
Right
Triangle
A mouse drag draws a filled right angle
triangle of cells. Click first on the apex of
the triangle, drag for base extents. The long
axis flips from horizontal to vertical based
on the aspect ratio.
Vertical
Right
Triangle
A mouse drag draws a filled right angle
triangle of cells. Click first on the apex of
the triangle, drag for base extents. The long
axis fixed vertically.
Horizontal
Right
Triangle
A mouse drag draws a filled right angle
triangle of cells. Click first on the apex of
the triangle, drag for base extents. The long
axis fixed horizontally.
Random A mouse click fills the workspace with
random cells. (Tip: Select Subtractive mode
to adjust density).
Flood Fill A mouse click selects all cells within a
bounded region.
Colour
Picker
A mouse click sets the current colour to the
cell colour.

Artistic Licence Engineering Ltd. Colour-Tramp User Guide 36 / 104
Select By
The Select By Toolbar is used to select all cells that match a
specific criterion. The first section of the toolbar sets the
criterion such as colour, intensity or width. The second section
sets the matching mode, such as ‘equal to’ the next cell to be
clicked.
Icon Name Purpose
Colour Select all cells that match the colour
content of the clicked cell.
Intensity Select all cells that match the intensity
content of the clicked cell.
Red Content Select all cells that match the red content
of the clicked cell.
Green
Content
Select all cells that match the green content
of the clicked cell.
Blue
Content
Select all cells that match the blue content
of the clicked cell.
Cyan
Content
Select all cells that match the cyan (blue +
green) content of the clicked cell.
Magenta
Content
Select all cells that match the magenta (red
+ blue) content of the clicked cell.
Yellow
Content
Select all cells that match the yellow (red +
green) content of the clicked cell.
Width
& Height
Select all cells that match the width and
height of the clicked cell.
Width Select all cells that match the width of the
clicked cell.
Height Select all cells that match the height of the
clicked cell.
Aspect
Ratio
Select all cells that match the aspect ratio
of the clicked cell. Aspect ratio is cell height
divided by cell width.
Equal A cell match occurs if the cell criterion is
equal to that of the clicked cell.
Not Equal A cell match occurs if the cell criterion is
not equal to that of the clicked cell.
Less Than A cell match occurs if the cell criterion is
less than that of the clicked cell.
Less
or Equal
A cell match occurs if the cell criterion is
less than or equal to that of the clicked cell.
Greater
or Equal
A cell match occurs if the cell criterion is
greater than or equal to the clicked cell.
Greater
Than
A cell match occurs if the cell criterion is
greater than that of the clicked cell.

Artistic Licence Engineering Ltd. Colour-Tramp User Guide 37 / 104
Move
The Move Toolbar is used to move cell selections and or colours
from one cell to another. The operation of this toolbar is affected
by the ‘Sticky Colour’ and ‘Crop Extents’ controls, which are
located in the Selection toolbar.
When ‘Sticky Colour’ is selected, the colour moves along with the
cell selection.
When ‘Auto-Record’ mode is selected, the workspace is recorded
to the Stores palette after each operation.
Icon Name Purpose
West The selected cells are moved one cell to the
west.
Before After
East The selected cells are moved one cell to the
east.
Before After
North The selected cells are moved one cell to the
north.
Before After

Artistic Licence Engineering Ltd. Colour-Tramp User Guide 38 / 104
Icon Name Purpose
South The selected cells are moved one cell to the
south.
Before After
North West The selected cells are moved one cell to the
north west.
Before After
South East The selected cells are moved one cell to the
south east.
Before After
North East The selected cells are moved one cell to the
north east.
Before After
South West The selected cells are moved one cell to the
south west.
Before After
Artistic Licence Engineering Ltd. Colour-Tramp User Guide 39 / 104
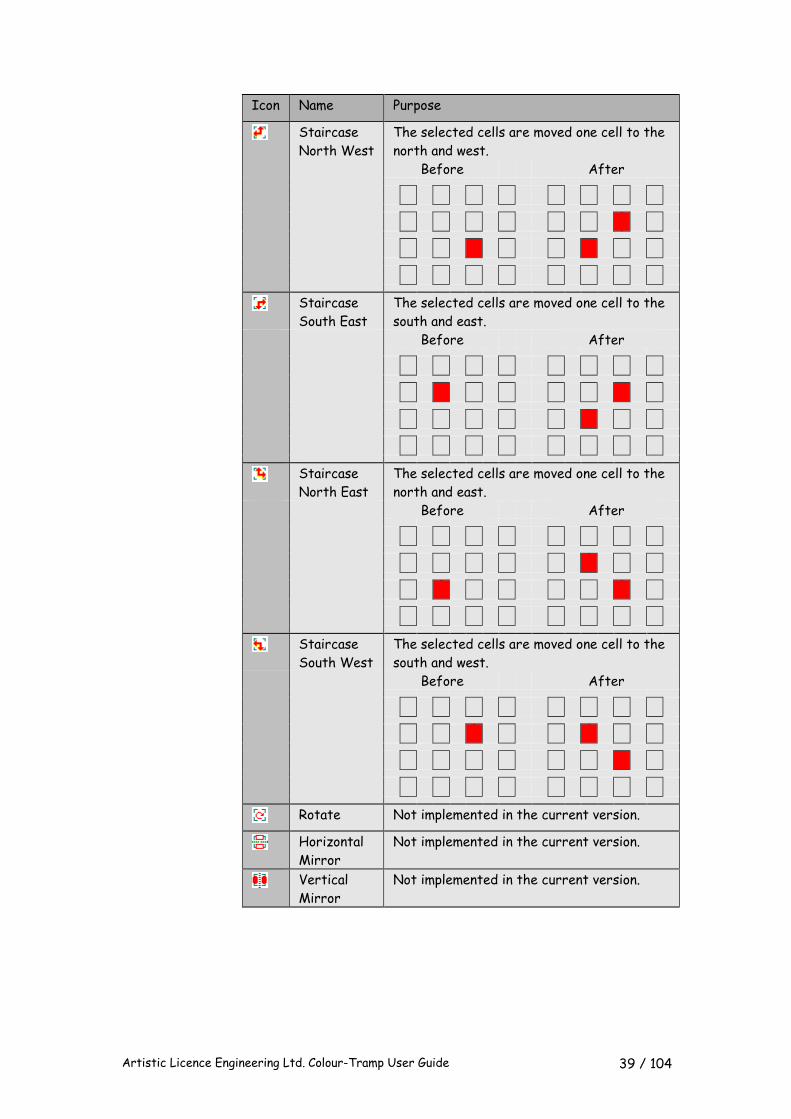
Icon Name Purpose
Staircase
North West
The selected cells are moved one cell to the
north and west.
Before After
Staircase
South East
The selected cells are moved one cell to the
south and east.
Before After
Staircase
North East
The selected cells are moved one cell to the
north and east.
Before After
Staircase
South West
The selected cells are moved one cell to the
south and west.
Before After
Rotate Not implemented in the current version.
Horizontal
Mirror
Not implemented in the current version.
Vertical
Mirror
Not implemented in the current version.

Artistic Licence Engineering Ltd. Colour-Tramp User Guide 40 / 104
Wipe
The Wipe Toolbar is used to copy cell selections and or colours
from one cell to another. The operation of this toolbar is affected
by the ‘Sticky Colour’ and ‘Crop Extents’ controls, which are
located in the Selection toolbar.
When ‘Sticky Colour’ is selected, the colour moves along with the
cell selection.
When ‘Auto-Record’ mode is selected, the workspace is recorded
to the Stores palette after each operation.
Icon Name Purpose
West The selected cells are copied one cell to the
west.
Before After
East The selected cells are copied one cell to the
east.
Before After
North The selected cells are copied one cell to the
north.
Before After

Artistic Licence Engineering Ltd. Colour-Tramp User Guide 41 / 104
Icon Name Purpose
South The selected cells are copied one cell to the
south.
Before After
North West The selected cells are copied one cell to the
north west.
Before After
South East The selected cells are copied one cell to the
south east.
Before After
North East The selected cells are copied one cell to the
north east.
Before After
South West The selected cells are copied one cell to the
south west.
Before After

Artistic Licence Engineering Ltd. Colour-Tramp User Guide 42 / 104
Icon Name Purpose
Staircase
North West
The selected cells are copied one cell to the
north and west.
Before After
Staircase
South East
The selected cells are copied one cell to the
south and east.
Before After
Staircase
North East
The selected cells are copied one cell to the
north and east.
Before After
Staircase
South West
The selected cells are copied one cell to the
south and west.
Before After

Artistic Licence Engineering Ltd. Colour-Tramp User Guide 43 / 104
Icon Name Purpose
Grow
Compass
The selected cells are copied one cell to all
four primary compass points.
Before After
Grow
Diagonal
The selected cells are copied one cell to all
four diagonal compass points.
Before After
Grow All The selected cells are copied one cell to all
eight compass points.
Before After

Artistic Licence Engineering Ltd. Colour-Tramp User Guide 44 / 104
Push
The Push Toolbar is used to move cell selections and or colours
from one cell to another whilst pushing neighbouring cells out of
the path. The operation of this toolbar is affected by the ‘Sticky
Colour’ and ‘Crop Extents’ controls, which are located in the
Selection toolbar.
When ‘Sticky Colour’ is selected, the colour moves along with the
cell selection.
When ‘Auto-Record’ mode is selected, the workspace is recorded
to the Stores palette after each operation.
Icon Name Purpose
West The selected cells are moved one cell to the
west. All horizontally neighbouring cells are
pushed out of the path.
Before After
East The selected cells are moved one cell to the
east. All horizontally neighbouring cells are
pushed out of the path.
Before After
North The selected cells are moved one cell to the
north. All vertically neighbouring cells are
pushed out of the path.
Before After

Artistic Licence Engineering Ltd. Colour-Tramp User Guide 45 / 104
Icon Name Purpose
South The selected cells are moved one cell to the
south. All vertically neighbouring cells are
pushed out of the path.
Before After
North West The selected cells are moved one cell to the
north west. All diagonally neighbouring cells
are pushed out of the path.
Before After
South East The selected cells are moved one cell to the
south east. All diagonally neighbouring cells
are pushed out of the path.
Before After
North East The selected cells are moved one cell to the
north east. All diagonally neighbouring cells
are pushed out of the path.
Before After

Artistic Licence Engineering Ltd. Colour-Tramp User Guide 46 / 104
Icon Name Purpose
South West The selected cells are moved one cell to the
south west. All diagonally neighbouring cells
are pushed out of the path.
Before After

Artistic Licence Engineering Ltd. Colour-Tramp User Guide 47 / 104
Layout
The Layout Toolbar is used to edit the cell layout and lamp
positions. These functions are used after the Layout Wizard has
been used to set the basic layout.
Icon Name Purpose
Delete Deletes selected cells. NB: Do not delete
cells after any sequences have been entered.
Move West Move selected cells west
Move North Move selected cells north
Move East Move selected cells east
Move South Move selected cells south
Duplicate
West
Make a duplicate of all selected cells at the
western boundary of the cells.
Duplicate
North
Make a duplicate of all selected cells at the
northern boundary of the cells.
Duplicate
East
Make a duplicate of all selected cells at the
eastern boundary of the cells.
Duplicate
South
Make a duplicate of all selected cells at the
south boundary of the cells.
Increase
Height
Increase the height of selected cells by two
pixels and re-centre.
Decrease
Height
Decrease the height of selected cells by two
pixels and re-centre.
Set Height Prompt user for new numeric height of all
selected cells. Cells are re-centred when
possible.
Match
Largest
Height
Change the height of all selected cells to
match the height of the largest selected
cell.
Match
Smallest
Height
Change the height of all selected cells to
match the height of the smallest selected
cell.
Increase
Width
Increase the width of selected cells by two
pixels and re-centre.
Decrease
Width
Decrease the width of selected cells by two
pixels and re-centre.
Set Width Prompt user for new numeric width of all
selected cells. Cells are re-centred when
possible.
Match
Largest
Width
Change the width of all selected cells to
match the width of the largest selected cell.

Artistic Licence Engineering Ltd. Colour-Tramp User Guide 48 / 104
Icon Name Purpose
Match
Smallest
Width
Change the width of all selected cells to
match the width of the smallest selected
cell.
Align West Align all selected cells such that their
western edge has the smallest possible gap
with the next cell on a horizontal line.
Align
horizontal
Centre
Align all selected cells such that they move
horizontally to produce a common vertical
centre line.
Align East Align all selected cells such that their
eastern edge has the smallest possible gap
with the next cell on a horizontal line.
Align South Align all selected cells such that their
southern edge has the smallest possible gap
with the next cell on a vertical line.
Align
vertical
centre
Align all selected cells such that they move
vertically to produce a common horizontal
centre line.
Align North Align all selected cells such that their
northern edge has the smallest possible gap
with the next cell on a vertical line.
Align Grid Not implemented in this version

Artistic Licence Engineering Ltd. Colour-Tramp User Guide 49 / 104
C E L L S E L E C T I O N
OVERVIEW
Cell selection operates in one of two modes:
Paint with colour.
Select and Choose Colour.
The decision as to which mode is used is purely subjective. The
former is best suited to users familiar with PC based paint
packages. The latter mode will be more familiar to lighting console
operators. The two modes can be used interchangeably.
PAINT WITH
COLOUR
‘Paint with Colour’ is selected using the first
button of the Selection toolbar.
In this mode, clicking on a cell immediately sets the cell colour to
the current colour. Editing proceeds by selecting a colour from the
Colour Picker and then painting it onto the cells.
SELECT AND
CHOOSE
COLOUR
Select and Choose Colour’ is selected using
the remaining four buttons of the Selection
toolbar.
In this mode, clicking on a cell selects that cell (and others
depending on the selected brush). Editing proceeds by selecting a
cell or group of cells and then choosing a colour from the Colour
Picker.
This mode is more powerful as all of the advanced editing features
are based on the concept of cell selection.

Artistic Licence Engineering Ltd. Colour-Tramp User Guide 50 / 104
GROUP
PALETTE
BUTTON
The Groups button displays the Group-Palette.
This is used to record and select groups of
cells. Groups do not directly affect the output;
they are a programming aid.
Groups that contain a selection are displayed
with a red tick superimposed on the group icon.
Clicking on an active group will select that set
of cells in the workspace. Selected cells are
denoted by a white bounding rectangle.
The Group palette is displayed by the Palettes
toolbar:
Additional group functions are available from the right click popup
menu. These functions are summarised in the table below:
Item Description
Record to
Group
(REPLACE)
Cells that are selected in the workspace replace
the list of cells contained in this group.
Send Group to
Workspace
(ADD)
The cells contained in the group are selected in
addition to those already selected in the
workspace.
Send Group to
Workspace
(SUBTRACT)
The cells contained in the group are deselected in
the workspace.
Send Group to
Workspace
(TOGGLE)
Cells contained in the group that are selected in
the workspace are deselected in the workspace.
Delete Group The list of cells contained in this group is
deleted.
Edit Name Displays a dialogue allowing entry of the group
name:

Artistic Licence Engineering Ltd. Colour-Tramp User Guide 51 / 104
C O L O U R S
OVERVIEW
The Colour Picker provides a wide
range of colour selection options. It
is displayed by the Palettes toolbar.
Colour-Tramp provides eleven gamuts or colour selection modes.
These are detailed below:
Recent
Colour
choices
Auto-
record
Recent
Colour List
Colour Gamut
Section
Colour
Gamut
Artistic Licence Engineering Ltd. Colour-Tramp User Guide 52 / 104
RGB GAMUT
The RGB gamut provides the spectrum of
fully saturated hues at full intensity,
without shades, tints or tones. The right
hand edge provides a quantised area for
more accurate colour selection.
X Axis = Quantisation
Y Axis = Hue
RGB FADE
GAMUT
The RGB Fade gamut provides the
spectrum of fully saturated hues with
intensity varying from left to right.
X Axis = Intensity (Brightness)
Y Axis = Hue
RGB
SATURATION
GAMUT
The RGB Saturation gamut provides the
spectrum of fully saturated hues in a
central vertical bar. All possible shades
are displayed to the left and all possible
tints are displayed to the right.
A shade is a fully saturated hue mixed
with black.
A tint is a fully saturated hue mixed with
white.
X Axis = Saturation
Y Axis = Hue

Artistic Licence Engineering Ltd. Colour-Tramp User Guide 53 / 104
R-W GAMUT
The R-W gamut provides the spectrum of
fully saturated hues at full intensity then
merges into black and white.
The right hand edge provides a quantised
area for more accurate colour selection.
X Axis = Quantisation
Y Axis = Hue
R-W FADE
GAMUT
The R-W Fade gamut provides the
spectrum of fully saturated hues with
intensity varying from left to right.
The lower part of the display merges into
black and white.
X Axis = Intensity (Brightness)
Y Axis = Hue
R-W
SATURATION
GAMUT
The R-W Saturation gamut provides the
spectrum of fully saturated hues in a
central vertical bar. All possible shades are
displayed to the left and all possible tints
are displayed to the right.
The lower part of the display merges into
black and white.
A shade is a fully saturated hue mixed with
black.
A tint is a fully saturated hue mixed with white.
X Axis = Saturation
Y Axis = Hue

Artistic Licence Engineering Ltd. Colour-Tramp User Guide 54 / 104
R-W
SATURATION
GAMUT
The Grey gamut is primarily used when
Colour-Tramp is used to control intensity
only lamps (Lamp-Tramp mode).
X Axis = Quantisation
Y Axis = Grey (Intensity)
RGB ADJUST
The RGB gamut is used to
adjust the red, green and
blue content of selected
cells.
There are two modes of
operation:
Absolute: Selected
cells are set to the
absolute value of the fader when it is moved.
Relative: The colour content of all selected cells is adjusted
when the fader is moved.
CMY ADJUST
The CMY gamut is used to
adjust the cyan, magenta
and yellow content of
selected cells.
There are two modes of
operation:
Absolute: Selected cells
are set to the absolute
value of the fader when it is moved.
Relative: The colour content of all selected cells is adjusted
when the fader is moved.

Artistic Licence Engineering Ltd. Colour-Tramp User Guide 55 / 104
SWATCH
LIBRARY
The Swatch Library provides a selection of
Lee Filter colours. This allows colour
matching with conventional filtered lights.
Thanks to Lee Filters for permission and
James Cobb for the data entry.
PALETTE
LIBRARY
The Palette Library is the most important
of the colour selection methods. When a
palette colour is applied to a cell, the cell
stores a palette reference number rather
than an absolute colour.
This means that when the colour assigned
to a palette is changed, all cells in all
sequences will be automatically edited. This
feature is extremely useful as it allows the
structure of sequences to be built without
commiting to a decision on colour.
PALETTE
CONFIG
The Palette Library provides two popup menus that are accessed by
right clicking on the Page or Palette respectively. These functions
are summarised in the tables below:

Artistic Licence Engineering Ltd. Colour-Tramp User Guide 56 / 104
PAGE POPUP
The commands available from the Page popup menu affect all of the
palette entries assigned to that page.
Item Description
Build Colour Page
from Workspace
This is a simple method of configuring
palettes at the start of programming. Use
any of the gamuts to set cells in the
workspace to your preferred set of
working colour.
The procedure is adjusted by three tick
boxes:
Include colours that exist in other
palettes. When ticked, all the colours in
the Workspace will be included in the
palette. When unticked, any colours
that already exist in other palettes will
be ignored.
Make palette entry for black. When
ticked, black is considered to be a
colour. When unticked, black is ignored.
Convert workspace to palettes. When
ticked, the workspace absolute colours
are replaced with the new palette
colours. There is no apparent change in
the workspace. This function is relevant
if you intend to record the workspace
in a Sequence.
Artistic Licence Engineering Ltd. Colour-Tramp User Guide 57 / 104
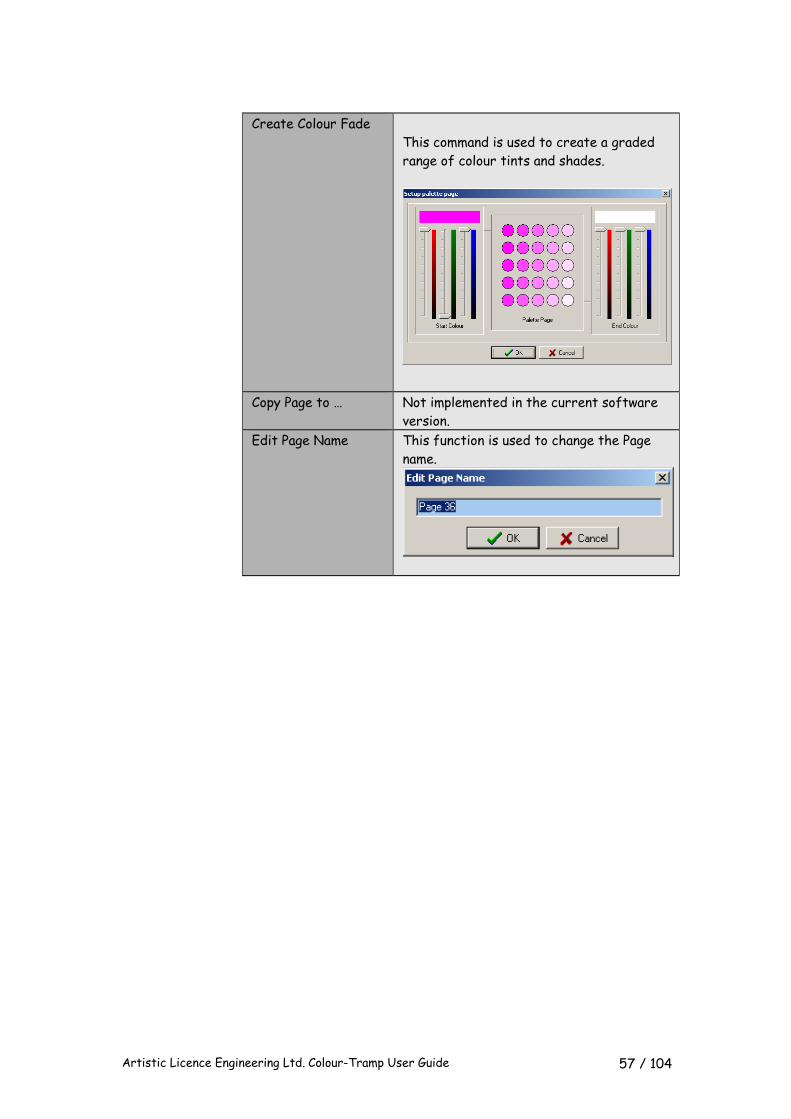
Create Colour Fade
This command is used to create a graded
range of colour tints and shades.
Copy Page to … Not implemented in the current software
version.
Edit Page Name This function is used to change the Page
name.

Artistic Licence Engineering Ltd. Colour-Tramp User Guide 58 / 104
PALETTE POPUP
The commands available from the Palette popup menu affect only
the selected palette.
Item Description
Set Colour to
Current Selection
This sets the palette entry to the current
colour selection (which is displayed in the
bottom right corner of the application).
Edit Colour This allows the standard Windows colour
selection dialogue to set the palette colour.
Edit Palette Name This function is used to change the Palette
name.

Artistic Licence Engineering Ltd. Colour-Tramp User Guide 59 / 104
Item Description
Edit Palette This function displays a dialogue that
allows the palette name and colour to be
edited. The default values of the first
twenty palettes are set to coincide with
the default values of the lamp library. For
this reason, the colour setting of the first
twenty palettes should not normally be
modified unless the user plans to generate
custom lamp libraries.
The following dialogue is displayed:
The numeric value shown is the decimal
representation of the selected colour.
The select colour button displays a colour
selection dialogue:
Delete Palette The Delete Palette function clears the
palette name to the default value and
clears all information in the palette.

Artistic Licence Engineering Ltd. Colour-Tramp User Guide 60 / 104
S T O R E S
OVERVIEW
Colour-Tramp uses a
WYSIWYG system of
recording. Whatever you see in
the workspace is recorded.
The Stores Palette is key to
the recording process.
Click on the tool bar entry for
Stores in order to display the
palette.
The following table describes
the three fundamental store
types.
Type Description
Sequence Records a list of steps that contain all cell
colours. The Sequence contains timing information
for each step, controlling the speed and methods
of playback.
Stack Records a list of steps that contain commands
including Submaster triggers and Page Changes.
The Stack is generally used to synchronise overall
show playback. A stack can also be selected to
auto-load when the program starts which provides
a method of fully automated playback.
Page Defines the order of Sequences in the playback
panel.

Artistic Licence Engineering Ltd. Colour-Tramp User Guide 61 / 104
RECORD
BUTTON
The Record button and the Stores palette are intimately linked.
When Record is pressed, the workspace is recorded to the entity
selected in the Stores palette. The following table describes the
detailed operation:
Store-Palette Selection Record Operation
Sequence Heading Next consecutive Sequence
added. Step 1 added to new
Sequence. Workspace recorded to
step 1.
Sequence New step addended to end of
Sequence. Workspace recorded to
new step.
Sequence Step New step inserted after selected
step. Workspace recorded to new
step.
Stack Heading New Stack added. First step of
new Stack added.
Stack New step appended to end of
Stack.
Stack Step New step inserted after selected
step.
Playback Page Heading Next consecutive Sequence
added. First playback of first
page assigned to new Sequence.
Workspace recorded to first step
of new Sequence.
Playback Page Next consecutive Sequence
added. First playback of selected
page assigned to new Sequence.
Workspace recorded to first step
of new Sequence.
Playback Entry Next consecutive Sequence
added. Selected playback of
selected page assigned to new
Sequence. Workspace recorded to
first step of new Sequence.
When the workspace is recorded, the last edited timing values are
used for the new recording. It therefore saves programming time
to set your preferred Sequence times after the first recording. As
with all areas of Colour-Tramp - the right click menu provides
access to more detailed controls.
TIP
Artistic Licence Engineering Ltd. Colour-Tramp User Guide 62 / 104
POPUP
MENUS
Popup menus are displayed when any entity within the Stores
palette is right clicked. The following tables detail the operation:
SEQUENCE
HEADER
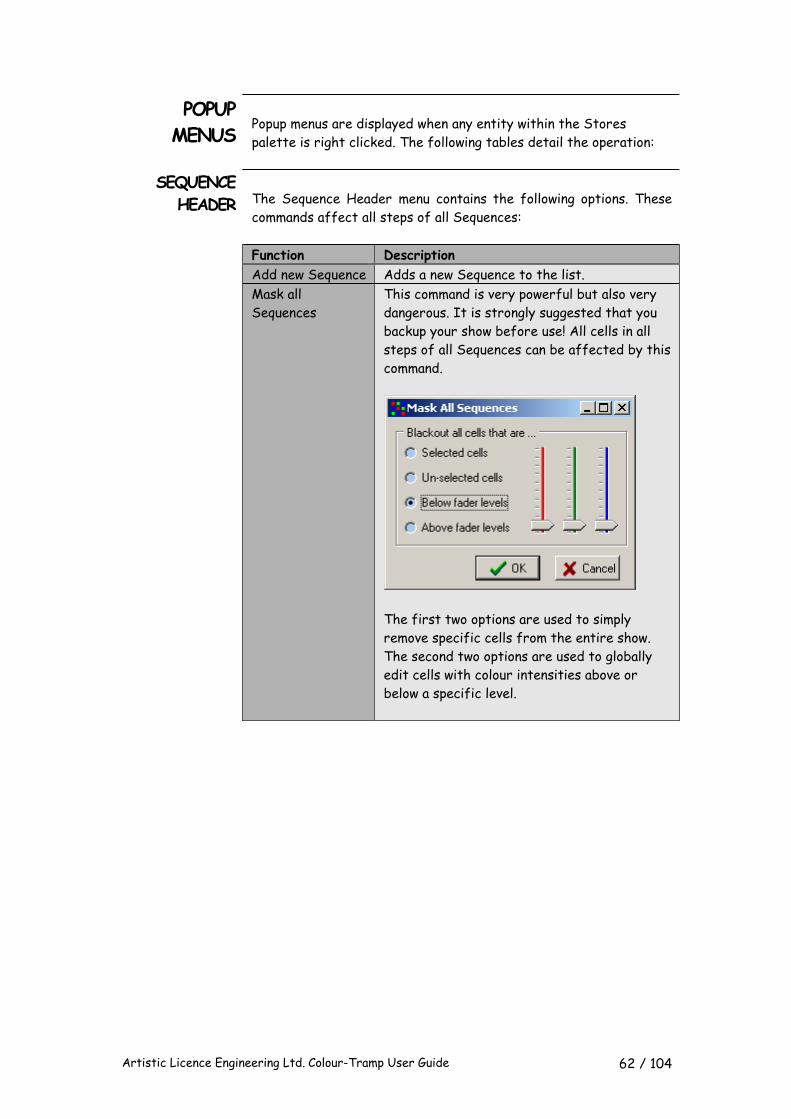
The Sequence Header menu contains the following options. These
commands affect all steps of all Sequences:
Function Description
Add new Sequence Adds a new Sequence to the list.
Mask all
Sequences
This command is very powerful but also very
dangerous. It is strongly suggested that you
backup your show before use! All cells in all
steps of all Sequences can be affected by this
command.
The first two options are used to simply
remove specific cells from the entire show.
The second two options are used to globally
edit cells with colour intensities above or
below a specific level.

Artistic Licence Engineering Ltd. Colour-Tramp User Guide 63 / 104
Build colour
palettes for all
Sequences
This command is used to convert all absolute
colours that are in use, to indirect palette
colours.
The configuration options are:
Include colours that exist in other
palettes: When ticked, all colours will be
added to the new palette. When unticked,
colours that already exist in other
palettes will be ignored.
Make a palette entry for black: When
ticked, black is treated as a normal colour.
Page: This is the Page in the Colour palette
that will be used. Please note that the
process will continue onto the next
consecutive colour palette pages if
additional entries are required.

Artistic Licence Engineering Ltd. Colour-Tramp User Guide 64 / 104
SEQUENCE
ENTRY
The Sequence menu contains the following options. These commands
affect all steps within the Sequence:
Function Description
Edit Settings This control is used to configure the Sequence
playback parameters. Please see the next
section for a detailed discussion of this
control.
Append step A new blank step is added to the end of the
sequence.
Add new Sequence Adds a new blank Sequence.
Duplicate
Sequence
Adds a new Sequence and makes a copy of this
Sequence.
Delete Sequence Deletes the selected Sequence.
Add new Sequence Adds a new Sequence to the list.
Mask Sequence Adjusts all cells in all steps of the selected
Sequence based on the specified criteria.
The first two options are used to simply
remove specific cells from the Sequence.
The second two options are used to edit all
cells in all steps of the Sequence which have
colour intensities above or below a specific
level.

Artistic Licence Engineering Ltd. Colour-Tramp User Guide 65 / 104
Build colour
palettes for all
Sequences
This command is used to convert all absolute
colours that are in use in the selected
Sequence, to indirect palette colours.
The configuration options are:
Include colours that exist in other
palettes: When ticked, all colours will be
added to the new palette. When unticked,
colours that already exist in other
palettes will be ignored.
Make a palette entry for black: When
ticked, black is treated as a normal colour.
Page: This is the Page in the Colour palette
that will be used. Please note that the
process will continue onto the next
consecutive colour palette pages if
additional entries are required.

Artistic Licence Engineering Ltd. Colour-Tramp User Guide 66 / 104
SEQUENCE
STEP
The Sequence Step menu contains the following options. These
commands affect the selected step within the Sequence:
Function Description
Edit this Step This control is used to configure the step
playback parameters. Please see the next
section for a detailed discussion of this
control.
Set all steps to
this time &
control
Copies the step playback parameters of this
step to all other steps in the Sequence.
Append step A new blank step is added to the end of the
sequence.
Insert step
before
A new blank step is inserted in the sequence
before the selected step.
Insert step after A new blank step is inserted in the sequence
after the selected step.
Add step to
workspace
(PLAYBACK)
All cells contained in the sequence step, which
are not black, are copied to the workspace.
Add workspace to
step
All cells contained in the workspace, which are
not black, are copied to the sequence step.
Copy workspace to
step (RECORD)
This is the main record function. The
workspace is recorded into the sequence step.
Delete step Deletes the current step.

Artistic Licence Engineering Ltd. Colour-Tramp User Guide 67 / 104
Mask Sequence Adjusts all cells in the selected step based on
the specified criteria.
The first two options are used to simply
remove specific cells from the step.
The second two options are used to edit all
cells in the selected step that have colour
intensities above or below a specific level.
Build colour
palettes for step
This command is used to convert all absolute
colours that are in use in the selected step, to
indirect palette colours.
The configuration options are:
Include colours that exist in other
palettes: When ticked, all colours will be
added to the new palette. When unticked,
colours that already exist in other
palettes will be ignored.
Make a palette entry for black: When
ticked, black is treated as a normal colour.
Page: This is the Page in the Colour palette
that will be used. Please note that the
process will continue onto the next
consecutive colour palette pages if
additional entries are required.

Artistic Licence Engineering Ltd. Colour-Tramp User Guide 68 / 104
STACK HEADER
The Stack Header menu contains the following option:
Function Description
Add new Stack Adds a new Sequence to the list.
STACK ENTRY
The Stack menu contains the following options. These commands
affect all steps within the Stack:
Function Description
Edit Settings This control is used to configure the Stack
playback parameters. Please see the next
section for a detailed discussion of this
control.
Append step A new blank step is added to the end of the
stack.
Add new Stack Adds a new blank Stack.
Delete Stack Deletes the selected Stack.

Artistic Licence Engineering Ltd. Colour-Tramp User Guide 69 / 104
STACK STEP
The Stack Step menu contains the following options. These
commands affect the selected step within the Stack:
Function Description
Edit this Step This control is used to configure the step
contents. Please see the next section for a
detailed discussion of this control.
Append step A new blank step is added to the end of the
stack.
Insert step
before
A new blank step is inserted in the stack
before the selected step.
Insert step after A new blank step is inserted in the stack after
the selected step.
Delete step Deletes the current step.

Artistic Licence Engineering Ltd. Colour-Tramp User Guide 70 / 104
PAGE
The Page menu contains the following options:
Function Description
Preset Page to Assign either sequences or ‘no action’ to all
playbacks on this page.
Delete Page Set all playbacks in a page to ‘no action’.
PAGE PLAYBACK
The Page Playback menu contains the following options:
Function Description
Configure
playback
Assign either a sequence or ‘no action’ to the
selected playback.
Insert playback
before this one
Inserts a blank playback before the current
one and moves the remainder up.
Insert playback
after this one
Inserts a blank playback after the current
one and moves the remainder up.
Delete playback Deletes the current playback and moves the
remainder of page down.
Preset remaining
playbacks
Sets all playbacks in the page from the
current playback to a consecutive range of
sequences.

Artistic Licence Engineering Ltd. Colour-Tramp User Guide 71 / 104
SEQUENCES
A sequence is a list of steps that controls the output from Colour-
Tramp. Each step contains the colour settings for all cells along
with timing and control information for that step.
Sequences have an associated fade profile that controls the
submaster fader operation when playback starts. Sequences must
be assigned to a playback page in order to be used.
There are two key configuration sections for sequences:
Sequence settings
Step configuration
These options are accessed from the right click popup menus as
detailed in the preceding section.
SEQUENCE
SETTINGS
The sequence settings dialogue controls overall playback of the
sequence.
The following table discusses each of the control parameters:
Submaster
fade profile
times
Sequence
name or
legend
Graphic
display of
Submaster
fade profile
Direction in
which steps
playback
Interaction
with other
playbacks

Artistic Licence Engineering Ltd. Colour-Tramp User Guide 72 / 104
Function Description
Wait time The time interval between the Submaster playback
start (pressing the ‘In’ button) and the start of the
Submaster fader movement. During this time phase,
the playback is not affecting the output.
In time The time interval over which the Submaster fader
moves from zero to full.
Hold time The hold time is disabled when the ‘Disable Out’ tick
box is ticked. In this mode, the Submaster stays at
full until an out fade command is given.
When ‘Disable Out’ is inactive, the hold time is the
time interval between the Submaster reaching
maximum and the Submaster starting to fade out.
Out time The out time is disabled when the ‘Disable Out’ tick
box is ticked. In this mode, the Submaster stays at
full until an out fade command is given.
When ‘Disable Out’ is inactive, the out time is the
time interval over which the Submaster moves from
full to zero.
Artistic Licence Engineering Ltd. Colour-Tramp User Guide 73 / 104
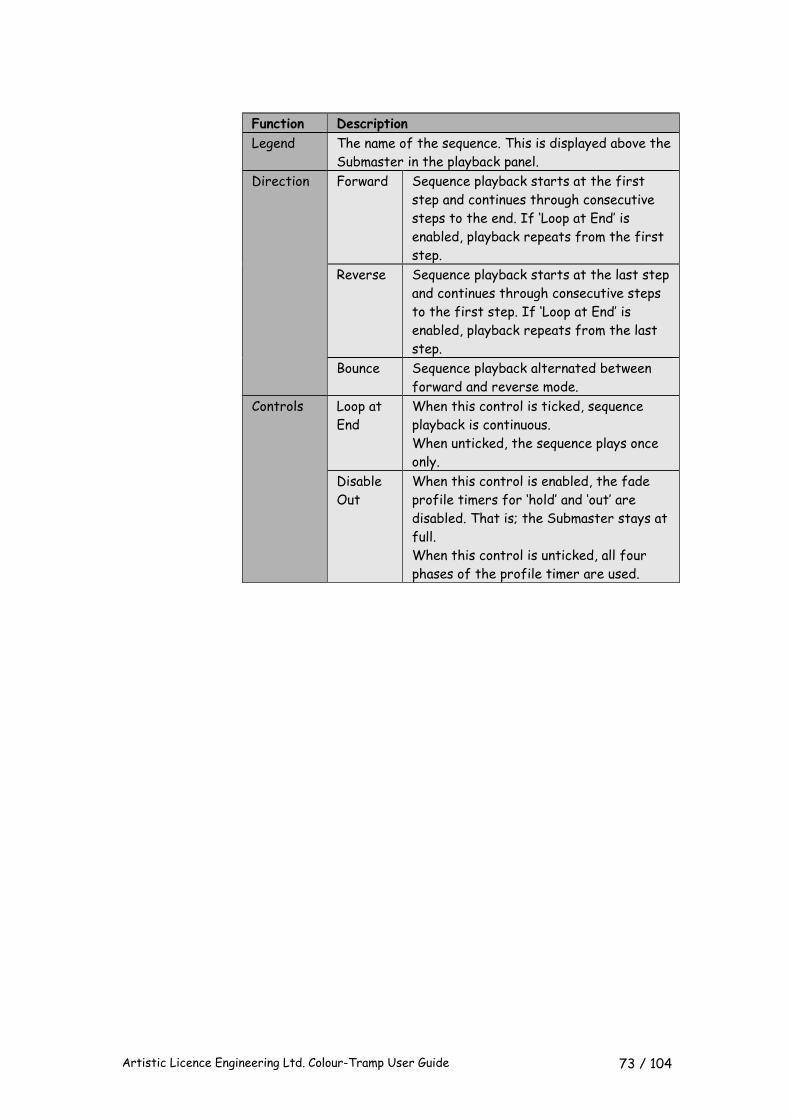
Function Description
Legend The name of the sequence. This is displayed above the
Submaster in the playback panel.
Direction Forward Sequence playback starts at the first
step and continues through consecutive
steps to the end. If ‘Loop at End’ is
enabled, playback repeats from the first
step.
Reverse Sequence playback starts at the last step
and continues through consecutive steps
to the first step. If ‘Loop at End’ is
enabled, playback repeats from the last
step.
Bounce Sequence playback alternated between
forward and reverse mode.
Controls Loop at
End
When this control is ticked, sequence
playback is continuous.
When unticked, the sequence plays once
only.
Disable
Out
When this control is enabled, the fade
profile timers for ‘hold’ and ‘out’ are
disabled. That is; the Submaster stays at
full.
When this control is unticked, all four
phases of the profile timer are used.

Artistic Licence Engineering Ltd. Colour-Tramp User Guide 74 / 104
Function Description
Playback
Mode
Playback mode defines how Submaster
playbacks interact with each other. The
submasters in the Playback Panel can be
considered as ‘layer controllers’. Playback
1 is the bottom layer or furthest from
the viewer. Colour interaction between
cells controlled by the lower number
playbacks is adjusted by changing the
playback mode of the higher numbered
playbacks.
The concept of layers is fundamental to
Colour-Tramp. Layers replace older
concepts such as HTP and LTP.
Layered Black is a transparent colour. All other
colours take priority over lower numbered
submasters.
The following example considers the
output of a single cell as the sequence
progresses:
Submaster 1 plays all white.
Submaster 2 plays red to black fade.
Result: Red to white fade.
Additive All colours additively mix with lower
numbered submasters.
The following example considers the
output of a single cell as the sequence
progresses:
Submaster 1 plays all white.
Submaster 2 plays red to black fade.
Result: The Submaster 2 sequence is not
affecting the output as the lower white
wins.
Sub 1 Sub 2 Result
Sub 1 Sub 2 Result
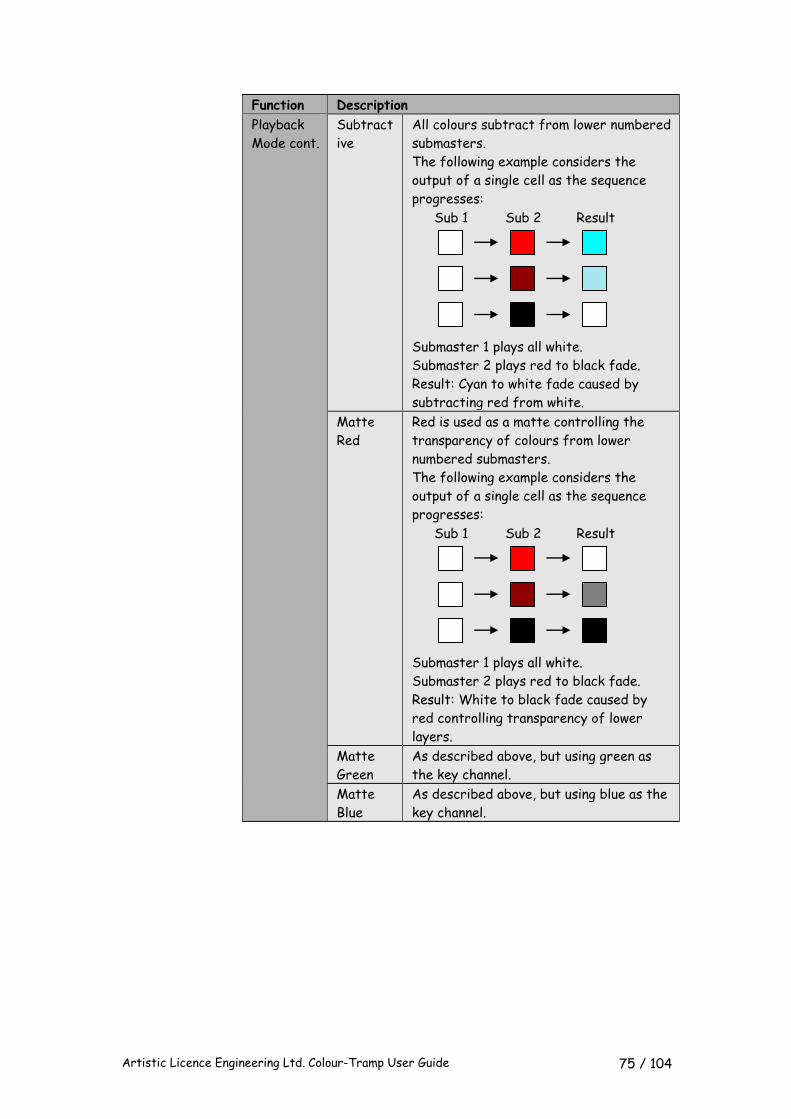
Artistic Licence Engineering Ltd. Colour-Tramp User Guide 75 / 104
Function Description
Playback
Mode cont.
Subtract
ive
All colours subtract from lower numbered
submasters.
The following example considers the
output of a single cell as the sequence
progresses:
Submaster 1 plays all white.
Submaster 2 plays red to black fade.
Result: Cyan to white fade caused by
subtracting red from white.
Matte
Red
Red is used as a matte controlling the
transparency of colours from lower
numbered submasters.
The following example considers the
output of a single cell as the sequence
progresses:
Submaster 1 plays all white.
Submaster 2 plays red to black fade.
Result: White to black fade caused by
red controlling transparency of lower
layers.
Matte
Green
As described above, but using green as
the key channel.
Matte
Blue
As described above, but using blue as the
key channel.
Sub 1 Sub 2 Result
Sub 1 Sub 2 Result

Artistic Licence Engineering Ltd. Colour-Tramp User Guide 76 / 104
SEQUENCE
STEP
SETTINGS
A sequence step contains the colour settings for all cells. It also
contains the playback time and optional controls that can trigger
other events.
These options are accessed from the right click popup menus as
detailed in the preceding section.
The following screen shot shows the key controls:
The table below discusses each of the control parameters.
Function Description
Fade time The time interval between the start of this step and
the step fade profile reaching full.
Dwell time The time interval between step fade profile
reaching full and the start of the next step.
Fade profile
time for this
step
Graphic of
step fade
profile
Selection of
conditional
events
The condition
to be tested
for true, false
The legend or
name of this
step
Buttons allow
editing of
other steps
Compact
removes
conditions
Change all
steps in
sequence
Then is
processed if
condition true

Artistic Licence Engineering Ltd. Colour-Tramp User Guide 77 / 104
Function Description
Legend The name or legend of this step. The ‘.’ At the start
of the name instructs Colour-Tramp to automatically
correct the name when steps are inserted or
deleted.
Prev Step Saves current step edits and then selects the
previous sequence step for editing. The highlighted
step in the Stores palette will change to reflect
this.
If the workspace is in preview mode, the step will
automatically preview when Prev or Next is selected.
Next Step Saves current step edits and then selects the next
sequence step for editing. The highlighted step in
the Stores palette will change to reflect this.
Compact Selects display of a smaller dialogue without the
conditional information. This setting is stored for
when the dialogue is next used.
Note that if a step contains conditional information,
the dialogue will open in expanded mode.
Global Applies all settings other than legend to all steps in
the sequence.
Condition The condition is used to either control which step is
executed next or to trigger another event.
If Event
Condition
When ‘Always’ is ticked, the event
defined by ‘Then’ is always executed
at the end of the step.
When Conditional is ticked, the
condition is evaluated. If the
condition evaluates to true the ‘Then’
event executes at the end of the
step. If the condition evaluates to
false the ‘Else’ event executes at the
end of the step.
Condition The pull down list displays all
conditions that have been
programmed in the Condition Palette.
Qualifier The Qualifier allows the true / false
test to be evaluated for <, <=, =, <>, >=,
or >.
Result The pull down list displays the
possible results of the condition.
Depending on the selected condition
this may be true / false or days of
the week etc.
TIP

Artistic Licence Engineering Ltd. Colour-Tramp User Guide 78 / 104
Function Description
Then / Else The Then and Else fields define events that will
execute at the end of the step depending upon the
condition.
Continue Continue to the next step.
Pause Pause playback of the sequence.
Wait Continue to test the condition.
Macro Execute Macro (Not currently
implemented).
Fade In
Sub
Fade in a submaster. This is analogous
to pressing the submaster’s In button
Fade Out
Sub
Fade in a submaster. This is analogous
to pressing the submaster’s Out
button
Change
Page
Selects a new playback page. Note
that submasters will not change unless
the profile fader is at zero.
Loop to
Step
Continue to a specific sequence step.
Jump to
Sequence
Jump to the first step of another
sequence.

Artistic Licence Engineering Ltd. Colour-Tramp User Guide 79 / 104
STACKS
A stack is a list of steps or events that are used to automate
playback within Colour-Tramp. Each step contains timing and control
information for that step.
There are two key configuration sections for sequences:
Stack settings
Step configuration
These options are accessed from the right click popup menus as
detailed in the preceding section.
STACK
SETTINGS
The overall stack playback is configured by the following dialogue.
The control parameters are discussed in the following table.
Function Description
Legend The name or legend of this stack.
Loop at End When ticked, the stack will continue looping
indefinitely.
Time Lock Controls the time base used for stack playback.
Relative Playback starts from zero time at the
beginning of stack execution.
Real Playback uses real time as set by the
PC’s internal clock.
MTC Playback uses MIDI Time Code as
received from the MIDI input of the PC
sound card.

Artistic Licence Engineering Ltd. Colour-Tramp User Guide 80 / 104
STACK STEP
CONFIG
A stack step contains the playback time and optional controls that
can trigger other events.
These options are accessed from the right click popup menus as
detailed in the preceding section.
The following screen shot shows the key controls:
The control parameters are discussed in the following table.
Function Description
Legend The name or legend of this step. The ‘.’ At the start
of the name instructs Colour-Tramp to automatically
correct the name when steps are inserted or
deleted.
Prev Step Saves current step edits and then selects the
previous stack step for editing. The highlighted step
in the Stores palette will change to reflect this.
Next Step Saves current step edits and then selects the next
stack step for editing. The highlighted step in the
Stores palette will change to reflect this.
Global Applies all settings other than legend to all steps in
the sequence.
Trigger event
or time of
this step
Selection of
conditional
events
The condition
to be tested
for true, false
The legend or
name of this
step
Buttons allow
editing of
other steps Change all
steps in
stack
Then is
processed if
condition true

Artistic Licence Engineering Ltd. Colour-Tramp User Guide 81 / 104
Function Description
Trigger
Step On
A stack step can be triggered based on one of three
criteria:
Time The meaning of the time field is
dependant upon whether the stack is
playing against absolute, real time or
MTC timebase.
Previous
Step
The step triggers as soon as the
previous step completes.
Manual The step waits for a manual go button
press.
Condition The condition is used to either control whether the
step is executed or to trigger an event.
If Event
Condition
When ‘Always’ is ticked, the event
defined by ‘Then’ is always executed.
When Conditional is ticked, the
condition is evaluated. If the
condition evaluates to true the ‘Then’
event executes. If the condition
evaluates to false the ‘Else’ event
executes.
Condition The pull down list displays all
conditions that have been
programmed in the Condition Palette.
Qualifier The Qualifier allows the true / false
test to be evaluated for <, <=, =, <>, >=,
or >.
Result The pull down list displays the
possible results of the condition.
Depending on the selected condition
this may be true / false or days of
the week etc.

Artistic Licence Engineering Ltd. Colour-Tramp User Guide 82 / 104
Function Description
Then / Else The Then and Else fields define the two possible
events that will execute in this step, depending upon
the condition.
Continue Continue to the next step.
Pause Pause playback of the stack.
Wait Continue to test the condition.
Macro Execute Macro (Not currently
implemented).
Fade In
Sub
Fade in a submaster. This is analogous
to pressing the submaster’s In button
Fade Out
Sub
Fade in a submaster. This is analogous
to pressing the submaster’s Out
button
Change
Page
Selects a new playback page. Note
that submasters will not change unless
the profile fader is at zero.
Loop to
Step
Continue to a specific stack step.
Jump to
Sequence
Jump to the first step of another
stack.

Artistic Licence Engineering Ltd. Colour-Tramp User Guide 83 / 104
P L A Y B A C K
OVERVIEW
Sequences are played back using the Playback Panel. Stacks are
played back in their own control panel.
PLAYBACK
PANEL
The Playback panel provides six independent, automated sub-
masters. Each sub-master is able to playback a sequence. The
allocation of sequences to playback pages is set in the Stores
palette.
The Playback panel is activated from
the palette toolbar.
The active Playback Page is selected with the two arrow keys in the
lower right of the screen. The sequence assigned to a submaster
only changes when the profile fader is at zero.
Master Faders
Two master faders are located on the left edge of the Playback
Panel.
The ‘Play Master’ masters all of the submaster profile faders.
The ‘Work Master’ controls output from the workspace. When the
Work Master is at zero, the only output is provided by submaster
playback. This is ‘Show Mode’.

Artistic Licence Engineering Ltd. Colour-Tramp User Guide 84 / 104
When the Work Master is above zero, the output of Colour-Tramp
is controlled by the Workspace Tab Bar.
The following table defines the interaction between the two master
faders.
The level of each fader can be set at application start from the
Preferences dialogue.
Work
Master
Play
Master
Workspace
Tab
Output
0 % 0 % Any No output
0 % > 1 % Any Playback panel output scaled
by Play Master
> 1% 0 % Workspace Workspace scaled by Work
Master
Preview Preview scaled by Work
Master
Output Output scaled by Work
Master
Diagnostics Diagnostics scaled by Work
Master
Playback Individual submaster playback
scaled by Work Master
TIP

Artistic Licence Engineering Ltd. Colour-Tramp User Guide 85 / 104
SEQUENCE
PLAYBACK
A Sequence contains both level and timing information. Two types
of timing exist: The submaster profile and the step timing.
The submaster profile affects overall playback of the sequence.
Step timing is unique for each step.
The following screen shot shows details of the sequence playback
controls.
The following table discusses each control in detail:
Submaster
number and
ganging btn
Sequence
name assigned
to submaster
The step that
will fade in
next
Sequence
direction:
Fwd, Rev, Bnc
Pause the
sequence
playback
Access popup
menu for this
sequence
Sets sequence
to run once on
In fade
Scales overall
sequence
speed
Shows step
fade status:
Fade / Dwell
The step that
will fade out
next
Step Fade /
Wait progress
indicator
Step cross
fade control
fader
Fade Profile
status: Wait,
In, Hold, Out
Fade Profile
progress
indicator
Submaster
profile master
fader
Submaster
profile fader
controls
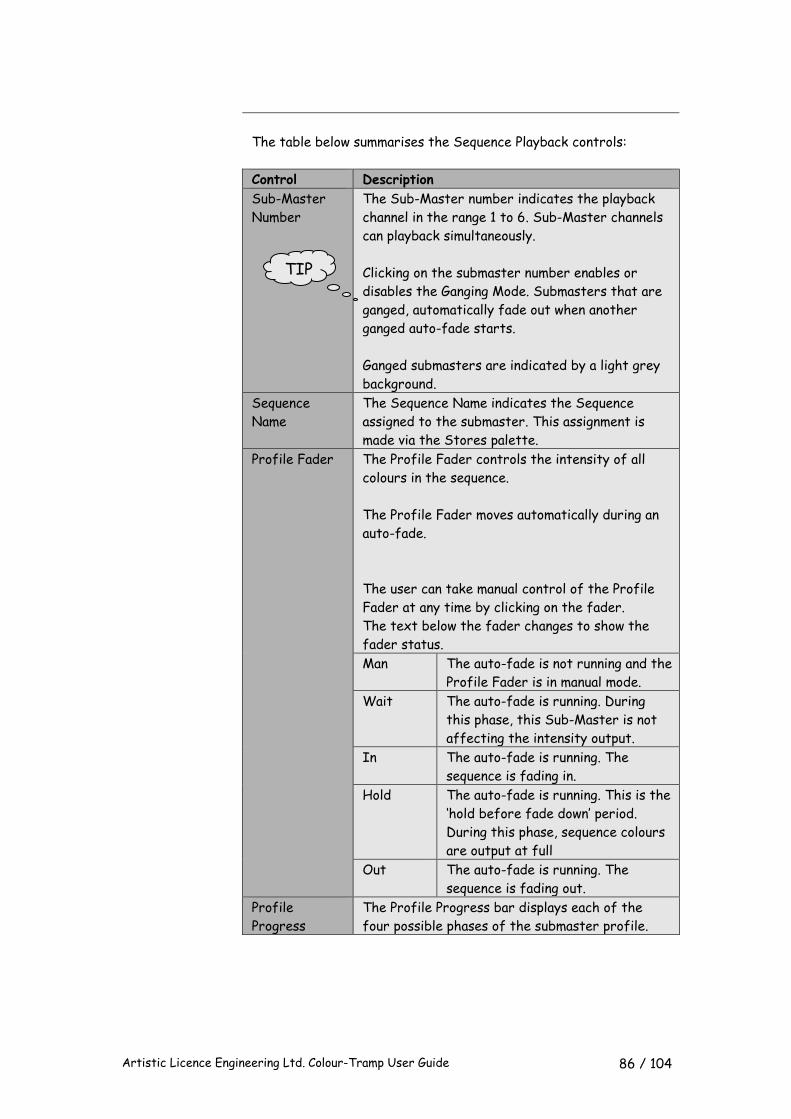
Artistic Licence Engineering Ltd. Colour-Tramp User Guide 86 / 104
The table below summarises the Sequence Playback controls:
Control Description
Sub-Master
Number
The Sub-Master number indicates the playback
channel in the range 1 to 6. Sub-Master channels
can playback simultaneously.
Clicking on the submaster number enables or
disables the Ganging Mode. Submasters that are
ganged, automatically fade out when another
ganged auto-fade starts.
Ganged submasters are indicated by a light grey
background.
Sequence
Name
The Sequence Name indicates the Sequence
assigned to the submaster. This assignment is
made via the Stores palette.
Profile Fader The Profile Fader controls the intensity of all
colours in the sequence.
The Profile Fader moves automatically during an
auto-fade.
The user can take manual control of the Profile
Fader at any time by clicking on the fader.
The text below the fader changes to show the
fader status.
Man The auto-fade is not running and the
Profile Fader is in manual mode.
Wait The auto-fade is running. During
this phase, this Sub-Master is not
affecting the intensity output.
In The auto-fade is running. The
sequence is fading in.
Hold The auto-fade is running. This is the
‘hold before fade down’ period.
During this phase, sequence colours
are output at full
Out The auto-fade is running. The
sequence is fading out.
Profile
Progress
The Profile Progress bar displays each of the
four possible phases of the submaster profile.
TIP

Artistic Licence Engineering Ltd. Colour-Tramp User Guide 87 / 104
Control Description
Step Master
The Step Master shows the transition between
consecutive steps in the sequence.
The Step Master moves automatically during
sequence operation.
The user can take manual control at any time by
clicking on the fader.
The text below and above the fader changes to
show the current and next step.
Rate The Rate fader scales the overall playback speed
of the sequence. When the fader is in the centre
position, playback is at the programmed speed.
The Rate fader is used to make temporary
changes to the speed. Use the Edit Settings
dialogue to change the programmed playback
speed.
In The In button starts the auto-fade. During the
auto-fade, the Pause button can be used to cancel
the auto-fade and return to manual mode.
The user can take manual control at any time by
clicking on the fader.
The auto-fade runs through the four phases of
Wait – Up – Hold –Down. The Hold – Down phases
can be disabled in the sequence setup dialogue.
Out The Out button starts the Hold – Down phase of
the auto-fade. This control can be used at any
time during the auto-fade.
Pause The Pause button cancels the auto-fade and
returns the faders to manual control. It does not
pause the sequence.
TIP

Artistic Licence Engineering Ltd. Colour-Tramp User Guide 88 / 104
Control Description
Forward The sequence plays back in the programmed
order.
Reverse The sequence plays back in reverse order.
Bounce When the button is selected, the Sequence plays
back alternately in forward and then reverse
direction.
Seq Pause Pauses the sequence. (Does not affect the auto-
fade).
One Shot When the button is selected, the sequence plays
back one cycle only.
Popup Displays a popup menu that accesses the settings
for this sequence.

Artistic Licence Engineering Ltd. Colour-Tramp User Guide 89 / 104
STACK
PLAYBACK
The Stack playback provides all the live stack controls and mimic
displays.
The Stack playback is activated from the palette toolbar.
The current stack is selected from the pull down list at the top of
the panel. The stack content is displayed in the scrolling display,
whilst the next step to execute is indicated by the grey highlight
bar.
The table below discusses each available control.
Current stack
selection.
Current
playback time.
The event type
of each step is
shown as an
icon.
Sets the overall
time base for
stack playback.
Pause stack
playback.
Start stack
and release
manual go.

Artistic Licence Engineering Ltd. Colour-Tramp User Guide 90 / 104
Control Description
Stack Select Pull down list used to select a stack for playback.
The preferences dialogue provides an auto-load
option that allows a specified stack to load and
run as soon as Colour-Tramp is started.
Playback Time Displays the current execution time of the stack.
The display format can be selected in the
preferences dialogue.
The time displayed is dependent upon the Time
Lock Setting:
Relative The display starts from zero time
at the beginning of stack
execution.
Real The display shows real time as set
by the PC’s internal clock.
MTC The display shows MIDI Time
Code as received from the MIDI
input of the PC sound card.
Step List Displays the list of steps contained in the current
stack. Each line displays an icon that represents
the event assigned to that step.
The grey highlight bar indicates the current step.
To set the starting step of the stack to a value
other than step 1, click on the required step. If
the stack is already running, a dialogue will be
displayed requesting confirmation.
Time Lock This is used to set the time base of stack
playback. This is normally programmed with the
stack, but can be set manually with this control.
This is particularly useful when testing a stack
that is programmed for real time mode.
Pause Button The pause button is used to pause execution of
the stack.
Run Button The run button is used to start execution of the
stack or to continue execution after a ‘manual
wait for go’ step is reached.

Artistic Licence Engineering Ltd. Colour-Tramp User Guide 91 / 104
P R E F E R E N C E S
OVERVIEW
The Preferences dialogue provides access to the following
configuration items.
DIAGNOSTICS Item Sub-item Description
DMX512
Diagnostic
mimic
The diagnostic mimic uses three channels to drive a
remote, relay-based enunciator. The first channel
(red) is driven to full to indicate that one or more
RDM devices are reporting errors. The second
channel (amber) is driven to full to indicate that one
or more RDM devices are reporting warnings. The
third channel (green) is driven to full to indicate that
no RDM devices are reporting errors or warnings and
that all patch information in Colour-Tramp matches
the start addresses and footprints retrieved from
the lamps.. Active between Set the time of day range
when this function is active. Diagnostic mimic is
…
Enable or disable this function.
Output to … Set the Art-Net Universe and
Start Address for the mimic.

Artistic Licence Engineering Ltd. Colour-Tramp User Guide 92 / 104
IMS The IMS or Installation Management Server is a web
based link to Artistic Licence for remote site
monitoring. Email report to … Email address at Artistic
Licence IMS Server. Email reporting is … Enable or disable the function. Host name Your ISP Host name. Port Number Your ISP Port Number. User ID Your ISP User ID. Send report at … Time of day to send report. Log file The log file is used to log RDM lamp warnings and
errors. The file name is RDM-Log.txt. It is located in
the Diagnostics sub folder. Do not log … Enable or disable the function.
OUTPUT Item Sub-item Description
Pipe This is used to set the relationship between internal
Pipes and external, Art-Net Universes. Colour-Tramp
Pipes number from 1 to 16. Art-Net Universes are
composed of two numbers in the range 0 to 15. The
first is the Sub-Net, the Second is the Universe. Pipe x outputs to
Art-Net …
Allocate each Colour-Tramp
Pipe to a network output.
SYSTEM
START
Item Sub-item Description
Auto-Load Defines all settings that will be used when Colour-
Tramp is next started. Please note that these
settings are stores in the Windows Registry and not
the Colour-Tramp show file.
Do Not Load … Enable or disable automatic
loading of the AutoLoad.ctf
file.
Do Not run Macro … Not implemented in this
version.
Do Not run Stack … Enable or disable automatic
execution of a stack after
automatic loading of a show
file.
Playback master
fader …
Set the default level of the
Playback Master Fader.
Space display … Set the default Workspace
display.
Workspace master
fader …
Set the default level of the
Workspace Master Fader.

Artistic Licence Engineering Ltd. Colour-Tramp User Guide 93 / 104
INTERFACE
SETTINGS
Item Sub-item Description
Serial Port
A
The Serial Port is available for use in the Conditions
dialogue.
Baud Rate … Programmable.
Data Bits … Programmable.
Parity … Programmable.
Physical Port Programmable.
Start Bits Always set to 1.
Stop Bits … Programmable.
VISUAL
SETTINGS
Item Sub-item Description
Times Display all times … Set the display format for
time fields.
Layout
Editor
Cell movement … Sets the number of pixels to
be moved by one button click in
the layout editor.
Shift key
accelerates …
Sets the multiplyer for the
above, to be used when the
shift key is held down.

Artistic Licence Engineering Ltd. Colour-Tramp User Guide 94 / 104
A U T O M A T I O N
OVERVIEW
Many applications for Colour-Tramp will require fully automated
startup of the system or remote control.
Power on show start is achieved as follows:
POWER ON
START
The majority of PCs now have a software controlled power button.
To achieve a PC power-up when mains power is switched on, you will
need to adjust the BIOS settings of the PC.
Unfortunately, these settings vary from manufacturer to
manufacturer, so an exact description of how to do this is not
possible. The following is a guide:
1. BIOS setup is usually accessed by pressing the ‘Delete’ key
during power on.
2.Look for a menu called ‘Power’. Switch on the option called
‘Automatically Restart after Power Loss’.
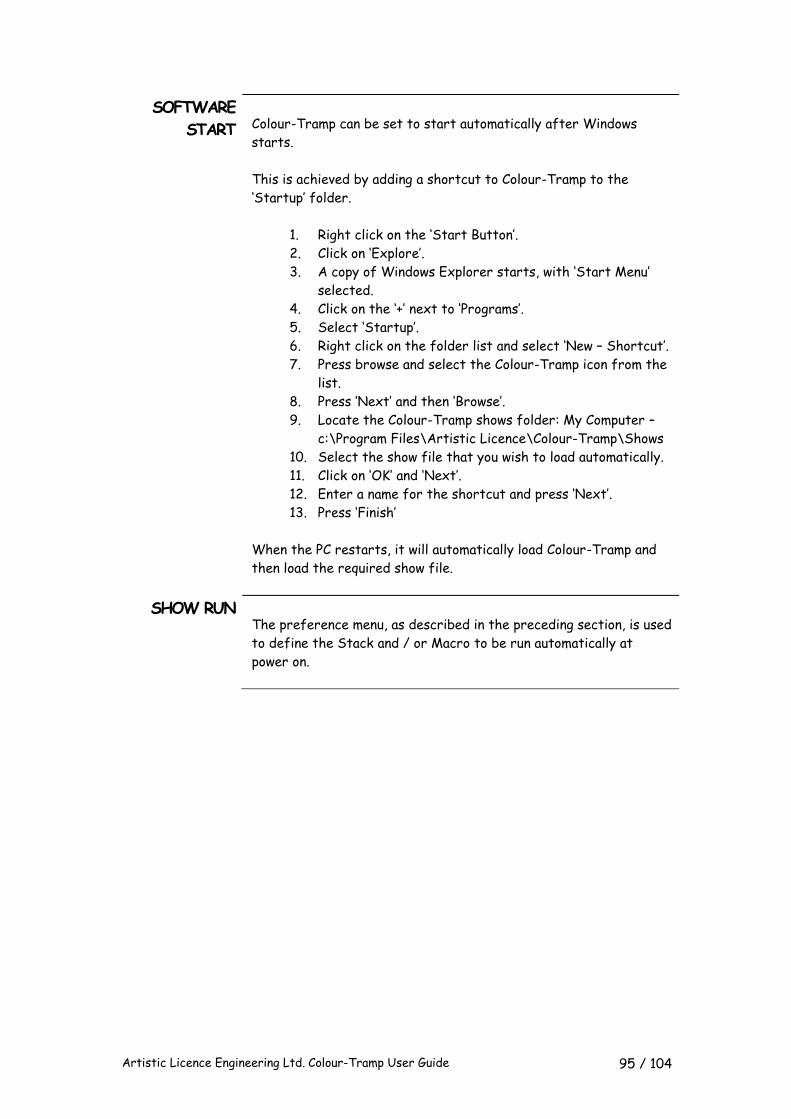
Artistic Licence Engineering Ltd. Colour-Tramp User Guide 95 / 104
SOFTWARE
START
Colour-Tramp can be set to start automatically after Windows
starts.
This is achieved by adding a shortcut to Colour-Tramp to the
‘Startup’ folder.
1. Right click on the ‘Start Button’.
2. Click on ‘Explore’.
3. A copy of Windows Explorer starts, with ‘Start Menu’
selected.
4. Click on the ‘+’ next to ‘Programs’.
5. Select ‘Startup’.
6. Right click on the folder list and select ‘New – Shortcut’.
7. Press browse and select the Colour-Tramp icon from the
list.
8. Press ‘Next’ and then ‘Browse’.
9. Locate the Colour-Tramp shows folder: My Computer –
c:\Program Files\Artistic Licence\Colour-Tramp\Shows
10. Select the show file that you wish to load automatically.
11. Click on ‘OK’ and ‘Next’.
12. Enter a name for the shortcut and press ‘Next’.
13. Press ‘Finish’
When the PC restarts, it will automatically load Colour-Tramp and
then load the required show file.
SHOW RUN
The preference menu, as described in the preceding section, is used
to define the Stack and / or Macro to be run automatically at
power on.

Artistic Licence Engineering Ltd. Colour-Tramp User Guide 96 / 104
REMOTE
CONTROL
Colour-Tramp can be remote controlled via DMX over Art-Net. This
is achieved by either remote controlling the playback panel or by
triggering Macros.
DMX CONFIG
A single universe of Art-Net DMX is used for all triggering
functions. This is defined in the preferences menu. Note that
remote control is disabled by setting the start address to zero. It
is also worth noting that it is possible to set the remote control
universe to one which is output by Colour-Tramp. Whilst this is
possible, it is not recommended for most applications. The reason is
that it is very easy to cause a triggering loop.
Chan Level Description
1 1-200 Select playback page 1-200. (Values 0 and
201-255 have no effect).
2 128-255 Select previous page. (Values 0-127 have no
affect).
3 128-255 Select next page. (Values 0-127 have no
affect).
4 0-255 Set Workspace master level.
5 0-255 Set Playback master level.
6 1-200 Trigger macro 1-200. (Values 0 and 201-255
have no effect).
7-10 - Not implemented
11 0-255 Set Sub-Master 1 fader level.
12 0-255 Set Sub-Master 2 fader level.
13 0-255 Set Sub-Master 3 fader level.
14 0-255 Set Sub-Master 4 fader level.
15 0-255 Set Sub-Master 5 fader level.
16 0-255 Set Sub-Master 6 fader level.
17 0-255 Set Sub-Master 7 fader level.
18 0-255 Set Sub-Master 8 fader level.
19 0-255 Set Sub-Master 9 fader level.
20 0-255 Set Sub-Master 10 fader level.
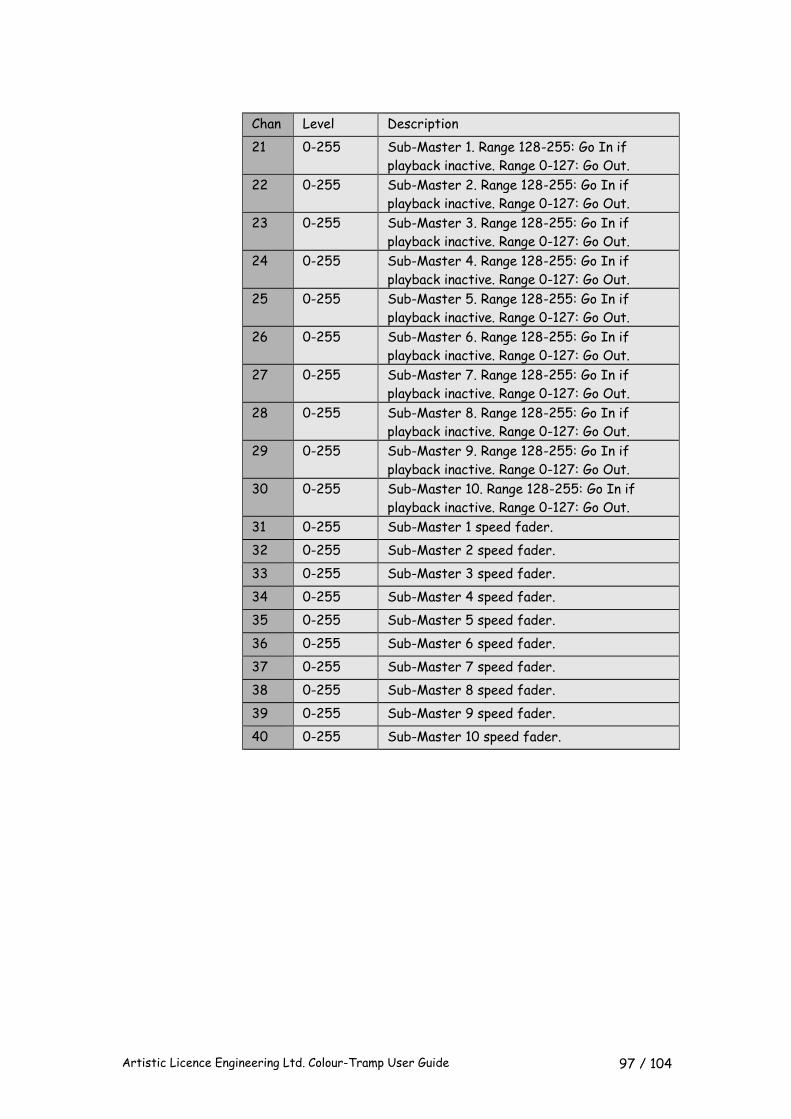
Artistic Licence Engineering Ltd. Colour-Tramp User Guide 97 / 104
Chan Level Description
21 0-255 Sub-Master 1. Range 128-255: Go In if
playback inactive. Range 0-127: Go Out.
22 0-255 Sub-Master 2. Range 128-255: Go In if
playback inactive. Range 0-127: Go Out.
23 0-255 Sub-Master 3. Range 128-255: Go In if
playback inactive. Range 0-127: Go Out.
24 0-255 Sub-Master 4. Range 128-255: Go In if
playback inactive. Range 0-127: Go Out.
25 0-255 Sub-Master 5. Range 128-255: Go In if
playback inactive. Range 0-127: Go Out.
26 0-255 Sub-Master 6. Range 128-255: Go In if
playback inactive. Range 0-127: Go Out.
27 0-255 Sub-Master 7. Range 128-255: Go In if
playback inactive. Range 0-127: Go Out.
28 0-255 Sub-Master 8. Range 128-255: Go In if
playback inactive. Range 0-127: Go Out.
29 0-255 Sub-Master 9. Range 128-255: Go In if
playback inactive. Range 0-127: Go Out.
30 0-255 Sub-Master 10. Range 128-255: Go In if
playback inactive. Range 0-127: Go Out.
31 0-255 Sub-Master 1 speed fader.
32 0-255 Sub-Master 2 speed fader.
33 0-255 Sub-Master 3 speed fader.
34 0-255 Sub-Master 4 speed fader.
35 0-255 Sub-Master 5 speed fader.
36 0-255 Sub-Master 6 speed fader.
37 0-255 Sub-Master 7 speed fader.
38 0-255 Sub-Master 8 speed fader.
39 0-255 Sub-Master 9 speed fader.
40 0-255 Sub-Master 10 speed fader.

Artistic Licence Engineering Ltd. Colour-Tramp User Guide 98 / 104
E X P O R T
OVERVIEW
The Export sub-menu is located in the File menu. Three options are
provided:
1. Export workspace to bitmap
2.Export all sequences to bitmap
3.Export to Show-Control
The first two options allow graphics to be exported for use in a
multimedia package. This allows, for example, generation of AVI of
Flash files for client presentations.
The third option is used for programming the Artistic Licence
Show-Control product.
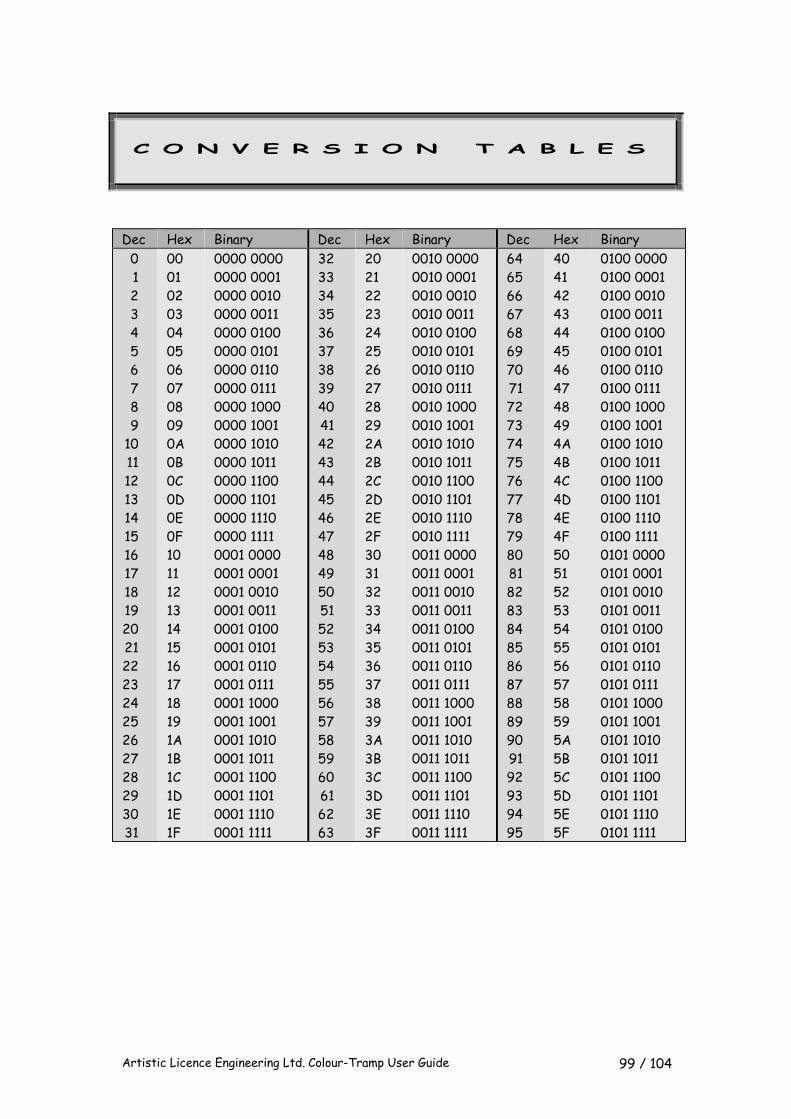
Artistic Licence Engineering Ltd. Colour-Tramp User Guide 99 / 104
C O N V E R S I O N T A B L E S
Dec Hex Binary Dec Hex Binary Dec Hex Binary
0
1
2
3
4
5
6
7
8
9
10
11
12
13
14
15
16
17
18
19
20
21
22
23
24
25
26
27
28
29
30
31
00
01
02
03
04
05
06
07
08
09
0A
0B
0C
0D
0E
0F
10
11
12
13
14
15
16
17
18
19
1A
1B
1C
1D
1E
1F
0000 0000
0000 0001
0000 0010
0000 0011
0000 0100
0000 0101
0000 0110
0000 0111
0000 1000
0000 1001
0000 1010
0000 1011
0000 1100
0000 1101
0000 1110
0000 1111
0001 0000
0001 0001
0001 0010
0001 0011
0001 0100
0001 0101
0001 0110
0001 0111
0001 1000
0001 1001
0001 1010
0001 1011
0001 1100
0001 1101
0001 1110
0001 1111
32
33
34
35
36
37
38
39
40
41
42
43
44
45
46
47
48
49
50
51
52
53
54
55
56
57
58
59
60
61
62
63
20
21
22
23
24
25
26
27
28
29
2A
2B
2C
2D
2E
2F
30
31
32
33
34
35
36
37
38
39
3A
3B
3C
3D
3E
3F
0010 0000
0010 0001
0010 0010
0010 0011
0010 0100
0010 0101
0010 0110
0010 0111
0010 1000
0010 1001
0010 1010
0010 1011
0010 1100
0010 1101
0010 1110
0010 1111
0011 0000
0011 0001
0011 0010
0011 0011
0011 0100
0011 0101
0011 0110
0011 0111
0011 1000
0011 1001
0011 1010
0011 1011
0011 1100
0011 1101
0011 1110
0011 1111
64
65
66
67
68
69
70
71
72
73
74
75
76
77
78
79
80
81
82
83
84
85
86
87
88
89
90
91
92
93
94
95
40
41
42
43
44
45
46
47
48
49
4A
4B
4C
4D
4E
4F
50
51
52
53
54
55
56
57
58
59
5A
5B
5C
5D
5E
5F
0100 0000
0100 0001
0100 0010
0100 0011
0100 0100
0100 0101
0100 0110
0100 0111
0100 1000
0100 1001
0100 1010
0100 1011
0100 1100
0100 1101
0100 1110
0100 1111
0101 0000
0101 0001
0101 0010
0101 0011
0101 0100
0101 0101
0101 0110
0101 0111
0101 1000
0101 1001
0101 1010
0101 1011
0101 1100
0101 1101
0101 1110
0101 1111

Artistic Licence Engineering Ltd. Colour-Tramp User Guide 100 / 104
Dec Hex Binary Dec Hex Binary Dec Hex Binary
96 60 0110 0000 128 80 1000 0000 160 A0 1010 0000
97 61 0110 0001 129 81 1000 0001 161 A1 1010 0001
98 62 0110 0010 130 82 1000 0010 162 A2 1010 0010
99 63 0110 0011 131 83 1000 0011 163 A3 1010 0011
100 64 0110 0100 132 84 1000 0100 164 A4 1010 0100
101 65 0110 0101 133 85 1000 0101 165 A5 1010 0101
102 66 0110 0110 134 86 1000 0110 166 A6 1010 0110
103 67 0110 0111 135 87 1000 0111 167 A7 1010 0111
104 68 0110 1000 136 88 1000 1000 168 A8 1010 1000
105 69 0110 1001 137 89 1000 1001 169 A9 1010 1001
106 6A 0110 1010 138 8A 1000 1010 170 AA 1010 1010
107 6B 0110 1011 139 8B 1000 1011 171 AB 1010 1011
108 6C 0110 1100 140 8C 1000 1100 172 AC 1010 1100
109 6D 0110 1101 141 8D 1000 1101 173 AD 1010 1101
110 6E 0110 1110 142 8E 1000 1110 174 AE 1010 1110
111 6F 0110 1111 143 8F 1000 1111 175 AF 1010 1111
112 70 0111 0000 144 90 1001 0000 176 B0 1011 0000
113 71 0111 0001 145 91 1001 0001 177 B1 1011 0001
114 72 0111 0010 146 92 1001 0010 178 B2 1011 0010
115 73 0111 0011 147 93 1001 0011 179 B3 1011 0011
116 74 0111 0100 148 94 1001 0100 180 B4 1011 0100
117 75 0111 0101 149 95 1001 0101 181 B5 1011 0101
118 76 0111 0110 150 96 1001 0110 182 B6 1011 0110
118 77 0111 0111 151 97 1001 0111 183 B7 1011 0111
119 78 0111 1000 152 98 1001 1000 184 B8 1011 1000
120 79 0111 1001 153 99 1001 1001 185 B9 1011 1001
121 7A 0111 1010 154 9A 1001 1010 186 BA 1011 1010
122 7B 0111 1011 155 9B 1001 1011 187 BB 1011 1011
123 7C 0111 1100 156 9C 1001 1100 188 BC 1011 1100
124 7D 0111 1101 157 9D 1001 1101 189 BD 1011 1101
125 7E 0111 1110 158 9E 1001 1110 190 BE 1011 1110
126 7F 0111 1111 159 9F 1001 1111 191 BF 1011 1111

Artistic Licence Engineering Ltd. Colour-Tramp User Guide 101 / 104
Dec Hex Binary Dec Hex Binary
192 C0 1100 0000 224 E0 1110 0000
193 C1 1100 0001 225 E1 1110 0001
194 C2 1100 0010 226 E2 1110 0010
195 C3 1100 0011 227 E3 1110 0011
196 C4 1100 0100 228 E4 1110 0100
197 C5 1100 0101 229 E5 1110 0101
198 C6 1100 0110 230 E6 1110 0110
199 C7 1100 0111 231 E7 1110 0111
200 C8 1100 1000 232 E8 1110 1000
201 C9 1100 1001 233 E9 1110 1001
202 CA 1100 1010 234 EA 1110 1010
203 CB 1100 1011 235 EB 1110 1011
204 CC 1100 1100 236 EC 1110 1100
205 CD 1100 1101 237 ED 1110 1101
206 CE 1100 1110 238 EE 1110 1110
207 CF 1100 1111 239 EF 1110 1111
208 D0 1101 0000 240 F0 1111 0000
209 D1 1101 0001 241 F1 1111 0001
210 D2 1101 0010 242 F2 1111 0010
211 D3 1101 0011 243 F3 1111 0011
212 D4 1101 0100 244 F4 1111 0100
213 D5 1101 0101 245 F5 1111 0101
214 D6 1101 0110 246 F6 1111 0110
215 D7 1101 0111 247 F7 1111 0111
216 D8 1101 1000 248 F8 1111 1000
217 D9 1101 1001 249 F9 1111 1001
218 DA 1101 1010 250 FA 1111 1010
219 DB 1101 1011 251 FB 1111 1011
220 DC 1101 1100 252 FC 1111 1100
221 DD 1101 1101 253 FD 1111 1101
222 DE 1101 1110 254 FE 1111 1110
223 DF 1101 1111 255 FF 1111 1111

Artistic Licence Engineering Ltd. Colour-Tramp User Guide 102 / 104
2
2000 · 13
A
Administrator · 13, 14
Artistic Licence · 5, 101
Art-Net · 11, 12, 16
auto-fade · 85, 86, 87
B
backup · 15
Binary · 96, 97, 98
C
CD · 15, 98
colour · 58
Colour · 13
consecutive · 60, 69, 86
Control · 14, 16, 85, 86, 87, 89
Cue · 60, 69, 82
D
Delete · 49, 58, 65, 68, 69
DMX · 11, 16
DMX-Dongle · 11
E
Ethernet · 11, 12, 16
example · 14
F
Flash · 1, 5, 11, 13, 14, 15, 16, 18, 28, 59, 60,
89
G
Group · 30, 31, 49
H
Hex · 96, 97, 98
HTP · 85
I
In · 14, 16, 86
Insert · 15, 65, 68, 69
intensity · 85
IP · 16
L
library · 11, 58
Lock · 78, 89
LTP · 85
M
manual · 18, 85, 86, 89
Mask · 16
MIDI · 78, 89
MTC · 78, 89
Multimedia · 59
N
Network · 16
I N D E X

Artistic Licence Engineering Ltd. Colour-Tramp User Guide 103 / 104
O
Open · 29, 30, 31, 32, 33, 35, 36, 39, 43, 46
Out · 86
output · 11, 49, 85
Output · 5
P
Page · 59, 60, 69, 70, 75, 78, 79, 82, 85, 90,
91, 92
Palette · 49, 58, 60
Pause · 86, 87, 89
Pentium · 13
phase · 85, 86
Playback · 60, 65, 78, 82, 84, 85, 89
Preset · 69
Q
Quick Start · 11
R
record · 49, 65
Record · 60, 65
Relative · 78, 89
restart · 14, 16
S
Save · 30, 31
Sequence · 59, 60, 61, 63, 65, 67, 68, 69, 70,
82, 84, 85, 86, 87
Show-Control · 5
sound card · 78, 89
speed · 30, 59, 86
Stack · 59, 60, 89
start · 15, 89
Store · 59, 60, 82, 85
Store-Palette · 59, 60, 82, 85
T
TCP/IP · 16
V
Version · 5
View · 30
W
Windows · 11, 13, 14, 16
workspace · 18, 28, 49, 59, 60, 65
Workspace · 49, 60
WYSIWYG · 59
X
XT · 13

Artistic Licence Engineering Ltd. Colour-Tramp User Guide 104 / 104
The information contained in this document is subject to change without notice. Artistic
Licence Engineering Ltd. makes no warranty of any kind with regard to this material,
including, but not limited to, the implied warranties of fitness for a particular purpose.
Artistic Licence Engineering Ltd. shall not be liable for errors contained herein or for
incidental or consequential damages in connection with the furnishing, performance or
use of this material.
All trademarks are acknowledged.
Artistic Licence
© Artistic Licence Engineering Ltd. 2002-2018
The Mould Making Workshop
Soby Mews
Bovey Tracey
TQ13 9JG
UK Tel: +44 (0)20 88 63 45 15
Email: [email protected]