
COLLISION DETECTION AND ALARM SYSTEM FOR A FORKLIFT
27
___. ___. ______ ________________________________ COLLISION DETECTION AND ALARM SYSTEM FOR A FORKLIFT Perttu Laukkanen Bachelor’s Thesis
Transcript of COLLISION DETECTION AND ALARM SYSTEM FOR A FORKLIFT

___. ___. ______ ________________________________
COLLISION DETECTION AND ALARM
SYSTEM FOR A FORKLIFT
Perttu Laukkanen
Bachelor’s Thesis

SAVONIA UNIVERSITY OF APPLIED SCIENCES Degree Programme
Information Technology
Author
Perttu Laukkanen
Title of Project
Collision Detection and Alarm System For a Forklift
Type of project
Final project
Date
8.12.2011
Pages
25+ 2
Academic supervisor
Arto Toppinen
Company
AP-TRUKIT OY
Abstract
The aim of this project was to create system for detecting collisions and sending out alarms for a forklift for AP-TRUKIT OY. The main objective was to integrate the shock sensor and the EZ-10 GSM modem into a working system and to create the necessary Python-language program for detecting the collisions and sending out the alarms in the form of an SMS message. Most of the work in the project involved the design of the circuit connecting the shock sensor and the EZ-10, and the design of the Python-code to operate the system. The aims of the project were met. The integration of the devices was successful and the Python code functions as intended. The system is also quite flexible and can easily be modified to accommodate different environments and device types.
Keywords
EZ-10, Python , Shock sensors, GSM
Confidentiality Public

SAVONIA-AMMATTIKORKEAKOULU TEKNIIKKA KUOPIO Degree Programme
Tietotekniikan koulutusohjelma
Tekijä
Perttu Laukkanen
Työn nimi
Trukin Törmäystunnistus- ja Hälytysjärjestelmä
Työn laji
Insinöörityö
Päiväys
8.12.2011
Sivumäärä 25+ 2
Työn valvoja
Arto Toppinen
Yritys
AP-TRUKIT OY
Tiivistelmä
Tämän lopputyön päätarkoitus oli luoda trukissa käytettävä järjestelmä tunnistamaan törmäyksiä ja lähettämään hälytyksiä. Firma jolle työ tehtiin oli AP-TRUKIT OY. Ensisijainen tavoite oli yhdistää shokkisensori ja EZ-10 GSM modeemi toimivaksi järjestelmäksi ja luoda tarvittava Python-kielinen ohjelma törmäysten tunnistamiseksi ja lähettämään hälytyksiä SMS-viesteinä. Suurin osa työstä kului shokkisensorin ja EZ-10-laitteen yhdistävän piirin sekä Python-koodin suunnitteluun. Projektin tavoitteet tulivat täytetyiksi. Laitteiden yhdistäminen onnistui ja Python-koodi toimii kuten pitääkin. Järjestelmä on myös melko joustava ja se on helppo muuntaa toimimaan erilaisissa ympäristöissä ja käyttämään erilaisia laitteita.
Avainsanat
EZ-10, Python , Shock sensors, GSM
Luottamuksellisuus Julkinen

AKNOWLEDGEMENTS I could not have finished this project without the support I received from a number of people. I would like to thank my project supervisor Arto Toppinen for giving me this great opportunity to expand my skills and the fact that despite his busy schedule he found the time to assist me with the project and provide information and support. I would also like to thank my girlfriend, my mother and my father for helping me to keep going when I encountered difficulties, especially my father for his excellent technical advice and knowledge.

TABLE OF CONTENTS 1. Introduction 2. Shock Sensors and Sensor Technology 2.1 Sensors 2.2 Piezoelectric Sensors 2.3 ZD-1 Piezoelectric Shock Sensor 3. GSM 3.1 EZ-10-QUAD-PY Terminal 3.2 Operating the EZ-10 3.3 The Python Program 4. The Connecting Circuit 5. Summary 5.1 The Functioning of the Device 5.2 User Guide 5.3 Conclusion 5.4 Further Developments

LIST OF ABBREVIATIONS GPIO General Purpose Input/Output GPRS General Packeted Radio Services GSM Global System for Mobile Communications PDU Protocol Data Units PZT Lead zirconate titanate SIM Subscriber Identity Module SMS Short Message Service

1. Introduction This project is an attempt to create a system comprised of a shock sensor and a GSM modem. There are countless situations in which detection of shocks, vibration or collisions are necessary. Most common uses for shock sensors are various types of alarms. Either burglar alarms to detect the shock caused by breaking into a house or a car, or different kinds of safety alarms such as the airbags of a car. In this case, the aim is to create a shock sensor based collision detection system to be installed in a forklift. The information collected by the sensors is useless unless it can be read by the people who need it. Just like a cars burglar alarm plays a loud sound to notify that the shock sensor was triggered, the collision detection system must be able to quickly notify the people who need to know. Today mobile communication has a massive amount of applications. One of them is working in tandem with sensors to remotely transmit the information provided by the sensors. The main aims of the project are to first create a system to tie together the shock sensor and the GSM modem so that the modem can receive the information it needs from the sensor and then create the program which automatically monitors the sensor information and if a collision happens, sends out an alarm in the form of an SMS-message. The devices selected were a ZD-1 piezoelectric high sensitivity shock sensor and an EZ-10 GPS GSM modem.

2. Shock Sensors and Sensor Technology 2.1 Sensors Modern technology allows for very accurate measuring of all kinds of natural quantities from things like heat or humidity to mechanical tilt or acceleration. Almost everything that people would want to measure can be done with great accuracy. Sensors are devices which measure the quantities and present them in a way that can be understood by the observers. In today’s world sensors have a massive amount of applications and can be found nearly everywhere from cell phone touch screens to solar cells. A simple definition of a sensor would be that it is a device that when affected by an outside quantity reacts by sending out a response that is proportional in size to the outside quantity affecting the sensor. Most sensors are electric or mechanical in nature, but there are other types such as the piezoelectric sensors like the one which is used in this project. The most important property of a sensor, apart from what it is supposed to measure, is its sensitivity. A sensors’ sensitivity must be taken into account when selecting what kind of sensor to use. Measuring very small changes requires a high sensitivity sensor whereas large changes require a sensor with a low sensitivity but a high range of detection. Sensors are generally designed to be as resistant as possible to interference from sources it is not supposed to measure and to have as little effect on the measured quantity as possible but these effects can never be completely eliminated and must therefore be taken into account as well when designing systems that make use of sensors. Finally, a sensor by itself only provides the information and it must always be integrated with something else to make use of that information, be that something else a human reading a thermometer to decide what clothes to put on or an alarm siren warning people that someone is trying to break into their car. (1)

2.2 Piezoelectric Sensors The piezoelectric effect is a phenomenon where certain materials accumulate internal electric charge when exposed to mechanical stress. There exists also the reverse piezoelectric effect, where the material experiences mechanical stress when exposed to an electric field. There are a number of applications for piezoelectric materials such as actuators, transducers, sonar, high voltage transformers and of course sensors. Piezoelectric sensors can measure force, strain, pressure or acceleration, the last one being the one measured by shock sensors. The most common piezoelectric material used for sensor manufacturing is Lead zirconate titanate(PZT), an artificial ceramic. It exhibits measurable piezoelectricity when deformed by 0.1% of its original size. The device used in this project is a Chinese-made PZR piezoelectric shock and vibration sensor. (2), (3) 2.3 ZD-1 Piezoelectric Shock Sensor The ZD-1 is a high-sensitivity lead zirconate titanate based shock sensor. It was selected for the project primarily because an earlier project that this one is a continuation of carefully studied the subject of shock sensors and selected it specifically for this purpose. Figure 1 shows a circuit diagram of the device.
Figure 1 A circuit diagram of the ZD-1 shock sensor

The device is extremely cheap, reliable and simple to operate. It is powered by a 5-12V power supply. The sensitivity can be adjusted by a knob in the front of the device, turning it clockwise increases sensitivity and counterclockwise decreases it. When the device detects a shock that is stronger than the set threshold a red LED on the front of the device lights up and the device sends a 1-second long pulse at the input voltage out of the output line. The device is 5x3x2cm in size and has a working temperature range of -10 to +50 degrees Celsius. The ZD-1 is the first component required for the system, but still more are needed. 3. GSM 3.1 EZ-10-QUAD-PY Terminal The second device necessary for our project is the GSM modem for sending the SMS-message. For this purpose, the Telit EZ-10-QUAD-PY Terminal GSM/GPRS modem was chosen. The reason for the selection was because the company for which the project was made already uses a variant of the same device in their forklifts for work-time supervision. Using the same device will therefore make the system easy to integrate into the existing devices. EZ-10 can also be programmed very easily with the high-level Python programming language which makes it possible to run the device automatically. The device requires a standard SIM card to function in a GSM network. Figure 2 Shows the EZ-10 device front the front, top and backsides. (4)
Figure 2 The EZ-10 modem (4)

The main features of the EZ-10 include: Powered by a 12-24V DC current. Operates in a quad frequency band ( GSM 850 / EGSM 900 / PCS 1800 / PCS 1900Mhz ) Class 10 GPRS device Maximum temperature range -20 to +70 degrees Celsius A standard RS232 serial interface for AT-commands and programming Molex 6-PIN RJ-11 interface for general input/output SMA connector for an external RF antenna SMA connector for an external GPS antenna EasyScript function allows at commands to by run through Python code Internal Python interpreter Fully upgradable firmware Figure 3 shows the interfaces and plugs of the EZ-10 in detail.
Figure 3 The EZ-10 with interfaces labeled (4) The power connector located on the left side of the device is a Molex 4-pin connector with a pin-layout as shown in figure 4 .

Figure 4 The pin layout of the EZ-10 power connector from the front (4) The most important interfaces for this project are the RS232 serial interface and the RJ-11 GPIO lines. The serial line is used to connect the device to a PC and the RJ-11 line for receiving the input signal from the shock sensor. The serial interface is a standard 9-pin female RS232 interface. It is connected to a PC using a 9-pin cable with 1 male and 1 female D9 connector. Other features are: Input voltage range -12V to 12V Baud rate from 300 to 115 200 bit/s Short circuit protection on all outputs The 6-pin RJ-11 connectors pin layout is shown in figures 5 and 6, and the input and output voltage ranges for the GPIO pins on figure 7, All of the lines in the GPIO interface have a 100pF bypass capacitor to ground and 100Ω series resistor.(4)
Figure 5 The pin order of the Molex 6-pin RJ-11 interface from the front (4)

Figure 6 The individual functions of the pins in the RJ-11 interface (4)
Figure 7 Input and output voltage ranges for the GPIO pins (4) 3.2 Operating the EZ-10 The EZ-10 is operated manually by a PC connected to the serial interface and using a terminal program, or automatically by uploaded Python scripts. Both of these methods use AT commands as to operate the device. AT commands are used as a command language that has been used by modems since the early 1980’s and most modems and phones use them for operation. The EZ-10 supports all the standard Hayes AT-commands as well as ETSI GSM 07.07, ETSI GSM 07.05 and FAX class 1 compatible commands. The 07.07 commands are specific to GPRS applications and the 07.05-ones deal with SMS. The AT commands are given to the device through a terminal program such as the Windows HyperTerminal or the RS-terminal, the latter of which was used in this project because of its improved additional functions such as automated output of some of the most used AT-commands and easier upload of Python-scripts.(4),(5)

All AT commands are divided into basic and extended commands. Basic commands are input by entering the prefix AT, followed by the command and terminated with the carriage return character. The default value for the carriage return character in ASCII decimal is 13. An example of a basic command would be: ATCMD<CR> Where “AT” is the prefix, “CMD” the basic command and “<CR>” the carriage return character for terminating the command. The extended commands are differ from the basic ones in that they are all separated from the prefix by a separator sign, most typically “+” .The extended commands are further divided into two groups, the parameter type commands and the action type commands. The parameter type commands are used for either storing values of a parameter for later use or reading the current value of the parameter. They also have a test command used for finding out the accepted value types and range. For example the commands: AT+CMD=?<CR> Tests the possible values for the parameter CMD AT+CMD?<CR> Checks the current value for the parameter CMD AT+CMD=10<CR> Sets the value of parameter CMD to 10 It is possible to use strings as parameter values without the use of quotes, but only if the string has no spaces in it. So for example AT+CMD=AAA<CR> would be a valid command, but AT+CMD=A AA<CR> is not and would have to instead be expressed as AT+CMD=”A AA”<CR>. The action type commands can be executed to make use of some associated function of the equipment, such as registering the device with the GSM network or sending an SMS message. They can also be read in order to return the possible subparameter range, assuming the command has any. Any parameters input into an action type command are not saved and only used for that specific invocation of the command.

The specific functioning of the commands and the syntax varies slightly based on which specific Telit-module is being used. For this purpose the EZ-10 module had a command called #SELINT (Select Interface) which can be used to change the devices AT-command interface between 3 choices by setting the parameter to 0,1 or 2. By default, the EZ-10 has the parameter set to 2, and that is the position where it is kept for this project. Finally a brief description of the specific AT-commands that are used in the project. “AT+CREG?” is used to check for the status of network registration. The command returns two parameters, first defines how the device handles code reports from the network registration and is set by default to report nothing, the second returns the current state of network registration. The possible values are: 0 - Not registered and currently not searching for a new operator 1 – Registered to the home network 2 – Not Registered but currently searching for a new operator 3 - Registration denied 4 – Unknown status 5 – Registered to a roaming network The “AT+CPIN?” and “AT+CPIN=1234” commands are used to read the status of the PIN-code required to use the SIM-card and to input the value. They are necessary for the device to successfully register to the GSM network. The “AT+CPIN?” command returns either an error code if for example the SIM-card is not inserted or not functioning, the currently entered PIN code, or the string “READY” which means a SIM card was detected but no PIN is entered. The “AT+CPIN=1234” is then used to set the PIN-number to 1234, or whichever number is needed. The “AT+CMGF” is a parameter command used for selecting the message format to be either PDU or text mode. In this program text mode was used because it allows entering the messages in plaintext. The script manipulation commands “AT#WSCRIPT” , “AT#DSCRIPT” “AT#ESCRIPT” and “AT#EXECSCR” are used, respectively, to write(upload) scripts to the module from the PC, to delete scripts from the modules memory, to select which script is to be made active and ready to be executed and finally to begin the execution of the script. Finally the “AT+CMGS” command is used for sending the actual SMS-messages. The sending process takes place in 3 phases. Firstly, the “AT+CMGS” command is entered with the desired destination address as a parameter. The modem then checks if a message can be sent to the network, if not, it return an error, if yes, the desired message can now be entered. Once the message has been sent to the modem, it is sent to the network by sending the hexadecimal character 0x1A to the modem.(5)

3.3 The Python Program The actual program necessary for automatically monitoring the shock sensor and sending the AT-commands was written in the Python language. The main reason for this was that the EZ-10 contains an extension called the Easy Script Extension which includes an internal python interpreter, as well as a number of interfaces for the interpreter to operate the GSM modem with. A typical application without the Easy Script Extension would include an external microcontroller that would operate the module through the physical AT serial line. How such a system might look is shown in Figure 8 (6)
Figure 8 A layout of a system using an external microcontroller (4) However with the Easy Script extension we effectively eliminate the need for an external microcontroller. In addition to the Python interpreter the extension includes 1,2MB of RAM for the Python engine to use as well as 2MB of non-volatile flash memory for storing the Python scripts and settings. Instead of an external device feeding commands through the physical serial port, the extension also includes a virtual serial port that the Python interpreter uses to send its commands to the modem engine. The way this system looks is shown in Figure 9

Figure 9 The layout of the Easy Script Extension using system (4) The uploaded Python scripts are stored in the Flash memory in a simple single level file system with no subdirectories allowed. Only a single python script can ever be running at a time, and any Python operations are always executed inside the Telit-module at the lowest possible priority so as not to interfere with the normal functions of the GPS or the GPRS modules. The Python interpreter communicates with the GPRS modem engine through a number of interfaces. The most important one is the MDM-interface, it allows the Python interface to send and receive AT commands and data to and from the modem engine and the GSM network. This is achieved through a virtual internal serial port that mimics the functioning of the actual physical serial port. Any AT-commands that can be used through the physical serial port can also be used through this one. There is also a second similar interface called the MDM2, which can be used when the first MDM interface is already in use.

The SER interface allows the Python interpreter to use the real physical serial port that would normally be used for sending AT-commands to the device from a terminal program. However when the python script is running no external AT commands can be entered and therefore the port is free for the interpreter to use. The SER interface can be used for reading inputs from an external device or sending debugging information into a terminal program. The GPIO interface allows the Python script to directly control the GPIO interfaces. The advantage of using this interface over the MDM is that no AT-commands are required here, the interface can control the I/O pins directly. The MOD interface contains an assortment of various useful functions. In this project it is used for creating timers without the need to write them in Python code. (6) The actual program code consists of 2 separate files titled “autorun.py” and “shocksens.pyo” respectively. The “autorun.py” is a simple 3-line program that loads the subprogram “shocksens” and runs it. The reason for this is because the script that is set to be executed when the device is powered is only ever compiled for that single use, and needs to be recompiled every time the device is reset, whereas the subprograms are compiled permanently and saved in a compiled form on the flash memory. Therefore it makes sense to keep the program that always needs to be compiled as simple as possible, as compiling a long and complicated program may take anything from 10 minutes to an hour. At the beginning of the program we load the necessary libraries, in this case the MDM, the SER, the GPIO and the MOD-libraries. The program then uses the SER and MDM interfaces to configure the physical serial port, set up the needed variables to their default values and initialize the network connection by checking the network status and inputting the PIN code associated with the SIM-card. After the connection has been established the program prints to the terminal program “Network Connection Established” and enters the main loop. In the main loop, the program sets the variable “SSstate”, which defines whether or not the shock sensor is currently detecting a shock to false and then goes to sleep for 10 seconds. The sleeping is done so as to save processing power for other applications running at the same time, seeing as how the Python scripts are already ran at the lowest possible priority. After the sleeping period is over, the program uses the GPIO interface to read the status of input PIN 5, where the shock sensor is connected, to determine whether it is in a high or low state and then stores this value in the variable “SSstate”. This value is then converted into an integer to allow it to be tested for truth value.

If the value of “SSstate” or that of “ShockAlarm” is found to be false, that is to say there is the shock sensor did not detect a shock and there are no unsent messages in line from previously recorded shocks, the program returns to the beginning of the main loop. If either of those variables is found to be true, the program sets “ShockAlarm” to true, prints “SHOCK” into the terminal and calls the function “SendSMS” with the function set to return its output value to the variable “ShockAlarmSent” and with the desired destination number and the message to be sent as parameters used in calling the function. The “SendSMS” function then rechecks the status of the network connection and sets the SMS sending mode to textmode, returning an error if either of these did not succeed. It proceeds with the actual sending, first defining the number to be sent to and waiting to make sure that the message can be sent. It then waits to see if the device responds with the symbol “>”, which is the text prompt for entering the message to be sent. The program then outputs the message which was defined in the main loop followed by the hex code 0x1A, which triggers the sending of the message. Depending on circumstances the sending may fail for a number of different reasons. Depending on which stage the sending failed, the function may return “FALSE” along with printing a specific error code in the terminal. If the sending succeeded, the function returns “TRUE” to the main loop. Finally the main loop checks if the variable “ShockAlarmSent” is true or false. If the sending of the SMS succeeded the value will be true, which causes the program to set the “ShockAlarm” variable to false and return to the beginning of the main loop. If the sending of the SMS failed for any reason the value of “ShockAlarmSent” will be false, which means that the variable “ShockAlarm” will remain true and the next time the loop runs the program will try to resend the message regardless of the current state of the shock sensor. The full code of the programs can be found as Appendices 1 and 2
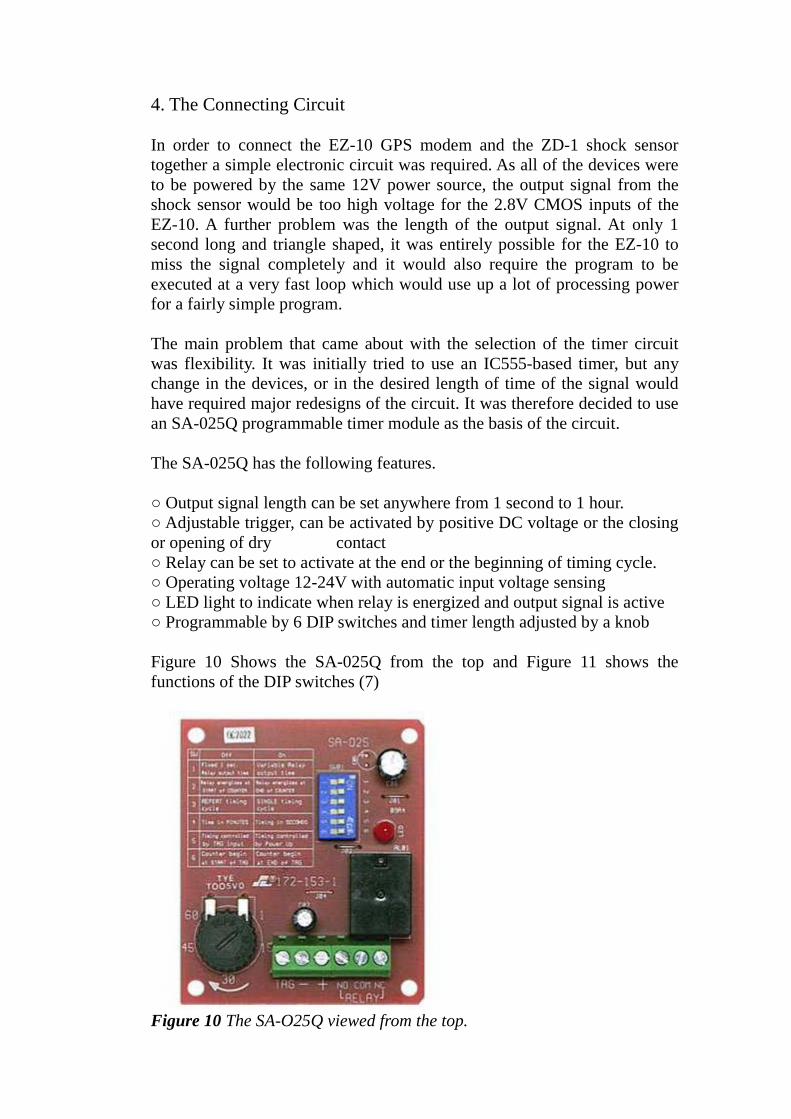
4. The Connecting Circuit In order to connect the EZ-10 GPS modem and the ZD-1 shock sensor together a simple electronic circuit was required. As all of the devices were to be powered by the same 12V power source, the output signal from the shock sensor would be too high voltage for the 2.8V CMOS inputs of the EZ-10. A further problem was the length of the output signal. At only 1 second long and triangle shaped, it was entirely possible for the EZ-10 to miss the signal completely and it would also require the program to be executed at a very fast loop which would use up a lot of processing power for a fairly simple program. The main problem that came about with the selection of the timer circuit was flexibility. It was initially tried to use an IC555-based timer, but any change in the devices, or in the desired length of time of the signal would have required major redesigns of the circuit. It was therefore decided to use an SA-025Q programmable timer module as the basis of the circuit. The SA-025Q has the following features. Output signal length can be set anywhere from 1 second to 1 hour. Adjustable trigger, can be activated by positive DC voltage or the closing or opening of dry contact Relay can be set to activate at the end or the beginning of timing cycle. Operating voltage 12-24V with automatic input voltage sensing LED light to indicate when relay is energized and output signal is active Programmable by 6 DIP switches and timer length adjusted by a knob Figure 10 Shows the SA-025Q from the top and Figure 11 shows the functions of the DIP switches (7)
Figure 10 The SA-O25Q viewed from the top.

Figure 11 The functions of the DIP switches In the circuit used here the switches are set as follows: #1 OFF #2 OFF #3 ON #4 ON #5 OFF #6 ON Timing knob set to 10. Therefore whenever the trigger input receives a positive DC voltage the module sends a steady, 10 second long signal at the input voltage(in this case, 12V) out of the relay output. The diagram of the circuit is shown in Figure 12
.+12V
NC
COM
NO 1KΩ PIN5
+
SA-025Q - EZ-10
TRG
PIN1
340Ω
ZD1
Figure 12 The circuit diagram of the connecting circuit
Switch Fuction ON OFF
#1 Timing starts At the end of trigger At the start of trigger
#2 How does the timing start When the module is powered upConnecting (+) to TRG
#3 Timer setting In seconds In minutes
#4 Steady relay output or pulse/flash? Steady relay output Pulse/flash output
#5 When does the relay output start At end of timing period At start of timing period
#6 Relay output mode, delayed or instant?Instant output Delayed output

As you can see from the diagram, the ZD-1 is powered directly from the “+” and “-“connectors of the SA-025Q of which “+” is directly tied into the relay input voltage while “-“acts as a ground. the output signal from the ZD1 is fed into the trigger input of the SA-025Q, whereas the relay output signal of the SA-025Q is connected to the EZ-10s GPIO input pins through a series and parallel resistor to lower the voltage to around 3V. Pin 1 of the EZ-10 is connected to the common ground. 5. Summary 5.1 The Functioning of the Device The testing of the device was performed simply by uploading the program into an EZ-10 module that was connected into a PC using the serial port and the RT-terminal program for debugging. The module was powered by a 230/12V network power adapter and connected to the ZD-1 shock sensor through the connecting circuit. The SA-025Q was powered by an external 12V power source which in turn then powered the ZD-1 sensor. Figure 13 shows the user interface of the terminal program as well the main loop of the shock sensor program running with no shocks detected.
Figure 13 RS-terminal user interface with the program running

After the device had successfully powered on, the network connection had been achieved and the main loop was running the test was initiated by dropping the shock sensor into a table from a height of about 15cm. The shock sensor successfully detected the shock and the LED in its front lit up to notify this. The SA-025Q then in turn detected the signal from the shock sensor and its LED lit up as well and remained lit for 10 seconds. The program then detected the modified signal when reading the state of I/O pin number 5 and switched to the “SendSMS”-function. All the checks were passed successfully and the message was sent, moments later confirmed as the message arrived on the GSM phone used for testing. Figure 14 shows the sending of the SMS message in the debug window:
Figure 14 The shock detection and the SMS sending process The program was also confirmed to be able to recover from temporary loss of network connection without failure. There was also an endurance test performed where the program ran continuously for approximately a week and was consistently able to detect shocks and send messages all the way through. 5.2 User Guide To operate the system in its current state all that is required is to power the devices on and the system starts up automatically. However, in order to change the content of the text message or the destination number, some changes to the program code are necessary. The content and the address of the message are both defined in the line calling the function “SendSMS” ShockAlarmSent=SendSMS('collision','+3584408XXXXX') In this case, the message sent would be the text “collision” and the number to be sent to “+3584408XXXXX”. Changing these is achieved simply by retyping these lines to whatever is desired. It is important to remember that the EZ-10 does not support special characters such as “ä” or “ö” in the message field. In order to upload the new program to the module it is necessary to delete both the old “shocksens.py” text file as well as the compiled “shocksens.pyo” from the modules memory and then to upload
the new changed plaintext “shocksens.py” file to the module. This can be done easily through the default functions of the RS-terminal program or manually through Windows HyperTerminal. The instructions for the manual upload are not covered in this thesis but can be found from the Telit Easy Script in Python Guide linked in the references page. Once the new script has been uploaded, it is necessary to give the device several minutes to compile the new program before it begins to run. 5.3 Conclusion The project took quite a bit longer to complete than I expected and there were many difficulties on the way but ultimately I think it was worth it. I learned plenty of things about a subject that had barely been covered by my education as well as learned a new programming language that I had never used before. And in the end, the original goals of the project were achieved. The system successfully integrates a shock sensor with a GSM modem and has a flexible connecting circuit that makes modifications easy. 5.4 Further Development As to where should the system go from here, I believe the most immediate developments required are threefold. Firstly, even though the shock sensor used in the project was apparently carefully selected specifically for this purpose, it is my opinion that for the purposes of detecting collisions of heavy machinery the ZD-1 may be quite a bit too sensitive, and a more heavy-duty shock sensor should probably be used. Secondly, the company that the project was made for uses their own in-house built variant of the EZ-10 modem which may present its own challenges when trying to integrate it into a system built for the generic EZ-10 model. Thirdly, this design assumes a stable 12V input voltage to power the devices and depending on the kind of power source available where the system is applied it is likely to need a further power electronic circuit to modify and stabilize the input voltage. Once all of the above issues have been addressed I believe the system would be ready for field tests.

REFERENCES
(1) Ripka. P and Tipek. A (2007) Modern Sensors Handbook. John Wiley & Sons
(2) http://en.wikipedia.org/wiki/Piezoelectric_sensor
(3) Noliac Ceramics NCE datasheet
http://www.noliac.com/Files/Billeder/02%20Standard/Ceramics/Noliac_CEramics_NCE_datasheet.pdf
(4) EZ-10 GPS Datasheet http://www.fouriersystems.com/files/download_center/EZ-10_GSM_Modem.pdf
(5) Telit AT-commands reference guide http://www.telit.com/module/infopool/download.php?id=542
(6) Telit Easy Script in Python guide
http://www.telit.com/module/infopool/download.php?id=617
(7) SA-025Q Programmable Timer Module Description
http://www.seco-larm.com/SA025.htm

APPENDICES Appendix 1. The autorun.py code in Python import shocksens if __name__ == '__main__': shocksens.main() Appendix 2. The shocksens.py code in Python import MDM import MOD import GPIO import SER TRUE = 1 FALSE = 0 def SendSMS(message,number): etimer=MOD.secCounter()+100 SER.send('\r\nSendSMS: Start') res = MDM.send('AT+CREG?\r',20) SER.send('\r\nSendSMS: connection check ok') res = res + MDM.send('AT+CMGF=1\r',20) SER.send('\r\nSendSMS: textmode ok') if(res.find('ERROR') == 1): SER.send('\r\nSendSMS: Error') return FALSE else: SER.send('\r\nSendSMS: sending message') res = MDM.send('AT+CMGS=' + number + ';\r', 0) res = MDM.receive(20) if(res.find('>') != -1): SER.send('\r\n#') res = MDM.send(message, 0) res = MDM.sendbyte(0x1A, 0) ok = MDM.receive(5) while((ok.find('+CMGS:') == -1 and ok.find('ERROR') == -1) and (MOD.secCounter() < etimer)): res = MDM.receive(5) ok = ok + res SER.send('#') if(ok.find('+CMGS:') != -1): SER.send('\r\nSendSMS: OK') return TRUE elif(ok.find('ERROR') != -1): SER.send('\r\nSendSMS: Error2') return FALSE else: SER.send('\r\nSendSMS: Error?') return FALSE else: SER.send('\r\nSendSMS: Error 3') return FALSE return FALSE
def main(): SER.set_speed('115200') SSstate = FALSE; ShockAlarm = FALSE; ShockAlarmSent = FALSE; SER.send('\r\nSER connection initialized!\r\n') MDM.send('AT+CREG?\r',40) MDM.send('AT+CPIN?\r',40) MDM.send('AT+CPIN=1234\r',150) SER.send('\r\nNetwork connection established\r\n') MOD.sleep(100) while 1 == 1: SER.send('\r\nMAIN-LOOP!') SSstate = FALSE; SER.send('\r\nBEFORE SLEEP!') MOD.sleep(100) #sleep for 10s SER.send('\r\nafter SLEEP!') SSstate = GPIO.getIOvalue(5) # Read the state of IO PIN 5 SER.send('\r\nafter gpio getvalue') SSstate = int(SSstate) # convert SSstate to int if (SSstate == TRUE): SER.send('\r\nSSstate = TRUE') SER.send('\r\nafter gpio value conversion to int') if ((SSstate == TRUE) | (ShockAlarm == TRUE)): ShockAlarm == TRUE #sets ShockAlarm to true
SER.send('\r\nSHOCK\r\n')# prints SHOCK to terminal
ShockAlarmSent=SendSMS('collision','+3584408XXXXX') #Send the defined message to the defined number
SER.send('\r\nAfter sending\r\n') if ShockAlarmSent == TRUE: #
Checks if the shock alarm was sent ShockAlarm == FALSE # If yes reset ShockAlarm to false


![Chapter 15 Collision Theorydavidhsu666.com/downloads/Collision-Elastic/MIT Collision...15-1 Chapter 15 Collision Theory Despite my resistance to hyperbole, the LHC [Large Hadron Collider]](https://static.fdocuments.in/doc/165x107/5e384a5efd5cba6d18442333/chapter-15-collision-collision-15-1-chapter-15-collision-theory-despite-my-resistance.jpg)