CollectiveAccess Documentation
35
CollectiveAccess Documentation Release 1.8 Whirl-i-Gig Dec 13, 2020
Transcript of CollectiveAccess Documentation

CollectiveAccess DocumentationRelease 1.8
Whirl-i-Gig
Dec 13, 2020


Introduction to CollectiveAccess
1 Contents 31.1 What is CollectiveAccess? . . . . . . . . . . . . . . . . . . . . . . . . . . . . . . . . . . . . . . . . 31.2 System Requirements . . . . . . . . . . . . . . . . . . . . . . . . . . . . . . . . . . . . . . . . . . 31.3 Installation . . . . . . . . . . . . . . . . . . . . . . . . . . . . . . . . . . . . . . . . . . . . . . . . 101.4 Setup.php . . . . . . . . . . . . . . . . . . . . . . . . . . . . . . . . . . . . . . . . . . . . . . . . . 171.5 Introduction to Themes . . . . . . . . . . . . . . . . . . . . . . . . . . . . . . . . . . . . . . . . . . 211.6 General Configuration . . . . . . . . . . . . . . . . . . . . . . . . . . . . . . . . . . . . . . . . . . 241.7 Meida Display & Access . . . . . . . . . . . . . . . . . . . . . . . . . . . . . . . . . . . . . . . . . 251.8 Public Access Configurations . . . . . . . . . . . . . . . . . . . . . . . . . . . . . . . . . . . . . . 251.9 Login & Registration . . . . . . . . . . . . . . . . . . . . . . . . . . . . . . . . . . . . . . . . . . . 251.10 Homepage & Static Pages . . . . . . . . . . . . . . . . . . . . . . . . . . . . . . . . . . . . . . . . 251.11 Pawtucket2 Site Pages . . . . . . . . . . . . . . . . . . . . . . . . . . . . . . . . . . . . . . . . . . 251.12 Search & Browse Pages and Settings . . . . . . . . . . . . . . . . . . . . . . . . . . . . . . . . . . 271.13 Detail Pages . . . . . . . . . . . . . . . . . . . . . . . . . . . . . . . . . . . . . . . . . . . . . . . 281.14 Lightboxes & Galleries . . . . . . . . . . . . . . . . . . . . . . . . . . . . . . . . . . . . . . . . . . 311.15 Classrooms . . . . . . . . . . . . . . . . . . . . . . . . . . . . . . . . . . . . . . . . . . . . . . . . 311.16 Contact & Mail Templates . . . . . . . . . . . . . . . . . . . . . . . . . . . . . . . . . . . . . . . . 31
i

ii

CollectiveAccess Documentation, Release 1.8
CollectiveAccess is open-source collections management and presentation software designed for museums, archives,and special collections also increasingly used by libraries, corporations and non-profits. It is designed to handle large,heterogeneous collections that have complex cataloguing requirements and require support for a variety of metadatastandards and media formats. CollectiveAccess is a collaboration between Whirl-i-Gig and partner institutions inNorth America and Europe with projects in 5 continents. The software is freely available under the open source GNUPublic License, meaning it’s not only free to download and use but that users are encouraged to share and distributecode.
Introduction to CollectiveAccess 1

CollectiveAccess Documentation, Release 1.8
2 Introduction to CollectiveAccess

CHAPTER 1
Contents
1.1 What is CollectiveAccess?
1.1.1 Who Uses CA?
1.1.2 Why Should I Use It?
1.2 System Requirements
1.2.1 What is Providence?
Providence is the core of CollectiveAccess. It includes a schema modeling framework, a database, a media systemframework capable of manipulating and converting digital images, video, audio and documents, and a web-based userinterface application for cataloguing, searching and managing your collections. If you are starting out with Collec-tiveAccess, Providence is the first (and most important) component you need to install. All other CollectiveAccesscomponents are add-ons to Providence and require a functional Providence installation.
1.2.2 Getting Started
Providence is a web-based application that runs on a designated server computer. Users access the server from theirown computers over a network using standard web browser software. As with any web-based application, Providenceis designed to be accessed via the internet, enabling collaborative cataloguing of collections by widely dispersed teams.However, you do not have to make your Providence installation accessible on the internet. It will function just as wellon a local network with no internet connectivity, or even on a single machine with no network connectivity at all. Whogets to access your system is entirely up to you and your network administrator.
The first step, before attempting an installation, is to verify that your server meets the basic requirements for runningProvidence:
3

CollectiveAccess Documentation, Release 1.8
Server Require-ments
Notes
Operating System Linux, Mac OS X 10.9+, or Windows (Server 2012+, Windows 7, 8 and 10 verified towork).
Server Memory 4 gb of RAM at minimum. If you intend to have CA handle large image files then yourserver should ideally have three times the size of the largest image when uncompressed. Ingeneral more memory is always better, and 8 gb of RAM is a good baseline assuming it isnot cost prohibitive.
Data Storage A simple formula for estimating storage requirements requires an expected number of me-dia items to be catalogued and an average size for those media items. Once these quantitiesare known an estimate can be derived using some simple arithmetic: <storage required inmb> = (<# of media items> * <average storage requirements per media item in mb>) + (<#of media items> * 5mb). 5mb is estimated overhead of storing derivatives (small JPEG,TilePic pan-and-zoom version, etc.) Unless cost-ineffective, it is recommended to doublethe calculated storage requirements when acquiring hardware. Storage requirements foryour metadata and database indices, even if your database is quite large, are usually negli-gible compared to the storage required for media.
Processor Multiprocessor/multicore architectures are desirable for the improved scalability they pro-vide, and well as the capability to speed the processing of uploaded media. Media process-ing is often CPU-bound (as opposed to database operations which are often I/O bound) andlends itself to multiprocessing. It is advisable to obtain a machine with at least a 2-coresand, if possible, 4-cores.
1.2.3 Core software requirements
Providence requires three core open-source software packages be installed prior to installation. Without these packagesProvidence cannot run:
Software Package NotesWebserver Apache version 2.4 or NGINX 1.14 or later are recommended.MYSQL Database Versions 5.5, 5.6 or 5.7 are supported. MySQL 8.0 is not yet supported. Make sure your
MySQL installation supports InnoDB tables. CollectiveAccess requires InnoDB support tofunction properly.
PHP programminglanguage
PHP version 5.6 or better is required. PHP 7.0 or later is strongly recommended. Note thatthe current version of CollectiveAccess, 1.7, will be the last to support PHP 5.6.
All of these should be available as pre-compiled packages for most Linux distributions and as installer packages forWindows. Apache and PHP come standard with recent versions of Mac OS X (desktop and server versions) - youshould not have to install them yourself. MySQL comes standard with Mac OS X Server but not desktop, so youwill have to install MySQL yourself if you are using the desktop version of Mac OS X. For Macs, Brew is a highlyrecommended way to get all of CA’s prerequisites up and running.
A step-by-step recipe for installing Apache, PHP, ImageMagick and MySQL on a Windows host is also available onthis wiki.
If setting up Apache, MySQL or PHP is daunting, you may want to consider pre-configured Apache/MySQL/PHPenvironments available for Windows and Macintosh such as MAMP and XAMPP. These can greatly simplify setupof CollectiveAccess and its’ requirements and are useful tools for experimentation and prototyping. They are notrecommended for hosting live systems, however.
4 Chapter 1. Contents

CollectiveAccess Documentation, Release 1.8
1.2.4 Required and Suggested Software Packages By Distribution
CentOS 7
Some packages used by CollectiveAccess are available only from 3rd party repositories. Packages recommended hereare from the following repositories:
• Nux: http://li.nux.ro/download/nux/dextop/el7/x86_64/nux-dextop-release-0-5.el7.nux.noarch.rpm
• Remi: http://rpms.remirepo.net/enterprise/remi-release-7.rpm
• EPEL: https://dl.fedoraproject.org/pub/epel/epel-release-latest-7.noarch.rpm
Required:
• mariadb-server [Database server]
• httpd [Web server]
• redis-server [Cache server]
• php php-mcrypt php-cli php-gd php-curl php-mysqlnd php-zip php-fileinfo php-devel php-gmagick php-opcache php-process php-xml php-mbstring php-redis [Runtime environment] (Remi, EPEL)
Suggested: - GraphicsMagick-devel [Image processing] - ghostscript-devel - ffmpeg-devel [Audio and video process-ing] (Nux) - libreoffice [Microsoft Office file processing] (EPEL) - dcraw [RAW image format support] - mediainfo[Media metadata extraction] - exiftool [Media metadata extraction] - xpdf [Media metadata extraction]
When installing a tool for media metadata extraction, you need only install one, although having multiple installedwill not cause issues.
Ubuntu 16.04
Some packages used by CollectiveAccess are available only from 3rd party repositories. Packages recommended hereare from the following repositories:
• ondrej/php: ppa:ondrej/php
• PECL: https://pecl.php.net
Required:
• mysql-server
• apache2
• redis-server
• php7.x libapache2-mod-php7.x php7.x-common php7.x-mbstring php7.x-xmlrpc php7.x-gd php7.x-xmlphp7.x-intl php7.x-mysql php7.x-cli php7.x-mcrypt php7.x-zip php7.x-curl php7.x-posix php7.x-dev php-pearphp7.x-
• pecl.php.net/gmagick-2.0.5RC1 [pecl install channel://pecl.php.net/gmagick-2.0.5RC1]
Suggested:
• graphicsmagick libgraphicsmagick-dev [Image processing]
• ffmpeg [Audio and video processing]
• ghostscript [PDF processing]
• libreoffice [Microsoft Office file processing]
• dcraw [RAW image format support]
• mediainfo [Media metadata extraction]
1.2. System Requirements 5

CollectiveAccess Documentation, Release 1.8
• xpdf [Media metadata extraction]
• exiftool [Media metadata extraction]
1.2.5 Directories
If you are running Apache on Linux, by default the root of your CollectiveAccess installation will likely be in/var/www/html.
1.2.6 Software requirements for media processing
Depending upon the types of media you intend to handle with CA you will also need to install various supportingsoftware libraries and tools. None of these is absolutely required for CA to install and operate but without themspecific types of media may not be supported (as noted below).
6 Chapter 1. Contents

CollectiveAccess Documentation, Release 1.8
Software Package Media Types NotesGraphicsMagick Images Version 1.3.16 or better is required. GraphicsMagick is the pre-
ferred option for processing image files on all platforms and is bet-ter performing than any other option. Be sure to compile or obtain aversion of GraphicsMagick with support for the formats you need!Support for some image formats is contingent upon other librariesbeing present on your server (eg. libTiff must be present for TIFFsupport]).
ImageMagick Images Version 6.5 or better is required. ImageMagick can handle moreimage formats than any other option but is significantly slower thanGraphicsMagick in most situations. Be sure to compile or obtaina version of ImageMagick with support for the formats you need!Support for some image formats is contingent upon other librariesbeing present on your server (eg. libTiff must be present for TIFFsupport]).
libGD Images A simple library for processing JPEG, GIF and PNG format images,GD is a fall-back for image processing when ImageMagick is notavailable. This library is typically bundled with PHP so you shouldnot need to install it separately. In some cases you may need to per-form a manual install or use a package provided by your operatingsystem provider. In addition to supporting a limited set of imageformats, GD is typically slows than ImageMagick or GraphicsMag-ick for many operations. If at all possible install GraphicsMagickon your server.
ffmpeg Audio, Video Required if you want to handle video or audio media. Be sure tocompile to support the file formats and codecs you require
qt-faststart Video A utility packaged as part of ffmpeg that modifies QuickTime outputfrom ffmpeg for “quick start” (play back starts as soon as possible)during progressive download. If you will be serving video out ofCollectiveAccess via progressive HTTP download you will proba-bly want to install this application. If it is not installed QuickTimefiles may not start playing until completely downloaded.
Ghostscript PDF Documents Ghostscript 8.71 or better is required to generate preview images ofuploaded PDF documents. PDF uploads will still work, but withoutpreview images, if Ghostscript is not installed. If you require colormanagement (if you are dealing with color PDF documents you do),then you must install Ghostscript 9.0 or better.
dcraw Images Required to support upload of proprietary CameraRAW formatsproduced by various higher-end digital cameras. Note that thatAdobeDNG format, a newer RAW format, is supported by Graph-icsMagick and ImageMagick.
PdfToText PDF Documents A utility to extract text from uploaded PDF files. If present CAwill use PdfToText to extract text for indexing. If PdfToText is notinstalled on your server CA will not be able to search the content ofuploaded PDF documents.
PdfMiner PDF Documents A utility to extract text and text locations from uploaded PDF files.If present CA will use PdfMiner to extract text for indexing andlocations to support highlighting of search results during PDF dis-play. If PdfMiner is not installed on your server CA will fall backto PdfToText for indexing and highlighting of search results will bedisabled.
MediaInfo Images, Audio,Video, PDF Docu-ments
A library for extraction of technical metadata from various audioand video file formats. If present CA can use MediaInfo to extracttechnical metadata, otherwise it will fall back to using various built-in methods such as GetID3.
ExifTool Images A library for extraction of embedded metadata from many imagefile formats. If present CA can use it to extract metadata for displayand import.
WkHTMLToPDF PDF Output WkHTMLToPDF is an application that can perform high qualityconversion of HTML code to PDF files. If present CollectiveAccesscan use WkHTMLToPDF to generate PDF-format labels and re-ports. Version 0.12.1 is supported. Do not use version 0.12.2, whichhas bugs that impede valid formatting of output. If WkHTML-ToPDF is not installed CollectiveAccess will try to use PhantomJSand failing that fall back to a slower built-in alternative.
PhantomJS PDF Output Like WkHTMLToPDF, PhantomJS is an application that can per-form high quality conversion of HTML code to PDF files. If presentCollectiveAccess can use PhantomJS to generate PDF-format labelsand reports. Version 1.9.8 or better is supported. PhantomJS willnot be used if WkHTMLToPDF is installed. If neither WkHTML-ToPDF nor PhantomJS are installed CollectiveAccess will fall backto a slower built-in alternative.
LibreOffice Office Documents LibreOffice is an open-source alternative to Microsoft Office. Col-lectiveAccess can use it to index and create previews for MicrosoftWord, Excel and Powerpoint document. LibreOffice 4.0 or better issupported.
1.2. System Requirements 7

CollectiveAccess Documentation, Release 1.8
Most users will want at a minimum GraphicsMagick and ffmpeg installed on their server, and should install otherpackages as needed. For image processing you need only one of the following: GraphicsMagick, ImageMagick,libGD.
1.2.7 PHP extensions for media processing (optional)
CA supports two different mechanisms to employ GraphicsMagick or ImageMagick. The preferred option is a PHPextensions that, when installed, provide a fast and efficient way for PHP applications such as CA to access Graphics-Magick or ImageMagick functionality. The option option invokes the GraphicsMagick or ImageMagick command-lineprogram directly without any PHP extension.
In general you should try to use a PHP extension rather than the command-line mechanism. The extensions providemuch better performance. Unfortunately, the extensions have proven to be unstable in some environments and canbe difficult to install on non-Linux systems (and in particular Windows). If you are running the PHP GMagick (forGraphicsMagick) or IMagick (for ImageMagick) extension and are seeing segmentation faults or incorrect imageencoding such as blank images you should remove the extension, let the command-line mechanism take over and seeif that improves things.
Both Gmagick and Imagick are available in the PHP PECL repository and often available as packages for variousoperating systems. They should be easy to install on Unix-y operating systems like Linux and Mac OS X. Installationon Windows is a waking nightmare.
1.2.8 Configuring PHP prior to installation
Once you have the core software requirements installed on your server you’re almost ready to install CA. But first youwill need to take a look at your PHP configuration file and possibly adjust a few options.
Your PHP configuration file is usually named php.ini. On Linux systems the php.ini file is often in /etc/php.ini or/usr/local/lib/php.ini. If you cannot locate your php.ini file, look for its location in the output of phpinfo(), either byrunning the PHP command line interpreter with the -i option (eg. php -i) or running a PHP script that looks like this:<?php phpinfo(); ?> The output from phpinfo() will include the precise location of the php.ini file used to configurePHP.
Once you’ve found your php.ini file open it up and verify and, if necessary, change the following values:
1. post_max_size - sets maximum size a POST-style HTTP request can be. The default value is 8 megabytes. Ifyou are uploading large media files (and most CollectiveAccess users are) you will need to raise this to a valuelarger than the largest file size you are likely to encounter.
2. upload_max_filesize - sets the maximum size of an uploaded file. Set this to a slightly smaller value that that setfor post_max_size.
3. memory_limit - sets the maximum amount of memory a PHP script may consume. The default is 128 megabyteswhich should be enough for many systems, unless you are (a) uploading large images (b) reindexing the searchindex of a large database or (c) importing data. Even if you have not received memory limit exceeded errors,you may want to increase this limit to 196 or 256 megabytes.
4. display_errors - determines whether errors are printed to the screen or not. In some installation this is set to “off”by default. While this is a good security decision for public-facing systems, it can make debugging installationproblems difficult. It is therefore suggested that while installing and testing CA you set this option to “On”
1.2.9 Installing Providence (finally!)
Now that you’ve got all the requirements in place it’s time to set up CollectiveAccess. You will need to perform thefollowing steps:
8 Chapter 1. Contents

CollectiveAccess Documentation, Release 1.8
1. Set up an empty MySQL database for your installation. Give the database a name and create a login for it withfull read/write access. Note the login information - you’ll need it later. You can use the MySQL command lineor web-based tools like phpMyAdmin to create the database and login.
2. Copy the contents of the CollectiveAccess software distribution to the root of the web server instance inwhich your installation will run. You can obtain the latest release version from our download page. If youare to obtain CollectiveAccess from the project’s GitHub repository then run the following command fromthe parent of the directory into which you want to install CA: git clone https://github.com/collectiveaccess/providence.git providence where the trailing “providence” is the name ofthe directory you want your installation to be in. Git will create the directory for you.
3. Copy the setup.php-dist file (in the root directory of the CA distribution) to a file named setup.php. Editsetup.php, changing the various directory paths and database login parameters to reflect your server setup.
4. Make sure the permissions on the app/tmp, vendor/ezyang/htmlpurifier/library/HTMLPurifier/DefinitionCache and media directories are such that the web server can writeto them. In the next step, the web-based installer will need the access to create directories for uploaded media,and to generate cached files. In most hosted environments these permissions will already be set correctly.
5. In a web browser navigate to the web-based installer. If the URL for your installation server ishttp://www.myCollectiveaccessSite.org then the URL to the installer is http://www.myCollectiveaccessSite.org/install. Enter your email address and select the installation profile(a profile is a set of pre-configured values for your system) that best fits your needs. Then click on the “begin”button. If you don’t see a profile suitable for your project you may want to ask on the support forum or look atour list of contributed profiles.
6. The installer will give you login information for your newly installed system when installation is complete. Besure to note this information in a safe place!
1.2.10 Optional post installation tasks
Set up for background encoding of media
By default, CollectiveAccess will process all uploaded media immediately upon receipt. For large media files this canmake the user’s browser in unresponsive for an extended period of time while CA performs large and complex mediaconversions. If you expect that you will be uploading many large media files you can enable background processingof media by setting the __CA_QUEUE_ENABLED__ setting to 1 in your setup.php (it is off by default).
Once background processing is enabled, all media files exceeding a specific size will be queued for later processing.Small sizes will still be run “while you wait” unless you modify the media processing configuration. To actuallyprocess the images in the queue you must run the script support/utils/processTaskQueue.php This script is typicallyrun from a crontab (in Unix-like operating systems, at least) with the hostname of your install as the first parameter.The hostname is needed in case you are running several instances of CA within the same install. If you are onlyrunning a single instance (just about everyone is) then you can just pass “default” as the parameter.
You can run the processTaskQueue.php script as often as you want. Only a single instance of the script is allowed torun at any given time, so you need not worry about out-of-control queue processing scripts running simultaneously anddepleting server resources. Note that the processTaskQueue.php should always be run under a user with write-accessto the CA media directory.
1.2.11 What to do if something goes wrong?
Tip: If your CollectiveAccess installation fails, the first thing to do is look at the error messages, if any. If youreceive a blank white screen odds are error messages are being suppressed in your PHP php.ini configuration file. Try
1.2. System Requirements 9

CollectiveAccess Documentation, Release 1.8
changing the display_errors option to “On” and then attempt to reinstall.
If you are totally stumped after reviewing the error messages and logs, ask us for help! You can post your questionson the CA support forum. Please include a full description of your problem as well as the operating system you arerunning, the version of CA you are running, the text of any error messages, the output of phpinfo() and the output ofthe CA “configuration check” (available in the “Manage” menu under “System Configuration”) - assuming you areable to log in. We will try our best to resolve your problems quickly.
You may also want to look at our list of OS specific Installation notes.
1.3 Installation
1.3.1 Installing on Linux
Ubuntu
Ubuntu 16.04LTS
To come
Ubuntu 18.04LTS
To come
Red Hat Enterprise Linux/CentOS
RHEL/CentOS 7
To come
RHEL/CentOS 8
To come
1.3.2 Installing on Mac OS
Note: Note: these instructions have been tested on MacOS 10.14 (Mojave). They may or may not work on earlierversions of MacOS.
CollectiveAccess relies on a number of open-source software packages to run, such as MySQL (database server), PHP(programming lanaguage) and Apache or nginx (web server) to name just a few. The simplest way to install theserequired packages on Mac OS is to use the Homebrew package manager. Homebrew can be installed by opening aMac OS Terminal window and pasting this command:
/usr/bin/ruby -e "$(curl -fsSL https://raw.githubusercontent.com/Homebrew/install/→˓master/install)"
10 Chapter 1. Contents

CollectiveAccess Documentation, Release 1.8
Once installed most required software can be installed using the brew command.
Mac OS 10.14 comes with the Apache web server preinstalled. It’s tricky to get PHP installed by Homebrew to workwith the preinstalled Apache though, so it’s best to use Homebrew-managed installation. Before we install Apachewith Homebrew, first shutdown the preinstalled server and disable it from starting automatically in the future usingthese Terminal commands:
sudo apachectl stopsudo launchctl unload -w /System/Library/LaunchDaemons/org.apache.httpd.plist 2>/dev/→˓null
Now install Apache by typing in Terminal:
brew install httpd
Next, set Apache to start itself automatically every time you reboot the Mac:
sudo brew services start httpd
You should now be able to connect to the web server on port 8080 (the default when installing with Brew) by going tothe URL http://localhost:8080 in a web browser running on the Mac. The message “It works!” should display.
Tip: If you want to run Apache on the standard port 80 you’ll need to open the Apache configuration file located at/usr/local/etc/httpd/httpd.conf, find the line Listen 8080 and change it to Listen 80. Then restart the server with theTerminal command sudo apachectl -k restart
Next install PHP version 7.2 running in the Terminal:
brew install [email protected]
Then edit the Apache configuration file located at /usr/local/etc/httpd/httpd.conf, adding the line:
LoadModule php7_module /usr/local/opt/[email protected]/lib/httpd/modules/libphp7.so
Next, look for this configuration in the Apache configuration file:
<IfModule dir_module>DirectoryIndex index.html
</IfModule>
and replace it with this:
<IfModule dir_module>DirectoryIndex index.php index.html
</IfModule>
<FilesMatch \.php$>SetHandler application/x-httpd-php
</FilesMatch>
Restart the server with the Terminal command sudo apachectl -k restart. You should now have PHP enabled withinyour Apache web server.
In order to use the PHP on the Terminal command line (which can be handy) you’ll need to add the Homebrew PHPinstallation directory into your command PATH. Do this by entering in the Terminal:
1.3. Installation 11

CollectiveAccess Documentation, Release 1.8
echo 'export PATH="/usr/local/opt/[email protected]/bin:$PATH"' >> ~/.bash_profileecho 'export PATH="/usr/local/opt/[email protected]/sbin:$PATH"' >> ~/.bash_profile
Close the current Terminal window and open a new one. Typing php -v in the Terminal should return output similarto:
PHP 7.1.23 (cli) (built: Feb 22 2019 22:08:13) ( NTS )Copyright (c) 1997-2018 The PHP GroupZend Engine v3.1.0, Copyright (c) 1998-2018 Zend Technologies
Now let’s install MySQL. CollectiveAccess works with version 5.7. It is not yet compatible with version 8.0. To installversion 5.7:
brew install [email protected]
Then add the MySQL install to your command line path with:
echo 'export PATH="/usr/local/opt/[email protected]/bin:$PATH"' >> ~/.bash_profile
You will need to close the Terminal window and open a new one for the path changes to take effect. Next start upMySQL, and configure it to restart automatically on reboot:
brew services start [email protected]
If you don’t want MySQL starting up automatically every time you boot your machine you can start it up on demandusing brew services run [email protected]
Next we install various packages to support processing of media: ffmpeg (audio/video), Ghostscript (PDFs), Graphic-sMagick (mages), mediainfo (metadata extraction and xpdf (content extraction from PDFs):
brew install ffmpeg ghostscript GraphicsMagick mediainfo xpdf
Finally, we are ready to install the CollectiveAccess Providence back-end cataloguing application. The web serverwe installed earlier uses /usr/local/var/www for documents by default (the “web server root” directory). We aregoing to place CollectiveAccess in this directory, in a subdirectory named ca. A URL for this directory will behttp://localhost:8080/ca (assuming that you’re still running on port 8080). If you’re running on port 80, the URL willbe http://localhost/ca.
Tip: You can use a different directory for the application by editing /usr/local/etc/httpd/httpd.conf. Edit the lineDocumentRoot “/usr/local/var/www” to point to your chosen directory.
You can download a release from https://github.com/collectiveaccess/providence/releases, or install is with Git. Usinga release in somewhat simpler to install, while using Git allows you to easily update files and switch to developmentversions of CollectiveAccess.
To install with Git, in the Terminal change directory into the web server root directory.
cd /usr/local/var/www
Then “clone” the Providence application code from GitHub:
git clone https://github.com/collectiveaccess/providence.git ca
If you prefer to download a release, place the release ZIP or tgz file downloaded from https://github.com/collectiveaccess/providence/releases into /usr/local/var/www and uncompress it. Then rename the resulting directory(named something like providence-1.7.8) to ca.
12 Chapter 1. Contents

CollectiveAccess Documentation, Release 1.8
In the Terminal change directory into the ca application directory and copy the setup.php-dist file to setup.php. Thisfile contains basic configuration for Providence. The “-dist” version is simply a template. The setup.php copy willneed to be customized for your installation:
cd /usr/local/var/www/cacp setup.php-dist setup.php
Edit setup.php, changing settings to suit. At a minimum you will need to edit the database login settings__CA_DB_USER__, __CA_DB_PASSWORD__, __CA_DB_DATABASE__. You may want to edit other settings,which are described in setup.php. You should also edit the __CA_STACKTRACE_ON_EXCEPTION__ to be true.This will allow you to receive full error messages on screen if something goes wrong.
By default brew installs the MySQL database with an all-access, password-less administrative account named root.It’s generally insecure to leave this account password-less, but in a testing environment this may not matter. Ifyou decide to use the root account, set __CA_DB_USER__ to “root”, leave __CA_DB_PASSWORD__ blank andset __CA_DB_DATABASE__ to the name you’ll use for your database. For this example, we’ll assume the database isto be named my_archive.
MySQL can support multiple databases in a single installation, so the my_archive database must be created explicitly.Log into mysql in the Terminal using the mysql command (assuming you haven’t set a password for the root account):
mysql -uroot
At the mysql> prompt enter:
CREATE DATABASE my_archive;
If you want to use a MySQL login specific to the newly created database, while still at the mysql> prompt enter:
GRANT ALL on my_archive.* to my_user@localhost identified by 'my_password';
where my_user is your preferred MySQL user name and my_password is your preferred password for the MySQLlogin. MySQL logins are specific to MySQL and have nothing to do with your server login. You can set the user nameand password to whatever you want, independent of all other login credentials.
Go back to setup.php and enter your MySQL login credentials into the __CA_DB_USER__, __CA_DB_PASSWORD__and __CA_DB_DATABASE__ settings.
Certain directories in the installation need to be writeable by the web server, within which CA runs. On MacOS,the web server typically runs as the user www. Change the permissions on the app/tmp, app/log, media and vendordirectories to be writeable by www in Terminal:
cd /usr/local/var/www/casudo chown -R www app/tmp app/log media vendorsudo chmod -R 755 app/tmp app/log media vendor
The first sudo command will require entry of your MacOS login password.
Navigate in a web browser to http://localhost:8080/ca (adjusting the port to whatever you have configured, if neces-sary). You should see:
1.3. Installation 13

CollectiveAccess Documentation, Release 1.8
setup/install/../../_static/images/first_install.png
Click on the installer link and you should see:
14 Chapter 1. Contents

CollectiveAccess Documentation, Release 1.8
setup/install/../../_static/images/install_screen.png
Select a profile, enter your email address and click on Begin installation. A profile is a preset template with recordtypes, fields and other cataloguing settings that the installer uses to define a new working system. The standard profilesProvidence ships with include implementations of widely used standards:
1.3. Installation 15

CollectiveAccess Documentation, Release 1.8
setup/install/../../_static/images/install_profiles.png
You can add your own profiles, or use profiles from other users by dropping profile files in the/usr/local/var/www/ca/install/profiles/xml directory.
If you want to experiment with different profiles you may wish to set the__CA_ALLOW_INSTALLER_TO_OVERWRITE_EXISTING_INSTALLS__ option in setup.php.By default the installer will refuse to install over an existing installation. With__CA_ALLOW_INSTALLER_TO_OVERWRITE_EXISTING_INSTALLS__ set the installer will include an op-tion to overwrite existing data. In a real system this is extremely dangerous – any one with access to the installer candelete the entire system – but is very handy for testing and evaluation.
1.3.3 Installing on Windows
Installation of media handling libraries and delegates such as ffmpeg can be problematic because it is more difficult tobuild software from source on Windows. See Compiling_ffmpeg for information how to install ffmpeg for Windows.
The format of the /app/conf/External_Applications.conf file is different in Windows installations. For example, the
16 Chapter 1. Contents

CollectiveAccess Documentation, Release 1.8
correct format for the entry describing the ghostscript application is
ghostscript_app = E:/prog/gs/gswin32c.exe
in this case, ghostscript is installed on disk E: in the subdirectory prog/gs. The application is the non-windows versionof ghostscript.
The app/helpers/mediaPluginHelpers.php file must also be updated to function properly in Windows. The entry forghostscript must be changed from
exec($ps_path_to_ghostscript." -v 2> /dev/null", $va_output, $vn_return);
to
exec($ps_path_to_ghostscript." -v 2> /$null", $va_output, $vn_return);
Similarly, all other media helper functions to detect the other processors you have installed for CA to used must beupdated to change /dev/null to /$null.
Other places that have /dev/null include
TilePicParser in applibcoreparsers CoreImage.php in applibcorePluginsMedia ImageMagick.php in applibcorePlug-insMedia PDFWand.php in applibcorePluginsMedia
references to /dev/null must be changed to /\$null in order for the plugin to work correctly. This is particularlyimportant if you are using ImageMagic. Both ImageMagick.php and TilePicParser.php must be changed for thisprocess to work.
The external_applications line for ImageMagick might be
imagemagick_path = E:/Prog/ImageMagick
depending on where you have installed ImageMagick. Both the static and dynamic versions of ImageMagick seem towork well.
The ImageMagick process is very slow and libGD is preferred for speed, but it requires much more memory. If youare using it locally where you have control over the memory size, up the memory limit entry of php.ini to
memory_limit = 512M
This will allow must photographs to be handled properly without the tilepic function running out of memory.
1.4 Setup.php
• Database server host name
• Database login user name
• Database login password
• Database name
• System Name
• Administrative Email
• Outgoing email
• Timezone Setting
• Background Processing
• Default Locale
1.4. Setup.php 17

CollectiveAccess Documentation, Release 1.8
• Clean URLs
• App Names for Multiple Collective Access Systems
• Google Maps Key
• Caching
• Overwrite Existing Installation
• Application Exception Error Messaging
In the main directory of your Providence install, there is a file called setup.php.dist. Make a copy of this file and renameit setup.php. For your Collective Access system to work, you MUST add values for your database server hostname,user name, password, database, and administrative e-email. You also set the site’s timezone in setup.php. Mostother settings can be left alone.
1.4.1 Database server host name
This is often set to ‘localhost’.
if (!defined("__CA_DB_HOST__")) {define("__CA_DB_HOST__", 'localhost');
}
1.4.2 Database login user name
if (!defined("__CA_DB_USER__")) {define("__CA_DB_USER__", 'your_username_here');
}
1.4.3 Database login password
if (!defined("__CA_DB_PASSWORD__")) {define("__CA_DB_PASSWORD__", 'your_password_here');
}
1.4.4 Database name
if (!defined("__CA_DB_DATABASE__")) {define("__CA_DB_DATABASE__", 'your_databasename_here');
}
1.4.5 System Name
This value will be used on emails, on the login screen, in browser window titles, etc.
if (!defined("__CA_APP_DISPLAY_NAME__")) {define("__CA_APP_DISPLAY_NAME__", "insert_name_here");
}
18 Chapter 1. Contents

CollectiveAccess Documentation, Release 1.8
1.4.6 Administrative Email
An e-mail must be set up at this stage to send error reports for system configuration issues.
if (!defined("__CA_ADMIN_EMAIL__")) {define("__CA_ADMIN_EMAIL__", '[email protected]');
}
1.4.7 Outgoing email
For CollectiveAccess to be able to send email notifications __CA_SMTP_SERVER__ and __CA_SMTP_PORT__must be set. If your outgoing (SMTP) mail server requires you to authenticate, configure your login and connectiondetails in __CA_SMTP_AUTH__, __CA_SMTP_USER__, __CA_SMTP_PASSWORD__ and __CA_SMTP_SSL__
__CA_SMTP_AUTH__ = authentication method for outgoing mail connection (set to PLAIN,→˓LOGIN or CRAM-MD5; leave blank if no authentication is used.)__CA_SMTP_SSL__ = SSL method to use for outgoing mail connection (set to SSL or TLS;→˓leave blank if not authentication is used.)
1.4.8 Timezone Setting
Set your preferred time zone here. The default is to use US Eastern Standard Time. A list of valid time zone settingsis available at http://us3.php.net/manual/en/timezones.php.
Note: When importing data, you should switch to value ‘UTC’ before import, or else dates may import incorrectly.
date_default_timezone_set('America/New_York');
1.4.9 Background Processing
The task queue allows users to push potentially long running processes, such as processing of large video and imagefiles into the background and continue working. Set this to a non-zero value if you want to use the task queue. Be sureto configure the task queue processing script to run (usually via CRON) if you set this option.
if (!defined("__CA_QUEUE_ENABLED__")) {define("__CA_QUEUE_ENABLED__", 0);
}
1.4.10 Default Locale
The default locale is used in situations where no locale is specifically set by the user, prior to login or prior to settingyour preferred locale in user preferences for the first time. You should set this to the locale in which your usersgenerally work.
Note: Whatever locale you set here MUST be present in your system locale list. The default value is US/English,which exists in most configurations.
1.4. Setup.php 19

CollectiveAccess Documentation, Release 1.8
if (!defined("__CA_DEFAULT_LOCALE__")) {define("__CA_DEFAULT_LOCALE__", "en_US");
}
1.4.11 Clean URLs
If the Apache mod_rewrite module is available on your server you may set this to have Providence use “clean” urls –urls with the index.php handler omitted. Only set this if your web server includes mod_rewrite and it is enabled usingthe provided .htaccess file.
define("__CA_USE_CLEAN_URLS__", 0);
1.4.12 App Names for Multiple Collective Access Systems
If you are running more than one instance of CollectiveAccess on the same server make sure each instance has its ownunique __CA_APP_NAME__ setting. __CA_APP_NAME__ must include letters, numbers and underscores only -no spaces or punctuation!
if (!defined("__CA_APP_NAME__")) {define("__CA_APP_NAME__", "your_name_here");
}
1.4.13 Google Maps Key
Add your Google Maps key to use for mapping and geocoding feature (optional).
if (!defined("__CA_GOOGLE_MAPS_KEY__")) {define("__CA_GOOGLE_MAPS_KEY__", "");
}
1.4.14 Caching
The default file-based caching should work acceptably in many setups. Alternate schema may be used, includingredis, sqlite, memcached or php APC. All require additional software be present on your server, and in general all willprovide better performance than file-based caching.
Options are: ‘file’, ‘memcached’, ‘redis’, ‘apc’ and ‘sqlite’. Memcached, redis and apc require PHP extensions that arenot part of the standard CollectiveAccess configuration check. If you do configure them here and your PHP installationdoesn’t have the required extension you may see critical errors. sqlite requires the PHP PDO extension and a workinginstall of sqlite. This is not guaranteed to be present on your server, but often is.
if (!defined('__CA_CACHE_BACKEND__')) {define('__CA_CACHE_BACKEND__', 'file');
}
Options for the caching back-ends you may wish to set include:
__CA_CACHE_FILEPATH__ = Path to on on disk location for storage of cached data__CA_CACHE_TTL__ = Cached data time-to-live (in seconds)__CA_MEMCACHED_HOST__ = Hostname of memcached server
(continues on next page)
20 Chapter 1. Contents
CollectiveAccess Documentation, Release 1.8
(continued from previous page)
__CA_MEMCACHED_PORT__ = Port of memcached server__CA_REDIS_HOST__ = Hostname of redis server__CA_REDIS_PORT__ = Port of redis server__CA_REDIS_DB__ = redis database index (typically a number between 0 and 15)
1.4.15 Overwrite Existing Installation
Overwriting an existing installation can be useful while a site is in development. Overwriting will completely destroythe database and anything in it, allowing you to pick a new installation profile and start over. This option should beset back to false before delivering to a client.
# Note that in overwriting your database you will destroy *all* data in the database# including any non-CollectiveAccess tables. Use this option at your own risk!if (!defined('__CA_ALLOW_INSTALLER_TO_OVERWRITE_EXISTING_INSTALLS__')) {
define('__CA_ALLOW_INSTALLER_TO_OVERWRITE_EXISTING_INSTALLS__', false);}
1.4.16 Application Exception Error Messaging
Set to display detailed error information on-screen whenever an application exception occurs. This can be helpful fordevelopers in situtations where detailed exception messages are useful but full debugging output is not required. Forproduction use you should set this to false. Note that exceptions are always logged to the application log in app/log,regardless of what is set here.
if (!defined('__CA_STACKTRACE_ON_EXCEPTION__')) {define('__CA_STACKTRACE_ON_EXCEPTION__', false);
}
require(__DIR__."/app/helpers/post-setup.php");
1.5 Introduction to Themes
1.5.1 Default Theme
The default theme is comprised of all the basic features you’ll need to publish your collection to the web, includingsearch and browse functions, online exhibitions, finding aids, asset detail pages and more! A live demo of Pawtucketis available at http://demo.collectiveaccess.org/pawtucket/.
Out of the box, Pawtucket includes the following tools:
• Access Control - You decide what gets published to the web at every level! Select content can also be madeavailable behind a login, or for users at a specific IP address.
• Browse - Find assets in your collection by keywords, subjects and controlled vocabularies, as well as dates,cross-table relationships and more.
• Collection Browser - Like an interactive Finding Aid, allow your users to view complex collection hierarchiesin an intuitive manner.
• Contact Form - A customizable form that users can use to contact you by email.
• Contribute Form - Allow users to contribute materials to your archive via a simple, customizable form.
1.5. Introduction to Themes 21

CollectiveAccess Documentation, Release 1.8
• Detail pages - Any Providence record can be published as a page in Pawtucket. Display media and informationabout assets in your collection, or people, places, subjects and more!
• Document and Media Viewer - View, Pan and Zoom into media and documents in-browser.
• Galleries - Showcase featured content and create online exhibition by easily publishing Sets to Pawtucket.
• Lightbox - Allow your users to create personal Lightboxes for their own research. Users can bookmark itemsfor later, add notes, create slideshows and share their Lightboxes with others.
• Lists - Display simple lists of your collection assets by type.
• Login and Registration - Put your Pawtucket installation behind a password, or require a login to view selectcontent.
• Reporting - Configurable PDF templates allow your users to download tear-sheets of collection items, galleries,Finding Aids and more.
• Search - Find collection assets with simple or customizable advanced search forms.
You’ll notice that the default theme displays media, record titles, descriptions and other basic information from yourcollection records by default. However, if you want to display more complex metadata or make aesthetic changes toPawtucket, you’ll need to create your own theme.
Everything in Pawtucket is customizable, and configuring your own theme is easy. Custom themes build off of thefeatures available in the default theme - even the most complex custom themes use the default theme as their backbone.In fact, the theme you create will selectively override the areas of the default theme that you want to change (ratherthan overriding the default theme as a whole). This ensures that the base code is consistent across all installations, thatyour theme will receive necessary updates in the future without affecting the custom areas of your theme.
To begin, visit Defining Your Own Theme.
1.5.2 Defining Your Own Theme
In order to display custom metadata, graphics and styling to your Pawtucket installation, you’ll need to define a customtheme. A custom theme selectively overrides the areas of the Default Theme that you’d like to tailor to your project.Nearly all custom themes will use at least some views from default theme to function. In fact, it is to your advantageto override only the views that are necessary for customization, as this will allow you to easily update your theme withfuture improvements to the Pawtucket base code as they become available.
Creating a theme
At it’s most basic, a custom theme needs only to have folders for Assets (such as graphic, javascript and css files),Configuration Files (these contain the options you’ll need to set to customize your search and other site functions),and Views (these control the layout and output of your data).
A blank theme named copyme comes pre-installed with your Pawtucket system - this consists of the basic themefolder structure and can be used as a template to get you started. To create your custom theme, simply copy thecopyme folder and its contents and name it what you like. For the purposes of this tutorial, we’ll assume a themename of mytheme. To complete the creation of your new theme, copy the contents of themes/default/conf into theconf folder in your theme.
Next, you’ll need to tell Pawtucket to use your theme instead of the default. This setting can be found on line 77 ofthe setup.php file in Pawtucket’s root directory. Change the theme setting to your theme’s folder name, like this:
$_CA_THEMES_BY_DEVICE = array('_default_' => 'mytheme' // use the 'default' theme for everything else
);
22 Chapter 1. Contents

CollectiveAccess Documentation, Release 1.8
Now that you’ve created your new theme, your Pawtucket site will look. . . exactly the same! This is because youhave not begun overriding files or settings yet. As a result, your custom theme is falling back entirely on content beinggenerated from the default theme.
Customizing your theme
To begin overriding default theme views, you need only to copy them from the default theme into the appropriatefolder in your custom theme. As an example, let’s replace the default CollectiveAccess logo in your theme. The logographic is declared on line 100 of themes/default/views/pageFormat/pageHeader.php, so you’ll want to copy this viewfile into themes/mytheme/views/pageFormat (do not change the filename). Once the file is copied, you can edit thecode to your liking. Since we are reference a new graphic, you’ll also want to upload your new logo to the assetsfolder in themes/mytheme/assets/pawtucket/graphics/.
Tip: Only copy the views from the default theme that are needed for your customized design. This will make updatesmore efficient by ensuring that your Pawtucket system draws on the default theme wherever possible, and reduces theneed to manually update code in your views.
If you navigate to themes/mytheme/assets/pawtucket/css, you’ll notice that it contains one blank css stylesheet, namedtheme.css. This is where you can add any css needed to customize your site and override any styles employed bythe default theme. Simply add the styles you’d like to override to this file and the changes will be reflected in yourPawtucket site. You can also add any additional css files you’d like to use to this css folder - just follow the instructionsfor loading additional Assets.
A great deal of common configuration options are available simply by editing Configuration Files. Please check thedocumentation for these files individually for a guide to the options available.
Advanced Customization
Most themes will limit their customization to the three areas listed above. However, the latest version of Pawtucketallows developers to create theme-specific Controllers in addition to the above. To create a theme specific controller,simply create a folder named controllers in your theme directory and copy the Controller you’d like to edit. This ishelpful if you want to pass new or custom variables to existing views, or create new site areas that are not included inthe default Pawtucket.
1.5.3 Assets
The assets folder contains any external files, including graphics, stylesheets, fonts and javascript libraries, that you mayneed to customize your Pawtucket installation. By default, the assets folder contains subfolders for css and graphicfiles, but you can create as many folders as you wish for other types of assets.
Loading New Assets
Pawtucket will automatically load your js and css assets throughout the installation, but first they must be configuredin the assets.conf file (note that new graphics in your graphics folder are excluded from this requirement).
By default, your list of assets might look like this:
themePackages = {# -----------------------pawtucket = {
css = css/main.css:100,
(continues on next page)
1.5. Introduction to Themes 23
CollectiveAccess Documentation, Release 1.8
(continued from previous page)
fonts = css/fonts.css,fontAwesome = css/Font-Awesome/css/font-awesome.css,themecss = css/theme.css:200
}# -----------------------
}
To add a new js file, you can create
1.5.4 Configuration Files
The default theme contains a set of configuration files that will help you customize various areas of your Pawtucketinstallation, including detail pages, search, browse, and others. The essential configuration files are preloaded withdefault values in themes/default/conf, and additional files are available in app/conf for more advanced configurationsettings.
Tip: Always copy a configuration file to your custom theme’s conf folder before making changes, otherwise updatesmay overwrite your settings!
1.5.5 Views
1.6 General Configuration
1.6.1 app.conf
The app.conf configuration file defines general behaviors and settings for a theme. The file has many possible settingsaffecting a wide-range of functions. Settings grouped broadly by function are described in detail below.
Login, registration and access control
Setting Description Allowed values Required?DefaultSynonymsdontAllowRegistrationAndLoginDisable login and registration options 0 or 1 No 0 dont_allow_registration_and_logindontAllowRegistration Disable registration option 0 or 1 No 0deployBristol When “Bristol” mode is enabled users
must login and have access only tosets for which they have been grantedread-level access.
0 or 1 No 0 deploy_bristol
pawtucketRequiresLoginRequire all Pawtucket users to loginfor access.
0 or 1 No 0 pawtucket_requires_login
Theme inheritance
Each theme inherits views and configuration from the Pawtucket default theme. You can use the options below toenable inheritance from other themes.
24 Chapter 1. Contents

CollectiveAccess Documentation, Release 1.8
Setting Description Allowed values Required?DefaultSynonymsallowThemeInheritanceEnables theme inheritance 0 or 1 No 0inheritFrom Name of theme to inherit from A valid theme name. Ex. itinera No None inherit_from
1.6.2 global.conf
1.7 Meida Display & Access
1.8 Public Access Configurations
1.9 Login & Registration
1.10 Homepage & Static Pages
1.11 Pawtucket2 Site Pages
• General Steps
• Template (.tmpl) Files
• template.conf
• scan-site-page-templates caUtils script
• Providence Editor
• Other Options
– Special placeholders
The site page feature provides users with an easy way to add blog-like functionality to their Pawtuckt2 site throughthe use of static page templates, which are edited in Providence, and which generate stand-alone pages on their frontend. These pages are fully customizable and also allow for media upload through Providence to give users without abackground in HTML/CSS the ability to create new pages for their site. This allows for easier editing of About, Contactand other pages that may require occasional updates but which are not part of an organization’s digital collections.
There are several components that that provide the design and configuration for these components: the page template(s)(a .tmpl file), your theme’s template.conf file in Pawtucket and the Site Page editor in Providence.
1.11.1 General Steps
• Create one or more .tmpl files. These provide the HTML markup for each type of site page and contain{{{[field]}}} placeholders for user-supplied values. These pages can use the Bootstrap CSS classes to structurethe layout. There are several examples included in the default Pawtucket2 theme.
• Add and modify a template.conf file to the Pawtucket theme. This file provides title and format instructionshow the user-supplied {{{[field]}}} values can be edited, including WYSIWG editor options and others. Anexample template.conf file is also included in the default Pawtucket2 theme.
1.7. Meida Display & Access 25

CollectiveAccess Documentation, Release 1.8
• Run the scan-site-page-templates utility in your Pawtucket’s support directory
• Create site page(s) in Providence using the site page editor
Note: A site page editor must be defined in your configuration file for this to be enabled.
1.11.2 Template (.tmpl) Files
These files provide the HTML layout of a site page and include the triple-curly bracketed field placeholders thatdesignate where user-editable text will be included. This layout can be very simple and just provide places for headerand body text, or they can provide more structure and customizable fields. A simple example is provided below:
<h1>{{{title}}}</h1><h3>{{{subtitle}}}</h3>
<div class="bodytext">{{{bodytext}}}
</div>
1.11.3 template.conf
This file controls how the user-editable fields defined in your templates (e.g. {{{title}}}) can be edited. This is a fairlyshort list of options that include the title, description, width and height of the editor that appears in the Providence sitepage editor. The full list of options is:
Option Description Values Examplelabel Main label for this field in Providence Plain Text Page titledescrip-tion
A brief description of the purpose of this field Plain Text The top-level ti-tle for this page
width The width of the editor in providence, in pixels Width in Pixels 600pxheight The height of the editor in Providence Set to “1” for a single row ed-
itor, otherwise set in pixels1 or 250px
usewysi-wygedi-tor
Enable or disable a WYSIWYG editor for thisfield. Enabling allows for embedding images
1 or 0 1
A simple template.conf file will look like:
fields = {title = {label = Page title,description = Title of page,width = 600px,height = 1
},bodytext = {label = Page text,description = Main text for page,usewysiwygeditor = 1,width = 600px,height = 300px
(continues on next page)
26 Chapter 1. Contents
CollectiveAccess Documentation, Release 1.8
(continued from previous page)
}}
1.11.4 scan-site-page-templates caUtils script
Before these pages can be created and/or edited, you must run a caUtils script on the command line in order forProvidence to detect the new/changed templates in Pawtucket2. To do so go to the support directory of your pawtucketinstall and run:
php -f bin/caUtils scan-site-page-templates
1.11.5 Providence Editor
Important: If you are implement Site Pages on an older version of Providence it is very likely you have not createdan User Interface for editing Site Pages. You must create this interface before you can create/edit these pages (Seeprovidence-user-interfaces for more information)
Once you have created the templates and conf file you will be able to create and edit these pages through Manage >Pawtucket > Site Pages. To be made available each page must be assigned a unique URL in the “URL Path” Field.This path ‘’‘must’‘’ start with a backslash (e.g. “/About/hours”)
The other bundles operate in the same manner as other editors in Providence. Images you upload through the Site Pagemedia bundle are available to embed in any field with WYSIWYG editing enabled. They can be selected by clickingthe image icon in the editor’s toolbar.
1.11.6 Other Options
Special placeholders
In your .tmpl files there are several special placeholders that perform specific functions. They are:
Placeholder Description Output{{{page_view_count}}} Displays the number of times this site page has been displayed “42”
1.12 Search & Browse Pages and Settings
1.12.1 Search Forms
1.12.2 Browse Forms & Facets
omitChildRecords = Don’t return child records in browse results
1.12. Search & Browse Pages and Settings 27

CollectiveAccess Documentation, Release 1.8
1.12.3 Results Pages
1.13 Detail Pages
1.13.1 detail.conf
The detail.conf configuration file defines all available detail views for a theme. Details are, as their name implies,detailed metadata displays for a specific item – a subject. At a minimum, a detail will be bound to a table. A detailmay be designed to display data for one of the following tables: objects, entities, occurrences, places, or collections.
You may define any number of details. Each will have a unique code that is used in Pawtucket URLs to reference thedetail.
Top-level settings
The primary top-level setting is detailTypes, a dictionary that contains definitions for each detail. Other top-levelsettings control download of media.
Setting Description Allowed values Required?DefaultSynonymsdetailTypes Dictionary of all detail pages avail-
able in this theme. Dictionary keysare short, unique codes for each avail-able detail. Values are dictionaries ofoptions for the detail, the format ofwhich is defined below.
Dictionary yes none
allowObjectRepresentationDownloadControls whether download of repre-sentations on object detail pages areallowed, and to whom they are avail-able.
anyone, logged_in,logged_in_privileged, never
no never allow_ca_objects_representation_download
restrictObjectRepresentationDownloadToObjectTypesControls which types of object recordsallow downloads when the policy setin allowObjectRepresentationDown-load enables downloads.
A list of object types.Ex. [books, maps, images]
no none-alltypesal-lowdown-loads
allow_ca_objects_representation_download_types
Settings for detailTypes
Keys in the detailTypes dictionary are used as unique detail codes. Values control detail display and functionality.
28 Chapter 1. Contents
CollectiveAccess Documentation, Release 1.8
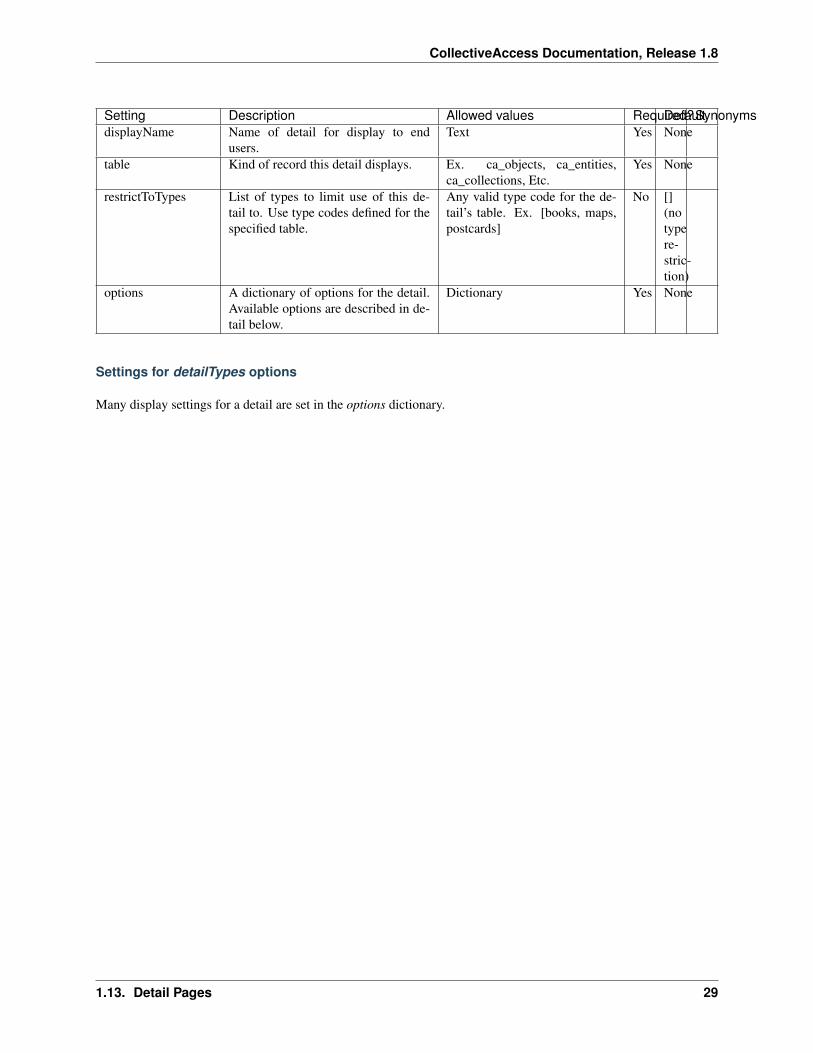
Setting Description Allowed values Required?DefaultSynonymsdisplayName Name of detail for display to end
users.Text Yes None
table Kind of record this detail displays. Ex. ca_objects, ca_entities,ca_collections, Etc.
Yes None
restrictToTypes List of types to limit use of this de-tail to. Use type codes defined for thespecified table.
Any valid type code for the de-tail’s table. Ex. [books, maps,postcards]
No [](notypere-stric-tion)
options A dictionary of options for the detail.Available options are described in de-tail below.
Dictionary Yes None
Settings for detailTypes options
Many display settings for a detail are set in the options dictionary.
1.13. Detail Pages 29
CollectiveAccess Documentation, Release 1.8
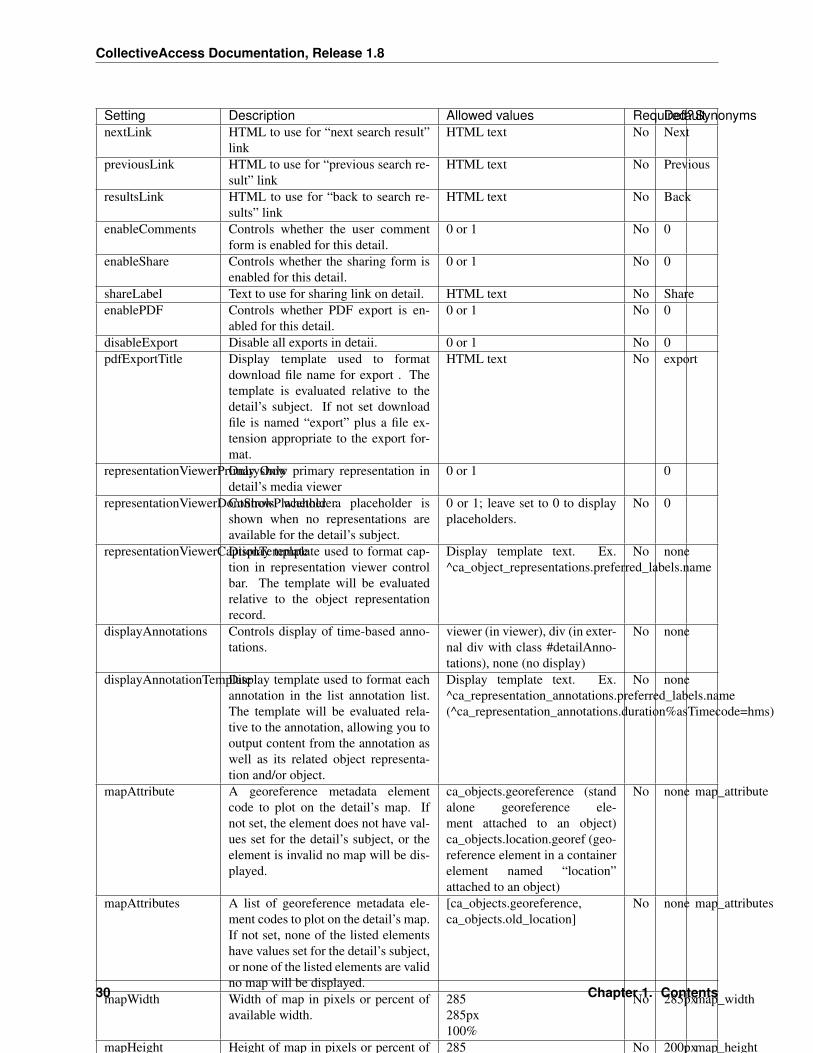
Setting Description Allowed values Required?DefaultSynonymsnextLink HTML to use for “next search result”
linkHTML text No Next
previousLink HTML to use for “previous search re-sult” link
HTML text No Previous
resultsLink HTML to use for “back to search re-sults” link
HTML text No Back
enableComments Controls whether the user commentform is enabled for this detail.
0 or 1 No 0
enableShare Controls whether the sharing form isenabled for this detail.
0 or 1 No 0
shareLabel Text to use for sharing link on detail. HTML text No ShareenablePDF Controls whether PDF export is en-
abled for this detail.0 or 1 No 0
disableExport Disable all exports in detaii. 0 or 1 No 0pdfExportTitle Display template used to format
download file name for export . Thetemplate is evaluated relative to thedetail’s subject. If not set downloadfile is named “export” plus a file ex-tension appropriate to the export for-mat.
HTML text No export
representationViewerPrimaryOnlyOnly show primary representation indetail’s media viewer
0 or 1 0
representationViewerDontShowPlaceholderControls whether a placeholder isshown when no representations areavailable for the detail’s subject.
0 or 1; leave set to 0 to displayplaceholders.
No 0
representationViewerCaptionTemplateDisplay template used to format cap-tion in representation viewer controlbar. The template will be evaluatedrelative to the object representationrecord.
Display template text. Ex.^ca_object_representations.preferred_labels.name
No none
displayAnnotations Controls display of time-based anno-tations.
viewer (in viewer), div (in exter-nal div with class #detailAnno-tations), none (no display)
No none
displayAnnotationTemplateDisplay template used to format eachannotation in the list annotation list.The template will be evaluated rela-tive to the annotation, allowing you tooutput content from the annotation aswell as its related object representa-tion and/or object.
Display template text. Ex.^ca_representation_annotations.preferred_labels.name(^ca_representation_annotations.duration%asTimecode=hms)
No none
mapAttribute A georeference metadata elementcode to plot on the detail’s map. Ifnot set, the element does not have val-ues set for the detail’s subject, or theelement is invalid no map will be dis-played.
ca_objects.georeference (standalone georeference ele-ment attached to an object)ca_objects.location.georef (geo-reference element in a containerelement named “location”attached to an object)
No none map_attribute
mapAttributes A list of georeference metadata ele-ment codes to plot on the detail’s map.If not set, none of the listed elementshave values set for the detail’s subject,or none of the listed elements are validno map will be displayed.
[ca_objects.georeference,ca_objects.old_location]
No none map_attributes
mapWidth Width of map in pixels or percent ofavailable width.
285285px100%
No 285pxmap_width
mapHeight Height of map in pixels or percent ofavailable width.
285285px100%
No 200pxmap_height
mapZoomLevel Zoom level to set for map on pageload.
A value between 0 and 18 No 12 zoom_level
mapContentTemplate Display template used to format la-bel displayed when a map marker isclicked. The template is evaluated rel-ative to the details subject.
Display template text. Ex.^ca_objects.idnoIf not set map markers will notrespond to clicks.
No none
30 Chapter 1. Contents

CollectiveAccess Documentation, Release 1.8
Detail URLs
Unique codes are used in URLs to select a detail for display. The URL format is:
https://<your-hostname>/Detail/<code>/<identifier> where <code> is the detail’s code and <identifier> is the numericrow id or alphanumeric record identifier to display.
1.14 Lightboxes & Galleries
1.15 Classrooms
1.16 Contact & Mail Templates
1.14. Lightboxes & Galleries 31