Coherence, JPA , and TopLink Grid - Oracle · Coherence, JPA , and TopLink Grid Hands-on Lab 1....
32
Coherence, JPA , and TopLink Grid Hands-on Lab 1. Introduction This hands-on lab introduces you to using Oracle Coherence with the Java Persistence API (JPA) and to the advanced JPA integration provided by TopLink Grid. Coherence can be used with JPA in two ways: to allow the Coherence to persist and retrieve objects to and from a database, and to provide TopLink JPA with a high performance cache. 2. Base Environment This lab requires the following: • Coherence 3.4 • TopLink 11g (including EclipseLink) • JDeveloper 11.1.1 • Oracle Database , TRADER schema (trader/trader) with the TRADES table 3. JPA Cache Store Lab 3.1. Instructions Follow the sequence of instructions below. You will use a combination of JDeveloper and shell commands to run Coherence Cache Servers; execute code to load create a random data set; then create and run your own code to warm the Cache Server and execute queries against the cache. 3.2. Explore JDeveloper and Verify Environment In this section, you will become familiar with the basic environment that is setup on your lab machine. The lab is based on using Ant and JDeveloper as an IDE to develop and run small applications that make use of a Coherence Cache Server. A shell can also be used to execute your application code and run the Coherence Cache Server instances. In either the JDeveloper or shell environments, an Ant script is used to run the Coherence Cache Servers and your application code. Start a terminal shell using the desktop icon and cd to ~/Desktop/Coherence-JPA-Lab. Execute an ant –p command to view the list of pre-defined targets in the supplied Ant build file. Start JDeveloper 11g using the desktop icon and in the Application Navigator view, Open Application: /root/Desktop/Coherence-JPA-Lab/coherence-jpa.jws.
Transcript of Coherence, JPA , and TopLink Grid - Oracle · Coherence, JPA , and TopLink Grid Hands-on Lab 1....

Coherence, JPA , and TopLink Grid
Hands-on Lab
1. Introduction
This hands-on lab introduces you to using Oracle Coherence with the Java Persistence API (JPA) and to the advanced JPA integration provided by TopLink Grid. Coherence can be used with JPA in two ways: to allow the Coherence to persist and retrieve objects to and from a database, and to provide TopLink JPA with a high performance cache.
2. Base Environment
This lab requires the following:
• Coherence 3.4
• TopLink 11g (including EclipseLink)
• JDeveloper 11.1.1
• Oracle Database , TRADER schema (trader/trader) with the TRADES table
3. JPA Cache Store Lab
3.1. Instructions
Follow the sequence of instructions below. You will use a combination of JDeveloper and shell commands to run Coherence Cache Servers; execute code to load create a random data set; then create and run your own code to warm the Cache Server and execute queries against the cache.
3.2. Explore JDeveloper and Verify Environment
In this section, you will become familiar with the basic environment that is setup on your lab machine. The lab is based on using Ant and JDeveloper as an IDE to develop and run small applications that make use of a Coherence Cache Server. A shell can also be used to execute your application code and run the Coherence Cache Server instances.
In either the JDeveloper or shell environments, an Ant script is used to run the Coherence Cache Servers and your application code.
Start a terminal shell using the desktop icon and cd to ~/Desktop/Coherence-JPA-Lab. Execute an ant –p command to view the list of pre-defined targets in the supplied Ant build file.
Start JDeveloper 11g using the desktop icon and in the Application Navigator view, Open Application: /root/Desktop/Coherence-JPA-Lab/coherence-jpa.jws.

2
Expand the coherence-jpa application node.
Verify the connection to the database.
In the Application Navigator open Application Resources, expand the Database node, open the Trader schema, expand the Tables node and select the TRADES table.
Examine the structure of the table.

3
In the Application Navigator open Projects, locate the Ant build.xml file. Load it into the editor by double clicking on it.
Execute the Ant display-data task to ensure the database can be accessed from the JDeveloper environment.

4
Right-click on the build.xml file. Select the Run Ant Target item, then select display-data from the list to execute the target.

5
When the target executes the results should show that no data was found in the table. This is the expected result. A random trade data set will be populated via the cache as the lab proceeds.
Now do the same thing from a shell to verify that it can successfully access the database.
In a shell, execute the display-data target. Verify that the connection is valid and the results are similar to the JDeveloper result.
> ant display-data

6
3.3. Create Trade JPA Entity
In this section, you will create a Trade JPA Entity object that represents the TRADES table in the database. The Trade Entity is used to fetch and store rows of data from the database table. It is used by the Coherence Cache Server to move data in and out of the cache.
Once the Trade Entity is created, you will populate the TRADES table via a client that loads data into a running Cache Server, which is then written out to the specified database table.
To create the Trade JPA Entity, you will reverse-engineer it from the TRADES database table following the steps below.

7
Using the Application Navigator, select the coherence-jpa project. Right mouse click and select the New item.

8
Expand the Business Tier node, then select EJB and the Entities from Tables item.
Press New to create a new persistence.xml file.

9
Select Online Database Connection and press Next.

10
Select the Trader database connection and press Next.
Press Query to populate the Available tables list. Move the Trades table to the Selected list and press Next.

11
Set the package name to be oracle.examples.model. Press Next to continue.
Change the Entity Name to Trade and verify the remaining details. If any data is different that that shown below, use the Back button to go back and rectify the problem. Press the Finish button to complete the task.

12
Explore the new files in the Application Navigator. Note the Trade.java class.
Double click Trade.java to open it in the file editor. Examine the class and take note of the annotations that are used to describe the persistence behaviour of the fields, the table mappings, etc.
You now will add a toString() method that overrides the default method that the class inherits.
Somewhere within the class, add the following method:
public String toString() {
return String.format(“Trade: %s %s@$%s”,
getSymbol(), getLot(), getPrice());
}

13
Double click persistence.xml to load it into the editor. Select the Overview tab to use the rich editor. You will now review database connection details.
Double-click on the coherence-jpa persistence unit to edit.

14
Select the Connection tab then open General. Select a Transaction Type of Resource Local.
Open TopLink Connection Pool and select Trader as the Connection. Open Show Connection Information and verify the User Name, Driver, Host Name, JDBC Port and SID are as displayed. These values are obtained from the JDeveloper Trader database connection used when generating the Trade Entity.
Now that the Trade Entity has been created and the persistence.xml completed, you can populate the database with a set of random Trade data.
The random data set is created by the TradeLoader class, which is provided within the project. This class creates a set of random Trade objects and puts them into a cache. The cache will then store them in the database using the Trade Entity and JPA provider.
private void load() { NamedCache cache = CacheFactory.getCache("Trade"); Map<Long,Trade> trades = new HashMap<Long,Trade>();

15
for (int i = 0; i < NUM_OF_TRADES; ++i) { Trade t = makeRandomTrade(i); trades.put(t.getId(),t); } System.out.println(" * putting " + trades.size() + " Trade objects"); cache.putAll(trades); }
The Cache Server is started using a target in the Ant build.xml file. In a shell, type ant run-cache-server to launch Ant and run an instance of the Cache Server.
Note: To configure the Cache Server to use the Trade Entity and JPA to store/fetch data from the database, it is started with a configuration file that defines the use of a read-write-backing-map-scheme. See the etc/how-to-config.xml file for the specific details. The how-to-config.xml is passed to the Cache Server on startup using the System property.
-D tangosol.coherence.cacheconfig=etc/how-to-config.xml
An Apache Ant log window will appear which shows the output from the process running the Cache Server. The end of the log window should look like the following:
With the Cache Server running, you now use the Ant run-load-data target to put a set of random Trade objects into the cache, and therefore into the database.
In a shell, type ant run-load-data to launch Ant and run an instance of the TradeLoader class, which creates and puts the Trades into the cache.
A new Apache Ant log window will be displayed showing the output from the run-load-data target. Note that you are, connecting to the Cache Server and loading 10,000 Trade objects into it.

16
The Cache Server log window will show log messages that indicate there is TopLink JPA activity occurring.
Once the run-load-data target has completed, you can execute the Ant display-data target to view what is now contained in the TRADES table.
The database is now populated with a random Trade data set. The trades were created as Java objects, stored in the Trade cache and subsequently written to the Trades table by the Cache Server.
The same Ant targets can all be executed from the command line. Go to the shell and execute any of the same Ant targets. You do not need to do this now, but feel free to explore if you wish.
Run-cache-server
>ant run-cache-server
Run-load-data
>ant run-load-data
Display-data
>ant display-data
Run-interactive
The Ant run-interactive target starts the Coherence console. It allows you to interact with a Cache Server and perform operations on a specified cache.

17
>ant run-interactive
For example, you can run the Coherence console, map to your Trade cache and view how many objects it contains. Or you can execute a list command that will display a subset of the objects in the cache.
Map (?): cache Trade
Map (Trade): size
Map (Trade) list

18
Does the output from the list command look familiar? Recall the toString method we added into the Trade class.
You may want to explore the Coherence cache configuration file that is used by the run-cache-server target to direct the Cache Server to create a map for the Trade JPA Entity. The file is located at /root/Desktop/Coherence-JPA-Lab/etc/how-to-confix.xml. Opening the file in JDeveloper allows you to review the settings.
Some items to note from the configuration file:
• The name of the cache is Trade
• A read-write-backing-scheme is created that is configured to with a TopLink JPA based CacheStore implementation
• The JPA Entity class is named; note there is a layer of abstraction here where the {cache-Name} token represents the literal value of the cache-name set earlier in the file

19
• The Peristence Unit name from the persistence.xml file (coherence-jpa) is specified.
<!--
ReadWriteBackingMap caching scheme.
-->
<read-write-backing-map-scheme>
<scheme-name>trade-store</scheme-name>
<internal-cache-scheme>
<local-scheme>
<scheme-ref>backing-map</scheme-ref>
</local-scheme>
</internal-cache-scheme>
<!-- Define the cache scheme -->
<cachestore-scheme>
<class-scheme>
<class-name>
oracle.eclipselink.coherence.standalone.EclipseLinkJPACacheStore
</class-name>
<init-params>
<!-- This param is the cache/Entity name -->
<init-param>
<param-type>java.lang.String</param-type>
<param-value>{cache-name}</param-value>
</init-param>
<!-- This param should match the value of the -->
<!-- persistence unit name in persistence.xml -->
<init-param>
<param-type>java.lang.String</param-type>
<param-value>coherence-jpa</param-value>
</init-param>
</init-params>
</class-scheme>
</cachestore-scheme>
<read-only>false</read-only>
</read-write-backing-map-scheme>
3.4. Develop a Cache Warmer
A common scenario when using Coherence is to pre-populate a cache before the application makes use of it. In this section, you will write a small Java class that warms your Cache Server by

20
causing it to fetch the Trade data from the database using JPA. This will move the data from the database into the cache in the form of Trade objects so it can be efficiently accessed by other applications.
Since the Cache Server is configured to use a read-write-backing-scheme using your Trade Entity, you just present the cache with a set of keys and ask it to return all the objects associated with the keys.
To create the CacheWarmer, you will create a new Java class. The class must be named oracle.examples.cache.CacheWarmer as it is pre-configured to run with that name from the Ant build script.
Using the Application Navigator, select the oracle.examples.cache node. Right mouse click and select New.
21
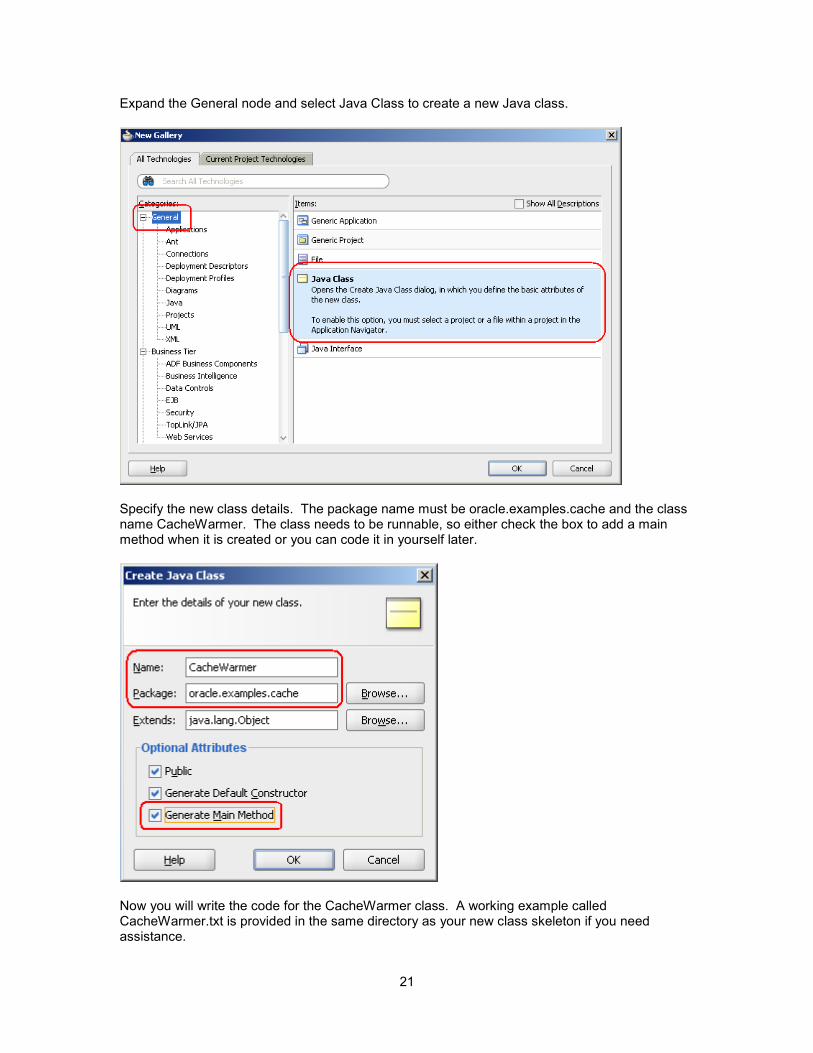
Expand the General node and select Java Class to create a new Java class.
Specify the new class details. The package name must be oracle.examples.cache and the class name CacheWarmer. The class needs to be runnable, so either check the box to add a main method when it is created or you can code it in yourself later.
Now you will write the code for the CacheWarmer class. A working example called CacheWarmer.txt is provided in the same directory as your new class skeleton if you need assistance.

22
• The general steps the class should perform are:
Create a reference to a cache called Trade.
Create a set of keys of objects to be retrieved from the cache – the Trade Entity has a Long as its key.
Get the objects from the cache using the keys, forcing the CacheServer to fetch the data from the database.
The relevant code segments to accomplish these tasks are:
NamedCache cache = CacheFactory.getCache(“Trade”);
List keys = new ArrayList();
for(long l=0; l< 100000; l++) {
keys.add(l);
}
List<Trade> trades = cache.getAll(keys);
Once you have finished developing the class, you can run it to fill the Cache Server with data from the database. This is performed using the Ant build script and the run-cache-warmer target.
Note: If you still have the Cache Server running, then stop it and restart to ensure it contains no Trades .
Note: The run-cache-warmer target is defined to run a class named oracle.examples.cache.CacheWarmer. If your class name is different the Ant target will not run successfully. You can either change the name of the class (and the associated filename of the class) or modify the build.xml to specify the actual name of your class.
<java classname="oracle.examples.cache.CacheWarmer"
fork="yes">
Select the build.xml file and with the right mouse button, select the Run Ant Target item and the run-cache-warmer target. This will launch Ant and run an instance of your CacheWarmer class, which fills the cache with data from the database.
Note: A Cache Server process must be running before you execute your CacheWarmer class. The CacheWarmer class is configured to run with local storage disabled, so it does not create a local cache, instead it works with a distributed Cache Server it locates via the Coherence discovery mechanism.

23
Your CacheWarmer class will run and fill the cache with objects that represent the list of keys you asked for.
3.5. View Coherence / JPA SQL Commands
There is an interesting side excursion you can do from here if you wish to see the database queries in action that are used to populate the cache.
To see the queries, stop all running instances of the Cache Server. This needs to be done in both JDeveloper and in any shells where a Cache Server is running.
With the Cache Servers terminated, edit the persistence.xml file and change the TopLink Logging Level value to FINE.

24
Open META-INF\persistence.xml and switch to the Overview tab if necessary.
Select the Logging tab and use the Log Level drop down to choose Fine.
Ensure there is an instance of the Cache Server running. If one is not running then start it using the Ant run-cache-server target as shown previously.
Now run your CacheWarmer using the Ant run-cache-warmer target.
View the log window from the Cache Server process and you will see the SQL queries that are being issued to obtain data from the database to fulfill the getAll operation performed against the cache with the specified key set.
3.6. Developer Cache Query
In this section you will develop another small application that performs an aggregated query against the Trade cache and measures the time required to perform the task.
Because the cache contains Trade objects, a reasonable query would be to discover the number of trades for every distinct company (symbol) and then derive the total market worth.
25
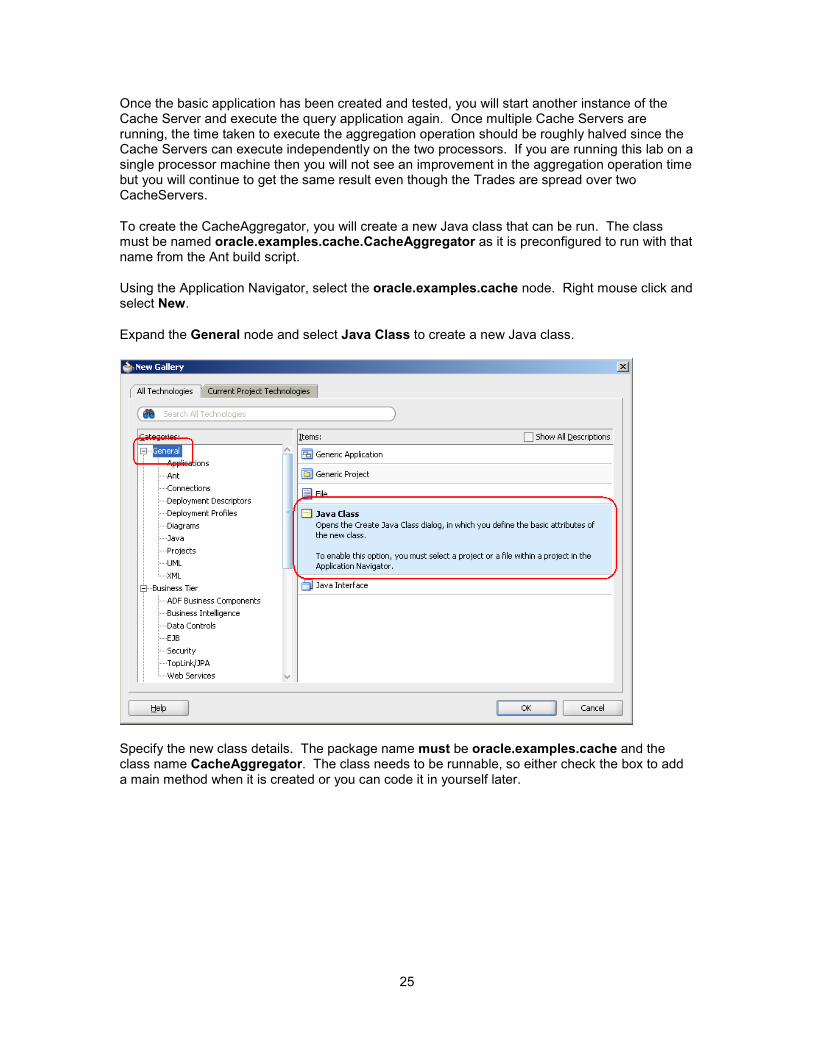
Once the basic application has been created and tested, you will start another instance of the Cache Server and execute the query application again. Once multiple Cache Servers are running, the time taken to execute the aggregation operation should be roughly halved since the Cache Servers can execute independently on the two processors. If you are running this lab on a single processor machine then you will not see an improvement in the aggregation operation time but you will continue to get the same result even though the Trades are spread over two CacheServers.
To create the CacheAggregator, you will create a new Java class that can be run. The class must be named oracle.examples.cache.CacheAggregator as it is preconfigured to run with that name from the Ant build script.
Using the Application Navigator, select the oracle.examples.cache node. Right mouse click and select New.
Expand the General node and select Java Class to create a new Java class.
Specify the new class details. The package name must be oracle.examples.cache and the class name CacheAggregator. The class needs to be runnable, so either check the box to add a main method when it is created or you can code it in yourself later.

26
Now you will write the code for the CacheAggregator class. A working example called CacheAggregator.txt is provided in the same directory as your new class skeleton if you need assistance.
The general steps the class should perform are to:
Create a reference to a cache called Trade.
Discover all the distinct symbols from the Trade objects in the cache
For each symbol, query the number of trades in the cache
Sum the price of every trade (time this operation for later comparison)
A completed example is provided in the same directory as your skeleton class if you wish to get working immediately.
The relevant types of code fragments you will need to use are shown below:
NamedCache cache = CacheFactory.getCache("Trade");
Set<String> symbolSet =
(Set<String>)cache.aggregate(
AlwaysFilter.INSTANCE,
new DistinctValues("getSymbol"));
int tradeTotal = 0;
Count count = new Count();
for(String symbol : symbolSet) {
int symbolCount =
((Integer)cache.aggregate(

27
new EqualsFilter("getSymbol",symbol),
count));
System.out.println(
"Symbol " + symbol + " has "
+ symbolCount + " trades");
tradeTotal += symbolCount;
}
System.out.println(
"The total number of trades in the market is "
+ tradeTotal);
DoubleSum aggSum = new DoubleSum("getPrice");
long lStart = System.currentTimeMillis();
Double DResult = (Double)cache.aggregate(
AlwaysFilter.INSTANCE, aggSum);
long lTime = System.currentTimeMillis() - lStart;
System.out.println(
"Total sum of all prices in the market is "
+ DResult);
System.out.println("Query took " + lTime + " ms");
To provide some form of meaningful measure of the operation against the cache, you should measure on of the operations that are performed against the cache.
For example, in the code segment shown about, the last cache.aggretate(…) operation is timed and the result displayed. This is very useful when multiple Cache Servers are running to enable the performance to be compared to the single Cache Server case.
//time this operation
long start = System.currentTimeMillis();
Double result = (Double)cache.aggregate(
filter, new DoubleSum("getPrice"));
long elapsed = System.currentTimeMillis() - start;
Once you have finished developing the class, you can then run it to query Cache Server. This is performed using the Ant build script and the run-cache-aggregator target.
Note: The run-cache-aggregator target is defined to run a class named oracle.examples.cache.CacheAggregator. If your class name is different the Ant target will not run successfully. You can either change the name of the class (and the associated filename of the class) or modify the build.xml to specify the actual name of your class.
<java classname="oracle.examples.cache.CacheAggregator"
fork="yes">

28
Select the build.xml file and with the right mouse button, select the Run Ant Target item and the run-cache-aggregator target. This will launch Ant and run an instance of your CacheAggregator class, which queries the cache and displays the results.
When your CacheAggregator class runs, it will display the data you have obtained from the cache.

29
Take note of the time required to perform the query.
5. Run Multiple Cache Servers
Once you have the CacheAggregator working and displaying data from the Cache Server, you can explore what happens when you run multiple Cache Servers.
You can start the second Cache Server one of two ways:
From within JDeveloper using the Ant run-cache-server target, or
Start another shell and execute the Ant run-cache-server command from there to start another Cache Server.
There is no need to run the run-cache-warmer target to warm up the second cache -- it will automatically synchronize its state with the first Cache Server.
After the second Cache Server has started and synchronized its data, execute the run-cache- aggregator target again.
You should now see the query time has been reduced (if you have multiple processors or cores) as a result of the query being executed across both Cache Servers in parallel.
4. TopLink Grid Coherence Cache Lab
In the previous sections we’ve seen Coherence backed by TopLink JPA for database access. In this section we configure TopLink to direct all queries (insert/update/delete) to Coherence instead of directly to the database. This allows developers to leverage the power of Coherence through the Java Persistence API.
Using TopLink JPA in front of Coherence requires a couple of minor changes to the lab configuration.
First, we need to change the type of Cache Store used by the trade-store backing map. In the how-to-config.xml file replace
oracle.eclipselink.coherence.standalone.EclipseLinkJPACacheStore
with
oracle.eclipselink.coherence.integrated.EclipseLinkJPACacheStore
The only difference in the package names is integrated vs. standalone.
Second, we need to tell TopLink how to use Coherence for the Trade Entity. Add the @Customizer(CoherenceReadWriteCustomizer.class) annotation to the Trade Entity and update the imports so it looks like the code below.
@Entity
@NamedQueries({
@NamedQuery(name = "Trade.findAll",
query = "select o from Trade o")
})

30
@Table(name = "TRADES")
@Customizer(CoherenceReadWriteCustomizer.class)
public class Trade implements Serializable {
This will configure TopLink to direct all read and write operations for the Trade Entity to Coherence.
One of the features of this configuration is the ability to use JPQL to query objects from Coherence instead of using Coherence Filters directly. For example, the Filter code below can be rewritten using the Java Persitence API and JPQL.
Set entrySet = cache.entrySet(
new AndFilter(
new AndFilter(
new EqualsFilter("getPrice",8d),
new EqualsFilter("getSymbol","ORCL")),
new GreaterEqualsFilter("getLot", 90L)));
List<Trade> trades = em
.createQuery("select t from Trade t where " +
"t.price = :price and t.symbol = :symbol " +
"and t.lot >= :lot")
.setParameter("price", 8d)
.setParameter("symbol", "ORCL")
.setParameter("lot", 90L)
.getResultList();

31
You can try it out by creating a new Java class called oracle.examples.cache.CacheQuery and copying the completed class definition from the provided CacheQuery.txt.
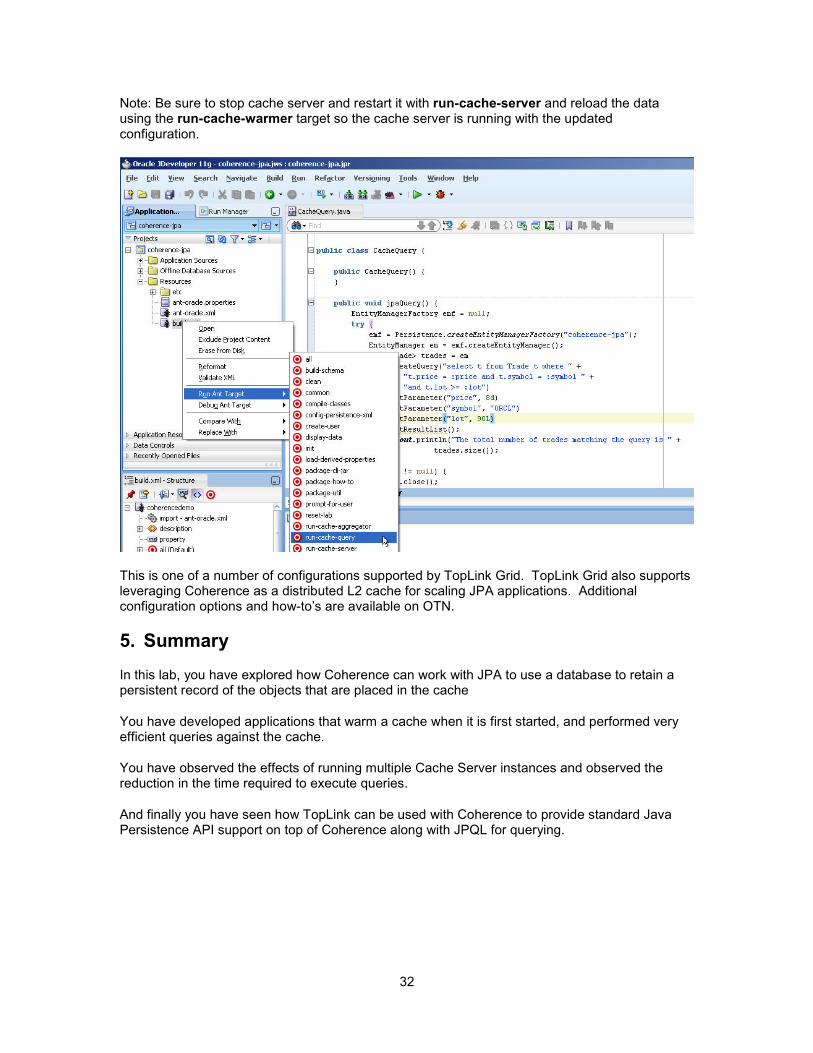
Once the class is defined you can run it with the ant target run-cache-query.
32
Note: Be sure to stop cache server and restart it with run-cache-server and reload the data using the run-cache-warmer target so the cache server is running with the updated configuration.
This is one of a number of configurations supported by TopLink Grid. TopLink Grid also supports leveraging Coherence as a distributed L2 cache for scaling JPA applications. Additional configuration options and how-to’s are available on OTN.
5. Summary
In this lab, you have explored how Coherence can work with JPA to use a database to retain a persistent record of the objects that are placed in the cache
You have developed applications that warm a cache when it is first started, and performed very efficient queries against the cache.
You have observed the effects of running multiple Cache Server instances and observed the reduction in the time required to execute queries.
And finally you have seen how TopLink can be used with Coherence to provide standard Java Persistence API support on top of Coherence along with JPQL for querying.