COBOL-IT Developer Studio Getting Started The Basics Version 1 · Page 1 \ COBOL-IT Developer...
95
Page 1 \ COBOL-IT Developer Studio Getting Started The Basics Version 1.8 COBOL-IT Developer Studio– Getting Started The Basics Version 1.8
Transcript of COBOL-IT Developer Studio Getting Started The Basics Version 1 · Page 1 \ COBOL-IT Developer...

Page 1
\
COBOL-IT Developer Studio
Getting Started
The Basics
Version 1.8
COBOL-IT Developer Studio– Getting Started
The Basics Version 1.8

Page 2
COBOL-IT Developer Studio Topics
This document describes how to install and how to use the COBOL-IT Developer Studio,
which is COBOL-IT’s eclipse-based development environment, designed to support users of the
COBOL-IT Compiler Suite. COBOL-IT is based on OpenCOBOL, originally developed by
Keisuke Nishida and maintained since 2007 by Roger While. In 2008, COBOL-IT forked its
own compiler branch, with the intention of developing a fully featured product and offering
professional support to the COBOL user industry.
The copyright for the COBOL-IT Developer Studio® is wholly owned by COBOL-IT.
Any unauthorized reproduction of the software without the express written consent of COBOLIT
is prohibited.
For more information, please contact us at: [email protected]
COBOL-IT Corporate Headquarters are located at
231, rue Saint-Honore
75001 Paris
Tel: +33.1.75.43.05
Email: [email protected]
COBOL-IT, COBOL-IT Compiler Suite, CitSQL, CitSORT, and COBOL-IT Developer Studio
are trademarks or registered trademarks of COBOL-IT.
Eclipse is a trademark of the Eclipse Foundation.
IBM, and AIX are registered trademarks of International Business Machines Corporation.
Linux is a registered trademark of Linus Torvalds.
Windows, Visual Studio, and Visual Studio Express are registered trademarks of Microsoft
Corporation.
Java and Solaris are registered trademarks of Sun Microsystems, Inc.
UNIX is a registered trademark of The Open Group HP is a registered trademark of Hewlett Packard, Inc.
Red Hat is a registered trademark of Red Hat, Inc.
SUSE is a registered trademark of Novell, Inc.
All other trademarks are the property of their respective owners.
COBOL-IT Developer Studio– Getting Started
The Basics Version 1.8
Introduction and License terms
COBOL-IT Developer Studio License terms

Page 3
COBOL-IT DEVELOPER STUDIO TOPICS ................................................................... 2
Introduction and License terms .................................................................................................................................. 2
Dependencies ................................................................................................................................................................ 4
USING THE COBOL-IT DEVELOPER STUDIO ............................................................. 5
Installing Developer Studio (Windows) ..................................................................................................................... 6
Installing Developer Studio (Linux) ......................................................................................................................... 10
Installing Updates to the Developer Studio ............................................................................................................. 19
The Eclipse Platform ................................................................................................................................................. 23
The COBOL-IT Developer Studio ........................................................................................................................... 25
Configuration Settings .............................................................................................................................................. 26
The File>New Wizards .............................................................................................................................................. 37
Compiler and Runtime Configuration ..................................................................................................................... 45
Compile, Run, Debug ................................................................................................................................................ 54
Summarizing key features of the Developer Studio ................................................................................................ 68
ADDITIONAL DEVELOPMENT SCENARIOS .............................................................. 69
Using existing source code in its current location ................................................................................................... 69
Importing existing source code into a Project structure ........................................................................................ 80
Dragging and dropping files and folders into a Project ......................................................................................... 87
Summary .................................................................................................................................................................... 87
FAQ ............................................................................................................................... 89
Using “Views” in Eclipse ........................................................................................................................................... 89
Managing Multiple Source Folders .......................................................................................................................... 92
Determining the version of Developer Studio ......................................................................................................... 94
COBOL-IT Developer Studio– Getting Started
The Basics Version 1.8

Page 4
Dependency Comment
“C” compiler The COBOL-IT Compiler requires a “C” compiler. While most
Linux>Unix installations will include a “C” compiler, many Windows
installations will not. Windows users can download the “express”
edition of Visual Studio from www.microsoft.com.
COBOL-IT Compiler
Suite
The COBOL-IT Compiler Suite, Standard Edition can be downloaded
at the COBOL-IT Online Portal. For access to the COBOL-IT Online
Portal, please contact your sales representative at [email protected].
The COBOL-IT Compiler Suite setup file is run during the startup of
the Developer Studio, so the Compiler Suite must be installed.
Java Runtime
Environment (JRE)
The COBOL-IT Developer Studio can be run with the Java Runtime
Environment (JRE) Version 1.6 or greater.
Eclipse Eclipse is included with the download of Developer Studio.
The COBOL-IT Developer Studio requires that the COBOL-IT Compiler Suite already be
installed on the host platform, and that a “C” compiler be installed on the host platform.
The COBOL-IT Developer Studio is an Eclipse plug-in, and as such, requires that Eclipse be
installed on the host platform. Eclipse, in turn, requires that a Java Runtime Environment (JRE)
be installed on the host platform.
For Windows-based installations, the COBOL-IT Developer Studio, Enterprise Edition can be
downloaded from the COBOL-IT online portal with a login and password provided by your
sales representative.
For Linux/UNIX-based installations, the COBOL-IT Developer Studio can be downloaded
through the Eclipse “Install new software” interface. Your sales representative will provide you
with the proper license.
The COBOL-IT Developer Studio, Enterprise Edition is available with Subscription. The
COBOL-IT Developer Studio, Enterprise Edition provides the following functionality:
Allows use of the COBOL-IT Compiler Suite Enterprise Edition
Provides Debugger Perspective both locally, and on Remote Systems
COBOL-IT Developer Studio– Getting Started
The Basics Version 1.8
Dependencies
Dependencies and Comments
The COBOL-IT Developer Studio Distribution

Page 5
Provides a Remote Systems Perspective, allowing use of Compiler, Runtime, and
Debugger functionalities on remote machines.
Using the COBOL-IT Developer Studio requires a license for both the COBOL-IT
Compiler Suite Enterprise Edition, and COBOL-IT Developer Suite.
Using the COBOL-IT Developer Studio This document describes how to install and how to use the COBOL-IT Developer Studio.
COBOL-IT Developer Studio is a COBOL development workshop based on the Eclipse
environment.
This IDE includes a project manager and a full screen editor dedicated to COBOL language with
colorized syntax and an interface to the COBOL debugger. It may be customized according to
the specific needs of each company. The Eclipse environment offers great flexibility through its
wide range of plug-ins.
The Developer Studio is the Eclipse-based COBOL-IT Development Environment , providing a
framework for using the Compiler, Runtime and Debugger in a Development environment with a
feature-rich COBOL Code Editor.
COBOL-IT Developer Studio enables COBOL developers to more easily maintain and enhance
their applications by offering them the entire range of possibilities and power of Eclipse.
This chapter guides the user through a practical exercise that includes installing the Developer
Studio, and launching a workspace.
COBOL-IT Developer Studio– Getting Started
The Basics Version 1.8

Page 6
COBOL-IT Developer Studio Windows distributions are provided in a zipped folder file format.
A file-naming convention is observed when naming the distribution files. For example, the
downloadable distribution for the Developer Studio version 1.8.7 for Windows operating
environments is named:
cobolit.dev.studio-1.8.7-win32.win32.x86.zip
The COBOL-IT Developer Studio is downloadable from COBOL-IT Online, with access
provided by your Sales Representative. Your login and password will give you access to the
Downloads Screen on COBOL-IT Online.
In the Active Authorizations Window of the Downloads screen, select "Cobol I T Developer
Studio". Active Authorizations are the Products you are currently authorized to Download.
Selecting “COBOL-IT Developer Studio“ will display a list of the Products you may download.
COBOL-IT Developer Studio– Getting Started
The Basics Version 1.8
Installing Developer Studio (Windows)

Page 7
From the list, select IDE Windows with jre.
After selecting “IDE Windows with jre”, you will advance to the Download method Screen.
On the Download method screen, use the default settings. Click OK to advance to the License
Agreement screen and then to the download server for the COBOL-IT Developer Studio.
COBOL-IT Developer Studio– Getting Started
The Basics Version 1.8

On the License Agreement Screen, click “I Agree” to advance to the Download Server for the
COBOL-IT Developer Studio.
On the Download Server for the COBOL-IT Developer Studio, select the most recent version of
the COBOL-IT Developer Studio. As your browser begins to download the COBOL-IT
Developer Studio with J R E, you will see a pop-up window at the bottom of the screen.
When the download is complete, the archive will be located in your Downloads folder.
COBOL-IT Developer Studio– Getting Started
The Basics Version 1.8
Page 8

Page 9
Navigate to your Downloads folder.
The COBOL-IT dev studio archive is a zipped archive.
Next, we will copy this archive into the COBOL IT installation directory.
Right-click on the COBOL-IT Dev Studio zipped archive in the COBOL-IT installation directory
and select “Extract All”. Notice that the citlicense.xml file is also located in your COBOL-IT
installation directory. This file has been supplied by your Sales Representative, and authorized
the use of both the Developer Studio and the COBOL-IT Compiler Suite Enterprise Edition.
The “Extract All” function will suggest a destination folder located under the COBOL-IT
COBOL-IT Developer Studio– Getting Started
The Basics Version 1.8

Page 10
installation directory and extract all of the files in the zipped folder into that directory.
is the COBOL-IT Developer Studio distribution. The COBOL-IT Developer Studio is an
application called “CDS”. Double-click on “CDS” to launch the Developer Studio.
The COBOL-IT Compiler Suite Enterprise Edition, Eclipse and the Java Runtime Environment
must be installed on your Linux machine.
To install Developer Studio in Linux, launch eclipse, and select a workspace.
COBOL-IT Developer Studio– Getting Started
The Basics Version 1.8
Installing Developer Studio (Linux)

Page 11
From the Welcome to Eclipse screen, click on the Workbench launcher.
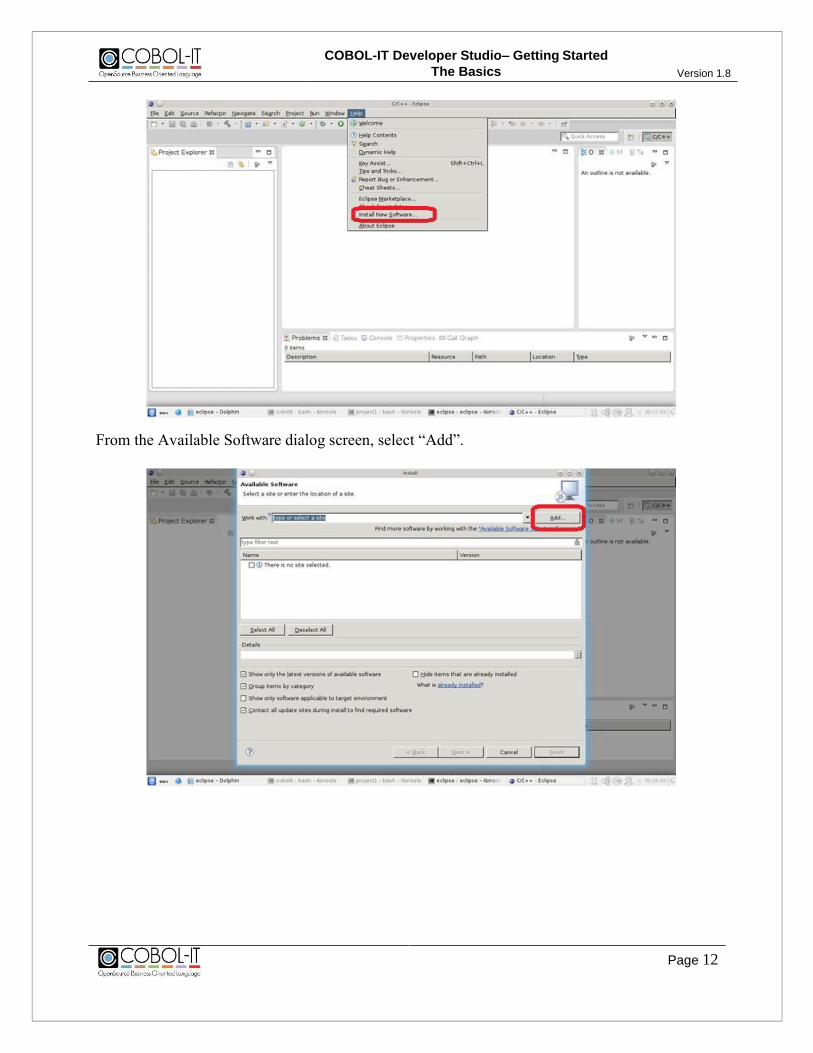
This opens Eclipse. From the Help menu, select “Install New Software”.
COBOL-IT Developer Studio– Getting Started
The Basics Version 1.8
Page 12
From the Available Software dialog screen, select “Add”.
COBOL-IT Developer Studio– Getting Started
The Basics Version 1.8
Page 13
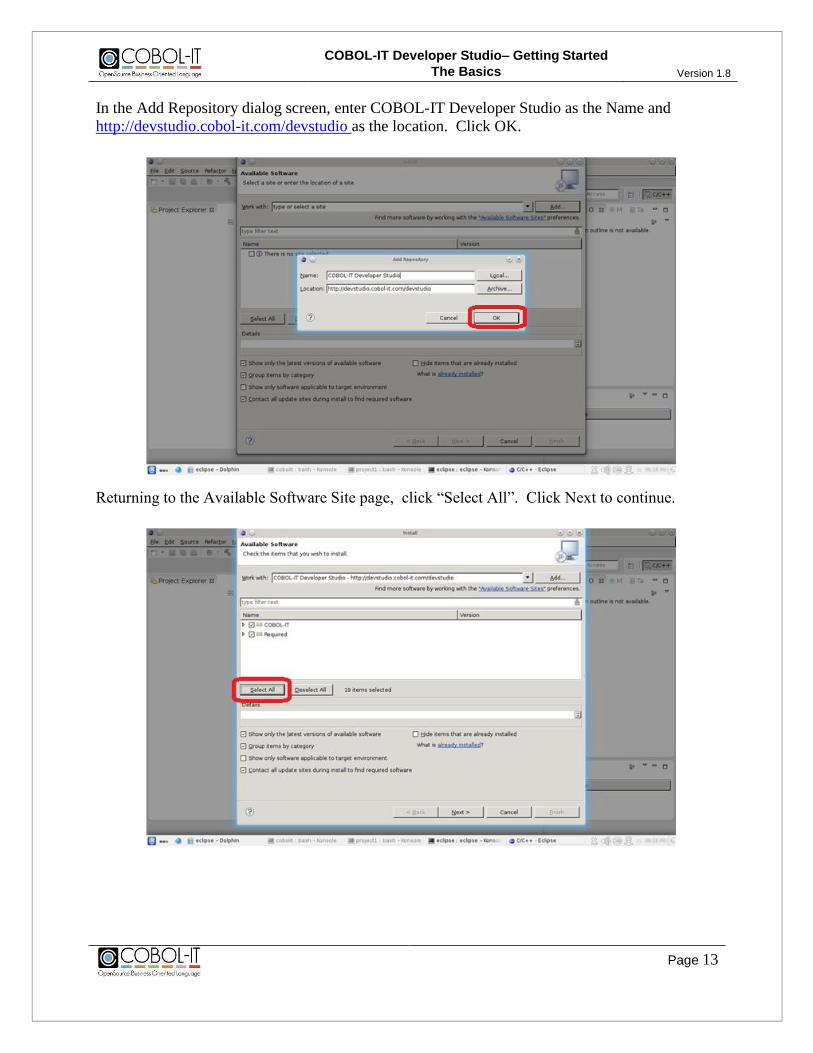
In the Add Repository dialog screen, enter COBOL-IT Developer Studio as the Name and
http://devstudio.cobol-it.com/devstudio as the location. Click OK.
Returning to the Available Software Site page, click “Select All”. Click Next to continue.
COBOL-IT Developer Studio– Getting Started
The Basics Version 1.8

Page 14
On the Install Details screen, accept the selections. Click on the Next button to continue.
Accept the license terms, and click “Finish”.
COBOL-IT Developer Studio– Getting Started
The Basics Version 1.8

Page 15
The software installs. If you receive a Security Warning, click “ok”. When the software has
been installed, you will be notified that Eclipse needs to be restarted. Click on “Restart Now”.
Eclipse Auto-restarts
COBOL-IT Developer Studio– Getting Started
The Basics Version 1.8

Page 16
After restarting Eclipse, you must open the Developer Studio Perspective.
To open the Developer Studio Perspective, Click on “Window” on the main menubar, and Select
“Open Perspective” from the Dropdown menu. Then select “Other” to see the “Open
Perspective” window. From the list of Perspectives, select “COBOL-IT Developer Studio.”.
COBOL-IT Developer Studio– Getting Started
The Basics Version 1.8

Page 17
This is the COBOL-IT Developer Studio.
Make the COBOL-IT Developer Studio your Default Perspective.
Select Window from the Main Menubar. From the dropdown menu, select “Preferences”. In the
panel on the left, click on “General” to expand the submenu. From the “General” submenu,
select “Perspectives”. Select “COBOL-IT Developer Studio” from the Available Perspectives
Window, and then click on the “Make Default” button. Click the OK.
COBOL-IT Developer Studio– Getting Started
The Basics Version 1.8

Page 18
Validate the Installation, by checking the license.
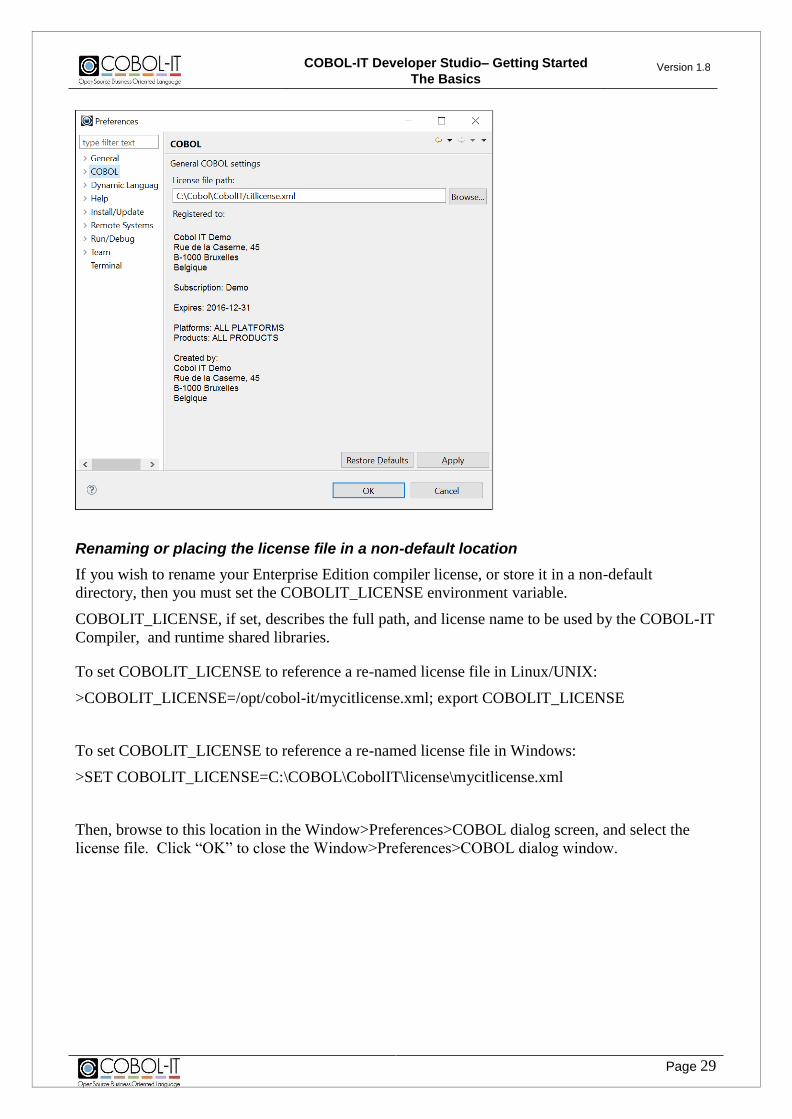
To validate the install, select Window, from the Main Menubar, and then select “Preferences”
from the dropdown menu. In the Preferences dialog screen, select “COBOL” from the panel on
the left. You will now need to browse to locate your COBOL-IT license file.
Click on the Browse button, navigate to the /opt/cobol-it directory, and select “citlicense.xml”.
The expiration date of your license, and the products and platforms supported will be displayed.
Verify that the Compiler Suite and Developer Studio are licensed on your platform.
Click OK to return to the Developer Studio.
COBOL-IT Developer Studio– Getting Started
The Basics Version 1.8

Page 19
In Windows, if the Developer Studio is installed under either the C:\Program Files or C:\Program
Files (x86) folders on your Windows system, and if you are running Windows 7 or Windows Vista,
then you must have Administrator privileges in order to perform Developer Studio updates. This is
because Windows 7 and Windows Vista consider the C:\Program Files and C:\Program Files (x86)
folders to be restricted directories.
Select Help/Check for Updates from the Main Menubar.
Eclipse is programmed to check the plug-ins you have installed for updates.
COBOL-IT Developer Studio– Getting Started
The Basics Version 1.8
Installing Updates to the Developer Studio
Administrator privileges required in some situations
To install an update to the Developer Studio

Page 20
On the Available Updates dialog screen, click “Select All”, and then click on the “Next>” button to
continue.
Review and confirm the updates.
If any updates are downloaded, you will be required to review and accept the terms of the Eclipse
license agreement.
Select the radio button titled “I accept the terms of the license agreement.”.
Click on the Finish button to begin the download and install of the updates.
COBOL-IT Developer Studio– Getting Started
The Basics Version 1.8

Page 21
Wait, while your software updates. You may receive a Security Warning that the software contains
unsigned content. Click “OK”. When you are prompted to restart Eclipse, click “Restart Now”.
COBOL-IT Developer Studio– Getting Started
The Basics Version 1.8

Page 22
To verify that your update has been installed, click on Help/About COBOL-IT Developer Studio.
Then, click on “Installation Details”.
The COBOL-IT Developer Studio Installation Details window contains Version Information about
COBOL-IT Developer Studio, and its dependencies in the Eclipse environment.
Locate the entry for COBOLITEclipse. Verify that it is the version you installed.
COBOL-IT Developer Studio– Getting Started
The Basics Version 1.8

Page 23
The Eclipse Platform stores your projects in a folder called a workspace.
When opened, Eclipse prompts the user to indicate where they wish to launch their workspace.
Eclipse guides the user from the “Workspace Launcher” screen through the “Welcome” screen, to
the Developer Studio IDE.
Users of the Developer Studio IDE should begin by de-selecting “Build Automatically” on the
dropdown menu under the Project button on the main mainubar.
Enter a path for the Workspace, and click “OK”.
COBOL-IT Developer Studio– Getting Started
The Basics Version 1.8
The Eclipse Platform
Key Concepts
The Workspace Launcher

Page 24
The Welcome Screen
Click on the “Workbench” icon to proceed to the Workbench.
De-select “Build Automatically”
You are now ready to start using the COBOL-IT Developer Studio.
COBOL-IT Developer Studio– Getting Started
The Basics Version 1.8
Page 25
This chapter guides the user through the installation of the COBOL-IT Developer Studio and
includes remarks about the Eclipse IDE. Then, there is a review of best practices for using the
COBOL-IT Developer Studio.
Best practices for using the COBOL-IT Developer Studio are:
1- Configure the Development Studio. We will review how to set some important behaviors,
such as turning off the automatic build, setting the Navigator filters to control what output
files will be shown, setting the auto-refresh, auto-save functionalities, showing line
numbers, and connecting the Debugger Perspective. There is a more detailed reference in
the Chapter entitled “Configuration Settings”.
2- Create a New Project>New Folder structure.
3- Create a New COBOL Program in the Project Folder.
4- Set the compiler options for the COBOL Program, including options required in order to use
the debugger, to create listing files, and to generate the object files in a separate folder.
5- Set the Pre-Build and Pre-Clean Scripts.
6- Set the runtime configuration for the COBOL Program, including the Pre-Run and Pre-
Debug Scripts.
7- Clean, and Build the Project.
8- Review the output from the Build in the Compiler Console Window, and possibly the
Problems window. The Problems window will display compiler errors detected in a
clickable interface that returns control to the line on which the compiler error was detected.
9- Run the program.
10- Run the program in the debugger.
We have also included reference chapters for :
1- Additional development scenarios, including:
a. Using existing source code in its current location
b. Importing existing source code into a New Project structure
c. Dragging and dropping files and folders from the Windows explorer into the Project
For reference material on using the COBOL-IT Debugger, see the related document :
Getting Started with the Developer_Studio
Debugger Perspective
For referfernce material on using the Remote System Perspective, see the related document:
Getting Started with the Developer Studio
Remote System Perspective
With these guidelines, we hope that your experience of Getting Started with the COBOL-IT
Developer Studio will be rewarding. The COBOL-IT Technical Services team welcomes your
feedback. Please submit comments and suggestions to [email protected].
COBOL-IT Developer Studio– Getting Started
The Basics Version 1.8
The COBOL-IT Developer Studio
Key Concepts

Page 26
Configuring your development environment using the Window>Preferences>General,
Window>Preferences>COBOL, and Window>Preferences>Run/Debug dialog screens causes the
settings to be applied at the Workspace level. Settings applied at the Workspace level are applied
automatically to all Projects in a Workspace.
The Automatic Build can be toggled off directly at the Main Menubar>Project>Build Automatically
function, or from within the Window>Preferences>General>Workspace>Build Automatically
function.
To toggle the function off at the Main Menubar, select Project, and check the value of the Build
Automatically function. If the function is enabled, there will be a checkmark next to the function
name. If the function is disabled, there will be no checkmark. The checkmark is a toggle which can
be turned off by clicking on it.
The reason we suggest turning this off is that COBOL, unlike some other programming languages,
does not generally benefit from the constant auto-build of the source as you are coding your
programs. Leaving this on generally causes more confusion than clarity and we strongly
recommend that it be disabled.
COBOL-IT Developer Studio– Getting Started
The Basics Version 1.8
Configuration Settings
Turn off the Automatic Build

Page 27
The screen print above shows the suggested settings for :
Build automatically ( off ). This can also be toggled off at the main menubar
Project>Build Automatically function.
Refresh using native hooks or polling ( on ).
Refresh on access ( on ). When the compile generates output files into the Project
folders and subfolders, it is convenient to have the folders
auto-refresh, and show the files. If either or both of these
automatic refresh settings is set to (off), there will be situations
where you will have to use the manual Refresh, located on the
right-click dropdown menu on the Project folder in the
Navigator window.
Save automatically before build (on). This can be a matter of personal preference. It is
convenient to be able to code, and then compile, without first
having manually clicked on a Save function. With this
function set to (on), using the Build, or Clean and Build
functions will automatically cause the source to be SAVE’d
before compiling.
COBOL-IT Developer Studio– Getting Started
The Basics Version 1.8
Window>Preferences>General>Workspace

The screen print above shows the suggested settings for :
Show line numbers ( on ). This causes line numbers to print in columns 1-5
Note- The COBOL Code Editor derives its Tab behaviors from the
Window>Preferences>COBOL>Editor dialog screen, as described below.
The Enterprise Edition License file is required in order to use the Developer Studio with the
Enterprise Edition of the Compiler, and Runtime. Users of the COBOL-IT Compiler Suite
Enterprise Edition have access to the Remote Project Management capabilities of the Developer
Studio, which include the ability to manage source code stored on a remote machine, and use the
compiler and runtime installed on that remote machine for development and debugging purposes.
See the chapter on the Remote Systems Perspective for more detail.
The Enterprise Edition license file is named citlicense.xml, and is emailed to Customers with
Subscriptions. The default behavior of the COBOL-IT Compiler Suite Enterprise Edition is to
check for the file citlicense.xml in the default installation directory, or the directory described by
the environment variable COBOLITDIR.
Use the Browse interface in Window>Preferences>COBOL to locate the license file, select it, and
click on “Apply”. Click “OK” to close the Window>Preferences>COBOL dialog window.
COBOL-IT Developer Studio– Getting Started
The Basics Version 1.8
Window>Preferences>General>Editors>Text Editors
Window>Preferences>COBOL>License file path
Page 28
Renaming or placing the license file in a non-default location
If you wish to rename your Enterprise Edition compiler license, or store it in a non-default
directory, then you must set the COBOLIT_LICENSE environment variable.
COBOLIT_LICENSE, if set, describes the full path, and license name to be used by the COBOL-IT
Compiler, and runtime shared libraries.
To set COBOLIT_LICENSE to reference a re-named license file in Linux/UNIX:
>COBOLIT_LICENSE=/opt/cobol-it/mycitlicense.xml; export COBOLIT_LICENSE
To set COBOLIT_LICENSE to reference a re-named license file in Windows:
>SET COBOLIT_LICENSE=C:\COBOL\CobolIT\license\mycitlicense.xml
Then, browse to this location in the Window>Preferences>COBOL dialog screen, and select the
license file. Click “OK” to close the Window>Preferences>COBOL dialog window.
COBOL-IT Developer Studio– Getting Started
The Basics Version 1.8
Page 29

The screen print above shows the suggested settings for :
Tab policy (Spaces only) This causes tab characters to be converted to spaces.
Indentation size (8) The effect of hitting the tab key in the Code Editor is to move
the cursor 8 spaces.
COBOL-IT Developer Studio– Getting Started
The Basics Version 1.8
Window>Preferences>COBOL>Editor
Page 30

Displayed tab size (8) If a tab character is contained in the source code it will be
displayed as 8 spaces.
Select the Enable source settings checkbox to open the Compiler interface.
Examine the Window>Preferences>COBOL>Compiler dialog screens, and you will see the
following default settings:
On the Source Tab:
Cobol program extension to compile: cob;cbl;COB;CBL
File extensions that the compiler will recognize as source files, and compile in a BUILD.
Key Concepts
Developer Studio will consider any file in any folder in your project with any of these extensions to
be a source file. It is important to understand that the Developer Studio does not restrict its search
for source files to specific directories.
Files that you wish to be included in a Build must have their file extensions declared as
COBOL program extensions.
It can be useful to group source files together in one or more source folders, and COBOL-IT
COBOL-IT Developer Studio– Getting Started
The Basics Version 1.8
Window>Preferences>COBOL>Compiler ( Default Settings )
Page 31

Page 32
does provide the ability to apply different compiler flags and scripts to files in different
folders.
Note that there is a separate interface for associating a file extension with the Developer
Studio COBOL Editor. This association is useful, in that files associated with the COBOL
Editor show a COBOL-IT icon in the Navigator Window, and will open in the COBOL
Editor when double-clicked. The COBOL Editor marks the Indicator Area in Column 7,
and marks Column 73 as the beginning of the Identification Area.
To see which files are associated with the COBOL Editor, reference
Window>Preferences>General>Editors>File Associations.
Cobol program to preprocess before compile: pco; PCO
File extensions that will be precompiled when using the –preprocess compiler flag.
Key Concepts
Developer Studio will consider any file in any folder in your project with any of these extensions to
be a file to pre-compile, when the –preprocess flag is selected. The Developer Studio does not
restrict its search for source pre-compile files to specific directories.
Files that you wish to be have the –preprocess command applied in a Build must have their
file extensions declared here.
The Customize Setup Tab
When you enable source settings, you are able to Customize your Setup scripts, and to set your
compiler flags.
Customizing your Setup.
The Customize Setup options give us the ability to run scripts before the Clean, Build, Run and
Debug operations are performed.
COBOL-IT Developer Studio– Getting Started
The Basics Version 1.8

Page 33
In Windows, your COBOL-IT setup script is called setenv_cobolit.bat.
Enter the full path, and name of your COBOL-IT setup script into the entry fields labeled “Pre-build
Script”, and “Pre-clean Script”.
These scripts will run before your Clean or Build executes.
Enter the full path, and name of your COBOL-IT setup script into the entry fields labeled “Pre-Run
Script”, and “Pre-Debug Script”.
These scripts will run before your Run or Debug executes.
Key Concepts
For a Clean, followed by a Build, the Developer Studio performs functions in the following order:
Generate the “Clean” makefile
Execute the Pre-Clean Script
Execute the “Clean” makefile
Executes the setenv_cobolit.bat file (Windows)
Executes the ${COBOLITDIR:-/opt/cobol-it}/bin/cobol-it-setup.sh shell script
(Linux/Unix)
Deletes Object files from the location indicated by the –o compiler flag setting. If
there is no –o compiler flag setting, deletes object files from the source directory.
Execute the Post-Clean Script
Generate the “Build” makefile
Execute the Pre-Build Script
Execute the Build makefile
Executes the setenv_cobolit.bat file (Windows)
Executes the ${COBOLITDIR:-/opt/cobol-it}/bin/cobol-it-setup.sh shell script
(Linux/Unix)
Executes the compile command built from the Compiler properties settings,
combined with defaults.
Execute the Post-Build Script
Now, let’s take a look at our compiler flags. Developer Studio is configured with certain defaults.
COBOL-IT Developer Studio– Getting Started
The Basics Version 1.8

Page 34
On the Language tab:
Assume fixed (ANSI) source format (-fixed)
Numeric display sign ASCII (-fsign-ascii)
Key concepts
The COBOL-IT Developer Studio assumes an ANSI source format by default. This causes the
COBOL Code Editor to display a column in line 7 to mark the Indicator Area, and a column in line
73 to mark the beginning of the Identification Area. It affects the way the code is parsed for
purposes of updating the Outline View.
If your source code is coded in “free” or “terminal” source format, you should change this
default prior to loading your source code in the Code Editor.
-fsign-ascii Corresponds to the SIGN “ASCII” directive. Usage of this compiler flag causes
numeric DISPLAY items that include signs to be interpreted according to the ASCII sign
convention. (default on ASCII machines)
COBOL-IT Developer Studio– Getting Started
The Basics Version 1.8

Page 35
On the Link tab:
Build a dynamically loadable module (-m or –b)
Key Concepts
The Developer Studio produces a dynamically loaded module by default, rather than a native
executable. This reflects the default behavior of the COBOL-IT compiler.
In summary-
The Developer Studio recognizes files with .COB, and .CBL as COBOL programs by
default. If you have COBOL programs with different extensions, you should modify this
entry on the Environment tab.
The Developer Studio assigns default settings of –fixed –fsign-ascii –m. You will see these
compiler flags included in the compiler strings assembled by the Developer Studio, and
printed in the Console View. If you wish to change any of these settings at the Workspace
Level, you should close, and re-open the Developer Studio in order to see your changes take
place.
To set compiler flags at the Workspace level, use the Window>Preferences>COBOL>Compiler
interface. Compiler flags that are set at the Workspace level will be inherited by all of the Projects
in your Workspace.
In the example below, you see the following settings:
On the Environment tab:
Add <directory> to copyfile path ( -I <directory> ): .\copy
On the Language tab:
Generate file as list file (-t <file> : .\lst
On the Link tab:
COBOL-IT Developer Studio– Getting Started
The Basics Version 1.8
Window>Preferences>COBOL>Compiler ( Compiler flags & Scripts )

Page 36
Place output into <directory> : .\object
On the Debug/Optimize tab:
Select [ x ] Produce debugging information ( -g )
To access the Perspectives Screen, expand the Run Debug option. In the Panel on the left, Select
Perspectives. In the option labeled “Open the associated perspective when launching”, select the
radio-button titled “Always”. This will cause the Developer Studio to switch to the Debugger
Perspective, when any Debug function is activated.
COBOL-IT Developer Studio– Getting Started
The Basics Version 1.8
Window>Preferences>Run/Debug>Perspectives>…

Page 37
The “New COBOL Project” wizard creates a sub-folder under the Workspace folder with the name
of the project.
The “New Folder” wizard adds sub-folders under the Project folder. These folders can be used to
organize other project elements such as copy files, list files, object files, and data files.
The “New COBOL Program” wizard opens a blank COBOL program in the COBOL-IT Code
Editor, and Saves it in the selected folder.
In the exercises below, we will create the new COBOL program in the Project folder. This has the
advantage of facilitating the use of relative path names in various configuration dialogs, but is not
required.
Select File>New>Project…>COBOL>COBOL Project , and click on [Next] to open the COBOL
Project Wizard
COBOL-IT Developer Studio– Getting Started
The Basics Version 1.8
The File>New Wizards
Key Concepts
New COBOL Project Wizard

Page 38
Create a new Project in workspace
Enter a project name. In the example below, we create a project called project1.
In this case, entering project1 as a Project name causes a subfolder called project1 to be created
under the workspace folder.
Here we are creating a new project in the workspace. Eclipse artifacts, such as the .project file, will
be created in this project directory. Click [Finish].
Now that we have created a COBOL project folder, we can create subfolders for the various
components in our project, such as copy files, list files, object files, and data files. To do this, we
will use the New Folder Wizard.
COBOL-IT Developer Studio– Getting Started
The Basics Version 1.8

Page 39
Select File>New>Folder to open the New Folder Wizard.
Select project1 by clicking on it.
Enter a folder name “copy”, and press the [Finish] button. Pressing [Finish] closes the New Folder
Wizard.
Repeat multiple times to create the subfolder “lst” for list files, the subfolder “object” for object
files, and the subfolder “data” for data files.
We now have a base project directory, and 4 subfolders, in which to do our Getting Started
development exercises.
We can now create a new COBOL program in the base project directory.
Note- In the initial Getting Started sample, we will not create a source folder, but instead will create
`our sample program, hello.cbl, in the project directory. This is the simplest configuration for a
simple sample case. Understanding the handling of source directories is important, however, and
this topic is treated in the chapter entitled “New Project Using Existing Source”.
COBOL-IT Developer Studio– Getting Started
The Basics Version 1.8
New Folder Wizard

Page 40
New Folder Advanced Functions
New Folder Advanced Functions allow you to add folders to your Project which are not located as
subfolders of the Project folder on the disk.
It is common that in a corporate work environment, copyfiles will be stored in a folder that all users
share. This folder can be referenced by the -I [copypath] compiler flag without adding the folder to
the project, so it is not strictly a requirement that it be part of the project.
However, the copyfile folder does have to be in the Project in order for the the Project to execute
certain functions like, "Open Declaration", for example. Or, if your copy file contains Procedure
Division code, then the copyfile folder has to be in the Project in order for the Debugger to step
through the Procedure Division code statements.
So, if your copyfiles are not in a subdirectory located underneath the Project, how do you get them
into the Project?
That is done at the point where you create a New Folder.
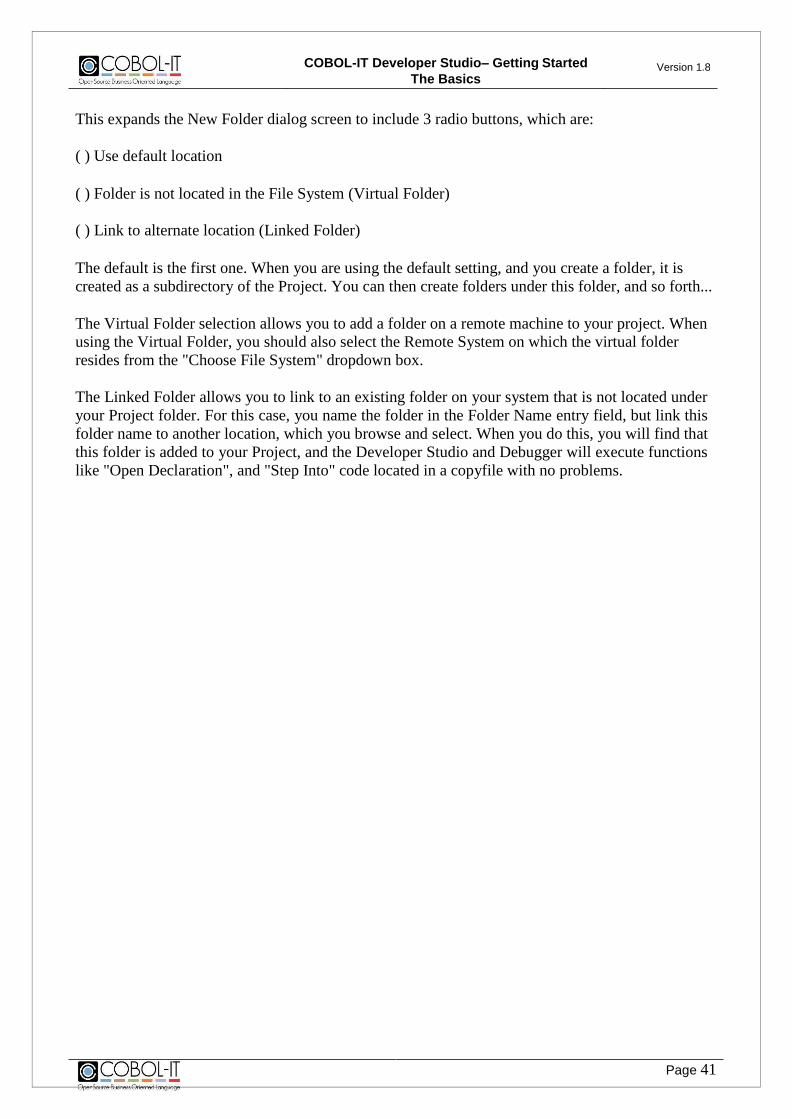
In File>New>Folder, ( the New Folder dialog Screen ), click on the Advanced> > button.
COBOL-IT Developer Studio– Getting Started
The Basics Version 1.8
Page 41
This expands the New Folder dialog screen to include 3 radio buttons, which are:
( ) Use default location
( ) Folder is not located in the File System (Virtual Folder)
( ) Link to alternate location (Linked Folder)
The default is the first one. When you are using the default setting, and you create a folder, it is
created as a subdirectory of the Project. You can then create folders under this folder, and so forth...
The Virtual Folder selection allows you to add a folder on a remote machine to your project. When
using the Virtual Folder, you should also select the Remote System on which the virtual folder
resides from the "Choose File System" dropdown box.
The Linked Folder allows you to link to an existing folder on your system that is not located under
your Project folder. For this case, you name the folder in the Folder Name entry field, but link this
folder name to another location, which you browse and select. When you do this, you will find that
this folder is added to your Project, and the Developer Studio and Debugger will execute functions
like "Open Declaration", and "Step Into" code located in a copyfile with no problems.
COBOL-IT Developer Studio– Getting Started
The Basics Version 1.8

Page 42
In the Navigator Window, select the project by clicking on it. This selection will ensure that the
Wizard will store the project folder as the default location for the new COBOL program, which is
what we want.
Select File>New>COBOL Program open the New COBOL Program Wizard.
Note that the Source Folder has been pre-filled with the base project folder name, and the cursor is
on the Name: field.
Enter the name of your new COBOL program, and press the [Finish] button.
Pressing [Finish] closes the New COBOL Program Wizard.
COBOL-IT Developer Studio– Getting Started
The Basics Version 1.8
New COBOL Program Wizard

Page 43
The Code Editor
You will see that you now have an empty COBOL program called hello.cbl in your Developer
Studio Code Editor. The Navigator Window reflects the folder hierarchy that has been created.
The Outline Window is empty, but you will see how it becomes populated as you enter code, and
create your program, hello.cbl.
Enter the code for hello.cbl.
Note that the Outline Window auto-updates as you type your COBOL program.
The Divisions (Procedure Division, Environment Division, etc… ) in your program are marked
with a blue D, the Sections (Working-Storage, etc… ) are marked with a Green S.
When expandable, an arrow appears to the left of the entry.
The Outline Window provides a useful navigation tool. Click on a title, and navigate directly to
that line of source in the COBOL program.
COBOL-IT Developer Studio– Getting Started
The Basics Version 1.8

Page 44
Save your COBOL program.
Note that when you have code in your Code Editor that has not been SAVE’d, the Save button is
enabled, and there is an asterisk to the left of the program name on the tab in which your program is
open. In this case, you will see the asterisk to the left of the hello.cbl tab title.
You can SAVE your COBOL program by clicking on the Save button on the Developer Studio
toolbar.
Note- A number of SAVE behaviors have been configured earlier in this exercise, in the
Window>Preferences>General>Workspace dialog screen, including a setting for Workspace save
interval (in minutes), and Save automatically before build.
Workspace save interval ensures that your work will be automatically saved at specified intervals.
Save automatically before build ensures that even if you forget to save your work before starting a
Build, the Developer Studio will automatically save the code changes before beginning the build.
Now we have a COBOL program. Let’s take a look at some Code Editor functions now.
COBOL-IT Developer Studio– Getting Started
The Basics Version 1.8

Page 45
Our Compiler configuration should:
Cause object files to be created in the .\object folder. By default they will be created in the
current directory. We will set the –o .\object compiler flag.
Cause listing files to be created in the .\lst folder. We will set the –t .\lst compiler flag.
Cause debugging information to be added to the object files, so they can be run in debug
mode. We will set the –g compiler flag.
Set the Pre-build and Pre-clean scripts. We will review the usefulness of these scripts, but
will not need to set them for our Getting-Started examples.
Note that these compiler flag and script settings have been made at the Workspace level in
our samples, and this is often the preferred way to work in the Developer Studio. We will
review Project-level interface for setting compiler flags and scripts, which can be used in
cases where a Project requires different settings than those set at the Workspace level.
Our Runtime configuration should:
Allow the runtime to locate the compiled objects in the .\object folder. We will review how
the COB_LIBRARY_PATH environment variable can be set in a batch file to achieve this
in a standard runtime configuration, or can be set in a customized runtime configuration.
COBOL-IT Developer Studio– Getting Started
The Basics Version 1.8
Compiler and Runtime Configuration
Key Concepts

Page 46
The Project>Properties dialog window allows us to set the compiler flags we need to use.
Click on the Project folder in the Navigator Window to select it. Right click, and select
“Properties” from the right-click dropdown menu to open the Properties dialog window.
In the menu on the left, select COBOL. In the COBOL dialog, click “Enable project settings” to
open the mult-tabbed dialog screens that enable the setting of compiler flags.
Setting Compiler flags at the Project level allows you to override settings set at the Workspace
level, or to add settings to those inherited from the settings made at the Workspace level
In the example below, observe how the –I <directory> compiler flag is inherited from the
Workspace settings.
On the Language tab, note the –t flag is set to “.\lst” to cause listing files to be created in the .\lst
folder. On the Link tab, note the –o flag is set to “.\object” to cause object files to be created in the
.\object folder. On the Debug>Optimize tab, note the –g flag is set to allow the compiled objects to
be run in the debugger.
All of these settings are inherited from settings made at the Workspace level.
Click OK to save your selections, and close the Properties dialog window.
COBOL-IT Developer Studio– Getting Started
The Basics Version 1.8
Set Compiler Flags in Project>Properties dialog
Page 47
At the Project Level, the Cmd Flags tab inherits settings made at the Workspace Level in
Window>Preferences>COBOL>Compiler>Source tab under the Customize Setup interface.
The Source tab allows you to configure the behaviors of the Project>Build and Project>Clean
commands. The Developer Studio will perform default scripts, and pre-defined scripts in the
following order:
For a Clean, followed by a Build, the Developer Studio performs functions in the following order:
Generate the “Clean” makefile
Execute the Pre-Clean Script
Execute the “Clean” makefile
Execute the Post-Clean Script
Generate the “Build” makefile
Execute the Pre-Build Script
Execute the Build makefile
Execute the Post-Build Script
For a more detailed description, see the instructions for configuring the Developer Studio in
Window>Preferences>COBOL>Compiler.
On the Project tab, set the Pre/Post-Build Scripts and Pre/Post-Clean Scripts using the Browse
button to navigate to the location of the script files.
When you select the “Run” function from the main toolbar, or from the main menubar, the standard
Developer Studio Behavior is to :
Create a file called com.cobolit.eclipse.exec_script.bat in a folder under the project folder called
.com.cobolit.eclipse.tmp.
Execute com.cobolit.eclipse.exec_script.bat.
com.cobolit.eclipse.exec_script.bat for hello.dll
CALL %COBOLITDIR%\setenv_cobolit.bat
cmd.exe /c start /wait cobcrun hello
If all of the programs in your project can be run with the same environment variables, then it is best
to set the environment variables in your Pre-run script. In an example in which a program,
COBOL-IT Developer Studio– Getting Started
The Basics Version 1.8
Setting the Pre/Post-Build and Pre/Post-Clean Scripts
Key Concepts
Standardize a Run Configuration
Key Concepts

Page 48
hello.cbl, has been compiled with the –o .\object compiler flag, the runtime requires that the
environment variable COB_LIBRARY_PATH be set to .\object. Your Pre-run script should
contain:
SET COB_LIBRARY_PATH=.\object
In cases where you need to run some of the programs in your project with special environment
variables, you can create a customized Run Configuration for those programs.
To create a customized Run Configuration for hello.cbl:
Right-click on the COBOL program hello.cbl in the Navigator Window.
Select Run As…. from the right-click dropdown menu, and then select “Run Configuration…” to
open the Run Configuration dialog window.
COBOL-IT Developer Studio– Getting Started
The Basics Version 1.8
Customize a Run Configuration

Page 49
The Run Configurations dialog window consists of a tree structure on the left panel, and a mult-
tabbed window in the right panel.
Create a new Runtime Configuration, and Assign it a Name
Select “COBOL Program” and click on the “New” toolbar button above the tree structure on the left
panel. On the Run Configurations dialog window, change the Name from “New Configuration” to
“hello.cbl”. Click on the “Apply” button to change the name of the configuration in the tree
structure on the left.
COBOL-IT Developer Studio– Getting Started
The Basics Version 1.8
The Run Configuration dialog window

Page 50
The Runtime tab allows you to configure the behaviors of the Project>Run and Project>Debug
commands. The Developer Studio will perform default scripts, and pre-defined scripts in the
following order:
For a Run, the Developer Studio performs functions in the following order:
*Note that the Pre-Run Script, and Post-Run Script are optional. If they do not exist, they will not
be executed.
Execute the Pre-Run Script
Set the environment variables defined in the Environment tab
Execute the object file/dll using cobcrun
Execute the Post-Run Script
For a Debug, the Developer Studio performs functions in the following order:
*Note that the Pre-Debug script, and Post-Debug Script are optional. If they do not exist, they will
not be executed.
Execute the Pre-Debug Script
Set the environment variables defined in the Environment tab
Execute the object file/dll using cobcdb
Execute the Post-Debug Script
In our exercise, we will not use pre-run and pre-debug scripts. The graphic below indicates how that
could be done.
.
COBOL-IT Developer Studio– Getting Started
The Basics Version 1.8
Set the Pre-Run and Pre-Debug Scripts on the Runtime tab
Key Concepts

Page 51
The Environment tab is where we will set the runtime environment variables that we need to
produce the desired behaviors.
On the environment tab, click on the “New” button to open the “New Environment Variable” dialog
screen.
In the New Environment Variable dialog, enter “COB_LIBRARY_PATH” in the Name entry-field,
and “.\object” in the Value entry-field.
Click OK to close the New Environment Variable dialog. Note that your selection is then
transferred back into the Environment Variables display area.
Click Apply, and Close, to save your settings, and close the Run Configuration Dialog Screen.
Right-click on the COBOL program in the Navigator Window.
Select Debug As…. from the right-click dropdown menu, and then select “Debug Configuration…”
to open the Debug Configuration dialog window.
COBOL-IT Developer Studio– Getting Started
The Basics Version 1.8
Set runtime environment variables on the Environment tab
Customize a Debug Configuration

Page 52
The Debug Configuration dialog window consists of a tree structure on the left panel, and a mult-
tabbed window in the right panel. In our initial configurations, we indicated that C/C++ runtime
configurations and Launch Group configurations should be filtered out, so they are no longer
visible.
COBOL-IT Developer Studio– Getting Started
The Basics Version 1.8
The Debug Configuration dialog window
Page 53
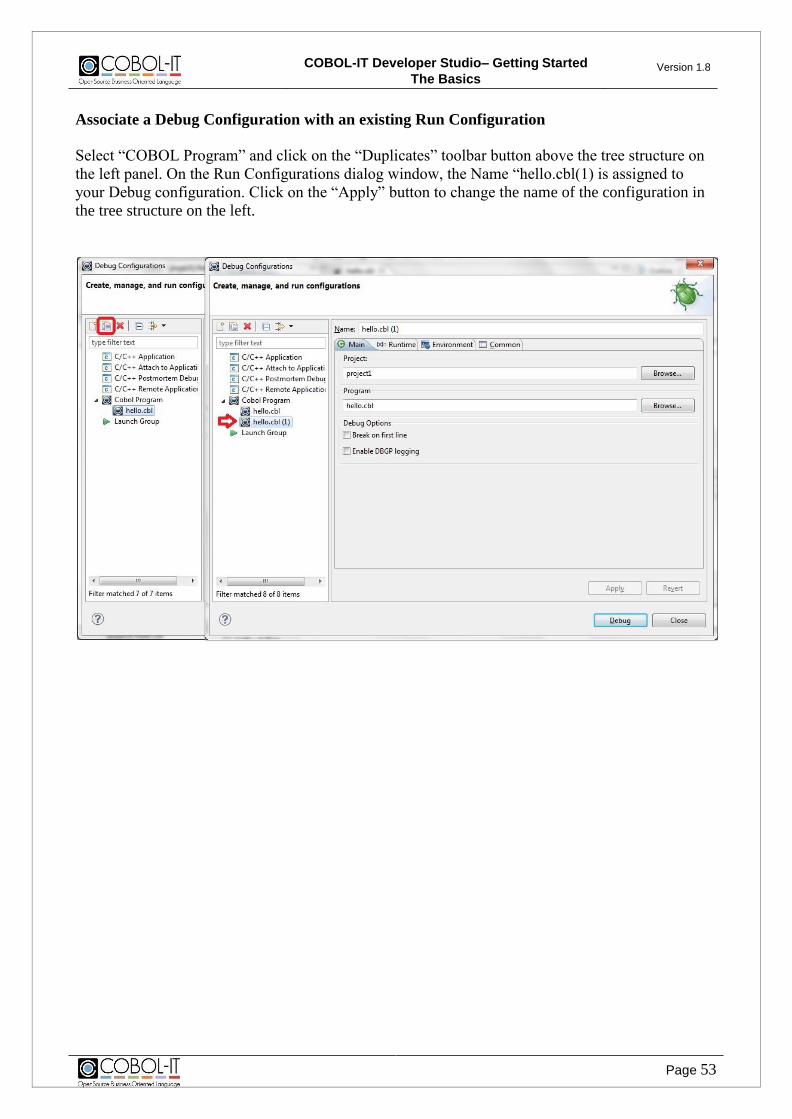
Associate a Debug Configuration with an existing Run Configuration
Select “COBOL Program” and click on the “Duplicates” toolbar button above the tree structure on
the left panel. On the Run Configurations dialog window, the Name “hello.cbl(1) is assigned to
your Debug configuration. Click on the “Apply” button to change the name of the configuration in
the tree structure on the left.
COBOL-IT Developer Studio– Getting Started
The Basics Version 1.8

Page 54
Certain runtime environment variables are suited for debugging, but would not otherwise be used.
We are now ready to review the Clean, Build, Run, and Debug operations.
Window > Preferences
In the Window>Preferences>General>Workspace dialog window, Build Automatically should be
de-selected, and Save automatically before build, and Refresh automatically should be selected.
If Save automatically before build is not set, you should manually Save your coding changes before
proceeding to the Clean and Build steps.
Compile with –g to use the Debug toolbar button, and run the program in the Debugger
Perspective.
When no “-o <filename>” compiler flag notation is included in the compiler command, the default
COBOL-IT Developer Studio– Getting Started
The Basics Version 1.8
Setting Environment Variables to enhance Debugging Output
Compile, Run, Debug
Key Concepts

Page 55
behavior of the Developer Studio is to create object files in the same directory as the source file.
Main Toolbar
Project>Build All and Project>Build Project can be used to Compile, and not Run a Program
A Build can be “forced” by using the “Clean” function before running any of the “Build”, “Run”, or
“Debug” functions.
The Run toolbar button on the Developer Studio main toolbar builds (if necessary) and runs the
program.
Compiler console window
Results of the Compile can be checked in the Compiler Console Window.
Project Right-click drop-down menu
Text files can be viewed with the Open with…>Text Editor function in the dropdown menu off of
the selected file.
Select Project from the Main Menu, and then Clean… from the dropdown menu to open the Clean
dialog screen.
COBOL-IT Developer Studio– Getting Started
The Basics Version 1.8
Clean, then Build

Page 56
Retain the defaults, which will “Clean all projects”, “Start a build immediately”, and “Build the
entire workspace.”.
Note- When you have multiple projects in your Workspace, it may be convenient to only build
selected projects.
Make sure you have SAVE’d your program before running the Clean.
The Clean will force a compile of the Project. Note that in the absence of a Clean, your Build
would report that the compiled object was up to date if no changes had been made to the source
since the last compile. You might wish to force a compile anyway, and Clean would provide this.
The Build that is executed automatically is a compile of all the programs in the project, using the
compiler flags set earlier in this exercise.
Clean and Build does not trigger a Run of the program.
COBOL-IT Developer Studio– Getting Started
The Basics Version 1.8
The Clean Dialog Screen

Page 57
The COBOL-IT Compiler console window is updated with the results of the Build. In between
informational messages that reference the Build function, you will see the command-line that is
being executed, with cobc, the compiler flags that are being used, and the program name.
When the compile is successful, as in the example below, you will see the name of the “C” program
that was successfully compiled by the host “C” compiler, and information on intermediate files that
were created.
When the compile is not successful, you will see compiler error reports, as they would appear if you
had executed the compile command on the command line. We will examine this case more closely
later in this document.
COBOL-IT Developer Studio– Getting Started
The Basics Version 1.8
Clean>Build updates the COBOL-IT Compiler console.

Page 58
Right click on a program in the Navigator window, and select Cobol>Clean to clean a single
program. Select Cobol>Build to build a single program. Select Cobol>Rebuild to rebuild a single
program. Use these functions when you are working on a single program in a larger project.
Clearing a Console Window deletes all of the text in that Window.
When you have the COBOL-IT Compiler Console window open, you will notice that there is a
“Clear Console” icon on the toolbar of the Output Windows. This button can be clicked on the
toolbar to clear the Console window.
Alternatively, you can click in the Compiler console window to position the cursor, then right-click,
and select the Clear function from the right-click drop-down menu.
COBOL-IT Developer Studio– Getting Started
The Basics Version 1.8
Clean, Build, and Rebuild a single program
Clearing the Console Window

Page 59
COBOL-IT Developer Studio– Getting Started
The Basics Version 1.8

Page 60
In this example, we have created a list file, called “hello.lst” in the lst folder. The list file is a text
file.
To open hello.lst in an Editor window, single-click hello.lst to select it, then right-click, and select
Open With>Text Editor.
COBOL-IT Developer Studio– Getting Started
The Basics Version 1.8
Open With…>Text Editor to view text files

Page 61
You are now ready to Run the COBOL program.
[ x ] It has been successfully compiled, and objects created in the .\object folder.
[ x ] The runtime configuration has been created, with COB_LIBRARY_PATH being set to allow
the runtime to locate the compiled object in the .\object folder.
[ x ] The output in the Compiler Console window has been checked, and the Project refreshed.
To Run hello.cbl, first open the file in the Code Editor. This places focus on the source file in the
Navigator view, and makes the Run button on the main toolbar visible. Then, click on the Run button on the Developer Studio toolbar.
Note that the Run button is only visible when focus is on a program that can be run. That is,
if you click on the “hello.lst” tab, which is displaying a List File, you will notice that the Run
button on the Developer Studio toolbar disappears.
We have two run configurations for hello.cbl. Click on the dropdown arrow next to the run button,
and select hello.cbl to run the program.
COBOL-IT Developer Studio– Getting Started
The Basics Version 1.8
Running the COBOL program

Page 62
You are now ready to Run the COBOL program in the Debugger Perspective.
[ x ] We included the –g compiler flag in our compile string, and
[ x ] Our Window>Preferences>Run/Debug>Perspectives dialog has been set to open the Debugger
Perspective when we launch the debugger.
To Run hello.cbl in the Debugger Perspective, first open the file in the Code Editor. This places
focus on the source file in the Navigator view, and makes the Debug button on the main toolbar
visible. Then, click on the Debug button on the Developer Studio toolbar.
Note that the Debug button is only visible when focus is on a program that can be run. That
is, if you click on the “hello.lst” tab, which is displaying a List File, you will notice that the Debug button on the Developer Studio toolbar disappears.
We have two run configurations for hello.cbl. Click on the dropdown arrow next to the debug
button, and select hello.cbl(1) to run the debug configuration.
COBOL-IT Developer Studio– Getting Started
The Basics Version 1.8
Running in the Debugger Perspective

Page 63
When you have finished debugging, you must terminate the debugger, by clicking on the
“Terminate” button.
COBOL-IT Developer Studio– Getting Started
The Basics Version 1.8
Terminate the Debugger

Page 64
After terminating a debug session, you can toggle back to the Developer Studio Perspective, and
resume development. You can widen the tab area that displays available perspectives by dragging it
to the left. When you have widened the tab, you will see the two perspectives, COBOL-IT
Debugger Perspective and COBOL-IT Developer Studio Perspective. To toggle between the two,
just click on from one tab to the other.
To save space on the tab area that displays the perspectives, you can right-click on the Perspective
and de-select “Show Text” so that only the icons will be displayed. The “Dock On” function in the
dropdown menu can be used to move the Perspective buttons to a different position on the screen.
COBOL-IT Developer Studio– Getting Started
The Basics Version 1.8
Toggle Perspectives to re-enter the Developer Studio Perspective

Page 65
Compiler errors are recorded on the Problems View, which records program name, and line
number, and provides a clickable interface to go to the error.
In the example below, a variable has been misspelled, in the statement ACCEPT w-dummy.
In the Problems View, click on the red (x) next to the informational message “w-dummy
undefined” to select it, and then double-click, and the error line is located.
You will notice that the error line in the source has also been marked with a red (x), and that the line
in which the error is located has been highlighted in blue.
COBOL-IT Developer Studio– Getting Started
The Basics Version 1.8
Correcting Compiler Errors from the Problems View

Page 66
Compiler errors are also recorded on the Compiler Console View, as follows: C:/COBOL/CobolIT/train/project1/hello.cbl: In paragraph 'main':
C:/COBOL/CobolIT/train/project1/hello.cbl:10: Error: 'w-dummy' undefined
This output is not in a clickable interface. However, you can easily isolate the line number in which
the error occurred, and use the Go To Line Number (Ctl + L ) function in the Code Editor to locate
the error.
COBOL-IT Developer Studio– Getting Started
The Basics Version 1.8
Correcting compiler errors from the Compiler Console View
Page 67
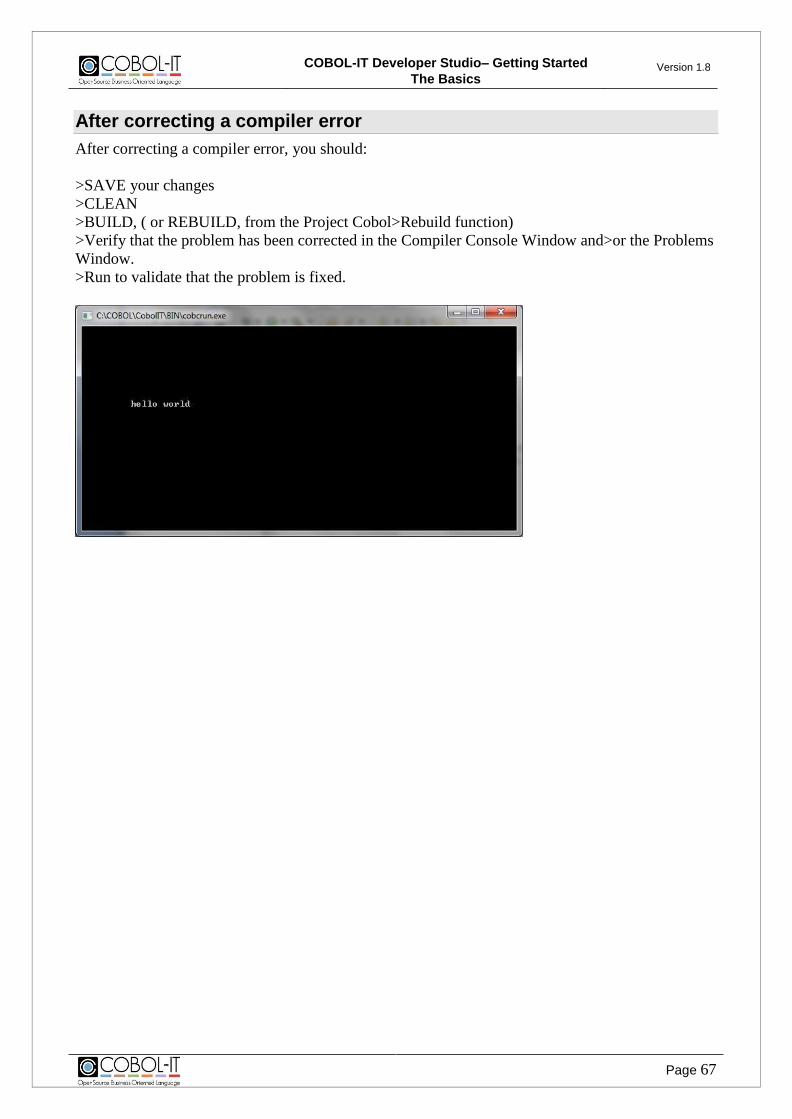
After correcting a compiler error, you should:
>SAVE your changes
>CLEAN
>BUILD, ( or REBUILD, from the Project Cobol>Rebuild function)
>Verify that the problem has been corrected in the Compiler Console Window and>or the Problems
Window.
>Run to validate that the problem is fixed.
COBOL-IT Developer Studio– Getting Started
The Basics Version 1.8
After correcting a compiler error

Page 68
In Summary, Key features of the Developer Studio include:
Desktop icons which cause setup batch files to execute.
The setup batch files ensure that the “C” compiler, and COBOL-IT Compiler Suite executables can
all be located by the Developer Studio.
New COBOL Project and New COBOL Program Wizards
We stepped through the use of the New Project, New Folder and New COBOL Program wizards
IDE Configuration Interfaces
We reviewed important IDE Configuration interfaces in the Window>Preferences>General,
Window>Preferences>Run/Debug, and Window>Preferences>COBOL dialog screens.
COBOL-Aware Code Editor
We created a small COBOL program, and observed how the Outline Window could be used to
facilitate navigation within a COBOL program. We SAVE’d our program in the Project folder.
Setting Compiler flags at the Workspace, or Project Level
We set compiler options that would allow us to store compiled objects in the .\objects folder ( -o), to store list files in the .\lst folder (-t), and to compile for use with the Debugger Perspective
at the Workspace Level.
Creating Standard or Customized Runtime Configurations
Standard Runtime Configurations can be made by setting environment variables in the COBOL-IT
setup script. Runtime Configuration interface to set runtime environment variables
We created a runtime configuration for our program hello.cbl, so that the runtime would be able to
locate the compiled objects in the .\object directory ( SET COB_LIBRARY_PATH).
Clean, Build, and check output in the Compiler Console Window
We used the Clean and Build function to compile the program, and then opened the Compiler
Console Window to view the results of the Compile.
Run, and Run in the COBOL-IT Debugger Perspective
We used the Run and Debug functions on the Developer Studio toolbar to run the program,
and then run the program in the Debugger Perspective.
Compiler errors can be located through a clickable interface in the Problems Window
We deliberately created an error condition in the program, and observed the results in the Problems
window, as well as in the Compiler Console Window. We corrected the problem, and ran the
program.
COBOL-IT Developer Studio– Getting Started
The Basics Version 1.8
Summarizing key features of the Developer Studio

Page 69
Additional development scenarios
Key concepts
This chapter guides the user through the use of the Developer Studio with existing source.
The chapter presents a practical exercise that includes launching a workspace, creating a new
project using existing source code, and developing, compiling, running and debugging the existing
COBOL programs.
The “New COBOL Project” wizard with “Use Existing Source” adds project information to the
selected directory containing the existing source.
Navigator Filters, Refresh Automatically, and Save automatically before build are set at the
Workspace level, and do not need to be reset.
In this example, the source code is stored in a src folder. This allows us to consider some of the
special configurations associated with source code in more detail.
Compile options are set at the Workspace level, and do not need to be reset.
Runtime configurations can be implemented through the run configuration interface, or through a
prerun batch/script file that is configured to run prior to the launching of the program by cobcrun.
The Directory Structure and files can be seen in the Navigator Window.
Select New>Project, and then select COBOL>COBOL Project to open the Create COBOL Project
Wizard.
In the Create COBOL Project Wizard, enter a new project name, “project2”, and select the radio
button “Create project from existing source”.
COBOL-IT Developer Studio– Getting Started
The Basics Version 1.8
Using existing source code in its current location

Page 70
Select File>New>Project…>COBOL>COBOL Project , and click on [Next] to open the COBOL
Project Wizard
In the Create a COBOL project Wizard, enter a project name. In the example below, we create a
project called project2.
Select the radio button titled “Create project at existing location (from existing source).
Browse, and select the sample directory at C:\COBOL\sampleprj.
In this case, Eclipse does not need to create a subfolder called project2, because the project folder
already exists.
COBOL-IT Developer Studio– Getting Started
The Basics Version 1.8
New Project Using Existing Source

Page 71
The new project project2 will be added to the Workspace. Eclipse artifacts, such as the .project file,
will be created in the existing directory. Click [Finish].
Note that eclipse artifacts, such as the .buildpath and .project files have been added to the existing
directory as a result of having created a new Project in the existing directory.
C:\COBOL\CobolIT\sampleprj>dir
Volume in drive C has no label.
Volume Serial Number is 1E36-6617
Directory of C:\COBOL\CobolIT\sampleprj
COBOL-IT Developer Studio– Getting Started
The Basics Version 1.8
Eclipse artifacts are created in the existing directory
02/15/2015 04:42 AM <DIR> .
02/15/2015 04:42 AM <DIR> ..
02/15/2015 04:42 AM 106 .buildpath
02/15/2015 04:42 AM 512 .project
02/15/2015 01:22 AM <DIR> c
02/15/2015 01:16 AM <DIR> copy
02/15/2015 01:56 AM <DIR> data
05/31/2011 12:04 PM 6,133 envcheck.cbl
02/15/2015 01:56 AM <DIR> lst
02/15/2015 01:56 AM <DIR> object
06/01/2011 10:50 AM 2,939 rescheck.cbl
02/15/2015 01:45 AM 8,245 resmain.cbl

Page 72
The folder structure of the existing folder is replicated in the Navigator Window.
Note that there is an equivalency between this view of the Project folder and subfolders, and the
System view of these folders.
If you add or delete folders or files here, they are added/deleted to/from the system folders. If you
add or delete files or folders at the system level, they will be added/deleted in your project as well.
COBOL-IT Developer Studio– Getting Started
The Basics Version 1.8
Existing files and folders appear in the Navigator Window

Page 73
Select project2 by clicking on it, then right-click, and select Properties from the right-click
dropdown menu to verify that location of the project folder is at the location of the existing source:
COBOL-IT Developer Studio– Getting Started
The Basics Version 1.8
Project>Properties>Resource

Page 74
Use the Project>Properties>COBOL dialog screen to check, and set compiler flags unique for this
project. project2 has a COPY folder, which must located by the compiler.
Note that project2 inherits the settings of the –I <directory>, -ext <extensions>, -t <directory>,
-o <directory>, and –g that were set at the Workspace Level.
Project2 contains data files, which are stored in a .\data folder. As a result, the runtime environment
variable COB_FILE_PATH is required, in order to run the program. The easiest way to handle this
is to update the Standard Run Configuration, which means that we must set this environment
variable. If you are using a prerun batch/script file, append the command:
SET COB_FILE_PATH=.\data to the script, as seen below:
SET COB_LIBRARY_PATH=.\object
SET COB_FILE_PATH=.\data
In our example, we will create a new runtime configuration that contains this new environment
variable.
COBOL-IT Developer Studio– Getting Started
The Basics Version 1.8
Project>Properties>COBOL
Update the Standard Run Configuration

Page 75
As there are now two projects in the Workspace, both the Clean and Build portions of the dialog
screen contains options.
In the Clean portion of the dialog screen, select the radio-button titled “Clean projects selected
below”, and select the checkbox titled “project2”.
In the Build portion of the dialog screen, select the radio-button titled “Build only selected
projects”.
Click OK.
COBOL-IT Developer Studio– Getting Started
The Basics Version 1.8
Clean and build project2
Page 76
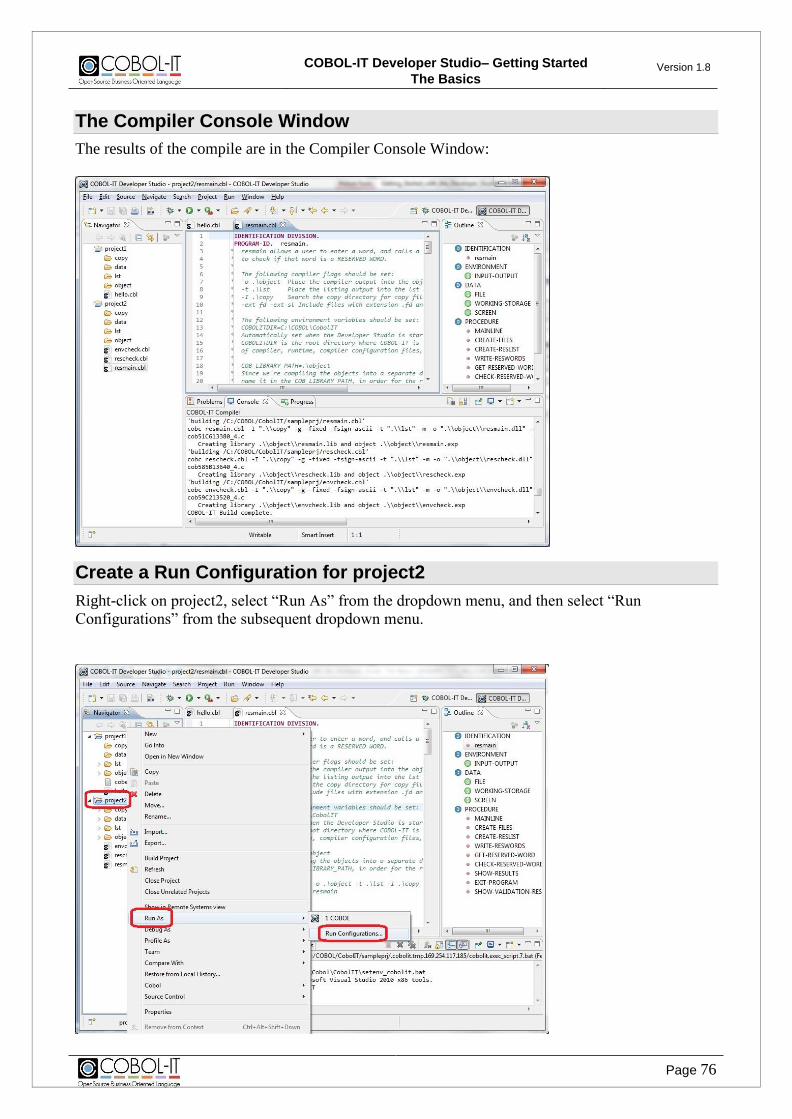
The results of the compile are in the Compiler Console Window:
Right-click on project2, select “Run As” from the dropdown menu, and then select “Run
Configurations” from the subsequent dropdown menu.
COBOL-IT Developer Studio– Getting Started
The Basics Version 1.8
The Compiler Console Window
Create a Run Configuration for project2

Page 77
COBOL-IT Developer Studio– Getting Started
The Basics Version 1.8
Select project2, and resmain.cbl
Clear the pre-run and pre-debug scripts

Page 78
Click on the “Run” button on the Developer Studio toolbar to run resmain.
COBOL-IT Developer Studio– Getting Started
The Basics Version 1.8
Add the environment variables
Run the COBOL program

Page 79
Note that if COB_FILE_PATH had not been set in your run configuration, this program would have
returned a File Status 35.
Click on the “Debug” button on the Developer Studio toolbar to run resmain in the Debugger
Perspective.
Single step with the Step Into (F5) function.
Run the program with the Resume (F8) function.
Details on the Debugger Perspective are contained the the Debugger Perspective Chapter.
COBOL-IT Developer Studio– Getting Started
The Basics Version 1.8
Running the COBOL program in the Debugger Perspective
Page 80
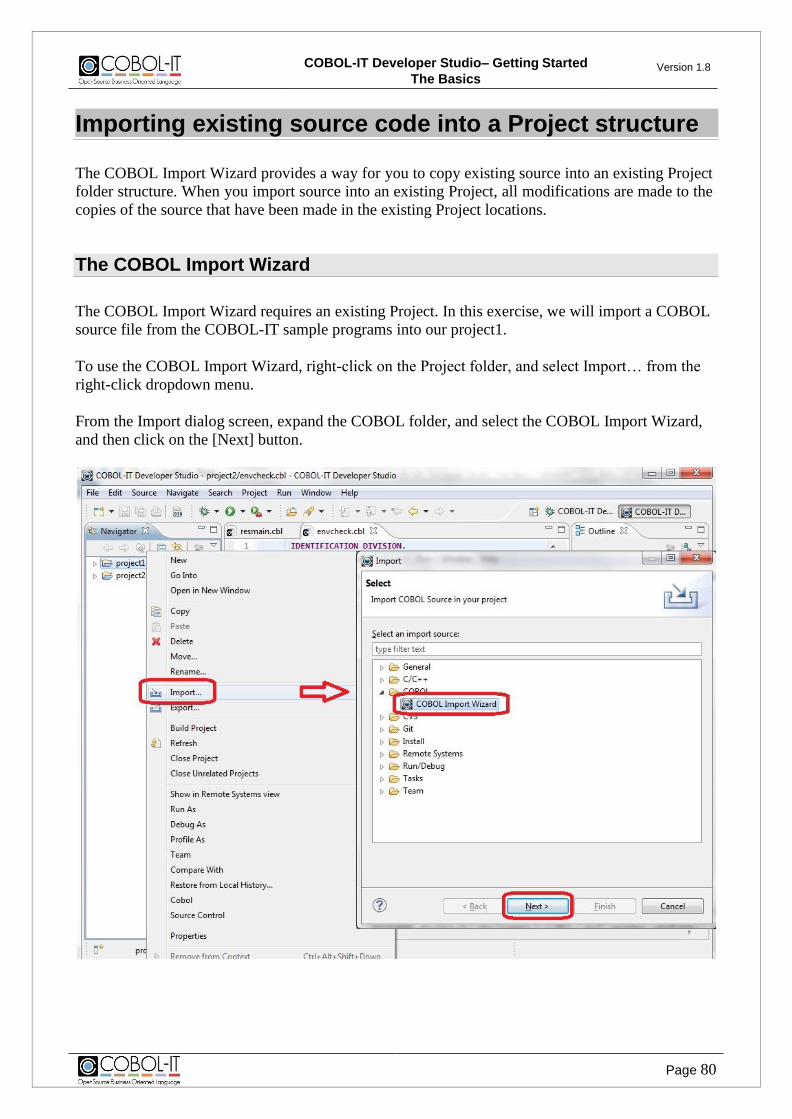
Importing existing source code into a Project structure
The COBOL Import Wizard provides a way for you to copy existing source into an existing Project
folder structure. When you import source into an existing Project, all modifications are made to the
copies of the source that have been made in the existing Project locations.
The COBOL Import Wizard requires an existing Project. In this exercise, we will import a COBOL
source file from the COBOL-IT sample programs into our project1.
To use the COBOL Import Wizard, right-click on the Project folder, and select Import… from the
right-click dropdown menu.
From the Import dialog screen, expand the COBOL folder, and select the COBOL Import Wizard,
and then click on the [Next] button.
COBOL-IT Developer Studio– Getting Started
The Basics Version 1.8
The COBOL Import Wizard

Page 81
Select the Import Directory
In the Import resources dialog screen, begin by clicking on the Browse.. button, which will open the
“Import from directory” dialog screen. In the “Import from directory” dialog, select a directory,
and click OK. This will cause the From directory: entry-field to be filled with your choice.
Underneath the From directory: entry-field, you will see the folder name you have selected in the
panel on the left, and the programs>files in that folder on the right.
To select the folder, and all files, and sub-folders ( and files within them ), click on the folder name
in the panel on the left. Selecting the folder name in the panel on the left will cause the file(s) in
the panel on the right to be auto-selected.
To select only the file ( in this case customer0.cbl ), just select the checkbox in the file in the panel
on the right. Click on the Finish button, to import the files into the existing project.
COBOL-IT Developer Studio– Getting Started
The Basics Version 1.8

Page 82
Imported files are automatically displayed in the project folder
The selected source file is copied into the existing Project Folder, and displayed in the Navigator
Window.
Compiler Configuration
Source files imported into a Project inherit the compiler flags that have been set with
Project>Properties. The program “customer0.cbl” that we have imported can be compiled with
existing compiler flags, so no new action needs to be taken.
COBOL-IT Developer Studio– Getting Started
The Basics Version 1.8

Page 83
Create a Run Configuration for the new source file(s)
Customer0.cbl requires the COB_LIBRARY_PATH and the COB_FILE_PATH environment
variables be set.
Clean and Build project1, which now contains the imported source file.
COBOL-IT Developer Studio– Getting Started
The Basics Version 1.8
Clean and Build
Page 84
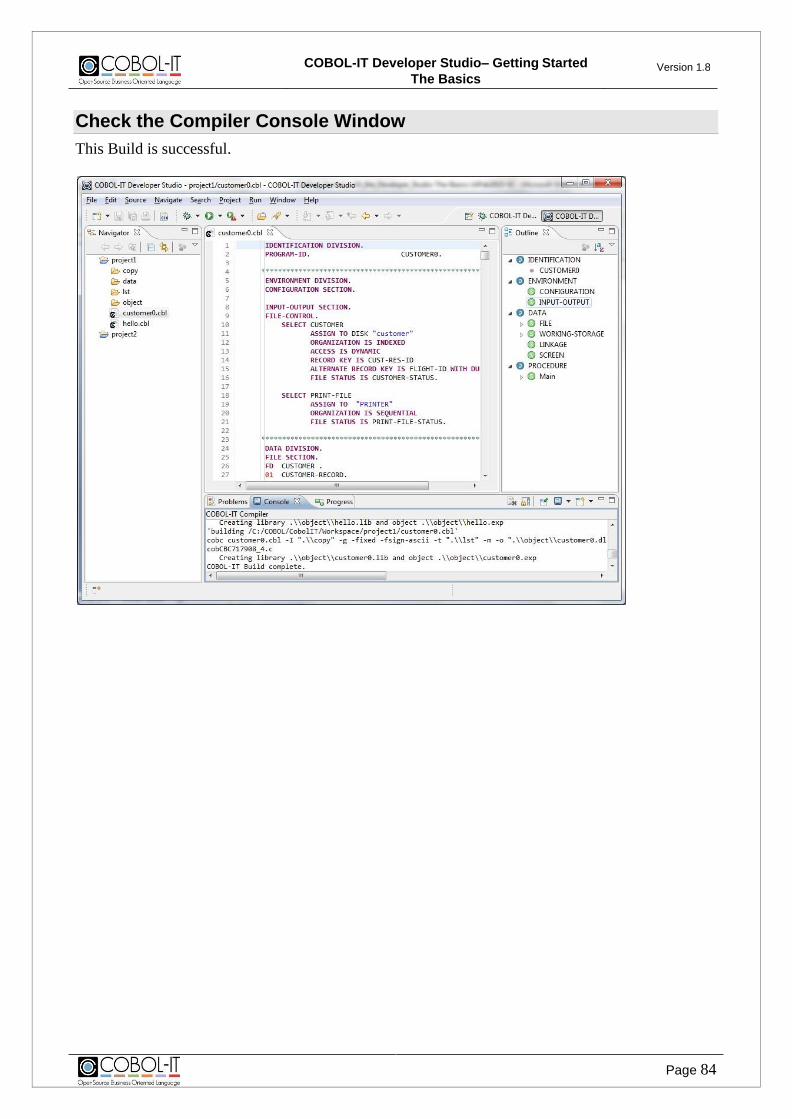
This Build is successful.
COBOL-IT Developer Studio– Getting Started
The Basics Version 1.8
Check the Compiler Console Window

Page 85
Click on the “Run” button on the Developer Studio toolbar.
COBOL-IT Developer Studio– Getting Started
The Basics Version 1.8
Run

Page 86
Click on the “Debug” button on the Developer Studio toolbar.
Single step through the source with the Step Into (F5) toolbar button.
COBOL-IT Developer Studio– Getting Started
The Basics Version 1.8
Run in Debug

Page 87
An alternative way to import files and folders into a Project is to select them, and drag and drop
them onto the Project folder in the Navigator window. In the Windows Explorer, selected a file, or
a group of files and perform a “drag and drop” operation.
File and Folder Operation
The File and Folder Operation dialog screen provides a number of options for using existing files
and folders. Select the “Copy files and folders” radio-button, and click “OK”.
Navigator Window updated
When the files have been COPY’ed into the Project folder, the Navigator Window is updated.
New Projects can be associated with Existing Source through the New Project wizard.
When using Existing Source, all Eclipse file artifacts are added to the existing source directories.
All editing is done on the files in the Existing Source directories
Working on multiple projects within a Workspace is possible, though you will notice how certain
screens, such as the Clean and Build screen provide more options when this is the case.
Configurations can be made at the Workspace level from within the Window>Preferences
interfaces. These configuration settings are automatically applied to all Projects within a
Workspace.
Configurations can be made at the Project level, from within the Project>Properties interfaces.
These configuration settings do not transfer from one project to another, as you add projects to the
workspace.
Configurations can be made at the Program level, by right-clicking on a program, and selecting
COBOL-IT Developer Studio– Getting Started
The Basics Version 1.8
Dragging and dropping files and folders into a Project
Summary

Page 88
Project>Proprties. These configuration settings apply only to the selected program.
Runtime configurations are useful in cases where a program requires a special configuration.
However, using Standard Configurations, in which the COBOL-IT setup file is altered to include
the necessary runtime environment variable settings is likely to be a more convenient solution.
Drag-and-drop functionality from the Windows Explorer directly into the Project folder in the
Developer Studio is supported.
The Developer Studio automatically launches the Debugger perspective when a debug operation is
launched. Make sure that your programs are compiled with –g prior to launching the Debugger
perspective.
The Enterprise Edition of the Developer Studio can be used to compile, run, and debug programs in
projects on remote machines.
COBOL-IT Developer Studio– Getting Started
The Basics Version 1.8

Page 89
FAQ
The Eclipse IDE is divided into a number of tabbed interfaces called Views. These Views can be
Minimized/Maximized, Opened/Closed, Detached/Attached, Repositioned with Drag and Drop.
Lets consider an example:
In the graphic below, the tabbed interfaces are titled “Navigator”, hello.cbl, Outline, Problems,
Console, and Progress. These are referred to, respectively, as the Navigator View, Code Editor
View, Outline View, Problems View, Console View, and Progress View.
COBOL-IT Developer Studio– Getting Started
The Basics Version 1.8
Using “Views” in Eclipse
Key Concepts

Page 90
Minimize / Maximize buttons are located in the upper right-hand corner of each of the Views on
your Developer Studio IDE.
To Minimize the Navigator View, click on the Minimize button in the upper right-hand corner
of the Navigator View. The Navigator View minimizes to the left-hand side of the Developer
Studio, and is shown by the icon ( see graphic below ).
To Restore the Navigator Window to its original position, click on the Restore icon positioned directly above the Navigator icon.
To Maximize the Navigator View, click on the Maximize button in the upper right-hand corner
of the Navigator View. The Navigator View occupies the entire screen, and all other views are minimized.
Note that the Toolbar for the maximized Navigator View now has a “Restore” button on it, where
the “Maximize” button was formerly placed. Clicking on this “Restore” button restores the
desktop.
Note also that the other views that were open have been mimized, and are shown minimized as
icons on the right hand side of the Developer Studio, along with “Restore” buttons. The desktop
can be partially or fully restored by clicking on these icons.
COBOL-IT Developer Studio– Getting Started
The Basics Version 1.8
Minimize/Restore a View
Maximize/Restore a View
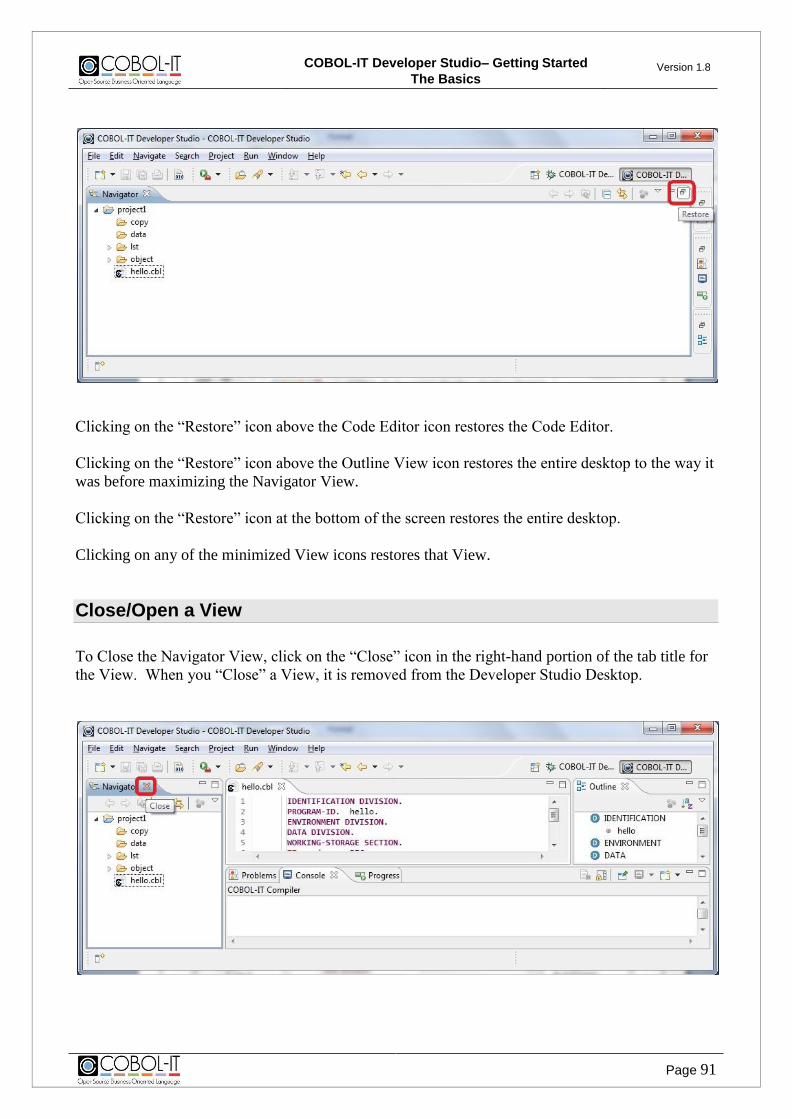
Page 91
Clicking on the “Restore” icon above the Code Editor icon restores the Code Editor.
Clicking on the “Restore” icon above the Outline View icon restores the entire desktop to the way it
was before maximizing the Navigator View.
Clicking on the “Restore” icon at the bottom of the screen restores the entire desktop.
Clicking on any of the minimized View icons restores that View.
To Close the Navigator View, click on the “Close” icon in the right-hand portion of the tab title for
the View. When you “Close” a View, it is removed from the Developer Studio Desktop.
COBOL-IT Developer Studio– Getting Started
The Basics Version 1.8
Close/Open a View

Page 92
To Open a View
In the graphic below, the Navigator View has been Closed. To Open the Navigator Window, select
Window>Show View>Other . Then, in the Show View dialog screen, select General>Navigator,
and click “Ok”.
Your application may require more than one Source Folder, and your Source Folders may need to
be separate because they require different compiler flags, or build scripts. COBOL-IT can
accommodate these needs.
To set the compiler flags for a Source Folder, right click on the Source Folder, and select
Properties>COBOL Properties>Enable Source Settings. Note that when following this set of
functions, the Window title for the COBOL Properties dialog window reflects the name of the
Source Folder. In the example below, this window title is: “Properties for src”.
COBOL-IT Developer Studio– Getting Started
The Basics Version 1.8
Managing Multiple Source Folders
Key Concepts

Page 93
Compiler flag and Environment settings, such as the –I setting in the example above, may
use relative notations. Where you see relative notations, the “.” refers to the root directory
of the Project, not the Source directory.
In the Workspace we have created for these Getting Started exercises, we have set a
compiler flag of –o .\object at the Workspace level. This will cause the object files to be
created in the object directory located under the Project directory. This behavior is the same
as we saw when the source files were contained in the root Project directory.
If there were no –o compiler flag setting, the Developer Studio would create the object files
in the Source Directory.
COBOL-IT Developer Studio– Getting Started
The Basics Version 1.8

Page 94
In the Help dropdown menu, select “About Eclipse Platform”.
On the “About Eclipse Platform” Window, select “Installation Details”.
In the “Eclipse Platform Installation Details Window, read the Version number of
COBOLITEclipse.
COBOL-IT Developer Studio– Getting Started
The Basics Version 1.8
Determining the version of Developer Studio

Page 95
www.cobol-it.com August, 2016
COBOL-IT Developer Studio– Getting Started
The Basics Version 1.8