Research Affairs & ORU Core Services Volunteer Appointment ...

CMS Net User Guide and Reference
Department of Health Care Services Children’s Medical Services Network
CMS Appointment Scheduling
User Manual (Step-by-Step) Revised: June 23, 2009
1

CMS Net User Guide and Reference
2
TABLE OF CONTENTS TABLE OF CONTENTS.................................................................................................................. 2 1 OVERVIEW ............................................................................................................................. 4 2 ACCESSING CMSNET SHEDULING APPOINTMENTS....................................................... 5 2.1 Using homepage quick search or CCS modules menu....................................................... 5 2.2 Appointments Due Quick Link ............................................................................................. 5 2.3 Appointments Booked Quick Link........................................................................................ 5 3 SETTING USER AVAILABILITY AND UNAVAILABILITY .................................................... 6 3.1 Set User Availability............................................................................................................. 6 3.2 Set User Unavailability......................................................................................................... 8 4 SEARCHING FOR AN APPOINTMENT............................................................................... 10 4.1 Search Results by Patient ................................................................................................. 10 4.1.1 Search by date and county................................................................................................ 11 4.2 Advance Search Options................................................................................................... 12 4.3 Search by user and appointment status............................................................................ 12 4.3.1 Display search results........................................................................................................ 13 5 ADDING AN APPOINTMENT............................................................................................... 14 5.1 Setting 1st available appointment....................................................................................... 15 5.2 Enter New Appointment Details......................................................................................... 16 5.2.1 Setting appointment by date, time and duration................................................................ 16 6 EDITING AN APPOINTMENT............................................................................................... 17 6.1 Editing an appointment date, time and duration................................................................ 17 6.1.1 Rules for selecting and changing the status...................................................................... 17 7 APPOINTMENT LETTER ..................................................................................................... 19 8 APPENDIX ............................................................................................................................ 20
CMS Net User Guide and Reference
List of Figures Figure 2-1, Access the Appointment Scheduling module .............................................................5 Figure 3-1, User Availability/Unavailability menu option ...............................................................6 Figure 3-2 Modify User Availability................................................................................................8 Figure 3-4, User Unavailability ......................................................................................................9 Figure 4-1, Main Scheduling Search screen ...............................................................................10 Figure 4-2, Patient Search by Name...........................................................................................10 Figure 4-3, Display from the Search Results screen...................................................................11 Figure 4-4, Client’s Search results ..............................................................................................11 Figure 4-5, Add new appointment or search for existing appointment........................................11 Figure 4-6, Main Scheduling Search screen ...............................................................................12 Figure 5-1, Creating a new appointment.....................................................................................14 Figure 5-2, Setting 1st available appointment..............................................................................15 Figure 5-3, Entering a detailed appointment ...............................................................................16 Figure 6-1, Cancellation status and reason ................................................................................18 Figure 6-2, Failed status and reason ..........................................................................................18 Figure 7-1, Generating an Appointment Letter............................................................................19
CMS Web Appointment Scheduling 3
CMS Net User Guide and Reference
CMS Web Appointment Scheduling 4
1 OVERVIEW
Children’s Medical Services Network (CMS Net) Appointment Scheduling module is used for scheduling, tracking and storing appointments.
Listed are features and functionalities of the Appointment Scheduling module:
• Ability to search and view appointments by scheduled time. • Ability to search and view appointments by clients and users. • Ability to search and view appointments by month, week, day or hours. • Be able to view user availability in incremental periods (Every 15, 30 minutes or an
hour). • Flexibility to modify existing current and future appointment dates and times. • Ability to schedule multiple appointments for a single user. • Ability to schedule single and multiple appointment(s) for a client. • Allow single user to schedule multiple appointments for multiple users. • Ability to schedule variable lengths of time for appointments. • Ability to enter comments and store to case note. • Ability to cancel current and future appointments. • Ability to view user availability prior to scheduling appointments – Open time slots • Display client’s language. • Ability to select 1st available appointment with the option to select next or future
appointment date. • Display patient header on the Add New Appointment screen. • Ability to generate an automatic case note. • Allow a user’s supervisor to view existing appointments and create new
appointments for the user. • Ability to indicate cancellation or failed appointment reasons. • Ability to sort by appointment date and time. • Ability to enter free text or comments within the appointment. • Ability to generate an appointment letter.
CMS Net User Guide and Reference
2 ACCESSING CMSNET SHEDULING APPOINTMENTS
2.1 Using homepage quick search or CCS modules menu
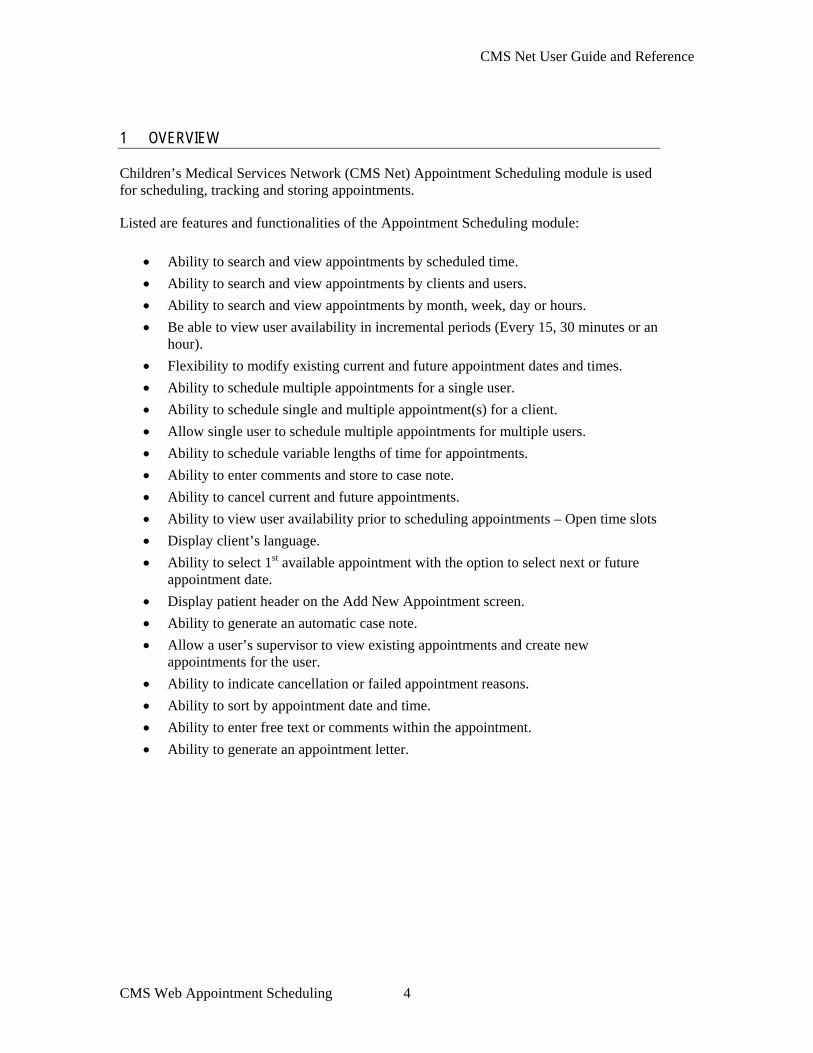
The Appointment Scheduling module can be accessed by hovering the mouse pointer over the ‘CCS Modules’ option to display the menu drop-down list. Click on the ‘Appt Scheduling’ option as shown in Figure 2-1 or on the Home page, expand the ‘Appt Scheduling’ option and click on the available quick search hyperlinks.
Figure 2-1, Access the Appointment Scheduling module
The Booked Appointments tracks all appointments scheduled for the user.
2.2 Appointments Due Quick Link
The Appointments Due quick link lists the user’s county clients with program eligibility end date(s) expiring in the next 60 days. The list is in alphabetical order by client’s CCS#, CIN#, client name, tickler date (program end date) and a “X” as a delete option. The tickler date is a hyperlink to the Add/Edit Appointment Scheduling screen and a user may delete a client from the tickler list if an appointment is not required by clicking on the “X”. The appointments that are cancelled or failed (not yet completed) will be added onto the tickler again with a Tickler status “Reschedule”.
2.3 Appointments Booked Quick Link
When clicking on the Appointments Booked quick link the search results screen will display user’s booked appointments.
CMS Web Appointment Scheduling 5
CMS Net User Guide and Reference
3 SETTING USER AVAILABILITY AND UNAVAILABILITY
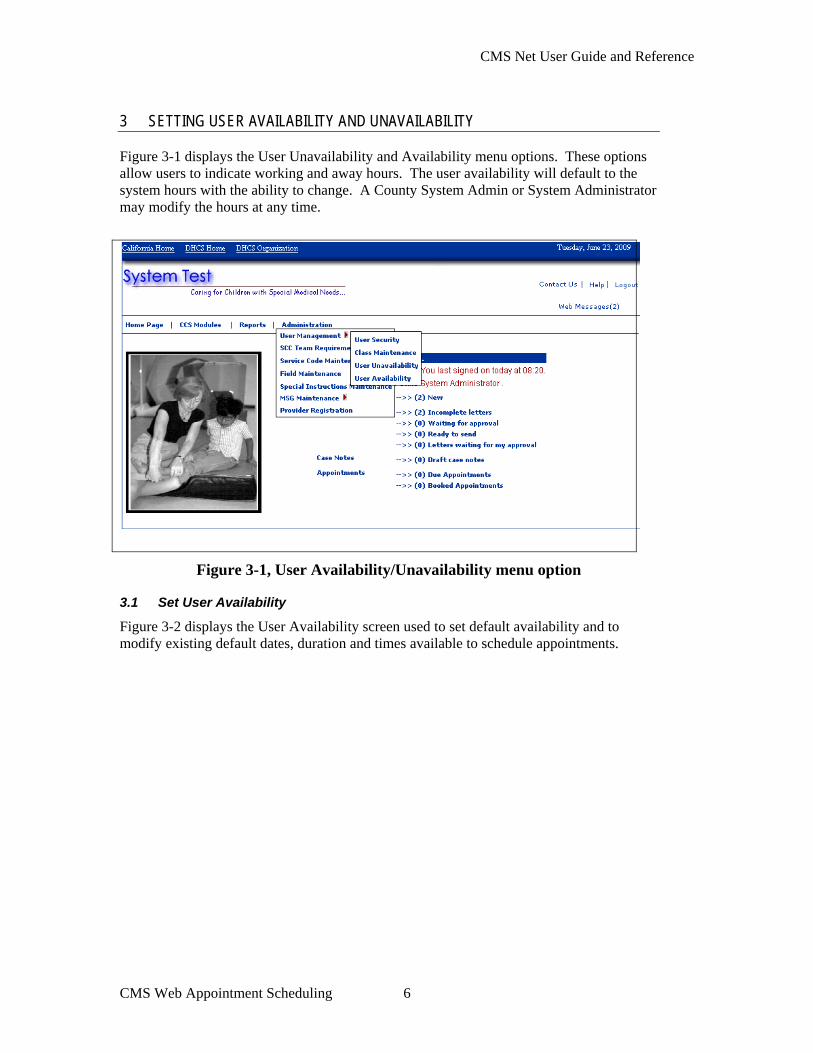
Figure 3-1 displays the User Unavailability and Availability menu options. These options allow users to indicate working and away hours. The user availability will default to the system hours with the ability to change. A County System Admin or System Administrator may modify the hours at any time.
Figure 3-1, User Availability/Unavailability menu option
3.1 Set User Availability
Figure 3-2 displays the User Availability screen used to set default availability and to modify existing default dates, duration and times available to schedule appointments.
CMS Web Appointment Scheduling 6

CMS Net User Guide and Reference
A county system administrator will set the availability for county user in user security screen by checking the box with the label: Set Default Availability. This will set the availability for the user from 8 a.m. to 12 p.m. and 1 p.m. to 5 p.m. until the year 2019. This availability can be later edited by the administrator by navigating to the Availability menu. This feature is used when setting up a new county user.
Step 1. Select Administration from the menu. Step 2. Select User Management option from the menu. Step 3. Select User Security from the menu. Step 4. Select the user from the Search screen Step 5. Click on Set Default Availability box and click the Save button. Note: The Set Default Availability box does not stay checked but when you go to the Availability screen you will see that a default period of time is set with the ability to modify.
Figure 3-2, Set default User Availability
CMS Web Appointment Scheduling 7

CMS Net User Guide and Reference
Step 1. Select Administration from the menu. Step 2. Select User Availability option from the menu. Step 3. Select User from the Search User screen Step 4. Enter the start date, end date, start time, end time and duration Step 5. Click the Save button.
Figure 3-2 Modify User Availability
3.2 Set User Unavailability
Figure 3-3 displays the User Unavailability screen used to indicate the dates, times and recurrence of unavailability.
Step 6. Select User from the Search User screen Step 7. Enter the start date, end date, start time, end time and unavailability reason. Step 8. Select recurrence pattern.
Note: a maximum limit exists on each recurrence. When entering a date if the recurrence pattern which exceeds the limit an error will display at the top of the screen. Daily 100 Weekly 52 Monthly 12 Yearly 10
CMS Web Appointment Scheduling 8

CMS Net User Guide and Reference
CMS Web Appointment Scheduling 9
Step 9. Click on the save button at the bottom of the screen.
Figure 3-3, User Unavailability
CMS Net User Guide and Reference
4 SEARCHING FOR AN APPOINTMENT
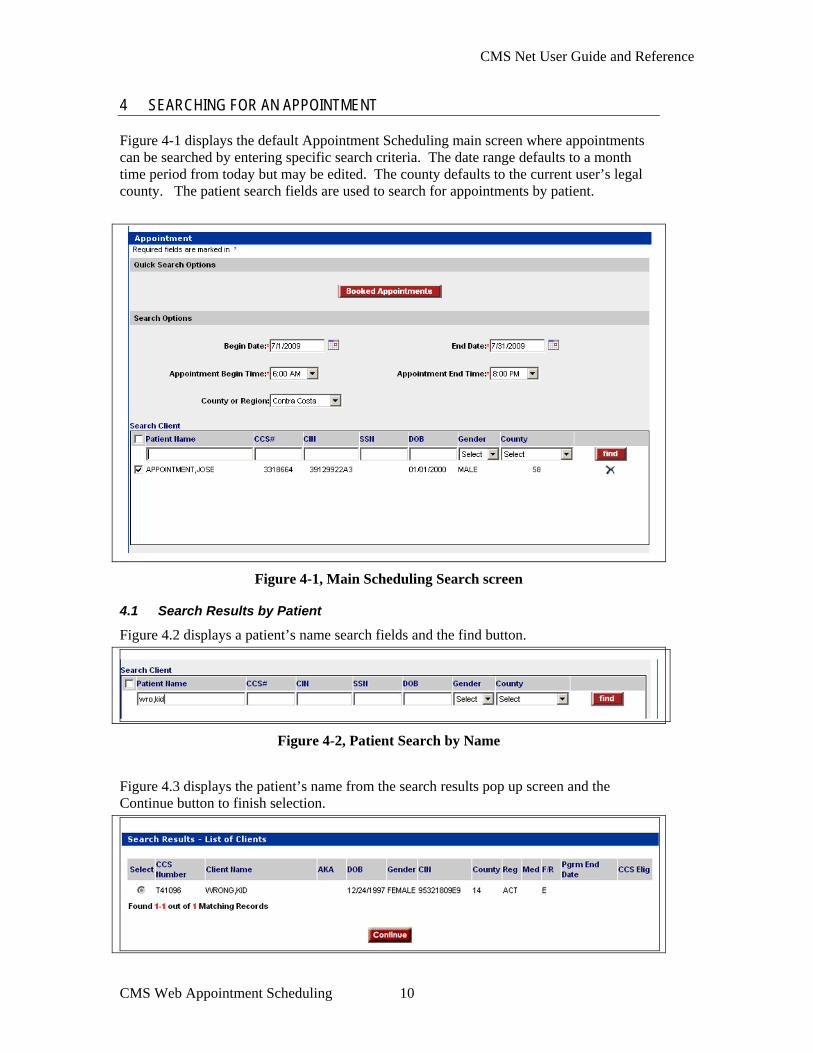
Figure 4-1 displays the default Appointment Scheduling main screen where appointments can be searched by entering specific search criteria. The date range defaults to a month time period from today but may be edited. The county defaults to the current user’s legal county. The patient search fields are used to search for appointments by patient.
Figure 4-1, Main Scheduling Search screen
4.1 Search Results by Patient
Figure 4.2 displays a patient’s name search fields and the find button.
Figure 4-2, Patient Search by Name
Figure 4.3 displays the patient’s name from the search results pop up screen and the Continue button to finish selection.
CMS Web Appointment Scheduling 10

CMS Net User Guide and Reference
CMS Web Appointment Scheduling 11
Figure 4-3, Display from the Search Results screen
Figure 4.4 displays patient’s name displays from the search results selection.
Figure 4-4, Client’s Search results
Figure 4.5 displays the buttons to take the next step in the appointment process.
Figure 4-5, Add new appointment or search for existing appointment.
4.1.1 Search by date and county
Step 1. Enter a date from the calendar. Note: Keep in mind, the CMS Web system has a 200 record results limit. Step 2. Select the county.(User’s county should default) Step 3. Click the ‘Search for existing appoint’ button The system displays all the appointments set by a specified date for the selected county.

CMS Net User Guide and Reference
4.2 Advance Search Options
Figure 4-2 displays the advanced search options to search by user or appointment status in the search criteria.
Figure 4-6, Main Scheduling Search screen
4.3 Search by user and appointment status
Step 1. Enter a user name, (last, first) and click on find. Select the user from the list.
Step 2. Select the appointment status. Step 3. Click on ‘Search for existing appoint’.
The system displays all the appointments set by user and appointment status.
CMS Web Appointment Scheduling 12
CMS Net User Guide and Reference
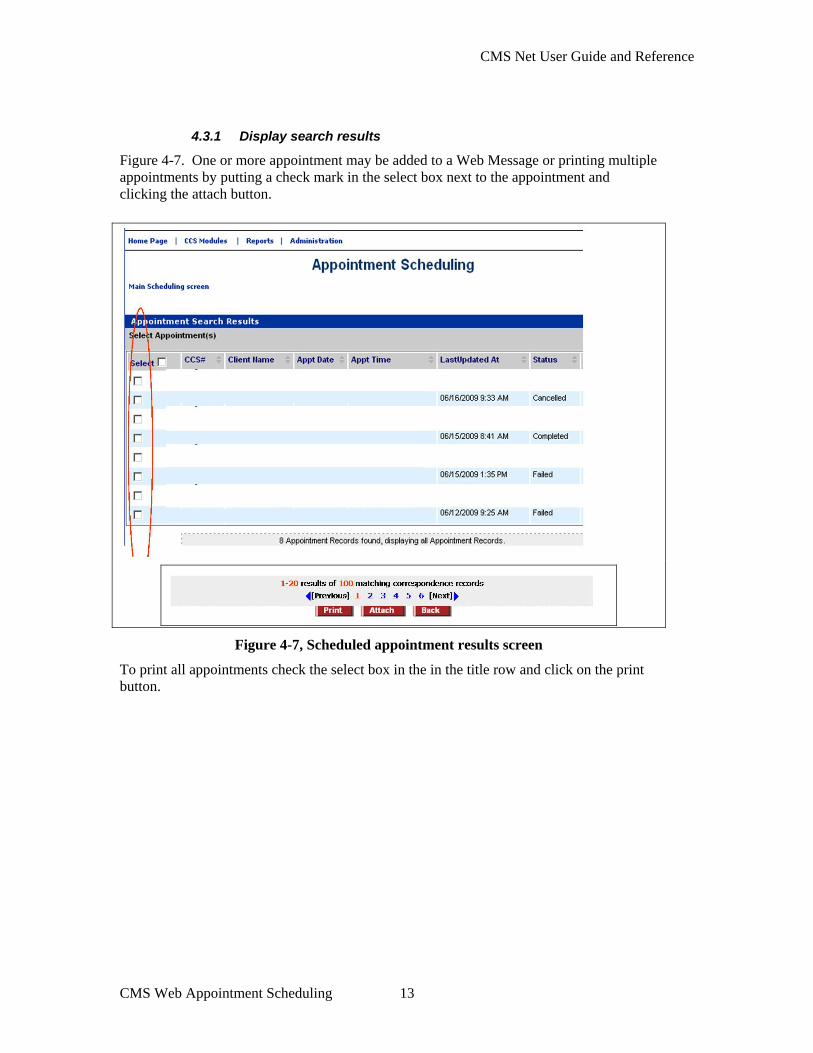
4.3.1 Display search results
Figure 4-7. One or more appointment may be added to a Web Message or printing multiple appointments by putting a check mark in the select box next to the appointment and clicking the attach button.
Figure 4-7, Scheduled appointment results screen
To print all appointments check the select box in the in the title row and click on the print button.
CMS Web Appointment Scheduling 13
CMS Net User Guide and Reference
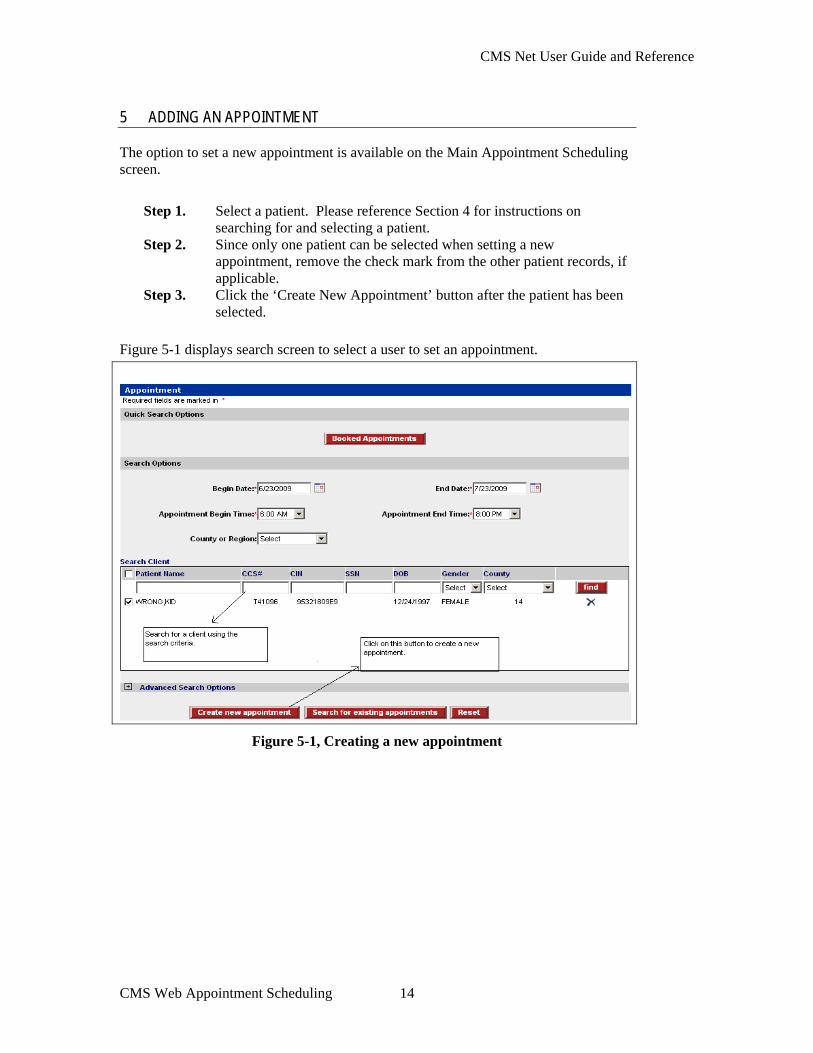
5 ADDING AN APPOINTMENT
The option to set a new appointment is available on the Main Appointment Scheduling screen.
Step 1. Select a patient. Please reference Section 4 for instructions on
searching for and selecting a patient. Step 2. Since only one patient can be selected when setting a new
appointment, remove the check mark from the other patient records, if applicable.
Step 3. Click the ‘Create New Appointment’ button after the patient has been selected.
Figure 5-1 displays search screen to select a user to set an appointment.
Figure 5-1, Creating a new appointment
CMS Web Appointment Scheduling 14

CMS Net User Guide and Reference
CMS Web Appointment Scheduling 15
5.1 Setting 1st available appointment
Verify the name showing in the header is the correct client. The user logged in will display in the Screener’s field. The name may be changed in the Appointment With field.
Step 1. Check the box next to 1st available Step 2. Click the ‘Save’ button.
Figure 5-2 displays setting the 1st available appointment with the day, date, and time.
Figure 5-2, Setting 1st available appointment
Appointments may be scheduled by selecting the 1st available appointment or by selecting another date and time from the calendar.
CMS Net User Guide and Reference
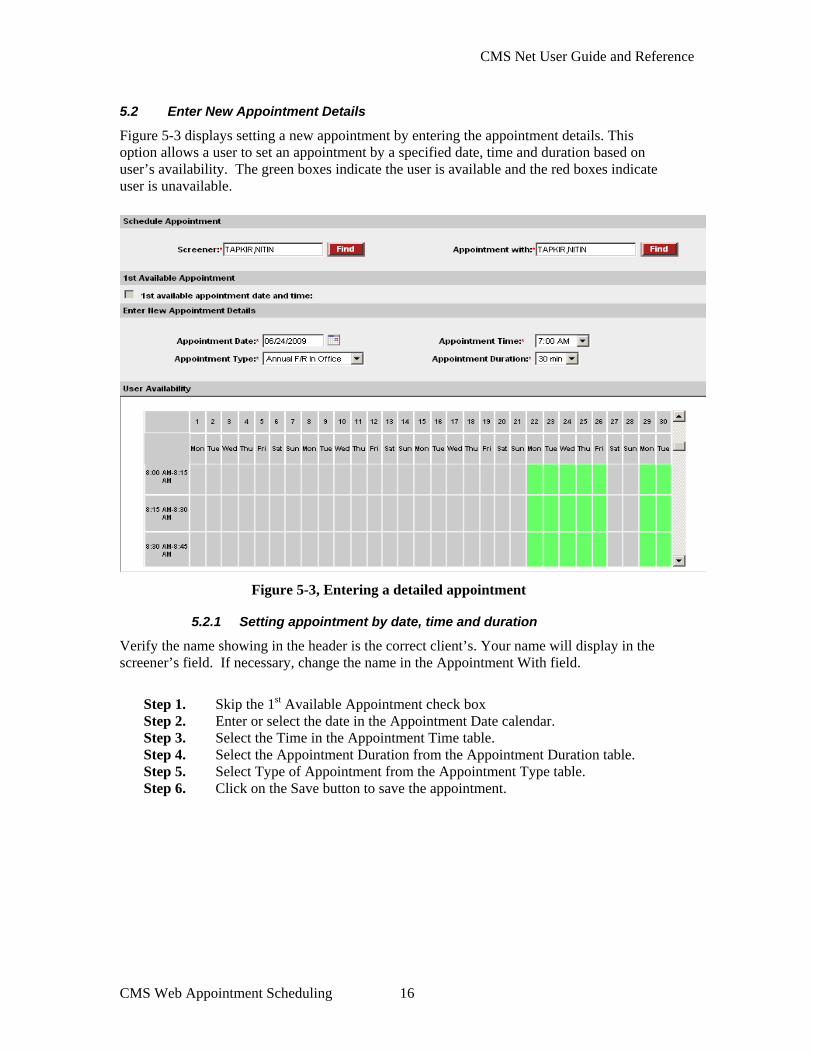
5.2 Enter New Appointment Details
Figure 5-3 displays setting a new appointment by entering the appointment details. This option allows a user to set an appointment by a specified date, time and duration based on user’s availability. The green boxes indicate the user is available and the red boxes indicate user is unavailable.
Figure 5-3, Entering a detailed appointment
5.2.1 Setting appointment by date, time and duration
Verify the name showing in the header is the correct client’s. Your name will display in the screener’s field. If necessary, change the name in the Appointment With field.
Step 1. Skip the 1st Available Appointment check box Step 2. Enter or select the date in the Appointment Date calendar. Step 3. Select the Time in the Appointment Time table. Step 4. Select the Appointment Duration from the Appointment Duration table. Step 5. Select Type of Appointment from the Appointment Type table. Step 6. Click on the Save button to save the appointment.
CMS Web Appointment Scheduling 16

CMS Net User Guide and Reference
6 EDITING AN APPOINTMENT
6.1 Editing an appointment date, time and duration
A current appointment may be edited by changing the date, time, appointment type or duration by clearing the existing values in the appointment detail fields, entering new values and clicking on the Save button. You may also remove the check from the box on the 1st available appointment to enter in appointment details. By updating the fields in either place the appointment will be changed to reflect the new date or time. There are a few restrictions.
• The client may not be changed. • Date may not be in the past • Date and time must be within the user’s availability • Cannot edit a past appointment except for updating the status to failed, completed
or cancelled. • Cannot change the status of a future cancelled appointment to booked appointment. • Cannot change the status of failed appointment to booked appointment.
Important Note: An appointment cannot be deleted after it is created.
6.1.1 Rules for selecting and changing the status.
A booked appointment status may be changed to Cancelled, Failed or Completed. If the booked status is changed the reason for cancellation or failure is required. An appointment with a status of Cancelled, Failed or Completed may not be changed after it has been selected and saved. Cancellation Reasons:
• Sick child • Conflicting appointment • Unrelated emergency • Forgot appointment • Interviewer sick • No transportation • Other • Parent unavailable • Client unavailable
Failed Reasons:
• Client did not show • Interviewer oversight • Other
CMS Web Appointment Scheduling 17
CMS Net User Guide and Reference
CMS Web Appointment Scheduling 18
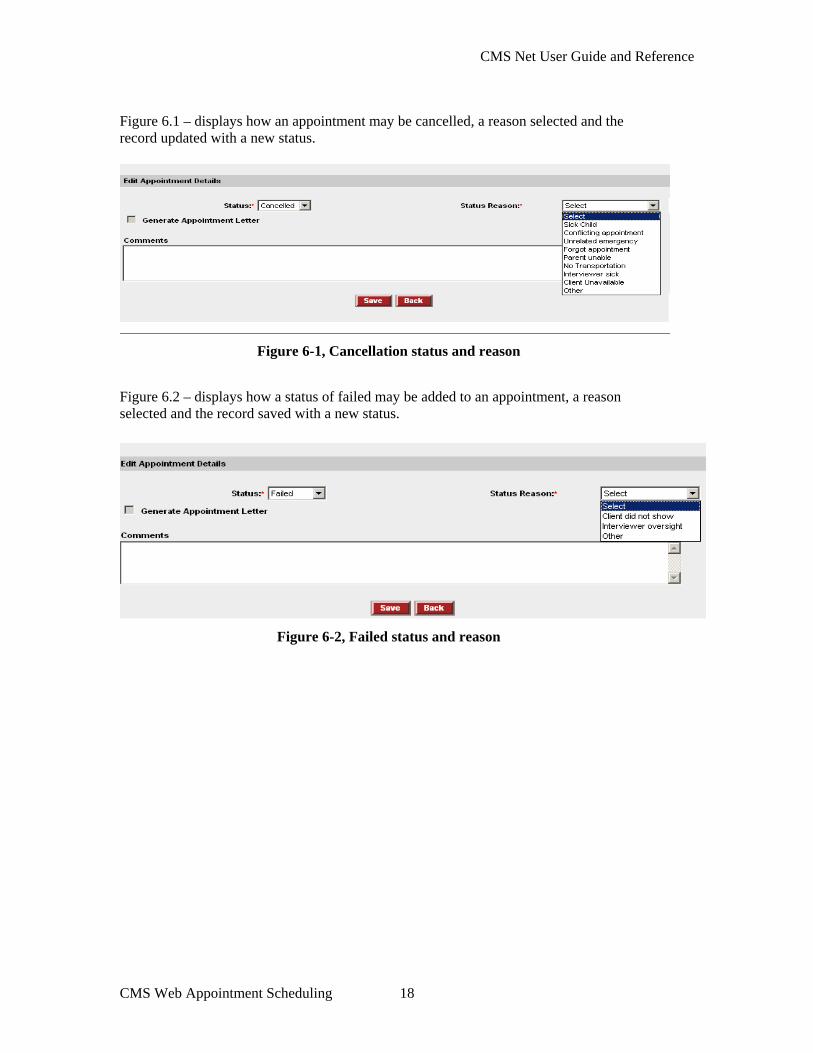
Figure 6.1 – displays how an appointment may be cancelled, a reason selected and the record updated with a new status.
Figure 6-1, Cancellation status and reason
Figure 6.2 – displays how a status of failed may be added to an appointment, a reason selected and the record saved with a new status.
Figure 6-2, Failed status and reason

CMS Net User Guide and Reference
7 APPOINTMENT LETTER
An appointment letter may be generated at the time of scheduling but is not required. (See Appendix 8 – sample of letter) By checking the box next to Generate Appointment Letter and clicking on save button the Edit Correspondence screen will appear to issue the letter and/or adding additional carbon copies, free text and print. If you decide later to generate a letter even after you have saved the booked appointment you may do so from the Edit Appointment screen. Figure 7.1 displays the check box next to Generate Appointment.
Figure 7-1, Generating an Appointment Letter
When a time or date has changed for an appointment a new letter maybe generated through the Edit Appointment screen. To reissue an existing letter you must use the Correspondence module. Note: See the Correspondence section in the manual for additional rules and requirements for generating a letter.
CMS Web Appointment Scheduling 19
CMS Net User Guide and Reference
8 APPENDIX
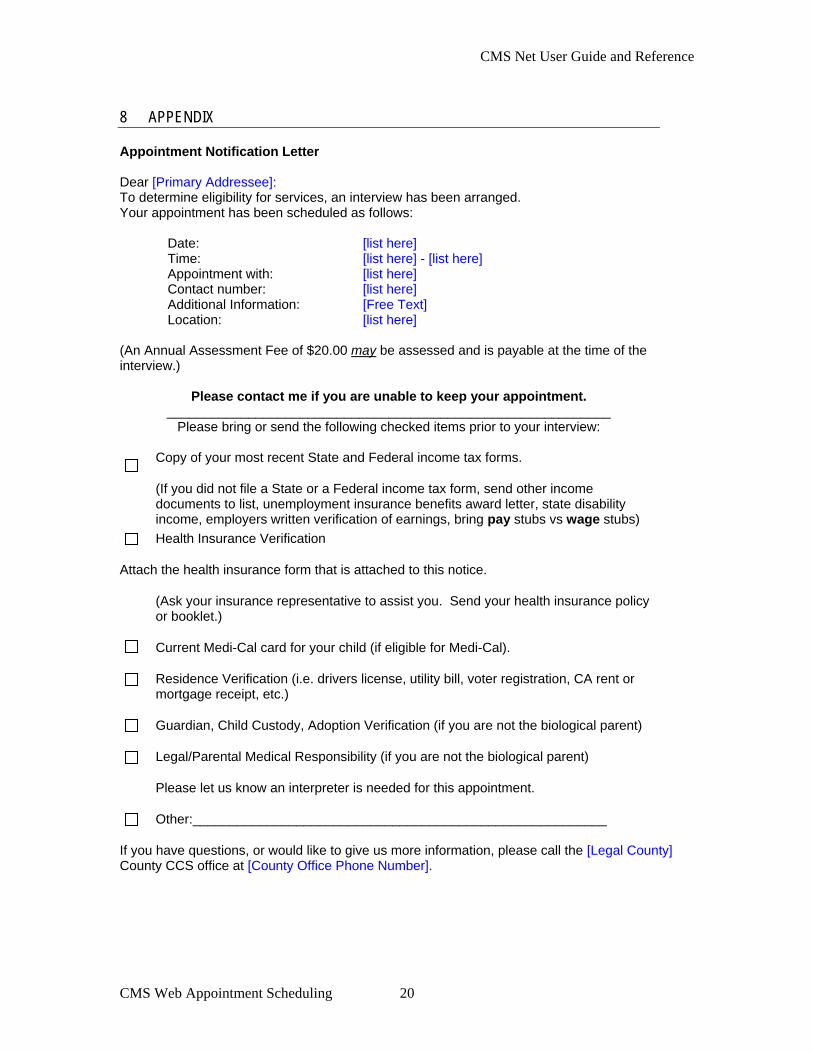
Appointment Notification Letter Dear [Primary Addressee]: To determine eligibility for services, an interview has been arranged. Your appointment has been scheduled as follows:
Date: [list here] Time: [list here] - [list here] Appointment with: [list here] Contact number: [list here] Additional Information: [Free Text] Location: [list here]
(An Annual Assessment Fee of $20.00 may be assessed and is payable at the time of the interview.)
Please contact me if you are unable to keep your appointment. ____________________________________________________________
Please bring or send the following checked items prior to your interview:
Copy of your most recent State and Federal income tax forms.
(If you did not file a State or a Federal income tax form, send other income documents to list, unemployment insurance benefits award letter, state disability income, employers written verification of earnings, bring pay stubs vs wage stubs)
Health Insurance Verification
Attach the health insurance form that is attached to this notice.
(Ask your insurance representative to assist you. Send your health insurance policy or booklet.)
Current Medi-Cal card for your child (if eligible for Medi-Cal).
Residence Verification (i.e. drivers license, utility bill, voter registration, CA rent or mortgage receipt, etc.)
Guardian, Child Custody, Adoption Verification (if you are not the biological parent)
Legal/Parental Medical Responsibility (if you are not the biological parent)
Please let us know an interpreter is needed for this appointment.
Other:________________________________________________________
If you have questions, or would like to give us more information, please call the [Legal County] County CCS office at [County Office Phone Number].
CMS Web Appointment Scheduling 20