CLOUD GATEWAY™ - Telstra · Cloud Gateway connections draw on some or all of the bandwidth you...
42
TELSTRA CORPORATION LIMITED (ABN 33 051 775 556) PAGE 1/42 DRAFT| [SECURITY CLASSIFICATION] | CLOUD GATEWAY™ USER GUIDE
Transcript of CLOUD GATEWAY™ - Telstra · Cloud Gateway connections draw on some or all of the bandwidth you...

TELSTRA CORPORATION LIMITED (ABN 33 051 775 556) PAGE 1/42 DRAFT| [SECURITY CLASSIFICATION] |
CLOUD GATEWAY™
USER GUIDE

TELSTRA CORPORATION LIMITED (ABN 33 051 775 556) FINAL TELSTRA RESTRICTED | | PAGE 2/42
WHAT’S INSIDE
OVERVIEW ....................................................................................................................................................... 5
COMPATIBLE CLOUD PROVIDERS ........................................................................................................... 6
USING THIS GUIDE ..................................................................................................................................... 6
PURCHASING A CLOUD GATEWAY™............................................................................................................. 7
REGISTERING FOR CLOUD GATEWAY™ .................................................................................................. 7
ACCESSING CLOUD GATEWAY™ .............................................................................................................. 7
YOUR BANDWIDTH ALLOCATION ............................................................................................................. 8
PURCHASING A CLOUD GATEWAY™ ........................................................................................................ 9
ADDING A CLOUD GATEWAY™ CONNECTION ........................................................................................... 12
GENERAL STEPS FOR ADDING A CLOUD GATEWAY™ CONNECTION .............................................. 13
SPECIFIC STEPS FOR ADDING A CLOUD GATEWAY™ CONNECTION ................................................ 15
Adding a Cloud Gateway™ connection to Microsoft® Services ............................................................ 16
Adding a Cloud Gateway™ connection to VMware vCloud® Air™ ....................................................... 18
Adding a Cloud Gateway™ connection to Amazon Web Services (AWS) ........................................... 20
Adding a Cloud Gateway™ connection to SoftLayer® ........................................................................... 22
Adding a Cloud Gateway™ connection to Telstra’s Virtual Server (Dedicated) Gen2 ......................... 23
Adding a Cloud Gateway™ connection to Virtual Storage (powered by NetApp®) ................................ 24
CONFIGURING YOUR CONNECTION ........................................................................................................... 26
Configuring your Cloud Gateway™ connection to Microsoft® Services ................................................. 26
Configuring your Cloud Gateway™ connection to VMware vCloud® Air™ .............................................. 26
Configuring your Cloud Gateway™ connection to Amazon Web Services (AWS) ................................ 27
Configuring your Cloud Gateway™ connection to SoftLayer® .............................................................. 27
Configuring your Cloud Gateway™ connection to Virtual Server (Dedicated) Gen2 ............................ 28
MODIFYING YOUR CLOUD GATEWAY™ CONNECTION ............................................................................. 30
MANAGING YOUR CLOUD GATEWAY™ ....................................................................................................... 32
CREATING A NEW CLOUD GATEWAY ALIAS ......................................................................................... 32
MODIFYING YOUR BANDWIDTH ALLOCATION ...................................................................................... 33
AMENDING YOUR CONTRACT TERM ..................................................................................................... 34

TELSTRA CORPORATION LIMITED (ABN 33 051 775 556) FINAL TELSTRA RESTRICTED | | PAGE 3/42
ACCESS CONTROL LIST (ACL) .................................................................................................................... 36
ACL ACTIONS ............................................................................................................................................ 36
SUBSCRIBE TO ACL – CREATE A PROFILE AND RULE TABLE ............................................................ 36
ADD/REMOVE ACL RULES ....................................................................................................................... 38
MANAGE ACL PROFILE(S) ........................................................................................................................ 39
SUPPORT ....................................................................................................................................................... 42

TELSTRA CORPORATION LIMITED (ABN 33 051 775 556) FINAL TELSTRA RESTRICTED | | PAGE 4/42
WELCOME TO CLOUD GATEWAY™
For sales, account set-up enquiries and technical support, contact your Telstra representative or choose from
our other support options.
You can access Cloud Gateway directly here or via Telstra’s Cloud Services Portal (either way, you’ll need
your login details).
CONVENTIONS USED IN THIS GUIDE The following typographical conventions are used in this guide for simplicity and readability:
Web addresses, email addresses and hyperlinks are shown in this colour in body text.
Button names and titles/features on your computer screen are shown in italics.
User input is shown in typewriter font.
Cloud Gateway™ User Guide, Version 5.1
© Telstra Corporation Limited (ABN 33 051 775 556) 2017. All rights reserved.
This work is confidential to Telstra and copyright. Apart from any use as permitted under the Copyright Act 1968,
information contained within this manual cannot be used for any other purpose other than the purpose for which it was
released. No part of this publication may be reproduced, stored in a retrieval system, or transmitted in any form or by any
means, electronic, mechanical, photocopying, recording or otherwise, without the written permission of Telstra
Corporation Limited.
Words mentioned in this book that are known to be trademarks, whether registered or unregistered, have been
capitalised or use initial capitals. Terms identified as trademarks include Microsoft®, SoftLayer® and vCloud® Air™.

TELSTRA CORPORATION LIMITED (ABN 33 051 775 556) FINAL TELSTRA RESTRICTED | | PAGE 5/42
CHAPTER 1
OVERVIEW
Telstra’s Cloud Gateway™ service is a simple way to access leading cloud platforms. It allows you to log in to
a single console, where you can view and manage multiple cloud connections in one place.
Having all of your connections in one place makes it easier to understand the relationships between your
Telstra private networks and your cloud services.
Whether you’re connecting to one or multiple cloud platforms – or adopting a hybrid cloud strategy – Cloud
Gateway aims to offer a seamless, one-stop solution that you can scale as your workloads change and your
business grows.

TELSTRA CORPORATION LIMITED (ABN 33 051 775 556) FINAL TELSTRA RESTRICTED | | PAGE 6/42
COMPATIBLE CLOUD PROVIDERS
At present, the Cloud Gateway service is compatible with cloud services provided by Amazon Web Services
(AWS), Microsoft® Azure, SoftLayer®, VMware vCloud® Air™ and Telstra’s Virtual Server (Dedicated) Gen2. It
doesn’t matter whether you purchased your cloud services through Telstra or from a provider other than
Telstra, as Cloud Gateway can enable you to connect.
The Cloud Gateway service is also required as part of the activation of Virtual Storage, our enterprise-class
storage service, which lets you keep your data in Telstra secure data centres while extending your data
environment into the cloud. You can leverage its storage and data management functions to multiple clouds.
Using Cloud Gateway, you can connect to one or many cloud providers quickly and easily change the speed
of connectivity.
Subscriptions purchased through Telstra (on the same account) will automatically be displayed when you log
in to the Cloud Gateway management console. To introduce subscriptions for cloud services purchased
somewhere other than Telstra, you’ll need your VMware service ID, AWS account ID or Microsoft Azure
ExpressRoute service key.
USING THIS GUIDE
There are four main aspects to using the Cloud Gateway service: purchasing a Cloud Gateway, adding a
Cloud Gateway connection, configuring your connection and managing your Cloud Gateway.
This guide walks you through each of these activities, starting with purchasing a Cloud Gateway.
TELSTRA CORPORATION LIMITED (ABN 33 051 775 556) FINAL TELSTRA RESTRICTED | | PAGE 7/42
CHAPTER 2
PURCHASING A CLOUD GATEWAY™
REGISTERING FOR CLOUD GATEWAY™
Before you can purchase Cloud Gateway™, you must first register for access to the Cloud Gateway
management console. Visit Telstra’s Cloud Services Store and locate the Cloud Gateway tile. Click the
button on this tile and you’ll be prompted to complete your registration.
New Telstra customers: you’ll need to create a Telstra account.
Existing Telstra customers: log in with your Telstra ID.
ACCESSING CLOUD GATEWAY™
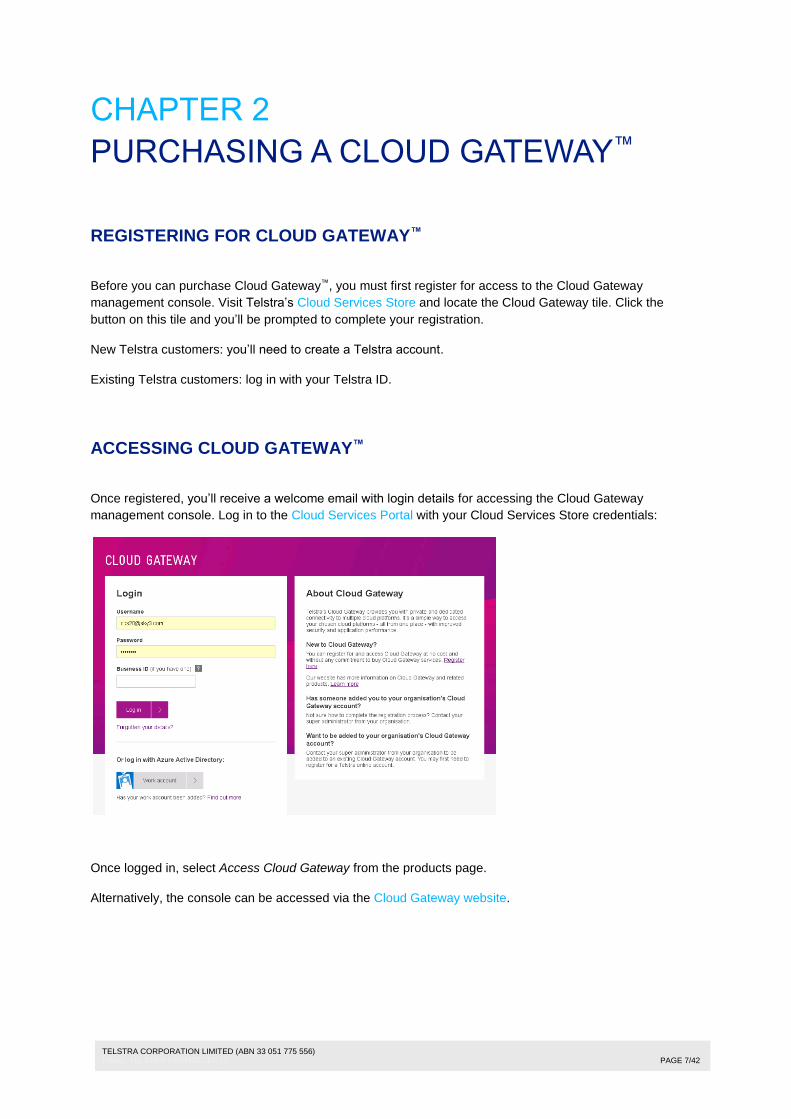
Once registered, you’ll receive a welcome email with login details for accessing the Cloud Gateway
management console. Log in to the Cloud Services Portal with your Cloud Services Store credentials:
Once logged in, select Access Cloud Gateway from the products page.
Alternatively, the console can be accessed via the Cloud Gateway website.

TELSTRA CORPORATION LIMITED (ABN 33 051 775 556) FINAL TELSTRA RESTRICTED | | PAGE 8/42
YOUR BANDWIDTH ALLOCATION
When you purchase a Cloud Gateway, you’ll be provided with options for how much and the type of
bandwidth to allocate to your Cloud Gateway. This bandwidth enables you to access your cloud platforms
quickly and securely from your private Telstra network. Make sure you consider the following:
Where you purchased your cloud services (this determines the bandwidth tier selected)
The number of cloud platforms that you’re planning to access from your Cloud Gateway
The number of workloads per cloud platform that you’ll need to support and the amount of bandwidth
per cloud you’ll need
The Telstra IP service (i.e. your Telstra IP VPN), from which you’d like to access your cloud services
The particular networking needs of your organisation.
There are two tiers of bandwidth to choose from:
Once you’ve decided which bandwidth tier and bandwidth you need for your organisation, you can nominate
your bandwidth tier(s), ranging from 10Mbps to 10Gbps. You can select only one bandwidth tier.
For Virtual Storage customers, this formula may help you quantify the bandwidth you need.
You can also add both types of bandwidth to the same Cloud Gateway and nominate different bandwidth
tiers for each. This works well where you have a mix of cloud services purchased from Telstra and other
providers. Please note that fees for Cloud Gateway are determined by the bandwidth tiers you select.

TELSTRA CORPORATION LIMITED (ABN 33 051 775 556) FINAL TELSTRA RESTRICTED | | PAGE 9/42
PURCHASING A CLOUD GATEWAY™
To make the most out of your Cloud Gateway subscription, you must ensure you have a compatible Telstra
IP network service and cloud services prior to purchasing a Cloud Gateway.
Step 1 – Log in to the Cloud Gateway™ management console
Step 2 – Add a Cloud Gateway
Step 3 – Enter your Cloud Gateway alias
Your alias cannot be more than 14 characters long. You can change this name later on. This allows
you to easily identify your Cloud Gateway when you come back to add connections and manage
your Cloud Gateway.

TELSTRA CORPORATION LIMITED (ABN 33 051 775 556) FINAL TELSTRA RESTRICTED | | PAGE 10/42
Step 4 – Nominate your bandwidth tier
Select your Cloud Gateway bandwidth tier(s). You can nominate only one tier, or nominate both if required.
Note, fees for your Cloud Gateway are determined by the bandwidth tier(s) you select here.
Step 5 – Select your contract term
There are four options available: monthly, 12 months, 24 months or 36 months. If you select
monthly, you can upgrade or downgrade your bandwidth allocation at any time.
Note: If you select a 12, 24 or 36-month contract, you won’t be able to downgrade your bandwidth
below the amount you originally allocated to your Cloud Gateway at the time of purchase. For
example, if you select a 50Mbps bandwidth tier when you purchase a Cloud Gateway for 12 months,
you can upgrade your bandwidth tier to 500Mbps, then downgrade to 200Mbps. However, you
cannot downgrade below 50Mbps during the 12-month term.
Select Continue.
Step 6 – Review your order
Confirm the details for your Cloud Gateway purchase. If you need to change anything, select Modify.
Read and accept our terms and conditions and select Purchase.

TELSTRA CORPORATION LIMITED (ABN 33 051 775 556) FINAL TELSTRA RESTRICTED | | PAGE 11/42
Step 7 – We’ll send you an email confirmation
Once your Cloud Gateway is set up, we’ll send you an email confirming your purchase. Once your
Cloud Gateway is ready, you’ll be able to start adding Cloud Gateway connections. Remember, you
can only add cloud connections if you have existing compatible public cloud services purchased
through Telstra or another provider. You can purchase public cloud services from Telstra’s Cloud
Services Store.

TELSTRA CORPORATION LIMITED (ABN 33 051 775 556) FINAL TELSTRA RESTRICTED | | PAGE 12/42
CHAPTER 3
ADDING A CLOUD GATEWAY™ CONNECTION
Once you’ve purchased a Cloud Gateway, you can then add connections to it. These are called Cloud
Gateway connections.
When you add a Cloud Gateway connection, you need to decide which cloud platform you intend to access
using this connection. You’ll also need to allocate bandwidth to your Cloud Gateway connection.
Cloud Gateway connections draw on some or all of the bandwidth you originally allocated to your Cloud
Gateway. Depending on the cloud platform you are accessing, there are varying bandwidth options for Cloud
Gateway conections:
Amazon Web Services (AWS)
Microsoft® Azure
SoftLayer® VMware vCloud® Air™
Virtual Server (Dedicated) Gen2
Supported bandwidth options
50Mbps
100 Mbps
200Mbps
300Mbps
400Mbps
500Mbps
50Mbps
100 Mbps
200 Mbps
500 Mbps
1Gbps
10Mbps
50Mbps
100Mbps
500Mbps
1Gbps
10Mbps
50 Mbps
100 Mbps
500 Mbps
1Gbps
10Mbps
50Mbps
100Mbps
500Mbps
1 Gbps
In this chapter, you’ll find:
general steps for adding any kind of Cloud Gateway connection
specific steps for adding particular Cloud Gateway connections

TELSTRA CORPORATION LIMITED (ABN 33 051 775 556) FINAL TELSTRA RESTRICTED | | PAGE 13/42
GENERAL STEPS FOR ADDING A CLOUD GATEWAY™ CONNECTION
Step 1 – Ensure you have unallocated bandwidth at your Cloud Gateway to allocate to your new
Cloud Gateway connection
If you already have connections established, you may need to purchase more bandwidth to support your new
Cloud Gateway connection. The Cloud Gateway summary will show you how much bandwidth you’ve already
allocated.
In the example above:
Of a total 100Mbps of bandwidth purchased for Cloud Gateway for cloud services purchased from
Telstra, 50Mbps of bandwidth have been allocated and 50Mbps of bandwidth are unallocated.
Of a total of 10Mbps of bandwidth purchased for Cloud Gateway for cloud services purchased from
providers other than Telstra, all 10Mbps are allocated.
You can purchase additional bandwidth for your Cloud Gateway, if required. Refer to ‘Modifying your
bandwidth allocation’.
Step 2 – Select the icon with a ‘plus’ sign
If you highlight your Cloud Gateway, three icons will appear. One of these icons is a ‘plus’ sign,
enabling you to connect a service to this Cloud Gateway.
Step 3 - Confirm your Telstra IP network FNN (full national number)
If you’ve already linked a Telstra IP network FNN to your Cloud Gateway management console,
select the private network you’d like to use for this connection. Otherwise, enter your Telstra IP
network FNN.

TELSTRA CORPORATION LIMITED (ABN 33 051 775 556) FINAL TELSTRA RESTRICTED | | PAGE 14/42
Two options will appear:
If you have an existing Telstra IP network service, select the first option. Enter the FNN details for
your Telstra IP network and choose an alias to help you identify this network (you can change your
network alias later on).
Select Continue and then Confirm.
You’ll have the option to add additional FNNs to your Cloud Gateway management console.
If you don’t have a Telstra IP network service, contact your Telstra representative or call us on 1800
620 345. You won’t be able to set up a Cloud Gateway connection without associating your Cloud
Gateway account with at least one compatible Telstra IP network service.

TELSTRA CORPORATION LIMITED (ABN 33 051 775 556) FINAL TELSTRA RESTRICTED | | PAGE 15/42
Step 4 – Check your Cloud Gateway is selected
Check that the correct Cloud Gateway is still highlighted. This is the Cloud Gateway to which you’ll
be adding your Cloud Gateway connection.
Step 5 – Choose your public cloud services
Decide whether you’re using this Cloud Gateway connection to access cloud services purchased
through Telstra or cloud services purchased through a provider other than Telstra.
Subscriptions purchased through Telstra will appear on the right-hand side of your screen. Select
the subscription you’d like to access using this connection.
Alternatively, you may wish to access cloud services purchased outside of Telstra. In this case,
select Connect to public cloud services from a provider other than Telstra. This button is also on the
right-hand side, further down.
Step 6 – Complete your connection details
You’ll then need to fill out a number of fields, depending on the cloud platform you want to access
using this Cloud Gateway connection. For more details about this step, see below for ‘Specific steps
for adding a Cloud Gateway connection’.
Step 7 – Receive email confirmation
We’ll email you once your Cloud Gateway connection is set up. Once you receive this email, there
will be a few more steps you need to take to finalise configuration – these steps will help ensure you
can fully utilise your Cloud Gateway connections.
For more details see Chapter 4, Configuring your Connection.
Please refer to the Cloud Gateway Technical Guide for specific details on how to connect and configure to
each cloud provider.
SPECIFIC STEPS FOR ADDING A CLOUD GATEWAY™ CONNECTION
Each Cloud Gateway connection has its own pre-requisites and pre-provisioning steps. These may differ
depending on the type of peering you are using.

TELSTRA CORPORATION LIMITED (ABN 33 051 775 556) FINAL TELSTRA RESTRICTED | | PAGE 16/42
Adding a Cloud Gateway™ connection to Microsoft® Services
Once you’ve submitted your order for a Cloud Gateway connection to Microsoft Services, it’s possible to
request the addition of public peering and/or Microsoft peering. Contact your Telstra representative to learn
more, or contact us.
Peering
type
Requirements to request a Cloud Gateway
connection Pre-provisioning steps
Private
Established Microsoft Azure tenancy with
ExpressRoute
Telstra IP network FNN
Microsoft Azure account ID
IP addresses must not overlap with these ranges:
0.0.0.0/8, 127.0.0.0/8, 169.254.0.0/16, 224.0.0.0/4,
240.0.0.0/4, 255.255.255.255/32
IP Address must not match these RFC 1918
summary routes:
o 10.0.0.0/8
o 172.16.0.0/12
o 192.168.0.0/16
Select /28 IP subnet block for
interconnect subnet
Allocate vNet addressing
Public
Established Microsoft Azure tenancy with
ExpressRoute
Existing private peering connection through Cloud
Gateway
Determine number of SNAT addresses
Network Design for source NAT of Azure Public
Peering traffic
Public IP addresses available for interconnect
transit (Yes/No)
IP addresses must not overlap with these ranges:
0.0.0.0/8, 127.0.0.0/8, 169.254.0.0/16, 224.0.0.0/4,
240.0.0.0/4, 255.255.255.255/32
IP Address must not match these RFC 1918
summary routes:
o 10.0.0.0/8
o 172.16.0.0/12
o 192.168.0.0/16
If public IPs are not available, you
can lease public IP addresses
from Telstra (minimum one and
maximum eight source NAT IPs)
Microsoft
Established Microsoft Azure tenancy with
ExpressRoute Premium add-on (mandatory for
Microsoft peering)
Existing private peering connection through Cloud
Gateway
Network Design for source NAT of Microsoft
peering traffic
Public IP addresses available for interconnect
transit (Yes/No)
IP addresses must not overlap with these ranges:
0.0.0.0/8, 127.0.0.0/8, 169.254.0.0/16, 224.0.0.0/4,
240.0.0.0/4, 255.255.255.255/32
IP Address must not match these RFC 1918
summary routes:
o 10.0.0.0/8
o 172.16.0.0/12
o 192.168.0.0/16
If public IPs are not available, you
can lease public IP addresses
from Telstra (4 or 8 for source
NAT)
Design VPC addressing scheme
Select /30 IP subnet block for
interconnect subnet
Choose route summarization
mechanism

TELSTRA CORPORATION LIMITED (ABN 33 051 775 556) FINAL TELSTRA RESTRICTED | | PAGE 17/42
Step 1 – Enter your ExpressRoute service key
If you’re accessing an Azure cloud service purchased through Telstra, your ExpressRoute service
key will need to be entered here.
Step 2 – Enter the details of your interconnect subnet
We use these addresses to connect your Telstra IP network service to your cloud services. This
subnet must not overlap with IP addresses in your Telstra IP network service, connected clouds or
interconnected subnets.
Note: You’ll receive an error message if your interconnect subnet is not in the correct format. For
Microsoft Azure, this needs to be /28 for private peering.
Step 4 – Review your order
Confirm the details for your Cloud Gateway connection.
If you need to change anything, select Modify.
If not, select Purchase.
Step 5 – Receive email confirmation
Once your Cloud Gateway connection is set up, we’ll let you know via email. You’ll then need to
finalise configuration for this connection (see Chapter 4, Configuring your connection).

TELSTRA CORPORATION LIMITED (ABN 33 051 775 556) FINAL TELSTRA RESTRICTED | | PAGE 18/42
Adding a Cloud Gateway™ connection to VMware vCloud® Air™
Requirements to request a Cloud Gateway
connection Pre-provisioning steps
Established vCloud Air tenancy purchased from
Telstra or VMware
Purchase Direct Conenct Add-on from vCloud Air
Telstra IP network FNN
VMware service ID
IP addresses must not overlap with these ranges:
0.0.0.0/8, 127.0.0.0/8, 169.254.0.0/16, 224.0.0.0/4,
240.0.0.0/4, 255.255.255.255/32
IP Address must not match these RFC 1918
summary routes:
o 10.0.0.0/8
o 172.16.0.0/12
o 192.168.0.0/16
Allocate /29 IP block for interconnect
subnet
Allocate compute subnets for vCloud
Air tenancy
Configure compute subnets within
vCloud Air tenancy
Step 1 – Confirm your existing VMware vCloud Air add-on
You’ll need to have already requested a VMware vCloud Air add-on and be able to confirm that this
add-on has already been set up.
If you’re connecting to vCloud Air services purchased through Telstra, you can request this add-on
through Telstra’s Cloud Services Portal. If you’re connecting to vCloud Air services purchased
somewhere other than Telstra, use the My VMware portal to request this add-on.
Step 2 – Enter your VMware service ID
If you’re accessing VMware vCloud Air services purchased through Telstra, your VM service ID will
already be populated. Otherwise, you’ll need to enter it here.
Step 3 – Select bandwidth for your Cloud Gateway connection
The amount of bandwidth you can allocate will depend on:
the bandwidth tier you originally allocated when purchasing your Cloud Gateway
how much of your bandwidth has already been allocated to other Cloud Gateway connections

TELSTRA CORPORATION LIMITED (ABN 33 051 775 556) FINAL TELSTRA RESTRICTED | | PAGE 19/42
Step 4 – Enter the details for your interconnect subnet
Note: you’ll receive an error message if your interconnect subnet is not in the correct format. For vCloud Air,
this needs to be /29.
Step 5 – Add compute subnets
You can add up to 10 compute subnets.
Step 6 – Select Continue
Step 7 – Review your order
Confirm the details for your Cloud Gateway connection.
If you need to change anything, select Modify.
If not, select Purchase.
Step 8 – Receive email confirmation
Once your Cloud Gateway connection is set up, we’ll let you know via email. You’ll then need to
finalise configuration for this connection (see Chapter 4, Configuring your connection).

TELSTRA CORPORATION LIMITED (ABN 33 051 775 556) FINAL TELSTRA RESTRICTED | | PAGE 20/42
Adding a Cloud Gateway™ connection to Amazon Web Services (AWS)
Peering Pre-requisites Pre-provisioning steps
Private
Established AWS tenancy in Cloud Gateway
Telstra IP network
AWS account ID
IP addresses must not overlap with these ranges:
0.0.0.0/8, 127.0.0.0/8, 169.254.0.0/16, 224.0.0.0/4,
240.0.0.0/4, 255.255.255.255/32
IP Address must not match these RFC 1918
summary routes:
o 10.0.0.0/8
o 172.16.0.0/12
o 192.168.0.0/16
Design VPC addressing scheme
Select /30 IP subnet block for
interconnect subnet
Choose route summarization
option
Public
Established AWS tenancy in Cloud Gateway
Telstra IP network
AWS account ID
Network design for source NAT of AWS traffic
Public IP addresses available for interconnect
transit (Yes/No)
IP addresses must not overlap with these ranges:
0.0.0.0/8, 127.0.0.0/8, 169.254.0.0/16, 224.0.0.0/4,
240.0.0.0/4, 255.255.255.255/32
IP Address must not match these RFC 1918
summary routes:
o 10.0.0.0/8
o 172.16.0.0/12
o 192.168.0.0/16
Design VPC addressing scheme
Select /30 IP subnet block for
interconnect subnet
Specify public prefixes to advertise
to AWS
Step 1 – Enter your AWS account ID
If you’re accessing AWS cloud services purchased through Telstra, your AWS account ID will
already be populated. Otherwise, you’ll need to enter it here.
Step 2 – Enter a connection name for your Cloud Gateway connection
This is the name that will appear when you log in to the AWS management console. Maximum 98
characters.
Step 3 – Select bandwidth for your Cloud Gateway connection
The amount of bandwidth you can allocate will depend on:
the bandwidth tier you originally allocated when purchasing your Cloud Gateway
how much of your bandwidth has already been allocated to other Cloud Gateway connections
Step 4 – Select location
Step 5 – Enter the details for your interconnect subnet
Note: you’ll receive an error message if your interconnect subnet is not in the correct format. For
AWS, this needs to be /30.
Step 6 – Select Continue

TELSTRA CORPORATION LIMITED (ABN 33 051 775 556) FINAL TELSTRA RESTRICTED | | PAGE 21/42
Step 7 – Review your order
Confirm the details for your Cloud Gateway connection.
If you need to make a change, select Modify.
If not, select Purchase.
Step 8 – Receive email confirmation
Once your Cloud Gateway connection is set up, we’ll let you know via email. You will then be
required to finalise configuration for this connection (see Chapter 4, Configuring your connection).
Keep in mind that AWS routing tables have a 100-route limit per Virtual Private Cloud (VPC). For
details see AWS documentation.

TELSTRA CORPORATION LIMITED (ABN 33 051 775 556) FINAL TELSTRA RESTRICTED | | PAGE 22/42
Adding a Cloud Gateway™ connection to SoftLayer®
Pre-requisites Pre-provisioning steps
Established SoftLayer platform tenancy from Telstra
Network design and analysis regarding SoftLayer
restricted private IP ranges (10.0.0.0/14,
10.200.0.0/14, 10.198.0.0/15, 0.0.0.0/8, 127.0.0.0/8,
169.254.0.0/16, 224.0.0.0/4, 240.0.0.0/4,
255.255.255.255/32)
IP Address must not match these RFC 1918
summary routes:
o 10.0.0.0/8
o 172.16.0.0/12
o 192.168.0.0/16
Telstra IP network FNN
SoftLayer platform account ID
Allocate /30 IP block for interconnect
subnet
Configure SoftLayer tenancy and
obtain SoftLayer compute subnets
from SoftLayer
Choose Telstra subnets for
accessing SoftLayer tenancy
Step 1 – Select bandwidth for your Cloud Gateway connection
The amount of bandwidth you can allocate will depend on:
the bandwidth tier you originally allocated when purchasing your Cloud Gateway
how much of your bandwidth has already been allocated to other Cloud Gateway connections
Step 2 – Enter the details for your interconnect subnet
Note: you’ll receive an error message if your interconnect subnet is not in the correct format. For
IBM SoftLayer, this needs to be /30 format.
Step 3 – Add Telstra subnets
You can add up to 10 Telstra subnets.
Step 4 – Add compute subnets
You can add up to 10 compute subnets.
Step 5 – Select Continue
Step 6 – Review your order
Confirm the details for your Cloud Gateway connection.
If you need to change anything, select Modify.
If not, select Purchase.
Step 7 – Receive email confirmation
We’ll confirm your Cloud Gateway connection request via email. The email will also include the next
steps to ensure your connection is fully operational: ordering Direct Link Cloud Exchange via the
SoftLayer Customer Portal (see Chapter 4, Configuring your connection).

TELSTRA CORPORATION LIMITED (ABN 33 051 775 556) FINAL TELSTRA RESTRICTED | | PAGE 23/42
Adding a Cloud Gateway™ connection to Telstra’s Virtual Server (Dedicated) Gen2
Pre-requisites Pre-provisioning steps
Established Virtual Server (Dedicated) Gen2 tenancy
from Telstra
Telstra IP network FNN
IP addresses must not overlap with these ranges:
0.0.0.0/8, 127.0.0.0/8, 169.254.0.0/16, 224.0.0.0/4,
240.0.0.0/4, 255.255.255.255/32
IP Address must not match these RFC 1918
summary routes:
o 10.0.0.0/8
o 172.16.0.0/12
o 192.168.0.0/16
Allocate /29 IP block for interconnect
subnet – this must not be the same
as the interconnect subnet provided
on your Virtual Server (Dedicated)
Gen2 application form.
Step 1 – Select bandwidth for your Cloud Gateway connection
The amount of bandwidth you can allocate will depend on:
the bandwidth tier you originally allocated when purchasing your Cloud Gateway
how much of your bandwidth has already been allocated to other Cloud Gateway connections
Note: Cloud Gateway connection only available for Sydney and Melbourne tenancies.
Step 2 – Enter the details for your interconnect subnet
Note: you’ll receive an error message if your interconnect subnet is not in the correct format. For
Virtual Server (Dedicated) Gen2, this needs to be /29 format.
Step 3 – Select Continue
Step 4 – Review your order
Confirm the details for your Cloud Gateway connection.
If you need to change anything, select Modify.
If not, select Purchase.
Step 5 – Receive email confirmation
We’ll confirm your Cloud Gateway connection request via email.

TELSTRA CORPORATION LIMITED (ABN 33 051 775 556) FINAL TELSTRA RESTRICTED | | PAGE 24/42
Adding a Cloud Gateway™ connection to Virtual Storage (powered by NetApp®)
As part of the activation of your Virtual Storage service, you’ll need to make sure you connect it to Cloud Gateway. This is to ensure a simple, scalable and secure connection to your Virtual Storage service from your Telstra IP network service. It’s also how network traffic generated by your Virtual Storage service is measured.
If you already have Cloud Gateway with us and you’ve allocated enough bandwidth for your Virtual Storage service, once you purchase Virtual Storage you can simply add a Cloud Gateway connection to your virtual storage array(s).
Remember, if you’ve purchased enough bandwidth in Cloud Gateway, you can also share your Cloud Gateway bandwidth across the other cloud services you add to it.
Pre-requisites
A Virtual Storage subscription purchased from Telstra
Your Virtual Storage service configured – specifically storage array(s) created –on
NetApp’s Virtual Storage portal. Find out how in the NetApp Virtual Storage Portal User
Guide
Your Telstra IP network FNN (full national number). If you don’t know your FNN, check
My Network or contract your Telstra representative.
Step 1 – Select the virtual storage array you want to connect to
Step 2 – Select bandwidth for your Virtual Storage connection
The amount of bandwidth you can allocate will depend on:
the bandwidth tier you originally allocated when purchasing your Cloud Gateway
how much of your bandwidth has already been allocated to other Cloud Gateway connections
(if you have any)

TELSTRA CORPORATION LIMITED (ABN 33 051 775 556) FINAL TELSTRA RESTRICTED | | PAGE 25/42
To help you estimate the bandwidth you need for your Virtual Storage performance tier, you’ll find some
guidance here.
Step 3 – Select Continue
Step 4 – Review your order
Confirm the details for your Cloud Gateway connection.
If you need to change anything, select Modify.
If not, select Purchase.
Step 5 – We’ll confirm your Virtual Storage connection request via email within five business days.

TELSTRA CORPORATION LIMITED (ABN 33 051 775 556) FINAL TELSTRA RESTRICTED | | PAGE 26/42
CHAPTER 4
CONFIGURING YOUR CONNECTION
Once we’ve set up your Cloud Gateway™ connection, there are a few more steps you’ll need to take to
finalise configuration on your end. These steps depend on the cloud platform you are accessing (and in
some cases, the type of peering you’re using).
When your Cloud Gateway connection is ready to be configured, we’ll send you an email to let you know. To
finalise your connection, follow the relevant points below.
Please check the Cloud Gateway Technical Guide for the technical rules and constraints specific to each
Cloud Gateway connection.
Configuring your Cloud Gateway™ connection to Microsoft® Services
Public peering and Microsoft peering will only be relevant for you if you’ve requested that one or both of
these peering options be added to your Cloud Gateway connection to Microsoft Services.
Peering Post-provisioning steps Service testing
Private
Configure vNet in Azure (ARM) portal
Link vNet using Azure portal or PowerShell
Test end-to-end connectivity from
Telstra IP network to Microsoft
Azure private peering
Public
Customer performs SNAT configuration Test end-to-end connectivity from
Telstra IP network to Microsoft
Azure public peering
Microsoft
Customer performs SNAT configuration Test end-to-end connectivity from
Telstra IP network to Microsoft
peering
Configuring your Cloud Gateway™ connection to VMware vCloud® Air™
Post-provisioning steps Service testing
Configure Telstra static routes on vCloud Air Edge
Test end-to-end connectivity from
Telstra IP network to vCloud Air
services

TELSTRA CORPORATION LIMITED (ABN 33 051 775 556) FINAL TELSTRA RESTRICTED | | PAGE 27/42
Configuring your Cloud Gateway™ connection to Amazon Web Services (AWS)
Peering Post-provisioning steps Service testing
Private
Configure Virtual Private Gateway (VPG) in AWS
Management Portal
Configure Virtual Private Cloud (VPC) in AWS
Management Portal
Link VPG to VPC
Test end-to-end connectivity from
Telstra IP network to AWS private
peering
Public
Perform customer side SNAT configuration
Configure VPG and VPC connections in AWS
Management Portal
Test end-to-end connectivity from
Telstra IP network to AWS public
peering
Keep in mind that AWS routing tables have a 100-route limit per Virtual Private Cloud (VPC). For details see
AWS documentation.
Configuring your Cloud Gateway™ connection to SoftLayer®
Pre-provisioning Service testing
Once you submit an order for a Cloud Gateway connection
to your SoftLayer platform services, we’ll send you an
email outlining the next steps to ordering Direct Link Cloud
Exchange via the SoftLayer Customer Portal. We’ve als
outlined these steps below. You’ll need to follow these
steps to ensure your connection is fully operational.
It takes us up to five business days to extend your Telstra
IP network and provision this Cloud Gateway connection.
Once you’ve completed and returned the SoftLayer questionnaire, a SoftLayer network engineer will test and confirm the connecton. The SoftLayer team can implement the Direct Link within 2-3 business days, though it may take longer for more complex configurations.
Once SoftLayer has confirmed the connection, they’ll email you with details on how to test it too. Charges will start for your Direct Link Cloud Exchange service once you confirm the connection is working.
Post-provisioning Service testing
Configure firewalls in your SoftLayer platform network
environment, as required
Test end-to-end connectivity from
Telstra IP network to SoftLayer
platform services

TELSTRA CORPORATION LIMITED (ABN 33 051 775 556) FINAL TELSTRA RESTRICTED | | PAGE 28/42
Once you’ve successfully configured your Cloud Gateway connection, it will appear as ‘active’ when
you log in to the Cloud Gateway management console.
How to set up Direct Link Cloud Exchange
1. Log in to the SoftLayer Customer Portal, select the ‘Network’ menu and navigate to ‘Direct Link’, ‘Cloud Exchange’.
2. Where it says ‘Enter your Cloud Exchange provider’, type ‘Telstra’.
3. Under ‘Select your Cloud Exchange location for end point’ (the same location you chose
in your SoftLayer connection request in the Cloud Gateway management console). The location should typically reflect the region where most of your SoftLayer-hosted servers are located; otherwise, see step 5 on choosing routing below.
4. Under ‘Choose virtual cross-connection speed’, select 1Gbps. View pricing
5. Under ‘Choose routing’, ‘Local’ means that access via Direct Link will be limited to servers hosted in the location chosen in step 3. If you select ‘Global’, the Direct Link connection can access servers in all SoftLayer data centres via SoftLayer’s private network. Note, if you’re ordering for a US location, you can only select ‘Global’ routing. Global routing incurs an additional fixed monthly charge plus metered over-usage charges. View pricing
6. You can add additional comments to your order before selecting ‘Submit’. A ticket number will be generated.
7. A SoftLayer Sales staff member will respond to the ticket with a series of networking questions. To complete the questions, you’ll need to log in to Telstra’s Cloud Gateway and note down the primary and secondary paths of the following:
SoftyLayer interconnect subnet: x.x.x.x/31 - Cloud Gateway virtual router: x.x.x.y/32 and - SoftLayer router: x.x.x.z/32
VLAN ID: xxxx
8. Once you’ve completed and returned the questionnaire, a SoftLayer network engineer will test and confirm the connecton. The SoftLayer team can implement the Direct Link within 2-3 business days, though it may take longer for more complex configurations.
9. Once SoftLayer has confirmed the connection, they’ll email you with details on how to
test it too. Charges will start for your Direct Link Cloud Exchange service once you confirm the connection is working.

TELSTRA CORPORATION LIMITED (ABN 33 051 775 556) FINAL TELSTRA RESTRICTED | | PAGE 29/42
Configuring your Cloud Gateway™ connection to Virtual Server (Dedicated)
Gen2
Post-provisioning Service testing
Configure subnets, load balanced and static routes in
your Virtual Server (Dedicated) Gen2 network
environment, as required
Test end-to-end connectivity from
Telstra IP network to Virtual Server
(Dedicated) Gen2
Once you’ve successfully configured your Cloud Gateway connection, it will appear as ‘active’ when
you log in to the Cloud Gateway management console.

TELSTRA CORPORATION LIMITED (ABN 33 051 775 556) FINAL TELSTRA RESTRICTED | | PAGE 30/42
CHAPTER 5
MODIFYING YOUR CLOUD GATEWAY™
CONNECTION
You can add or modify the following on your Cloud Gateway connections.
Much like Cloud Gateway, if you opt to increase your bandwidth on a particular Cloud Gateway connection,
you won’t be charged. You will be charged a fee if you choose to decrease your bandwidth and for any other
modifications. To upgrade bandwidth on a Cloud Gateway connection, make sure you’ve first purchased
enough Cloud Gateway bandwidth.
Bandwidth upgrade
Bandwidth downgrade
Interconnect subnets
Compute subnet
Default route suppression (enable/disable)
Microsoft peering and public peering
Amazon Web Services (AWS)
Yes – contact us Yes – contact us
Yes – contact us
N/A N/A N/A
Microsoft Services (Azure)
Yes – first make the upgrade in the Microsoft Azure portal then synchronise it in the Cloud Gateway management console.
Not supported by Microsoft*
Yes – contact us
N/A Yes Yes – contact us
VMware vCloud® Air™
Yes Yes Yes – contact us
Yes N/A N/A
IBM SoftLayer®
Yes Yes Yes – contact us
N/A N/A N/A
Virtual Server (Dedicated) Gen2
Yes Yes Yes – contact us
N/A N/A N/A
Virtual Storage powered by NetApp®
Yes – contact us Yes – contact us
N/A N/A N/A N/A
*Microsoft do not support a downgrade of an ExpressRoute service. To downgrade bandwidth you will need to cancel the Cloud Gateway connection and the ExpressRoute
service respectively; order a new express route at the new bandwidth and a new Cloud Gateway connection with new S Key details.
Learn more about modifying bandwidth (for modification fees, you can contact your Telstra representative,
view the fees when you select ‘modify’ on Cloud Gateway or one of its connections in the Cloud Gateway
management console, or access the pricing guide in the console).

TELSTRA CORPORATION LIMITED (ABN 33 051 775 556) FINAL TELSTRA RESTRICTED | | PAGE 31/42
Changes listed as ‘yes’ in the table above (without the need to contact us) can be submitted via the Cloud
Gateway management console.
Step 1 – Use your Cloud Services credentials to log in to the Cloud Gateway management console.
Step 2 – Select the Cloud Gateway connection you’d like to modify.
Step 3 – Select the information icon:
Step 4 – Select the ‘Modify’ button, which appears beneath the summary details.
Step 5 – Select ‘Continue’ to review your proposed change(s).
Step 7 – Once you’ve reviewed your change(s), select ‘Confirm’.
Step 8 – We’ll send you an email to confirm we’ve received your modification request.
Step 9 – Once we’ve processed your request, we’ll send you a second email to confirm that the modification is
complete.
Step 10 – To view these changes, log back in to the Cloud Gateway management console.

TELSTRA CORPORATION LIMITED (ABN 33 051 775 556) FINAL TELSTRA RESTRICTED | | PAGE 32/42
CHAPTER 6
MANAGING YOUR CLOUD GATEWAY™
Once your Cloud Gateway™ is active, you can manage it in the following ways:
Create a new Cloud Gateway alias
Modify your bandwidth allocation
Amend your contract term
To modify your Cloud Gateway connections, you’ll need to contact your Telstra representative or call us on
1800 620 345. Have your Cloud Gateway subscription ID ready, as well as the subscription IDs for each
Cloud Gateway connection.
CREATING A NEW CLOUD GATEWAY ALIAS
Step 1 – View Cloud Gateway details
Select the Cloud Gateway that you want to manage. When the three icons appear, select the
information icon to view your Cloud Gateway details.
Scroll down the page and select Modify.
Step 2 – Enter your new Cloud Gateway alias
Type in the new nickname that you’d like to associate with this Cloud Gateway – it can’t be longer
than 14 characters – then select Continue.
Step 3 – Confirm your change
Review the details for your new Cloud Gateway alias, then select Purchase.

TELSTRA CORPORATION LIMITED (ABN 33 051 775 556) FINAL TELSTRA RESTRICTED | | PAGE 33/42
Step 4 – Receive email confirmation
Once your change has been processed, we’ll let you know via email.
MODIFYING YOUR BANDWIDTH ALLOCATION
Step 1 – View Cloud Gateway details
Select the Cloud Gateway you’d like to modify. When the three icons appear, select the information
icon to view your details. Review how much bandwidth you’ve already allocated to this Cloud
Gateway and how much of this bandwidth allocation is already being used by your Cloud Gateway
connections.
Scroll down the page and select Modify.
Step 2 – Select your new bandwidth allocation
For each type of bandwidth associated with your Cloud Gateway, select your desired bandwidth tier.
Whether or not you can downgrade your bandwidth depends on your contract term.

TELSTRA CORPORATION LIMITED (ABN 33 051 775 556) FINAL TELSTRA RESTRICTED | | PAGE 34/42
Select Continue.
Step 3 – Confirm your change
Review the details for your new bandwidth allocation, then select Confirm.
Step 4 – Receive email confirmation
Once your change has been processed, we’ll let you know via email.
AMENDING YOUR CONTRACT TERM
Step 1 – View Cloud Gateway details
Select the Cloud Gateway you’d like to modify. When the three icons appear, select the information
icon to view your Cloud Gateway details.
Scroll down the page and select Modify.
Step 2 – Select your new contract term
TELSTRA CORPORATION LIMITED (ABN 33 051 775 556) FINAL TELSTRA RESTRICTED | | PAGE 35/42
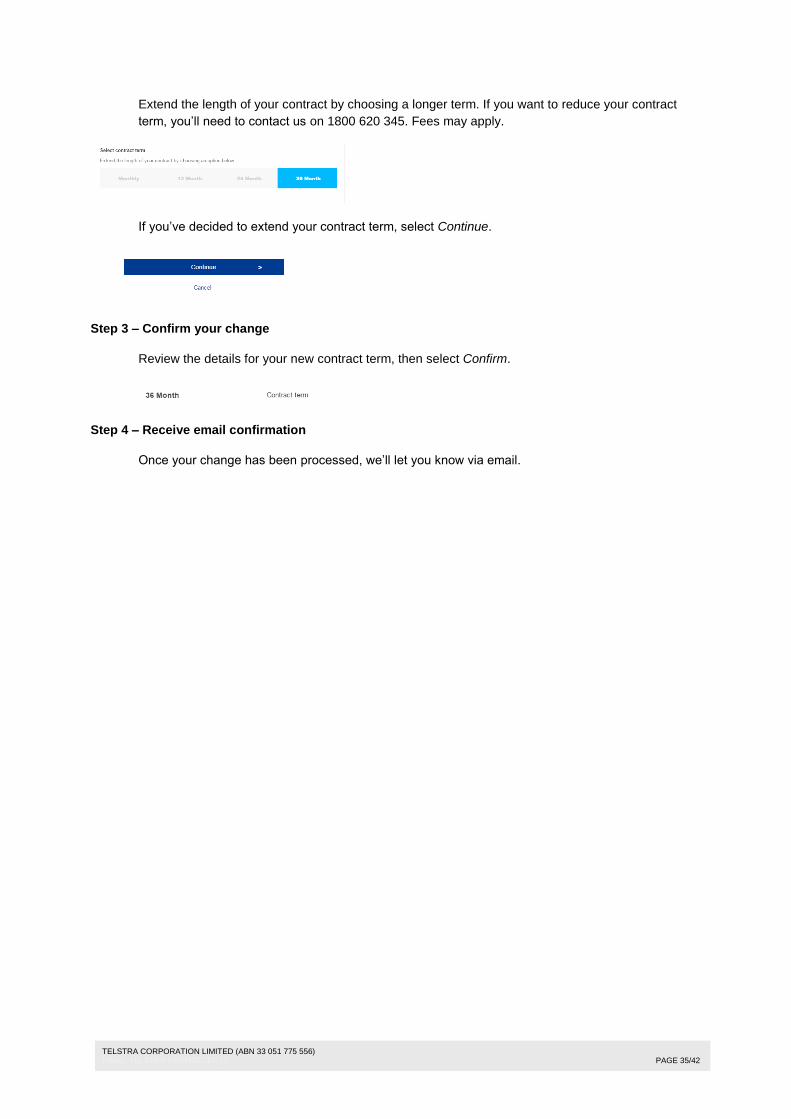
Extend the length of your contract by choosing a longer term. If you want to reduce your contract
term, you’ll need to contact us on 1800 620 345. Fees may apply.
If you’ve decided to extend your contract term, select Continue.
Step 3 – Confirm your change
Review the details for your new contract term, then select Confirm.
Step 4 – Receive email confirmation
Once your change has been processed, we’ll let you know via email.

TELSTRA CORPORATION LIMITED (ABN 33 051 775 556) FINAL TELSTRA RESTRICTED | | PAGE 36/42
CHAPTER 7
ACCESS CONTROL LIST (ACL)
An Access Control List (ACL) is an optional add-on feature in Cloud Gateway, which allows you to create a
list of routing rules that you can use to allow or deny traffic between your Telstra IP network service (IP VPN)
and Cloud Gateway connection(s).
It gives you more control of your service, fine-tuning performance and network accessibility.
You’ll start paying for this service once you apply it to a Cloud Gateway.
Notes:
To avoid access errors to your connection, an ACL profile must be created accurately by
someone who understands your ACL requirements and its relationship to your network design.
ACL is not available with our Virtual Storage service
Once you subscribe to ACL and create a profile(s), you can change the rules on it; you can have up to 100
rules on a profile.
ACL ACTIONS
In each billing month, 10 ACL actions are included as part of your subscription. ACL actions are
modifications to your service and include:
Create and cancel an ACL subscription at the Cloud Gateway level
Apply an ACL to a Cloud Gateway connection (either after creating a new ACL profile or when
applying an existing one)
Deactivate an ACL profile from a connection
Modify an active ACL profile on a connection
If you make more than 10 modifications, you will pay a fee for each additional one.
SUBSCRIBE TO ACL – CREATE A PROFILE AND RULE TABLE
You can purchase a subscription to ACL once you have at least one active Cloud Gateway connection.
You can purchase ACL at the Cloud Gateway level or at the Cloud Gateway connection level.
To purchase, log in to the Cloud Gateway management console. Then, to:
Purchase at the Cloud Gateway level

TELSTRA CORPORATION LIMITED (ABN 33 051 775 556) FINAL TELSTRA RESTRICTED | | PAGE 37/42
1. Choose your Cloud Gateway subscription (you might only have one).
2. Select Add-ons, then Purchase.
3. Select Create a new ACL profile (you can also select any existing profile you’ve previously
created and apply it to a connection).
4. Complete the details to subscribe to ACL, including the name, description and rule table for
your ACL profile. (You can add rules to a profile by completing the table on the screen or by
uploading a CSV file of your rules – a template CSV file is available on the form if you need it).
5. Select the Cloud Gateway connection to which you’d like to apply your ACL rules.
6. Select Purchase.
Purchase at the Cloud Gateway connection level
1. Choose your Cloud Gateway connection (note: in order to apply the ACL profile the Cloud
Gateway connection you’re applying it to needs to be active).
2. Select Purchase.

TELSTRA CORPORATION LIMITED (ABN 33 051 775 556) FINAL TELSTRA RESTRICTED | | PAGE 38/42
For example:
3. Select Create a new ACL profile (you can also select any existing profile you’ve previously
created and apply it to a connection).
4. Complete the details to subscribe to ACL, including the name, description and rule table for
your ACL profile. (You can add rules to a profile by completing the table on the screen or by
uploading a CSV file of your rules – a template CSV file is available on the form if you need it).
5. Select Purchase.
ADD/REMOVE ACL RULES You can add rules to a profile by completing the table on the screen or by uploading a CSV file of your rules
– a template CSV file is available on the form if you need it.
Enter your subnet/IP addresses (in CIDR format) of both your Telstra IP network service and your cloud
service to specify the path to which the ACL rule will be applied. Select Allow or Deny as the rule. Select
Save.
Create your IP address rules. For each row, specify a subnet or single IP address on your Telstra IP network
and cloud service in CIDR notation (e.g. 203.0.113.5/32).
You can add up to 100 rules per profile.
Subnets not included in these rules will be denied access. To permit access to unlisted subnets, include a
rule with Any in both the Telstra IP network and Cloud service fields.
Note: to avoid access errors to your connection, this form must be completed accurately by someone who
understands your Access Control List requirements and its relationship to your network design.

TELSTRA CORPORATION LIMITED (ABN 33 051 775 556) FINAL TELSTRA RESTRICTED | | PAGE 39/42
MANAGE ACL PROFILE(S)
Access the profile management page
To view and manage your ACL profile(s), log in to the Cloud Gateway management console and, under
your selected Cloud Gateway (you might only have one), select Add-ons, then Manage profiles.
Alternatively select Access Control List from the add-on menu option on the top-right of the console,
which will lead you to the profile management page.
To view:
When you follow either of the instructions above, your list of ACL profiles appears. Select a profile and
its rule table plus the Cloud Gateway connections you’ve applied it to. These details will appear at the
bottom of the screen.
To copy:
Once you’ve accessed the page where you can manage your profile(s) (see above), select Copy to
replicate the rule table of the selected profile OR obtain a copy of the rule table by selecting Download
CSV while viewing a profile, then create a new profile.

TELSTRA CORPORATION LIMITED (ABN 33 051 775 556) FINAL TELSTRA RESTRICTED | | PAGE 40/42
To remove:
You can only remove a profile that isn’t applied to a Cloud Gateway connection(s).
1. Before removing it, make sure it’s deactivated from all connections.
2. Access the profile management page, select the Remove button and confirm the removal.
To modify:
ACL profiles cannot be modified directly. To modify a profile, you must first copy it and reassign the
copy to an existing Cloud Gateway connection.
1. Once you’ve accessed the page where you manage your profiles (see above), select the
connection whose ACL profile you want to modify.
2. Select Modify.
3. Select the new profile you want to apply to this connection and save.

TELSTRA CORPORATION LIMITED (ABN 33 051 775 556) FINAL TELSTRA RESTRICTED | | PAGE 41/42
For example:
Still have questions about ACL? Our knowledge article might help.

TELSTRA CORPORATION LIMITED (ABN 33 051 775 556) FINAL TELSTRA RESTRICTED | | PAGE 42/42
CHAPTER 8
SUPPORT
If you have any questions, contact your Telstra representative or call us on 1800 620 345 and quote your
Cloud Gateway subscription ID. We're available 24/7.
You can also log and track indicidents or faults or, to learn more, view our support pages for knowledge
articles and FAQs.