Clinical techniques 4 - Brooke
26
4 Drug administration techniques 4.1 Clinical pathology 4.2 Blood sampling 4.3 Blood smears and staining 4.4 Haematology and biochemistry 4.5 Sterile skin preparation 4.6 References 4.7 Clinical techniques 71
Transcript of Clinical techniques 4 - Brooke

4Drug administration techniques 4.1
Clinical pathology 4.2
Blood sampling 4.3
Blood smears and staining 4.4
Haematology and biochemistry 4.5
Sterile skin preparation 4.6
References 4.7
Clinical techniques
71

72
Drug administration to equids is a routine daily task for veterinarians, but care must be taken to do it correctly every time. All drug administration routes have the potential for negative consequences.
Remember: In the first instance, cause no harm!
Veterinarians can have a large positive impact on equine welfare by ensuring medicines are administered properly.
When using any drug, ask the following questions:
1. Is it the correct drug?
2. Is it the correct dose?
3. Is it the correct route?
4. Is it a welfare friendly administration technique?
5. What are the possible complications?
Oral administration
Drugs given by mouth are designated as ‘Per Os’ (p/o or PO).
Many drugs are designed for use in tablet, bolus or powder form, given directly into the mouth or mixed in food. Other routes of oral administration include using a stomach tube or drench technique.
Always ensure that the handler is competent and that the person administering the drug has the equipment and drug ready to ensure that the procedure takes as short a time as possible for the animal. The head will need to be raised until the animal swallows to ensure that the drug is ingested. Figure 4.1.1 shows a calm, competent person administering a drug PO. The owner is present to reassure the donkey. It is an unpleasant experience, but it is possible to make it as quick for the animal as possible whilst still ensuring correct dosage.
Ensure there is no food in the mouth before starting the administration technique. Ensure the full dose is consumed; if any amount of drug is lost or dropped from the mouth, re-dosing will be necessary.
4.1 Drug administration techniques
Figure 4.1.1 Administering oral medication to a donkey.

DRUG ADMINISTRATION TECHNIQUES 4.1
Administering tablets or powder
Two techniques are as follows:
1. Form a paste by mixing the powder with water. Draw this mixture up into a plastic syringe. Raise the head, open the mouth and deposit the drug on the back of the tongue or in the cheek pouch. If a smaller amount is to be administered it might be possible to deposit this under the tongue. Close the mouth and keep the head raised until the paste has been swallowed.
2. Roll a bolus by mixing tablets or powder with thick molasses, jaggery (unrefined cane sugar) or other locally available palatable substances. Offer the mixture to the animal to eat and supervise until finished.
Administering liquids
Drenching
Drenching is the technique of administration of liquid products directly into the back of the mouth and down the throat. This carries a risk of aspiration pneumonia; liquid paraffin is best avoided and powder suspensions are especially risky. If drenching is essential, allow the animal to swallow more easily by letting it close its mouth regularly and pouring the liquid very slowly.
Never pour liquids directly into an animal’s nose: this will result in severe inflammation of the nasal cavity and pharynx and most likely result in aspiration pneumonia.
The following drugs are available as preparations for drenching:
Antacids (magnesium carbonate and sodium carbonate, and omeprazole) Laxatives (magnesium sulphate) Take care! These can cause aspiration pneumonia if they
go down the trachea. Anthelmintics (fenbendazole, oxfendazole, ivermectin)
Nasogastric (stomach) tube insertion
If large volumes or potentially irritating fluids such as liquid paraffin are to be given orally, it is recommended to use a stomach tube (Figure 4.1.2). This is also used to aid in diagnosis of colic cases (see Section 11.5 Colic).
Equipment required
Stomach tube designed for equids. Ensure the end of the tube is rounded and the tube is smooth, so as not to damage the delicate nasal mucosa. Soaking in hot water before use will make the tube more flexible.
A large funnel which should fit the other end of the tube tightly.
73
Figure 4.1.2 Administering fluids by a nasogastric tube.

4 CLINICAL TECHNIQUES
To pass a stomach tube
1. Restraint is important Use a head collar. If a twitch is necessary, ensure that the animal can breathe freely and the nostrils are not distorted (see Section 2.3). Over-restraint will cause the animal to become nervous which will make the procedure much more difficult.
Sedation can interfere with the swallowing mechanism making intubation more difficult and it can also lead to a decreased cough reflex if the tube is in the trachea, so try to avoid this if possible.
2. Mark the tube Hold one end at the position of the stomach on the outside of the animal and trace along the outside of the oesophagus to the nostril, mark the tube at the nostril and throat. When introducing the tube the marks will show how far into the animal the tube has reached, when the animal should swallow the tube and when it should have reached the stomach.
3. Lubricate the end with liquid paraffin, water or obstetrical lubricant.
4. Introduce the tube slowly and gently into the ventral meatus (lower part of the nostril). It helps to keep the thumb of the hand introducing the tube pressed firmly down on to the tube to keep it directed ventrally in the nostril and prevent it moving dorsally in the nasal cavity where it will cause bleeding as it comes into contact with the ethmoid turbinates. Keep the animal’s head flexed and advance the tube slowly. When the tip is at the pharynx, the animal may swallow, cough or move its head. Some resistance is encountered as the tube passes over the epiglottis; do not force it. Try to pass the tube on the first swallow, if this is not possible wait until the animal swallows again to pass the tube. Do not force it down.
5. Continue advancing the tube into the oesophagus.
Visualise the tube going down the left-hand side of the neck in the region of the jugular groove (and/or feel it).
If the tube is in the correct position there will be negative pressure when sucking air back. If the tube is in the trachea it is possible to suck and blow freely down the tube and the tube cannot be visualised in the left jugular groove. Ensure that the tube can be seen on the left side of the neck – do not rely on the animal coughing if the tube is incorrectly placed in the trachea. Once in the stomach, gas that smells like ingesta will be emitted and a bubbling noise from the stomach may be heard.
The information in Table 4.1.1 may help to ensure that the tube is placed correctly into the stomach and not the lungs.
Check for gastric reflux
Once the tube is placed correctly in the stomach, pour a small volume of fluid (< 500 mls) into the tube via a raised funnel connected to the end. Once it has gone in under the influence of gravity lower the free end of the tube to the ground, which allows any excess gastric fluid to be siphoned off. This can be encouraged by rapidly withdrawing the tube by 10 cm, and then repositioning it. Repeat this process a number of times – repositioning the tube within the stomach to ensure that the stomach is not distended before liquid is added in a greater volume.
74

DRUG ADMINISTRATION TECHNIQUES 4.1
Failure to detect gastric reflux can lead to gastric rupture if a large volume of fluid is added to an already full stomach.
Pour the liquid into the funnel and hold it as high as possible.
TIP If medicating with liquid paraffin this will run in more easily if mixed with warm water.
Removal of the tube
This is achieved by bending the end of the tube over and withdrawing it slowly and in one smooth movement. Kinking the tube helps prevent any residual fluid from entering the lungs as the tube passes the larynx. Try to prevent the animal from throwing its head up as the tube is removed, as this can cause bleeding from the nose.
How to manage possible complications of using a stomach tube
Nosebleed (epistaxis) This is a common complication, especially if the animal moves its head a lot, the tube is too big or is not in the ventral meatus. It looks alarming but will stop in a short time. Keep the animal quiet until the bleeding stops.
Aspiration of fluid into the lungs This is a much more serious complication compared to epistaxis. It can occur if the tube is placed in the lungs instead of the stomach, and can result in death within minutes. Alternatively, despite correct placement of the tube, careless or over-zealous fluid administration or tube removal may still result in some of the fluid entering the lungs, causing aspiration pneumonia. See Section 12.7 for treatment of this condition.
75
Sign Tube in oesophagus (correct) Tube in trachea (incorrect)
Resistance
Left jugular groove
Coughing
Breathing
Blow down the tube
Stress
Slight resistance to passage of the tube
Tube visible and palpable as it passes down the oesophagus
No coughing after the tube passes the pharynx
No breath (air movement) felt when end of tube held near the handler’s cheek
Smell of stomach contents and gurgling sounds from the end of the tube when it reaches the stomach
Little or no distress seen in the animal as the tube is advanced
No resistance to passage of tube in early stages
Tube not palpable or visible in left jugular groove
Repeated spasmodic coughing as tube is advanced
Regular breathing movements felt when end of tube held near the handler’s cheek
No smell of stomach contents No gurgling sounds
Animal is very uncomfortable and resists handling. (A very sick or painful equid may not react a lot to the procedure even if the tube is in the trachea, so rely on the other parameters.)
Table 4.1.1 Signs that can help determine if a nasogastric tube is in the oesophagus or trachea.

4 CLINICAL TECHNIQUES
Injections
All injections carry a risk of infection and can cause pain, fear and distress to some extent. They should never be given unnecessarily. Use paraprofessional training opportunities to demonstrate correct techniques to others. The following rules apply for all injections:
Always use a sterile syringe and needle (Figure 4.1.3) to avoid creating an injection site abscess (see Section 15.3). Wipe the top of the medicine bottle with surgical spirit if it is dirty (Figure 4.1.4).
Always use the narrowest gauge (G) that allows smooth injection of the drug, i.e. 20G or 21G for watery drugs and vaccines, 16G or 18G for oily drugs or suspensions.
Always ensure the injection site is clean and free from mud or dirt.
Subcutaneous injection
Drugs given by subcutaneous injection are designated as s/c or SC.
Ensure that the drug is formulated to be given subcutaneously. Many drugs are poorly absorbed from subcutaneous tissue or can give a bad reaction, especially if large volumes are given.
Any skin site may be used, but preferred areas are the neck (see Figure 4.1.5) and pectoral regions where there is looser skin covering the body. Using a short needle (one inch), pinch the skin and introduce the needle almost parallel to the skin surface to avoid placement in underlying muscle, there should be little resistance to injection. The depot of drug under the skin leaves a small swelling, which disappears as the drug is absorbed.
76
Figure 4.1.3 Selection of a correct sterile needle.
Figure 4.1.5 Subcutaneous injection in a horse.
Figure 4.1.4 Wiping clean the top of a drug bottle.

DRUG ADMINISTRATION TECHNIQUES 4.1
Intramuscular injection
Drugs given by intramuscular injection are designated as i/m or IM.
Ensure that the drug is formulated for intramuscular use. Some drugs cause severe inflammation when injected intramuscularly. As a precaution never give more than 20 ml in any one site. Malignant oedema is a rare, often fatal, infection caused by Clostridial bacteria, typically caused by activation of dormant spores within the muscle; a possibility if IM injections are not given cleanly and carefully or if an irritant drug (e.g. flunixin meglumine) is used.
Ensure a competent handler and consider the safety of the handler, the animal and the administrator of the drug at all times.
Ensure that all drugs are ready and drawn up and all equipment (needles and syringes) are sterile. Suitable needles for IM injections in equids are 18–21G depending on the viscosity of the solution (e.g. 18G for penicillin). The length of the needle for adult horses and mules and well-muscled adult donkeys should be 1.5 inches, for foals and thin donkeys one inch would suffice, to inject the drug deep into the muscle mass.
There are three preferred sites for intra-muscular injections:
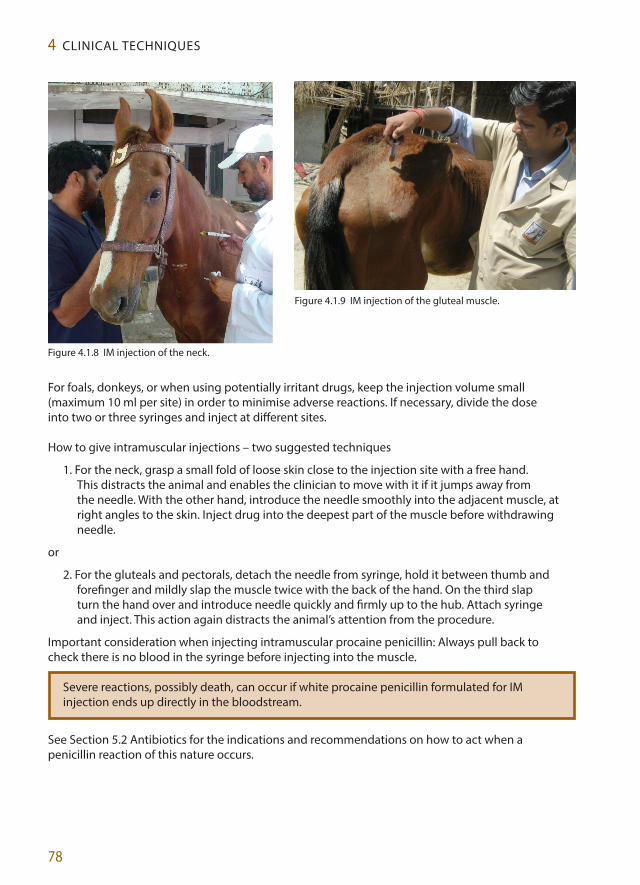
1. Neck – in the triangle of muscle demarcated by the nuchal ligament, the dorsal border of the cervical spine and the cranial border of the scapula. Alternatively a hand can be placed on the neck with the base at the junction of the neck and the shoulder, half-way between the crest and the ventral side of the neck: the hand will be covering the area suitable for injection (Figures 4.1.6 and 4.1.8).
2. Gluteal muscles – in the centre of the muscular square bordered by the tuber coxae, tuber ischii, sacrum and base of tail. Do not inject caudal to the femur as this may damage the sciatic nerve (Figures 4.1.7 and 4.1.9). For gluteal injections ensure safety when administering the injection by maintaining body position as close to the animal as possible; use a spare hand on the animal’s body to detect sudden movements.
3. Pectoral muscle (horses only) – in thickest part. Maximum volume is 5 ml per site and do not inject potentially irritating drugs in this area as it will affect movement.
77
Figure 4.1.6 The white tape outlines the area safe for IM injection of the neck. The cross indicates the position a hand would occupy if placed with the base at the junction of the neck and shoulder, half-way between the crest and ventral neck and would be the ideal place for IM injection.
Figure 4.1.7 The black cross indicates safe placement of IM injection in the gluteals.
4 CLINICAL TECHNIQUES
For foals, donkeys, or when using potentially irritant drugs, keep the injection volume small (maximum 10 ml per site) in order to minimise adverse reactions. If necessary, divide the dose into two or three syringes and inject at different sites.
How to give intramuscular injections – two suggested techniques
1. For the neck, grasp a small fold of loose skin close to the injection site with a free hand. This distracts the animal and enables the clinician to move with it if it jumps away from the needle. With the other hand, introduce the needle smoothly into the adjacent muscle, at right angles to the skin. Inject drug into the deepest part of the muscle before withdrawing needle.
or
2. For the gluteals and pectorals, detach the needle from syringe, hold it between thumb and forefinger and mildly slap the muscle twice with the back of the hand. On the third slap turn the hand over and introduce needle quickly and firmly up to the hub. Attach syringe and inject. This action again distracts the animal’s attention from the procedure.
Important consideration when injecting intramuscular procaine penicillin: Always pull back to check there is no blood in the syringe before injecting into the muscle.
Severe reactions, possibly death, can occur if white procaine penicillin formulated for IM injection ends up directly in the bloodstream.
See Section 5.2 Antibiotics for the indications and recommendations on how to act when a penicillin reaction of this nature occurs.
78
Figure 4.1.8 IM injection of the neck.
Figure 4.1.9 IM injection of the gluteal muscle.

DRUG ADMINISTRATION TECHNIQUES 4.1
Intravenous injection
Drugs given by intravenous injection are designated as i/v or IV.
Ensure that the drug formulation is suitable for intravenous use. Many drugs (including almost all suspensions and some oily preparations) cause severe systemic reactions or death when injected by this route. Check that the drug is within the expiry date and contains no particles or contamination.
The correct site for IV injection is the cranial third of the jugular vein, where there is less risk of hitting the carotid artery. Inject slowly over 5–10 seconds.
Do not inject drugs into the carotid artery!
Venous blood is dark red and flows in a steady drip or trickle. If the blood is bright red and flows in spurts, then the needle is in the carotid artery.
Always ensure that a competent handler is present and use safe positions when injecting. Ensure all drugs are drawn up ready in syringes and all equipment is sterile. Suitable needles for IV injection are 21–18G, the larger for more viscous or larger quantities that need administering more quickly; a 19G would suffice for most routine IV injections. A 1–1.5-inch length needle can be used depending on the size of the animal.
Two techniques for IV injection
1. Detached needle Raise the jugular vein by occluding it with a thumb at the base of the neck; it should be visible in all but the fattest animals. Insert the needle into the vein and check that venous blood is flowing freely. Once satisfied, attach the syringe and inject slowly. Always draw back regularly on the syringe to check that the needle is still in the vein. The advantages of this technique are that it is easy to see if the needle is in the jugular vein, and that nervous animals usually settle once the needle is in. When inserting the needle imagine following the line of the vein up the neck, i.e. once through the skin, angle the needle upwards and do not insert it at an acute angle. This avoids inserting the needle too deeply through the vein and into the carotid artery.
or
2. Needle attached Raise the vein and insert the needle whilst attached to the syringe. Draw back and check for dark (venous) blood entering syringe (Figure 4.1.10). If the blood is bright red and/or under pressure it means that the needle may be in the carotid artery. When satisfied, proceed as described above. It is more difficult to ensure that the needle is not in the carotid artery with this method.
79
Figure 4.1.10 IV injection in a donkey.

4 CLINICAL TECHNIQUES
Possible complications of intravenous injection
1. Intra-arterial injection A serious complication occurs when the drug is injected into the carotid artery. The risk is highest if the needle is too long or is inserted accidentally low down in the neck. Typically, intra-arterial injection will cause the animal to collapse before the injection is finished. Seizures, twitching and coma may occur. Recovery depends on the type and volume of drug injected and the degree of cerebral inflammation caused. Some animals recover spontaneously in a few minutes. Others may die or have residual neurological damage.
2. Peri-vascular injection If the needle comes out of the vein and drugs are injected into the surrounding tissue, local irritation and inflammation may occur which can damage surrounding nerves. The severity depends on the type and volume of drug and the structures affected. Treat local swelling symptomatically and dilute the drug by infusing normal saline around the area and massage.
If the animal is extremely fractious, and when using medication which is particularly irrititant when injected perivascularly, insert a catheter to administer the medication.
3. Phlebitis/thrombophlebitis Inflammation and partial or total occlusion of the jugular vein can occur as a complication of repeated IV injections or venous catheterisation, especially if the technique is not sterile. Thickening of the vein is visible and palpable, being hot, painful and swollen in acute cases. Raising the vein makes the site of occlusion more obvious. If the vein is totally occluded, there may be oedema of the head, which normally resolves over time as collateral circulation is established. Treat phlebitis with warm compresses, massage and NSAIDs. Prevent by using a sterile technique and avoiding multiple injections or long-term catheterisation of the same vein.
Placing an intravenous catheter
An IV catheter should be used:
for IV fluid therapy or slow infusion of drugs (Figure 4.1.11) when repeated blood sampling or IV injections are needed such as during a general
anaesthetic for safer administration of irritant drugs (minimises possibility of complications described
above) for euthanasia if multiple drugs are to be used, large volumes need to be given, and to allow
venous access throughout the procedure.
In most cases with working equids, IV catheters will not be left in the animal (‘indwelling’) for long periods of time as this increases the risk of infection. Any animal requiring daily IV injections should also be monitored by a veterinarian. Do not leave IV drugs for the owner to inject. If catheters are not available, the only other option is a long (2-inch) 14 or 16G needle. However, remember never to leave a needle in an animal, they always need to be taken out.
Catheter placement
1. Shave the skin over the cranial third of the jugular vein and prepare it aseptically. This eases catheter placement and minimises the risk of infection. See Section 4.6 of this chapter for explanation of how to carry out a sterile scrub of an area.
80

DRUG ADMINISTRATION TECHNIQUES 4.1
2. For wide-bore catheters or nervous animals, inject a subcutaneous bleb of local anaesthetic (LA) before catheter placement. See Section 7.2 for use of LAs.
3. Raise the vein. With the stylet (metal needle) in place, introduce the catheter at 45 degrees to the neck until blood is seen at the hub. Insert a further 2–3 mm, then flatten the catheter out almost against the neck, keep the stylet still while continuing to advance the plastic catheter up to its hub following the course of the vein underneath the skin. The catheter should advance without resistance. Remove the stylet and attach a bung or extension set to avoid introducing air into the jugular vein.
4. Secure the catheter with a piece of tape around the hub and the neck (Figure 4.1.11), or attach to the skin with two skin sutures. LA is placed subcutaneously in two blebs, one either side of the hub of the catheter, and then two simple skin sutures placed and tied onto the placement doles on either side of the catheter hub. A needle and forceps are not required to do this; simply thread two strands of suture material through two sterile needles and use the needle to place the thread through the skin. Ensure a sufficient length of thread to be able to tie the knots easily by hand.
5. Ensure any giving set or extension set that is being attached to the catheter has been flushed with sterile saline so that air is not administered intravenously.
6. Each time the catheter is used, ensure it is still in the vein. To keep it patent, flush with normal saline before and after each injection. For long-term use, change the catheter every 48 hours, alternating between the two jugular veins to minimise the risk of thrombophlebitis.
Handle the catheter as aseptically as possible, even once it is in place, to reduce the risk of thrombophlebitis.
81
Figure 4.1.11 IV catheter in place and administration of fluids. Both down-the-vein (top and centre) and up-the-vein positioning of the catheter (bottom) are shown.

4 CLINICAL TECHNIQUES
Complications of intravenous catheterisation
1. Thrombophlebitis – as discussed on page 80.
2. Air embolism – If a catheter is placed pointing in a downward direction (down-the-vein), and is not covered by an injection cap, it will suck air into the jugular vein. This can be fatal – and therefore catheters should never be left open.
3. Embolisation of a piece of the catheter can occur if it is severed (when an animal struggles) or if it is cut when being removed. Never leave an owner to inject through or remove a catheter; this should only be done by a trained veterinarian.
For further information on fluid therapy refer to Chapter 6.
Intra-articular injection
Introducing a needle into the joint of a working equid may occasionally be necessary in order to:
take a sample of synovial fluid from a joint, if infection (septic arthritis) is suspected flush an infected joint inject antibiotics into an infected joint inject anti-inflammatory drugs into an inflamed joint.
Aseptic preparation and knowledge of anatomy is paramount to avoid creating unnecessary harm.
Procedure
1. Sedation is recommended to minimise the likelihood of the animal flexing the joint and breaking the needle during injection. In nervous animals, it may be necessary to inject a subcutaneous bleb of local anaesthetic. Flushing the joint can be painful and may require general anaesthesia.
2. Shave the hair 3–5 cm above and below the joint, all the way around the limb – as it may be necessary to move the needle to a different site during the procedure.
3. Scrub the site from the centre outwards (as for a surgical operation – see Section 4.6 of this chapter) using sterile cotton wool or swabs and antiseptic: chlorohexadine gluconate (CG) or povidone iodine (PI). The antiseptic should be left on the skin for a minimum of 2 minutes for CG and 3 minutes for PI, to ensure all the bacteria are killed (Stinner et al. 2011).
4. Scrub hands in the same way and wear sterile surgical gloves if available. Always use a new, sterile syringe and needle.
The correct sites for joint injection should be studied carefully.
Refer to equine anatomy and lameness textbooks for details; see also Chapter 14 The musculoskeletal system.
The decision to administer drugs intra-articularly should be made after considering the potential complications of entering a synovial structure. If bacteria or dirt inadvertently contaminate a
82

CLINICAL PATHOLOGY 4.2
synovial structure during an injection, this can lead to an incurable lameness potentially ending an equid’s working life and requiring euthanasia on welfare grounds.
Direct intra-synovial administration produces higher drug levels in a joint than systemic administration which is useful for the treatment of certain conditions, e.g. joint infection or arthritis. However, anything injected intra-articularly should be chosen carefully to prevent further inflammation or irritation of the joint. Only drugs labelled for intra-articular use should be used.
83
4.2Clinical pathology
What is ‘clinical pathology’?
Clinical pathology aims to diagnose disease using laboratory testing of blood and other bodily fluids, tissues, and microscopic evaluation of individual cells.
Within this chapter techniques for sampling, examining and testing (haematology and biochemistry) are described. For urinalysis see Chapter 13 The urinary and reproductive systems), for faecal analysis see Chapter 11 The gastrointestinal system, and Chapter 17 Parasitology gives further information on faecal egg counts, as well as referring to other clinical pathology texts where more information can be found.
What to consider when choosing a test?
Always remember the following when deciding on which test to undertake:
Think carefully about the history of the case. Think about the presenting problem and the possible underlying causes. Ensure the test fits in with the clinical signs, not the other way round. What is the likelihood the animal is suffering from a particular disease? Negative results do not necessarily rule out a disease process and equally a positive result
does not confirm it. Will doing the test compromise animal welfare? Will the treatment change depending on the results, i.e. is a diagnosis necessary?
What factors can affect the reliability of a test?
Problems with the ‘marker’ of disease, e.g. antibody levels may vary at different stages of the disease
Differences between individual animals Problems with sample collection or storage, e.g. not stored at the correct temperature Problems with the testing procedure, e.g. not carried out correctly

4 CLINICAL TECHNIQUES
What to consider when submitting a sample to a laboratory?
Telephone the laboratory and ask for advice about what to submit. Follow their instructions, i.e. keep the sample cool, freeze, or air-dry as instructed. Package the sample safely. Label with details of the animal and date collected. Provide a history to the laboratory including any previous treatment.
Interpret all results in light of the clinical picture.
Glossary
Below are some terms encountered when interpreting clinical tests:
Sensitivity The proportion of animals with disease which test positive
Specificity The proportion of animals without disease which test negative
Predictive value of a positive test How likely it is that an animal which tests positive actually has the disease
Predictive value of a negative test How likely it is that an animal which tests negative really is free from disease
True positive The animal has the disease and the test is positive.
False positive The animal does not have the disease but the test is positive.
True negative The animal does not have the disease and the test is negative.
False negative The animal has the disease but the test is negative.
84

85
Taking blood samples
The number and nature of blood tests that are required will determine the volume and type of samples to be collected.
A blood sample is usually taken to assess the function of internal organs (‘biochemistry’), and/or to look at the blood cells (‘haematology’). See Section 4.5 for more details.
What blood tubes to use?
Plain tubes Allow whole blood to clot. The serum layer is separated in the laboratory and tested for enzymes and proteins to assess organ function (biochemistry) or for specific antibodies against particular viruses and bacteria (serology).
EDTA tubes Contain anticoagulant which stops blood from clotting. These samples are used to make blood smears, perform counts of different types of white blood cells (such as neutrophils or eosinophils) and red blood cells which give information on certain processes such as infection, inflammation, or anaemia.
Other tubes Other sample tubes such as lithium heparin, sodium citrate, DNA sampling tubes and those for blood culture are used for specific tests (contact the local laboratory to discover which tests are available for equids and what sample tubes are required).
Never compromise the welfare of an animal by taking a sample, blood or otherwise, without knowing why, what sample is required (volume and tube type) and whether the laboratory has the capacity to do the tests required. If the required information will not be gained, do not take a sample.
Two techniques for taking blood from major veins1. Attach a one-inch, 19–20G needle to a syringe.
Raise the vein and insert the needle. Keeping the vein raised, draw back steadily on the syringe until the required amount of blood is in the syringe (see Figure 4.3.1). Release the pressure on the vein before withdrawing the needle to avoid causing a haematoma.
or2. Insert a double-ended vacutainer needle into the
raised vein, then attach a vacutainer tube. Blood will flow into tube when the needle is correctly placed. Release the vein before withdrawing.
4.3Blood sampling
Figure 4.3.1 Collecting blood samples from the jugular vein.

86
Blood smears and staining4.4
How to make a blood smear?
Learning the technique of good blood smear preparation is very useful. These are used to detect blood parasites (see Chapter 17) and perform differential white blood cell counts without having to send samples to the laboratory (refer to histology texts for further information on interpretation of smears).
Technique for making a blood smear
1. Acquire a blood sample. This is possible from a number of places including the ear tip. For the ear tip sample, clip a small area at the tip of one ear. Prick the skin with a 21G needle, squeeze a drop of blood directly onto a microscope slide and smear immediately before the blood clots; see Figure 4.4.1.
2. Use two glass microscope slides. Put a drop of fresh or EDTA tube blood at one end of one of the slides.
3. Holding the second slide (the ’spreader’) at an angle of about 45 degrees, back it up against the drop of blood on the first slide until it runs (by capillary action along the short edge).
4. With an even motion, push the spreader along the whole length of the first slide so that the blood smears evenly; do not push the blood itself by having it ahead of the spreader. A good smear will have a thin, tapered, ‘feathered’ edge where the blood is less thick and looks thin and feathery.
Figure 4.4.1. A) Prick the tip of an ear after clipping. B) Squeeze a drop of blood onto a glass slide. C) Blood smear preparation: Place the second slide at a 45 degree angle to the first. D) Touch the slide edge to the drop of blood to allow blood to spread along the leading edge, then push second slide along the first to create a smear. Ensure a good tapered, thin, ‘feathered’ edge. E) Air dry blood smears before staining and examination under a microscope.
A B C
D E

BLOOD SMEARS AND STAINING 4.4
A good blood smear should:
extend from one-half to three-quarters of the length of the slide have a thin, tapered, ‘feathered’ edge at the end of the smear be free of holes, lines or other defects.
If taking a blood sample from the jugular vein, ensure the following:
Use a fresh sample mixed with EDTA. Mix the sample well before taking a drop for the slide. Air dry quickly before staining. Examine straight away. When sending it away to a laboratory do not stain but follow the above steps and put it
into a slide container.
Staining techniques
The most common and easiest to perform are the Diff-quick and Gram staining techniques described below (RVC 2012).
Diff-quick staining technique
To perform this staining technique use the following three solutions:
1. Fixative (Fast green in methanol) – This is a pale green colour.
2. Stain solution 1 (Eosin G in phosphate buffer) – This is a red colour.
3. Stain solution 2 (Thiazine dye in phosphate buffer) – This is a blue colour.
Protocol
Allow the smear to air dry. Dip the slide 5 times, for 1 second each time, into the fixative. Allow excess fixative to
drain after each dipping. Dip the slide 5 times, for 1 second each time, into Stain solution 1. Allow excess stain to
drain after each dipping. Dip the slide 5 times, for 1 second each time, into Stain solution 2. Allow excess stain to
drain after each dipping. Rinse the slide in distilled water (or Weise’s buffer, pH 7.2). Blot or allow to air dry.
Examine first at low power to identify structures and then at higher power under oil immersion. If a sample has been taken using a piece of sticky tape (see Section 15.2. Diagnosis of skin abnormalities) then allow this to dry and dip according to the protocol above. After rinsing, stick the tape to a slide (sticky side down) and continue with the protocol.
Observation. Note the following:
Microflora and fauna present Morphology and organisation of squames (shed skin cells) Inflammatory cells Hairs, fibres, etc. Yeasts, bacteria and squames staining blue Inflammatory cells staining as follows: cell nucei – blue, cytoplasm – red.
87

4 CLINICAL TECHNIQUES
Gram staining technique
To perform this staining technique, use the following four solutions:
1. Crystal violet, 0.5% aqueous solution
2. Gram’s iodine (Lugol’s iodine)
3. Gram decolouriser (acetone/alcohol)
4. Safranin, 0.5% aqueous solution
Protocol
Fix a thin smear by passing the slide through a flame for 3 seconds (e.g. a Bunsen burner). Stain with crystal violet for 30 seconds. Wash momentarily with water. Mordant with Gram’s iodine for 30 seconds. Wash momentarily with water. De-colourise with acetone/alcohol. Allow de-colouriser to flow over the slide held at a
30-degree angle until the colour just ceases to flow from the smear for a few seconds. Wash immediately with water for 5 seconds. Counterstain with safranin for 15 seconds. Wash with water. Blot dry.
Examine under oil immersion at x 1000.
Observe
Gram-positive bacteria will stain blue. Gram-negative bacteria will stain red.
88
4.5 Haematology and biochemistry
Always consider the following:
Decide on the appropriate haematological diagnostic test and interpret the results in light of the clinical picture.
Distinguish different cell types on a blood smear and morphological changes (see Section 4.4 of this chapter for the technique of making a blood smear).
Always interpret results in the light of the clinical picture.

HAEMATOLOGY AND BIOCHEMISTRY 4.5
Haematological analysis
Haematological evaluation consists of three components:
1. Automated analysis (by a laboratory)
2. Manual methods
3. Microscopic evaluation
Below are procedures described for manual techniques.
Manual Packed Cell Volume (PCV)
PCV is a measure of the number of erythrocytes per cubic ml of blood. Manual PCV or micro-haematocrit is one of the most accurate, reliable and reproducible
techniques for evaluation of the erythron (red blood cell). Important features are standardisation of spinning time and recognition of time necessary
for maximum packing.
Technique: Fill a capillary tube ¾ full and seal one end with clay or heat. Centrifuge for 6 minutes and read the PCV by placing the spun capillary tube against a haematocrit reader (Merck 2011).
Manual cell count
Manual counts for Red Blood Cell (RBC) and/or White Blood Cell (WBC) may be done using a haemocytometer. This is very time consuming and best left to the laboratories.
Errors inherent in manual cell counts include:
random settling of cells within the counting chamber estimation of cell count from a very small volume of sample variation associated with filling of separate chambers for counts and inaccuracies of
pipetting.
Differential cell count
Conduct a differential cell count just behind the feathered edge of a blood smear:
WBC estimate Platelet estimate Morphology of leukcotyes (WBC), erythrocytes (RBC) and platelets
Observing a blood smear
View microscopically on x40 dry or x50 oil.
View macroscopically to see if the smear is of a good quality. View microscopically behind the feathered edge to check individual cells are visible, not
overlapping, smudged, etc.
89

4 CLINICAL TECHNIQUES
Estimate WBC
Average number of leukocytes in dry high (x40) field is calculated by counting the total number of WBC in 10 fields ÷ 10 x 2000 = estimated total WBC.
Go up to x100 oil immersion. Assess the morphology. Complete a differential count.
Differential WBC count technique: Observe 100 WBC and express specific WBC types as a percentage of the total count (Fuentes-Arderiu and Dot-Bach 2009).
Estimate the platelet numbers
Estimation from the average number of platelets per high power field (x 1,000 oil immersion):
< 3–6 platelets on average – supports thrombocytopaenia.
10–25 platelets on average – suggests platelet count within normal limits.
> 25 – implies increased platelets (unusual).
Horses are prone to platelet clumping. They are also prone to rouleaux formation (stacking up of RBC like coins) which may be seen on this or the lower power.
White blood cells (leukocytes)
Refer to clinical pathology texts for images of normal and abnormal leukocytes. Below are listed a normal WBC differential and changes seen with certain abnormal states and diseases.
Normal differential WBC = neutrophils (45–55%), monocytes (0–3%), lymphocytes (35–50%), eosinophils (0–5%). NOTE: Basophils are very unusual. Ideally, actual numbers of each cell type per 109/L would be given rather than percentages. (This reference range is from the Department of Veterinary Pathology, University of Liverpool, UK. Values from other laboratories can vary – Knottenbelt 2006).
Toxic leukocyte changes
There is an increased cytopolasmic basophilia and increased granularity of neutrophils; left shift, i.e. increased number of band cells.
Equine band cells have slightly less chromatin clumping and are more U-shaped (less indentation).
Classic stress leukogram
There is slight to moderate leukocytosis (WBC usually < or = 25 x 109/l) with neutrophilia and eosinopaenia (not the same thing as left shift), this is due to increased band cells.
A stress leukogram where WBC count is < 25 x 109/l is likely to be due to inflammation or other reasons, not just due to stress.
90

HAEMATOLOGY AND BIOCHEMISTRY 4.5
Trypanosomiasis
Trypanosomes can be seen free in the blood not intracellularly (see Section 17.8). Trypanosomes can be hard to find as the animal can have intermittent parasitaemia. Serial smears can be taken every 4 days for more accurate detection rates.
Piroplasmosis
These are intracellular parasites (see Section 17.7). Babesia equi often clump together with four merozoites forming a cross shape (referred to
as a Maltese Cross). Very low sensitivity as there will be lots of animals which are positive that this test does not
pick up.
Thrombocytopaenia
Decreased platelet count may be the result of:
platelet destruction platelet consumption sequestration blood loss decreased production.
Check smear for signs of clumping; this will result in an artificially low count. Less than 50 x 109/l may result in bleeding.
A number of tests are available for testing platelet function, although these are unlikely to be used in practice.
PTT (partial thromboplastin time) – a test for plasma clotting difficulties APTT (activated partial thromboplastin time) – assessment of haemostasis (Casella et al.
2009)
Saline autoagglutination: Dilute blood 1:4 in saline. If clumps remain this indicates true agglutination.
Donkeys! A difference between prothrombin time and APTT has been found between donkeys and horses in a study by Mendoza et al. (2011), so always be cautious in diagnosing and unnecessarily treating coagulopathy in donkeys.
Biochemistry
The liver
A list of available tests is shown over; different laboratories my offer all or some of these.
Only SDH and GLDH are completely liver specific.
91

4 CLINICAL TECHNIQUES
92
Hypoalbuminaemia is associated with liver problems especially if chronic in duration; no other signs may be seen and this may be the only change in the blood.
Tests
(Those in bold are most commonly seen elevated with liver problems.)
Alkaline Phosphatase (ALP)
Aspartate Aminotransferase (AST)
Gamma-Glutamyl Transferase (GGT)
Total Protein (TP)
Albumin (Alb)
Total Bilirubin (Tbili)
Direct and Indirect Bilirubin (DBili, IBili)
Bile Acids
Glutamate Dehydrogenase (GLDH)
Idiotal Dehydrogenase (IDH - formerly Sorbitol Dehydrogenase - SDH)
Arginase (Arg)
LDH, Isoenzyme 5
Increased bilirubin (especially indirect) is liver specific. Keep sample out of the sunshine and it will remain stable for 48 hours.
Serum bile acids may be raised with anorexia.
The kidneys
The following tests assess kidney function:
Creatinine Urine protein Urea Serum electrolytes Total protein Urinalysis Albumin
Elevations in urea and creatinine reflect decreased glomerular filtration rate. This may be associated with pre-renal, renal or post-renal conditions. Evaluation of urine specific gravity and urinalysis with ancillary tests to rule out concurrent disease that may affect the kidney provides the basis for determination of whether or not renal disease is present (see Chapter 13).
It is estimated that 65–70% of the nephrons must be dysfunctional before elevations of creatinine and urea and decreased urine specific gravity are detected in association with renal disease.
Urea may be decreased in liver disease.

STERILE SKIN PREPARATION 4.6
Muscle
The following tests assess muscle damage:
Asparate Aminotransferase (AST) – increases more slowly but stays high for longer Creatine Kinase (CK) – very high straight away Urine myoglobinuria
Serum proteins
Elevated Total Protein (TP) with elevated albumin (and globulins) = likely dehydration Elevated TP with increased globulin and normal or decreased albumin = possible
dehydration or possible inflammation Decreased TP with decreased albumin and globulins = protein losing disease
(enteropathy or nephropathy)
93
4.6Sterile skin preparation
Aseptic scrub procedure
Ensure that the animal is calm and handled by a competent person. If necessary the animal can be sedated for clipping the hair, depending on the condition of the patient and the forthcoming procedure.
Clipping hair
Depending on the procedure it may be appropriate to clip the hair from the area as this is a major potential contaminator. For surgeries and catheter placement it is advisable to clip the area; although some evidence from Hague et al. (1997) stated that after appropriate preparation there was no difference in bacterial numbers isolated in clipped and non-clipped sites prior to arthrocentesis.
Know the anatomical boundaries and the essential area to clip.
Have all equipment to hand:
Sterile gloves Sterile swabs/cotton wool Scrub solution: Povidone iodine (PI) or 4% chlorhexidine gluconate (CG) 70% surgical alcohol (e.g. isopropanol) or sterile saline

4 CLINICAL TECHNIQUES
The scrub solution is made up in a bowl in advance of the scrub procedure. Gloves are worn. A swab is soaked in scrub solution and squeezed to remove the excess, then starting from the central point of the procedure (e.g. point of proposed entry of catheter, or surgical site) the area is wiped in a circular motion working outwards. Once the outside edge is reached the swab is discarded and not returned to the central point. The next swab is taken and the procedure repeated, until the swab leaving the periphery is visually clean. A solution of 70% surgical alcohol is sprayed/poured over the area after a PI scrub, or sterile saline can be used after a CG scrub.
No difference in bacterial numbers has been seen between these two methods of PI and CG scrub preparation (Wilson et al. 2011).
Scrub time
Studies looking at the effect of bacterial load and scrub time saw no difference between 10 minutes, 5 minutes, 3 x 30 seconds, and a one-step protocol of a surgical preparation of iodophor (solution was in skin contact for 2 minutes) (Zubrod et al. 2004).
For PI, the recommended contact time is 3 minutes.
However, always check for discolouration of the swabs. If at the end of 3 minutes the swabs are still showing signs of dirt, then continue scrubbing until they come away clean.
For CG the recommendation is a minimum of 2 minutes’ skin contact time.
Again, check on the state of the swabs to ensure all dirt is removed (Stinner et al. 2011).
94

95
Casella, S., Giannetto, C., Fazio, F., Giudice, E., Piccione, G. (2009) Assessment of Prothrombin time, activated prothrombin time, and fibrinogen concentration on equine plasma samples following different storage conditions. J. Vet. Diagn. Invest. 21, 674–678.
Fuentes-Arderiu, X., Dot-Bach, D. (2009) Measurement uncertainty in manual differential leukocyte counting. Clin. Chem. Lab. Med. 47 (1), 112–115.
Hague, B.A., Honnas, C.M., Simpson, R.B., Peloso, J.G. (1997) Evaluation of skin bacterial flora before and after aseptic preparation of clipped and non-clipped arthrocentesis sites in horses. Vet. Surgery. 26, 121–125.
Knottenbelt (2006) Equine Formulary. Saunders. Elsevier Ltd. pp. 4, 7.
Mendoza, F.J., Perez-Ecija, R.A., Montreal, L., Estepa, J.C. (2011) Coagulation profiles of healthy Andalusian donkeys are different than those of healthy horses. J.Vet. Intern. Med. 25, 967–970.
Merck (2011) Blood sample preparation and evaluation. (Online) Available at http://www.merckvetmanual.com/mvm/index.jsp?cfile=htm/bc/150216.htm (accessed 7 December 2012).
RVC (2012) Diagnosis in dermatology. (Online) Available at http://www.rvc.ac.uk/review/Dermatology/Tests/Diffquik.htm (accessed 12 November 2012).
Stinner, D.J., Krueger, C.A., Masini, B.D., Wenke, J.C. (2011) Time-dependent effect of chlorhexidine surgical prep. J. Hospital infections. 79 (4), 313–316.
Wilson, D.G., Hartmen, F., Carter, V.R., Klohnen, A., MacWilliams, P.S. (2011) Comparison of three preoperative skin preparation techniques in ponies. Equine vet. Educ. 23 (9), 462–465.
Zubrod, C.J., Farnsworth, K.D., Oaks, J.L. (2004) Evaluation of arthrocentesis site bacterial flora and after 4 methods of preparation in horses with and without evidence of skin contamination. Vet. Surgery. 33, 525–530.
Further reading
Consult texts on clinical pathology and veterinary laboratory medicine for more information on this subject.
Coumbe, K.M. (2012) Equine Veterinary Nursing. 2nd Edn. Wiley Blackwell. p. 417.
The Royal Veterinary College website has information on staining. (Online) Available at http://www.rvc.ac.uk/review/Dermatology/Tests/Diffquik.htm (accessed 12 November 2012).
4.7References